Viedoc is a service over the internet system for managing Case Report Form (CRF) data in clinical studies and patient registries.
Viedoc is an Electronic Data Capture (EDC) system that enables easy data capture, management, validation and presentation of clinical trial data. Viedoc is a Software-as-a-Service (SaaS) accessed directly through a web browser and requires no installation. It is intuitive and user-friendly and enables efficient sharing of information.
Viedoc is a study centric system, that is, all the functionalities are more or less related to a specific study. Usually a study in Viedoc corresponds to a clinical trial or other types of projects where data collection is applicable.
The main functionalities provided by Viedoc are:
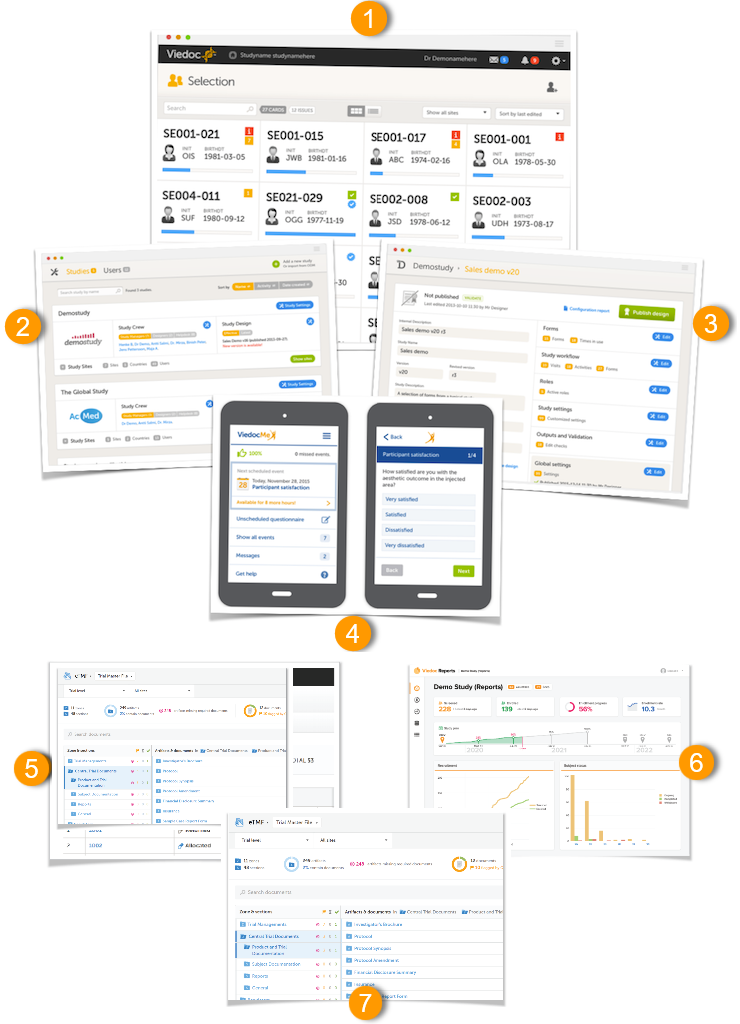
The following diagram is an overview of the main Viedoc interactions and functionalities:

Viedoc is compliant with all relevant guidelines, standards and regulations in Europe, North America and Japan, including:
Every study has at least one study site, which corresponds to a clinic. A Viedoc user can have access to one or several studies in Viedoc and for one study the user can have access to one, several or all study sites. A Viedoc user is linked to a study site using a user role. A single user can have one or several roles for a study site and can also have different roles for different sites.
During a study, there are typically a number of questions to be answered and completed with data about the subject. A group of questions that belong together are captured in a form. Forms can be event-dependent or event-independent (log forms / common events). Event-dependent forms are linked to a specific event and the data belonging to these forms is registered during or in relation to a study event. Event-independent forms can be used to report data or events that happen before, between, or after events. Medical history events, concomitant medications, or adverse events are examples of forms that can be captured in event-independent forms.
All study subjects are identified using a unique subject key. In addition to the subject key, a subject can be identified using background information such as gender, initials, or date of birth. The subject’s background information is usually entered when adding the subject in the system and will most likely not change during the course of a study.
The Viedoc platform consists of seven different applications:
Viedoc Learning is a collection of user guides designed to support users across all our products, roles, and functionalities. The full list of user guides can be found in: Viedoc Learning Directory.
Studies are grouped in Viedoc under organization(s); that is, each client has its own organization where all studies belonging to that organization are stored. By default, one organization administrator is appointed to each organization. This person has been trained by a Viedoc Product Specialist and is responsible for providing access to users within the organization and for adding new studies to the platform.
| Important! It is the responsibility of the organization administrator to make sure that all users within the organization have received appropriate training for their respective tasks. |
As a Viedoc client, you will be provided with access to two separate environments/instances: one for test/development studies and one for production studies. The purpose of the test/development environment is to allow the evaluation and use of Viedoc without the need of a contract for a specific ongoing study.
Any study that is to be taken in production is normally initiated on the test/development environment and later moved to the production environment once it is “ready” to be shared with the Sponsor or other external party. Please observe that a study in the production environment can be set to operate in demo mode by adding a site of the type “training” to it.
Note! The demo mode of a production study should not be confused with a study in the test/development environment. The purpose of the demo mode is to allow site staff access to specific training site(s) in order to gain sufficient knowledge of the system before accessing production data. When a study has sites with both production and training types added, a switch will be available in Viedoc Clinic. This offers a choice of which mode the data will be entered to - demo or production.
Studies and study designs can be easily transferred from one environment to the other via the ODM export and import feature.
Contact your organization administrator to get access to the respective area.
Note! There is no guarantee that studies running on the test/development environment are completely and continuously backed-up. This environment should therefore never be used for any production studies.
All production studies need to have a valid license before they can be taken into production. The license is provided by a Viedoc representative. The license fee for the study is based on several factors such as duration, number of sites and patients, among others. The license fee is charged starting with the first patient added and for the duration of the study; which means, until the study is locked in Viedoc. If the study is not deleted from the database within 2 months, a post-study access fee may apply.
Every license is connected to a reference ID. The reference ID can be found on the signed study work order and should be entered in the field Reference ID in the Study settings in Viedoc Admin (1 in the image):
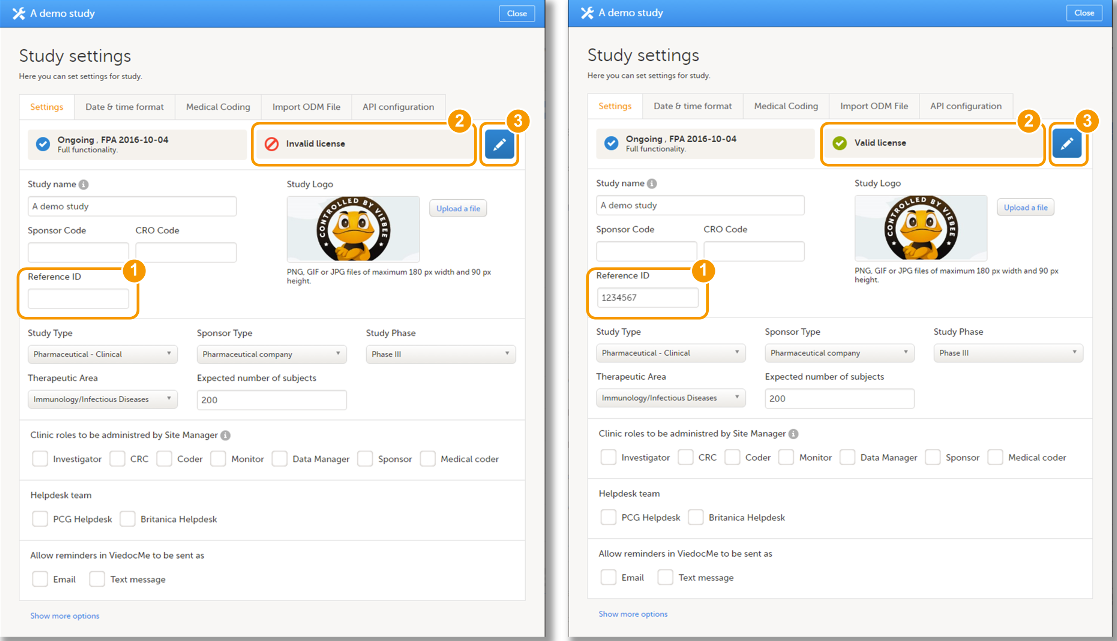
Upon entry of the reference ID, the reference ID is verified. If the reference ID is valid, the text Valid license key will be indicated at the following places:
Once the reference ID has been verified, the study can be taken into production. A study is in the production mode once Production is selected as a site type. As soon as at least one site of production type is added, the Reference ID is locked and there is no way to unlock it afterwards.
For more information regarding license fee and reference ID, please contact your Viedoc representative.
Information about new and updated functionality and bug fixes can be found in the Release notes which can be downloaded from the Viedoc website:
Viedoc Designer is where you perform the technical part of a study build, either from scratch or by importing a design from a previous project. A design consists of the study forms, the study schedule, study roles, and other configurations and settings, as described further in this curriculum.
Access to Viedoc Designer is given by a Study Manager who invites you to a project. If you have access to Viedoc Designer, you can see the Designer icon in the top-right corner of the main page, after logging in to Viedoc:
In Designer you may also have access to private designs where you can manage your own templates. All other design projects are assigned to you by the Study Manager. The difference between the private design and the other design projects is that a private design never can be published to a study. A private design project is an area where you can save your personal favorite templates to be used later in real design projects, and is only accessible by yourself.
When working in Viedoc Designer select the Designer icon (D) in the top left of any page you are on to return to your Designer start page. If you have access to more than one organization, this icon will navigate you to the organizations page where all your studies are listed.
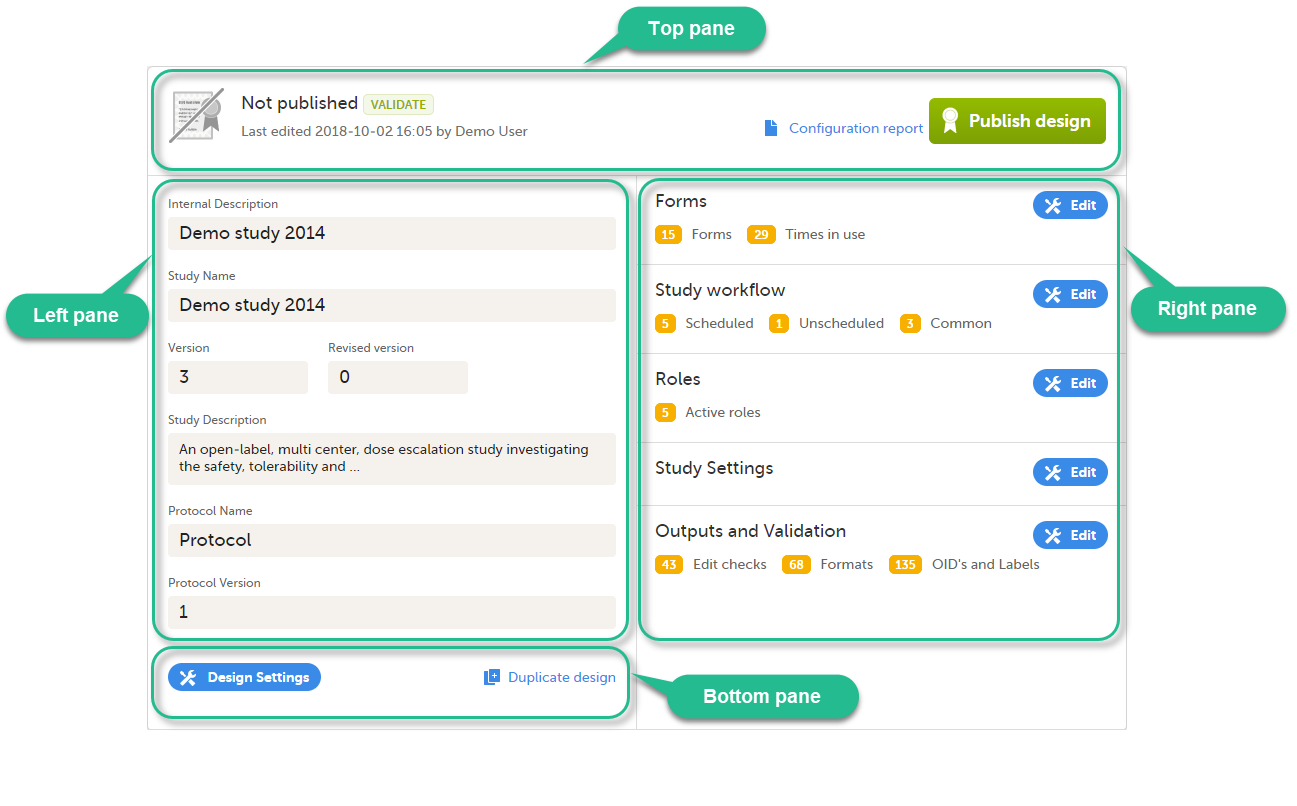
When clicking the Designer icon, Viedoc Designer opens and displays a list of the studies you have been given access to as a Designer (2), as well as your private designs (3). If you have many projects you can search for the project you want to work with via the search field (1):
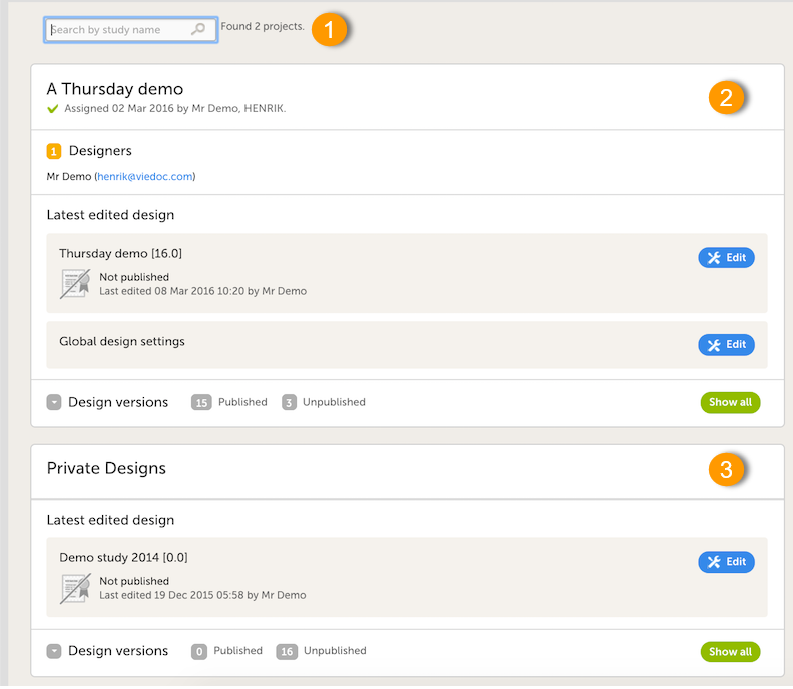
For each study, the following information is provided:
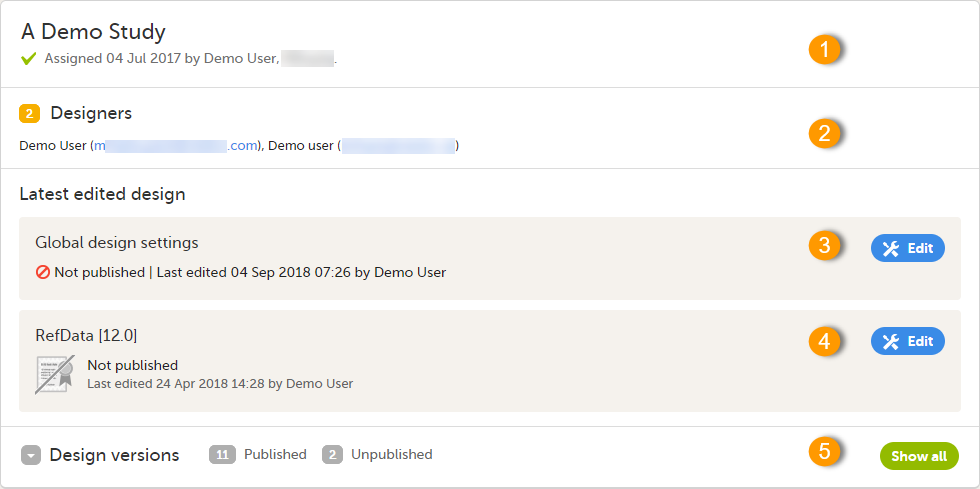
1. The name of the design and also who assigned the project to you and when.
2. List of designers having access to the design.
3. Link to Global design settings (applicable for all design versions). The following configurations are available under Global design settings:
4. Link to latest edited study design version and status of that version. In the study design, you set up the forms, study workflow, user roles, study settings (such as Source Data Verification (SDV) settings, randomization, subject ID generation settings and so on). For a complete overview of the study design settings, see Overview of study design.
5. Link to display all design versions. For details see Duplicate a design - versions and revisions.
Customer computer requirements are defined as capabilities required by the customer computer to use all features of Viedoc with the intended graphical presentation and within guaranteed response times of Viedoc.
Viedoc supports the following browsers:
For non-compliant browsers you will receive a message on the login page that your browser is not supported.
For Viedoc Designer:
Viedoc does not support the use of private mode browsing in Safari.
The following are required for Viedoc to run in the compatible web browsers:
No data is permanently stored on the customer computer. All data stored in session cookies or local web storage is deleted when the browser session is terminated. The only exception to this is the optional persistent cookie used in the main portal of Viedoc 4 to remember if a user chooses to issue a 2FA trust for the browser for 30 days, and thus avoid further second-factor authentication during this period.
Viedoc 3 has no automatic checks enforcing the above requirements. Viedoc 4 checks for, and enforces, browser type and version, and support for JavaScript, local web storage, and session cookies.
The following screen resolutions are required:
Viedoc requires an internet connection of at least 384 kbit/s.
Viedoc requires an outbound firewall policy allowing encrypted HTTP to be established and communicated to a remote server on port 443 (HTTPS) using Transport Layer Security (TLS) version 1.2 or higher.
There are several layers of security built into the platform. Below are some examples:
This is used in Clinic>Overview of Viedoc Clinic and Admin & Designer>System languages.
Viedoc Clinic is available in the following languages:
This refers to a single source piece about the Clinic system languages.
Viedoc Logistics is available in the following languages:
Viedoc Coder is available in the following languages:
Viedoc Admin and Viedoc Designer are available in the following languages:
Viedoc SDV Manager is available in the following languages:
Viedoc Me is available in the following languages:
Viedoc Reports is available in the following languages:
Viedoc TMF is available in the following languages:
For information about how to change the system language, see Manage your Viedoc account.
If you require any additional language that is not listed above, please contact your Viedoc representative.
Note! Viedoc does not allow users to use a default browser translation within the system. This prevents individual users from overriding the chosen system language and agreed-upon terminology and formulations.
| Important! All information related to managing your Viedoc account can be found in the following user guide: Viedoc User Account Management |
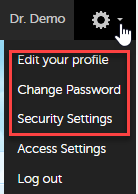
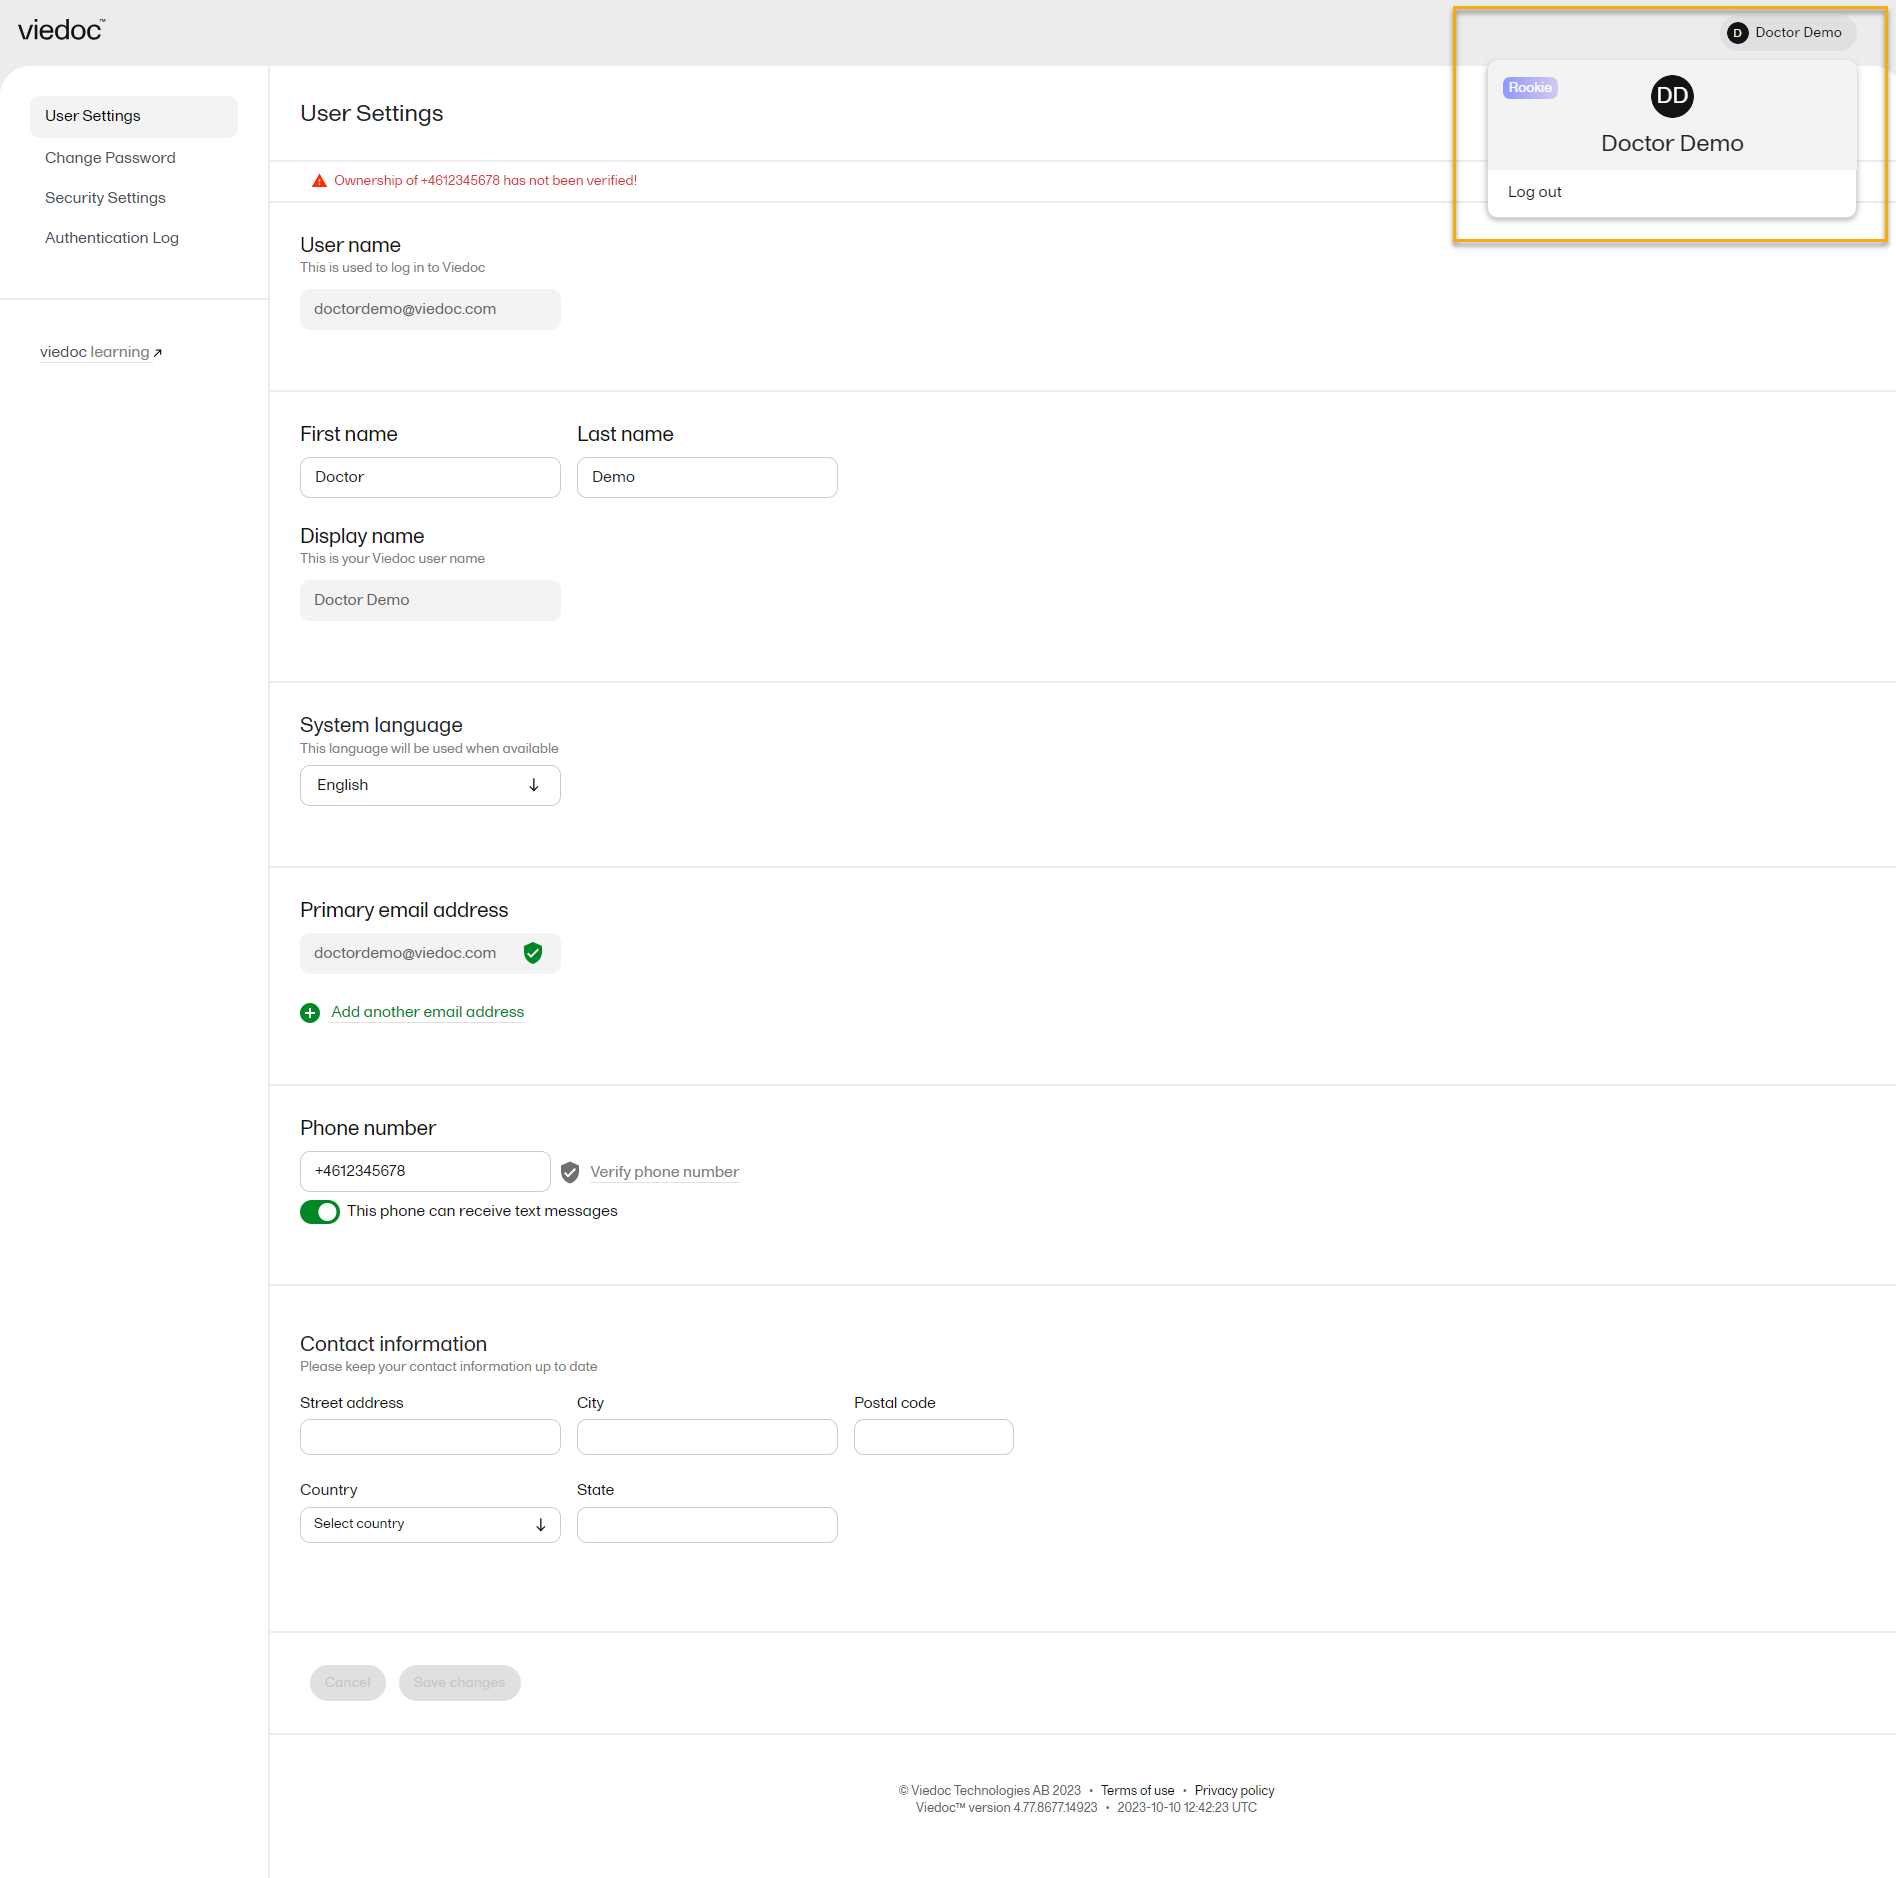
From the settings button (wheel) you can perform all actions related to managing your Viedoc account by selecting any of the following: Edit your profile, Change Password, Security Settings:
Selecting any of these options opens a new page, in the example below, the User Settings page. Select the Viedoc learning link to open the Viedoc User Account Management Guide:

NOTE! If you update the User settings section here, make sure to also update User settings in System lessons>Viedoc User Account Management>User settings
When you are logged in to Viedoc, you can edit your profile.
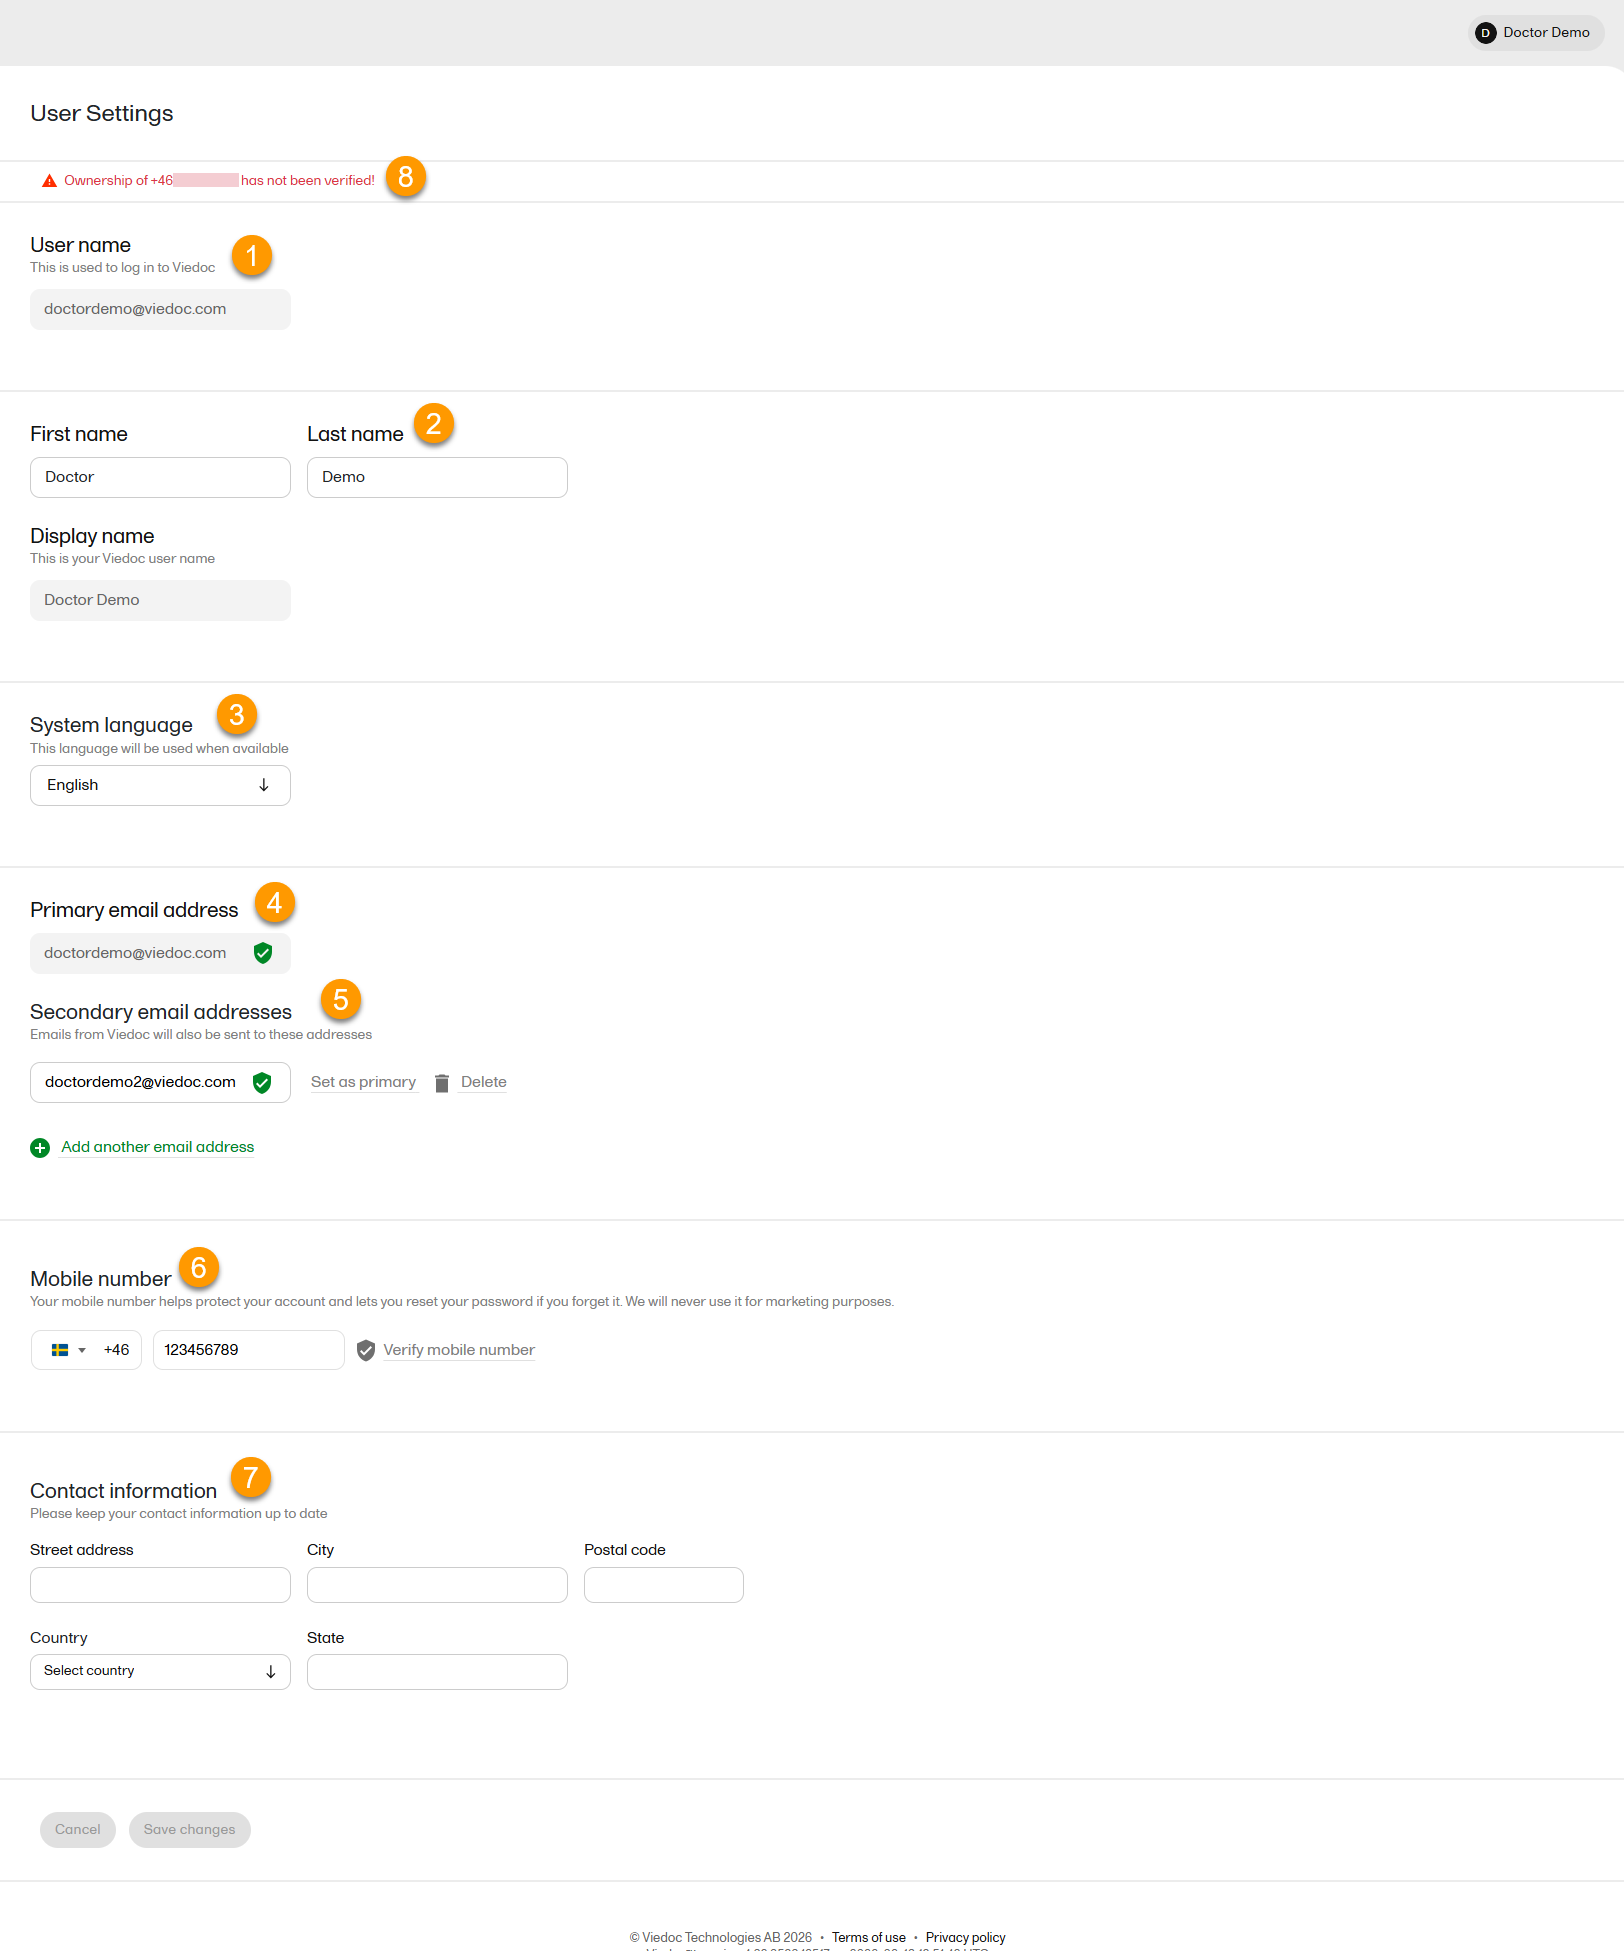
To view or edit your user settings, select the settings button (wheel) in the top right corner of the landing page, and select Edit your profile. The User Settings page opens, where you can configure the following:
1. User name - this is your primary email address used for your Viedoc account. This is the user name you use to log in to Viedoc. See the information below about your primary email address.
2. First name and Last name - fill in these fields that are used for your Display name, used in Viedoc to identify your user.
3. System language - select the language of your choice from the drop-down menu.
4. Primary email address - this is the same as the User name described above. It is the email address used in Viedoc to log in, as well as for Viedoc user account-related operations (account setup, password recovery, study invitations).
By default, this is set to the email address used to initiate the Viedoc user account.
The primary email address must be unique and is mandatory. Therefore, it is not possible to delete the primary email address.
See Changing the primary email address.
5. Secondary email addresses - you can add up to 3 additional email addresses.
Secondary email addresses is used only for:
Delivering second-factor verification codes for self-service password resets initiated by the user.
Sending a notification about changes to your user account when a secondary email address is added or removed.
See Adding a secondary email address and Verifying a secondary email address.
6. Mobile number - Select your country code and enter your mobile number.
You will be asked to Save and verify mobile number. A validation warning (8) will be displayed if the mobile number is not valid.
See Editing your mobile number and Verifying your mobile number.
Important!
|
7. Contact information - fill in the following fields: your street address, city, state, postal code and country.
To add a new (secondary) email address to your account:
| 1 | Select the Add another email address link under the current primary email address. |
| 2 | Enter the email address in the new field under Secondary email addresses. |
| 3 | Select Save changes. A notification email is sent to both the primary email address and to the newly added email address to inform you about the change. At the top of the Edit your profile page, you will see a warning message saying that the newly entered email address is not verified. |
To verify a secondary email address:
| 1 |
Select the Verify email address link next to the newly added email address. A six-digit code will be sent to your new email address and a Verify ownership pop-up is displayed asking you to provide the code in order to verify the new email address. Note! The verification link for the secondary email address is shown only after having saved the changes you may have performed on the other fields on the same page. |
| 2 | Enter the received code and select Confirm. The newly added secondary email address is now verified. |
To change the primary address to one of the existing secondary email addresses:
| 1 | Select Set as primary next to the secondary email address that is to be set as the primary email address. |
| 2 | Select Save changes. A notification email will be sent to both email addresses to inform you about the change. You will use the new primary email address the next time you log in to Viedoc. |
Note! For a secondary email address to be able to be set as primary, it has to be verified first.
To edit your mobile number:
| 1 | Select your country code and enter your mobile number. |
| 2 | Select Save and verify mobile number. A notification email will be sent to your primary email address to inform you about the change. |
To verify your mobile number:
| 1 | Make sure that the mobile number is correctly entered and select Verify mobile number. |
| 2 | A six-digit code will be sent as a text message to your mobile and a Verify mobile number pop-up is displayed. It will ask you to provide the code in order to verify the mobile number. |
| 3 | Enter the code and select Confirm. The mobile number is now verified. |
From the settings button (wheel) you can perform all actions related to study access management in Access Settings.

Select the settings button (wheel) in the top right corner of the window, and select Access settings.
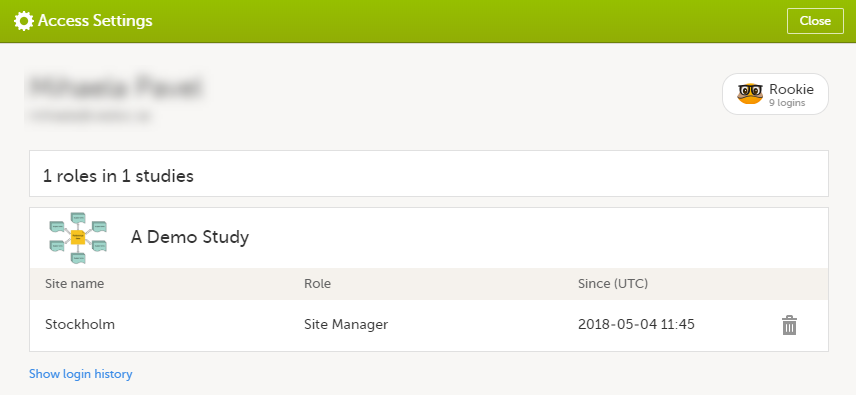
The following information is provided, grouped by study:
For users with organization roles, these are listed in the top of the page, in a separate section, providing the following information:
To remove yourself from a certain role within a study:
| 1 |
Select the trash can icon on the right, corresponding to the role, site and study to be removed from: A confirmation window is displayed. |
| 2 |
Select Delete to confirm the deletion: A notification email will be sent to all the Study Managers, or to the Site Managers if any roles are delegated. |
You can remove your Viedoc account when you have no study memberships left, that is, 0 roles in 0 studies.
To delete your Viedoc account:
| 1 | Go to Access Settings. To be able to remove your account, you should have no roles left in any study and no pending invitations: |
| 2 | Select Remove account from Viedoc. You will be prompted to confirm the account removal by entering your password: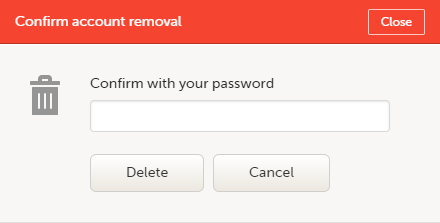 |
| 3 | Enter your password and select Delete. A confirmation message is displayed and a notification email will be sent to your primary email address: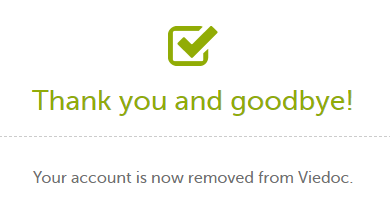
For identification purposes, Viedoc will keep: the user ID, display name, primary email address, and login history. They are kept until all the studies you have participated in are deleted. All other information related to your account will be removed from Viedoc. |
In case you have study invitations that you have not accepted or rejected yet, the Pending invitations window displays a list of all your pending study invitations:
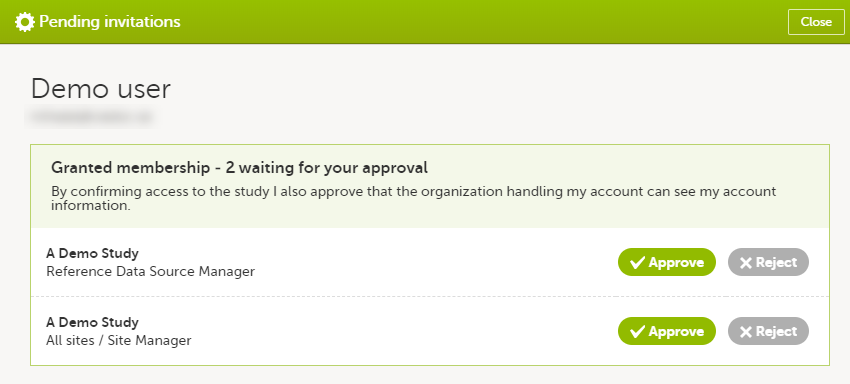
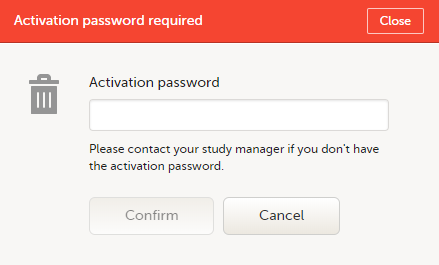
To accept a study invitation, select Approve next to the respective study role. If this is the first role you have in the respective study, and if the study requires an activation password, you will be prompted to enter it:
Note! All the pending role invitations for a user are automatically approved when the Application Programming Interface (API) method GetToken/Token is used.
To reject a study invitation, select Reject next to the respective study role. The invitation will be removed from the Pending invitations list.
To postpone the approval or rejection of study invitations, select Close in the top right corner of the Pending invitations window and postpone providing an answer to the study invitation.
To access the pending invitations again, the Pending invitations window is shown:
From Viedoc you can log out from different locations:

Note! If you exit the system without logging out, any subject you are currently working with will be locked for other users. After 5 minutes, the subject will be automatically unlocked.
Detailed information on changes in the current release, the release schedule and notes from previous releases can be found in the release notes on the Viedoc website here:
https://www.viedoc.com/support/release-notes/
For more information on future releases, please contact your Viedoc representative.
This page lists Viedoc's system-wide and design limitations. Some of these limitations are due to technical, regulatory, or security requirements, while others result from architectural design decisions that ensure system stability and integrity. For limitations related to specific features, please refer to the relevant sections in the Viedoc Learning.
NOTE: This lesson will contain only system-wide known limitations after the 4.84 release
We no longer support SMS notifications in the following countries:
This glossary contains common terms and acronyms found in the Learning. They are sorted in alphabetical order by the full term (not by abbreviation).
A B C D E F G H I J K L M N O P Q R S T U V W X Y Z
| Term | Abbreviation | Definition | ||
|---|---|---|---|---|
| Active Pharmaceutical Ingredient | API | The ingredient in a pharmaceutical drug or pesticide that is biologically active. | ||
| Application Programming Interface | API | A set of rules and protocols that allows software applications to communicate with each other. Note! Not to be confused with Active Pharmaceutical Ingredient. | ||
| Adverse Event | AE | Any unwanted effect caused by the administration of drugs. The onset of an adverse event may be sudden or develop over time. | ||
| Anatomic Therapeutic Chemical classification system | ATC | A drug classification system that classifies the active ingredient of drugs according to the organ or system on which they act and their therapeutic, pharmacological and chemical properties. | ||
| Annotated CRF | aCRF | A blank CRF with annotations that coordinate each datapoint in a form with its corresponding dataset name. In Viedoc, it equals to a printout of a form with Show IDs enabled. | ||
| Application Programming Interface | API | A set of routines, protocols, and tools for building software applications that specifies how software components should interact. | ||
| Attributable, Legible, Contemporaneous, Original, Accurate | ALCOA+ | The principles of data integrity. The plus sign denotes the four additions: Complete, Consistent, Enduring, and Available. | ||
| Audit trail | An audit trail (or audit log) is a security-relevant chronological record, set of records, or destination and source of records that provide documentary evidence of the sequence of activities that have affected a specific operation, procedure, or event at any time. The records are of importance for the clinical study, as specified by applicable international standards (from the FDA and EMEA). The audit trail allows reconstruction of the events relating to the creation, modification, or deletion of an electronic record. |
|||
| B | ||||
| Blinding | A procedure in which one or more parties to the trial are kept unaware of the treatment assignment(s). Single-blinding usually refers to the subject(s) being unaware, and double-blinding usually refers to the subject(s), investigator(s), monitor, and, in some cases, data analyst(s) being unaware of the treatment assignment(s). | |||
| C | ||||
| Case Report Form | CRF | A printed, optical, or electronic document designed to record all protocol-required information on each study subject. | ||
| The China Personal Information Protection Law | PIPL | The data privacy law in China, targeted at personal information protection. | ||
| Clinical Data Acquisition Standards Harmonization | CDASH | A standard developed by CDISC that provides guidance to develop the CRF. | ||
| Clinical Data Interchange Standards Consortium | CDISC | A global, open, multidisciplinary, non-profit organization that has established standards to support the acquisition, exchange, submission and archive of clinical research data and metadata. | ||
| Clinical Data Interchange Standards Consortium Define Extensible Markup Language | CDISC Define-XML | A metadata format defined by CDISC that is sent with every study in each submission, which tells the regulatory authorities what datasets, variables, controlled terms, and other specified metadata were used. | ||
| Clinic role | User roles in Viedoc that give access to Viedoc Clinic, such as Investigators, Monitors, and Data Managers.The clinic roles are study-specific. These roles, and the rights that belong to these roles, can be defined in Viedoc Designer. Each study can have an unlimited number of clinic roles. | |||
| Clinical data manager | Responsible for the management of the data in the clinical trial. Assists in protocol development and database selection and configuration. | |||
| Clinical Research Associate | CRA | A person employed by the sponsor, or by a CRO, acting on a sponsor’s behalf, who handles most of the administrative responsibilities of a clinical trial, acts as a liaison between investigative site and sponsor, monitors the progress of the investigator’s sites participating in a clinical study, and reviews all data and records before a monitor’s visit. | ||
| Clinical Review | CR | A clinical review gives the Monitor the possibility to mark forms as reviewed. | ||
| Clinical Trial Management System | CTMS | A Clinical Trial Management System is a software system used by biotechnology and pharmaceutical industries to manage clinical trials in clinical research. The system maintains and manages planning, performing and reporting functions, along with participant contact information, tracking deadlines and milestones. | ||
| Code of Federal Regulations | CFR | The codification of the general and permanent rules and regulations by the executive departments and agencies of the U.S. federal government. | ||
| Comma-Separated Values | CSV | A set of database rows and columns stored in a text file such that the rows are separated by a new line while the columns are separated by a semicolon or a comma. | ||
| Common event | An event that occurs separately or parallel to the workflow, for example concomitant medication, adverse event, medical history, dose adjustments, and daily compliance reporting. | |||
| Computerized Systems Used In Clinical Investigations | CSUCI | A guidance document established by the FDA intended to assist in ensuring confidence in the reliability, quality, and integrity of electronic source data and source documentation (that is, electronic records). | ||
| Concomitant Medication | CM | Drugs given to a patient at the same time, or almost at the same time, as the drug under study. | ||
| Contract Research Organization | CRO | A company that contracts with the sponsor to perform one or more of the sponsor’s duties in a clinical trial. | ||
| Coordinated Universal Time | UTC | The primary time standard by which the world regulates clocks and time. Viedoc stores all timestamps in UTC. In the cases when a time zone can be established (for example a specific site scope is selected), the timestamp is displayed with the time zone applied. | ||
| D | ||||
| Data Manager | DM | A user role in Viedoc with permission to lock and export data into different formats, view reports and metrics, and add pre-queries. | ||
|
De-identification |
Related to DICOM and involves: Removing direct identifiers, replacing identifiers with pseudonyms, scrubbing burned-in annotations in image pixels and removing private tags | |||
| Demo mode | A mode in Viedoc specifically used for demonstrations and training new Viedoc users. No real data should ever be entered in Demo mode. | |||
| Designer | A user role in Viedoc that can create the setup (design) of the study in Viedoc Designer. | |||
| DICOM |
DICOM (Digital Imaging and Communications in Medicine) files contain both imaging data and embedded metadata. Certain metadata fields may contain Protected Health Information (PHI), either directly (e.g., patient identifiers) or indirectly (e.g., dates or site-related information). Viedoc supports the de-identification of DICOM files. |
|||
| Dictionary Manager | A user role in Viedoc with permission to upload medical coding dictionaries. | |||
| Drug Information Association | DIA | A global forum for those involved in healthcare product development and lifecycle management to exchange knowledge and collaborate. | ||
| E | ||||
| Edit checks | A check of the data that verifies whether the data entered into the form are within a certain range that is specified in Viedoc Designer. If the entered data are outside the specified range, the system will automatically display a message that is defined under Query Message. | |||
| Electronic Case Report Form | eCRF | An electronic document designed to record all protocol-required information on each study subject throughout the study. | ||
| Electronic Common Technical Document | eCTD | A standard format for submitting applications, amendments, supplements, and reports to the FDA. | ||
| Electronic Data Capture | EDC |
The use of computerized systems to collect clinical trial data in electronic form as opposed to paper form. A software system, typically delivered as a cloud-based (SaaS) solution, used to collect and manage clinical trial data in electronic format as opposed to paper format. |
||
| Electronic Investigator Site File | eISF | The digital version of the minimum list of essential documents that a study site needs to maintain throughout a clinical trial. Included documents could be: Clinical Study Protocol, Investigator Brochure, Informed Consent, CVs etc. | ||
| Electronic Patient Reported Outcome | ePRO | A patient-reported outcome that is collected by electronic methods. Viedoc Me is the ePRO solution of Viedoc. | ||
| Electronic Trial Master File | eTMF | A type of content management system with a collection of essential documents which allows the conduct of a clinical trial to be reconstructed and evaluated. | ||
| eTMF Manager | A user role in Viedoc that has permission to manage the eTMF application in Viedoc Admin. The eTMF Manager maps Viedoc Clinic roles to eTMF roles. The eTMF Manager also has permission to manage the eTMF structure in Viedoc eTMF. | |||
| Event | A moment when the patient visits or contacts the clinic, or initiates an event through the Viedoc ePRO application Viedoc Me, and data are recorded. | |||
| European Medicines Agency | EMA | A decentralised agency of the European Union (EU) that is responsible for the scientific evaluation, supervision, and safety monitoring of medicines developed by pharmaceutical companies for use in the EU. | ||
| European Medicines Agency Good Clinical Practice Inspectors Working Group | EMA GCP IWG | The EMA GCP Inspectors Working Group focuses on harmonisation and co-ordination of GCP related activities at Community level. Involved in the preparation of new and revised guidance on GCP and community procedures relating to inspection. | ||
| Exchange Mechanism Standard | EMS | The exchange mechanism standard is a model for transferring eTMF data between sponsors, CROs, other stakeholders, and vendor systems. | ||
| Extensible Markup Language | XML | A markup language that defines a set of rules for encoding documents in a format that is both human-readable and machine-readable. | ||
| F | ||||
| Food and Drug Administration | FDA | An agency of the U.S. federal government’s Department of Health and Human Services that ensures the safety of foods, pharmaceuticals and other products. | ||
| G | ||||
| General Data Protection Regulation | GDPR | A regulation in the European Union (EU) law on data protection and privacy in the EU and the European Economic Area (EEA). Primarily aimed to give control to individuals over their personal data and to simplify the regulatory environment for international business by unifying the regulation within the EU. | ||
| Good Automated Manufacturing Practice | GAMP | A subcommittee of, and a series of good practice guides on drug manufacturing published by, the International Society for Pharmaceutical Engineering. | ||
| GAMP5 | The last major revision of the GAMP Guide for Validation of Automated Systems in Pharmaceutical Manufacture, released in February 2008. | |||
| Good Clinical Practice | GCP | A standard for the design, conduct, performance, monitoring, auditing, recording, analyses, and reporting of clinical trials that provides assurance that the data and reported results are credible, accurate, and that the rights, integrity, and confidentiality of trial subjects are protected. | ||
| Good Manufacturing Practice | GMP | The manufacturing guidelines recommended by the relevant agencies. | ||
| Globally Unique Identifier | GUID | A unique key containing numbers and letters that identifies the study. | ||
| H | ||||
| Health Insurance Portability and Accountability Act | HIPAA | A Privacy Rule that is the first comprehensive Federal protection for the privacy of personal health information. Research organizations and researchers may or may not be covered by the HIPAA Privacy Rule. | ||
| Hyper Text Markup Language | HTML | The standard markup language for documents designed to be displayed in a web browser. | ||
| I | ||||
| Identity Provider | IdP | A system entity that creates, maintains, and manages identity information. | ||
| Independent Ethics Committee | IEC | An institutional review board (IRB). | ||
| Informed Consent Form | A document containing all elements of a research study, explained in lay terms. The consent form must be signed prior to participation in any study activity. The affirmative decision of the IEC/IRB that the clinical trial has been reviewed and may be conducted at the institution site within the constraints set forth by the IEC/IRB, the institution, Good Clinical Practice (GCP), and the applicable regulatory requirements. The appointed ethical committee is responsible for reviewing each human subject protocol to ensure the ethical protection of these subjects. | |||
| Input factors | When used in randomization: Prognostic factors that might influence the effect of treatment on the subjects. | |||
| Institutional Review Board | IRB | Committee(s) made up of experts and community representatives who review and approve clinical trials to make certain that they fulfill stringent ethical standards to protect subjects’ rights as participants in an experiment. | ||
| International Council for Harmonisation of Technical Requirements for Pharmaceuticals for Human Use | ICH | An initiative that brings together regulatory authorities and pharmaceutical industry to discuss scientific and technical aspects of pharmaceutical product development and registration. | ||
| International Organization for Standardization | ISO | An organization promoting worldwide proprietary, industrial, and commercial standards. | ||
| Investigational Medicinal Product | IMP | A medicine for research. | ||
| Investigational Product | IP | A preventative (vaccine), a therapeutic (drug or biologic), device, diagnostic, or palliative used in a clinical trial. Also abbreviated IMP (Investigational Medicinal Product) and IMD (Investigational Medical Device). An investigational medical device is one that is the subject of a clinical study designed to evaluate the effectiveness and/or safety of the device. | ||
| Investigator Site File | ISF | The minimum list of essential documents that a study site needs to maintain throughout a clinical trial. Included documents could be Clinical Study Protocol, Investigator Brochure, Informed Consent, CVs etc. | ||
| Iyakuhinmei Data File | IDF | A medical coding dictionary used for coding clinical and drug safety data and for reporting safety data to the Japanese Pharmaceuticals and Medical Devices Agency (PMDA). | ||
| J | ||||
| Japanese Pharmaceuticals and Medical Devices Agency | PMDA | PMDA (Pharmaceuticals and Medical Devices Agency) is a Japanese regulatory agency, working together with Ministry of Health, Labour and Welfare. Their obligation is to protect the public health by assuring safety, efficacy and quality of pharmaceuticals and medical devices. | ||
| JavaScript | JS | A scripting language, primarily used on the web. Used to enhance HTML pages and is commonly found embedded in HTML code. Viedoc is using JS to define advanced edit checks, expressions, and comparisons. | ||
| K | ||||
| Kaifu | The send/receive/return process for handling booklets | |||
| Key Risk Indicator | KRI | In Viedoc Reports, the Key Risk Indicators are the measurement of unfavorable events that can adversely impact a study, and are measured by site. | ||
| L | ||||
| Linking form | A linking form is a form that contains a link to refer to another form. There can be one or more instances of the linked form. | |||
| Linked form | A linked form is a form that is linked to from another form (a linking form). | |||
| M | ||||
| Medical coding | The process of translating reported events like Adverse Events, Medical History and Concomitant Medications in a universal code according to a medical coding dictionary. | |||
| Medical Dictionary for Regulatory Activities | MedDRA | A medical coding dictionary developed by the Maintenance and Support Services Organization (MSSO). MedDRA is supported by ICH. | ||
| N | ||||
| National Medical Products Administration | NMPA | The Chinese agency for regulating drugs and medical devices. | ||
| Numeric rating scale | NRS | A numeric rating scale using numbers to identify the items in the scale, on a scale of 0 to 10. Commonly used to evaluate pain intensity. | ||
| O | ||||
| Object Identifier | OID | An identifier mechanism for naming any object, concept, or "thing" with a globally unambiguous persistent name. | ||
| Operational Data Model | ODM | A standard for electronic clinical data as defined by CDISC. The highlights of ODM include audit trail, utilization of XML technology, and machine-readable and human-readable data. All information is independent of databases, and storage of ODM is independent of hardware and software. | ||
| Output factors | When used in randomization: the result after a patient has been randomized, that is, the treatment group or kit number (in case of a blinded output) that the patient is assigned to. | |||
| P | ||||
| Patient Reported Outcome | PRO | A health outcome directly reported by the patient who experienced it. | ||
| Portable Document Format Archive | PDF/A | An ISO-standardized version of the PDF specialized for use in the archiving and long-term preservation of electronic documents. | ||
| Post Marketing Surveillance | PMS | The practice of monitoring the safety of a pharmaceutical drug or device after it has been released on the market and an important part of the science of pharmacovigilance. Viedoc PMS is Viedoc's electronic data capture solution developed especially for post-marketing surveillance studies. PMS in Japan differs from other PMS studies in the world, with concepts such as kaifu function and booklets. | ||
| Protected Health Information | PHI | Protected Health Information, for example, patient identifiers. Which can be personal identifiers. Personal identifiers are data elements that can directly (such as the patient name) or indirectly (such as dates or site-related information) identify an individual. |
||
| Q | ||||
| Quality Control | QC | The operational technique and activities undertaken within the quality assurance system to verify that the requirements for quality of the trial are met. | ||
| R | ||||
| Randomization | A method based on chance by which study participants are assigned to a treatment group. Randomization minimizes the difference among groups by equally distributing people with particular characteristics among all the trial arms. | |||
| Randomization and Trial Supply Management | RTSM | A system that unifies the randomization, allocation, and supply management in a clinical trial. | ||
| Representational State Transfer | REST | A REST API (also known as RESTful API) is an application programming interface (API or web API) that conforms to the constraints of REST architectural style and allows for interaction with RESTful web services. | ||
| S | ||||
| Scheduled event | Events to the clinic by the patient that are defined in the study protocol. The events can also be subject-initiated through Viedoc Me, the ePRO application. | |||
| Study/Trial Design Model in XML (SDM-XML) | SDM | An extension of ODM-XML which allows organizations to provide rigorous, machine-readable, interchangeable descriptions of the designs of their clinical studies, including treatment plans, eligibility and times and events. SDM-XML defines three key sub-modules – Structure, Workflow, and Timing – permitting various levels of detail in any representation of a clinical study’s design. | ||
| Study Data Tabulation Model | SDTM | A CDISC standard for how to structure raw data for a submission. SDTM is one of the required standards for data submission to FDA (U.S.) and PMDA (Japan). |
||
| Security Assertion Markup Language | SAML | An open XML-based standard for exchanging authentication and authorization identities between security domains. | ||
| Security Token Service | STS | An open standard web service for issuing, validating, renewing, and cancelling security tokens for use with, for example, an API. | ||
| Serious Adverse Event | SAE | Any event resulting in death, a life-threatening situation, hospitalization, or prolonged hospitalization, disability, incapacity, or congenital defect. |
||
| Single Sign-On | SSO | An authentication process that allows a user to access multiple applications with one set of login credentials. | ||
| Site | A clinic or other medical institute visited by subjects and where their data are recorded. | |||
| Site Manager | SIM | A user role in Viedoc Admin that can edit the details of their respective sites and invite site users to their sites. | ||
| Software As A Service | SaaS | Also known as web-based software, on-demand software, cloud software, and hosted software. Typically accessed by users via a web browser. | ||
| Standard Operating Procedure | SOP | Detailed, written instructions to achieve uniformity of the performance of a specific function. | ||
| Source Data | The original data when first recorded. | |||
| Source Data Verification | SDV | The process by which data within the CRF is compared to the original source of information (and vice versa). Helps to ensure eCRF and source records together meet various protocol and clinical expectations. | ||
| Source Documentation | All original records and certified copies of original records of clinical findings, observations, or other activities in a clinical trial necessary for the reconstruction and evaluation of the trial. Source data are contained in the source documents. | |||
| Sponsor | Any organization that provides the institutional base for clinical trial researchers. This includes commercial groups: pharmaceutical companies, non-profit organizations, universities, and medical centers. | |||
| Statistical Analysis System | SAS | A format used for statistical analysis in the SAS software suite. | ||
| Study crew | Viedoc users and all staff involved in the clinical trial. In most cases, these terms refer to users of Viedoc Clinic (see also Clinic role). | |||
| Study design | The design of the study that covers all the details about how the study is supposed to be performed, such as treatment details, medical examinations and other data to be collected, the workflow, and the Viedoc permissions of the different clinic roles that contribute to the study. The study design is set up in accordance with the clinical trial protocol. | |||
| Study Manager | STM | A user role in Viedoc that has permission to manage the administration of the study in Viedoc Admin. The study manager invites the study crew, adds sites, and applies study designs to sites. This user role is usually assigned to the project manager of the clinical trial. | ||
| Subject | A person participating in the clinical trial. Also referred to as patient. | |||
| System roles | User roles in Viedoc that are defined by the system and give access to Viedoc Admin and/or Viedoc Designer. Examples are: Study Manager, Site Manager, Designer, Dictionary Manager, Unblinded Statistician. | |||
| T | ||||
| Transport Layer Security | TLS | Protocols designed to provide communications security over a computer network. | ||
| Trial Master File | TMF | A type of content management system for the pharmaceutical industry, providing a formalized means of organizing and storing documents, images, and other digital content for clinical trials that may be required for compliance with government regulatory agencies. | ||
| U | ||||
| Unblinded statistician | A user role in Viedoc that manages the randomization and kit allocation lists in Viedoc Admin. | |||
| Unscheduled event | Additional events to the clinic by the patient that are not pre-defined in the study protocol. | |||
| V | ||||
| Viedoc Inspection Readiness Packet | VIRP | A file that can be downloaded in Viedoc, containing all the information needed to fulfill regulatory expectations. | ||
| W | ||||
| World Health Organization Drug Dictionary | WHODrug | A dictionary maintained and updated by Uppsala Monitoring Centre. | ||
| WHODrug Koda | An AI-driven coding engine by UMC that connects via REST API to automatically code verbatim entries to WHODrug Global and select the most appropriate ATC code. | |||
| X | ||||
| Y | ||||
| Z | ||||
It is important to be fully prepared for an inspection of relevant documentation about the EDC system used in a clinical trial. If the correct documentation is available for review by the regulatory authorities and certain validations have been performed, inspectors can then assess the systems used when collecting subject data in clinical trials.
There are also specific expectations that sponsors must comply with, depending on the regulatory body, European Medicines Agency (EMA) Food and Drug Administration (FDA) and the Japanese Pharmaceuticals and Medical Devices Agency (PMDA) even though these are similar in that they all expect the sponsor to have a complete understanding of the system. They also expect that the sponsor (or Contract Research Organization (CRO), if delegated) fully understands the functionality of the EDC system being used and can demonstrate this understanding and explain how the system has been validated.
To assist in preparing for inspections, Viedoc has developed the Viedoc Inspection Readiness Packet (VIRP) which provides you with the information you need in order to fulfil regulatory expectations and requirements.
The VIRP is available for every release of Viedoc. The VIRP introduction describes the contents of VIRP in more detail, and also talks about additional documentation you should provide. The VIRP introduction is included in VIRP.
eLearning: Viedoc also provides an eLearning lesson - Inspection Readiness when Working in Viedoc, which describes in detail the information needed step-by-step, as well as having additional information about potential pitfalls, what happens when new functionality is introduced in a release, about backward compatibility and more.
The Viedoc Release Binder. We also store a snapshot of the information in our development environment for each release. This information is included in the Release Binder for that release which is stored in SharePoint and can be shared with inspectors either in a webinar or onsite.
When it comes to preparing for regulatory inspections, there are different areas of responsibility for the Sponsor/CRO and Viedoc.
The Sponsor/CRO should be able to rely on Viedoc standard qualification documentation as there are no sponsor or study-specific software modifications made to the standard product. The configuration of Viedoc for use in a study is done using only functionality that has been validated before being released to the study.
Each new Viedoc version is fully validated before release - which takes place every 6-8 weeks. These releases are installed on all production servers at the same time, meaning all customers and all studies are updated at the same time. Furthermore, we ensure that ongoing studies are not affected by fulfilling the following two requirements:
The new release must be 100% backward compatible.
Any new functionality in the release shall be disabled for ongoing studies by default.
Some areas and activities, however, remain the responsibility of the sponsor/CRO and should be documented:
It is a Sponsor/CRO responsibility to validate the study configuration and confirm that the study has been set up in accordance with the study protocol. This validation should be documented.
The different versions of systems used during the study and a synopsis of the differences between the versions should be stored as part of the study record in the sponsor (e)TMF.
A risk-based assessment documenting the decision to rely on VIRP should be carried out.
A checklist of the required functions (such as randomization module, patient ePRO module, coding module) for your trial on our epic1 level, and where necessary, individual features1.
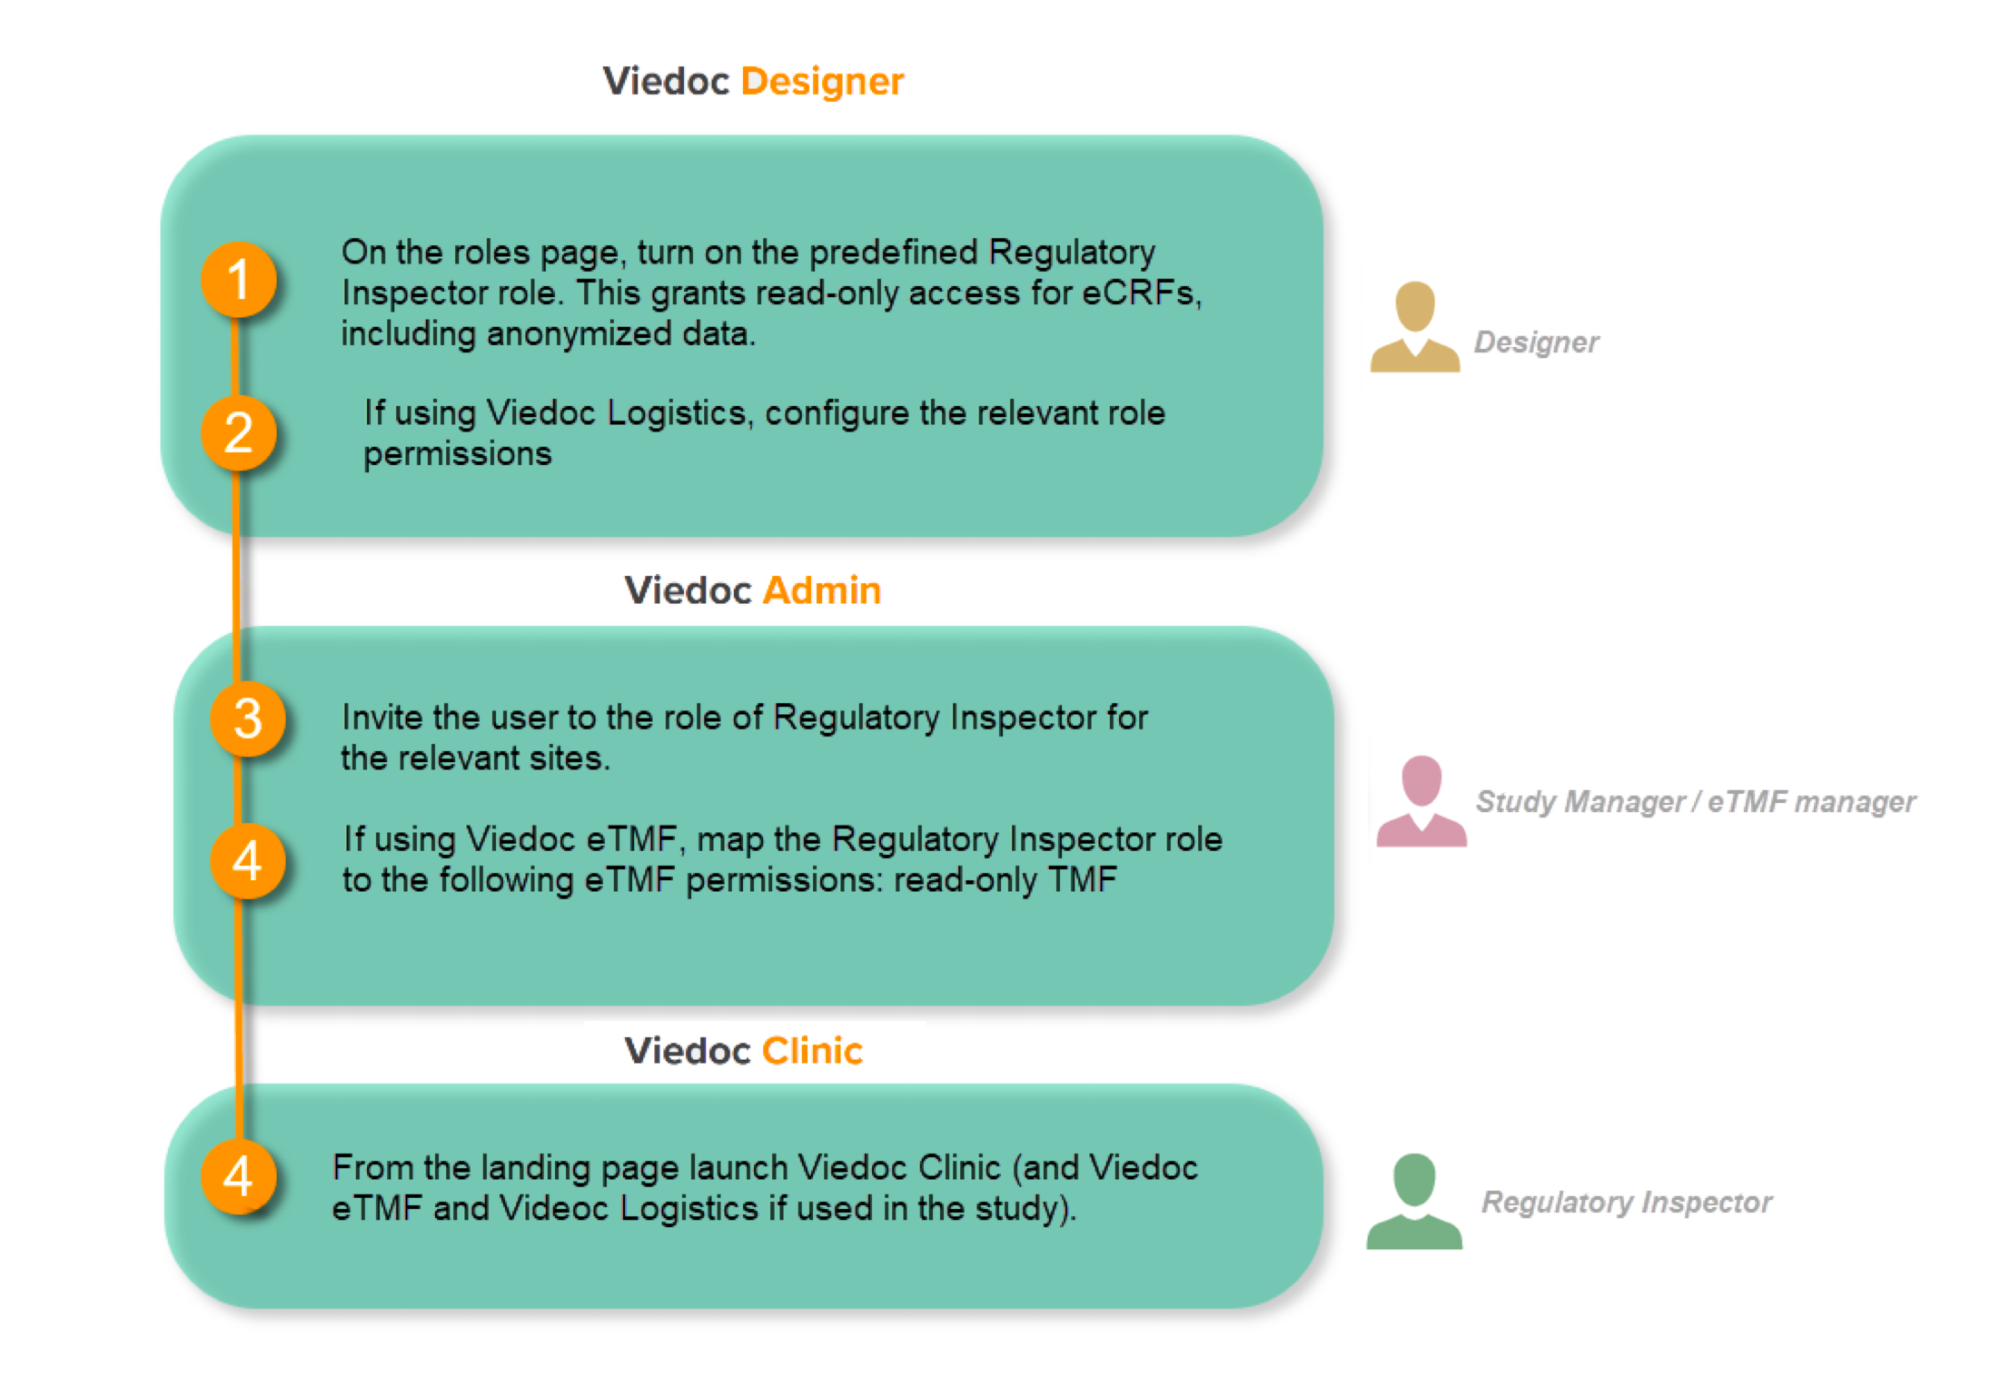
When the inspector visits, they must have access to Viedoc. Regulatory inspectors have the legal right to view all data in the study – even patient data and hidden (anonymized) items in the audit trail. The study manager should invite the inspector to the Viedoc user role Regulatory Inspector when they arrive.
Follow these steps to ensure that the inspector has all the correct access permissions in Viedoc:
This step is performed by the Designer.
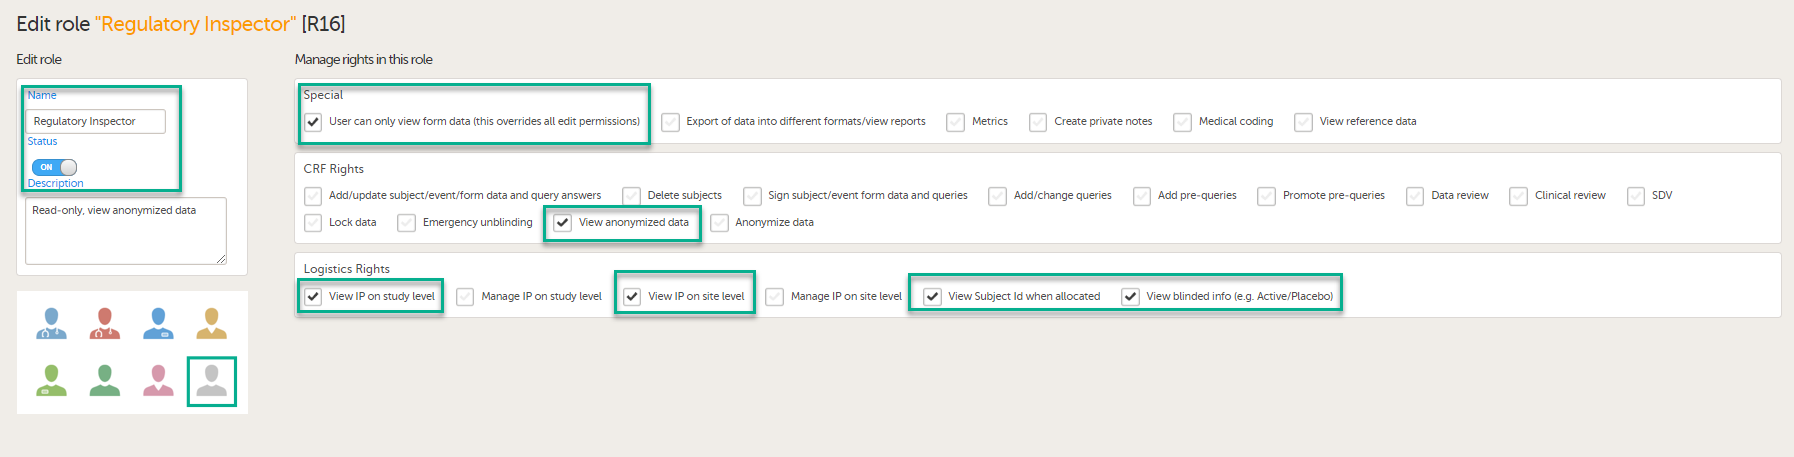
In Viedoc Designer, on the Roles page, configure the Regulatory Inspector user role and make sure it is turned on.
To allow the Regulatory Inspector access to study data, their role must be configured with Read-only for form data and View anonymized data and blinded data permissions on the Roles page.
If the study uses Viedoc Logistics, the following role permissions in Logistics Rights for the Regulatory Inspector role must be configured on the Roles page:
View IP (Investigational Product) on study level,
View IP on site level
View subject ID when allocated
View blinded info (e.g. Active/Placebo).
See the image below and Configuring roles.

Note! Should the inspector also require access to Viedoc Admin or Viedoc Designer, and the study is managed by a Viedoc representative, you are always welcome to contact your Viedoc representative if you need assistance.
These steps are performed by the Study manager.
In Viedoc Admin, the study manager invites the Regulatory Inspector to the study for all sites. See Managing users.
The inspector should also be invited to the study with the role of Unblinded Statistician, in order to have access to the randomization lists and be able to download them in Viedoc Admin.
Note! This role is only used for randomized studies, when it is necessary to have control over who has access to and can manage the randomization lists.
The inspector should also be able to access the eLearning. There is a requirement for customers to be able to present to regulatory inspectors, on request, the version of the eLearning used to train staff during the course of the study.
The Documentation tab under Study settings provides a list of all documentation and training sections.

The Regulatory Inspector role should be granted access to the relevant eLearning documentation on the Study settings page.
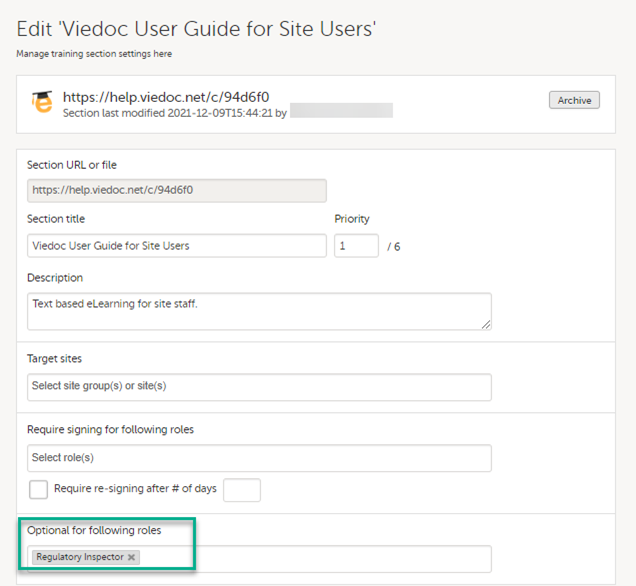
See the Viedoc Admin User Guide Setting up user documentation and training
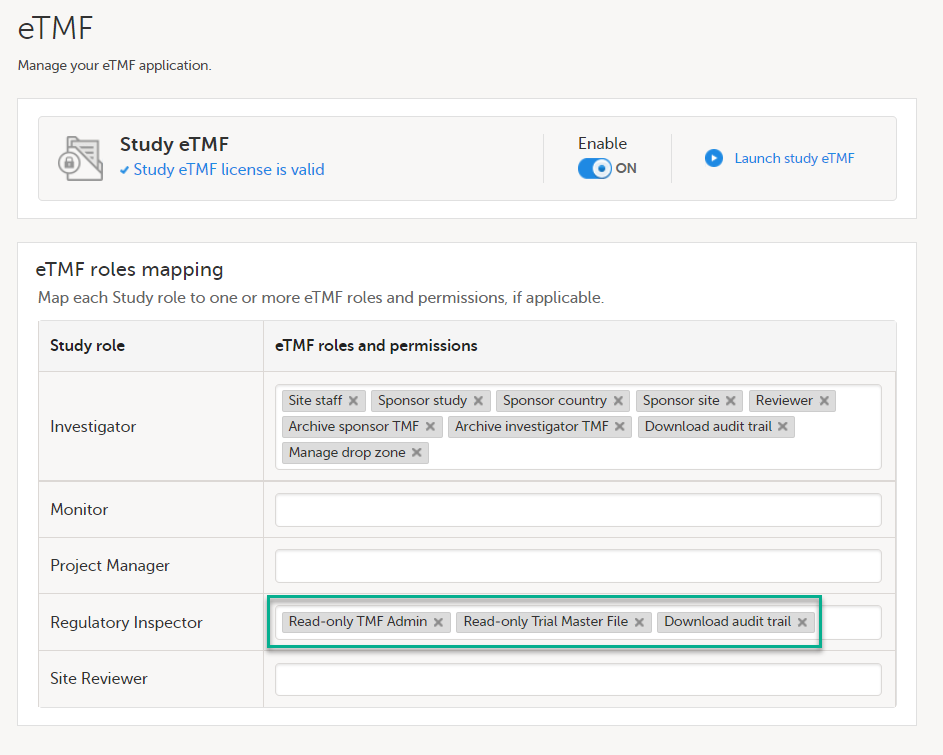
If the study uses Viedoc eTMF, the study manager/eTMF manager should map the Regulatory Inspector study role to an eTMF role with at least the following permissions: Read-only TMF Admin, Read-only Trial Master File and Download audit trail.

See Viedoc User Guide for eTMF Managers - Managing Viedoc eTMF - Mapping user roles.
These steps are performed by the Regulatory Inspector.
The regulatory inspector accepts the invitation and activates their account - see Viedoc User Guide for Site Users: Managing your Viedoc account
The inspector can now launch Viedoc Clinic and the Viedoc eTMF from the landing page.
1 At Viedoc, we publish our User Requirements Specification in an easy-to-understand format made up of epics, features, and user stories.
Epics describe an overall module within Viedoc, such as audit trail, ePRO, and medical coding.
Features describe a given functionality in more detail, such as Viedoc Connect, form link items, and email alerts.
User stories are the detailed, broken-down requirements used by the system developers when designing, implementing, and validating Viedoc.
This is the central directory of all the Viedoc Learning user guides, designed to support users across various products, roles, and functionalities. You can access each guide using the links below.
Product user guides:
Role-based user guides:
PMS user guides:
This lesson is intended as a guide for which production instance to use. We recommend using your training instance in the same region as the production instance you plan to use.
Viedoc maintains server instances in Europe, Japan, China and the US. Each region has a primary server as well as a redundancy. They are served out of two Microsoft Azure regions as follows: The US instances are in US West and US East. The European instances use France Central and France South, the Japanese instances use Japan East and Japan West , and the mainland China instances use China North and China South. These locations are chosen for connectivity and privacy regulation purposes.
Each region has a training and a production instance for your studies.
When a production study is added in Viedoc, it is added within an organization in one of the four production instances. We recommend that the entire study should use the chosen production instance, but this is not an absolute must. It is possible to run different studies on different instances.
Certain regions have alternate capabilities which use different sub-processors. You can find out more here: Service Status.
Note! Viedoc Connect is disabled on the Chinese instances.
For a more in-depth technical description, please see Viedoc Technical Description.
Up to date information on the status of Viedoc server instances and incident reporting can be found on the Status page: https://status.viedoc.com/. Here you can also subscribe to receive updates as they are posted.
Note! Sometimes there may be a need to work on several servers for reasons such as the following:
See also Navigating GDPR for Clinical Trials for more information about GDPR for clinical trials.
A short summary of the available Viedoc instances is listed below.
Note! The EU instance is recommended for customers that must maintain GDPR compliance.
Note! This instance is recommended for customers that must maintain APPI compliance.
Note! This instance is recommended for customers that must maintain compliance with HGR and PIPL.
More information on managing studies in China can be found here: Managing studies in China.
For connecting your development environment or any other system to the Viedoc public web service using the Windows Communication Foundation (WCF) standards, use the following:
For the EU:
https://v4api.viedoc.net/HelipadService.svc?wsdl
https://v4apitraining.viedoc.net/HelipadService.svc?wsdl
For Japan:
https://v4apijp.viedoc.net/HelipadService.svc?wsdl
https://v4apitrainingjp.viedoc.net/HelipadService.svc?wsdl
https://v4apistagejp.viedoc.net/HelipadService.svc?wsdl
For China:
https://api.viedoc.cn/HelipadService.svc?wsdl
https://apitraining.viedoc.cn/HelipadService.svc?wsdl
For the USA:
https://api.us.viedoc.com/HelipadService.svc?wsdl
https://apitraining.us.viedoc.com/HelipadService.svc?wsdl
It is important to know that when transferring data from one region to another you will need to comply with the local data privacy legislation, for example:
It is not possible to share a study between instances, but it is possible to run a separate study on an alternate instance. Doing so present some things to be considered:
Below we have listed a few scenarios advising on which instances we would recommend using.
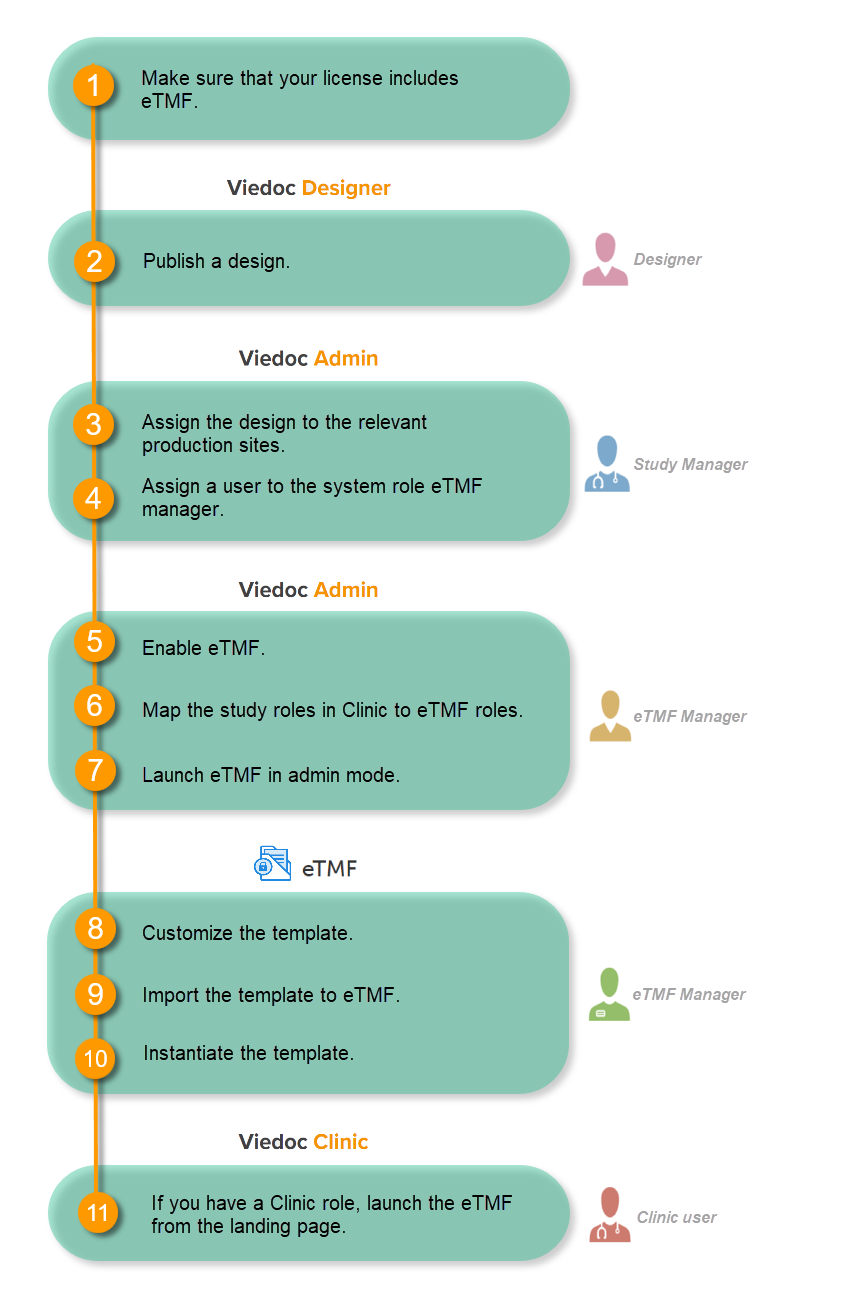
Make sure you have a valid license for using Viedoc eTMF.
This step is performed by the Designer.
Note! To publish the CRF design, you only need to have the roles configured and enabled, and a form added to the start event in your workflow (the form can be without any items at this stage). The actual CRF design can be added in subsequent versions.
See Publishing a study design.
This step is performed by the Study Manager.
This step is performed by the Study Manager.
See Managing users.
This step is performed by the eTMF Manager.
| 1 |
In the study details page, select the tools symbol in the eTMF area: 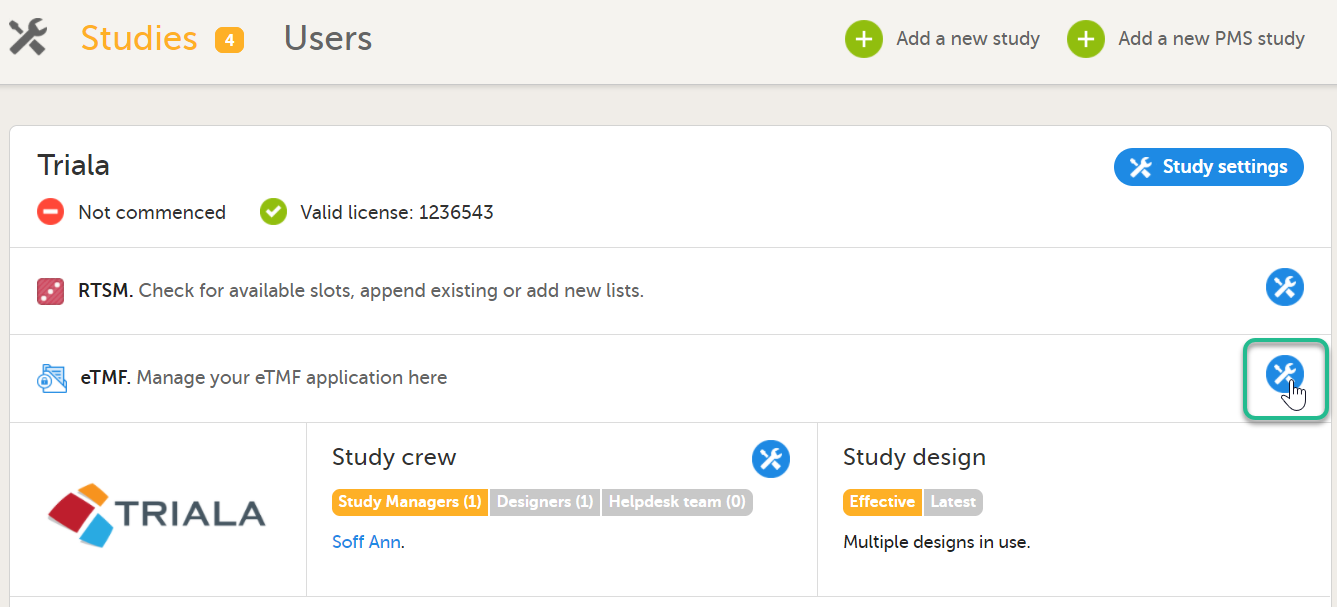 |
| 2 |
Toggle the Enable switch to ON in the eTMF settings pop-up: 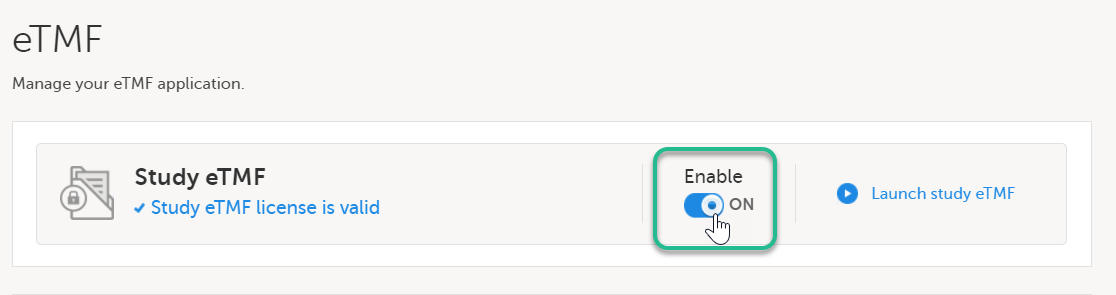
|
This step is performed by the eTMF Manager.
| 1 |
In the eTMF roles mapping area, select the eTMF roles and permissions that you want to map to the Viedoc study roles: 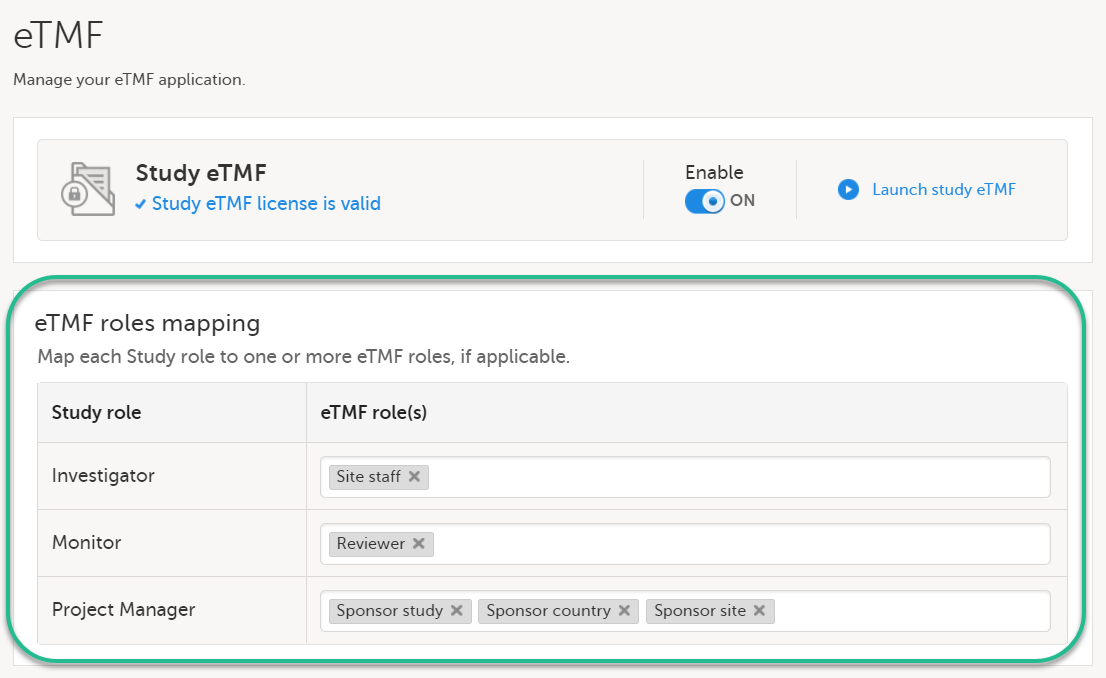
|
| 2 | Select Save changes. |
This step is performed by the eTMF Manager.
| 1 |
On the study details page, select the tools symbol in the eTMF area: |
| 2 | Select Launch study eTMF: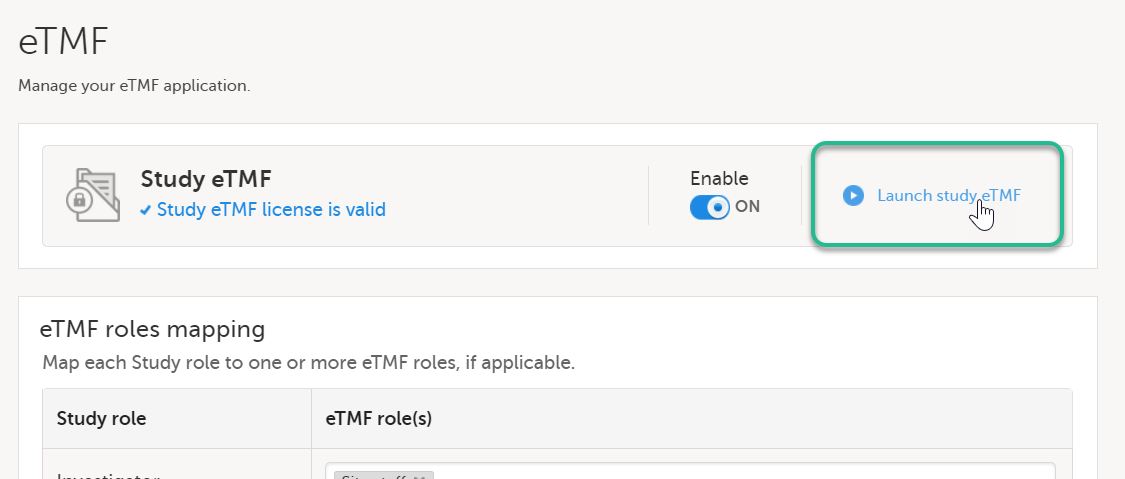 |
This step is performed by the eTMF Manager.
The first time you set up your eTMF application, you begin with a baseline template provided by Viedoc. This template is not intended to be used as it is, but to be adapted to the needs of your organization. See Viedoc-provided templates to download the template.
Once customized, import the template to eTMF, see Import the template.
Imported templates can be customized to fit your study needs.
To export a template for customization:
| 1 |
In Viedoc eTMF, select the TMF Admin view: 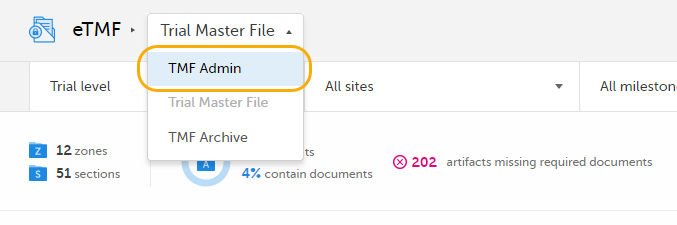
|
| 2 |
Select the Templates tab: 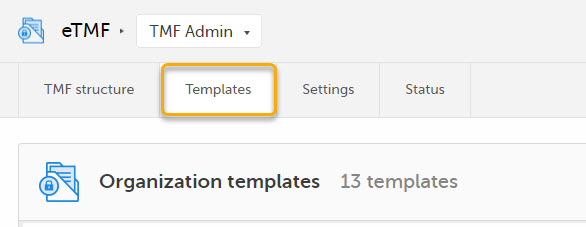
|
| 3 |
Select Export for the template you want to customize. The template is downloaded in Excel format. 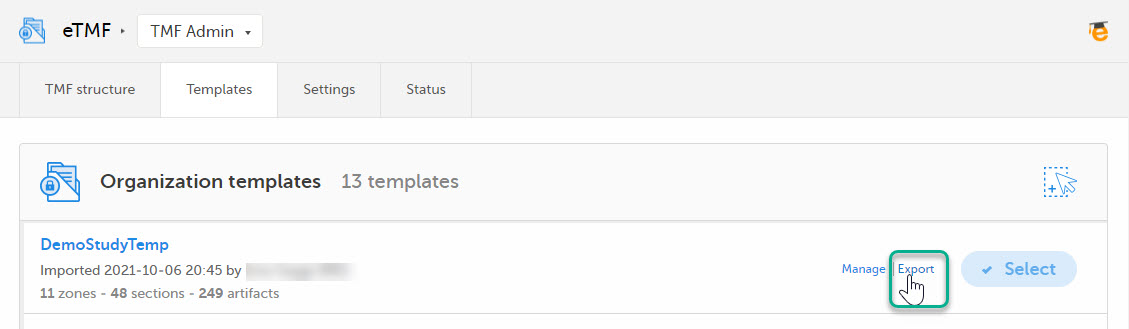
|
There are two types of templates:
It is recommended that you adapt the eTMF template to your specific documentation landscape. For example, you can customize, add, or delete zones, sections, and artifacts.
See also Customizing a template.
This step is performed by the eTMF Manager.
| 1 |
Select Import in Organization templates or Study templates, depending on what type of template you're importing. 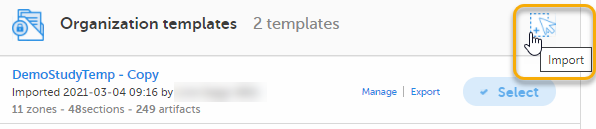
|
| 2 |
Once imported, select your template to make it available in the TMF structure. 
|
This step is performed by the eTMF Manager.
On the TMF structure tab, select the Instantiate button for the template.
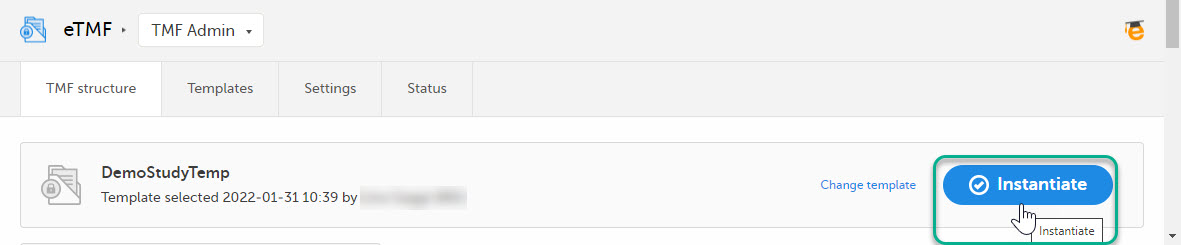
The template is now applied to the trial and the eTMF structure is available for end users to work with.
This step is performed by a Clinic user with a mapped eTMF role.
Select the eTMF icon on the Viedoc landing page:
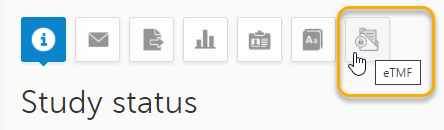
The eTMF application opens.
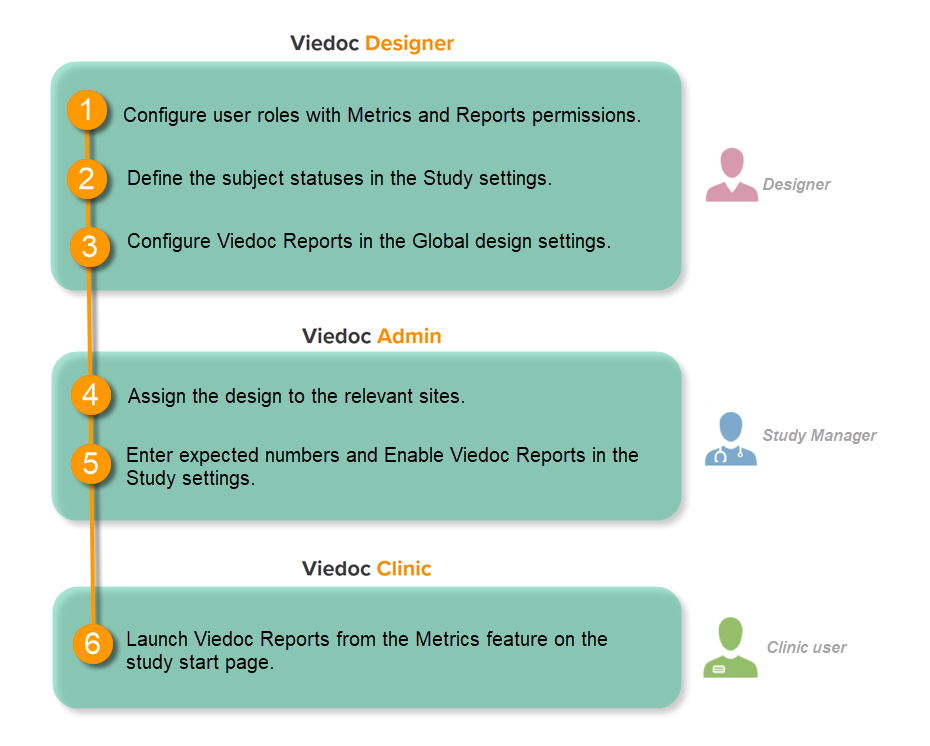
This step is performed by the Designer.
To let Clinic users use Viedoc Reports, their roles must be configured with Metrics and Reports permissions in the Roles page. The Reports option becomes visible when selecting Metrics.
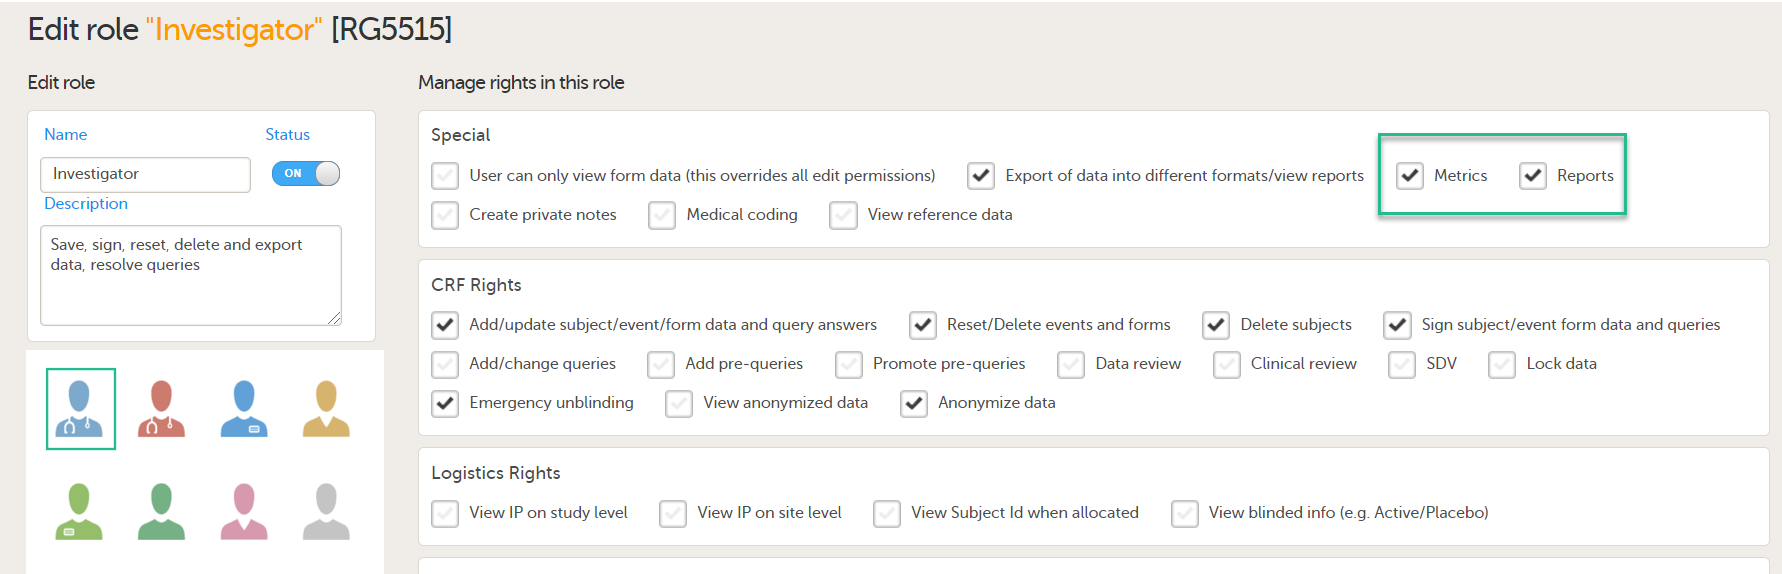
To be able to download report files, the user also needs the permission Export of data into different formats/view reports.

Note! The export is allowed only if the export permission is applicable to all the assigned sites.
See Configuring roles.
This step is performed by the Designer.
Set an expression for how and when a subject is considered both screened and enrolled in the study.
See Subject status.
This step is performed by the Designer.
| 1 |
In Viedoc Designer, select the study for which you would like to configure Viedoc Reports. |
| 2 |
In the Global design settings field, click Edit. 
|
| 3 |
In the Reports configuration field, click Edit. 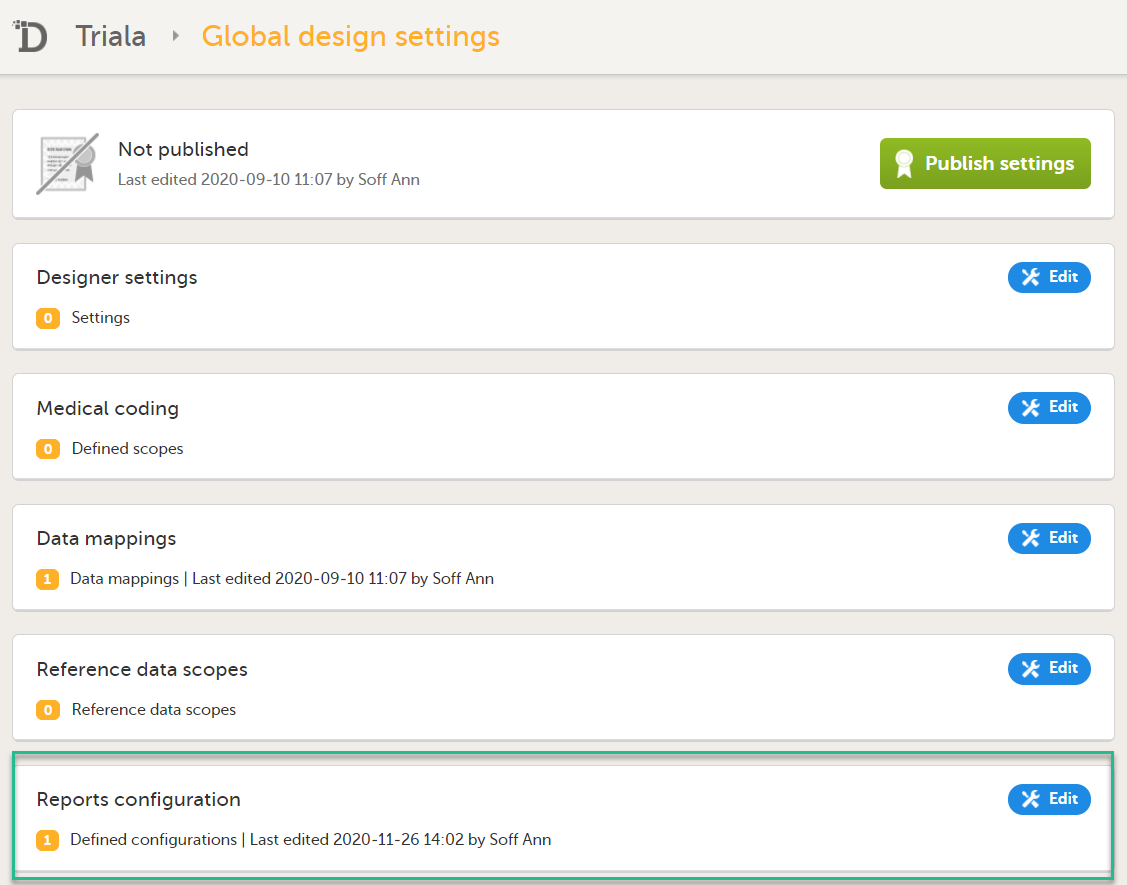
|
| 4 |
You can now configure the settings by clicking Edit in one of the fields: Visibility settings, Dashboard, Demographics, Adverse events, and Custom reports. See Configuring Viedoc Reports for details. 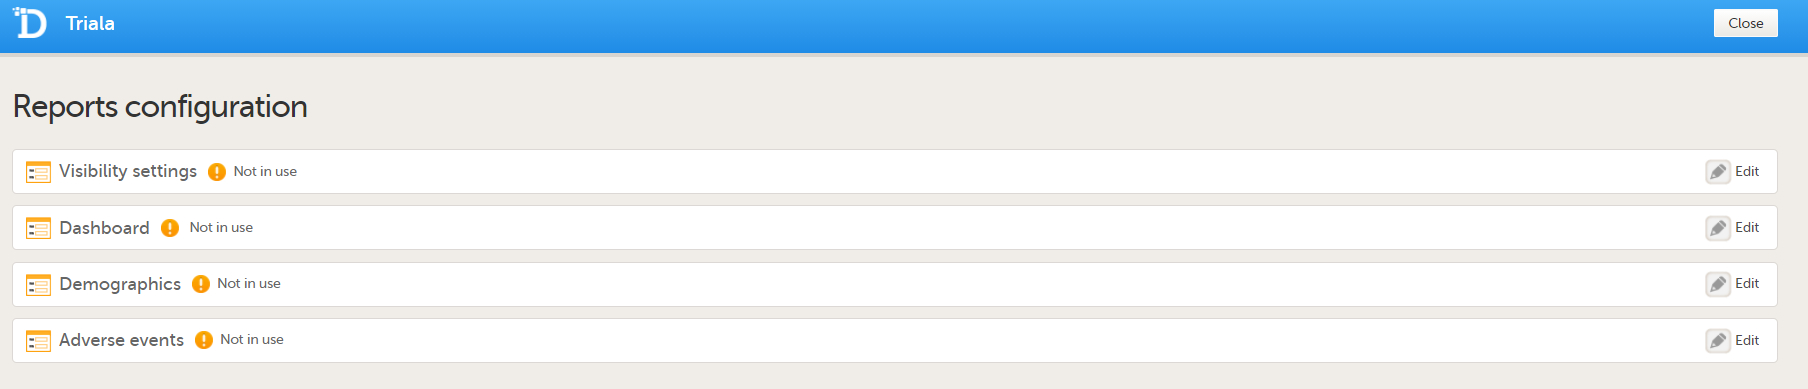
After editing and saving any changes, the Not in use status changes to In use. |
| 5 |
Publish your global design settings. 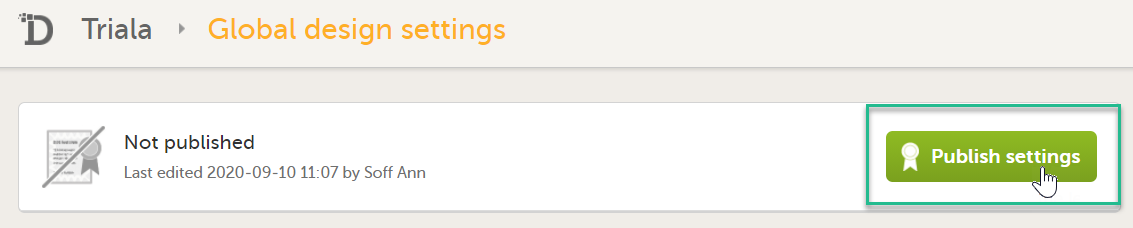
|
| 6 | Publish your design. See Publishing a study design. |
This step is performed by the Study Manager.
This step is performed by the Study Manager.
| 1 |
Click Study settings for the study in which you want to set up Viedoc Reports. 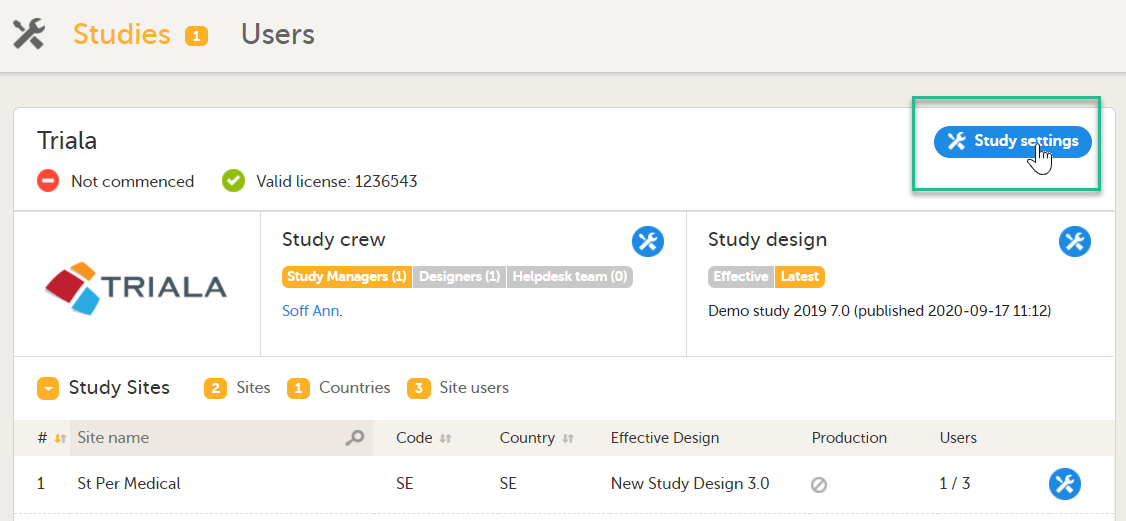
|
| 2 |
In the Study settings pop-up window, enter the total number of expected screened and enrolled subjects and the expected end date of the enrollment period. 
Note! This data must be entered on both study level and for each individual site. |
| 3 |
Scroll down to and click Show more options. 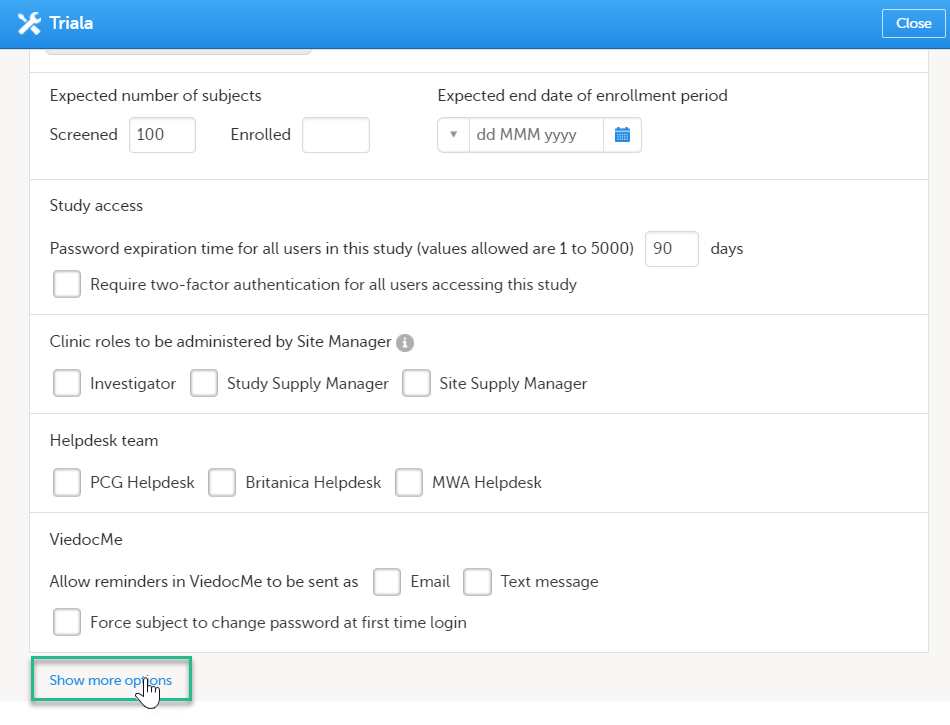
|
| 4 |
Select Enable Viedoc Reports and click Save changes. 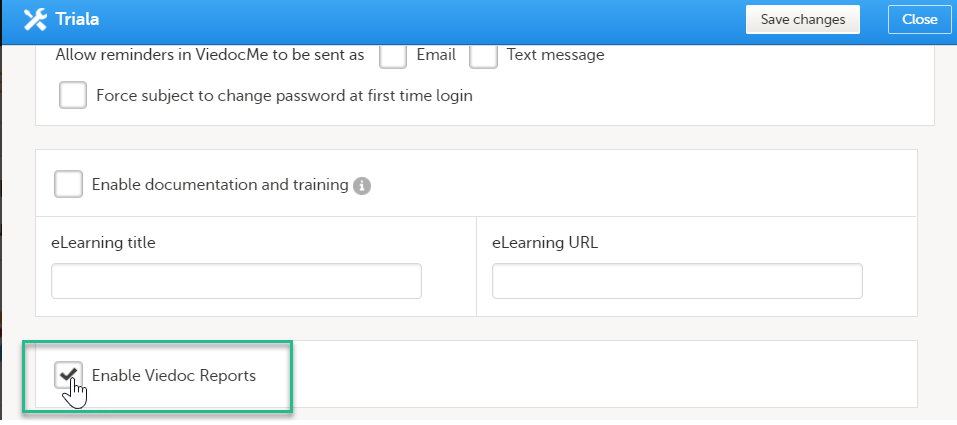
|
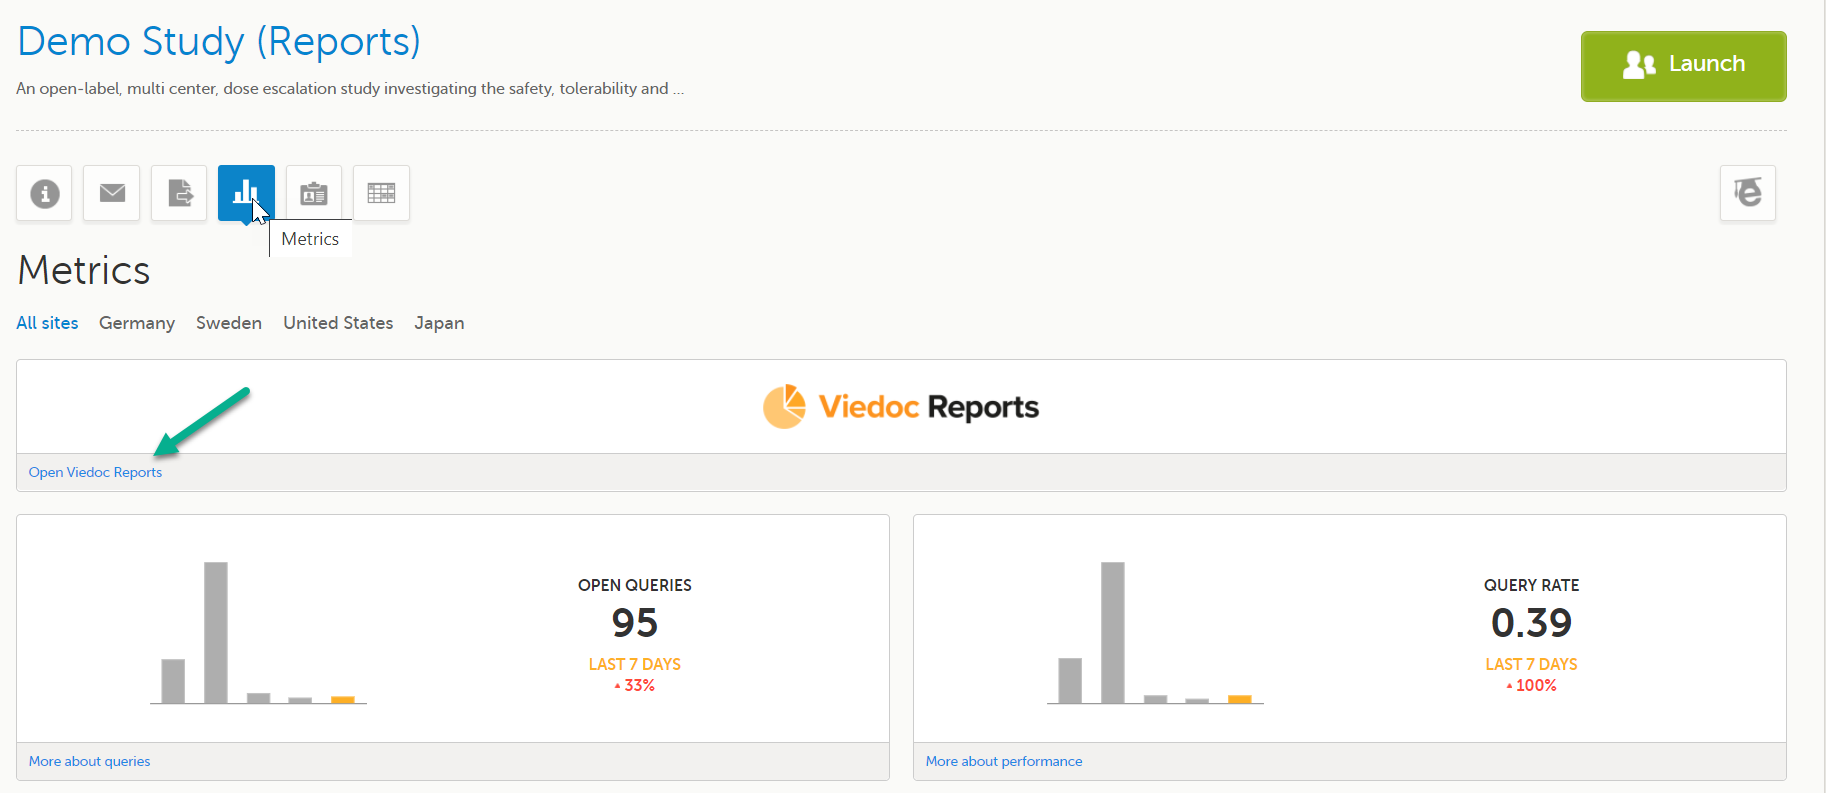
This step is performed by the Clinic user.
Launch Viedoc Reports from the Metrics feature on the study start page.
Thorough preparation for inspection of the EDC system used in a clinical trial is of great importance. The regulatory authorities see the EDC system used for a clinical trial as an important computerized system with regards to both patient safety and data integrity.
To assist in this process, Viedoc has developed the Viedoc Inspection Readiness Packet (VIRP) which provides you with the information you need to prepare for a regulatory inspection and to fulfil regulatory expectations and requirements. The VIRP introduction describes the contents of VIRP in more detail, and also talks about additional documentation you should provide. The VIRP introduction is included in VIRP.
If you decide to use VIRP we provide an eLearning lesson which describes the information needed step-by-step in order to fulfil inspector expectations: Inspection Readiness When Working in Viedoc
You can read about how to download the Viedoc Inspection Readiness Packet here: VIRP
You will need to give full read-only access and invite the inspector to the Regulatory Inspector role in the Viedoc system as described below.
This step is performed by the Designer.
To allow the Regulatory Inspector viewing access to study data, their role must be configured with read-only and view anonymized and blinded data permissions on the Roles page.
Note!
If the study uses Viedoc Logistics, the following role permissions in Logistics Rights for the Regulatory Inspector role must be configured on the Roles page:
See Configuring roles.
Note! Should the inspector also require access to Viedoc Admin or Viedoc Designer, you are always welcome to contact your Viedoc representative if you need assistance.
This step is performed by the Study Manager.
Note! For randomized studies, the inspector should also be invited to the study with the role of Unblinded Statistician, in order to have access to the randomization lists and be able to download them in Viedoc Admin.
See Managing users.
If the study is using the eTMF, map the Regulatory Inspector study role to an eTMF role with the permissions read-only TMF Admin, read-only Trial Master File and Download audit trail.
This step is performed by the Study Manager/eTMF Manager.
Launch Viedoc Clinic and Viedoc eTMF and Viedoc Logistics (if used in the study) from the landing page.
This step is performed by the Regulatory Inspector.
When building a study in Viedoc, you are first given access to a training server, (for example, v4training.viedoc.net). This is so that you can use and evaluate Viedoc without the need for a contract or license. Studies that are to be taken into production are then migrated from the training server to the production server. For more information, see Migrating a study design from training to production.
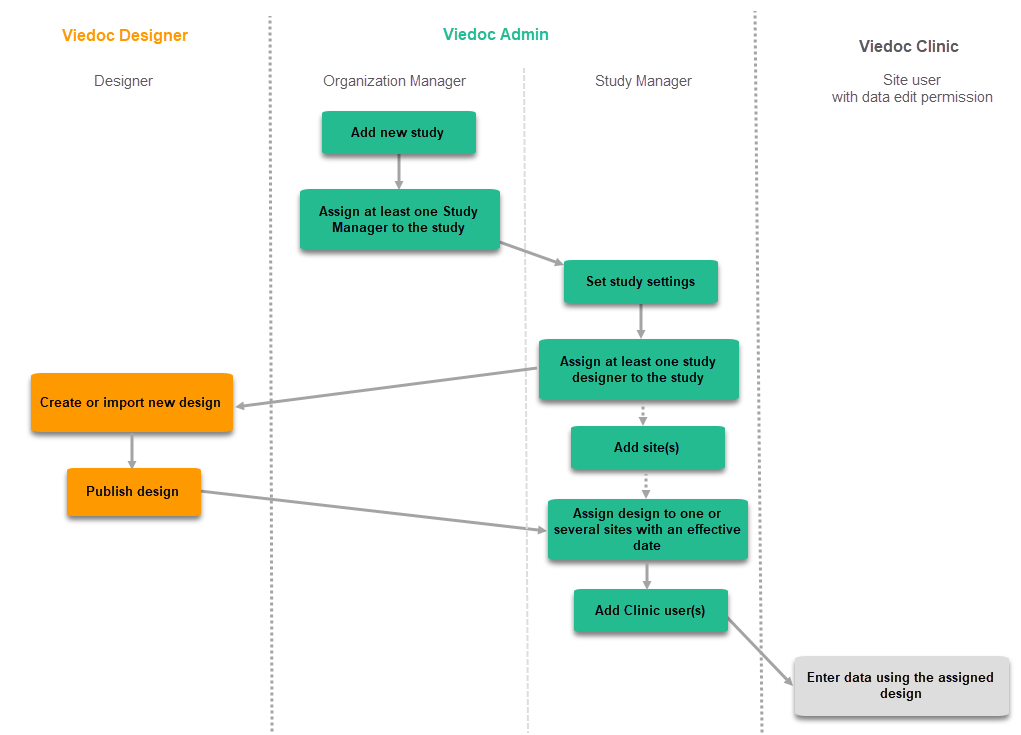
A study can be considered as live when there is a validated study design on a production site. The schematic below shows the steps that are needed, and which roles have permission to perform these steps.

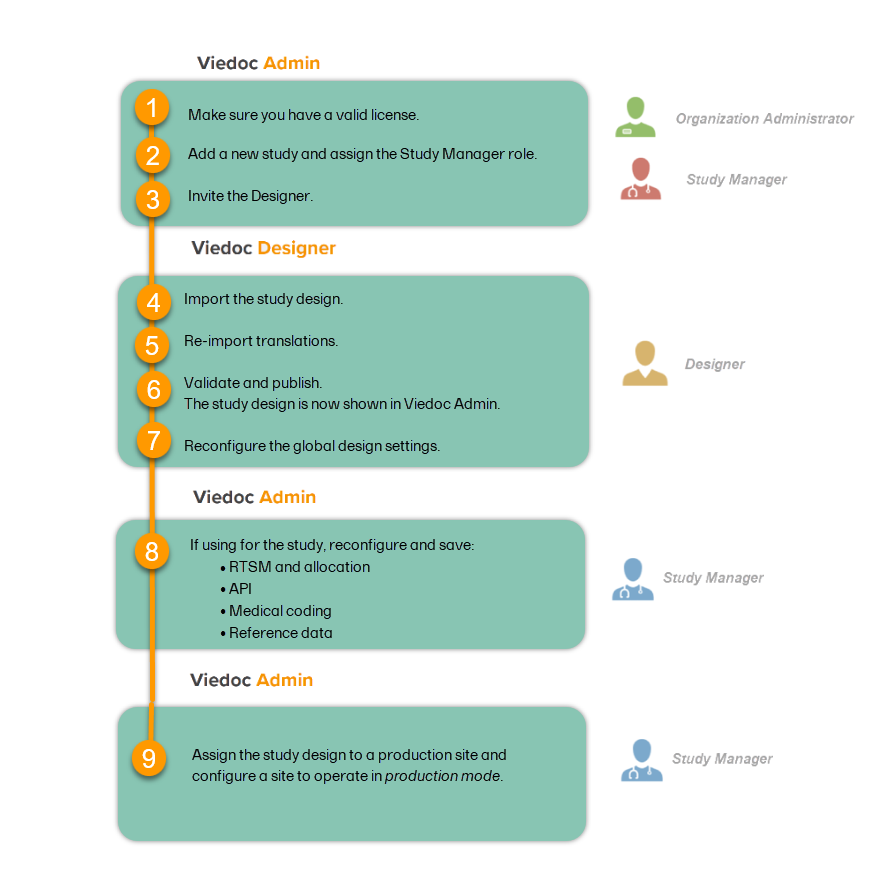
This step is performed by the Organization Administrator.
This step is performed by the Organization Administrator, after the study has been built and tested on the training server and the study design is exported.
| 1 |
On the production server, add a new study in Viedoc Admin. For more information, see Adding a new study. 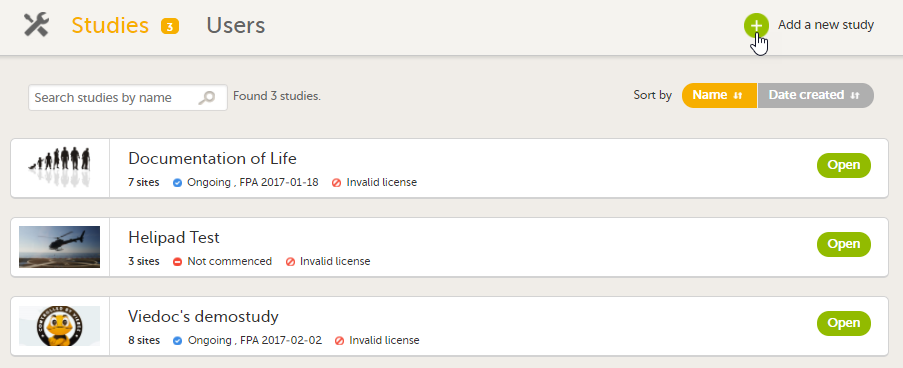
|
| 2 | Assign the Study Manager role to yourself or anyone from the team. For more information, see Managing users (for Org Admin). |
This step is performed by the Study Manager.
Invite a user to the Designer role. For more information, see Managing users (for Org Admin).
This step is performed by the Designer.
Import the study design ODM file (which was previously exported from the training server).
For further instructions, see Importing a new design version.
This step is performed by the Designer.
If used for the study, import the Viedoc Me translations. For instructions, see Managing translations for subject-initiated events.
This step is performed by the Designer.
Validate and publish the design. For more information, see Validating a study design.
Note! The study design becomes available to the Study Manager in Viedoc Admin when it has been published.
These steps are performed by the Designer.
| 1 |
Reconfigure and publish the global design settings (as these are not in the ODM file) in the same way as on the test environment. For more information, see Overview of Viedoc Designer. 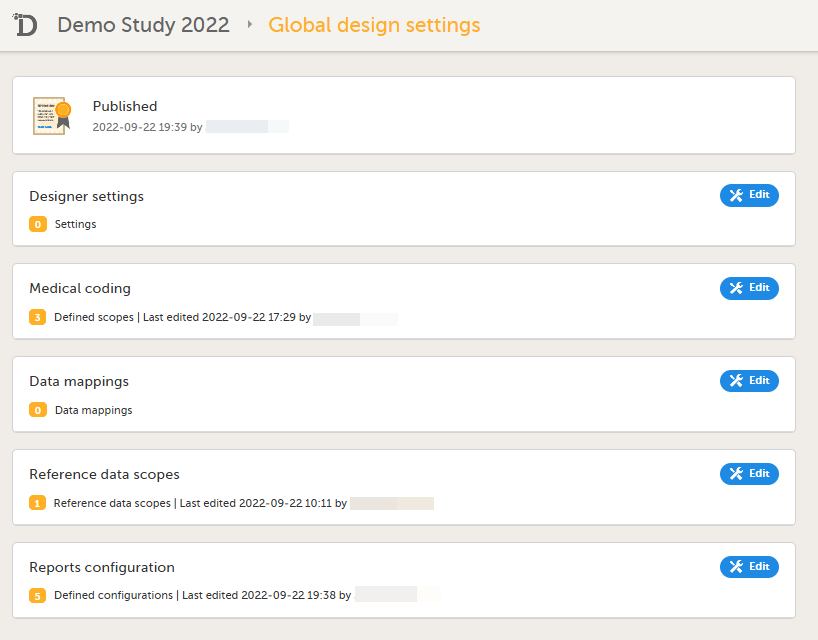
|
| 2 |
If used for the study, reconfigure Viedoc Reports. For more information, see Quick Guide for setting up Viedoc Reports. If the features listed below are used for the study, the Study Designer will need to reconfigure and save these features in Viedoc Designer:
|
These steps are performed by the Study Manager.
If the features listed below are used for the study, the Study Manager will need to manually reconfigure and save these features in Viedoc Admin:
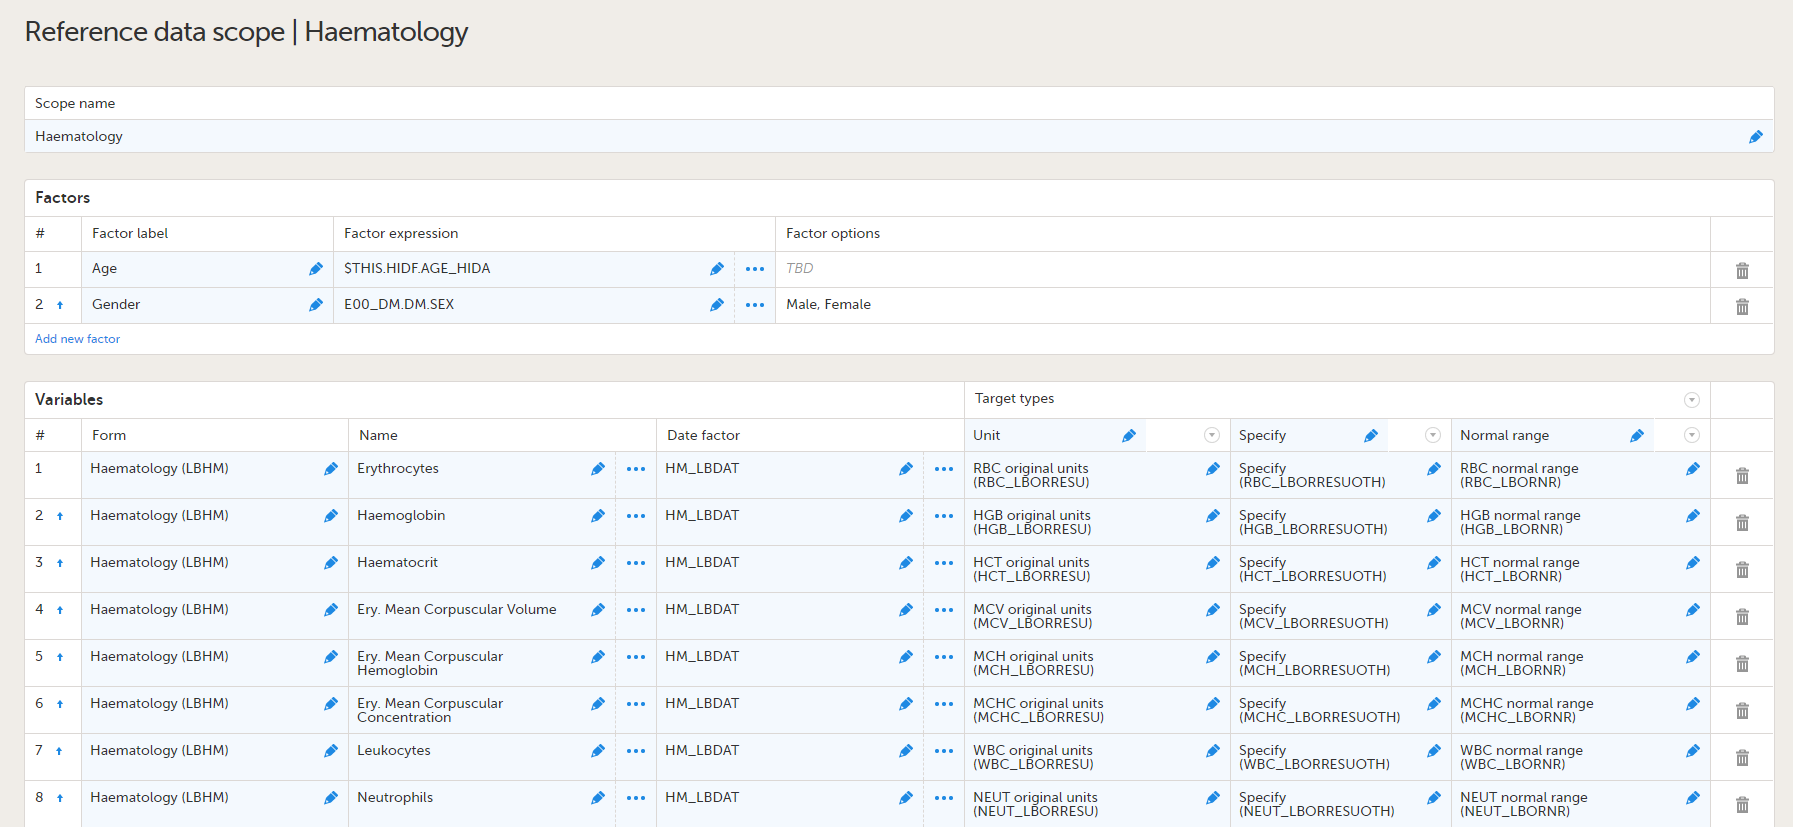
Note! To perform the reconfigurations in Viedoc Admin and in Viedoc Designer, the user must be assigned to the relevant user roles. For example, Unblinded Statistician for the RTSM and global allocation list, Reference Source Data Manager for the reference data, Dictionary Manager to manage the medical coding dictionaries, and API Manager for the API configuration.
This step is performed by the Study Manager.
Assign the study design to at least one or several production sites in the study, and select an effective starting time for that design to be applied to the site.
Once a study is on the production server it is possible to configure the sites to operate in one of the following modes:
Your study is now in production, and you can start work on the site.
| Important! This process cannot be used for revising an existing design version on production, as importing the design will always result in a totally new version. For more information about new versions and revisions see: handling eCRF updates after going live. |
The following steps have to be performed in Viedoc when creating and configuring the study for the first time:
A notification email is sent out to you when you have been assigned a new design project. When logging in to Viedoc and opening Viedoc Designer, you will find the project in the list of projects. If you have many projects you can use the Search by study name text field in the top left corner to find it. For details, see Overview of Viedoc Designer.
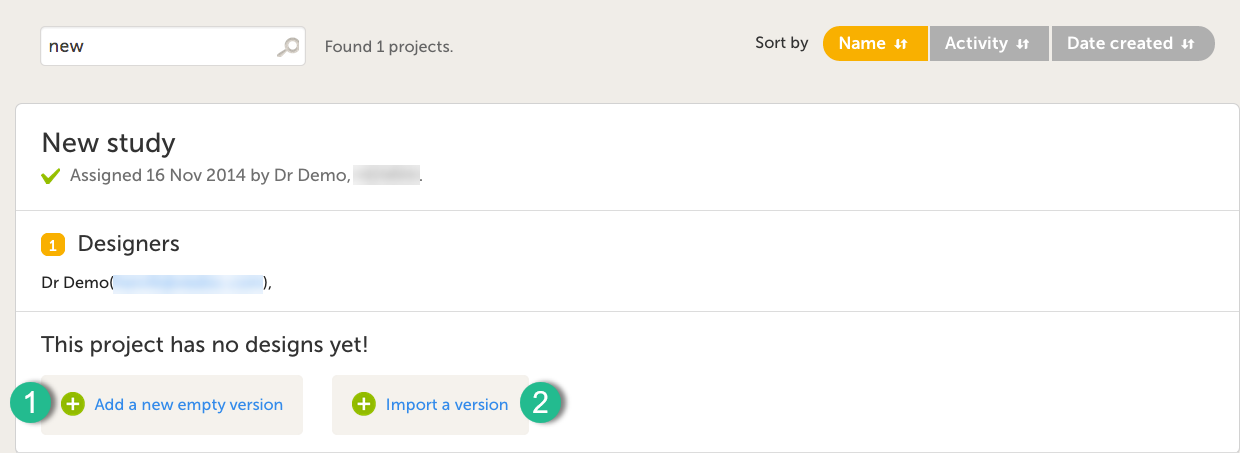
It is possible to initiate a design in two different ways:
1. By creating a new design from scratch - using the Add a new empty version option.
2. By importing an existing design - using the Import a version option.
| 1 |
Click on Add new empty version. The New study design pop-up opens: |
| 2 |
Set the general information regarding the design:
Of all the above, only the Study description will be shown in Viedoc Clinic when the user selects the respective study. All the other details are for internal use only, that is, they will be shown only in Viedoc Admin and/or Viedoc Designer. Note! All these fields can be changed in a new version or revision of the study design. |
| 3 |
Click Save changes. You will be directed to the design overview page: For further details, see Overview of study design. |
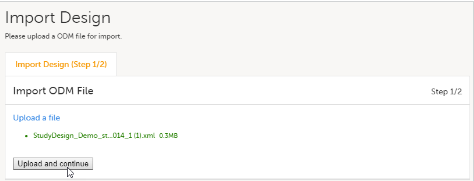
The format supported for importing a design is Clinical Data Interchange Standards Consortium (CDISC) Operational Data Model (ODM) with or without CDISC Study/Trial Design Model and Viedoc extensions – which means that it is possible to import study designs from manually created configurations, or from configurations generated in other systems, as long as they are CDISC compliant.
| 1 |
Click Import a version. The Import design pop-up opens: 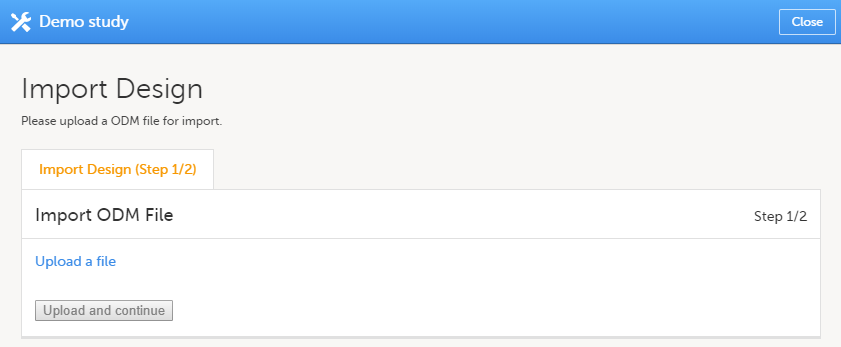
|
| 2 | Click the Upload a file link and select the file to be imported. |
| 3 |
Click Upload and continue: 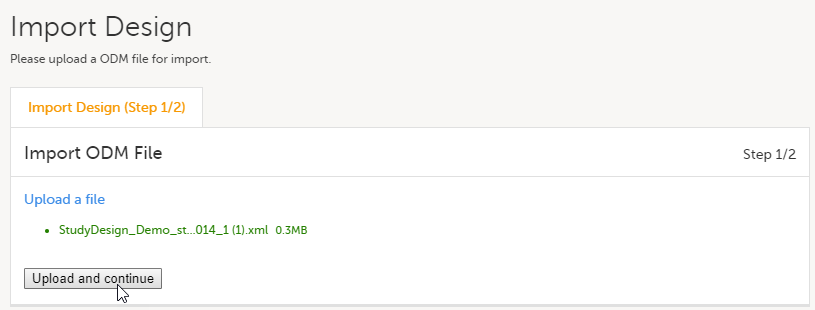
|
| 4 |
Select a design version to import - if there are more design versions in the uploaded file, choose here which one to import. Select language to import - if there are more languages available in the uploaded file, the main design language (usually English) should be chosen. |
| 5 | Click Import. You will be directed to the design overview page. For further details, see Overview of study design. |
This lesson describes the steps to be performed when you already have a couple of design versions and want to import a new design version.
The case of importing a new design at the very beginning, when no design version exists for the study, is described in the lesson Initiating a design.
The format supported for importing a design is Clinical Data Interchange Standards Consortium (CDISC) Operational Data Model (ODM) with or without CDISC Study/Trial Design Model and Viedoc extensions – which means that it is possible to import study designs from manually created configurations, or from configurations generated in other systems, as long as they are CDISC compliant.
To import a new design version to your study:
| 1 |
In Viedoc Designer, go to your study and click Design versions: A list of all existing design versions is displayed: |
| 2 |
In the bottom of the list, click Import a version. The Import design pop-up opens: |
| 3 | Click the Upload a file link and select the file to be imported. |
| 4 |
Click Upload and continue: |
| 5 |
Select a design version to import - if there are more design versions in the uploaded file, choose here which one to import. Select language to import - if there are more languages available in the uploaded file, the main design language (usually English) should be chosen. |
| 6 | Click Import. You will be directed to the design overview page. For further details, see Overview of study design. |
This lesson describes the steps to be performed when you already have a couple of design versions and want to add a new empty design version.
The case of creating a new design at the very beginning, when no design version exists for the study, is described in the lesson Initiating a design.
To add a new empty design version to your study:
| 1 |
In Viedoc Designer, go to your study and click Design versions: A list of all existing design versions is displayed: |
| 2 | In the bottom of the list, click Add a new empty version. The New Study Design pop-up opens: |
| 3 | Fill-in the study design details and click Save changes. You will be directed to the design overview page, with a totally new (empty) design. For further details, see Overview of study design. |
You get to the Overview of the study design page, in one of the following ways:
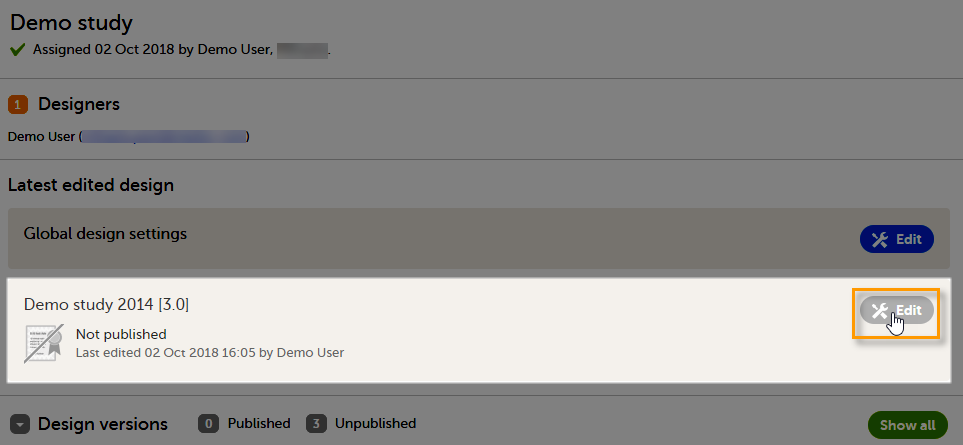
The Overview of study design page consists of the following main areas:
Forms are used for data entry in Viedoc. They can include various elements configured to collect study data in flexible ways. This lesson provides an overview of creating and editing forms, the different form item types, their properties, and global form templates.
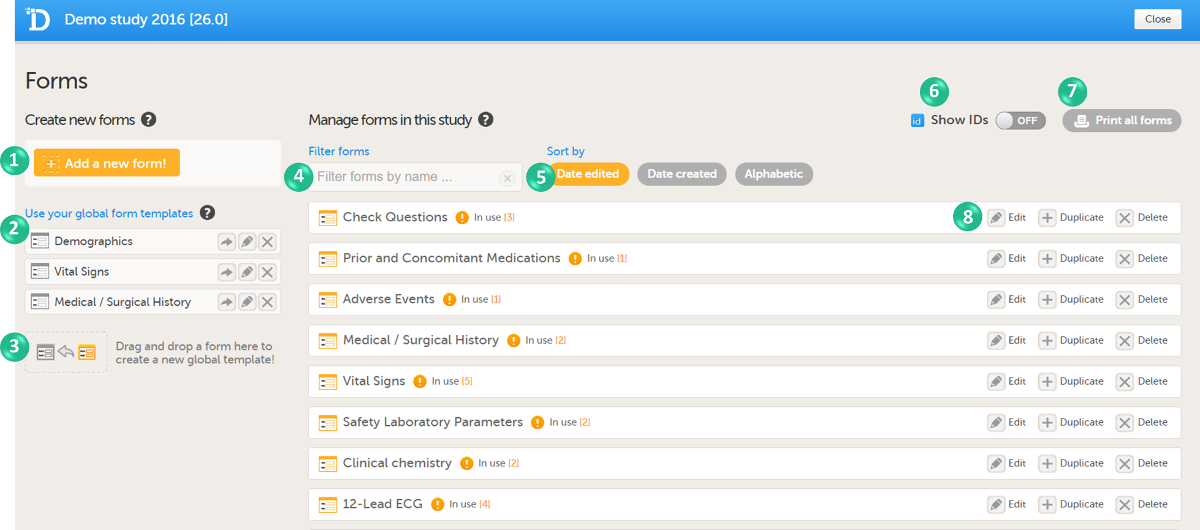
In Viedoc Designer, the Forms page allows you to create, edit and manage forms.
On the Forms page, you can:
1. Create an entirely new form, see Creating a new form below.
2. Create a new form by using a form from the global templates, see Creating a form using a global template below.
3. Add a form to the global templates, see Creating a global template below.
4. Filter and search forms.
5. Sort forms by the date they are edited, the date they are created or by name. Default is Date edited.
6. Show/Hide the form/item IDs.
7. Print forms with IDs (annotated CRF) or without IDs (unannotated CRF).
8. Edit, duplicate or delete a form.
A form consists of one or several item groups that contain one or several items.
A white box in the form defines an item group (a group of items). An item group can include a header.
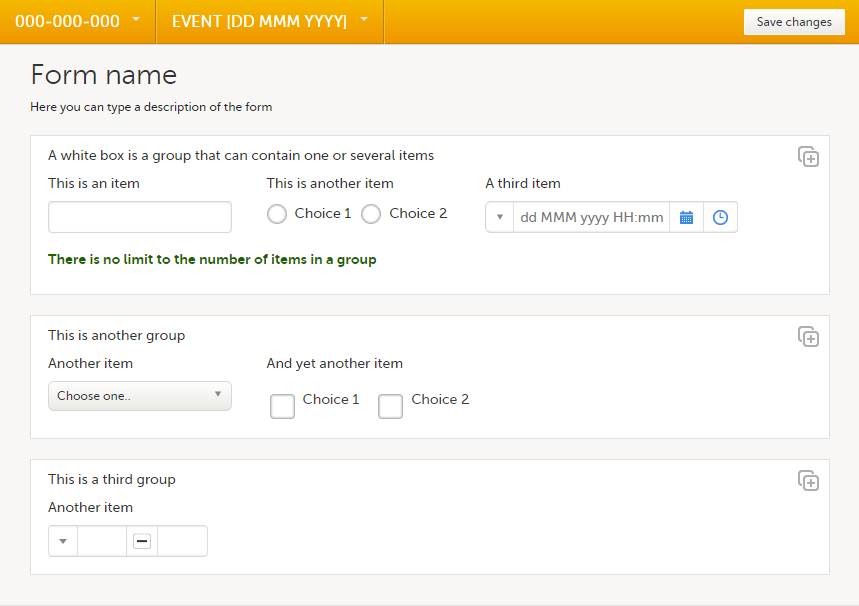
An item is highlighted with a yellow box when you hover the cursor over it.
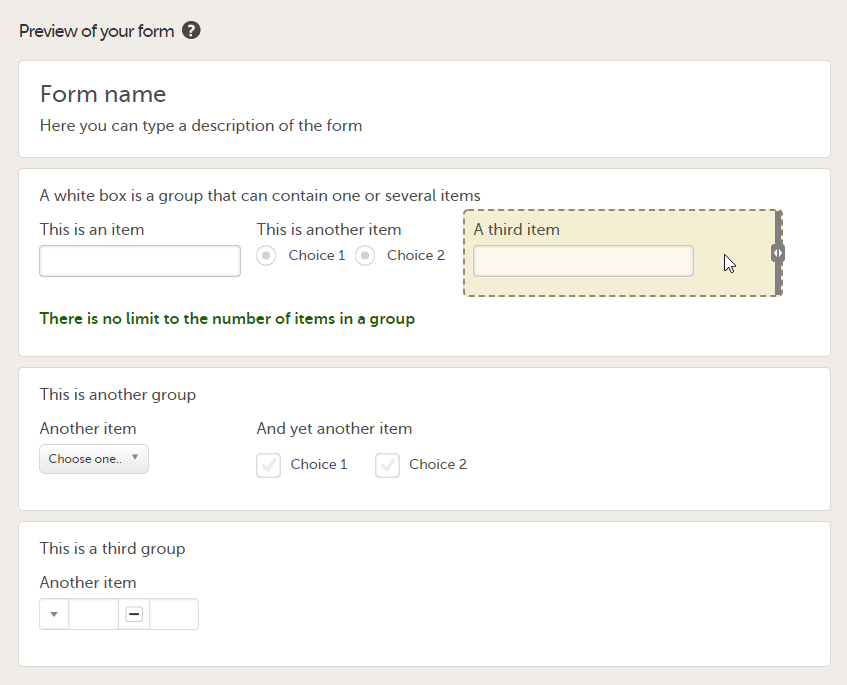 You can adjust the settings of an item group and the settings of single items.
You can create a new form by:
To create a new form in Viedoc Designer:
| 1 |
In the study design, select Edit in the Forms field.
|
| 2 | Select Add a new form!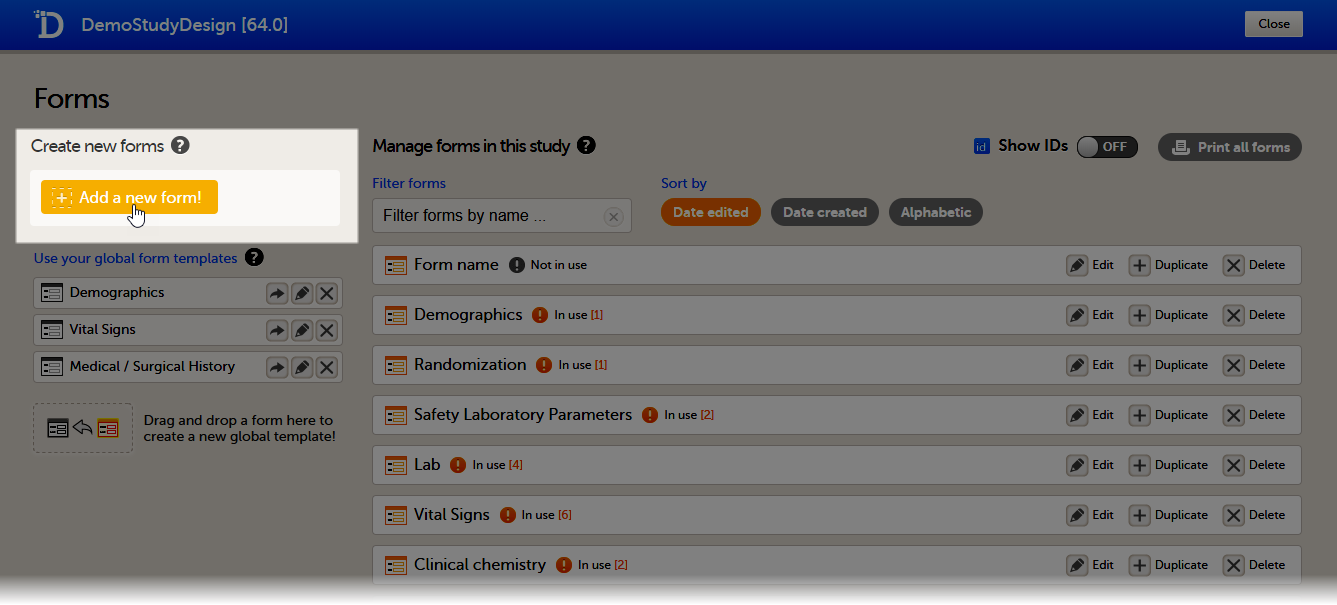 A new form is created, and the Form Settings pop-up opens (continue to next section below). A new form is created, and the Form Settings pop-up opens (continue to next section below). |
| 1 |
In the Form Settings pop-up, on the General tab, enter or edit the following:
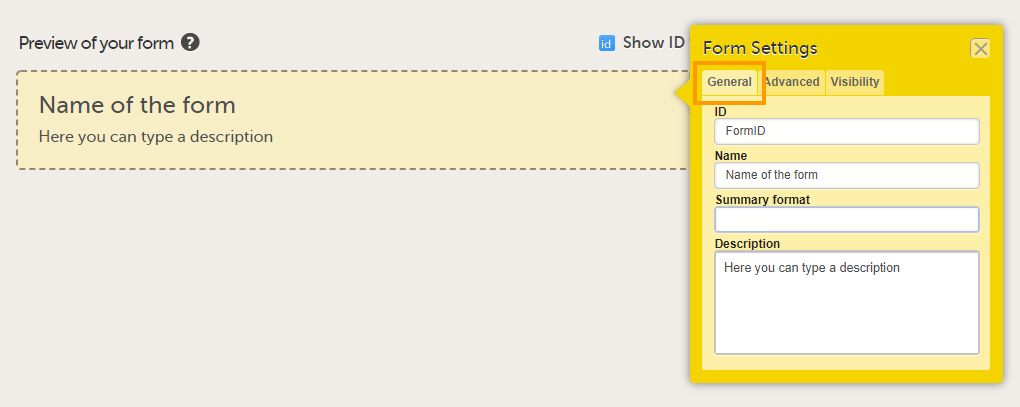
Tip! You can enter a summary format that defines how the form will be displayed in Viedoc Clinic. It is easiest to enter this after the form has been set up and filled with items and item groups. For more information, see Summary format of the form below. |
| 2 |
On the Advanced tab, select:
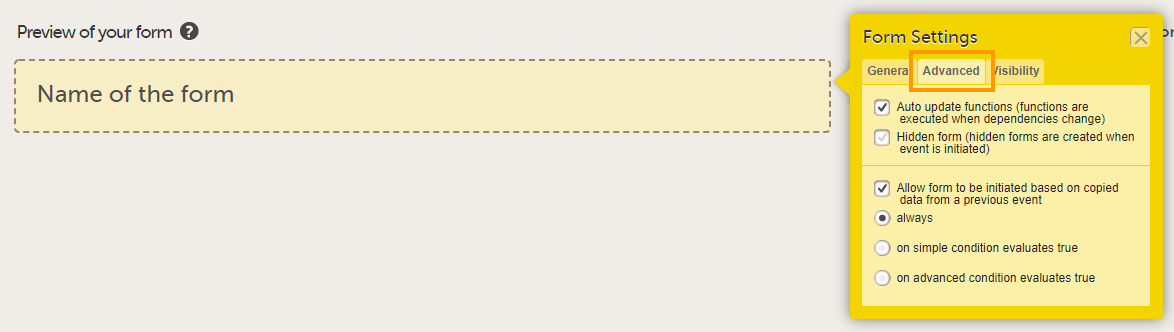
Tip! You can edit these settings at a later time. |
| 3 |
On the Visibility tab, select:
If you select Selected roles, select which roles should be able to view the form and to edit the data. Note! Only user roles with editing permissions for the study start event form can add a new patient card and activate a Viedoc Me account. 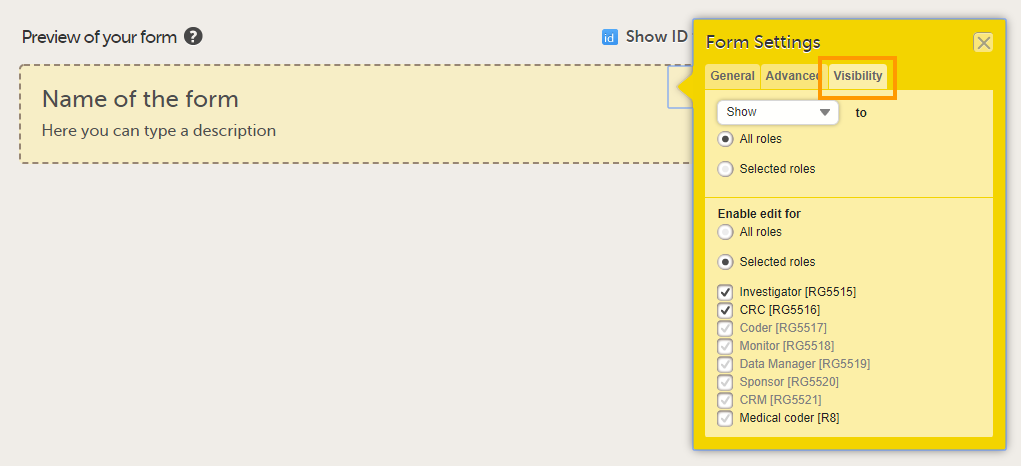
Note! Alerts do not respect role visibility conditions. Items within forms that are hidden to certain roles may become visible in alert messages. For more information, see Alerts. |
| 4 | Select Save changes at the top of the Forms page to save the form. |
The Summary format is a form identifier available In the Form settings on the General tab. It is used to define how the form will be displayed in the following places in Viedoc Clinic when the form is initiated:
1. The list of forms in the event view on the Subject Details page (see images below).
2. The form name when the form is displayed in view/edit mode (see images below).
3. The Add subject form.
4. The Signing console (see images below).
5. The Data Review Console.
6. The header of the Form History PDF (see images below).
7. The PDF export for Viedoc versions 4.39 and higher.
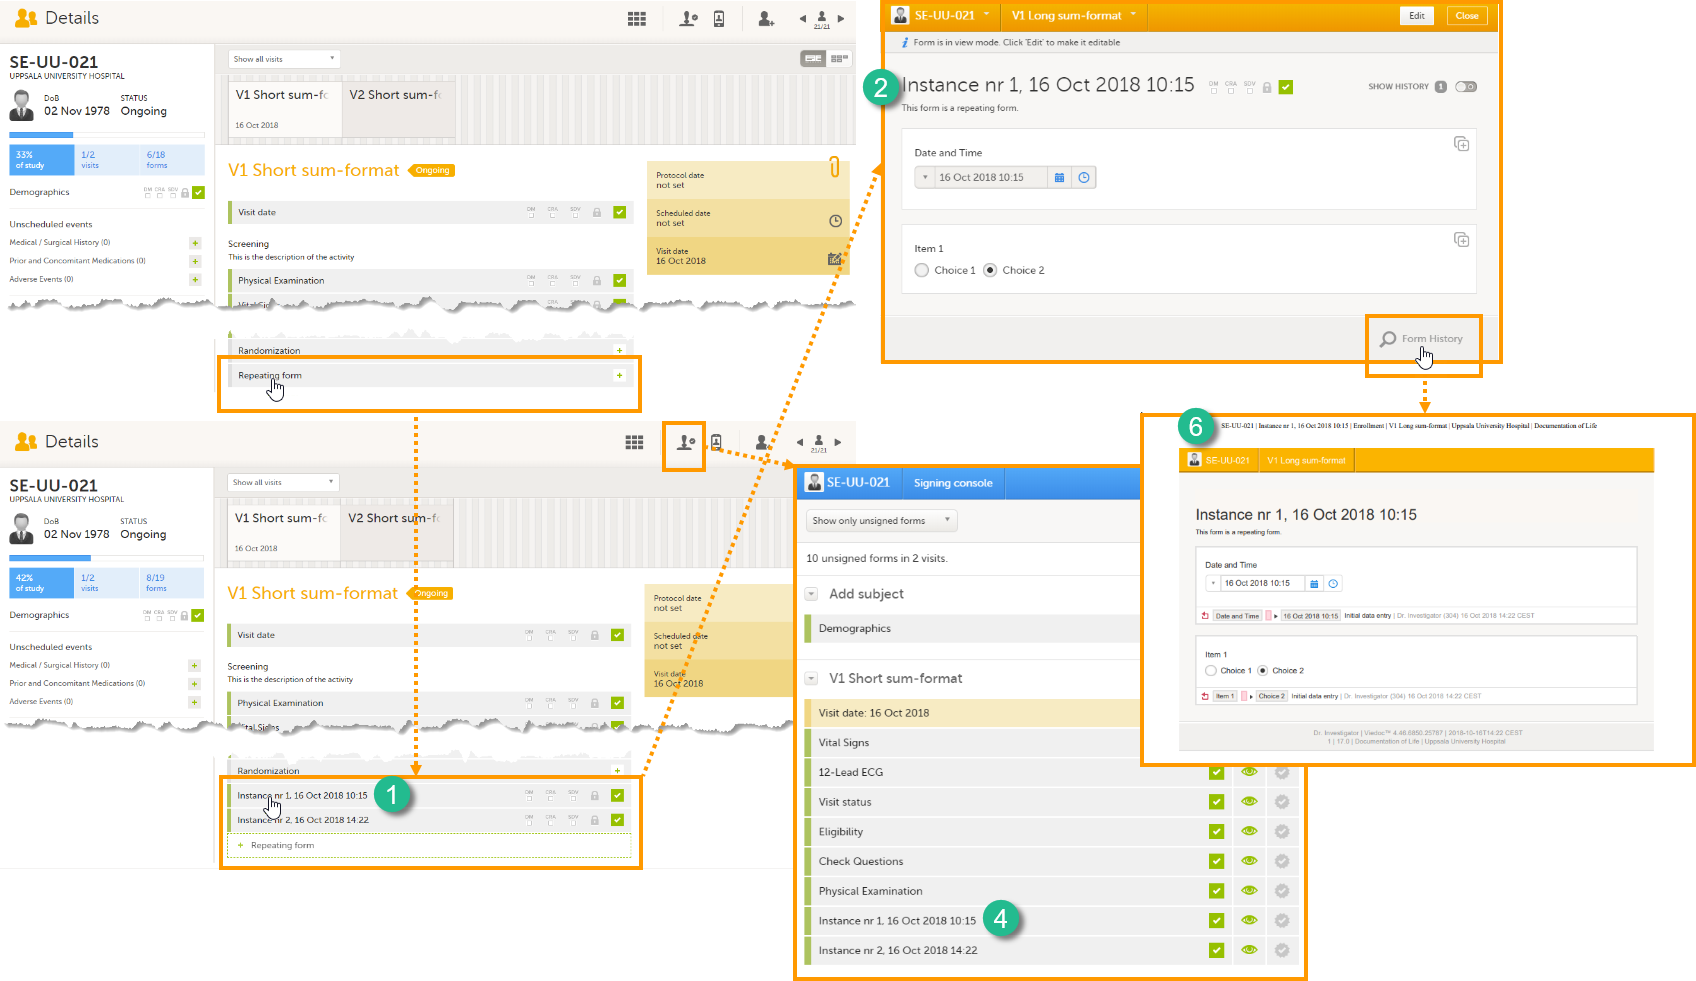
The Summary format is a field in which you can enter variables as well as free text. See the complete list at Using JavaScript in Viedoc). For repeating forms, you can use the FormRepeatKey in the summary format to distinguish between the different instances of the same form.
In the example above, the summary format of the repeating form is set to Instance nr {FormRepeatKey}, {DATE}.
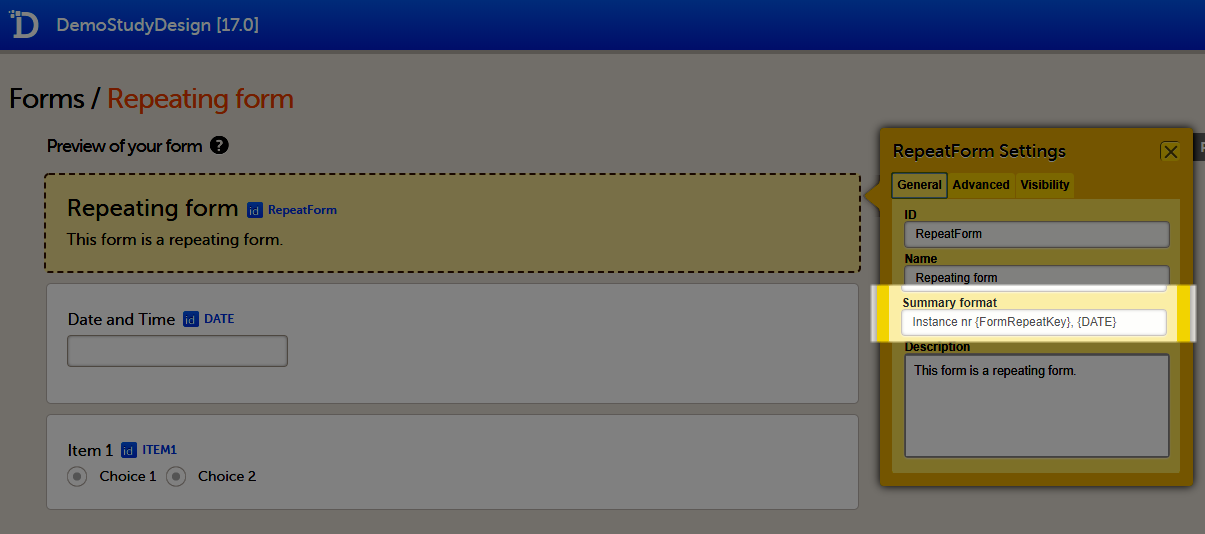 When date variables are used in the summary format, the date format is formatted as set in the study settings in Viedoc Admin, see General study settings.
For more information about repeating forms, see Study workflow. A more comprehensive example of how to use the summary format is described in the use case example in Using repeating forms.
Before the form is initiated, if the summary format is left empty, the form name is used to display the form at these places in Viedoc Clinic.
Note! If a long summary format is used, this will increase the size of the header in the PDF. If the PDF header contains more than three rows of text, it will overlap with the contents of the PDF (that is, the screenshot of the form).
Tip! If the option Allow form to be initiated based on copied data from a previous event is activated for the form, you can include one or more of the form sequence numbers in the Summary format to help identify the form instance the data is copied from in Viedoc Clinic.
For more details, see Allowing a form to be copied below.
On the Advanced tab, in the Form settings, there is an option to Auto update functions (functions are executed when dependencies change). If this option is enabled, the form is automatically updated when it contains items with a function that depends on items from other forms.
If the value of one or more of the dependency items is changed (whether in Viedoc Clinic, Viedoc Me or via the API), the function is re-executed, and the form updates automatically as follows:
Note! The Auto-update functions option is only useful when there are items in the form that use functions that depend on items from other form(s), known as cross-form items.
Enable this option only when the form contains cross-form items. If no cross-form dependencies exist, enabling the Auto-update functions option unnecessarily affects system performance.
If a form with the Auto-update functions option enabled is monitor-locked, it is still updated by re-executing the functions. When a value changes, the form is saved and the review and the signature are broken, but the monitor-lock for the form remains in place.
Consider a form, (Form A) that contains a cross-form item (Calculated_Item) that uses a function (F) which is dependent on two items in another form: Input_Item_1 and Input_Item_2 in Form B. The Auto-update functions option is enabled for Form A.
When Form B is saved (in Viedoc Clinic, Viedoc Me, or via API), the function F is re-executed. If, this results in a changed value for Calculated_Item , then Form A is updated as follows:
Calculated_Item is updated to the new valueWhen a form is auto-updated due to dependency changes, the reason for change is displayed in the form history:
Automatically updated due to dependency change.
When the Auto-update functions option is enabled in a new revision of the study design, and the Hidden form option is not enabled, the form is marked as changed and the functions are executed during the upgrade.
If the option Auto-update functions is enabled for a form, that form can be set to be a Hidden form. Hidden forms are automatically initiated when the event is initiated in either Viedoc Clinic, Viedoc Me or via the API, but are not visible.
Note! The Auto-update functions option for hidden forms increases computational system load and can affect system performance.
Hidden forms (or data in hidden forms) are:
When the Hidden form option is disabled in a new revision of the study design, the form is automatically upgraded and made visible.
When the Hidden form option is enabled in a new revision of the study design, a manual upgrade or batch approval is required for the existing (visible) forms after the revision has been applied. After the investigator confirms this, the form becomes hidden.
In the Form settings on the Advanced tab, there is an option to Allow form to be initiated based on copied data from a previous event. When this option is activated, the data in a form can be copied from a form within one event to another instance of the same form within another event.
When this option is activated, you must select whether the form is to be copyable always, or only if certain criteria are met (on simple/advanced conditions):
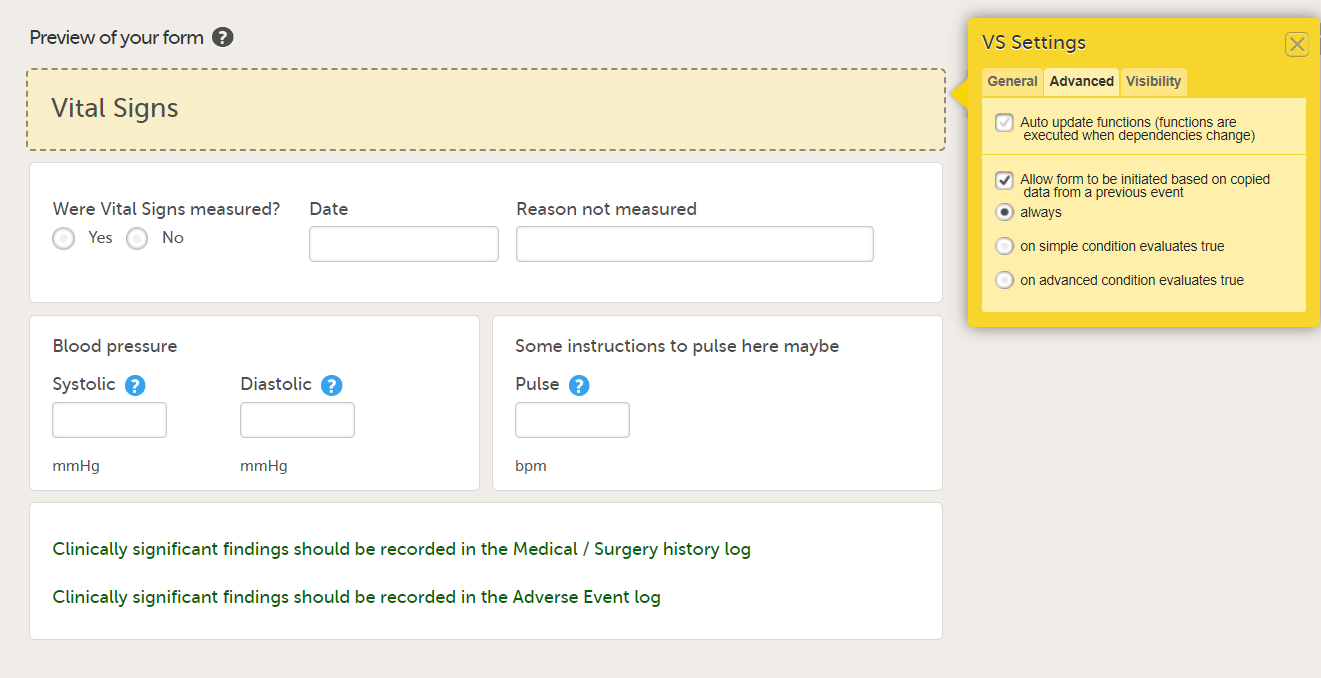
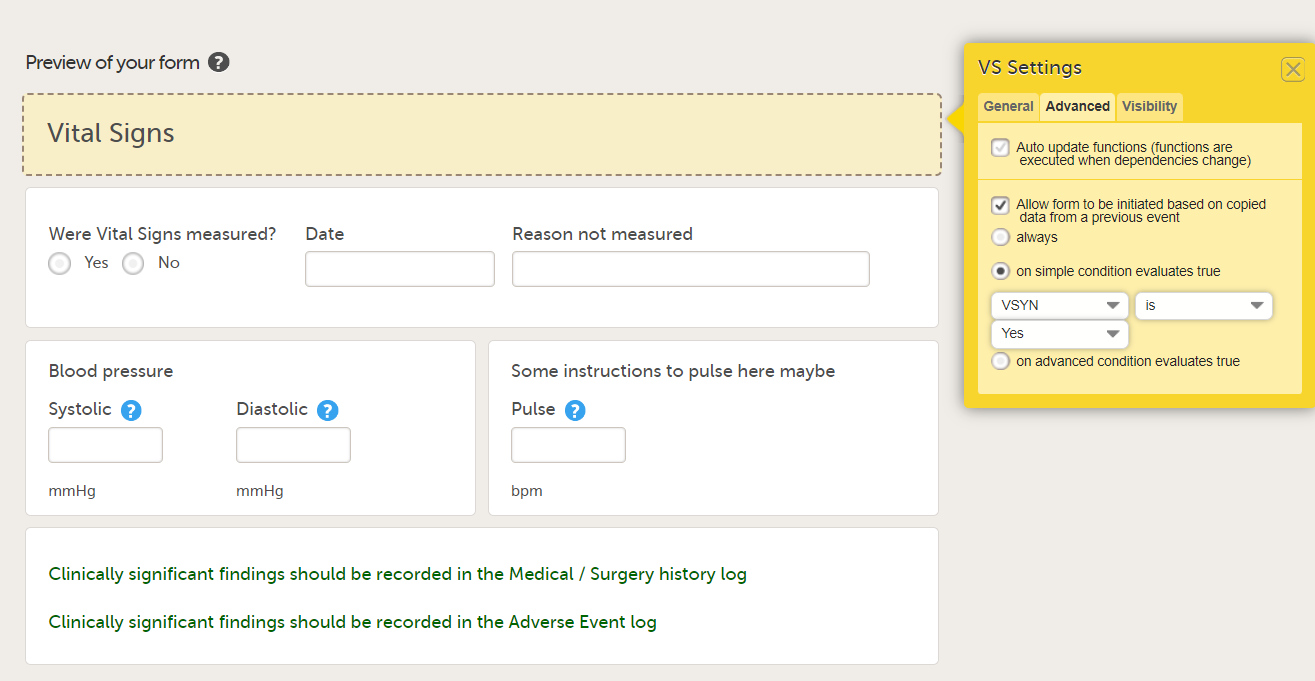
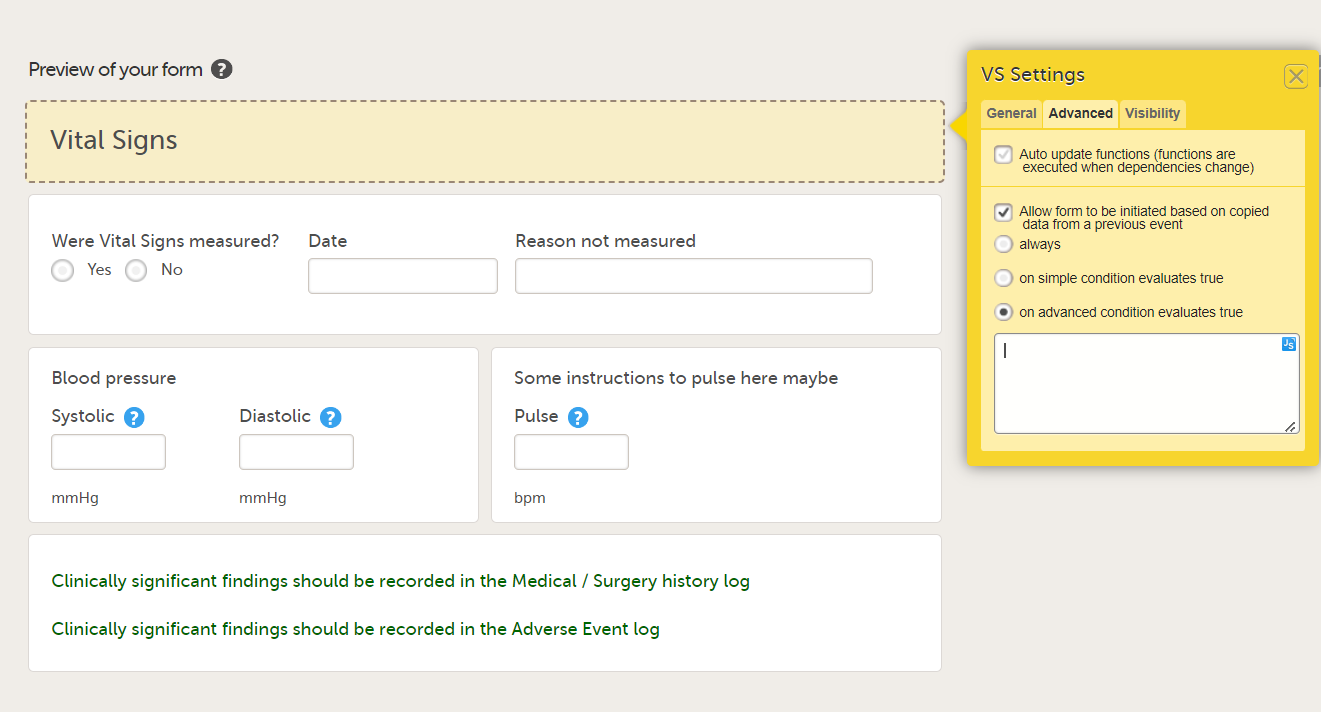
Notes!
The following form sequence numbers are used to make it easier to track different form instances at subject level, which are useful especially for the form instances initiated by copying the data from previous event.
FormRepeatKey: Counter that identifies the specific instance of a repeating form within a specific activity. This is available in the export output for Viedoc output version 4.39 and onwards.SubjectFormSeqNo: Counter that uniquely identifies the instance of a specific form on a subject level, that is, it starts with 1 and it is incremented each time a new instance of the form is created for that subject. This is available in the export output for Viedoc output version 4.51 and onwards.OriginSubjectFormSeqNo: For a copied form instance, it identifies the form instance from which data was copied for the first time. For the first instance of the form (that is, not copied) it gets the value of the SubjectFormSeqNo. This is available in the export output for Viedoc output version 4.51 and onwards.SourceSubjectFormSeqNo: For a copied form instance, a counter that identifies the source of a copied form instance (the form instance the data was copied from). It gets the value of the SubjectFormSeqNo from which the form instance was copied. For the first instance of the form (that is, not copied) it is empty, that is, null. This is available in the export output for Viedoc output version 4.51 and onwards.The example below illustrates how the values for these sequence numbers are assigned. The demo form used is set as repeatable and copyable and is included in Visit 1, Visit 2 and Visit 3.
We perform the following actions in Viedoc Clinic:
| 1 | Initiate Visit 1 and fill in three instances of the Demo form, these instances will get the sequence numbers as illustrated below: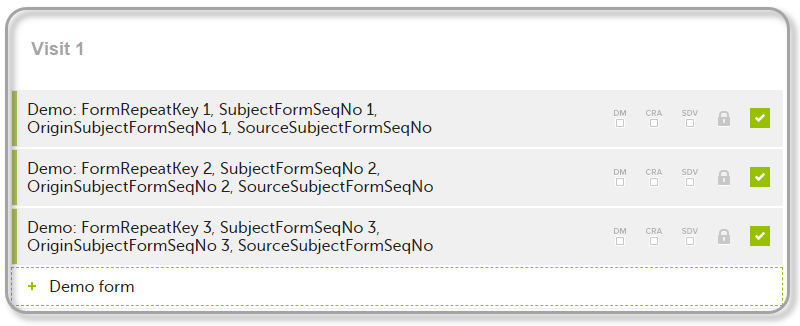 |
| 2 | Initiate Visit 2. Demo form will be available to be initiated by copying data from one of the previously filled-in form instances within Visit 1, so all the three instances will be shown as ghost forms: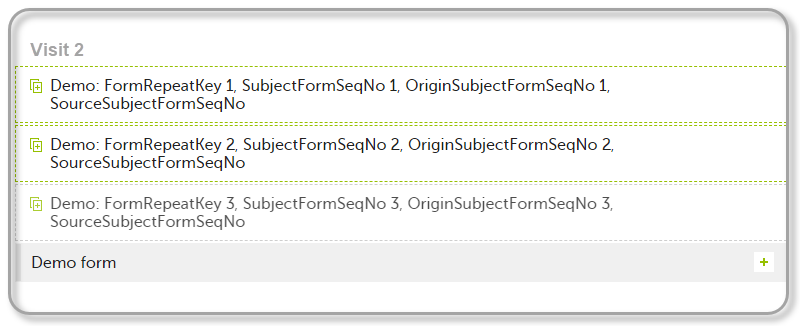 |
| 3 | Create an instance of Demo form within Visit 2 by copying the data from the third instance of the form filled in within Visit 1. This will result in the new form instance getting the sequence numbers as illustrated below: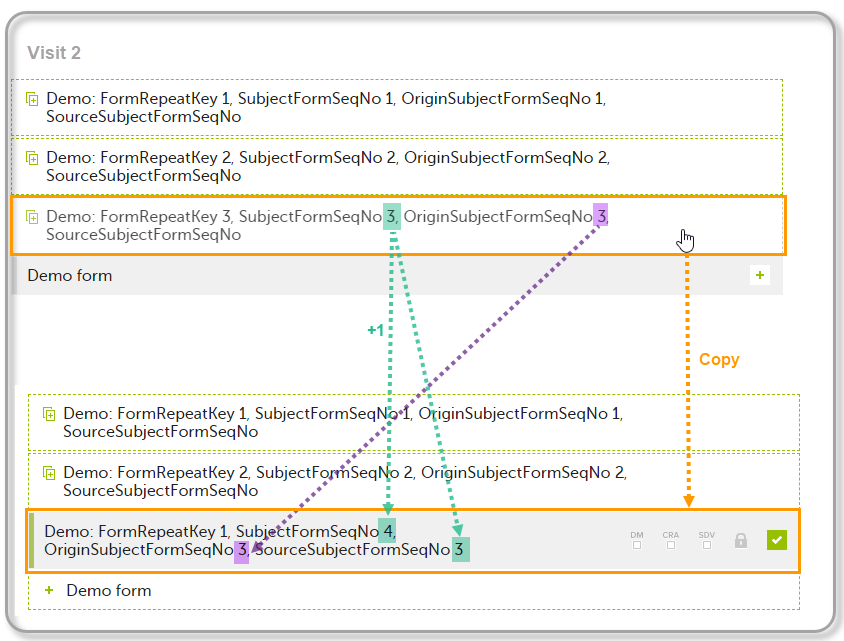 |
| 4 | Initiate Visit 3. Demo form will be available to be initiated by copying data from one of the previously filled-in form instances within Visit 1 and Visit 2, as below: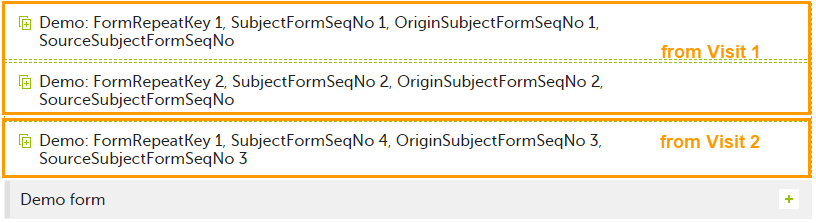 |
| 5 | Create an instance of Demo form within Visit 3 by copying the data from the form filled in within Visit 2. This will result in the new form instance getting the sequence numbers as illustrated below: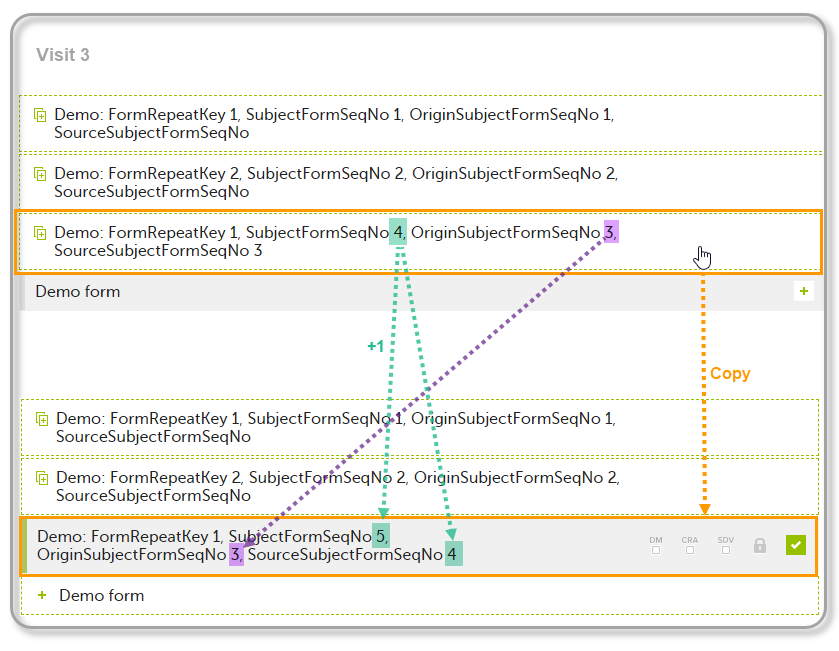 |
These sequence numbers are available to be used within expressions only to get the value of the sequence number for a specific form instance, that is, by using {SubjectFormSeqNo}, {OriginFormSeqNo}, {SourceFormSeqNo}.
In the above example, the form Summary format was configured by using these sequence numbers as below:
Form Repeat Key {FormRepeatKey}, SubjectFormSeqNo {SubjectFormSeqNo}, OriginFormSeqNo {OriginFormSeqNo}, SourceFormSeqNo {SourceFormSeqNo}
Notes!
In the excel export output, these form sequence numbers allows to track, for the form instances that were initiated by copying data from previous events, where the data originates from, as below:
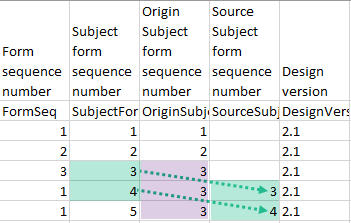
Analyzing the values of the form sequence numbers, only the form instances that were initiated by copying the data from previous visits have values populated in the Source Subject form sequence number column, that is, the last two rows in the example. The data was copied from the form instance having the same Subject form sequence number value, highlighted in green in the above image. The form instance that the data was copied for the first time is identified by the value of the Origin Subject form sequence number, that is, "3" in our example.
To view and test a form, select Preview of your form. All changes to the form must be saved before they can be viewed in the preview mode.
A preview of your form will open, displaying the form as it will look in Viedoc Clinic. You can test the items, and possible functions, data checks, dependencies and visibility settings (that depend on items within the same form) by filling in some values. Note that the following settings cannot be tested in the preview mode:
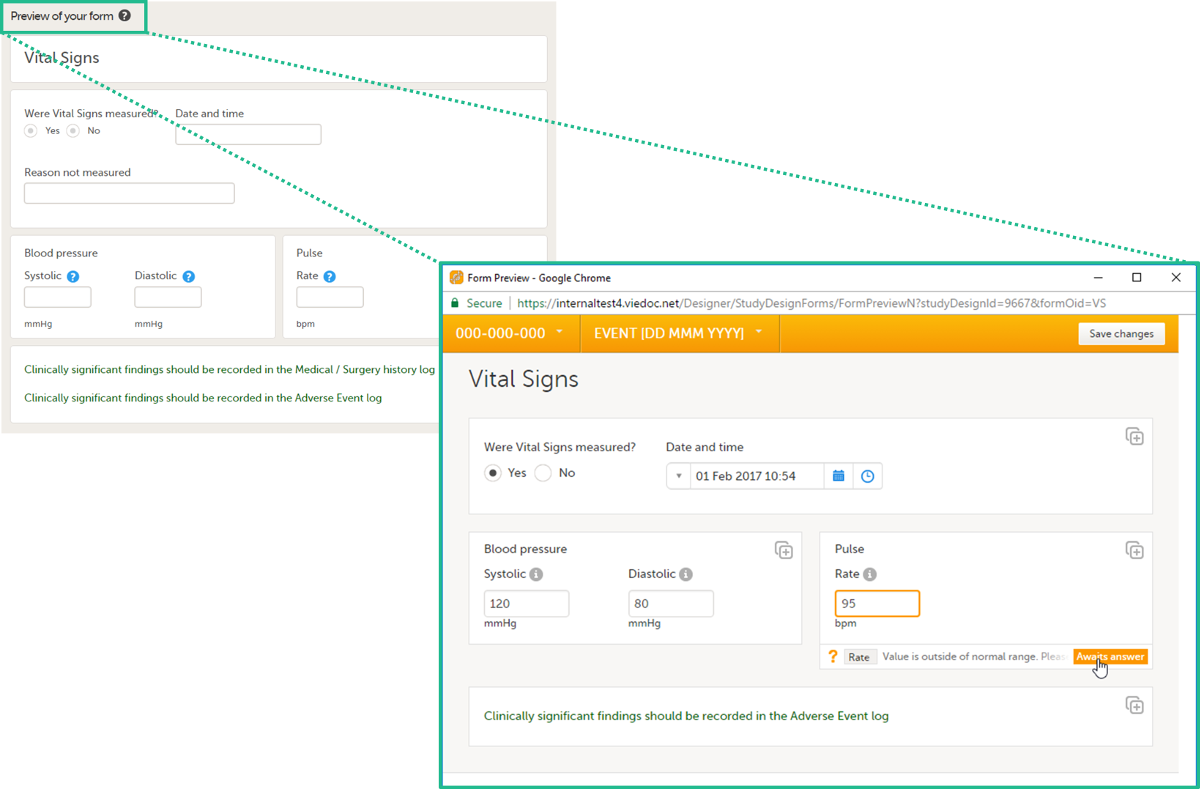
If the form is translated to other languages, it is possible to also view the translated versions of the form in the preview mode.
To exit the preview mode, select the close button.
A form can contain different types of items. The available items are shown in the screenshot and described in the table below.
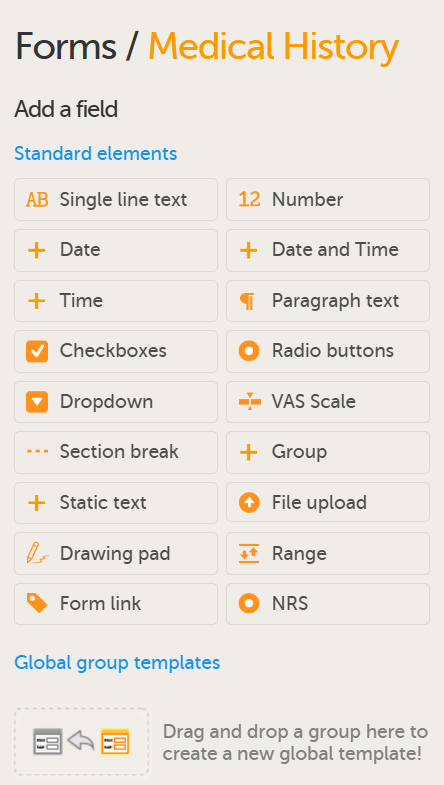
Available form items:
| Item type | Used for |
|---|---|
| Single line text | Capturing free text, that is, string type data. |
| Number | Capturing numeric data. |
| Date | Capturing year, month, and date. |
| Date and time | Capturing year, month, date, hours, and minutes. |
| Time | Capturing hours and minutes. This is structurally different from other date items as it does not include year, month, date, or seconds. |
| Paragraph text | Capturing larger texts. |
| Checkboxes* | Multiple choice questions that allow more than one answer. The Clinic user can select one, more than one, or every option from a list, and a query will fire if no selection is made. |
| Radio buttons* | Multiple-choice questions that allow only one answer. |
| Dropdown list* | Multiple choice questions that allow only one answer, the options are displayed in a dropdown list that allows the selection of a single option. |
| Visual Analog Scale (VAS) | Displaying a scale with slider (in Viedoc Me) and a numeric field (in Viedoc Clinic) for monitoring of pain or the intensity of symptoms. See VAS below for more information. |
| Section break | A divider on the page. |
| Group | Adding an item group to the form. |
| Static text | Displaying text (information) on the form. |
| File upload | Uploading a file to the form, typically images or PDF files, see File upload below. |
| DICOM upload | Uploading a ZIP archive containing Digital Imaging and Communications in Medicine (DICOM) files for de-identification of Protected Health Information (PHI) |
| Drawing pad | Displaying a drawing area (in Viedoc Me) and a File upload item (in Viedoc Clinic) for collecting drawings of symptoms/signature. See Drawing pad below for more information. |
| Range | Entering a range of values. See Range item below for more information. The range values are entered as number items (see above). |
| Form link | Adding links between different forms. See Form link item below for more information. |
| Numeric Rating Scale (NRS) | Capturing responses on a fixed numeric rating scale. See NRS items below for more information. |
Notes!
watch is a reserved word, using this in a form for example labels or IDs, or for the internal study design description as a stand-alone word will result in an exported annotated/blank CRF which does not contain any form elements. However, if using the label watch as part of a longer text, or using Watch (with the initial letter caplitalized), the exported annotated/blank CRF will contain the form elements.To ensure compliance with the Clinical Data Interchange Standards Consortium (CDISC), the coded values should follow certain guidelines to ensure consistency and interoperability. These guidelines help maintain the integrity and clarity of the data, making it easier to manage and interpret data across different platforms and systems.
Note!
For the code list items (checkboxes, radio buttons, numeric rating scales, and dropdown lists), it is possible to:
Below are some example code list strategies with explanations, that adhere to these guidelines, as an example, for a radio button for collecting data for 'Smoking Status'.
Numeric values
Zeros can be used, but not negative numbers, as the hyphen may disrupt other systems, for example, SAS.
You can use this strategy if you want the code list item type to remain as a number type format. This is used in cases where you are calculating a score from the coded values.
| Label | Coded Value |
| Never Smoked | 1 |
| Former Smoker | 2 |
| Current Smoker | 3 |
Alphabetic values
Avoid using spaces or special characters. Preferably use all capital letters and fewer than 8 characters. Other systems (including Viedoc in some situations), may add prefixes or suffixes to these coded values in exports or when integrating.
Use this strategy if you would like the format to be as string type format and/or to have a code list that is sensible and easily identifiable.
| Label | Coded Value |
| Never Smoked | A |
| Former Smoker | B |
| Current Smoker | C |
| Label | Coded Value |
| Never Smoked | NEVER |
| Former Smoker | FORMER |
| Current Smoker | CURRENT |
Alphanumeric values
This approach is acceptable, if less favorable. A tip is to use a consistent pattern for the chosen values, and to avoid using some options with only letters, and some options with only numbers. This can cause format issues in exports, as sometimes the values may be handled as numbers and other times as string type. Also avoid using spaces and special characters. The example below is always handled as a string:
| Label | Coded Value |
| Never Smoked | A1 |
| Former Smoker | A2 |
| Current Smoker | A3 |
The Visual Analog Scale (VAS) item can be used to measure a characteristic that ranges across a continuum of values, for example a subject's level of pain or the intensity of certain symptoms. By default, the scale runs from 0 to 100.
Depending on in what forms the VAS is used, the scale will function as follows:
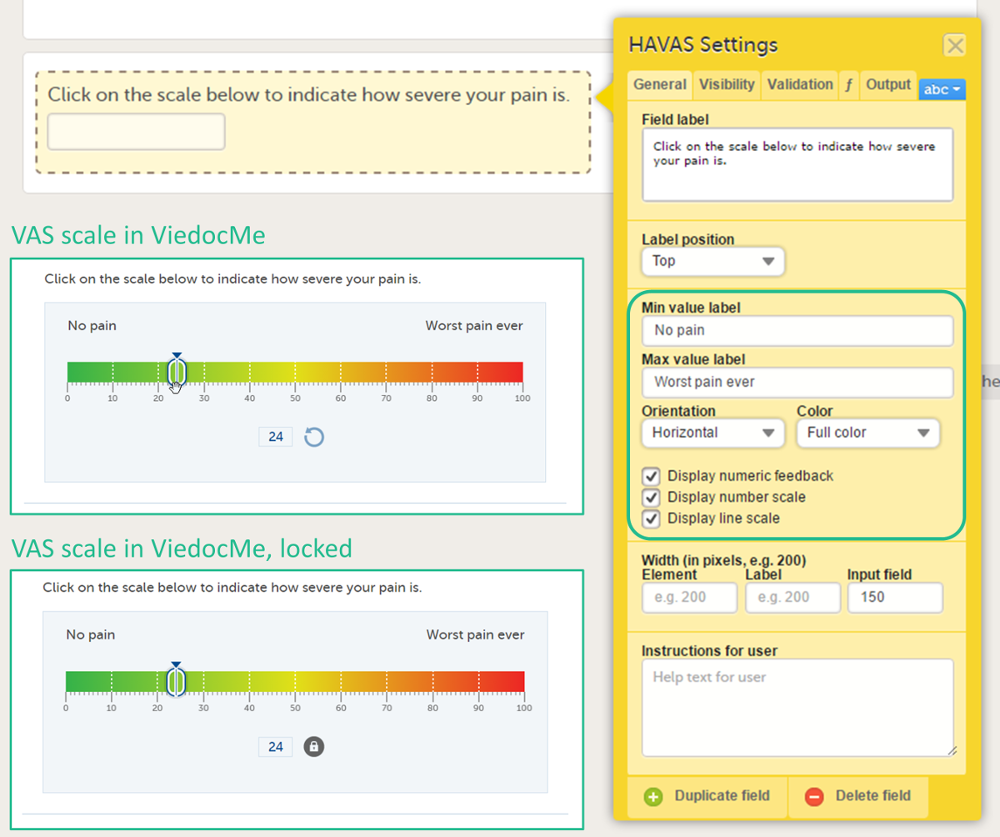
Tip! If you want to ensure that the VAS is displayed at 10 cm, we recommend the use of an iPad Mini for filling out Viedoc Me questionnaires.
There are two types of File upload items, File upload and Drawing pad (Viedoc Me). See Drawing pad for more information.
The File upload item allows the Clinic user to upload a file to the form. The maximum allowed file size is:
Upon form save, the file upload information becomes available in the audit trail. The uploaded files are included in the export output, when exporting to Excel, Comma-Separated Values (CSV), PDF or Operational Data Model (ODM). The following information is included: file name, file size in bytes, file hash (MD5).
Uploading password protected zip files is not supported, as Viedoc is not able to scan these files for viruses. You can also not upload executable files. The complete list of unsupported file types can be found in the section Blacklisted file formats in Entering/editing data in the Viedoc Clinic User Guide.
The DICOM file upload item allows Clinic users to upload Digital Imaging and Communications in Medicine (DICOM) files for de-identification during upload to the Viedoc system. Clinic users can upload ZIP archives with DICOM files, automatically remove Protected Health Information (PHI) as defined by the Health Insurance Portability and Accountability Act HIPAA and DICOM PS3.15 tags according to the DICOM Standards Committee, and have the option to apply pixel masking and controlled handling of sensitive fields (for example, birthdate).
Notes!
If a form includes a DICOM upload item, the de-identified files are uploaded as a new ZIP file and are downloadable. Upon saving the form, the file upload information becomes available in the audit trail. Files are not uploaded to Viedoc until completing this final step (the de-identification runs in the browser). The uploaded files are included in the export output, when exporting to Excel, Comma-Separated Values (CSV), PDF or Operational Data Model (ODM). The following information is included: study name, subject key, and the current date and time on your local machine (all part of the file name <studyName><subjectKey><YYYYMMDDTHHMMSSZ>.zip), file size in bytes, file hash (MD5).
For more information about how Clinic users interact with DICOM, see DICOM file upload and de-identification.
The drawing pad item allows Viedoc Me users to make drawings and submit them to Clinic. The drawings are saved as files and can be downloaded in Clinic just like the File upload items.
Three background options are available when designing the drawing pad:
The Range item allows the Clinic user to define and fill in a range of values. An example is the normal range for a specific laboratory measurement in a Lab form.
When using the Reference Data feature, range items should allow the maximum number of decimal digits (6).
When filling in the form in Viedoc Clinic, the Clinic user can define the range of values by selecting one of the following options:
- – Inclusive in between.< – Less than.≤ – Less than or equal to.> – Greater than.≥ – Greater than or equal to.= – Equal.For more information, see Using JavaScript in Viedoc.
The form link item allows Clinic users to add links between different events and forms containing related/dependent data. For example, while editing the Prior and Concomitant Medications form, users can link to several registered Medical History events.
Note!
To create and configure form link items:
| 1 |
Add the form link item to any of the forms included in your study design (see Adding items to a form below). |
| 2 |
Select Form link to open the form link item. 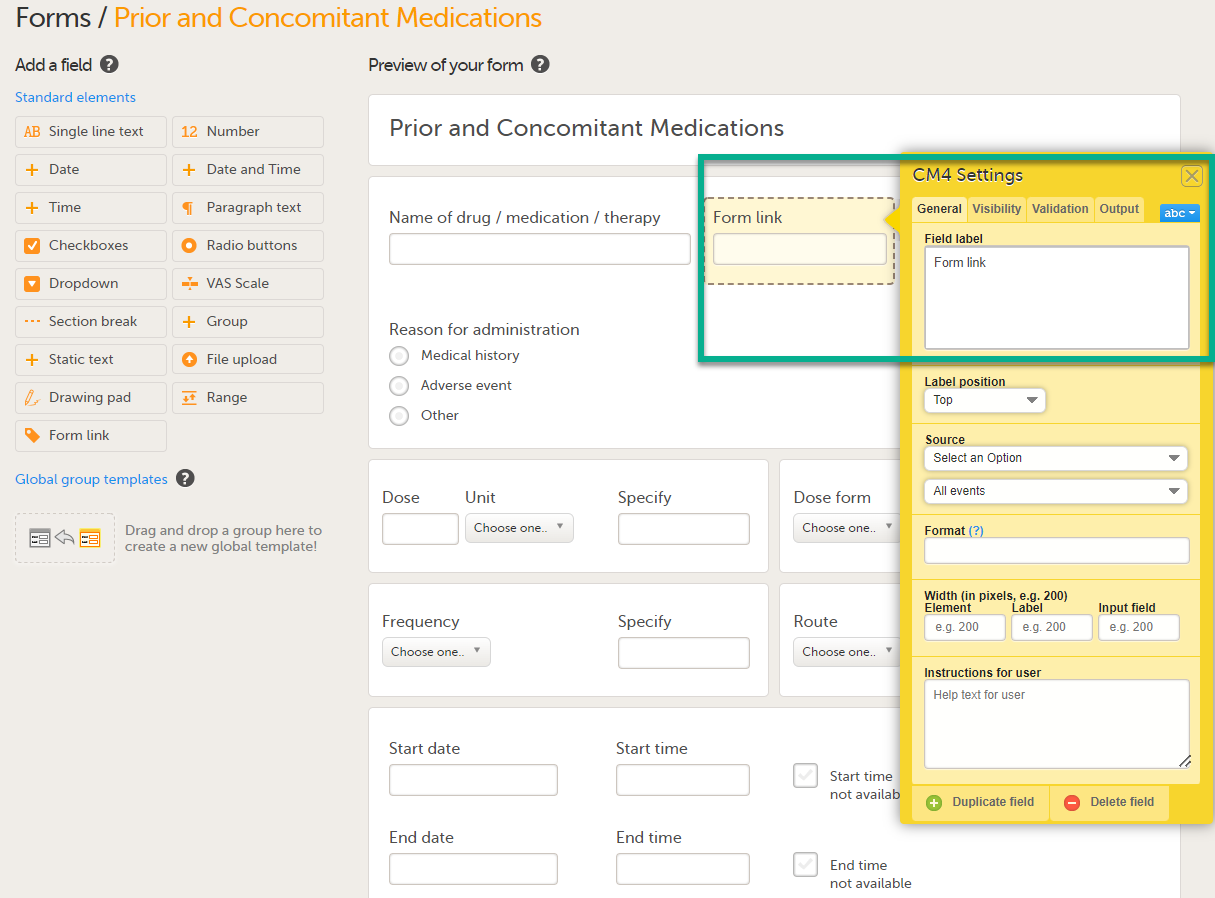
|
| 3 |
In Settings, there are four different tabs, General, Visibility, Validation and Output. See Configuring an item for more information about the tabs. 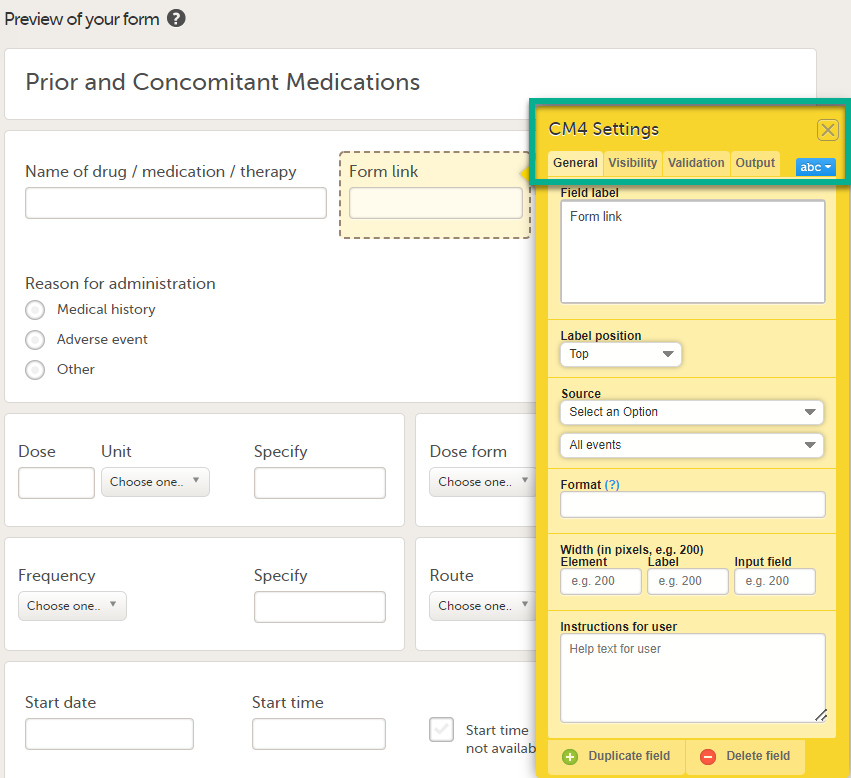
|
| 4 |
Under Source: 1. Select Select an Option to open a dropdown menu and select the form you want to display. In this case Medical History. 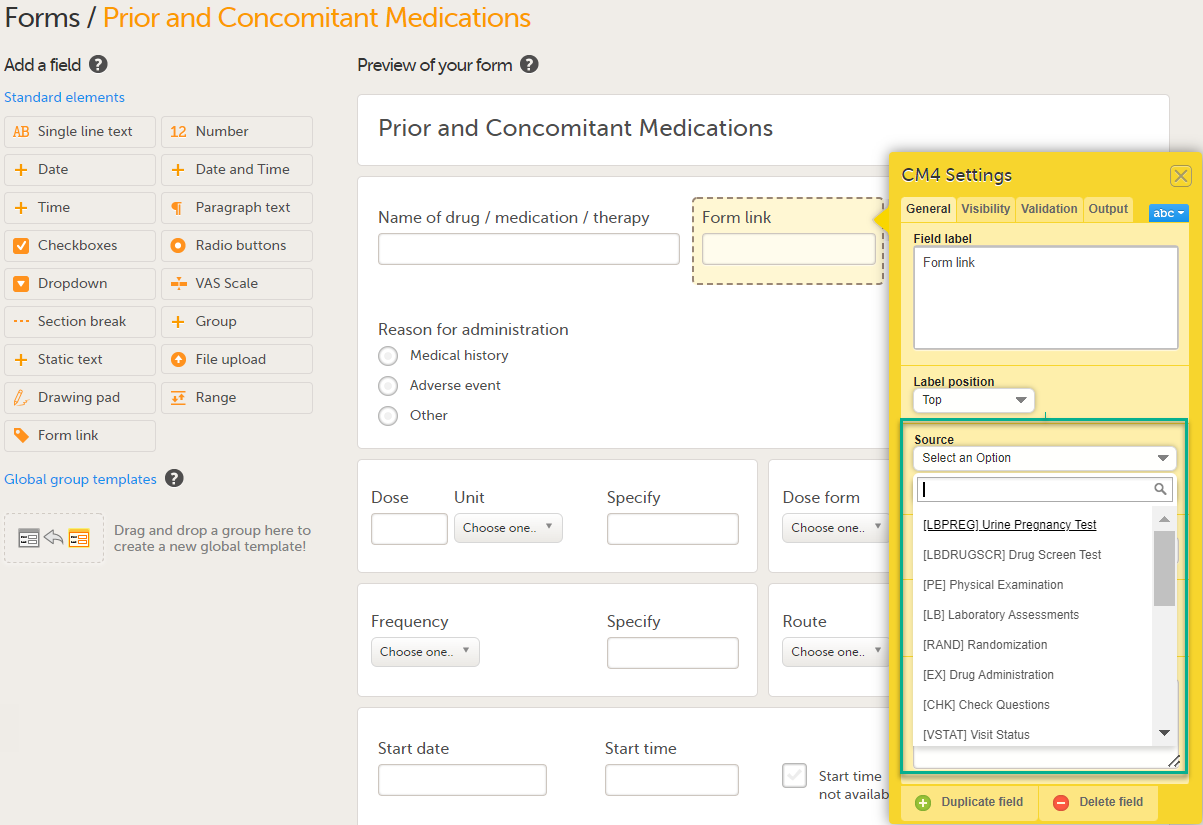
Note! You can either search in the Source field menu or scroll in the dropdown list . 2. Select the Event. In this example the Medical History event is selected in Common events. Note! Depending on your study design, in the Study workflow, you can choose to link the form either to all events with a specific form added (in this case Medical History) or to a single event. In the image below you can see that both the Medical History form in Source and the Medical History Event in Common Events have been added. In this example, all instances of the form type Medical History in Common Events are available for the Clinic user to link to. 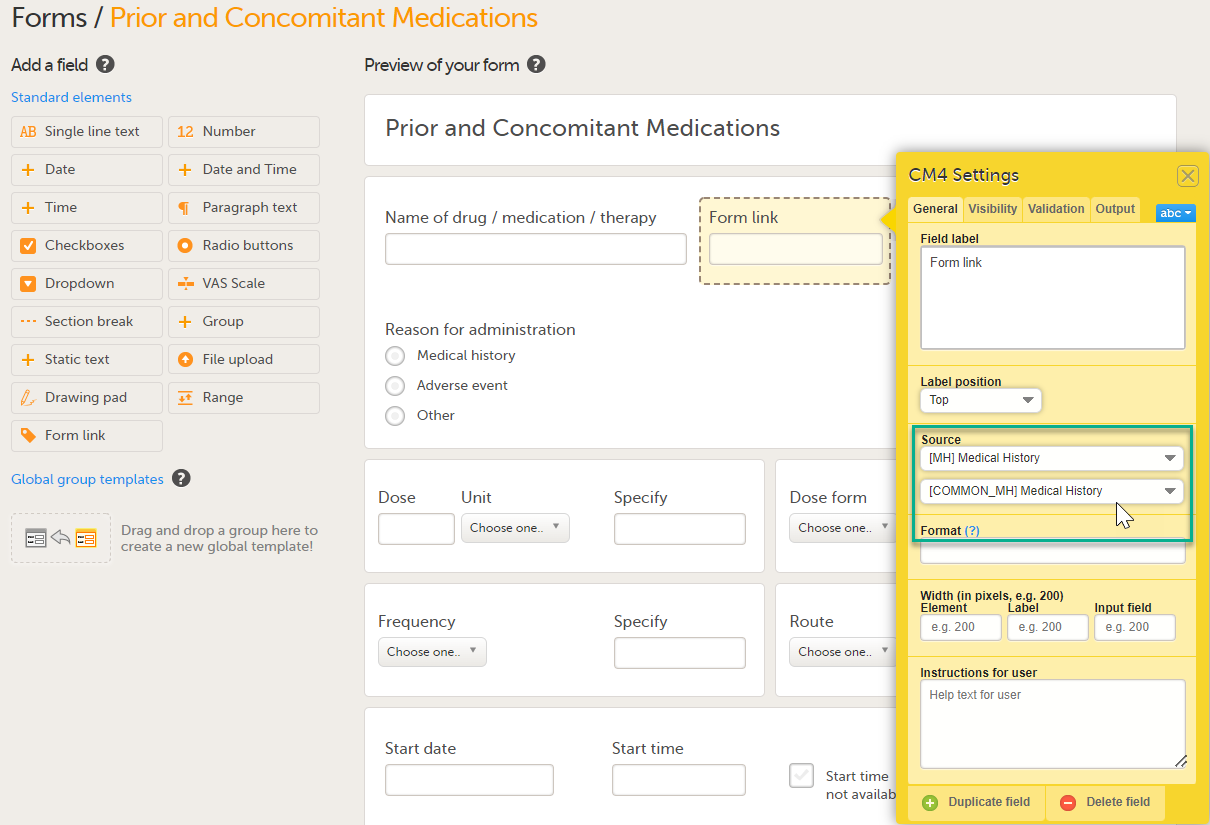
|
| 5 |
Under Format, add the items to be displayed for the available form link(s). For example the Term, Sequence number, and Start, Ongoing and End date for the Medical History. This defines how the form will be displayed in Viedoc Clinic. Tip! Select the question mark for information about summary formats. For more information see Summary format of the form. 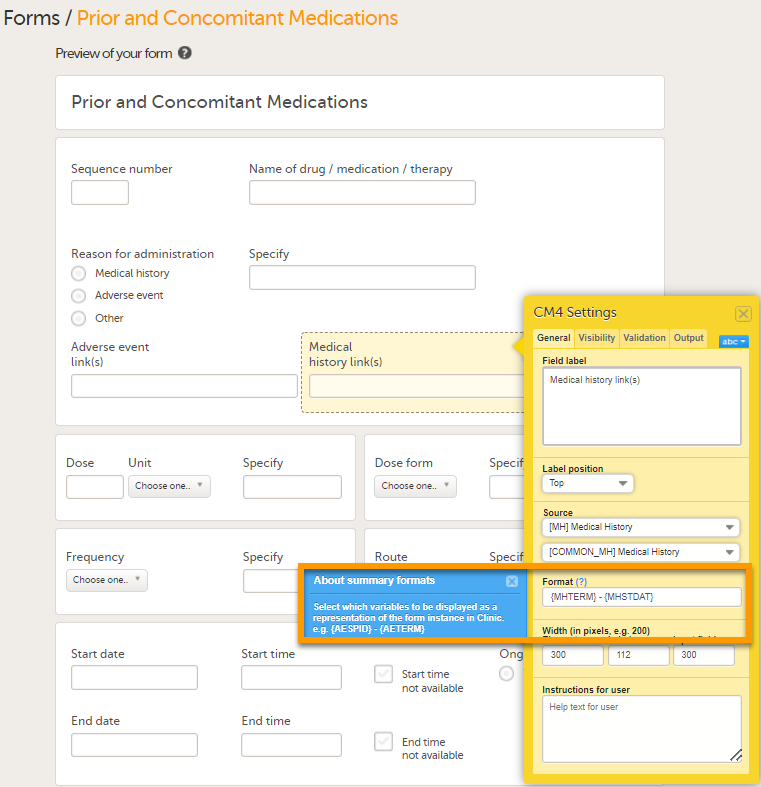
|
| 6 |
Select Save Changes Notes!
|
A design with form link validation errors cannot be published. If validation fails, the design will not be published and an error message is displayed:

The format string must refer to the valid item ID of the source form for the display format to be populated and displayed in Viedoc Clinic.
If there is a circular reference between source forms, for example a form link having source form as the form containing the form link, an error message is displayed which identifies the forms with the issue.
The Numeric Rating Scale (NRS) item is designed for collecting ratings on a clearly defined numerical scale (for example 0 to 10):
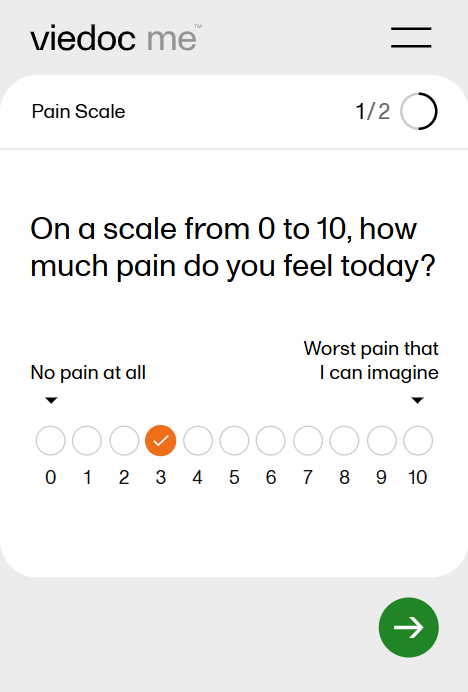
The NRS item is similar in appearance and behavior to the radio button item type, but it has several special characteristics, including:
Additionally,
Note! The NRS item type is not supported in the previous (legacy) version of Viedoc Me.
To add an item to the form:
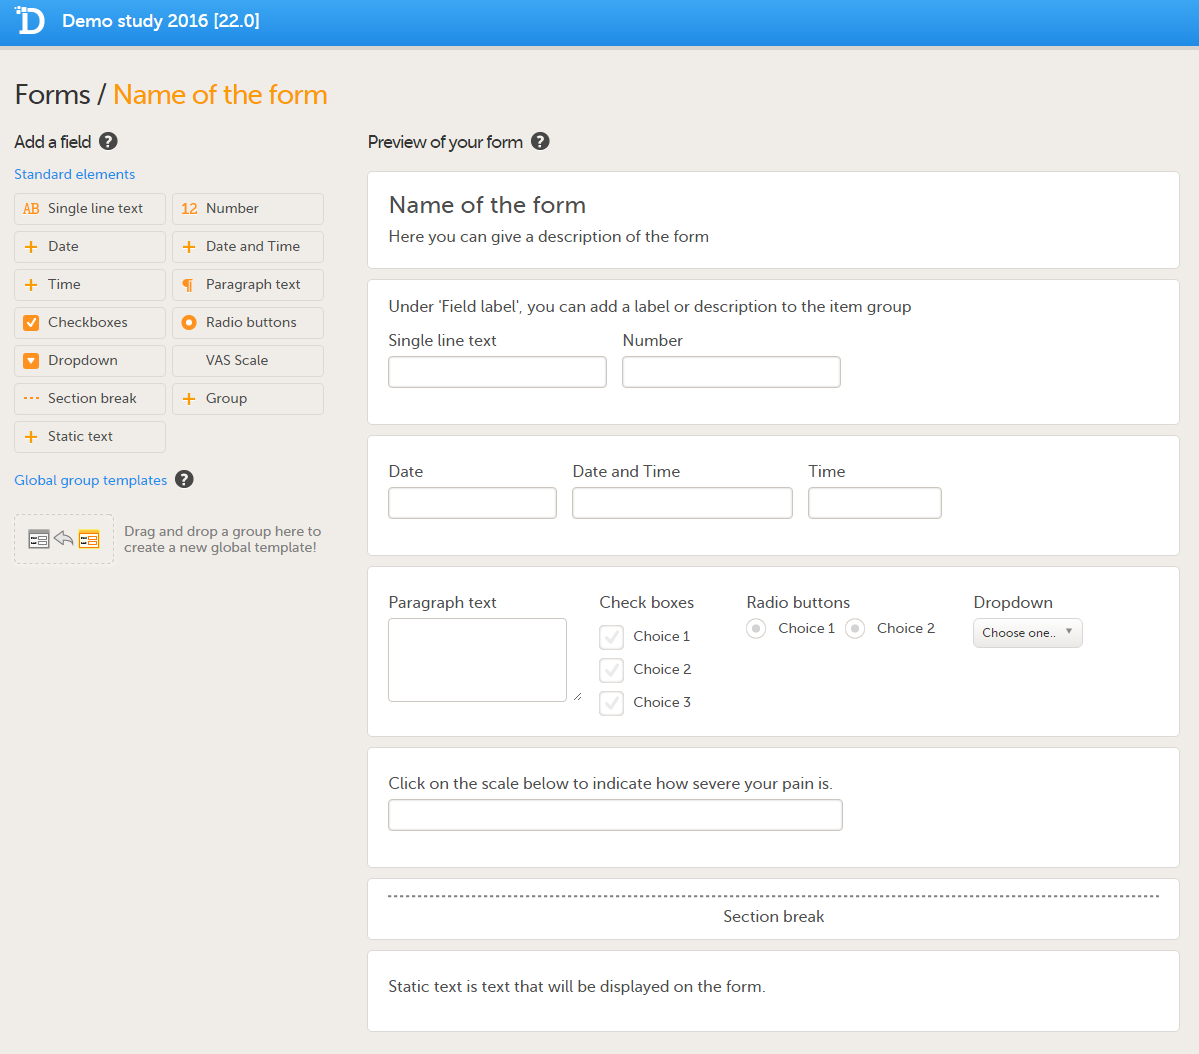 If you select one of the standard elements, the item will appear in the selected group. If no group is selected, the item will appear in a new group on the form.
You can move the items within the group or between groups by dragging and dropping the items.
After having made changes to the form, select Save changes.
You can also create item groups using global item group templates, see Global item group templates below.
You can configure an item in the item settings pop-up. Select the yellow box around the item to open the item settings pop-up.
The item settings pop-up has five different tabs:
| Tab | Settings to adjust |
|---|---|
| General (1) | Set the appearance of the item. |
| Visibility (2) |
Set the visibility conditions of the item. Note! If you set an item to hidden for certain clinic role(s), these role(s) cannot see the form PDF. The PDF remains invisible to these roles even after the hidden item is removed from the form in a new revision. This is because the form PDF includes a full audit trail of all items that ever existed in the form revisions, even items hidden to certain roles. For that reason, the form PDF will not be displayed to any of these roles. Important! Do not use item visibility settings for blinded data. Blinded data should be collected in a separate form, for example a randomization form. |
| Validation (3) | Set the ID of the item and add data checks that validate the item. |
| Function (f) (4) | Set functions that calculate the item, or set default values. |
| Output (5) | Set the Output field ID (OID) and Output Field Label. This is useful in case you would like the item to have another ID or label in the export than the ID that is used within Viedoc. See also the Learning section Outputs and validation. |
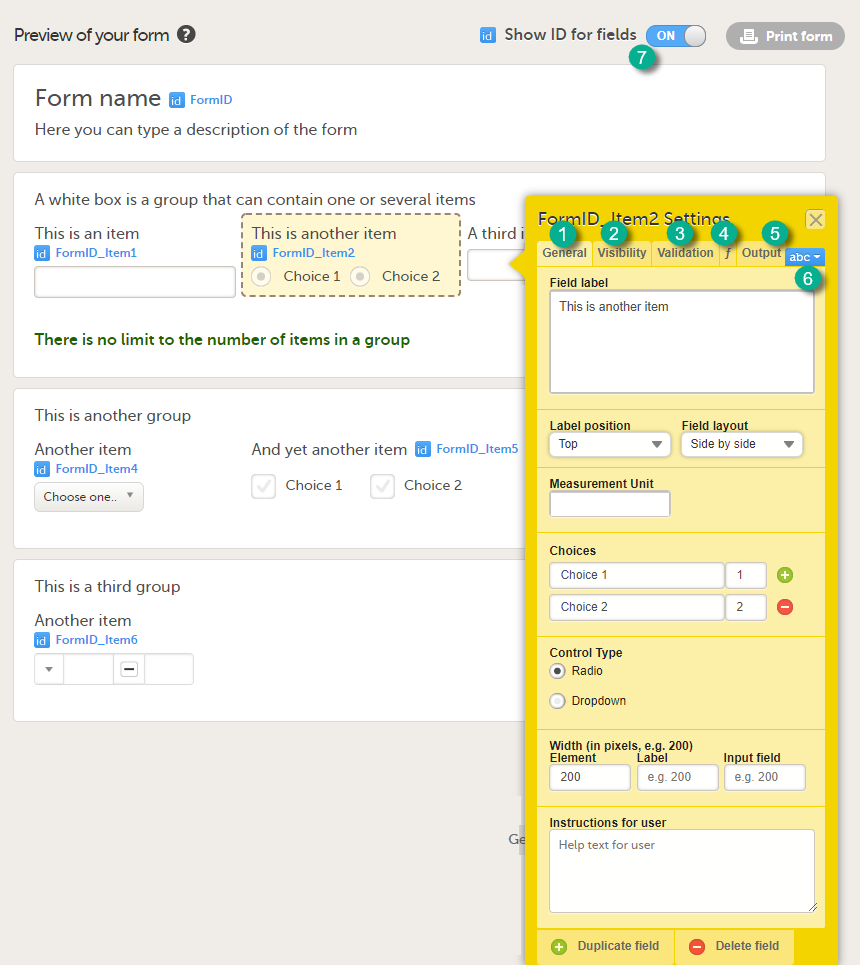 In the sections below, the settings that can be made in these five tabs are described in more detail.
You can change the lay-out of any text you enter. Select abc (6) to open a menu in which you can control font style (normal, bold, italic, underline, superscript or subscript), font colour (black, grey, red, green) and font size (small, normal, large, huge). Mark the text and select the respective icon.
Our font sizes correspond to these respective pixels and points.
| Size | Pixel | Point |
|---|---|---|
| Small | 16px or 18px | 12.5pt or 13.5pt |
| Normal | 25px | 18.75pt |
| Large | 28px | 21pt |
| Huge | 32px | 24pt |
Tip! If you set the Show ID for fields switch (7) to ON, the field IDs of the form and all items on it will be displayed in blue text.
On the General tab, you can adjust the appearance of the item.

You can adjust the following settings:
1. Field label: a label that describes the item. The field label will be used as the item label when exporting data, unless an Output Field ID or Output Field Label is defined on the Output tab.
2. Label position: the position of the label relative to the input field. The default, and recommended, position is 'top' (above the label).
3. Decimal digits: For numeric items only, the number of allowed decimals.
4. Measurement unit: a measurement unit for the item. The measurement unit will be displayed below the input field.
Note! If you enter a measurement unit for an item in a form that is used in Viedoc Me it is not displayed in Viedoc Me.
To display the measurement unit in Viedoc Me, incorporate the measurement unit in the question text or use a static text to display the unit.
5. Width of:
6. Instructions for user: free text, for example a more detailed description of the item. When text is entered here, an i (info) icon will be displayed beside the field label. Hovering over this icon with the mouse will display the text.
For checkboxes, you can enter the text for the choice labels in the Choices field. If the text for the choice labels is long, it will be truncated when the form is displayed in Viedoc Clinic. You can avoid truncation by activating the Allow line break checkbox. When this checkbox is activated, the checkbox label respects the width of the item and the text will continue on the next line.
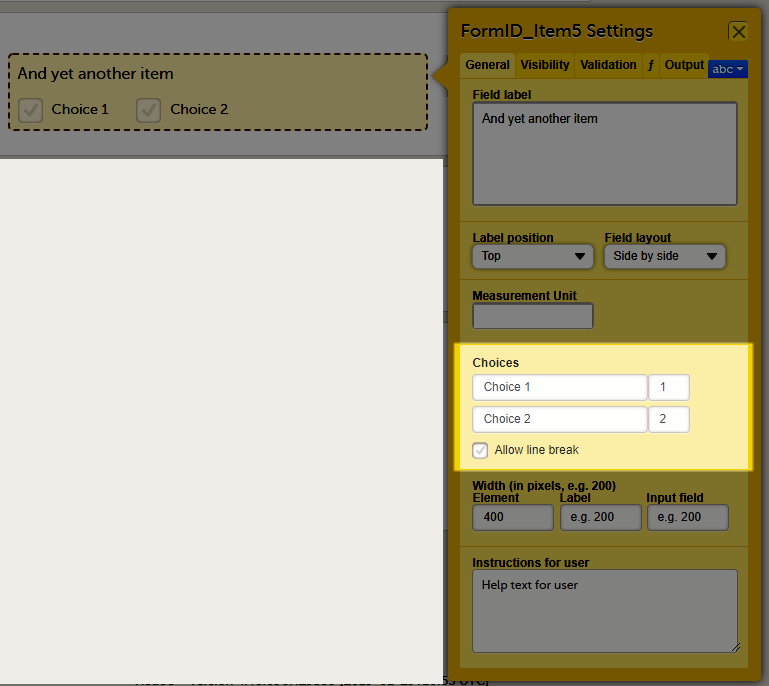
Note! When a dropdown item is added to a form, a Choose one.. option is automatically included as the first entry in the dropdown list:
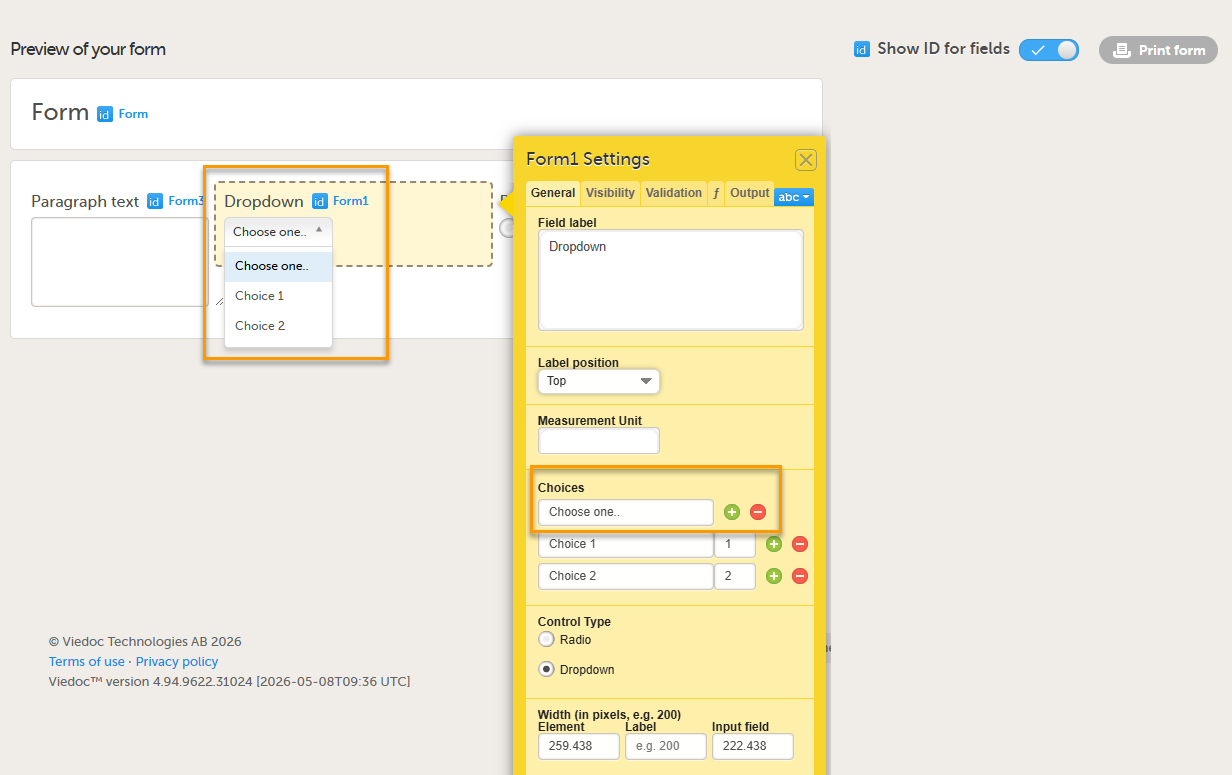
The Allow line break checkbox is by default activated for studies starting after Viedoc release 4.48 in February 2019, and by default inactivated for studies started before Viedoc release 4.48 in February 2019.
You can adjust the following settings of the VAS:
* These settings should be used when you are using the VAS for the EQ5D questionnaire.
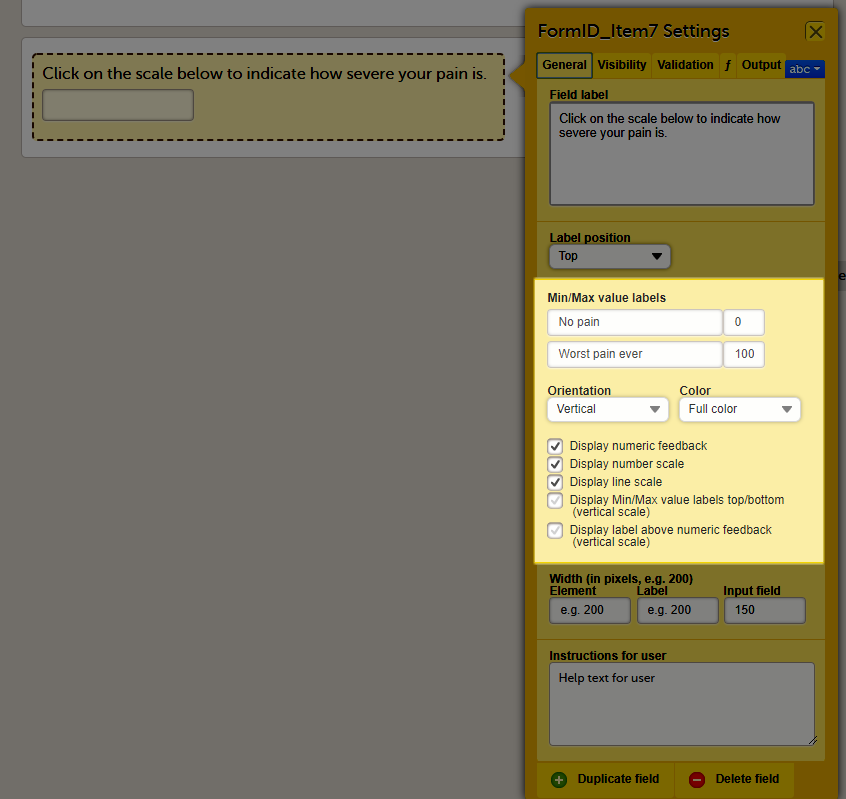
For file upload, you can select if you want a thumbnail to be displayed.
On the General tab, select one of the following options from the Display thumbnail dropdown list:
Notes!
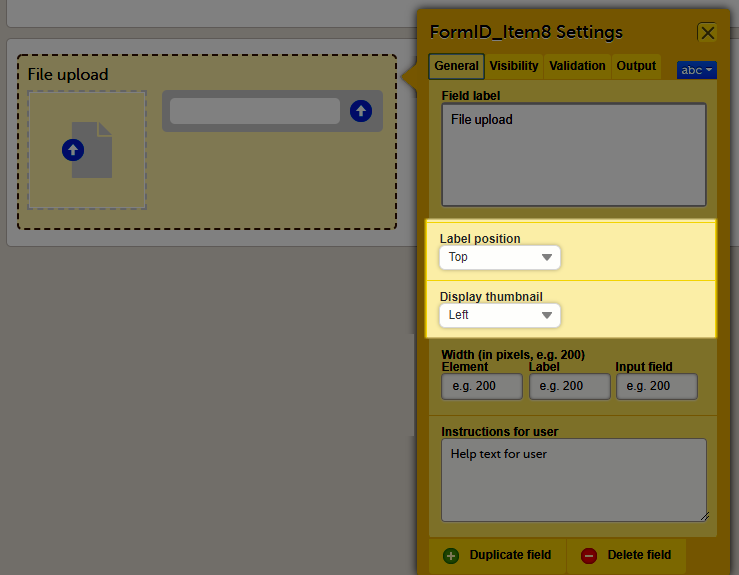
On the Visibility tab, you can adjust the visibility conditions of the item.

You can set the following conditions (see image):
1. Which roles can view the item? Select Show or Hide, and select:
2. When is the item shown? Select Show or Hide and select when the item should be shown or hidden:
Notes!
3. Who can edit the item? Select Enable edit for:
To show or hide an item based on a simple condition that depends on only one item in the same form, follow the steps below.
| 1 | Select on simple condition evaluates true. |
| 2 | Select the item on which the visibility condition should be based. |
| 3 | Select whether this item should be equal to (is) or not equal to (is not) a certain value, for the condition to be true. |
| 4 | Enter the value on which the visibility condition should be based. |
To show or hide an item based on an advanced condition, which allows multiple dependencies, follow the steps below.
| 1 | Select on advanced condition evaluates true. |
| 2 | Use JavaScript to define the condition. For more information about JavaScript, see the Learning lesson Using JavaScript in Viedoc. |
Note! Do not use Hide to all roles! If an item is hidden to all roles, the data stored in the item will be cleared upon saving the form. If you wish to store values in a field that should be hidden for all users, select Hide and always as described under nr 2 in the image.
On the Validation tab, you can set the ID of the item and add data checks that validate the data entered into the input field.
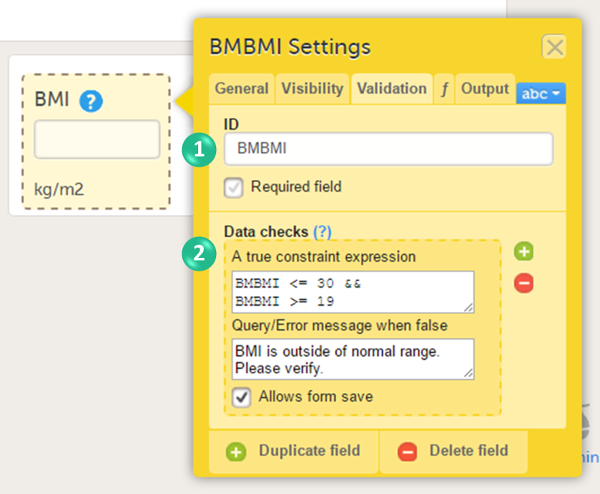
You can set the following conditions (see image):
1. You can change the item ID. The item ID is the ID that will be used to identify the item in the database and in the export output. It is also used when referring to the item in JavaScript expressions.
The item ID will be used as the item label when exporting data, unless an Output Field ID or Output Field Label is defined on the Output tab, see Item settings - Output.
Note! The item ID should not be changed from one study design version to the next in a production study. If you change the ID of an item, data checks, role visibility conditions and other features that identify the item based on the item ID will stop working. If you need to change an ID after the study is set to production, change its Output Field ID under the output tab.
If the checkbox Required field is selected, then the following happens in Clinic:
2. You can enter system checks and/or data checks.
System checks are checks pre-defined by the system. System checks are for example available for Date and Date and Time items, in which they prevent the entry of dates in the future. To activate this system check, select the checkbox Prevent dates after, and then select Event date or Current clinic date.
Data checks are checks that can be defined by the user. To define a data check, follow the steps below:
| 1 | Select the + icon. |
| 2 | In the field A true constraint expression, enter the condition on which you would like the data entered in the input field to be accepted, without triggering a query or error message. Use JavaScript to define the condition. For more information about JavaScript, see Using JavaScript in Viedoc. |
| 3 | In the field Query/Error message when false, enter the error message that should be displayed when data are entered that are not fulfilling the conditions defined in step 1. |
| 4 | By default, the form can be saved even if data are entered that are triggering a query or error message. If you would like to disable form save, clear the checkbox Allows form save. |
You can enter multiple data checks for the same item.
To remove a data check, select the - icon.
For the Date and Date and Time items, there is a system check available that allows preventing the Clinic user from entering future dates when filling in the form in Viedoc Clinic. To set this, activate the checkbox Prevent dates after in the System checks field and select:
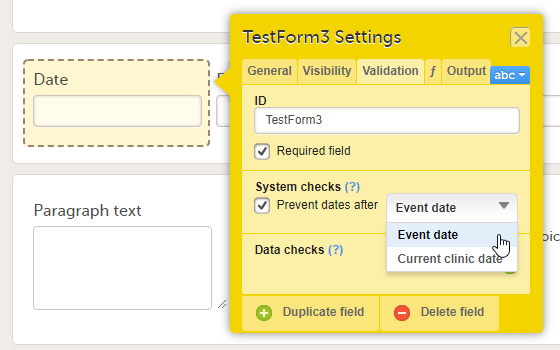
For the Single line text and Paragraph text items, there is a system check available that allows setting a minimum required and/or a maximum allowed length of the entry into the field in Viedoc Clinic, in number of characters:
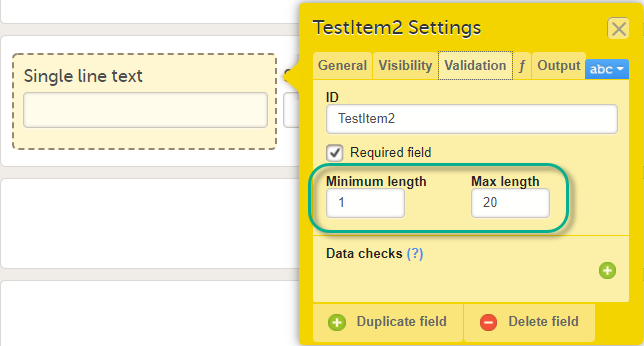
Please note that the minimum/maximum length settings are independent of the Required field settings, i.e. can be used even if the Required field is unchecked. This is useful if you want to define a text item that is optional to be entered in Viedoc Clinic. However, if something is entered in the optional text field you want to make sure it is, for example, at least 2 characters, or perhaps at most 10 characters long.
Note! Max character length is 12,000. Exceeding the max character length results in truncation of the PDF in export.
On the Validation tab, you can enter data checks that validate the data entered into the input field. The properties available for the file upload item are:
ItemID.FileName - the name of the uploaded fileItemID.FileSize - the size of the uploaded file in bytesItemID.FileHash - the MD5 hash of the uploaded fileSee also Using JavaScript in Viedoc for more details.
On the Validation tab, you can enter data checks that validate the data entered into the input field. The properties available for the range item are:
RangeObject.Lower - the lower limit of the range (number)RangeObject.LowerFormat - the number of decimals used for the lower limit of the range (number)RangeObject.Upper - the upper limit of the range (number)RangeObject.UpperFormat - the number of decimals used for the upper limit of the range (number)RangeObject.Comparator - the comparator used to define the range (string). The available comparators are:
InclusiveInBetween - defines a range beween a lower and an upper defined limit.LessThanLessThanOrEqualToGreaterThanGreaterThanOrEqualToEqualToRangeObject.StringValue - the string representation of the respective range item (string)The functions available to be used in conjunction with the range item, including the functions that can be used to obtain RangeObject, are described in Using JavaScript in Viedoc.
On the Function tab, you can set functions that calculate the item, or set a default value that will be displayed as a default in the input field.

There are two options:
1. Function. If you define a function, then the field will become read-only for the site user. As an example, BMI (as shown in the image) will automatically be calculated from the height (BMHGHT) and weight (BMWGHT) entered by the user. This value will be shown in the BMI field, and will not be editable by the user.
To set a function, select Function. In the field Function logic (JavaScript), enter the function using JavaScript. For more information about expressions that can be used, select the ? icon. A pop-up will open that displays information on how to refer to items from other forms, items from specific events or activities, context variables and checkboxes.
2. Default value. A default value will be displayed in the field the first time the form is opened and the item becomes visible, but the value will still be editable for the site user.
To set a default value, select Default value. In the field Default Value or JavaScript expression, enter the value you would like to set as default, or enter a JavaScript expression.
For more information about JavaScript, see Using JavaScript in Viedoc.
Note! Functions and default values are not supported in Viedoc Me forms.
On the Output tab, you can set the Output field ID (OID, 1) and Output Field Label (2). See also the Learning section Outputs and validation.
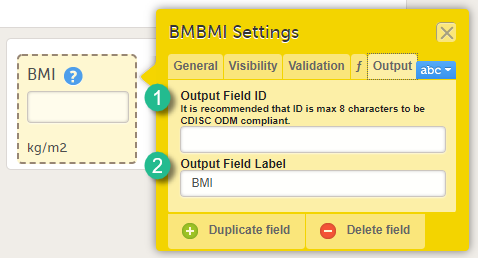
Entering an Output Field ID and Output Field Label is useful in case you would like the item to have another ID or label in the export than the ID and label that are used within Viedoc. Changing the Output ID will keep the variable correct in the system so that everything in the study design still works computationally, but the export shows the ID you want it to have (see the image below).
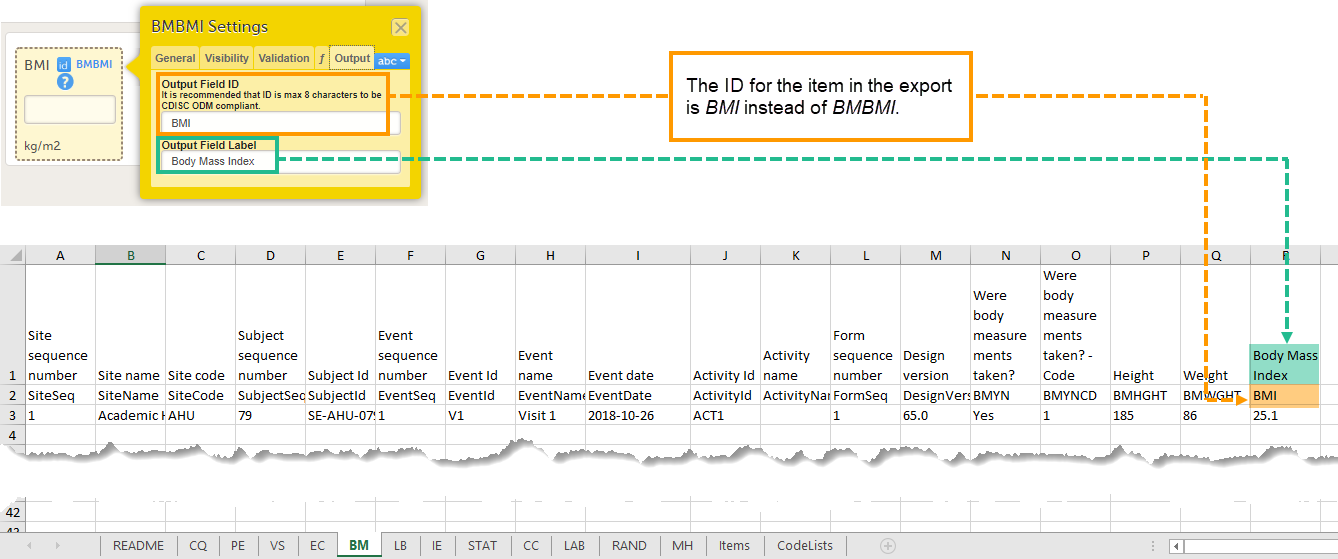
Changing the Output ID in the export might also be useful when importing data into legacy systems, for example SAS, that cannot handle special characters, such as < or >. The Output field label can then be changed to "less than" and the label can be imported to SAS without problems.
Using repeating item groups allows Viedoc Clinic users to add multiple instances of the same group of items within a form when entering data. This is useful when the number of repeated observations varies, such as multiple measurements or multiple analytes in a single form.
Note! If repeating item groups are included in the study design, the repeating item group structure defined in the study design is preserved when the design is imported into another study. This is handled automatically in Viedoc Admin when the study design is assigned.
Repeating item groups included in ODM files are supported during the import. The repeating item group structure defined in the study design is preserved when the ODM file is imported.
The minimum number of item groups set in the study design is visible in Viedoc Clinic. Additional item groups can be added dynamically up to the maximum number of occurrences.
Notes!
Additionally, columns specific to the repeating item group have been added to the complete configuration report in Excel format. For more information, see Configuration report.
To create and configure a repeating item group:
| 1 |
Open the Forms page and select the form and the item group you want to set as a repeating item group. In the Item Settings pop-up, on the General tab, select Allow group to repeat and enter the minimum and maximum number of group repeat occurrences you require: 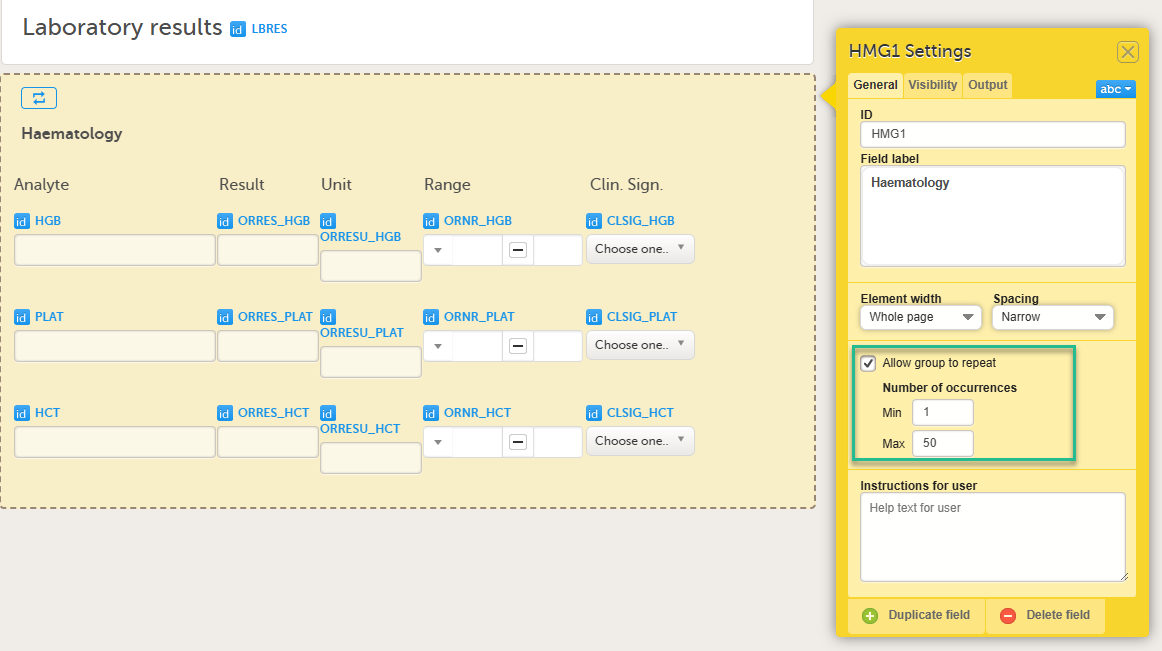
Notes!
|
|
| 2 |
On the General tab, enter the item group name in the ID field, ensuring it is unique, and select Save. The Repeating item group icon is shown on the form:
You can edit the item group ID when:
The item group ID is read-only when the item group is in an existing design revision. |
Note! When writing JavaScript expressions for referencing to items inside a repeating item group from another item group, for visibility conditions and summary format, special syntax is required to reference the individual data points. For more information about JavaScript, see Using JavaScript in Viedoc.
You can also set up alerts for repeating item groups that are issued in defined conditions (for example, in case of a lab result being filled in for any of the repeating items).
Setting up the alerts is done in Viedoc Designer, under Study Settings > Alerts. For more information about alerts and trackers, see Alerts.
Notes! Alerts are evaluated at the form level, not at the level of individual repeating item group instances. When a form contains repeating item groups, alert conditions must therefore be written at the form level.
If you want to trigger an alert when any instance of a repeating item group meets a condition, the condition must list all relevant repeating instances.
If you want to trigger an alert for a specific instance of a repeating item group, for example, a second instance of a repeating item group has been filled in, you must write a separate condition for that instance.
To duplicate an item, select the item and select Duplicate field in the item settings pop-up (number 1 in the image).
To delete an item, select the item and select Delete field in the item settings pop-up (number 2 in the image).
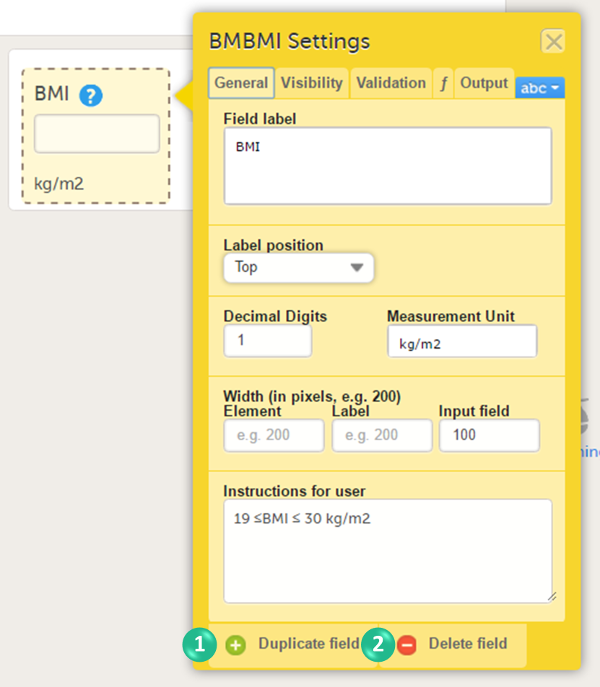
When an item is duplicated, the duplicate item contains all the data checks that are configured for the original item. The system will automatically create an item ID for the duplicate item in the following format: ItemID_Copy1, see image.
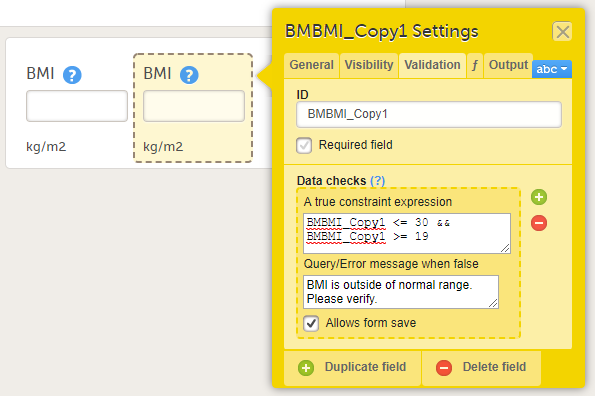
In addition to creating a new form from scratch, it is also possible to create a form using a global template.
To create a form using a global template, select the arrow icon beside a global template (nr 1 in the image) to open the global template. You can now edit and save the form. Any changes to the form will not affect the global template.
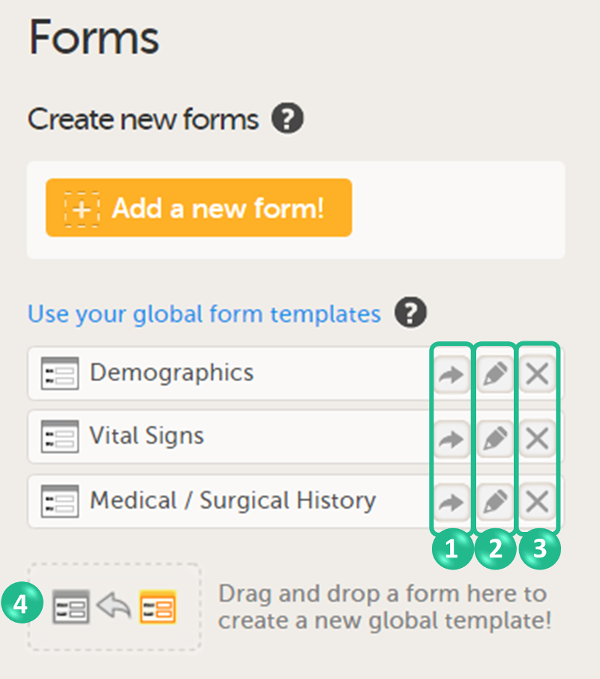
You can create a global template from one of the forms that are used in the design by dragging and dropping the form to the field Drag and drop a form here to create a new global template! (nr 4 in the image).
The form will appear in the list of global templates, and can be used or edited as described earlier. All item settings made in the form will be preserved when the form is added to the global templates.
The global templates are available for all studies within your organization, and for all users within your organization that have access to Designer.
You can edit a global template by selecting the edit (pen) icon beside the global template (nr 2 in the image).
The global template will open and you can edit the template. This will not affect the original form that has been used as the basis of the template, or any other form instances that are created based on the form template.
You can delete a global template by selecting the delete (X) icon beside the global template (nr 3 in the image). A pop-up will appear. Select Delete to confirm deleting the global template, or select Cancel to cancel.
You can also create item groups using global item group templates. Global group templates are available on the Forms page.
The global item group templates are available for all studies within your organization, and for all users within your organization that have access to Designer.
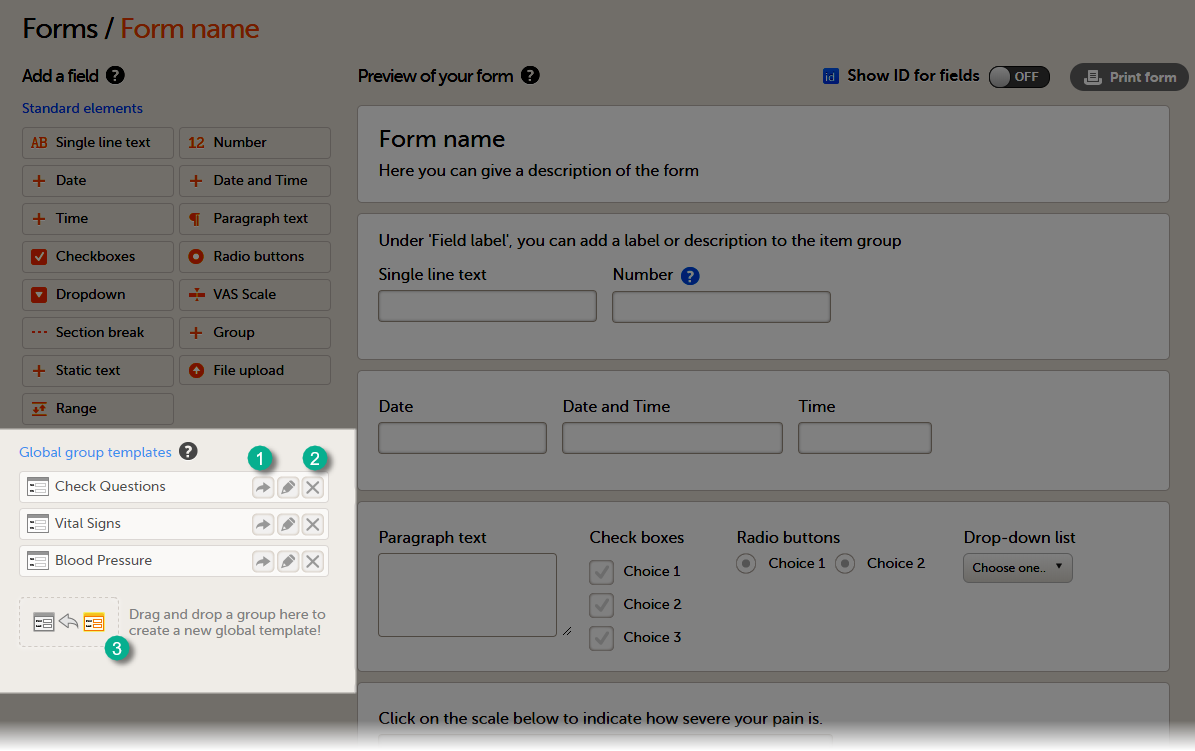 To add a global item group template to your form, select the arrow icon beside a global template (1). You can now edit the item group. Any changes to the item group will not affect the global item group template.
To delete a global item group template, select the delete (X) icon (2) beside the global template. A pop-up will appear. Select Delete to confirm deleting the global template, or select Cancel to cancel.
To create a global group template, drag and drop an item group to the field Drag and drop a group here to create a new global template! (3)
The pen icon between the arrow and the cross is for renaming the group template. But this did not work at the time of writing this Learning. Add later once the function is added to Viedoc:
To rename a global item group template, select the pen icon (2) and.
This functionality currently opens the form to edit the form (July 2025).
Note! When an item group is added to the Global group templates, the item group ID automatically assigned by the system is not retained. To assign a name to the new item group template, the name has to be entered in the Output Label field on the Output tab. If no name is entered in the Output Label field, the name of the item group template will remain blank, see image below.
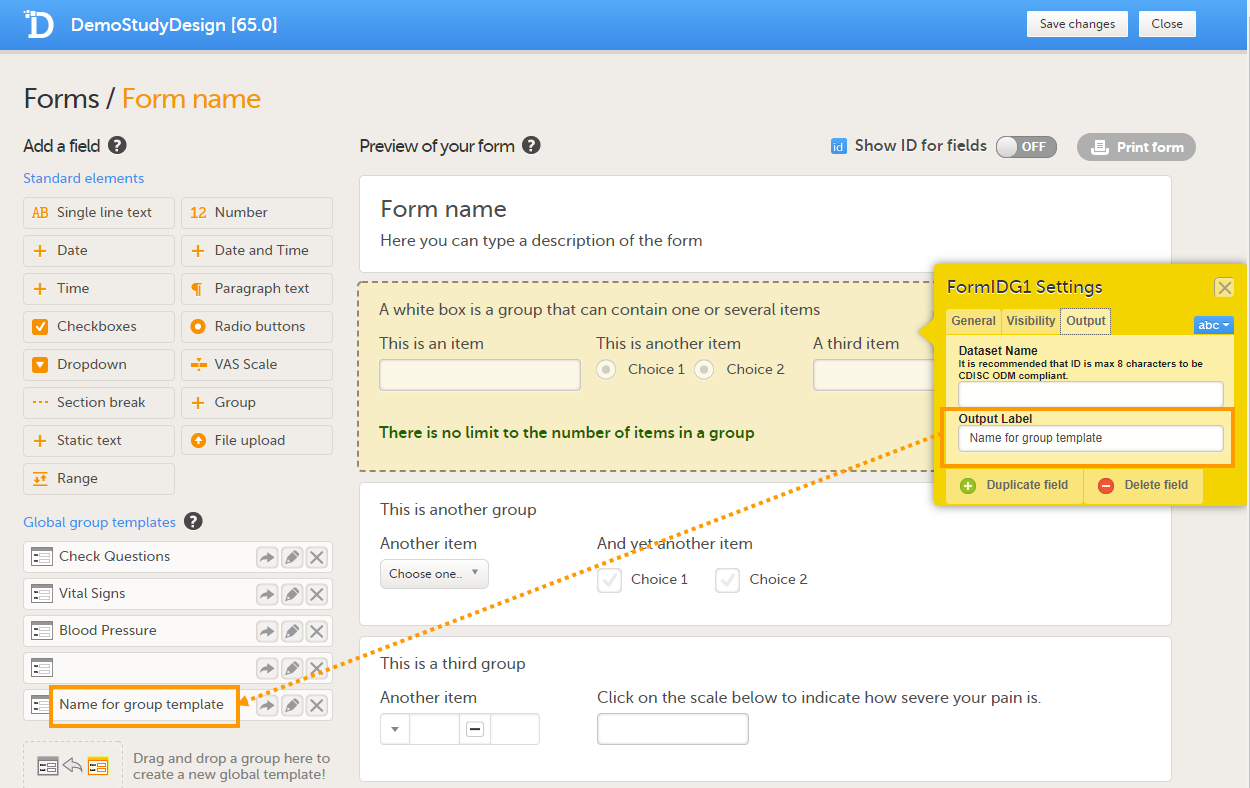
This section gives two examples of forms that are Clinical Data Acquisition Standards Harmonization (CDASH) compliant.
The following image provides an example of a Vital Signs form created in Viedoc Designer.
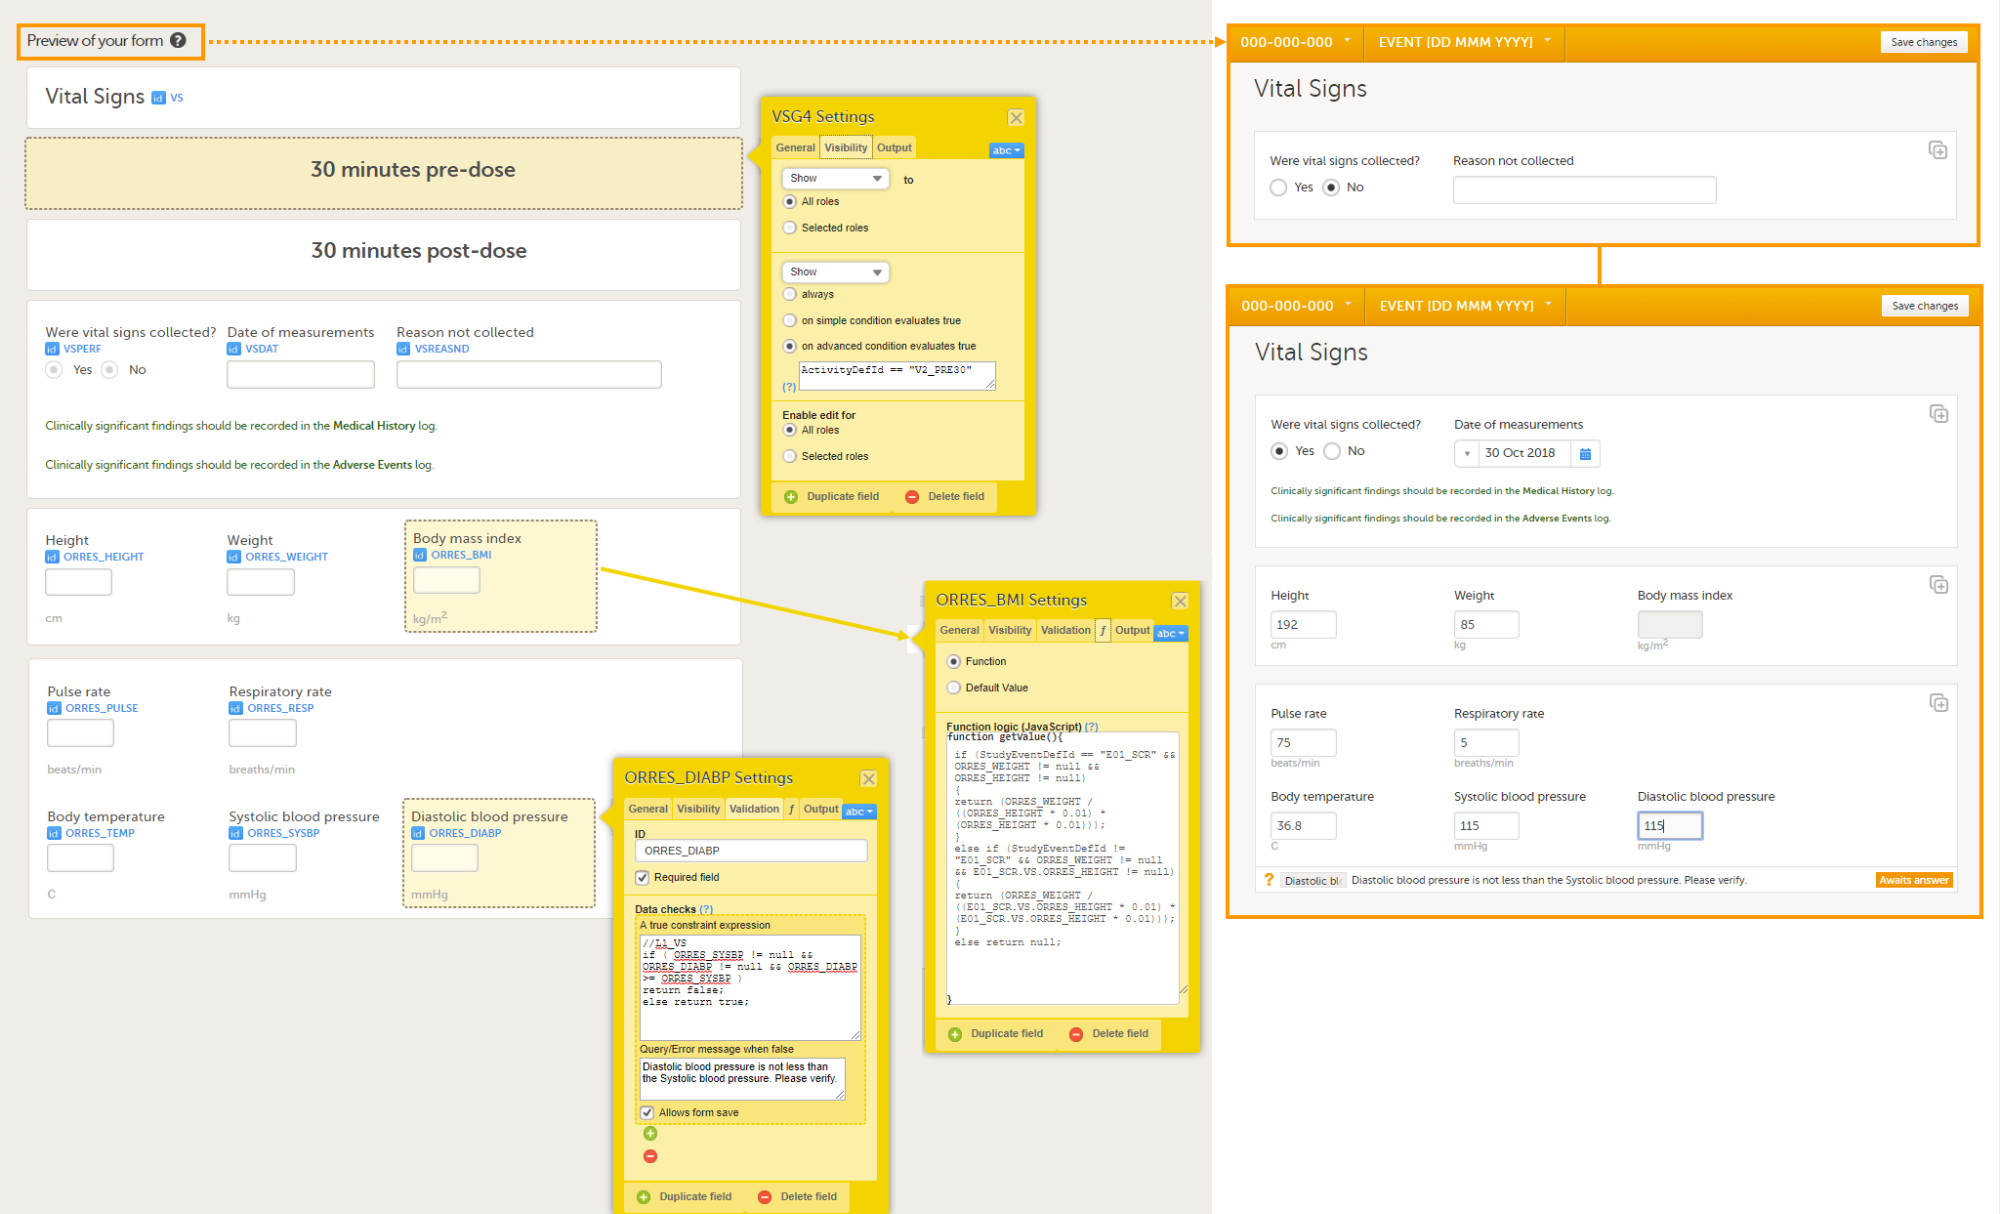
The item group settings and item settings in this form are as follows:
ActivityDefId == "V2_PRE30"or ActivityDefId == "V2_POST30"//L1_VS
if ( ORRES_SYSBP != null && ORRES_DIABP != null && ORRES_DIABP >= ORRES_SYSBP )
return false;
else return true;if (StudyEventDefId == "E01_SCR" && ORRES_WEIGHT != null && ORRES_HEIGHT != null)
{
return (ORRES_WEIGHT / ((ORRES_HEIGHT * 0.01) * (ORRES_HEIGHT * 0.01)));
}
else if (StudyEventDefId != "E01_SCR" && ORRES_WEIGHT != null && E01_SCR.VS.ORRES_HEIGHT != null)
{
return (ORRES_WEIGHT / ((E01_SCR.VS.ORRES_HEIGHT * 0.01) * (E01_SCR.VS.ORRES_HEIGHT * 0.01)));
}
else return null;return 1;return EventDate;The following image provides an example of a Medical History form created in Viedoc Designer.
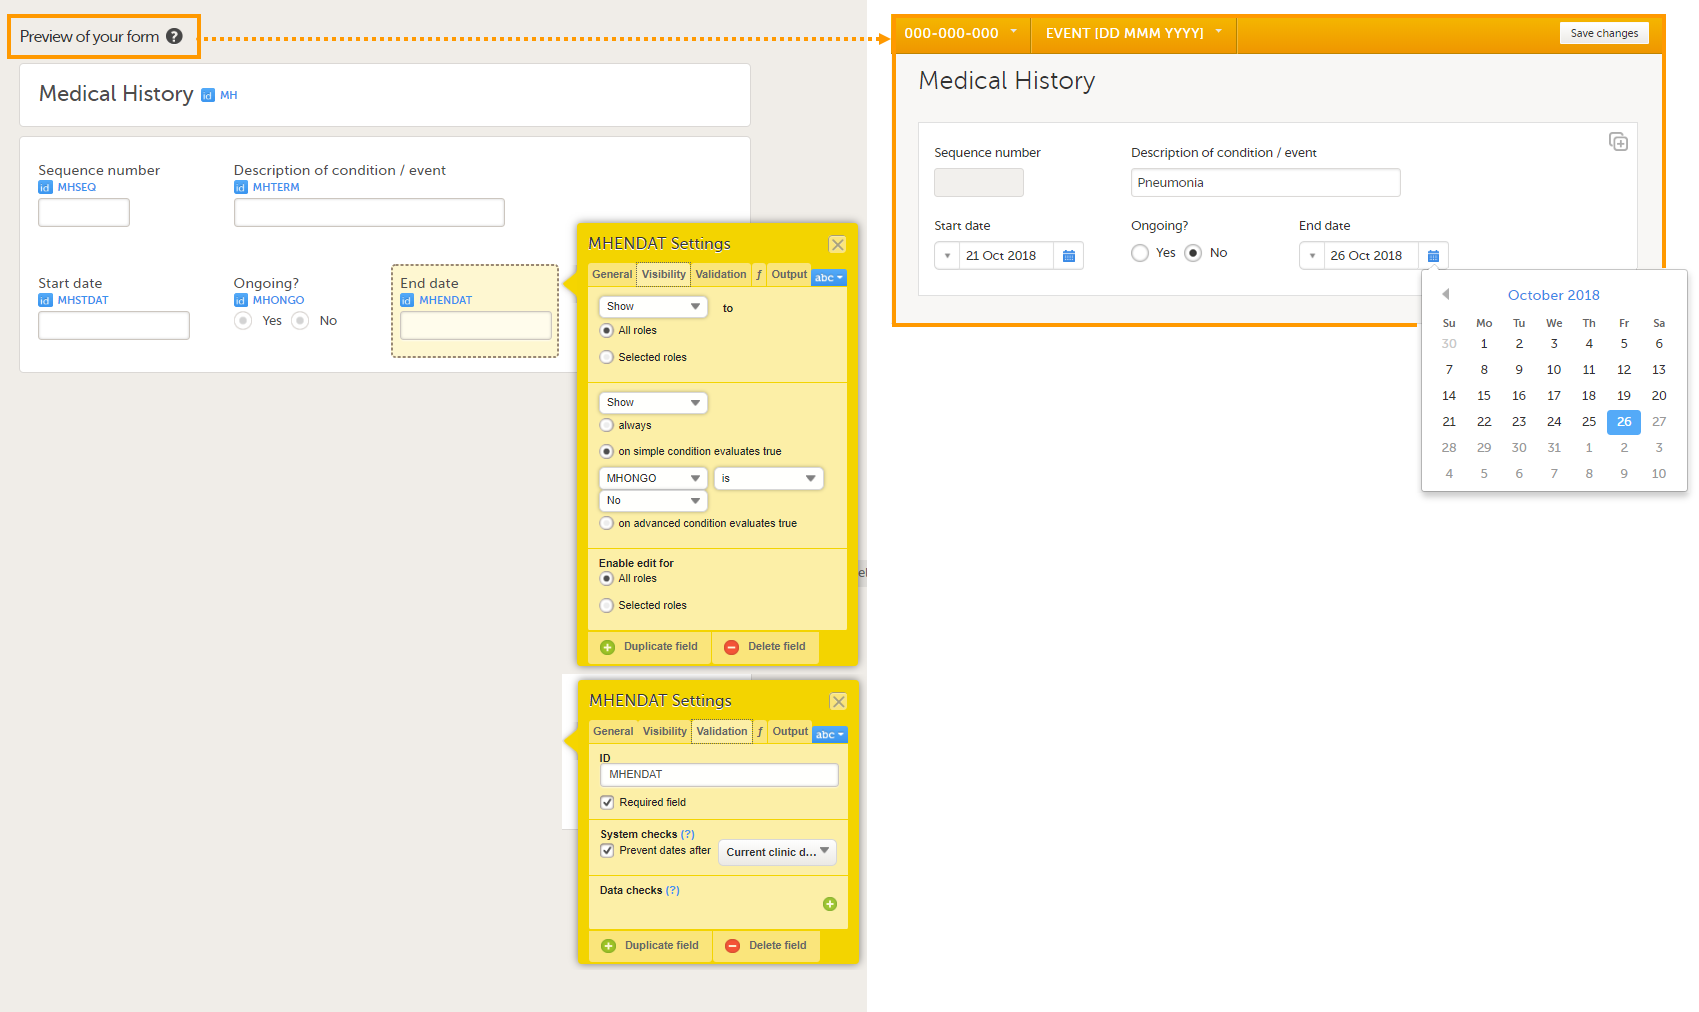
The item group settings and item settings in this form are as follows:
return StudyEventRepeatKey;When naming events, forms, items, functions, and variables, you need to avoid a number of reserved words. Otherwise, unexpected behavior or even errors can occur. There are also limits to the maximum number of characters in the IDs and labels. For more information, see Reserved words.
This lesson describes how to set up the study events.
In the Study workflow page, you can set up the events in the study and populate the events with activities and forms. An event is what is shown in Viedoc Clinic as for example an adverse event. Events are initiated in Viedoc Clinic or by the subjects in Viedoc Me.
There are four different types of events in Viedoc:

1. Study Start event - only one form is allowed, typically a form containing patient identification data. This is the form that opens when the clinic user clicks Add new card (add subject) in Viedoc Clinic.
Notes!
| Important! Add the study start event first, add an activity and a form, and click Save. Make sure that these steps are performed before proceeding with adding other events to the study workflow. |
2. Scheduled Events - events scheduled according to the protocol.
3. Unscheduled Events - additional, on-demand events. If unscheduled events are set up in the study design, the Add event icon will appear in Viedoc Clinic and the clinic user can add these events on demand.
4. Common Events - events that occur separately or parallel to the workflow. These events are not linked to a scheduled event. Examples are:
These four types of events are displayed in Viedoc Clinic as follows:
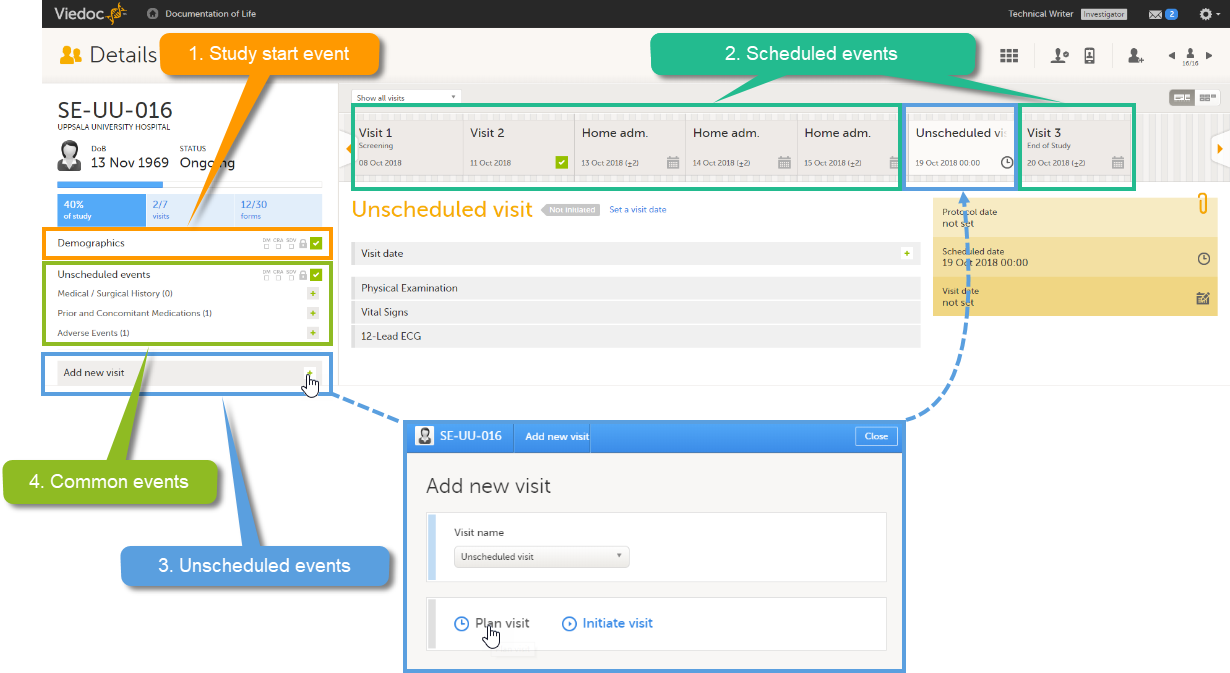
Note! The common events appear in Viedoc Clinic in the field Common events. The unscheduled events appear in the drop-down list in the Add new event pop-up, and in the event slider once initiated.
The image below shows an overview of the Study workflow page.
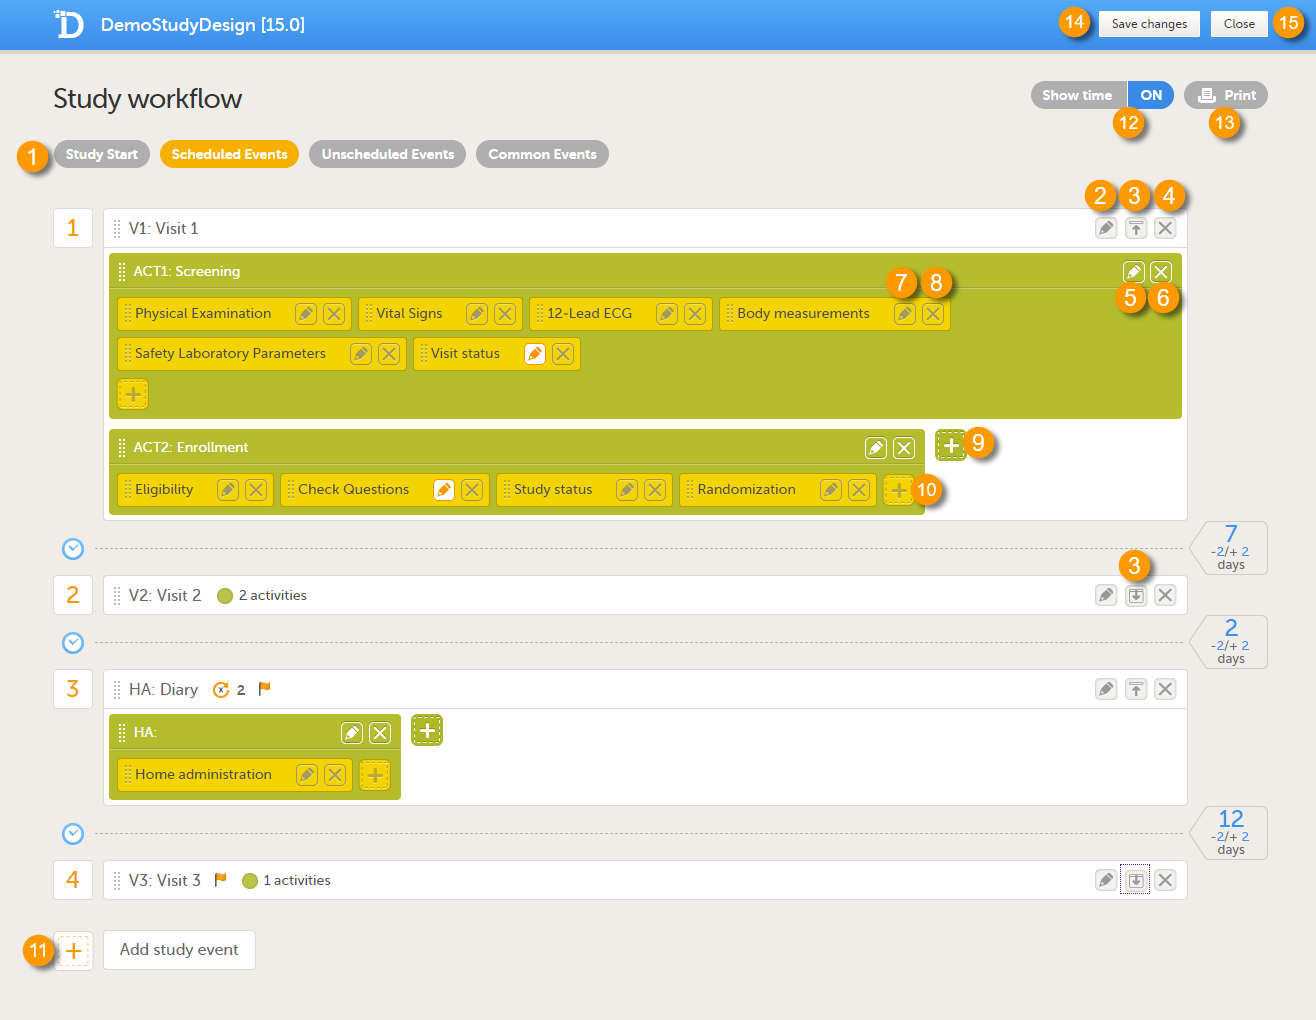
A white box represents an event.
A green box within an event represents an activity.
A yellow box within an activity represents a form.
An event can contain one or several activities. An activity can contain one or several forms. Both events and activities can have visibility conditions that make them visible only if the defined conditions are true, see Visibility settings for events.
It is possible to include the same form multiple times in the same event as long as it is placed in different activities. An example scenario is measurement of vital signs before and after administration of a drug (pre-dose and post-dose activity).
On the Study workflow page, you can:
1. Choose between the type of events that you want to configure
2. Edit the event settings: General settings, Visibility settings for events, Scheduling
3. Collapse/Expand the event
4. Delete the event
5. Edit the Activity settings
6. Delete the activity from the event
7. Edit the Form instance settings
8. Delete the form from the activity
9. Add an activity to the event
10. Add a form to the activity
11. Add an event to the study workflow
12. Select whether to show the time line in days or not: show time ON/OFF
13. Print the study workflow to PDF, see Printing the study workflow to PDF
14. Save the changes made to the study workflow
15. Close the Study workflow page
| Symbol | Definition |
|---|---|
 |
The event has visibility conditions. |
 |
The event is a recurring event, and the number of recurrences in addition to the original event is shown (2 in the example). |
 |
The number of activities in the event (only shown when the event is collapsed). |
 |
Form instance settings: no settings are made. |
 |
Form instance settings: either the Customize item visibility settings are edited, or the form is set to be a repeating form. |
Tip! The study workflow PDF can be used as a draft of your study's source documentation.
You can print the study workflow to PDF by clicking Print in the upper-right corner of the Study workflow page:
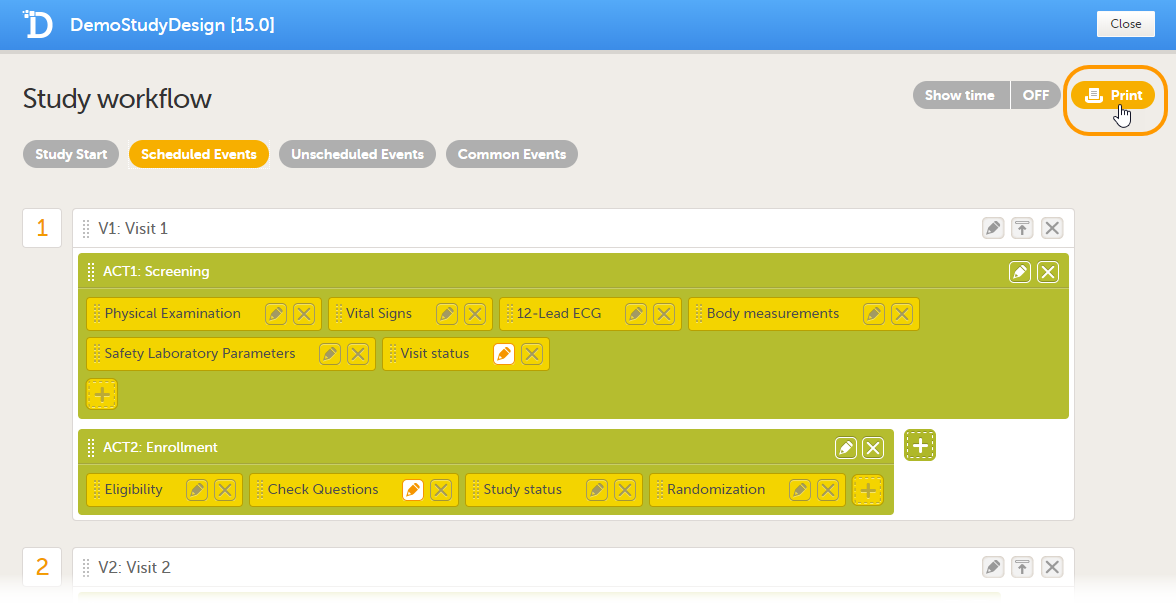
The PDF contains a summary of the study on the first page, and a list of all the events with all activities and forms as configured in the study workflow. This means that a form may appear several times in the PDF if that form is used several times in the study workflow.
The PDF is build up as follows:
The PDF contains bookmarks for the first page of the document (the study summary) as well as for each event, activity and form in the study workflow. Each page contains information on the event and activity that the respective form belongs to in the page header.
Notes!
The first time you print the workflow, a PDF file is generated and stored on the server. The next time you click Print, and no changes were performed on the design, the PDF file is retrieved from the server and not re-generated. A new file is generated only if changes were performed to the study design. The file therefore may not include changes to the study image and study name, since these are being set in Viedoc Admin.
If the study design is edited during the printing of the study workflow, the printing is canceled.
Click the pen icon in the upper right corner of the event to open the Study event settings pop-up.
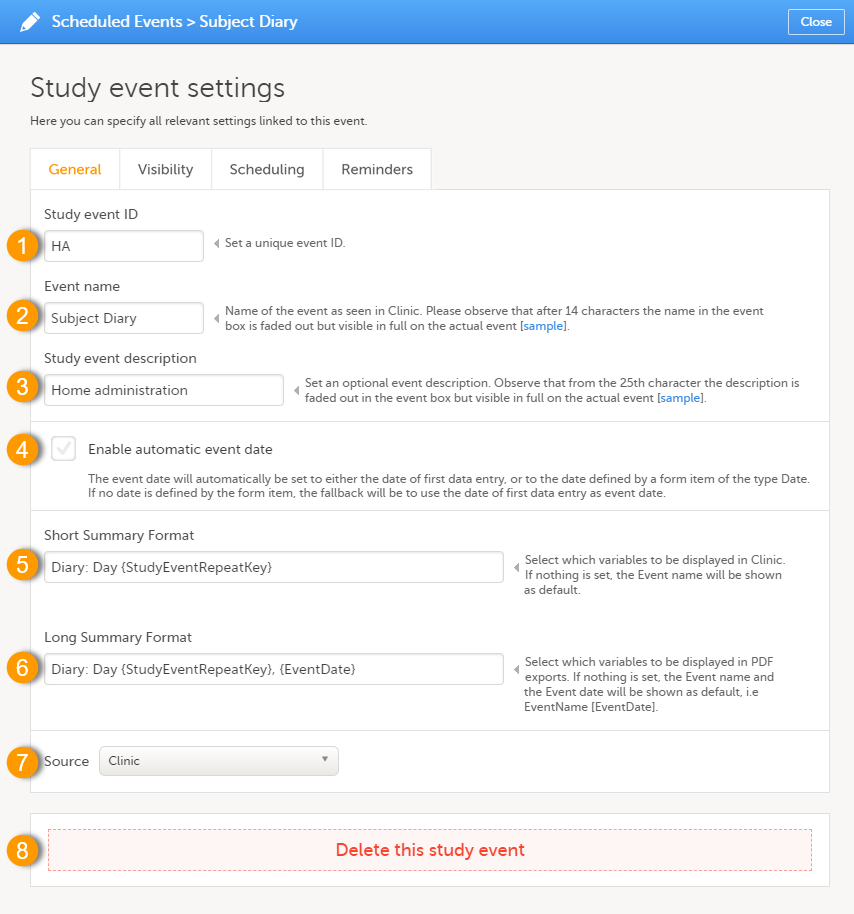
On the General tab you can configure the following:
1. Study event ID - a unique ID used to identify the event. This field is mandatory and it cannot contain spaces or special characters.
2. Event name - the name of the event. This field is mandatory. Please observe that after 14 characters the name in the event box is faded out but fully visible on the actual event page.
3. Study event description - an optional description of the event. Please observe that from the 25th character the description is faded out in the event box but fully visible on the actual event page.
4. Enable automatic event date - see Automatic event date below.
5. Short Summary Format - see Short summary format below.
6. Long Summary Format - see Long summary format below.
7. Source - select if the respective event is a Viedoc Clinic or a Viedoc Me event. See Subject-initiated events below.
8. Delete this study event - click to delete the respective event.
The automatic event date option sets the event date based on another date than the one manually set in the Event date form in Viedoc Clinic:
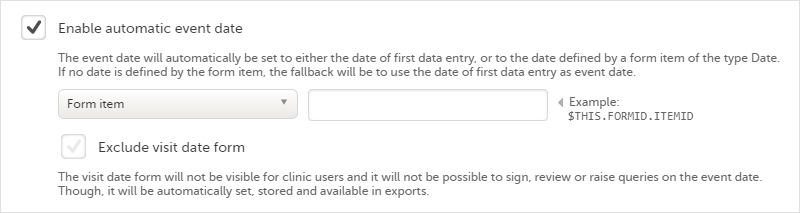
Enabling/disabling the automatic event date is only possible for scheduled events and unscheduled events. For the study start event, common events and subject initiated events, the option Enable automatic event date is checked by default and set to read-only, meaning that the event date is always set automatically.
The automatic event date is based on one of the following settings you choose in the drop-down list:
FormRepeatKey, this specified form instance is used.The item is specified through an expression in this format: $THIS.FormID.ItemID. For details, see Using JavaScript in Viedoc.
|
Important! The event must always be specified as |
In Viedoc Clinic, the automatic event date setting is impacted as follows:
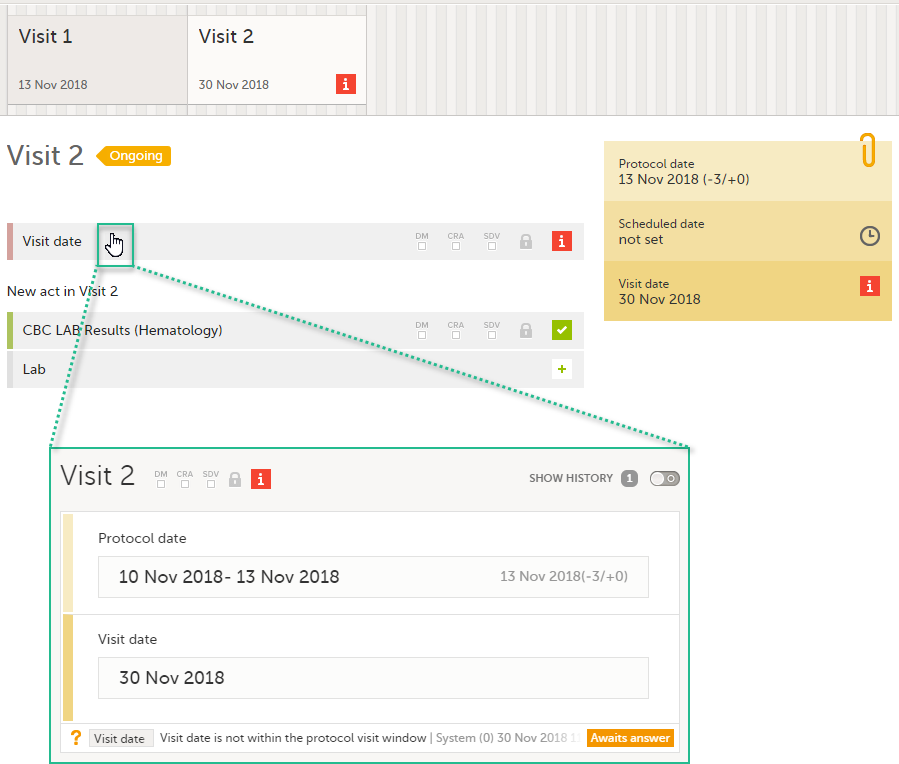
If the Enable automatic event date option is checked, it is possible to exclude the Event date form from Viedoc Clinic, by checking Exclude event date form. This means that the Event date form is not shown on the Details page, in the Data Review console, in the Signing console, or in the Issues list, and that it is not possible to raise queries on the event date. The Event date form is neither included in metrics but still available in the data export.
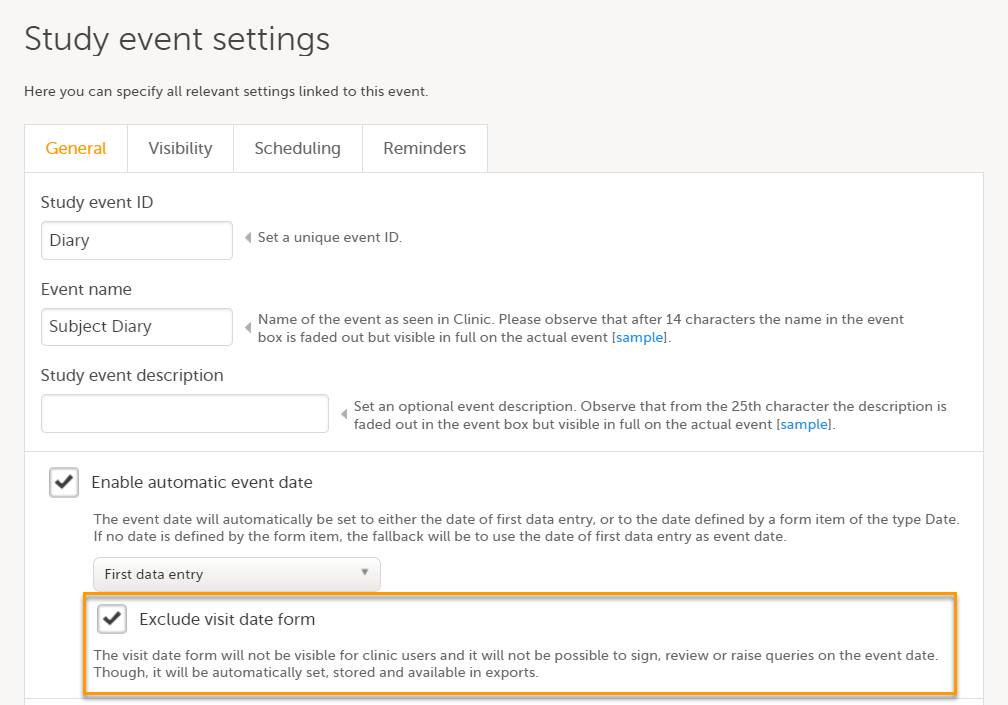
When the option Exclude event date form is not checked, the event date is visible in Viedoc Clinic:
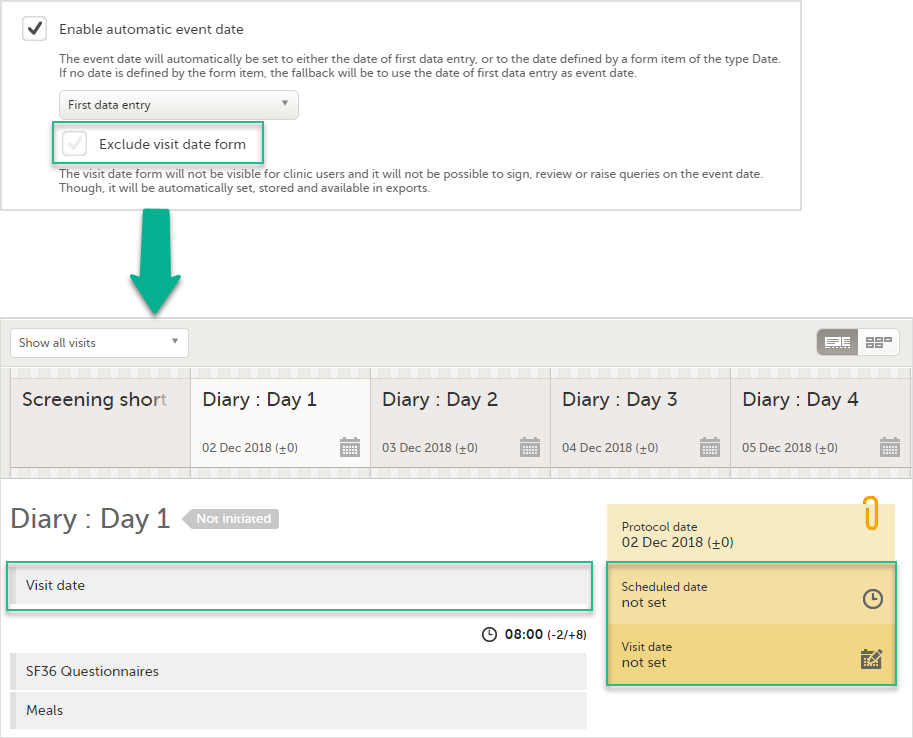
When the option Exclude event date form is checked, the Event date form is not visible in Viedoc Clinic:
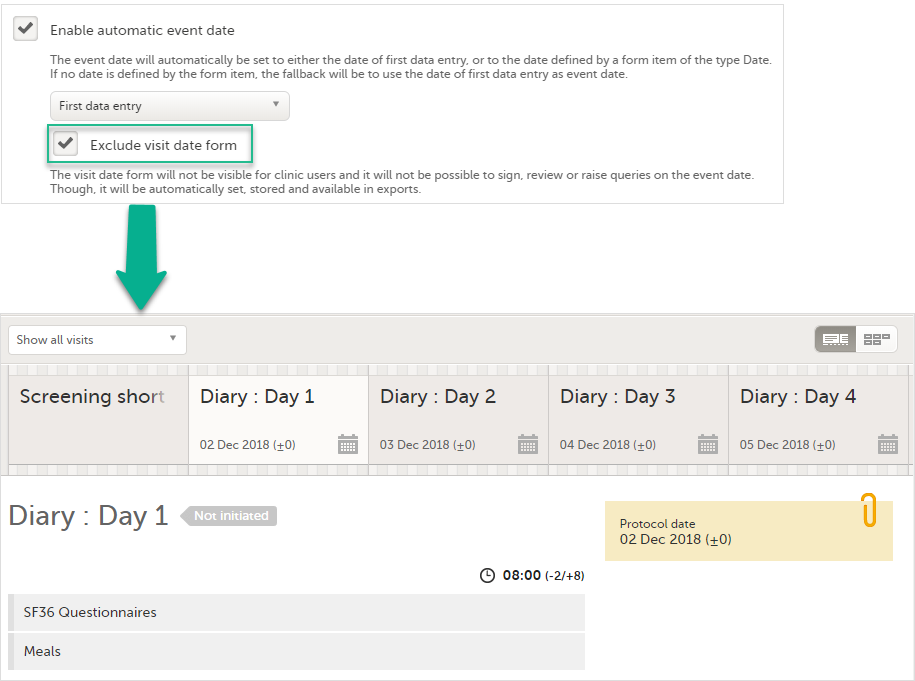
Note! It is only the Event date form that is excluded, the event date might be still visible in some places in Viedoc Clinic if the event date is used in the Short Summary Format (see Short summary format below) and/or the Long Summary Format (see Long summary format below). Note that this setting also affects the Date and Date/Time items in forms; the event date option is not available when excluding the Event date form.
For the study start event, common events and subject-initiated events, the option Exclude event date form is checked by default and set to read-only, meaning that the Event date form will always be excluded from Viedoc Clinic for these types of events.
When the automatic event date settings are changed in a revision of the study design, the following actions are triggered:
| Current settings | Change in the revision of study design (Viedoc Designer) | Result after applying revision (Viedoc Clinic) |
|---|---|---|
| Enable automatic event date is checked. | Uncheck Enable automatic event date. | Existing event dates are preserved. The Event date form becomes visible if it was hidden (that is, if Exclude event date form was selected before applying the revision). |
| Enable automatic event date is checked. | Change from First data entry to a Form item or vice-versa. | Existing event dates are updated accordingly. |
| Enable automatic event date is checked and set to a Form item. | Change the item. | Existing event dates are updated accordingly. |
Note! Changes of the automatic event date settings within a revision do not require site approval.
For more details about how a study design version is burnt-in depending on the event date, see Viedoc study configuration management.
For ongoing studies, started before the automatic event date was introduced (Viedoc 4.47), it is possible to change the event settings and configure the automatic event date in a revision of the study design.
The short summary format is an event identifier that is used to define how the event will be displayed at the following places in Viedoc Clinic:
1. The event slider on the Details page
2. The header of the event on the Details page
3. The Event date form
4. The Signing console
5. The Data Review console
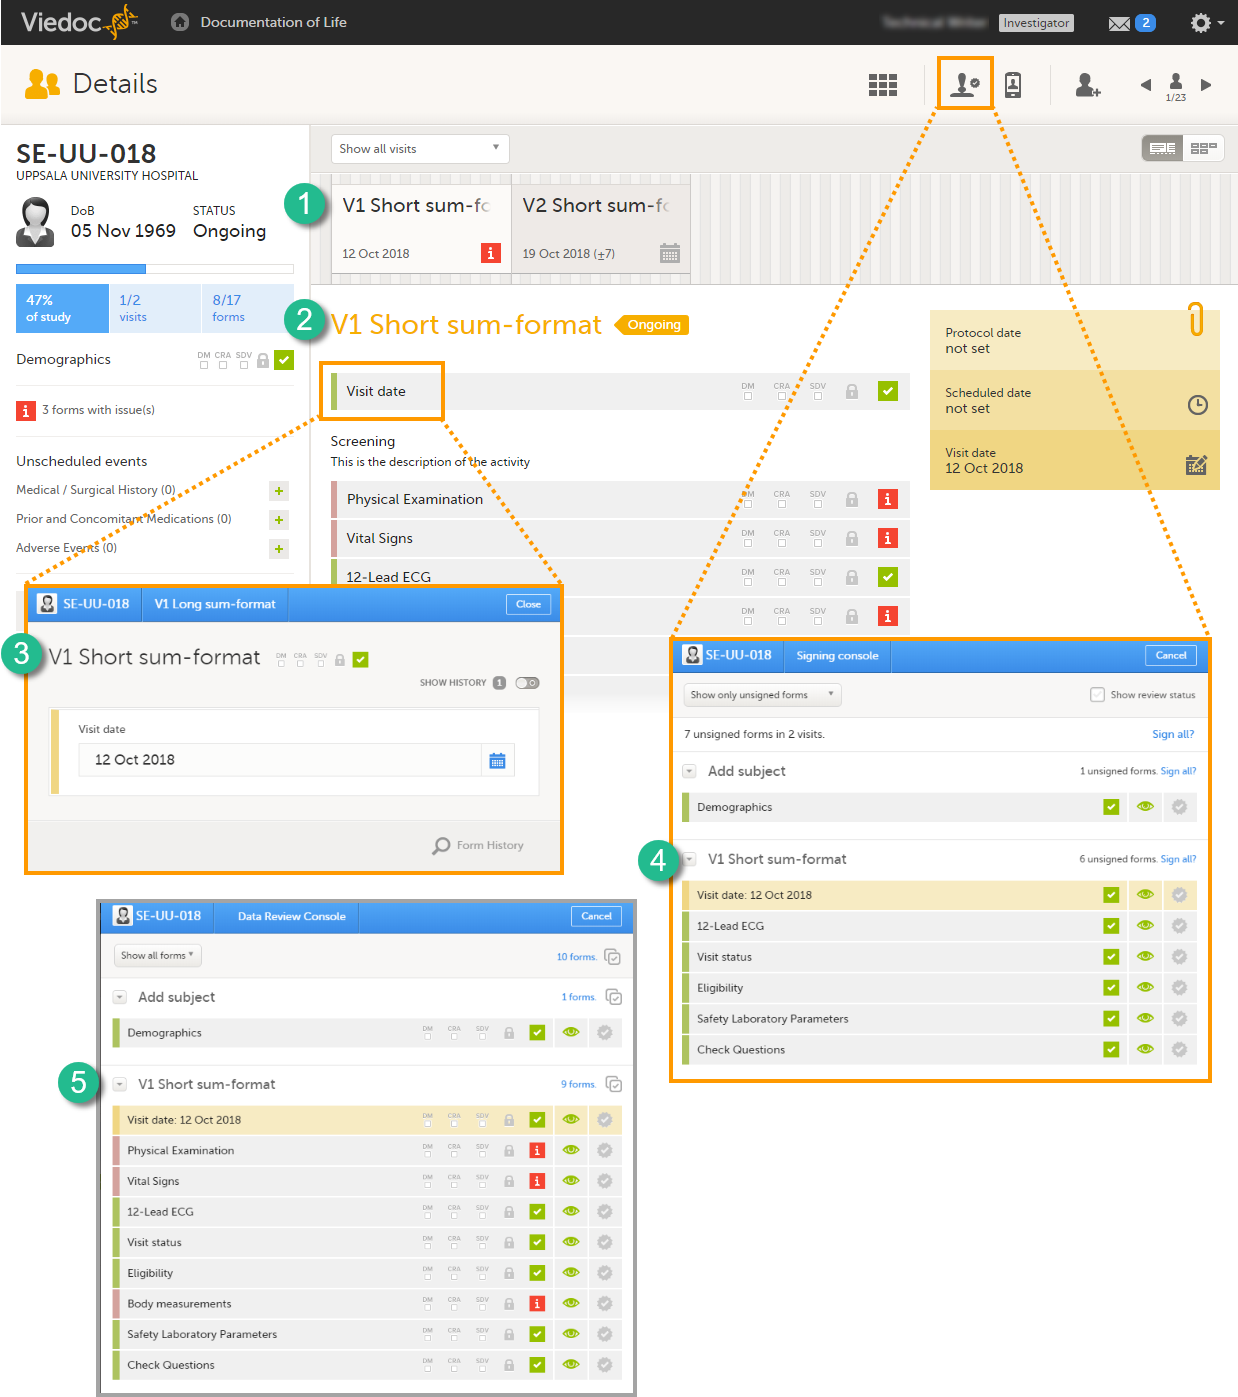
The short summary format is a field in which you can enter variables (see the complete list at Using JavaScript in Viedoc) as well as free text. For recurring events (see Recurring events below), you can use the StudyEventRepeatKey in the short summary format to distinguish between the different occurrences of the same event. An example is described in the use case example in Scheduling events.
Note!
If nothing is set in the short summary format field, the event name will be displayed as default at the above listed places in Viedoc Clinic.
Note! In Viedoc Clinic, on the Selection page in the Events view, the short summary format is not used to identify the event name. Instead, the Event name is displayed (as set in the Study event settings in the study design). In the case of a recurring event, a counter is shown to differentiate between the events using the StudyEventRepeatKey
The long summary format is an event identifier that is used to define how the event will be displayed after it is initiated, at the following places:
1. The form header in Viedoc Clinic
2. The header of the Form History PDF
3. The PDF export for Viedoc versions 4.39 and higher
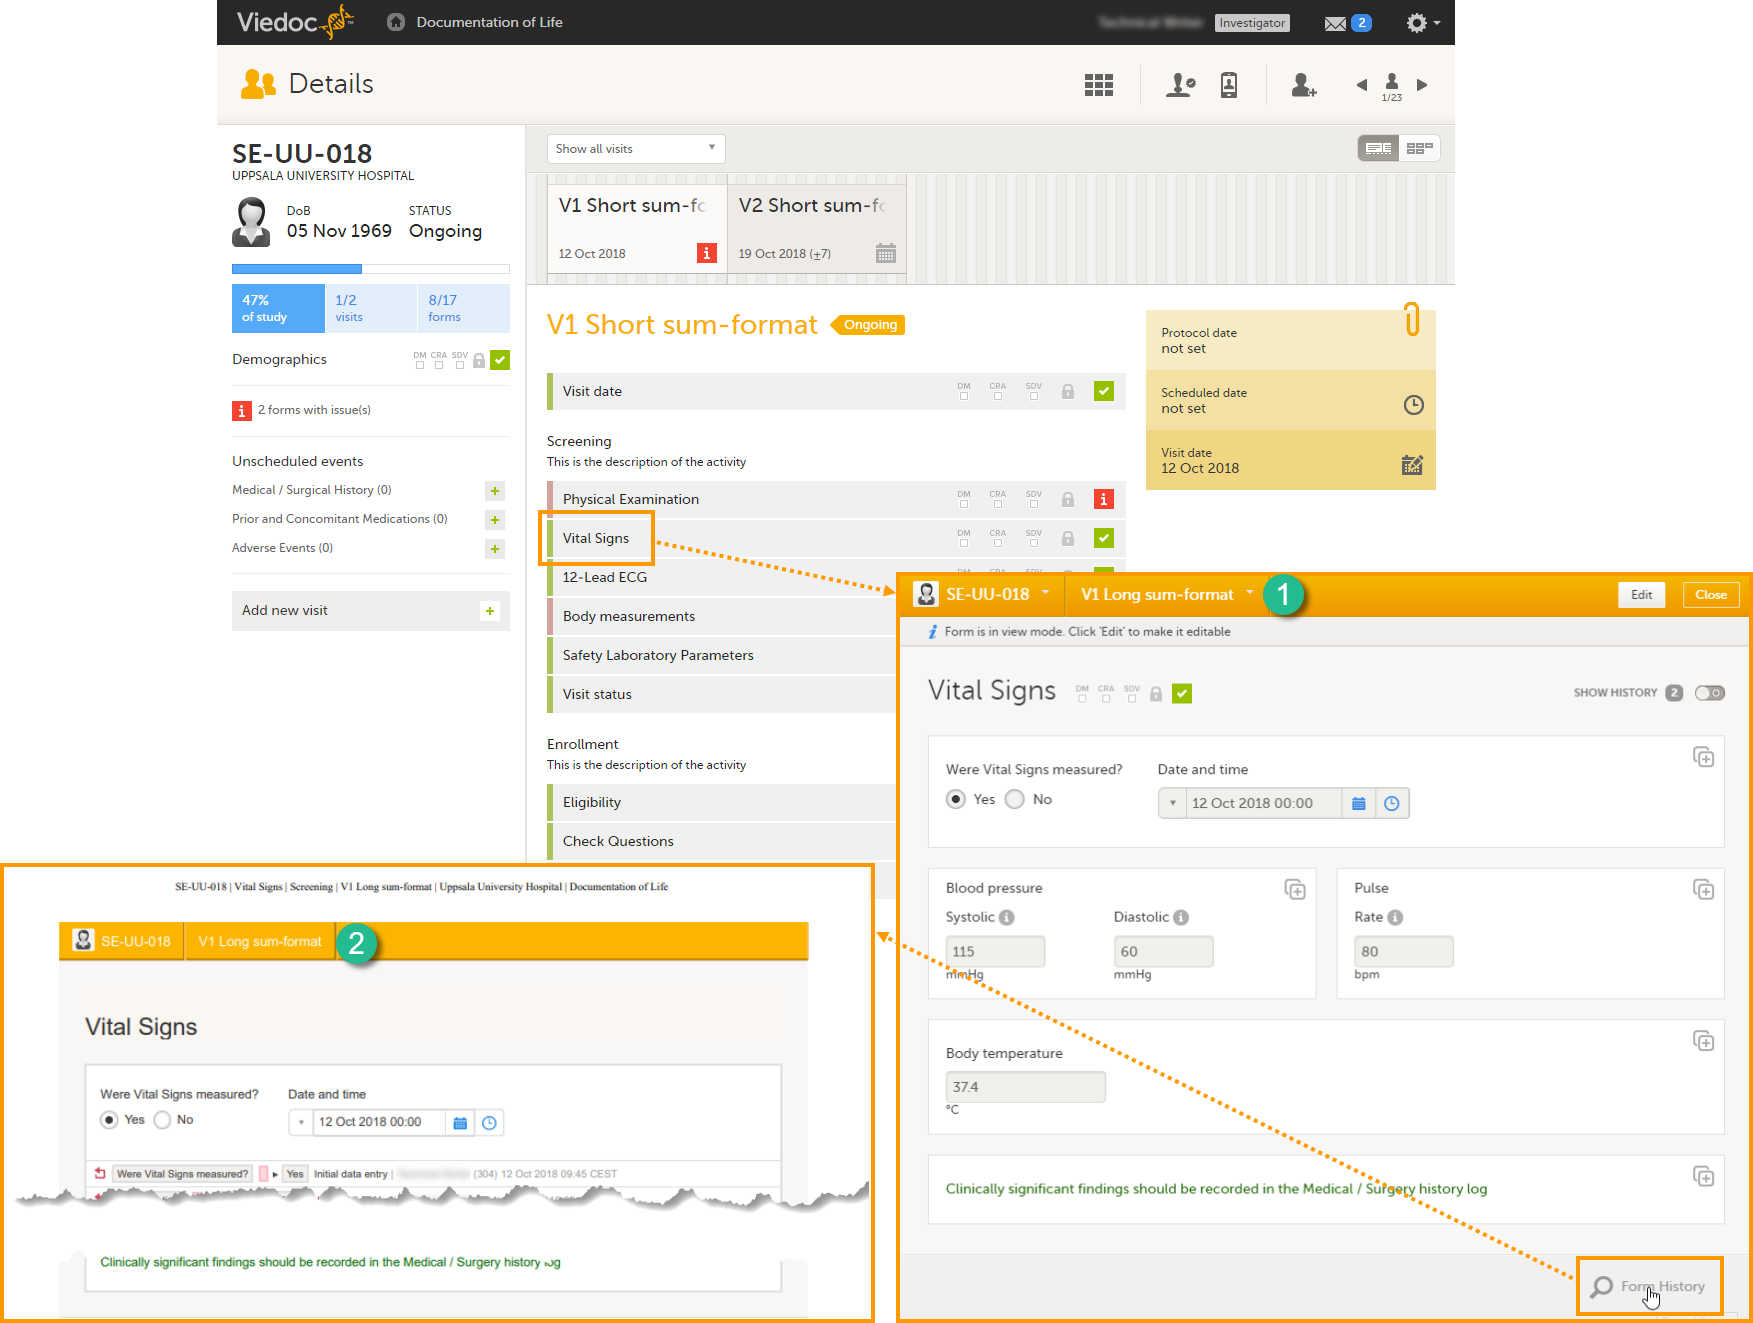
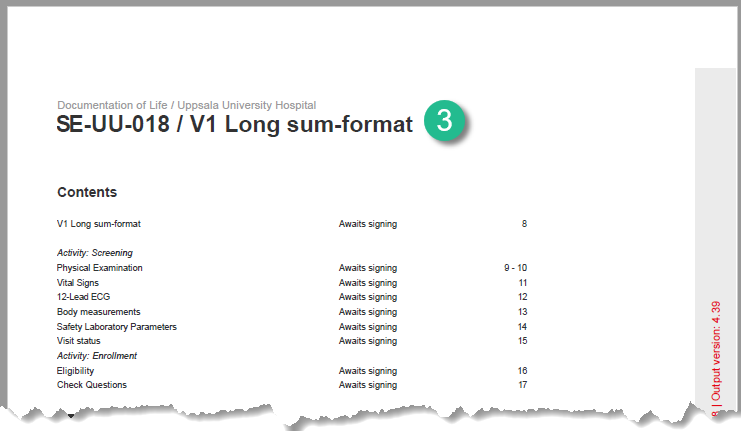
Before the event is initiated in Viedoc Clinic, the short summary format is used to identify the event in all the above mentioned.
The long summary format is a field in which you can enter variables (see the complete list at Using JavaScript in Viedoc) as well as free text. For recurring events (see Recurring events), you can use the StudyEventRepeatKey in the short summary format to distinguish between the different occurrences of the same event. An example is described in the use case example in Scheduling events.
Note! The event summary format is always read from the current effective design version and is not related in any way to the design version burnt in when the event is initiated (for details about design versions see Viedoc Configuration Management). Thus, the variables used within the summary format are read also from the current effective design version, and not from the version burnt into the form where the variable value is picked from.
If nothing is set in the long summary format field, the event name together with the event date within brackets will be displayed as default at the above listed places in Viedoc Clinic.
Note! In Viedoc Clinic, on the Selection page in the Events view, the long summary format is not used to identify the event name. Instead, the Event name is displayed (as set in the Study event settings in the study design). In case of a recurring event, a counter is shown to differentiate between the events using the StudyEventRepeatKey. The PDF export will show the same counter in the case of recurring events.
Note! If a long summary format is used, this will increase the size of the header in the PDF. If the PDF header contains more than three rows of text, it will overlap with the contents of the PDF.
The summary format for common events is an event identifier used to define how the respective event will be displayed in:
1. The list of forms in the Unscheduled events pop-up in Viedoc Clinic (the pop-up that lists common events)
2. The form header of the common event
3. The header of the Form History PDF
4. The PDF export for Viedoc versions 4.39 and higher
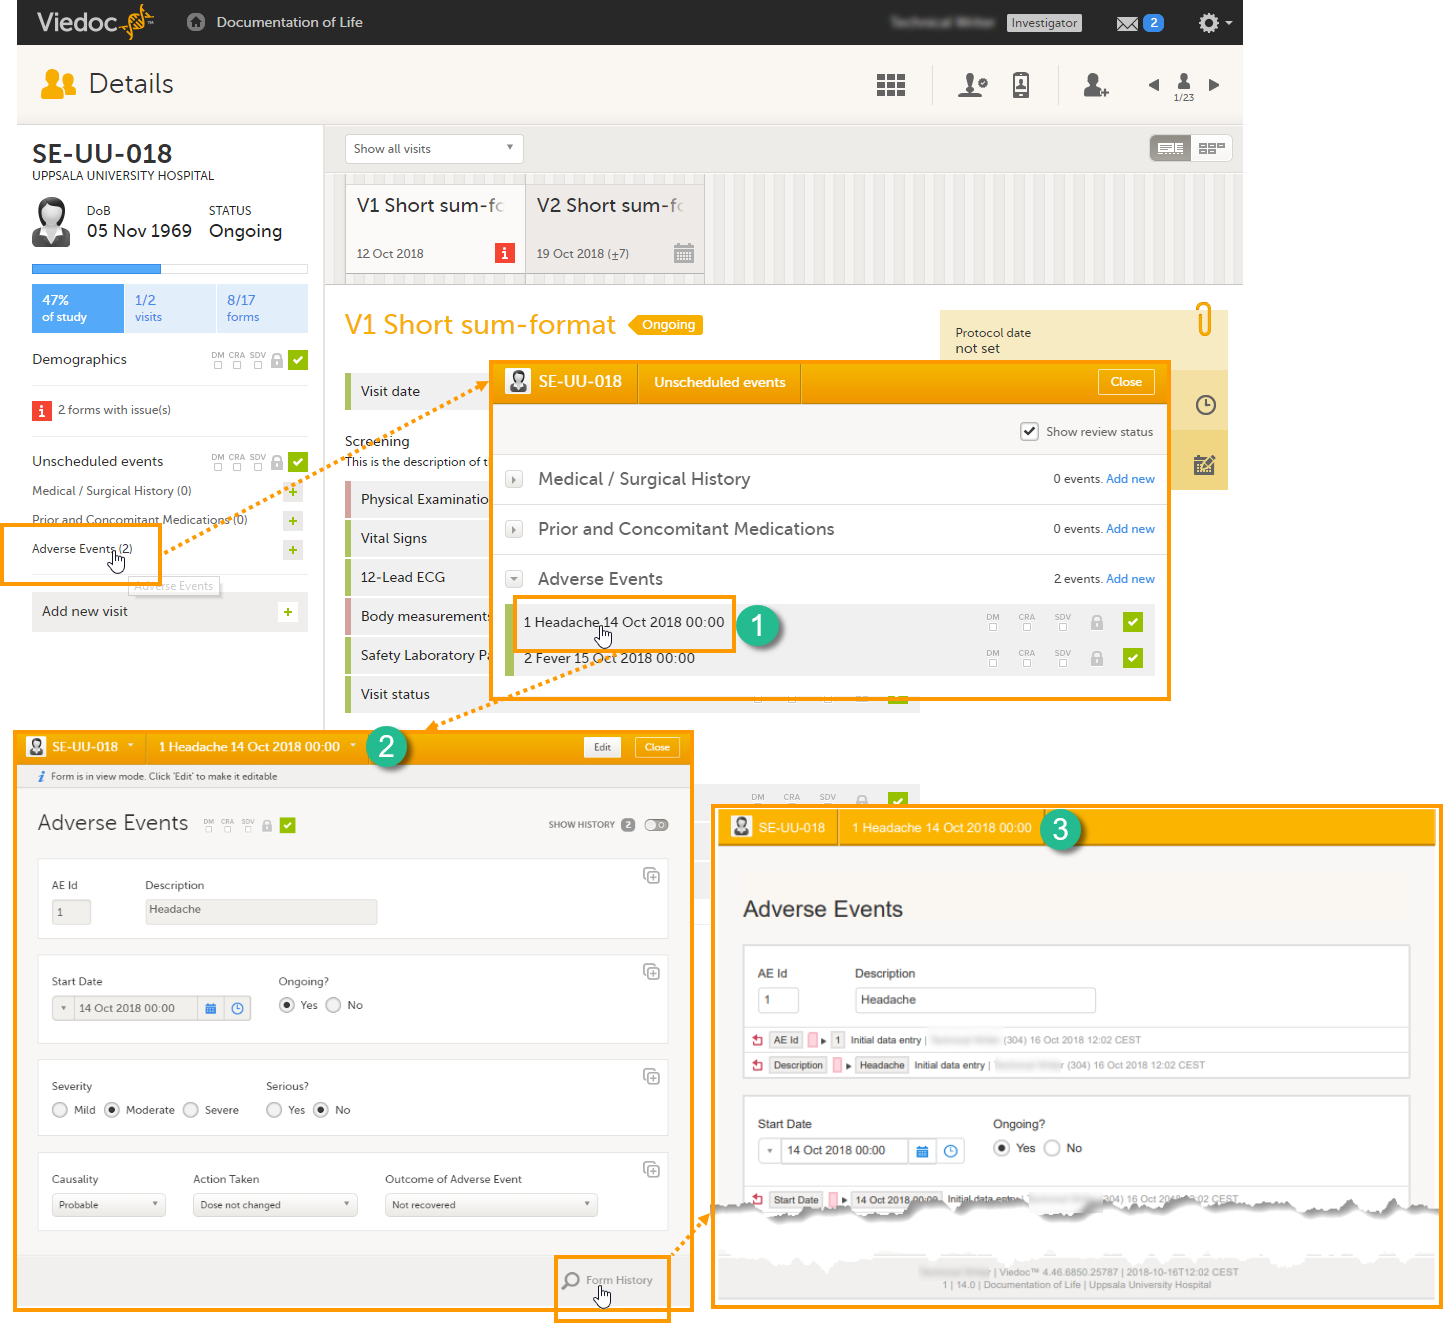
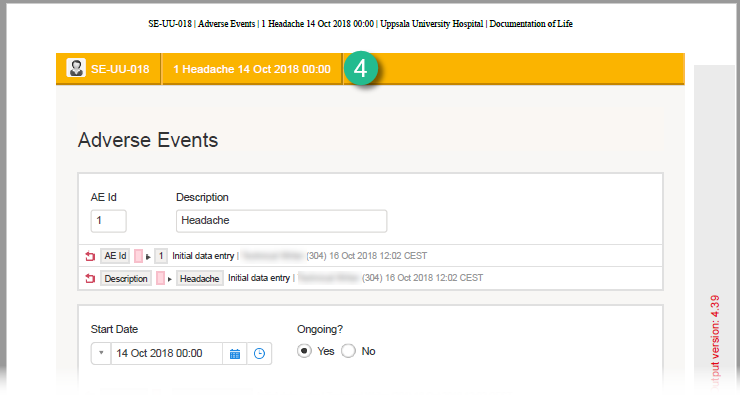
The summary format is a field in which you can enter variables (see the complete list at Using JavaScript in Viedoc) as well as free text. In the example in the image, the summary format is set to {AE.AENO}{AE.AEEVENT}{AE.AESTDT} in Viedoc Designer. For the first adverse event Headache for subject SE-UU-018 with start date 14 October 2018, the summary format will be: 1 Headache 14 Oct 2018 00:00.
Click the pen icon in the upper right corner of the event to open the Study event settings pop-up.

On the Visibility tab, you can add a condition that dictates that the event is visible only when the condition is evaluated to true. The condition is written as an expression in JavaScript.
If the Visibility condition field is left empty, the event will always be visible in Viedoc Clinic.
Note! Visibility conditions can only be set for scheduled events. It is not possible to set a visibility condition for the study start event, unscheduled events or common events.
Click the pen icon in the upper right corner of the event to open the Study event settings pop-up.
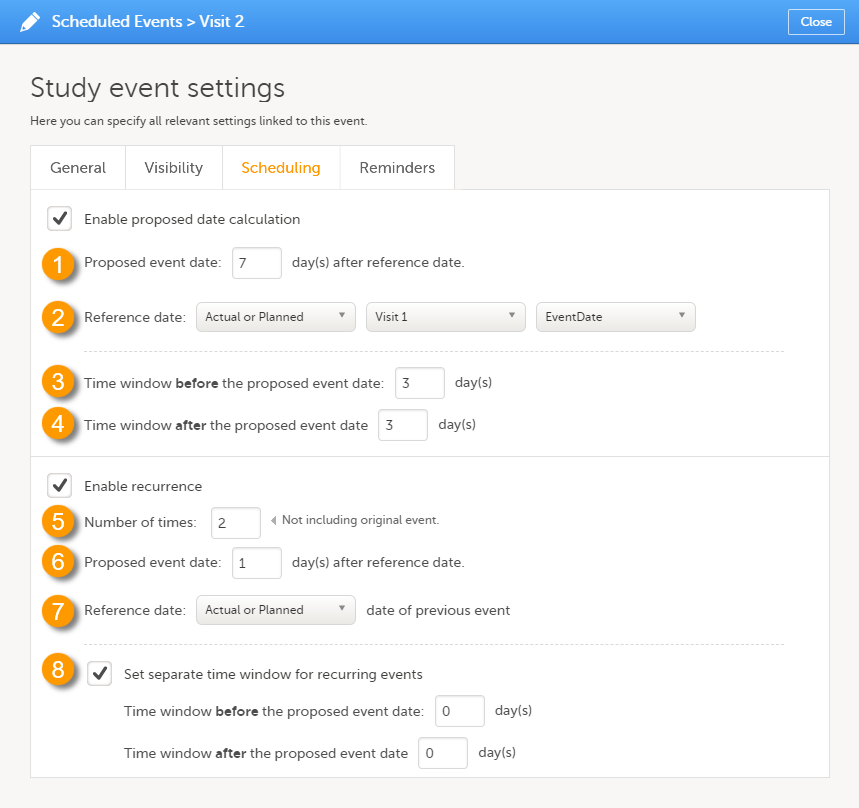
On the Scheduling tab, you can configure the calculation of the proposed date and the recurrence settings.
Note! You can only configure the scheduling of scheduled events. Event scheduling is not available for the study start event, unscheduled events or common events.
Select the Enable proposed date calculation checkbox if you want to activate calculation of a proposed date for the event, and configure the following (see image above):
1. Set the Proposed event date to n day(s) after reference date, in which n is the number of days between the event and the reference date.
2. Define the Reference date by selecting whether it should be based on the Actual or Planned or Proposed event date, and select the reference event from the drop-down list.
Note! If Actual or Planned is selected for the Reference date, then the scheduled date is calculated on the Reference date entered by site. However, if the reference event has not been initiated, then the Planned date is used. And if the reference event has not been planned, then the Proposed date of the reference event is used.
3 + 4. Optionally: Set a time window during which the event can be initiated, by entering a number of days in the Time window before field (3), and in the Time window after field (4). By default these are set to 0 days.
Select the Enable recurrence checkbox if you want to allow the event to reoccur on a scheduled basis, and configure the following (see image above):
5. Type the Number of times the event should reoccur, in addition to the first occurrence of the event. For example, if this number is set to 3 times, then the event will occur 4 times in total. The maximum number that can be entered is 999.
6. Set the Proposed event date to n day(s) after reference date, in which n is the number of days between two consecutive occurrences.
7. Select whether the reference date should be based on the Actual or Planned or the Proposed date of the previous occurrence of the event.
8. Optionally: Set a separate time window during which the recurrences of the event can be initiated, by entering a number of days in the Time window before field, and in the Time window after field. If nothing is entered here, then the time window set for the original event (at 3 and 4) applies.
For a use case example of scheduling recurring events, see Scheduling Events.
Reminders can be configured to be sent at an interval for scheduled events that are not completed. A completed event is defined as follows:
The complete condition is evaluated on a regular basis at a defined timepoint (site local time) according to the configured event reminders interval. Changes such as below will affect the next evaluation as follows:
Recurring events have the same reminder settings as the original one.
Click the pen icon in the upper right corner of a scheduled event to open the Study event settings pop-up.
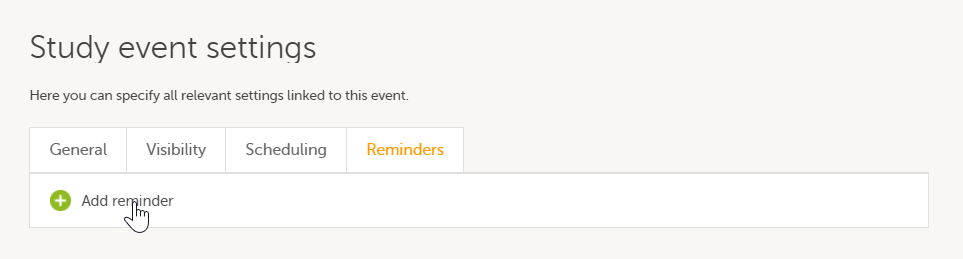
On the Reminders tab, you can define reminders of the event so that users can be notified about approaching and/or delayed events. The reminders are shown as messages in Viedoc Clinic, and, optionally, sent as emails. To configure reminders, click Add reminder.
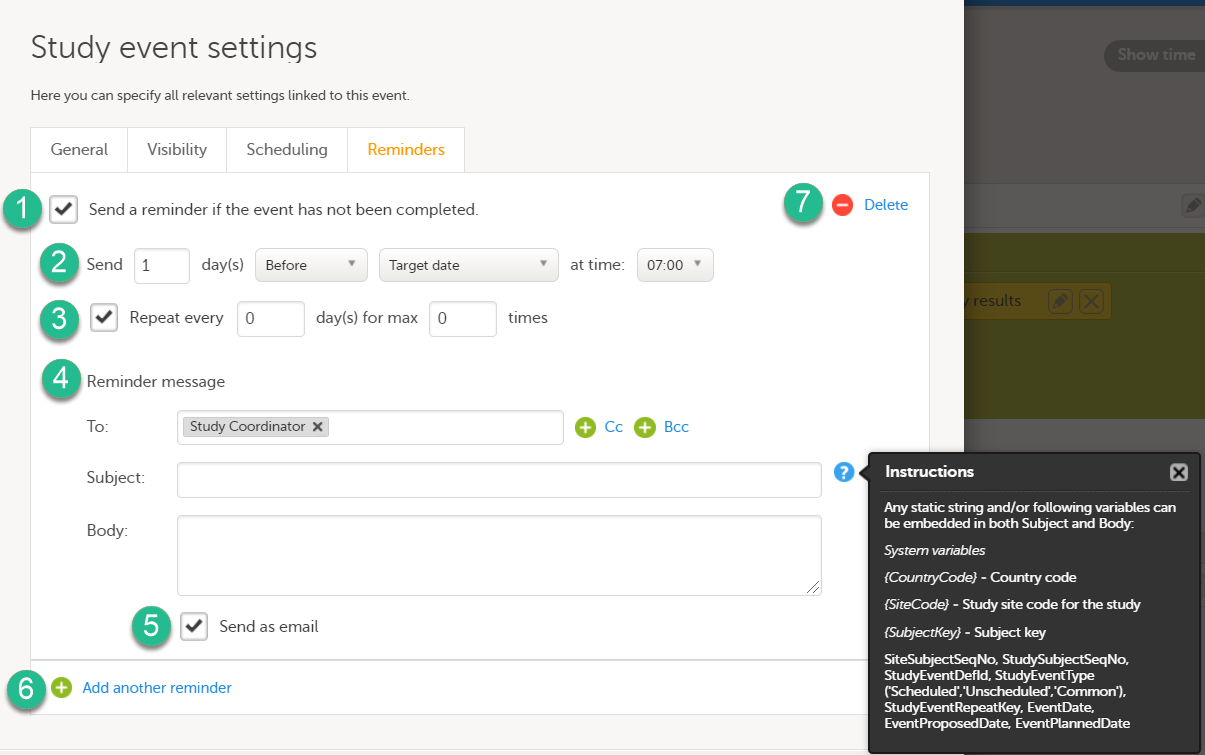
Configure the following:
1. Select Send a reminder if the event has not been completed to activate the reminder.
2. Make the settings for when the reminder shall be sent: enter the number of days (between 1-99) that the reminder shall be sent Before or After one of the following:
Also pick at what local site time the reminder shall be sent.
3. Define an interval for sending repeating reminders. Select Repeat every and enter the day(s) (between 1-99) and maximum number of times (between 1-999) that the reminder shall be sent. Not selecting this option results in reminders being sent once, as defined in step 2.
4. Compose your reminder message:
5. Select Send as email to also send reminders to the recipients email addresses. Not selecting this option results in reminders being shown as internal Viedoc messages only.
6. Click Add another reminder to configure several reminders.
7. Click Delete reminder to remove it.
If you, for a certain event, would like to collect data from subjects using Viedoc Me, you need to select Subject initiated from the Source drop-down list in the general settings of the event (see General settings for events).
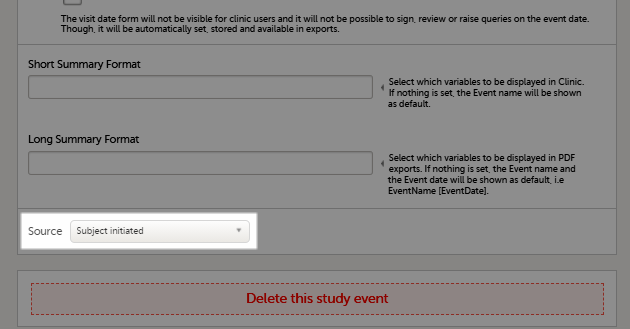
Note!
If at least one of the events in the study workflow are marked as subject-initiated, the mobile phone icon will appear on the Details page in Viedoc Clinic. The clinic user can use this icon to initiate a Viedoc Me account for that specific subject.

Note! The summary format of subject-initiated events is not displayed in Viedoc Me, it is only displayed in Viedoc Clinic.
When creating a new event, it is possible to start configuring it by duplicating the settings of an existing event. This is done by checking the Use an existing event to duplicate settings, activities and forms checkbox and selecting from the drop-down list the event the settings will be copied from:
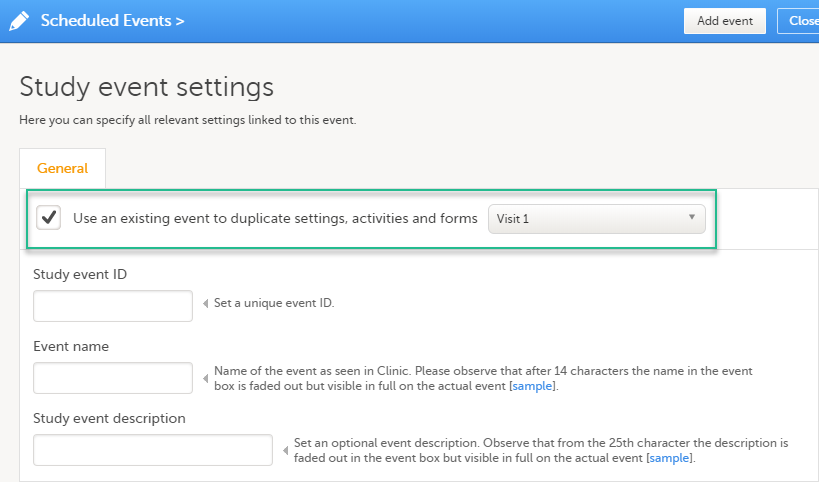
After entering the Study event ID, Event name, Study event description and clicking Add event, a new event is created with the same configuration as the selected event with regards to:
To add an activity to an event, click the (+) icon in the event field:
 You can edit an existing activity by clicking the pen icon in the upper right corner of the activity:
 The Activity settings pop-up opens that has the following tabs:
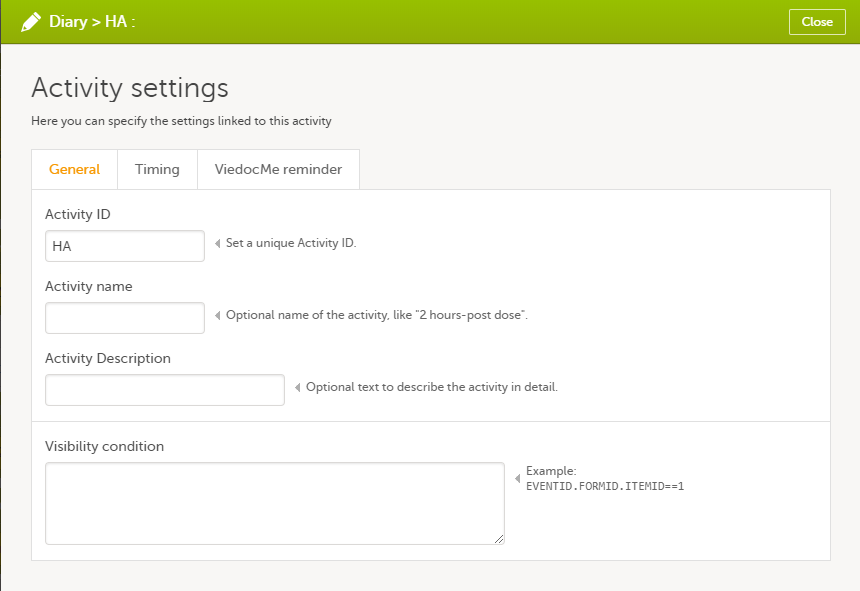
For scheduled events that are set as subject-initiated (see Subject-initiated events), you can schedule the activity as follows:
| 1 |
Click the pen icon to open the activity settings window.
The activity settings pop-up opens. |
| 2 |
On the Timing tab, select the checkbox for Enable proposed time calculation for subject initiated activities. Click the clock icon and enter a time at which the Viedoc Me questionnaire to be available for the subject to fill in.
|
| 3 |
In the Time window before/after the proposed time fields, enter the number of hours before/after the proposed time set above. The default is 1h before and 1h after the proposed time. Note! Setting the time window to +/- 0 hours means that the subject must start the Viedoc Me questionnaire exactly on the proposed time, that is, on exactly that minute! 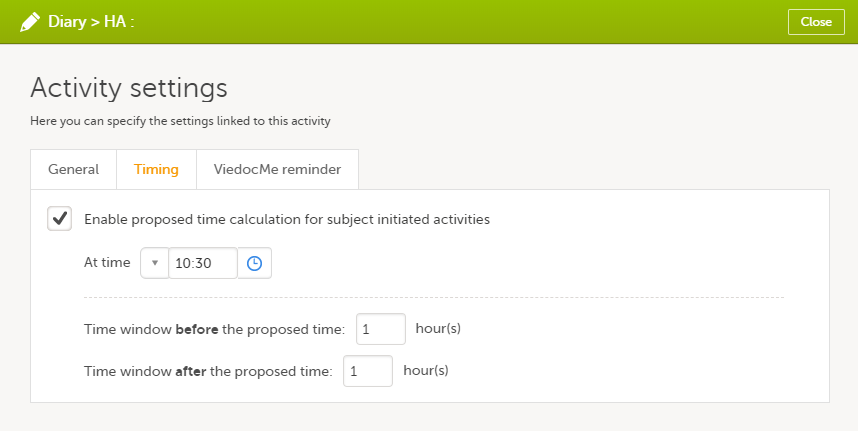
When a proposed time calculation is set for an activity, the selected time window is displayed in the activity header in the study workflow. 
|
For scheduled events that are set as subject-initiated (see Subject-initiated events), you can configure Viedoc Me reminders as follows:
| 1 |
Click the pen icon to open the activity settings pop-up.
The activity settings pop-up opens. |
| 2 |
On the Viedoc Me reminder tab, click Add a reminder. 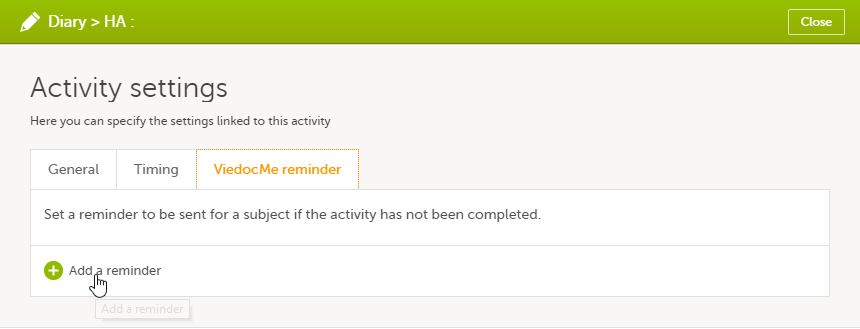
|
| 3 |
Configure the reminder:
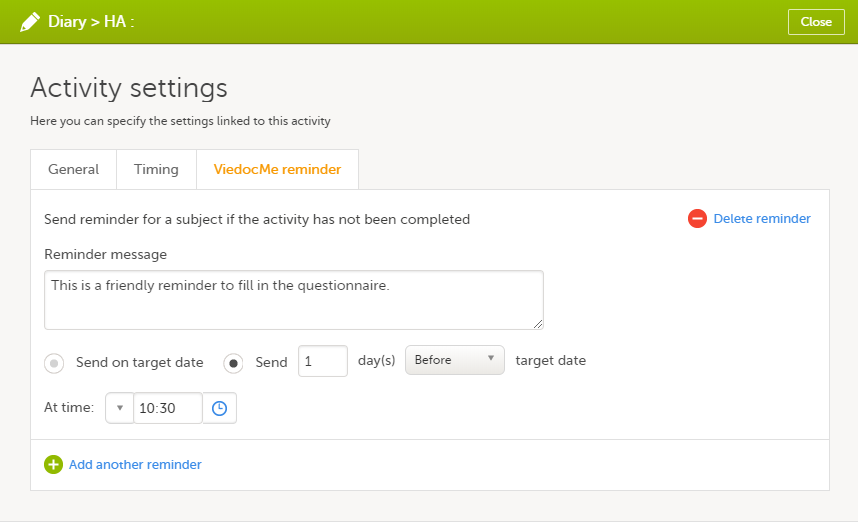
|
| 4 |
If you want to add more reminders for the same activity, click Add another reminder, and set the reminder message, date and time. 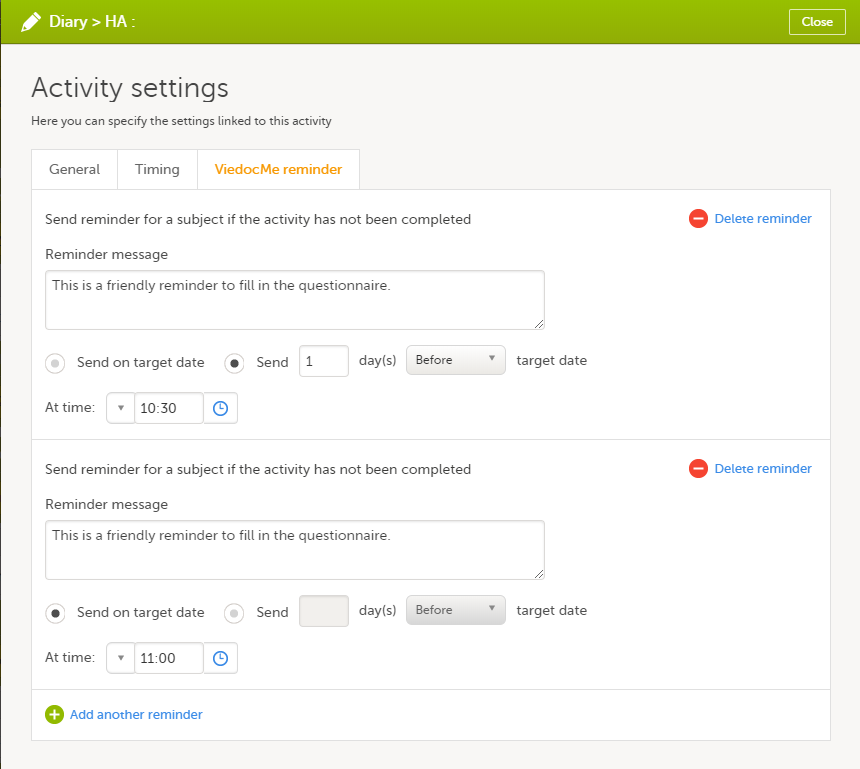
|
| 5 | Click Close to save you settings. The pop-up closes. |
To remove a reminder, click Delete reminder.
|
Important! For reminders to be sent to the subjects, the following settings must be completed:
|
Note!
The text of the reminder message can be translated. This is done in the same way as translation of the forms within subject-initiated events. For more information see Managing translations for subject-initiated events.
You can edit the form instance settings by clicking the pen icon in the upper right corner of the form. On the Form instance settings pop-up, you can perform the following settings:
1. Customize item visibility - If this option is enabled, you can select which items will be displayed in the form instance in Viedoc Clinic. The unchecked items will be excluded from the view in Viedoc Clinic. By default, the Customize item visibility checkbox is not activated, and all the items are included.
2. Allow form to repeat - see Repeating forms below.
If the option Allow form to repeat is enabled, the form is allowed to repeat. That means that multiple instances of the same form can be added to that activity in Viedoc Clinic.
To set a form as repeating, activate the Allow form to repeat checkbox and select:
Note! The item visibility and repeating form settings are only applicable to that specific instance of the form for which they are set, that is, in that specific activity. These settings do not affect other instances of the same form in other activities.
Click Save & Preview to save the changes performed and preview the form.
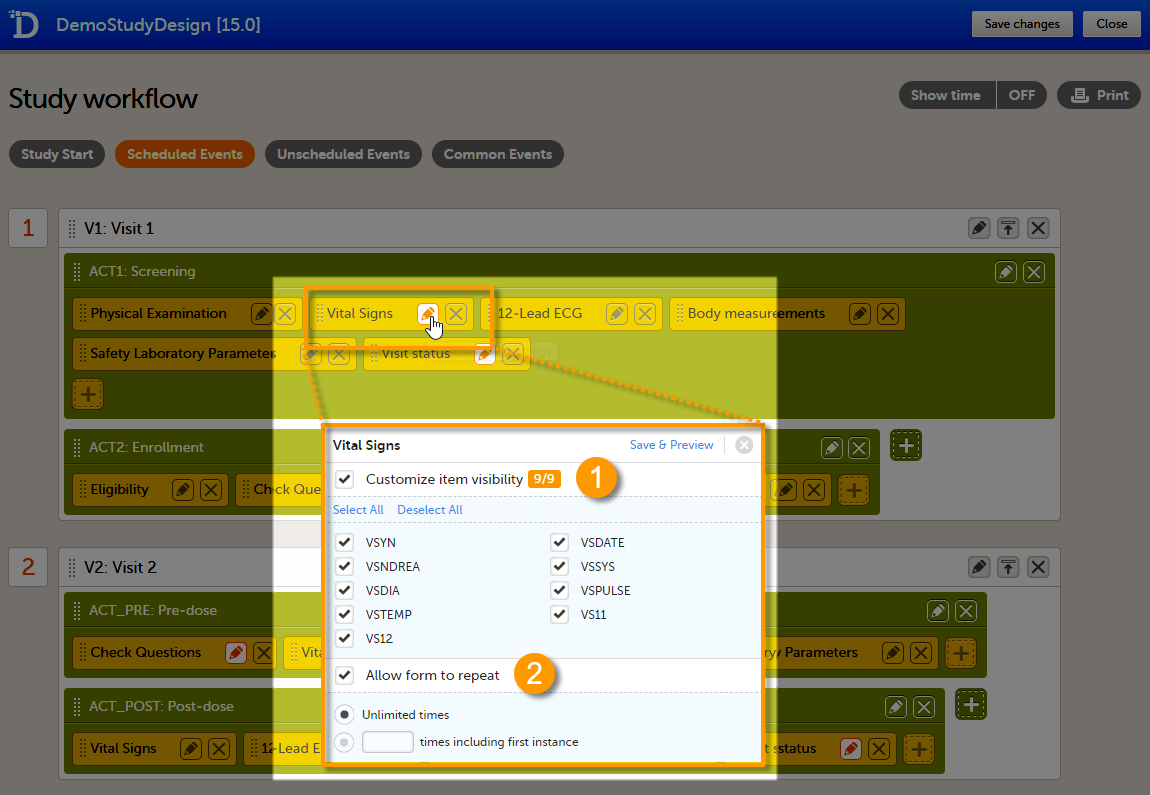
For more information on how the clinic user can work with repeating forms in Viedoc Clinic, see the section Repeating forms in lesson Entering/Editing data in Viedoc Clinic User Guide.
Note!
For more information about repeating forms, see the use case example in Using repeating forms.
Viedoc Me is Viedoc's Electronic Patient Reported Outcome (ePRO) application. Viedoc Me is activated in a study simply by setting an event to subject-initiated in the study workflow. Thus, Viedoc Me is set up in the same designer application as the standard forms. A license is needed to use Viedoc Me but a license is not required for designing events.
Note! Only user roles with editing permissions for the study start event form can activate a Viedoc Me account. If you do not have editing permissions, the phone icon (as seen in the image below) will not be visible on the Details page.

To understand how Viedoc Me operates for the end users, please read the following eLearning:

In Viedoc Me, the standard items are translated by Viedoc, such as the Back and Next buttons. Other texts in the forms are translated by the Designer, see Managing translations.
For a list of the supported Viedoc Me languages, see System languages. If another language is required, please contact support weeks in advance.
Note!
The form is created just like any other form, however, there are a few differences to a standard form as described below. For general information on creating a form, see Creating and editing forms.
Notes!
When creating the Viedoc Me forms, the language should be the same as for the standard forms. It is not necessary to create another form for every language that is to be used in the study, doing so would split the database. Multiple translations can be uploaded for a single form and a specific language is activated when a user selects that language. That way, all languages consolidate to the same form.
You can see your translated Viedoc Me forms by selecting a language in the form preview:
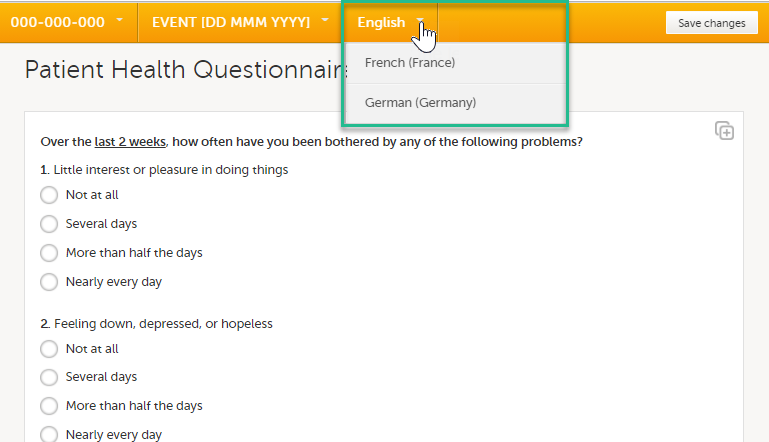
Excel and CSV exports show the form as configured in Designer (and seen in Clinic), while PDF exports show the form in the language used by the user.
Each item group will show as a new page when the form (questionnaire) is viewed by the study participant.
The Visual Analog Scale (VAS) displays a scale with a slider in Viedoc Me and not a numeric field as in Viedoc Clinic.
By selecting on the scale or by moving the slider, a subject can indicate how severe the pain or symptoms are. Selecting the reset button will remove the slider and clear the numeric value. The slider will reappear when the user clicks on the scale. Once the Viedoc Me questionnaire has been submitted, the slider is disabled and the reset button is replaced by a lock.
If you want to ensure that the VAS is displayed at 10 cm, we recommend the use of an iPad Mini (in horizontal orientation) for filling out Viedoc Me questionnaires.
To add an image, see How to add an image to a form in Viedoc.
The File upload item allows the subject to upload a file to the form. The maximum allowed file size is 512 MB for Viedoc Me forms.
The drawing pad item allows Viedoc Me users to make drawings and submit them to Clinic. The drawings are saved as files and can be downloaded in Clinic just like the File upload items.
Three background options are available when designing the drawing pad:
Data checks, functions, queries, default values and forms with form link items are not supported in Viedoc Me forms.
When the form is created, it needs to be placed within an activity, just like any other form. You also need to select the source as Subject initiated in the Study event settings.
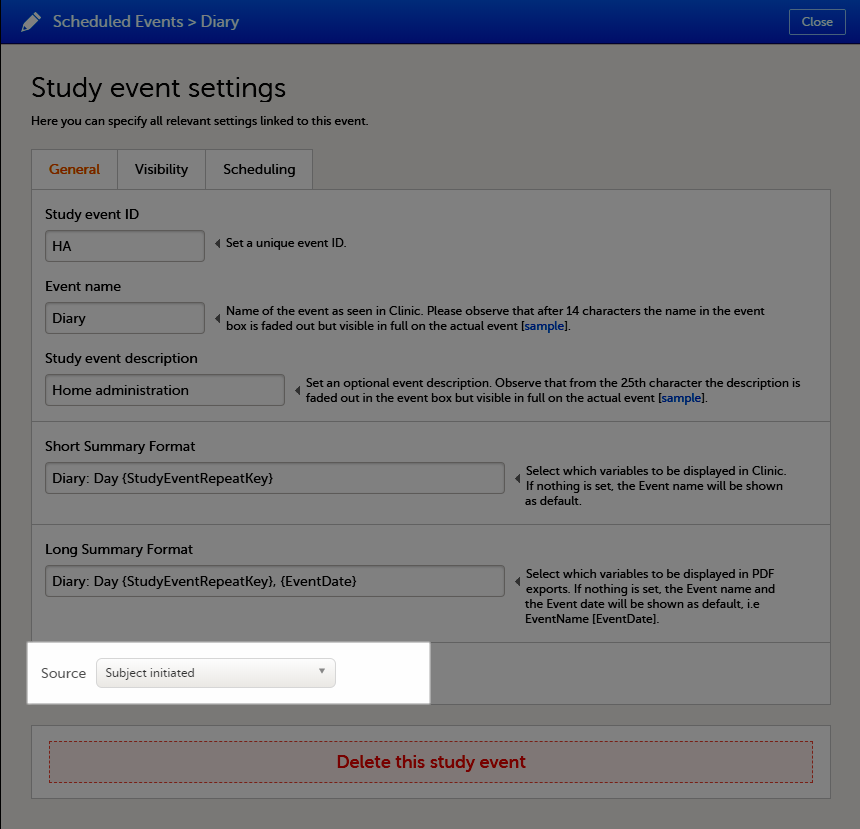
If at least one of the events in the study workflow is marked as subject-initiated, the mobile phone icon will appear on the Details page in Viedoc Clinic, given that the study license has got Videoc Me enabled. The clinic user selects this icon to initiate a Viedoc Me account for the subject.
Note!
Subject-initiated events can be scheduled on two levels:

To schedule a subject-initiated event:
| 1 |
Select the pen icon to open the activity settings window.
The activity settings window opens. |
| 2 |
On the Timing tab, select the checkbox for Enable proposed time calculation for subject initiated activities. Select the clock icon and enter a time at which the Viedoc Me questionnaire is to be available for the subject to fill in. 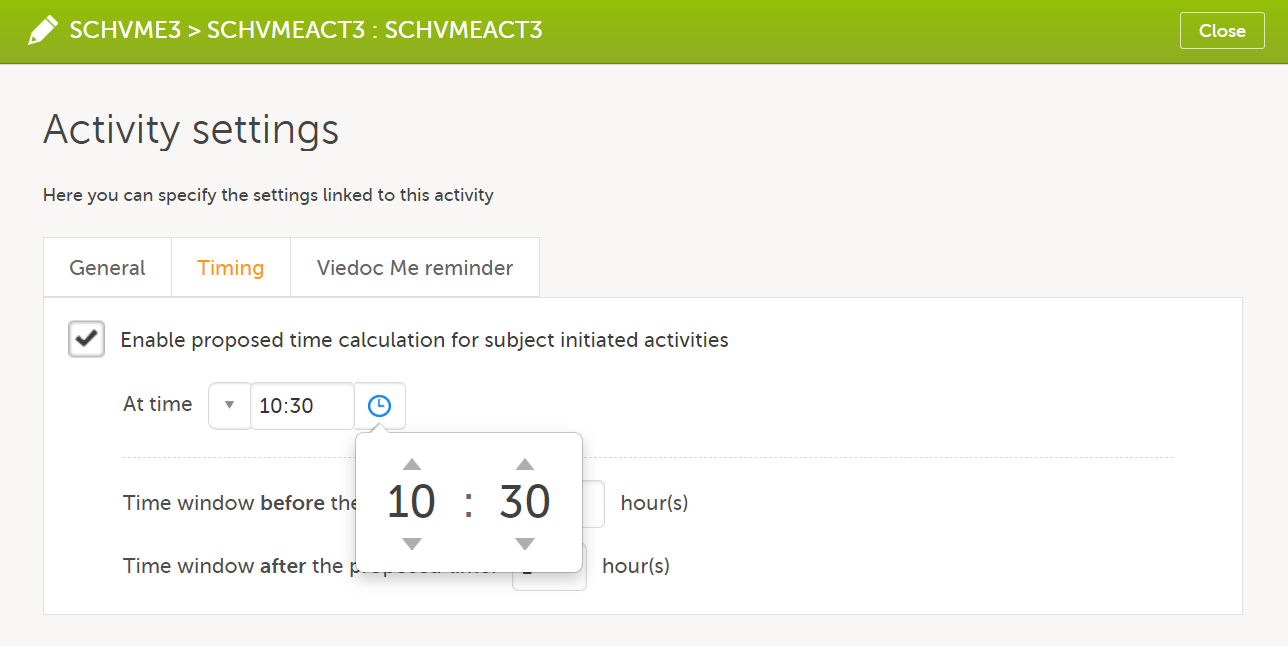
The default time is 00:00. If you want to start all over, select the dropdown list and select Reset to return to the default time. |
| 3 |
In the Time window before/after the proposed time fields, enter the number of hours before/after the proposed time set above. The default is 1h before and 1h after the proposed time. Note! Setting the time window to +/- 0 hours means that the subject must start the Viedoc Me questionnaire exactly on the proposed time, that is, on exactly that minute! 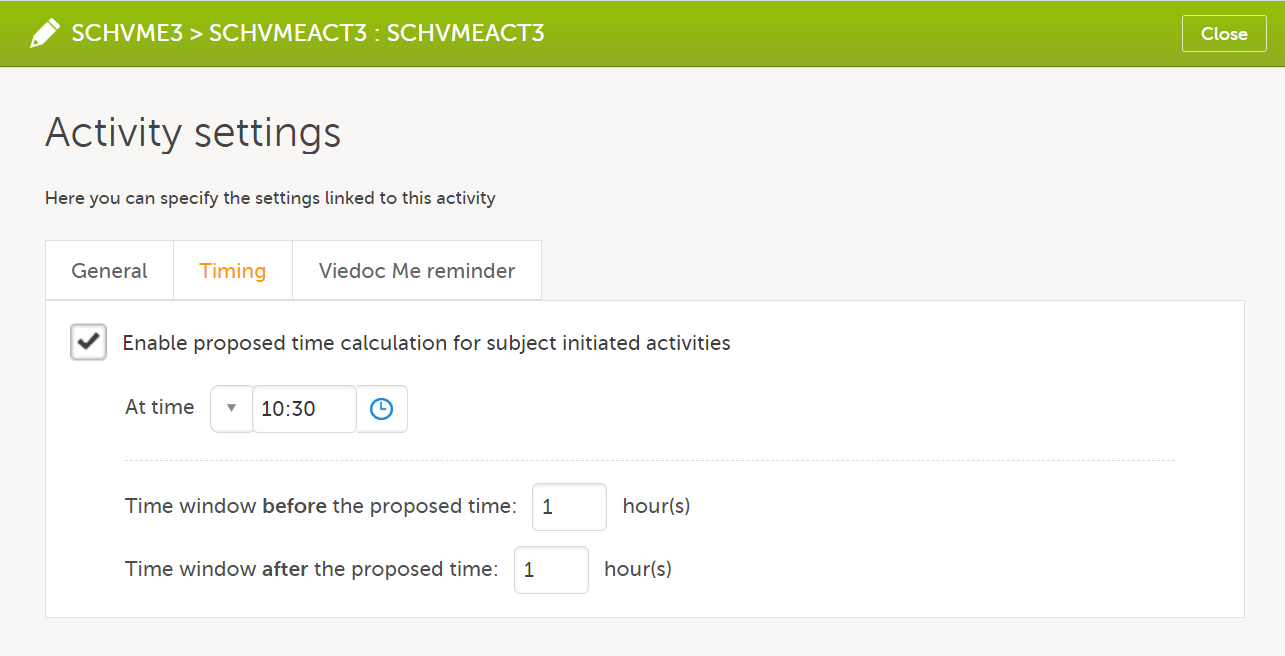
When a proposed time calculation is set for an activity, the selected time window is displayed in the activity header in the study workflow.
|
To set Viedoc Me reminders to the subjects:
| 1 |
Select the pen icon to open the activity settings window.
The activity settings window opens. |
| 2 |
On the Viedoc Me reminder tab, select Add a reminder. 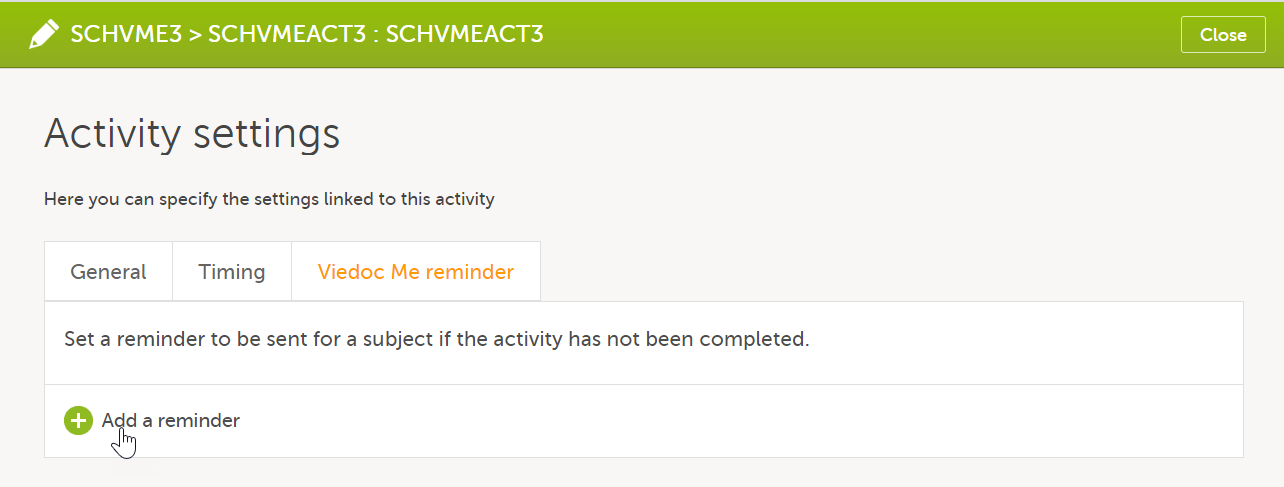
|
| 3 |
Configure the reminder:
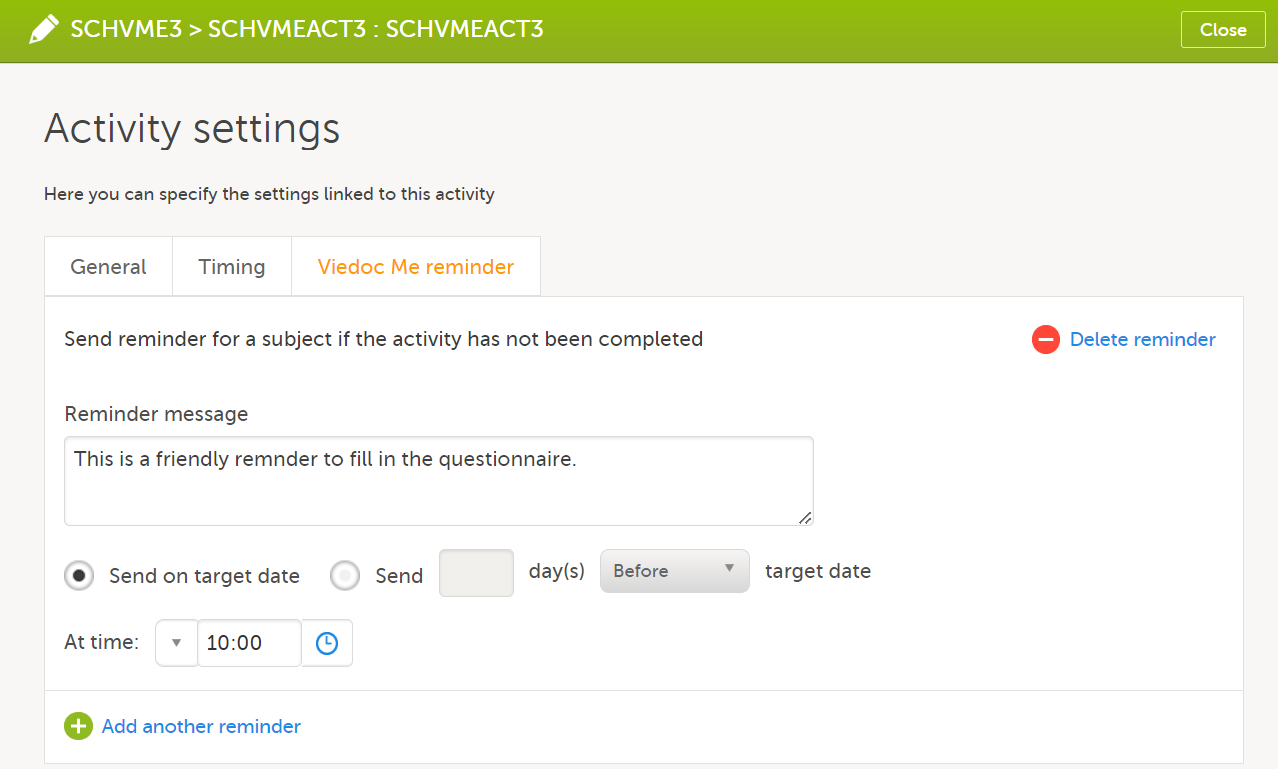
|
| 4 |
If you want to add more reminders for the same activity, select Add another reminder, and set the reminder message, date and time. 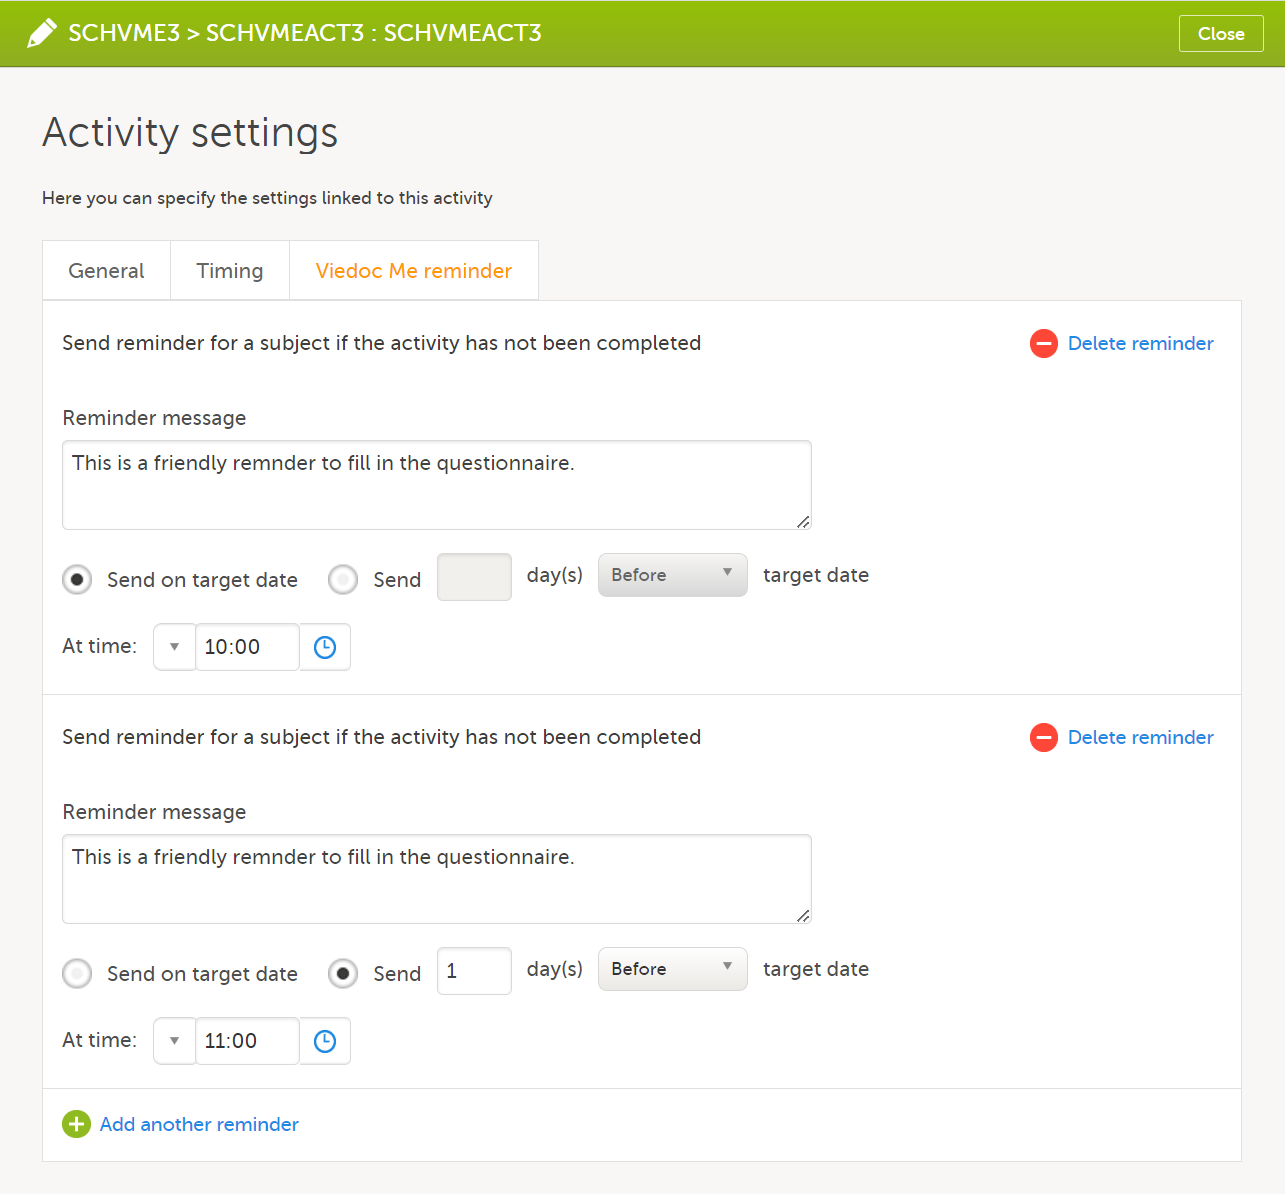
|
| 5 | Select Close to save you settings. The window closes. |
To remove a reminder, select Delete reminder.
|
Important! For reminders to be sent to the subjects, the following settings must be completed:
|
Note!
today() and now().The text of the reminder message can be translated. This is done in the same way as translation of the forms within subject-initiated events, see Managing translations.
A new version is recommended when Viedoc Me forms are locked upon receipt. These forms must be unlocked before a revision can be applied. Therefore, it is best to change Viedoc Me forms in a new version. Remember to also update translations if necessary, see Managing translations.
It is possible to translate the forms in the subject-initiated events, as well as the respective reminders, by following these steps:
When migrating a study from training to production, and exporting the design, the translations for Viedoc Me are lost and must be managed again in the production environment after the design is imported. See also Migrating a study design from training to production.
|
Important! If you have performed the translation while working on the training server and intend to import the design to the production server afterwards, in order to have the translations available after the import you have to repeat the following operations on the production server as well:
If you revise your design (for example by changing texts that were translated or item IDs) after having performed the translation, make sure to update the translations accordingly and re-import the translated files. |
It is possible to define the default language used when setting up the study design, as well as the languages you want support for.
Note! For reference, these are the system languages in use: System Languages. Viedoc does not allow users to use a default browser translation within the system. This prevents individual users from overriding the chosen system language and agreed upon terminology and formulations.
Note! The languages Cebuano (ceb), Hiligaynon (hil), and Tagalog (tl) are available in Viedoc Designer when adding additional languages in the Design settings. These languages are currently displayed as: Unknown language (tl), Unknown language (ceb), Unknown language (hil). However, translation files for these languages can be exported and imported as expected.
To set languages for translation:
| 1 | In Viedoc Designer, select Design Settings and select the Details tab. |
| 2 |
In the Languages section, set the following:
|
| 3 | Select Save changes. |
To export the text of the forms for translation:
| 1 | In Viedoc Designer, select Design Settings and select the Language Import/Export tab. |
| 2 | In the Export language texts for translation area, select the language to translate into from the dropdown list. The available languages in the list are the ones selected as Additional when setting the languages (see instructions Selecting the languages for translation). |
| 3 |
Select and select the forms to be translated, one by one. Make sure that you select the forms included in subject-initiated events. The form named Workflow contains all the reminders set up in the study workflow. |
| 4 | Select Export. You will get an Excel file with one separate sheet for each selected form, containing all the texts for the respective form. |
In the Excel file obtained at the previous step, add the translated text in the column to the right. Make sure that only the text is translated and the tags are kept exactly as in the Default text column.
Note! If the text to translate contains only numbers, it could cause problems when you import the translated file into Viedoc in the next step. To solve this, either remove the numbers or prefix them with a ' (for example '1). Adding the prefix will cause Excel to treat the numbers as text.
When the translation is performed and you have the Excel file, you have to import it by following the steps below:
| 1 | Go to the Design Settings section, under the Language Import/Export tab. |
| 2 | Under Import language texts for form translation, select Upload a file. |
| 3 | Browse and select the Excel file that contains the translation. |
| 4 | Select Import. |
Note!
The clinic roles, and their permissions, are configured in the study design in Viedoc Designer. The clinic roles are configured on the Roles page in Viedoc Designer.
You can set up roles by:
Roles are configured on the Roles page. In Viedoc Designer, in the study design, select the Edit icon in the Roles field to open the Roles page.
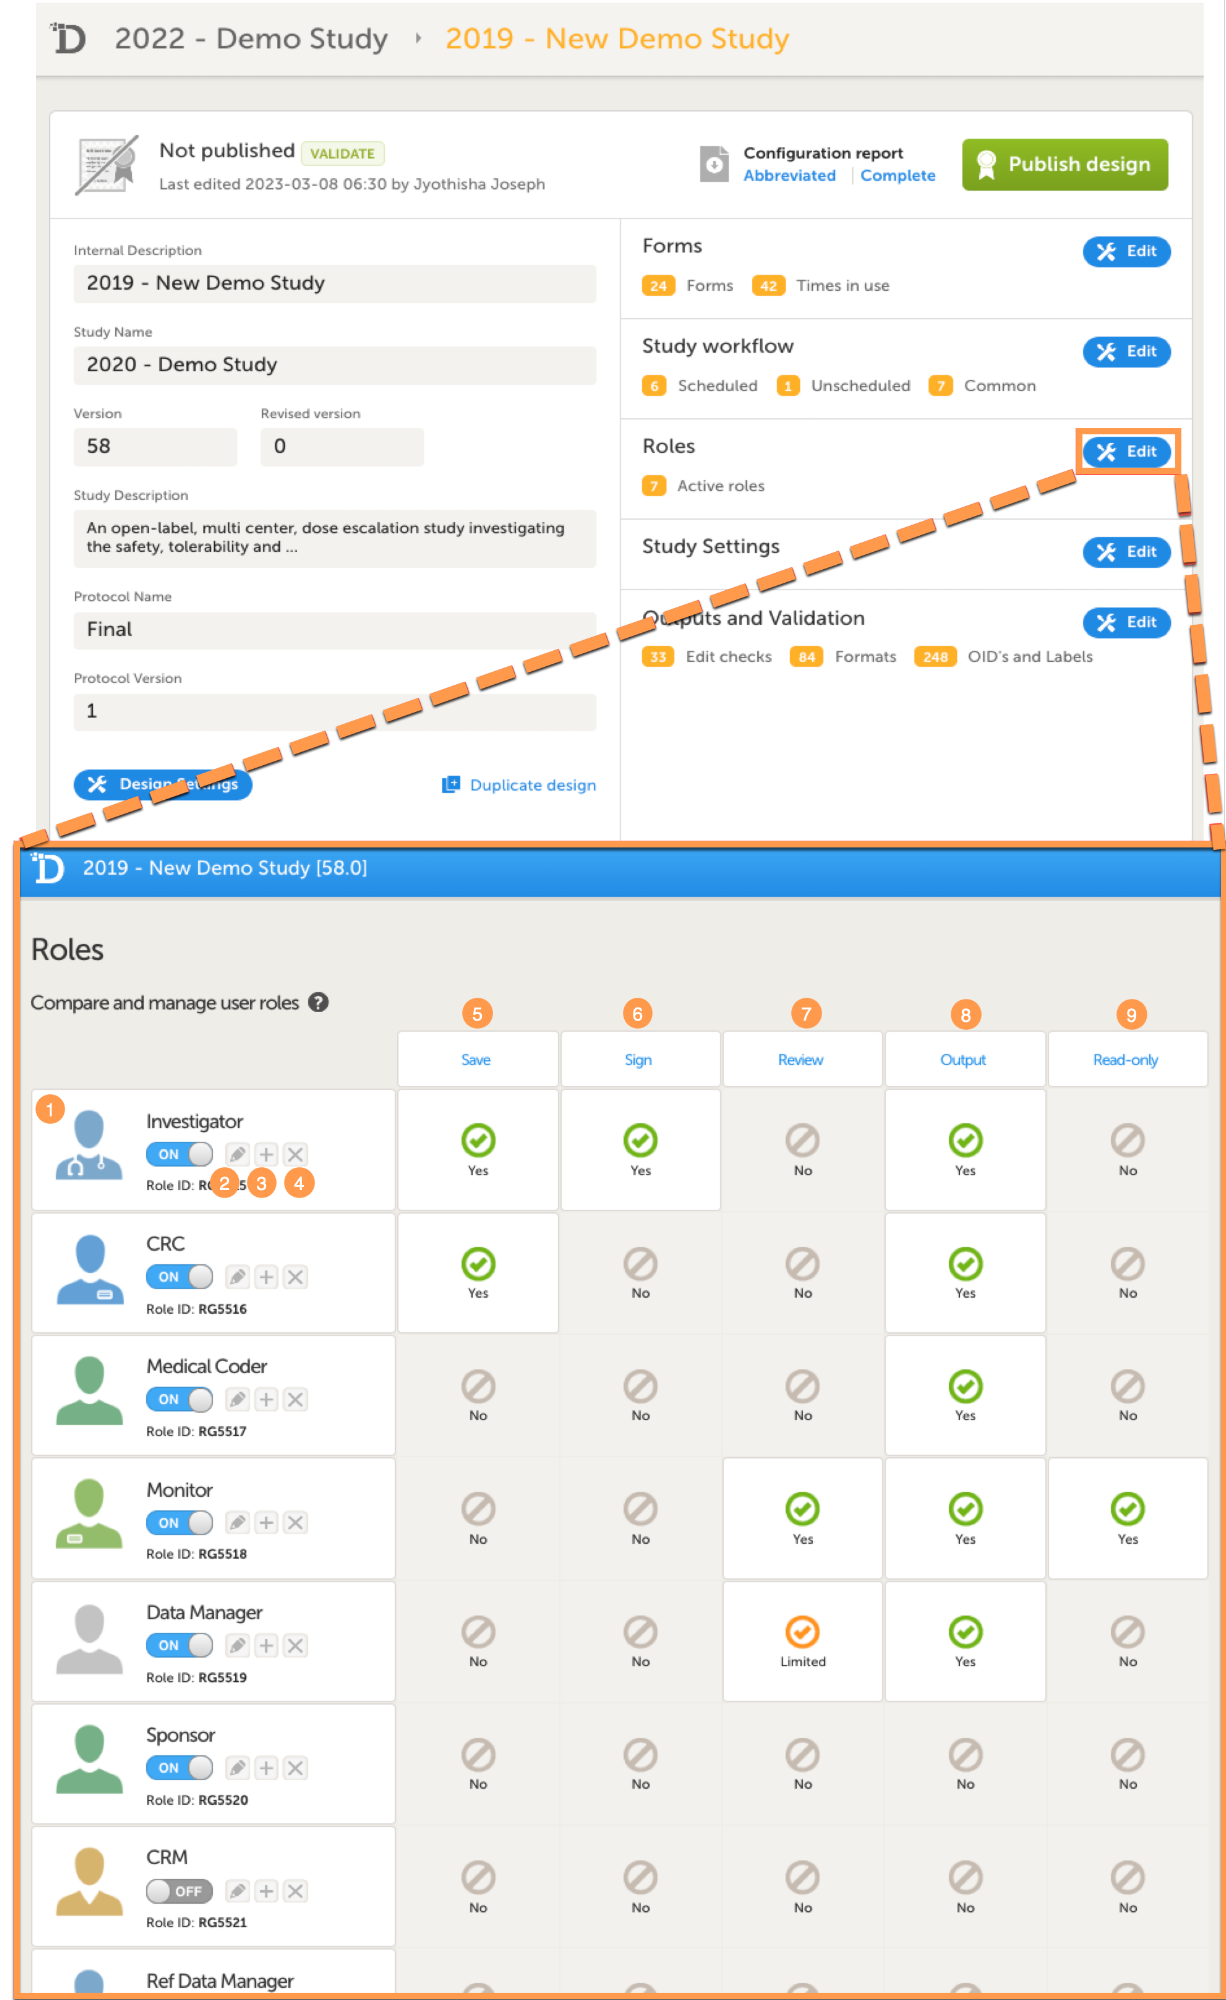
On the Roles page you can view or do the following:
1. View the roles in your study. For each role, the following is displayed: the name of the role, an avatar, a switch to set the role to ON or OFF, and an overview of the rights this user has, see below.
2. Edit the role by selecting the pen icon. The Edit role page opens, see The Edit role ("...") page.
3. Create a copy of a role by selecting the + icon. A duplicate of that role is created and added at the bottom of the list.
4. Delete a role by selecting the cross icon.
Note! To avoid a mismatch of roles between different design versions, we recommend that you do not delete a role, but instead set the switch to OFF to disable the role.
5-9. For each role, quickly get an overview of the rights that concern saving (5), signing (6), reviewing (7), exporting (8) data, and viewing (9) data (in read-only mode).
If you select the pen icon for a role, the Edit role "(Role name)" page opens:
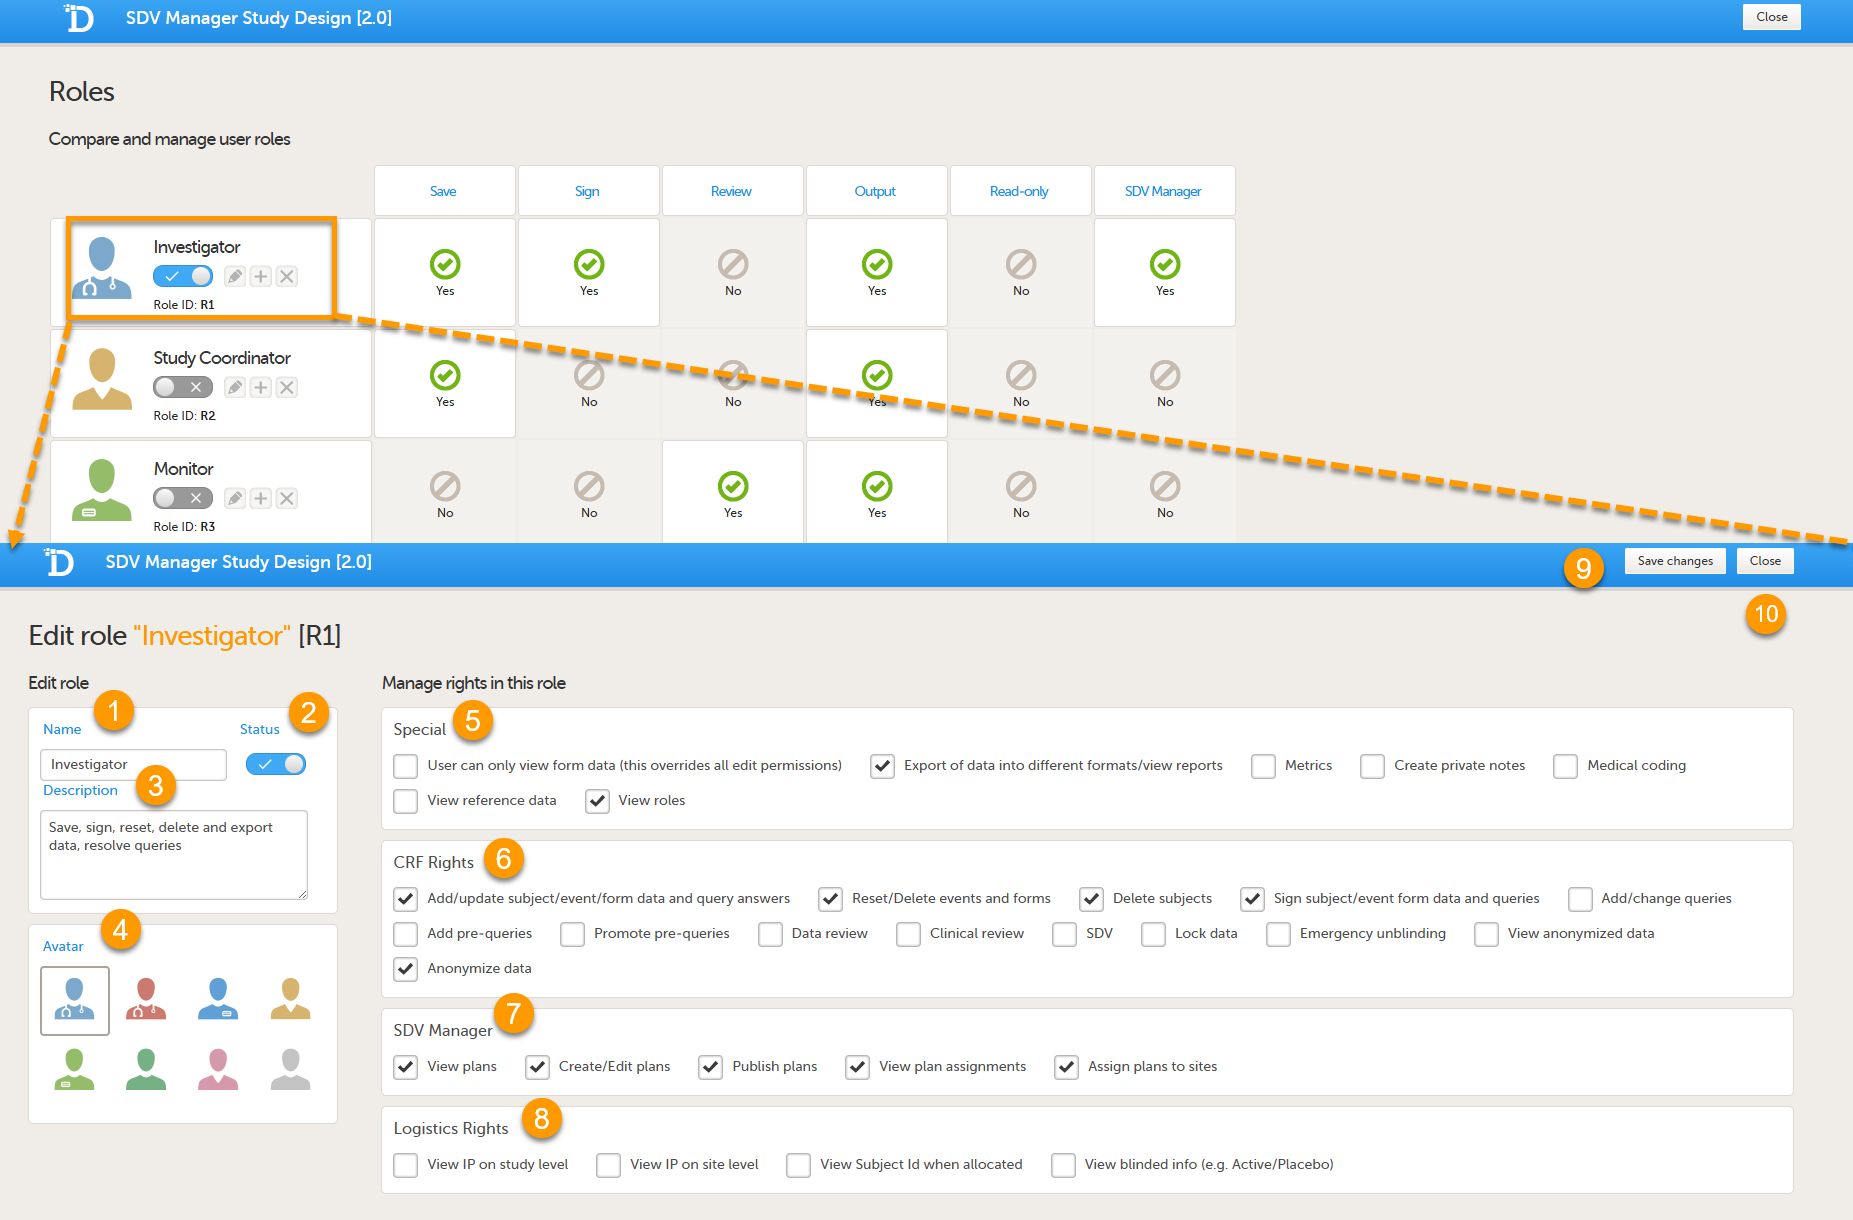
On the Edit role page you can edit the following:
1. Enter a name for the role. This will be the name for the role as used in Viedoc Clinic and Viedoc Admin, as well as in the e-mails with the role invitation.
2. Set the status to ON or OFF to enable or disable the role. This is the same switch as on the Roles page, see Switching a role ON or OFF.
3. Enter an optional description of the role.
4. Select an avatar. The avatar is displayed on the Roles page, but not anywhere else in Viedoc.
5-8. The rights that can be activated or de-activated for a certain role, divided into special rights (5),
Case Report Form (CRF) rights (6), SDV Manager (7) and Logistics (8), see also User rights.
Note! In special rights, the rights to configure permission to view the Roles page, View roles in Clinic is selected by default.
9. Save the changes.
10. Close the page and return to the study design.
The following rights can be selected from:
|
Important!
|
By default, a set of predefined roles is set up by the system, and it can be modified for your study.
The default roles and default permissions are listed in the following table:
| Role | Special rights | CRF rights | Logistics rights | eLearning |
|---|---|---|---|---|
| Investigator | - Export of data into different formats/view reports |
- Add/update subject/event/form data and query answers |
Viedoc User Guide for Site Users | |
| Study Coordinator | - Export of data into different formats/view reports | - Add/update subject/event/form data and query answers - Reset/Delete events and forms - Delete subjects |
Viedoc User Guide for Site Users | |
| Monitor |
- Export of data into different formats/view reports |
- Add/change queries - Promote pre-queries - Clinical review - SDV - Lock data |
- Viedoc User Guide for Monitors - Viedoc Reports User Guide |
|
| Project Manager | - User can only view form data (this overrides all edit permissions) - Export of data into different formats/view reports - Metrics - Viedoc Reports - Create private notes |
None | - Viedoc User Guide for Project Managers - Viedoc Reports User Guide |
|
| Data Manager | - Export of data into different formats/view reports - Metrics - Viedoc Reports - Create private notes |
- Add pre-queries - Data review |
- Viedoc User Guide for Data Managers - Viedoc Reports User Guide |
|
| Medical coder | - User can only view form data (this overrides all edit permissions) - Export of data into different formats/view reports - Medical coding - Perform medical coding - Approve medical coding |
- Add/change queries | Viedoc User Guide for Medical Coders | |
| Study Supply Manager | - Manage IP on study level - View blinded info (for example Active/Placebo) |
|||
| Site Supply Manager | - Manage IP on site level - View Subject Id when allocated |
|||
| Regulatory Inspector | - User can only view form data (this overrides all edit permissions) | - View anonymized data | ||
| SDV Manager |
For users responsible for managing the full SDV plan lifecycle. Individual permissions can also be assigned independently to other roles. |
Viedoc Clinic User Guide |
To enable a role in your study, set the switch to ON.
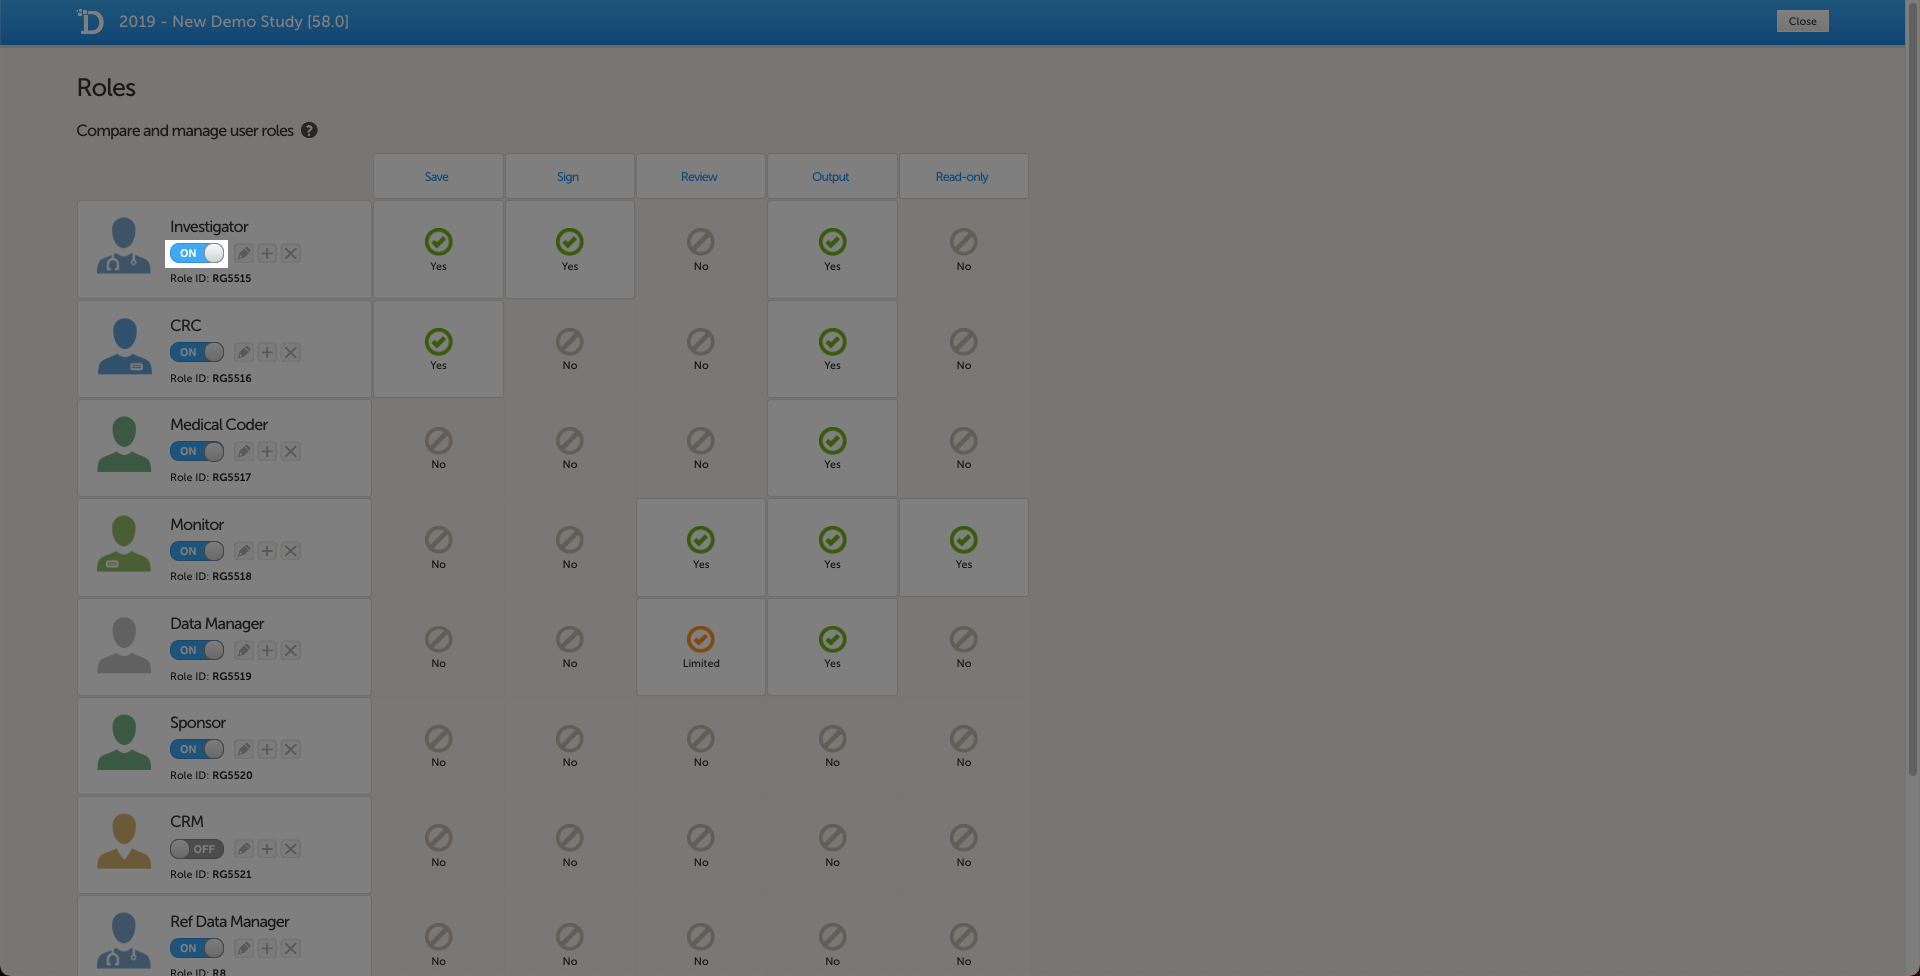
To disable a role in your study, set the switch to OFF.
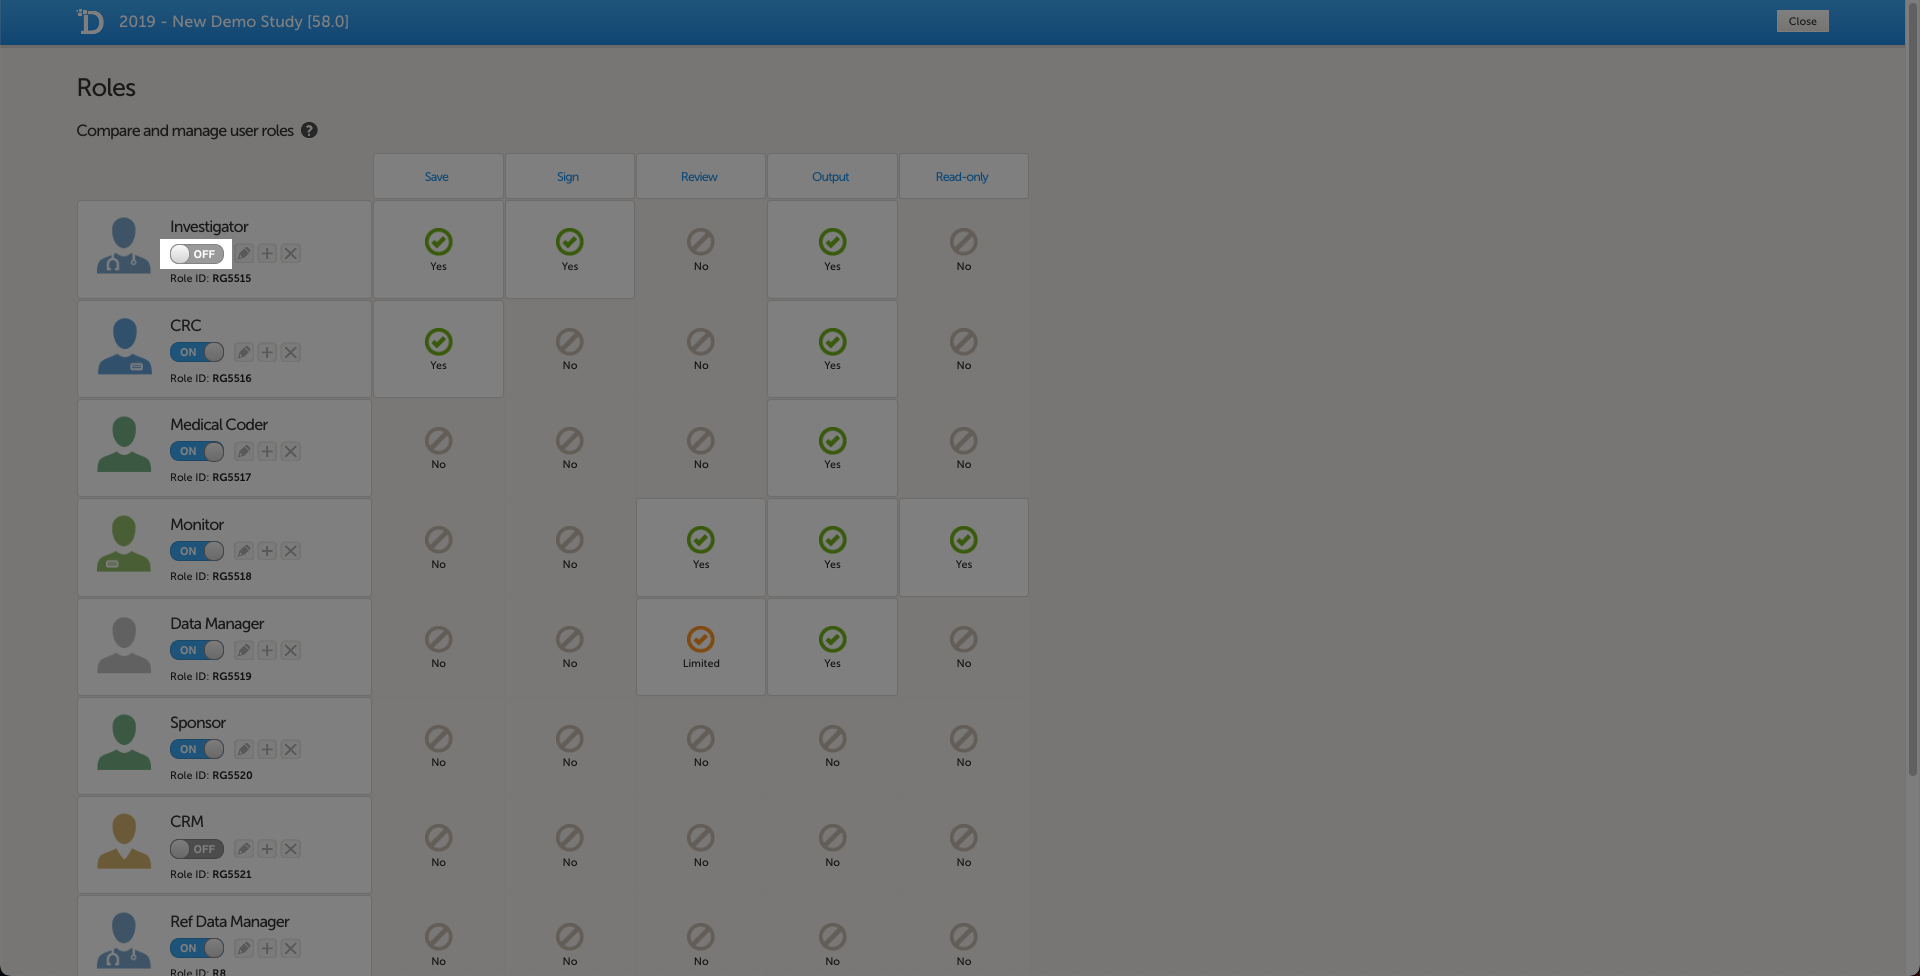
To modify a role, select the pen icon. The Edit role "(Role name)" page opens (see The Edit role ("...") page). Select the permissions that you want users with this role to have, and select Save changes to save. The Edit role page closes and you return to the Roles page.
If you do not want to save any changes, select Close to return to the Roles page.
To add a new role, select Add new role at the bottom of the Roles page.
The Edit role page opens.
Enter a name for the role and an optional description, and select an avatar.
Enable the role by setting the status to ON.
Select the rights that users with this role should have, and select Save changes.
Note! To avoid a mismatch of roles between different designs, we recommend that you do not delete a role, but instead set the status to OFF if a role is not used.
The outputs and validation section summarizes some of the item settings that are performed in Viedoc Designer and provides a better overview and an easier way to update the settings
The following settings can be viewed and edited:
The Edit checks table displays all data checks and system checks that are defined in the study per form. Edit checks verify whether data entered into the form are within a certain range that is specified under True Expression. The edit checks can be defined in Viedoc Designer when configuring the forms and items. For details on configuring edit checks within forms, see Creating and editing forms.
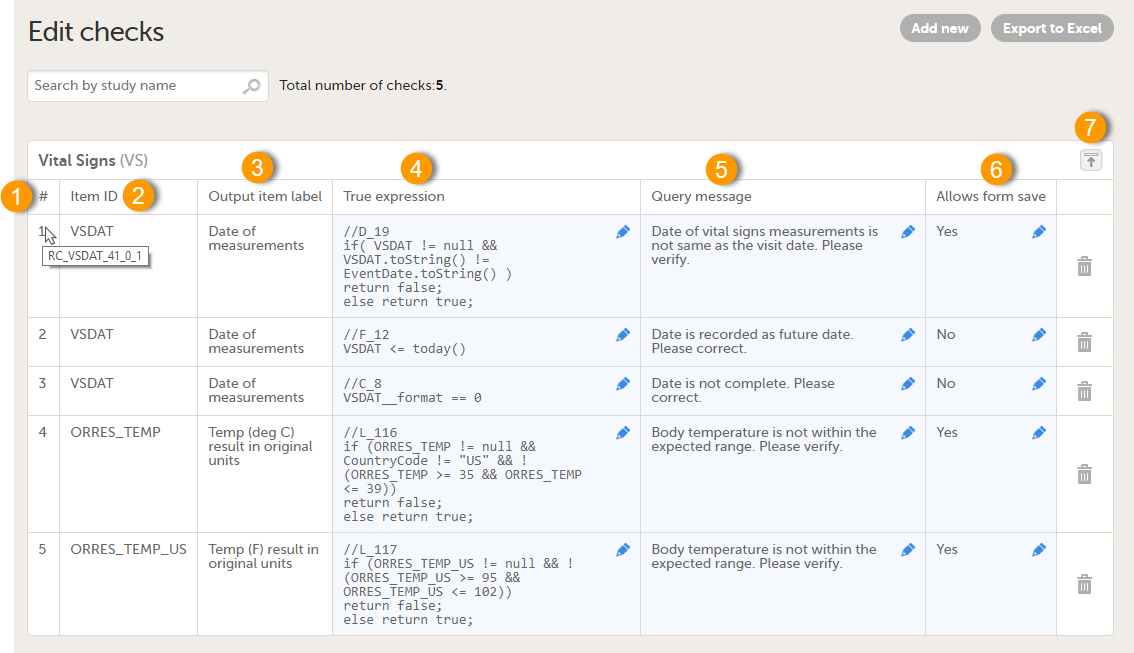
The existing edit checks are grouped per form, and the following information is provided for each configured edit check:
1. Order number. Starts with 1 for each form. Hovering over the edit check number in the table displays the edit check ID. The edit check ID has the following structure: RC_FieldItemOID_Version-number_Revision-number_Counter, and defines to which field in the form it belongs, and in which design version and revision the edit check was entered. When exporting the edit checks to Excel, the edit check ID’s are listed under Range Check OID.
2. The ID of the item the edit check belongs to.
3. The output label of the item the edit check belongs to.
4. True expression - the edit check expression. See also Using JavaScript in Viedoc.
5. Query message - the message that will be displayed in Viedoc Clinic for the site user.
6. Allows form save - Yes/No, depending if you want to allow the form to be saved or not. If set to Yes and the form is saved with data that causes an edit check to fire, a query will be raised on the respective item in Viedoc Clinic.
7. Expand/collapse button - for expanding/collapsing the edit checks within a form.
The system checks are read-only. They are displayed in the list, but can not be edited or removed.
It is possible to export all defined edit checks to Excel by clicking Export to Excel.
It is possible to edit existing edit checks by clicking on the pen icon and editing the respective field:

Any error in the edit check definition (true expression) is clearly indicated in the table:
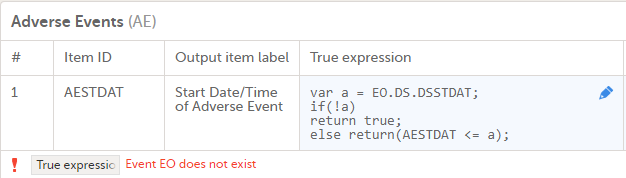
Notes!
$THIS inside a form to refer to an item within a different instance of the same form, does not work,as it always refers to the same form instance. This is true when referring to an item in the same form within another activity, or when referring to another form instance within the same activity (applicable for repeating forms).$PREV function, the $PREV functions in these two events refer to each other as the previous event, and not to the event that occurred earlier in the study workflow. This creates a circular reference and makes it impossible to refer to earlier event(s).The formats page enables you to prepare common formats that are being used by more code list items, i.e. allows you to set one format name for all items with same options.
The code list items in Viedoc are items that have a code list of possible values that can be filled in when entering data. These are:
For example, when having many radio button items with same code list values and text (Yes/No for example), by default each item is assigned one format name, but here you can set a common format to be used by all these items.
This is useful especially when exporting with Statistical Analysis System (SAS), as you need to specify the format name when using items in reports and tables.
If, for example, we have the following form defined, with four radio button items having the same choices (Yes/No).
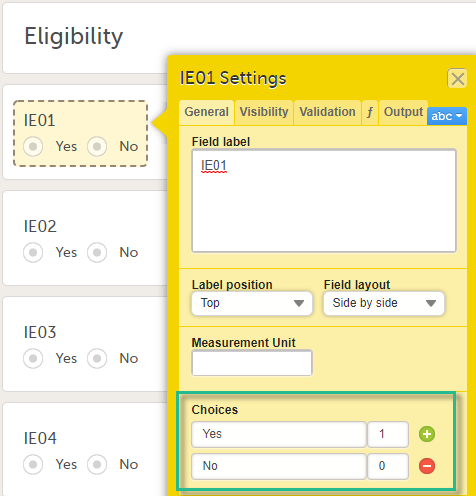
In the Formats section, each item has the same Code list display text (Yes/No) and Code list value (0/1).
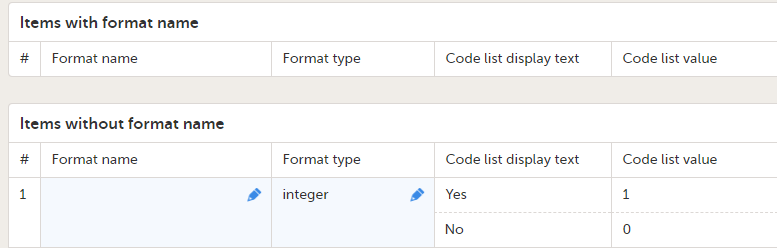
Before applying a common format name for the items in our example above, these items are represented in the Operational Data Model (ODM) export output as illustrated below, having each item pointing to a different code list using the CodeListRef:
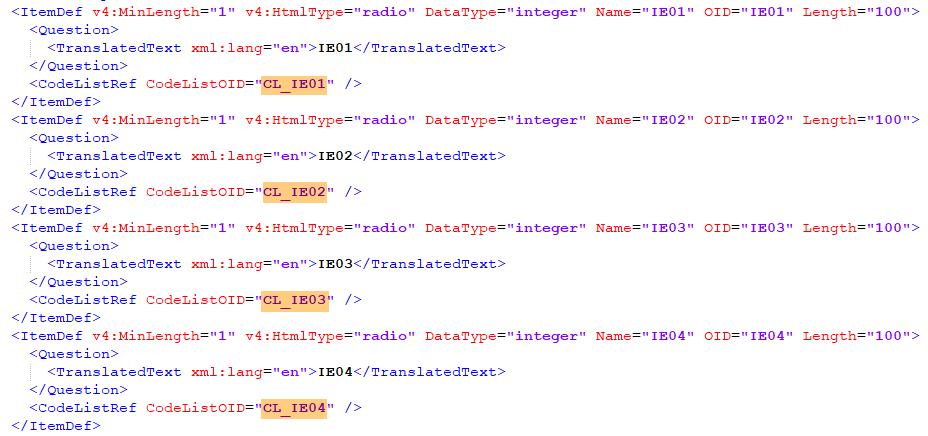
Each CodeList contains the CodedValue and the displayed text:

When data is entered and exported as Comma-Separated Values (CSV), two additional files are created. When exported as Excel, two additional sheets are created. These are:
In our example, before setting the format, the Items sheet looks as below:
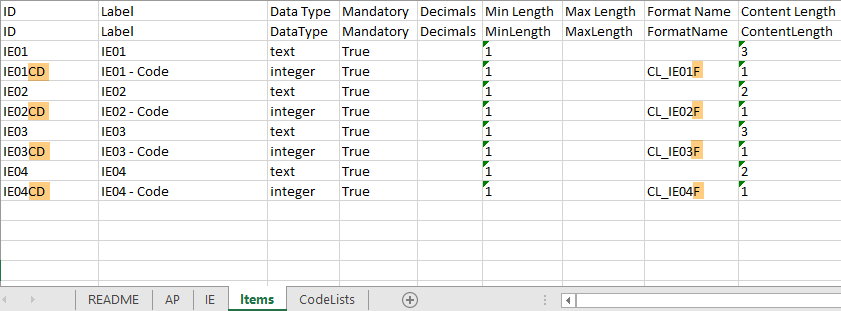
The items that have a codelist have an additional row with ID suffixed with “CD”, for the code. In this case, we only have radio buttons, but if checkboxes and/or dropdown lists would be included, those would also have additional rows with “CD” for the codes.
The default Format name (that is, before applying any format) for each code is CL_ItemIDF.
In our example, before setting the format, the CodeLists sheet looks as below:
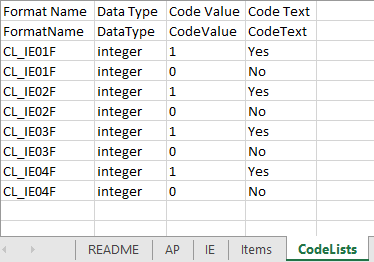
Each referred Format Name contains information about each code value. In this case, only “Yes” as “1” and “No” as “0”.
As we have four separate radio buttons in the IE form, we have four unique formats, each with two different values.
When CSV export is made with Include corresponding SAS script option checked, you get all forms in separate files, and “_CodeLists” and “_Items” with contents described briefly above. (See also Exporting for SAS)
In addition, the SAS files CSV2SAS and _RunMe are included.
The _RunMe file is quite small and this is what is used to import the data in to SAS, that is, this script is opened and run in SAS. Its job is locating the path to the files to be imported and starting the actual work with the doWork function(macro) that exists in the CSV2SAS file:

The essential part related to Formats within the CSV2SAS script is on row 306, where the contents of the Codelists file is passed on to the CreateSasFormats macro, which takes the contents and creates the formats.:

After that, the Items metadata in the Items file are read and the formats are applied to the applicable items in SAS.
In SAS, the above example will create four formats for the IE form:
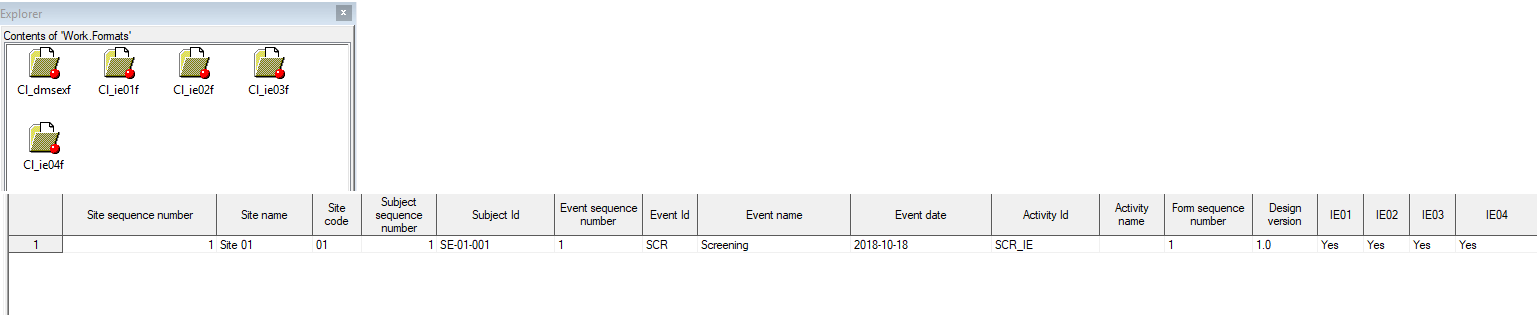
To set a format name in Viedoc Designer under study design settings > Outputs and Validation > Formats, type in the format name in the Format name column for one of the four items. The item will appear in the upper table Items with format name, as shown in the image below.
As soon as you have defined a format name, all items with the exact same settings (code list name and value) will be flagged and you can provide the same format name to those by clicking the link, as shown in the image.
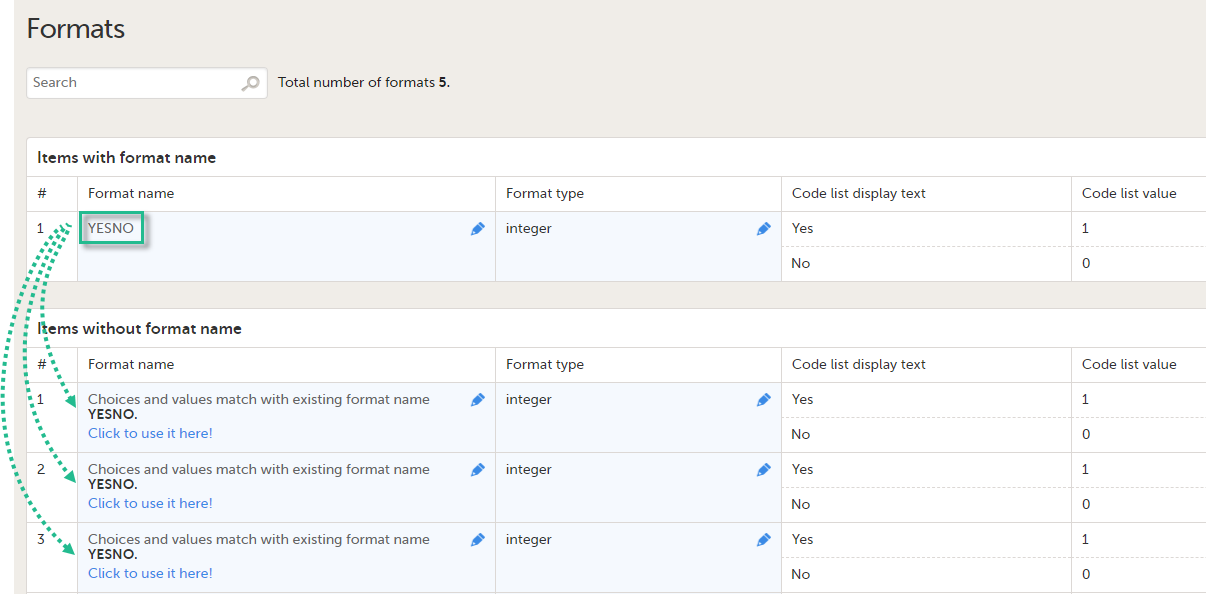
Because this is used mainly for SAS, Viedoc checks that the Format name complies with SAS requirements, as follows:
If any of the above is not fulfilled, an error message will be displayed:
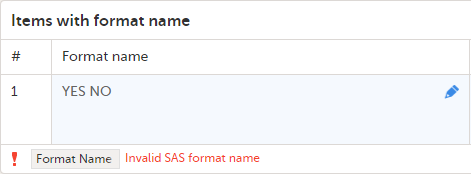
All formats can be exported to Excel by clicking Export to Excel.
Note! Leading zeros in code list values will not be included in the export for the following formats:
So, for example, a code list value such as 001 will end up as 1 in the export.
Note! The above note is available also in the lesson Designer>Study build>Creating and editing forms.
After applying the common format name (YESNO) for all the four items in our example, these items are represented in the ODM export output as illustrated below, having each item pointing to the same code list using the CodeListRef:
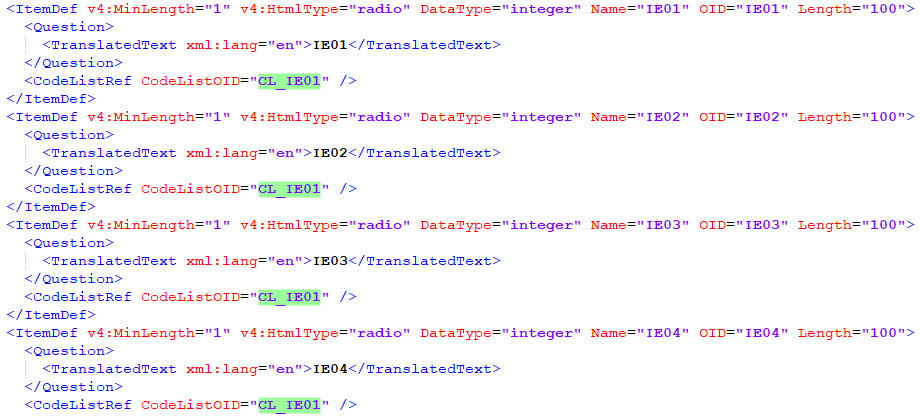
The format that we have defined is added to the CodeList:
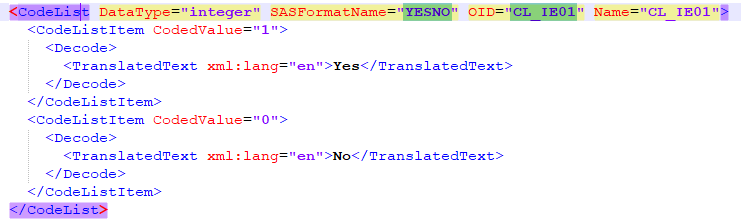
In our example, after setting the format, looking at the Items information, the only difference is that the Format Name has been changed to “YESNO”, that is, there is one common format for all the four items:
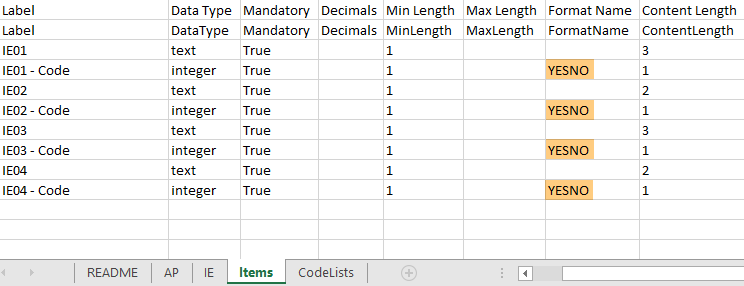
In our example, after setting the format, the CodeLists sheet looks as below:
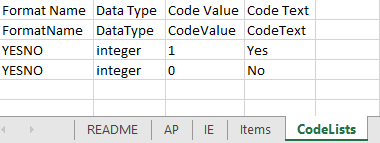
After having applied the format in Viedoc Designer, importing to SAS creates only one format:

It is also possible to change the output export value as well as the format type (integer/text).
If, in our example, we change the Output export value to a text value, the Format type must be changed to text:

This action does not change the content of the items in the ODM file:
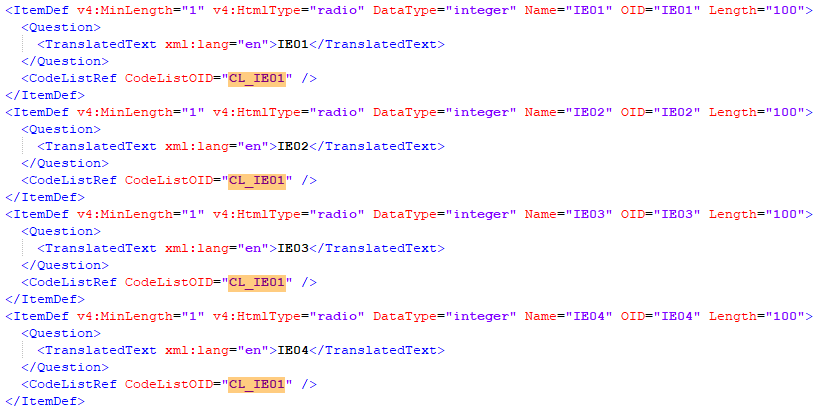
...but the output export values defined have been added in the Alias section:
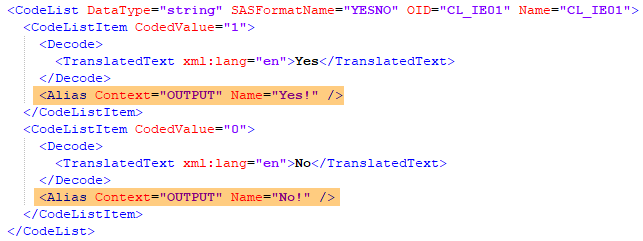
The Items sheet in the Excel file now shows "text" as a Data Type for the codes and the Content Length varies, as the new codes are now "YES!" (length = 4) and "NO!" (length = 3):
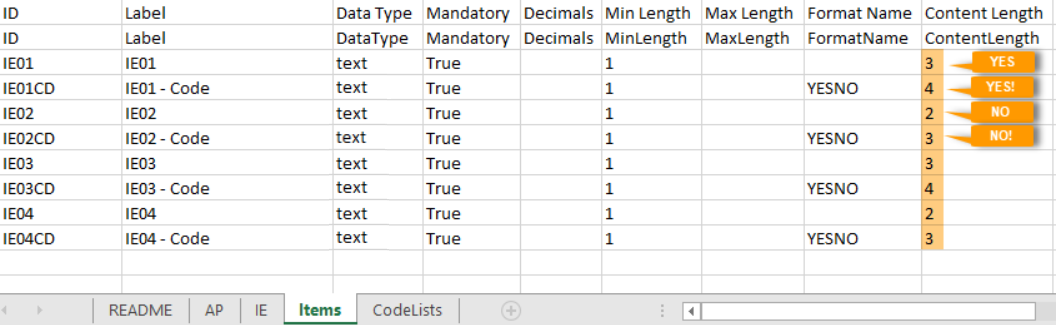
The CodeLists in the Excel file now have new Code Values:
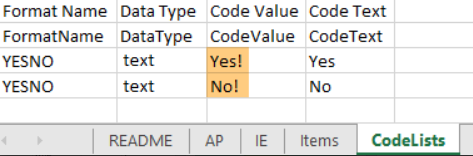
So, we can say that, as a result, the original Code value is replaced in the export output with the new values set in the Output export value (in our example "0" and "1" were replaced by "NO!" and "YES!" respectively).
This page enables you to revise and modify your Output IDs (OID) and Labels without affecting existing visibility conditions, functions and/or data checks as these use the field IDs.
Note! If the Output IDs (OID) and Output labels have been defined in the study design, these are shown in the Excel/CSV/SAS export. If the Output IDs (OID) and Output labels are left undefined (blank) in the study design, then the configured Item ID and label is used.
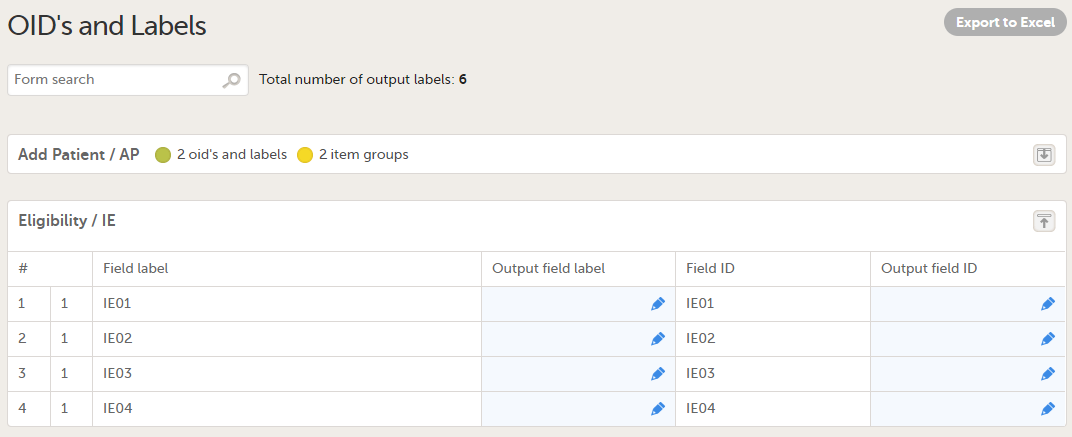
Blue cells are editable. Make sure your study has unique and relevant output IDs set and that all output labels are not too long and that they describe the item correctly.
Note! If you enter the same output field label as the field ID, Viedoc will change the output field label to the field label.
This could be useful in different scenarios, such as:
The items(fields) in the list are grouped by item group, and then ordered by item order in that group. For example, for the form below:
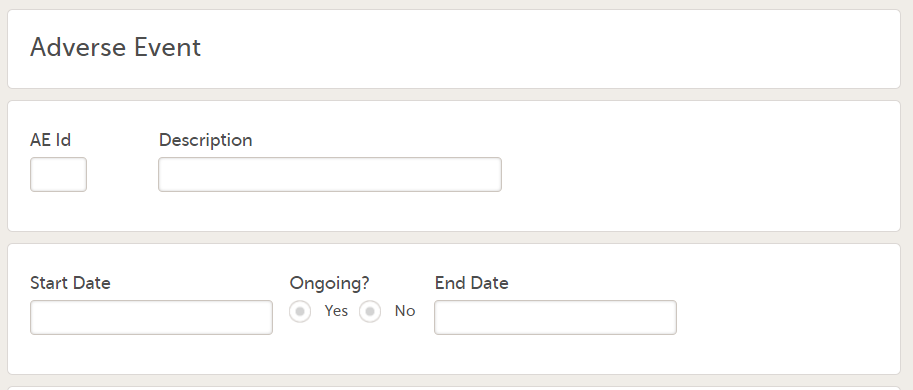
...the OIDs and Labels are listed as below:
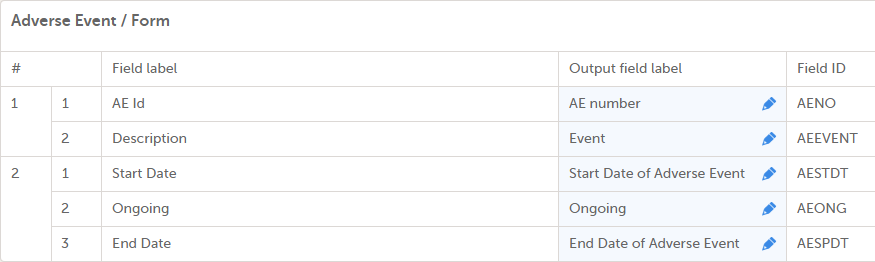
You can export all items to Excel by clicking Export to Excel.
In our example (shown earlier in Formats), if we set the Output field label for the first item (IE01) to "Inclusion 01":
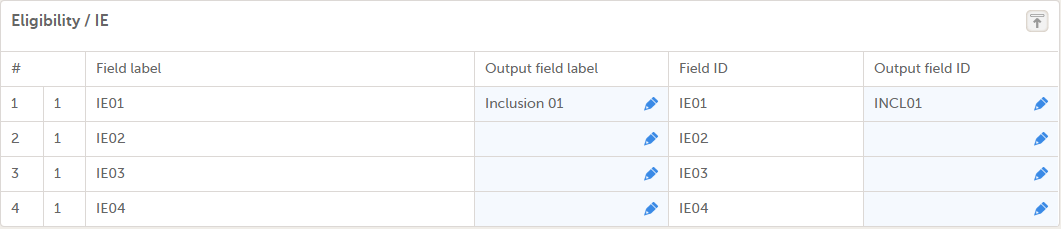
...which is the same as setting the item Output field label under Forms > Item settings > Output:
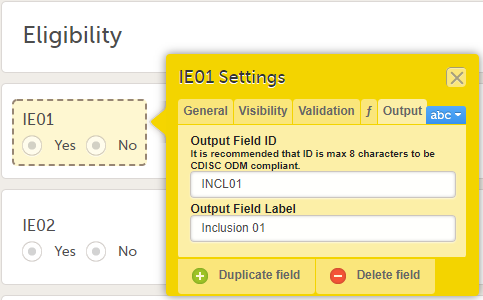
As a result, in the ODM file we can see two additions: the “SASFieldName” and a new Alias:

When such an alias and/or SASFieldName exist in the design, the export generated takes this label and ID instead of the question text and Field ID.
The exported data, for example, in Excel format, would display these as:

In SAS, this is shown as:
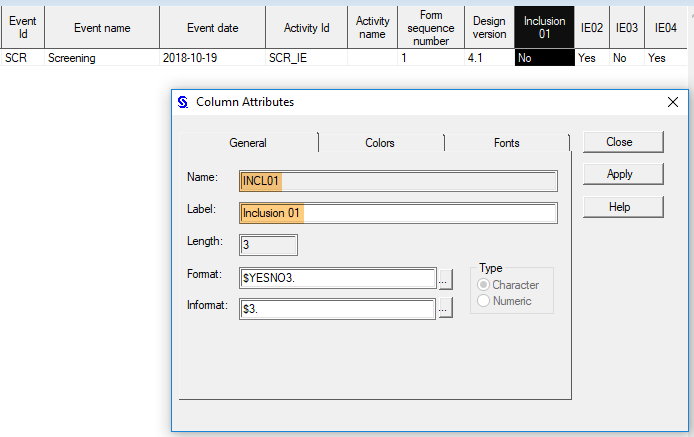
To avoid data conflicts, there are some reserved words that you need to avoid when naming forms, items, functions, and variables in Viedoc. Such a conflict can occur, for example, when executing functions in Viedoc, when exporting data from Viedoc, or when analyzing your data in SAS, and it might lead to unwanted behavior or even errors.
The following are Viedoc's internal JavaScript functions, so they should not be used as form or item OIDs:
addDays |
age |
bmi |
createRangeValue |
date |
days |
getDecimalCount |
getRangeValue |
getRangeValueFormattedNumber |
hours |
inRange |
minute |
now |
parseDate |
parseRangeValue |
parseTime |
subDays |
time |
today |
Note! There is a set of reserved words for the SAS macro facility. If you intend to use that facility, avoid these words in your Viedoc forms and item identifiers.
Avoid these words in form names:
CodeLists |
Event dates |
Items |
Queries |
README |
Review status |
SDV |
WHODrug* |
* or any other medical coding dictionary name, such as MedDRA or ATC
Note! If you need to analyze your data using SAS, there are some reserved words that you need to avoid in your Viedoc form identifiers. These identifiers are used as data set names in SAS.
Avoid the following when naming items:
__ARID |
__DATASTATUS |
__format |
__GROUPDATASTATUS |
__SDV |
ActivityId |
ActivityName |
DesignVersion |
EventDate |
EventId |
EventName |
EventSeq |
HAS_FILTERED_VALUES |
InitiatedBy |
InitiatedDate |
LastEditedBy |
LastEditedDate |
SiteCode |
SiteName |
SiteSeq |
SubjectId |
SubjectSeq |
Note!
CD to the original item name. Therefore, it is not recommended to give your Viedoc items IDs ending with CD.watch is a reserved word, using this in a form for example labels or IDs, or for the internal design description as a stand-alone word will result in an exported annotated/blank CRF which does not contain any form elements. However, if using the label watch as part of a longer text, or using Watch (with the initial letter caplitalized), the exported annotated/blank CRF will contain the form elements.Avoid using JavaScript keywords in item IDs and functions.
Do not use the following as item OIDs or as variable names in functions:
ActivityDefId |
Category |
CountryCode |
EventDate |
FormDefId |
FormId |
FormRepeatKey |
Language |
OriginSubjectFormSeqNo |
RoleDefId |
SiteCode |
SiteSubjectSeqNo |
SourceSubjectFormSeqNo |
StudyEventDefId |
StudyEventId |
StudyEventName |
StudyEventRepeatKey |
StudyEventType |
StudyId |
StudySiteId |
StudySubjectSeqNo |
SubjectFormSeqNo |
SubjectId |
SubjectKey |
Avoid the following when naming events, forms, and items:
$EVENT |
$LAST |
$PREV |
$THIS |
When naming IDs and labels, the following limits apply:
| Form ID | 33 characters |
| Form name | no limitation, however esthetical considerations should be considered |
| Activity ID | truncated at 32 characters |
| Activity name | no limitation, however esthetical considerations should be considered |
| Event ID | truncated at 32 characters |
| Event name | no limitation, however esthetical considerations should be considered |
In Microsoft Windows, there is a number of reserved file names. Do not use them as dataset names in Viedoc as they could create issues when attempting to open them in Windows or SAS.
You can download a report of the study design in an abbreviated or complete version.
To download one of the files, select Abbreviated or Complete on the study design overview page:

The configuration report in PDF format contains a summary of the following settings within the study design:
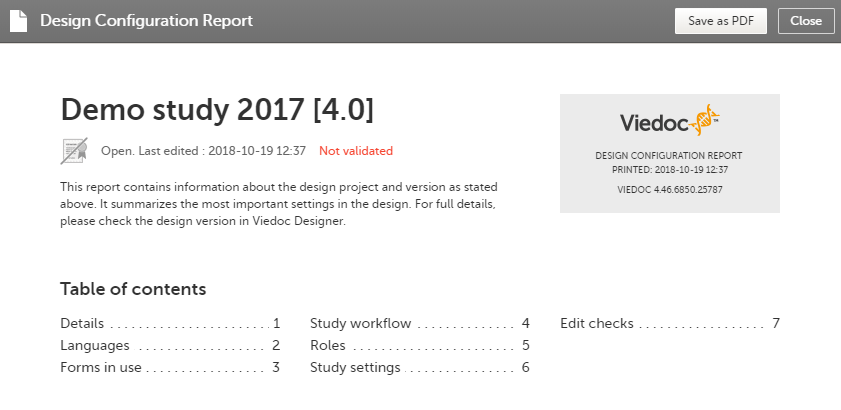
For Japanese PMS studies, the Abbreviated Configuration report also shows whether the Partial Submit Setup is enabled, and lists the existing partial submit definitions:
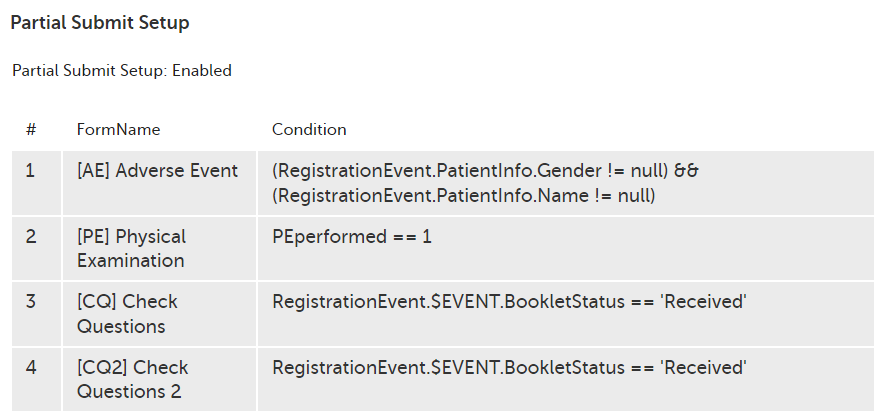
The configuration report in Excel format is a detailed report of the study design. Each sheet corresponds to the settings made in Designer, as shown in the following table:
| Sheet | Corresponding section in Designer |
|---|---|
| Design info | 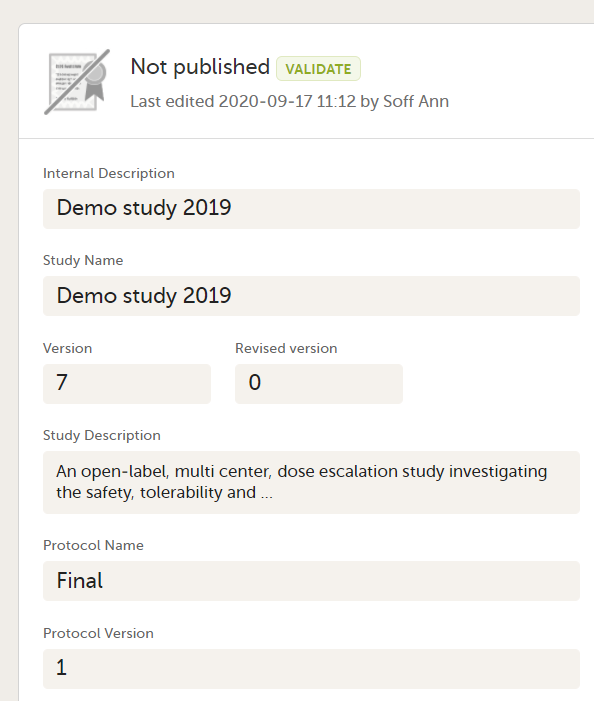 |
| Design settings | 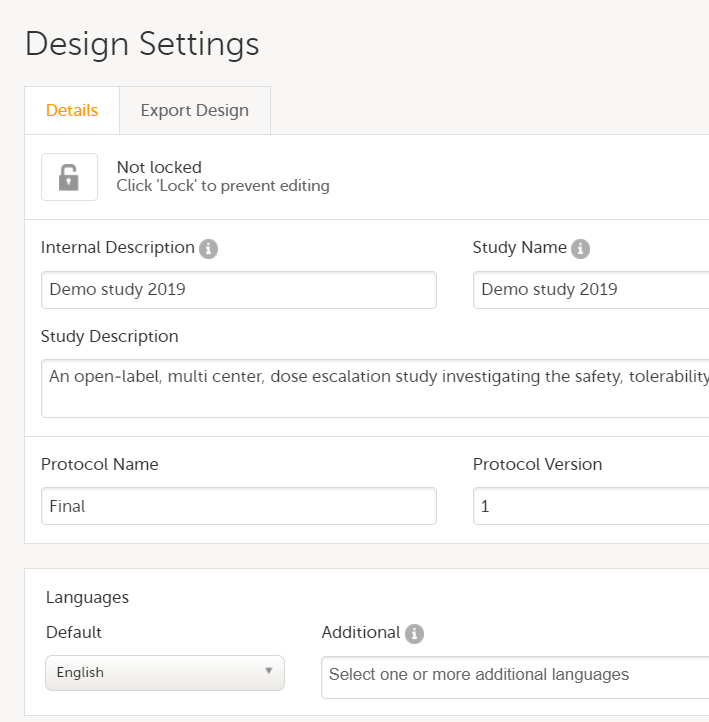 |
| Global-Designer settings | 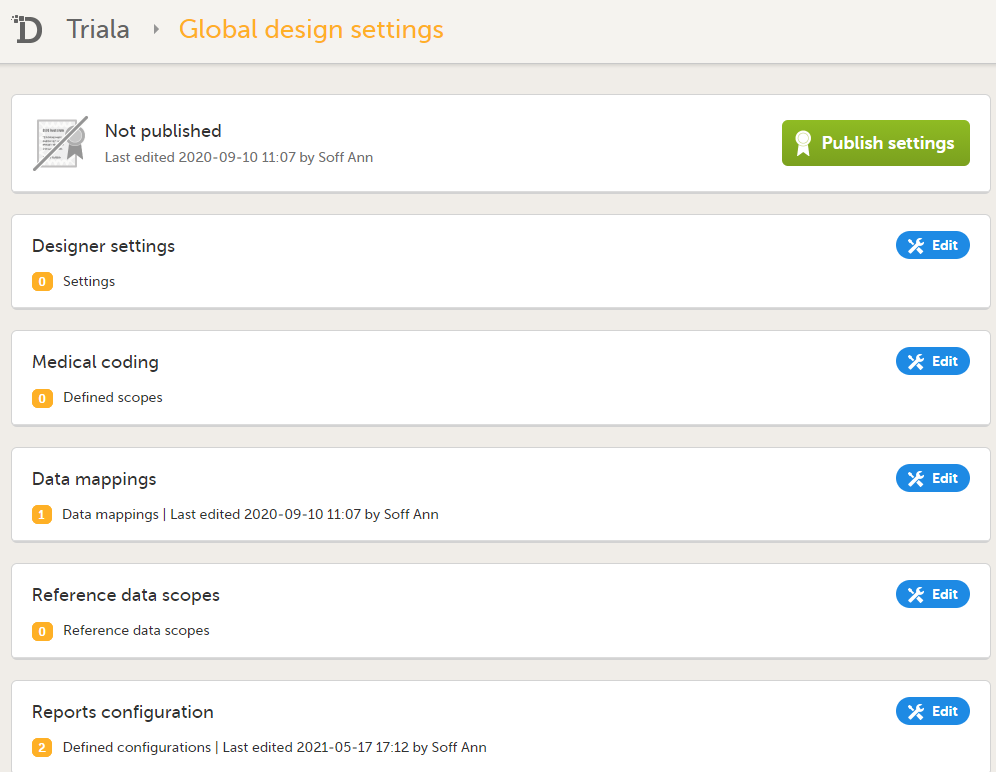 |
| Global-Medical coding | |
| Global-Data mappings | |
| Global-Reference data scopes | |
| Global-Reports configuration | |
| Settings-Selection view | 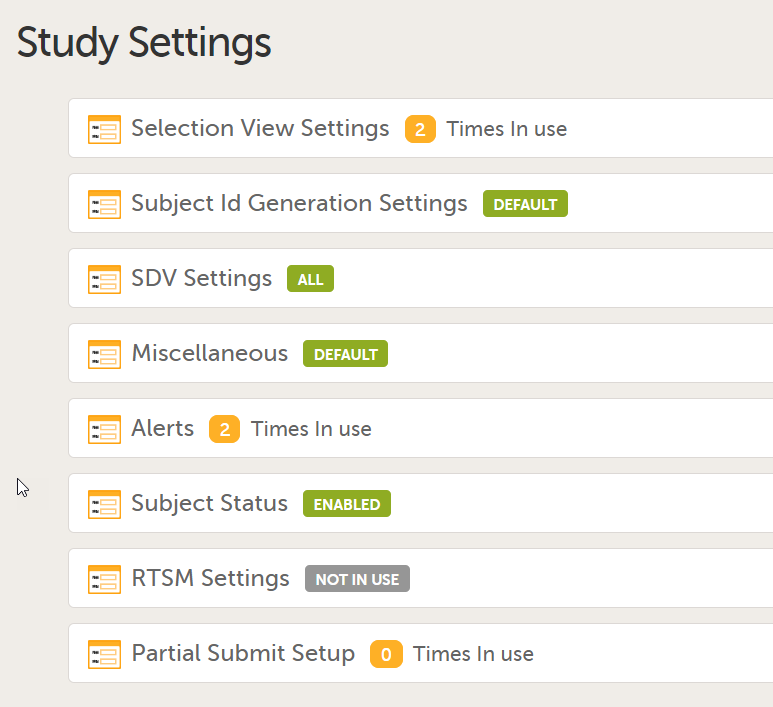 |
| Settings-Subject Id Generation | |
| Settings-SDV | |
| Settings-Miscellaneous | |
| Settings-Alerts | |
| Settings-Subject Status | |
| Settings-RTSM | |
| Settings-eLearning | |
| Settings-Partial Submit Setup (Japanese PMS studies only) | |
| Roles | 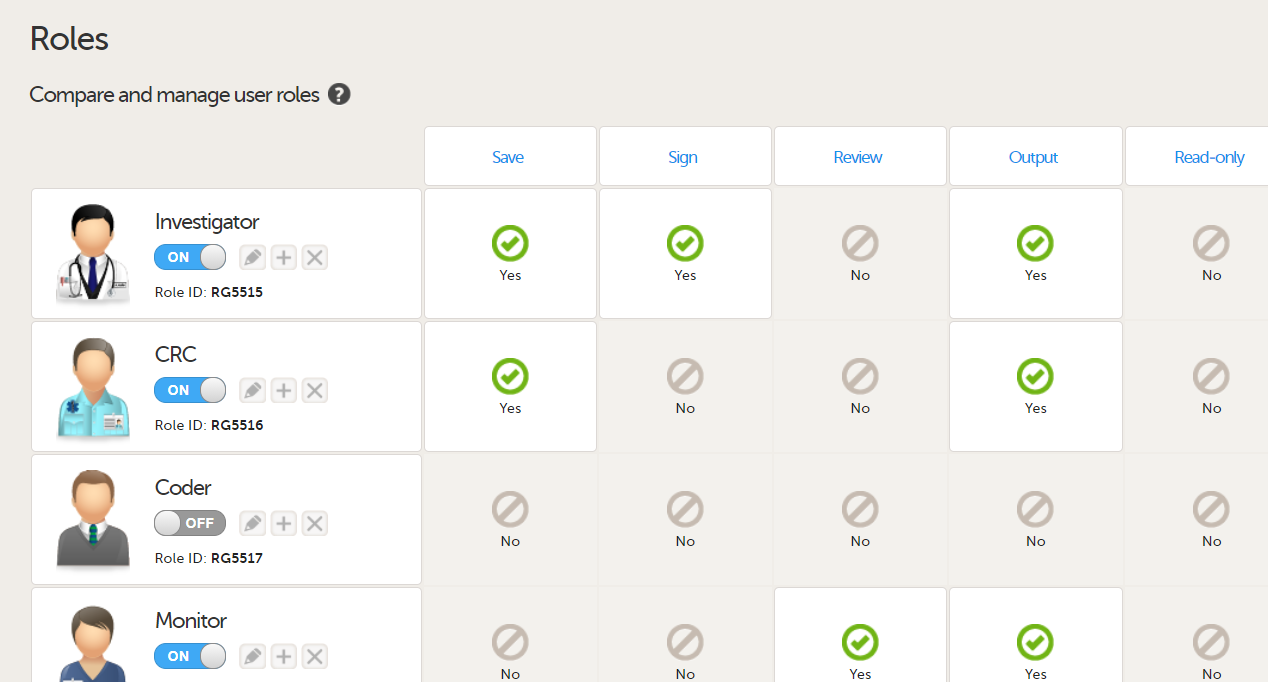 |
| Forms | 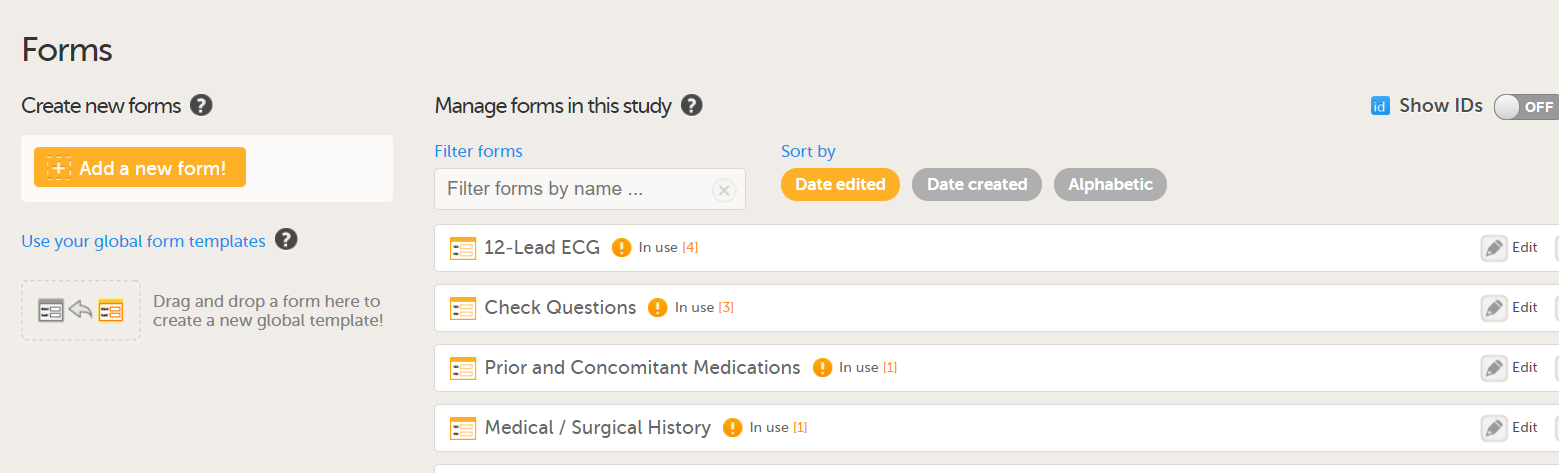 |
| Items and Groups | 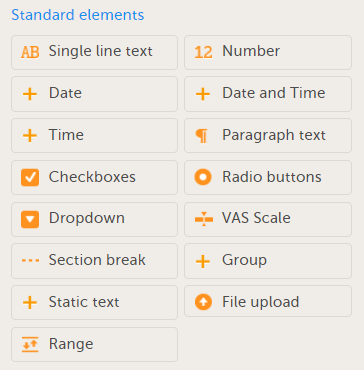 |
| Study workflow-Events | 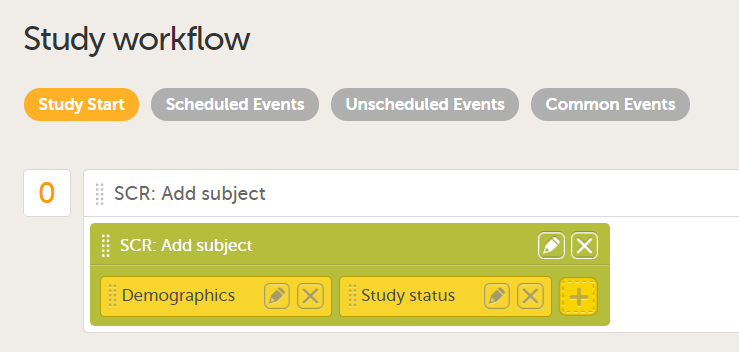 |
| Study workflow-Activities | |
| Study workflow-Forms | |
| Viedoc Me reminder | 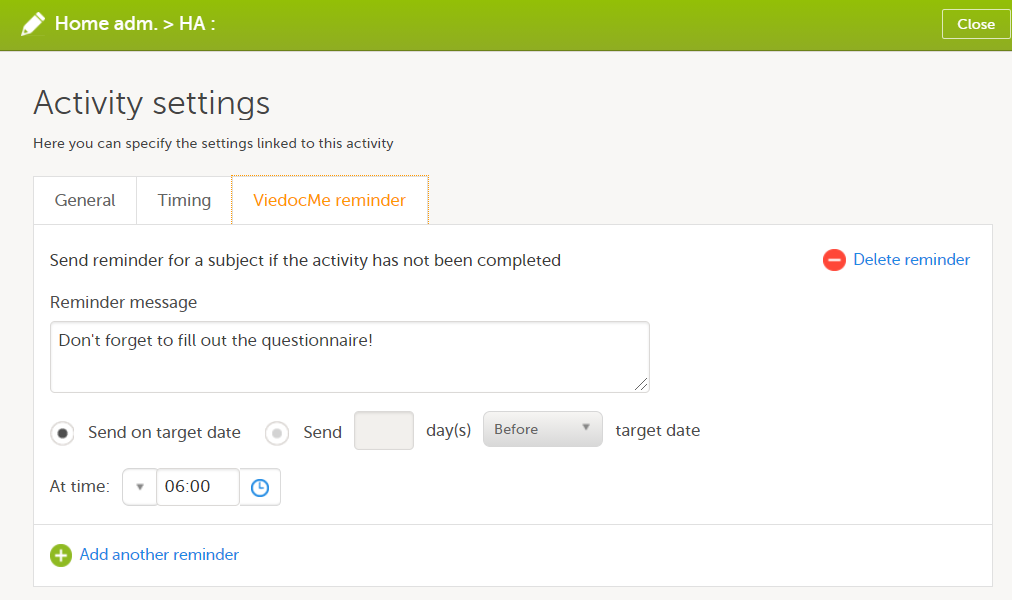 |
| Functions and Conditions |
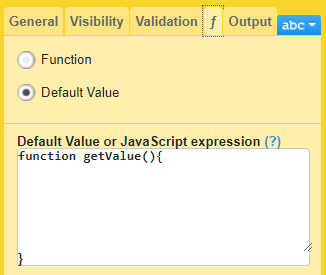
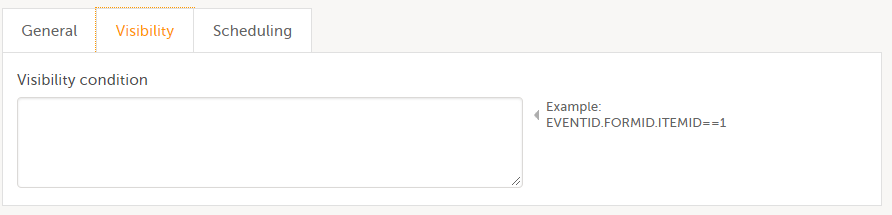
|
| Data checks | 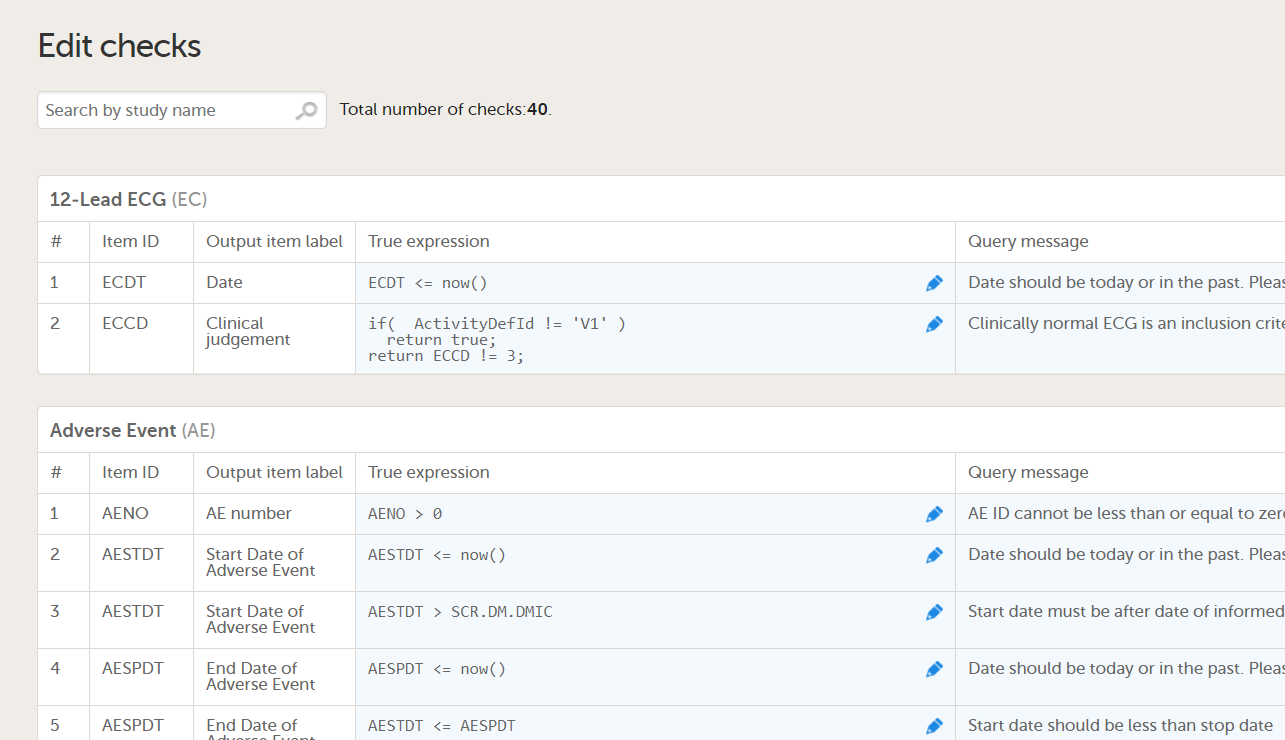 |
| Code lists | 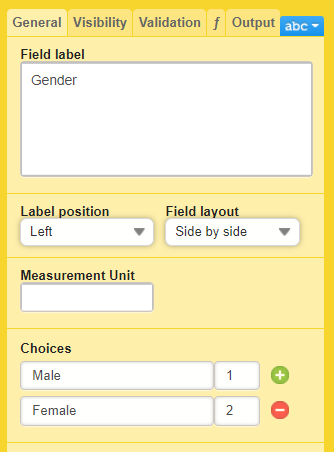 |
The report is self-explanatory but in the following sections you can find useful tips on how to navigate and understand some content of the file:
In Designer, if data mappings are defined:
...they show up in the Global-Data mappings sheet:
Note! Only the names of the data mappings are listed. For details about a data mapping, refer to the Define-XML file.
In Designer, if Include single forms and items is selected in the SDV Settings:

...it is marked (X) in the SDV Settings sheet:

...and items with SDV settings are marked (X) in the Items and Groups sheet in the SDV column:
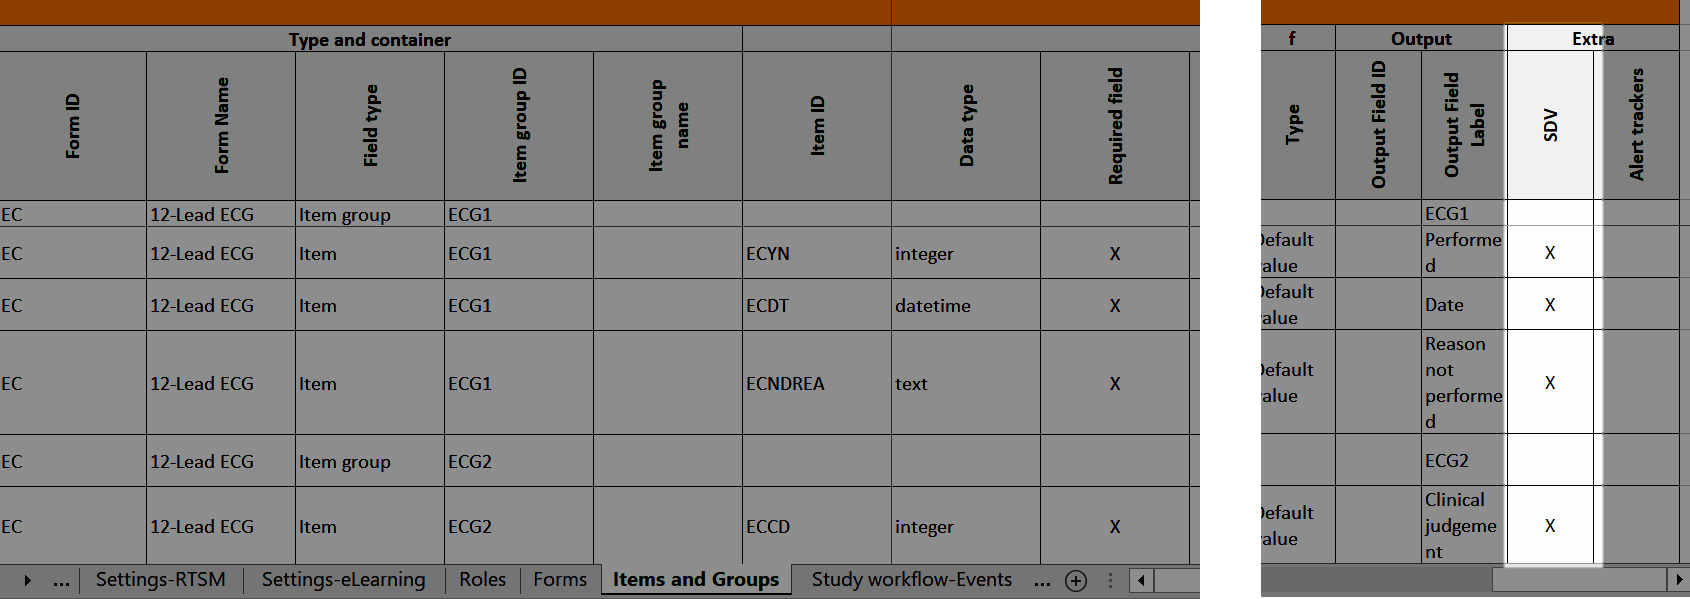
In Designer, if alerts are set in Study Settings:
...they show up in the Settings-Alert sheet:
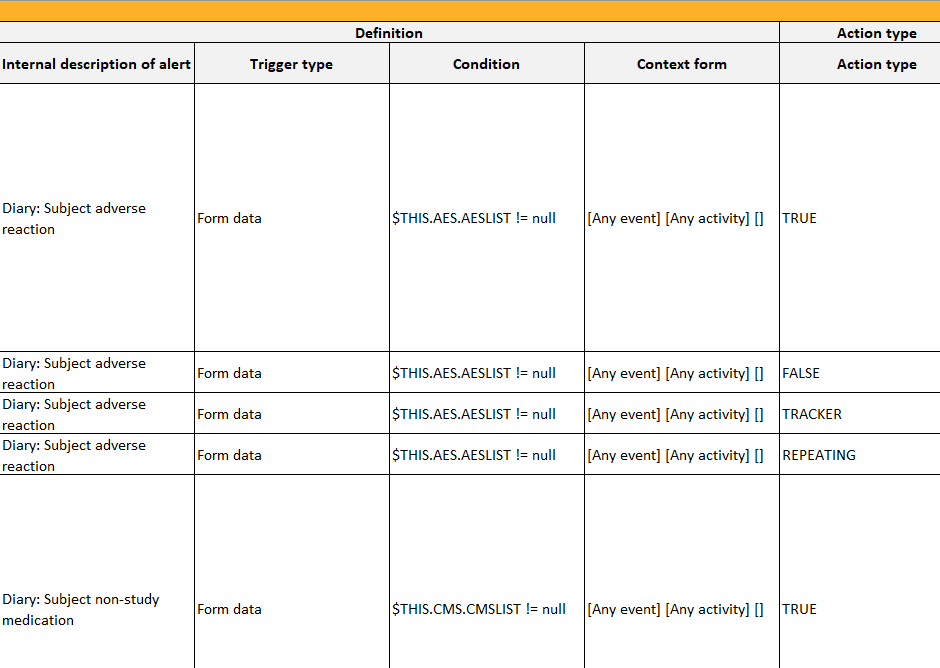
In Designer, if alert trackers are set:
...they show up in the Items and Groups sheet:
In Designer, if RTSM settings are set:
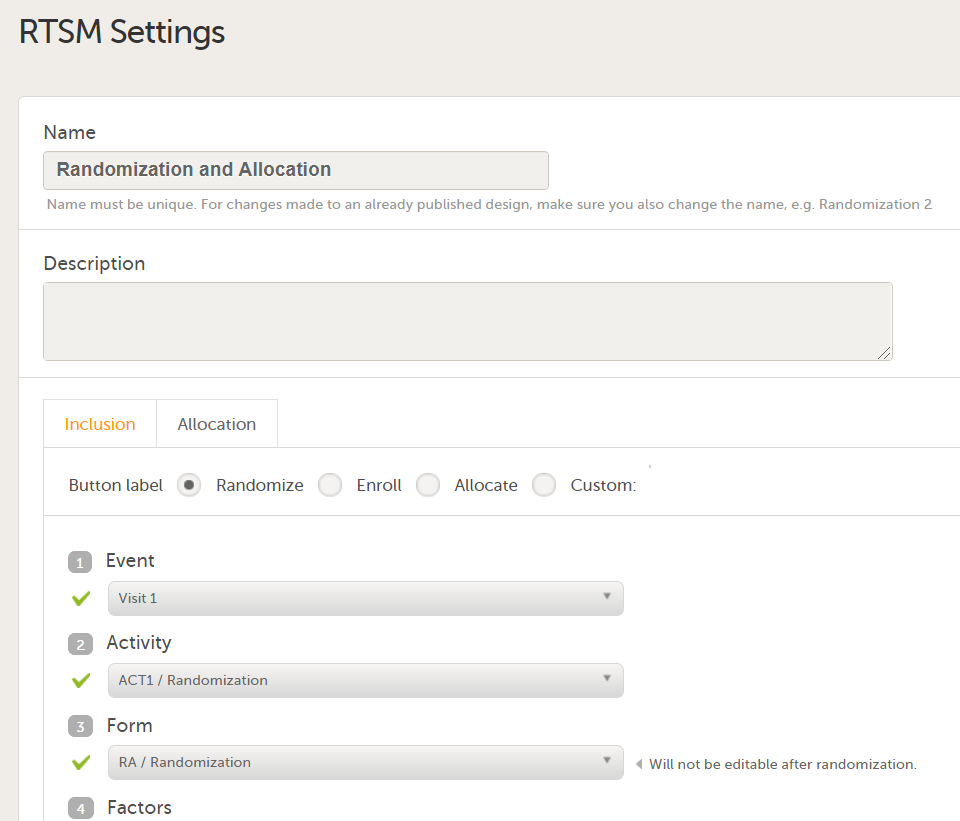
...they show up in the Settings-RTSM sheet:
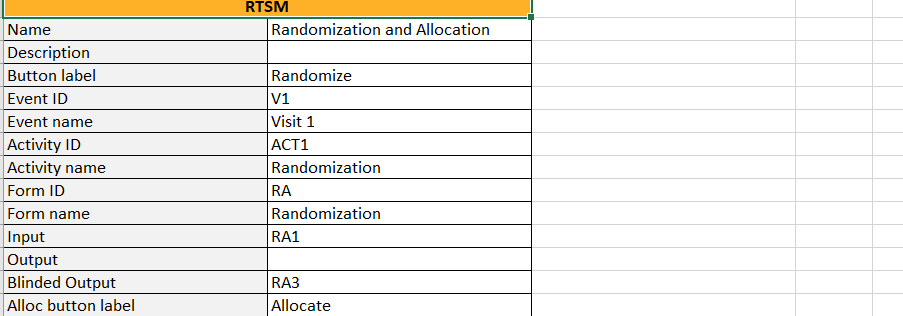
...with advanced allocation settings showing up below the RTSM settings, column-wise:
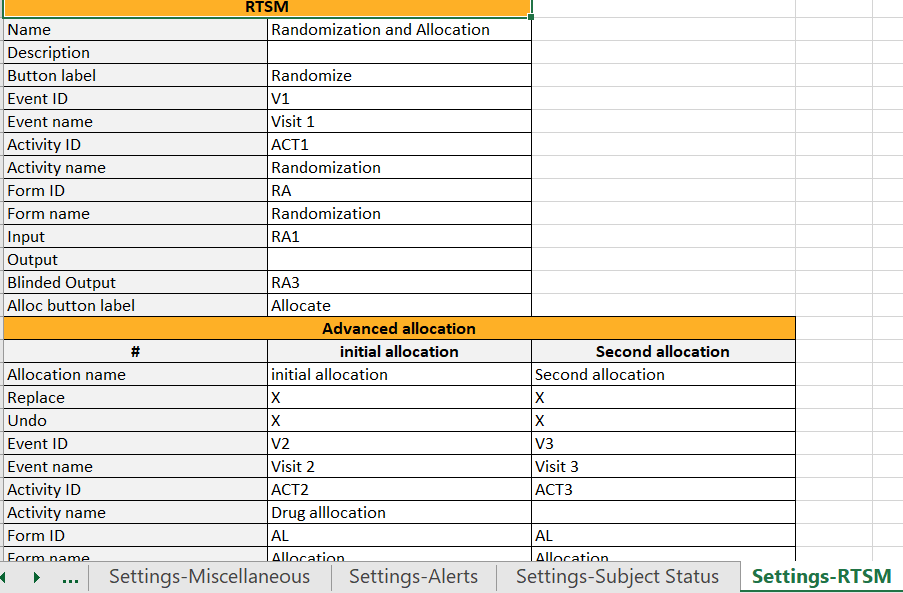
In Designer, for Japanese PMS studies only, in the Complete Configuration report, the Partial Submit Setup:
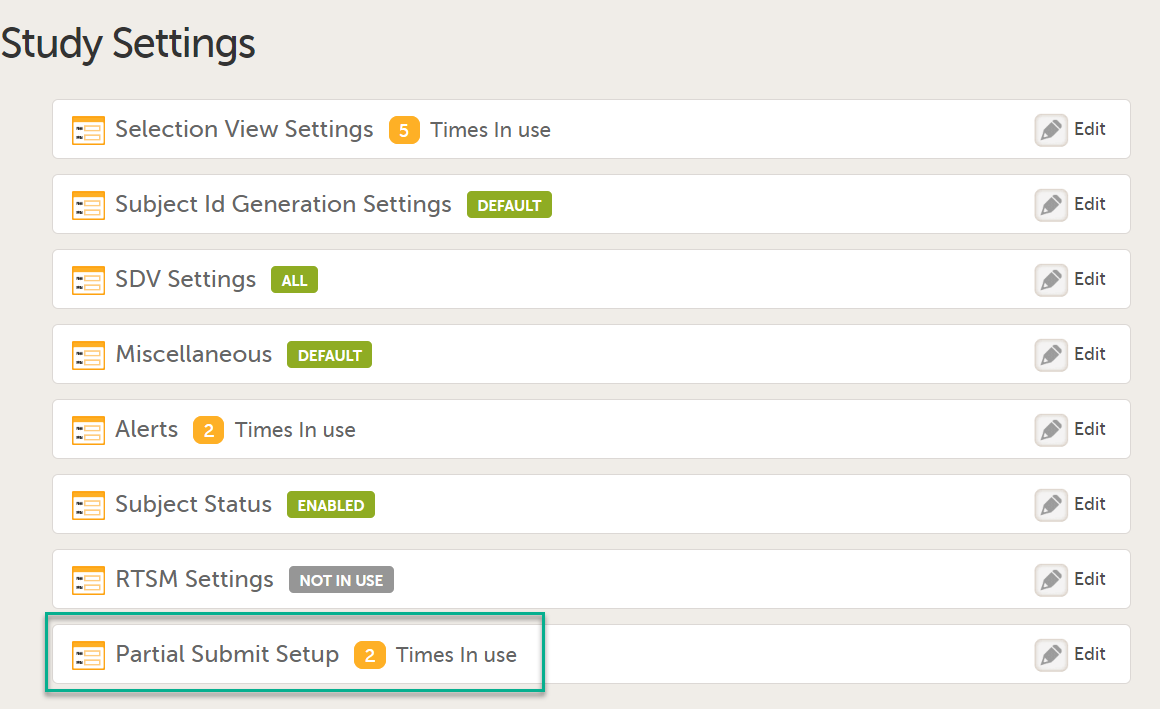
shows up in the Settings-Partial Submit Setup sheet:
The Settings-Partial Submit Setup sheet contains the following information:
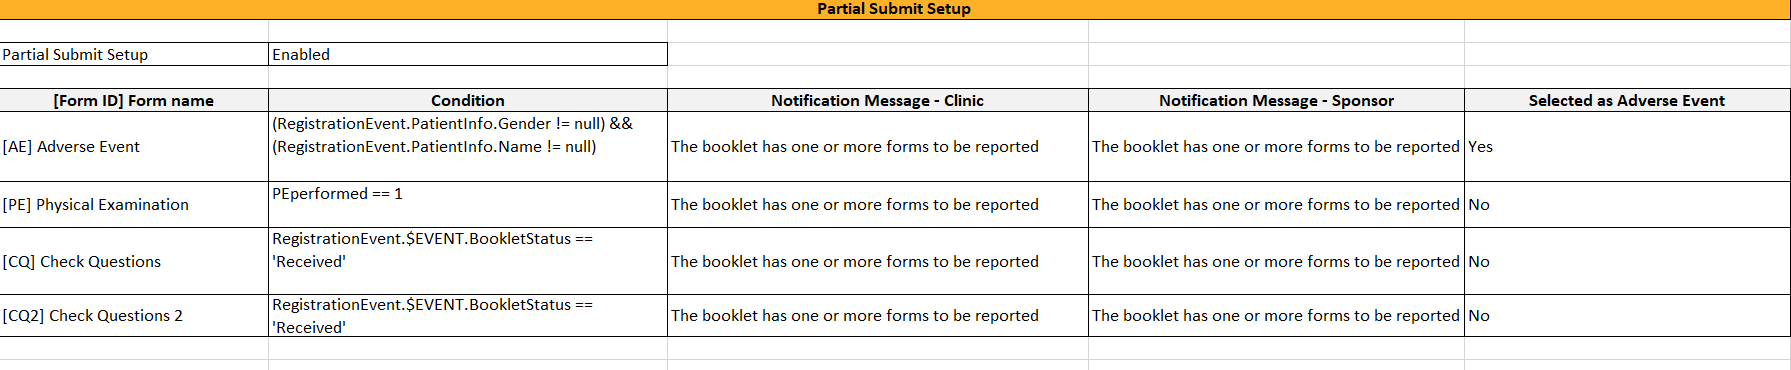
In Designer, if a copy on advanced condition is defined, it is marked (X) in the Copy on advanced condition column:
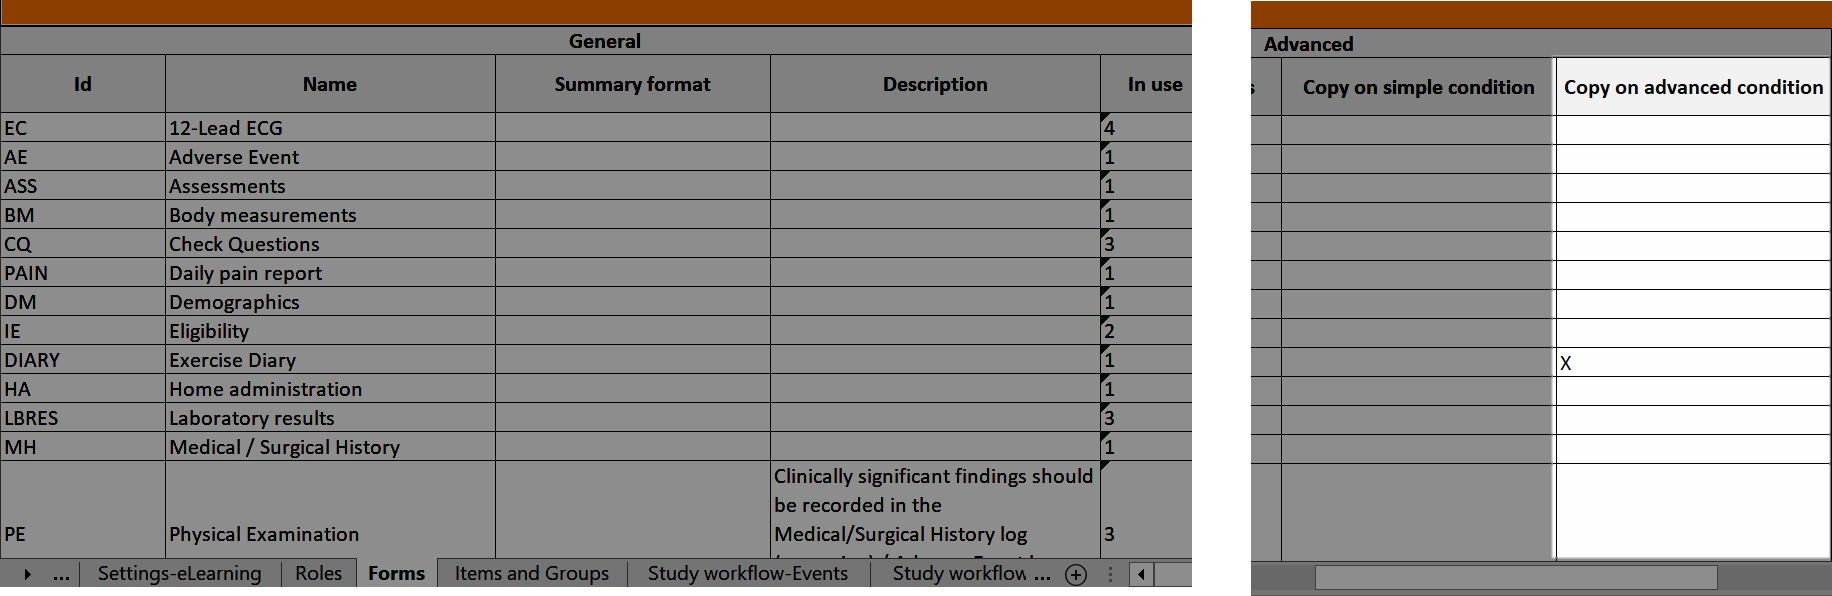
...and the definition of the copy condition shows up in the Function and Conditions sheet in the Type column as AdvancedCopyCondition:
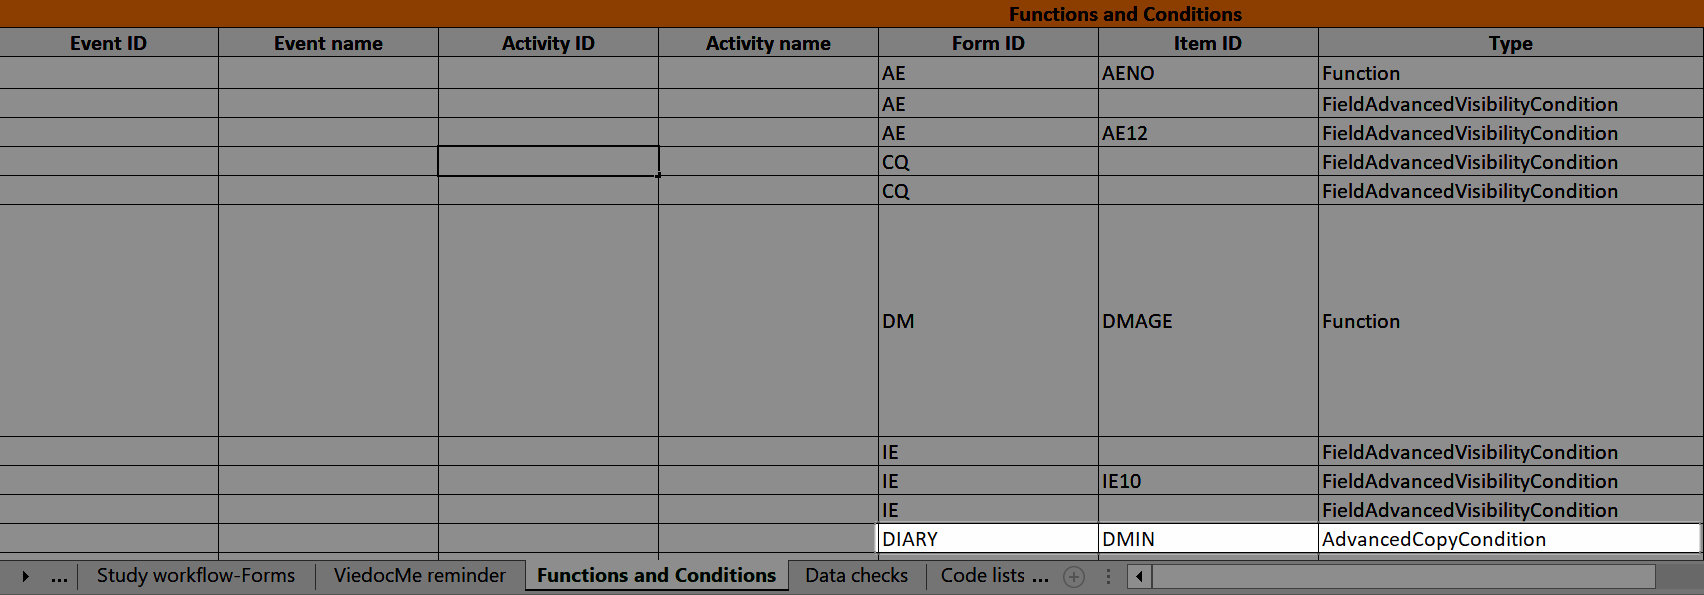
Forms that are included in subject-initated events are marked (X) in the Viedoc Me column. If a Viedoc Me form is translated, the languages and their cultures show up in the Additional languages column.
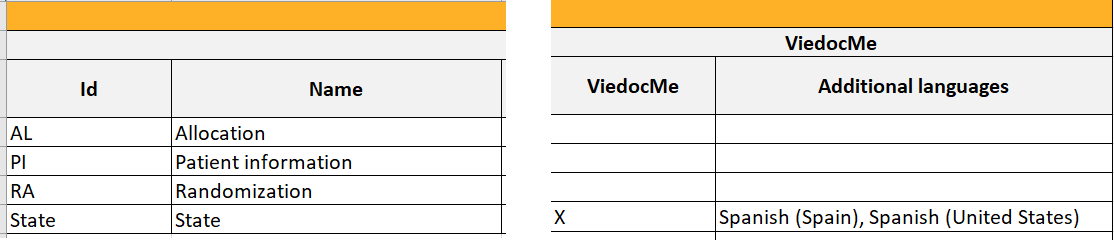
The Items and Groups sheet shows all the properties that are set for the design items, thus, only some of the properties apply to an individual item.
Item group ID and Item group name identify the item groups. They also specify what item group the individual items are located in. In the below example, an item group named "Inclusion criteria" is specified. The next row specifies an item named "IEIC" that is located inside the item group:
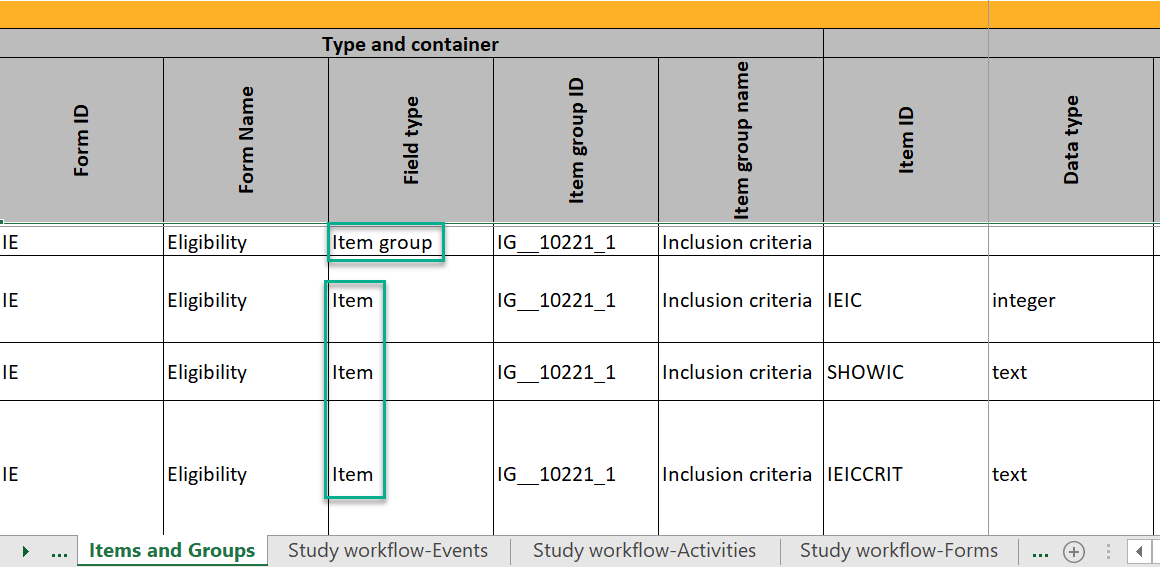
If an item group has been configured as a repeating item group in the study design, the following columns specific to the repeating item group have been added to the Items and Groups sheet:
For non-repeating item groups, the Min repeat and Max repeat cells are empty and the Repeating cell shows No.
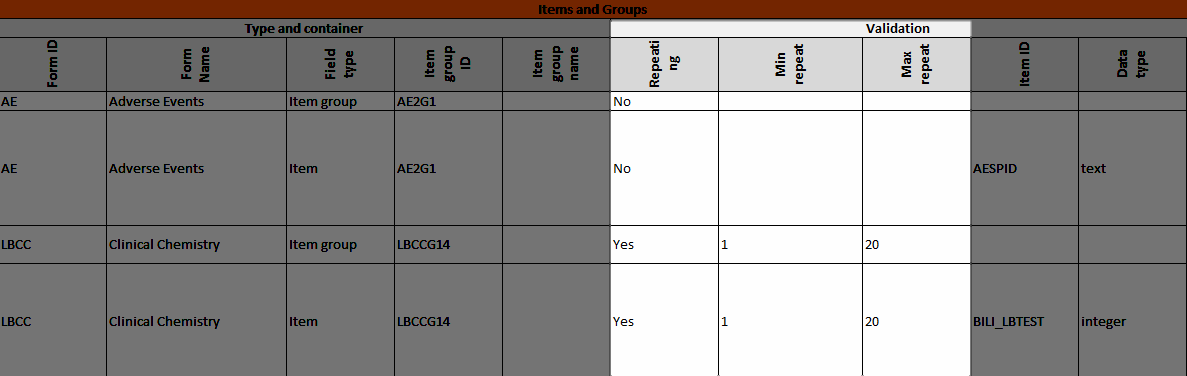
The Data checks column shows if data checks (edit checks) are implemented:
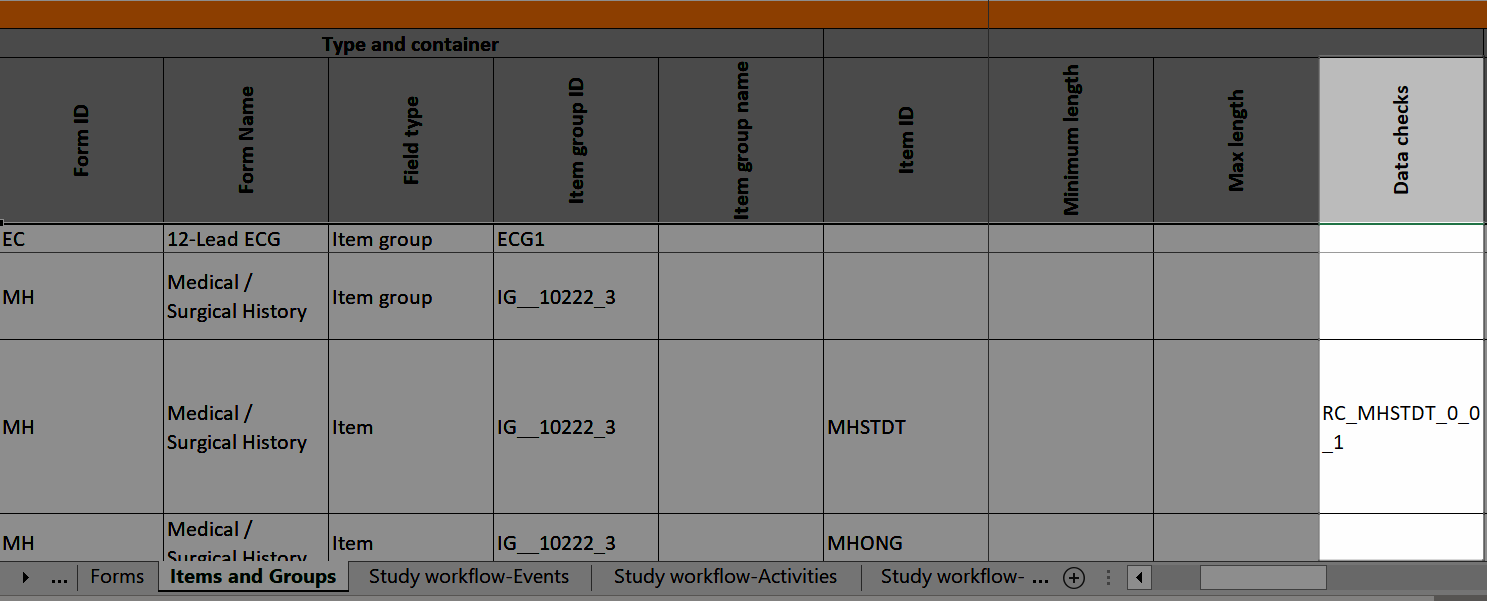
...and the definition of the data check in JavaScript shows up in the Data checks sheet:
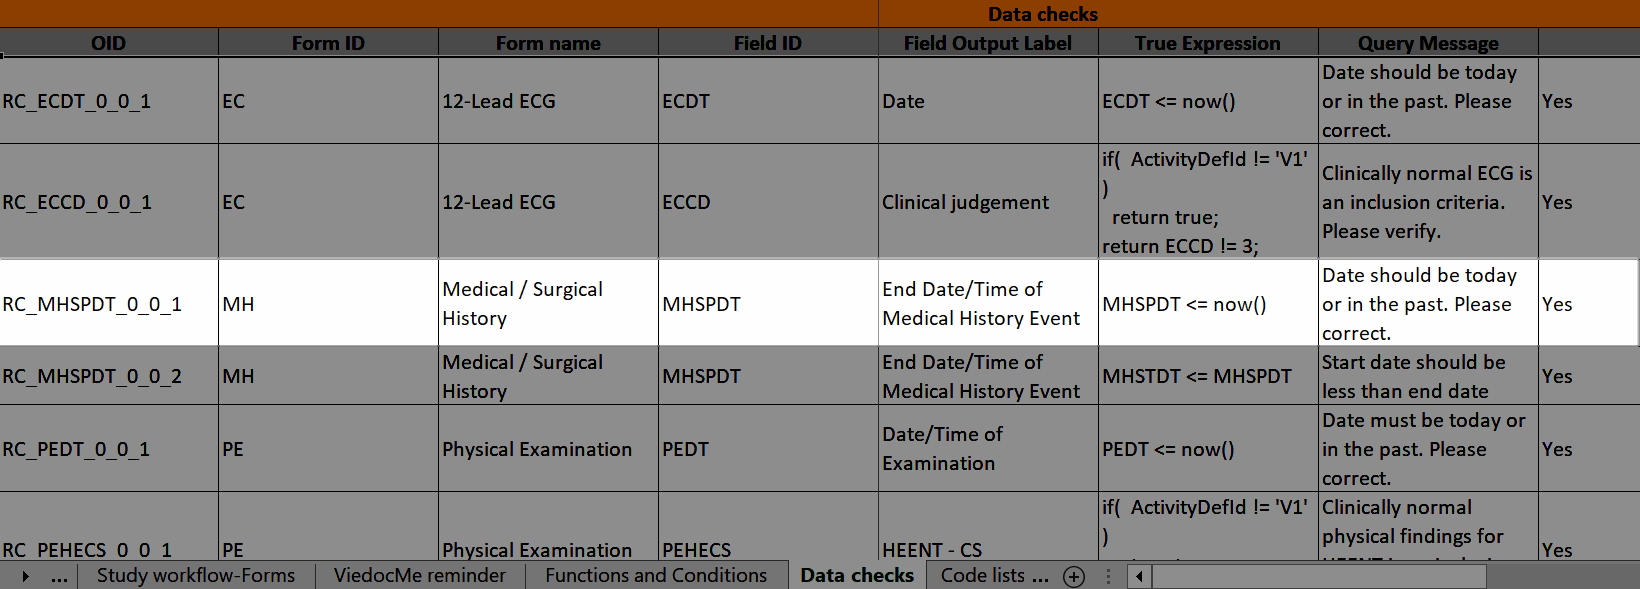
In Designer, if an advanced visibility condition is defined:
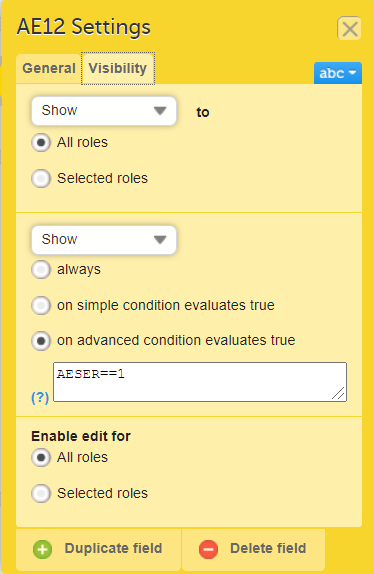
...it is marked (X) in the Show on advanced condition column:
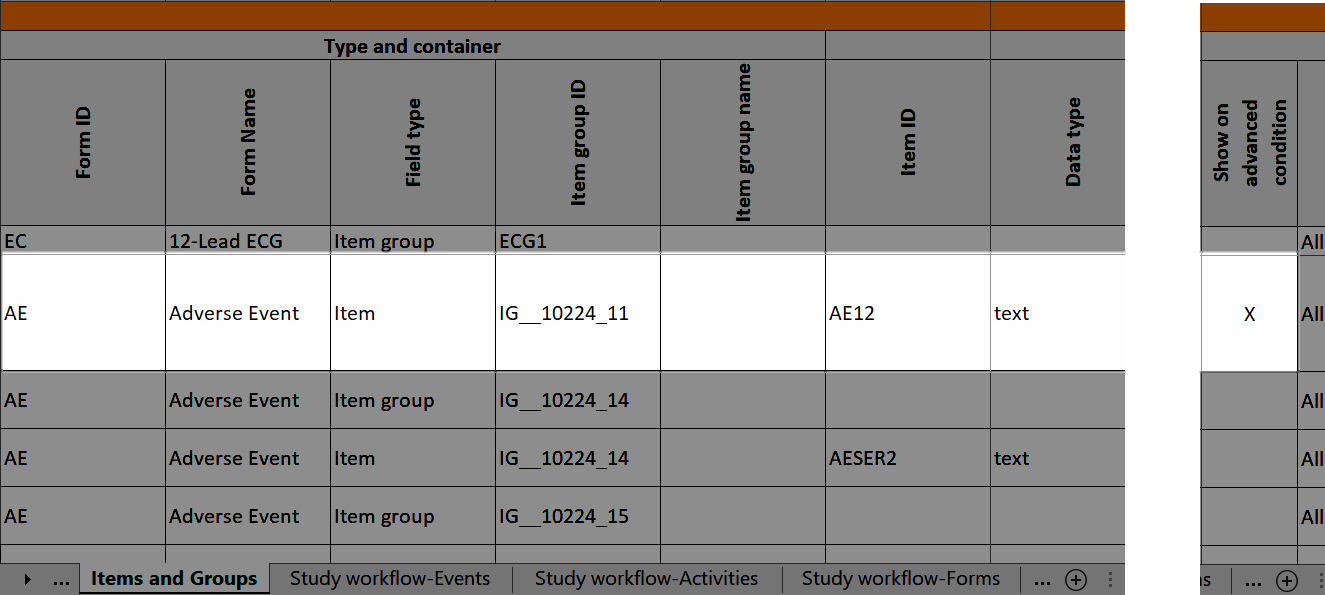 ...and the definition of the advanced visibility condition shows up in the Functions and Conditions sheet in the Type column as FieldAdvancedVisibilityCondition:
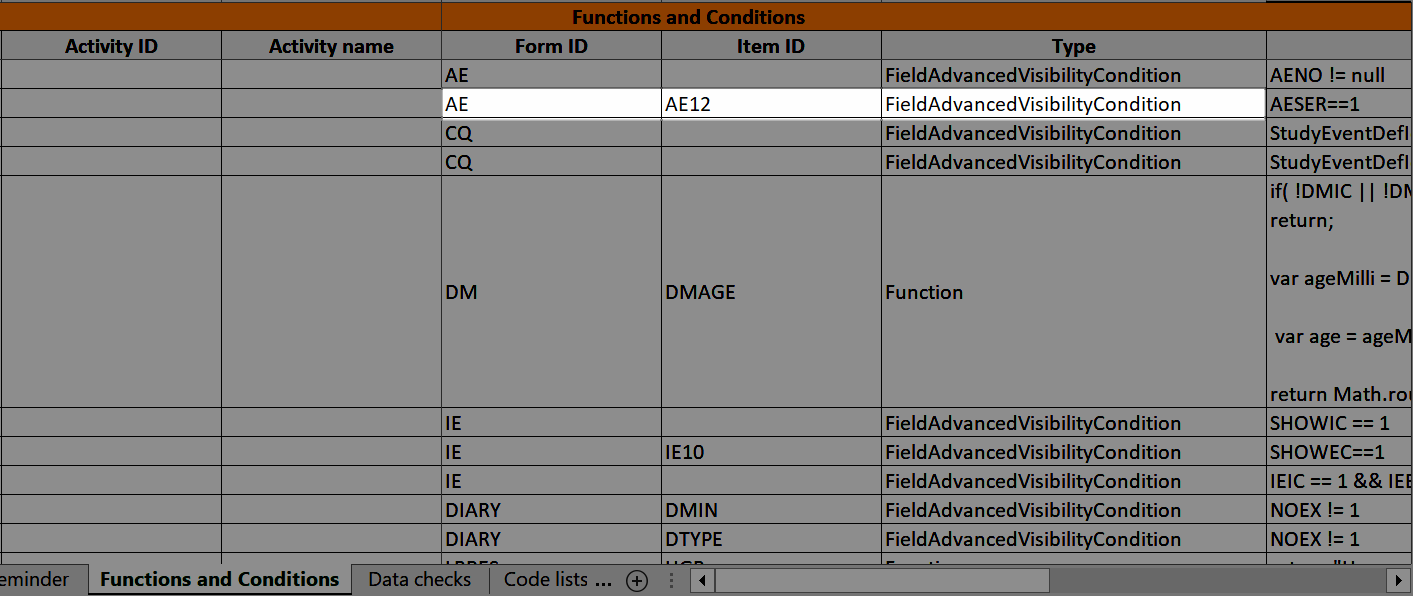
In Designer, if an item is hidden in an event/activity:
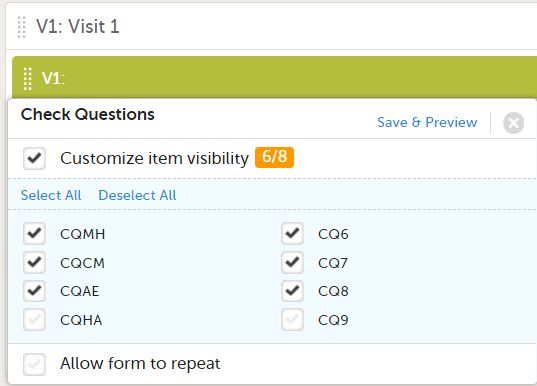
...the event/activity in which the item is hidden shows up in the Hidden in activity column:
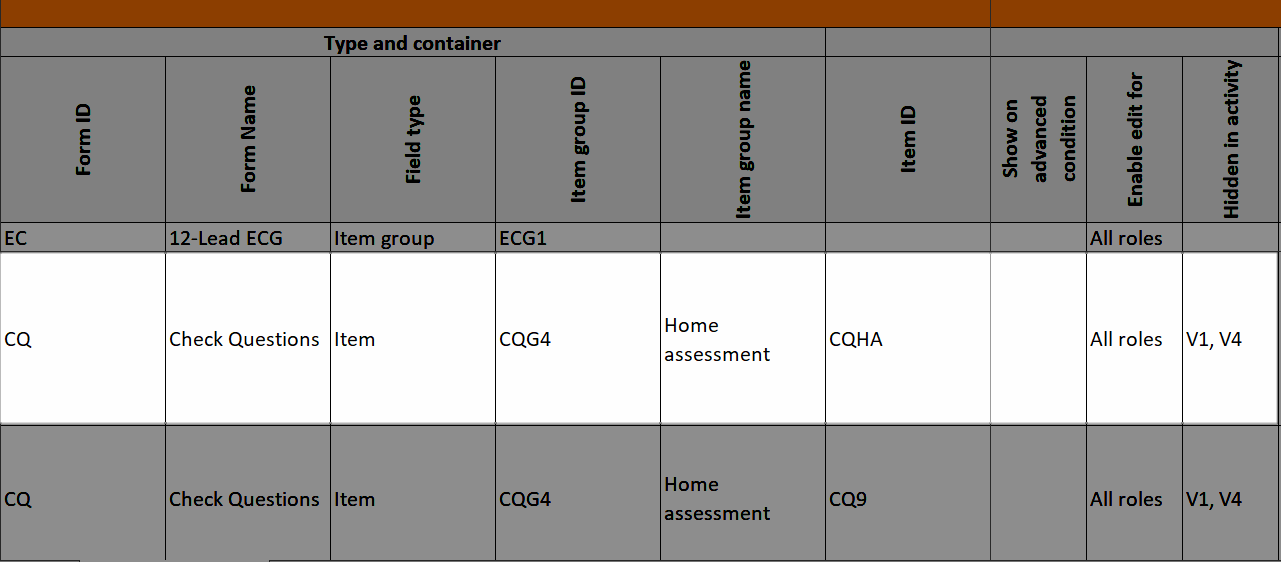
...and the hidden items show up in the Study workflow-Forms sheet in the Hidden items column:
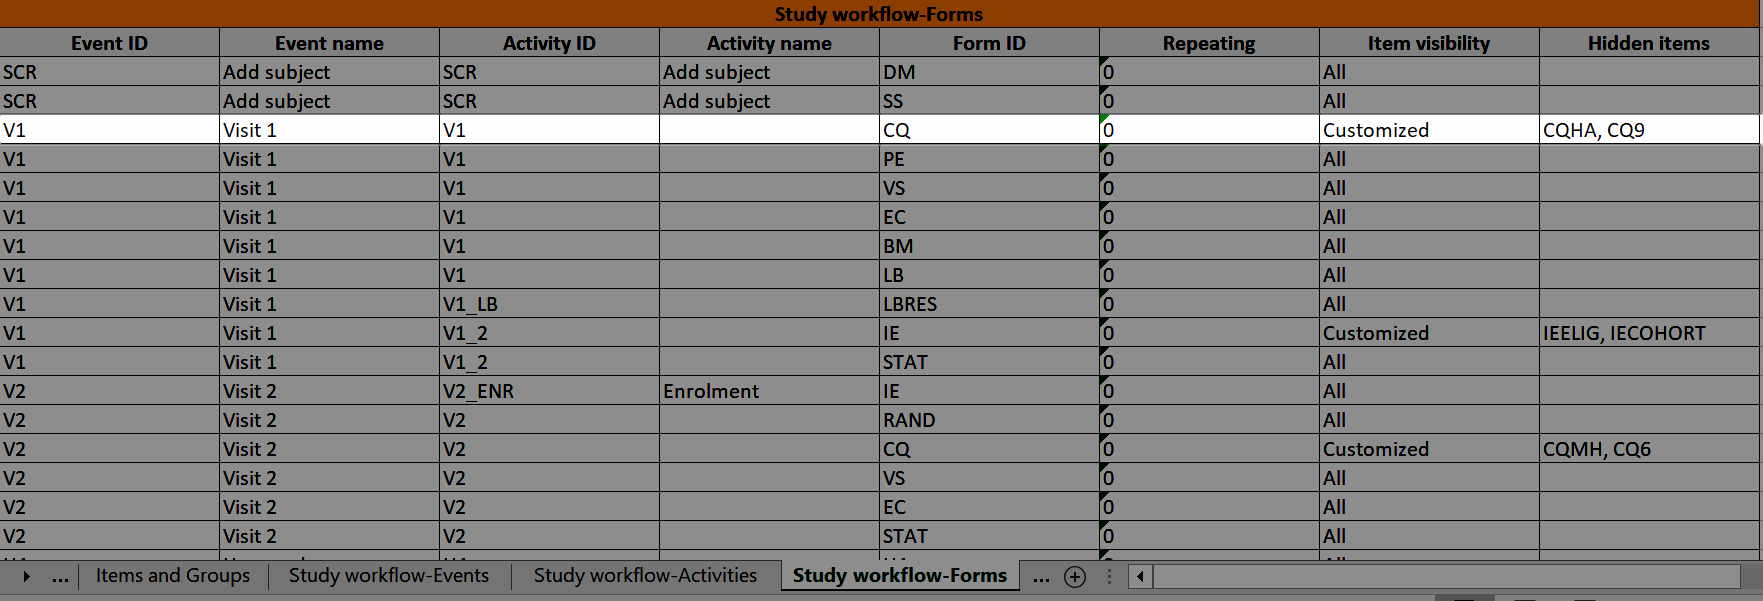
In Designer, if a function or a default value is set to initiate an item:
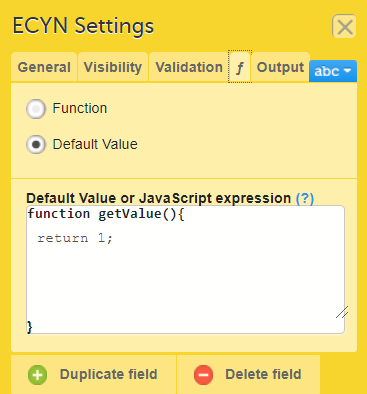
...it shows up in the f-Type column:
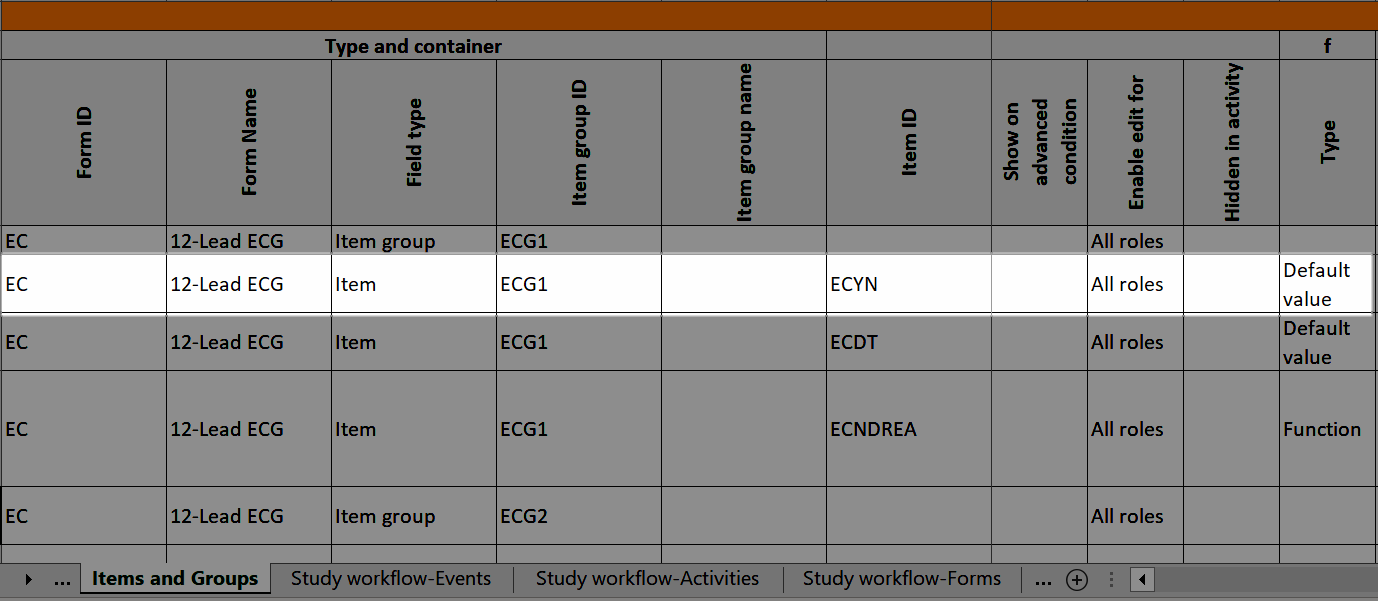
...and the definition of the default value or function shows up in the Functions and Conditions sheet:
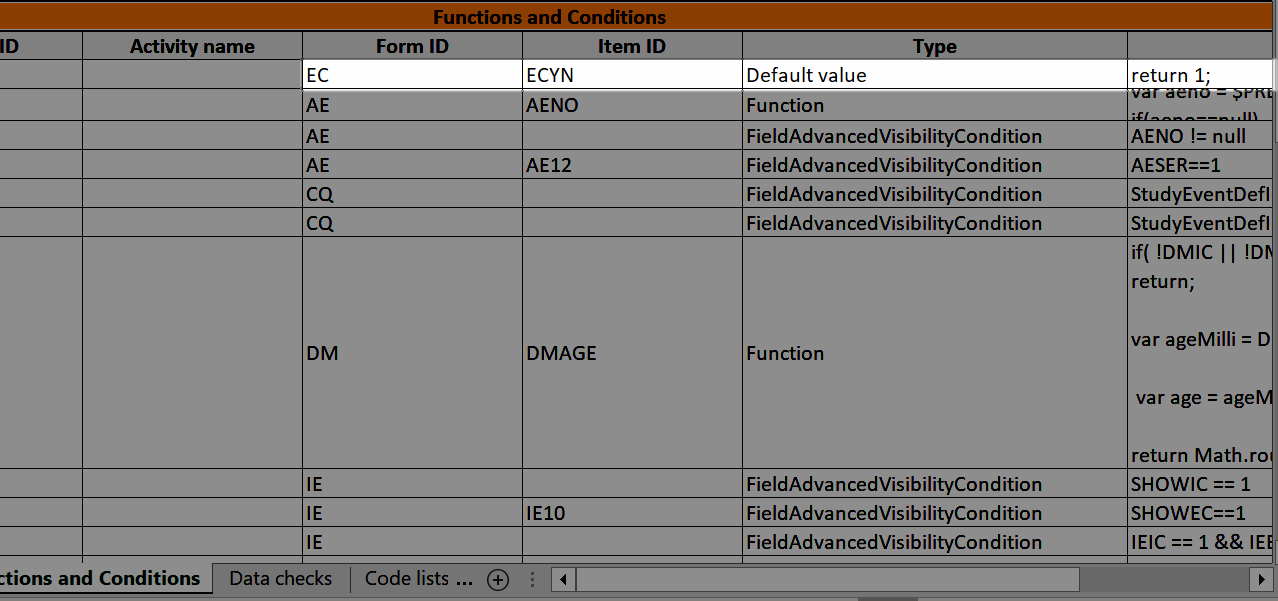
The SDV column shows if the item is set to be SDV:d, see Settings-SDV.
The Alert trackers column shows the name of the trackers that specify tracking on the item, see Alert trackers.
In Designer, if a visibility condition is defined:
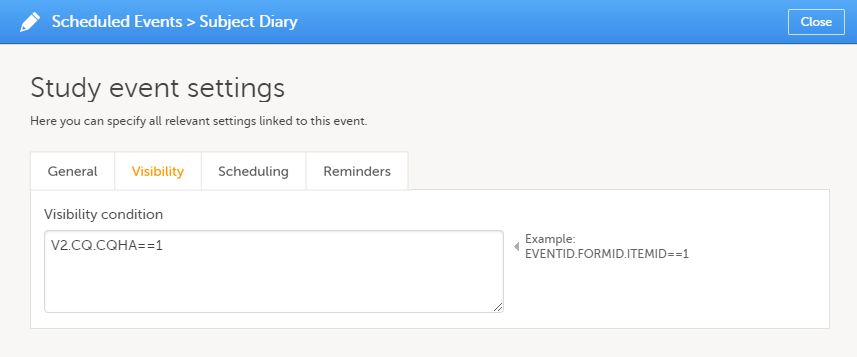
...it is marked (X) in the Visibility condition column:
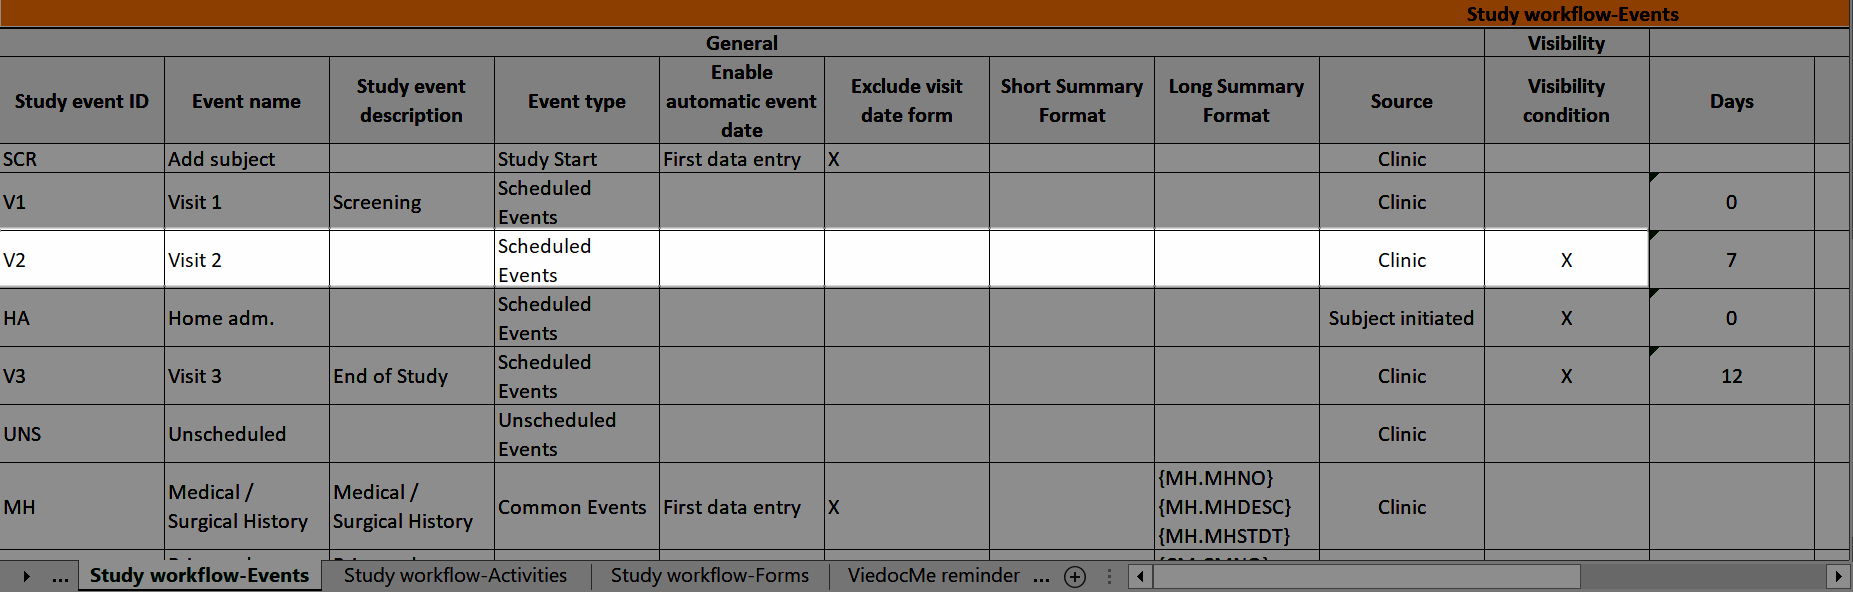
...and the definition of the visibility condition shows up in the Functions and Conditions sheet in the Type column as EventAdvancedVisibilityCondition:
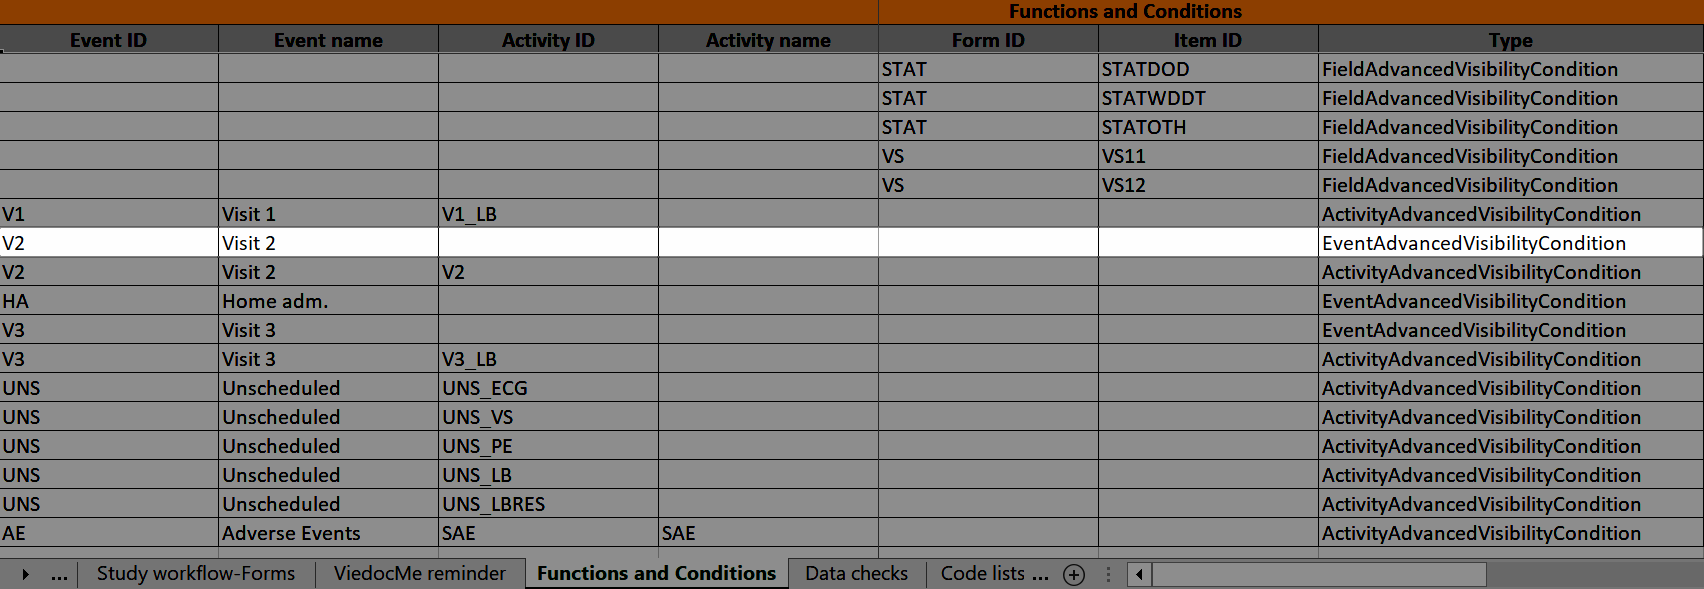
The Study event ID and Event name columns show what event the activity belongs to:
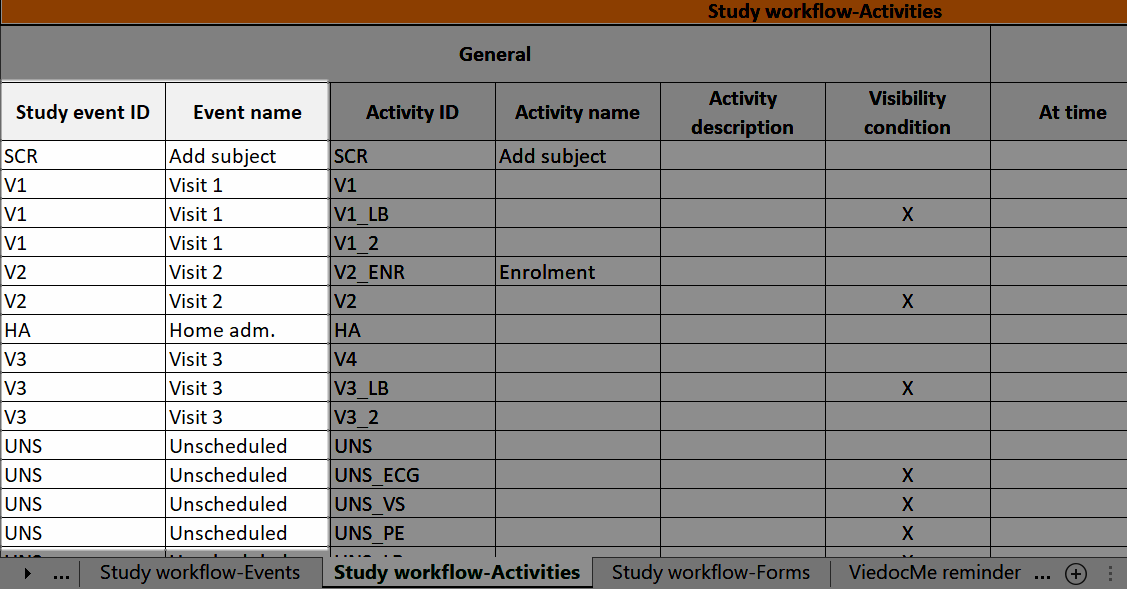
In Designer, if a visibility condition is defined:
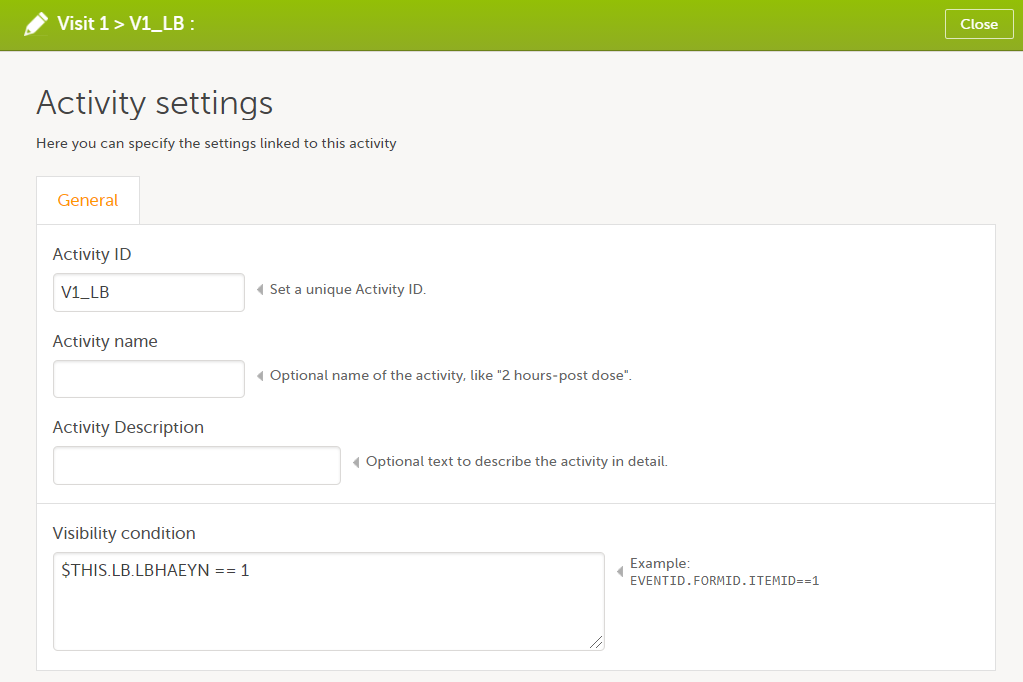
...it is marked (X) in the Visibility condition column:
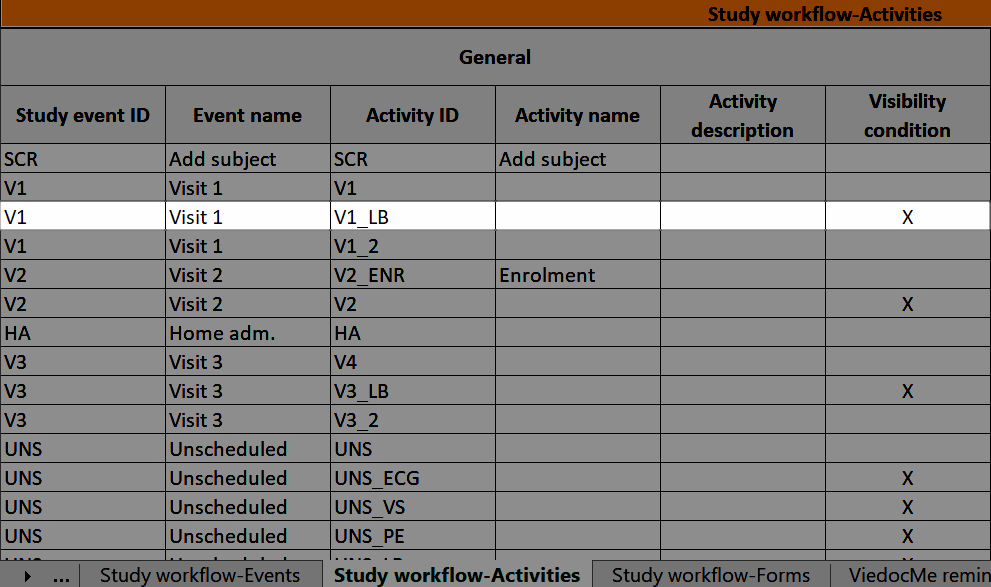
...and the definition of the visibility condition shows up in the Functions and Conditions sheet in the Type column as ActivityAdvancedVisibilityCondition:
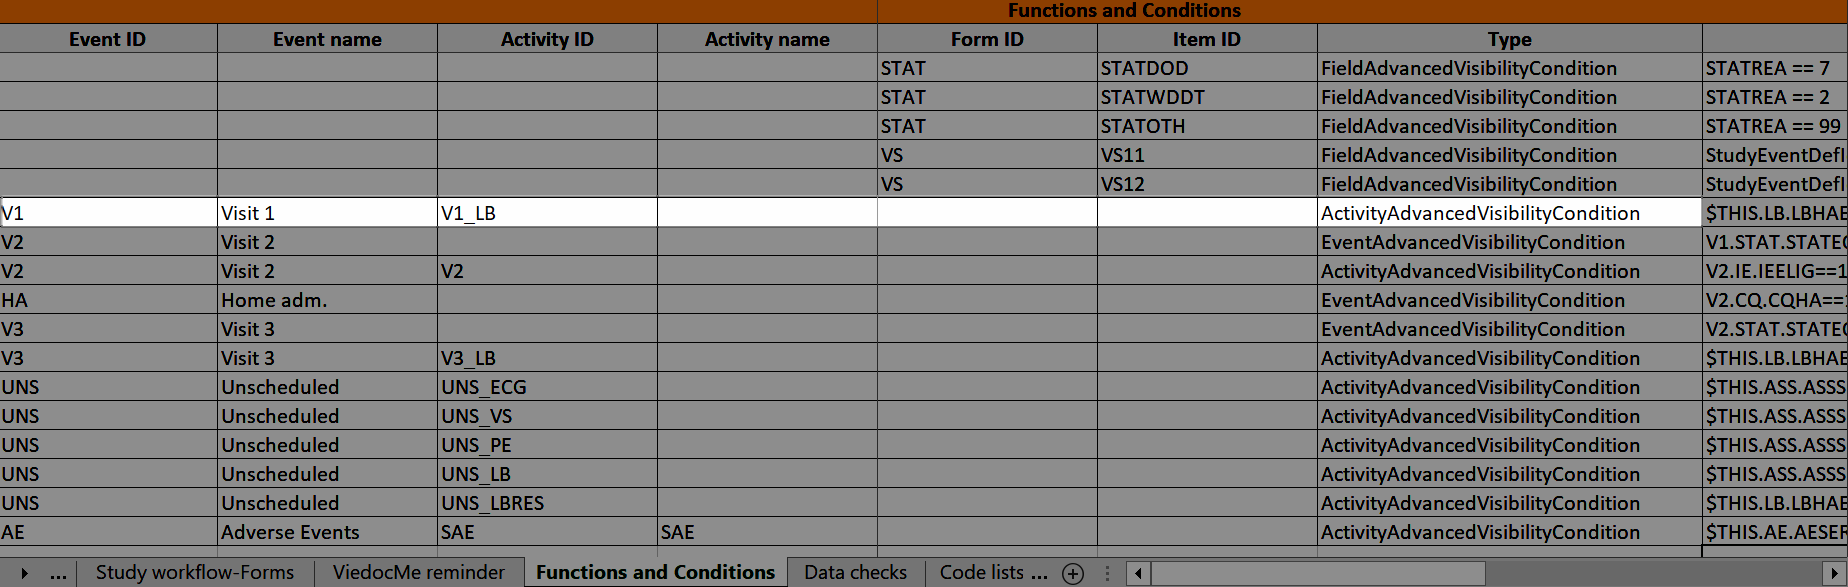
The Viedoc Me reminder column shows if the activity defines a Viedoc Me reminder. The reminder settings show up under the Viedoc Me reminder sheet, see Viedoc Me reminder.
The Event ID, Event name, Activity ID, and Activity name columns show which event and activity the form belongs to:
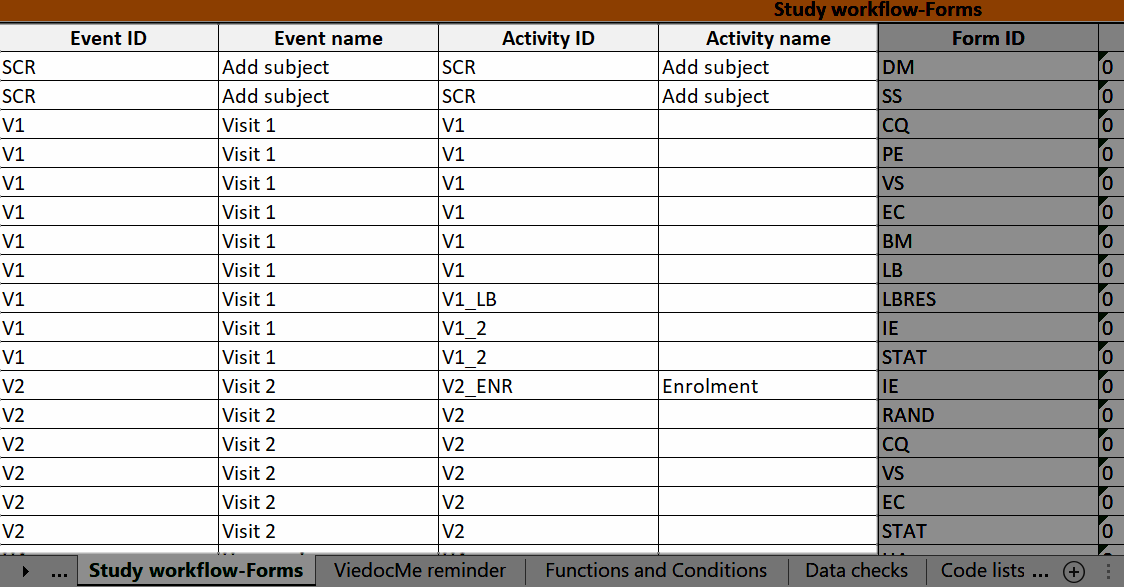
In Designer, if Viedoc Me reminders are set:
...they show up in the Viedoc Me reminder sheet:
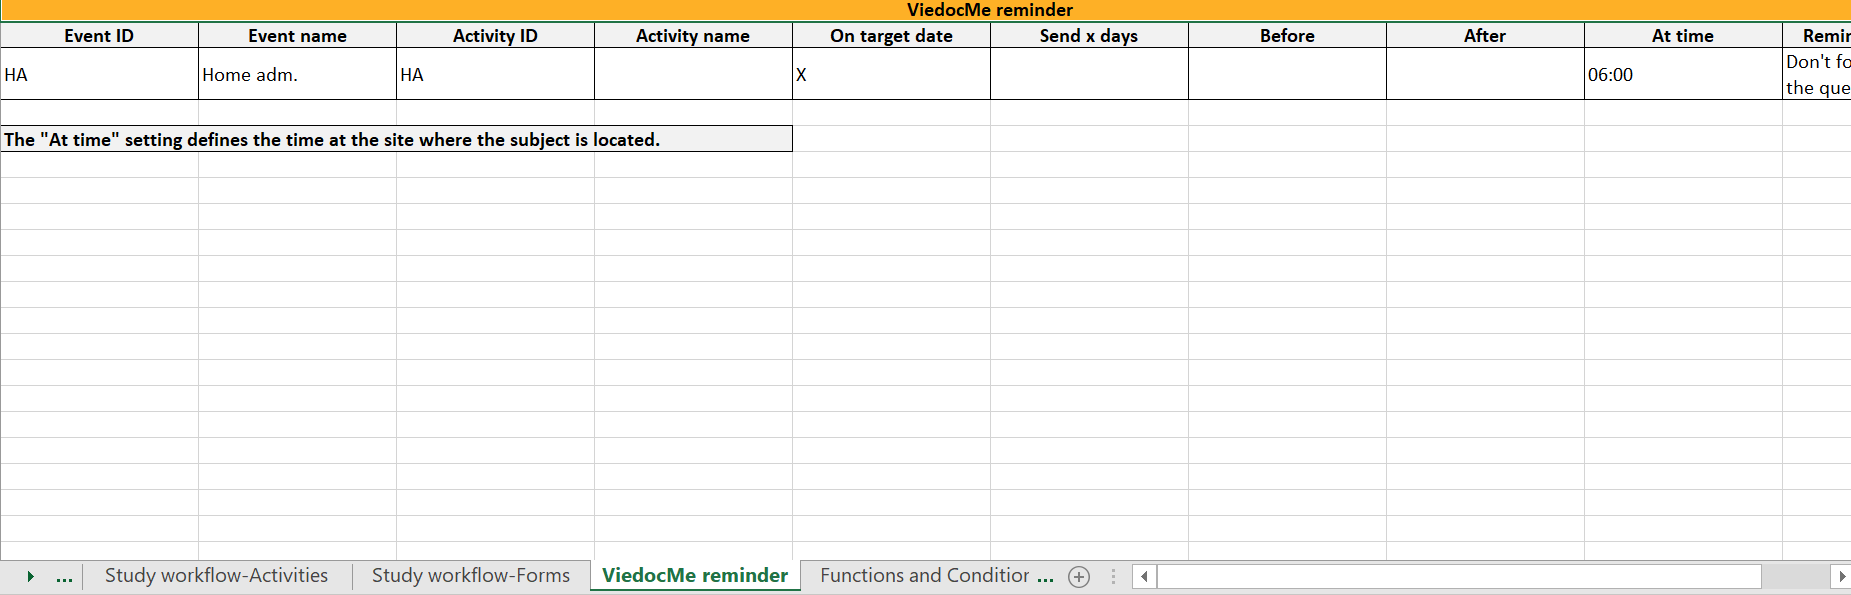
The Event ID, Event name, Activity ID, and Activity name columns define what event and activity the reminder belongs to.
The OID, Form ID, Form name, Field ID, and Field Output Label columns define the location of the data check.

Disclaimer: The overall structure of this report with regards to names and the order of columns can change to reflect future extensions of Viedoc Designer.
This lesson provides information about the Clinical Data Interchange Standards Consortium (CDISC) Operational Data Model (ODM) file structure and terminology, to help in interpreting the Viedoc study design ODM XML file structure and the data export output ODM XML file structure. Understanding this structure is useful when using the design version compare option to track changes between study design versions.
The ODM is a vendor-neutral, platform-independent format that facilitates data exchange and archiving. It includes metadata, clinical data, administrative data, and audit information, that is essential for study setup and execution.
In Viedoc Designer, the export function is used to export a study design to a Clinical Data Interchange Standards Consortium (CDISC) Operational Data Model (ODM) file. The attributes of each item in the ODM file, include data type, name, and Object Identifier (OID) which follow the ODM standard. The study design can be exported with or without CDISC SDM and Viedoc extensions. The CDISC SDM extensions follow the CDISC Study/Trial Design Model in XML (SDM-XML). SDM is an extension of ODM, and defines three key sub-modules - structure, workflow, and timing - permitting various levels of detail in any representation of a clinical study’s design.
Viedoc extensions: Vendor extensions are unique attributes in Viedoc that are not part of the ODM standard.
These attributes are highlighted with the prefix v4: in the exported ODM file:

Note! When exporting designs from Viedoc Designer, you can exclude vendor extensions if you want to work with systems other than Viedoc.
The CDISC ODM file can be used for import into another project or another instance of Viedoc, for example a training instance. As the file is CDISC compliant, it can also be used in other systems equally compliant with CDISC standards.
The structure of exported clinical data has a hierarchy from high-level data down to individual items. It is important to understand the clinical data structure for exporting data, as it is structured in a way that is necessary for correct data handling. Each subject has multiple events, each event contains forms, item groups, and items.
The diagram below shows the differences in structure between the Viedoc Design ODM file structure and the data export ODM file structure from Viedoc Clinic.
Note! When exporting a data ODM from Viedoc Clinic, the MetaDataVersion includes the data for ALL designs that have been used to collect data for any data point in that export.
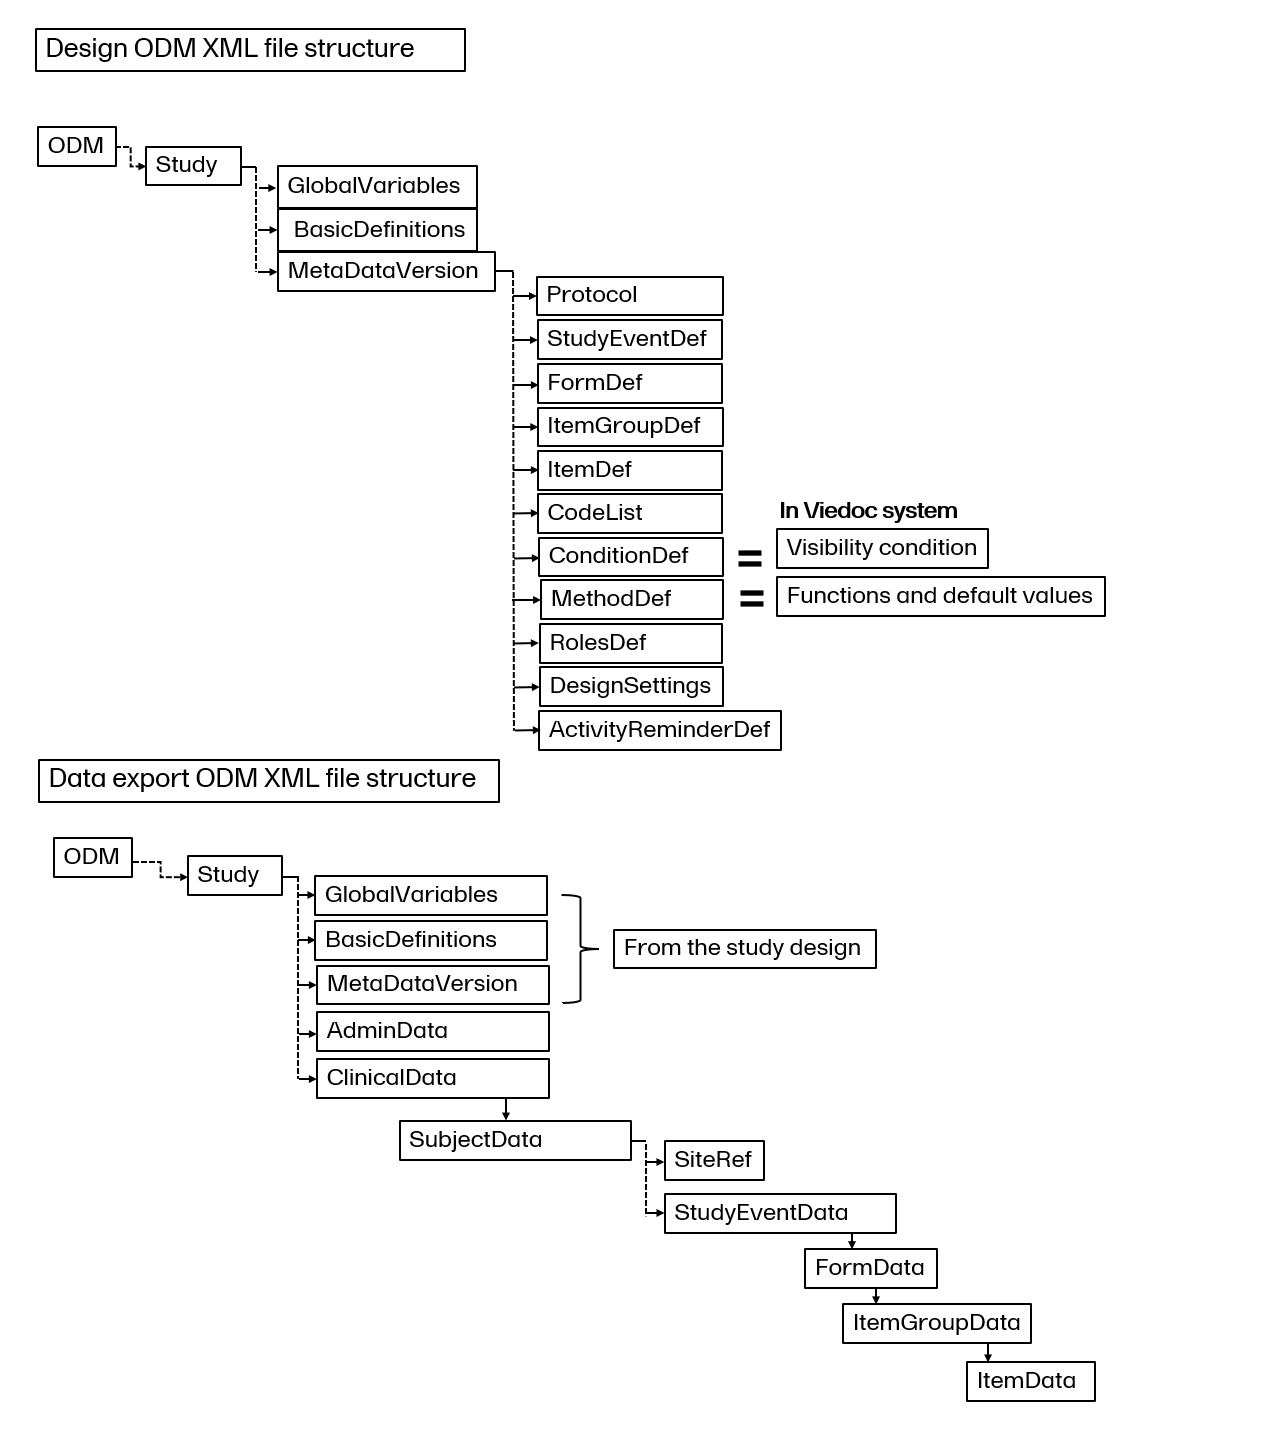
Global variables include general summary information about the study.
StudyName: Defines the study name.StudyDescription: Brief description of the type of study.ProtocolName: Specifies the study protocol name.A metadata version defines the protocol, the types of study events, forms, item groups, and items that form the study data.
Examples:
The protocol section is part of the CDISC SDM extension, and contains the study workflow information, for example, study entry and exit criteria, and trigger conditions for e-mails and timing, as well as study event references, which are the types of study events that are allowed to occur within the study.
In Viedoc, events can be split into multiple activities. This section also has all of the activity definitions and all of the form references to the forms in each activity:

A study event definition, StudyEventDef packages a set of forms. Within each study event definition, there are references to activities and forms, and within activities, there are references to forms. More information about how the form is set up is detailed in the form definition.
To find the information in a form definition: FormDef from a form reference: FormRef section, simply search for the relevant form definition, in this example, the DM form is the form referenced:


Select and expand the relevant form definition in the search results to view the form definition:

A form definition, FormDef describes a type of form that can occur in a study.
The form definition will contain information about the item groups in the form as an ItemGroupRef. Similarly, if you want to view the Item Group definition information, you can perform a search as described above.
An item group definition, ItemGroupDef describes a type of item group that can occur within a study, with the references to the individual items.These individual references are called ItemRef.

An item definition, ItemDef describes each item included in the study design. The item definition will also contain range checks, which correspond to any validation check added to the item. If a CodeListRef is contained within an item definition, it has a code list ID and is a reference to a CodeList:

To locate the code list information, search for the code list OID in the code list reference.
A code list, CodeList defines a discrete set of permitted values for an item.
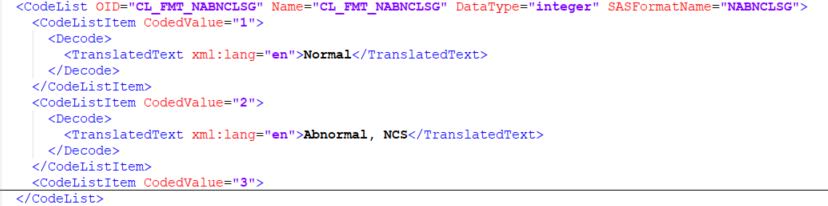
A condition definition, ConditionDef defines a boolean condition. In Viedoc, the visibility conditions in the study design are converted to a condition definition.
In the simple visibility condition example below, if the item value =1, then the highlighted item will be visible:

There are also advanced visibility conditions which in the ODM file translates to FormalExpression followed by JavaScript code:
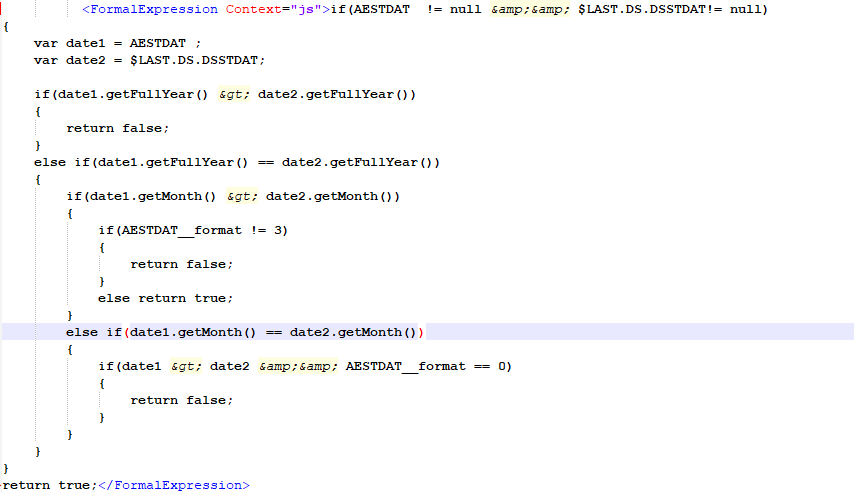
In the ODM file, method definitions, MethodDef are used for functions and default values in the design, and are important for interpreting the design. For more information, For more details about functions and how to use JavaScript in Viedoc, see default value and Viedoc provided functions in Using JavaScript in Viedoc.
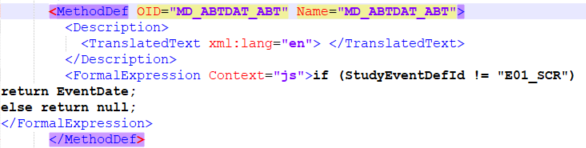
Roles definitions, RolesDef is a unique Viedoc vendor extension showing the different roles and associated permissions for the study.
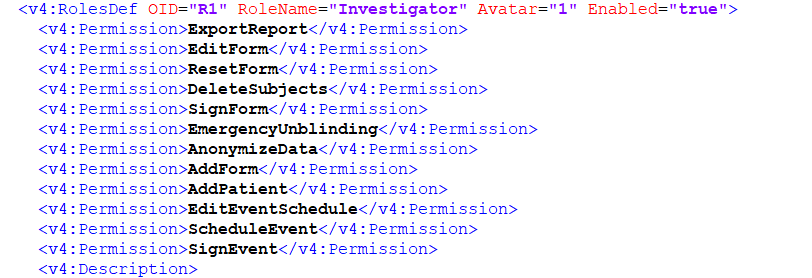
Design settings, DesignSettings is a unique Viedoc vendor extension showing selected study settings, if Source Data Verification (SDV) is selected for forms and items specified in the study design. This section will also have validation warnings and errors from the design.

The activity reminder definition is a unique Viedoc vendor extension showing the type of activity reminder and message for subject initiated events (Viedoc Me).

On the Overview of study design page, is a Validate icon. Selecting Validate results in the system validating the design to find inconsistencies, errors in the study design, such as duplicate ID:s, edit checks that don’t compute due to incorrect ID:s or syntax, etc. A subset of the validation will also be run when saving individual pages, for example, when saving a form, the study workflow or the RTSM settings.
Note! Validation of alerts, selection view settings, event visibility, subject status condition, common event summary format and subject ID generation settings for deleted items is not performed.

Any issues found with the study design during the validation process are displayed as either an error or as a warning.
If a warning is triggered during the validation process, a warning message is displayed at the top of the Overview of study design page:

Note! You can still publish the study design if a warning message is displayed. However, we still recommend that the issues are resolved before assigning or applying the study design to a site.
If you do publish a design with warnings, we strongly recommend you to review the warning to fully understand it, as well as the consequences of publishing for your study.
If an error is found during the validation process, a warning message is displayed at the top of the Overview of study design page:

Note! If an error message is displayed, You can not publish the study design, and the Publish button is disabled.
Warning and errors are also highlighted under the Validate icon, with the numbers of errors found, and each of the areas affected by the respective error(s) are also highlighted with the same message, with the numbers of errors found.
Errors and warnings can be displayed simultaneously:
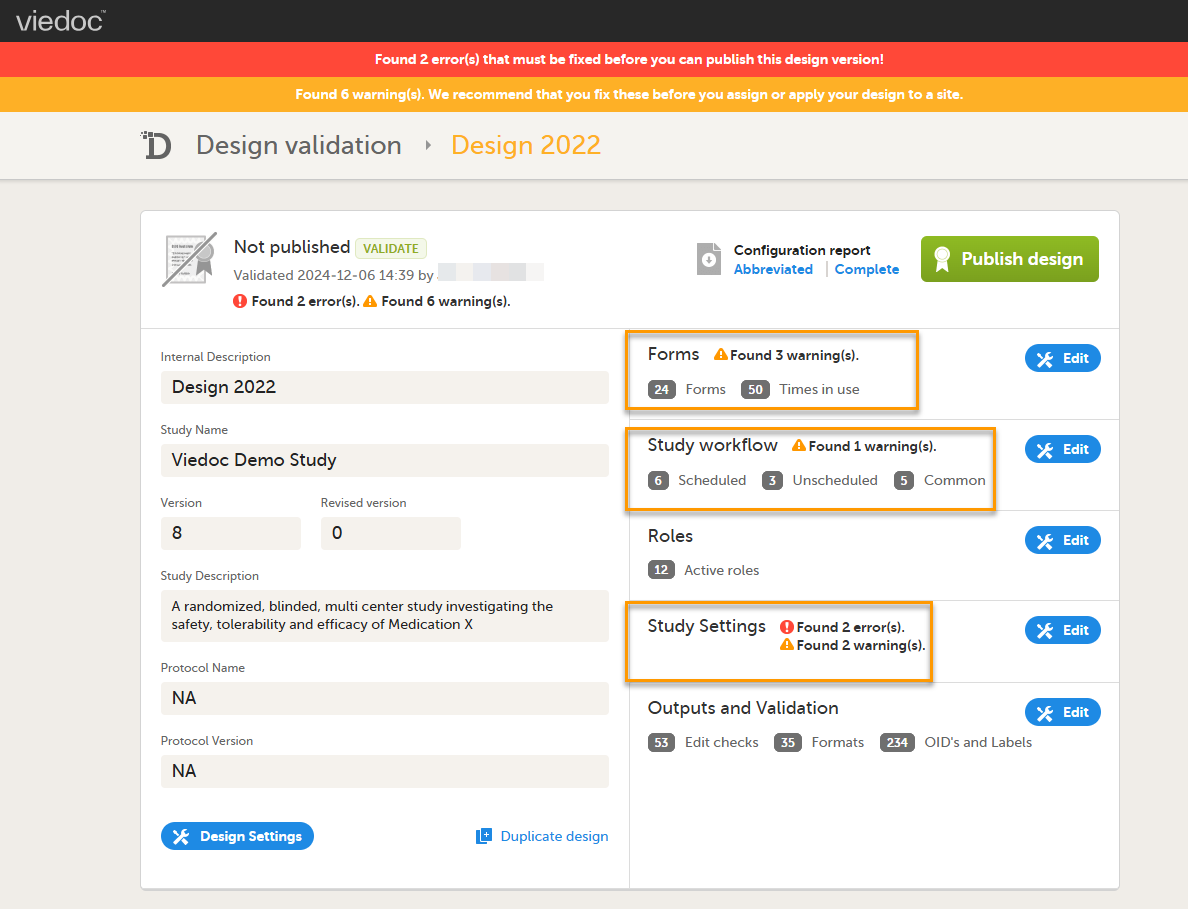
The type, design publishing status, (the CanPublish="true" tag indicates the design can still be published), and the reason for an error or a warning are also reflected in the exported study design Operational Data Model (ODM) file:

If no errors are found during the validation, the Validated mark is displayed:
A design is not available for the Study Manager until it has been published. Whenever you are ready with the design, click Publish. This will first validate the design and if no errors are detected, the version will be locked for editing and published, becoming available in Viedoc Admin. All the study design settings are however available in view mode:
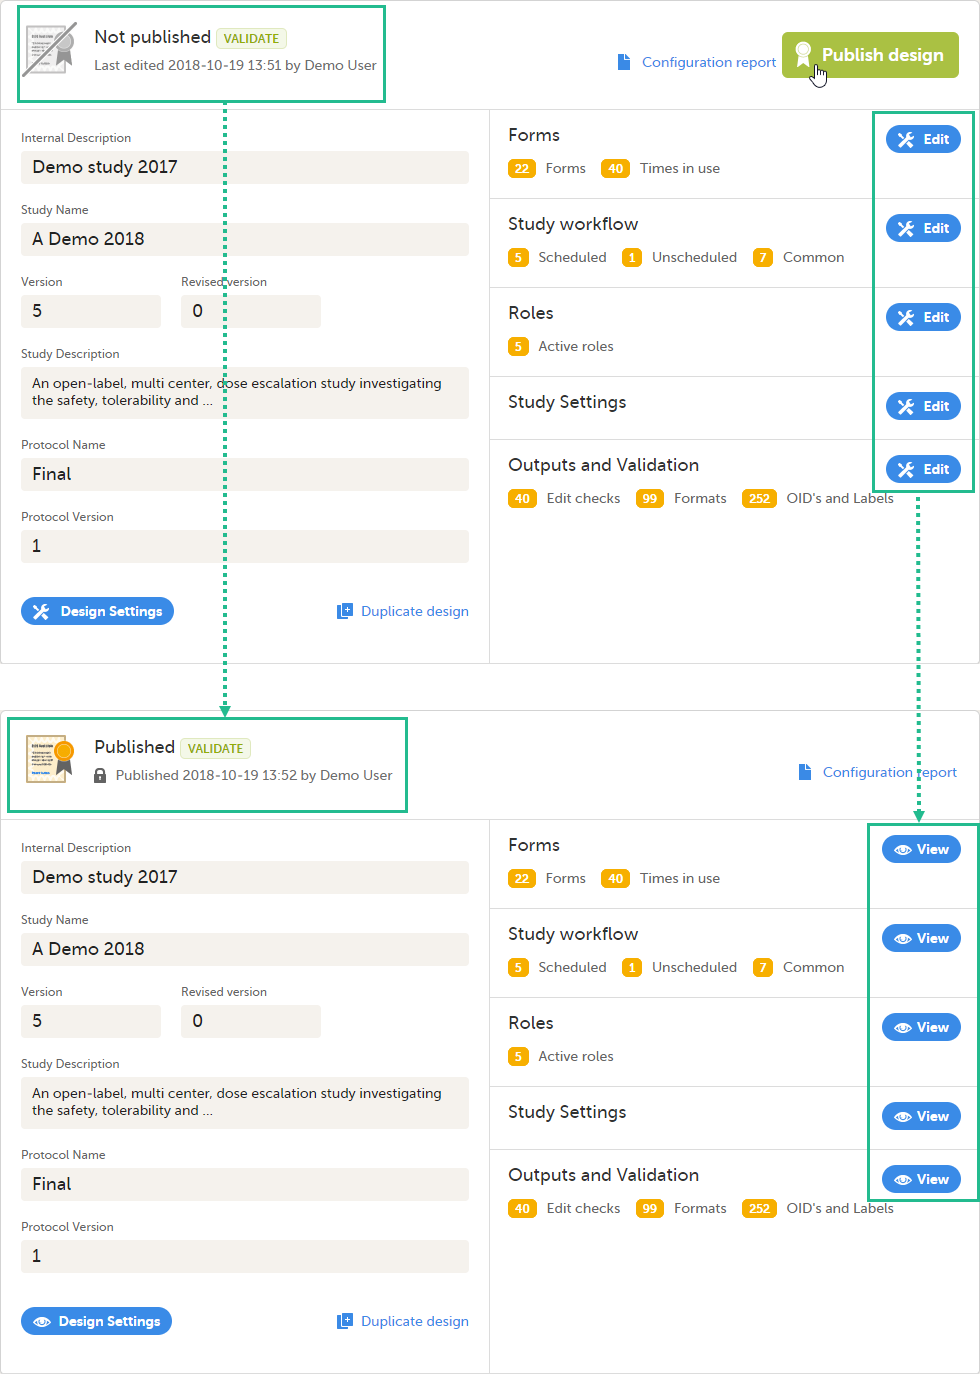
A published study design can be unpublished and unlocked, only if this has not been assigned to any site(s) yet in Viedoc Admin.
To unpublish:
| 1 |
Go to Design Settings and click Unpublish: 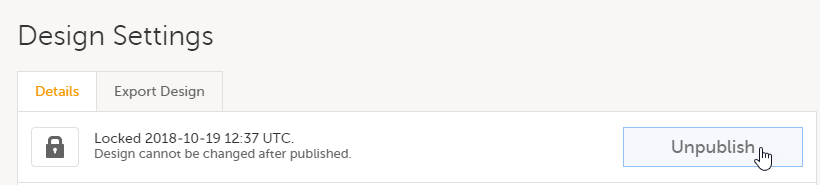
You will be directed to the study design page where all the settings are in the view mode. The study design is not published, but still locked: 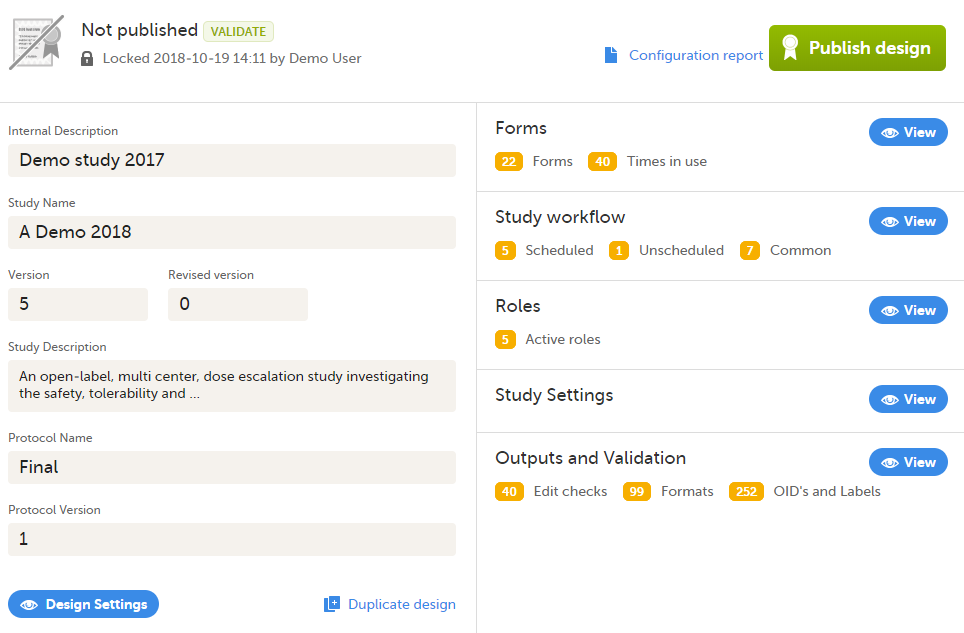
|
| 2 |
To make the study design editable again, go back to Design Settings and click Unlock: 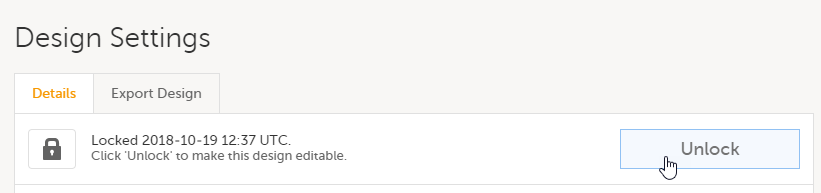
|
From the study design overview page, you can access the Design Settings, by clicking the Design Settings icon in the bottom-right side of the page:
The Design Settings page allows you to:
1.Lock/Unlock/Unpublish the study design.
2. Edit the study design details. These are set up when initiating the study. See Initiating a design.
3. Set up the default language and additional languages for subject-initiated events (see Managing translations for subject-initiated events).
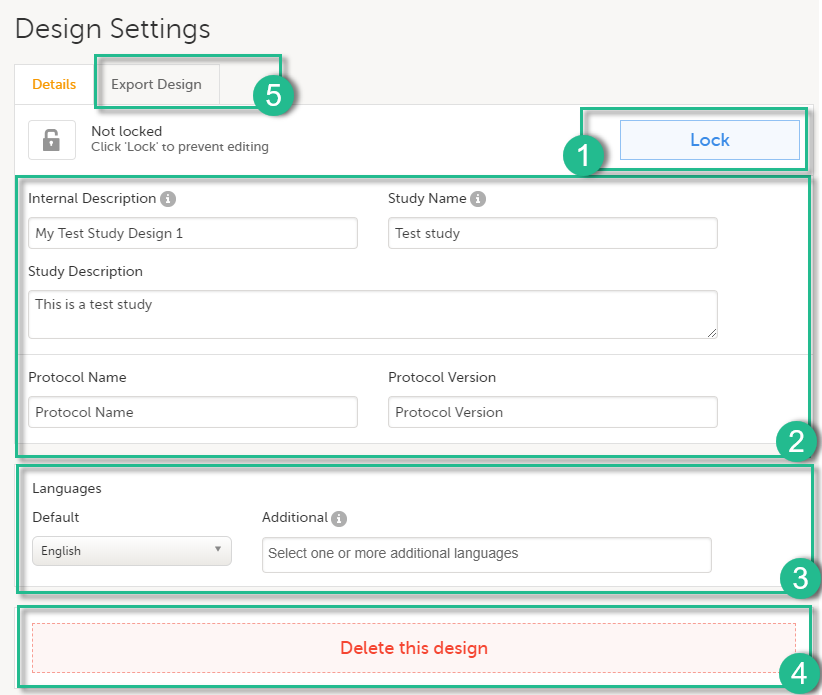
If you want to make sure that no unintentional changes are performed to a design, for example during a pause in the design development or because the design will be used as a a template design, you can lock it from editing by clicking Lock.
To unlock the study design, click Unlock.
Note! A design cannot be unlocked/unpublished after it has been assigned in Viedoc Admin.
It is possible to manually lock a design only before it is published. After a design has been published, it is automatically locked. See also Publishing a design.
A study design version can be deleted as long as it has not been published, by clicking Delete. If the design version has been published, the study design is automatically locked.
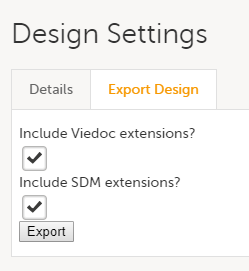
The export function is used to export a study design to a Clinical Data Interchange Standards Consortium (CDISC) Operational Data Model (ODM) file, with or without CDISC SDM and Viedoc extensions. The CDISC ODM file can be used for import in another project or another instance of Viedoc, for example a training instance. As the file is CDISC compliant, it can also be used in other systems equally compliant with CDISC standards.
CDISC SDM contains study workflow information. Viedoc extensions are Viedoc specific settings that cannot be described as part of the CDISC standards. If Viedoc is the target system, both check-boxes should be checked.
This lesson provides an overview of the test and production servers and describes the main steps to be performed when building a study on the training server and then migrating it to the production server.
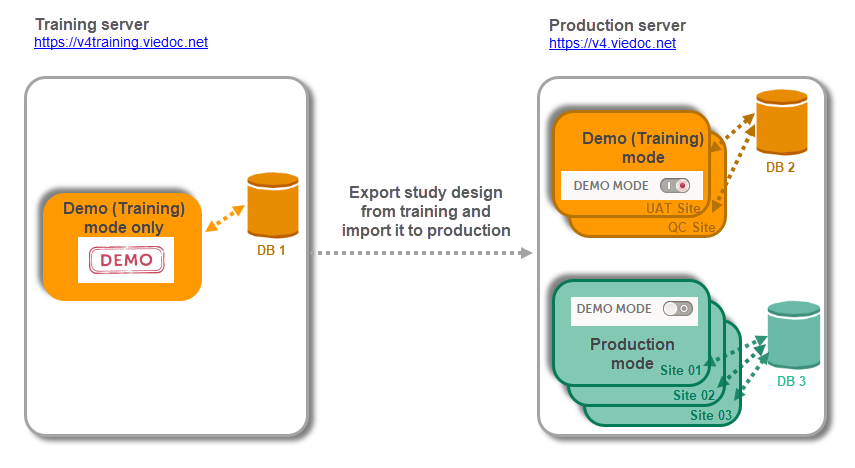
Please note that there are different database instances the data is saved on depending on the server (i.e. training server and production server), as well as depending on the operation mode (i.e. Demo (Training) mode and Production mode).
As a Viedoc client, you will be provided first with access to the so-called training server (v4training.viedoc.net). The purpose of the test/build server is to allow you to evaluate and use Viedoc without the need of a contract for a specific study. No license (Reference ID) is required for this server. Here you can build a study and perform all kinds of tests, with all the sites running in demo mode.
Note! It is not guaranteed that studies running on the test/development server are completely and continuously backed-up. This server should therefore never be used for any production studies.
Any study that is supposed to be taken in production is normally initiated on the training server and later moved to the production server (v4.viedoc.net) once it is “ready” to be shared with the Sponsor or other external party.
Studies and/or study designs can be easily transferred from one server to the other via the Clinical Data Interchange Standards Consortium (CDISC) Operational Data Model (ODM) export and import feature in Viedoc Designer. For detailed instructions see the step by step guide below.
For a study on the production server it is possible to configure the sites to operate in one of the following:
|
Important! The demo mode of a production study should not be confused with a study on the test/build server. When a study has sites of both production and training types added, a switch will be available in Viedoc Clinic, making it possible to choose in which mode the data will be entered to, that is, demo or production. |
When the study is completely set up in the production environment, there are two different modes that a site can be set to operate on, as described below. This is configured in Viedoc Admin under Site Settings (see image below and detailed instructions in Managing study sites lesson). There are two different database instances that the data will be saved on for each of the modes, that is, when operating on demo mode the data will be saved only on the demo database instance and when operating on production mode, the data will be saved only on the production database instance.
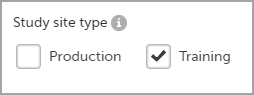
| Important! As data entered when operating in this mode is saved on a separate database instance, this should never be used for entering any real data, but for testing purposes only. |

| Important! A valid license (Ref ID) is needed in order to be able to set a site to operate in production mode. |
Important! This is not recommended, because setting the same site to operate in both Production and Training mode:
|
Given the above described functionality, it is recommended, on the production server, to have separate site(s) only in Training (demo) mode, for testing/demo purposes (for example, for User Acceptance Testing (UAT)), and the production sites to operate only in Production mode. This way, the user access can be easily managed and the risk of mixing real data with test/demo data is eliminated.
| 1 |
Build and test your study on the training server. |
| 2 |
Export the study design, as described in Exporting/Locking/Deleting a study design. Notes! The exported study design does not contain the Global design settings and Viedoc Me translations. These will need to be performed again manually on the production environment after the design is imported. See the next step for details. |
| 3 |
On the production server:
|
| Important! This process cannot be used for revising an existing design version on production, as importing the design will always result in a totally new version. |
The configuration of a study in Viedoc consists of two types of settings:
This lesson focuses on the configuration type that holds most of the study configuration, that is version-controlled settings.
Version-controlled settings are contained in a “design” and are identified by a version number. Study design version numbers are unique within a study. If there exist five study design versions, all originating from the same design, and a new design is created from scratch within the same study, it will have version 6.
Study design version numbers are accompanied with a revision number. For example, “1.0” means that this is version 1 and that it has not been revised, since the revision part of the version is 0. Revisions are explained in Revision of study design version.
Study designs are assigned on site level. Work on a site cannot start before a study design is assigned to that site, as there is no study configuration associated with that site.
When the Designer has finished setting up a study design in Viedoc Designer, he/she has to publish the study design, so that it becomes available to the Study Manager in Viedoc Admin.
The Study Manager then chooses to assign the study design to one or several study sites. This step is accompanied with selecting an effective starting time for the study design on the selected study sites.
There can be more than one design version assigned to a site.
Versions are burnt in at event level, based on the date of first data entry.
The applicable design version for an event is determined by comparing the event date to the effectiveness period of the study design version(s) assigned to the site. When an instance of an event is started, the study design version is burnt into it, indefinitely. All forms belonging to this event will then inherit that same study design version.
When the version has been burnt-in, the forms within the event always get their settings, structure and lay-out read from that same study design version, even if the event date, or design effectiveness periods, have changed so that a different study design version is available.
In Viedoc, there are four different types of events, and the study design version is burnt in as follows:
Notes!
For more details on the automatic event date settings, see the Study workflow lesson.
During the course of a study, multiple versions of the study design can be assigned to a site, with different periods of effectiveness. For example, Site 01 could have Version 1 as the effective study design version during January 1st – January 15th and Version 2 as effective study design version after January 15th, whereas Site 02 has Version 2 as the only effective study design version starting January 5th, as illustrated in the image:
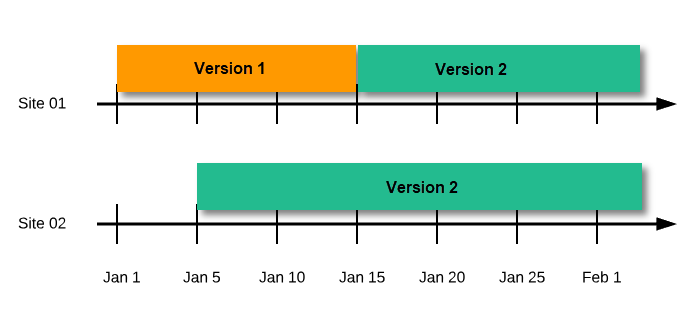
There is no end date for the effectiveness periods of study design versions. If a design is applied on January 1st, this is the effective version until a new version with a later start date is encountered, independently of when it was assigned.
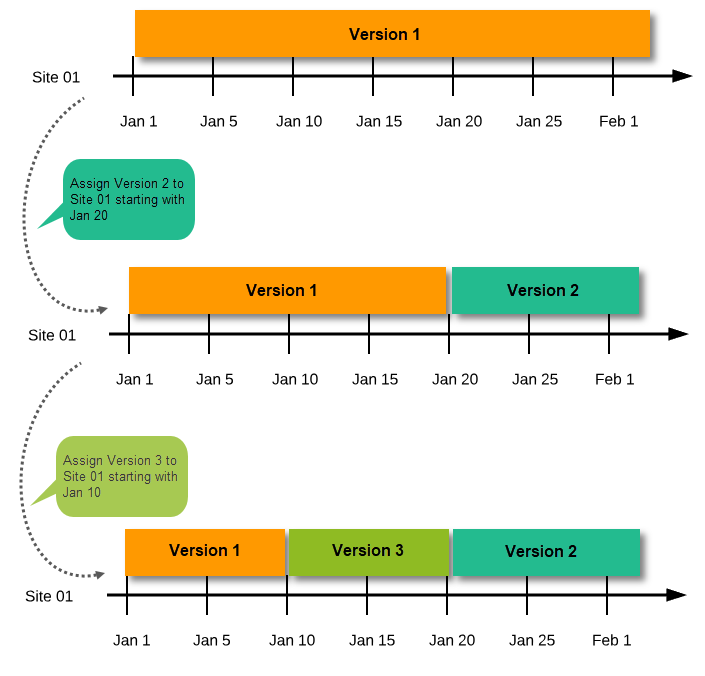
Important! The periods of effectiveness of a study design version are connected to the event timing of the first data entry and not to the current time at system usage.
For example, in the below image, if:
...then:

If an event is initiated with a date when no design version is in effect, the version effective at current time of system usage will be used:
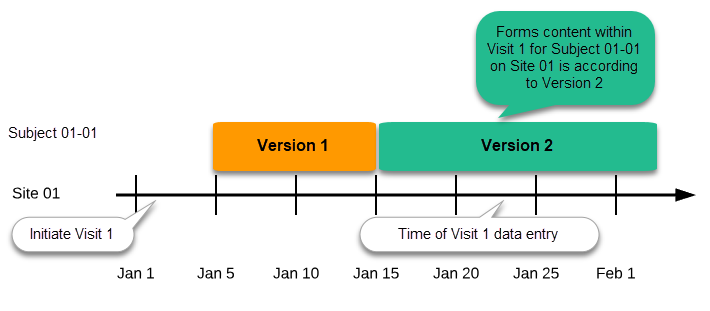
A new version can be assigned with the same timing as the currently assigned version and will then replace the currently assigned version, except for already entered data (due to the version “burn-in”, as described in Version burn-in).
For example, if we have Version 1 assigned to Site 01 starting at Jan 1, and we have the following events:
...and we assign Version 2 to Site 01 starting at Jan 1, and then:
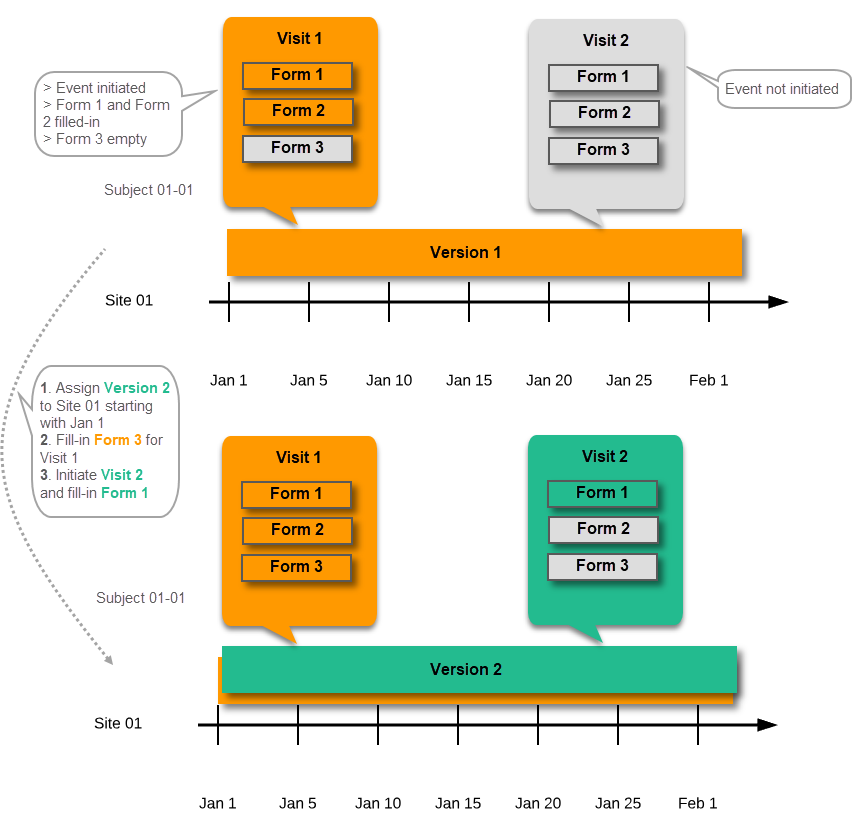
In case the event date is changed after it was initiated, to a date when another version is applicable, the version for that event does not change, as it was burnt-in at the date when the event was initiated (see Version burn-in):
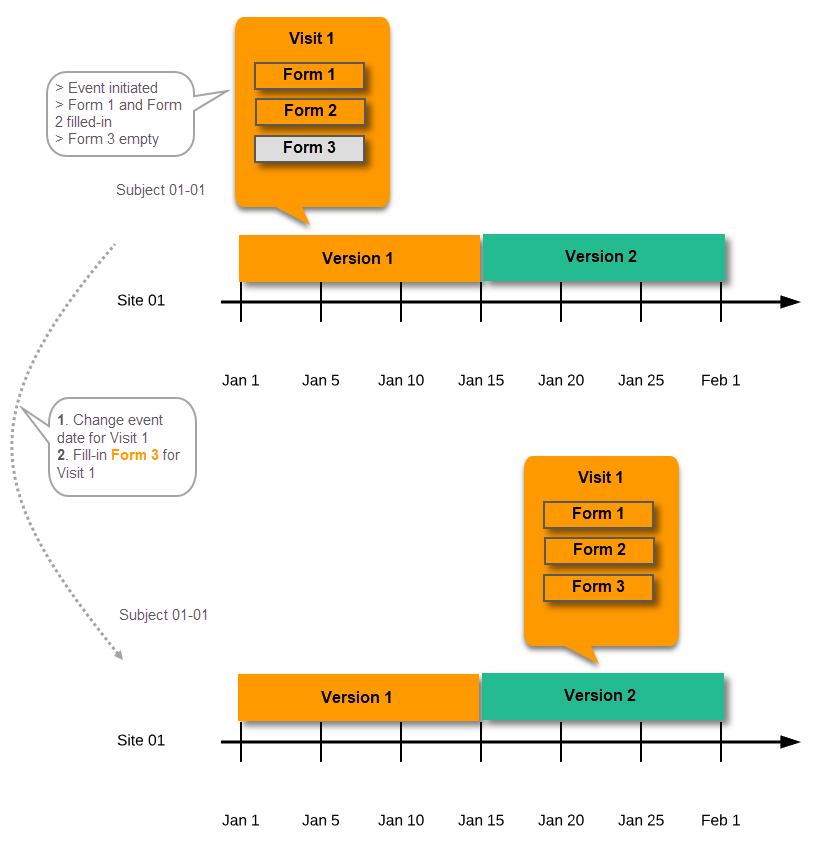
The following settings are always read from the study design version that is burnt-into the event:
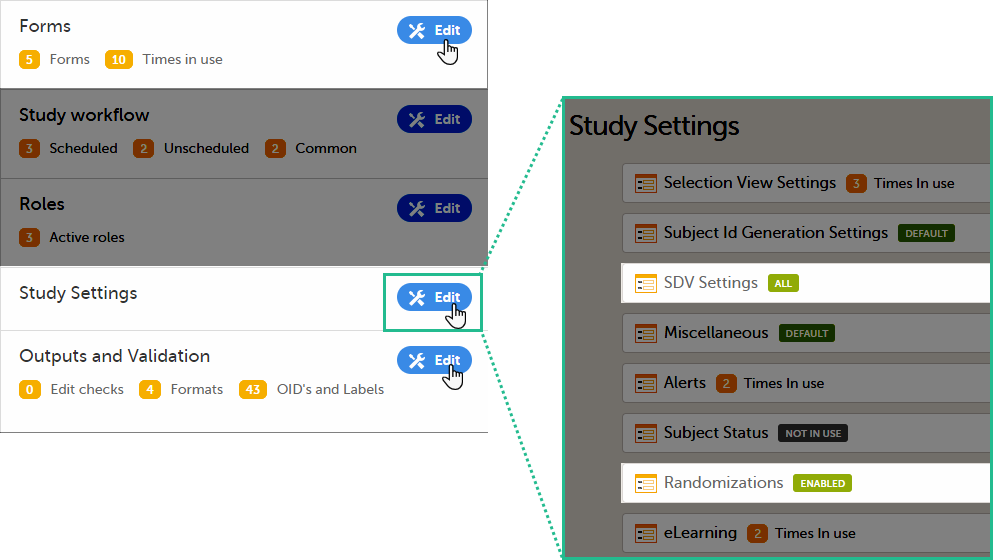
We call "current effective design" the study design version that is effective at the current time of system usage.
Settings that are not directly related to data collection structure, as well as settings that are common on the site level, are read from the study design version that is effective at the time of system usage (that is, “time right now”). These settings are:

This means that the study workflow for a subject can change as time passes and a new design version becomes effective for the site the subject belongs to:
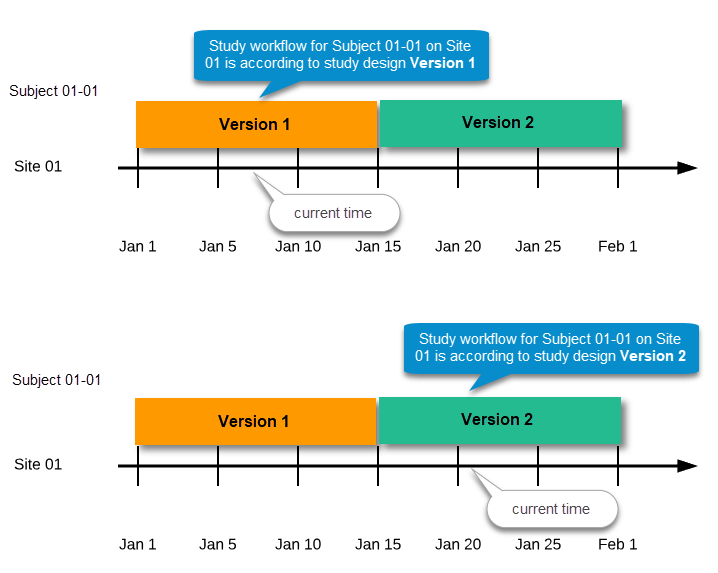
If there is a need to correct something in a study design version that is already assigned, and in particular if it has already been used to enter data (as that version is then burnt in and cannot be replaced by assigning a new version with the same time frame of validity), the study design version has to be revised.
The following settings can be revised as part of a revision of a study design version:
The latest effective design for each site will be used to define the permissions that will apply to each role.
* Note! The study design IDs (Event IDs, Activity IDs, Form IDs, Item group IDs and Item IDs), item dictionary (“choice”) codes and any items involved in randomization cannot be changed. An exception is that if an item needs to be moved to another item group, the ID can and must be changed as this will be treated as deleting an item and adding it again.
Once a study design version is revised, the revision part of the version number (initially 0) is incremented. For example, if study design version 1.0 is revised, it will receive the version number 1.1. When a revision of a study design version is published, it replaces its predecessor in terms of site assignment. For example, if a Study Manager wants to assign version 1 to a site, and this version now has a revision, version 1.1 will be available for assignment and not 1.0.
Additionally, only the latest revision of each study design version can be used as starting point for additional revision. For example, if we want to revise study design version 1, that has already been revised to version 1.1, we can only select 1.1 as starting point of the revision and not 1.0.
If forms that were previously part of an event in the workflow are now removed, already initiated forms are not touched. From a study workflow point-of-view they are now orphan forms, but from a user point-of-view there is no real difference to the appearance, as they stay as is on the event that they were previously part of.
Application of a revised study design version is used to upgrade forms that are already burnt-in, with a predecessor of the study design version in terms of revisions, to the latest revision of the study design. Applying a revision is different from assigning study design versions, as assigning study design versions only affects forms belonging to events that have not been initiated yet.
When a revised version of a study design version is applied to a site, that revision will (eventually, after necessary site confirmations, see Changes in a revision that affect data integrity below) replace the version it is revising, including the base version and all previous revisions made to the version (as illustrated in the example in the image below, where 1.2 replaces both 1.0 and 1.1). Thus, effective period is not changed.
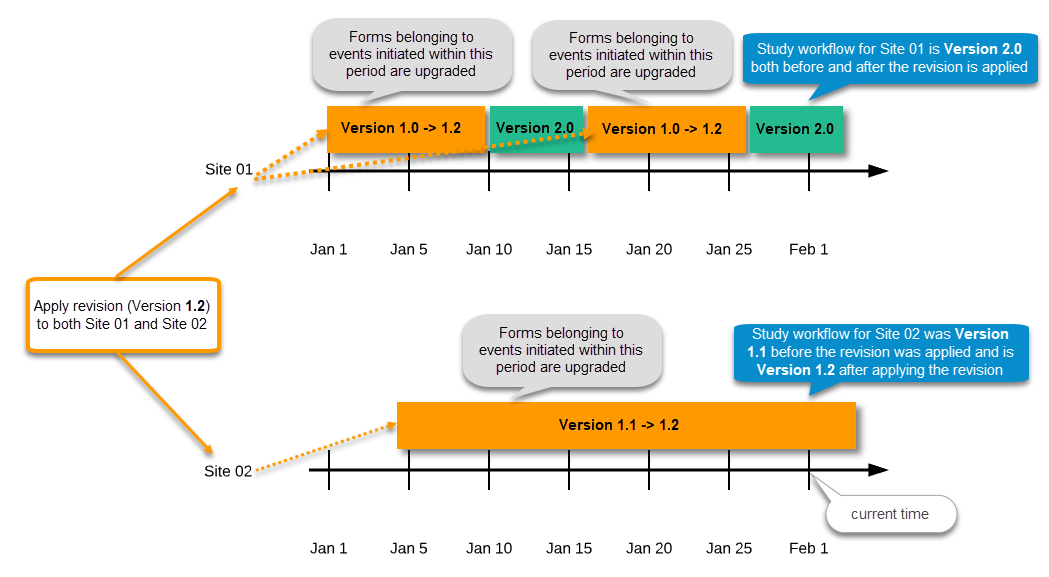
There are two parallel tracks being followed when a revised study design is applied, depending on whether the data integrity is affected by the changes in a revision or not, as described in the following subsections.
Note! It is recommended that you use the design revision impact analysis before you apply any revision. For more information, see Design revision impact analysis.
Note! You can NOT apply an earlier revision if a later revision has already been applied to another site. This applies to both demo sites and production sites. For example, if version 1.2 has already been applied to a site with user acceptance testing (UAT) underway, then version 1.1 cannot be applied to a production site. It is only possible to apply version 1.2.
A revision with changes that do not affect data integrity is applied without confirmation by the site staff. For all form instances in which form data is not affected by the revision, the revision is processed immediately.
Changes within a revision that do not affect data integrity:
Any discrepancies no longer valid are closed and any new discrepancies will be flagged.
The forms that are locked (by Monitor, Data Manager, or any user who has data lock permission) will be upgraded, as no data will be touched by these types of changes.
Form signature and review status will not be affected by these kind of updates.
Applying a revision with changes that potentially do affect data integrity requires confirmation by the site staff. Before the Study Manager can apply a revised study design, a mandatory information text has to be entered that will be used to notify the site staff about the changes (see the complete workflow below in Workflow - Revision of an existing version).
Changes that potentially do affect data integrity:
A flag will be put on the form instance indicating that there is an upgrade pending. Until the upgrade is confirmed by site personnel (see Site confirmation of version upgrade), the form will remain in its original version.
When a revised study design is applied to a site, all forms pending an upgrade (where data integrity is potentially affected) are marked by a red flag, and a notification for the site is displayed on the Messages pane on the study start page.
The notification is accompanied with a standard text informing the site about the upgrade action and confirmation prompt that has to be electronically signed. This action can be performed by anyone at the site with data edit permission. See also the lesson in Viedoc Clinic User Guide - Approving eCRF changes.
When signed, all forms pending upgrade (listed in Changes in a revision that affect data integrity) will be upgraded to the revised version of the study design. This is a background activity that can take some time if there are considerable amounts of forms to be upgraded.
For the subjects that are being edited by clinic users during the upgrade process, the upgrade will stay pending until the respective subjects are released.
Optionally, forms can be upgraded manually, one-by-one, by the site. This is performed by navigating to the forms affected, opening them for editing and re-saving them. When the form is opened for editing, it will be shown using the new upgraded design with all data filled in.
A recommendation to the site could be to manually upgrade a few forms to fully understand the potential impact of the upgrade and then upgrade the rest using the batch approval feature.
|
Important! The upgrade is not performed for:
If performing batch approval and forms affected by the upgrade are skipped, as a result of one of the above mentioned scenarios, a new message will be displayed on the Message page. The changes can then be approved after a user with permission unlocks the locked forms. |
Forms upgraded to a new design revision lose any existing signature and review flags (clinical review, data review). The SDV flag is lost on item level.
If a particular item, that did not require SDV, is affected by the upgrade (that is, edited in the design, see Changes in a revision that affect data integrity), the form-level SDV flag will be kept. That means an upgrade of a form can lead to losing existing signature and review flags (clinical review, data review), but keeping the SDV flag.
If a particular item, that was previously source data verified, is affected by the upgrade (that is, edited in the design, see Changes in a revision that affect data integrity), it is no longer flagged as having been source-data verified. The form-level SDV flag is lost if any item in the form lost its SDV flag. The form-level SDV flag is also lost if an item is removed from a form as part of the upgrade.
The following steps have to be performed in Viedoc when creating and configuring the study for the first time:
The workflow for creating a new design version starting from an existing version of the study design, to implement a protocol amendment and assign it to one or several sites, is the following:

The workflow for revising an existing study design version and applying it to one particular site is as following:
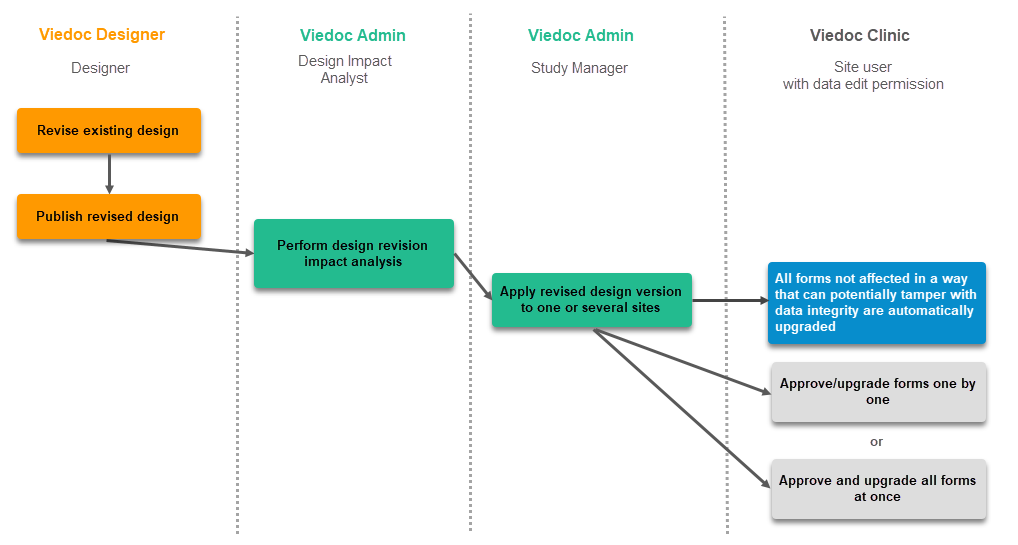
Important! If a new revision is applied before previous one(s) are approved by a site user, then the approval will upgrade affected forms to the latest revision, regardless of which of the upgrades the site user approves. For information on site approval see Approving eCRF changes in Viedoc Clinic User Guide.
Note! An upgrade message is displayed for the site under the Messages pane on the study start page, even for the revisions with changes that do not affect data integrity, that is, when the forms are automatically upgraded.
If an iterative approach is used during development of a configuration, there will be many versions created as part of the workflow: [ setup --> test --> correct --> test --> setup --> test --> correct --> test --> … ]. It is still advisable to revise existing versions (instead of creating new versions) whenever possible to keep the number of versions to a minimum, as this will make the study design repository less cluttered and more easy to manage.
In Viedoc Designer, the following actions related to the study design can be performed, as described in the respective lessons:
In Viedoc Admin, you can see the current effective design for each site, assign a study design version to one or several sites, and apply a revised version of a study design to one or several sites. All these are described in detail in Assigning a study design.
The settings within the study design are version controlled and identified by the version number. Study design version numbers are unique within a study, for example if there are five study design versions, all originating from the same design, and a new design is created from scratch within the same study, it will have version 6.
Study design version numbers are accompanied with a revision number, that is “1.0” means version 1 and that it has not been revised as the revision part of the version is 0. In a similar way, "1.6" means revision 6 of version 1.
Study design versions and revisions are explained in detail in Viedoc study configuration management.
After a design version was published, changes to the study design can be performed by clicking Duplicate design in the study design overview page.

There are two different ways to perform changes on an existing version of the study design:
The current version and revision number of the study design are displayed on the study design overview page:

The version and revision number of the study design used to initiate the form instance is displayed in the form footer in Viedoc Clinic:
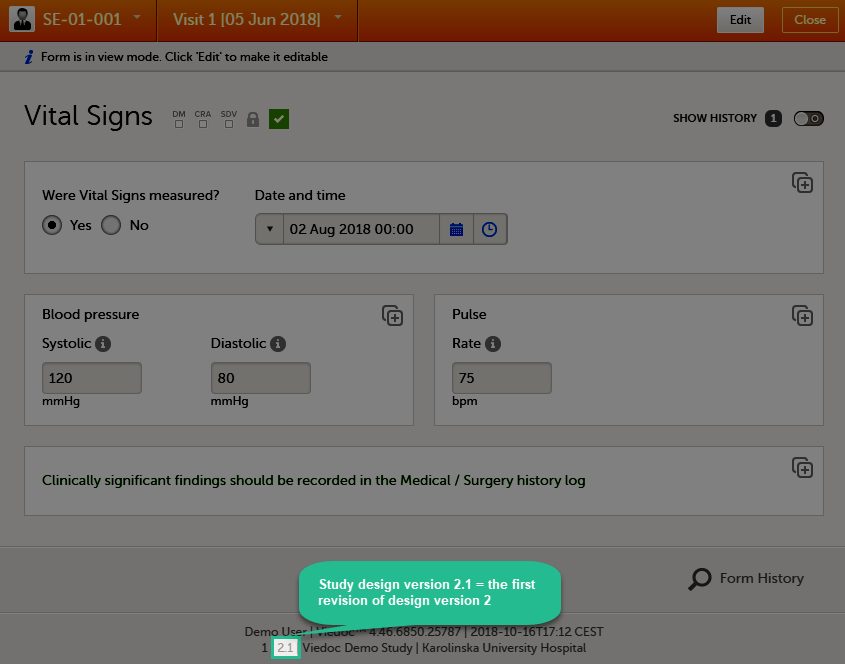
In an ideal situation when the version of the study design that is assigned at study start is perfect, new versions should only be used when there is an actual need to have different versions of the “study” over time or on different sites, that is due to protocol amendments, or other legit differences like data collection restrictions in different countries.
The general rule is therefore:
However, some changes are not allowed as part of a revision and requires creation of new versions more often than the rule suggests. See Viedoc study configuration management lesson for a detailed list on which changes are allowed as a part of a revision.
Prerequisite: Please read the following lesson to understand the difference between a revision and a new version:
Viedoc study configuration management
The way of handling protocol amendments and updates/corrections to the eCRF depends on the situation each time. The following table gives a general guideline on when to do a new version versus a revision:

New version |
In a new version, all changes to the study design are allowed. However, just because something can be changed does not mean it is a good idea to do so. It is safest to stick to the original structure and design as far as possible. For example, when making changes in the Study Workflow, be mindful of how these changes will affect the dependencies of previous versions. In terms of scheduling and visibility conditions, all events will behave as per the current effective design. Note! The final order of the events as seen in PDF records depends on the dates entered by the user and not on what was programmed in the Study Workflow. A new version is required when:
|
|---|---|

Revision |
In a revision, the types of changes that can be made to the design are limited: a. It is not possible to add items with the same ID, and a deleted item cannot be brought back. A revision is required when:
|
|
|
Sometimes an update to the eCRF will require both a new version and one or more revisions. |
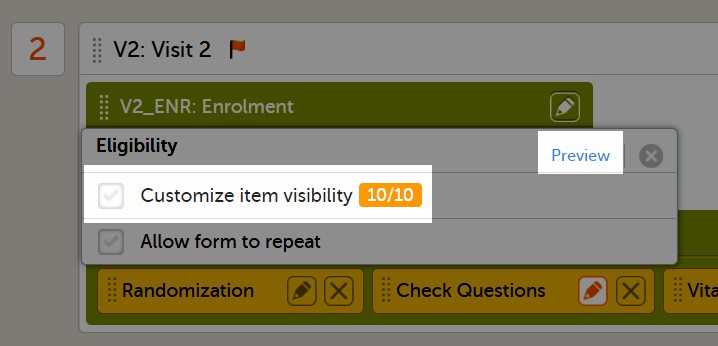
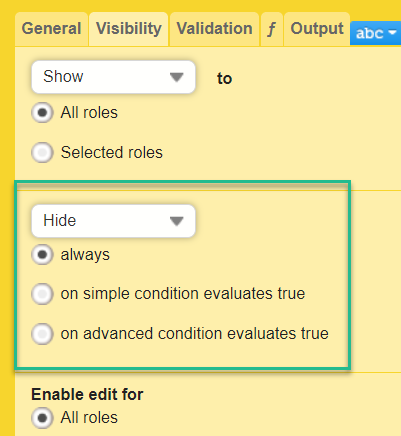
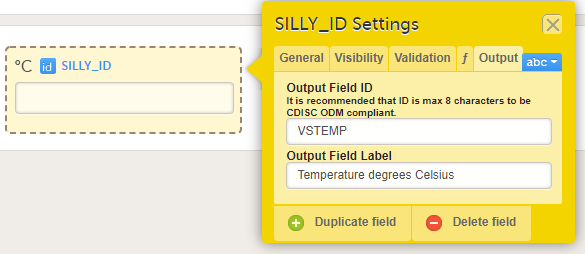
For items with code lists—radio buttons, dropdown lists, and checkboxes—each code list option consists of two parts:
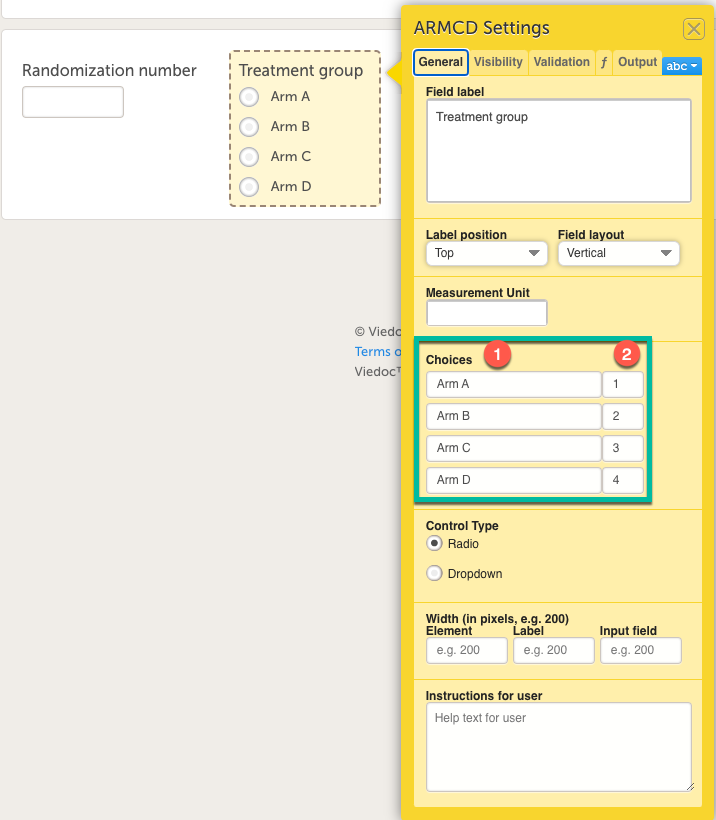
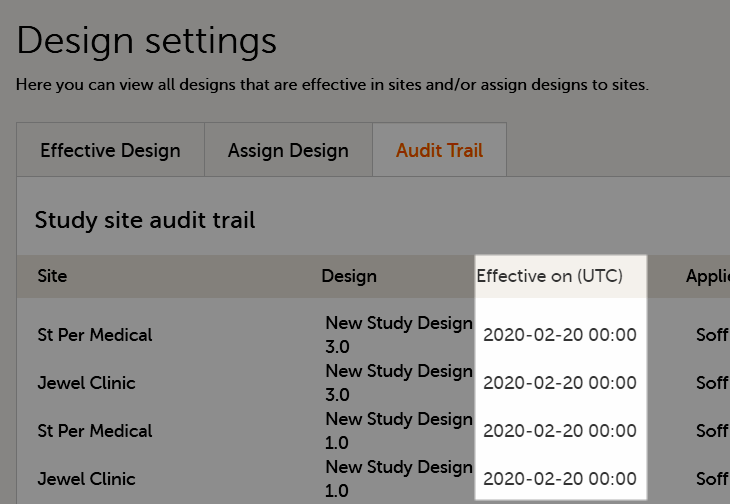
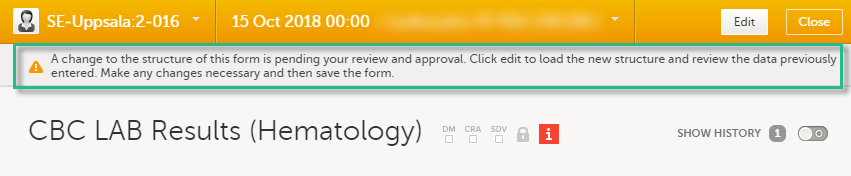
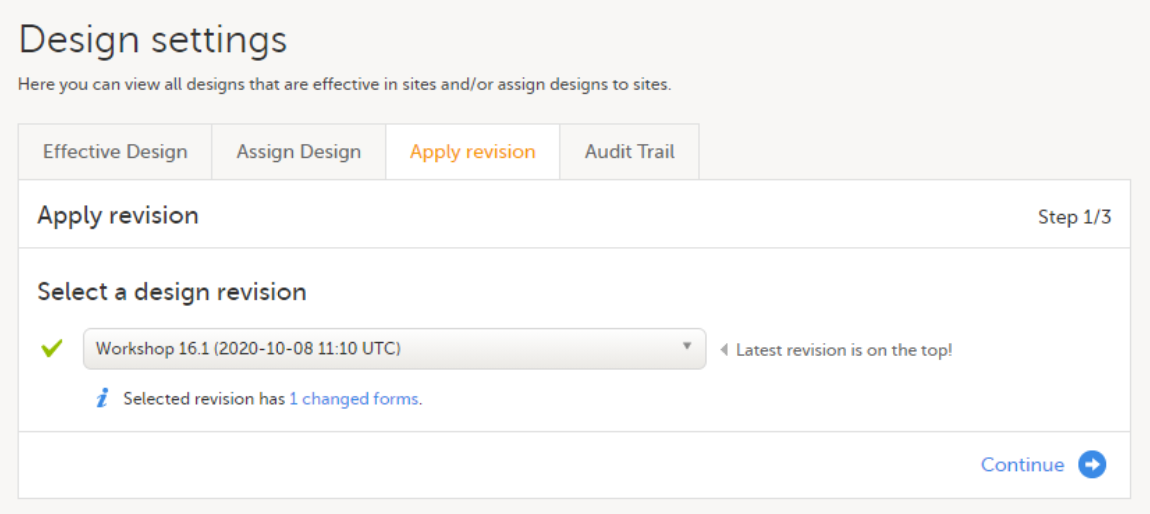
To find out what impact a change to a design will have on SDV or signatures, use the Viedoc design revision impact analysis tool:
| 1 | Make the change to your design. |
| 2 | Publish the design. |
| 3 |
Open Viedoc Admin and run the design revision impact tool according to these instructions: Viedoc design revision impact analysis. Note! Be careful not to accidentally apply the changes. |
| 4 | Unpublish the design. |
| 5 | Unlock the design. |
| 6 | Now, you can continue making any necessary changes to the design. |
Note! All steps below are performed on the production server. After going live, the training server should only be used to test a proof of concept.
| 1 |
Do an Excel export of all forms that will be affected by the update. Select the Event dates and Review status options. 
|
| 2 |
The effective design version can be found in the export for each form under the column Design version. Use this information to see which versions will need to be revised. 
|
| 3 |
Go to Designer and download a complete configuration report for each version that needs revision. 
|
| 4 | In each configuration report, check for items that will be affected (do a Ctrl+F search of the item’s ID). Check for dependencies on visibility conditions, functions, and edit checks. For more information, see Configuration report. |
| 5 | Make changes as appropriate in each version. |
The design version compare feature in Viedoc Designer allows study designers to compare design versions to easily identify the differences between two selected study designs. This is useful as a quality control measure, or as a way of documenting that any requested changes have been implemented.
The design version compare feature compares GlobalVariables BasicDefinitions and MetaDataVersion data changes between different design versions or revisions in a study for both published and unpublished designs. This means that any modification made to a design version will be captured in the design version compare output. Global design settings are not included in the design version compare feature.
To compare the study design of one study with a design from another study, you need to import the design into the relevant study and compare them there.
For more information about the Clinical Data Interchange Standards Consortium (CDISC) Operational Data Model (ODM) and the Viedoc study design ODM XML file structure, see Design ODM file structure and Exporting the study design.
To compare a new design version for your study:
| 1 |
In Viedoc Designer, go to your study, and select Source design: 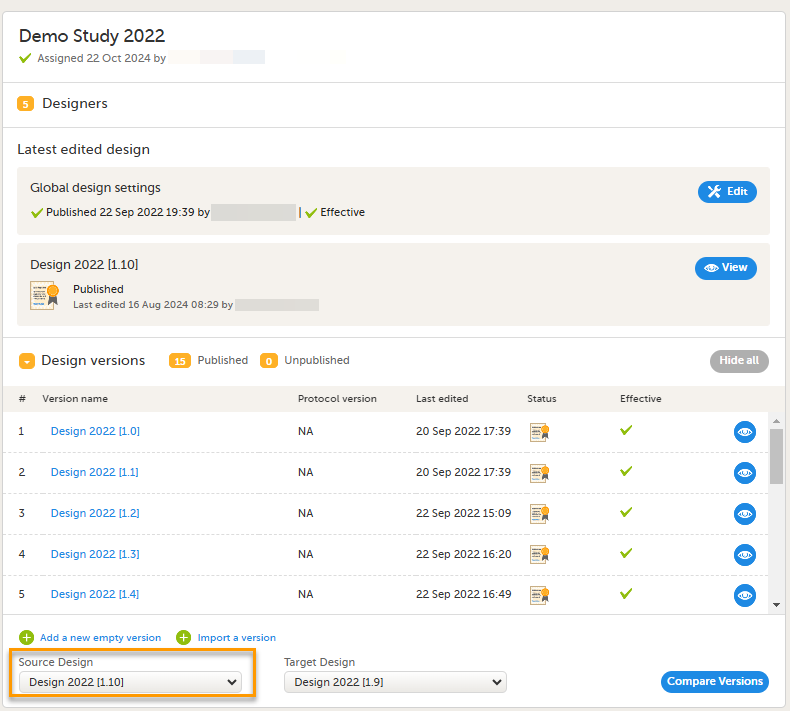
A list of all the study design versions is displayed. Note! The default target design refers to the highest design version, while the default source design corresponds to the second highest version. |
| 2 |
Select the study design version which contains the value(s) you want to compare with another design version: 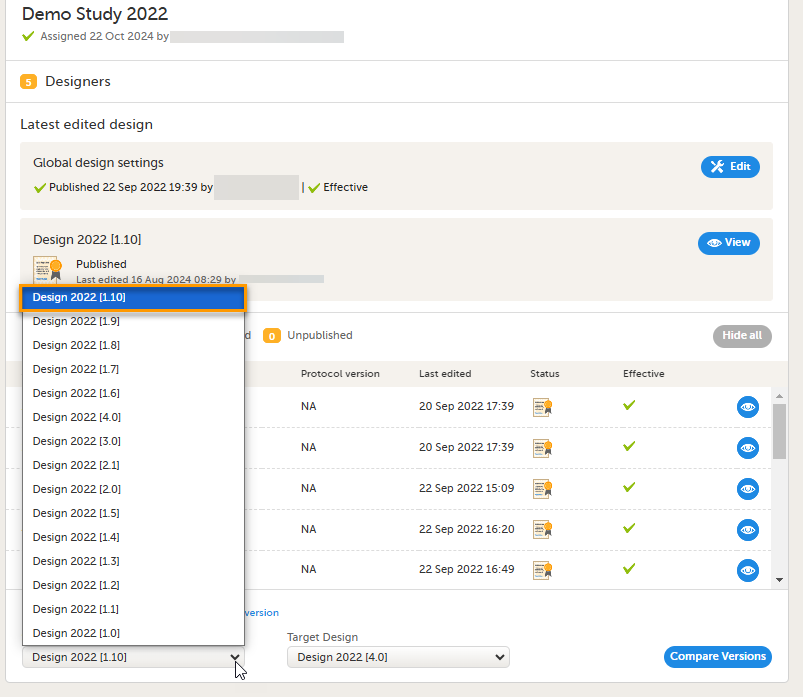
|
| 3 |
Select Target design to show a list of design versions you want to compare the Source design with: 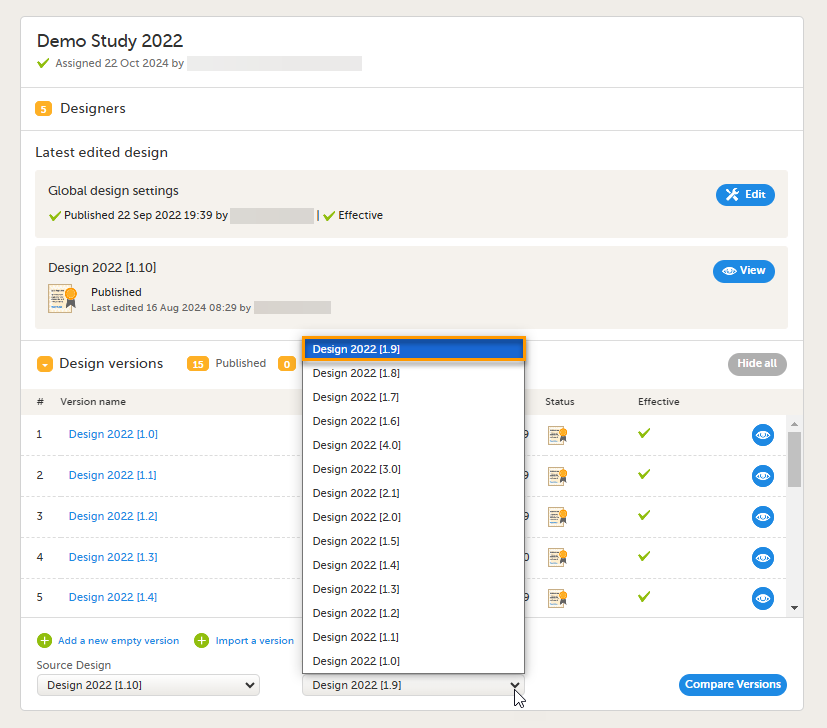
|
| 4 |
Select Compare versions: 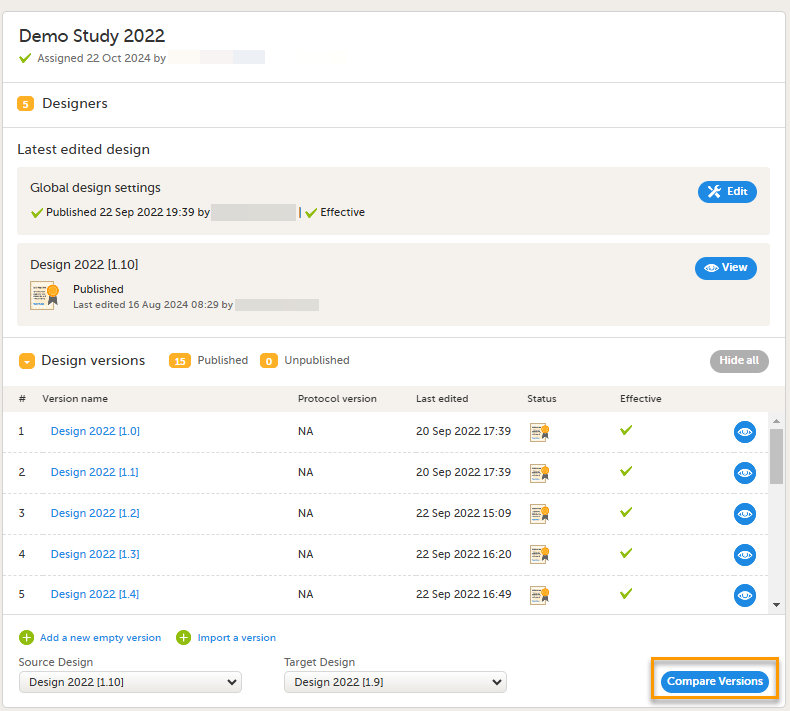
|
|
The Design Version Compare report is generated in a new browser tab, showing all of the changes to the design categorized in the same structure as the study design ODM XML file. You can view:
For more information about repeating item groups, see Creating and editing forms 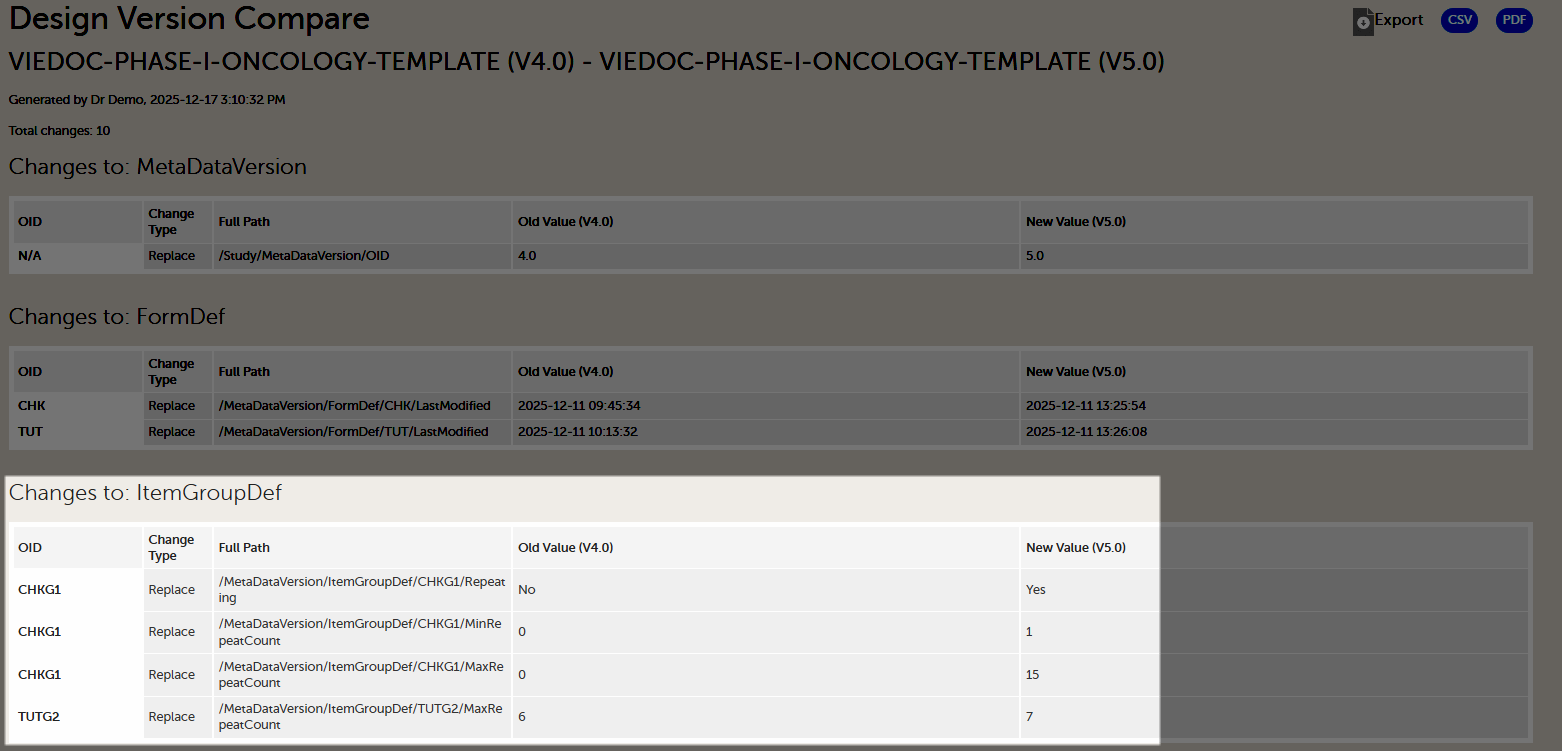
|
You can export the design version compare output as a dynamic CSV file. This allows you to open, filter, and analyze the comparison data in Excel.
Note! If you open the CSV file directly in Excel, and use Data > Text to Columns, the content may be misaligned and difficult to sort or filter.
To open the CSV file correctly in Excel:
| 1 | In Excel, select Data > From Text/CSV: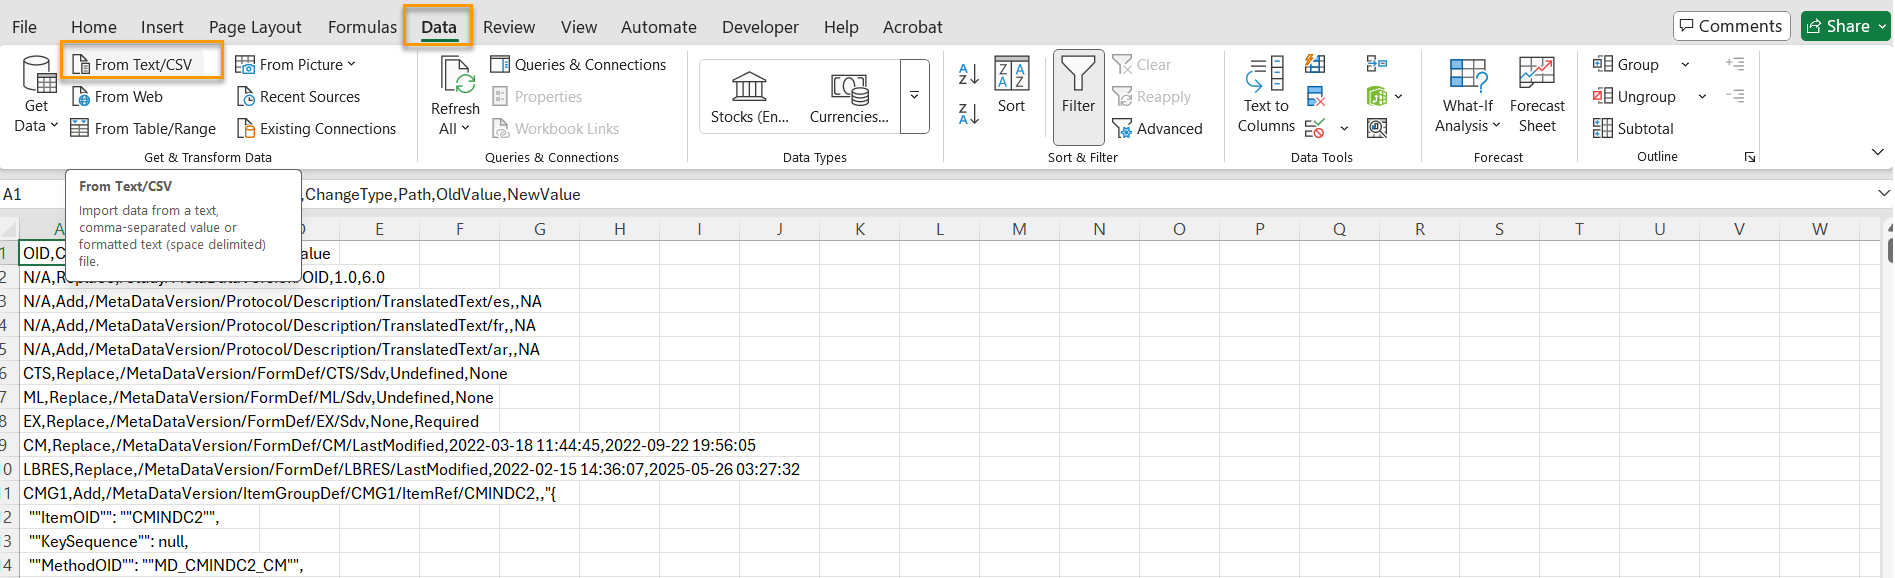 |
| 2 |
Select your exported file, then in the preview window, select Load. 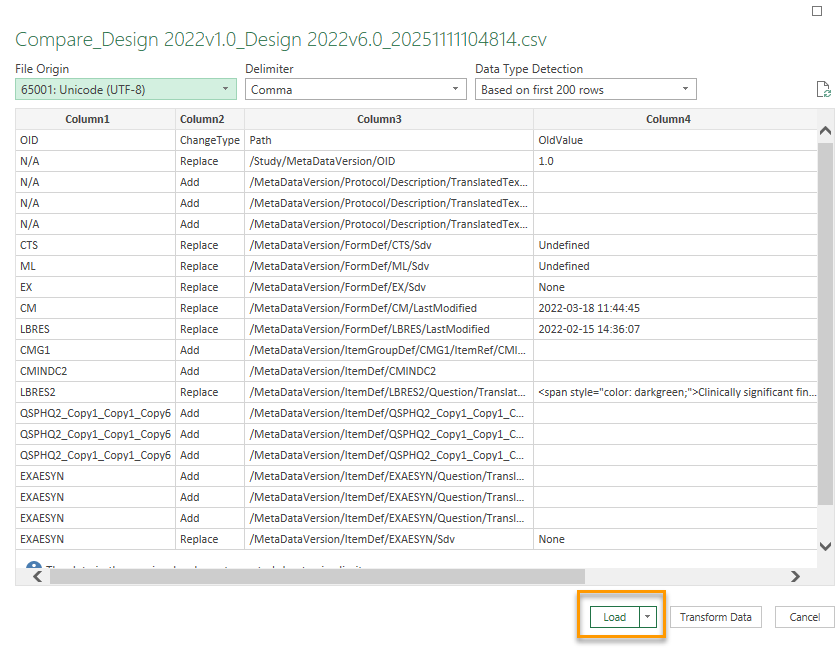
|
| 3 | Select Transform Data. The file opens in Power Query: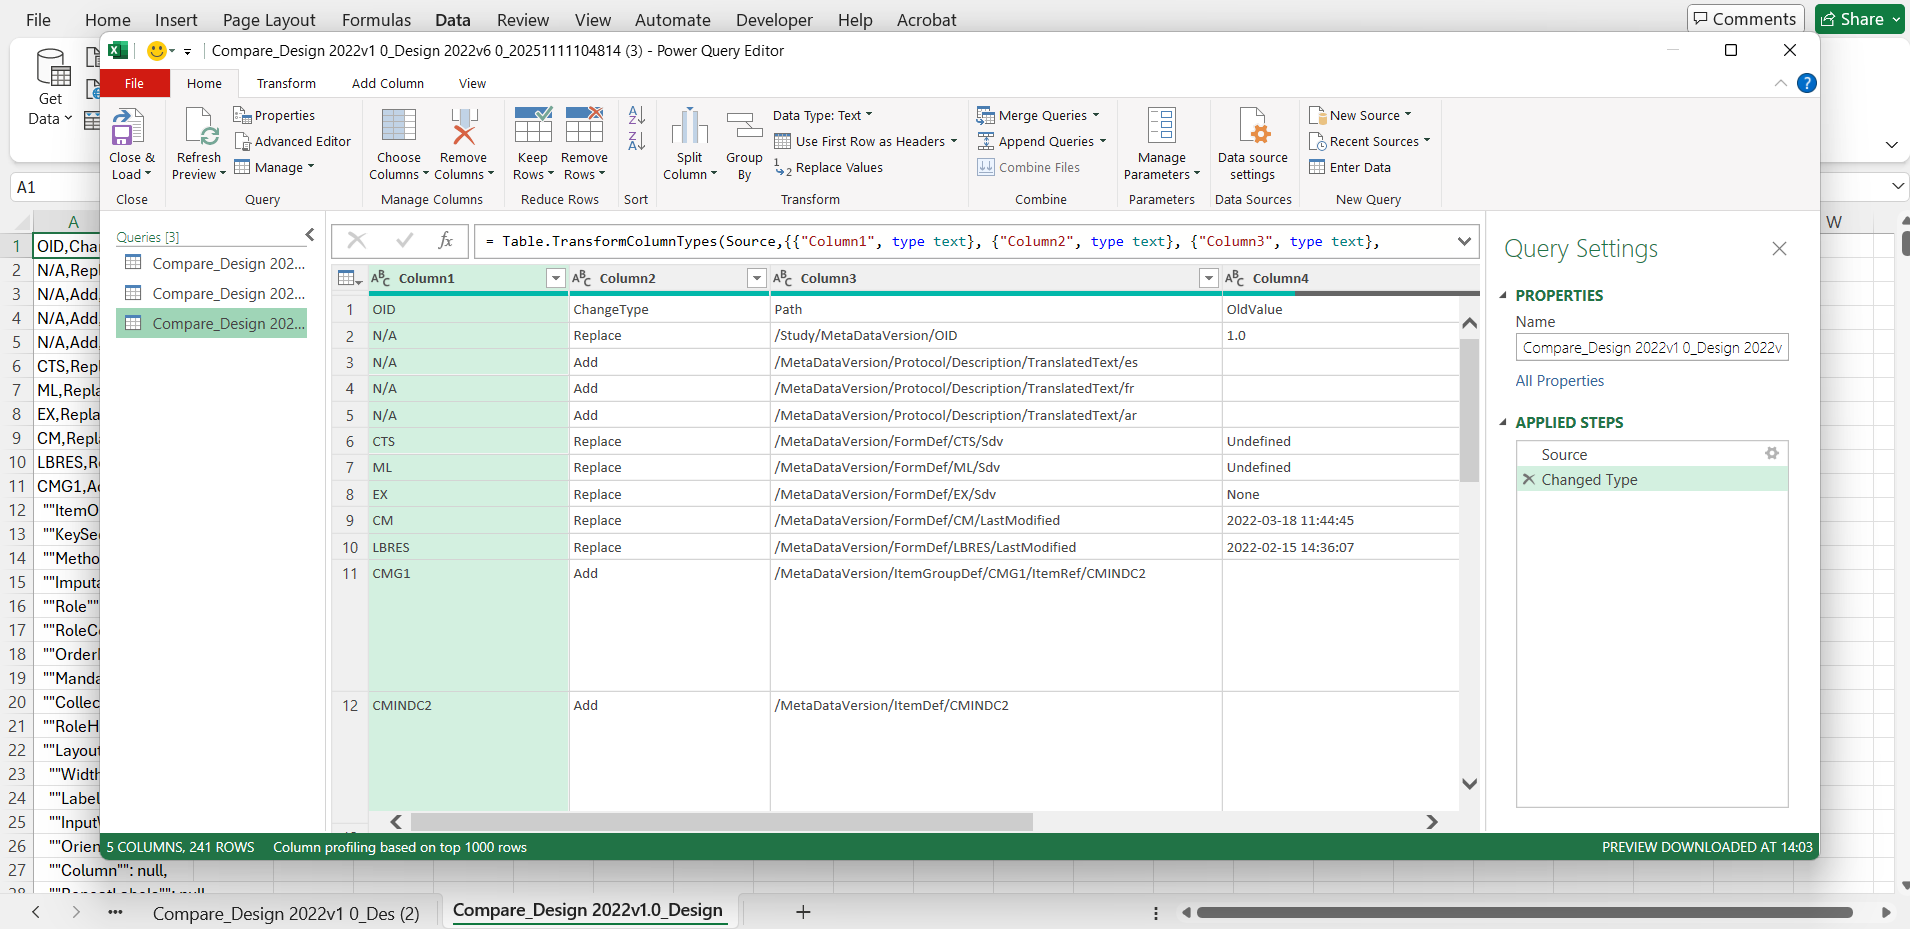 |
| 4 | In the Power Query editor, select Use First Row as Headers: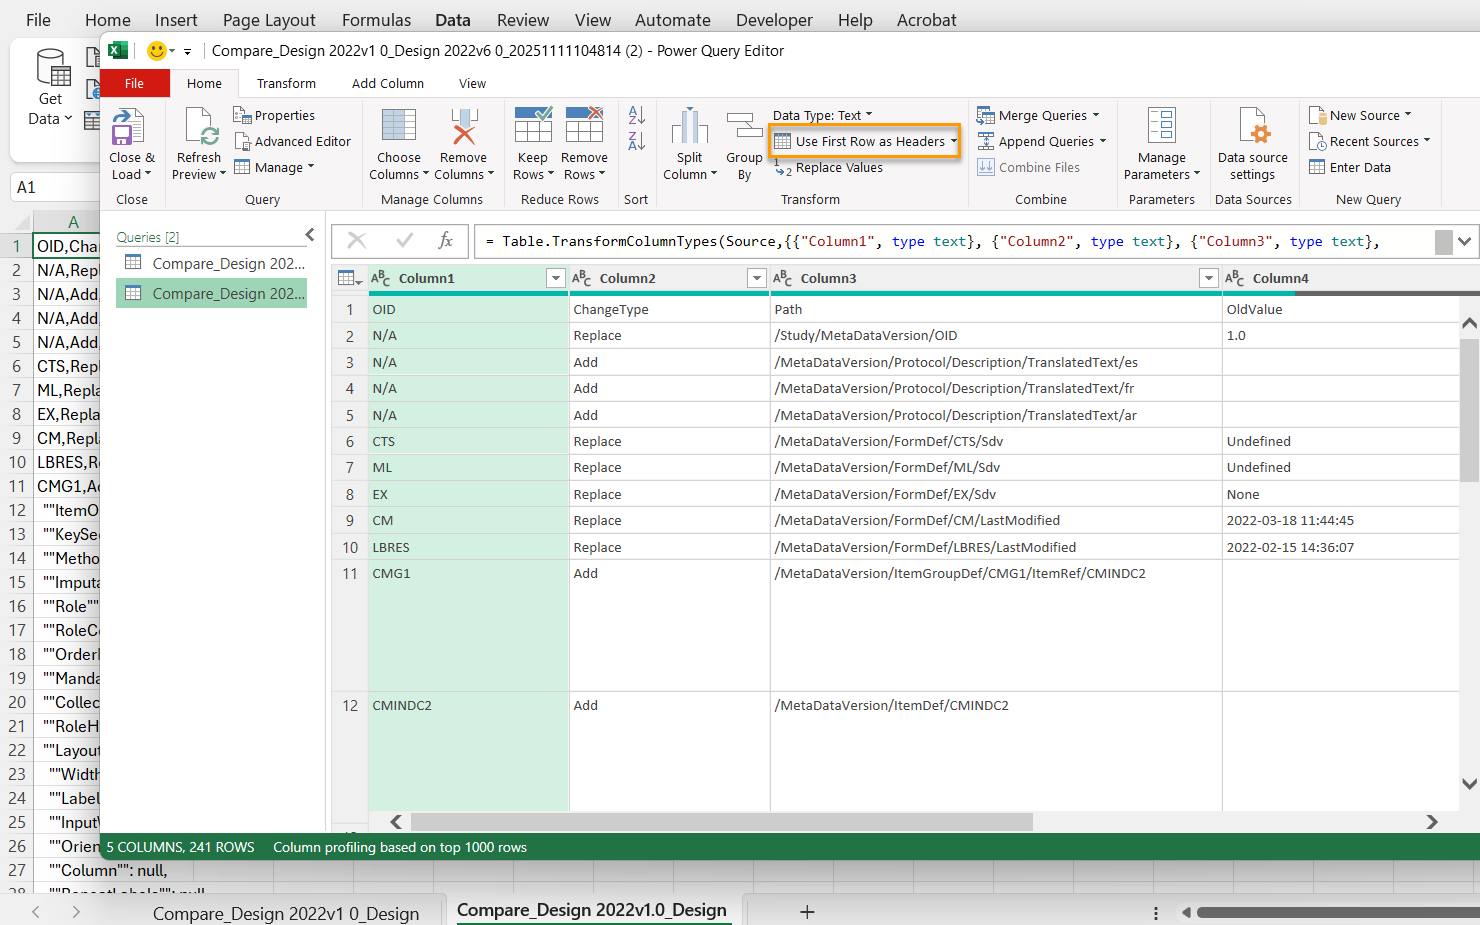 |
| 5 |
Select Close & Load.
|
An individual change in your design can affect multiple places in the study design ODM file. The design version compare output highlights all of the changes in the study design ODM file, and details the impact on the ODM design, rather than the individual change performed in Viedoc designer.
For example, when you delete a form from an activity, this appears as a remove action in:
Protocol section (the form is removed from the activity)StudyEventDef (the form is removed from the event)ConditionDef (if item visibility was customized for the form being removed).If any of the study design versions you are comparing include duplicated OIDs, the ODM design version comparison will fail, and an error message is shown. This can occur when comparing with old design versions which left orphan (that is, unreferenced and unused) definitions in the ODM export. Although this has no impact on the data collection, it prevents design comparison. To solve this issue, remove the duplicate OIDs from your study designs.
Example: In cases where you are comparing an older design version (for example, 1.0) with a newer design version, (for example, 6.2), it is possible that the older design version has already been published and assigned to sites, and therefore can not be edited. Equally, it is possible that even if design version 6.2 is still editable, design version 1.0 might not be.
A workaround is to export design version 1.0, clean it, import it as design version 7.0 to compare it with 6.2, and then delete design version 7.0.
If you modify the OID of an item, it is treated as a removal of the old item and an addition of the new item. This behavior is the same for item groups, forms, activities and events and is also reflected in the design version compare output.
If validation warnings or error messages have been triggered in any of the design versions being compared, the individual warnings and errors are not displayed separately in the design version compare output. The total number of errors in the respective sections in the design are shown, for example, Errors/FormDef and Errors/ActivityDef.
"[Image] Length XXX" instead of the entire string.Note! From the 4.86 release, the code snippet used for adding images to forms has been slightly modified. In existing study designs, the code updates when the form is saved in a new design version. This results in a change to the length of the code and this is therefore included in the compare output. This also applies to the code snippet used for adding hyperlinks to forms.
If you import a study design into Viedoc Designer, without first saving the workflow, the design ODM file will include:
Epoch1 in the section protocol > structureActivityDef ACT_FINISH in the section protocol > structure as well as in the section protocol > workflow.These records are removed when the study workflow is saved. So if one of the design versions in the comparison includes a design version that was imported without saving the workflow, and the other design version in the comparison does not, the compare output will display that these records have been removed or added depending on which design is your source and target design.
Note! These records do not have any impact on the data collection and can be ignored in the design version compare output.
In the source design:
v4 attribute Width="full" and Spacing="wide" and RoleHideShow="Show".ItemGroupDef and the ItemGroupRef in the design ODM file.Width="full" and Spacing="wide" and RoleHideShow="Show", if no other option is selected.$EVENT is created in the FormDef section. As the designs are processed and $Event is created for both the source and target design, there is a possibility, with very large study designs, that the $EVENT form is created one second later for the target design than for the source design.In the design version compare output this would then show as a replace with the full path:
/MetaDataVersion/FormDef/$EVENT/Created
/MetaDataVersion/FormDef/$EVENT/LastModified

Note! This discrepancy has no impact on the study design or on the data collection and can be ignored.
If you export the design to review the ODM file manually, there is a different timepoint in the exported ODM. This is because during export, the $EVENT is created in the same way as it was created for the comparison.
If you add or remove something from the study design, the design version compare will utilize the last common denominator, and group any information beyond that point.
For example, if you remove the form with the OID DS the last common denominator is Study/MetaData/Forms/DS, anything beyond that point does not exist in the new design, and is grouped in the Old value column.

For releases 4.79 and earlier, an OrderNumber attribute was added for Alerts.
Note! The order number attributes had no impact on Alerts functionality.
v4:HideShow=show, the v4 attribute "HideShow" was not added to the condition definitions- ConditionDef. It was however added when the form was saved.This attribute was therefore not consistently defined for all of the condition definitions in the exported ODM study design. This did not have any impact, as the absence of this attribute was treated as "show" by default."HideShow" is consistently added to the ConditionDef when saving the study workflow. As a result, if the workflow in the source design was saved with customized item visibility in the study workflow, and the same form was saved in the target design, the v4 attribute HideShow="show" will be added to the condition definitions for that form. This is also reflected in the design version compare output.Minor updates have been made to how HTML text style attributes are stored in the ODM. Text color in item labels is now saved using RGBA values (for example: rgba (255, 0, 0, 1)) instead of named colors (for example: style="color: darkgreen;"). Other styling attributes, for example, font size and italic formatting have also been adjusted slightly. Forms previously saved in Designer will remain unaffected when modified in a revision. When a form is saved again in a new design version, the updated attributes will apply.
Note! These changes do not affect how text is displayed in Viedoc Clinic but will be visible in the exported ODM and in the design version compare output.
The information to be displayed on the subject card is set on this page. The subject cards are displayed on the Selection page in Viedoc Clinic.
There is room for 2 variables apart from the gender on the card. Choose the form and item to be displayed and set a header of the variable.
Additional variables can be added but these will only be shown if the user chooses the "list/table view" option in Clinic to display the subjects. See Selection page for details on how this is shown in Viedoc Clinic.

Notes!
The format for the Subject ID, used to identify a subject within the system, can be configured under Study Settings > Subject ID generation settings:

The ID of the subject can be set in various ways.
The Viedoc default configuration consists of the country code followed by the site ID and finally the consecutive subject ID. This can be changed by modifying the contents of the text field:
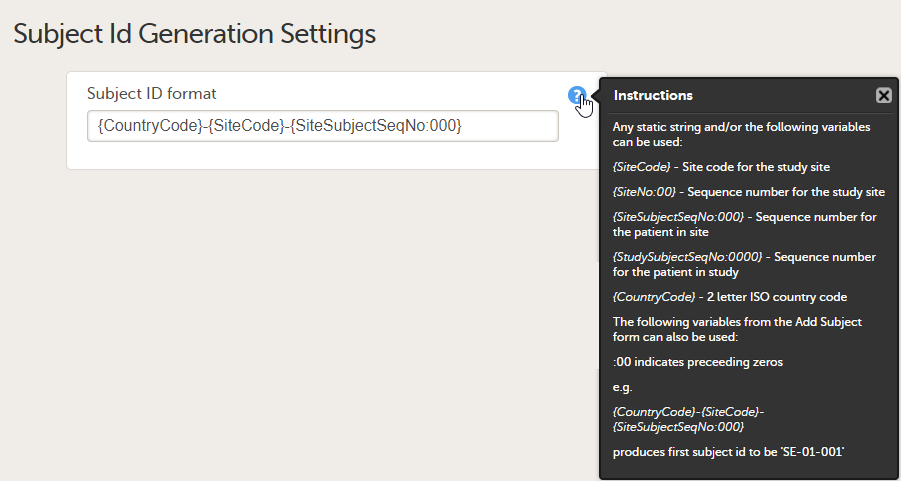
Any item collected on the form that is selected for the start event in the workflow can also be used when setting up the ID. Click the blue "?" instructions icon for more info.
Note! It is not recommended to use any of the characters that are invalid for a filename in Windows, because the value of the Subject ID is used within the file name of the exported PDF file, when the FDA submission format (eCTD) option is checked, and therefore the export will fail in this particular case.
Since any of the SiteCode and SiteNo can be used within the Subject ID, it is important to understand the difference between these two variables before configuring the Subject ID Generation Settings.
The value of the SiteCode variable is the string that is manually set in Viedoc Admin, under Site settings (see Managing study sites).
SiteNo is a system variable automatically generated by the system that uniquely identifies the site within the study. This is the one that comes out in the export output as Site Sequence Number.
The "0" used in the formats {SiteNo:00}, {SiteSubjectSeqNo:000}, {StudySubjectSeqNo:0000} is for padding those numbers with leading zeros. If the value that is being formatted has a digit in the position where the zero appears in the format string, that digit is copied to the result string; otherwise, a zero appears in the result string. This means that, for example, if we want the SiteSubjectSeqNo to always be formatted as a number with a total length of three digits, then we use {SiteSubjectSeqNo:000} and the values will then be 001, 002, 003 and so on.
The SiteCode can also be padded, but only if it consists exclusively of digits. For example, if the Subject ID format is set to {CountryCode}-{SiteCode:00}-{SiteSubjectSeqNo:000}, and if the CountryCode is set to SE and the SiteCode is set to 1, then the first added subject will be SE-01-001, the second one SE-01-002, and so on. Note that the padding has no effect if the SiteCode is set to be a string containing characters, such as UP2.
To add for example "SCR" in front of the ID, simply add SCR in the text field:

If applicable for your study, the Viedoc Source Data Verification SDV Manager application is available.
Users assigned the role of SDV Manager can define Source Data Verification (SDV) requirements and plans and apply them selectively across study sites based on risk.
Note! All new studies from the Viedoc 4.95 release onwards will have the new Viedoc SDV Manager enabled by default as shown in Study Settings:
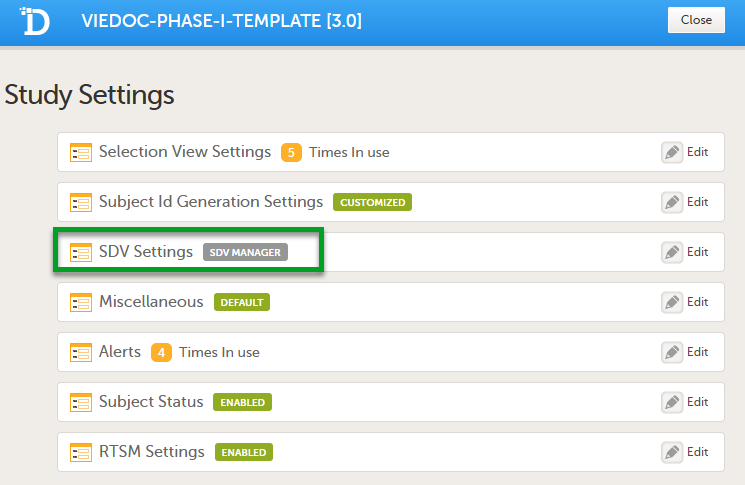
Existing studies will retain their current SDV settings, and have the option to update to the SDV Manager.
| Important! Once the SDV Manager is enabled for a study, it cannot be reverted. |
For existing studies, which use the legacy SDV, if a study updates to use the SDV Manager, you will still be able to view the original forms and items selected for SDV. The SDV settings beome read-only, and you are notified that the SDV settings are managed by SDV Manager:
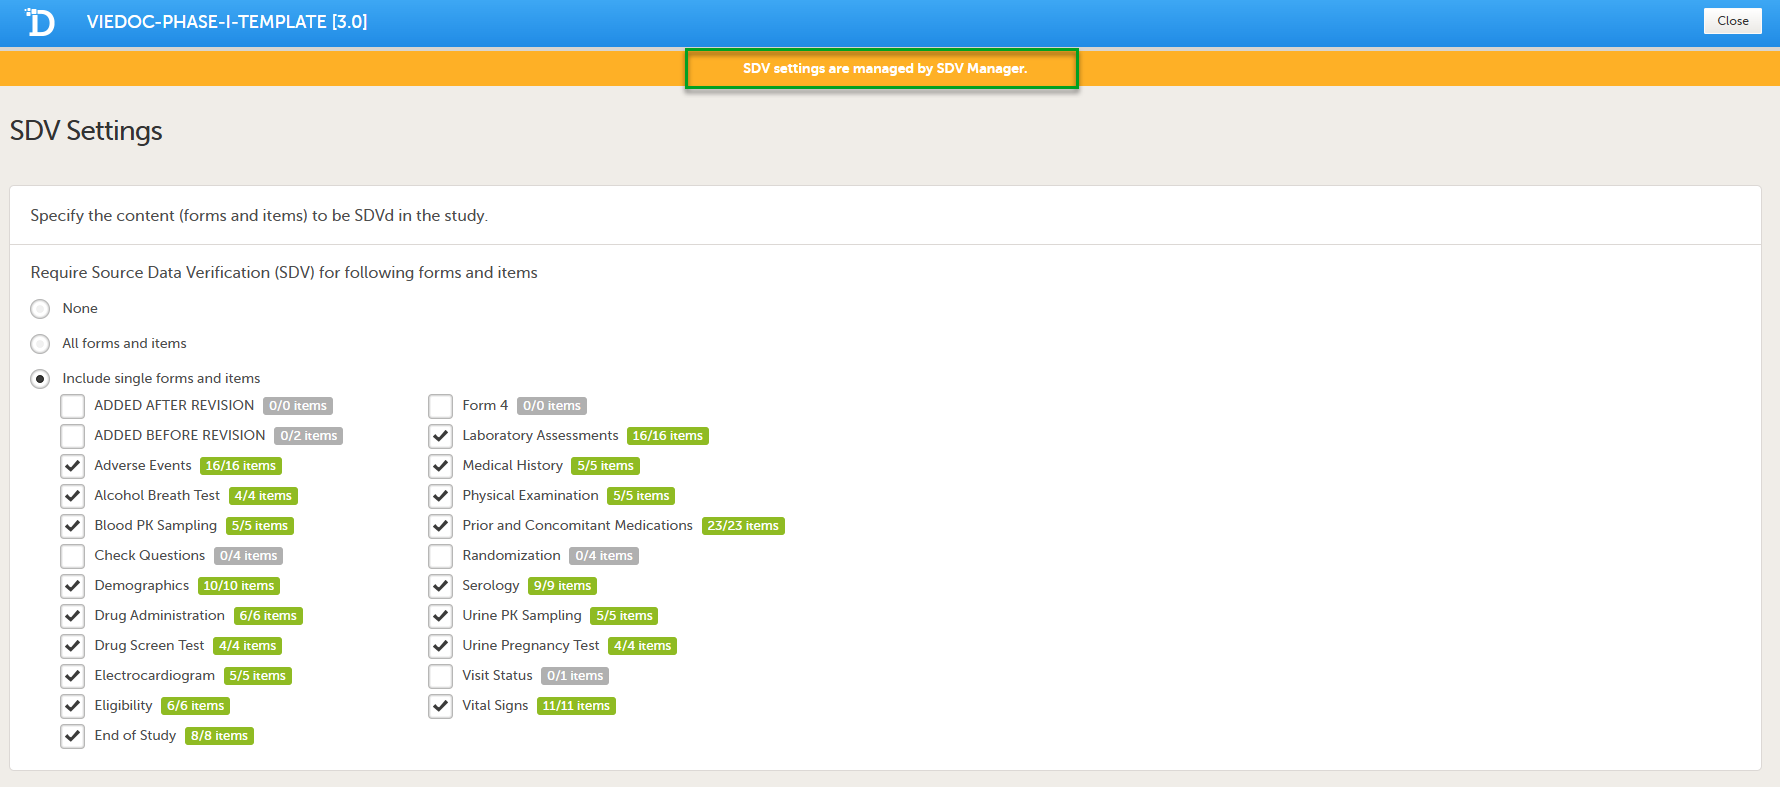
When SDV Manager is enabled, SDV is not controlled by the study design settings. Instead, SDV is controlled by Dynamic SDV rules configured in the SDV Manager application. These rules determine which items require SDV and whether SDV is required or optional. This allows Monitors to see which items are required and which are optional.
For more information, see Viedoc SDV Manager.
SDV behavior differs from legacy SDV by introducing an SDV Behaviour dropdown with three options:
The Source Data Verification (SDV) setting enables you to choose which forms and items that require SDV in your study.
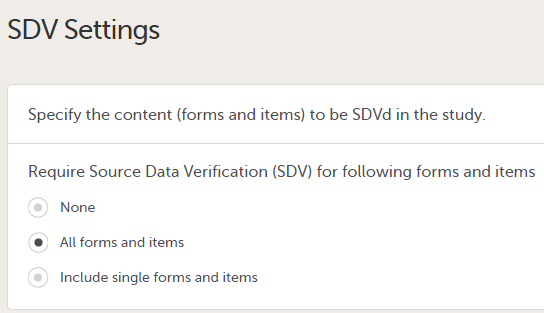
The available options are:
Note! The SDV Settings can only be edited in a new design version (not a revision).
This section is for various settings that don't fit anywhere else.
Currently you can choose to enable/disable the need for entering a reason when a field is left blank, i.e. when confirming data as missing in Viedoc Clinic.
By setting up an alert in your study you can notify users about important occurrences in the data. You can set up alerts that are issued in defined conditions (for example, in case of a Serious Adverse Event).
Setting up the alerts is done in Viedoc Designer, under Study Settings > Alerts:
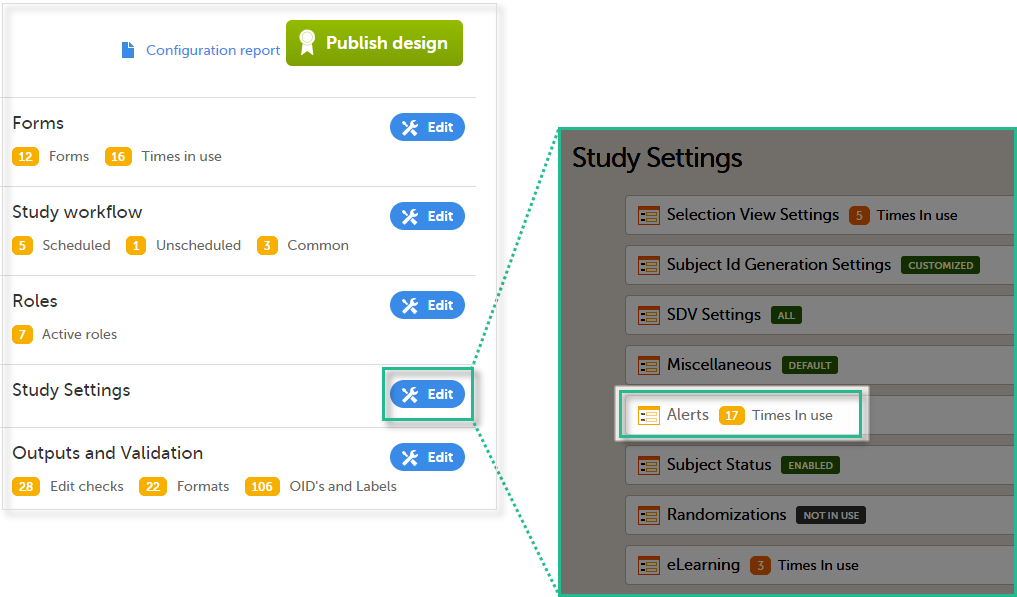
The Alerts page displays a list of existing alerts (if any) and allows you to add new ones, as illustrated below:
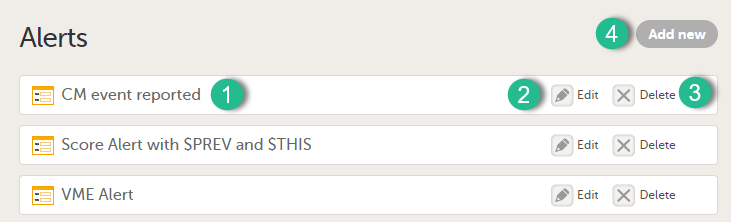
1. The internal description of the alert.
2. Edit button that directs you to the alert details page, where you can see/edit the alert.
3. Delete button for removing the alert.
4. Add new button that allows you to create a new alert by opening the alert details page.
Depending on if the alert was configured before or after Viedoc version 4.37, the alert settings are slightly different. The following sections describe in detail the settings for the two types of alerts:

The alert consists of:
SAE == 1 && SCR.PATINFO.SEX == 1. For details about variables and conditions, see Using JavaScript in Viedoc.SAE == 1.For details on how the condition is evaluated in conjunction with the context form, see section How the condition is evaluated.
Note! When changing the context form for an existing alert, this becomes a new alert (in terms of evaluating the condition and triggering the alert, that is, the new alert is not active in the beginning). Changing the context form for an existing alert is the same as removing the existing alert and creating a new one with the same configuration except for the context form.
For Japanese PMS studies, there is a setting where you define which type of change that will trigger the alert. There are two options:
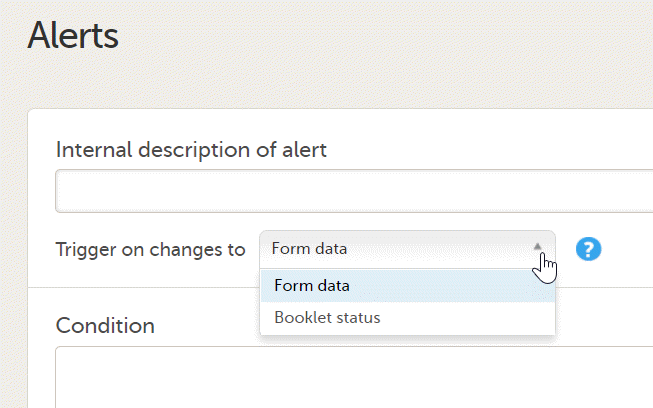
In the four action tabs, you set up the messages to be sent when an alert is triggered. Alerts are sent as internal messages within Viedoc and can be seen on the Study start page under the Messages pane. The messages can also be sent as email copies.
By selecting the respective checkbox in the action tabs, the alert message is triggered as follows:
By default, the respective checkbox is unchecked for all four tabs. If no checkbox is selected, no message is sent. An activated action is shown with a checkmark in the tabs pane:

In the message section, you set up the message to be sent and select the user roles that shall receive it.
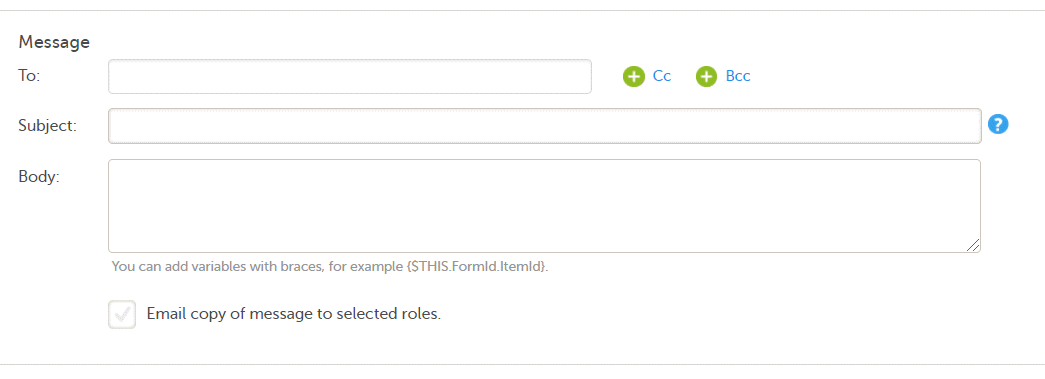 In the To field, click to select the roles that shall receive the message. Click to add Cc: (Carbon Copy) and Bcc: (Blind Carbon Copy) fields.
In the Subject field, type the subject of the message.
In the Body field, type the message to be sent.
Note! If an image is included in an alert (in the subject, the message body, or in a table of changes from a tracker alert), the system returns:
Any static string and/or the following variables can be embedded in both Subject and Body:
{SAE}.EventId.FormId.ItemId, for example {SCR.PATINFO.SEX}.Note! The item values included in the message are visible for all the users holding the defined roles in To:, Cc:, and Bcc: without respecting the role visibility settings.
The following image illustrates an example of how the alert message configured in Viedoc Designer looks in Viedoc Clinic:
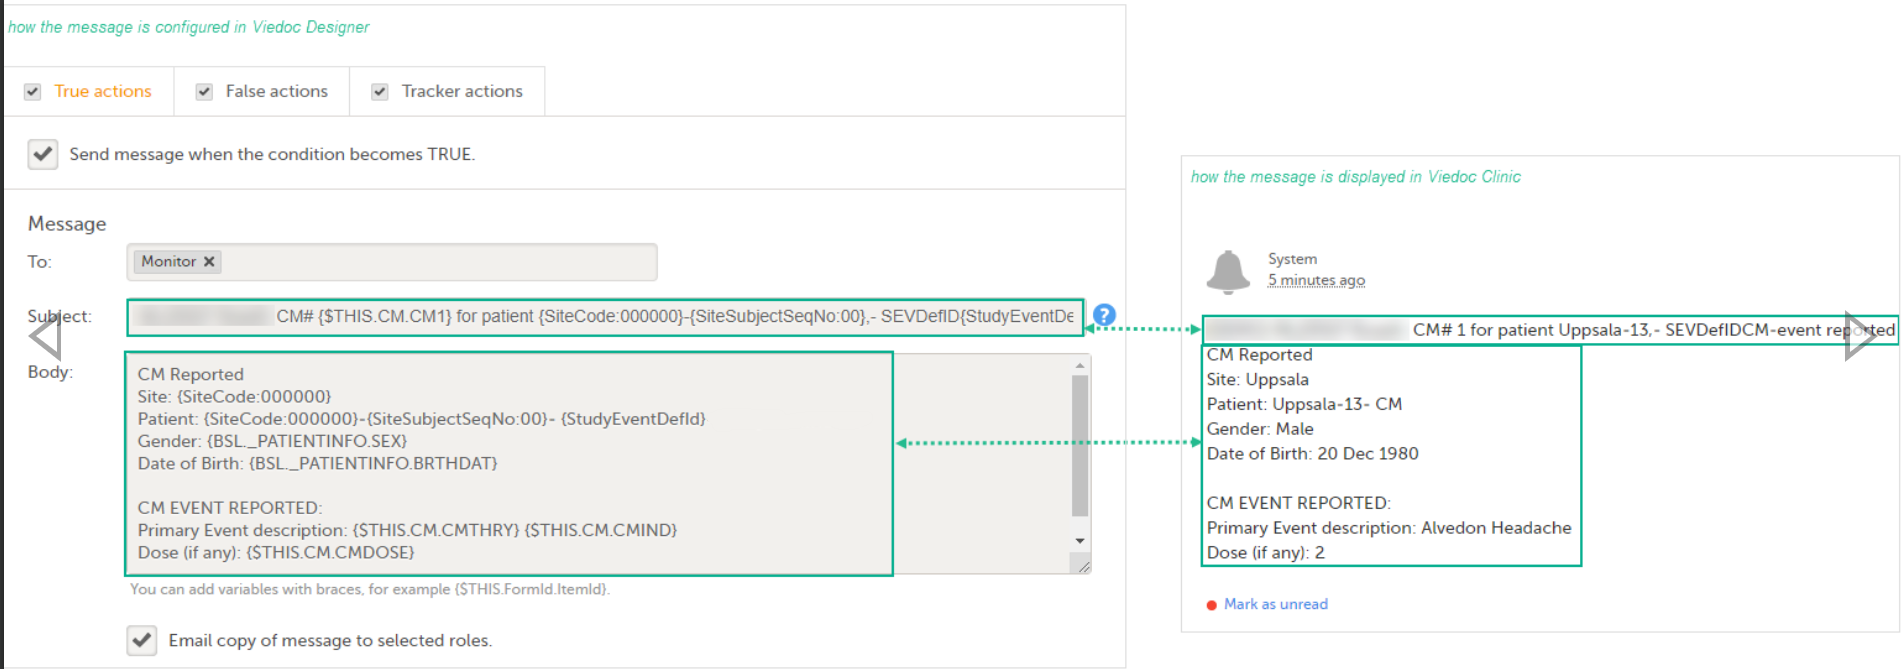
By selecting Email copy of message to selected roles, a separate email is sent to each user assigned to a role listed in the To: field. Users assigned to roles listed in the Cc: field receive a separate copy of each e-mail.
For example, if there are five users assigned to roles listed in the To: field, and one user assigned to the role in the Cc: field, then five separate emails are sent, and the user with the role in Cc: gets the same e-mail five times.
Note! If there are no users with the roles listed in the To: field, no email is sent.
When Email copy of message to selected roles is selected, the option Attach form PDF becomes available. By selecting this option, the PDF of the form that triggered the alert action is sent as a PDF attachment with the email as follows:
For True actions, the attached form PDF is the form selected in Context form.
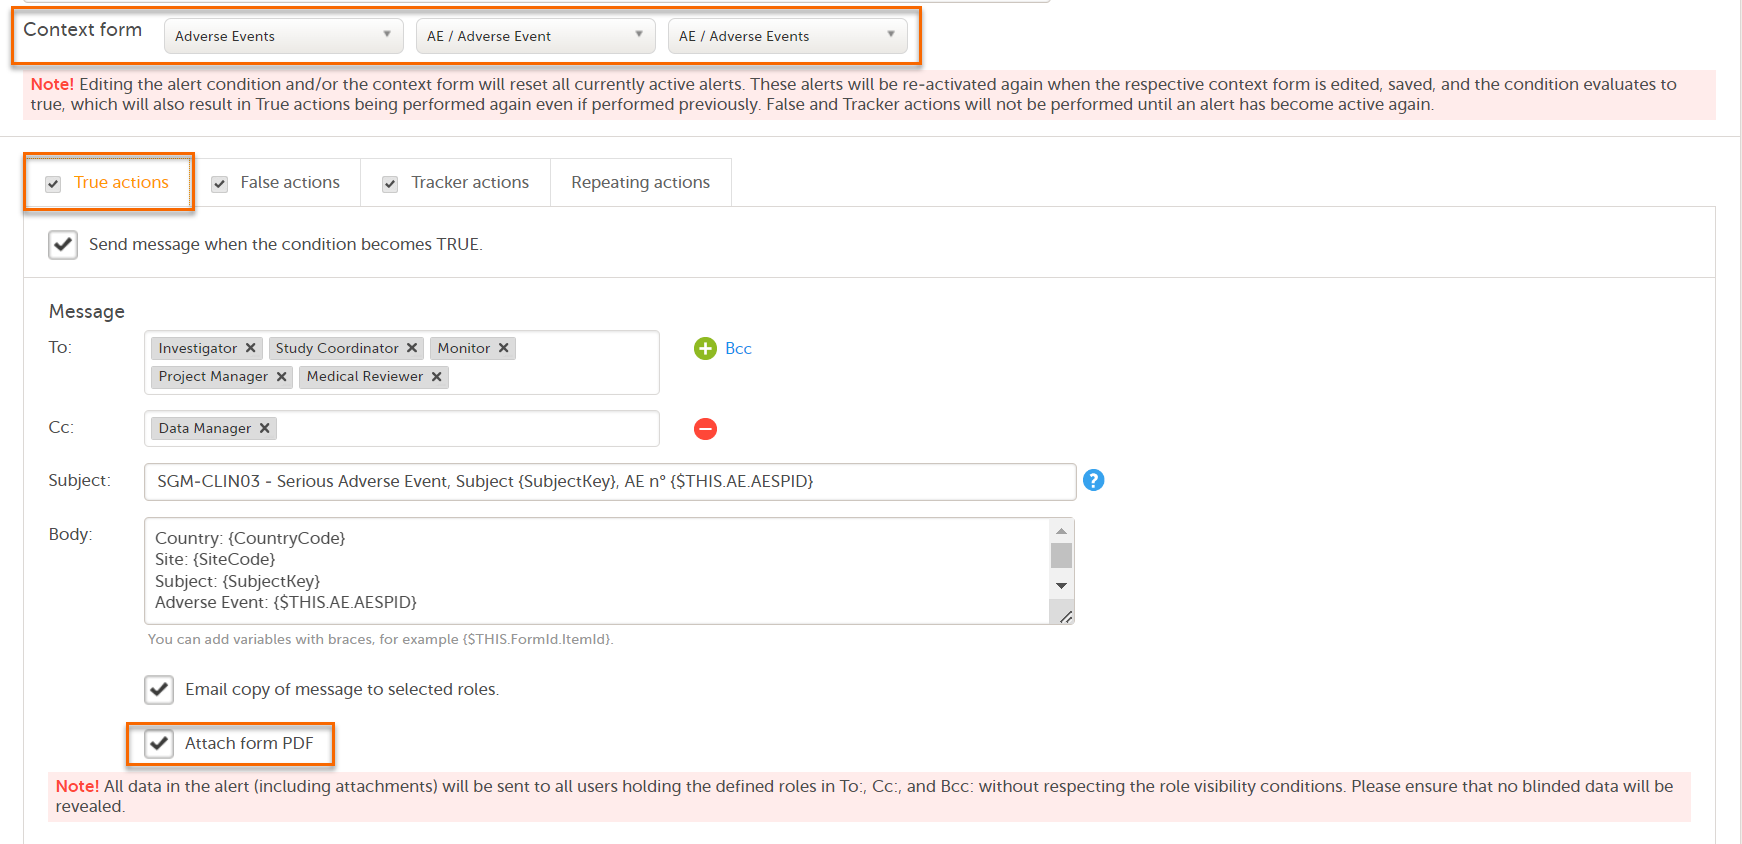
For False actions, the attached form PDF is the PDF of the context form instance that triggered the true actions
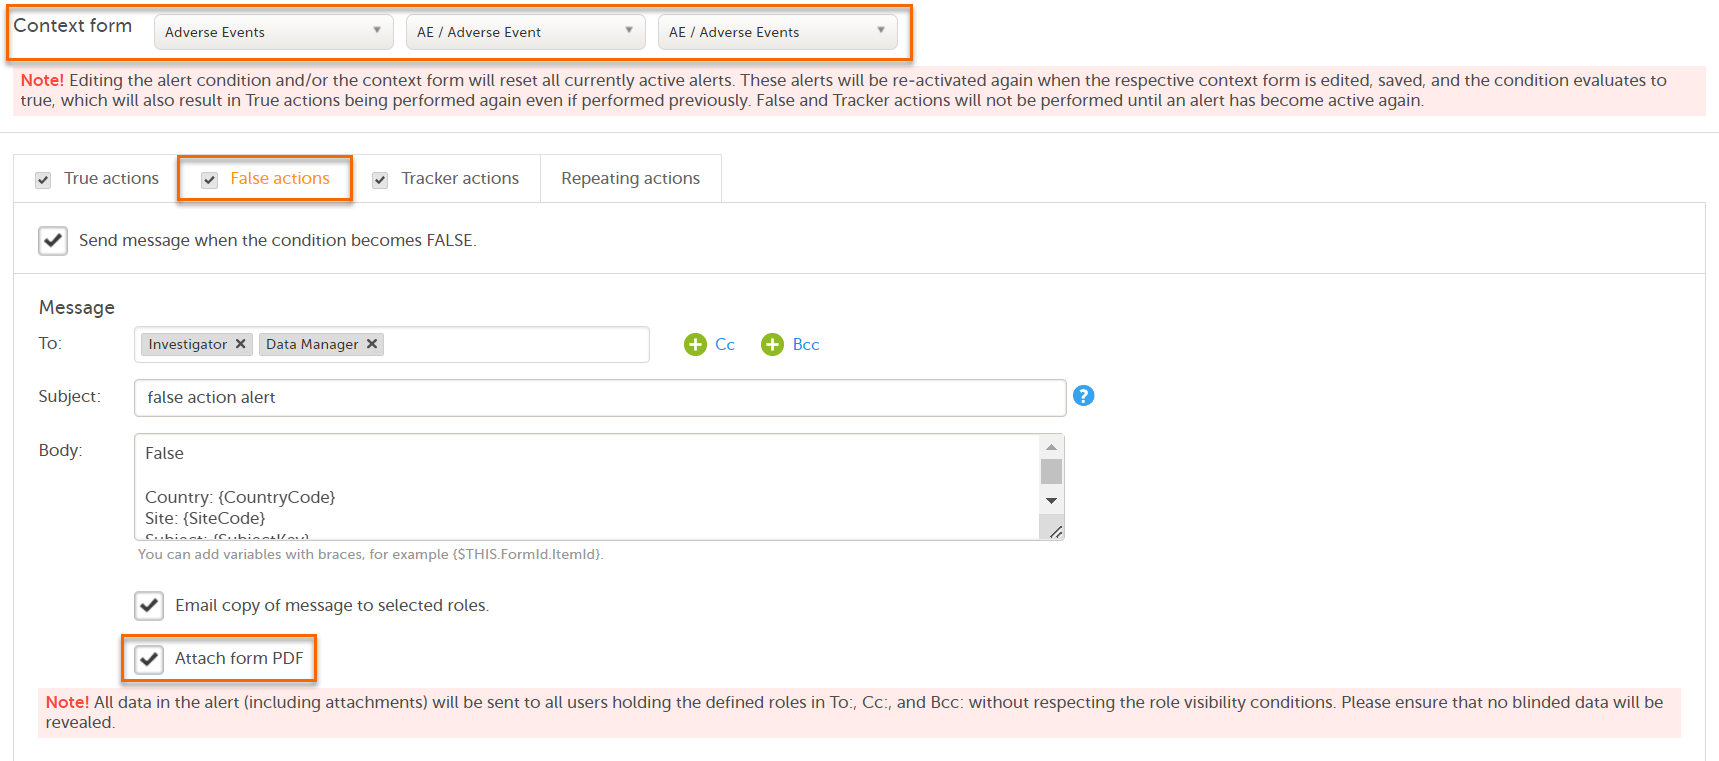
For Tracker actions, if the tracked items are outside the Context form, the attached form PDF is the form where the tracked items were changed, as long as the condition is still TRUE.
For more information, see Context form.
Notes!
The true action is activated by selecting the option Send message when the condition is TRUE. This results in messages being sent when the condition is evaluated to true.
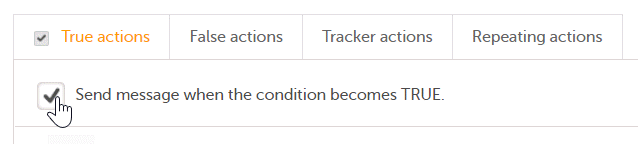
The false action is activated by selecting the option Send message when the condition is FALSE. This results in messages being sent when the condition is evaluated to false after being true.
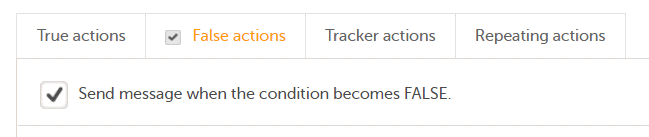
The tracker action is activated by selecting the checkbox Send message when any of the tracked items is changed AND the condition is TRUE. This results in messages being sent when the condition evaluates to true for the first time and any of the tracked items are changed. Tracking stops and the alert becomes inactive when the condition evaluates to false.
You can choose to track changes made on:
1. All forms and items
2. Single forms and items - select the form(s) to be tracked by selecting the corresponding checkbox. For each of the forms you can also select the specific items to be tracked. By default, all the items in the form are selected. By clicking on the items box next to the respective form, a pop-up opens where you can select the items to be tracked.
Note!
The message is sent as described below, depending if the tracked items are within or outside of the context form:
Note! Changes on the tracked items is sent to all the users holding the defined roles in To:, Cc:, and Bcc: without respecting the role visibility settings. Due to this, make sure that no hidden data is revealed in the table of changes.
By selecting Include table of changes, a table is included in the message body, providing information about the tracked item(s) that were changed. The following data is provided in the table:
The repeating action is activated by selecting the checkbox Send additional messages as long as the condition is TRUE. This results in messages being sent after the condition is first evaluated to true. Then messages are sent repeatedly at the defined interval until the condition is false, or, when the maximum limit is reached.
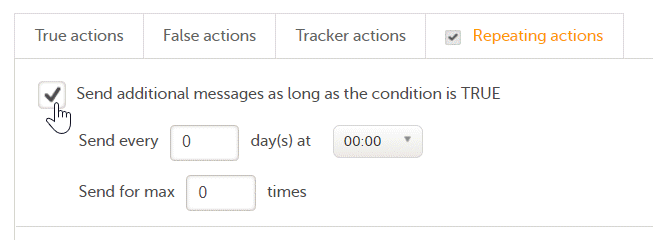
The repeating action is set up by making the following settings:
The context form is required to be set for an alert, to define where the condition will be evaluated, that is, the saving of which form in Viedoc Clinic will determine the alert condition to be evaluated.
There are three possible ways to set up the context form:
The workflow followed in the case of a new alert consists of the following steps:
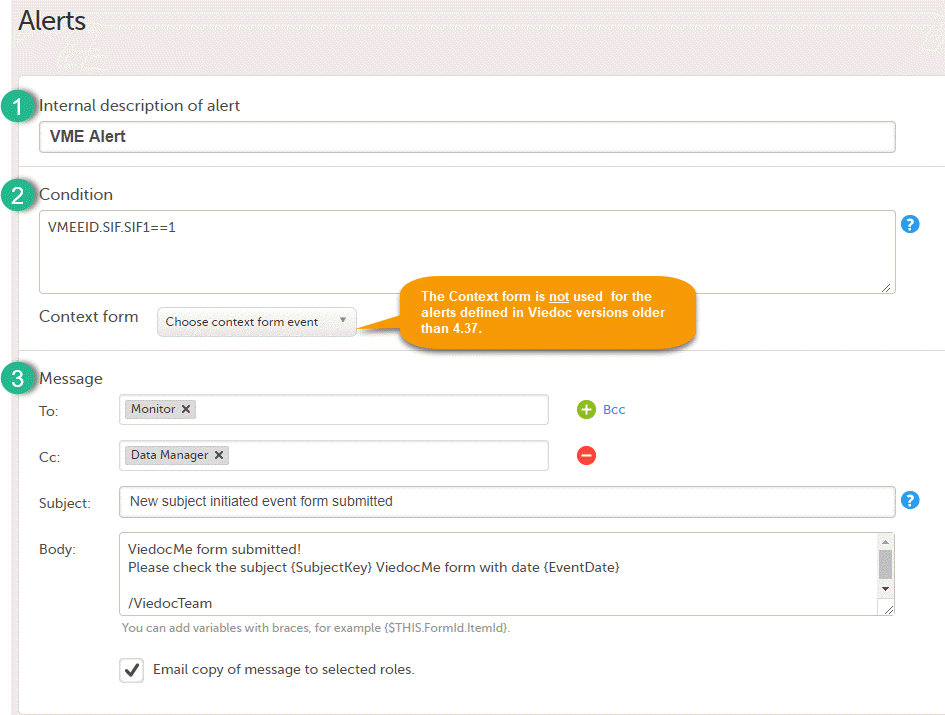
The alert consists of:
SAE == 1 && SCR.PATINFO.SEX == 1. Fore details about variables and conditions see Using JavaScript in Viedoc.SAE == 1.|
Important! The Context form is not used for the alerts defined in Viedoc versions older than 4.37. You can still keep the "old" alert and continue to use it in the same way by not setting any context form for it. You can update the condition or the message settings for it. Once a context form is set and the alert is saved, this becomes a new alert and there is no way to revert to the old version (prior to 4.37). |
The subject status calculations are used in Viedoc in the following places:
The subject status calculation happens when saving a form or applying a new design version to the site.
In the Subject status settings, the following statuses are defined:
For each status, three definitions are set:
See Using JavaScript in Viedoc for details on how JavaScript expressions can be used in Viedoc.

For Viedoc Reports, the subject status settings are used to make calculations for the Study progress graph.
When setting up Viedoc Reports, make sure to define the Screened and Enrolled conditions using JavaScript expressions. These are used to populate the Recruitment plot with data.
Note! Viedoc Reports counts screening failures by deriving withdrawn, but not enrolled. In a future release, the screening failure status will be implemented in Viedoc Reports.
This lesson describes how to configure the Randomization and Trial Supply Management (RTSM) in Viedoc Designer.
Viedoc offers support for randomization. Subjects can be randomized using:
Dynamic randomization ensures a more even distribution of subjects across the treatment groups, with regard to prognostic factors that might influence the effect of treatment on the subjects.
The randomization in Viedoc is configured in a similar way for static and dynamic randomization. The main difference is that for static randomization, a list with outcomes (randomization numbers, treatment groups, and so on) - the randomization list - is created and uploaded by the user, while for dynamic randomization, an algorithm is used to assign subjects to a treatment group and the randomization list is created by the system.
It is possible to upload a separate allocation list that allocates an Investigational Product (IP) to the subject. When the subject is randomized, Viedoc informs the clinic user which IP should be given to the subject. The allocation list is most commonly used in double-blind studies. Uploading of the allocation list is done in a similar way for static and dynamic randomization.
| Term | Definition |
|---|---|
| RTSM | Randomization and Trial Supply Management. |
| Blinded role | A role that does not know which treatment the subject is receiving. Most roles in a clinical trial should be blinded. |
| Unblinded Statistician |
A system role that can configure the randomization in Viedoc Admin. The Unblinded Statistician sees which subjects are assigned to which treatments, and should therefore not have any role in the study where he/she should not know this information. An Unblinded Statistician can never again work in a blinded role within that study. |
| Randomization list | A list for allocating subjects to treatments or groups. The randomization list shows all available slots in the randomization. When randomization has started (that is, when the first subject has been randomized), the randomization list also shows which subjects have been assigned to which treatment or group. |
| Allocation list | A list for allocating IP to subjects. The allocation list shows all available IPs. When randomization has started, the allocation list also shows which IPs have been assigned to which subjects. Advanced allocation can be set up and for this there are two options for the allocation list(s):
|
| Scope |
Defines the scope from which a randomization slot or an IP should be selected. One of the following scopes can be chosen:
|
| Factor (Prognostic factor) |
Items that might influence the effect of treatment on the subjects, and that are to be used as input when randomizing the subject. For example sex or age. Viedoc supports the use of drop-down lists, radio buttons, integer and free text data types as input items. |
| Outcome | Items to be populated by the randomization service, for example treatment group. |
| Blinded outcome | Items to be populated by the randomization service, that should remain blinded until after the subject has been unblinded or emergency unblinded for a specific subject. These items will not be visible for any user in the system, except for the Unblinded Statistician who can see them in Viedoc Admin, or until an emergency unblinding was performed (for details on how the emergency unblinding is performed in Viedoc Clinic, see Randomization, allocation and emergency unblinding). |
Randomizations are configured in Viedoc Designer and Viedoc Admin, and executed in Viedoc Clinic. The schematic below depicts what different steps need to be taken, and which roles have permission to perform these steps, depending on the allocation configuration type as described below:

- Configuring individual forms for randomization and allocation, to keep the two steps separated in the study workflow
- The possibility to perform multiple allocations at different visits during the study
- The possibility to replace an already performed allocation with a new allocation
- The possibility to undo an already performed allocation
The configuration workflow in this case looks as illustrated in the following image:

This is a single-sourced file that should have the following content:
Introduction to randomization
Detailed instructions regarding these steps are described in:
An example of how to configure a dynamic randomization is described in detail in the following lesson:
For a video tutorial on how to configure a static list randomization and a dynamic randomization, see:
For more information on blinding, please see:
There are different workflows to be followed when setting up the randomization and allocation in Viedoc Designer, as illustrated in the Workflow section above.
To set up randomization in your study, you have to perform the following steps in Viedoc Designer:
Notes!
Tip! Once saved in Viedoc Clinic, the randomization form cannot be edited anymore. Add a message to the form asking the clinic user to make sure the data are correct before randomizing the patient. It is advisable to avoid using fields that are manually editable within the randomization form (an alternative would be to use fields auto-populated with data from other forms).
See also the eLearning section A use case for dynamic randomization for a complete example of designing the randomization form, and setting up the randomization in Viedoc Designer and Viedoc Admin.
Note! The randomization mapping is exactly the same irrespective of the randomization method (static/dynamic) that will be used. The choice of randomization method is made in Viedoc Admin, after the randomization mapping has been set up.
Note! The randomization event should not be the study start event. This will halt advanced features and result in an error.
To configure the design of the randomization, follow the steps below.
| 1 |
Open the study in Viedoc Designer. Click Edit in the Study Settings field to open the Study Settings page. 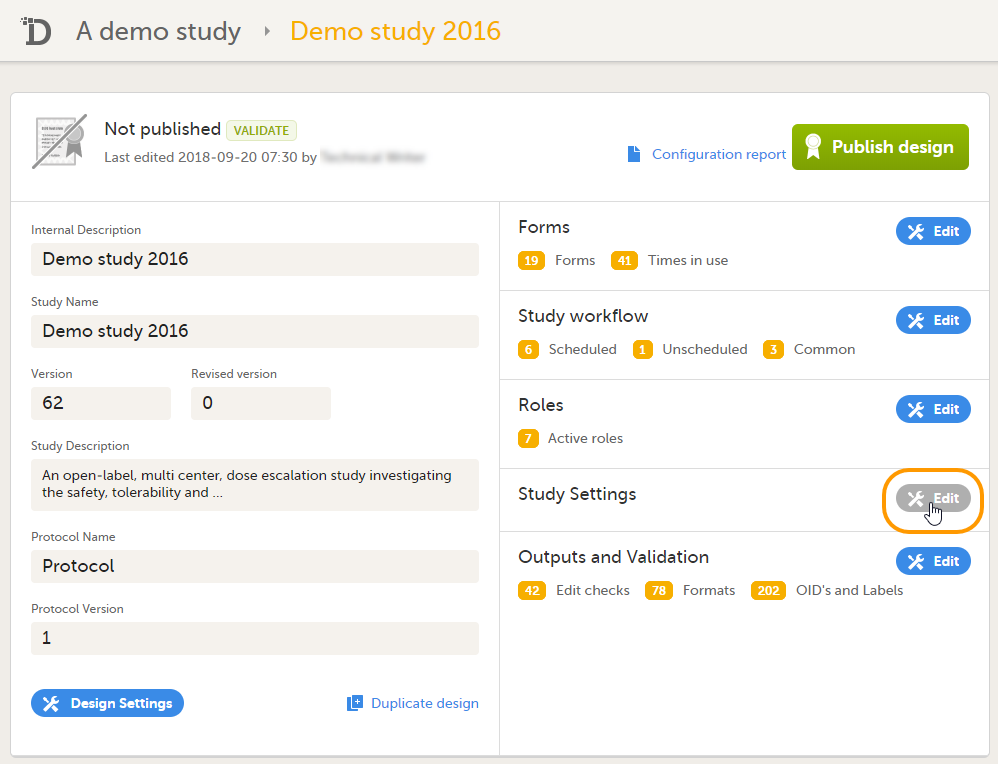
|
| 2 |
Click Edit in the RTSM Settings field to open the RTSM Settings page. 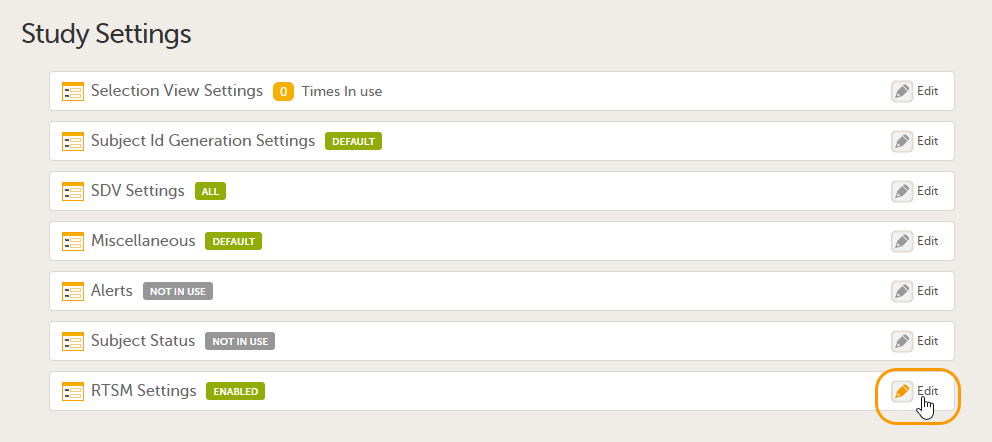
|
| 3 |
Click Add new. 
The RTSM Settings page opens. |
| 4 |
Set up the randomization mapping under Inclusion tab, as follows:
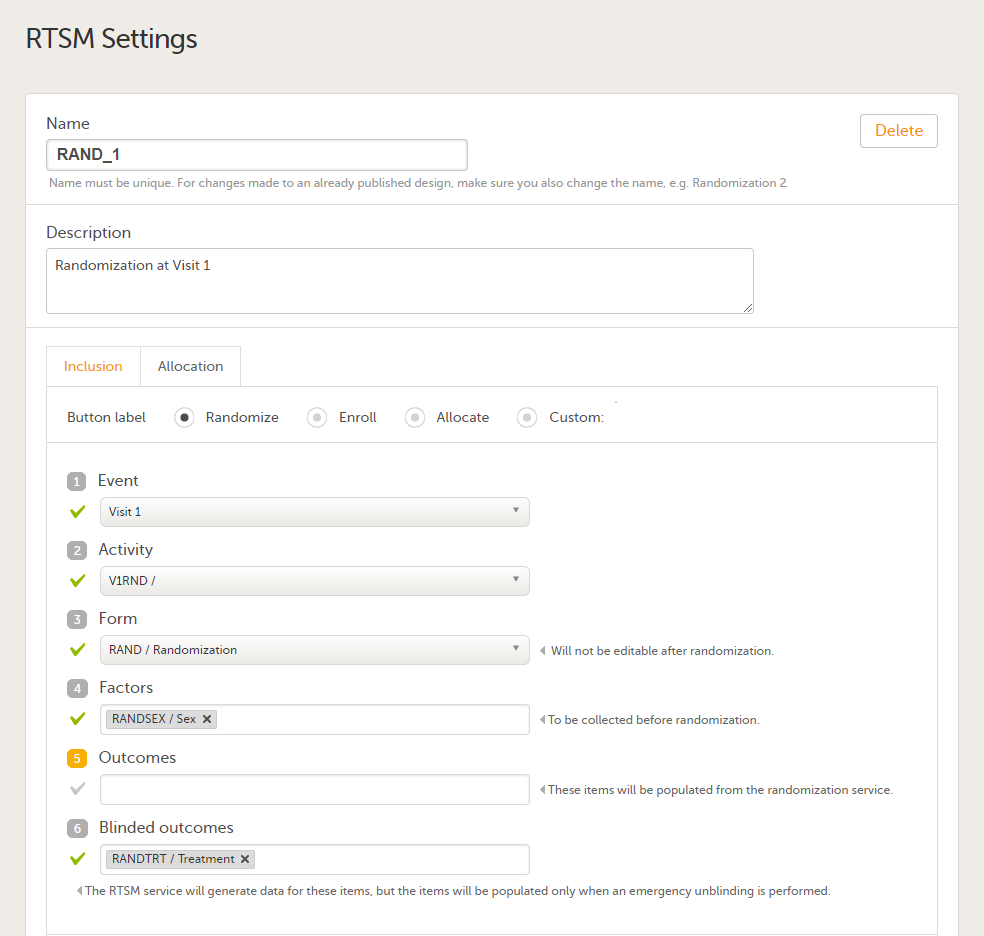
|
| 5 |
Click Save changes, and click Close. |
After the randomization mapping has been set up, the study design needs to be published for the randomization to become active.
Note! The randomization mapping is part of the study design. It is not possible to edit an existing randomization mapping after the study design has been published. If the randomization has to be changed, a new study design version has to be created, see Duplicating a design - versions and revisions.
To edit the randomization mapping, follow the steps below.
| 1 |
Open the study in Viedoc Designer. Click Edit in the Study Settings field to open the Study Settings page.
|
| 2 |
Click Edit in the RTSM Settings field to open the RTSM Settings page.
|
| 3 | Click Edit in the field of the randomization you would like to edit. The RTSM Settings page opens. |
| 4 | Edit the randomization settings as you wish. Click Save changes, and click Close. The RTSM Settings page closes. |
Note! The randomization mapping is part of the study design. It is not possible to delete an existing randomization mapping after the study design has been published. If the randomization has to be changed, a new study design version has to be created, see Duplicating a design - versions and revisions.
To delete a randomization mapping, follow the steps below.
| 1 |
Open the study in Viedoc Designer. Click Edit in the Study Settings field to open the Study Settings page.
|
| 2 |
Click Edit in the RTSM Settings field to open the RTSM Settings page.
|
| 3 | Click Edit in the field of the randomization you would like to edit. The RTSM Settings page opens. |
| 4 |
Click Delete.
|
To set up the advanced allocation, follow the steps below.
| 1 | Open the study in Viedoc Designer. Click Edit in the Study Settings field to open the Study Settings page. |
| 2 | Click Edit in the RTSM Settings field to open the RTSM Settings page. |
| 3 | Click Edit in the field of the randomization you would like to edit. The RTSM Settings page opens. |
| 4 | Under the Inclusion tab, in the bottom, select Enable advanced allocation. The Allocation input properties and Allocation output properties are displayed. |
| 5 |
Set the Property ID(s) and Property Label(s). These are used for mapping when setting up the global allocation list in Viedoc Admin (note that a global allocation list has to be used in conjunction with the Logistics functionality). For details about the allocation list see Configuring the Global allocation list. Click the "+" icon to add new input/output properties. See Mapping the allocation input and output properties below. Important! Property Label(s) must be defined here for all the inputs and outputs of all the allocation(s) that are to be used in the study and configured in the next steps, as this will not be possible to be updated at a later point after the RTSM settings are approved and published. |
| 6 | Click Continue to Allocation. You will be directed to the Allocation tab. |
| 7 |
Set up the allocation as follows:

|
| 8 | Optionally, click Add another allocation to add a new allocation and perform the settings in step 7 above. Notes! - This is needed if you want to use the allocation multiple times in different events or activities. - When using multiple allocations, make sure that all the input and output property labels are added, as described at step 5 above. |
| 9 | Click Save changes. |
For the advanced allocation, you need to define the input and output properties that will be used.
As input for the allocation, it is possible to use the outcome from the Inclusion, as well as any items from the allocation form.
As output for the allocation, it is possible to use items from the allocation form.
Before defining these input and output properties, the following prerequisites are needed:
Considering an example:

These input and output properties are defined as follows:
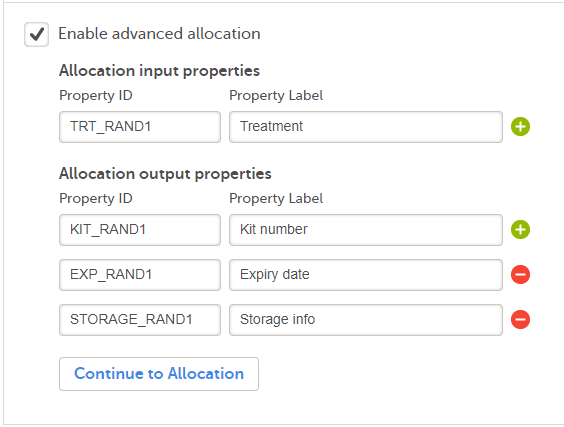


Depending on the study settings performed in Viedoc Admin (see General study settings), the user documentation can be set up in one of the following ways:
In the eLearning settings under study design, it is possible to configure the eLearning curriculums that should be available for assignment to the clinic roles in your study.
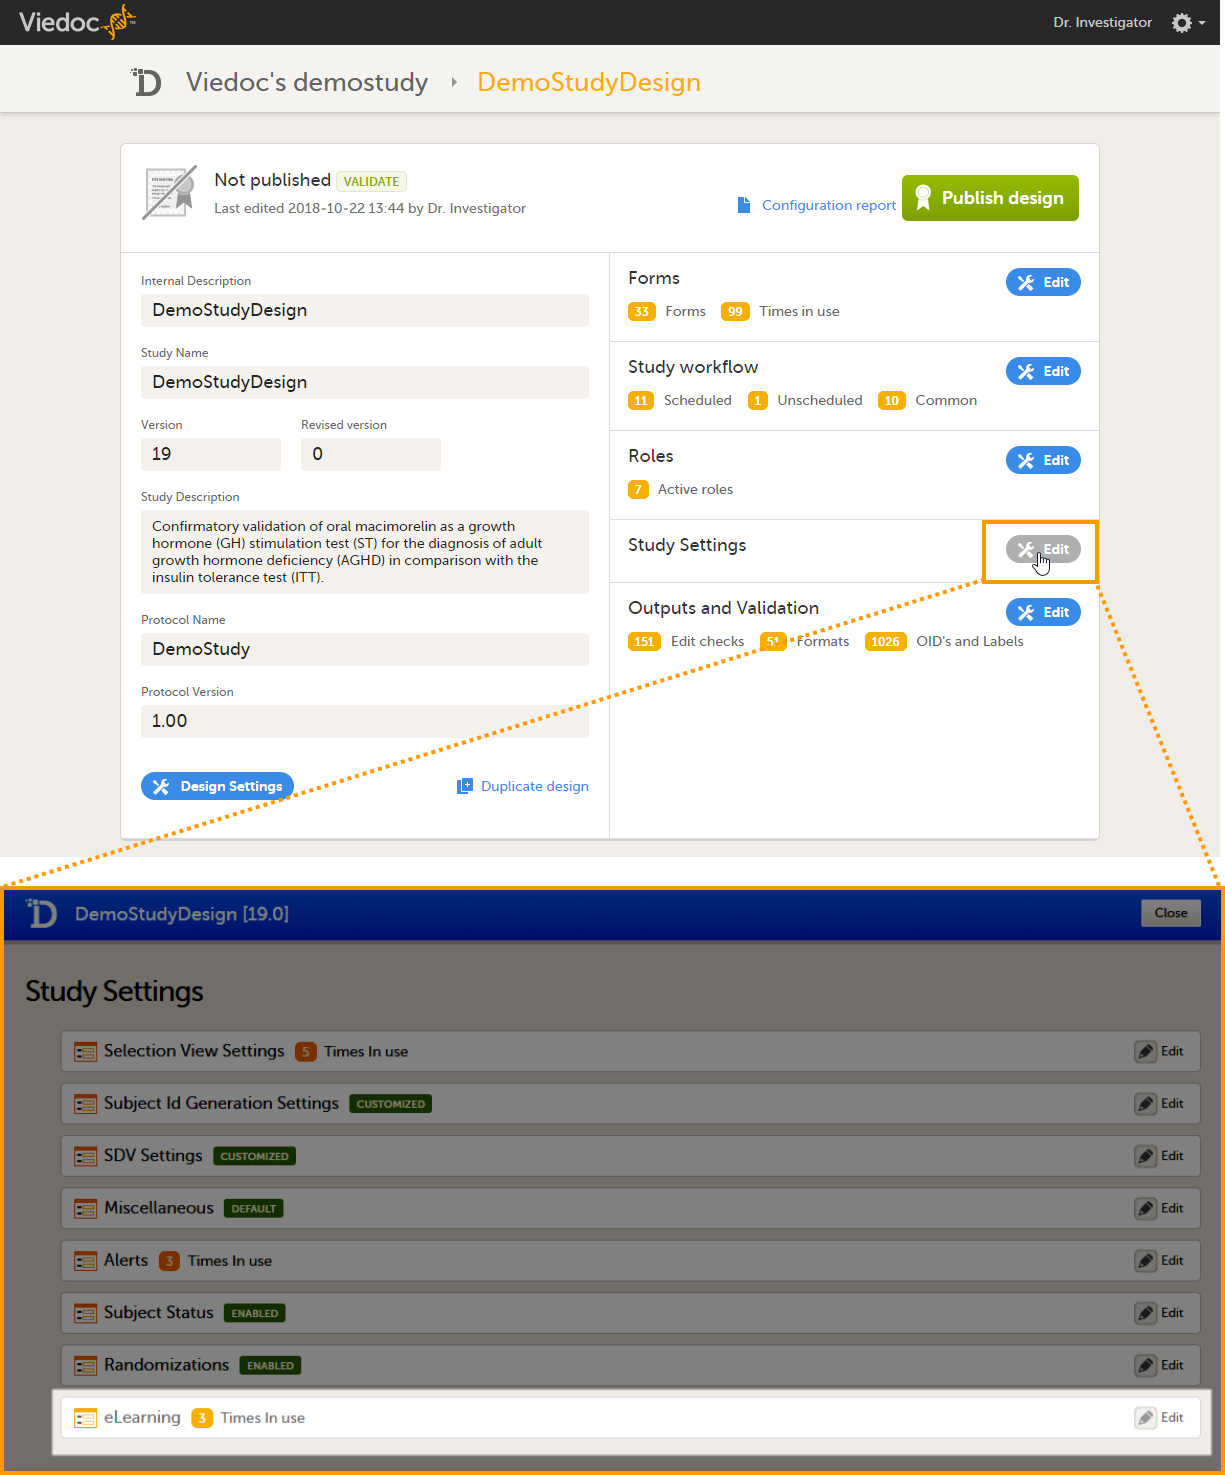
The number in orange (3 in the image) depicts the number of curriculums that have been added to your study.
If you click Edit in the eLearning field, the eLearning settings page opens. The eLearning curriculums that are configured here will become available for assignment to clinic roles on the Roles page, see Configuring roles.
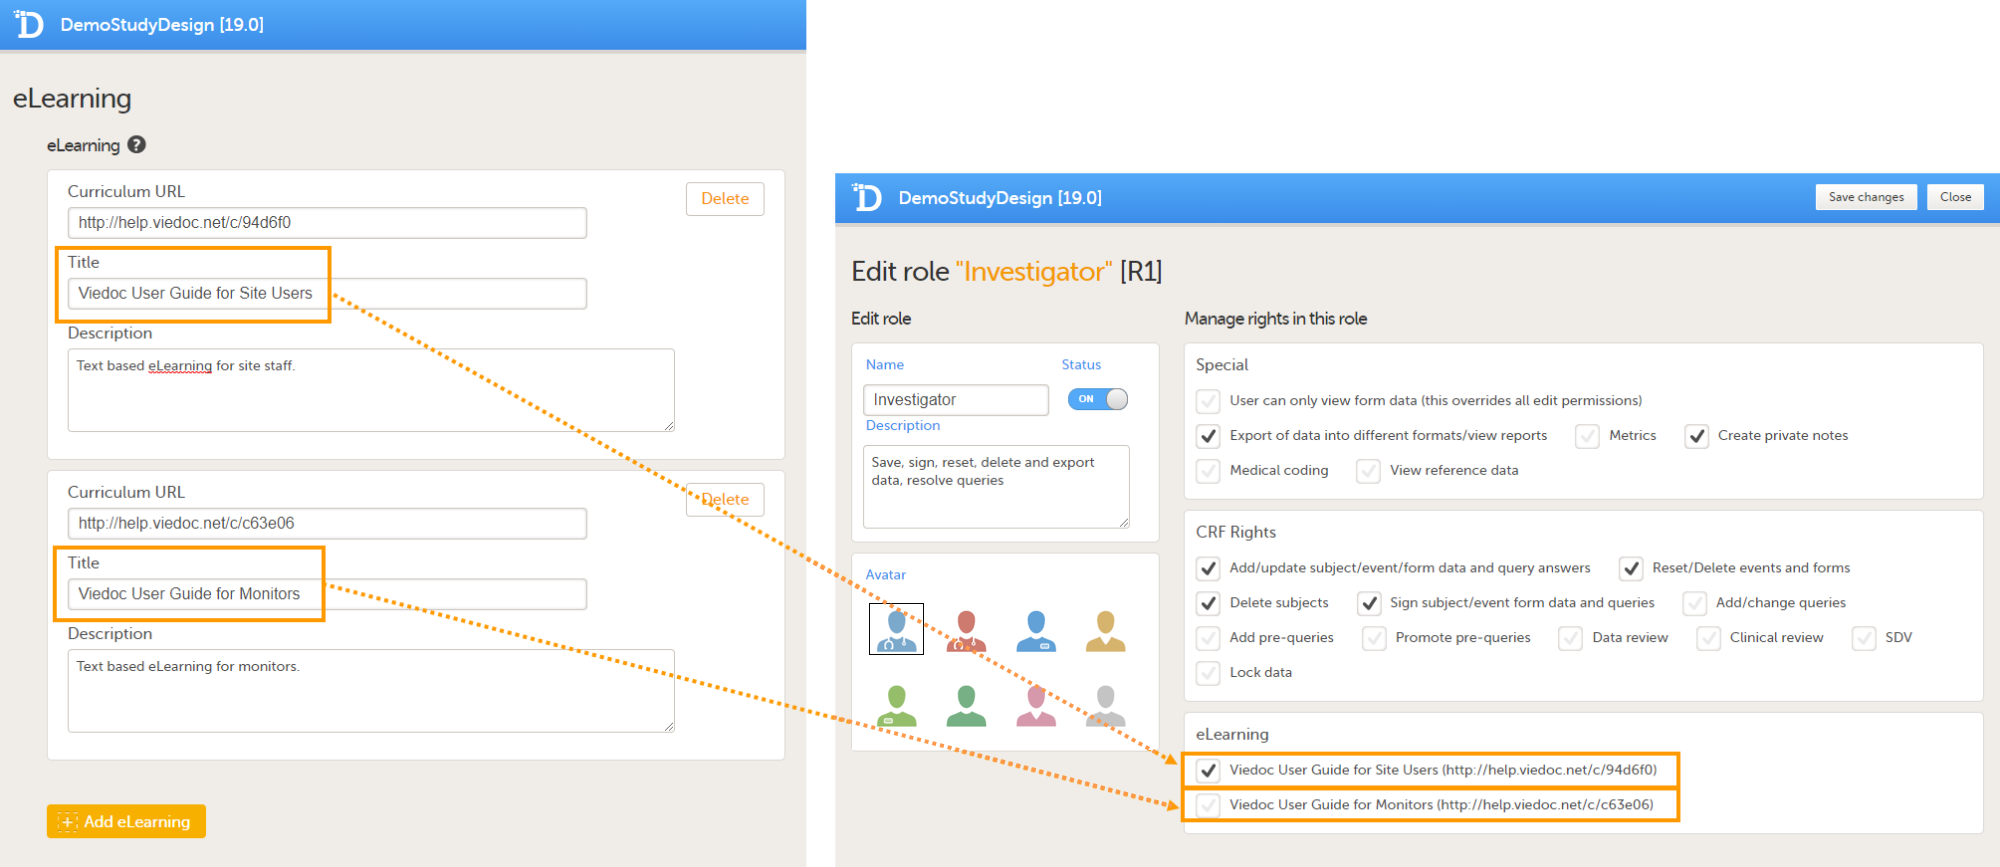
For studies starting after the release of Viedoc 4.47 in the beginning of December 2018, the following five new role-based eLearning user guides (curriculums) for site staff are available by default:
| Curriculum | URL | Added as default to the following clinic role(s) |
|---|---|---|
| Viedoc User Guide for Site Users | https://help.viedoc.net/c/94d6f0 | Investigator, Study Coordinator, Monitor |
| Viedoc User Guide for Monitors | https://help.viedoc.net/c/c63e06 | Monitor |
| Viedoc User Guide for Data Managers | https://help.viedoc.net/c/1994d8 | Data Manager |
| Viedoc User Guide for Project Managers | https://help.viedoc.net/c/04361f | Project Manager |
| Viedoc User Guide for Medical Coders | https://help.viedoc.net/c/3108de | Medical Coder |
| Viedoc PMS User Guide for Clinic Side Users | https://help.viedoc.net/c/91715f | |
| Viedoc PMS User Guide for Sponsor Side Users | https://help.viedoc.net/c/590df1 |
If you wish, you can add the old eLearning user guides (Site User Training and Monitor Training Program, see For studies started before November 2018), to your studies (see Adding and editing an eLearning curriculum for instructions). Note! The Site User Training and Monitor Training Program are not updated with new information about new features after the release of Viedoc 4.46 in November 2018. We do not recommend to add these curriculums to new studies.
For studies started before the release of Viedoc 4.46 in November 2018, the following two old eLearning user guides are available by default:
| Curriculum | URL | Added as default to the following clinic role(s) |
|---|---|---|
| Site User Training (V4) | https://elearn.viedoc.net/Curriculum/SUTV4 | Investigator, Study Coordinator, Monitor |
| Monitor Training Program (V4) | https://elearn.viedoc.net/Curriculum/MTPV4 | Monitor, Data Manager |
Note! The Site User Training and Monitor Training Program are not updated with new information about new features after the release of Viedoc 4.46 in November 2018.
You can add any of the new user guides (Viedoc User Guide for Site Users, Viedoc User Guide for Monitors, Viedoc User Guide for Data Managers, Viedoc User Guide for Project Managers, and/or Viedoc User Guide for Medical Coders, see For studies starting after November 2018 above) to your study. To add the new user guides to your study, enter the URL of the curriculums in the eLearning settings in Viedoc Designer, see Adding and editing an eLearning curriculum for instructions.
To add an eLearning curriculum (user guide), follow the steps below.
| 1 |
Open the study design in Viedoc Designer and click Edit in the Study Settings field. 
|
| 2 |
Click Edit in the eLearning field. 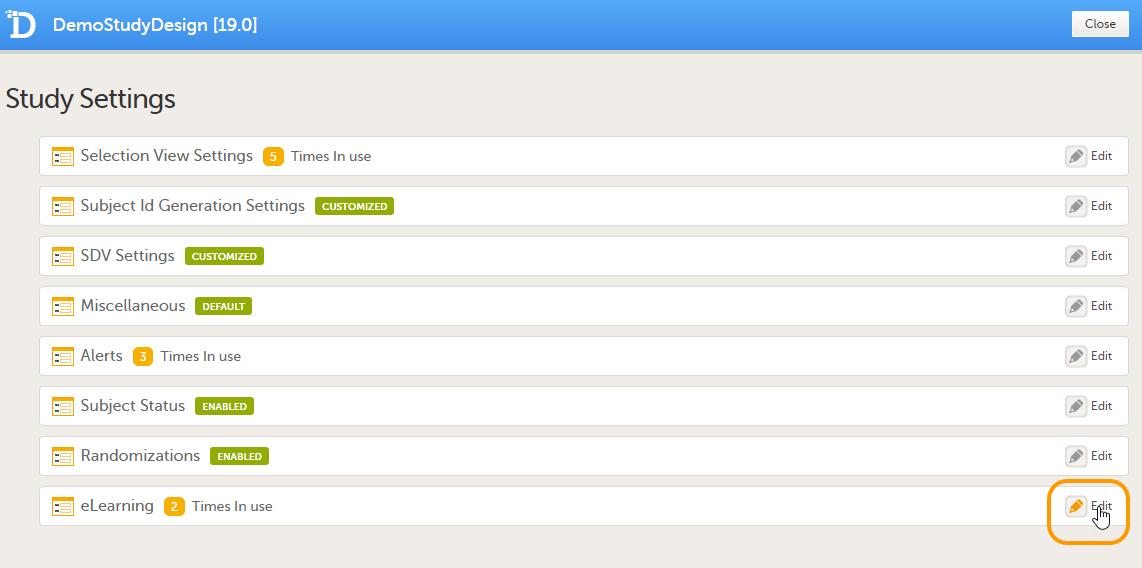
The eLearning settings page opens. |
| 3 |
Click Add eLearning. 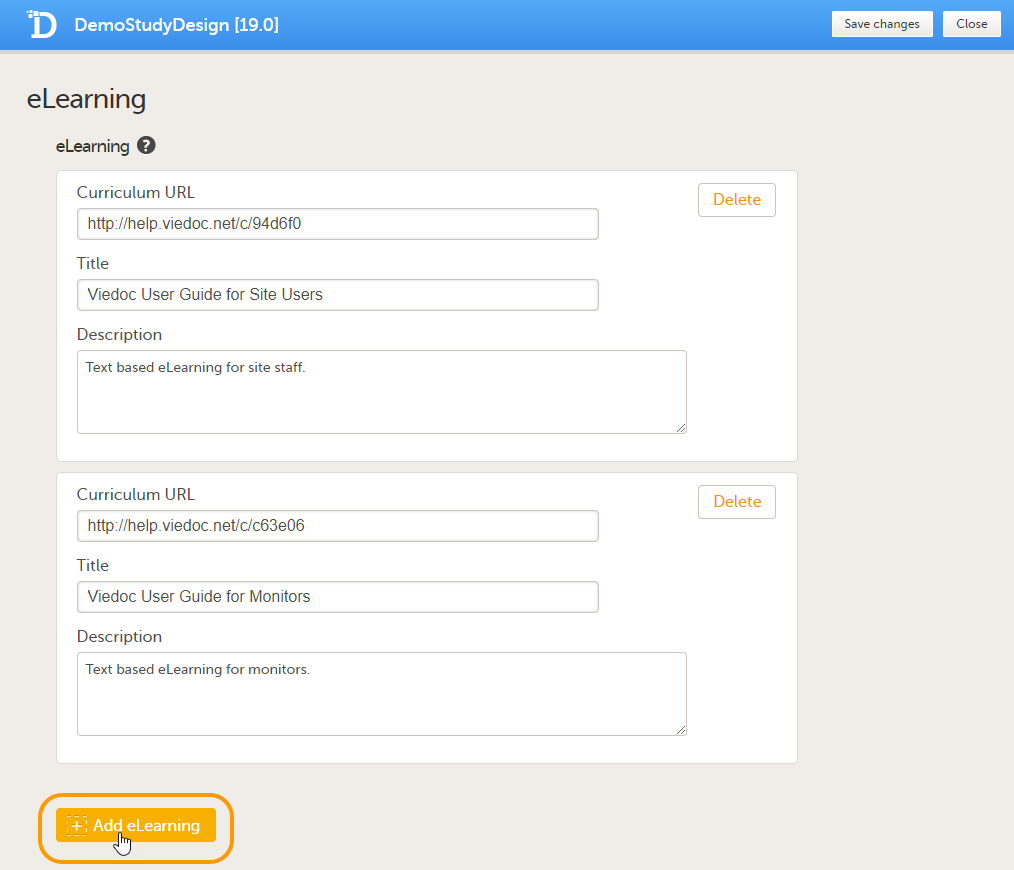
A new section is added. |
| 4 |
Enter the following details: 
Note that the launch box will only be displayed to users that have access to multiple curriculums, for example because they have multiple roles. |
| 5 |
Click Save changes and click Close. 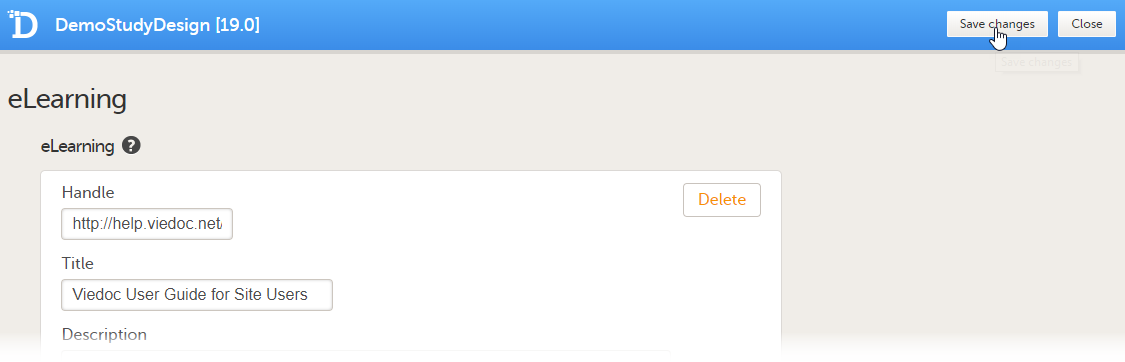
|
You can edit the curriculum settings by editing the fields Curriculum URL, Title and Description.
You can remove a curriculum by clicking Delete. A pop-up opens asking you to confirm whether you want to delete the curriculum. Click Delete to remove the curriculum or click Cancel to cancel.
This lesson describes how to configure partial submits of forms in Viedoc Designer.
From Viedoc release 4.74, for Japanese PMS studies, Partial Submit Setup is available, which allows the study designer to configure which forms will be able to be submitted individually. Any form in use from the current design can be selected.
| Important! By default, Partial Submit Setup is disabled. If it is not enabled, the default behavior is that only AE forms (with FormID = AE) can be submitted individually. |
Setting up the partial submit is done in Viedoc Designer, under Study Settings > Partial Submit Setup.
Note! The Partial Submit Setup settings can only be edited in a new design version (not a revision).
For clinic users to be able to partially submit other individual forms, (as opposed to AE forms only) in a booklet, you must enable Partial Submit Setup in Study Settings in Viedoc Designer.
Note!
| Important! When Partial Submit Setup is enabled, only the forms with an added Partial Submit Definition can be partially submitted in Viedoc Clinic. This includes AE forms. You can choose any form in the current design that is in use, that is, it was added to the study workflow, to add a Partial Submit Definition to. |
To enable the Partial Submit Setup:
| 1 |
Open the study in Viedoc Designer. The Overview of the study design page opens. 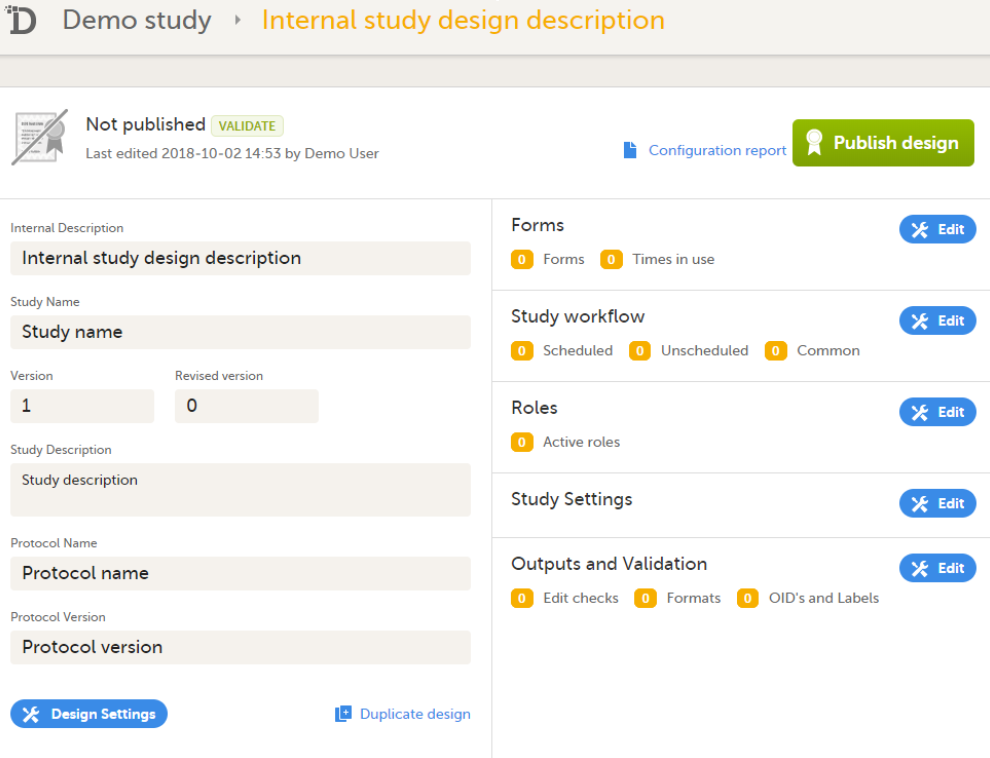
|
| 2 |
Select Edit in the Study Settings field to open the Study Settings page. 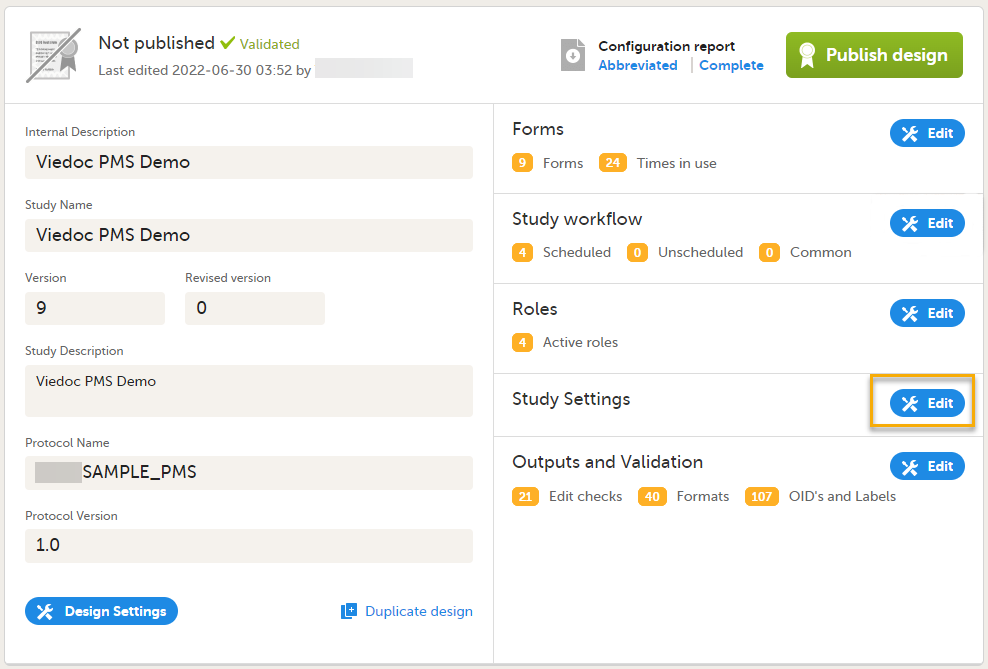
|
| 3 |
The first time the Study Settings page opens, Partial Submit Setup is flagged as NOT IN USE. 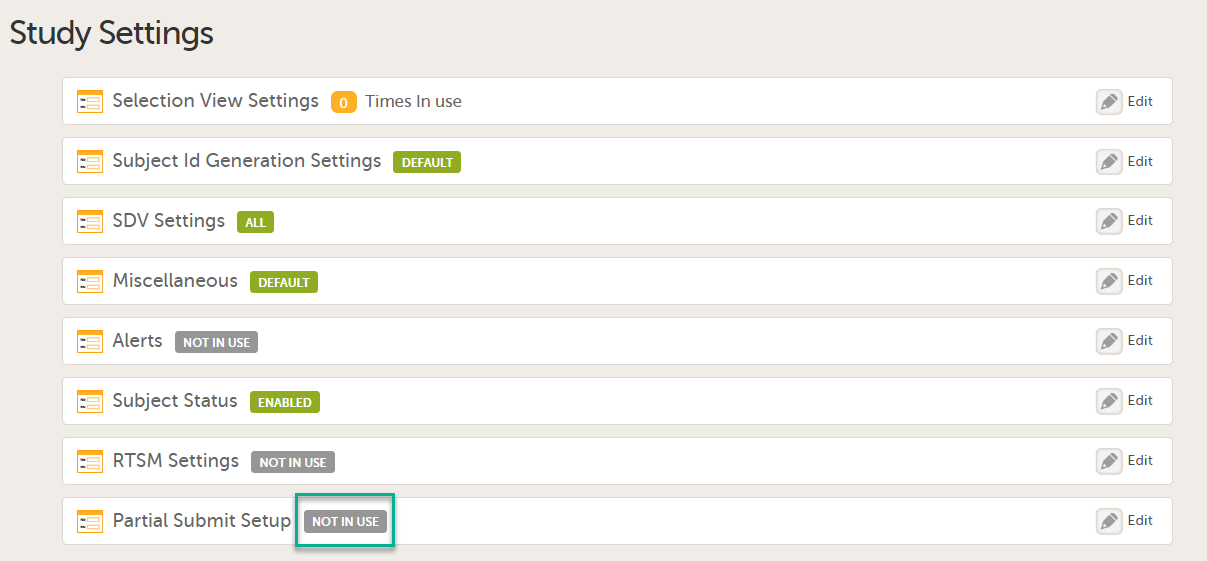
In Study Settings, select Edit in the Partial Submit Setup field. 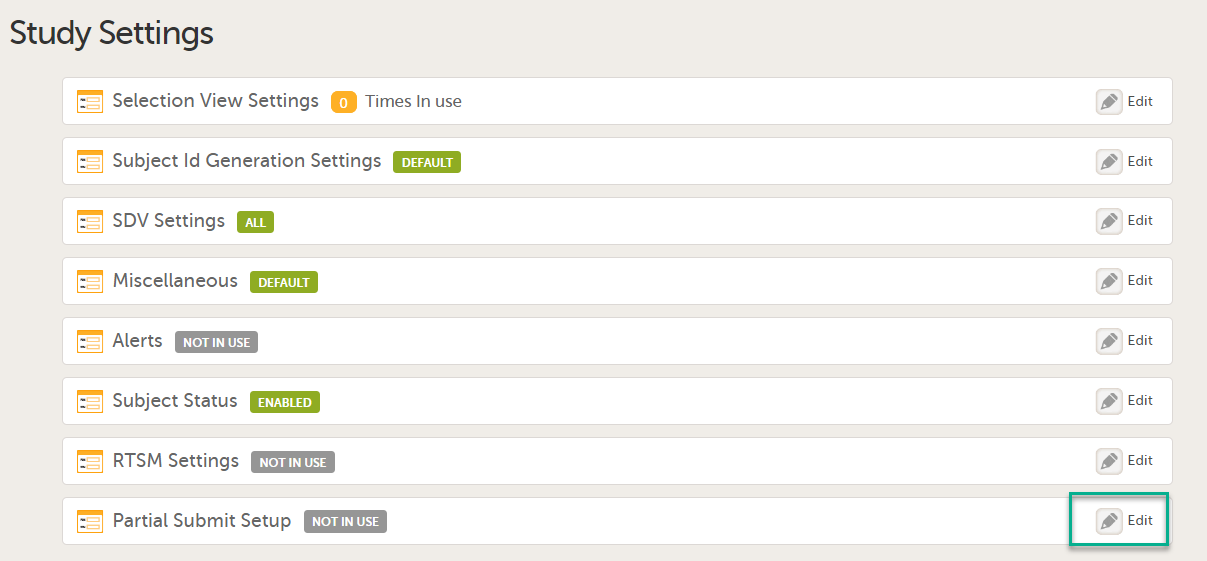
The Partial Submit Setup page opens. |
| 4 |
On the Partial Submit Setup page, select Enable Partial Submit Setup. 
|
| 5 |
A confirmation pop-up appears as shown below. 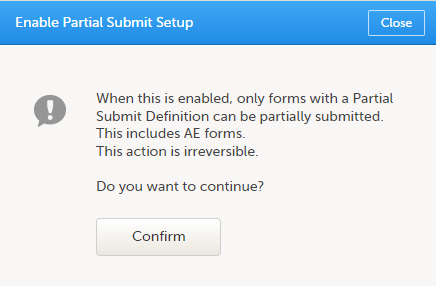
Select Confirm to continue. The Partial Submit Setup page is now available in Study Settings. Here you can add and edit one or more Partial Submit Definitions. |
When you have enabled the Partial Submit Setup, follow the steps below to add a Partial Submit Definition:
| 1 |
In Study Settings, select Edit in the Partial Submit Setup field.
The Partial Submit Setup page opens. This page lists all the existing defined partial submits for the study design. 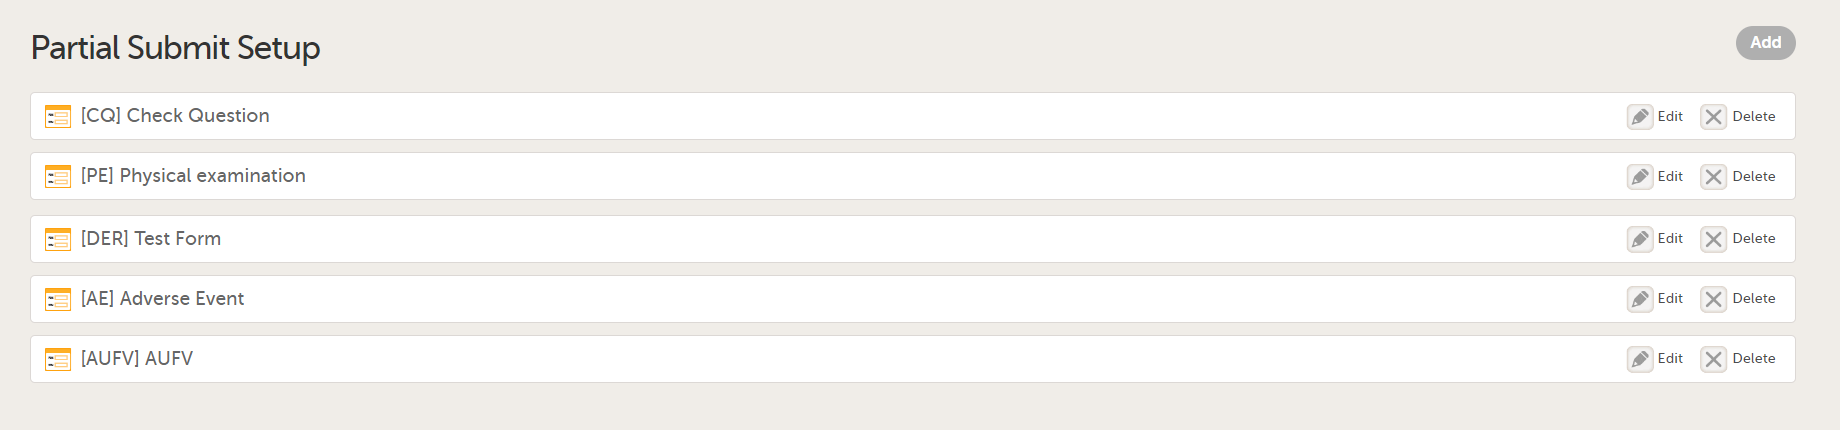
|
||||
| 2 |
Select Add to add a new Partial Submit Definition. 
|
||||
| 3 |
The Add a Partial Submit Definition page opens. Under Forms, in the Choose a form dropdown, select the form you want to add the partial submit definition to. 
Forms are labelled in the format [Form ID] Form name. You can select one or more forms to add definitions for a partial submit. You can choose any form from the list of forms in use in the current study design. Note! It is only possible to define one Partial Submit Definition per form. |
||||
| 4 |
On the Add a Partial Submit Definition page, configure the following settings as required: 1. Select as Adverse Event: Select this option to define a form as an Adverse Event. 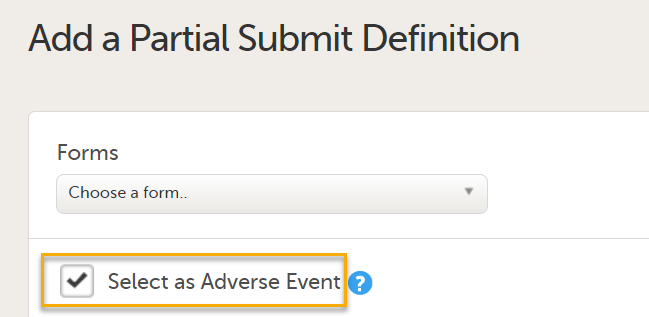
Note! Forms with Partial Submit Definitions that are selected as AEs are included in the counters for Has unreported AEs on the sponsor side shown on the Booklet overview page. See Booklet overview for more information. Unreported AE forms for studies with Partial Submit Setup enabled are counted when the following conditions apply:
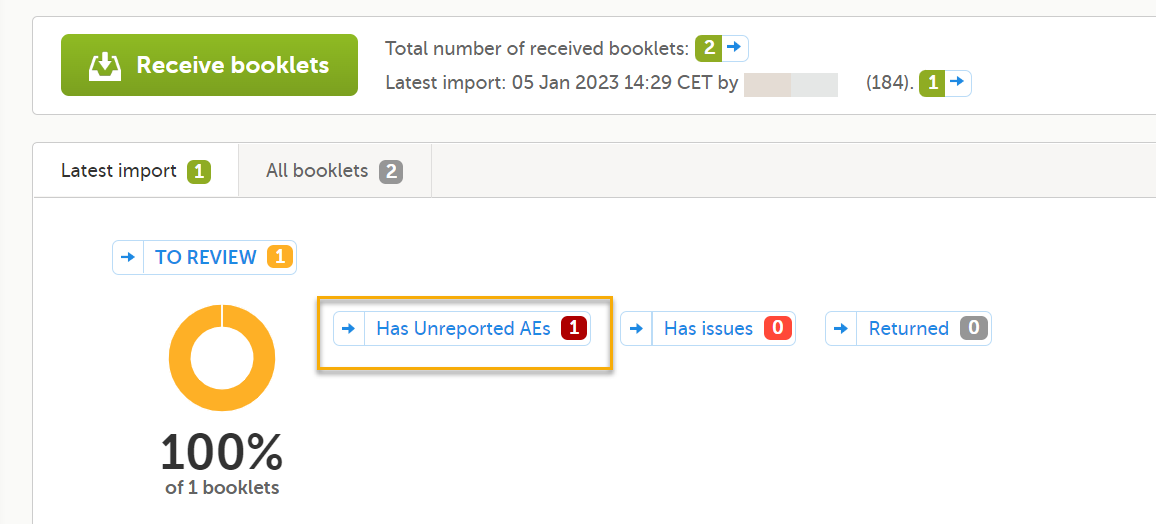
2. Condition: In the Condition field, you can enter an optional JavaScript condition that must be TRUE for clinic users to be able to submit the form individually (to partially submit the form). To add a JavaScript condition: Add the condition in the Condition field: If the Condition field is not filled in, the selected form can still be partially submitted. The condition is evaluated as follows:
For more information, see Using JavaScript in Viedoc 3. Notification messages for unreported forms: There is a mandatory notification message for both the clinic and the sponsor side users with the following default text: 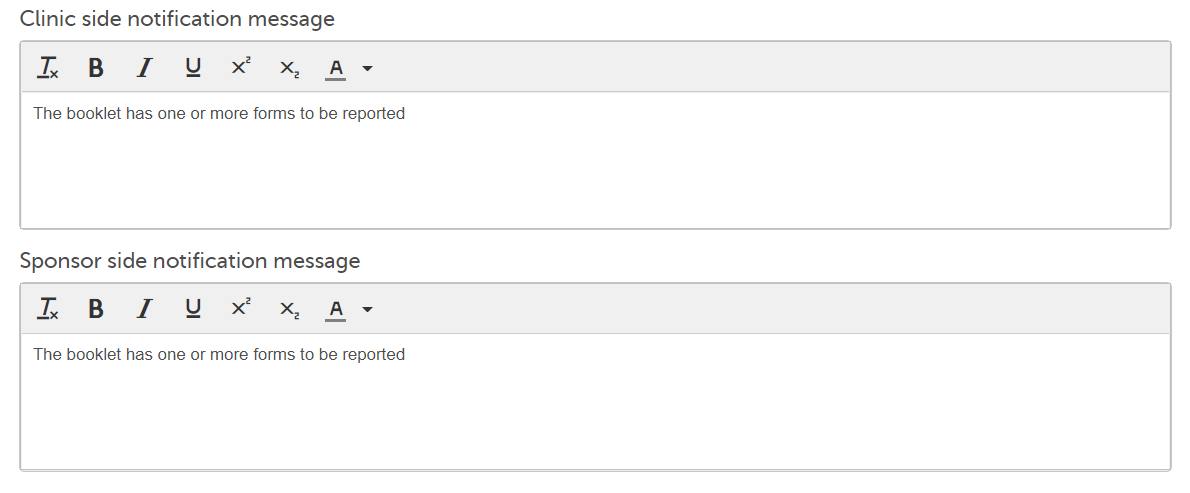
Note! Although the default message text shown in Viedoc Designer is displayed as black, the default message text in clinic is red: 
You can add a customized notification message to be shown on the clinic side or on the sponsor side for each Partial Submit Definiton. To edit the notification message, enter your text in either the clinic side or sponsor side notification message field. You can also customize the font size, color, and style of the text: 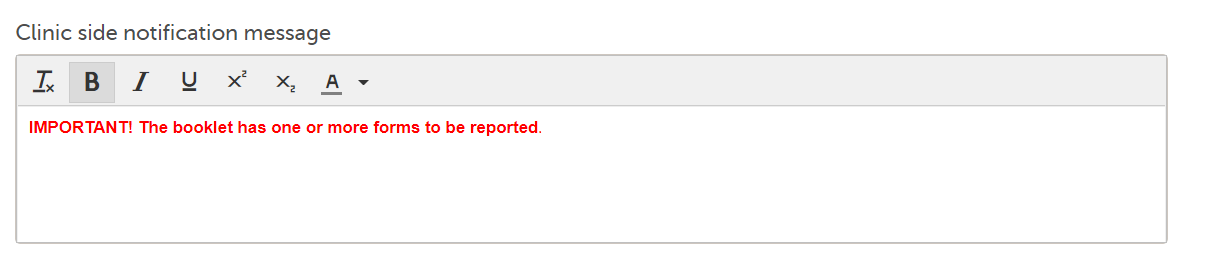
Note! The messages are included in the Complete Configuration report only. |
||||
| 5 |
Select Save changes. You will be directed to the Partial Submit Setup page where a confirmation message is displayed: 
|
Partial Submit Setup can be configured only in a new design version, that is, it is not possible in a revised version.
Partial Submit Setup is always read from the current effective design applied to a site. For more information about the "current effective design" see, Settings read from current effective design.
For existing studies in Viedoc Clinic, the following applies to updates to forms in a new study design.
When a new study design version is assigned, with a form that is configured to be submitted individually, all of the existing (saved) forms can be submitted individually and the warning message is shown.
When a new study design version is assigned, where it is no longer possible to individually submit a form, the following applies for the existing (saved) forms:
You can edit a Partial Submit Definition when the Study Settings can be edited, that is, in a new design version which is unpublished and unlocked and it is not a design revision. The Partial Submit Definition can still be viewed if the study design is a revision, published or locked.
Note! On the Study Settings page, for the Partial Submit Setup, a counter shows the number of existing partial submit definitions. Each existing partial submit definition is labelled as:
| 1 |
To edit an existing form with a partial submit definition, select Edit on the form you want to edit on the Partial Submit Setup page. The Edit Partial Submit Definition page opens. 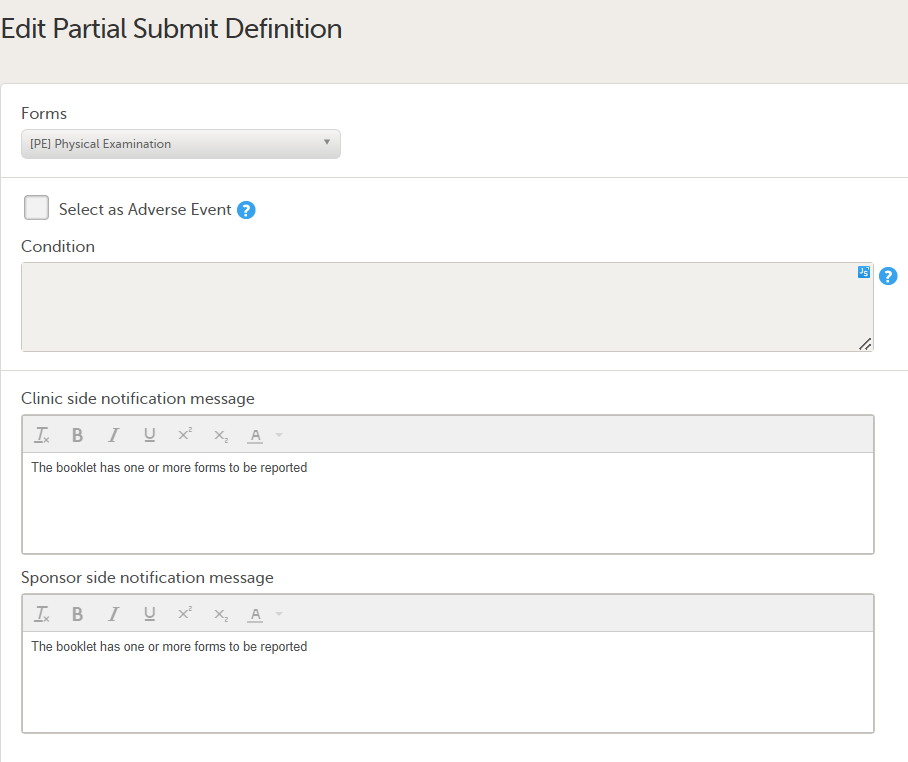
|
| 2 |
In the Forms dropdown menu, select the form you want to edit. You can choose any form from the list of forms in use in the current design: 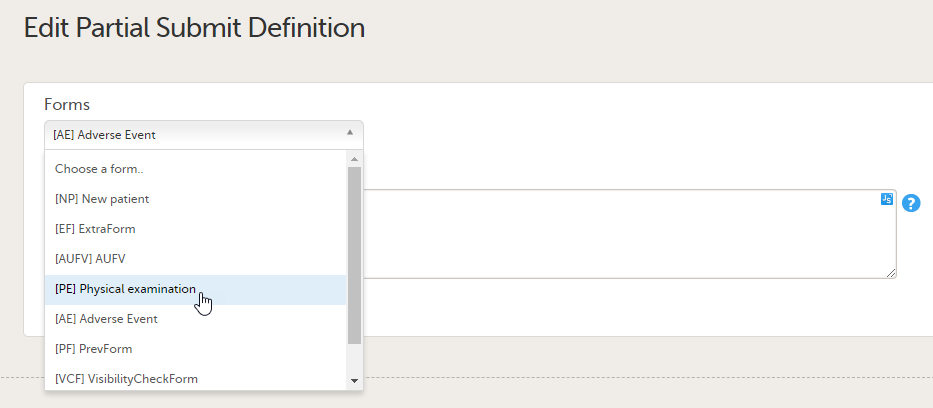
Note! The form name is not visible if the form ID has been changed, or the form has been deleted from the study design. If a form name or the form ID has been changed, an error message is displayed when validating the study design: 
|
| 3 |
When editing the Partial Submit Definition, the default notification message for the clinic side and the sponsor side is shown as described above. To edit the notification message, enter your text in either the clinic side or the sponsor side notification message field:
|
| 4 |
Select Save changes. You will be directed to the Partial Submit Setup page where a confirmation message is displayed:
|
You can delete a Partial Submit Definition from Study Settings>Partial Submit Setup when the study design can be edited, that is, it is not a design revision and is unpublished and unlocked.
Note! Before deleting a Partial Submit Definition please read the following information:
To delete a Partial Submit Definition, follow the steps below:
| 1 |
Select Delete on the form with the partial submit definition you want to remove. 
|
| 2 |
A message is shown asking for confirmation: 
Select Yes to delete the form. After deletion, the original selected form for the deleted partial submit definition will still be available if you want to add a new partial submit definition to that form. Note! The Delete button is disabled when the study settings are in view mode, which is when the study design cannot be edited. |
The Partial Submit Setup configuration is available in the Excel configuration report of the study design, to give a complete overview of the study design version. In Viedoc Designer, the complete configuration report contains all the settings configured in Study Settings.
For more information, see Configuration report.
The Designer Settings allows you to configure the default format that will be used in Viedoc Designer for various item types.
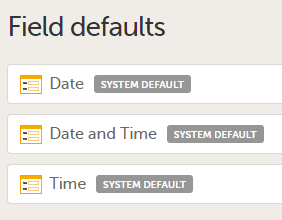
Under Field defaults the following can be configured:
For each of the above item types, the following parameters can be configured:
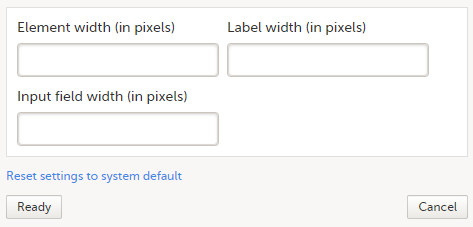
To update the default values:
| 1 | Go to Global design settings > Designer settings > Field defaults |
| 2 |
Select the item type you want to edit the default field format for:
|
| 3 |
Enter the values in pixels for the respective fields or Click Reset settings to system defaults to go back to the system default values. |
| 4 | Click Ready |
| 5 | Click Save changes |
| 6 | Publish the Global design settings |
The following image shows an example of how setting all the widths listed above to 500 px for the Date type item affects the look of the Date item in Viedoc Designer when editing Forms:
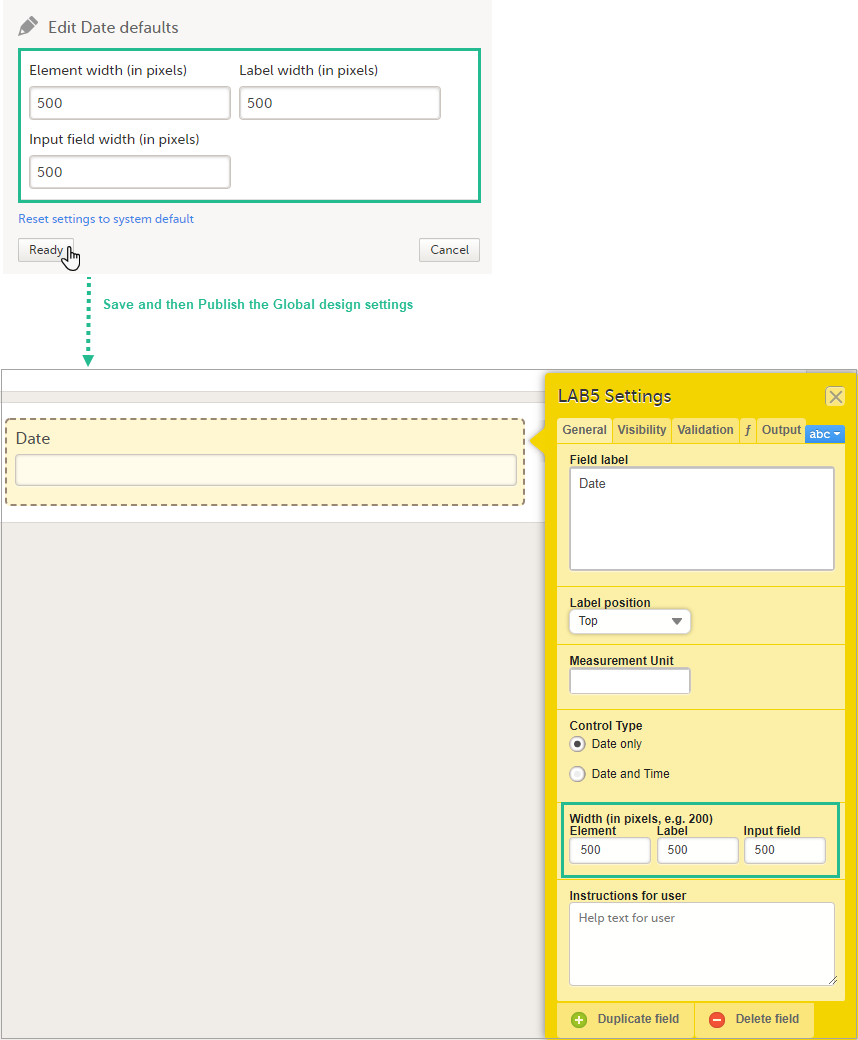
This lesson describes how to configure medical coding scopes in Viedoc Designer.
This piece of content is used in Designer > Configuring medical coding scopes and Admin > Managing medical coding dictionaries.
Viedoc offers support for medical coding. The medical coding feature allows you to code data, such as Adverse Events, Medical History and Concomitant Medications, in a standardized way.
Viedoc supports the following types of dictionaries:
Medical coding is configured in Viedoc Designer and Viedoc Admin, and executed in Viedoc Clinic. The schematic below depicts what different steps need to be taken, and which roles have permission to perform these steps.
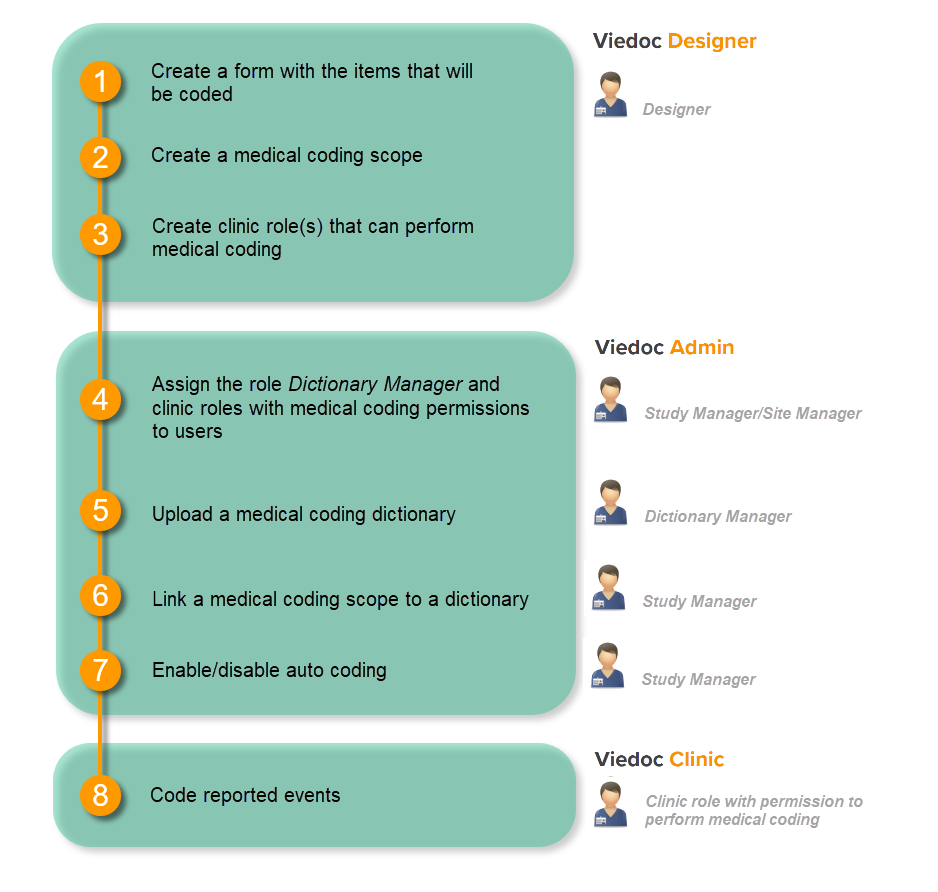
This is a single-sourced file that should have the following content:
Introduction to medical coding, description of the workflow.
For more detailed instructions regarding these steps, see:
A medical coding scope maps the items to be coded to a medical coding dictionary. The scope defines the following:
After a medical coding scope has been created in Viedoc Designer, and linked to a medical coding dictionary in Viedoc Admin, the defined items become available for coding in the medical coding console in Viedoc Clinic.
You need to create a separate scope for each item to be coded. Only text items can be coded. If you would like to code the same item multiple times using different types of dictionaries, you need to create a separate scope for each dictionary type to be used for that item.
The medical coding of already coded items breaks when data in, or related to, these items is edited. In the medical coding console in Viedoc Clinic, these items are flagged and must be re-coded. Therefore, it is necessary to define when the medical coding should break. That is, to define the level at which editing the data should lead to a code break.
For example, if form level is selected, the coding breaks when any item in the form that contains the coded item is edited. If item level is selected, the coding breaks only when the coded item itself is edited.
The level at which medical coding breaks is determined in the medical coding scope in Viedoc Designer. It is possible to select one of the following levels for breaking the code:
Note! The behavior described above applies in the same way for repeating item groups, with one exception: for scopes with a break level set to group where the group is repeating, the coding breaks when any item within that specific group instance is edited.
To set up medical coding in your study, you must perform the following steps in Viedoc Designer:
To create a medical coding scope, follow the steps below.
| 1 |
In Designer, go to the study for which you would like to create medical coding scopes, and select the Edit icon in the Global design settings field to open the Global design settings window. |
| 2 |
In the Medical coding field, select the Edit icon to open the medical coding settings. 
|
| 3 |
Select Add a new medical coding scope.
|
| 4 |
Set-up the scope:
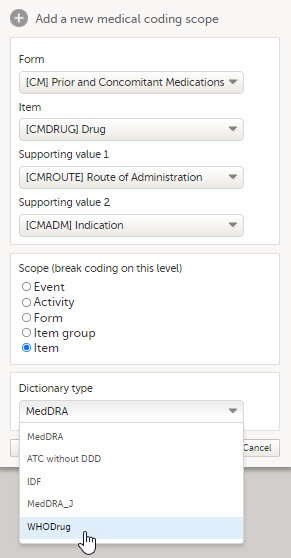
|
| 5 | Select Ready. The pop-up closes. |
| 6 | Select Save changes, and select Close to close the Medical coding window. |
Note! For the medical coding scope to take effect, you need to publish the global design settings.
From Viedoc version 4.95, Viedoc Coder supports repeating item groups in medical coding scopes.This allows you to configure coding scopes for forms where the coded term and its supporting values are collected within repeating rows of data, for example, concomitant medications entered across multiple rows.
Note! Repeating item groups are not supported for Medical coding version 4.78 and earlier.
For information on how to configure a repeating item group in a form in Viedoc Designer, see repeating item groups in Creating and editing forms.
The screenshot below shows an example of a Concomitant Medications form with a repeating item group as it appears in Viedoc Clinic:
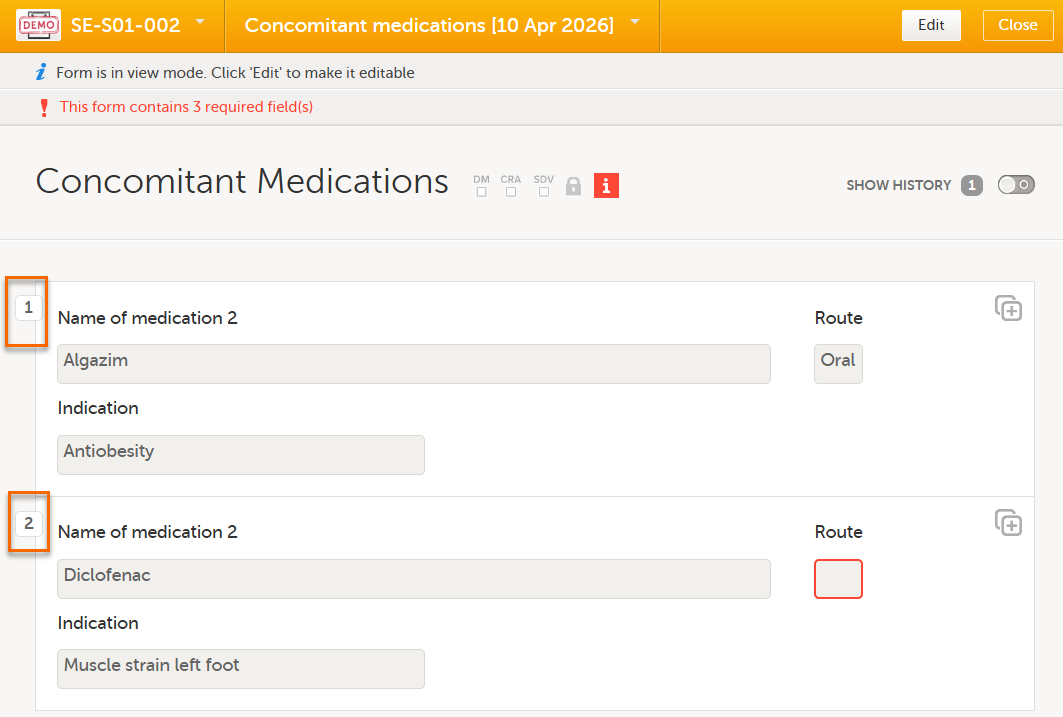
To add a form with a repeating item group to a coding scope:
Follow the steps described in Creating a medical coding scope above. When setting up the scope in step 4, note the following:
Note! A standard item group cannot be converted to a repeating item group in a design revision. This update must be made in a new design version.
The following configurations are supported when creating a medical coding scope that includes repeating item groups:
Note! If the scope configuration does not comply with the supported combinations listed above:
In order to use medical coding in your study, you need to set up one or more clinic roles that have the following permissions (rights):
Note! You need to have at least one clinic role with permission to perform medical coding.
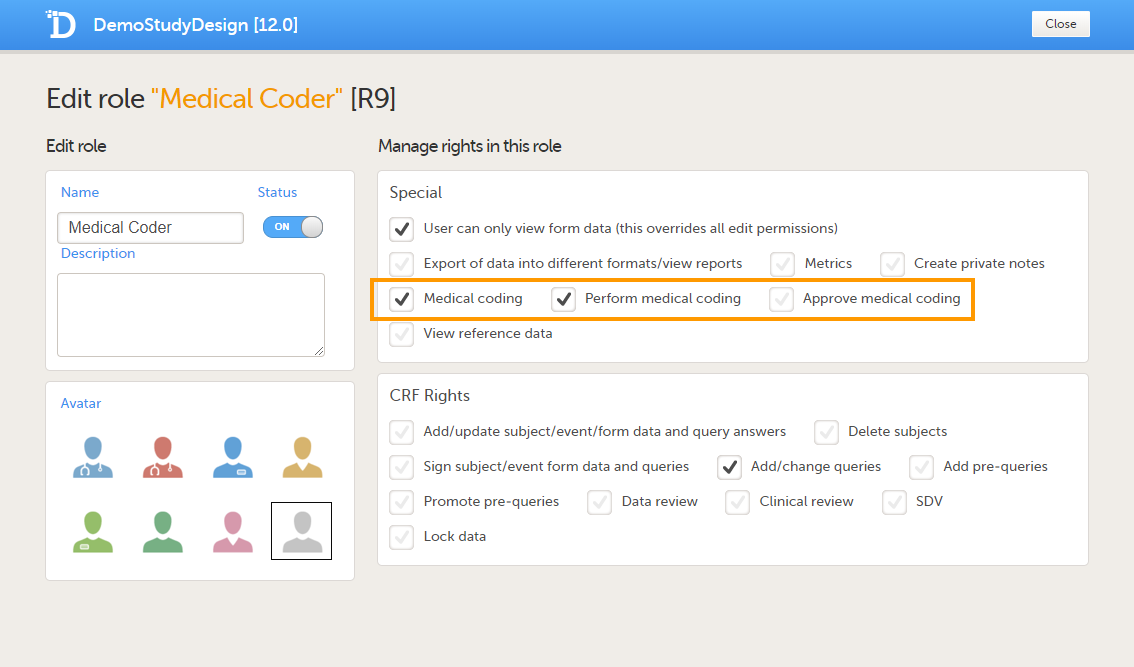
Roles that only have the permission Medical coding activated, without Perform medical coding or Approve medical coding, can see the medical coding status in Viedoc Clinic, but cannot open the medical coding console and perform or approve medical coding. This setting is typically used by a project manager or a sponsor.
The permissions (rights) for each clinic role are configured in the Roles section of the study design In Viedoc Designer. For more detailed instructions on how to configure clinic roles, see Configuring roles.
You can edit a medical coding scope by selecting Edit.
Note! It is not possible to edit a medical coding scope when the Global design settings have been published.
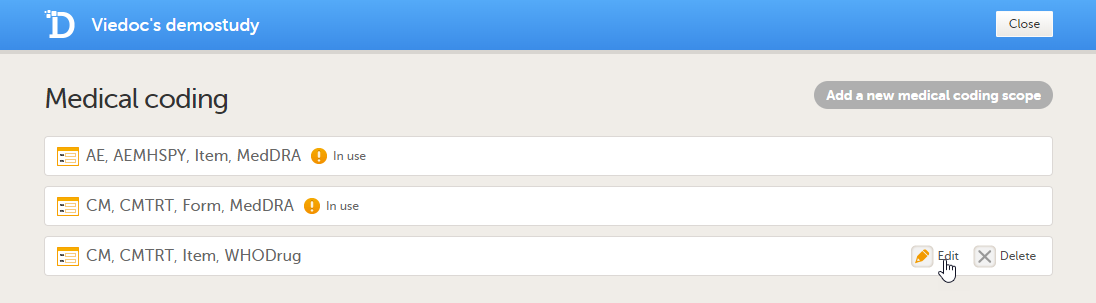
You can delete a medical coding scope by selecting Delete.
Note! It is not possible to delete a medical coding scope when the Global design settings have been published.
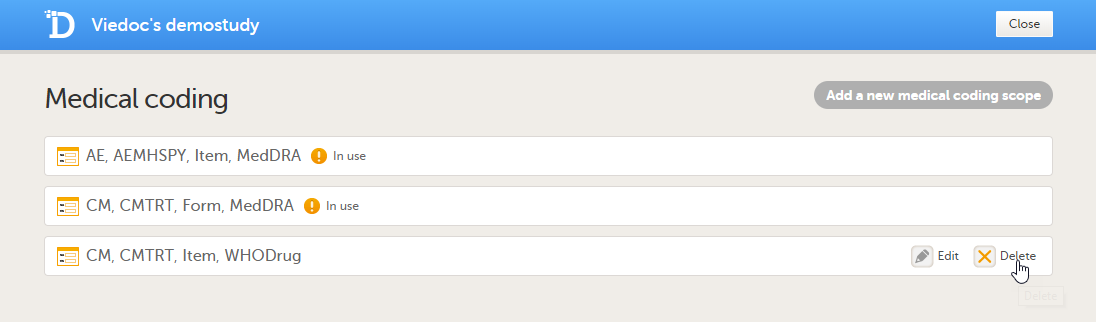
Viedoc offers support for importing data, for example laboratory data, into your study in Viedoc using the Viedoc Data Import application. When importing data, the Viedoc Data Import application does the following:
The Viedoc Data Import Application can be downloaded from the Data mappings window in Global design settings in Viedoc Designer.
This lesson describes how to create a data mapping file for the import of data into Viedoc using the Viedoc Data Import Application. For more information on how to download the Viedoc Data Import Application and how to run the application to import data, see Viedoc Data Import Application.
Instructions on how to create a data mapping file and how to import data using the Viedoc Data Import Application can also be found in our video tutorial.
In order to import data into Viedoc, the following is needed:
The data mapping file defines how the external data will be mapped to form items in Viedoc. You can create a data mapping file in Global design settings in Viedoc Designer. Internally, the data mapping will be stored in Clinical Data Interchange Standards Consortium Define Extensible Markup Language (CDISC Define-XML) format.
The configuration file is an XML file that defines (mandatory):
In the configuration file, you can also define the following (optional):
One configuration file can contain the import configurations for multiple studies.
You can create a Viedoc API client key in the Study settings window on the API configuration tab in Viedoc Admin. For instructions, see Viedoc Data Import Application.
The import of data into Viedoc using the Viedoc Data Import Application involves the following steps:
The data mapping file describes each column of the data file containing the data to be imported, and defines where these data should be imported into Viedoc. A separate data mapping file should be created for each study, and for each type of data file to be imported.
The data mapping window in the Global design settings in Viedoc Designer has the following main fields (see image):
1. Data Mapping Name, a name (free text) for the data mapping.
2. Domain Name, the domain name that will be stored in the Define-XML file. The domain name is not used when importing data. However, the domain name can be used as a reference to link an import to a form in Viedoc.
3. Data mapping table, that has two main parts:
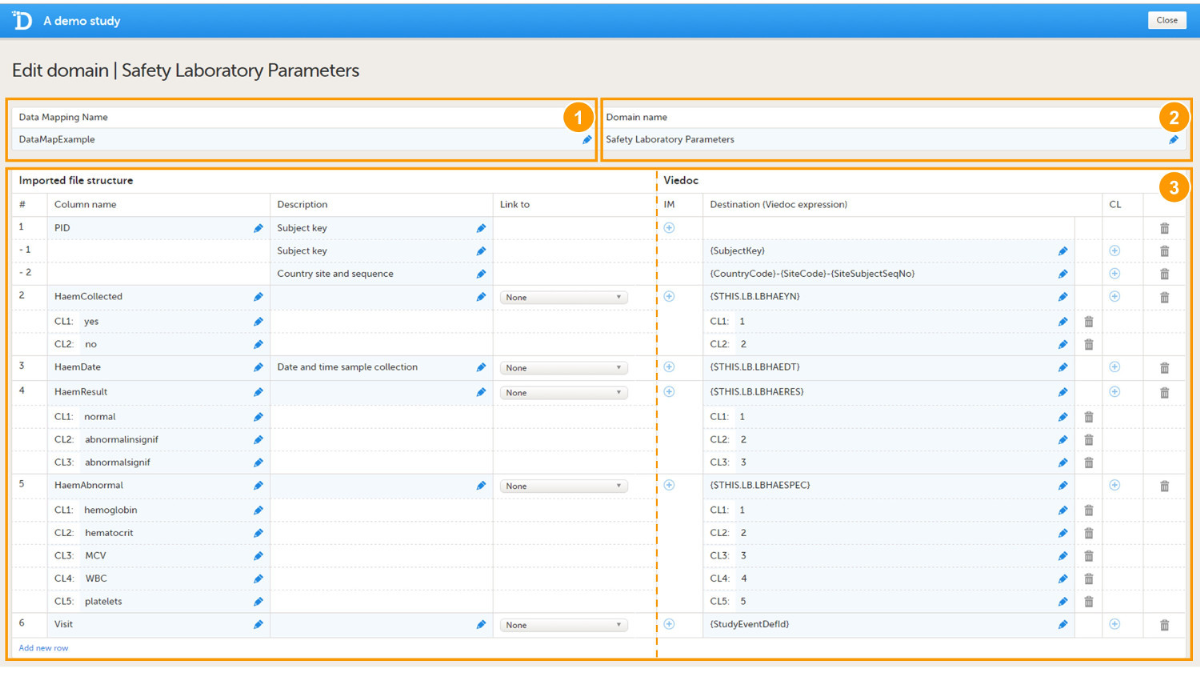
The data mapping table has the following columns:
| Column name | Description |
|---|---|
| # | Number of the column in the data file to be imported. |
| Column name | Name of the column in the data file to be imported. |
| Description | Description of the parameter in that specific column to be imported (free text). |
| Link to | Links the content to a parameter defined in another column in the data file. This is used when importing data in a tall-skinny format. |
| IM | Item mapping: inserts more rows into the table so that one data column can be mapped to multiple destinations in Viedoc. |
| Destination | Address in Viedoc into which the data should be imported. This directs the data to the correct subject, event, form and field. |
| CL | Code list: a list of codes that build up a dictionary that can be used to map the imported data values into their corresponding items in Viedoc. |
The following table gives an overview of the variables that can be mapped.
| Variable | Mandatory to map, yes or no? |
|---|---|
SiteCode |
Mandatory at all times |
SubjectKey |
Mandatory for importing data into existing subjects, not mandatory when new subjects are to be added. |
SiteSubjectSeqNo |
Not mandatory if the SubjectKey is mapped. Can be mapped separately for matching existing subjects or creating new subjects. |
StudySubjectSeqNo |
Not mandatory if the SubjectKey is mapped. Can be mapped separately for matching existing subjects or creating new subjects. |
StudyEventDefId |
Mandatory for matching the event that the data should be imported into. |
EventDate |
When importing data into unscheduled events, either EventDate or StudyEventRepeatKey is mandatory. Optional for scheduled events. |
StudyEventRepeatKey |
When importing data into unscheduled events, either EventDate or StudyEventRepeatKey is mandatory. Optional for scheduled events. |
FormDefId |
Mandatory for matching the form that the data should be imported into. |
ItemDefId |
Mandatory for matching the item that the data should be imported into, can be combined with FormDefId to one string. |
FormRepeatKey |
Mandatory only when the same form occurs multiple times within the same event. |
ItemGroupDefId |
When importing data to repeating item groups. |
ItemGroupRepeatKey |
When importing data to repeating item groups. |
When importing CSV data into repeating item groups, by using the Viedoc Import Application, the data mapping file must specify both the item group and the repeating instance by mapping ItemGroupDefId and ItemGroupRepeatKey. Mapping ItemGroupDefId and ItemGroupRepeatKey enables the Viedoc Import Application to generate ODM data that represents repeating item group instances. This allows CSV data to be imported into repeating item groups by using the extended support in the Viedoc WCF API.
ItemGroupDefId identifies the repeating item group that the data belongs to. ItemGroupRepeatKey identifies the specific instance of that item group. By mapping these variables, the Viedoc Import Application can distinguish between multiple instances of the same item group.
To create a data mapping file:
| 1 | In Viedoc Designer, select the study for which you would like to create a data mapping file. |
| 2 | In the Global design settings field, click Edit to open the global design settings. |
| 3 | In the Data mappings field, click Edit to open the data mappings overview.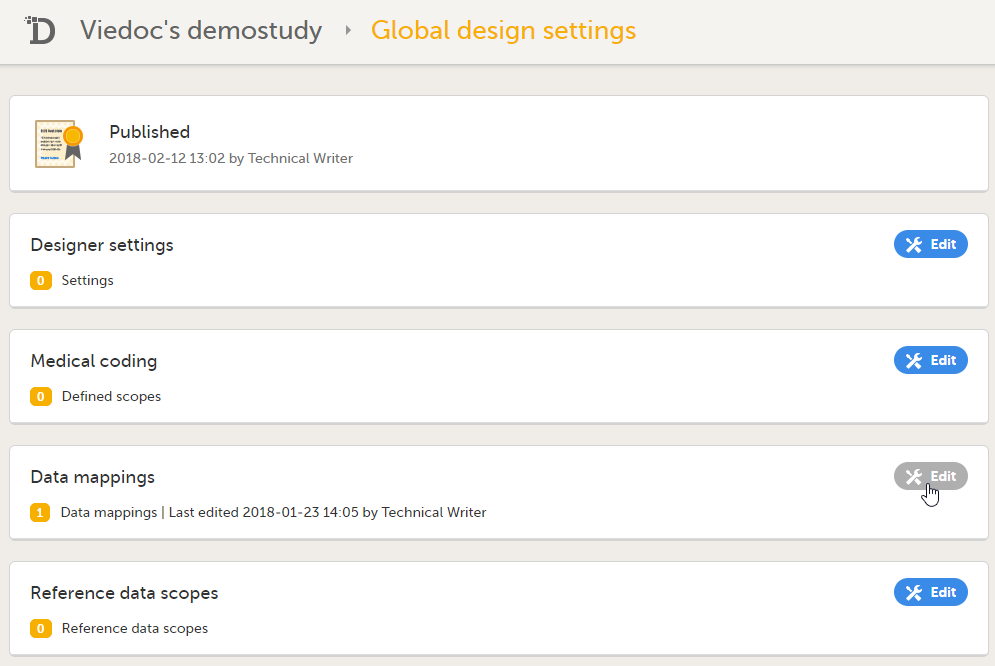 |
| 4 | Click Add new data mapping, or if a data mapping has already been created, select the data mapping that you would like to edit. 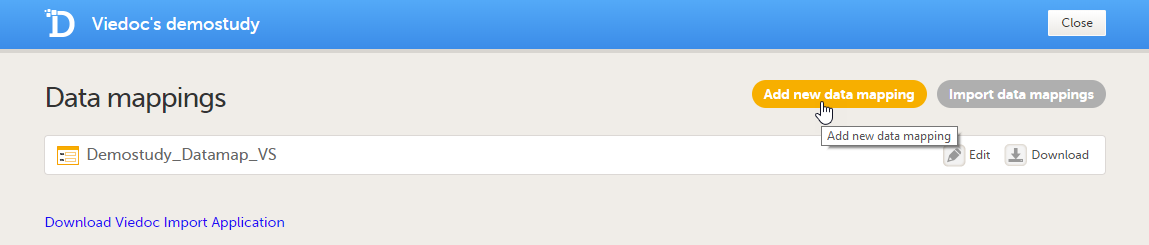 |
| 5 | Type a name for the data mapping in the Data Mapping Name field, and type a domain name in the Domain name field. |
| 6 | Click Add new row to add a new row to the table, and fill in:
 If you would like to map one data column to more than one destination in Viedoc, click the
 + icon in the IM column to add more mapping details.
If you would like to enter code list items, click the 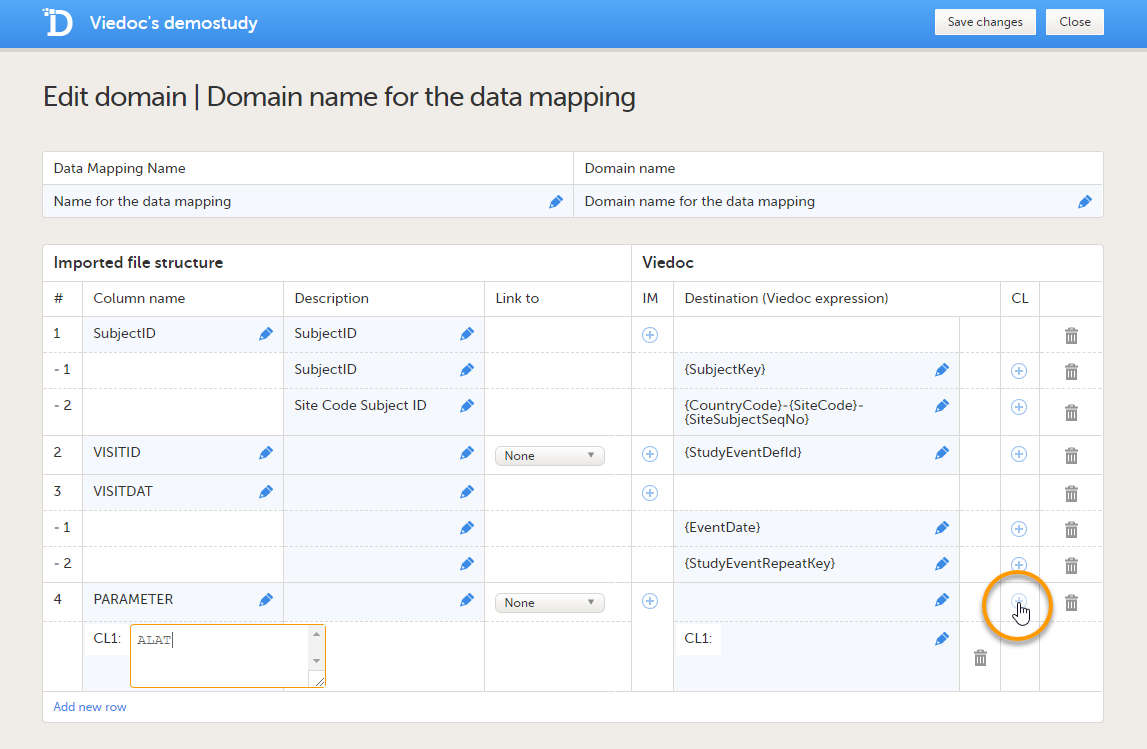 |
| 7 |
Repeat step 6 with the next column in the data file, until all the columns in the data file are described in the data mapping table. If you would like to link the contents of the current row to the contents of another row, select the row to link to from the Link to dropdown menu. This is mainly used for data in tall-skinny format. If you select one of the items from the drop-down list in the Link to column, the system automatically creates rows with the same code list items as the item (row) that is being linked to. Linked rows can be updated by clicking on the refresh button. 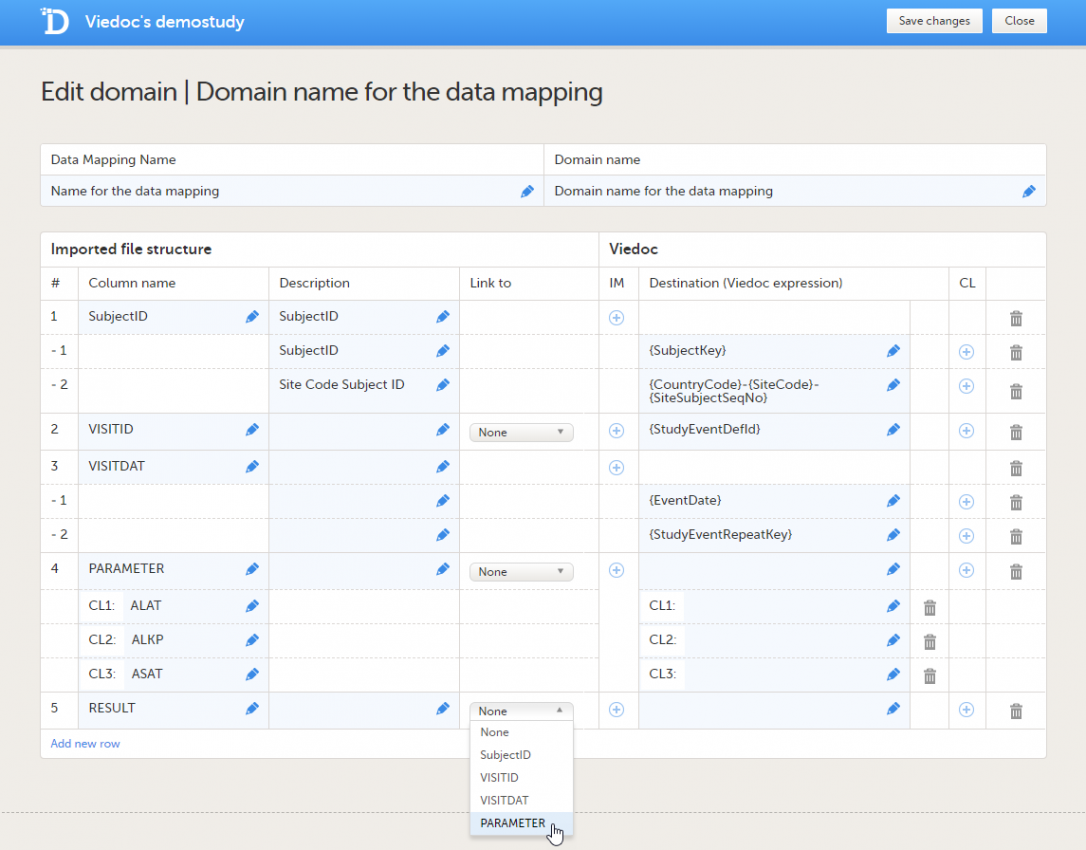 |
| 8 | Click Save changes, and click Close to close the data mapping table. |
| 9 | Click Close to exit the data mappings overview. |
| 10 | Click Publish settings in the Global design settings window to publish the changes.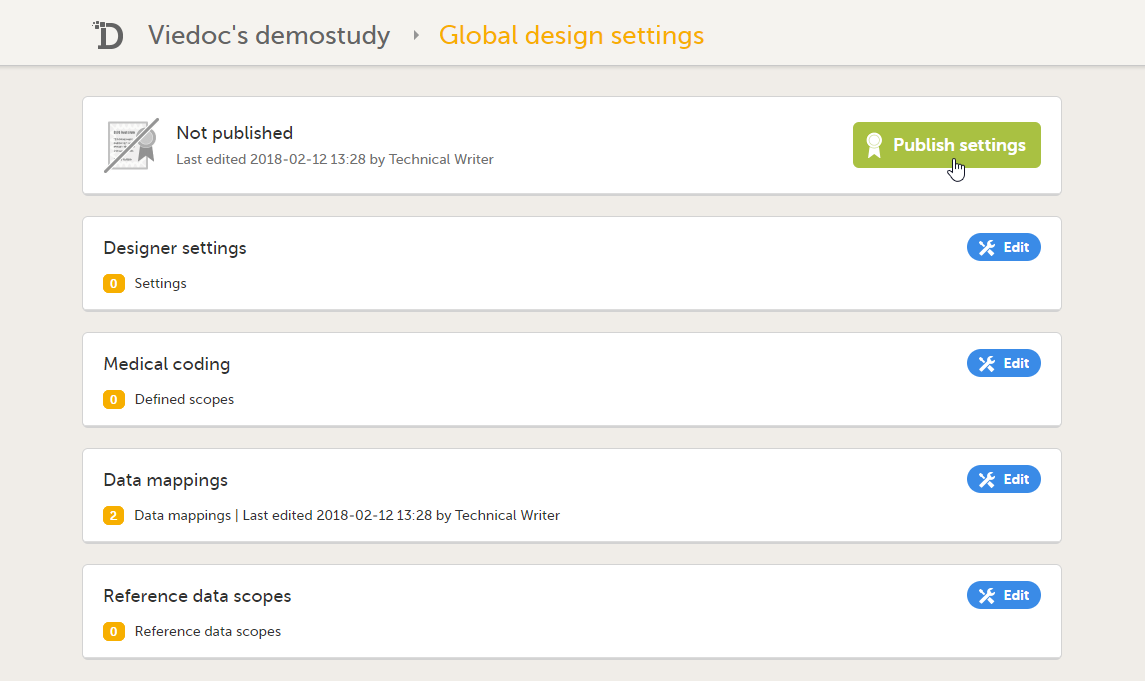 |
| 11 | In the Data mappings field, click Edit to open the data mappings overview. |
| 12 | Click the Download icon for the data mapping that you just created.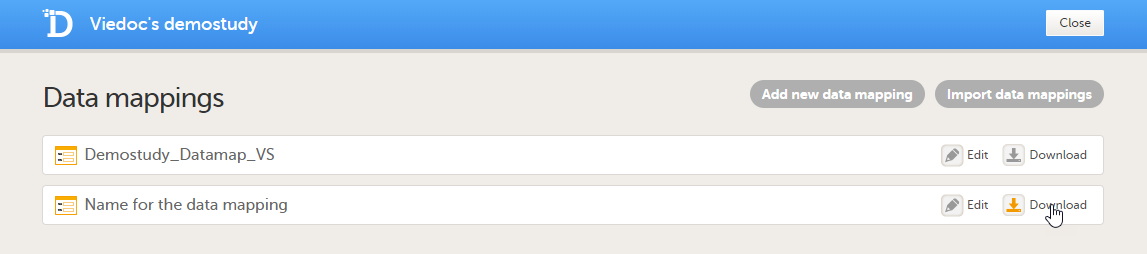 An xml file will be downloaded that contains the data mapping. |
| 13 | Save the xml file in the work folder. |
*When mapping data using code lists to a form where multiple check boxes can be activated in one field, it is only possible to map the data based on choice number, not based on choice label. It is for this reason only possible to import values, not strings.
Map the subject ID to {SubjectKey}. The mapping is case-sensitive!
Map the site code in one of the two following ways:
{CountryCode}-{SiteCode}-{SiteSubjectSeqNo}. Click the + icon in the IM column to add these mapping details to the subject key mapping.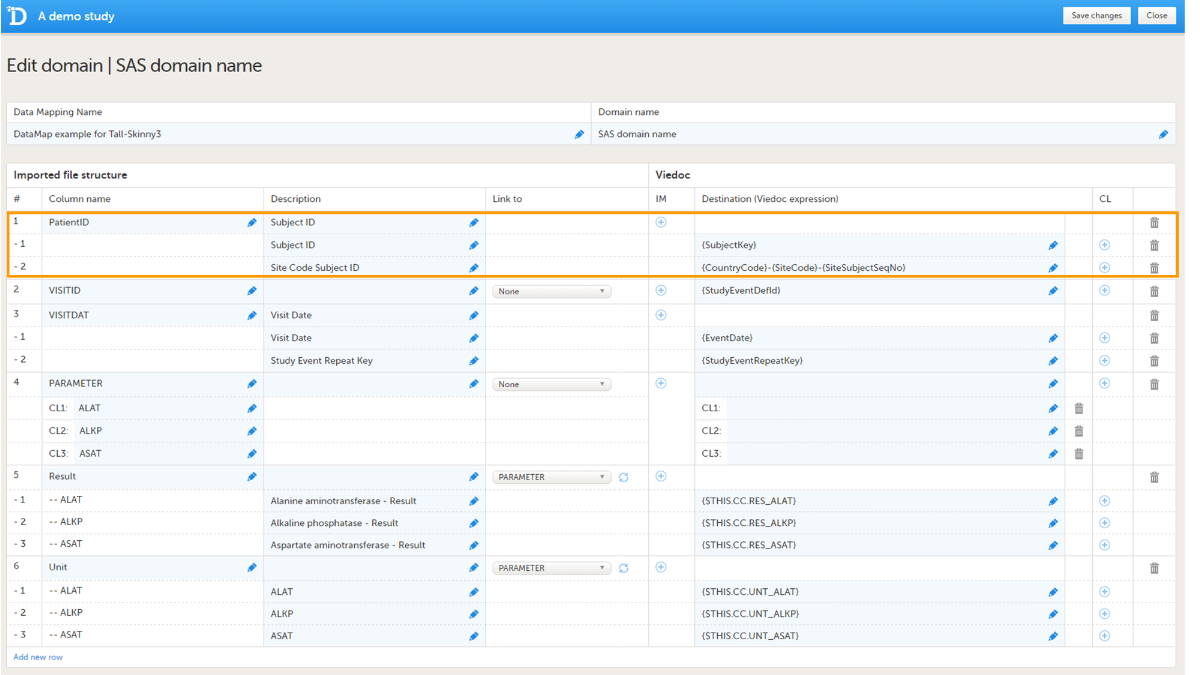
The format of the subject key is defined in the Subject Id Generation Settings in the Study Settings in Viedoc Designer. See Subject Id Generation Settings for more information.
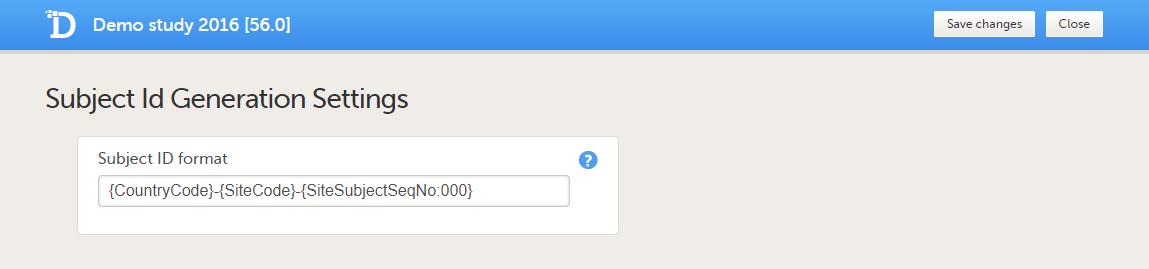
Viedoc imports the data into existing subjects by matching the complete subject key as a string. Instead of mapping to the subject key, it is also possible to map the subject ID to {SiteCode} and {SiteSubjectSeqNo}. If both the subject key and the site subject sequence number are provided during the import, the site subject sequence number will take precedence.
It is possible to add new subjects through the data import, see below for more information.
The event ID should be mapped to {StudyEventDefId}, see image. The mapping is case-sensitive!
The date of the event can be mapped in two different ways (optional):
{EventDate}.{$THIS.$EVENT.EventDate}.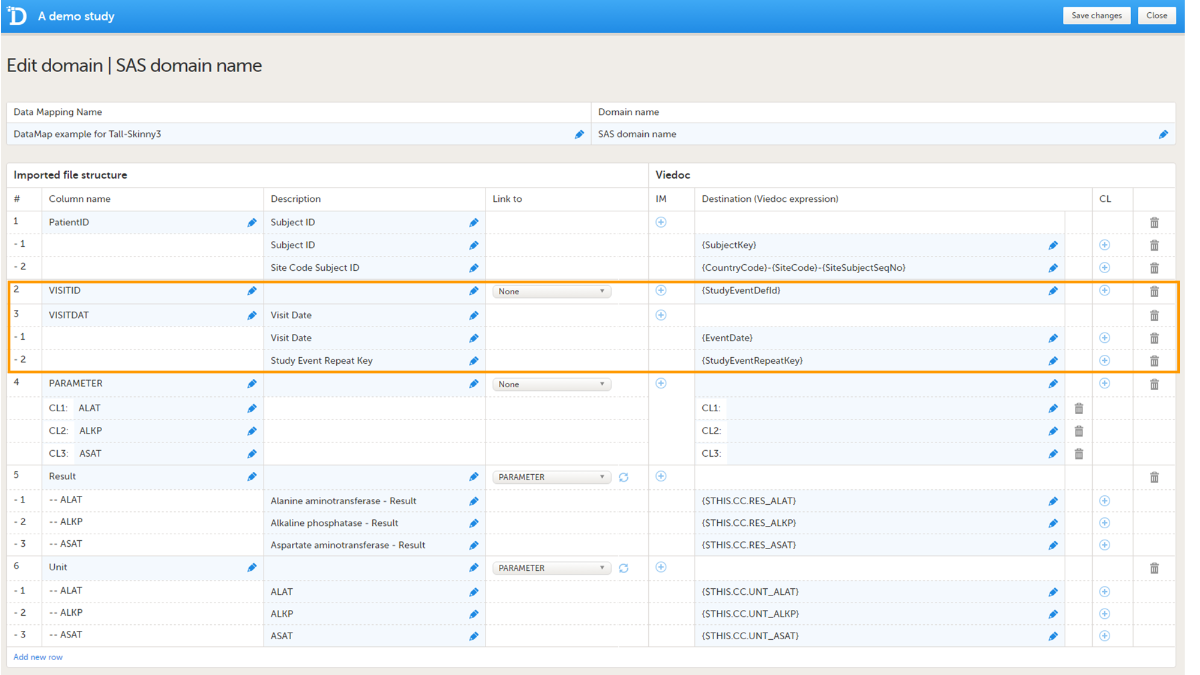
Data will be imported into scheduled events even if the event date is not given or not matching the initiated event date.
The event ID should be mapped to :
{StudyEventDefId}, along with{EventDate} or {StudyEventRepeatKey}. The event will then be matched on event date or on event sequence number.The mapping is case sensitive!
If the event has been initiated, the Viedoc Import Application checks whether the date in the data file matches with the existing date. If the dates are matching, the data will be imported. If the dates are not matching, the data will not be imported.
If the event has not been initiated yet, the event date will be imported and/or an event sequence number will be created.
Recurring events should be mapped to {StudyEventRepeatKey}, along with {StudyEventDefId}.
You can also map data to a certain activity within an event using the Activity ID. This is useful when the same form is used in two different activities within the same event, for example before and after administration of a drug. The Activity ID should be mapped to {FormRepeatKey}. For more information about mapping data to specific activities, see the example below under Using FormRepeatKey to map activities and repeating forms.
The data, for example laboratory results, should be mapped to the correct form and field ID. The mapping of these data is also case sensitive.
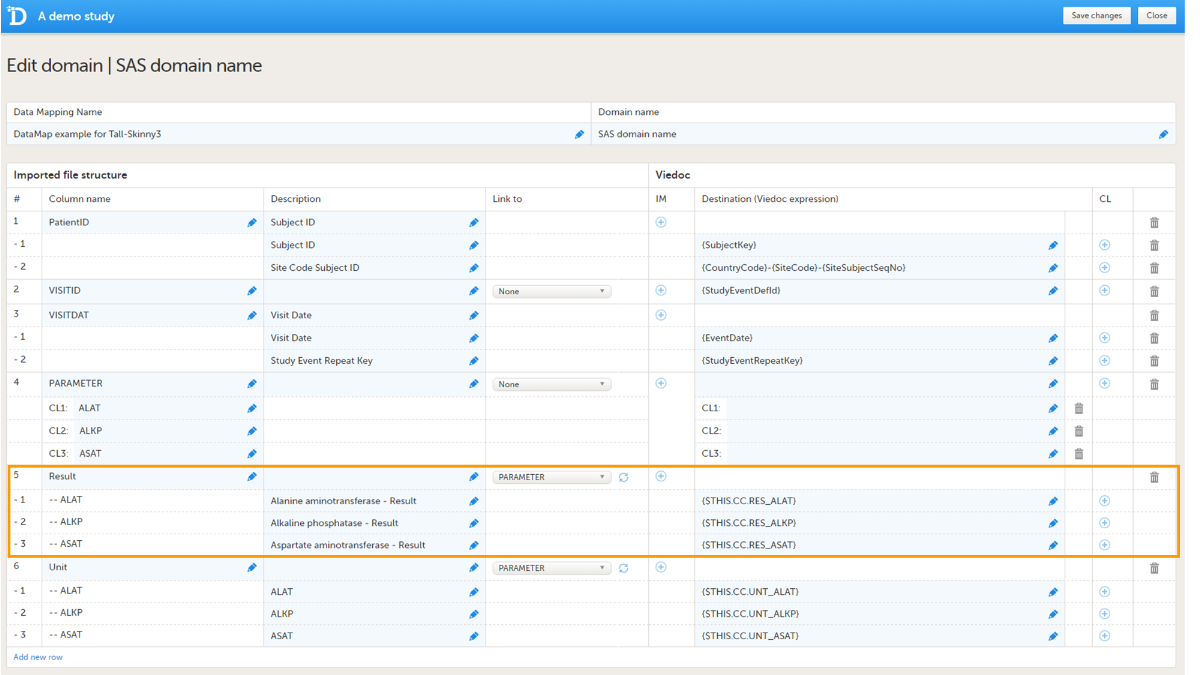
In the example in the image, the laboratory results of the alanine aminotransferase serum levels are mapped to {$THIS.CC.RES_ALAT}. This is built up as follows:
You can also specify a scheduled event explicitly in the data mapping. For example, it is possible to map the above data directly to Event 1 using {E1.CC.RES_ALAT}. In that case, the event ID does not have to be included in the data file, and, hence, the event ID does not need to be mapped to {StudyEventDefId}, because the event is already specified in the destination of the data.
You can remove a table row by clicking on the trash can icon.
You can import and edit an existing Define-XML file by clicking on Import data mappings in the Data mappings overview. Select the file you would like to import and click Open. Edit the data mapping table if necessary and click Save changes to save the data mapping.
You can remove existing data mappings in the Data mappings overview by clicking Delete. It is not possible to delete a data mapping that has already been published.
The form repeat key can be used to specify:
The form repeat key should be mapped to {FormRepeatKey}.
The form repeat key attribute in the Operational Data Model (ODM) contains both the ActivityDefID and the FormRepeatKey, separated with a $, as in the following format: {FormRepeatKey}${ActivityDefID}.
In the example of the image below, we map data into the vital signs form VS, that is used in two different activities within event 1:Activity 1 and Activity 2. In Activity 2, the form is set as repeating.
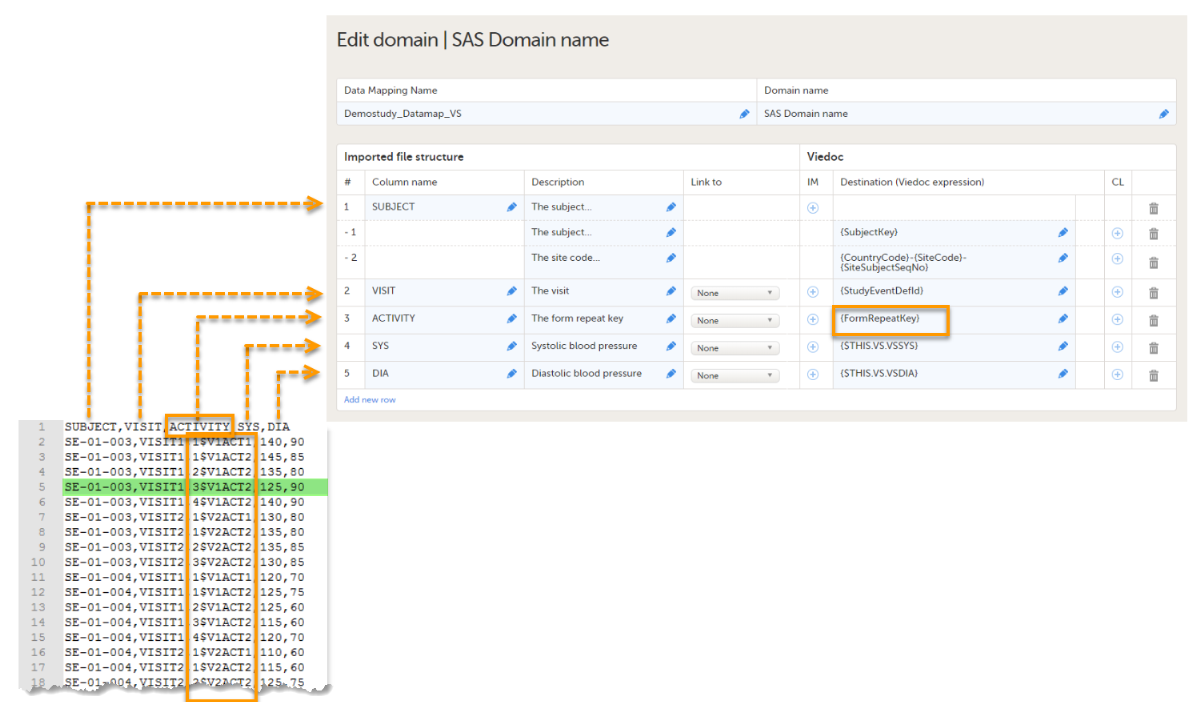
The activity column in the data file specifies both the form repeat key (1, 2, 3, 4) and the ActivityDefId (V1ACT1, V2ACT2), separated by $. The activity column is mapped to {FormRepeatKey}. The data highlighted in green will be imported in the third instance of the VS form in Activity 2.
If only the FormRepeatKey is specified during the data import, and not the ActivityDefId, the data will be imported into the first activity in which the respective form is used.
You can add new subjects through the import of data. In that case, the configuration file the tag AllowCreatingSubjects should be set to true, for more information, see Viedoc Data Import application.
To enable Viedoc to add new subjects, one of the following should be mapped:
If only the subject key is mapped, Viedoc needs to extract the country code, site code and site subject sequence number from the subject ID. It is necessary to map the format used for the subject ID, for example: {CountryCode}-{SiteCode}-{SiteSubjectSeqNo}.
Note that Viedoc can only correctly extract the country code, site code, and site subject sequence number within a subject ID if one of the following two requirements are met:
{CountryCode}-{SiteCode}-{SiteSubjectSeqNo}.{CountryCode}{SiteCode}{SiteSubjectSeqNo:000} (with no separators, for example, SE02001) then the mapping must also be set as {CountryCode:00}{SiteCode:00}{SiteSubjectSeqNo:000} so that the correct digits are mapped for the country and site codes.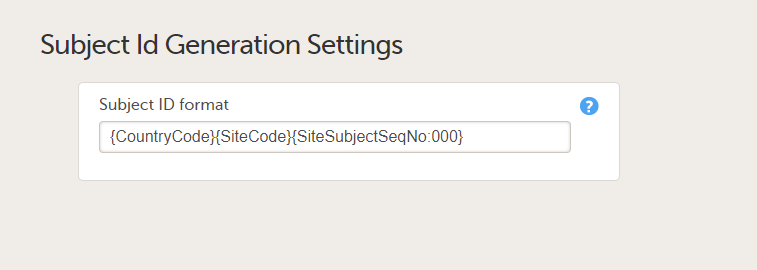
When importing to range items, there are two scenarios:
Note! If importing Inclusive In Between values and the delimiter in the file is comma you have to put the range value within quotation marks.
When importing to checkboxes you have to specify the code value separated by comma, for example “1,3,5”.
Note! If the delimiter in the file is comma you have to put the value within quotation marks.
When importing partial dates to date fields you should only add the parts of the date that is known. For example if the day is not known, then add “2020-01” (year and month) or, if the month is not known, add “2020”.
This lesson describes how to configure reference data scopes in Viedoc Designer.
Viedoc offers support for adding reference data that will be automatically populated to specific forms. When reference data are configured for your study, it is not necessary to fill in reference values for each subject in each form separately.
It is possible to configure different sets of reference data that will be populated to the form based on:
| Term | Definition |
|---|---|
| Reference data source |
An institute that provides reference data, for example a lab. |
| Reference data scope | A mapping of the items that should be automatically populated with reference values, and the factors that they should depend on. One or more reference data scopes can be configured in Viedoc Designer > Global Settings, as set(s) of variables and factors (see definitions below). |
| Factor | A parameter that affects the reference data, for example a subject’s sex. Factors may affect the normal range for a test result. |
| Variable | A specific measurement to be carried out. |
| Date factor | The date the sample was collected or the measurement carried out. This field determines on which date the reference data to be populated are based, for example when the event date is not the same as the collection or measurement date. |
| Target type | An item of a certain type of information that a reference data source can provide for a specific variable (such as range, unit, low/high values, etc.). Any number of target types can be defined by the user. |
Reference data are configured in Viedoc Designer, Viedoc Admin and Viedoc Clinic. The schematic below depicts what different steps need to be taken, and which roles have permission to perform these steps.
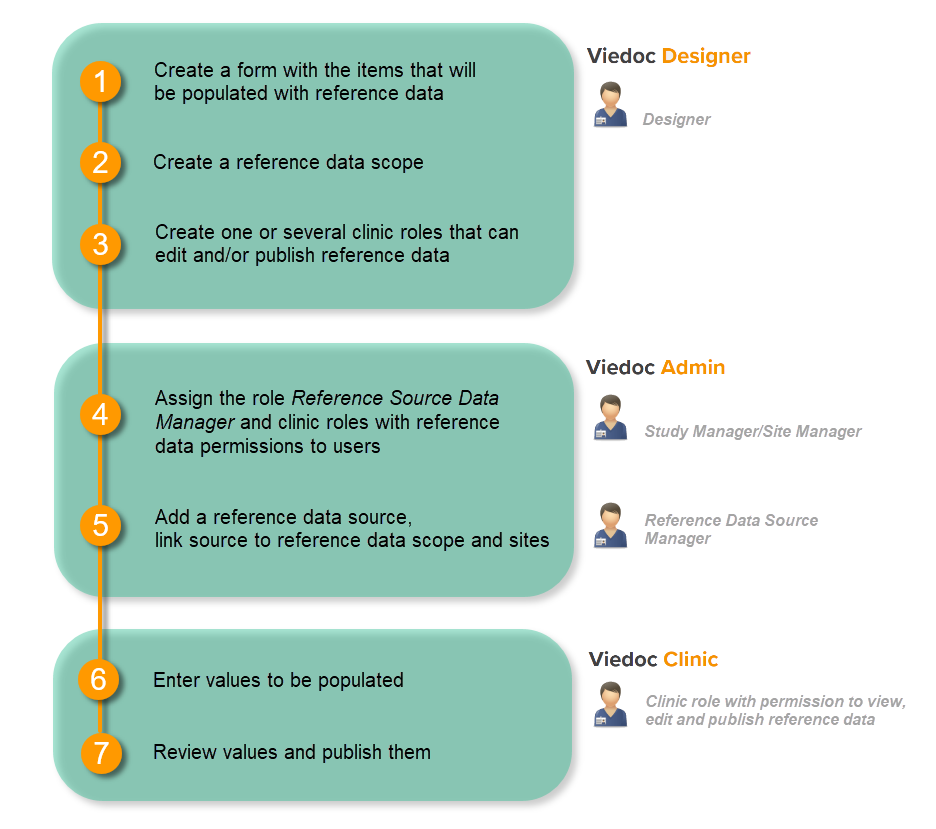 http://help.viedoc.net/l/5cf069/en/
This is a single-sourced file that should have the following content:
Introduction to reference data, description of the workflow.
For more detailed instructions regarding these steps, see:
For a detailed example of how to work with reference data, see:
For a video tutorial on how to work with reference data, see
A reference data scope is a mapping of the items that should be automatically populated with reference values, and a listing of the factors that affect these data. The data for one reference data scope will be populated to one specific lab data form. Reference data scopes are configured in Global Design Settings in Viedoc Designer.
A reference data scope is linked to a reference data source and defines the following:
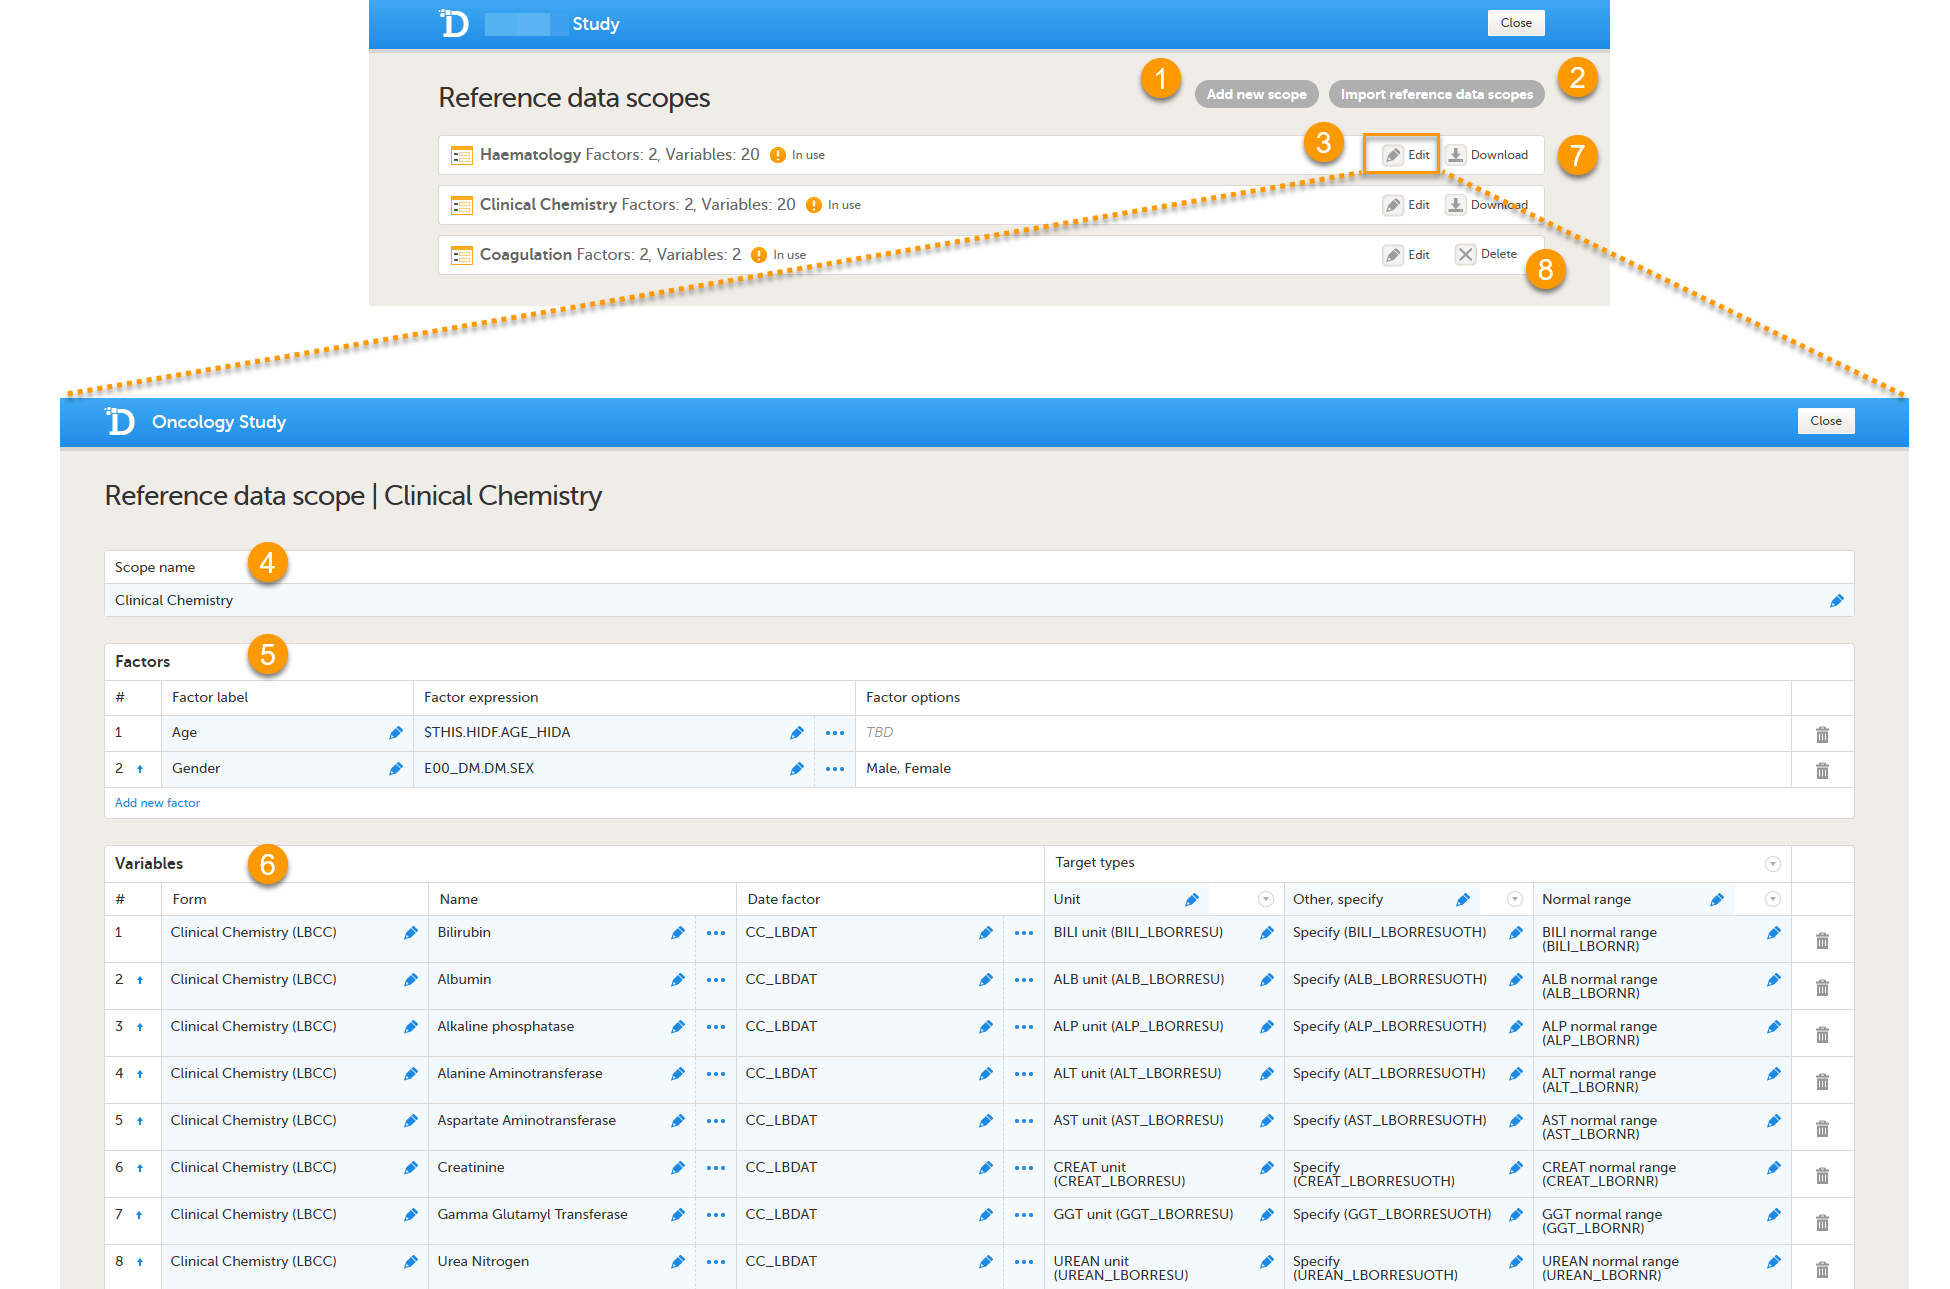
On the Reference data scopes page, you can:
1. Add a new scope, see Creating a reference data scope.
2. Import a scope, see Importing a reference data scope.
3. Edit an existing scope, see Editing a reference data scope. The Reference Data Scope page opens, where you can configure the following:
4. Scope name. The scope name is displayed in Viedoc Admin, where the scope can be linked to a reference data source. It is also displayed in Viedoc Clinic, where the reference data values can be entered. The scope name is a mandatory field.
Tip! Use a scope name that contains a (short) description of the measurements to be carried out. This will make it easier to identify the scope in Viedoc Admin and Viedoc Clinic.
5.The factors that affect the reference data (see Factors).
6. The variables that will be measured and the fields that will be auto-populated with reference data (see Variables).
7. Download a reference scope.
Note! You can only download a reference data scope after it has been published in the Global design settings.
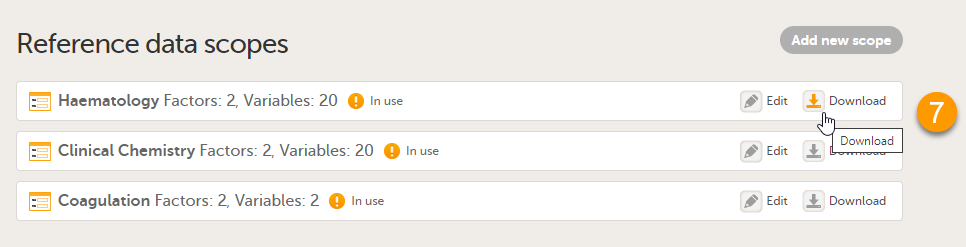
See Downloading a reference data scope
8. Delete an existing scope, see Deleting a reference data scope.
Note! You can only delete a reference data scope before it has been published in the Global design settings.
A factor is a parameter that may affect the normal range for a test result, such as a subject’s gender or age. The factors defined here will become available in the reference data editor in Viedoc Clinic.
 On the Reference data scope page, you can:
1. Add a new factor.
2. Delete a factor.
3. Edit a factor.
Each factor is defined by:
All the above fields must be filled in when defining the factors.
A variable is a specific measurement to be carried out. The variables defined here will become available in the reference data editor in Viedoc Clinic.
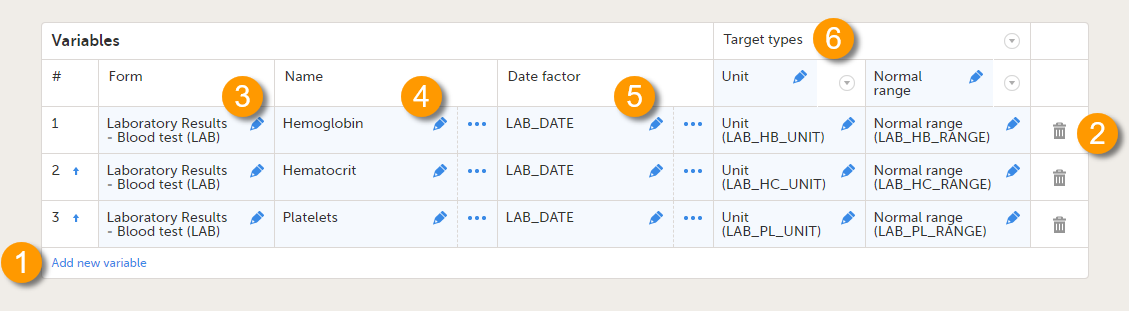 On the Reference data scope page, you can:
1. Add a new variable.
2. Delete a variable.
3-6. Edit a variable.
Each variable is defined by:
All the above fields are mandatory to fill in when defining the variables.
Note! One form item can only be mapped to one scope. If the form item is mapped to multiple scopes, the following error message is displayed: Design items can only be related to one scope.
Note! A variable cannot be mapped to form items that contain functions. If the variable is mapped to an item containing a function, the following error message will be displayed: It is not possible to relate to design items that contain functions.
You can use repeating item groups in reference data scopes. Repeating item groups allow multiple instances of a group of items to be collected in the same form.
When a reference data scope uses items from repeating item groups, the following rules apply to ensure that variables, date factors, and target types can be evaluated correctly:
If the above rules are not followed, the following error message is displayed: Name, date factor, and target type items must be in the same repeating item group.
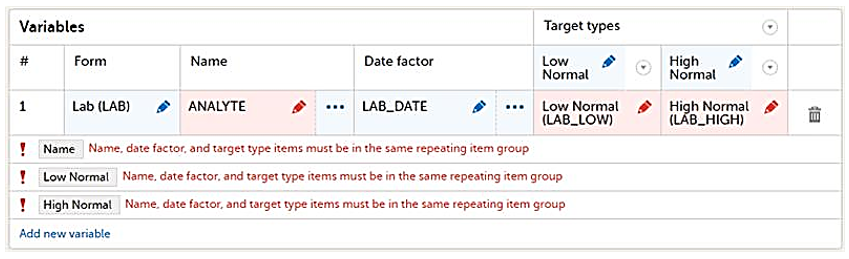
Note! Items in repeating item groups cannot be referenced in a factor expression. A factor expression must resolve to a single value, but items in repeating item groups can have multiple instances.
If a factor expression references an item in a repeating item group, the following error message is displayed: Items in repeating item groups cannot be referenced in a factor expression.

There are two types of variables:
An example of a static variable is given in the image below.
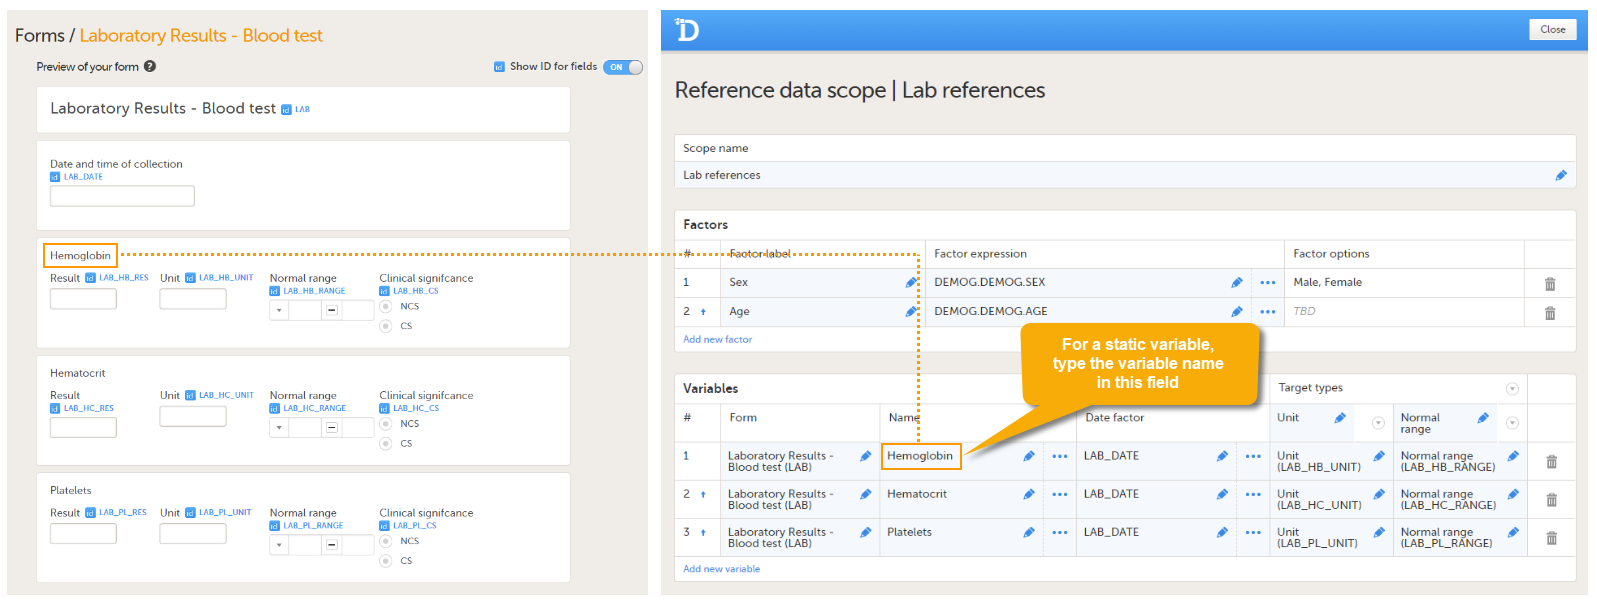
An example of a dynamic variable is given in the image below. If the item consists of radio buttons or a drop-down list, and thus has a code list, the variable names as displayed in the reference data editor in Viedoc Clinic are taken from the code list items. For each code list item, a separate set of reference values has to be entered in the reference data editor. When the clinic user then fills in the form in Viedoc Clinic, the selection he/she makes from the radio buttons or drop-down list determines which reference values are populated to the form.
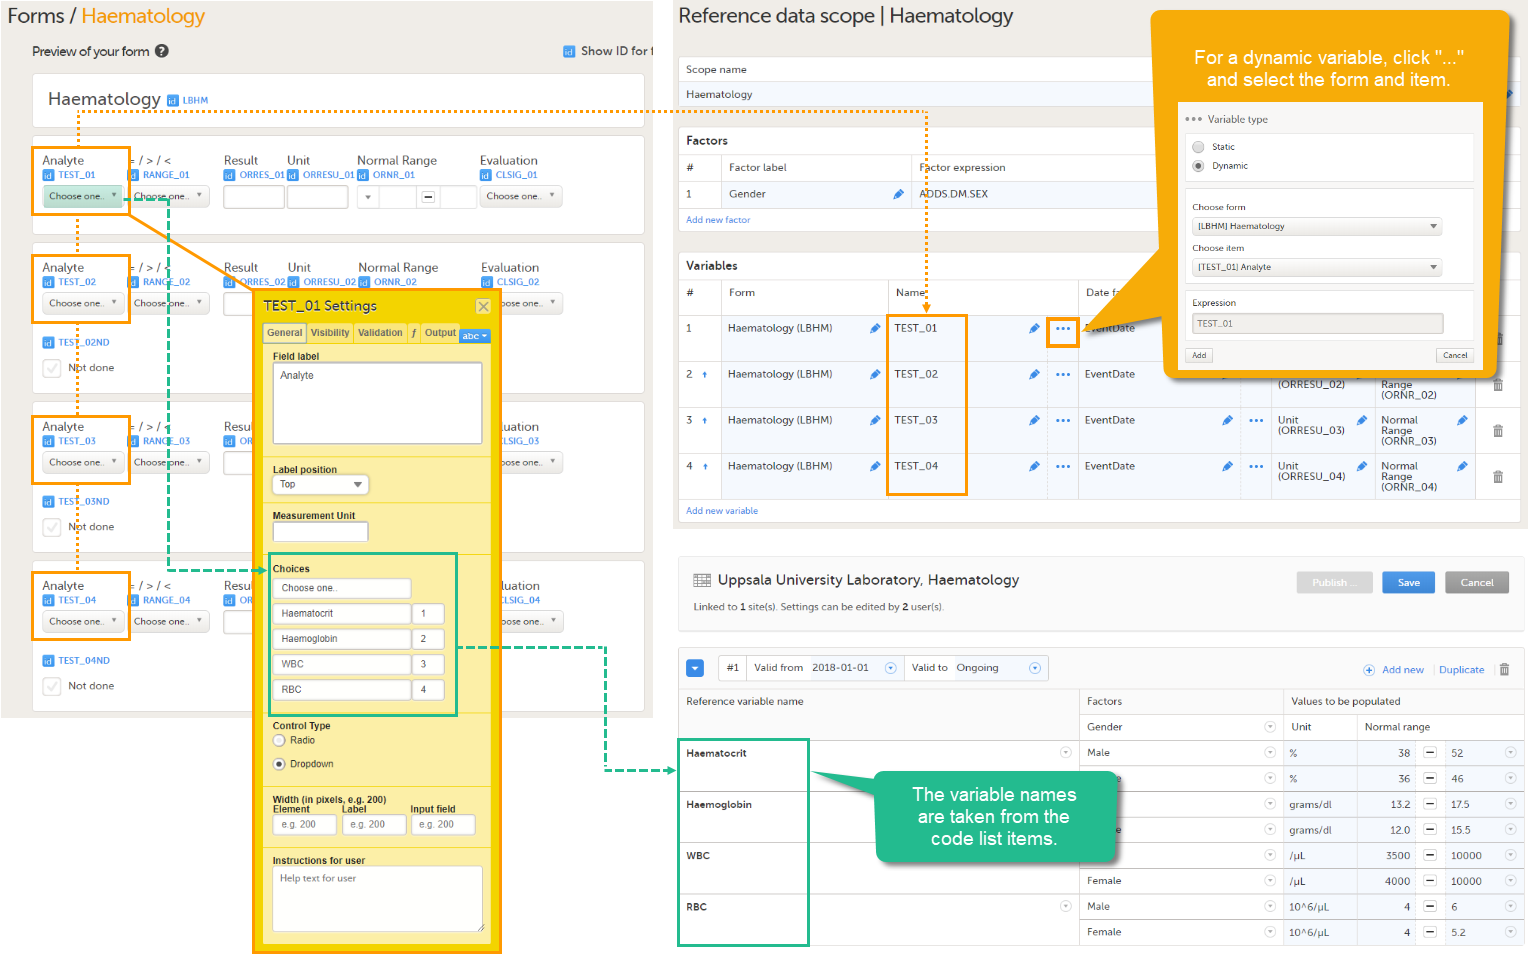
In order to set up reference data in your study, you have to perform the following steps in Viedoc Designer:
Tip! When creating forms, set the items that serve as factors to Required. If a factor item is left empty in Viedoc Clinic, no reference values can be auto-populated. Setting the item that serves as a factor to Required avoids that they will be left empty. In the example below, Age in the form Demographics serves as a factor for the reference data for the variable Hemoglobin in the form Laboratory Test Results. To make sure that reference values can be populated, the subject's age needs to be provided. The item Age in the form Demographics is therefore set to Required field.
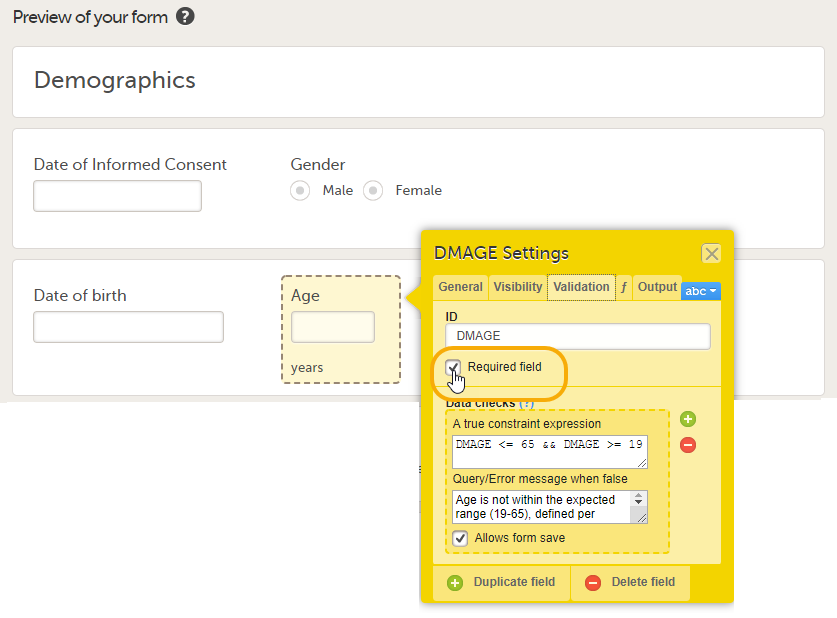
To create a reference data scope, follow the steps below.
| 1 | In Viedoc Designer, open the Global Design Settings page. In the Reference data scopes field, select Edit. |
| 2 | Select Add new scope. The Reference data scope page opens. |
| 3 | Enter a name for the scope. The scope name will be visible in Viedoc Admin, where the scope can be linked to a reference data source, and in Viedoc Clinic, where the reference data values can be entered. |
| 4 |
Set the factor(s) as follows:
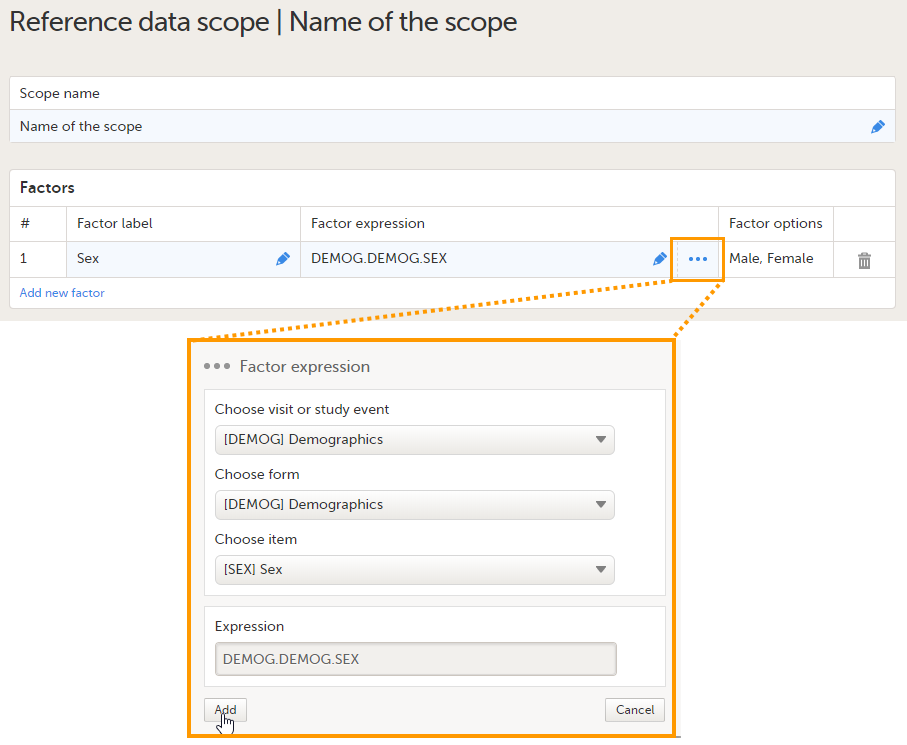
The Factor options field automatically displays the options that belong to the selected form items. If no options are predefined for the selected form item, the field will display TBD. You can add as many factors as you like. You can delete a factor by selecting the trash can icon. See also Factors for more information. |
| 5 |
Set the variable(s) as follows:
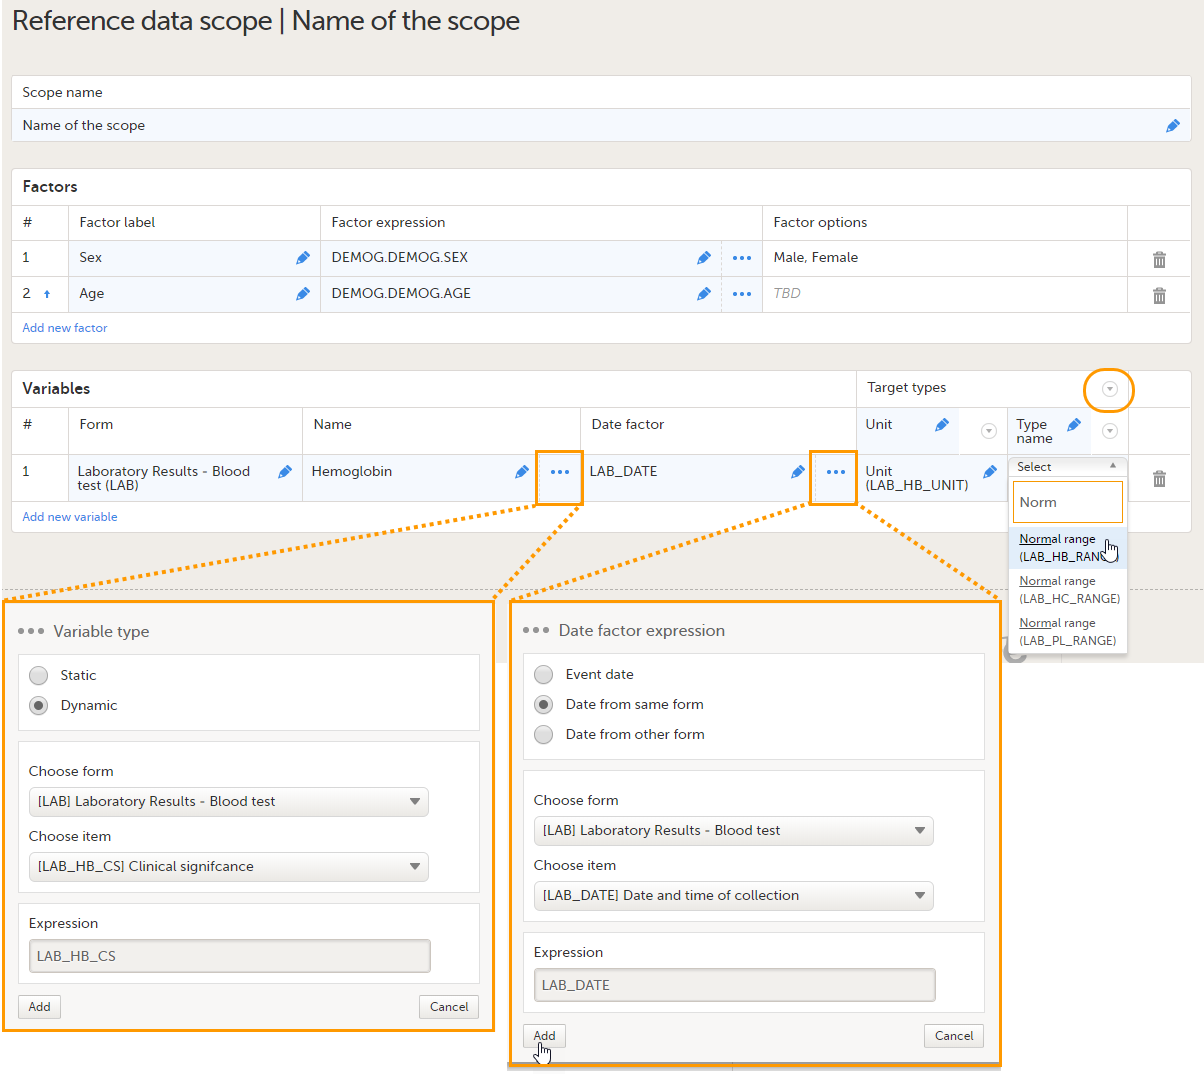
You can add as many variables and target types as you like. You can delete a variable by selecting the trash can icon. You can delete a target type by selecting the arrow to the right of the target type name and selecting Remove type. You can move the target types to the left or to the right by selecting the arrow to the right of the target type name and selecting Move to right or Move to left. See also Variables for more information. |
| 6 |
Select Save changes. |
Note! In order for the newly created reference data scope to take effect, you need to publish the global design settings.
Once the reference data scope has been linked to a reference data source in Viedoc Admin (see Managing reference data sources in Viedoc Admin), it is possible to enter reference values to that source-scope combination in Viedoc Clinic. The reference values should be published in Viedoc Clinic to make them available for auto-population to the subject forms (see Working with reference data in Viedoc Clinic). If the reference data scope is changed and published in Viedoc Designer after the reference values have been published in Viedoc Clinic, the following message will appear in Viedoc Clinic.
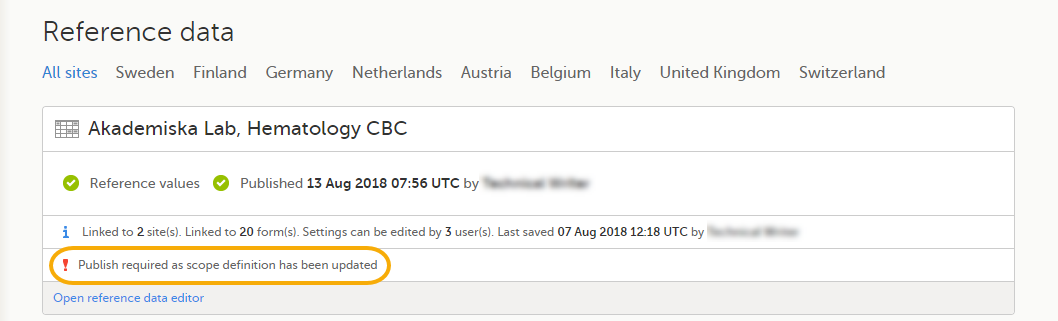
The reference date source-scope combination needs to be updated and published again in Viedoc Clinic, for the reference values to become available for auto-population to the subject forms.
In order to use reference data in your study, you need to create one or more clinic roles that have permission to perform one or more of the following actions:
Note! You need to have at least one clinic role with permission to edit reference data and one clinic role with permission to publish reference data. This does not have to be the same role.

The permissions (rights) for each clinic role are configured in the Roles section of the study design In Viedoc Designer. For more detailed instructions on how to configure clinic roles, see Configuring roles.
To edit a reference data scope, open the Global design settings page in Viedoc Designer. In the Reference data scopes field, select Edit to open the Reference data scopes page. Select Edit to open the reference data scope you would like to edit and make the required changes.
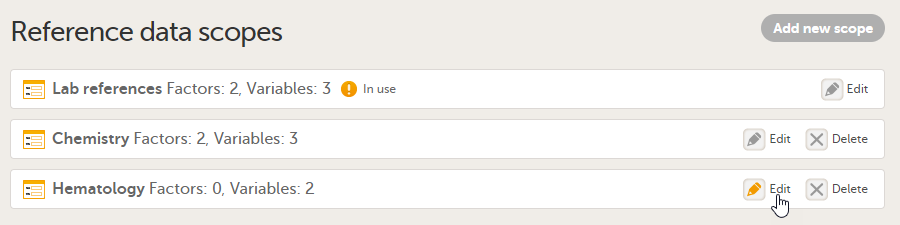
See also Factors, Variables and Creating a reference data scope for more information.
You can edit a reference data scope at any time, even after the Global design settings have been published and the scope has been linked to a reference data source. In order for the changes to take effect, you have to publish the Global design settings again.
Note! You can only delete a reference data scope before it has been published in the Global design settings.
To delete a reference data scope, open the Global design settings page in Viedoc Designer. In the Reference data scopes field, select Delete. A confirmation pop-up opens. Select Delete to proceed with removing the scope, or select Cancel to return without deleting the scope.
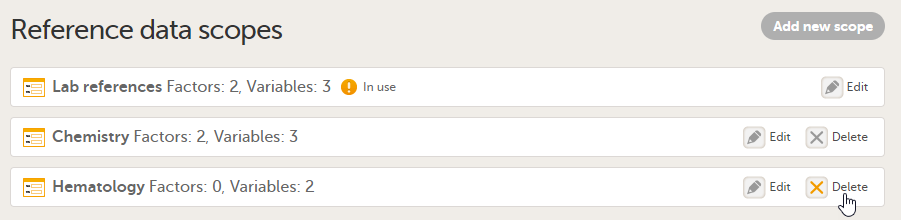
Note! You can only download a reference data scope after it has been published in the Global design settings.
To download a reference data scope, open the Global design settings page in Viedoc Designer. In the Reference data scopes field, select Download.
When you select Download, the downloaded file in JSON format is available in your browser:

To import a reference data scope, open the Global design settings page in Viedoc Designer.
| 1. |
In the Reference data scopes field, select Import reference data scopes.
|
| 2. | Select the file you want to import.
Notes!
|
| 3. |
In the edit view you can review the imported reference data scope. Select Edit to open the imported reference data scope and make any required changes. See Editing a reference data scope |
| 4. | Select Save Changes to save the imported reference data scope. This gives you the option of viewing and modifying the reference data scope before saving it. The scope will then appear in the list of reference data scopes. Note! The reference data scope is not saved to the Viedoc database until you select Save Changes. You can always import a new reference data scope. |
In Reports configuration, you set up what data the Viedoc Reports application will collect and display. You also set up the report pages that the users can access. The five main settings are as follows:
For more information about Viedoc Reports, see Viedoc Reports User Guide.
To configure Reports:
| 1 | In Viedoc Designer, select the study for which you would like to configure Reports. |
| 2 |
In the Global design settings field, click Edit. 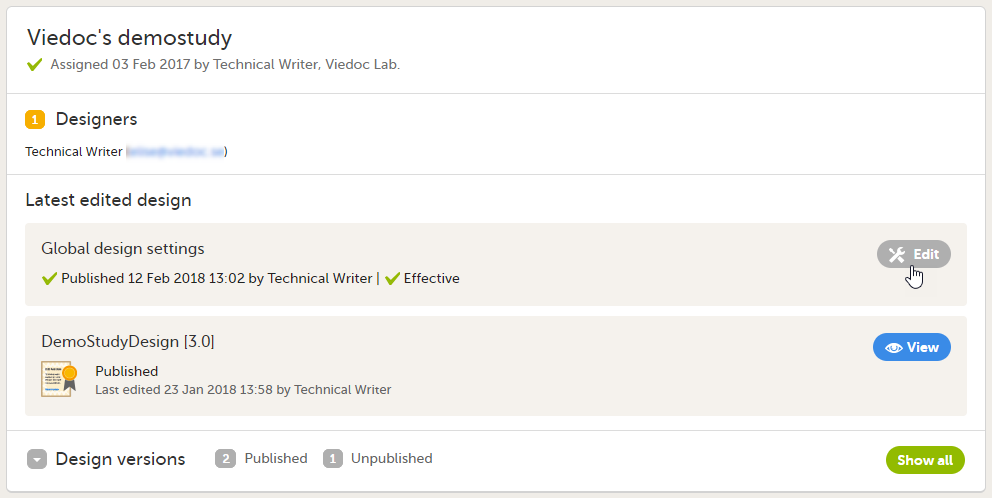
|
| 3 |
In the Reports configuration field, click Edit. 
|
| 4 |
You can now configure the settings by clicking Edit in one of the fields: Visibility settings, Dashboard, Demographics, Adverse events, Custom reports. 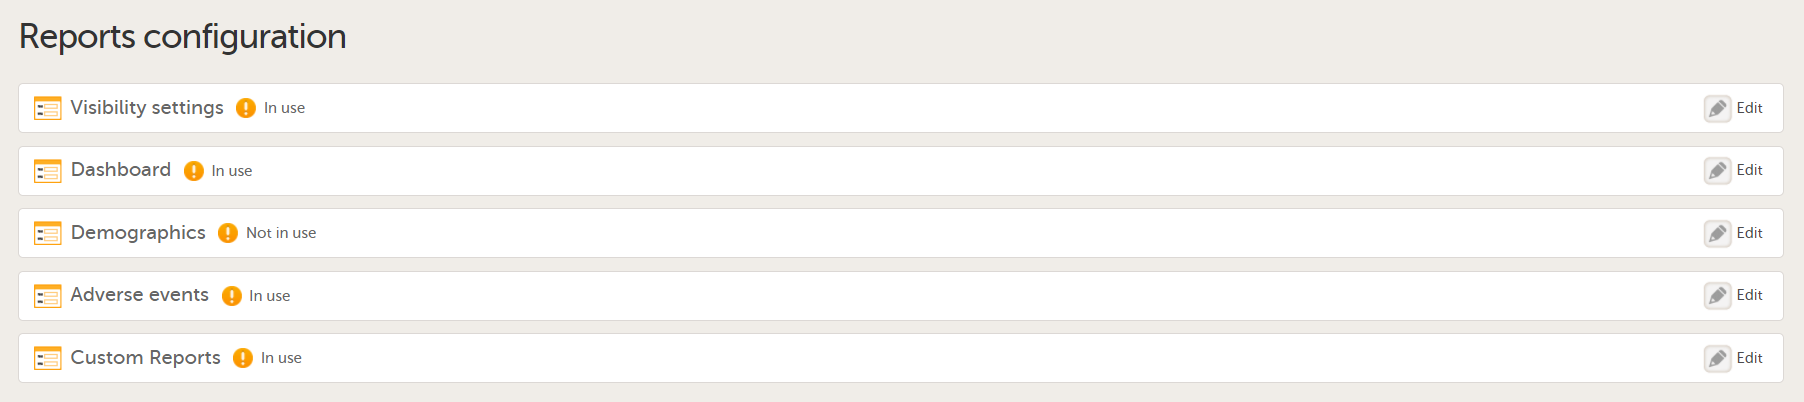
After editing and saving any changes, the Not in use status changes to In use. |
| 5 |
Publish your global design settings. |
| 6 | Publish your design. |
In Visibility settings, you can configure the roles that should have access to the different report pages:
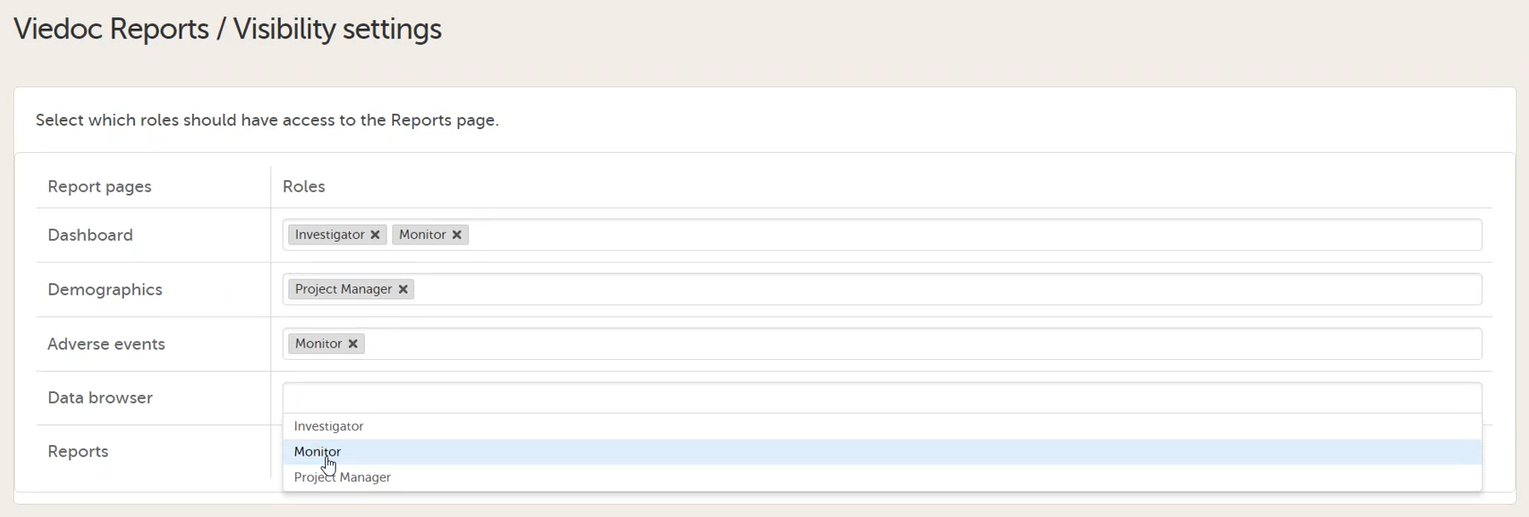
By clicking on a field, a dropdown list is displayed with the roles that are selectable for each page. When all pages are mapped with the desired roles, click Save changes and close the window.
Note!
In Dashboard, you can select a form and an item from which the reason for withdrawal or discontinuation is collected. This is then presented in Reports in a graph. For this to work, you must have a form with a codelist item where you have several options. After making your settings, click Save changes and close the window.
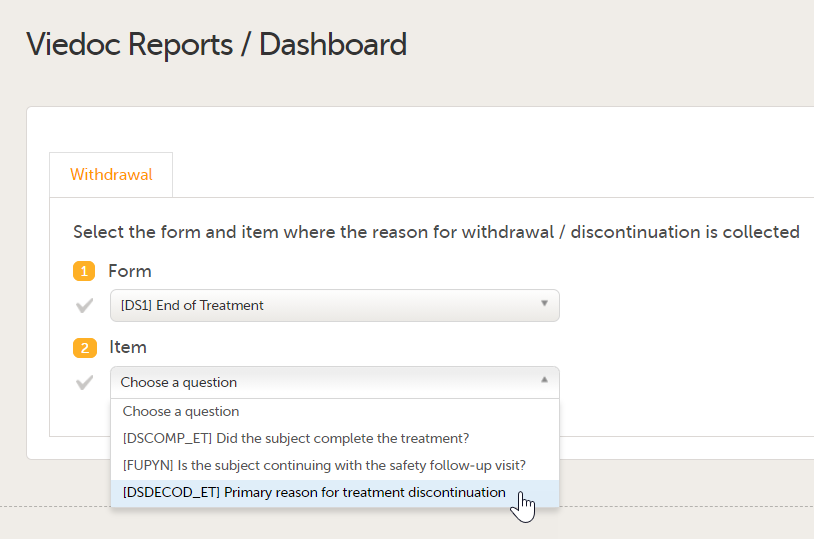
In Demographics, you can configure up to five graphs to be presented in the Demographics page, showing the distribution of the Demographics data.
To configure the graphs:
| 1 |
Select a form and the corresponding form item from which you want the data to be collected. 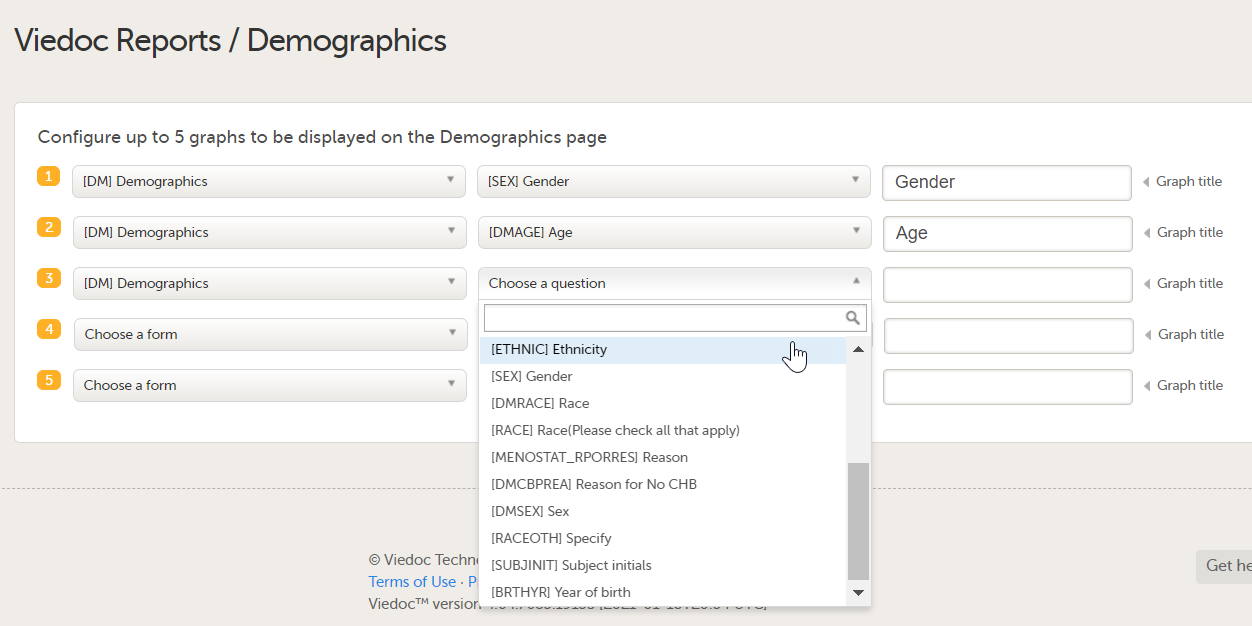
|
| 2 |
Give the graph a title. Note! If you don't name it, the form item name is used as the title. |
| 3 | After making your settings, click Save changes and close the window. |
Note! When selecting the items to populate the plots, if the same item or form is used across more than one event, or, if the form is a repeating form, the system will use the latest non-blank value only.
In Adverse events, you can configure up to five graphs to be presented in the Adverse events page, showing the distribution of Adverse events data.
To configure the graphs:
| 1 |
Select the Adverse event form and the corresponding form items from which you want the data to be collected. 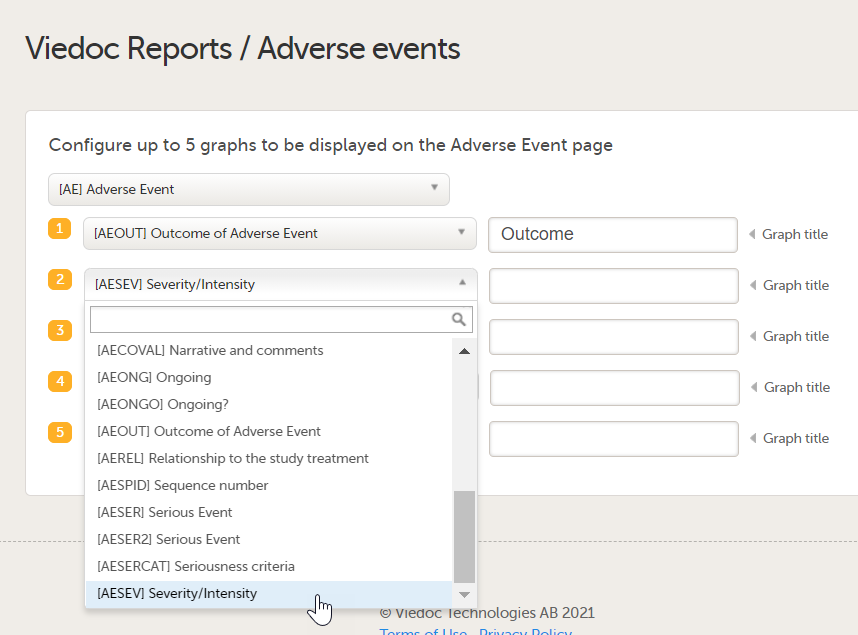
|
| 2 |
Give the graph a title. Note! If you don't name it, the form item name is used as the title. |
| 3 | After making your settings, click Save changes and close the window. |
In Custom reports, you can upload your own, programmed custom reports in R format.
To upload a report:
| 1 |
Click Add a new custom report. 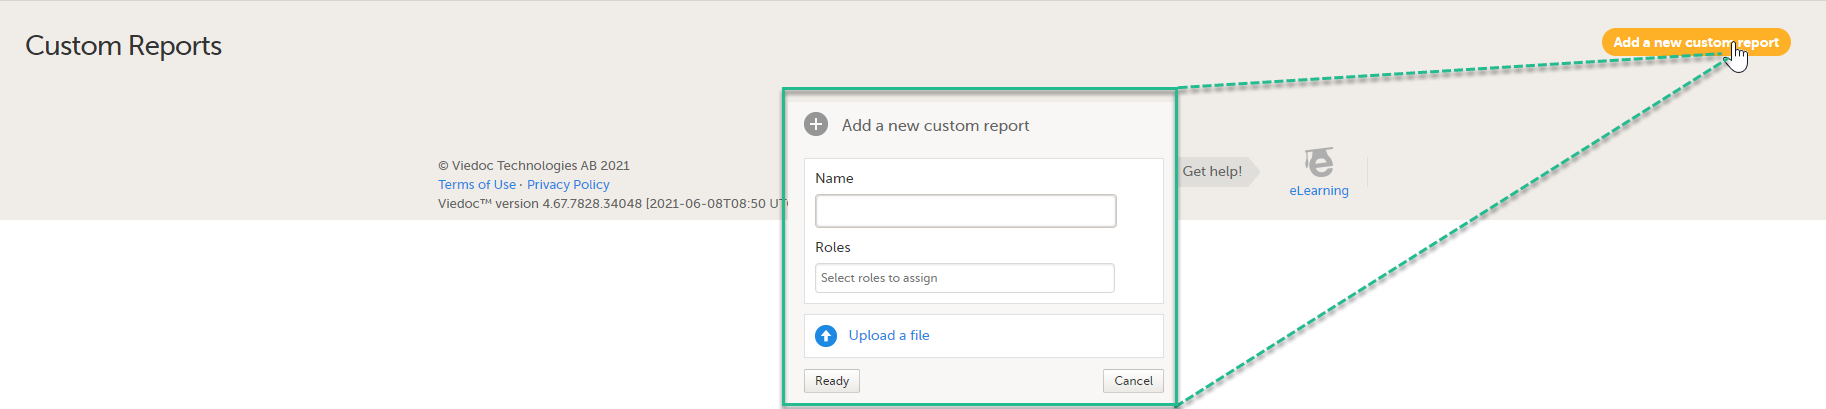
|
| 2 |
In the window that is displayed, enter a Name for the report. This name will be visible for the user in Viedoc Reports. Note! If you want to be able to download the report in XML format, the report name must contain the text string |
| 3 |
Click the Roles field and select the user roles in the dropdown list that should have access to the specific report. For a role to be visible here, ensure that:
|
| 4 | Select Production and/or Training mode. Only selecting training mode allows you to test your custom reports on demo data before using them on production data. You can edit the mode later at any time. |
| 5 |
Click Upload a file and select your R file. 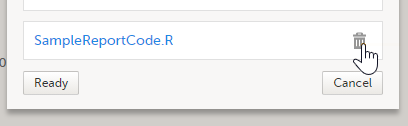
|
| 6 | When all settings are done, click Ready. |
Saved custom reports can be edited or deleted from the main window. When editing an existing custom report definition you can change the name, change the roles that have access to the report, and/or upload a new version of the R file.

You can also change the order of how the reports will be shown in Viedoc Reports. Simply drag and drop the reports in the order of your choice and then click Save changes. The sequence numbers to the left reflect the order of how your custom reports appear for the end user of Viedoc Reports.
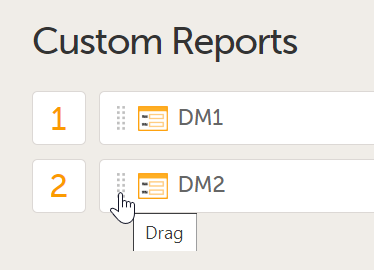
Note! After configuring Viedoc Reports, it must then be enabled in study settings in Viedoc Admin. For more information on setting up Viedoc Reports, see the Quick guide for setting up Viedoc Reports.
In Viedoc Designer, JavaScript can be used to provide a lot more flexibility when working with the study design, by:
Important! The syntax used is the JavaScript syntax, as described in ECMAScript 5.1 standards. This is why it is important to verify the functionality against the ECMAScript 5.1 specification and out of range values.
Note! If an incorrectly formatted JavaScript code is put in the study design, the outcome of the executed JavaScript code in Viedoc Clinic will be handled as a "false result" for Visibility conditions, Data checks and Alerts. If used in a Function for an item, the item will not be populated, and a note will show up in the Form Audit record mentioning an issue in the study design.
Note! If the full reference path for an item in an alert body, for example, COMMON_AE.AESPID is used, and the event is specified in the reference, and the event can recur, such as for Common and Unscheduled events, the value that is returned is from the latest form instance based on event date.
The variables used are the items in the design, referred to as described in section Addressing Viedoc items.
The operators used are listed in section Operators.
An item from a different form (a cross form item) is addressed in Viedoc in the following format: Event.Form.Item. It consists of three identifiers separated by ".", as following:
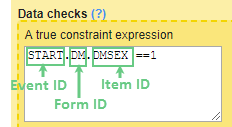
Note!
The event can be specified in one of the following ways:
EventID - the Event ID as specified in the Event settings.EventID[StudyEventRepeatKey] - if the event is recurring and you want to specify a certain occurrence, this is done by writing its StudyEventRepeatKey value within [ ].EventID$FIRSTn - to identify the nth initiated event, in case the specified form appears in multiple events. See Relative path section below for a complete description of the indexers.The form can be specified in one of the following ways:
FormID - the form ID as specified in Viedoc Designer under form settings.FormID[FormRepeatKey] - if the form is a repeating form and you want to specify a particular instance, this is done by writing its FormRepeatKey value within [ ].FormID$ActivityID - optionally, it is possible to specify the activity, in case the respective form appears in multiple activities within the same event.DM$MORNING.WEIGHT - refers to the WEIGHT item in the DM form within the MORNING activity.FormID$ActivityID[FormRepeatKey] - if you want to specify both the activity and a particular instance of a repeating form, this is specified in this format.To access an item in the same form, it is sufficient to use the ItemID only, there is no need to specify the event and form. In this case, when changing the value of the input item in Viedoc Clinic, the result item (depending on the input item) will update its value at the same time.
In case of using the Event.Form.Item for an item within the same form, when changing the value of the input item in Viedoc Clinic, the result item value will be updated only after saving the form and re-opening it.
To access an item in another form (so called cross form item) it is necessary to specify the event and the form:
EventID.FormID.ItemID
Using repeating item groups allows Viedoc Clinic users to add multiple instances of the same group of items when entering data.
To access specific data points entered in repeating item groups, JavaScript expressions support referencing individual instances so they can be used in functions, data checks, and visibility conditions.
When referencing an item from a repeating item group in a form Summary format or JavaScript expression, each repeated instance of an item can be referenced by adding the repeat index to the item ID:
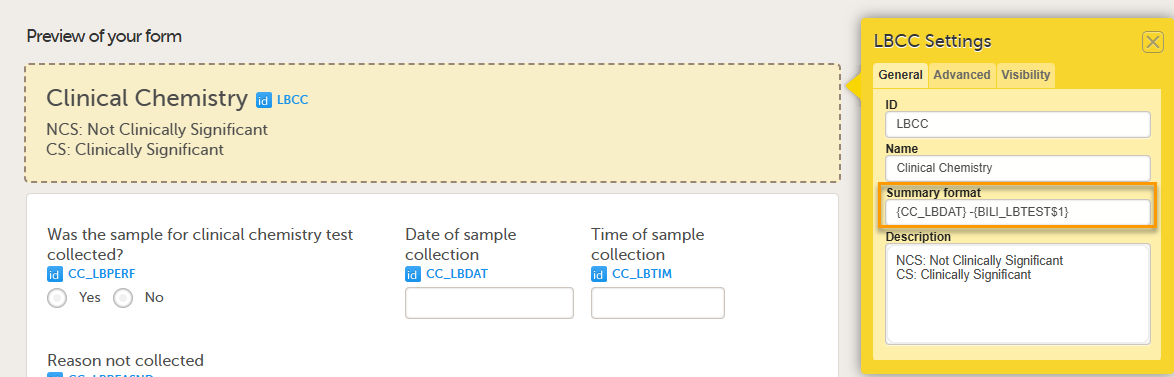
To reference a specific instance of an item inside a repeating item group, use a syntax such as: ItemID$[Index]
The repeat index identifies which occurrence of the item is being referenced. For example:
RESULT$1 – the first instance of RESULTRESULT$3 – the third instance of RESULTA missing index triggers a validation error when the system cannot determine which instance should be used.
Note! It is possible to refer to another item in the same repeating item group without specifying a repeat index. In this case, the expression applies to the current item instance. For example, RESULT instead of RESULT$3, or Event.Form.Item instead of Event.Form.Item$3.
You can use the ItemGroupRepeatKey variable in item expressions and functions to reference the index of the current instance within a repeating item group. This variable is available only for items within a repeating item group and the item group itself.
JavaScript expressions for repeating item groups are not evaluated in form preview. To see how repeating item groups behave with JavaScript logic, open the form in Viedoc Clinic.
It is also possible to access cross form variable using relative path. Some special keywords are used in this case. Keywords that can be appended to StudyEventDefId. These keywords can also be used without StudyEventDefId to select any event.
| Keyword | Description | Example(s) |
|---|---|---|
$FIRSTn |
Selects the first event with the form initiated, n is an optional index and it goes forward (meaning that on a timeline $FIRST2 comes before $FIRST3) |
AE$FIRST.AEFORM.AEDATE |
$LASTn |
Selects the last event with the form initiated, n is an optional index and it goes backwards (meaning that on a timeline $LAST2 comes after $LAST3) |
AE$LAST.AEFORM.AEDATE |
$PREVn |
Selects the previous event with the form initiated, n is an optional index and it goes backwards (meaning that on a timeline $PREV2 comes after $PREV3 |
WEIGHT < $PREV.DM.WEIGHT + 10 |
$THIS |
Selects the current context event |
Here comes an example of using the optional indexer (n in the above table).
On the Add patient form, we have a text item that should have the latest non-blank value of another text item (called NAME) that is present on a form (called PROFILE) which is present on all scheduled (the first one called START) and unscheduled events.
The function below can be used on the item of the Add patient form:
if($LAST.PROFILE.NAME != null) return $LAST.PROFILE.NAME;

if($LAST2.PROFILE.NAME != null) return $LAST2.PROFILE.NAME;

if($LAST3.PROFILE.NAME != null) return $LAST3.PROFILE.NAME;

if($LAST4.PROFILE.NAME != null) return $LAST4.PROFILE.NAME;

if($LAST5.PROFILE.NAME != null) return $LAST5.PROFILE.NAME;

if(START.PROFILE.NAME != null) return START.PROFILE.NAME;

return 'NOT SET';
This will allow for the item being saved blank for the last 4 events, or else fallback to the value of the item on the start event.
Accessing the date of another event uses same principle as any cross form variable, uses a fixed form id $EVENT and item id EventDate.
For example, AESTDT > BL.$EVENT.EventDate, means that the start date of AE must be after BL event date.
The below JavaScript operators are used:
The following table lists the Viedoc items together with their JavaScript data types and default values.
| Viedoc item | JavaScript data type | Default value |
|---|---|---|
| Single line text | String | null |
| Number | Number | null |
| Date |
Date object. Note! JavaScript counts months from 0 to 11. Thus, January is 0 and December is 11. Note! In an expression such as Note! Due to this, the date field will not behave as a date object when used in JS expressions. To account for this, the date string has to be converted to a date object by adding it as input for new Date(). Note! The |
null |
| Time | Date object | null |
| Paragraph text | String | null |
| Checkbox | Array of string/number* | [ ] |
| Radio button | String/Number* | null |
| Dropdown | String/Number* | null |
| File |
Object with following members:
|
null |
| Range | String representation of a range object (see more details in section Range item specific functions and properties). | null |
*The item type for checkbox, radio button or dropdown menu is usually number, unless any of the choice codes is not a number.
In JavaScript data is passed in two ways: by value and by reference, respectively.
The following JavaScript data types are the ones that are "passed by value":
This means that, when comparing two variables of the above mentioned types, their values will be compared. It means that, for example if we have the following code:
var a = 3;

var b = 'def';

var x = a;

var y = b;
...then a will get the value 3, b will get the value 'def', x will get the value 3, y will get the value 'def'. Variables a and x have the same value (3), and b and y have the same value ('def'). Still, all the four variables are independent. If we continue now and change the value of a to 5, this will have no impact on var x, which still has the value of 3.
The following JavaScript data types are "passed by reference":
This means that variables of these types get a reference to a certain value, not the value itself.
See Data types section for information on which Viedoc items are objects.
The date is always an object in JavaScript. If we have for example, the following:
var d=new Date();

var c=d;

d.setDate(10);
...then variable d is created as a date object, variable c is assigned to reference to the same value as d, and then each and every time we change d, c will dynamically change as well, as it references the same value as d does. So, when we set d to the 10th of the current month, c will automatically get the same value.
When an expression is evaluated in a form context, the following variables are accessible:
| Variable name | Data type | Default value |
|---|---|---|
ItemId , as configured in Viedoc Designer. |
As specified in Data types table, depending on the item type. | As specified in Data types table. |
SubjectKey |
String | null only for add patient. |
SiteSubjectSeqNo |
Number | Sequence number of the subject in the site (starts with 1). |
StudySubjectSeqNo |
Number | Sequence number of the subject in the study (starts with 1). |
SiteCode |
String | The site code as set in Viedoc Admin. |
CountryCode |
String | Two letter International Organization for Standardization (ISO) country code of the site. |
StudyEventDefId |
String | The ID of the study event as specified in the study workflow in Viedoc Designer. |
StudyEventType |
String | "Scheduled", "Unscheduled" or "Common" |
StudyEventRepeatKey |
String | The number that identifies a specific recurrence of a study event that is repeating (such as recurring events or common events). |
FormDefId |
String | The ID of the form as specified in Viedoc Designer > forms > settings. |
FormRepeatKey |
String | Counter that identifies the specific instance of a repeating form within a specific activity. |
SubjectFormSeqNo |
String | Counter that uniquely identifies the instance of a specific form on a subject level, that is, it starts with 1 and it is incremented each time a new instance of the form is created for that subject. See Form sequence numbers below for more details. |
OriginSubjectFormSeqNo |
String | For a copied form instance, it identifies the form instance from which data was copied for the first time. For the first instance of the form (not copied) it gets the value of the SubjectFormSeqNo. See Form sequence numbers below for more details. |
SourceSubjectFormSeqNo |
String | For a copied form instance, a counter that identifies the source of a copied form instance (the form instance the data was copied from). It gets the value of the SubjectFormSeqNo from which the form instance was copied. For the first instance of the form (not copied) it is empty (null). See Form sequence numbers below for more details. |
EventDate |
Date object | Current date for common events, all other current events date. |
ActivityDefId |
String | The ID of the activity as specified in the study workflow in Viedoc Designer. |
|
Note! Please note that a double underscore must be used. |
Date object |
Date types: 0. Date only for example Numeric with decimals |
BookletStatus |
String |
For PMS studies only! The status of the booklet, can be one of the following:
Default status is NotSubmitted. This system variable can be accessed by 3 part expression <event identifier>.$EVENT.BookletStatus, for example $THIS.$EVENT.BookletStatus, V1.$EVENT.BookletStatus, or $PREV.$EVENT.BookletStatus. |
Below is a table of statistics variables that can be used in study designs.
For the variables, all values are current values at the time of evaluation expression. This means that the value (the total number, for example) is tied to the specific event.
Variables are available in the following format: <Event Identifier>.$STATS.<variable as mentioned in the table below>
For example: $THIS.$STATS.QueryRaisedCount
|
Variable name |
Data type | Description |
|---|---|---|
|
|
Number | The total number of queries raised in the event. |
|
|
Number | The total number of queries resolved in the event. |
|
|
Number | The total number of queries rejected in the event. |
|
|
Number | The total number of queries approved in the event. |
|
|
Number | The total number of queries closed in the event. |
IncompleteFormsCount |
Number | The total number of incomplete forms in the event. |
|
|
Number | The total number of unlocked forms in the event. |
|
|
Number | The total number of forms where the CRA is not checked in the event. |
|
|
Number | The total number of forms not reviewed by the data manager in the event. |
|
|
Number | The total number of forms that have not been SDV'd in the event. (Where SDV is Source Data Verification.) |
|
|
Number | The total number of forms that have not been signed by the investigator in the event. |
Note! These statistics variables are not supported for any summary format. Expressions containing these variables are not evaluated when the counts are updated or changed.
The following form sequence numbers are used to make it easier to track different form instances at subject level, which are useful especially for the form instances initiated by copying the data from previous event.
FormRepeatKey: Counter that identifies the specific instance of a repeating form within a specific activity. This is available in the export output for Viedoc output version 4.39 and onwards.SubjectFormSeqNo: Counter that uniquely identifies the instance of a specific form on a subject level, that is, it starts with 1 and it is incremented each time a new instance of the form is created for that subject. This is available in the export output for Viedoc output version 4.51 and onwards.OriginSubjectFormSeqNo: For a copied form instance, it identifies the form instance from which data was copied for the first time. For the first instance of the form (that is, not copied) it gets the value of the SubjectFormSeqNo. This is available in the export output for Viedoc output version 4.51 and onwards.SourceSubjectFormSeqNo: For a copied form instance, a counter that identifies the source of a copied form instance (the form instance the data was copied from). It gets the value of the SubjectFormSeqNo from which the form instance was copied. For the first instance of the form (that is, not copied) it is empty, that is, null. This is available in the export output for Viedoc output version 4.51 and onwards.The example below illustrates how the values for these sequence numbers are assigned. The demo form used is set as repeatable and copyable and is included in Visit 1, Visit 2 and Visit 3.
We perform the following actions in Viedoc Clinic:
| 1 | Initiate Visit 1 and fill in three instances of the Demo form, these instances will get the sequence numbers as illustrated below: |
| 2 | Initiate Visit 2. Demo form will be available to be initiated by copying data from one of the previously filled-in form instances within Visit 1, so all the three instances will be shown as ghost forms: |
| 3 | Create an instance of Demo form within Visit 2 by copying the data from the third instance of the form filled in within Visit 1. This will result in the new form instance getting the sequence numbers as illustrated below: |
| 4 | Initiate Visit 3. Demo form will be available to be initiated by copying data from one of the previously filled-in form instances within Visit 1 and Visit 2, as below: |
| 5 | Create an instance of Demo form within Visit 3 by copying the data from the form filled in within Visit 2. This will result in the new form instance getting the sequence numbers as illustrated below: |
These sequence numbers are available to be used within expressions only to get the value of the sequence number for a specific form instance, that is, by using {SubjectFormSeqNo}, {OriginFormSeqNo}, {SourceFormSeqNo}.
In the above example, the form Summary format was configured by using these sequence numbers as below:
Form Repeat Key {FormRepeatKey}, SubjectFormSeqNo {SubjectFormSeqNo}, OriginFormSeqNo {OriginFormSeqNo}, SourceFormSeqNo {SourceFormSeqNo}
Notes!
In the excel export output, these form sequence numbers allows to track, for the form instances that were initiated by copying data from previous events, where the data originates from, as below:
Analyzing the values of the form sequence numbers, only the form instances that were initiated by copying the data from previous visits have values populated in the Source Subject form sequence number column, that is, the last two rows in the example. The data was copied from the form instance having the same Subject form sequence number value, highlighted in green in the above image. The form instance that the data was copied for the first time is identified by the value of the Origin Subject form sequence number, that is, "3" in our example.
An expression in Viedoc is a JavaScript function body written in ECMAScript 5.1 standards.
For example:
return 2;


var a=2;

var b=3;

return a+b;
Expressions can be written as single statement. Viedoc converts them into a function body.
expression is converted to return (expression), for example:
2
converts to
return (2);
or
VSDT <= now()
converts to
return ( VSDT <= now());
Important! When using loops (for, for/in, while, do/while) consider the following:
The JavaScript expression editor is an additional help tool when writing JavaScript expressions. These are the main features of the editor:
The JavaScript expression editor is available in all locations in Viedoc where it is possible to enter an advanced condition as a JavaScript expression, for example in form settings, alerts settings, edit check expressions, and subject status settings.
To open the editor, click the JS button in the JavaScript text editor field:

The editor opens:
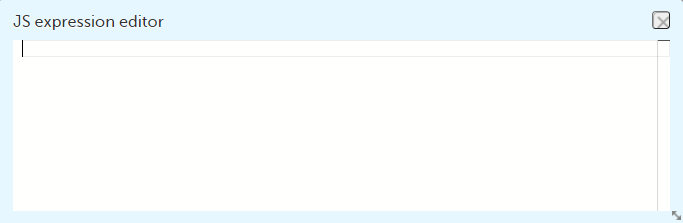
You can move the editor window around on your screen, and you can resize it by using the double-pointed arrow in the lower right corner.
The JavaScript expression editor supports autocomplete and lookup for:
age, date, and todayWhen you start typing in the JS expression editor window, a help pane displays autocomplete suggestions. To read more about an item in the list of suggestions, hover over it with the mouse and then click on the > symbol in the top right corner of the pane or type Ctrl+space.
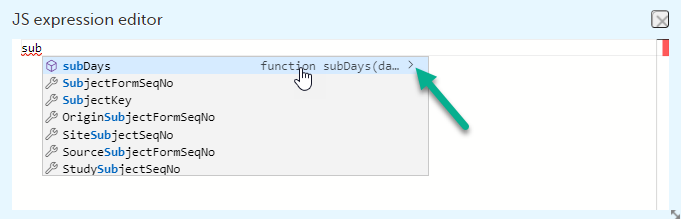
The help pane then displays information about the syntax of the item and parameters, return values etc.:
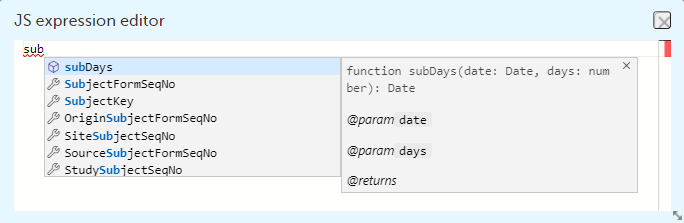
For items that are radio buttons, checkboxes, or dropdown menus, the help pane displays information about the code list values:
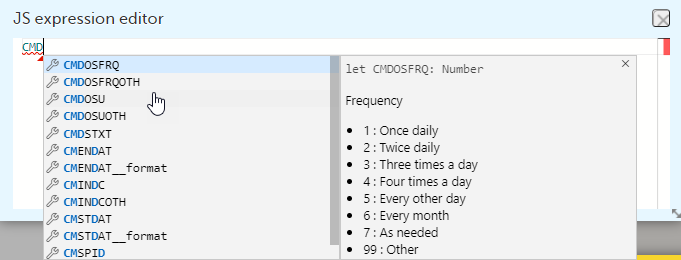
Tip! To see a list of all available items, type Ctrl+space or start typing.
If there is an error in the code, it is underlined in red. To find out more about the error, hover over it with the mouse.
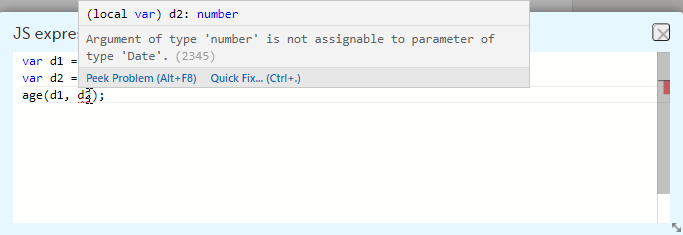
Click on Peek Problem or type Alt+F8 to display the error information inline in the editor window. To receive suggestions on how to fix the error, click Quick Fix.
Note! In some cases, the JavaScript expression editor incorrectly flags expressions as faulty. However, the validation that is performed when you save your changes will correctly validate your expression. For more information, see Unsupported expression types.
For the Viedoc-provided items and functions, the help pane can contain a link to the section of the eLearning that has more information about the specific item or function.

The following types of expressions are not supported by the JavaScript expression editor. However, they are still valid, and your study design will be correctly validated when you save the changes.
[$ActivityDefId]$FIRST[index]The boolean expressions are the expressions that return a boolean value, either true or false. They are used in the Visibility and Validation.
true - everything with a real value is true, such as:
100"Hello""false"7 + 1 + 3.145 < 6false - everything without a real value is false, such as:
0Undefinednull""For example, a validation expression to check that the weight is > 65 for males ('M') and > 45 for females. Gender (ItemID=GENDER) is collected in Patient Information form (FormID = PI) withing the Screening event (EventID = SCR) and weight (ItemID = WEIGHT) is collected in Demographics form in each event. Below is the edit check written for the WEIGHT item:
if (SCR.PI.GENDER == 'M')

return WEIGHT > 65;

else

return WEIGHT > 45;
Dates in JavaScript are objects. This means that comparisons need to be handled with care. First, always check if the dates have a NULL value. This makes any data check or visibility condition involving dates into an if...then... statement
Example 1
Date must be before the visit date:
if (Date1 != null)
return Date1<EventDate;
else return true;
Example 2
Date1 and Date2 should be the same date:
if (Date1 != null && Date2 != null)
return Date1 - Date2 == 0;
else return true;
Example 3
There can be situations when you want to use the function .toString(), such as in the following example.
Date1 and Date2 should be the same date:
if (Date1 != null && Date2 != null)
return Date1.toString() == Date2.toString();
else return true;
However, the .toString() function can sometimes take things too literally. For example, if Date1 includes the time at midnight (for example 2024-NOV-26T00:00) while Date2 does not (for example 2024-11-26), then the above comparison using .toString() might evaluate as FALSE even though the dates are the same in terms of common sense. The comparison that handles the dates as numbers will evaluate as TRUE because both dates will have the same numeric value.
Dates can be compared directly (as in example 1 above) using:
But if you need to use == or !=, you must either perform some arithmetic between the dates (as in example 2 above) to force JavaScript to handle the dates as numeric values, or convert to string (using the .toString() function) as in example 3 above.
When checking for NULL, do not convert to string as this would lead to a change of the value during conversion (for example, from NULL to something different).
Note! Remember to check for NULL before invoking any function on an object.
See the Pass by value vs. pass by reference section for an explanation on working with objects.
For checking if two dates are the same in Viedoc, the function below can be used:
function sameDay(d1, d2) {
return d1.getFullYear() === d2.getFullYear() &&
d1.getMonth() === d2.getMonth() &&
d1.getDate() === d2.getDate();
}
return sameDay(Date1, Date2);
where Date1 and Date2 are the Item IDs used in Viedoc for the date items being compared.
For getting the latest date out of, for example, three different dates, the following can be used:
if(DATE1 != null && DATE2 != null && DATE3 != null)

{

var latestDate = Math.max(DATE1.valueOf(), DATE2.valueOf(), DATE3.valueOf());

return new Date(latestDate);

}

return null;
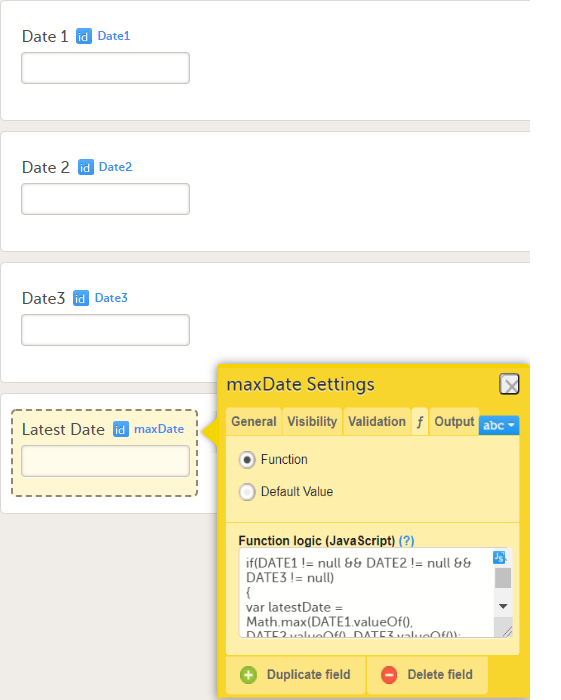
In a similar way, for getting the earliest date, the Math.max function should be replaced with Math.min:
if(DATE1 != null && DATE2 != null && DATE3 != null)

{

var earliestDate = Math.min(DATE1.valueOf(), DATE2.valueOf(), DATE3.valueOf());

return new Date(earliestDate );

}

return null;
Note! The .valueOf() function does not work for primitive data types. The JavaScript editor supports the function, but it should not be used for primitive data types.
The metadata values of the file datatype can be accessed in expressions, as shown in the image:

The default value expressions are executed and the resulting value is set only when the form is initialized.
Note! If there is visibility condition set on an item with a function or a default value, whenever the item becomes hidden, its value is reset to the default value.
| Function | Description | Implementation |
|---|---|---|
date(dateString) |
Converts date string to JavaScript date object. The dateString must be in "yyyy-mm-dd" format. | |
today() |
Returns current site date. | |
now() |
Returns current site date and time (in site timezone). | |
addDays (date, days) |
Add the specified number of days to the specified date object. | |
bmi ( weightInKg, heightInCM ) |
Returns the bmi (body mass index) calculated based on the provided weight (in kg) and height (in cm). | function bmi(weight, height) { |
days ( DateA, DateB ) |
Calculates the number of days between 2 dates provided as input parameters: Note! The result is always rounded to the nearest integer (see function implementation below), and when using at least one input parameter that contains both date and time, this means that, for example, for a difference of 1.3 days the function will return 1, and for a difference of 1.7 days the function will return 2. |
function days(endDate, startDate) { |
hours( DateTimeA, DateTimeB ) |
Calculates the number of hours between 2 "date and time" items provided as input parameters: DateTimeA and DateTimeB, as DateTimeA - DateTimeB. |
function hours(endDateTime, startDateTime) { |
minutes( DateTimeA, DateTimeB ) |
Calculates the number of minutes between 2 "date and time" items provided as input parameters: DateTimeA and DateTimeB, as DateTimeA - DateTimeB. |
function minutes(endDateTime, startDateTime) { |
When working with check box items (or array types in general), a special JavaScript function is used to evaluate visibility conditions and edit checks: [].contains( x )
This function checks if an array type contains a value and evaluates as either true or false.
Examples:
ItemID.contains(CodeListValue)
Where ItemID is the ID of the check box and CodeListValue is the ID of one of the code list options for the check box. If code list is selected, then the function evaluates as true.
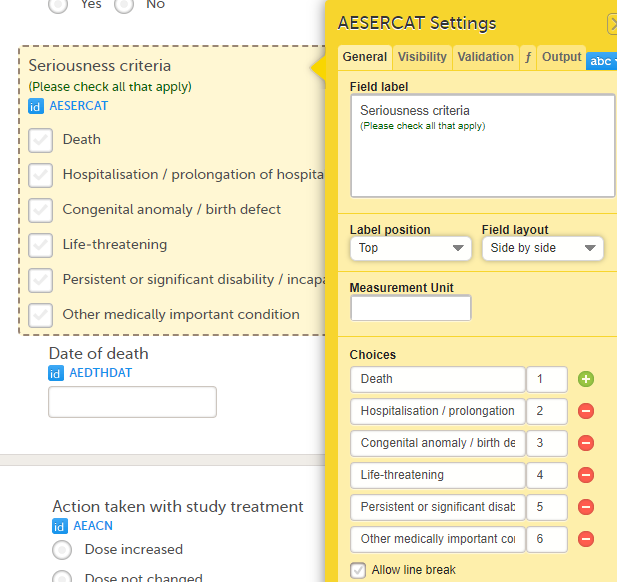
if(ItemID.contains(3))

return !ItemID.contains(1) && !ItemID.contains(2);

else return true;
In the example above, 3 is the code list for the none of the above options and 1 and 2 are the code lists for the other options in the list. Also note the use of the exclamation mark, which means "NOT" as in, the array should not contain this code list value.
var skipActivities = ['V1A1', 'V2A1', 'V3A1'];
skipActivities.contains(ActivityDefId);
If the above were used as an advanced visibility condition for a group, then the group would only show if it existed within that Activity.
The range item is the string representation of a range object. The functions that can be used to convert the respective string to a range object and vice versa are described below.
The properties available for the range object are:
| Property | Description | Type |
|---|---|---|
RangeObject*.Lower |
the lower limit of the range | number |
RangeObject*.LowerFormat |
the number of decimals used for the lower limit of the range | number |
RangeObject*.Upper |
the upper limit of the range | number |
RangeObject*.UpperFormat |
the number of decimals used for the upper limit of the range | number |
RangeObject*.Comparator |
the comparator used to define the range. The available comparators are:
Note! When using the comparator in functions, make sure to write it between quotes, for example |
string |
RangeObject*.StringValue |
the string representation of the respective range item | string |
*RangeObject can be obtained as output of the first two functions described below.
The functions available to be used in conjunction with the range item are described in the table below.
| Function | Input | Output | Example |
|---|---|---|---|
parseRangeValue(value) |
value as string | range object, null if the input is empty or if it cannot be parsed |
|
createRangeValue(lower, comparator,upper) |
- lower limit as string or float - comparator as string - upper limit as string or float |
range object, null if the input is empty or if it cannot be parsed | createRangeValue("1.3", "InclusiveInBetween", "2.0") |
getRangeValue(rangeValue) |
rangeValue as range object | string representation of the range defined by the input range object |
|
inRange(rangeValue, numericValue) |
- range value as string or range object - numeric value |
- boolean value showing if the input numeric value is within the input range (true) or not (false):
|
|
This example code populates a range item:
var rangeValue = createRangeValue("1.3", "InclusiveInBetween", "2.0");

return getRangeValue(rangeValue);
The ECMAScript contains math objects that can be used for mathematical calculations.
For a Viedoc item it is possible to write a function in order to assign a particular value to it, either by writing a function that would return a result depending on other items/conditions, or by assigning a default value, as illustrated in the image:
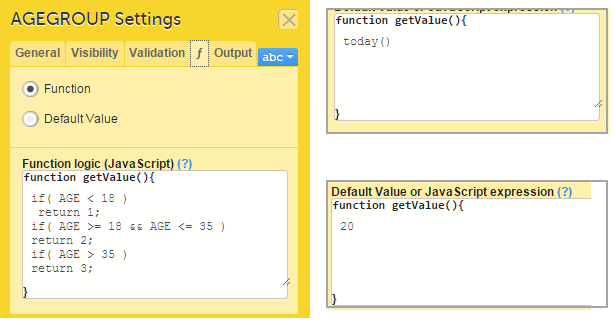
Note!
To debug you can use the following in your expression:
debugger; statement.The above statement will have effect only when opening the developer tools of the browser while entering data to the respective form in Viedoc Clinic.
Note!
During Save changes and VALIDATE operations in Viedoc Designer, the expressions are validated using a compiler, which would find most of the errors. However, since JavaScript is a dynamic language, not everything can be validated.
For example, AGE.foo () will not throw an error, because AGE is a variable in a form and the compiler does not know its type.
| Important! The designer must test the expression in all the possible paths using either preview or Viedoc Clinic. |
See the following lessons for some examples of using JavaScript:
The following function calculates the exact age (in whole numbers):
var ret;

if(BRTHDAT != null && RFICDAT != null){

if(BRTHDAT <= RFICDAT){

ret =(RFICDAT.getFullYear()-BRTHDAT.getFullYear()) - 1;

if((BRTHDAT.getMonth() < RFICDAT.getMonth()) || (RFICDAT.getMonth() == BRTHDAT.getMonth() && BRTHDAT.getDate() <= RFICDAT.getDate())){

ret++;

}

}

return ret;

}

return null;
If using the Reference Data feature, beware of having an age that is between ranges. For example, an age of 18.5 will be between the ranges 0-18 and 19-45, and thus, neither range will apply.
For more details about functions and how to use JavaScript in Viedoc see lesson Using JavaScript in Viedoc.
To add an auto counter in your form:
| 1 | Add a single line text item |
| 2 |
On the functions (f) tab of the item settings pop-up, enter the code below:
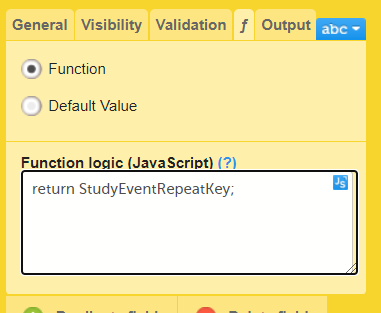
Note! |
For more details about functions and how to use JavaScript in Viedoc see lesson Using JavaScript in Viedoc.
This section provides examples of using JavaScript for setting visibility conditions.
In this example, we set the visibility of an item in the Adverse Events form based on more than one condition.
The Adverse Events form is configured as illustrated in the image.
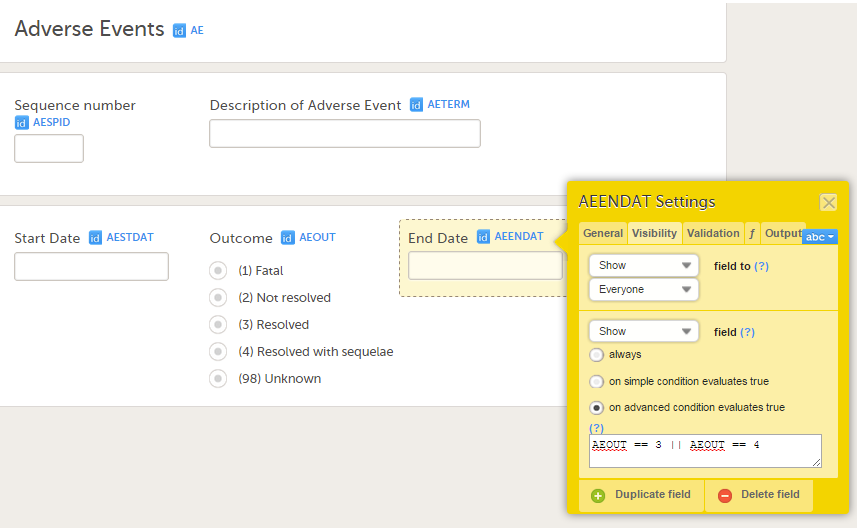
We want to make the End Date item visible only if the Outcome is equal to the options (3) Resolved or (4) Resolved with sequelae. To achieve this, we write the following code under the Visibility tab of the End Date item settings:
AEOUT == 3 || AEOUT == 4
In this example, we set an item, a gender-related question, in the Eligibility form to be displayed for the relevant gender only, in this case male subjects.
The gender question (DMSEX) is collected in the Demographics (DM) form, and is "1" for "male". The DM form is located in the study start event, which has event ID "START". To set the question (item IEIC03 in the Eligibility form) to be visible only for male subjects (i.e., only if gender = male = 1), we write the following code on the Visibility tab of the IEIC03 item settings:
START.DM.DMSEX==1
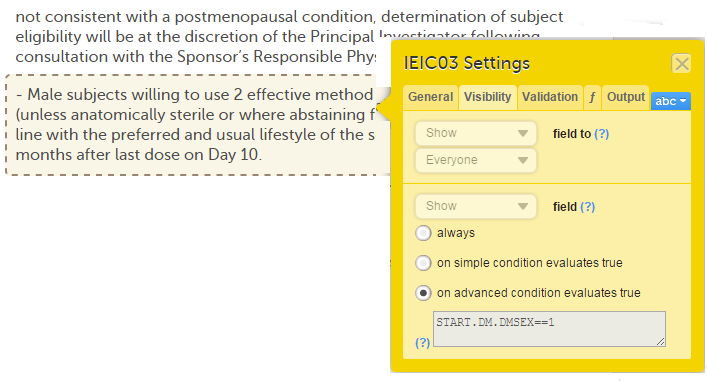
For more details about functions and how to use JavaScript in Viedoc see lesson Using JavaScript in Viedoc.
This example shows how to calculate the difference in time between two time variables.
To calculate the difference in time between the variables Start time and Stop time as illustrated in the image, enter the below code:
if (!START || !END) return null;


var diff = (END - START) / (1000 * 60); // minutes


return diff;

or
if (!START || !END) return null;


var diffInMinutes = ( END.getHours()*60+END.getMinutes() ) - ( START.getHours()*60+START.getMinutes() )


return diffInMinutes;
For more details about functions and how to use JavaScript in Viedoc see lesson Using JavaScript in Viedoc.
Note! As it is not possible to have time without a date in JavaScript the date is set automatically to current site date when the time is selected.
It is possible to control the format of a Date/Time item in Viedoc, by adding a data check to the item. This is done on the Validation tab of the Item Settings pop-up, by entering the following code in the field A true constant expression:
ItemID__format == n, where n can have one of the values 0,1,2, or 3, depending on the desired format, as described below.
For example, if the Date of birth field has the ID = DOB:
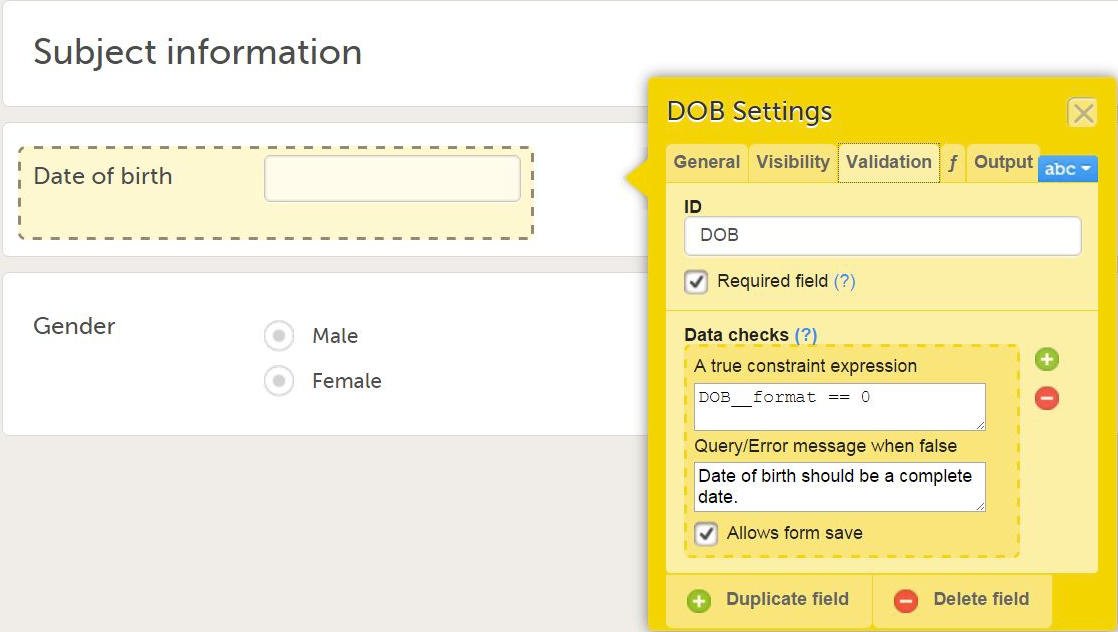
the true expression would be:
DOB__format == 0, for a complete date format.DOB__format == 1, for a date and time format.DOB__format == 2, if you would need to limit the date entry to only allow year and month, and not permit day entry. For example there are limitation in certain countries to collect a full date of birth.DOB__format == 3, if you need to limit the date entry to only allow year.If the same form is used within different events (for example Event1, Event2 and Event3), and we want to configure an edit check (for example, DATE1 must be before DATE2) only for a specific event (for example Event3), this can be done using the following code (it is always recommended to check for NULL before referring to the dates):
if(StudyEventDefId == "Event3" && DATE2!=null && DATE1!=null)

return DATE2>=DATE1;

else return true;
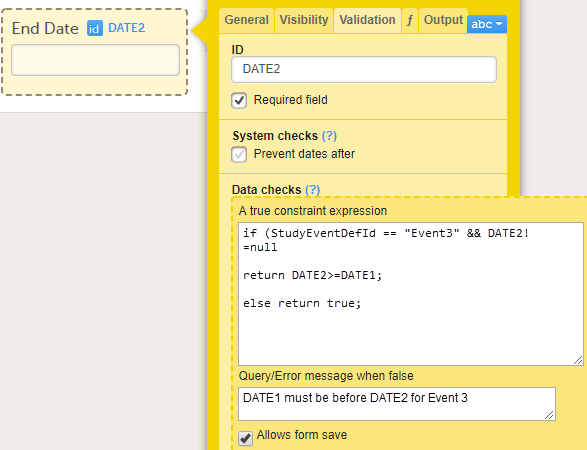
This will perform the check only for Event3.
Similarly, if we want to perform the check only for a particular activity (ACT1) within Event3, we can use the following code:
if(ActivityDefId == "ACT1" && DATE1 != null && DATE2 != null)

return DATE1<=DATE2;

else return true;
The Date and Time variable returns time 00:00 if only the date is being filled in. You might want to check for this, in order to make sure that the site user does not miss to enter the time as well.
To do that, you can use the following code as an edit check for the Date and Time variable. Replace the ItemID below with the ID of your Date and Time variable:
var datetocheck = new Date(ItemID);
if (datetocheck != null && datetocheck.getHours() == 0 && datetocheck.getMinutes() == 0)
return false;
return true;
Note! To control significant digits, use a free-text field. Number fields in Viedoc will chop the zeros preceding and succeeding a value, since 1 is treated as 1.0 and 0001. Thus, 1, 1.0, and 00001 are all technically the same "number."
Sometimes you might want to make sure that the number of entered decimal digits of a number item are neither more nor fewer than a specified number. To do so, add code to the validation of a text item, in the Data checks section.
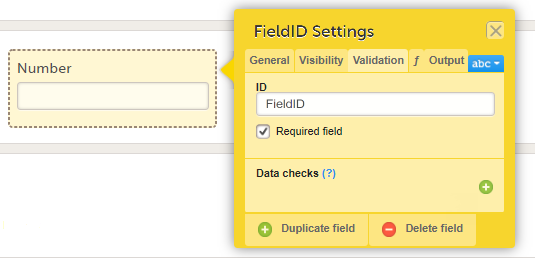
The following example code makes sure that the exact number of decimal digits in a free-text item is 1:
var re = /((\d+)(\.\d{1}))$/;
return re.test(FieldID)==true;
where FieldID is the ID of the number item and 1 is the number of decimal digits.
For more information on how to use JavaScript in Viedoc see Using JavaScript in Viedoc.
This section provides examples of using JavaScript to extract descriptions from a form link item.
Given that the form link item Format field contains the information as shown in the image below:
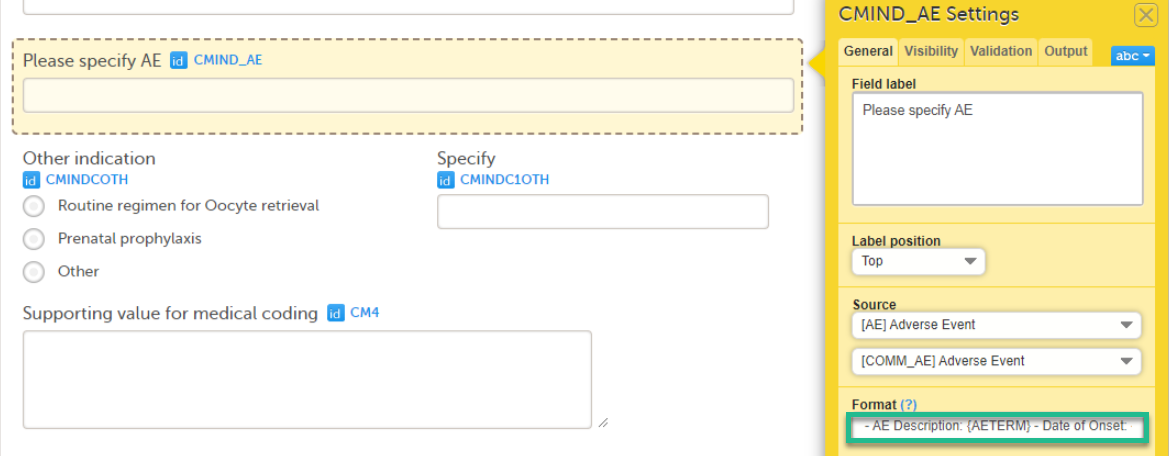
It is useful to be able to extract the AETERM(s) from the Format field and populate them to a new field. This can then be used as a supportive item in medical coding.
Example code:
| var merged = [].concat.apply([], CMIND_AE); function getStringBetween(str, start, end) { var result = str.match(new RegExp(start + "(.*)" + end)); return result[1]; } var supportingValues = merged.map(function(formlink){ return getStringBetween(formlink.summary, 'AE Description:', '- Date of Onset:'); }); return supportingValues; |
For more information on how to use JavaScript in Viedoc see Using JavaScript in Viedoc.
This lesson illustrates an example for how to schedule events in Viedoc Designer, and shows how the scheduled events look in Viedoc Clinic.
For complete information about how to add an event and configure the event settings in Viedoc Designer, see Study workflow.
In our example, we have the following Scheduled events:
This section describes the event settings performed under Study workflow.
For complete information about how to add an event and configure the event settings in Viedoc Designer, see Study workflow.
In the Study event settings > General we set the following:
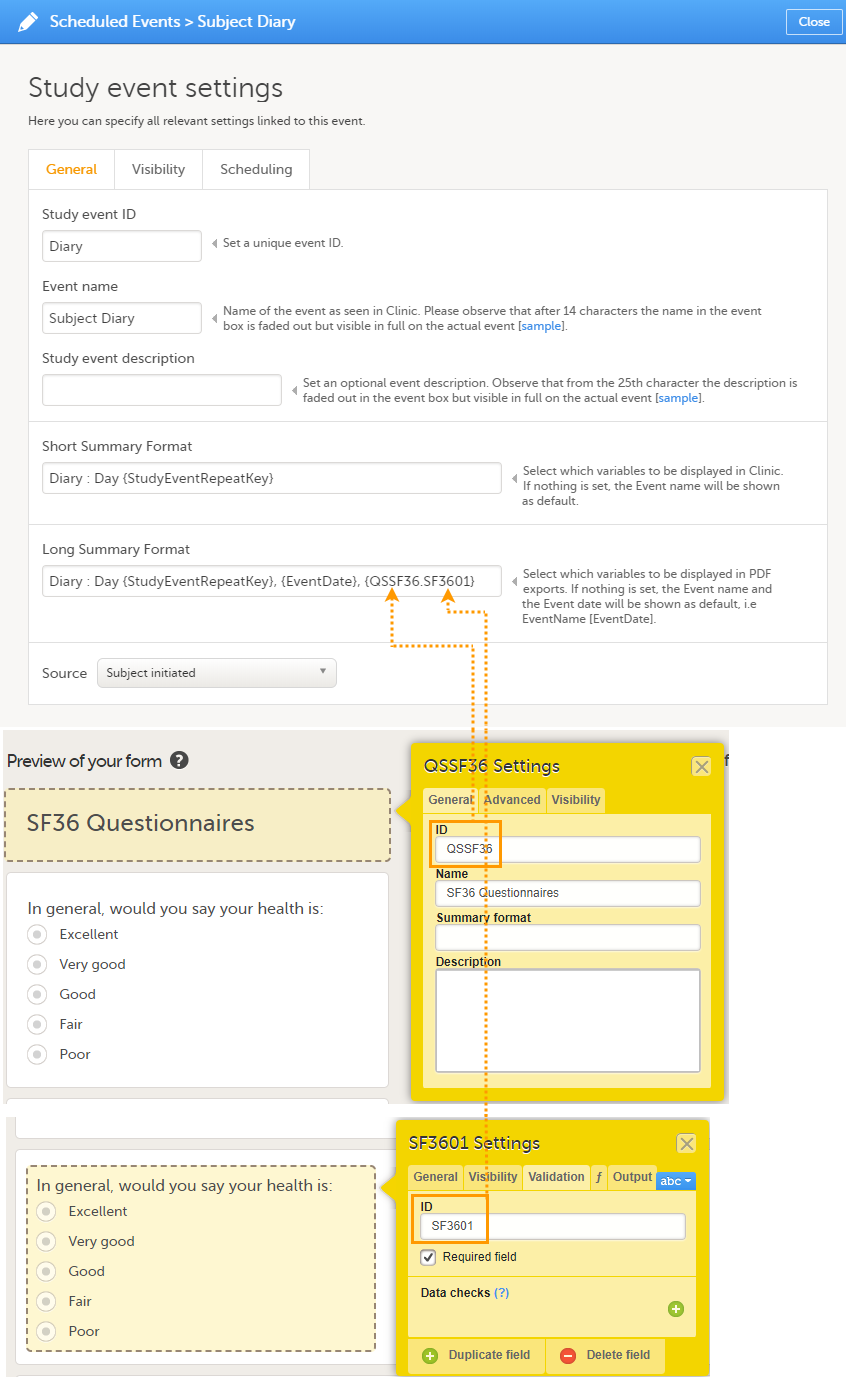
In the Study event settings > Scheduling we set the following:
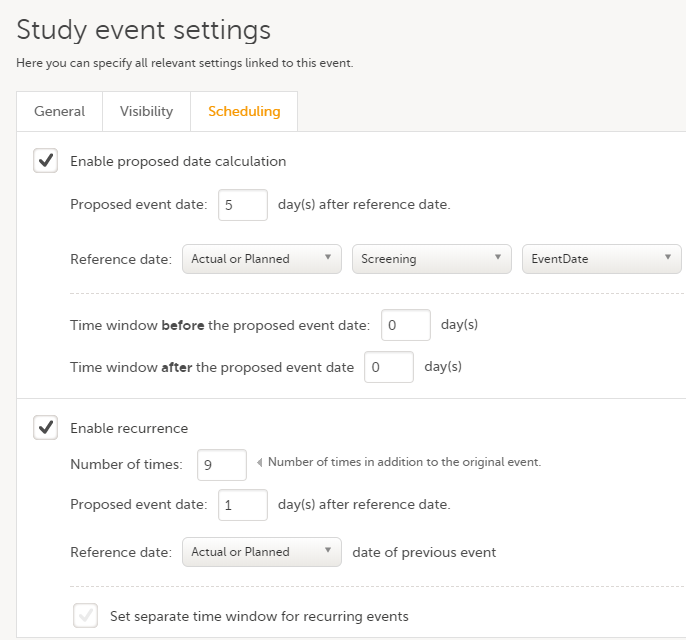
When we open the Subject Details page of a subject in Viedoc Clinic and look at the event settings, we see the following:
If we initiate the first event - Screening on 01 Jan 2018, for example, then the first occurrence of the Diary event will have as proposed date 06 Jan 2018. This is according to the Diary event settings described above, having as proposed date 5 days after the actual or planned date of the previous event (Screening), with no time window.
Thereafter, the following occurrences of the Diary event will have as proposed date 1 day after the proposed date of the previous occurrence, as illustrated in the image.
Each of the occurrences of the Diary event are displayed in the subject details page by using the Short summary format according to the settings performed in the event general settings.
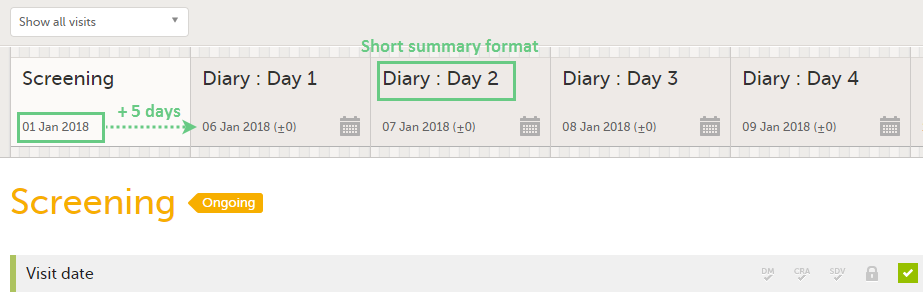
After the event was initiated, the event is identified by the long summary format:
For activities within subject initiated events, it is possible to enable proposed time calculation.
To do this:
| 1 | Go to the Study workflow then click on the pen icon corresponding to the respective activity to open the Activity settings window. |
| 2 |
Click on the Timing tab, and: 1. check Enable proposed time calculation 2. set the proposed time 3 and 4. set the time windows, if needed |
In the example in the image below, we have set the proposed time at 8:00 with a time window of -2/+8 hours (2 hours before and 8 hours after the proposed time). This would make the activity to appear in Viedoc Me as illustrated in the bottom of the image:
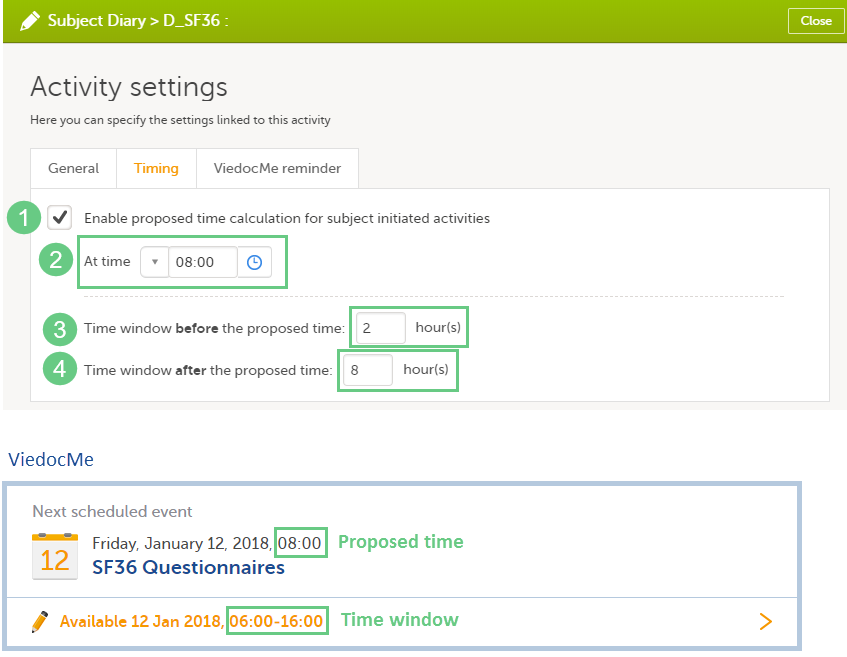
This lesson illustrates an example of using repeating forms. It shows how to configure repeating forms in Viedoc Designer and how they look in Viedoc Clinic.
For a complete description of the settings for repeating forms, see the chapter Forms in Study workflow.
In this example, we create a form called Meals that will be set as repeating, so that one instance of the form can be filled in in Viedoc Clinic for each meal a specific subject uses.
The form is designed within the study design in the Forms section. For details about form settings see Creating and editing forms.
We have two items in our form:
When planning to use a form as repeating, it is important to set the Summary format in such a way that the instances of the same form are easily identified in Viedoc Clinic.
In our example, we set the summary format to {FormRepeatKey}. {STDML} Time: {MLTIM}. This will help in identifying the different form instances in Viedoc Clinic, as shown in the image.
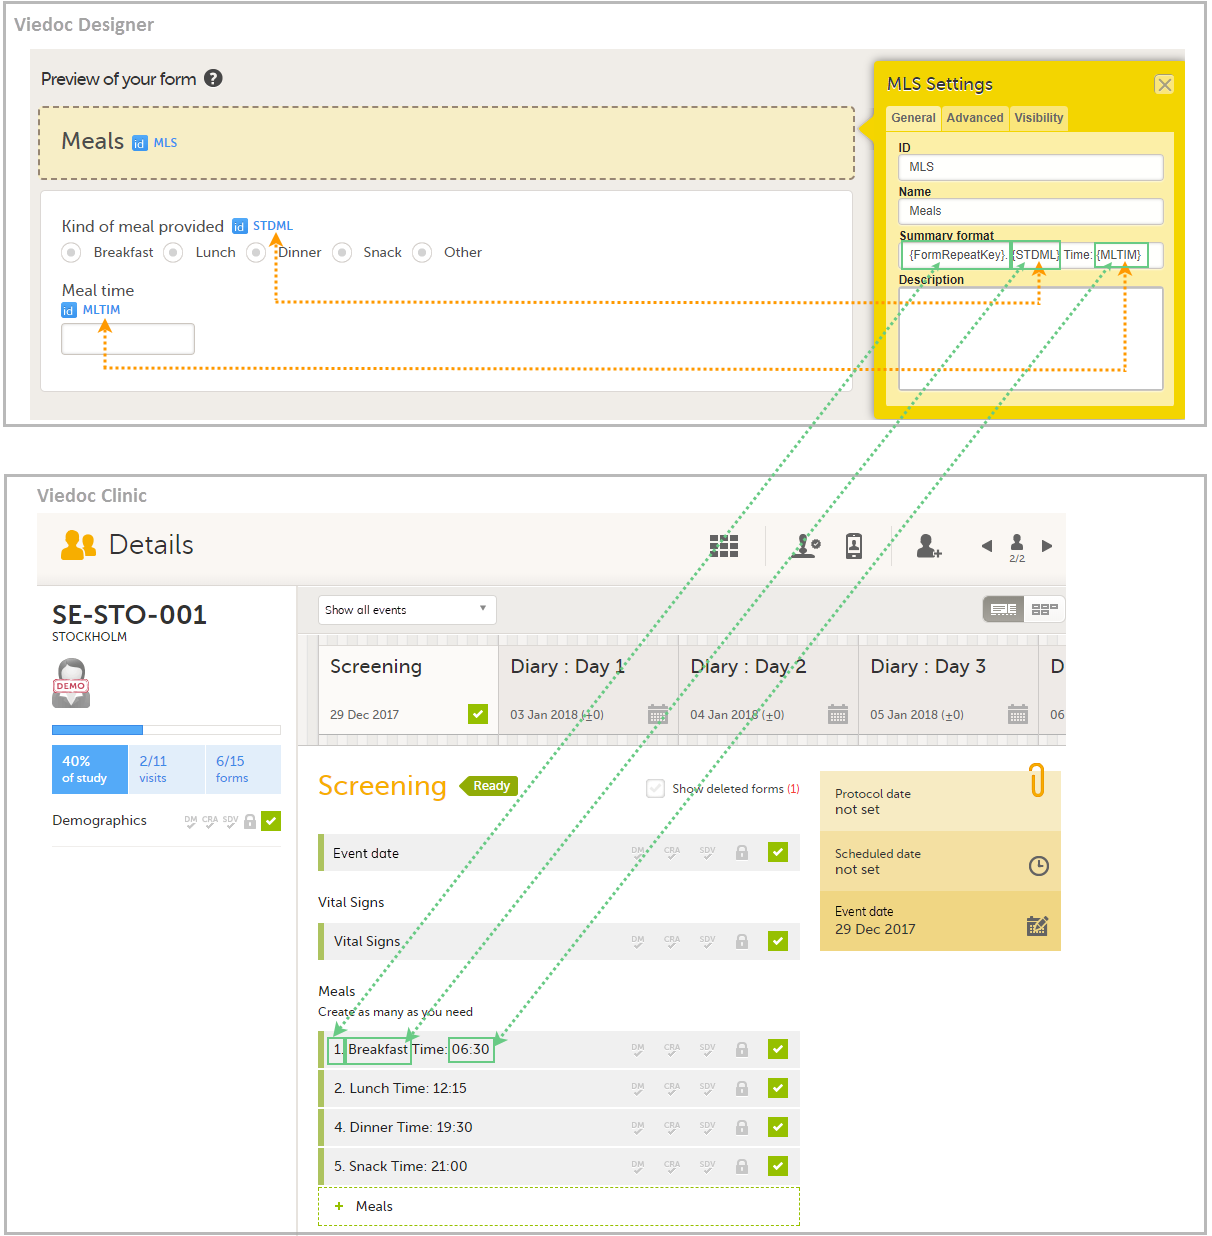
Setting a form as repeating is done at activity level and therefore it is configured under Study workflow. For a complete description of repeating form settings see the Forms chapter in Study workflow.
In our example, we add the activity Meals to the Screening event, and we add the form Meals to the activity Meals. We click the pen icon of the Meals form and select Allow form to repeat and Unlimited times. This means that for this form, an unlimited number of instances can be added in Viedoc Clinic for a specific subject, within the respective event and activity.
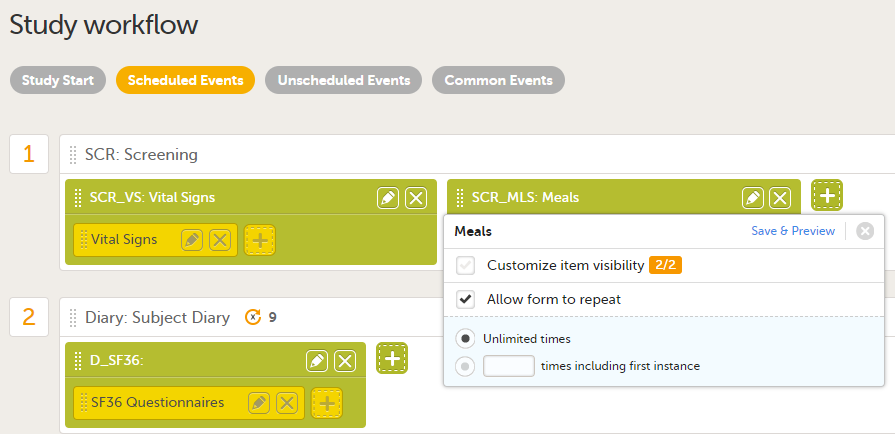
If we now go to the Subject Details page of a subject in Viedoc Clinic, and add a few instances of the Meals form to the Screening event, it will look as shown in the image:
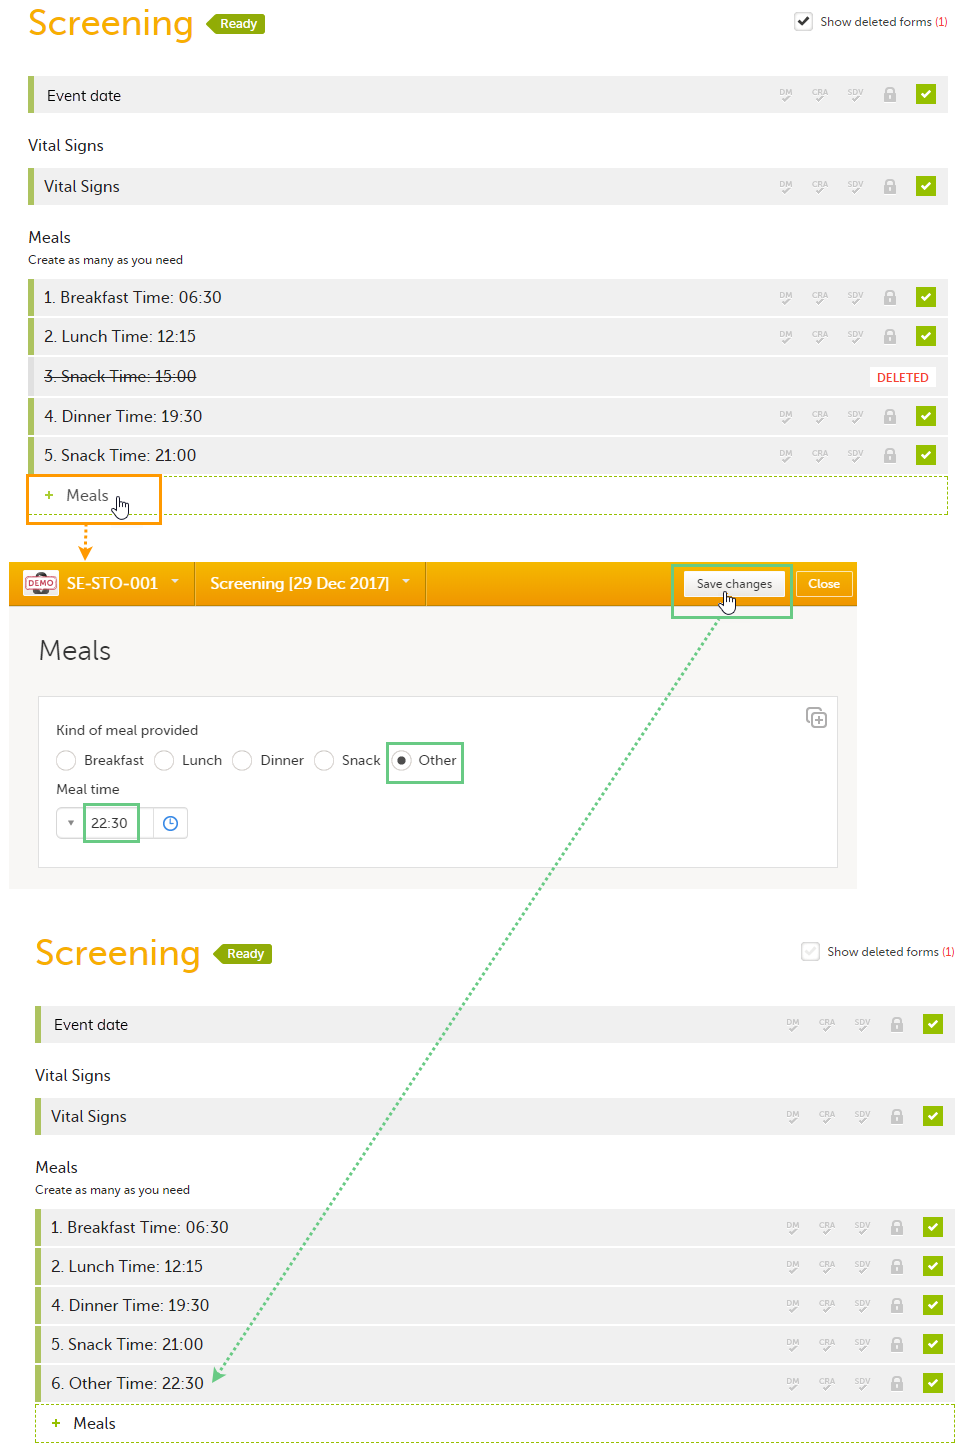
Each instance of the form is identified by the Summary format that we have set for the form, as illustrated in section Designing the form.
If we delete one instance of the form, the FormRepeatKey of that instance will not be re-used. In the example illustrated in the image, we delete the form instance with FormRepeatKey = 3. When we then add a new form instance, the new instance will receive the next available FormRepeatKey, which is FormRepeatKey = 4.
Note! Please note that an instance of a repeating form cannot be reset, it can only be deleted, which means that the same instance cannot be filled in again. A new instance must be created in this case.
This lesson provides a use case for working with reference data in Viedoc Designer, Viedoc Admin, and Viedoc Clinic.
Viedoc offers support for adding reference data that will be automatically populated to specific forms. When reference data are configured for your study, it is not necessary to fill in reference values for each subject in each form separately.
It is possible to configure different sets of reference data that will be populated to the form based on:
| Term | Definition |
|---|---|
| Reference data source |
An institute that provides reference data, for example a lab. |
| Reference data scope | A mapping of the items that should be automatically populated with reference values, and the factors that they should depend on. One or more reference data scopes can be configured in Viedoc Designer > Global Settings, as set(s) of variables and factors (see definitions below). |
| Factor | A parameter that affects the reference data, for example a subject’s sex. Factors may affect the normal range for a test result. |
| Variable | A specific measurement to be carried out. |
| Date factor | The date the sample was collected or the measurement carried out. This field determines on which date the reference data to be populated are based, for example when the event date is not the same as the collection or measurement date. |
| Target type | An item of a certain type of information that a reference data source can provide for a specific variable (such as range, unit, low/high values, etc.). Any number of target types can be defined by the user. |
Reference data are configured in Viedoc Designer, Viedoc Admin and Viedoc Clinic. The schematic below depicts what different steps need to be taken, and which roles have permission to perform these steps.
http://help.viedoc.net/l/5cf069/en/
This is a single-sourced file that should have the following content:
Introduction to reference data, description of the workflow.
For more detailed instructions regarding these steps, see:
For a video tutorial on how to work with reference data, see
This lesson illustrates an example of configuring reference data in Viedoc Designer, Viedoc Admin, and Viedoc Clinic. It also shows how reference data are populated to the subject forms in Viedoc Clinic.
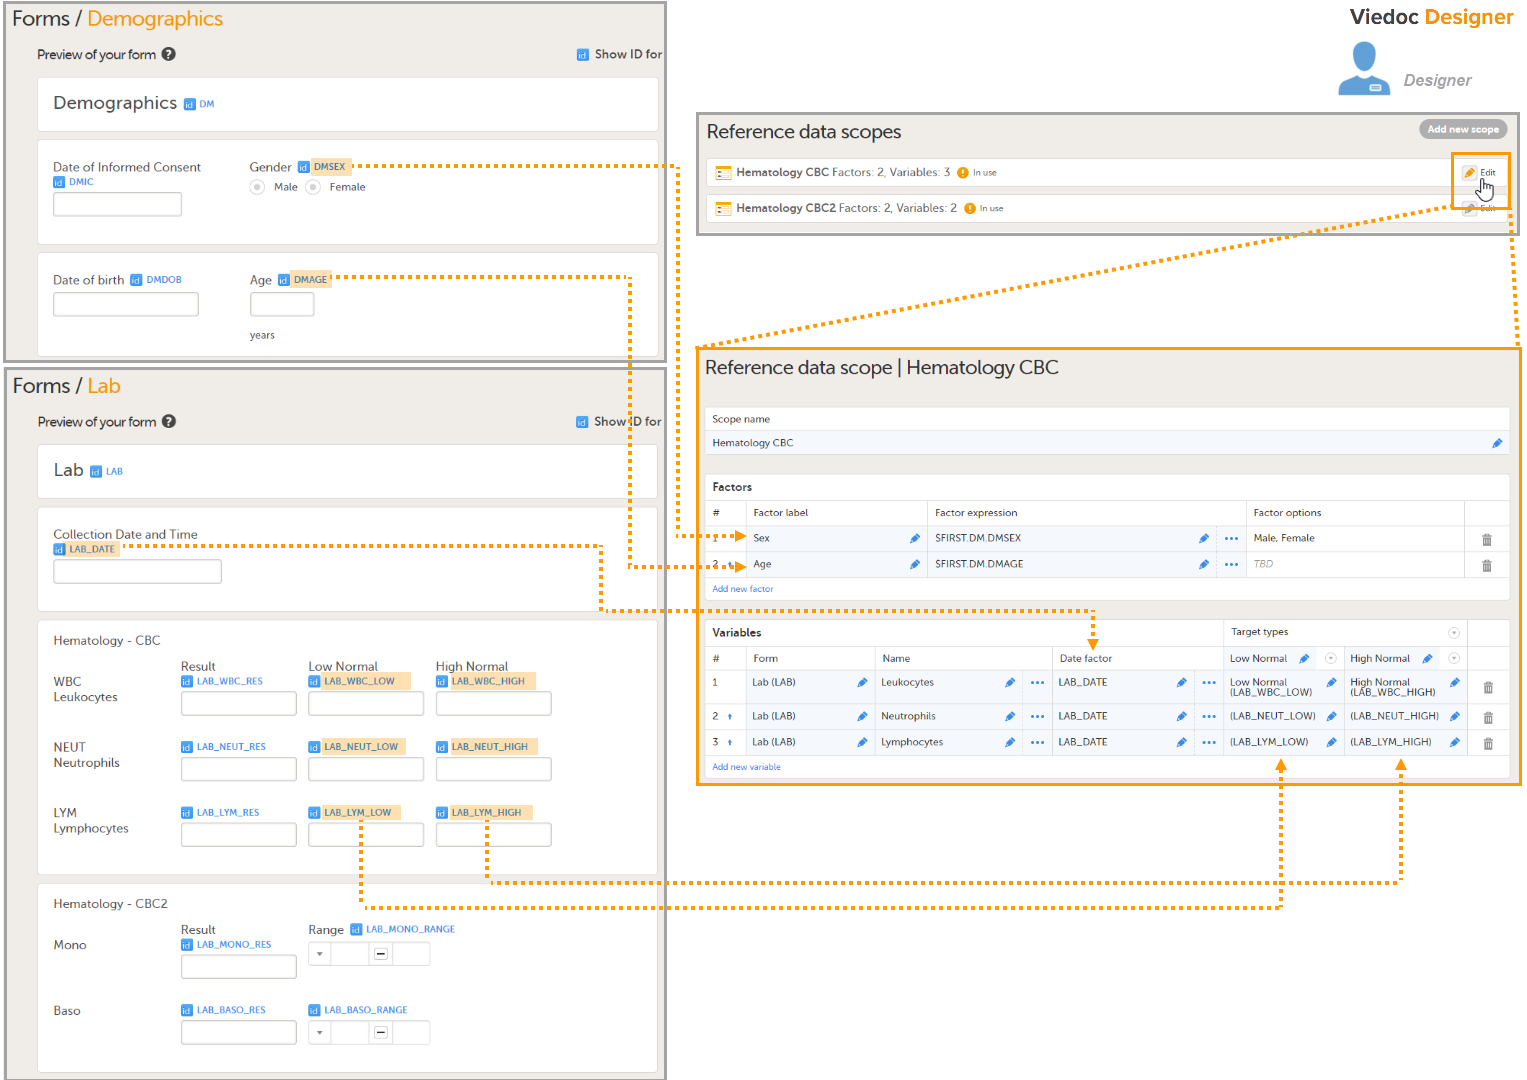
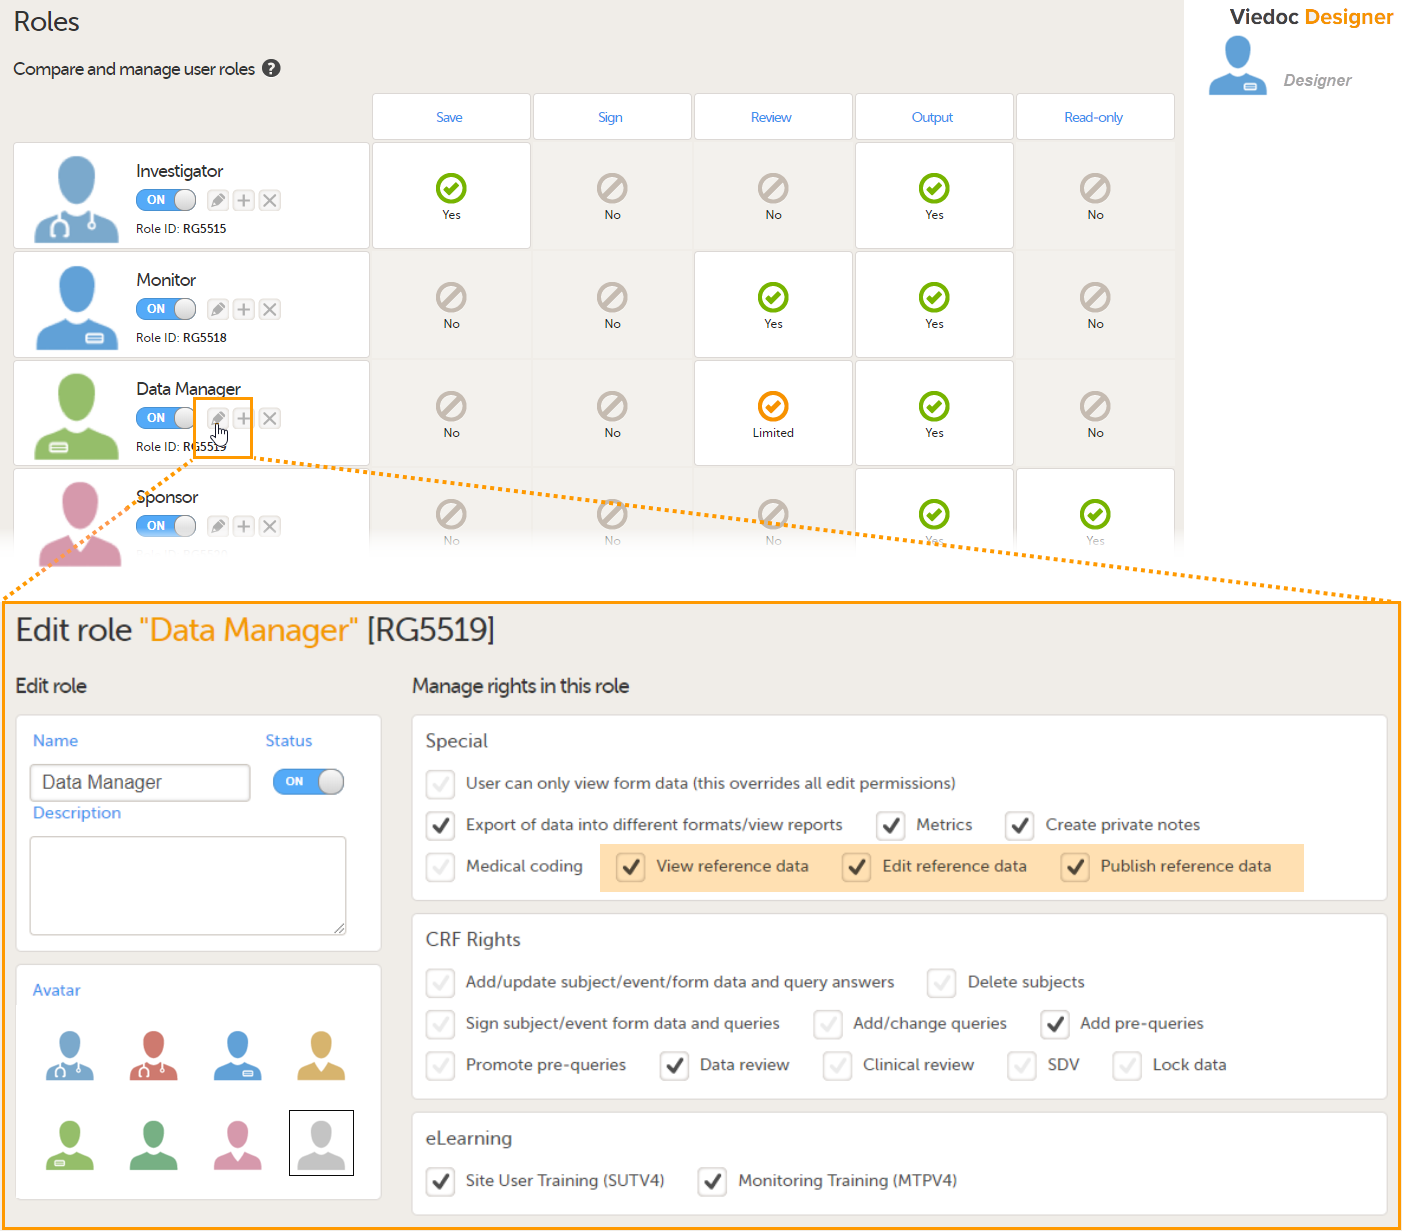
For more detailed instruction, see Configuring reference data scopes, and Configuring roles in Viedoc Designer.
In Viedoc Admin, open the Reference data source(s) window and add the reference data sources (the labs or institutes that will provide the reference data). Link the reference data source to the reference data scopes and to the sites for which they should be used.
For more detailed instruction, see Managing reference data sources in Viedoc Admin.
In this example, we have defined two reference data sources: Akademiska Lab and Karolinska Lab. The Akademiska Lab is linked to two scopes: Hematology CBC and Hematology CBC2. It is also linked to the system site group Sweden (all production sites in Sweden). The Karolinska Lab is only linked to the scope Hematology CBC, and to the site Karolinska Institute Stockholm.
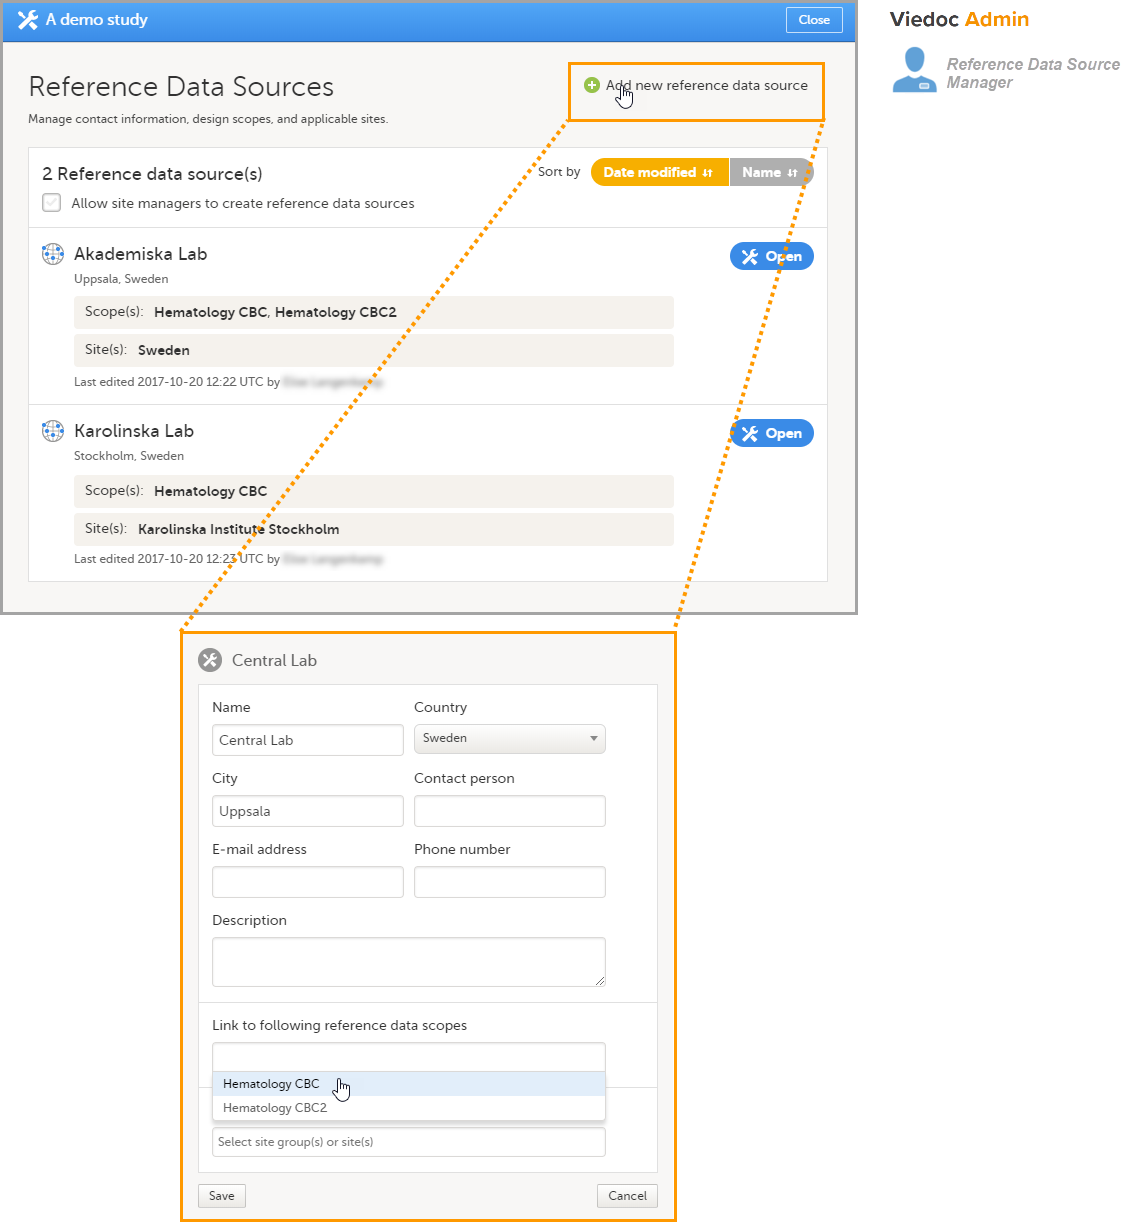
For each of the defined reference data source-scope combinations, reference data value sets will become available in Viedoc Clinic.
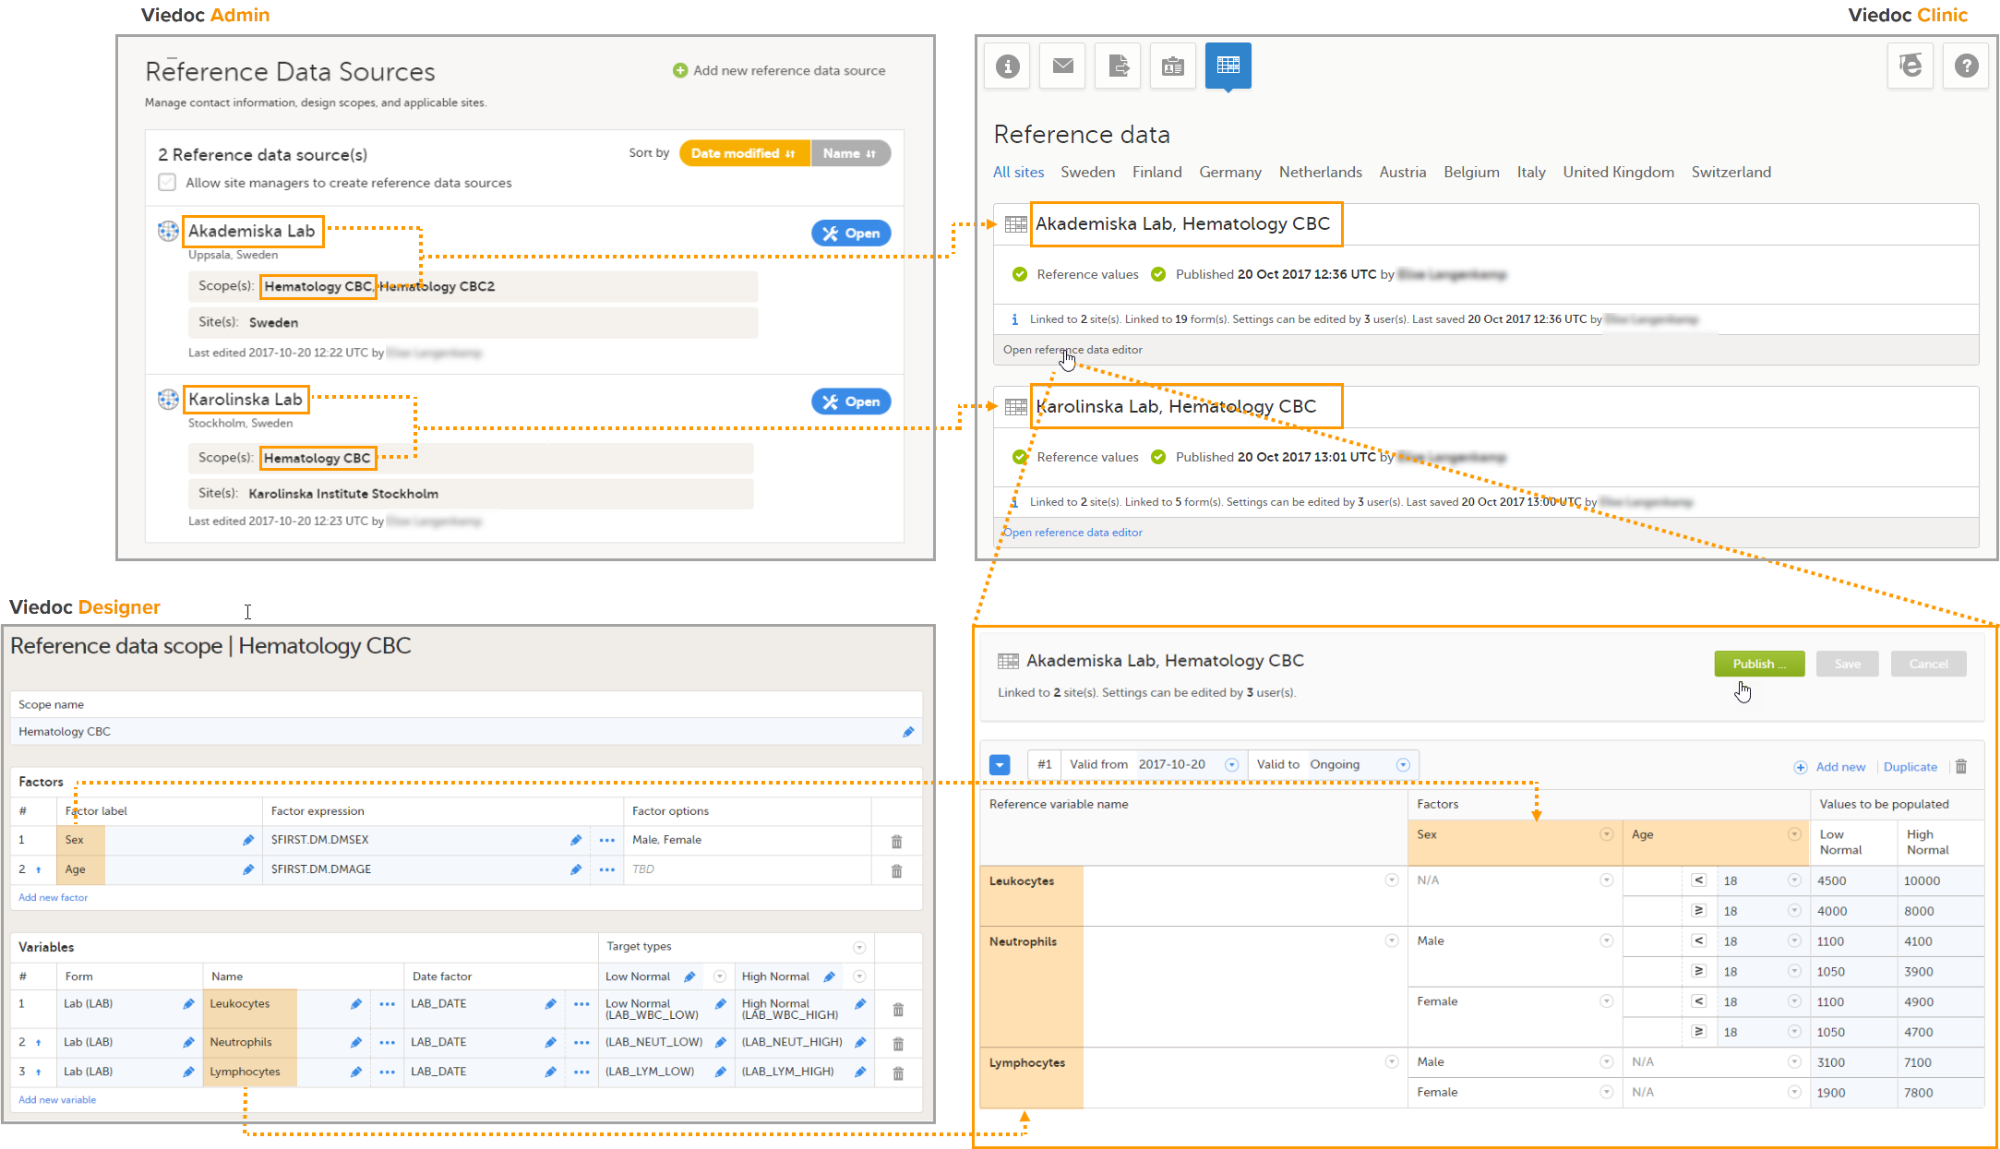
For more detailed instruction, see Working with reference data in Viedoc Clinic.
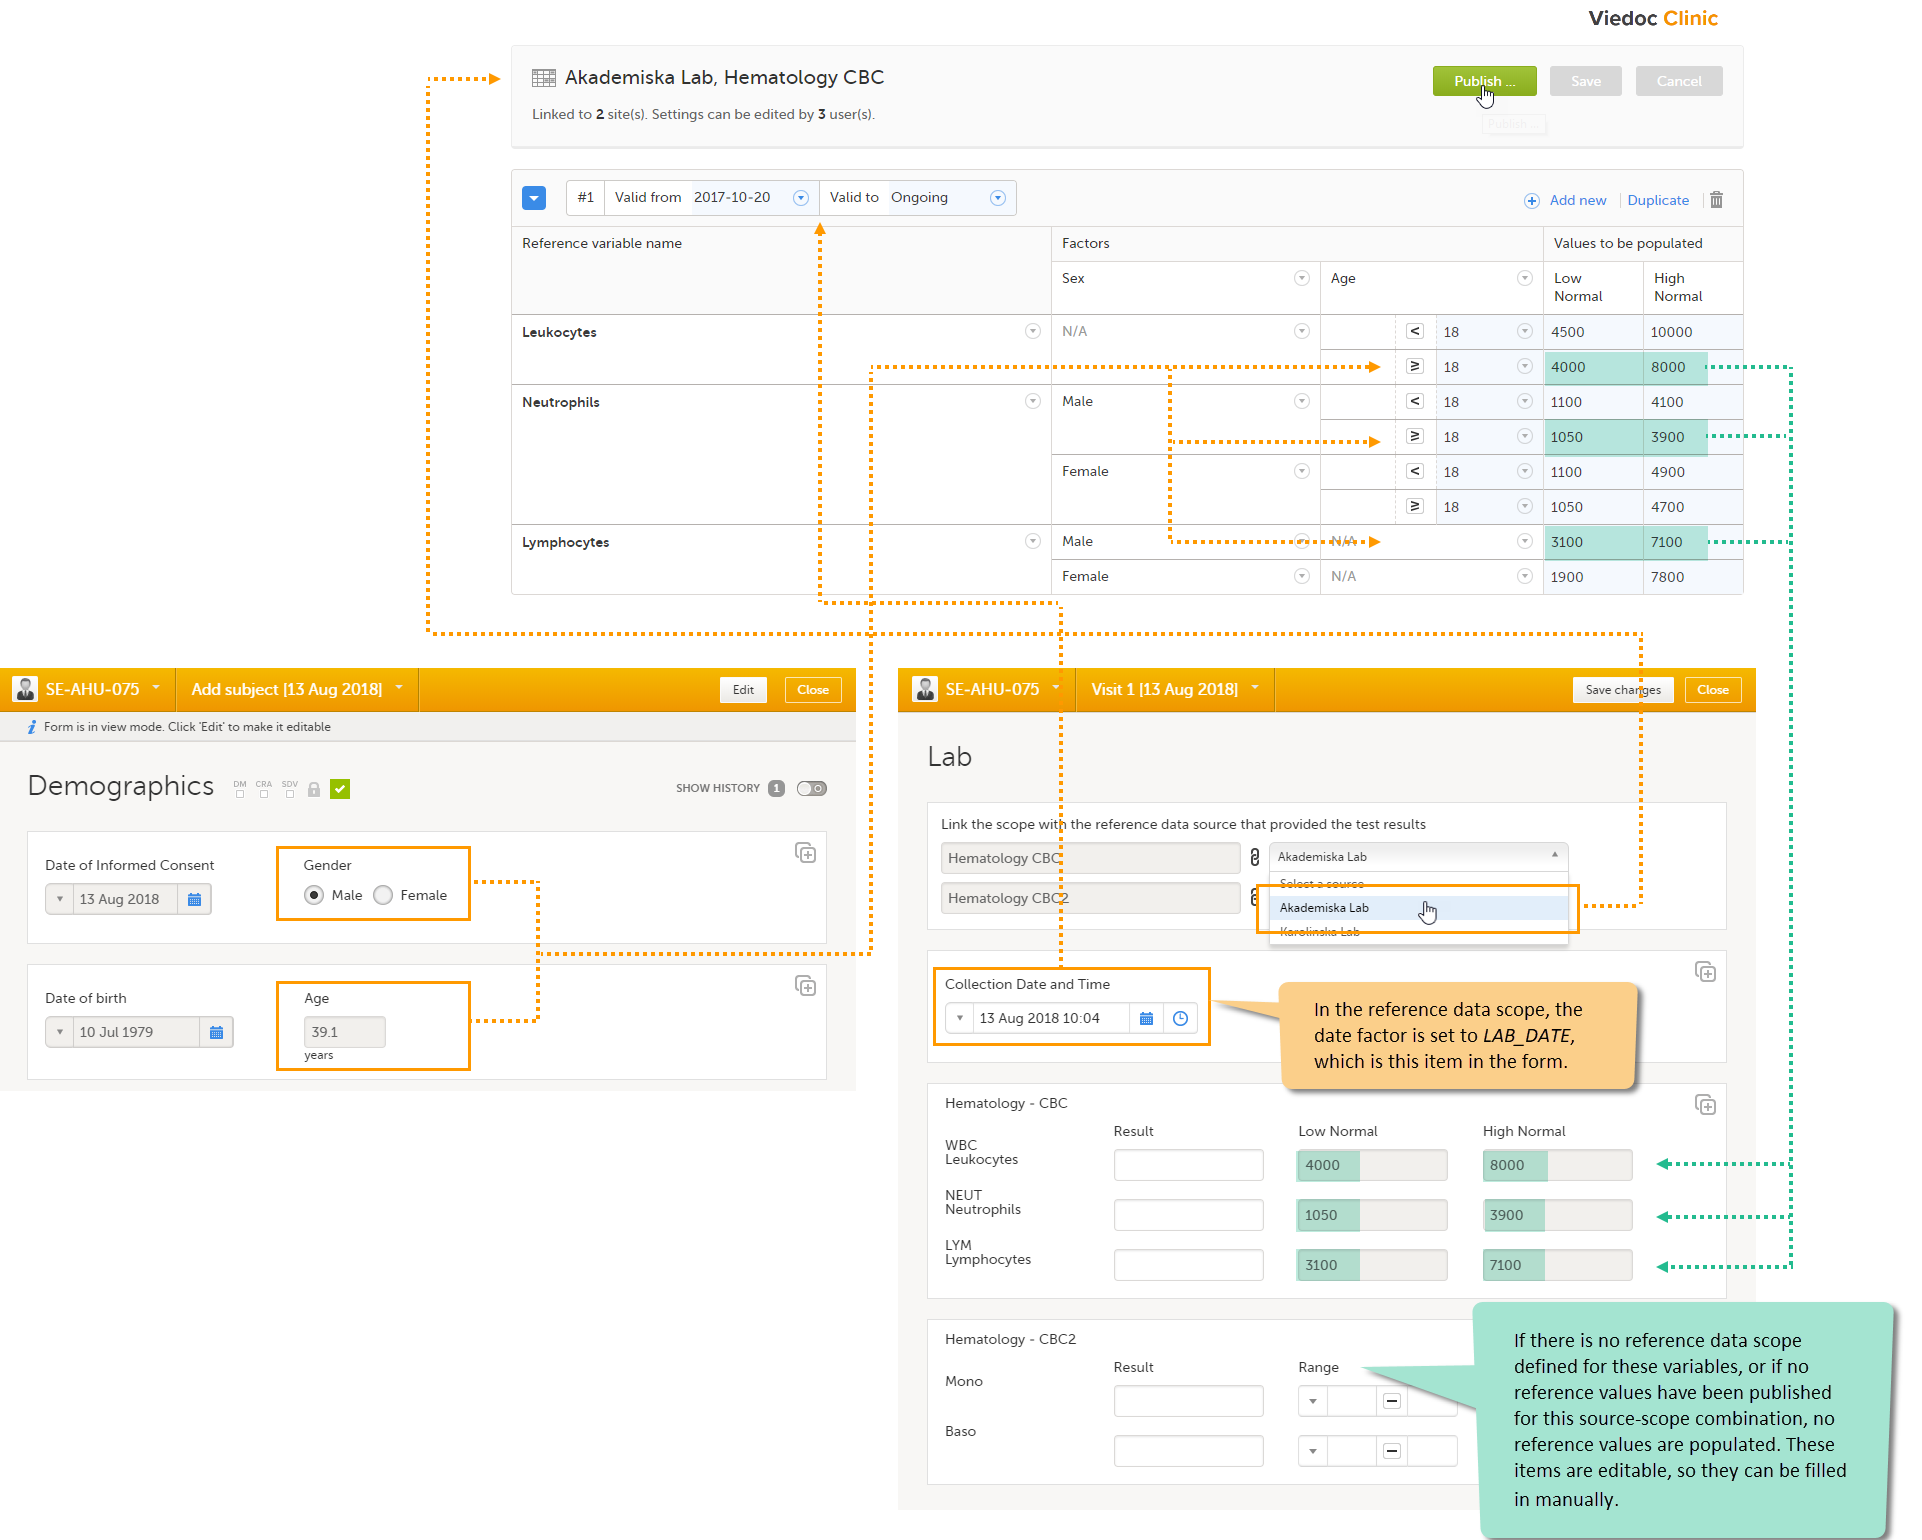
The system verifies:
If the date matches the validity of the reference values, the system auto-populates the relevant reference values to the subject form, based on the defined factors.
If you do not select a reference data source, no values will be automatically populated. The items are editable so that they can be filled in manually. Similarly, if no scope is defined (as for the Mono and Baso items in the form), or if no reference values are entered for that specific source-scope combination or for that specific date, the items remain empty and can be filled in manually.
For more detailed instruction, see Working with reference data in Viedoc Clinic.
This lesson provides a use case for configuring a dynamic randomization in Viedoc Designer, Viedoc Admin, and Viedoc Clinic. It also explains the algorithm that is used for assigning subjects to treatments, and how the calculations are executed.
| Important! The Randomization feature must be included in your study license in order for the randomization configuration to be available in production mode. You can still configure a randomization in demo mode without a license. |
Viedoc offers support for randomization. Subjects can be randomized using:
Dynamic randomization ensures a more even distribution of subjects across the treatment groups, with regard to prognostic factors that might influence the effect of treatment on the subjects.
The randomization in Viedoc is configured in a similar way for static and dynamic randomization. The main difference is that for static randomization, a list with outcomes (randomization numbers, treatment groups, and so on) - the randomization list - is created and uploaded by the user, while for dynamic randomization, an algorithm is used to assign subjects to a treatment group and the randomization list is created by the system.
It is possible to upload a separate allocation list that allocates an Investigational Product (IP) to the subject. When the subject is randomized, Viedoc informs the clinic user which IP should be given to the subject. The allocation list is most commonly used in double-blind studies. Uploading of the allocation list is done in a similar way for static and dynamic randomization.
| Term | Definition |
|---|---|
| RTSM | Randomization and Trial Supply Management. |
| Blinded role | A role that does not know which treatment the subject is receiving. Most roles in a clinical trial should be blinded. |
| Unblinded Statistician |
A system role that can configure the randomization in Viedoc Admin. The Unblinded Statistician sees which subjects are assigned to which treatments, and should therefore not have any role in the study where he/she should not know this information. An Unblinded Statistician can never again work in a blinded role within that study. |
| Randomization list | A list for allocating subjects to treatments or groups. The randomization list shows all available slots in the randomization. When randomization has started (that is, when the first subject has been randomized), the randomization list also shows which subjects have been assigned to which treatment or group. |
| Allocation list | A list for allocating IP to subjects. The allocation list shows all available IPs. When randomization has started, the allocation list also shows which IPs have been assigned to which subjects. Advanced allocation can be set up and for this there are two options for the allocation list(s):
|
| Scope |
Defines the scope from which a randomization slot or an IP should be selected. One of the following scopes can be chosen:
|
| Factor (Prognostic factor) |
Items that might influence the effect of treatment on the subjects, and that are to be used as input when randomizing the subject. For example sex or age. Viedoc supports the use of drop-down lists, radio buttons, integer and free text data types as input items. |
| Outcome | Items to be populated by the randomization service, for example treatment group. |
| Blinded outcome | Items to be populated by the randomization service, that should remain blinded until after the subject has been unblinded or emergency unblinded for a specific subject. These items will not be visible for any user in the system, except for the Unblinded Statistician who can see them in Viedoc Admin, or until an emergency unblinding was performed (for details on how the emergency unblinding is performed in Viedoc Clinic, see Randomization, allocation and emergency unblinding). |
Randomizations are configured in Viedoc Designer and Viedoc Admin, and executed in Viedoc Clinic. The schematic below depicts what different steps need to be taken, and which roles have permission to perform these steps, depending on the allocation configuration type as described below:
- Configuring individual forms for randomization and allocation, to keep the two steps separated in the study workflow
- The possibility to perform multiple allocations at different visits during the study
- The possibility to replace an already performed allocation with a new allocation
- The possibility to undo an already performed allocation
The configuration workflow in this case looks as illustrated in the following image:
This is a single-sourced file that should have the following content:
Introduction to randomization
Detailed instructions regarding these steps are described in:
For a video tutorial on how to configure a static list randomization and a dynamic randomization, see:
Let's consider the following scenario: We conduct a trial in which we compare three treatments: A, B and C. We want to randomly assign patients to these treatments, and we want treatment A to be allocated 50% of the time, and treatments B and C 25% of the time respectively. The prognostic factors that might influence the effect of the treatment on the subject, and that we would like to balance for in the randomization, are the subject's sex (male or female) and the subject's age (<= 30 or > 30). We consider it more important to balance for the subject's sex than for the subject's age, so we set a higher factor weight on the factor sex.
In summary:
In this randomization example, we use two forms:
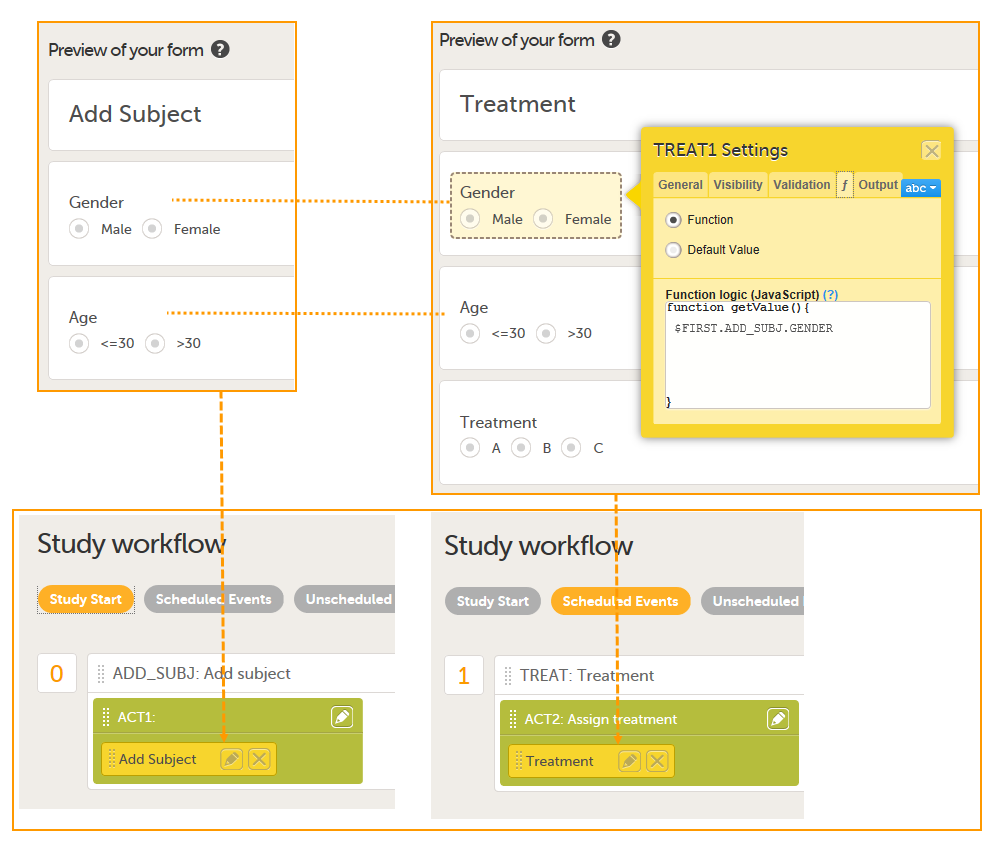 The form Add Subject is added to the activity ACT1 in the Add_SUBJ Study Start event. The form Treatment is added to the activity ACT2: Assign treatment in the Treatment event, which is the first scheduled event.
Note! The randomization form (here called Treatment) must contain all of the input factors and outcomes you intend to use for making assignments.
Tip! Once saved in Viedoc Clinic, the randomization form cannot be edited anymore. Add a message to the form asking the clinic user to make sure that the data are correct before randomizing the patient (see image below).
Tip! Because the Treatment item in the Treatment form is the item that will be populated by the randomization service, and should not be filled in by the clinic user, it may be a good idea to make it invisible to the clinic user as long as the patient is not randomized. In order to achieve this, you can set the visibility conditions On advanced conditions evaluates true for this item to TREAT!=null (show item when it is not null). Then, the clinic user cannot see the item when opening the form. But once the clinic user clicks Randomize, the randomization service allocates the subject to a treatment, the item is not equal to null anymore and appears in the form.
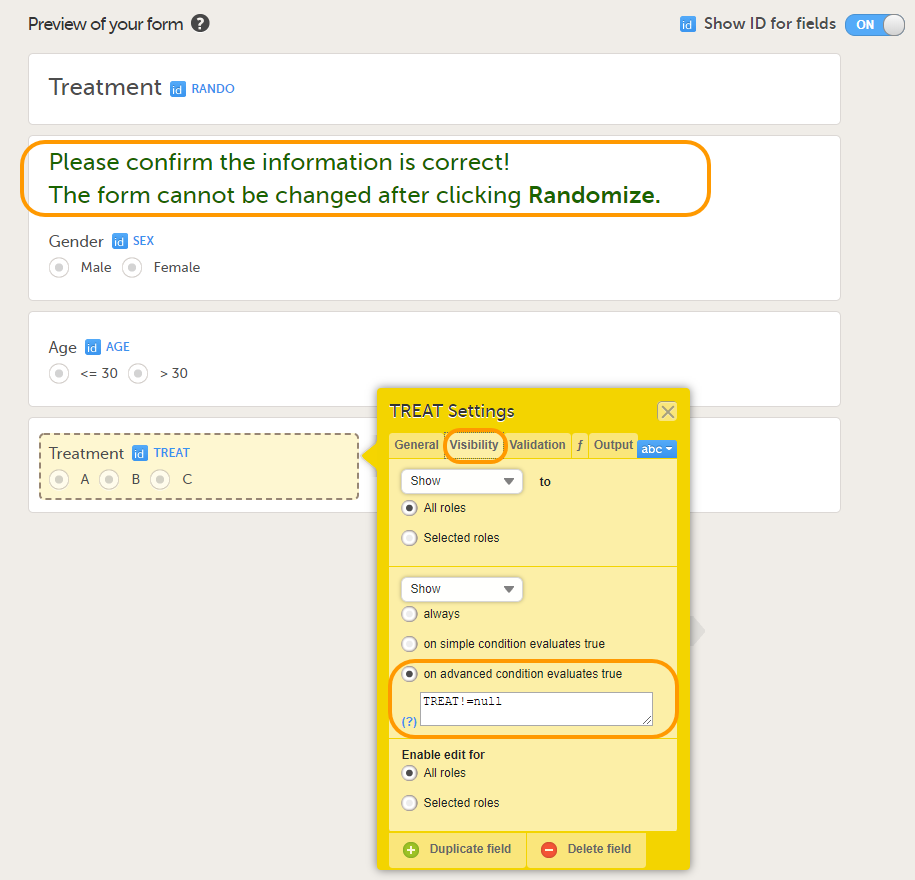
In this example, the randomization outcome (treatment) is not blinded. If you decide to set up a blinded outcome, this item has to be included in the randomization form as well. The blinded outcome will never be shown to the clinic user, it is not available in the export, and you cannot program visibility conditions or edit checks based on the blinded outcome.
The randomization mapping is set up under Study Settings in the study design in Viedoc Designer. The randomization mapping tells Viedoc where the randomization form is and how to use the variables on that form.
We set up the randomization as follows:
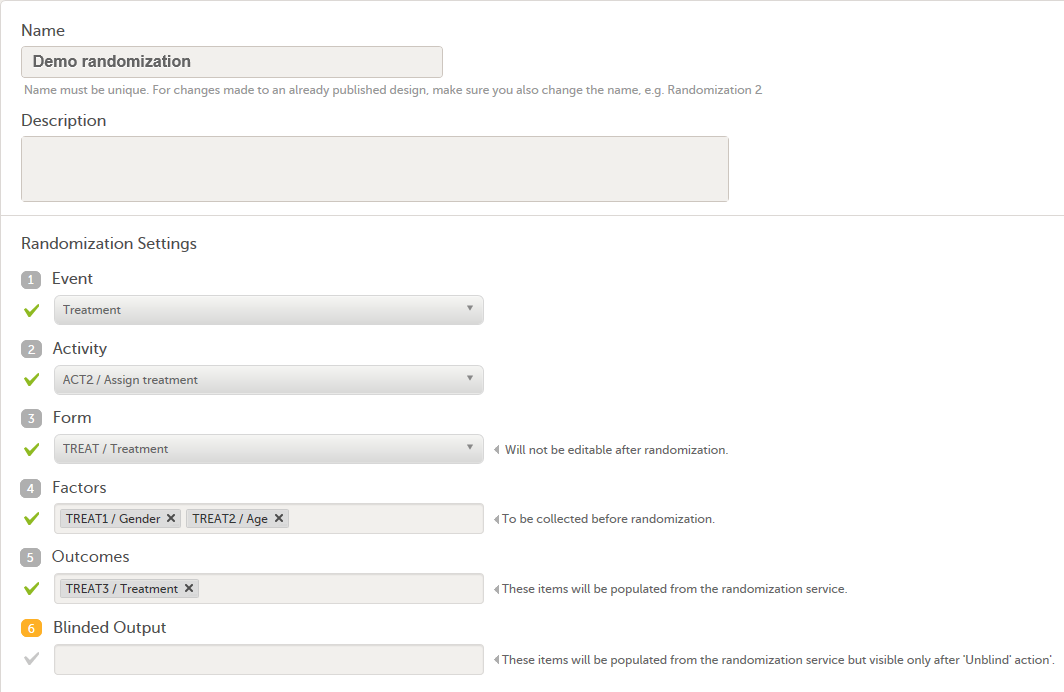
For step by step instructions on how to set up the randomization mapping in Viedoc Designer, see Setting up the randomization.
After the randomization mapping has been set up, the study design needs to be published for the randomization to become active.
The Study Manager needs to invite a user to the role Unblinded Statistician. The role Unblinded Statistician should only be given to users that are supposed to be unblinded and that do not participate in study evaluation procedures, otherwise the blind will break. An Unblinded Statistician can never work in a blinded role within that study.
For step by step instructions on how to assign roles to users, see Managing users (STM and SIM).
Note! The randomization can only be configured by users that are assigned the system role Unblinded Statistician.
To enter the Randomizations page, select the toolbox icon in the Randomization is on field in Viedoc Admin.
In this example, we do not use allocation, so we only set up a Randomization list, as follows:
From the Randomization method dropdown list, we select Dynamic (Pocock/Simon).
Note! The dynamic randomization method can only be chosen if the following criteria are met:
Note! You will need to create the dynamic randomization configuration individually for demo mode and production mode after creating the dynamic randomization settings.
Select Approve settings & generate list. The Create configuration link is displayed:
 Select Create configuration to configure the dynamic randomization.
We configure the dynamic randomization as follows:
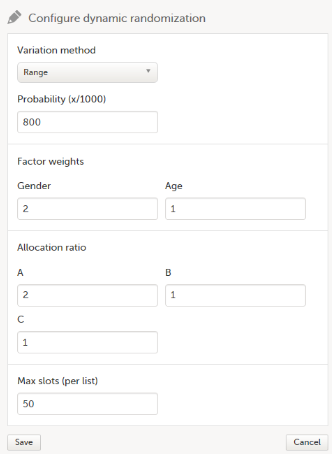
For step by step instructions on how to set up the randomization in Viedoc Admin, see Configuring a dynamic randomization.
When the clinic user has added a subject in Viedoc Clinic (i.e., filled in the Add Subject form), and opens the Treatment form, the values for Gender and Age are automatically populated from the Add subject form. Upon clicking Randomize, the subject will be assigned to one of the treatment groups. The Treatment item will appear in the form, populated by the randomization service.
 Note! Upon randomizing the subject, the randomization form (Treatment form) becomes read-only. This means that no item in the Treatment form will be editable, not even if the value for Gender or Age changes in the original Add subject form.
This section explains how the calculations are made for assigning one of the three treatments (A, B or C) each time a new subject is randomized.
The underlying theory for the dynamic randomization method that is implemented in Viedoc is described in the following articles:
The Donald E. Knuth's subtractive random number generator algorithm that is used in the modified Pocock and Simon method implemented in Viedoc is described in the following article:
The following table lists the terms that the algorithm used for dynamic randomization according to the Pocock and Simon method is based on.
| Term | Description | Calculated as |
|---|---|---|
| D | The amount of variation in the set of values for a factor |
|
| G | The total amount of imbalance across all factors | Sum of weighted D (D multiplied by factor weight) for all factors. |
| P (p) | The probability with which the treatment that minimizes imbalance is assigned |
The probability determines the extent to which one wishes to favour the treatment group that would lead to the smallest imbalance. During the randomization, the probability P for each treatment assignment is calculated, based on a probability cut-off. This probability cut-off (referred to as p below) is a static decimal between 0 and 1 that is provided by a statistician. In Viedoc, the probability cut-off has to be entered as x/1000. So for a p of 0.8 (80%), the number 800 should be entered. During randomization, P for each treatment will be distributed as follows:
|
| Random | A random number between 0 and 1 | Generated using Donald E. Knuth's subtractive random number generator algorithm |
| seed | A value used to initialize the random number generator | Based on the number of ticks to represent the current date |
Using the above algorithms, a frequency table is calculated for each new subject to be randomized. A random number greater than or equal to 0 and less than 1 is generated using a seed value based on the number of ticks to represent the current date. Using the Ps and this random number, a treatment index is chosen and the patient is thereby assigned this treatment.
When a new subject is added and should be randomly assigned a treatment, the following calculations are performed:
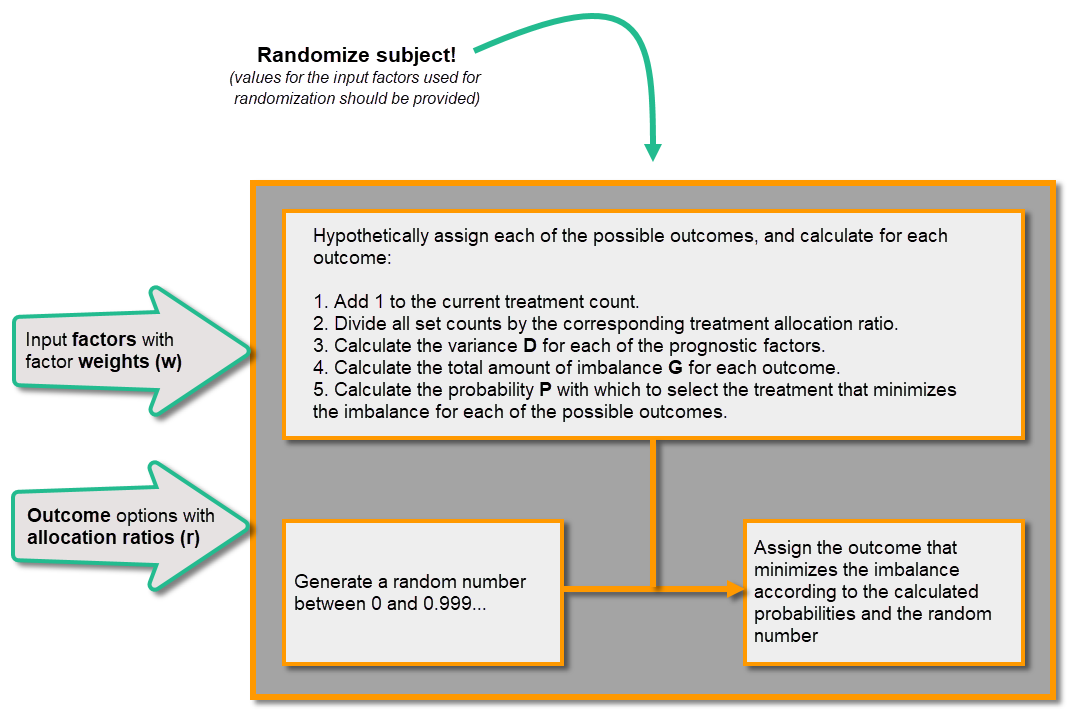
Once the first subject is randomized, it is possible to download the randomization list from Viedoc Admin.
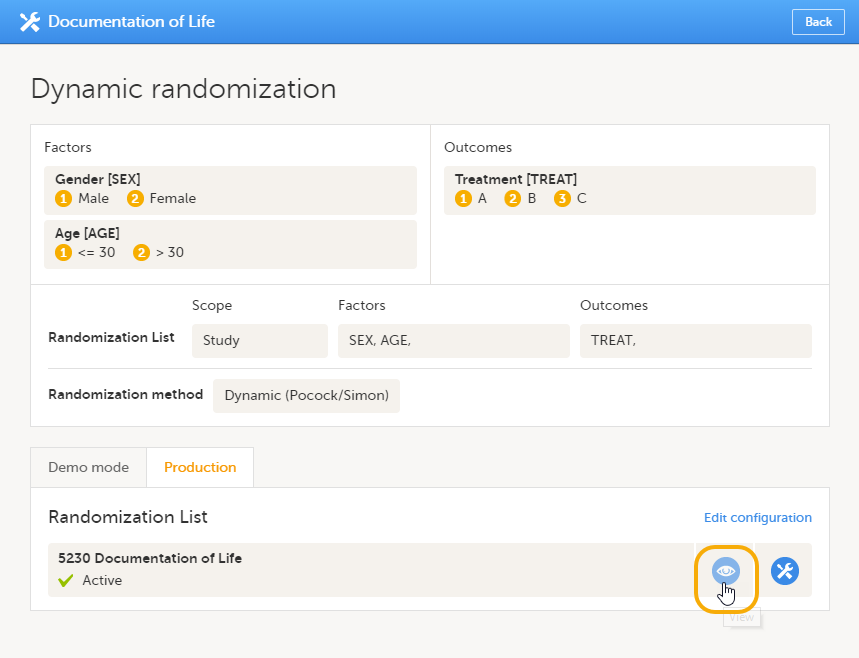 An Excel file is downloaded, which has the following three sheets:
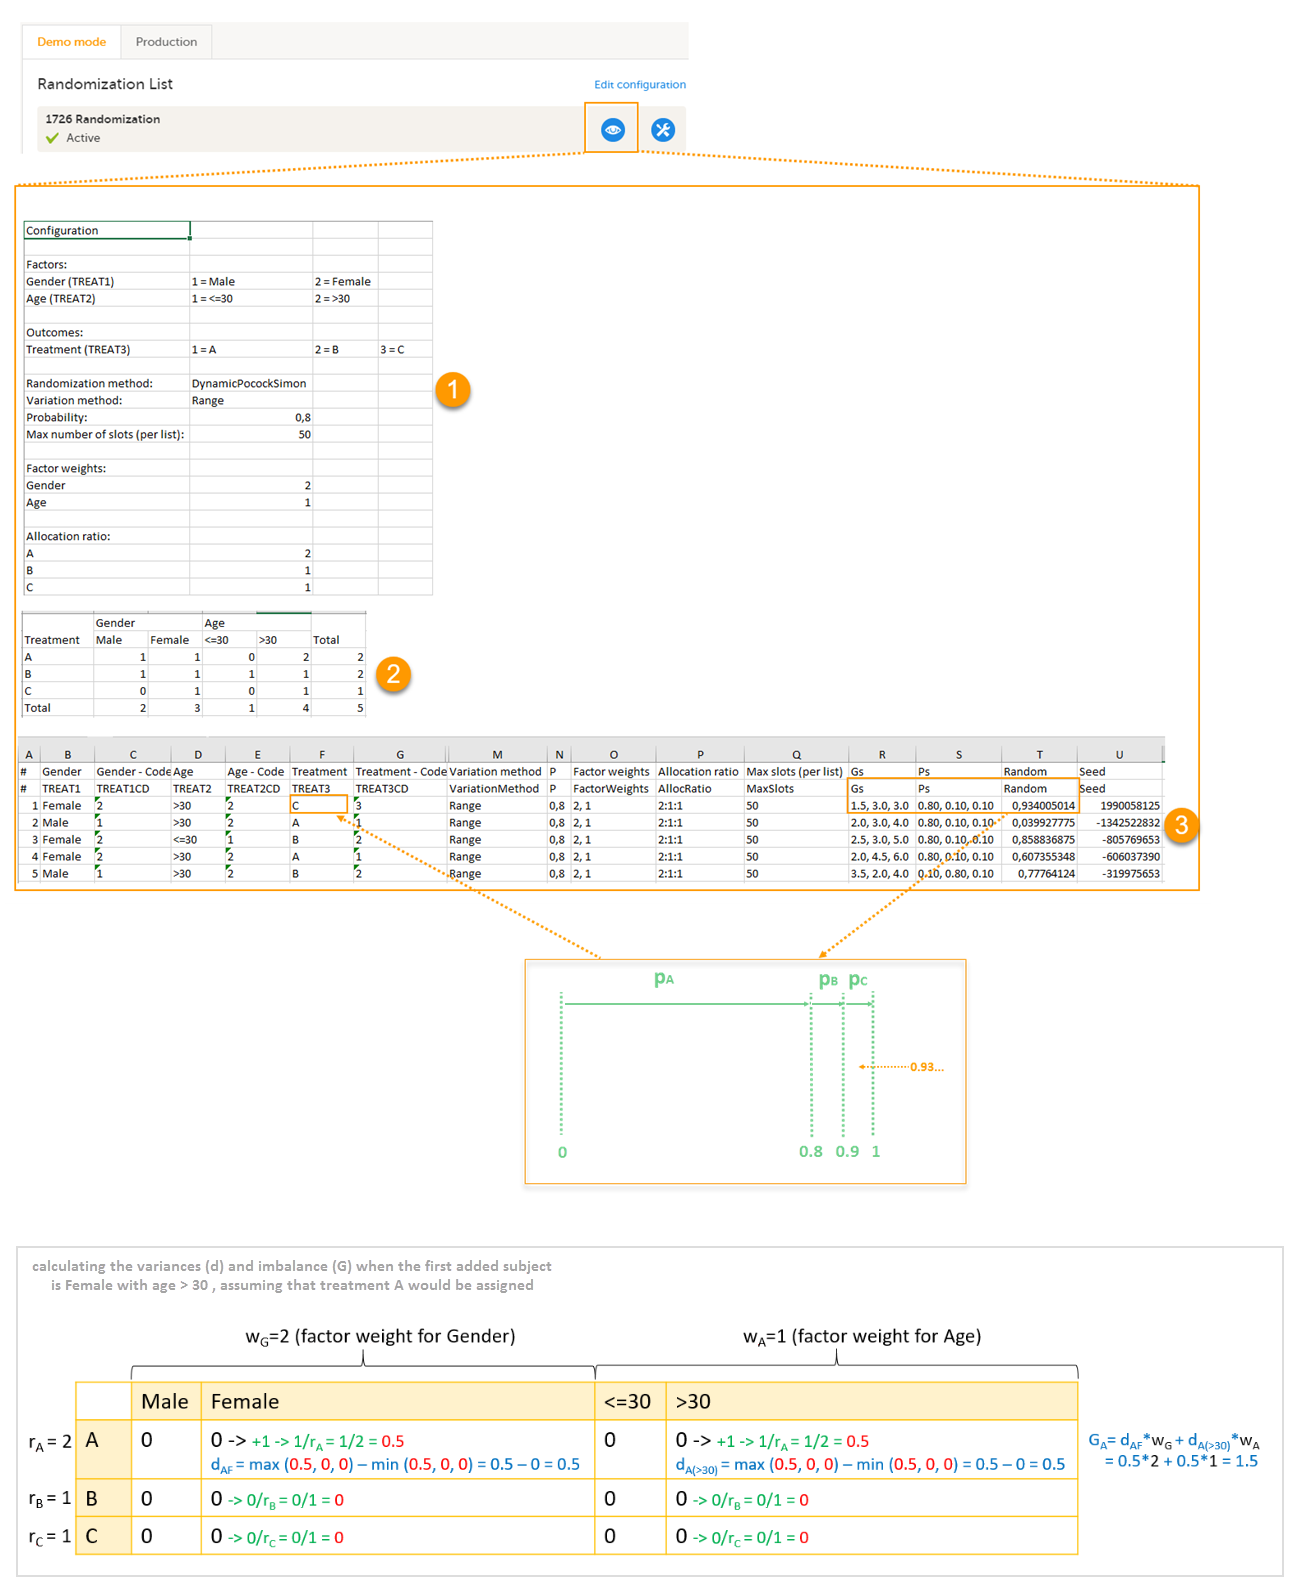
Let's consider the first added subject and take a look at how the first set of calculations is performed in order to assign a randomized treatment.
All the values in the distribution table (illustrated by 2 in the image) are equal to 0 at start point. We are adding a first subject with Gender = Female and Age > 30. For this, we follow the workflow for calculating D, G and P for each of the three possible outcomes (treatments).
We are going to use the following notations:
We start by hypothetically assigning each of the three treatments and calculating the variances for each assignment. Because the subject to be added is a female with age > 30, we only have to calculate the variances for those factor values.
Then we calculate the total amount of imbalance for each of the three possible treatment assignments. These are the values displayed in the table in the Slots sheet (3 in the image), for the first entry, in the Gs column:
Then we calculate the probability (P) for each of the three possible treatment assignments. We have set the probability (p) to 0.8 in our example. The treatment with the lowest G (in our case A) will receive the Probability (P) as p (in our case 0.8). The remaining treamment assignments will split the remaining probability. These are the values displayed in the table in the Slots sheet (3 in the image), for the first entry, in the Ps column:
Then we generate a random number between 0 and 1 using Donald E. Knuth's subtractive random number generator algorithm and a seed value based on the number of ticks to represent the current date. The number is displayed in the table in the Slots sheet (3 in the image), for the first entry, in the Random column, in our example Random = 0.934...Considering the probabilities for each treatment assignment, and the random number, treatment C will be assigned to the first subject, as illustrated in the image.
This section explains how to add an image to a form in Viedoc.
Before anything else, make sure that the image you are using is optimised in terms of pixel size. Apart from setting the desired width and height of the image you should also shrink it to the minimum possible file size by removing all unnecessary information while keeping the required level of image quality. The file format should be either PNG or JPG. Optimising the image can be done by using Photoshop or a similar software. We also recommend using a site like http://optimizilla.com to remove things that Photoshop cannot handle.
| Important! Please observe that you are responsible for any image uploaded on an external site. |
Follow the step-by-step guide below to add your image to a form:
| 1 |
Add a static text field in the form where you would like to place the image. 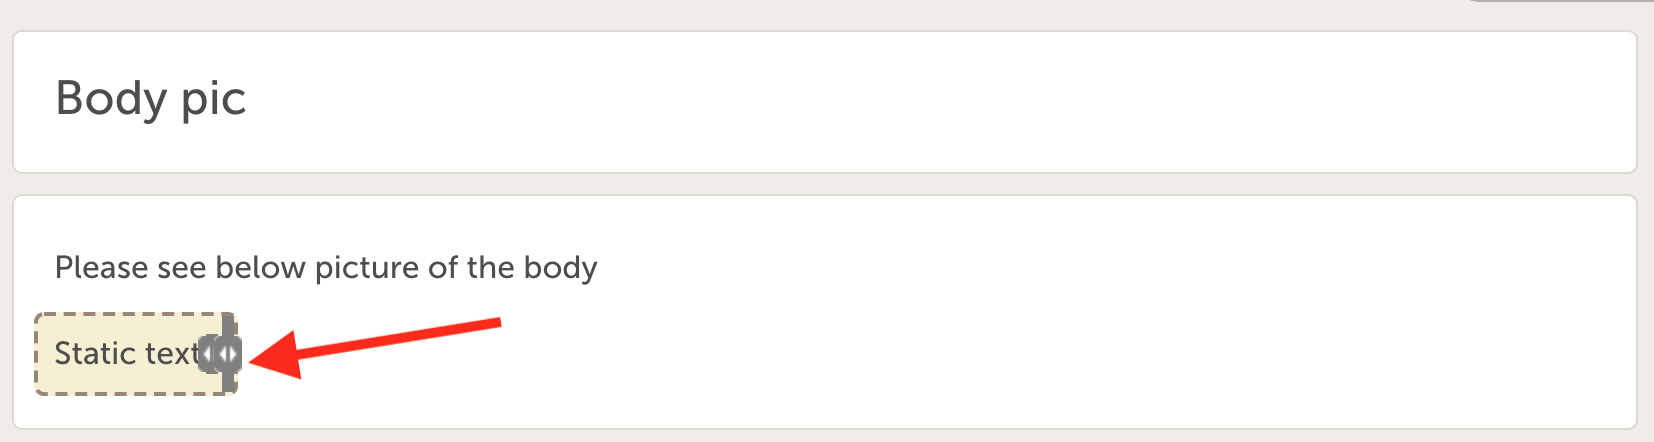
|
| 2 | Export the Operational Data Model (ODM). |
| 3 | Open the ODM in a text editor and search for the variable ID for the static text field added in step 1 above. |
| 4 |
Replace "Static text" in blue below with this code:
The code will make sure the image is not larger than the browser window. 
|
| 5 | Go to http://www.cssportal.com/image-to-data/ and upload the image (works with PNG and JPG images only). Make sure to only upload an image that is optimized in pixel size or the size of your ODM will become too big. |
| 6 |
Copy all the text in the Data URI field (double-click to mark all text). 
|
| 7 |
Paste it to the src parameter. See image: 
|
| 8 | Save the ODM and import this edited design into Viedoc as a new version. The version that was exported can be deleted (to keep the version numbers continuous). |
In Viedoc Clinic, the image will be displayed as follows:
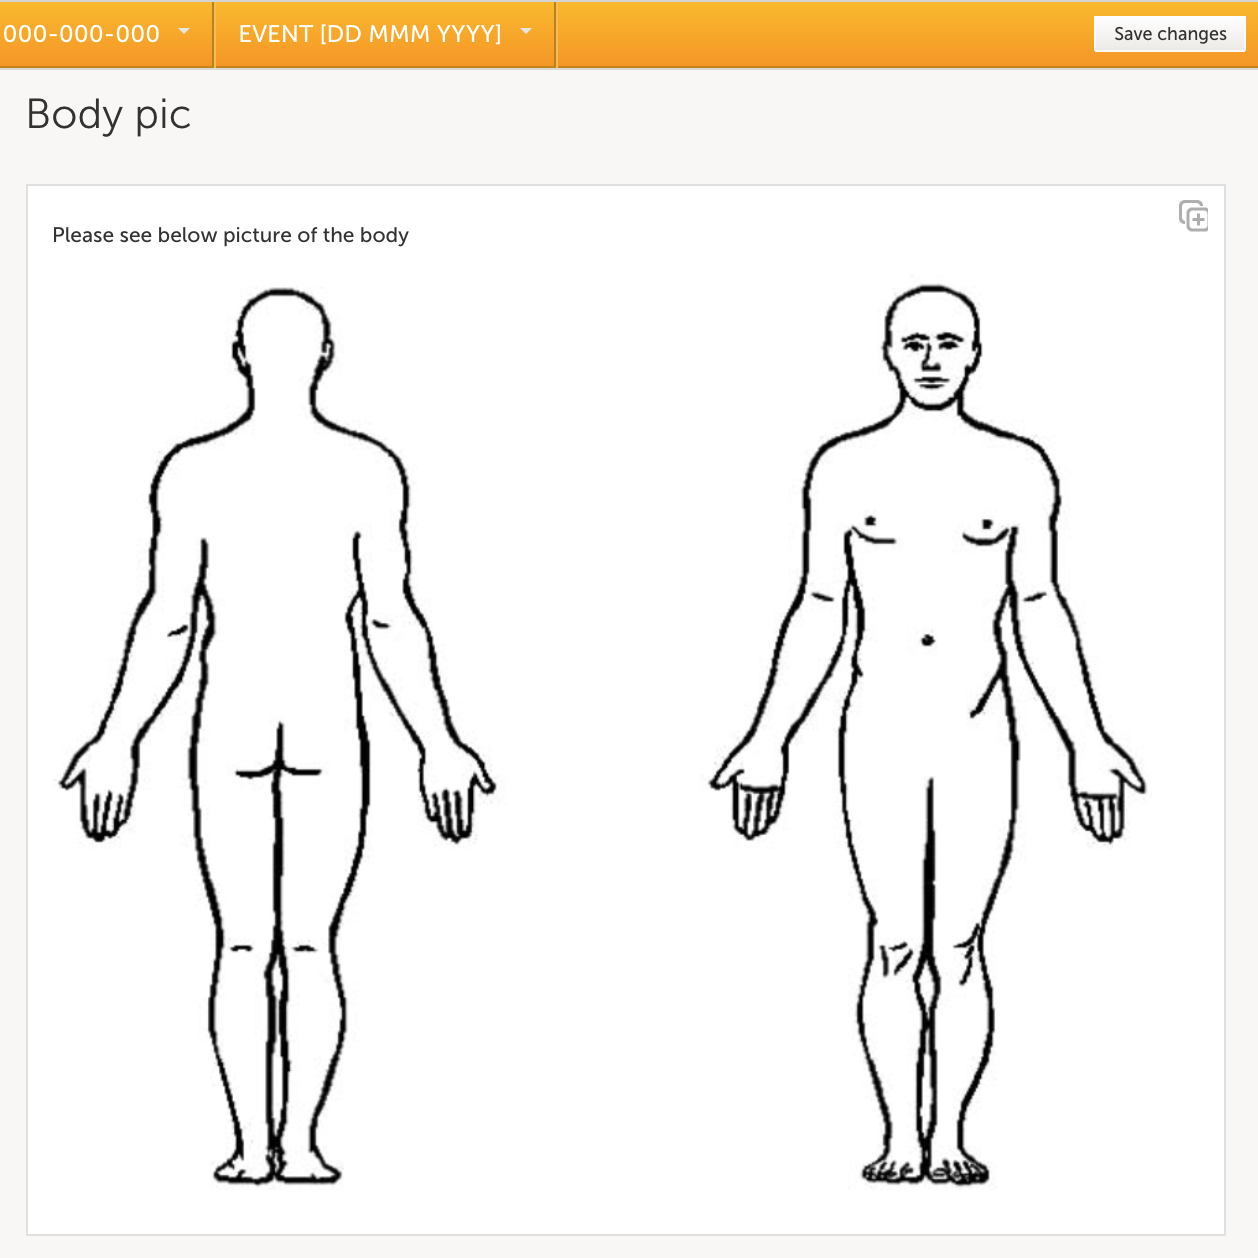
In Viedoc Me, the image will be displayed as follows:
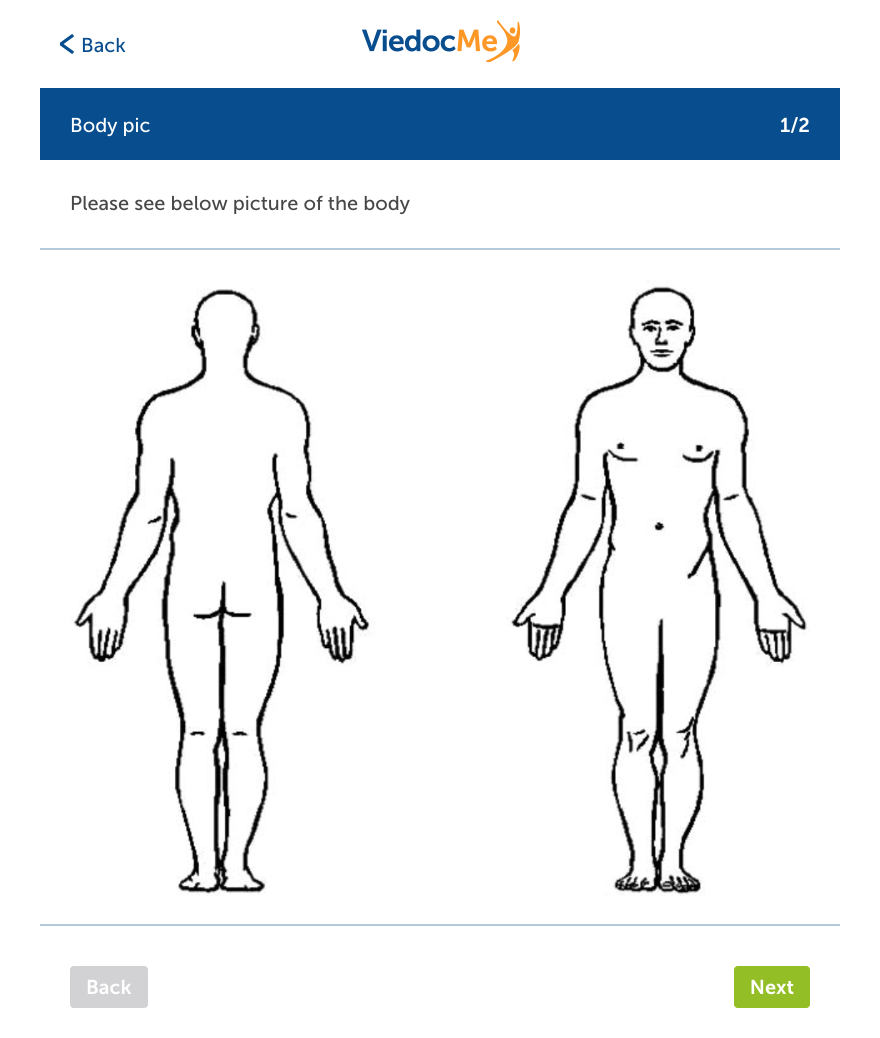
Let's consider the following scenario: We conduct a trial with newborn subjects, where we need to trigger an event window deviation check if the screening event is conducted outside an event window of 14 days from the Date of Birth collected in the Demographics form.
We design the Demographics form (FormID = DM) where we include a Date item - Date of birth, with the ItemID = DOB:

In the study design, under Study workflow, we configure the Add subject as a Study start event:
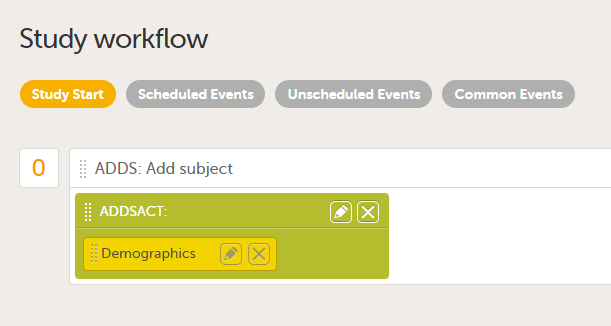
We want the event date to be automatically set to the Date of Birth. For this, the Enable automatic event date option is checked and set to Form item and the item specified is the Date of Birth within the Demographics form: $THIS.DM.DOB:
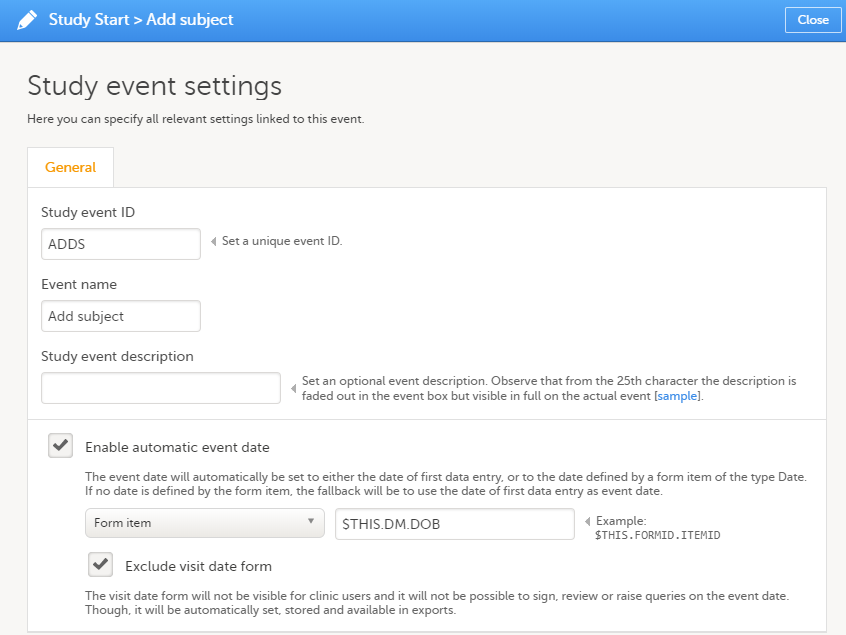
We want to ensure that a deviation check is triggered when the Screening event is outside the 14 days time window from the Date of Birth collected in the Demographics form. For this, we configure the Screening event, as a Scheduled event with a proposed date calculation based on the event date of the Add subject event, with a time window of 14 days, as illustrated below:
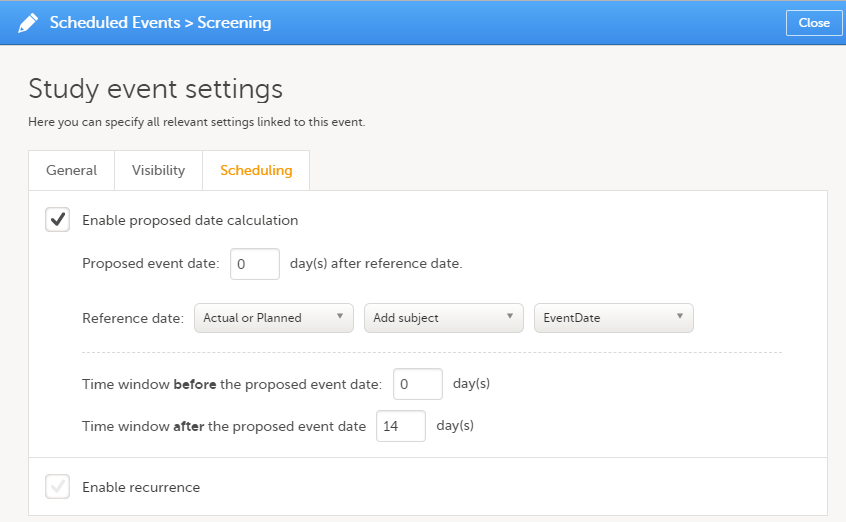
In Viedoc Clinic, after the subject is added, the Screening event will look as illustrated below, with a proposed date within max 14 days from the Date of Birth:
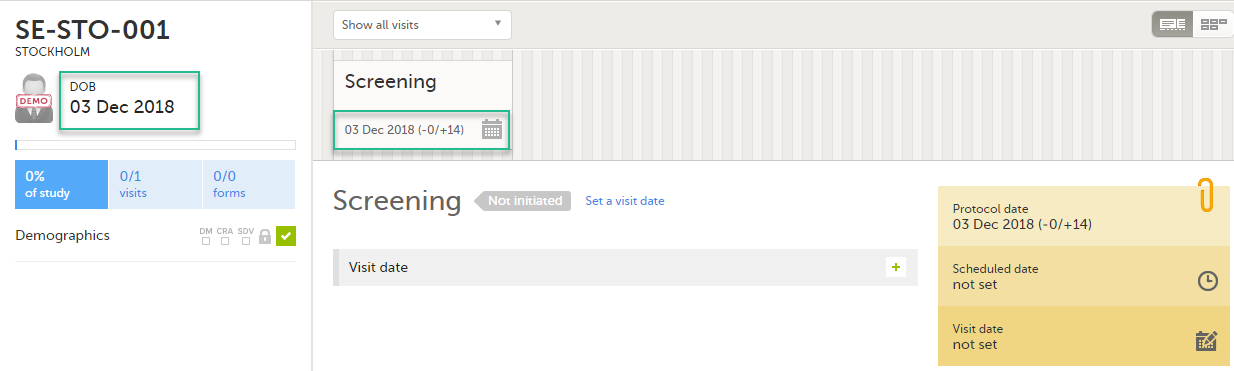
This use case shows how to change from an autogenerated to a manually entered subject ID, to avoid a mix of patterns in the study.
{CountryCode}-{SiteCode}-{SiteSubjectSeqNo:000}
In version 2 of the design, the subject IDs are taken from the field subjid in the Study start event, thus the pattern:
subjid
This is assigned to all sites and subjects get subject IDs looking like this:

In Viedoc Clinic, you can now see a mix of patterns for the subject IDs:
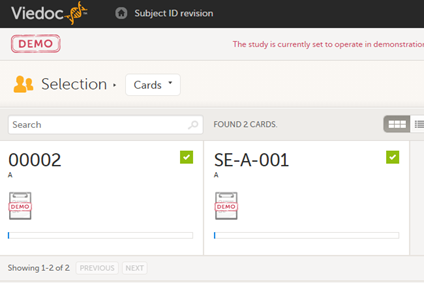
One way of solving the mix of patterns is to make a revision of the Study start event form in version 1 and apply it to the study. The revision will not change the subject ID pattern, as this is not possible in revisions, instead we make an insignificant change to trigger an update of the subject ID. The recommended change is an insignificant text change to one of the items in the Study start event form. The Investigator then has to approve this change, and the subject IDs are updated:
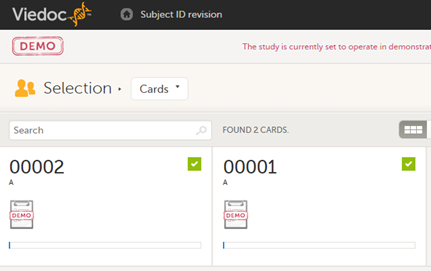
Another way of doing it is to trigger an update of all subject IDs by changing the country of all sites, and then immediately change it back again.
This page provides Viedoc study templates you can download and reuse in your own studies. Each template is based on a realistic study scenario and includes form design, edit checks, visibility conditions, and workflows.
The Design considerations section below explains important design choices. Some recommendations support compliance and best practice, while others are optional preferences.
Note! Please ensure to validate any template content you use for your specific study.
The template studies cover a number of forms in different variations. The sections below describe several template studies, sorted by forms. The studies and forms have been designed according to Clinical Data Acquisition Standards Harmonization (CDASH) recommendations and best practices in Viedoc. They are complete with form design, edit checks, visibility conditions, and event workflows, as well as settings like randomization, Viedoc Me, and data mapping for import.
The scenario for this template study is a small, randomized, and blinded phase I study. It has been configured with a set of forms and a workflow typical for a phase I study.
For this study, no lab data is being collected in Viedoc, but only the sampling details. Lab PK sampling is performed frequently and in several activities across events. Several validation checks have been set up to ensure deviations in sampling time points are captured.
A simple static randomization without any input factors is set up, but advanced allocation is not used.
The intended workflow is explained in the Design considerations section.
The scenario for this template study is a large, randomized, and blinded multi-site phase II/III study with many different features configured.
A central lab is used, and the import application imports the data directly from the lab into Viedoc.
The randomization is stratified on gender, and the study uses the advanced allocation to allocate kits to subjects. With this feature enabled, you can also set up Viedoc Logistics in Viedoc Admin.
The study uses Viedoc Me to capture data for two standardized questionnaires. The study is planned for Germany, France, and the US, so the corresponding translations have been included for the Viedoc Me forms, in German (Germany) and French (France).
Finally, a requirement for this study is also a “video adjudication workflow”. This has all been built in the design by using core functionality of the Electronic Data Capture (EDC), that is, the file upload item, role-based edit rights, role-based visibility, and email alerts.
The intended workflow is explained in the Design considerations section.
The scenario for this template study is a multi-site oncology study. The workflow has been set up with a treatment phase with several treatment cycles, and a follow-up phase with recurring follow-up events.
Since local labs are used, the study uses the reference data editor to simplify the entry of lab data. Standard RECIST forms are used to capture lesion details as well as disease response. This is an open-label study and no randomization is performed in Viedoc.
The intended workflow is explained in the Design considerations section.
Download the English design ODM and supportive documentation here.
Download the Chinese design ODM and supportive documentation here.
Download the Japanese design ODM and supportive documentation here.
This section contains clarifications and recommendations associated with the designs. It is recommended that you review the sections below together with the actual designs. Forms considered to be straight-forward in the design are not mentioned below.
| Form/section | Study | Comment |
|---|---|---|
| Adverse events | All |
Any form can be used as a common event, but typically it is used for adverse event, medical history, and use of medications. Common for all of them is that they are typically not directly connected to a scheduled event. A few things are common for the design of all common events. Data is only entered in a common event when an event has occurred or when there is a medication to enter. Therefore, it is recommended not to use any leading questions, for example, "Did the subject experience any adverse event?". These kind of check questions could serve as a reminder, but would be better placed in the scheduled events (see Check questions form). The system variable An optional approach for the medical history form could be to design it as a repeating form on the first scheduled event, see Repeating form. |
| Prior and concomitant medications | All | |
| Pregnancy report | Phase II | |
| Previous cancer procedures | Oncology | |
| Previous cancer medications | Oncology |
| Form/Section | Study | Comment |
|---|---|---|
| Medical history | Phase I |
In this study, the medical history is captured in an event form. In most designs, medical history is captured in a common event, but some users prefer to capture this data at the first event. In this design, a repeating form has been used at the first event as an example of that approach. "Medical history" is added as an activity name to make this clearer in the patient overview. |
| Form/Section | Study | Comment |
|---|---|---|
| Check questions | All |
A general Check questions form can be used to remind the site staff of the data to be entered in the common events, such as adverse events and concomitant medications, as well as other study-specific reminders. For the use of Check questions form in unscheduled events, see Unscheduled events. |
| Form/Section | Study | Comment |
|---|---|---|
| Check questions | All |
In clinical trials, unscheduled events are commonly performed as needed, and usually only a some of the assessments are performed in scheduled events. A general recommendation is to include a question about assessments performed in the Check questions form. Note! In these designs, an item group has been used with “assessments performed” that is only displayed in the unscheduled events. Visibility conditions on the activity level will then control what forms are displayed based on the selections in the Check questions form. This way you can build one single unscheduled event in the study workflow, and in Viedoc Clinic keep one single unscheduled event flexible when it comes to the forms required. It will also make it easy for the end user to decide what forms to trigger for the event. Adding multiple unscheduled events in the design is therefore only used when you have very distinct types of events and you want to direct the user by triggering the relevant forms, for example, “Unscheduled drug dispense” or “Unscheduled lab sampling”. Even in these examples you can question the need for these because it would still work well with one flexible unscheduled event. |
| Form/Section | Study | Comment |
|---|---|---|
| Eligibility | All |
In most studies, it is recommended to use a single question for confirming all eligibility criteria, or one question for inclusion criteria and one for exclusion criteria. Whenever a patient is not eligible, the individual criteria can be triggered so the user can specify the criteria not met (for inclusion criteria) or criteria met (for exclusion criteria). This design is according to the recommendations in CDASH. The reason for not having individual questions for each criterion is that the moment when the site staff is entering data in the eligibility form is usually not the moment when the site is actually reviewing each eligibility criterion. Usually, the site has already made their review with the patient beforehand, and entering data in the eligibility form is just about confirming this. Answering questions about each criterion will risk being a tedious activity with limited value, because the site staff is unlikely to review and evaluate each criterion again. If you want to display the criteria from the protocol, there are several ways to do that without having individual questions for each criterion:
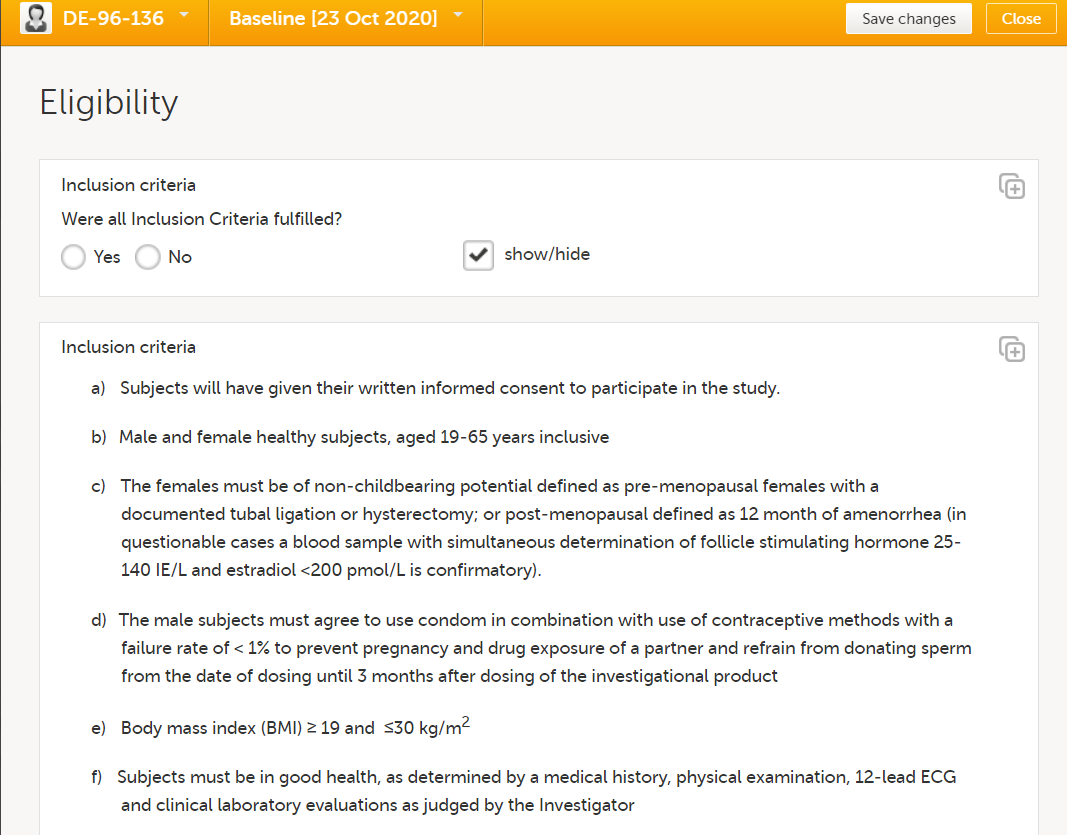
At the end of the form, a calculated eligibility summary triggers subsequent activities. |
| Form/Section | Study | Comment |
|---|---|---|
| Disease Response - RECIST v1.1 | Oncology |
Although there are variations to designs of RECIST forms, they all share the same principle. Lesion IDs are populated through functions. In subsequent events, follow-ups are being made on the previously registered lesions. For these events, the lesion identifiers are populated with default values and only selected parameters are presented as blank and requiring new information entered. Possible new lesions would be added in a separate form, but would in this study not be tracked in the same way. An overall assessment would be done in the disease response form. |
| New Lesions - RECIST v1.1 | Oncology | |
| Non-Target Lesions - RECIST v1.1 | Oncology | |
| Survival Status | Oncology | |
| Target Lesions - RECIST v1.1 | Oncology |
| Form/Section | Study | Comment |
|---|---|---|
| Clinical chemistry | Oncology |
These lab forms are adapted for the reference data editor. The forms have been designed assuming there will be many different labs, reporting results in different units, result formats and age ranges. So these forms are intended to work well on all occasions when the reference data editor is to be used, but the form design will also work for manual data entry.
|
| Coagulation | Oncology | |
| Haematology | Oncology | |
| Urinalysis | Oncology |
| Form/Section | Study | Comment |
|---|---|---|
| Clinical chemistry | Phase II |
This is a lab form adapted for data import. The items in this form will need to be adapted to what the lab will transfer.
(1) Reported units are the units that the site will want to see and are used to seeing in lab reports and so on, commonly SI in Europe and conventional in the US. These are also the items displayed in Viedoc Clinic. This will ensure that the site can view and evaluate the lab data in the units they are used to.
|
| Haematology | Phase II | |
| Urinalysis | Phase II | |
| Laboratory Assessments | Phase II | Because lab data is captured through the data import application, there is no need to enter any lab details manually. It is recommended to document the sampling in a separate form, because this provides more clarity to the user. This also makes it easier for users to detect if samples have been taken, but no lab data has yet been imported. |
| Form/Section | Study | Comment |
|---|---|---|
| Randomization | Phase I and Phase II |
It is recommended to avoid manual data entry in randomization and kit allocation forms (see below).
Note! For the gender item, manual data entry is not used, but a function to populate this value from its original form, in this case the demographics form. 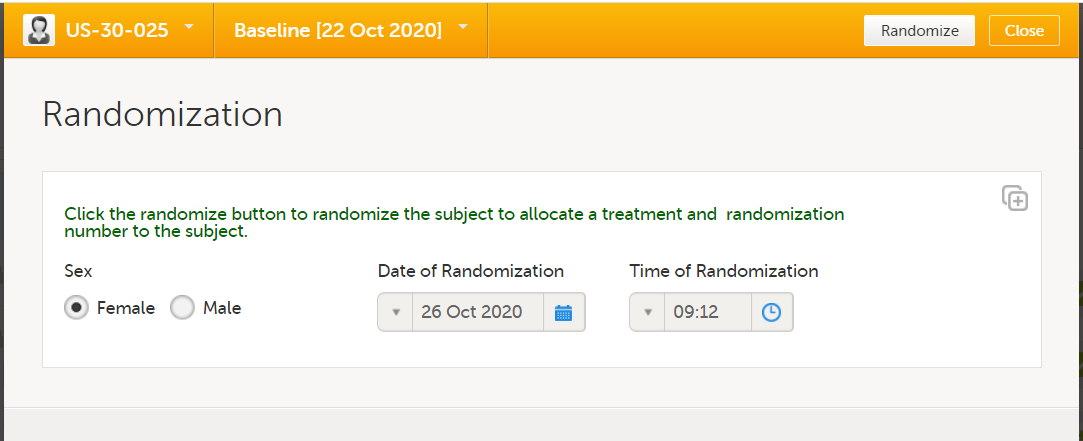
This is done for two reasons:
|
| Kit allocation | Phase II |
This form assumes the use of an allocation list and that kits are allocated from a kit list. None of the items in this form are intended for manual entry. Just like with the randomization form, it is recommended to not have any manual entry fields within an allocation form because they will not be editable once the allocation is performed. Because the kit number is the most critical output item, it is kept in a separate item group at the top so that it is displayed clearly.
|
| Form/Section | Study | Comment |
|---|---|---|
| GAD-7 | Phase II |
This is a standardized questionnaire designed for use in Viedoc Me. Within each item, the field layout is vertical, because this will ensure the answer options are more clearly presented regardless of screen resolution on the subjects' device. An important consideration when designing forms intended for Viedoc Me is how the items should be grouped. All items within one item group will be displayed on one page in Viedoc Me. Sometimes it is preferable to have fewer and longer pages in Viedoc Me, and sometimes many short pages. There are no strict rules to apply to this, so you will need to test what is most suitable for each form designed. The general recommendations are to keep the pages fairly short unless there are many similar questions that fall under the same category. In the Viedoc Me forms for this study, the same question is asked for a number of different problems. In such a scenario, it is easy to enter data even if the page is a little bit longer. If each item was a question in its own with a completely different category/question text, it is generally recommended to separate these items in different item groups. For the PHQ-9 questionnaire, the decision was to separate the final item in a separate item group, because this was considered as a completely different question. A calculation for the total score of the questionnaires has not been added in Viedoc. Although it is possible to add a function for calculating the score in a separate form in a site-initiated event, the needs for the study should be considered. If a total score would be needed for, for example, the continuous safety follow-up of a patient or to take any other action during the study, like changing a subject’s treatment dose and so on, it is warmly recommended to use a function to calculate the score in Viedoc. On the other hand, if it is only used for the final outcome analysis towards the end, it might as well be calculated outside Viedoc by the study statistician. |
| PHQ-9 | Phase II | |
| Workflow configuration | Phase II |
Please also note how the Viedoc Me events and activities have been configured in the study workflow. The Viedoc Me schedule has been set up so that submissions are expected in association with the clinic events, but with a few days difference from the event date allowed. Reminders have also been activated, to ensure that compliance is as high as possible. Note the visibility conditions for the Viedoc Me events. The Viedoc Me event and corresponding clinic event will be triggered with the same conditions. Thus, the Viedoc Me event will always become visible when the corresponding clinic event does. This is expected to work well in this study, but will be less suitable if a site is running several events behind in data entry. If that is a concern, you could consider triggering all Viedoc Me events upfront. In such a scenario, you could add visibility conditions to hide uninitiated events as soon as a subject is withdrawn, to avoid them from showing when no longer relevant. So be mindful of how the visibility for the Viedoc Me events is used. Three separate Viedoc Me reminders have been set up. Under normal circumstances, one reminder is sufficient, but when low compliance is a concern, you could consider using multiple reminders. |
| Form/Section | Study | Comment |
|---|---|---|
| Video upload | Phase II |
The intended workflow is the following:
There are several advantages of using Viedoc for a workflow like this: the email alerts will ensure that appropriate actions can be taken quickly, all assessments are properly documented, and they are all available in the same system. |
| Reviewer 1 assessment | Phase II | |
| Reviewer 2 | Phase II |
| Form/Section | Study | Comment |
|---|---|---|
| Drug screen test | Phase I | In this form, any potential drug use is being checked. In the assumption for this study it is not considered relevant to know which drug has been used in case of a positive test, so those details are not captured in the CRF. A positive test would lead to the subject not being eligible. This is often sufficient to check with an edit check in the eligibility form (subject with a positive drug screen test cannot be entered as eligible - see edit check L9_IE), but in this case a static text with a reminder of this eligibility criterion within this form has been added to provide additional clarity and further highlight that the subject is not eligible. This is included in the design to showcase an additional option rather than a recommendation. |
| Blood PK sampling | Phase I | In this form, a function returning the sampling time point based on the ActivityDefId has been used for the sampling time point item. A similar layout can be achieved by using multiple static texts with visibility conditions. This approach has the advantages of the information being included in the export and the item can be used in the form summary format if desired (not done in this design). |
| Urine PK sampling | Phase I | |
| Demographics | Phase II | This form is different compared to a standard demographics form. In this study, it is assumed that sites in Germany are used and that full birth date must not be collected for the subjects in this country. So for this country, a different item is shown; "Year of birth (BRTHYR)" instead of "Date of birth (BRTHDAT)". This is controlled through a visibility condition using the country code. Then there are three different age items: AGE1: age calculation based on full birth date and informed consent date for all countries except for Germany AGE2: manual entry age field for German sites (including an edit check to only allow for ages that are possible based on the informed consent date and birth year). AGE: Hidden item, returning the age item with data, that is, either AGE1 or AGE2. This AGE item is used on the subject cards. An alternative approach is to collect birth year only for all countries. When you are using visibility conditions or edit checks based on country code, it is recommended to add demo sites in the relevant countries so that the design can be tested properly. For example in this study it would be recommended to use one demo site in Germany and one demo site in another country. |
| Drug accountability | Phase II | The drug accountability form in this study is not including any details of dispensed kits, this is all managed and contained within the kit allocation form. This form is instead intended to capture the details on the number of tablets left in the returned kits. The kits themselves can be marked as returned in the Logistics view. If it is not important to capture the number of tablets and so on in a returned kit in the EDC, you can rely on the action in the Logistics view. That is, only mark the kit as returned in the Logistics view and skip the tablet count and the drug accountability form |
| Physical examination | Phase II |
For the body system (physical examination) item and analyte (serology), a function displays the name of the body system/analyte. It is displayed in its own item to include the body system/analyte as an item in the export. This design is preferred by many because it gives the user more clarity in the export and makes it a little bit more "SDTM-like". This approach has also been used in the lab forms for the template studies An option is to instead specify the body system in the label for the item or as label for the item group. |
| Serology | Phase II | |
| EORTC QLQ-C30 Questionnaire | Oncology | Viedoc Me would be the best choice for the vast majority of studies when patient-reported outcomes are collected. Because Viedoc Me holds so many advantages over collecting questionnaire/diary data on paper, it is the preferred choice both by sponsors and sites. However, in certain studies it might not be feasible. This is an example of a questionnaire set up for manual data entry by the sites. In such a scenario, additional items, like date and time of completion of the questionnaire should be added. In Viedoc Me these items would be redundant because you can rely on system-generated date and timestamps for Viedoc Me data entry. |
| Hidden form | Oncology |
As the name suggests, this is a hidden form in Viedoc Clinic (yet visible in study design) with two items with different purposes:
|
| Physical examination | Oncology |
The recommended approach is to use a leading question to capture whether an overall assessment was performed, for example, "Was the physical examination performed?". This can even be set to YES as a default value in the item function settings to simplify data entry. In this form, an alternative approach has been used for capturing details if an examination of each body system has not been performed. Normally, for each body system, it would be recommended to use the system functionality to confirm items as missing if an assessment has not been performed. This requires a reason to be provided by the site and it will be flagged for the monitor to approve. The items confirmed as missing are also included in the query export, which makes them easy to identify in any given study. Therefore, this is the recommended approach to use. However, in certain scenarios, although rare, this is not desired. One example could be if the study has an exploratory part, or for any other reason, expect and accept that there will be a lot of assessments/examinations not performed and there is no need to flag this or capture the reason for why the assessment was not performed. In such a scenario, this design with "not done-checkboxes" for each (or all) body system will mean fewer clicks and quicker data entry from the site staff if many assessments are expected to be missing. The downside would be a reduced control, because these items will not be flagged for the monitor and a reduced overview of missing values because you would have to collect this information in different items and forms. So this approach is not recommended, unless there is a good reason to use it. |
| Vital signs | Oncology |
In this study, height is collected once, but weight and the BMI in several events. Note that the BMI calculation compares the weight of the current event with the height of the screening event. Note! In pediatric studies, where height changes during the study are expected, the height will commonly be collected in each event, and BMI will be calculated from height and weight in the same form. |
| Workflow | Oncology |
Oncology studies can often have a complex workflow. In this design, we assume a study where data needs to be collected from several treatment days only during the first treatment cycle, but for remaining treatment cycles data is only registered for the first day. If the need for the study is different and some limited data needs to be collected for multiple days within multiple cycles, it could also be considered to add multiple days within each event and let an event constitute an entire treatment cycle rather than an individual day in the treatment cycle. If such an approach is used, each day in the treatment cycle could be set up within a separate activity. 
|
| Event status | All | In these designs, event status forms are used to always have an item dedicated to show whether the subject is continuing to the next event or withdrawing from the study. This will make it easier to configure the visibility conditions of the subsequent event, because it will rely on the same item and the same form added at different events, compared to using visibility conditions depending on data entry in various different forms and items. This will also give the site user the possibility to trigger the "Study End" form to withdraw the subject at any study event. If an additional "early withdrawal event" is expected, an additional question in this form can be added to collect the information if the subject will return for an early withdrawal event and use that response to trigger the early withdrawal event. If this approach is used across studies, you can ensure that events and end-of-study forms are triggered consistently across studies. This design approach is often also preferred from site users because they will only see the events in Viedoc when they are relevant for the subject. |
| End of study | All | In this form, the same item, DSSTDAT, has been used for both "date of completion" and "date of discontinuation". Instead of having a label for the item itself, two different static texts are being alternated to display "date of completion" or "date of discontinuation". The output field label ensures that a label is exported for the item. |
| Alerts | All | In all template studies, the role “Safety Notifications” has been added. You will note that this role has no permissions in the roles section. This role is used only as a recipient for email alerts. This way you can be more selective of what users should receive the alerts. If some users with access as “Sponsor” would prefer the alert and others don’t, they could be invited with “Sponsor” + “Safety Notifications” or only “Sponsor”. Without this role, you would need to treat all users with access as “Sponsor” the same way. That is, all or none would receive the alerts. |
This lesson explains how to add a link to a form in Viedoc.
In Viedoc, it is possible to add links to forms when you edit them in Viedoc Designer. This can be useful for example, when using Viedoc Me, a trial patient could select a link in a form to watch an instructional video on the web.
While a basic understanding of coding and text editors is required, the steps to add a hyperlink to a form are straightforward.
To add a hyperlink to a form:
| 1 |
From the Forms editor in Viedoc Designer, select Static text from the Standard elements menu. 
|
| 2 |
Select Save changes. 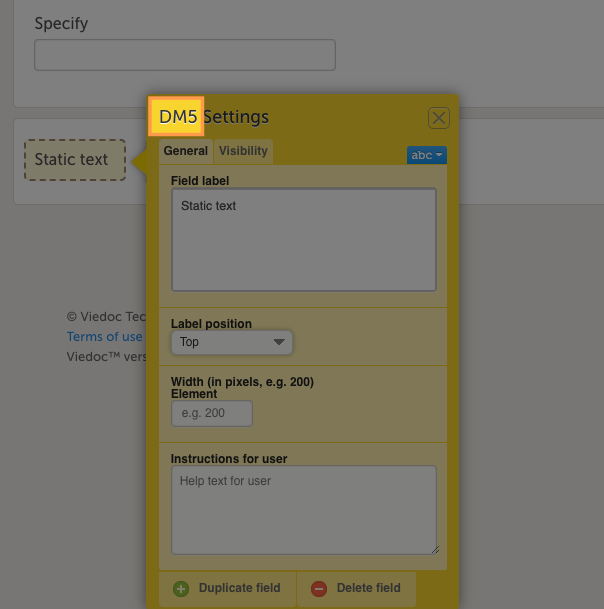
Note! Make a note of the name of the static text element or its variable ID (in the example shown, this is DM5). |
| 3 |
Return to the Overview of study design page and select Design Settings. 
|
| 4 |
In the Design Settings page, select the Export Design tab. 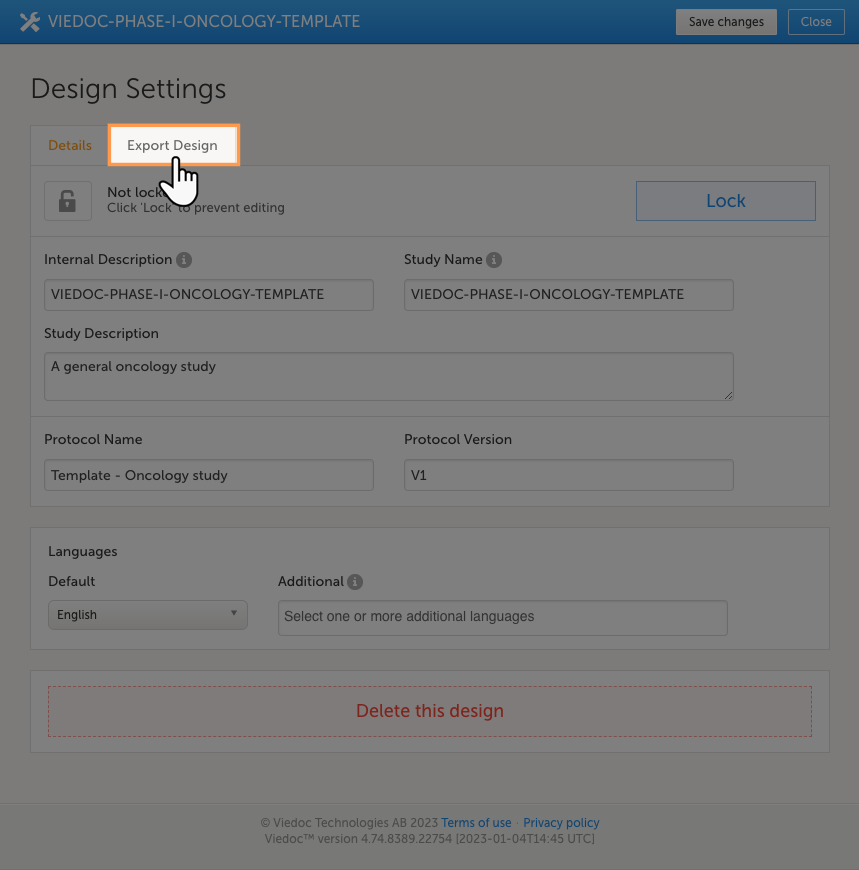
|
| 5 |
Select the checkboxes for the options you require and then select Export. 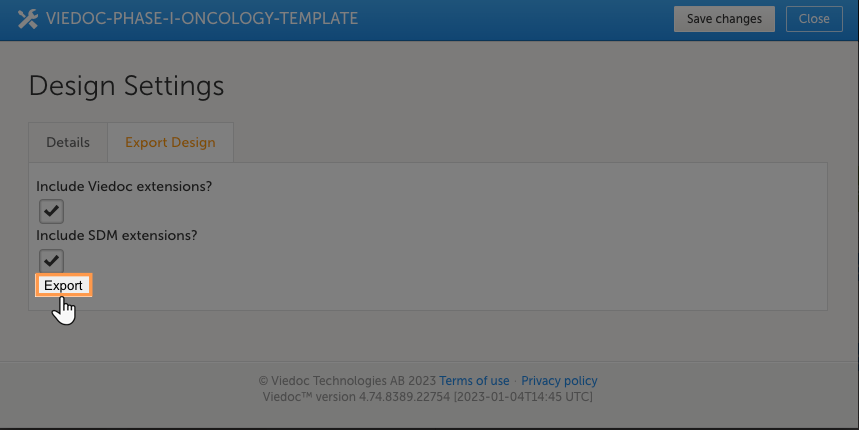
|
| 6 | The ODM file will download. When the ODM file download is complete, open it in a text editor that can read and edit files with the .XML file extension. (For windows users, we recommend Notepad ++. For Mac users, we recommend TextEdit.) |
| 7 |
Open the ODM file in your preferred text editor and search for the variable ID. 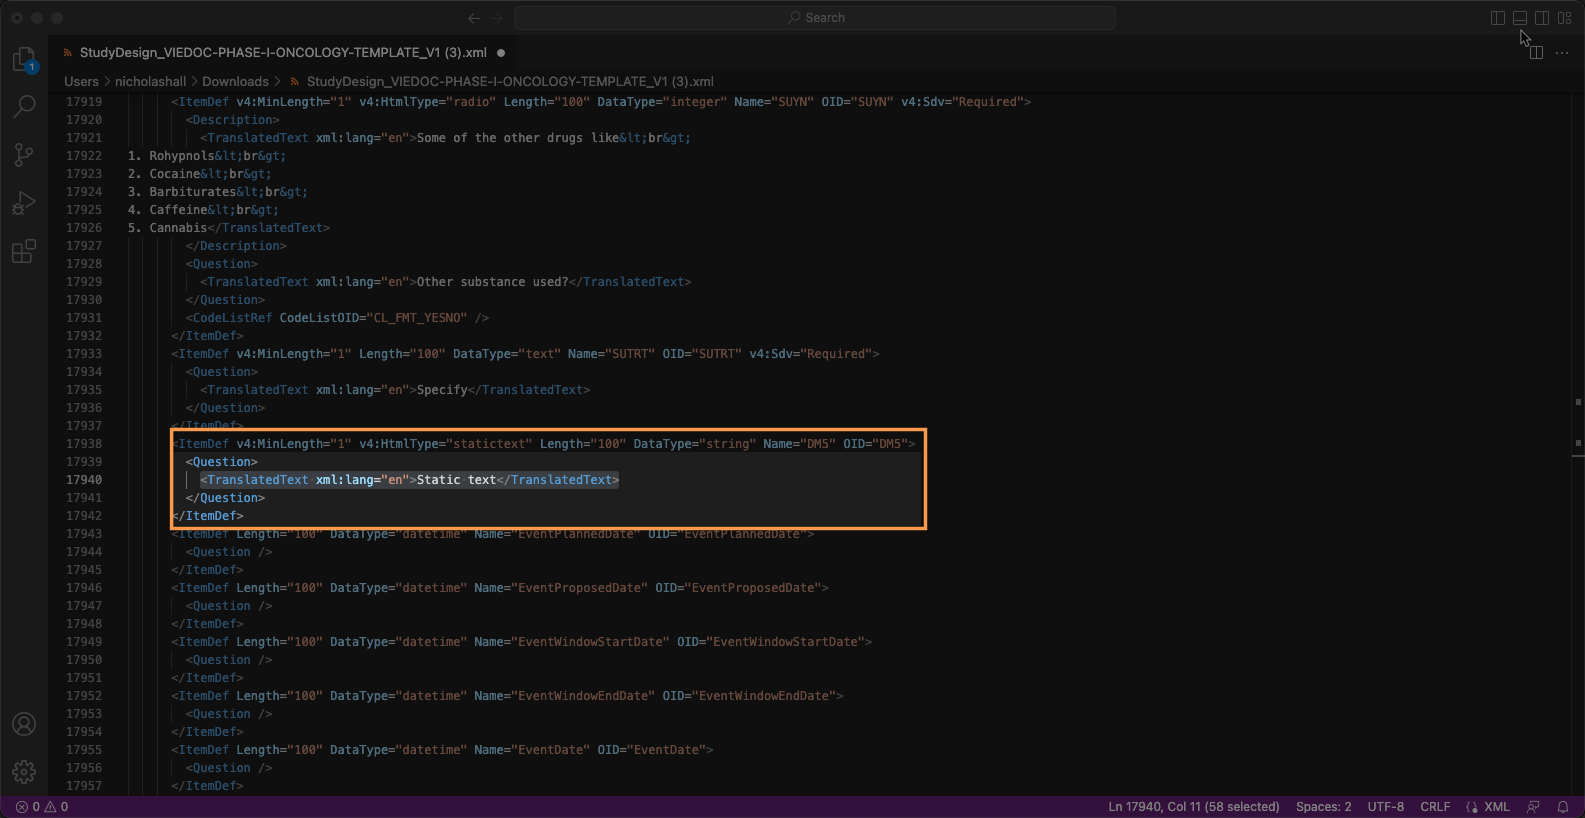
|
| 8 |
When you find the variable ID, replace "Static text" with text that looks like this: The The For example: 
|
| 9 |
After making your changes, save the file. Import the design and check to ensure the link appears on the form. For more information about importing a design, see: Importing a new design version. |
Viedoc supports using the programming language R for custom reports. This lesson lists several custom reports written for our template studies or any studies that follow the Clinical Data Acquisition Standards Harmonization (CDASH) standards. For instructions about how to add custom reports, see Creating Custom Reports.
TIPS!
Details and example images of each report are shown below:
This report displays all ongoing adverse events. This demonstrates a good example of how to filter data based on specific criteria, as well as how to create a report with two sub-reports.
This custom report generates the following output:
Sub-report 'Ongoing AEs': A table of all adverse events (AEs) that are ongoing, sorted by start date (ascending).
Sub-report 'Start Date > 30 days': A table of ongoing AEs with a start date of more than 30 days ago.
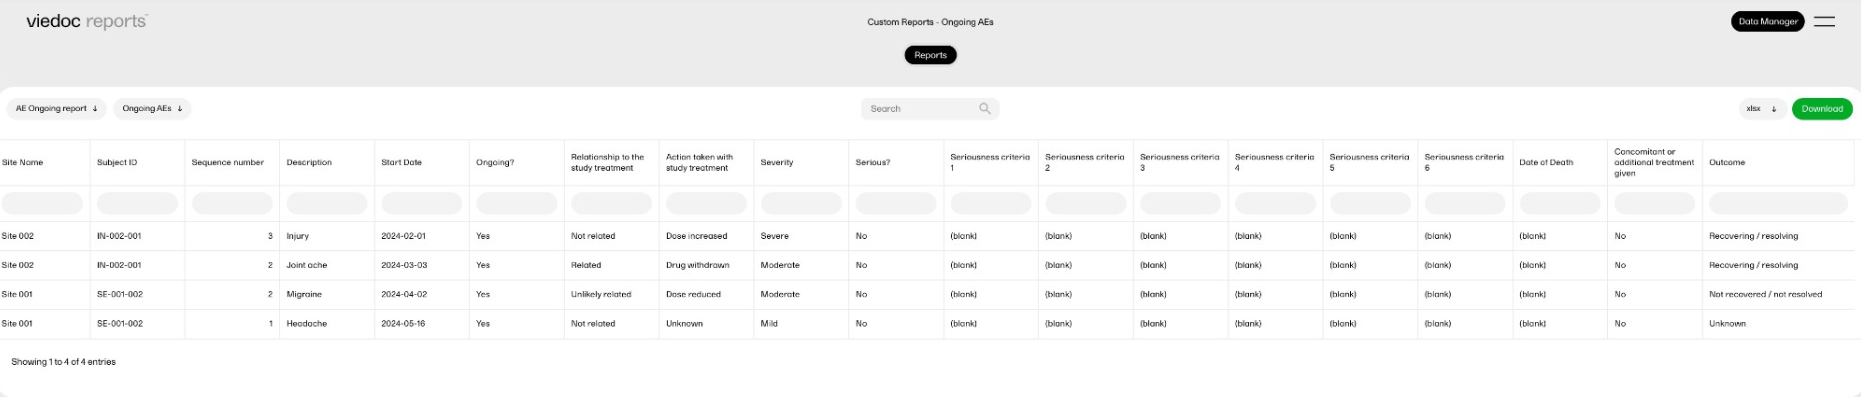
This report displays selected data consisting of adverse events (AEs) that were recorded as treatment-related and serious, and summarizes the data by site.
This custom report generates the following output:
Sub-report 'by Subject': A table of all AEs entered as possibly related to the study treatment and as Serious.
Sub-report 'by Site': A table of the number of AEs fulfilling the above criteria per site.
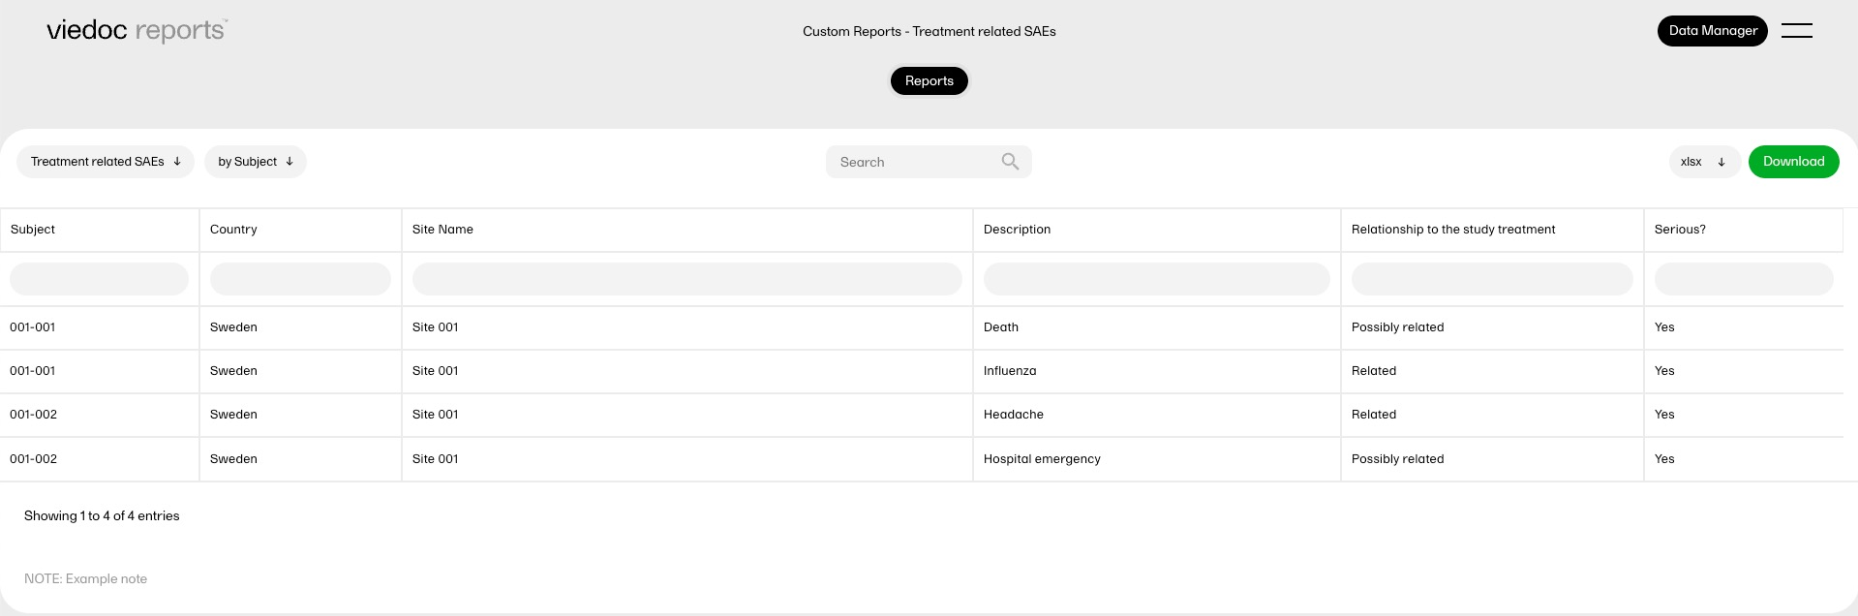
This report displays all the serious adverse events (SAEs) with the corresponding demographic data. It is an example of how data from two different forms can be combined into a single custom report, as well as flag missing data.
This custom report generates the following output:
A table of AEs entered as Serious, combined with the subject's sex and age from the demographic form.
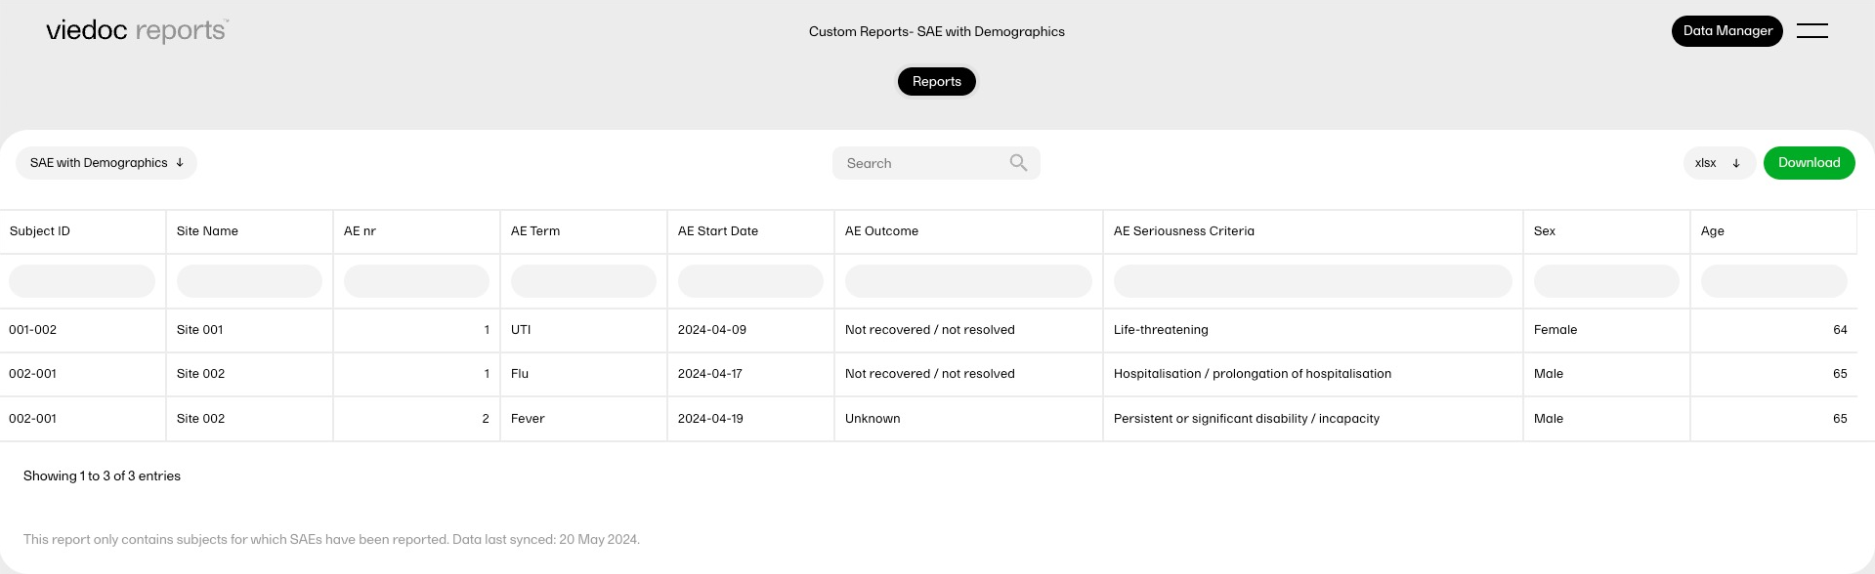
This report displays statistical outliers identified in the data.
This custom report generates the following output:
Sub-report 'Systolic BP': A table listing outliers in the systolic blood pressure data.
Sub-report 'Diastolic BP': A table listing outliers in the diastolic blood pressure data.
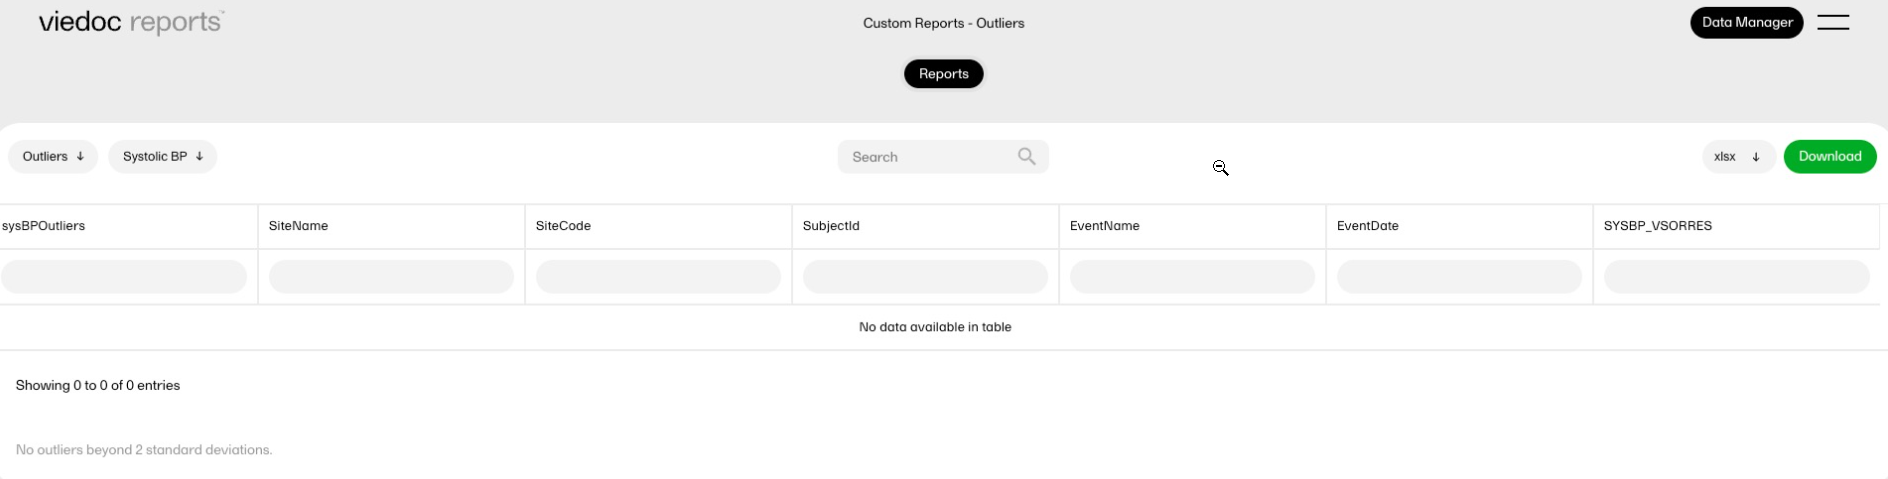
This report calculates the drug accountability between two visits, and displays the calculated values in new columns. It demonstrates how a custom report could be used to calculate scores or other metrics.
This custom report generates the following output:
A table of allocated and returned kits with the expected and the actual returned numbers of tablets.
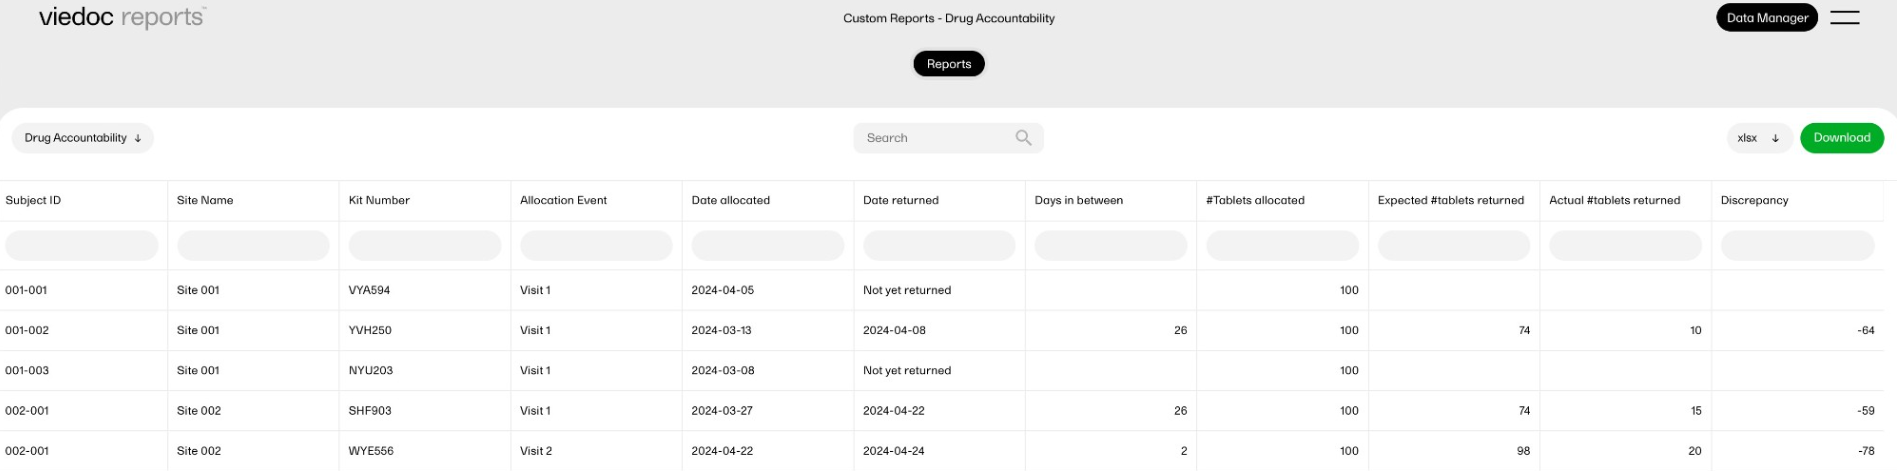
This report compares AEs with concomitant medication (CMs) to check for inconsistencies in data entry. This is something that previously was an offline check that required a manual comparison of the data. This custom report provides a list of the problematic data immediately.
This custom report generates the following output:
Sub-report 'CMs linked to AEs where no meds were prescribed': A table showing the concomitant medication (CMs) entries that are linked to the adverse events entries in which it was reported that no treatments or medications were prescribed.
Sub-report 'AEs where meds were prescribed not linked to CMs': A table showing adverse events entries for which it was reported that treatments or medications were prescribed, but for which no concomitant medications entry exists.
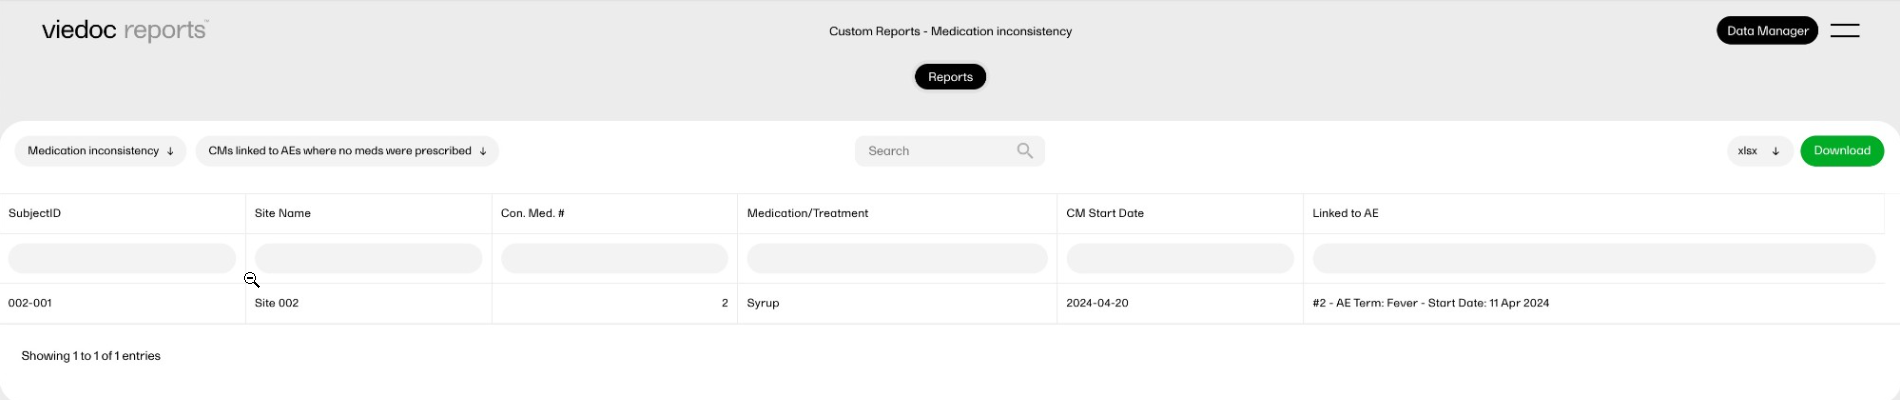
This report displays simple scatter plots using the 'plotly' package.
This custom report generates the following output:
Sub-report 'Mean Arterial Pressure' (MAP): A plot of the calculated MAP.
Sub-report 'Systolic only': A plot of the systolic blood pressure.
Sub-report 'Diastolic only': A plot of the diastolic blood pressure.
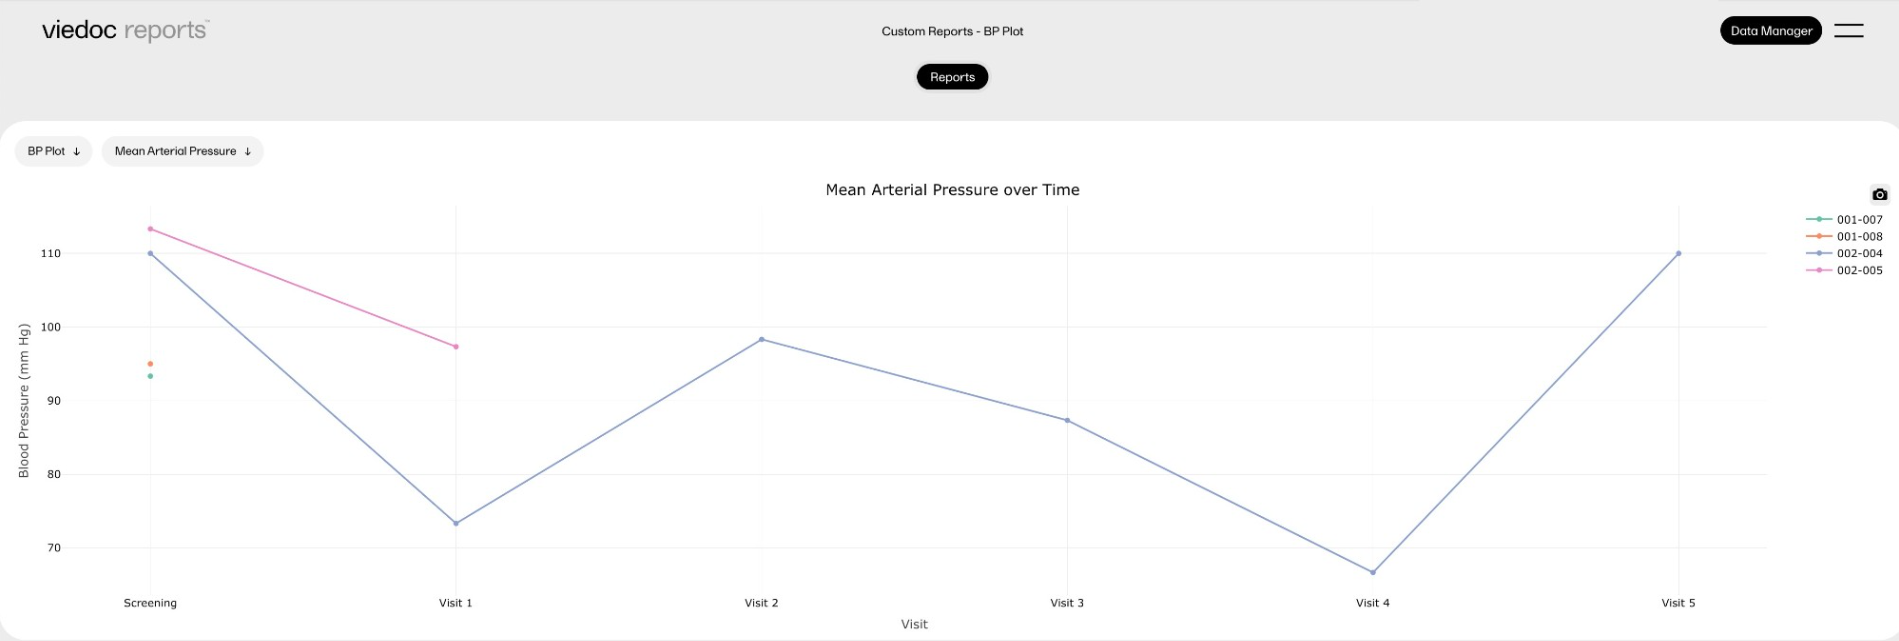
This report displays a survival analysis using the Survival package, as well as a more complicated plot using the 'plotly' package.
This custom report generates the following output:
Sub-report 'Survival Curve': A plot of the Kaplan-Meier model, with 95% confidence intervals.
Sub-report 'Survival Table': A table with the plotted values.
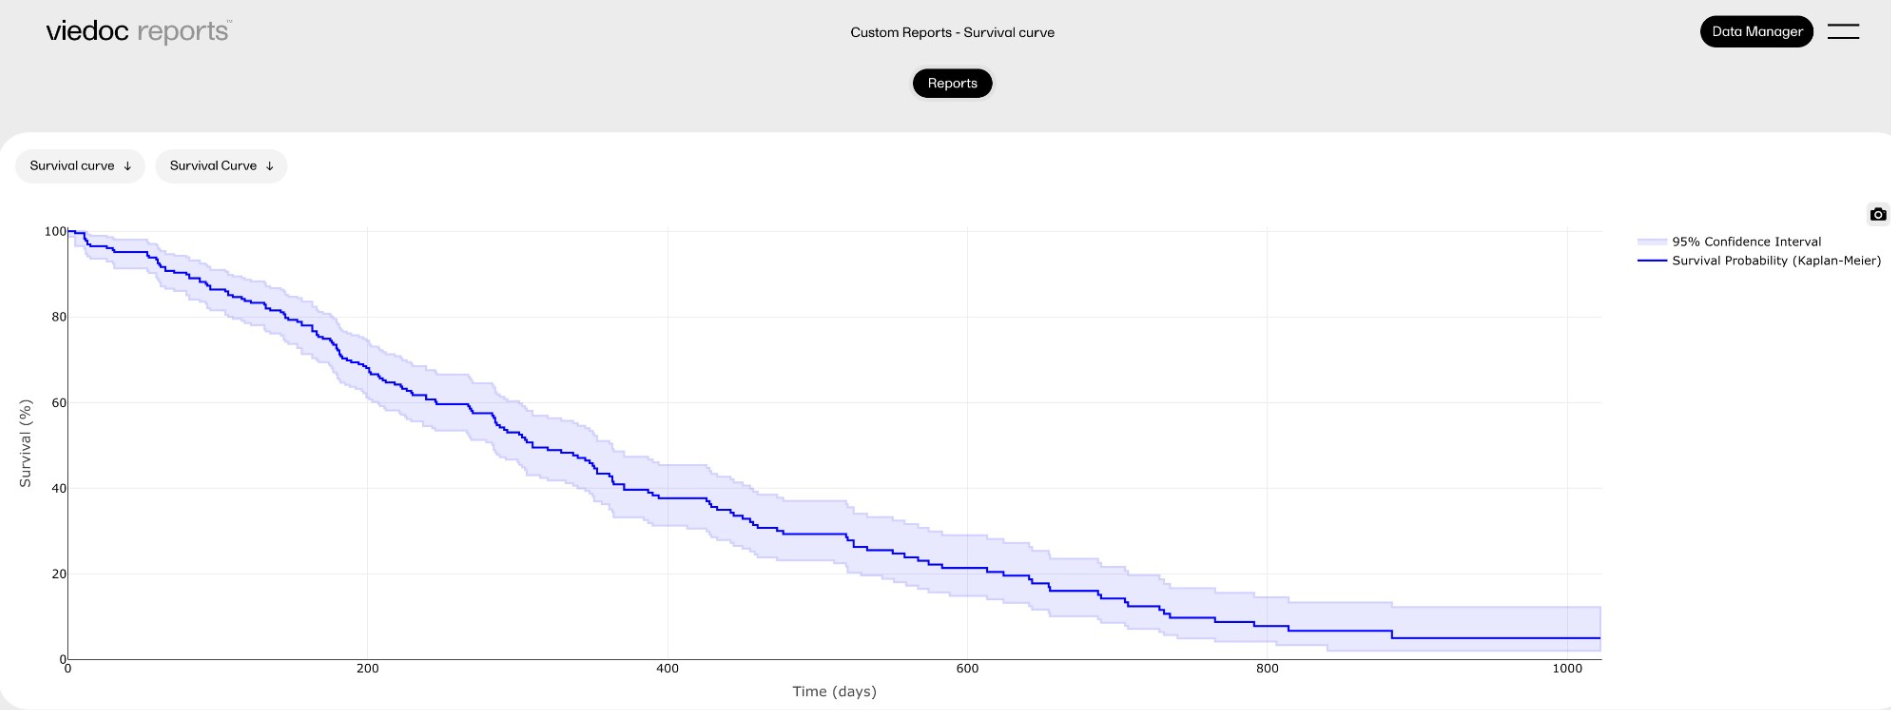
Proper management of blinded data ensures unbiased study outcomes, reduced bias, regulatory compliance, data integrity, and patient safety. Incorrect handling of blinded data can result in accidental unblinding, regulatory findings, and data contamination.
Data can be blinded in several ways in Viedoc. In most cases, it is best to use the dedicated blinding functionality in the RTSM application, but carefully configured role visibilities can also maintain a study blind.
Note! If the role that has the permission for Emergency unblinding also has a role visibility condition that makes the blinded outcome hidden for this role, the outcome gets hidden for all roles after unblinding, and not just for the role specified in Viedoc Designer.
This lesson will describe best practices for handling blinded data in Viedoc.
To ensure the integrity of blinded data in clinical trials, regularly review access logs and settings to verify compliance. The following best practices should be followed in Viedoc:
The Randomization and Trial Supply Management (RTSM) module in Viedoc is designed to handle blinded outcomes securely.
Note! To maintain the integrity of blinded studies, do not allow users to undo allocations. If an allocation is undone, it is returned to the list of kits available to all subjects. If another subject is then assigned the returned kit, then you know both subjects are on the same treatment.
For more information, see RTSM Settings.
Blinded treatment assignments and related data should always be stored separately from general study data.
Role-based visibility settings allow study teams to control data access for different users.
If roles are not properly restricted:
When setting up alerts, all data in the alert (including attachments) will be sent to all users holding the defined roles in To:, Cc:, and Bcc: without respecting the role visibility conditions. Therefore it is important to consider role-based visibility settings and the content of alerts to ensure that blinded data is not disclosed.
Conducting a final review before study activation ensures that blinded data remains secure.
There are some visibility settings and conditions that can be used in Viedoc to make certain fields invisible on forms. However this is not true blinding, and hidden data in these fields will appear in exports and audit trail details.
For example, the Hide Always setting is used to make specific items within a form permanently invisible to users in Viedoc Clinic, while still retaining the data for export and audit trail purposes. However, it is not recommended to use the Hide Always setting to conceal treatment assignments or other blinded data.
This setting only removes the item from the visible form interface but does not prevent the data from appearing in:
Read more about item-level visibility settings here.
To further reinforce best practices for handling blinded data, refer to the following resources:
This video demonstrates how to add a new study in Viedoc Admin, create a simple study design in Viedoc Designer, manage users in Viedoc Admin and enter data as a site user in Viedoc Clinic.
If you have difficulties in viewing the video, click here.
This video demonstrates how to import data into Viedoc using the Viedoc Data Import Application.
If you have difficulties in viewing the video, click here.
For more information, see Viedoc Data Import Application.
This video demonstrates how to work with reference data in Viedoc.
If you have difficulties in viewing the video, click here.
This video demonstrates how to configure a static list randomization and a dynamic randomization in Viedoc.
If you have difficulties in viewing the video, click here.
This video demonstrates how to set up Viedoc Me in Admin and Designer.
If you have difficulties in viewing the video, click here.
This video gives an overview of how to set up Viedoc Logistics to ship your investigational product between sites and depots and how to allocate kits to patients.
If you have difficulties in viewing this video, click here.
This video demonstrates how to use R with Viedoc Reports.
If you have difficulties viewing the video, please click here.
Our Working Smarter webinar series is designed to help Viedoc users get the most out of the platform, from practical tips and feature deep dives to best practices and expert insights. Each session addresses topics for our users including highlighting new features, sharing useful tips, best practices, or deeper insights into specific areas of Viedoc.
Whether you're new to the system or an experienced user, these webinars are here to help you work smarter.
The full list of webinars in Viedoc’s Working Smarter Series, including recordings and Q&A, is provided below.
October 2024
https://help.viedoc.net/l/a29eab/en/
November 2024
https://help.viedoc.net/l/04c262/en/
January 2025
https://help.viedoc.net/l/893419/en/
February 2025
https://help.viedoc.net/l/bb2d9a/en/
March 2025
https://help.viedoc.net/l/027d45/en/
April 2025
https://help.viedoc.net/l/f94362/en/
June 2025
https://help.viedoc.net/l/227838/en/
September 2025
https://help.viedoc.net/l/b01136/en/
November 2025
https://help.viedoc.net/l/f914f3/en/
February 2026
https://help.viedoc.net/l/6c61f9/en/
June 2026
https://help.viedoc.net/l/53c7fb/en/
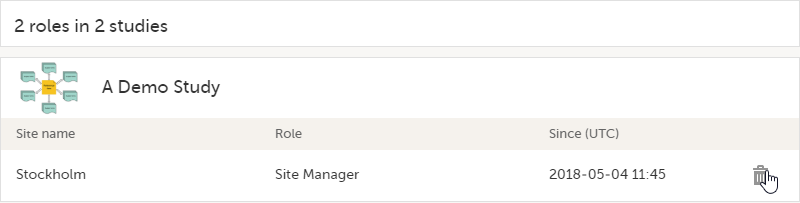
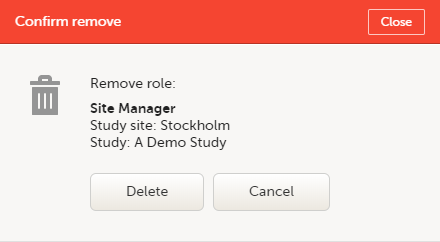
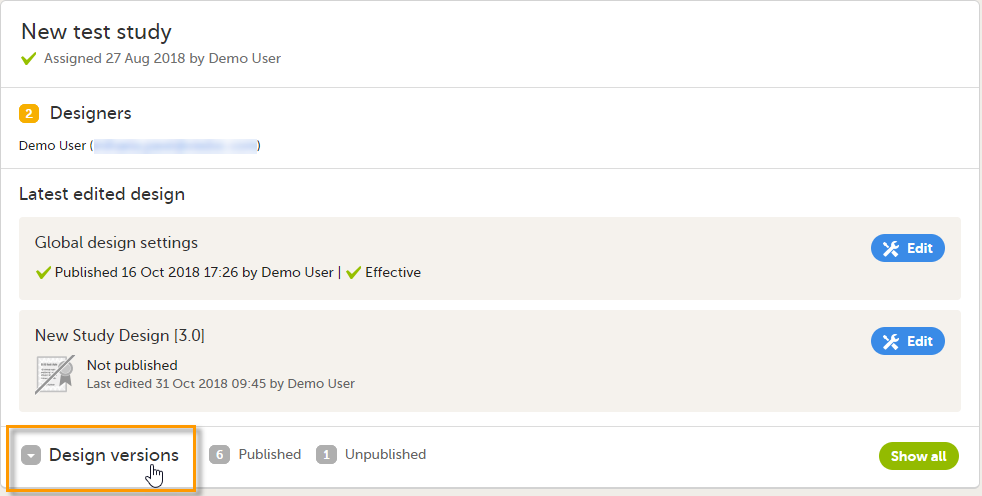
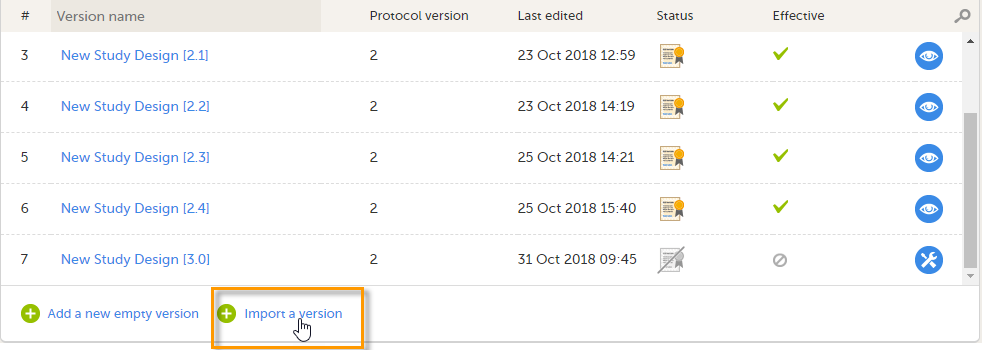
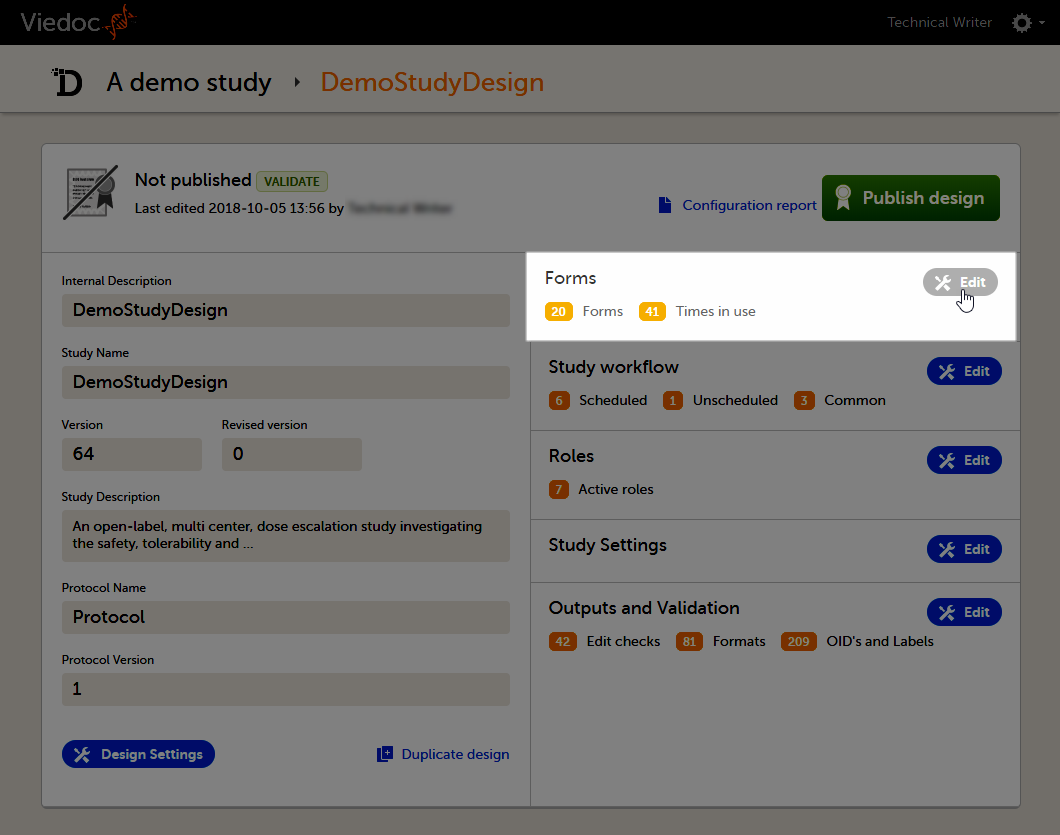 The Forms page opens.
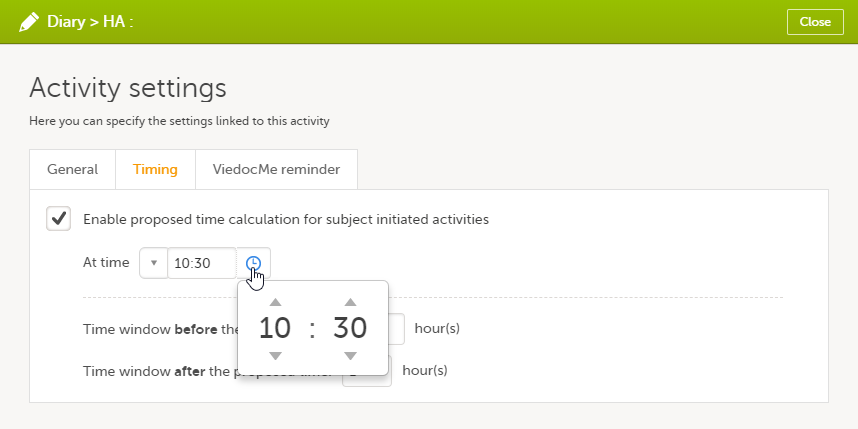 The default time is 00:00. If you want to start all over, click the drop-down list and select Reset to return to the default time.
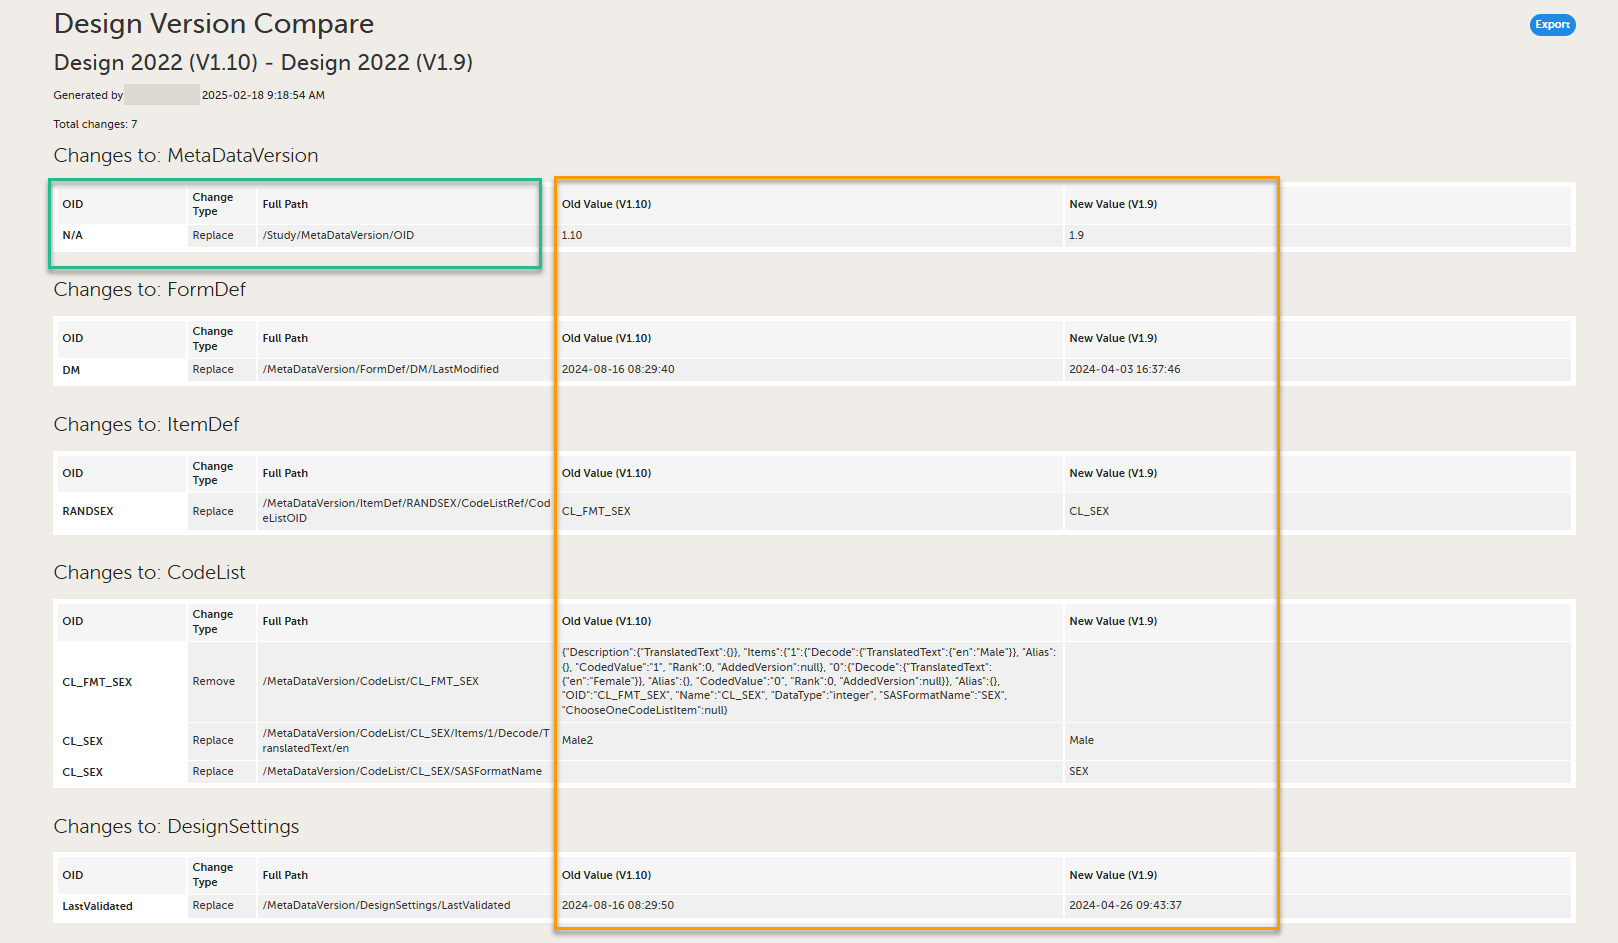
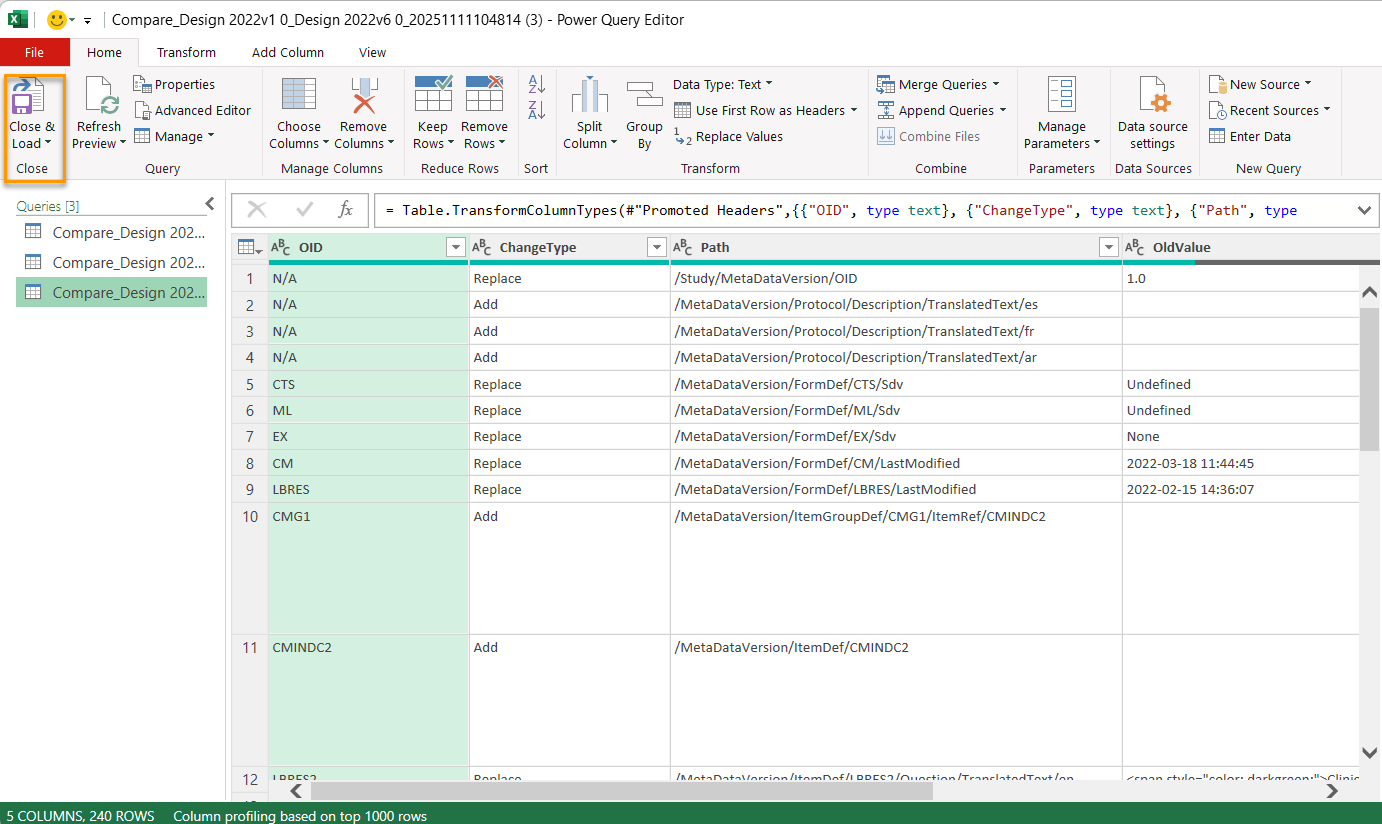
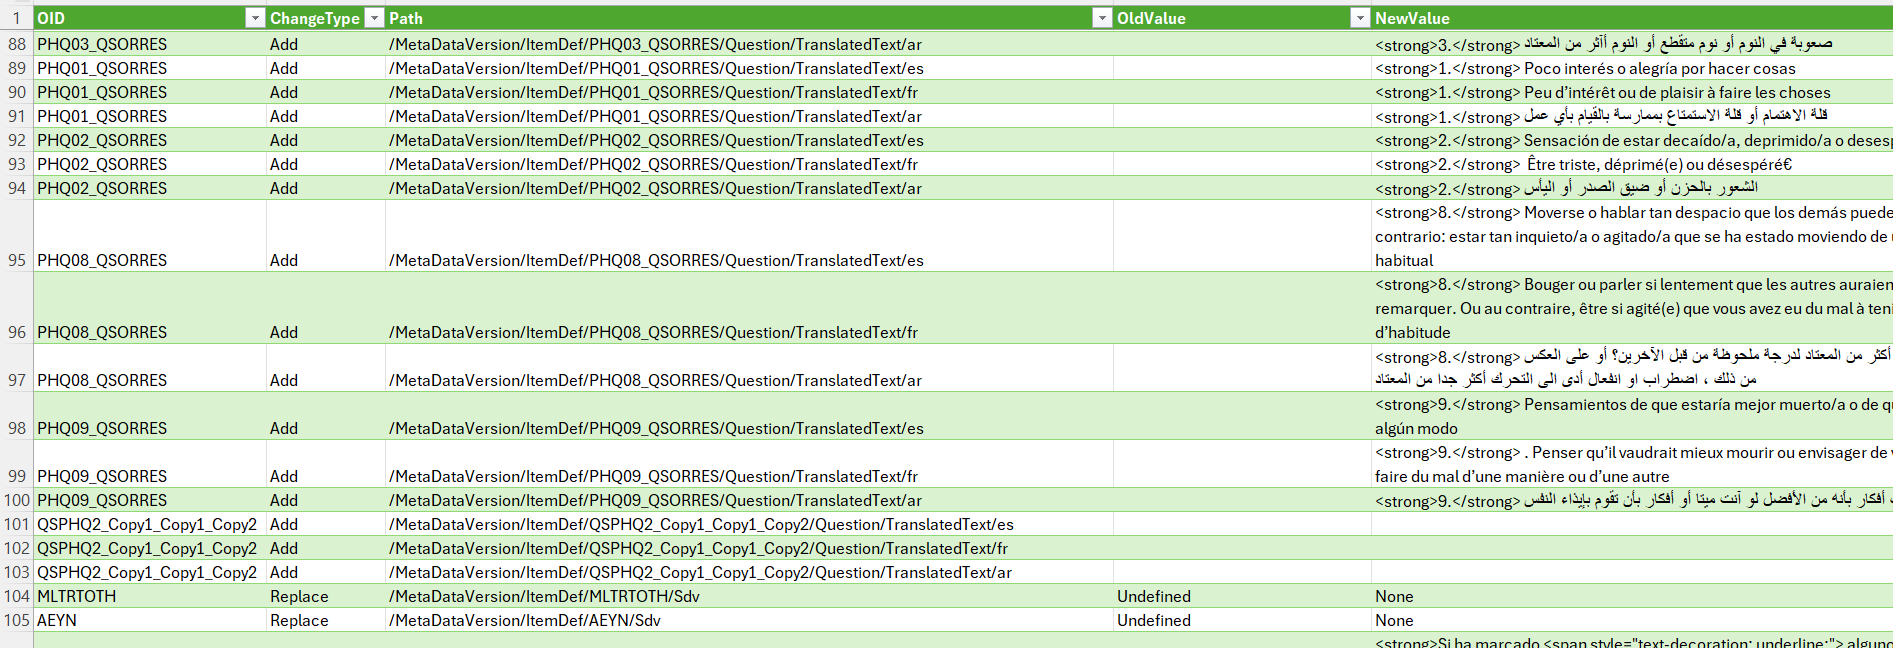
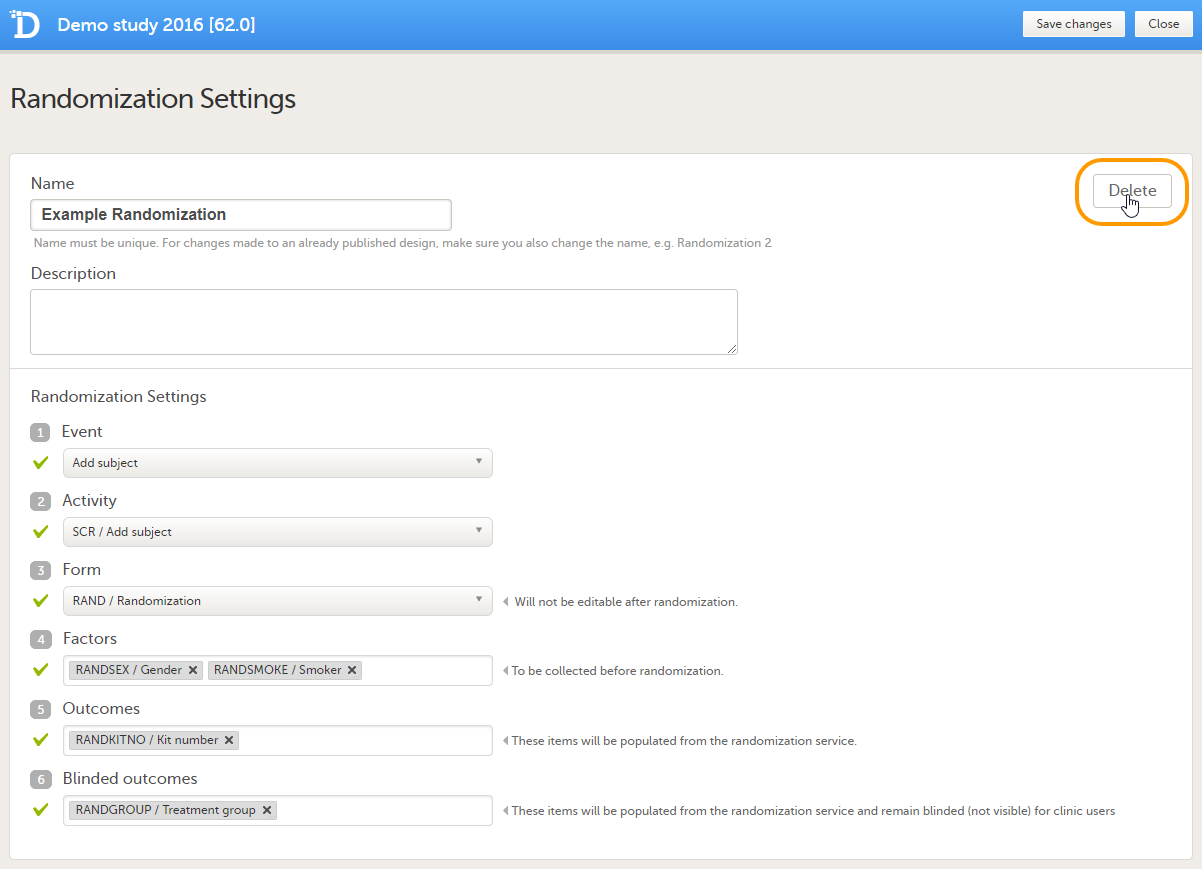 A pop-up opens that asks you to confirm deletion. Click Delete to confirm.