Viedoc Data Import Application
Introduction
Viedoc offers the possibility to import data, for example laboratory data, into your study in Viedoc using the Viedoc Data Import Application. When importing data, the Viedoc Data Import application does the following:
- It converts the provided data into Operational Data Model (ODM) format using a data mapping file, and
- It pushes the data into Viedoc through the Viedoc Application Programming Interface (API).
This document describes how to import data into Viedoc using the Viedoc Data Import Application. It describes the data import procedure in general, and provides instructions for the following steps:
- Downloading the data mapping file in Clinical Data Interchange Standards Consortium Define Extensible Markup Language (CDISC Define-XML) format from Viedoc Designer.
- Creating a Viedoc API client ID in Viedoc Admin. For information, see API configuration.
- Creating a configuration file.
- Preparing the work folder.
- Downloading the Viedoc Data Import Application.
- Dropping data into the work folder.
- Running the Viedoc Data Import Application.
More information
This document does not describe how to create the data mapping file in CDISC Define-XML format. Instructions on how to create a data mapping file can be found in Creating a data mapping for import of data.
More information on importing data into Viedoc can be found in our video tutorial.
More information about server instances can be found in Guide to Viedoc server instances
Note! It is only possible to import values (choice numbers), and not strings (choice labels), when importing data into data fields where multiple checkboxes can be checked.
About importing data into Viedoc
The Viedoc Data Import Application
Viedoc offers the possibility to import data into forms, for example laboratory data, via the Viedoc Data Import Application.
To import data into Viedoc, the Viedoc Data Import Application first converts the supplied data into ODM clinical data format. To do this, the application needs:
-
A data mapping file, which will be used to translate the supplied data into ODM format,
-
A configuration file,
-
The data file containing the data to be imported into Viedoc. The data file should be a delimited file. Comma-Separated Values (CSV) files are supported as default; any other file delimiter can be used by specifying the delimiter of choice in the configuration file.
Then, the Viedoc Data Import Application pushes the ODM clinical data into Viedoc through the Viedoc API. To do this, the application needs:
-
A Viedoc user name and password with access to role appropriate permissions.
-
A study-specific Viedoc API client key.
You can download the latest version of the Viedoc Data Import Application from the Data mappings window in Global design settings in Viedoc Designer. For instructions, see section 3.6 Downloading the Viedoc Data Import Application.
Note! From the Viedoc 4.92 release, the Viedoc Data Import Application supports mapping data to ItemGroupDefId and ItemGroupRepeatKey in the data mapping file. As a result of this change, the Import Application can take advantage of the extended support in the Viedoc WCF API and import CSV data into repeating item group structures.
This Viedoc Data Import Application version is required when importing data into repeating item groups.
The data mapping file
The data mapping file defines how the external data are mapped into form items in Viedoc. It describes each column of the data file to be imported, and the destination of the data in Viedoc.
The data mapping file is created in Global design settings in Viedoc Designer. Internally, the data mapping is stored in CDISC Define-XML format. For each type of data file to be imported, a separate data mapping file should be created.
For instructions on how to create a data mapping file, see Creating a data mapping for import of data.
The configuration file
The configuration file defines the following:
-
which Viedoc studies the data should be imported into,
-
where to find the data mapping file,
-
where to find the data file containing the data that should be imported,
-
which API instance the data should be imported into (v4, v4training, v4jp and so on),
-
the login credentials that should be used when importing the data.
The above information is mandatory to define in the configuration file. Optionally, you can use the configuration file to define the following:
-
whether you would like new subjects to be created automatically during the data import, when the imported data contain data for a subject that has not been added to the study yet,
-
whether you would like events to be initiated during the data import, when the imported data contain data for events that have not been initiated yet,
-
which character encoding should be used, when the imported file is read, and
-
which file delimiter should be used, when the imported file is parsed.
The configuration file is an XML file that can be created in any text editor. One configuration file can contain the import configurations for multiple import projects and studies.
For instructions on how to create a configuration file, see section 3.5 Creating a configuration file and prepare the work folder.
Importing data into Viedoc using the Viedoc Data Import Application
Introduction
This section provides instructions for importing data into Viedoc using the Viedoc Data Import Application.
Creating a data mapping file
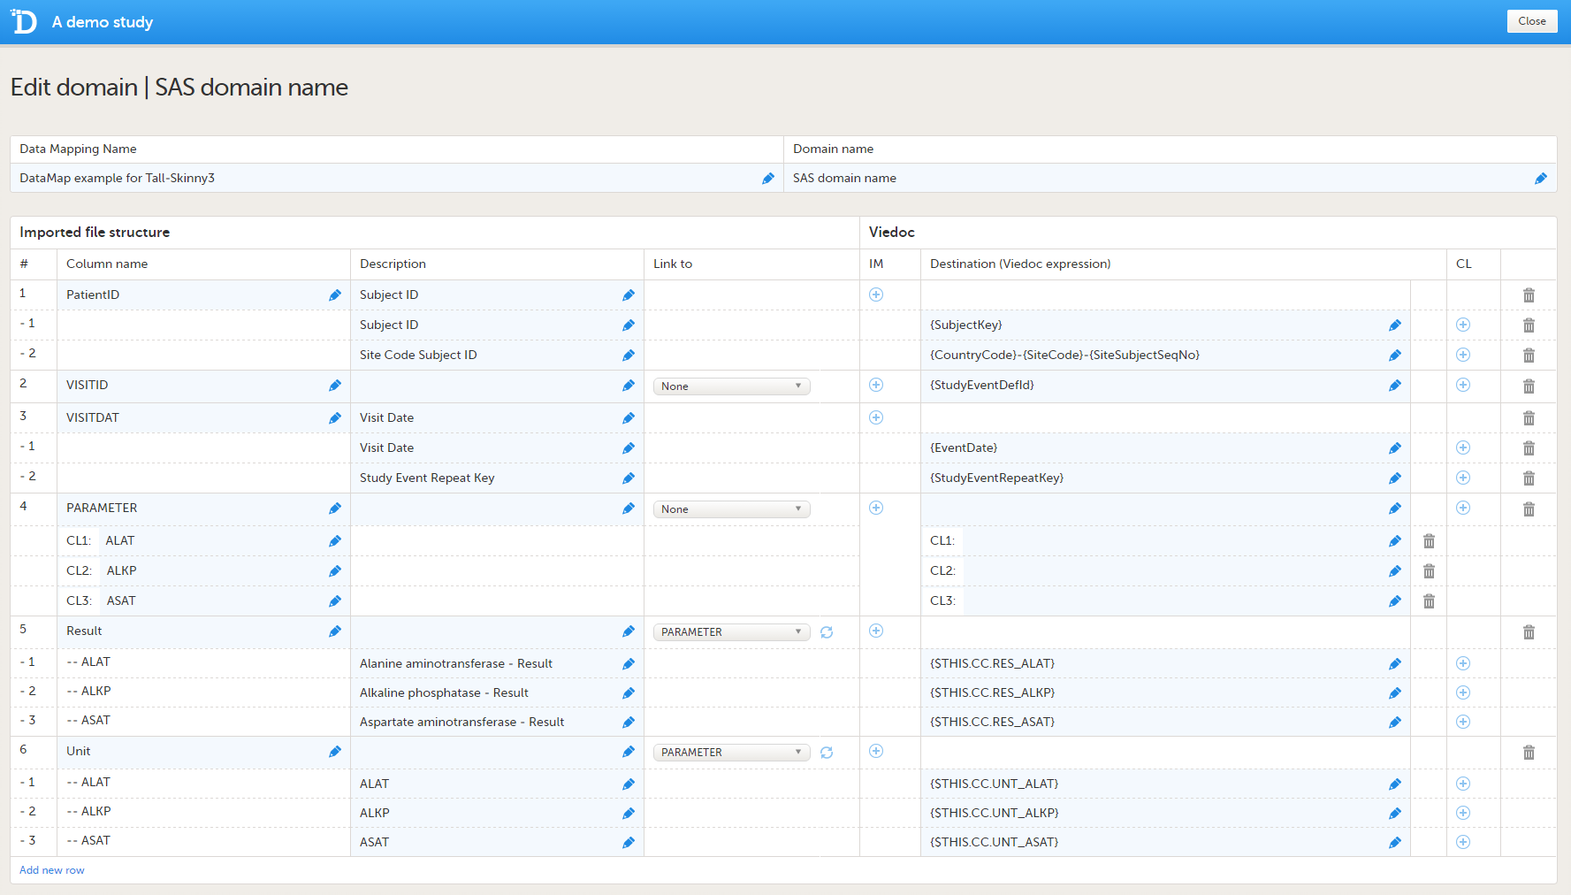
Create a data mapping file in Viedoc Designer according to the instructions in Creating a data mapping for import of data. In the data mapping file, every column of the data file should be mapped to the corresponding form item in Viedoc. You need one data mapping file for each type of data file that you wish to import.
When all the columns in the data file are mapped, save the data mapping, and publish the changes in the Global design settings window.
Downloading the data mapping file
Download the data mapping file as follows (see also the instructions in Data mapping for import of data in the eLearning):
| 1 | In the Data mappings field, click Edit to open the data mappings overview. |
| 2 | Click the Download icon behind the data mapping that you just created. An XML file will be downloaded that contains the data mapping. |
Creating a Viedoc API client ID
See API configuration.
Creating a configuration file and preparing the work folder
Creating a folder structure on your computer
To create a folder structure to store the configuration file, the data mapping file, and the data to be imported:
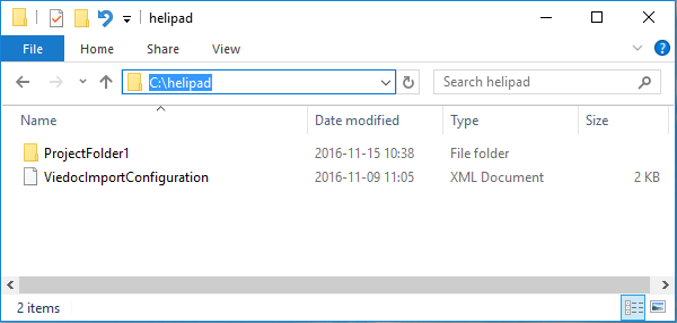
- Create a work folder on your computer.
In the example used for this document, a work folder called "helipad" is directly created on the C-drive, see also section 3.5.3 An example of a correct folder structure. - Within the work folder, create one subfolder (project folder) for each import project,
for example "ProjectFolder1". -
Save the data mapping file in the respective project folder within the work folder.
Creating the configuration file
To create the configuration file:
| 1 |
In your text editor of choice, create an XML file according to the following example (copy and paste the text if necessary):
|
| 2 |
Edit the XML tags and specify the following information. Note! All XML tags are case sensitive! The a) b) c) For the EU, the URL is:
For Japan, the URL is:
For China, the URL is:
For the USA, the URL is:
d) e) f) g) h) i) j) Note that the The |
| 3 | If you would like to import multiple types of data files, add a new <ImportConfiguration> section for each type of data file, and edit the XML tags as described in step 2. |
| 4 | Save the configuration file in the work folder. |
|
Name |
Type of encoding |
|---|---|
| gb2312 | Chinese SImplified (GB2312) |
| utf-16 | Unicode |
| unicodeFFFE | Unicode (Big endian) |
| Windows-1252 | Western European (Windows) |
| x-mac-korean | Korean (Mac) |
| x-mac-chinesesimp | Chinese Simplified (Mac) |
| utf-32 | Unicode (UTF-32) |
| utf-32BE | Unicode (UTF-32 Big endian) |
| us-ascii | US-ASCII |
| x-cp20936 | Chinese Simplified (GB2312-80) |
| x-cp20949 | Korean Wansung |
| iso-8859-1 | Western European (ISO) |
| iso-8859-8 | Hebrew (ISO-Visual) |
| iso-8859-8-1 | Hebrew (ISO-Logical) |
| iso-2022-jp | Japanese (JIS) |
| csISO2022JP | Japanese (JIS-Allow 1 byte Kana) |
| iso-2022-jp | Japanese (JIS-Allow 1 byte Kana - SO/SI) |
| iso-2022-kr | Korean (ISO) |
| x-cp50227 | Chinese Simplified (ISO-2022) |
| euc-jp | Japanese (EUC) |
| EUC-CN | Chinese Simplified (EUC) |
| euc-kr | Korean (EUC) |
| hz-gb-2312 | Chinese Simplified (HZ) |
| GB18030 | Chinese Simplified (GB18030) |
| x-iscii-de | ISCII Devanagari |
| x-iscii-be | ISCII Bengali |
| x-iscii-ta | ISCII Tamil |
| x-iscii-te | ISCII Telugu |
| x-iscii-as | ISCII Assamese |
| x-iscii-or | ISCII Oriya |
| x-iscii-ka | ISCII Kannada |
| x-iscii-ma | ISCII Malayalam |
| x-iscii-gu | ISCII Gujarati |
| x-iscii-pa | ISCII Punjabi |
| utf-7 | Unicode (UTF-7) |
| utf-8 | Unicode (UTF-8) |
An example of a correct folder structure
In the configuration file of the example above, the work folder is C:\helipad. The work folder contains the project folder ProjectFolder1 and the configuration file ViedocImportConfiguration.xml.
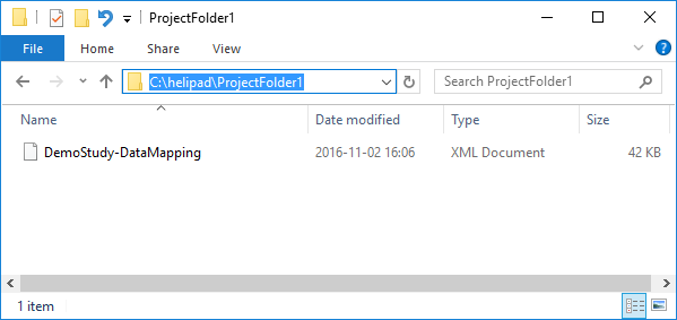
The data file(s) containing the data to be imported should also be saved in the project folder.
Downloading the Viedoc Data Import Application
Note! The Data Import Application only works for Windows OS and not Linux or Mac.
To download and install the Viedoc Data Import Application:
| 1 | In the Global design settings in Viedoc Designer, click the Edit icon in the Data mappings field to open the Data mappings window.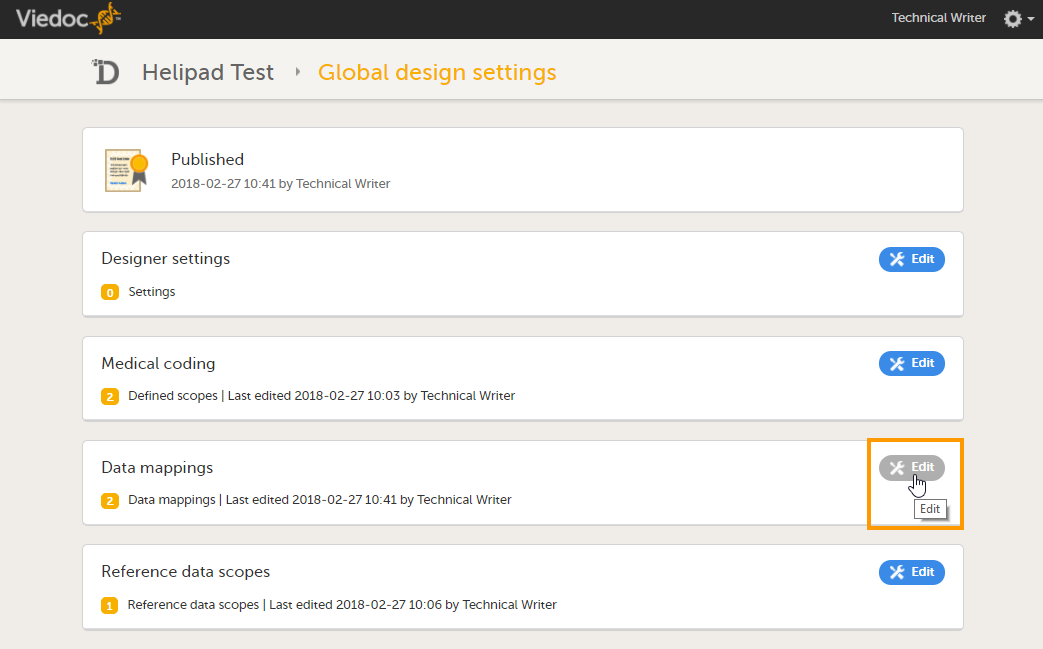 |
| 2 | Click Download Viedoc Import Application to download the installation file. A zip file is downloaded. 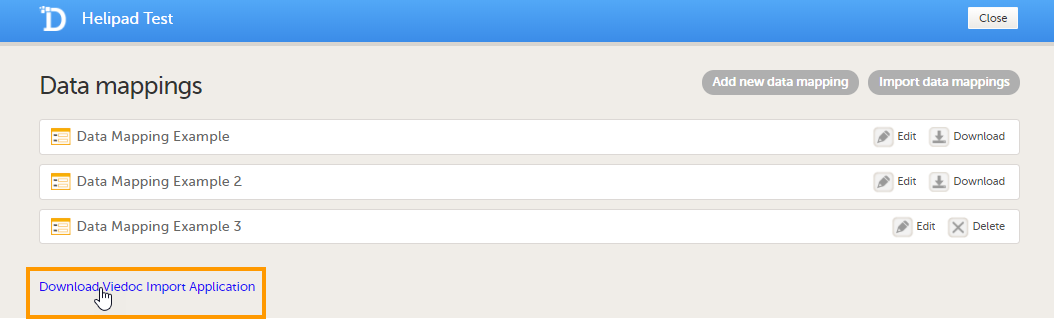 |
| 3 | Save the zip file on any location on your computer and extract the contents. |
Dropping data into the project folder
Save the data file containing the data to be imported in the project folder.
Running the Viedoc Data Import Application
To run the application and import the data:
| 1 | Double-click the Viedoc Data Import Application icon to start the application. When starting the application for the first time, the following window appears: 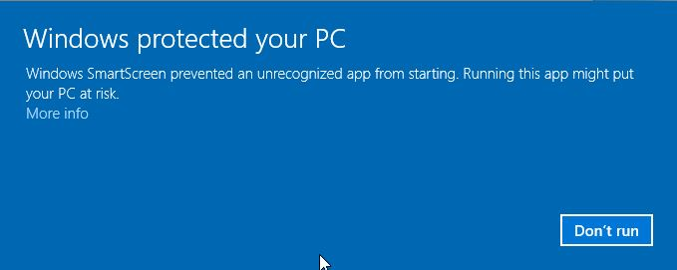
|
| 2 |
Click More info, and then click Run anyway.

|
| 3 | Enter the path to the configuration file, for example: C:\helipad\ViedocImportConfiguration.xml, and press Enter. The application imports the data in the data file into Viedoc, and moves the data file into an archive folder within the project folder (the systems creates the archive folder automatically, if it has not created one yet). |

When the application is run, it goes through all the project folders that are specified in the configuration file, and imports the data of all the data files found in these project folders. If no data files are found in a specific project folder, that project is skipped.
After the import, the application closes automatically.
You can monitor the status of the import in Viedoc Admin. To do this, click the Edit icon in the API configuration field in Viedoc Admin to open the API configuration window. The Submit data History list displays which client ID is used for the import, the date and time of the import, and the status. The contents of the data import and a log file can be downloaded.
Importing more data
Whenever you have new data to import, save the data file in the respective project folder and run the application again by double-clicking the Viedoc Data Import Application icon.
You can edit the configuration file at any time to add, edit, or remove import projects.
About the password
If you have specified a password in the configuration file, the Viedoc Data Import Application replaces this password with an encrypted password when running the application for the first time. The encrypted password is saved in the configuration file.
If you have not specified a password in the configuration file, the application asks you for a password upon start-up.
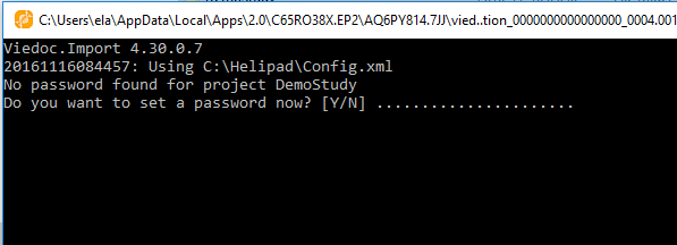
To enter a password, press Y (yes), type your password and press Enter. Type your password again and press Enter. The system will save your password as an encrypted password in the configuration file.
If you press N (no), or do not press anything for 15 seconds, or enter the wrong password, the application cannot login and does not import any data. The application displays Error logging in: Invalid userName or password.
If you have changed your Viedoc password, replace the old password in the configuration file with the new password and save the configuration file. The next time the Viedoc Data Import Application is run, the new password will be used to login and import the data.
Automating import through the Task Scheduler
Please see this link for instructions on how to automate imports through the Task Scheduler.