Configuring subject-initiated (Viedoc Me) events
Introduction
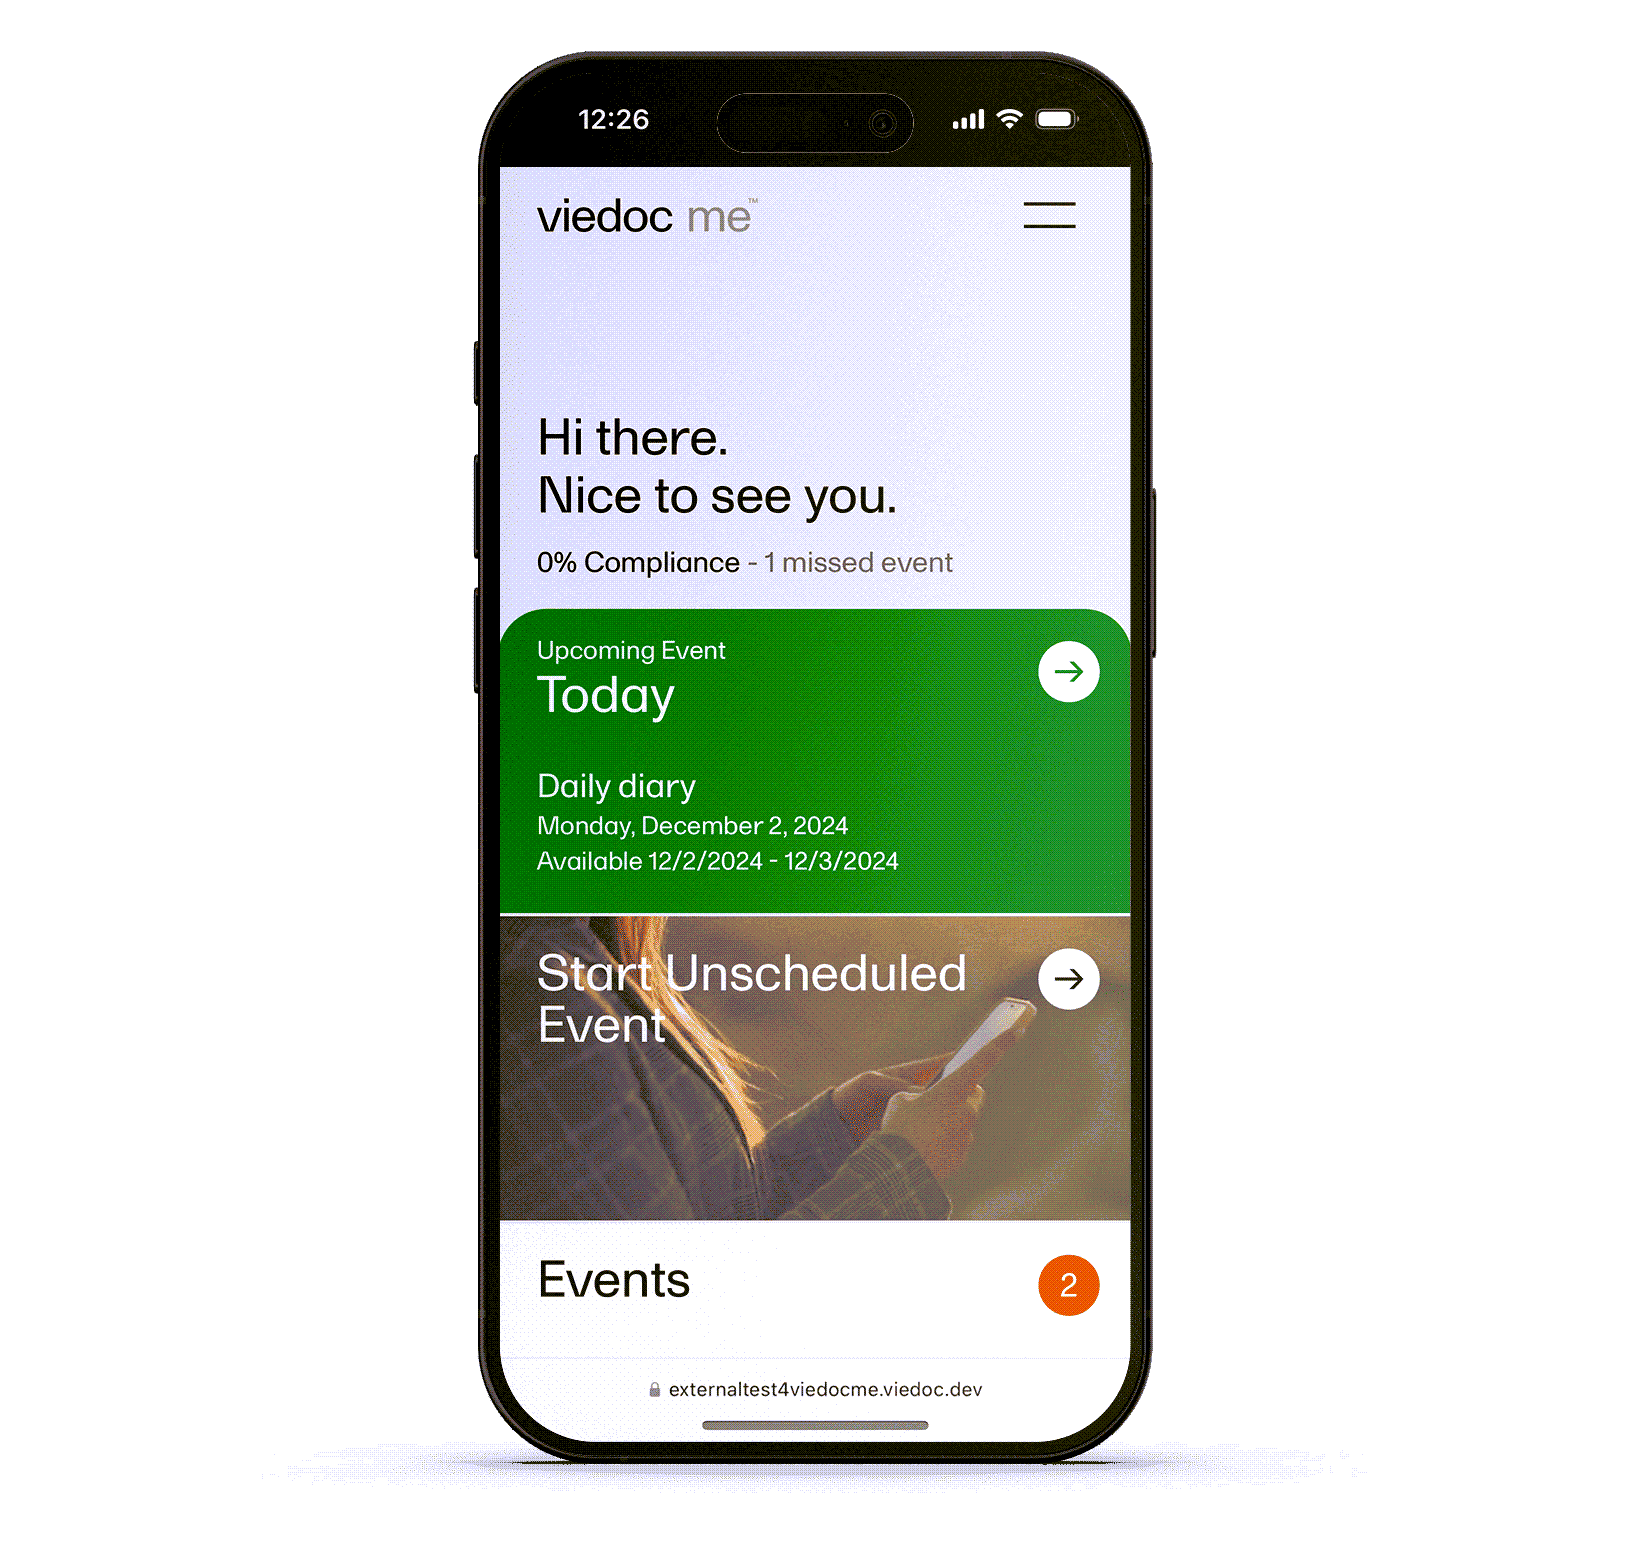
Viedoc Me is Viedoc's Electronic Patient Reported Outcome (ePRO) application. Viedoc Me is activated in a study simply by setting an event to subject-initiated in the study workflow. Thus, Viedoc Me is set up in the same designer application as the standard forms. A license is needed to use Viedoc Me but a license is not required for designing events.
Note! Only user roles with editing permissions for the study start event form can activate a Viedoc Me account. If you do not have editing permissions, the phone icon (as seen in the image below) will not be visible on the Details page.

To understand how Viedoc Me operates for the end users, please read the following eLearning:
- Managing Viedoc Me (for site staff)
- Using Viedoc Me (information for study participants) version 4.70 and earlier
- Using Viedoc Me (information for study participants)
System languages
In Viedoc Me, the standard items are translated by Viedoc, such as the Back and Next buttons. Other texts in the forms are translated by the Designer, see Managing translations.
For a list of the supported Viedoc Me languages, see System languages. If another language is required, please contact support weeks in advance.
Note!
- The user’s language settings in their internet browser can affect how Viedoc Me is shown. If Viedoc Me’s system language does not appear in the correct language, have the user check the settings in their browser.
Designing subject-initiated events
Creating a form
The form is created just like any other form, however, there are a few differences to a standard form as described below. For general information on creating a form, see Creating and editing forms.
Notes!
- Groups and items in subject-initiated events must be editable by all roles. They cannot have specific roles set for edit permission.
- When creating forms for Viedoc Me, visibility conditions can only include variables that have already been introduced, and that are in the same form and on the same page. This behavior differs from the behavior in Viedoc Clinic.
Language
When creating the Viedoc Me forms, the language should be the same as for the standard forms. It is not necessary to create another form for every language that is to be used in the study, doing so would split the database. Multiple translations can be uploaded for a single form and a specific language is activated when a user selects that language. That way, all languages consolidate to the same form.
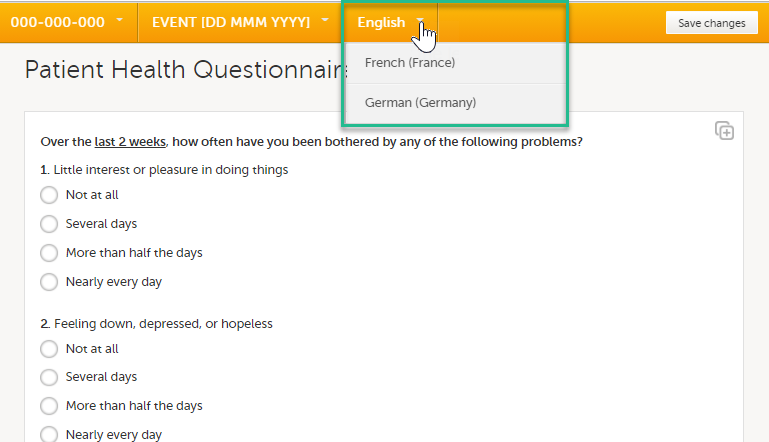
You can see your translated Viedoc Me forms by selecting a language in the form preview:
Excel and CSV exports show the form as configured in Designer (and seen in Clinic), while PDF exports show the form in the language used by the user.
Item groups as pages
Each item group will show as a new page when the form (questionnaire) is viewed by the study participant.
VAS
The Visual Analog Scale (VAS) displays a scale with a slider in Viedoc Me and not a numeric field as in Viedoc Clinic.
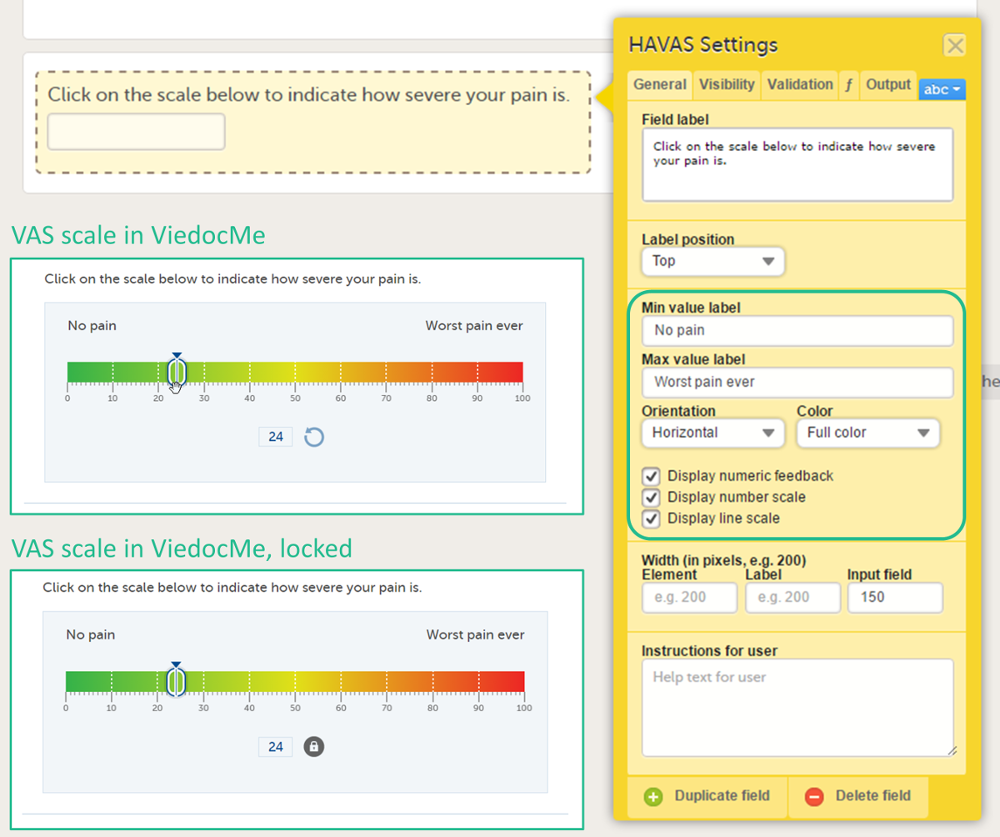
By selecting on the scale or by moving the slider, a subject can indicate how severe the pain or symptoms are. Selecting the reset button will remove the slider and clear the numeric value. The slider will reappear when the user clicks on the scale. Once the Viedoc Me questionnaire has been submitted, the slider is disabled and the reset button is replaced by a lock.
If you want to ensure that the VAS is displayed at 10 cm, we recommend the use of an iPad Mini (in horizontal orientation) for filling out Viedoc Me questionnaires.
Image
To add an image, see How to add an image to a form in Viedoc.
File upload
The File upload item allows the subject to upload a file to the form. The maximum allowed file size is 512 MB for Viedoc Me forms.
Drawing pad
The drawing pad item allows Viedoc Me users to make drawings and submit them to Clinic. The drawings are saved as files and can be downloaded in Clinic just like the File upload items.
Three background options are available when designing the drawing pad:
- Empty: displays a completely empty drawing area where the user can make free drawings.
- Full body: displays a human body viewed from the front and back that the user can draw upon.
- Signature: displays an empty line where the user can draw their signature.
Data checks, functions, queries, and default values
Data checks, functions, queries, default values and forms with form link items are not supported in Viedoc Me forms.
Including the form in an event
When the form is created, it needs to be placed within an activity, just like any other form. You also need to select the source as Subject initiated in the Study event settings.
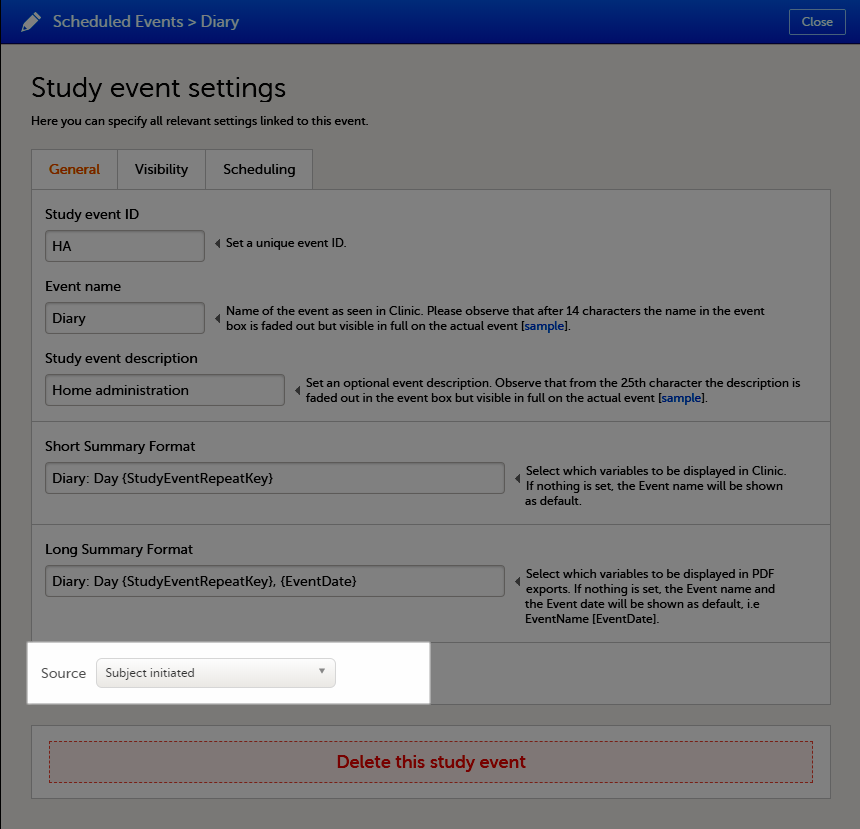
If at least one of the events in the study workflow is marked as subject-initiated, the mobile phone icon will appear on the Details page in Viedoc Clinic, given that the study license has got Videoc Me enabled. The clinic user selects this icon to initiate a Viedoc Me account for the subject.
Note!
- Forms to be completed by the clinic cannot be mixed with Viedoc Me questionnaire forms in the same event, so you need to create a separate subject-initiated event for Viedoc Me forms.
- The study start event and the first event under scheduled events cannot be subject-initiated events.
- Scheduled subject-initiated events must have the scheduling enabled (Enable proposed date calculation) in order to appear in Viedoc Me. If an event cannot be scheduled, it is per definition an unscheduled event, and should be designed as such.
Scheduling subject-initiated events
Subject-initiated events can be scheduled on two levels:
- On event level, to set the date that the event shall occur.
- On activity level, to set the time that the activities shall occur. This means that you can schedule an event on a date, and then schedule for example three activities during the day to happen (morning/lunch/evening):

To schedule a subject-initiated event:
| 1 |
Select the pen icon to open the activity settings window. 
The activity settings window opens. |
| 2 |
On the Timing tab, select the checkbox for Enable proposed time calculation for subject initiated activities. Select the clock icon and enter a time at which the Viedoc Me questionnaire is to be available for the subject to fill in. 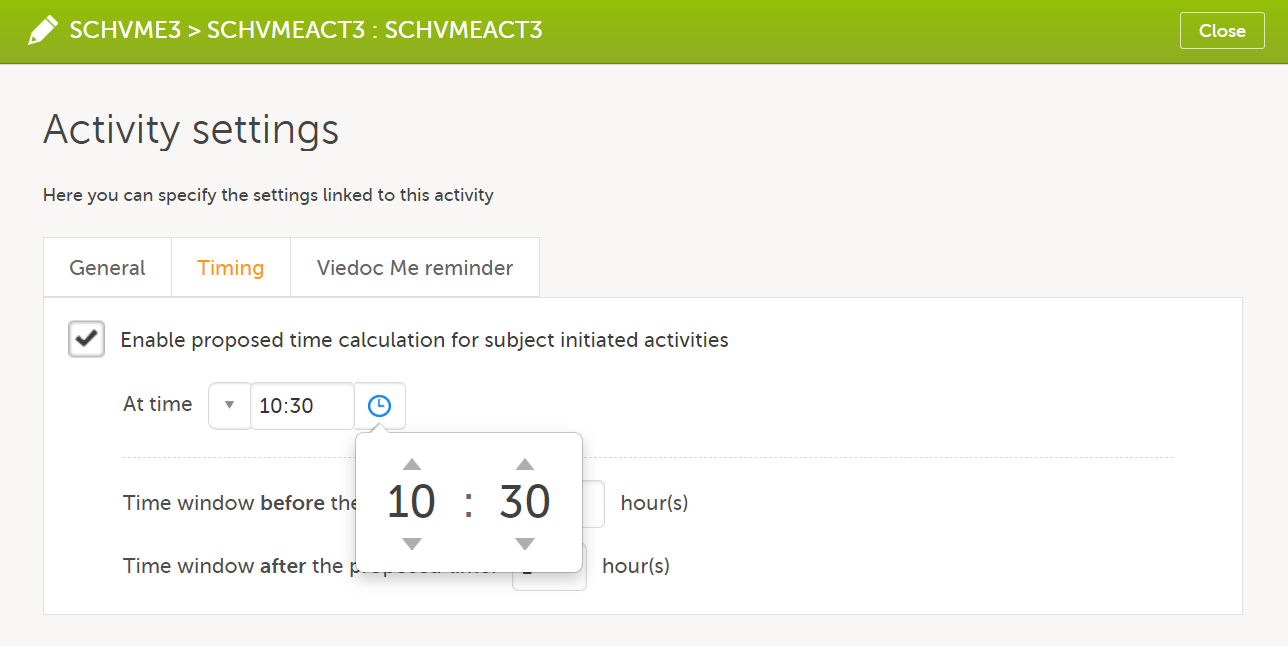
The default time is 00:00. If you want to start all over, select the dropdown list and select Reset to return to the default time. |
| 3 |
In the Time window before/after the proposed time fields, enter the number of hours before/after the proposed time set above. The default is 1h before and 1h after the proposed time. Note! Setting the time window to +/- 0 hours means that the subject must start the Viedoc Me questionnaire exactly on the proposed time, that is, on exactly that minute! 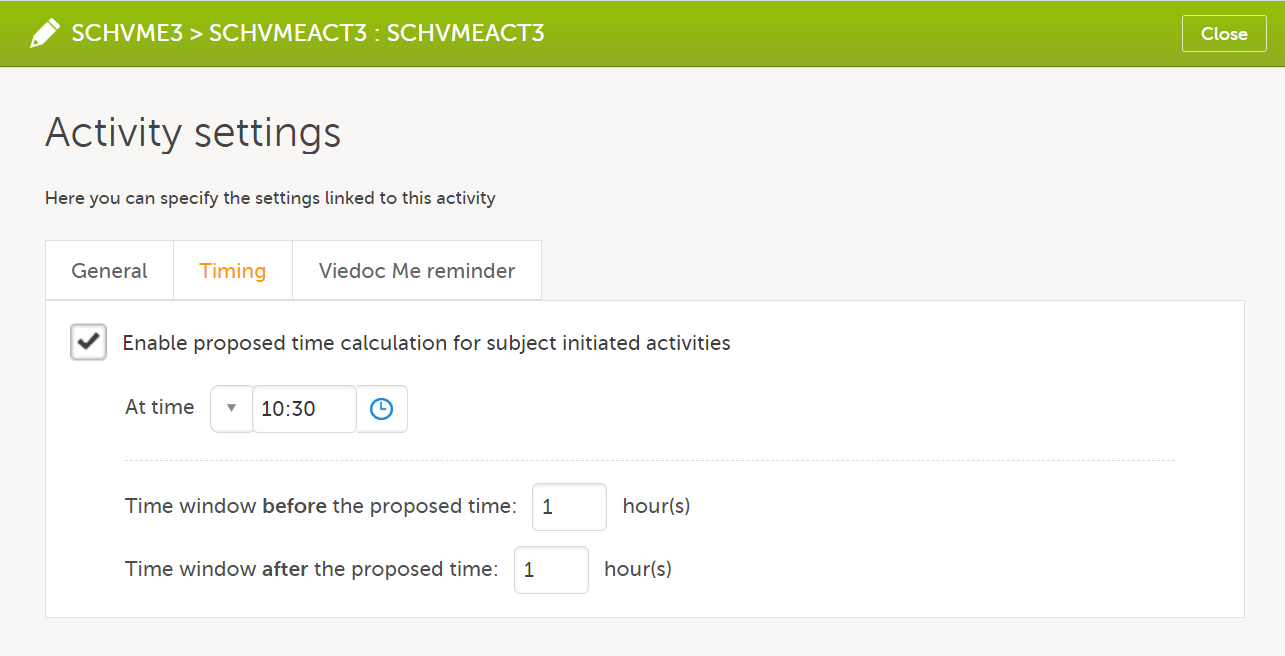
When a proposed time calculation is set for an activity, the selected time window is displayed in the activity header in the study workflow. 
|
Setting reminders to the subjects
To set Viedoc Me reminders to the subjects:
| 1 |
Select the pen icon to open the activity settings window.
The activity settings window opens. |
| 2 |
On the Viedoc Me reminder tab, select Add a reminder. 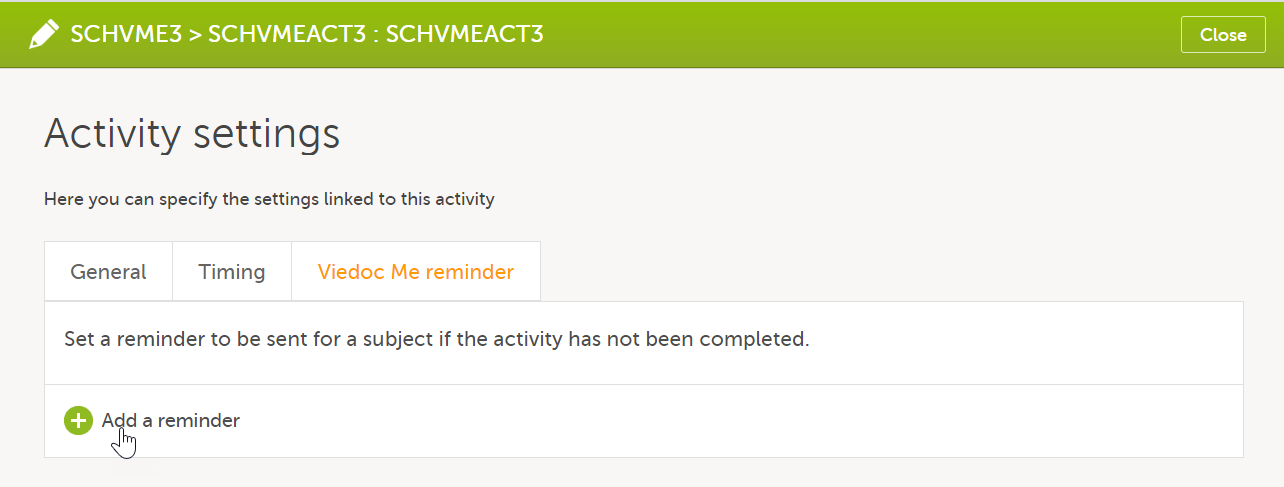
|
| 3 |
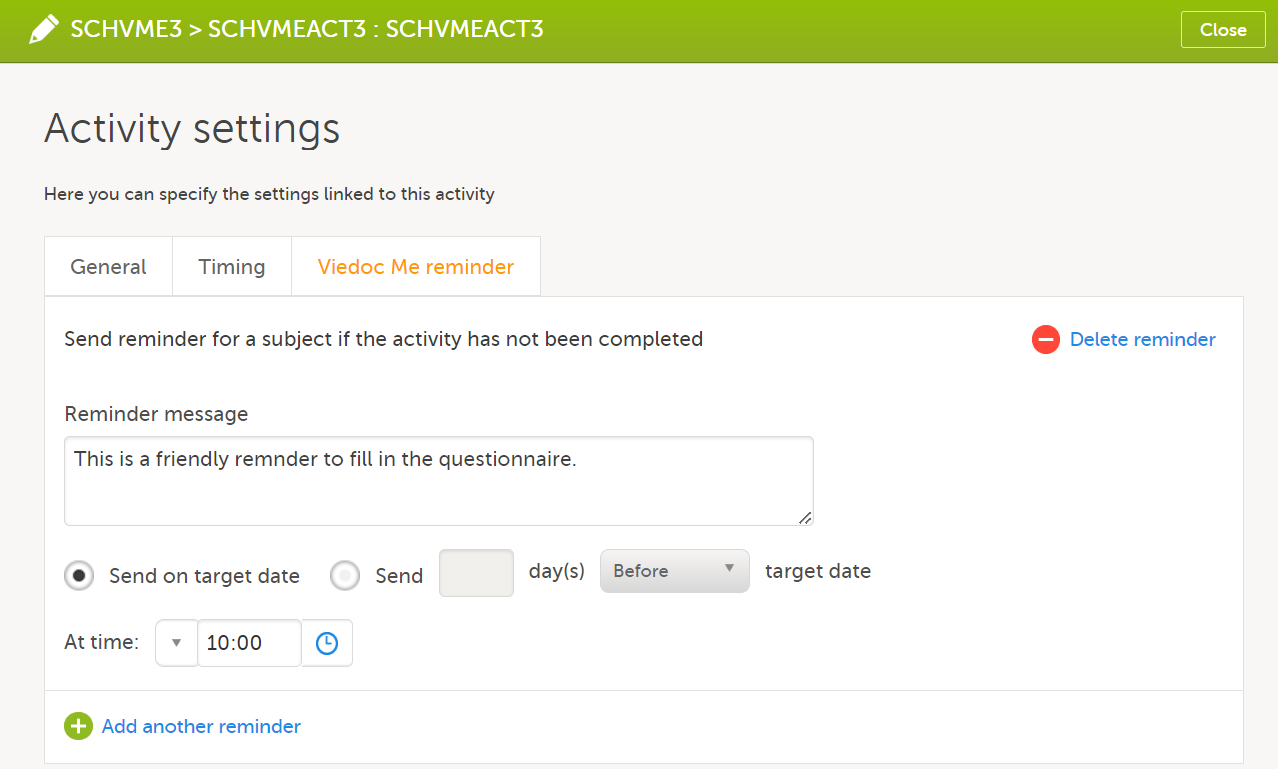
Configure the reminder:
|
| 4 |
If you want to add more reminders for the same activity, select Add another reminder, and set the reminder message, date and time. 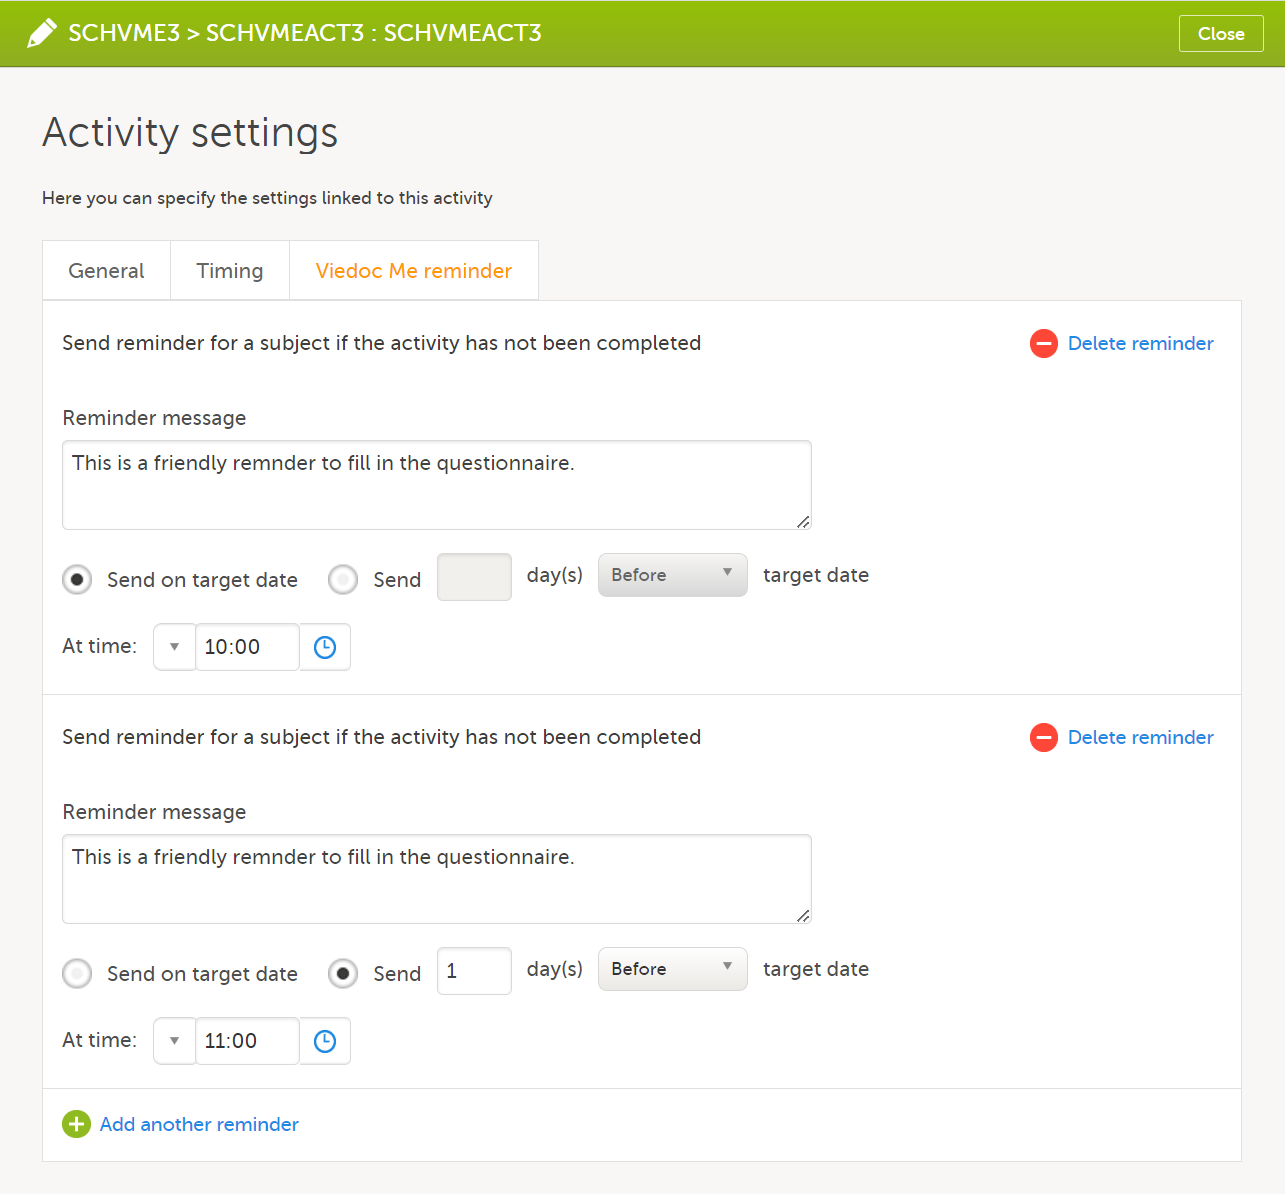
|
| 5 | Select Close to save you settings. The window closes. |
To remove a reminder, select Delete reminder.
|
Important! For reminders to be sent to the subjects, the following settings must be completed:
|
Note!
- Viedoc Me reminders are sent to the subject if the activity is not completed, that is, when there is at least one uncompleted form within the activity.
- Viedoc Me reminders are sent according to the current effective study design. That means that even to subjects added in older design versions, the Viedoc Me reminders are sent according to the settings made in the design version that is currently active.
- Viedoc Me reminders are sent based on the time zone for the site's geographical location.
- Viedoc Me reminders are not sent retroactively. If a subject is added after the time when the reminder should have been sent, the reminder is not sent to that subject.
- Viedoc Me reminders are not sent if the event is not visible.
- As telecommunications operators are using spam filters to block malicious SMS messages, please avoid using the following words, especially in combination with a URL, when setting up subject reminders: Click, following, {url}.
This is because Including certain keywords in combination with a URL is more likely to trigger the operator's filter to flag a message as malicious and thereby block it from being sent. - Reminders are calculated and scheduled when subject data is modified, that is, when a subject is added or edited (an event is initiated, a form is filled in) based on visibility at that time. So if visibility conditions change the result based on time, the system cannot evaluate every moment and update the reminder schedules. Examples of such visibility conditions are the functions
today()andnow().
The text of the reminder message can be translated. This is done in the same way as translation of the forms within subject-initiated events, see Managing translations.
Managing updates after going live
A new version is recommended when Viedoc Me forms are locked upon receipt. These forms must be unlocked before a revision can be applied. Therefore, it is best to change Viedoc Me forms in a new version. Remember to also update translations if necessary, see Managing translations.
Managing translations
It is possible to translate the forms in the subject-initiated events, as well as the respective reminders, by following these steps:
Migrating a study from training to production
When migrating a study from training to production, and exporting the design, the translations for Viedoc Me are lost and must be managed again in the production environment after the design is imported. See also Migrating a study design from training to production.
|
Important! If you have performed the translation while working on the training server and intend to import the design to the production server afterwards, in order to have the translations available after the import you have to repeat the following operations on the production server as well:
If you revise your design (for example by changing texts that were translated or item IDs) after having performed the translation, make sure to update the translations accordingly and re-import the translated files. |
Selecting the languages for translation
It is possible to define the default language used when setting up the study design, as well as the languages you want support for.
Note! For reference, these are the system languages in use: System Languages. Viedoc does not allow users to use a default browser translation within the system. This prevents individual users from overriding the chosen system language and agreed upon terminology and formulations.
Note! The languages Cebuano (ceb), Hiligaynon (hil), and Tagalog (tl) are available in Viedoc Designer when adding additional languages in the Design settings. These languages are currently displayed as: Unknown language (tl), Unknown language (ceb), Unknown language (hil). However, translation files for these languages can be exported and imported as expected.
To set languages for translation:
| 1 | In Viedoc Designer, select Design Settings and select the Details tab. |
| 2 |
In the Languages section, set the following:
|
| 3 | Select Save changes. |
Exporting the forms text for translation
To export the text of the forms for translation:
| 1 | In Viedoc Designer, select Design Settings and select the Language Import/Export tab. |
| 2 | In the Export language texts for translation area, select the language to translate into from the dropdown list. The available languages in the list are the ones selected as Additional when setting the languages (see instructions Selecting the languages for translation). |
| 3 |
Select and select the forms to be translated, one by one. Make sure that you select the forms included in subject-initiated events. The form named Workflow contains all the reminders set up in the study workflow. |
| 4 | Select Export. You will get an Excel file with one separate sheet for each selected form, containing all the texts for the respective form. |
Performing the translation
In the Excel file obtained at the previous step, add the translated text in the column to the right. Make sure that only the text is translated and the tags are kept exactly as in the Default text column.
Note! If the text to translate contains only numbers, it could cause problems when you import the translated file into Viedoc in the next step. To solve this, either remove the numbers or prefix them with a ' (for example '1). Adding the prefix will cause Excel to treat the numbers as text.
Importing the translated file
When the translation is performed and you have the Excel file, you have to import it by following the steps below:
| 1 | Go to the Design Settings section, under the Language Import/Export tab. |
| 2 | Under Import language texts for form translation, select Upload a file. |
| 3 | Browse and select the Excel file that contains the translation. |
| 4 | Select Import. |
Note!
- If additional languages are imported (to be used in Viedoc Me) and following this the code lists are combined via Formats, (for example, for SAS export) the imported languages are lost. The workaround is to import the languages again after the code lists have been combined.
- For Viedoc Me translations, if any of the translated values in the file to be imported is a number, the file import fails without prompting any feedback to the end user. The workaround is to remove the numbers from the columns in the translated file that correspond to the translated content before importing the file in Viedoc Designer (the numeric values will be kept in the original English version and will be displayed as such in the translated Viedoc Me form).