Creating a data mapping for import of data
Introduction
Viedoc offers support for importing data, for example laboratory data, into your study in Viedoc using the Viedoc Data Import application. When importing data, the Viedoc Data Import application does the following:
- it converts the provided data into Clinical Data Interchange Standards Consortium (CDISC) Operational Data Model (ODM) clinical data format using a data mapping file, and
- it pushes the data into Viedoc through the Viedoc Application Programming Interface (API).
The Viedoc Data Import Application can be downloaded from the Data mappings window in Global design settings in Viedoc Designer.
This lesson describes how to create a data mapping file for the import of data into Viedoc using the Viedoc Data Import Application. For more information on how to download the Viedoc Data Import Application and how to run the application to import data, see Viedoc Data Import Application.
Instructions on how to create a data mapping file and how to import data using the Viedoc Data Import Application can also be found in our video tutorial.
About importing data into Viedoc
What is needed to import data?
In order to import data into Viedoc, the following is needed:
- the Viedoc Data Import application
- a data mapping file
- a configuration file
- a valid Viedoc username and password, and a study-specific Viedoc API client key
- the data file containing the data to be imported. The data file should be a delimited file, such as a Comma-Separated Value (CSV) file.
The data mapping file
The data mapping file defines how the external data will be mapped to form items in Viedoc. You can create a data mapping file in Global design settings in Viedoc Designer. Internally, the data mapping will be stored in Clinical Data Interchange Standards Consortium Define Extensible Markup Language (CDISC Define-XML) format.
The configuration file
The configuration file is an XML file that defines (mandatory):
- where to find the data mapping file
- where to find the data that should be imported
- into which Viedoc study data should be imported
- into which API instance the data should be imported
- the login credentials that should be used when importing the data
In the configuration file, you can also define the following (optional):
- whether you would like new subjects to be added by the data import
- whether you would like events to be initiated by the data import
- which character encoding should be used, when the imported file is read
- which file delimiter should be used, when the imported file is parsed
One configuration file can contain the import configurations for multiple studies.
The Viedoc API client key
You can create a Viedoc API client key in the Study settings window on the API configuration tab in Viedoc Admin. For instructions, see Viedoc Data Import Application.
The data import procedure
The import of data into Viedoc using the Viedoc Data Import Application involves the following steps:
- Creating a data mapping file in Viedoc Designer
- Creating a Viedoc API client key in Viedoc Admin
- Creating a configuration file (not in Viedoc)
- Preparing the work folder
- Installing the Viedoc Data Import Application
- Dropping data into the work folder
- Running the Viedoc Data Import Application
Description of the data mapping file
What is a data mapping file?
The data mapping file describes each column of the data file containing the data to be imported, and defines where these data should be imported into Viedoc. A separate data mapping file should be created for each study, and for each type of data file to be imported.
Structure of the data mapping file
The data mapping window in the Global design settings in Viedoc Designer has the following main fields (see image):
1. Data Mapping Name, a name (free text) for the data mapping.
2. Domain Name, the domain name that will be stored in the Define-XML file. The domain name is not used when importing data. However, the domain name can be used as a reference to link an import to a form in Viedoc.
3. Data mapping table, that has two main parts:
- Imported file structure, describing each column of the data file to be imported.
- Viedoc, describing the destination of the data in Viedoc.
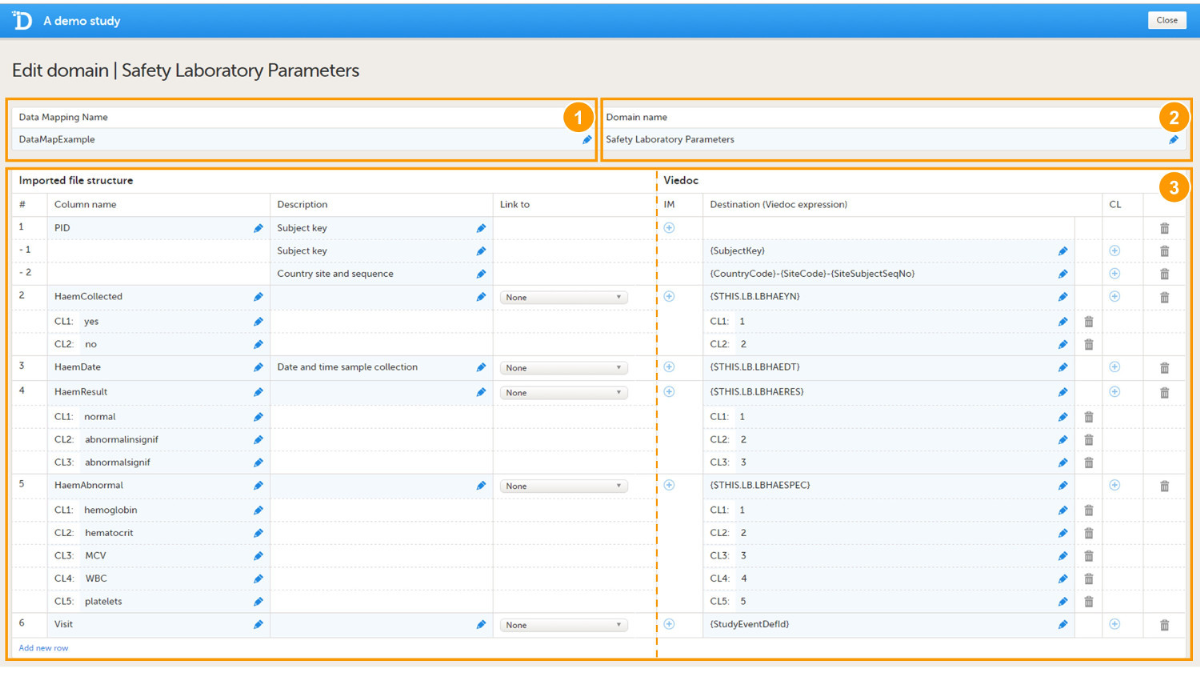
Columns of the data mapping file
The data mapping table has the following columns:
| Column name | Description |
|---|---|
| # | Number of the column in the data file to be imported. |
| Column name | Name of the column in the data file to be imported. |
| Description | Description of the parameter in that specific column to be imported (free text). |
| Link to | Links the content to a parameter defined in another column in the data file. This is used when importing data in a tall-skinny format. |
| IM | Item mapping: inserts more rows into the table so that one data column can be mapped to multiple destinations in Viedoc. |
| Destination | Address in Viedoc into which the data should be imported. This directs the data to the correct subject, event, form and field. |
| CL | Code list: a list of codes that build up a dictionary that can be used to map the imported data values into their corresponding items in Viedoc. |
Overview of variables to be mapped
The following table gives an overview of the variables that can be mapped.
| Variable | Mandatory to map, yes or no? |
|---|---|
SiteCode |
Mandatory at all times |
SubjectKey |
Mandatory for importing data into existing subjects, not mandatory when new subjects are to be added. |
SiteSubjectSeqNo |
Not mandatory if the SubjectKey is mapped. Can be mapped separately for matching existing subjects or creating new subjects. |
StudySubjectSeqNo |
Not mandatory if the SubjectKey is mapped. Can be mapped separately for matching existing subjects or creating new subjects. |
StudyEventDefId |
Mandatory for matching the event that the data should be imported into. |
EventDate |
When importing data into unscheduled events, either EventDate or StudyEventRepeatKey is mandatory. Optional for scheduled events. |
StudyEventRepeatKey |
When importing data into unscheduled events, either EventDate or StudyEventRepeatKey is mandatory. Optional for scheduled events. |
FormDefId |
Mandatory for matching the form that the data should be imported into. |
ItemDefId |
Mandatory for matching the item that the data should be imported into, can be combined with FormDefId to one string. |
FormRepeatKey |
Mandatory only when the same form occurs multiple times within the same event. |
ItemGroupDefId |
When importing data to repeating item groups. |
ItemGroupRepeatKey |
When importing data to repeating item groups. |
Mapping repeating item groups
When importing CSV data into repeating item groups, by using the Viedoc Import Application, the data mapping file must specify both the item group and the repeating instance by mapping ItemGroupDefId and ItemGroupRepeatKey. Mapping ItemGroupDefId and ItemGroupRepeatKey enables the Viedoc Import Application to generate ODM data that represents repeating item group instances. This allows CSV data to be imported into repeating item groups by using the extended support in the Viedoc WCF API.
ItemGroupDefId identifies the repeating item group that the data belongs to. ItemGroupRepeatKey identifies the specific instance of that item group. By mapping these variables, the Viedoc Import Application can distinguish between multiple instances of the same item group.
Step-by-step guides
Creating the data mapping file
To create a data mapping file:
| 1 | In Viedoc Designer, select the study for which you would like to create a data mapping file. |
| 2 | In the Global design settings field, click Edit to open the global design settings. |
| 3 | In the Data mappings field, click Edit to open the data mappings overview.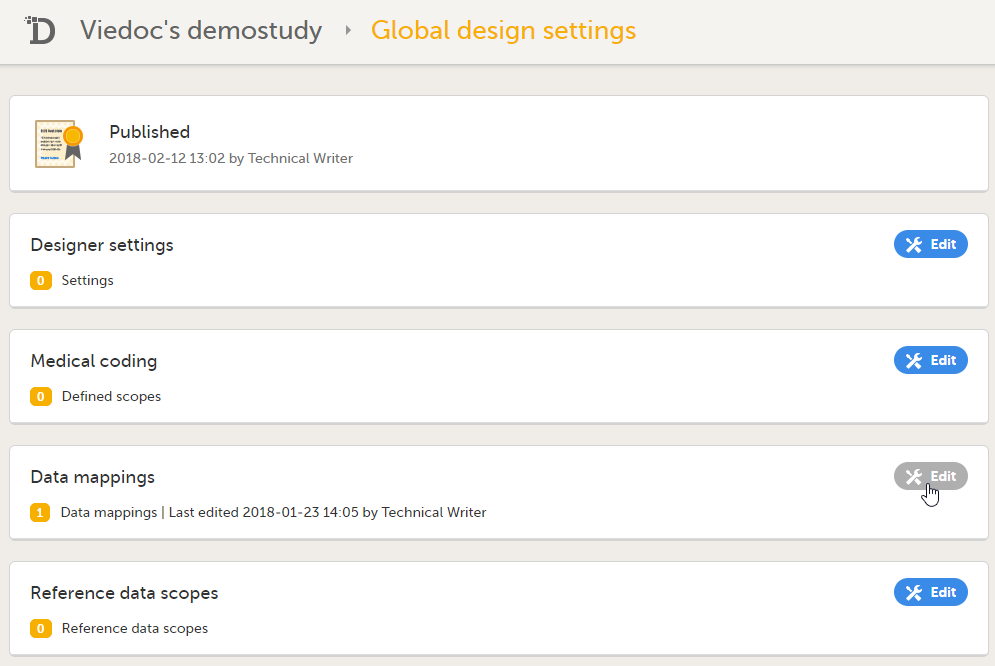 |
| 4 | Click Add new data mapping, or if a data mapping has already been created, select the data mapping that you would like to edit. 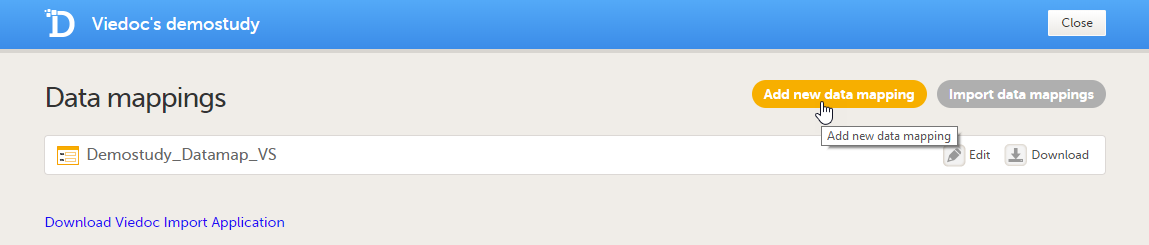 |
| 5 | Type a name for the data mapping in the Data Mapping Name field, and type a domain name in the Domain name field. |
| 6 | Click Add new row to add a new row to the table, and fill in:
 If you would like to map one data column to more than one destination in Viedoc, click the
 + icon in the IM column to add more mapping details.
If you would like to enter code list items, click the 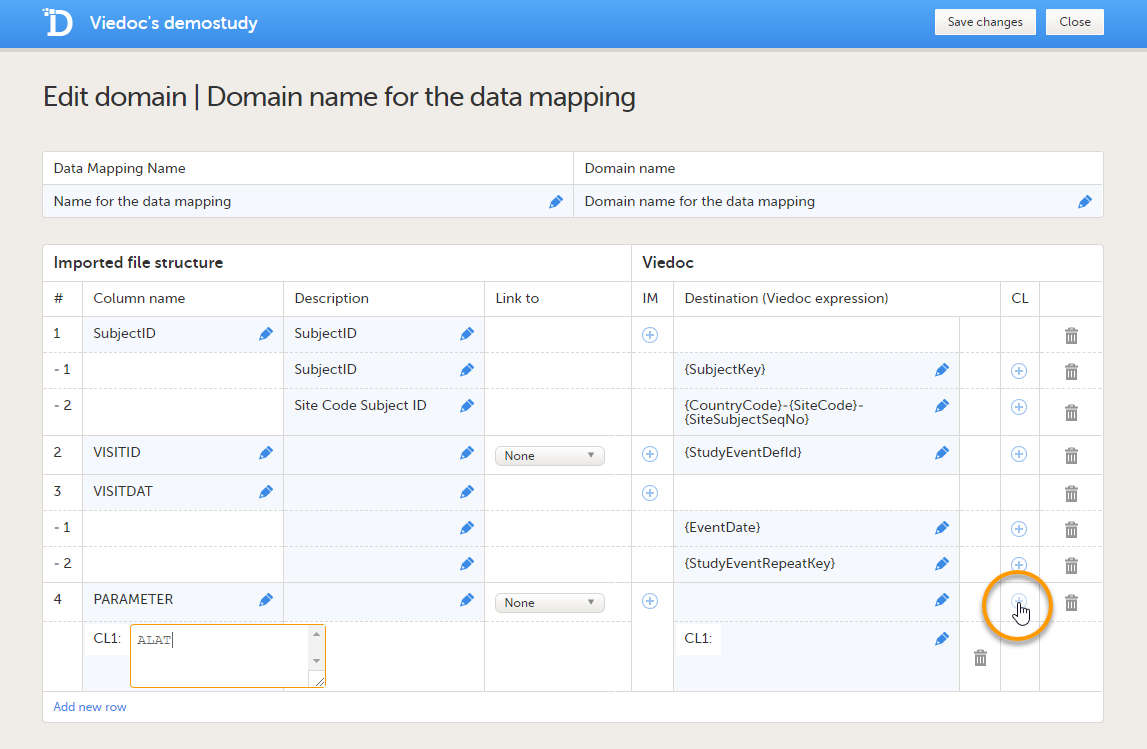 |
| 7 |
Repeat step 6 with the next column in the data file, until all the columns in the data file are described in the data mapping table. If you would like to link the contents of the current row to the contents of another row, select the row to link to from the Link to dropdown menu. This is mainly used for data in tall-skinny format. If you select one of the items from the drop-down list in the Link to column, the system automatically creates rows with the same code list items as the item (row) that is being linked to. Linked rows can be updated by clicking on the refresh button. 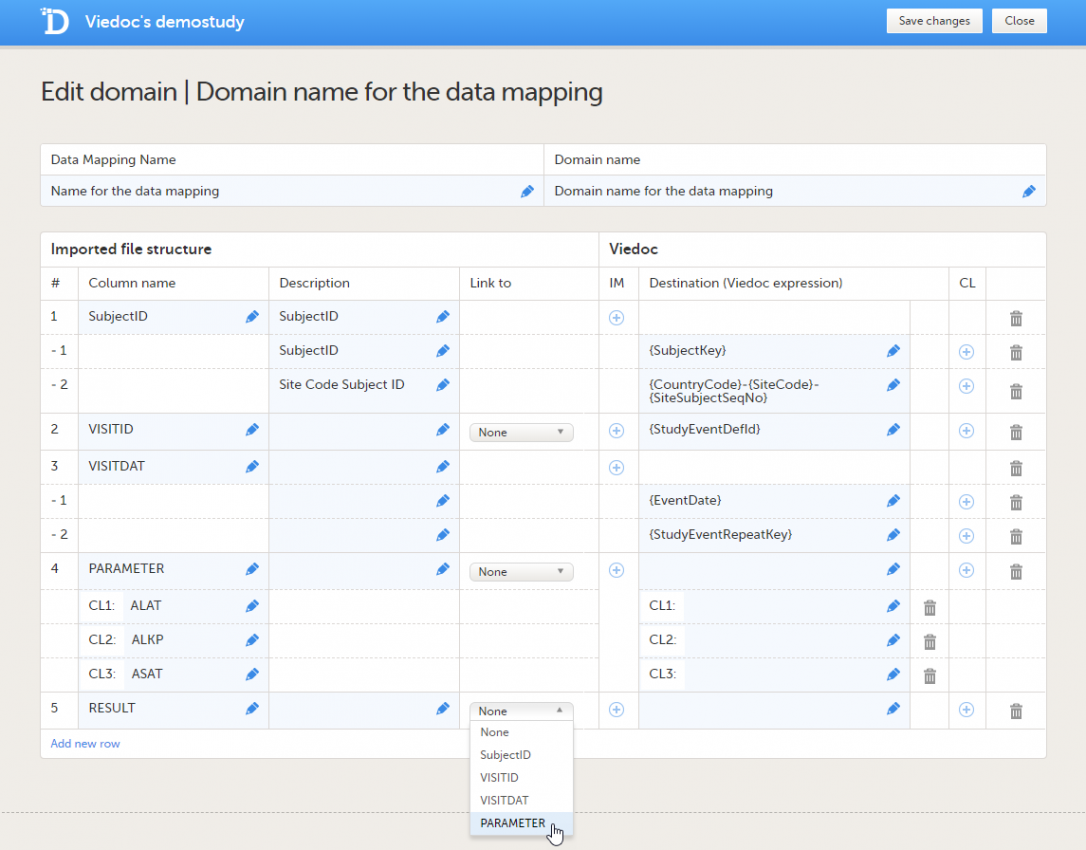 |
| 8 | Click Save changes, and click Close to close the data mapping table. |
| 9 | Click Close to exit the data mappings overview. |
| 10 | Click Publish settings in the Global design settings window to publish the changes.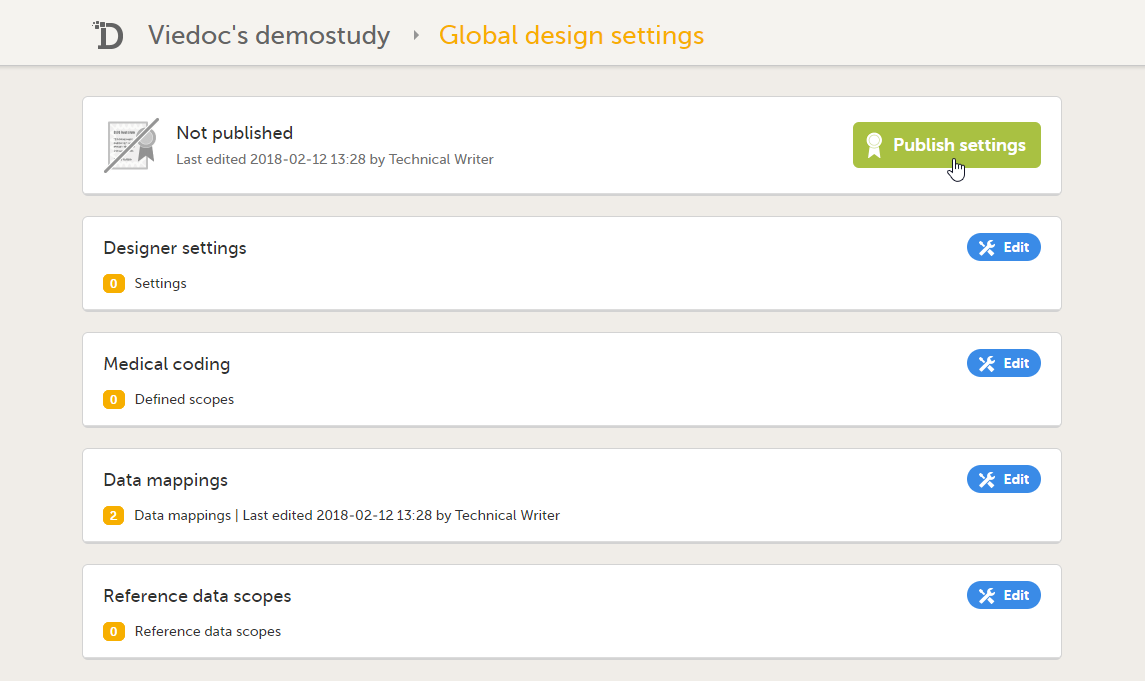 |
| 11 | In the Data mappings field, click Edit to open the data mappings overview. |
| 12 | Click the Download icon for the data mapping that you just created.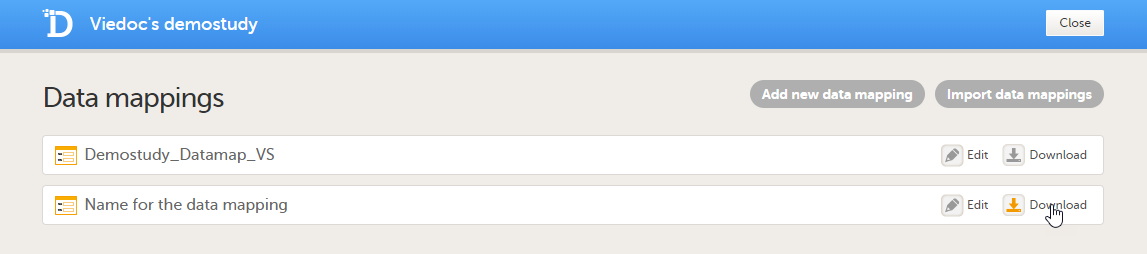 An xml file will be downloaded that contains the data mapping. |
| 13 | Save the xml file in the work folder. |
*When mapping data using code lists to a form where multiple check boxes can be activated in one field, it is only possible to map the data based on choice number, not based on choice label. It is for this reason only possible to import values, not strings.
Mapping the subject ID
Map the subject ID to {SubjectKey}. The mapping is case-sensitive!
Map the site code in one of the two following ways:
- map the site code to SiteCode in a separate row in the data mapping table, or
- map the format of the subject key, as in the example:
{CountryCode}-{SiteCode}-{SiteSubjectSeqNo}. Click the+icon in the IM column to add these mapping details to the subject key mapping.
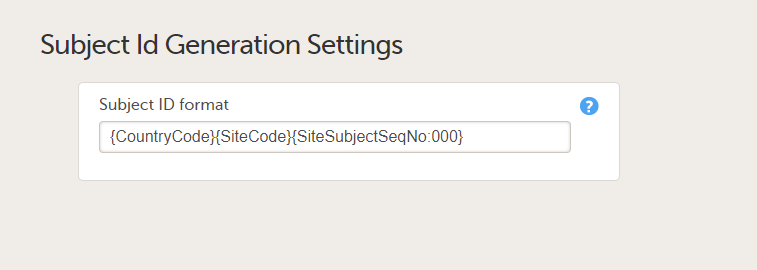
The format of the subject key is defined in the Subject Id Generation Settings in the Study Settings in Viedoc Designer. See Subject Id Generation Settings for more information.
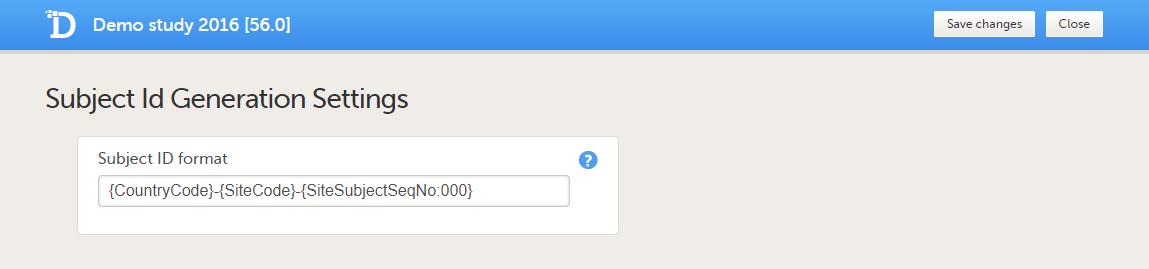
Viedoc imports the data into existing subjects by matching the complete subject key as a string. Instead of mapping to the subject key, it is also possible to map the subject ID to {SiteCode} and {SiteSubjectSeqNo}. If both the subject key and the site subject sequence number are provided during the import, the site subject sequence number will take precedence.
It is possible to add new subjects through the data import, see below for more information.
Mapping the event ID and event date
Mapping scheduled events
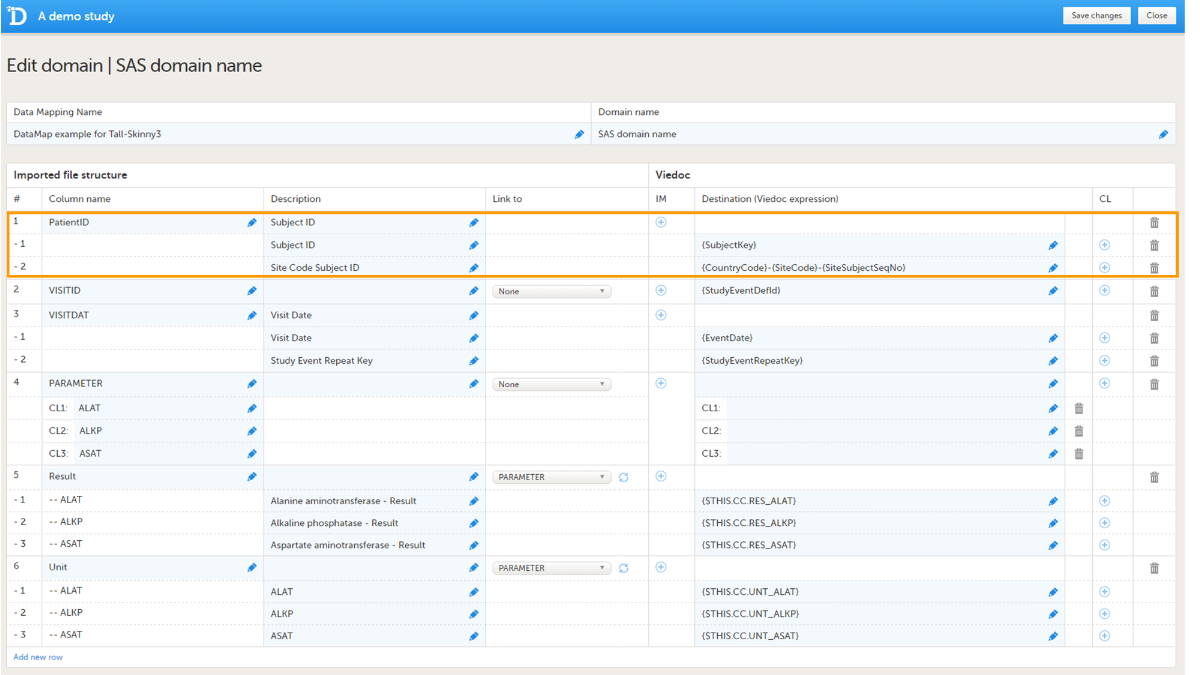
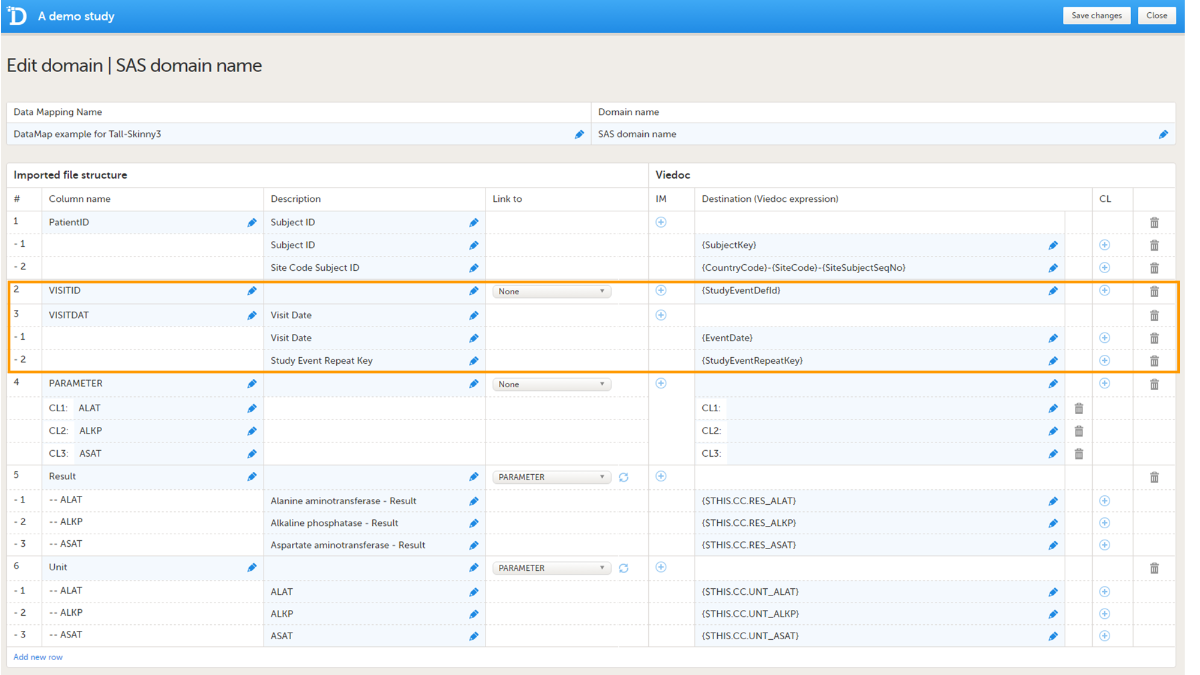
The event ID should be mapped to {StudyEventDefId}, see image. The mapping is case-sensitive!
The date of the event can be mapped in two different ways (optional):
- Mapping to
{EventDate}.
{EventDate} is used to initiate events if the event has not been initiated yet. If the event already has been initiated, the Viedoc Import Application imports the data but keeps the existing event date. - Mapping to
{$THIS.$EVENT.EventDate}.
{$THIS.$EVENT.EventDate} is used to update the event date. If the event already has been initiated, the Viedoc Import Application updates the existing event date with the new event date. Note that for matching the events, it is necessary to map the original event date to {EventDate} as well, so that the system recognizes which event should be updated.
Data will be imported into scheduled events even if the event date is not given or not matching the initiated event date.
Mapping unscheduled and common events
The event ID should be mapped to :
{StudyEventDefId}, along with- either
{EventDate}or{StudyEventRepeatKey}. The event will then be matched on event date or on event sequence number.
The mapping is case sensitive!
If the event has been initiated, the Viedoc Import Application checks whether the date in the data file matches with the existing date. If the dates are matching, the data will be imported. If the dates are not matching, the data will not be imported.
If the event has not been initiated yet, the event date will be imported and/or an event sequence number will be created.
Mapping recurring events
Recurring events should be mapped to {StudyEventRepeatKey}, along with {StudyEventDefId}.
Mapping a certain activity within a event
You can also map data to a certain activity within an event using the Activity ID. This is useful when the same form is used in two different activities within the same event, for example before and after administration of a drug. The Activity ID should be mapped to {FormRepeatKey}. For more information about mapping data to specific activities, see the example below under Using FormRepeatKey to map activities and repeating forms.
Mapping the data
The data, for example laboratory results, should be mapped to the correct form and field ID. The mapping of these data is also case sensitive.
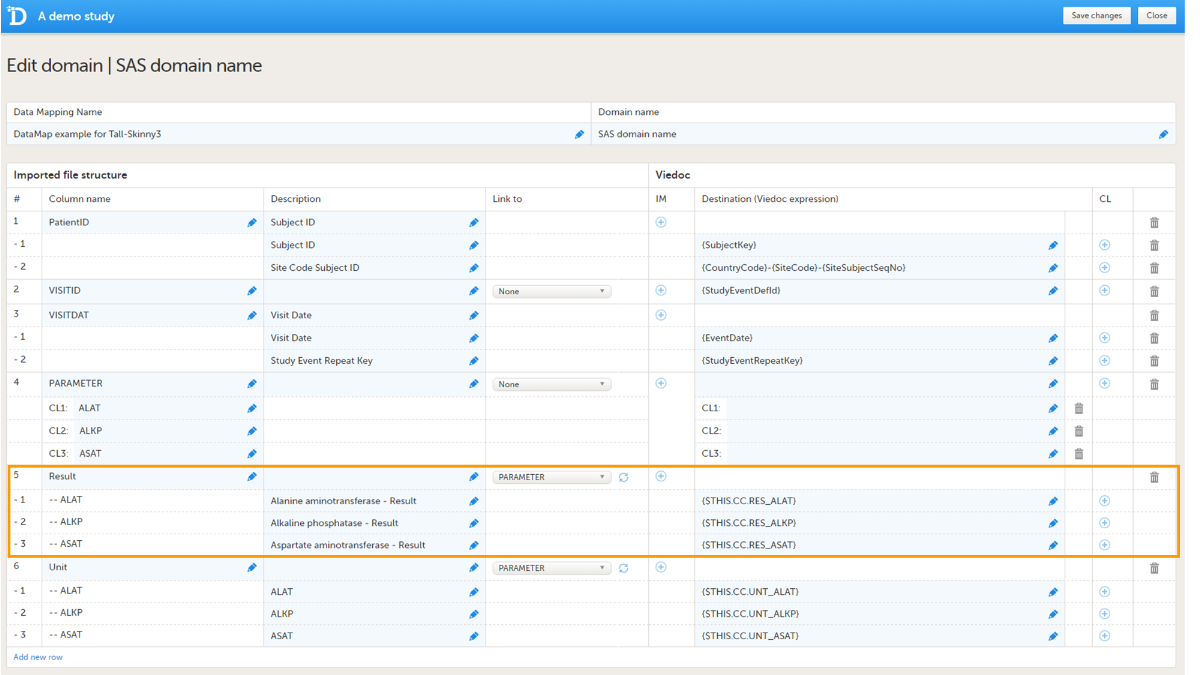
In the example in the image, the laboratory results of the alanine aminotransferase serum levels are mapped to {$THIS.CC.RES_ALAT}. This is built up as follows:
- $THIS maps the data to the event as defined earlier in the mapping.
- CC is the ID of the form that the data should be imported into.
- RES_ALAT is the ID of the field in the form that the data should be imported into.
You can also specify a scheduled event explicitly in the data mapping. For example, it is possible to map the above data directly to Event 1 using {E1.CC.RES_ALAT}. In that case, the event ID does not have to be included in the data file, and, hence, the event ID does not need to be mapped to {StudyEventDefId}, because the event is already specified in the destination of the data.
Editing or removing a data mapping file
You can remove a table row by clicking on the trash can icon.
You can import and edit an existing Define-XML file by clicking on Import data mappings in the Data mappings overview. Select the file you would like to import and click Open. Edit the data mapping table if necessary and click Save changes to save the data mapping.
You can remove existing data mappings in the Data mappings overview by clicking Delete. It is not possible to delete a data mapping that has already been published.
Good to know!
Using FormRepeatKey to map activities and repeating forms
The form repeat key can be used to specify:
- which activity the data should be imported into, in case the same form is used in different activities within the same event, and
- which form the data should be imported into, in case the form is repeating.
The form repeat key should be mapped to {FormRepeatKey}.
The form repeat key attribute in the Operational Data Model (ODM) contains both the ActivityDefID and the FormRepeatKey, separated with a $, as in the following format: {FormRepeatKey}${ActivityDefID}.
In the example of the image below, we map data into the vital signs form VS, that is used in two different activities within event 1:Activity 1 and Activity 2. In Activity 2, the form is set as repeating.
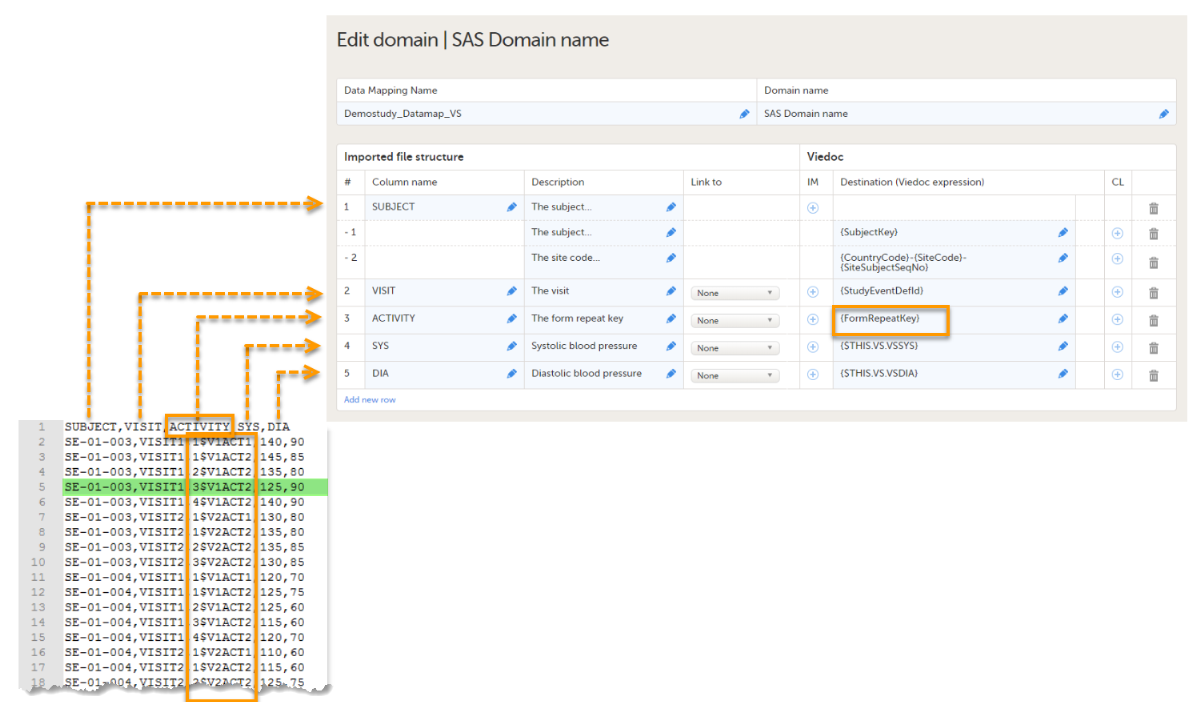
The activity column in the data file specifies both the form repeat key (1, 2, 3, 4) and the ActivityDefId (V1ACT1, V2ACT2), separated by $. The activity column is mapped to {FormRepeatKey}. The data highlighted in green will be imported in the third instance of the VS form in Activity 2.
If only the FormRepeatKey is specified during the data import, and not the ActivityDefId, the data will be imported into the first activity in which the respective form is used.
Adding new subjects through the import of data
You can add new subjects through the import of data. In that case, the configuration file the tag AllowCreatingSubjects should be set to true, for more information, see Viedoc Data Import application.
To enable Viedoc to add new subjects, one of the following should be mapped:
- {SiteCode}, the next available site subject sequence number will then be assigned to the new subject.
- {SiteCode} and {SiteSubjectSeqNo}, to assign a site subject sequence number to the new subject yourself.
- {SubjectKey}.
If only the subject key is mapped, Viedoc needs to extract the country code, site code and site subject sequence number from the subject ID. It is necessary to map the format used for the subject ID, for example: {CountryCode}-{SiteCode}-{SiteSubjectSeqNo}.
Note that Viedoc can only correctly extract the country code, site code, and site subject sequence number within a subject ID if one of the following two requirements are met:
- The country code, site code and subject sequence number are separated with a separator (any symbol), for example:
{CountryCode}-{SiteCode}-{SiteSubjectSeqNo}. - The exact number of digits in the country code, the site code, and the site subject sequence number are specified in the subject ID generation settings in Viedoc Designer. For example, if the subject ID generation settings in the study design are set at
{CountryCode}{SiteCode}{SiteSubjectSeqNo:000}(with no separators, for example, SE02001) then the mapping must also be set as{CountryCode:00}{SiteCode:00}{SiteSubjectSeqNo:000}so that the correct digits are mapped for the country and site codes.
Special cases when importing data
Range items
When importing to range items, there are two scenarios:
- If the range is = / < / <= / > / >=, then the value in the file should for example be ">=10".
- If the range is an Inclusive In Between, then you write as follows [Lower,Upper], for example "[10.2,20.1]". Note that the lower and upper limits are separated by comma and decimals specified with period.
Note! If importing Inclusive In Between values and the delimiter in the file is comma you have to put the range value within quotation marks.
Checkboxes
When importing to checkboxes you have to specify the code value separated by comma, for example “1,3,5”.
Note! If the delimiter in the file is comma you have to put the value within quotation marks.
Partial dates
When importing partial dates to date fields you should only add the parts of the date that is known. For example if the day is not known, then add “2020-01” (year and month) or, if the month is not known, add “2020”.