Alerts
Introduction
By setting up an alert in your study you can notify users about important occurrences in the data. You can set up alerts that are issued in defined conditions (for example, in case of a Serious Adverse Event).
Setting up the alerts is done in Viedoc Designer, under Study Settings > Alerts:
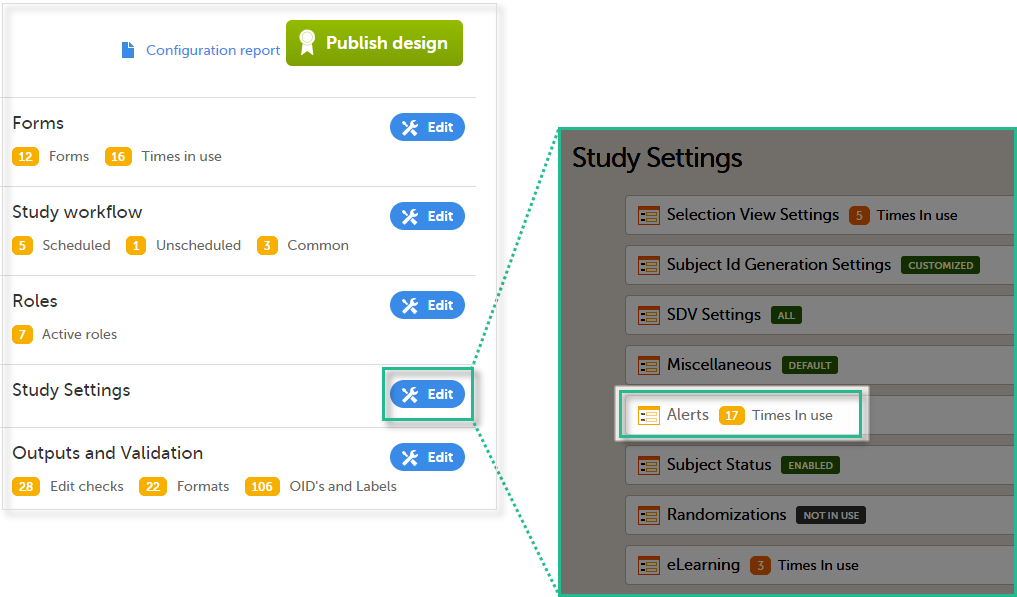
The Alerts page displays a list of existing alerts (if any) and allows you to add new ones, as illustrated below:
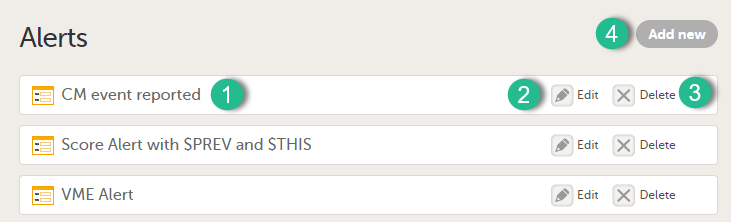
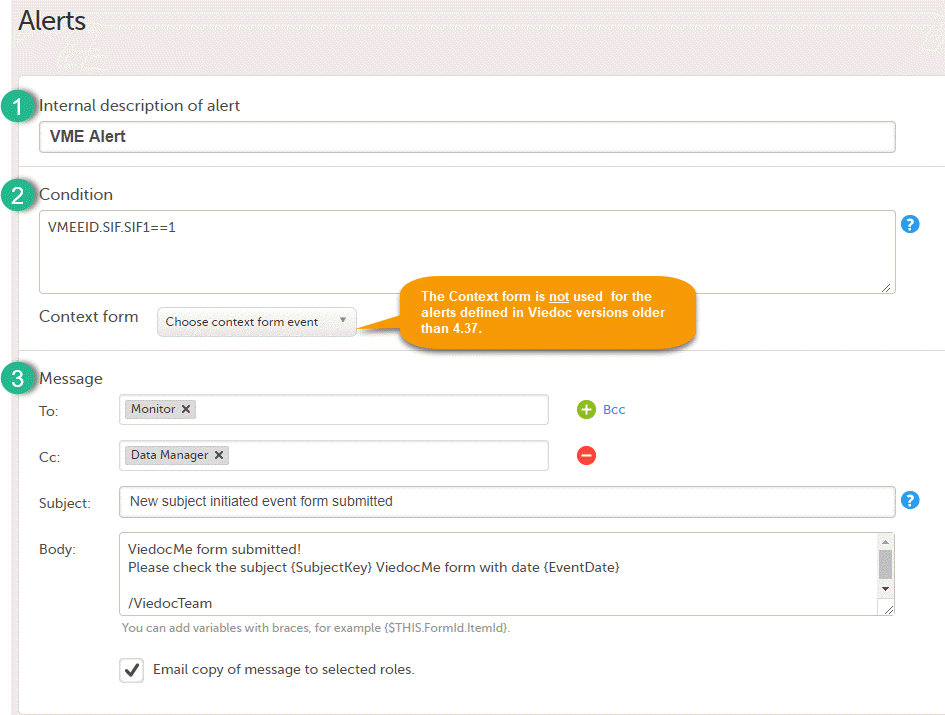
1. The internal description of the alert.
2. Edit button that directs you to the alert details page, where you can see/edit the alert.
3. Delete button for removing the alert.
4. Add new button that allows you to create a new alert by opening the alert details page.
Depending on if the alert was configured before or after Viedoc version 4.37, the alert settings are slightly different. The following sections describe in detail the settings for the two types of alerts:
Alerts in Viedoc version 4.37 and later

The alert consists of:
- Internal description (1) - This is a mandatory field. Enter a description of the alert. This is for internal use, visible only in Viedoc Designer.
- Condition (2) - This is a mandatory field. Enter the condition that triggers the alert. The condition is written in the same manner as in the Visibility conditions when designing the forms, for example
SAE == 1 && SCR.PATINFO.SEX == 1. For details about variables and conditions, see Using JavaScript in Viedoc.
If using variables from the selected context form, these can be referenced directly using only the ItemId. For exampleSAE == 1.
The alert is triggered once the condition is evaluated to true. For details on how the condition is evaluated in conjunction with the context form, see section How the condition is evaluated. - Context form (3) - This setting is mandatory. Select the event, activity, and form where the condition shall be evaluated:
- Select the context form event from the drop-down list. All the events in the study are available, as well as the option Any event.
- Select the context form activity:
- If a particular event was selected at step 1, then all the activities in the respective event are available in the list, as well as the Any activity option.
- If Any event was selected at step 1, then only the Any activity option is available.
- Select the context form.
For details on how the condition is evaluated in conjunction with the context form, see section How the condition is evaluated.
Note! When changing the context form for an existing alert, this becomes a new alert (in terms of evaluating the condition and triggering the alert, that is, the new alert is not active in the beginning). Changing the context form for an existing alert is the same as removing the existing alert and creating a new one with the same configuration except for the context form.
- Actions (4, 5, 6, 7) - configure the messages to be sent out when the alert is triggered. It is possible to send out notification messages when:
- the condition is evaluated to true - configured under the True actions tab.
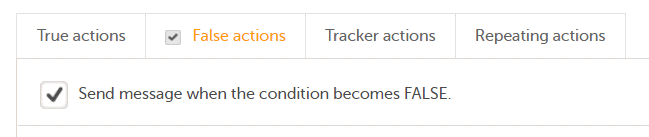
- the condition changes from true to false (no action is taken if the condition is evaluated to false from the beginning) - configured under the False actions tab.
- changes are performed to forms and items in the event that triggered the alert - configured under the Tracker actions tab.
- the condition is evaluated at a defined interval and an additional message is set up - configured under the Repeating actions tab.
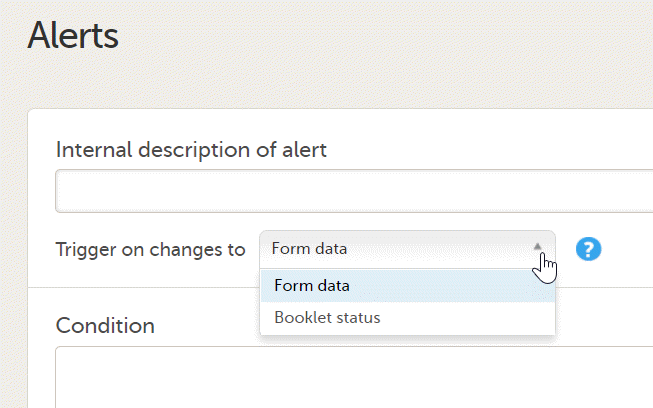
Alert triggers for Japanese PMS studies
For Japanese PMS studies, there is a setting where you define which type of change that will trigger the alert. There are two options:
- On context form data changes - the condition is evaluated when the selected context form below is saved. This option is default for all existing alerts.
- On booklet status changes - the condition is evaluated when a booklet status is changed. The booklet that changes its status will then be the context.
Actions
In the four action tabs, you set up the messages to be sent when an alert is triggered. Alerts are sent as internal messages within Viedoc and can be seen on the Study start page under the Messages pane. The messages can also be sent as email copies.
By selecting the respective checkbox in the action tabs, the alert message is triggered as follows:
- True actions - send message when the condition becomes TRUE
- False actions - send message when the condition becomes FALSE
- Tracker actions - send message when any of the tracked items is changed AND the condition is TRUE
- Repeating actions - send additional messages as long as the condition is TRUE
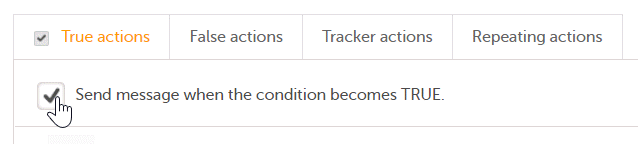
By default, the respective checkbox is unchecked for all four tabs. If no checkbox is selected, no message is sent. An activated action is shown with a checkmark in the tabs pane:

Setting up the message
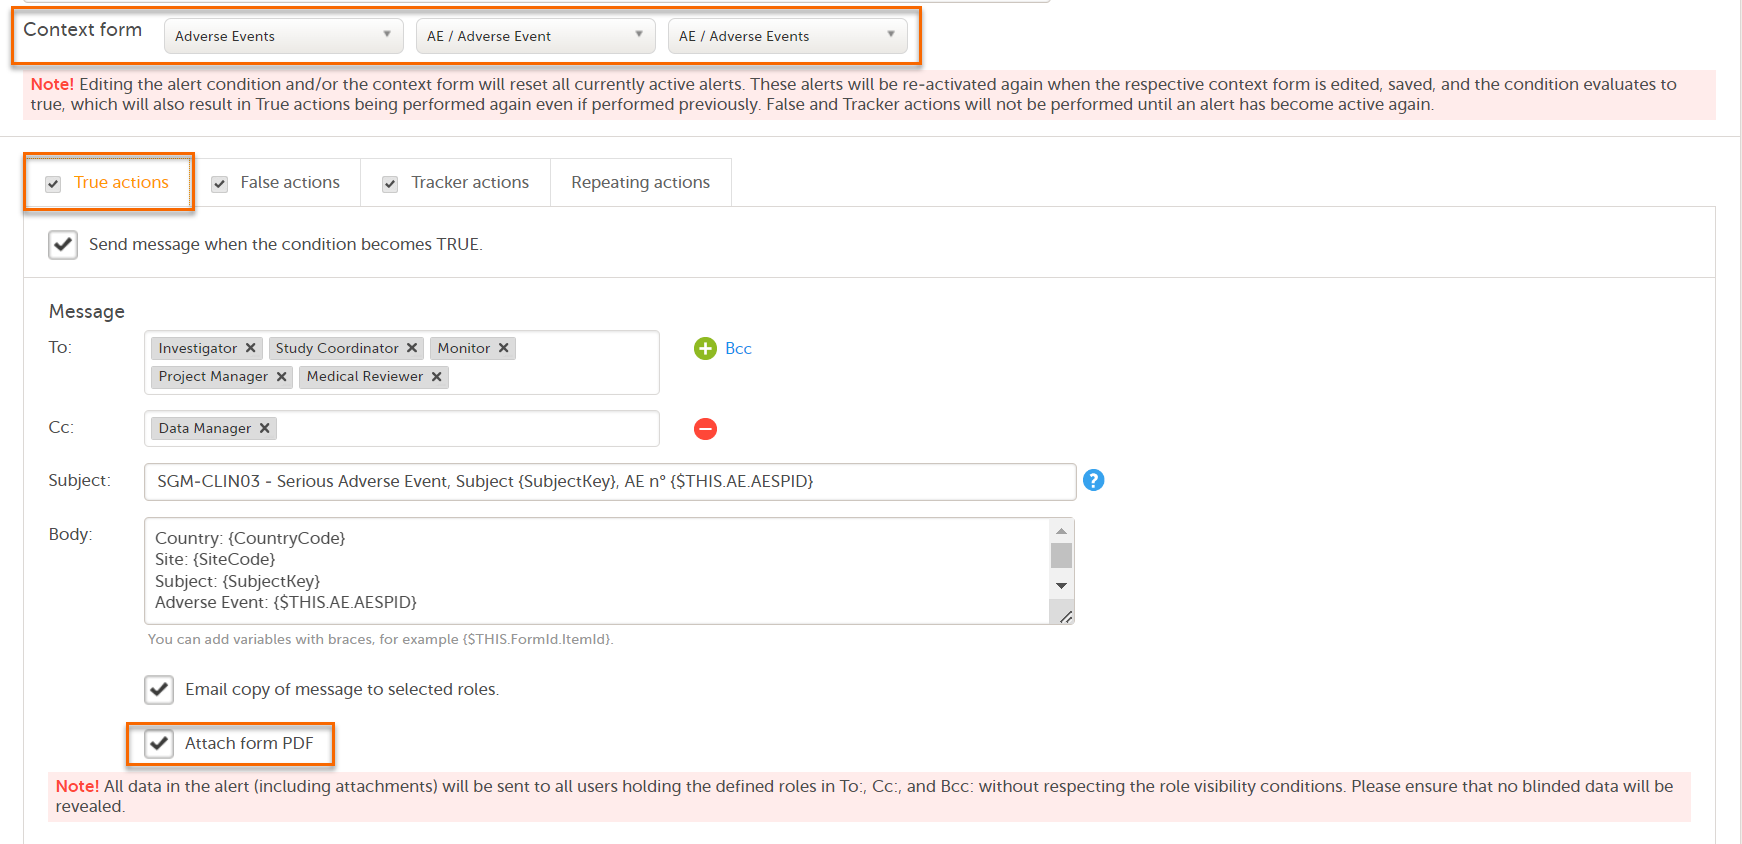
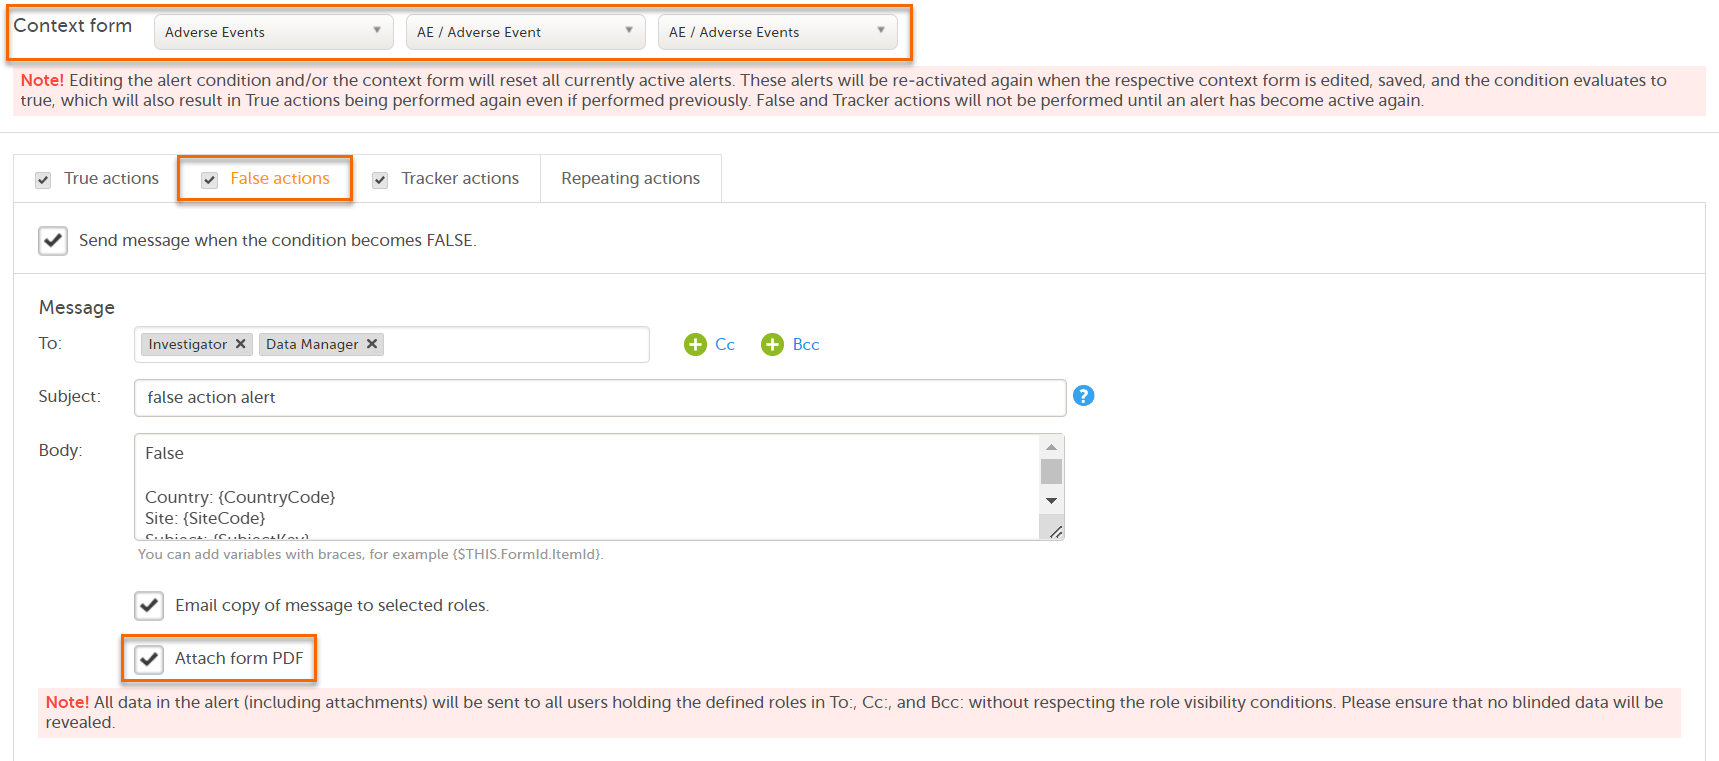
In the message section, you set up the message to be sent and select the user roles that shall receive it.
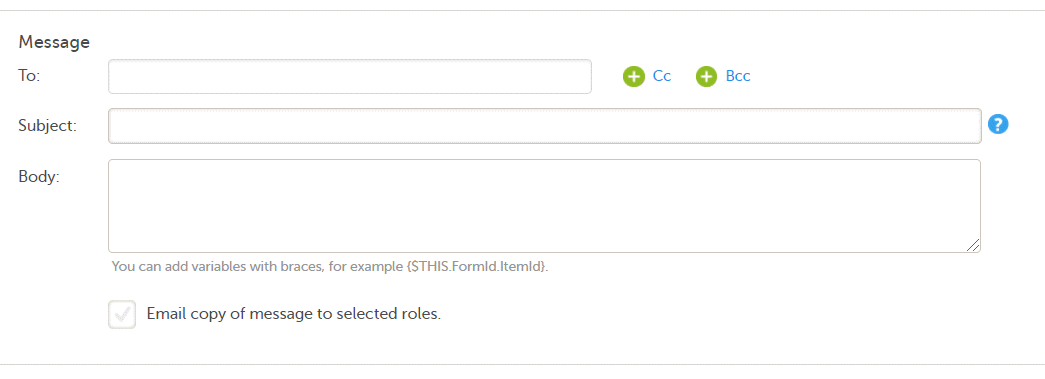 In the To field, click to select the roles that shall receive the message. Click to add Cc: (Carbon Copy) and Bcc: (Blind Carbon Copy) fields.
In the Subject field, type the subject of the message.
In the Body field, type the message to be sent.
Note! If an image is included in an alert (in the subject, the message body, or in a table of changes from a tracker alert), the system returns:
- The filename with its extension type
- A unique GUID.
The actual image is not included as an attachment.
Using variables
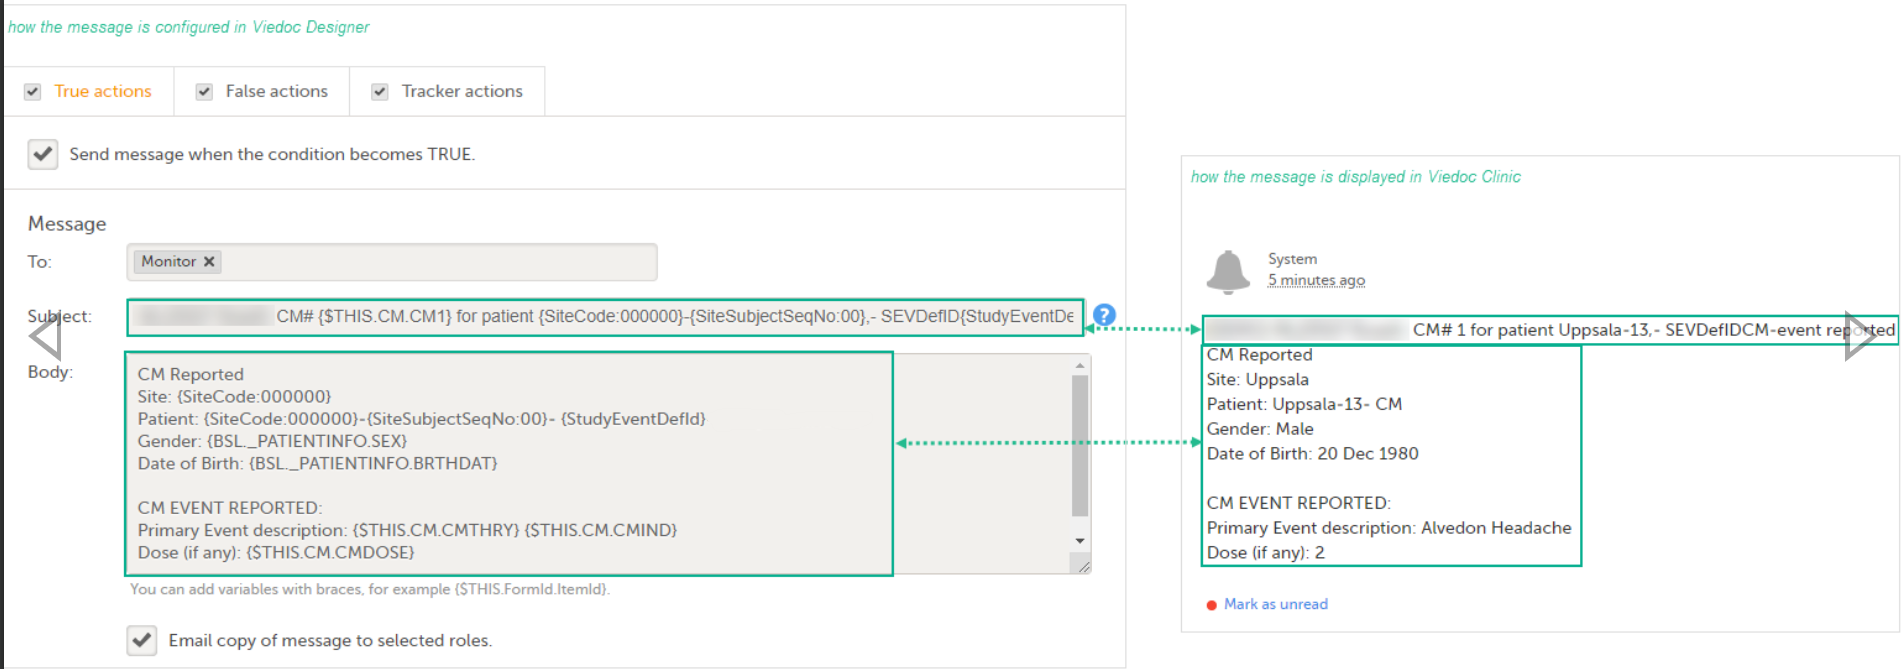
Any static string and/or the following variables can be embedded in both Subject and Body:
- Context form variables - can be referenced directly using item ID, for example
{SAE}. - System variables. For a list of available system variables, see the section System variables in the lesson Using JavaScript in Viedoc.
- Other variables - can be referenced using the format
EventId.FormId.ItemId, for example{SCR.PATINFO.SEX}.
Note! The item values included in the message are visible for all the users holding the defined roles in To:, Cc:, and Bcc: without respecting the role visibility settings.
The following image illustrates an example of how the alert message configured in Viedoc Designer looks in Viedoc Clinic:
Email copy of message to selected roles
By selecting Email copy of message to selected roles, a separate email is sent to each user assigned to a role listed in the To: field. Users assigned to roles listed in the Cc: field receive a separate copy of each e-mail.
For example, if there are five users assigned to roles listed in the To: field, and one user assigned to the role in the Cc: field, then five separate emails are sent, and the user with the role in Cc: gets the same e-mail five times.
Note! If there are no users with the roles listed in the To: field, no email is sent.
Attach a form PDF to email copy of message
When Email copy of message to selected roles is selected, the option Attach form PDF becomes available. By selecting this option, the PDF of the form that triggered the alert action is sent as a PDF attachment with the email as follows:
For True actions, the attached form PDF is the form selected in Context form.
For False actions, the attached form PDF is the PDF of the context form instance that triggered the true actions
For Tracker actions, if the tracked items are outside the Context form, the attached form PDF is the form where the tracked items were changed, as long as the condition is still TRUE.
For more information, see Context form.
Notes!
- Attaching a form PDF to an email copy of an alert message is not available for repeating actions
- Attaching a form PDF to an email copy of an alert message is not available for internal messages within Viedoc (seen on the Study start page under the Messages pane)
- If the form PDFs are not created by the system within 3 minutes, the email copy of an alert message is sent without the PDF attachment.
- For Japanese PMS Studies, the option Attach form PDF to an email copy of a message is only available if the alert is triggered by form data changes and NOT booklet status changes
- All data in the alert (including attachments) will be sent to all users holding the defined roles in To:, Cc:, and Bcc: without respecting the role visibility conditions. Please ensure that no blinded data will be revealed
- The system roles Organization Administrators and Study Managers can choose to password-protect the form PDFs attached to an email copy of an alert message
True actions
The true action is activated by selecting the option Send message when the condition is TRUE. This results in messages being sent when the condition is evaluated to true.
False actions
The false action is activated by selecting the option Send message when the condition is FALSE. This results in messages being sent when the condition is evaluated to false after being true.
Tracker actions
The tracker action is activated by selecting the checkbox Send message when any of the tracked items is changed AND the condition is TRUE. This results in messages being sent when the condition evaluates to true for the first time and any of the tracked items are changed. Tracking stops and the alert becomes inactive when the condition evaluates to false.
You can choose to track changes made on:
1. All forms and items
2. Single forms and items - select the form(s) to be tracked by selecting the corresponding checkbox. For each of the forms you can also select the specific items to be tracked. By default, all the items in the form are selected. By clicking on the items box next to the respective form, a pop-up opens where you can select the items to be tracked.
Note!
- The forms and items available to be selected for tracking are the ones in the current effective design.
- It is not possible to track changes on items located in a hidden form.
Context form
The message is sent as described below, depending if the tracked items are within or outside of the context form:
- If the tracked items are outside of the context form, a new message configured under Tracker actions is sent every time one or more of the items marked for tracking were changed within the event where the alert was triggered or within the study start event, as long as the condition is true.
- If the tracked items are within the context form and this form is present multiple times within the respective event (that is, the context form is a repeating form or it appears multiple times within the event in different activities), the tracker message is sent out for the respective instance of the form where the tracked item(s) was changed. A separate tracker message is sent for each active alert within the event. No tracker message is sent to any other active alerts other than the one for which the context form was edited.
Note! Changes on the tracked items is sent to all the users holding the defined roles in To:, Cc:, and Bcc: without respecting the role visibility settings. Due to this, make sure that no hidden data is revealed in the table of changes.
Include table of changes
By selecting Include table of changes, a table is included in the message body, providing information about the tracked item(s) that were changed. The following data is provided in the table:
- Date and time when the change was performed (the local date and time from Viedoc Clinic)
- The form and item that was changed
- The old item value
- The new item value
Repeating actions
The repeating action is activated by selecting the checkbox Send additional messages as long as the condition is TRUE. This results in messages being sent after the condition is first evaluated to true. Then messages are sent repeatedly at the defined interval until the condition is false, or, when the maximum limit is reached.
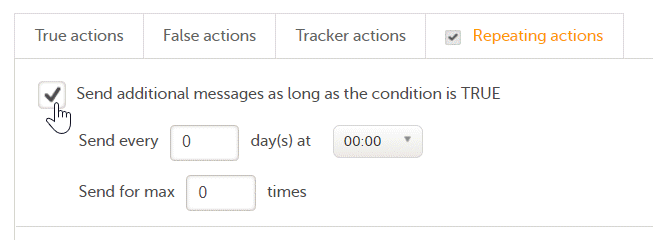
The repeating action is set up by making the following settings:
- Send every - enter at what interval (how often) the condition shall be evaluated.
- day(s) at - set at what point in time (00:00 - 23:00) the condition shall be evaluated (Clinic/Site time).
- Send to max ( ) times - enter the maximum number of times that the message shall be sent. The repeating interval stops when the condition is false or when the max limit is reached (valid values 1-999).
How the condition is evaluated
Condition and context form
The context form is required to be set for an alert, to define where the condition will be evaluated, that is, the saving of which form in Viedoc Clinic will determine the alert condition to be evaluated.
There are three possible ways to set up the context form:
- Any event, Any activity, Specific form - In this case, the condition is evaluated in the context of the saved specified form in Viedoc Clinic, regardless of the event or activity within which the save is performed. The event where the form was saved will be considered for trackers.
- Specific event, Any activity, Specific form - In this case, the condition is evaluated in the specified form, as a result of saving the form in Viedoc Clinic within the specified event. If the context form appears repeatedly in more activities, the form that was just saved is considered for evaluating the condition, regardless of the activity.
- Specific event, Specific activity, Specific form - In this case, the condition is evaluated in the specified form, as a result of saving the form in Viedoc Clinic within the specified event and activity.
New alerts
The workflow followed in the case of a new alert consists of the following steps:
- A new alert is saved through one of the following:
- adding a new alert.
- editing the condition and/or the context form of an existing alert, which leads to re-setting the alert and treating it as a new one.
- After the alert is saved, no action is performed until the context form is saved in Viedoc Clinic.
- When the context form is saved in Viedoc Clinic, the alert condition is evaluated and:
- if the condition is false, no action is performed. The alert becomes active for the first time when the condition is evaluated to true as a result of the form save.
- if the condition is true:
- The True actions are performed, if enabled.
- The tracking is turned on. This means that the system begins tracking of the items as selected under Tracker actions, that is, each time one or more of these items are changed within the same event as the context form was saved or within the study start event, the actions configured under Tracker actions will be performed.
Existing alerts - condition turns from true to false
- For an existing alert (that was defined, saved and in active state), considering that before performing changes on the context form the condition is true:
- True actions are performed if enabled, as the condition is true.
- False actions are ignored, as the condition is true.
- Tracker actions are on, as the condition is true. This means that every time one or more items marked for tracking is changed within the same event as the context form was last saved causing the condition to turn true or within the study start event, the actions defined under Tracker actions are being performed
- If the context form is then being saved in Viedoc Clinic, and, as a result, the condition is evaluated to false:
- True actions are ignored, as the condition is false.
- False actions are performed if enabled, as the condition is true.
- Tracker actions are turned off. No tracking is performed until the condition becomes true again.
Existing alerts - condition turns from false to true
- For an existing alert (that was defined, saved and in active state), considering that before performing changes on the context form the condition is false:
- True actions are ignored, as the condition is false.
- False actions were performed if enabled, as the condition is false.
- Tracker actions are off, as the condition is false
- If the context form is then being saved in Viedoc Clinic, and, as a result, the condition is evaluated to true:
- True actions are performed if enabled, as the condition is true.
- False actions are ignored, as the condition is true.
- Tracker actions are turned on. This means that every time one or more items marked for tracking will be changed within the same event as the context form was last saved causing the condition to turn true or within the study start event, the actions defined under Tracker actions will be performed.
Alerts in Viedoc versions older than 4.37
The alert consists of:
- Internal description (1) - for internal use, visible only in Viedoc Designer.
- Condition (2) - Here you can set/edit the condition that triggers the alert. The condition is written in the same manner as in the Visibility conditions when designing the forms, for example.
SAE == 1 && SCR.PATINFO.SEX == 1. Fore details about variables and conditions see Using JavaScript in Viedoc.
If using variables from the selected context form, these can be referenced directly using only the ItemId. For exampleSAE == 1.
The alert is triggered once the condition is evaluated to true. - Message (3) part where you decide who should receive the message and what the subject and content of the message should be.
Alerts are by default always sent as an internal message within Viedoc and can be seen on the study start page under the Messages pane. As an option you can choose to also Email a copy of message to selected roles.
Note! Keep in mind that, if no users are defined in the system for the respective study having the roles specified in To:, Cc:, Bcc: fields, then no message/email is sent out.
|
Important! The Context form is not used for the alerts defined in Viedoc versions older than 4.37. You can still keep the "old" alert and continue to use it in the same way by not setting any context form for it. You can update the condition or the message settings for it. Once a context form is set and the alert is saved, this becomes a new alert and there is no way to revert to the old version (prior to 4.37). |