Study workflow
This lesson describes how to set up the study events.
Introduction
In the Study workflow page, you can set up the events in the study and populate the events with activities and forms. An event is what is shown in Viedoc Clinic as for example an adverse event. Events are initiated in Viedoc Clinic or by the subjects in Viedoc Me.
Four types of events
There are four different types of events in Viedoc:

1. Study Start event - only one form is allowed, typically a form containing patient identification data. This is the form that opens when the clinic user clicks Add new card (add subject) in Viedoc Clinic.
Notes!
- Only user roles with editing permissions for the study start event form can add a new patient card and activate a Viedoc Me account.
- When the event ID for the Study Start event contains the word START, including combinations with other words and punctuation, and scheduling other events based on the Study Start event, this results in an error. The workaround is to use a different ID for the Study Start event, one that doesn’t contain the word START.
| Important! Add the study start event first, add an activity and a form, and click Save. Make sure that these steps are performed before proceeding with adding other events to the study workflow. |
2. Scheduled Events - events scheduled according to the protocol.
3. Unscheduled Events - additional, on-demand events. If unscheduled events are set up in the study design, the Add event icon will appear in Viedoc Clinic and the clinic user can add these events on demand.
4. Common Events - events that occur separately or parallel to the workflow. These events are not linked to a scheduled event. Examples are:
- Concomitant medication
- Adverse events
- Medical history
- Dose adjustments
- Daily compliance reporting
These four types of events are displayed in Viedoc Clinic as follows:
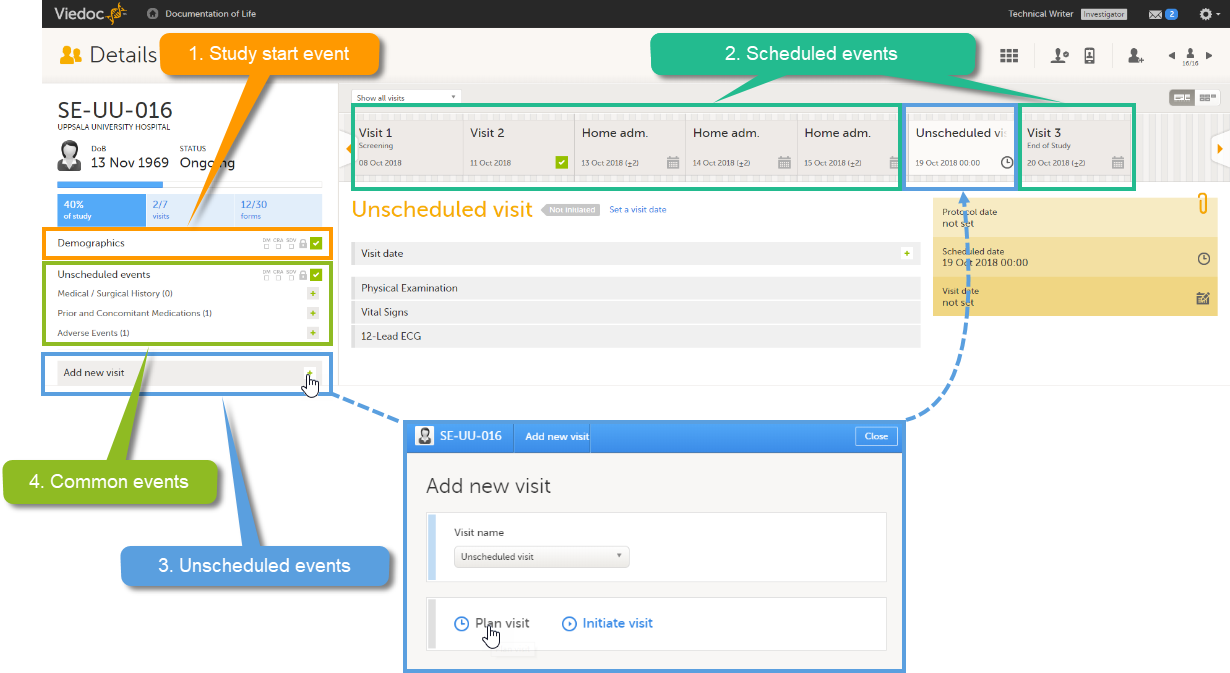
Note! The common events appear in Viedoc Clinic in the field Common events. The unscheduled events appear in the drop-down list in the Add new event pop-up, and in the event slider once initiated.
Events - activities - forms
The image below shows an overview of the Study workflow page.
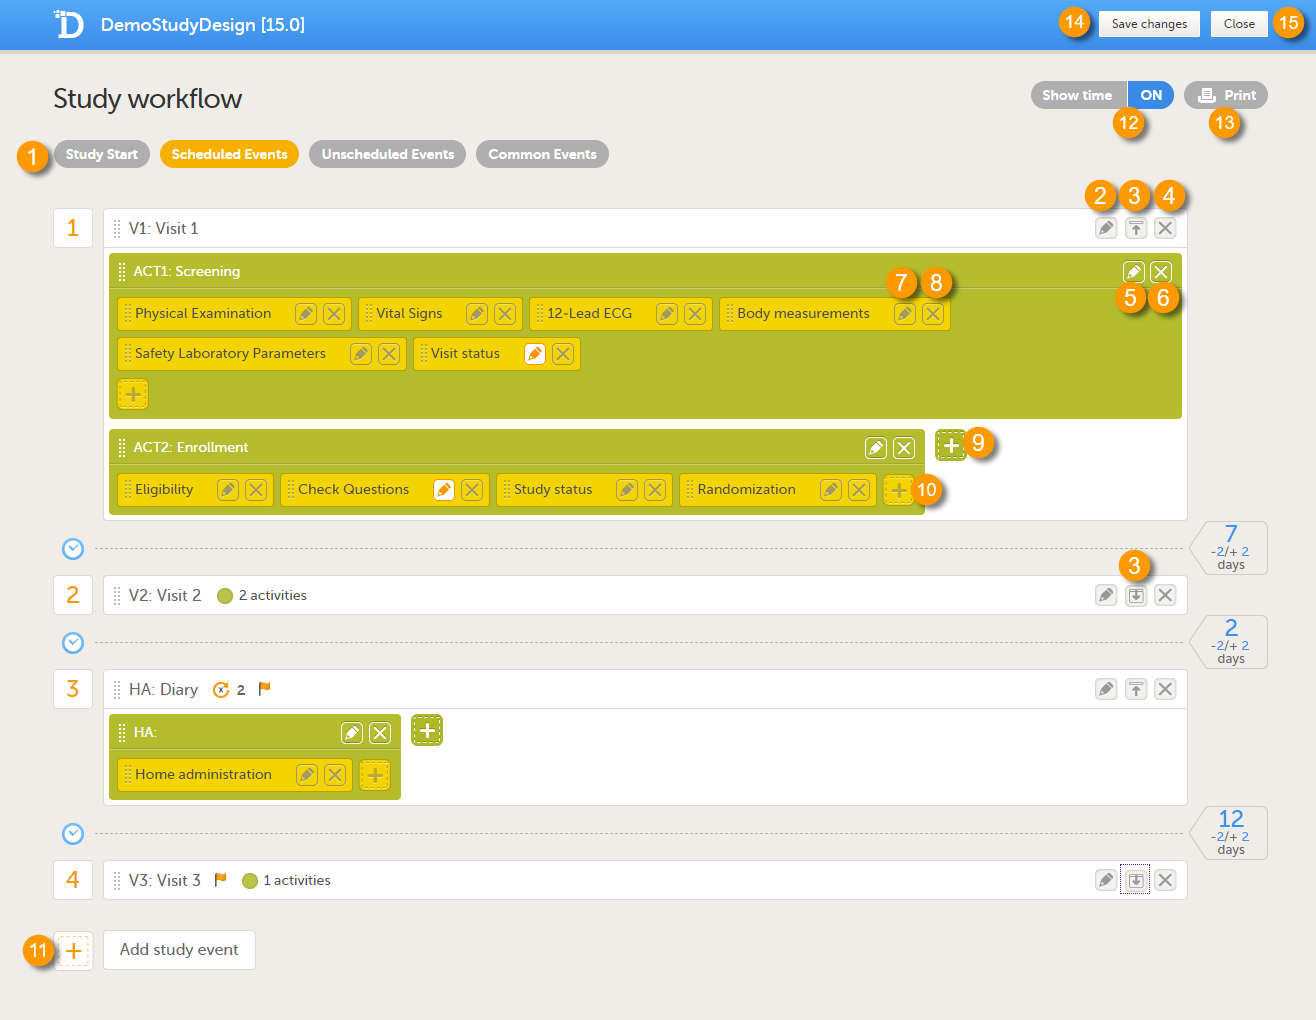
A white box represents an event.
A green box within an event represents an activity.
A yellow box within an activity represents a form.
An event can contain one or several activities. An activity can contain one or several forms. Both events and activities can have visibility conditions that make them visible only if the defined conditions are true, see Visibility settings for events.
It is possible to include the same form multiple times in the same event as long as it is placed in different activities. An example scenario is measurement of vital signs before and after administration of a drug (pre-dose and post-dose activity).
On the Study workflow page, you can:
1. Choose between the type of events that you want to configure
2. Edit the event settings: General settings, Visibility settings for events, Scheduling
3. Collapse/Expand the event
4. Delete the event
5. Edit the Activity settings
6. Delete the activity from the event
7. Edit the Form instance settings
8. Delete the form from the activity
9. Add an activity to the event
10. Add a form to the activity
11. Add an event to the study workflow
12. Select whether to show the time line in days or not: show time ON/OFF
13. Print the study workflow to PDF, see Printing the study workflow to PDF
14. Save the changes made to the study workflow
15. Close the Study workflow page
What do the symbols mean?
| Symbol | Definition |
|---|---|
 |
The event has visibility conditions. |
 |
The event is a recurring event, and the number of recurrences in addition to the original event is shown (2 in the example). |
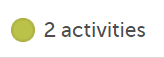 |
The number of activities in the event (only shown when the event is collapsed). |
 |
Form instance settings: no settings are made. |
 |
Form instance settings: either the Customize item visibility settings are edited, or the form is set to be a repeating form. |
Printing the study workflow to PDF
Tip! The study workflow PDF can be used as a draft of your study's source documentation.
You can print the study workflow to PDF by clicking Print in the upper-right corner of the Study workflow page:
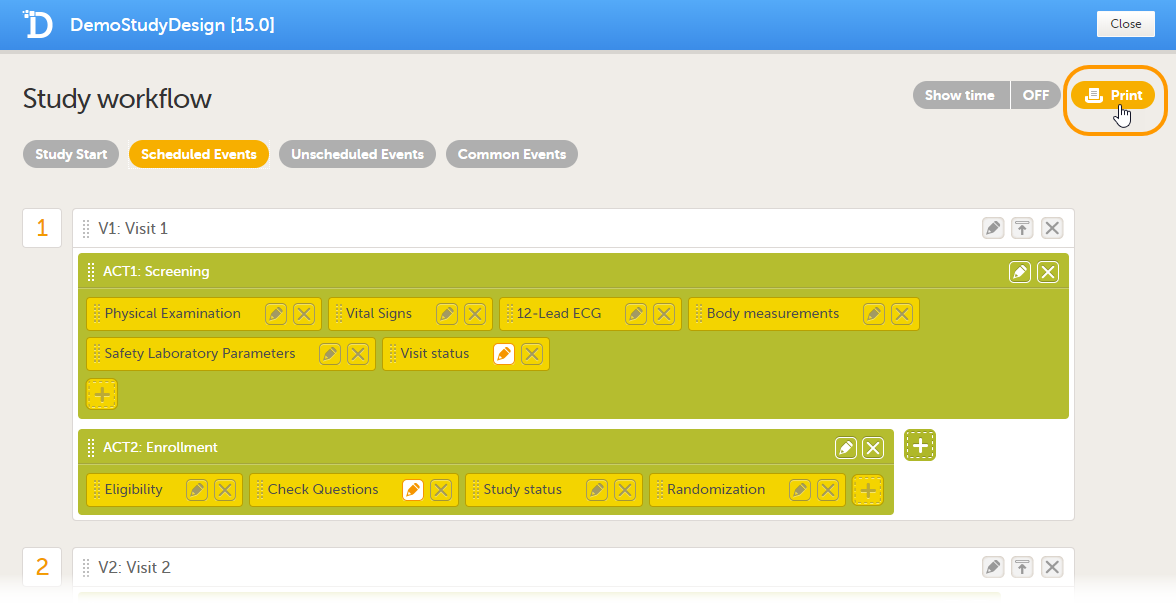
The PDF contains a summary of the study on the first page, and a list of all the events with all activities and forms as configured in the study workflow. This means that a form may appear several times in the PDF if that form is used several times in the study workflow.
The PDF is build up as follows:
- A study summary page that contains:
- Study image and study name - as set in Viedoc Admin (see lesson General study settings in Viedoc Admin User Guide).
- The Internal Description of the design
- Design version and revision
- The number of unique forms. If a certain form is used multiple times in various activities, then it is counted only once here.
- The total number of forms. If a certain form is used multiple times in various activities, then the total number of appearances is counted here.
- The total number of forms within the four types of events:
- Study start
- Scheduled events
- Unscheduled events
- Common events.
- A summary of each event, in the order set up in the study workflow, that contains:
- Event description
- Event date
- Event window (if applicable)
- List of activities and forms - with information on whether the form is subject-initiated or whether it is hidden for certain roles
- The forms, in the same format as the forms are shown in the form preview in the study workflow.
The PDF contains bookmarks for the first page of the document (the study summary) as well as for each event, activity and form in the study workflow. Each page contains information on the event and activity that the respective form belongs to in the page header.
Notes!
- If, in the Study Workflow, there are more activities with the same activity name within the same event, then the forms in these activities are incorrectly displayed in the bookmarks list in the study workflow PDF. Only the bookmarks list is affected, the events/activities/forms are correctly displayed within the document.
- The PDFs generated as empty CRFs will not display all code list items for radio buttons, dropdown lists and checkboxes if these have been configured with many code list items in a vertical layout.
- Items that are set as hidden in the workflow (see Form instance settings) will not be displayed in the PDF. Item groups that become empty as a result of items being set to hidden will not be shown in the PDF either.
- In the printed workflow PDF, the Choose one.. option is now included in dropdown code lists, and the order number of each code list item is displayed in a numbered badge (for example, #1, #2) next to the item name.
The first time you print the workflow, a PDF file is generated and stored on the server. The next time you click Print, and no changes were performed on the design, the PDF file is retrieved from the server and not re-generated. A new file is generated only if changes were performed to the study design. The file therefore may not include changes to the study image and study name, since these are being set in Viedoc Admin.
If the study design is edited during the printing of the study workflow, the printing is canceled.
Events
General settings for events
Click the pen icon in the upper right corner of the event to open the Study event settings pop-up.
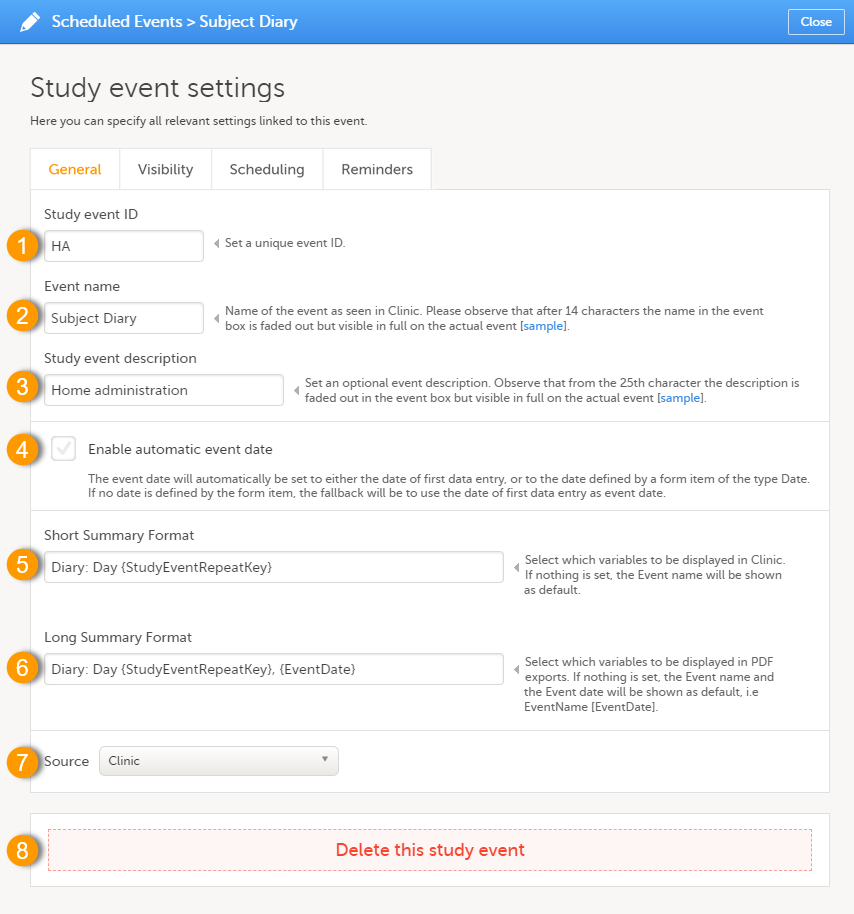
On the General tab you can configure the following:
1. Study event ID - a unique ID used to identify the event. This field is mandatory and it cannot contain spaces or special characters.
2. Event name - the name of the event. This field is mandatory. Please observe that after 14 characters the name in the event box is faded out but fully visible on the actual event page.
3. Study event description - an optional description of the event. Please observe that from the 25th character the description is faded out in the event box but fully visible on the actual event page.
4. Enable automatic event date - see Automatic event date below.
5. Short Summary Format - see Short summary format below.
6. Long Summary Format - see Long summary format below.
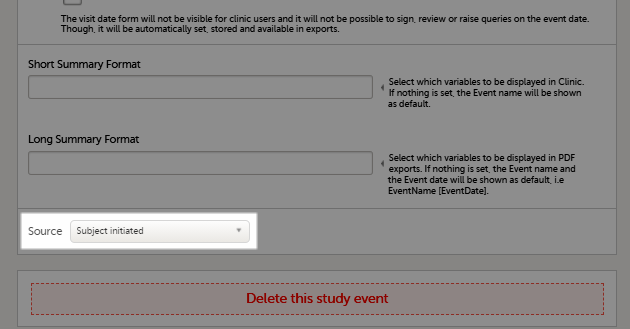
7. Source - select if the respective event is a Viedoc Clinic or a Viedoc Me event. See Subject-initiated events below.
8. Delete this study event - click to delete the respective event.
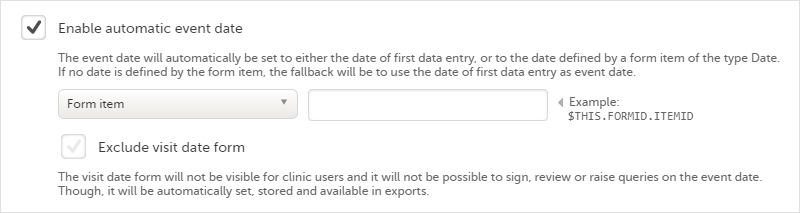
Automatic event date
The automatic event date option sets the event date based on another date than the one manually set in the Event date form in Viedoc Clinic:
Enabling/disabling the automatic event date is only possible for scheduled events and unscheduled events. For the study start event, common events and subject initiated events, the option Enable automatic event date is checked by default and set to read-only, meaning that the event date is always set automatically.
The automatic event date is based on one of the following settings you choose in the drop-down list:
- First data entry - the event date is set to when the first data is entered and saved within the event, in the current site time zone.
Note! When the automatic event date is based on First data entry, a scheduled event is not editable until its event window is reached. - Form item - the event date is set to a specific Date or Date and time item within the event. See Creating and editing forms for more information.
- If the form instance is specified by the
FormRepeatKey, this specified form instance is used. - If the form instance is not specified, the first form instance is used.
- If the form instance is specified by the
The item is specified through an expression in this format: $THIS.FormID.ItemID. For details, see Using JavaScript in Viedoc.
|
Important! The event must always be specified as |
In Viedoc Clinic, the automatic event date setting is impacted as follows:
- If a form is reset that contains a specified item, the event date is set according to the first data entry.
- If data is being filled in within the event, and the specified form item is not filled in yet, the event date is set to the date of first data entry, until the respective item is filled in.
- Clinic staff can change an automatically assigned event date on scheduled and unscheduled events if the event date is based on first data entry. An automatically assigned event date is not editable if it is based on a form item. The option to change an automatically assigned event date is set in Viedoc Admin.
- If a time window is set for the event (see Proposed date calculation below), the following applies if the automatically set event date is outside of the time window:
- If the Exclude event date form option is not checked - a query is raised on the Event date form:
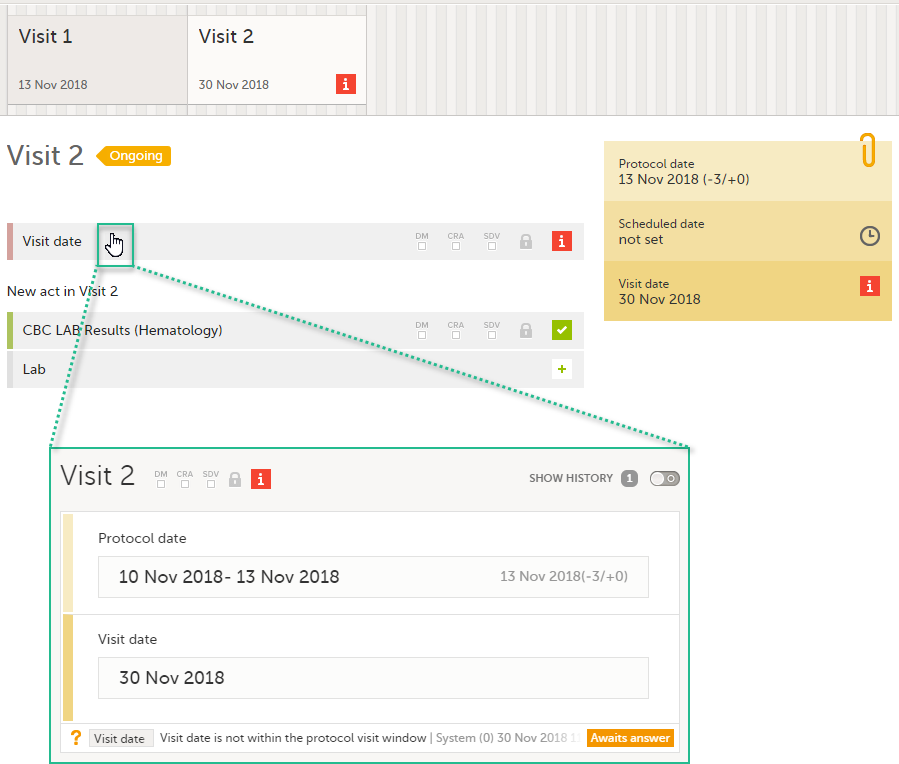
- If the Exclude event date form option is checked - this is not flagged in Viedoc Clinic in any way, as a query cannot be raised if the Event date form is not visible (see Exclude event date form below).
- If the Exclude event date form option is not checked - a query is raised on the Event date form:
- Events that are added using the automatic event date functionality will burn-in the current effective design.
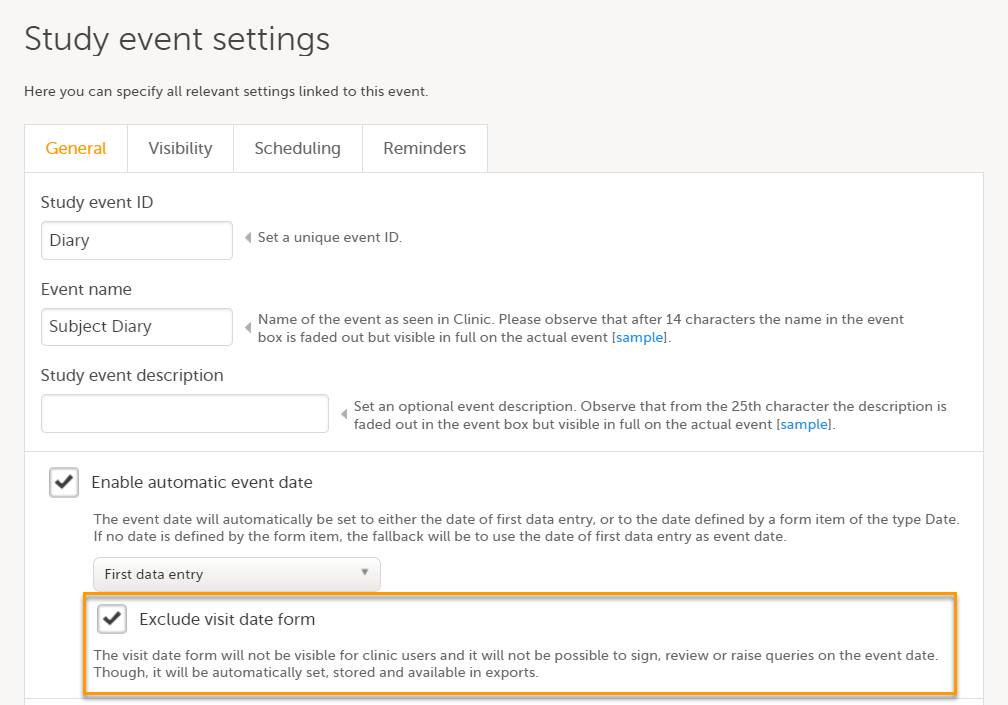
Exclude event date form
If the Enable automatic event date option is checked, it is possible to exclude the Event date form from Viedoc Clinic, by checking Exclude event date form. This means that the Event date form is not shown on the Details page, in the Data Review console, in the Signing console, or in the Issues list, and that it is not possible to raise queries on the event date. The Event date form is neither included in metrics but still available in the data export.
When the option Exclude event date form is not checked, the event date is visible in Viedoc Clinic:
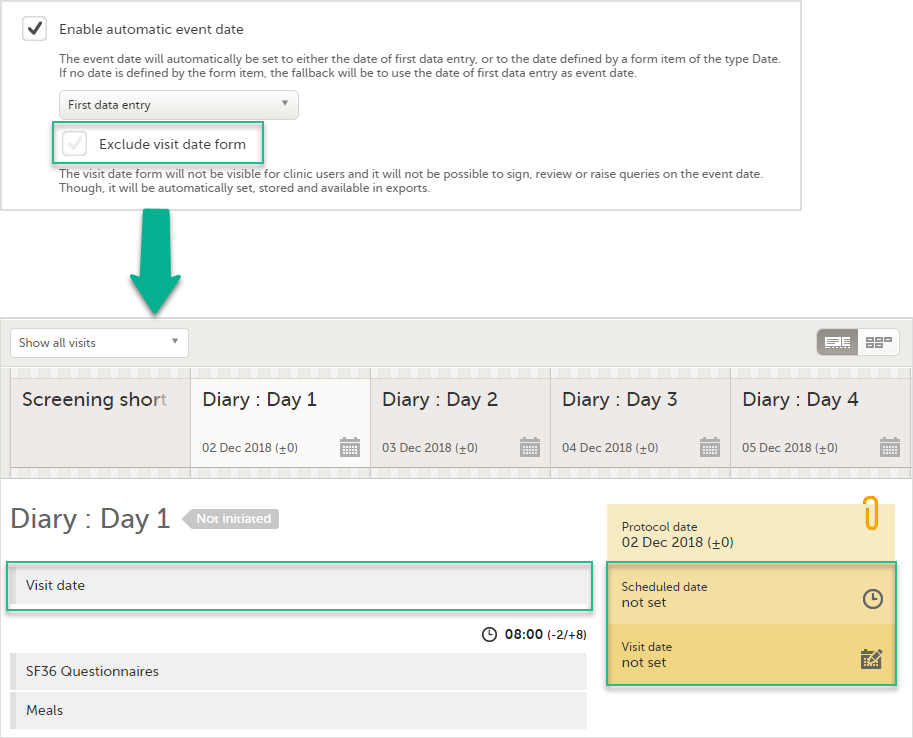
When the option Exclude event date form is checked, the Event date form is not visible in Viedoc Clinic:
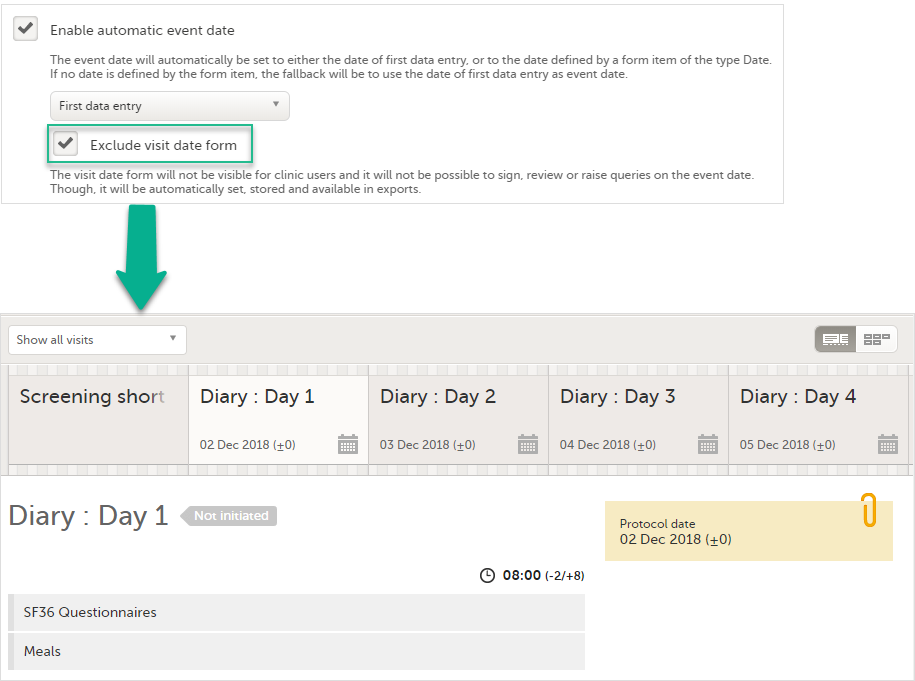
Note! It is only the Event date form that is excluded, the event date might be still visible in some places in Viedoc Clinic if the event date is used in the Short Summary Format (see Short summary format below) and/or the Long Summary Format (see Long summary format below). Note that this setting also affects the Date and Date/Time items in forms; the event date option is not available when excluding the Event date form.
For the study start event, common events and subject-initiated events, the option Exclude event date form is checked by default and set to read-only, meaning that the Event date form will always be excluded from Viedoc Clinic for these types of events.
Changes of automatic event date settings within a revision
When the automatic event date settings are changed in a revision of the study design, the following actions are triggered:
| Current settings | Change in the revision of study design (Viedoc Designer) | Result after applying revision (Viedoc Clinic) |
|---|---|---|
| Enable automatic event date is checked. | Uncheck Enable automatic event date. | Existing event dates are preserved. The Event date form becomes visible if it was hidden (that is, if Exclude event date form was selected before applying the revision). |
| Enable automatic event date is checked. | Change from First data entry to a Form item or vice-versa. | Existing event dates are updated accordingly. |
| Enable automatic event date is checked and set to a Form item. | Change the item. | Existing event dates are updated accordingly. |
Note! Changes of the automatic event date settings within a revision do not require site approval.
For more details about how a study design version is burnt-in depending on the event date, see Viedoc study configuration management.
For studies started before automatic event date was introduced
For ongoing studies, started before the automatic event date was introduced (Viedoc 4.47), it is possible to change the event settings and configure the automatic event date in a revision of the study design.
Short summary format
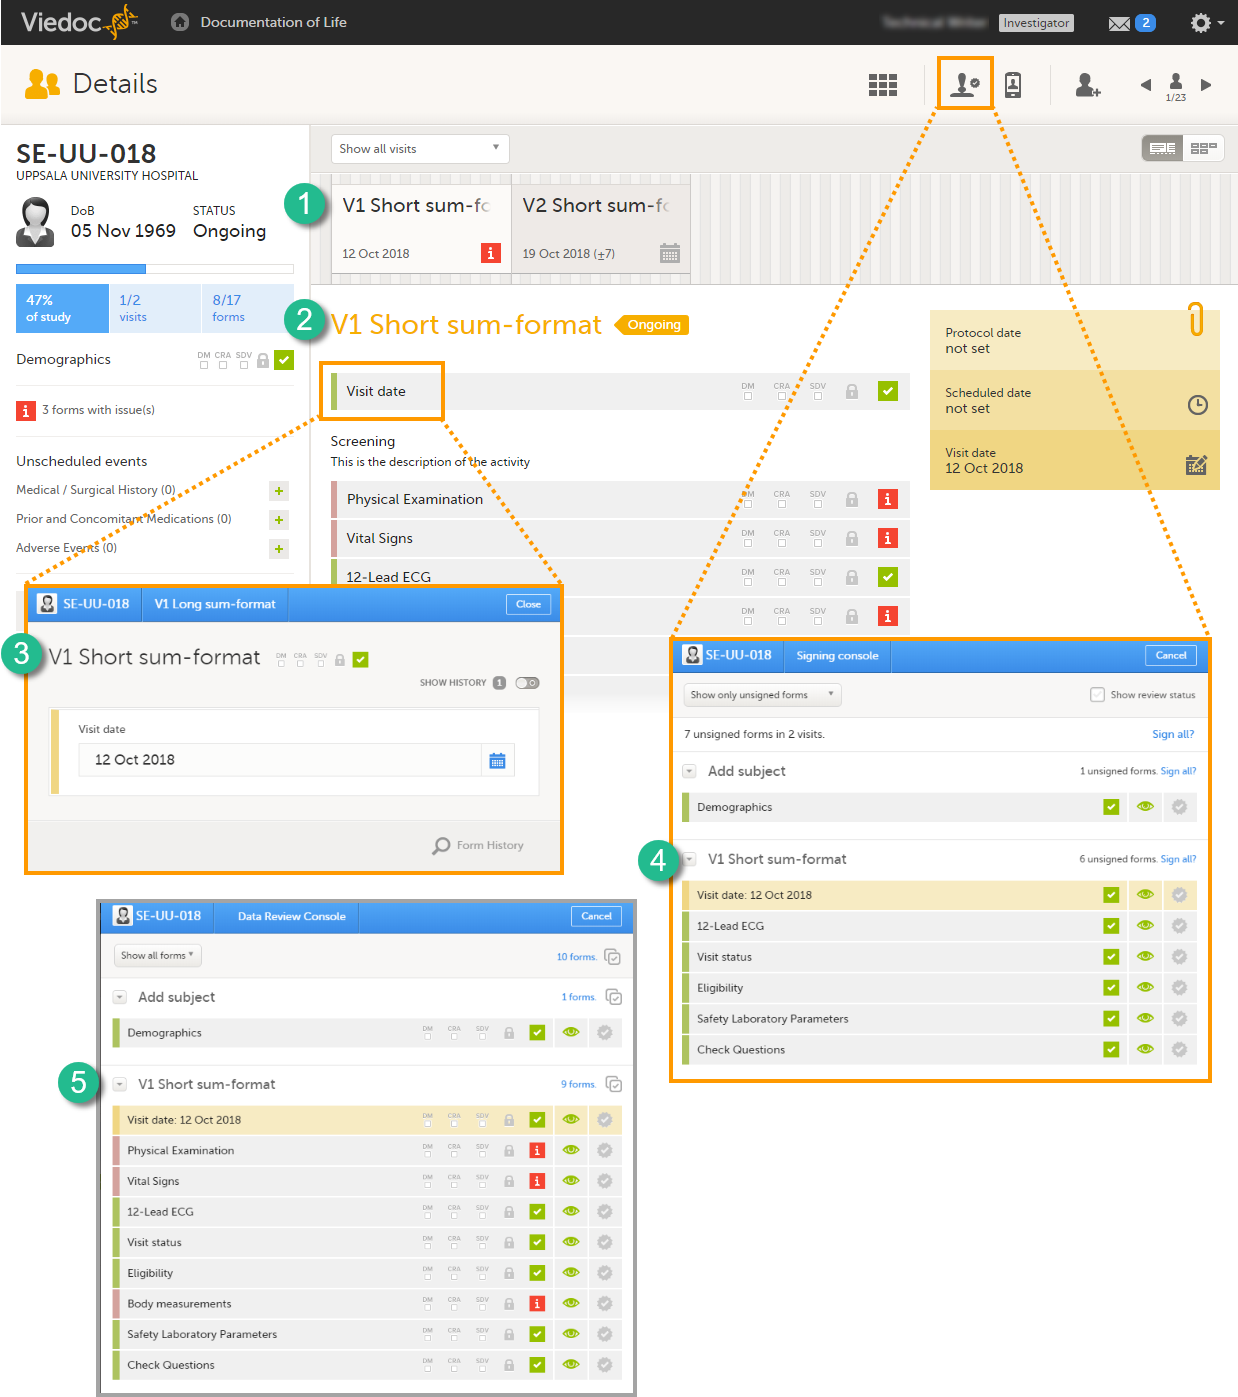
The short summary format is an event identifier that is used to define how the event will be displayed at the following places in Viedoc Clinic:
1. The event slider on the Details page
2. The header of the event on the Details page
3. The Event date form
4. The Signing console
5. The Data Review console
The short summary format is a field in which you can enter variables (see the complete list at Using JavaScript in Viedoc) as well as free text. For recurring events (see Recurring events below), you can use the StudyEventRepeatKey in the short summary format to distinguish between the different occurrences of the same event. An example is described in the use case example in Scheduling events.
Note!
- The event summary format is always read from the current effective design version and is not related in any way to the design version burnt in when the event is initiated (for details about design versions see Viedoc Configuration Management). Thus, the variables used within the summary format are read also from the current effective design version, and not from the version burnt into the form where the variable value is picked from.
If nothing is set in the short summary format field, the event name will be displayed as default at the above listed places in Viedoc Clinic.
Note! In Viedoc Clinic, on the Selection page in the Events view, the short summary format is not used to identify the event name. Instead, the Event name is displayed (as set in the Study event settings in the study design). In the case of a recurring event, a counter is shown to differentiate between the events using the StudyEventRepeatKey
Long summary format
The long summary format is an event identifier that is used to define how the event will be displayed after it is initiated, at the following places:
1. The form header in Viedoc Clinic
2. The header of the Form History PDF
3. The PDF export for Viedoc versions 4.39 and higher
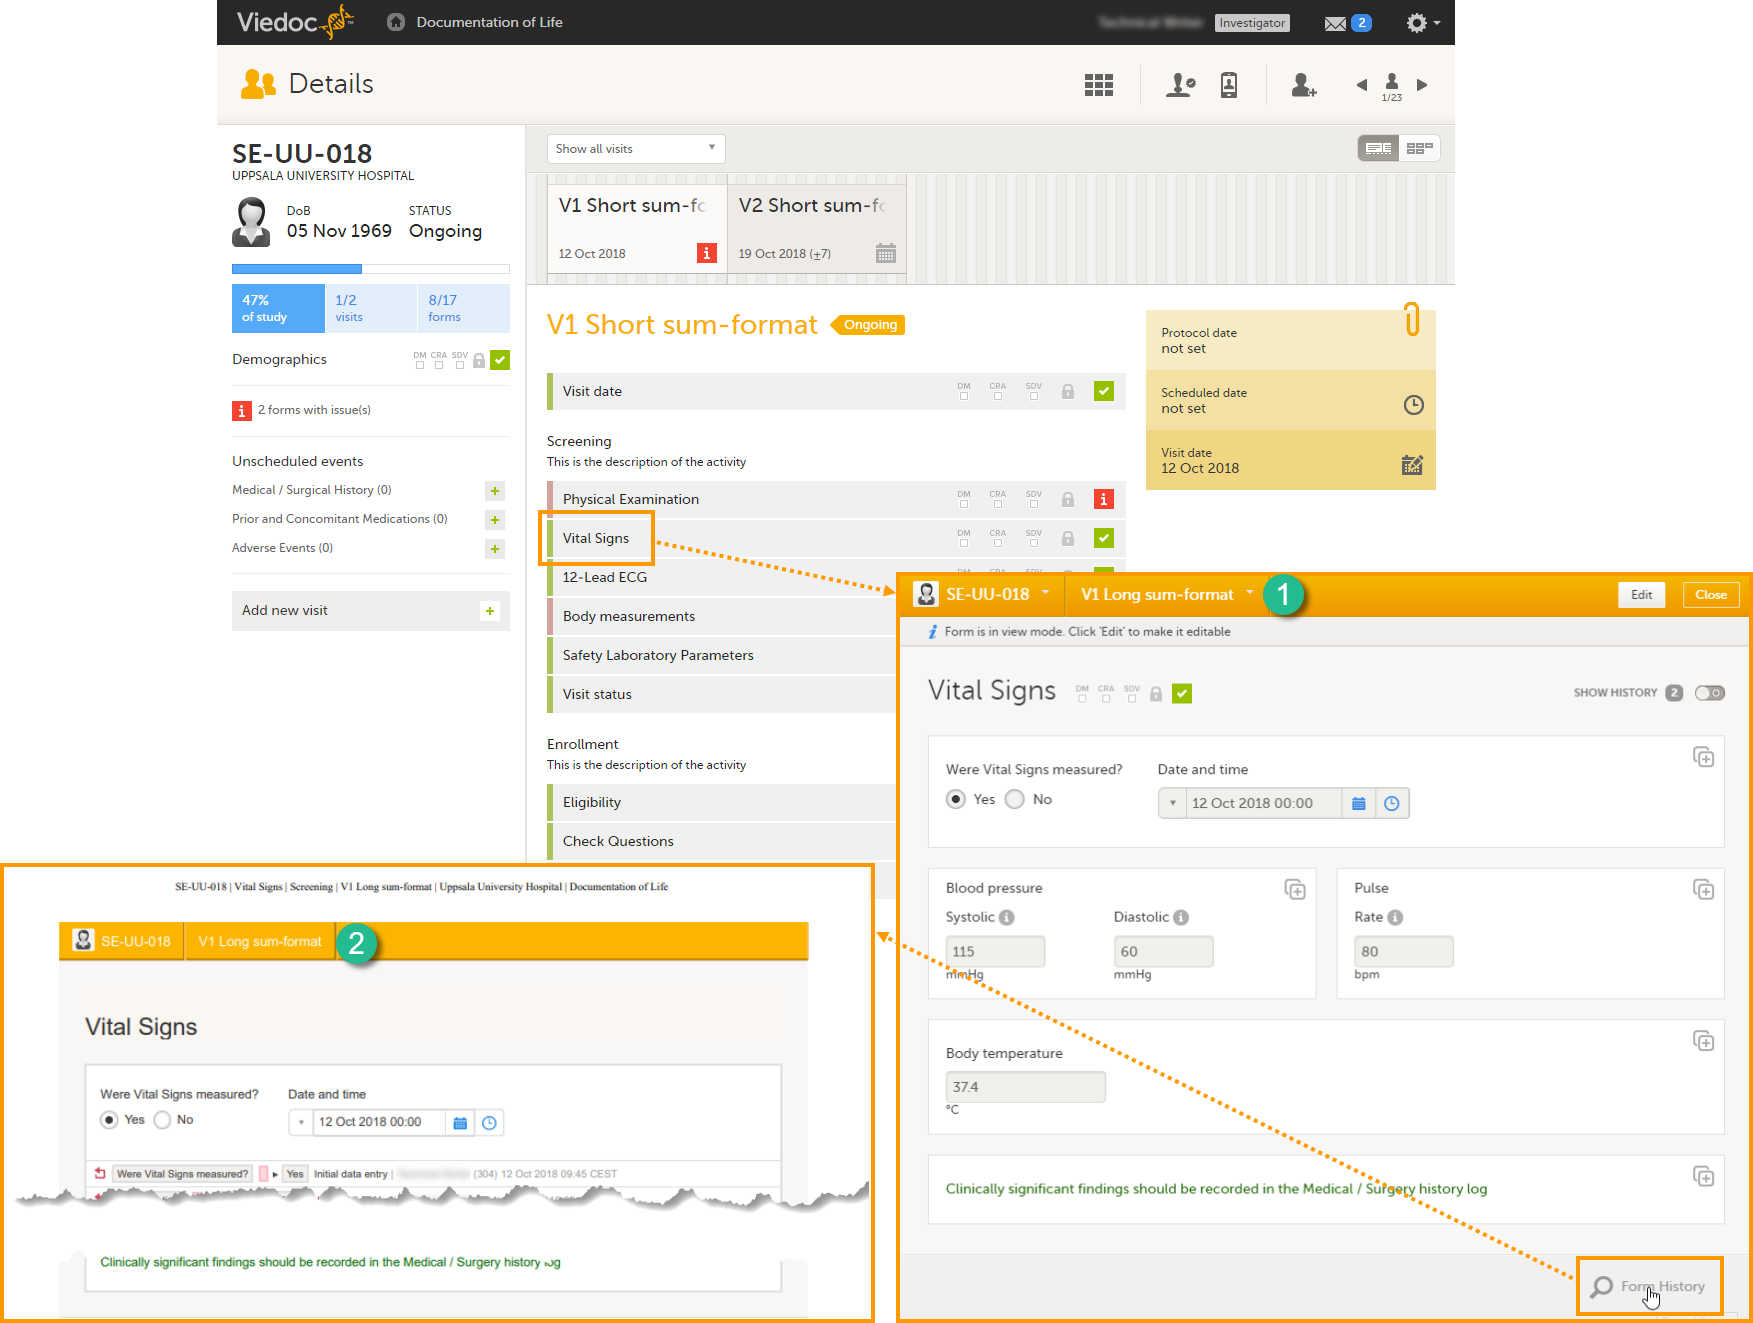
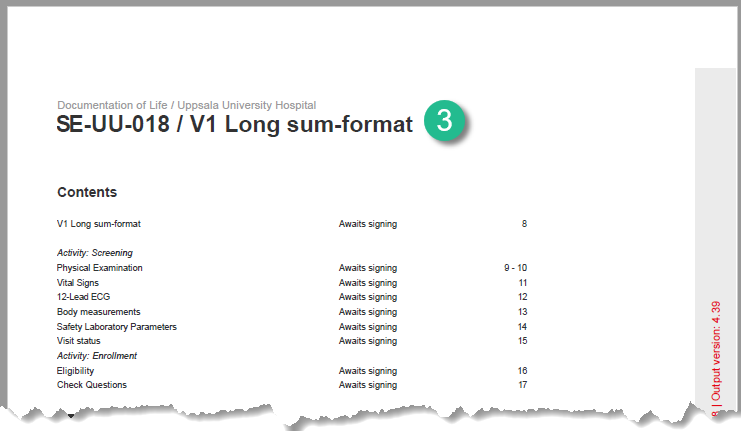
Before the event is initiated in Viedoc Clinic, the short summary format is used to identify the event in all the above mentioned.
The long summary format is a field in which you can enter variables (see the complete list at Using JavaScript in Viedoc) as well as free text. For recurring events (see Recurring events), you can use the StudyEventRepeatKey in the short summary format to distinguish between the different occurrences of the same event. An example is described in the use case example in Scheduling events.
Note! The event summary format is always read from the current effective design version and is not related in any way to the design version burnt in when the event is initiated (for details about design versions see Viedoc Configuration Management). Thus, the variables used within the summary format are read also from the current effective design version, and not from the version burnt into the form where the variable value is picked from.
If nothing is set in the long summary format field, the event name together with the event date within brackets will be displayed as default at the above listed places in Viedoc Clinic.
Note! In Viedoc Clinic, on the Selection page in the Events view, the long summary format is not used to identify the event name. Instead, the Event name is displayed (as set in the Study event settings in the study design). In case of a recurring event, a counter is shown to differentiate between the events using the StudyEventRepeatKey. The PDF export will show the same counter in the case of recurring events.
Note! If a long summary format is used, this will increase the size of the header in the PDF. If the PDF header contains more than three rows of text, it will overlap with the contents of the PDF.
Summary format for common events
The summary format for common events is an event identifier used to define how the respective event will be displayed in:
1. The list of forms in the Unscheduled events pop-up in Viedoc Clinic (the pop-up that lists common events)
2. The form header of the common event
3. The header of the Form History PDF
4. The PDF export for Viedoc versions 4.39 and higher
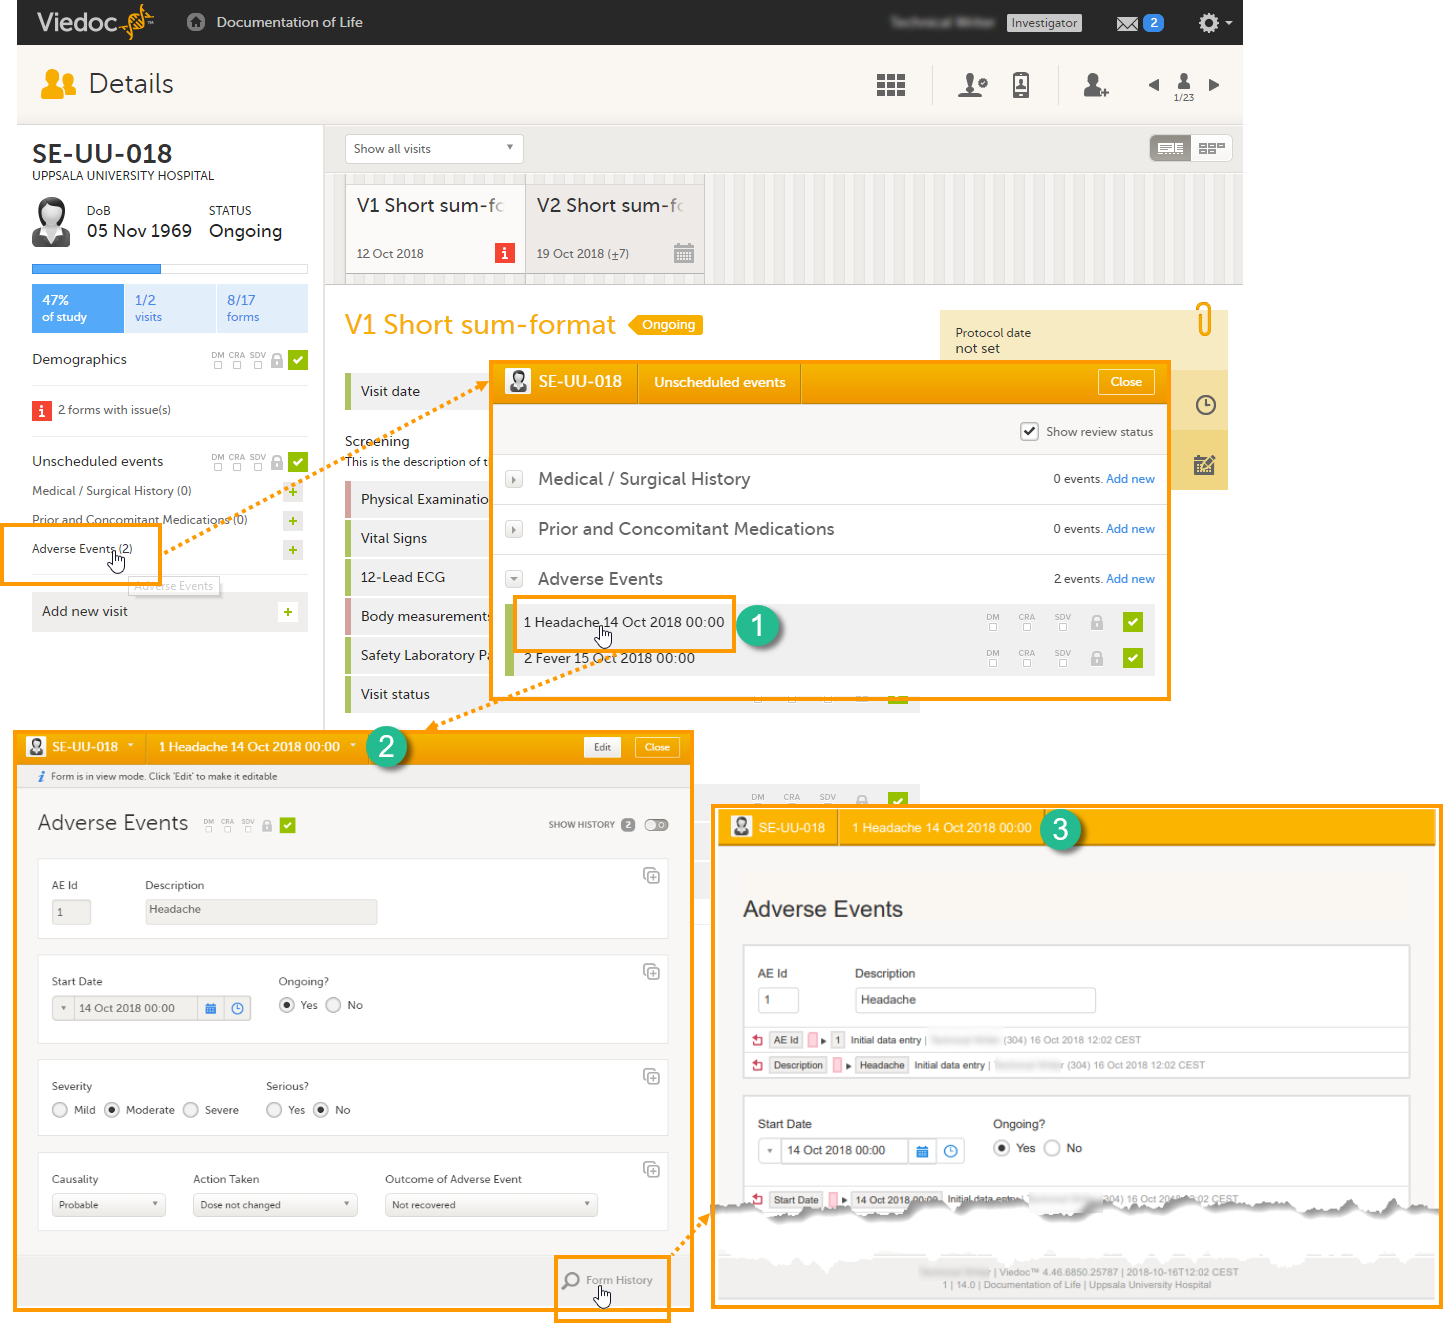
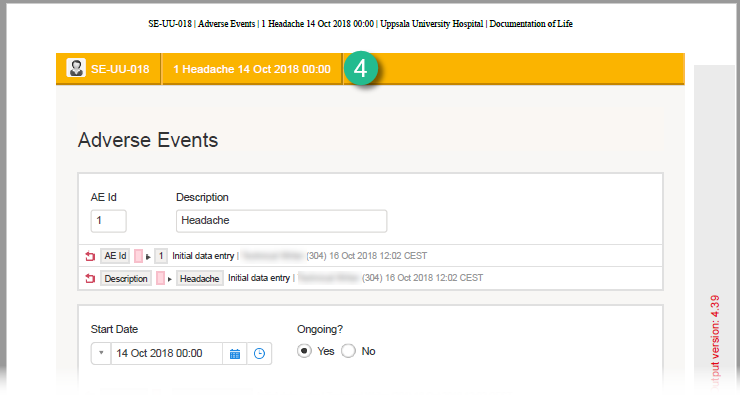
The summary format is a field in which you can enter variables (see the complete list at Using JavaScript in Viedoc) as well as free text. In the example in the image, the summary format is set to {AE.AENO}{AE.AEEVENT}{AE.AESTDT} in Viedoc Designer. For the first adverse event Headache for subject SE-UU-018 with start date 14 October 2018, the summary format will be: 1 Headache 14 Oct 2018 00:00.
Visibility settings for events
Click the pen icon in the upper right corner of the event to open the Study event settings pop-up.
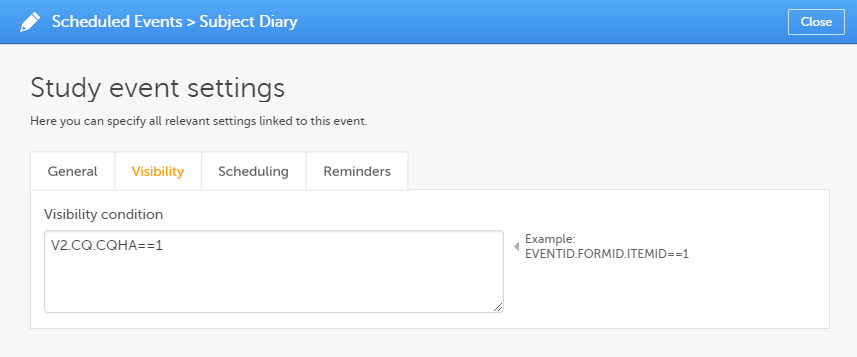
On the Visibility tab, you can add a condition that dictates that the event is visible only when the condition is evaluated to true. The condition is written as an expression in JavaScript.
If the Visibility condition field is left empty, the event will always be visible in Viedoc Clinic.
Note! Visibility conditions can only be set for scheduled events. It is not possible to set a visibility condition for the study start event, unscheduled events or common events.
Scheduling events
Click the pen icon in the upper right corner of the event to open the Study event settings pop-up.
On the Scheduling tab, you can configure the calculation of the proposed date and the recurrence settings.
Note! You can only configure the scheduling of scheduled events. Event scheduling is not available for the study start event, unscheduled events or common events.
Proposed date calculation
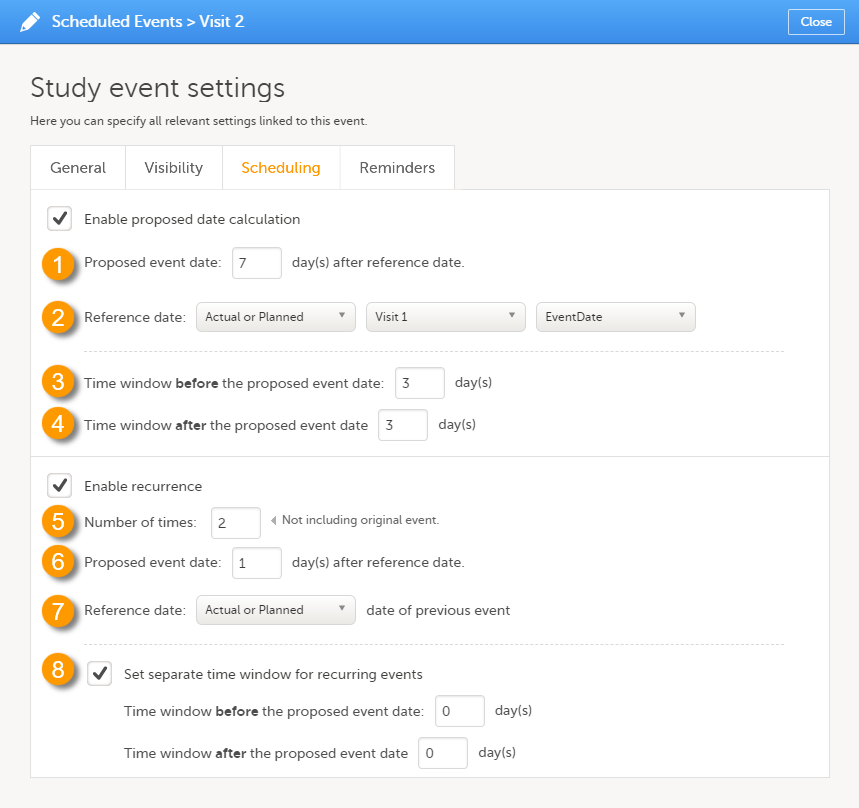
Select the Enable proposed date calculation checkbox if you want to activate calculation of a proposed date for the event, and configure the following (see image above):
1. Set the Proposed event date to n day(s) after reference date, in which n is the number of days between the event and the reference date.
2. Define the Reference date by selecting whether it should be based on the Actual or Planned or Proposed event date, and select the reference event from the drop-down list.
Note! If Actual or Planned is selected for the Reference date, then the scheduled date is calculated on the Reference date entered by site. However, if the reference event has not been initiated, then the Planned date is used. And if the reference event has not been planned, then the Proposed date of the reference event is used.
3 + 4. Optionally: Set a time window during which the event can be initiated, by entering a number of days in the Time window before field (3), and in the Time window after field (4). By default these are set to 0 days.
Recurring events
Select the Enable recurrence checkbox if you want to allow the event to reoccur on a scheduled basis, and configure the following (see image above):
5. Type the Number of times the event should reoccur, in addition to the first occurrence of the event. For example, if this number is set to 3 times, then the event will occur 4 times in total. The maximum number that can be entered is 999.
6. Set the Proposed event date to n day(s) after reference date, in which n is the number of days between two consecutive occurrences.
7. Select whether the reference date should be based on the Actual or Planned or the Proposed date of the previous occurrence of the event.
8. Optionally: Set a separate time window during which the recurrences of the event can be initiated, by entering a number of days in the Time window before field, and in the Time window after field. If nothing is entered here, then the time window set for the original event (at 3 and 4) applies.
For a use case example of scheduling recurring events, see Scheduling Events.
Scheduled event reminders
Reminders can be configured to be sent at an interval for scheduled events that are not completed. A completed event is defined as follows:
- For regular studies - All forms are completely filled in (green). Queries do not affect the completed condition.
- For Japanese PMS studies - The booklet is not in control of the site (it is Submitted/Received/Frozen).
The complete condition is evaluated on a regular basis at a defined timepoint (site local time) according to the configured event reminders interval. Changes such as below will affect the next evaluation as follows:
- form data is saved (a reminder is triggered if the complete condition is false)
- a form is reset (a reminder is triggered and the complete condition is false, because data was reset)
- a recurring form instance is deleted (a reminder is triggered if the complete condition is false)
- an event is deleted in the latest effective design (removes all reminders when the new design is applied)
Recurring events have the same reminder settings as the original one.
Setting scheduled event reminders
Click the pen icon in the upper right corner of a scheduled event to open the Study event settings pop-up.
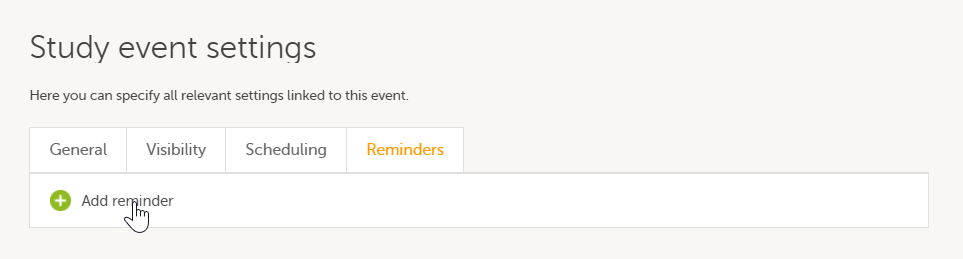
On the Reminders tab, you can define reminders of the event so that users can be notified about approaching and/or delayed events. The reminders are shown as messages in Viedoc Clinic, and, optionally, sent as emails. To configure reminders, click Add reminder.
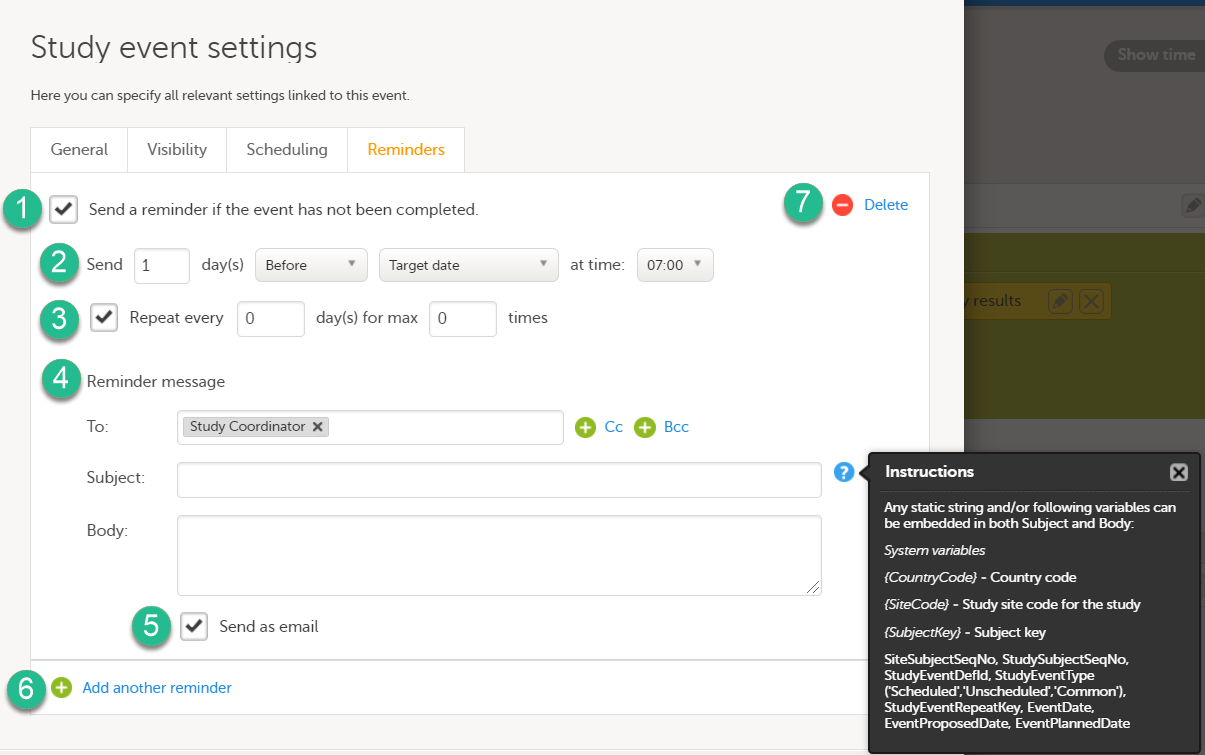
Configure the following:
1. Select Send a reminder if the event has not been completed to activate the reminder.
2. Make the settings for when the reminder shall be sent: enter the number of days (between 1-99) that the reminder shall be sent Before or After one of the following:
- Target date - the reminder is sent on the planned date for the event. Depending on the scenario, the target date equals the date of an initiated event, a planned event, or a re-scheduled (proposed) event.
- Window start date / Window end date - sending a reminder on the window start or end date only works if you have enabled scheduling for the event with time windows on the Scheduling tab.
Also pick at what local site time the reminder shall be sent.
3. Define an interval for sending repeating reminders. Select Repeat every and enter the day(s) (between 1-99) and maximum number of times (between 1-999) that the reminder shall be sent. Not selecting this option results in reminders being sent once, as defined in step 2.
4. Compose your reminder message:
- Click the To: field to select the study roles that shall receive the reminders. Click the green plus symbols to add fields for Cc / Bcc recipients. Note! For Japanese PMS studies, only roles with access to Clinic side data are available as recipients.
- Enter a message subject. You can use variables in both the Subject and Body fields, as described when clicking the blue question mark symbol.
- Enter the reminder text that your recipients will receive.
5. Select Send as email to also send reminders to the recipients email addresses. Not selecting this option results in reminders being shown as internal Viedoc messages only.
6. Click Add another reminder to configure several reminders.
7. Click Delete reminder to remove it.
Subject-initiated events
If you, for a certain event, would like to collect data from subjects using Viedoc Me, you need to select Subject initiated from the Source drop-down list in the general settings of the event (see General settings for events).
Note!
- An event can either be a Viedoc Clinic event, or a subject-initiated event. Forms to be completed by the clinic cannot be mixed with Viedoc Me questionnaire forms in the same event, so you need to create a separate subject-initiated event for Viedoc Me forms.
- The study start event and the first event under scheduled events cannot be subject-initiated events.
- Subject-initiated events must be scheduled in order to appear in Viedoc Me. If an event cannot be scheduled, it is per definition an unscheduled event, and should be designed as such.
If at least one of the events in the study workflow are marked as subject-initiated, the mobile phone icon will appear on the Details page in Viedoc Clinic. The clinic user can use this icon to initiate a Viedoc Me account for that specific subject.

Note! The summary format of subject-initiated events is not displayed in Viedoc Me, it is only displayed in Viedoc Clinic.
Duplicating the event settings
When creating a new event, it is possible to start configuring it by duplicating the settings of an existing event. This is done by checking the Use an existing event to duplicate settings, activities and forms checkbox and selecting from the drop-down list the event the settings will be copied from:
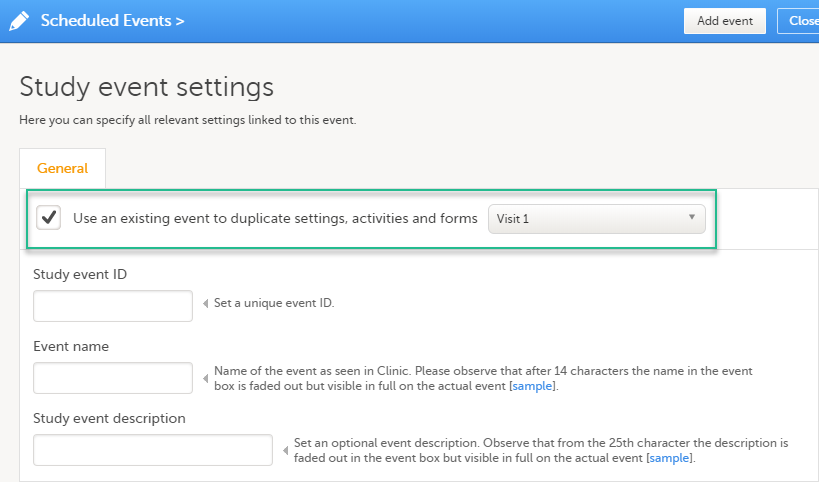
After entering the Study event ID, Event name, Study event description and clicking Add event, a new event is created with the same configuration as the selected event with regards to:
- The activities and forms
- Visibility
- Scheduling
- Automatic event date
- Short/long summary format
- Source (clinic/subject initiated)
Activities
Activity settings
To add an activity to an event, click the (+) icon in the event field:
 You can edit an existing activity by clicking the pen icon in the upper right corner of the activity:
 The Activity settings pop-up opens that has the following tabs:
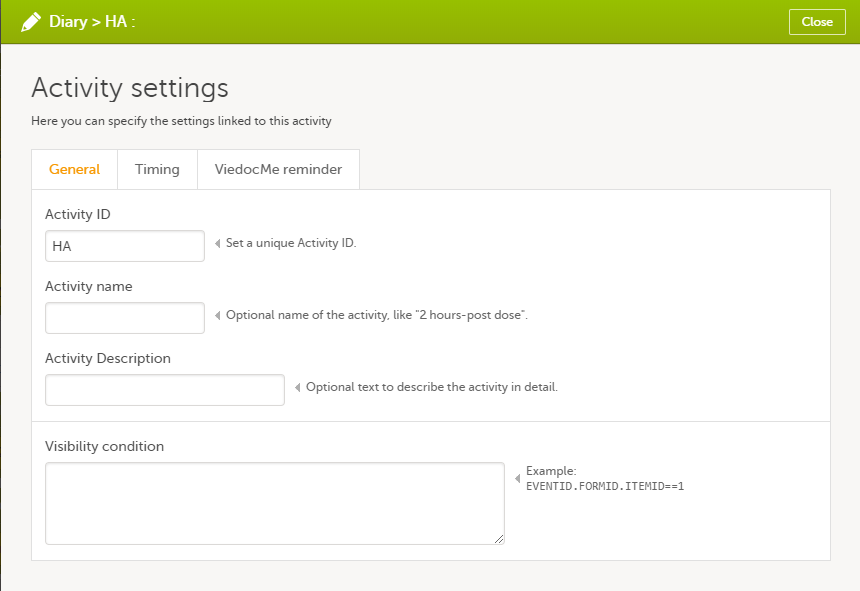
- General settings. Here you can configure:
- Activity ID - a unique ID used to identify the activity. This field is mandatory and it cannot contain spaces or special characters.
- Activity name - the name of the activity. This field is optional.
- Activity description - an optional description of the activity.
- Visibility condition - sets the activity to be visible only when the condition is evaluated to true. The condition is written as an expression in JavaScript. If the field is left empty, then the activity will always be visible in Viedoc Clinic.
- Timing. Only for subject-initiated events, see Scheduling subject-initiated events.
- Viedoc Me reminder. Only for subject-initiated events, see Setting Viedoc Me reminders.
Activity settings for subject-initiated events
Scheduling subject-initiated (Viedoc Me) events
For scheduled events that are set as subject-initiated (see Subject-initiated events), you can schedule the activity as follows:
| 1 |
Click the pen icon to open the activity settings window.
The activity settings pop-up opens. |
| 2 |
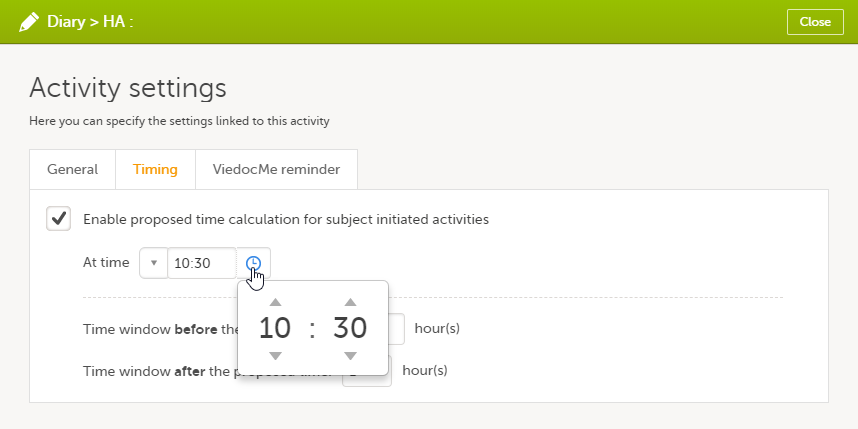
On the Timing tab, select the checkbox for Enable proposed time calculation for subject initiated activities. Click the clock icon and enter a time at which the Viedoc Me questionnaire to be available for the subject to fill in.
|
| 3 |
In the Time window before/after the proposed time fields, enter the number of hours before/after the proposed time set above. The default is 1h before and 1h after the proposed time. Note! Setting the time window to +/- 0 hours means that the subject must start the Viedoc Me questionnaire exactly on the proposed time, that is, on exactly that minute! 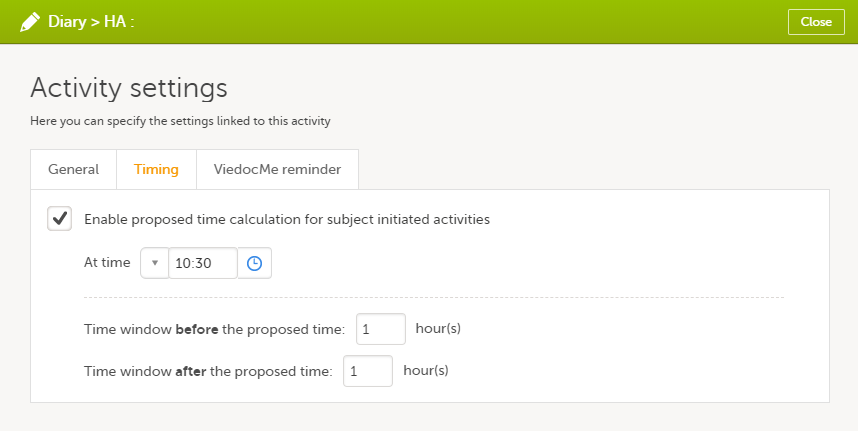
When a proposed time calculation is set for an activity, the selected time window is displayed in the activity header in the study workflow. 
|
 The default time is 00:00. If you want to start all over, click the drop-down list and select Reset to return to the default time.
Setting Viedoc Me reminders
For scheduled events that are set as subject-initiated (see Subject-initiated events), you can configure Viedoc Me reminders as follows:
| 1 |
Click the pen icon to open the activity settings pop-up.
The activity settings pop-up opens. |
| 2 |
On the Viedoc Me reminder tab, click Add a reminder. 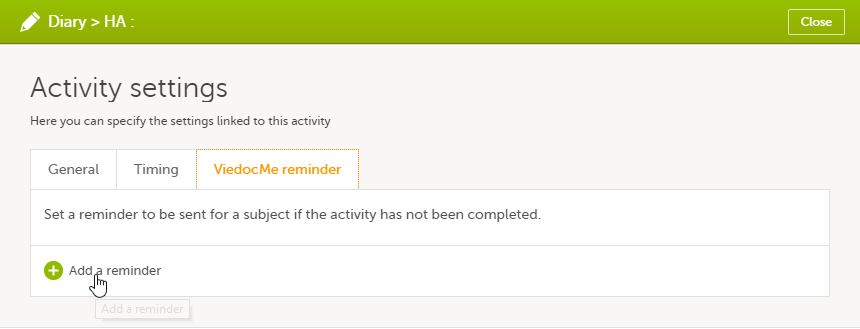
|
| 3 |
Configure the reminder:
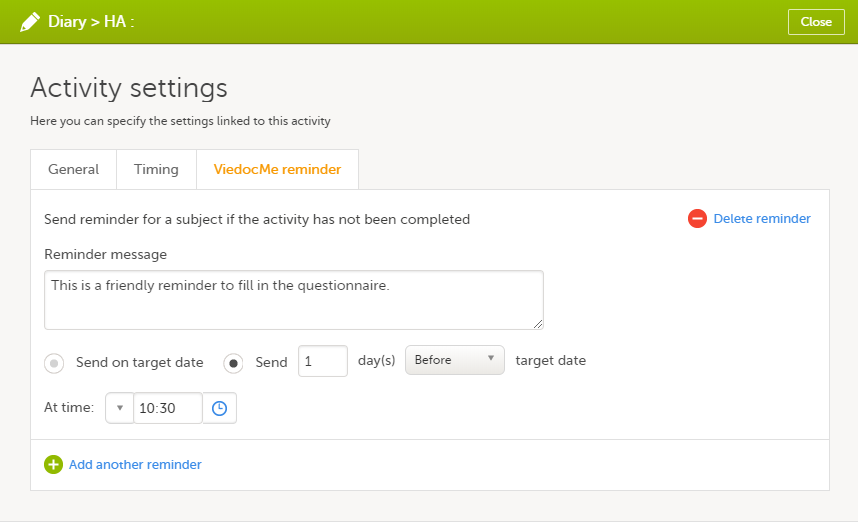
|
| 4 |
If you want to add more reminders for the same activity, click Add another reminder, and set the reminder message, date and time. 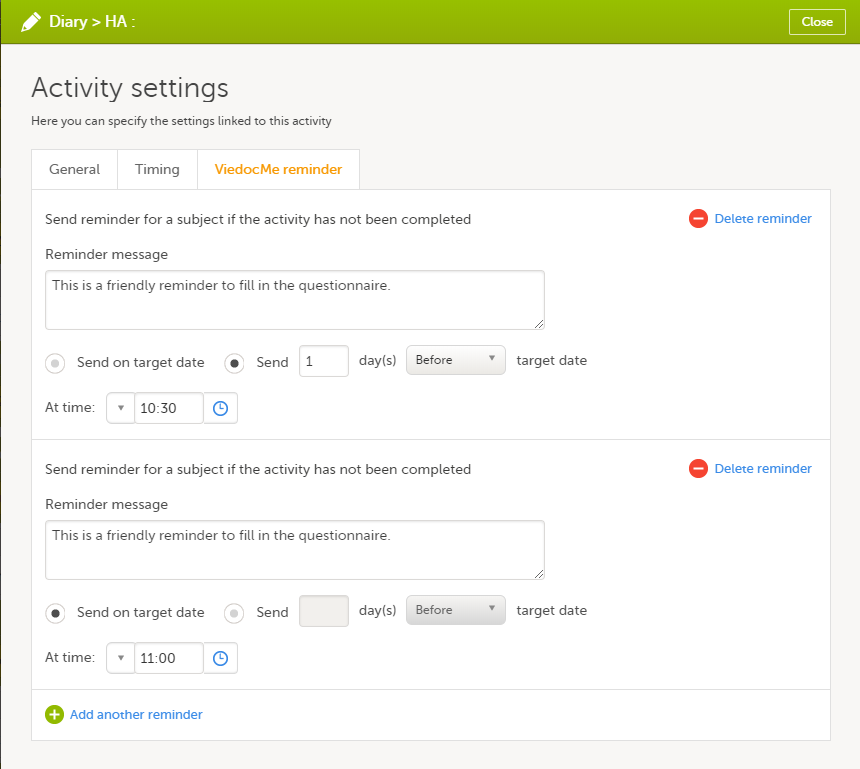
|
| 5 | Click Close to save you settings. The pop-up closes. |
To remove a reminder, click Delete reminder.
|
Important! For reminders to be sent to the subjects, the following settings must be completed:
|
Note!
- Viedoc Me reminders are sent to the subject if the activity is not completed, that is, when there is at least one uncompleted form within the activity.
- Viedoc Me reminders are sent according to the current effective study design. That means that even to subjects added in older design versions, the Viedoc Me reminders are sent according to the settings made in the design version that is currently active.
- Viedoc Me reminders are sent based on the time zone current for the site.
- Viedoc Me reminders are not sent retroactively. If a subject is added after the time when the reminder should have been sent, the reminder is not sent to that subject.
- Viedoc Me reminders are not sent if the event is not visible.
The text of the reminder message can be translated. This is done in the same way as translation of the forms within subject-initiated events. For more information see Managing translations for subject-initiated events.
Forms
Form instance settings
You can edit the form instance settings by clicking the pen icon in the upper right corner of the form. On the Form instance settings pop-up, you can perform the following settings:
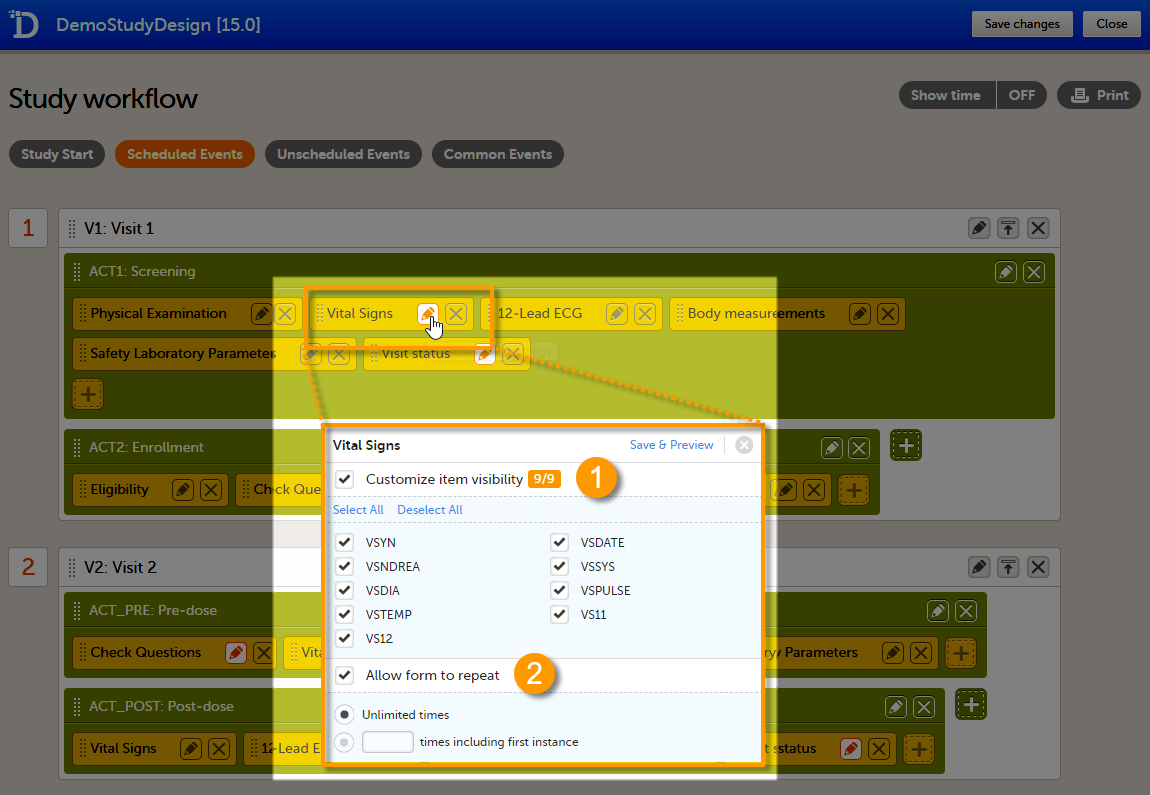
1. Customize item visibility - If this option is enabled, you can select which items will be displayed in the form instance in Viedoc Clinic. The unchecked items will be excluded from the view in Viedoc Clinic. By default, the Customize item visibility checkbox is not activated, and all the items are included.
2. Allow form to repeat - see Repeating forms below.
Repeating forms
If the option Allow form to repeat is enabled, the form is allowed to repeat. That means that multiple instances of the same form can be added to that activity in Viedoc Clinic.
To set a form as repeating, activate the Allow form to repeat checkbox and select:
- Unlimited times - to allow the clinic user to create an unlimited number of instances of that form in that activity, or
- n times including first instance, and enter a number - to allow the clinic user to create a maximum of n instances of that form in that activity. This includes the first instance of the form. The maximum number that can be entered is 99.
Note! The item visibility and repeating form settings are only applicable to that specific instance of the form for which they are set, that is, in that specific activity. These settings do not affect other instances of the same form in other activities.
Click Save & Preview to save the changes performed and preview the form.
For more information on how the clinic user can work with repeating forms in Viedoc Clinic, see the section Repeating forms in lesson Entering/Editing data in Viedoc Clinic User Guide.
Note!
- Randomization forms, and forms in which both Auto update functions and Hidden form are selected, cannot be set as repeating.
- Only forms within scheduled and unscheduled events can be set as repeating. It is not possible to set forms within the study start event or common events as repeating. It is also not possible to set forms within subject-initiated events as repeating.
- Alert trackers for items in repeating forms will trigger as soon as any of the form instances is changed.
For more information about repeating forms, see the use case example in Using repeating forms.