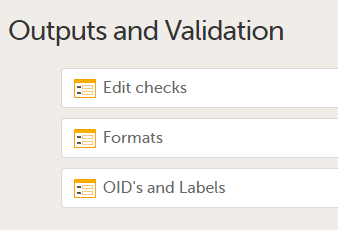
Outputs and validation
Introduction
The outputs and validation section summarizes some of the item settings that are performed in Viedoc Designer and provides a better overview and an easier way to update the settings
The following settings can be viewed and edited:
Edit checks
The Edit checks table displays all data checks and system checks that are defined in the study per form. Edit checks verify whether data entered into the form are within a certain range that is specified under True Expression. The edit checks can be defined in Viedoc Designer when configuring the forms and items. For details on configuring edit checks within forms, see Creating and editing forms.
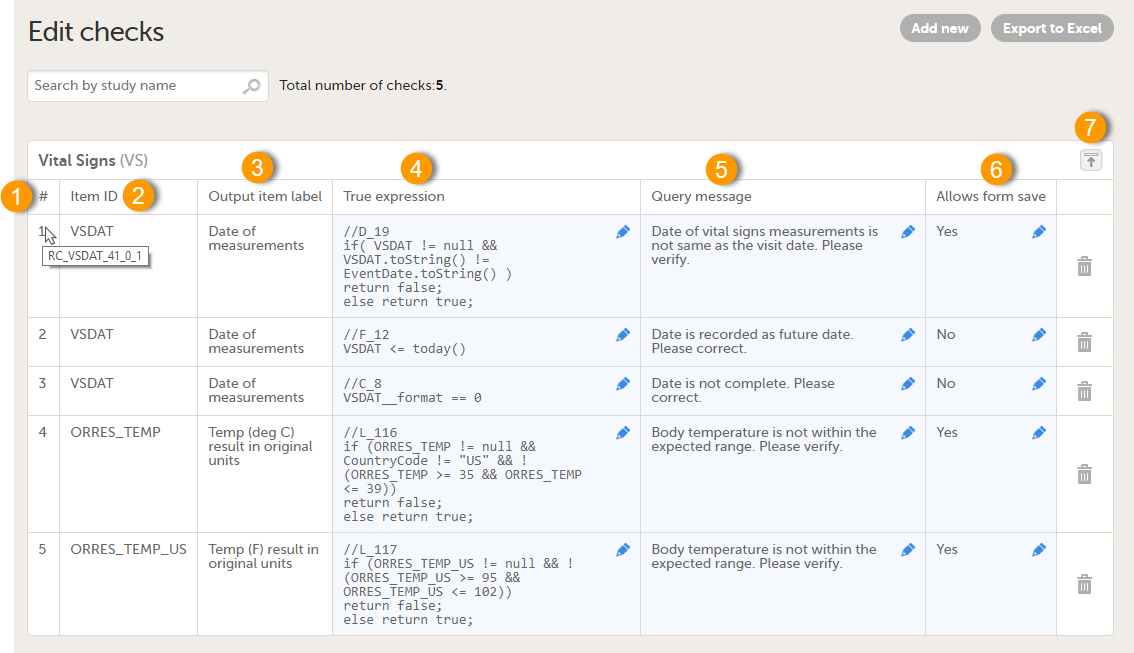
The existing edit checks are grouped per form, and the following information is provided for each configured edit check:
1. Order number. Starts with 1 for each form. Hovering over the edit check number in the table displays the edit check ID. The edit check ID has the following structure: RC_FieldItemOID_Version-number_Revision-number_Counter, and defines to which field in the form it belongs, and in which design version and revision the edit check was entered. When exporting the edit checks to Excel, the edit check ID’s are listed under Range Check OID.
2. The ID of the item the edit check belongs to.
3. The output label of the item the edit check belongs to.
4. True expression - the edit check expression. See also Using JavaScript in Viedoc.
5. Query message - the message that will be displayed in Viedoc Clinic for the site user.
6. Allows form save - Yes/No, depending if you want to allow the form to be saved or not. If set to Yes and the form is saved with data that causes an edit check to fire, a query will be raised on the respective item in Viedoc Clinic.
7. Expand/collapse button - for expanding/collapsing the edit checks within a form.
The system checks are read-only. They are displayed in the list, but can not be edited or removed.
It is possible to export all defined edit checks to Excel by clicking Export to Excel.
It is possible to edit existing edit checks by clicking on the pen icon and editing the respective field:

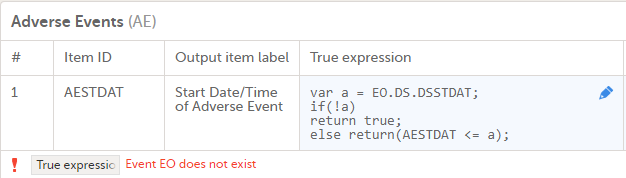
Any error in the edit check definition (true expression) is clearly indicated in the table:
Notes!
- Using
$THISinside a form to refer to an item within a different instance of the same form, does not work,as it always refers to the same form instance. This is true when referring to an item in the same form within another activity, or when referring to another form instance within the same activity (applicable for repeating forms). - If two scheduled events have the same event date, and both events contain a form with a function or datacheck that uses the
$PREVfunction, the$PREVfunctions in these two events refer to each other as the previous event, and not to the event that occurred earlier in the study workflow. This creates a circular reference and makes it impossible to refer to earlier event(s).
Formats
The formats page enables you to prepare common formats that are being used by more code list items, i.e. allows you to set one format name for all items with same options.
The code list items in Viedoc are items that have a code list of possible values that can be filled in when entering data. These are:
- Checkboxes
- Radio buttons
- Dropdown lists
For example, when having many radio button items with same code list values and text (Yes/No for example), by default each item is assigned one format name, but here you can set a common format to be used by all these items.
This is useful especially when exporting with Statistical Analysis System (SAS), as you need to specify the format name when using items in reports and tables.
Before setting the format
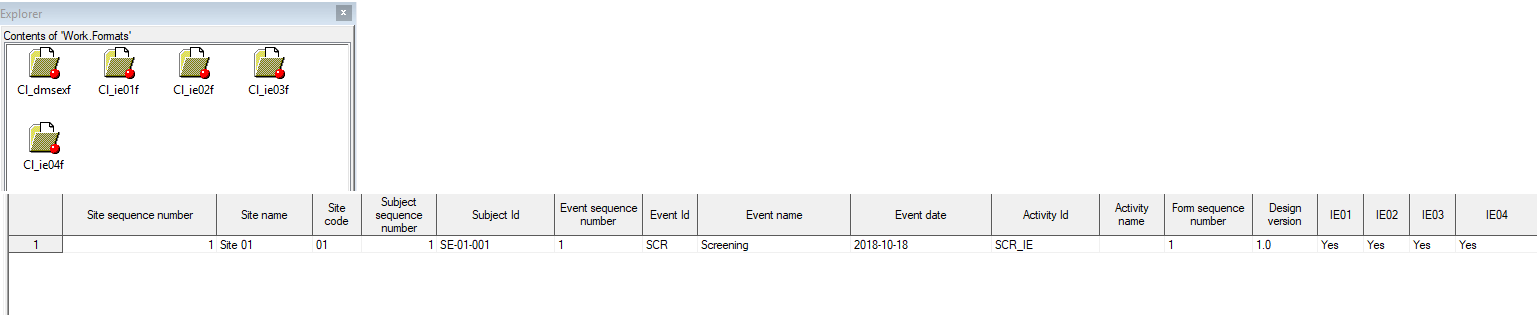
If, for example, we have the following form defined, with four radio button items having the same choices (Yes/No).
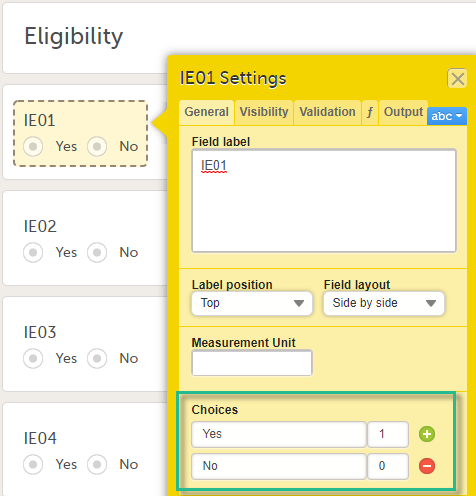
In the Formats section, each item has the same Code list display text (Yes/No) and Code list value (0/1).
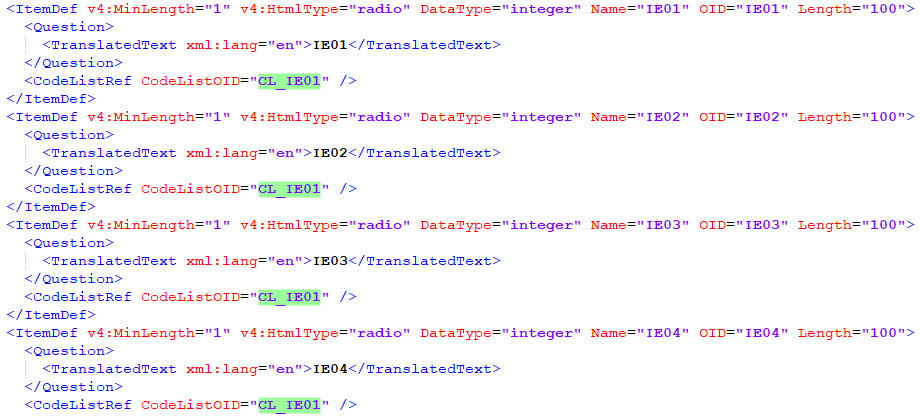
Code list items in ODM export
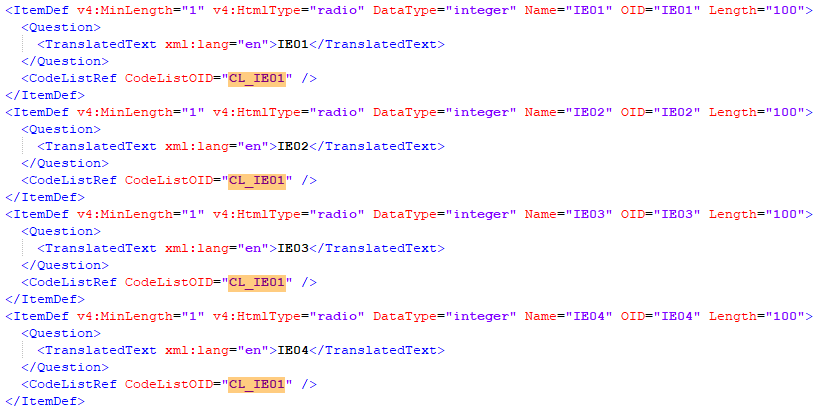
Before applying a common format name for the items in our example above, these items are represented in the Operational Data Model (ODM) export output as illustrated below, having each item pointing to a different code list using the CodeListRef:
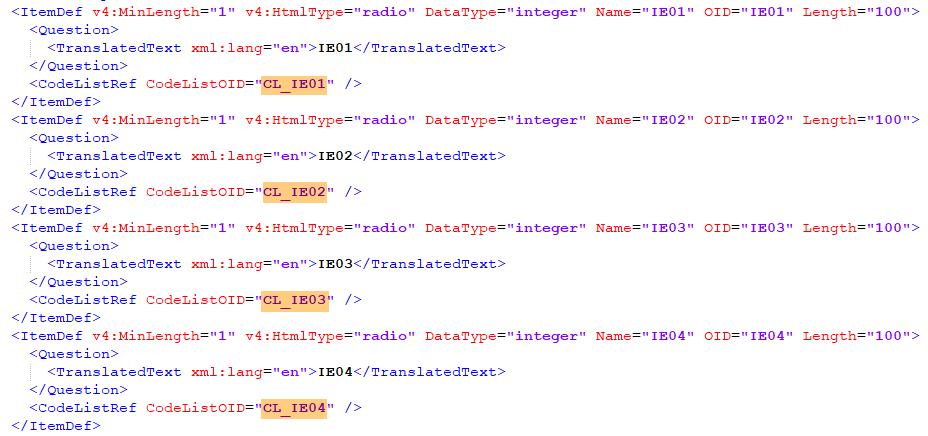
Each CodeList contains the CodedValue and the displayed text:

Code list items in CSV/Excel export
When data is entered and exported as Comma-Separated Values (CSV), two additional files are created. When exported as Excel, two additional sheets are created. These are:
- Items - includes information about all items available (including metadata info like SubjectId, EventId and so on), in the scope of the export, excluding static text items and section breaks.
- CodeLists - includes information about the items that have a code list, that is, radio buttons, dropdown lists, and checkboxes.
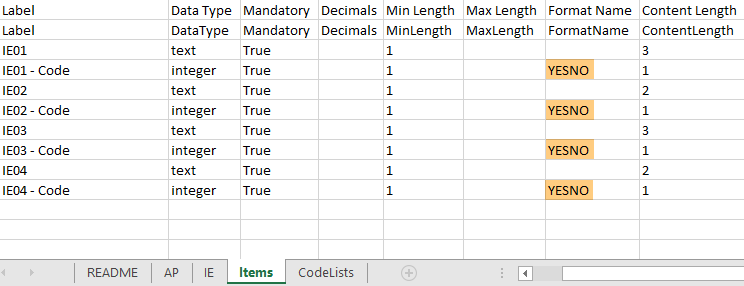
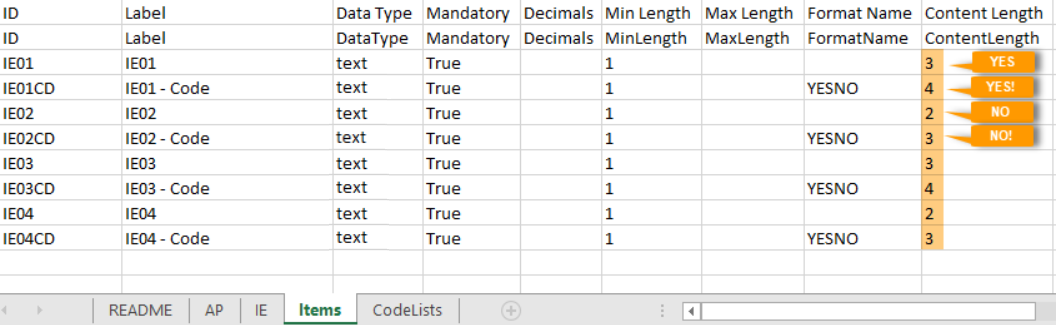
In our example, before setting the format, the Items sheet looks as below:
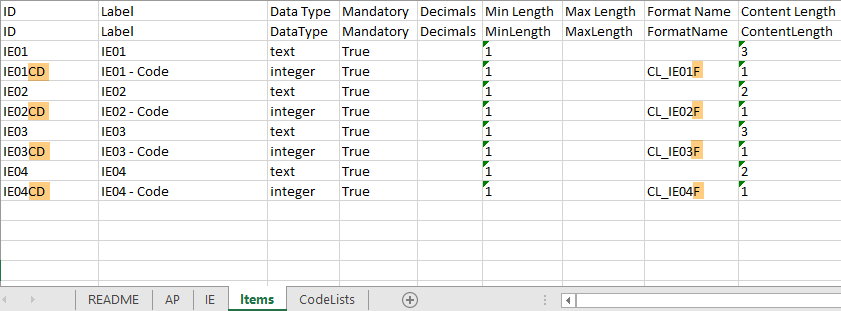
The items that have a codelist have an additional row with ID suffixed with “CD”, for the code. In this case, we only have radio buttons, but if checkboxes and/or dropdown lists would be included, those would also have additional rows with “CD” for the codes.
The default Format name (that is, before applying any format) for each code is CL_ItemIDF.
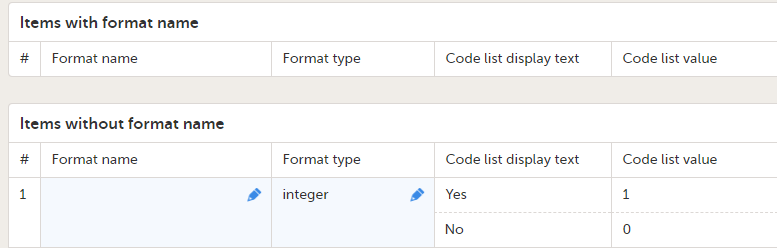
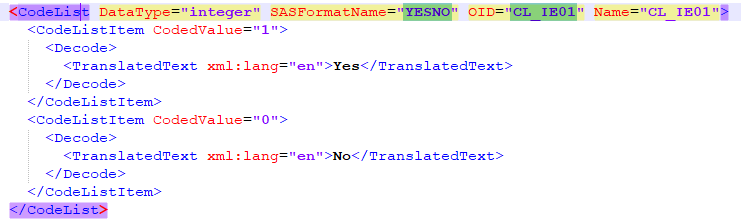
In our example, before setting the format, the CodeLists sheet looks as below:
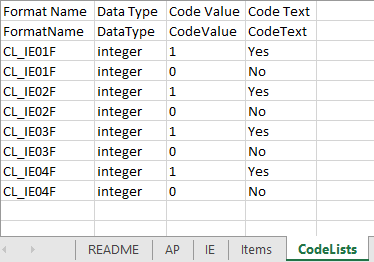
Each referred Format Name contains information about each code value. In this case, only “Yes” as “1” and “No” as “0”.
As we have four separate radio buttons in the IE form, we have four unique formats, each with two different values.
SAS script files
When CSV export is made with Include corresponding SAS script option checked, you get all forms in separate files, and “_CodeLists” and “_Items” with contents described briefly above. (See also Exporting for SAS)
In addition, the SAS files CSV2SAS and _RunMe are included.
The _RunMe file is quite small and this is what is used to import the data in to SAS, that is, this script is opened and run in SAS. Its job is locating the path to the files to be imported and starting the actual work with the doWork function(macro) that exists in the CSV2SAS file:

The essential part related to Formats within the CSV2SAS script is on row 306, where the contents of the Codelists file is passed on to the CreateSasFormats macro, which takes the contents and creates the formats.:

After that, the Items metadata in the Items file are read and the formats are applied to the applicable items in SAS.
In SAS, the above example will create four formats for the IE form:
Setting the format name
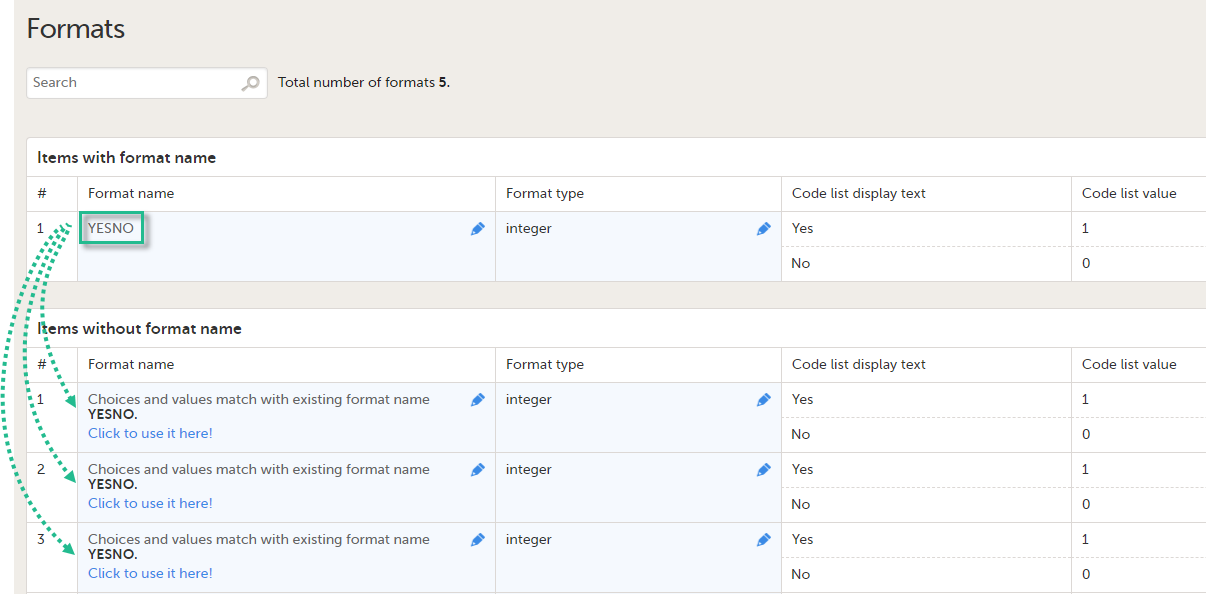
To set a format name in Viedoc Designer under study design settings > Outputs and Validation > Formats, type in the format name in the Format name column for one of the four items. The item will appear in the upper table Items with format name, as shown in the image below.
As soon as you have defined a format name, all items with the exact same settings (code list name and value) will be flagged and you can provide the same format name to those by clicking the link, as shown in the image.
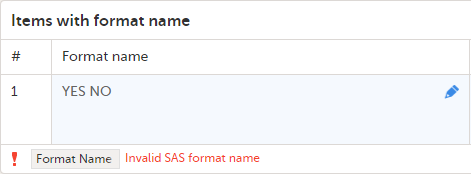
Because this is used mainly for SAS, Viedoc checks that the Format name complies with SAS requirements, as follows:
- it must be unique
- it must not exceed 8 characters
- the first character must begin with an English letter (A-Z, a-z) or an underscore
- it cannot contain blanks
- it cannot contain any special characters other than the underscore
- it must end with an English letter (A-Z, a-z)
If any of the above is not fulfilled, an error message will be displayed:
All formats can be exported to Excel by clicking Export to Excel.
Note! Leading zeros in code list values will not be included in the export for the following formats:
- CSV
- Excel
- Audit log (1 row per item including history)
- ODM
So, for example, a code list value such as 001 will end up as 1 in the export.
Note! The above note is available also in the lesson Designer>Study build>Creating and editing forms.
After setting the format
Code list items in ODM export
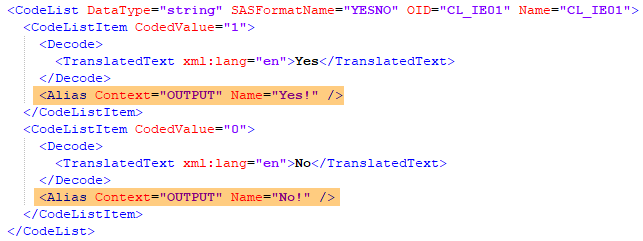
After applying the common format name (YESNO) for all the four items in our example, these items are represented in the ODM export output as illustrated below, having each item pointing to the same code list using the CodeListRef:
The format that we have defined is added to the CodeList:
Code list items in CSV/Excel export
In our example, after setting the format, looking at the Items information, the only difference is that the Format Name has been changed to “YESNO”, that is, there is one common format for all the four items:
In our example, after setting the format, the CodeLists sheet looks as below:
SAS format
After having applied the format in Viedoc Designer, importing to SAS creates only one format:

Changing the format type
It is also possible to change the output export value as well as the format type (integer/text).
If, in our example, we change the Output export value to a text value, the Format type must be changed to text:

This action does not change the content of the items in the ODM file:
...but the output export values defined have been added in the Alias section:
The Items sheet in the Excel file now shows "text" as a Data Type for the codes and the Content Length varies, as the new codes are now "YES!" (length = 4) and "NO!" (length = 3):
The CodeLists in the Excel file now have new Code Values:
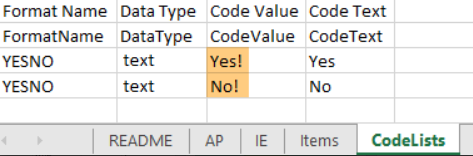
So, we can say that, as a result, the original Code value is replaced in the export output with the new values set in the Output export value (in our example "0" and "1" were replaced by "NO!" and "YES!" respectively).
OIDs and Labels
This page enables you to to revise and modify your Output IDs (OID) and Labels without affecting existing visibility conditions, functions and/or data checks as these use the field IDs.
Note! If the Output IDs (OID) and Output labels have been defined in the study design, these are shown in the Excel/CSV/SAS export. If the Output IDs (OID) and Output labels are left undefined (blank) in the study design, then the configured Item ID and label is used.
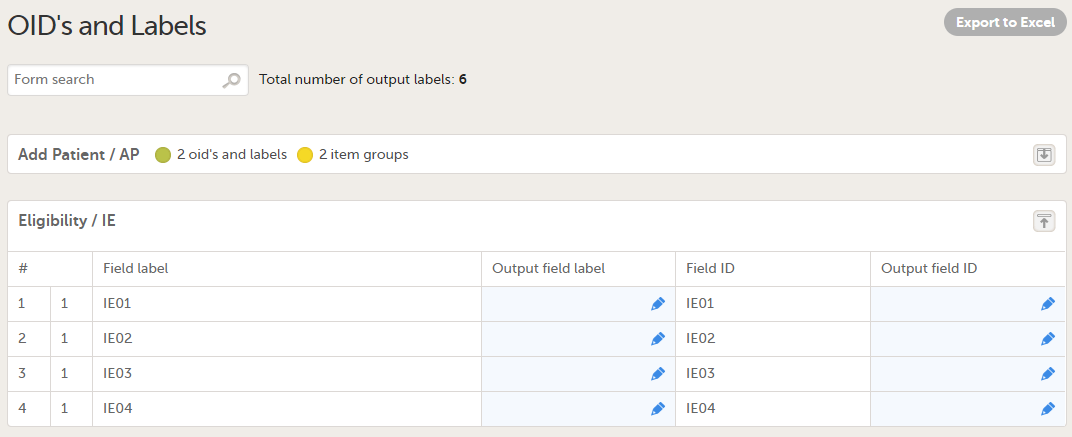
Blue cells are editable. Make sure your study has unique and relevant output IDs set and that all output labels are not too long and that they describe the item correctly.
Note! If you enter the same output field label as the field ID, Viedoc will change the output field label to the field label.
This could be useful in different scenarios, such as:
- when the item does not have a question text in the design.
- when the question text is long and you want to shorten it for the export output.
- you want to have a more descriptive label.
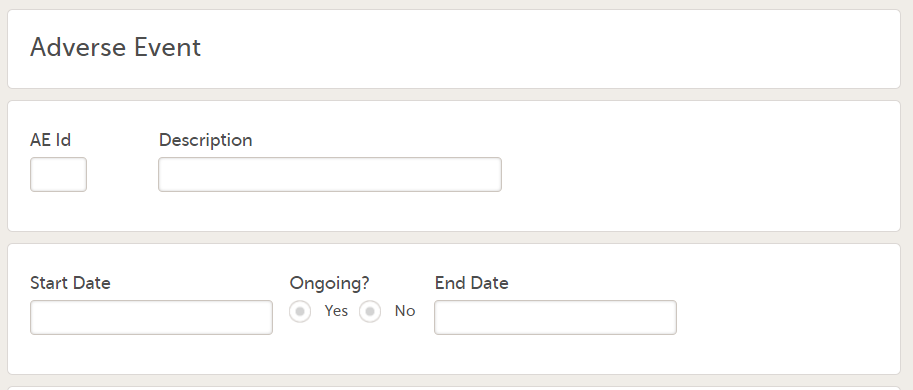
The items(fields) in the list are grouped by item group, and then ordered by item order in that group. For example, for the form below:
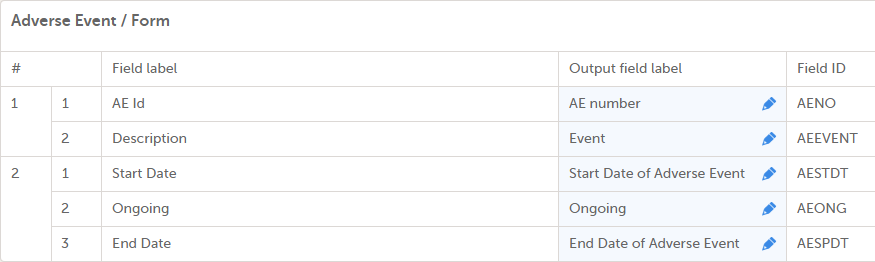
...the OIDs and Labels are listed as below:
You can export all items to Excel by clicking Export to Excel.
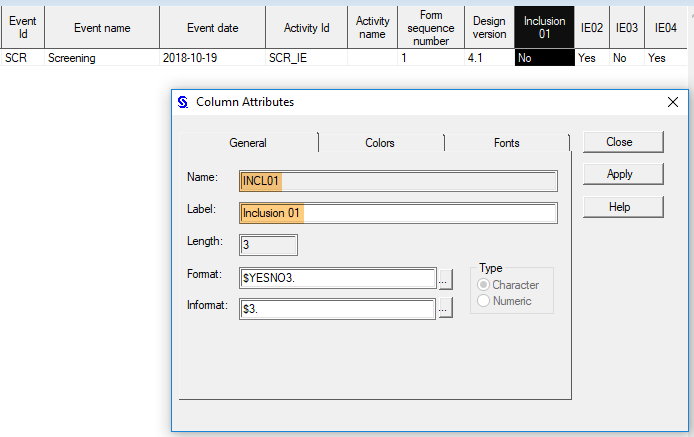
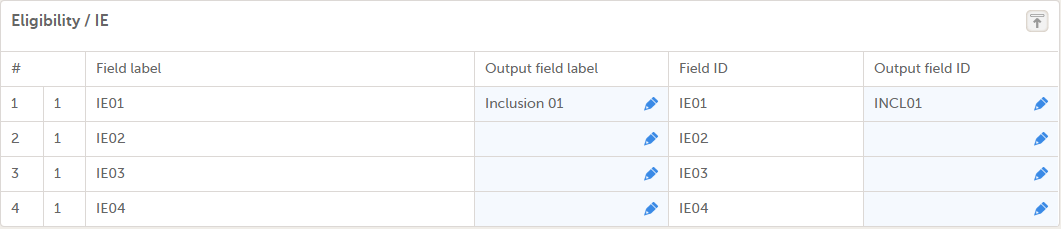
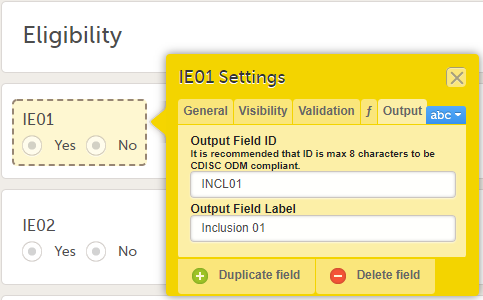
In our example (shown earlier in Formats), if we set the Output field label for the first item (IE01) to "Inclusion 01":
...which is the same as setting the item Output field label under Forms > Item settings > Output:
As a result, in the ODM file we can see two additions: the “SASFieldName” and a new Alias:

When such an alias and/or SASFieldName exist in the design, the export generated takes this label and ID instead of the question text and Field ID.
The exported data, for example, in Excel format, would display these as:

In SAS, this is shown as: