Configuring the global allocation list
Introduction
The allocation list setup can be performed only by users assigned to the Unblinded Statistician role.
When randomization is used within a study (see Configuring a static randomization / Configuring a dynamic randomization), the allocation list can be defined in two different ways:
| Important! The randomization feature must be included in your study license in order for the randomization configuration and the global allocation list to be available in production mode. You can still configure a randomization in demo mode without a license. |
- Individual allocation list - separate allocation lists are used for each defined randomization. In this case, the allocation list is configured and uploaded in the randomization settings page in Viedoc Admin as described in Configuring a static randomization / Configuring a dynamic randomization.
- Global allocation list - one global allocation list is used for all the defined randomizations. This is available only if advanced allocation is enabled in Viedoc Designer (for details on advanced allocation settings in Viedoc Designer, see Setting up the randomization lesson)..
- To be able to use Logistics, a global allocation list must be used.
If the allocation list is not uploaded, or, in case of using Logistics, if no kits are available at the current defined scope (Study / Country / Study Site), when trying to perform the allocation in Viedoc Clinic, the system will respond with "No slots found for allocation.".
Configuring the global allocation list
The global allocation list is set up under the RTSM settings in Viedoc Admin:
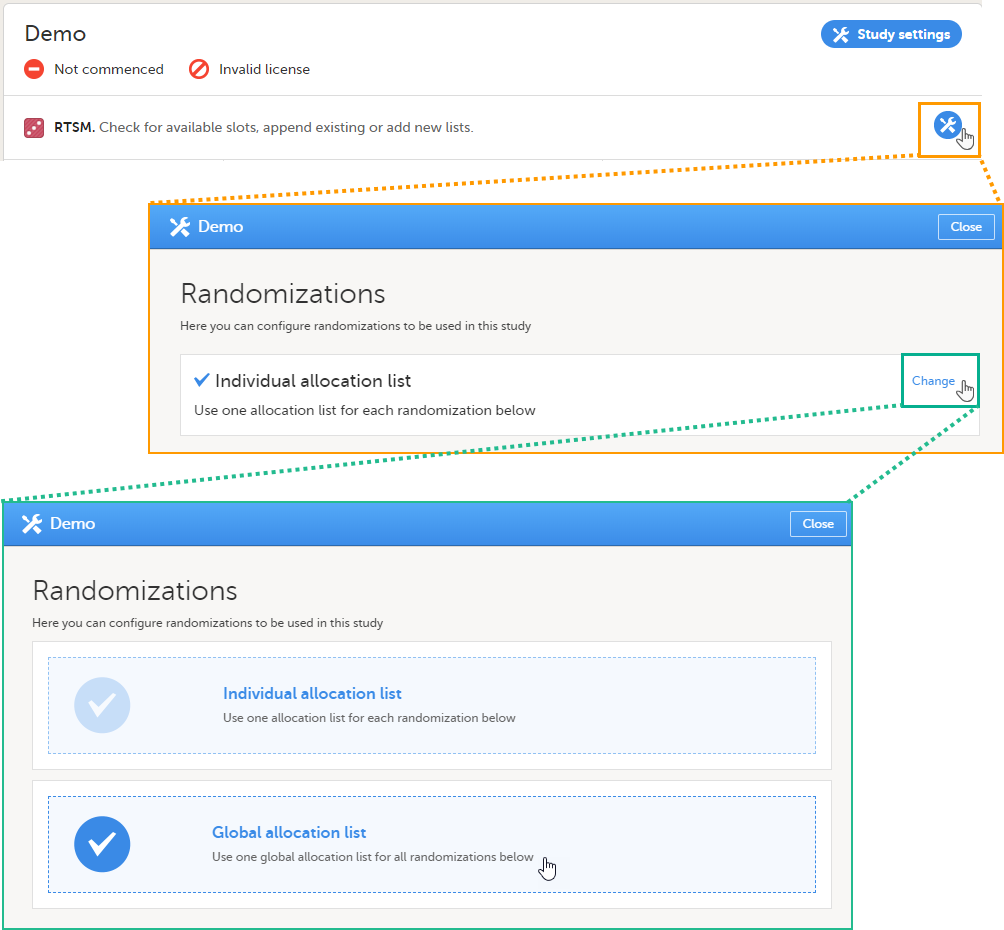
If the global allocation list is selected to be used for all the randomizations defined in the study, the Global allocation list setup is displayed at the bottom of the Randomizations pop-up, as well as the option to Enable logistics, as below:
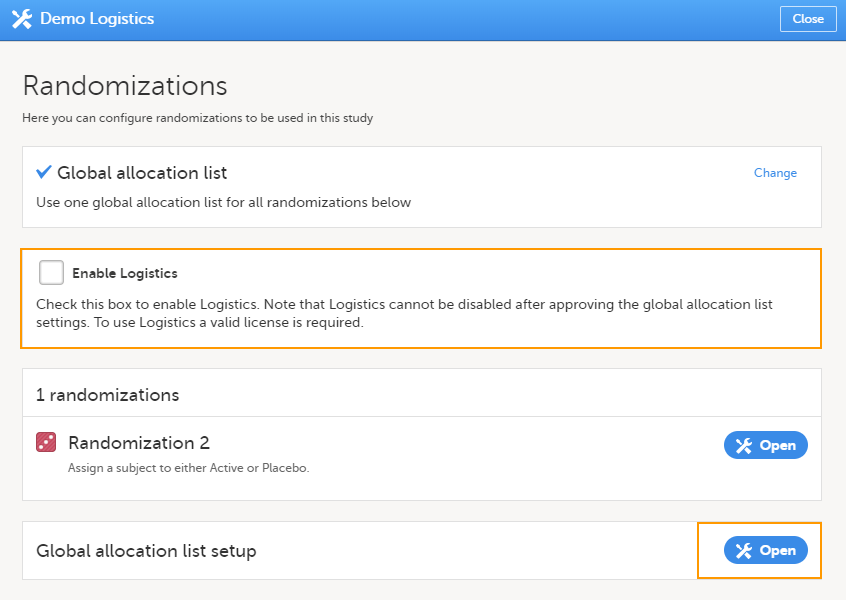 Enable Logistics - if checked, this allows you to use the Logistics functionality in Viedoc. For more information about the logistics functionality see Overview of Viedoc Logistics.
|
Important!
|
Configuring the global allocation list
To configure the global allocation list:
| 1 | Click Open next to the Global Allocation list setup. The Definition page will be displayed: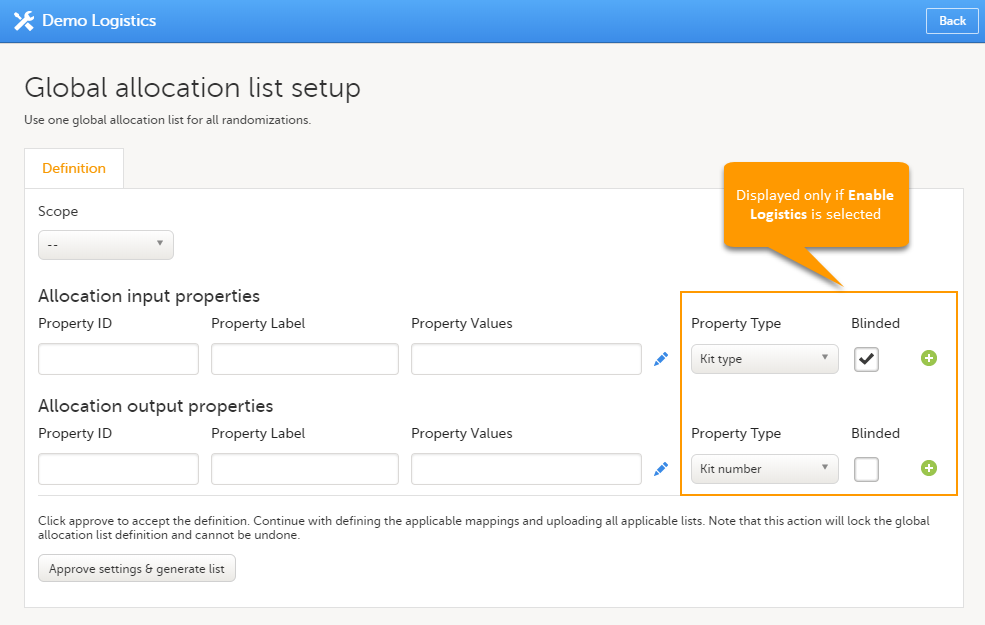 |
|
| 2 |
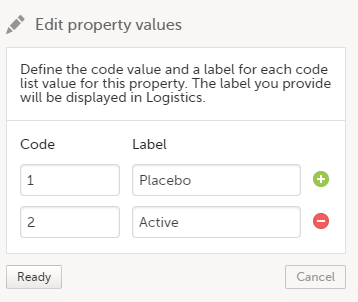
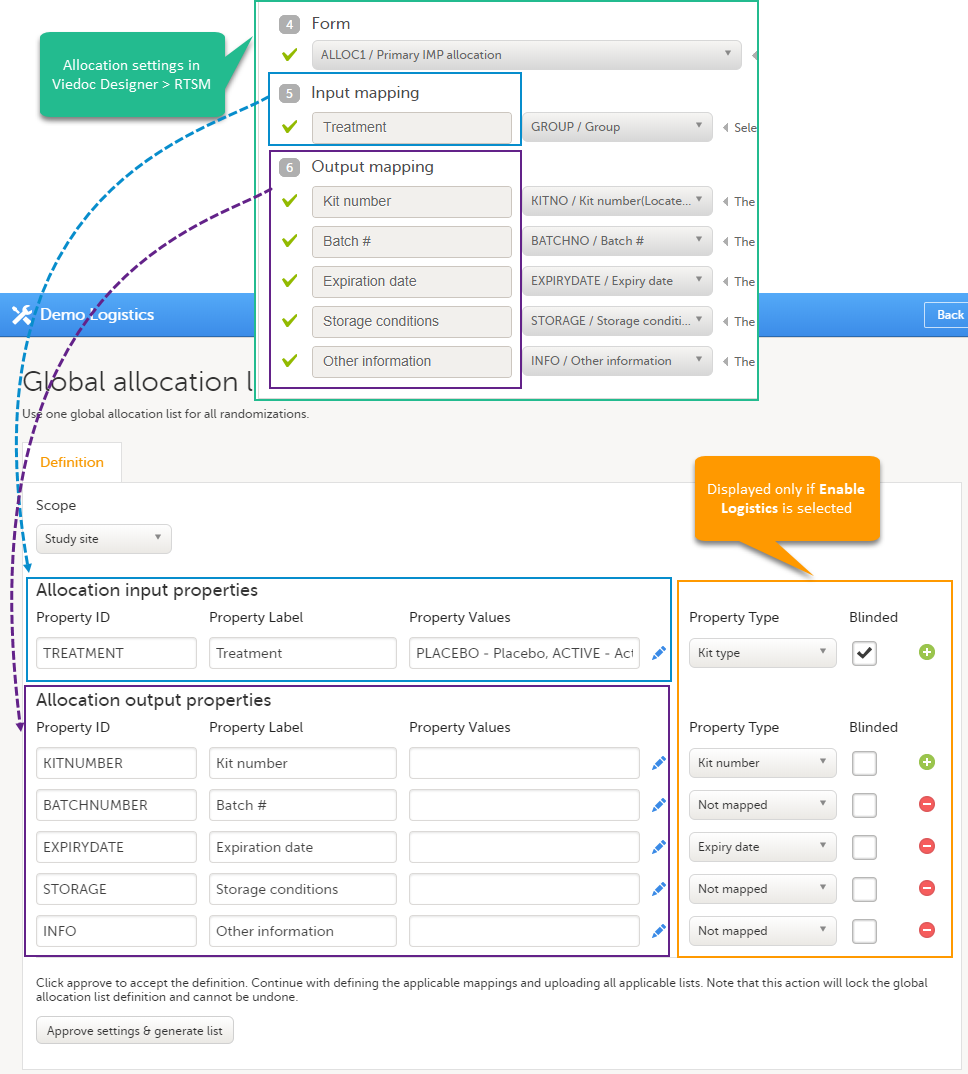
Under the Definition tab, set the following:
If Logistics is enabled, this impacts the way the kits can be managed, as described in Managing kits.
See an example below: |
|
| 3 |
|
|
| 4 | Under the Mapping tab, map each input and output properties defined in step 1 to the respective input and output properties defined for each advanced allocation in the study design. For the properties that do not apply to one or more of the randomizations in the list, select Not mapped. Note that multiple rows and thus multiple mappings will only be needed when different definitions has been used. Click Save changes. 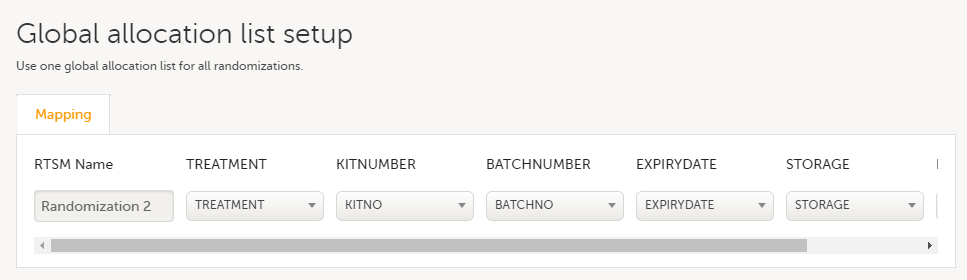 |
|
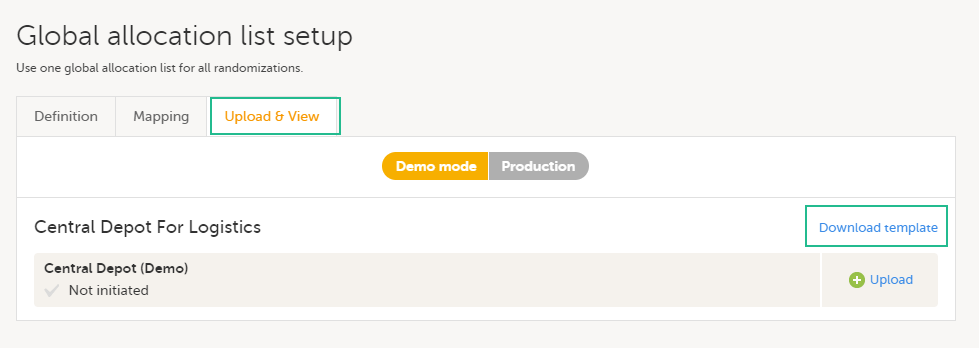
| 5 |
Under the Upload & View tab, download the template of the allocation list: Note! If your study does not have a license key (Reference ID), or has a license key that does not include the randomization feature, on the Global allocation list setup, under the Upload and view tab:

A template excel file is downloaded:
|
|
| 6 | Use the downloaded template file to fill in the allocation list and save the file: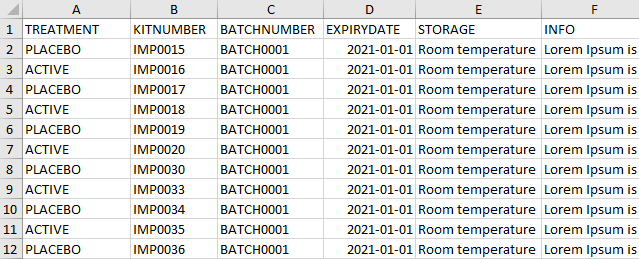 Note! The cell format for the dates (for example EXPIRYDATE) must be set to Text. Make sure that Excel does not format this to Date. If the format of the dates is not set to text, the upload of the allocation list will fail and an error message will be displayed. |
|
| 7 | Click Upload, select the file containing the allocation list and click Open. The file will be uploaded.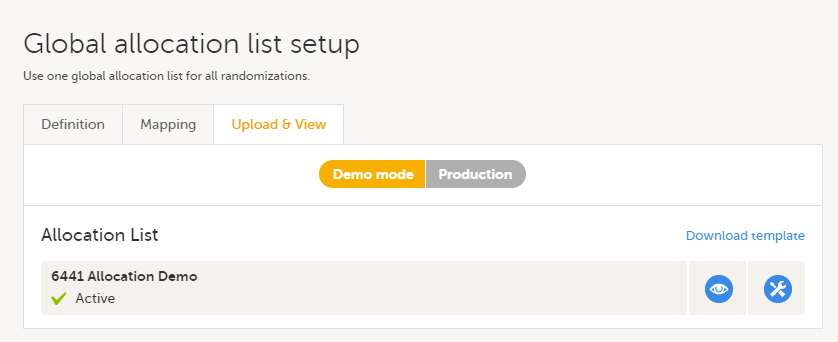 |

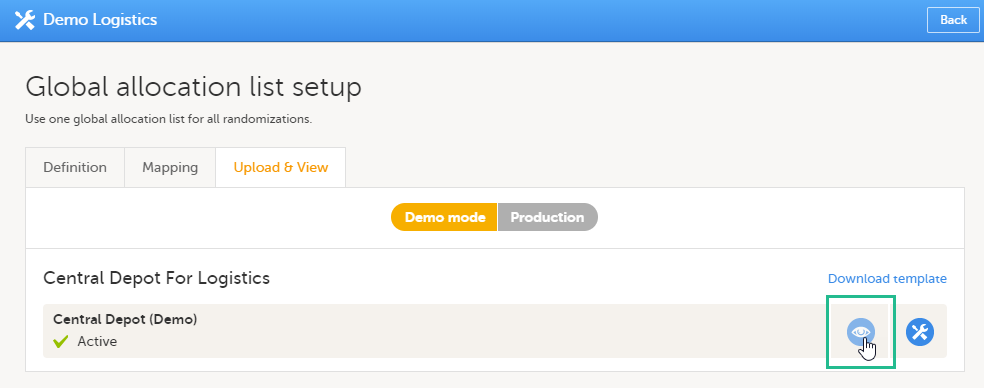
Viewing an allocation list
To view the allocation list, under Upload & View tab, click the view icon:
 An Excel file is downloaded that has the following sheets:
- Configuration - summarizes the factors and outcomes and their code lists configured for the allocation.
- Current distribution - displays the distribution of randomized patients over the different factors and groups.
- Slots - lists all the slots, the factors and outcomes (kit number in this case), and whether the slot is still available. If the slot has been taken, the subject details, the user details (email address) of the clinic user who allocated the subject, and date and time of allocation are also displayed.
Note! The above Excel file reflects the kit status according to the randomization and allocation forms in Viedoc Clinic. All changes to kit status made in the Logistics interface can be seen in the Logistics stock list Excel file (see Stock list and Kit details view).
If the Logistics functionality is enabled, the Slots and Current distribution always reflects only the list of kits currently at Central depot. The kits that are on site are not included in the list, these can be tracked only from the Logistics interface (see Viedoc Logistics User Guide).
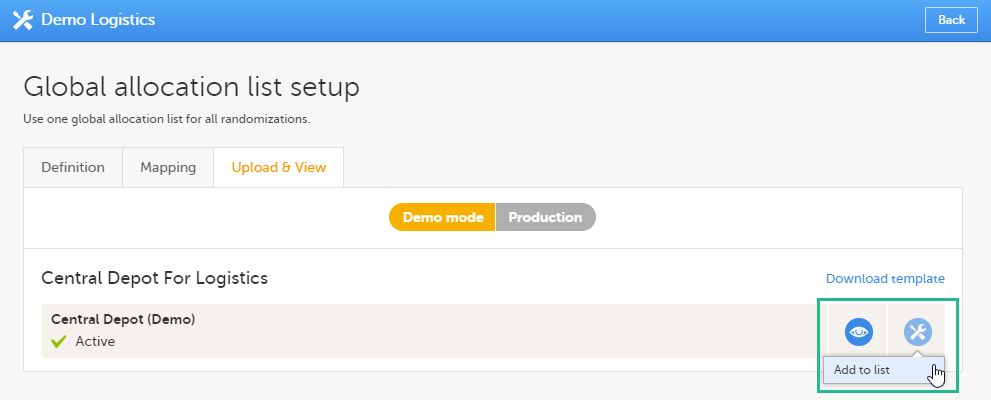
Editing an allocation list
To add new kits to the allocation list, click the tools icon and select Add to list:
 Upload the Excel file with the new kits. This has to be in the same format as the originally uploaded list, see step 6 in Configuring the global allocation list above.