Template studies
Introduction
This page provides Viedoc study templates you can download and reuse in your own studies. Each template is based on a realistic study scenario and includes form design, edit checks, visibility conditions, and workflows.
The Design considerations section below explains important design choices. Some recommendations support compliance and best practice, while others are optional preferences.
Note! Please ensure to validate any template content you use for your specific study.
About the template studies
The template studies cover a number of forms in different variations. The sections below describe several template studies, sorted by forms. The studies and forms have been designed according to Clinical Data Acquisition Standards Harmonization (CDASH) recommendations and best practices in Viedoc. They are complete with form design, edit checks, visibility conditions, and event workflows, as well as settings like randomization, Viedoc Me, and data mapping for import.
Phase I template
The scenario for this template study is a small, randomized, and blinded phase I study. It has been configured with a set of forms and a workflow typical for a phase I study.
For this study, no lab data is being collected in Viedoc, but only the sampling details. Lab PK sampling is performed frequently and in several activities across events. Several validation checks have been set up to ensure deviations in sampling time points are captured.
A simple static randomization without any input factors is set up, but advanced allocation is not used.
The intended workflow is explained in the Design considerations section.
Phase II/III template
The scenario for this template study is a large, randomized, and blinded multi-site phase II/III study with many different features configured.
A central lab is used, and the import application imports the data directly from the lab into Viedoc.
The randomization is stratified on gender, and the study uses the advanced allocation to allocate kits to subjects. With this feature enabled, you can also set up Viedoc Logistics in Viedoc Admin.
The study uses Viedoc Me to capture data for two standardized questionnaires. The study is planned for Germany, France, and the US, so the corresponding translations have been included for the Viedoc Me forms, in German (Germany) and French (France).
Finally, a requirement for this study is also a “video adjudication workflow”. This has all been built in the design by using core functionality of the Electronic Data Capture (EDC), that is, the file upload item, role-based edit rights, role-based visibility, and email alerts.
The intended workflow is explained in the Design considerations section.
Oncology template
The scenario for this template study is a multi-site oncology study. The workflow has been set up with a treatment phase with several treatment cycles, and a follow-up phase with recurring follow-up events.
Since local labs are used, the study uses the reference data editor to simplify the entry of lab data. Standard RECIST forms are used to capture lesion details as well as disease response. This is an open-label study and no randomization is performed in Viedoc.
The intended workflow is explained in the Design considerations section.
Download the templates
Download the English design ODM and supportive documentation here.
Download the Chinese design ODM and supportive documentation here.
Download the Japanese design ODM and supportive documentation here.
Design considerations
This section contains clarifications and recommendations associated with the designs. It is recommended that you review the sections below together with the actual designs. Forms considered to be straight-forward in the design are not mentioned below.
Common events
| Form/section | Study | Comment |
|---|---|---|
| Adverse events | All |
Any form can be used as a common event, but typically it is used for adverse event, medical history, and use of medications. Common for all of them is that they are typically not directly connected to a scheduled event. A few things are common for the design of all common events. Data is only entered in a common event when an event has occurred or when there is a medication to enter. Therefore, it is recommended not to use any leading questions, for example, "Did the subject experience any adverse event?". These kind of check questions could serve as a reminder, but would be better placed in the scheduled events (see Check questions form). The system variable An optional approach for the medical history form could be to design it as a repeating form on the first scheduled event, see Repeating form. |
| Prior and concomitant medications | All | |
| Pregnancy report | Phase II | |
| Previous cancer procedures | Oncology | |
| Previous cancer medications | Oncology |
Repeating form
| Form/Section | Study | Comment |
|---|---|---|
| Medical history | Phase I |
In this study, the medical history is captured in an event form. In most designs, medical history is captured in a common event, but some users prefer to capture this data at the first event. In this design, a repeating form has been used at the first event as an example of that approach. "Medical history" is added as an activity name to make this clearer in the patient overview. |
Check questions form
| Form/Section | Study | Comment |
|---|---|---|
| Check questions | All |
A general Check questions form can be used to remind the site staff of the data to be entered in the common events, such as adverse events and concomitant medications, as well as other study-specific reminders. For the use of Check questions form in unscheduled events, see Unscheduled events. |
Unscheduled events
| Form/Section | Study | Comment |
|---|---|---|
| Check questions | All |
In clinical trials, unscheduled events are commonly performed as needed, and usually only a some of the assessments are performed in scheduled events. A general recommendation is to include a question about assessments performed in the Check questions form. Note! In these designs, an item group has been used with “assessments performed” that is only displayed in the unscheduled events. Visibility conditions on the activity level will then control what forms are displayed based on the selections in the Check questions form. This way you can build one single unscheduled event in the study workflow, and in Viedoc Clinic keep one single unscheduled event flexible when it comes to the forms required. It will also make it easy for the end user to decide what forms to trigger for the event. Adding multiple unscheduled events in the design is therefore only used when you have very distinct types of events and you want to direct the user by triggering the relevant forms, for example, “Unscheduled drug dispense” or “Unscheduled lab sampling”. Even in these examples you can question the need for these because it would still work well with one flexible unscheduled event. |
Eligibility form
| Form/Section | Study | Comment |
|---|---|---|
| Eligibility | All |
In most studies, it is recommended to use a single question for confirming all eligibility criteria, or one question for inclusion criteria and one for exclusion criteria. Whenever a patient is not eligible, the individual criteria can be triggered so the user can specify the criteria not met (for inclusion criteria) or criteria met (for exclusion criteria). This design is according to the recommendations in CDASH. The reason for not having individual questions for each criterion is that the moment when the site staff is entering data in the eligibility form is usually not the moment when the site is actually reviewing each eligibility criterion. Usually, the site has already made their review with the patient beforehand, and entering data in the eligibility form is just about confirming this. Answering questions about each criterion will risk being a tedious activity with limited value, because the site staff is unlikely to review and evaluate each criterion again. If you want to display the criteria from the protocol, there are several ways to do that without having individual questions for each criterion:
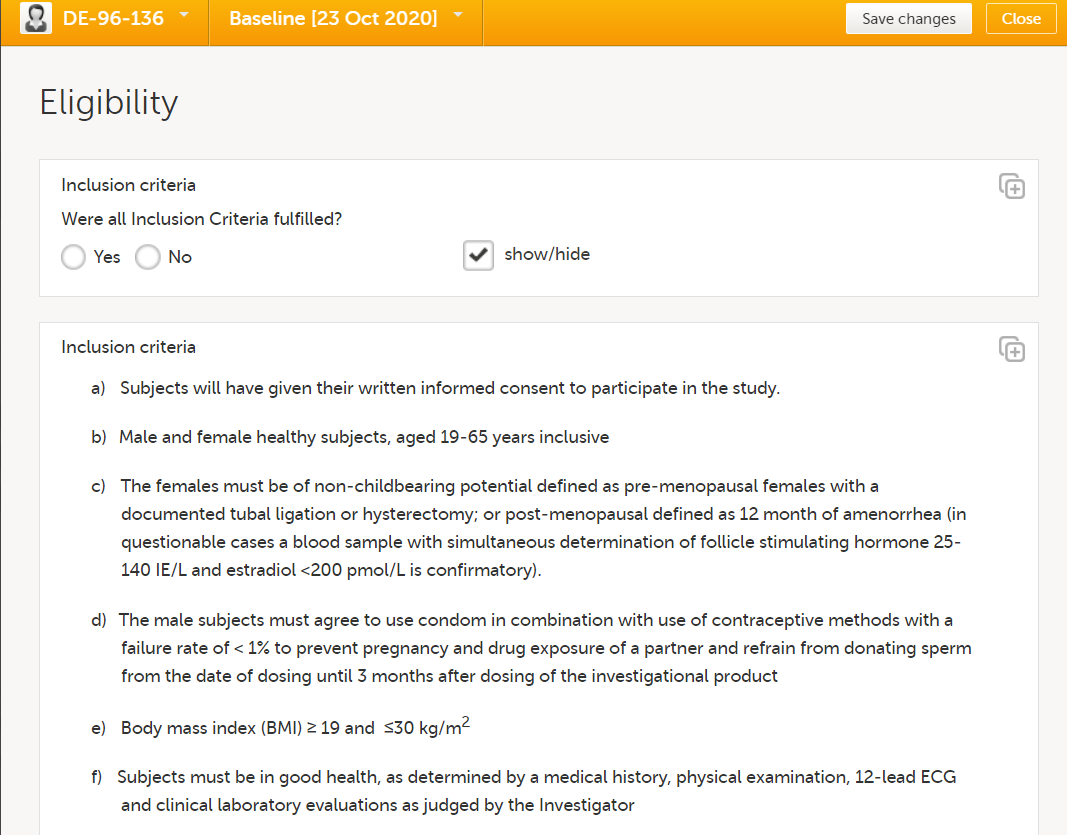
At the end of the form, a calculated eligibility summary triggers subsequent activities. |
RECIST form
| Form/Section | Study | Comment |
|---|---|---|
| Disease Response - RECIST v1.1 | Oncology |
Although there are variations to designs of RECIST forms, they all share the same principle. Lesion IDs are populated through functions. In subsequent events, follow-ups are being made on the previously registered lesions. For these events, the lesion identifiers are populated with default values and only selected parameters are presented as blank and requiring new information entered. Possible new lesions would be added in a separate form, but would in this study not be tracked in the same way. An overall assessment would be done in the disease response form. |
| New Lesions - RECIST v1.1 | Oncology | |
| Non-Target Lesions - RECIST v1.1 | Oncology | |
| Survival Status | Oncology | |
| Target Lesions - RECIST v1.1 | Oncology |
Lab forms for reference data editor
| Form/Section | Study | Comment |
|---|---|---|
| Clinical chemistry | Oncology |
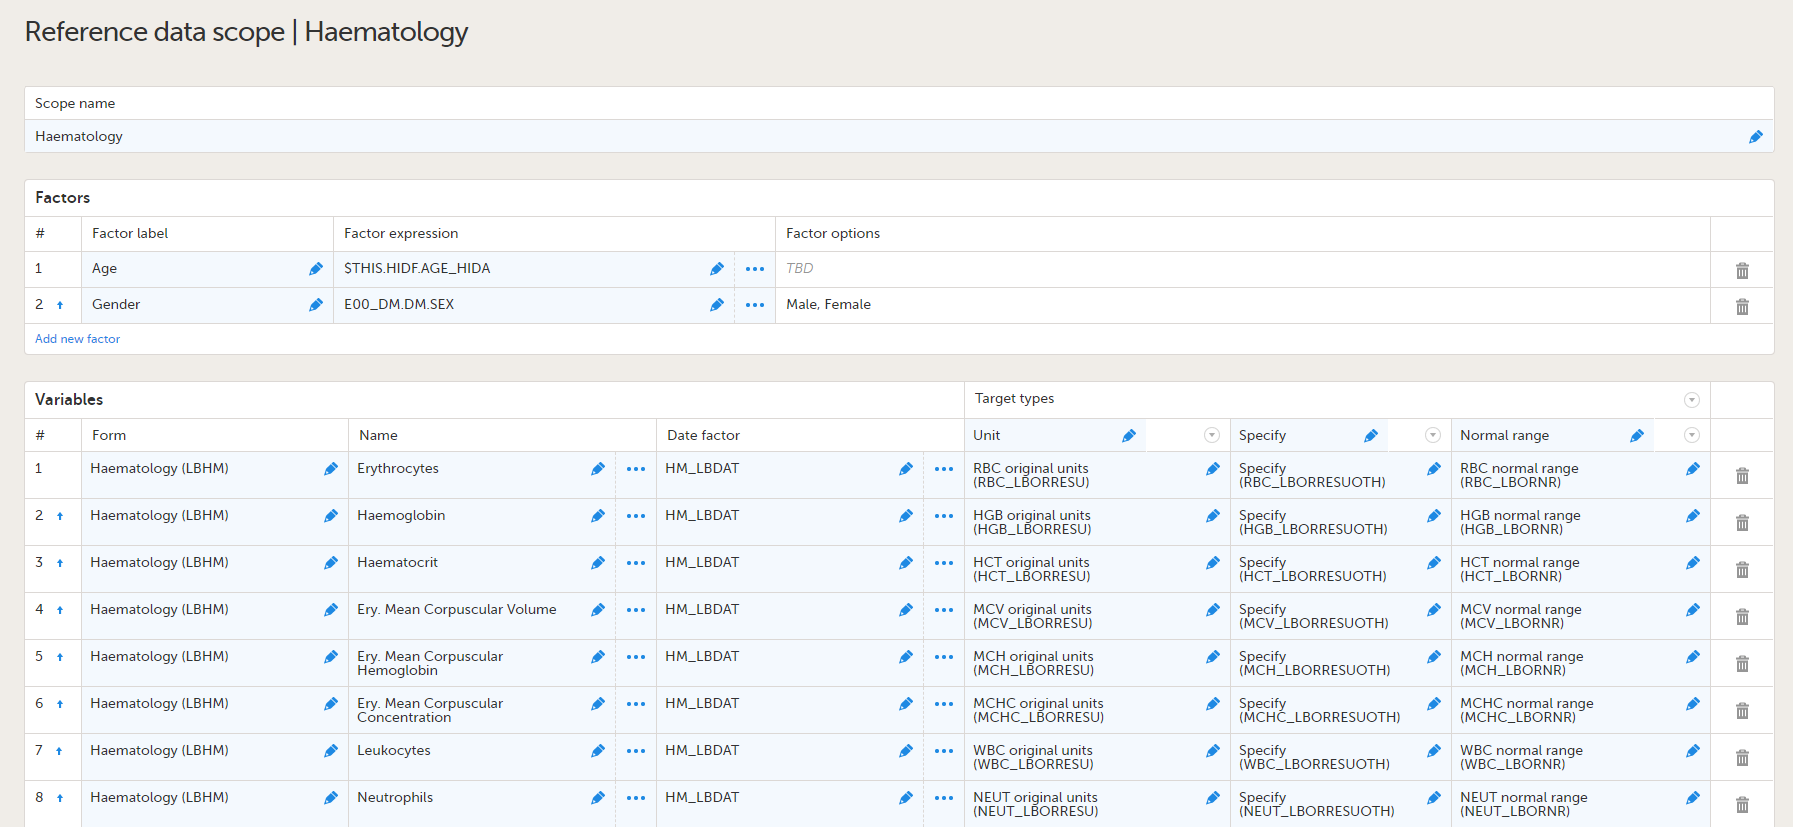
These lab forms are adapted for the reference data editor. The forms have been designed assuming there will be many different labs, reporting results in different units, result formats and age ranges. So these forms are intended to work well on all occasions when the reference data editor is to be used, but the form design will also work for manual data entry.
|
| Coagulation | Oncology | |
| Haematology | Oncology | |
| Urinalysis | Oncology |
Lab forms for data import
| Form/Section | Study | Comment |
|---|---|---|
| Clinical chemistry | Phase II |
This is a lab form adapted for data import. The items in this form will need to be adapted to what the lab will transfer.
(1) Reported units are the units that the site will want to see and are used to seeing in lab reports and so on, commonly SI in Europe and conventional in the US. These are also the items displayed in Viedoc Clinic. This will ensure that the site can view and evaluate the lab data in the units they are used to.
|
| Haematology | Phase II | |
| Urinalysis | Phase II | |
| Laboratory Assessments | Phase II | Because lab data is captured through the data import application, there is no need to enter any lab details manually. It is recommended to document the sampling in a separate form, because this provides more clarity to the user. This also makes it easier for users to detect if samples have been taken, but no lab data has yet been imported. |
RTSM configuration
| Form/Section | Study | Comment |
|---|---|---|
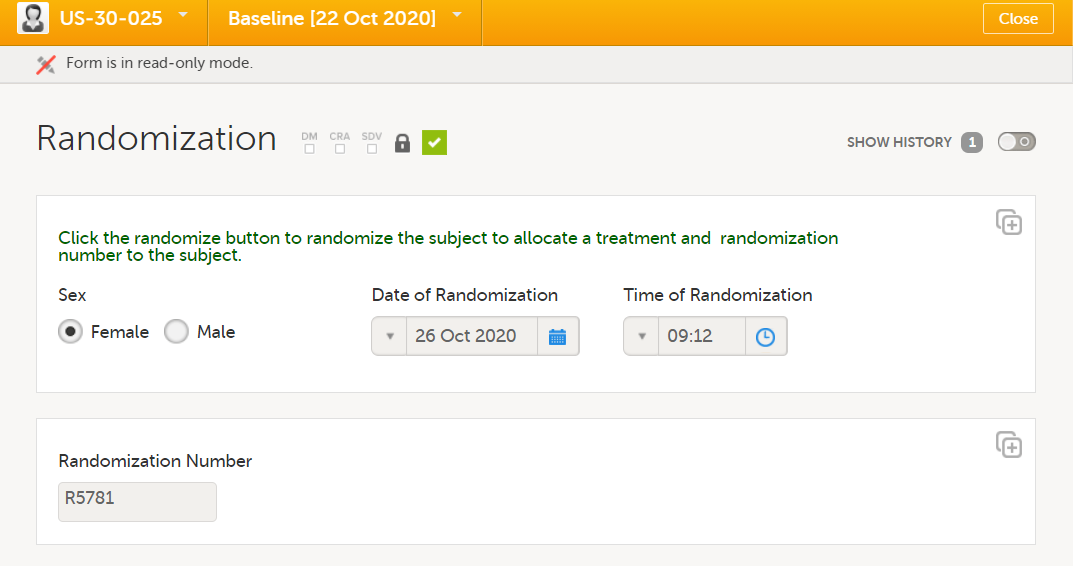
| Randomization | Phase I and Phase II |
It is recommended to avoid manual data entry in randomization and kit allocation forms (see below).
Note! For the gender item, manual data entry is not used, but a function to populate this value from its original form, in this case the demographics form. 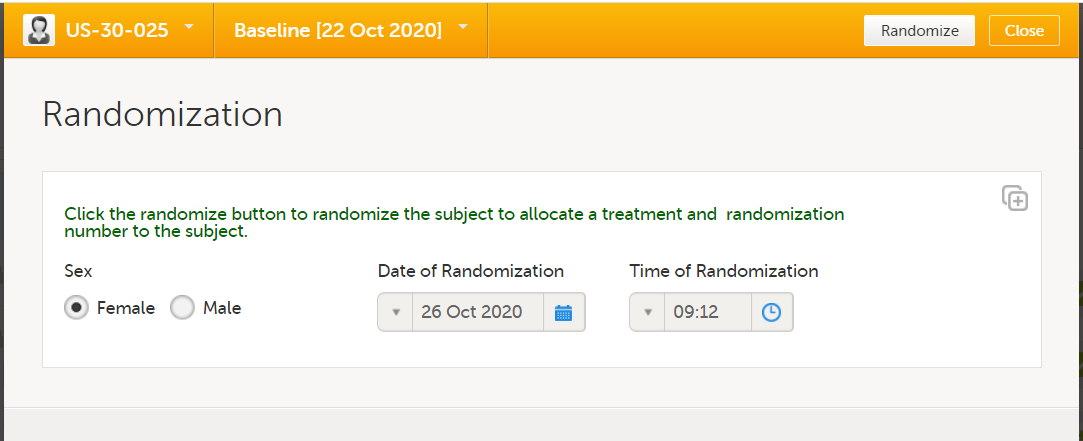
This is done for two reasons:
|
| Kit allocation | Phase II |
This form assumes the use of an allocation list and that kits are allocated from a kit list. None of the items in this form are intended for manual entry. Just like with the randomization form, it is recommended to not have any manual entry fields within an allocation form because they will not be editable once the allocation is performed. Because the kit number is the most critical output item, it is kept in a separate item group at the top so that it is displayed clearly.
|
Viedoc Me configuration
| Form/Section | Study | Comment |
|---|---|---|
| GAD-7 | Phase II |
This is a standardized questionnaire designed for use in Viedoc Me. Within each item, the field layout is vertical, because this will ensure the answer options are more clearly presented regardless of screen resolution on the subjects' device. An important consideration when designing forms intended for Viedoc Me is how the items should be grouped. All items within one item group will be displayed on one page in Viedoc Me. Sometimes it is preferable to have fewer and longer pages in Viedoc Me, and sometimes many short pages. There are no strict rules to apply to this, so you will need to test what is most suitable for each form designed. The general recommendations are to keep the pages fairly short unless there are many similar questions that fall under the same category. In the Viedoc Me forms for this study, the same question is asked for a number of different problems. In such a scenario, it is easy to enter data even if the page is a little bit longer. If each item was a question in its own with a completely different category/question text, it is generally recommended to separate these items in different item groups. For the PHQ-9 questionnaire, the decision was to separate the final item in a separate item group, because this was considered as a completely different question. A calculation for the total score of the questionnaires has not been added in Viedoc. Although it is possible to add a function for calculating the score in a separate form in a site-initiated event, the needs for the study should be considered. If a total score would be needed for, for example, the continuous safety follow-up of a patient or to take any other action during the study, like changing a subject’s treatment dose and so on, it is warmly recommended to use a function to calculate the score in Viedoc. On the other hand, if it is only used for the final outcome analysis towards the end, it might as well be calculated outside Viedoc by the study statistician. |
| PHQ-9 | Phase II | |
| Workflow configuration | Phase II |
Please also note how the Viedoc Me events and activities have been configured in the study workflow. The Viedoc Me schedule has been set up so that submissions are expected in association with the clinic events, but with a few days difference from the event date allowed. Reminders have also been activated, to ensure that compliance is as high as possible. Note the visibility conditions for the Viedoc Me events. The Viedoc Me event and corresponding clinic event will be triggered with the same conditions. Thus, the Viedoc Me event will always become visible when the corresponding clinic event does. This is expected to work well in this study, but will be less suitable if a site is running several events behind in data entry. If that is a concern, you could consider triggering all Viedoc Me events upfront. In such a scenario, you could add visibility conditions to hide uninitiated events as soon as a subject is withdrawn, to avoid them from showing when no longer relevant. So be mindful of how the visibility for the Viedoc Me events is used. Three separate Viedoc Me reminders have been set up. Under normal circumstances, one reminder is sufficient, but when low compliance is a concern, you could consider using multiple reminders. |
Video adjudication workflow
| Form/Section | Study | Comment |
|---|---|---|
| Video upload | Phase II |
The intended workflow is the following:
There are several advantages of using Viedoc for a workflow like this: the email alerts will ensure that appropriate actions can be taken quickly, all assessments are properly documented, and they are all available in the same system. |
| Reviewer 1 assessment | Phase II | |
| Reviewer 2 | Phase II |
Other
| Form/Section | Study | Comment |
|---|---|---|
| Drug screen test | Phase I | In this form, any potential drug use is being checked. In the assumption for this study it is not considered relevant to know which drug has been used in case of a positive test, so those details are not captured in the CRF. A positive test would lead to the subject not being eligible. This is often sufficient to check with an edit check in the eligibility form (subject with a positive drug screen test cannot be entered as eligible - see edit check L9_IE), but in this case a static text with a reminder of this eligibility criterion within this form has been added to provide additional clarity and further highlight that the subject is not eligible. This is included in the design to showcase an additional option rather than a recommendation. |
| Blood PK sampling | Phase I | In this form, a function returning the sampling time point based on the ActivityDefId has been used for the sampling time point item. A similar layout can be achieved by using multiple static texts with visibility conditions. This approach has the advantages of the information being included in the export and the item can be used in the form summary format if desired (not done in this design). |
| Urine PK sampling | Phase I | |
| Demographics | Phase II | This form is different compared to a standard demographics form. In this study, it is assumed that sites in Germany are used and that full birth date must not be collected for the subjects in this country. So for this country, a different item is shown; "Year of birth (BRTHYR)" instead of "Date of birth (BRTHDAT)". This is controlled through a visibility condition using the country code. Then there are three different age items: AGE1: age calculation based on full birth date and informed consent date for all countries except for Germany AGE2: manual entry age field for German sites (including an edit check to only allow for ages that are possible based on the informed consent date and birth year). AGE: Hidden item, returning the age item with data, that is, either AGE1 or AGE2. This AGE item is used on the subject cards. An alternative approach is to collect birth year only for all countries. When you are using visibility conditions or edit checks based on country code, it is recommended to add demo sites in the relevant countries so that the design can be tested properly. For example in this study it would be recommended to use one demo site in Germany and one demo site in another country. |
| Drug accountability | Phase II | The drug accountability form in this study is not including any details of dispensed kits, this is all managed and contained within the kit allocation form. This form is instead intended to capture the details on the number of tablets left in the returned kits. The kits themselves can be marked as returned in the Logistics view. If it is not important to capture the number of tablets and so on in a returned kit in the EDC, you can rely on the action in the Logistics view. That is, only mark the kit as returned in the Logistics view and skip the tablet count and the drug accountability form |
| Physical examination | Phase II |
For the body system (physical examination) item and analyte (serology), a function displays the name of the body system/analyte. It is displayed in its own item to include the body system/analyte as an item in the export. This design is preferred by many because it gives the user more clarity in the export and makes it a little bit more "SDTM-like". This approach has also been used in the lab forms for the template studies An option is to instead specify the body system in the label for the item or as label for the item group. |
| Serology | Phase II | |
| EORTC QLQ-C30 Questionnaire | Oncology | Viedoc Me would be the best choice for the vast majority of studies when patient-reported outcomes are collected. Because Viedoc Me holds so many advantages over collecting questionnaire/diary data on paper, it is the preferred choice both by sponsors and sites. However, in certain studies it might not be feasible. This is an example of a questionnaire set up for manual data entry by the sites. In such a scenario, additional items, like date and time of completion of the questionnaire should be added. In Viedoc Me these items would be redundant because you can rely on system-generated date and timestamps for Viedoc Me data entry. |
| Hidden form | Oncology |
As the name suggests, this is a hidden form in Viedoc Clinic (yet visible in study design) with two items with different purposes:
|
| Physical examination | Oncology |
The recommended approach is to use a leading question to capture whether an overall assessment was performed, for example, "Was the physical examination performed?". This can even be set to YES as a default value in the item function settings to simplify data entry. In this form, an alternative approach has been used for capturing details if an examination of each body system has not been performed. Normally, for each body system, it would be recommended to use the system functionality to confirm items as missing if an assessment has not been performed. This requires a reason to be provided by the site and it will be flagged for the monitor to approve. The items confirmed as missing are also included in the query export, which makes them easy to identify in any given study. Therefore, this is the recommended approach to use. However, in certain scenarios, although rare, this is not desired. One example could be if the study has an exploratory part, or for any other reason, expect and accept that there will be a lot of assessments/examinations not performed and there is no need to flag this or capture the reason for why the assessment was not performed. In such a scenario, this design with "not done-checkboxes" for each (or all) body system will mean fewer clicks and quicker data entry from the site staff if many assessments are expected to be missing. The downside would be a reduced control, because these items will not be flagged for the monitor and a reduced overview of missing values because you would have to collect this information in different items and forms. So this approach is not recommended, unless there is a good reason to use it. |
| Vital signs | Oncology |
In this study, height is collected once, but weight and the BMI in several events. Note that the BMI calculation compares the weight of the current event with the height of the screening event. Note! In pediatric studies, where height changes during the study are expected, the height will commonly be collected in each event, and BMI will be calculated from height and weight in the same form. |
| Workflow | Oncology |
Oncology studies can often have a complex workflow. In this design, we assume a study where data needs to be collected from several treatment days only during the first treatment cycle, but for remaining treatment cycles data is only registered for the first day. If the need for the study is different and some limited data needs to be collected for multiple days within multiple cycles, it could also be considered to add multiple days within each event and let an event constitute an entire treatment cycle rather than an individual day in the treatment cycle. If such an approach is used, each day in the treatment cycle could be set up within a separate activity. 
|
| Event status | All | In these designs, event status forms are used to always have an item dedicated to show whether the subject is continuing to the next event or withdrawing from the study. This will make it easier to configure the visibility conditions of the subsequent event, because it will rely on the same item and the same form added at different events, compared to using visibility conditions depending on data entry in various different forms and items. This will also give the site user the possibility to trigger the "Study End" form to withdraw the subject at any study event. If an additional "early withdrawal event" is expected, an additional question in this form can be added to collect the information if the subject will return for an early withdrawal event and use that response to trigger the early withdrawal event. If this approach is used across studies, you can ensure that events and end-of-study forms are triggered consistently across studies. This design approach is often also preferred from site users because they will only see the events in Viedoc when they are relevant for the subject. |
| End of study | All | In this form, the same item, DSSTDAT, has been used for both "date of completion" and "date of discontinuation". Instead of having a label for the item itself, two different static texts are being alternated to display "date of completion" or "date of discontinuation". The output field label ensures that a label is exported for the item. |
| Alerts | All | In all template studies, the role “Safety Notifications” has been added. You will note that this role has no permissions in the roles section. This role is used only as a recipient for email alerts. This way you can be more selective of what users should receive the alerts. If some users with access as “Sponsor” would prefer the alert and others don’t, they could be invited with “Sponsor” + “Safety Notifications” or only “Sponsor”. Without this role, you would need to treat all users with access as “Sponsor” the same way. That is, all or none would receive the alerts. |