RTSM Settings
This lesson describes how to configure the Randomization and Trial Supply Management (RTSM) in Viedoc Designer.
Introduction
About the randomization service
Viedoc offers support for randomization. Subjects can be randomized using:
- static randomization: randomization based on a randomized list,
- dynamic randomization (Pocock and Simon): randomization based on an algorithm.
Dynamic randomization ensures a more even distribution of subjects across the treatment groups, with regard to prognostic factors that might influence the effect of treatment on the subjects.
The randomization in Viedoc is configured in a similar way for static and dynamic randomization. The main difference is that for static randomization, a list with outcomes (randomization numbers, treatment groups, and so on) - the randomization list - is created and uploaded by the user, while for dynamic randomization, an algorithm is used to assign subjects to a treatment group and the randomization list is created by the system.
It is possible to upload a separate allocation list that allocates an Investigational Product (IP) to the subject. When the subject is randomized, Viedoc informs the clinic user which IP should be given to the subject. The allocation list is most commonly used in double-blind studies. Uploading of the allocation list is done in a similar way for static and dynamic randomization.
Terminology
| Term | Definition |
|---|---|
| RTSM | Randomization and Trial Supply Management. |
| Blinded role | A role that does not know which treatment the subject is receiving. Most roles in a clinical trial should be blinded. |
| Unblinded Statistician |
A system role that can configure the randomization in Viedoc Admin. The Unblinded Statistician sees which subjects are assigned to which treatments, and should therefore not have any role in the study where he/she should not know this information. An Unblinded Statistician can never again work in a blinded role within that study. |
| Randomization list | A list for allocating subjects to treatments or groups. The randomization list shows all available slots in the randomization. When randomization has started (that is, when the first subject has been randomized), the randomization list also shows which subjects have been assigned to which treatment or group. |
| Allocation list | A list for allocating IP to subjects. The allocation list shows all available IPs. When randomization has started, the allocation list also shows which IPs have been assigned to which subjects. Advanced allocation can be set up and for this there are two options for the allocation list(s):
|
| Scope |
Defines the scope from which a randomization slot or an IP should be selected. One of the following scopes can be chosen:
|
| Factor (Prognostic factor) |
Items that might influence the effect of treatment on the subjects, and that are to be used as input when randomizing the subject. For example sex or age. Viedoc supports the use of drop-down lists, radio buttons, integer and free text data types as input items. |
| Outcome | Items to be populated by the randomization service, for example treatment group. |
| Blinded outcome | Items to be populated by the randomization service, that should remain blinded until after the subject has been unblinded or emergency unblinded for a specific subject. These items will not be visible for any user in the system, except for the Unblinded Statistician who can see them in Viedoc Admin, or until an emergency unblinding was performed (for details on how the emergency unblinding is performed in Viedoc Clinic, see Randomization, allocation and emergency unblinding). |
Workflow
Randomizations are configured in Viedoc Designer and Viedoc Admin, and executed in Viedoc Clinic. The schematic below depicts what different steps need to be taken, and which roles have permission to perform these steps, depending on the allocation configuration type as described below:
- Randomization, optionally together with allocation performed at the same time as the randomization within the same form. In this case the form is locked (and therefore not possible to be edited) after the randomization is performed in Viedoc Clinic.
The configuration workflow in this case looks as illustrated in the following image:

- Randomization, optionally together with advanced allocation allows you to set up the allocation in a more flexible way, including:
- Configuring individual forms for randomization and allocation, to keep the two steps separated in the study workflow
- The possibility to perform multiple allocations at different visits during the study
- The possibility to replace an already performed allocation with a new allocation
- The possibility to undo an already performed allocation
The configuration workflow in this case looks as illustrated in the following image:

This is a single-sourced file that should have the following content:
Introduction to randomization
Detailed instructions regarding these steps are described in:
- Setting up the randomization in Viedoc Designer (this lesson!)
- Configuring a static randomization in Viedoc Admin
- Configuring a dynamic randomization in Viedoc Admin
An example of how to configure a dynamic randomization is described in detail in the following lesson:
For a video tutorial on how to configure a static list randomization and a dynamic randomization, see:
For more information on blinding, please see:
Step-by-step guides
Workflow in Viedoc Designer
There are different workflows to be followed when setting up the randomization and allocation in Viedoc Designer, as illustrated in the Workflow section above.
To set up randomization in your study, you have to perform the following steps in Viedoc Designer:
- Create one randomization form that contains the following items:
- items that serve as factors,
- items that are to be populated by the randomization service, for example, treatment or group and kit number.
See the eLearning section Creating and editing forms.
- Only if advanced allocation is to be used, create one or more allocation forms (can be the same form as the randomization form) that contains the following items:
- items that serve as input for the allocation,
- items that serve as output for the allocation (that are to be populated by the allocation service)
See the eLearning section Creating and editing forms.
- Set up the mapping for the randomization. This tells Viedoc where the randomization form is and how to use the variables in that form. The randomization mapping is not affected by the choice of randomization method (static or dynamic). See Setting up the randomization mapping below.
- Only if advanced allocation is to be used, set up the mapping for the allocation. This tells Viedoc where the allocation form is and how to use the variables on that form. See Setting up advanced allocation below.
Notes!
- The randomization form must contain all the input factors and outcomes you intend to use for making assignments.
- The RTSM settings can only be edited in a new design version (not a revision).
Tip! Once saved in Viedoc Clinic, the randomization form cannot be edited anymore. Add a message to the form asking the clinic user to make sure the data are correct before randomizing the patient. It is advisable to avoid using fields that are manually editable within the randomization form (an alternative would be to use fields auto-populated with data from other forms).
See also the eLearning section A use case for dynamic randomization for a complete example of designing the randomization form, and setting up the randomization in Viedoc Designer and Viedoc Admin.
Setting up the randomization mapping
Note! The randomization mapping is exactly the same irrespective of the randomization method (static/dynamic) that will be used. The choice of randomization method is made in Viedoc Admin, after the randomization mapping has been set up.
Note! The randomization event should not be the study start event. This will halt advanced features and result in an error.
To configure the design of the randomization, follow the steps below.
| 1 |
Open the study in Viedoc Designer. Click Edit in the Study Settings field to open the Study Settings page. 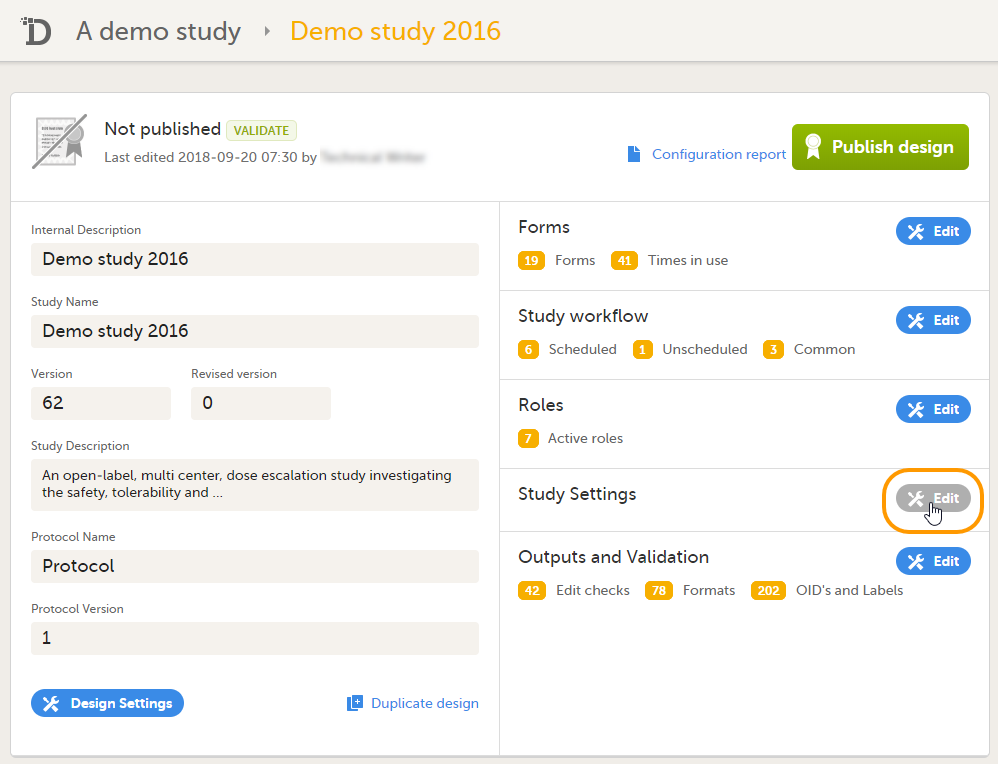
|
| 2 |
Click Edit in the RTSM Settings field to open the RTSM Settings page. 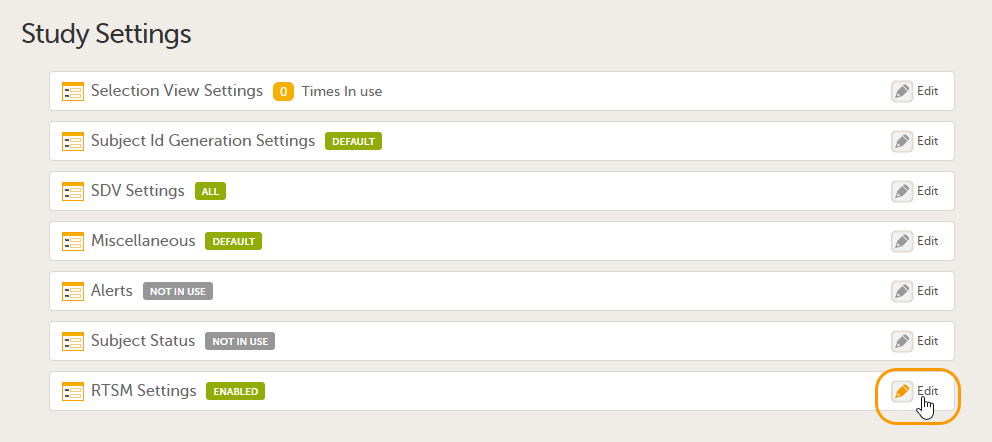
|
| 3 |
Click Add new. 
The RTSM Settings page opens. |
| 4 |
Set up the randomization mapping under Inclusion tab, as follows:
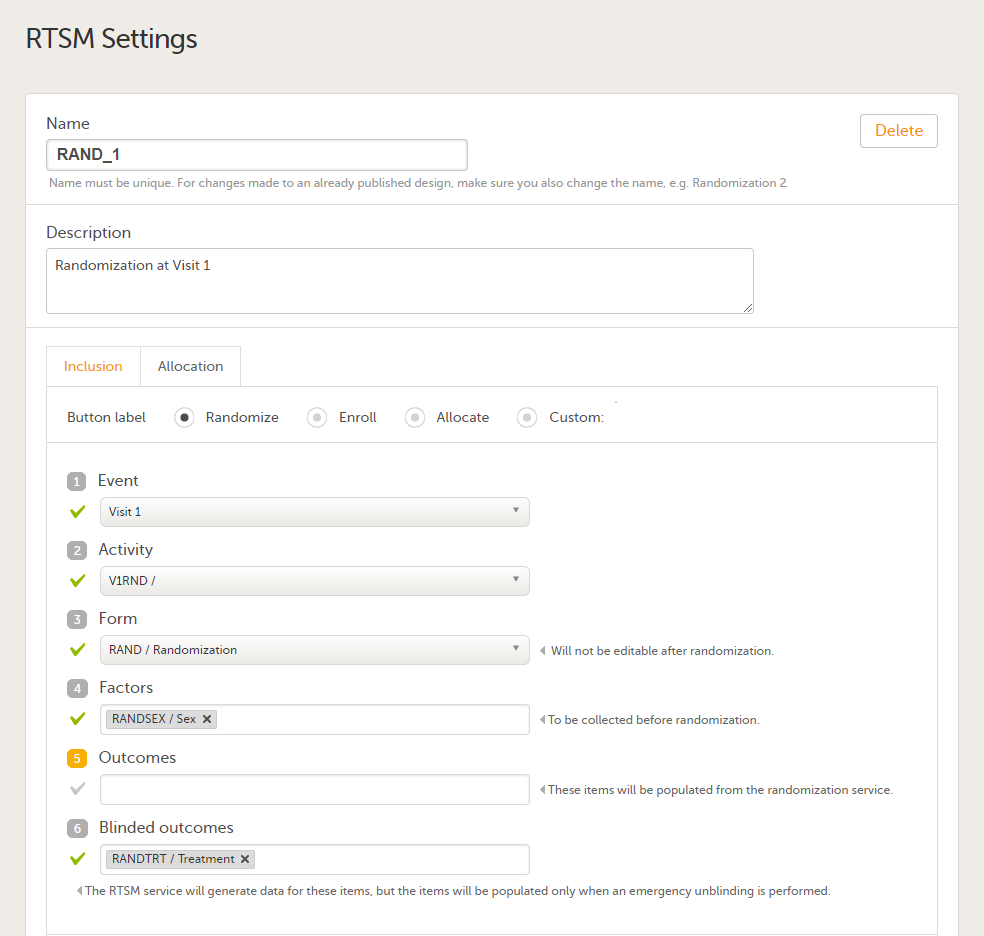
|
| 5 |
Click Save changes, and click Close. |
After the randomization mapping has been set up, the study design needs to be published for the randomization to become active.
Editing the randomization mapping
Note! The randomization mapping is part of the study design. It is not possible to edit an existing randomization mapping after the study design has been published. If the randomization has to be changed, a new study design version has to be created, see Duplicating a design - versions and revisions.
To edit the randomization mapping, follow the steps below.
| 1 |
Open the study in Viedoc Designer. Click Edit in the Study Settings field to open the Study Settings page.
|
| 2 |
Click Edit in the RTSM Settings field to open the RTSM Settings page.
|
| 3 | Click Edit in the field of the randomization you would like to edit. The RTSM Settings page opens. |
| 4 | Edit the randomization settings as you wish. Click Save changes, and click Close. The RTSM Settings page closes. |
Deleting a randomization mapping
Note! The randomization mapping is part of the study design. It is not possible to delete an existing randomization mapping after the study design has been published. If the randomization has to be changed, a new study design version has to be created, see Duplicating a design - versions and revisions.
To delete a randomization mapping, follow the steps below.
| 1 |
Open the study in Viedoc Designer. Click Edit in the Study Settings field to open the Study Settings page.
|
| 2 |
Click Edit in the RTSM Settings field to open the RTSM Settings page.
|
| 3 | Click Edit in the field of the randomization you would like to edit. The RTSM Settings page opens. |
| 4 |
Click Delete.
|
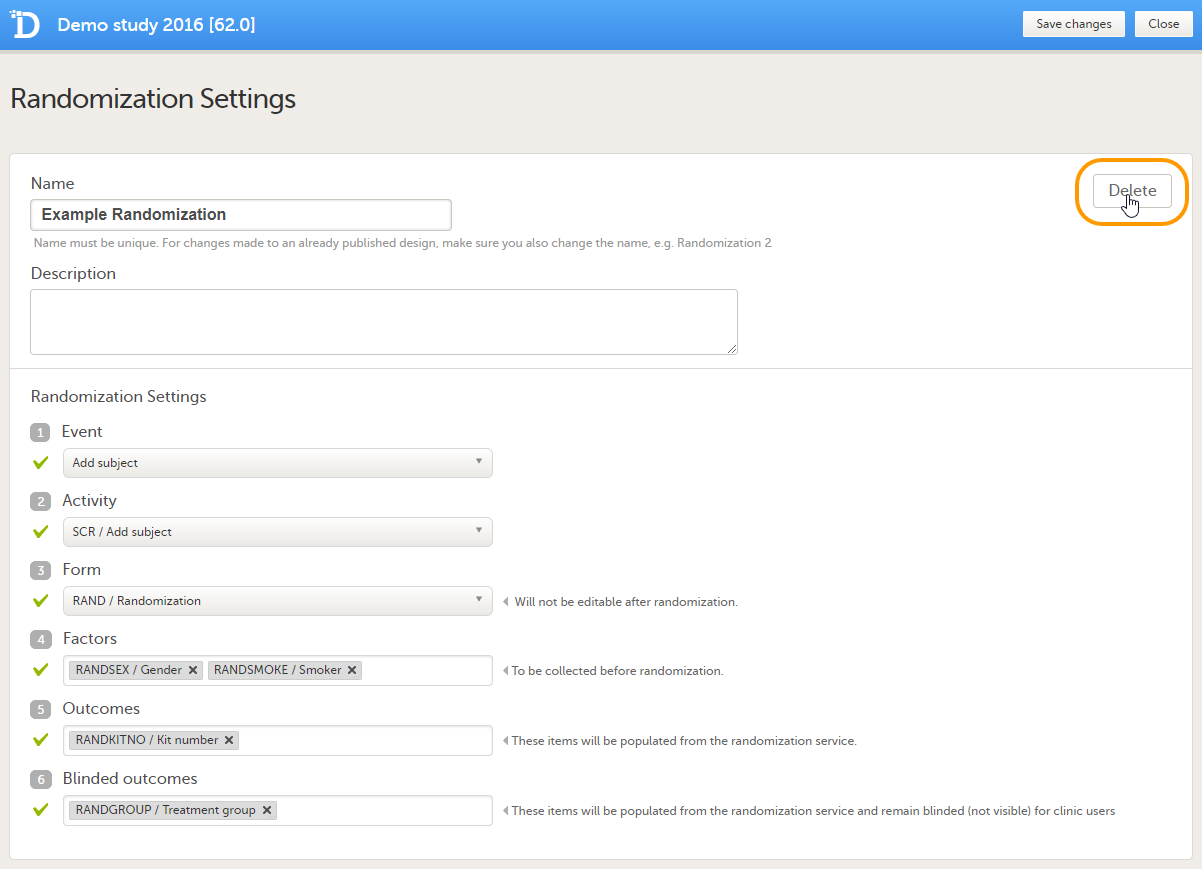 A pop-up opens that asks you to confirm deletion. Click Delete to confirm.
Setting up advanced allocation
To set up the advanced allocation, follow the steps below.
| 1 | Open the study in Viedoc Designer. Click Edit in the Study Settings field to open the Study Settings page. |
| 2 | Click Edit in the RTSM Settings field to open the RTSM Settings page. |
| 3 | Click Edit in the field of the randomization you would like to edit. The RTSM Settings page opens. |
| 4 | Under the Inclusion tab, in the bottom, select Enable advanced allocation. The Allocation input properties and Allocation output properties are displayed. |
| 5 |
Set the Property ID(s) and Property Label(s). These are used for mapping when setting up the global allocation list in Viedoc Admin (note that a global allocation list has to be used in conjunction with the Logistics functionality). For details about the allocation list see Configuring the Global allocation list. Click the "+" icon to add new input/output properties. See Mapping the allocation input and output properties below. Important! Property Label(s) must be defined here for all the inputs and outputs of all the allocation(s) that are to be used in the study and configured in the next steps, as this will not be possible to be updated at a later point after the RTSM settings are approved and published. |
| 6 | Click Continue to Allocation. You will be directed to the Allocation tab. |
| 7 |
Set up the allocation as follows:

|
| 8 | Optionally, click Add another allocation to add a new allocation and perform the settings in step 7 above. Notes! - This is needed if you want to use the allocation multiple times in different events or activities. - When using multiple allocations, make sure that all the input and output property labels are added, as described at step 5 above. |
| 9 | Click Save changes. |
Mapping the allocation input and output properties
For the advanced allocation, you need to define the input and output properties that will be used.
As input for the allocation, it is possible to use the outcome from the Inclusion, as well as any items from the allocation form.
As output for the allocation, it is possible to use items from the allocation form.
Before defining these input and output properties, the following prerequisites are needed:
- have designed the randomization and allocation form(s)
- which would be the input for the allocation(s)
- which would be the output of the allocation(s)
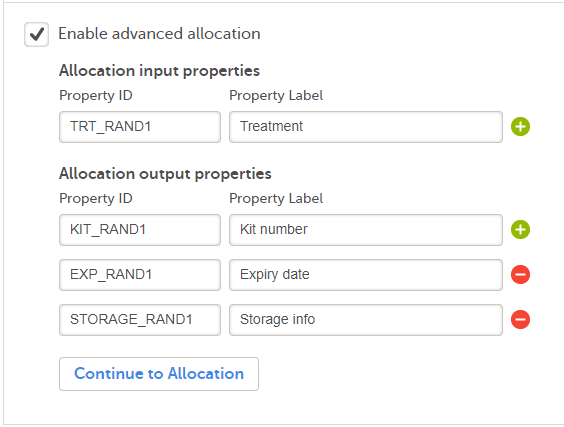
Considering an example:
- if the outcome of the randomization is the Treatment item, and this is used as an input for the allocation, and
- if the output of the allocation consists of the following items from the allocation form: Kit number, Expiry date and Storage conditions:

These input and output properties are defined as follows:
- Under the Inclusion tab, when selecting to Enable advanced allocation, the Allocation input properties and Allocation output properties are shown, where the Property ID(s) and Property Label(s) should be defined. Just type in the IDs and the Labels manually. For the example above, these could be:
- Under the Allocation tab, when you set up the allocation:
- Input mapping - select the input item for the input properties set previously under Inclusion. The available items are the outcomes from the Inclusion and any item from the allocation form. For the example above, this would be the Treatment from the randomization form:

- Output mapping - select the output items in the allocation form that will be populated as a result of the allocation. For the example above, these would be:

- Input mapping - select the input item for the input properties set previously under Inclusion. The available items are the outcomes from the Inclusion and any item from the allocation form. For the example above, this would be the Treatment from the randomization form: