Creating and editing forms
Introduction
Forms are used for data entry in Viedoc. They can include various elements configured to collect study data in flexible ways. This lesson provides an overview of creating and editing forms, the different form item types, their properties, and global form templates.
The Forms page
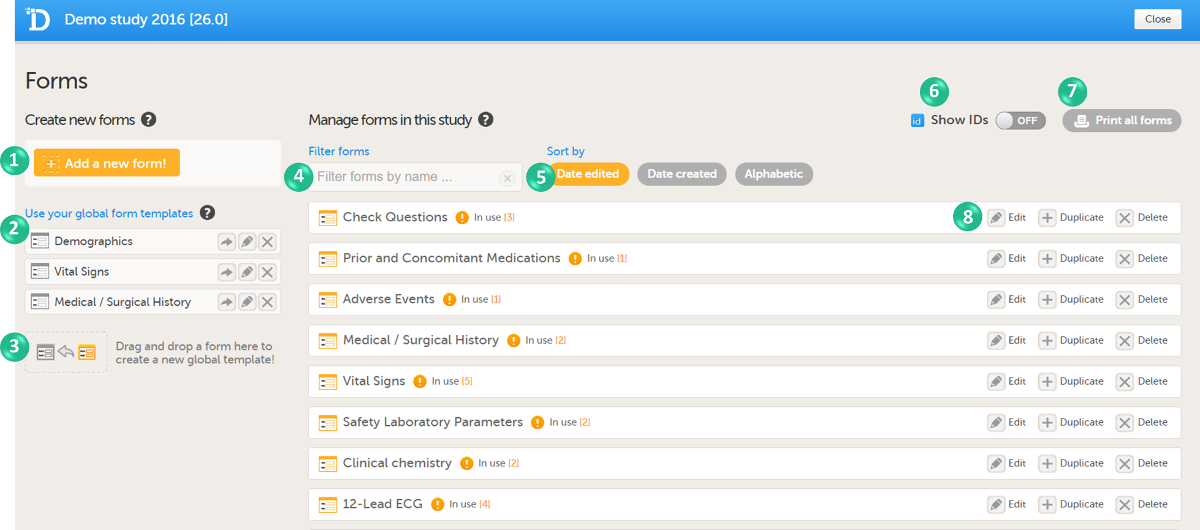
In Viedoc Designer, the Forms page allows you to create, edit and manage forms.
On the Forms page, you can:
1. Create an entirely new form, see Creating a new form below.
2. Create a new form by using a form from the global templates, see Creating a form using a global template below.
3. Add a form to the global templates, see Creating a global template below.
4. Filter and search forms.
5. Sort forms by the date they are edited, the date they are created or by name. Default is Date edited.
6. Show/Hide the form/item IDs.
7. Print forms with IDs (annotated CRF) or without IDs (unannotated CRF).
8. Edit, duplicate or delete a form.
Form layout and content
A form consists of one or several item groups that contain one or several items.
A white box in the form defines an item group (a group of items). An item group can include a header.
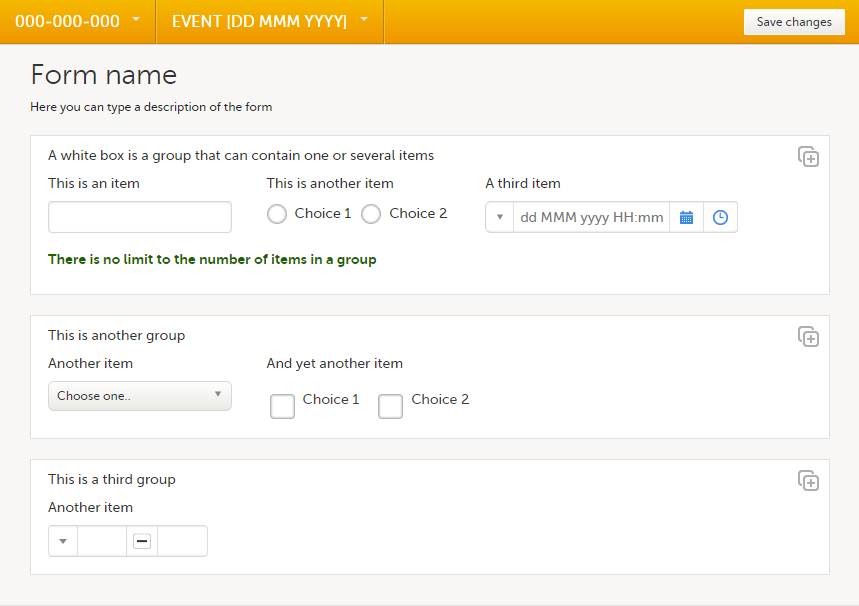
An item is highlighted with a yellow box when you hover the cursor over it.
 You can adjust the settings of an item group and the settings of single items.
- To access the item group settings, select the white box (outside any item) that forms the group.
- To access the item settings, select the area (yellow box) of an item.
Creating a new form
You can create a new form by:
- adding a new form in the study design
- using a global template (see Global form templates below).
To create a new form in Viedoc Designer:
| 1 |
In the study design, select Edit in the Forms field.
|
| 2 | Select Add a new form!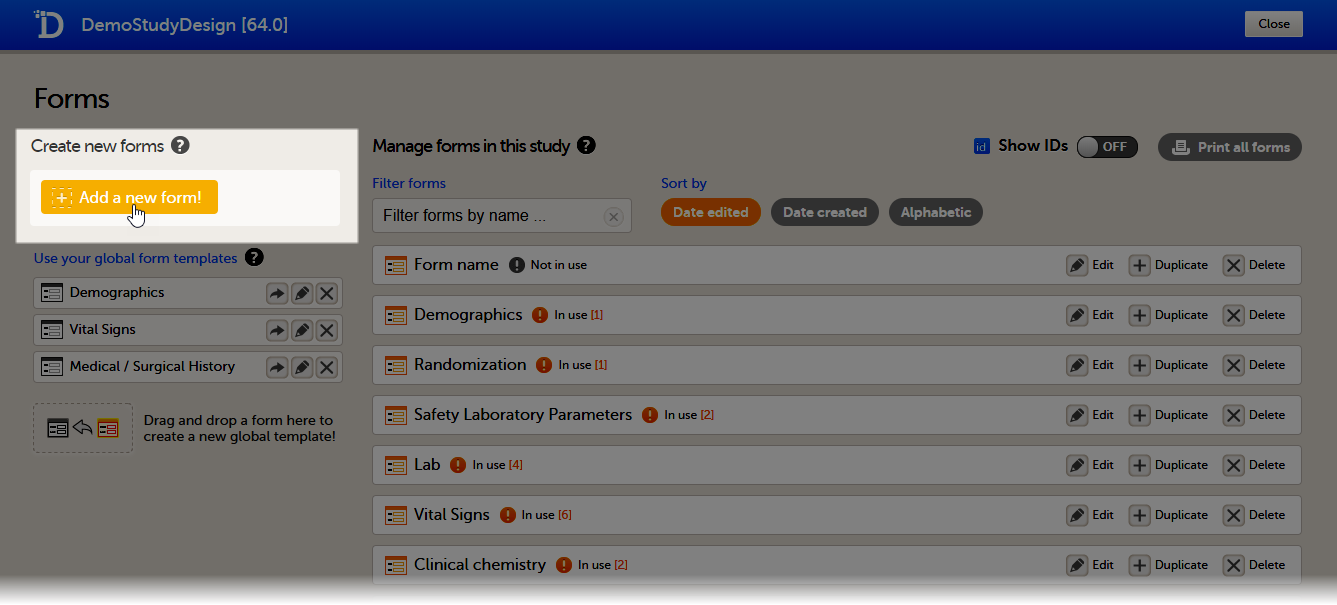 A new form is created, and the Form Settings pop-up opens (continue to next section below). A new form is created, and the Form Settings pop-up opens (continue to next section below). |
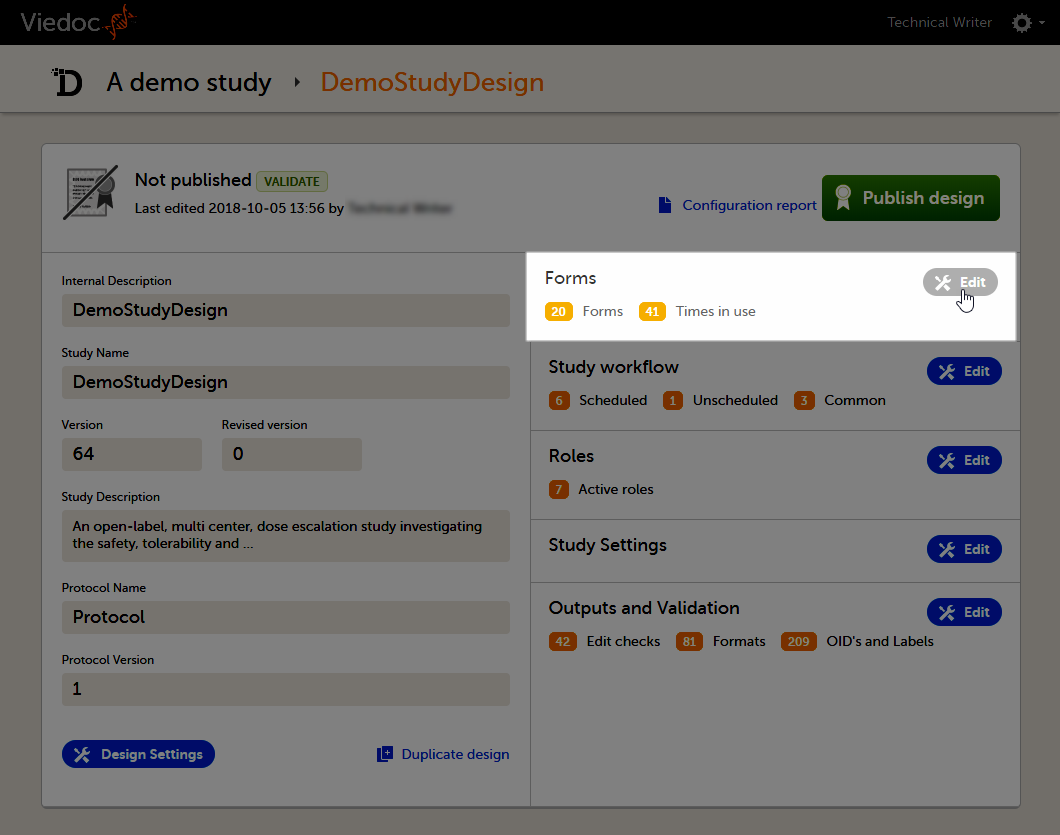 The Forms page opens.
Editing the form settings
| 1 |
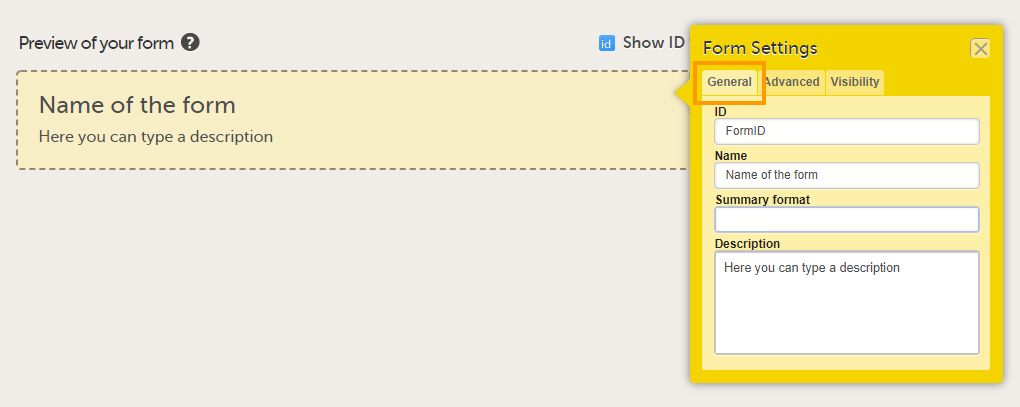
In the Form Settings pop-up, on the General tab, enter or edit the following:
Tip! You can enter a summary format that defines how the form will be displayed in Viedoc Clinic. It is easiest to enter this after the form has been set up and filled with items and item groups. For more information, see Summary format of the form below. |
| 2 |
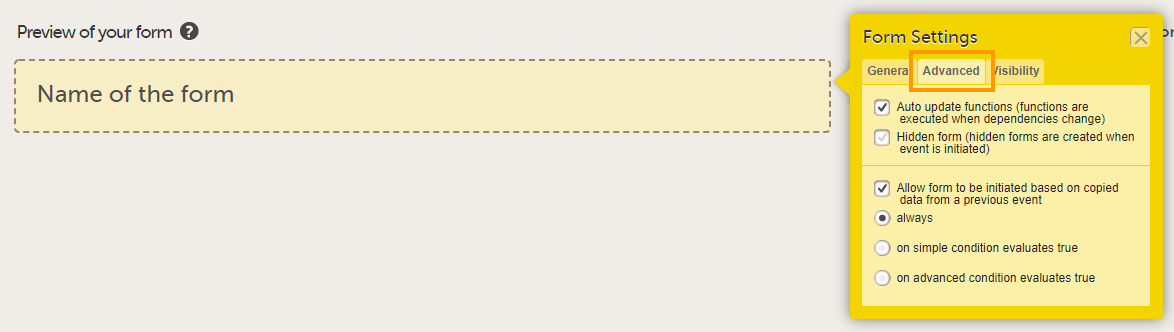
On the Advanced tab, select:
Tip! You can edit these settings at a later time. |
| 3 |
On the Visibility tab, select:
If you select Selected roles, select which roles should be able to view the form and to edit the data. Note! Only user roles with editing permissions for the study start event form can add a new patient card and activate a Viedoc Me account. 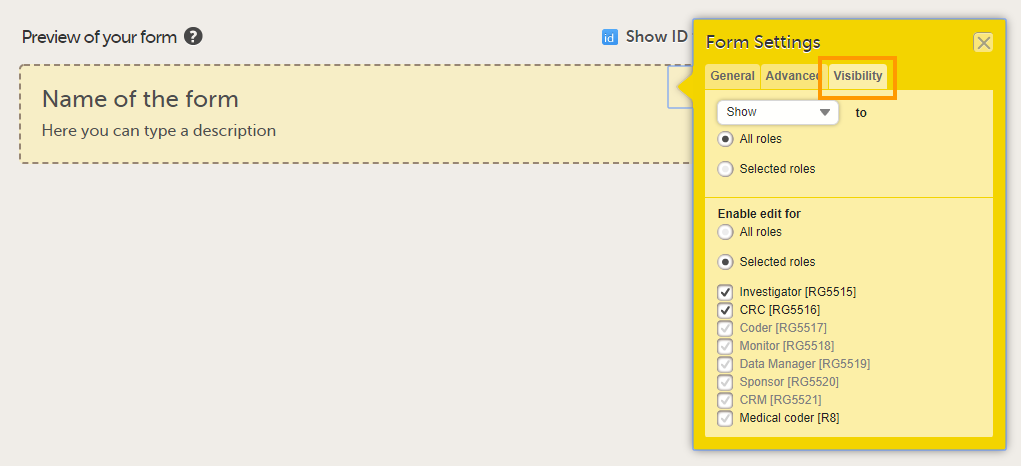
Note! Alerts do not respect role visibility conditions. Items within forms that are hidden to certain roles may become visible in alert messages. For more information, see Alerts. |
| 4 | Select Save changes at the top of the Forms page to save the form. |
Summary format
The Summary format is a form identifier available In the Form settings on the General tab. It is used to define how the form will be displayed in the following places in Viedoc Clinic when the form is initiated:
1. The list of forms in the event view on the Subject Details page (see images below).
2. The form name when the form is displayed in view/edit mode (see images below).
3. The Add subject form.
4. The Signing console (see images below).
5. The Data Review Console.
6. The header of the Form History PDF (see images below).
7. The PDF export for Viedoc versions 4.39 and higher.
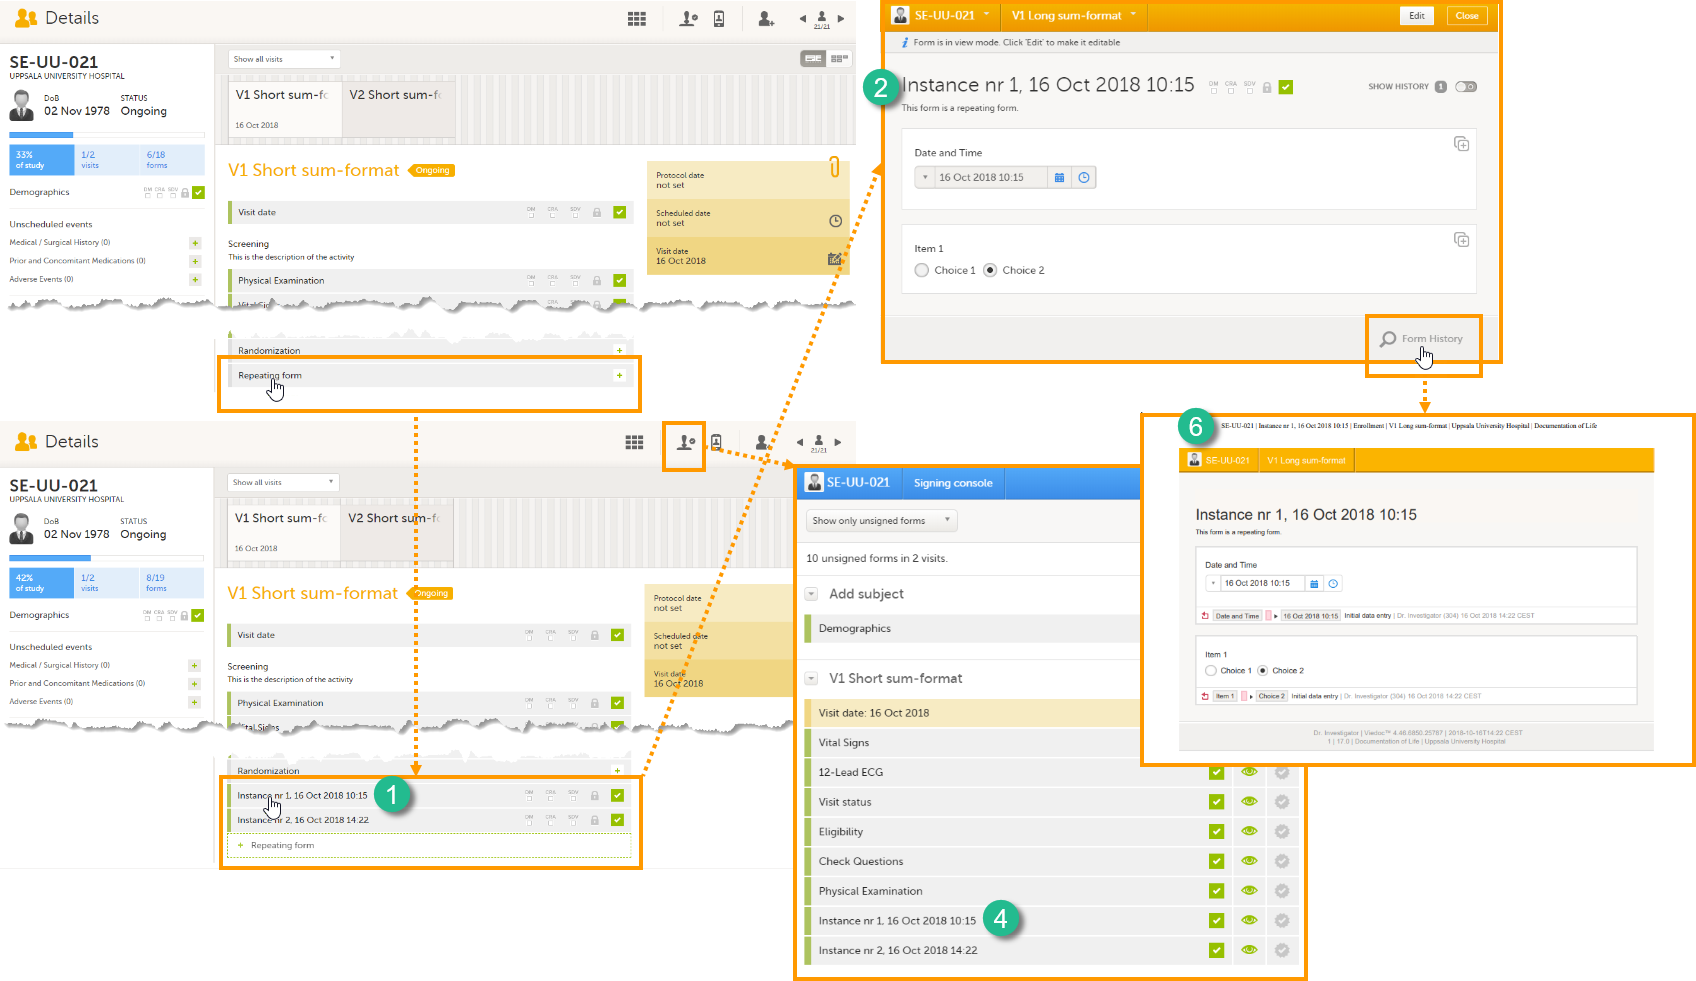
The Summary format is a field in which you can enter variables as well as free text. See the complete list at Using JavaScript in Viedoc). For repeating forms, you can use the FormRepeatKey in the summary format to distinguish between the different instances of the same form.
In the example above, the summary format of the repeating form is set to Instance nr {FormRepeatKey}, {DATE}.
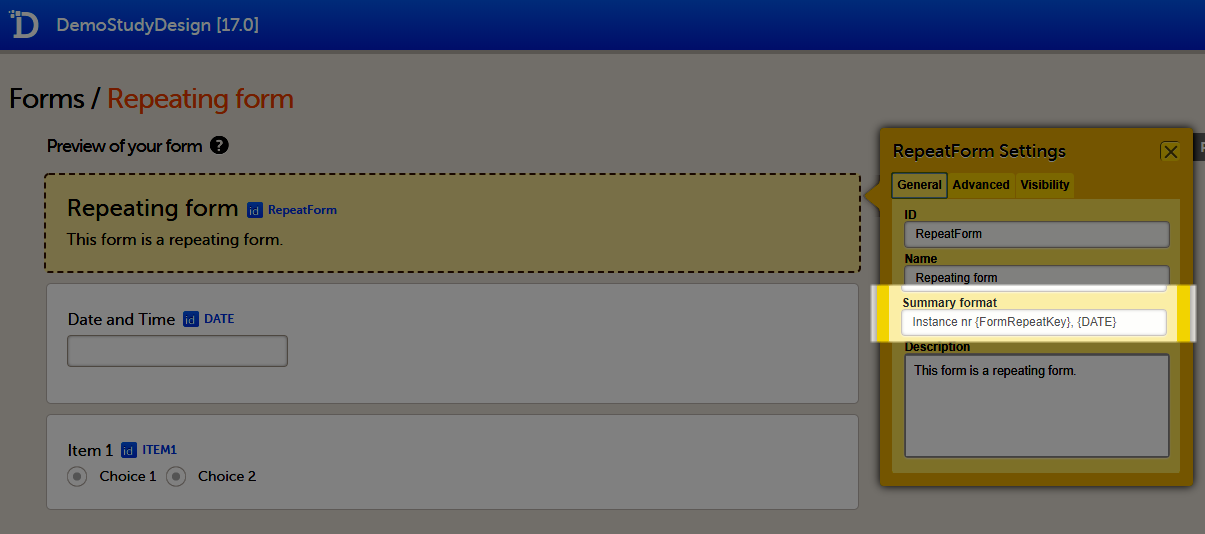 When date variables are used in the summary format, the date format is formatted as set in the study settings in Viedoc Admin, see General study settings.
For more information about repeating forms, see Study workflow. A more comprehensive example of how to use the summary format is described in the use case example in Using repeating forms.
Before the form is initiated, if the summary format is left empty, the form name is used to display the form at these places in Viedoc Clinic.
Note! If a long summary format is used, this will increase the size of the header in the PDF. If the PDF header contains more than three rows of text, it will overlap with the contents of the PDF (that is, the screenshot of the form).
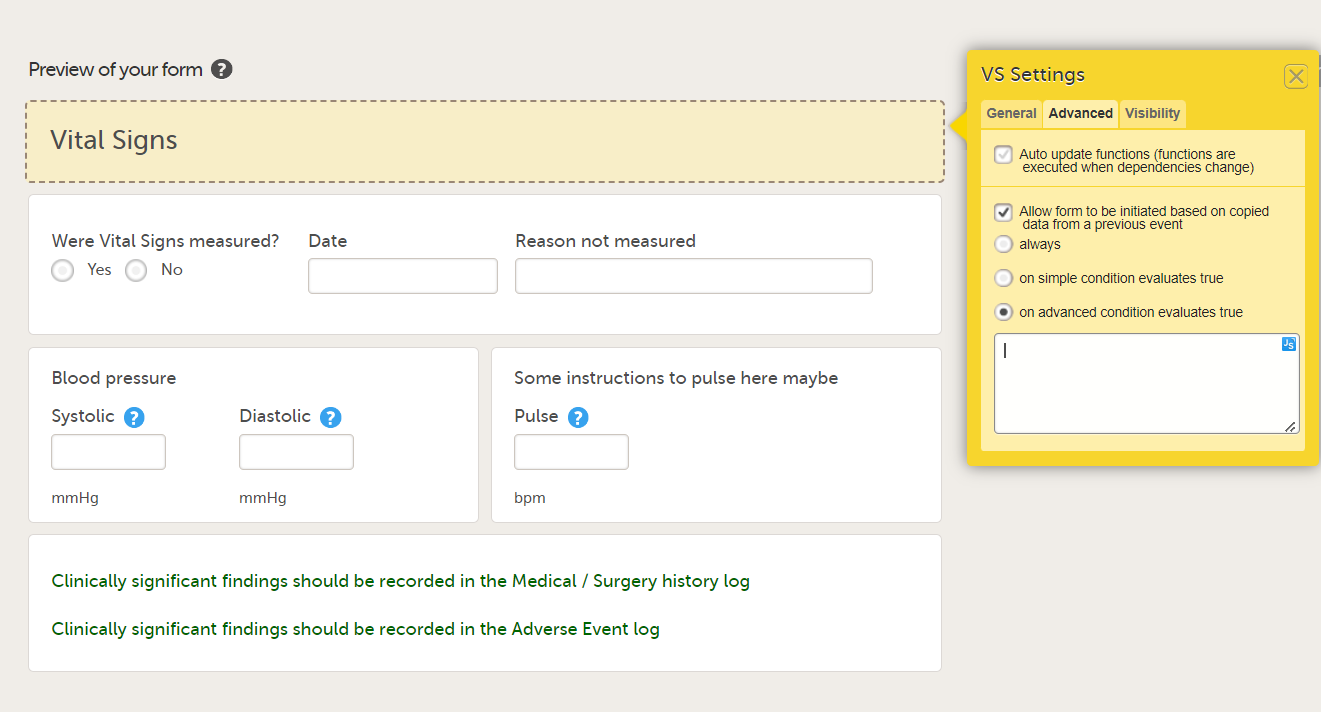
Tip! If the option Allow form to be initiated based on copied data from a previous event is activated for the form, you can include one or more of the form sequence numbers in the Summary format to help identify the form instance the data is copied from in Viedoc Clinic.
For more details, see Allowing a form to be copied below.
Auto-update functions
On the Advanced tab, in the Form settings, there is an option to Auto update functions (functions are executed when dependencies change). If this option is enabled, the form is automatically updated when it contains items with a function that depends on items from other forms.
If the value of one or more of the dependency items is changed (whether in Viedoc Clinic, Viedoc Me or via the API), the function is re-executed, and the form updates automatically as follows:
- the item is updated with the new value that resulted from re-executing the function
- the visibility conditions are validated
- the edit checks are validated
- the form status is updated
Note! The Auto-update functions option is only useful when there are items in the form that use functions that depend on items from other form(s), known as cross-form items.
Enable this option only when the form contains cross-form items. If no cross-form dependencies exist, enabling the Auto-update functions option unnecessarily affects system performance.
If a form with the Auto-update functions option enabled is monitor-locked, it is still updated by re-executing the functions. When a value changes, the form is saved and the review and the signature are broken, but the monitor-lock for the form remains in place.
Example of the auto-update functions
Consider a form, (Form A) that contains a cross-form item (Calculated_Item) that uses a function (F) which is dependent on two items in another form: Input_Item_1 and Input_Item_2 in Form B. The Auto-update functions option is enabled for Form A.
When Form B is saved (in Viedoc Clinic, Viedoc Me, or via API), the function F is re-executed. If, this results in a changed value for Calculated_Item , then Form A is updated as follows:
Calculated_Itemis updated to the new value- Visibility conditions are re-validated
- Edit checks are re-validated
- Form status is updated (for example, missing fields)
Impact of auto-update functions on form history and revisions
When a form is auto-updated due to dependency changes, the reason for change is displayed in the form history:
Automatically updated due to dependency change.
When the Auto-update functions option is enabled in a new revision of the study design, and the Hidden form option is not enabled, the form is marked as changed and the functions are executed during the upgrade.
Hidden forms
If the option Auto-update functions is enabled for a form, that form can be set to be a Hidden form. Hidden forms are automatically initiated when the event is initiated in either Viedoc Clinic, Viedoc Me or via the API, but are not visible.
Note! The Auto-update functions option for hidden forms increases computational system load and can affect system performance.
Hidden forms (or data in hidden forms) are:
- not included in any status/statistics/metrics count,
- not included in the PDF archive,
- not signed,
- automatically reset when the respective event is reset,
- included in the export.
When the Hidden form option is disabled in a new revision of the study design, the form is automatically upgraded and made visible.
When the Hidden form option is enabled in a new revision of the study design, a manual upgrade or batch approval is required for the existing (visible) forms after the revision has been applied. After the investigator confirms this, the form becomes hidden.
Allowing a form to be copied
In the Form settings on the Advanced tab, there is an option to Allow form to be initiated based on copied data from a previous event. When this option is activated, the data in a form can be copied from a form within one event to another instance of the same form within another event.
When this option is activated, you must select whether the form is to be copyable always, or only if certain criteria are met (on simple/advanced conditions):
- always
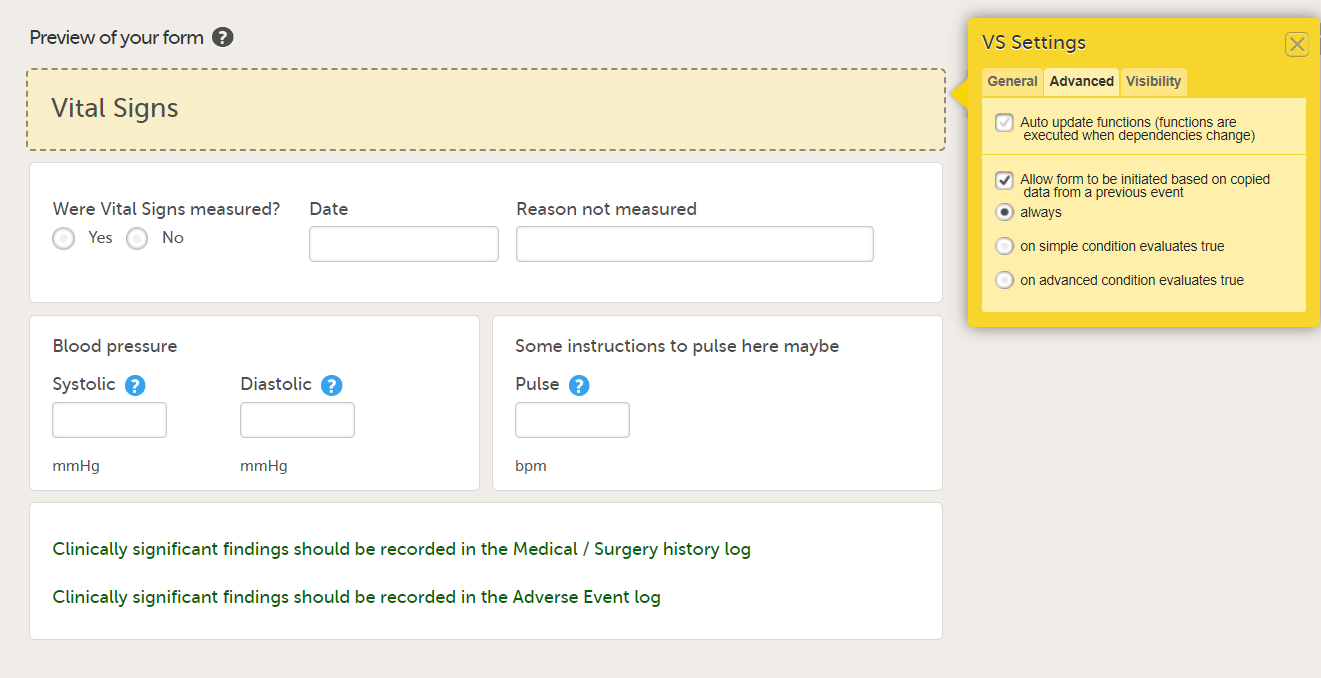
- on simple condition evaluates true. From the dropdown menus, select the item in the form that the condition should be based on, select is or is not, and select the codelist item to specify the condition.
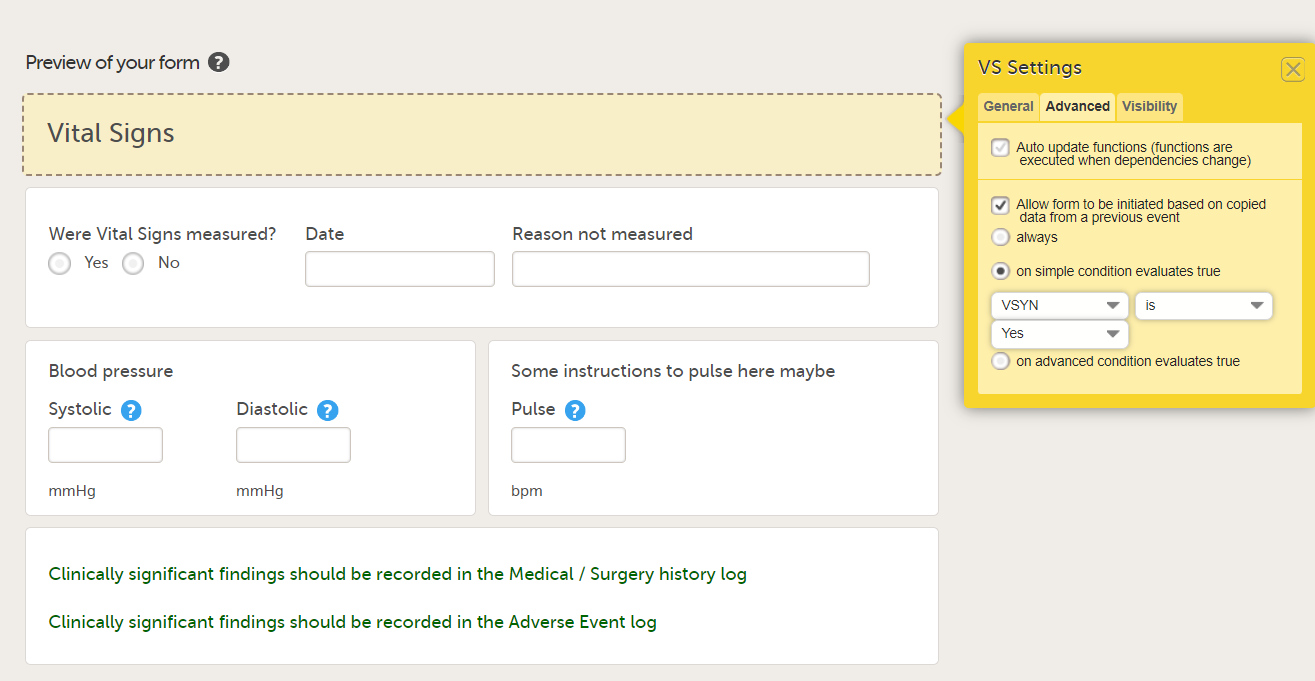
- on advanced condition evaluates true. Enter an expression in JavaScript to specify the condition.
Notes!
- It is not possible to add multiple instances of a copyable form to one event, even in different activities. As soon as the option Allow form to be initiated based on copied data from a previous event is activated, the form can be added only once to each event. It is however possible to set a copyable form as repeating, see the section Repeating forms in the lesson Study Workflow.
- The settings made under Allow form to be initiated based on copied data from a previous event overrule possible visibility conditions set on the event/activity in the study workflow. In other words, copyable forms do not follow visibility conditions set on activity or event level. Thus, if you include a copyable form in an event/activity on which visibility conditions are set, the ghost form of the copyable form is displayed in Viedoc Clinic even if the activity is not displayed because the visibility conditions are not met. To make sure the ghost form of the copyable form is displayed only in certain conditions, specify the Allow form to be initiated based on copied data from a previous event criteria as described above.
- It is not possible to copy data from a form within one event to another instance of the same form within another event for a Common Event.
Tracking form instances using form sequence numbers
The following form sequence numbers are used to make it easier to track different form instances at subject level, which are useful especially for the form instances initiated by copying the data from previous event.
FormRepeatKey: Counter that identifies the specific instance of a repeating form within a specific activity. This is available in the export output for Viedoc output version 4.39 and onwards.SubjectFormSeqNo: Counter that uniquely identifies the instance of a specific form on a subject level, that is, it starts with 1 and it is incremented each time a new instance of the form is created for that subject. This is available in the export output for Viedoc output version 4.51 and onwards.OriginSubjectFormSeqNo: For a copied form instance, it identifies the form instance from which data was copied for the first time. For the first instance of the form (that is, not copied) it gets the value of theSubjectFormSeqNo. This is available in the export output for Viedoc output version 4.51 and onwards.SourceSubjectFormSeqNo: For a copied form instance, a counter that identifies the source of a copied form instance (the form instance the data was copied from). It gets the value of theSubjectFormSeqNofrom which the form instance was copied. For the first instance of the form (that is, not copied) it is empty, that is, null. This is available in the export output for Viedoc output version 4.51 and onwards.
The example below illustrates how the values for these sequence numbers are assigned. The demo form used is set as repeatable and copyable and is included in Visit 1, Visit 2 and Visit 3.
We perform the following actions in Viedoc Clinic:
| 1 | Initiate Visit 1 and fill in three instances of the Demo form, these instances will get the sequence numbers as illustrated below: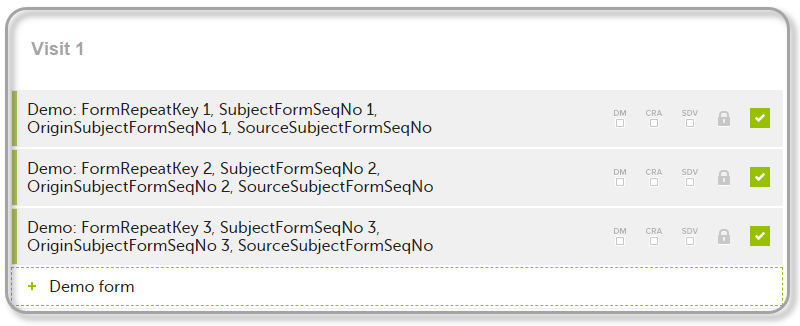 |
| 2 | Initiate Visit 2. Demo form will be available to be initiated by copying data from one of the previously filled-in form instances within Visit 1, so all the three instances will be shown as ghost forms: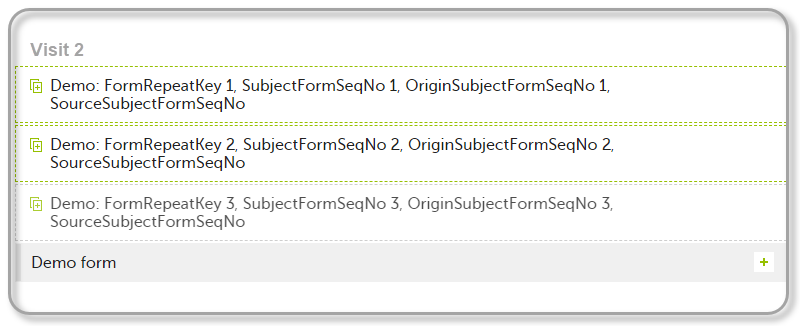 |
| 3 | Create an instance of Demo form within Visit 2 by copying the data from the third instance of the form filled in within Visit 1. This will result in the new form instance getting the sequence numbers as illustrated below: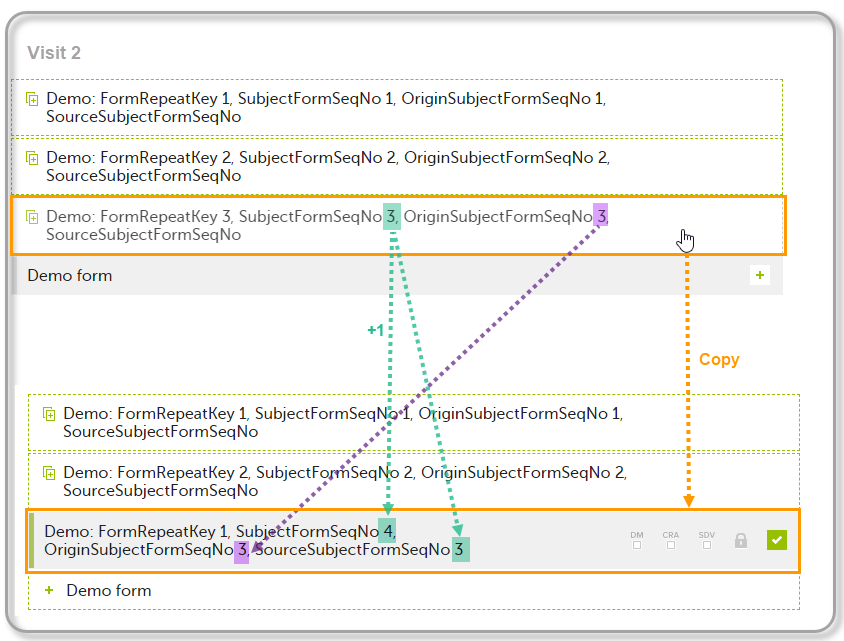 |
| 4 | Initiate Visit 3. Demo form will be available to be initiated by copying data from one of the previously filled-in form instances within Visit 1 and Visit 2, as below: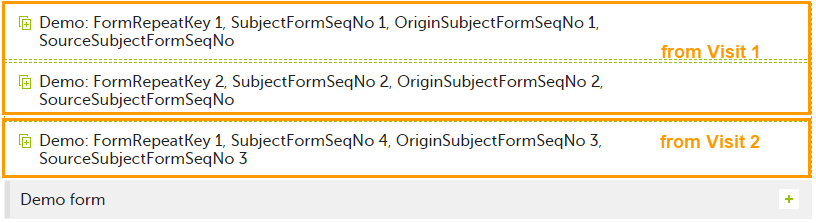 |
| 5 | Create an instance of Demo form within Visit 3 by copying the data from the form filled in within Visit 2. This will result in the new form instance getting the sequence numbers as illustrated below: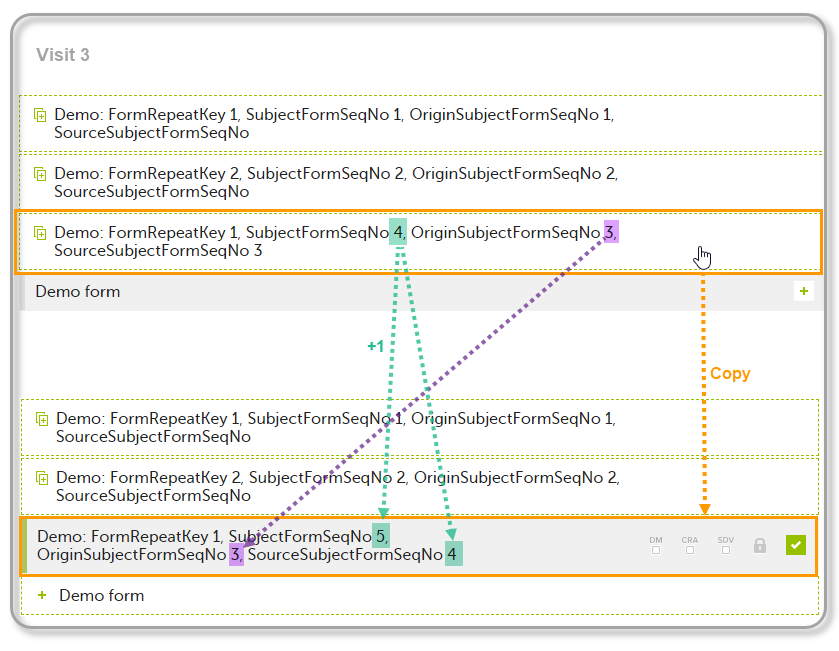 |
These sequence numbers are available to be used within expressions only to get the value of the sequence number for a specific form instance, that is, by using {SubjectFormSeqNo}, {OriginFormSeqNo}, {SourceFormSeqNo}.
In the above example, the form Summary format was configured by using these sequence numbers as below:
Form Repeat Key {FormRepeatKey}, SubjectFormSeqNo {SubjectFormSeqNo}, OriginFormSeqNo {OriginFormSeqNo}, SourceFormSeqNo {SourceFormSeqNo}
Notes!
- Only the FormRepeatKey is used to identify a specific instance of the form in data mapping for data import,as well as in the item identifier used in JavaScript (for example EventID.FormID$ActivityID[FormRepeatKey].ItemID).
- When resetting a form, the sequence numbers are still allocated to it, and the next available ones are used for the new instances.
In the excel export output, these form sequence numbers allows to track, for the form instances that were initiated by copying data from previous events, where the data originates from, as below:
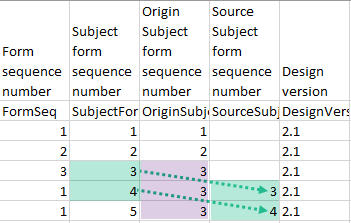
Analyzing the values of the form sequence numbers, only the form instances that were initiated by copying the data from previous visits have values populated in the Source Subject form sequence number column, that is, the last two rows in the example. The data was copied from the form instance having the same Subject form sequence number value, highlighted in green in the above image. The form instance that the data was copied for the first time is identified by the value of the Origin Subject form sequence number, that is, "3" in our example.
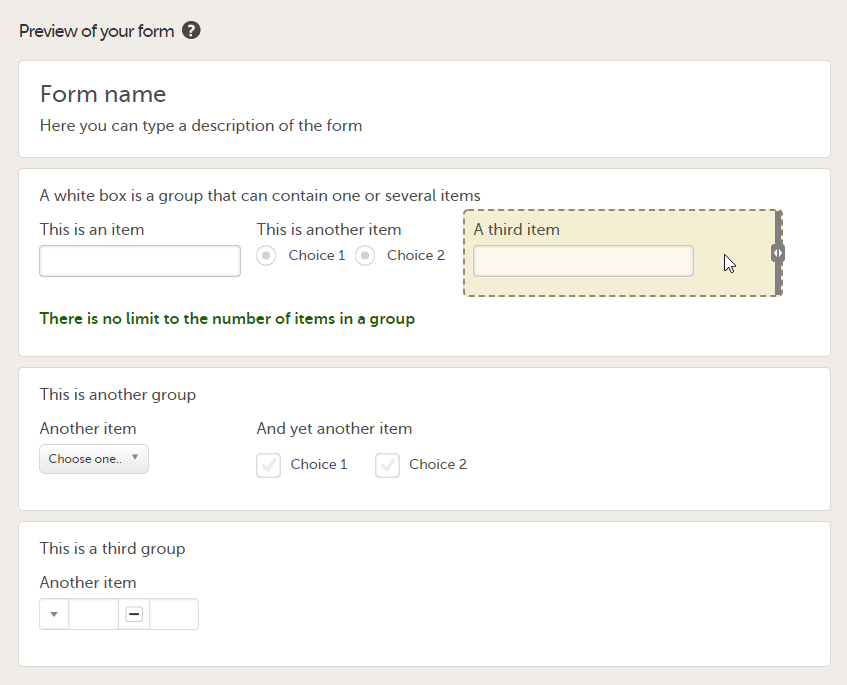
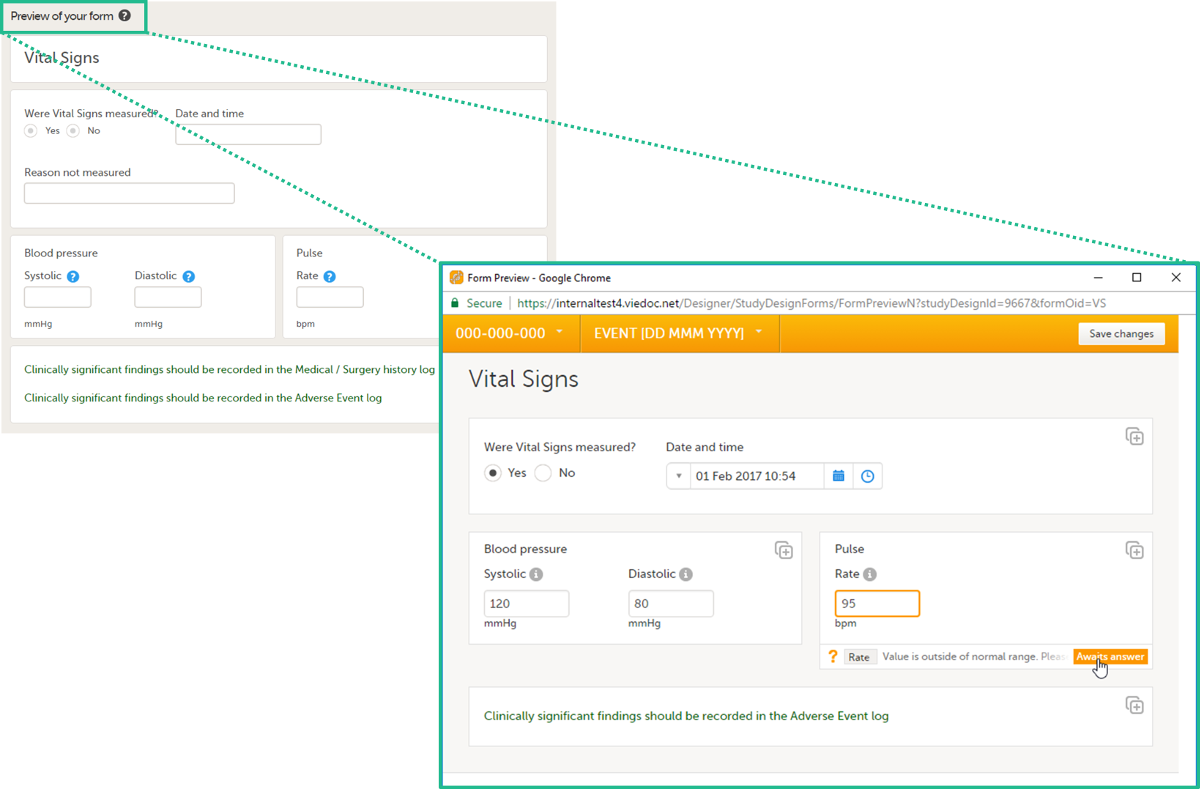
Previewing a form
To view and test a form, select Preview of your form. All changes to the form must be saved before they can be viewed in the preview mode.
A preview of your form will open, displaying the form as it will look in Viedoc Clinic. You can test the items, and possible functions, data checks, dependencies and visibility settings (that depend on items within the same form) by filling in some values. Note that the following settings cannot be tested in the preview mode:
- Visibility settings that depend on items in other forms or events
- Role visibility settings
- Settings that enable edit by certain roles
If the form is translated to other languages, it is possible to also view the translated versions of the form in the preview mode.
To exit the preview mode, select the close button.
Form item types
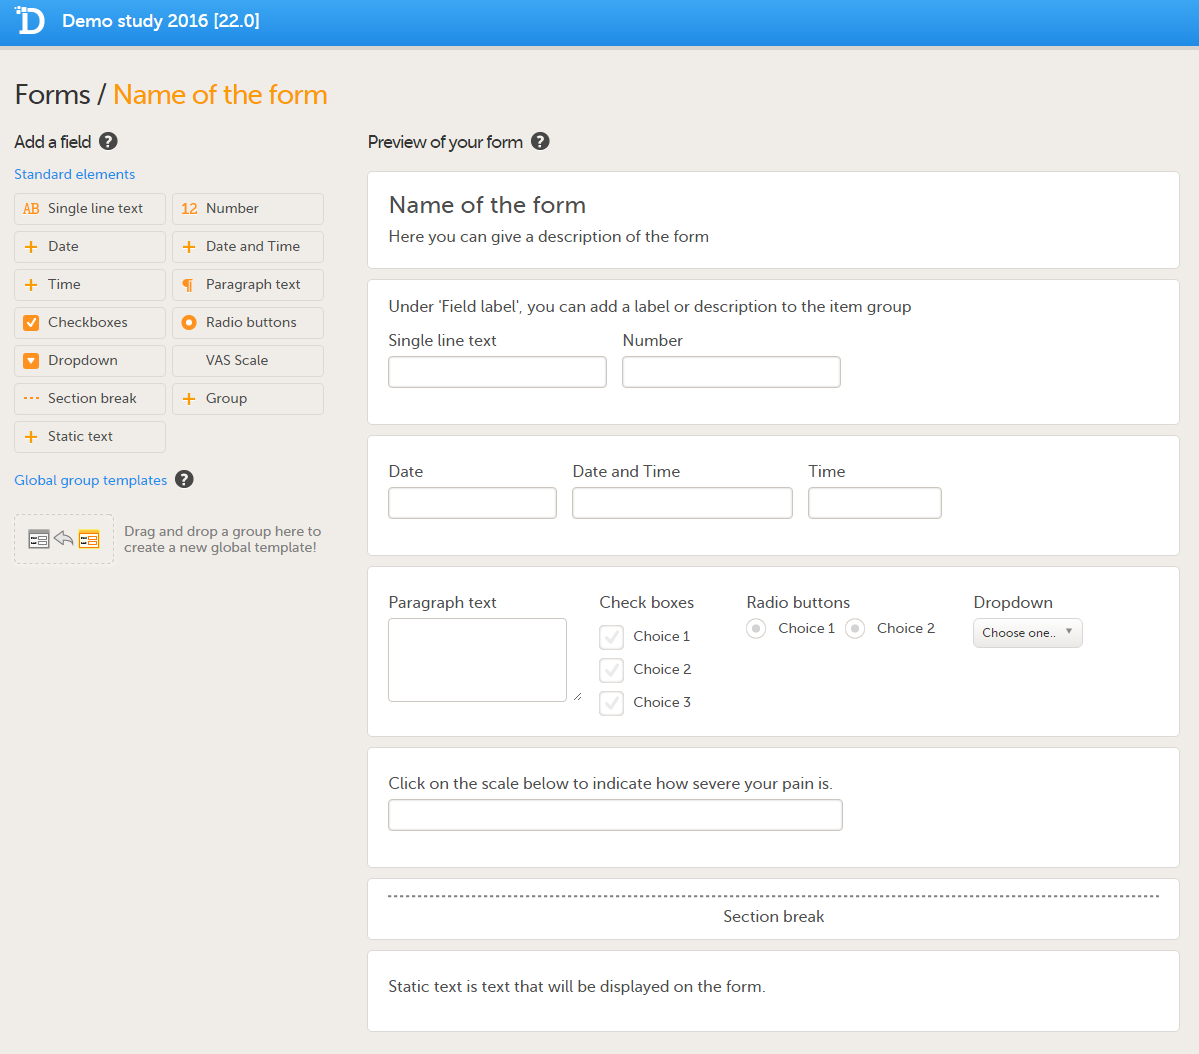
A form can contain different types of items. The available items are shown in the screenshot and described in the table below.
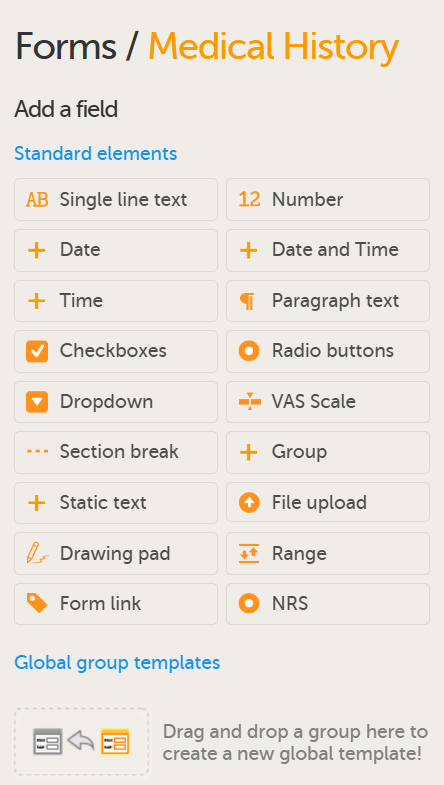
Available form items:
| Item type | Used for |
|---|---|
| Single line text | Capturing free text, that is, string type data. |
| Number | Capturing numeric data. |
| Date | Capturing year, month, and date. |
| Date and time | Capturing year, month, date, hours, and minutes. |
| Time | Capturing hours and minutes. This is structurally different from other date items as it does not include year, month, date, or seconds. |
| Paragraph text | Capturing larger texts. |
| Checkboxes* | Multiple choice questions that allow more than one answer. The Clinic user can select one, more than one, or every option from a list, and a query will fire if no selection is made. |
| Radio buttons* | Multiple-choice questions that allow only one answer. |
| Dropdown list* | Multiple choice questions that allow only one answer, the options are displayed in a dropdown list that allows the selection of a single option. |
| Visual Analog Scale (VAS) | Displaying a scale with slider (in Viedoc Me) and a numeric field (in Viedoc Clinic) for monitoring of pain or the intensity of symptoms. See VAS below for more information. |
| Section break | A divider on the page. |
| Group | Adding an item group to the form. |
| Static text | Displaying text (information) on the form. |
| File upload | Uploading a file to the form, typically images or PDF files, see File upload below. |
| DICOM upload | Uploading a ZIP archive containing Digital Imaging and Communications in Medicine (DICOM) files for de-identification of Protected Health Information (PHI) |
| Drawing pad | Displaying a drawing area (in Viedoc Me) and a File upload item (in Viedoc Clinic) for collecting drawings of symptoms/signature. See Drawing pad below for more information. |
| Range | Entering a range of values. See Range item below for more information. The range values are entered as number items (see above). |
| Form link | Adding links between different forms. See Form link item below for more information. |
| Numeric Rating Scale (NRS) | Capturing responses on a fixed numeric rating scale. See NRS items below for more information. |
Notes!
- The code list item types (checkboxes, radio buttons, numeric rating scales, and dropdown lists), should not contain leading zeros.
- The code list value should not contain a comma (,).
- Code lists with more options than can fit on a single page in the printed PDF will continue over multiple pages. Individual code list items extending over a page break will be split across two pages and will be displayed imperfectly.
- In the printed form PDF, the order number of each code list item is displayed in a numbered badge (for example, #1, #2) next to the item name.
- In the printed form PDF, the Choose one.. option is now included in dropdown code lists.
watchis a reserved word, using this in a form for example labels or IDs, or for the internal study design description as a stand-alone word will result in an exported annotated/blank CRF which does not contain any form elements. However, if using the labelwatchas part of a longer text, or usingWatch(with the initial letter caplitalized), the exported annotated/blank CRF will contain the form elements.
Code list item types guidelines
To ensure compliance with the Clinical Data Interchange Standards Consortium (CDISC), the coded values should follow certain guidelines to ensure consistency and interoperability. These guidelines help maintain the integrity and clarity of the data, making it easier to manage and interpret data across different platforms and systems.
Note!
For the code list items (checkboxes, radio buttons, numeric rating scales, and dropdown lists), it is possible to:
- Leave the same code list labels blank. This should be avoided. Unique code list labels should be used for each of the choices within the same item.
Below are some example code list strategies with explanations, that adhere to these guidelines, as an example, for a radio button for collecting data for 'Smoking Status'.
Numeric values
Zeros can be used, but not negative numbers, as the hyphen may disrupt other systems, for example, SAS.
You can use this strategy if you want the code list item type to remain as a number type format. This is used in cases where you are calculating a score from the coded values.
| Label | Coded Value |
| Never Smoked | 1 |
| Former Smoker | 2 |
| Current Smoker | 3 |
Alphabetic values
Avoid using spaces or special characters. Preferably use all capital letters and fewer than 8 characters. Other systems (including Viedoc in some situations), may add prefixes or suffixes to these coded values in exports or when integrating.
Use this strategy if you would like the format to be as string type format and/or to have a code list that is sensible and easily identifiable.
| Label | Coded Value |
| Never Smoked | A |
| Former Smoker | B |
| Current Smoker | C |
| Label | Coded Value |
| Never Smoked | NEVER |
| Former Smoker | FORMER |
| Current Smoker | CURRENT |
Alphanumeric values
This approach is acceptable, if less favorable. A tip is to use a consistent pattern for the chosen values, and to avoid using some options with only letters, and some options with only numbers. This can cause format issues in exports, as sometimes the values may be handled as numbers and other times as string type. Also avoid using spaces and special characters. The example below is always handled as a string:
| Label | Coded Value |
| Never Smoked | A1 |
| Former Smoker | A2 |
| Current Smoker | A3 |
VAS items
The Visual Analog Scale (VAS) item can be used to measure a characteristic that ranges across a continuum of values, for example a subject's level of pain or the intensity of certain symptoms. By default, the scale runs from 0 to 100.
Depending on in what forms the VAS is used, the scale will function as follows:
- When used for forms in Viedoc Clinic, the VAS will appear as a numeric field, into which a number between 0 and 100 can be filled in.
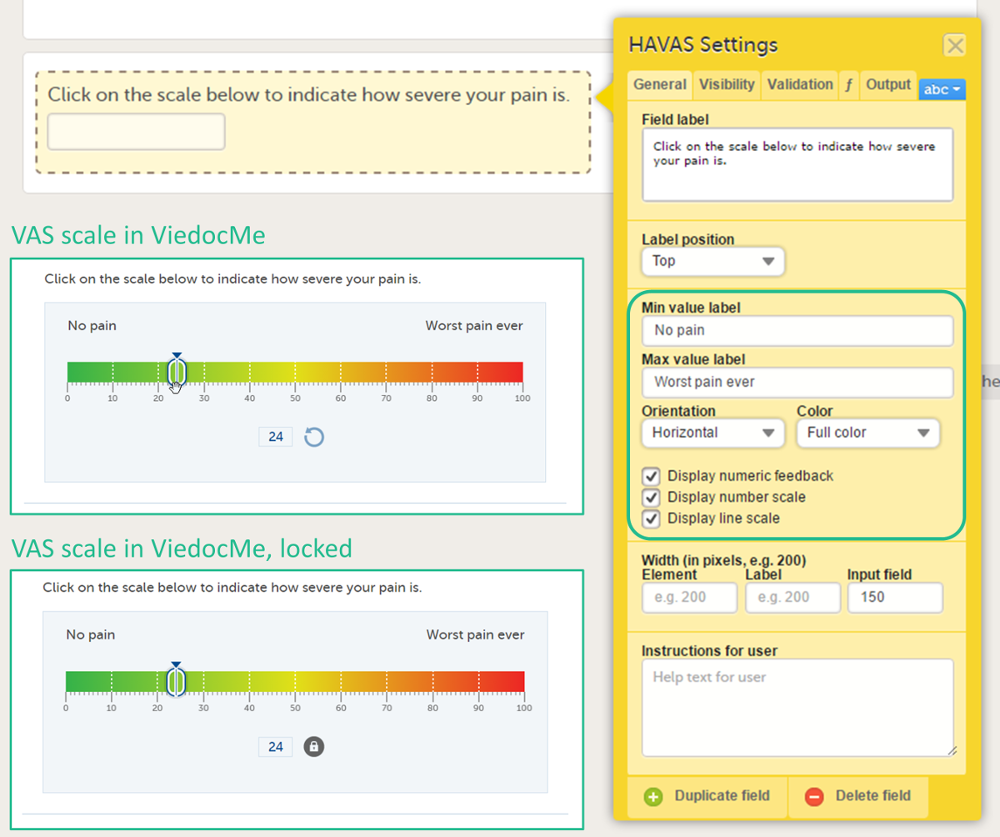
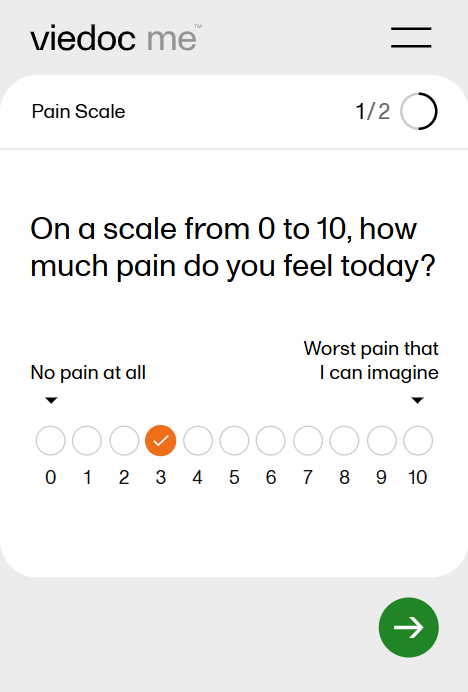
- When used for questionnaires in Viedoc Me, the VAS looks like a scale with a slider, see image. By selecting the scale or by moving the slider, a subject can indicate how severe the pain or symptoms are. Selecting the reset button will remove the slider and clear the numeric value. The slider will reappear when the user selects the scale. Once the Viedoc Me questionnaire has been submitted, the slider is disabled and the reset button is replaced by a lock.
Tip! If you want to ensure that the VAS is displayed at 10 cm, we recommend the use of an iPad Mini for filling out Viedoc Me questionnaires.
File upload
There are two types of File upload items, File upload and Drawing pad (Viedoc Me). See Drawing pad for more information.
The File upload item allows the Clinic user to upload a file to the form. The maximum allowed file size is:
- 2 GB for the Viedoc Clinic forms.
- 512 MB for the Viedoc Me forms.
Upon form save, the file upload information becomes available in the audit trail. The uploaded files are included in the export output, when exporting to Excel, Comma-Separated Values (CSV), PDF or Operational Data Model (ODM). The following information is included: file name, file size in bytes, file hash (MD5).
Uploading password protected zip files is not supported, as Viedoc is not able to scan these files for viruses. You can also not upload executable files. The complete list of unsupported file types can be found in the section Blacklisted file formats in Entering/editing data in the Viedoc Clinic User Guide.
DICOM file upload
The DICOM file upload item allows Clinic users to upload Digital Imaging and Communications in Medicine (DICOM) files for de-identification during upload to the Viedoc system. Clinic users can upload ZIP archives with DICOM files, automatically remove Protected Health Information (PHI) as defined by the Health Insurance Portability and Accountability Act HIPAA and DICOM PS3.15 tags according to the DICOM Standards Committee, and have the option to apply pixel masking and controlled handling of sensitive fields (for example, birthdate).
Notes!
- Non-DICOM files cannot be uploaded. No other parts of the Viedoc Suite (for example Viedoc Me), can use this item type. The maximum allowed file size is 2 GB.
- To ensure that no unprocessed data is uploaded, the entire de-identification process is performed client-side, meaning that the hardware specifications of the computer used can have a noticeable impact on the processing performance.
If a form includes a DICOM upload item, the de-identified files are uploaded as a new ZIP file and are downloadable. Upon saving the form, the file upload information becomes available in the audit trail. Files are not uploaded to Viedoc until completing this final step (the de-identification runs in the browser). The uploaded files are included in the export output, when exporting to Excel, Comma-Separated Values (CSV), PDF or Operational Data Model (ODM). The following information is included: study name, subject key, and the current date and time on your local machine (all part of the file name <studyName><subjectKey><YYYYMMDDTHHMMSSZ>.zip), file size in bytes, file hash (MD5).
For more information about how Clinic users interact with DICOM, see DICOM file upload and de-identification.
Drawing pad
The drawing pad item allows Viedoc Me users to make drawings and submit them to Clinic. The drawings are saved as files and can be downloaded in Clinic just like the File upload items.
Three background options are available when designing the drawing pad:
- Empty: displays a completely empty drawing area where the user can make free drawings.
- Full body: displays a human body viewed from the front and back that the user can draw upon.
- Signature: displays an empty line where the user can draw their signature.
Range item
The Range item allows the Clinic user to define and fill in a range of values. An example is the normal range for a specific laboratory measurement in a Lab form.
When using the Reference Data feature, range items should allow the maximum number of decimal digits (6).
When filling in the form in Viedoc Clinic, the Clinic user can define the range of values by selecting one of the following options:
-– Inclusive in between.<– Less than.≤– Less than or equal to.>– Greater than.≥– Greater than or equal to.=– Equal.
For more information, see Using JavaScript in Viedoc.
Form link item
The form link item allows Clinic users to add links between different events and forms containing related/dependent data. For example, while editing the Prior and Concomitant Medications form, users can link to several registered Medical History events.
Note!
- Form link item is also available for Japanese PMS studies.
- Subject-initiated events (Viedoc Me) do not support form link items.
To create and configure form link items:
| 1 |
Add the form link item to any of the forms included in your study design (see Adding items to a form below). |
| 2 |
Select Form link to open the form link item. 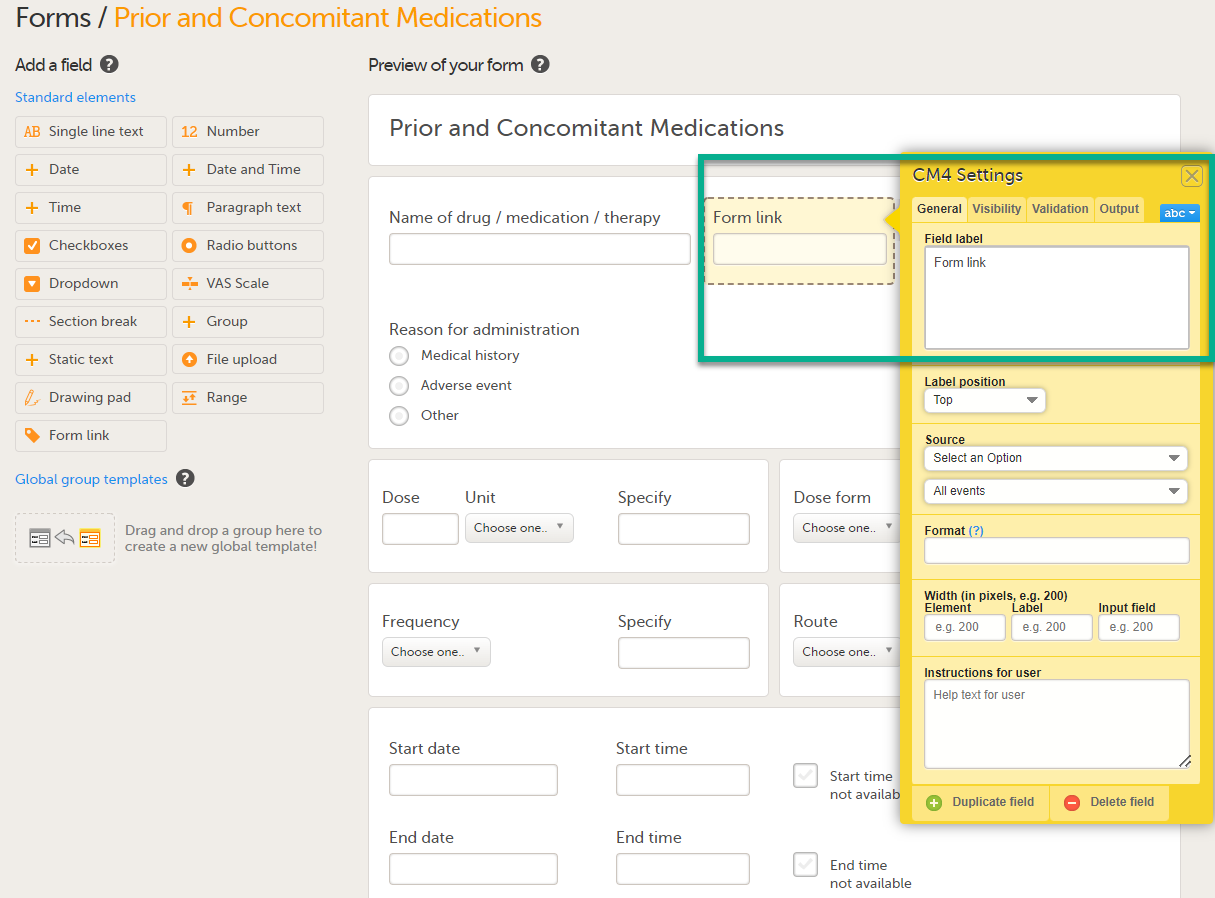
|
| 3 |
In Settings, there are four different tabs, General, Visibility, Validation and Output. See Configuring an item for more information about the tabs. 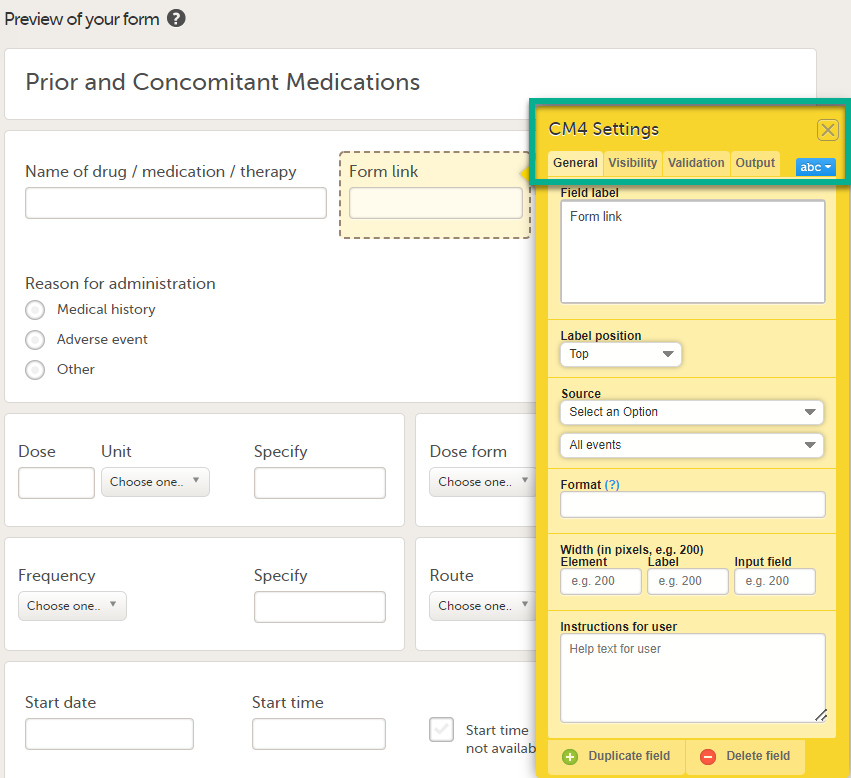
|
| 4 |
Under Source: 1. Select Select an Option to open a dropdown menu and select the form you want to display. In this case Medical History. 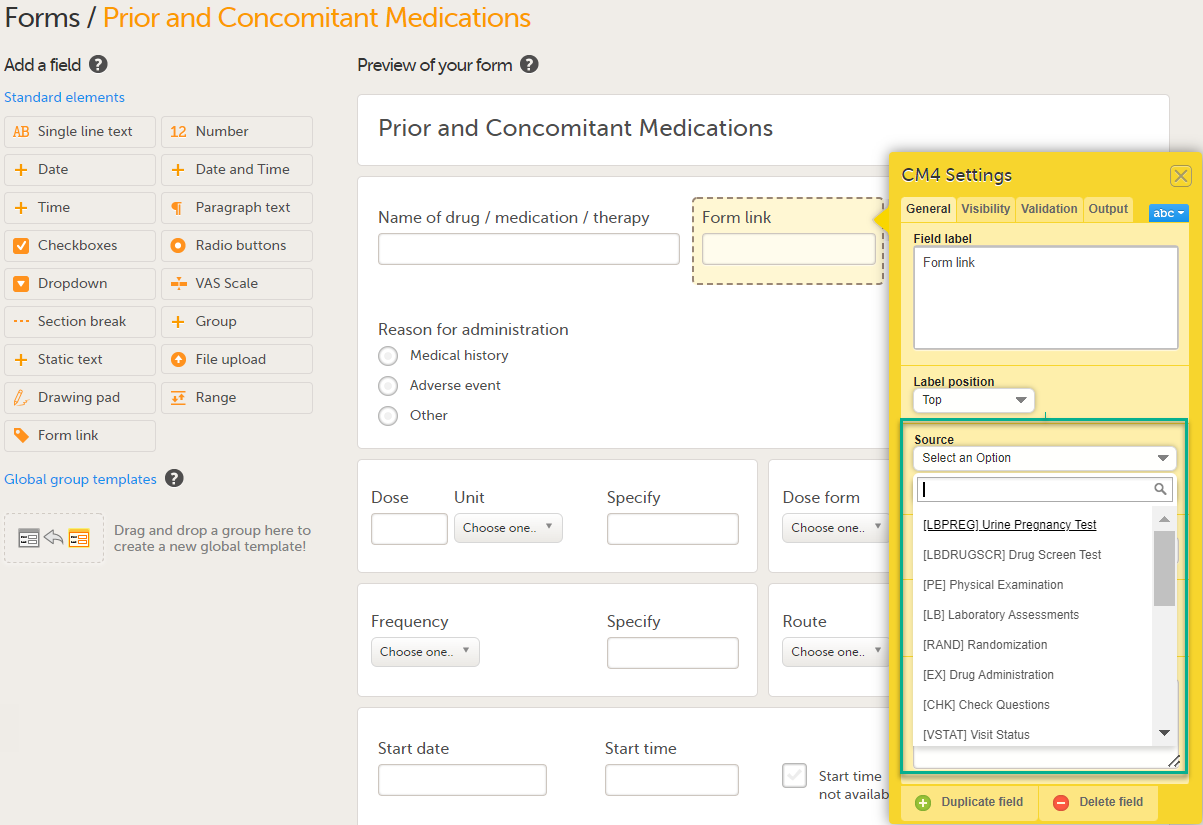
Note! You can either search in the Source field menu or scroll in the dropdown list . 2. Select the Event. In this example the Medical History event is selected in Common events. Note! Depending on your study design, in the Study workflow, you can choose to link the form either to all events with a specific form added (in this case Medical History) or to a single event. In the image below you can see that both the Medical History form in Source and the Medical History Event in Common Events have been added. In this example, all instances of the form type Medical History in Common Events are available for the Clinic user to link to. 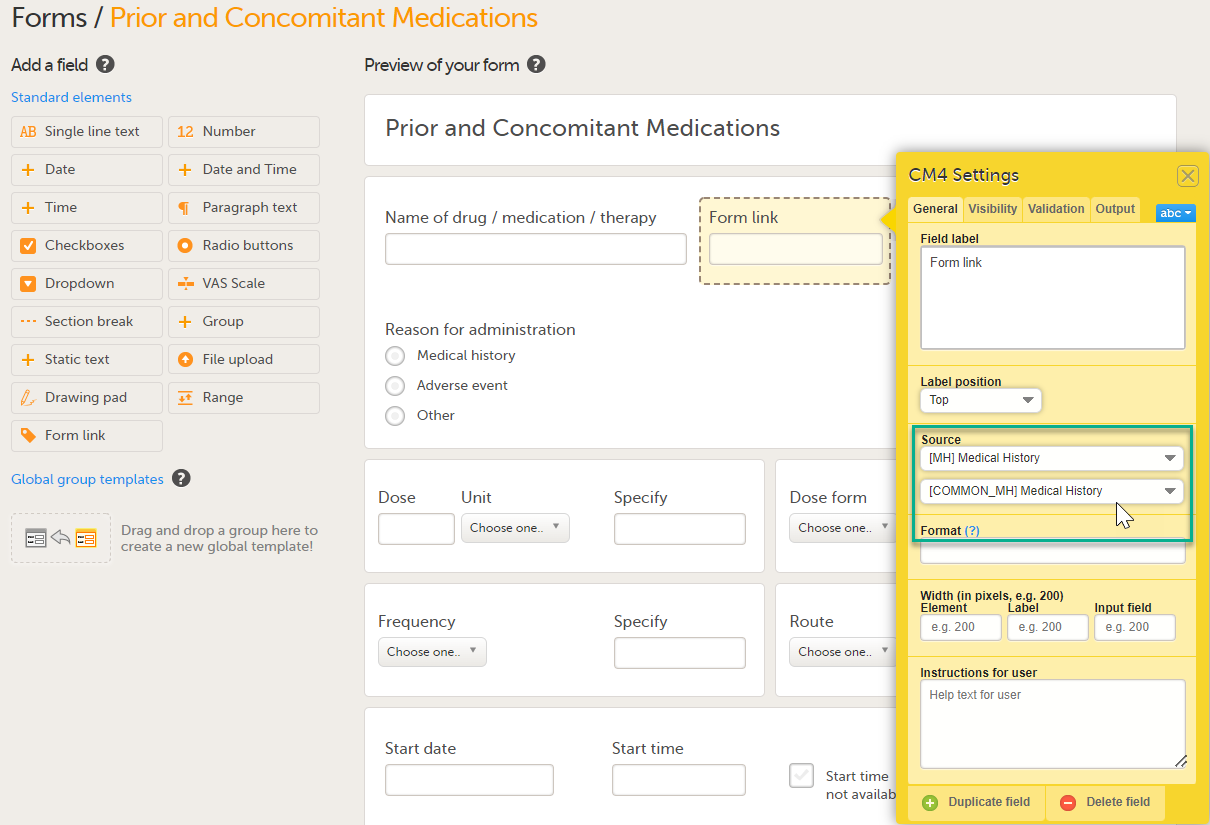
|
| 5 |
Under Format, add the items to be displayed for the available form link(s). For example the Term, Sequence number, and Start, Ongoing and End date for the Medical History. This defines how the form will be displayed in Viedoc Clinic. Tip! Select the question mark for information about summary formats. For more information see Summary format of the form. 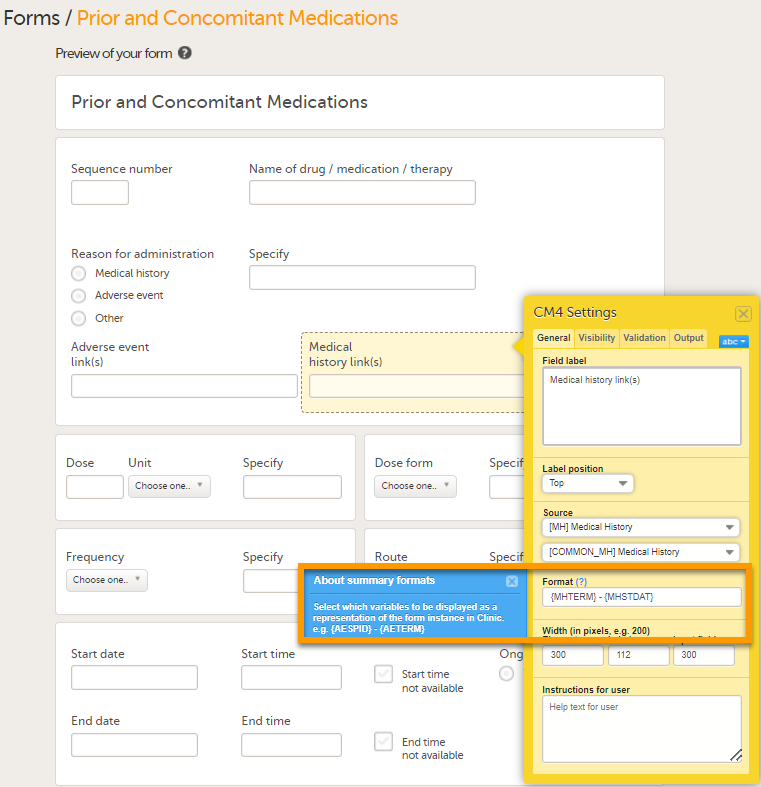
|
| 6 |
Select Save Changes Notes!
|
Form link validation
A design with form link validation errors cannot be published. If validation fails, the design will not be published and an error message is displayed:

The format string must refer to the valid item ID of the source form for the display format to be populated and displayed in Viedoc Clinic.
If there is a circular reference between source forms, for example a form link having source form as the form containing the form link, an error message is displayed which identifies the forms with the issue.
NRS items
The Numeric Rating Scale (NRS) item is designed for collecting ratings on a clearly defined numerical scale (for example 0 to 10):
The NRS item is similar in appearance and behavior to the radio button item type, but it has several special characteristics, including:
- Code list items (radio buttons) have an equal "hit" area regardless of the length of their label. They are equally sized and spaced, and are arranged horizontally in a single row. Vertical layout is not currently supported. You can choose a minimum of 2 and a maximum of 11 code list items for an NRS item.
- Code list labels are always below each button, have the same font type and size, and can have a maximum of 3 characters each.
- Anchor labels can be set for the leftmost and rightmost items in the scale (e.g., "No pain" to "Worst pain") and will always be shown above the buttons. The anchor labels are clearly associated with (point to) the first and last button, and will not go too far into the middle of the scale for readability (text will wrap to the next line).
Additionally,
- Columns specific to the NRS have been added to the complete configuration report.
- NRS details are also included in the exported ODM.
Note! The NRS item type is not supported in the previous (legacy) version of Viedoc Me.
Adding items to a form
To add an item to the form:
- Select one of the standard elements (items) in the left pane of the form window, or
- Drag and drop an element (item) to an existing item group.
 If you select one of the standard elements, the item will appear in the selected group. If no group is selected, the item will appear in a new group on the form.
You can move the items within the group or between groups by dragging and dropping the items.
After having made changes to the form, select Save changes.
You can also create item groups using global item group templates, see Global item group templates below.
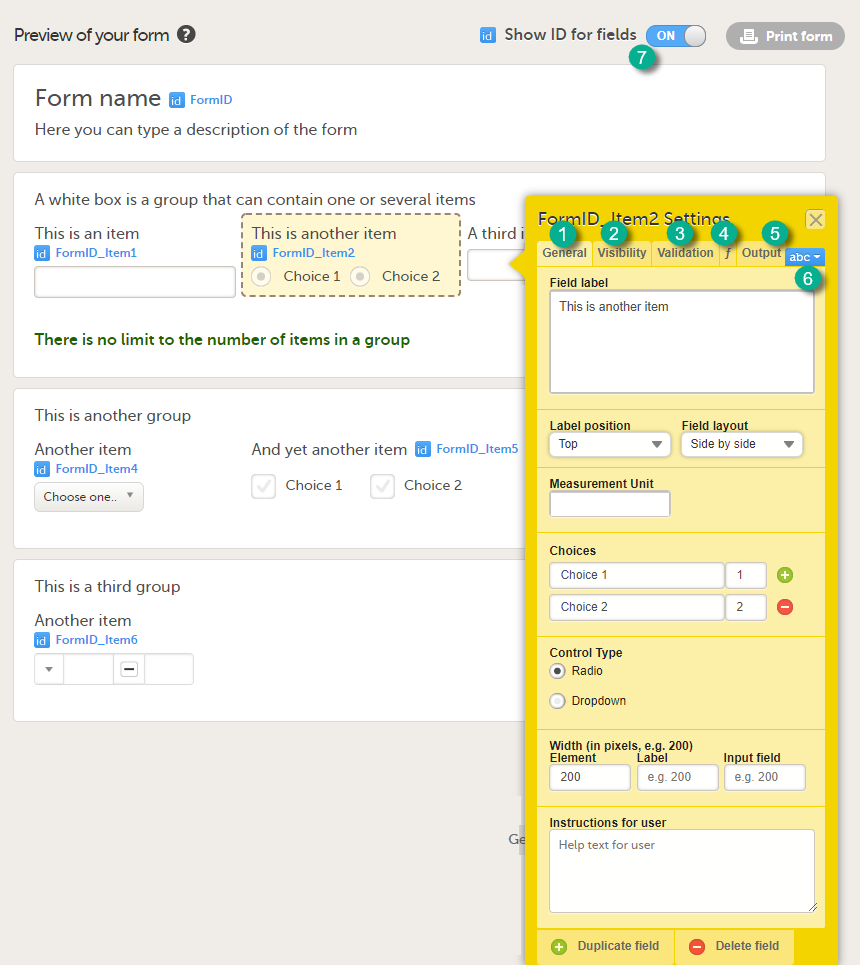
Configuring an item
You can configure an item in the item settings pop-up. Select the yellow box around the item to open the item settings pop-up.
The item settings pop-up has five different tabs:
| Tab | Settings to adjust |
|---|---|
| General (1) | Set the appearance of the item. |
| Visibility (2) |
Set the visibility conditions of the item. Note! If you set an item to hidden for certain clinic role(s), these role(s) cannot see the form PDF. The PDF remains invisible to these roles even after the hidden item is removed from the form in a new revision. This is because the form PDF includes a full audit trail of all items that ever existed in the form revisions, even items hidden to certain roles. For that reason, the form PDF will not be displayed to any of these roles. Important! Do not use item visibility settings for blinded data. Blinded data should be collected in a separate form, for example a randomization form. |
| Validation (3) | Set the ID of the item and add data checks that validate the item. |
| Function (f) (4) | Set functions that calculate the item, or set default values. |
| Output (5) | Set the Output field ID (OID) and Output Field Label. This is useful in case you would like the item to have another ID or label in the export than the ID that is used within Viedoc. See also the Learning section Outputs and validation. |
 In the sections below, the settings that can be made in these five tabs are described in more detail.
You can change the lay-out of any text you enter. Select abc (6) to open a menu in which you can control font style (normal, bold, italic, underline, superscript or subscript), font colour (black, grey, red, green) and font size (small, normal, large, huge). Mark the text and select the respective icon.
Our font sizes correspond to these respective pixels and points.
| Size | Pixel | Point |
|---|---|---|
| Small | 16px or 18px | 12.5pt or 13.5pt |
| Normal | 25px | 18.75pt |
| Large | 28px | 21pt |
| Huge | 32px | 24pt |
Tip! If you set the Show ID for fields switch (7) to ON, the field IDs of the form and all items on it will be displayed in blue text.
Configuring form item settings
Item settings: General tab
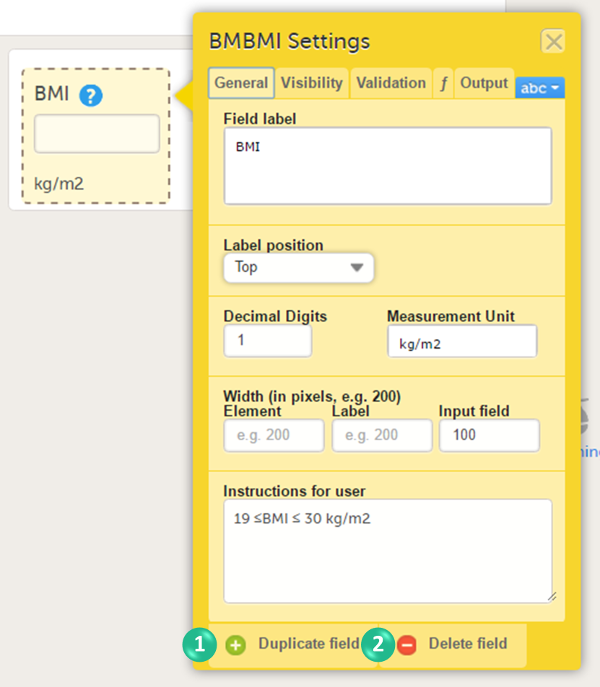
On the General tab, you can adjust the appearance of the item.

You can adjust the following settings:
1. Field label: a label that describes the item. The field label will be used as the item label when exporting data, unless an Output Field ID or Output Field Label is defined on the Output tab.
2. Label position: the position of the label relative to the input field. The default, and recommended, position is 'top' (above the label).
3. Decimal digits: For numeric items only, the number of allowed decimals.
4. Measurement unit: a measurement unit for the item. The measurement unit will be displayed below the input field.
Note! If you enter a measurement unit for an item in a form that is used in Viedoc Me it is not displayed in Viedoc Me.
To display the measurement unit in Viedoc Me, incorporate the measurement unit in the question text or use a static text to display the unit.
5. Width of:
- Element: the size of the outer element box (whole item) in pixels.
- Label: the size of the field label in pixels.
- Input field: the size of the input field in pixels.
6. Instructions for user: free text, for example a more detailed description of the item. When text is entered here, an i (info) icon will be displayed beside the field label. Hovering over this icon with the mouse will display the text.
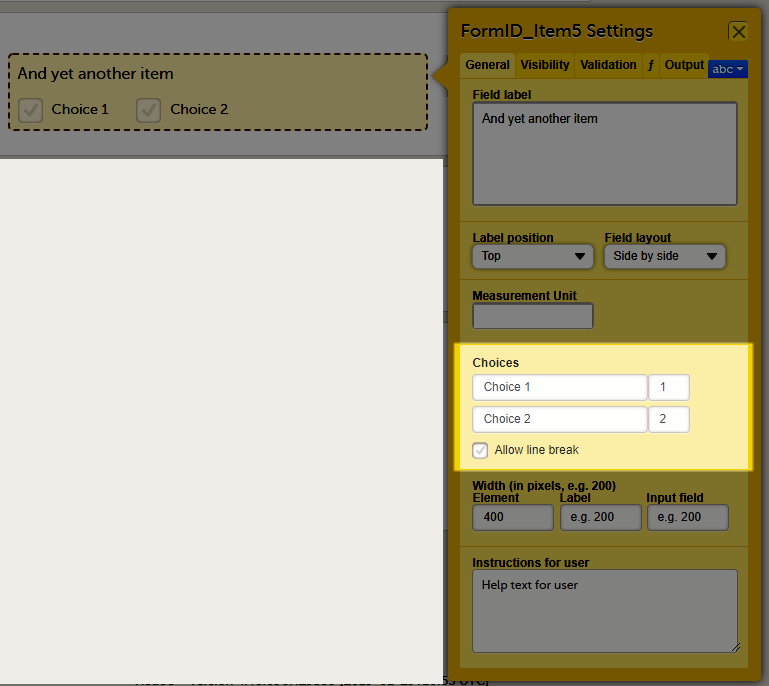
General settings for checkbox items
For checkboxes, you can enter the text for the choice labels in the Choices field. If the text for the choice labels is long, it will be truncated when the form is displayed in Viedoc Clinic. You can avoid truncation by activating the Allow line break checkbox. When this checkbox is activated, the checkbox label respects the width of the item and the text will continue on the next line.
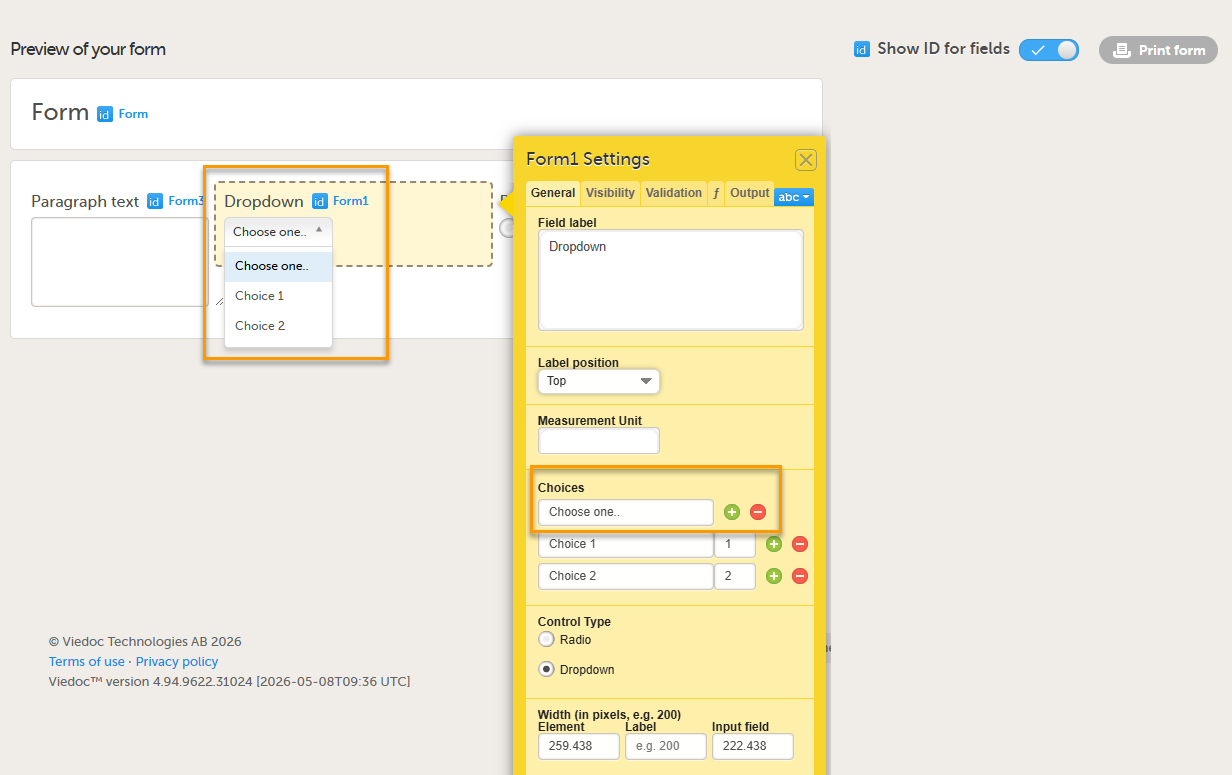
Note! When a dropdown item is added to a form, a Choose one.. option is automatically included as the first entry in the dropdown list:
The Allow line break checkbox is by default activated for studies starting after Viedoc release 4.48 in February 2019, and by default inactivated for studies started before Viedoc release 4.48 in February 2019.
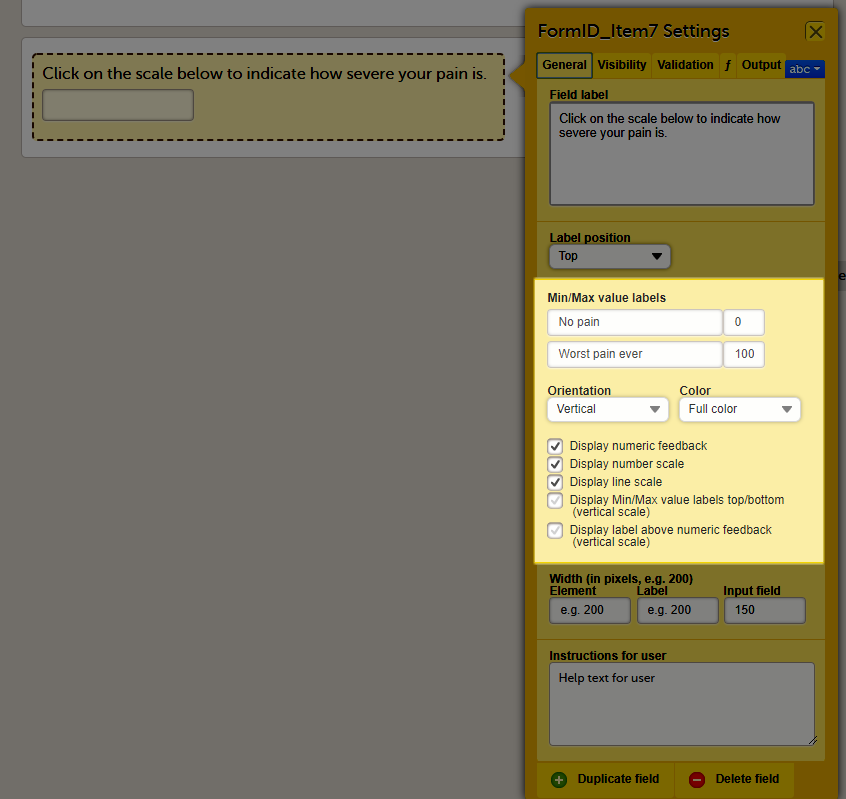
General settings for VAS
You can adjust the following settings of the VAS:
- Min value label: Enter a label that is displayed at the minimum value of the VAS.
- Max value label: Enter a label that is displayed at the maximum value of the VAS.
- Orientation: Select the orientation of the scale: horizontal or vertical.
- Color: Select whether the scale should be displayed in full color or gray-scale.
- Display numeric feedback: Display a number below the scale that indicates the position of the slider.
- Display number scale: Display a numeric scale.
- Display line scale: Display tick marks on the scale.
- Display Min/Max value labels top/bottom (vertical scale)*: Display the minimum and maximum values on the bottom and top of the scale. This option is only available for the vertical orientation.
- Display label above numeric feedback (vertical scale)*: Configure a label that will be displayed above the numeric feedback. This option is only available for the vertical orientation and only if the Display numeric feedback option was checked.
* These settings should be used when you are using the VAS for the EQ5D questionnaire.
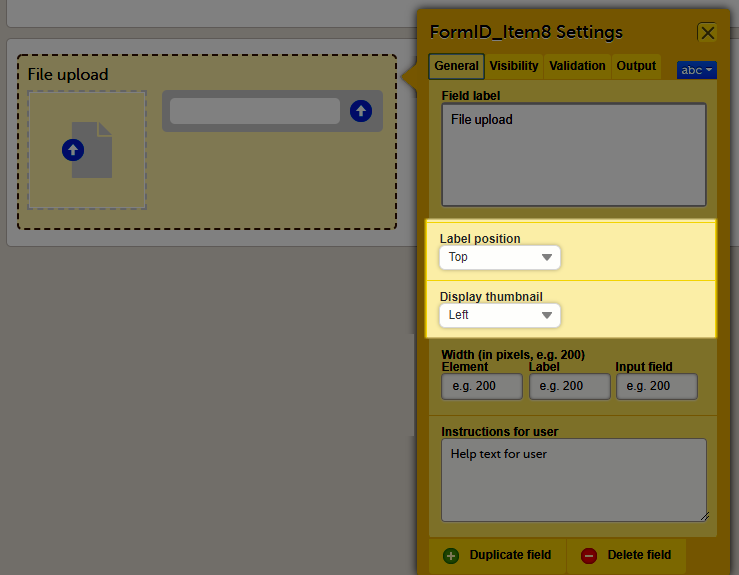
General settings for File Upload
For file upload, you can select if you want a thumbnail to be displayed.
On the General tab, select one of the following options from the Display thumbnail dropdown list:
- Left: the thumbnail will be displayed on the left side of the file upload field.
- Below: the thumbnail will be displayed below the file upload field.
- None: no thumbnail will be displayed.
Notes!
- The thumbnail is only supported for jpeg, gif and png files. If you select to show a thumbnail for other file types, it will only show the file extension.
- The use of thumbnails will increase the amount of stored data. The total amount of data used by a study can be monitored in Viedoc Admin on the Studies overview page and on the Study page.
Form item settings: Visibility tab
On the Visibility tab, you can adjust the visibility conditions of the item.

You can set the following conditions (see image):
1. Which roles can view the item? Select Show or Hide, and select:
- All roles, to show or hide the item to/from all roles.
- Selected roles, to show or hide the item to/from a selection of roles. Select the roles to/from which the item should be shown or hidden.
2. When is the item shown? Select Show or Hide and select when the item should be shown or hidden:
- always
- based on a simple condition: dependency on only one item on the same form, see below.
- based on an advanced condition: dependencies on other forms or events, see below.
Notes!
- An item set as hide always will be populated with data as a result of function execution only if it is present in an non-hidden item group. An item group becomes hidden if all the items in the group are set as hidden or if the item group itself is set to hidden.
- An item set as hide always will be included in the data export and in the audit trail. Setting items to hide always should therefore only be done to remove items during a revision, if you want to keep the data, or in case there is a function in another item depending on it.
3. Who can edit the item? Select Enable edit for:
- All roles, so that any role that can view the item also can edit the item.
- Selected roles, so that only selected roles can edit the item. Select the roles that shall be able to edit the item.
Simple visibility conditions
To show or hide an item based on a simple condition that depends on only one item in the same form, follow the steps below.
| 1 | Select on simple condition evaluates true. |
| 2 | Select the item on which the visibility condition should be based. |
| 3 | Select whether this item should be equal to (is) or not equal to (is not) a certain value, for the condition to be true. |
| 4 | Enter the value on which the visibility condition should be based. |
Advanced visibility conditions
To show or hide an item based on an advanced condition, which allows multiple dependencies, follow the steps below.
| 1 | Select on advanced condition evaluates true. |
| 2 | Use JavaScript to define the condition. For more information about JavaScript, see the Learning lesson Using JavaScript in Viedoc. |
Note! Do not use Hide to all roles! If an item is hidden to all roles, the data stored in the item will be cleared upon saving the form. If you wish to store values in a field that should be hidden for all users, select Hide and always as described under nr 2 in the image.
Form item settings: Validation tab
On the Validation tab, you can set the ID of the item and add data checks that validate the data entered into the input field.
You can set the following conditions (see image):
1. You can change the item ID. The item ID is the ID that will be used to identify the item in the database and in the export output. It is also used when referring to the item in JavaScript expressions.
The item ID will be used as the item label when exporting data, unless an Output Field ID or Output Field Label is defined on the Output tab, see Item settings - Output.
Note! The item ID should not be changed from one study design version to the next in a production study. If you change the ID of an item, data checks, role visibility conditions and other features that identify the item based on the item ID will stop working. If you need to change an ID after the study is set to production, change its Output Field ID under the output tab.
If the checkbox Required field is selected, then the following happens in Clinic:
- If the item is left empty, a system check fires when the form is saved. A warning message is displayed stating that the field is required.
- The "Confirm field as missing" action is visible. Note that this action only appears if Required field is selected.
2. You can enter system checks and/or data checks.
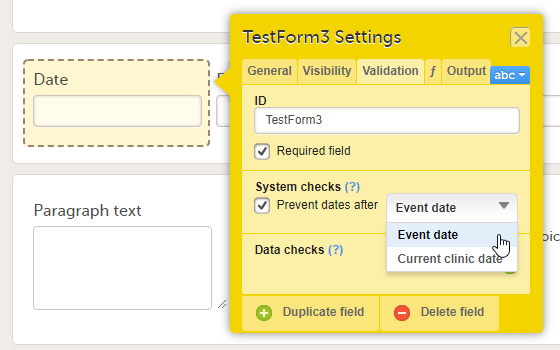
System checks are checks pre-defined by the system. System checks are for example available for Date and Date and Time items, in which they prevent the entry of dates in the future. To activate this system check, select the checkbox Prevent dates after, and then select Event date or Current clinic date.
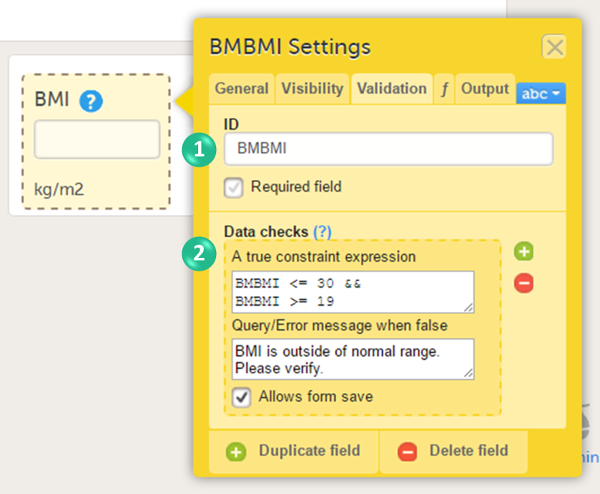
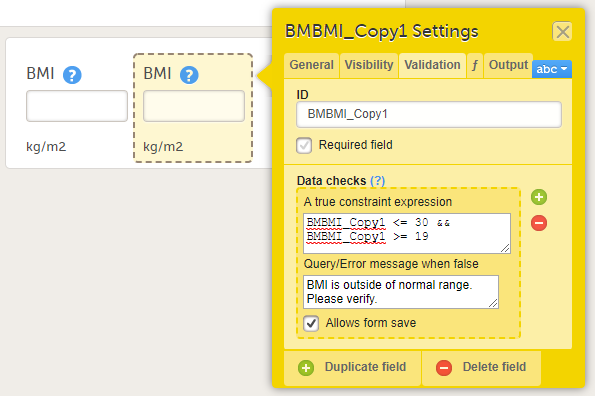
Data checks are checks that can be defined by the user. To define a data check, follow the steps below:
| 1 | Select the + icon. |
| 2 | In the field A true constraint expression, enter the condition on which you would like the data entered in the input field to be accepted, without triggering a query or error message. Use JavaScript to define the condition. For more information about JavaScript, see Using JavaScript in Viedoc. |
| 3 | In the field Query/Error message when false, enter the error message that should be displayed when data are entered that are not fulfilling the conditions defined in step 1. |
| 4 | By default, the form can be saved even if data are entered that are triggering a query or error message. If you would like to disable form save, clear the checkbox Allows form save. |
You can enter multiple data checks for the same item.
To remove a data check, select the - icon.
Validation settings for Date and Date and Time items
For the Date and Date and Time items, there is a system check available that allows preventing the Clinic user from entering future dates when filling in the form in Viedoc Clinic. To set this, activate the checkbox Prevent dates after in the System checks field and select:
- Event date
- Current clinic date
Validation settings for Single line text and Paragraph text items
For the Single line text and Paragraph text items, there is a system check available that allows setting a minimum required and/or a maximum allowed length of the entry into the field in Viedoc Clinic, in number of characters:
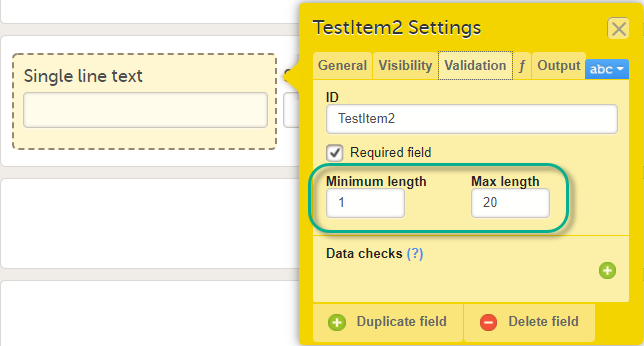
Please note that the minimum/maximum length settings are independent of the Required field settings, i.e. can be used even if the Required field is unchecked. This is useful if you want to define a text item that is optional to be entered in Viedoc Clinic. However, if something is entered in the optional text field you want to make sure it is, for example, at least 2 characters, or perhaps at most 10 characters long.
Note! Max character length is 12,000. Exceeding the max character length results in truncation of the PDF in export.
Validation settings for File upload
On the Validation tab, you can enter data checks that validate the data entered into the input field. The properties available for the file upload item are:
ItemID.FileName- the name of the uploaded fileItemID.FileSize- the size of the uploaded file in bytesItemID.FileHash- the MD5 hash of the uploaded file
See also Using JavaScript in Viedoc for more details.
Validation settings for Range item
On the Validation tab, you can enter data checks that validate the data entered into the input field. The properties available for the range item are:
RangeObject.Lower- the lower limit of the range (number)RangeObject.LowerFormat- the number of decimals used for the lower limit of the range (number)RangeObject.Upper- the upper limit of the range (number)RangeObject.UpperFormat- the number of decimals used for the upper limit of the range (number)RangeObject.Comparator- the comparator used to define the range (string). The available comparators are:InclusiveInBetween- defines a range beween a lower and an upper defined limit.LessThanLessThanOrEqualToGreaterThanGreaterThanOrEqualToEqualTo
Note! When using the comparator in functions, write it between quotes: "LessThan". It is case sensitive, so type it exactly as stated here.
RangeObject.StringValue- the string representation of the respective range item (string)
The functions available to be used in conjunction with the range item, including the functions that can be used to obtain RangeObject, are described in Using JavaScript in Viedoc.
Form item settings: Function (f) tab
On the Function tab, you can set functions that calculate the item, or set a default value that will be displayed as a default in the input field.

There are two options:
1. Function. If you define a function, then the field will become read-only for the site user. As an example, BMI (as shown in the image) will automatically be calculated from the height (BMHGHT) and weight (BMWGHT) entered by the user. This value will be shown in the BMI field, and will not be editable by the user.
To set a function, select Function. In the field Function logic (JavaScript), enter the function using JavaScript. For more information about expressions that can be used, select the ? icon. A pop-up will open that displays information on how to refer to items from other forms, items from specific events or activities, context variables and checkboxes.
2. Default value. A default value will be displayed in the field the first time the form is opened and the item becomes visible, but the value will still be editable for the site user.
To set a default value, select Default value. In the field Default Value or JavaScript expression, enter the value you would like to set as default, or enter a JavaScript expression.
For more information about JavaScript, see Using JavaScript in Viedoc.
Note! Functions and default values are not supported in Viedoc Me forms.
Form item settings: Output tab
On the Output tab, you can set the Output field ID (OID, 1) and Output Field Label (2). See also the Learning section Outputs and validation.
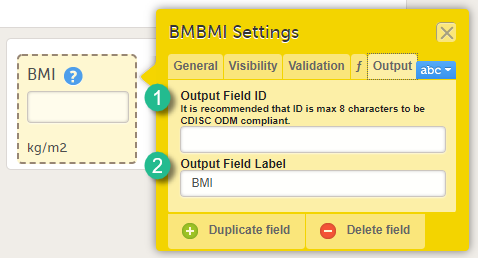
Entering an Output Field ID and Output Field Label is useful in case you would like the item to have another ID or label in the export than the ID and label that are used within Viedoc. Changing the Output ID will keep the variable correct in the system so that everything in the study design still works computationally, but the export shows the ID you want it to have (see the image below).
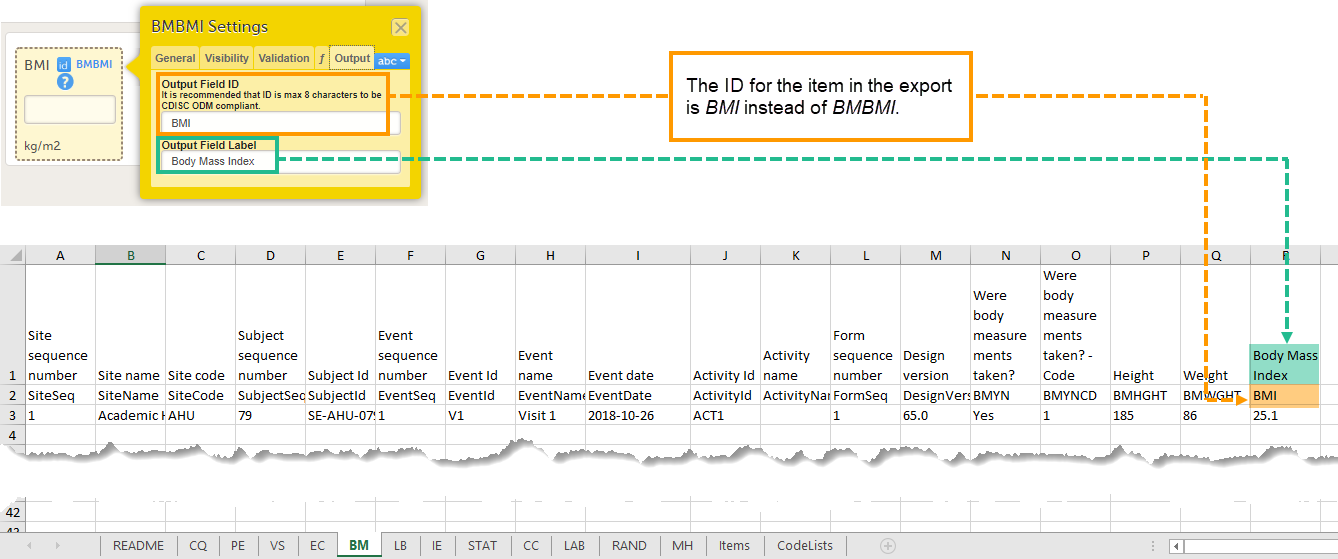
Changing the Output ID in the export might also be useful when importing data into legacy systems, for example SAS, that cannot handle special characters, such as < or >. The Output field label can then be changed to "less than" and the label can be imported to SAS without problems.
Repeating item groups
Using repeating item groups allows Viedoc Clinic users to add multiple instances of the same group of items within a form when entering data. This is useful when the number of repeated observations varies, such as multiple measurements or multiple analytes in a single form.
Note! If repeating item groups are included in the study design, the repeating item group structure defined in the study design is preserved when the design is imported into another study. This is handled automatically in Viedoc Admin when the study design is assigned.
Repeating item groups included in ODM files are supported during the import. The repeating item group structure defined in the study design is preserved when the ODM file is imported.
The minimum number of item groups set in the study design is visible in Viedoc Clinic. Additional item groups can be added dynamically up to the maximum number of occurrences.
Notes!
- Repeating item groups differ from common event forms, which repeat at the form level. Repeating item groups repeat only a group of items within a single form.
- Repeating item groups can not be used inside a form included in a subject-initiated event, a randomization form or an allocation form.
- Forms in Viedoc Me do not support repeating item groups.
- Form link items cannot be mapped to an item in a repeating item group.
- In the Preview of your form view, repeating item groups are shown as standard item groups, individual recurrences are not shown.
- In Global Design Settings, repeating item groups are not supported when creating a medical coding scope.
- When re-importing data into repeating item groups with a dynamic structure, to overwrite a previously imported record, and you include only a specific occurrence, all subsequent occurrences are deleted. For more information, see Re-importing data into repeating item groups
Additionally, columns specific to the repeating item group have been added to the complete configuration report in Excel format. For more information, see Configuration report.
Adding a repeating item group
To create and configure a repeating item group:
| 1 |
Open the Forms page and select the form and the item group you want to set as a repeating item group. In the Item Settings pop-up, on the General tab, select Allow group to repeat and enter the minimum and maximum number of group repeat occurrences you require: 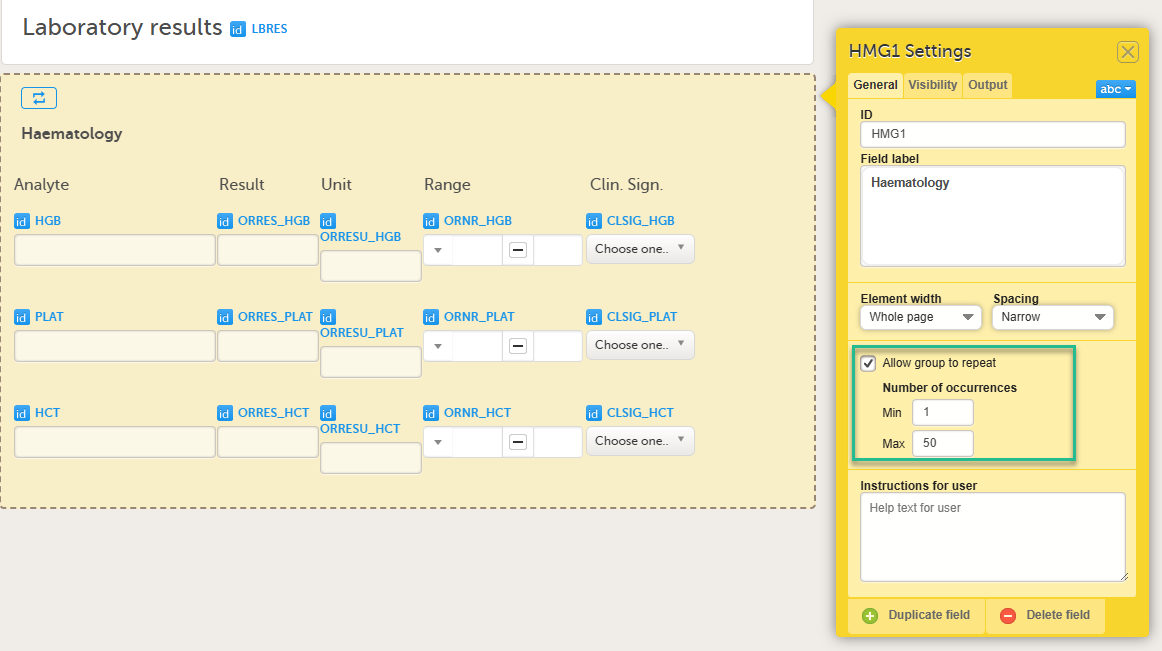
Notes!
|
|
| 2 |
On the General tab, enter the item group name in the ID field, ensuring it is unique, and select Save. The Repeating item group icon is shown on the form:
You can edit the item group ID when:
The item group ID is read-only when the item group is in an existing design revision. |
Note! When writing JavaScript expressions for referencing to items inside a repeating item group from another item group, for visibility conditions and summary format, special syntax is required to reference the individual data points. For more information about JavaScript, see Using JavaScript in Viedoc.
Alerts and repeating item groups
You can also set up alerts for repeating item groups that are issued in defined conditions (for example, in case of a lab result being filled in for any of the repeating items).
Setting up the alerts is done in Viedoc Designer, under Study Settings > Alerts. For more information about alerts and trackers, see Alerts.
Notes! Alerts are evaluated at the form level, not at the level of individual repeating item group instances. When a form contains repeating item groups, alert conditions must therefore be written at the form level.
If you want to trigger an alert when any instance of a repeating item group meets a condition, the condition must list all relevant repeating instances.
If you want to trigger an alert for a specific instance of a repeating item group, for example, a second instance of a repeating item group has been filled in, you must write a separate condition for that instance.
Duplicating and deleting items
To duplicate an item, select the item and select Duplicate field in the item settings pop-up (number 1 in the image).
To delete an item, select the item and select Delete field in the item settings pop-up (number 2 in the image).
When an item is duplicated, the duplicate item contains all the data checks that are configured for the original item. The system will automatically create an item ID for the duplicate item in the following format: ItemID_Copy1, see image.
Templates
Global form templates
In addition to creating a new form from scratch, it is also possible to create a form using a global template.
Creating a form using a global template
To create a form using a global template, select the arrow icon beside a global template (nr 1 in the image) to open the global template. You can now edit and save the form. Any changes to the form will not affect the global template.
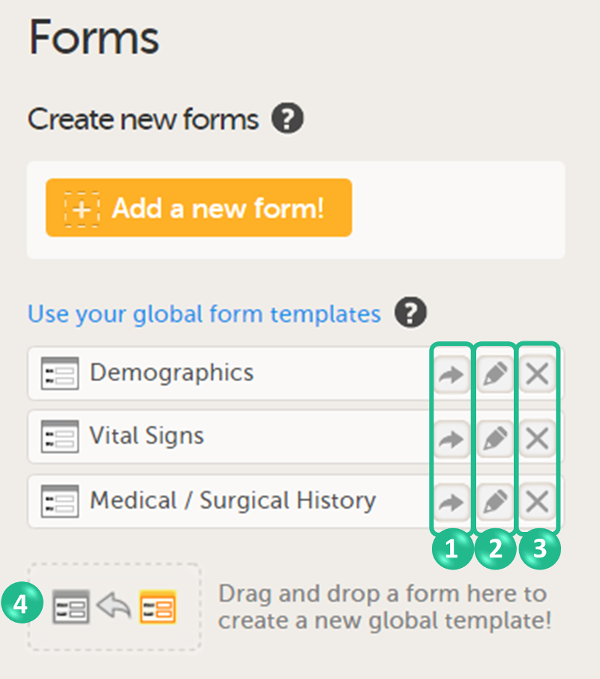
Creating a global template
You can create a global template from one of the forms that are used in the design by dragging and dropping the form to the field Drag and drop a form here to create a new global template! (nr 4 in the image).
The form will appear in the list of global templates, and can be used or edited as described earlier. All item settings made in the form will be preserved when the form is added to the global templates.
The global templates are available for all studies within your organization, and for all users within your organization that have access to Designer.
Editing a global template
You can edit a global template by selecting the edit (pen) icon beside the global template (nr 2 in the image).
The global template will open and you can edit the template. This will not affect the original form that has been used as the basis of the template, or any other form instances that are created based on the form template.
Deleting a global template
You can delete a global template by selecting the delete (X) icon beside the global template (nr 3 in the image). A pop-up will appear. Select Delete to confirm deleting the global template, or select Cancel to cancel.
Global item group templates
You can also create item groups using global item group templates. Global group templates are available on the Forms page.
The global item group templates are available for all studies within your organization, and for all users within your organization that have access to Designer.
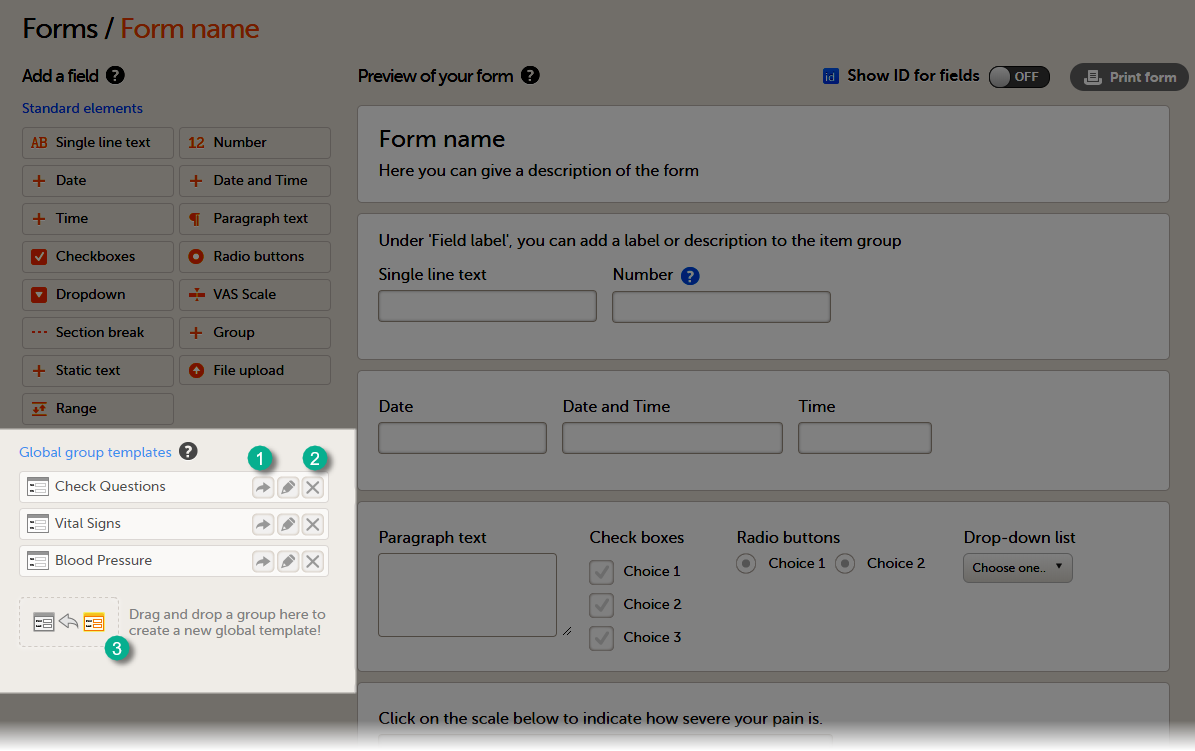 To add a global item group template to your form, select the arrow icon beside a global template (1). You can now edit the item group. Any changes to the item group will not affect the global item group template.
To delete a global item group template, select the delete (X) icon (2) beside the global template. A pop-up will appear. Select Delete to confirm deleting the global template, or select Cancel to cancel.
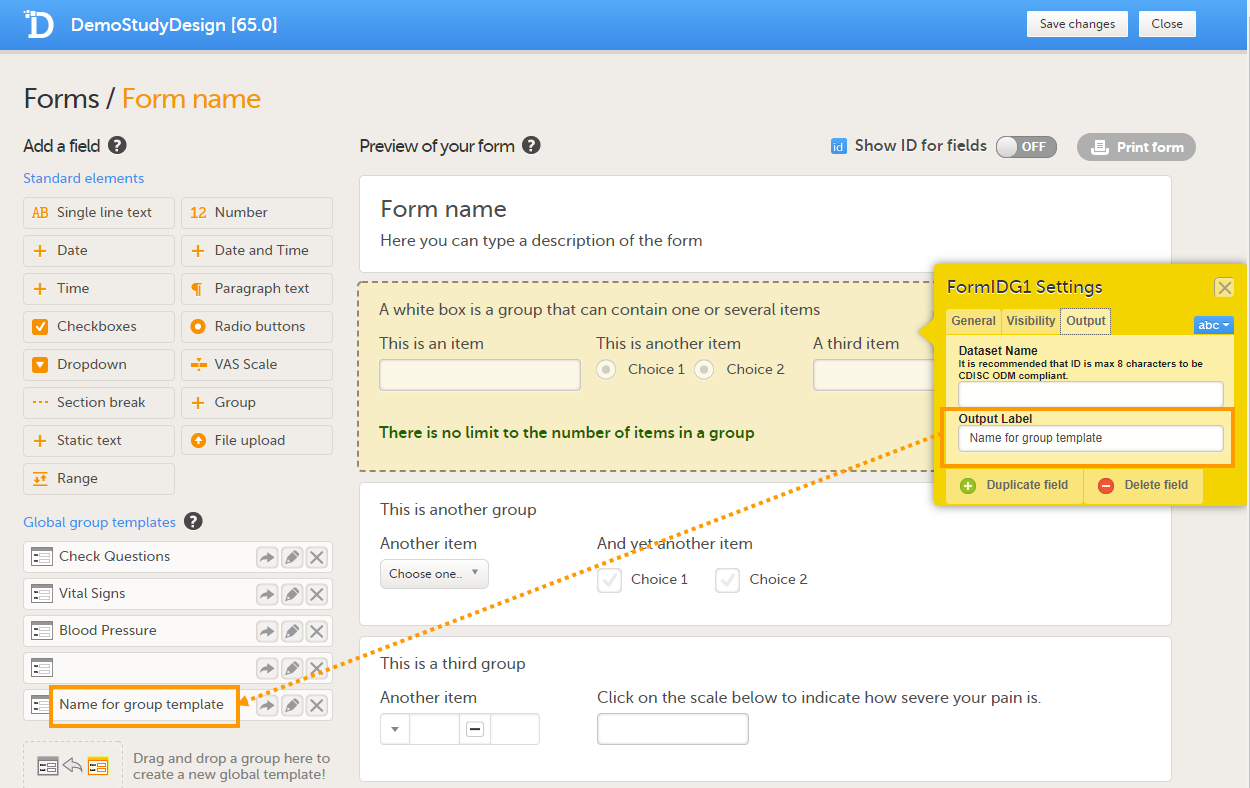
To create a global group template, drag and drop an item group to the field Drag and drop a group here to create a new global template! (3)
The pen icon between the arrow and the cross is for renaming the group template. But this did not work at the time of writing this Learning. Add later once the function is added to Viedoc:
To rename a global item group template, select the pen icon (2) and.
This functionality currently opens the form to edit the form (July 2025).
Note! When an item group is added to the Global group templates, the item group ID automatically assigned by the system is not retained. To assign a name to the new item group template, the name has to be entered in the Output Label field on the Output tab. If no name is entered in the Output Label field, the name of the item group template will remain blank, see image below.
Form examples
This section gives two examples of forms that are Clinical Data Acquisition Standards Harmonization (CDASH) compliant.
Vital Signs form
The following image provides an example of a Vital Signs form created in Viedoc Designer.
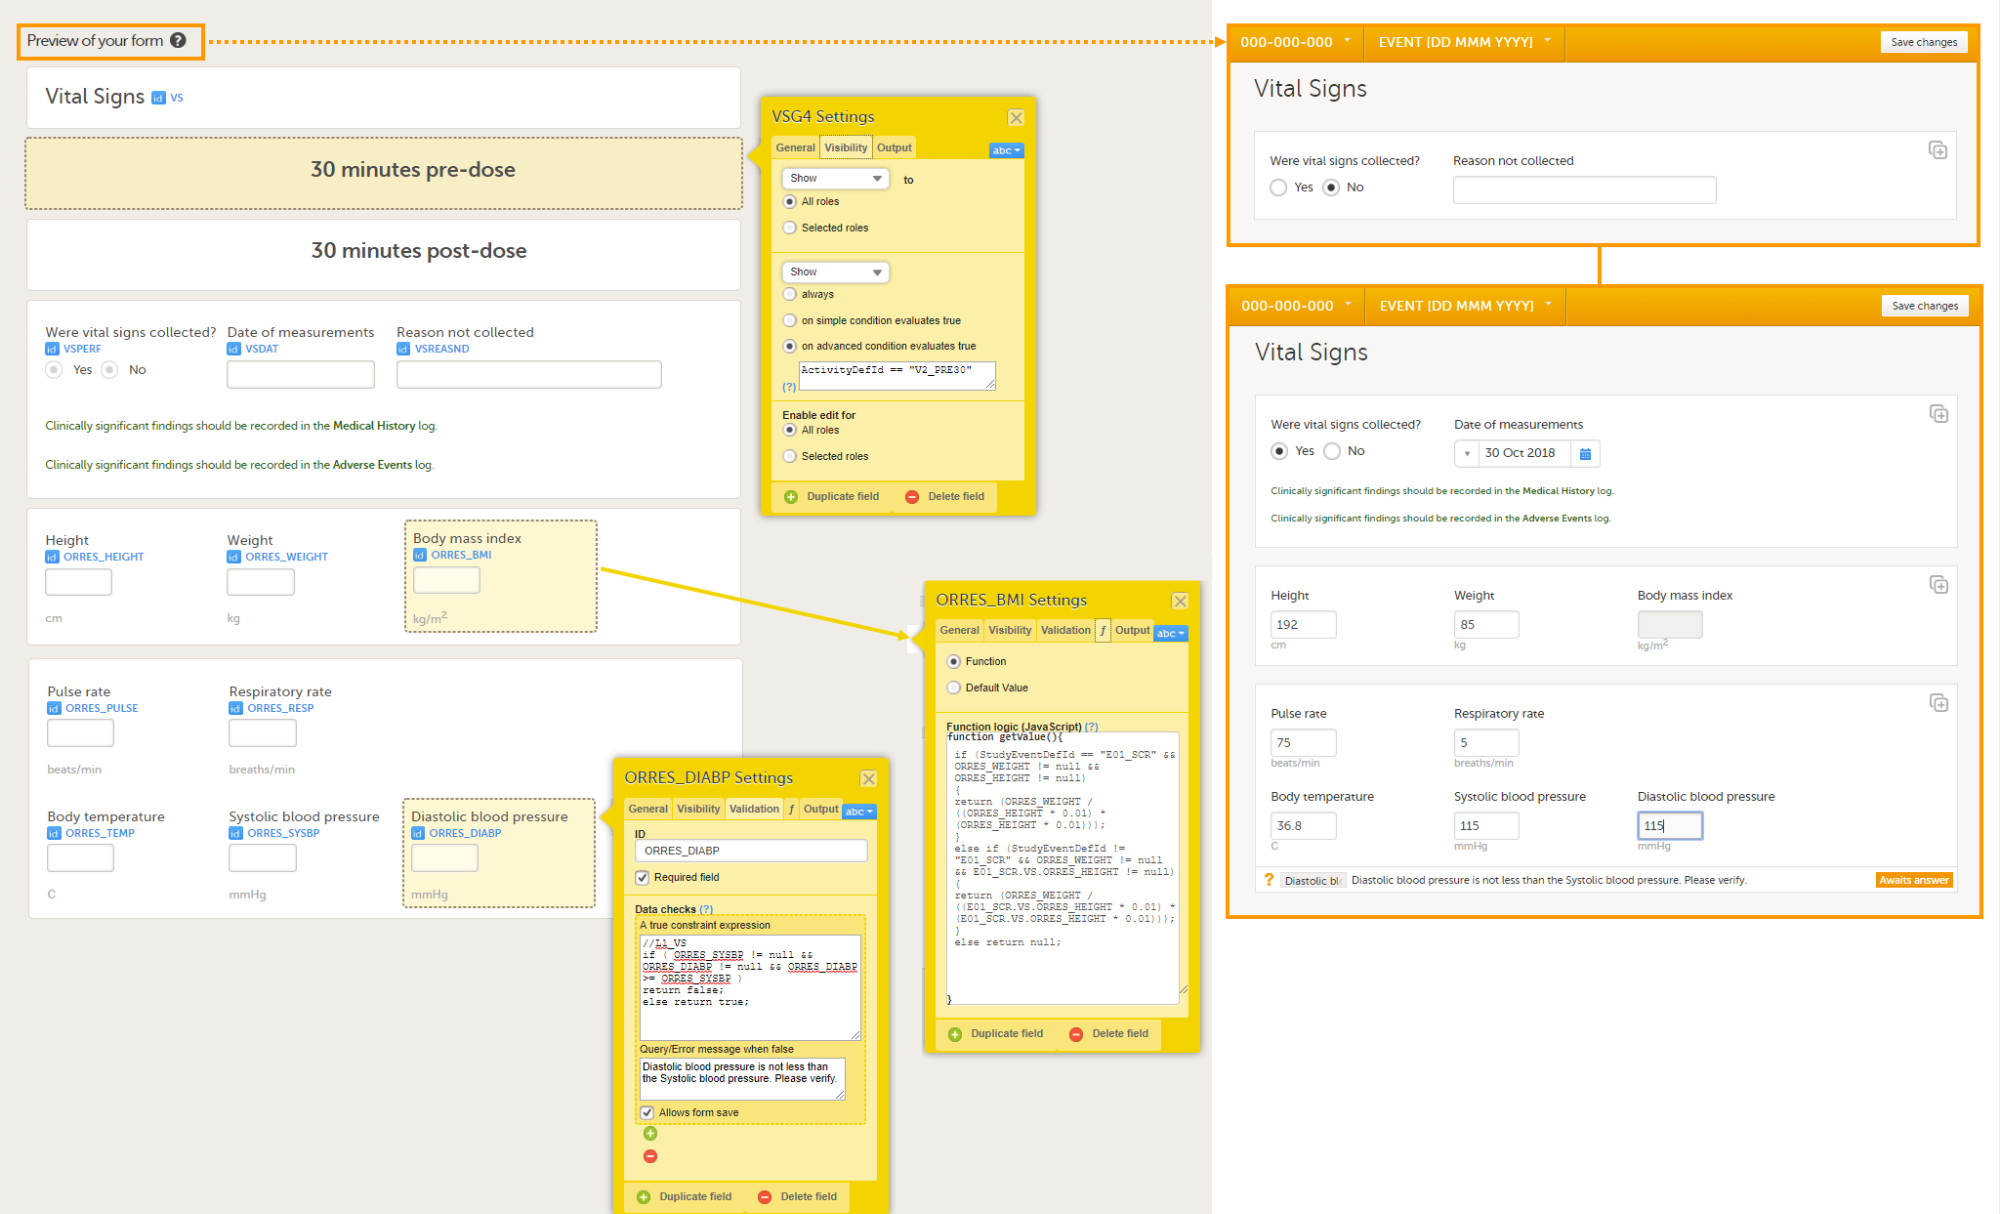
The item group settings and item settings in this form are as follows:
- Visibility settings (on the Visibility tab) are set on:
- the two item groups at the top containing the field label 30 minutes pre-dose and 30 minutes post-dose;
to make them visible only during Event 2, either in activity PRE30 or acitivy POST30:
⇒ on advanced condition evaluates trueActivityDefId == "V2_PRE30"orActivityDefId == "V2_POST30" - the item Date of measurement, the two lines of text in green (Clinically significant findings should be recorded in the Medical History/Adverse Events log), and the two item groups at the bottom containing vital signs results;
to make them visible only when the answer to Were vital signs collect? is Yes:
⇒ on simple condition evaluates true VSPERF is Yes. - the item Reason not collected;
to make it visible only when the answer to Were vital signs collect? is No:
⇒ on simple condition evaluates true VSPERF is No.
- the two item groups at the top containing the field label 30 minutes pre-dose and 30 minutes post-dose;
- System checks (on the Validation tab) are set on:
- the item Date of measurement,
⇒ Prevent dates after Current clinic date.
- the item Date of measurement,
- Data checks (on the Validation tab) are set on:
- the item Diastolic blood pressure;
to ensure that the value entered here is lower than the value entered in the item Systolic blood pressure:
⇒ A true constraint expression:
//L1_VS

		if ( ORRES_SYSBP != null && ORRES_DIABP != null && ORRES_DIABP >= ORRES_SYSBP )

		return false;

		else return true;
⇒ Query/Error message when false: Diastolic blood pressure is not less than the Systolic blood pressure. Please verify.
- the item Diastolic blood pressure;
-
- the item Body mass index;
to calculate the body mass index based on the weight entered in the same instance of this form and the height entered in the instance of this form that is used in the event E01_SCR: Screening:
if (StudyEventDefId == "E01_SCR" && ORRES_WEIGHT != null && ORRES_HEIGHT != null)

		{

		return (ORRES_WEIGHT / ((ORRES_HEIGHT * 0.01) * (ORRES_HEIGHT * 0.01)));

		}

		else if (StudyEventDefId != "E01_SCR" && ORRES_WEIGHT != null && E01_SCR.VS.ORRES_HEIGHT != null)

		{

		return (ORRES_WEIGHT / ((E01_SCR.VS.ORRES_HEIGHT * 0.01) * (E01_SCR.VS.ORRES_HEIGHT * 0.01)));

		}

		else return null;
- the item Body mass index;
- A default value (on the f tab) is set on:
- the item Were vital signs collected?;
so that the answer Yes is filled-in as a default when the Clinic user opens the form in Viedoc Clinic.
return 1; - the item Date of measurement;
so that the event date is filled-in as a default when the Clinic user opens the form in Viedoc Clinic.
return EventDate;
- the item Were vital signs collected?;
- Output Field Labels (on the Output tab) are set on:
- the items Height, Weight, Body mass index, Heart rate, Pulse rate, Respiratory rate, Body temperature, Systolic blood pressure, and Diastolic blood pressure, with a description of the field and units, for example Temp (C) result in original units. These output field labels are displayed in the export.
Medical History form
The following image provides an example of a Medical History form created in Viedoc Designer.
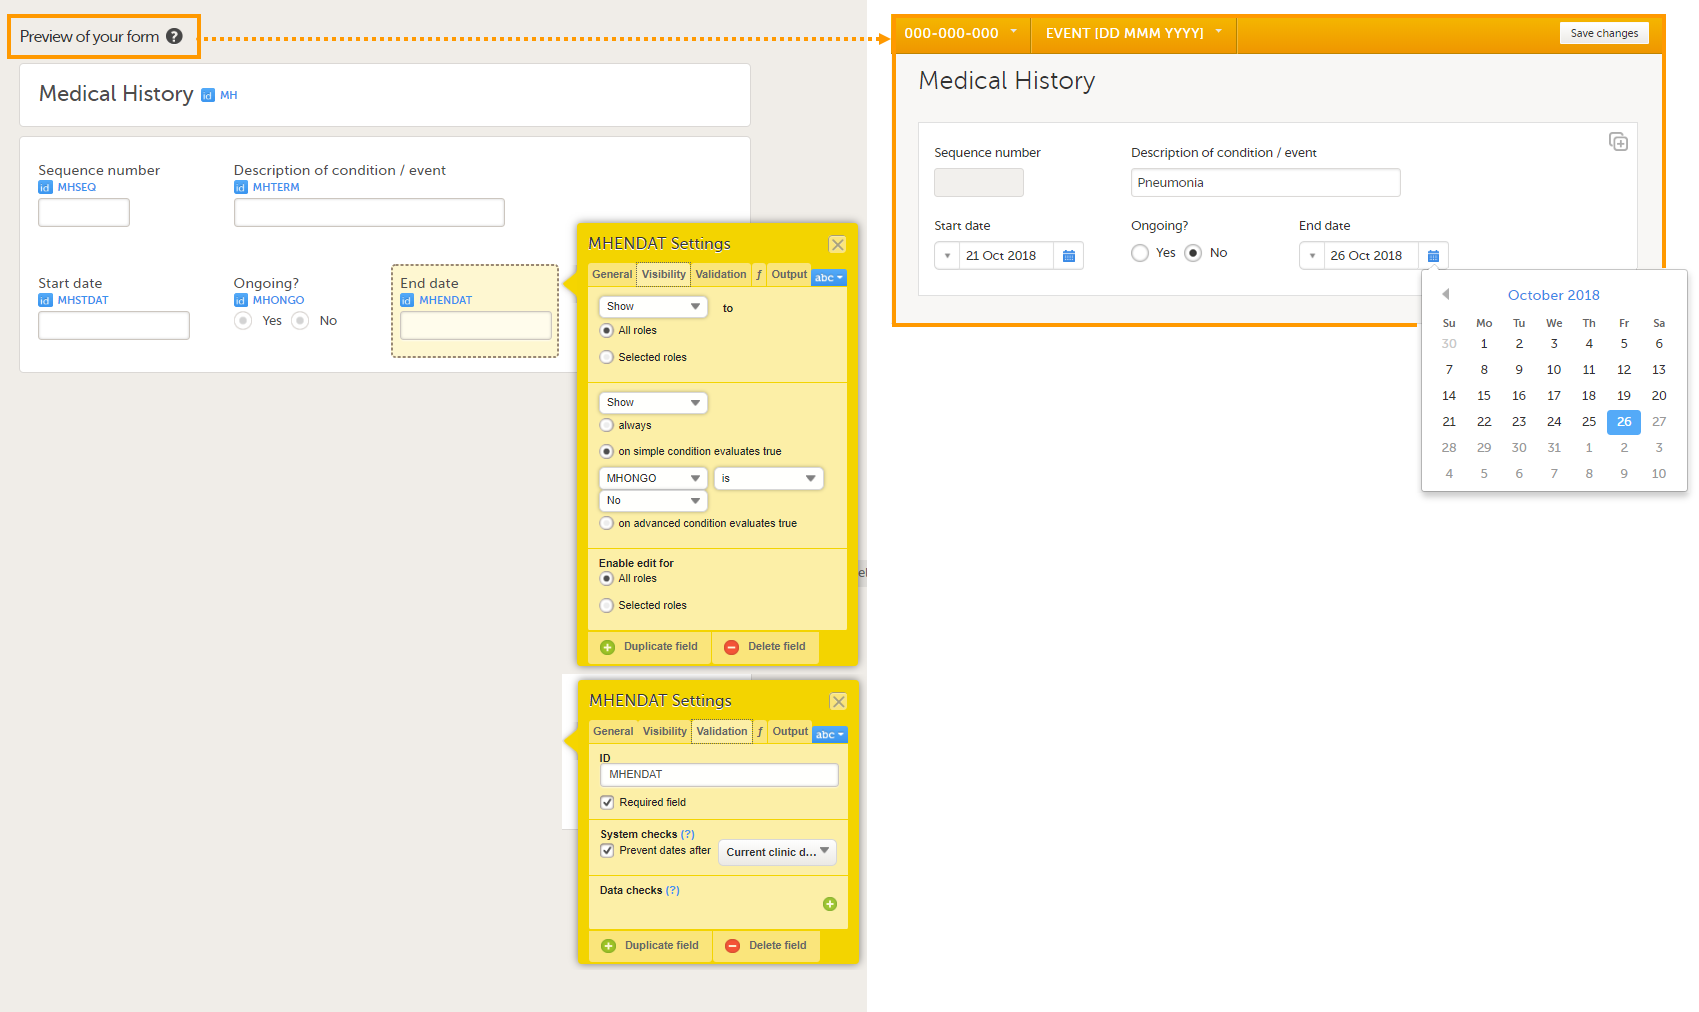
The item group settings and item settings in this form are as follows:
- Visibility settings (on the Visibility tab) are set on:
- the item End date;
to make it visible only when the answer to the question Ongoing? is No.
⇒ on simple condition evaluates true MHONGO is No.
- the item End date;
- System checks (on the Validation tab) are set on:
- the item Start date,
⇒ Prevent dates after Current clinic date. - the item End date,
⇒ Prevent dates after Current clinic date.
- the item Start date,
- A function (on the f tab) is set on:
- the item Sequence number;
to obtain the sequence number for the instance of the current medical history form:
return StudyEventRepeatKey;
- the item Sequence number;
Reserved words
When naming events, forms, items, functions, and variables, you need to avoid a number of reserved words. Otherwise, unexpected behavior or even errors can occur. There are also limits to the maximum number of characters in the IDs and labels. For more information, see Reserved words.