Viedoc is a service over the internet system for managing Case Report Form (CRF) data in clinical studies and patient registries.
Viedoc is an Electronic Data Capture (EDC) system that enables easy data capture, management, validation and presentation of clinical trial data. Viedoc is a Software-as-a-Service (SaaS) accessed directly through a web browser and requires no installation. It is intuitive and user-friendly and enables efficient sharing of information.
Viedoc is a study centric system, that is, all the functionalities are more or less related to a specific study. Usually a study in Viedoc corresponds to a clinical trial or other types of projects where data collection is applicable.
The main functionalities provided by Viedoc are:
The following diagram is an overview of the main Viedoc interactions and functionalities:
Viedoc is compliant with all relevant guidelines, standards and regulations in Europe, North America and Japan, including:
Every study has at least one study site, which corresponds to a clinic. A Viedoc user can have access to one or several studies in Viedoc and for one study the user can have access to one, several or all study sites. A Viedoc user is linked to a study site using a user role. A single user can have one or several roles for a study site and can also have different roles for different sites.
During a study, there are typically a number of questions to be answered and completed with data about the subject. A group of questions that belong together are captured in a form. Forms can be event-dependent or event-independent (log forms / common events). Event-dependent forms are linked to a specific event and the data belonging to these forms is registered during or in relation to a study event. Event-independent forms can be used to report data or events that happen before, between, or after events. Medical history events, concomitant medications, or adverse events are examples of forms that can be captured in event-independent forms.
All study subjects are identified using a unique subject key. In addition to the subject key, a subject can be identified using background information such as gender, initials, or date of birth. The subject’s background information is usually entered when adding the subject in the system and will most likely not change during the course of a study.
The Viedoc platform consists of seven different applications:
Viedoc Learning is a collection of user guides designed to support users across all our products, roles, and functionalities. The full list of user guides can be found in: Viedoc Learning Directory.
Studies are grouped in Viedoc under organization(s); that is, each client has its own organization where all studies belonging to that organization are stored. By default, one organization administrator is appointed to each organization. This person has been trained by a Viedoc Product Specialist and is responsible for providing access to users within the organization and for adding new studies to the platform.
| Important! It is the responsibility of the organization administrator to make sure that all users within the organization have received appropriate training for their respective tasks. |
As a Viedoc client, you will be provided with access to two separate environments/instances: one for test/development studies and one for production studies. The purpose of the test/development environment is to allow the evaluation and use of Viedoc without the need of a contract for a specific ongoing study.
Any study that is to be taken in production is normally initiated on the test/development environment and later moved to the production environment once it is “ready” to be shared with the Sponsor or other external party. Please observe that a study in the production environment can be set to operate in demo mode by adding a site of the type “training” to it.
Note! The demo mode of a production study should not be confused with a study in the test/development environment. The purpose of the demo mode is to allow site staff access to specific training site(s) in order to gain sufficient knowledge of the system before accessing production data. When a study has sites with both production and training types added, a switch will be available in Viedoc Clinic. This offers a choice of which mode the data will be entered to - demo or production.
Studies and study designs can be easily transferred from one environment to the other via the ODM export and import feature.
Contact your organization administrator to get access to the respective area.
Note! There is no guarantee that studies running on the test/development environment are completely and continuously backed-up. This environment should therefore never be used for any production studies.
All production studies need to have a valid license before they can be taken into production. The license is provided by a Viedoc representative. The license fee for the study is based on several factors such as duration, number of sites and patients, among others. The license fee is charged starting with the first patient added and for the duration of the study; which means, until the study is locked in Viedoc. If the study is not deleted from the database within 2 months, a post-study access fee may apply.
Every license is connected to a reference ID. The reference ID can be found on the signed study work order and should be entered in the field Reference ID in the Study settings in Viedoc Admin (1 in the image):
Upon entry of the reference ID, the reference ID is verified. If the reference ID is valid, the text Valid license key will be indicated at the following places:
Once the reference ID has been verified, the study can be taken into production. A study is in the production mode once Production is selected as a site type. As soon as at least one site of production type is added, the Reference ID is locked and there is no way to unlock it afterwards.
For more information regarding license fee and reference ID, please contact your Viedoc representative.
Information about new and updated functionality and bug fixes can be found in the Release notes which can be downloaded from the Viedoc website:
This section provides an overview of Viedoc Admin. It summarizes the main settings that can be configured in Viedoc Admin.
Viedoc Admin is the starting point for every new Viedoc project. Viedoc Admin is the application where you can manage the administrative aspects of a study. The following actions can be performed in Viedoc Admin:
Access to Viedoc Admin is granted by either the Organization Administrator or the Study Manager.
For the Organization Administrator, the organization overview is the first page that is shown upon accessing Viedoc Admin.
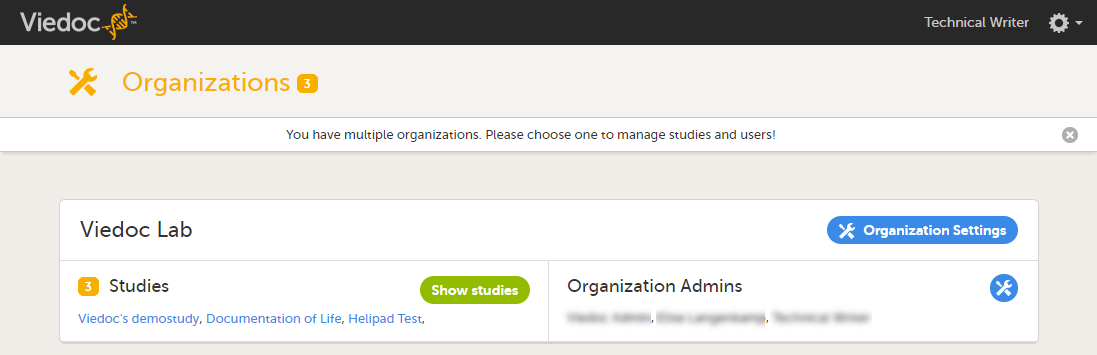
On the organization overview, you can:
For all users that are not Organization Administrator, the study overview is the first page that is shown upon accessing Viedoc Admin. This page lists all studies in which the user has a system role.

For each study, the following information is displayed:
1. The logo of the study
2. The name of the study
3. Some study details are:
This section explains Study Status.
A study can have these statuses:
Note! The study status will change from Not commenced to Ongoing when the first production site is added. A study license is required to make that change.
Your used data storage keeps track of the amount of data used by the documents added in Admin, as well as the files uploaded in eCRF.
The data storage number is updated on a daily basis.
To open a study and access the study details page, click the study. You can search for a study by entering the study name in the search field. You can sort the studies by study name or by the date when the study was created.
Note! A study needs to have a valid license to be taken into production. For more information about the study license, see the chapter about licensing in Overview of Viedoc. For more information about how to take a study live, see Adding a new study.
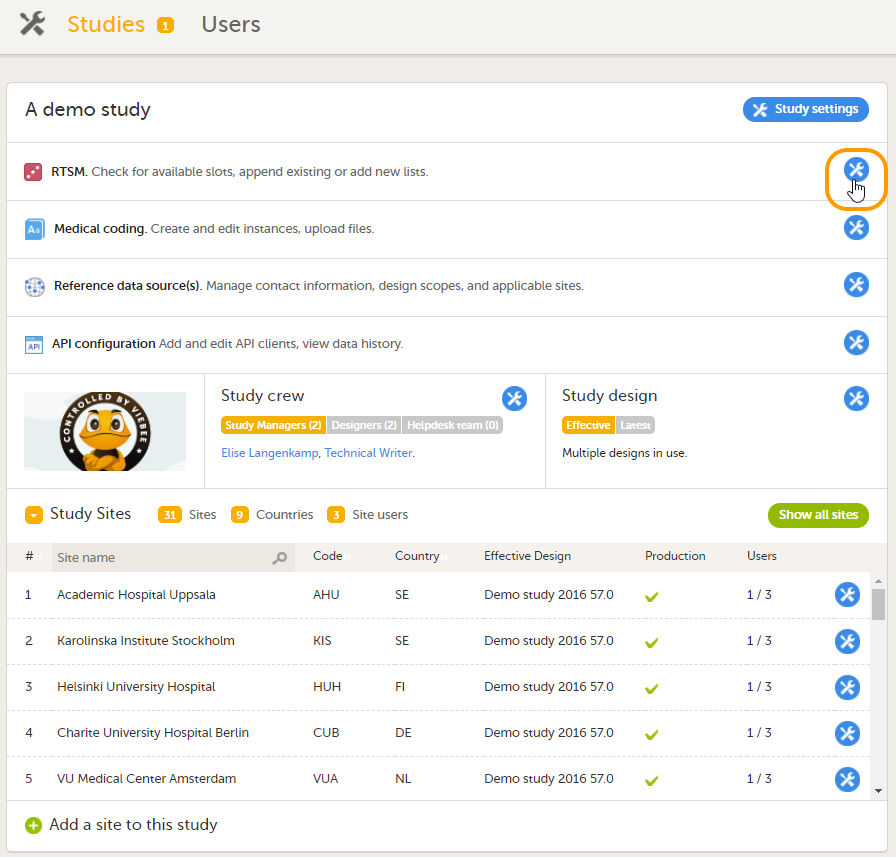
The study details page is the first page that is shown upon accessing a study. On the study details page, you can interact with the settings in the following ways (see image):
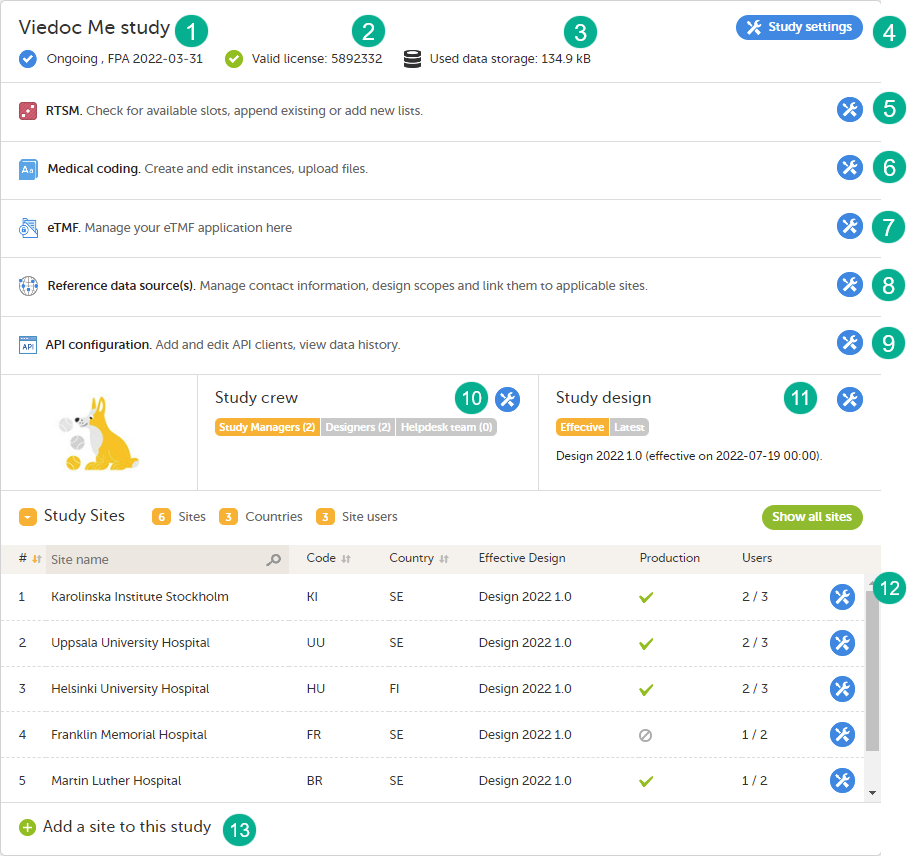
1. FPA
2. License status
3. Data storage
4. Edit the general study settings, see General study settings.
5. Manage the reference data sources, see Managing reference data sources.
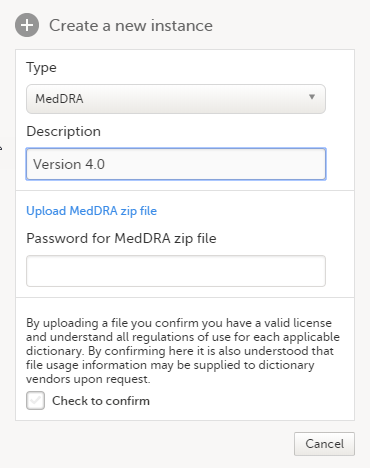
6. Upload and manage medical coding dictionaries, see Managing medical coding dictionaries.
7. Manage the eTMF, see Quick guide for setting up Viedoc TMF
8. Manage the reference data sources, see Managing reference data sources.
9. Configure the API, see Viedoc WCF API, API configuration, and Viedoc Data Import Application.
10. Manage the study crew, see Managing users (Org Admin) and Managing users (STM and SIM).
11. Apply study design versions and revisions, see Assigning a study design.
12. Edit the study site settings and invite users to the study site, see Managing study sites and Managing users (STM and SIM).
13. Add study sites, see Managing study sites.
Customer computer requirements are defined as capabilities required by the customer computer to use all features of Viedoc with the intended graphical presentation and within guaranteed response times of Viedoc.
Viedoc supports the following browsers:
For non-compliant browsers you will receive a message on the login page that your browser is not supported.
For Viedoc Designer:
Viedoc does not support the use of private mode browsing in Safari.
The following are required for Viedoc to run in the compatible web browsers:
No data is permanently stored on the customer computer. All data stored in session cookies or local web storage is deleted when the browser session is terminated. The only exception to this is the optional persistent cookie used in the main portal of Viedoc 4 to remember if a user chooses to issue a 2FA trust for the browser for 30 days, and thus avoid further second-factor authentication during this period.
Viedoc 3 has no automatic checks enforcing the above requirements. Viedoc 4 checks for, and enforces, browser type and version, and support for JavaScript, local web storage, and session cookies.
The following screen resolutions are required:
Viedoc requires an internet connection of at least 384 kbit/s.
Viedoc requires an outbound firewall policy allowing encrypted HTTP to be established and communicated to a remote server on port 443 (HTTPS) using Transport Layer Security (TLS) version 1.2 or higher.
There are several layers of security built into the platform. Below are some examples:
This is used in Clinic>Overview of Viedoc Clinic and Admin & Designer>System languages.
Viedoc Clinic is available in the following languages:
This refers to a single source piece about the Clinic system languages.
Viedoc Logistics is available in the following languages:
Viedoc Coder is available in the following languages:
Viedoc Admin and Viedoc Designer are available in the following languages:
Viedoc SDV Manager is available in the following languages:
Viedoc Me is available in the following languages:
Viedoc Reports is available in the following languages:
Viedoc TMF is available in the following languages:
For information about how to change the system language, see Manage your Viedoc account.
If you require any additional language that is not listed above, please contact your Viedoc representative.
Note! Viedoc does not allow users to use a default browser translation within the system. This prevents individual users from overriding the chosen system language and agreed-upon terminology and formulations.
| Important! All information related to managing your Viedoc account can be found in the following user guide: Viedoc User Account Management |
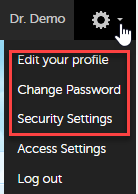
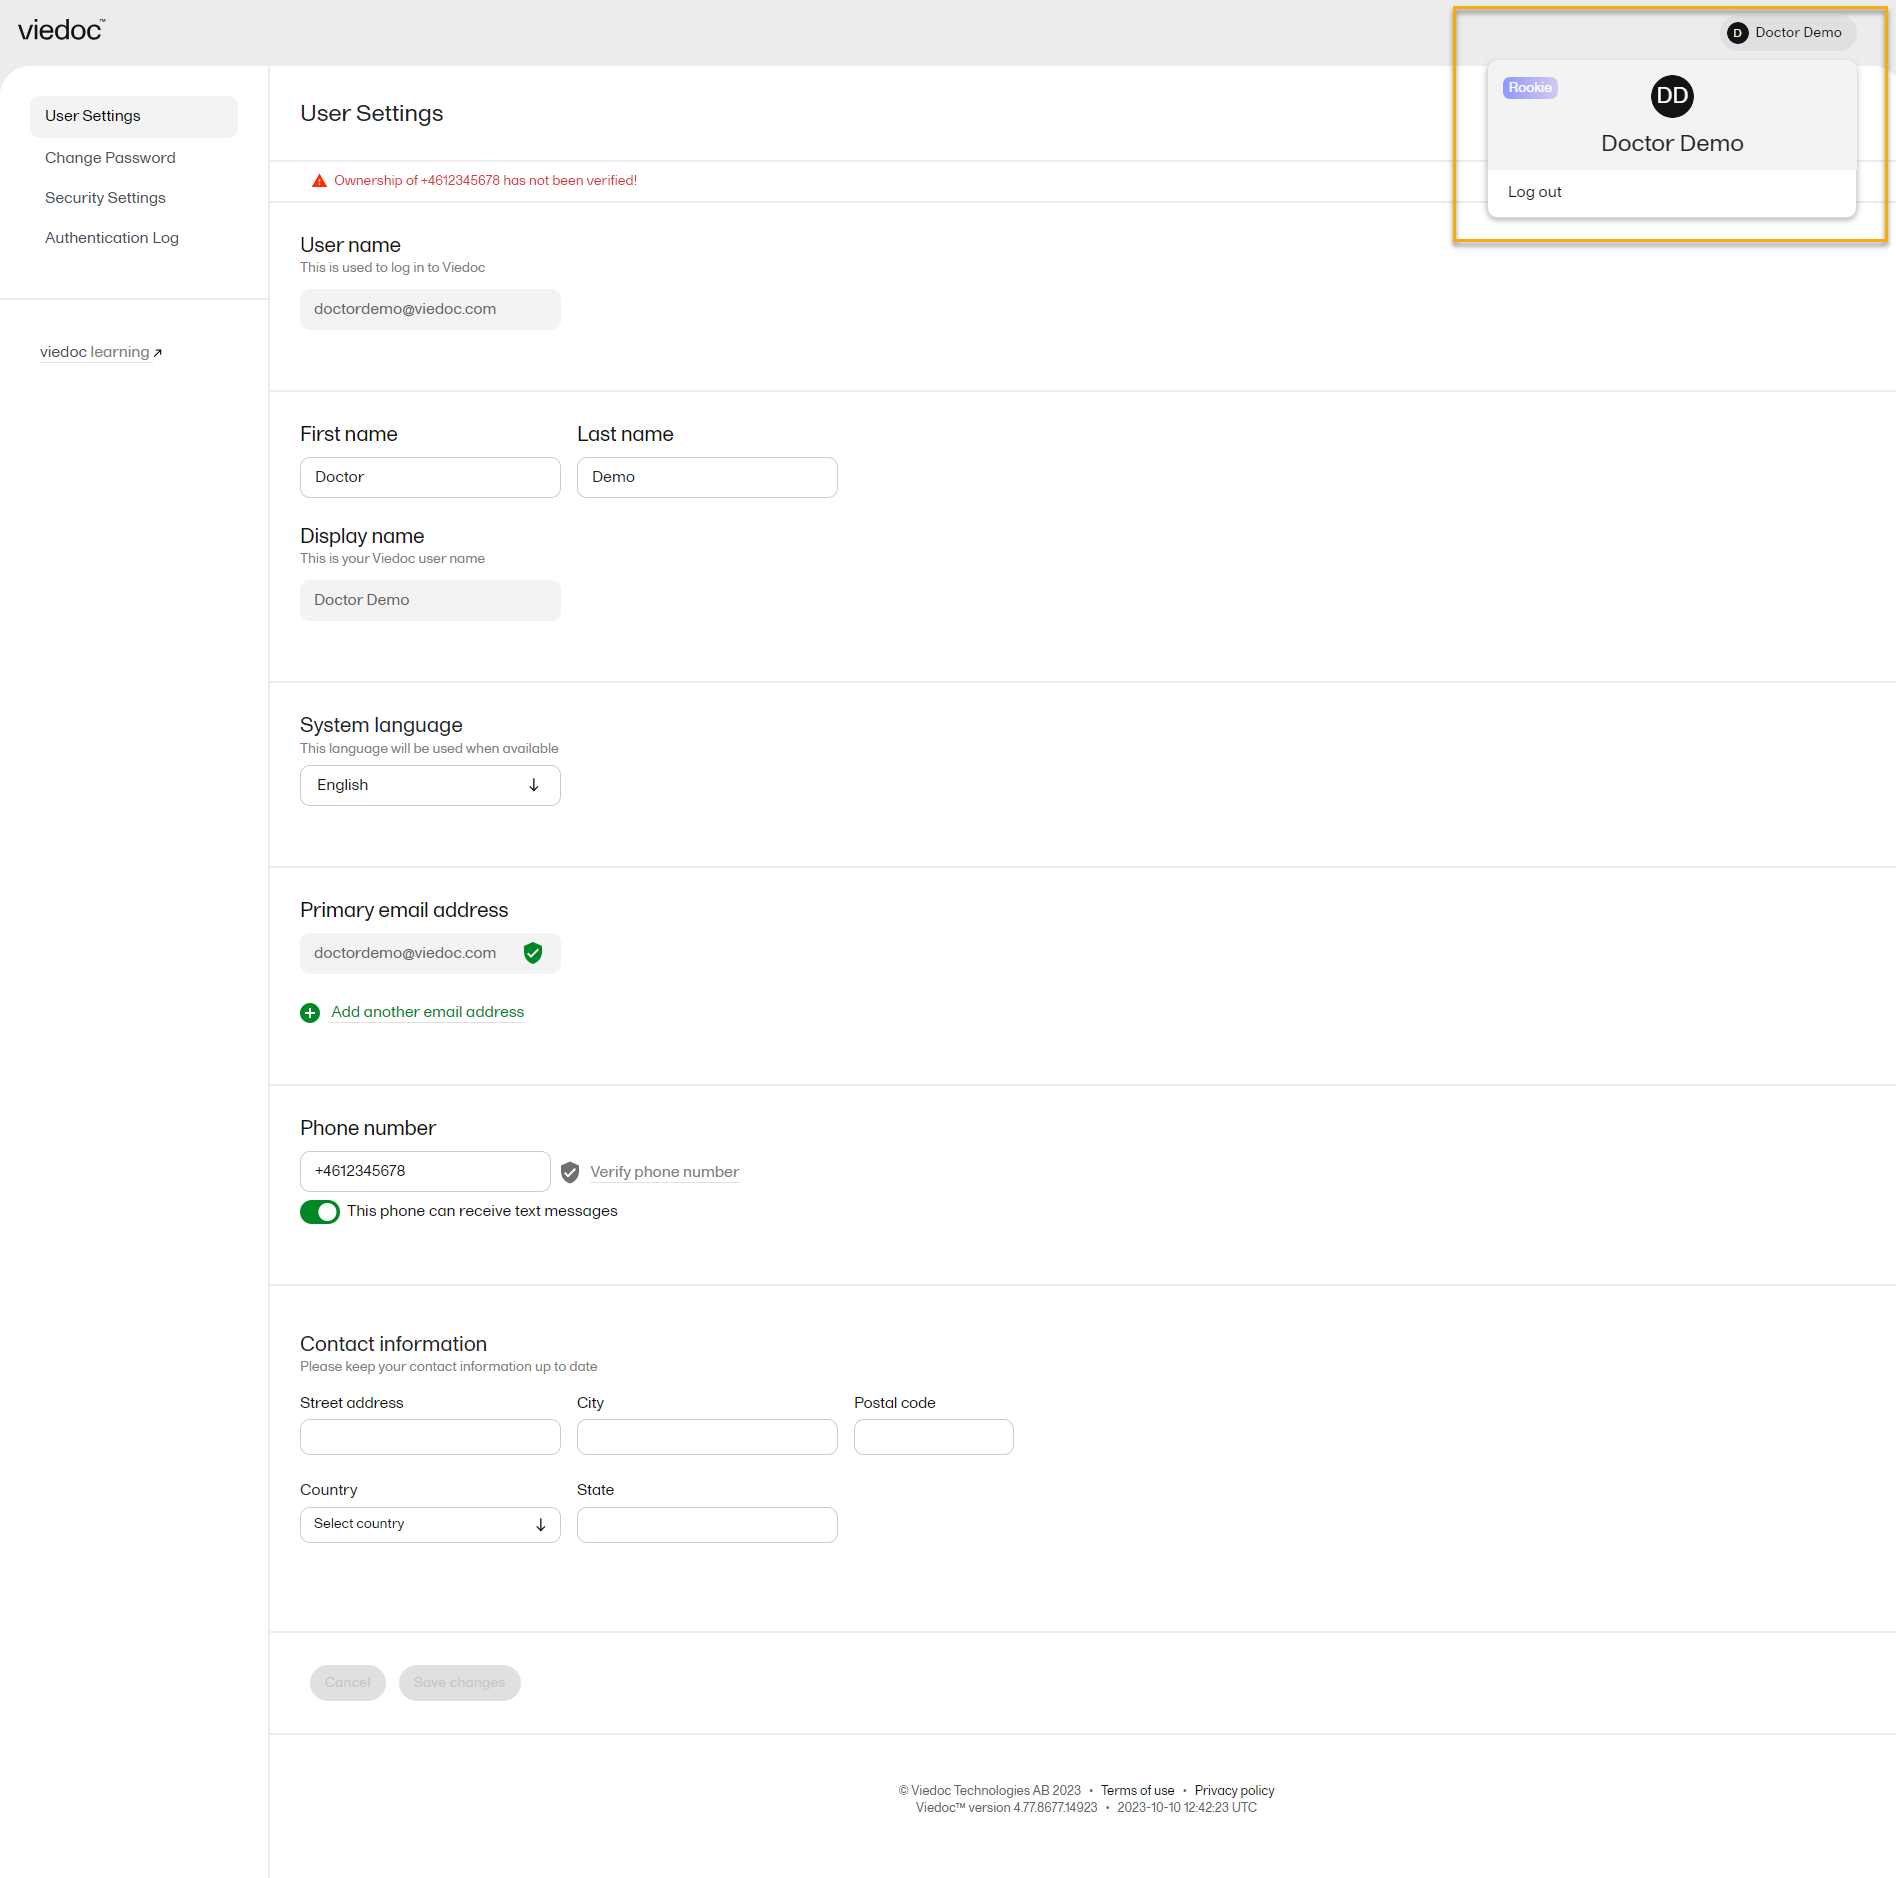
From the settings button (wheel) you can perform all actions related to managing your Viedoc account by selecting any of the following: Edit your profile, Change Password, Security Settings:
Selecting any of these options opens a new page, in the example below, the User Settings page. Select the Viedoc learning link to open the Viedoc User Account Management Guide:

NOTE! If you update the User settings section here, make sure to also update User settings in System lessons>Viedoc User Account Management>User settings
When you are logged in to Viedoc, you can edit your profile.
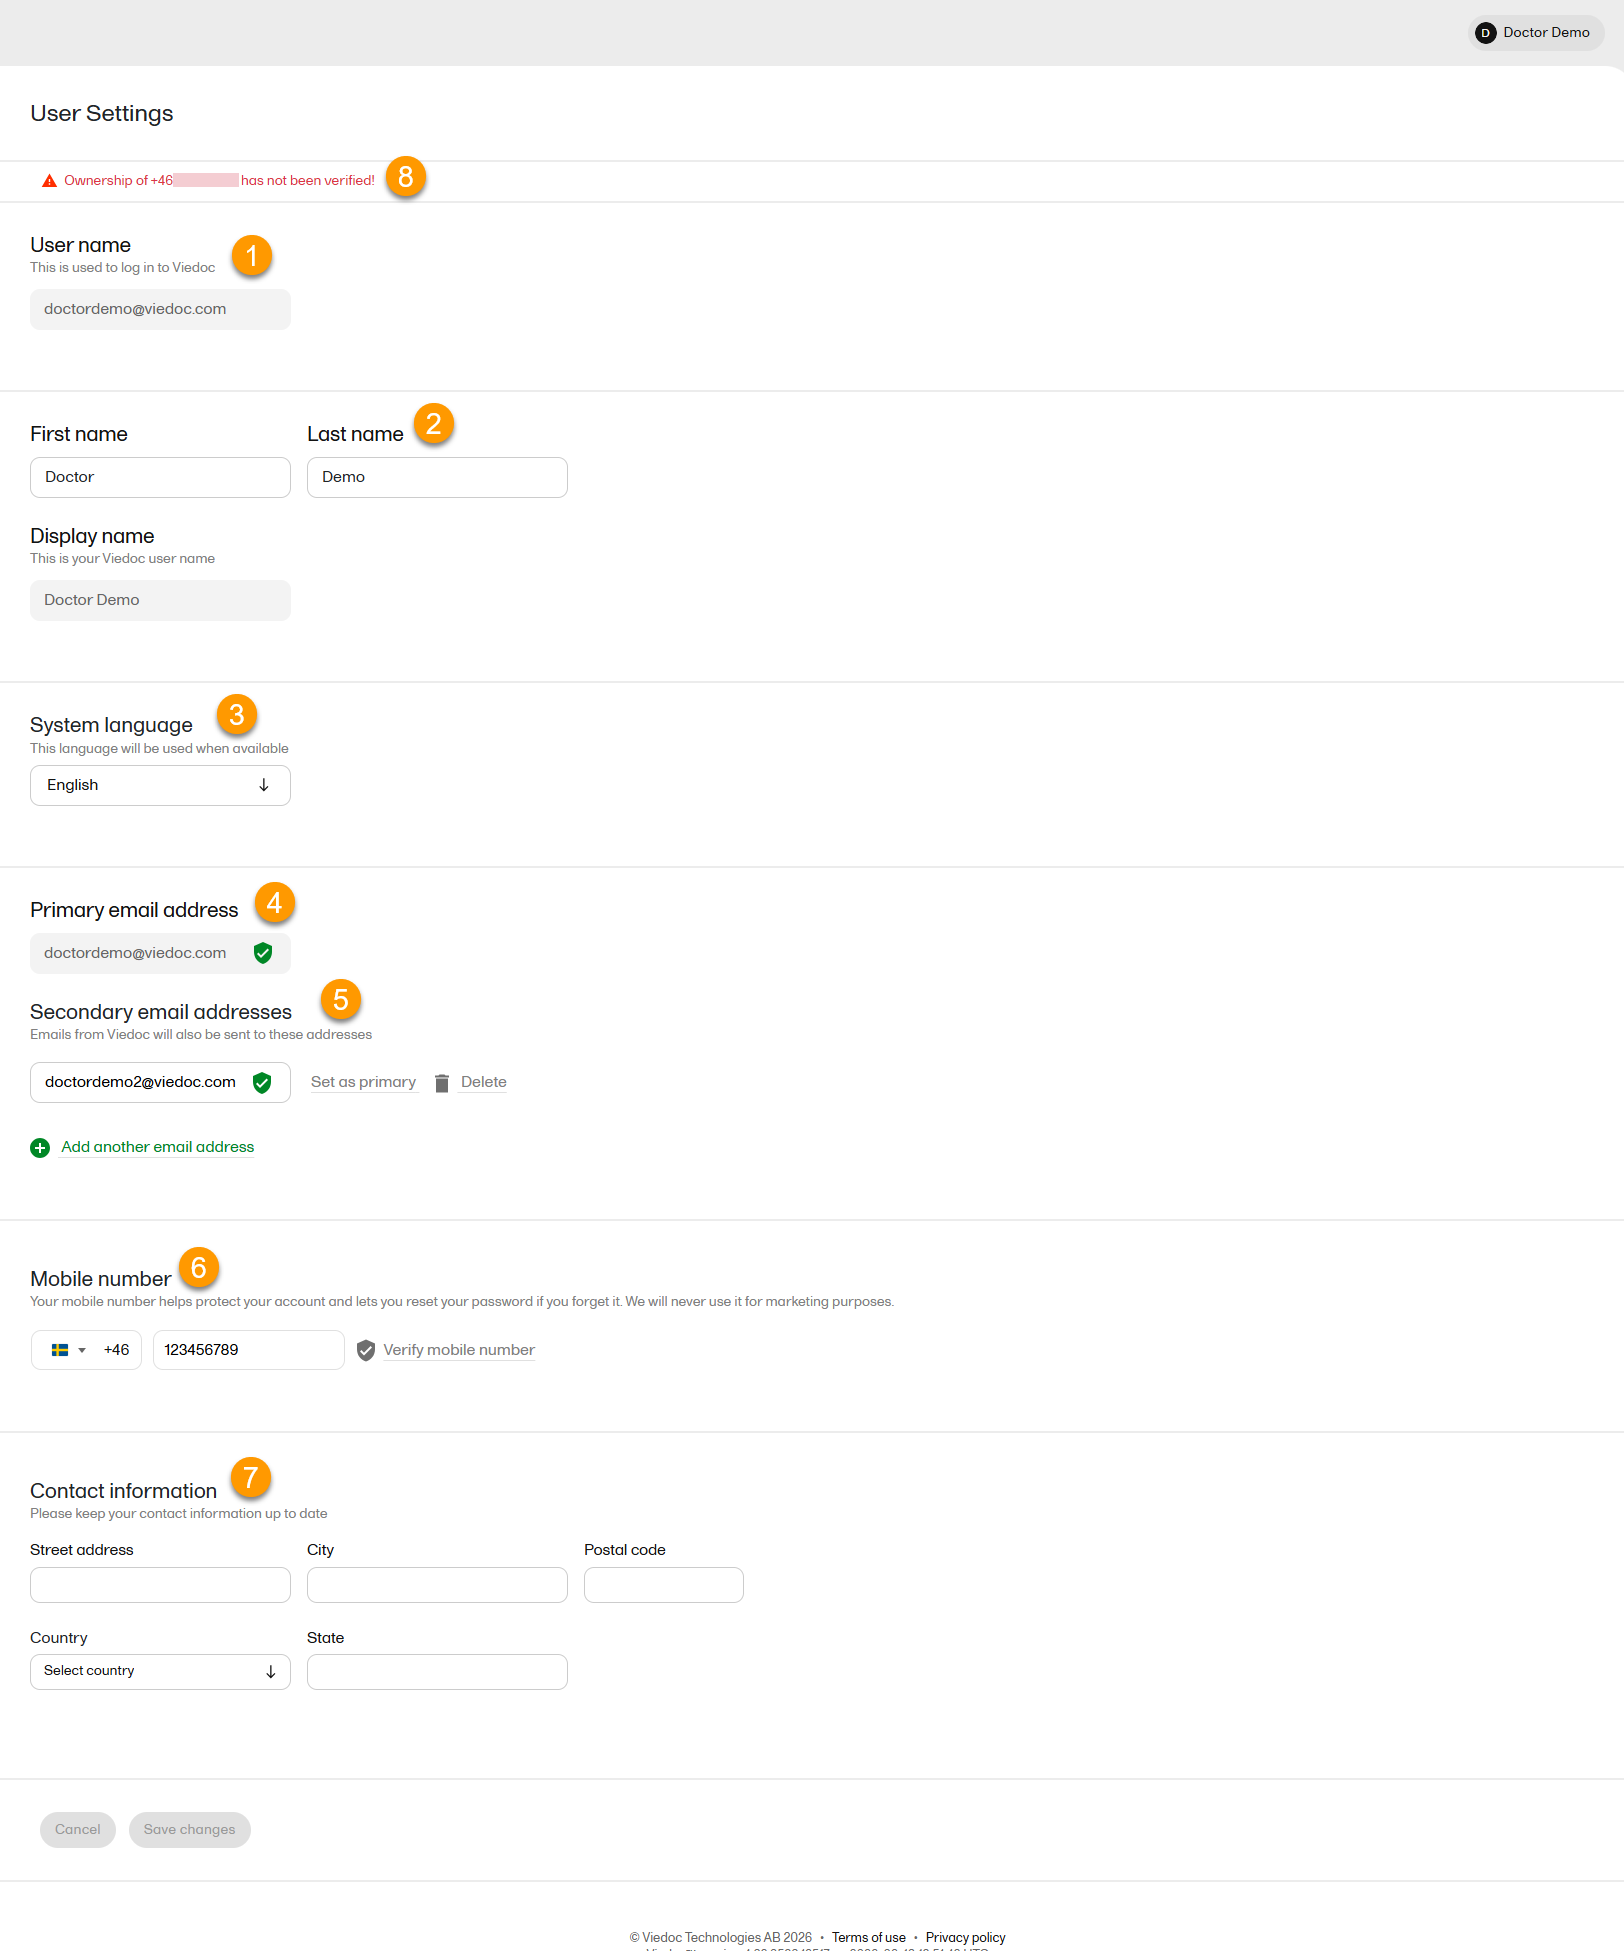
To view or edit your user settings, select the settings button (wheel) in the top right corner of the landing page, and select Edit your profile. The User Settings page opens, where you can configure the following:
1. User name - this is your primary email address used for your Viedoc account. This is the user name you use to log in to Viedoc. See the information below about your primary email address.
2. First name and Last name - fill in these fields that are used for your Display name, used in Viedoc to identify your user.
3. System language - select the language of your choice from the drop-down menu.
4. Primary email address - this is the same as the User name described above. It is the email address used in Viedoc to log in, as well as for Viedoc user account-related operations (account setup, password recovery, study invitations).
By default, this is set to the email address used to initiate the Viedoc user account.
The primary email address must be unique and is mandatory. Therefore, it is not possible to delete the primary email address.
See Changing the primary email address.
5. Secondary email addresses - you can add up to 3 additional email addresses.
Secondary email addresses is used only for:
Delivering second-factor verification codes for self-service password resets initiated by the user.
Sending a notification about changes to your user account when a secondary email address is added or removed.
See Adding a secondary email address and Verifying a secondary email address.
6. Mobile number - Select your country code and enter your mobile number.
You will be asked to Save and verify mobile number. A validation warning (8) will be displayed if the mobile number is not valid.
See Editing your mobile number and Verifying your mobile number.
Important!
|
7. Contact information - fill in the following fields: your street address, city, state, postal code and country.
To add a new (secondary) email address to your account:
| 1 | Select the Add another email address link under the current primary email address. |
| 2 | Enter the email address in the new field under Secondary email addresses. |
| 3 | Select Save changes. A notification email is sent to both the primary email address and to the newly added email address to inform you about the change. At the top of the Edit your profile page, you will see a warning message saying that the newly entered email address is not verified. |
To verify a secondary email address:
| 1 |
Select the Verify email address link next to the newly added email address. A six-digit code will be sent to your new email address and a Verify ownership pop-up is displayed asking you to provide the code in order to verify the new email address. Note! The verification link for the secondary email address is shown only after having saved the changes you may have performed on the other fields on the same page. |
| 2 | Enter the received code and select Confirm. The newly added secondary email address is now verified. |
To change the primary address to one of the existing secondary email addresses:
| 1 | Select Set as primary next to the secondary email address that is to be set as the primary email address. |
| 2 | Select Save changes. A notification email will be sent to both email addresses to inform you about the change. You will use the new primary email address the next time you log in to Viedoc. |
Note! For a secondary email address to be able to be set as primary, it has to be verified first.
To edit your mobile number:
| 1 | Select your country code and enter your mobile number. |
| 2 | Select Save and verify mobile number. A notification email will be sent to your primary email address to inform you about the change. |
To verify your mobile number:
| 1 | Make sure that the mobile number is correctly entered and select Verify mobile number. |
| 2 | A six-digit code will be sent as a text message to your mobile and a Verify mobile number pop-up is displayed. It will ask you to provide the code in order to verify the mobile number. |
| 3 | Enter the code and select Confirm. The mobile number is now verified. |
From the settings button (wheel) you can perform all actions related to study access management in Access Settings.

Select the settings button (wheel) in the top right corner of the window, and select Access settings.
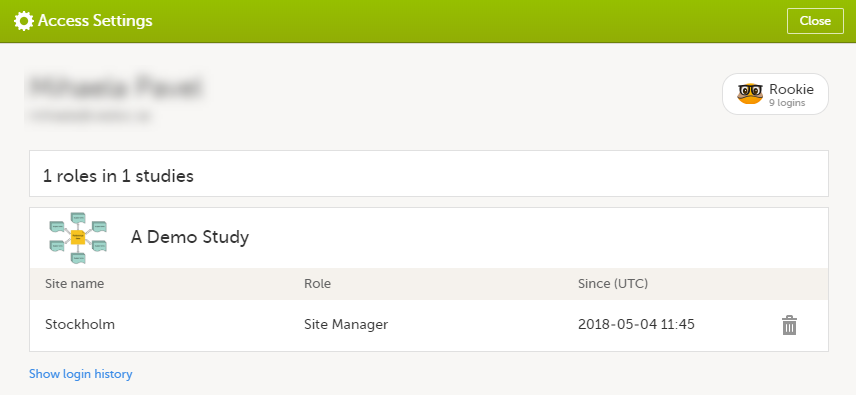
The following information is provided, grouped by study:
For users with organization roles, these are listed in the top of the page, in a separate section, providing the following information:
To remove yourself from a certain role within a study:
| 1 |
Select the trash can icon on the right, corresponding to the role, site and study to be removed from: A confirmation window is displayed. |
| 2 |
Select Delete to confirm the deletion: A notification email will be sent to all the Study Managers, or to the Site Managers if any roles are delegated. |
You can remove your Viedoc account when you have no study memberships left, that is, 0 roles in 0 studies.
To delete your Viedoc account:
| 1 | Go to Access Settings. To be able to remove your account, you should have no roles left in any study and no pending invitations: |
| 2 | Select Remove account from Viedoc. You will be prompted to confirm the account removal by entering your password: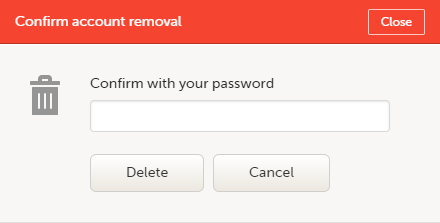 |
| 3 | Enter your password and select Delete. A confirmation message is displayed and a notification email will be sent to your primary email address: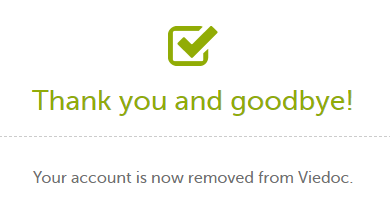
For identification purposes, Viedoc will keep: the user ID, display name, primary email address, and login history. They are kept until all the studies you have participated in are deleted. All other information related to your account will be removed from Viedoc. |
In case you have study invitations that you have not accepted or rejected yet, the Pending invitations window displays a list of all your pending study invitations:
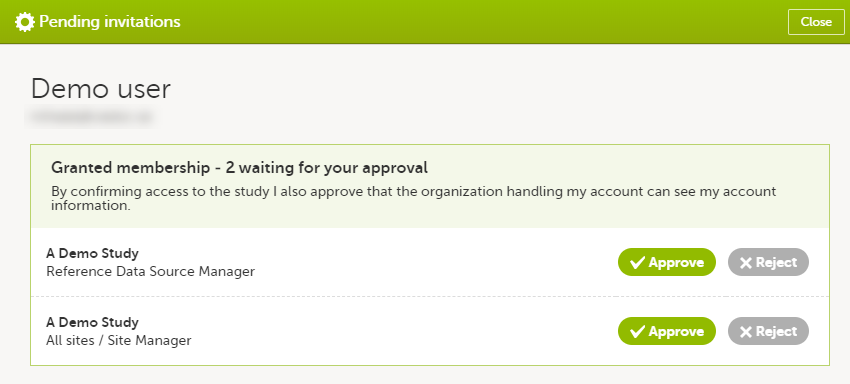
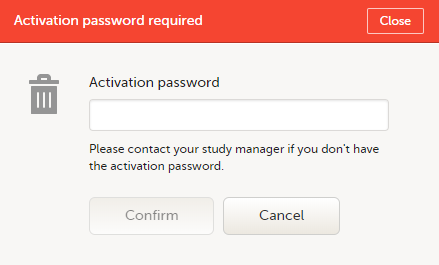
To accept a study invitation, select Approve next to the respective study role. If this is the first role you have in the respective study, and if the study requires an activation password, you will be prompted to enter it:
Note! All the pending role invitations for a user are automatically approved when the Application Programming Interface (API) method GetToken/Token is used.
To reject a study invitation, select Reject next to the respective study role. The invitation will be removed from the Pending invitations list.
To postpone the approval or rejection of study invitations, select Close in the top right corner of the Pending invitations window and postpone providing an answer to the study invitation.
To access the pending invitations again, the Pending invitations window is shown:
From Viedoc you can log out from different locations:

Note! If you exit the system without logging out, any subject you are currently working with will be locked for other users. After 5 minutes, the subject will be automatically unlocked.
The configuration of a study in Viedoc consists of two types of settings:
This lesson focuses on the configuration type that holds most of the study configuration, that is version-controlled settings.
Version-controlled settings are contained in a “design” and are identified by a version number. Study design version numbers are unique within a study. If there exist five study design versions, all originating from the same design, and a new design is created from scratch within the same study, it will have version 6.
Study design version numbers are accompanied with a revision number. For example, “1.0” means that this is version 1 and that it has not been revised, since the revision part of the version is 0. Revisions are explained in Revision of study design version.
Study designs are assigned on site level. Work on a site cannot start before a study design is assigned to that site, as there is no study configuration associated with that site.
When the Designer has finished setting up a study design in Viedoc Designer, he/she has to publish the study design, so that it becomes available to the Study Manager in Viedoc Admin.
The Study Manager then chooses to assign the study design to one or several study sites. This step is accompanied with selecting an effective starting time for the study design on the selected study sites.
There can be more than one design version assigned to a site.
Versions are burnt in at event level, based on the date of first data entry.
The applicable design version for an event is determined by comparing the event date to the effectiveness period of the study design version(s) assigned to the site. When an instance of an event is started, the study design version is burnt into it, indefinitely. All forms belonging to this event will then inherit that same study design version.
When the version has been burnt-in, the forms within the event always get their settings, structure and lay-out read from that same study design version, even if the event date, or design effectiveness periods, have changed so that a different study design version is available.
In Viedoc, there are four different types of events, and the study design version is burnt in as follows:
Notes!
For more details on the automatic event date settings, see the Study workflow lesson.
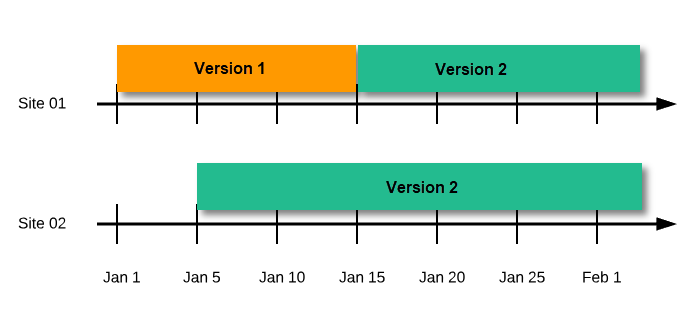
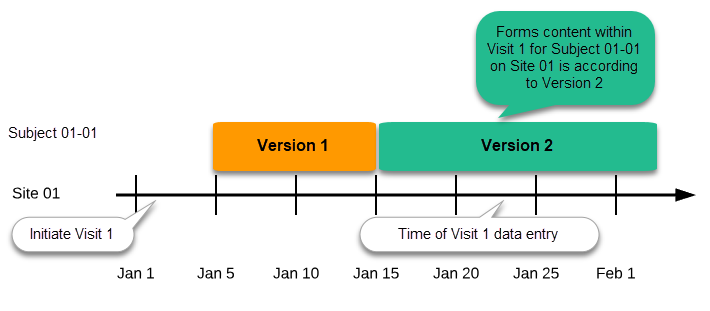
During the course of a study, multiple versions of the study design can be assigned to a site, with different periods of effectiveness. For example, Site 01 could have Version 1 as the effective study design version during January 1st – January 15th and Version 2 as effective study design version after January 15th, whereas Site 02 has Version 2 as the only effective study design version starting January 5th, as illustrated in the image:
There is no end date for the effectiveness periods of study design versions. If a design is applied on January 1st, this is the effective version until a new version with a later start date is encountered, independently of when it was assigned.
Important! The periods of effectiveness of a study design version are connected to the event timing of the first data entry and not to the current time at system usage.
For example, in the below image, if:
...then:

If an event is initiated with a date when no design version is in effect, the version effective at current time of system usage will be used:
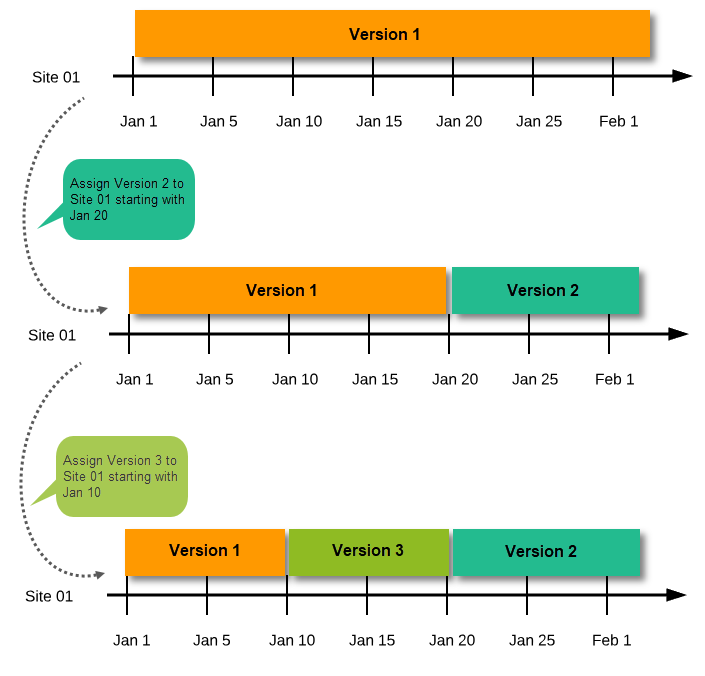
A new version can be assigned with the same timing as the currently assigned version and will then replace the currently assigned version, except for already entered data (due to the version “burn-in”, as described in Version burn-in).
For example, if we have Version 1 assigned to Site 01 starting at Jan 1, and we have the following events:
...and we assign Version 2 to Site 01 starting at Jan 1, and then:
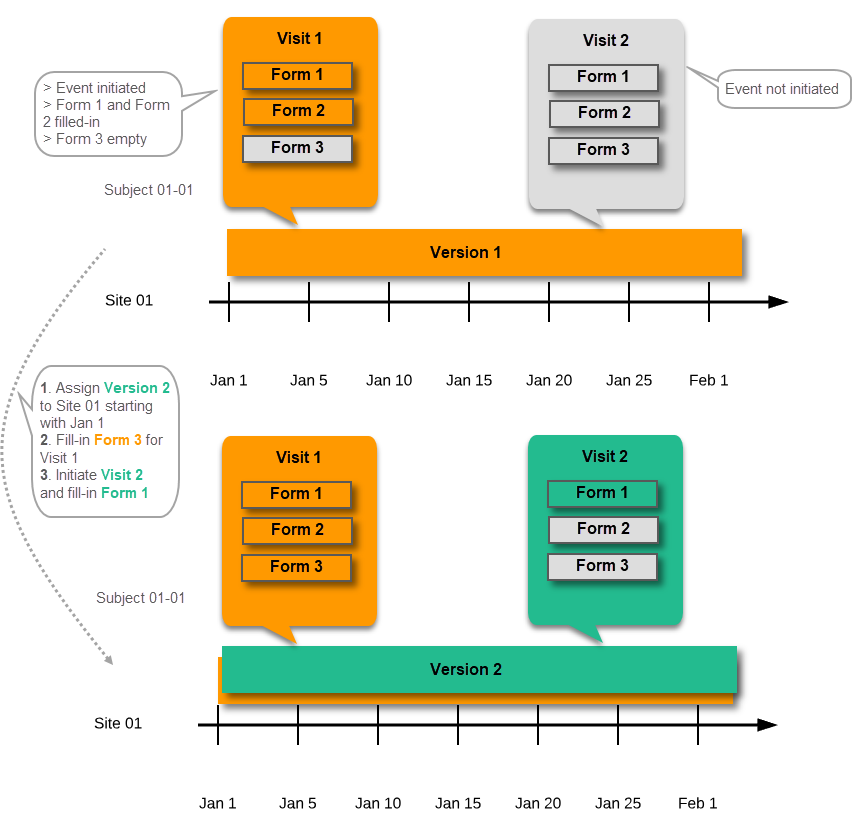
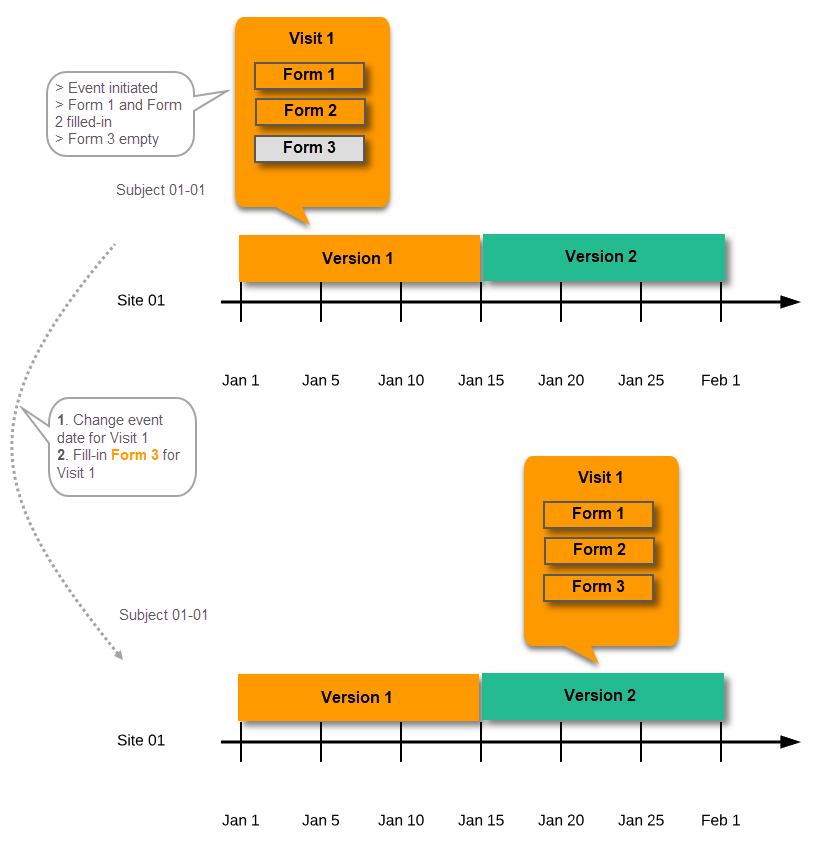
In case the event date is changed after it was initiated, to a date when another version is applicable, the version for that event does not change, as it was burnt-in at the date when the event was initiated (see Version burn-in):
The following settings are always read from the study design version that is burnt-into the event:
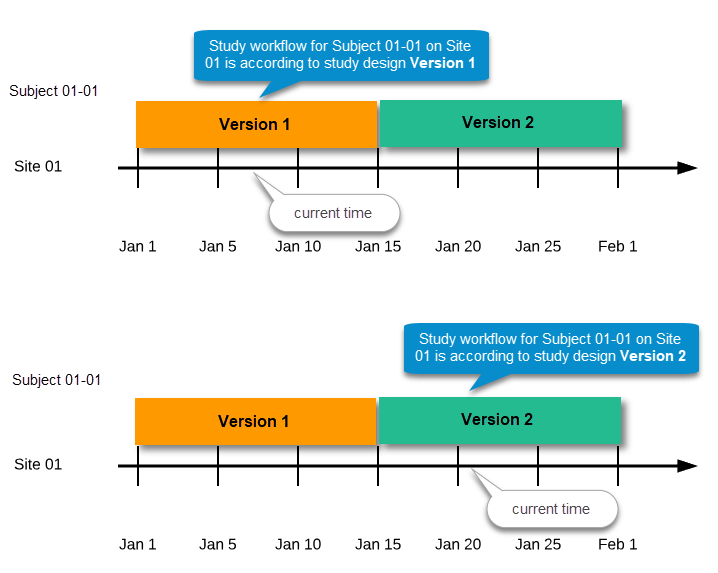
We call "current effective design" the study design version that is effective at the current time of system usage.
Settings that are not directly related to data collection structure, as well as settings that are common on the site level, are read from the study design version that is effective at the time of system usage (that is, “time right now”). These settings are:

This means that the study workflow for a subject can change as time passes and a new design version becomes effective for the site the subject belongs to:
If there is a need to correct something in a study design version that is already assigned, and in particular if it has already been used to enter data (as that version is then burnt in and cannot be replaced by assigning a new version with the same time frame of validity), the study design version has to be revised.
The following settings can be revised as part of a revision of a study design version:
The latest effective design for each site will be used to define the permissions that will apply to each role.
* Note! The study design IDs (Event IDs, Activity IDs, Form IDs, Item group IDs and Item IDs), item dictionary (“choice”) codes and any items involved in randomization cannot be changed. An exception is that if an item needs to be moved to another item group, the ID can and must be changed as this will be treated as deleting an item and adding it again.
Once a study design version is revised, the revision part of the version number (initially 0) is incremented. For example, if study design version 1.0 is revised, it will receive the version number 1.1. When a revision of a study design version is published, it replaces its predecessor in terms of site assignment. For example, if a Study Manager wants to assign version 1 to a site, and this version now has a revision, version 1.1 will be available for assignment and not 1.0.
Additionally, only the latest revision of each study design version can be used as starting point for additional revision. For example, if we want to revise study design version 1, that has already been revised to version 1.1, we can only select 1.1 as starting point of the revision and not 1.0.
If forms that were previously part of an event in the workflow are now removed, already initiated forms are not touched. From a study workflow point-of-view they are now orphan forms, but from a user point-of-view there is no real difference to the appearance, as they stay as is on the event that they were previously part of.
Application of a revised study design version is used to upgrade forms that are already burnt-in, with a predecessor of the study design version in terms of revisions, to the latest revision of the study design. Applying a revision is different from assigning study design versions, as assigning study design versions only affects forms belonging to events that have not been initiated yet.
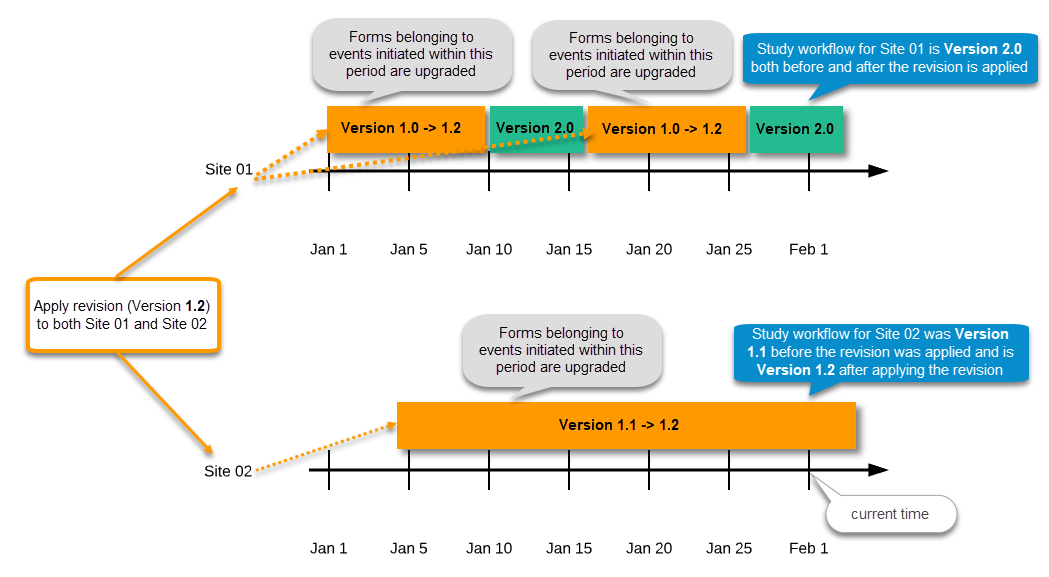
When a revised version of a study design version is applied to a site, that revision will (eventually, after necessary site confirmations, see Changes in a revision that affect data integrity below) replace the version it is revising, including the base version and all previous revisions made to the version (as illustrated in the example in the image below, where 1.2 replaces both 1.0 and 1.1). Thus, effective period is not changed.
There are two parallel tracks being followed when a revised study design is applied, depending on whether the data integrity is affected by the changes in a revision or not, as described in the following subsections.
Note! It is recommended that you use the design revision impact analysis before you apply any revision. For more information, see Design revision impact analysis.
Note! You can NOT apply an earlier revision if a later revision has already been applied to another site. This applies to both demo sites and production sites. For example, if version 1.2 has already been applied to a site with user acceptance testing (UAT) underway, then version 1.1 cannot be applied to a production site. It is only possible to apply version 1.2.
A revision with changes that do not affect data integrity is applied without confirmation by the site staff. For all form instances in which form data is not affected by the revision, the revision is processed immediately.
Changes within a revision that do not affect data integrity:
Any discrepancies no longer valid are closed and any new discrepancies will be flagged.
The forms that are locked (by Monitor, Data Manager, or any user who has data lock permission) will be upgraded, as no data will be touched by these types of changes.
Form signature and review status will not be affected by these kind of updates.
Applying a revision with changes that potentially do affect data integrity requires confirmation by the site staff. Before the Study Manager can apply a revised study design, a mandatory information text has to be entered that will be used to notify the site staff about the changes (see the complete workflow below in Workflow - Revision of an existing version).
Changes that potentially do affect data integrity:
A flag will be put on the form instance indicating that there is an upgrade pending. Until the upgrade is confirmed by site personnel (see Site confirmation of version upgrade), the form will remain in its original version.
When a revised study design is applied to a site, all forms pending an upgrade (where data integrity is potentially affected) are marked by a red flag, and a notification for the site is displayed on the Messages pane on the study start page.
The notification is accompanied with a standard text informing the site about the upgrade action and confirmation prompt that has to be electronically signed. This action can be performed by anyone at the site with data edit permission. See also the lesson in Viedoc Clinic User Guide - Approving eCRF changes.
When signed, all forms pending upgrade (listed in Changes in a revision that affect data integrity) will be upgraded to the revised version of the study design. This is a background activity that can take some time if there are considerable amounts of forms to be upgraded.
For the subjects that are being edited by clinic users during the upgrade process, the upgrade will stay pending until the respective subjects are released.
Optionally, forms can be upgraded manually, one-by-one, by the site. This is performed by navigating to the forms affected, opening them for editing and re-saving them. When the form is opened for editing, it will be shown using the new upgraded design with all data filled in.
A recommendation to the site could be to manually upgrade a few forms to fully understand the potential impact of the upgrade and then upgrade the rest using the batch approval feature.
|
Important! The upgrade is not performed for:
If performing batch approval and forms affected by the upgrade are skipped, as a result of one of the above mentioned scenarios, a new message will be displayed on the Message page. The changes can then be approved after a user with permission unlocks the locked forms. |
Forms upgraded to a new design revision lose any existing signature and review flags (clinical review, data review). The SDV flag is lost on item level.
If a particular item, that did not require SDV, is affected by the upgrade (that is, edited in the design, see Changes in a revision that affect data integrity), the form-level SDV flag will be kept. That means an upgrade of a form can lead to losing existing signature and review flags (clinical review, data review), but keeping the SDV flag.
If a particular item, that was previously source data verified, is affected by the upgrade (that is, edited in the design, see Changes in a revision that affect data integrity), it is no longer flagged as having been source-data verified. The form-level SDV flag is lost if any item in the form lost its SDV flag. The form-level SDV flag is also lost if an item is removed from a form as part of the upgrade.
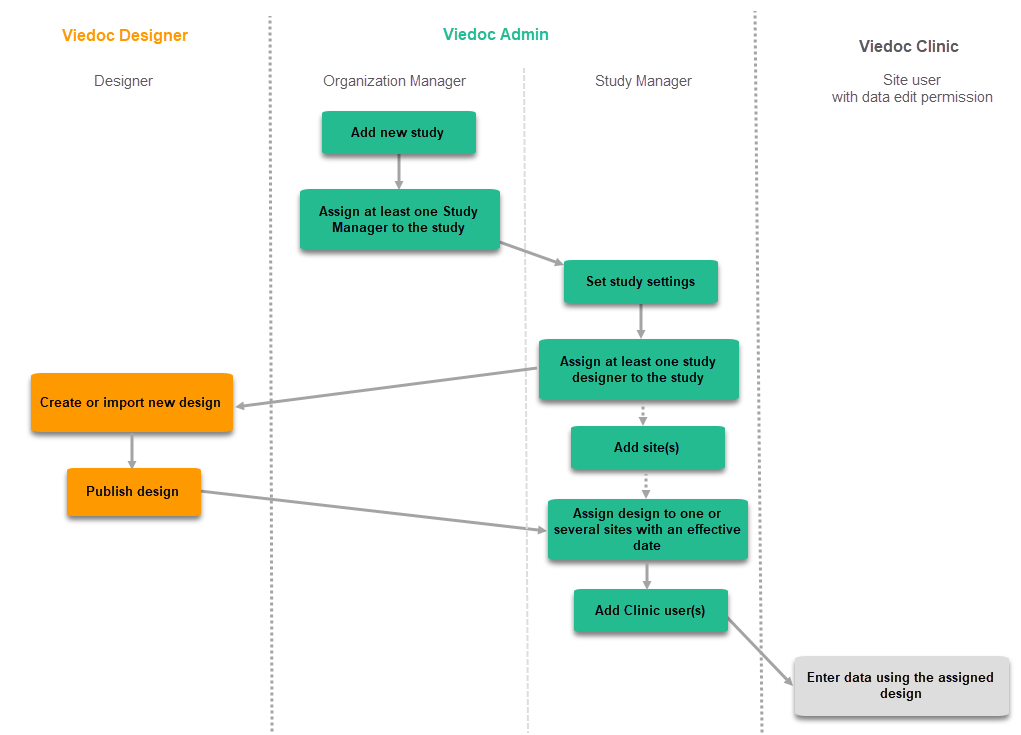
The following steps have to be performed in Viedoc when creating and configuring the study for the first time:
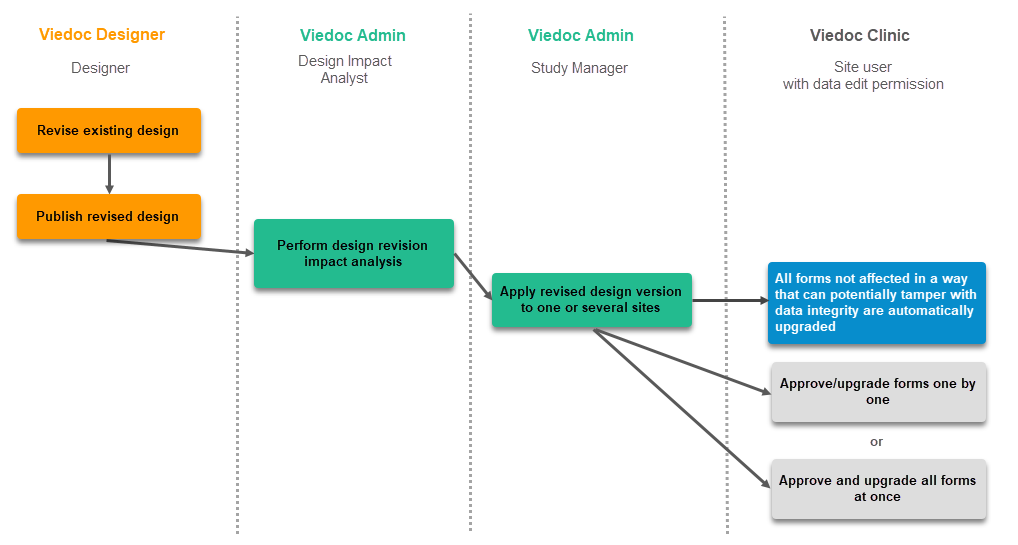
The workflow for creating a new design version starting from an existing version of the study design, to implement a protocol amendment and assign it to one or several sites, is the following:

The workflow for revising an existing study design version and applying it to one particular site is as following:
Important! If a new revision is applied before previous one(s) are approved by a site user, then the approval will upgrade affected forms to the latest revision, regardless of which of the upgrades the site user approves. For information on site approval see Approving eCRF changes in Viedoc Clinic User Guide.
Note! An upgrade message is displayed for the site under the Messages pane on the study start page, even for the revisions with changes that do not affect data integrity, that is, when the forms are automatically upgraded.
If an iterative approach is used during development of a configuration, there will be many versions created as part of the workflow: [ setup --> test --> correct --> test --> setup --> test --> correct --> test --> … ]. It is still advisable to revise existing versions (instead of creating new versions) whenever possible to keep the number of versions to a minimum, as this will make the study design repository less cluttered and more easy to manage.
In Viedoc Designer, the following actions related to the study design can be performed, as described in the respective lessons:
In Viedoc Admin, you can see the current effective design for each site, assign a study design version to one or several sites, and apply a revised version of a study design to one or several sites. All these are described in detail in Assigning a study design.
Detailed information on changes in the current release, the release schedule and notes from previous releases can be found in the release notes on the Viedoc website here:
https://www.viedoc.com/support/release-notes/
For more information on future releases, please contact your Viedoc representative.
This page lists Viedoc's system-wide and design limitations. Some of these limitations are due to technical, regulatory, or security requirements, while others result from architectural design decisions that ensure system stability and integrity. For limitations related to specific features, please refer to the relevant sections in the Viedoc Learning.
NOTE: This lesson will contain only system-wide known limitations after the 4.84 release
We no longer support SMS notifications in the following countries:
This glossary contains common terms and acronyms found in the Learning. They are sorted in alphabetical order by the full term (not by abbreviation).
A B C D E F G H I J K L M N O P Q R S T U V W X Y Z
| Term | Abbreviation | Definition | ||
|---|---|---|---|---|
| Active Pharmaceutical Ingredient | API | The ingredient in a pharmaceutical drug or pesticide that is biologically active. | ||
| Application Programming Interface | API | A set of rules and protocols that allows software applications to communicate with each other. Note! Not to be confused with Active Pharmaceutical Ingredient. | ||
| Adverse Event | AE | Any unwanted effect caused by the administration of drugs. The onset of an adverse event may be sudden or develop over time. | ||
| Anatomic Therapeutic Chemical classification system | ATC | A drug classification system that classifies the active ingredient of drugs according to the organ or system on which they act and their therapeutic, pharmacological and chemical properties. | ||
| Annotated CRF | aCRF | A blank CRF with annotations that coordinate each datapoint in a form with its corresponding dataset name. In Viedoc, it equals to a printout of a form with Show IDs enabled. | ||
| Application Programming Interface | API | A set of routines, protocols, and tools for building software applications that specifies how software components should interact. | ||
| Attributable, Legible, Contemporaneous, Original, Accurate | ALCOA+ | The principles of data integrity. The plus sign denotes the four additions: Complete, Consistent, Enduring, and Available. | ||
| Audit trail | An audit trail (or audit log) is a security-relevant chronological record, set of records, or destination and source of records that provide documentary evidence of the sequence of activities that have affected a specific operation, procedure, or event at any time. The records are of importance for the clinical study, as specified by applicable international standards (from the FDA and EMEA). The audit trail allows reconstruction of the events relating to the creation, modification, or deletion of an electronic record. |
|||
| B | ||||
| Blinding | A procedure in which one or more parties to the trial are kept unaware of the treatment assignment(s). Single-blinding usually refers to the subject(s) being unaware, and double-blinding usually refers to the subject(s), investigator(s), monitor, and, in some cases, data analyst(s) being unaware of the treatment assignment(s). | |||
| C | ||||
| Case Report Form | CRF | A printed, optical, or electronic document designed to record all protocol-required information on each study subject. | ||
| The China Personal Information Protection Law | PIPL | The data privacy law in China, targeted at personal information protection. | ||
| Clinical Data Acquisition Standards Harmonization | CDASH | A standard developed by CDISC that provides guidance to develop the CRF. | ||
| Clinical Data Interchange Standards Consortium | CDISC | A global, open, multidisciplinary, non-profit organization that has established standards to support the acquisition, exchange, submission and archive of clinical research data and metadata. | ||
| Clinical Data Interchange Standards Consortium Define Extensible Markup Language | CDISC Define-XML | A metadata format defined by CDISC that is sent with every study in each submission, which tells the regulatory authorities what datasets, variables, controlled terms, and other specified metadata were used. | ||
| Clinic role | User roles in Viedoc that give access to Viedoc Clinic, such as Investigators, Monitors, and Data Managers.The clinic roles are study-specific. These roles, and the rights that belong to these roles, can be defined in Viedoc Designer. Each study can have an unlimited number of clinic roles. | |||
| Clinical data manager | Responsible for the management of the data in the clinical trial. Assists in protocol development and database selection and configuration. | |||
| Clinical Research Associate | CRA | A person employed by the sponsor, or by a CRO, acting on a sponsor’s behalf, who handles most of the administrative responsibilities of a clinical trial, acts as a liaison between investigative site and sponsor, monitors the progress of the investigator’s sites participating in a clinical study, and reviews all data and records before a monitor’s visit. | ||
| Clinical Review | CR | A clinical review gives the Monitor the possibility to mark forms as reviewed. | ||
| Clinical Trial Management System | CTMS | A Clinical Trial Management System is a software system used by biotechnology and pharmaceutical industries to manage clinical trials in clinical research. The system maintains and manages planning, performing and reporting functions, along with participant contact information, tracking deadlines and milestones. | ||
| Code of Federal Regulations | CFR | The codification of the general and permanent rules and regulations by the executive departments and agencies of the U.S. federal government. | ||
| Comma-Separated Values | CSV | A set of database rows and columns stored in a text file such that the rows are separated by a new line while the columns are separated by a semicolon or a comma. | ||
| Common event | An event that occurs separately or parallel to the workflow, for example concomitant medication, adverse event, medical history, dose adjustments, and daily compliance reporting. | |||
| Computerized Systems Used In Clinical Investigations | CSUCI | A guidance document established by the FDA intended to assist in ensuring confidence in the reliability, quality, and integrity of electronic source data and source documentation (that is, electronic records). | ||
| Concomitant Medication | CM | Drugs given to a patient at the same time, or almost at the same time, as the drug under study. | ||
| Contract Research Organization | CRO | A company that contracts with the sponsor to perform one or more of the sponsor’s duties in a clinical trial. | ||
| Coordinated Universal Time | UTC | The primary time standard by which the world regulates clocks and time. Viedoc stores all timestamps in UTC. In the cases when a time zone can be established (for example a specific site scope is selected), the timestamp is displayed with the time zone applied. | ||
| D | ||||
| Data Manager | DM | A user role in Viedoc with permission to lock and export data into different formats, view reports and metrics, and add pre-queries. | ||
|
De-identification |
Related to DICOM and involves: Removing direct identifiers, replacing identifiers with pseudonyms, scrubbing burned-in annotations in image pixels and removing private tags | |||
| Demo mode | A mode in Viedoc specifically used for demonstrations and training new Viedoc users. No real data should ever be entered in Demo mode. | |||
| Designer | A user role in Viedoc that can create the setup (design) of the study in Viedoc Designer. | |||
| DICOM |
DICOM (Digital Imaging and Communications in Medicine) files contain both imaging data and embedded metadata. Certain metadata fields may contain Protected Health Information (PHI), either directly (e.g., patient identifiers) or indirectly (e.g., dates or site-related information). Viedoc supports the de-identification of DICOM files. |
|||
| Dictionary Manager | A user role in Viedoc with permission to upload medical coding dictionaries. | |||
| Drug Information Association | DIA | A global forum for those involved in healthcare product development and lifecycle management to exchange knowledge and collaborate. | ||
| E | ||||
| Edit checks | A check of the data that verifies whether the data entered into the form are within a certain range that is specified in Viedoc Designer. If the entered data are outside the specified range, the system will automatically display a message that is defined under Query Message. | |||
| Electronic Case Report Form | eCRF | An electronic document designed to record all protocol-required information on each study subject throughout the study. | ||
| Electronic Common Technical Document | eCTD | A standard format for submitting applications, amendments, supplements, and reports to the FDA. | ||
| Electronic Data Capture | EDC |
The use of computerized systems to collect clinical trial data in electronic form as opposed to paper form. A software system, typically delivered as a cloud-based (SaaS) solution, used to collect and manage clinical trial data in electronic format as opposed to paper format. |
||
| Electronic Investigator Site File | eISF | The digital version of the minimum list of essential documents that a study site needs to maintain throughout a clinical trial. Included documents could be: Clinical Study Protocol, Investigator Brochure, Informed Consent, CVs etc. | ||
| Electronic Patient Reported Outcome | ePRO | A patient-reported outcome that is collected by electronic methods. Viedoc Me is the ePRO solution of Viedoc. | ||
| Electronic Trial Master File | eTMF | A type of content management system with a collection of essential documents which allows the conduct of a clinical trial to be reconstructed and evaluated. | ||
| eTMF Manager | A user role in Viedoc that has permission to manage the eTMF application in Viedoc Admin. The eTMF Manager maps Viedoc Clinic roles to eTMF roles. The eTMF Manager also has permission to manage the eTMF structure in Viedoc eTMF. | |||
| Event | A moment when the patient visits or contacts the clinic, or initiates an event through the Viedoc ePRO application Viedoc Me, and data are recorded. | |||
| European Medicines Agency | EMA | A decentralised agency of the European Union (EU) that is responsible for the scientific evaluation, supervision, and safety monitoring of medicines developed by pharmaceutical companies for use in the EU. | ||
| European Medicines Agency Good Clinical Practice Inspectors Working Group | EMA GCP IWG | The EMA GCP Inspectors Working Group focuses on harmonisation and co-ordination of GCP related activities at Community level. Involved in the preparation of new and revised guidance on GCP and community procedures relating to inspection. | ||
| Exchange Mechanism Standard | EMS | The exchange mechanism standard is a model for transferring eTMF data between sponsors, CROs, other stakeholders, and vendor systems. | ||
| Extensible Markup Language | XML | A markup language that defines a set of rules for encoding documents in a format that is both human-readable and machine-readable. | ||
| F | ||||
| Food and Drug Administration | FDA | An agency of the U.S. federal government’s Department of Health and Human Services that ensures the safety of foods, pharmaceuticals and other products. | ||
| G | ||||
| General Data Protection Regulation | GDPR | A regulation in the European Union (EU) law on data protection and privacy in the EU and the European Economic Area (EEA). Primarily aimed to give control to individuals over their personal data and to simplify the regulatory environment for international business by unifying the regulation within the EU. | ||
| Good Automated Manufacturing Practice | GAMP | A subcommittee of, and a series of good practice guides on drug manufacturing published by, the International Society for Pharmaceutical Engineering. | ||
| GAMP5 | The last major revision of the GAMP Guide for Validation of Automated Systems in Pharmaceutical Manufacture, released in February 2008. | |||
| Good Clinical Practice | GCP | A standard for the design, conduct, performance, monitoring, auditing, recording, analyses, and reporting of clinical trials that provides assurance that the data and reported results are credible, accurate, and that the rights, integrity, and confidentiality of trial subjects are protected. | ||
| Good Manufacturing Practice | GMP | The manufacturing guidelines recommended by the relevant agencies. | ||
| Globally Unique Identifier | GUID | A unique key containing numbers and letters that identifies the study. | ||
| H | ||||
| Health Insurance Portability and Accountability Act | HIPAA | A Privacy Rule that is the first comprehensive Federal protection for the privacy of personal health information. Research organizations and researchers may or may not be covered by the HIPAA Privacy Rule. | ||
| Hyper Text Markup Language | HTML | The standard markup language for documents designed to be displayed in a web browser. | ||
| I | ||||
| Identity Provider | IdP | A system entity that creates, maintains, and manages identity information. | ||
| Independent Ethics Committee | IEC | An institutional review board (IRB). | ||
| Informed Consent Form | A document containing all elements of a research study, explained in lay terms. The consent form must be signed prior to participation in any study activity. The affirmative decision of the IEC/IRB that the clinical trial has been reviewed and may be conducted at the institution site within the constraints set forth by the IEC/IRB, the institution, Good Clinical Practice (GCP), and the applicable regulatory requirements. The appointed ethical committee is responsible for reviewing each human subject protocol to ensure the ethical protection of these subjects. | |||
| Input factors | When used in randomization: Prognostic factors that might influence the effect of treatment on the subjects. | |||
| Institutional Review Board | IRB | Committee(s) made up of experts and community representatives who review and approve clinical trials to make certain that they fulfill stringent ethical standards to protect subjects’ rights as participants in an experiment. | ||
| International Council for Harmonisation of Technical Requirements for Pharmaceuticals for Human Use | ICH | An initiative that brings together regulatory authorities and pharmaceutical industry to discuss scientific and technical aspects of pharmaceutical product development and registration. | ||
| International Organization for Standardization | ISO | An organization promoting worldwide proprietary, industrial, and commercial standards. | ||
| Investigational Medicinal Product | IMP | A medicine for research. | ||
| Investigational Product | IP | A preventative (vaccine), a therapeutic (drug or biologic), device, diagnostic, or palliative used in a clinical trial. Also abbreviated IMP (Investigational Medicinal Product) and IMD (Investigational Medical Device). An investigational medical device is one that is the subject of a clinical study designed to evaluate the effectiveness and/or safety of the device. | ||
| Investigator Site File | ISF | The minimum list of essential documents that a study site needs to maintain throughout a clinical trial. Included documents could be Clinical Study Protocol, Investigator Brochure, Informed Consent, CVs etc. | ||
| Iyakuhinmei Data File | IDF | A medical coding dictionary used for coding clinical and drug safety data and for reporting safety data to the Japanese Pharmaceuticals and Medical Devices Agency (PMDA). | ||
| J | ||||
| Japanese Pharmaceuticals and Medical Devices Agency | PMDA | PMDA (Pharmaceuticals and Medical Devices Agency) is a Japanese regulatory agency, working together with Ministry of Health, Labour and Welfare. Their obligation is to protect the public health by assuring safety, efficacy and quality of pharmaceuticals and medical devices. | ||
| JavaScript | JS | A scripting language, primarily used on the web. Used to enhance HTML pages and is commonly found embedded in HTML code. Viedoc is using JS to define advanced edit checks, expressions, and comparisons. | ||
| K | ||||
| Kaifu | The send/receive/return process for handling booklets | |||
| Key Risk Indicator | KRI | In Viedoc Reports, the Key Risk Indicators are the measurement of unfavorable events that can adversely impact a study, and are measured by site. | ||
| L | ||||
| Linking form | A linking form is a form that contains a link to refer to another form. There can be one or more instances of the linked form. | |||
| Linked form | A linked form is a form that is linked to from another form (a linking form). | |||
| M | ||||
| Medical coding | The process of translating reported events like Adverse Events, Medical History and Concomitant Medications in a universal code according to a medical coding dictionary. | |||
| Medical Dictionary for Regulatory Activities | MedDRA | A medical coding dictionary developed by the Maintenance and Support Services Organization (MSSO). MedDRA is supported by ICH. | ||
| N | ||||
| National Medical Products Administration | NMPA | The Chinese agency for regulating drugs and medical devices. | ||
| Numeric rating scale | NRS | A numeric rating scale using numbers to identify the items in the scale, on a scale of 0 to 10. Commonly used to evaluate pain intensity. | ||
| O | ||||
| Object Identifier | OID | An identifier mechanism for naming any object, concept, or "thing" with a globally unambiguous persistent name. | ||
| Operational Data Model | ODM | A standard for electronic clinical data as defined by CDISC. The highlights of ODM include audit trail, utilization of XML technology, and machine-readable and human-readable data. All information is independent of databases, and storage of ODM is independent of hardware and software. | ||
| Output factors | When used in randomization: the result after a patient has been randomized, that is, the treatment group or kit number (in case of a blinded output) that the patient is assigned to. | |||
| P | ||||
| Patient Reported Outcome | PRO | A health outcome directly reported by the patient who experienced it. | ||
| Portable Document Format Archive | PDF/A | An ISO-standardized version of the PDF specialized for use in the archiving and long-term preservation of electronic documents. | ||
| Post Marketing Surveillance | PMS | The practice of monitoring the safety of a pharmaceutical drug or device after it has been released on the market and an important part of the science of pharmacovigilance. Viedoc PMS is Viedoc's electronic data capture solution developed especially for post-marketing surveillance studies. PMS in Japan differs from other PMS studies in the world, with concepts such as kaifu function and booklets. | ||
| Protected Health Information | PHI | Protected Health Information, for example, patient identifiers. Which can be personal identifiers. Personal identifiers are data elements that can directly (such as the patient name) or indirectly (such as dates or site-related information) identify an individual. |
||
| Q | ||||
| Quality Control | QC | The operational technique and activities undertaken within the quality assurance system to verify that the requirements for quality of the trial are met. | ||
| R | ||||
| Randomization | A method based on chance by which study participants are assigned to a treatment group. Randomization minimizes the difference among groups by equally distributing people with particular characteristics among all the trial arms. | |||
| Randomization and Trial Supply Management | RTSM | A system that unifies the randomization, allocation, and supply management in a clinical trial. | ||
| Representational State Transfer | REST | A REST API (also known as RESTful API) is an application programming interface (API or web API) that conforms to the constraints of REST architectural style and allows for interaction with RESTful web services. | ||
| S | ||||
| Scheduled event | Events to the clinic by the patient that are defined in the study protocol. The events can also be subject-initiated through Viedoc Me, the ePRO application. | |||
| Study/Trial Design Model in XML (SDM-XML) | SDM | An extension of ODM-XML which allows organizations to provide rigorous, machine-readable, interchangeable descriptions of the designs of their clinical studies, including treatment plans, eligibility and times and events. SDM-XML defines three key sub-modules – Structure, Workflow, and Timing – permitting various levels of detail in any representation of a clinical study’s design. | ||
| Study Data Tabulation Model | SDTM | A CDISC standard for how to structure raw data for a submission. SDTM is one of the required standards for data submission to FDA (U.S.) and PMDA (Japan). |
||
| Security Assertion Markup Language | SAML | An open XML-based standard for exchanging authentication and authorization identities between security domains. | ||
| Security Token Service | STS | An open standard web service for issuing, validating, renewing, and cancelling security tokens for use with, for example, an API. | ||
| Serious Adverse Event | SAE | Any event resulting in death, a life-threatening situation, hospitalization, or prolonged hospitalization, disability, incapacity, or congenital defect. |
||
| Single Sign-On | SSO | An authentication process that allows a user to access multiple applications with one set of login credentials. | ||
| Site | A clinic or other medical institute visited by subjects and where their data are recorded. | |||
| Site Manager | SIM | A user role in Viedoc Admin that can edit the details of their respective sites and invite site users to their sites. | ||
| Software As A Service | SaaS | Also known as web-based software, on-demand software, cloud software, and hosted software. Typically accessed by users via a web browser. | ||
| Standard Operating Procedure | SOP | Detailed, written instructions to achieve uniformity of the performance of a specific function. | ||
| Source Data | The original data when first recorded. | |||
| Source Data Verification | SDV | The process by which data within the CRF is compared to the original source of information (and vice versa). Helps to ensure eCRF and source records together meet various protocol and clinical expectations. | ||
| Source Documentation | All original records and certified copies of original records of clinical findings, observations, or other activities in a clinical trial necessary for the reconstruction and evaluation of the trial. Source data are contained in the source documents. | |||
| Sponsor | Any organization that provides the institutional base for clinical trial researchers. This includes commercial groups: pharmaceutical companies, non-profit organizations, universities, and medical centers. | |||
| Statistical Analysis System | SAS | A format used for statistical analysis in the SAS software suite. | ||
| Study crew | Viedoc users and all staff involved in the clinical trial. In most cases, these terms refer to users of Viedoc Clinic (see also Clinic role). | |||
| Study design | The design of the study that covers all the details about how the study is supposed to be performed, such as treatment details, medical examinations and other data to be collected, the workflow, and the Viedoc permissions of the different clinic roles that contribute to the study. The study design is set up in accordance with the clinical trial protocol. | |||
| Study Manager | STM | A user role in Viedoc that has permission to manage the administration of the study in Viedoc Admin. The study manager invites the study crew, adds sites, and applies study designs to sites. This user role is usually assigned to the project manager of the clinical trial. | ||
| Subject | A person participating in the clinical trial. Also referred to as patient. | |||
| System roles | User roles in Viedoc that are defined by the system and give access to Viedoc Admin and/or Viedoc Designer. Examples are: Study Manager, Site Manager, Designer, Dictionary Manager, Unblinded Statistician. | |||
| T | ||||
| Transport Layer Security | TLS | Protocols designed to provide communications security over a computer network. | ||
| Trial Master File | TMF | A type of content management system for the pharmaceutical industry, providing a formalized means of organizing and storing documents, images, and other digital content for clinical trials that may be required for compliance with government regulatory agencies. | ||
| U | ||||
| Unblinded statistician | A user role in Viedoc that manages the randomization and kit allocation lists in Viedoc Admin. | |||
| Unscheduled event | Additional events to the clinic by the patient that are not pre-defined in the study protocol. | |||
| V | ||||
| Viedoc Inspection Readiness Packet | VIRP | A file that can be downloaded in Viedoc, containing all the information needed to fulfill regulatory expectations. | ||
| W | ||||
| World Health Organization Drug Dictionary | WHODrug | A dictionary maintained and updated by Uppsala Monitoring Centre. | ||
| WHODrug Koda | An AI-driven coding engine by UMC that connects via REST API to automatically code verbatim entries to WHODrug Global and select the most appropriate ATC code. | |||
| X | ||||
| Y | ||||
| Z | ||||
It is important to be fully prepared for an inspection of relevant documentation about the EDC system used in a clinical trial. If the correct documentation is available for review by the regulatory authorities and certain validations have been performed, inspectors can then assess the systems used when collecting subject data in clinical trials.
There are also specific expectations that sponsors must comply with, depending on the regulatory body, European Medicines Agency (EMA) Food and Drug Administration (FDA) and the Japanese Pharmaceuticals and Medical Devices Agency (PMDA) even though these are similar in that they all expect the sponsor to have a complete understanding of the system. They also expect that the sponsor (or Contract Research Organization (CRO), if delegated) fully understands the functionality of the EDC system being used and can demonstrate this understanding and explain how the system has been validated.
To assist in preparing for inspections, Viedoc has developed the Viedoc Inspection Readiness Packet (VIRP) which provides you with the information you need in order to fulfil regulatory expectations and requirements.
The VIRP is available for every release of Viedoc. The VIRP introduction describes the contents of VIRP in more detail, and also talks about additional documentation you should provide. The VIRP introduction is included in VIRP.
eLearning: Viedoc also provides an eLearning lesson - Inspection Readiness when Working in Viedoc, which describes in detail the information needed step-by-step, as well as having additional information about potential pitfalls, what happens when new functionality is introduced in a release, about backward compatibility and more.
The Viedoc Release Binder. We also store a snapshot of the information in our development environment for each release. This information is included in the Release Binder for that release which is stored in SharePoint and can be shared with inspectors either in a webinar or onsite.
When it comes to preparing for regulatory inspections, there are different areas of responsibility for the Sponsor/CRO and Viedoc.
The Sponsor/CRO should be able to rely on Viedoc standard qualification documentation as there are no sponsor or study-specific software modifications made to the standard product. The configuration of Viedoc for use in a study is done using only functionality that has been validated before being released to the study.
Each new Viedoc version is fully validated before release - which takes place every 6-8 weeks. These releases are installed on all production servers at the same time, meaning all customers and all studies are updated at the same time. Furthermore, we ensure that ongoing studies are not affected by fulfilling the following two requirements:
The new release must be 100% backward compatible.
Any new functionality in the release shall be disabled for ongoing studies by default.
Some areas and activities, however, remain the responsibility of the sponsor/CRO and should be documented:
It is a Sponsor/CRO responsibility to validate the study configuration and confirm that the study has been set up in accordance with the study protocol. This validation should be documented.
The different versions of systems used during the study and a synopsis of the differences between the versions should be stored as part of the study record in the sponsor (e)TMF.
A risk-based assessment documenting the decision to rely on VIRP should be carried out.
A checklist of the required functions (such as randomization module, patient ePRO module, coding module) for your trial on our epic1 level, and where necessary, individual features1.
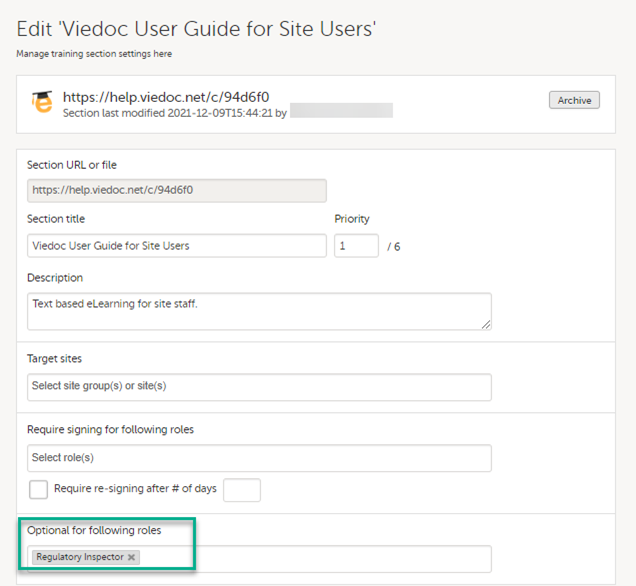
When the inspector visits, they must have access to Viedoc. Regulatory inspectors have the legal right to view all data in the study – even patient data and hidden (anonymized) items in the audit trail. The study manager should invite the inspector to the Viedoc user role Regulatory Inspector when they arrive.
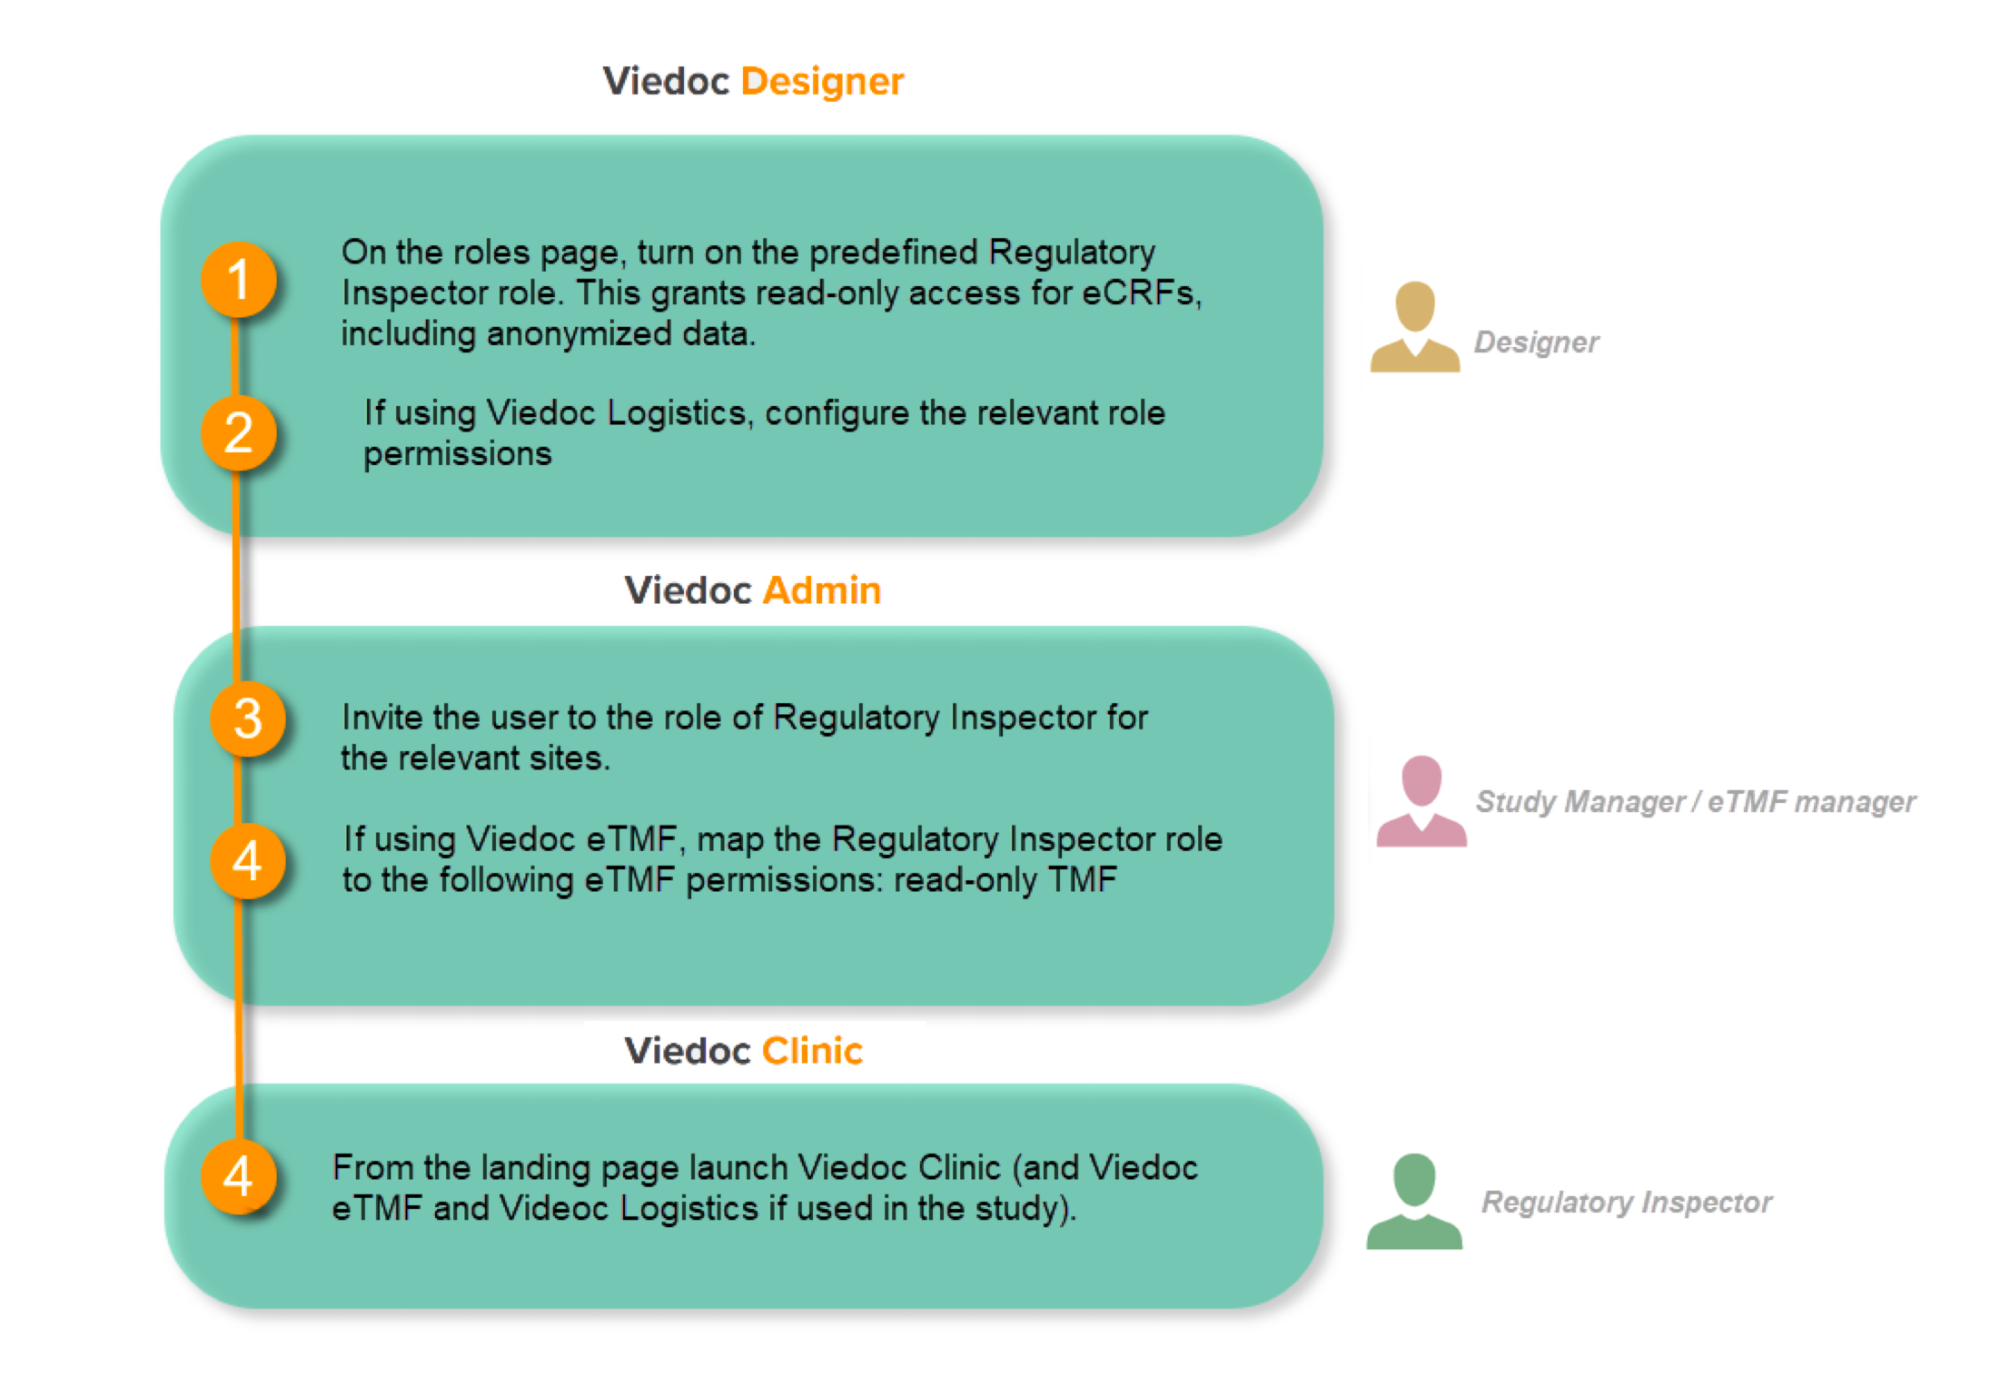
Follow these steps to ensure that the inspector has all the correct access permissions in Viedoc:
This step is performed by the Designer.
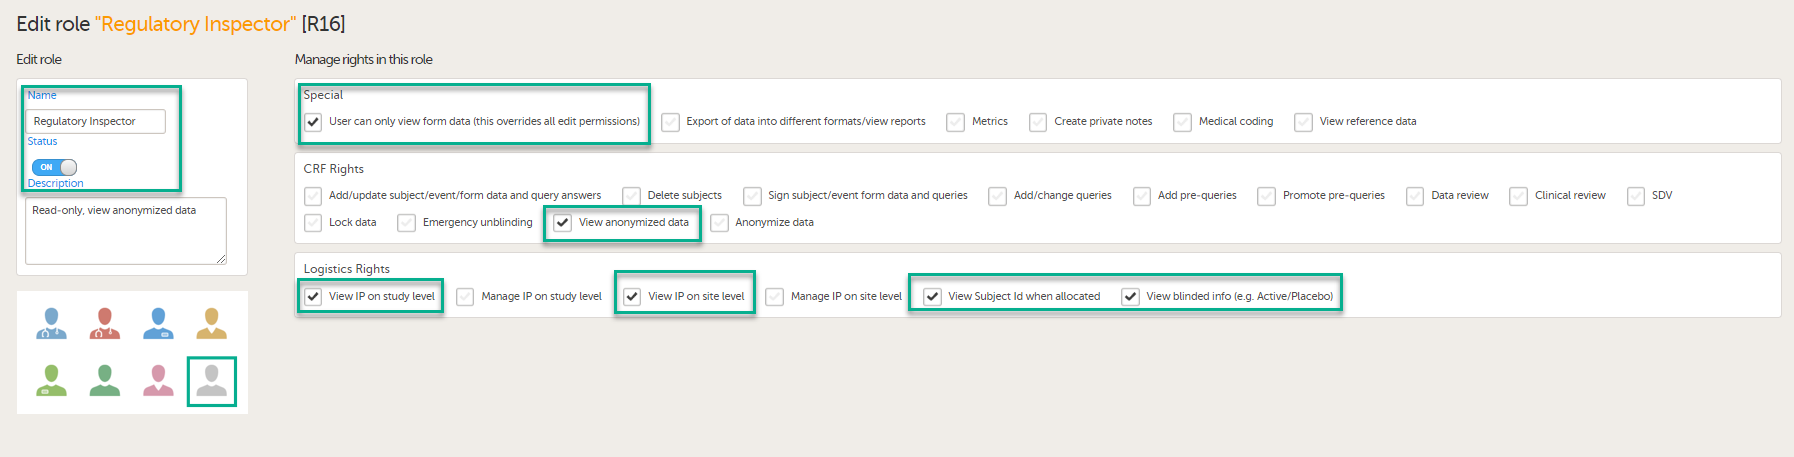
In Viedoc Designer, on the Roles page, configure the Regulatory Inspector user role and make sure it is turned on.
To allow the Regulatory Inspector access to study data, their role must be configured with Read-only for form data and View anonymized data and blinded data permissions on the Roles page.
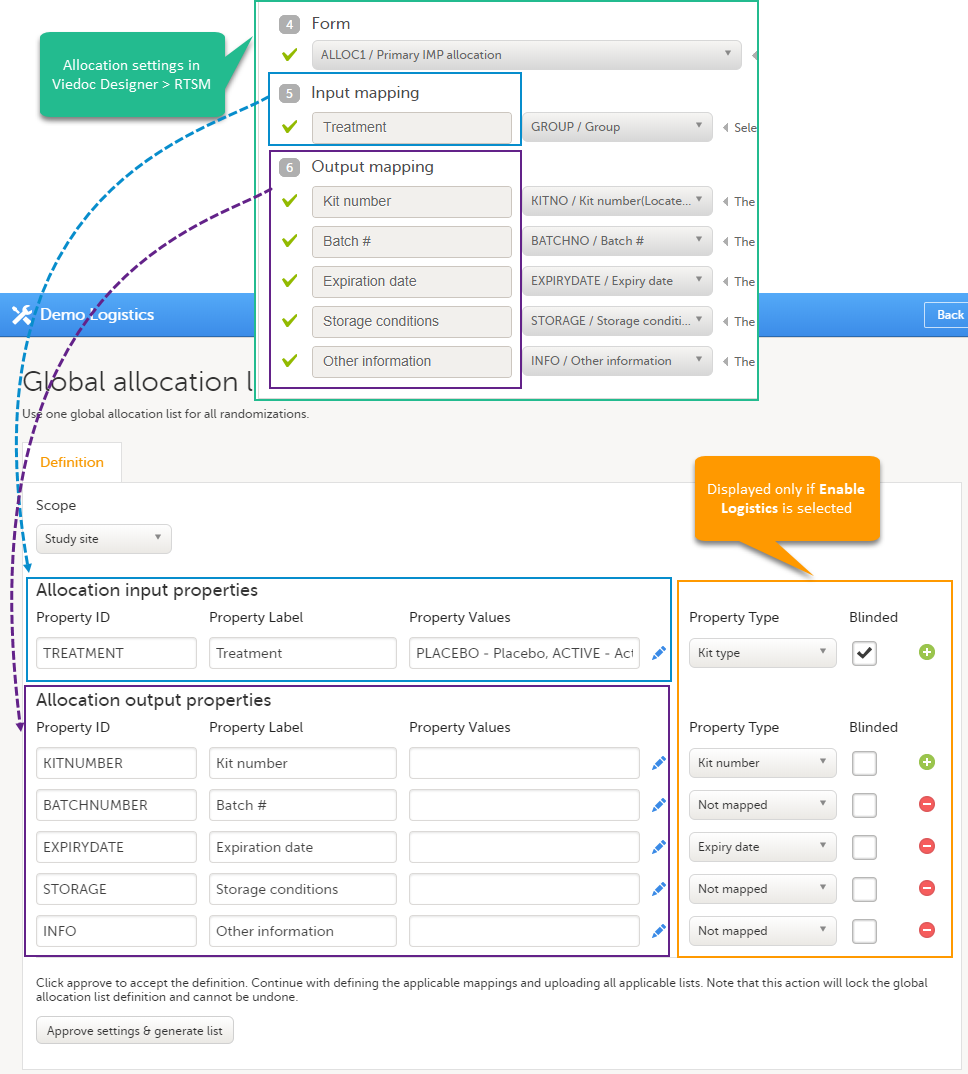
If the study uses Viedoc Logistics, the following role permissions in Logistics Rights for the Regulatory Inspector role must be configured on the Roles page:
View IP (Investigational Product) on study level,
View IP on site level
View subject ID when allocated
View blinded info (e.g. Active/Placebo).
See the image below and Configuring roles.

Note! Should the inspector also require access to Viedoc Admin or Viedoc Designer, and the study is managed by a Viedoc representative, you are always welcome to contact your Viedoc representative if you need assistance.
These steps are performed by the Study manager.
In Viedoc Admin, the study manager invites the Regulatory Inspector to the study for all sites. See Managing users.
The inspector should also be invited to the study with the role of Unblinded Statistician, in order to have access to the randomization lists and be able to download them in Viedoc Admin.
Note! This role is only used for randomized studies, when it is necessary to have control over who has access to and can manage the randomization lists.
The inspector should also be able to access the eLearning. There is a requirement for customers to be able to present to regulatory inspectors, on request, the version of the eLearning used to train staff during the course of the study.
The Documentation tab under Study settings provides a list of all documentation and training sections.

The Regulatory Inspector role should be granted access to the relevant eLearning documentation on the Study settings page.
See the Viedoc Admin User Guide Setting up user documentation and training
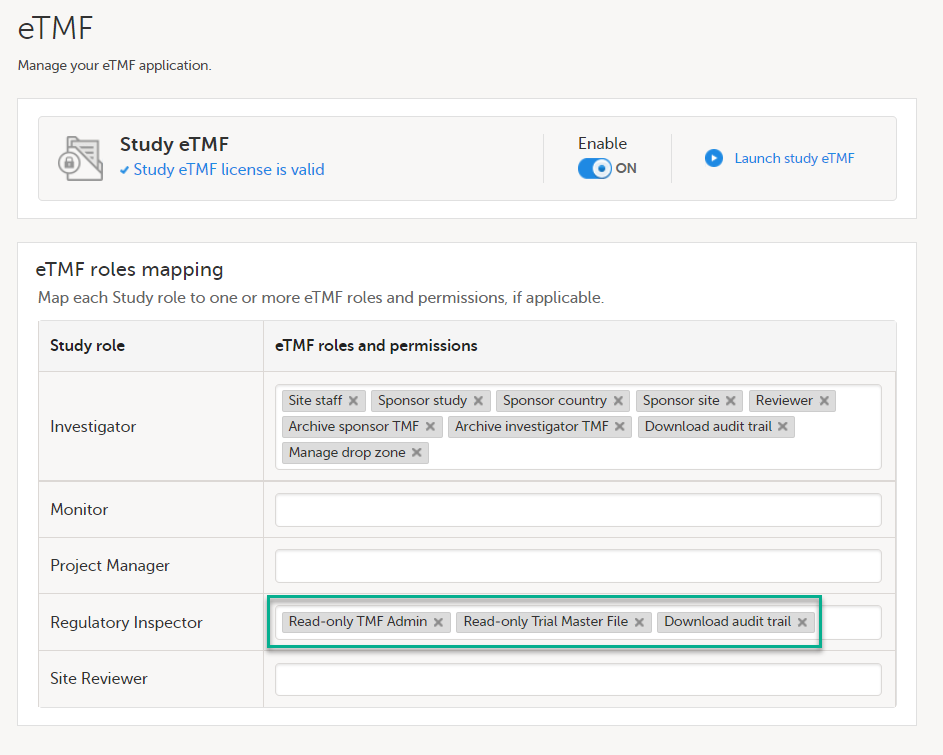
If the study uses Viedoc eTMF, the study manager/eTMF manager should map the Regulatory Inspector study role to an eTMF role with at least the following permissions: Read-only TMF Admin, Read-only Trial Master File and Download audit trail.

See Viedoc User Guide for eTMF Managers - Managing Viedoc eTMF - Mapping user roles.
These steps are performed by the Regulatory Inspector.
The regulatory inspector accepts the invitation and activates their account - see Viedoc User Guide for Site Users: Managing your Viedoc account
The inspector can now launch Viedoc Clinic and the Viedoc eTMF from the landing page.
1 At Viedoc, we publish our User Requirements Specification in an easy-to-understand format made up of epics, features, and user stories.
Epics describe an overall module within Viedoc, such as audit trail, ePRO, and medical coding.
Features describe a given functionality in more detail, such as Viedoc Connect, form link items, and email alerts.
User stories are the detailed, broken-down requirements used by the system developers when designing, implementing, and validating Viedoc.
This is the central directory of all the Viedoc Learning user guides, designed to support users across various products, roles, and functionalities. You can access each guide using the links below.
Product user guides:
Role-based user guides:
PMS user guides:
This lesson is intended as a guide for which production instance to use. We recommend using your training instance in the same region as the production instance you plan to use.
Viedoc maintains server instances in Europe, Japan, China and the US. Each region has a primary server as well as a redundancy. They are served out of two Microsoft Azure regions as follows: The US instances are in US West and US East. The European instances use France Central and France South, the Japanese instances use Japan East and Japan West , and the mainland China instances use China North and China South. These locations are chosen for connectivity and privacy regulation purposes.
Each region has a training and a production instance for your studies.
When a production study is added in Viedoc, it is added within an organization in one of the four production instances. We recommend that the entire study should use the chosen production instance, but this is not an absolute must. It is possible to run different studies on different instances.
Certain regions have alternate capabilities which use different sub-processors. You can find out more here: Service Status.
Note! Viedoc Connect is disabled on the Chinese instances.
For a more in-depth technical description, please see Viedoc Technical Description.
Up to date information on the status of Viedoc server instances and incident reporting can be found on the Status page: https://status.viedoc.com/. Here you can also subscribe to receive updates as they are posted.
Note! Sometimes there may be a need to work on several servers for reasons such as the following:
See also Navigating GDPR for Clinical Trials for more information about GDPR for clinical trials.
A short summary of the available Viedoc instances is listed below.
Note! The EU instance is recommended for customers that must maintain GDPR compliance.
Note! This instance is recommended for customers that must maintain APPI compliance.
Note! This instance is recommended for customers that must maintain compliance with HGR and PIPL.
More information on managing studies in China can be found here: Managing studies in China.
For connecting your development environment or any other system to the Viedoc public web service using the Windows Communication Foundation (WCF) standards, use the following:
For the EU:
https://v4api.viedoc.net/HelipadService.svc?wsdl
https://v4apitraining.viedoc.net/HelipadService.svc?wsdl
For Japan:
https://v4apijp.viedoc.net/HelipadService.svc?wsdl
https://v4apitrainingjp.viedoc.net/HelipadService.svc?wsdl
https://v4apistagejp.viedoc.net/HelipadService.svc?wsdl
For China:
https://api.viedoc.cn/HelipadService.svc?wsdl
https://apitraining.viedoc.cn/HelipadService.svc?wsdl
For the USA:
https://api.us.viedoc.com/HelipadService.svc?wsdl
https://apitraining.us.viedoc.com/HelipadService.svc?wsdl
It is important to know that when transferring data from one region to another you will need to comply with the local data privacy legislation, for example:
It is not possible to share a study between instances, but it is possible to run a separate study on an alternate instance. Doing so present some things to be considered:
Below we have listed a few scenarios advising on which instances we would recommend using.
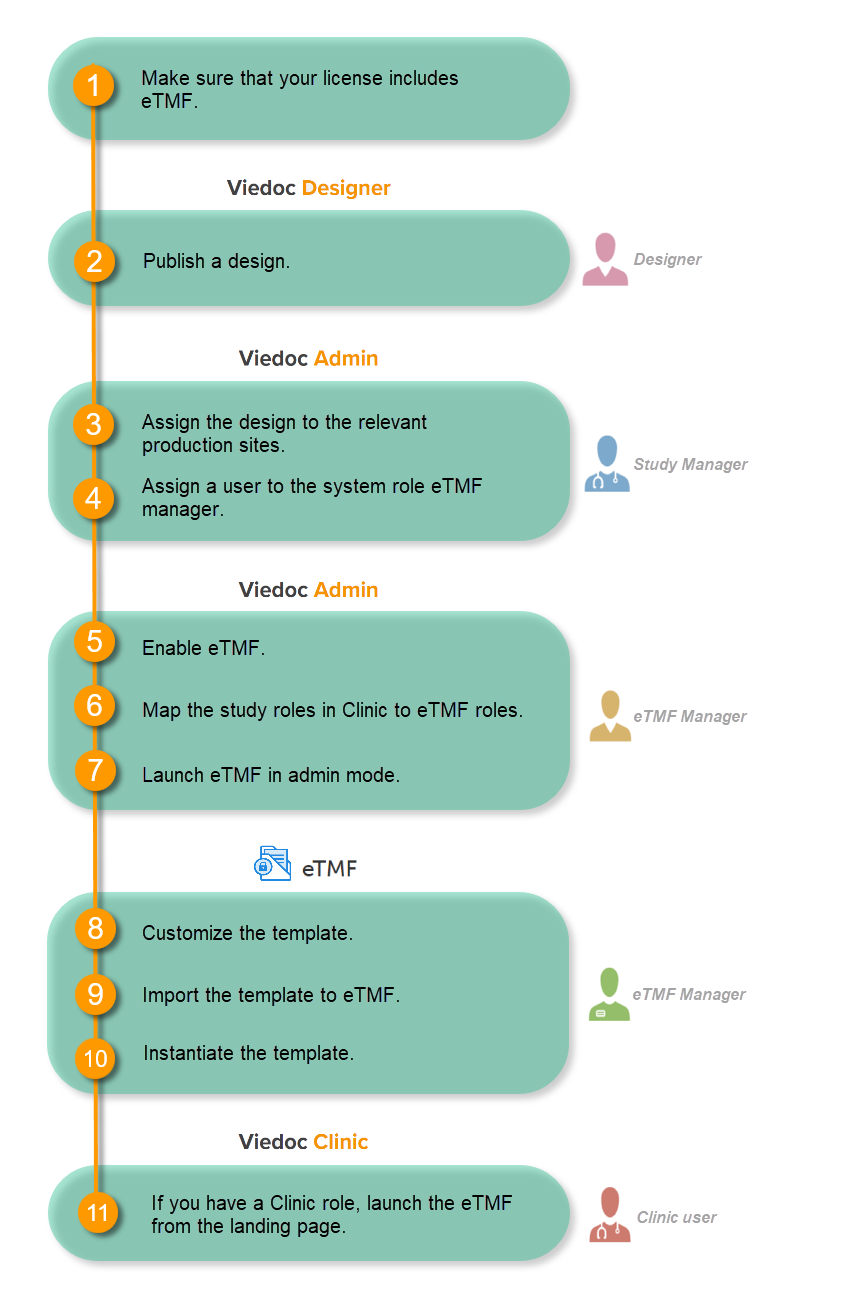
Make sure you have a valid license for using Viedoc eTMF.
This step is performed by the Designer.
Note! To publish the CRF design, you only need to have the roles configured and enabled, and a form added to the start event in your workflow (the form can be without any items at this stage). The actual CRF design can be added in subsequent versions.
See Publishing a study design.
This step is performed by the Study Manager.
This step is performed by the Study Manager.
See Managing users.
This step is performed by the eTMF Manager.
| 1 |
In the study details page, select the tools symbol in the eTMF area: 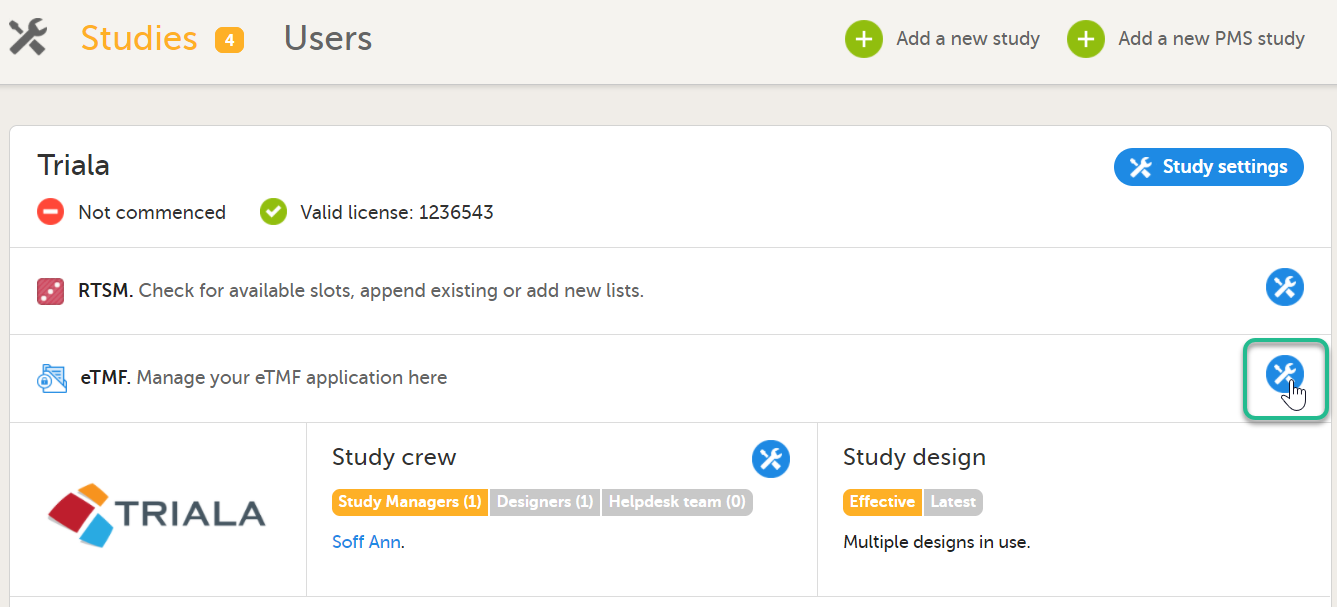 |
| 2 |
Toggle the Enable switch to ON in the eTMF settings pop-up: 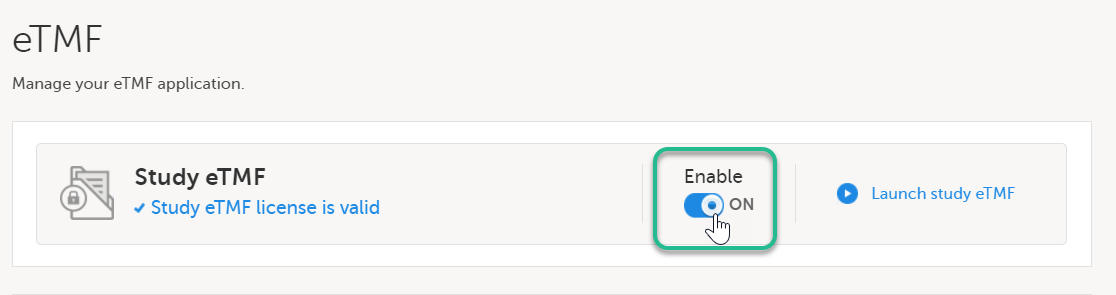
|
This step is performed by the eTMF Manager.
| 1 |
In the eTMF roles mapping area, select the eTMF roles and permissions that you want to map to the Viedoc study roles: 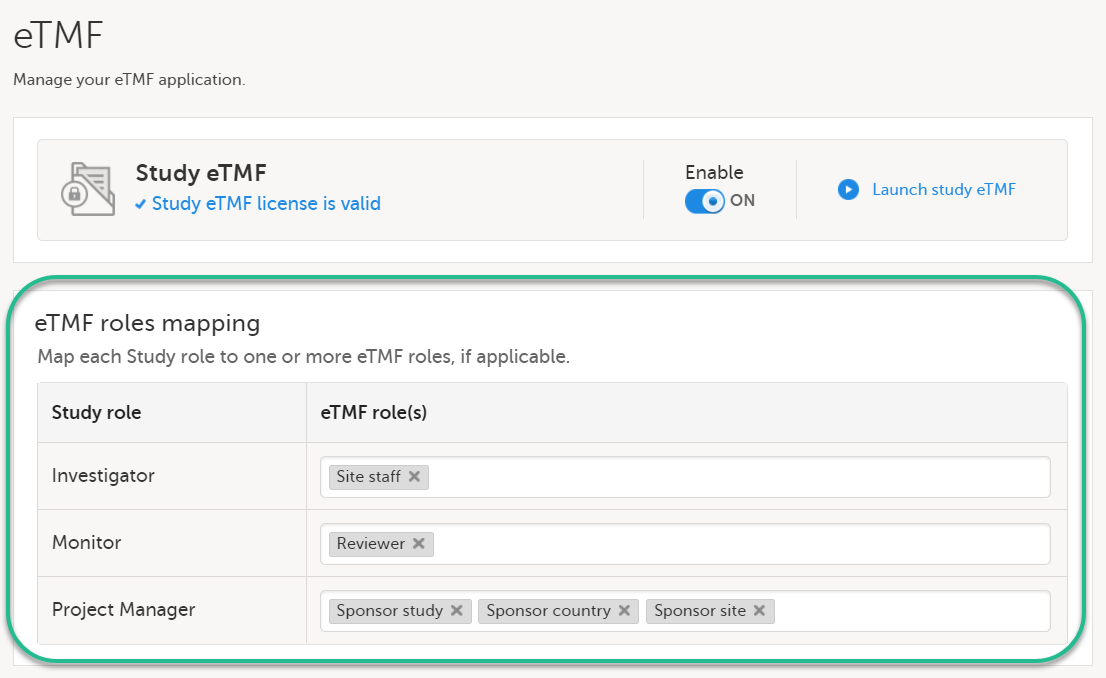
|
| 2 | Select Save changes. |
This step is performed by the eTMF Manager.
| 1 |
On the study details page, select the tools symbol in the eTMF area: |
| 2 | Select Launch study eTMF: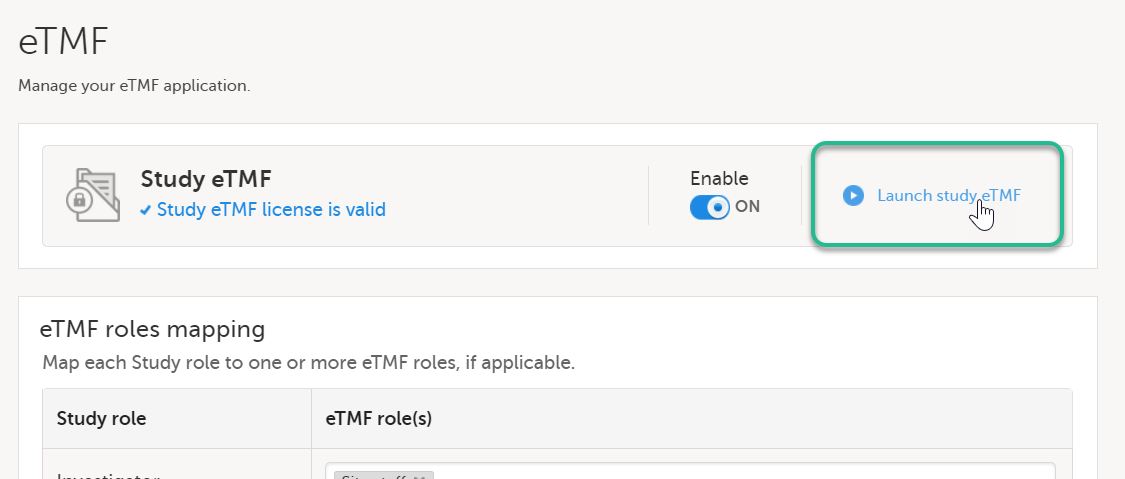 |
This step is performed by the eTMF Manager.
The first time you set up your eTMF application, you begin with a baseline template provided by Viedoc. This template is not intended to be used as it is, but to be adapted to the needs of your organization. See Viedoc-provided templates to download the template.
Once customized, import the template to eTMF, see Import the template.
Imported templates can be customized to fit your study needs.
To export a template for customization:
| 1 |
In Viedoc eTMF, select the TMF Admin view: 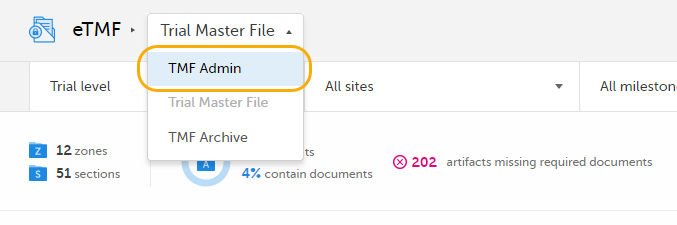
|
| 2 |
Select the Templates tab: 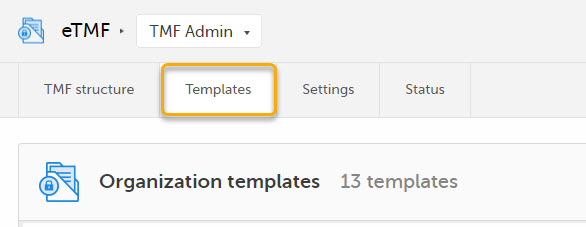
|
| 3 |
Select Export for the template you want to customize. The template is downloaded in Excel format. 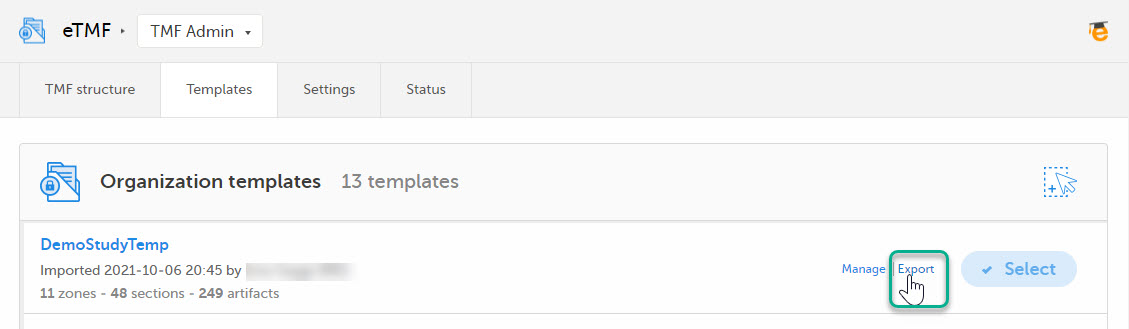
|
There are two types of templates:
It is recommended that you adapt the eTMF template to your specific documentation landscape. For example, you can customize, add, or delete zones, sections, and artifacts.
See also Customizing a template.
This step is performed by the eTMF Manager.
| 1 |
Select Import in Organization templates or Study templates, depending on what type of template you're importing. 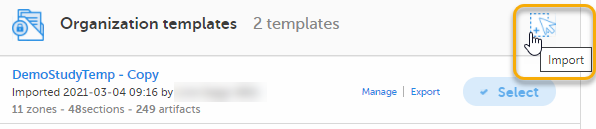
|
| 2 |
Once imported, select your template to make it available in the TMF structure. 
|
This step is performed by the eTMF Manager.
On the TMF structure tab, select the Instantiate button for the template.
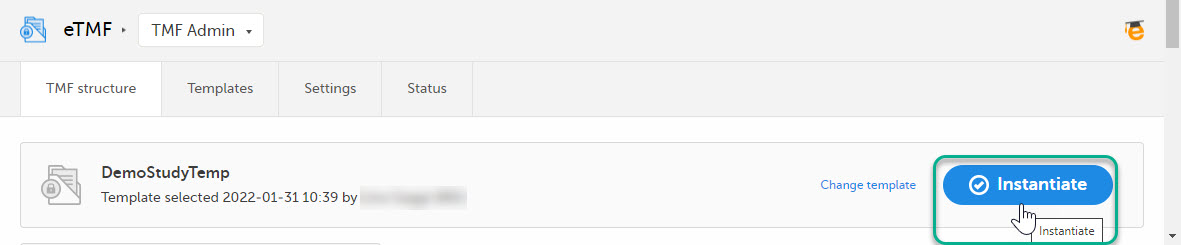
The template is now applied to the trial and the eTMF structure is available for end users to work with.
This step is performed by a Clinic user with a mapped eTMF role.
Select the eTMF icon on the Viedoc landing page:
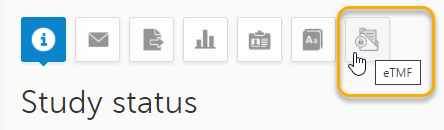
The eTMF application opens.
This step is performed by the Designer.
To let Clinic users use Viedoc Reports, their roles must be configured with Metrics and Reports permissions in the Roles page. The Reports option becomes visible when selecting Metrics.
To be able to download report files, the user also needs the permission Export of data into different formats/view reports.

Note! The export is allowed only if the export permission is applicable to all the assigned sites.
See Configuring roles.
This step is performed by the Designer.
Set an expression for how and when a subject is considered both screened and enrolled in the study.
See Subject status.
This step is performed by the Designer.
| 1 |
In Viedoc Designer, select the study for which you would like to configure Viedoc Reports. |
| 2 |
In the Global design settings field, click Edit. 
|
| 3 |
In the Reports configuration field, click Edit. 
|
| 4 |
You can now configure the settings by clicking Edit in one of the fields: Visibility settings, Dashboard, Demographics, Adverse events, and Custom reports. See Configuring Viedoc Reports for details. 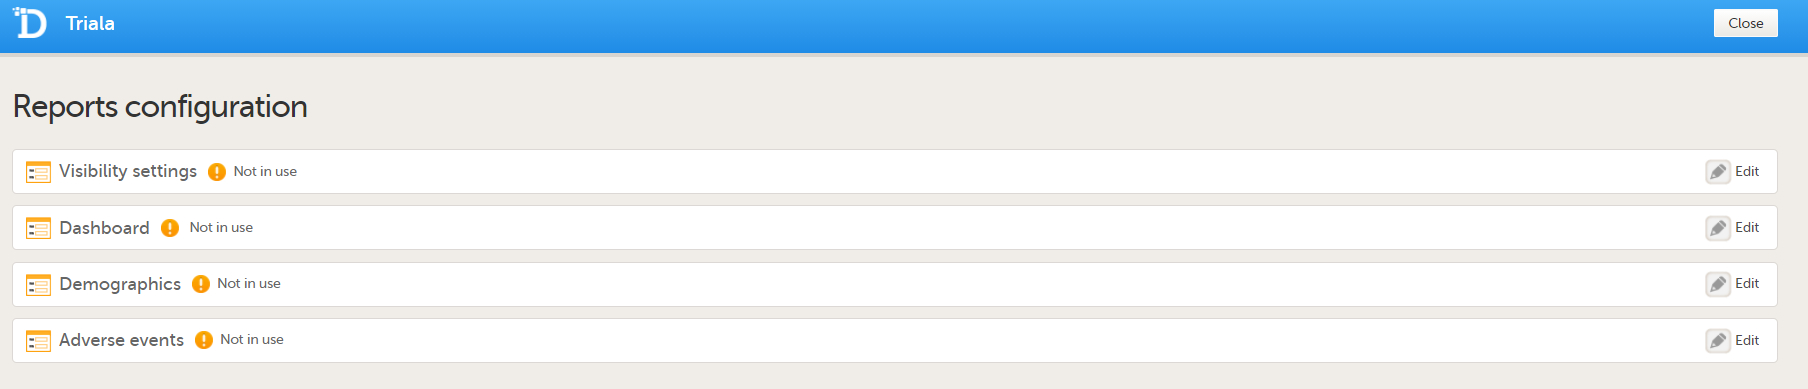
After editing and saving any changes, the Not in use status changes to In use. |
| 5 |
Publish your global design settings. 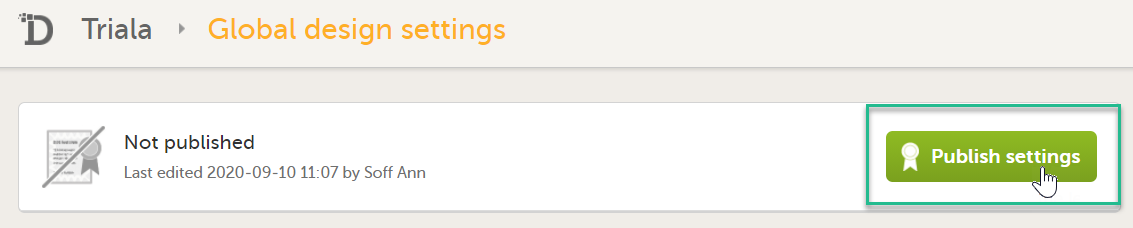
|
| 6 | Publish your design. See Publishing a study design. |
This step is performed by the Study Manager.
This step is performed by the Study Manager.
| 1 |
Click Study settings for the study in which you want to set up Viedoc Reports. 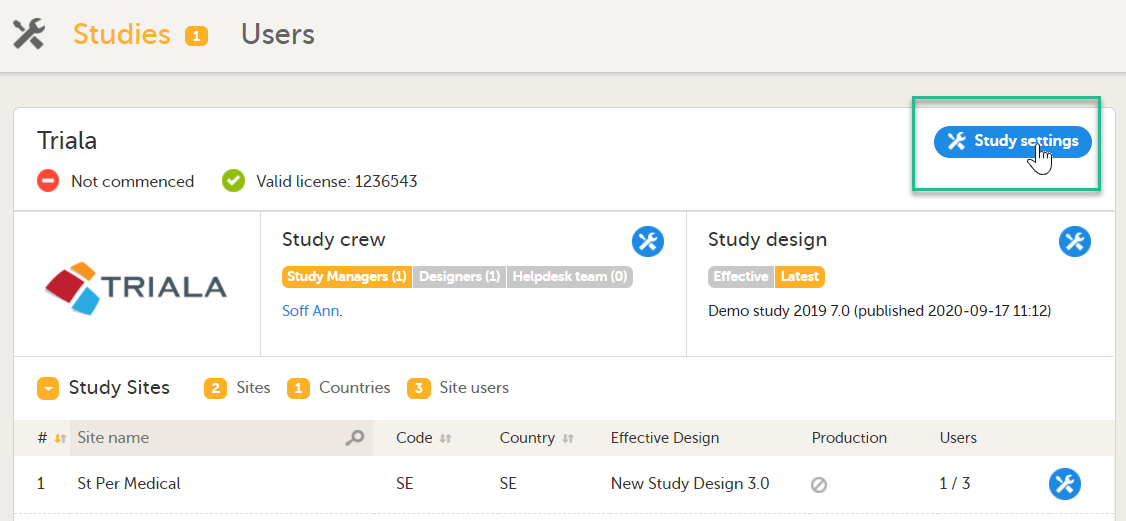
|
| 2 |
In the Study settings pop-up window, enter the total number of expected screened and enrolled subjects and the expected end date of the enrollment period. 
Note! This data must be entered on both study level and for each individual site. |
| 3 |
Scroll down to and click Show more options. 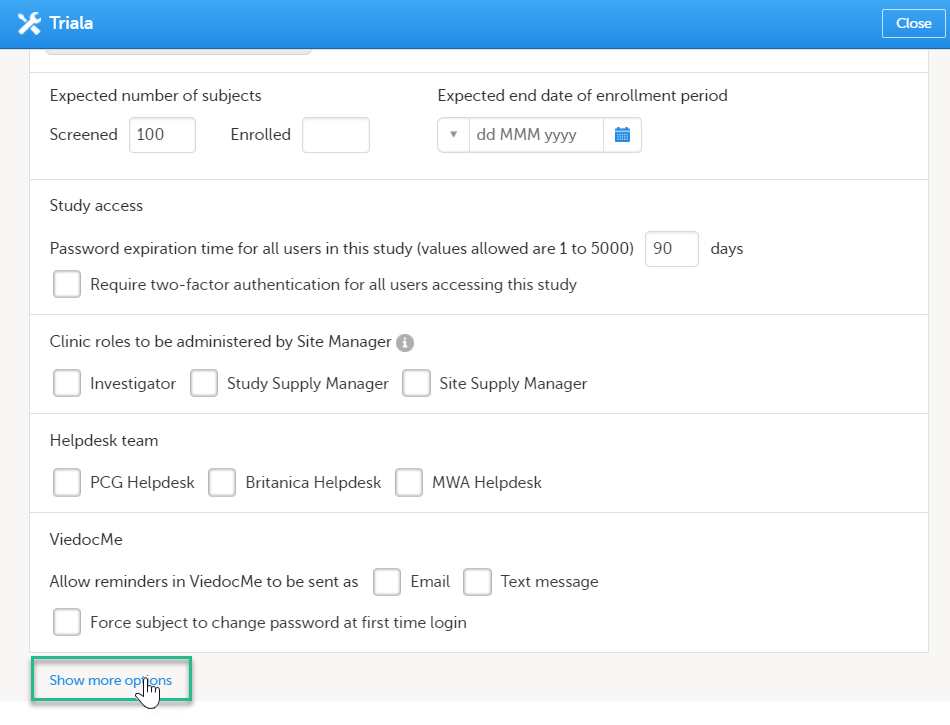
|
| 4 |
Select Enable Viedoc Reports and click Save changes. 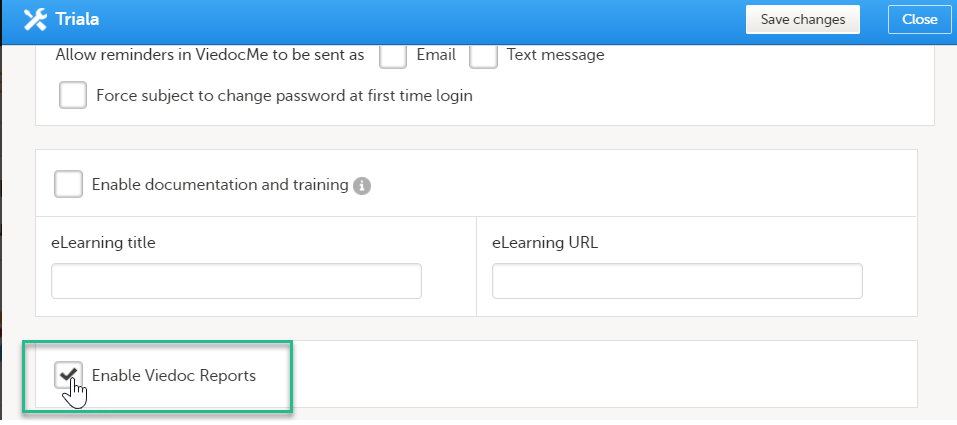
|
This step is performed by the Clinic user.
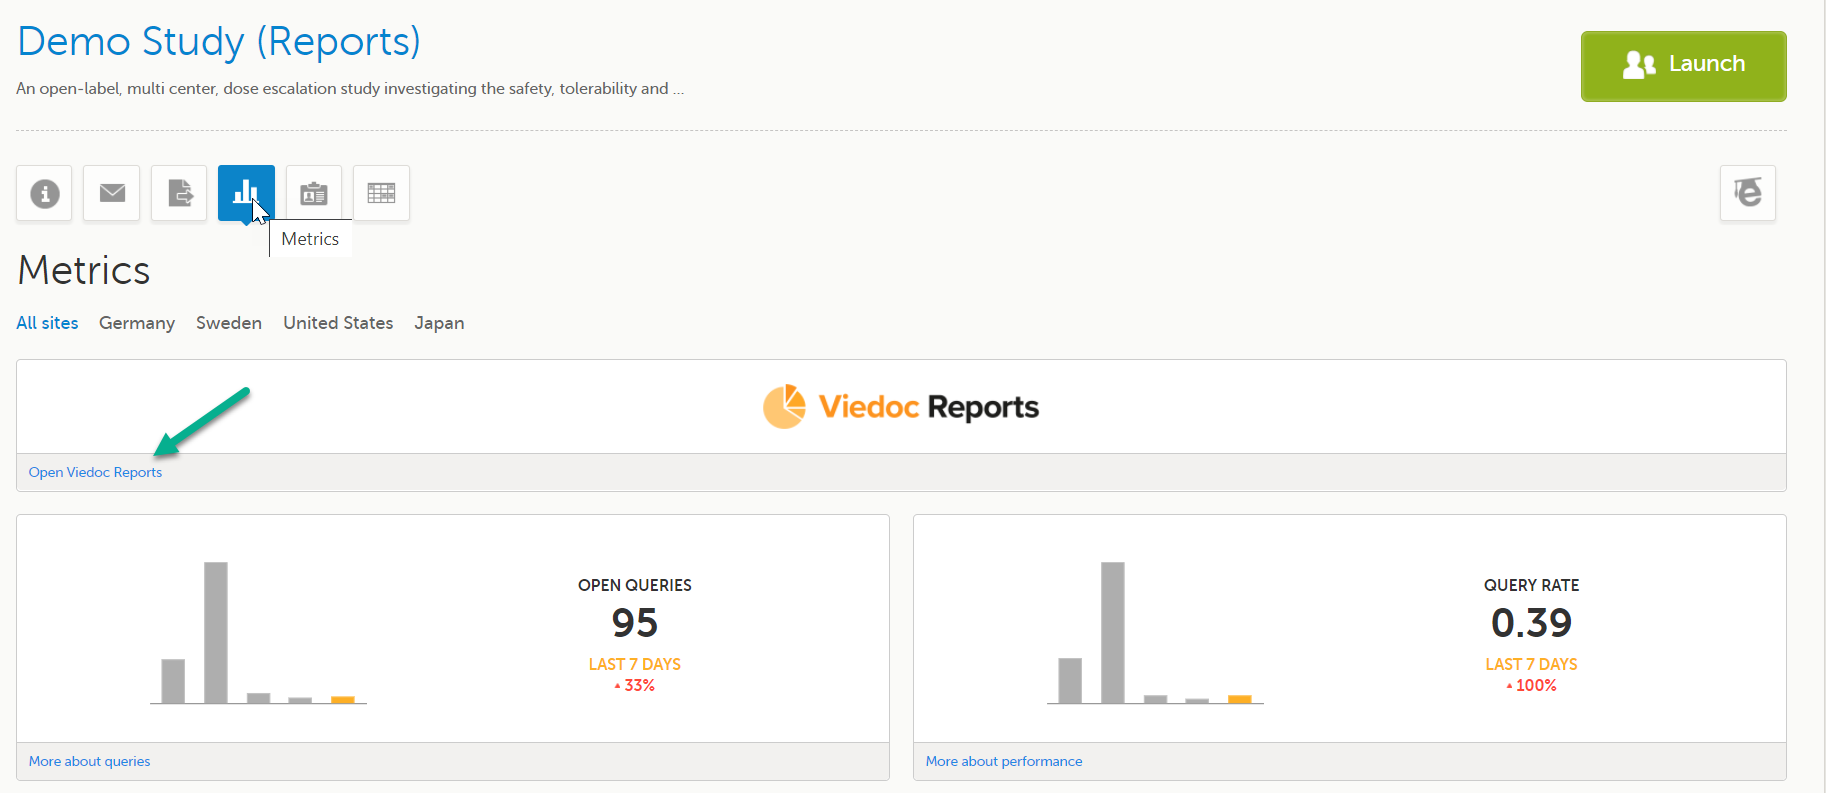
Launch Viedoc Reports from the Metrics feature on the study start page.
Thorough preparation for inspection of the EDC system used in a clinical trial is of great importance. The regulatory authorities see the EDC system used for a clinical trial as an important computerized system with regards to both patient safety and data integrity.
To assist in this process, Viedoc has developed the Viedoc Inspection Readiness Packet (VIRP) which provides you with the information you need to prepare for a regulatory inspection and to fulfil regulatory expectations and requirements. The VIRP introduction describes the contents of VIRP in more detail, and also talks about additional documentation you should provide. The VIRP introduction is included in VIRP.
If you decide to use VIRP we provide an eLearning lesson which describes the information needed step-by-step in order to fulfil inspector expectations: Inspection Readiness When Working in Viedoc
You can read about how to download the Viedoc Inspection Readiness Packet here: VIRP
You will need to give full read-only access and invite the inspector to the Regulatory Inspector role in the Viedoc system as described below.
This step is performed by the Designer.
To allow the Regulatory Inspector viewing access to study data, their role must be configured with read-only and view anonymized and blinded data permissions on the Roles page.
Note!
If the study uses Viedoc Logistics, the following role permissions in Logistics Rights for the Regulatory Inspector role must be configured on the Roles page:
See Configuring roles.
Note! Should the inspector also require access to Viedoc Admin or Viedoc Designer, you are always welcome to contact your Viedoc representative if you need assistance.
This step is performed by the Study Manager.
Note! For randomized studies, the inspector should also be invited to the study with the role of Unblinded Statistician, in order to have access to the randomization lists and be able to download them in Viedoc Admin.
See Managing users.
If the study is using the eTMF, map the Regulatory Inspector study role to an eTMF role with the permissions read-only TMF Admin, read-only Trial Master File and Download audit trail.
This step is performed by the Study Manager/eTMF Manager.
Launch Viedoc Clinic and Viedoc eTMF and Viedoc Logistics (if used in the study) from the landing page.
This step is performed by the Regulatory Inspector.
When building a study in Viedoc, you are first given access to a training server, (for example, v4training.viedoc.net). This is so that you can use and evaluate Viedoc without the need for a contract or license. Studies that are to be taken into production are then migrated from the training server to the production server. For more information, see Migrating a study design from training to production.
A study can be considered as live when there is a validated study design on a production site. The schematic below shows the steps that are needed, and which roles have permission to perform these steps.

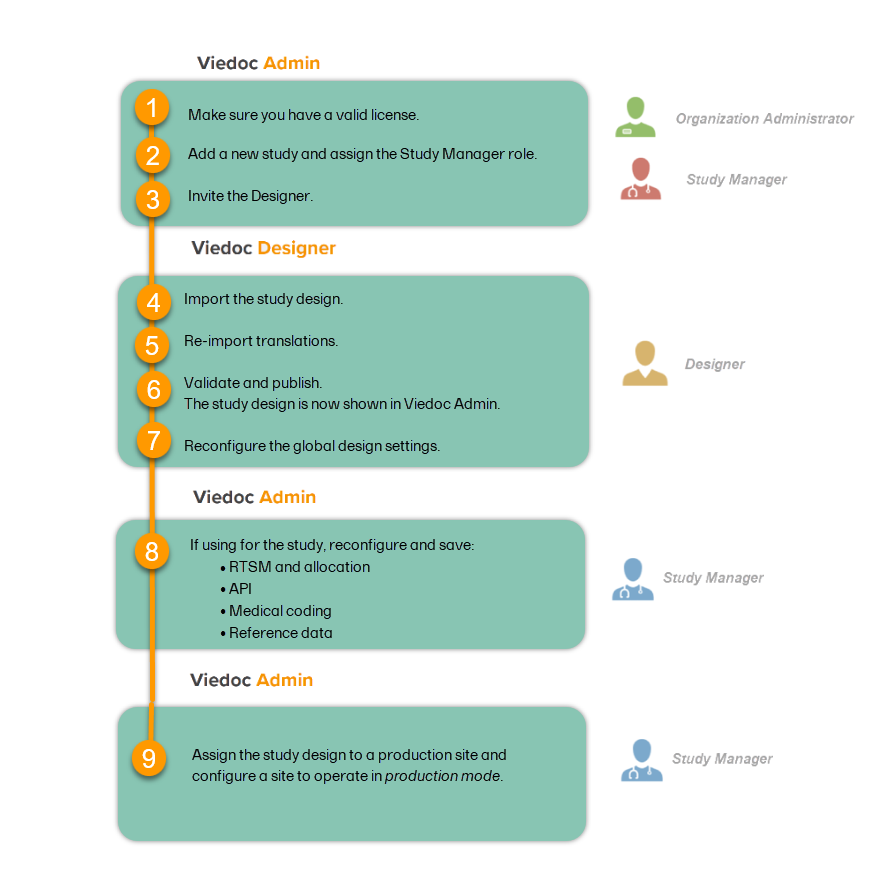
This step is performed by the Organization Administrator.
This step is performed by the Organization Administrator, after the study has been built and tested on the training server and the study design is exported.
| 1 |
On the production server, add a new study in Viedoc Admin. For more information, see Adding a new study. 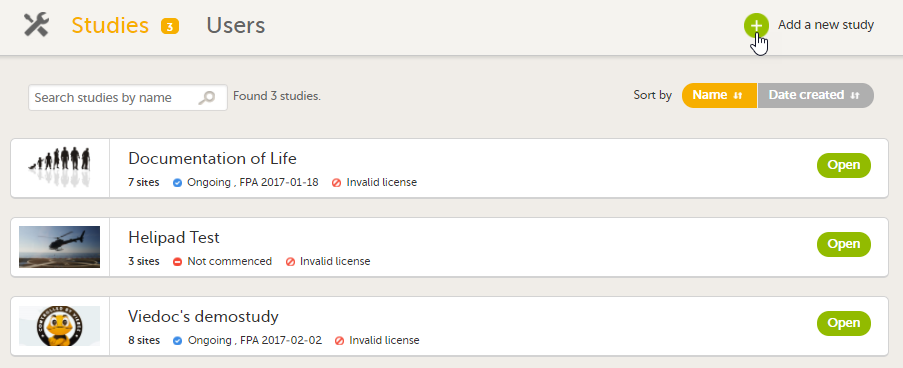
|
| 2 | Assign the Study Manager role to yourself or anyone from the team. For more information, see Managing users (for Org Admin). |
This step is performed by the Study Manager.
Invite a user to the Designer role. For more information, see Managing users (for Org Admin).
This step is performed by the Designer.
Import the study design ODM file (which was previously exported from the training server).
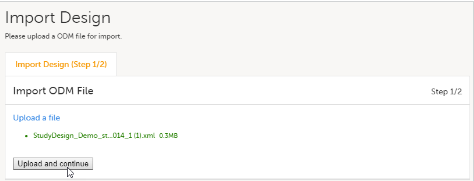
For further instructions, see Importing a new design version.
This step is performed by the Designer.
If used for the study, import the Viedoc Me translations. For instructions, see Managing translations for subject-initiated events.
This step is performed by the Designer.
Validate and publish the design. For more information, see Validating a study design.
Note! The study design becomes available to the Study Manager in Viedoc Admin when it has been published.
These steps are performed by the Designer.
| 1 |
Reconfigure and publish the global design settings (as these are not in the ODM file) in the same way as on the test environment. For more information, see Overview of Viedoc Designer. 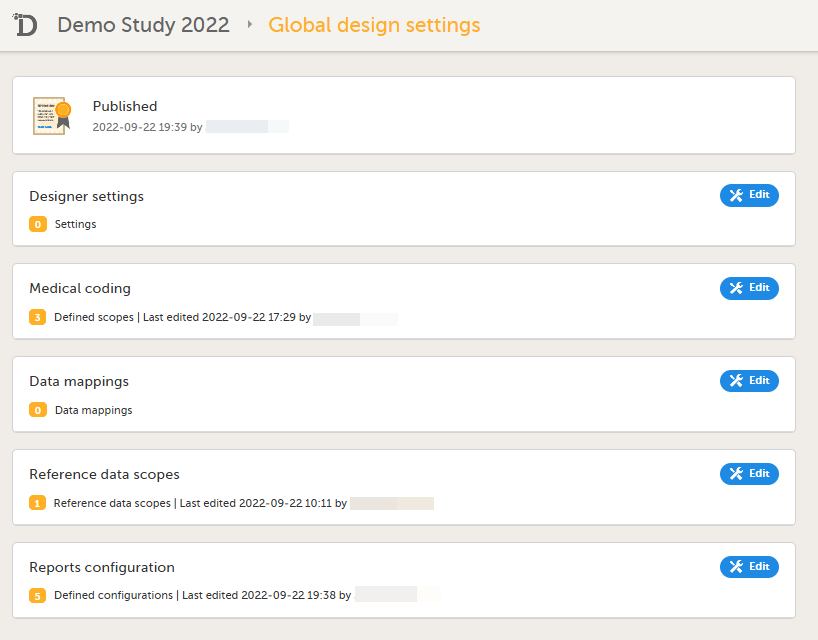
|
| 2 |
If used for the study, reconfigure Viedoc Reports. For more information, see Quick Guide for setting up Viedoc Reports. If the features listed below are used for the study, the Study Designer will need to reconfigure and save these features in Viedoc Designer:
|
These steps are performed by the Study Manager.
If the features listed below are used for the study, the Study Manager will need to manually reconfigure and save these features in Viedoc Admin:
Note! To perform the reconfigurations in Viedoc Admin and in Viedoc Designer, the user must be assigned to the relevant user roles. For example, Unblinded Statistician for the RTSM and global allocation list, Reference Source Data Manager for the reference data, Dictionary Manager to manage the medical coding dictionaries, and API Manager for the API configuration.
This step is performed by the Study Manager.
Assign the study design to at least one or several production sites in the study, and select an effective starting time for that design to be applied to the site.
Once a study is on the production server it is possible to configure the sites to operate in one of the following modes:
Your study is now in production, and you can start work on the site.
| Important! This process cannot be used for revising an existing design version on production, as importing the design will always result in a totally new version. For more information about new versions and revisions see: handling eCRF updates after going live. |
Studies are grouped in Viedoc under organizations; that is, each client has its own organization where all studies belonging to that organization are stored. The System Administrator at Viedoc Technologies can add a new organization, and then also assign at least one Organization Administrator (Org Admin) to that organization. The Org Admin can then create studies and invite Study Managers to those studies within that organization.
For the Org Admins, the organization overview is the first page that is shown upon accessing Viedoc Admin. As an Org Admin, you can:
More information about Viedoc Admin can be found here: Overview of Viedoc Admin
It is the responsibility of the Org Admin to make sure that all users within the organization have received appropriate training for their respective tasks. More information about managing users for Org Admins can be found here.
As the Org Admin has the authority (directly and indirectly) to manage access to studies in their organization, Viedoc recognizes the importance for the customer to be in sole control of their organization and data. No Viedoc employee will have Org Admin access to a customer's organization when there are live studies in the organization.
Users with access as Org Admin have the permission to invite themselves or other users as Study Manager to the studies within their organization. The Study Manager has the permission to invite users with different roles to the given study. Thus, the Org Admin has the authority (directly and indirectly) to manage access to studies in their organization. So by granting Org Admin access only to one or a few trusted users, you can limit the number of users and vendors that have access (directly or indirectly) to your data.
Users with Org Admin access should preferably have a high-level overview within the company or organization, since the Org Admin can directly or indirectly access all studies within the organization as well as create new studies. This should be a user that is trusted and authorized to perform the activities as described in section 2.1. The role of this user might differ for different companies, but it could be the CEO, Director of Data Management, Lead Data Manager, Manager of Clinical Operations etc.
Org Admins can delegate the responsibility by inviting additional Org Admins. By doing this, each organization can manage their own organization after having it set up by the Viedoc System Administrator and having the first Org Admin invited. Giving too many user Org Admin access is a security risk and we recommend that you try to have 2-4 Org Admins in your organization to have sufficient backup.
The System Administrator at Viedoc will only be allowed to invite customer users as Org Admins once this has been confirmed in writing by the legal representative (the person signing the Master Service Agreement).
This lesson provides instructions on how to add a new study. Adding a new study is done in Viedoc Admin. Only the Organization Administrator can add studies.
Note! For all production studies, make sure a contract with Viedoc Technologies exists before proceeding. See Overview of Viedoc for information about licensing.
Note! Adding a new study can only be done by the Organization Administrator.
To add a new study:
| 1 | Open Viedoc Admin and click Show studies in the organization you would like to add a study to. The study overview page opens. | |
| 2 |
Click Add a new study. 
The Add a new study pop-up opens. |
|
| 3 |
Enter a name for the study, and the e-mail address to the person that will be appointed as Study Manager.
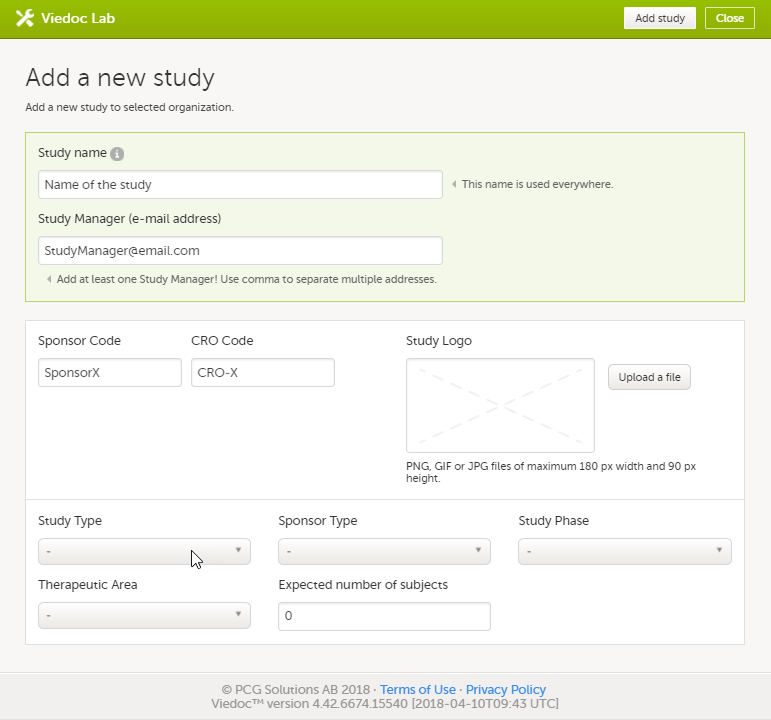
The information in the green area is required. Optionally, you can enter details about the sponsor and the study, but these fields can also be filled in at a later stage by the appointed Study Manager under Study settings. |
|
| 4 | Click Add study. The study will appear in the list of studies on the study overview page. An e-mail is sent to the Study Manager with an invitation to the newly created study. |
To complete setting up the study, the following steps need to be performed by the Study Manager:
These steps are described in more detail in the eLearning lessons under Study Management.
For an overview of the configuration workflow for initiating a study, see Initiating a design.
For a video tutorial that demonstrates how to add a new study in Viedoc Admin, create a simple study design in Viedoc Designer, manage users in Viedoc Admin and enter data as a site user in Viedoc Clinic, see How to set up a study.
This lesson describes the types of roles that are supported by Viedoc, how to assign roles to users and where to view the users that have access to a study, and the user details. The instructions are intended for the Organization Administrator (Org Admin).
This content is shared by the lessons in the following user guides
Admin: "Managing users (for Org Admin)"
Monitors & Project Managers: "Managing users"
Clinic: Signing data
The Study Manager should, in cooperation with the Site Manager(s), ensure that all users of Viedoc are informed, and certify that all electronic signatures created in the system are intended to be the legally binding equivalent of a traditional handwritten signature.
In Viedoc, the purpose/meaning of a signature is always “responsibility” as used in Sec. 11.50 of Food and Drug Administration (FDA) 21 Code of Federal Regulations (CFR) part 11. The signer is thereby acknowledging his/her responsibility for the entered data. Viedoc keeps account of what was signed, who signed it, and when the signature was performed.
http://help.viedoc.net/l/1648/This content is shared by the lessons in the following user guides
Admin: "Managing users (for Org Admin)"
Monitors & Project Managers: "Managing users"
Viedoc supports two different types of roles.
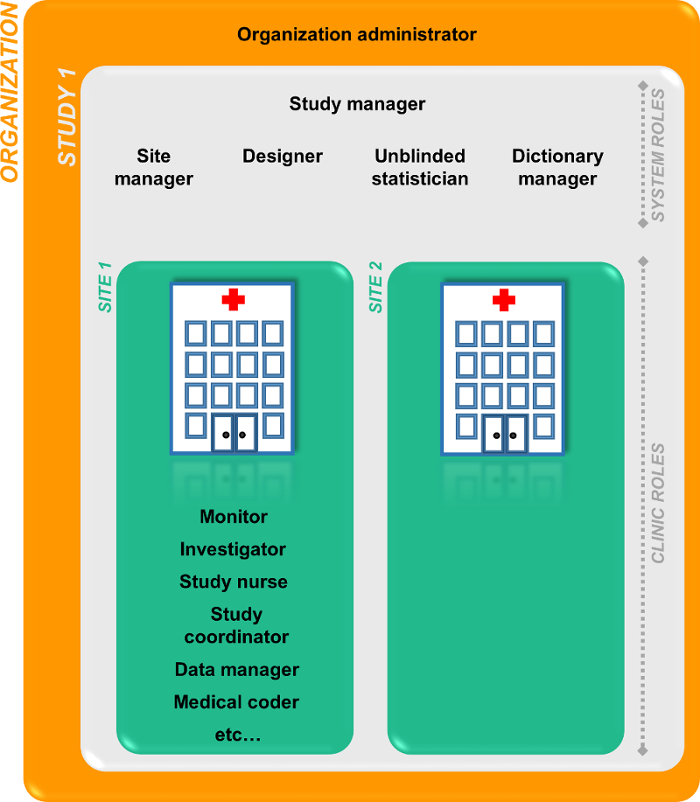
The Organization Administrator invites the Study Manager. The Study Manager can assign users to system roles and clinic roles. The Study Manager can also delegate the management of clinic roles to the Site Manager.
The system roles are predefined in Viedoc, they cannot be adjusted for your study. The system roles give access to various features in Viedoc Admin or Viedoc Designer.
The following system roles are available.
| Role | Description |
|---|---|
| Organization Administrator | The Organization Administrator is responsible for all projects within the organization. The Organization Administrator initiates projects, and assigns Study Managers to every project in Viedoc Admin. |
| Study Manager | The Study Manager assigns roles to users, adds sites to the study and applies study designs to the sites in Viedoc Admin. For a typical clinical trial, the role of Study Manager in Viedoc is assigned to the project manager. |
| Designer | The Designer builds the study in Viedoc Designer. |
| Site Manager | The Site Managers are appointed by the Study Manager and use Viedoc Admin to assign clinic roles to site users. For a typical clinical trial, the role of Site Manager in Viedoc is assigned to the Clinical Research Associate (CRA). |
| Unblinded Statistician | The Unblinded Statistician manages the randomization lists in Viedoc Admin. This role is only used for randomized studies, when it is necessary to have control over who has access to and can manage the randomization lists. |
| Dictionary Manager | The Dictionary Manager uploads medical coding dictionaries. |
| Reference Data Source Manager | The Reference Data Source Manager manages the reference data sources at study level. The Reference Data Source Manager can also delegate the management of data sources at site level to the Site manager. |
| API Manager | The Application Programming Interface (API) Manager has access to the API settings and performs the API configurations. Complete instructions on how to configure the API are provided in Viedoc API. |
| eTMF Manager | The eTMF Manager manages the eTMF application in Viedoc Admin. The eTMF Manager maps Viedoc Clinic roles to eTMF roles. The eTMF Manager also has permission to manage the eTMF structure in Viedoc eTMF. |
| Design Impact Analyst |
The Design Impact Analyst can run an impact analysis in Viedoc Admin. A user with the role can see what impact a new design revision will have on existing form instances before applying the revision. Note! Before you invite a user with this role, read Design revision impact analysis to understand in which scenarios the design revision impact analysis report might reveal blinded information. |
One organization can have more than one Organization Administrator. One study can have more than one Study Manager, Designer, Unblinded Statistician, Dictionary Manager, Reference Data Source Manager and API Manager. One site can have more than one Site Manager.
The clinic roles, and the rights that belong to these roles, can be set up in the study design in Viedoc Designer. They are study-specific and give access to Viedoc Clinic. Clinic roles are assigned to site users by the Study Manager or the Site Manager. Each study can have an unlimited number of clinic roles.
Examples of clinic roles are:
Note!
For example: The Publish SDV Plans permission is enabled for the Data Manager role.
User A is invited as a Data Manager to the Uppsala site. The high-level SDV plan is in use on 10 sites in the study.
User A reviews the edits made to the high-level SDV plan and publishes it. The updated plan will now take effect on all of the 10 sites in the study.
For more information about SDV Manager, see Viedoc SDV Manager.
http://help.viedoc.net/l/829deb/A list of users can be viewed at the following three places:
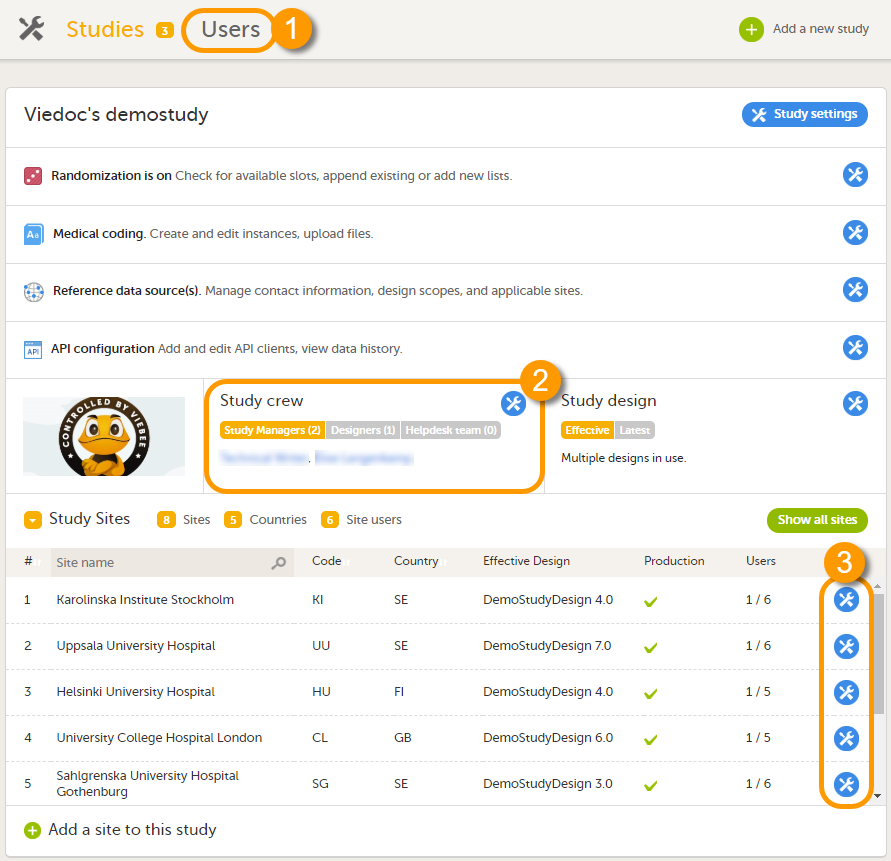
1. On the Users page. This page displays a list of users assigned to any role in any study within the organization.
2. In the Study crew window. This window displays a list of all users assigned to a system role in the study.
3. On the Site users tab of the site settings window. This tab displays a list of all users assigned to a clinic role within that specific site.
Note! All three user lists only display the users and roles you have permission to manage (invite or remove). If you are a Study Manager, you can also see the Organization Administrator. If you are a Site Manager, you can also see the Study Manager. However, in both cases you cannot invite users to these roles or remove these roles from users.
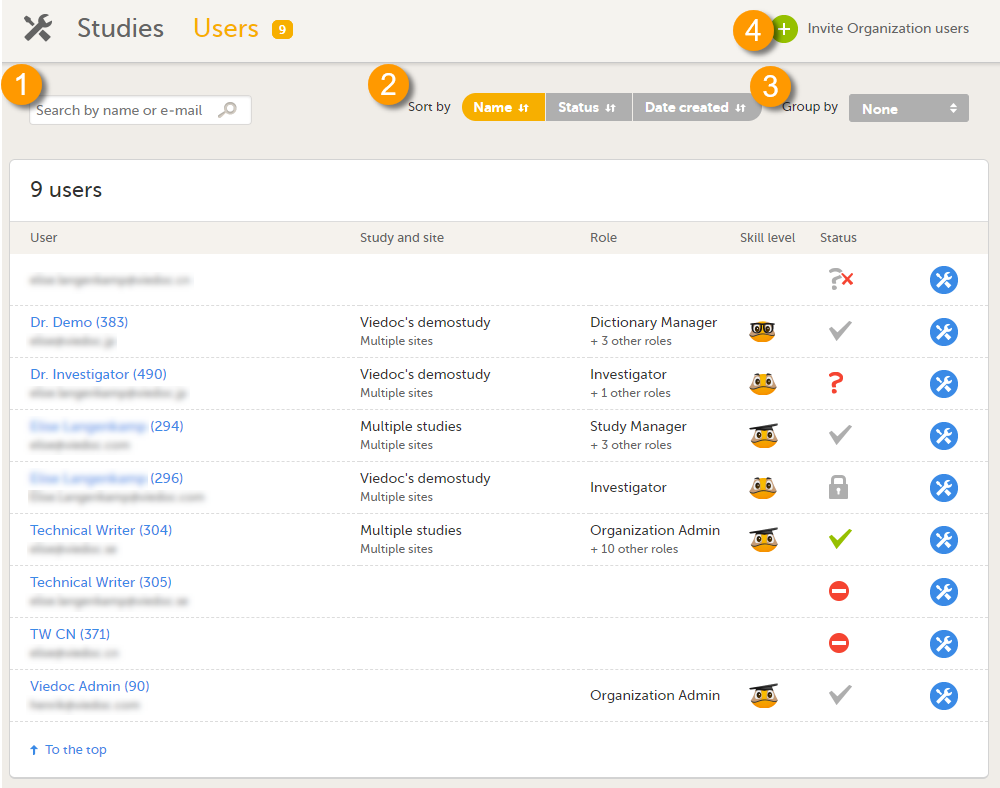
The Users page lists all users within the organization, and displays the following information:
If a user has no approved roles, because the invitation is still pending or rejected, or because the roles have been removed, only the user's e-mail address is displayed and all the other fields remain empty.
On this page, you can (see image):
1. Search for a specific user among all users within the organization by entering the user’s name or e-mail address in the search field
2. Sort the list of users by name, status or date of creation
3. Group the list of users by study by selecting Studies in the Group by field
4. Invite organization users (only available for the Organization Administrator)
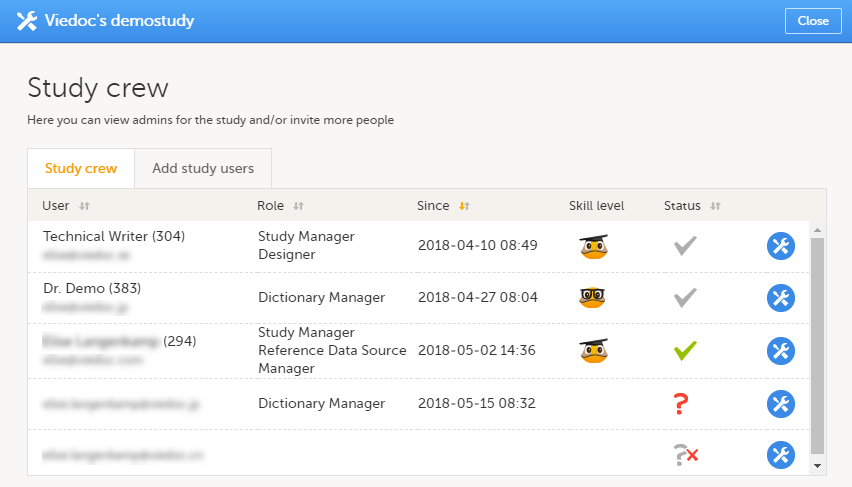
The Study crew window lists all users in the study that are assigned to a system role, and displays the following information:
*If the user has multiple roles, the date and time of invitation or acceptance of the first role that gives access to that site is displayed.
You can sort the users by name, role, date of (accepted) invitation and status. To sort the users, click on the column headers, or click on the arrows to the right of the column header. You can sort the users in ascending and descending order.
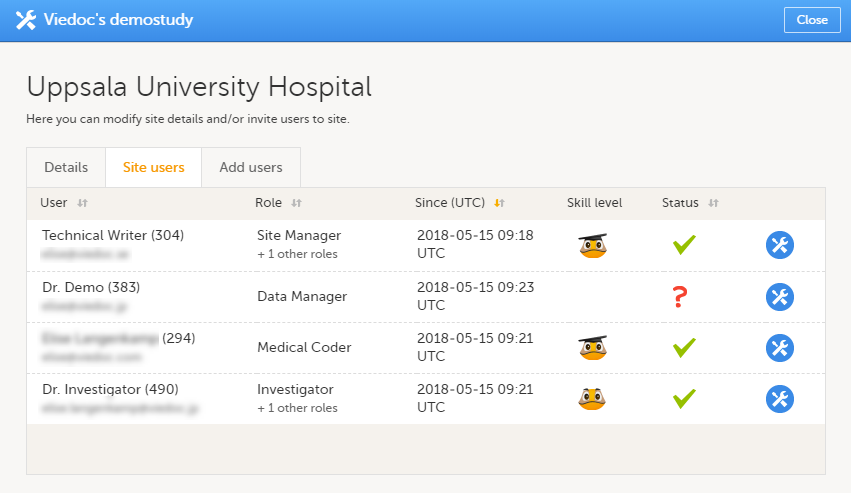
The Site users tab in the Site settings window lists all users with clinic roles that have access to that site, and displays the following information:
*If the user has multiple roles, the date and time of invitation or acceptance of the first role that gives access to that site is displayed.
You can sort the users by name, role, date of (accepted) invitation and status. To sort the users, click on the column headers, or click on the arrows to the right of the column header. You can sort the users in ascending and descending order.
The Viedoc skill level gives an indication of how experienced the user is in using Viedoc. It is based on the number of logins by that user.
| Skill level | Icon | Description |
|---|---|---|
| Rookie |  |
≤ 20 logins |
| Semi-pro |  |
21-100 logins |
| Pro |  |
101-1000 logins |
| Legend |  |
> 1000 logins |
The status of the users is displayed in the status column:
| Status | Icon | Description |
|---|---|---|
| Online |  |
The user is currently logged in to Viedoc, and has no pending invitations. |
| Offline |  |
The user is currently not logged in to Viedoc, and had no pending invitations. |
| Pending |  |
The user has at least one pending invitation to a role. The question mark is displayed even if the user has accepted invitations to other roles. |
| Pending certification |  |
The user has mandatory documentation assigned that was not confirmed as read & understood. |
| Rejected |  |
The user has rejected all invitations to roles. The user has never had access to the study. |
| Locked out |  |
The user is locked out from Viedoc (the user has entered the wrong password three times in a row). |
| Removed |  |
The user has had roles in the study before, but has currently no roles left. |
For the Users page (see Users), the following applies:
If the users are not grouped by study, the user's status symbol will reflect the overall status in all studies you have access to. That means, if the user has one pending invitation in one of the studies, the status will be pending and a red question mark will appear. If the users are grouped by study, the status symbol will reflect the status per study. That means that a user's status can be pending in one study, and logged in in another study.
The content is shared by the lessons 'Managing Users (OA)" and "Managing Users (STM and SIM)"
To view the details of a specific user, click the toolbox icon behind the name of that user in any of the previously described user lists. The User Settings window opens:
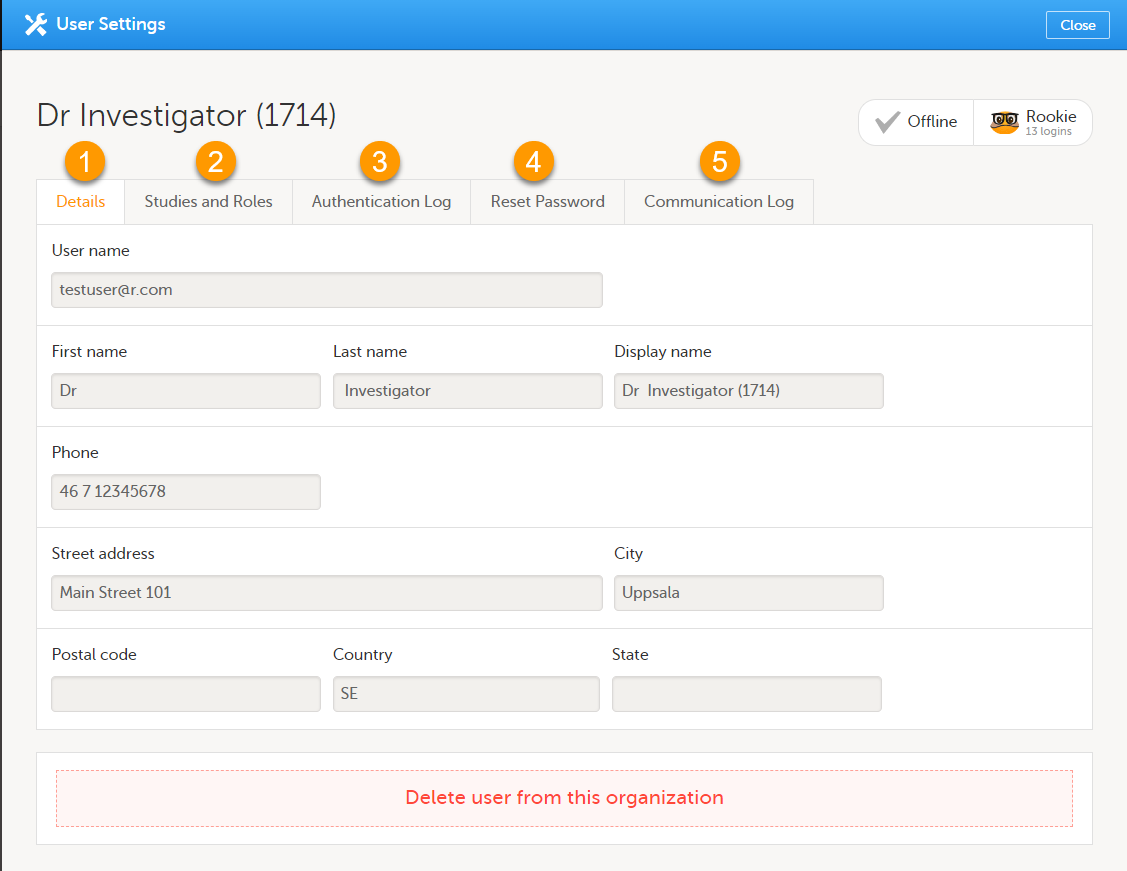
The User Settings window displays the name and email address of the user, the user ID (in parentheses), the status and the skill level. You can perform the following actions:
1. On the Details tab, you can view the user's name and contact details.
2. On the Studies and Roles tab, you can view a list of all roles and sites the user has access to, including the date and time of invitation/acceptance of that role. The roles are grouped per study. You can delete roles by clicking the trash can icon next to the role.
3. On the Authentication log tab, you can view a list of logins by the user, including date and time, the IP address, and the browser that was used. The number of displayed entries is limited to the latest 100 logins.
4. On the Reset Password tab, you can reset the password for that user, if the user has forgotten their password and does not have their mobile number or a secondary email address. Viedoc will send a notification to the user with a link to create a new password.
Note! The authentication code will be required if the user wants to reset their password using the Forgot your password? link on the login page. The authentication code is sent to the user's verified mobile number or to the user's secondary email address. If neither of these options are selected, the user needs to contact their Study Manager to receive a link to reset their password.
5. On the Communication Log tab, you can view the latest 20 communication logs for a user and download an Excel file with the complete user-specific Communication Log containing information about email and SMS communication to study users. All users with access permissions (Study/Site Managers) to the User settings in Viedoc Admin can access the Communication Log.
Note! Email and SMS communication logs before the Viedoc 4.70 release are available, however these do not have the same level of detail.
https://help.viedoc.net/processwire/page/edit/?id=2008The content is shared by the lessons 'Managing Users (OA)" and "Managing Users (STM and SIM)"
For each study, you can download user logs in PDF and Excel format with information about all users and roles for the sites you have access to. See Downloading the user logs for instructions.
Notes!
The content of the logs depends on the system role that you have, as follows:
| If you are a... | ... then the logs contain: |
|---|---|
| Organization Administrator |
The system roles Application Programming Interface (API) Manager, Dictionary Manager, Unblinded Statistician, Reference Data Source Manager, and eTMF Manager. |
| Study Manager | The system roles API Manager, Dictionary Manager, Unblinded Statistician and Reference Data Source Manager, eTMF Manager, and all sites and site users in the study. |
| Site Manager | The system roles API Manager, Dictionary Manager, Unblinded Statistician and Reference Data Source Manager, eTMF Manager, and all sites you have access to, together with their site users. |
The Log of users and roles PDF contains information about all users and roles for the sites you have access to, grouped in the following chapters:
The User administration log contains information about all users and roles for the sites you have access to, with the following sheets:
There are two different Communication logs. One contains user-specific and one contains study-specific communication information.
Note!
The user-specific Communication log contains information about email and SMS communication to the study users.
All users with access permissions (study/site managers) for the User Settings in Viedoc Admin can view the Communication Log for a specific user. The Communication Log tab has the following columns:

The Excel file contains a sheet named User Communication Logs and includes all email and text message (SMS) communications to the study user on the same Excel sheet.
Note! Users must have activated the Viedoc account and accepted at least one invitation in order to have their communication included in the Communication Log tab in the User Settings window.
The User Communication Logs sheet in the Excel file contains information about user-specific communication – this is the user activity in Viedoc that is unrelated to a specific study:
The file name format is: UserCommunicationLog-UserID-YYYYMMDDhhmmss. (Using UTC)
All the logs are included in the same Excel sheet. The excel sheet has the following columns:
| Column | Description |
|---|---|
| Message ID | GUID: A unique identifier for the message |
| Type of Communication | SMS/email |
| Datetime (UTC) | Date and time for the communication |
| Message Type |
The action that the communication is related to:
|
| To | The email address the message is sent to. For SMS messages, this column is empty. |
| Status | Success/Failed |
| Provider | Provider name - the provider that was used to send the message to the recipient |
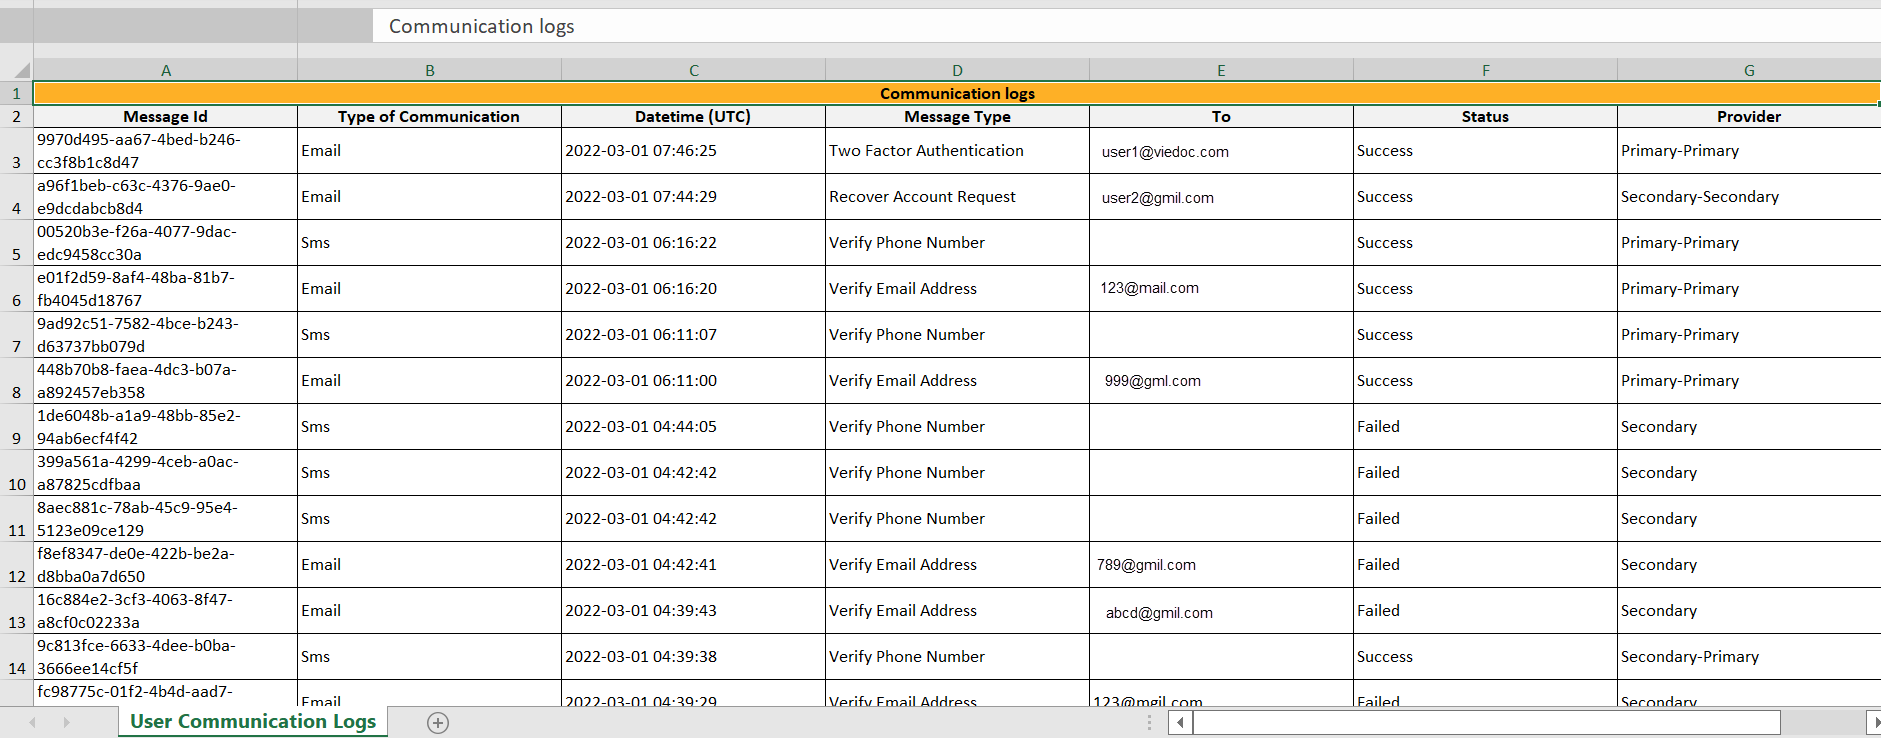
In Admin, under Users - Group by Studies, in the User Logs dropdown list, a separate file called User communication log is available containing the information listed below.
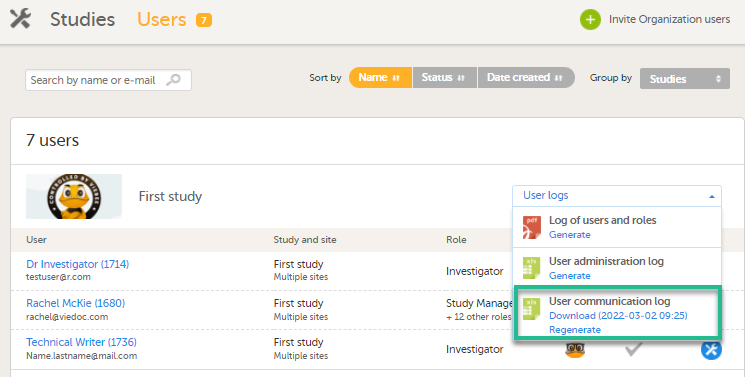
This log contains information about study-specific communication and emails only, related to:
The Excel file contains a sheet named Study Communication Logs.
The file name format is: UserCommunicationLog-YYYYMMDDhhmmss. (Using UTC)
The Excel sheet has the following columns:
| Column | Description |
|---|---|
| Message ID | GUID: A unique identifier for the message |
| Communication Type | |
| Date time (UTC) | Date and time for the communication |
| Message Type |
The action that the communication is related to:
|
| Site Type | Training/Production (For the message types Invitation and Invitation rejected, this column is empty.) |
| To | Email address(es) (For SMS messages, this column is empty.) |
| CC | The email address(es) of the recipients of a copy |
| BCC | The email address(es) of the recipients of a blind copy |
| Status | Success/Failed |
| Provider | Provider name - The provider that was used to send the email to the recipient |

Note!
The content is shared by the lessons 'Managing Users for Org Admin" and "Managing Users and is called User logs in the single source file"
The Study Manager can give users access to individual sites, or to a groups of sites at once. These groups of sites are called system site groups and are automatically created by the system when sites are added to the study. The following systems site groups are created by the system:
When you invite users to a system site group, the users will automatically receive instant access to all sites in that group, including all future sites that will be added to that group at a later time. For example, if you invite a user to the country 'Hungary', that user will receive access to all sites in Hungary. Similarly, users that were invited to a system site group will automatically lose access to a site if that site is removed from the group. For more information about system site groups, see Managing study sites.
http://help.viedoc.net/l/81e4bd/The content is shared by the lessons 'Managing Users (Org Admin)" and "Managing Users (STM and SIM)"
By default, every organization has at least one Organization Administrator, added by the system administrator at Viedoc Technologies. Additional Organization Administrators can only be added by the Organization Administrator.
To add an Organization Administrator:
| 1 |
In the Organizations window in Viedoc Admin, click the toolbox icon in the Organization Administrators field. |
| 2 | On the Add administrators tab, enter the email address of the user you would like to invite to the role Organization Administrator.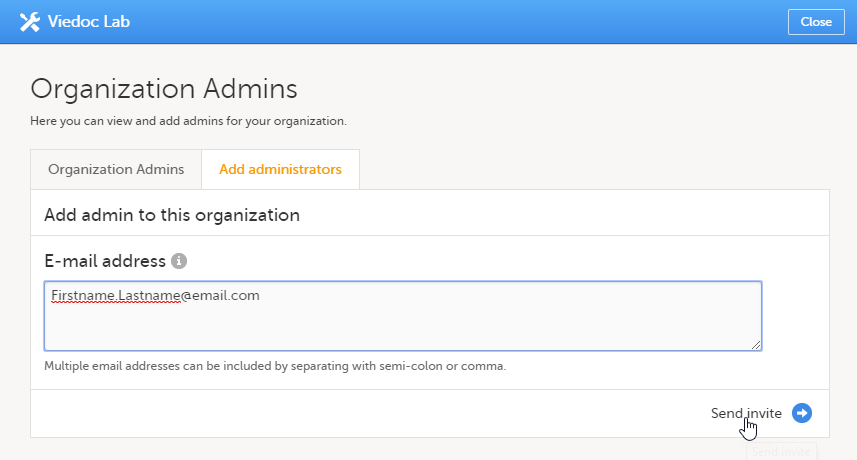 Tip! You can invite multiple users at once by adding multiple email addresses in the field. Separate the email addresses with a semi-colon or comma. |
| 3 | Click Send invite. An invitation email is sent to the email address you specified. |
You can also assign users to organization roles (Organization Administrator, eLearning Administrator, and Designer at organization level) via the Users page:
| 1 |
On the Users page, click Invite Organization users. The Organization team pop-up opens. |
| 2 |
Enter the email address of the user you would like to invite, and select the role to which you would like to invite the user. You can add multiple roles by clicking in the Select roles to assign field. Tip! You can invite multiple users at once by adding multiple email addresses in the field. Separate the email addresses with a semi-colon or comma. All entered users will be assigned to all selected roles. |
| 3 | Click Save changes. An invitation email is sent to the email address(es) you specified. |
A Designer at organization level receives access to Viedoc Designer for all studies within the organization, and receives access to the Private Designs section, see image below.
To assign an eLearning Administrator via the Users page:
| 1 |
On the Users page, click Invite Organization users. The Organization team pop-up opens. |
| 2 |
Enter the email address of the user you would like to invite, and select the role to which you would like to invite the user. You can add multiple roles by clicking in the Select roles to assign field. 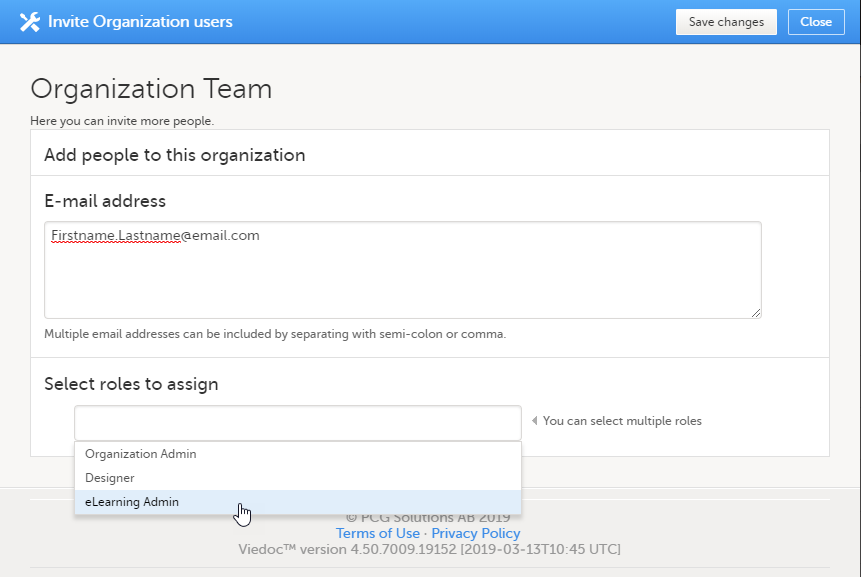
Tip! You can invite multiple users at once by adding multiple email addresses in the field. Separate the email addresses with a semi-colon or comma. All entered users will be assigned to all selected roles. |
| 3 | Click Save changes. An invitation email is sent to the email address(es) you specified. |
Once a user has been assigned to the role eLearning Administrator, the user can access the Viedoc eLearning platform and create customized user documentation for your organization. For users with eLearning Administrator permissions, the following icon appears on the landing page in Viedoc Clinic, which gives access to the Viedoc eLearning platform.
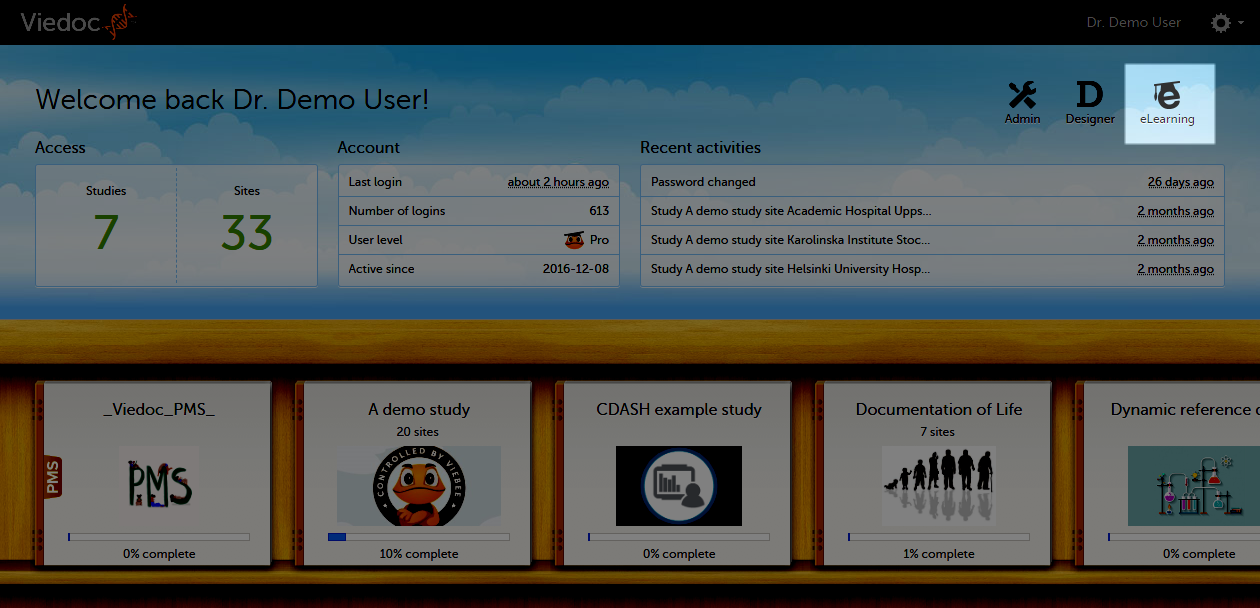
Note! Study Managers can only be added by the Organization Administrator.
To add a Study Manager:
| 1 | In Viedoc Admin, open the study to which you would like to invite users. |
| 2 | Click the toolbox icon in the Study crew field. The Study crew pop-up opens. |
| 3 |
In the Add study users tab, enter the email address of the user you would like to invite. Click Continue. Tip! You can invite multiple users at once by adding multiple email addresses in the field. Separate the email addresses with a semi-colon or comma. |
| 4 | Select the role to which you would like to invite the user. You can add multiple roles by clicking the + icon. Newly added roles can be removed by clicking the - icon. |
| 5 | Click Send invite. An invitation email is sent to the email address(es) you specified. |
Viedoc offers the possibility to remove all roles from a user in all studies within the organization at once. Only users that have active roles can be removed from the organization, if the user has any pending invitations, it is not possible to remove the user from the organization.
Only the Organization Administrator can remove a user from the organization.
Note! This feature does not remove the user account, it only removes all roles and permissions within the organization. The user can still log in and log out, but not view any studies within that organization.
To remove all roles from a user at once:
| 1 | On the Users page, scroll to the user whose roles you would like to remove. Click the toolbox icon behind the name of the user.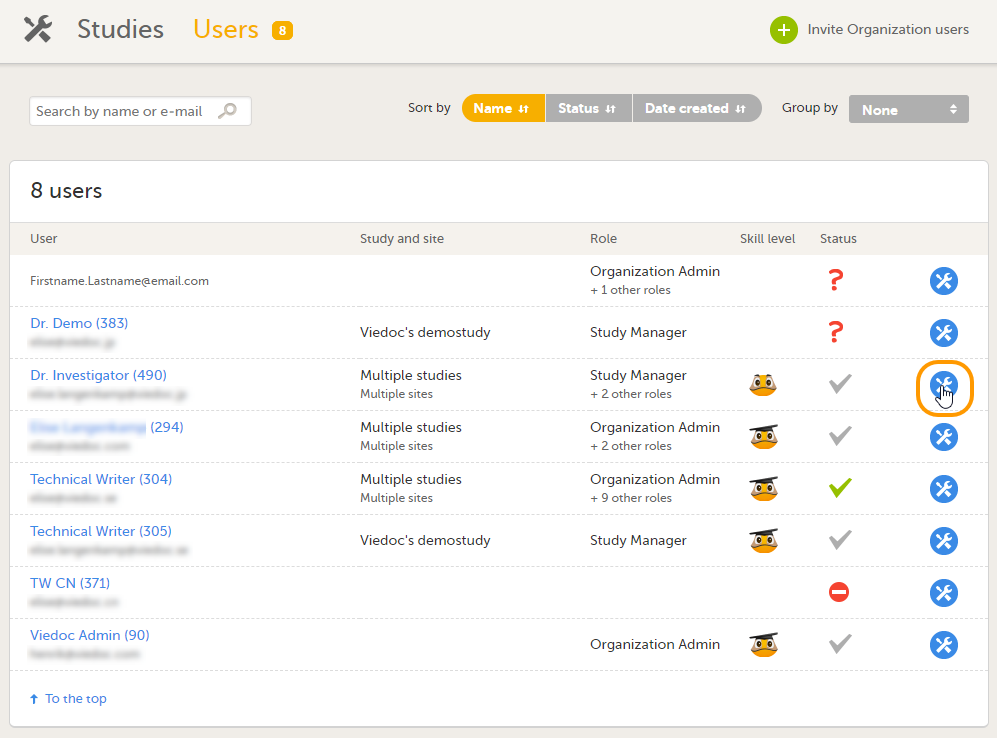 The User Settings pop-up opens. |
| 2 |
Click Delete user from this organization. 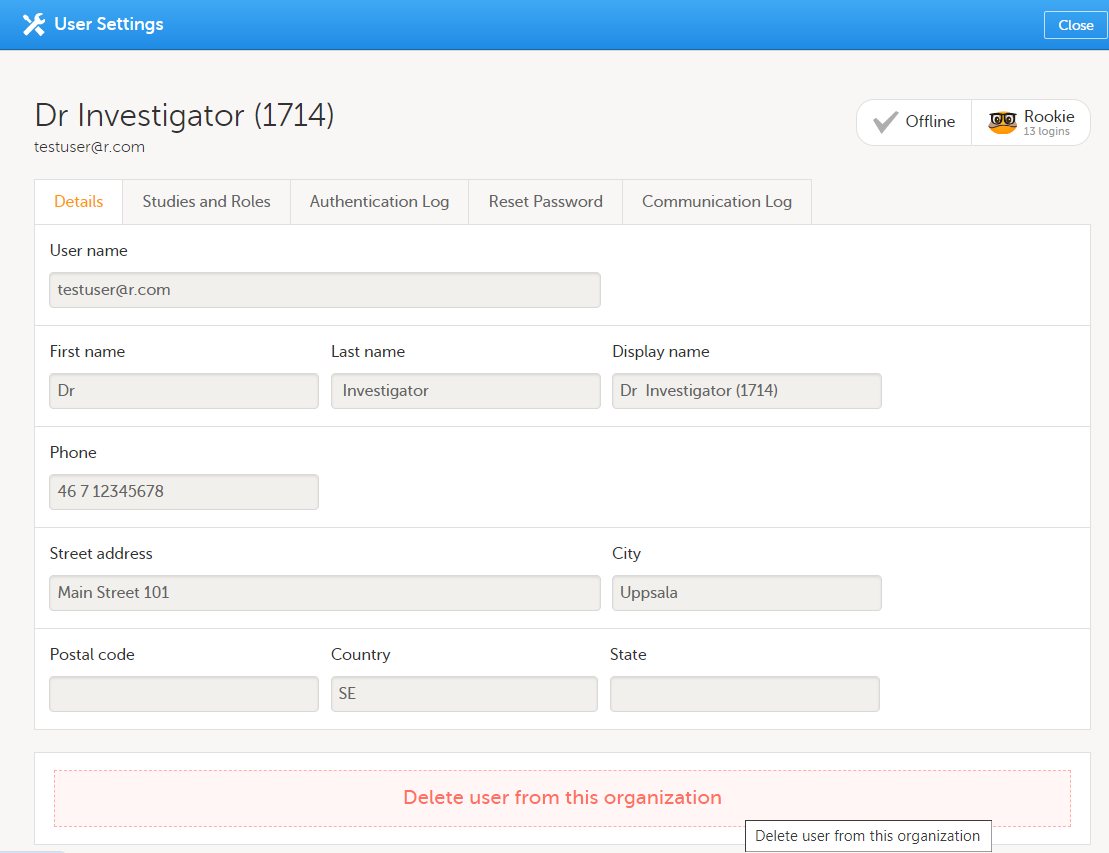
|
| 3 | Click Delete to confirm that the roles should be removed. All roles to which the user had access will be removed and the user's status will appear as Removed on the Users page. |
To download the user roles report:
| 1 | On the Users page, select to group the users by Studies. |
| 2 |
Scroll to the study from which you would like to download the user report, and, if the Log of users and roles PDF has not been previously generated for the study, you can generate it by clicking the Generate a PDF file 'Log of users and roles' link: As a result, the PDF file that contains a full history of all roles and users, permissions, user logs sorted per site, and all user account logs sorted per user is generated and available for download:
|
This lesson describes how a study is deleted. The instructions are intended for the Organization Administrator.
A study can be permanently deleted from Viedoc when the study is locked. Deletion is initiated by the Study Manager, who can submit a request to delete the study from Viedoc to the Organization Administrator. The Organization Administrator can then approve or reject a request for study deletion.
After study deletion is requested by the Study Manager and approved by the Organization Administrator, the study is shelved on Viedoc's database. A deleted study is not visible in Viedoc Clinic or Viedoc Designer, the study is only displayed in the study overview page of the Organization Administrator in Viedoc Admin.
The Organization Administrator is able to revert the deletion of a study within 180 days after the deletion request has been approved. After this period, the study will be permanently purged from Viedoc's database, and all study details and data will be permanently removed. It will not be possible to find any traces of the study and the subjects included.
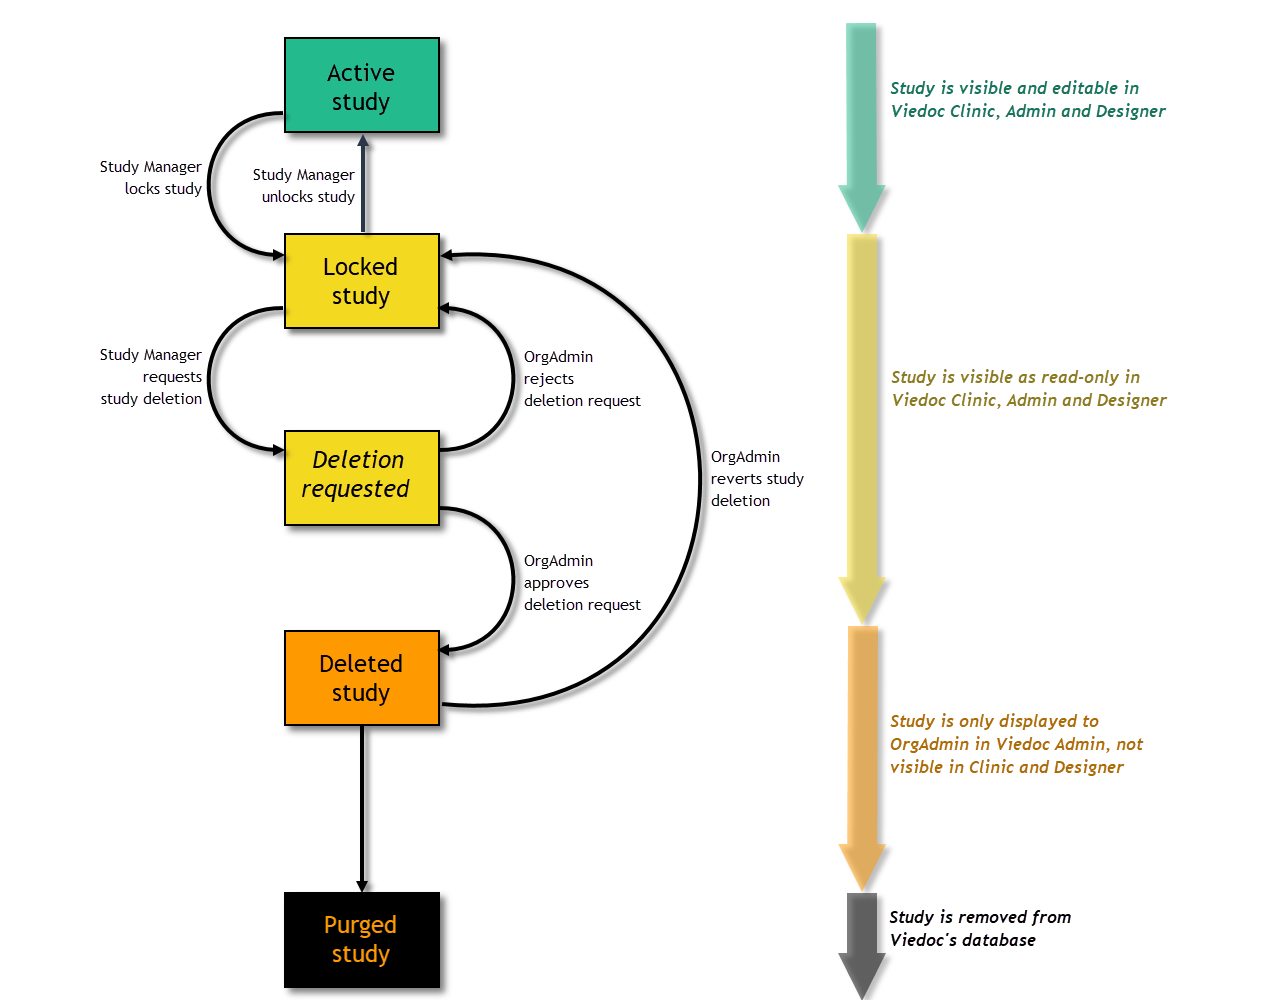
For traceability, all study delete actions are audit trailed. You can download a report that provides a full history of all requests for study deletion, approvals of study deletion, and reversions of study deletion that are performed in the study, including who performed the actions and when (date and time in Coordinated Universal Time (UTC)), and the reason that was given for deleting the study or reverting study delete.
Note! This section is intended for the Organization Administrator. For instructions for the Study Manager, see Deleting a study (STM).
Note! Before approving the deletion of a study, make sure that the necessary user reports, data export archive and study design are downloaded.
To approve a request for study deletion:
| 1 | Open the study in Viedoc Admin and click Study settings. The Study settings pop-up opens. |
| 2 |
Click the blue pen icon. The study status pop-up opens. |
| 3 |
Click Approve study deletion.

|
| 4 |
If you agree that all necessary actions are completed, enter a reason for approval of study deletion, and enter your password. |
| 5 |
Click Approve study deletion. 
|
When study deletion is approved, the study will not be visible anymore in Viedoc Clinic or Viedoc Designer, and all user roles will be inactivated. The study will only be displayed to the Organization Administrator on the study overview page.
To reject a request for study deletion:
| 1 | Open the study in Viedoc Admin and click Study settings. The Study settings pop-up opens. |
| 2 |
Click the blue pen icon. The study status pop-up opens. |
| 3 |
Click Reject study deletion. A pop-up opens. |
| 4 |
Enter a reason for rejecting the study deletion and enter your password. 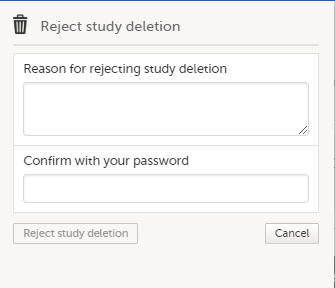
|
| 5 |
Click Reject study deletion. All Study Managers and Organization Administrators will be notified of the rejection by email. |
Note! Deletion of a study can be reverted within 180 days after study deletion was approved. The study will then be set back to locked state.
To revert the study deletion:
| 1 |
Open the study in Viedoc Admin. 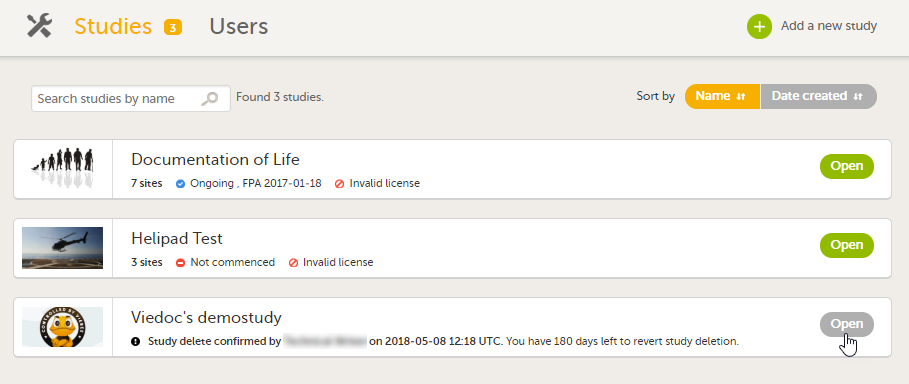
The study status pop-up opens. |
| 2 |
Click Revert study deletion.
A pop-up opens |
| 3 |
Enter a reason for reverting the study deletion and enter your password. 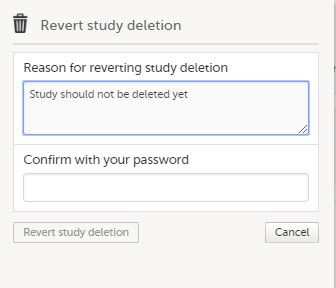
|
| 4 |
Click Revert study deletion. All Study Managers and Organization Administrators will be notified of the reversion of study deletion by email. The study will be set back to locked state and be visible again in Viedoc Clinic and Viedoc Designer. |
To download the study status report:
| 1 |
Open the study in Viedoc Admin.
|
| 2 | Click Download study status report.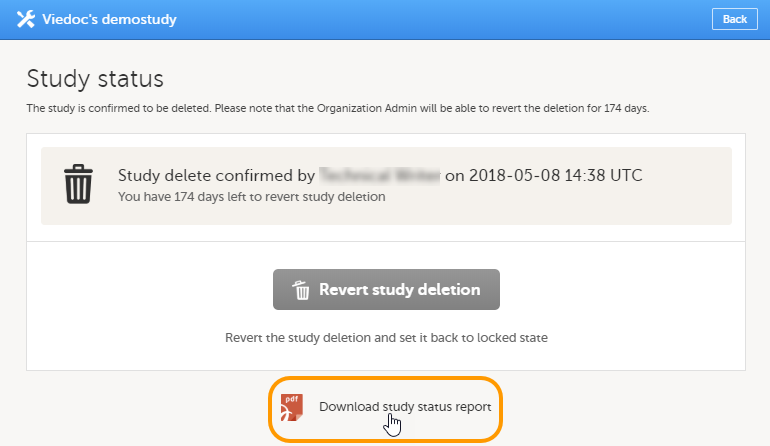 A PDF is downloaded that lists all database lock and delete actions, including when and by whom the study was locked/deleted, and the reason that was given for locking/deleting the study. |
Single sign-on (SSO) is a user verification method that lets you access multiple, independent software systems by using only one set of login credentials (username and password).
Once you have set up and activated SSO for your organization in Viedoc, all users with the same email domain will be authenticated via the external Identity Provider (IdP) that you specify.
The Viedoc SSO solution uses Security Assertion Markup Language (SAML) 2.0. It is an open Extensible Markup Language (XML)-based standard for exchanging authentication and authorization identities between security domains.
Note! If a user account is set up for SSO, Application Programming Interface (API) access to Viedoc is not allowed.
Before you activate Single Sign-On (SSO), make sure the environment and your organization is fully prepared by completing the checklist below:
SSO preparation checklist for Hostmasters
Verify user email alignment
Ensure that the email addresses used for the Viedoc accounts match what is on file in the external IdP (for example, Google Workspace or Azure Active Directory). If the emails do not match, affected users will not be able to log in.
Confirm domain ownership within your company
Check whether you are the only organization in Viedoc that is using this specific email domain. There may be other groups in your company that are using the same email domain and Viedoc. You will be activating SSO for them as well, so make sure they are also prepared (see item 1 above).
Communicate the activation date and new login URL
Inform all users when SSO will be activated, and provide them with the new SSO login URL. Users will be redirected to the new URL if they use the old one, but communicating the change in advance helps avoid confusion.
Plan for certificate renewal
The SSO certificate expires after one year. If you are manually adding the certificate, set an external reminder to renew the certificate before it expires. An expired SSO certificate will prevent users from logging in. Alternatively, enable the auto refresh option in the SSO settings (see more in Automatic certificate refresh below).
Configuring single sign-on in Viedoc is a four-step procedure, described in more detail in the next sections using a sample domain:
Tip! Example use cases for setting up Google Workspace or Microsoft Azure AD as IdPs are available in the SSO Configuration Examples lesson.
To add a domain:
| 1 |
Navigate to Viedoc Admin and select Organization Settings. 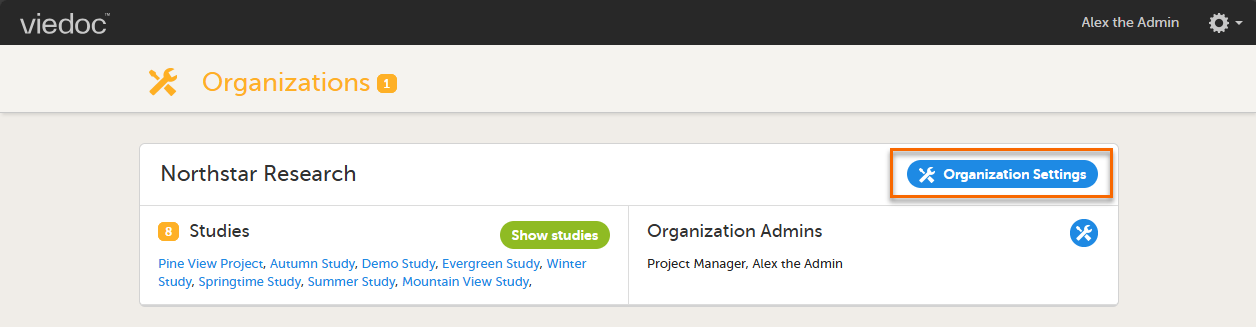
|
| 2 |
Select the SSO tab and select Add SSO configuration. 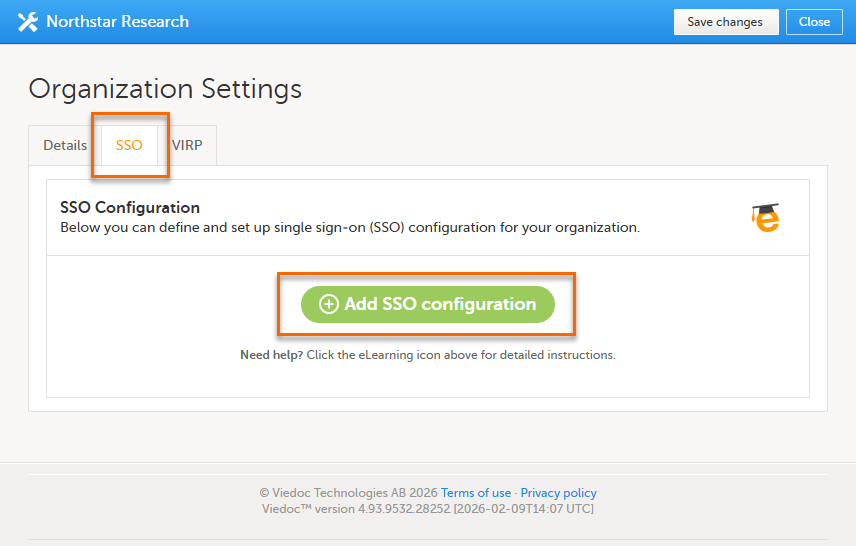
|
| 3 |
Enter the name of the domain that you want the SSO configuration to apply to. 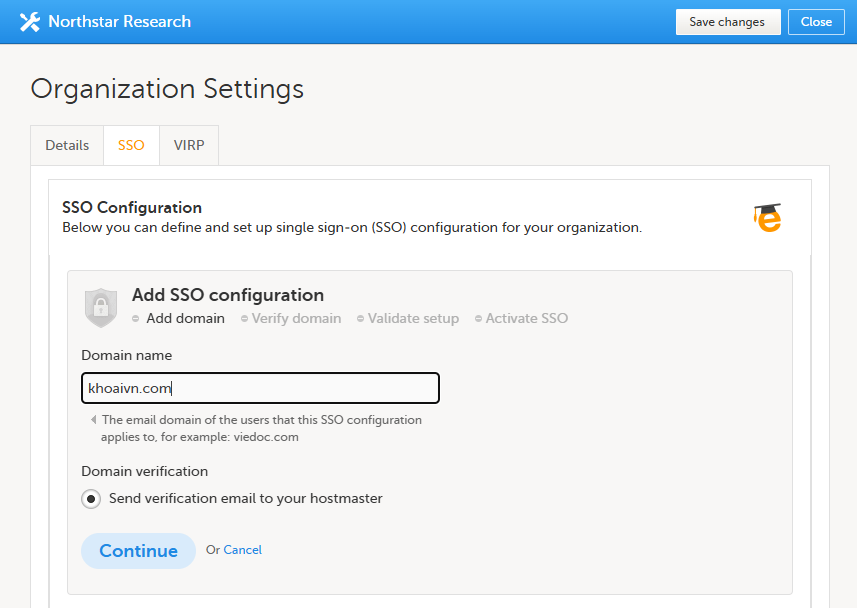
|
| 4 |
Select Continue. An email is sent to the hostmaster of the domain. The email contains a verification key that you will need in the next step to verify the domain. |
To ensure that you are authorized to set up single sign-on (SSO) for a specific domain, you need to verify ownership of the domain.
To verify the domain:
| 1 |
In Viedoc Admin, select Organization Settings, and select the SSO tab. |
| 2 |
If you are not automatically directed to the Verify domain step, select the corresponding link. Enter the verification key from the email that was sent to the domain hostmaster and select Verify. 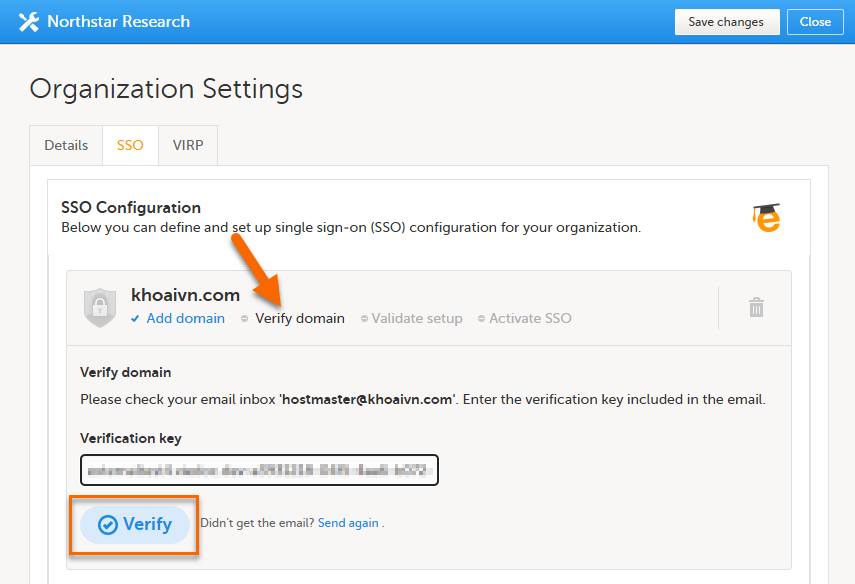
|
| 3 |
When the verification is successfully performed, Viedoc automatically redirects you to the Validate setup step. |
In this step, you provide the information required for the SAML setup.
There are two options to validate the setup, described below:
Tip! Example use cases for setting up Google Workspace or Microsoft Azure AD as IdPs are available in the SSO Configuration Examples lesson.
To validate the setup manually:
| 1 |
In Viedoc Admin, select Organization Settings, and select the SSO tab. |
| 2 |
If you are not automatically directed to the Validate setup step, select the corresponding link. The Redirect URL and Entity ID fields are automatically filled in based on the information from the previous step and cannot be edited. If you need to edit this information, select Verify domain to go back one step. Note! The Redirect URL field displays a hyphen ( 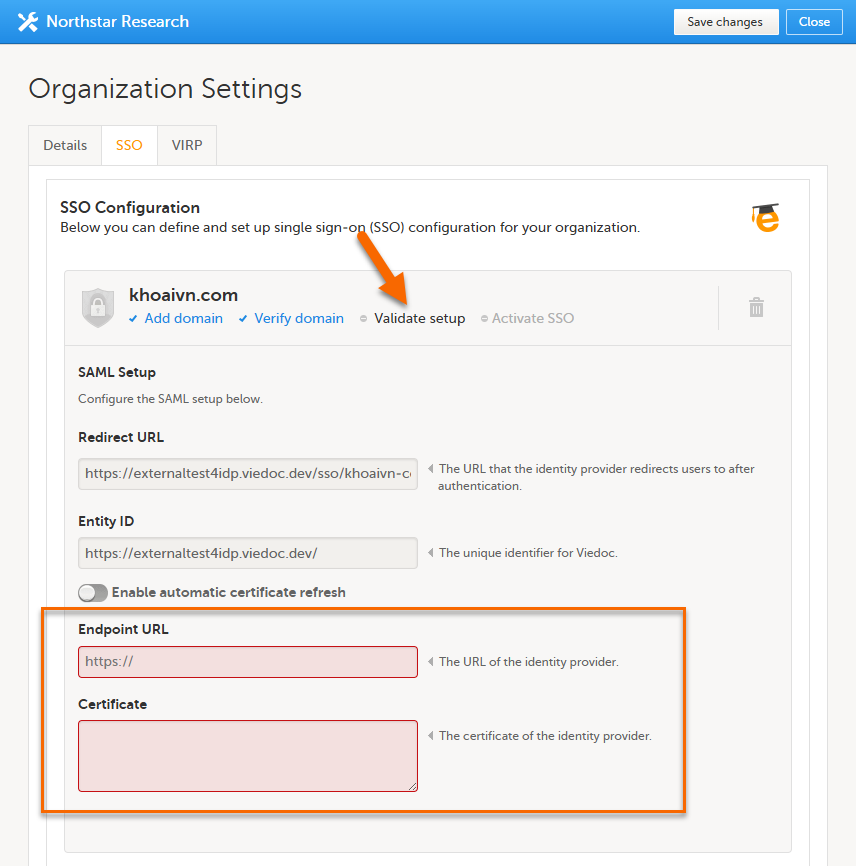
|
| 3 |
Enter the following information from your IdP configuration:
Important! The certificate has an expiry date. We recommend that you make sure your organization has procedures in place to keep track of the expiry date to avoid login failures. If the certificate is about to expire, please make sure to renew it and update the SSO configuration in Viedoc Admin. |
| 4 |
Select Validate to start a trial login sequence. This opens a new browser tab where you are prompted to log in to the specified IdP at the Endpoint URL. |
| 5 |
After logging in to the IdP, return to the Viedoc tab of your browser and select Next. 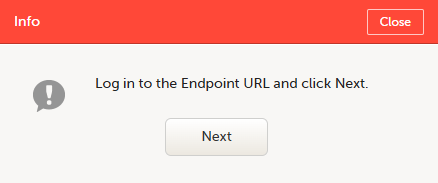
If the validation was not successful, please check your settings and try again. If the validation was successful, you are now ready to continue with the Activate SSO step. |
If your IdP provides a federation metadata URL, we recommend using automatic certificate refresh.
Enabling Automatic certificate refresh allows Viedoc to retrieve identity certificates via a Federation Metadata URL. When the certificate is renewed or updated in your Identity Provider (IdP), Viedoc automatically updates the certificate in the SSO configuration, helping to prevent login interruptions due to expired certificates.
To enable automatic certificate refresh and validate the setup:
| 1 |
In Viedoc Admin, select Organization Settings, and select the SSO tab. |
| 2 |
If you are not automatically directed to the Validate setup step, select the corresponding link. Select the Enable automatic certificate refresh switch. A new Federation Metadata URL field is displayed. 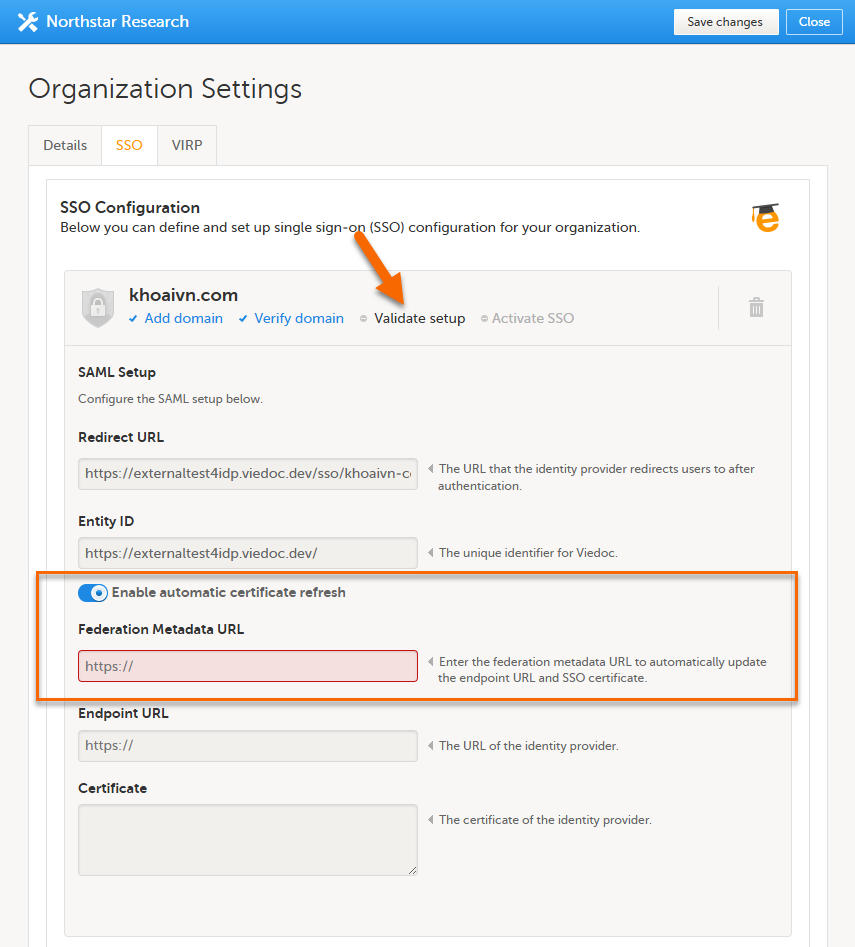
|
| 3 |
Enter the following information from your IdP configuration:
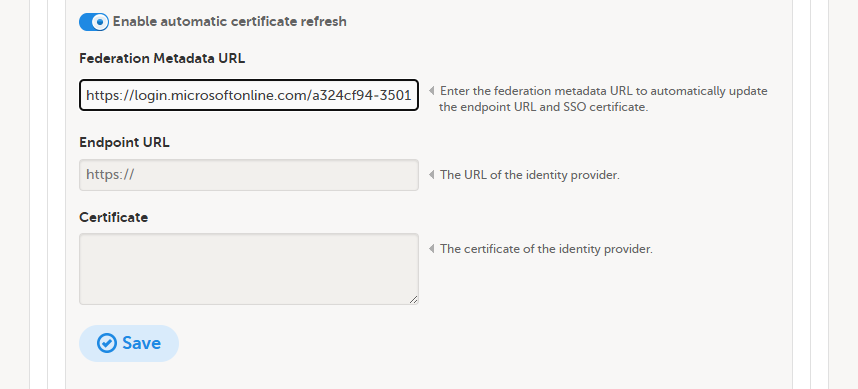
|
| 4 |
Select Save. Viedoc retrieves the SAML configuration from the metadata URL and updates the Endpoint URL and Certificate fields. These fields cannot be edited when automatic certificate refresh is enabled. 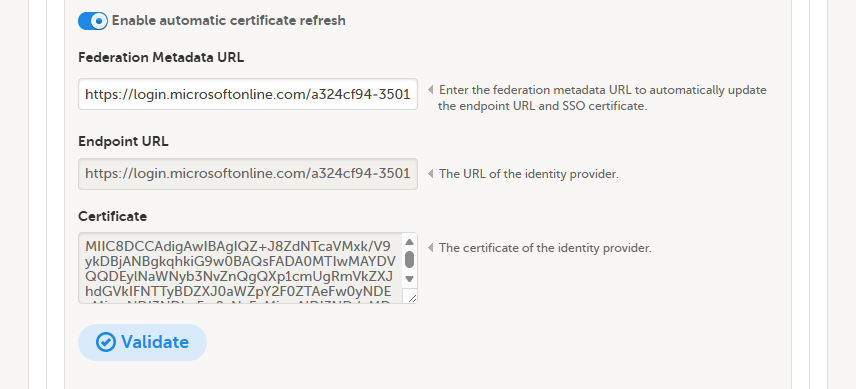
|
| 5 | Select Validate to start a trial login sequence. This opens a new browser tab where you are prompted to log in to the specified IdP at the Endpoint URL. |
| 6 |
After logging in to the IdP, return to the Viedoc tab of your browser and select Next.
If the validation was not successful, please check your settings and try again. If the validation was successful, you are now ready to continue with the Activate SSO step. |
When the steps Add domain, Verify domain, and Validate setup have been successfully completed, you can activate the SSO configuration for your organization.
To activate SSO:
| 1 | In Viedoc Admin, select Organization Settings, and select the SSO tab. |
| 2 |
If you are not automatically directed to the Activate SSO step, select the corresponding link. Select the Active switch to turn it on. 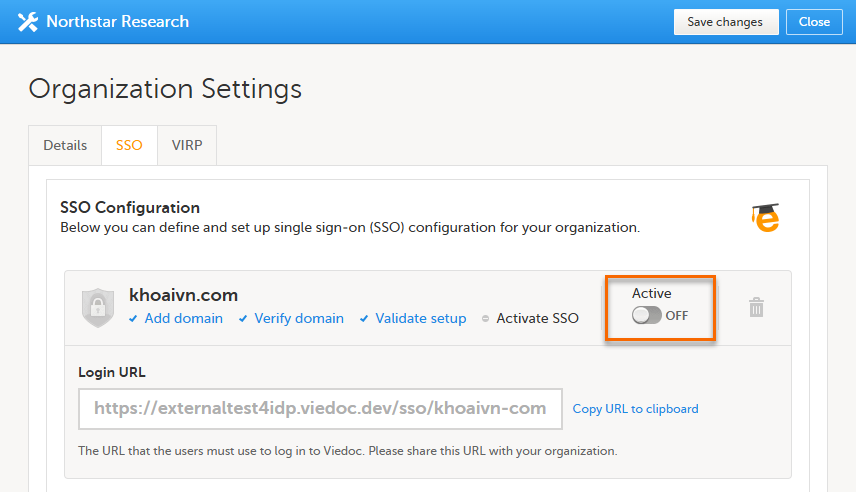
|
| 3 |
If all your SSO settings are correct and your organization has been informed of the new login routine, select Yes. 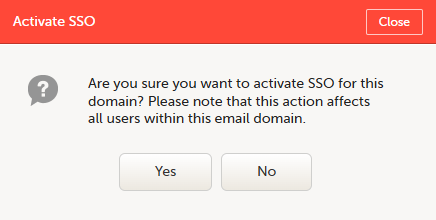
|
Copy the Login URL and share it with the users in your organization. When you activate the SSO configuration, this is the URL that they must use to log in to Viedoc.
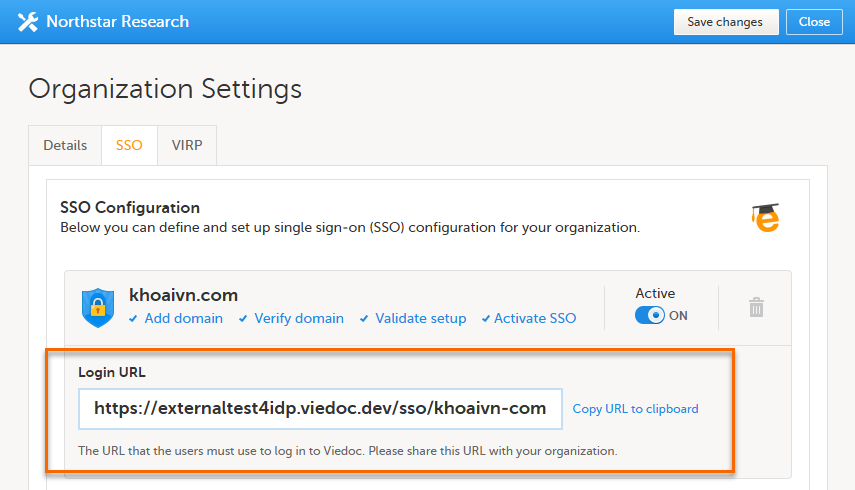
To deactivate SSO:
| 1 | In Viedoc Admin, select Organization Settings, and select the SSO tab. |
| 2 |
Select the Active switch to turn it off. 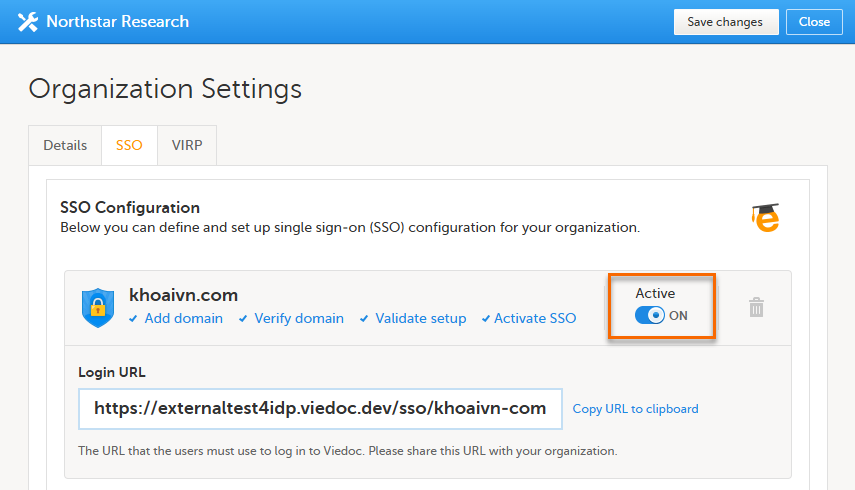
|
| 3 |
In the pop-up box that is displayed, select Yes. 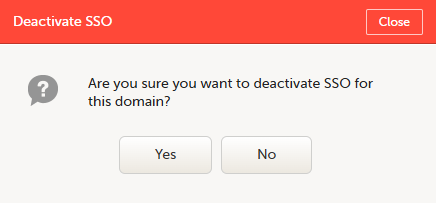
Note! Deactivating an SSO configuration does not delete the configuration information from Viedoc. |
To delete an SSO configuration:
| 1 | In Viedoc Admin, select Organization Settings, and select the SSO tab. |
| 2 |
Select the trash can icon. 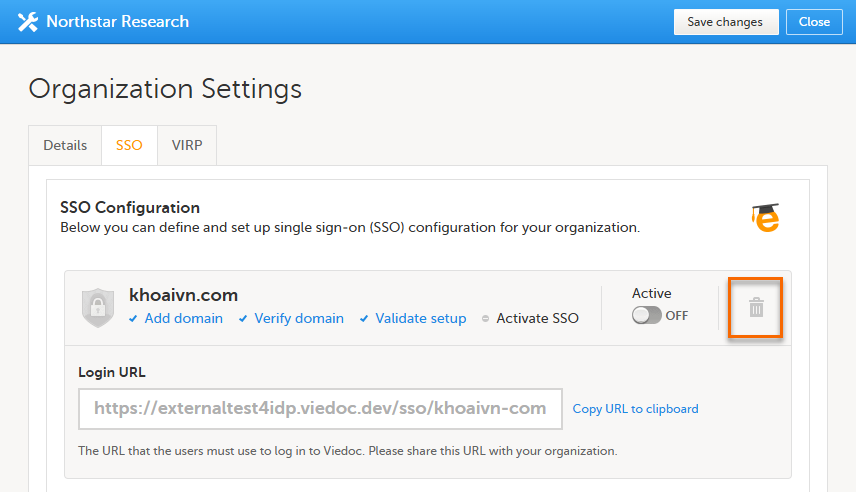
|
| 3 |
In the pop-up box that is displayed, select Yes. 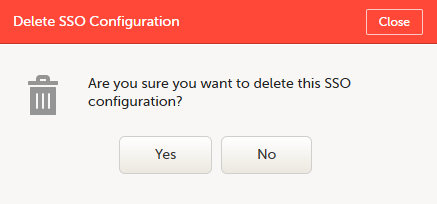
Note: Deleting an SSO configuration affects all Viedoc organizations that use the same SSO configuration. |
Organization Administrators can download Viedoc Inspection Readiness Packet (VIRP), which contains all the information you need to fulfill inspector expectations. When using Viedoc, you only need to validate that your study configuration is in compliance with your study protocol, the rest is included in VIRP. You can read more about VIRP here.
To download VIRP:
| 1 |
Open Viedoc Admin and click Organization Settings. 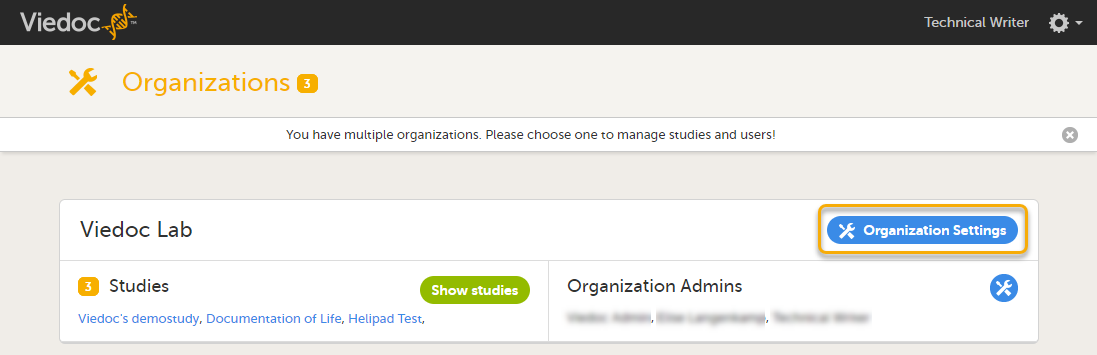
|
| 2 |
Click the VIRP tab. 
|
| 3 | Click Download on the packet you wish to download. Note! All previous Viedoc versions (from 4.0 and onward) are always included in each packet. |
This lesson describes the settings that can be made in Study settings.
In Study settings, you can configure the general settings of the study such as details about the study, access to the study, and manage the helpdesk. You can also adjust the date and time formats used throughout the whole study, manage the medical coding dictionaries, import Operational Data Model (ODM) files, and access the Admin audit trail report.
To open the settings, select Study settings on the study details page:
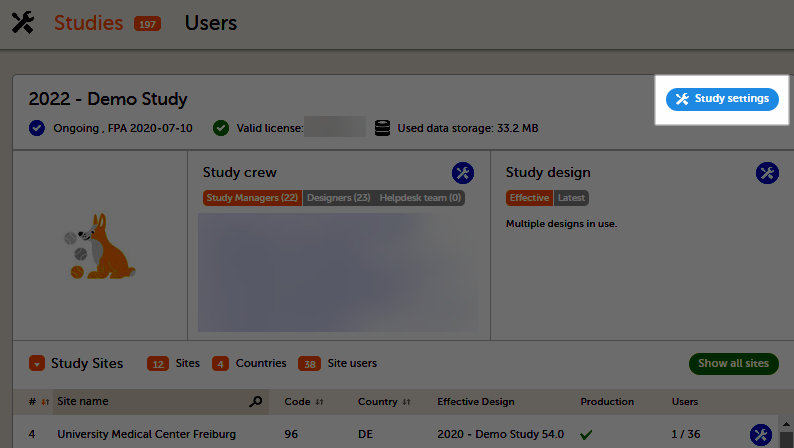
In the Study settings pop-up, the following tabs are available:
On the Settings tab, you can set various settings for the study:
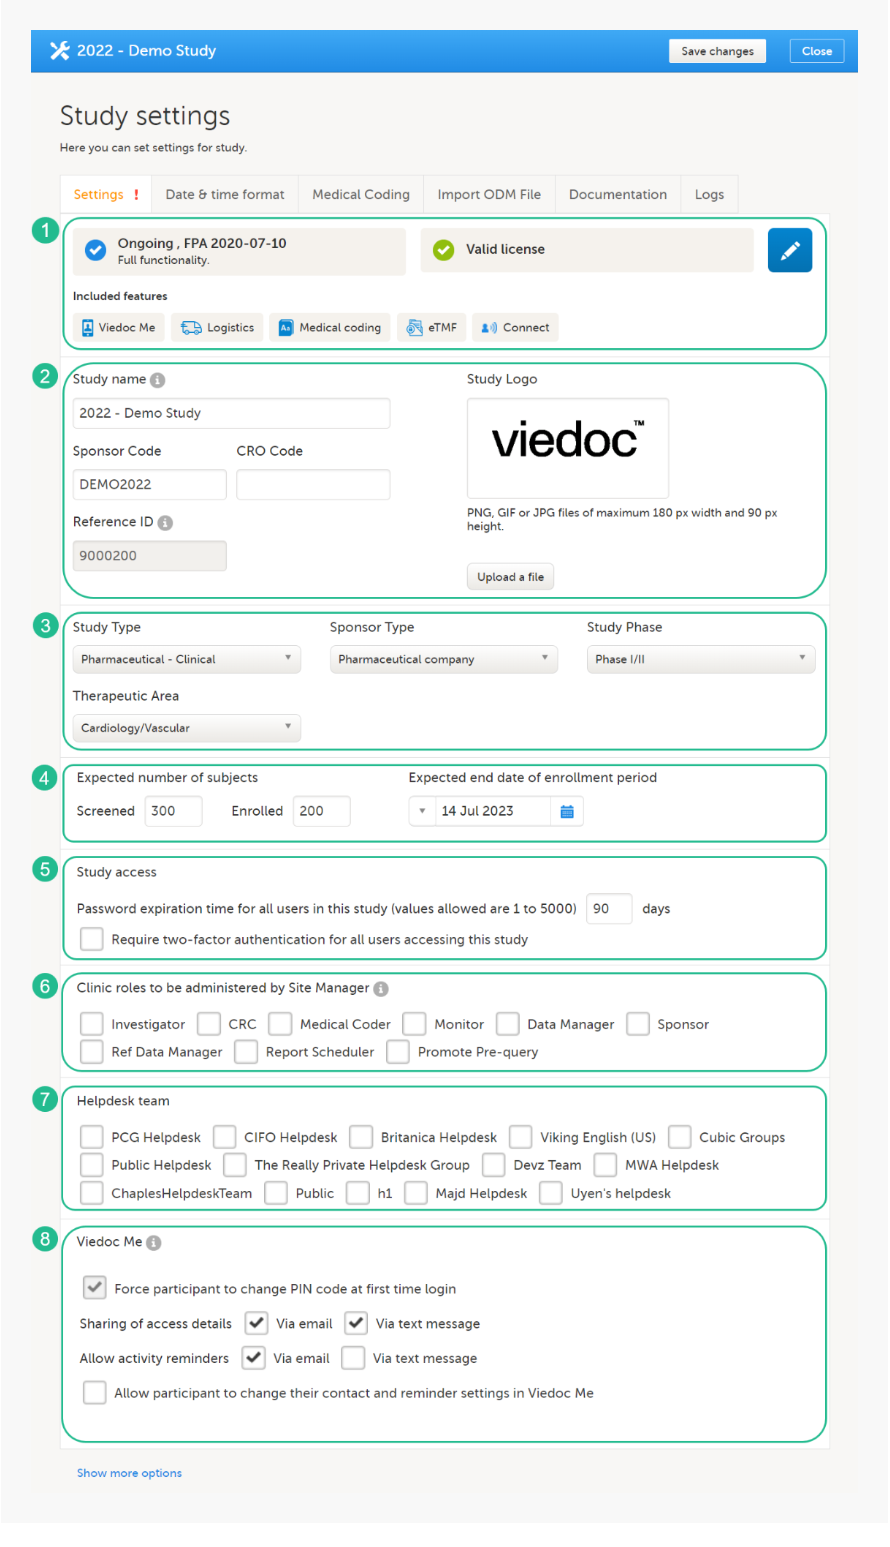
Study settings included in the Settings tab, as shown in the image above:
1. Study Status, License & Features. Here you can view the study status, the study license status, and the features included in the license. By selecting the study status or license status, you can also see the production and demo study Globally Unique Identifier (GUID), which is used for identification of your study when contacting Viedoc support. If you would like to add a feature, please contact your Viedoc representative. Select the blue pen icon on the right to open the Study status page, see Locking a study for more information.
2. Study Details. Enter details of the study: study name, sponsor code, CRO code, study logo, and the reference ID (for information about the reference ID, see the section Licensing in Overview of Viedoc).
3. Study Description. Select the information relevant to the study, including the study type, sponsor type, study phase, and therapeutic area. The following options are available in the dropdown lists:
| Study Type | Sponsor Type | Study Phase | Therapeutic Area |
|---|---|---|---|
| Pharmaceutical - Clinical | Pharmaceutical company | Preclinical | Cardiology/Vascular |
| Pharmaceutical - Post-approval | Biotechnology company | Phase 0 | Dental Implant |
| Medical Device | Government agency | Phase I | Dermatology/Plastic Surgery |
| Veterinary | Academic research | Phase I/II | Endocrinology |
| Uncategorized/Other | Other | Phase II | Epidemiology |
| Uncategorized/Other | Phase IIA | Gastroenterology | |
| Phase IIB | Hematology | ||
| Phase III | Immunology/Infectious Diseases | ||
| Phase IV - PMS | Musculoskeletal/Sports Medicine | ||
| Phase IV - Japanese PMS | Nephrology/Urology | ||
| Phase V | Neurology | ||
| Patient registry | Obstetrics/Gynecology | ||
| Uncategorized/Other | Oncology | ||
| Ophthalmology | |||
| Otolaryngology | |||
| Pediatrics/Neonatology | |||
| Pharmacology/Toxicology | |||
| Psychiatry/Psychology | |||
| Pulmonary/Respiratory Diseases | |||
| Rheumatology | |||
| Trauma/Emergency Medicine | |||
| Uncategorized/Other |
4. Expected Subjects & Enrollment Period. Set the number of expected screened and enrolled subjects, and the expected end date of the enrollment period. These settings are used by the Viedoc Reports applications.
5. Study Access. Select when the password expiry should take place and whether a study will require two-factor authentication. Please see Study access settings for more information.
6. Clinic roles to be administered by the Site Manager. Select the roles that are to be administered by the Site Manager instead of the Study Manager, see Managing users for more information.
7. Helpdesk Team. Manage the Helpdesk settings, see Assigning a helpdesk for more information.
8. Viedoc Me. Select the options for Viedoc Me:
Note! After the Viedoc 4.93 release, starting new studies in legacy Viedoc Me is no longer supported. This does not affect ongoing studies already using the legacy Viedoc Me version. These studies will remain on the Viedoc Me version that is enabled at the time of the 4.93 release. New studies must use the current version of Viedoc Me.
Note! When changes have been made on this tab, a red exclamation sign will appear at the top of the settings tab. If you select the Save Changes button at the top right of the window, the exclamation sign will disappear.
| Study-specific considerations for text message reminders in China When studies are run with Viedoc Me in China and text message reminders are used, we need to have the message contents approved by the underlying text message gateway providers, in order to comply with the Cyber Security Law of the Peoples Republic of China, so that the text messages are allowed and come through to the trial subjects. After you have finalized the message contents, you will need to contact your Viedoc representative and provide some details of the study so that we can get the approval. Please plan for one week for your request to process. All system functionality works in the same way and if you're not looking at the URL, you won't notice the difference between the Chinese and European instances. |
When you select Show more options, the following options appear:
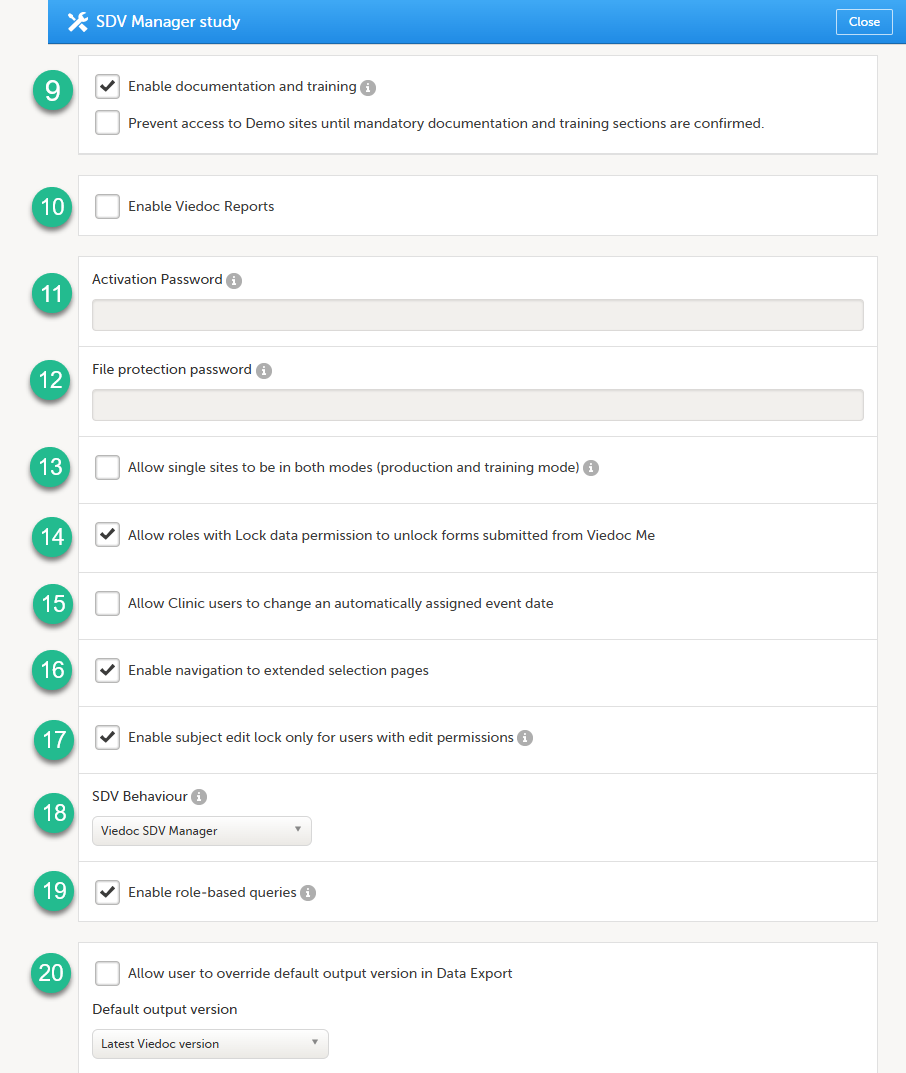
9. Enable documentation and training
 When this option is selected, then:
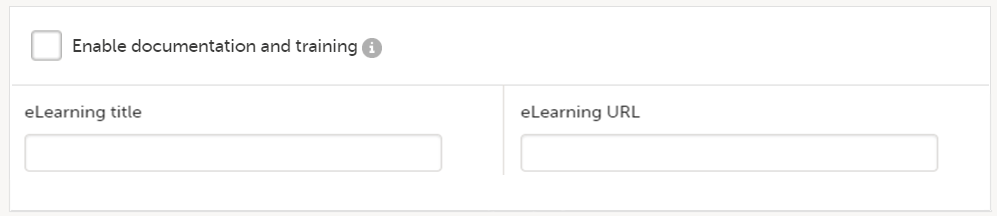 When this option is deselected, then:
10. Enable Viedoc Reports. When this option is selected, users with Reports permission are able to launch Viedoc Reports from the Metrics feature.
11. Activation password. If a password is set, all study users (clinic roles and system roles) are required to enter that password to access the study. This password is required only once, when the user accepts a role invitation and accesses the study for the first time.
12. File protection password. If Attach form PDF is selected for an email copy of alert messages, there is an option to enable password protection for the attached files. If a file protection password is set here, the attached form PDFs sent with the alert emails will be password protected and the user receiving the email needs the password in order to open the file. Only study users with edit rights for study settings, (the Organization Administrator and the Study Manager) can edit and save a password. Study users with view permission (the Site Manager) can view the file protection password. The file protection password option is also available for Japanese PMS studies.
Note! If the option to enable file protection password is not set (the field is not filled in), the attached files will not be password protected.
13. Allow single sites to be in both modes (production and training mode). If this option is selected, a site can operate as either a production environment, a demo (training) environment, or both (that is, you can select between the two). This is used to invite users to a training site before they go live. After the training, the site can be activated (that is, set to production).
14. Allow roles with Lock data permission to unlock forms submitted from Viedoc Me. When this option is selected, users with lock permission can unlock forms submitted by subjects through Viedoc Me, so that the forms are open for data edit by for example the Investigator. This option is automatically selected for all studies starting after the Viedoc release 4.48 in February 2019. For studies that started earlier, this option is by default set to inactive, and can be selected manually.
15. Allow Clinic users to change an automatically assigned event date. If this option is selected, it is possible for the clinic users to change automatically set event dates in the Event date form, if the date is based on the first data entry. The event date is not editable if it is based on a form item. For more information, see Study workflow in Viedoc Designer User Guide.
16. Enable navigation to extended selection pages. When this option is selected, users can navigate between all the selection pages that they have access to in Viedoc Clinic.
17. Enable subject edit lock only for users with edit permission. When this option is selected, multiple users without edit permissions (for example, monitors and data managers) can, in Viedoc Clinic, work on the same subject that is being edited by a user with edit permission (for example, an investigator or a study coordinator).
18. SDV Behavior. Select from Form level SDV, Item level SDV or, from Viedoc release 4.95, Viedoc SDV Manager.
Note! If SDV Manager is enabled, it cannot be disabled at a later time.
For studies starting after the Viedoc 4.95 release, Viedoc SDV Manager is enabled by default.
19. Enable role-based queries. If this option is selected, it restricts, at study level, the approval of
the query resolution to the same user role who raised the query. This option is deselected by default for
studies that started before the release of Viedoc 4.80. The option is selected by default for studies that started after the release of Viedoc 4.80.
20. Allow user to override default option version in Data Export, see Data export compatibility with previous Viedoc versions below for more information.
Note! In addition to the options described in the previous section, there are two settings available under Show more options for Japanese PMS Studies.
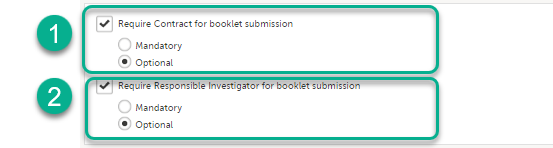
On the Settings tab, if Enable documentation and training is deselected, the eLearning curriculums that clinic users have access to from Viedoc Clinic are configured in Viedoc Designer. For details, see eLearning settings and Configuring roles in Viedoc Designer User Guide.
If Enable documentation and training is selected, it is possible to add an additional curriculum from Viedoc Admin that clinic users can access when launching the eLearning from Viedoc Clinic.
To add an additional curriculum:
| 1 |
In Viedoc Admin, select Study settings. |
| 2 | On the Settings tab, scroll down to the bottom of the pop-up and select Show more options. |
| 3 | Enter the name of the curriculum you would like to add in the eLearning title field. Enter the URL to that curriculum in the eLearning URL field. |
| 4 | Select Save changes. The pop-up closes. |
If a clinic user launches the eLearning from the landing page in Viedoc Clinic, a pop-up appears in which the clinic user can select which eLearning curriculum he/she would like to view. The newly added curriculum is included in the pop-up.
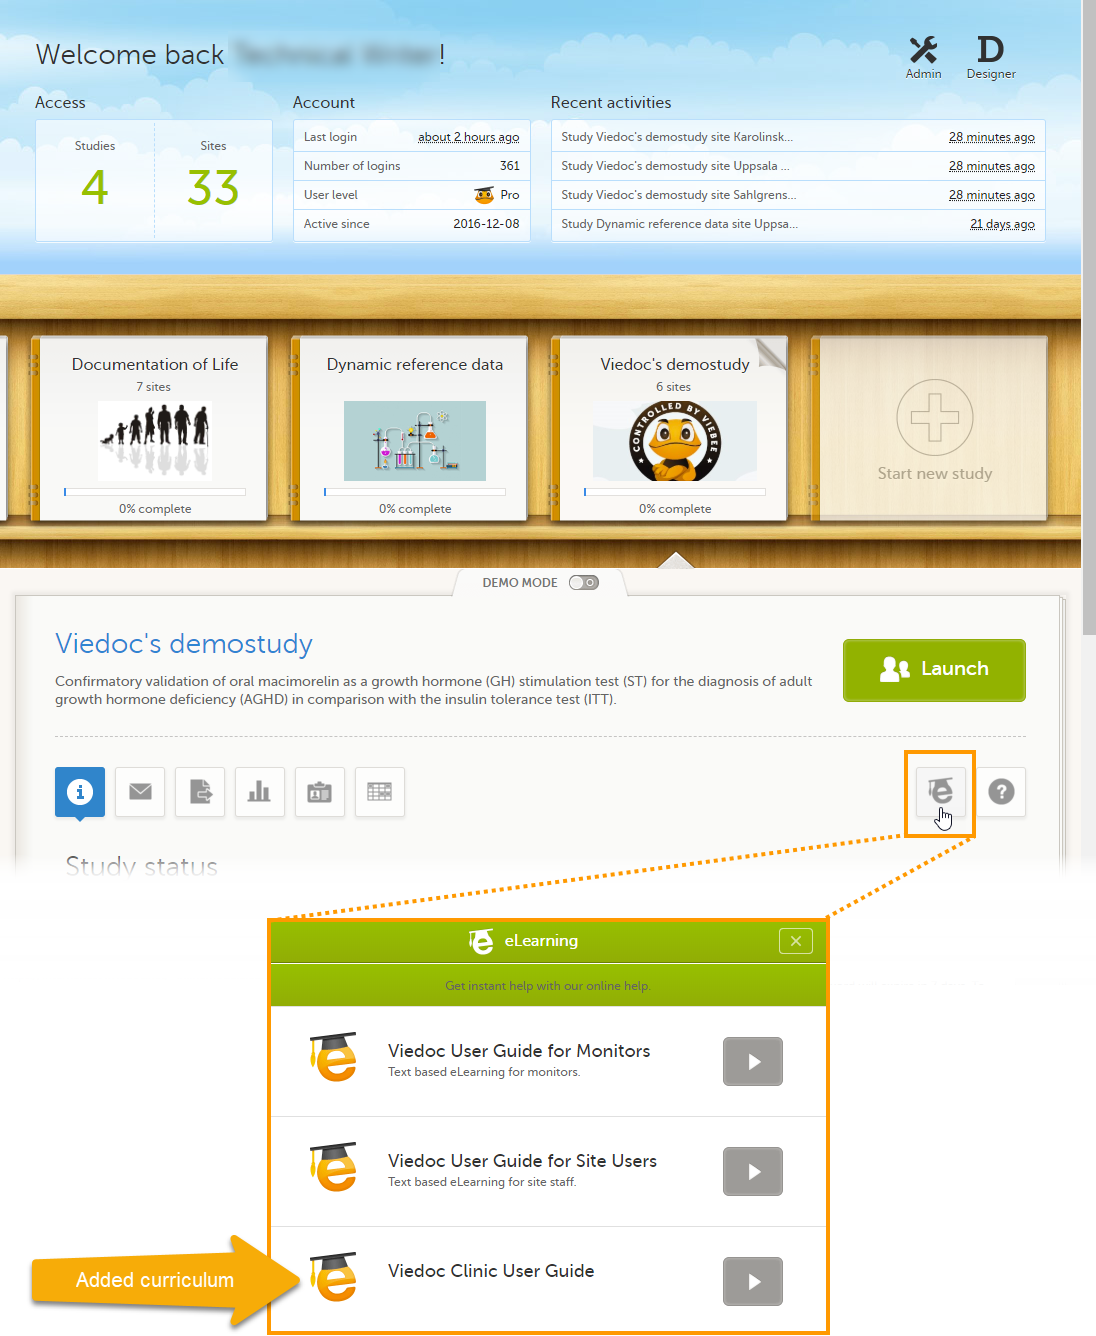
On the Settings tab, in the Study access field, you can configure the password expiration time and activate two-factor authentication for all users in the study.
If a user has access to more than one study, the password settings for all studies are checked upon login. If the password expiration settings for any of these studies dictate that the password is expired, the user is redirected to the Change password pop-up and is forced to change his/her password. An internal message displayed on the Messages page in Viedoc Clinic will notify the user about the password expiration time ten days in advance.
The password expiration time can be set to any value between 1 day and 5000 days.
The use of two-factor authentication provides an extra security measure at login. After entering the user name and password, the user is required to enter an authentication code that he/she received via text message or email to be able to login.
When exporting data, Viedoc offers the possibility to create a data export file that is compatible with files exported from previous versions of Viedoc. The default Viedoc version that is used when exporting data can be set in Viedoc Admin.
To set the Viedoc version to be used for data export:
| 1 | In Viedoc Admin, select Study settings to open the study settings pop-up. |
| 2 |
On the Settings tab, select Show more options. 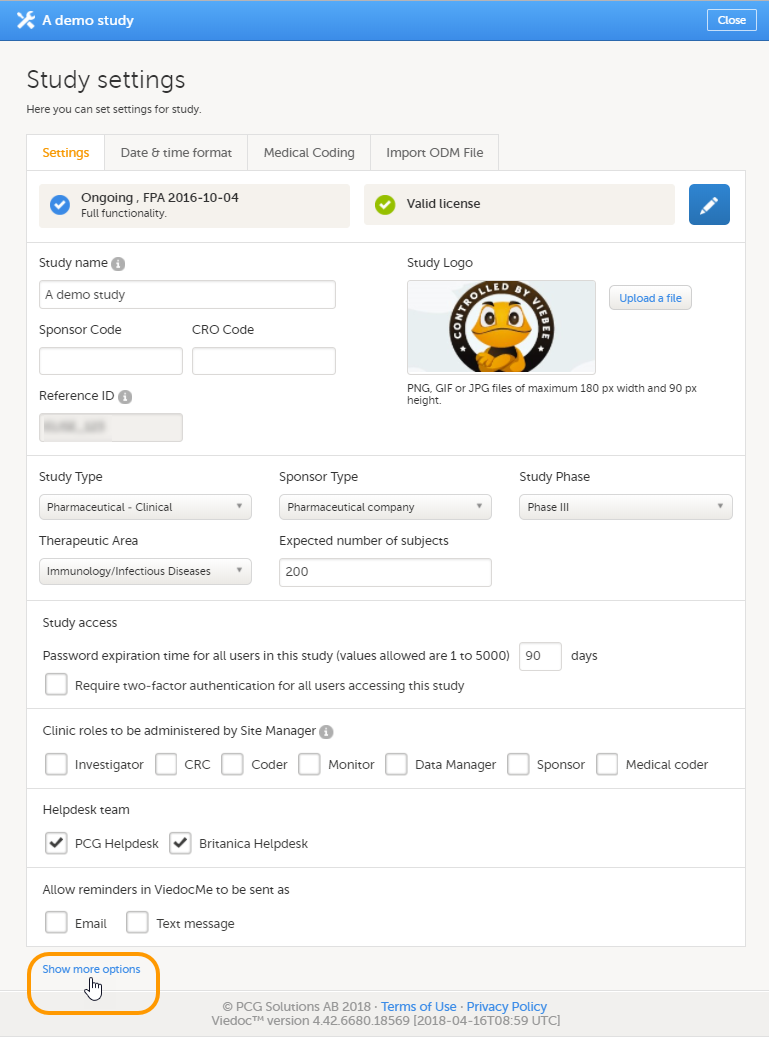
|
| 3 |
Select the default export output version from the Default output version dropdown list. 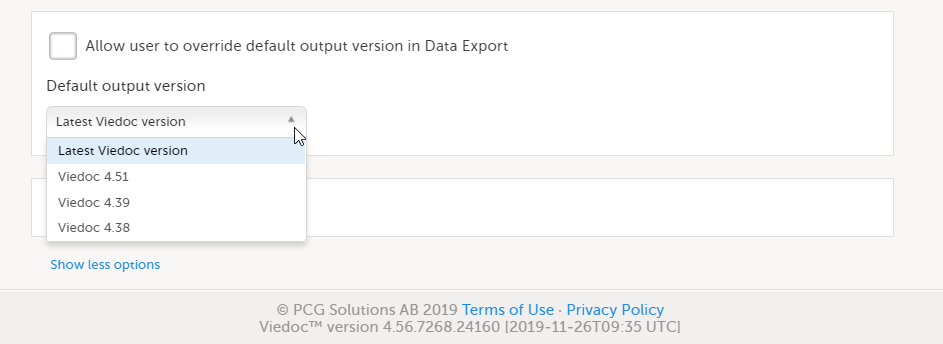
|
| 4 | If you would like to allow clinic users to be able to override the default output version and select the output version themselves, select Allow user to override default output version in Data Export. When this option is selected, clinic users can select the export output version themselves. If this option is left deselected, clinic users can only export data in the output version selected here. |
| 5 | Select Close to save the changes. |
The Viedoc versions available in the Output version dropdown menu are only those versions in which changes to the data structure were introduced.
This text is used in the lessons General study settings (Admin) and API configuration (Admin).
As of Viedoc release 4.79, the following output versions are available:
| Output version | Changes in data structure |
|---|---|
| Latest Viedoc version | When choosing Latest Viedoc version, the exported data will automatically follow the structure of the latest Viedoc release in which changes to the data structure were introduced. |
| Viedoc 4.79 | Introduction of a number of changes to the ODM data export. See the table below for details. |
| Viedoc 4.77 | For studies where item-level SDV is enabled, when exporting review status, the SDV sheet in the CSV and Excel data exports will include only the items that require SDV and are visible to the user. On the Review status sheet, items that do not require SDV are indicated with N/A . |
| Viedoc 4.68 |
Introduction of pdf archive export system check which splits the archive into one pdf file per subject and stores resultant PDF in a zip file. |
| Viedoc 4.67 | Introduction of two new columns for approving medical coding: "approved by" and "approved on date". |
| Viedoc 4.51 | Introduction of three new form repeat keys and the table of contents in the PDF export, see the table below for details |
| Viedoc 4.39 | Introduction of repeating forms and recurring events, see the table below for details. |
| Viedoc 4.38 | Original output format (Viedoc versions 4.38 or older). |
In Viedoc 4.79, the following changes to the export output were introduced:
| File type | Changes in the export output format |
|---|---|
| ODM |
Introduction of support for partial datetime, date, and time. This is now the default type when exporting designs and data in ODM format. Partial dates as per the ISO 6801 standard are written up to the most detailed value available. This makes the export compliant with CDISC ODM. |
| ODM |
When exporting a design to ODM, multi-selection code lists are handled as follows: Checkbox item definitions are split by code list items.
For example, when splitting a checkbox ItemDef with OID="CHK" and code list IDs "Yes" and "No", the split checkbox ItemDefs will have the OIDs "__CHK__Yes" and "__CHK__No", respectively. That is, the original OIDs and the code list IDs are prefixed with two underscore characters and separated by two underscore characters. In Viedoc Designer, checkbox items are exported as multiple ItemDefs - one for each selection value. In Viedoc Clinic and the Viedoc API: In the latest export version, checkboxes are exported as separate items for metadata and clinical data. In previous export versions, checkboxes are exported as one item. This has been introduced to be compliant with CDISC ODM. |
| ODM |
Bug fix: In the ODM data export, the content of the Question element for study event items and booklet forms was not complete. According to the CDISC standard, the element should include one of the TranslatedText attributes. This is now solved, and the Question element is populated with a string related to the corresponding OID. This is applied to all export versions. |
| ODM |
Bug fix: In the ODM data export, the MeasuremetUnit.Name contained HTML code, making it non-compliant with the CDISC standard. This is now solved, and the HTML code is removed from the name. This is applied to all export versions. |
| ODM |
Bug fix: In the ODM data export, the translated text was missing for meta.Protocol.Description.TranslatedText. This is now solved, and the body is populated with the protocol name, as visible on the design overview page. This is applied to all export versions. |
| ODM |
Bug fix: In the ODM data export, the Length attribute was incorrect, making it non-compliant with the CDISC standard. This is now solved, and Length is populated as per the ItemDef data type. This is applied to all export versions. |
| ODM |
Bug fix: In the ODM data export, there was a mismatch between the item data type and the code list data type for checkboxes. This is now solved, and the checkbox data is split into different items, in the same way as for CSV and Excel exports. This is implemented in a new export version, version 4.79. |
| ODM |
Bug fix: In the ODM data export, the study OID and ClinicalData didn't respect the Production/Demo mode for sites. This is now solved, and the study OID and ClinicalData are populated based on the Production/Demo mode of the exported study. This is applied without a new export version. |
| ODM |
Bug fix: In the ODM data export, non-repeating forms included a repeat key, making the ODM data export non-compliant with the CDISC standard. This is now solved. This is implemented in a new export version, version 4.79. |
| ODM |
Bug fix: In the ODM data export, the KeySet elements had an unregistered value for the ItemOID attribute, making the ODM data export non-compliant with the CDISC standard. This is now solved, and the KeySet elements reference items within the same MetaDataVersion. This is implemented in a new export version, version 4.79. |
| ODM |
Bug fix: In the ODM data export, the attribute OrderNumber of the element StudyEventRef was not valid with respect to its type, integer. This is now solved, and StudyEventRef elements have unique and non-empty consecutive order numbers. This is applied to all export versions. |
| ODM |
Bug fix: In the ODM data export, there was a data type mismatch between CodeList and ItemDef, making the ODM data export non-compliant with the CDISC standard. This is now solved by always having a matching data type between ItemDef and CodeList. This is applied to all export versions. |
| ODM |
Bug fix: In the ODM data export, the element MeasurementUnitRef had an unregistered value for the MeasurementUnitOID attribute, making the ODM data export non-compliant with the CDISC standard. This is now solved, and measurement units not referenced in any MetaDataVersion are not included in the ODM data export. This is applied to all export versions. |
| ODM |
Bug fix: In the ODM data export, the Alias names were not correctly populated. This is now solved, and any code list item aliases with empty names are removed at import and export - and the Alias names are populated with the context values. This is applied to all export versions. |
| ODM |
Bug fix: In the ODM data export, the SAS field name and the SAS dataset name were not populated. This is now solved, and the SAS field name is populated based on the ItemDef OID, and the SAS dataset name is populated based on the FormDefOID, which means that the OIDs are SAS-compliant. There is an option for this in the data export. This is applied to all export versions. |
| ODM |
Bug fix: In the ODM data export, revisions linked to study events and revisions linked to forms requiring approval of the new design revision were not included. This is now solved. This is applied to all export versions. |
| ODM |
Bug fix: In the ODM data export, alerts had repeating order numbers. This is now solved, and the order numbers for all study settings alerts in Viedoc Designer are removed. This is applied to all export versions. |
| ODM |
Bug fix: In the ODM data export, the item group containing the reference data items was not added to the MetaDataVersion. This is now solved. This is applied to all export versions. |
In Viedoc 4.51, the following changes to the export output were introduced:
| File type | Changes in the export output format |
|---|---|
| Excel | Addition of three columns for the new form sequence numbers introduced:
|
| ODM | Three new form sequence numbers were introduced, as Viedoc extensions: v4:SubjectFormSeqNo, v4:OriginSubjectFormSeqNo and v4:SourceSubjectFormSeqNo, within the FormData, right after the FormRepeatKey. |
| A table of contents was added to the PDF archive, starting on page 2 of the file. |
In Viedoc 4.39, the following changes to the export output were introduced:
| File type | Changes in the export output format |
| Excel | Addition of a column for Form sequence number (FormSeq) that contains the FormRepeatKey. |
| ODM | The FormRepeatKey now contains the activity ID as well, in the following format: FormRepeatKey$ActivityId. The ExportVersion attribute has been added to the ODM. |
| The summary formats are used to display the event and form names. |
On the Date & time format tab, you can edit the format of date and time used in all fields displaying a date or a time in Viedoc.
You can edit the date and time format in two different ways:
You can choose one of the following formats:
| Date/time format | Description | Example |
|---|---|---|
| dd | Two-digit day of the month | 01 |
| d | One-digit day of the month | 1 |
| MMMM | Name of the month fully spelled | February |
| MMM | Abbreviated name of the month (three letters) | Feb |
| MM | Two-digit number of the month | 02 |
| yyyy | Four-digit year | 2010 |
| yy | Two-digit year | 10 |
| HH | Two-digit 24-hour time | 08:15 |
| H | One-digit 24-hour time | 8:15 |
| hh | Two-digit 12-hour time (use in conjunction with tt) | 08:15 am |
| h | One-digit 12-hour time (use in conjunction with tt) | 8:15 am |
| mm | Two-digit minutes | 15 |
| ss | Two-digit seconds | 30 |
| tt | am or pm | am |
You can configure the following date and time fields:
| Date field | Description |
|---|---|
| Date pattern* | Format for dates, in cases where day, month and year to be entered are known |
| Unknown day pattern | Format for dates, in cases where only the month and year to be entered are known |
| Unknown month pattern | Format for dates, in cases where only the year to be entered is known |
| Date & time pattern* | Format for dates, in cases where both date and time are to be entered |
| Time pattern* | Format for times |
*For studies that use the Viedoc eTMF application, the patterns set in Viedoc Admin will be inherited by the eTMF application.
Note! The date and time formats set in Viedoc Admin to be used throughout the study do not apply to Viedoc Me.
After you have edited the date and time format, select Save changes to save the settings and close the pop-up.
On the Medical Coding tab, you can attach medical coding dictionary instances to medical coding scopes. There is also an option for enabling or disabling auto coding. For more information about the medical coding settings, see Managing medical coding dictionaries.
On the Import ODM file tab, you can upload and import ODM files. For more information on how to upload an ODM file, see Importing data from ODM file.
On the Documentation tab, you can manage the documentation and training sections. For detailed information about the documentation and training, see Setting up user documentation and training.
Note! This tab is visible only if the option Enable documentation and training is selected in Study settings.
On the Logs tab, you can generate and download an Admin audit trail report in Excel format.
The Admin audit trail report contains information about all settings and changes of study settings that have been made by authorized users in Viedoc Admin.
If the report has already been generated, you can download the latest generated report or regenerate it.
For more information about the report, see Admin audit trail report.
If the Enable documentation and training option is checked under Study Settings (see General study settings), a separate Documentation section is available in Viedoc Admin under Study Settings, that allows to:
If the Enable documentation and training option is checked under Study Settings in Viedoc Admin for ongoing studies (started before Viedoc release 4.51), any already configured eLearning sections in Viedoc Designer will not be available anymore. Instead, these can be copied and transferred from Viedoc Designer to Viedoc Admin, by clicking the link that is available when accessing the Documentation page, as illustrated below:
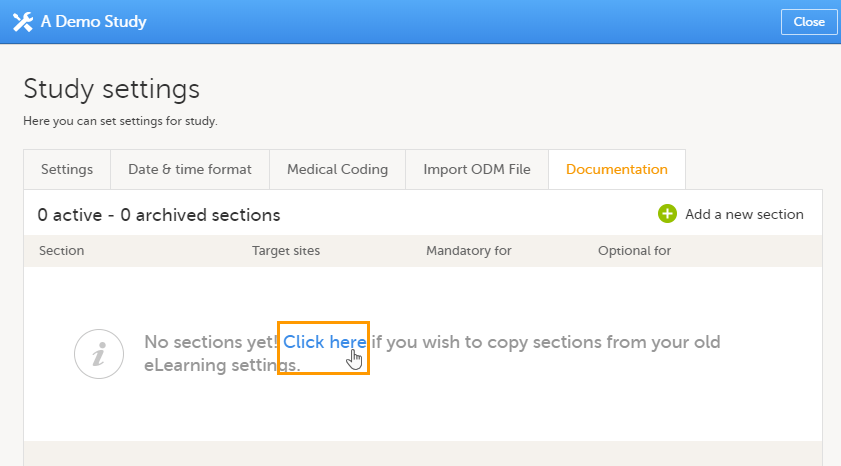
Note! This operation can be performed only:
As a result, the existing eLearning sections from Viedoc Designer are copied and listed under the Documentation tab and can be further configured (that is, assigned to specific roles/sites), as described later in this lesson.
For new studies, starting after Viedoc release 4.51 in May 2019, the following 5 role-based Viedoc eLearning curriculums for site staff are provided by default as training sections:
| Viedoc eLearning curriculum | Section URL |
|---|---|
| Viedoc User Guide for Site Users | https://help.viedoc.net/c/94d6f0 |
| Viedoc User Guide for Monitors | https://help.viedoc.net/c/c63e06 |
| Viedoc User Guide for Data Managers | https://help.viedoc.net/c/1994d8 |
| Viedoc User Guide for Project Managers | https://help.viedoc.net/c/04361f |
| Viedoc User Guide for Medical Coders | https://help.viedoc.net/c/3108de |
| Viedoc User Guide for Supply Managers (for Logistics) | https://help.viedoc.net/c/4a40d5/ |
| Viedoc PMS User Guide for Clinic Side Users | https://help.viedoc.net/c/91715f |
| Viedoc PMS User Guide for Sponsor Side Users | https://help.viedoc.net/c/590df1 |
In order to make these curriculums available for the different clinic roles, you need to edit each of the training sections, as described in section Editing a training section below.
The Documentation tab under Study Settings provides a list of all the existing sections, as illustrated in the following image.
A training section is a piece of documentation (either a file or an URL) that can be made available (as optional or mandatory) for specific user roles within specific sites, as instructed in Managing training sections below.
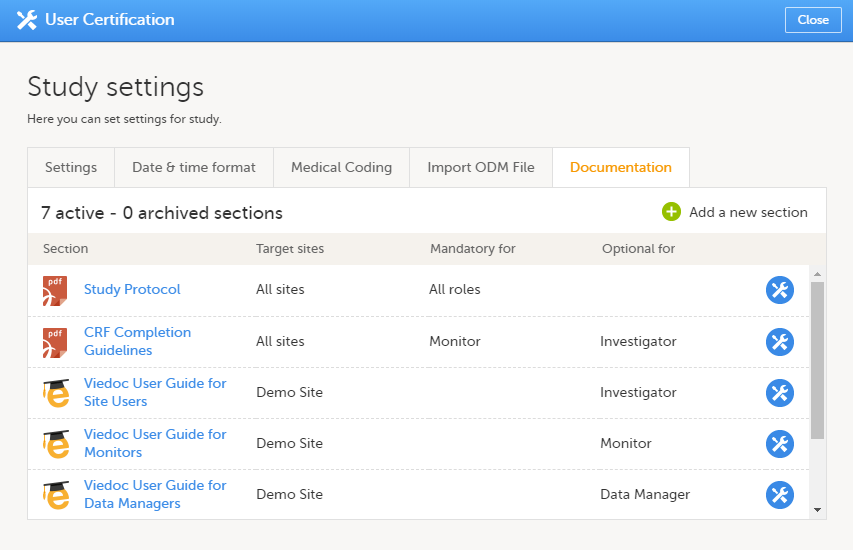 On the top bar you can see:
For each section in the list the following information is provided:
The section icons for various types of files/URLs used are listed in the table below:
| Icon | Description |
|---|---|
 |
URL to Viedoc eLearning system |
 |
URL (other than Viedoc eLearning, mentioned above) |
 |
PDF file |
 |
Word document |
 |
Excel file |
 |
Power Point file |
 |
Other file type than the ones mentioned above |
To add a new section, follow the steps below.
| 1 | Click Add a new section link on the top right of the Documentation page. The Add a new training section page is displayed.
Here you can set the following:
|
||
| 2 | Click Add section on the top right of the page. The section will be added to the list under the Documentation page. |
To edit an existing section, follow the steps below.
| 1 | Click the toolbox icon to the right of the section in the list: The edit section page opens. |
| 2 | Perform the changes you need and click Save changes in the top right of the page. You can edit all the fields, except for the Section URL/file. For a detailed description of the fields, see Adding a new section. |
It is possible to archive an existing section, for versioning purposes. For example, if we have an existing section with the study protocol file (version 1), and, at some point, we get an updated version of the file (version 2) that we want to make accessible for clinic users. In this case, we would archive the section that contains the version 1 of the file and would add a new section where we upload the version 2 of the study protocol.
An archived section will no longer be accessible in Viedoc Clinic under Documentation & training (as illustrated in section How it looks in Viedoc Clinic). An archived section can be restored at any time, becoming accessible again in Viedoc Clinic, according to the settings made for the section.
To archive an existing section, follow the steps below.
| 1 | Click the toolbox icon to the right of the section in the list: The edit section page opens. |
| 2 | Click Archive: The edit section page closes and the section is displayed as Archived in the list under the Documentation tab: 
An archived section will no longer be accessible in Viedoc Clinic. An archived section can be restored at any time, becoming accessible again in Viedoc Clinic, according to the settings made for the section. |
To restore an archived section, follow the steps below:
| 1 | Click the toolbox icon to the right of the archived section in the list: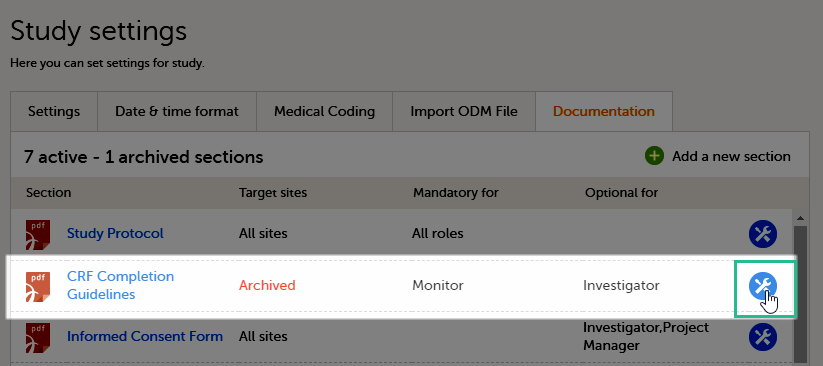 The edit section page opens. The edit section page opens. |
| 2 | Click Restore:
The section will be restored and become accessible again in Viedoc Clinic, according to the section settings. |
It is possible to delete an existing section. Deleting a section cannot be undone, so if you need to re-use the section, you might want to archive it instead (see Archiving/Restoring a section above). An archived section can be restored afterwards, while a deleted section will be completely removed. Therefore, if you like to keep a history over the documentation versions that have been available for reading throughout the study it is recommended to archive instead of deleting.
A deleted section will no longer be visible in Viedoc Clinic.
To delete an existing section follow the steps below:
| 1 | Click toolbox icon to the right of the section in the list: The edit section page opens. |
| 2 | Click Delete this section in the bottom of the page: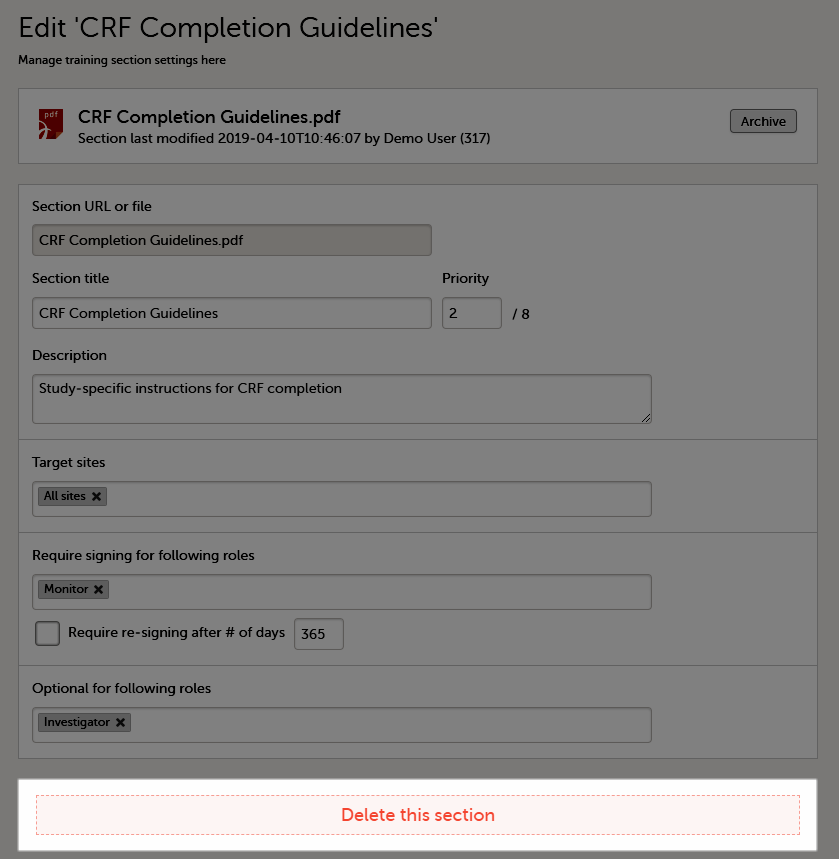 A confirmation pop-up is displayed. A confirmation pop-up is displayed. |
| 3 | Click Confirm to delete the section, or Cancel to return to the edit section page without deleting.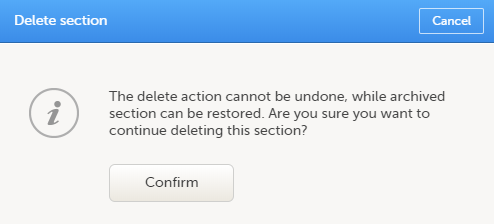 |
For example, if we have the following sections defined in Viedoc Admin under Study Settings > Documentation:
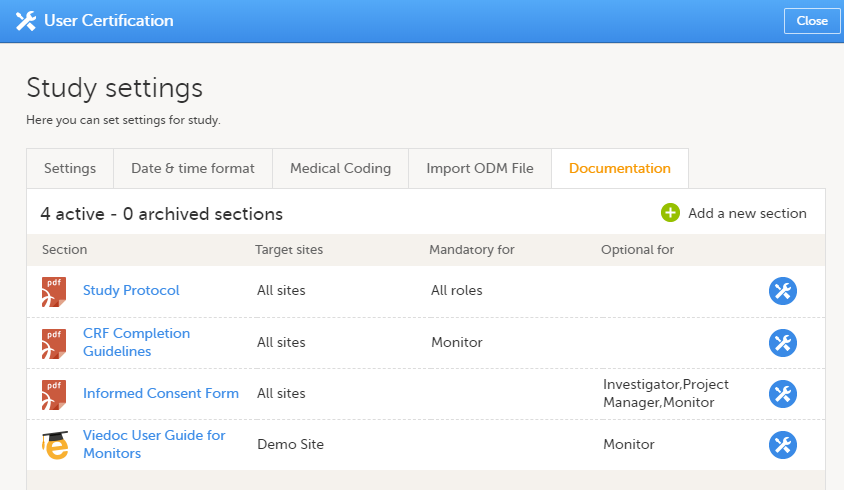 The user having the Monitor role for the Demo Site, will see in Viedoc Clinic, on the Study Start page, under Documentation and training, the following:
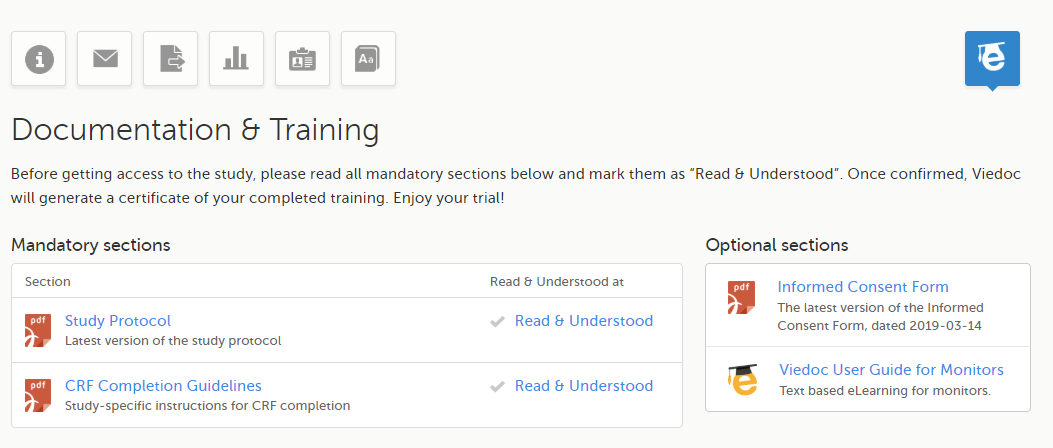
For more details about the Documentation and training section in Viedoc Clinic, see Documentation and Training.
The clinic users having mandatory documentation assigned who have not read and signed all the mandatory documentation yet, are displayed in the user listings in Viedoc Admin with the status Not certified. For details about user status see Managing users.
Information on which users have been certified, for which roles and which sections, is also included in the 'Log of users and roles' PDF report that can be downloaded from Viedoc Admin, as described in Managing users.
This lesson describes the types of roles that are supported by Viedoc, how to assign roles to users and where to view the users that have access to a study, and their user details. The instructions are intended for Study Managers (STM) and Site Managers (SIM).
This content is shared by the lessons in the following user guides
Admin: "Managing users (for Org Admin)"
Monitors & Project Managers: "Managing users"
Clinic: Signing data
The Study Manager should, in cooperation with the Site Manager(s), ensure that all users of Viedoc are informed, and certify that all electronic signatures created in the system are intended to be the legally binding equivalent of a traditional handwritten signature.
In Viedoc, the purpose/meaning of a signature is always “responsibility” as used in Sec. 11.50 of Food and Drug Administration (FDA) 21 Code of Federal Regulations (CFR) part 11. The signer is thereby acknowledging his/her responsibility for the entered data. Viedoc keeps account of what was signed, who signed it, and when the signature was performed.
http://help.viedoc.net/l/1648/This content is shared by the lessons in the following user guides
Admin: "Managing users (for Org Admin)"
Monitors & Project Managers: "Managing users"
Viedoc supports two different types of roles.
The Organization Administrator invites the Study Manager. The Study Manager can assign users to system roles and clinic roles. The Study Manager can also delegate the management of clinic roles to the Site Manager.
The system roles are predefined in Viedoc, they cannot be adjusted for your study. The system roles give access to various features in Viedoc Admin or Viedoc Designer.
The following system roles are available.
| Role | Description |
|---|---|
| Organization Administrator | The Organization Administrator is responsible for all projects within the organization. The Organization Administrator initiates projects, and assigns Study Managers to every project in Viedoc Admin. |
| Study Manager | The Study Manager assigns roles to users, adds sites to the study and applies study designs to the sites in Viedoc Admin. For a typical clinical trial, the role of Study Manager in Viedoc is assigned to the project manager. |
| Designer | The Designer builds the study in Viedoc Designer. |
| Site Manager | The Site Managers are appointed by the Study Manager and use Viedoc Admin to assign clinic roles to site users. For a typical clinical trial, the role of Site Manager in Viedoc is assigned to the Clinical Research Associate (CRA). |
| Unblinded Statistician | The Unblinded Statistician manages the randomization lists in Viedoc Admin. This role is only used for randomized studies, when it is necessary to have control over who has access to and can manage the randomization lists. |
| Dictionary Manager | The Dictionary Manager uploads medical coding dictionaries. |
| Reference Data Source Manager | The Reference Data Source Manager manages the reference data sources at study level. The Reference Data Source Manager can also delegate the management of data sources at site level to the Site manager. |
| API Manager | The Application Programming Interface (API) Manager has access to the API settings and performs the API configurations. Complete instructions on how to configure the API are provided in Viedoc API. |
| eTMF Manager | The eTMF Manager manages the eTMF application in Viedoc Admin. The eTMF Manager maps Viedoc Clinic roles to eTMF roles. The eTMF Manager also has permission to manage the eTMF structure in Viedoc eTMF. |
| Design Impact Analyst |
The Design Impact Analyst can run an impact analysis in Viedoc Admin. A user with the role can see what impact a new design revision will have on existing form instances before applying the revision. Note! Before you invite a user with this role, read Design revision impact analysis to understand in which scenarios the design revision impact analysis report might reveal blinded information. |
One organization can have more than one Organization Administrator. One study can have more than one Study Manager, Designer, Unblinded Statistician, Dictionary Manager, Reference Data Source Manager and API Manager. One site can have more than one Site Manager.
The clinic roles, and the rights that belong to these roles, can be set up in the study design in Viedoc Designer. They are study-specific and give access to Viedoc Clinic. Clinic roles are assigned to site users by the Study Manager or the Site Manager. Each study can have an unlimited number of clinic roles.
Examples of clinic roles are:
Note!
For example: The Publish SDV Plans permission is enabled for the Data Manager role.
User A is invited as a Data Manager to the Uppsala site. The high-level SDV plan is in use on 10 sites in the study.
User A reviews the edits made to the high-level SDV plan and publishes it. The updated plan will now take effect on all of the 10 sites in the study.
For more information about SDV Manager, see Viedoc SDV Manager.
http://help.viedoc.net/l/829deb/A list of users can be viewed at the following three places:
1. On the Users page. This page displays a list of users assigned to any role in any study within the organization.
2. In the Study crew window. This window displays a list of all users assigned to a system role in the study.
3. On the Site users tab of the site settings window. This tab displays a list of all users assigned to a clinic role within that specific site.
Note! All three user lists only display the users and roles you have permission to manage (invite or remove). If you are a Study Manager, you can also see the Organization Administrator. If you are a Site Manager, you can also see the Study Manager. However, in both cases you cannot invite users to these roles or remove these roles from users.
The Users page lists all users within the organization, and displays the following information:
If a user has no approved roles, because the invitation is still pending or rejected, or because the roles have been removed, only the user's e-mail address is displayed and all the other fields remain empty.
On this page, you can (see image):
1. Search for a specific user among all users within the organization by entering the user’s name or e-mail address in the search field
2. Sort the list of users by name, status or date of creation
3. Group the list of users by study by selecting Studies in the Group by field
4. Invite organization users (only available for the Organization Administrator)
The Study crew window lists all users in the study that are assigned to a system role, and displays the following information:
*If the user has multiple roles, the date and time of invitation or acceptance of the first role that gives access to that site is displayed.
You can sort the users by name, role, date of (accepted) invitation and status. To sort the users, click on the column headers, or click on the arrows to the right of the column header. You can sort the users in ascending and descending order.
The Site users tab in the Site settings window lists all users with clinic roles that have access to that site, and displays the following information:
*If the user has multiple roles, the date and time of invitation or acceptance of the first role that gives access to that site is displayed.
You can sort the users by name, role, date of (accepted) invitation and status. To sort the users, click on the column headers, or click on the arrows to the right of the column header. You can sort the users in ascending and descending order.
The Viedoc skill level gives an indication of how experienced the user is in using Viedoc. It is based on the number of logins by that user.
| Skill level | Icon | Description |
|---|---|---|
| Rookie | |
≤ 20 logins |
| Semi-pro | |
21-100 logins |
| Pro | |
101-1000 logins |
| Legend | |
> 1000 logins |
The status of the users is displayed in the status column:
| Status | Icon | Description |
|---|---|---|
| Online | |
The user is currently logged in to Viedoc, and has no pending invitations. |
| Offline | |
The user is currently not logged in to Viedoc, and had no pending invitations. |
| Pending | |
The user has at least one pending invitation to a role. The question mark is displayed even if the user has accepted invitations to other roles. |
| Pending certification | |
The user has mandatory documentation assigned that was not confirmed as read & understood. |
| Rejected | |
The user has rejected all invitations to roles. The user has never had access to the study. |
| Locked out | |
The user is locked out from Viedoc (the user has entered the wrong password three times in a row). |
| Removed | |
The user has had roles in the study before, but has currently no roles left. |
For the Users page (see Users), the following applies:
If the users are not grouped by study, the user's status symbol will reflect the overall status in all studies you have access to. That means, if the user has one pending invitation in one of the studies, the status will be pending and a red question mark will appear. If the users are grouped by study, the status symbol will reflect the status per study. That means that a user's status can be pending in one study, and logged in in another study.
To view the details of a specific user, click the toolbox icon behind the name of that user in any of the previously described user lists. The User Settings window opens:
The User Settings window displays the name and email address of the user, the user ID (in parentheses), the status and the skill level. You can perform the following actions:
1. On the Details tab, you can view the user's name and contact details.
2. On the Studies and Roles tab, you can view a list of all roles and sites the user has access to, including the date and time of invitation/acceptance of that role. The roles are grouped per study. You can delete roles by clicking the trash can icon next to the role.
3. On the Authentication log tab, you can view a list of logins by the user, including date and time, the IP address, and the browser that was used. The number of displayed entries is limited to the latest 100 logins.
4. On the Reset Password tab, you can reset the password for that user, if the user has forgotten their password and does not have their mobile number or a secondary email address. Viedoc will send a notification to the user with a link to create a new password.
Note! The authentication code will be required if the user wants to reset their password using the Forgot your password? link on the login page. The authentication code is sent to the user's verified mobile number or to the user's secondary email address. If neither of these options are selected, the user needs to contact their Study Manager to receive a link to reset their password.
5. On the Communication Log tab, you can view the latest 20 communication logs for a user and download an Excel file with the complete user-specific Communication Log containing information about email and SMS communication to study users. All users with access permissions (Study/Site Managers) to the User settings in Viedoc Admin can access the Communication Log.
Note! Email and SMS communication logs before the Viedoc 4.70 release are available, however these do not have the same level of detail.
https://help.viedoc.net/processwire/page/edit/?id=2007The content is shared by the lessons 'Managing Users (OA)" and "Managing Users (STM and SIM)"
For each study, you can download user logs in PDF and Excel format with information about all users and roles for the sites you have access to. See Downloading the user logs for instructions.
Notes!
The content of the logs depends on the system role that you have, as follows:
| If you are a... | ... then the logs contain: |
|---|---|
| Organization Administrator |
The system roles Application Programming Interface (API) Manager, Dictionary Manager, Unblinded Statistician, Reference Data Source Manager, and eTMF Manager. |
| Study Manager | The system roles API Manager, Dictionary Manager, Unblinded Statistician and Reference Data Source Manager, eTMF Manager, and all sites and site users in the study. |
| Site Manager | The system roles API Manager, Dictionary Manager, Unblinded Statistician and Reference Data Source Manager, eTMF Manager, and all sites you have access to, together with their site users. |
The Log of users and roles PDF contains information about all users and roles for the sites you have access to, grouped in the following chapters:
The User administration log contains information about all users and roles for the sites you have access to, with the following sheets:
There are two different Communication logs. One contains user-specific and one contains study-specific communication information.
Note!
The user-specific Communication log contains information about email and SMS communication to the study users.
All users with access permissions (study/site managers) for the User Settings in Viedoc Admin can view the Communication Log for a specific user. The Communication Log tab has the following columns:
The Excel file contains a sheet named User Communication Logs and includes all email and text message (SMS) communications to the study user on the same Excel sheet.
Note! Users must have activated the Viedoc account and accepted at least one invitation in order to have their communication included in the Communication Log tab in the User Settings window.
The User Communication Logs sheet in the Excel file contains information about user-specific communication – this is the user activity in Viedoc that is unrelated to a specific study:
The file name format is: UserCommunicationLog-UserID-YYYYMMDDhhmmss. (Using UTC)
All the logs are included in the same Excel sheet. The excel sheet has the following columns:
| Column | Description |
|---|---|
| Message ID | GUID: A unique identifier for the message |
| Type of Communication | SMS/email |
| Datetime (UTC) | Date and time for the communication |
| Message Type |
The action that the communication is related to:
|
| To | The email address the message is sent to. For SMS messages, this column is empty. |
| Status | Success/Failed |
| Provider | Provider name - the provider that was used to send the message to the recipient |
In Admin, under Users - Group by Studies, in the User Logs dropdown list, a separate file called User communication log is available containing the information listed below.
This log contains information about study-specific communication and emails only, related to:
The Excel file contains a sheet named Study Communication Logs.
The file name format is: UserCommunicationLog-YYYYMMDDhhmmss. (Using UTC)
The Excel sheet has the following columns:
| Column | Description |
|---|---|
| Message ID | GUID: A unique identifier for the message |
| Communication Type | |
| Date time (UTC) | Date and time for the communication |
| Message Type |
The action that the communication is related to:
|
| Site Type | Training/Production (For the message types Invitation and Invitation rejected, this column is empty.) |
| To | Email address(es) (For SMS messages, this column is empty.) |
| CC | The email address(es) of the recipients of a copy |
| BCC | The email address(es) of the recipients of a blind copy |
| Status | Success/Failed |
| Provider | Provider name - The provider that was used to send the email to the recipient |
Note!
The content is shared by the lessons 'Managing Users- Org Admin and "Managing Users -system lessons and is called User logs in the single source file"
The Study Manager can give users access to individual sites, or to a groups of sites at once. These groups of sites are called system site groups and are automatically created by the system when sites are added to the study. The following systems site groups are created by the system:
When you invite users to a system site group, the users will automatically receive instant access to all sites in that group, including all future sites that will be added to that group at a later time. For example, if you invite a user to the country 'Hungary', that user will receive access to all sites in Hungary. Similarly, users that were invited to a system site group will automatically lose access to a site if that site is removed from the group. For more information about system site groups, see Managing study sites.
http://help.viedoc.net/l/81e4bd/Only the Study Manager can invite users to system roles. The Study Manager can also invite users to clinic roles, or he/she can delegate the management of (some of the) clinic roles to the Site Manager, see Delegating user management to the Site Manager for instructions. Once the management of clinic roles is delegated to the Site Manager, the Study Manager cannot invite users to these roles anymore.
If a user should receive access to multiple sites, the quickest way to invite the user is through the study crew window (described in this section). If a user should receive access to only one site, you can also invite the user through the site settings window of that site (see Assigning users to clinic roles for instructions).
To invite users:
| 1 | In Viedoc Admin, open the study to which you would like to invite users. |
| 2 | Click the toolbox icon in the Study crew field. The Study crew pop-up opens. |
| 3 | On the Add study users tab, enter the e-mail address of the user you would like to invite. Click Continue. Tip! You can invite multiple users at once by adding multiple e-mail addresses in the field. Separate the e-mail addresses with a semi-colon or comma. |
| 4 |
Select the role to which you would like to invite the user. Note! If any of the clinic roles are delegated to the Site Manager (see Delegating user management to the Site Managers), the delegated roles do not appear in the dropdown list. |
| 5 |
If you selected the role Site Manager or a clinic role, select the system site group or the individual sites to which the user should get access. To select a system site group, click on the name of the group (displayed in bold). To select an individual site, click on the name of the site.
|
| 6 | Click Send invite. An invitation e-mail will be sent to the e-mail address(es) you specified. |
It is possible to re-invite a user to those roles that are in state pending, i.e. to resend the invitation email to the user for that role.
To resend an invitation:
| 1 | On the Users page, scroll to the user whom you would like to re-invite. Click the toolbox icon behind the name of the user: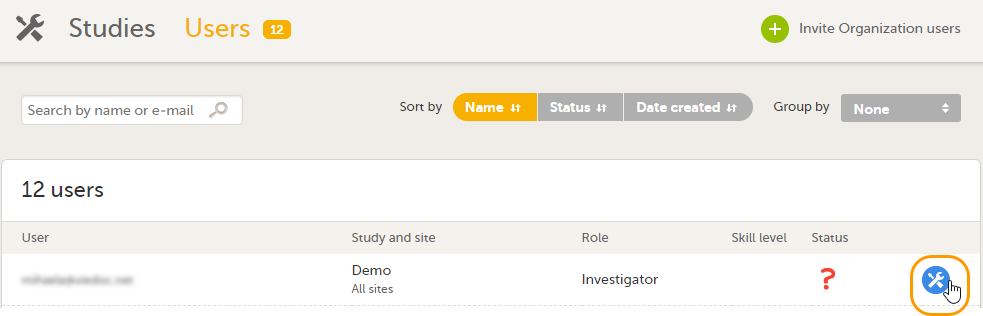 The User Settings pop-up opens. The User Settings pop-up opens. |
| 2 | In the User Settings pop-up, click the Resend invitation icon for the pending role:
A new invitation email is sent and:

|
It is possible to remove a user's access to a role. This can only be done by the Study Manager. If the Study Manager has delegated the management of clinic roles to the Site Managers, only the Site Managers can remove access to these roles and sites.
To remove the access from users:
| 1 | On the Users page, scroll to the user whose access you would like to remove. Click the toolbox icon behind the name of the user.

|
| 2 |
On the Studies and Roles tab, scroll to the study, site and role for which the access should be removed. Click the trash can icon. 
A pop up appears. |
| 3 |
Click Delete to confirm that the access should be removed, or click Cancel to cancel. |
Any records generated by the user are stored in the audit trail even when the user has been removed.
If a user has typed in the wrong password more than three times, and do not have a secondary email address or mobile number with text messaging enabled – and therefore cannot use the Forgot your password link – the account will be locked. The Study Manager or Site Manager can unlock a locked account so the user can reset their password without having to provide an authentication code.
To unlock a user account:
| 1 | On the Users page, scroll to the user whose account you would like to unlock. Click the toolbox icon behind the name of the user.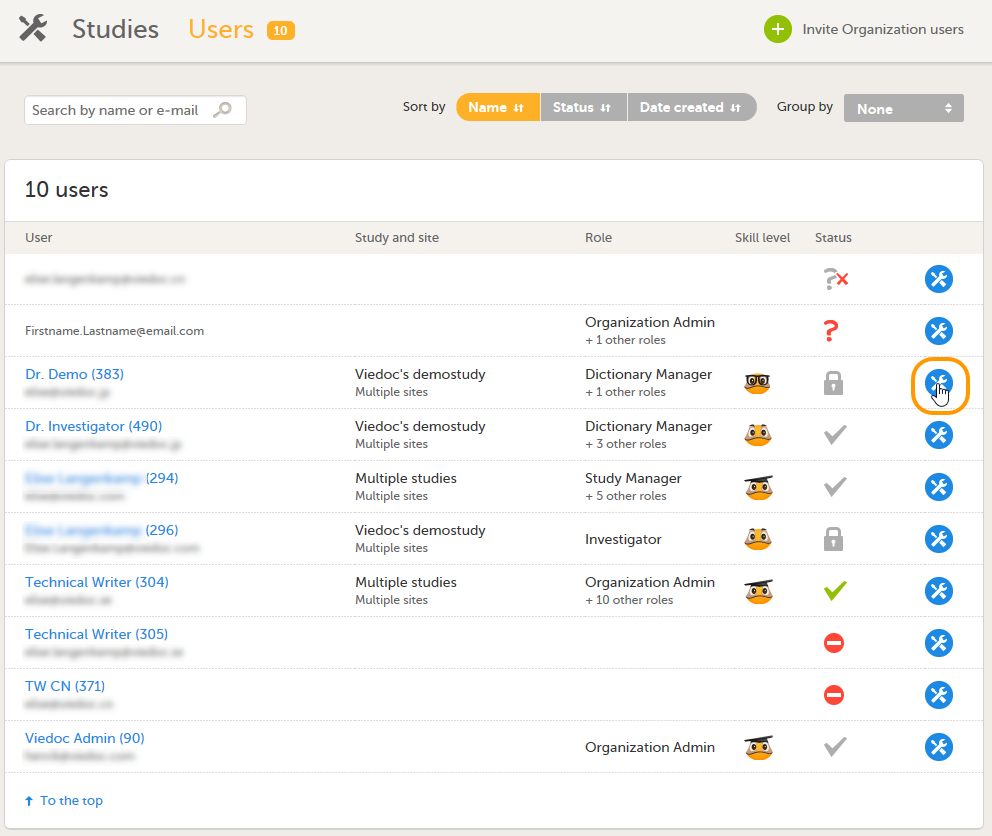 The User Settings pop-up opens. |
| 2 |
On the Reset Password tab, click Reset Password. 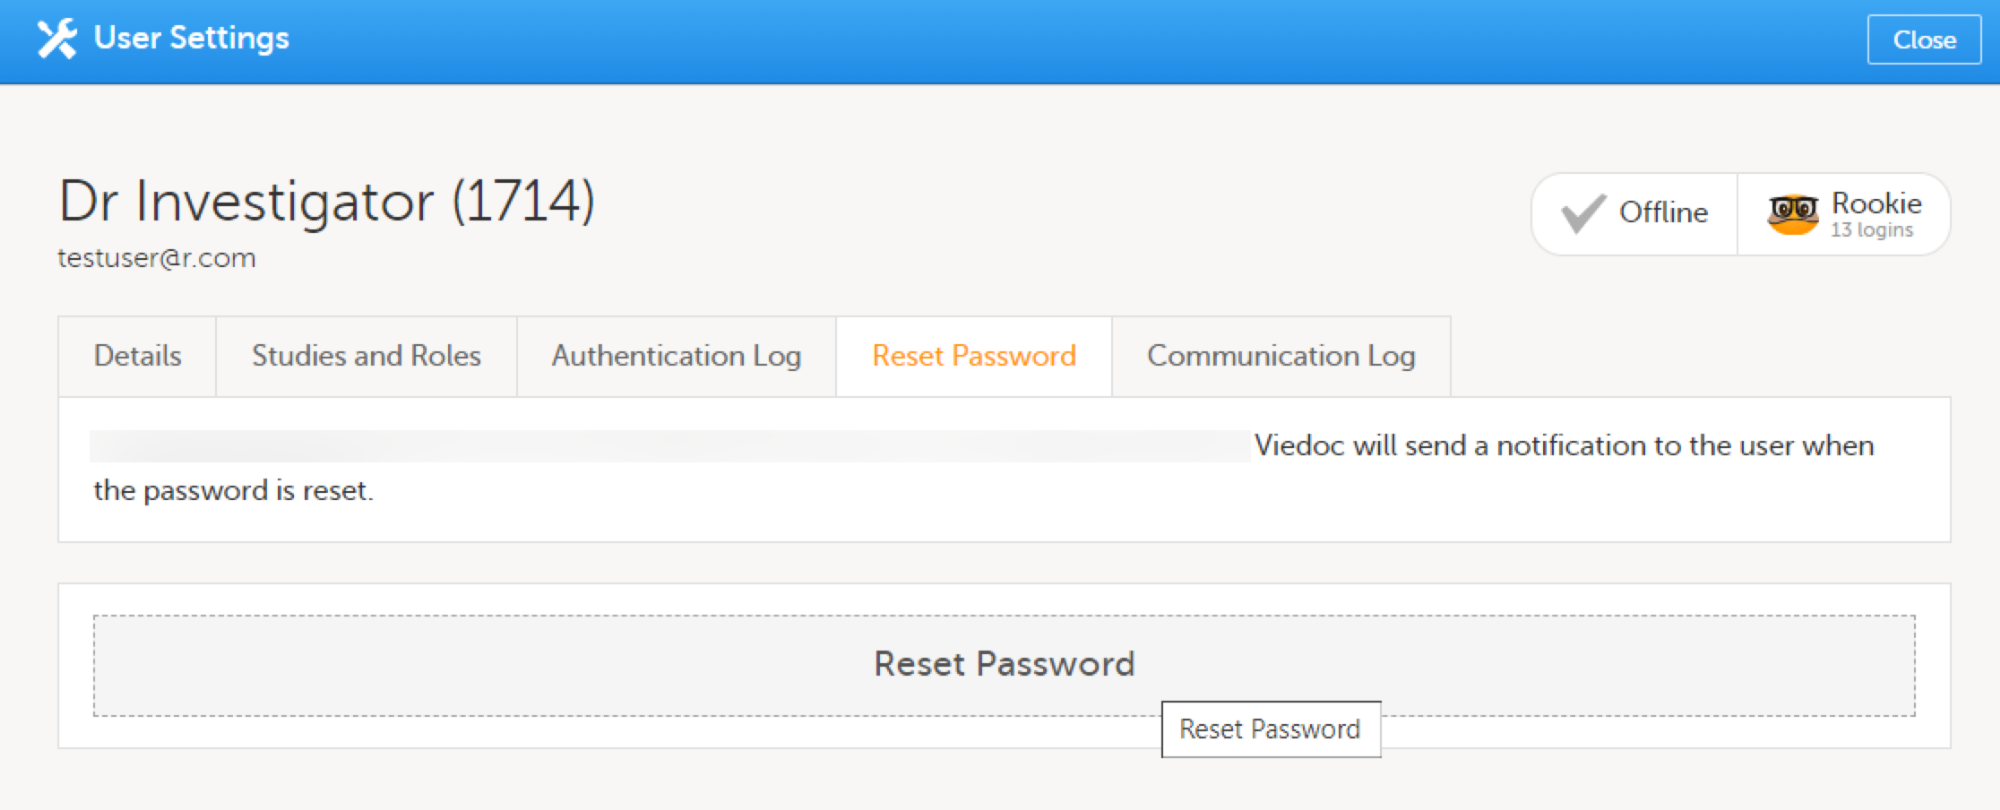
The user will receive an e-mail with a link to reset the password. The user can then reset their password without having to provide an authentication code. |
Note! The authentication code will be required if the user wants to reset their password using the Forgot your password? link on the login page. The authentication code is sent to the mobile number the user set to receive text messages or to the user's secondary email address. If neither of these options are selected, the user needs to contact their Study Manager to receive a link to reset their password.
Note! The email with the link to reset the password is only valid for twelve hours. If the user has not reset the password within twelve hours, a new e-mail needs to be sent.
The Study Manager can delegate the management of clinic roles to the Site Manager.
To select the roles that should be managed by the Site Manager:
| 1 | In Viedoc Admin, click Study settings. The study settings window opens. |
| 2 | On the Settings tab, in the field Clinic roles to be administered by Site Manager, select which roles should be assigned by the site manager. The roles that can be selected here are the clinic roles that are defined in the study design. |
| 3 | Click Save changes, and click Close. |
Note! These settings apply to all sites and all Site Managers involved in the study. When the assignment of (some of the) clinic roles is delegated to the Site Manager, these clinic roles can no longer be managed by the Study Manager.
To download the user logs:
| 1 | On the Users page, select to group the users by Studies. |
| 2 |
Scroll to the study from which you would like to download the user log and click User logs to open the dropdown menu. 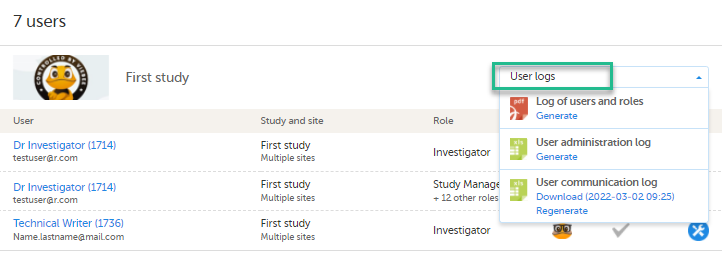
If the log was not previously generated, click Generate a PDF file or Generate an Excel file. If the log was previously generated, the most recent version is stored on the server, shown with a date and time stamp. You can download it by clicking the link, or, generate an updated version by clicking Regenerate. Note! The user logs are generated in the language set by the user who is generating the log. Therefore, the previously generated file is available for download only if it was generated in the language you have currently set in Viedoc. |
The Site Manager can invite users to (some of the) clinic roles, if the study manager has delegated the management of these clinic roles to the site manager.
To invite users to a specific site:
| 1 | In Viedoc Admin, click the toolbox icon behind the site to which you would like to invite users. The site settings pop-up opens. |
| 2 | On the Add study users tab, enter the e-mail address of the user you would like to invite. Click Continue.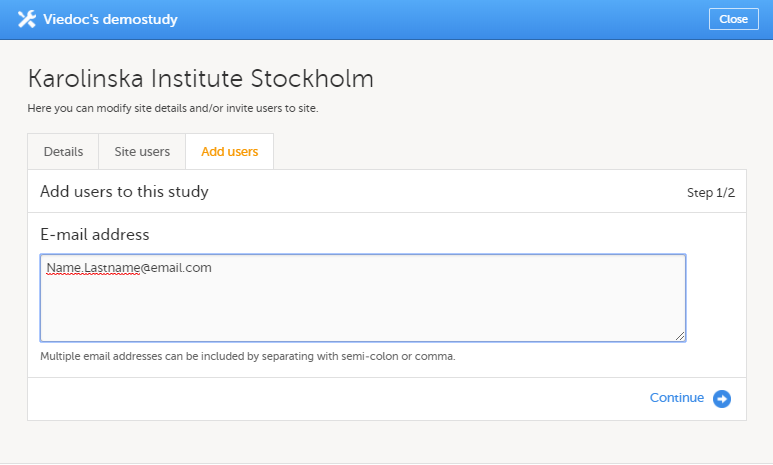 Tip! You can invite multiple users at once by adding multiple e-mail addresses in the field. Separate the e-mail addresses with a semi-colon or comma. |
| 3 | Select the role to which you would like to invite the user.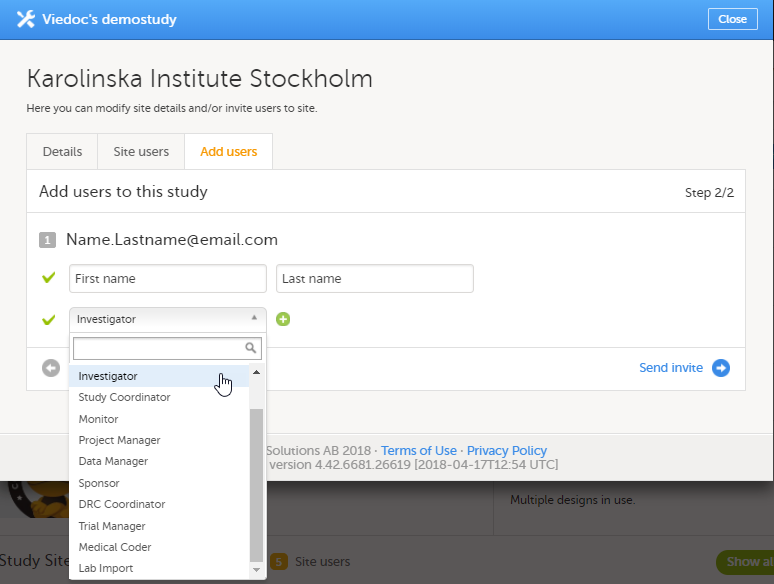 You can add multiple roles by clicking the + icon. Newly added roles can be removed by clicking the - icon. |
| 4 | Click Send invite. An invitation e-mail will be sent to the e-mail address or e-mail addresses you specified. |
Click here for instructions on how to remove a user.
Click here for instructions on how to unlock a user account.
This lesson provides instructions on how to manage the study sites in your study. It also provides a description of system site groups.
The study site list displays all sites that are included in the study. For each site, the study site list also displays the site code, country, which study design version is used, and whether the site is a production site or not. The column Users indicates how many users the site has, and the amount of users that are currently logged in. For example, 1/4 means that the site has 4 users of which 1 is currently logged in.
The header of the study site list summarizes the total number of sites, the total number of countries and the total number of site users.
The sites are numbered in the order they are added. You can sort the sites in the study site list by number, site code and country by clicking on the respective column header of the study site list.
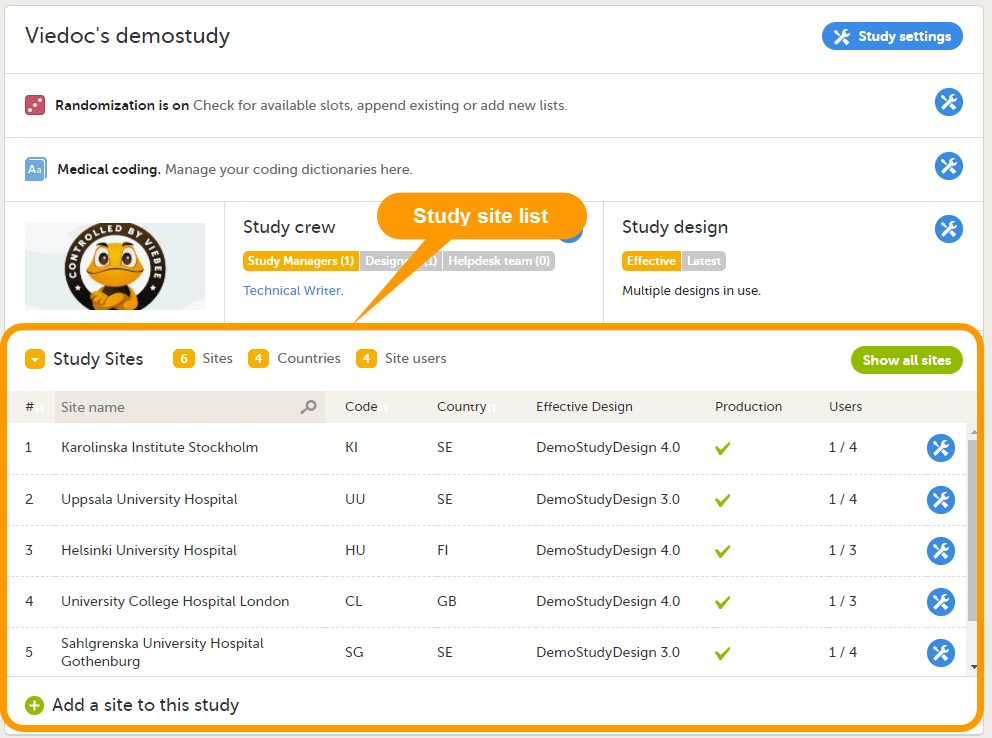
If you have added many sites to your study, a scrollbar appears to the right of the study site list that enables you to scroll through the study sites. To view a list of all sites, click the Show all sites button (see no. 1 in the image below). To return to the default view with the scrollbar, click the Show less button.
Tip! You can search for a site by entering (part of) its name in the search field (see no. 2 in the image below).
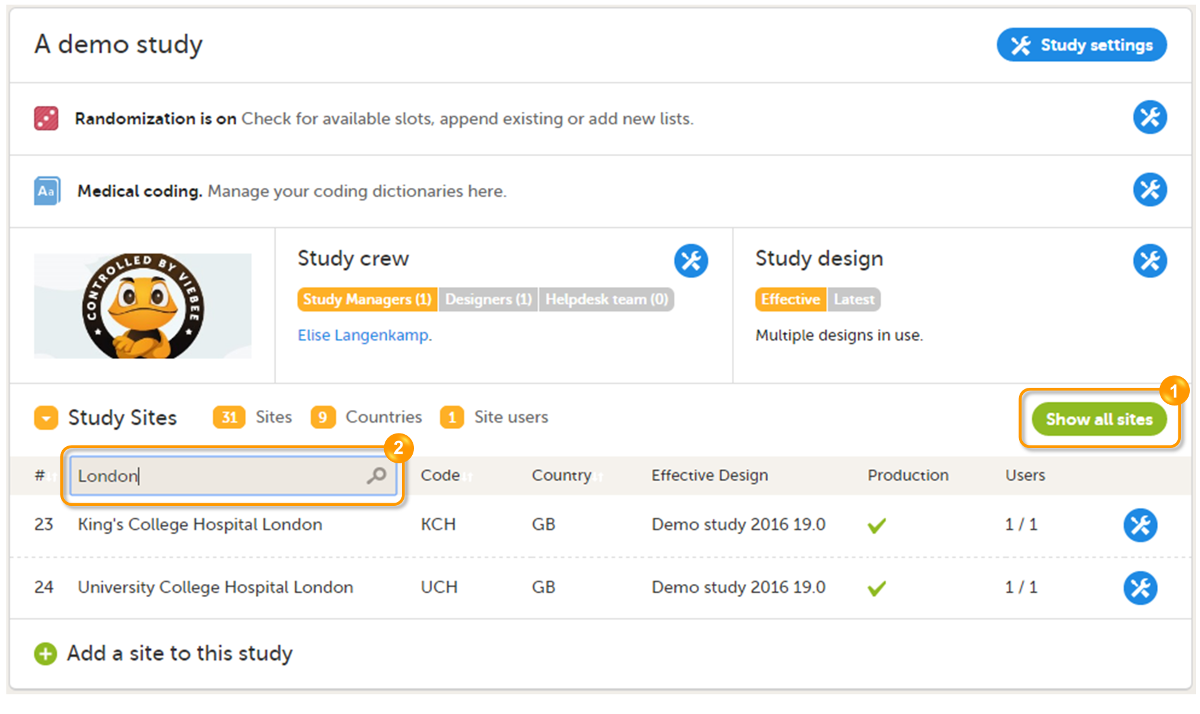
The system automatically creates groups of the sites that are added. This enables the Study Manager to assign site staff to all sites within a group at once. Site staff can also be assigned to individual sites.
The system site groups are visible when adding site staff to the study crew, as displayed in the image. See also the eLearning section Managing users.
The following system site groups are automatically created by the system:
Note that sites that do not belong to a system site group (such as training sites) are listed under a separate header (for example Training sites) at the bottom of the list of site groups and sites when assigning staff. This header lacks the folder icon, and does not represent a system site group.
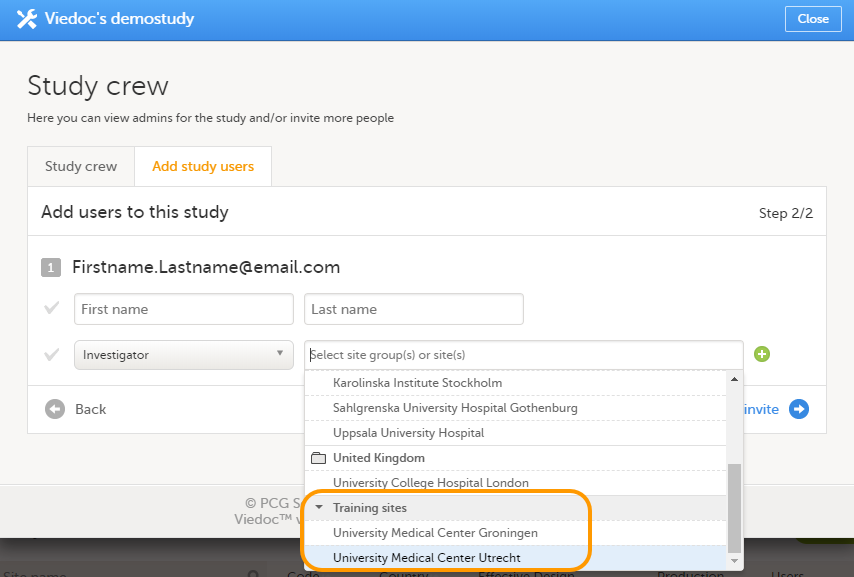
When you add a new site to the study, the site will automatically be added to the applicable system site groups. The site staff assigned to those system site groups will automatically receive instant access to the newly added site.
When a site is removed from the study, the site will automatically be removed from the applicable system site groups. The site staff assigned to those system site groups will not have access to that site anymore.
When you change the country settings of a site from country A to country B, that site will automatically be removed from the country A group and added to the country B group. Similarly, when you edit the production/training mode settings of a site, that site will automatically be added to or removed from the All production sites group.
Adding sites to the study can only be done by the Study Manager.
The role of a Site Manager is to invite site users to a site. Yet, before a Site Manager can invite site users to a site, the Study Manager must select to which roles the Site Manager can invite users. These are normally roles like Investigator, Study Nurse, or Study Coordinator. For more information, see the eLearning section Managing users.
Only the Study Manager can edit the site settings. The Site Manager can view the site settings as read-only.
It is possible to limit the number of subjects for a site by setting a maximum number of subjects in the site settings. Once this limit is reached, it is not longer possible to add a new subject to the site, nor in Viedoc Clinic, neither through the import of data via the Application Programming Interface (API). Deleted subjects are not included in this limit.
To add a site/clinic to the study:
| 1 |
In Viedoc Admin, on the study overview page, click Add a site to this study. 
A pop-up window opens. |
| 2 |
Enter the name of the site (1), and enter the e-mail address of the Site Manager (2). 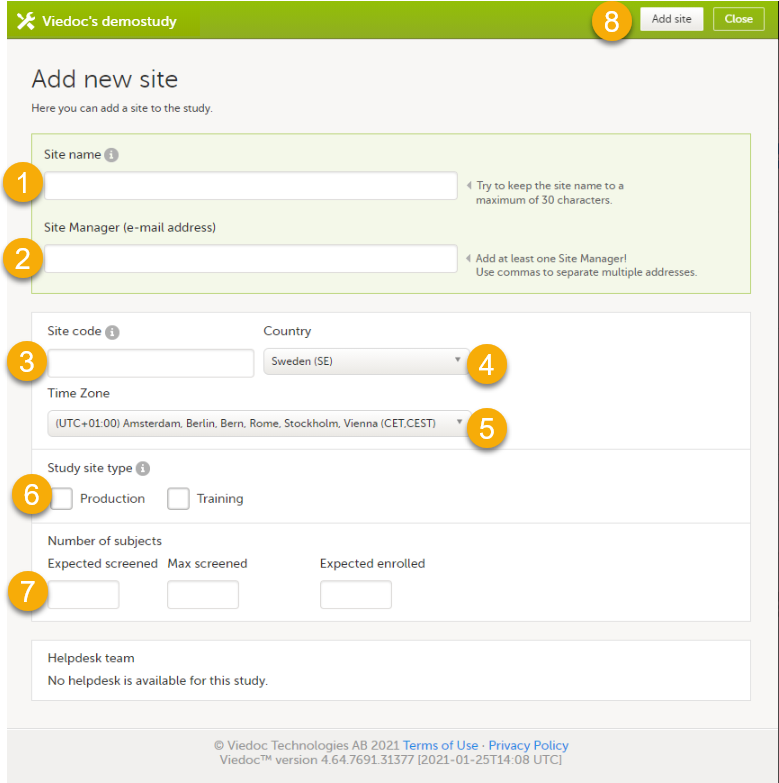
|
| 3 | Enter a code for the site (3). The site code can be used as part of the patient ID and will be indicated on the card. |
| 4 | Select the country in which the site is located (4), and select the time zone in which the site is located (5). |
| 5 | In the Study site type field (6), select whether the site should be available in production mode or training mode. |
| 6 |
Optionally, in the Number of subjects field (7), enter the expected number of screened subjects, the maximum number of screened subjects, and the expected number of enrolled subjects for the site. The expected numbers of subjects are used for Metrics in Viedoc Clinic (see Metrics). The maximum is used to limit the number of subjects for this site, see Maximum number of subjects per site above. |
| 7 | Click Add site (8). The pop-up closes and the site is added to the list of study sites. |
To edit the settings for a study site:
| 1 |
Click the toolbox icon behind the name of the site in the study site list. A pop-up opens. |
| 2 |
Edit the settings you would like to change. 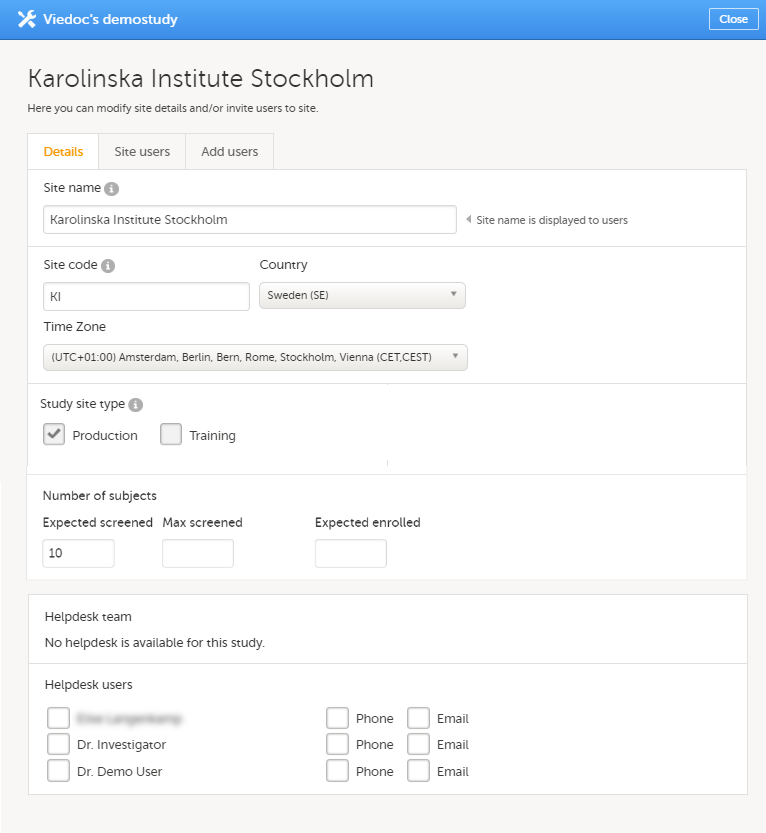
|
It is not possible to remove a study site in production mode from the study.
This section explains how to assign a design to sites in a study. It is necessary to assign a study design to the sites in the study to start work on the site.
Study designs are assigned to a study on a site level. The work on a site can only start when a study design version or revision has been assigned to that site. Without a design, there is no study configuration associated with the site.
When the Study Designer has finished setting up a study design in Viedoc Designer, and has published the study design, it becomes available in Viedoc Admin. At least one site should have been added to the study before a study design can be assigned. The Study Manager can then assign the study design to one or several sites in the study, and select an effective starting time for that design to be applied to the site.
A design can be assigned to all sites at once, or to individual sites in the study. It is therefore possible to assign different study design versions or revisions to different sites in the study. Since study design versions or revisions are assigned to sites with a certain starting date, one site can have a certain study design version or revision assigned to it during a certain period of time, and another version or revision during another period of time.
The Study design field in the Study details pages displays the active designs in the study, and whether there are any new design versions or revisions available.
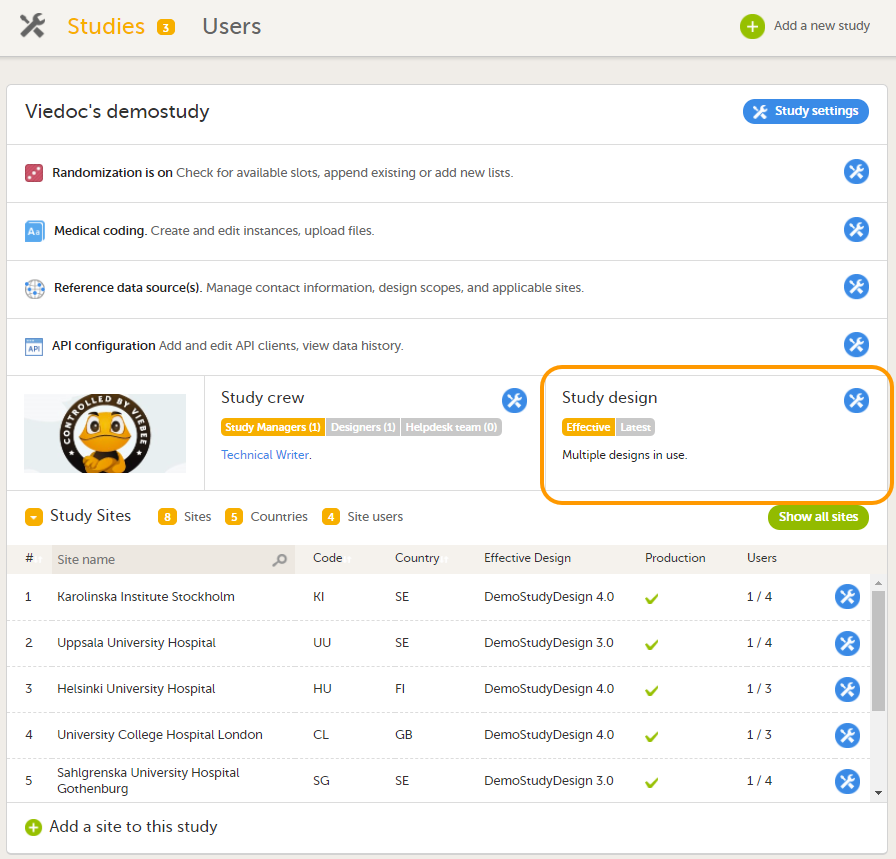
To see the study design or designs that are in use, click Effective.
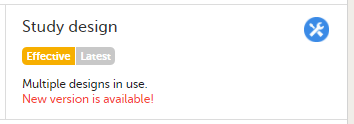
To see whether there is a new design version or revision available, click Latest.
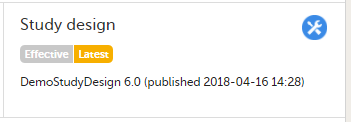
Note! The study design needs to be published in Viedoc Designer, before it is available in Viedoc Admin.
The settings in the study design are version-controlled and identified by the version number. Study design version numbers are unique within a study. If there are five study design versions in the study, and a new one is created, the new version will have version number 6. Study design version numbers are accompanied with a revision number. For example, version "1.6" means revision 6 of version 1.
The main reason to assign a new study design version to a site after study start is that protocol amendments require changes to be made to the study design, for example changes to the study that apply from a specific point in time during the course of the study.
If there is a need to correct errors in a study design version that has already been assigned and used for entering data, the study design version has to be revised and the revision has to be applied to the applicable sites.
For more detailed information, see Viedoc study configuration management.
To view a list of effective designs for all sites, click the toolbox icon in the Study design field on the study details page. The Design settings pop-up opens:
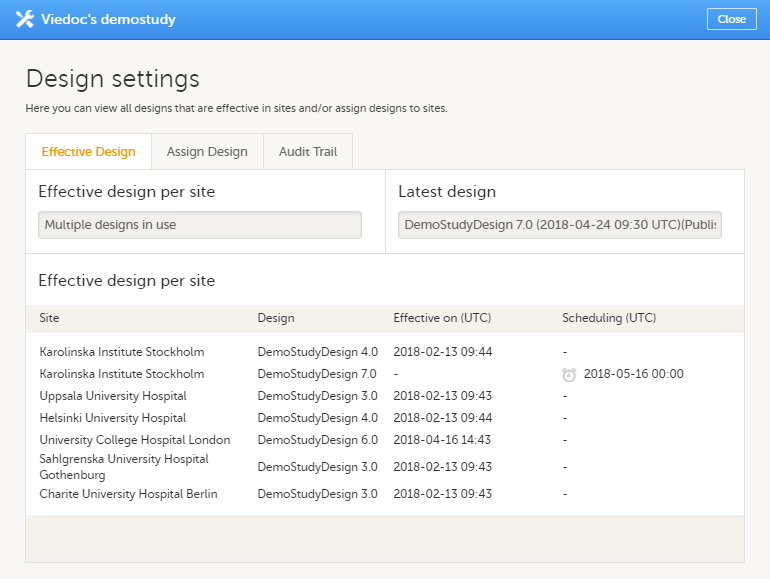
In the Effective design per site list, the current effective designs (design effective on this date) and the designs scheduled to become effective are listed per site. The list also includes information about when that design became effective on the site, and/or when the design is scheduled to become effective on the site. Time is displayed in Coordinated Universal Time (UTC).
To assign a design to sites in a study, follow the steps below.
| 1 | Click the toolbox icon in the Study design field on the study details page. The Design settings pop-up opens. |
| 2 |
On the Assign Design tab:
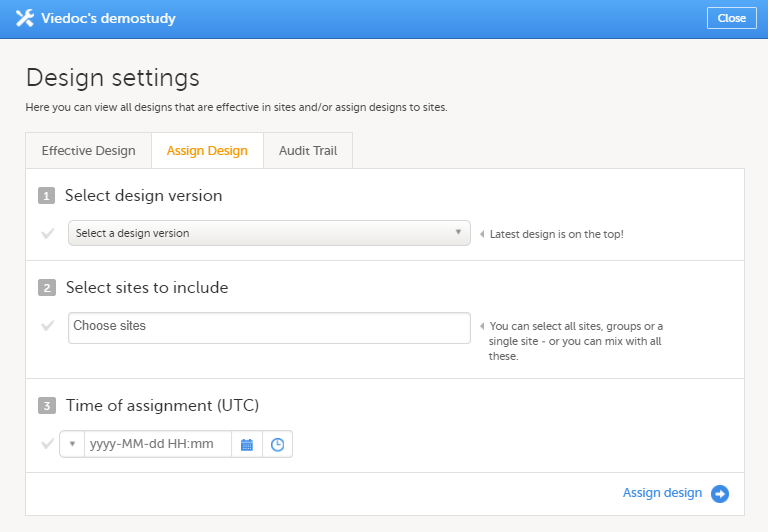
|
| 3 | Click Assign design. |
The design is applied to the site and a confirmation message is briefly shown.
Assigning a new design version is done in exactly the same way as assigning a study design. See Assigning a study design for instructions.
Note! It is a good idea to keep all production sites on the same design version. For more information about the consequences to exports when the design versions do not match, please see Exporting data.
Application of a revised study design is used to upgrade forms that are already saved. When a revision of a study design is applied to a site, that revision will (after confirmation by the site) replace the version it is revising.
Note! It is recommended that you use the revision impact analysis before applying any revision. For more information, see Design revision impact analysis.
Note!
Note! You can NOT apply an earlier revision if a later revision has already been applied to another site. This applies to both demo sites and production sites. For example, if version 1.2 has already been applied to a site with user acceptance testing (UAT) underway, then version 1.1 cannot be applied to a production site. It is only possible to apply version 1.2.
To apply a design revision to sites in a study, follow the steps below.
| 1 | Click the toolbox icon in the Study design field on the study details page. The Design settings pop-up opens. |
| 2 |
On the Apply Revision tab, select the design revision from the drop-down list and click Continue (Step 1/3). 
The system provides information about the impact of the revision by showing how many forms have been changed in blue text. |
| 3 |
Select the sites the revision should be applied to. It is possible to select 'All sites', or individual sites. 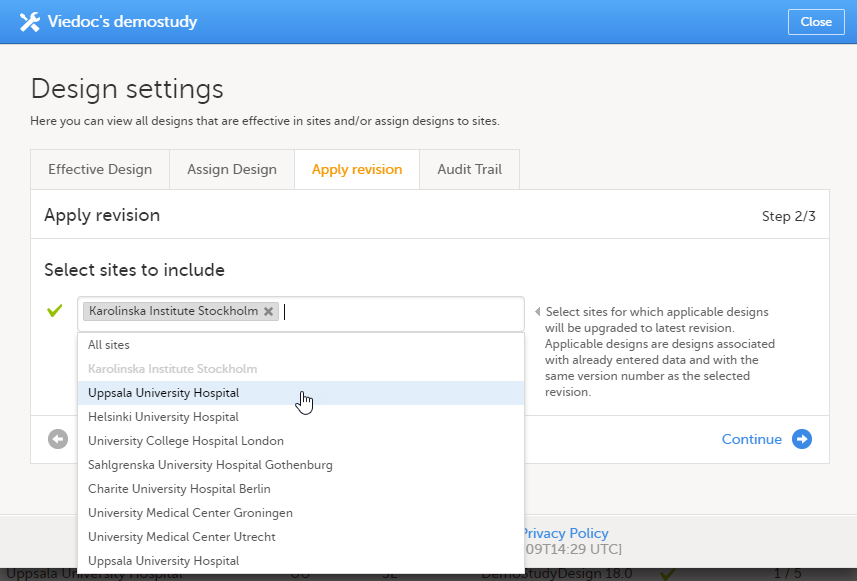
|
| 4 |
Type a message to the Clinic user in the Upgrade message field. This message could be a summary of the changes in the revision. It is displayed in Viedoc Clinic on the Messages page. 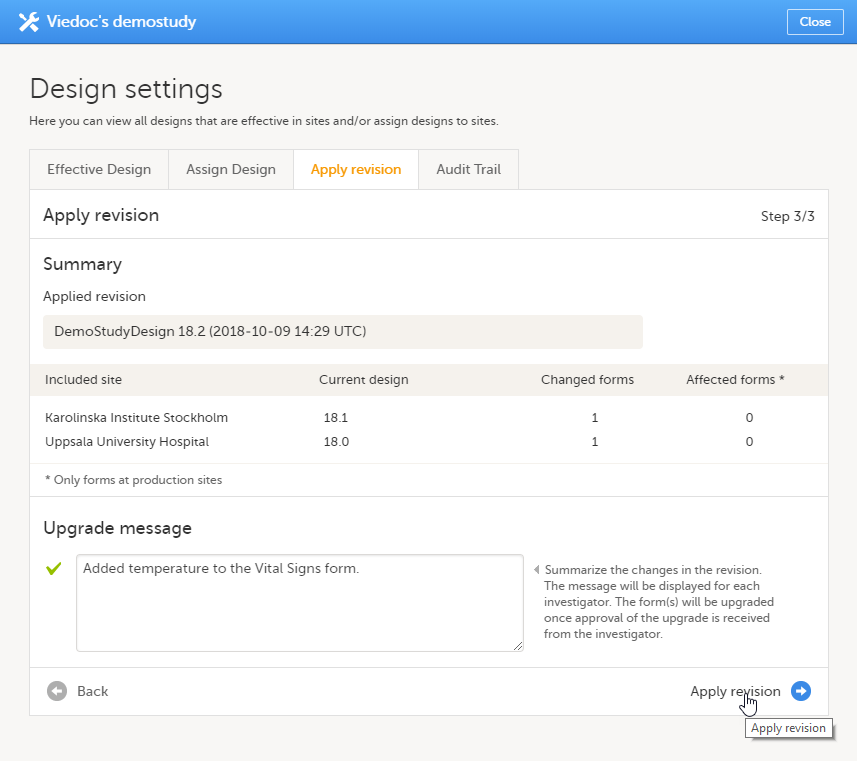
Click Apply revision (Step 3/3). |
After a revision has been applied, the clinic user (with permission to enter data) needs to approve the application in Viedoc Clinic. On the Messages page in Viedoc Clinic, the following message is displayed.
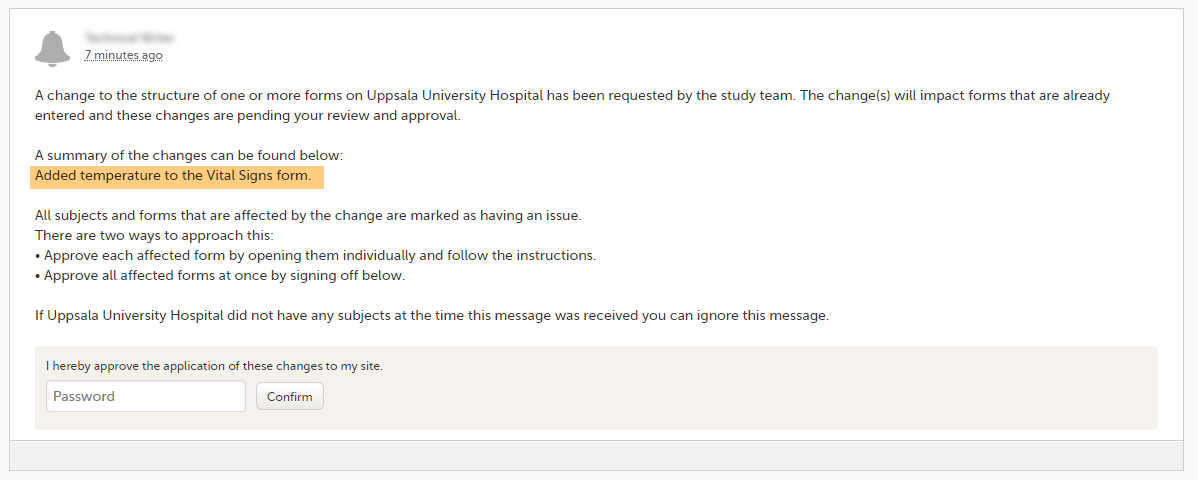 Application of the revision can be done in two ways:
Forms upgraded to a new design revision by the site will lose any existing signature and review flags (clinical review, data review). The Source Data Verification (SDV) flag is lost on item level. If a particular item, that was previously source data verified, is affected by the upgrade, it will no longer be flagged as having been source-data verified. The form-level SDV flag will be lost if any item in the form lost its SDV flag. The form-level SDV flag will also be lost if an item is removed from a form as part of the upgrade.
To view a list of effective designs for all sites, click the toolbox icon in the Study design field on the study details page. In the Design settings pop-up, open the Audit Trail tab.
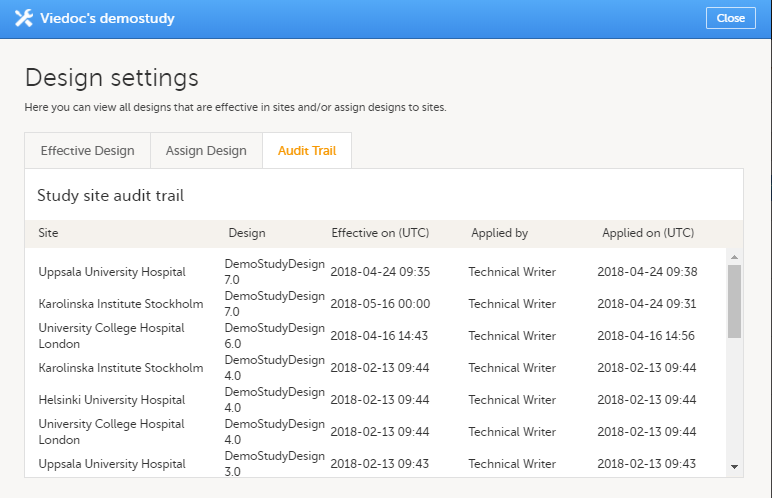
The audit trail lists the sites to which designs are assigned, which design is assign, on what date that design is effective. It also lists who assigned the design to that site and on what date.
This lesson describes how to configure the helpdesk information for a study.
A helpdesk user is a user that can act as support for the individual site. When a user is selected to be a helpdesk user, his/her contact information (name, phone and/or email) becomes available to the site staff, and the site staff can contact him/her with questions about the study. A helpdesk user can be any user that has access to the study, and that has a role that is not delegated to the Site Manager.
For information about delegating roles to the Site Manager, see the eLearning section about Managing users (STM and SIM).
Helpdesk users are assigned on site level.
To add a helpdesk user, follow the steps below.
| 1 |
Click the toolbox icon behind the name of the site in the study site list to open the site settings pop-up. 
|
| 2 |
In the field Helpdesk users, select the users that should be available as helpdesk users. The users listed in this field are all clinic users that are assigned to that specific site, and that have a role that is not administered by the Site Manager. Select the way the helpdesk user can be contacted: phone and/or e-mail. 
|
The users selected as helpdesk users will be displayed in Viedoc Clinic. Click the help icon on the landing page to view a list of helpdesk users that can be contacted by the site staff in case they need support.
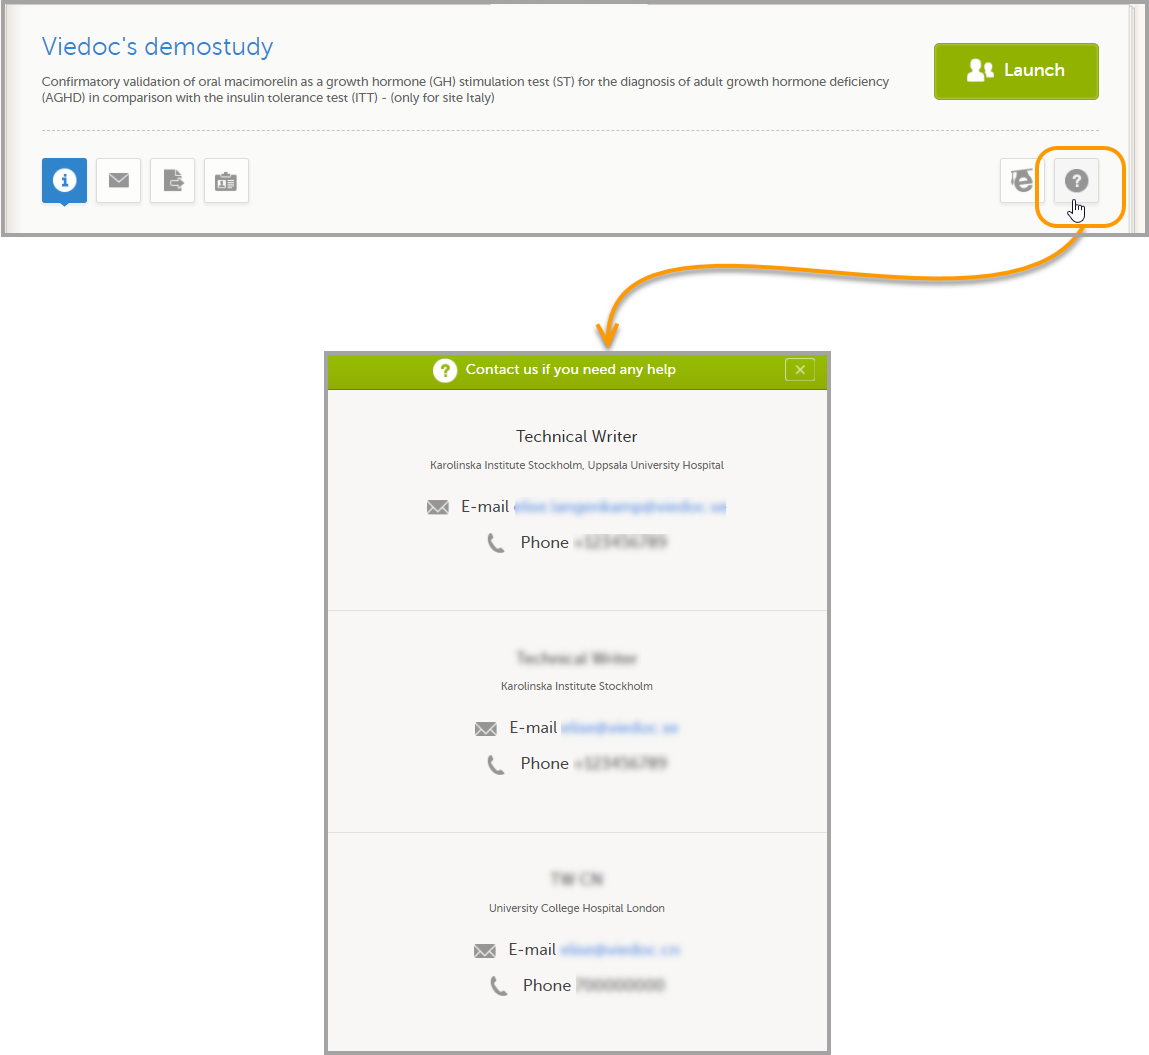
A study can be locked in Viedoc when the study is completed, that is, when all events have been completed, reviewed and approved/signed, and no more data will be added to the study. When the study is locked in Viedoc, it is still possible to view and export data, but it is NOT possible to add or edit any data. It is also NOT possible to change the study settings or add new sites. However, it is still possible to invite new users to existing sites. These users will then receive access as read-only.
When the study is locked, a lock icon is displayed in Viedoc Clinic:
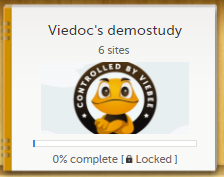
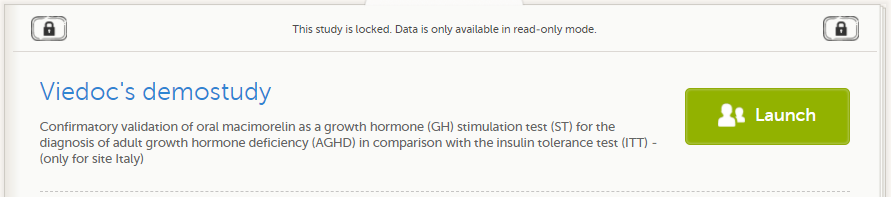

Note! The study license is a based on the study state and will be invoiced until the study is locked. After the study is locked, a post study access fee will be charged if the study is not deleted within three months.
Note! It is possible to unlock a locked study, and lock it again.
When the study is locked, a request for deletion of the study from Viedoc can be submitted, see Deleting a study (STM) for more information.
For traceability, all lock and unlock actions are audit trailed. You can download a report that provides a full history of the lock and unlock actions, including who performed the actions and when (date and time in Coordinated Universal Time (UTC)), and the reason that was given for locking/unlocking the study. The report also contains the full history of all requests for study deletion, approvals of study deletion, and reversions of study deletion that are performed in the study.
Note! A study can only be locked by the Study Manager.
To lock a study, follow the steps below.
| 1 | Open the study in Viedoc Admin and click Study settings. The Study settings window opens. |
| 2 |
Click the blue pen icon. |
| 3 |
Click Complete and lock study. 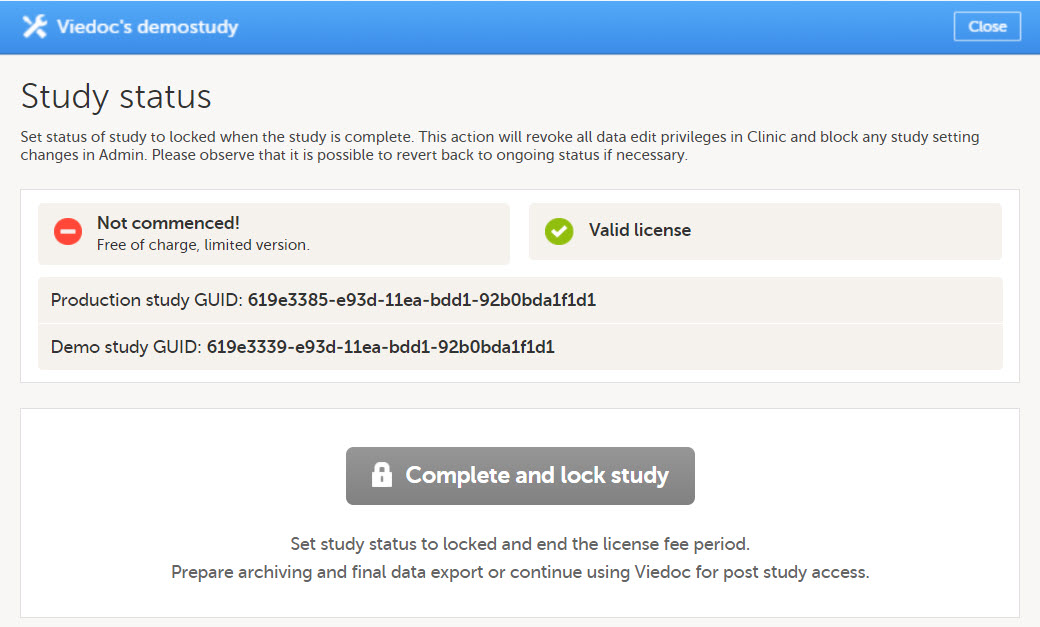
|
| 4 |
A pop-up opens. Enter a reason for locking the study, and enter your password. 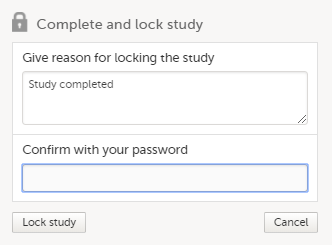
|
| 5 |
Click Lock study. |
Note! A study can only be unlocked by the Study Manager.
To unlock a study, follow the steps below.
| 1 | Open the study in Viedoc Admin and click Study settings. The Study settings window opens. |
| 2 |
Click the blue pen icon. |
| 3 |
Click Unlock study. Enter a reason for unlocking the study, and enter your password. |
| 4 | Click Unlock study. |
To download the study status report, follow the steps below.
| 1 | Open the study in Viedoc Admin and click Study settings. The Study settings window opens. |
| 2 |
Click the blue pen icon.
|
| 3 |
Click Download study status report. |
This is a description of the main steps in the process of archiving a clinical study. The detailed instructions for each step are described in the linked lessons.
Archiving a clinical study is the responsibility of the sponsor (study Trial Master File (TMF)) and the investigators (site TMFs). The study archive should include all study data and metadata, including the study design.
When a study is complete, you typically need to go through the steps below.
As a Study Manager, you can lock a study when all events have been completed, reviewed, approved/signed, and no more data will be added to the study.
When a study is locked, it is still possible to view and export data. It is not possible to add or edit any data. It is also not possible to change the study settings or add new sites. However, it is still possible to invite new users to existing sites. These users will then receive read-only access.
For more information, see Locking a study.
You can export study data if your Viedoc Clinic user role is set up with the rights for it. For more information, see the Data export section in Viedoc Clinic User Guide.
Make sure to filter the data export to include the following:
The data export in Viedoc supports all file formats that are required for archiving and regulatory purposes, including these formats:
As part of the TMF structure, the sponsor should define the exact details of:
You can export the study design from Viedoc Designer. For more information, see Exporting/Locking/Deleting a study design. If a study has more than one version of the study design, remember to export all versions.
On the Users page, select to group the users by Studies.
Scroll to the study from which you would like to download the user log and select User logs to open the dropdown menu.

If the log was not previously generated, click Generate a PDF file or Generate an Excel file. If the log was previously generated, the most recent version is stored on the server, shown with a date and time stamp. You can download it by selecting the link, or generate an updated version by clicking Regenerate.
Note! The user logs are generated in the language set by the user who is generating the log. Therefore, the previously generated file is available for download only if it was generated in the language you have currently set in Viedoc.
A study can be permanently deleted from Viedoc when the study is locked. Deletion is initiated by the Study Manager, who can submit a request to delete the study to the Organization Administrator. The Organization Administrator can then approve or reject the request.
After study deletion is approved by the Organization Administrator, the study is shelved in Viedoc's database. A deleted study is not visible in Viedoc Clinic or Viedoc Designer, the study is only displayed in the study overview page of the Organization Administrator in Viedoc Admin.
The Organization Administrator can revert the deletion of a study within 180 days after the deletion request has been approved. After this period, the study, including all study details and data, will be permanently deleted from the Viedoc database. It will not be possible to find any traces of the study and the subjects included.
For more information, see:
This lesson describes how a study is deleted. The instructions are intended for the Study Manager (STM).
A study can be permanently deleted from Viedoc when the study is locked. Deletion is initiated by the Study Manager, who can submit a request to delete the study from Viedoc to the Organization Administrator. The Organization Administrator can then approve or reject a request for study deletion.
After study deletion is requested by the Study Manager and approved by the Organization Administrator, the study is shelved on Viedoc's database. A deleted study is not visible in Viedoc Clinic or Viedoc Designer, the study is only displayed in the study overview page of the Organization Administrator in Viedoc Admin.
The Organization Administrator is able to revert the deletion of a study within 180 days after the deletion request has been approved. After this period, the study will be permanently purged from Viedoc's database, and all study details and data will be permanently removed. It will not be possible to find any traces of the study and the subjects included.

For traceability, all study delete actions are audit trailed. You can download a report that provides a full history of all requests for study deletion, approvals of study deletion, and reversions of study deletion that are performed in the study, including who performed the actions and when (date and time in UTC), and the reason that was given for deleting the study or reverting study delete. The report also contains the full history of all lock and unlock actions.
Note! This section is intended for the Study Manager. For instructions for the Organization Manager, see Deleting a study (Org Admin).
A request for study deletion can only be submitted by the Study Manager. A study can only be deleted after the study is locked. For information on how to lock a study, see Locking a study.
Note! Before deleting the study, make sure that you have downloaded the user report, the data export archive and the study design. Download and archive the study data in the formats necessary, available formats are Excel, Comma-Separated Values (CSV), Operational Data Model (ODM) and PDF. For instructions, see:
To submit a request for study deletion:
| 1 | Open the study in Viedoc Admin and select Study settings. The Study settings pop-up opens. |
| 2 |
Select the blue pen icon. The study status pop-up opens. |
| 3 | Select Request study deletion.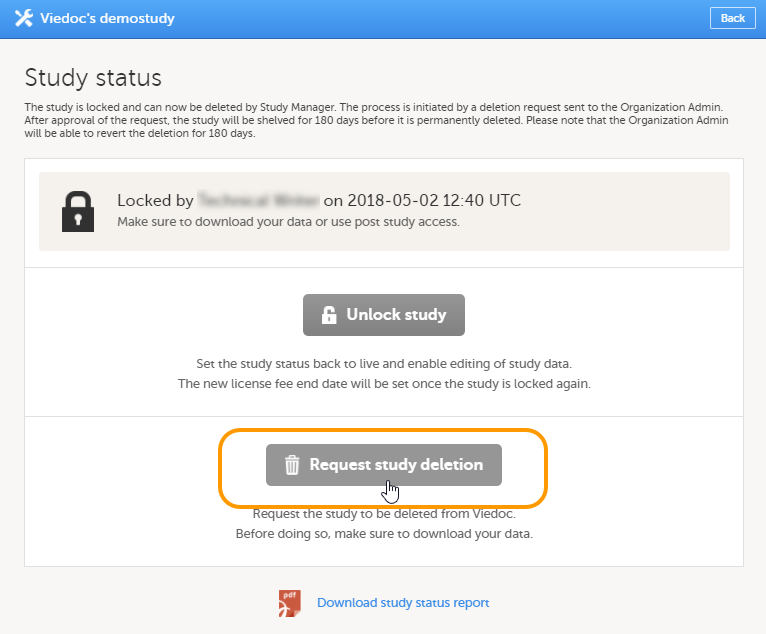 The request study delete pop-up opens. |
| 4 |
Select whether the following actions are done or not done:
Enter a reason for deleting the study, and enter your password. 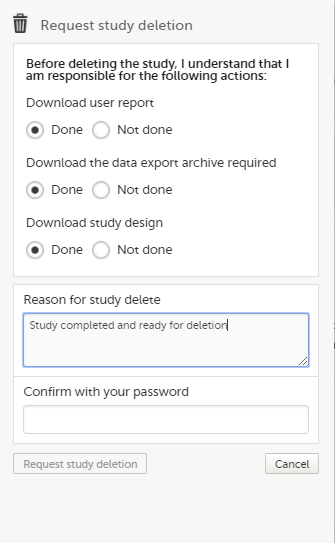
|
| 5 | Select Request study deletion. The Study status page displays that deletion of the study is requested, by whom and when (date and time in Coordinated Universal Time (UTC)), and the study delete request will be sent to the Organization Administrator. All Study Managers and Organization Administrators will be notified of the request by email. 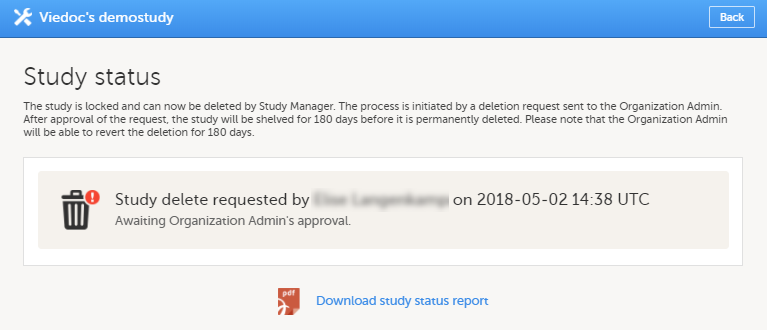 |
When study deletion has been requested, the study page will display the status "Study delete requested by ... on ..." Until the request has been approved, the study will be in locked state and visible in Viedoc Clinic and Viedoc Designer.
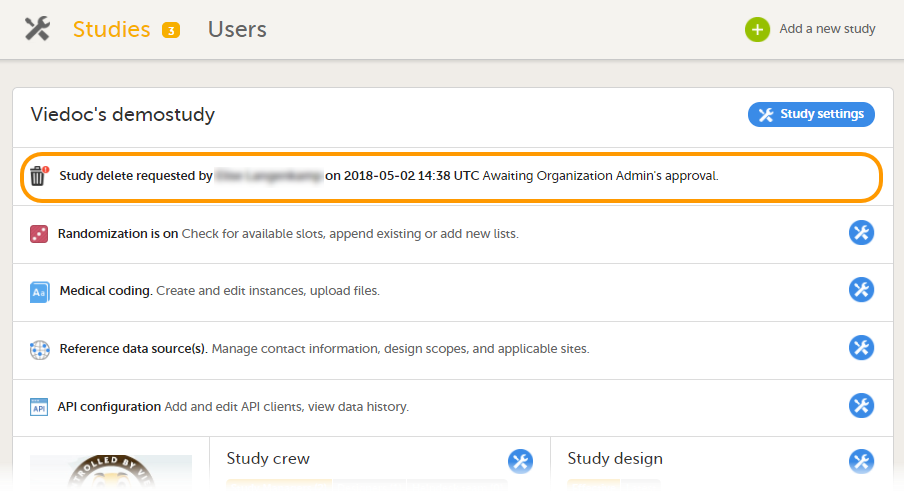
To download the study status report:
| 1 | Open the study in Viedoc Admin and select Study settings. The Study settings pop-up opens. |
| 2 |
Select the blue pen icon. 
The Study status pop-up opens. |
| 3 | Select Download study status report. A PDF is downloaded that lists all database lock and delete actions, including when and by whom the study was locked/deleted, and the reason that was given for locking/deleting the study. |
The Admin audit trail report contains information about all settings and changes of study settings that have been made by authorized users in Viedoc Admin.
To download the Admin audit trail report:
| 1 |
In Viedoc Admin, open the study settings from the study details page. 
|
| 2 |
On the Logs tab, you can generate and download the Admin audit trail report. If the report was already generated, you can regenerate it to get a report with all the latest information. 
|
| 3 |
When you select Download, an Excel file is available in your browser. 
|
The Excel file contains the following sheets:
The following table lists the actions, identifiers, and reasons that are associated with the areas:
| Area | Action | Identifier | Reason |
|---|---|---|---|
| eTMF |
|
empty |
For the Enable action: If switched on, Enable eTMF, if switched off, Disable eTMF For the Map roles action: Configure access to eTMF |
| Medical Coding |
|
For the edit medical coding instance action: The sequence and name | User-entered reason if available, otherwise the same as the action |
| Reference Data Sources |
|
Unique identifier if available For the Add, Edit, and Delete actions: The sequence of the reference data source |
For the Edit settings action: Edit reference data sources settings For the Add action: Add reference data source For the Edit action: Edit reference data source For the Delete action: Delete reference data source |
| RTSM |
(For dynamic randomizations only): Create configuration, Edit configuration
|
RTSM name or allocation name if available. For the actions on global allocation, the identifier is Global allocation. |
The same as the action if not specified below. For all the actions that are performed on a specific Production or Demo mode, this is added to the reason, for example, Upload randomization list - Production For the Approve settings action: Approve RTSM settings For the Upload randomization list action: Upload randomization list For the Upload individual allocation list action: Upload allocation list For the Add to randomization list action: Add to randomization list For the Add to individual allocation list action: Add to individual allocation list For the Restart action: Restart RTSM For the Edit configuration action: Edit RTSM configuration For the Create configuation action: Create RTSM configuration |
| Site Settings |
|
The site number | The same as the action |
| Study Design |
|
Design or revision name and version | The same as the action |
| Study Settings |
|
For the edit medical coding action: the coding scope For the documentation actions: the section name |
For the Add study action: Create study For the other actions: User-entered reason if available. Otherwise, the reason is the same as the action. |
| User Invitations |
|
Unique identifier if available. For the reset password action:
|
The same as the action |
| User Logs |
|
empty | The same as the action |
| WCF API client configuration |
|
Client ID (GUID) |
For the Add action: Add API client For the Edit action: Edit API client For the Delete action: Delete API client |
| Web API client configuration |
|
Client ID (GUID) |
For the Add action: Add API client For the Edit action: Edit API client For the Delete action: Delete API client |
Note! Some data might not be available for the actions performed before the release of Viedoc 4.72.
Before applying a new design revision, Admin users with the system role Design Impact Analyst can use the design revision impact analysis tool to perform an impact analysis. The analysis shows the number of existing form instances per site that will require confirmation by site staff, regardless of who created the revision.
Important! It is recommended that this revision impact analysis is used before applying any revision.
The Design Impact Analyst can generate, regenerate, and download the Excel report.
To generate the Excel report:
| 1 | In Viedoc Admin, select your study. |
| 2 |
Select Edit in the Study design section. 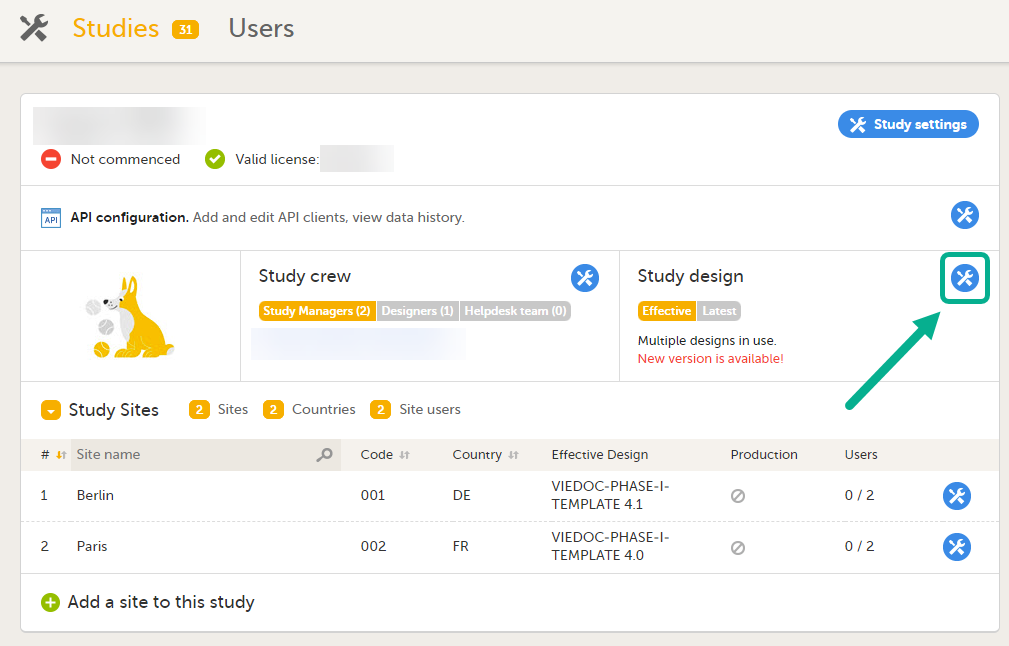
|
| 3 |
In the Design settings window, open the tab Apply revision. 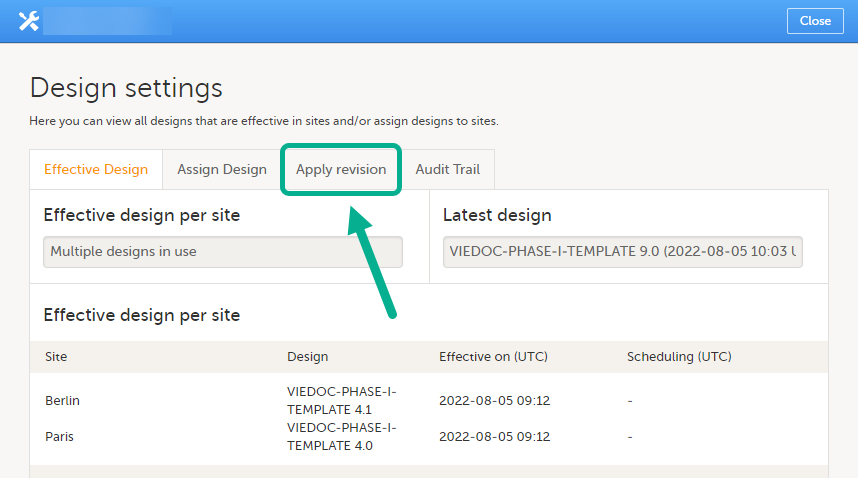
|
| 4 |
On the tab Apply revision, select a design revision in the dropdown menu. 
|
| 5 | Select Continue to go to the next step. |
| 6 | Select the sites where the revision will be applied. |
| 7 | Select Continue to go to the next step. |
| 8 |
In step 3, you'll see a summary of the revision. The table includes a column called Req confirmation, which is the number of existing form instances that will require confirmation from site staff. The time of the latest performed impact analysis per site is shown in the table. 
|
| 9 |
If this is the first impact analysis, you can select to Generate the report. Then select Download. For subsequent sessions, you can select Download or Regenerate. 
|
The Excel report contains these sheets:
The Summary sheet shows the number of forms that will potentially lose their status regarding these parameters:
Note! By default, the contents of the Excel sheets Production and Training are filtered to show only the rows that have the value Yes in the column Req confirmation.
The Production and Training sheets contain these columns:
| Column | Description |
|---|---|
| Site Code | The site code, as defined for the study |
| Site Name | The site name, as defined for the study |
| Current Design | The version and revision number of the currently used design for the site |
| Revision being analyzed | The version and revision number of the design revision that is being analyzed |
| Subject Key | The subject key |
| StudyEventDefId | The ID of the study event |
| StudyEventRepeatKey | The number of repeats of the study event |
| FormDefId | The form ID |
| FormRepeatKey | The number of repeats of the form |
| ActivityDefId | The activity ID |
| FormEditStateLocked |
Yes - if the form was locked for edit when the report was generated No - if the form was NOT locked for edit when the report was generated |
| Req confirmation |
Yes - if the form instance will require a confirmation by site staff after the revision has been applied No - if the form instance will NOT require a confirmation by site staff after the revision has been applied |
| Signed |
Yes - if the form instance is signed No - if the form instance is NOT signed |
| SDV |
Yes - if the form instance has been SDVd No - if the form instance has NOT been SDVd |
| ClinicalReview |
Yes - if the form instance has undergone a clinical review No - if the form instance has NOT undergone a clinical review |
| DataReview |
Yes - if the form instance has undergone a data review No - if the form instance has NOT undergone a data review |
| PMS side |
Note! This column is only available for PMS studies. Clinic - if the form belongs to the Clinic side of the PMS study. Forms that are submitted but not yet received belong to the Clinic side. Sponsor - if the form belongs to the Sponsor side of the PMS study |
It is important to understand that the revision impact analysis provides a lot of details about the upcoming revision, and it might even be unblinding in certain circumstances.
If a study design uses role-based visibility for items that could reveal the subject's treatment, and the mere presence of the item is unblinding, the revision impact analysis could reveal which treatment the subject is on.
For this reason, the permission to view and generate the revision impact analysis is isolated to a dedicated user role, and we recommend caution before you invite a user with this role.
A CRF design uses a role called treating investigator and another called evaluating investigator. The treatment is blinded to all users in the study except for the treating investigator.
The RTSM settings for the design uses a non-blinded outcome to display the treatment, but this is only visible to the treating investigator.
Subjects are assigned to treatment X or treatment Y.
Based on the assigned treatment, in the randomization form, the form Drug Administration is triggered. This form is filled in by the treating investigator and hidden to all other users because this is also revealing the treatment of the subject.
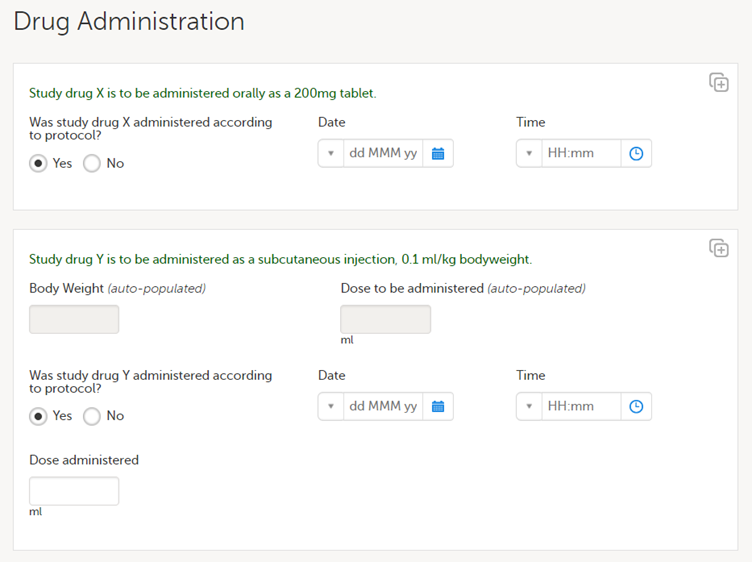
The first item group is only displayed to subjects assigned to treatment X, and the second item group is only displayed when the subject is assigned to treatment Y.
Let's assume that there are complaints on this CRF design, and the second item group is changed in a revision by changing the label of the final item from Dose administered to Actual dose administered for clarity. The revision impact analysis will then show which forms, and for which subjects, forms are requiring a manual upgrade - this would be all subjects that have been assigned to treatment Y. This is where the revision impact analysis would be unblinding.
In a scenario like this, we recommend that an unblinded user in the study team is invited with the Design Impact Analyst role to avoid unblinding to other members of the study team.
Note! If a designer has access as a Design Impact Analyst, this user could theoretically identify the treatment of each subject by creating a revision with changes to sensitive items (as described above), with the sole purpose to see the impact in the impact analysis report, and afterwards deleting the revision. For this reason, we recommend that the Design Impact Analyst role is not given to a designer when the CRF is designed according to the example above.
A similar study is using the same approach with the roles treating investigator and evaluating investigator. The difference is that, in this CRF design, dosing details for treatment X and treatment Y are captured in the same form, using the same item. The difference between subjects assigned to the different treatments will be the values in the items rather than the presence of certain items.
If a change to a label is done in a revision, the revision impact analysis will NOT be unblinding, because all randomized subjects are expected to have the same items.
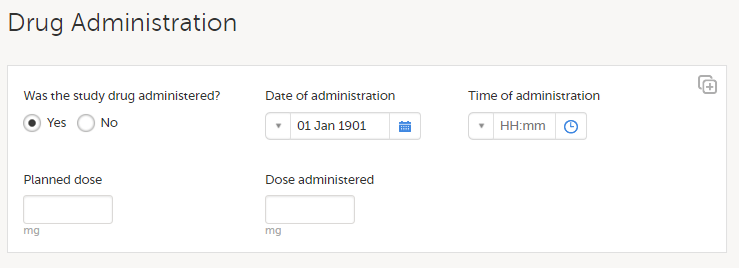
In a scenario like this, any user of the study team could be invited with the Design Impact Analyst role, as this will not risk unblinding other members of the study team. The recommendation is to invite users that would be responsible for applying the revision to this role so they can see the impact before they apply a revision.
Thus, if a study design uses role-based visibility for items that could reveal the subject's treatment, and the mere presence of the item is unblinding, the revision impact analysis could reveal which treatment the subject is on.
The configuration of a study in Viedoc consists of two types of settings:
This lesson focuses on the configuration type that holds most of the study configuration, that is version-controlled settings.
Version-controlled settings are contained in a “design” and are identified by a version number. Study design version numbers are unique within a study. If there exist five study design versions, all originating from the same design, and a new design is created from scratch within the same study, it will have version 6.
Study design version numbers are accompanied with a revision number. For example, “1.0” means that this is version 1 and that it has not been revised, since the revision part of the version is 0. Revisions are explained in Revision of study design version.
Study designs are assigned on site level. Work on a site cannot start before a study design is assigned to that site, as there is no study configuration associated with that site.
When the Designer has finished setting up a study design in Viedoc Designer, he/she has to publish the study design, so that it becomes available to the Study Manager in Viedoc Admin.
The Study Manager then chooses to assign the study design to one or several study sites. This step is accompanied with selecting an effective starting time for the study design on the selected study sites.
There can be more than one design version assigned to a site.
Versions are burnt in at event level, based on the date of first data entry.
The applicable design version for an event is determined by comparing the event date to the effectiveness period of the study design version(s) assigned to the site. When an instance of an event is started, the study design version is burnt into it, indefinitely. All forms belonging to this event will then inherit that same study design version.
When the version has been burnt-in, the forms within the event always get their settings, structure and lay-out read from that same study design version, even if the event date, or design effectiveness periods, have changed so that a different study design version is available.
In Viedoc, there are four different types of events, and the study design version is burnt in as follows:
Notes!
For more details on the automatic event date settings, see the Study workflow lesson.
During the course of a study, multiple versions of the study design can be assigned to a site, with different periods of effectiveness. For example, Site 01 could have Version 1 as the effective study design version during January 1st – January 15th and Version 2 as effective study design version after January 15th, whereas Site 02 has Version 2 as the only effective study design version starting January 5th, as illustrated in the image:
There is no end date for the effectiveness periods of study design versions. If a design is applied on January 1st, this is the effective version until a new version with a later start date is encountered, independently of when it was assigned.
Important! The periods of effectiveness of a study design version are connected to the event timing of the first data entry and not to the current time at system usage.
For example, in the below image, if:
...then:
If an event is initiated with a date when no design version is in effect, the version effective at current time of system usage will be used:
A new version can be assigned with the same timing as the currently assigned version and will then replace the currently assigned version, except for already entered data (due to the version “burn-in”, as described in Version burn-in).
For example, if we have Version 1 assigned to Site 01 starting at Jan 1, and we have the following events:
...and we assign Version 2 to Site 01 starting at Jan 1, and then:
In case the event date is changed after it was initiated, to a date when another version is applicable, the version for that event does not change, as it was burnt-in at the date when the event was initiated (see Version burn-in):
The following settings are always read from the study design version that is burnt-into the event:
We call "current effective design" the study design version that is effective at the current time of system usage.
Settings that are not directly related to data collection structure, as well as settings that are common on the site level, are read from the study design version that is effective at the time of system usage (that is, “time right now”). These settings are:
This means that the study workflow for a subject can change as time passes and a new design version becomes effective for the site the subject belongs to:
If there is a need to correct something in a study design version that is already assigned, and in particular if it has already been used to enter data (as that version is then burnt in and cannot be replaced by assigning a new version with the same time frame of validity), the study design version has to be revised.
The following settings can be revised as part of a revision of a study design version:
The latest effective design for each site will be used to define the permissions that will apply to each role.
* Note! The study design IDs (Event IDs, Activity IDs, Form IDs, Item group IDs and Item IDs), item dictionary (“choice”) codes and any items involved in randomization cannot be changed. An exception is that if an item needs to be moved to another item group, the ID can and must be changed as this will be treated as deleting an item and adding it again.
Once a study design version is revised, the revision part of the version number (initially 0) is incremented. For example, if study design version 1.0 is revised, it will receive the version number 1.1. When a revision of a study design version is published, it replaces its predecessor in terms of site assignment. For example, if a Study Manager wants to assign version 1 to a site, and this version now has a revision, version 1.1 will be available for assignment and not 1.0.
Additionally, only the latest revision of each study design version can be used as starting point for additional revision. For example, if we want to revise study design version 1, that has already been revised to version 1.1, we can only select 1.1 as starting point of the revision and not 1.0.
If forms that were previously part of an event in the workflow are now removed, already initiated forms are not touched. From a study workflow point-of-view they are now orphan forms, but from a user point-of-view there is no real difference to the appearance, as they stay as is on the event that they were previously part of.
Application of a revised study design version is used to upgrade forms that are already burnt-in, with a predecessor of the study design version in terms of revisions, to the latest revision of the study design. Applying a revision is different from assigning study design versions, as assigning study design versions only affects forms belonging to events that have not been initiated yet.
When a revised version of a study design version is applied to a site, that revision will (eventually, after necessary site confirmations, see Changes in a revision that affect data integrity below) replace the version it is revising, including the base version and all previous revisions made to the version (as illustrated in the example in the image below, where 1.2 replaces both 1.0 and 1.1). Thus, effective period is not changed.
There are two parallel tracks being followed when a revised study design is applied, depending on whether the data integrity is affected by the changes in a revision or not, as described in the following subsections.
Note! It is recommended that you use the design revision impact analysis before you apply any revision. For more information, see Design revision impact analysis.
Note! You can NOT apply an earlier revision if a later revision has already been applied to another site. This applies to both demo sites and production sites. For example, if version 1.2 has already been applied to a site with user acceptance testing (UAT) underway, then version 1.1 cannot be applied to a production site. It is only possible to apply version 1.2.
A revision with changes that do not affect data integrity is applied without confirmation by the site staff. For all form instances in which form data is not affected by the revision, the revision is processed immediately.
Changes within a revision that do not affect data integrity:
Any discrepancies no longer valid are closed and any new discrepancies will be flagged.
The forms that are locked (by Monitor, Data Manager, or any user who has data lock permission) will be upgraded, as no data will be touched by these types of changes.
Form signature and review status will not be affected by these kind of updates.
Applying a revision with changes that potentially do affect data integrity requires confirmation by the site staff. Before the Study Manager can apply a revised study design, a mandatory information text has to be entered that will be used to notify the site staff about the changes (see the complete workflow below in Workflow - Revision of an existing version).
Changes that potentially do affect data integrity:
A flag will be put on the form instance indicating that there is an upgrade pending. Until the upgrade is confirmed by site personnel (see Site confirmation of version upgrade), the form will remain in its original version.
When a revised study design is applied to a site, all forms pending an upgrade (where data integrity is potentially affected) are marked by a red flag, and a notification for the site is displayed on the Messages pane on the study start page.
The notification is accompanied with a standard text informing the site about the upgrade action and confirmation prompt that has to be electronically signed. This action can be performed by anyone at the site with data edit permission. See also the lesson in Viedoc Clinic User Guide - Approving eCRF changes.
When signed, all forms pending upgrade (listed in Changes in a revision that affect data integrity) will be upgraded to the revised version of the study design. This is a background activity that can take some time if there are considerable amounts of forms to be upgraded.
For the subjects that are being edited by clinic users during the upgrade process, the upgrade will stay pending until the respective subjects are released.
Optionally, forms can be upgraded manually, one-by-one, by the site. This is performed by navigating to the forms affected, opening them for editing and re-saving them. When the form is opened for editing, it will be shown using the new upgraded design with all data filled in.
A recommendation to the site could be to manually upgrade a few forms to fully understand the potential impact of the upgrade and then upgrade the rest using the batch approval feature.
|
Important! The upgrade is not performed for:
If performing batch approval and forms affected by the upgrade are skipped, as a result of one of the above mentioned scenarios, a new message will be displayed on the Message page. The changes can then be approved after a user with permission unlocks the locked forms. |
Forms upgraded to a new design revision lose any existing signature and review flags (clinical review, data review). The SDV flag is lost on item level.
If a particular item, that did not require SDV, is affected by the upgrade (that is, edited in the design, see Changes in a revision that affect data integrity), the form-level SDV flag will be kept. That means an upgrade of a form can lead to losing existing signature and review flags (clinical review, data review), but keeping the SDV flag.
If a particular item, that was previously source data verified, is affected by the upgrade (that is, edited in the design, see Changes in a revision that affect data integrity), it is no longer flagged as having been source-data verified. The form-level SDV flag is lost if any item in the form lost its SDV flag. The form-level SDV flag is also lost if an item is removed from a form as part of the upgrade.
The following steps have to be performed in Viedoc when creating and configuring the study for the first time:
The workflow for creating a new design version starting from an existing version of the study design, to implement a protocol amendment and assign it to one or several sites, is the following:
The workflow for revising an existing study design version and applying it to one particular site is as following:
Important! If a new revision is applied before previous one(s) are approved by a site user, then the approval will upgrade affected forms to the latest revision, regardless of which of the upgrades the site user approves. For information on site approval see Approving eCRF changes in Viedoc Clinic User Guide.
Note! An upgrade message is displayed for the site under the Messages pane on the study start page, even for the revisions with changes that do not affect data integrity, that is, when the forms are automatically upgraded.
If an iterative approach is used during development of a configuration, there will be many versions created as part of the workflow: [ setup --> test --> correct --> test --> setup --> test --> correct --> test --> … ]. It is still advisable to revise existing versions (instead of creating new versions) whenever possible to keep the number of versions to a minimum, as this will make the study design repository less cluttered and more easy to manage.
In Viedoc Designer, the following actions related to the study design can be performed, as described in the respective lessons:
In Viedoc Admin, you can see the current effective design for each site, assign a study design version to one or several sites, and apply a revised version of a study design to one or several sites. All these are described in detail in Assigning a study design.
Prerequisite: Please read the following lesson to understand the difference between a revision and a new version:
Viedoc study configuration management
The way of handling protocol amendments and updates/corrections to the eCRF depends on the situation each time. The following table gives a general guideline on when to do a new version versus a revision:

New version |
In a new version, all changes to the study design are allowed. However, just because something can be changed does not mean it is a good idea to do so. It is safest to stick to the original structure and design as far as possible. For example, when making changes in the Study Workflow, be mindful of how these changes will affect the dependencies of previous versions. In terms of scheduling and visibility conditions, all events will behave as per the current effective design. Note! The final order of the events as seen in PDF records depends on the dates entered by the user and not on what was programmed in the Study Workflow. A new version is required when:
|
|---|---|

Revision |
In a revision, the types of changes that can be made to the design are limited: a. It is not possible to add items with the same ID, and a deleted item cannot be brought back. A revision is required when:
|
|
|
Sometimes an update to the eCRF will require both a new version and one or more revisions. |
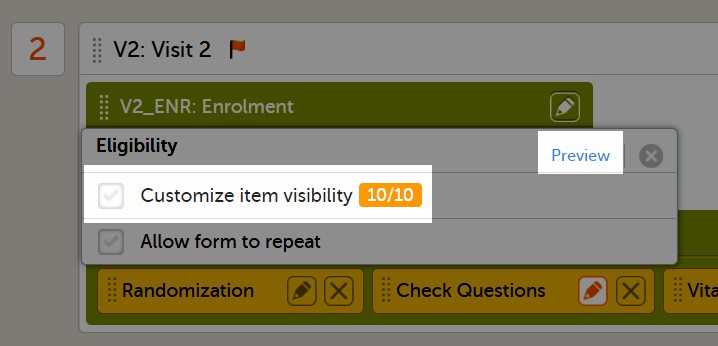
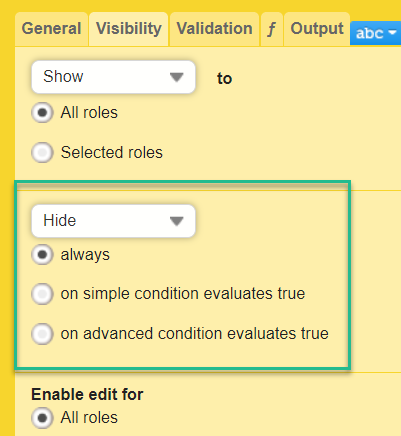
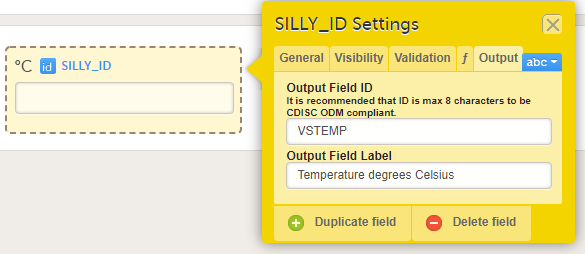
For items with code lists—radio buttons, dropdown lists, and checkboxes—each code list option consists of two parts:
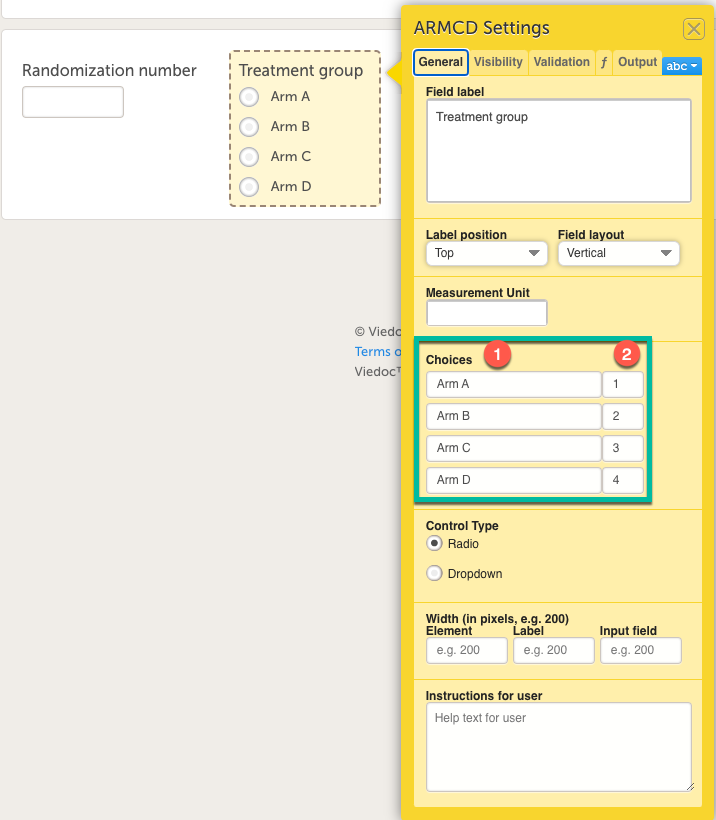
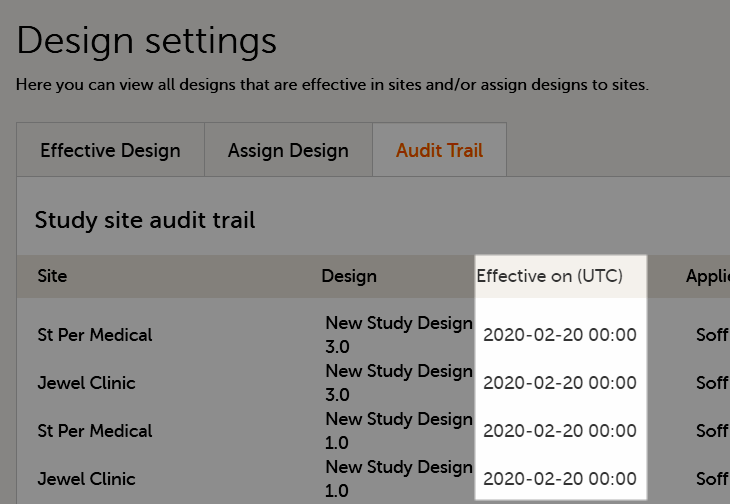
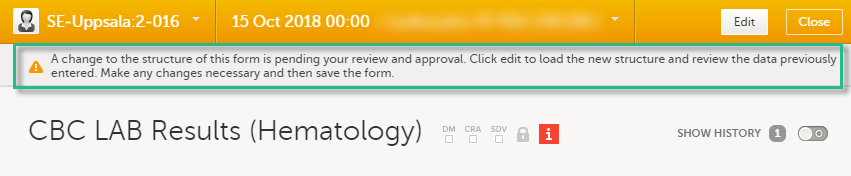
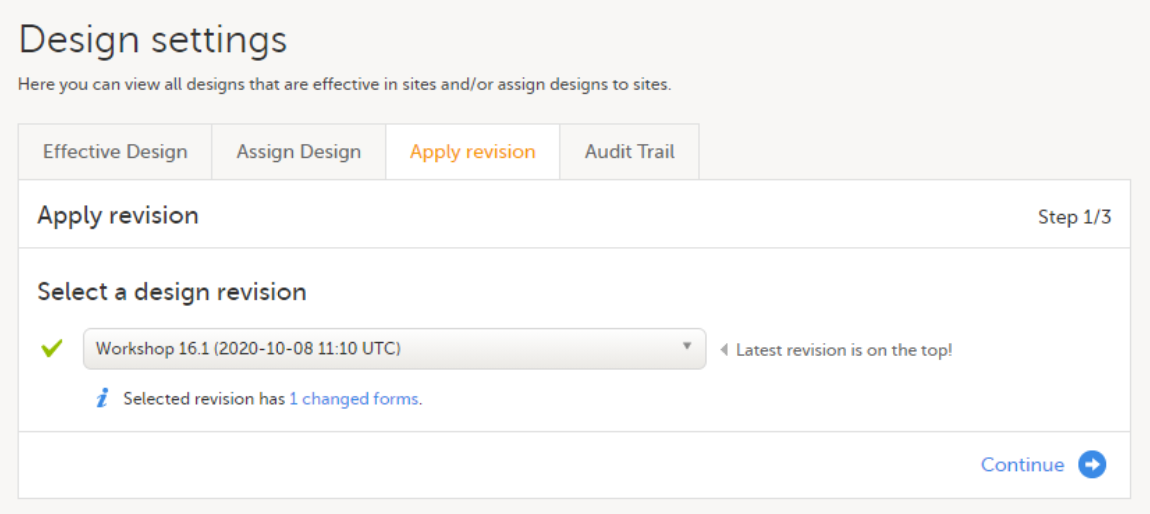
To find out what impact a change to a design will have on SDV or signatures, use the Viedoc design revision impact analysis tool:
| 1 | Make the change to your design. |
| 2 | Publish the design. |
| 3 |
Open Viedoc Admin and run the design revision impact tool according to these instructions: Viedoc design revision impact analysis. Note! Be careful not to accidentally apply the changes. |
| 4 | Unpublish the design. |
| 5 | Unlock the design. |
| 6 | Now, you can continue making any necessary changes to the design. |
Note! All steps below are performed on the production server. After going live, the training server should only be used to test a proof of concept.
| 1 |
Do an Excel export of all forms that will be affected by the update. Select the Event dates and Review status options. 
|
| 2 |
The effective design version can be found in the export for each form under the column Design version. Use this information to see which versions will need to be revised. 
|
| 3 |
Go to Designer and download a complete configuration report for each version that needs revision. 
|
| 4 | In each configuration report, check for items that will be affected (do a Ctrl+F search of the item’s ID). Check for dependencies on visibility conditions, functions, and edit checks. For more information, see Configuration report. |
| 5 | Make changes as appropriate in each version. |
This lesson describes how to manage reference data sources in Viedoc Admin.
Viedoc offers support for adding reference data that will be automatically populated to specific forms. When reference data are configured for your study, it is not necessary to fill in reference values for each subject in each form separately.
It is possible to configure different sets of reference data that will be populated to the form based on:
| Term | Definition |
|---|---|
| Reference data source |
An institute that provides reference data, for example a lab. |
| Reference data scope | A mapping of the items that should be automatically populated with reference values, and the factors that they should depend on. One or more reference data scopes can be configured in Viedoc Designer > Global Settings, as set(s) of variables and factors (see definitions below). |
| Factor | A parameter that affects the reference data, for example a subject’s sex. Factors may affect the normal range for a test result. |
| Variable | A specific measurement to be carried out. |
| Date factor | The date the sample was collected or the measurement carried out. This field determines on which date the reference data to be populated are based, for example when the event date is not the same as the collection or measurement date. |
| Target type | An item of a certain type of information that a reference data source can provide for a specific variable (such as range, unit, low/high values, etc.). Any number of target types can be defined by the user. |
Reference data are configured in Viedoc Designer, Viedoc Admin and Viedoc Clinic. The schematic below depicts what different steps need to be taken, and which roles have permission to perform these steps.
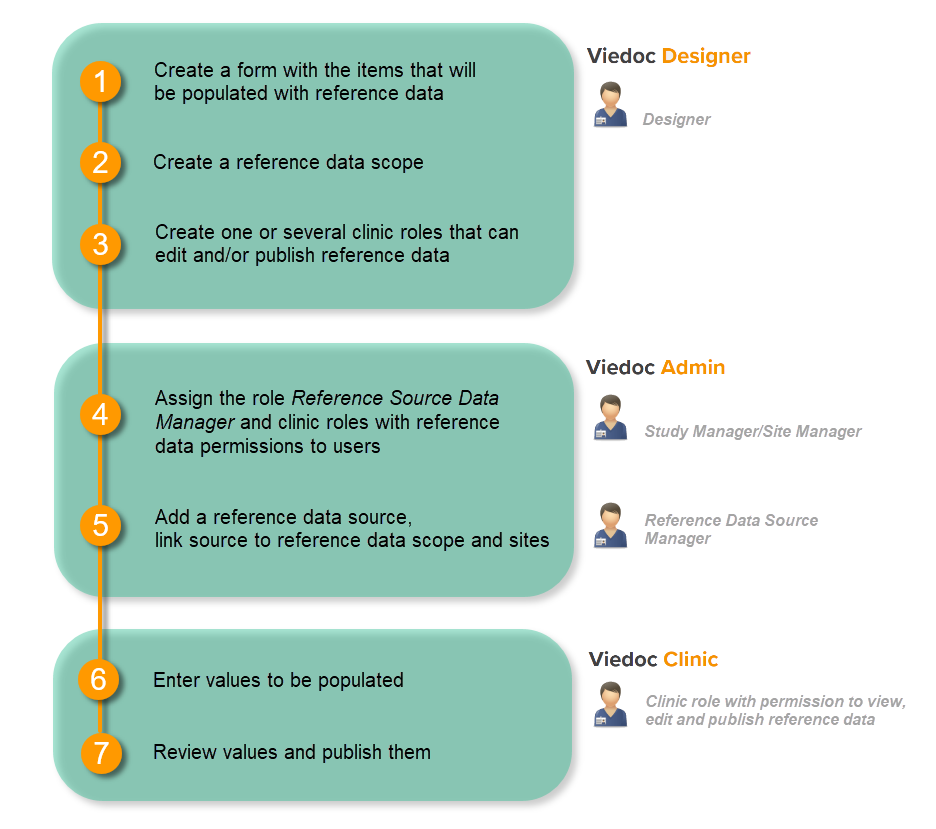 http://help.viedoc.net/l/5cf069/en/
This is a single-sourced file that should have the following content:
Introduction to reference data, description of the workflow.
For more detailed instructions regarding these steps, see:
For a detailed example of how to work with reference data, see:
For a video tutorial on how to work with reference data, see
The reference data sources are configured in Viedoc Admin. A reference data source is an institute that provides reference values, for example a laboratory. It is possible to add multiple reference data sources. Each reference data source is linked to one or more reference data scopes that define the following:
The reference data source is also linked to one or more sites in the study.
The user roles that give permission to manage the reference data sources in Viedoc Admin are:
Note! The site-specific reference data sources that were added by the site manager are not editable by the reference data source manager, they can only be viewed as read-only by the reference data source manager.
See Managing users (STM and SIM) for more information about the different user roles and the management of these roles.
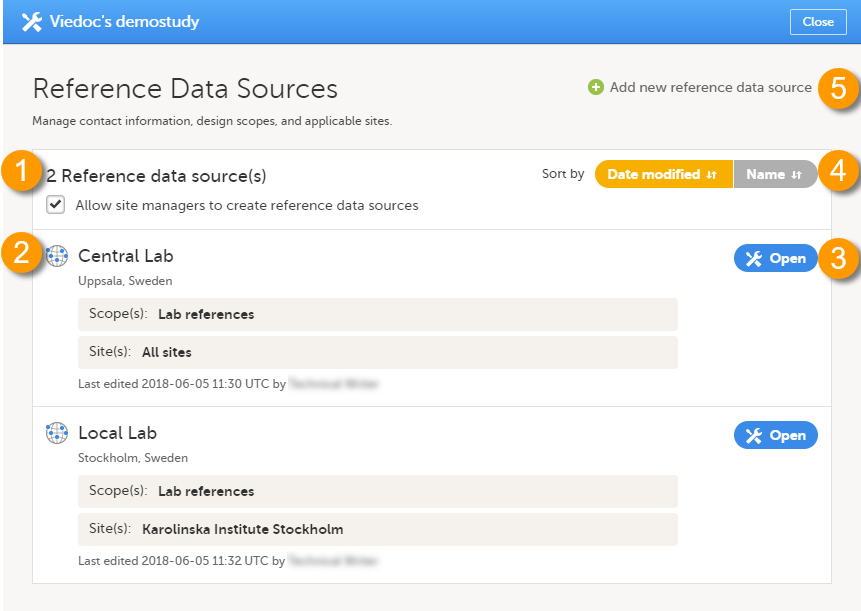
On the Reference Data Sources window, you can:
1. view a list of all reference data sources. If the Allow site managers to create reference data sources option is checked, then the site managers are allowed to manage the data sources assigned to the study site(s) they are managing.
2. view the details of a reference data source:
3. open and edit the details of a reference data source.
4. sort the list of the reference data sources by:
The option that is currently used for sorting is highlighted in orange.
5. add a new reference data source.
Note! Adding a reference data source can only be done by the Reference Data Source Manager.
To add a new reference data source, follow the steps below.
| 1 |
Click the toolbox icon in the Reference data source(s) field.
|
| 2 |
Click Add new reference data source. 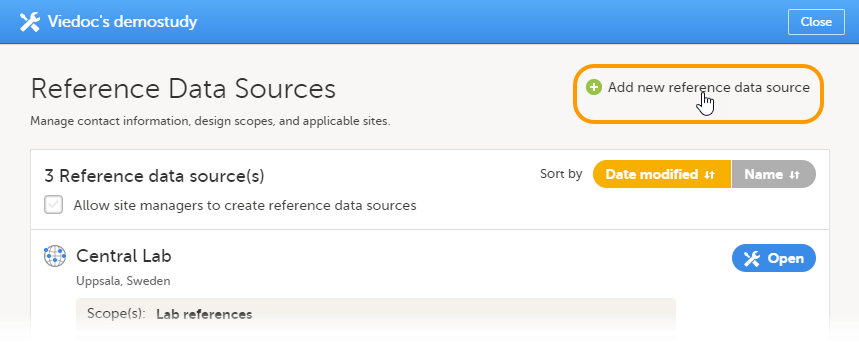
|
| 3 |
Enter the following details about the reference data source:
In the Link to following reference data scopes field, select the reference data scopes to which the source should be linked. In the Available for use in the following sites field, select the study sites to which the source should be linked. You can select individual sites, or a complete study site group at once (for more information about study site groups, see About system site groups in Managing study sites). You can add multiple sites or study site groups. 
|
| 4 | Click Save. The new reference data source is added to the list of reference data sources. |
To edit the details of a reference data source, follow the steps below.
| 1 |
Click the toolbox icon in the Reference data source(s) field.
|
| 2 |
Click Open to open the reference data source you would like to edit. 
|
| 3 | Edit the details and click Save to save the changes you made. |
To delete a reference data source, follow the steps below.
Note! A reference data source cannot be deleted if at least one site in production mode was assigned to that source and if reference data has been published in Viedoc Clinic for that data source (in combination with a reference data scope).
| 1 |
Click the toolbox icon in the Reference data source(s) field.
|
| 2 |
Click Open to open the reference data source you would like to delete.
|
| 3 |
Click Delete this reference data source. 
The reference data source is deleted. |
This lesson provides a use case for working with reference data in Viedoc Designer, Viedoc Admin, and Viedoc Clinic.
Viedoc offers support for adding reference data that will be automatically populated to specific forms. When reference data are configured for your study, it is not necessary to fill in reference values for each subject in each form separately.
It is possible to configure different sets of reference data that will be populated to the form based on:
| Term | Definition |
|---|---|
| Reference data source |
An institute that provides reference data, for example a lab. |
| Reference data scope | A mapping of the items that should be automatically populated with reference values, and the factors that they should depend on. One or more reference data scopes can be configured in Viedoc Designer > Global Settings, as set(s) of variables and factors (see definitions below). |
| Factor | A parameter that affects the reference data, for example a subject’s sex. Factors may affect the normal range for a test result. |
| Variable | A specific measurement to be carried out. |
| Date factor | The date the sample was collected or the measurement carried out. This field determines on which date the reference data to be populated are based, for example when the event date is not the same as the collection or measurement date. |
| Target type | An item of a certain type of information that a reference data source can provide for a specific variable (such as range, unit, low/high values, etc.). Any number of target types can be defined by the user. |
Reference data are configured in Viedoc Designer, Viedoc Admin and Viedoc Clinic. The schematic below depicts what different steps need to be taken, and which roles have permission to perform these steps.
http://help.viedoc.net/l/5cf069/en/
This is a single-sourced file that should have the following content:
Introduction to reference data, description of the workflow.
For more detailed instructions regarding these steps, see:
For a video tutorial on how to work with reference data, see
This lesson illustrates an example of configuring reference data in Viedoc Designer, Viedoc Admin, and Viedoc Clinic. It also shows how reference data are populated to the subject forms in Viedoc Clinic.
For more detailed instruction, see Configuring reference data scopes, and Configuring roles in Viedoc Designer.
In Viedoc Admin, open the Reference data source(s) window and add the reference data sources (the labs or institutes that will provide the reference data). Link the reference data source to the reference data scopes and to the sites for which they should be used.
For more detailed instruction, see Managing reference data sources in Viedoc Admin.
In this example, we have defined two reference data sources: Akademiska Lab and Karolinska Lab. The Akademiska Lab is linked to two scopes: Hematology CBC and Hematology CBC2. It is also linked to the system site group Sweden (all production sites in Sweden). The Karolinska Lab is only linked to the scope Hematology CBC, and to the site Karolinska Institute Stockholm.
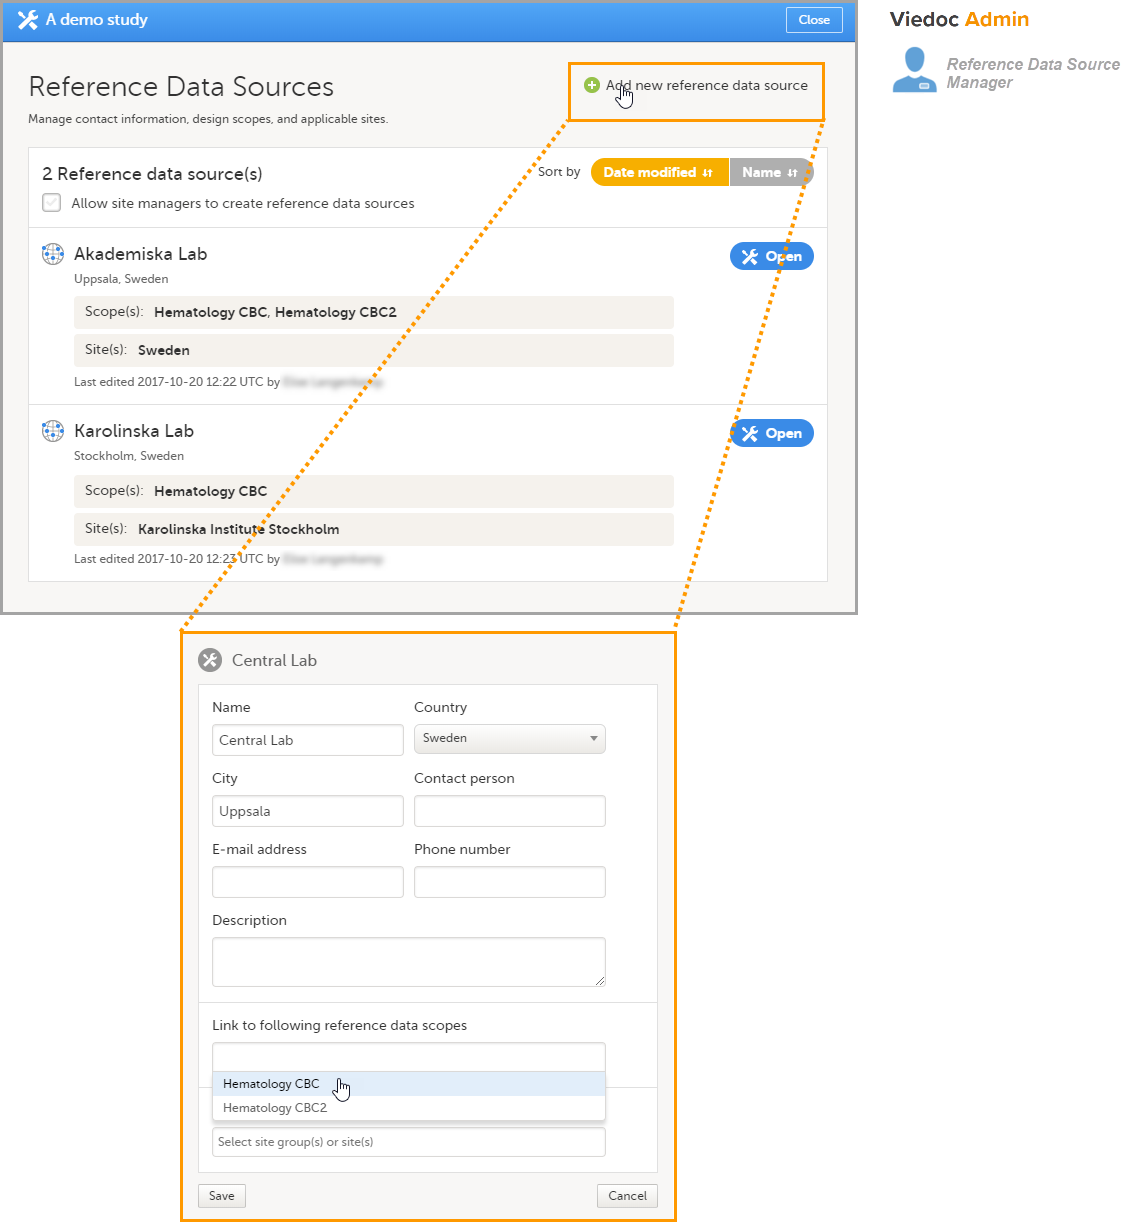
For each of the defined reference data source-scope combinations, reference data value sets will become available in Viedoc Clinic.
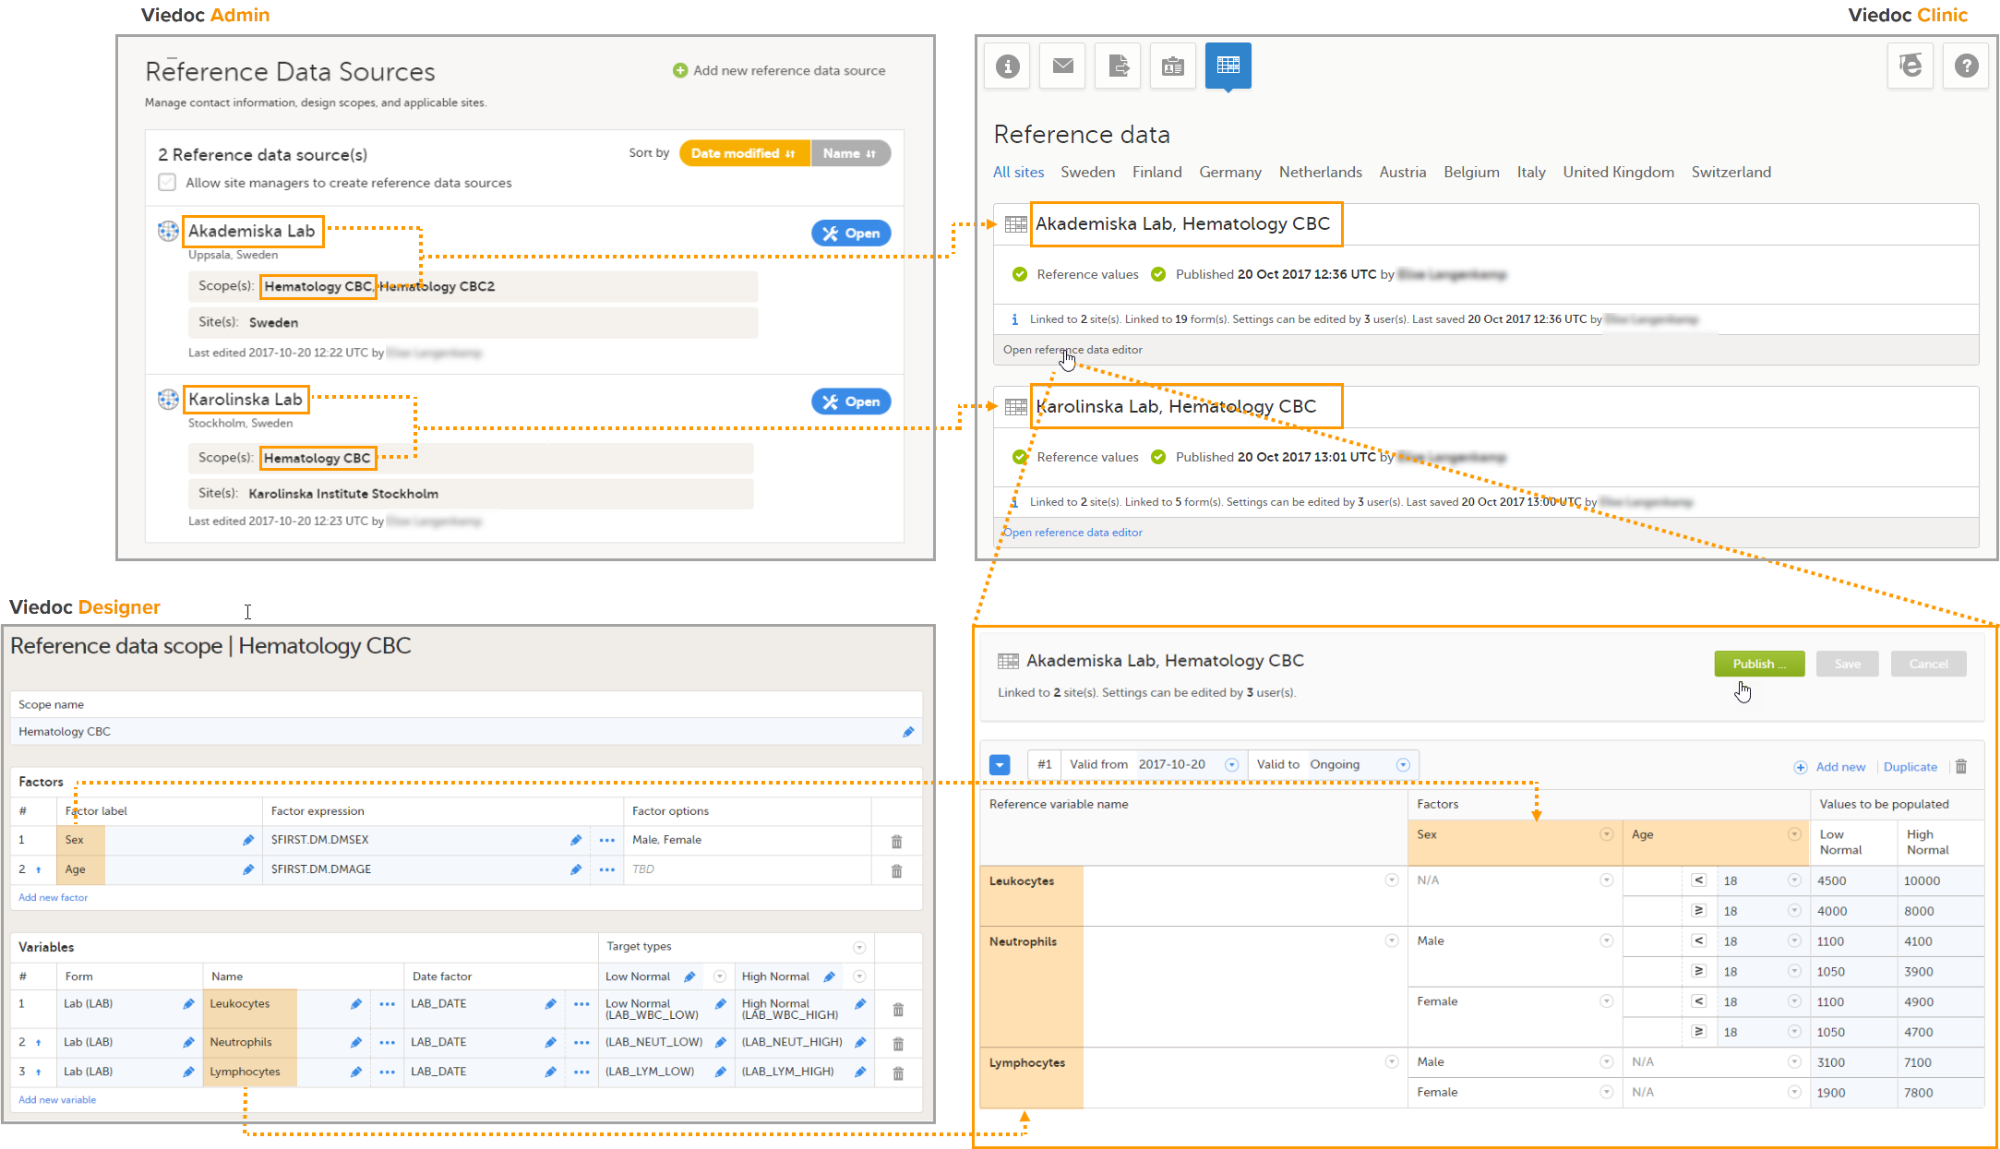
For more detailed instruction, see Working with reference data in Viedoc Clinic.
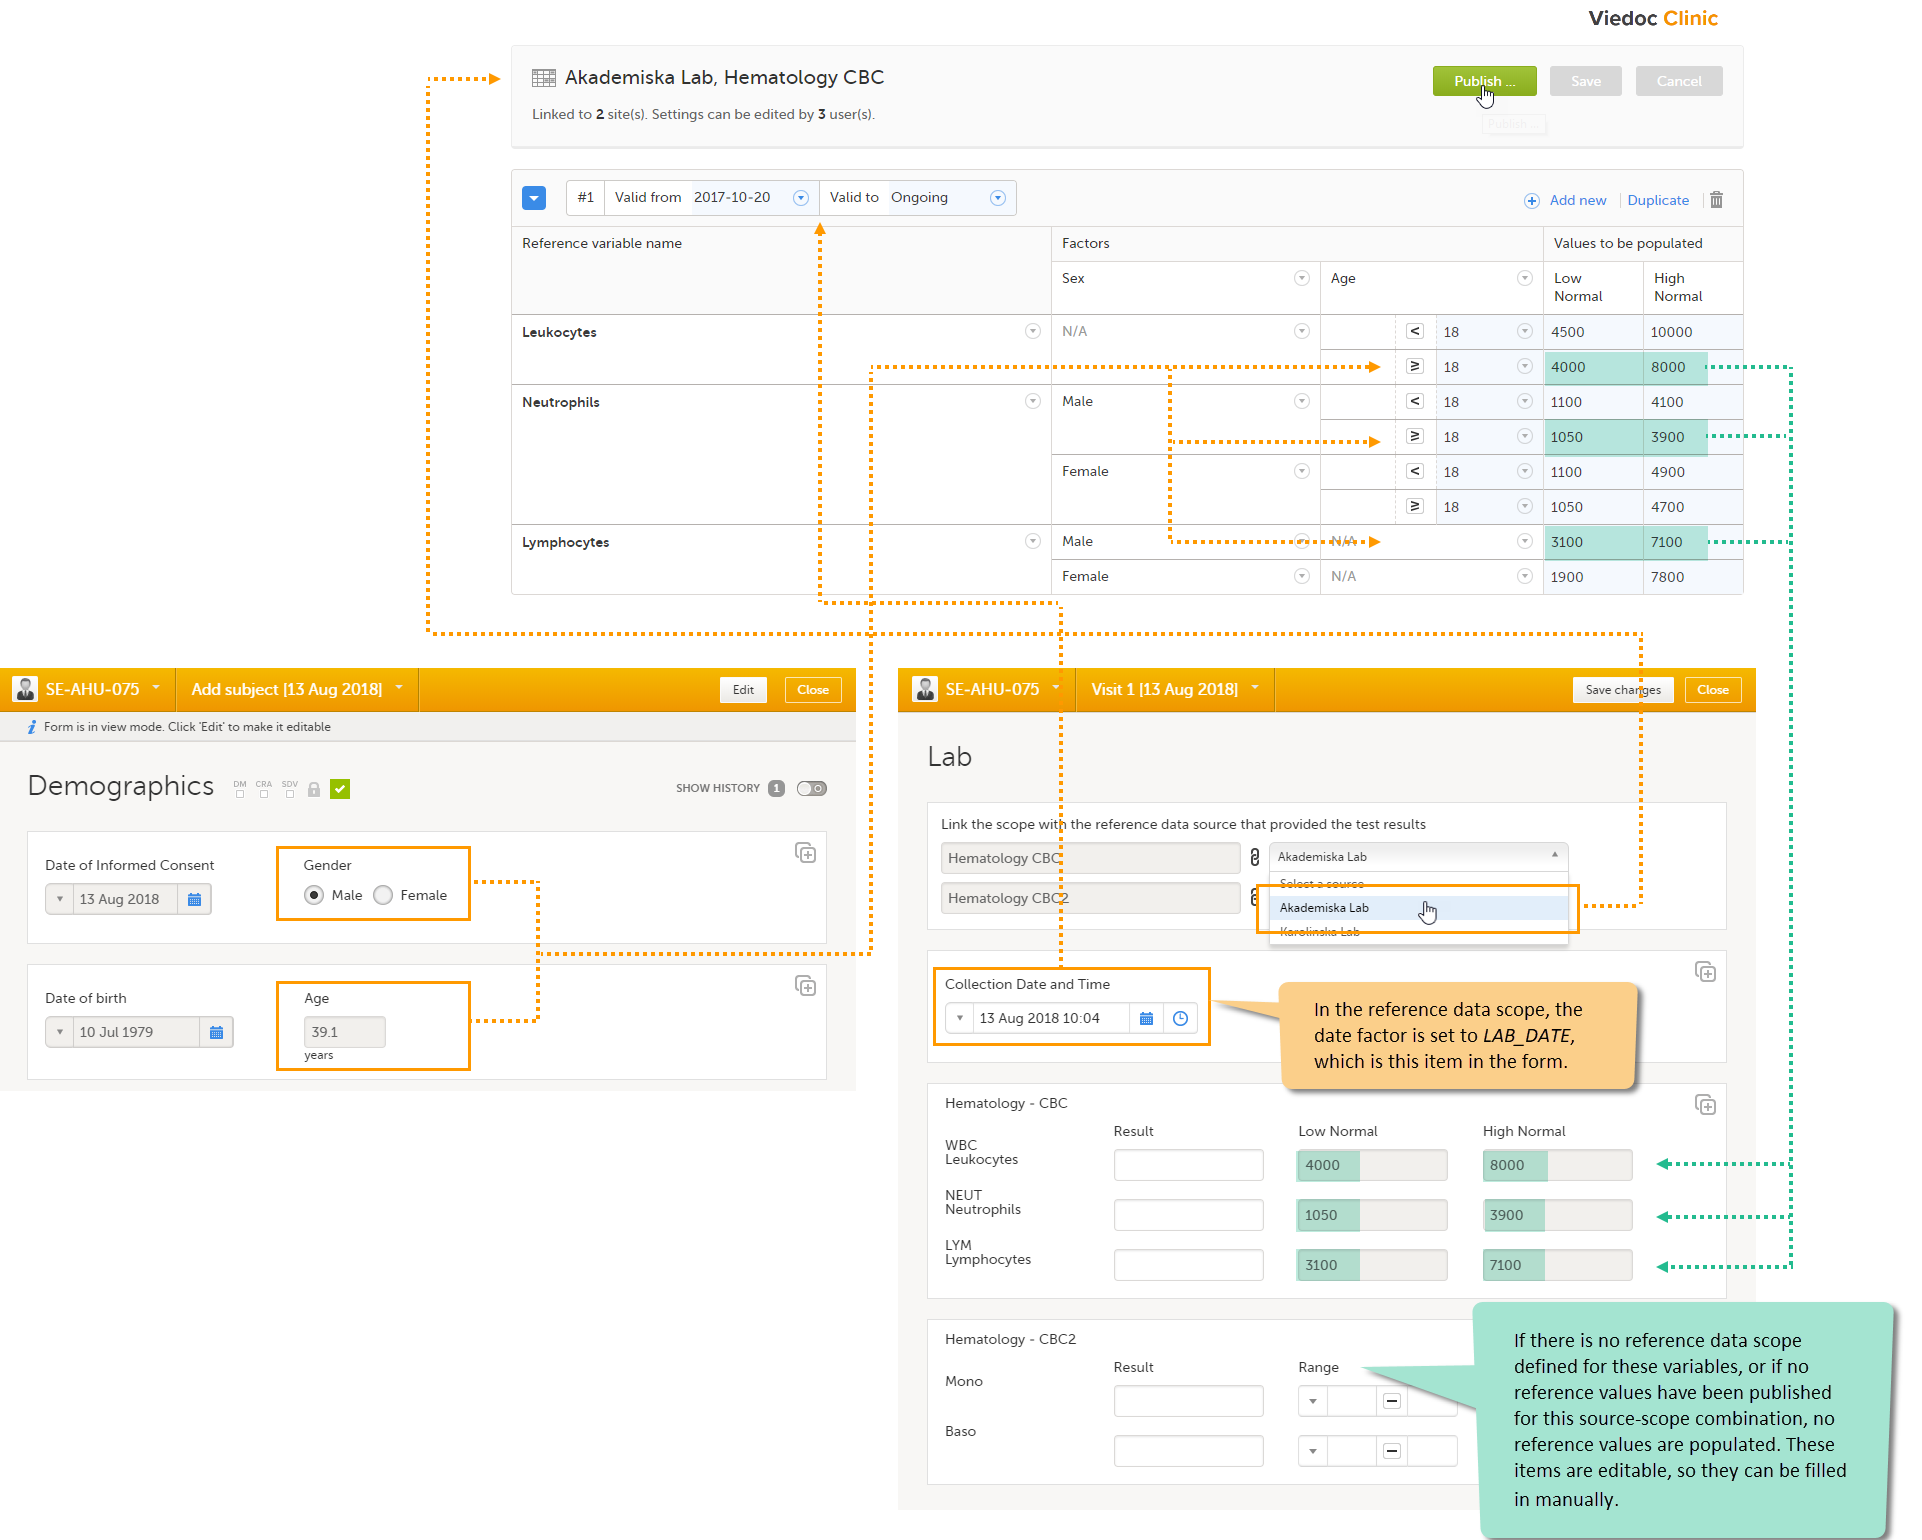
The system verifies:
If the date matches the validity of the reference values, the system auto-populates the relevant reference values to the subject form, based on the defined factors.
If you do not select a reference data source, no values will be automatically populated. The items are editable so that they can be filled in manually. Similarly, if no scope is defined (as for the Mono and Baso items in the form), or if no reference values are entered for that specific source-scope combination or for that specific date, the items remain empty and can be filled in manually.
For more detailed instruction, see Working with reference data in Viedoc Clinic.
Viedoc offers the possibility to import data, for example laboratory data, into your study in Viedoc using the Viedoc Data Import Application. When importing data, the Viedoc Data Import application does the following:
This document describes how to import data into Viedoc using the Viedoc Data Import Application. It describes the data import procedure in general, and provides instructions for the following steps:
This document does not describe how to create the data mapping file in CDISC Define-XML format. Instructions on how to create a data mapping file can be found in Creating a data mapping for import of data.
More information on importing data into Viedoc can be found in our video tutorial.
More information about server instances can be found in Guide to Viedoc server instances
Note! It is only possible to import values (choice numbers), and not strings (choice labels), when importing data into data fields where multiple checkboxes can be checked.
Viedoc offers the possibility to import data into forms, for example laboratory data, via the Viedoc Data Import Application.
To import data into Viedoc, the Viedoc Data Import Application first converts the supplied data into ODM clinical data format. To do this, the application needs:
A data mapping file, which will be used to translate the supplied data into ODM format,
A configuration file,
The data file containing the data to be imported into Viedoc. The data file should be a delimited file. Comma-Separated Values (CSV) files are supported as default; any other file delimiter can be used by specifying the delimiter of choice in the configuration file.
Then, the Viedoc Data Import Application pushes the ODM clinical data into Viedoc through the Viedoc API. To do this, the application needs:
A Viedoc user name and password with access to role appropriate permissions.
A study-specific Viedoc API client key.
You can download the latest version of the Viedoc Data Import Application from the Data mappings window in Global design settings in Viedoc Designer. For instructions, see section 3.6 Downloading the Viedoc Data Import Application.
Note! From the Viedoc 4.92 release, the Viedoc Data Import Application supports mapping data to ItemGroupDefId and ItemGroupRepeatKey in the data mapping file. As a result of this change, the Import Application can take advantage of the extended support in the Viedoc WCF API and import CSV data into repeating item group structures.
This Viedoc Data Import Application version is required when importing data into repeating item groups.
The data mapping file defines how the external data are mapped into form items in Viedoc. It describes each column of the data file to be imported, and the destination of the data in Viedoc.
The data mapping file is created in Global design settings in Viedoc Designer. Internally, the data mapping is stored in CDISC Define-XML format. For each type of data file to be imported, a separate data mapping file should be created.
For instructions on how to create a data mapping file, see Creating a data mapping for import of data.
The configuration file defines the following:
which Viedoc studies the data should be imported into,
where to find the data mapping file,
where to find the data file containing the data that should be imported,
which API instance the data should be imported into (v4, v4training, v4jp and so on),
the login credentials that should be used when importing the data.
The above information is mandatory to define in the configuration file. Optionally, you can use the configuration file to define the following:
whether you would like new subjects to be created automatically during the data import, when the imported data contain data for a subject that has not been added to the study yet,
whether you would like events to be initiated during the data import, when the imported data contain data for events that have not been initiated yet,
which character encoding should be used, when the imported file is read, and
which file delimiter should be used, when the imported file is parsed.
The configuration file is an XML file that can be created in any text editor. One configuration file can contain the import configurations for multiple import projects and studies.
For instructions on how to create a configuration file, see section 3.5 Creating a configuration file and prepare the work folder.
This section provides instructions for importing data into Viedoc using the Viedoc Data Import Application.
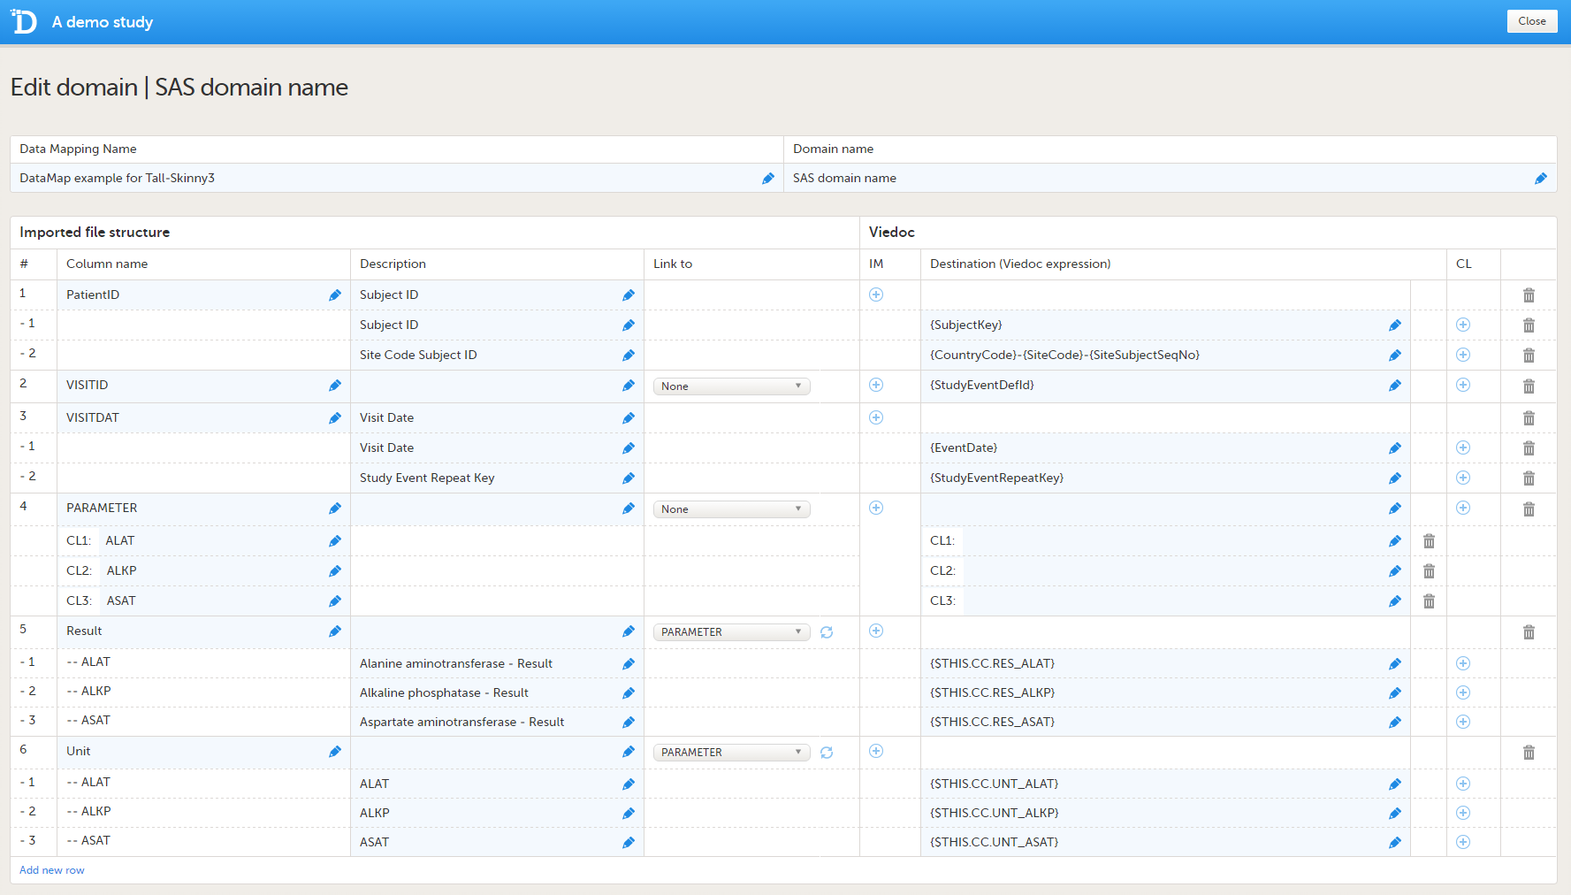
Create a data mapping file in Viedoc Designer according to the instructions in Creating a data mapping for import of data. In the data mapping file, every column of the data file should be mapped to the corresponding form item in Viedoc. You need one data mapping file for each type of data file that you wish to import.
When all the columns in the data file are mapped, save the data mapping, and publish the changes in the Global design settings window.
Download the data mapping file as follows (see also the instructions in Data mapping for import of data in the eLearning):
| 1 | In the Data mappings field, click Edit to open the data mappings overview. |
| 2 | Click the Download icon behind the data mapping that you just created. An XML file will be downloaded that contains the data mapping. |
See API configuration.
To create a folder structure to store the configuration file, the data mapping file, and the data to be imported:
Save the data mapping file in the respective project folder within the work folder.
To create the configuration file:
| 1 |
In your text editor of choice, create an XML file according to the following example (copy and paste the text if necessary):
|
| 2 |
Edit the XML tags and specify the following information. Note! All XML tags are case sensitive! The a) b) c) For the EU, the URL is:
For Japan, the URL is:
For China, the URL is:
For the USA, the URL is:
d) e) f) g) h) i) j) Note that the The |
| 3 | If you would like to import multiple types of data files, add a new <ImportConfiguration> section for each type of data file, and edit the XML tags as described in step 2. |
| 4 | Save the configuration file in the work folder. |
|
Name |
Type of encoding |
|---|---|
| gb2312 | Chinese SImplified (GB2312) |
| utf-16 | Unicode |
| unicodeFFFE | Unicode (Big endian) |
| Windows-1252 | Western European (Windows) |
| x-mac-korean | Korean (Mac) |
| x-mac-chinesesimp | Chinese Simplified (Mac) |
| utf-32 | Unicode (UTF-32) |
| utf-32BE | Unicode (UTF-32 Big endian) |
| us-ascii | US-ASCII |
| x-cp20936 | Chinese Simplified (GB2312-80) |
| x-cp20949 | Korean Wansung |
| iso-8859-1 | Western European (ISO) |
| iso-8859-8 | Hebrew (ISO-Visual) |
| iso-8859-8-1 | Hebrew (ISO-Logical) |
| iso-2022-jp | Japanese (JIS) |
| csISO2022JP | Japanese (JIS-Allow 1 byte Kana) |
| iso-2022-jp | Japanese (JIS-Allow 1 byte Kana - SO/SI) |
| iso-2022-kr | Korean (ISO) |
| x-cp50227 | Chinese Simplified (ISO-2022) |
| euc-jp | Japanese (EUC) |
| EUC-CN | Chinese Simplified (EUC) |
| euc-kr | Korean (EUC) |
| hz-gb-2312 | Chinese Simplified (HZ) |
| GB18030 | Chinese Simplified (GB18030) |
| x-iscii-de | ISCII Devanagari |
| x-iscii-be | ISCII Bengali |
| x-iscii-ta | ISCII Tamil |
| x-iscii-te | ISCII Telugu |
| x-iscii-as | ISCII Assamese |
| x-iscii-or | ISCII Oriya |
| x-iscii-ka | ISCII Kannada |
| x-iscii-ma | ISCII Malayalam |
| x-iscii-gu | ISCII Gujarati |
| x-iscii-pa | ISCII Punjabi |
| utf-7 | Unicode (UTF-7) |
| utf-8 | Unicode (UTF-8) |
In the configuration file of the example above, the work folder is C:\helipad. The work folder contains the project folder ProjectFolder1 and the configuration file ViedocImportConfiguration.xml.
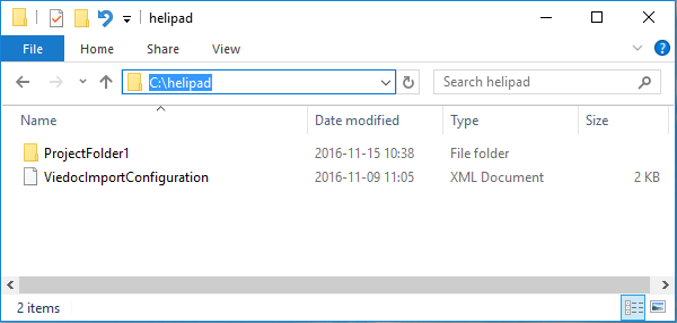
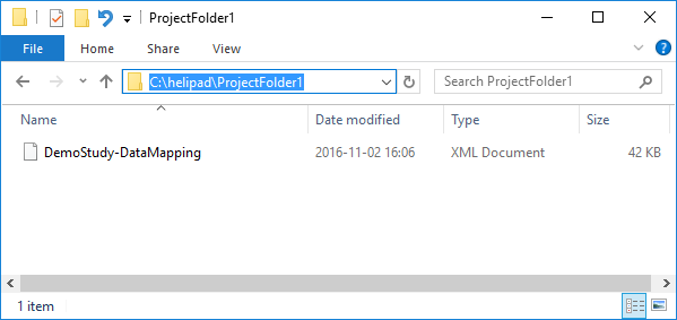
The data file(s) containing the data to be imported should also be saved in the project folder.
Note! The Data Import Application only works for Windows OS and not Linux or Mac.
To download and install the Viedoc Data Import Application:
| 1 | In the Global design settings in Viedoc Designer, click the Edit icon in the Data mappings field to open the Data mappings window.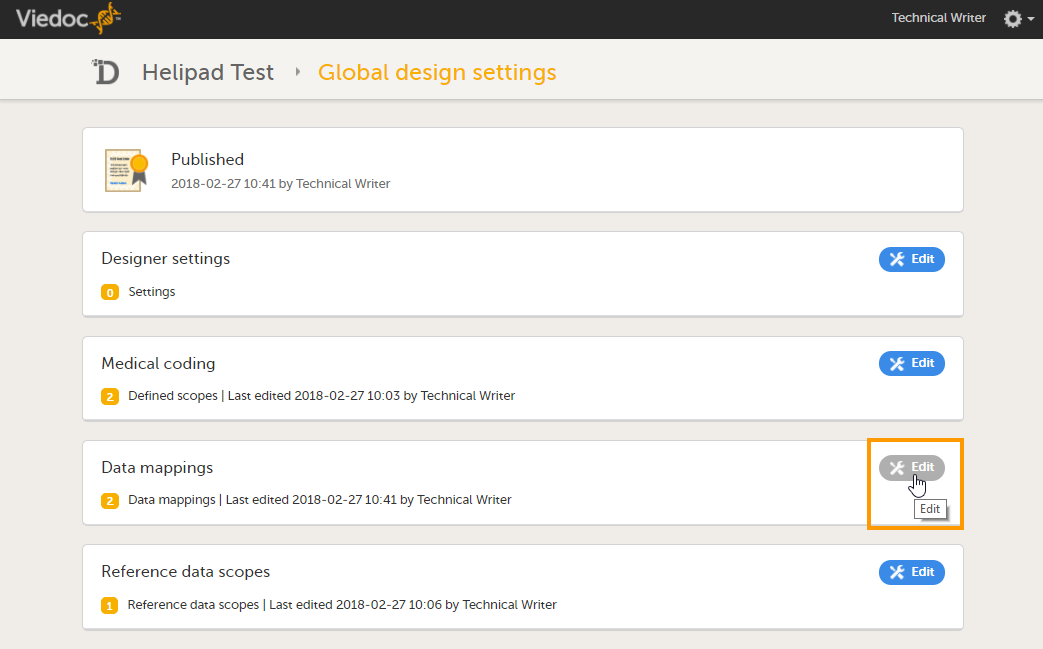 |
| 2 | Click Download Viedoc Import Application to download the installation file. A zip file is downloaded. 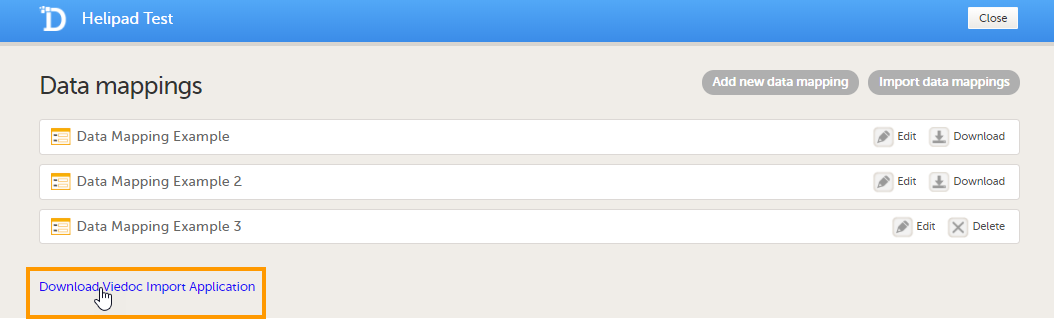 |
| 3 | Save the zip file on any location on your computer and extract the contents. |
Save the data file containing the data to be imported in the project folder.
To run the application and import the data:
| 1 | Double-click the Viedoc Data Import Application icon to start the application. When starting the application for the first time, the following window appears: 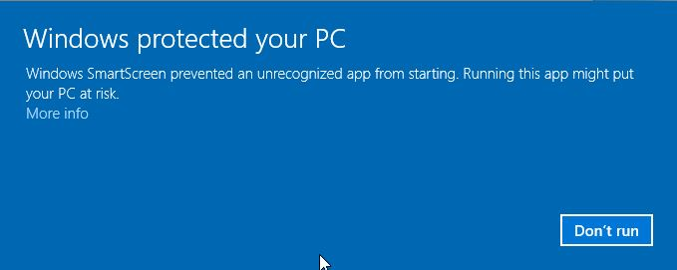
|
| 2 |
Click More info, and then click Run anyway.

|
| 3 | Enter the path to the configuration file, for example: C:\helipad\ViedocImportConfiguration.xml, and press Enter. The application imports the data in the data file into Viedoc, and moves the data file into an archive folder within the project folder (the systems creates the archive folder automatically, if it has not created one yet). |
When the application is run, it goes through all the project folders that are specified in the configuration file, and imports the data of all the data files found in these project folders. If no data files are found in a specific project folder, that project is skipped.
After the import, the application closes automatically.
You can monitor the status of the import in Viedoc Admin. To do this, click the Edit icon in the API configuration field in Viedoc Admin to open the API configuration window. The Submit data History list displays which client ID is used for the import, the date and time of the import, and the status. The contents of the data import and a log file can be downloaded.
Whenever you have new data to import, save the data file in the respective project folder and run the application again by double-clicking the Viedoc Data Import Application icon.
You can edit the configuration file at any time to add, edit, or remove import projects.
If you have specified a password in the configuration file, the Viedoc Data Import Application replaces this password with an encrypted password when running the application for the first time. The encrypted password is saved in the configuration file.
If you have not specified a password in the configuration file, the application asks you for a password upon start-up.
To enter a password, press Y (yes), type your password and press Enter. Type your password again and press Enter. The system will save your password as an encrypted password in the configuration file.
If you press N (no), or do not press anything for 15 seconds, or enter the wrong password, the application cannot login and does not import any data. The application displays Error logging in: Invalid userName or password.
If you have changed your Viedoc password, replace the old password in the configuration file with the new password and save the configuration file. The next time the Viedoc Data Import Application is run, the new password will be used to login and import the data.
Please see this link for instructions on how to automate imports through the Task Scheduler.
This document contains information on connecting your development environment or any other system to the Viedoc public web service using the Windows Communication Foundation (WCF) standards.
The Viedoc public Application Programming Interface (API) is a Simple Object Access Protocol (SOAP) over a Hypertext Transfer Protocol (HTTP) service. The API can be reached at: https://[VIEDOC_HOST]/HelipadService.svc
A wsdl metadata file can be downloaded from: https://[VIEDOC_HOST]/HelipadService.svc?wsdl
For the EU:
https://v4api.viedoc.net/HelipadService.svc?wsdl
https://v4apitraining.viedoc.net/HelipadService.svc?wsdl
For Japan:
https://v4apijp.viedoc.net/HelipadService.svc?wsdl
https://v4apitrainingjp.viedoc.net/HelipadService.svc?wsdl
https://v4apistagejp.viedoc.net/HelipadService.svc?wsdl
For China:
https://api.viedoc.cn/HelipadService.svc?wsdl
https://apitraining.viedoc.cn/HelipadService.svc?wsdl
For the USA:
https://api.us.viedoc.com/HelipadService.svc?wsdl
https://apitraining.us.viedoc.com/HelipadService.svc?wsdl
Contact Viedoc Technologies for information about which host to connect to.
See Guide to Viedoc server instances for more information.
The Token method is used for authenticating the client. This method must be called to receive a token for authenticating all subsequent requests.
To authenticate the client, the following must be provided:
An active Client ID, a client ID (GUID) linked to a specific study in Viedoc. The client ID is linked to either the demo or the production study.
A Viedoc user name and password. To submit data into Viedoc, you need access to the study in Viedoc and to the study site with a role that allows data entry.
Important! You can only access the API configuration window and create an API client ID if you are assigned the role API Manager. All the pending role invitations for a user are automatically approved when the Token/GetToken method is used. |
For information about how to obtain a client ID, see API configuration.
ApiTokenModel tokenModel = Token(ApiAuthenticationModel loginModel);
The Token method has the following parameters:
| Parameter | Data type | Description |
|---|---|---|
loginModel |
ApiAuthenticationModel |
A collection of authentication information. See section 3.1 ApiAuthenticationModel for a description. |
The Token method returns an ApiTokenModel object that has the following properties:
| Property | Data type | Description |
|---|---|---|
Token |
string |
A new authentication token that can be used for authentication in subsequent requests |
Result |
ApiResultType |
Defines the type and status of the result returned from method invocation. See section 3.2 ApiResultType for details |
ErrorCode |
int |
In case of an error result: contains an integer specifying the type of error. See section 4 Error codes for details. |
ErrorMessage |
string |
In case of an error result: human readable description of the error |
ExpiryDateTime |
DateTime |
Token expiration date and time |
|
|
|
|
For a description of the GetToken method, see the description of the Token method in section 2.1 Token.
ApiTokenModel GetToken(Guid ClientGuid, string UserName, string password,

int timeSpanInSeconds);
The GetToken method has the following parameters:
| Parameter | Data type | Description |
|---|---|---|
ClientGuid |
ApiAuthenticationModel |
Client ID linked to a specific study in Viedoc. Can be obtained from Viedoc Admin. Required. |
UserName |
string |
Viedoc login username. Required. |
Password |
string |
Matching Viedoc login password. Required. |
TimeSpanInSeconds |
int |
Time (in seconds) that the authentication token will be valid for. Optional. Default is 300 seconds (5 min). Maximum is 1800 seconds (30 min). |
For a list of the returns of the GetToken method, see the returns of the Token method as described in section 2.1.4 Returns.
Use the SubmitData method for submitting data into Viedoc.
Note! The SubmitData method supports importing data for repeating item groups by specifying ItemGroupOID and the ItemGroupRepeatKey on the ItemGroupData elements.
ApiSubmitResultModel SubmitData(string token, string odmXml,
ApiSubmitDataOptions options = null);
The SubmitData method has the following parameters:
| Parameter | Data type | Description |
|---|---|---|
token |
string |
Authentication token. Can be obtained by invoking the Token method with client ID, username, and password. |
odmXml |
string |
The data to be uploaded in ODM format |
options |
ApiSubmitDataOptions |
Submit data options. Optional. See section 3.3 ApiSubmitDataOptions. |
The SubmitData method returns an ApiSubmitResultModel object that has the following properties:
| Property | Data type | Description |
|---|---|---|
Token |
string |
A new authentication token that can be used for authentication in subsequent requests |
Result |
ApiResultType |
Defines the type and status of the result returned from method invocation. See the section 3.2 ApiResultType for details. |
ErrorCode |
int |
In case of an error result: contains an integer specifying the type of error. See section 4 Error codes for details. |
ErrorMessage |
string |
In case of an error result: human readable description of the error |
TransactionGuid |
GUID |
A GUID assigned to the transaction that can be used to identify the transaction in future requests, for example when invoking TransactionStatus or TransactionData. Every single call to the SubmitData method is assigned one transaction GUID, irrespective of how many subjects or data points are uploaded. |
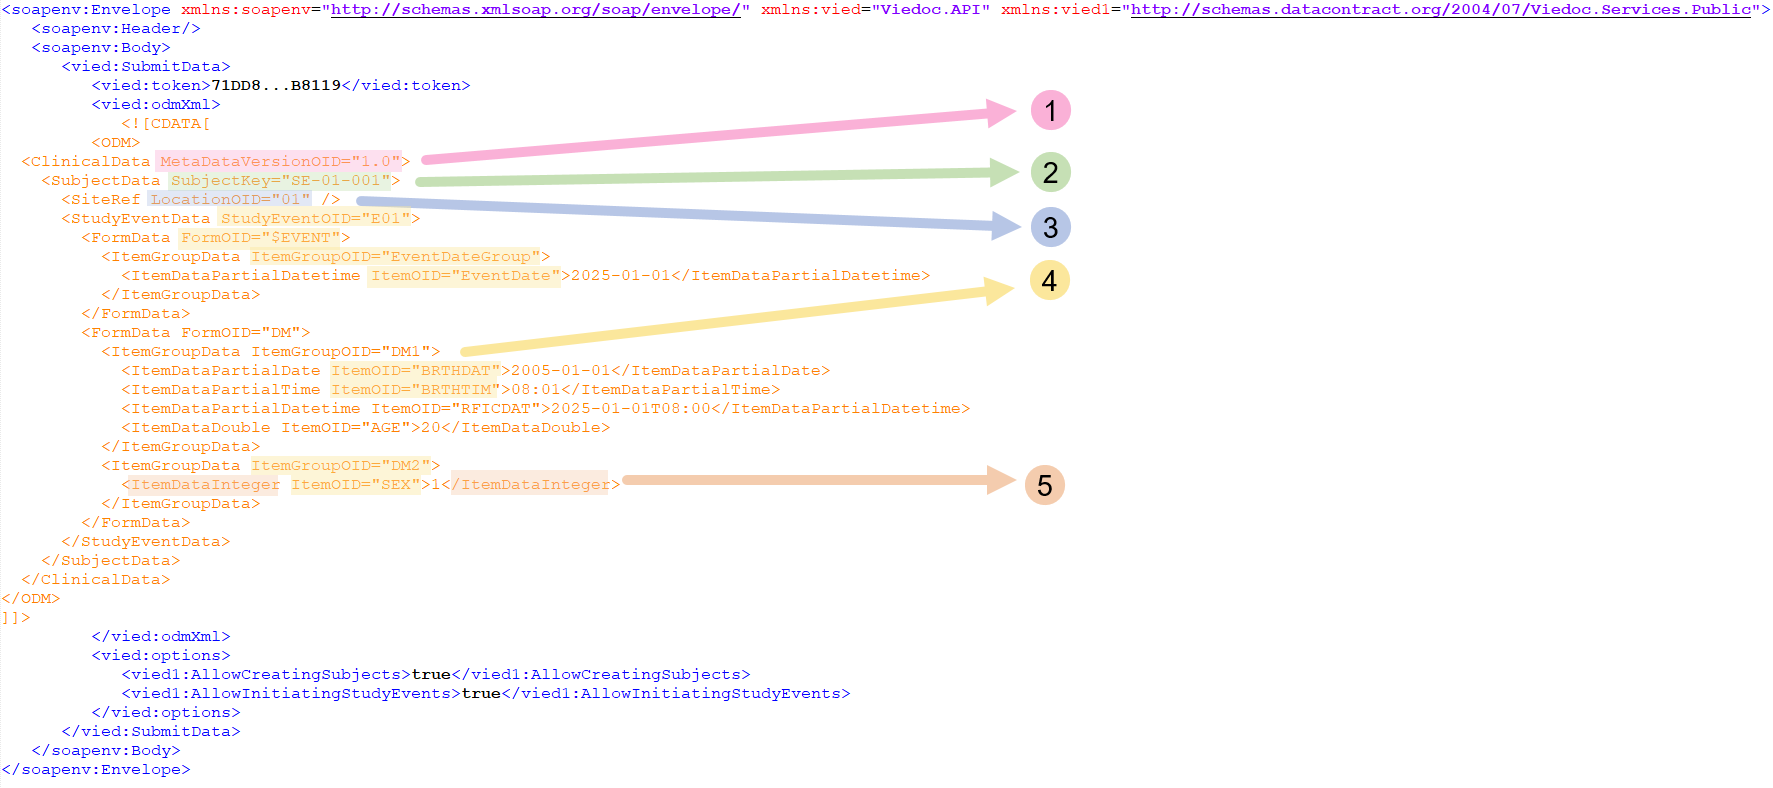
Note! To access the example call as a text that you can copy into your tool, click here.
| Number | Item | Description |
|---|---|---|
| 1 | MetaDataVersionOID |
[Version].[Revision] of the metadata that will be used for the imported data |
| 2 | SubjectKey |
Subject key in Viedoc for the subject that the data will be imported to |
| 3 | LocationOID |
Study site ID, can be obtained from Viedoc Admin |
| 4 |
|
Event, form, or item Object Identifiers (OIDs), can be obtained from an exported metadata version or from Viedoc Designer Note! If the StudyEvent repeats, a StudyEventRepeatKey should be given. For example: |
| 5 | ItemDataInteger |
Allowed data value types are:
|
* CRF variables that collect time data have no container for time zone in Viedoc. Data in such variables is typically regarded to represent time in the same time zone as where the study site is located. Thus, it is recommended to submit time data without the time zone information, for example 2020-01-29T08:34:00. If time zone is of interest, for example if a blood sample was analyzed in a lab located in a different time zone, an additional CRF variable can be used to collect that information. When time zone information is submitted to Viedoc through the API (or the import application) as part of a data value, it will be factored into the data value. This is due to the fact that Viedoc has no place to store it. For example, 2000-01-01T00:00:00+01:00 (1 hour offset) will be converted to 1999-12-31T23:00:00Z (no offset) and will be visible in the CRF as 1999-12-31 23:00. For this reason, it is advisable to take care of any conversions required to get rid of time zone information before you submit time data to Viedoc.
|
|
You can import a file, for example an image, to a File Upload item. This is similar to importing any other kind of data via the SubmitData method. The file must be converted to a base64 string before it can be imported.
How the conversion is done depends on the programs that you are using, (for example, in Python you can use the b64encode function from the base64 module).
The item data type for the file upload item should be specified as ItemDataBase64Binary in the ODM XML. In addition to its value (the base64 string), the v4:FileName property must be specified. That is, the file name including the extension. The XML namespace v4 must be defined in the ODM start tag.
See the image below:
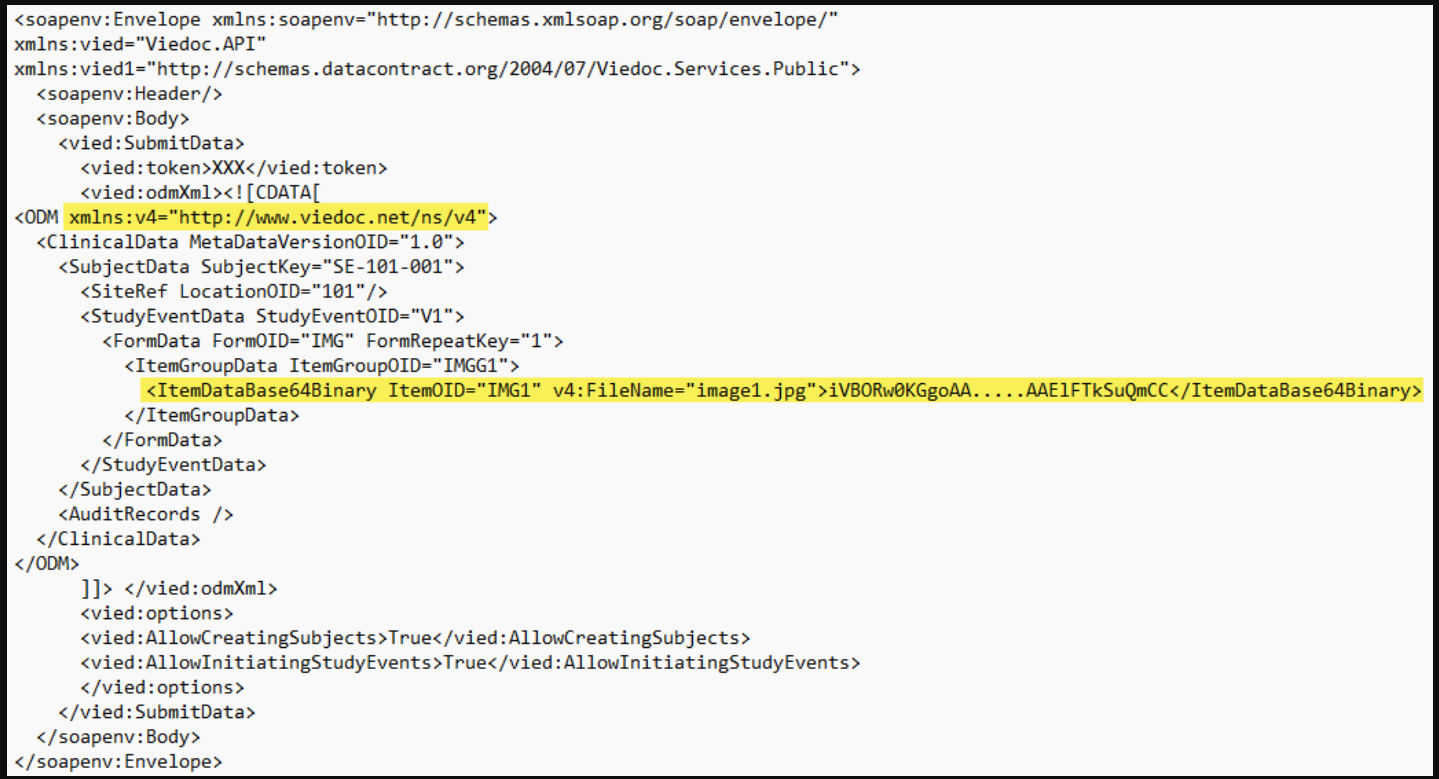
The TransactionStatus method can be used to check the import status of previously submitted data.
ApiResultModel resultModel = TransactionStatus(string token, GUID transactionGUID);
The TransactionStatus method has the following parameters:
| Parameter | Data type | Description |
|---|---|---|
token |
string |
Authentication token |
transactionGUID |
GUID |
The transaction GUID obtained when invoking the SubmitData method |
The TransactionStatus method returns an ApiResultModel object that has the following properties:
| Property | Data type | Description |
|---|---|---|
Token |
string |
A new authentication token that can be used for authentication in subsequent requests |
Result |
ApiResultType |
Defines the type and status of the result returned from method invocation. See section 3.2 ApiResultType for details. |
ErrorCode |
int |
In case of an error result: contains an integer specifying the type of error. See section 4 Error codes for details. |
ErrorMessage |
string |
In case of an error result: human readable description of the error |
|
|
|
|
The TransactionData method can be used to obtain previously submitted data.
ApiTransactionDataModel dataModel = TransactionData(string token, GUID transactionGUID);
The TransactionData method has the following parameters:
| Parameter | Data type | Description |
|---|---|---|
token |
string |
Authentication token |
transactionGUID |
GUID |
GUID obtained when invoking the SubmitData method |
The TransactionData method returns an ApiTransactionDataModel object that has the following properties:
| Property | Data type | Description |
|---|---|---|
Token |
string |
A new authentication token that can be used for authentication in subsequent requests |
Result |
ApiResultType |
Defines the type and status of the result returned from method invocation. See section 3.2 ApiResultType for details. |
ErrorCode |
int |
In case of an error result: contains an integer specifying the type of error. See section 4 Error codes for details. |
ErrorMessage |
string |
In case of an error result: human readable description of the error |
OdmXml |
string |
The uploaded data in ODM format |
|
|
|
|
The GetMetaData method can be used to get any study metadata version in ODM format.
ApiGetMetaDataResultModel metaDataResultModel = GetMetaData(string token, string metaDataOid, bool includeSdm, bool includeViedocExtensions);
The GetMetaData method has the following parameters:
| Parameter | Data type | Description |
|---|---|---|
token |
string |
Authentication token |
metaDataOid |
string |
Metadata OID in the format: [Version]. [Revision]. For example, 1.1 means version 1 and revision 1. The metadata OID can be obtained from Viedoc Admin or Designer. |
includeSdm |
bool |
Defines whether Study Design Model (SDM) properties should be included in the exported metadata ODM file. Can be set to true or false, default is set to false. |
includeViedocExtensions |
bool |
Defines whether Viedoc-specific extension properties should be included in the exported metadata ODM file. Can be set to true or false, default is set to false. |
The GetMetaData method returns an ApiGetMetaDataResultModel object that has the following properties:
| Property | Data type | Description |
|---|---|---|
Token |
string |
A new authentication token that can be used for authentication in subsequent requests |
Result |
ApiResultType |
Defines the type and status of the result returned from method invocation. See section 3.2 ApiResultType for details. |
ErrorCode |
int |
In case of an error result: contains an integer specifying the type of error. See section 4 Error codes for details. |
ErrorMessage |
string |
In case of an error result: human readable description of the error |
OdmXml |
string |
ODM including the requested metadata version in the study |
|
|
|
|
The GetMetaDataVersionForKeySets method can be used to get the study design version(s) (metadata version) for a set of data point(s).
ApiGetMetaDataVersionsResultModel GetMetaDataVersionsForKeySets(string token, List<ViedocKeySet> keySets)
The GetMetaDataVersionForKeySets method has the following parameters:
| Parameter | Data type | Description |
|---|---|---|
token |
string |
Authentication token |
keySets |
List<ViedocKeySet> |
Contains a list of keysets for which study design (metadata) version should be fetched. All the individual keys in a keyset are optional and the returned study design version will be based on all the keys specified. See section 3.4 ViedocKeySet. |
The GetMetaDataVersionForKeySets method returns an ApiGetMetaDataVersionsResultModel object that has the following properties:
| Property | Data type | Description |
|---|---|---|
Token |
string |
A new authentication token that can be used for authentication in subsequent requests |
Result |
ApiResultType |
Defines the type and status of the result returned from method invocation. See section 3.2 ApiResultType for details. |
ErrorCode |
int |
In case of an error result: contains an integer specifying the type of error. See section 4 Error codes for details. |
ErrorMessage |
string |
In case of an error result: human readable description of the error |
KeySets |
List<ViedocKeySet> |
ODM including the requested metadata version in the study |
|
|
|
|
The GetClinicalStudySites method returns information about the sites that a user has access to in Viedoc Clinic.
ApiGetClinicalStudySitesResultModel GetClinicalStudySites(string token);
The GetClinicalStudySites method has the following parameters:
| Parameter | Data type | Description |
|---|---|---|
token |
string |
Authentication token. |
The GetClinicalStudySites method returns an ApiStudySiteModel object that has the following properties:
| Property | Data type | Description |
|---|---|---|
Country |
string |
The country name |
CountryCode |
string |
Two-letter country code |
ExpectedNumberOfSubjectsEnrolled |
int |
The expected number of enrolled subjects on site |
ExpectedNumberOfSubjectsScreened |
int |
The expected number of screened subjects on site |
MaximumNumberOfSubjectsScreened |
int |
The maximum number of screened subjects on site |
Guid |
string |
Unique ID of the site |
SiteCode |
string |
Site code as set in Admin |
SiteName |
string |
Site name as set in Admin |
SiteNumber |
int |
Site number |
SiteType |
string |
Site type: Training or Production |
TimeZone |
string |
The Windows time zone ID |
TzOffset |
int |
The offset (in minutes) from UTC |
|
</soapenv:Envelope> |
|
|
The GetClinicalData method can be used for exporting clinical data in ODM format.
ApiGetClinicalDataResultModel GetClinicalData(string token, ApiGetClinicalDataRequestModel options);
The GetClinicalData method has the following parameters:
| Parameter | Data type | Description |
|---|---|---|
token |
string |
Authentication token |
options |
ApiGetClinicalDataRequestModel |
Options and filters for clinical data export. See section 3.5 ApiGetClinicalDataRequestModel. |
The GetClinicalData method returns an ApiGetClinicalDataResultModel object that has the following properties:
| Property | Data type | Description |
|---|---|---|
Token |
string |
A new authentication token that can be used for authentication in subsequent requests |
Result |
ApiResultType |
Defines the type and status of the result returned from method invocation. An ApiResultType enum with the value Success or Error is used. |
ErrorCode |
int |
In case of an error result: contains an integer specifying the type of error. See section 4 Error codes for details. |
ErrorMessage |
string |
In case of an error result: human readable description of the error |
OdmXml |
string |
The exported data in ODM format |
| Important! The order of the clauses is crucial. It is important to follow the order in the example code below: |
|
|
|
MetaDataVersionOID="21.0">
v4:SiteSubjectSeqNo="6">
|
Note! GetClinicalData does not support StudyEventRepeatKey.
The ApiAuthenticationModel data type contains the following elements:
| Property | Data type | Description |
|---|---|---|
ClientGUID |
GUID |
Client ID linked to a specific study in Viedoc. Can be obtained from Viedoc Admin. Required. |
UserName |
string |
Viedoc login username. Required. |
Password |
string |
Matching Viedoc login password. Required. |
TimeSpanInSeconds |
int |
Time (in seconds) that the authentication token will be valid for. Optional. Default is 300 seconds (5 min). Maximum is 1800 seconds (30 min). |
ApiResultType is an enum data type with one of the following values*:
Pending |
The request is being processed and no result yet. |
Success |
The request has completed successfully. |
Error |
The request terminated with an error. See error code and message for a description of the error that occurred. |
InProgress |
Data import has started and date is currently being processed. |
PartialComplete |
Data import has started but is in an idle state waiting for remaining subjects to be unlocked so that data import can resume. |
| Data import has started but a subject is not found due to invalid ID. The subject is not imported and the system continues to identify the next subject. | |
*For GetClinicalData, only an ApiResultType enum data type with the value Success or Error is used. |
|
Note!
SubmitData allows the submitting of data into a form that exists in the effective design but that does not exist within the respective event according to the study workflow. In such a case, a new form is created and is added to the event.| Property | Data type | Description |
|---|---|---|
AllowCreatingSubjects |
bool |
Defines whether new subjects will be created during the data import when unmatched subjects are found. Can be set to true or false, default is set to true. |
AllowInitiatingStudyEvents |
bool |
Defines whether uninitiated events will be initiated during the data import. Can be set to true or false, default is true. |
The ViedocKeySet data type contains the following properties:
| Property | Data type | Description |
|---|---|---|
Uniqueld |
string |
For internal use only. The value of this property will be ignored if populated in a request. |
SubjectKey |
string |
Subject key of a subject in Viedoc |
StudySiteId |
int |
Database ID of the study site |
CountryCode |
string |
Two letter country code |
SiteCode |
string |
Site code as set in Admin. Required. |
SiteNo |
int |
Site number |
StudySujbectSeqNo |
int |
Sequence number of a subject on a study level |
SiteSubjectSeqNo |
int |
Sequence number of a subject on a site level |
StudyEventDefId |
string |
Study event OID as set in the study design |
StudyEventRepeatKey |
string |
Study event repeat key |
EventDate |
DateTime |
Event date in ISO8601 format |
FormDefId |
string |
Form OID as set in the study design |
FormRepeatKey |
string |
Form repeat key |
ItemDefId |
string |
Item OID as set in the study design |
MetaDataVersionOID |
string |
Study design OID (version) in the form [VERSION].[REVISION]. Will be populated in the response based on the submitted values of all the previous keys. |
The ApiGetClinicalDataRequestModel data type contains the following properties:
| Property | Data type | Description |
|---|---|---|
SiteCode |
string |
Site code as set in Admin. Required. |
SubjectFilter |
string |
Subject filter using any string. Optional. |
SubjectKey |
string |
Subject key of a subject in Viedoc. Optional. |
StudyEventOID |
string |
Study event OID as set in the study design. Optional. |
FormOID |
string |
Form OID as set in the study design. Optional. |
ItemOID |
string |
Item OID as set in the study design. Optional. |
TimePeriodDateType |
ApiTimePeriodDateType |
SystemDate|EventDate. Optional. |
TimePeriodOption |
ApiTimePeriodOption |
Until|From|Between. Optional. |
FromDate |
DateTime |
Used to match data by entered or event date. Optional. |
ToDate |
DateTime |
Used to match data by entered or event date. Optional. |
ExcludeExtensions |
bool |
Defines whether to exclude the Study Design Model (SDM), Viedoc and audit trails. Can be set to true or false, default is set to false. |
IncludeAdminData |
bool |
Defines whether to include user and study site data in the export. Can be set to true or false, default is set tofalse. |
IncludeVisitDates |
bool |
Defines whether the event date form will be included in the export. The event date form includes the event date, planned date and the event window. Can be set to true or false, default is set to false. |
IncludeQueries |
bool |
Defines whether queries will be included in the export. Can be set to true or false, default is set to false. |
IncludeReviewStatus |
bool |
Defines whether review status will be included in the export. Can be set to true or false, default is set tofalse. |
IncludeSignatures |
bool |
Defines whether signatures will be included in the export. Can be set to true or false, default is set tofalse. |
IncludeMedicalCoding |
bool |
Defines whether medical coding will be included in the export. Can be set to true or false, default is set tofalse. |
IncludeSubjectStatus |
bool |
Defines whether to include the subject status in the export. Can be set to true or false, default is set to false. |
ViedocVersion |
string |
Defines which data structure version is used for the export. As of Viedoc release 4.39, the data structure version can be set to 4.38, 4.39 or Latest Viedoc Version. If nothing is specified, the Viedoc version set in the API configuration settings in Viedoc Admin is used. |
The following table displays a list of error codes and their description.
| Code | Message | Description |
|---|---|---|
| 100 | Invalid username or password | The provided username or password is invalid. |
| 101 | Invalid Client GUID | The provided client ID is invalid. |
| 102 | Invalid token | The token is invalid. |
| 103 | NOT USED | |
| 104 | Xml data is required | No ODM XML data was included in the request. |
| 105 | NOT USED | |
| 106 | Invalid Client GUID/User | The provided token represents an invalid client GUID or an invalid user. This is very unlikely to occur when the token is generated from the system. |
| 107 | NOT USED | |
| 108 | NOT USED | |
| 109 | Unauthorized access, only user who submitted data can get transaction information |
TransactionData and TransactionStatus can only beinvoked by the user who submitted the data. |
| 110 | Invalid transaction GUID | |
| 111 | Permission denied | The user does not have access to the specified resource. |
| 112 | Metadata version not found | The requested metadata version could not be found in the study. |
| 114 | User is SSO user | The domain is set up for single sign-on, and API login is not supported. |
| 121 | Invalid study site | |
| 122 | User does not have export permission to site |
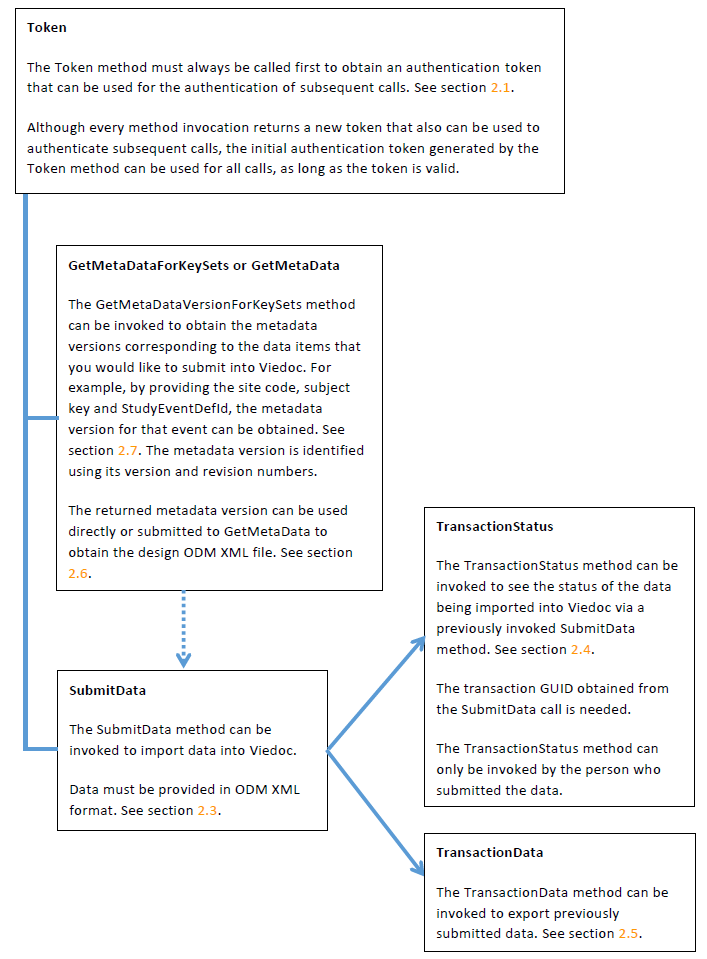
This chapter serves as an example of how to submit data into Viedoc. It provides instructions on where in Viedoc you can obtain the following information:
This chapter also provides instructions to construct the clinical data file using the obtained information.
See API configuration.
Note down the study site code and effective design version for the site or sites that data will be imported into. The
study site code and effective design are displayed in the study sites list in Viedoc Admin. The effective design version
is displayed in the form of [VERSION].[REVISION] for each site separately.
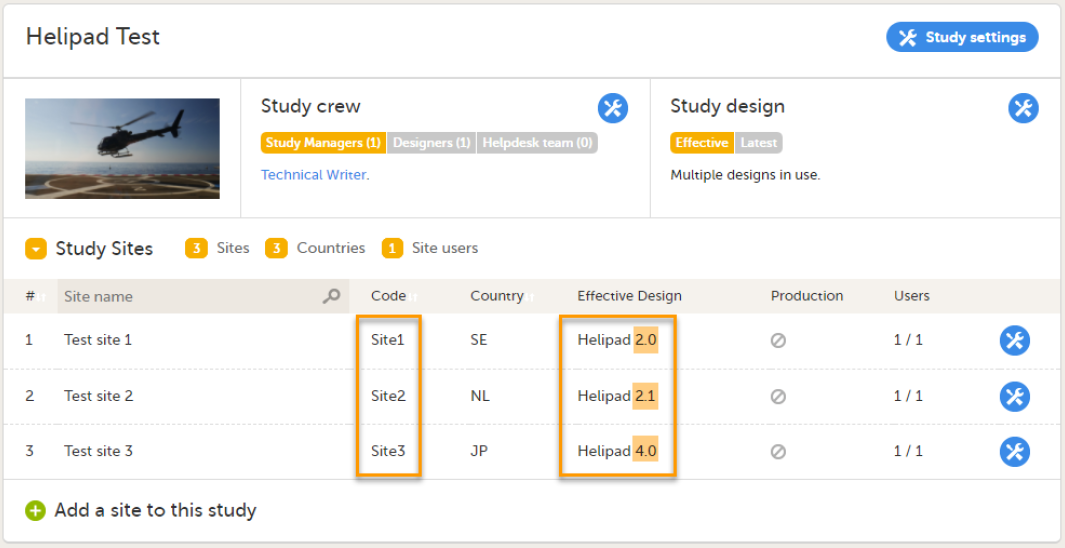
Obtain the following OIDs:
StudyEventOIDFormOIDItemGroupOIDItemOIDThese OIDs can either be obtained from the study design in Viedoc Designer or by downloading the metadata
version by invoking the GetMetaData API method.
|
|
If you choose to download the metadata version by invoking the GetMetaData API method, search the returned ODM file for the following elements, and note down the OIDs:
StudyEventDef (to obtain the StudyEventOID)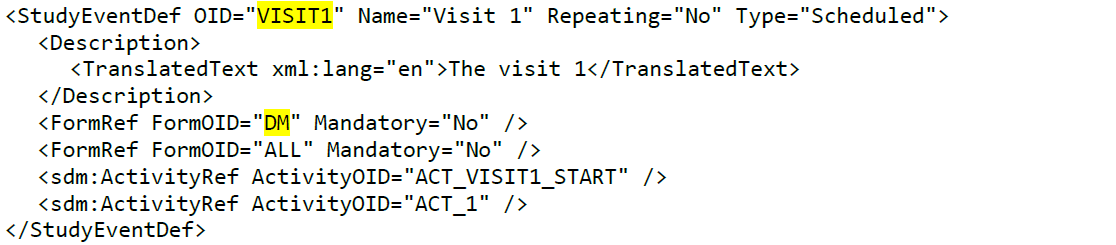
FormDef (to obtain the FormOID)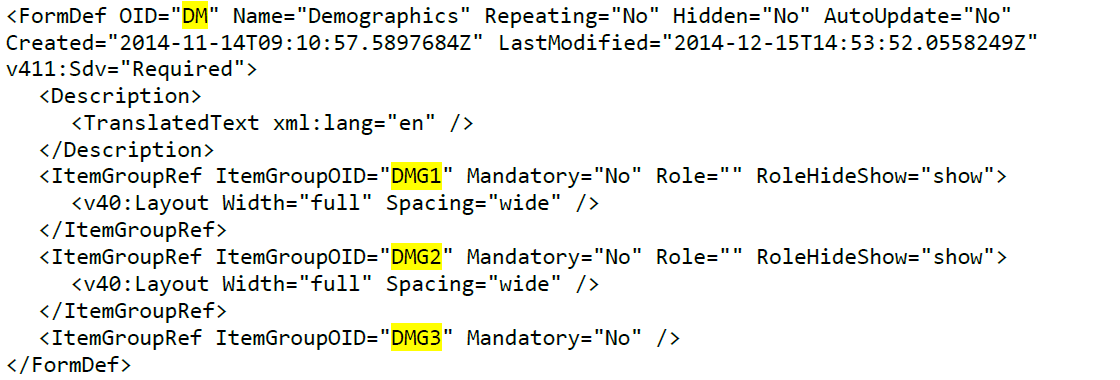
ItemGroupDef (to obtain the ItemGroupOID) and ItemRef (to obtain the ItemOID)
Obtain the item data types. The item data types can be obtained from Viedoc Designer or found in the DataType attribute of the ItemDef element in ODM.
When constructing the ClinicalData elements, use the data element corresponding to the item data type.
| ItemDef Data type | ItemData Data type |
|---|---|
| String | ItemDataString |
| Text | ItemDataString |
| Integer | ItemDataInteger |
| Double | ItemDataDouble |
| DateTime | ItemDataPartialDateTime |
| Date | ItemDataPartialDate |
| Time | ItemDataPartialTime |
The subject key is obtained from Viedoc Clinic.
It is also possible to match subjects using the StudySubjectSeqNo or the StudySiteSubjectSeqNo. These are the sequence number of the subject in a study and study site respectively.
When trying to match data for an imported subject with a subject in Viedoc, the StudySubjectSeqNo and StudySiteSubjectSeqNo are used first. They can both be specified as extension attributes on the SubjectData element in the ODM clinical data. If no matching subject is found using the StudySubjectSeqNo or StudySiteSubjectSeqNo, the subject key is used to find a matching subject.
If no matching subject could be found using either method, the following applies:
AllowCreateSubjects is set to true, a new subject is created.AllowCreateSubjects is set to false, the subject is skipped.DataImportLog is indicated as PartialComplete and shows which subject that does not exist.When creating a new subject in Viedoc, the subject will receive the next available StudySubjectSeqNo and StudySiteSubjectSeqNo. These sequence numbers can be overridden in two different ways:
Note! To access the example ODM XML ClinicalData file as a text that you can copy into your tool, click here.
All text highlighted in yellow should be replaced with the MetaData version OID, Studysite OID, and Item OIDs obtained as previously described.
All text highlighted in green should be replaced with the values for the respective items.
The ClinicalData ODM can then be submitted using the SubmitData method as described earlier, see section 2.3 SubmitData.
Viedoc supports the import of data using the Clinical Data Interchange Standards Consortium (CDISC) Operational Data Model (ODM) Extensible Markup Language (XML) standard format, making it possible to migrate data from other Electronic Data Capture (EDC) systems to Viedoc.
ODM is a vendor-neutral, platform-independent format for exchanging and archiving clinical study data. ODM includes all information (clinical data, along with its associated metadata, administrative data, reference data, and audit information) necessary to share data among different software systems during study setup, operation, analysis, and submission. ODM also includes all information for long-term retention as part of an archive to facilitate the regulatory-compliant acquisition, archival and exchange of metadata and data. For more information see https://www.cdisc.org/standards/data-exchange/odm.
In Viedoc Admin, you can import data from another EDC system (including Viedoc 3) using the ODM standard format to Viedoc by uploading an ODM XML file. Viedoc supports data import:
v4:".|
Important!
|
The following data is not included in the ODM import:
The system performs an automatic mapping based on site Name (not case-sensitive). If the Code extension is present (for example if the ODM file originates from Viedoc), this is mapped as well. If this is empty, only the Name is used.

If v4:TimeZone is present in the ODM file, this will be used during the import. If this is not present, the UTC time zone will be used.
If v4:StudySiteSeqNo is present in the ODM file, this will be used during the import. If this is not present, it will be assigned the following value: the maximum v4:StudySiteSeqNo + 1.
If <v4:Address> and <Country> are present in the ODM file, these will be used during the import, otherwise the default will be “SE” (Sweden).
The users are imported by full name and email address.
Note! The users are not active immediately after the import is performed, the user information is only imported in the audit trail. You have to send invitations to these users using the imported email addresses in order for them to get login access to Viedoc.
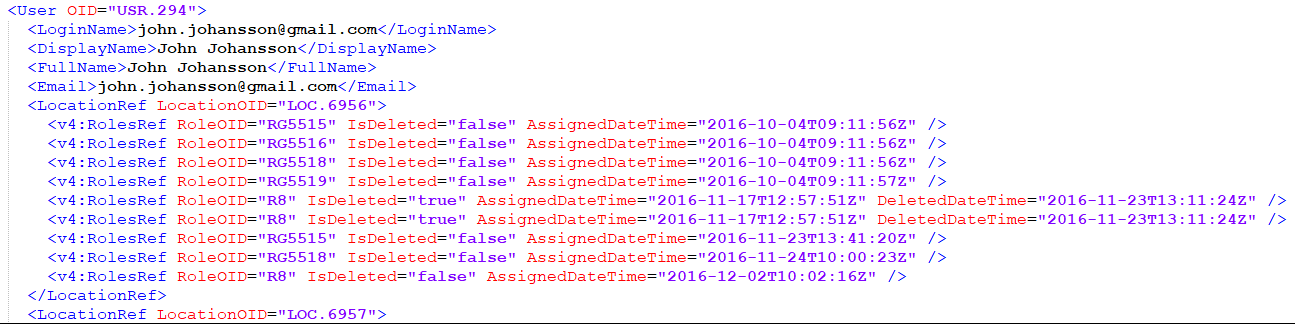
The element LocationRef allows specifying which sites a user is invited to.
The element v4:RolesRef is a Viedoc extension that allows specifying which roles the respective user has for a specific site, as well as the date when the role was assigned/deleted.
When importing an ODM file to an existing study with existing data, the first step is to assign the subject to a site. This is done by using the subject's SiteRef information in the ODM file:

All the sites in the ODM file to be imported (LocationOIDs) are mapped to existing site(s) or new one(s), as described at Step 2/5, prior to the subjects mapping.
A subject is identified in the ODM file by the SubjectKey attribute, which is a standard ODM parameter (string) and it corresponds in Viedoc to the Subject ID that is generated in Viedoc according to the Subject Id Generation Settings.

SubjectKey The subject mapping is performed using the SubjectKey.
SubjectKey, and:When a new subject is created in Viedoc, there are two behind-the-scenes system items created for it:

v4:StudySubjectSeqNo is a sequence number of subjects on study level. If a subject is the second subject in the study, this item is 2.v4:SiteSubjectSeqNo is a sequence number of subjects on site level. So if the same subject is the first subject on the site, this item is 1.These two system items (Viedoc extensions) are used for various purposes, of which the Subject ID is the most important, see Subject Id Generation Settings. For a newly created subject, these sequence numbers can be:
SubjectKey, if they are being used in the Subject Id Generation Settings for the study the data is imported to, or otherwisev4:StudySubjectSeqNo) and site (v4:SiteSubjectSeqNo) respectively.Notes!
v4:StudySubjectSeqNo or v4:SiteSubjectSeqNo is either provided in the ODM file to be imported or mapped during the import process (at Step 3/5 described later on), these are used to perform the subject mapping, see Mapping to existing subjects by StudySubjectSeqNo and/or SiteSubjectSeqNo below.v4:StudySubjectSeqNo and/or v4:SiteSubjectSeqNoThese two system items (Viedoc extensions) are used for various purposes, of which the Subject ID is the most important, see Subject Id Generation Settings.
If any of these sequence numbers is provided in the ODM file as Viedoc extension, or if they are mapped during the import process (see Step 3/5 below), the subject mapping is performed as follows:
v4:SiteSubjectSeqNo and then by v4:StudySubjectSeqNo.SubjectKey is used for mapping, as described above in Mapping to existing subjects by SubjectKey.Note! If the sequence numbers for these items are present in the ODM file, but they are also mapped during the import process (see Step 3/5 below), then the mapping takes precedence.
Before you start importing the ODM file, you have to make sure that you already have a study in Viedoc that has a study design that matches the data structure in the ODM file to be imported. The metadata version(s) in the ODM file to be imported must contain all the events, forms, item groups, items and code list values that are referenced by ClinicalData. The import process performs the matching only by using OIDs.
In case you do not have such a study yet, you can create a study and perform the ODM import as described below:
A. Create a study in Viedoc Admin (for instructions see Adding new study) and invite a user as Study Designer. This user will get access to Viedoc Designer.
B. In Viedoc Designer, import the design from the ODM file to the study you have just created in Viedoc Admin (for instructions see Initiating a design).
C. In Viedoc Designer, open the study with the newly imported study design, go to Study Settings and configure the Subject ID Generation Settings (for instructions see Subject Id Generation Settings). This will impact the selection you have to make later on during the import in Step 3/5.
Note! Step C does not have to be performed if the ODM file has been exported from Viedoc 4 including extensions.
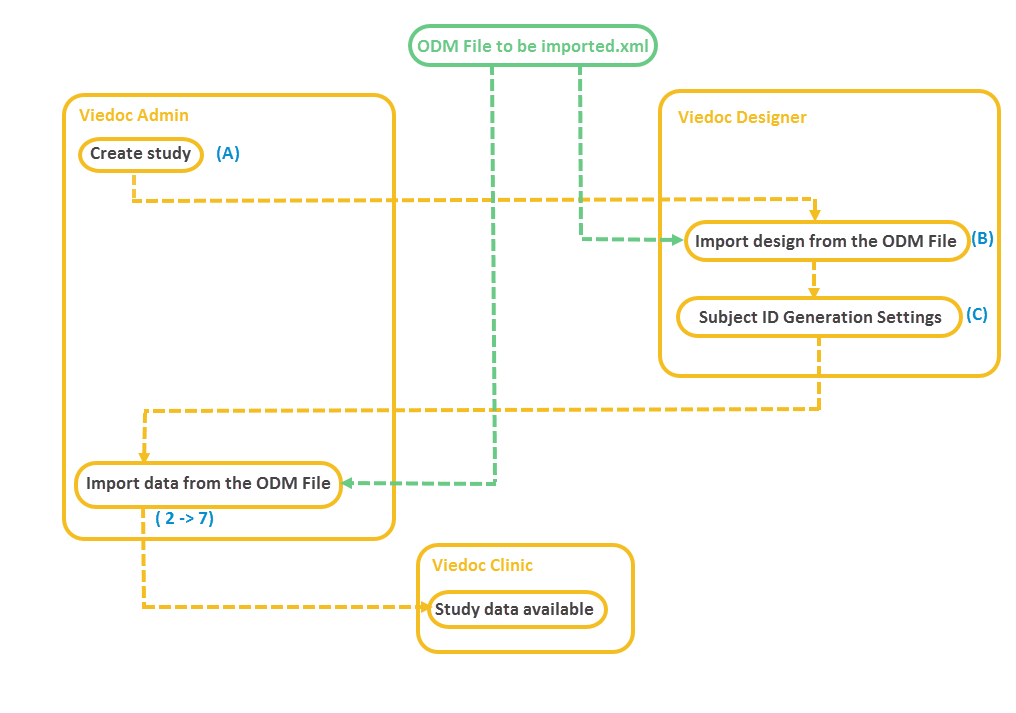
This section provides a step by step guide for importing an ODM file.
In Viedoc Admin, go to the study into which the data should be imported. Click Study Settings.
The Study settings pop-up opens.
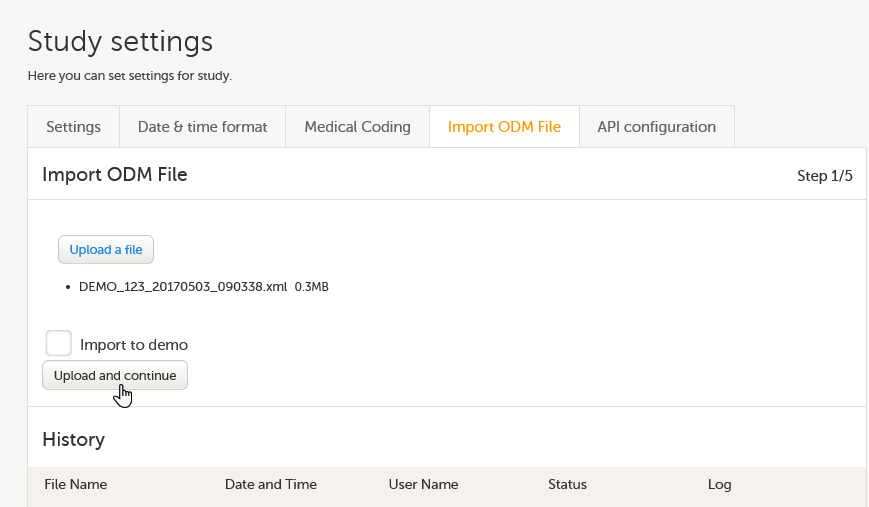 On the Import ODM File tab, click Upload a file, and browse to the ODM file you would like to import. The file name and size will appear right under the Upload a file button.
If you would like to import the ODM file to a demo version of the study, select the Import to demo checkbox.
In case you receive an error message saying that the file cannot be uploaded due to missing content (according to the CDISC ODM standard), you have to go back to your ODM file, fix the error and upload the file again.
Click Upload and continue. This takes you to step 2/5.
In the Metadata version to study design version mappings field, two columns are displayed. Metadata version OID (from xml) lists all the versions found in the ODM file you have uploaded. In the Study design version select the study design version in Viedoc that the data should be imported into. The design has to match exactly your ODM data to be imported.
In the Study site mappings field, three columns are displayed. Column 1 and 2 (see image) represent all the sites found in the ODM file you have uploaded. Column 3 represents the sites available in the study you have selected to import into. The system performs an automatic mapping based on site name (not case sensitive). If the code extension is present (if the ODM file originates from Viedoc), this is mapped as well. If the code extension is empty, only the name is mapped. If no match is found, the system will map to “Create new site” as a default.
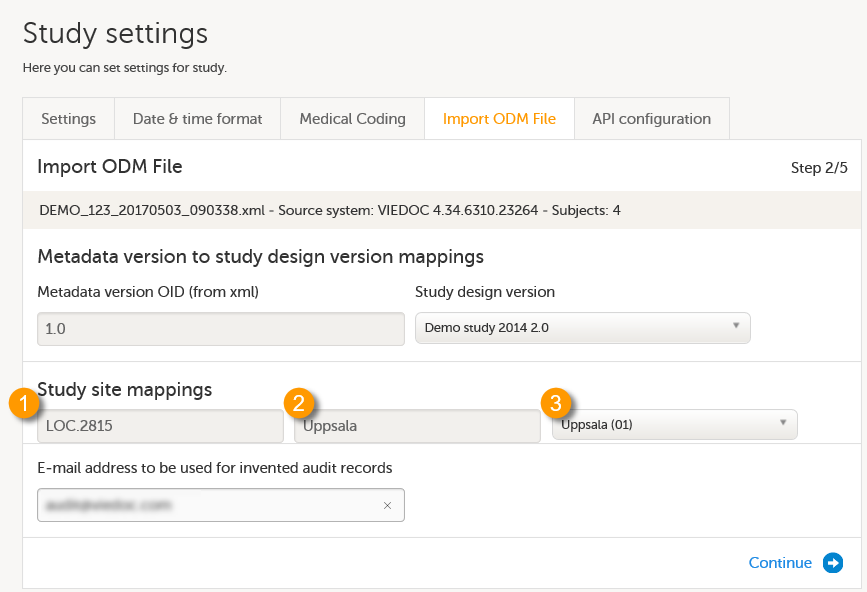 Check whether the automatic mapping performed by the system is correct. If necessary, manually perform the mapping by selecting a site from the drop-down list.
Note! If a match is found but you anyway select Create new site from the drop-down list, a duplicate site will be created. This is not recommended!
Note! Make sure that every Location in the ODM file to be imported has at least one MetaDataVersionRef defined, otherwise no design version will be assigned to the respective site.
In the Email address to be used for invented audit records field, enter an email address that can be used when the import needs to create audit records.
Click Continue. This takes you to step 3/5.
Under Study event dates, select what date items you want to be matched to your events. If no selection is made and a form and item combination within the event called $EVENT.EventDate is found (the way Viedoc stores event dates), this will be used. If the ODM file originates from Viedoc 4, and has been exported including extensions, you will find this form/item combination in the drop-down list.
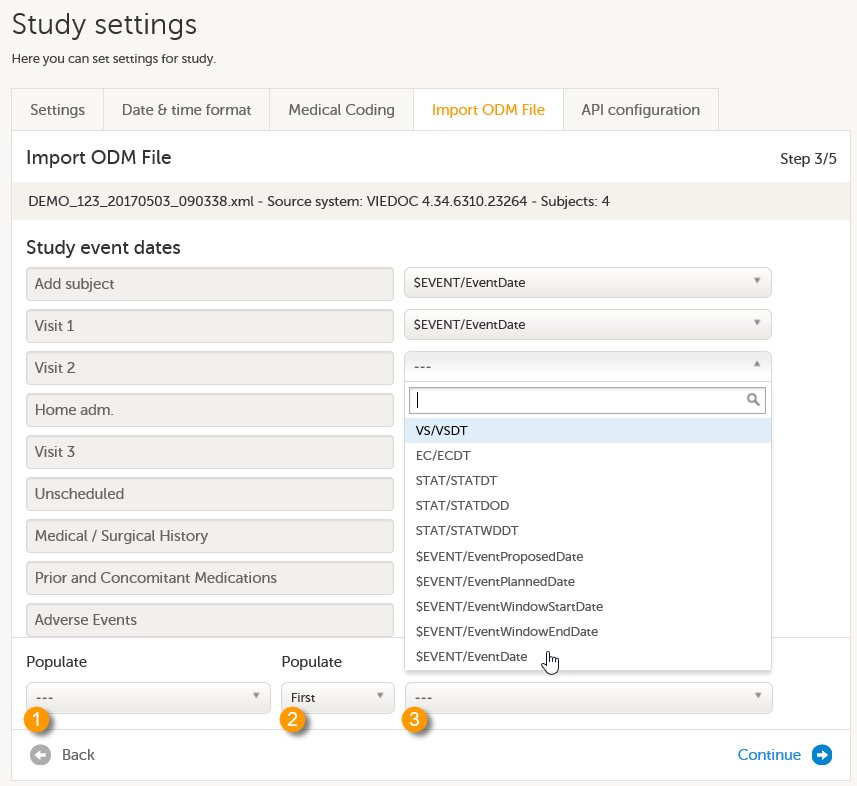
The settings to be performed under Populate depend on whether the ODM file to be imported originates from Viedoc and thus has the SiteSubjectSeqNo and/or StudySubjectSeqNo extensions, or not. See also Import of subjects.
Note! Once you have selected an option from the drop-down list, it is not possible to clear the selection and return to the default (--- or no selection). It is only possible to select another option from the drop-down list.
Click Continue. This takes you to step 4/5.
In the Select events to be excluded field, click and select from the drop-down list the events that you do not want to be included in the imported study. If you want to exclude multiple events, click and select again.
In the Select forms to be excluded field, click and select from the drop-down list the forms that you do not want to be included in the imported study. If you want to exclude multiple forms, click and select again.
| Important! When importing an ODM file that was exported from Viedoc 4, you must exclude the $EVENT form. |
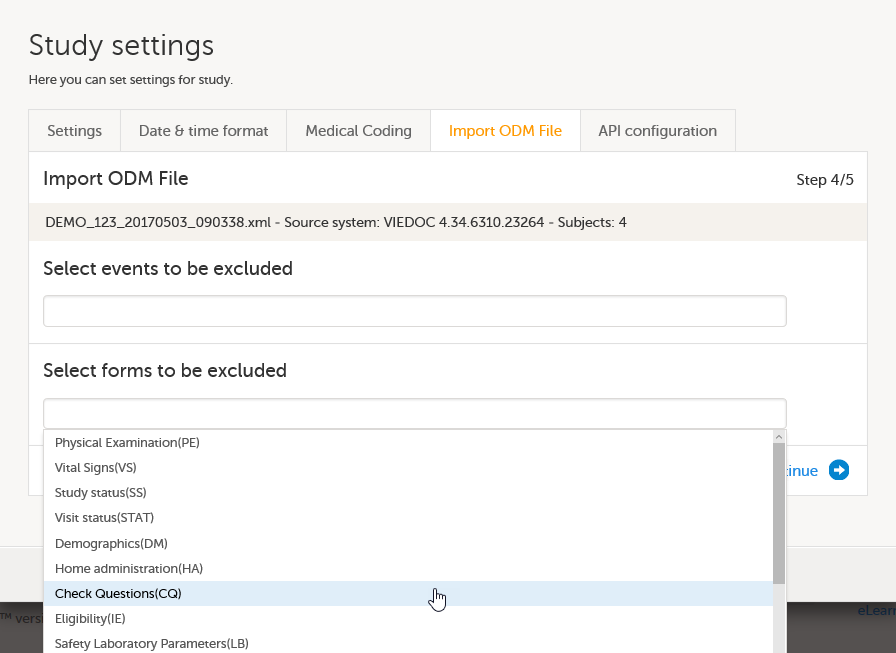
Click Continue. This takes you to step 5/5.
In the Users field, a list of the imported users identified by email address and full name is displayed. In the Confirm import with your password field, enter your password to confirm the list of users to be added to your study, and click Import.
Note! The users are not active immediately after the import is performed. They are only imported to the system. You have to send invitations to these users using the imported email addresses in order for them to get login access to Viedoc. For instructions see Managing users.
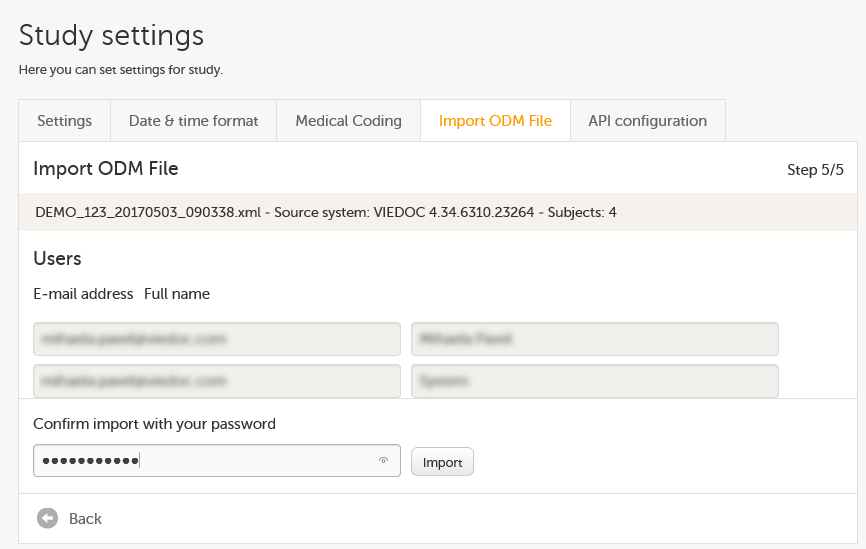
Once you have imported the file and invited the users, your study is available in Viedoc and accessible for the users you have invited.
The PDFs with form history are not immediately available after the import. They will be generated and become available in Viedoc after you have performed an export to PDF in Viedoc Clinic. For instructions, see Exporting data.
All the functions are re-executed after the import.
To access the API configuration feature and to manage API clients for a study in Viedoc Admin, you need to have the user role API Manager for the study.
An API client ID is needed when using the API to connect to and interact with any API endpoint related to your Viedoc study.
The client ID is used as follows:
To ensure backward compatibility with previous Viedoc versions, you can select which data structure version should be used when creating an API client ID.
To add an API client and to obtain a client ID:
| 1 | On the Viedoc landing page, select the Admin icon to open Viedoc Admin. |
| 2 |
Open the study that you would like to work with and select the Edit button in the API configuration field to open the API configuration pop-up. 
Note! You must have the API Manager user role to see the API configuration field. |
| 3 |
On the tab WCF API client, select Add a new API client. 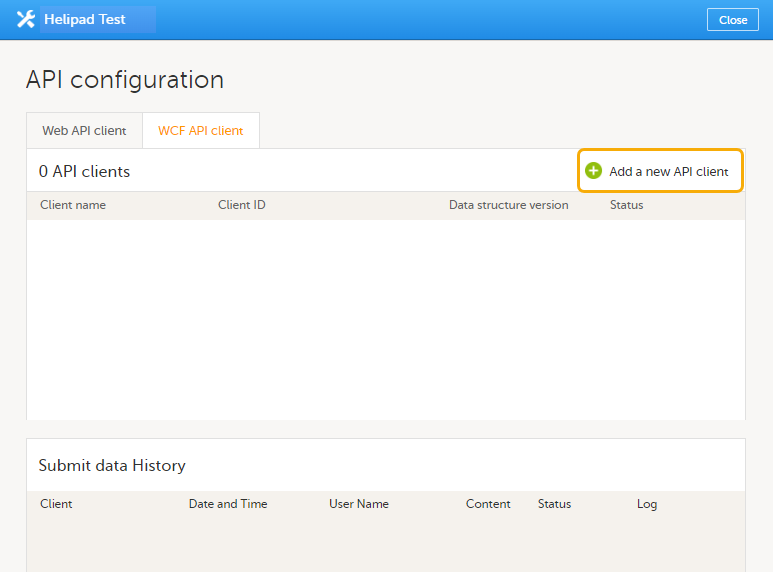
|
| 4 |
Enter a name for the API client. Select whether the client should be linked to a production or demo study in the Status dropdown menu. Select Add. 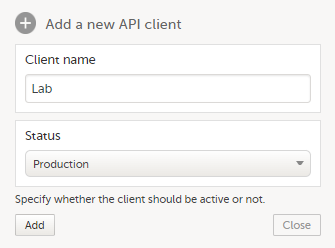
|
| 5 |
A client ID is generated and appears in the list of WCF API clients (1). 
|
| 6 |
Select which data structure version you want the data structure to be compatible with from the Data structure version dropdown menu (2). You can edit the status of a client at any time by selecting a new status (Production, Inactive, or Demo) from the Status dropdown menu. For more information about the versions, see About the data structure version of API client ID. |
| 7 | Note down the client ID to be used later. |
To add a Viedoc Web API client and to obtain the API client ID:
| 1 | On the Viedoc landing page, select the Admin icon to open Viedoc Admin. |
| 2 |
Open the study that you would like to work with and select the Edit button in the API configuration field to open the API configuration pop-up box.
Note! You must have the API Manager user role to see the API configuration field. |
| 3 |
On the tab Web API client, select Add a new Web API client. 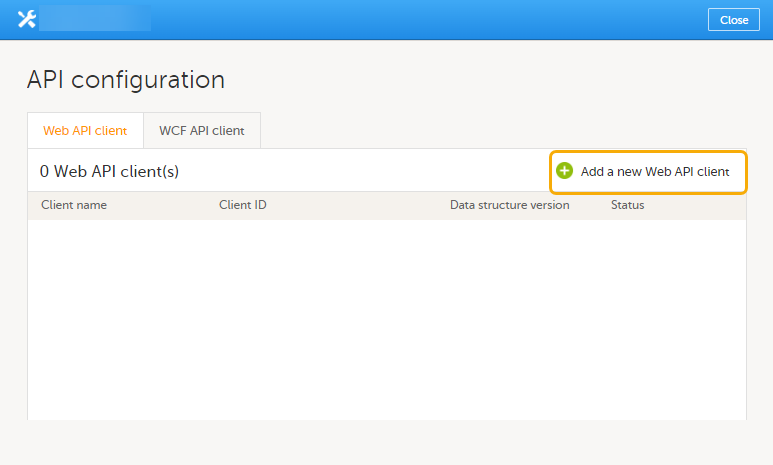
|
| 4 |
Enter a name for the API client. 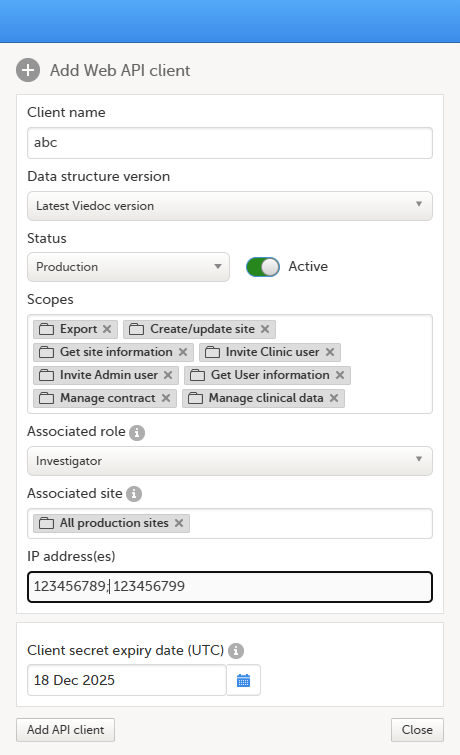 |
| 5 | Select which data structure version you want the data structure to be compatible with. |
| 6 |
Select whether the client should be linked to a production or a demo study in the Status dropdown menu. You can edit the status of a client at any time by selecting a new status (Production, or Demo) from the Status dropdown menu. |
| 7 |
Select the applicable scopes for a user. The available scopes are:
Note! See below for more information about how to define the Export scope. |
| 8 |
Optionally, enter the IP addresses from which requests to the Web API endpoints are permitted. Note!
|
| 9 | The client secret expiry date is set to one year ahead by default. If needed, you can set another date, but it cannot be more than one year after the current date. |
| 10 | Select Add API client. |
| 11 |
When the API client has been added, the following fields are displayed:
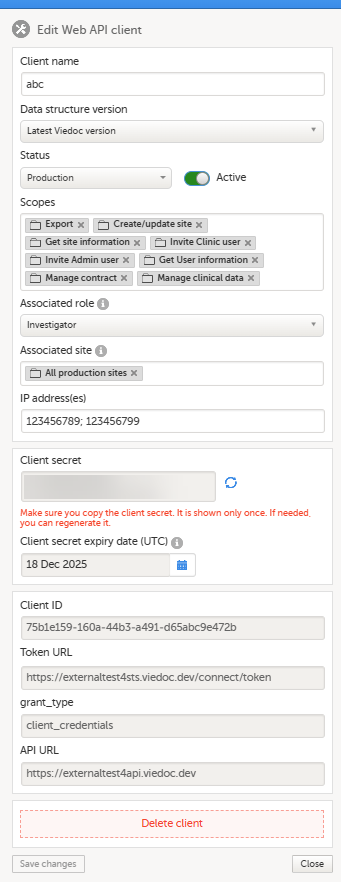 |
| 12 | Note down the client ID to be used later. |
| 13 | If needed, you can change the settings for the scopes, the status, and the data structure version. |
| 14 | Select Save changes. |
When creating an API client ID, you need to select which data structure version you would like to use. The Viedoc versions you can select are only those versions in which changes to the data structure were introduced.
This text is used in the lessons General study settings (Admin) and API configuration (Admin).
As of Viedoc release 4.79, the following output versions are available:
| Output version | Changes in data structure |
|---|---|
| Latest Viedoc version | When choosing Latest Viedoc version, the exported data will automatically follow the structure of the latest Viedoc release in which changes to the data structure were introduced. |
| Viedoc 4.79 | Introduction of a number of changes to the ODM data export. See the table below for details. |
| Viedoc 4.77 | For studies where item-level SDV is enabled, when exporting review status, the SDV sheet in the CSV and Excel data exports will include only the items that require SDV and are visible to the user. On the Review status sheet, items that do not require SDV are indicated with N/A . |
| Viedoc 4.68 |
Introduction of pdf archive export system check which splits the archive into one pdf file per subject and stores resultant PDF in a zip file. |
| Viedoc 4.67 | Introduction of two new columns for approving medical coding: "approved by" and "approved on date". |
| Viedoc 4.51 | Introduction of three new form repeat keys and the table of contents in the PDF export, see the table below for details |
| Viedoc 4.39 | Introduction of repeating forms and recurring events, see the table below for details. |
| Viedoc 4.38 | Original output format (Viedoc versions 4.38 or older). |
In Viedoc 4.79, the following changes to the export output were introduced:
| File type | Changes in the export output format |
|---|---|
| ODM |
Introduction of support for partial datetime, date, and time. This is now the default type when exporting designs and data in ODM format. Partial dates as per the ISO 6801 standard are written up to the most detailed value available. This makes the export compliant with CDISC ODM. |
| ODM |
When exporting a design to ODM, multi-selection code lists are handled as follows: Checkbox item definitions are split by code list items.
For example, when splitting a checkbox ItemDef with OID="CHK" and code list IDs "Yes" and "No", the split checkbox ItemDefs will have the OIDs "__CHK__Yes" and "__CHK__No", respectively. That is, the original OIDs and the code list IDs are prefixed with two underscore characters and separated by two underscore characters. In Viedoc Designer, checkbox items are exported as multiple ItemDefs - one for each selection value. In Viedoc Clinic and the Viedoc API: In the latest export version, checkboxes are exported as separate items for metadata and clinical data. In previous export versions, checkboxes are exported as one item. This has been introduced to be compliant with CDISC ODM. |
| ODM |
Bug fix: In the ODM data export, the content of the Question element for study event items and booklet forms was not complete. According to the CDISC standard, the element should include one of the TranslatedText attributes. This is now solved, and the Question element is populated with a string related to the corresponding OID. This is applied to all export versions. |
| ODM |
Bug fix: In the ODM data export, the MeasuremetUnit.Name contained HTML code, making it non-compliant with the CDISC standard. This is now solved, and the HTML code is removed from the name. This is applied to all export versions. |
| ODM |
Bug fix: In the ODM data export, the translated text was missing for meta.Protocol.Description.TranslatedText. This is now solved, and the body is populated with the protocol name, as visible on the design overview page. This is applied to all export versions. |
| ODM |
Bug fix: In the ODM data export, the Length attribute was incorrect, making it non-compliant with the CDISC standard. This is now solved, and Length is populated as per the ItemDef data type. This is applied to all export versions. |
| ODM |
Bug fix: In the ODM data export, there was a mismatch between the item data type and the code list data type for checkboxes. This is now solved, and the checkbox data is split into different items, in the same way as for CSV and Excel exports. This is implemented in a new export version, version 4.79. |
| ODM |
Bug fix: In the ODM data export, the study OID and ClinicalData didn't respect the Production/Demo mode for sites. This is now solved, and the study OID and ClinicalData are populated based on the Production/Demo mode of the exported study. This is applied without a new export version. |
| ODM |
Bug fix: In the ODM data export, non-repeating forms included a repeat key, making the ODM data export non-compliant with the CDISC standard. This is now solved. This is implemented in a new export version, version 4.79. |
| ODM |
Bug fix: In the ODM data export, the KeySet elements had an unregistered value for the ItemOID attribute, making the ODM data export non-compliant with the CDISC standard. This is now solved, and the KeySet elements reference items within the same MetaDataVersion. This is implemented in a new export version, version 4.79. |
| ODM |
Bug fix: In the ODM data export, the attribute OrderNumber of the element StudyEventRef was not valid with respect to its type, integer. This is now solved, and StudyEventRef elements have unique and non-empty consecutive order numbers. This is applied to all export versions. |
| ODM |
Bug fix: In the ODM data export, there was a data type mismatch between CodeList and ItemDef, making the ODM data export non-compliant with the CDISC standard. This is now solved by always having a matching data type between ItemDef and CodeList. This is applied to all export versions. |
| ODM |
Bug fix: In the ODM data export, the element MeasurementUnitRef had an unregistered value for the MeasurementUnitOID attribute, making the ODM data export non-compliant with the CDISC standard. This is now solved, and measurement units not referenced in any MetaDataVersion are not included in the ODM data export. This is applied to all export versions. |
| ODM |
Bug fix: In the ODM data export, the Alias names were not correctly populated. This is now solved, and any code list item aliases with empty names are removed at import and export - and the Alias names are populated with the context values. This is applied to all export versions. |
| ODM |
Bug fix: In the ODM data export, the SAS field name and the SAS dataset name were not populated. This is now solved, and the SAS field name is populated based on the ItemDef OID, and the SAS dataset name is populated based on the FormDefOID, which means that the OIDs are SAS-compliant. There is an option for this in the data export. This is applied to all export versions. |
| ODM |
Bug fix: In the ODM data export, revisions linked to study events and revisions linked to forms requiring approval of the new design revision were not included. This is now solved. This is applied to all export versions. |
| ODM |
Bug fix: In the ODM data export, alerts had repeating order numbers. This is now solved, and the order numbers for all study settings alerts in Viedoc Designer are removed. This is applied to all export versions. |
| ODM |
Bug fix: In the ODM data export, the item group containing the reference data items was not added to the MetaDataVersion. This is now solved. This is applied to all export versions. |
In Viedoc 4.51, the following changes to the export output were introduced:
| File type | Changes in the export output format |
|---|---|
| Excel | Addition of three columns for the new form sequence numbers introduced:
|
| ODM | Three new form sequence numbers were introduced, as Viedoc extensions: v4:SubjectFormSeqNo, v4:OriginSubjectFormSeqNo and v4:SourceSubjectFormSeqNo, within the FormData, right after the FormRepeatKey. |
| A table of contents was added to the PDF archive, starting on page 2 of the file. |
In Viedoc 4.39, the following changes to the export output were introduced:
| File type | Changes in the export output format |
| Excel | Addition of a column for Form sequence number (FormSeq) that contains the FormRepeatKey. |
| ODM | The FormRepeatKey now contains the activity ID as well, in the following format: FormRepeatKey$ActivityId. The ExportVersion attribute has been added to the ODM. |
| The summary formats are used to display the event and form names. |
As an API Manager, in order to restrict what data is available to export through the Web API, when configuring a Web API Client you need to define the export scope. This is done by associating a role and site(s) to the Web API Client.
Only data that is available for the associated role under one of the associated sites will be included in the exported data.
The API export endpoint will then be accessible to a specific associated user role and site(s) only.
Note! You can select only one Associated role per Web API client.
To define the Export scope:
| 1 |
In the Add Web API client, in the Scopes field, select Export: 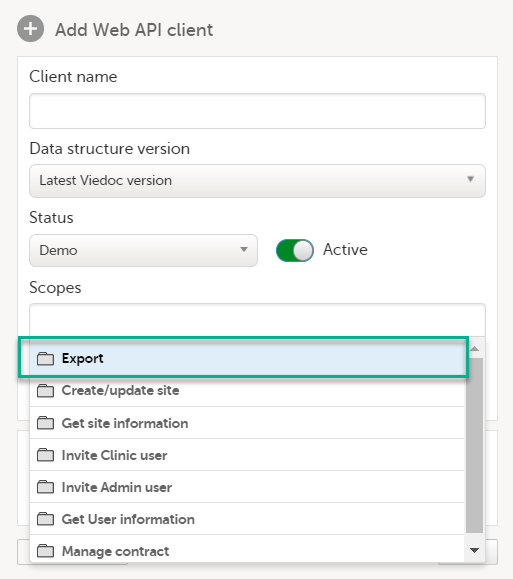
The Associated role and Associated site dropdown menus are displayed: 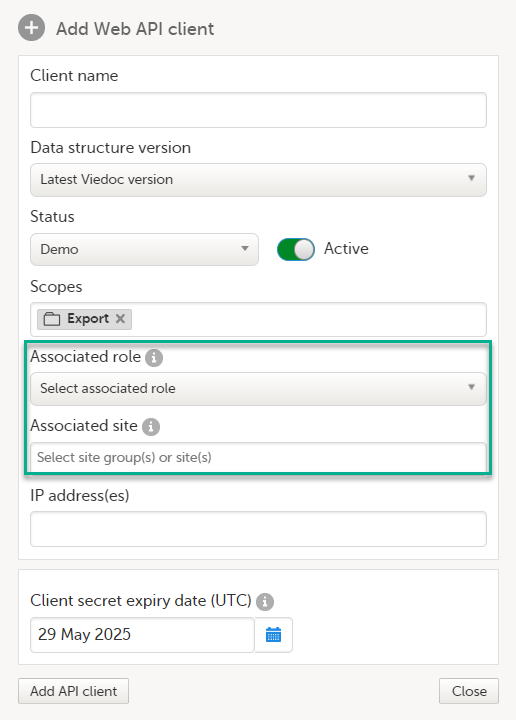
|
| 2 |
Select the Associated role and Associated site: 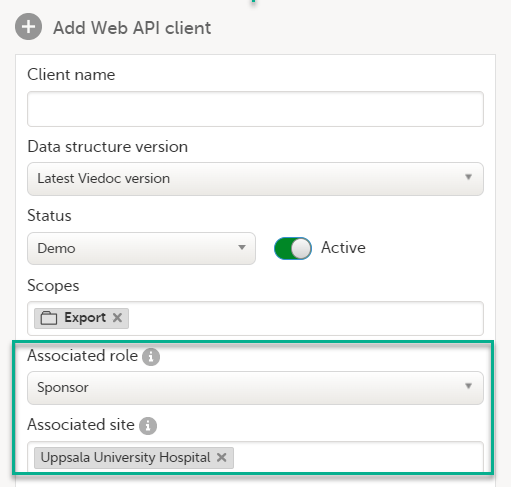
The associated roles available for selection are the Clinic user roles which have data export permission. The available sites are the sites with an assigned study design together with their corresponding site groups. Note! Web API requests will return an error code if a role and/or site is specified that does not comply with the configuration of the Web API client. For example, if the configuration of the Web API Client is as follows:
|
Notes!
The Viedoc Security Token Service (STS) is a centralized service for issuing and validating access tokens for use with APIs in the Viedoc eClinical suite. In other words, the Viedoc STS is an Identity Provider (IdP) that provides authentication services for so-called principals (or security principals). Principals can be computers, services, computational entities such as processes and threads, or any group of such things.
The Viedoc STS is separate from the Viedoc REST API.
Note! Viedoc STS is not used for the Viedoc WCF API.
The Viedoc STS consists of a web service with endpoints for getting and validating tokens. The Viedoc STS also exposes metadata (as JSON documents). This metadata is used by clients and APIs for self-configuration when communicating with the service.
The Viedoc STS follows the OAuth 2.0 standard, which is the industry standard for authentication and authorization for web applications and mobile applications. For more information, see The OAuth 2.0 Authorization Framework.
The Viedoc STS is publicly accessible.
The Viedoc REST API requires authentication and authorization on every request. To achieve this, an access token must be included in the request as an HTTP authorization header. The token should be supplied with the Bearer authentication HTTP scheme.
The Viedoc REST API only accepts tokens issued by the Viedoc STS.
Viedoc STS uses a non-interactive grant type called Client Credentials. This grant type is easy to use and is specifically made for scenarios where there is no user ID. In other words, this grant type lets you retrieve tokens for machine-to-machine communication only.
In a token issue request to the Viedoc STS, you need to supply a set of credentials, that is, keys and values, as form data in an HTTP POST request. These are examples of such credentials:
| Key | Value | Description |
|---|---|---|
client_id |
viedoc-web |
The client ID to issue a token for. |
client_secret |
viedoc-secret |
The client secret (=password) for the given client ID. |
grant_type |
client_credentials |
The type of authentication. |
Note! For information about the Web API client (how to obtain the client id and client secret), see API Configuration.
To retrieve an access token, make a POST request to the "token endpoint" of the Viedoc STS, located at http://<base-url>/connect/token, with the keys and values (described in the section Credentials) above the POST request body.
When using the Identity Model in .NET Framework or .NET Core, you can use extension methods on HttpClient. The following example shows a suitable method for working with the Client Credentials grant type:
|
|
Running the code above will generate a strongly typed response containing either an error or, if successful, an access token to use in requests to the Viedoc API.
For more information, see the documentation of the .NET integration library IdentityModel.
Tokens must be validated on several parameters for your application to trust that the tokens have not been tampered with. The main validation criteria are:
You can validate tokens with one of these two methods:
The validation can be done automatically with the use of convenience libraries. See examples for .NET and JavaScript below.
When building a Web API based on ASP.NET Core, token validation can be done via extensions to the request pipeline. The request pipeline automatically works with the built-in authorization system, that is "principals", in ASP.NET Core. When you set up the pipeline in your Startup.cs file, you can add JWT Bearer authorization as in the following example.
The first step in the example adds the NuGet package Microsoft.AspNetCore.Authentication.JwtBearer.
|
|
For more information, see Overview of ASP.NET Core Authentication | Microsoft Docs.
You can use the oidc-client JavaScript library to:
The library is available as an NPM package, and it is primarily intended for use in JavaScript clients. For more information, see the oidc-client documentation.
The web site https://jwt.io offers the possibility to validate tokens. Simply paste your token into the field Encoded and then the field Decoded will display information about your token.
Sending the token back to the STS for validation should be seen as a last resort, in cases where, for some reason, it is impossible or infeasible to validate the token with an offline method.
For more information, see Introspection Endpoint.
The Viedoc Web API is documented on the Viedoc API swagger page. The Viedoc.API swagger page is accessible at:
<API URL>/swagger, where the API URL depends on the environment. For example, see the following link:
https://v4apitraining.viedoc.net/swagger/
For more information, see the instructions below on how to access the API URL for your environment.
To view the Viedoc Web API swagger page, you need the API URL in Viedoc Admin.
Note! You must have the API Manager user role to see the API configuration field.
To view the API URL in Viedoc Admin:
| 1 | On the Viedoc landing page, select the Admin icon to open Viedoc Admin. |
| 2 |
Open the study that you would like to work with and select the Edit button in the API configuration field to open the API configuration pop-up. 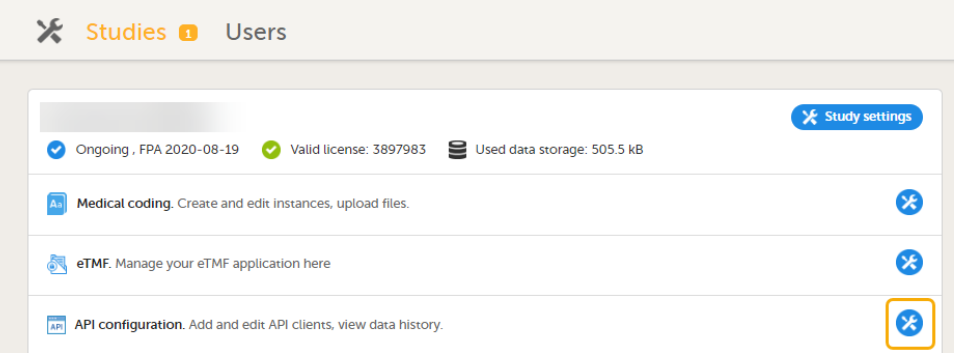
|
| 3 |
On the Web API client tab, select Edit for the API Client you want to access. 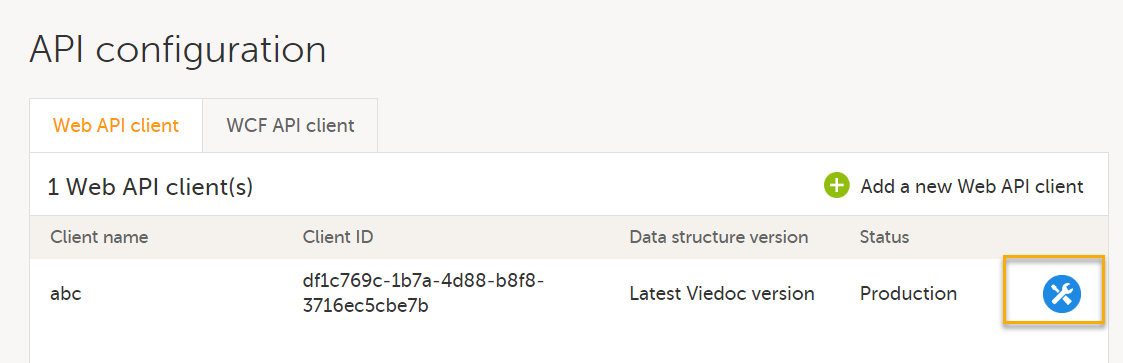
|
| 4 |
The Edit Web API client pop-up opens: 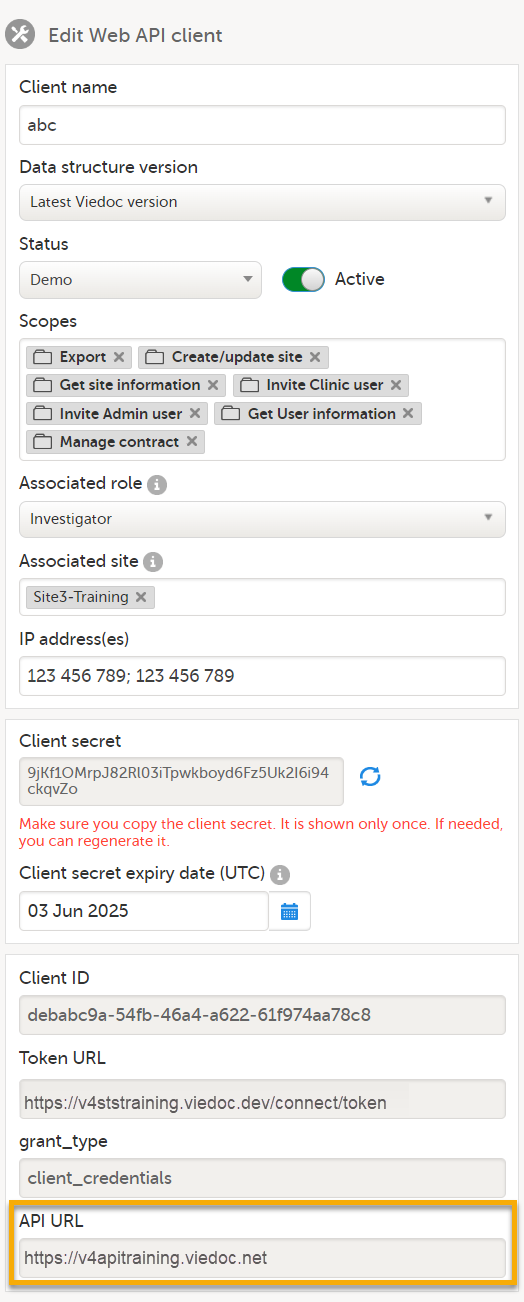
Using the example above, add /swagger to the API URL: https://v4apitraining.viedoc.net/swagger to open the swagger page: 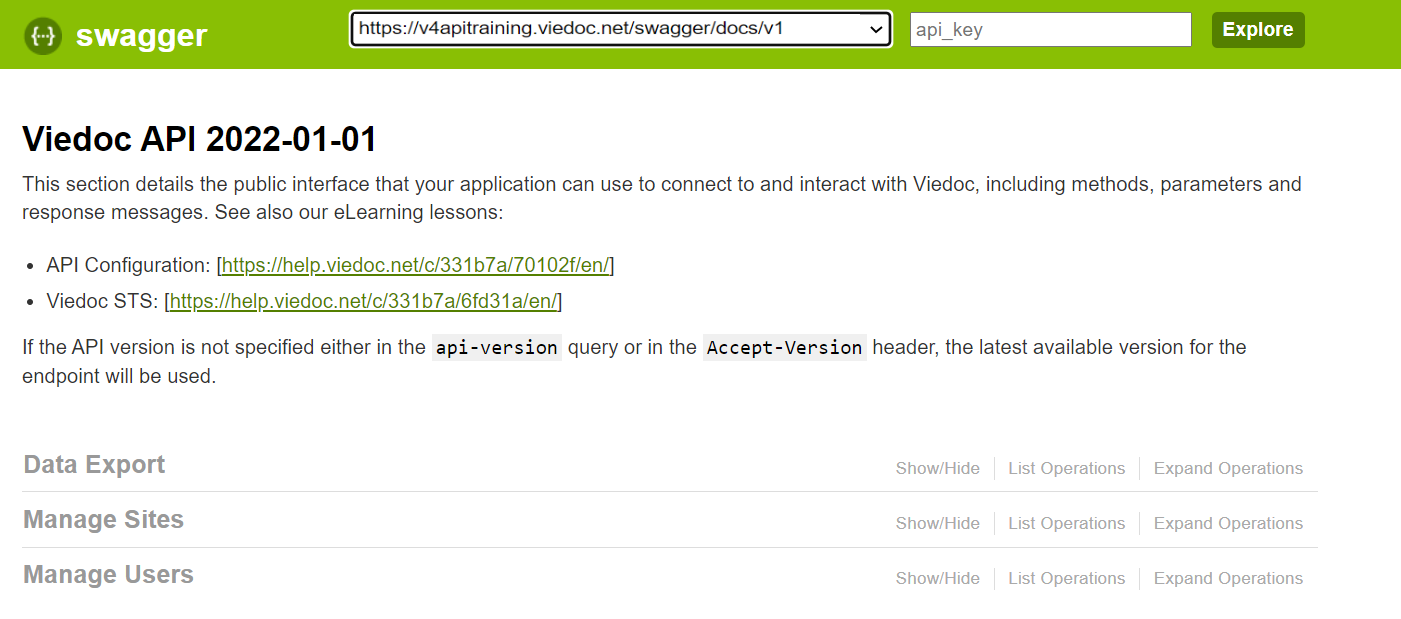
|
The Viedoc Web API swagger page contains information about how to connect to and interact with Viedoc using the Viedoc Web API, including methods, parameters and response messages.
Updates to the Viedoc Web API considered as breaking changes will always be introduced in a new API version. To ensure backward compatibility is maintained, you need to specify the API version to be used.
Important! If the API version is not specified either in the api-version query or in the Accept-Version header, the latest available version for the endpoint will be used. Different versions will also be available for different endpoints. |
In the api-version query field or in the Accept-Version header field you can specify which API version should be used to connect to and interact with Viedoc.
To specify the API version, enter the date of the version required into the api-version query field or into the Accept-Version header field as shown in the example below for the dataexport/start endpoint.

|
Available versions |
|
| Viedoc Web API version Changes from previous version: N/A- first version. |
2022-01-01 |
IdentityServer documentationIdentityModel documentationThis lesson explains how to export data via Viedoc's web API. You will be shown three examples: Windows command prompt, Python, and R.
Note! You must have the API Manager role in order to see the API configuration field.
Important! To export data, enable the Export scope and to select the correct Status while configuring the API client. We have two modes: demo and production.
Demo – Used to access sites that operate in Demo/Training mode
Production – Used to access sites that operate in Production mode
After creating the API client, take note of the following information, as it is needed in subsequent steps:
Client secret – Needed to obtain the token. Tip! Make sure you copy it, because it is shown only once. If needed, you can regenerate it.
Client ID – Needed to obtain the token.
Token URL – Used for obtaining the token, which is needed to authorize all subsequent API calls.
API URL – All other API calls are made to this base URL with varying endpoints.
Notes!
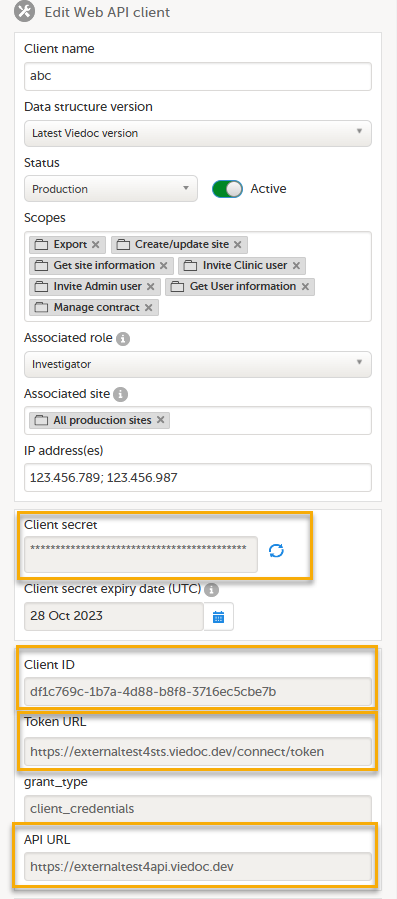
For more information on how to configure the API client, select this link: API configuration.
This section describes the steps to export the data using the Windows command prompt.
| 1 |
Obtain the token Note! Replace "xxxx" with your Client ID and "yyyy" with your Client Secret. The TokenURL is obtained from Viedoc Admin. This is an example of template including the output: 
|
|
| 2 |
Start the export process Note! Replace This is an example of the template including the output:
|
|
| 3 |
Check the export process To check the export process, you can use the following code as a template:
Note! Replace This is an example of the output:
|
|
| 4 |
Download the export To download the export, you can use the following code as a template:
xxxx with the token and the APIURL with the API URL obtained in Viedoc Admin. Replace yyyy with the export ID. Finally, the path where the file will be saved needs to be specified along with the name and file extension (.zip for CSV exports, .xlsx for Excel, and .xml for XML).
This is an example of the template including the output: 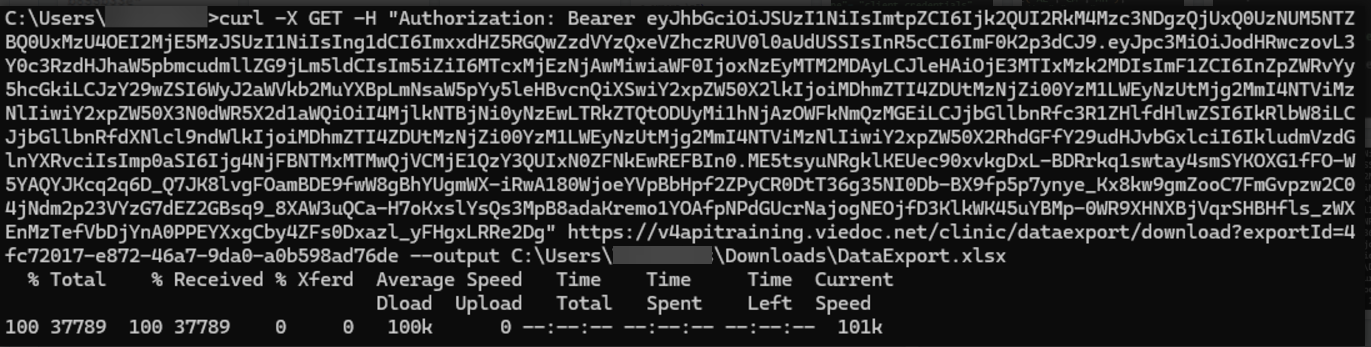
|
This section will take you through the steps to export data using Python.
Note! This example uses the requests package for Python. Ensure that you have it installed before running the code below. To install the requests package open command prompt or terminal and type pip install requests.
| 1 |
Obtain the token
This is an example of how to structure the request for a token in Python: 
|
|
| 2 |
Start the export To start the export process, you can use the following code as a template:
Note! The This is an example of the start of the export process: 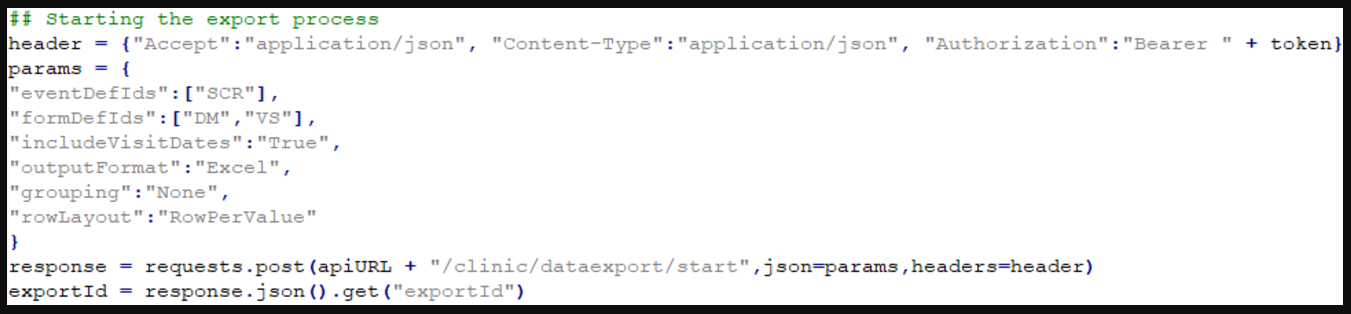
|
|
| 3 |
Check the export status To check the export status, you can use the following code as a template:
Note! The above code checks for the completion of the export process every 3 seconds. 
|
|
| 4 |
Download the export To download the export, you can use the following code as a template:
Note! You need to specify the file path where you will save the file, as well as the file name.
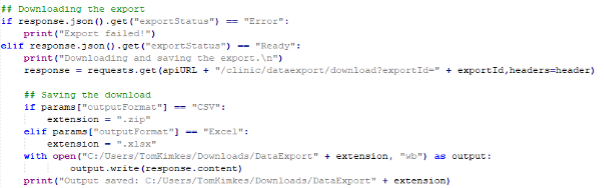
|
This section will take you through how to export data using R.
Note! This example uses the httr and jsonlite packages for R. You need to install them before running the code in this example. To do so, type (install.packages(c("httr", "jsonlite")) into your R console. You only need to do this once.
| 1 |
Obtain the token To obtain the token, you can use the following code as a template:
Note! Replace the This is an example of how to structure a token request: 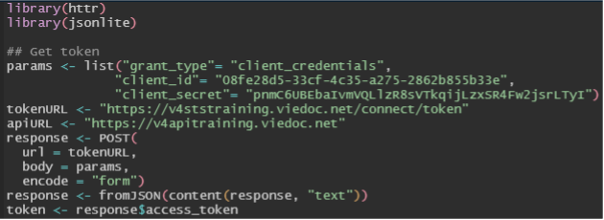
|
|
| 2 |
Start the export process To start the export process, you can use the following code as a template:
Note! The 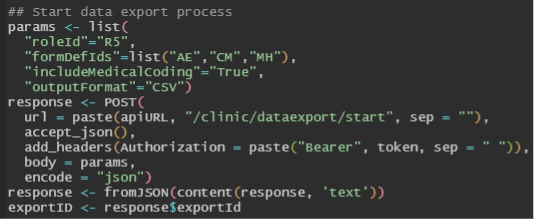
|
|
| 3 |
Check the export status To check the export status, you can use the following code as a template:
Below is a screenshot of the export status: Note! The above code checks for the completion of the export process every 4 seconds. |
|
| 4 |
Download the export To download the data export, you can use the following code as a template:
Note! You need to specify the file path where you will save the file, as well as the file name. Below is a screenshot of the export download: 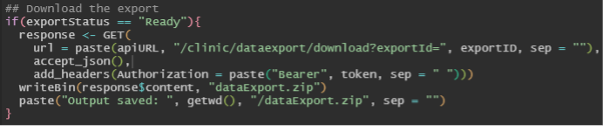
|
|
| 5 |
Analysis
This is a screenshot of the exported data for analysis: 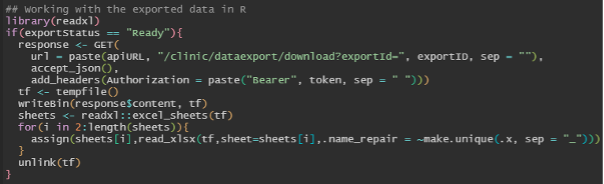
|
This lesson describes how to manage medical coding dictionaries in Viedoc Admin.
This piece of content is used in Designer > Configuring medical coding scopes and Admin > Managing medical coding dictionaries.
Viedoc offers support for medical coding. The medical coding feature allows you to code data, such as Adverse Events, Medical History and Concomitant Medications, in a standardized way.
Viedoc supports the following types of dictionaries:
Medical coding is configured in Viedoc Designer and Viedoc Admin, and executed in Viedoc Clinic. The schematic below depicts what different steps need to be taken, and which roles have permission to perform these steps.
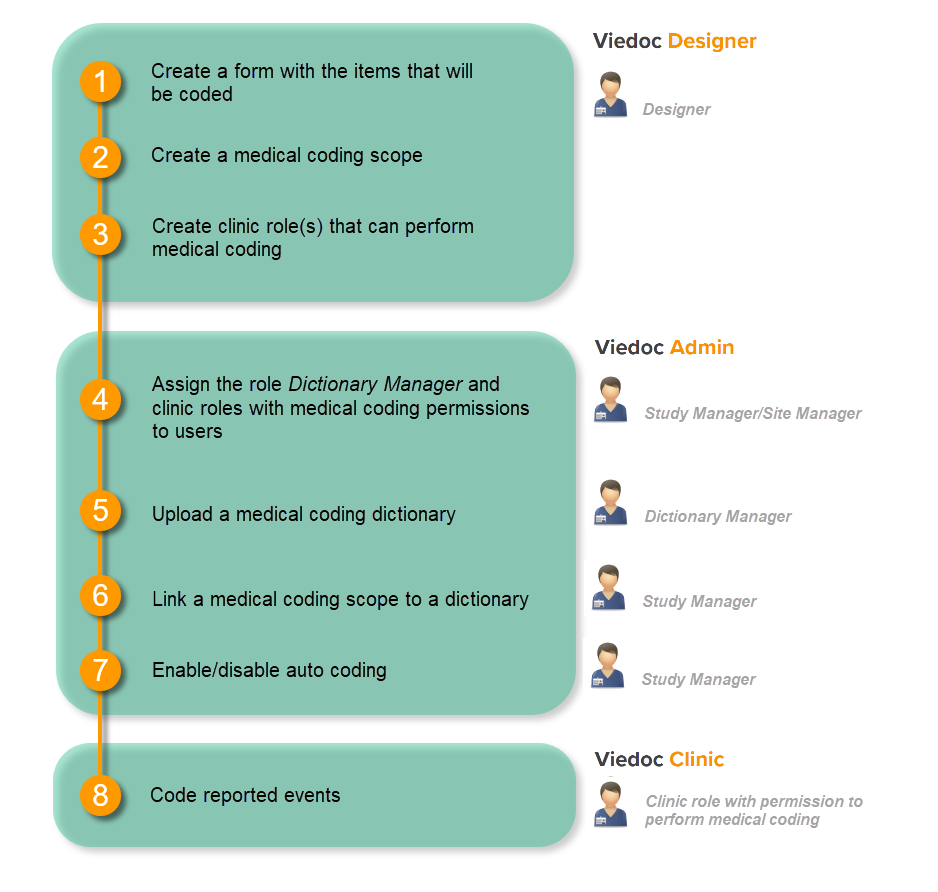
This is a single-sourced file that should have the following content:
Introduction to medical coding, description of the workflow.
For more detailed instructions regarding these steps, see:
In Viedoc Admin, creating a dictionary instance is done according to the following procedure:
For detailed instructions, see the Step-by-step guides.
Note! Licenses for medical coding dictionaries are not supplied by Viedoc. It is the user's own responsibility to purchase a license for the dictionary to be used, and to update the uploaded dictionaries.
To enter the Medical coding page in Viedoc Admin, and to view uploaded dictionary instances or create a new instance, select the toolbox icon in the Medical coding field on the study start page. The Medical coding page opens.
Note! The Medical coding page is only visible for users with the system role Dictionary Manager.
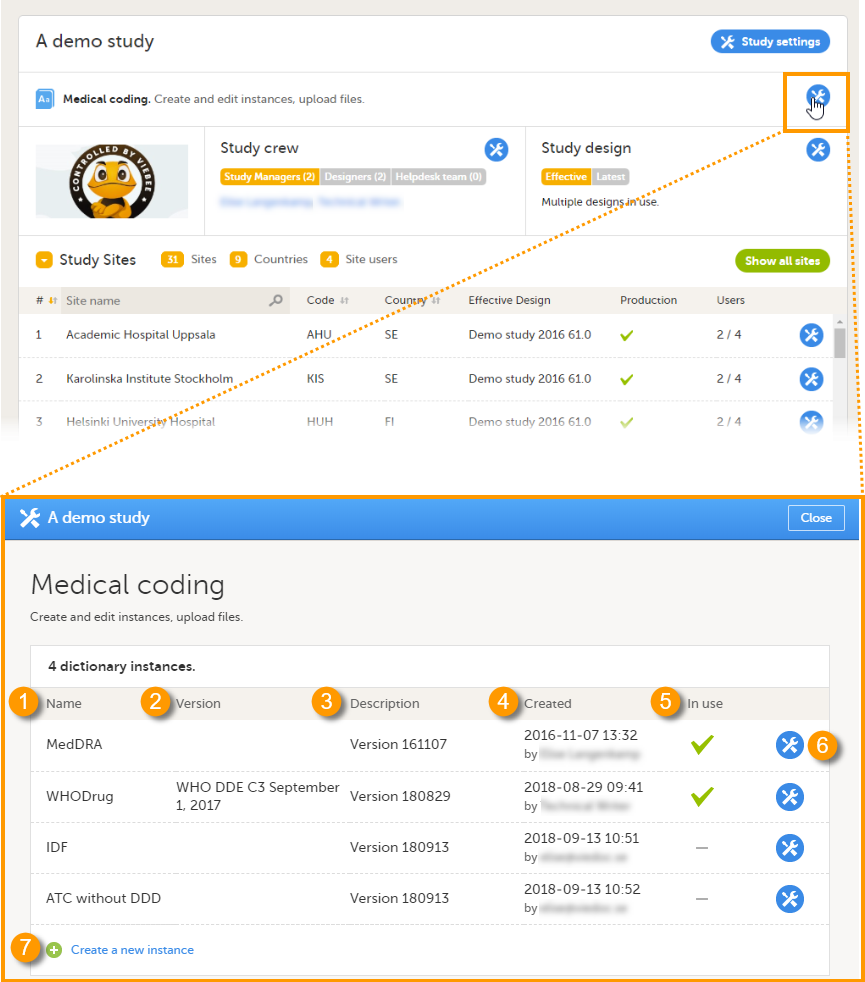
On this page, the following information is displayed:
1. Name - the type of dictionary
2. Version - the version of the dictionary, if applicable
3. Description - a custom description of the dictionary, added by the Dictionary Manager when uploading the dictionary
4. Created - the date when the dictionary has been uploaded, and by whom
5. In use - shows whether the dictionary is linked to a coding scope, as follows:
| Icon | Description |
|---|---|
 |
The dictionary instance is linked to a coding scope. |
 |
The dictionary instance is not linked to a coding scope. |
On this page, you can perform the following actions:
6. Select the toolbox icon to edit the dictionary instance. You can only edit the description of the dictionary instance.
7. Select Create a new instance to upload a new dictionary, see Creating a new dictionary instance.
Note! Creating a dictionary instance (uploading a dictionary) can only be done by the Dictionary Manager.
To create a dictionary instance, on the study page, follow the steps below.
| 1 |
Select the toolbox icon in the Medical coding field to open the Medical coding window. 
|
| 2 |
Select Create a new instance.
|
| 3 |
In the Create a new instance pop-up:
For World Health Organization Drug Dictionary (WHODrug) files, see WHODrug files. |
| 5 | Select Close to close the Medical coding window. |
When you have downloaded the WHODrug Global files, you should locate them in your system.
|
Important! From the 2026 WHODrug release, WHODrug files will be distributed in CSV format instead of TXT format. To support these changes, Viedoc Admin now supports uploading WHODrug version 2026 files in CSV format.
|
For WHODrug versions up to and including 2025, below is a view of how the files will possibly appear:
| 1 |
2. These are the relevant folders that you need to select to extract or unzip. |
| 2 |
Once you've selected the relevant file folder, you must extract (unzip) its contents. Then you will select the next folder which is the one labeled c3, as shown below: 
|
| 3 |
Upload this zipped folder to Viedoc and Viedoc will complete the final extraction for you, placing the WHODrug files in your study. |
For WHODrug you can also connect directly to WHODrug Koda to get suggestions for both the drug name and the ATC assignment for the specific drug, to enhance the medical coding.
When you upload a WHODrug dictionary, or there is an existing WHODrug Dictionary, the Dictionary License section is displayed:
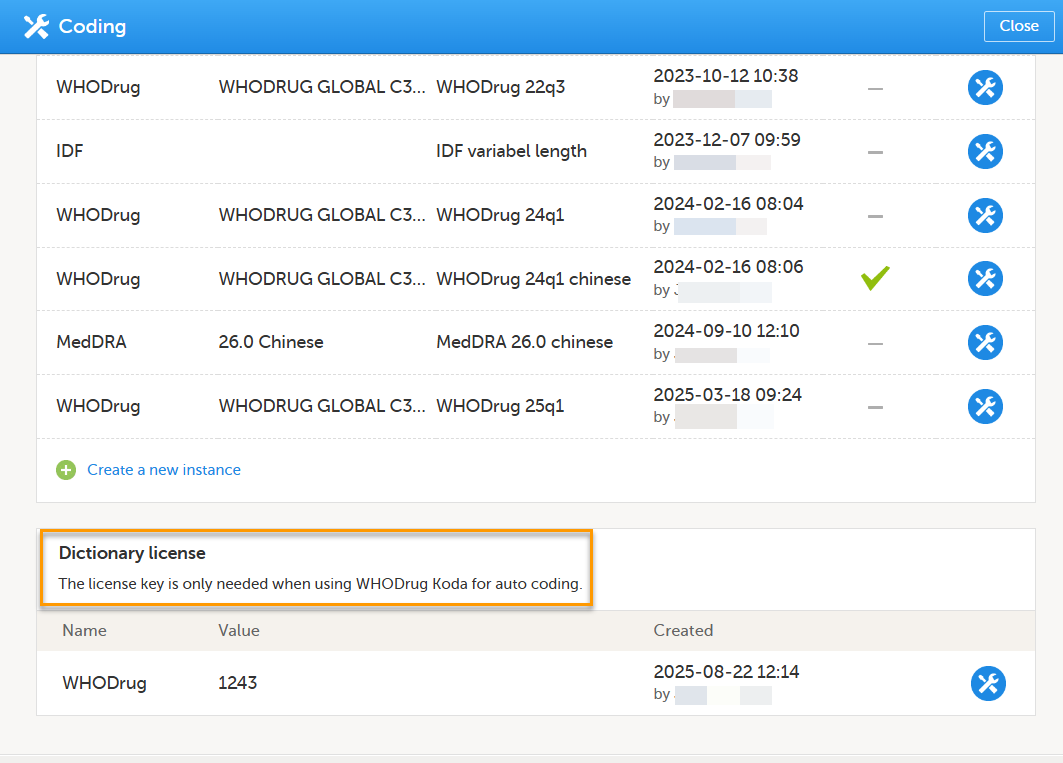
Enter your user key to connect to WHODrug Koda.
The Manage WHODrug Koda user key pop-up displays the user key details and allows for adding, editing or removing the user key.
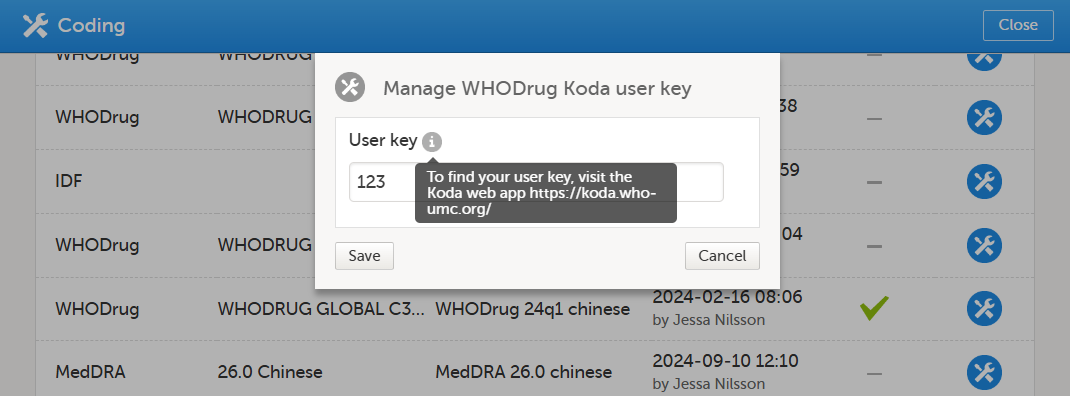
If you have forgotten your user key, hover over the tooltip for the website address to the Koda web application.
Your user key will only work if it is a valid user key and you have a valid license.
Note! Linking the coding scopes to the uploaded medical coding dictionaries can only be done by the Study Manager.
To link the coding scopes to a dictionary instance and to enable auto coding:
| 1 | On the study details page in Viedoc Admin, select Study settings to open the study settings pop-up. |
| 2 |
Select the Medical Coding tab. 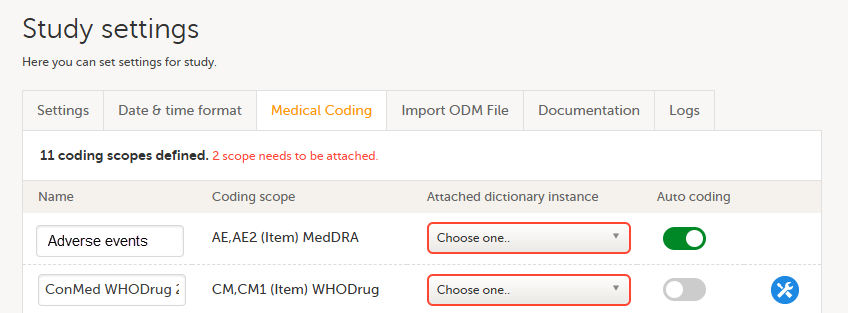
If no scopes are listed, contact the Designer of the study. |
| 3 |
Type a name for each coding scope in the Name field. This name is displayed in the medical coding console in Viedoc Clinic. |
| 4 | Select which dictionary and which version should be applied to each coding scope. You can only select an instance applicable for the coding scope. For example, you can only link a Medical Dictionary for Regulatory Activities (MedDRA) dictionary instance to a MedDRA scope. Note! For a new study, when setting up a scope for the first time, after you have selected the dictionary, the Auto coding button remains greyed out and can not be selected. 
An error message is displayed: 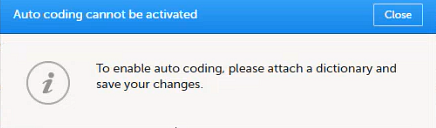
|
| 5 |
To activate the Auto coding button after you have selected a dictionary: 1. Select save changes: 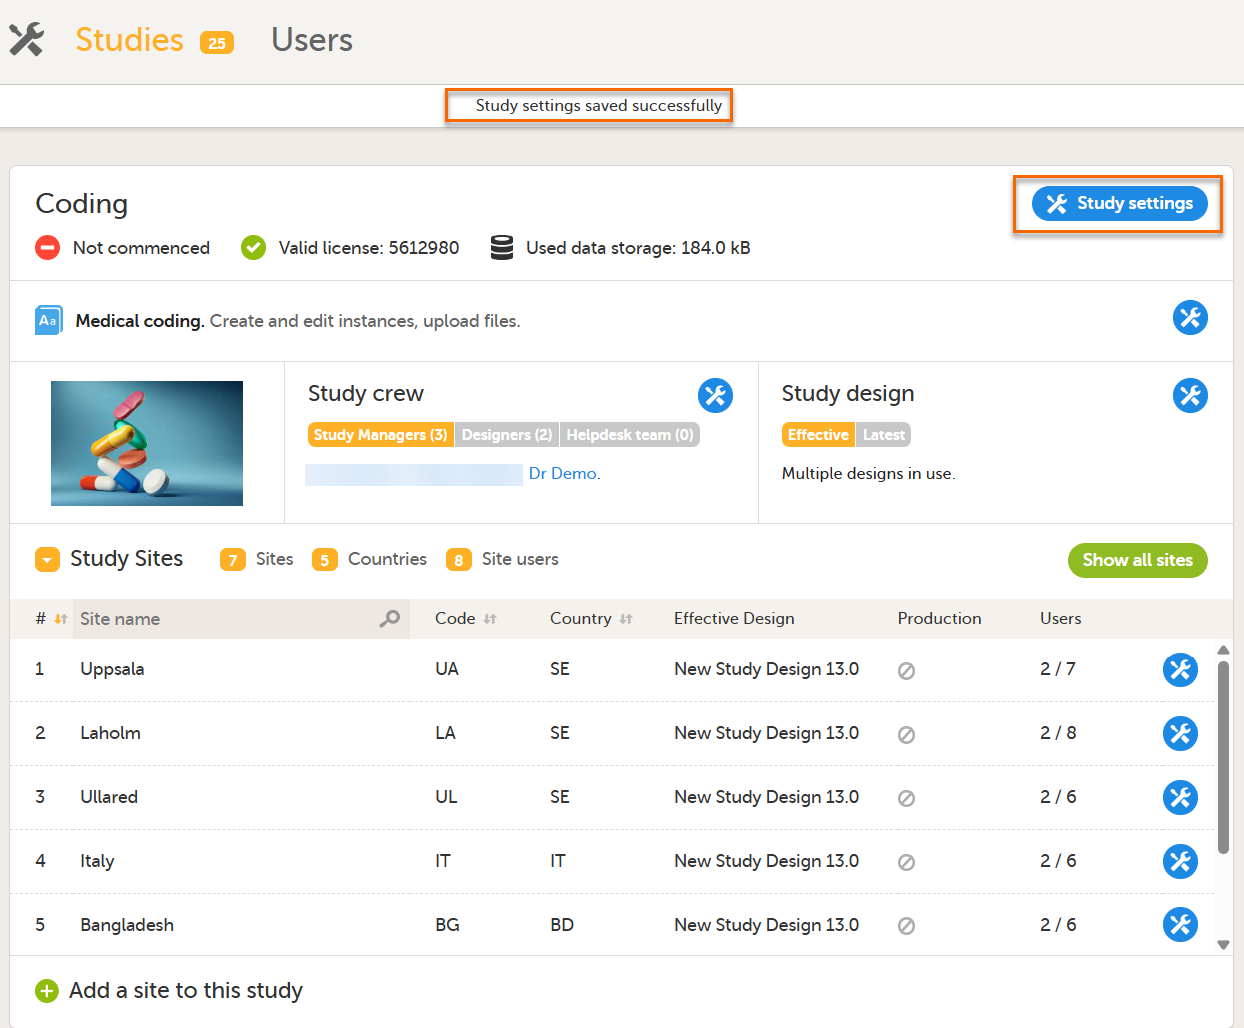
3. Select the Medical coding tab: When you have attached a WHODrug dictionary, and are connected to WHODrug Koda, there are three additional coding settings rules to configure. Note! For WHODrug, we recommend checking and configuring the rules before activating auto coding. When auto coding is activated, all uncoded items are coded using the current rule settings. The settings are: Preferred base rule, Generic rule and Country rule. The settings are enabled by default and are available for all scopes with a WHODrug dictionary. The Rules are specifically for WHODrug Koda. 1. Select the toolbox icon. The coding settings pop-up opens: 
The following example illustrates when you might choose to enable or disable the Country rule:
To get the best results for ATC coding, map items (route and indication), from your study design. |
| 6 |
In Study settings, you can now enable Auto coding.
Select the button to enable or disable auto coding for the respective scope. 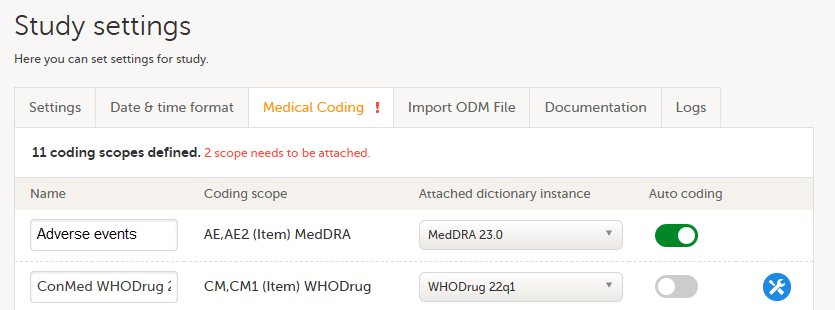
|
| 7 |
Select Save changes to save the changes. |
From Viedoc version 4.95, medical coding scopes support items within repeating item groups when using Viedoc Coder. When a coding scope is configured in Viedoc Designer using forms and items from a repeating item group, and that scope is linked to a dictionary instance in Viedoc Admin, the repeating entries will appear in Viedoc Coder and are available for coding in the same way as standard entries.
For more information, see:
Configuring medical coding scopes in Viedoc Designer.
Medical coding in Viedoc Clinic.
Note!
You can replace an old version of the medical coding dictionary with a new version, and continue coding on the same scopes. Replacing an old medical coding dictionary version with a new version involves the following steps:
Note! It is not necessary to create new coding scopes in the study design.
From the moment the new medical coding dictionary version has been uploaded and linked to the medical coding scope, the medical coding console in Viedoc Clinic will use the new version for coding the terms in that scope. Terms that have been coded before updating the dictionary version will keep their codes from the previous dictionary version. The dictionary version that is used for coding each term is displayed when the medical coding is exported.
It is not possible to delete a dictionary instance.
To convert an Anatomic Therapeutic Chemical classification system (ATC) dictionary:
| 1 | Open the xlsx file in Microsoft Excel. |
| 2 | Sort the contents of the file by column A, on cell contents, and in the order A to Z. |
| 3 |
If Defined Daily Dose (DDD) is included in the file (columns C, D, E, and F), delete these columns, as well as the note column if there is one. 
|
| 4 |
Insert a new column B. 
|
| 5 |
In cell B2, write a formula. To add a formula, start by typing an equal sign ( The formula will look different depending on the language of your Excel installation. These are some examples:
Note! Depending on the regional settings in your operating system, you might need to replace the semicolons with commas. 
|
| 6 |
Fill all cells in the B column with the same formula, for example by dragging the small plus sign ( 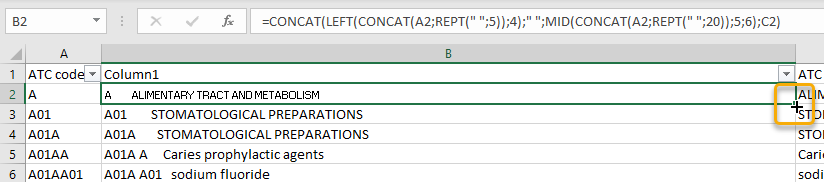
|
| 7 |
Remove row 1 (the header row). Do to this, you might first need to turn off the header row on the Table Design page.
|
| 8 |
Select column B and copy it. 
|
| 9 | Paste the copied column into a raw text editor such as Windows Notepad. It is important to use an editor that does not add any formatting. |
| 10 |
In the raw text editor, search for the quotation mark character ( 
|
| 11 |
If there are empty lines at the end of the file, remove them. |
| 12 | Save your file with an appropriate filename that reflects the ATC version and with the filename extension asc. |
| 13 | Upload the file to Viedoc according to these instructions: Creating a dictionary instance. |
This lesson describes how to configure a static randomization in Viedoc Admin.
Viedoc offers support for randomization. Subjects can be randomized using:
Dynamic randomization ensures a more even distribution of subjects across the treatment groups, with regard to prognostic factors that might influence the effect of treatment on the subjects.
The randomization in Viedoc is configured in a similar way for static and dynamic randomization. The main difference is that for static randomization, a list with outcomes (randomization numbers, treatment groups, and so on) - the randomization list - is created and uploaded by the user, while for dynamic randomization, an algorithm is used to assign subjects to a treatment group and the randomization list is created by the system.
It is possible to upload a separate allocation list that allocates an Investigational Product (IP) to the subject. When the subject is randomized, Viedoc informs the clinic user which IP should be given to the subject. The allocation list is most commonly used in double-blind studies. Uploading of the allocation list is done in a similar way for static and dynamic randomization.
| Term | Definition |
|---|---|
| RTSM | Randomization and Trial Supply Management. |
| Blinded role | A role that does not know which treatment the subject is receiving. Most roles in a clinical trial should be blinded. |
| Unblinded Statistician |
A system role that can configure the randomization in Viedoc Admin. The Unblinded Statistician sees which subjects are assigned to which treatments, and should therefore not have any role in the study where he/she should not know this information. An Unblinded Statistician can never again work in a blinded role within that study. |
| Randomization list | A list for allocating subjects to treatments or groups. The randomization list shows all available slots in the randomization. When randomization has started (that is, when the first subject has been randomized), the randomization list also shows which subjects have been assigned to which treatment or group. |
| Allocation list | A list for allocating IP to subjects. The allocation list shows all available IPs. When randomization has started, the allocation list also shows which IPs have been assigned to which subjects. Advanced allocation can be set up and for this there are two options for the allocation list(s):
|
| Scope |
Defines the scope from which a randomization slot or an IP should be selected. One of the following scopes can be chosen:
|
| Factor (Prognostic factor) |
Items that might influence the effect of treatment on the subjects, and that are to be used as input when randomizing the subject. For example sex or age. Viedoc supports the use of drop-down lists, radio buttons, integer and free text data types as input items. |
| Outcome | Items to be populated by the randomization service, for example treatment group. |
| Blinded outcome | Items to be populated by the randomization service, that should remain blinded until after the subject has been unblinded or emergency unblinded for a specific subject. These items will not be visible for any user in the system, except for the Unblinded Statistician who can see them in Viedoc Admin, or until an emergency unblinding was performed (for details on how the emergency unblinding is performed in Viedoc Clinic, see Randomization, allocation and emergency unblinding). |
Randomizations are configured in Viedoc Designer and Viedoc Admin, and executed in Viedoc Clinic. The schematic below depicts what different steps need to be taken, and which roles have permission to perform these steps, depending on the allocation configuration type as described below:

- Configuring individual forms for randomization and allocation, to keep the two steps separated in the study workflow
- The possibility to perform multiple allocations at different visits during the study
- The possibility to replace an already performed allocation with a new allocation
- The possibility to undo an already performed allocation
The configuration workflow in this case looks as illustrated in the following image:

This is a single-sourced file that should have the following content:
Introduction to randomization
Detailed instructions regarding these steps are described in:
An example of how to configure a dynamic randomization is described in detail in the following lesson:
For a video tutorial on how to configure a static list randomization and a dynamic randomization, see:
| Important! The randomization feature must be included in your study license in order for the randomization configuration to be available in production mode. You can still configure a randomization in demo mode without a license. |
On the randomization page, under the Demo mode tab, you can perform all the configuration actions, select the link to download the template (Excel file) for the randomization list, and upload a file with a randomization list or an allocation list.
If your study license has the randomization feature included, it will be shown on the Study settings page on the Settings tab under Included features:

If your study does not have a license key (Reference ID), or has a license key that does not include the randomization feature, on the randomization page, under the Production tab:
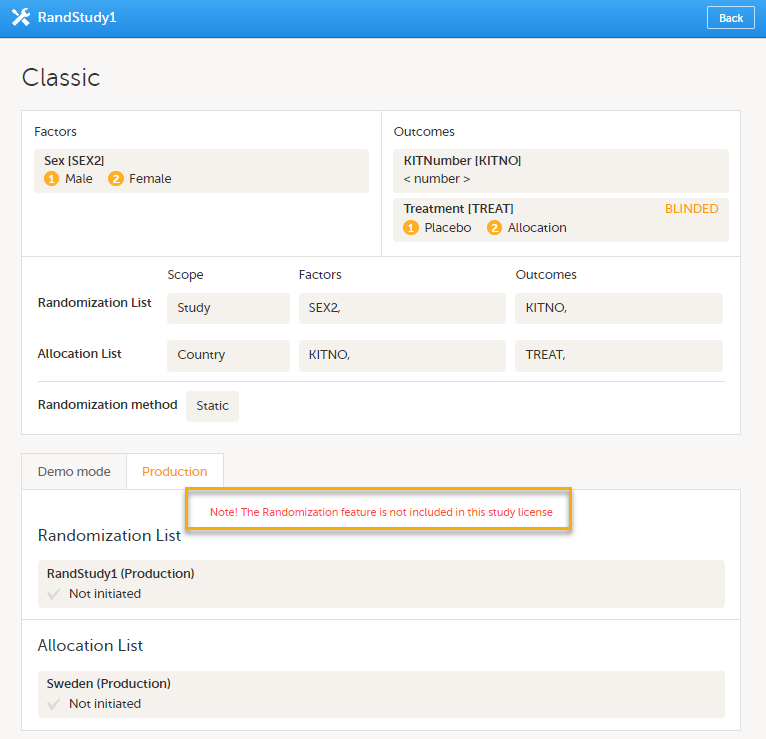
For more information about licensing, see Overview of Viedoc
Static randomizations are based on randomized lists that are uploaded by the user. These lists should be generated by the user in advance to ensure that the allocation of subjects to treatments, and of Investigational Products (IP) to subjects, is random. When a subject is randomized, Viedoc assigns that subject to the next free slot in the list, which then decides the treatment the subject is to receive.
Note! The randomization page is only visible for users with the role Unblinded Statistician.
Once the randomization mapping has been set up in Viedoc Designer, the RTSM field appears for users with the role Unblinded Statistician. When you click the toolbox icon in the RTSM field, the Randomizations pop-up opens. Here you can do the following:
1. Choose the type of the allocation list to be used:
2. View a list of randomizations that have been added to your study.
3. Open the Randomization page to configure the randomization or view the randomization details.
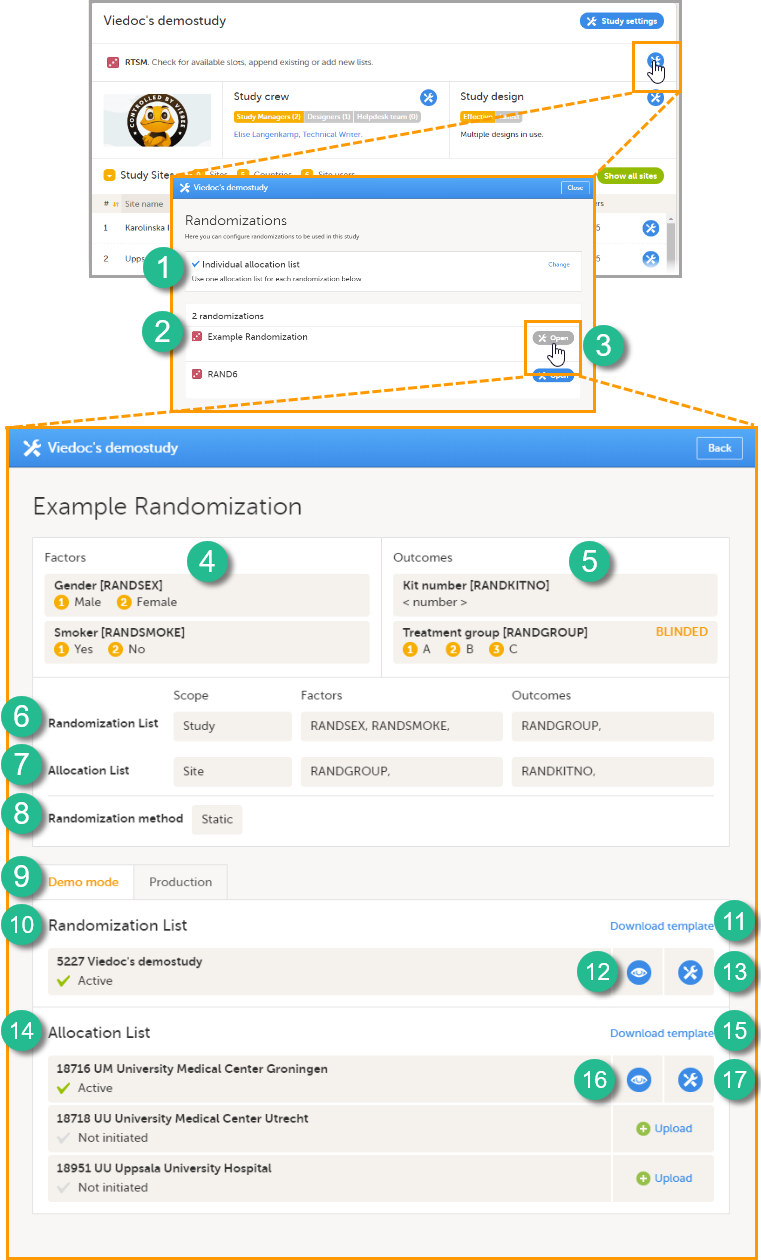
On the Randomization page, you can view or do the following:
4. View the items, and their code lists, that have been mapped as input factors.
5. View the items, and their code lists, that have been mapped as outcome and blinded outcome.
6. Set up the randomization list by defining:
7. Optional: set up the allocation list by defining:
8. Select the randomization method.
9-17. You can test the randomization in demo mode by uploading dummy randomization lists and dummy allocation lists to make sure everything works as expected before randomizing patients in production mode. Click the tab (9) to switch between demo mode and production mode.
10. View the details of the randomization list for the different scopes: the scope (in this example the study) and the status (Active, Inactive or Not initiated). In this field, you can upload the randomization list by clicking Upload (not visible in the image). Once a randomization list has been uploaded, icon 11 and 12 appear.
11. Download a template (Excel file) for the randomization list.
12. View the randomization list. An Excel file is downloaded. For a description of the randomization list, see The randomization list.
13. Edit the randomization list. You can select one of the two following options:
14. View the details of the allocation lists for the different scopes: the scope (in this example the sites, for each scope a different allocation list needs to be uploaded) and the status (Active, Inactive or Not initiated). In this field, you can upload the randomization list by clicking Upload. Once a randomization list has been uploaded, icon 15 and 16 appear.
15. Download a template (Excel file) for the allocation list.
16. View the allocation list. An Excel file is downloaded. For a description of the allocation list, see The allocation list.
17. Edit the allocation list here, if you selected to use Individual allocation list. You can select one of the two following options:
The numbers in front of the study name and site names in the Randomization List and Allocation List fields (5227, 18716, 18718, and 18951 in the image) are the study identification number and site identification numbers that are generated by the system and used for internal identification of study and sites.
A template randomization list customized for your randomization configuration can be downloaded by clicking Download template in the Randomization List field (see nr 11 in the image above). For the example shown in the image above, the template randomization list looks as follows:
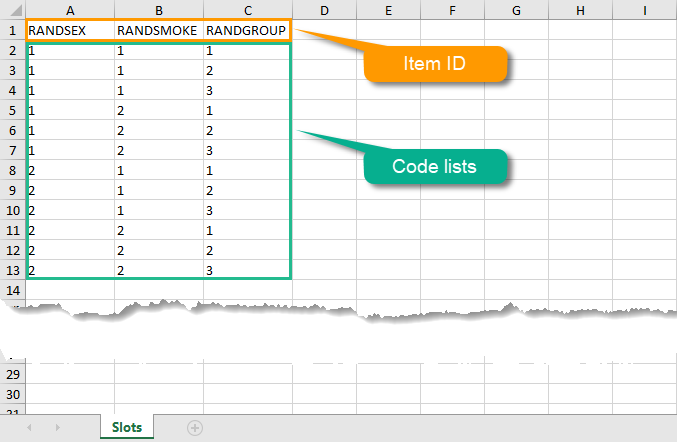
The list shows the factors and outcomes. The Item IDs are displayed as column names, their code lists are displayed in the rows below. Every possible combination of factor(s) and outcome(s) is shown here. The randomization list that you should upload, should contain exactly these Item IDs as column names. It also should contain exactly these combinations of factor(s) and outcome(s), in a randomized manner. Each row represents a slot, the total number of rows in the randomization list equals the total number of slots.
Once the randomization is started, it is possible to view the active randomization list by clicking View in the Randomization List field (see nr 12 in the image above). An Excel file is downloaded that has the following sheets:
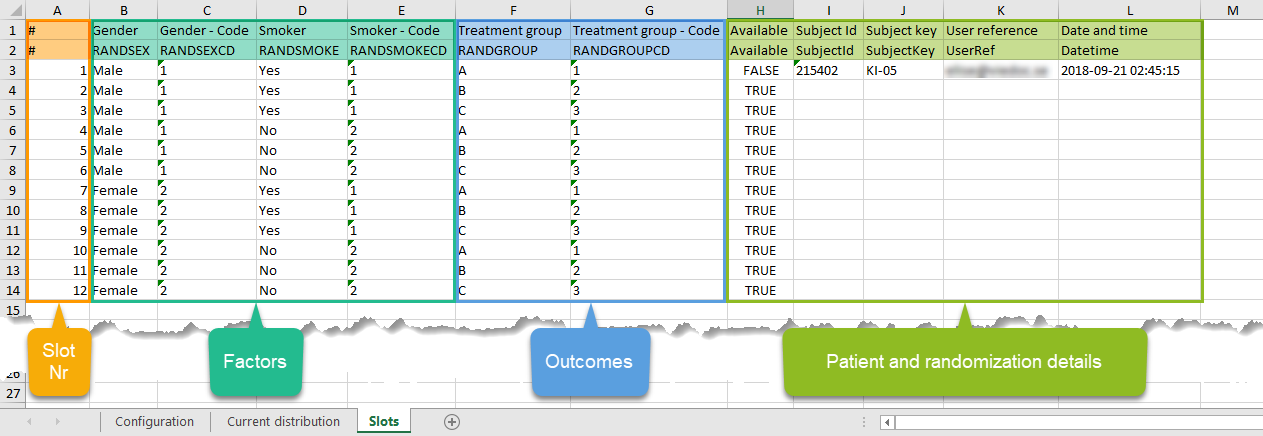
If allocation is activated, a file with available slots (kit numbers) should be uploaded for each scope (study, country or site), before the first allocation is performed.
A template allocation list customized for your randomization configuration can be downloaded by clicking Download template in the Allocation List field (see nr 15 in the image above). For the example shown in the image above, the template allocation list looks as follows:

The list shows the factors and outcomes. The Item IDs are displayed as column names, their code lists are displayed in the rows below. Every possible combination for the factors and outcomes is shown here. The item RANDKITNO (kit numbers) was configured to be a free text field, so the allocation list says <string>. A list of kit numbers has to be added to the file, before the template can be uploaded as allocation list, as in the example below:

Once the randomization is started, it is possible to view the allocation list by clicking the view button in the Allocation List field (see nr 16 in the image above). An Excel file is downloaded that has the following sheets:
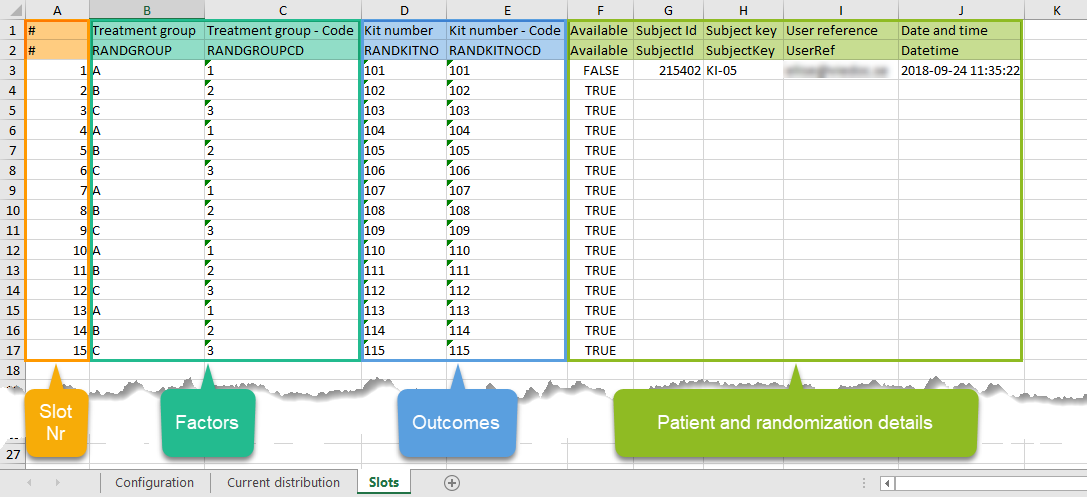
Note! The randomization can only be configured by users that are assigned the system role Unblinded Statistician.
To configure the randomization, follow the steps below.
| 1 |
In Viedoc Admin, go to the study for which you would like to configure the randomization. In the RTSM field, click the toolbox icon to open the randomization window. |
| 2 |
Click Open to select the randomization you would like to configure. The Randomization configuration window opens as a pop up. This window also displays the prognostic factors and outcomes that have been defined in Viedoc Designer. |
| 3 |
In the Randomization List field, select:

|
| 4 |
If you want to use allocation, select the Allocation list checkbox, select the scope of the allocation list, and, only if advanced allocation is NOT enabled in Viedoc Designer, the input factors, and the desired outcome (for example, kit number). Based on the allocated treatment, a kit number will then be assigned to the subject. |
| 5 | From the Randomization method drop-down list, select Static randomization. |
| 6 |
Click Approve settings & generate list. |
The randomization list initially indicates status Not initiated. A randomization list with the available slots for randomization should be uploaded to enable randomization.
You can download a template slot list in Excel from Viedoc Admin, or you can create one yourself. To download the template slot list from Viedoc, click Download template.
To upload a randomization list, follow the steps below.
| 1 |
Click Upload. |
| 2 |
Select the file containing the slot list and click Open. The file will be uploaded. |
Once the randomization list has been uploaded, the status of the randomization will turn into Active. From that moment, the randomization list (displaying which slots are taken) can be downloaded in Excel format by clicking View.
To edit an active randomization list, follow the steps below.
| 1 | Click the toolbox icon. |
| 2 | Select: Add to list or Upload new list.
|
| 3 |
Select the file containing the slot list and click Open. |
There are two different options for the allocation list, as follows:
This is set up under the RTSM settings in Viedoc Admin, as illustrated in the image below:
If individual allocation list(s) are used for each randomization, the allocation list will be uploaded separately for each defined randomization, as described below.
You can download a template slot list in Excel from Viedoc Admin, or you can create one yourself. To download the template allocation list from Viedoc, click Download template.

For an example of the allocation list to be uploaded, see The allocation list.
To upload an allocation list, follow the steps below.
| 1 | Click Upload. |
| 2 | Select the file containing the slot list and click Open. The file will be uploaded. |
The allocation list can be viewed in a similar way as the randomization list, see Viewing a randomization list.
The allocation list can be edited in a similar way as the randomization list, see Editing a randomization list.
This lesson describes how to configure a dynamic randomization in Viedoc Admin.
Viedoc offers support for randomization. Subjects can be randomized using:
Dynamic randomization ensures a more even distribution of subjects across the treatment groups, with regard to prognostic factors that might influence the effect of treatment on the subjects.
The randomization in Viedoc is configured in a similar way for static and dynamic randomization. The main difference is that for static randomization, a list with outcomes (randomization numbers, treatment groups, and so on) - the randomization list - is created and uploaded by the user, while for dynamic randomization, an algorithm is used to assign subjects to a treatment group and the randomization list is created by the system.
It is possible to upload a separate allocation list that allocates an Investigational Product (IP) to the subject. When the subject is randomized, Viedoc informs the clinic user which IP should be given to the subject. The allocation list is most commonly used in double-blind studies. Uploading of the allocation list is done in a similar way for static and dynamic randomization.
| Term | Definition |
|---|---|
| RTSM | Randomization and Trial Supply Management. |
| Blinded role | A role that does not know which treatment the subject is receiving. Most roles in a clinical trial should be blinded. |
| Unblinded Statistician |
A system role that can configure the randomization in Viedoc Admin. The Unblinded Statistician sees which subjects are assigned to which treatments, and should therefore not have any role in the study where he/she should not know this information. An Unblinded Statistician can never again work in a blinded role within that study. |
| Randomization list | A list for allocating subjects to treatments or groups. The randomization list shows all available slots in the randomization. When randomization has started (that is, when the first subject has been randomized), the randomization list also shows which subjects have been assigned to which treatment or group. |
| Allocation list | A list for allocating IP to subjects. The allocation list shows all available IPs. When randomization has started, the allocation list also shows which IPs have been assigned to which subjects. Advanced allocation can be set up and for this there are two options for the allocation list(s):
|
| Scope |
Defines the scope from which a randomization slot or an IP should be selected. One of the following scopes can be chosen:
|
| Factor (Prognostic factor) |
Items that might influence the effect of treatment on the subjects, and that are to be used as input when randomizing the subject. For example sex or age. Viedoc supports the use of drop-down lists, radio buttons, integer and free text data types as input items. |
| Outcome | Items to be populated by the randomization service, for example treatment group. |
| Blinded outcome | Items to be populated by the randomization service, that should remain blinded until after the subject has been unblinded or emergency unblinded for a specific subject. These items will not be visible for any user in the system, except for the Unblinded Statistician who can see them in Viedoc Admin, or until an emergency unblinding was performed (for details on how the emergency unblinding is performed in Viedoc Clinic, see Randomization, allocation and emergency unblinding). |
Randomizations are configured in Viedoc Designer and Viedoc Admin, and executed in Viedoc Clinic. The schematic below depicts what different steps need to be taken, and which roles have permission to perform these steps, depending on the allocation configuration type as described below:
- Configuring individual forms for randomization and allocation, to keep the two steps separated in the study workflow
- The possibility to perform multiple allocations at different visits during the study
- The possibility to replace an already performed allocation with a new allocation
- The possibility to undo an already performed allocation
The configuration workflow in this case looks as illustrated in the following image:
This is a single-sourced file that should have the following content:
Introduction to randomization
Detailed instructions regarding these steps are described in:
An example of how to configure a dynamic randomization is described in detail in the following lesson:
For a video tutorial on how to configure a static list randomization and a dynamic randomization, see:
| Important! The randomization feature must be included in your study license in order for the randomization configuration to be available in production mode. You can still configure a randomization in demo mode without a license. |
On the randomization page, under the Demo tab, you can create the configuration and perform all the configuration actions for the dynamic randomization, and select the Edit settings and generate new list link.
If your study license has the randomization feature included, it will be shown on the Study settings page under Included features on the Settings tab:
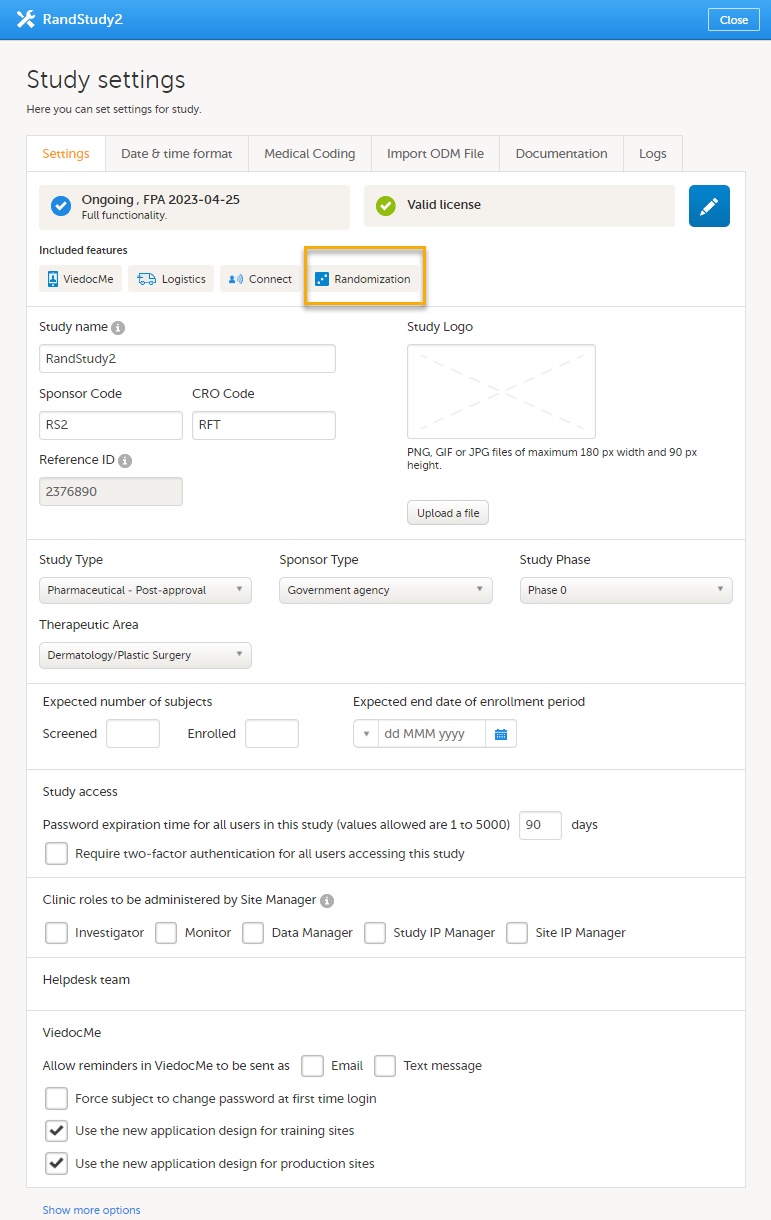
If your study either does not have a license key (Reference ID), or has a license key that does not include the randomization feature, on the randomization page, under the Production tab:
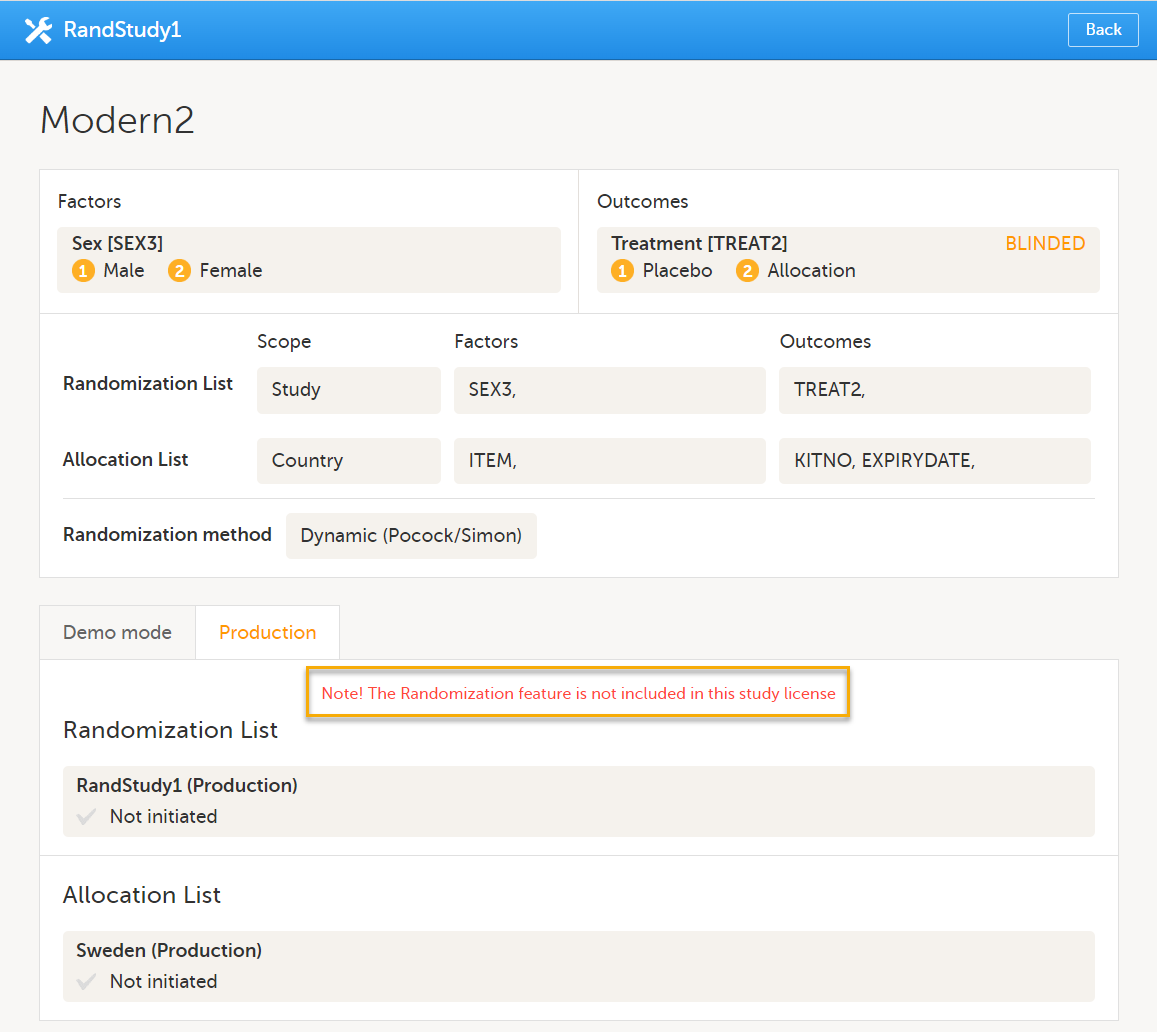
For more information on licensing, see Overview of Viedoc
For dynamic randomization, the randomization service in Viedoc allocates a treatment to the subject based on previously given information. That means that the probability of a subject getting assigned to a treatment will change depending on previous assignments. This way, dynamic randomization ensures a more even distribution of the subjects across factors and treatments for each site.
For dynamic randomization, you do not need to upload a randomization list in the beginning of the study. Instead, you need to configure an algorithm for how the probability of assignments will be calculated. The randomization service in Viedoc then creates a randomization list while assigning subjects to treatments.
Viedoc offers the Pocock and Simon method for dynamic randomization. The Pocock and Simon method aims to minimize imbalance in the distribution of subjects across the treatment groups, with regard to prognostic factors that might influence the effect of treatment on the subjects. It does so by hypothetically assigning a new subject to each of the treatment groups and calculating the amount of imbalance for each assignment. The method then assigns the subject to the treatment group with the smallest imbalance.
When configuring a Pocock and Simon randomization, it is possible to set the relative importance of the factors, and the desired division of treatments to be allocated. Two different variation methods can be chosen: Range and Range squared, see Concepts and terminology for dynamic randomizations for more information.
The original statement of the Pocock and Simon method was deterministic, random number values were only used in tie-breaking situations. The randomization service in Viedoc is based on a modified Pocock and Simon method in which every randomization decision depends on a random number. For this, Donald E. Knuth's subtractive random number generator algorithm is used, see References.
The underlying theory for the dynamic randomization method that is implemented in Viedoc is described in the following articles:
The Donald E. Knuth's subtractive random number generator algorithm that is used in the modified Pocock and Simon method implemented in Viedoc is described in the following article:
In Viedoc, the same annotations as in the above mentioned articles are used.
| Term | Description |
|---|---|
| Factor weight |
The relative importance of a factor when calculating imbalance, set as an integer value greater than zero. For example, if it is more important to achieve balance in the factor Gender than in the factor Age, then a factor weight of 2 could be set on Gender and a factor weight of 1 set on Age. |
| Outcome weight |
Allocation ratio. The desired division of treatments to be allocated. For example, if we have three treatments, A, B and C, and we would like treatment A to be allocated 50% of the time, and treatment B and C 25% of the time respectively, we would set the allocation ratio as follows: Treatment A: 2, Treatment B: 1, and Treatment C: 1. |
| D | The amount of variation in the set of values for a factor, that is, the imbalance for one factor. The amount of variation can be calculated as:
Tip! Range square increases the spread of the distribution and may be useful if you have many factors. Note! When calculating D, the allocation ratio is taken into account. A treatment that should be allocated more often (that is, has a higher outcome weight) has its D reduced so as to favour the treatment. |
| G |
The total amount of imbalance across all factors. G is calculated by multiplying D for each factor with its factor weight, and then summing this up for all factors. In other words, G is calculated as the weighted sum of {dik}, where dik is the lack of balance among treatment assignments. The weighted sum is used when some prognostic factors are considered more important than others. If it is more important to obtain balance across a certain factor, this factor will get a higher factor weight. Thus its imbalance will have a larger impact on the G, which will make the treatment assignment leading to that specific G more unfavourable. If D is calculated as range square, the range is squared before any factor weight is applied. |
| P (p) |
The probability with which the treatment that minimizes imbalance is assigned. The probability determines the extent to which one wishes to favour the treatment group that would lead to the smallest imbalance. During the randomization, the probability P for each treatment assignment is calculated, based on a probability cut-off. This probability cut-off (referred to as p below) is a static decimal between 0 and 1 that is provided by a statistician. In Viedoc, the probability cut-off has to be entered as x/1000. So for a p of 0.8 (80%), the number 800 should be entered. During randomization, P for each treatment will be distributed as follows:
|
| Random | A random number between 0 and 1, generated using Donald E. Knuth's subtractive random number generator algorithm. |
| seed | A value that is used to initialize the random number generator and that is based on the number of ticks to represent the current date. |
In the section A use case for dynamic randomization, a detailed example of how to configure a dynamic randomization is provided. This use case example also describes the algorithm, and the calculations that are executed by Viedoc in order to assign a subject to a treatment group.
Note! The randomization page is only visible for users with the role Unblinded Statistician.
Once the randomization mapping has been set up in Viedoc Designer, the RTSM field appears for users with the role Unblinded Statistician. When you click the toolbox icon in the RTSM field, the Randomizations pop-up opens. Here you can do the following:
1. Choose the type of the allocation list to be used:
2. View a list of randomizations that have been added to your study.
3. Open the Randomization page to configure the randomization or view the randomization details.
Note! If no randomization configuration is created, it is not possible to randomize a patient in Viedoc Clinic.
On the Randomization page, you can view or do the following:
4. View the items, and their code lists, that have been mapped as input factors.
5. View the items, and their code lists, that have been mapped as outcome and blinded outcome.
6. Set up the randomization list by defining:
7. Optional: set up the allocation list by defining:
8. Select the randomization method.
9-17. You can test the randomization in demo mode by uploading dummy randomization lists and dummy allocation lists to make sure everything works as expected before randomizing patients in production mode. Click the tab (8) to switch between demo mode and production mode.
10. View the details of the randomization list for the different scopes: the scope (in this example the study) and the status (Active, Inactive or Not initiated). In this field, you can upload the randomization list by clicking Upload (not visible in the image). Once a randomization list has been uploaded, icon 11 and 12 appear.
11. Download a template (Excel file) for the randomization list.
12. View the randomization list. An Excel file is downloaded. For a description of the randomization list, see The randomization list.
13. Edit the randomization list. You can select one of the two following options:
14. View the details of the allocation lists for the different scopes: the scope (in this example the sites, for each scope a different allocation list needs to be uploaded) and the status (Active, Inactive or Not initiated). In this field, you can upload the randomization list by clicking Upload. Once a randomization list has been uploaded, icon 15 and 16 appear.
15. Download a template (Excel file) for the allocation list.
16. View the allocation list. An Excel file is downloaded. For a description of the allocation list, see The allocation list.
17. Edit the allocation list here, if you selected to use Individual allocation list. You can select one of the two following options:
The numbers in front of the study name and site names in the Randomization List and Allocation List fields (5228, 18213, 18215, and 18217 in the image) are the study identification number and site identification numbers that are generated by the system and used for internal identification of study and sites.
Once the randomization is started, it is possible to view the randomization list by clicking View in the Randomization List field (see nr 12 in the image above). An Excel file is downloaded that has the following sheets:
If allocation is activated, a file with available slots (kit numbers) should be uploaded for each scope (study, country or site), before the first subject can be randomized.
A template allocation list customized for your randomization configuration can be downloaded by clicking Download template in the Allocation List field (see nr 15 in the image above). For the example shown in the image above, the template allocation list looks as follows:
The list shows the factors and outcomes. The Item IDs are displayed as column names, their code lists are displayed in the rows below. Every possible combination for the factors and outcomes is shown here. The item RANDKITNO (kit numbers) was configured to be an open text field, so the allocation list says <string>. A list of kit numbers has to be added to the file, before the template can be uploaded as allocation list, as in the example below:
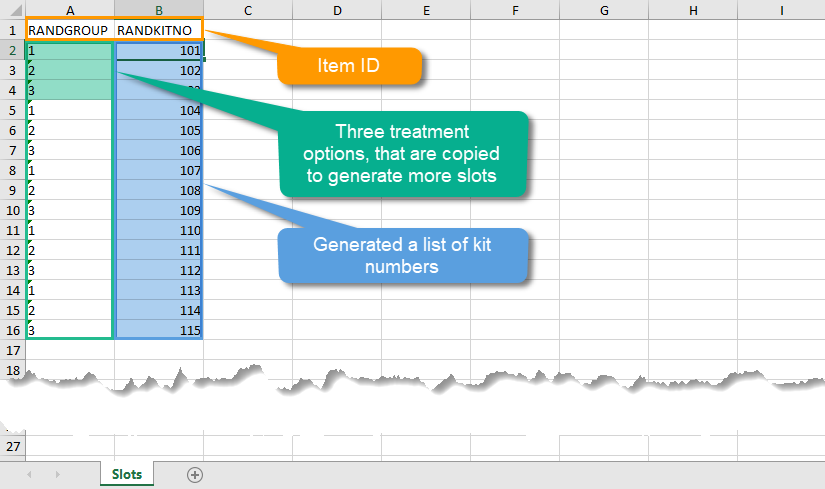
Once the randomization is started, it is possible to view the allocation list by clicking the view button in the Allocation List field (see nr 16 in the image above). An Excel file is downloaded that has the following sheets:
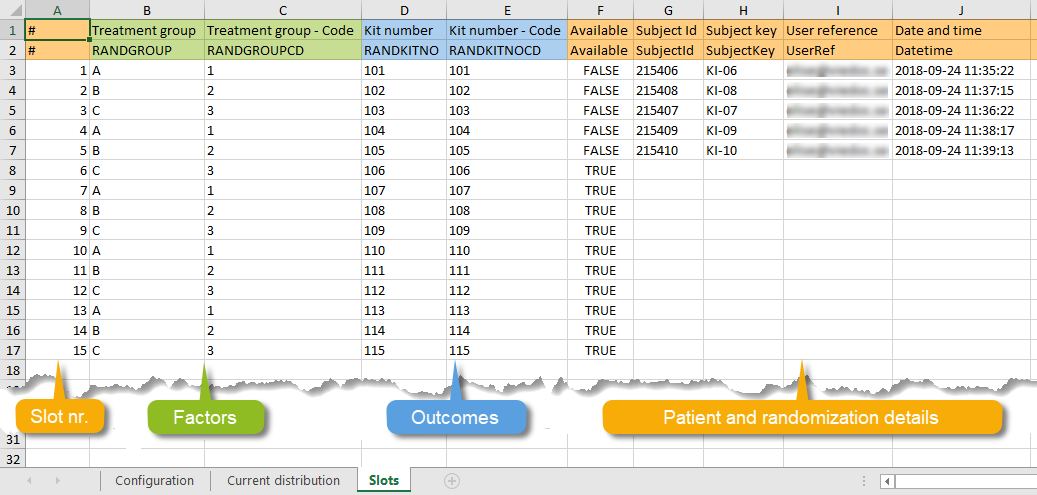
Note! The randomization can only be configured by users that are assigned the system role Unblinded Statistician.
To configure the randomization, follow the steps below.
| 1 |
In Viedoc Admin, go to the study for which you would like to configure the randomization. In the RTSM field, click the toolbox icon to open the randomization window. |
| 2 |
Click Open to select the randomization you would like to configure. The Randomization configuration window opens as a pop up. This window also displays the prognostic factors and outcomes that have been defined in Viedoc Designer. 
|
| 3 |
In the Randomization List field, select:
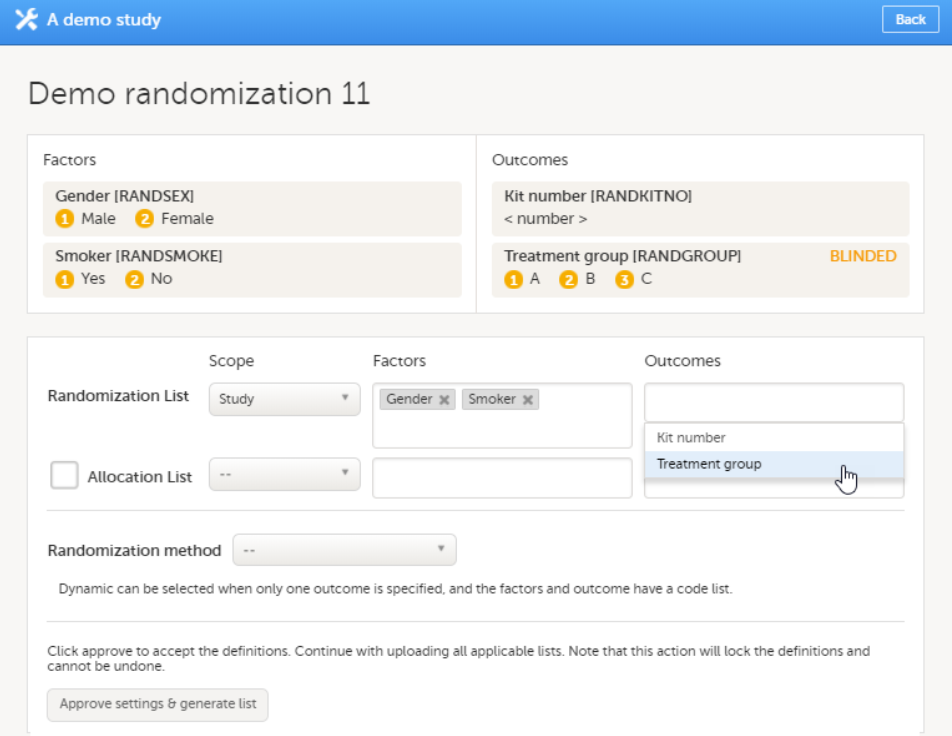
Note! To be able to perform a dynamic randomization, you need to specify only one outcome for the randomization list, and you need to make sure that the items used as factors and outcome have a code list. It is not possible to use free text items in the randomization list for dynamic randomization. Note! You can also select Country or Study Site as factors. Yet, if you have set the scope to Country or Study site, you cannot use Country or Site respectively as input factor(s). |
| 4 |
If you want to use allocation, select the Allocation list checkbox, select the scope of the allocation list, and, only if advanced allocation is not enabled in Viedoc Designer, the input factors, and the desired outcome (for example, kit number). Based on the allocated treatment, a kit number will then be assigned to the subject. 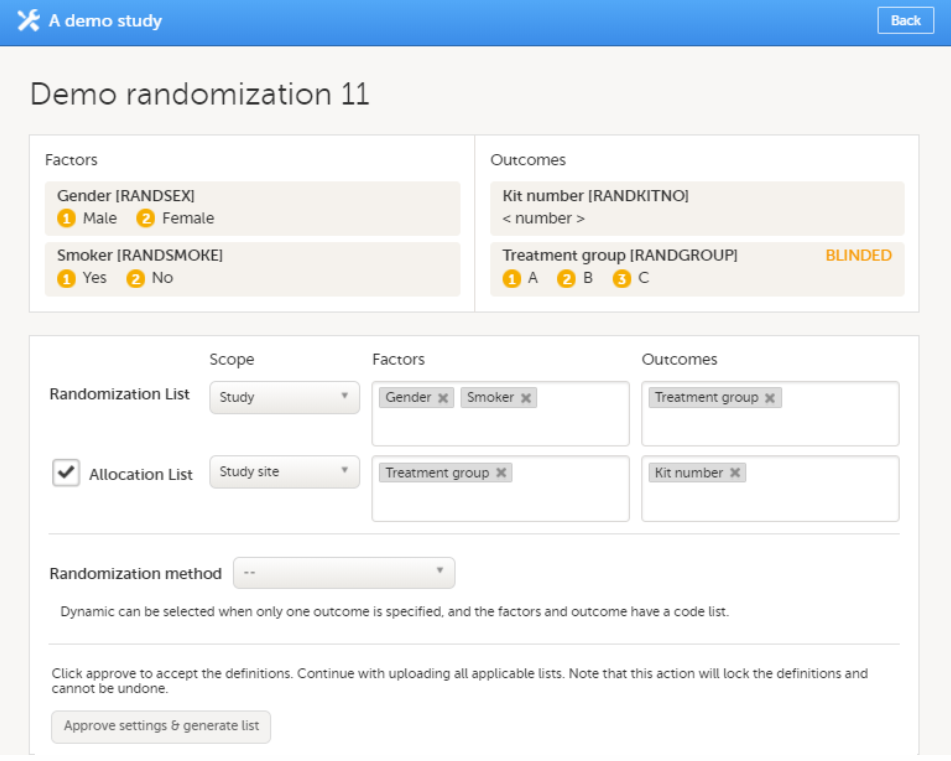
From the Randomization method dropdown list, select Dynamic (Pocock and Simon). |
| 5 |
Select Create configuration to configure the dynamic randomization: 
Note! You will need to create the dynamic randomization configuration individually for demo mode and production mode after creating the dynamic randomization settings. |
| 6 |
Configure the dynamic randomization (see also Concepts and terminology for dynamic randomization):

The randomization page reloads and shows the randomization list with status Inactive, and the Allocation lists that are to be uploaded (status Not initiated). |
When the maximum number of slots is reached during randomization, no additional subjects can be randomized. You can edit the maximum number of slots in the randomization configuration at any time, see Editing the configuration of a dynamic randomization.
There are two different options for the allocation lists, as follows:
This is set up under the RTSM settings in Viedoc Admin, as illustrated in the image below:
If individual allocation list(s) are used for each randomization, the allocation list will be uploaded separately for each defined randomization, as described below.
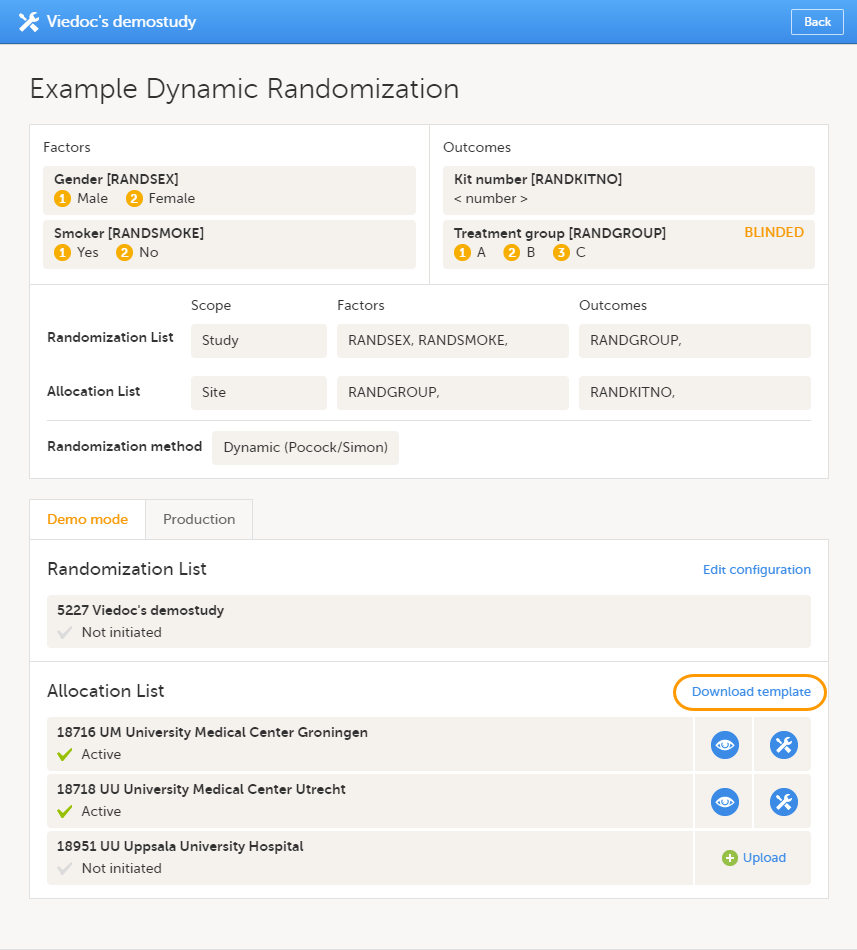
To upload an allocation list, follow the steps below.
| 1 | Click Upload. |
| 2 | Select the file containing the slot list and click Open. The file will be uploaded. |
The allocation list can be viewed in a similar way as the randomization list, see Viewing the randomization list.
To edit an active allocation list, follow the steps below.
| 1 | Click the toolbox icon next to the allocation list you would like to edit. |
| 2 | Select: Add to list or Upload new list.
|
| 3 |
Select the file containing the slot list and click Open. |
The randomization list initially indicates status Not initiated and turns to status Active once the first subject has been randomized.
From that moment, the distribution list can be downloaded in Excel format by clicking View.
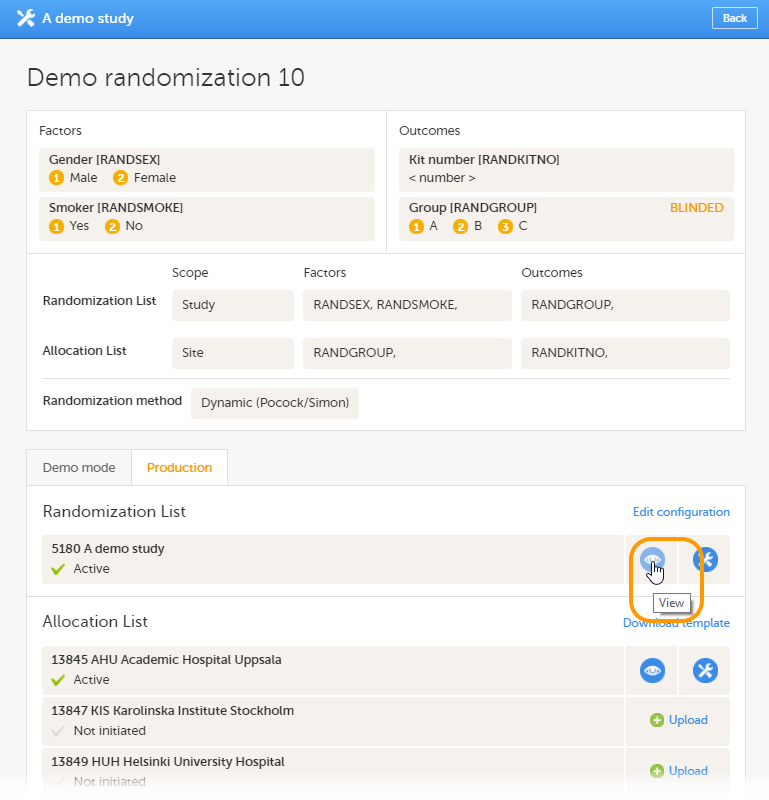
If you would like to restart a dynamic randomization, click the toolbox icon in the Randomization List field and select Restart.
 Restarting the randomization will reset the slot list. Newly added subjects will be randomized independently of the subjects that were randomized before the restart.
If you would like to edit the configuration of an ongoing Pocock and Simon dynamic randomization, click Edit configuration.
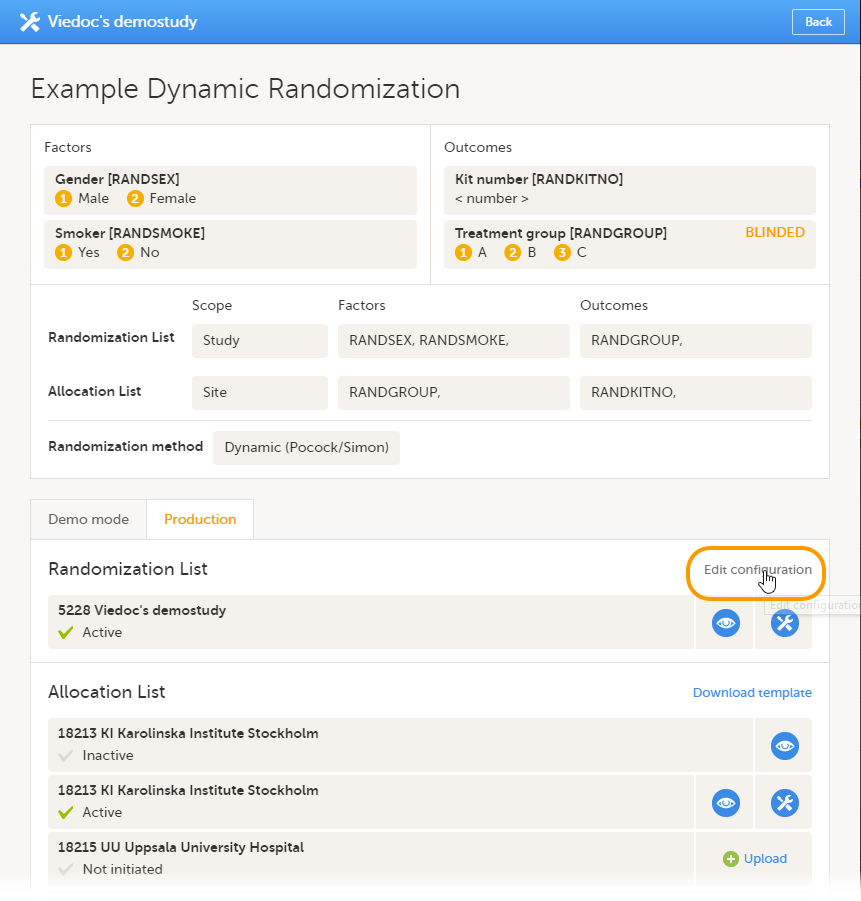 A pop-up opens where you can edit the settings for variation method, probability, factor weights, allocation ratio and maximum number of slots per list. For a more detailed explanation, see step 6 in Configuring a dynamic randomization.
You can edit the randomization configuration at any time during randomization.
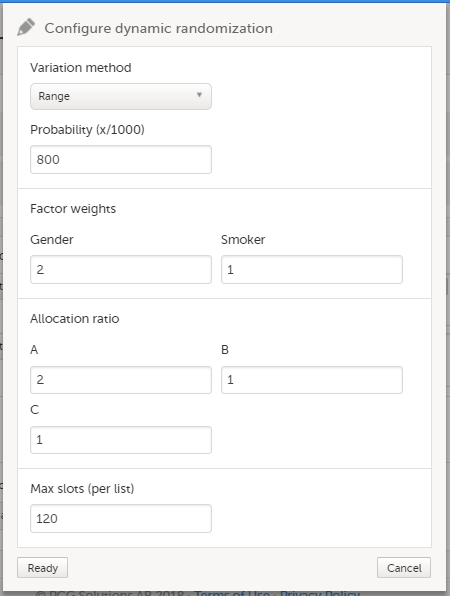
The allocation list setup can be performed only by users assigned to the Unblinded Statistician role.
When randomization is used within a study (see Configuring a static randomization / Configuring a dynamic randomization), the allocation list can be defined in two different ways:
| Important! The randomization feature must be included in your study license in order for the randomization configuration and the global allocation list to be available in production mode. You can still configure a randomization in demo mode without a license. |
The global allocation list is set up under the RTSM settings in Viedoc Admin:
If the global allocation list is selected to be used for all the randomizations defined in the study, the Global allocation list setup is displayed at the bottom of the Randomizations pop-up, as well as the option to Enable logistics, as below:
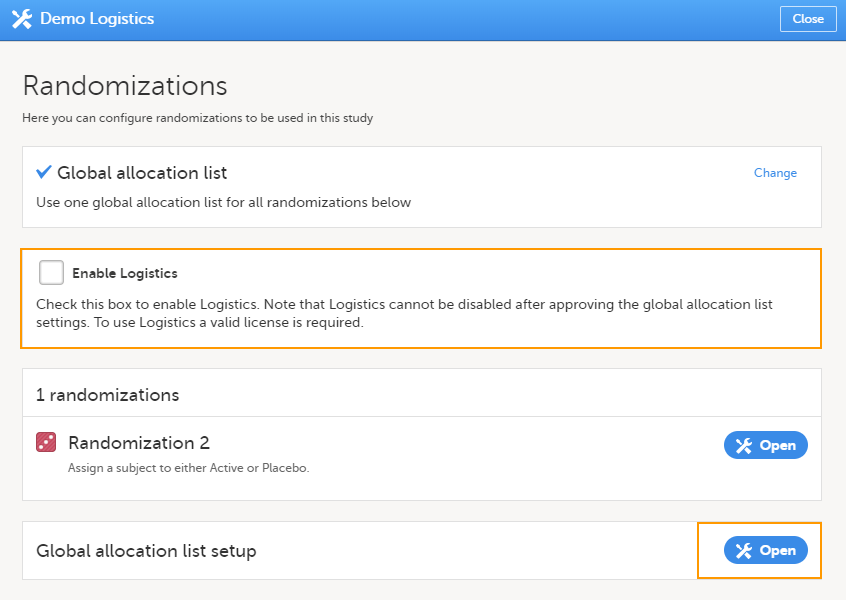 Enable Logistics - if checked, this allows you to use the Logistics functionality in Viedoc. For more information about the logistics functionality see Overview of Viedoc Logistics.
|
Important!
|
To configure the global allocation list:
| 1 | Click Open next to the Global Allocation list setup. The Definition page will be displayed: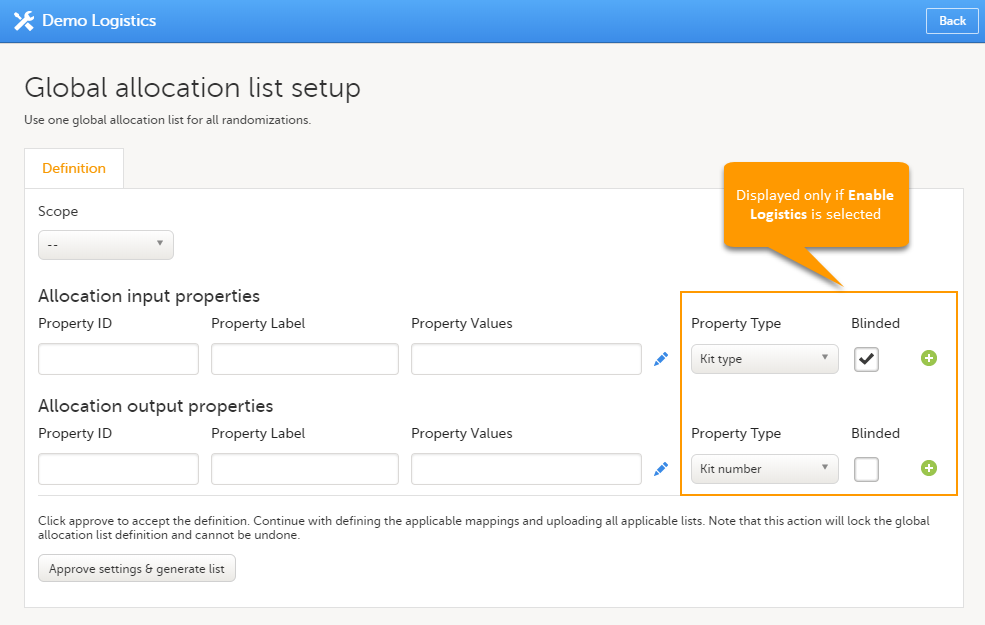 |
|
| 2 |
Under the Definition tab, set the following:
If Logistics is enabled, this impacts the way the kits can be managed, as described in Managing kits.
See an example below: |
|
| 3 |
|
|
| 4 | Under the Mapping tab, map each input and output properties defined in step 1 to the respective input and output properties defined for each advanced allocation in the study design. For the properties that do not apply to one or more of the randomizations in the list, select Not mapped. Note that multiple rows and thus multiple mappings will only be needed when different definitions has been used. Click Save changes. 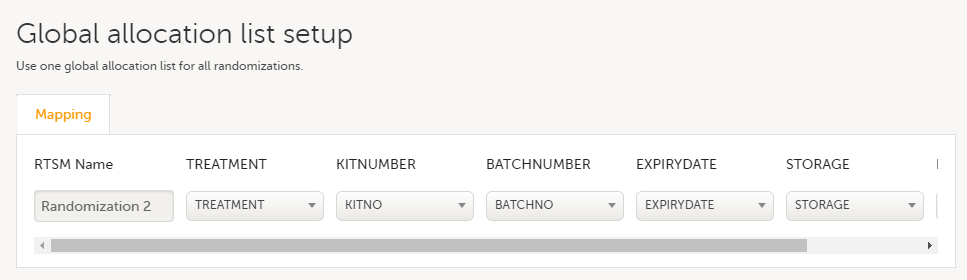 |
|
| 5 |
Under the Upload & View tab, download the template of the allocation list: Note! If your study does not have a license key (Reference ID), or has a license key that does not include the randomization feature, on the Global allocation list setup, under the Upload and view tab:

A template excel file is downloaded:
|
|
| 6 | Use the downloaded template file to fill in the allocation list and save the file: Note! The cell format for the dates (for example EXPIRYDATE) must be set to Text. Make sure that Excel does not format this to Date. If the format of the dates is not set to text, the upload of the allocation list will fail and an error message will be displayed. |
|
| 7 | Click Upload, select the file containing the allocation list and click Open. The file will be uploaded. |
To view the allocation list, under Upload & View tab, click the view icon:
 An Excel file is downloaded that has the following sheets:
Note! The above Excel file reflects the kit status according to the randomization and allocation forms in Viedoc Clinic. All changes to kit status made in the Logistics interface can be seen in the Logistics stock list Excel file (see Stock list and Kit details view).
If the Logistics functionality is enabled, the Slots and Current distribution always reflects only the list of kits currently at Central depot. The kits that are on site are not included in the list, these can be tracked only from the Logistics interface (see Viedoc Logistics User Guide).
To add new kits to the allocation list, click the tools icon and select Add to list:
 Upload the Excel file with the new kits. This has to be in the same format as the originally uploaded list, see step 6 in Configuring the global allocation list above.
This lesson provides a use case for configuring a dynamic randomization in Viedoc Designer, Viedoc Admin, and Viedoc Clinic. It also explains the algorithm that is used for assigning subjects to treatments, and how the calculations are executed.
| Important! The Randomization feature must be included in your study license in order for the randomization configuration to be available in production mode. You can still configure a randomization in demo mode without a license. |
Viedoc offers support for randomization. Subjects can be randomized using:
Dynamic randomization ensures a more even distribution of subjects across the treatment groups, with regard to prognostic factors that might influence the effect of treatment on the subjects.
The randomization in Viedoc is configured in a similar way for static and dynamic randomization. The main difference is that for static randomization, a list with outcomes (randomization numbers, treatment groups, and so on) - the randomization list - is created and uploaded by the user, while for dynamic randomization, an algorithm is used to assign subjects to a treatment group and the randomization list is created by the system.
It is possible to upload a separate allocation list that allocates an Investigational Product (IP) to the subject. When the subject is randomized, Viedoc informs the clinic user which IP should be given to the subject. The allocation list is most commonly used in double-blind studies. Uploading of the allocation list is done in a similar way for static and dynamic randomization.
| Term | Definition |
|---|---|
| RTSM | Randomization and Trial Supply Management. |
| Blinded role | A role that does not know which treatment the subject is receiving. Most roles in a clinical trial should be blinded. |
| Unblinded Statistician |
A system role that can configure the randomization in Viedoc Admin. The Unblinded Statistician sees which subjects are assigned to which treatments, and should therefore not have any role in the study where he/she should not know this information. An Unblinded Statistician can never again work in a blinded role within that study. |
| Randomization list | A list for allocating subjects to treatments or groups. The randomization list shows all available slots in the randomization. When randomization has started (that is, when the first subject has been randomized), the randomization list also shows which subjects have been assigned to which treatment or group. |
| Allocation list | A list for allocating IP to subjects. The allocation list shows all available IPs. When randomization has started, the allocation list also shows which IPs have been assigned to which subjects. Advanced allocation can be set up and for this there are two options for the allocation list(s):
|
| Scope |
Defines the scope from which a randomization slot or an IP should be selected. One of the following scopes can be chosen:
|
| Factor (Prognostic factor) |
Items that might influence the effect of treatment on the subjects, and that are to be used as input when randomizing the subject. For example sex or age. Viedoc supports the use of drop-down lists, radio buttons, integer and free text data types as input items. |
| Outcome | Items to be populated by the randomization service, for example treatment group. |
| Blinded outcome | Items to be populated by the randomization service, that should remain blinded until after the subject has been unblinded or emergency unblinded for a specific subject. These items will not be visible for any user in the system, except for the Unblinded Statistician who can see them in Viedoc Admin, or until an emergency unblinding was performed (for details on how the emergency unblinding is performed in Viedoc Clinic, see Randomization, allocation and emergency unblinding). |
Randomizations are configured in Viedoc Designer and Viedoc Admin, and executed in Viedoc Clinic. The schematic below depicts what different steps need to be taken, and which roles have permission to perform these steps, depending on the allocation configuration type as described below:
- Configuring individual forms for randomization and allocation, to keep the two steps separated in the study workflow
- The possibility to perform multiple allocations at different visits during the study
- The possibility to replace an already performed allocation with a new allocation
- The possibility to undo an already performed allocation
The configuration workflow in this case looks as illustrated in the following image:
This is a single-sourced file that should have the following content:
Introduction to randomization
Detailed instructions regarding these steps are described in:
For a video tutorial on how to configure a static list randomization and a dynamic randomization, see:
Let's consider the following scenario: We conduct a trial in which we compare three treatments: A, B and C. We want to randomly assign patients to these treatments, and we want treatment A to be allocated 50% of the time, and treatments B and C 25% of the time respectively. The prognostic factors that might influence the effect of the treatment on the subject, and that we would like to balance for in the randomization, are the subject's sex (male or female) and the subject's age (<= 30 or > 30). We consider it more important to balance for the subject's sex than for the subject's age, so we set a higher factor weight on the factor sex.
In summary:
In this randomization example, we use two forms:
 The form Add Subject is added to the activity ACT1 in the Add_SUBJ Study Start event. The form Treatment is added to the activity ACT2: Assign treatment in the Treatment event, which is the first scheduled event.
Note! The randomization form (here called Treatment) must contain all of the input factors and outcomes you intend to use for making assignments.
Tip! Once saved in Viedoc Clinic, the randomization form cannot be edited anymore. Add a message to the form asking the clinic user to make sure that the data are correct before randomizing the patient (see image below).
Tip! Because the Treatment item in the Treatment form is the item that will be populated by the randomization service, and should not be filled in by the clinic user, it may be a good idea to make it invisible to the clinic user as long as the patient is not randomized. In order to achieve this, you can set the visibility conditions On advanced conditions evaluates true for this item to TREAT!=null (show item when it is not null). Then, the clinic user cannot see the item when opening the form. But once the clinic user clicks Randomize, the randomization service allocates the subject to a treatment, the item is not equal to null anymore and appears in the form.
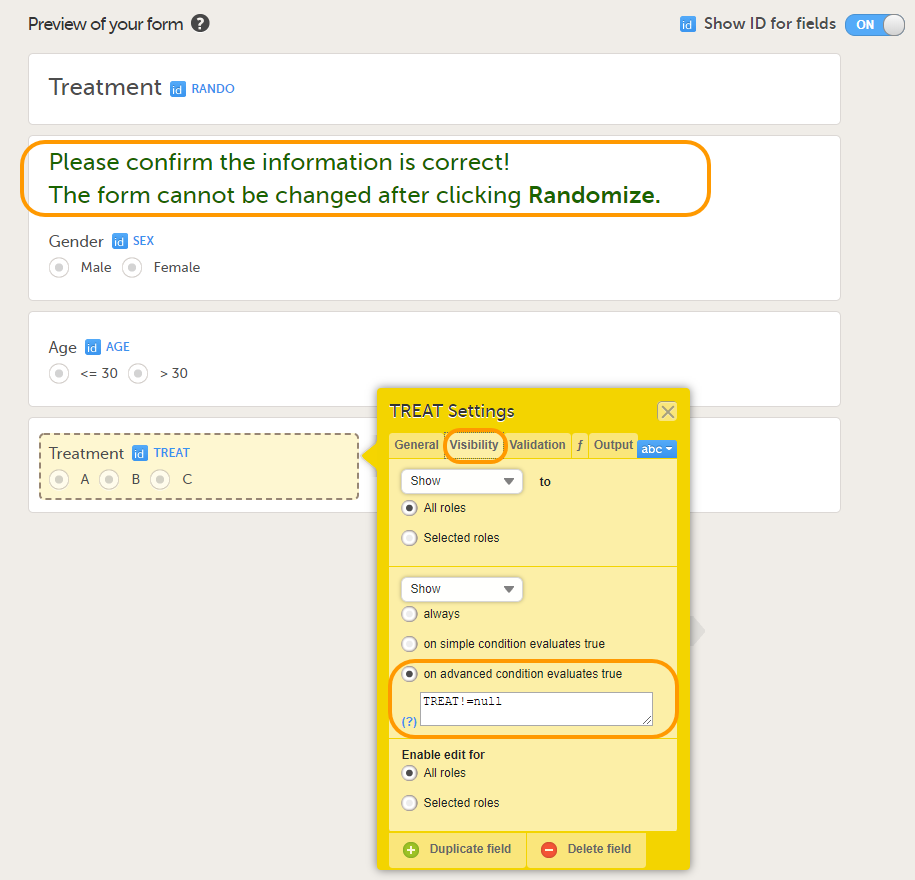
In this example, the randomization outcome (treatment) is not blinded. If you decide to set up a blinded outcome, this item has to be included in the randomization form as well. The blinded outcome will never be shown to the clinic user, it is not available in the export, and you cannot program visibility conditions or edit checks based on the blinded outcome.
The randomization mapping is set up under Study Settings in the study design in Viedoc Designer. The randomization mapping tells Viedoc where the randomization form is and how to use the variables on that form.
We set up the randomization as follows:
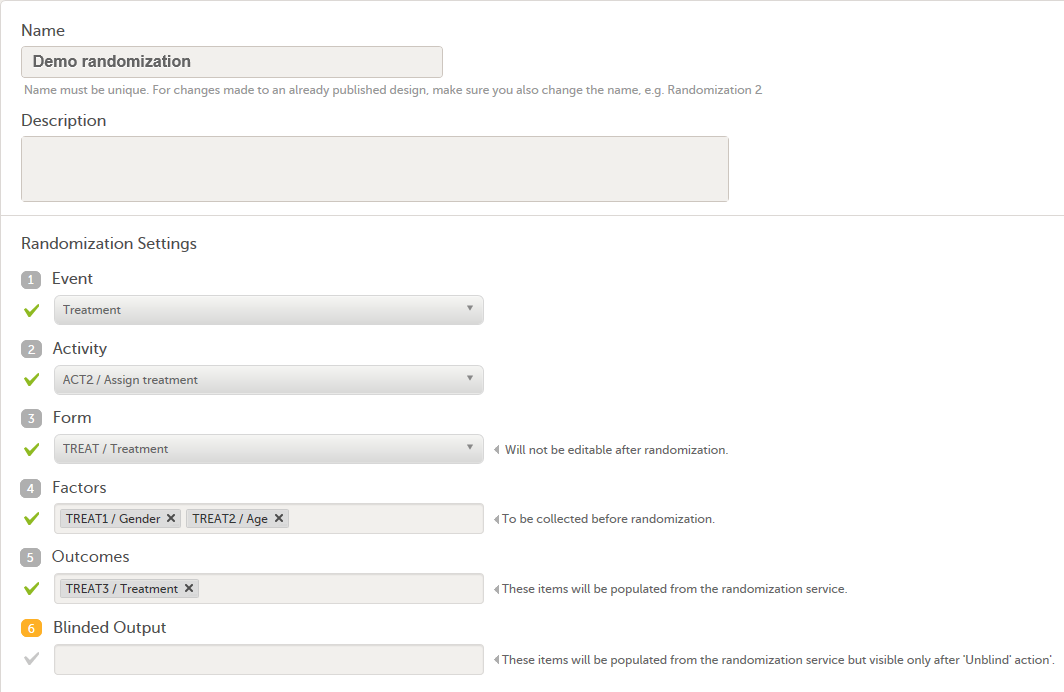
For step by step instructions on how to set up the randomization mapping in Viedoc Designer, see Setting up the randomization.
After the randomization mapping has been set up, the study design needs to be published for the randomization to become active.
The Study Manager needs to invite a user to the role Unblinded Statistician. The role Unblinded Statistician should only be given to users that are supposed to be unblinded and that do not participate in study evaluation procedures, otherwise the blind will break. An Unblinded Statistician can never work in a blinded role within that study.
For step by step instructions on how to assign roles to users, see Managing users (STM and SIM).
Note! The randomization can only be configured by users that are assigned the system role Unblinded Statistician.
To enter the Randomizations page, select the toolbox icon in the Randomization is on field in Viedoc Admin.
In this example, we do not use allocation, so we only set up a Randomization list, as follows:
From the Randomization method dropdown list, we select Dynamic (Pocock/Simon).
Note! The dynamic randomization method can only be chosen if the following criteria are met:
Note! You will need to create the dynamic randomization configuration individually for demo mode and production mode after creating the dynamic randomization settings.
Select Approve settings & generate list. The Create configuration link is displayed:
 Select Create configuration to configure the dynamic randomization.
We configure the dynamic randomization as follows:
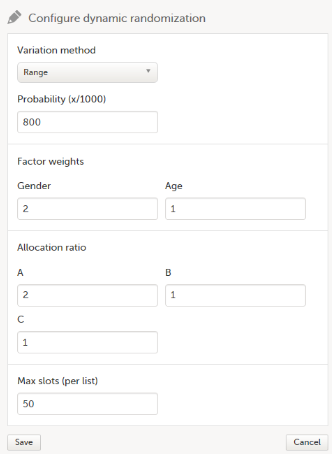
For step by step instructions on how to set up the randomization in Viedoc Admin, see Configuring a dynamic randomization.
When the clinic user has added a subject in Viedoc Clinic (i.e., filled in the Add Subject form), and opens the Treatment form, the values for Gender and Age are automatically populated from the Add subject form. Upon clicking Randomize, the subject will be assigned to one of the treatment groups. The Treatment item will appear in the form, populated by the randomization service.
 Note! Upon randomizing the subject, the randomization form (Treatment form) becomes read-only. This means that no item in the Treatment form will be editable, not even if the value for Gender or Age changes in the original Add subject form.
This section explains how the calculations are made for assigning one of the three treatments (A, B or C) each time a new subject is randomized.
The underlying theory for the dynamic randomization method that is implemented in Viedoc is described in the following articles:
The Donald E. Knuth's subtractive random number generator algorithm that is used in the modified Pocock and Simon method implemented in Viedoc is described in the following article:
The following table lists the terms that the algorithm used for dynamic randomization according to the Pocock and Simon method is based on.
| Term | Description | Calculated as |
|---|---|---|
| D | The amount of variation in the set of values for a factor |
|
| G | The total amount of imbalance across all factors | Sum of weighted D (D multiplied by factor weight) for all factors. |
| P (p) | The probability with which the treatment that minimizes imbalance is assigned |
The probability determines the extent to which one wishes to favour the treatment group that would lead to the smallest imbalance. During the randomization, the probability P for each treatment assignment is calculated, based on a probability cut-off. This probability cut-off (referred to as p below) is a static decimal between 0 and 1 that is provided by a statistician. In Viedoc, the probability cut-off has to be entered as x/1000. So for a p of 0.8 (80%), the number 800 should be entered. During randomization, P for each treatment will be distributed as follows:
|
| Random | A random number between 0 and 1 | Generated using Donald E. Knuth's subtractive random number generator algorithm |
| seed | A value used to initialize the random number generator | Based on the number of ticks to represent the current date |
Using the above algorithms, a frequency table is calculated for each new subject to be randomized. A random number greater than or equal to 0 and less than 1 is generated using a seed value based on the number of ticks to represent the current date. Using the Ps and this random number, a treatment index is chosen and the patient is thereby assigned this treatment.
When a new subject is added and should be randomly assigned a treatment, the following calculations are performed:
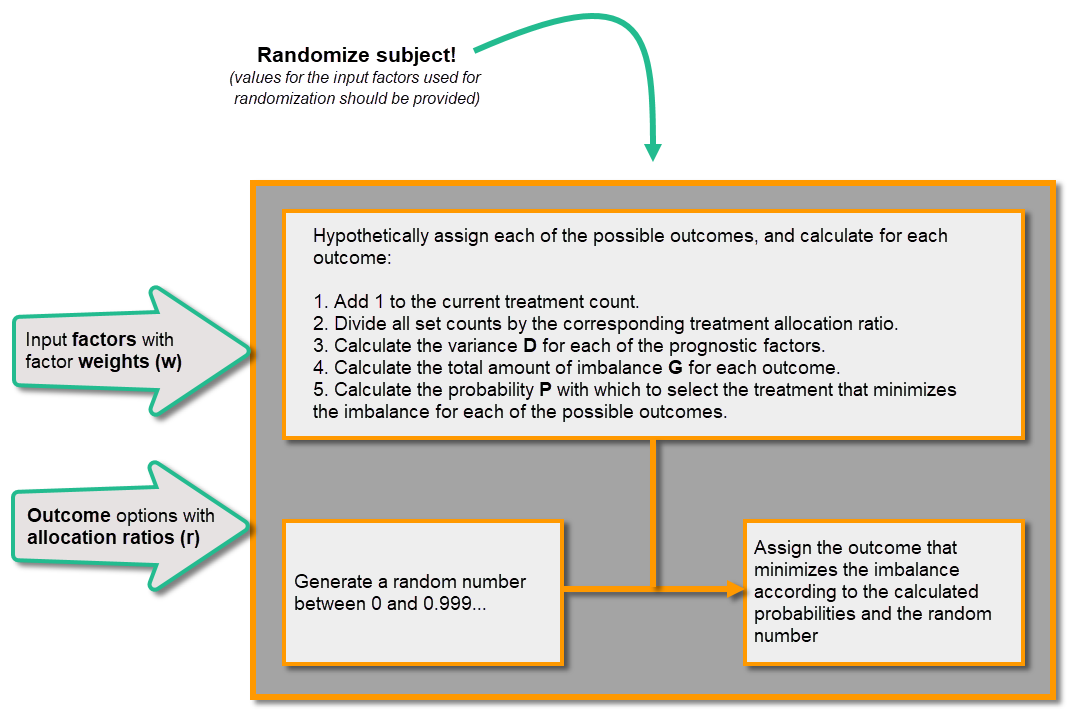
Once the first subject is randomized, it is possible to download the randomization list from Viedoc Admin.
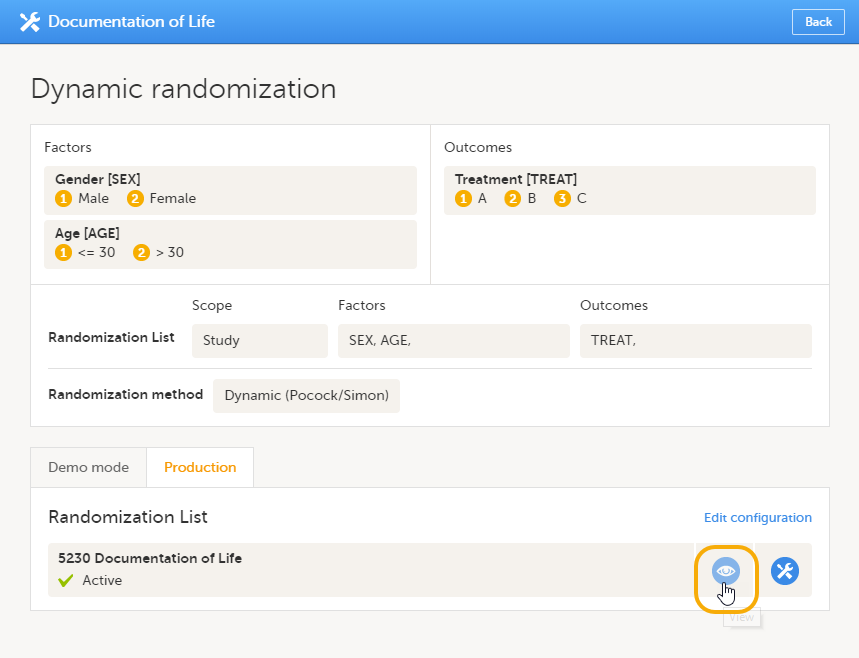 An Excel file is downloaded, which has the following three sheets:
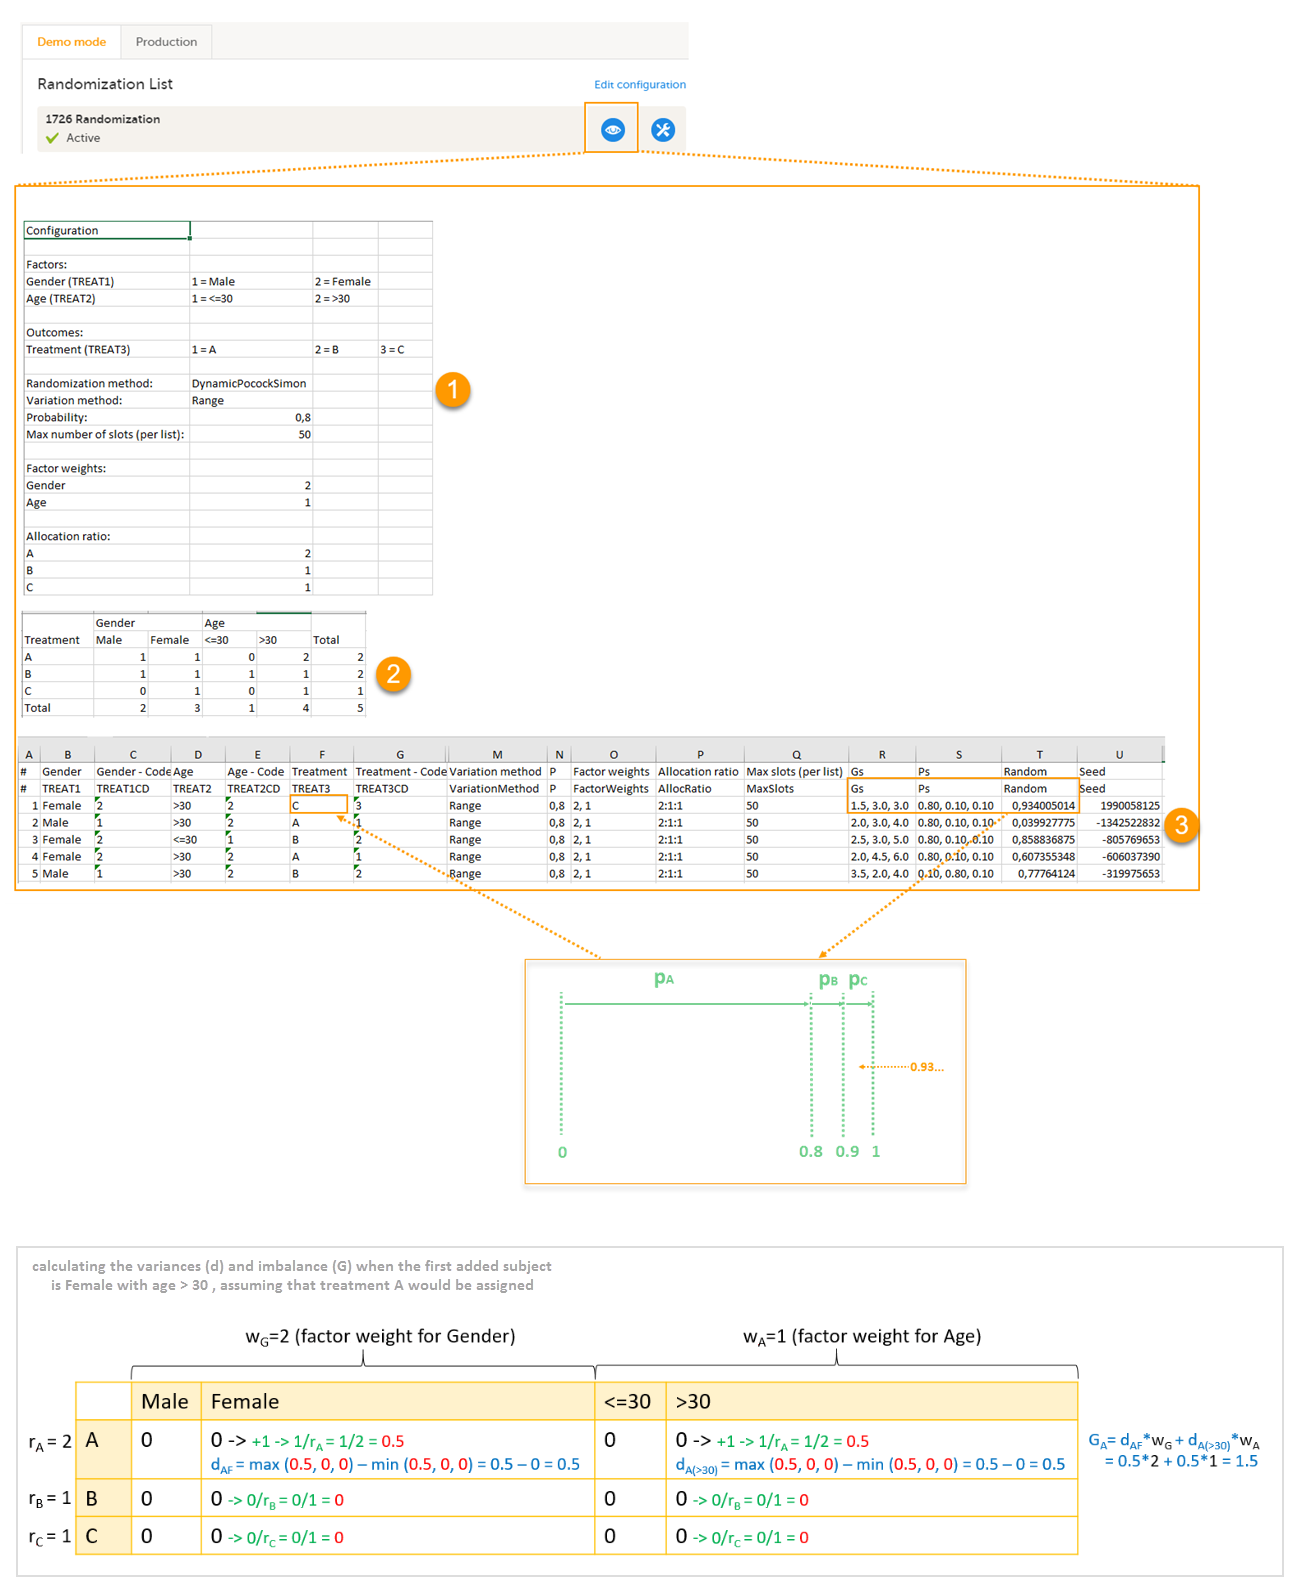
Let's consider the first added subject and take a look at how the first set of calculations is performed in order to assign a randomized treatment.
All the values in the distribution table (illustrated by 2 in the image) are equal to 0 at start point. We are adding a first subject with Gender = Female and Age > 30. For this, we follow the workflow for calculating D, G and P for each of the three possible outcomes (treatments).
We are going to use the following notations:
We start by hypothetically assigning each of the three treatments and calculating the variances for each assignment. Because the subject to be added is a female with age > 30, we only have to calculate the variances for those factor values.
Then we calculate the total amount of imbalance for each of the three possible treatment assignments. These are the values displayed in the table in the Slots sheet (3 in the image), for the first entry, in the Gs column:
Then we calculate the probability (P) for each of the three possible treatment assignments. We have set the probability (p) to 0.8 in our example. The treatment with the lowest G (in our case A) will receive the Probability (P) as p (in our case 0.8). The remaining treamment assignments will split the remaining probability. These are the values displayed in the table in the Slots sheet (3 in the image), for the first entry, in the Ps column:
Then we generate a random number between 0 and 1 using Donald E. Knuth's subtractive random number generator algorithm and a seed value based on the number of ticks to represent the current date. The number is displayed in the table in the Slots sheet (3 in the image), for the first entry, in the Random column, in our example Random = 0.934...Considering the probabilities for each treatment assignment, and the random number, treatment C will be assigned to the first subject, as illustrated in the image.
This use case shows how to change from an autogenerated to a manually entered subject ID, to avoid a mix of patterns in the study.
{CountryCode}-{SiteCode}-{SiteSubjectSeqNo:000}
In version 2 of the design, the subject IDs are taken from the field subjid in the Study start event, thus the pattern:
subjid
This is assigned to all sites and subjects get subject IDs looking like this:

In Viedoc Clinic, you can now see a mix of patterns for the subject IDs:
One way of solving the mix of patterns is to make a revision of the Study start event form in version 1 and apply it to the study. The revision will not change the subject ID pattern, as this is not possible in revisions, instead we make an insignificant change to trigger an update of the subject ID. The recommended change is an insignificant text change to one of the items in the Study start event form. The Investigator then has to approve this change, and the subject IDs are updated:
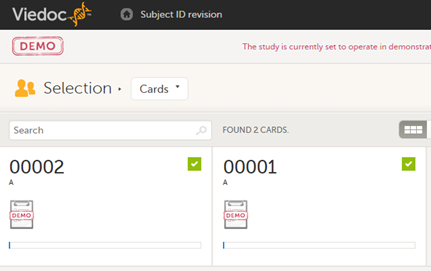
Another way of doing it is to trigger an update of all subject IDs by changing the country of all sites, and then immediately change it back again.
This lesson provides example configurations for setting up single sign-on (SSO) in Viedoc using commonly used Identity Providers (IdPs). These examples show how to configure the IdP side of the integration. For steps performed in Viedoc Admin, refer to the lesson Single sign-on.
Required roles/permissions:
Configuration steps:
Before following these examples, complete the following SSO configuration steps in Viedoc Admin, as described in the lesson Single sign-on:
This lesson assumes that you are already on the Validate setup step in Viedoc Admin.
You will need:
Access to the Hostmaster email address to the domain name for which you want to configure SSO.
Organization Admin access to Viedoc.
Administrator access to Google Workspace.
In this example we use a sample domain name and the European Viedoc training instance.
| 1 |
In Viedoc Admin, select Organization Settings, and select the SSO tab. Select the Validate setup step. Copy the Redirect URL and the Entity ID. 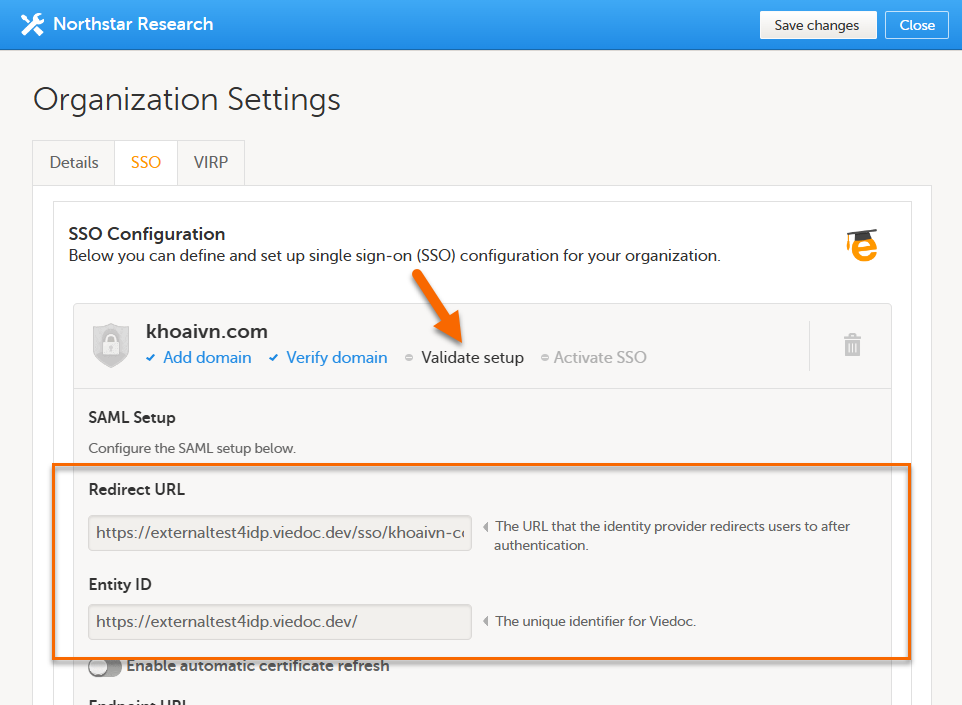
|
| 2 |
In a separate tab, log in to Google Workspace Admin Console, go to Apps > SAML apps. 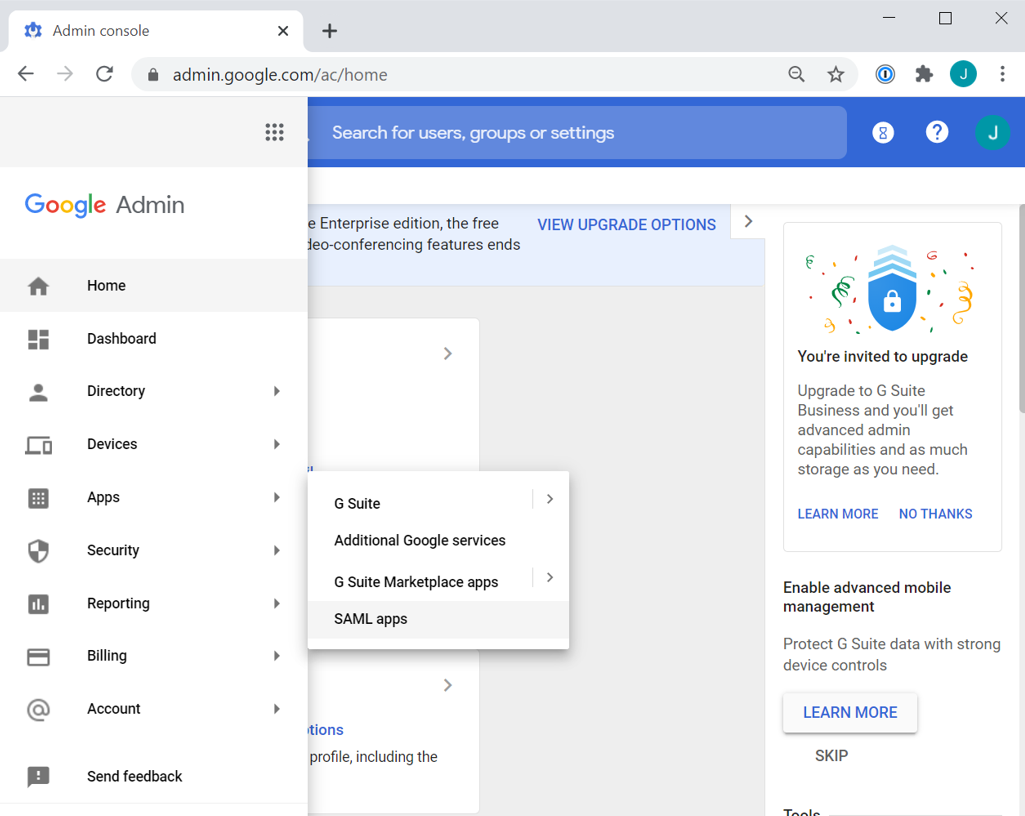
|
| 3 |
Select Add service and SETUP MY OWN CUSTOM APP: 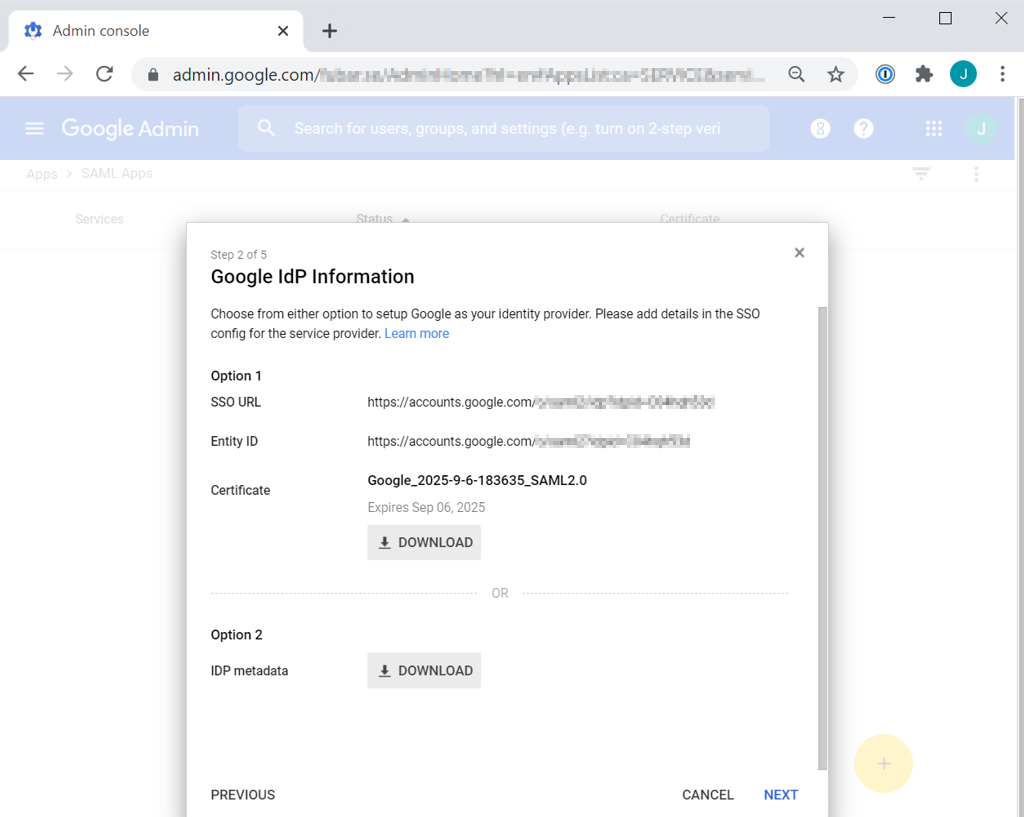
|
| 4 |
Return to the Viedoc Organization settings, SSO in the first tab. From the Google IdP Information window:
Select Save. 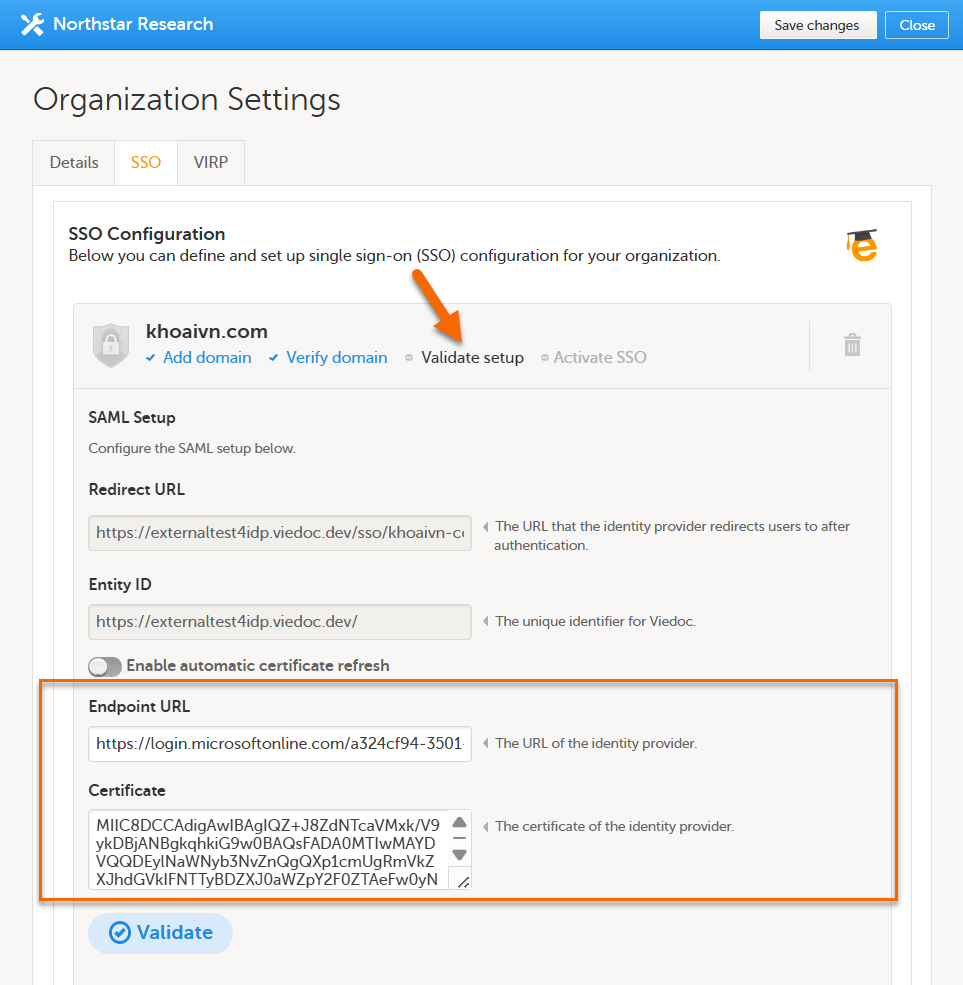
|
| 5 |
Go back to the Google Workspace tab and select Next. |
| 6 |
In the Basic information for your Custom App window:
Select Next. 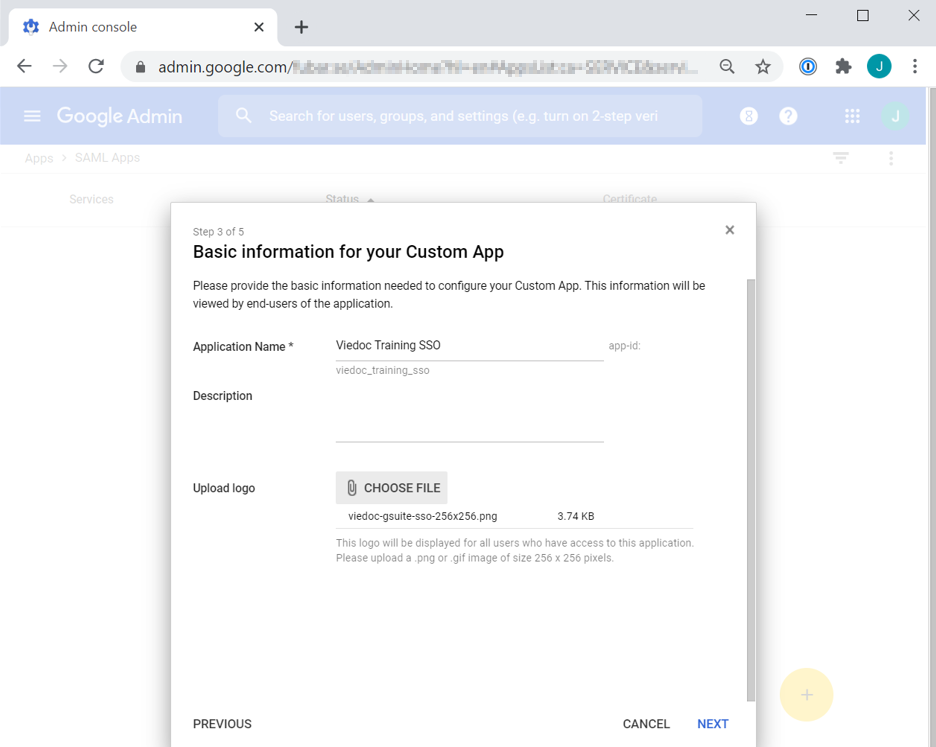 |
| 7 |
In the Service Provider Details window:
Select Next. 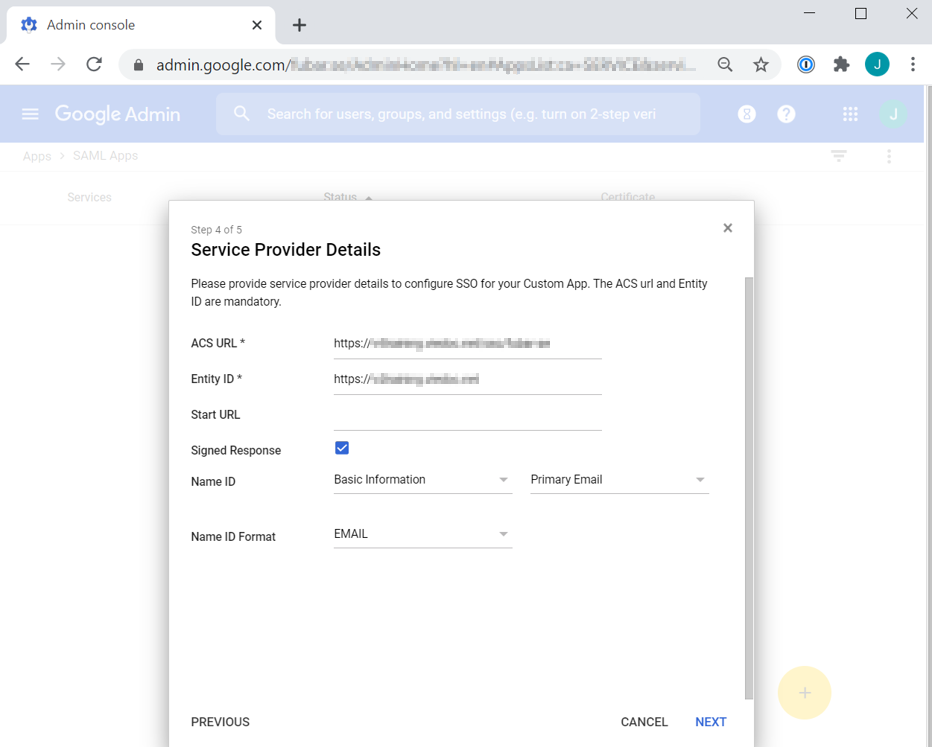
|
| 8 |
In the Attribute Mapping window, select Finish. 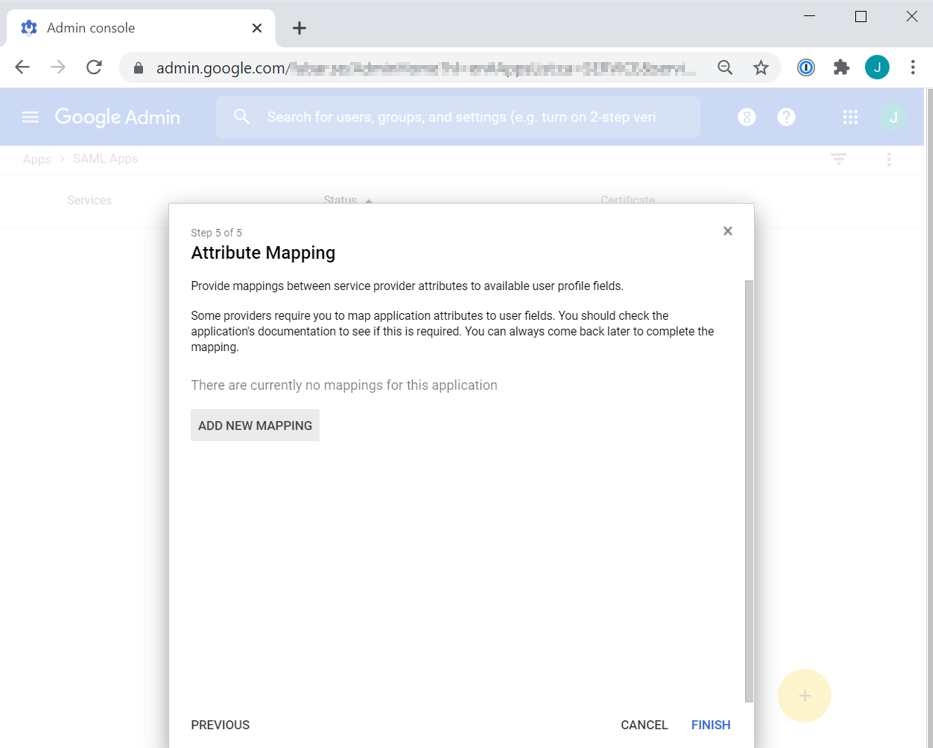
|
| 9 |
Select OK. 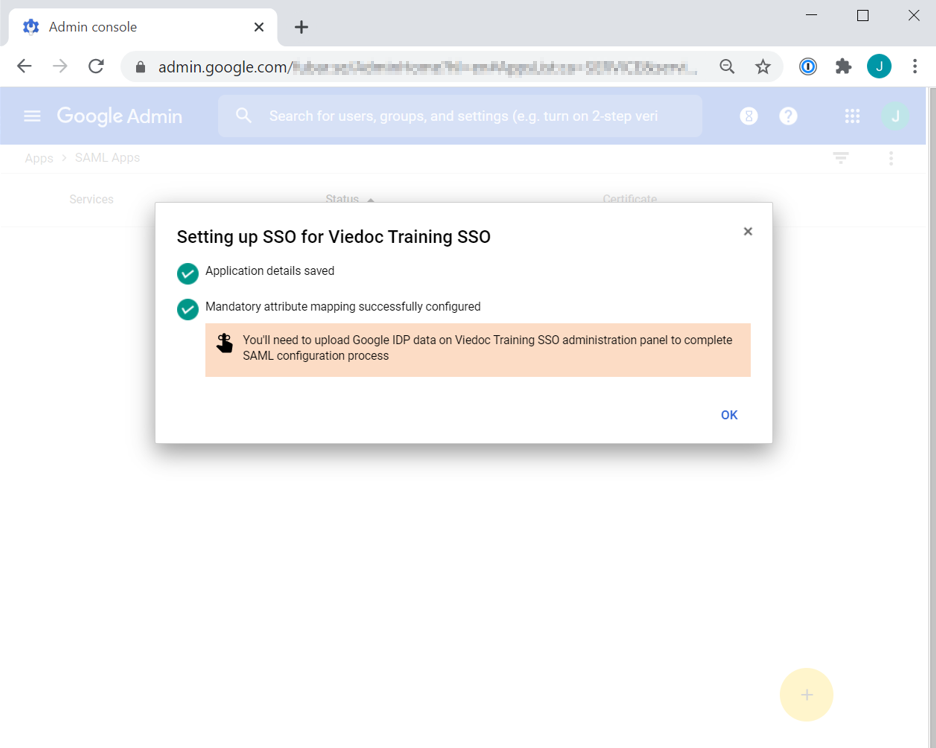
|
| 10 |
Select the down arrow of the User access section of the newly configured SAML App. Select ON for everyone and Save. 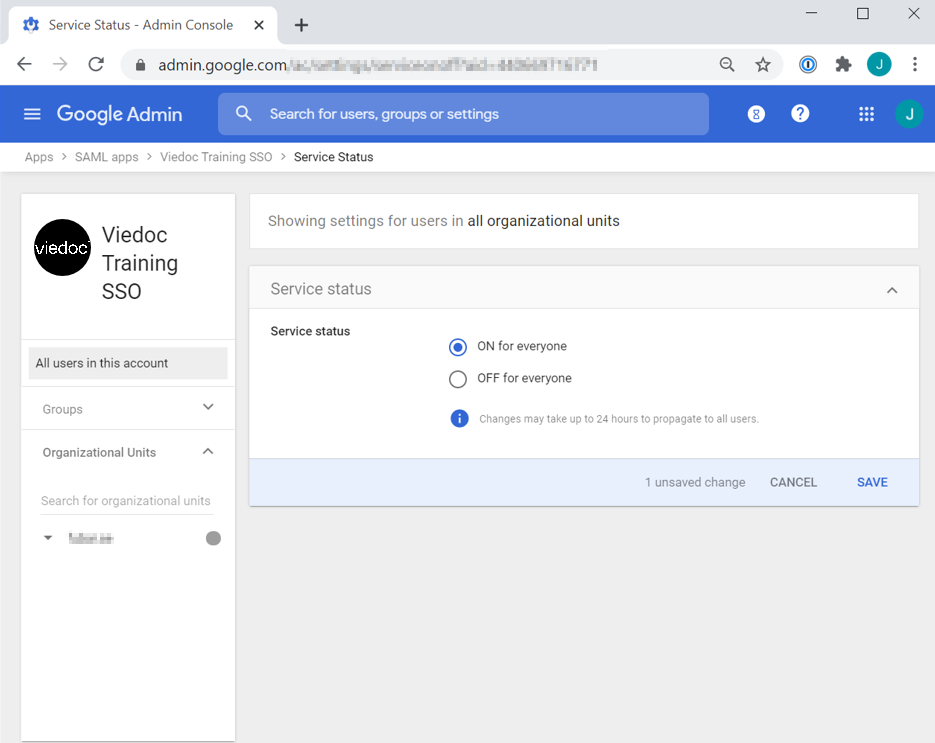
|
| 11 |
Go back to the Viedoc tab and select Validate to complete the validation step. Note! You might be prompted to enter your email address and password in order to authenticate with your IdP if not already logged in. Upon successful authentication you will automatically be redirected to the domain verification page. For steps performed in Viedoc Admin, refer to the lesson Single sign-on. |
You will need:
Access to the Hostmaster email address to the domain name for which you want to configure SSO.
Organization Admin access to Viedoc.
Administrator access to Microsoft Azure Active Directory (AD).
In this example we use a sample domain name and the European Viedoc training instance.
| 1 |
In Viedoc Admin, select Organization Settings, and select the SSO tab. Select the Validate setup step. Copy the Redirect URL and the Entity ID.
|
| 2 |
In a separate tab, log in to the Microsoft Azure portal and go to Azure Active Directory. Select Enterprise Applications > New application and Non-gallery application. 
|
| 3 |
Enter an appropriate Name describing the Viedoc instance, for example “Viedoc Training SSO”. Select Add. 
|
| 4 |
Select Single Sign-On > SAML. 
|
| 5 |
Select Edit the Basic SAML Configuration. From the Viedoc tab, copy and paste:
select Save and close the pop-up. 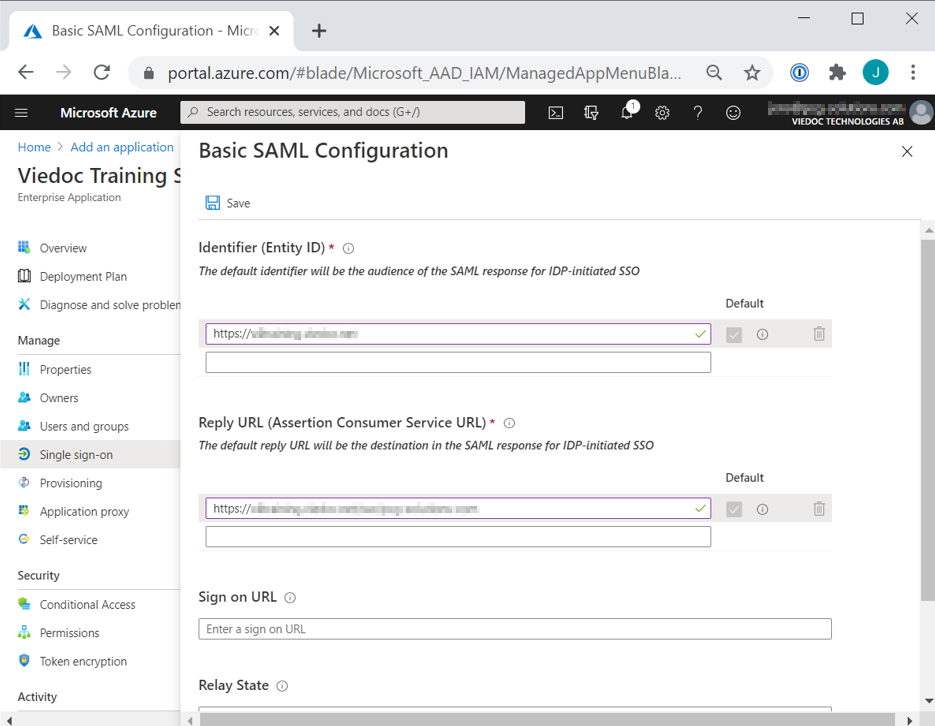
|
| 6 |
Select to Edit the User Attributes & Claims. 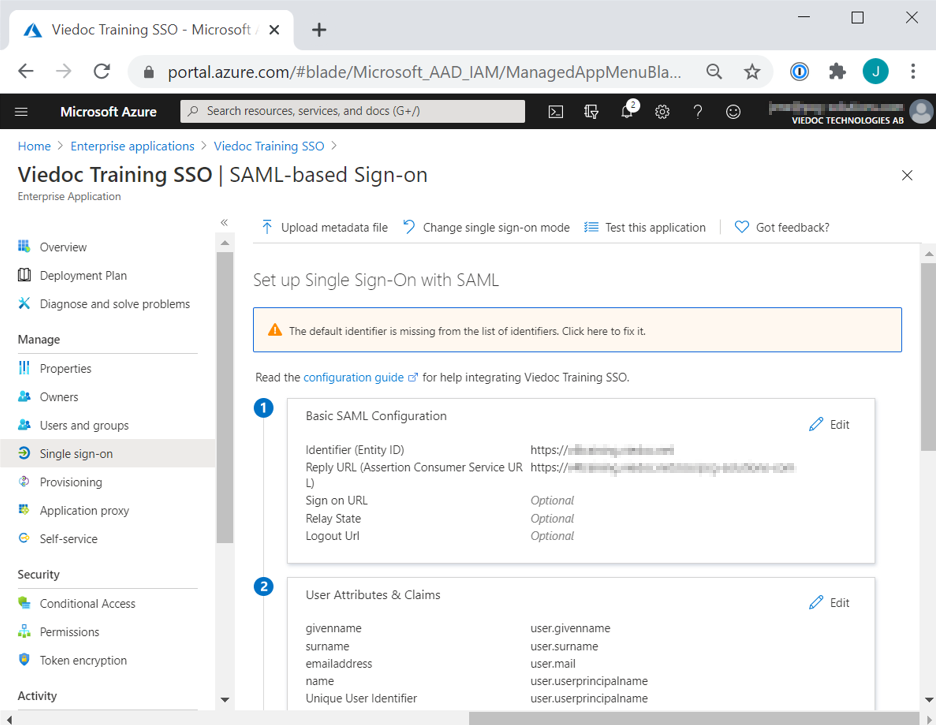
|
| 7 |
Map the Unique User Identifier (Name ID) to the attribute that best matches the email address that users authenticate with in Viedoc, typically [user.userprincipalname] or [user.mail]. 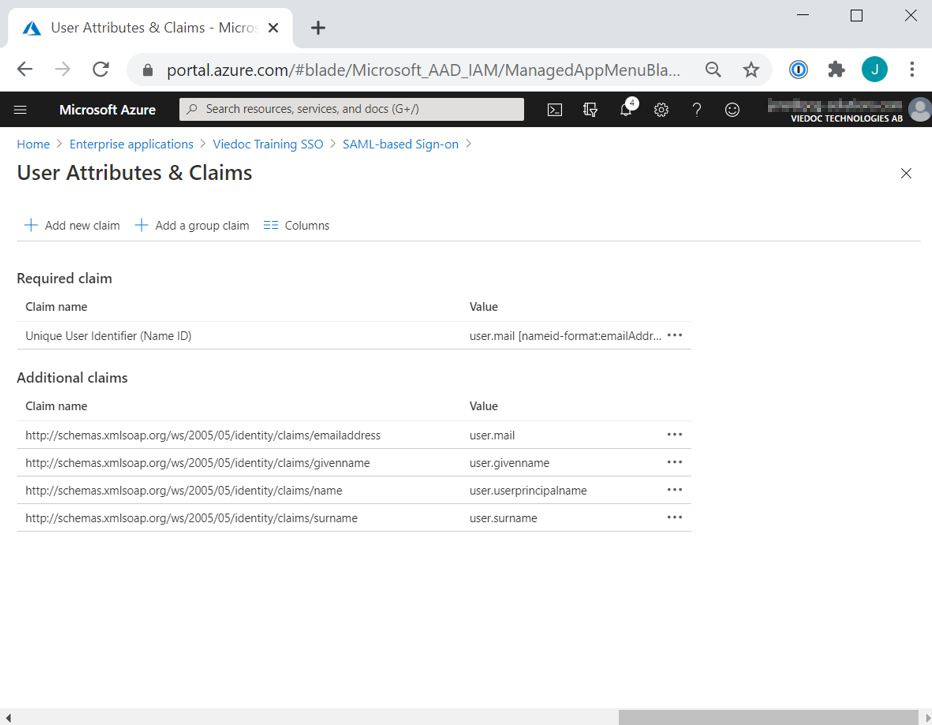
|
| 8 |
From the Azure AD window:
Select Save.
|
| 9 |
Download the Viedoc logo from https://www.viedoc.com/brand-resources#logos and upload it to the Properties section in the Azure AD tab. 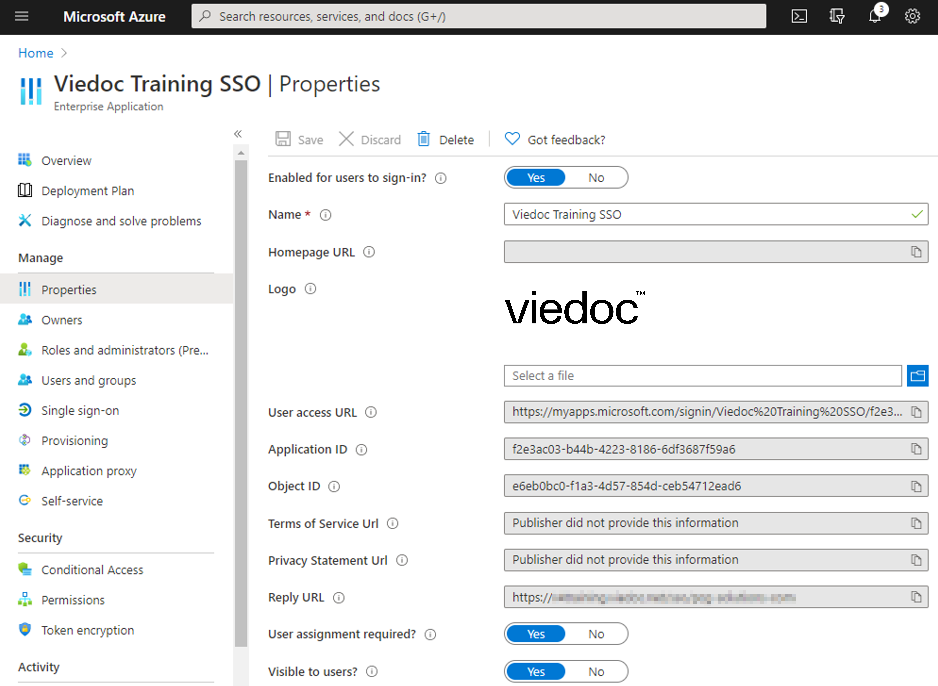
|
| 10 |
Under Users and groups, add all users or security groups that shall be able to log in to Viedoc using SSO. 
|
| 11 |
Go back to the Viedoc tab and select Validate. Note! You might be prompted to enter your email address and password in order to authenticate with your IdP if not already logged in. Upon successful authentication you will automatically be redirected to the domain verification page. 
|
| 12 |
Go back to the Viedoc tab and select Validate to complete the validation step. Note! You might be prompted to enter your email address and password in order to authenticate with your IdP if not already logged in. Upon successful authentication you will automatically be redirected to the domain verification page. For steps performed in Viedoc Admin, refer to the lesson Single sign-on. |
After completing the IdP configuration and validating the setup in Viedoc, follow the activation steps described in the lesson Single sign-on.
This video demonstrates how to add a new study in Viedoc Admin, create a simple study design in Viedoc Designer, manage users in Viedoc Admin and enter data as a site user in Viedoc Clinic.
If you have difficulties in viewing the video, click here.
This video demonstrates how to import data into Viedoc using the Viedoc Data Import Application.
If you have difficulties in viewing the video, click here.
For more information, see Viedoc Data Import Application.
This video demonstrates how to work with reference data in Viedoc.
If you have difficulties in viewing the video, click here.
This video demonstrates how to configure a static list randomization and a dynamic randomization in Viedoc.
If you have difficulties in viewing the video, click here.
This video demonstrates how to manage users in Viedoc Admin.
If you encounter difficulties in viewing this video click here.
This video demonstrates how to set up Viedoc Me in Admin and Designer.
If you have difficulties in viewing the video, click here.
This video gives an overview of how to set up Viedoc Logistics to ship your investigational product between sites and depots and how to allocate kits to patients.
If you have difficulties in viewing this video, click here.
This video demonstrates how to use R with Viedoc Reports.
If you have difficulties viewing the video, please click here.
Our Working Smarter webinar series is designed to help Viedoc users get the most out of the platform, from practical tips and feature deep dives to best practices and expert insights. Each session addresses topics for our users including highlighting new features, sharing useful tips, best practices, or deeper insights into specific areas of Viedoc.
Whether you're new to the system or an experienced user, these webinars are here to help you work smarter.
The full list of webinars in Viedoc’s Working Smarter Series, including recordings and Q&A, is provided below.
October 2024
https://help.viedoc.net/l/a29eab/en/
November 2024
https://help.viedoc.net/l/04c262/en/
January 2025
https://help.viedoc.net/l/893419/en/
February 2025
https://help.viedoc.net/l/bb2d9a/en/
March 2025
https://help.viedoc.net/l/027d45/en/
April 2025
https://help.viedoc.net/l/f94362/en/
June 2025
https://help.viedoc.net/l/227838/en/
September 2025
https://help.viedoc.net/l/b01136/en/
November 2025
https://help.viedoc.net/l/f914f3/en/
February 2026
https://help.viedoc.net/l/6c61f9/en/
June 2026
https://help.viedoc.net/l/53c7fb/en/

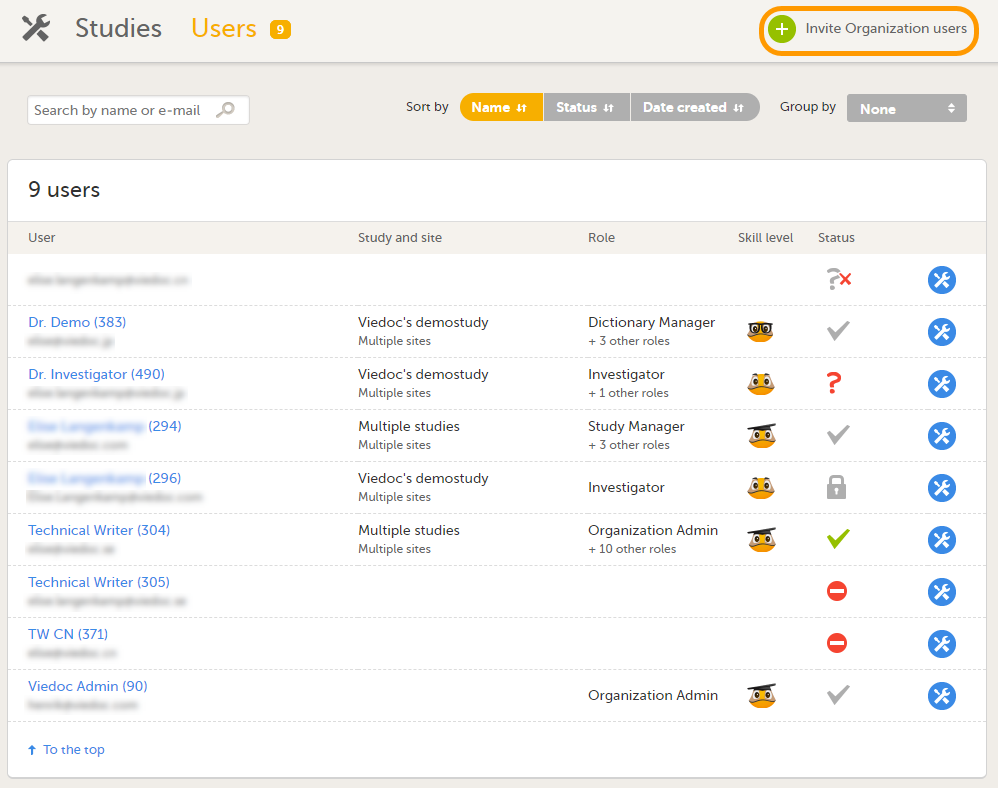
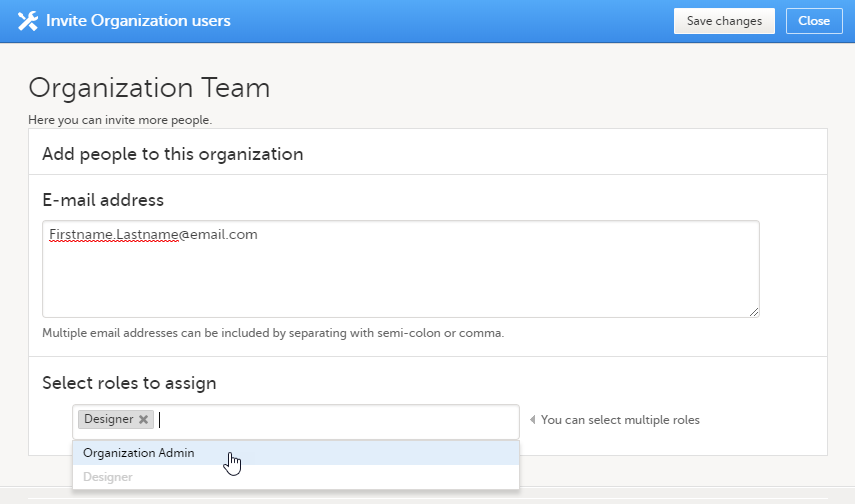
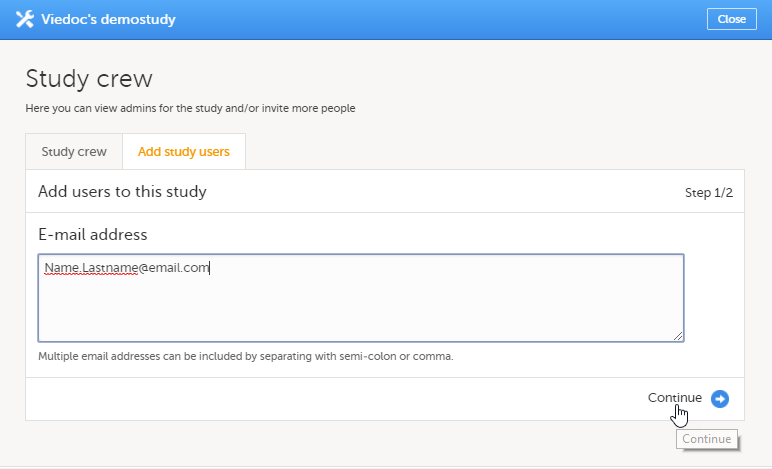


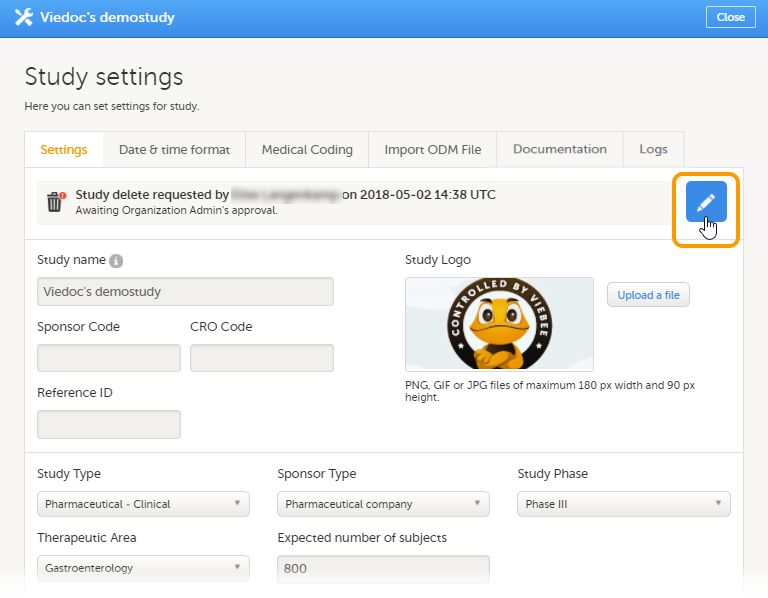


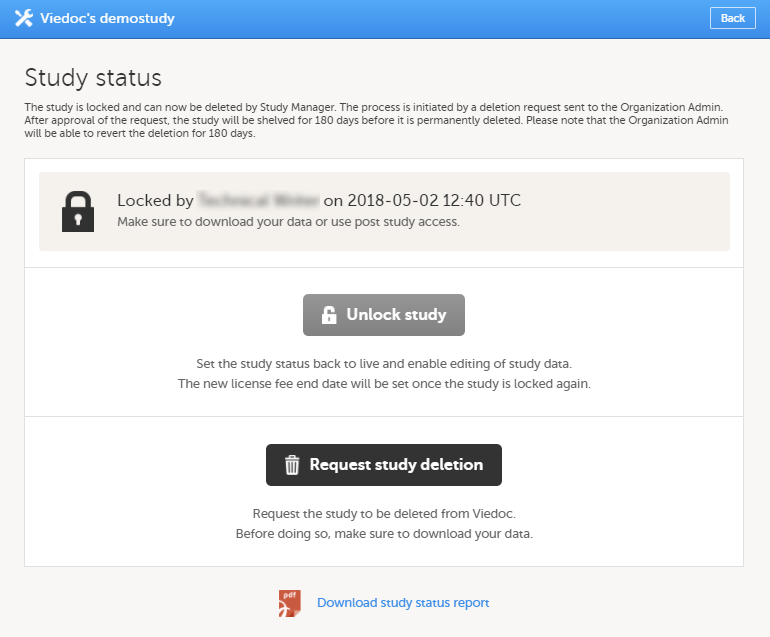
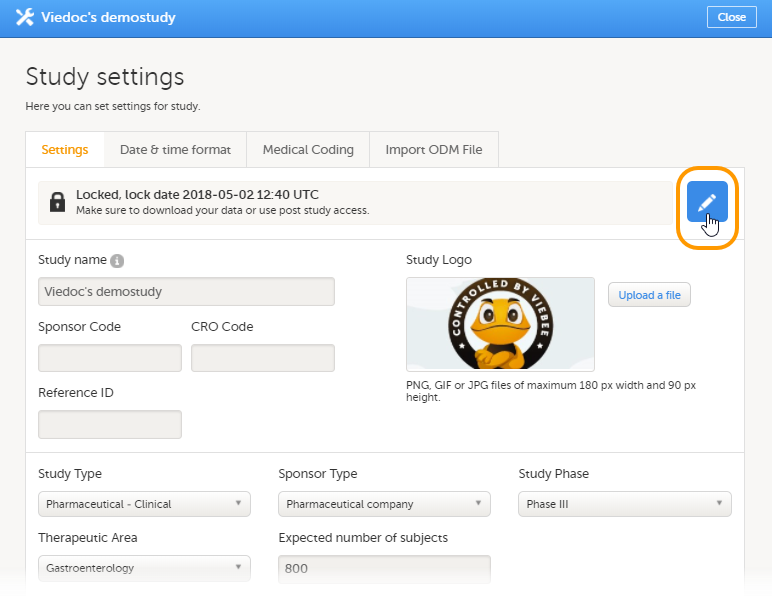

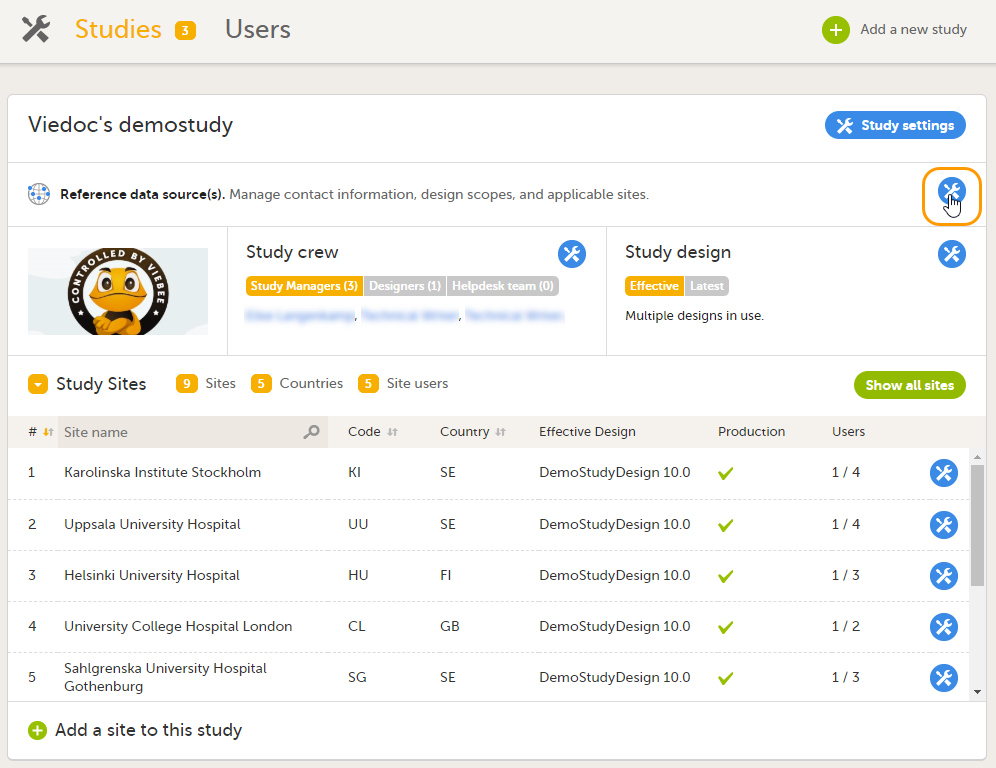

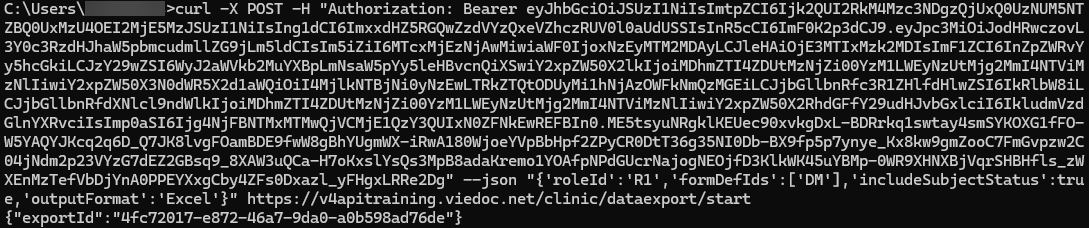
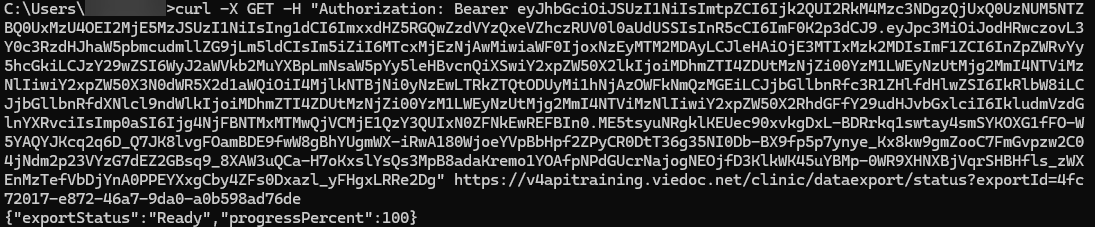 When the export status shows as