Exporting data
Introduction
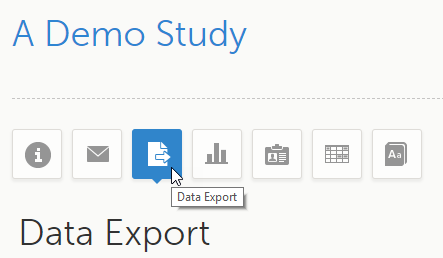
The Data Export page can be accessed by clicking the Data Export icon in the study start page:
The Data Export page enables you to preview and download study data:
- Preview - Using the preview feature, you can review the data directly on the screen, and generate different types of graphs from the data. It is also possible to directly access the underlying electronic Case Report Form (eCRF) pages.
- Export - You can export the data to an external file for further analysis or archiving. Viedoc supports export of data to the following formats:
Filtering the data to be previewed/exported
You can filter the data that you want to preview/export, as described in the following sections.
Filtering data by country and site
If you have access to multiple sites, you can filter the data for a specific country or site.
To filter data for a specific country, click on the name of the country. The selected country appears in blue letters besides the Data Export header, while the site(s) for the selected country are listed below:
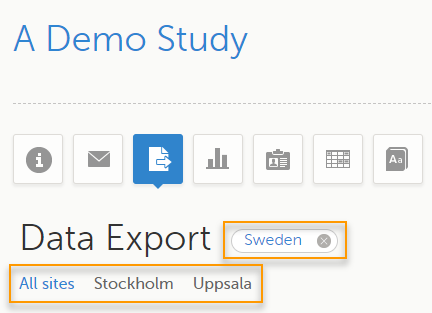
For a specific country, you can choose to export the data for:
- All sites (default)
- A specific site that you select. The current selection is highlighted in blue text.
Note! Only one site can be selected at a time.
To undo the selection of the site, click All sites.
To undo the selection of a country, click the cross x icon beside the name of that country.
While filtering for country or site, the number of subjects depicted in between brackets in the Subjects to include field is updated accordingly.
Including subjects
You can choose to include all subjects in the data preview or export, or include a selection of subjects.
To select which subjects to include:
| 1 | Select Include single subject(s). |
| 2 |
Click the Repeat this step for each subject you want to include in the data preview/export. |
To undo the selection of certain subjects, click the - icon, or click the cross x icon next to the subject ID:

Events and time period
You can choose to include all the data or only for certain events. You can also filter the data added or edited during a certain time period.
Note! The available events are the ones existing in the latest design version applied on the first of the selected sites to be included in the export. If there are multiple design versions running for different of the selected sites, you have to select one site at a time in order to get the available events for the respective site.
Selecting events
You can choose to:
- Include all events (default)
- Include Single events. See below the instructions for selecting single events.
To select which events to include:
| 1 | Select Single event(s). |
| 2 |
Click the |
To undo the selection of certain events, click the - icon, or click the cross x icon next to the event:

Selecting a time period
To include data from a specific time period:
| 1 | Select the Time period checkbox: |
| 2 | Select one of the following options from the first drop-down list:
|
| 3 | Select whether to define the time period until a certain date, from a certain date, or between two dates. |
| 4 | Select the date(s). |
Tip! Filtering for data that were added or edited since a specific date is especially useful if you want to see all new and changed data since for example your last monitoring visit.
To undo the selection of a certain time period, click the cross x icon next to it:

Forms and items
You can choose which forms and items to be included in the export output:
- Include all forms and items (default)
- Include single forms and items - see the instructions below on how to select forms and items.
Note! Only data belonging to forms and items that exist in the latest effective design applied to the first of the selected sites will be included in the export. Also note that the forms and fields available to choose from are determined by the visibility settings for your user role.
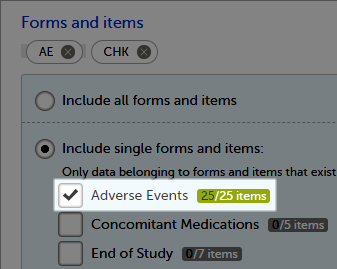
To include data from specific form(s):
| 1 | Select Include single forms and items. |
| 2 | Select the forms and items to be included, in one of the following ways:
|
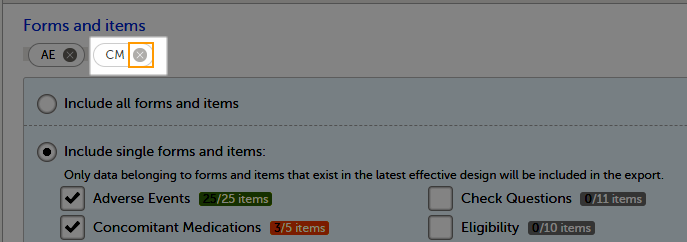
To undo the selection of a certain form, click the cross x icon next to it:
Type of data
Filter data by review status
You can filter the data to be included in the export by the review status, as follows:
- Signed data (selected by default) - data that has been signed in Viedoc Clinic (typically by the Investigator). For information on how data is signed see Signing data.
- Not signed data (selected by default) - unsigned data.
- SDV performed or N/A (selected by default) - data on which the Source Data Verification (SDV) was performed (marked by the SDV flag in Viedoc Clinic) and data that does not require SDV.
- SDV pending (selected by default) - data that requires SDV that was not performed (not yet marked by the SDV flag in Viedoc Clinic).
Additional information
You can select to include additional information, depending on the export output format, as described in the following sections.
Booklet status
For PMS studies, there is an option to include booklet status and booklet status history in the export.
When selecting to include Booklet status, the Booklet status history option becomes available.
Depending on if the booklet status is included in the export or not, the export contains the following information:
- Without Booklet history - there is one row for each booklet, providing information about the current status of the booklet.
- With Booklet history - there is one row for each change in the booklet status, that is, there can be many rows for one and the same booklet.
Booklets in submitted status are not included in exports triggered by users on the sponsor side. The booklets are included to those users when they are received.
Note! Clinic actions to submit/recall back and forth are not available on the sponsor side. Only the latest submit of the booklet that was received by the sponsor is included.
If the Booklet Status is selected and the following options: Require Responsible Investigator for booklet submission, and Require Contract for booklet submission, are enabled for the study, two columns are added to the export.
- Contract number - of the selected contract for the specific booklet.
- Responsible Investigator - user name (internal ID) of the user selected as Responsible Investigator for the specific booklet.
If Booklet history is selected at export, the historically selected Contract and Responsible Investigator are included in the respective booklet status. The most recent contract information shall be shown, regardless of the booklet status.
Note! If the contract linked to a booklet is edited, the contract information is updated in the existing row for that booklet in the export performed after the information was updated.
The booklet status can be exported to the following export output formats:
When selecting to include Booklet status in the Excel export, a separate Booklet status sheet is created that lists all the forms with the following information:
| Column name | Description |
|---|---|
| Site sequence number | A counter that identifies the site globally within the study |
| Site name | The site name, as set in Viedoc Admin |
| Site code | The site code, as set in Viedoc Admin |
| Subject sequence number | A counter that identifies the subject within the site |
| Subject Id | The Subject ID, in the format configured in Viedoc Designer. The Subject ID is the subject identifier displayed in Viedoc Clinic on the subject card, subject details page, and so on. |
| Booklet sequence number | A counter that identifies the booklet within the sequence of booklets for the same subject |
| Booklet Id | The booklet ID, as set in the study design (in Viedoc Designer) |
| Booklet name | The booklet name, as set in the study design (in Viedoc Designer) and displayed in Viedoc Clinic |
| Booklet status | One of Not initiated, Initiated, Submitted, Received, Returned, or Frozen |
| Booklet activity | Initiated, Submitted, Recalled, Received, Frozen, Unfrozen, or Returned |
| Date & time (UTC) | The date and time of the status change |
| User name (ID) | The name (ID) of the user who changed the booklet status |
| Contract number | The number of the selected contract for the specific booklet. Note! This column is present in the export only if the option to link the booklet to a contract is enabled for the study. |
| Responsible Investigator | User name (internal userID ) of the user selected as Responsible Investigator for the specific booklet. Note! This column is present in the export only if the option to link the booklet to a contract is enabled for the study. |
Queries and Query history
When selecting to include Queries, the Query history option becomes available.
The Queries can be exported to the following export output formats:
- Microsoft Excel - Office Open Extensible Markup Language (XML)
- CSV
- Operational Data Model ODM - in this case, the Query history is not optional, but will be included regardless. For this reason it is not displayed as an option.
See also:
Review status
The review status can be exported to the following export output formats:
- Microsoft Excel - Office Open XML - when selecting one row per item as Layout, the review status is not included in the export.
- CSV - when selecting one row per item as Layout, the review status is not included in the export.
- PDF - PDF Archive (PDF/A) - only the signature information is included (not SDV, lock status, or CRA review status).
ODM
See also:
Event dates
The event dates can be exported to the following export output formats:
When selecting to include Event dates in the Excel export, a separate Event dates sheet is created that lists all the events with the following information:
| Column name | Description |
|---|---|
| Site sequence number | A counter that identifies the site globally within the study |
| Site name | The site name, as set in Viedoc Admin |
| Site code | The site code, as set in Viedoc Admin |
| Subject sequence number | A counter that identifies the subject within the site |
| Subject Id | The Subject ID, in the format configured in Viedoc Designer. The Subject ID is the subject identifier displayed in Viedoc Clinic on the subject card, subject details page, and so on. |
| Event Id | The event ID, as set in the study design (in Viedoc Designer) |
| Event name | The event name, as set in the study design (in Viedoc Designer) and displayed in Viedoc Clinic |
| Event repeat key | For recurring events, the counter that identifies different occurrences of the same event (identified by the Event ID). Available for output versions Viedoc 4.39 and onward. |
| Event status | The current status of the event. It can be one of the following:
|
| Event date | The event date, as set in Viedoc Clinic when the event is initiated |
| Planned date | The event planned date, as set in Viedoc Clinic when the event is planned |
| Proposed date | The proposed date for the event, if set in the study design |
| Window start date | The event time window start date, if set in the study design. |
| Window end date | The event time window end date, if set in the study design |
| Initiated by | The name and ID of the user who initiated the event |
| Initiated date (UTC) | The date and time (UTC) when the event was initiated |
| Last edited by | The name and ID of the user who last edited the event |
| Last edited date (UTC) | The date and time (UTC) when the event was last edited |
| Design version | The design version/revision that is active for the event |
Uploaded files
When selecting the Uploaded files option, the uploaded file together with the thumbnail (if it exists) are part of the Excel, CSV and PDF export output:
- Excel - the export file (.xls) together with all the referenced file uploads are included in a zip file.
- CSV, PDF - A folder with all the referenced file uploads is included in the export zip file.
- When you select Include history (available only for one row per item), the current version of the uploaded file will be included as usual, and the previous versions of the files will be stored in subfolders named as the Edit sequence number.
The export output (Excel, PDF, CSV, ODM) as well as the Data preview provides the following information about uploaded files:
- File Name
- File Size (in bytes)
- File Hash
- Path to where the actual file is located in the exported zip file
The following information on the uploaded file is available in the full history:
- Who has uploaded the file
- Upload date
- Initial/Updated (first file uploaded/update of an existing file)
- File Name
- File Size (in bytes)
- File Hash (MD5)
- Link to file
Pending forms
The pending forms can be exported to the following export output formats:
Forms are considered pending when they are uninitiated in initiated events. This applies to all types of events, including subject-initiated events. For repeating forms, if the first instance of the form is uninitiated, the form is considered pending. Resetting a form results in that form being pending.
When selecting to include Pending forms in the Excel export, a separate Pending forms sheet is created that lists all the forms with the following information:
| Column name | Description |
|---|---|
| Site sequence number | A counter that identifies the site globally within the study |
| Site name | The site name, as set in Viedoc Admin |
| Site code | The site code, as set in Viedoc Admin |
| Subject sequence number | A counter that identifies the subject within the site |
| Subject Id | The Subject ID, in the format configured in Viedoc Designer. The Subject ID is the subject identifier displayed in Viedoc Clinic on the subject card, subject details page, and so on. |
| Event sequence number | A counter that identifies the event within the sequence of events for the same subject |
| Event Id | The event ID, as set in the study design (in Viedoc Designer) |
| Event name | The event name, as set in the study design (in Viedoc Designer) and displayed in Viedoc Clinic |
| Event repeat key | For recurring events, the counter that identifies different occurrences of the same event (identified by the Event ID). Available for output versions Viedoc 4.39 and onward. |
| Activity Id | The activity ID, as set in the study design (in Viedoc Designer) |
| Activity name | The activity name, as set in the study design (in Viedoc Designer) and displayed in Viedoc Clinic |
| Form Id | The form ID, as set in the study design (in Viedoc Designer) |
| Form name | The form name, as set in the study design (in Viedoc Designer) and displayed in Viedoc Clinic |
| Event date | The event date, as set in Viedoc Clinic when the event is initiated |
| Pending since |
The date and time since when the form has been pending This is not always the date when the event was initiated. For a form that has been hidden due to a visibility condition, the pending since date is the date when the form is made available. |
Medical coding
The medical coding can be exported to the following export output formats:
- Microsoft Excel - Office Open XML. For details, see Medical coding in Excel export.
- CSV - similar output information as in Excel.
- ODM - for details, see Medical coding in ODM export.
Edit status
The edit status can be exported to the following export output formats:
Subject status
The subject status can be exported to the following export output formats:
The sheet Calculated subject status contains the following columns:
- Site sequence number
- Site name
- Site code
- Subject sequence number
- Subject Id
- Screened state
- Screened on date/datetime (site local)
- Enrolled state
- Enrolled on date/datetime (site local)
- Completed state
- Completed on date/datetime (site local)
- Withdrawn state
- Withdrawn on date/datetime (site local)
Export output formats
Select the export output format of the data under Output format > Output to:
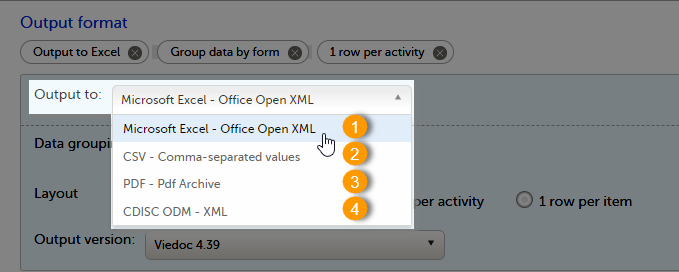
You can export the data to one of the following formats:
1. Microsoft Excel - Office Open XML
2. CSV
3. PDF - PDF/A
4. ODM
Microsoft Excel / CSV
Viedoc uses Microsoft Excel Open XML format which is compatible with Excel version 2007 and later.
For details about the Excel export options and the format/structure of the output file, see Excel export.
CSV
The output of the CSV export is similar to the Excel export output. The CSV export output consists of a zip archive containing one CSV file that corresponds to each sheet from the Excel export. For details about the Excel export options and the format/structure of the output file, see Excel export.
For the CSV export and one row per activity selected layout, there is also the option to Include corresponding SAS script. For details, see Exporting for SAS.
For details about the PDF export and the format/structure of the output file, see PDF export output.
CDISC ODM
The Clinical Data Interchange Standards Consortium (CDISC) Operational Data Model (ODM) is a vendor neutral, platform independent format for interchange and archive of clinical trials data. The format includes the clinical data along with its associated metadata, administrative data, reference data and audit information. All of the information that needs to be shared among different software systems during the setup, operation, analysis, submission or for long term retention as part of an archive is included in the model.
This is used to export the data to an ODM file, with or without Viedoc extensions. To include the Viedoc extensions in the exported file, select the Include extensions checkbox. Viedoc extensions are Viedoc specific settings that cannot be described as part of the CDISC standards. If the exported file is to be imported to Viedoc at a future time, the checkbox should be checked.
The ODM export file is built up as follows:
- The
Studytag contains the information on the study settings, study design, workflow. - The
AdminDatacontains data about the user and site settings. - The
ClinicalDatatag contains the data that was filled in in Viedoc Clinic. - The
Associationtag contains information about the performed actions such as SDV, raising and approving queries, medical coding, lock, CRA and DM reviews.
See also:
- Queries in ODM export
- Medical coding in ODM export
- Review status in ODM export
- Excel export (See for more information on how to export Audit trail history.)
Export compatibility with previous Viedoc versions
It is possible to select the Viedoc version that the exported file should be compatible with. This option enables you to export files that have the same format as files exported from previous Viedoc versions.
Note! This functionality is optional and set in the study settings in Viedoc Admin. It might not be activated for your study.
If activated for your study, you can select the Viedoc version that you wish the exported file to be compatible with under Output format and export, from the Output version drop-down menu. If you wish to create an export file according to the latest Viedoc version, select Latest Viedoc version:
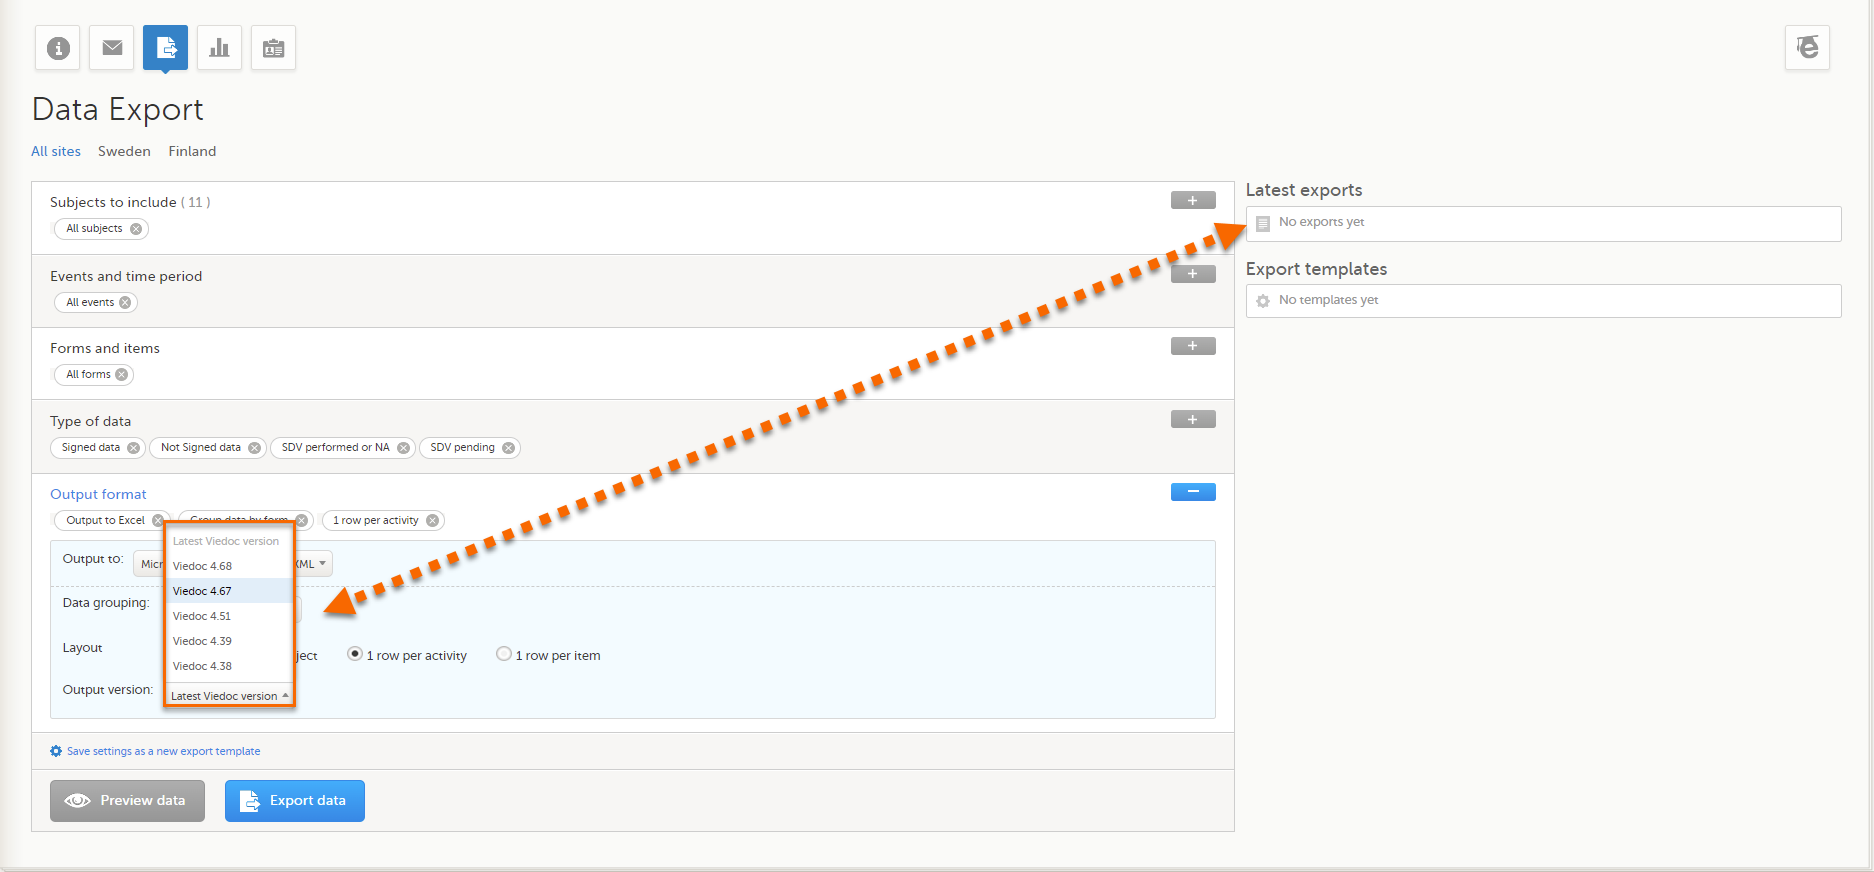
The Viedoc version used for data export is listed in the Latest exports area on the right side of the export page.
The exported file contains information about which Viedoc version was used to create it. You can find information about the Viedoc version in the following places:
- For Excel, the Viedoc version used is displayed in the README sheet.
- For CSV, the Viedoc version used is displayed in the README text file.
- For PDF, the Viedoc version used is displayed on every page in the footer or side bar.
- For ODM, the Viedoc version used is displayed in the Export version extension.
Output versions
The Viedoc versions available in the Output version dropdown menu are only those versions in which changes to the data structure were introduced.
As of Viedoc release 4.77, the following output versions are available:
| Output version | Changes in data structure |
|---|---|
| Latest Viedoc version | When choosing Latest Viedoc version, the exported data will automatically follow the structure of the latest Viedoc release in which changes to the data structure were introduced. |
| Viedoc 4.77 | For studies where item-level SDV is enabled, when exporting review status, the SDV sheet in the CSV and Excel data exports will include only the items that require SDV and are visible to the user. On the Review status sheet, items that do not require SDV are indicated with N/A. |
| Viedoc 4.68 |
Introduction of pdf archive export system check which splits the archive into one pdf file per subject and stores resultant PDF in a zip file. |
| Viedoc 4.67 | Introduction of two new columns for approving medical coding: "approved by" and "approved on date". |
| Viedoc 4.51 | Introduction of three new form repeat keys and the table of contents in the PDF export, see the table below for details |
| Viedoc 4.39 | Introduction of repeating forms and recurring events, see the table below for details. |
| Viedoc 4.38 | Original output format (Viedoc versions 4.38 or older). |
In Viedoc 4.51, the following changes to the export output were introduced:
| File type | Changes in the export output format |
|---|---|
| Excel | Addition of three columns for the new form sequence numbers introduced:
|
| ODM | Three new form sequence numbers were introduced, as Viedoc extensions: v4:SubjectFormSeqNo, v4:OriginSubjectFormSeqNo and v4:SourceSubjectFormSeqNo, within the FormData, right after the FormRepeatKey. |
| A table of contents was added to the PDF archive, starting on page 2 of the file. |
In Viedoc 4.39, the following changes to the export output were introduced:
| File type | Changes in the export output format |
| Excel | Addition of a column for Form sequence number (FormSeq) that contains the FormRepeatKey. |
| ODM | The FormRepeatKey now contains the activity ID as well, in the following format: FormRepeatKey$ActivityId. The ExportVersion attribute has been added to the ODM. |
| The summary formats are used to display the event and form names. |
Previewing data
The Preview data button is only available when you have selected Excel or CSV as output format for the export.
The preview is not available when you have selected 1 row per item.
Data table
On the data tab, you can preview the data in table format:
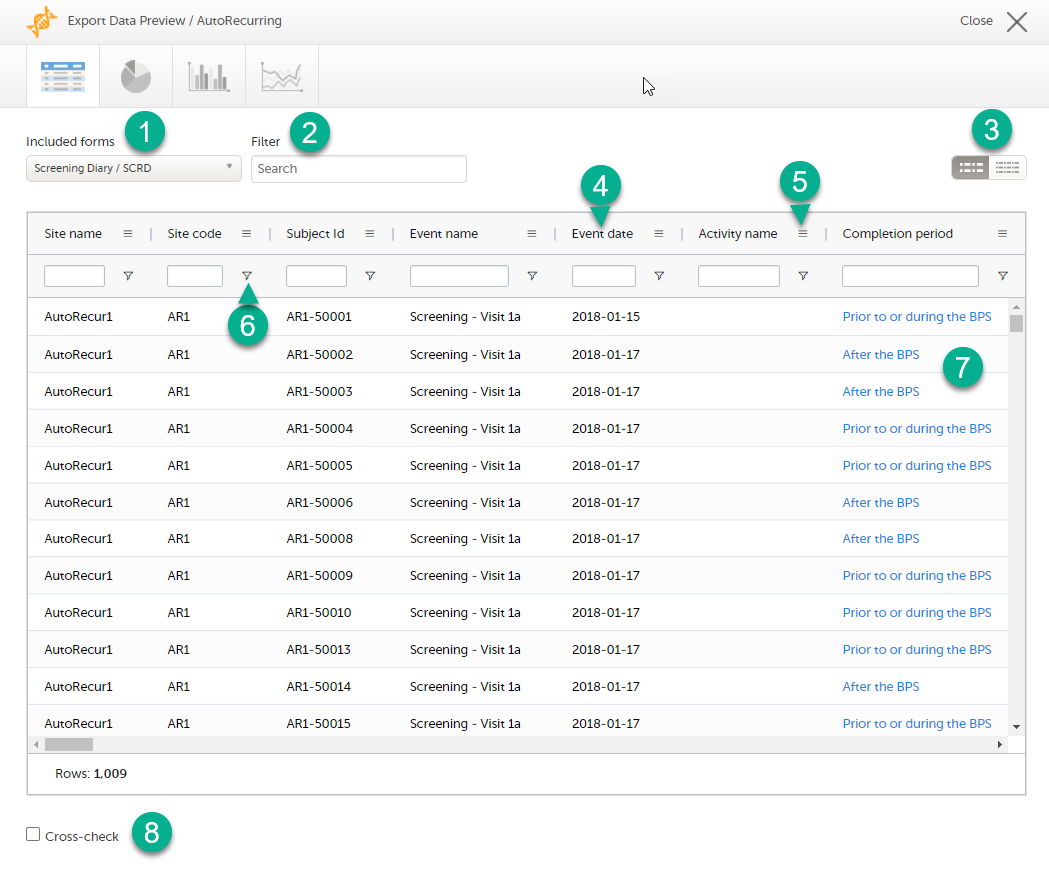
1. If you have selected Group data by form, you can select the form for which you want to display data.
2. Use the Filter text box to filter the preview data by any text in any field. The preview is filtered on all words in this field.
3. Toggle between spacious view and compact view.
4. Click a column header to sort the data in ascending order. Click again to sort in descending order. A third click removes the column sort order. To rearrange the order of the columns in the table, simply click on a column header and drag the column sideways.
5. Click to open the column menu. For more information, see Column menu.
6. Click to access the column filter. For more information, see Column filter.
7. Click any hyperlink data point in the table to view the underlying form in read-only mode.
8. Select Cross-check to display a second data table. This lets you cross-check data between the two tables. Form selection and the filtering and sorting of data in the second table are independent of the settings in the first table.
Column menu
The column menu contains:
|
|
|
|
|
For more information, see the following sub-sections.
Column display options
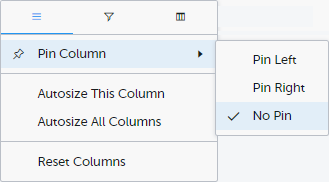
Pin Left/Right makes a column remain visible in the leftmost or rightmost position when you scroll sideways. Select No Pin to unpin the column.
Autosize adjusts the column width to the width of the text in the column.
Reset Columns resets the pinning, sizing, and order of columns to the initial state.
Column filter
Use the column filters to narrow down the selection of preview data.

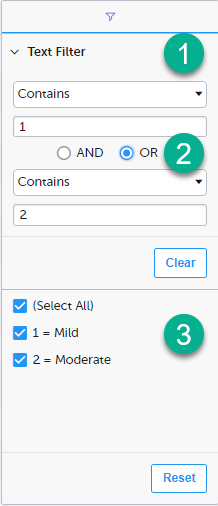
1. Depending on the type of item in the column, you can specify one of these types of filters:
- Text filter with the following filter operators:
- Contains
- Not contains
- Equals
- Not equal
- Starts with
- Ends with
Form items that are radio buttons, drop-down menus, checkboxes, dates, or date/time items are treated as text.
Note! The text filters are case-insensitive.
- Number filter with the following filter operators:
- Equals
- Not equal
- Less than
- Less than or equals
- Greater than
- Greater than or equals
- In range
2. Once you have specified a filter, you can specify another one for the same column, either as an AND filter or an OR filter.
3. Predefined filter options based on the data available in the column.
Column selection options
Select the columns to be displayed in the preview table.
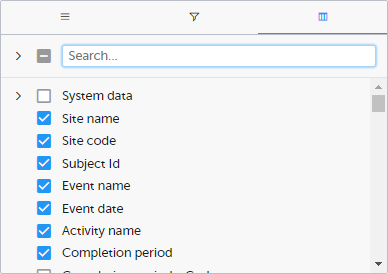
Use the Search field to search for columns.
By default, system data is excluded from the table. To include system data, select the column(s) to include from the System data category. Note that some system data columns are only available when you have selected 1 row per activity. For more information, see Excel export.
Data table context menu
When you right-click in a cell in the data table, this context menu is displayed:
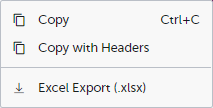
Copy: Copies the cell value to your clipboard.
Copy with Headers: Copies the cell value and its column header to your clipboard.
Excel Export: Exports the preview data on the data tab. The resulting Excel file will have the same sorting and filtering of data and order of columns as the preview.
Pie chart
Select the data set you wish to plot in a chart, and click Draw:
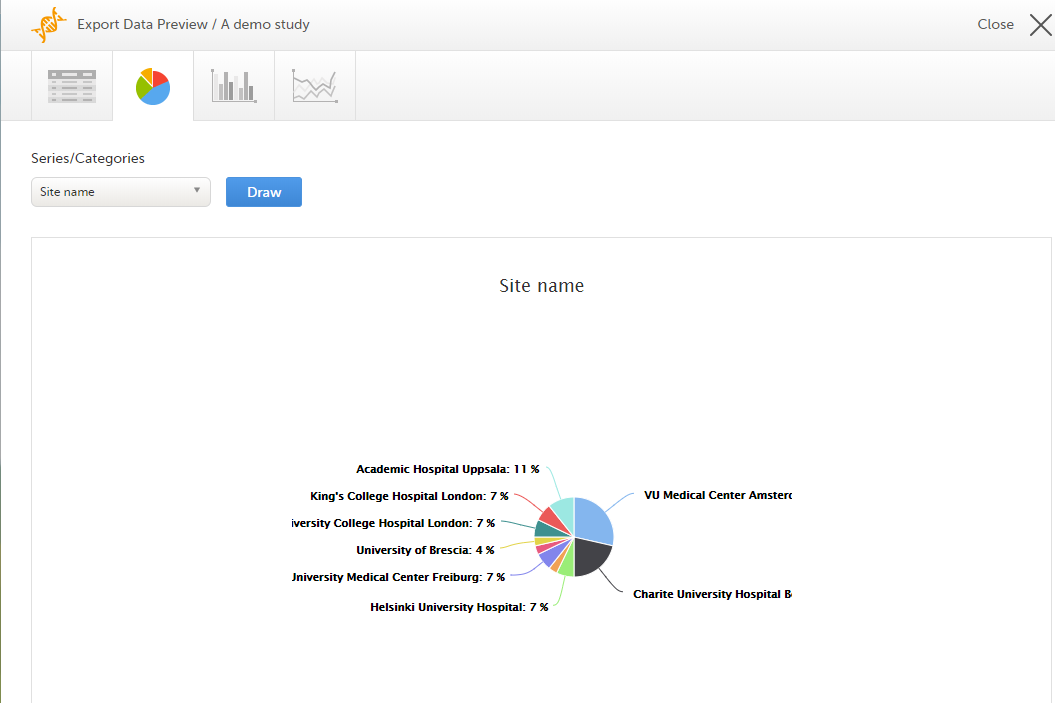
If you have selected Group data by form, you can only choose data sets from the form you have selected on the data table tab.
Click any data point to view its details.
Note! The pie chart has access to the same data as the data tab. That means that if you applied filters on the data tab, only the filtered data will be available in the pie chart.
Column chart
Select which data you would like to plot on the X-axis and Y-axis, which series should be created, and click Draw:
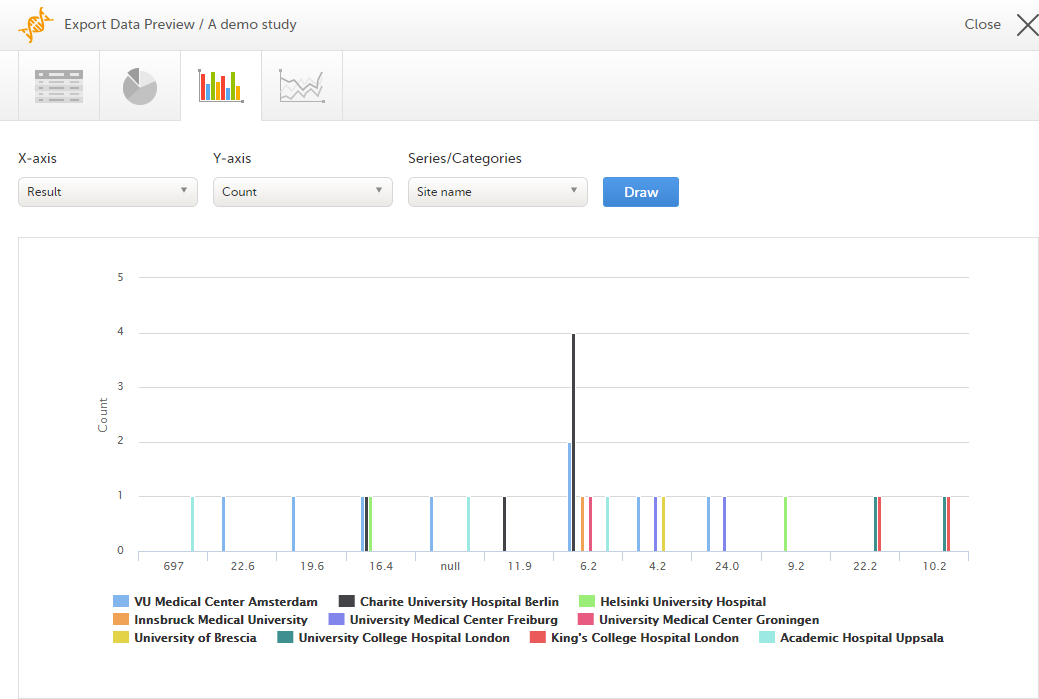
If you have selected Group data by form, you can only choose data sets from the form you have selected on the data table tab.
Click any column to view details of the data.
Note! The column chart has access to the same data as the data tab. That means that if you applied filters on the data tab, only the filtered data will be available in the column chart.
Line chart
Select which data you would like to plot on the X-axis and Y-axis, which series should be created, and click Draw:
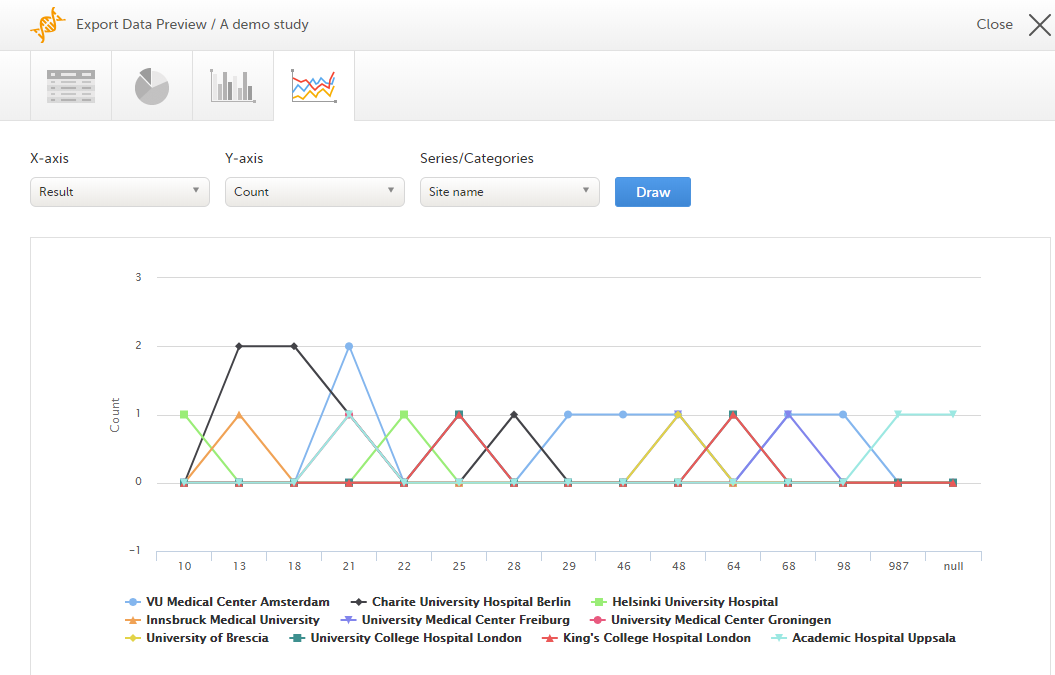
If you have selected Group data by form, you can only choose data sets from the form you have selected on the data table tab.
Note! The line chart has access to the same data as the data tab. That means that if you applied filters on the data tab, only the filtered data will be available in the line chart.
Data export templates
When you have made settings for an export, you can save them as a template. Then you, and optionally others, can use the template to easily make new exports with the same settings.
Saving export settings as a template
To save your settings as a template:
| 1 |
Click Save settings as a new export template. 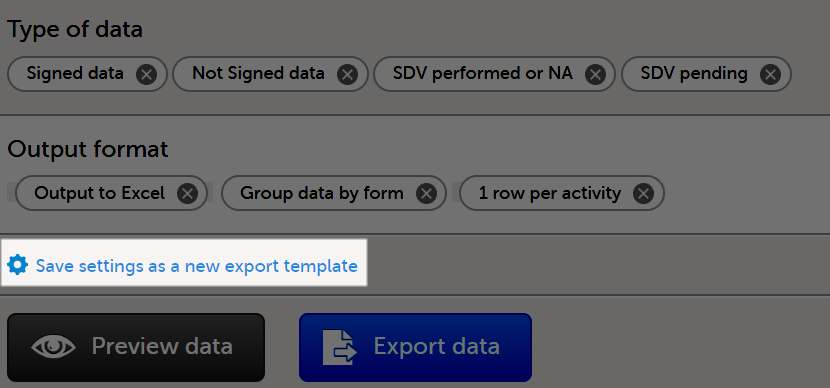
|
| 2 |
In the pop-up that is displayed, enter a name for the template and select whether it should be private or shared. If you select Shared, you are prompted to also select the roles that will be able to use the template. The roles available in the drop-down list are the ones with export permissions for the latest effective design of the study in question. 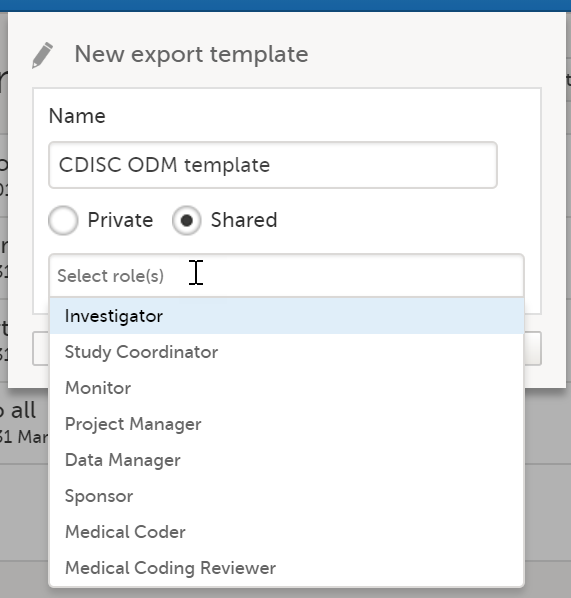
|
| 3 |
Click Save. Now the Export templates list is displayed, with your newly created template at the top of the list: 
|
Applying a data export template
To apply a data export template:
| 1 |
Click View all templates in the Export templates area of the Data export page. 
|
| 2 |
Click the apply icon for the template that you want to apply. 
|
| 3 | Click Export data to perform an export with the settings in the template. |
Tip! Alternatively, you can use the quick access apply, available in the Export templates area:

Editing a data export template
To edit a data export template:
| 1 |
Click View all templates in the Export templates area of the Data export page. 
|
| 2 |
The Export templates list is displayed. Click the edit icon for the template that you want to edit. 
|
| 3 |
In the pop-up that is displayed, you can edit the name of the export template and the settings for Private/Shared. Note! You can only edit a template that you created yourself. |
Deleting a data export template
To delete a data export template:
| 1 |
Click View all templates in the Export templates area of the Data export page. 
|
| 2 |
The Export templates list is displayed. Click the trash can icon for the template that you want to delete. 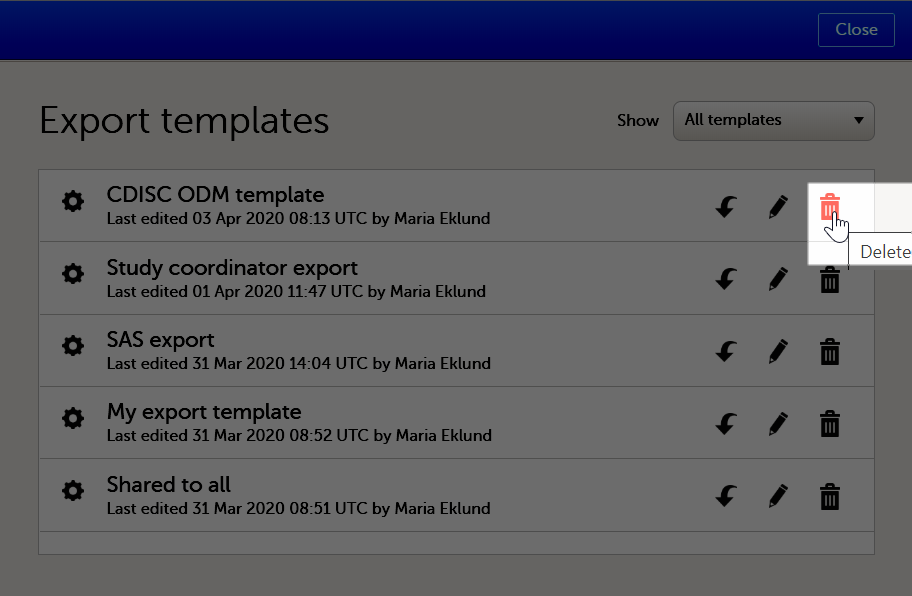
|
| 3 |
In the pop-up that is displayed, click Delete. 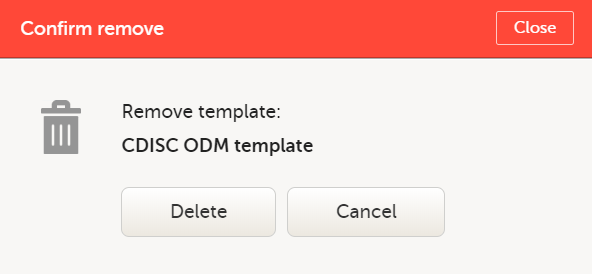
Note: You can only delete a data export template that you created yourself. |
Exporting data
To perform a data export:
| 1 | Filter the data to be exported. See Filtering the data to be exported. |
| 2 | Select the Output format. |
| 3 | Optionally, select the Output version. |
| 4 | Optionally, preview the data to be exported. |
| 5 |
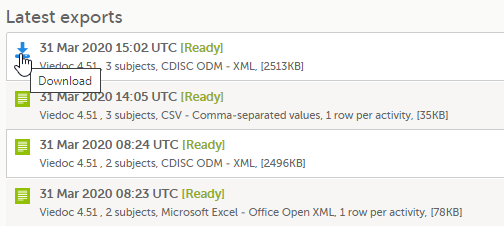
Click Export data. The status of the export is displayed in the Latest exports area, on the top of the list. When the export is completed, you can download the exported file: The exported file is downloaded locally. The filename is generated as follows: SponsorCode_CountryCode_SiteCode_Date_Time, where:
Note! If any of the characters that are invalid for a filename in Windows are used within any of the SponsorCode or SiteCode, these characters will be automatically replaced with - within the exported filename. |
Latest exports
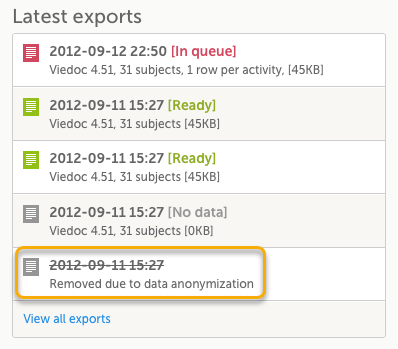
You can see a log of the requested exports in the Latest exports area, where you can download the exported files or delete the logs.
Note! The list of the latest exports is user-specific, that is, you can only see the exports made by yourself.
The latest five exports are shown in the list. To get the complete list of the initiated exports, click the View all exports link at the bottom of the list.

Each log entry provides the following information:
1. The date and time when the export was initiated.
2. The export status:
- In Queue - the export request is in queue, waiting to be processed.
- In Progress - the exported started and is in progress.
- Ready - the file was successfully exported and is ready for download.
- Error - an error was encountered and the export was not performed.
3. Viedoc output version - see Output versions.
4. The number of exported subjects.
5. The format of the output file.
6. The selected layout, if applicable.
7. File size
Note! If data has been masked after an export was made, it is not possible to download that export because it could include the data that was later masked.
