Managing kits
Introduction
You manage the kits by changing the kit status. Changing the kit status is done by selecting an action, to a single kit or to a selection of multiple kits at once. The available actions depend on the current kit status.
You can perform the following actions in Viedoc Logistics: Transfer - Receive - Cancel - Return - Quarantine - Restore - Invalidate - Edit expiry date
The following table shows what happens to the kit(s) when performing the actions:
| Action | Result |
|---|---|
| Transfer | Initiates a kit shipment to the selected destination. The kit is in transit, illustrated by a truck icon in the stock list. |
| Receive | Completes a kit shipment. The new location is set. |
| Cancel | Cancels a kit shipment. The previous location is set. |
| Return | Sets the kit status of an allocated kit as returned from the study subject. |
| Quarantine | Sets the kit in quarantine, making it temporarily unavailable for allocation. |
| Restore | Restores a kit from quarantine and makes it valid for allocation. |
| Invalidate | Makes a kit not available for allocation. |
| Edit expiry date | Changes the expiry date of the kit. |
Kit management
Action pane
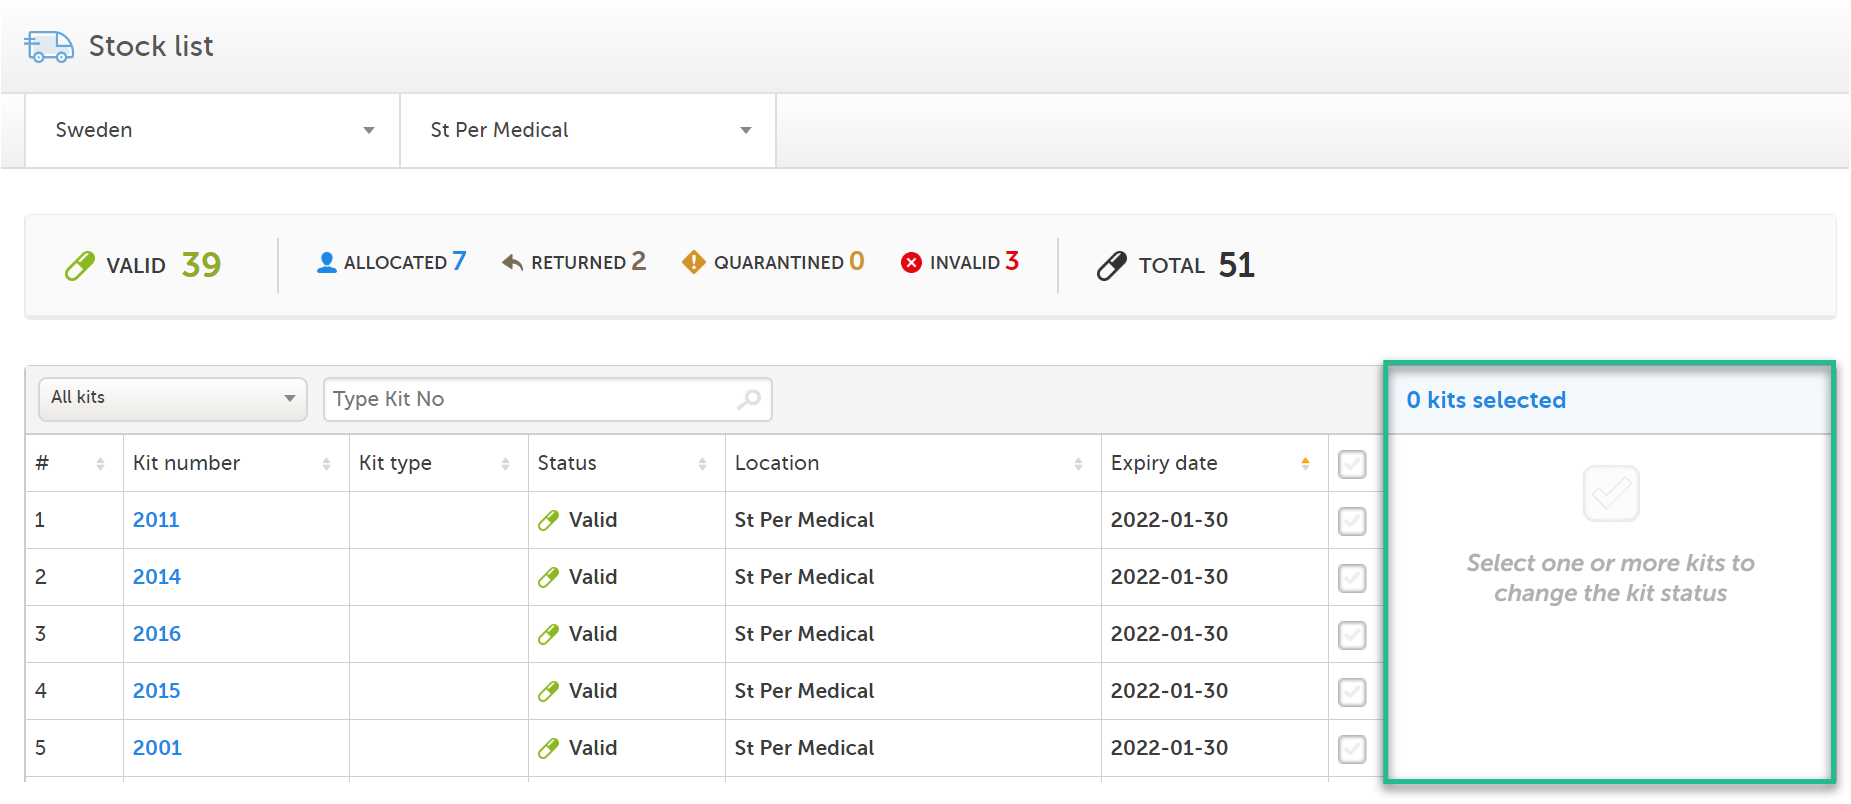
You manage the kits from the action pane. The pane is available in two places:
1. On the Stock list page, to the right:
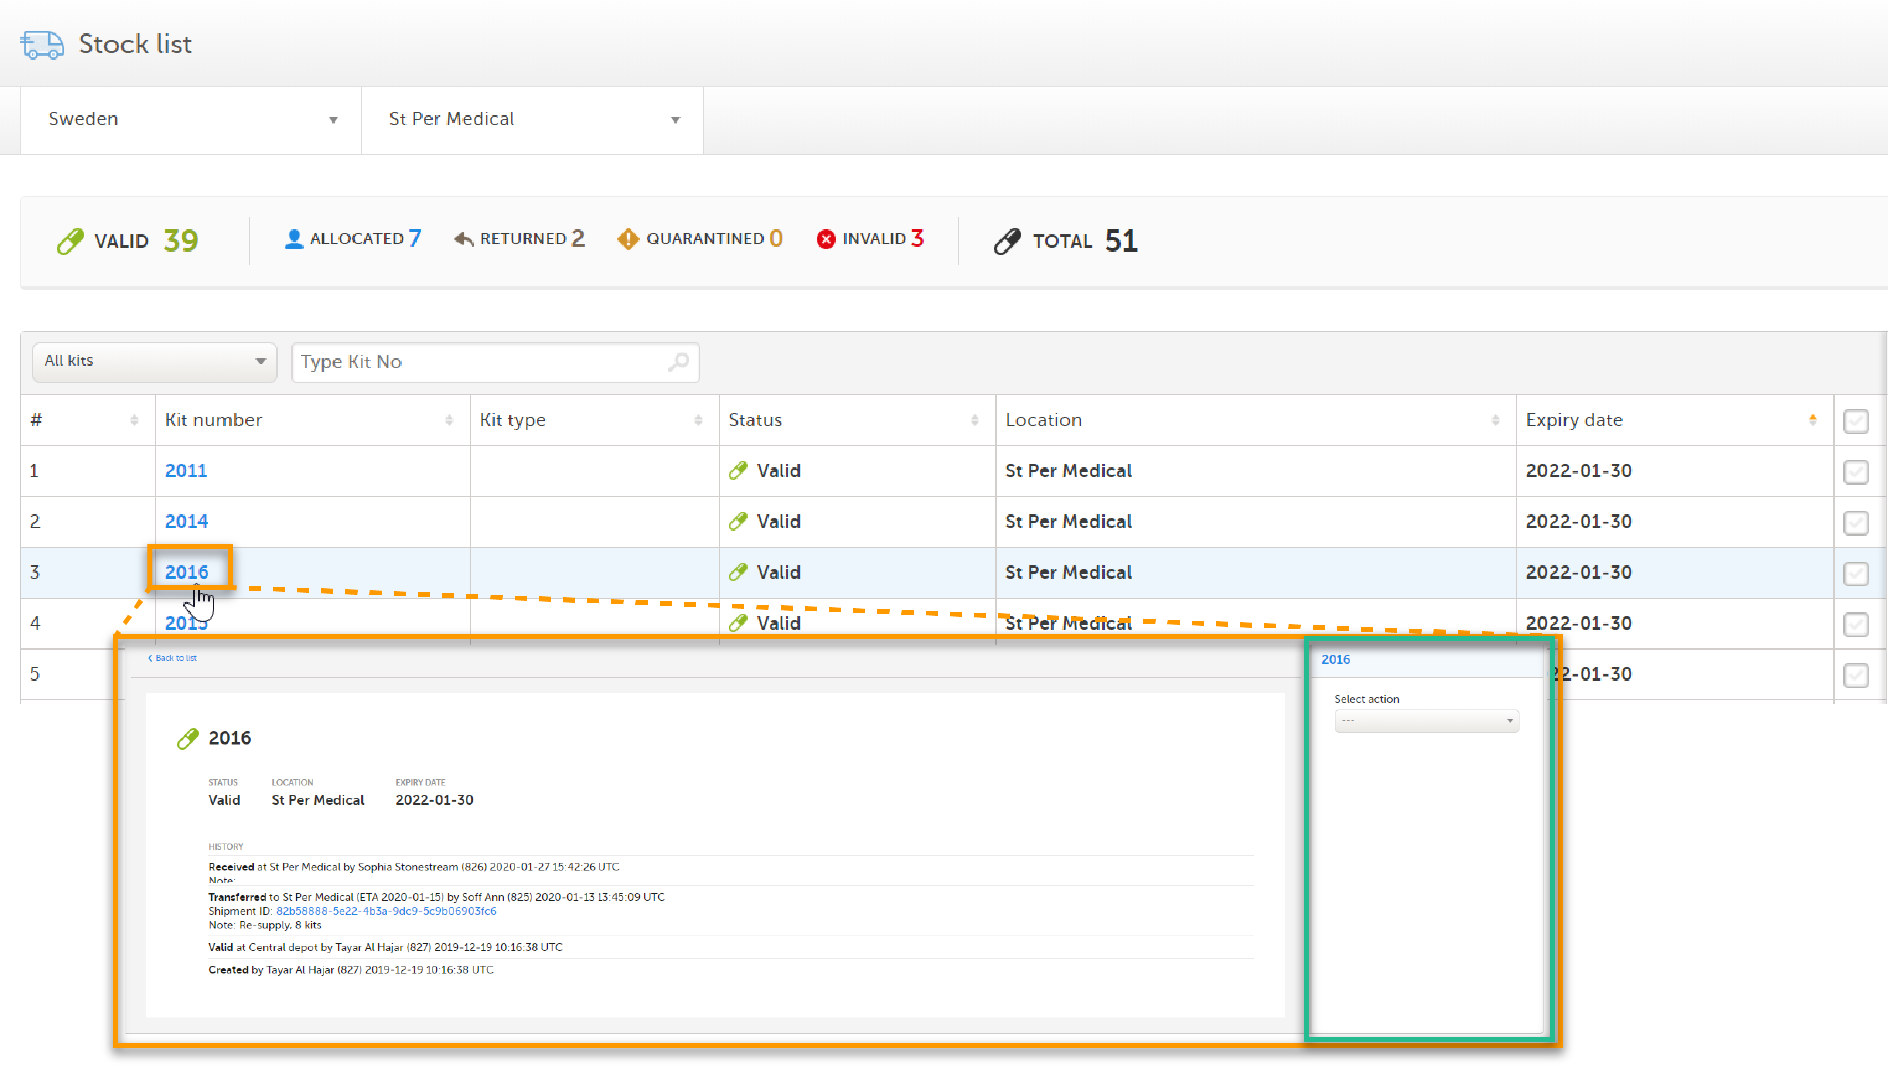
2. In the kit details view, by clicking on a Kit number in the stock list:
In the kit details view, you can only manage the kit you've selected. When you manage kits from the Stock list page, you can manage a selection of kits at once, see Selecting multiple kits below.
Selecting multiple kits
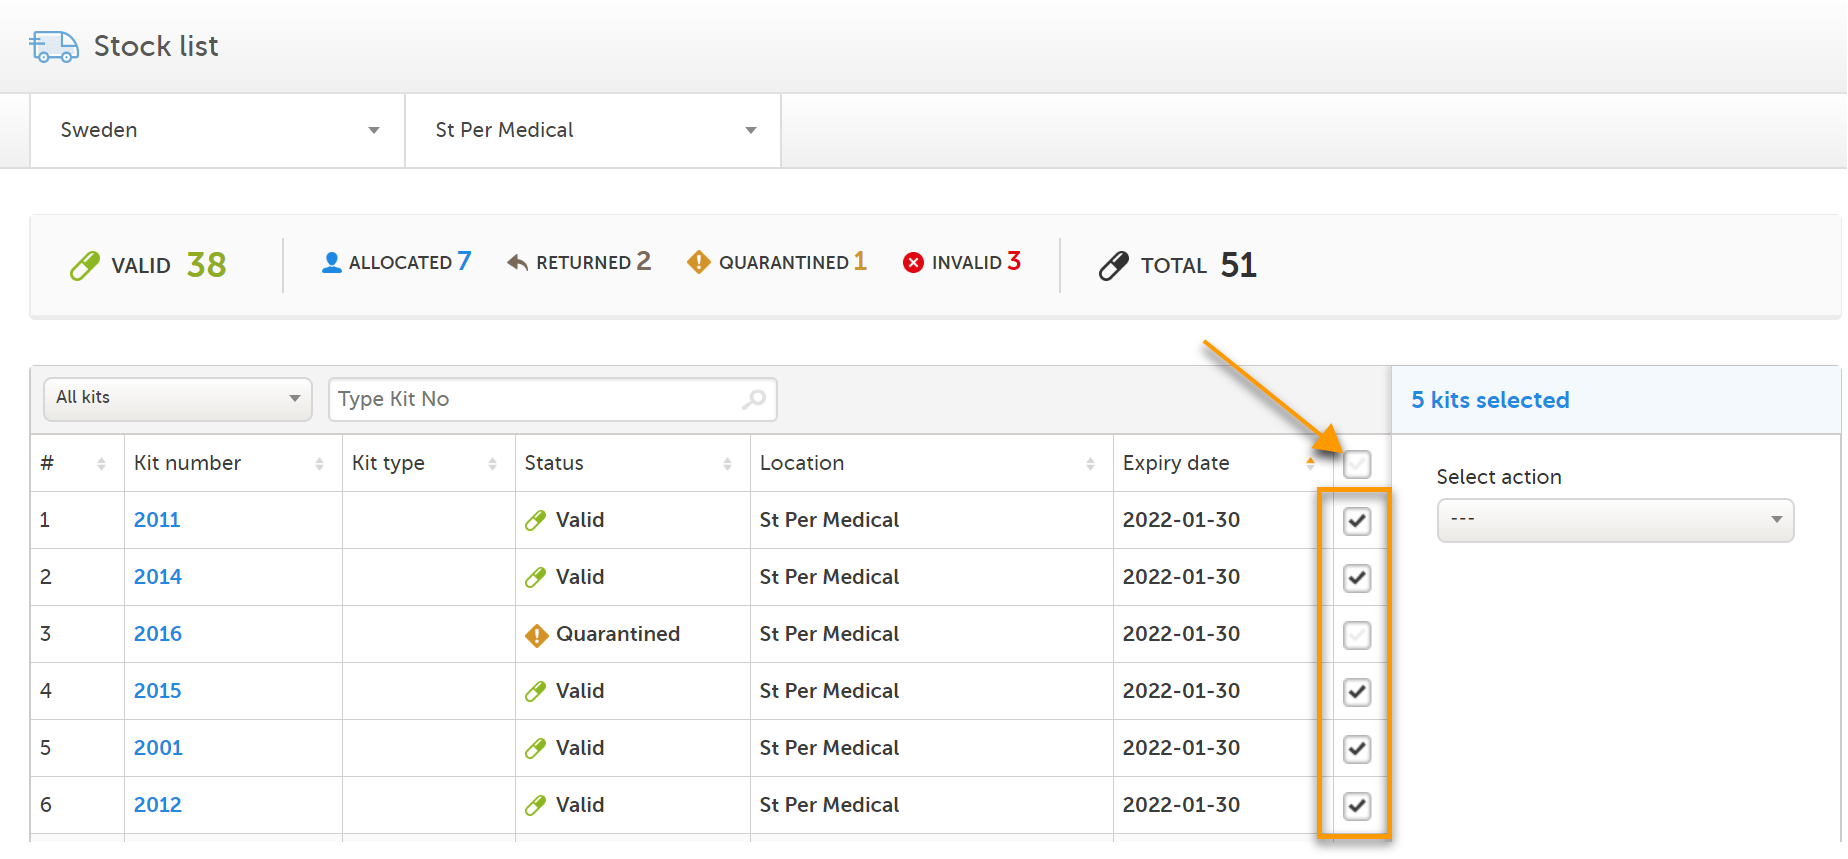
You can manage multiple kits at once if you want to perform the same action to a selection of kits. To select multiple kits, check the boxes in the rightmost column of the stock list. To select all kits, check the top box of the column.
No actions available
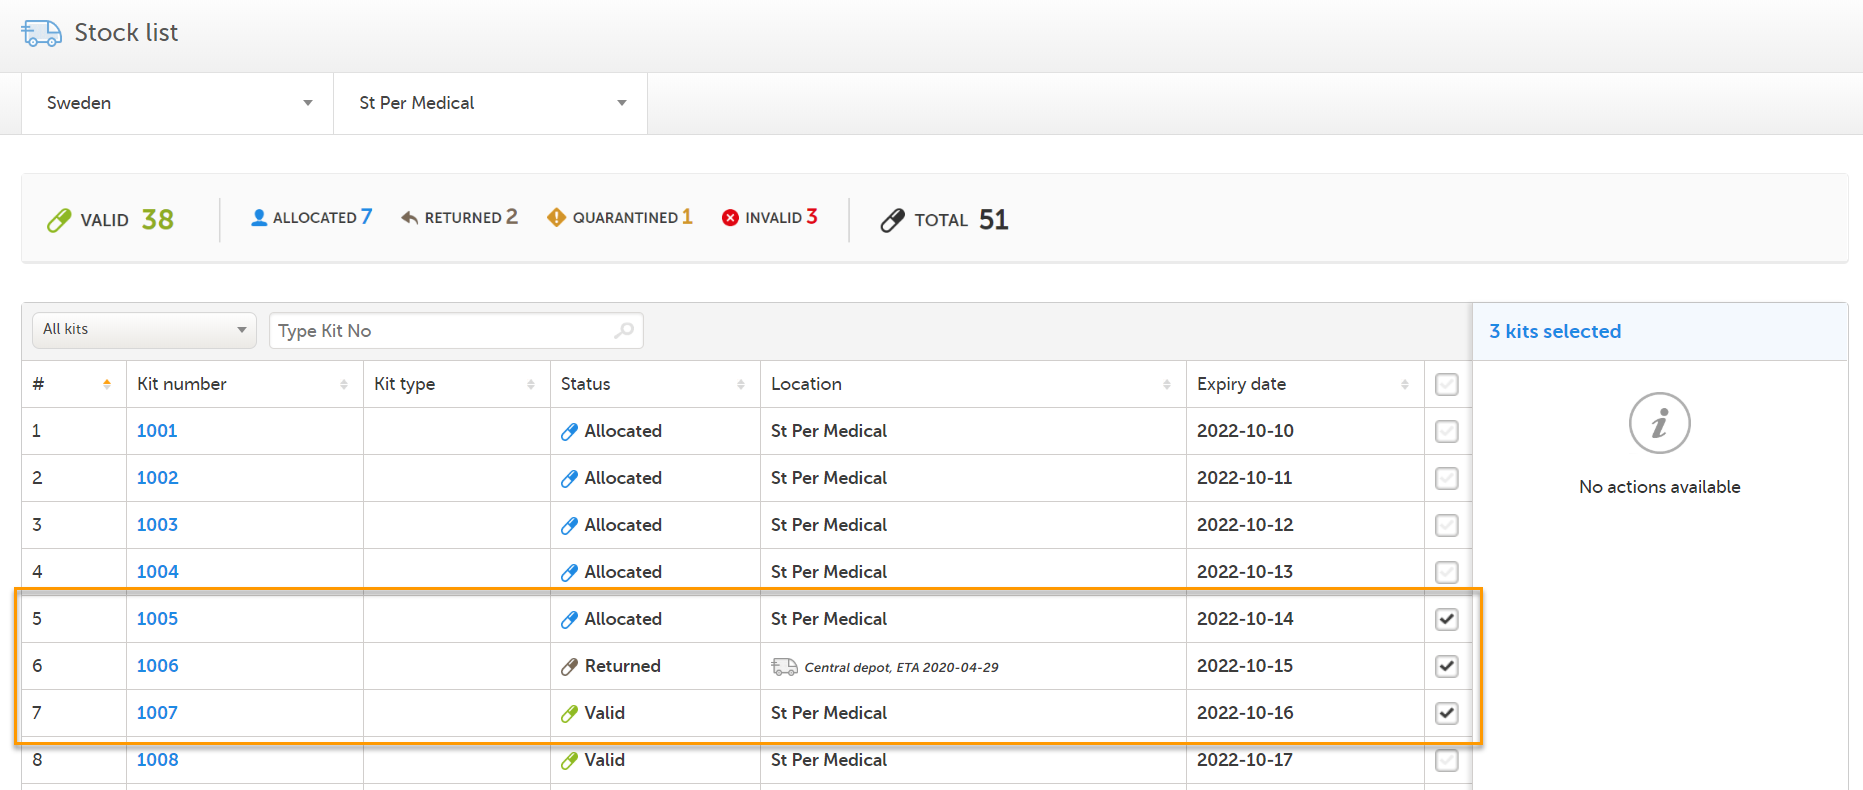
Depending on your selection of kits in the stock list, there may be no applicable actions available. The available actions depend on the current status and/or location of the selected kits. If an action is not available, adjust the selection so that only kits that are applicable for the intended action are selected. Let's look at an example:
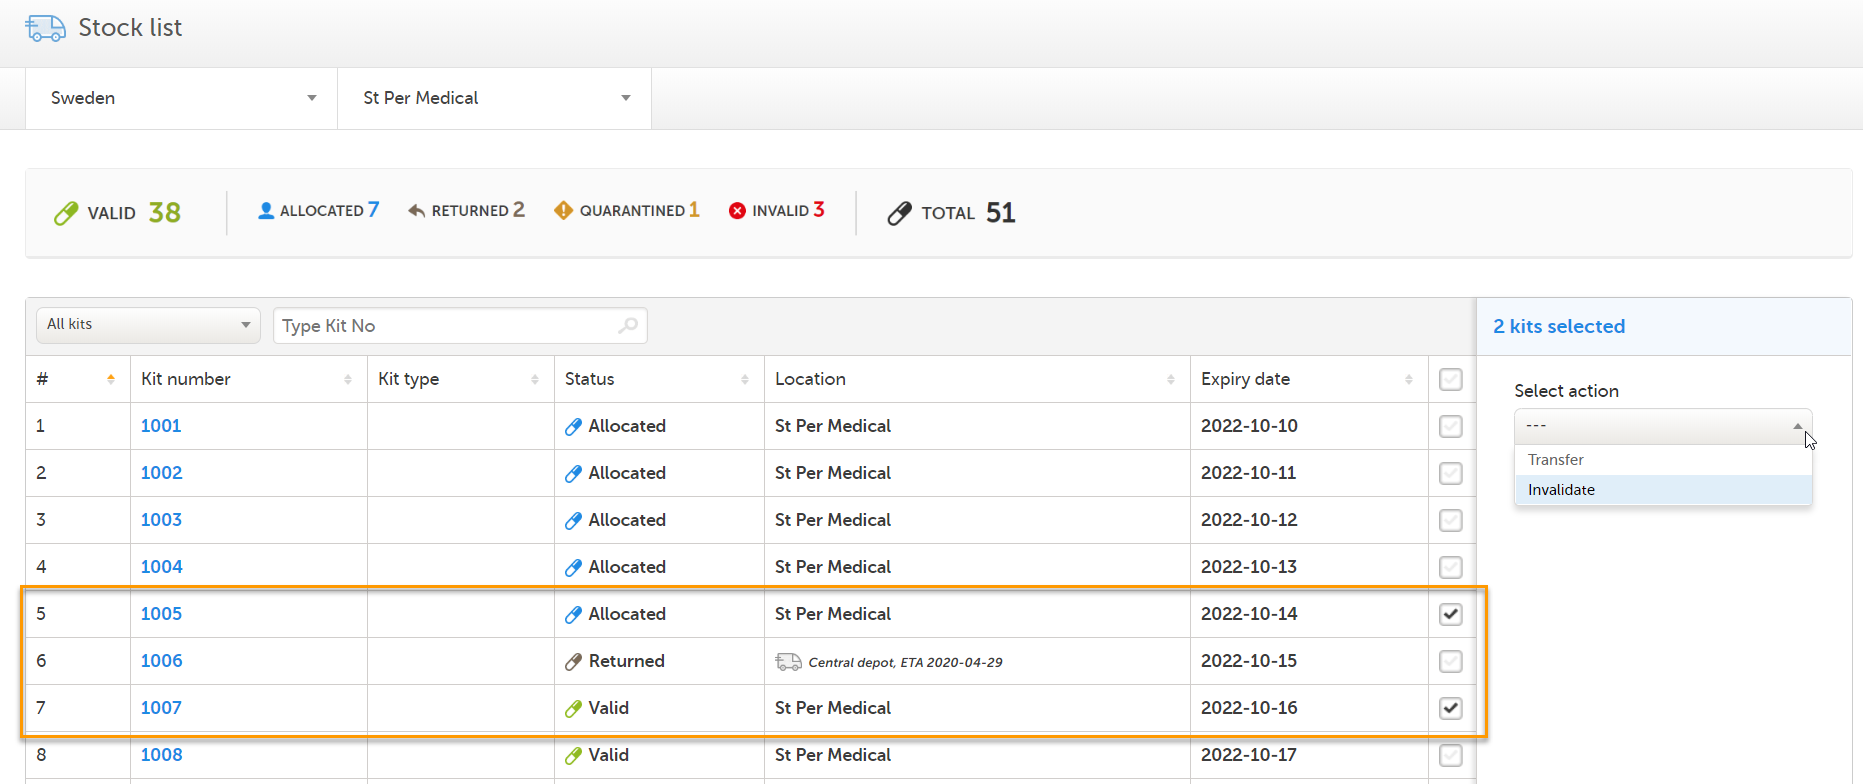
1. Three kits are selected, giving us the message No actions available:
2. Now, let's uncheck kit 1006 (in transit with status Returned). The actions Transfer and Invalidate becomes selectable, since these actions are both applicable for kit 1005 (Allocated) and 1007 (Valid):
For an overview of the conditions for setting actions, see Summary.
Performing actions
All actions that are performed to the kits are logged in the audit trail, which is visible in the kit details view. See Stock list and kit details view for more information.
Transferring a kit
| 1 | Select the kit(s) to transfer. |
| 2 | In the action pane, select Transfer in the action drop-down list. |
| 3 | Select the destination in the drop-down list. |
| 4 | Optional: Click on the field and select the date of the Expected Time of Arrival (ETA) in the date picker. |
| 5 | Optional: Enter a note. |
| 6 |
Click Apply. Now, two things happen: 1. A Shipment ID is generated, making it possible to keep track of the shipment: 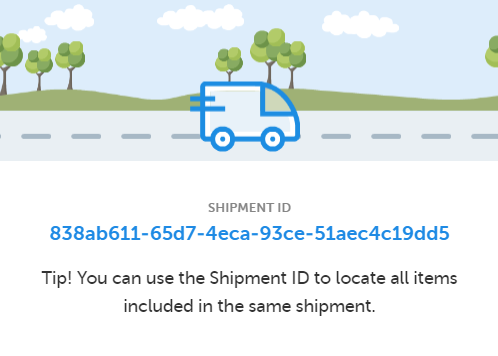
The Shipment ID is also found in the audit trail in the kit details view. See Tracking shipments for more information on Shipment ID. 2. The location is set to In transit—illustrated with a truck icon in the Location column of the stock list—until the kit(s) are received or canceled.
|
The action Transfer can be performed if the conditions are as follows (the settings may vary depending on study setup):
| To perform action... | The kit must have status... | And be located at... | So that study users can... | And site users can... |
|---|---|---|---|---|
| Transfer | • Valid • Invalid • Allocated • Returned • Quarantined |
• Central depot • Country depot • Site |
Transfer from Central depot to: • Country depot • Site Transfer from Country depot to: |
Transfer from Site to:
• Central depot |
Transfer kits from site to site
If there is a need to transfer valid kits from one site to another, for example in a scenario where Site A has remaining kits that will not be used, and the supply at Site B is running low, the user on site A can send the kits to Central or Country depot, where the Study Supply Manager or other user with permission to manage the kits in turn sends the kits to site B.
Receiving a kit
| 1 | Select the kit(s) to receive. |
| 2 | In the action pane, select Receive in the drop-down list. |
| 3 | Optional: Enter a note. |
| 4 | Click Apply. The kit is now located at target destination. |
The action Recieve can be performed if the conditions are as follows:
| To perform action... | The kit must have status... | And be located at... | So that study supply users can... | And site supply users can... |
|---|---|---|---|---|
| Receive | • Valid • Invalid • Allocated • Returned • Quarantined |
• In transit | Receive transfer to: • Central depot • Country depot |
Receive transfer to: • Site |
Cancelling a kit transfer
To cancel a kit transfer:
| 1 | Select the kit(s) for which the transfer should be cancelled. |
| 2 | In the action pane, select Cancel in the drop-down list. |
| 3 | Optional: Enter a note. |
| 4 | Click Apply. The kit is now located at the previous location (from which it was transferred). |
The action Cancel can be performed if the conditions are as follows:
| To perform action... | The kit must have status... | And be located at... | So that study users can... | And site users can... |
|---|---|---|---|---|
| Cancel | • Valid • Invalid • Allocated • Returned • Quarantined |
• In transit | Cancel transfer from: • Central depot • Country depot |
Cancel transfer from: • Site |
Allocating a kit
Kit allocation is the process of designating a kit to a specific subject. Kit allocation is performed in Viedoc Clinic and the feature is integrated with Viedoc Logistics. When a kit is allocated in Viedoc Clinic, the kit is immediately set as Allocated in Viedoc Logistics. Only kits with status Valid can be allocated, and there must be sufficient kits in stock at the location where the allocation will take place. Allocating kits is also dependent on the study set up, see Scope of allocation below.
Workflows for kit allocation
The regular workflow for kit allocation is as follows:
| Order | Kit status | Description | Action |
|---|---|---|---|
| 1 | Valid | The kit is valid and available for allocation. | Allocate (in Viedoc Clinic) |
| 2 | Allocated | The kit is allocated to a specific subject. | Return |
| 3 | Returned | The kit is returned to the site. |
However, there can also be variations to the regular workflow of allocating a kit, as in the following three scenarios.
1. The kit allocation is undone:
| Order | Kit status | Description | Action |
|---|---|---|---|
| 1 | Valid | The kit is valid and available for allocation. | Allocate (in Viedoc Clinic) |
| 2 | Allocated | The kit is allocated to a specific subject. | Undo (in Viedoc Clinic) |
| 3 | Valid | The kit is valid and available for allocation. |
2. The kit is invalidated after allocation and then returned:
| Order | Kit status | Description | Action |
|---|---|---|---|
| 1 | Valid | The kit is valid and available for allocation. | Allocate (in Viedoc Clinic) |
| 2 | Allocated | The kit is allocated to a specific subject. | Invalidate |
| 3 | Invalid | The kit is invalid. | Return |
| 4 | Invalid | The kit is returned to the site (kit status Invalid remains). |
3. The kit is allocated, returned and then invalidated:
| Order | Kit status | Description | Action |
|---|---|---|---|
| 1 | Valid | The kit is valid and available for allocation. | Allocate (in Viedoc Clinic) |
| 2 | Allocated | The kit is allocated to a specific subject. | Return |
| 3 | Returned | The kit is returned to the site. | Invalidate |
| 4 | Invalid | The kit is invalid. |
Note! Kits that have been allocated and then become invalidated or returned, as in scenario 2 and 3, are shown in the stock list as Invalid or Returned. It is only possible to identify if an invalid or returned kit was previously allocated by checking the kit details view of each kit.
Scope of allocation
The option for where a kit can be allocated from is dependent on the study setup. In the most flexible setup, kits can be allocated from the Country and/or Central depot if no kits are available at Site. There are three possible scopes for allocation:
1. The scope is set to allocation at Site (Study site) only. The kit must be valid and located at site in order to allocate the kit.
2. The scope is set to allocation at Site and Country depot (Country). If no valid kit is available at site, allocation is performed with the next available kit from the country depot. After allocation, the kit is transferred to site and physically delivered to the study subject.
3. The scope is set to allocation at Site and Central depot (Study). If no valid kit is available at site, allocation can be performed from the central depot. After allocation, the kit is transferred to site and physically delivered to the study subject.
Returning a kit after allocation
| 1 | Select the kit to return. |
| 2 | In the action pane, select Return in the drop-down list. |
| 3 | Optional: Enter a note. |
| 4 | Click Apply. The kit status is set to Returned. |
The action Return can be performed if the conditions are as follows:
| To perform action... | The kit must have status... | And be located at... | So that study users can... | And site users can... |
|---|---|---|---|---|
| Return | • Allocated • Invalid (after allocation) |
Site | N/A | Return allocated kit on: • Site |
Setting a kit in quarantine
In some scenarios, it could be unclear if a kit is valid for allocation. The kit action Quarantine can then be used, setting the kit as Quarantined until further actions are taken. The kit can be restored, invalidated or transferred when in quarantine.
To set a kit in quarantine:
| 1 | Select the kit to set in quarantine. |
| 2 | In the action pane, select Quarantine in the drop-down list. |
| 3 | Enter the reason for setting the kit in quarantine. |
| 4 | Click Apply. The kit status is set to Quarantined. |
The action Quarantine can be performed if the conditions are as follows:
| To perform action... | The kit must have status... | And be located at... | So that study users can... | And site users can... |
|---|---|---|---|---|
| Quarantine | • Valid |
• Central depot |
Quarantine kits on: |
Quarantine kits on: |
Restoring a kit from quarantine
To restore a kit and set it as valid:
| 1 | Select the quarantined kit to restore. |
| 2 | In the action pane, select Restore in the drop-down list. |
| 3 | Enter the reason for restoring the kit. |
| 4 | Click Apply. The kit status is set to Valid. |
The action Restore can be performed if the conditions are as follows:
| To perform action... | The kit must have status... | And be located at... | So that study users can... | And site users can... |
|---|---|---|---|---|
| Restore | • Quarantined |
• Central depot |
Restore kits on: |
Restore kits on: |
Invalidating a kit
During the course of the study, if a kit for some reason is not valid before or after allocation, for example if it is lost or broken, the action Invalidate sets the kit as Invalid. A kit can be invalidated at any time during the study.
| Important! Invalidating a kit is an irreversible action - the kit will always have the status Invalid, irrespective of its allocation status or whether it is returned after invalidating the kit. |
To set a kit as invalid:
| 1 | Select the kit to invalidate. |
| 2 | In the action pane, select Invalidate in the drop-down list. |
| 3 | Select Missing / Broken / Other in the reason drop-down list. If reason Other was selected: Enter the reason for invalidating the kit. |
| 4 | Click Apply. The kit status is set to Invalid. |
The action Invalidate can be performed if the conditions are as follows:
| To perform action... | The kit must have status... | And be located at... | So that study users can... | And site users can... |
|---|---|---|---|---|
| Invalidate | • Valid • Allocated • Returned • Quarantined |
• In transit |
Invalidate kit:
• In transit from/to Central depot |
Invalidate kit:
• At Site |
Missing kits
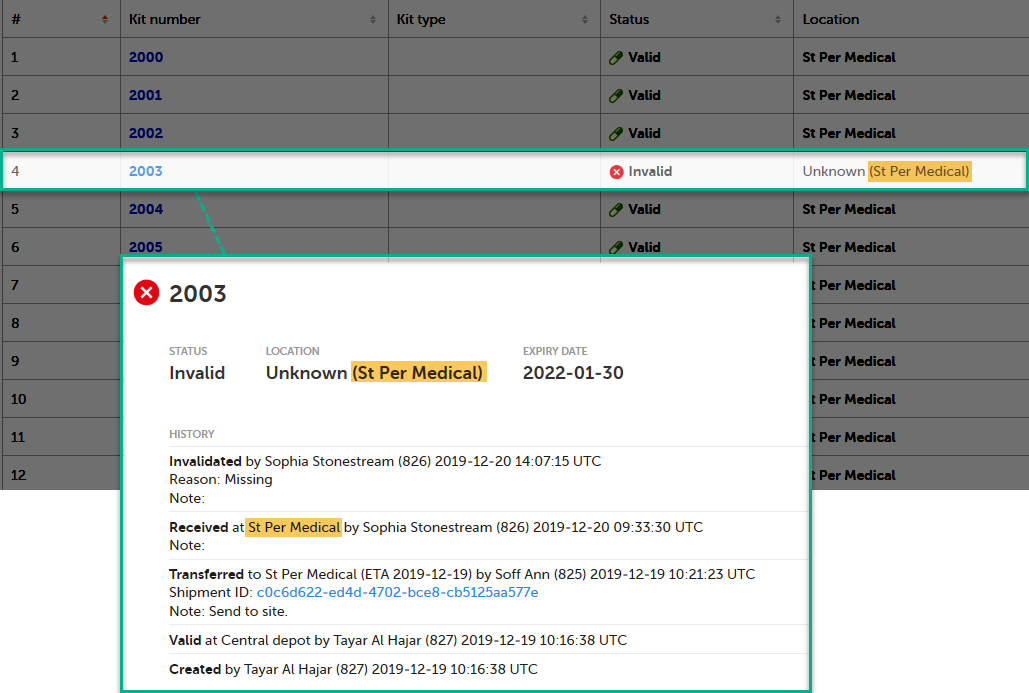
When a kit is invalidated and the reason is set to Missing, the following happens:
- The kit is outgrayed in the stock list and becomes unselectable.
- The location is set to Unknown in the stock list and in the kit details view, with the last known location stated in parenthesis.
- No further transfer is possible.
In the below example, the last known location was on site, at St Per Medical, where the kit was received:
Editing the expiry date
Note! The action to edit the expiry date is only available for users that manage kits on study level.
In the stock list, expired kits are shown with a red expiry date in the Expiry date column (1), for example 2020-05-19.
If an expiry period was set by a Study Supply Manager, and the expiry date is within that period, the number of days of the expiry period is shown in parentheses next to the expiry date (2), for example 2020-06-02 (-14). In this example, the expiry period is set to 14 days. For more information on expiry period, see Setting an expiry period.
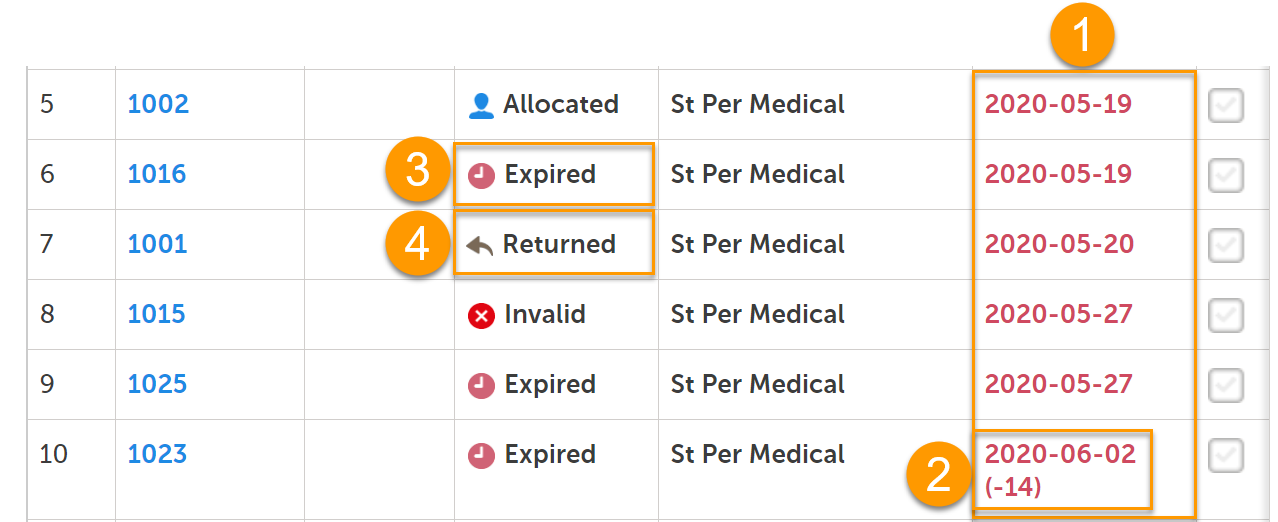
Only kits that have kit status Valid prior to expiry will get the new kit status Expired (3). If the expiry date is then edited so that the kit is no longer expired, the kit status will return to Valid.
Kits with status other than Valid can also expire but their kit status remain (4). All expired kits can however always be identified with a red-colored date in the Expiry date column.
To edit the expiry date:
| 1 | Select the kit for which you want to edit the expiry date. |
| 2 | In the action pane, select Edit expiry date in the drop-down list. |
| 3 | Select a date in the date picker. |
| 4 | Enter the reason for editing the expiry date. |
| 5 |
Click Apply. The new expiry date of the kit(s) is saved. |
The action Edit expiry date can be performed if the conditions are as follows:
| To perform action... | The kit must have status... | And be located at... | So that study users can... | And site users can... |
|---|---|---|---|---|
| Edit expiry date | • Valid • Allocated • Returned • Quarantined • Invalid • Expired |
• In transit |
Edit expiry date on kits:
• In transit from/to Central depot |
Workflows
Chart
The actions available depend on the current kit status. Below is a chart illustrating the possible workflows depending on kit status.
Tip! Start at the circle with kit status VALID and follow the arrows to see what actions are available from there.
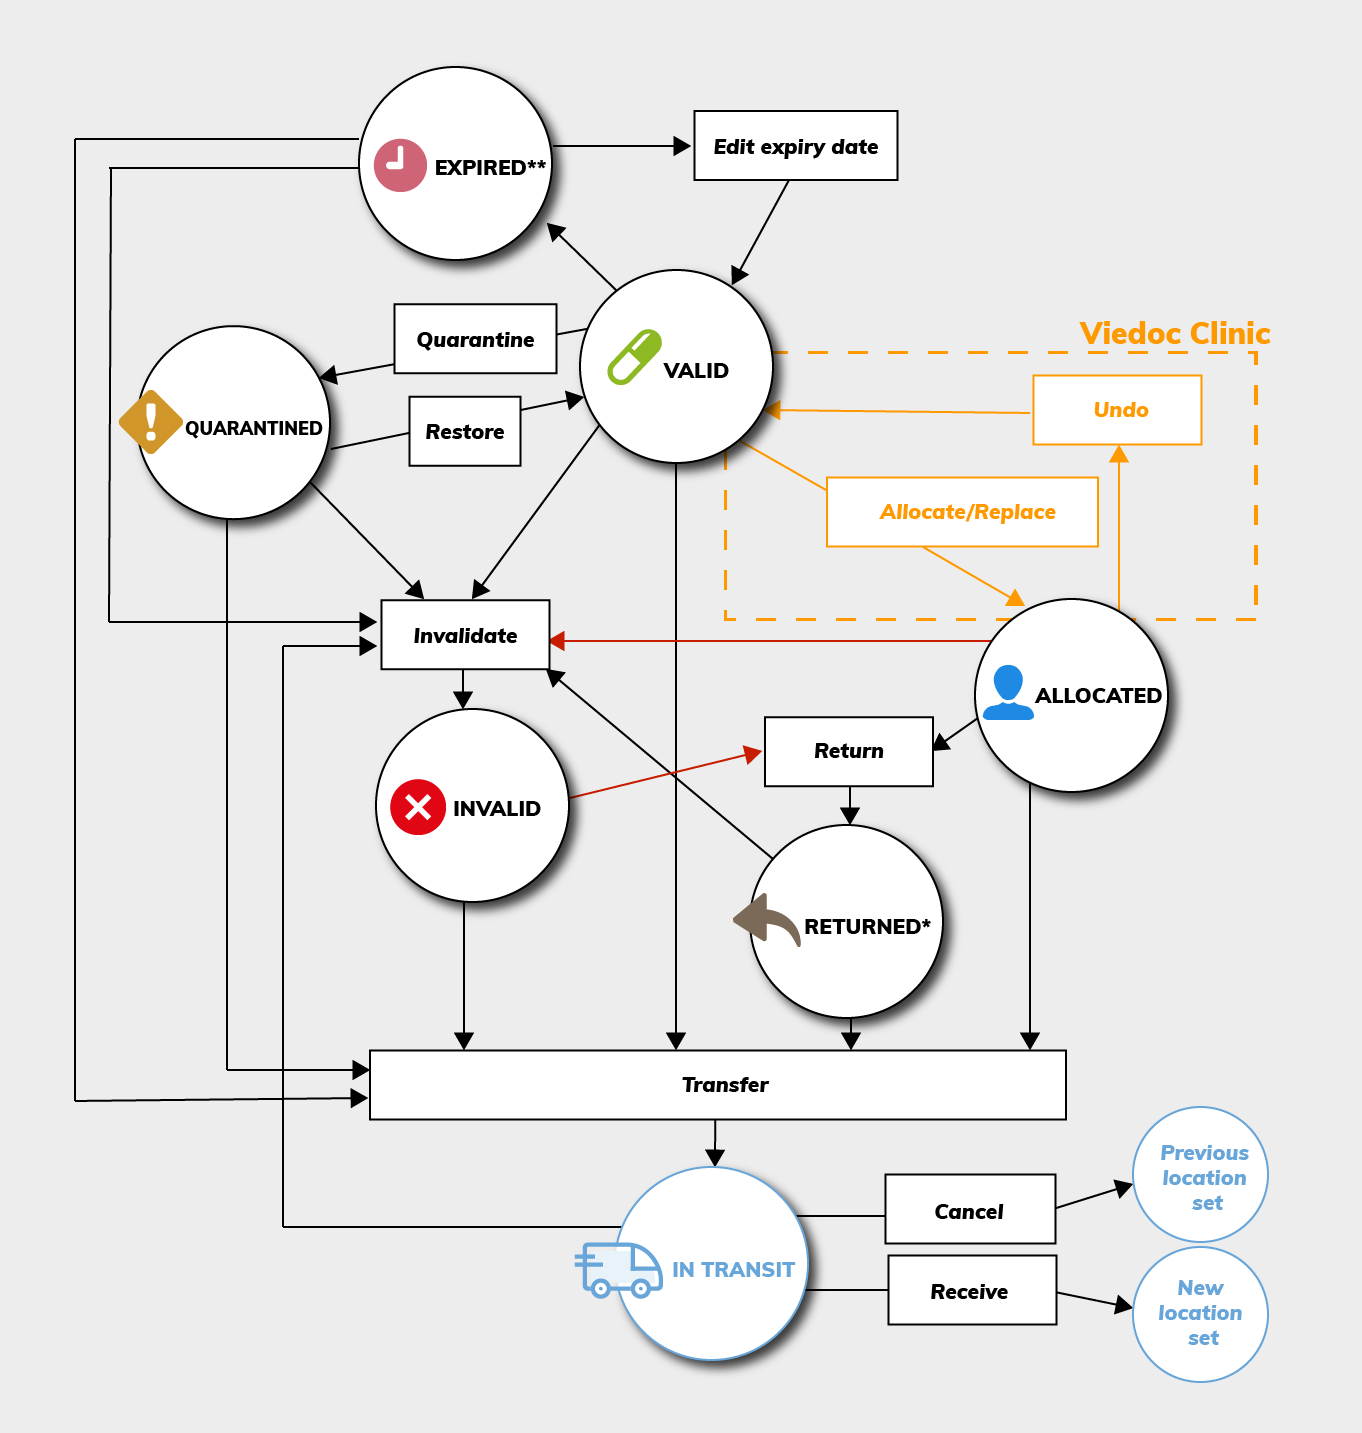
*A returned kit that has been invalidated will remain as Invalid. That is, it will not be set as Returned.
**An expired kit is set to Expired only if it was Valid at the time of expiry. See Editing the expiry date for more information.
Summary
To sum it all up, actions are dependent on kit status, location, and user role permissions. Your user role determines which sites you have access to and where you can handle kits. But in general, and as set up with the default roles Study Supply Manager and Site Supply Manager, the following applies:
| To perform action... | The kit must have status... | And be located at... | So that study users can... | And site users can... |
|---|---|---|---|---|
| Transfer |
• Valid |
• Central depot |
Transfer from Central depot to: Transfer from Country depot to: |
Transfer from Site to: • Central depot • Country depot |
| Receive | • Valid • Invalid • Allocated • Returned • Quarantined |
• In transit |
Receive transfer to:
• Central depot |
Receive transfer to:
• Site |
| Cancel | • Valid • Invalid • Allocated • Returned • Quarantined |
• In transit |
Cancel transfer from:
• Central depot |
Cancel transfer from:
• Site |
| Return |
• Allocated |
• Site |
N/A | Return allocated kit on:
• Site |
| Quarantine | • Valid |
• Central depot |
Quarantine kits on: |
Quarantine kits on: |
| Restore | • Quarantined |
• Central depot |
Restore kits on: |
Restore kits on: |
| Edit expiry date | • Valid • Allocated • Returned • Quarantined • Invalid • Expired |
• In transit |
Edit expiry date on kits:
• In transit from/to Central depot |
|
| Invalidate | • Valid • Allocated • Returned • Quarantined |
• In transit |
Invalidate kit:
• In transit from/to Central depot |
Invalidate kit:
• At Site |