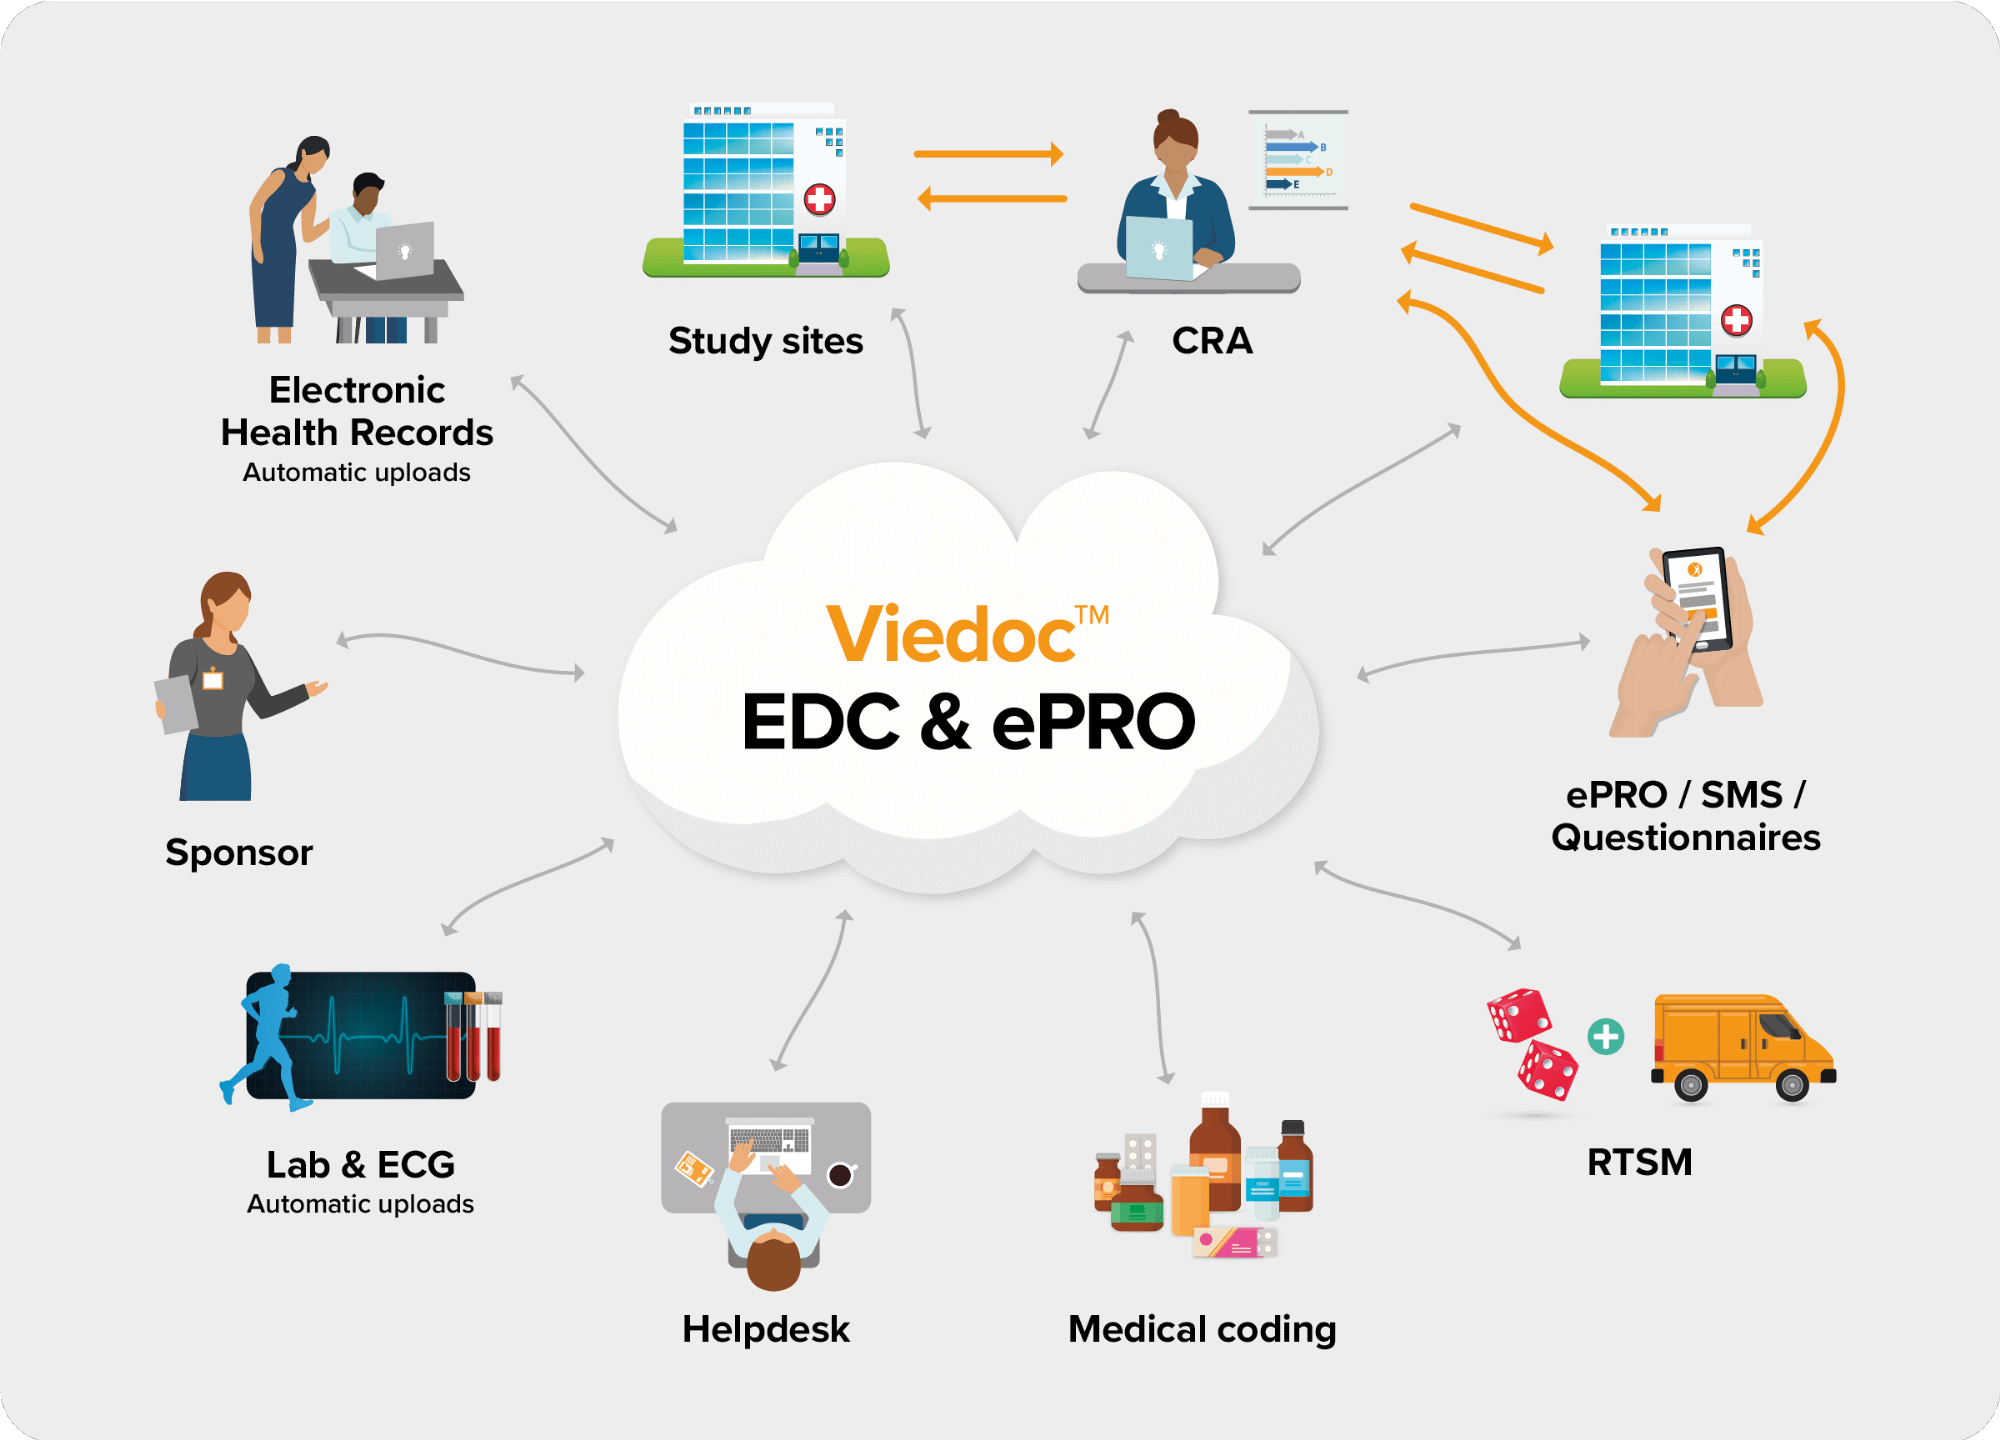
Viedoc is a service over the internet system for managing Case Report Form (CRF) data in clinical studies and patient registries.
Viedoc is an Electronic Data Capture (EDC) system that enables easy data capture, management, validation and presentation of clinical trial data. Viedoc is a Software-as-a-Service (SaaS) accessed directly through a web browser and requires no installation. It is intuitive and user-friendly and enables efficient sharing of information.
Viedoc is a study centric system, that is, all the functionalities are more or less related to a specific study. Usually a study in Viedoc corresponds to a clinical trial or other types of projects where data collection is applicable.
The main functionalities provided by Viedoc are:
The following diagram is an overview of the main Viedoc interactions and functionalities:
Viedoc is compliant with all relevant guidelines, standards and regulations in Europe, North America and Japan, including:
Every study has at least one study site, which corresponds to a clinic. A Viedoc user can have access to one or several studies in Viedoc and for one study the user can have access to one, several or all study sites. A Viedoc user is linked to a study site using a user role. A single user can have one or several roles for a study site and can also have different roles for different sites.
During a study, there are typically a number of questions to be answered and completed with data about the subject. A group of questions that belong together are captured in a form. Forms can be event-dependent or event-independent (log forms / common events). Event-dependent forms are linked to a specific event and the data belonging to these forms is registered during or in relation to a study event. Event-independent forms can be used to report data or events that happen before, between, or after events. Medical history events, concomitant medications, or adverse events are examples of forms that can be captured in event-independent forms.
All study subjects are identified using a unique subject key. In addition to the subject key, a subject can be identified using background information such as gender, initials, or date of birth. The subject’s background information is usually entered when adding the subject in the system and will most likely not change during the course of a study.
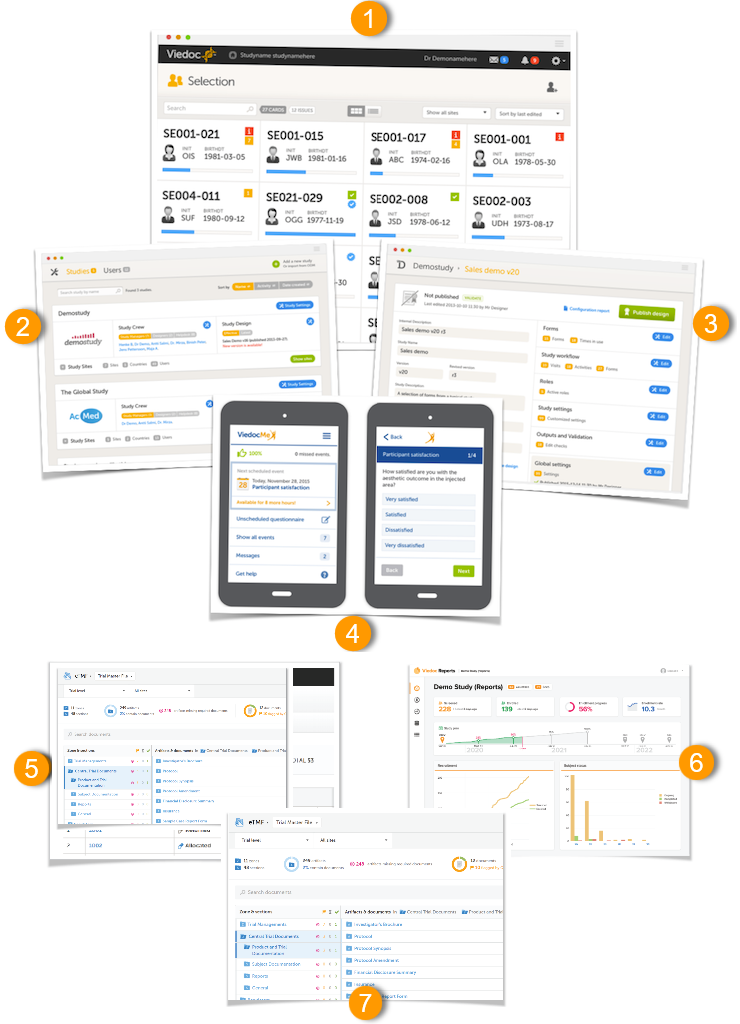
The Viedoc platform consists of seven different applications:
Viedoc Learning is a collection of user guides designed to support users across all our products, roles, and functionalities. The full list of user guides can be found in: Viedoc Learning Directory.
Studies are grouped in Viedoc under organization(s); that is, each client has its own organization where all studies belonging to that organization are stored. By default, one organization administrator is appointed to each organization. This person has been trained by a Viedoc Product Specialist and is responsible for providing access to users within the organization and for adding new studies to the platform.
| Important! It is the responsibility of the organization administrator to make sure that all users within the organization have received appropriate training for their respective tasks. |
As a Viedoc client, you will be provided with access to two separate environments/instances: one for test/development studies and one for production studies. The purpose of the test/development environment is to allow the evaluation and use of Viedoc without the need of a contract for a specific ongoing study.
Any study that is to be taken in production is normally initiated on the test/development environment and later moved to the production environment once it is “ready” to be shared with the Sponsor or other external party. Please observe that a study in the production environment can be set to operate in demo mode by adding a site of the type “training” to it.
Note! The demo mode of a production study should not be confused with a study in the test/development environment. The purpose of the demo mode is to allow site staff access to specific training site(s) in order to gain sufficient knowledge of the system before accessing production data. When a study has sites with both production and training types added, a switch will be available in Viedoc Clinic. This offers a choice of which mode the data will be entered to - demo or production.
Studies and study designs can be easily transferred from one environment to the other via the ODM export and import feature.
Contact your organization administrator to get access to the respective area.
Note! There is no guarantee that studies running on the test/development environment are completely and continuously backed-up. This environment should therefore never be used for any production studies.
All production studies need to have a valid license before they can be taken into production. The license is provided by a Viedoc representative. The license fee for the study is based on several factors such as duration, number of sites and patients, among others. The license fee is charged starting with the first patient added and for the duration of the study; which means, until the study is locked in Viedoc. If the study is not deleted from the database within 2 months, a post-study access fee may apply.
Every license is connected to a reference ID. The reference ID can be found on the signed study work order and should be entered in the field Reference ID in the Study settings in Viedoc Admin (1 in the image):
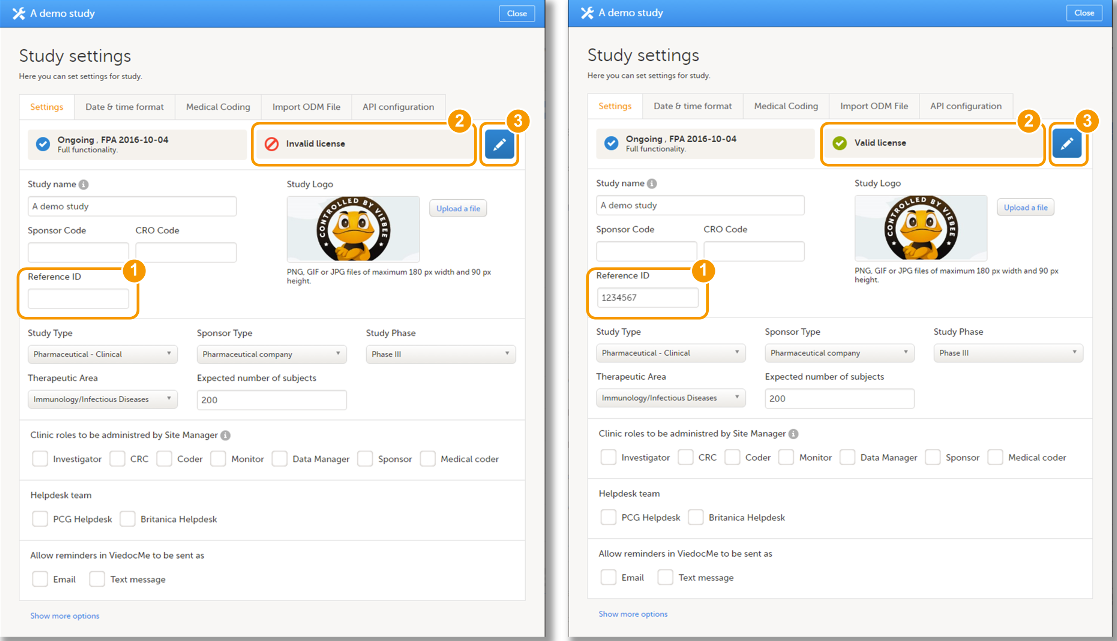
Upon entry of the reference ID, the reference ID is verified. If the reference ID is valid, the text Valid license key will be indicated at the following places:
Once the reference ID has been verified, the study can be taken into production. A study is in the production mode once Production is selected as a site type. As soon as at least one site of production type is added, the Reference ID is locked and there is no way to unlock it afterwards.
For more information regarding license fee and reference ID, please contact your Viedoc representative.
Information about new and updated functionality and bug fixes can be found in the Release notes which can be downloaded from the Viedoc website:
This lesson provides an overview of Viedoc Clinic. It describes the user interface and summarizes the main settings that can be configured in Viedoc Clinic.
Viedoc Clinic is the interface for the end user, and is primarily used by site and study staff (Investigators, Study Coordinators, Monitors, Data Managers and so on) and keeps track of all the activities performed by the site.
The access to Viedoc Clinic is by invitation only and provided by either the Study Manager or Site Manager. If invited, you will find the invitation in your email inbox (from no-reply@viedoc.net). In some cases the email can be caught by your email spam filter and in that case you will find it in the email spam folder. For detailed instructions on account activation, see Managing your Viedoc account.
The following main actions can be performed in Viedoc Clinic:
Customer computer requirements are defined as capabilities required by the customer computer to use all features of Viedoc with the intended graphical presentation and within guaranteed response times of Viedoc.
Viedoc supports the following browsers:
For non-compliant browsers you will receive a message on the login page that your browser is not supported.
For Viedoc Designer:
Viedoc does not support the use of private mode browsing in Safari.
The following are required for Viedoc to run in the compatible web browsers:
No data is permanently stored on the customer computer. All data stored in session cookies or local web storage is deleted when the browser session is terminated. The only exception to this is the optional persistent cookie used in the main portal of Viedoc 4 to remember if a user chooses to issue a 2FA trust for the browser for 30 days, and thus avoid further second-factor authentication during this period.
Viedoc 3 has no automatic checks enforcing the above requirements. Viedoc 4 checks for, and enforces, browser type and version, and support for JavaScript, local web storage, and session cookies.
The following screen resolutions are required:
Viedoc requires an internet connection of at least 384 kbit/s.
Viedoc requires an outbound firewall policy allowing encrypted HTTP to be established and communicated to a remote server on port 443 (HTTPS) using Transport Layer Security (TLS) version 1.2 or higher.
There are several layers of security built into the platform. Below are some examples:
This is used in Clinic>Overview of Viedoc Clinic and Admin & Designer>System languages.
Viedoc Clinic is available in the following languages:
This refers to a single source piece about the Clinic system languages.
Viedoc Logistics is available in the following languages:
Viedoc Coder is available in the following languages:
Viedoc Admin and Viedoc Designer are available in the following languages:
Viedoc Me is available in the following languages:
Viedoc Reports is available in the following languages:
Viedoc TMF is available in the following languages:
For information about how to change the system language, see Manage your Viedoc account.
If you require any additional language that is not listed above, please contact your Viedoc representative.
Note! Viedoc does not allow users to use a default browser translation within the system. This prevents individual users from overriding the chosen system language and agreed-upon terminology and formulations.
| Important! All information related to managing your Viedoc account can be found in the following user guide: Viedoc User Account Management |
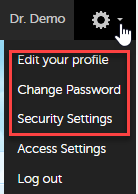
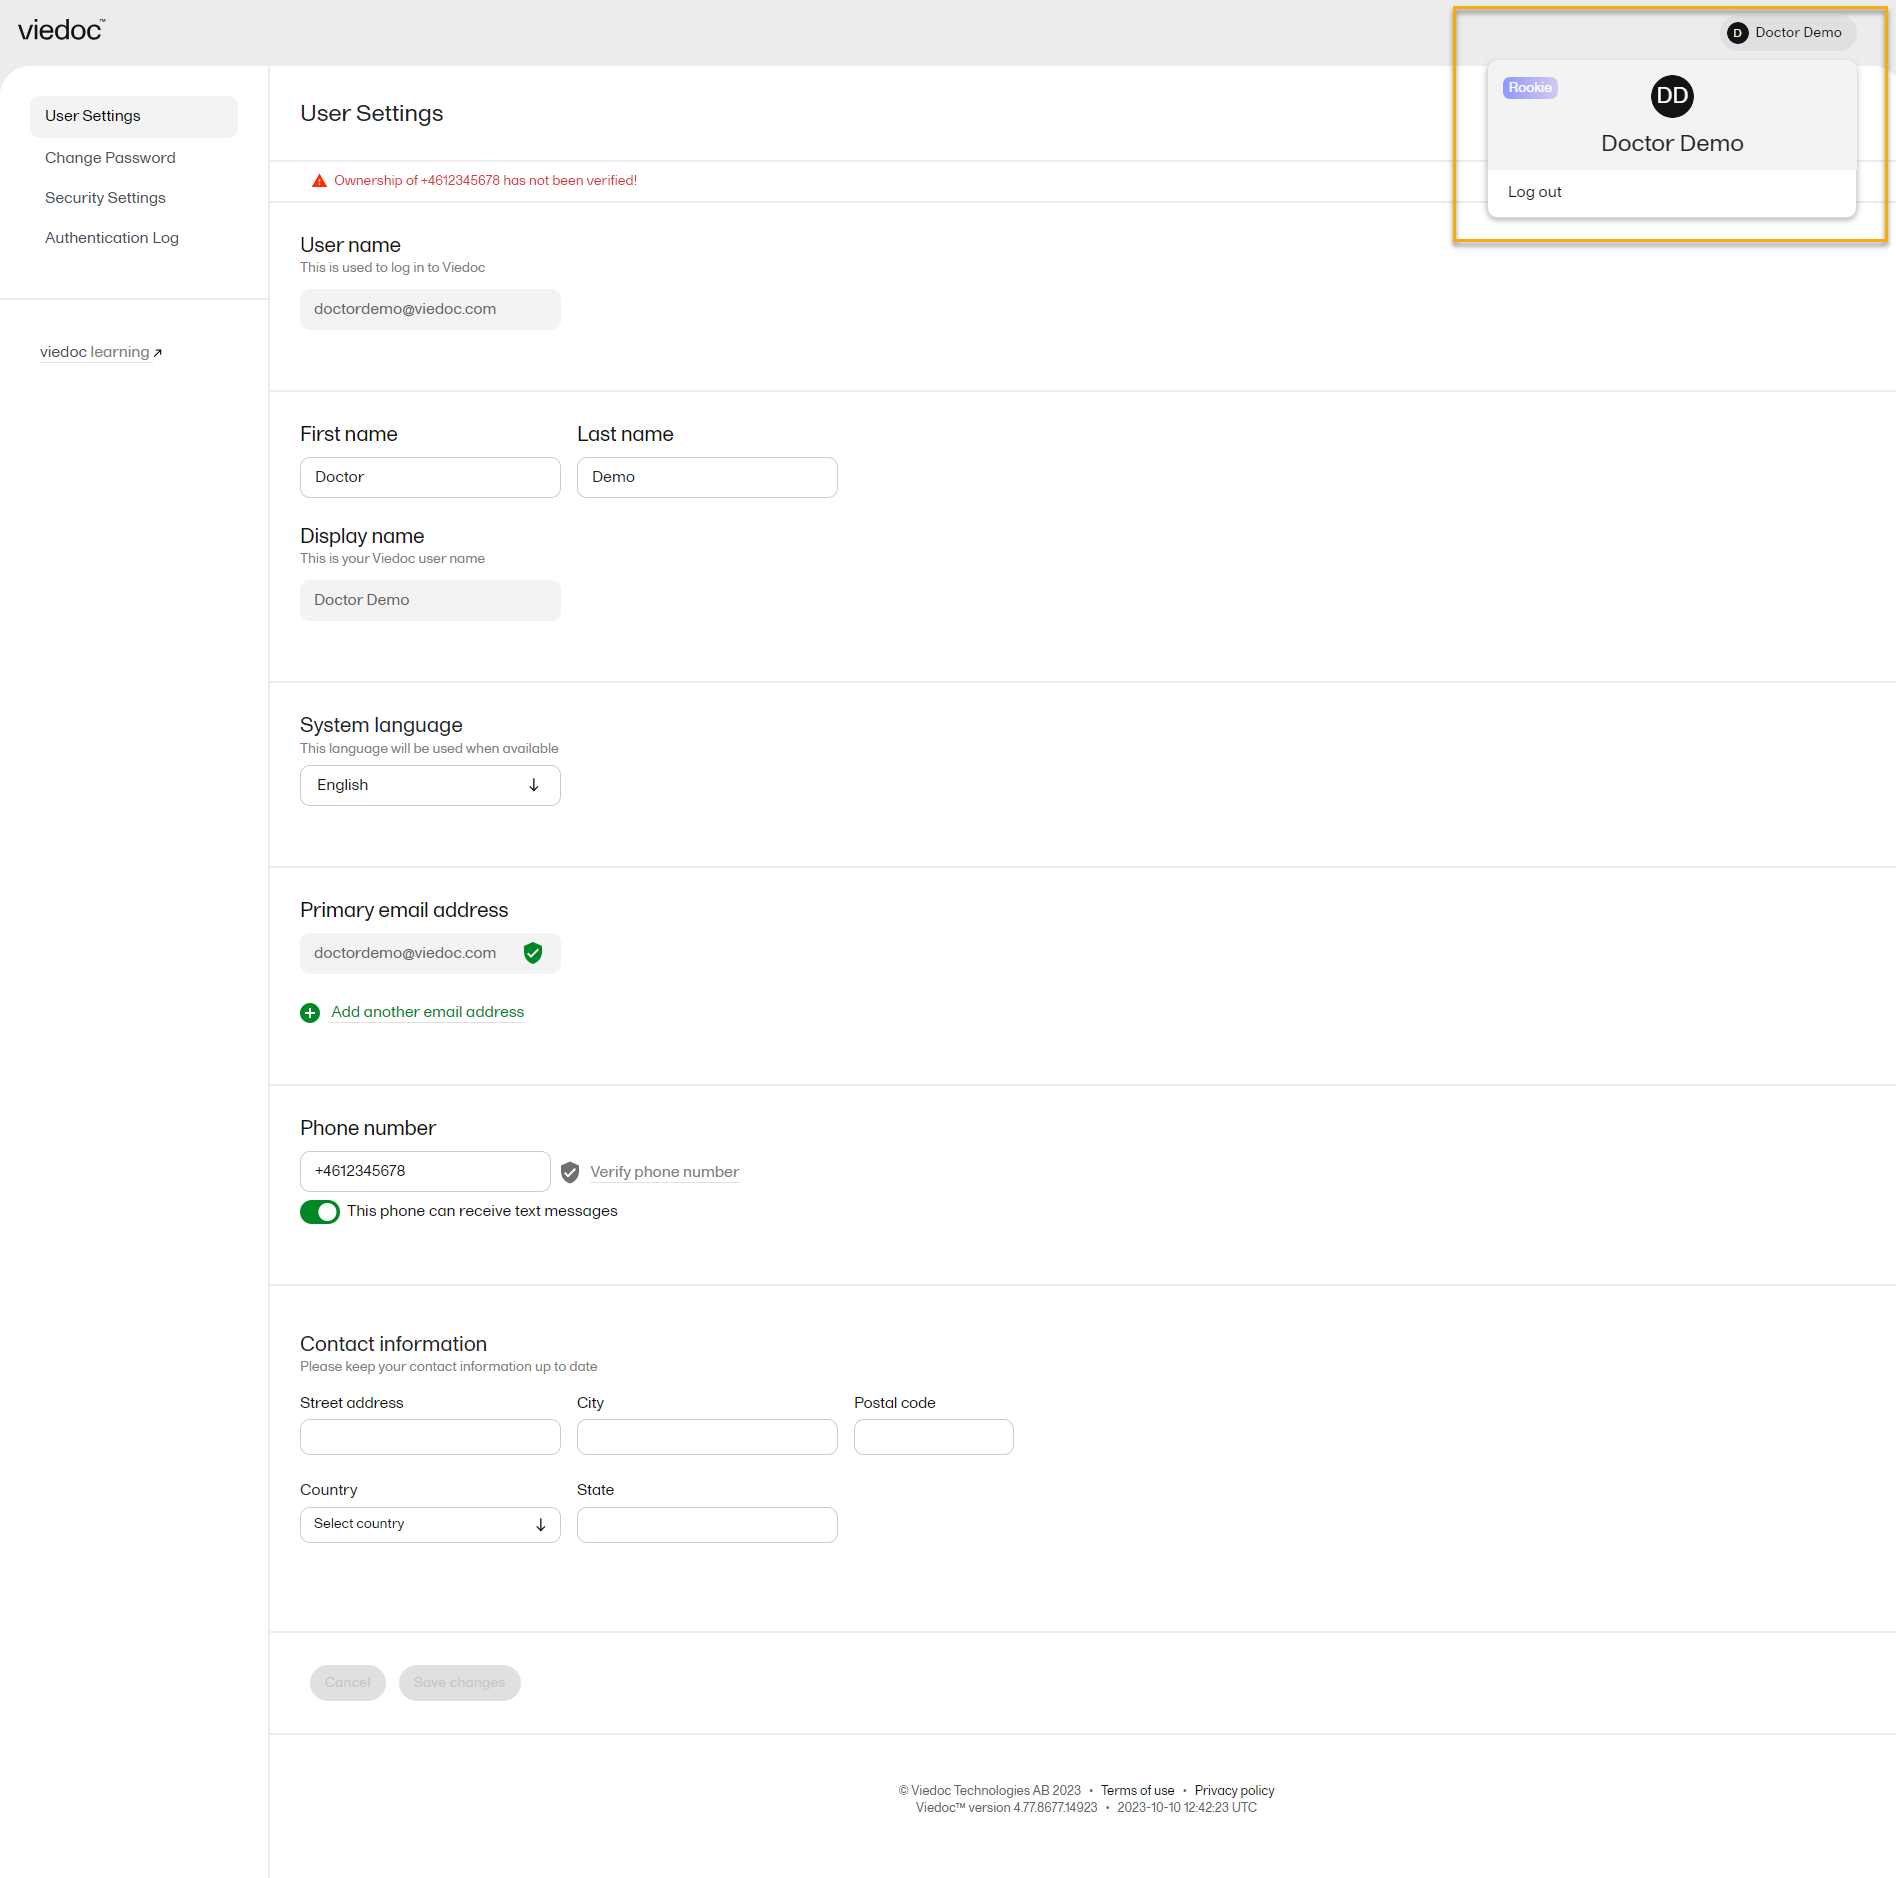
From the settings button (wheel) you can perform all actions related to managing your Viedoc account by selecting any of the following: Edit your profile, Change Password, Security Settings:
Selecting any of these options opens a new page, in the example below, the User Settings page. Select the Viedoc learning link to open the Viedoc User Account Management Guide:

NOTE! If you update the User settings section here, make sure to also update User settings in System lessons>Viedoc User Account Management>User settings
When you are logged in to Viedoc, you can edit your profile.
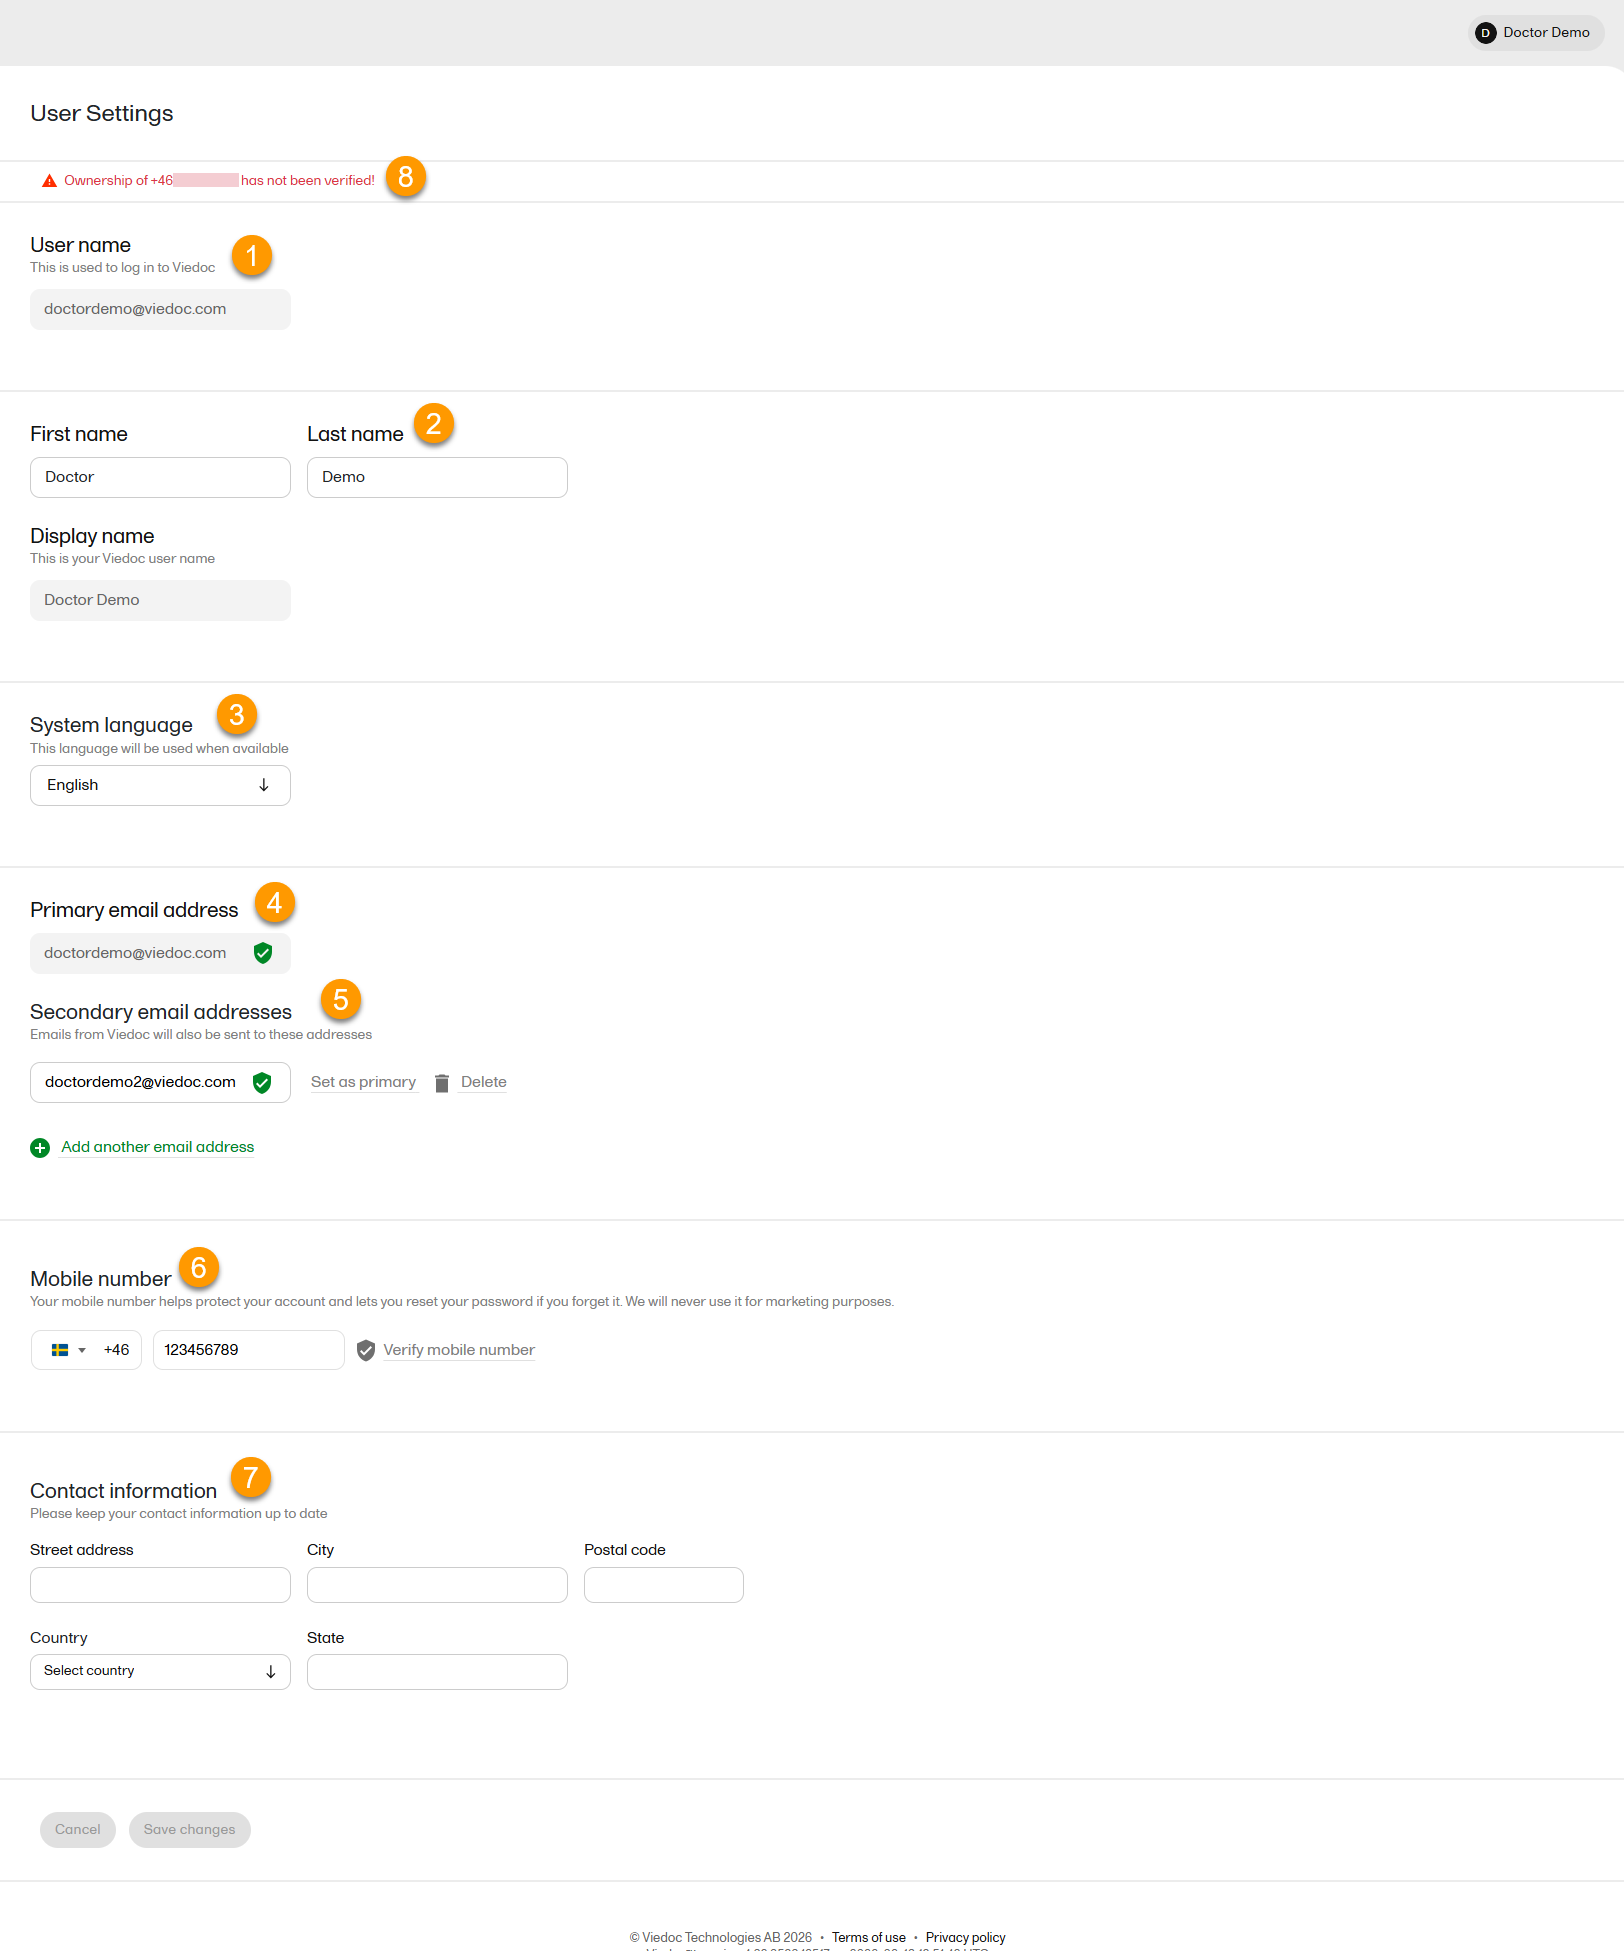
To view or edit your user settings, select the settings button (wheel) in the top right corner of the landing page, and select Edit your profile. The User Settings page opens, where you can configure the following:
1. User name - this is your primary email address used for your Viedoc account. This is the user name you use to log in to Viedoc. See the information below about your primary email address.
2. First name and Last name - fill in these fields that are used for your Display name, used in Viedoc to identify your user.
3. System language - select the language of your choice from the drop-down menu.
4. Primary email address - this is the same as the User name described above. It is the email address used in Viedoc to log in, as well as for Viedoc user account-related operations (account setup, password recovery, study invitations).
By default, this is set to the email address used to initiate the Viedoc user account.
The primary email address must be unique and is mandatory. Therefore, it is not possible to delete the primary email address.
See Changing the primary email address.
5. Secondary email addresses - you can add up to 3 additional email addresses.
Secondary email addresses is used only for:
Delivering second-factor verification codes for self-service password resets initiated by the user.
Sending a notification about changes to your user account when a secondary email address is added or removed.
See Adding a secondary email address and Verifying a secondary email address.
6. Mobile number - Select your country code and enter your mobile number.
You will be asked to Save and verify mobile number. A validation warning (8) will be displayed if the mobile number is not valid.
See Editing your mobile number and Verifying your mobile number.
Important!
|
7. Contact information - fill in the following fields: your street address, city, state, postal code and country.
To add a new (secondary) email address to your account:
| 1 | Select the Add another email address link under the current primary email address. |
| 2 | Enter the email address in the new field under Secondary email addresses. |
| 3 | Select Save changes. A notification email is sent to both the primary email address and to the newly added email address to inform you about the change. At the top of the Edit your profile page, you will see a warning message saying that the newly entered email address is not verified. |
To verify a secondary email address:
| 1 |
Select the Verify email address link next to the newly added email address. A six-digit code will be sent to your new email address and a Verify ownership pop-up is displayed asking you to provide the code in order to verify the new email address. Note! The verification link for the secondary email address is shown only after having saved the changes you may have performed on the other fields on the same page. |
| 2 | Enter the received code and select Confirm. The newly added secondary email address is now verified. |
To change the primary address to one of the existing secondary email addresses:
| 1 | Select Set as primary next to the secondary email address that is to be set as the primary email address. |
| 2 | Select Save changes. A notification email will be sent to both email addresses to inform you about the change. You will use the new primary email address the next time you log in to Viedoc. |
Note! For a secondary email address to be able to be set as primary, it has to be verified first.
To edit your mobile number:
| 1 | Select your country code and enter your mobile number. |
| 2 | Select Save and verify mobile number. A notification email will be sent to your primary email address to inform you about the change. |
To verify your mobile number:
| 1 | Make sure that the mobile number is correctly entered and select Verify mobile number. |
| 2 | A six-digit code will be sent as a text message to your mobile and a Verify mobile number pop-up is displayed. It will ask you to provide the code in order to verify the mobile number. |
| 3 | Enter the code and select Confirm. The mobile number is now verified. |
From the settings button (wheel) you can perform all actions related to study access management in Access Settings.

Select the settings button (wheel) in the top right corner of the window, and select Access settings.
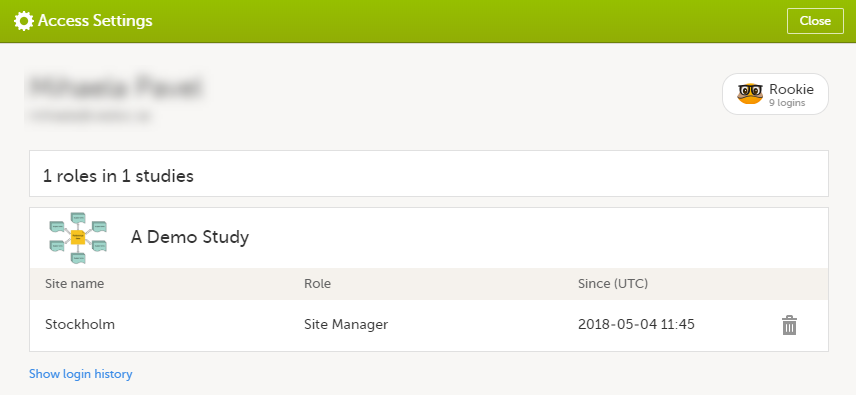
The following information is provided, grouped by study:
For users with organization roles, these are listed in the top of the page, in a separate section, providing the following information:
To remove yourself from a certain role within a study:
| 1 |
Select the trash can icon on the right, corresponding to the role, site and study to be removed from: A confirmation window is displayed. |
| 2 |
Select Delete to confirm the deletion: A notification email will be sent to all the Study Managers, or to the Site Managers if any roles are delegated. |
You can remove your Viedoc account when you have no study memberships left, that is, 0 roles in 0 studies.
To delete your Viedoc account:
| 1 | Go to Access Settings. To be able to remove your account, you should have no roles left in any study and no pending invitations: |
| 2 | Select Remove account from Viedoc. You will be prompted to confirm the account removal by entering your password: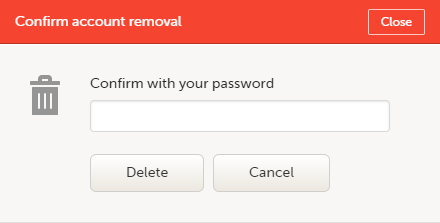 |
| 3 | Enter your password and select Delete. A confirmation message is displayed and a notification email will be sent to your primary email address: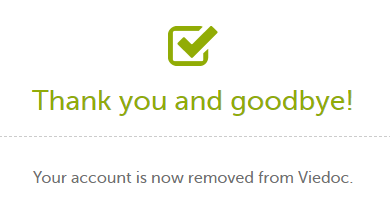
For identification purposes, Viedoc will keep: the user ID, display name, primary email address, and login history. They are kept until all the studies you have participated in are deleted. All other information related to your account will be removed from Viedoc. |
In case you have study invitations that you have not accepted or rejected yet, the Pending invitations window displays a list of all your pending study invitations:
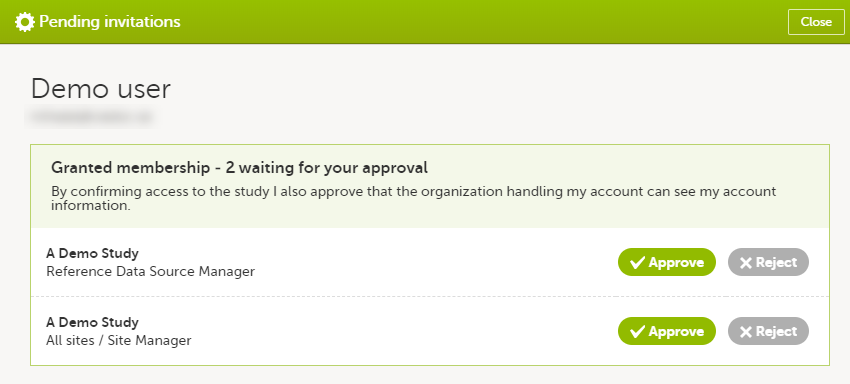
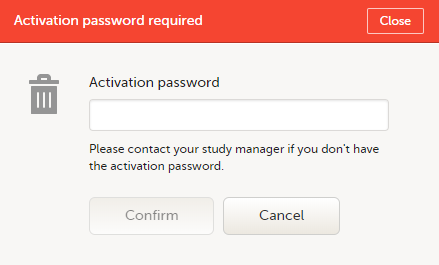
To accept a study invitation, select Approve next to the respective study role. If this is the first role you have in the respective study, and if the study requires an activation password, you will be prompted to enter it:
Note! All the pending role invitations for a user are automatically approved when the Application Programming Interface (API) method GetToken/Token is used.
To reject a study invitation, select Reject next to the respective study role. The invitation will be removed from the Pending invitations list.
To postpone the approval or rejection of study invitations, select Close in the top right corner of the Pending invitations window and postpone providing an answer to the study invitation.
To access the pending invitations again, the Pending invitations window is shown:
From Viedoc you can log out from different locations:

Note! If you exit the system without logging out, any subject you are currently working with will be locked for other users. After 5 minutes, the subject will be automatically unlocked.
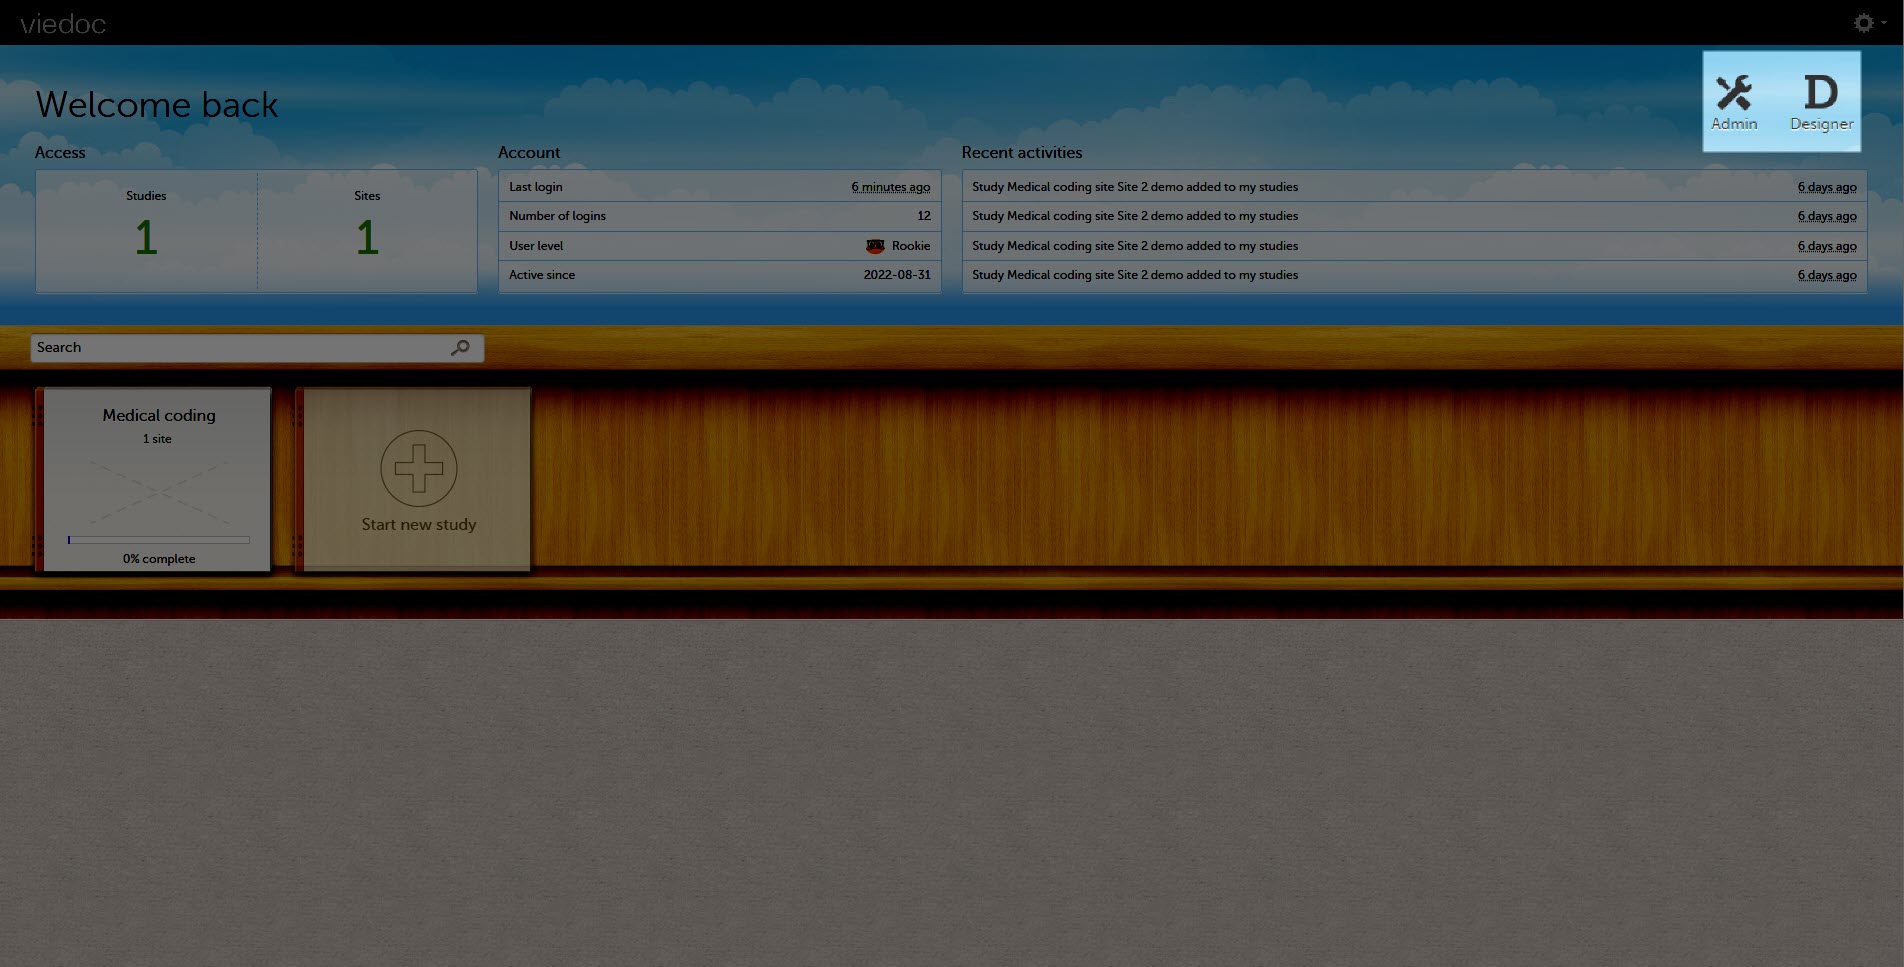
This lesson describes the Viedoc landing page, which is displayed directly after a successful log in:
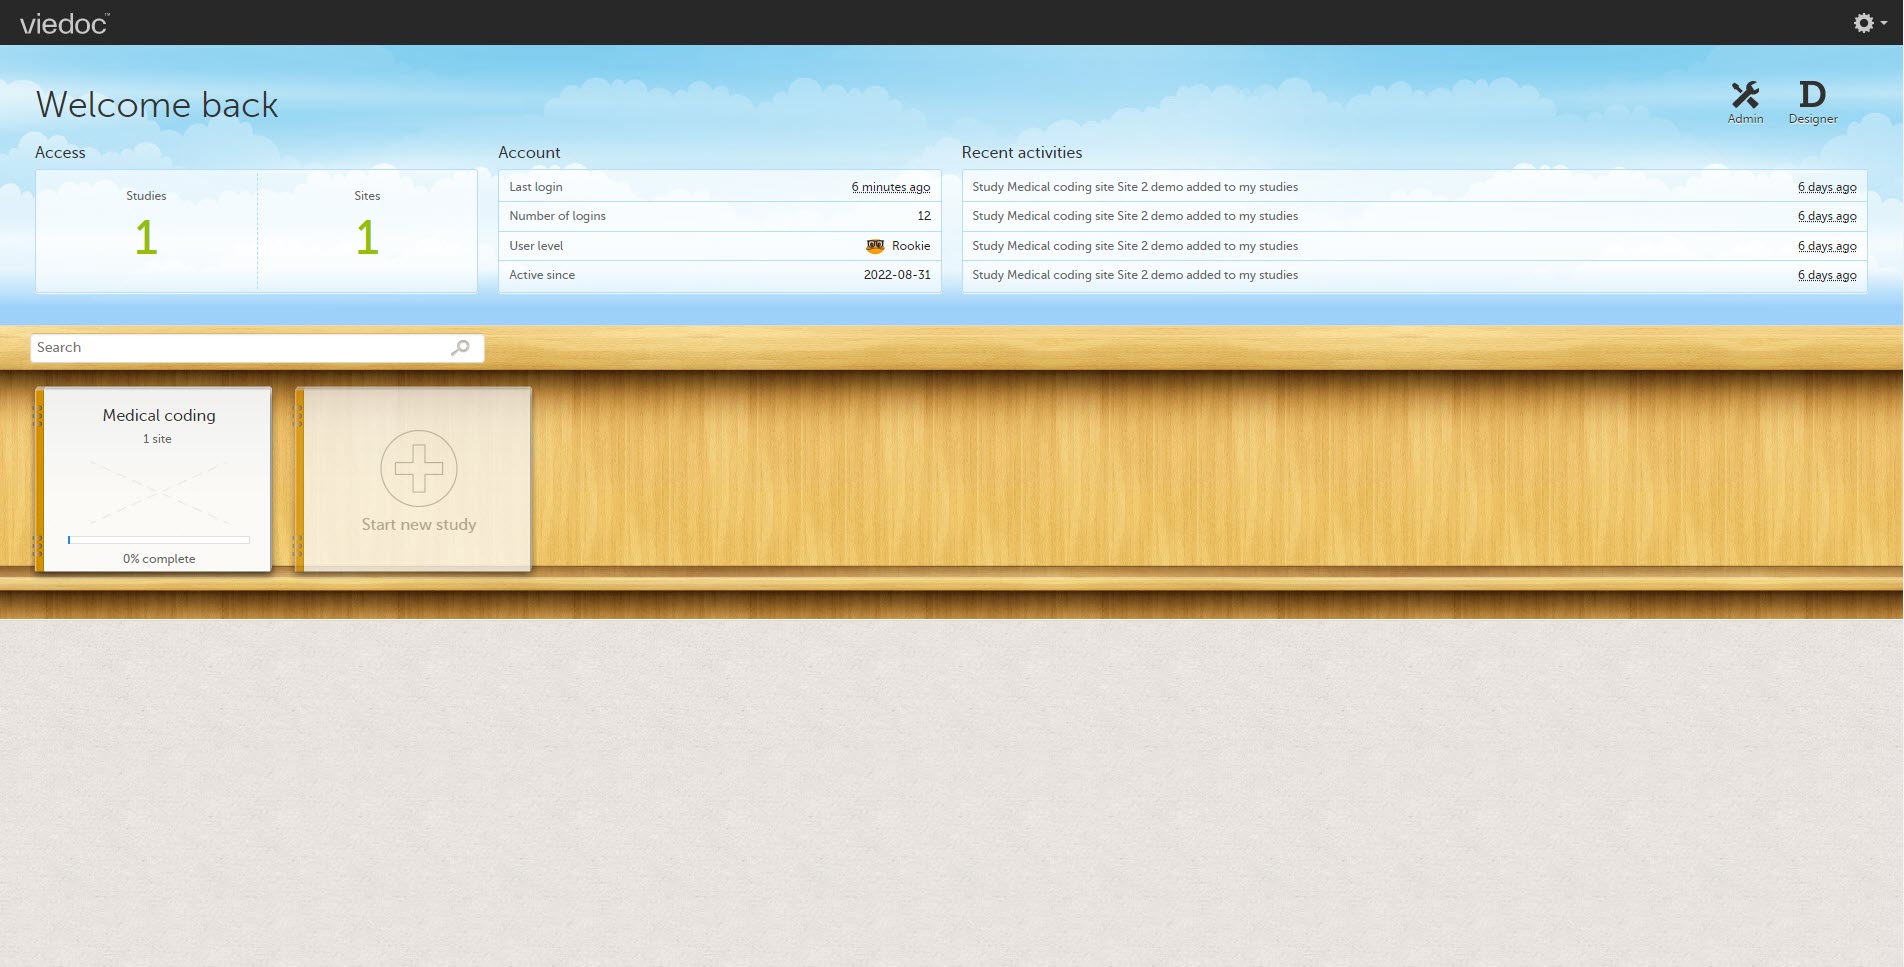
The landing page provides the following summary information:
| Skill level | Icon | Description |
|---|---|---|
| Rookie |  |
≤ 20 logins |
| Semi-pro |  |
21-100 logins |
| Pro |  |
101-1000 logins |
| Legend |  |
> 1000 logins |
The study slider shows the studies you have access to - each study is represented by a study logo. If you have access to many studies, you can easily find a specific study by entering the study name in the search field. All studies containing characters of the search string appear in the search results.
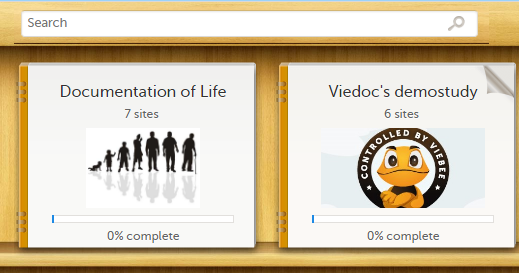
A progress bar is shown below each study logo. The percentage displayed is calculated by the mean completion of each subject (rounded down). Thus, it measures the total completion of the study.
Note!
Select a study logo to select a study to work with. The study start page is loaded on the lower half of the screen, for more information, see Study start page.
If you are an Administrator and/or Designer you will also have access to Viedoc Admin and Viedoc Designer. Select the respective icon at the upper right corner of the landing page:
Detailed information on changes in the current release, the release schedule and notes from previous releases can be found in the release notes on the Viedoc website here:
https://www.viedoc.com/support/release-notes/
For more information on future releases, please contact your Viedoc representative.
This page lists Viedoc's system-wide and design limitations. Some of these limitations are due to technical, regulatory, or security requirements, while others result from architectural design decisions that ensure system stability and integrity. For limitations related to specific features, please refer to the relevant sections in the Viedoc Learning.
NOTE: This lesson will contain only system-wide known limitations after the 4.84 release
We no longer support SMS notifications in the following countries:
This glossary contains common terms and acronyms found in the Learning. They are sorted in alphabetical order by the full term (not by abbreviation).
A B C D E F G H I J K L M N O P Q R S T U V W X Y Z
| Term | Abbreviation | Definition | ||
|---|---|---|---|---|
| Active Pharmaceutical Ingredient | API | The ingredient in a pharmaceutical drug or pesticide that is biologically active. | ||
| Application Programming Interface | API | A set of rules and protocols that allows software applications to communicate with each other. Note! Not to be confused with Active Pharmaceutical Ingredient. | ||
| Adverse Event | AE | Any unwanted effect caused by the administration of drugs. The onset of an adverse event may be sudden or develop over time. | ||
| Anatomic Therapeutic Chemical classification system | ATC | A drug classification system that classifies the active ingredient of drugs according to the organ or system on which they act and their therapeutic, pharmacological and chemical properties. | ||
| Annotated CRF | aCRF | A blank CRF with annotations that coordinate each datapoint in a form with its corresponding dataset name. In Viedoc, it equals to a printout of a form with Show IDs enabled. | ||
| Application Programming Interface | API | A set of routines, protocols, and tools for building software applications that specifies how software components should interact. | ||
| Attributable, Legible, Contemporaneous, Original, Accurate | ALCOA+ | The principles of data integrity. The plus sign denotes the four additions: Complete, Consistent, Enduring, and Available. | ||
| Audit trail | An audit trail (or audit log) is a security-relevant chronological record, set of records, or destination and source of records that provide documentary evidence of the sequence of activities that have affected a specific operation, procedure, or event at any time. The records are of importance for the clinical study, as specified by applicable international standards (from the FDA and EMEA). The audit trail allows reconstruction of the events relating to the creation, modification, or deletion of an electronic record. |
|||
| B | ||||
| Blinding | A procedure in which one or more parties to the trial are kept unaware of the treatment assignment(s). Single-blinding usually refers to the subject(s) being unaware, and double-blinding usually refers to the subject(s), investigator(s), monitor, and, in some cases, data analyst(s) being unaware of the treatment assignment(s). | |||
| C | ||||
| Case Report Form | CRF | A printed, optical, or electronic document designed to record all protocol-required information on each study subject. | ||
| The China Personal Information Protection Law | PIPL | The data privacy law in China, targeted at personal information protection. | ||
| Clinical Data Acquisition Standards Harmonization | CDASH | A standard developed by CDISC that provides guidance to develop the CRF. | ||
| Clinical Data Interchange Standards Consortium | CDISC | A global, open, multidisciplinary, non-profit organization that has established standards to support the acquisition, exchange, submission and archive of clinical research data and metadata. | ||
| Clinical Data Interchange Standards Consortium Define Extensible Markup Language | CDISC Define-XML | A metadata format defined by CDISC that is sent with every study in each submission, which tells the regulatory authorities what datasets, variables, controlled terms, and other specified metadata were used. | ||
| Clinic role | User roles in Viedoc that give access to Viedoc Clinic, such as Investigators, Monitors, and Data Managers.The clinic roles are study-specific. These roles, and the rights that belong to these roles, can be defined in Viedoc Designer. Each study can have an unlimited number of clinic roles. | |||
| Clinical data manager | Responsible for the management of the data in the clinical trial. Assists in protocol development and database selection and configuration. | |||
| Clinical Research Associate | CRA | A person employed by the sponsor, or by a CRO, acting on a sponsor’s behalf, who handles most of the administrative responsibilities of a clinical trial, acts as a liaison between investigative site and sponsor, monitors the progress of the investigator’s sites participating in a clinical study, and reviews all data and records before a monitor’s visit. | ||
| Clinical Review | CR | A clinical review gives the Monitor the possibility to mark forms as reviewed. | ||
| Clinical Trial Management System | CTMS | A Clinical Trial Management System is a software system used by biotechnology and pharmaceutical industries to manage clinical trials in clinical research. The system maintains and manages planning, performing and reporting functions, along with participant contact information, tracking deadlines and milestones. | ||
| Code of Federal Regulations | CFR | The codification of the general and permanent rules and regulations by the executive departments and agencies of the U.S. federal government. | ||
| Comma-Separated Values | CSV | A set of database rows and columns stored in a text file such that the rows are separated by a new line while the columns are separated by a semicolon or a comma. | ||
| Common event | An event that occurs separately or parallel to the workflow, for example concomitant medication, adverse event, medical history, dose adjustments, and daily compliance reporting. | |||
| Computerized Systems Used In Clinical Investigations | CSUCI | A guidance document established by the FDA intended to assist in ensuring confidence in the reliability, quality, and integrity of electronic source data and source documentation (that is, electronic records). | ||
| Concomitant Medication | CM | Drugs given to a patient at the same time, or almost at the same time, as the drug under study. | ||
| Contract Research Organization | CRO | A company that contracts with the sponsor to perform one or more of the sponsor’s duties in a clinical trial. | ||
| Coordinated Universal Time | UTC | The primary time standard by which the world regulates clocks and time. Viedoc stores all timestamps in UTC. In the cases when a time zone can be established (for example a specific site scope is selected), the timestamp is displayed with the time zone applied. | ||
| D | ||||
| Data Manager | DM | A user role in Viedoc with permission to lock and export data into different formats, view reports and metrics, and add pre-queries. | ||
| Demo mode | A mode in Viedoc specifically used for demonstrations and training new Viedoc users. No real data should ever be entered in Demo mode. | |||
| Designer | A user role in Viedoc that can create the setup (design) of the study in Viedoc Designer. | |||
| Dictionary Manager | A user role in Viedoc with permission to upload medical coding dictionaries. | |||
| Drug Information Association | DIA | A global forum for those involved in healthcare product development and lifecycle management to exchange knowledge and collaborate. | ||
| E | ||||
| Edit checks | A check of the data that verifies whether the data entered into the form are within a certain range that is specified in Viedoc Designer. If the entered data are outside the specified range, the system will automatically display a message that is defined under Query Message. | |||
| Electronic Case Report Form | eCRF | An electronic document designed to record all protocol-required information on each study subject throughout the study. | ||
| Electronic Common Technical Document | eCTD | A standard format for submitting applications, amendments, supplements, and reports to the FDA. | ||
| Electronic Data Capture | EDC |
The use of computerized systems to collect clinical trial data in electronic form as opposed to paper form. A software system, typically delivered as a cloud-based (SaaS) solution, used to collect and manage clinical trial data in electronic format as opposed to paper format. |
||
| Electronic Investigator Site File | eISF | The digital version of the minimum list of essential documents that a study site needs to maintain throughout a clinical trial. Included documents could be: Clinical Study Protocol, Investigator Brochure, Informed Consent, CVs etc. | ||
| Electronic Patient Reported Outcome | ePRO | A patient-reported outcome that is collected by electronic methods. Viedoc Me is the ePRO solution of Viedoc. | ||
| Electronic Trial Master File | eTMF | A type of content management system with a collection of essential documents which allows the conduct of a clinical trial to be reconstructed and evaluated. | ||
| eTMF Manager | A user role in Viedoc that has permission to manage the eTMF application in Viedoc Admin. The eTMF Manager maps Viedoc Clinic roles to eTMF roles. The eTMF Manager also has permission to manage the eTMF structure in Viedoc eTMF. | |||
| Event | A moment when the patient visits or contacts the clinic, or initiates an event through the Viedoc ePRO application Viedoc Me, and data are recorded. | |||
| European Medicines Agency | EMA | A decentralised agency of the European Union (EU) that is responsible for the scientific evaluation, supervision, and safety monitoring of medicines developed by pharmaceutical companies for use in the EU. | ||
| European Medicines Agency Good Clinical Practice Inspectors Working Group | EMA GCP IWG | The EMA GCP Inspectors Working Group focuses on harmonisation and co-ordination of GCP related activities at Community level. Involved in the preparation of new and revised guidance on GCP and community procedures relating to inspection. | ||
| Exchange Mechanism Standard | EMS | The exchange mechanism standard is a model for transferring eTMF data between sponsors, CROs, other stakeholders, and vendor systems. | ||
| Extensible Markup Language | XML | A markup language that defines a set of rules for encoding documents in a format that is both human-readable and machine-readable. | ||
| F | ||||
| Food and Drug Administration | FDA | An agency of the U.S. federal government’s Department of Health and Human Services that ensures the safety of foods, pharmaceuticals and other products. | ||
| G | ||||
| General Data Protection Regulation | GDPR | A regulation in the European Union (EU) law on data protection and privacy in the EU and the European Economic Area (EEA). Primarily aimed to give control to individuals over their personal data and to simplify the regulatory environment for international business by unifying the regulation within the EU. | ||
| Good Automated Manufacturing Practice | GAMP | A subcommittee of, and a series of good practice guides on drug manufacturing published by, the International Society for Pharmaceutical Engineering. | ||
| GAMP5 | The last major revision of the GAMP Guide for Validation of Automated Systems in Pharmaceutical Manufacture, released in February 2008. | |||
| Good Clinical Practice | GCP | A standard for the design, conduct, performance, monitoring, auditing, recording, analyses, and reporting of clinical trials that provides assurance that the data and reported results are credible, accurate, and that the rights, integrity, and confidentiality of trial subjects are protected. | ||
| Good Manufacturing Practice | GMP | The manufacturing guidelines recommended by the relevant agencies. | ||
| Globally Unique Identifier | GUID | A unique key containing numbers and letters that identifies the study. | ||
| H | ||||
| Health Insurance Portability and Accountability Act | HIPAA | A Privacy Rule that is the first comprehensive Federal protection for the privacy of personal health information. Research organizations and researchers may or may not be covered by the HIPAA Privacy Rule. | ||
| Hyper Text Markup Language | HTML | The standard markup language for documents designed to be displayed in a web browser. | ||
| I | ||||
| Identity Provider | IdP | A system entity that creates, maintains, and manages identity information. | ||
| Independent Ethics Committee | IEC | An institutional review board (IRB). | ||
| Informed Consent Form | A document containing all elements of a research study, explained in lay terms. The consent form must be signed prior to participation in any study activity. The affirmative decision of the IEC/IRB that the clinical trial has been reviewed and may be conducted at the institution site within the constraints set forth by the IEC/IRB, the institution, Good Clinical Practice (GCP), and the applicable regulatory requirements. The appointed ethical committee is responsible for reviewing each human subject protocol to ensure the ethical protection of these subjects. | |||
| Input factors | When used in randomization: Prognostic factors that might influence the effect of treatment on the subjects. | |||
| Institutional Review Board | IRB | Committee(s) made up of experts and community representatives who review and approve clinical trials to make certain that they fulfill stringent ethical standards to protect subjects’ rights as participants in an experiment. | ||
| International Council for Harmonisation of Technical Requirements for Pharmaceuticals for Human Use | ICH | An initiative that brings together regulatory authorities and pharmaceutical industry to discuss scientific and technical aspects of pharmaceutical product development and registration. | ||
| International Organization for Standardization | ISO | An organization promoting worldwide proprietary, industrial, and commercial standards. | ||
| Investigational Medicinal Product | IMP | A medicine for research. | ||
| Investigational Product | IP | A preventative (vaccine), a therapeutic (drug or biologic), device, diagnostic, or palliative used in a clinical trial. Also abbreviated IMP (Investigational Medicinal Product) and IMD (Investigational Medical Device). An investigational medical device is one that is the subject of a clinical study designed to evaluate the effectiveness and/or safety of the device. | ||
| Investigator Site File | ISF | The minimum list of essential documents that a study site needs to maintain throughout a clinical trial. Included documents could be Clinical Study Protocol, Investigator Brochure, Informed Consent, CVs etc. | ||
| Iyakuhinmei Data File | IDF | A medical coding dictionary used for coding clinical and drug safety data and for reporting safety data to the Japanese Pharmaceuticals and Medical Devices Agency (PMDA). | ||
| J | ||||
| Japanese Pharmaceuticals and Medical Devices Agency | PMDA | PMDA (Pharmaceuticals and Medical Devices Agency) is a Japanese regulatory agency, working together with Ministry of Health, Labour and Welfare. Their obligation is to protect the public health by assuring safety, efficacy and quality of pharmaceuticals and medical devices. | ||
| JavaScript | JS | A scripting language, primarily used on the web. Used to enhance HTML pages and is commonly found embedded in HTML code. Viedoc is using JS to define advanced edit checks, expressions, and comparisons. | ||
| K | ||||
| Kaifu | The send/receive/return process for handling booklets | |||
| Key Risk Indicator | KRI | In Viedoc Reports, the Key Risk Indicators are the measurement of unfavorable events that can adversely impact a study, and are measured by site. | ||
| L | ||||
| Linking form | A linking form is a form that contains a link to refer to another form. There can be one or more instances of the linked form. | |||
| Linked form | A linked form is a form that is linked to from another form (a linking form). | |||
| M | ||||
| Medical coding | The process of translating reported events like Adverse Events, Medical History and Concomitant Medications in a universal code according to a medical coding dictionary. | |||
| Medical Dictionary for Regulatory Activities | MedDRA | A medical coding dictionary developed by the Maintenance and Support Services Organization (MSSO). MedDRA is supported by ICH. | ||
| N | ||||
| National Medical Products Administration | NMPA | The Chinese agency for regulating drugs and medical devices. | ||
| Numeric rating scale | NRS | A numeric rating scale using numbers to identify the items in the scale, on a scale of 0 to 10. Commonly used to evaluate pain intensity. | ||
| O | ||||
| Object Identifier | OID | An identifier mechanism for naming any object, concept, or "thing" with a globally unambiguous persistent name. | ||
| Operational Data Model | ODM | A standard for electronic clinical data as defined by CDISC. The highlights of ODM include audit trail, utilization of XML technology, and machine-readable and human-readable data. All information is independent of databases, and storage of ODM is independent of hardware and software. | ||
| Output factors | When used in randomization: the result after a patient has been randomized, that is, the treatment group or kit number (in case of a blinded output) that the patient is assigned to. | |||
| P | ||||
| Patient Reported Outcome | PRO | A health outcome directly reported by the patient who experienced it. | ||
| Portable Document Format Archive | PDF/A | An ISO-standardized version of the PDF specialized for use in the archiving and long-term preservation of electronic documents. | ||
| Post Marketing Surveillance | PMS | The practice of monitoring the safety of a pharmaceutical drug or device after it has been released on the market and an important part of the science of pharmacovigilance. Viedoc PMS is Viedoc's electronic data capture solution developed especially for post-marketing surveillance studies. PMS in Japan differs from other PMS studies in the world, with concepts such as kaifu function and booklets. | ||
| Q | ||||
| Quality Control | QC | The operational technique and activities undertaken within the quality assurance system to verify that the requirements for quality of the trial are met. | ||
| R | ||||
| Randomization | A method based on chance by which study participants are assigned to a treatment group. Randomization minimizes the difference among groups by equally distributing people with particular characteristics among all the trial arms. | |||
| Randomization and Trial Supply Management | RTSM | A system that unifies the randomization, allocation, and supply management in a clinical trial. | ||
| Representational State Transfer | REST | A REST API (also known as RESTful API) is an application programming interface (API or web API) that conforms to the constraints of REST architectural style and allows for interaction with RESTful web services. | ||
| S | ||||
| Scheduled event | Events to the clinic by the patient that are defined in the study protocol. The events can also be subject-initiated through Viedoc Me, the ePRO application. | |||
| Study/Trial Design Model in XML (SDM-XML) | SDM | An extension of ODM-XML which allows organizations to provide rigorous, machine-readable, interchangeable descriptions of the designs of their clinical studies, including treatment plans, eligibility and times and events. SDM-XML defines three key sub-modules – Structure, Workflow, and Timing – permitting various levels of detail in any representation of a clinical study’s design. | ||
| Study Data Tabulation Model | SDTM | A CDISC standard for how to structure raw data for a submission. SDTM is one of the required standards for data submission to FDA (U.S.) and PMDA (Japan). |
||
| Security Assertion Markup Language | SAML | An open XML-based standard for exchanging authentication and authorization identities between security domains. | ||
| Security Token Service | STS | An open standard web service for issuing, validating, renewing, and cancelling security tokens for use with, for example, an API. | ||
| Serious Adverse Event | SAE | Any event resulting in death, a life-threatening situation, hospitalization, or prolonged hospitalization, disability, incapacity, or congenital defect. |
||
| Single Sign-On | SSO | An authentication process that allows a user to access multiple applications with one set of login credentials. | ||
| Site | A clinic or other medical institute visited by subjects and where their data are recorded. | |||
| Site Manager | SIM | A user role in Viedoc Admin that can edit the details of their respective sites and invite site users to their sites. | ||
| Software As A Service | SaaS | Also known as web-based software, on-demand software, cloud software, and hosted software. Typically accessed by users via a web browser. | ||
| Standard Operating Procedure | SOP | Detailed, written instructions to achieve uniformity of the performance of a specific function. | ||
| Source Data | The original data when first recorded. | |||
| Source Data Verification | SDV | The process by which data within the CRF is compared to the original source of information (and vice versa). Helps to ensure eCRF and source records together meet various protocol and clinical expectations. | ||
| Source Documentation | All original records and certified copies of original records of clinical findings, observations, or other activities in a clinical trial necessary for the reconstruction and evaluation of the trial. Source data are contained in the source documents. | |||
| Sponsor | Any organization that provides the institutional base for clinical trial researchers. This includes commercial groups: pharmaceutical companies, non-profit organizations, universities, and medical centers. | |||
| Statistical Analysis System | SAS | A format used for statistical analysis in the SAS software suite. | ||
| Study crew | Viedoc users and all staff involved in the clinical trial. In most cases, these terms refer to users of Viedoc Clinic (see also Clinic role). | |||
| Study design | The design of the study that covers all the details about how the study is supposed to be performed, such as treatment details, medical examinations and other data to be collected, the workflow, and the Viedoc permissions of the different clinic roles that contribute to the study. The study design is set up in accordance with the clinical trial protocol. | |||
| Study Manager | STM | A user role in Viedoc that has permission to manage the administration of the study in Viedoc Admin. The study manager invites the study crew, adds sites, and applies study designs to sites. This user role is usually assigned to the project manager of the clinical trial. | ||
| Subject | A person participating in the clinical trial. Also referred to as patient. | |||
| System roles | User roles in Viedoc that are defined by the system and give access to Viedoc Admin and/or Viedoc Designer. Examples are: Study Manager, Site Manager, Designer, Dictionary Manager, Unblinded Statistician. | |||
| T | ||||
| Transport Layer Security | TLS | Protocols designed to provide communications security over a computer network. | ||
| Trial Master File | TMF | A type of content management system for the pharmaceutical industry, providing a formalized means of organizing and storing documents, images, and other digital content for clinical trials that may be required for compliance with government regulatory agencies. | ||
| U | ||||
| Unblinded statistician | A user role in Viedoc that manages the randomization and kit allocation lists in Viedoc Admin. | |||
| Unscheduled event | Additional events to the clinic by the patient that are not pre-defined in the study protocol. | |||
| V | ||||
| Viedoc Inspection Readiness Packet | VIRP | A file that can be downloaded in Viedoc, containing all the information needed to fulfill regulatory expectations. | ||
| W | ||||
| World Health Organization Drug Dictionary | WHODrug | A dictionary maintained and updated by Uppsala Monitoring Centre. | ||
| WHODrug Koda | An AI-driven coding engine by UMC that connects via REST API to automatically code verbatim entries to WHODrug Global and select the most appropriate ATC code. | |||
| X | ||||
| Y | ||||
| Z | ||||
It is important to be fully prepared for an inspection of relevant documentation about the EDC system used in a clinical trial. If the correct documentation is available for review by the regulatory authorities and certain validations have been performed, inspectors can then assess the systems used when collecting subject data in clinical trials.
There are also specific expectations that sponsors must comply with, depending on the regulatory body, European Medicines Agency (EMA) Food and Drug Administration (FDA) and the Japanese Pharmaceuticals and Medical Devices Agency (PMDA) even though these are similar in that they all expect the sponsor to have a complete understanding of the system. They also expect that the sponsor (or Contract Research Organization (CRO), if delegated) fully understands the functionality of the EDC system being used and can demonstrate this understanding and explain how the system has been validated.
To assist in preparing for inspections, Viedoc has developed the Viedoc Inspection Readiness Packet (VIRP) which provides you with the information you need in order to fulfil regulatory expectations and requirements.
The VIRP is available for every release of Viedoc. The VIRP introduction describes the contents of VIRP in more detail, and also talks about additional documentation you should provide. The VIRP introduction is included in VIRP.
eLearning: Viedoc also provides an eLearning lesson - Inspection Readiness when Working in Viedoc, which describes in detail the information needed step-by-step, as well as having additional information about potential pitfalls, what happens when new functionality is introduced in a release, about backward compatibility and more.
The Viedoc Release Binder. We also store a snapshot of the information in our development environment for each release. This information is included in the Release Binder for that release which is stored in SharePoint and can be shared with inspectors either in a webinar or onsite.
When it comes to preparing for regulatory inspections, there are different areas of responsibility for the Sponsor/CRO and Viedoc.
The Sponsor/CRO should be able to rely on Viedoc standard qualification documentation as there are no sponsor or study-specific software modifications made to the standard product. The configuration of Viedoc for use in a study is done using only functionality that has been validated before being released to the study.
Each new Viedoc version is fully validated before release - which takes place every 6-8 weeks. These releases are installed on all production servers at the same time, meaning all customers and all studies are updated at the same time. Furthermore, we ensure that ongoing studies are not affected by fulfilling the following two requirements:
The new release must be 100% backward compatible.
Any new functionality in the release shall be disabled for ongoing studies by default.
Some areas and activities, however, remain the responsibility of the sponsor/CRO and should be documented:
It is a Sponsor/CRO responsibility to validate the study configuration and confirm that the study has been set up in accordance with the study protocol. This validation should be documented.
The different versions of systems used during the study and a synopsis of the differences between the versions should be stored as part of the study record in the sponsor (e)TMF.
A risk-based assessment documenting the decision to rely on VIRP should be carried out.
A checklist of the required functions (such as randomization module, patient ePRO module, coding module) for your trial on our epic1 level, and where necessary, individual features1.
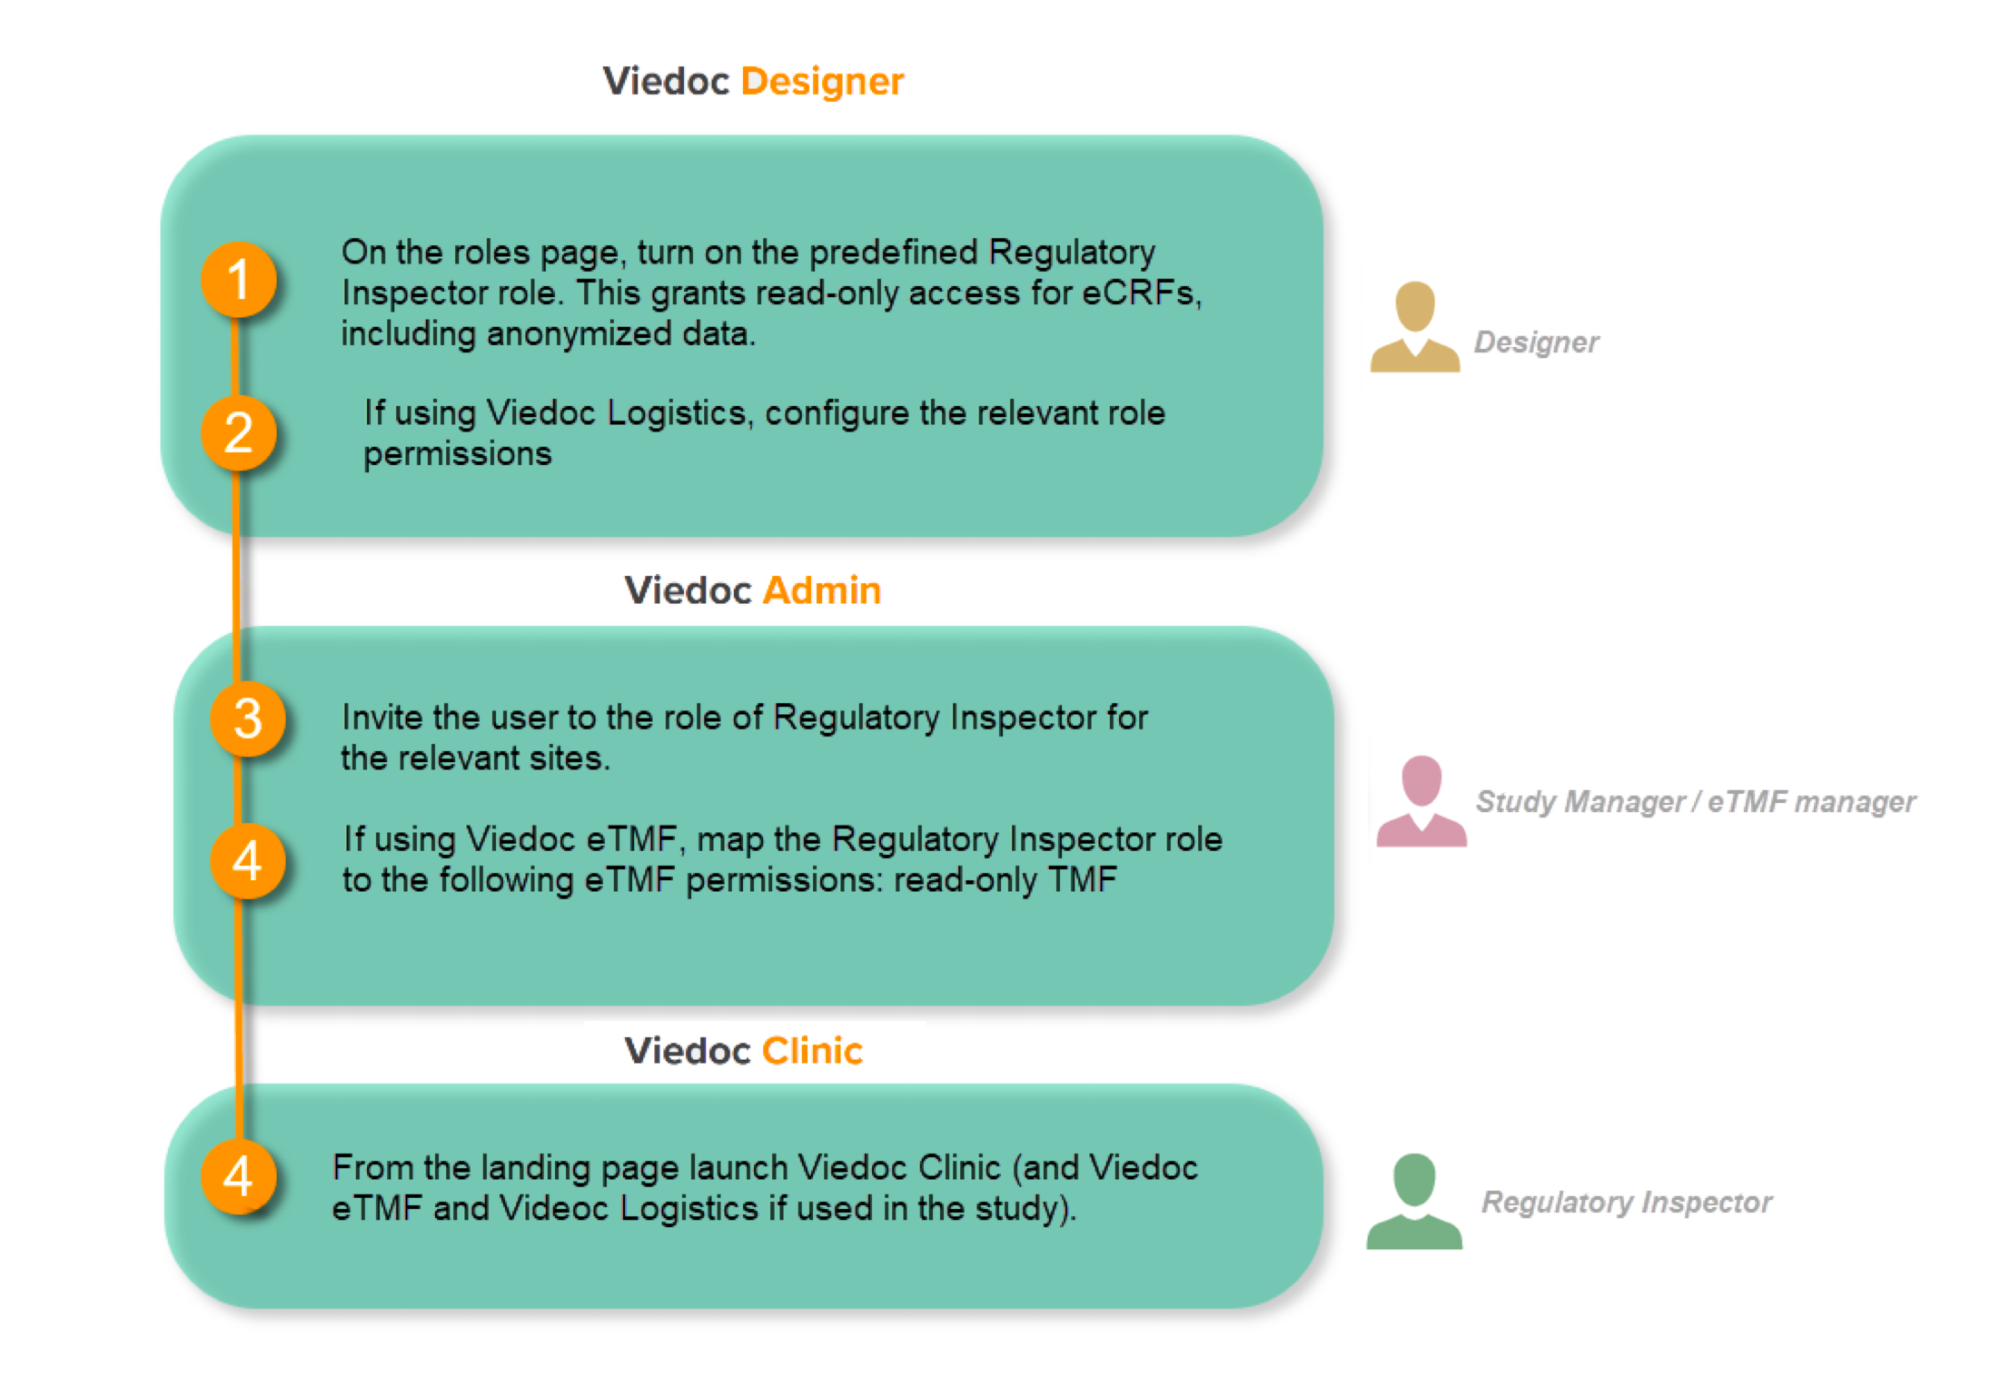
When the inspector visits, they must have access to Viedoc. Regulatory inspectors have the legal right to view all data in the study – even patient data and hidden (anonymized) items in the audit trail. The study manager should invite the inspector to the Viedoc user role Regulatory Inspector when they arrive.
Follow these steps to ensure that the inspector has all the correct access permissions in Viedoc:
This step is performed by the Designer.
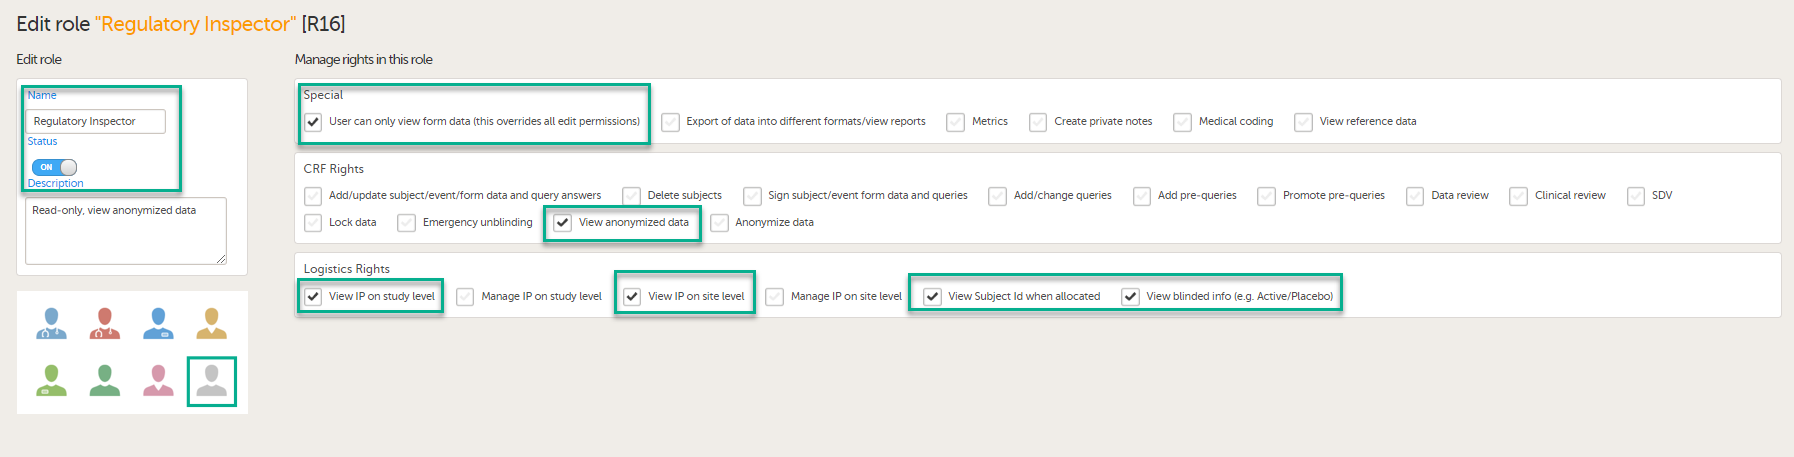
In Viedoc Designer, on the Roles page, configure the Regulatory Inspector user role and make sure it is turned on.
To allow the Regulatory Inspector access to study data, their role must be configured with Read-only for form data and View anonymized data and blinded data permissions on the Roles page.
If the study uses Viedoc Logistics, the following role permissions in Logistics Rights for the Regulatory Inspector role must be configured on the Roles page:
View IP (Investigational Product) on study level,
View IP on site level
View subject ID when allocated
View blinded info (e.g. Active/Placebo).
See the image below and Configuring roles.

Note! Should the inspector also require access to Viedoc Admin or Viedoc Designer, and the study is managed by a Viedoc representative, you are always welcome to contact your Viedoc representative if you need assistance.
These steps are performed by the Study manager.
In Viedoc Admin, the study manager invites the Regulatory Inspector to the study for all sites. See Managing users.
The inspector should also be invited to the study with the role of Unblinded Statistician, in order to have access to the randomization lists and be able to download them in Viedoc Admin.
Note! This role is only used for randomized studies, when it is necessary to have control over who has access to and can manage the randomization lists.
The inspector should also be able to access the eLearning. There is a requirement for customers to be able to present to regulatory inspectors, on request, the version of the eLearning used to train staff during the course of the study.
The Documentation tab under Study settings provides a list of all documentation and training sections.

The Regulatory Inspector role should be granted access to the relevant eLearning documentation on the Study settings page.
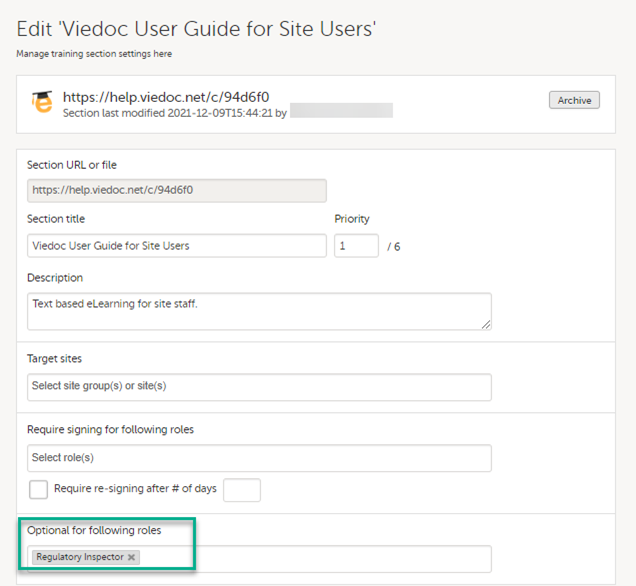
See the Viedoc Admin User Guide Setting up user documentation and training
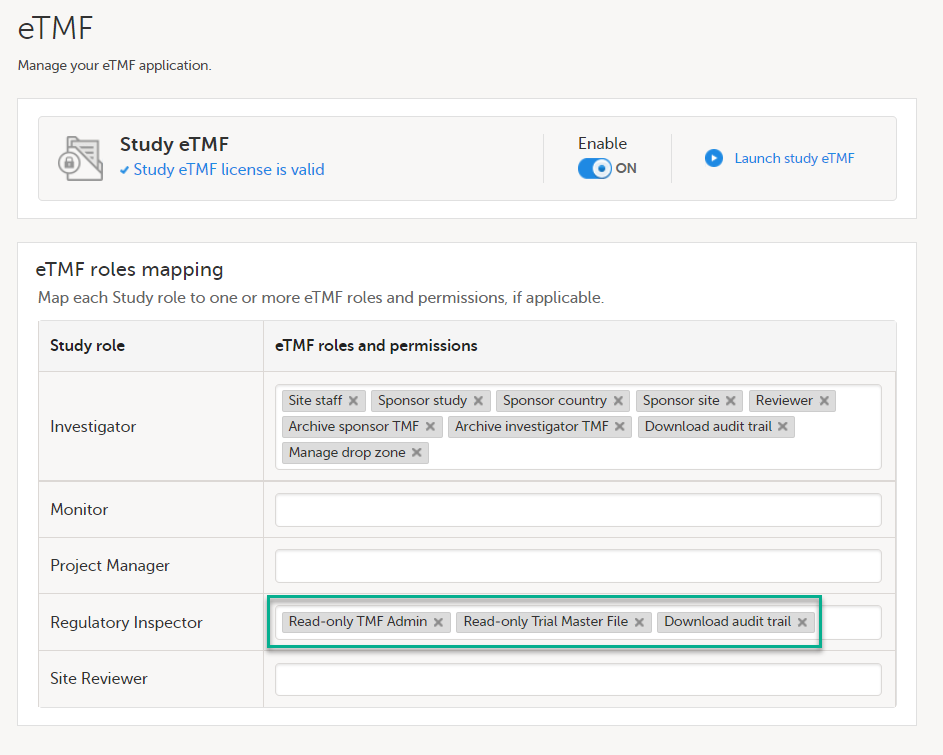
If the study uses Viedoc eTMF, the study manager/eTMF manager should map the Regulatory Inspector study role to an eTMF role with at least the following permissions: Read-only TMF Admin, Read-only Trial Master File and Download audit trail.

See Viedoc User Guide for eTMF Managers - Managing Viedoc eTMF - Mapping user roles.
These steps are performed by the Regulatory Inspector.
The regulatory inspector accepts the invitation and activates their account - see Viedoc User Guide for Site Users: Managing your Viedoc account
The inspector can now launch Viedoc Clinic and the Viedoc eTMF from the landing page.
1 At Viedoc, we publish our User Requirements Specification in an easy-to-understand format made up of epics, features, and user stories.
Epics describe an overall module within Viedoc, such as audit trail, ePRO, and medical coding.
Features describe a given functionality in more detail, such as Viedoc Connect, form link items, and email alerts.
User stories are the detailed, broken-down requirements used by the system developers when designing, implementing, and validating Viedoc.
This is the central directory of all the Viedoc Learning user guides, designed to support users across various products, roles, and functionalities. You can access each guide using the links below.
Product user guides:
Role-based user guides:
PMS user guides:
Thorough preparation for inspection of the EDC system used in a clinical trial is of great importance. The regulatory authorities see the EDC system used for a clinical trial as an important computerized system with regards to both patient safety and data integrity.
To assist in this process, Viedoc has developed the Viedoc Inspection Readiness Packet (VIRP) which provides you with the information you need to prepare for a regulatory inspection and to fulfil regulatory expectations and requirements. The VIRP introduction describes the contents of VIRP in more detail, and also talks about additional documentation you should provide. The VIRP introduction is included in VIRP.
If you decide to use VIRP we provide an eLearning lesson which describes the information needed step-by-step in order to fulfil inspector expectations: Inspection Readiness When Working in Viedoc
You can read about how to download the Viedoc Inspection Readiness Packet here: VIRP
You will need to give full read-only access and invite the inspector to the Regulatory Inspector role in the Viedoc system as described below.
This step is performed by the Designer.
To allow the Regulatory Inspector viewing access to study data, their role must be configured with read-only and view anonymized and blinded data permissions on the Roles page.
Note!
If the study uses Viedoc Logistics, the following role permissions in Logistics Rights for the Regulatory Inspector role must be configured on the Roles page:
See Configuring roles.
Note! Should the inspector also require access to Viedoc Admin or Viedoc Designer, you are always welcome to contact your Viedoc representative if you need assistance.
This step is performed by the Study Manager.
Note! For randomized studies, the inspector should also be invited to the study with the role of Unblinded Statistician, in order to have access to the randomization lists and be able to download them in Viedoc Admin.
See Managing users.
If the study is using the eTMF, map the Regulatory Inspector study role to an eTMF role with the permissions read-only TMF Admin, read-only Trial Master File and Download audit trail.
This step is performed by the Study Manager/eTMF Manager.
Launch Viedoc Clinic and Viedoc eTMF and Viedoc Logistics (if used in the study) from the landing page.
This step is performed by the Regulatory Inspector.
When you select the study logo in the landing page, the study start page loads, which contains the following icons that give access to different features, or enable you to view information about the study:
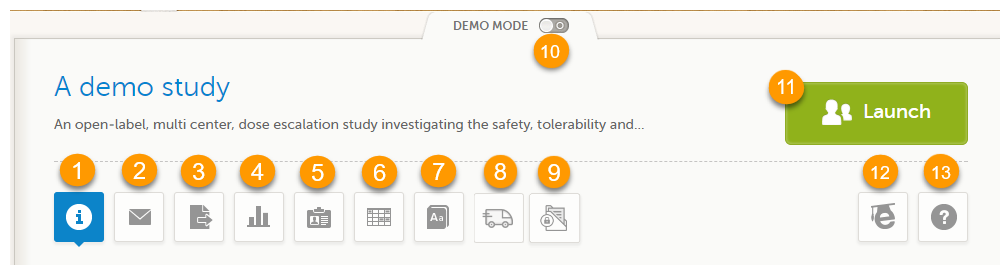
1. Study status
2. Messages
3. Data Export
4. Metrics and Viedoc Reports
5. Roles
6. Reference data
7. Medical coding
8. Viedoc Logistics
9. Viedoc eTMF
10. Demo mode
11. Launch
12. eLearning / Documentation & Training
13. Support
Notes!
The first page displayed when you select a study is, depending on the status of the mandatory documentation and training materials, as below:
| Important! All the mandatory materials must be "Read & Understood" and signed before you can launch the study. You might be able to launch the study in demo mode, depending on the study settings performed by the Study Manager. |
The Study status page is the first page that is shown when accessing a study, if you do not have any mandatory documentation and training material that needs to be signed. This page gives you an overview of the progress of the study - on study, country and/or site level (depending on which sites you have access to):
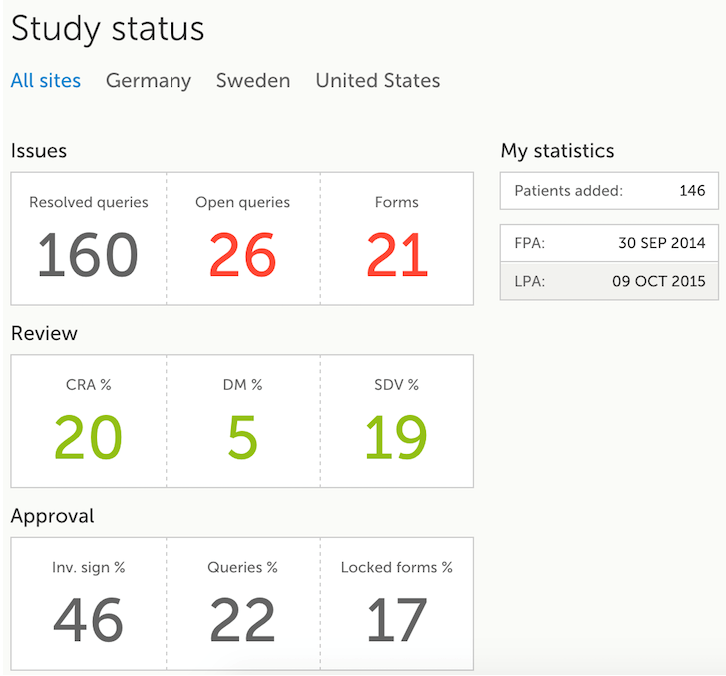
You can filter the displayed data for country or site by selecting the name of the country or site:
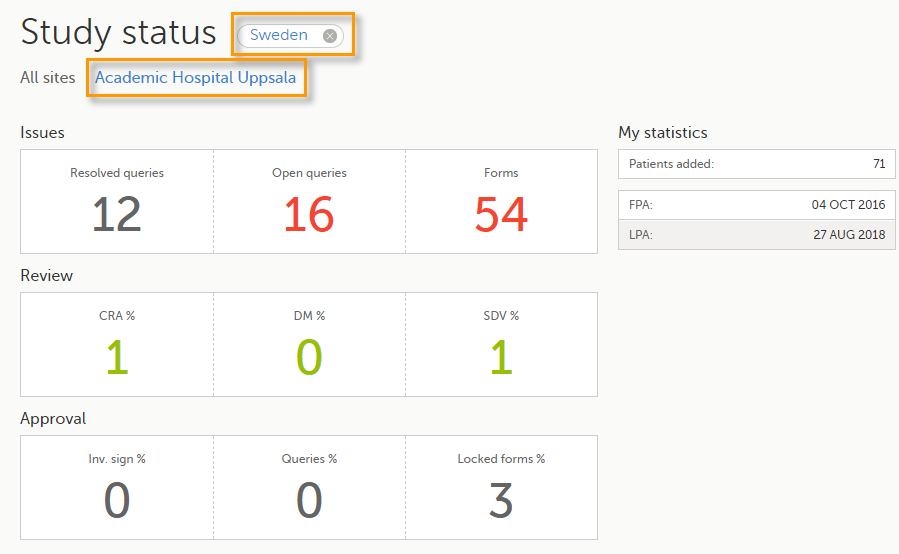
The following statistical information is provided, for the selected site(s):
Note! For resolved and open queries, this includes only manual and validation queries, not missing data queries. For resolved queries, the following statuses are included: Resolved, Rejected, Approved, and Closed.
Note! All the numbers reflect the data entered in the selected operation mode (demo or production), that is, if demo mode is selected, then the numbers reflect only the data entered in demo mode.
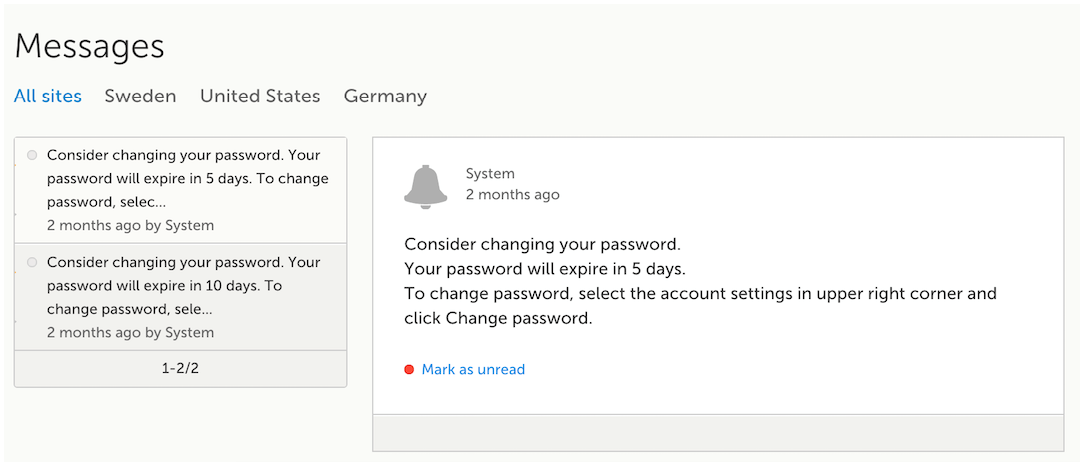
A message can either be a system message (such as notifications on password expiration), a study message (such as eCRF changes - for more information, see Approving eCRF changes, or other notifications according to the study configuration).
In the message window, a blue dot indicates a study-specific alert, a yellow dot indicates a form change requiring approval, and a red dot indicates an expiring password.
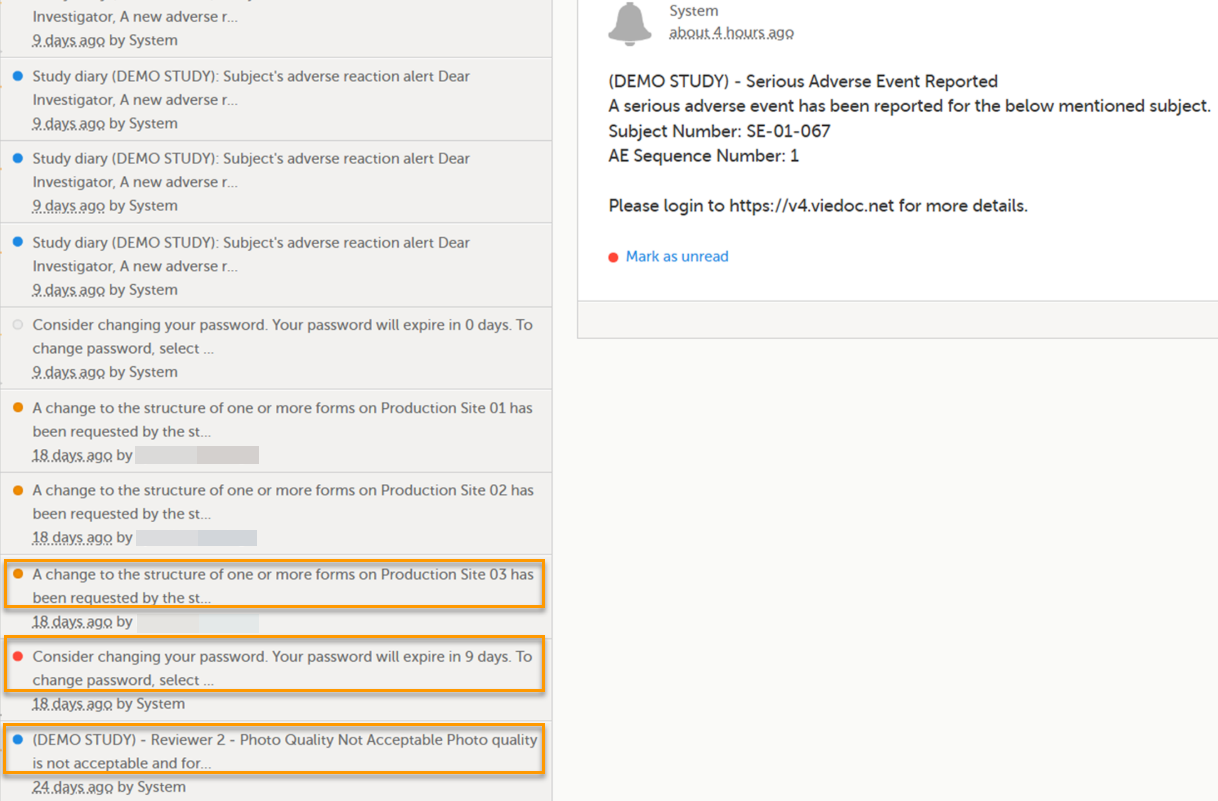
An indicator in the top bar of the application indicates whether you have unread messages.
 Alert messages
According to the study configuration, you can receive alert notifications about important occurrences in the data. (For example, in case of a Serious Adverse Event). Alert notifications can be received in the Messages page and as an email.
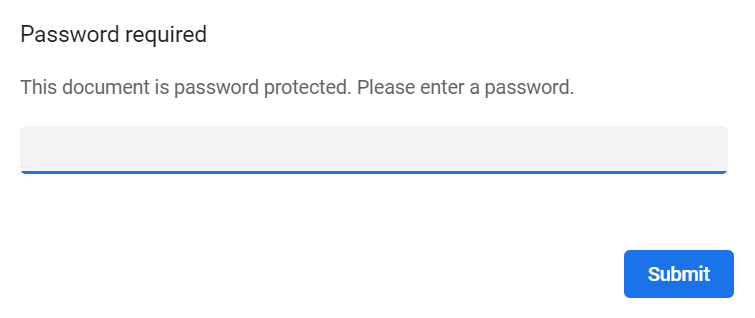
Depending on the configuration/study setup, the email might have the PDF of the form that triggered that alert as an attachment.
If the option to enable password protection for the alert email attachments has been selected for your study, you should receive a password to enter to open the attachments. The password is provided by your Study Manager.
When you receive an email copy of the alert message with a password-protected attachment, when you open the file you will see the pop-up below where you can enter your password:
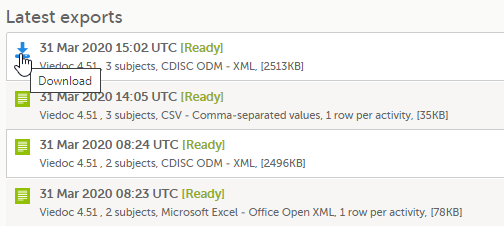
The Data export page enables you to review and download study data in the following formats:
Note! Data export might not be available to all users.
For more information about data export and preview, see Exporting data.
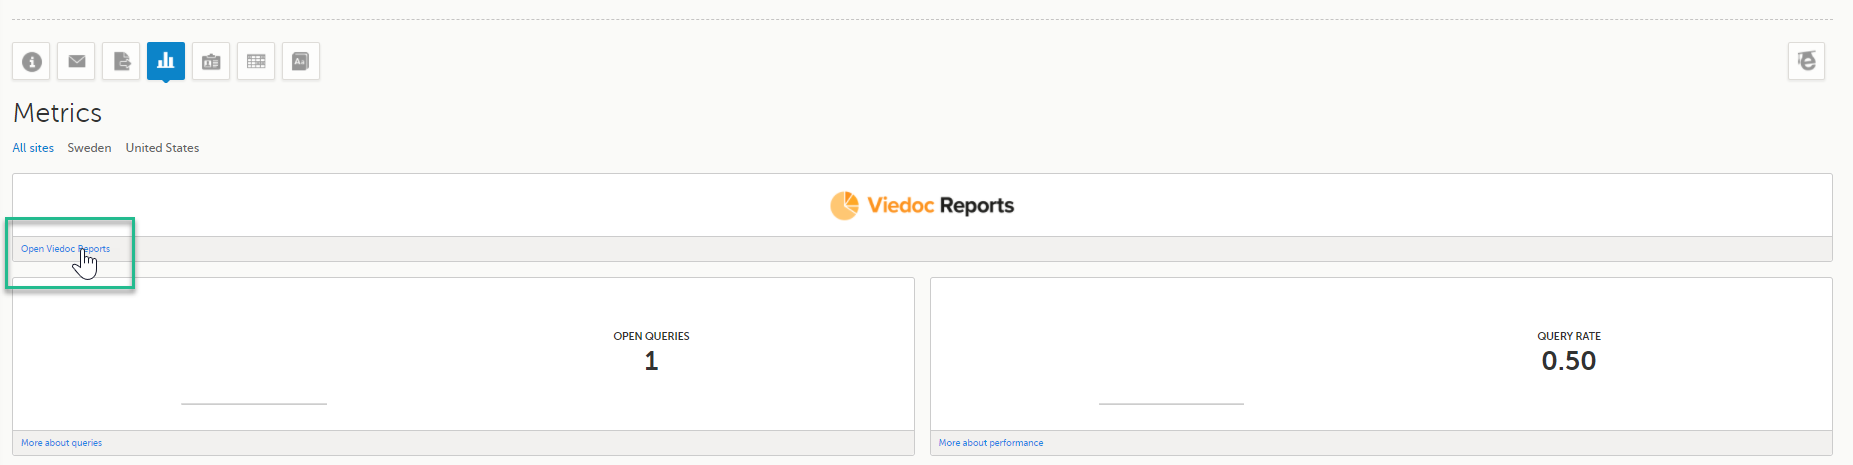
The Metrics page gives an overview of the quality of data in terms of open queries and missing data.
Note! Metrics might not be available to all users.
For a detailed description, see Metrics.
If Viedoc Reports is included in the study license and enabled, it is accessed from the Metrics feature. For more information, see Launching Viedoc Reports.
Note! The Roles page is only available for users with special permission to view roles, as per the study design.
The Roles page provides information on:
Under My roles you can see the roles that you have in the respective study:
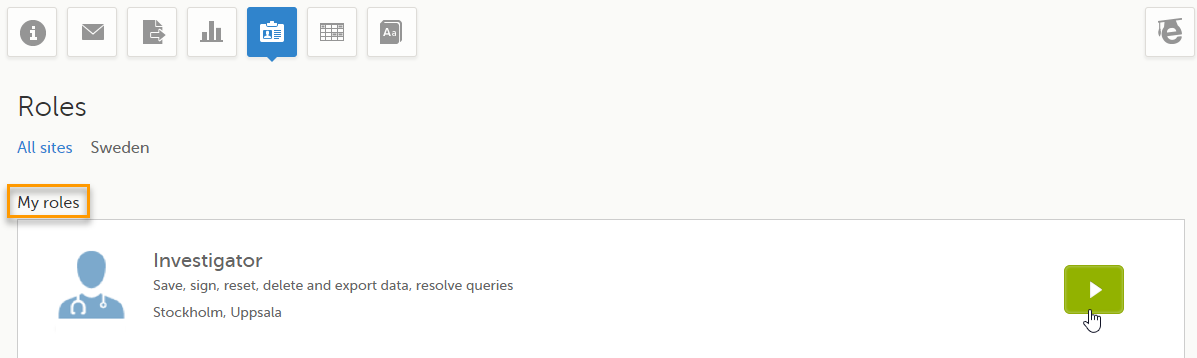
The following information is displayed (with examples):
By selecting the green arrow button to the right, you will be directed to the Selection page. This is equivalent to selecting the Launch button.
Here you can see a list of all the roles and the respective user(s) for the site(s) you have access to:

To see user details of each role, select Show log. The log displays:
*date and time in Coordinated Universal Time (UTC) time zone
For each study, you can download user logs in PDF and Excel format with information about all users and roles for the sites you have access to.The generated file reflects the country/site selection in the language you have currently set in Viedoc.
Notes!
You can generate the log for the country/site selection in your current Viedoc language by selecting Generate a PDF file / Generate an Excel file at the bottom of the study start page:

Once the user log is generated you can:

The Log of users and roles PDF contains the following chapters:
The User administration log contains information about all users and roles for the sites you have access to, with the following sheets:
When you select the reference data icon, the list of available reference data source-scope combinations is displayed. From here you can open the reference data editor. For details see Working with reference data.
Note! Reference data might not be available to all users.
The medical coding feature allows you to code reported events like Adverse Events, Medical History and Concomitant Medications. When you select the medical coding icon, the page displays metrics regarding medical coding. There is one set of metrics for each medical coding scope available.
Note! Medical coding might not be available to all users.
For more information about medical coding, see Medical coding.
Viedoc Logistics is the interface for managing the supply of your study. A valid license is required to use Viedoc Logistics.
For more information about Viedoc Logistics, see Viedoc Logistics User Guide.
Viedoc eTMF is a digital repository for capturing, managing, sharing, and storing essential documents.
For more information about Viedoc eTMF, see Viedoc eTMF User Guide.
If enabled, a study can operate in demo mode. You can easily switch between demo mode and production mode using the DEMO MODE switch:

The DEMO MODE switch is only visible when you have access to both production and demo mode.
The demo mode is clearly indicated with demo icons. Make sure you do not enter any real data in demo mode!
See also the video tutorial Activate demo mode.
Select the Launch button to access the patient data and electronic Case Report Forms (eCRFs). The button is only visible when you have access to the study in Viedoc Clinic.
If multiple roles are assigned to you in this study, you are first prompted to select the role you would like to use to access the study.
If you have mandatory documentation pending to be read and signed, this is the first page that is displayed when you access the study.
Under this section, you have access to several eLearning programs and various documentation, depending on the roles that have been assigned to you. For details about the user documentation and certificates, see Documentation & Training.
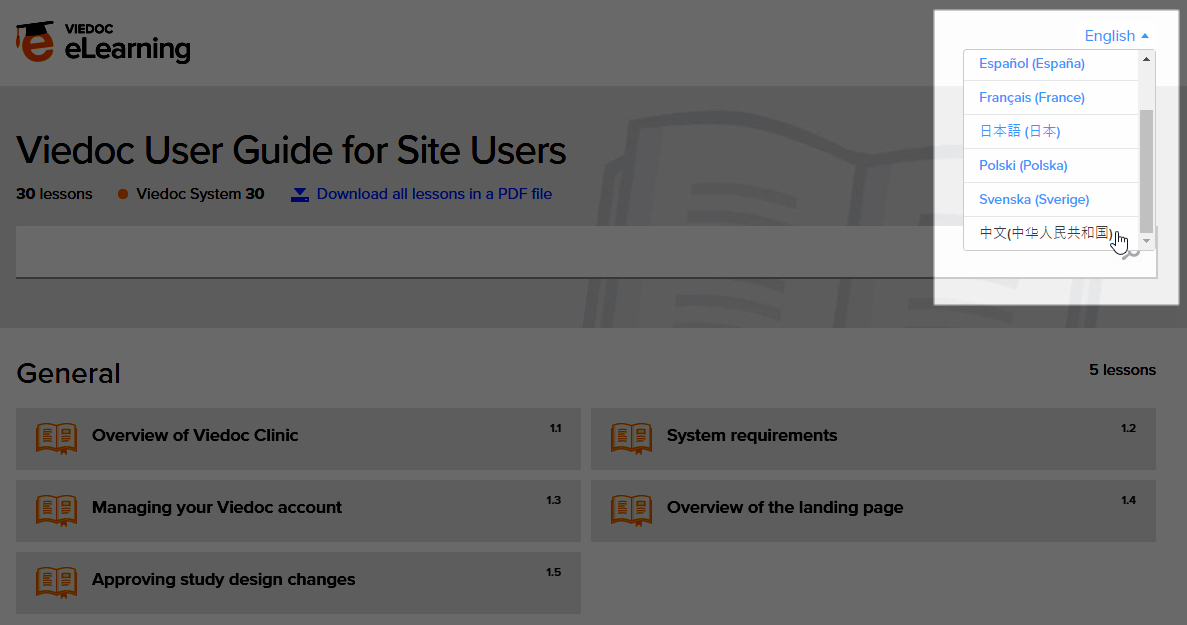
The Viedoc Clinic User Guides are available in the following languages:
To change the language of the Viedoc User Guide, once opened, select the language from the upper right corner, as illustrated below:
Tip! The various lessons in the Viedoc eLearning can easily be compiled into a PDF and printed if you need to store them in the investigator binder.
Select the support icon to open a pop-up with contact details to the users that can help you in case you need support. Normally you will find the contact details of the Monitor here, as the Monitor typically is the first point of contact to the site.
Depending on the study settings and on the role(s) you have within a study, you might have access to various user documentation. This lesson describes the scenario when, under the eLearning section, you get access to the Documentation & Training page, with mandatory and/or optional documentation section(s), as illustrated in the following image:

The available documentation and training materials are split in two main categories:
1. Mandatory sections - contains all the materials that are mandatory for you to read, understand and sign before starting to work.
If you have mandatory documentation pending to be read and signed, then the first page that opens when you access the study is the Documentation and Training.
| Important! All the materials under Mandatory sections must be "Read & Understood" and signed before you can launch the study. You might be able to launch the study in demo mode, depending on the study settings performed by the Study Manager. |
2. Optional sections - contains additional educational and reference materials that you have access to. Simply click on the link to open each of the available documents/links.
To work within a study for which mandatory training sections were assigned, you need to read, understand and sign all the sections listed as mandatory.
To obtain the user certificate:
| 1 | Click the link to open the section. Read through and, when you're done, go back to the Documentation and Training page and click Read & Understood. A date and time stamp in Coordinated Universal Time (UTC) will be shown in the Read & Understood at column: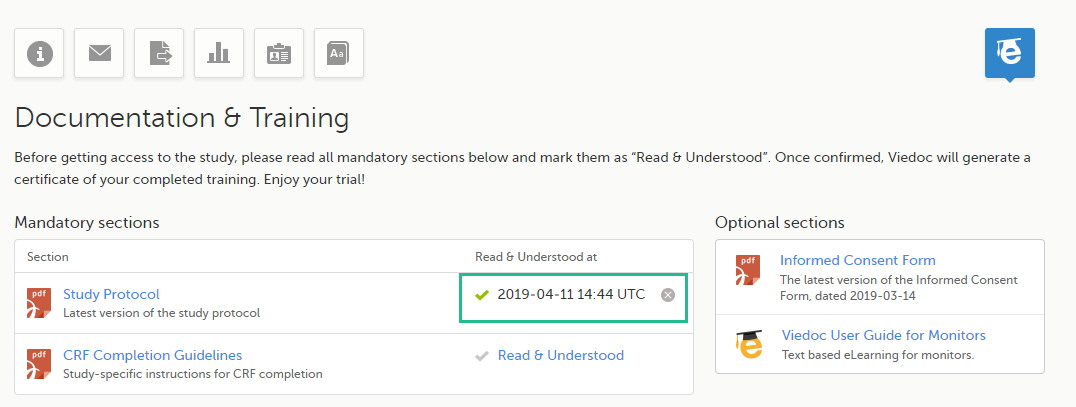 |
| 2 | Repeat step 1 for each of the mandatory sections. When all the mandatory sections are marked as "Read & Understood", a Confirm 'Read & Understood' link becomes available: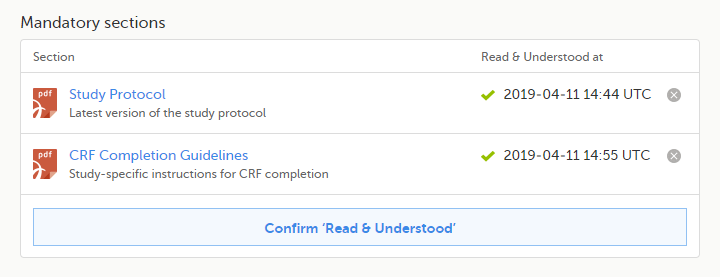 |
| 3 | Click Confirm 'Read & Understood'. A confirmation pop-up opens: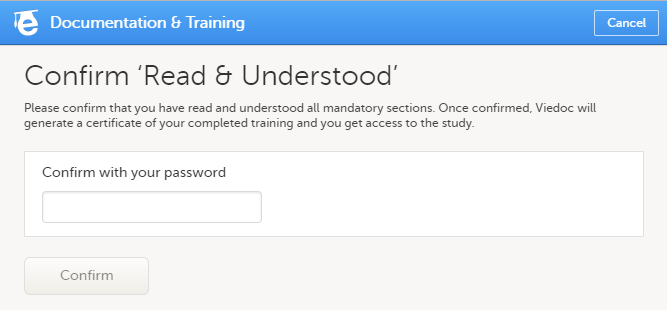 |
| 4 | Enter your Viedoc account password and click Confirm. A confirmation message together with the date and time stamp (UTC) is displayed at the bottom of Mandatory sections. Also, a link to Download your User Certificate becomes available: |
| 5 |
Now you got your certification and are able to access the study. The Launch button is now available. You can also Download your User Certificate. For details, see Downloading your user certificate. The mandatory sections are still available for your further reference, you can at any time go back and open any of those by clicking the section link. |
After you have completed all your mandatory readings and have signed and confirmed, as described in the previous section, you can download your user certificate in PDF format by clicking Download your User Certificate in the bottom of Mandatory sections.
The following information is provided on the certificate:
Note! As a Viedoc Clinic user, you need a special permission to view the metrics.
The metrics feature gives an overview of the quality of data in terms of open queries, missing data and overall site performance. You can filter the displayed data by country and site.
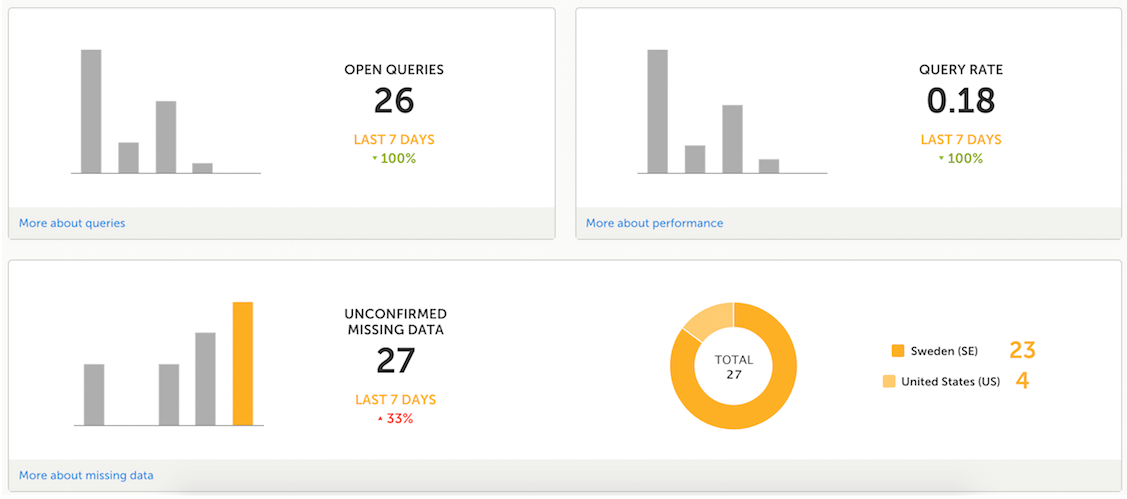
The metrics graphs depict:


Click More about [...] to open a page with detailed metrics about queries, performance or missing data. All detailed metrics pages include filtering possibilities and a bar to show the review status.
Note! The number of open queries differs between the Queries page and the Performance page. The Performance page also includes queries with the state Removed.
If you have access to Viedoc Reports, you can open it from the Metrics feature.
The Queries page includes filtering possibilities and a bar to show the review status for the entire study.
For detailed information about the query process in Viedoc, see Queries overview.
You can filter the data by selecting from the drop-down lists in the top of the page:

Based on the selected filter, the following information is provided:
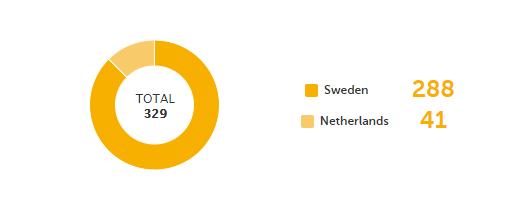
Queries - a diagram that shows the graphical distribution, the total number as well as the percentage of:
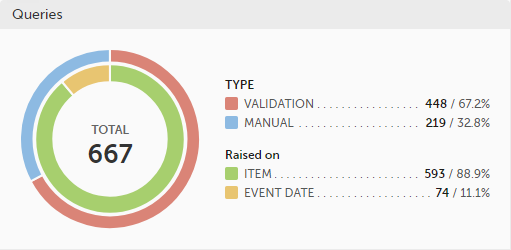
The number in the center of the circle shows the total number of queries.
Note!
For detailed information about query states and pro, see Queries overview.
Query state - a pie chart shows the queries distribution based on the query state:
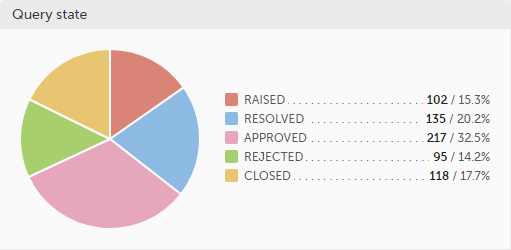
For detailed information about query states and process, see Queries overview.
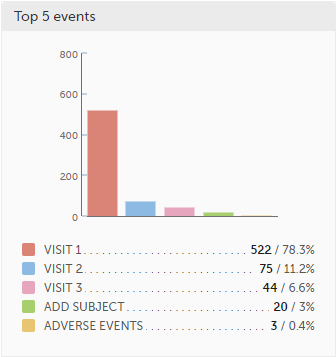
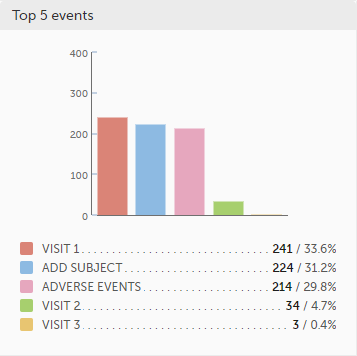
Top 5 events - a column bar shows the top five events with the highest number of raised queries (numeric and percentage). The legend of the graph displays the event name.
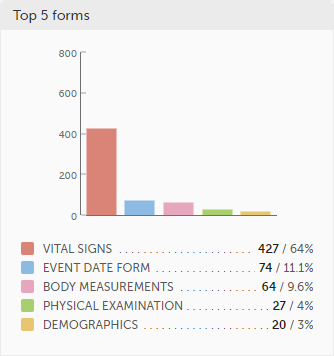
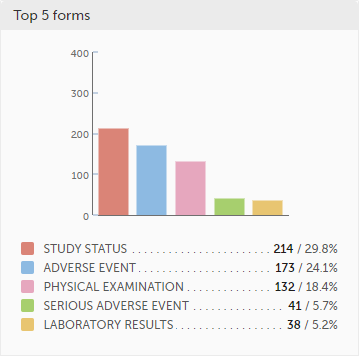
Top 5 forms - a column bar shows the top five forms with the highest number of raised queries (numeric and percentage). The legend of the graph displays the form name.
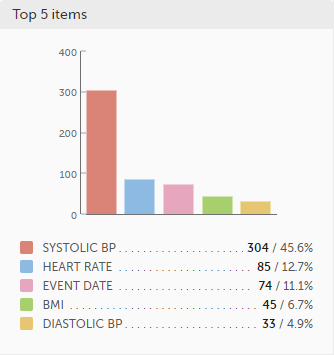
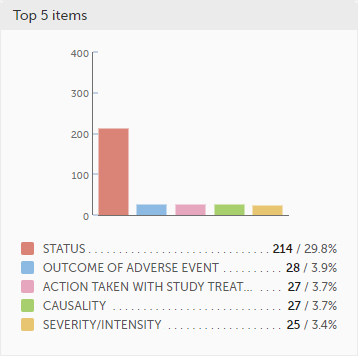
Top 5 items - a column bar shows the top five items with the highest number of raised queries (numeric and percentage). The legend of the graph displays the item name.
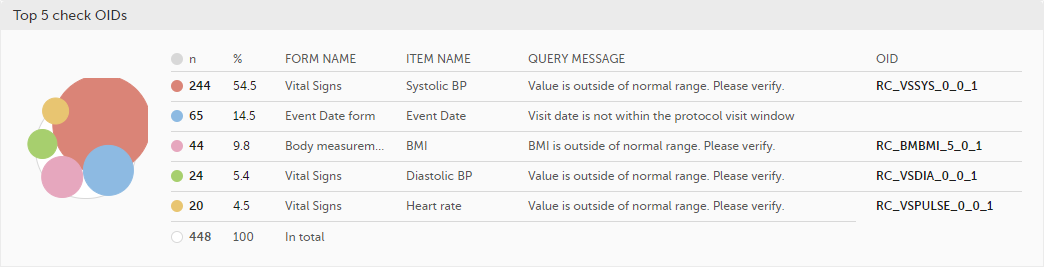
Top 5 check OIDs - top five most triggered edit checks are displayed in a table including the actual number, percentage, Object Identifier (OID), form name as well as the query message.
The last row of the table shows the total number of queries.
Top 5 subjects (raised queries) - top five subjects that have the highest number of queries with current status raised are displayed in a table including the actual number, percentage, subject ID, study progress, site name as well as date of when the latest query was raised, name of who raised the query as well as the actual query message.
The last row of the table shows the total number of subjects.

For detailed information about query states and process, see Queries overview.
In the bottom of the Queries details page you have the options to:
The Performance page allows you to compare data from:
With data in one of the following:

Based on the comparison selection the graphs will show statistics about:

Subjects - detailed data on the subjects on the selected site(s) (in orange) and compared site(s) (in gray):
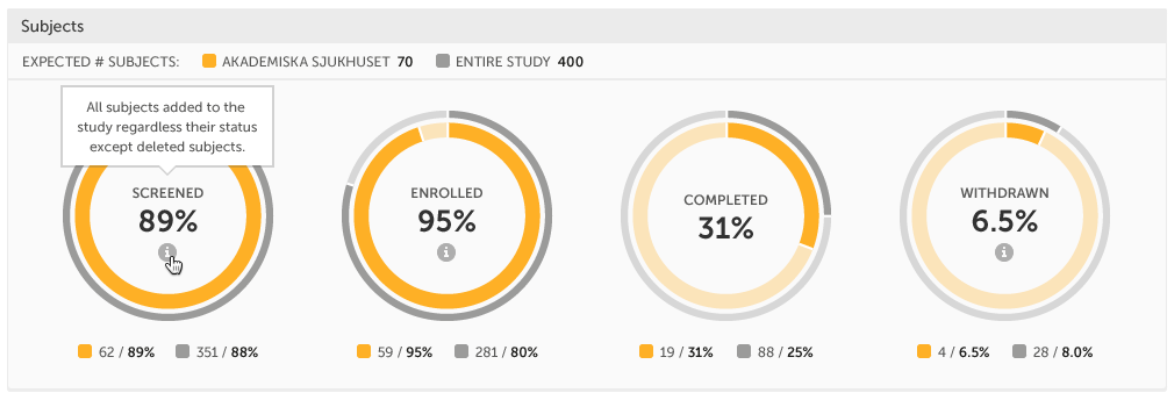
The conditions for the following subject statuses are defined in the study design (in Viedoc Designer under Study Settings > Subject status):
Tip! If there is an i symbol inside of a ring graph, you can hover over it to see a description of the status.
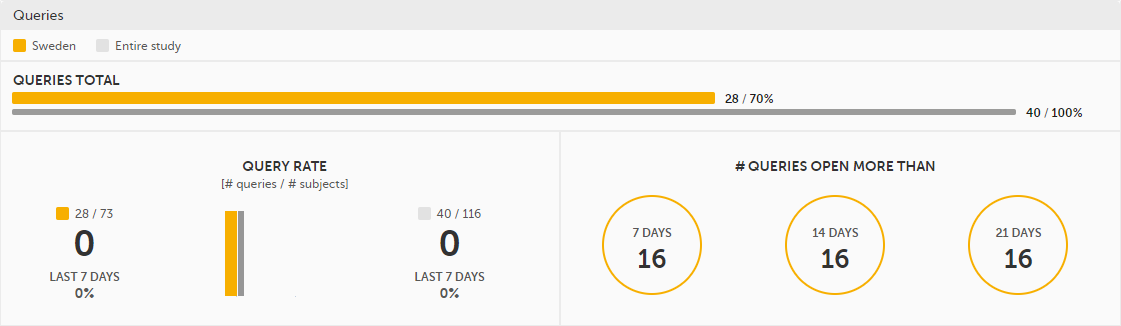
Queries - detailed data on queries on the selected site(s) (in orange) and compared site(s) (in gray):
For detailed information about query states and process, see Queries overview.
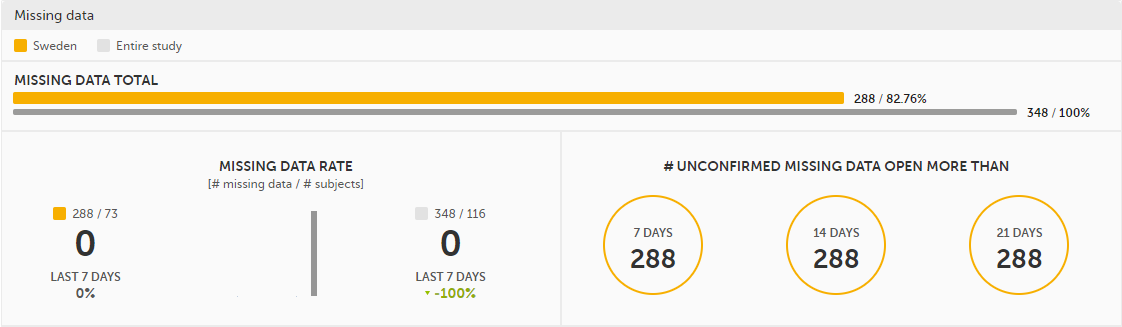
Missing data - detailed information on missing data (both confirmed and unconfirmed data) on the selected site(s) (in orange) and compared site(s) (in gray):
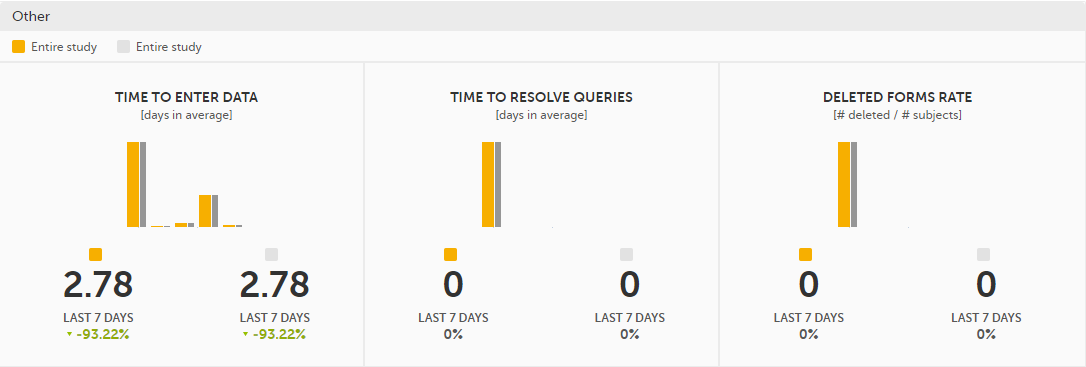
Other - miscellaneous detailed data on the selected site(s) (in orange) and compared site(s) (in gray):
In the bottom of the Performance details page you have the options to:
The Missing data page includes filtering possibilities and a bar to show the review status for the entire study.
You can filter the data by selecting from the drop-down lists in the top of the page:

Based on the selected filter the graphs will show statistics about:
Top 5 events - a column bar shows the top five events with the highest number of items with missing data (confirmed and unconfirmed), both numeric and percentage. The legend of the graph displays the event name.
Top 5 forms - a column bar shows the top five forms with the highest number of items with missing data (confirmed and unconfirmed), both numeric and percentage. The legend of the graph displays the form name.
Top 5 items - a column bar shows the top five items with missing data (confirmed and unconfirmed), both numeric and percentage. The legend of the graph displays the item name.
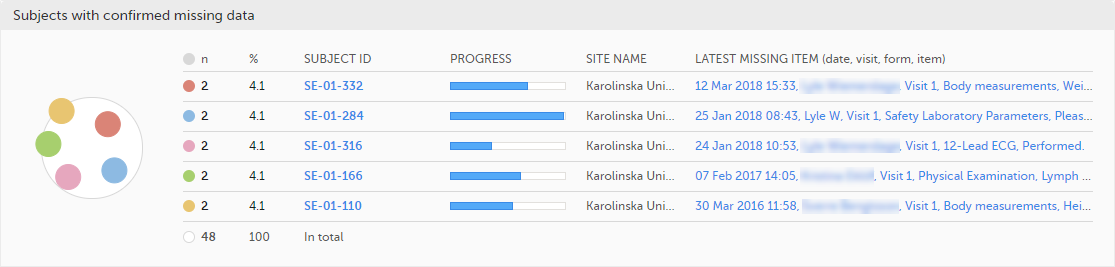
The top 5 subjects that have the highest level of confirmed missing data are displayed in a table including:
The last row of the table shows the total number of subjects with confirmed missing data.
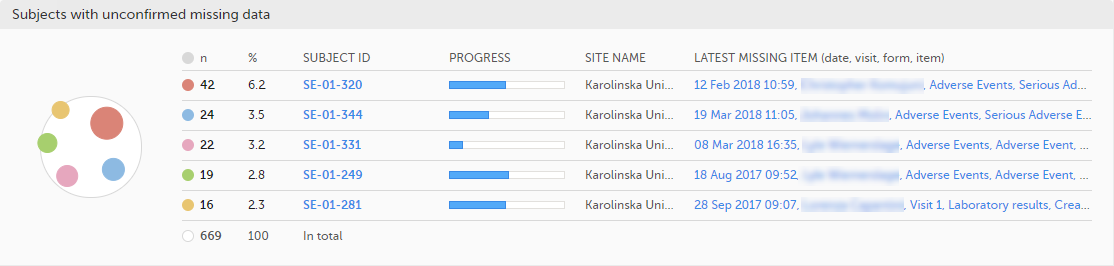
The top 5 subjects that have the highest level of unconfirmed missing data are displayed in a table including:
The last row of the table shows the total number of subjects with unconfirmed missing data.
In the bottom of the Missing data details page you have the options to:
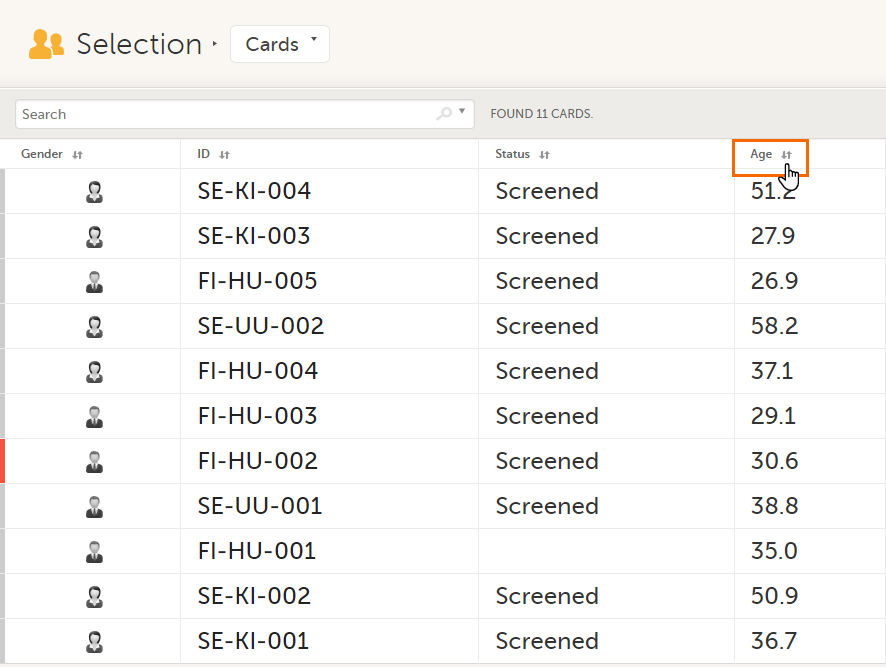
The Selection page displays all the subjects from all the sites you have access to:
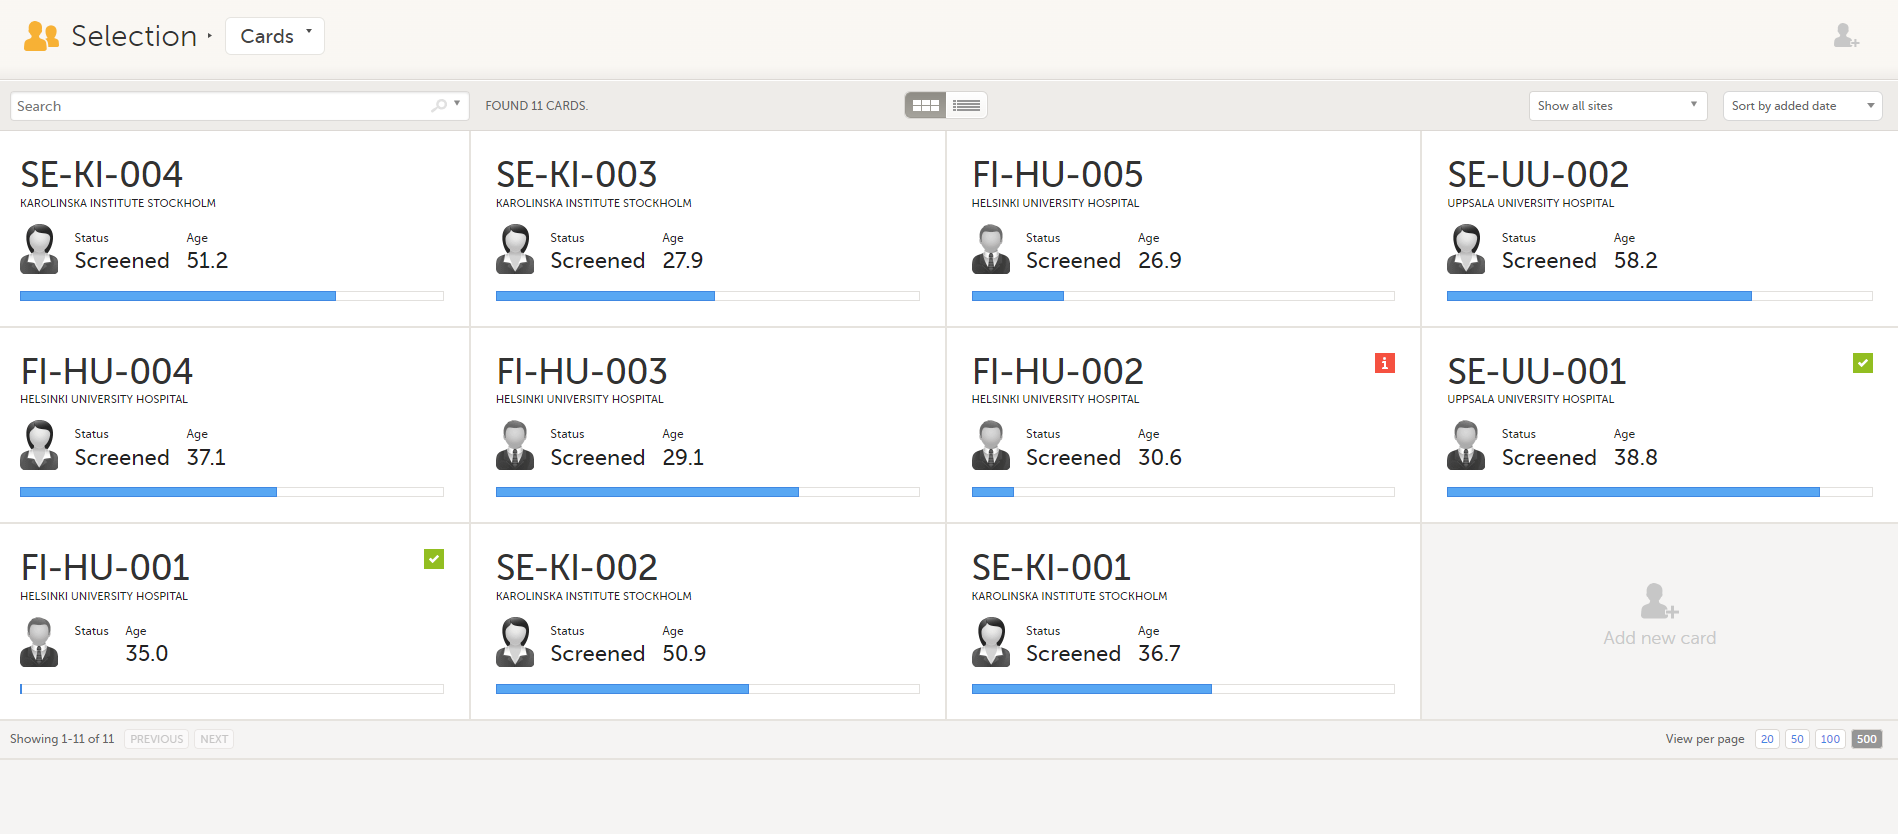
In the default view, each subject is represented by a card. Depending on your study setup, the Selection page can be displayed in several ways. See Views of the Selection page.
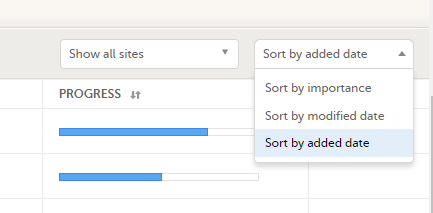
In the top right corner of the Selection page, you have dropdown menus to sort and filter the view. The options depend on the selected view. The selected sorting will be kept throughout your session.
In the table view of the Selection page, you can also sort by column in descending or ascending order by selecting a column header with the arrow symbol. Lit-up arrows indicate the selected sorting in orange:
Notes!
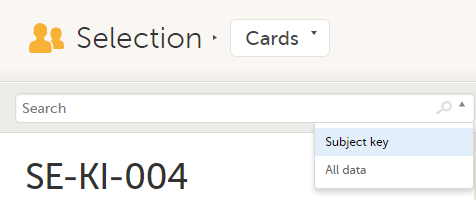
To search for a specific subject or any other information collected for a subject, you can type the text you are looking for in the search field:
The system will return the subjects with the information sought that has been entered in the Case Report Form (CRF).
Subject key and All data are two filters that can be applied to the search.
Note! For faster searches, we recommend that you select the Subject key filter.
| Important! If your search returns nothing, it could indicate a problem with your study design. Please contact your Professional Services representative to assist you. |
The Selection page displays a number of icons explained in the following table:
| Icon | Description |
|---|---|
 |
Issue - at least one open query and/or missing data |
 |
Task - there are tasks to be completed, the number indicates the number of tasks |
 |
Complete - all initiated events have been completely filled in |
 |
Signed - all data that is possible to sign has been signed |
 |
Read-only - the card is being open for edit by another user. Note that the subject card can still be accessed for review or SDV by a user without edit permissions, for example a monitor or a data manager. |
 |
In progress - the event is initiated but not completed This icon is only shown when none of the other status icons apply |
 |
Locked - the data in all forms of the event is locked |
Note! The icons showing depend on your user role permissions.
Depending on the study setup, the Selection page looks a bit different.
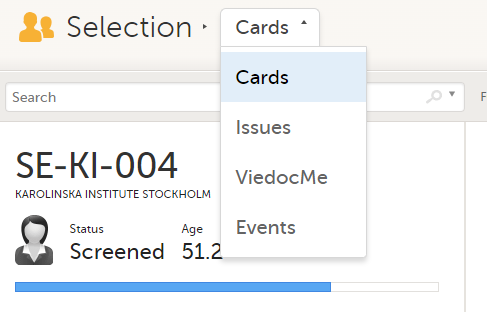
In the Cards view, you can see all the subjects from all the sites you have access to. Select to display the subject cards side-by-side (default) or in a table:
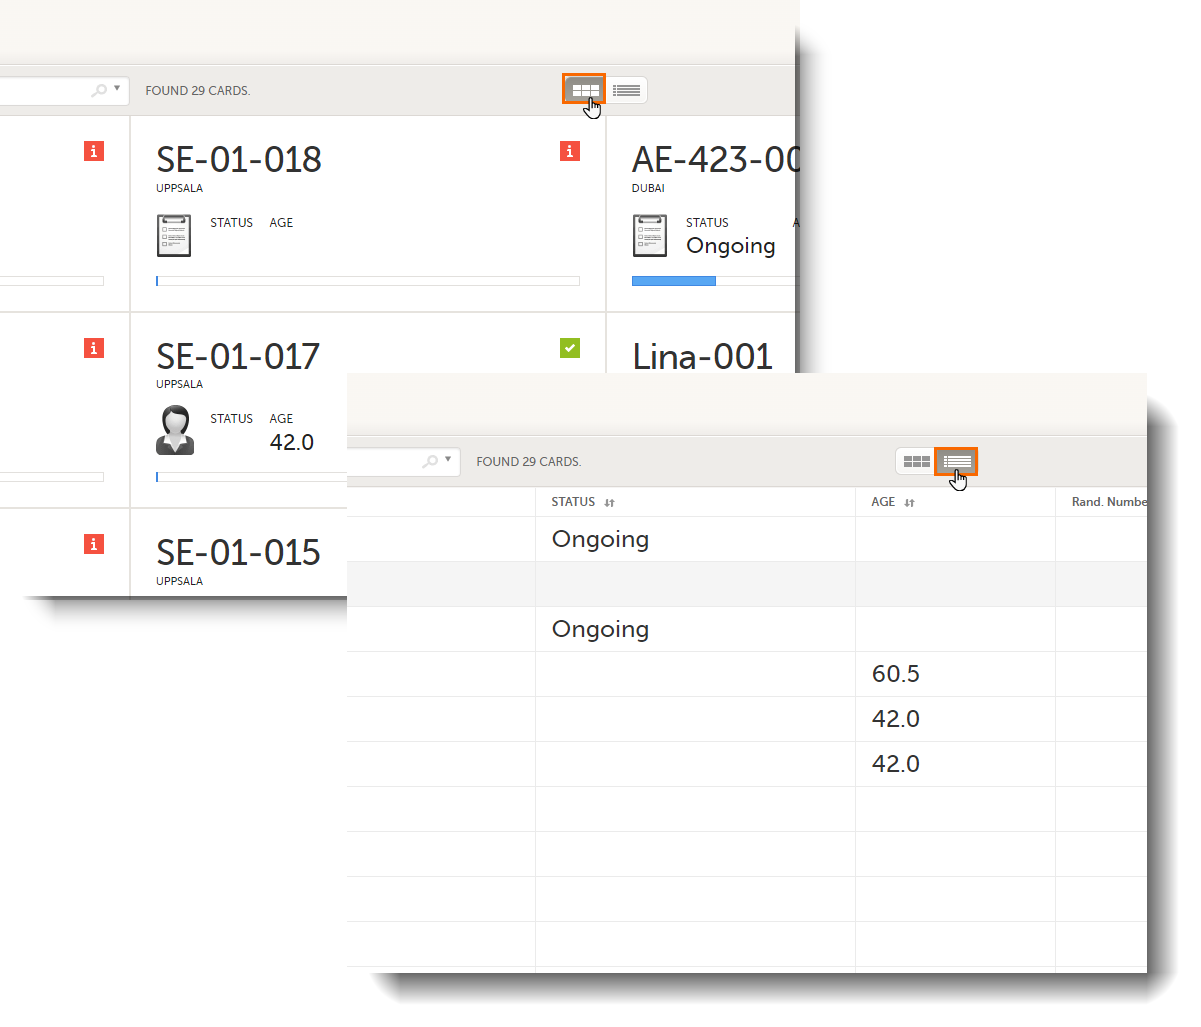
The subjects are sorted by added date, where the most recently added subject is displayed first. You can sort the subject cards by selecting an option in the upper right corner:
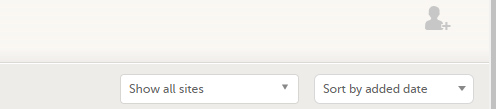
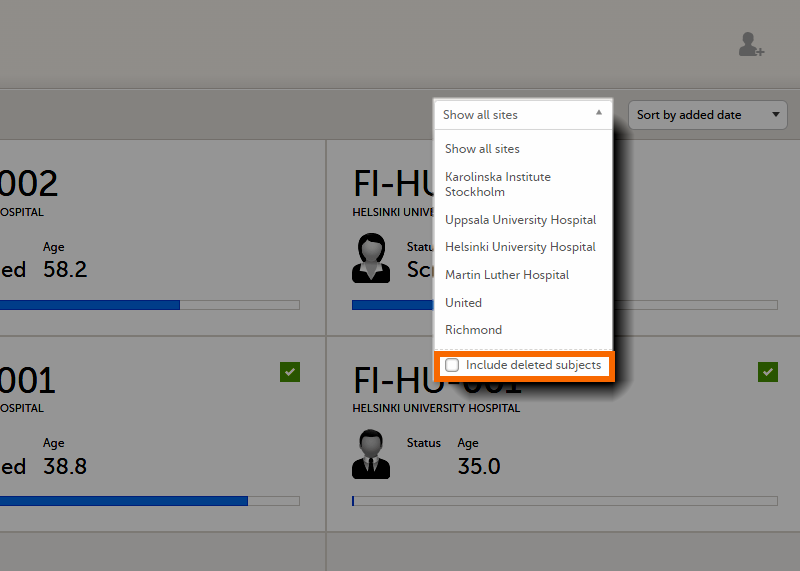
To display only the subjects for a particular site, select the site from the dropdown list. Click Include deleted subjects at the bottom of the dropdown menu to display deleted subjects:
Each card provides subject information as per the respective study design:
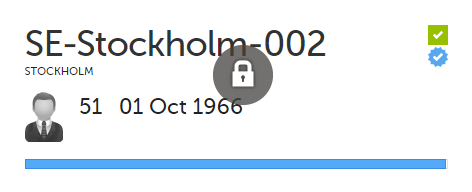
If all the forms were locked (typically by the Monitor), this is shown with a padlock icon on the respective subject card:
Note! The Selection page does not consider the role visibility except for task count; therefore, the subject status reflects the general status of the subject in the study, regardless of the user who has work to be performed. The subject details view reflects the subject status considering the role visibility. This could result in a subject status where a subject could have a green check mark or be locked, while in the Selection page it is not (due to some other user role having unfinished work or forms to complete on the respective subject). See Entering and Editing data for more information on the subject details view.
In the Issues view, you can see the existing issues listed in a table:
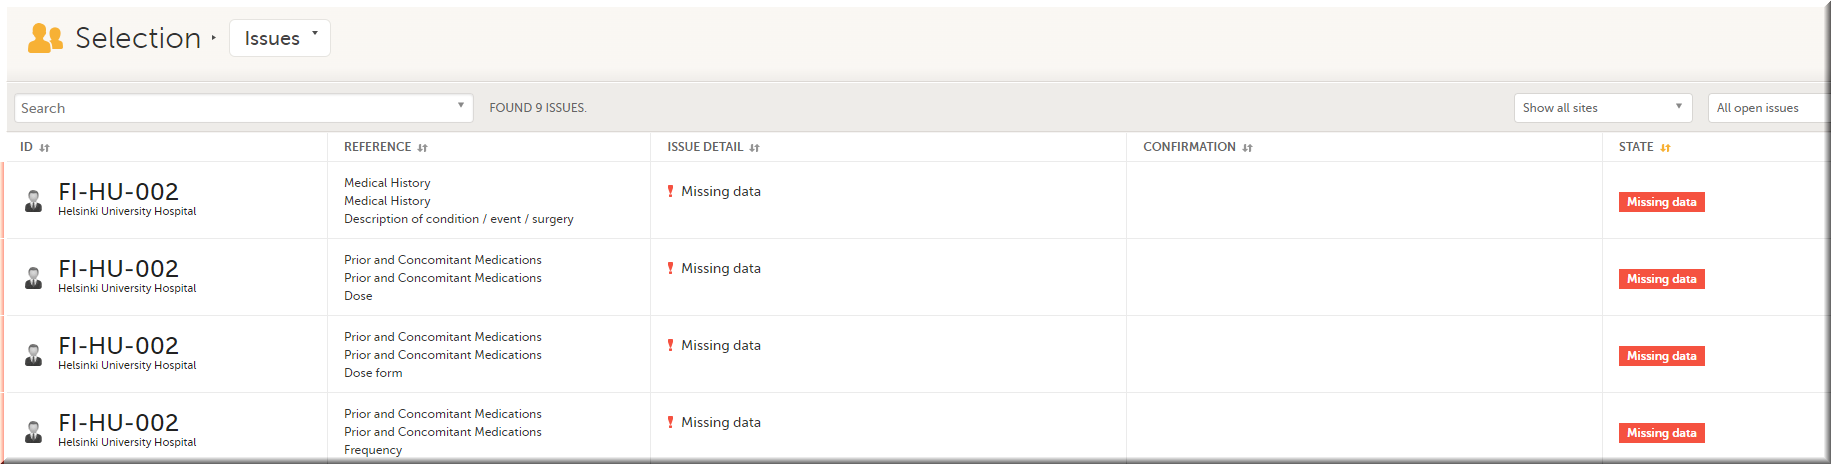
Click any row to open the form where the issue was raised:

Close the form to go back to the Issues list.
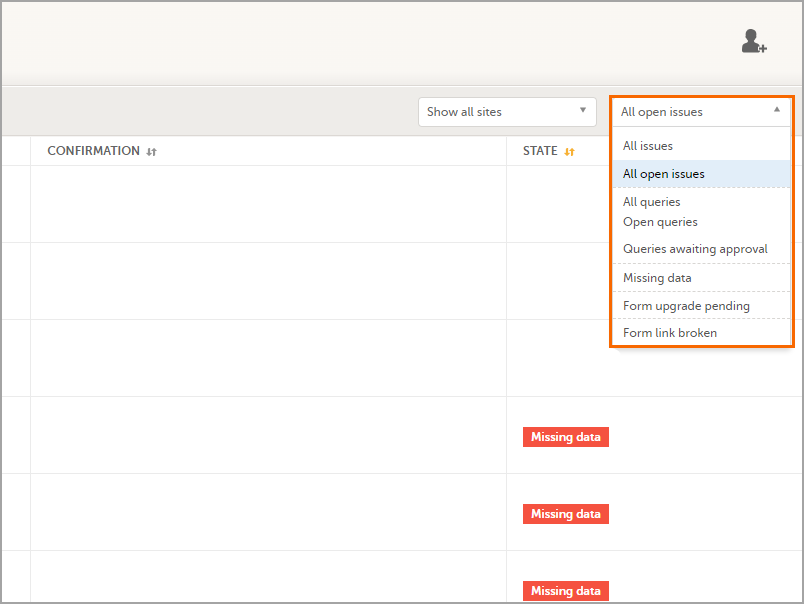
You can filter the Issues list using the dropdown lists in the upper right corner of the page:
In the Viedoc Me account view, you can monitor and follow up on the subjects' expected Viedoc Me event submissions.
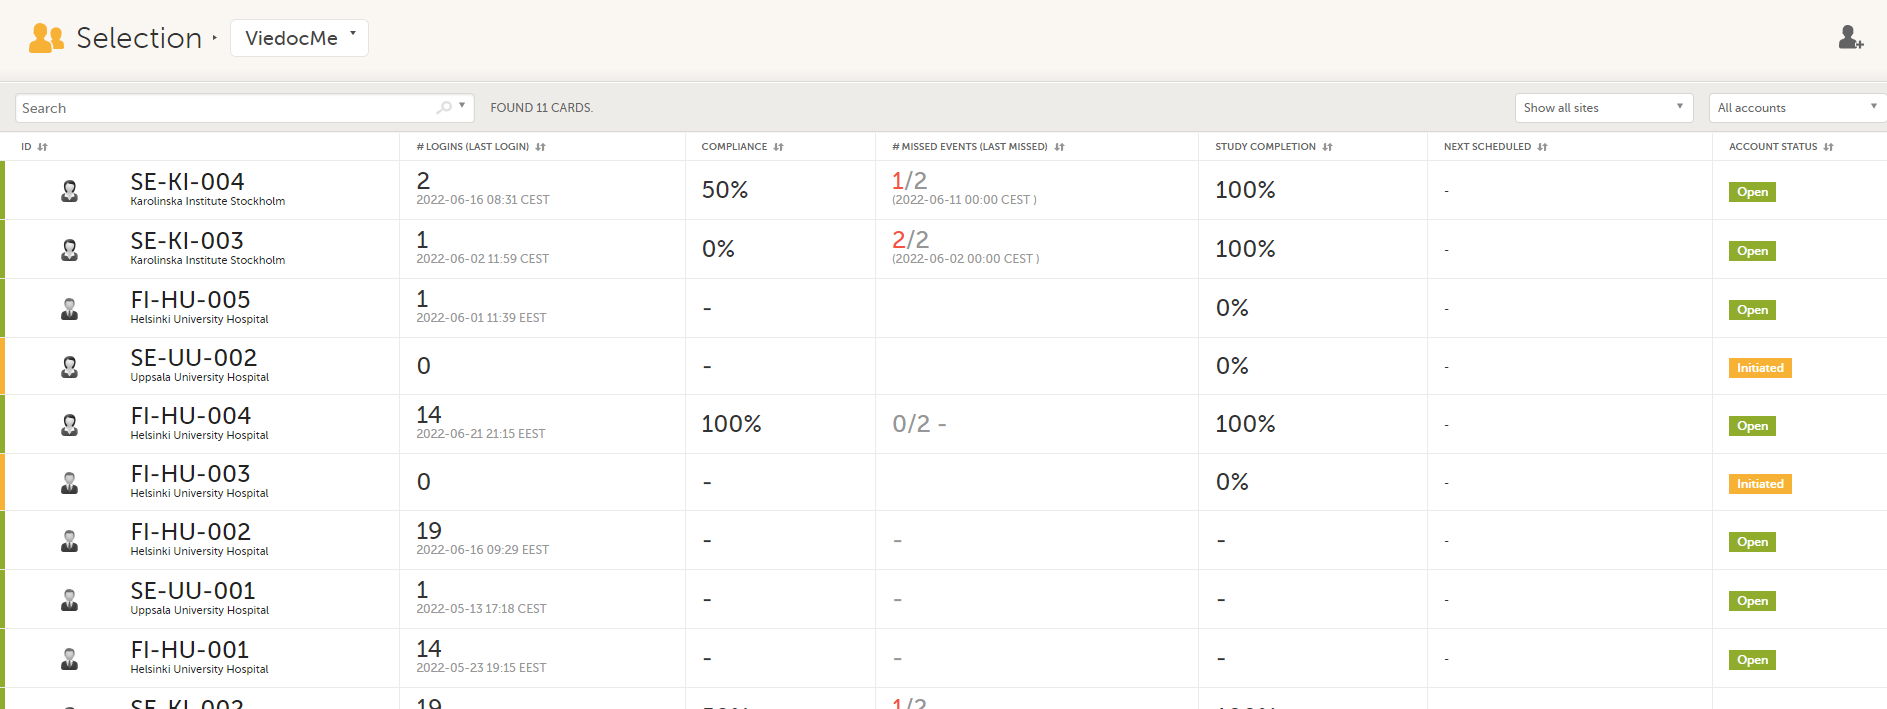
For each subject, the following information is listed:
In the Events view, you can see the status of each event for each subject listed in a table.
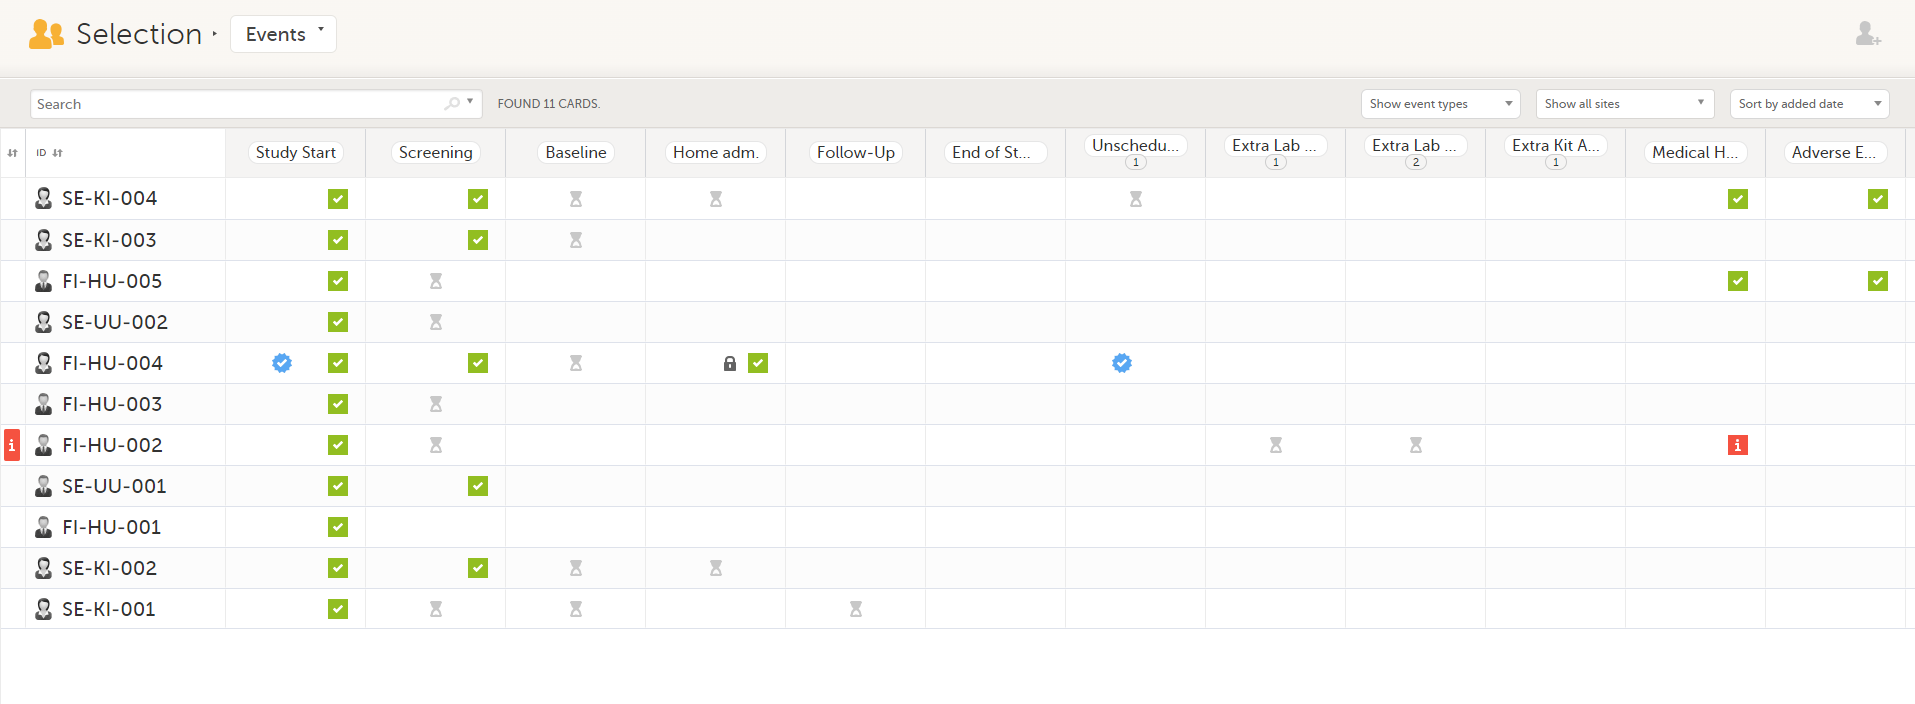
The first column indicates if there are issues/tasks in any of the subjects' events. If there are both issues and tasks for a subject, then issues [ i ] are shown in the column.
Select any cell to go to the event in the Details page:

Click back in the browser to return to the Events view.
Select an empty cell to view the subject's latest event.
The list of subjects can be filtered using the dropdown lists in the upper right corner of the page:
Note! On the selection page, in the Events view, the event name (as set in the Study event settings in the study design) is displayed. If there is a recurring event, a counter is shown under the event name, for example: Follow up 1, Follow up 2.
To add a new subject:
| 1 |
Make sure that you have selected a site (center) from the sites dropdown list.
|
| 2 |
Complete the form and select Save changes on the top right side of the page. A new subject is now added. |
Note! Only user roles with editing permissions for the study start event form can add a new subject. If you do not have editing permissions, you cannot select Add new card and no icon is visible in the top right side of the page.
See also the video tutorial Add and select subjects.
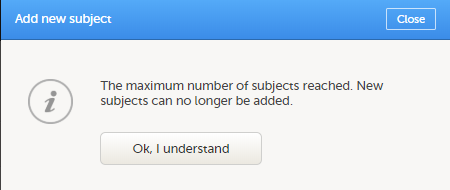
If you receive the following message, the maximum number of subjects that is configured for your site has been reached, and you cannot add new subjects. If you need to add a new subject anyway, contact your Study Manager.
Note! When making edits to this lesson, make sure to check if the corresponding edits are needed also in PMS>Clinic Side>Entering and editing data in a PMS study.
When you select a subject card in the Selection page, or add a new subject, the Details page opens.
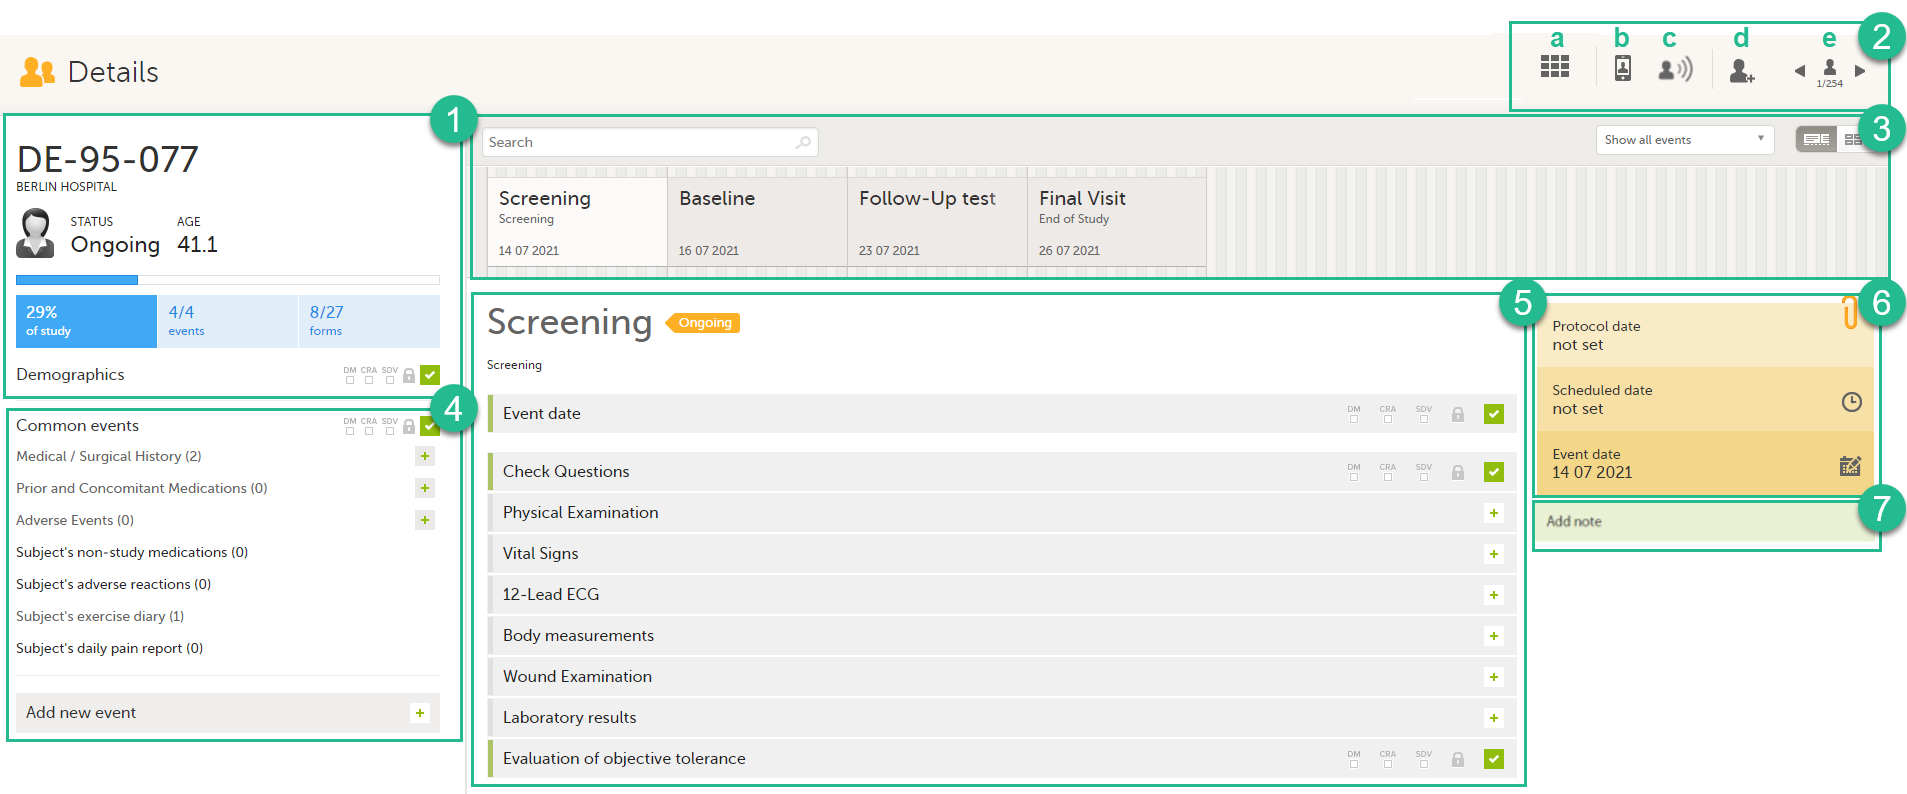
Here you will find the following information:
1. Subject details - including subject ID, site name and a status summary.
Note! The subject details view reflects the subject status and the review flags considering the role visibility, while the Selection page does not take into account the role visibility. Therefore, the subject status on the Selection page reflects the general status of the subject in the study, regardless of the user who has tasks to be performed. This could result, for example, in a subject status in the subject details view where a subject could have a green check mark or being locked, while in the Selection page it is not (due to some other user role having unfinished work/forms to complete on the respective subject).
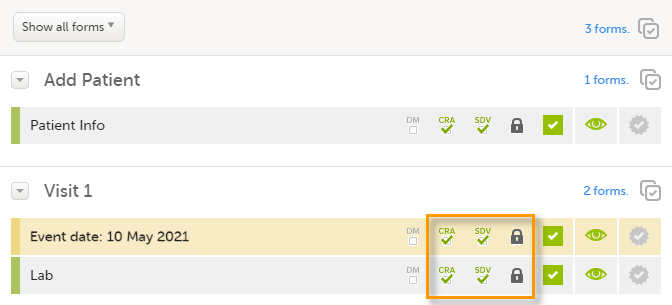
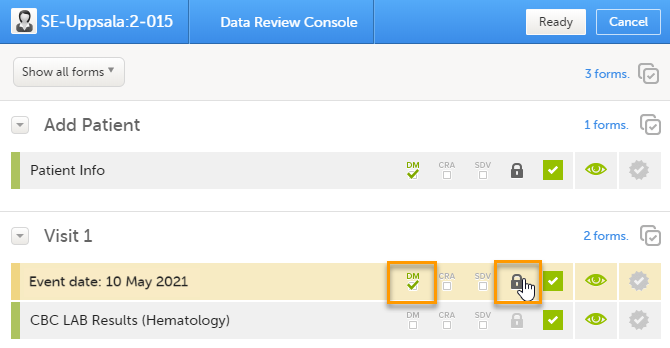
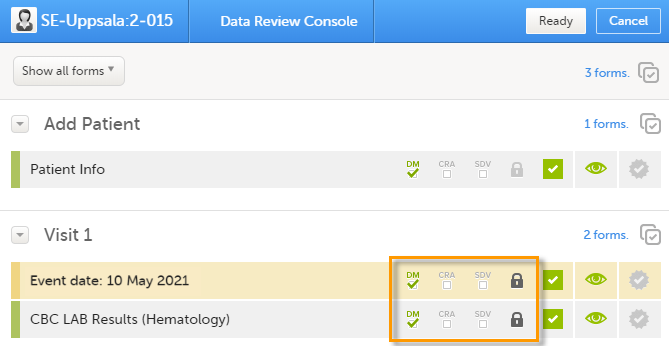
The following flags show the status of each form:
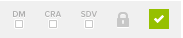
| Flag | Description |
|---|---|
| DM | Shows if the data was reviewed by the Data Manager (DM) or other role with review permission. Green check-mark if performed, otherwise grey. |
| CRA | Clinical review indicator, reviewed by Clinical Research Associate (CRA) or other role with review permission. Green check-mark if performed, otherwise grey. |
| SDV | Source Data Verification (SDV) indicator. Green check-mark if performed, otherwise grey. |
| Lock | Black if the form was locked by the Monitor, otherwise grey. |
| Status | Shows the status of the data entered:
|
Note! The flags are not displayed for the empty forms.
2. Toolbar with the following functions:
a. Return to the Selection page
b. Set up Viedoc Me
c. Initiate a Viedoc Connect call
d. Add a new subject
e. Toggle between subjects
Depending on the role and permissions you have, the following might also be available:
See also the video tutorial Enter data.
3. Event slider - a list of all the scheduled and unscheduled events for the subject.
From the top-left corner you can search for events. All events containing characters of the search string are filtered and shown in the slider.
From the top-right corner you can toggle the view and change the way the events are displayed: only by name or with detailed cards. Tip! Toggle to the "only by name" view to fit all events, if there are many matches in your search result.
From the dropdown list to the right you can select to:
4. Common events - here you can add events that cannot be scheduled in advance, such as adverse events, by clicking on the respective event name.
You can also add unscheduled events by clicking the Add new event link. The unplanned events will show up in the event slider inserted among the existing events according to the event date.
5. The list of the forms to be filled in for the event selected in the event slider (2). Click the form bar to open it and enter the data. Depending on the study setup, it may be necessary to initiate the event through the Event date form, to be able to enter data. For more information, see Initiating an event.
6. The protocol date, the scheduled date (if set), and the event date (if set).
7. Private notes. For details, see Adding private notes.
When you click on a form on the Details page, the form opens. The below image shows an example of a form:
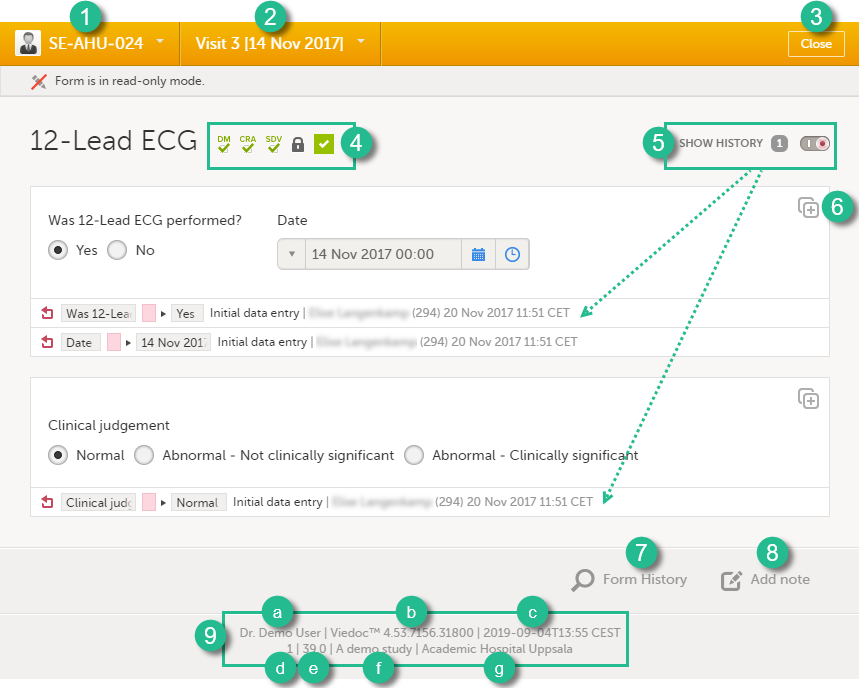
1. Subject ID. You can use this dropdown list to navigate to other subjects within the same form, see Navigating between subjects/events within the same form.
2. Event name. You can use this dropdown list to navigate to other events within the same form, see Navigating between subjects/events within the same form.
3. Close. Click to close the form and return to the Details page.
4. Flags showing the status of the form, see the description of these flags above.
5. Show history. Activate the switch to display the history of each form item.
6. Action button. Click to select a field (item) and select the type of action you wish to perform, for example to confirm data as missing or to add a private note. For more information, see Confirm data as missing and Adding private notes.
7. Form history, see Form history PDF.
8. Add note. Click to add a private note to the form, see Adding private notes.
9. Footer of the form, containing the following information:
a. User name
b. Viedoc version number
c. Date and time of last form edit
d. The protocol version that the study is based on
e. Study design version number of the version that is active on the moment the event is initiated
f. Name of the study
g. Name of the site
There are two types of events that can be initiated for a subject:
To start entering data on an event, the event must first be initiated.
The exception is when the event date is configured in the study design to be automatically set and based on the data entered within the event.
Note! When the event date is automatically set, the following apply to the Event date form based on the settings in the study design:
When initiatiating an event, you can either plan the event for a future date or you can initiate the event immediately.
You might need to plan the event based on the study workflow. For example, some studies may need a series of Viedoc Me assessments before a visit. The Viedoc Me events will not be made visible until the you have planned the next visit.
To initiate a scheduled event:
| 1 |
Open the Event date form, in one of the following ways: a - Next to the event name, click Set an event date. 

|
| 2 |
In the event date pop-up, click Initiate event and select the date: Note! For the events that are already scheduled, the protocol date is also displayed. Entering an event date that is outside the protocol date will raise a warning message. |
| 3 | Click Save changes. The event date pop-up closes and the event is initiated. The event status changes to Ongoing. |
To add and initiate an unscheduled event manually:
| 1 |
On the Details page, click Add new event in the left-side pane. The Add new event pop-up opens. |
| 2 | Choose the Event name from the dropdown list. The events available are the ones that were configured by the study designer as unscheduled events. |
| 3 | Click Initiate event and select the date: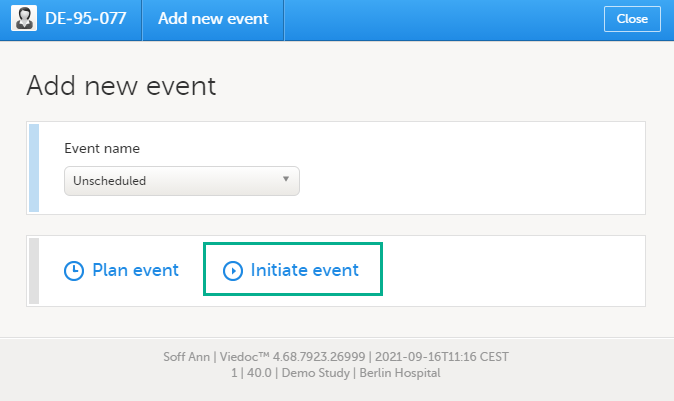 |
| 4 | Click Add event. The event date pop-up closes and the event is added and initiated. The unplanned events will show up in the event slider inserted among the existing events according to the event date. The event status changes to Ongoing. |
Important! Working in multiple browser tabs when entering data may cause data conflicts and other serious problems. Therefore it is important to only work in one browser tab when entering or editing data.
When the event date is set, automatically or manually, it is possible to start filling in the forms.
To enter data in a form:
| 1 |
Open a form by clicking the form bar: 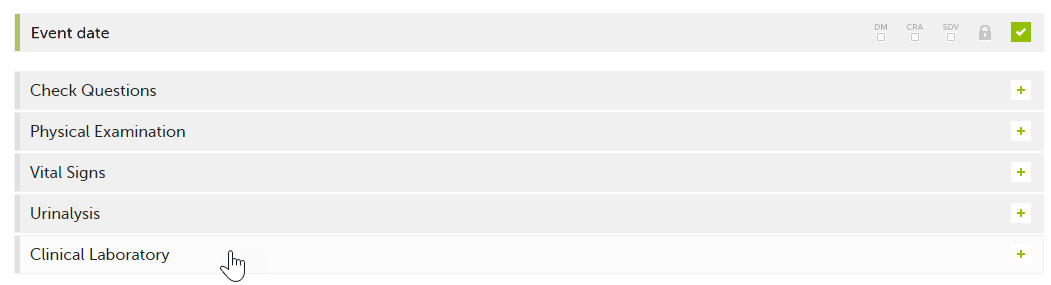
|
| 2 |
Fill in the fields - most fields are self-explanatory when it comes to how they should be filled in: 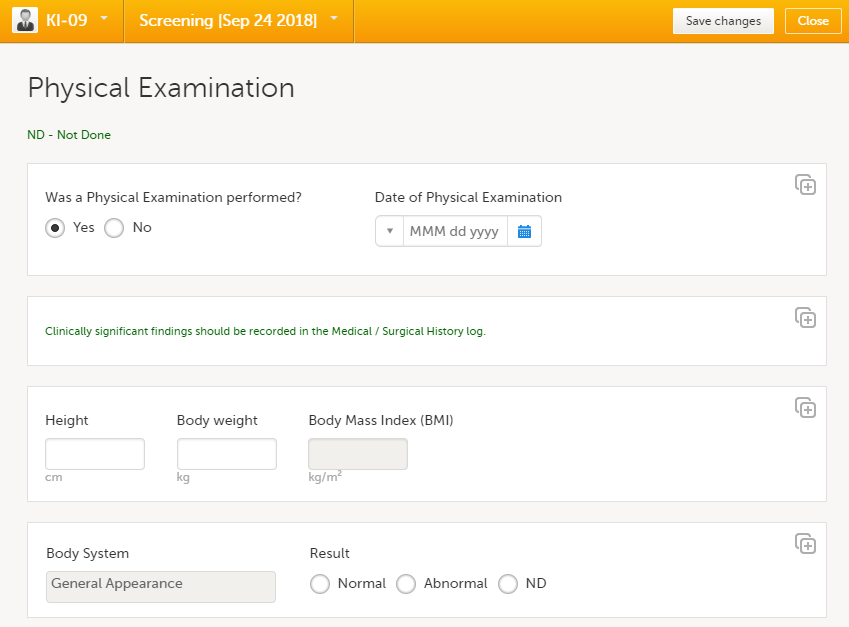
|
| 3 | Click Save changes. |
When all the forms in one event are filled in, the event is considered completed and a green check mark appears on the event tab in the event slider.
Below, we explain how to fill in some of the most common fields in a form:
You can fill in the date field in two ways:
|
 |

|
Tip! You can click the month/year header to view all months of the year, and then click the year header to view a range of years.
You can fill in the time field in two ways:
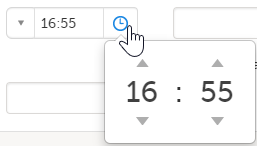
You can define a range of values by selecting a comparator symbol, and then enter the numeric value(s). You can chose between the following comparators:
|
- Inclusive in between |
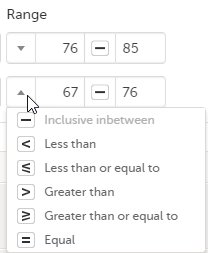 |
To upload a file to a form:
| 1 | Click the arrow on the right side of the upload box or click the thumbnail if this is available.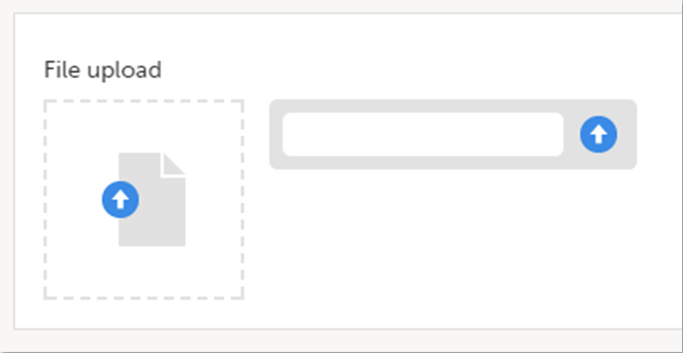 |
| 2 | Browse for the file to be uploaded and click Open. During the upload process:
|
| 3 | The uploaded file(s) will be stored once the respective form is saved by clicking Save changes. |
You can download an existing file by clicking the file name or by clicking the thumbnail (if it exists). If a drawing pad item was submitted from Viedoc Me it will be available as a downloadable file.
You can remove an uploaded file by clicking the trash can icon on the right side of the file name.
Note!
When editing a form, you can add links between different types of forms with the Form link item. This can be useful for example, to quickly see when a medication was taken by a subject and for what reason.
Notes!
Forms can be linked with several instances of a specified form type. For example, while editing the Prior and Concomitant Medications form, links can be made to several registered Medical History events.
To link two forms:
|
1 |
Open a subject card. In this card you can see two Medical History forms under Common events: 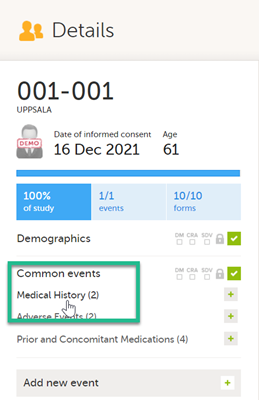
|
| 2 |
In this example, we will link the Prior and Concomitant Medications form to the existing Medical History form instances and enter the medication that the subject has taken for the Medical History event. 
|
|
3 |
To link the Prior and Concomitant Medications form to the Medical History form instances: Select Add new in the Prior and Concomitant Medications form. 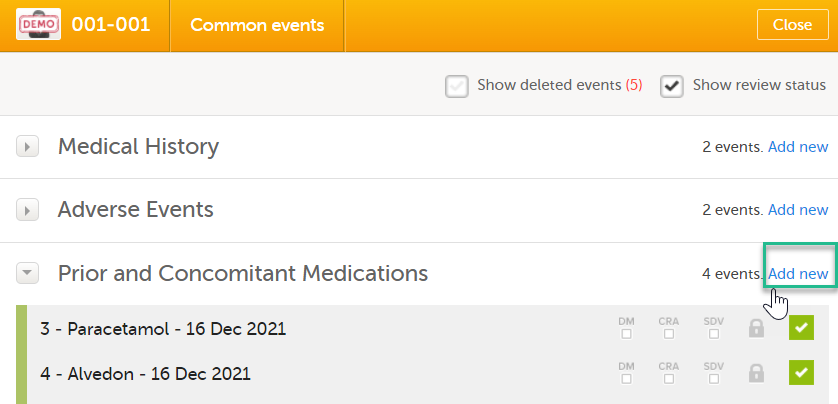
|
| 4 |
In the Prior and Concomitant Medications forms, select Medical history to show all existing form instances of the same type. The available link items are shown in a dropdown list. 1. Enter the name of the drug/medication/therapy. 2. Select the relevant Medical history. 3. Select Save changes - the Prior and Concomitant Medications form is now linked to the Medical history form instance. Notes!
|
| 4 |
After saving the form, select any link item to open and read that form. In the example shown below, the Adverse events form. Closing the form returns you to the original form, in this example the Prior and Concomitant Medications form. 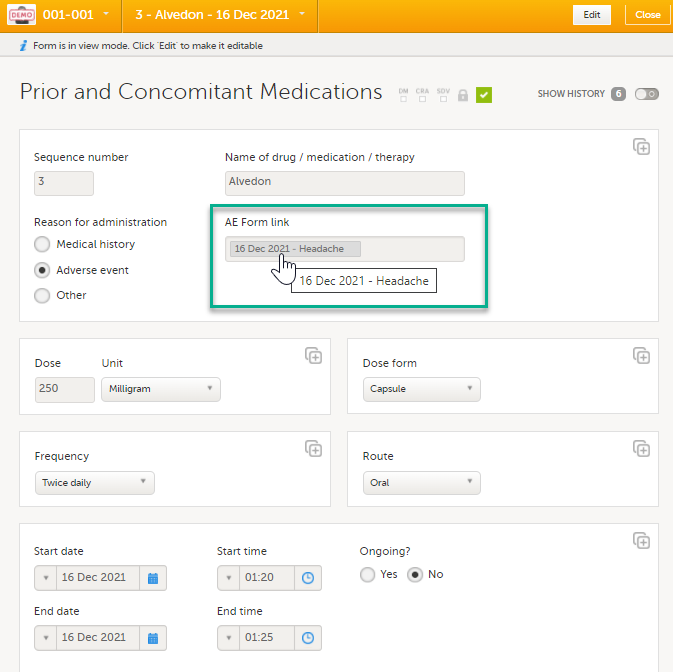
Note! You can also search in the form link item field. This can be useful to find a specific form instance if there are many adverse events for example. |
If you update a linked form by resetting, deleting, or changing data, the following occurs:

In the Issues view of the Selection page, forms are easily identified and are labelled Form link broken:
In the Events view of the Selection page, forms are easily identified and marked with an issue flag (the red [ i ] icon). Select the red [ i ] icon to open the subject card.
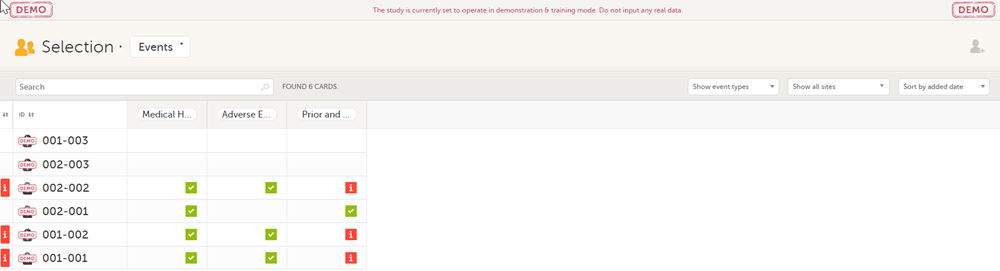
On the subject card, the issue is marked with an issue flag:
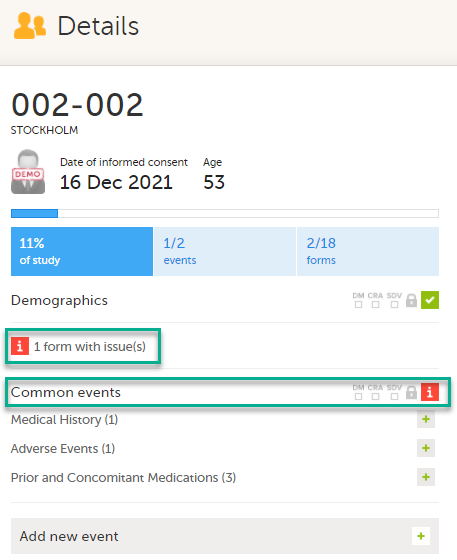
| 1 |
Select the red [ i ] icon to open the issue, (in this example under Common events).
|
| 2 |
Select the red [ i ] icon (in this example under Prior and Concomitant Medications) to open the form with the issue. 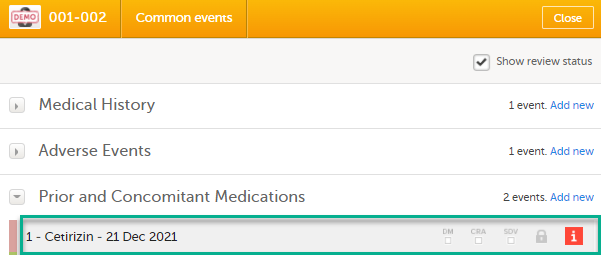
|
| 3 |
Select Edit to update the form: 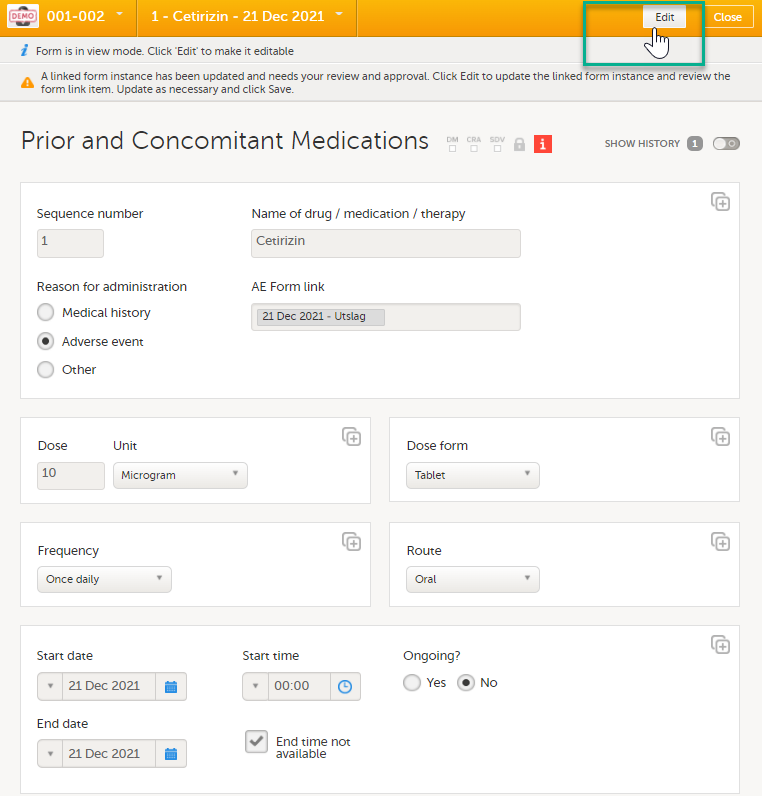
|
| 4 |
A message is displayed as part of the audit trail when the linked items are updated: 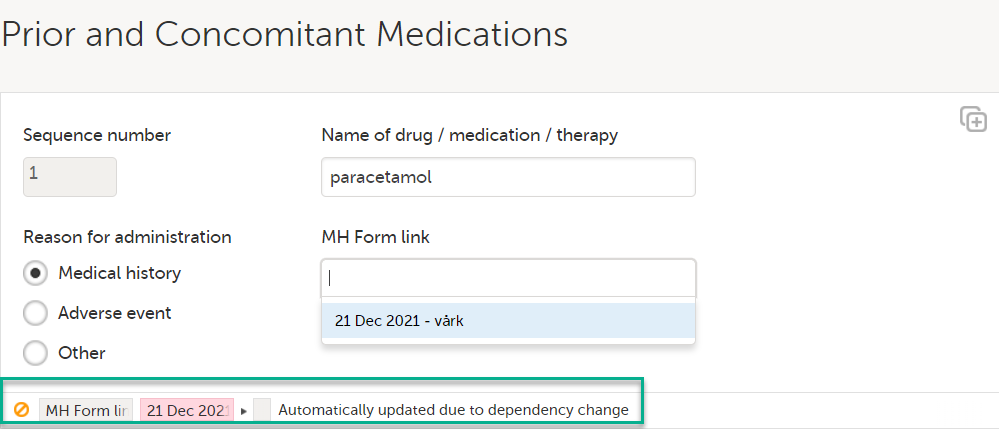
|
Once you have a form open, it is possible to navigate through different subjects, or different events, if the form is included in other initiated events as well. This function is available through the dropdown lists in the form header, as illustrated below:
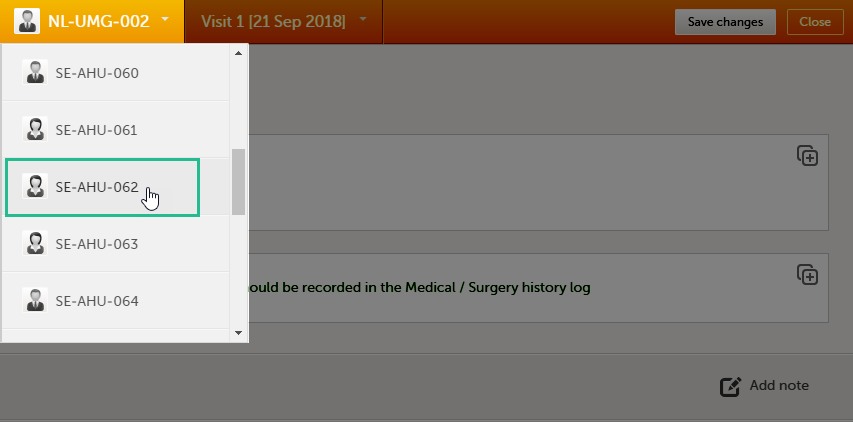
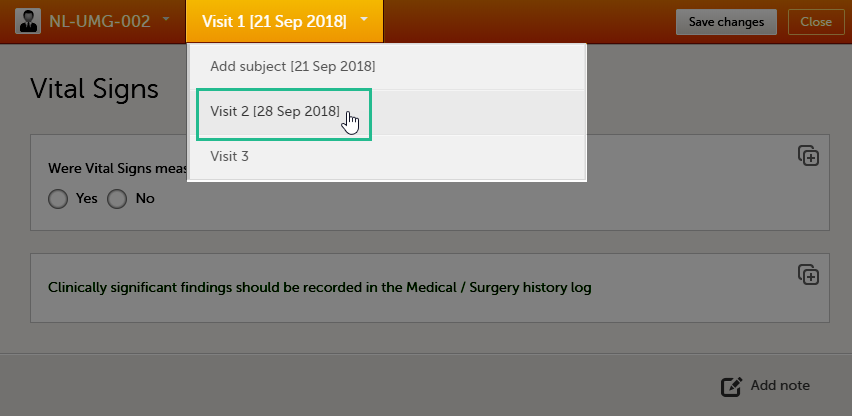
To edit data that already have been saved:
| 1 | Open the form that contains the data you want to change. |
| 2 | Click Edit in the top right corner of the form.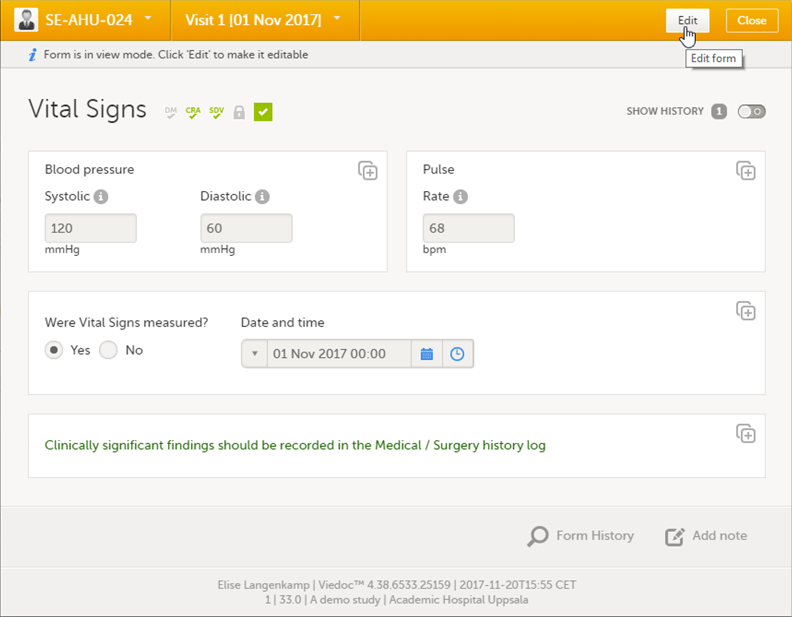 |
| 3 | Edit the data and click Give reason. A pop-up opens. 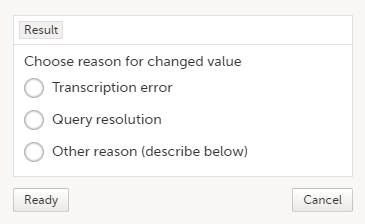 |
| 4 | Select one of the pre-formulated reasons for change, or click Other reason and provide a description. Click Ready and Save changes. |
Notes!
It is possible to create several instances of the same form within one activity. This can only be done if the form is set as repeating in the study design.
If a form is set as repeating, a ghost form will appear once you have filled in and saved the first instance of the form (see the lab form example in the image).
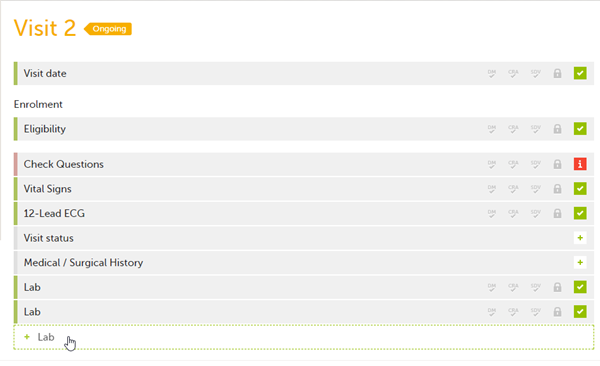
Note! The ghost form of a repeating form is displayed below the main form and marked with a + icon. If you see a ghost form above the main form, it is a copyable form. See the image below, and see Copyable forms.
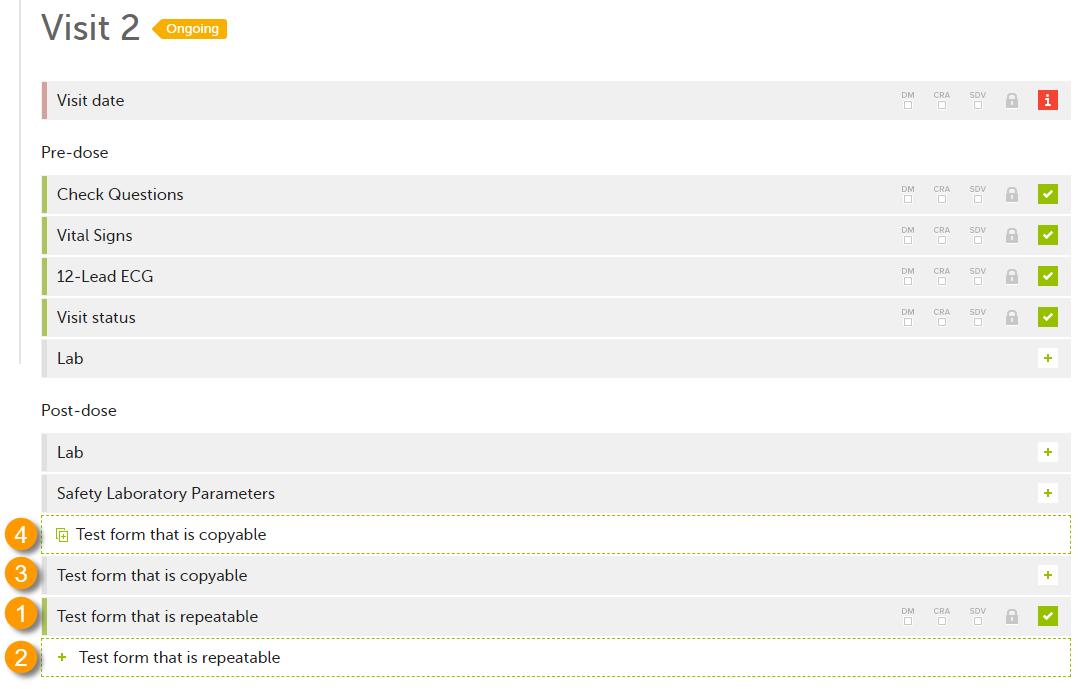 1. Main form instance of repeating form
2. Ghost form of a repeating form, displayed below the main form instance and marked with a + icon
3. Main form instance of a copyable form
4. Ghost form of a copyable form, displayed above the main form instance and marked with a copy icon
To fill in an instance of a repeating form:
| 1 | Click the ghost form. A new instance of the form opens. |
| 2 | Fill in the form instance and click Save changes. If you have not reached the maximum allowed number of instances of a repeating form, a ghost form appears every time you save a new instance of the form. If the maximum number of instances of the repeating form is reached, no ghost form will appear upon saving a new instance of the form. |
To delete an instance of a repeating form:
| 1 | Open the respective instance of the form and click Edit. |
| 2 | Click Delete form. |
| 3 | Select or enter a reason for deleting the form and click Delete. The instance of the form is removed. |
Note!
Using repeating item groups allows you to dynamically add multiple rows of data within the same form. This is useful when the number of repeated observations varies, such as multiple measurements or multiple analytes in a single form.
Repeating item groups are defined in the study design. The minimum and maximum number of item groups that can be added is also defined in the study design.
Notes!
To add an instance of a repeating item group to a form:
| 1. |
Open a form that contains a repeating item group: 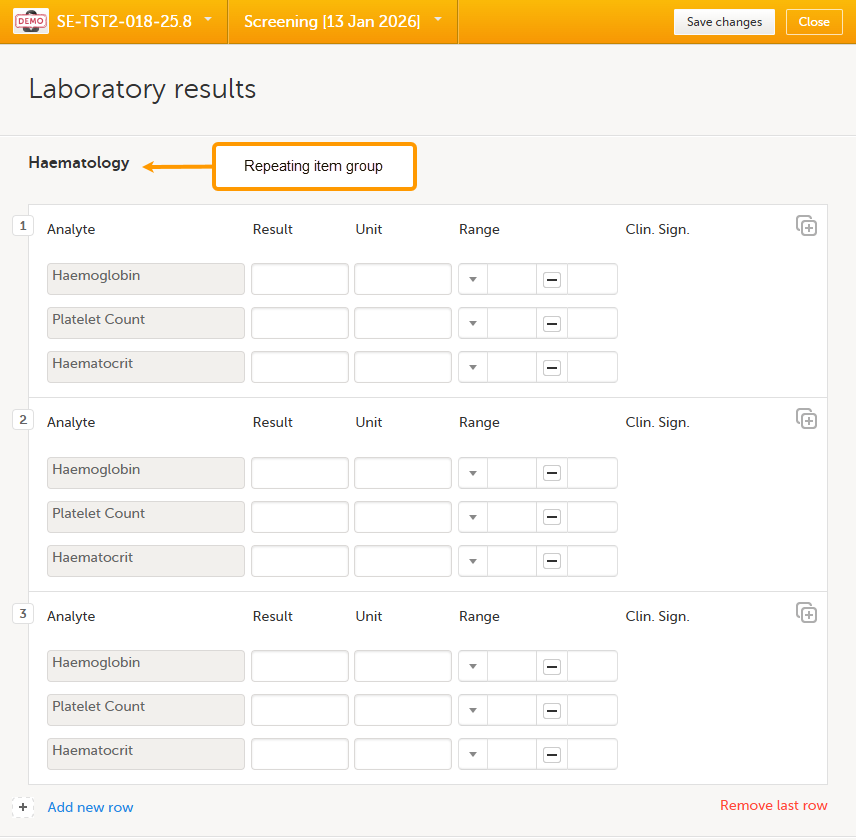
|
| 2. |
Select Add new row: 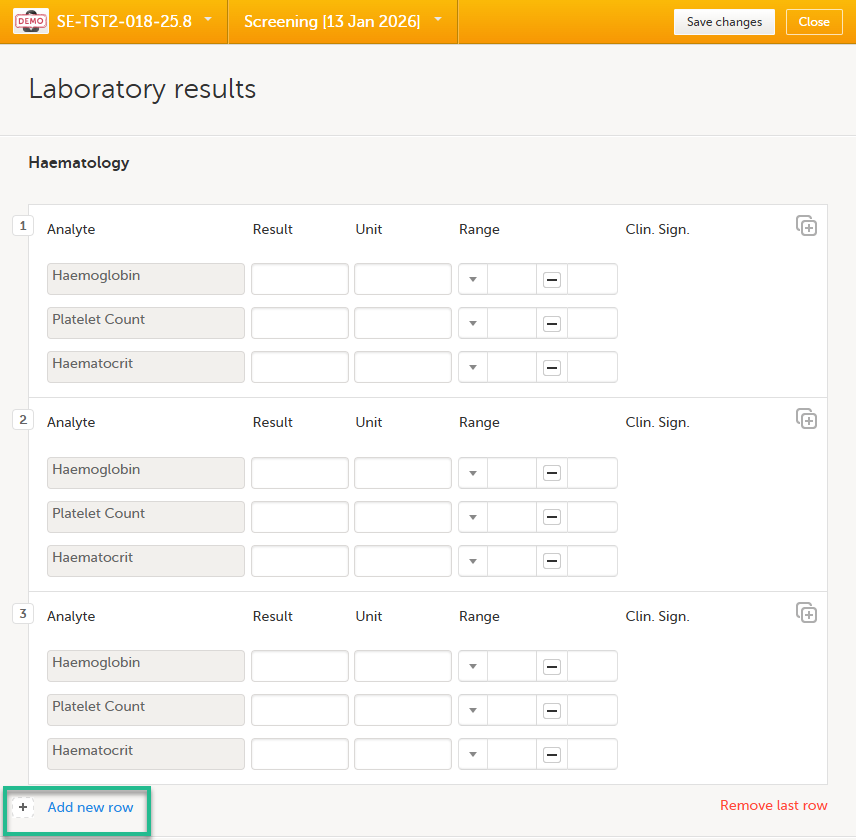
A new instance of the repeated item group opens. |
| 3. |
Enter your data and select Save changes. If the maximum number of occurrences has been reached, no additional rows can be added. Notes!
For more information about the scope and reference data, see How the reference data feature works within forms. |
To remove the last row of a repeating item group:
| 1. |
Open the form and select Remove last row: 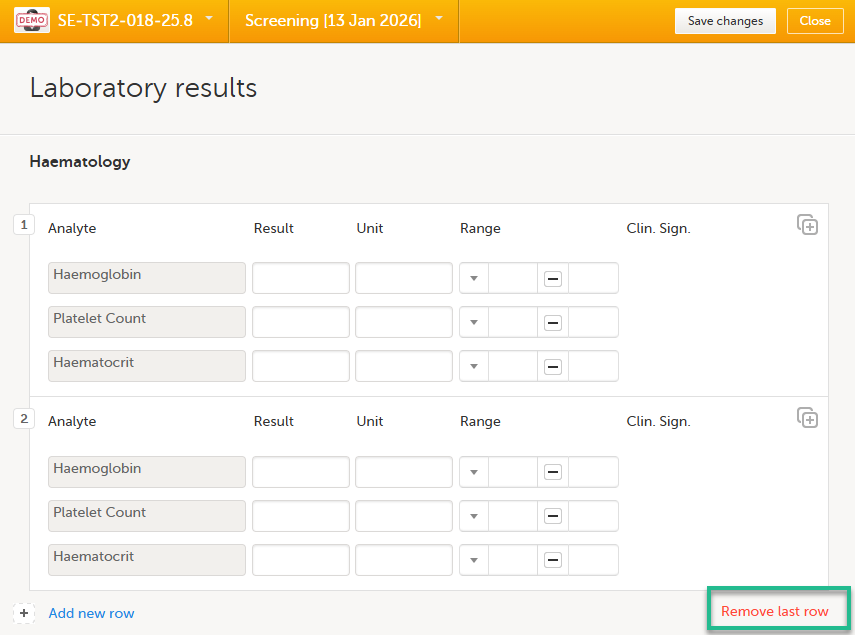
|
| 2. |
Select Save changes. You are prompted for a reason for change: Give reason. 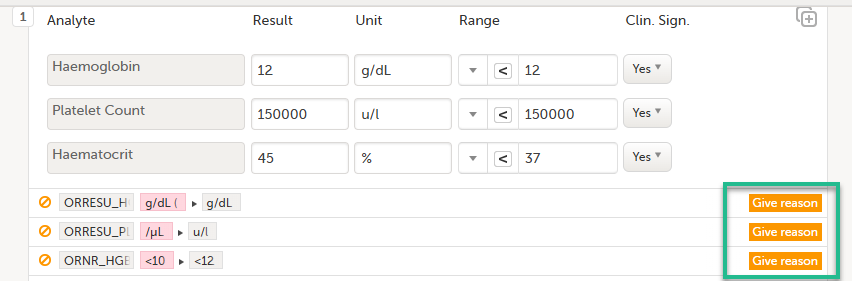
|
| 3. |
The Choose reason for changed value pop-up is displayed: 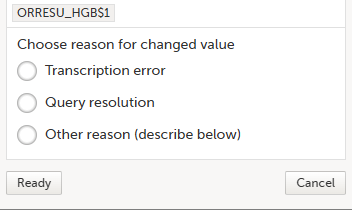
Select an option in the pop-up, for example Query resolution. The same reason is applied to all items in the same instance of that repeating item group: 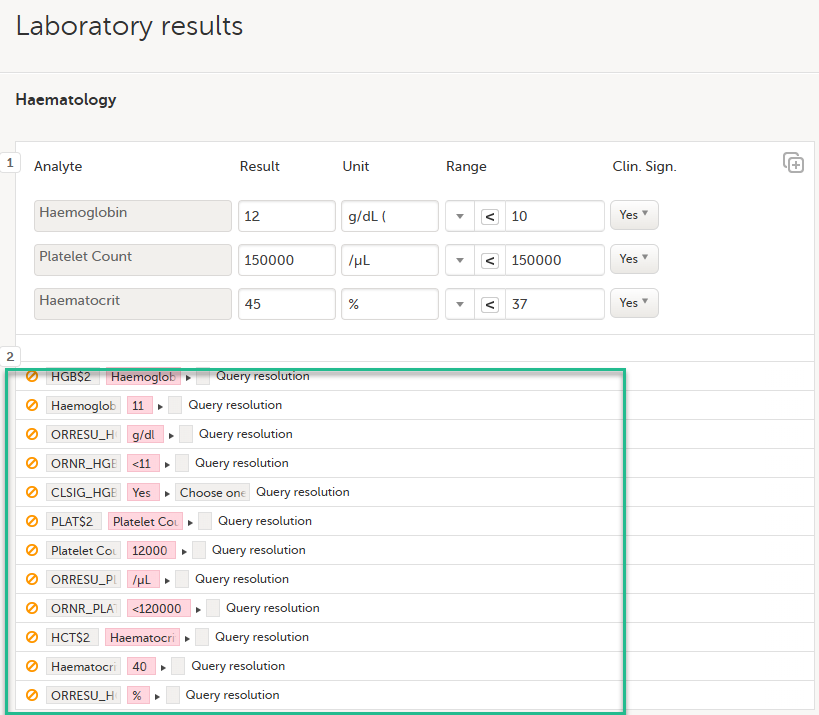
|
Notes!
It is possible to initiate a form based on copied data from a previous event. This can only be done if the form is set as copyable in the study design.
If a form is set as copyable, a ghost form will appear above the main form.
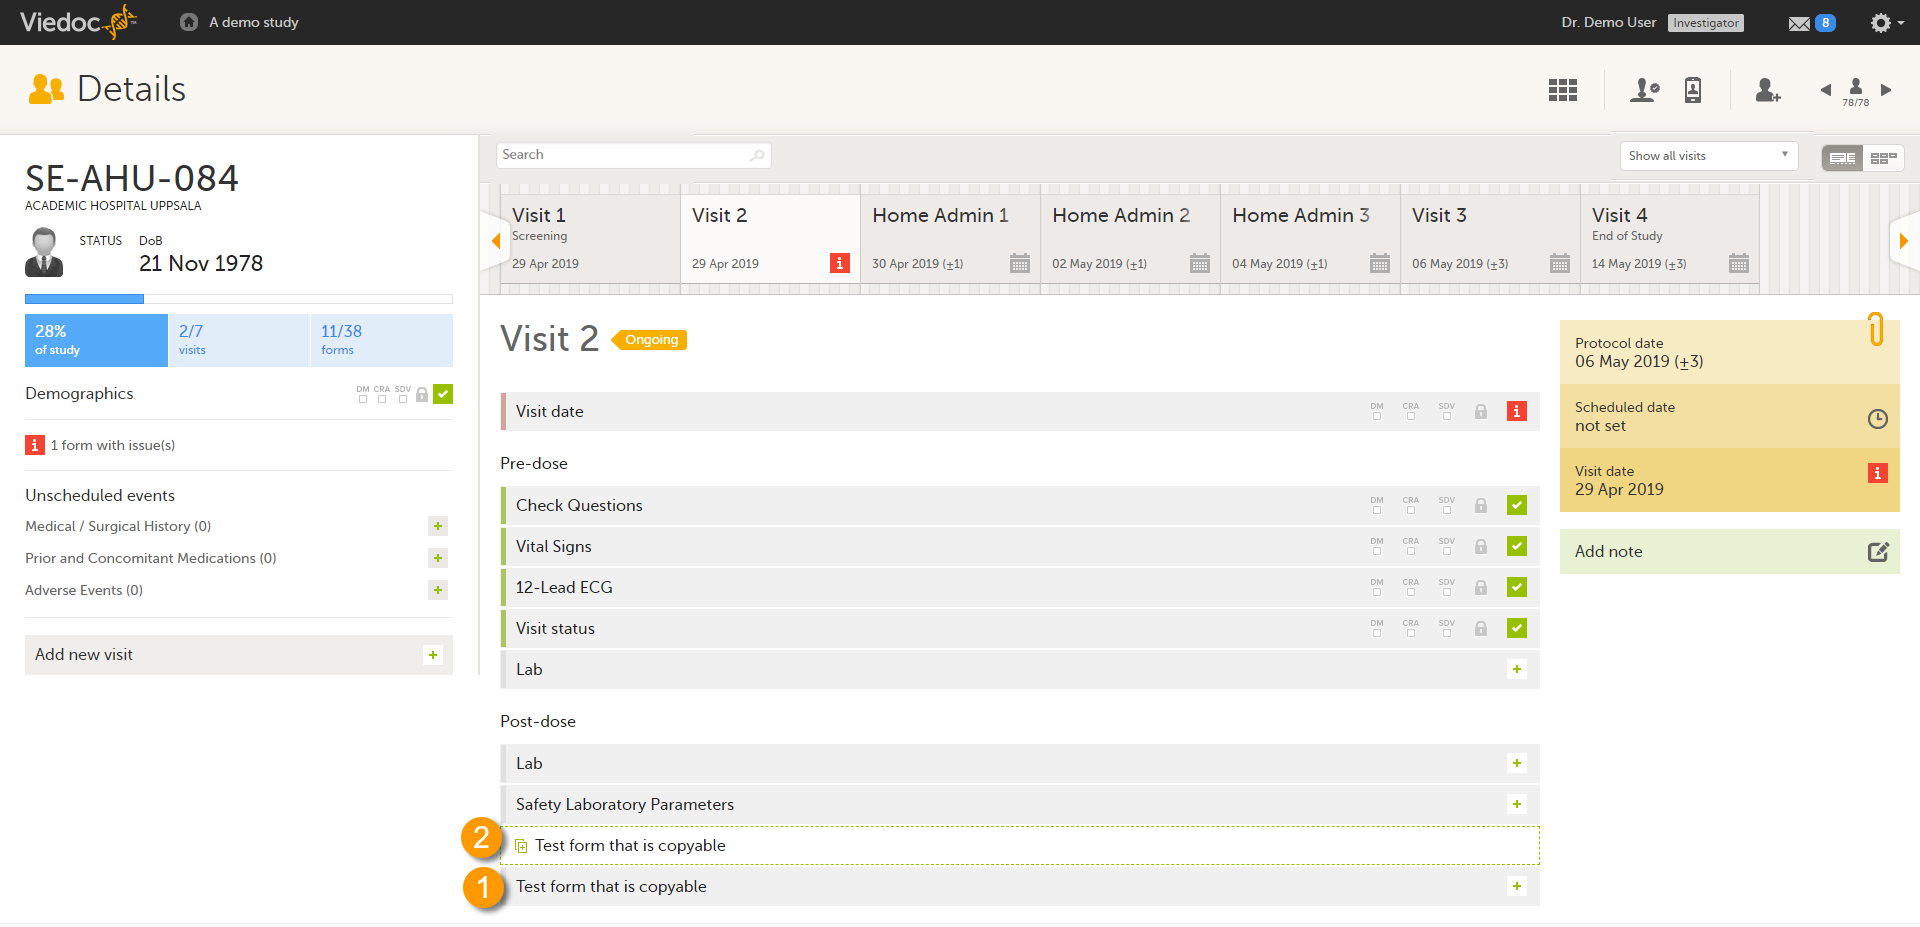
1. Main form - click the main form to enter data manually. Data from the same form in a previous event will not be copied into this form in the current event.
2. Ghost form - click the ghost form to initiate the form by copying data from a previous event. See below for instructions.
Note! The ghost form of a copyable form is displayed above the main form, and marked with a copy icon. If you see a ghost form below the main form, it is a repeating form. See the image below, and see Repeating forms.
1. Main form instance of repeating form.
2. Ghost form of a repeating form, displayed below the main form instance and marked with a + icon.
3. Main form instance of a copyable form.
4. Ghost form of a copyable form, displayed above the main form instance and marked with a copy icon.
If the copyable form is also set as repeating (see Repeating forms), and in the previous event, three instances of that form have been initiated, then in the current event all three instances appear as ghost form. By clicking one of these ghost forms, you can select the instance from which the data are copied.
To initiate a form based on data copied from a previous event:
| 1 |
Click the ghost form.
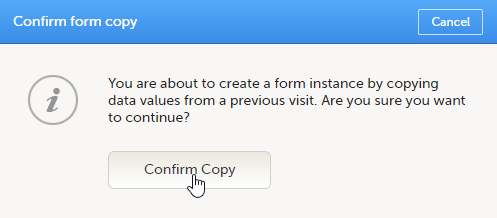
|
| 2 |
Click Confirm to continue. 
|
| 3 |
The ghost form disappears and the form is displayed as initiated. |
To delete a copied form:
| 1 | Open the form and click Edit. |
| 2 | Click Delete form. |
| 3 | Select or enter a reason for deleting the form and click Delete. The copied form is removed and the ghost form re-appears. |
Note!
To mark the data as missing, if you are not able to provide information in a field:
| 1 |
Click the action icon in the top right corner of each field group: A pop-up opens. |
| 2 | Select the field for which the data is missing in the dropdown menu. |
| 3 | Select Confirm field is missing and provide a reason. Note! The Confirm field is missing action is only shown for the fields that are set as "Required" in the study design. |
| 4 | Click Ready. Below the field, the text Confirmed as missing is displayed, together with the reason provided above. |
You can add private notes for:
Note! It is only possible to add private notes if this feature is enabled for your role.
You can add private notes to every event. Private notes are only visible to the user that created the notes, and can only be edited by that user. Adding or editing a private note does not break the signature. It is possible to add as many notes as you like. Notes are ordered according to date in descending order.
To add a private note for an event:
| 1 | Click Add note on the right pane of the Details page. |
| 2 | Enter the note text and click Ready. |
| 3 | Click Save changes. The notes pop-up closes. |
To add another note:
| 1 | Click Open notes. |
| 2 | Click Add another note. |
| 3 | Enter the note text and click Ready. |
| 4 | Click Save changes. The notes pop-up is closed and the new note is displayed in the right pane of the Details page. |
To edit an existing note:
| 1 | Click Open notes. |
| 2 | Click the pen icon behind the note you want to edit. |
| 3 | Edit the note text and click Ready. |
| 4 | Click Close. The notes pop-up is closed. |
To delete a private note:
| 1 | Click Open notes. |
| 2 | Click the trash can icon behind the note you want to delete. |
| 3 | Click Save changes. The notes pop-up closes. |
To see a history of changes to private notes, activate the Show history switch. Private notes are not recorded in the audit trail, neither included in the data export.
You can add private notes to every form. Private notes are only visible to the user that created the notes, and can only be edited by that user. Adding or editing a private note does not break the signature.
To add a private note for a form:
| 1 | Click Add note on the bottom of the form. |
| 2 | Enter the note text and click Save note. The note pop-up closes and the note is displayed on the form. |
You can add private notes to single fields in a form. Private notes are only visible to the user that created the notes, and can only be edited by that user. Adding or editing a private note does not break the signature.
To add a private note for an event:
| 1 |
Click the action icon in the top right corner of the field group. 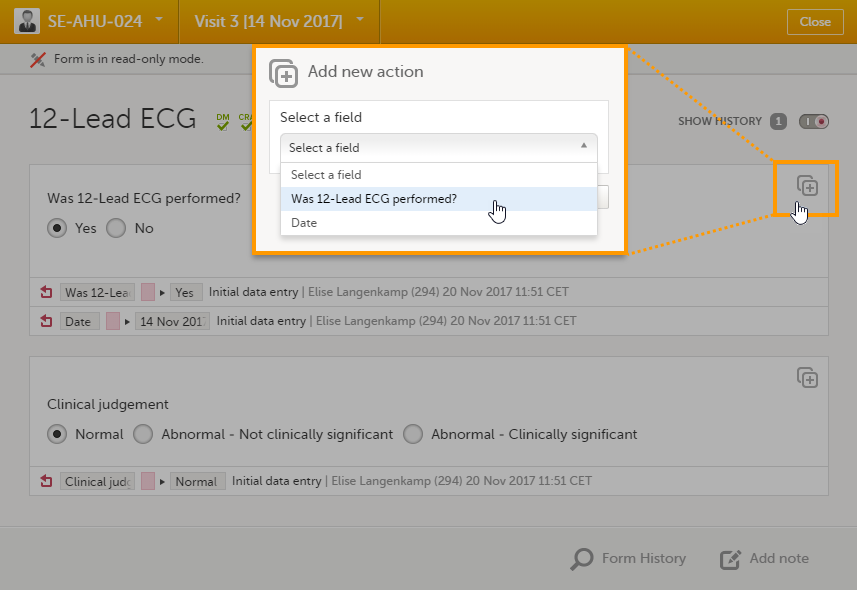
|
| 2 |
Enter the note text and click Ready. 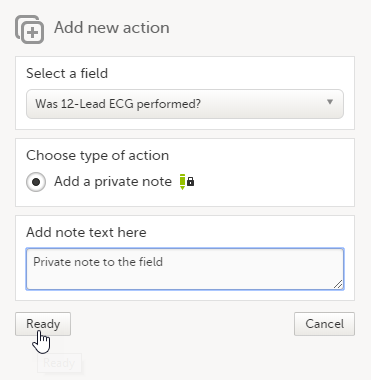
|
| 3 |
Click Save changes. 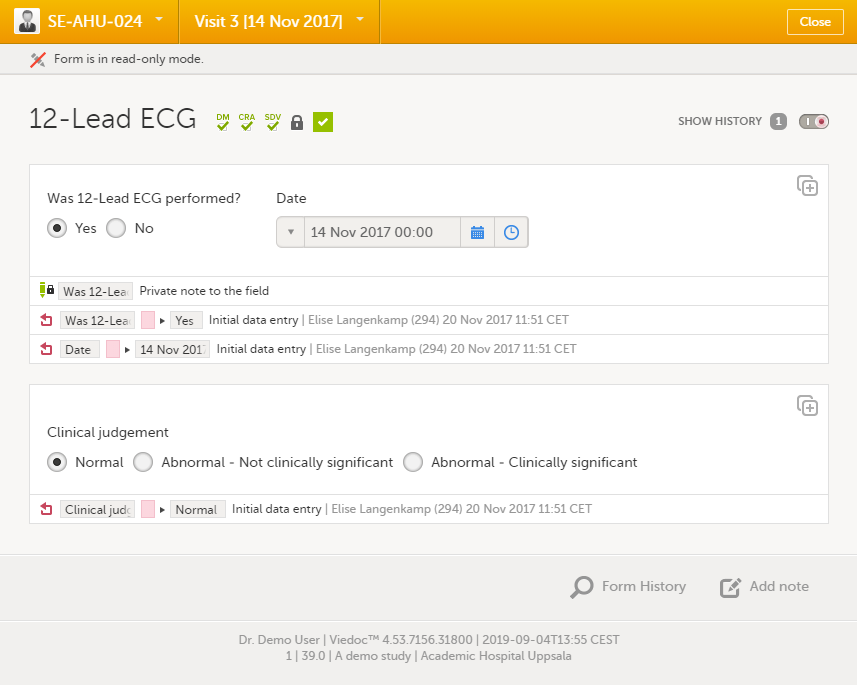
|
For complete instructions on how to resolve a query, see Resolving queries.
See also:
You can view the history of a form, including information on who entered the initial data and who made any changes. To view the history, activate the Show history switch on the top right side of the form:
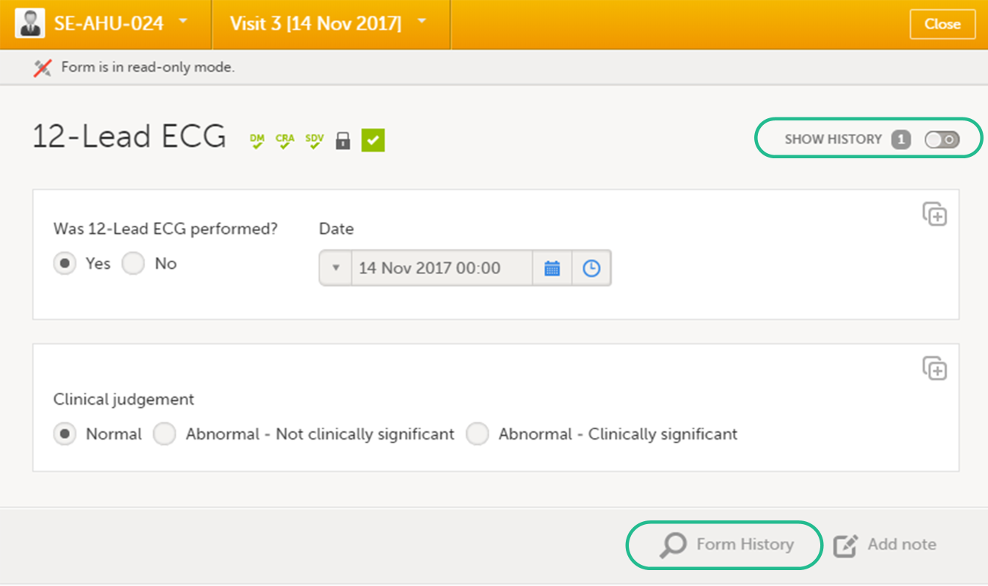
Note!
To make the form history and the form history PDFs more manageable in terms of size, there is a limit to the number of displayed audit trail records. The history only displays the initial data entry and the latest 25 audit trail records. If there are more records, a message is displayed:
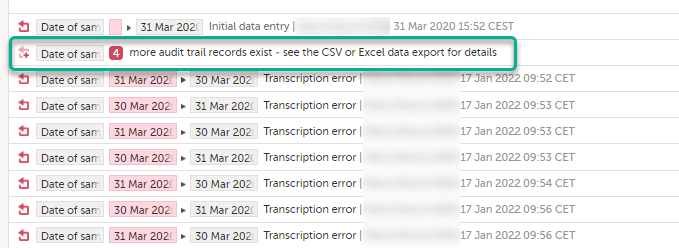
To see the complete form history, export to CSV or Excel. For more details on how to download and export the Admin Audit trail please select this link.
Note! It is not very likely that clinic staff would make more than 25 edits to a field. However, when working with JavaScript functions, that is a possibility.
You can download PDFs of all the saved versions of the form by clicking Form History located on the bottom right side of the form.
If any of the fields in the form are hidden for your role, you are not able to see the form PDFs.
By clicking Form History, a list with all the form versions is displayed, and you can choose which version you want to download. There is one version of the form for each change performed on the eCRF.
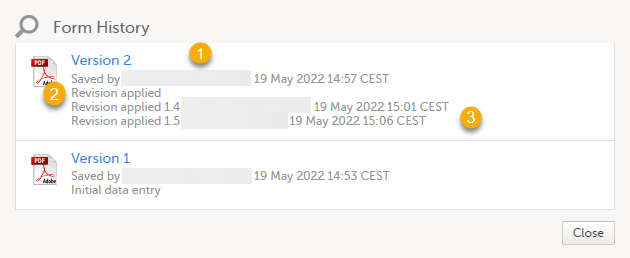
1. The user name of the user who saved the edited form.
2. "Revision applied" is displayed when a user has updated the form according to a new design revision. This can be done in one of two ways:
3. "Revision applied X.Y <Study Manager user name> <date time>" is displayed when the system has automatically updated the form according to a new design revision. This happens if the update in the revision does not affect the data integrity.
The PDF shows a screenshot of the form with the editing history included:

The page header and footer provide the following information, as illustrated in the previous image:
1. Subject ID
2. Form name
3. Event info (in the format set in the study design)
4. Site name
5. Study name
6. User name - the user who last edited the form
7. Version number - the version of the eCRF
8. Viedoc version number
9. Date and time when the form was last edited
10. Page number out of total number of pages of the PDF document
If sensitive data has been entered into a form, it is possible to mask such data so that it is not visible in the form history (except for roles with the specific permission). Sensitive data can, for example, reveal information about a subject's name or gender.
To mask sensitive data in the form history, your role must have the permission to anonymize data. The permission is set up in Viedoc Designer.
When sensitive data has been entered into a form, you first need to edit the data into something not sensitive, see Editing data. Then a record in the form history is created.
To mask sensitive text data in the form history:
| 1 | Click Show history in the top right corner of the form to open the form history. |
| 2 |
For the history record with the sensitive data, click the Changed value icon. 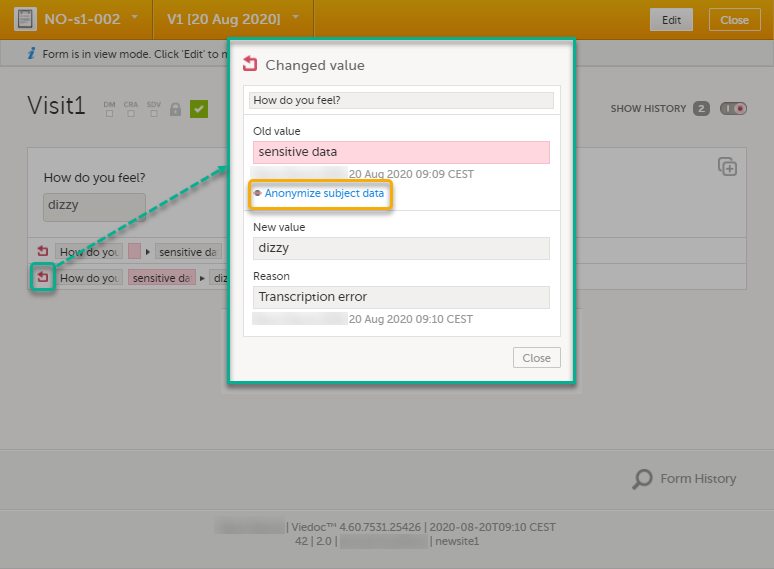
|
| 3 | Click Anonymize subject data. |
| 4 |
In the pop-up that is displayed, select Anonymize data value and click Continue. 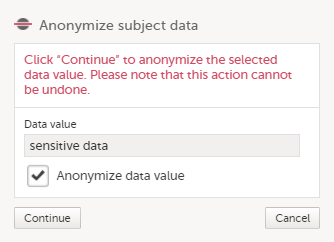
|
| 5 | Enter your password and select Submit. |
| 6 |
The pop-up now displays a text confirming that the data is anonymized. Click Ready. Note! All masking actions are logged so that it is possible to see when they were made and by whom. 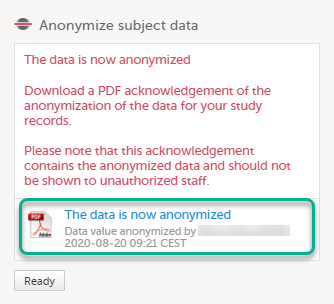
Note! When the data has been masked, a PDF acknowledgement is created. The PDF contains information about what has been masked, when and by whom it was done. To download the PDF, click the link in the pop-up. It is recommended to archive the PDF together with your study documentation. |
| 7 |
The form history now displays asterisks in place of the sensitive data. 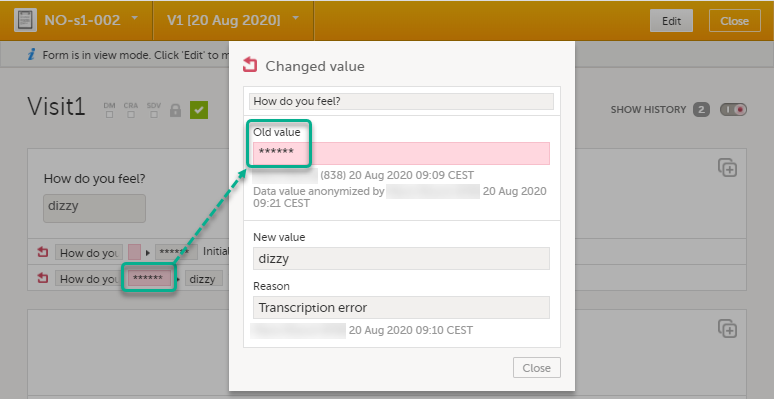
Note! The masked data will be masked also in an export. Note! Anonymization of data in linked forms does not affect the form link items, these have to be anonymized separately. |
To mask a sensitive filename in the form history:
| 1 | Click Show history in the top right corner of the form to open the form history. |
| 2 |
For the history record with the sensitive filename, click the Changed value icon. 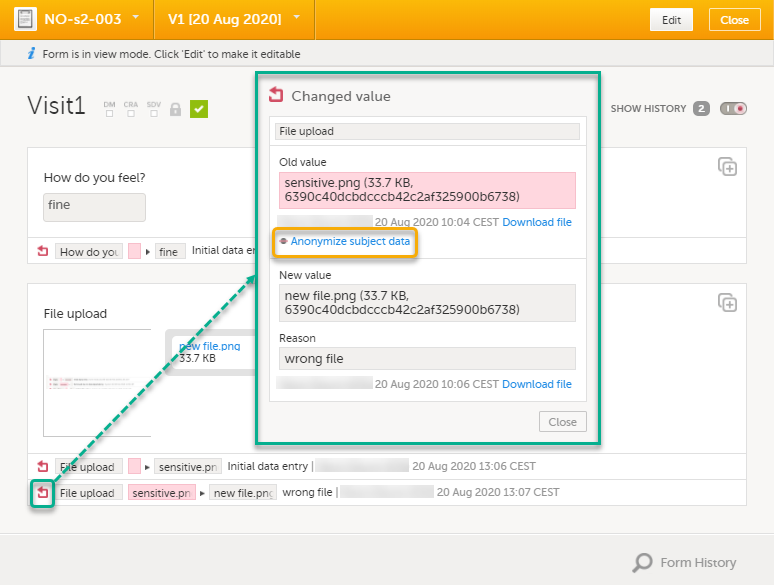
|
| 3 | Click Anonymize subject data. |
| 4 |
In the pop-up that is displayed, select Anonymize file name and click Continue. 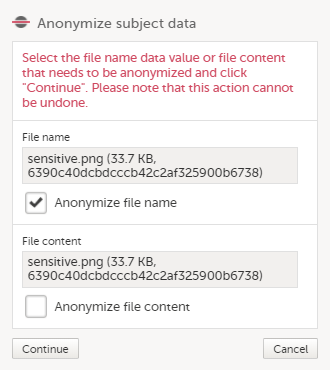
|
| 5 | Enter your password and click Confirm. |
| 6 |
The pop-up now displays a text confirming that the filename is anonymized. Click Ready. 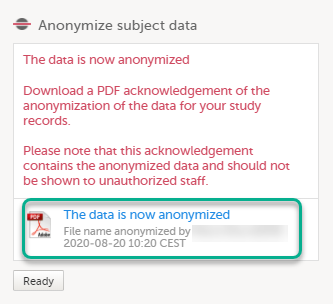
Note! When the filename has been masked, a PDF acknowledgement is created. The PDF contains information about what has been masked, when and by whom it was done. To download the PDF, click the link in the pop-up. It is recommended to archive the PDF together with your study documentation. |
| 7 |
The masked filename is now no longer visible in the form history. 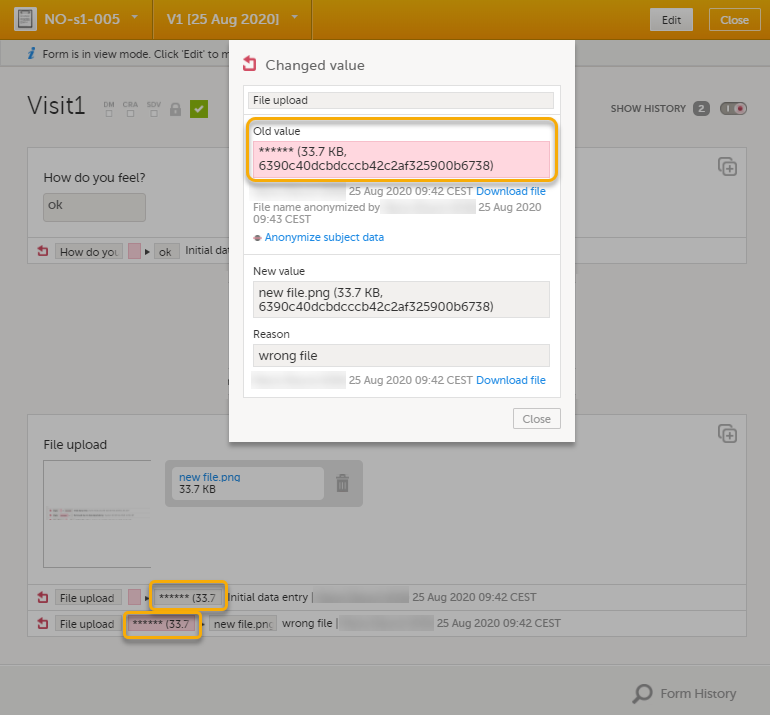
|
| 1 | Click Show history in the top right corner of the form to open the form history. |
| 2 |
For the history record with the sensitive file content, click the Changed value icon.
|
| 3 | Click Anonymize subject data. |
| 4 |
In the pop-up that is displayed, select Anonymize file content and click Continue. 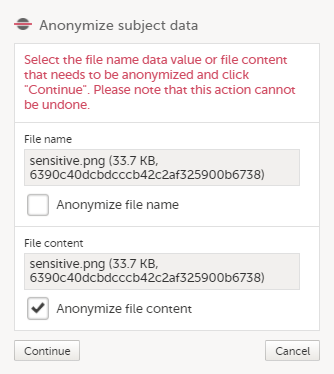
|
| 5 | Enter your password and click Confirm. |
| 6 |
The pop-up now displays a text confirming that the data is anonymized. Click Ready. 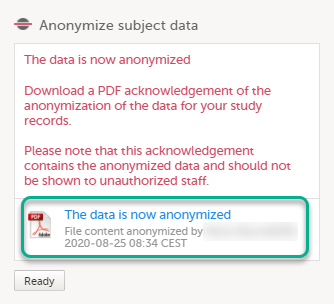
Note! When the file content has been masked, a PDF acknowledgement is created. The PDF contains information about what has been masked, when and by whom it was done. To download the PDF, click the link in the pop-up. It is recommended to archive the PDF together with your study documentation. |
| 7 |
The masked file is now no longer accessible in the form history. 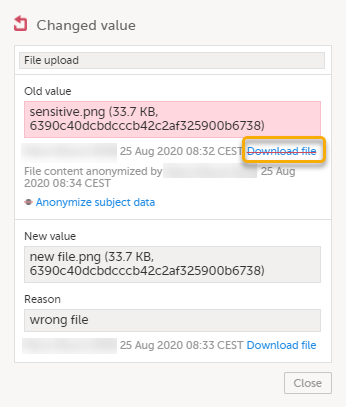
|
Historical data exports that were created before the data masking can no longer be downloaded because such exports could include the data that was later masked.

When data has been masked, it is reflected in all form PDFs.
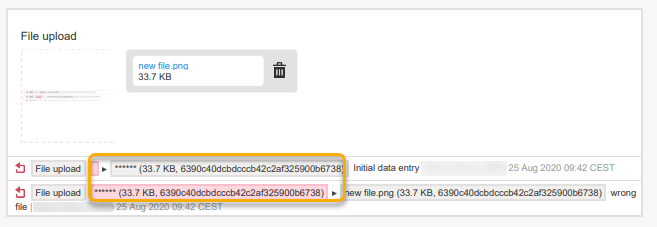
For a form version with masked data, and for all previous form versions, all form PDFs become unavailable because they could include the data that was masked.
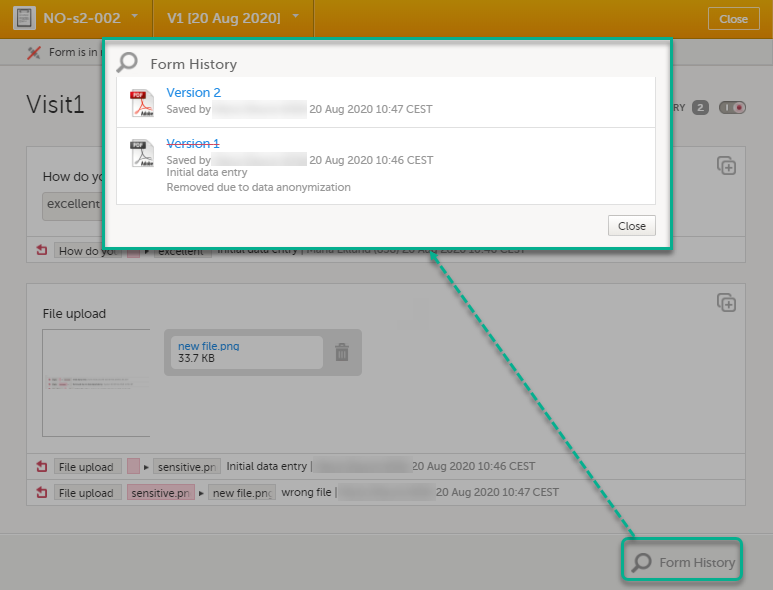
For roles with the permission to view anonymized data, it is possible to view masked data in the form history. The permission is set up in Viedoc Designer.
To view masked data:
| 1 | Click Show history in the top right corner of the form to open the form history. |
| 2 |
For the history record with the masked data, click the Changed value icon. 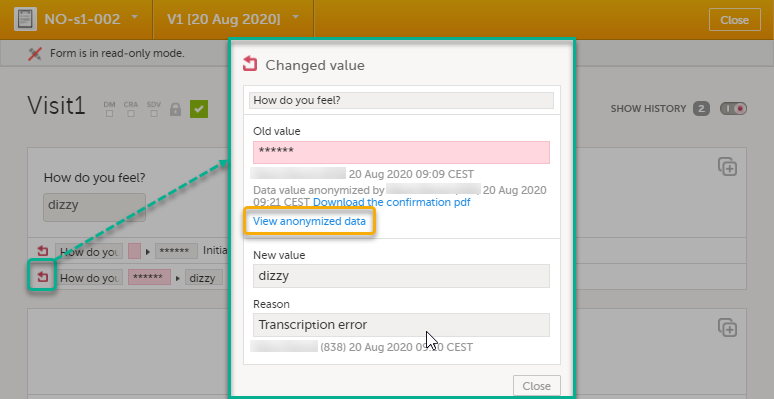
Note! You can download a confirmation PDF using the link in this pop-up. |
| 3 | Click View anonymized data. |
| 4 |
For masked text and filenames, the sensitive data is immediately displayed in the field Old value. For masked file content, the disabled download link for the file is enabled. 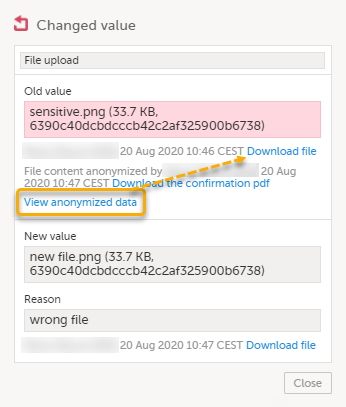
Note! From this pop-up, you can download a confirmation PDF. The PDF contains masked data and should not be shown to unauthorized staff. |
The following executable file types are considered as high risk because essentially all computers with the listed operating system installed can carry out the commands contained in the executable file.
In other words, files with the extensions listed below can be executed with some basic part of Windows, Mac OS, Linux, and so on.
Due to this, the following file formats will not be accepted by Viedoc form file loader:
| Extension | Format | Operating system(s) |
|---|---|---|
|
ACTION |
Automator Action |
Mac OS |
|
APK |
Application |
Android |
|
APP |
Executable |
Mac OS |
|
BAT |
Batch File |
Windows |
|
BIN |
Binary Executable |
Windows, Mac OS, Linux |
|
CMD |
Command Script |
Windows |
|
COM |
Command File |
Windows |
|
COMMAND |
Terminal Command |
Mac OS |
|
CPL |
Control Panel Extension |
Windows |
|
CSH |
C Shell Script |
Mac OS, Linux |
|
EXE |
Executable |
Windows |
|
GADGET |
Windows Gadget |
Windows |
|
INF1 |
Setup Information File |
Windows |
|
INS |
Internet Communication Settings |
Windows |
|
INX |
InstallShield Compiled Script |
Windows |
|
IPA |
Application |
iOS |
|
ISU |
InstallShield Uninstaller Script |
Windows |
|
JOB |
Windows Task Scheduler Job File |
Windows |
|
JSE |
JScript Encoded File |
Windows |
|
KSH |
Unix Korn Shell Script |
Linux |
|
LNK |
File Shortcut |
Windows |
|
MSC |
Microsoft Common Console Document |
Windows |
|
MSI |
Windows Installer Package |
Windows |
|
MSP |
Windows Installer Patch |
Windows |
|
MST |
Windows Installer Setup Transform File |
Windows |
|
OSX |
Executable |
Mac OS |
|
OUT |
Executable |
Linux |
|
PAF |
Portable Application Installer File |
Windows |
|
PIF |
Program Information File |
Windows |
|
PRG |
Executable |
GEM |
|
PS1 |
Windows PowerShell Cmdlet |
Windows |
|
REG |
Registry Data File |
Windows |
|
RGS |
Registry Script |
Windows |
|
RUN |
Executable |
Linux |
|
SCR |
Screensaver Executable |
Windows |
|
SCT |
Windows Scriptlet |
Windows |
|
SHB |
Windows Document Shortcut |
Windows |
|
SHS |
Shell Scrap Object |
Windows |
|
U3P |
U3 Smart Application |
Windows |
|
VB |
VBScript File |
Windows |
|
VBE |
VBScript Encoded Script |
Windows |
|
VBS |
VBScript File |
Windows |
|
VBSCRIPT |
Visual Basic Script |
Windows |
|
WORKFLOW |
Automator Workflow |
Mac OS |
|
WS |
Windows Script |
Windows |
|
WSF |
Windows Script |
Windows |
|
WSH |
Windows Script Preference |
Windows |
Note! When editing this lesson, check if the corresponding edits are also needed in the PMS User Guide for Clinic Side Users>Resetting and deleting data in a PMS Study lesson.
This lesson describes how to delete a subject, a form, or an event.
Notes!
|
Important! Although no data is deleted from the database, it is not possible to revert any deleted data. Therefore, please make sure to double-check the data before you delete the data. If any data is deleted by mistake, the deleted data is still available for preview and can be re-entered manually based on the old records. To view deleted forms, select Show deleted forms in the upper right corner of the form on the Details page. |
Resetting a form means that all data in the form is erased and the fields in the form appear empty again.
The old data in the form is still available for tracking purposes and can be accessed by activating the Show deleted forms checkbox on the Details page:

To reset a form:
| 1 | Open the form and select Edit in the top right corner. The Reset form icon appears in the bottom left corner of the form. 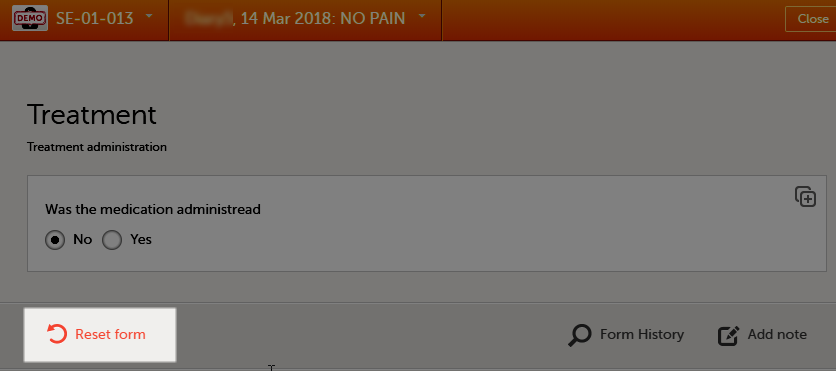 |
| 2 | Select Reset form. A pop-up appears asking for the reason for resetting the form. 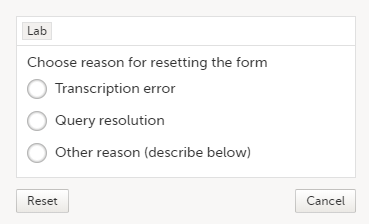 |
| 3 | Enter the reason and select Reset. |
Note!
In case you made a selection in a radio button and want to return to the state in which no option is selected, you can reset the radio button. To reset a radio button, select the selected radio button again, and it will be deselected:
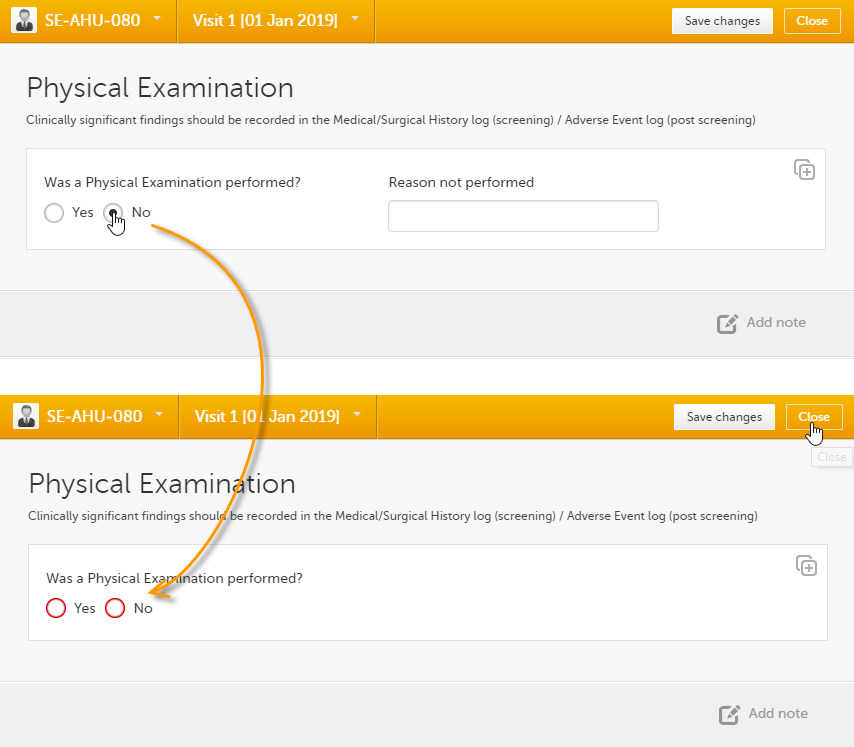
To delete a common event such as Adverse Event, Concomitant Medications or Medical History:
| 1 | Open the event and select Edit in the top right corner. The Delete event icon appears in the bottom left corner of the form. 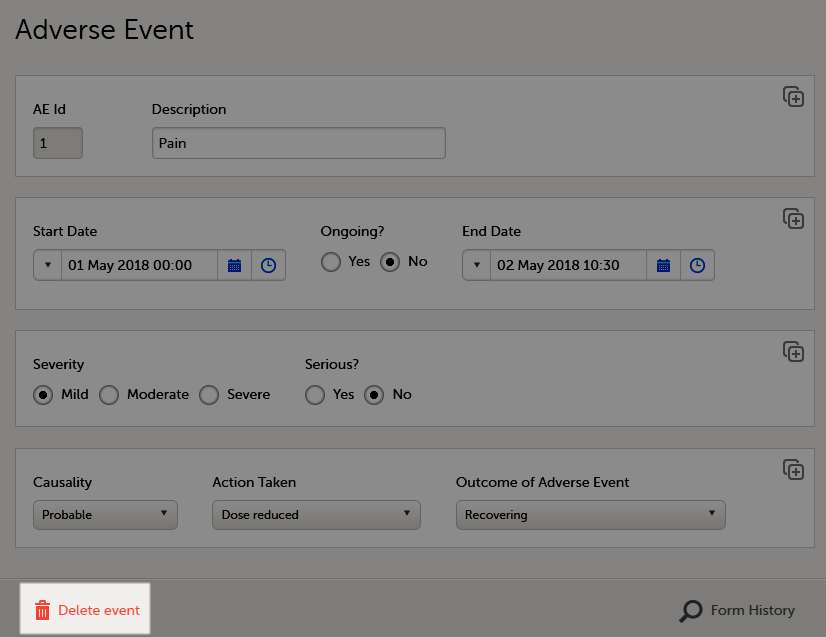 |
| 2 | Select Delete event. A pop-up appears asking for the reason for deleting the event. 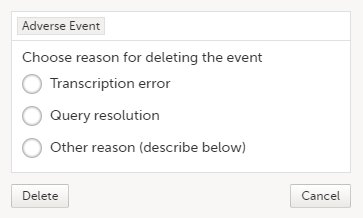 |
| 3 | Provide the reason and select Delete. The event is deleted but available for tracking purposes in the history. |
Note!
If you have added an event manually using the Add new event button (see Entering/Editing data), you can remove the manually added event if it does not contain any data. If any form within a manually added event is completed, the form needs to be reset before the event can be deleted.
To delete a manually added event:
| 1 | Open the event and select Event date. The Event date form opens.  |
| 2 |
Select Delete event. 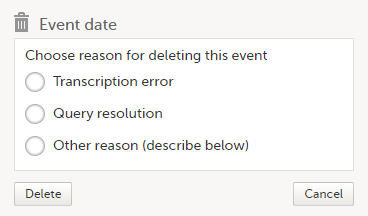
|
| 3 |
Provide the reason and select Delete. |
Once the event is deleted, the event gets a DELETED stamp, the event name appears in strikethrough, and the content of the event is displayed in grey. By default, all deleted events are still visible in the schedule. You can select to show or hide the deleted events by selecting or clearing the Include deleted events checkbox in the Show all events drop-down list:
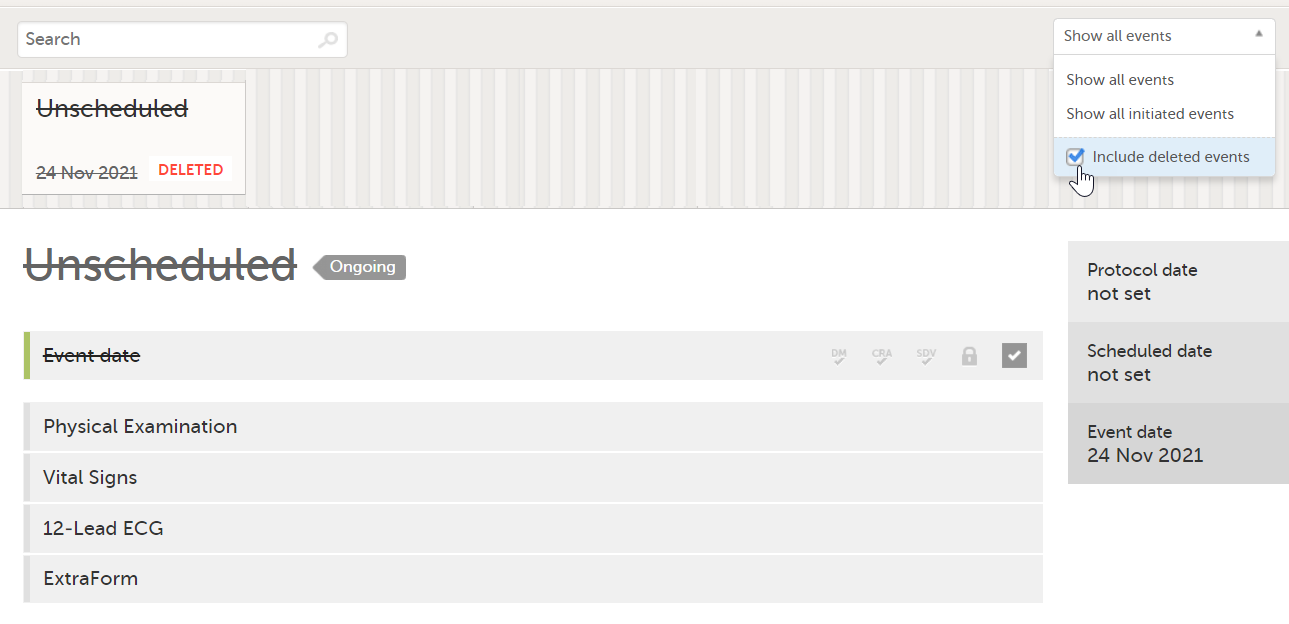
If you have initiated or planned a scheduled event by mistake, you can set it back to its previous status. If any data is entered on the event, the forms with data need to be reset before the event status can be reset.
Note! If a scheduled event with visibility conditions is reset and the conditions were not fulfilled, the event status is set as "Deleted".
To reset the event status for a scheduled event that was initiated/planned:
| 1 | Open the event and select Event date. The Event date form opens. |
| 2 |
Select the trash can icon next to the date. 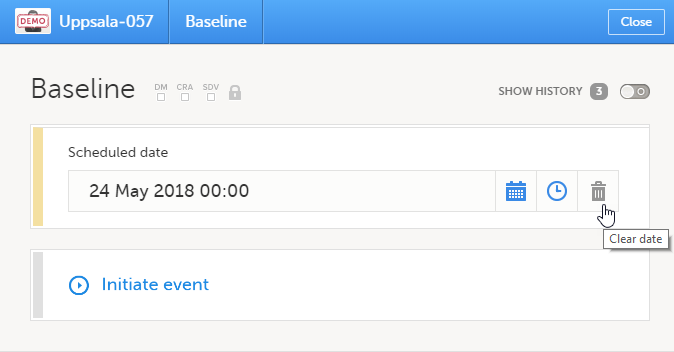
|
| 3 |
The date is now not set. |
| 4 | Provide the reason and select Ready: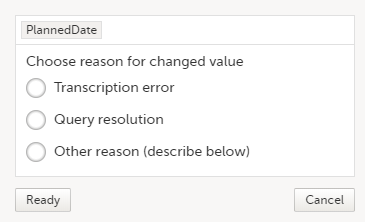 |
Note! A subject cannot be deleted if the form that was used to add the subject is locked.
To remove a subject from the study:
| 1 |
On the Details page, select the form that was used to add the subject. |
| 2 |
Select Delete subject. A confirmation pop-up appears. |
| 3 |
Select Continue. 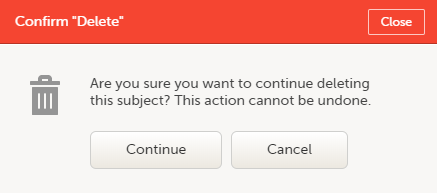
You will be prompted to enter the reason for deletion. |
| 4 | Provide a reason, enter your password and select Delete.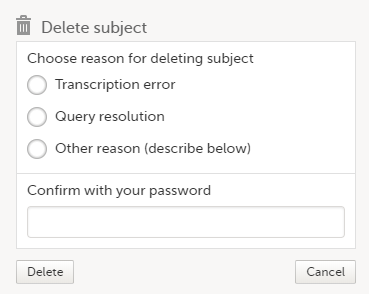 |
After deletion, the Details page is marked in grey, but all forms are still accessible.

The subject card is also still visible on the Selection page. You can select to remove the subject card from the Selection page by clearing the Include deleted subjects checkbox in the drop-down list of the site in the top right corner of the Selection page.
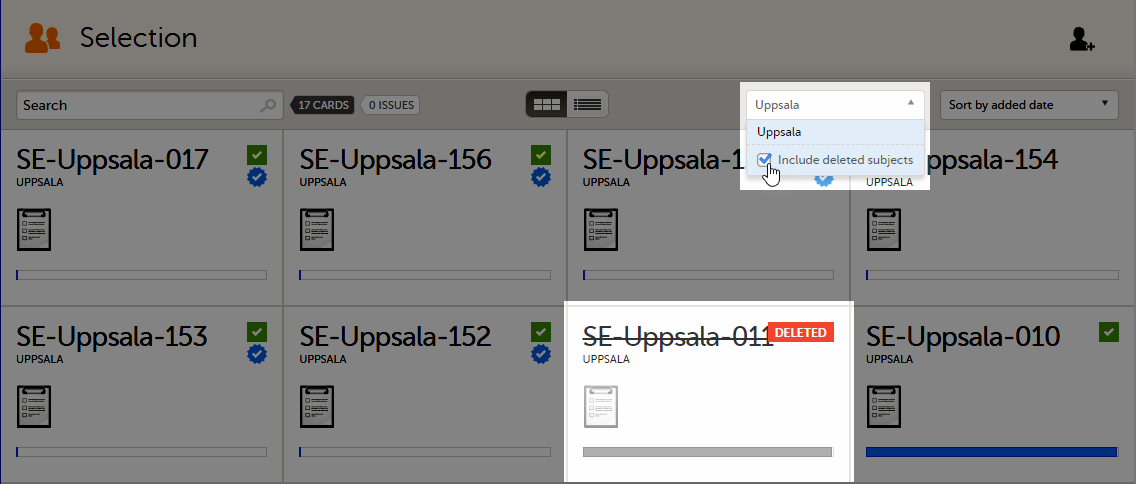
The Investigator signs the data. Signing for a subject can be done on an individual form, event, or across a study using the signing console.
This content is shared by the lessons in the following user guides
Admin: "Managing users (for Org Admin)"
Monitors & Project Managers: "Managing users"
Clinic: Signing data
The Study Manager should, in cooperation with the Site Manager(s), ensure that all users of Viedoc are informed, and certify that all electronic signatures created in the system are intended to be the legally binding equivalent of a traditional handwritten signature.
In Viedoc, the purpose/meaning of a signature is always “responsibility” as used in Sec. 11.50 of Food and Drug Administration (FDA) 21 Code of Federal Regulations (CFR) part 11. The signer is thereby acknowledging his/her responsibility for the entered data. Viedoc keeps account of what was signed, who signed it, and when the signature was performed.
To access the signing console, go to the Details page and select the SIGN icon:
The signing console opens:

The signing console lists all of the initiated forms with no issues for the selected subject, grouped by event.
You can use the filter in the top of the page to:
The eye icons help you identify which forms you have visited (the most recent version of the form):
To review a form, select the form bar. Closing the form takes you back to the signing console.
To view the review status of:
...for each form, check the Show review status checkbox in the top right corner of the page.
To sign the data:
| 1 | Mark the form(s) to be signed in one of the following ways:
|
|
| 2 |
Select Ready on the top bar of the page. A confirmation pop-up appears: |
|
| 3 |
Type in your password and select Confirm.
|
Note! For scheduled and unscheduled events, the event date form ($EVENT) still counts, even when it is excluded when you use automatic event dates.
$EVENT form. This cannot be selected to be signed but can be signed if you select Sign all (for subject or event).$EVENT form. As a result, the sign symbol for the event is not visible, even though it looks as though all forms have been signed.See also the video tutorial: Sign data.
Viedoc offers support for adding centralized reference data to the study, which is automatically populated to the subject forms. When centralized reference data is added to a study, reference values don’t need to be entered individually for each subject and each form.
It is possible to configure different sets of reference data that will be populated to the form based on:
| Term | Definition |
|---|---|
| Reference data source | A source that provides reference data (for example a lab). |
| Reference data scope | A set of measurements that a reference data source carries out, and the parameters that might affect these data. The data in one reference data scope will be populated to one lab data form. One or more reference data scopes can be configured in Viedoc Designer > Global Settings, as set(s) of variables and factors (see definitions below). |
| Factor | A parameter that affects the reference data, for example a subject’s gender. Factors may affect the normal range for a test result. |
| Variable | A specific measurement to be carried out. |
| Target type | Item of a certain type of information that a reference data source can provide (such as range, unit, low/high values) for a specific measurement (defined by a variable). Any number of target types can be defined by the user. |
Reference data sources are configured in Viedoc Admin. Each reference data source is linked to one or more reference data scopes that define the following:
For each reference data source-scope combination, the reference values that should be auto-populated to the forms should be entered in the reference data editor in Viedoc Clinic. This can be done by clinic users that have permission to edit and save reference data.
To make the reference values available for auto-population to the subject forms, the reference values should be published. This can be done by clinic users that have permission to publish the reference data values.
See also the video tutorial demonstrating how to work with reference data in Enter reference data.
Note! You only have access to reference data on the landing page, and to the reference data editor, if you have a role with permission to view, edit and/or publish reference data.
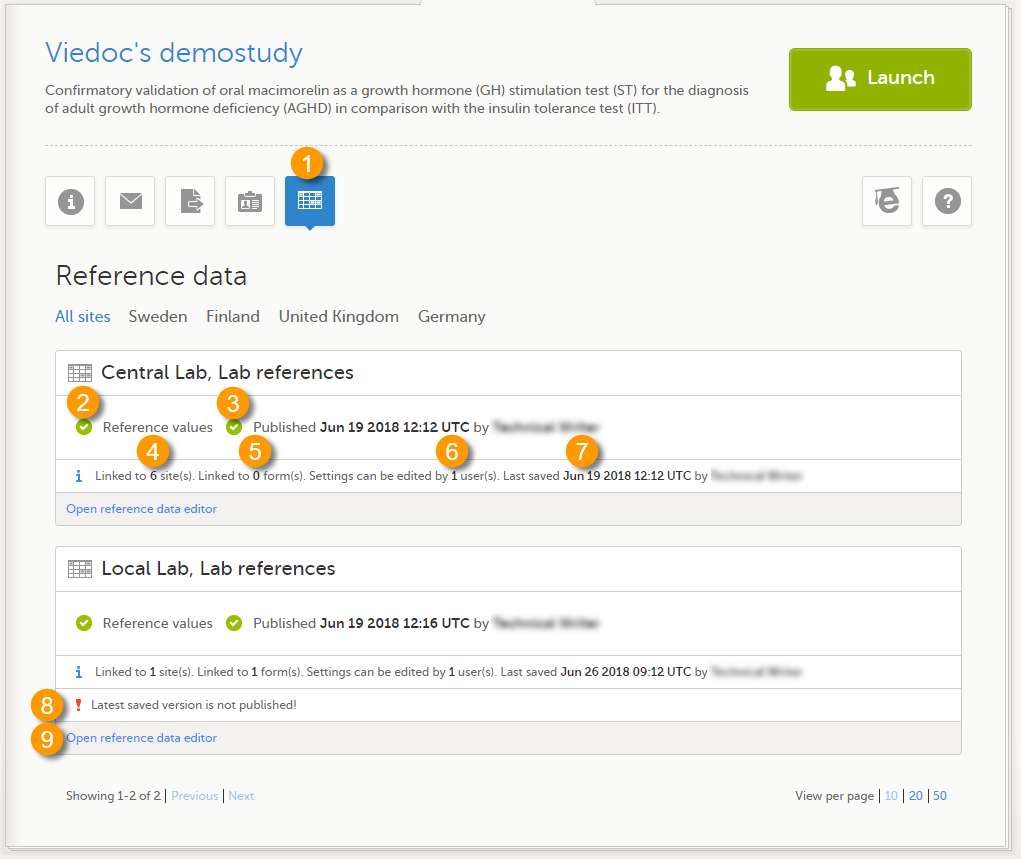
On the landing page, you can view or do the following:
1. Select the Reference data icon to display all the reference data source-scope combinations that are linked to the sites you have access to.
For each reference data source-scope combination, the following information is provided:
2. Status indicator that indicates whether reference values have been entered (green) or whether the fields are still empty (grey).
3. Status indicator that indicates whether the reference values have been Published (including date, time and user who published them) or whether the reference values are Not published yet.
4. The number of sites that the reference data source is linked to. This gives an indication of how many sites are impacted in case the reference values are edited.
5. The number of forms that the reference values have been populated to. This gives an indication of how many forms are impacted in case the reference values are edited.
6. The number of users that have permission to edit the reference values.
7. Name of the user who performed the last changes to the reference values, including date and time.
8. Warning message if the latest saved version was not published.
9. Select Open reference data editor to view or edit the reference data, see The reference data editor.
When you select Open reference data editor on the reference data section of the landing page, the reference data editor opens for that specific reference data source-scope combination. Depending on the user rights that are connected to your role, you can view as read-only, edit and/or publish the reference data.
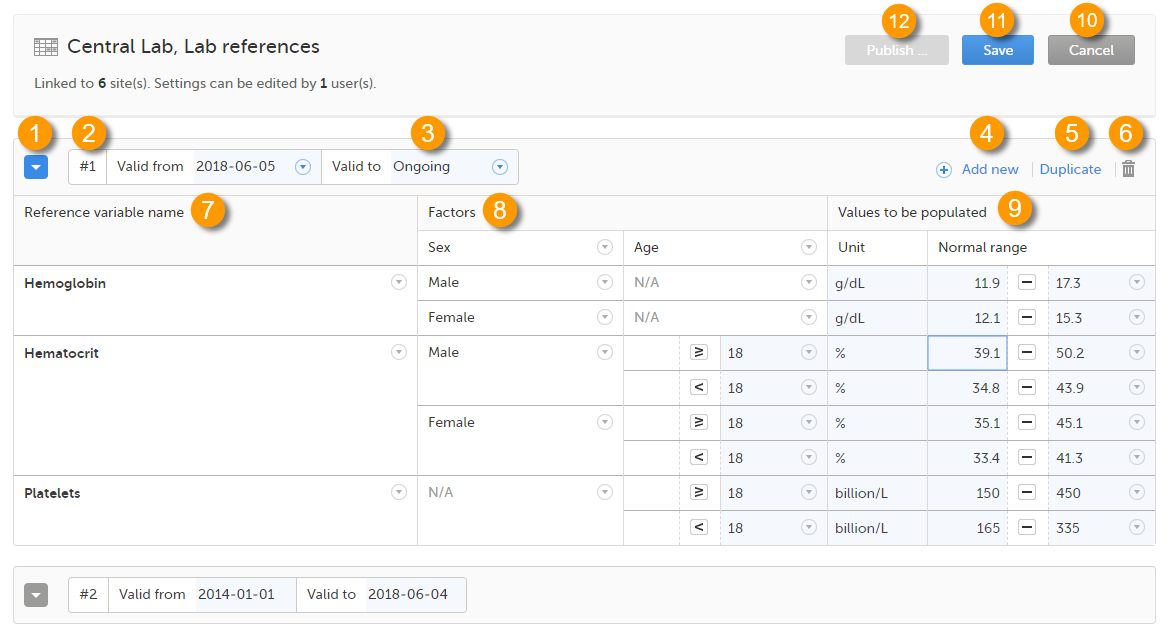 On the reference data editor, you can view or do the following:
1. Select the arrow to expand the reference data table for that specific time period. The newest time period is expanded by default and shown at the top of the list.
2. The number of the reference data set for a given time period. This number is given by default, based on the order in which the reference data sets have been created.
3. The period the reference data set is valid.
4. Select Add new to create a new reference data set for a new time period.
5. Select Duplicate to create a new reference data set for a new time period based on a previously created set.
6. Select the trash can icon to remove an existing reference data set time period.
7. Reference variable name - the variable that are defined for that reference data scope. A variable is a specific measurement to be carried out. See Variables for more information.
8. Factors - the factors that are defined in the scope. Factors are parameters that affect the reference data. See Factors for more information.
9. Values to be populated - the reference data values provided by the reference data source. The values entered here will automatically be populated to the subject forms.
10. Select Cancel to discard all the changes performed and revert to the latest published reference data.
11. Select Save to save the changes performed.
Note! Only users with clinic roles that have permission to edit reference data can edit and save the reference data.
Upon save, the reference data set becomes available for publishing.
12. Select Publish to publish the reference data. A pop-up appears asking you to enter a message. This message appears in the Messages section on the landing page.
Publishing makes the data available for auto-population into the subject forms.
Note! Only users with clinic roles that have permission to publish reference data can publish the reference data.
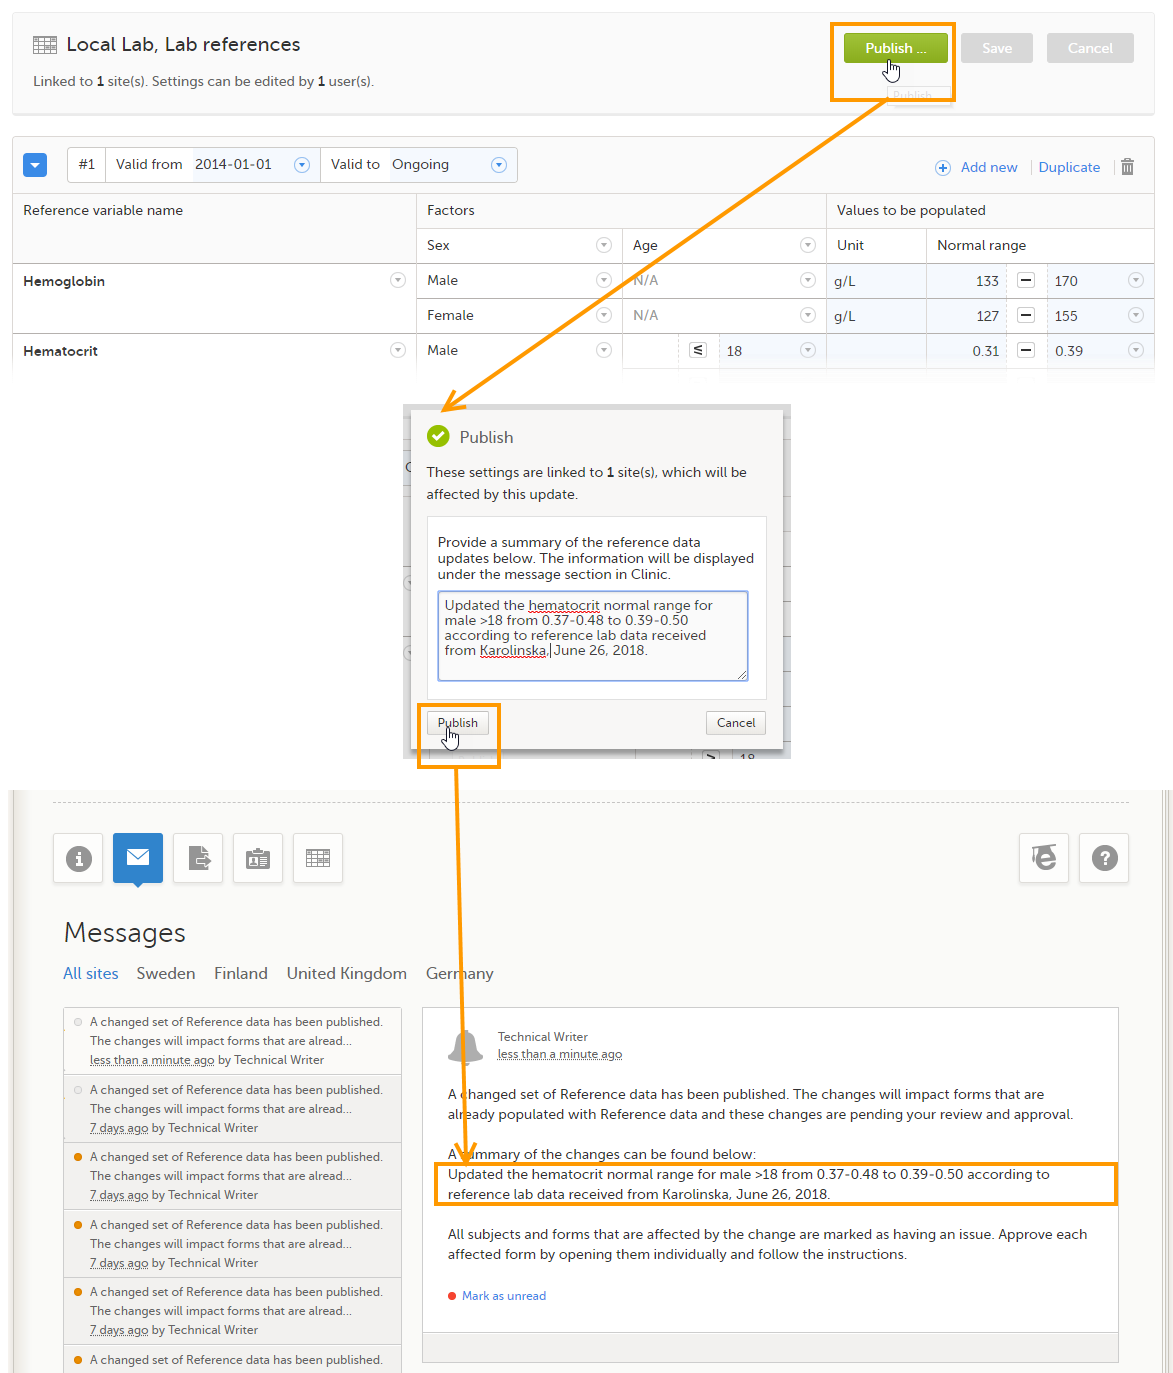
The column Reference variable name displays the variables that were configured for the reference data scope. By selecting the arrow to the right of the variable name, you can:
When the variable is not included, such as 3 in the image, you can:
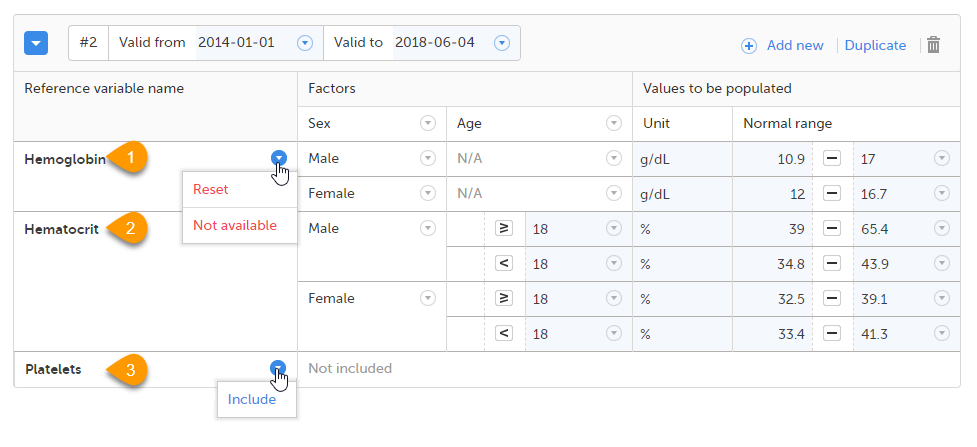
Note! If you do not want automatic population of reference data for a certain variable, the variable should be set to Not included. This way, it is possible to manually add reference data for that variable to a form.
The column Factors displays the factors that were configured for the reference data scope. In this column, you can:
1. Select the arrow to the right of Factors, and select a factor from the drop-down list to add that factor to the table. If no arrow is displayed, all factors predefined in the reference data scope are already added (as in the image).
2. Select the arrow to the right of the factor label and select Remove to remove that factor from the table.
By default, a newly added factor is populated with N/A (not applicable) in the table. You can edit this by selecting the arrow to the right of N/A and select one of the options from the drop-down list. The drop-down list displayed varies depending on whether the factor has predefined factor options or not.
3. For a factor that has predefined options, such as Sex in the example:
+ in front of it to add a new row to the column populated with the selected option, or4. For a numeric range (no predefined options), such as Age in the example:
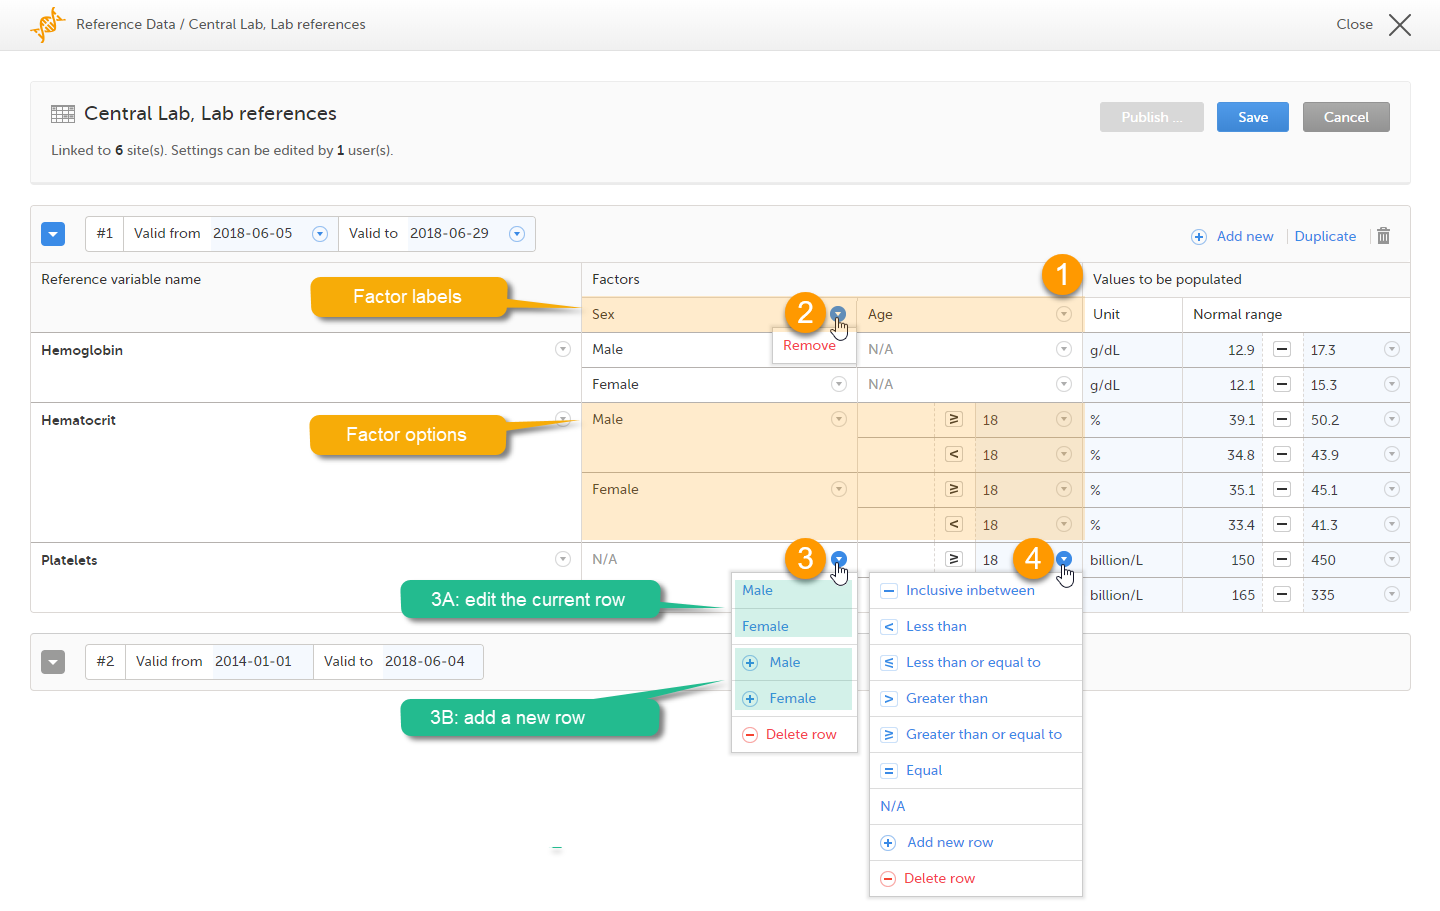
Note! If you would like to add the factor option N/A to a factor that also has other options, the option N/A should be the last entry for that variable in the table. The reason for this is that, while populating a form with reference data, the system is matching the factor options starting from the top of the table. If a match is found, the corresponding data are populated to the form. The option N/A is always a match. So if N/A is listed at the top of the table, the search will stop and the form will be populated with the data corresponding to N/A. If you want the system to match the other factor options first, these should be listed before N/A in the table.
When the reference data are published, they become available for auto population to the forms they are intended to be used in.
To populate a form with reference data, the Investigator/Study Nurse/site staff selects:
It is also possible that the event date is used instead of date and time of collection. In that case, the reference data populate after the source is selected.
Tip! If you do not want any reference data to be populated automatically, do not select a reference data source, but leave the drop-down list as Select a source. No automatic population of data will take place and you can fill in the fields manually.
Note! When populating numeric fields using functions and reference data, they automatically receive the number of decimals configured in the design.
Note! No reference data can be populated, if...
Note! You can only enter reference values when your role has permission to edit reference data.
To enter a new set of reference values:
| 1 | On the Viedoc landing page, select the Reference data icon. |
| 2 |
Select Open reference data editor for the reference data source-scope combination you would like to enter values into.
|
| 3 |
Select the date from which, and to which, this set of reference values is valid in the Valid to and Valid from fields. 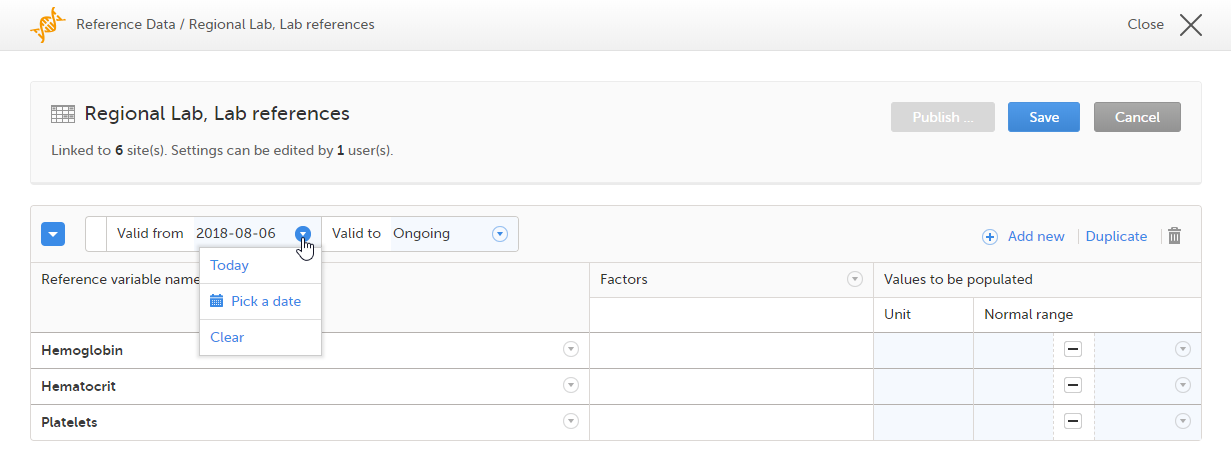
|
| 4 |
Select the arrow to the right of Factors and select the factors that should be included. 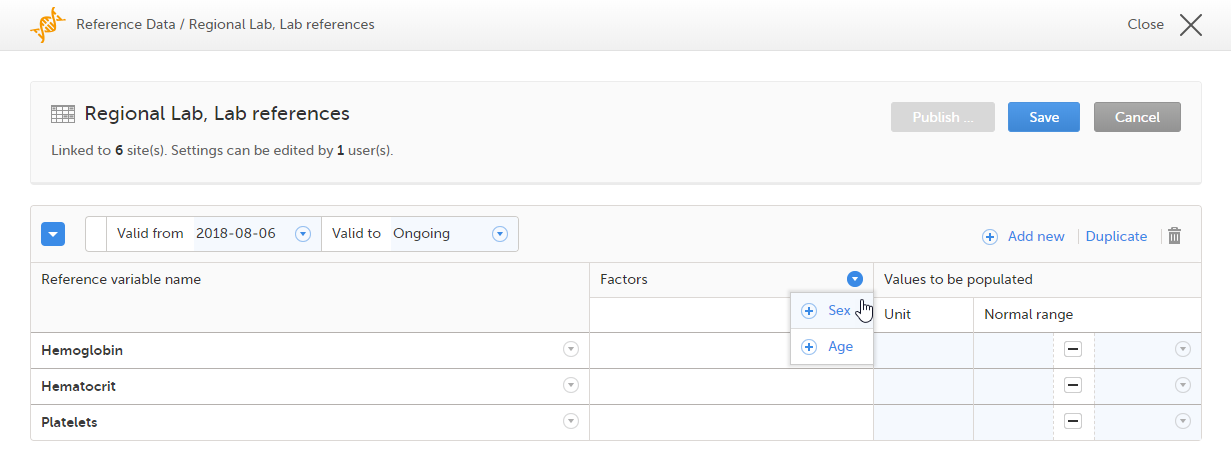
|
| 5 |
For every variable, and for every factor, select the arrow to the right of N/A and select the factor options that should be included. If the factor is a numeric range, select Set a value. By default, the inclusive in between option appears. 
If you would like to change the type of the range, select the arrow again and select the type of range you would like to include. If necessary, select Add new row to add rows. Manually enter the values of the range in the blue fields. 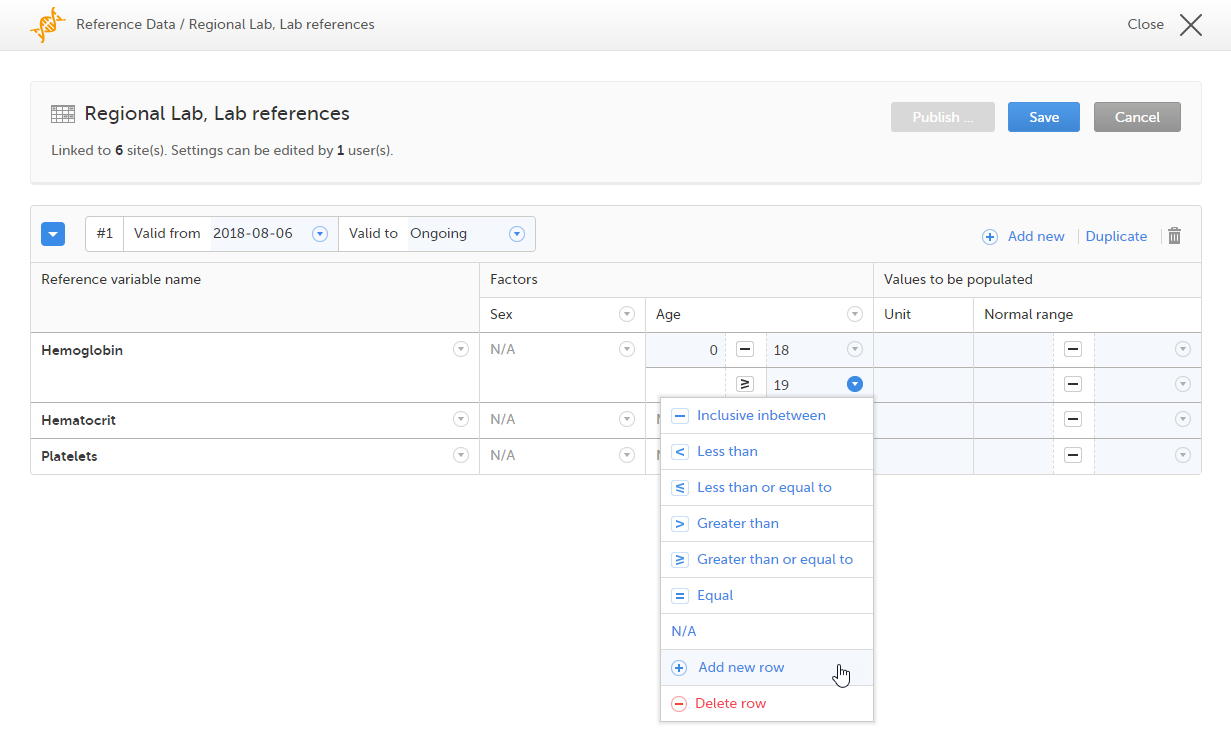
See also Factors for more information. |
| 6 | For every variable, and for every factor, enter the reference values that should be automatically populated to the forms. |
| 7 | Select Save to save the reference data. |
To publish reference data:
Note! You can only publish reference data when your role has permission to publish reference data.
| 1 |
Select Publish.
|
| 2 |
Enter a summary of the reference data updates in the field.
|
If the reference data scope is changed and published in Viedoc Designer after the reference values have been published in Viedoc Clinic, the following message will appear on the Reference data page.
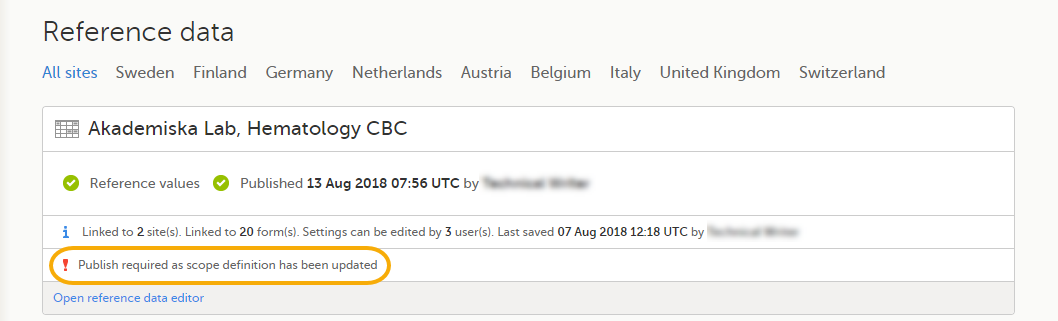
The reference date source-scope combination needs to be updated and published again in Viedoc Clinic, for the reference values to become available for auto-population to the subject forms.
If the reference values change for already populated data, the affected forms will be marked with a red issue icon [ i ].
Note! You can only edit data when your role has permission to edit reference data.
To edit a set of reference values:
| 1 | On the Viedoc landing page, select the Reference data icon. |
| 2 | Select Open reference data editor for the reference data source-reference data scope combination you would like to enter values into. |
| 3 | Edit the variables (see Variables), factors (see Factors), or the reference values. |
| 4 | Select Save to save the reference data. |
If the reference values change during a study for already populated data, ALL affected forms will be marked with a red issue icon [ i ], and a message is displayed on the top of the form as illustrated below:
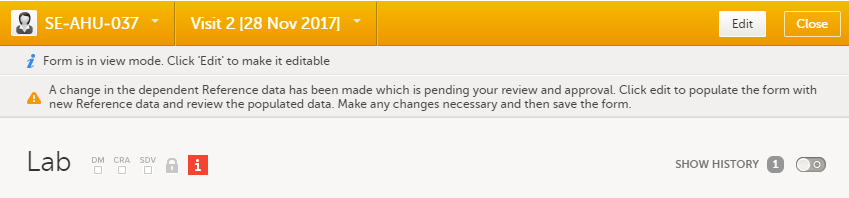
Note! To avoid all forms being marked with a red issue icon, you can follow the alternative procedure as described in the next section.
The affected forms are also listed on the Selection page, under the ISSUES view, being marked as Pending Reference data upgrade. For more details, see Selection page.
To make changes to a reference data set during a study and without causing all affected forms to get issues, you can create a copy of the existing reference data set and make the changes there.
To create a duplicate of your reference data set::
| 1 | Open the reference data editor. |
| 2 |
Select Duplicate. 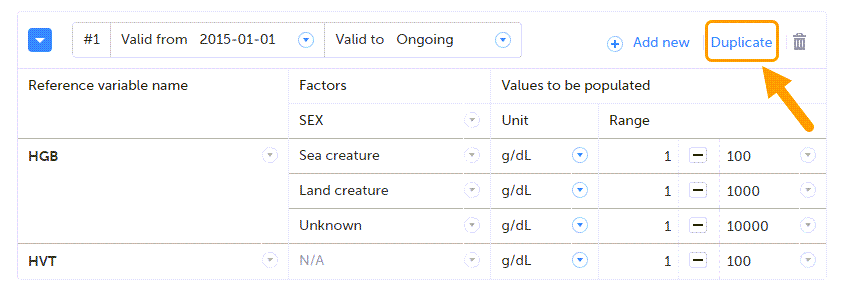
The original set is displayed at the bottom of the list and the new set at the top. |
| 3 | Make your changes in the new set. |
| 4 |
Set the dates for when you want the two sets to apply. Note! The stop date of the previous set cannot overlap the start date of the new set. It is recommended to make the new set start on the day after the old set ends. |
| 5 | Save the changes. |
| 6 | Select Publish... and write a note to the site staff, explaining what has been changed. |
| 7 |
Select Publish. |
Viedoc supports forms containing repeating item groups when using reference data values. The values of items in repeating item groups are defined in the reference data editor, according to the reference data scope specified in the study design.
Data configured in the reference data editor is displayed in the referenced form once the appropriate scope is selected.
When you add a new repeating instance to a form, their values are automatically populated based on the currently published reference data scope:
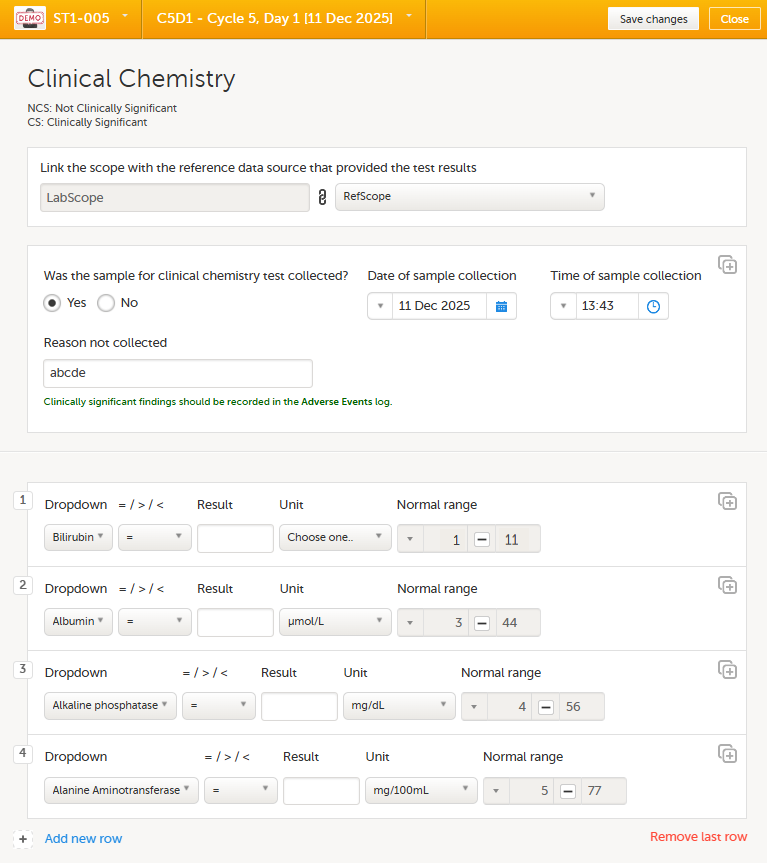
For more information on repeating item groups, see Entering/Editing data.
When publishing a new reference data scope with updated values, the corresponding form is marked as Update Pending.
If randomization and allocation are used in your study, some specific forms are used for randomization and allocation, that have a specific behaviour compared to the other forms. This lesson describes the particularities of the randomization and allocation forms and how to work with these.
It is important to know that the randomization form will be locked after the randomization was performed, so the form won't be possible to edit.
An example of a simple randomization form:
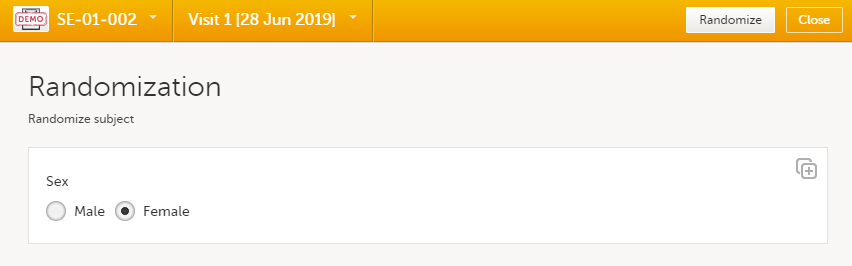 You can notice that, compared to the other forms, here the Edit option is replaced by the Randomize (or something else, depending on the configurations in your study).
Note! If the randomization is configured for the study start event, there is no Randomize button. Instead, the randomization happens when saving the form.
To randomize the subject, click Randomize. The randomization is performed and the form is locked:

In case of any medical emergency or serious medical condition that occurs while the participant is taking part in a study, the participant may not be able to be treated adequately unless it becomes known which treatment they have been receiving. In such situations, unblinding may become necessary.
| Important! Unblinding a subject will reveal the subject's treatment and unblind all personnel with permission to view this data in the study. |
If you have permission to perform an emergency unblinding, the Unblind subject appears on the randomization form, after the subject was randomized:

To unblind a subject:
| 1 | Click Unblind subject: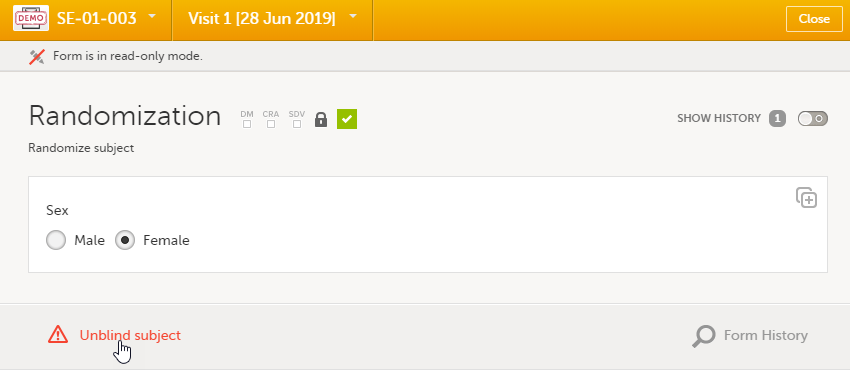 The Unblind subject pop-up will be displayed. The Unblind subject pop-up will be displayed. |
| 2 | Type the reason for unblinding and select Continue. |
| 3 |
Enter your password and select Confirm. The treatment is now visible in the randomization form for the unblinded subject, for all the roles with permission to view the data: |
If configured for your study, allocation can be performed additionally to the randomization. This can be performed within the same form as the randomization or in a separate allocation form.
It is important to know that the allocation form will be locked after the allocation is performed, so the form won't be possible to edit. Still, the following actions can be performed after the allocation:
An example of an allocation form:
 To perform the allocation for the first time to a subject, click Allocate (or something else, depending on the configurations in your study). The allocation is performed and the form is locked:
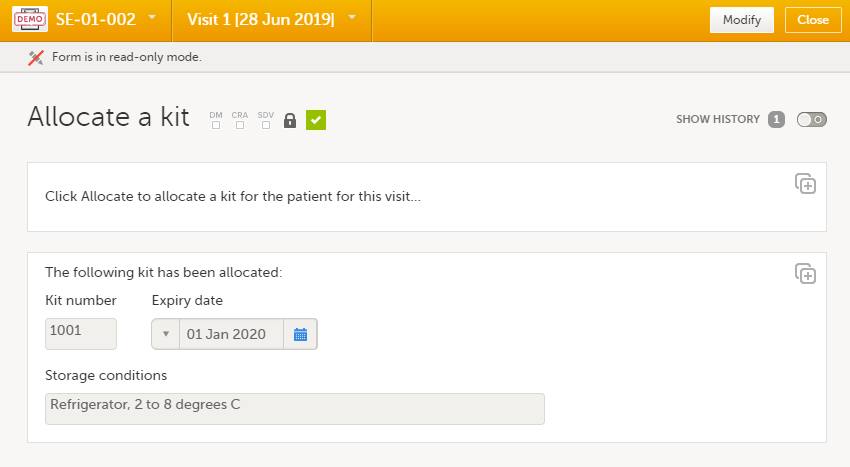
The action is registered in the audit trailed as Initial data entry and a new version of the form PDF is generated (see Allocation actions in audit trail).
Note! To perform an allocation after the existing allocation was undone, see Undo allocation.
To undo an existing allocation:
| 1 | Open the allocation form and click Modify. A pop-up is displayed: |
| 2 | Select Undo allocation. |
| 3 | If multiple allocations are performed within the same form, select from the dropdown list the allocation you want to undo under Select allocation: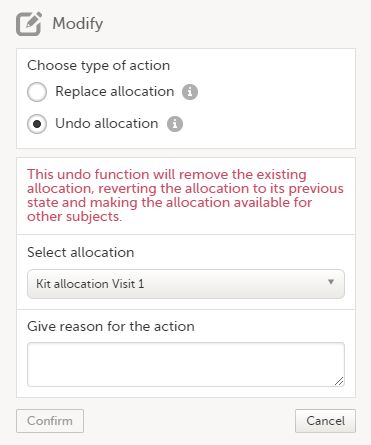 |
| 4 |
Type the reason for undoing the allocation (this text will be shown in the audit trail afterwards, see Allocation actions in audit trail) and select Confirm: The allocation is undone and a message is displayed on the top of the form: This will remove the existing allocation by reverting the allocation to its previous state and making the previously allocated kit available for other subjects. A new version of the form PDF is generated (see Allocation actions in audit trail). A new allocation can be performed for the subject, as described below. |
To perform a new allocation, for a subject for which a previous allocation was undone:
| 1 | Select Modify on the allocation form for a subject for which the previous allocation was undone: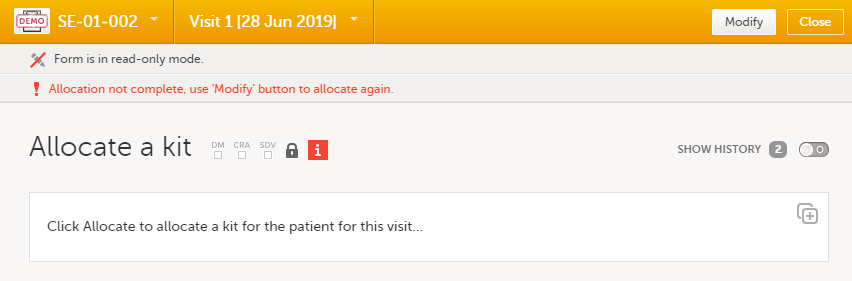
The Modify pop-up is displayed: 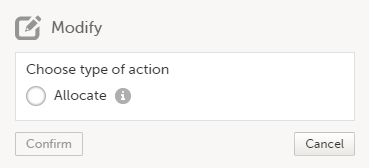
|
| 2 | Select Allocate. If multiple allocations are performed within the same form, select from the dropdown list the allocation to be performed, enter the reason (this text will be shown in the audit trail afterwards, see Allocation actions in audit trail) and select Confirm: |
| 3 | The allocation is performed and the form is locked: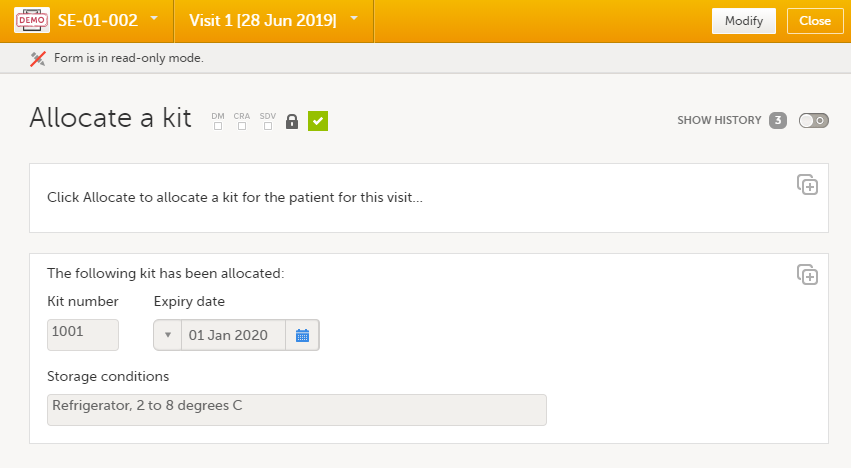
A new version of the form PDF is generated (see Allocation actions in audit trail). |
To replace an existing allocation with a new one, that is, to assign a new kit to a subject:
| 1 | Open the allocation form and select Modify: |
| 2 |
Select Replace allocation. If multiple allocations are performed within the same form, select from the dropdown list the allocation to be replaced, enter the reason (this text will be shown in the audit trail afterwards, see Allocation actions in audit trail) and click Confirm: A new allocation is performed: |
All the actions performed on allocation are recorded in the audit trail as follows:

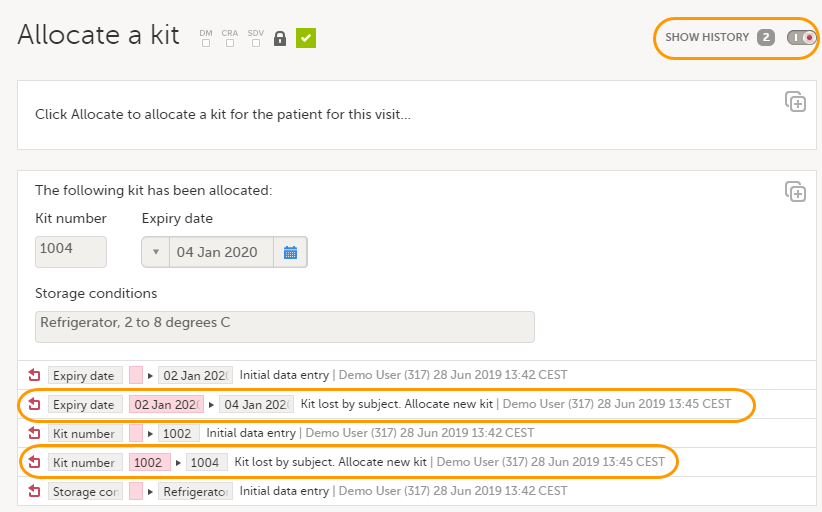
The allocation actions performed within a form are also shown in the Form History:
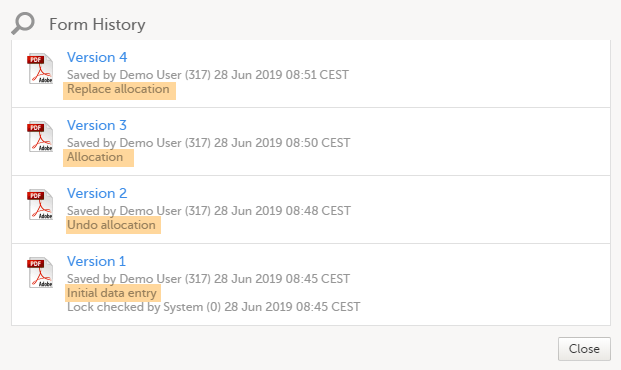
Changes to the electronic Case Report Form (eCRF) can occur during the course of a study. Normally this is due to an amendment. The definition of an amendment is that it is a change in the protocol from a specific time-point. This means that already saved forms and events should not be affected by the amendment.
Sometimes there is however a need to change the structure/content of already saved forms and events, for example when there is an error in the configuration (a missed question, a spelling error, and so on). For these changes to be applied on already saved data, a confirmation is needed from the site staff.
Whenever there is a change to the structure of the form(s), a message will appear on the study start page, in the Messages pane on the right side, for the site to acknowledge:
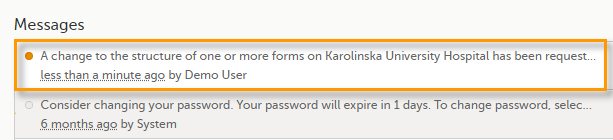
By clicking on the message, a detailed text is shown, that summarizes the changes to the eCRF as entered by the Study Manager.
An approval is needed before the saved forms will be upgraded to the new version, for those types of changes that potentially affect data integrity, such as form names, field labels, instructions text, and so on.
The changes that do not affect data integrity, such as field length, number of decimals, and so on, are automatically applied and the confirmation from the site staff is not required.
The forms affected by the upgrade are marked with an issue flag (the red [ i ] icon). A summary of the affected forms can be viewed in the Selection page, by selecting the ISSUES view and filtering from the drop-down list in the upper right corner by Form upgrade pending:
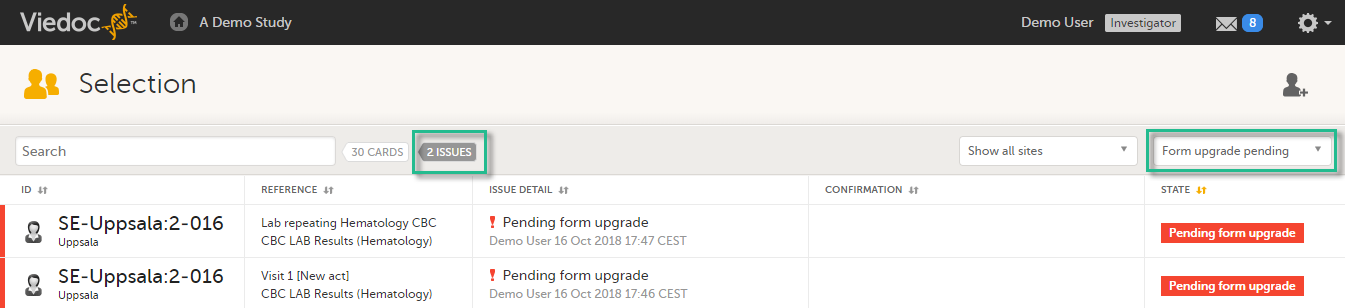
By clicking on each of the forms in the list, the respective form is open, highlighting that a change to the structure of the form was performed and you need to edit the form to load the new structure and review the data:
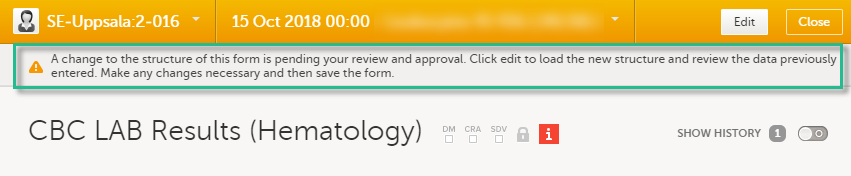
It is also possible to batch approve all affected forms at once by typing in your password and clicking Confirm in the upgrade message pane:
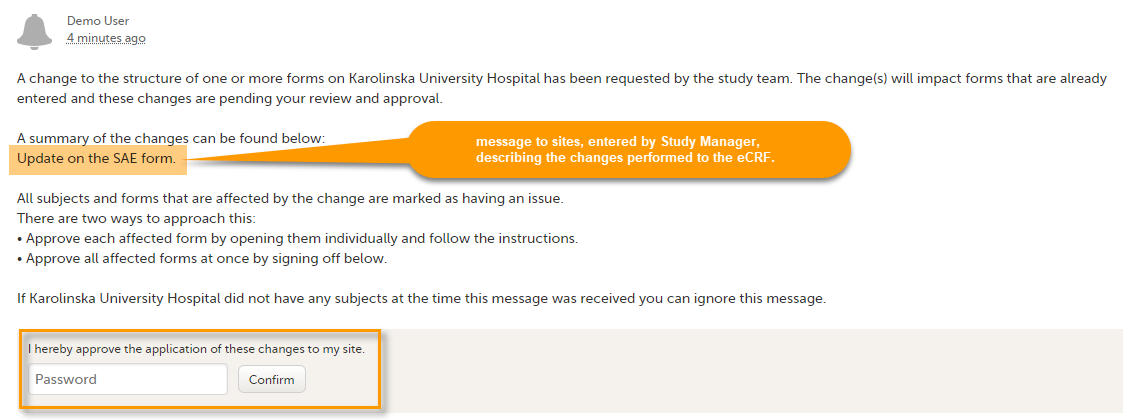
A recommended approach is to manually upgrade a few forms to fully understand the potential impact of the upgrade and then upgrade the rest using the batch approval feature.
| Important! If a change is applied before previous one(s) being approved, then the approval will upgrade affected forms to the latest applied version, regardless which of the upgrades the site user approves, and regardless of the approval method (described above) used. |
If no confirmation is given:
Any site user with data edit permission can approve the changes. Once confirmed, the date and name of the user who approved will be displayed in the message.
|
Important! The upgrade is not being performed for:
If performing batch approval and forms affected by the upgrade are skipped, as a result of one of the above mentioned scenarios, a new message will be displayed in the Message pane. The changes can then be approved after a user with permission unlocks the locked forms. |
Note! When editing this lesson, check if the corresponding edits are also needed in the PMS User Guide for Clinic Side Users>Issues and Tasks in a PMS Study.
The Selection page displays all subjects from all sites you have access to. Each subject is represented by a subject card.
In the upper-right corner of each subject card, orange and red icons are displayed when there are issues (such as queries) and tasks to be solved/completed for that subject. These icons help you to identify where actions are needed.
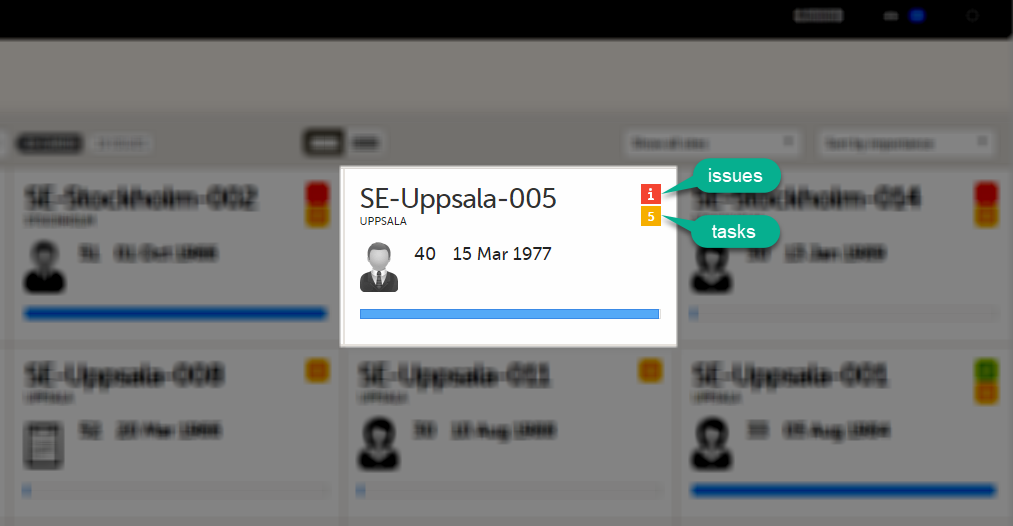
All issues and tasks should eventually disappear but when present they help you identify where action is needed.
Note! The issue list will not be visible for sites that have more than 1000 subjects.
It is possible to switch between the views showing Cards/Issues/Viedoc Me/Events by selecting the dropdown list next to Selection.
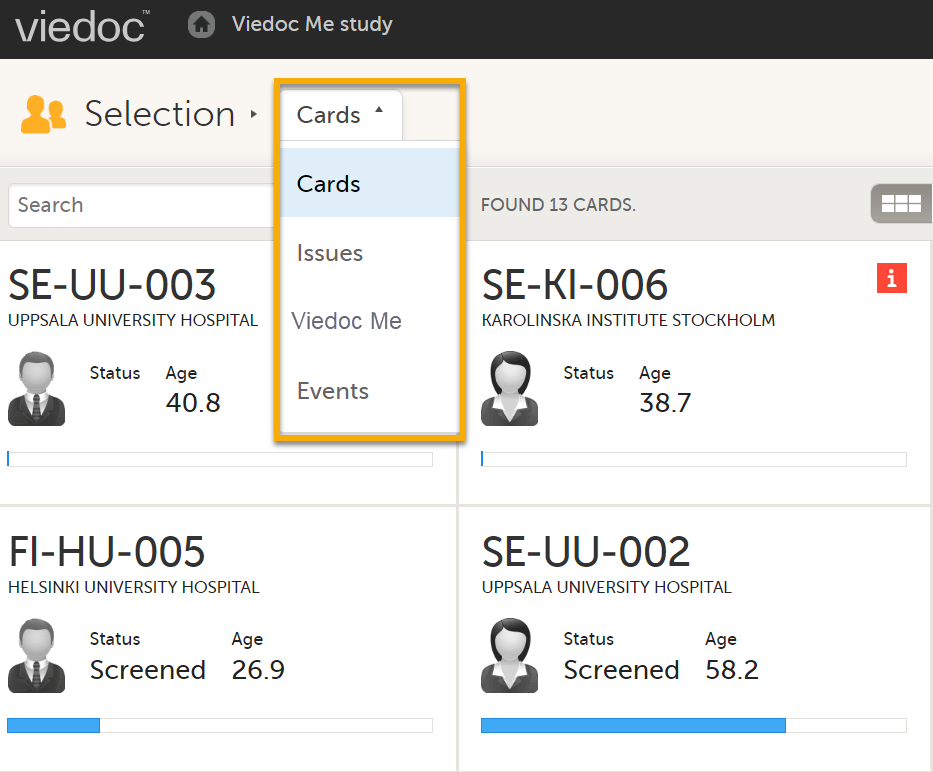
The ISSUES view displays the list of existing issues.
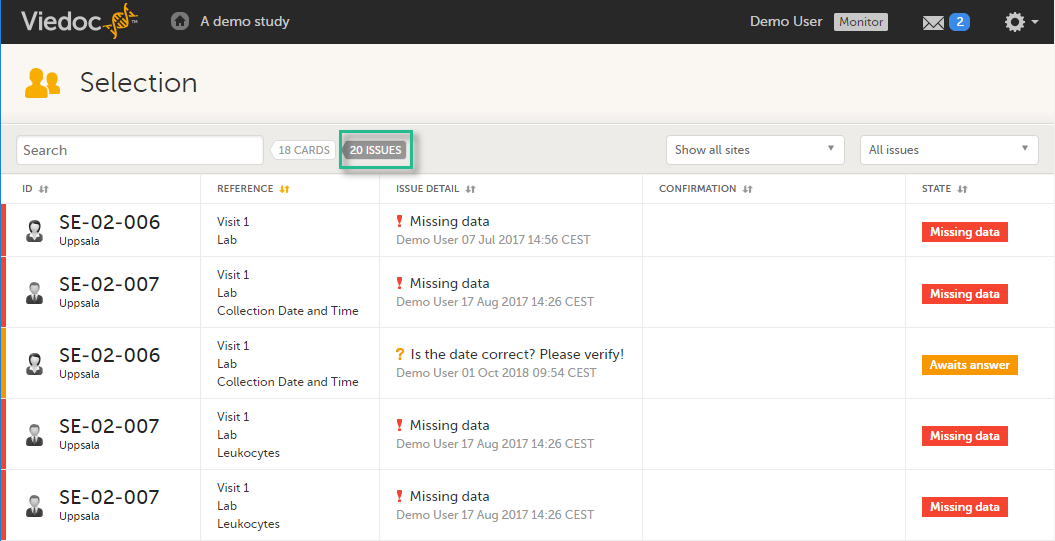
Select any row to open the form where the issue has been raised. If you close the form, you will return to this issue list again.
The list of issues can be filtered by using the dropdown lists on the upper-right of the page. You can filter the issues:
As soon as data has been entered, the orange task icon appears, indicating that there is data ready for review, or queries answers to be approved (see Raising/Approving/Rejecting Queries). The number of tasks is displayed. If there are more than nine tasks to be performed on a booklet or form, +9 will be displayed in the icon. Tasks should be handled continuously throughout the study to make sure data at all times is as clean and accurate as possible.
Tasks are tracked on three levels:
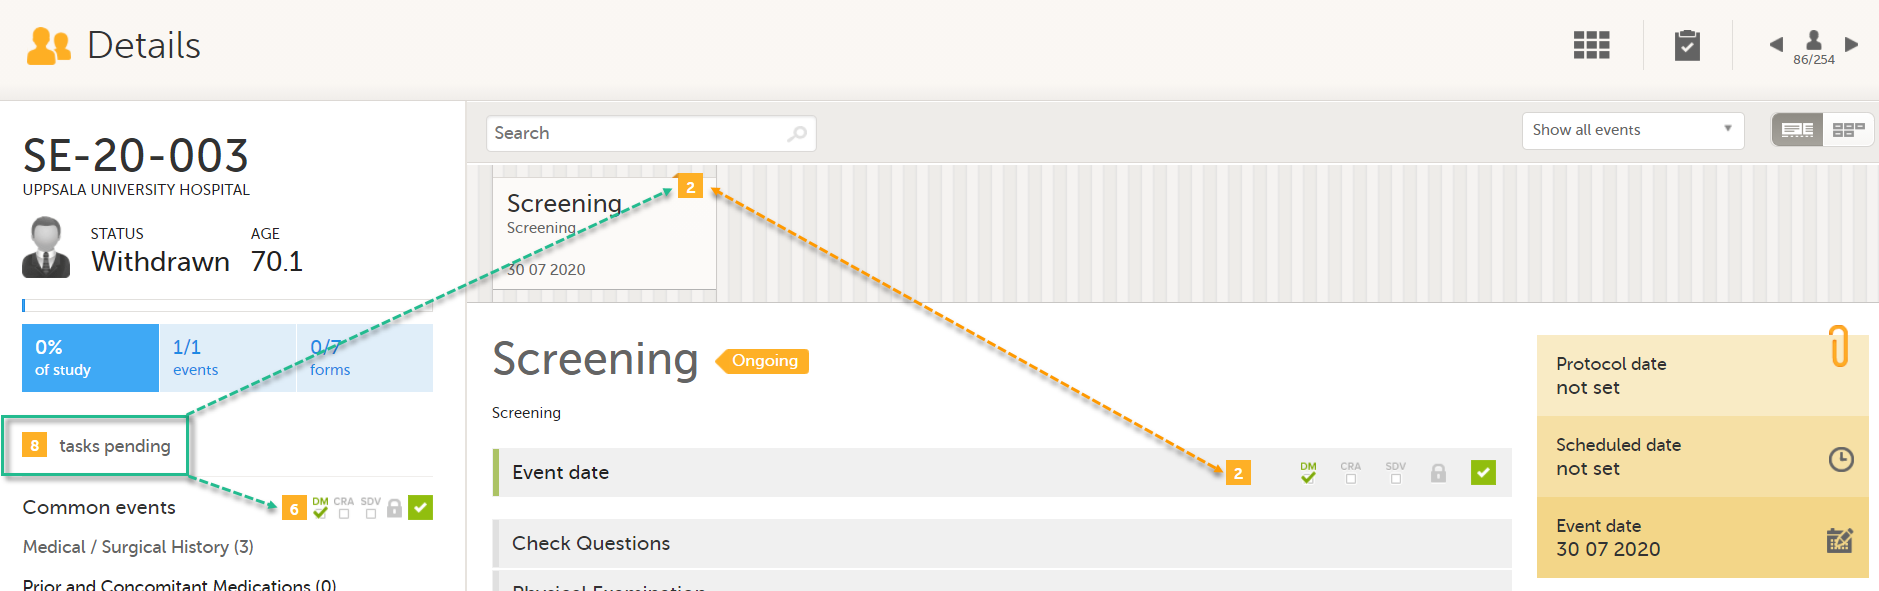
As soon as a task is completed, it will disappear from the views.
Note! If Role based queries is enabled for your study, the task counter includes only the queries raised by the same role, that is, the ones that the active user role can take action on.
Note that much of the information in this lesson is the same as in the lesson Data review and Lock.
The requirements on data review and Source Data Verification (SDV) vary between studies. This lesson describes what is possible in Viedoc.
In this example, clinical review and SDV are tasks to be completed. The number of tasks to be completed is displayed in the orange task icon:
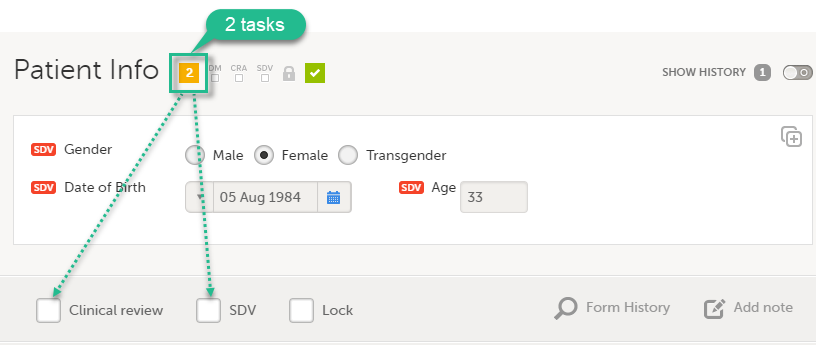
The orange task icon disappears when the checkboxes for clinical review and SDV are selected and the tasks are completed.
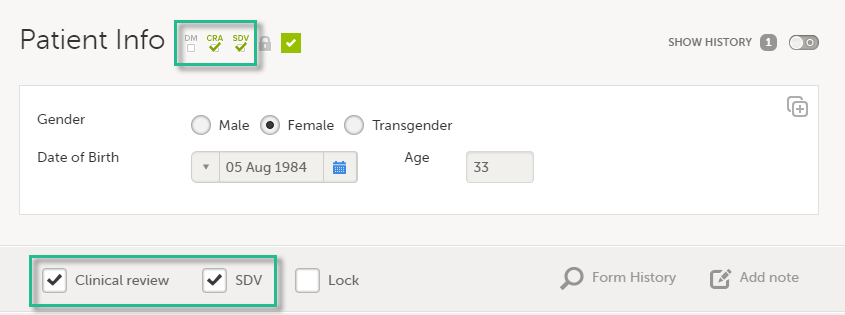
Note! If a user with edit permission is editing the subject card, you can still perform the clinical review and the SDV. And vice versa, the clinical review and SDV will not lock the subject for users who need to edit it.
The purpose of clinical review is to give the Monitor the possibility to mark forms as reviewed.
Marking a form as clinical reviewed can be performed in one of the following ways:
Marking a form as reviewed does not mean that you are on-site having access to source data. It means that you have done a clinical review off-site of the content in the forms, and that you are prepared for your upcoming monitoring visit.
Note! If a form is edited after you have marked it as clinical reviewed, the review status breaks and the form must be reviewed again. The review task appears again in the orange task box icon.
Source data verification is normally the most time-consuming activity for the Clinical Research Associate (CRA), as it requires access to source notes. All forms that require SDV are highlighted with task(s).
SDV can be performed in one of the following ways:
Note! If a form is edited after you have marked it as SDV, and the update affects any item that requires SDV, the SDV status is reset, and the form and the form must be marked as SDV again. The SDV task appears again in the orange task box icon. However, only the fields that were changed on the form are required to be SDV'ed again. These fields are clearly indicated with the red SDV icon.
If the study has the setting for item-level SDV enabled, SDV can be performed for individual items in a form.
If the study design specifies that an item requires SDV, there will be an SDV icon next to the item in the form. The red icon indicates that SDV has not been performed. To perform SDV, simply click on the red icon. The icon then turns into a green SDV icon.
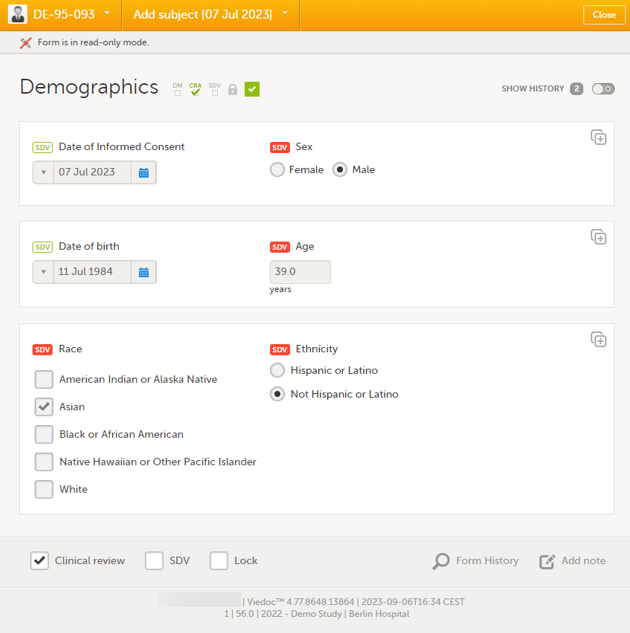
When all visible items that require SDV have been SDV'ed, the SDV checkbox at the bottom of the form will be automatically selected. And vice versa, if you select the SDV checkbox at the bottom of the form, all visible items that require SDV will be indicated with a green SDV icon.
Notes!
Locking data in a form can be performed in one of the following ways:
Locking a form should only be performed if there are no more expected changes to that form, that is, if the data is clean.
| Important! Updates to the electronic Case Report Form (eCRF) are not applied to locked forms. If you are aware of any upcoming changes to the eCRF that potentially affect already saved and locked forms, make sure that these are unlocked before the new design version is published to the site. |
If all forms in all events for a subject have been locked, the subject card on the Selection page will be displayed with a lock icon, indicating all data is locked:

Regular clinic forms can be unlocked by clearing the Lock checkbox at the bottom of a form. Unlocking a form opens it up for editing by users with edit data permission (for example the Investigator).
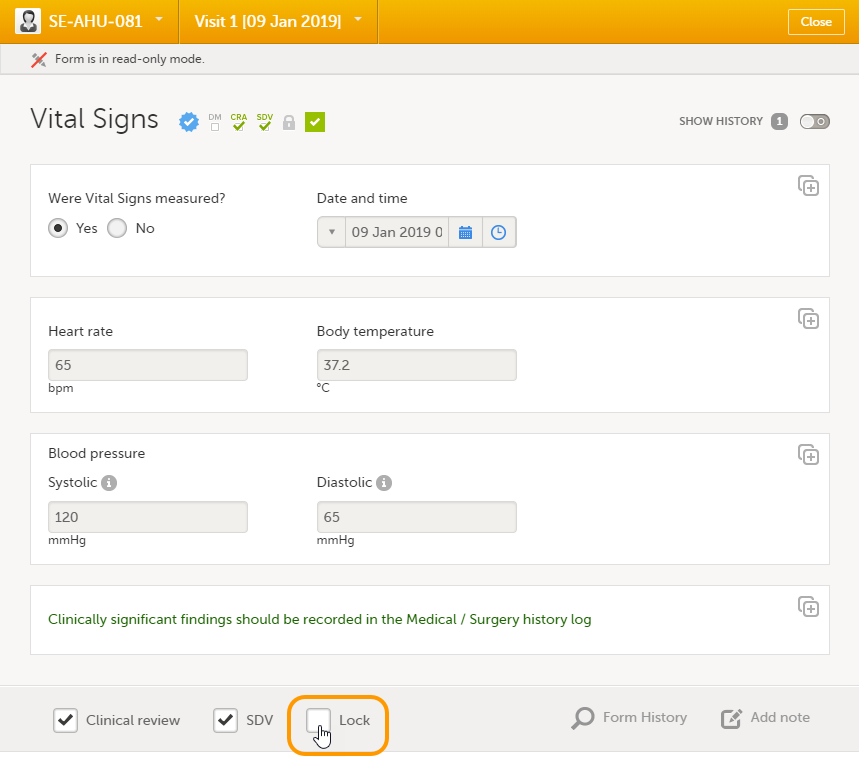
Subject-submitted (Viedoc Me) forms that are filled in by the subject are locked by default.
You may have the possibility to unlock a subject-submitted form if this option is activated for your study. In this case, the Lock checkbox appears at the bottom of the subject-submitted form. The form can be locked or unlocked by selecting or clearing the checkbox respectively. Unlocking a form opens it up for editing by users with edit data permission (for example the Investigator).
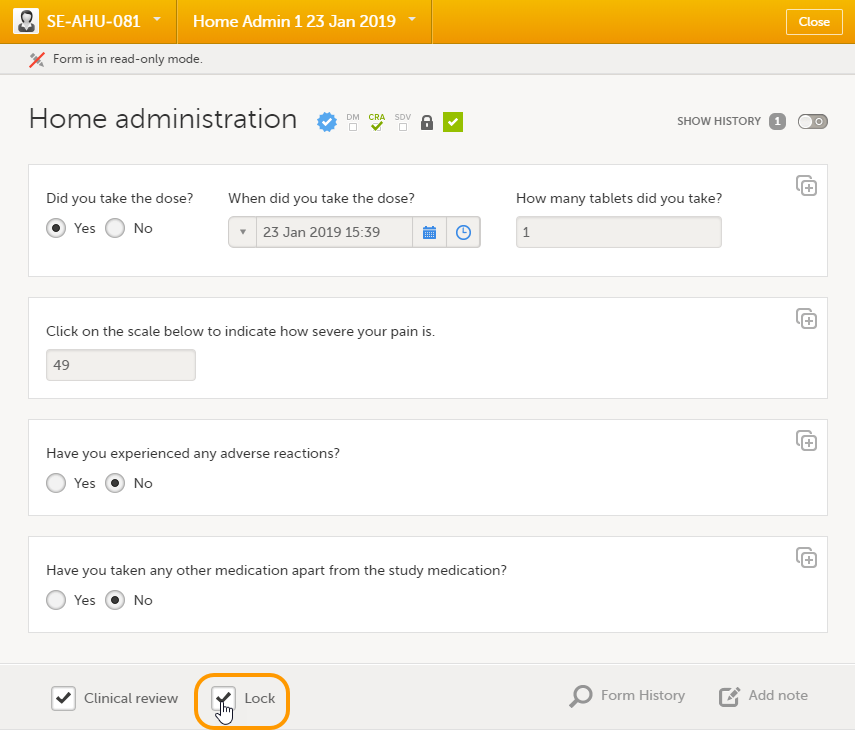
You can perform clinical review, SDV, and/or lock of the forms batch-wise, by using the data review console. To open the data review console, click the icon in the top right corner of the Details page.
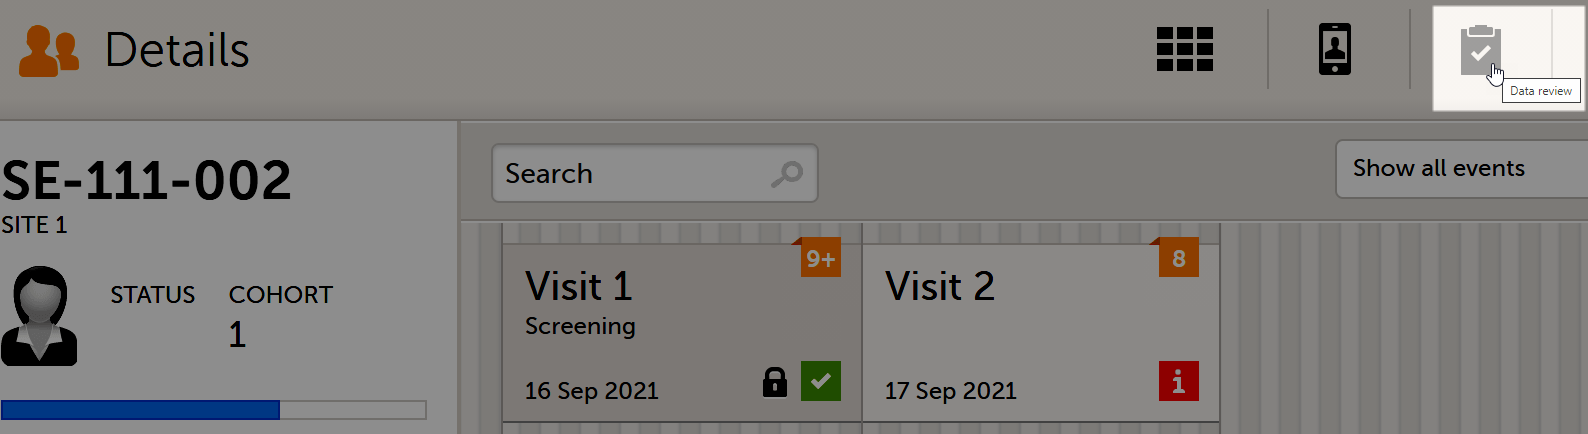
The data review console displays an overview of all forms of a subject that require data review, SDV, or lock. It shows which forms have been reviewed, SDV'ed, or locked. The green and grey eye icons help you identifying forms that you have not previously visited: the green eye icon marks the forms that you have already visited, the grey eye icon marks the forms that you have not visited yet.
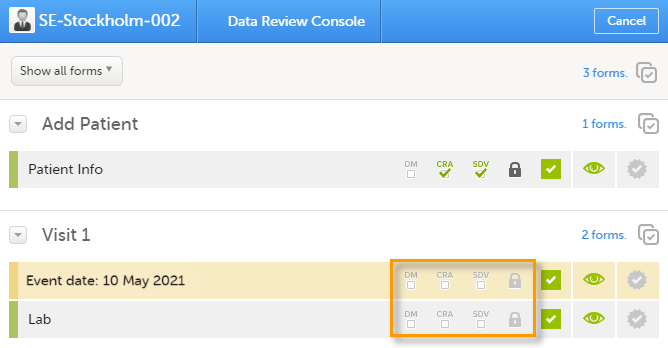
To review and/or lock the forms:
| 1 |
Select the form(s) to be reviewed in one of the following ways:
|
| 2 |
In the dialog that opens, select Clinical review, SDV, Lock as needed, and click Ready: The status of the selected forms is updated according to the selected actions. |
If any of the marked forms have not been visited by you before, you will be asked whether you want to continue with the action or not. If you choose to continue, the forms will be marked according to your selections, that is, the system will not prevent you from marking unvisited forms as reviewed, SDV'ed, or locked.
Note! If the study has the setting for item-level SDV enabled, and a form contains items that require SDV but are not visible to you, you will not be able to change the SDV status for the entire form.
The current workload can be checked on the Study status or the Metrics pages.
Note that much of the information in this lesson is the same as in the lesson Clinical review, SDV, and Lock.
The requirements on data review and source data verification vary between studies. This lesson describes what is possible in Viedoc.
If applicable for your study, data review is a task to be completed. The number of tasks to be completed is displayed in the orange task icon:
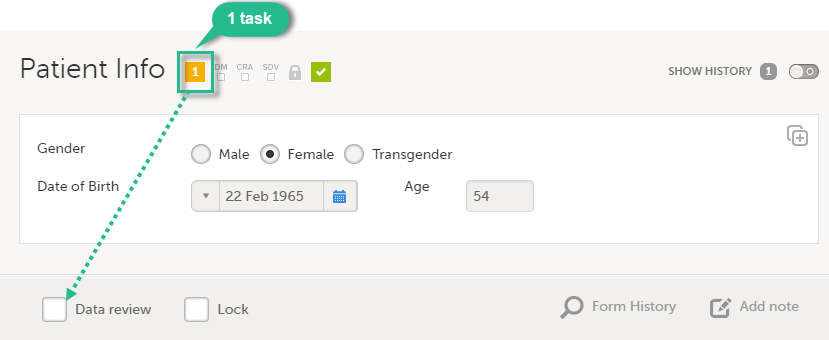
The orange task icon disappears when the checkboxes for clinical review and Source Data Verification (SDV) are selected and the task is completed.
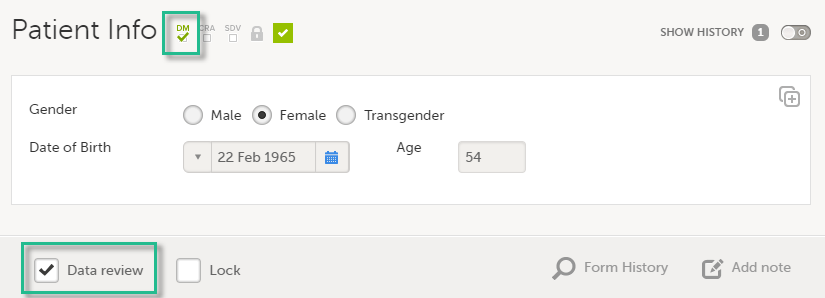
Note! If a user with edit permission is editing the subject card, you can still perform the clinical review and the SDV. And vice versa, the clinical review and the SDV will not lock the subject for users who need to edit it.
The purpose of data review is to give the Data Manager the possibility to mark forms as reviewed.
Marking a form as data reviewed can be performed in one of the following ways:
Note! If a form is edited after you have marked it as data reviewed, the review status breaks and the form must be reviewed again. The review task appears again in the orange task box icon.
Locking data in a form can be performed in one of the following ways:
Locking a form should only be performed if there are no more expected changes to that form; that is, if the data is clean.
| Important! Updates to the electronic Case Report Form (eCRF) are not applied to locked forms. If you are aware of any upcoming changes to the eCRF that potentially affect already saved and locked forms, make sure that these are unlocked before the new design version is published to the site. |
If all forms in all events for a subject have been locked, the subject card on the Selection page will be displayed with a lock icon, indicating all data is locked:
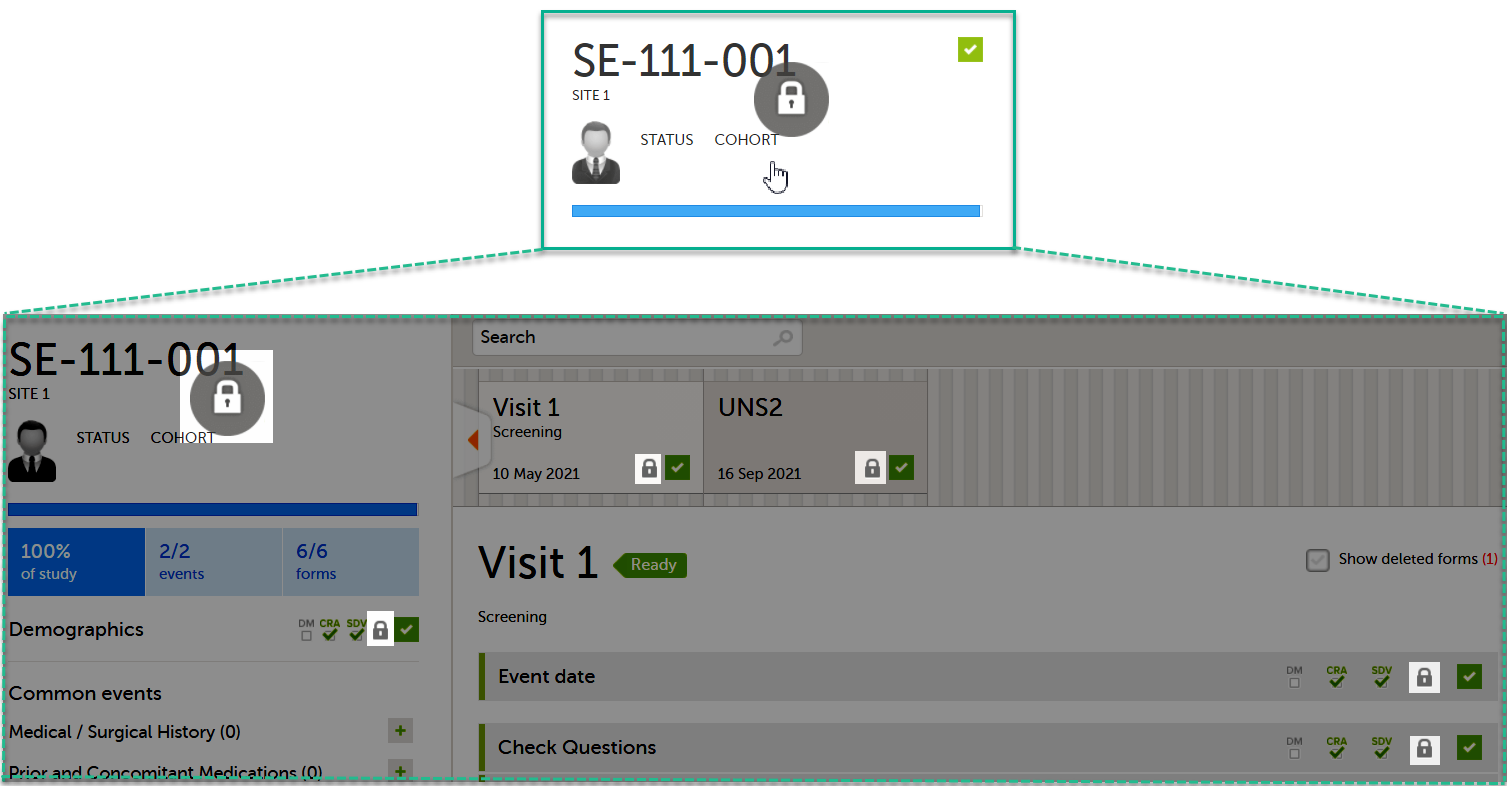
Regular clinic forms can be unlocked by clearing the Lock checkbox at the bottom of a form. Unlocking a form opens it up for editing by users with edit data permission (for example the Investigator).
Subject-submitted (Viedoc Me) forms that are filled in by the subject are locked by default.
You may have the possibility to unlock a subject-submitted form if this option is activated for your study. In this case, the Lock checkbox appears at the bottom of the subject-submitted form. The form can be locked or unlocked by selecting or clearing the checkbox respectively. Unlocking a form opens it up for editing by users with edit data permission (for example the Investigator).
You can perform data review and lock of the forms batch-wise, by using the data review console. To open the data review console, click the icon in the top right corner of the Details page.

The data review console displays an overview of all forms of a subject that require data review, SDV or lock. It shows which forms have been reviewed, SDV'ed or locked. The green and grey eye icons help you identify which forms you have visited (the most recent version of the form): the green eye icon means that you have visited the last version of the form, the grey eye icon means that you have not visited the latest version of the form.
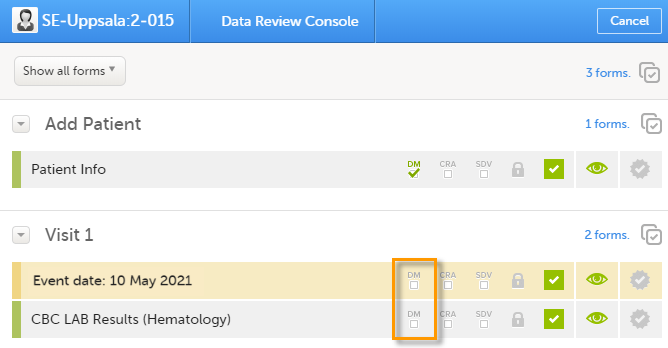
To review and/or lock the forms:
| 1 |
Select the form(s) to be reviewed in one of the following ways:
|
|
| 2 |
In the pop-up that opens, mark with Data review and/or Lock as needed, and click Ready:
|
If any of the marked forms have not been visited by you before, you will be asked whether you want to continue with the action or not. If you choose to continue, the forms will be marked according to your selections, that is, the system will not prevent you from marking unvisited forms as reviewed or locked.
Note! If the study has the setting for item-level SDV enabled, and a form contains items that require SDV but are not visible to you, you will not be able to change the SDV status for the entire form.
The current workload can be checked on the Study status or the Metrics pages.
A query is a question about data. In Viedoc, queries can be raised:
Note! All the related queries are automatically closed, when:
In case of a validation query, when this is resolved by data edit, it is automatically closed. See Validation queries.
Resolving a query always breaks the form signature, even if there are no data changes involved.
A summary of the number of queries is displayed on the study start page, as illustrated below.
Note! This is a summary of the whole study and it does not take into consideration the role visibility conditions.
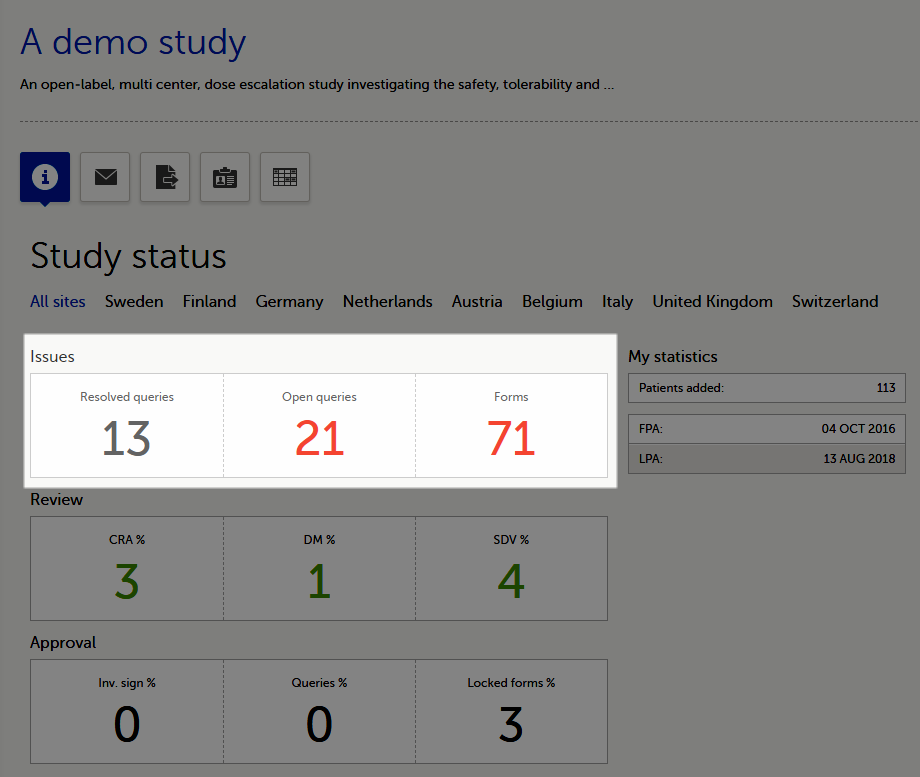
A query is raised in a form field. After a query is raised, the respective form is marked with the red issue icon i:

| Important! For all new studies started after release 4.80, the default setting Enable role-based queries is selected. For studies started before release 4.80, the default setting Enable role-based queries is cleared. For studies started before Viedoc release 4.80, all query actions will still work as usual until role-based queries is enabled. |
When the role-based queries option is enabled for your study, it restricts, at study level, the approval of the query resolution to the same user role who raised the query.
Notes!
For more information, see the eLearning lesson on Role-based queries.
Viedoc Clinic users with permission to raise queries/pre-queries, can manually add a query to any field value.
Manually raised queries can be:
Viedoc offers support for query review, that is, to review a query before it is released to the site. This is done through pre-queries.
The pre-query process can involve either two or three roles, as follows:
An unlimited number of pre-queries can be added on the same field at the same time.
The following image illustrates the main actions that can be performed on a pre-query and all the states the pre-query goes through before it is released as a query:
1. The pre-query is added by the user with permission to add pre-queries, typically the Data Manager.
As a result, a pre-query is raised, becoming visible for the Viedoc Clinic user with permission to promote pre-queries, typically the Monitor.
2. The raised pre-query can be removed, for example if it is invalid or added by mistake.
3. The raised pre-query is promoted or rejected by the Viedoc Clinic user with permission to promote pre-queries, typically the Monitor.
4. The promoted pre-query is released by the Viedoc Clinic user with permission to add queries (typically the Monitor), becoming a raised query that is visible for the Viedoc Clinic user with permission to add/update query answers (typically the Investigator), who will be responsible for resolving the query, as described in Queries.
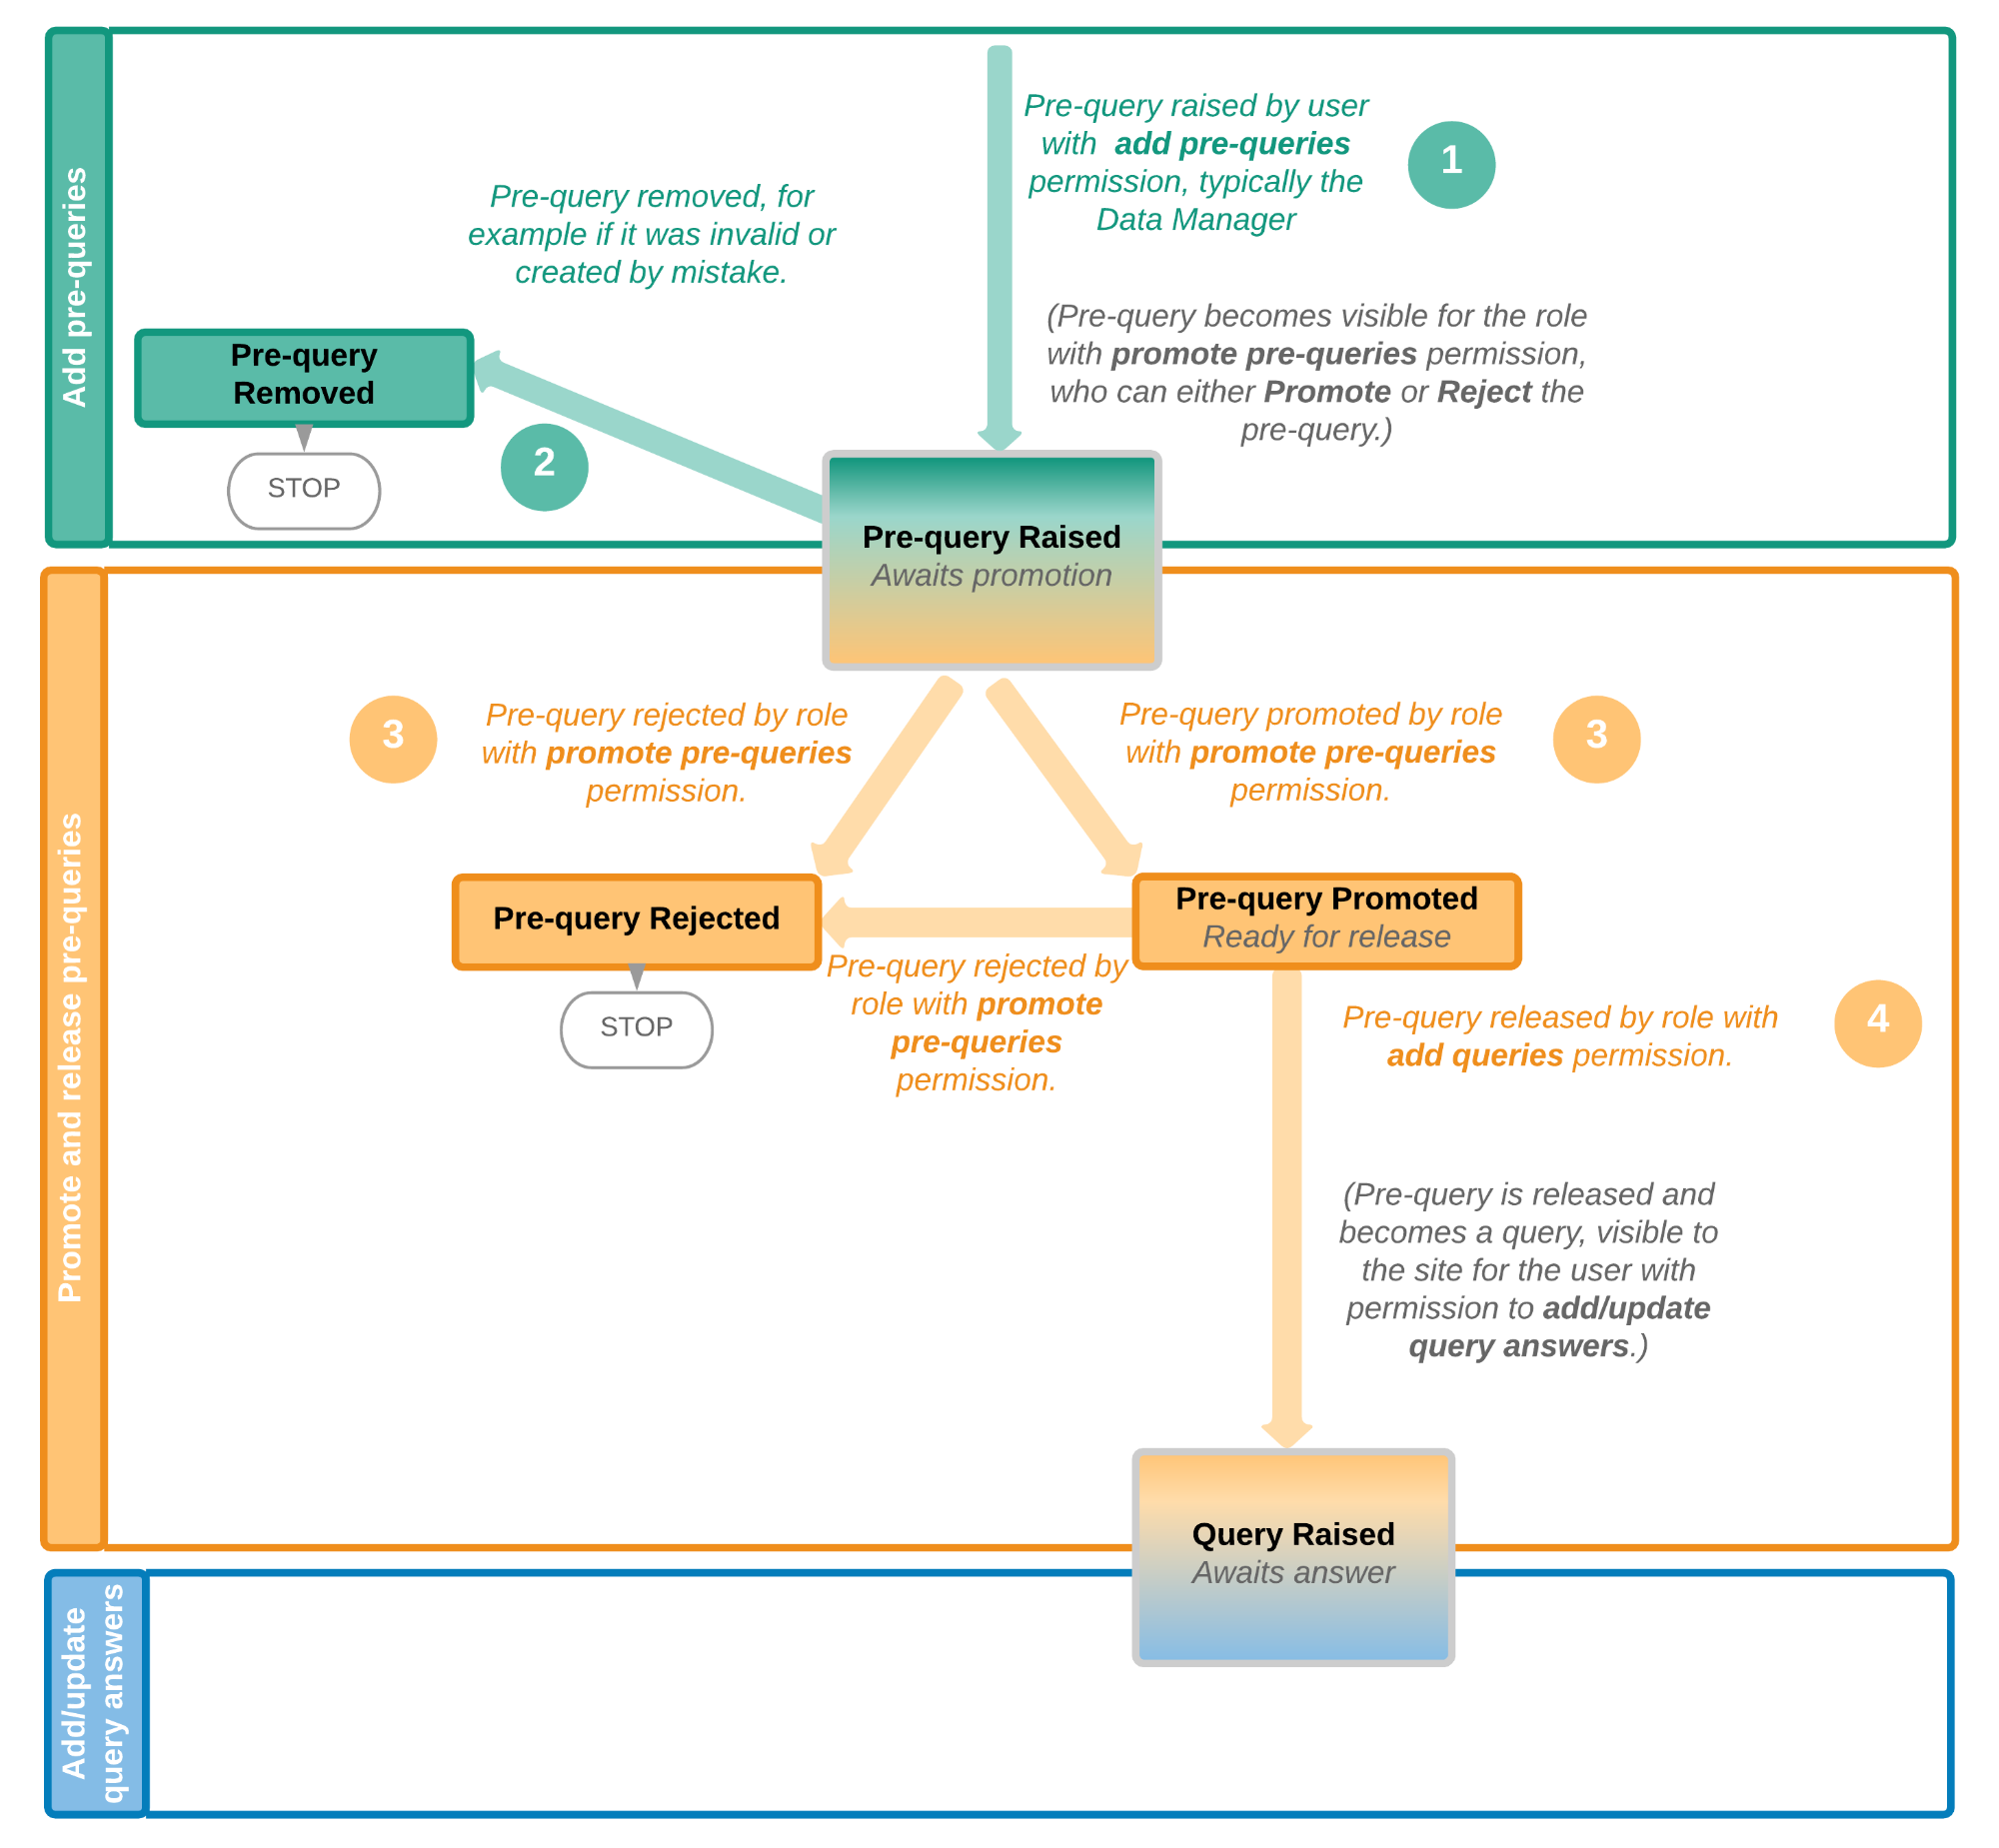
The table below summarizes the different states of a pre-query in Viedoc Clinic, in the export output (Excel/Operational Data Model (ODM), as well as the possible actions that can be performed on a pre-query and the state this will transition to.
| In Viedoc Clinic | In export output | through... | becomes... |
|---|---|---|---|
| Awaits promotion | PrequeryRaised | Promote pre-query (by Monitor) | PrequeryPromoted (Ready for release) |
| Reject pre-query (by Monitor) | PrequeryRejected (Rejected) | ||
| Ready for release | PrequeryPromoted | Release pre-query (by Monitor) | QueryRaised (Awaits answer) |
| Reject pre-query (by Monitor) | PrequeryRejected (Rejected) | ||
| Rejected | PrequeryRejected | N/A. No action can be performed on a rejected pre-query. | N/A. Final state |
| Removed | PrequeryRemoved | N/A. No action can be performed on a removed pre-query. | N/A. Final state |
The query process involves two different roles with different permissions in handling queries:
A query is raised in Viedoc either when a query is manually added or when a pre-query is released.
An unlimited number of queries can be added on the same item at the same time.
The following image illustrates the main actions that can be performed on a query and all the states it goes through:
1. A query is raised through one of the following:
2. A raised query can be removed, for example if it is invalid or added by mistake.
3.a. The user with permission to add/update subject/event/form data and query answers, typically the Investigator, resolves the query by one of the following:
3.b. When confirming data as missing, typically by the Investigator, this becomes a resolved query that awaits approval. This type of query can only be approved at step 4 below.
4. The user with permission to add/change queries can:
See also Query states.
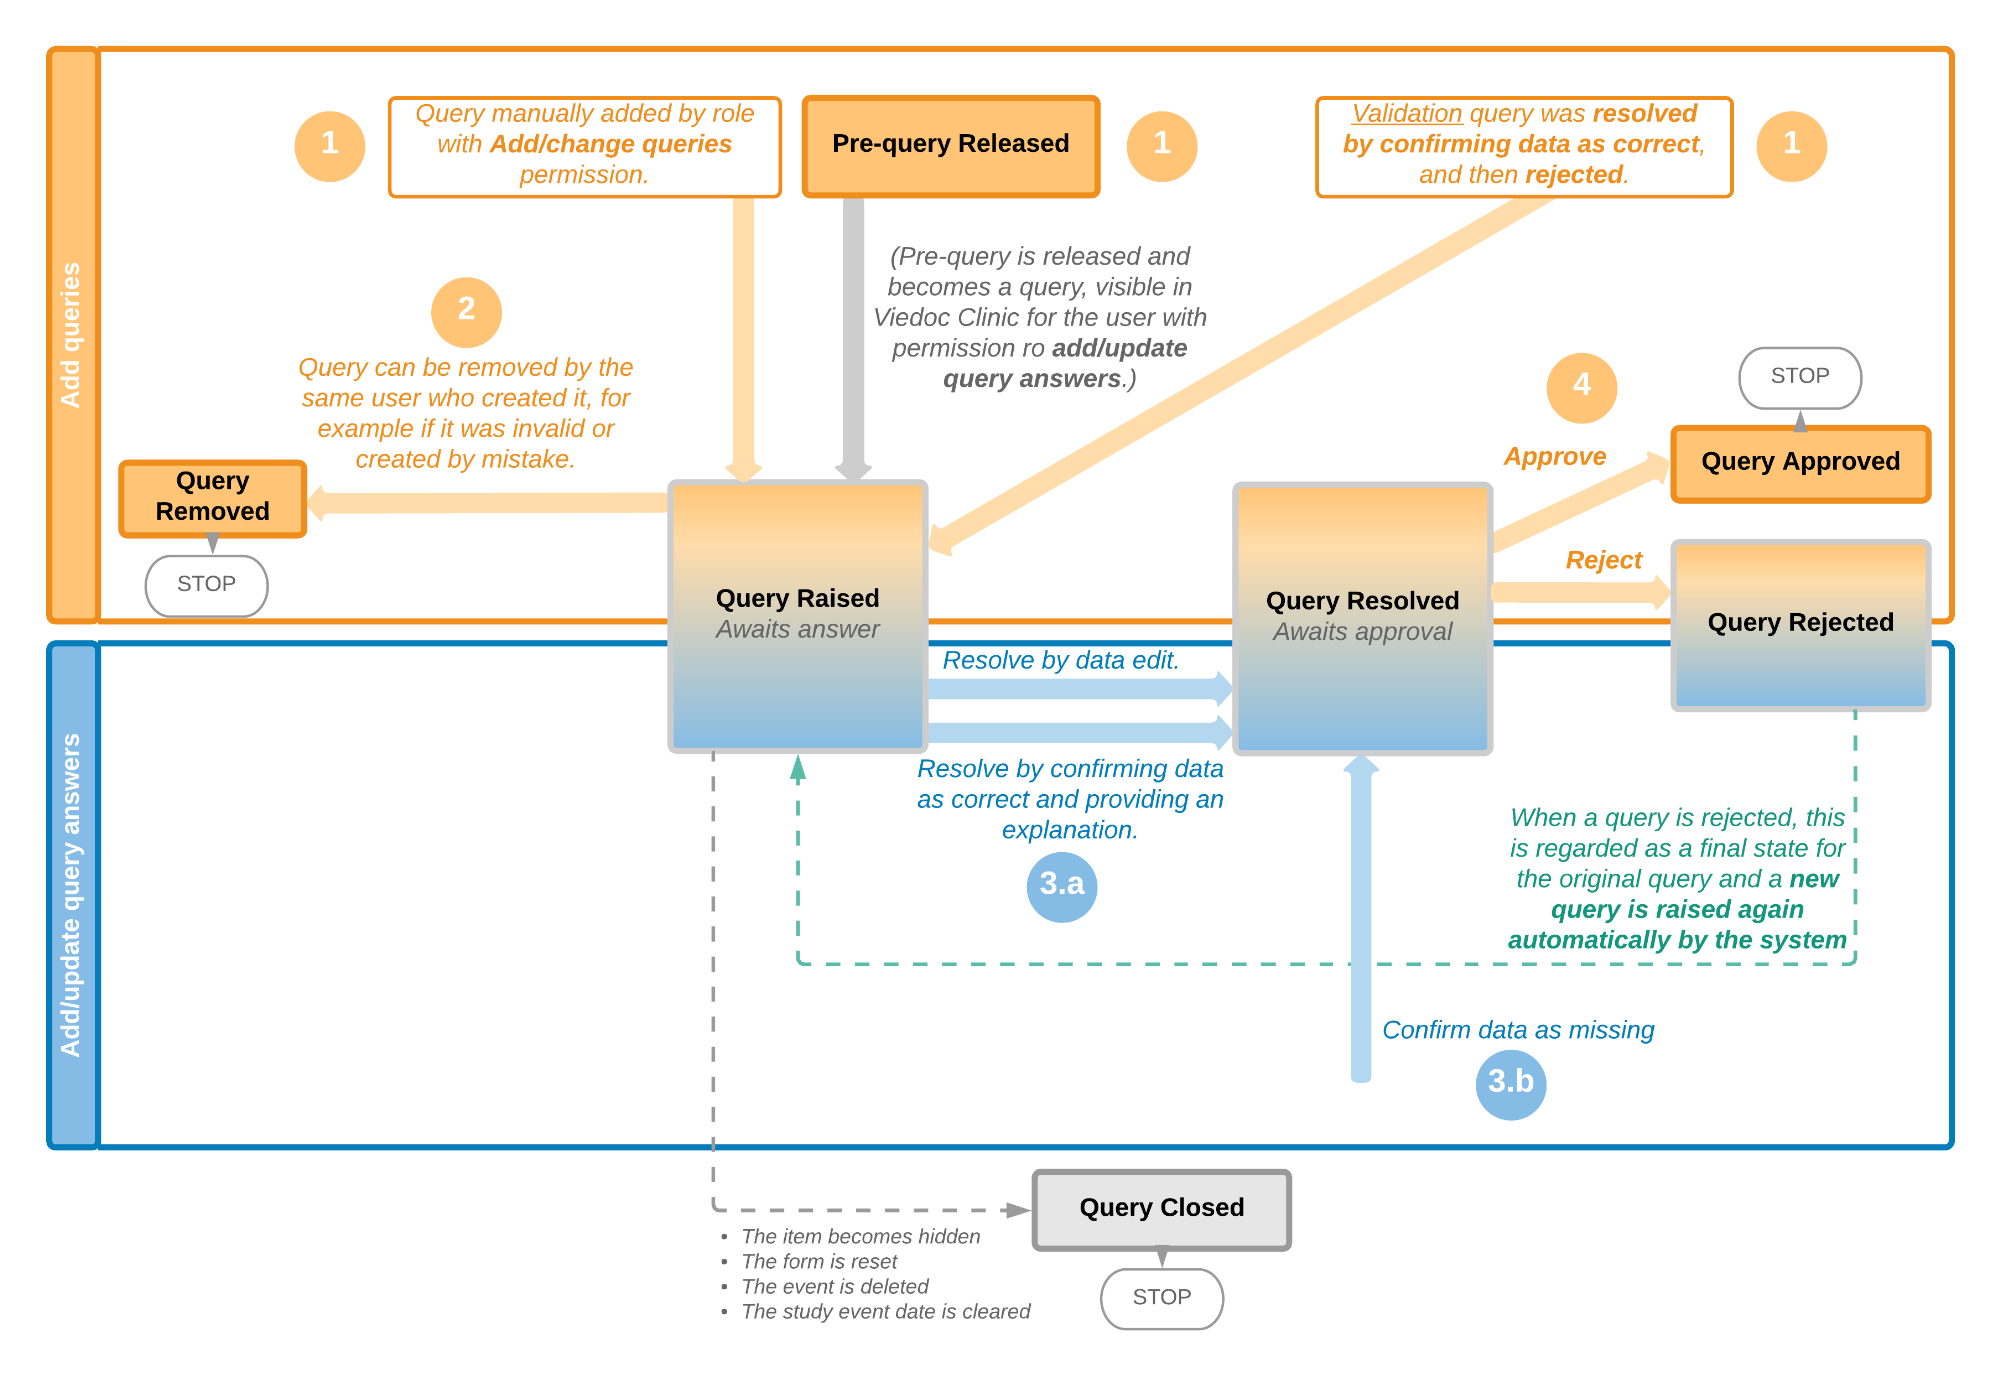
The following image illustrates the main actions that can be performed on a validation query and all the states it goes through:
1. A query is raised as a result of a validation performed by the system.
2. The user with permission to add/update subject/event/form data and query answers, typically the Investigator, resolves the query by one of the following:
3. The user with permission to add/change queries can:
See also Query states.

The table below summarizes the different states of a query in Viedoc Clinic, in the export output (Excel/ODM, as well as the possible actions that can be performed on a query and the state this will transition to.
Note! All the related queries are automatically closed, when:
| In Viedoc Clinic | In export output | Through... | Becomes... |
|---|---|---|---|
| Awaits answer | QueryRaised | Remove query (by Monitor) | QueryRemoved (Removed) |
| Edit query (by Monitor) | QueryRaised (Awaits answer) | ||
| Resolve query (by Investigator) | QueryResolved (Awaits approval) | ||
| Awaits approval | QueryResolved | Approve query (by Monitor) | QueryApproved (Approved) |
| Reject query (by Monitor) | QueryRejected (Rejected) | ||
| Rejected | QueryRejected | N/A. No action can be performed on a rejected query. Note! When a query is rejected, this is regarded as a final state for the original query and a new query is raised again automatically by the system. |
N/A. Final state |
| Approved | QueryApproved | N/A. No action can be performed on an approved query. | N/A. Final state |
| Closed | QueryClosed | N/A. No action can be performed on a closed query. | N/A. Final state |
| Removed | QueryRemoved | N/A. No action can be performed on a removed query. | N/A. Final state |
In order to include the query information in the exported file, you need to select Queries under the Type of data in the Data export page. When selecting to include Queries, the Query history option becomes available.
The queries can be exported to the following export output formats:
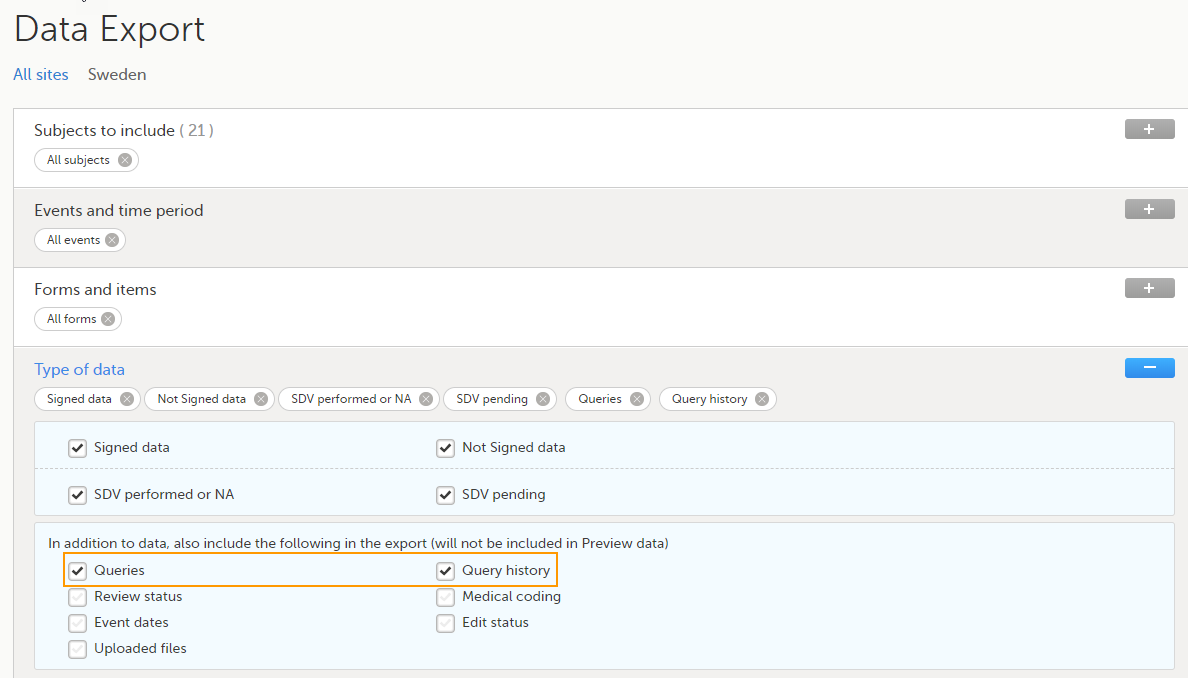
For more details and instructions on how to perform an export, see Exporting data.
For details on how queries look in the ODM export see Queries in ODM export.
For details on how queries look in the Excel/CSV exported file see Queries in Excel export.
For an overview of the entire query process see Queries overview.
To be able to raise a pre-query you must have the permission to add pre-queries, typically the Data Manager (DM).
To add a pre-query:
| 1 | Open the form that contains the field the pre-query will be raised on. |
| 2 | Click the + icon in the top-right corner of the group that contains the respective field. The Add new action pop-up is displayed:
|
| 3 |
Click Ready. The pre-query is created and needs to be promoted and released by the user with permission to promote pre-queries (typically the Monitor), in order to be visible as a query for the site staff. A Removed state is a final state for a pre-query. |
A pre-query is always marked by this icon:
Once a pre-query has been promoted and released, it becomes a query and it is marked by this icon:
To be able to promote/reject a pre-query you must have the permission to promote pre-queries, typically the Monitor.
If there are any pre-queries that await promotion, these are marked as tasks. For details about tasks, see Issues and tasks.
To promote a pre-query:
| 1 |
Browse to the task and open the respective pre-query that is marked with state Awaits promotion. A pop-up is displayed where you can either Promote or Reject the pre-query: 
|
| 2 |
|
A pre-query can be released after it has been promoted, that is, a pre-query in Ready for release state.
A pre-query waiting to be released is marked as a task. For details about tasks, see Issues and tasks.
After releasing a pre-query, this will become a raised query visible to the site staff. This is why, releasing a pre-query can be performed by a user with permission to add queries.
To release a pre-query:
| 1 | Browse to the task and open the pre-query that is Ready for release. A pop-up is displayed where you can either Release or Reject the pre-query: |
| 2 |
Note! When role-based queries is enabled for your study, when a pre-query is released, (typically by the Monitor):
For more information on pre-queries, see Queries overview. |
For an overview of the entire query process see Queries overview.
A query can be added/edited/removed/approved by the user with permission to add/change queries.
Note! When the role-based queries option is enabled for your study, all of the above actions are restricted to the same role as the role who raised the query. For more information, see Role-based queries.
To raise a query:
| 1 | Open the form that contains the field the query will be raised on. |
| 2 | Click the + icon in the top-right corner of the group that contains the respective field. The Add new action pop-up is displayed.
|
| 3 |
Click Ready. The query was raised and it is now visible for the site and ready to be resolved, with state Awaits answer: 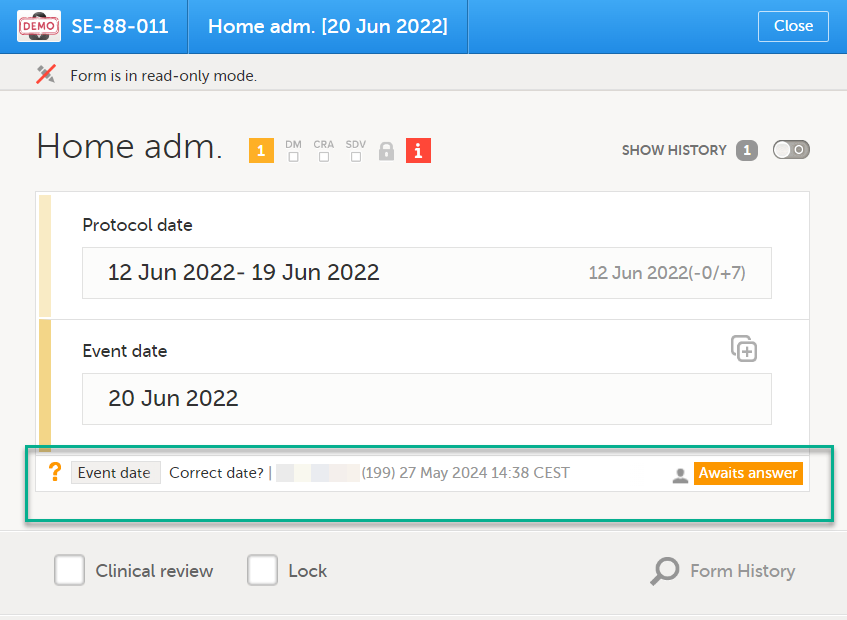
|
After the query has been raised it can be:
The text of a raised query can be edited as long as the query was not resolved (Awaits answer).
To edit a query:
| 1 |
Open the query (from the respective form) and click Edit: Note! The avatar icon and the user role who raised the query is only visible if role-based queries is enabled for the study. For more information, see Role-based queries. |
| 2 |
Edit the text and click Save query: The query text is now updated. |
A query can be removed, for example if invalid or added by mistake, as long as the query was not resolved (Awaits answer).
To remove a query:
| 1 |
Open the query (from the respective form) and click Remove: 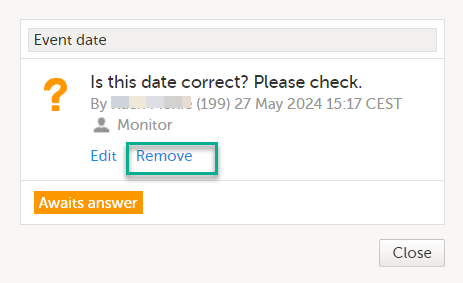
Note! The avatar icon and the user role who raised the query is only visible if role-based queries is enabled for the study. For more information, see Role-based queries. |
| 2 |
Click Save query to confirm: 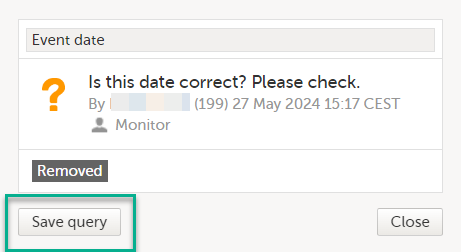
The query state is Removed. This is a final state for a query. |
After the query was resolved by the site (typically the Investigator), it is marked as a task, it is in Awaits approval state and can be either approved or rejected.
Note! An exception is a query raised as a result of confirming data as missing by the site user. This type of query can only be approved.
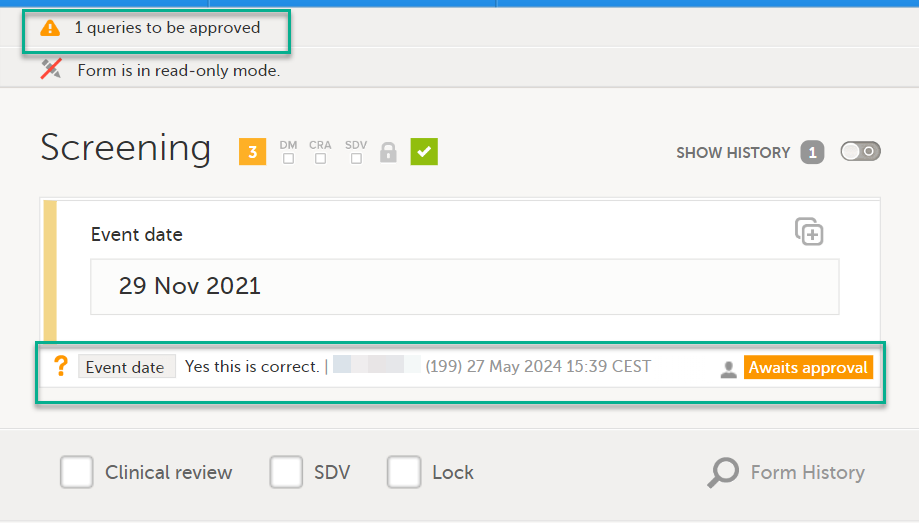
To approve a query:
| 1 | Open the query. The query pop-up opens displaying the list of the query history: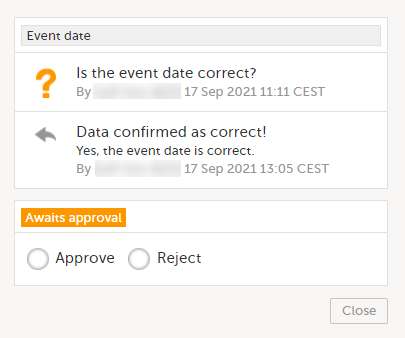 |
| 2 |
Select Approve and click Save query: The query is now Approved. This is a final state for a query: 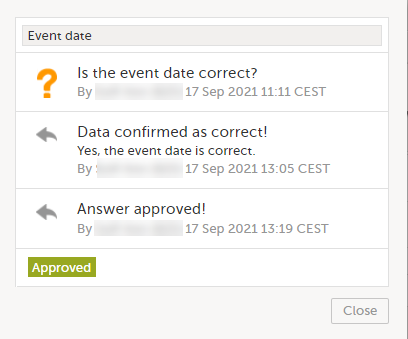
|
To reject a query:
| 1 |
Open the query. The query pop-up opens displaying the list of the query history: 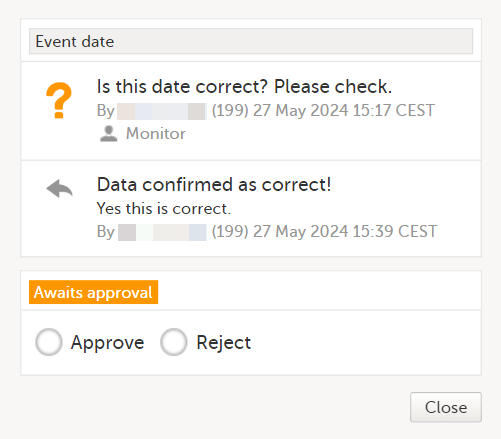
Note! The avatar icon and the user role who raised the query is only visible if role-based queries is enabled for the study. For more information, see Role-based queries. |
| 2 |
Select Reject, optionally rephrase the query and click Save query: 
The old query is closed with state Rejected and a new query is raised that Awaits answer: 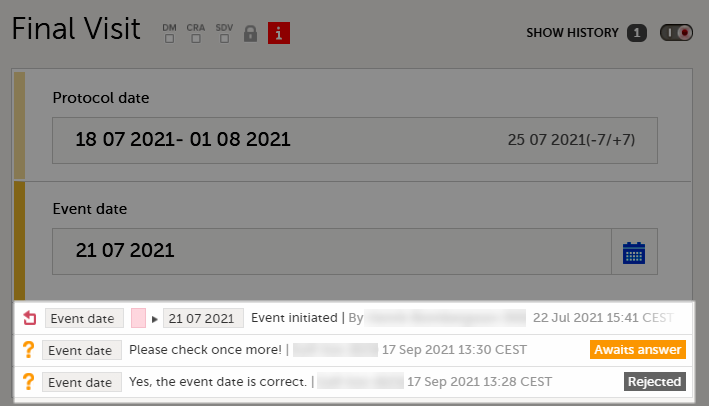
|
For an overview of the entire query process see Queries overview.
If a query is raised during data entry, a query message will appear as soon as you leave the field. To resolve the query, click the query message for more details, or correct the data directly before you continue entering data in the rest of the form.
If a query is raised after the form has been saved, the form is marked with a red issue icon i.
To resolve a query:
| 1 | Open the form that contains a query. |
| 2 | Click Edit in the top right corner of the form. |
| 3 |
Depending on if the entered data is correct or not:
Note! The avatar icon and the user role who raised the query is only visible if role-based queries is enabled for the study. For more information, see Role-based queries. 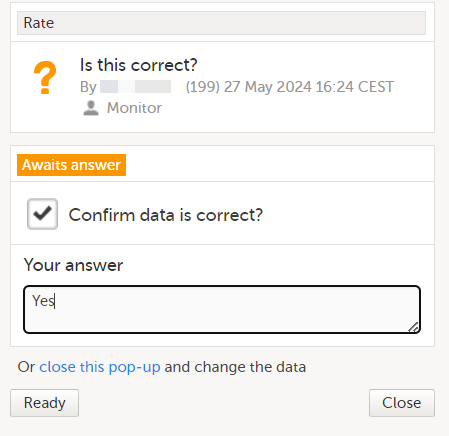
|
| 4 | Click Ready. |
| 5 | Click Save changes. |
If you add an edit check to an item, you have the option to allow saving of the form. If you allow it, a query is raised. You can save the form and then take care of the query later.
If you don't allow it, you have to solve the edit check immediately or you cannot save the form. We call this a hard check.
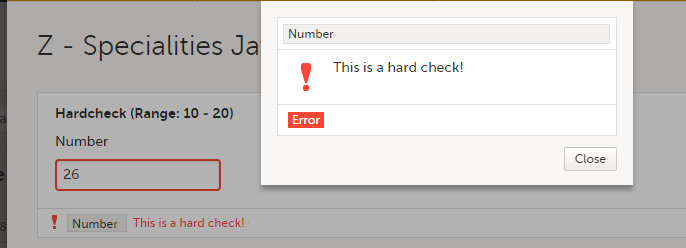
See also the video tutorial Issue: Resolve a query.
When the role-based queries option is enabled for your study, it restricts, at study level, the approval of the query resolution to the same user role as the user who raised the query.
Notes!
For more information on validation queries and missing data and the entire query process, see Queries overview.
|
Important! |
When role-based queries is enabled for a study, there are some updates to the information that is displayed in Viedoc Clinic. This is to support easily identifying which role raised a query, (if a query was raised by the same role as the current active user). This applies to pre-queries and for manually raised queries in forms, in the query history pop-up, in the Issues view and in the export output, as described below.
When role-based queries is enabled:
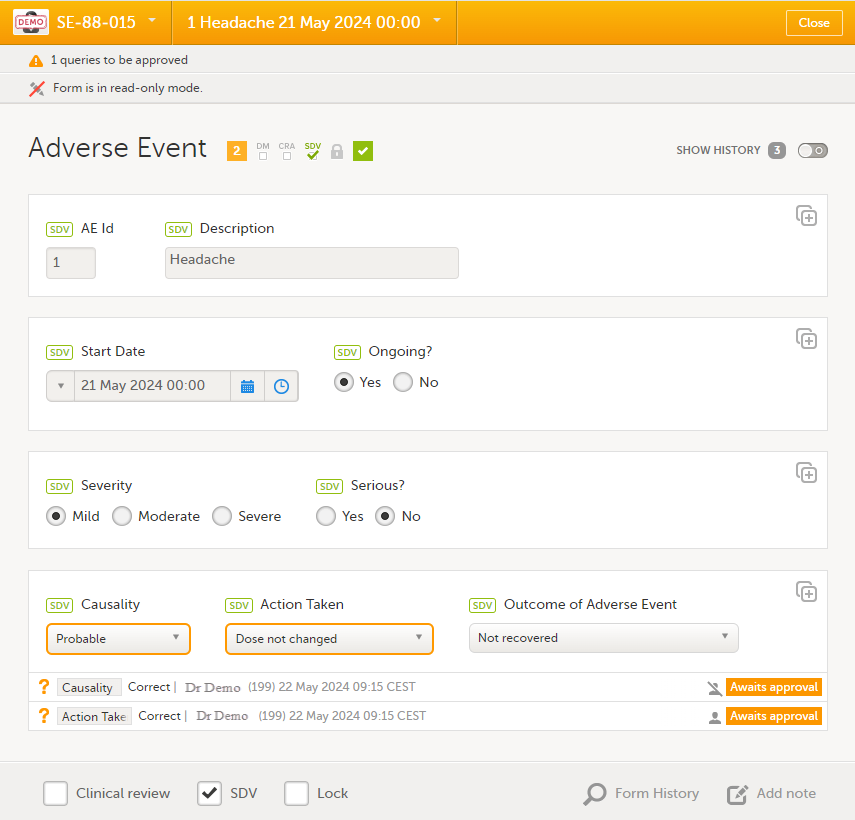
If a query was raised by a different user role, one that also has permission to add/change queries, the query will still be visible in the form. The user can see another role’s actions on a query, however the query action will be flagged with a strikethrough avatar icon to indicate that no actions can be performed.
Note! The user role who raised the query is displayed by hovering over the avatar icon, as in the image below - Raised by (user role), and also in the query history pop-up, as shown below.
In the example below, the user is a Monitor and can only perform actions on the query raised by another user with the Monitor role, shown with the avatar with no strikethrough.
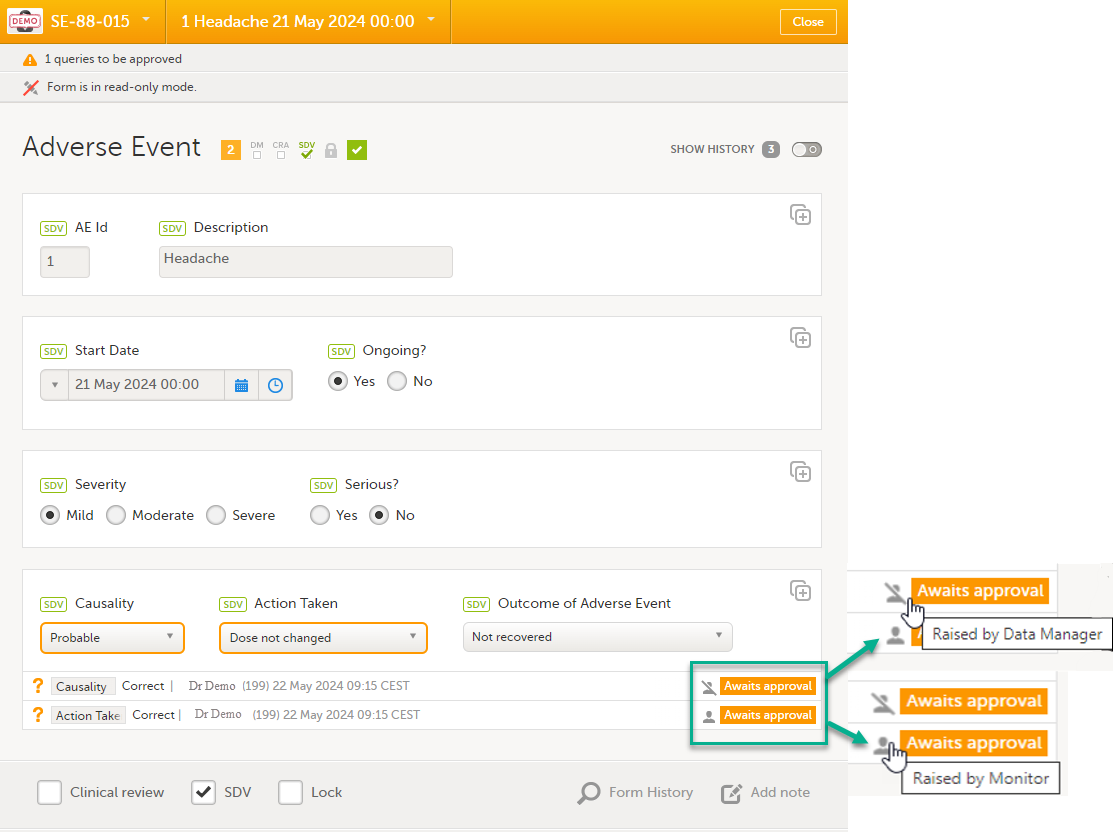
For the roles with permission to add/update query answers (such as Investigators), the role which raised the query is not shown on the form, however, it is shown in the query history pop-up which shows the query history:

When role-based queries is enabled, when a raised pre-query is released, (typically by the Monitor), the resulting new query visible for the Viedoc Clinic user with permission to add/update query answers, typically the Investigator), is considered as being raised by the same role that released the pre-query.
For more information on pre-queries, see Queries overview.
When opening the ISSUES list, for user roles with permission to add/change queries, such as Monitors and Data Managers, there is a filter available which is applied by default: My role's queries.
This filter lists all the open manually raised queries that were raised by the same role and that have the status Awaits approval and Awaits answer:
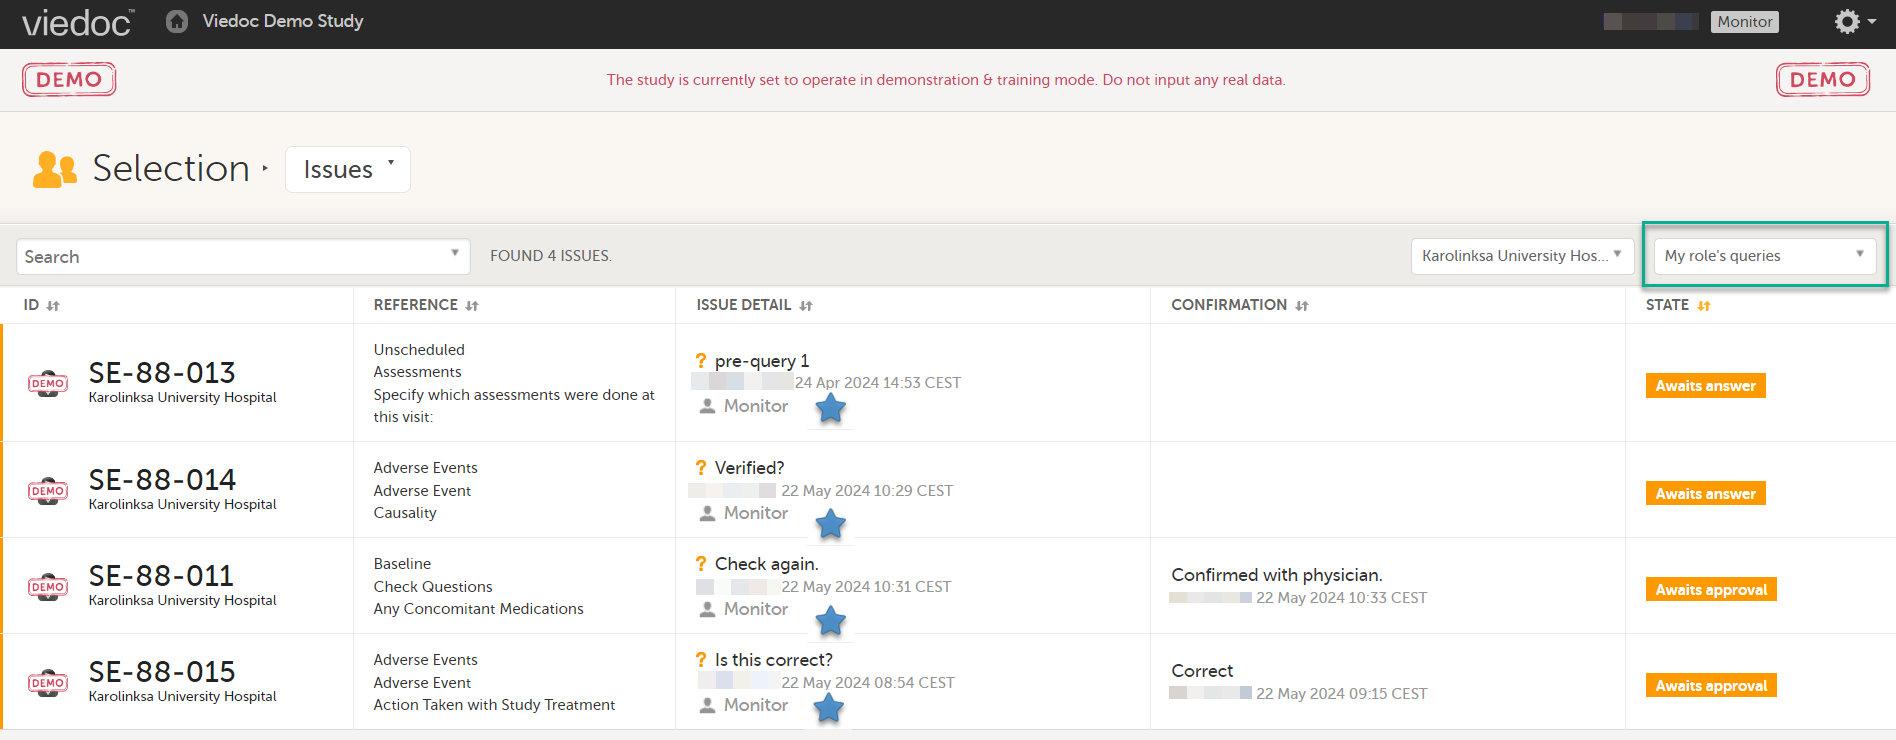
The role who raised a query is is shown in the Issue list as part of the ISSUE DETAIL, for all users regardless of their role or permissions.
The number of tasks to be performed counts only the queries that the user is allowed to perform actions on, based on their user role:

The Queries can be exported to the following export output formats:
After the Viedoc 4.80 release, in the Excel export output, two extra columns are added to the Queries sheet, the two rightmost columns. These are added to existing export versions regardless of whether role-based queries is enabled or not for the study.
These columns contain:
The Data Export page can be accessed by selecting the Data Export icon in the study start page:
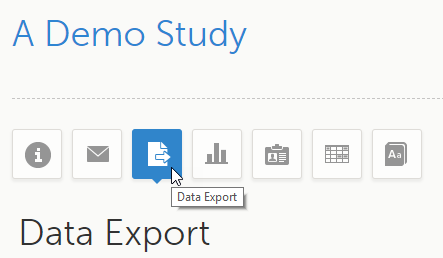
The Data Export page enables you to preview and download study data:Layout option
You can filter the data that you want to preview/export, as described in the following sections.
If you have access to multiple sites, you can filter the data for a specific country or site.
To filter data for a specific country, select the name of the country. The selected country appears in blue letters besides the Data Export header, while the site(s) for the selected country are listed below:
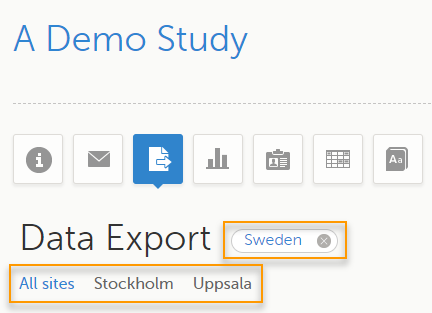
For a specific country, you can choose to export the data for:
To undo the selection of the site, select All sites.
To undo the selection of a country, select the cross x icon beside the name of that country.
While filtering for country or site, the number of subjects depicted in between brackets in the Subjects to include field is updated accordingly.
You can choose to include all subjects in the data preview or export, or include a selection of subjects.
To select which subjects to include:
| 1 | Select Include single subject(s). |
| 2 |
Select the Repeat this step for each subject you want to include in the data preview/export. |
To undo the selection of certain subjects, select the - icon, or select the cross x icon next to the subject ID:
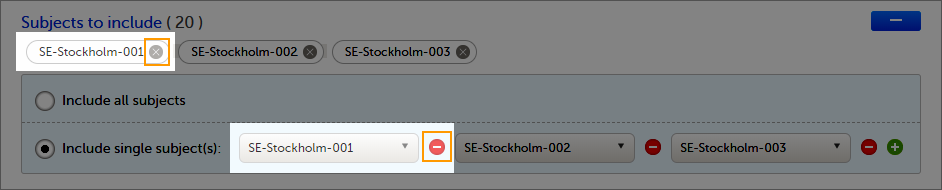
You can choose to include all the data or only for certain events. You can also filter the data added or edited during a certain time period.
Note! The available events are the ones existing in the latest design version applied on the first of the selected sites to be included in the export. If there are multiple design versions running for different of the selected sites, you have to select one site at a time in order to get the available events for the respective site.
You can choose to:
To select which events to include:
| 1 | Select Single event(s). |
| 2 |
Select the |
To undo the selection of certain events, select the - icon, or select the cross x icon next to the event:
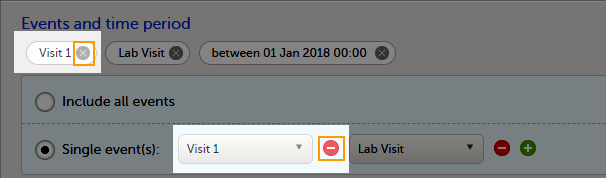
To include data from a specific time period:
| 1 | Select the Time period checkbox: |
| 2 | Select one of the following options from the first drop-down list:
|
| 3 | Select whether to define the time period until a certain date, from a certain date, or between two dates. |
| 4 | Select the date(s). |
Tip! Filtering for data that were added or edited since a specific date is especially useful if you want to see all new and changed data since for example your last monitoring visit.
To undo the selection of a certain time period, select the cross x icon next to it:

You can choose which forms and items to be included in the export output:
Note! Only data belonging to forms and items that exist in the latest effective design applied to the first of the selected sites will be included in the export. Also note that the forms and fields available to choose from are determined by the visibility settings for your user role.
To include data from specific form(s):
| 1 | Select Include single forms and items. |
| 2 | Select the forms and items to be included, in one of the following ways:
|
To undo the selection of a certain form, select the cross x icon next to it:
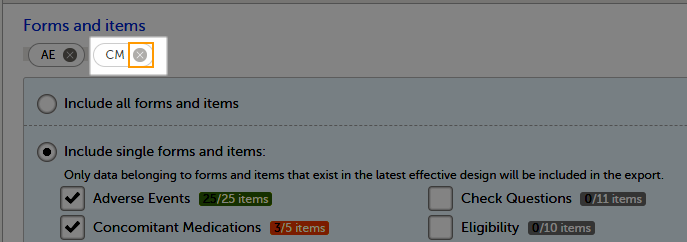
You can filter the data to be included in the export by the review status, as follows:
You can select to include additional information, depending on the export output format, as described in the following sections.
For PMS studies, there is an option to include booklet status and booklet status history in the export.
When selecting to include Booklet status, the Booklet status history option becomes available.
Depending on if the booklet status is included in the export or not, the export contains the following information:
Booklets in submitted status are not included in exports triggered by users on the sponsor side. The booklets are included to those users when they are received.
Note! Clinic actions to submit/recall back and forth are not available on the sponsor side. Only the latest submit of the booklet that was received by the sponsor is included.
If the Booklet Status is selected and the following options: Require Responsible Investigator for booklet submission, and Require Contract for booklet submission, are enabled for the study, two columns are added to the export.
If Booklet history is selected at export, the historically selected Contract and Responsible Investigator are included in the respective booklet status. The most recent contract information shall be shown, regardless of the booklet status.
Note! If the contract linked to a booklet is edited, the contract information is updated in the existing row for that booklet in the export performed after the information was updated.
The booklet status can be exported to the following export output formats:
When selecting to include Booklet status in the Excel export, a separate Booklet status sheet is created that lists all the forms with the following information:
| Column name | Description |
|---|---|
| Site sequence number | A counter that identifies the site globally within the study |
| Site name | The site name, as set in Viedoc Admin |
| Site code | The site code, as set in Viedoc Admin |
| Subject sequence number | A counter that identifies the subject within the site |
| Subject Id | The Subject ID, in the format configured in Viedoc Designer. The Subject ID is the subject identifier displayed in Viedoc Clinic on the subject card, subject details page, and so on. |
| Booklet sequence number | A counter that identifies the booklet within the sequence of booklets for the same subject |
| Booklet Id | The booklet ID, as set in the study design (in Viedoc Designer) |
| Booklet name | The booklet name, as set in the study design (in Viedoc Designer) and displayed in Viedoc Clinic |
| Booklet status | One of Not initiated, Initiated, Submitted, Received, Returned, or Frozen |
| Booklet activity | Initiated, Submitted, Recalled, Received, Frozen, Unfrozen, or Returned |
| Date & time (UTC) | The date and time of the status change |
| User name (ID) | The name (ID) of the user who changed the booklet status |
| Contract number | The number of the selected contract for the specific booklet. Note! This column is present in the export only if the option to link the booklet to a contract is enabled for the study. |
| Responsible Investigator | User name (internal userID ) of the user selected as Responsible Investigator for the specific booklet. Note! This column is present in the export only if the option to link the booklet to a contract is enabled for the study. |
When selecting to include Queries, the Query history option becomes available.
The Queries can be exported to the following export output formats:
See also:
The review status can be exported to the following export output formats:
See also:
The event dates can be exported to the following export output formats:
When selecting to include Event dates in the Excel export, a separate Event dates sheet is created that lists all the events with the following information:
| Column name | Description |
|---|---|
| Site sequence number | A counter that identifies the site globally within the study |
| Site name | The site name, as set in Viedoc Admin |
| Site code | The site code, as set in Viedoc Admin |
| Subject sequence number | A counter that identifies the subject within the site |
| Subject Id | The Subject ID, in the format configured in Viedoc Designer. The Subject ID is the subject identifier displayed in Viedoc Clinic on the subject card, subject details page, and so on. |
| Event Id | The event ID, as set in the study design (in Viedoc Designer) |
| Event name | The event name, as set in the study design (in Viedoc Designer) and displayed in Viedoc Clinic |
| Event repeat key | For recurring events, the counter that identifies different occurrences of the same event (identified by the Event ID). Available for output versions Viedoc 4.39 and onward. |
| Event status | The current status of the event. It can be one of the following:
|
| Event date | The event date, as set in Viedoc Clinic when the event is initiated |
| Planned date | The event planned date, as set in Viedoc Clinic when the event is planned |
| Proposed date | The proposed date for the event, if set in the study design |
| Window start date | The event time window start date, if set in the study design. |
| Window end date | The event time window end date, if set in the study design |
| Initiated by | The name and ID of the user who initiated the event |
| Initiated date (UTC) | The date and time (UTC) when the event was initiated |
| Last edited by | The name and ID of the user who last edited the event |
| Last edited date (UTC) | The date and time (UTC) when the event was last edited |
| Design version | The design version/revision that is active for the event |
When selecting the Uploaded files option, the uploaded file together with the thumbnail (if it exists) are part of the Excel, CSV and PDF export output:
The folder structure obtained when you unzip the file is as follows:
|
- SponsorCode_YYYYMMDD_HHmmss (date and time in UTC format) - FileData - StudySite (SiteCode) - SubjectKey - StudyEventOID - EventRepeatKey - ActivityOID - ActivityRepeatKey - FormOID - FormRepeatKey (if any) - ItemGroupOID - ItemGroupRepeatKey (if any) - ItemDefOID - FileName.extension (original filename) - FileName_tn.extension (thumbnail filename) |
The export output (Excel, PDF, CSV, ODM) as well as the Data preview provides the following information about uploaded files:
The following information on the uploaded file is available in the full history:
The pending forms can be exported to the following export output formats:
Forms are considered pending when they are uninitiated in initiated events. This applies to all types of events, including subject-initiated events. For repeating forms, if the first instance of the form is uninitiated, the form is considered pending. Resetting a form results in that form being pending.
When selecting to include Pending forms in the Excel export, a separate Pending forms sheet is created that lists all the forms with the following information:
| Column name | Description |
|---|---|
| Site sequence number | A counter that identifies the site globally within the study |
| Site name | The site name, as set in Viedoc Admin |
| Site code | The site code, as set in Viedoc Admin |
| Subject sequence number | A counter that identifies the subject within the site |
| Subject Id | The Subject ID, in the format configured in Viedoc Designer. The Subject ID is the subject identifier displayed in Viedoc Clinic on the subject card, subject details page, and so on. |
| Event sequence number | A counter that identifies the event within the sequence of events for the same subject |
| Event Id | The event ID, as set in the study design (in Viedoc Designer) |
| Event name | The event name, as set in the study design (in Viedoc Designer) and displayed in Viedoc Clinic |
| Event repeat key | For recurring events, the counter that identifies different occurrences of the same event (identified by the Event ID). Available for output versions Viedoc 4.39 and onward. |
| Activity Id | The activity ID, as set in the study design (in Viedoc Designer) |
| Activity name | The activity name, as set in the study design (in Viedoc Designer) and displayed in Viedoc Clinic |
| Form Id | The form ID, as set in the study design (in Viedoc Designer) |
| Form name | The form name, as set in the study design (in Viedoc Designer) and displayed in Viedoc Clinic |
| Event date | The event date, as set in Viedoc Clinic when the event is initiated |
| Pending since |
The date and time since when the form has been pending This is not always the date when the event was initiated. For a form that has been hidden due to a visibility condition, the pending since date is the date when the form is made available. |
The medical coding can be exported to the following export output formats:
Note! When exporting medical coding data to Excel or CSV format in studies using Viedoc Coder, Medical coding history is available. This export includes the full audit trail for each coded item.
Medical coding history can also be included in CSV exports through the Viedoc Web API and the Viedoc WCF API.
For more information, see Medical coding in Excel export.
The edit status can be exported to the following export output formats:
The subject status can be exported to the following export output formats:
The sheet Calculated subject status contains the following columns:
Select the export output format of the data under Output format > Output to:
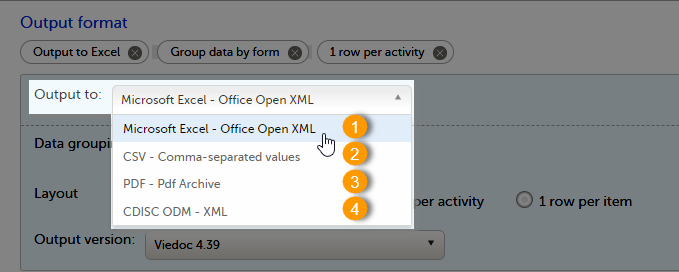
You can export the data to one of the following formats:
1. Microsoft Excel - Office Open XML
2. CSV
3. PDF - PDF/A
4. ODM
Viedoc uses Microsoft Excel Open XML format which is compatible with Excel version 2007 and later.
For details about the Excel export options and the format/structure of the output file, see Excel export.
The output of the CSV export is similar to the Excel export output. The CSV export output consists of a zip archive containing one CSV file that corresponds to each sheet from the Excel export. For details about the Excel export options and the format/structure of the output file, see Excel export.
For the CSV export and the one row per activity selected layout, there is also the option to Include corresponding SAS script. For details, see Exporting for SAS.
For the CSV export, for study designs which include repeating item groups, when the one row per activity and group data by form options are selected, there is also the option to export Repeating item groups as a separate form. This option is selected by default. For details, see Excel export.
Notes! The export to CSV fails if the same OID was used in Viedoc Designer in different design versions with different casing (for example, an OID defined as AE in design version 1 and AE in design version 2).
Labels are truncated to 200 characters when CSV data is imported to SAS using the CSV2SAS macro.
The Excel/CSV export does not include items set to “Hide Always" in visibility conditions when a singleform is selected for export.
For details about the PDF export and the format/structure of the output file, see PDF export output.
The Clinical Data Interchange Standards Consortium (CDISC) Operational Data Model (ODM) is a vendor neutral, platform independent format for interchange and archive of clinical trials data. The format includes the clinical data along with its associated metadata, administrative data, reference data and audit information. All of the information that needs to be shared among different software systems during the setup, operation, analysis, submission or for long-term retention as part of an archive is included in the model.
This is used for exporting the data to an ODM file, with or without Viedoc extensions. To include the Viedoc extensions in the exported file, select the Include extensions checkbox. Viedoc extensions are Viedoc-specific settings that cannot be described as part of the CDISC standards. If the exported file is to be imported to Viedoc at a future time, the checkbox should be selected.
Select SAS compliant XML to automatically populate the SAS field name and the SAS dataset name.
The ODM export file is built up as follows:
Study tag contains the information on the study settings, study design, workflow.AdminData contains data about the user and site settings.ClinicalData tag contains the data that was filled in in Viedoc Clinic.Association tag contains information about the performed actions such as SDV, raising and approving queries, medical coding, lock, CRA and DM reviews.The ODM export also supports repeating item groups in both the standard CDISC ODM and SAS-compliant formats. Repeating item group data is exported with ItemGroupRepeatKey attributes, which identifies each instance of a repeating item group.
This ensures ODM exports are compliant with the CDISC ODM standard for repeating item groups.
See also:
It is possible to select the Viedoc version that the exported file should be compatible with. This option enables you to export files that have the same format as files exported from previous Viedoc versions.
Note! This functionality is optional and set in the study settings in Viedoc Admin. It might not be activated for your study.
If activated for your study, you can select the Viedoc version that you wish the exported file to be compatible with under Output format and export, from the Output version drop-down menu. If you wish to create an export file according to the latest Viedoc version, select Latest Viedoc version:
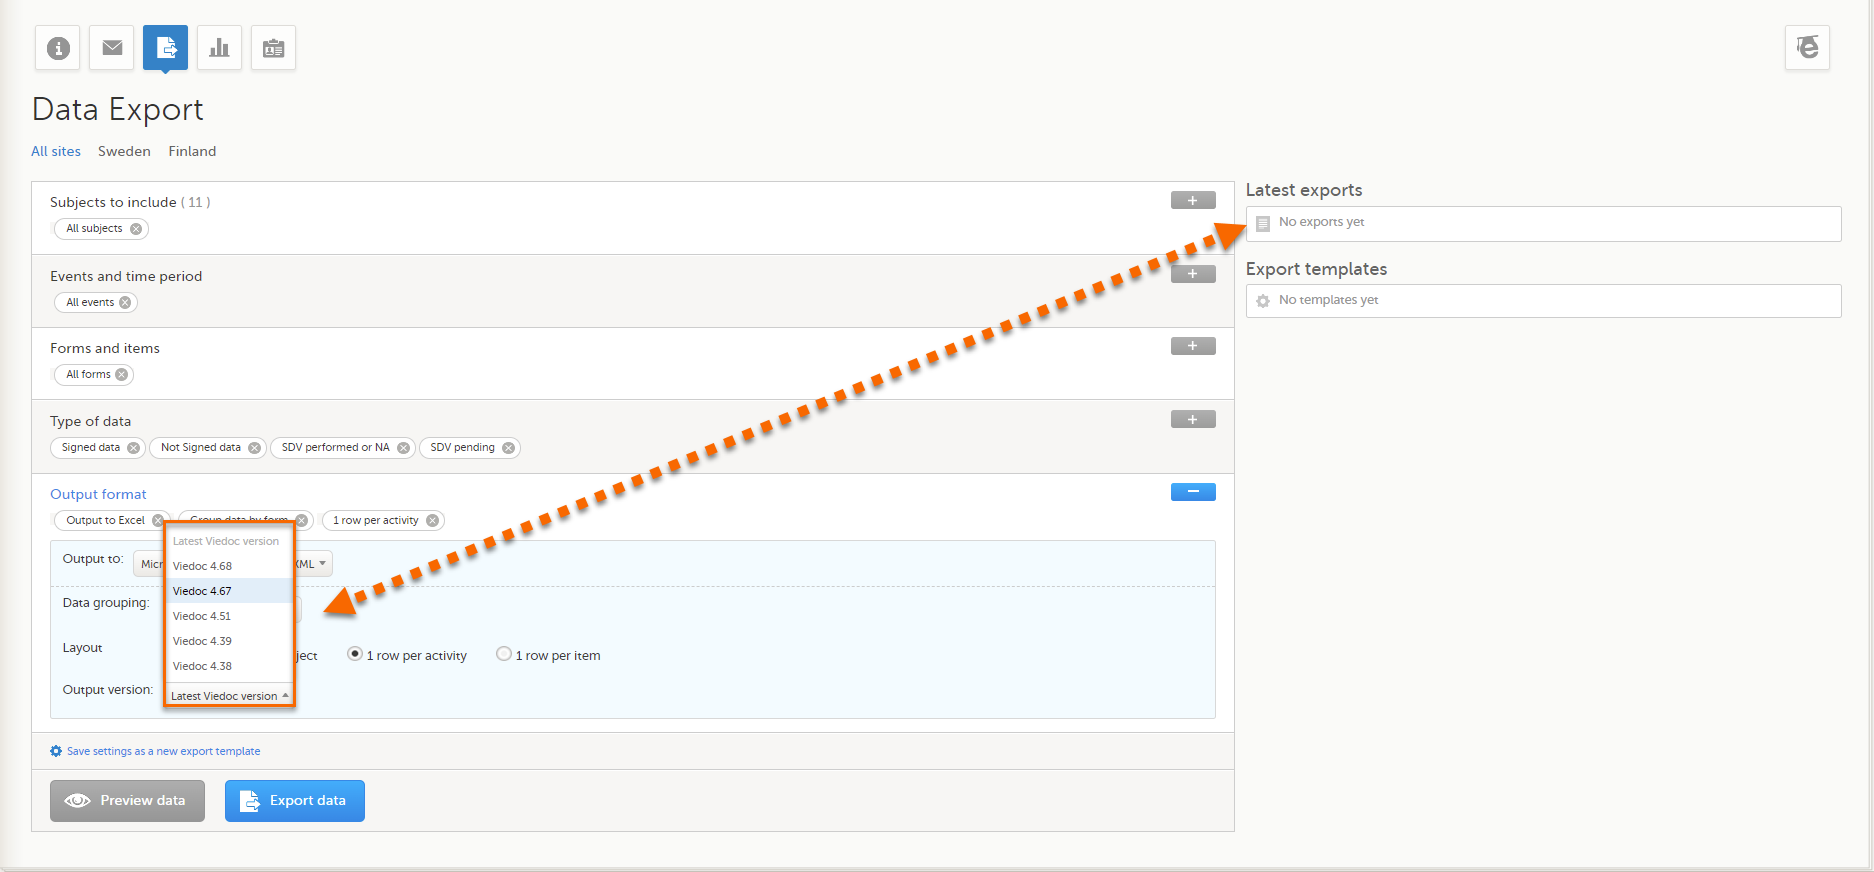
The Viedoc version used for data export is listed in the Latest exports area on the right side of the export page.
The exported file contains information about which Viedoc version was used to create it. You can find information about the Viedoc version in the following places:
The Viedoc versions available in the Output version dropdown menu are only those versions in which changes to the data structure were introduced.
As of Viedoc release 4.79, the following output versions are available:
| Output version | Changes in data structure |
|---|---|
| Latest Viedoc version | When choosing Latest Viedoc version, the exported data will automatically follow the structure of the latest Viedoc release in which changes to the data structure were introduced. |
| Viedoc 4.79 | Introduction of a number of changes to the ODM data export. See the table below for details. |
| Viedoc 4.77 | For studies where item-level SDV is enabled, when exporting review status, the SDV sheet in the CSV and Excel data exports will include only the items that require SDV and are visible to the user. On the Review status sheet, items that do not require SDV are indicated with N/A. |
| Viedoc 4.68 |
Introduction of pdf archive export system check which splits the archive into one pdf file per subject and stores resultant PDF in a zip file. |
| Viedoc 4.67 | Introduction of two new columns for approving medical coding: "approved by" and "approved on date". |
| Viedoc 4.51 | Introduction of three new form repeat keys and the table of contents in the PDF export, see the table below for details |
| Viedoc 4.39 | Introduction of repeating forms and recurring events, see the table below for details. |
| Viedoc 4.38 | Original output format (Viedoc versions 4.38 or older). |
In Viedoc 4.79, the following changes to the export output were introduced:
| File type | Changes in the export output format |
|---|---|
| ODM |
Introduction of support for partial datetime, date, and time. This is now the default type when exporting designs and data in ODM format. Partial dates as per the ISO 6801 standard are written up to the most detailed value available. This makes the export compliant with CDISC ODM. |
| ODM |
When exporting a design to ODM, multi-selection code lists are handled as follows: Checkbox item definitions are split by code list items.
For example, when splitting a checkbox ItemDef with OID="CHK" and code list IDs "Yes" and "No", the split checkbox ItemDefs will have the OIDs "__CHK__Yes" and "__CHK__No", respectively. That is, the original OIDs and the code list IDs are prefixed with two underscore characters and separated by two underscore characters. In Viedoc Designer, checkbox items are exported as multiple ItemDefs - one for each selection value. In Viedoc Clinic and the Viedoc API: In the latest export version, checkboxes are exported as separate items for metadata and clinical data. In previous export versions, checkboxes are exported as one item. This has been introduced to be compliant with CDISC ODM. |
| ODM |
Bug fix: In the ODM data export, the content of the Question element for study event items and booklet forms was not complete. According to the CDISC standard, the element should include one of the TranslatedText attributes. This is now solved, and the Question element is populated with a string related to the corresponding OID. This is applied to all export versions. |
| ODM |
Bug fix: In the ODM data export, the MeasuremetUnit.Name contained HTML code, making it non-compliant with the CDISC standard. This is now solved, and the HTML code is removed from the name. This is applied to all export versions. |
| ODM |
Bug fix: In the ODM data export, the translated text was missing for meta.Protocol.Description.TranslatedText. This is now solved, and the body is populated with the protocol name, as visible on the design overview page. This is applied to all export versions. |
| ODM |
Bug fix: In the ODM data export, the Length attribute was incorrect, making it non-compliant with the CDISC standard. This is now solved, and Length is populated as per the ItemDef data type. This is applied to all export versions. |
| ODM |
Bug fix: In the ODM data export, there was a mismatch between the item data type and the code list data type for checkboxes. This is now solved, and the checkbox data is split into different items, in the same way as for CSV and Excel exports. This is implemented in a new export version, version 4.79. |
| ODM |
Bug fix: In the ODM data export, the study OID and ClinicalData didn't respect the Production/Demo mode for sites. This is now solved, and the study OID and ClinicalData are populated based on the Production/Demo mode of the exported study. This is applied without a new export version. |
| ODM |
Bug fix: In the ODM data export, non-repeating forms included a repeat key, making the ODM data export non-compliant with the CDISC standard. This is now solved. This is implemented in a new export version, version 4.79. |
| ODM |
Bug fix: In the ODM data export, the KeySet elements had an unregistered value for the ItemOID attribute, making the ODM data export non-compliant with the CDISC standard. This is now solved, and the KeySet elements reference items within the same MetaDataVersion. This is implemented in a new export version, version 4.79. |
| ODM |
Bug fix: In the ODM data export, the attribute OrderNumber of the element StudyEventRef was not valid with respect to its type, integer. This is now solved, and StudyEventRef elements have unique and non-empty consecutive order numbers. This is applied to all export versions. |
| ODM |
Bug fix: In the ODM data export, there was a data type mismatch between CodeList and ItemDef, making the ODM data export non-compliant with the CDISC standard. This is now solved by always having a matching data type between ItemDef and CodeList. This is applied to all export versions. |
| ODM |
Bug fix: In the ODM data export, the element MeasurementUnitRef had an unregistered value for the MeasurementUnitOID attribute, making the ODM data export non-compliant with the CDISC standard. This is now solved, and measurement units not referenced in any MetaDataVersion are not included in the ODM data export. This is applied to all export versions. |
| ODM |
Bug fix: In the ODM data export, the Alias names were not correctly populated. This is now solved, and any code list item aliases with empty names are removed at import and export - and the Alias names are populated with the context values. This is applied to all export versions. |
| ODM |
Bug fix: In the ODM data export, the SAS field name and the SAS dataset name were not populated. This is now solved, and the SAS field name is populated based on the ItemDef OID, and the SAS dataset name is populated based on the FormDefOID, which means that the OIDs are SAS-compliant. There is an option for this in the data export. This is applied to all export versions. |
| ODM |
Bug fix: In the ODM data export, revisions linked to study events and revisions linked to forms requiring approval of the new design revision were not included. This is now solved. This is applied to all export versions. |
| ODM |
Bug fix: In the ODM data export, alerts had repeating order numbers. This is now solved, and the order numbers for all study settings alerts in Viedoc Designer are removed. This is applied to all export versions. |
| ODM |
Bug fix: In the ODM data export, the item group containing the reference data items was not added to the MetaDataVersion. This is now solved. This is applied to all export versions. |
In Viedoc 4.51, the following changes to the export output were introduced:
| File type | Changes in the export output format |
|---|---|
| Excel | Addition of three columns for the new form sequence numbers introduced:
|
| ODM | Three new form sequence numbers were introduced, as Viedoc extensions: v4:SubjectFormSeqNo, v4:OriginSubjectFormSeqNo and v4:SourceSubjectFormSeqNo, within the FormData, right after the FormRepeatKey. |
| A table of contents was added to the PDF archive, starting on page 2 of the file. |
In Viedoc 4.39, the following changes to the export output were introduced:
| File type | Changes in the export output format |
| Excel | Addition of a column for Form sequence number (FormSeq) that contains the FormRepeatKey. |
| ODM | The FormRepeatKey now contains the activity ID as well, in the following format: FormRepeatKey$ActivityId. The ExportVersion attribute has been added to the ODM. |
| The summary formats are used to display the event and form names. |
When exporting data from Viedoc, the system determines the available events, forms, and data points based on the study design version applied to the first selected site. Understanding how this works is important when a study includes sites with different study designs or multiple design versions.
What happens when study designs differ?
If a study contains multiple study designs or different versions across sites, the exported data is structured based on the design of the first selected site. This means:
What does "first selected site" mean?
The first selected site is the first site in the study that is chosen for export. The exact determination depends on:
Example: If a study has sites in Germany, Sweden, United States, and Japan, and Germany is the first selected site, the export will be based on the latest design version applied to the first site in Germany.
Selecting multiple sites with different study designs
If multiple sites are selected and they have different design versions, users must:
Best practices to ensure accurate exports:
Note! User visibility settings affect data exports. If an item is missing, check that your user role has the necessary permissions, and that the item exists in the latest design version applied to the first selected site.
Example scenario: How study design affects data export
Scenario: A study has Site A using Design Version 1.0, and Site B using Design Version 2.0. When exporting data:
The Preview data button is only available when you have selected Excel or CSV as output format for the export.
The preview is not available when you have selected 1 row per item.
On the data tab, you can preview the data in table format:
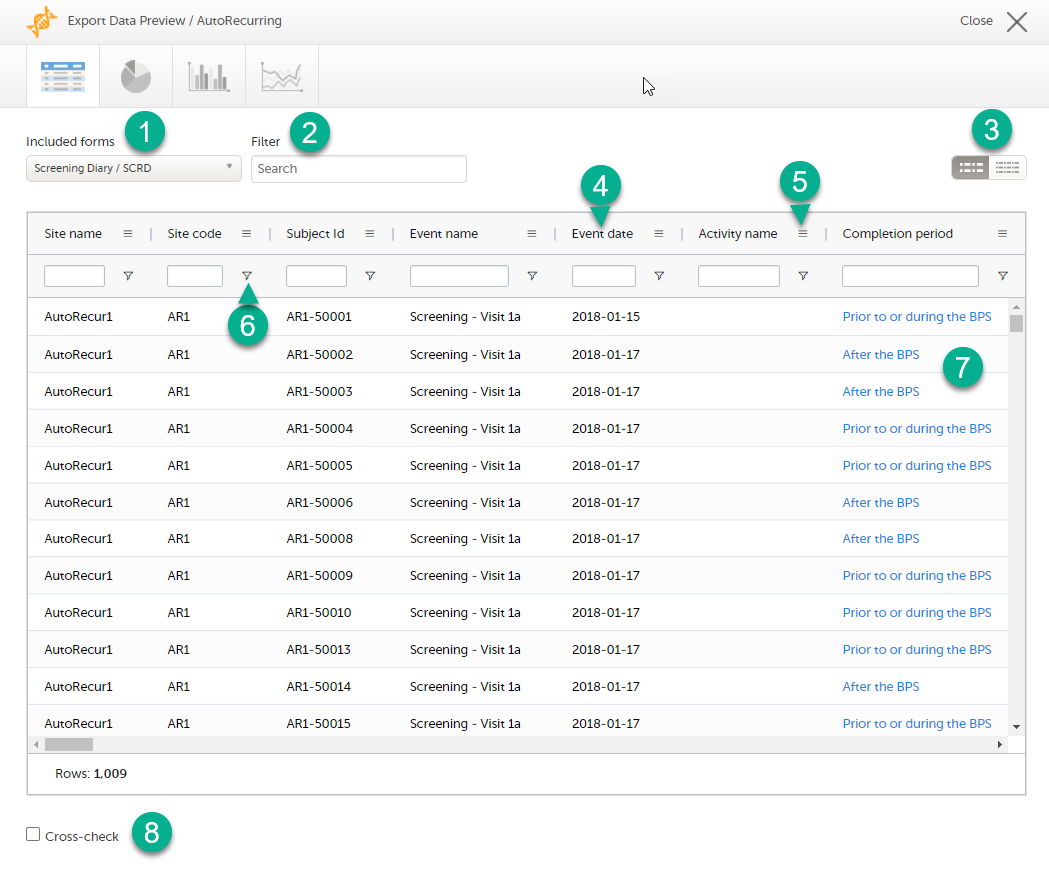
1. If you have selected Group data by form, you can select the form for which you want to display data.
2. Use the Filter text box to filter the preview data by any text in any field. The preview is filtered on all words in this field.
3. Toggle between spacious view and compact view.
4. Select a column header to sort the data in ascending order. Select again to sort in descending order. Selecting a third time removes the column sort order. To rearrange the order of the columns in the table, simply select a column header and drag the column sideways.
5. Select to open the column menu. For more information, see Column menu.
6. Select to access the column filter. For more information, see Column filter.
7. Select any hyperlink data point in the table to view the underlying form in read-only mode.
8. Select Cross-check to display a second data table. This lets you cross-check data between the two tables. Form selection and the filtering and sorting of data in the second table are independent of the settings in the first table.
The column menu contains:
|
 |
|
 |
|
 |
For more information, see the following sub-sections.
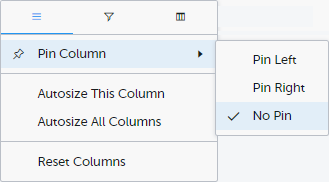
Pin Left/Right makes a column remain visible in the leftmost or rightmost position when you scroll sideways. Select No Pin to unpin the column.
Autosize adjusts the column width to the width of the text in the column.
Reset Columns resets the pinning, sizing, and order of columns to the initial state.
Use the column filters to narrow down the selection of preview data.

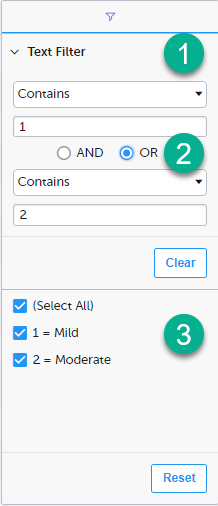
1. Depending on the type of item in the column, you can specify one of these types of filters:
Form items that are radio buttons, drop-down menus, checkboxes, dates, or date/time items are treated as text.
Note! The text filters are case-insensitive.
2. Once you have specified a filter, you can specify another one for the same column, either as an AND filter or an OR filter.
3. Predefined filter options based on the data available in the column.
Select the columns to be displayed in the preview table.
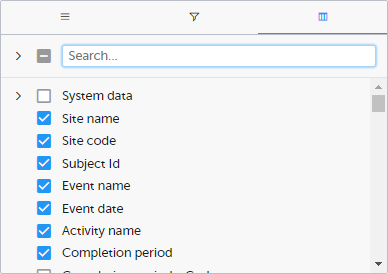
Use the Search field to search for columns.
By default, system data is excluded from the table. To include system data, select the column(s) to include from the System data category. Note that some system data columns are only available when you have selected 1 row per activity. For more information, see Excel export.
When you right-click in a cell in the data table, this context menu is displayed:
Copy: Copies the cell value to your clipboard.
Copy with Headers: Copies the cell value and its column header to your clipboard.
Excel Export: Exports the preview data on the data tab. The resulting Excel file will have the same sorting and filtering of data and order of columns as the preview.
Select the data set you wish to plot in a chart, and select Draw:
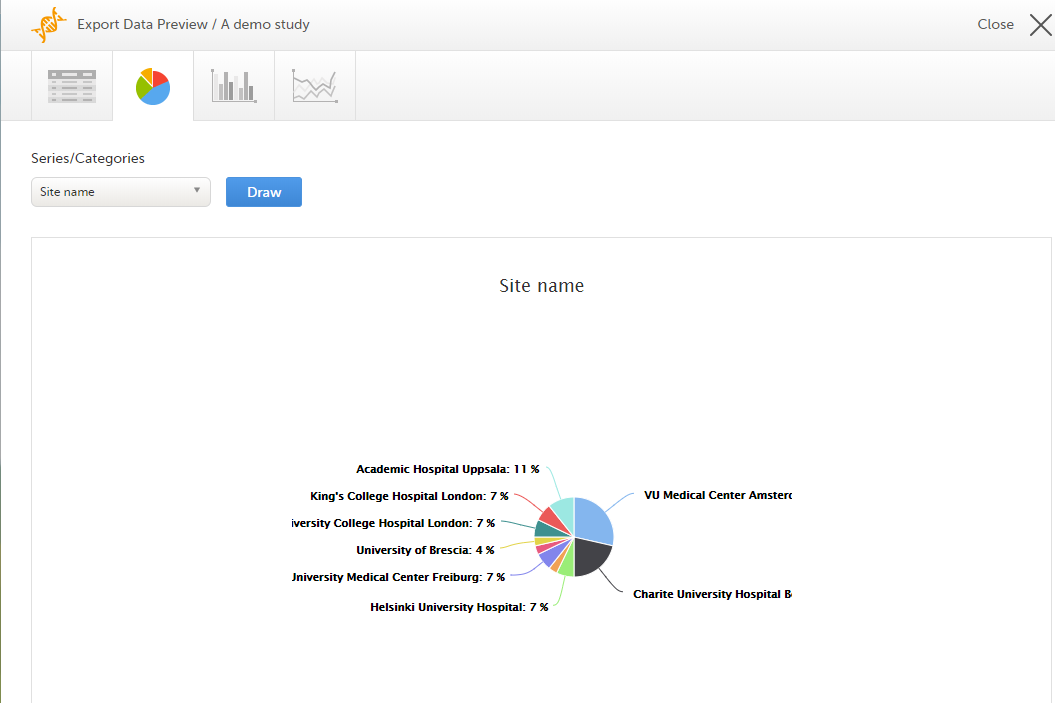
If you have selected Group data by form, you can only choose data sets from the form you have selected on the data table tab.
Select any data point to view its details.
Note! The pie chart has access to the same data as the data tab. That means that if you applied filters on the data tab, only the filtered data will be available in the pie chart.
Select which data you would like to plot on the X-axis and Y-axis, which series should be created, and select Draw:
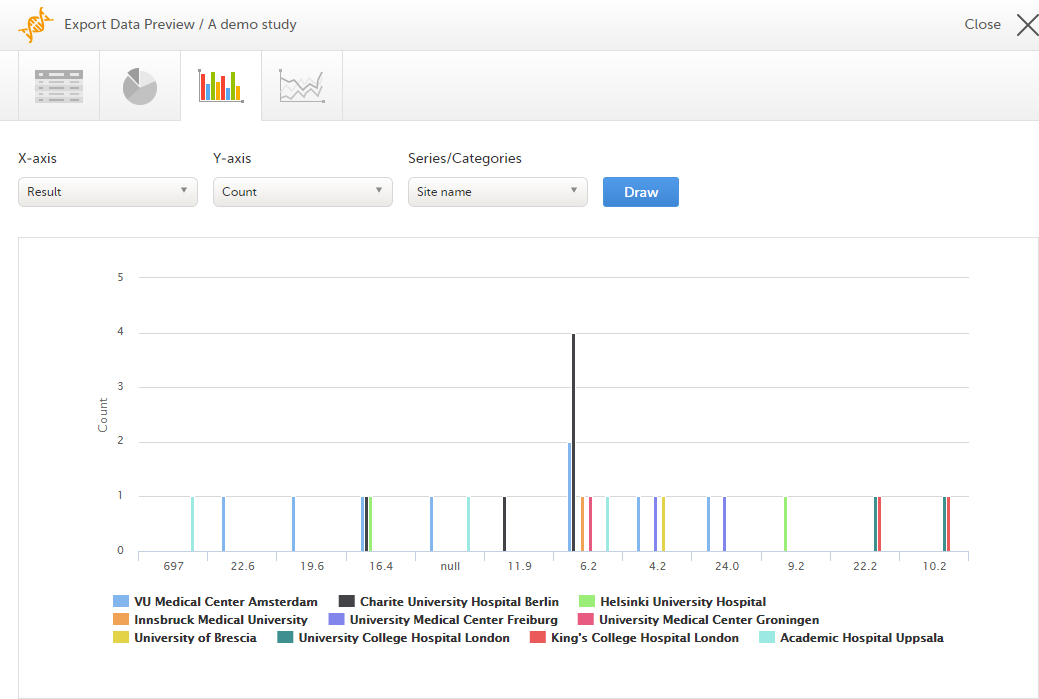
If you have selected Group data by form, you can only choose data sets from the form you have selected on the data table tab.
Select any column to view details of the data.
Note! The column chart has access to the same data as the data tab. That means that if you applied filters on the data tab, only the filtered data will be available in the column chart.
Select which data you would like to plot on the X-axis and Y-axis, which series should be created, and select Draw:
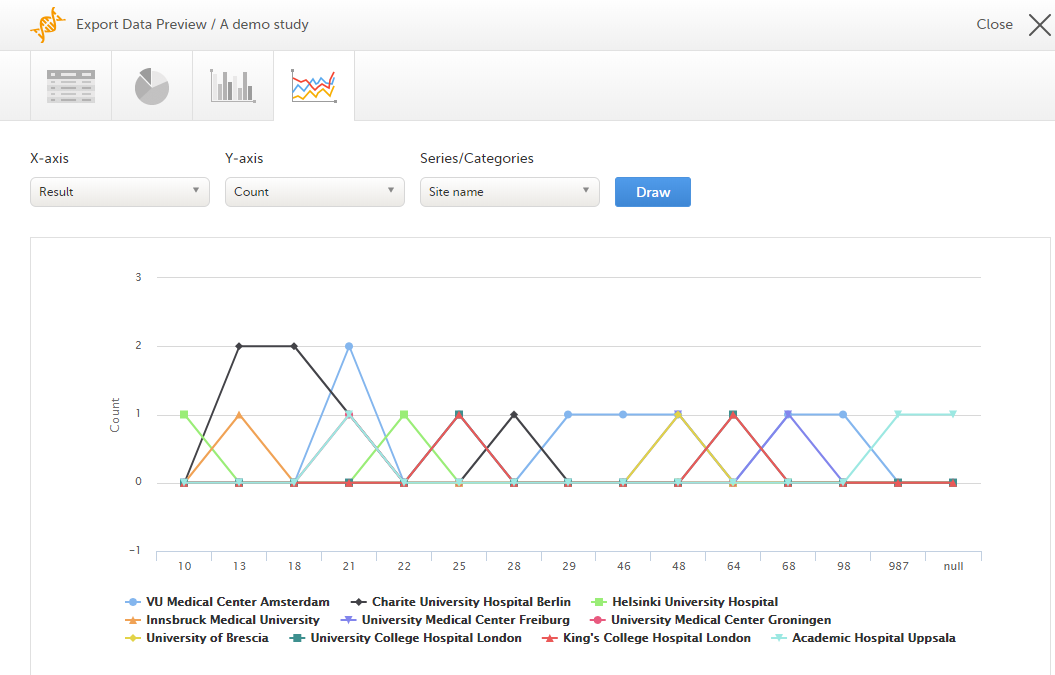
If you have selected Group data by form, you can only choose data sets from the form you have selected on the data table tab.
Note! The line chart has access to the same data as the data tab. That means that if you applied filters on the data tab, only the filtered data will be available in the line chart.
When you have made settings for an export, you can save them as a template. Then you, and optionally others, can use the template to easily make new exports with the same settings.
To save your settings as a template:
| 1 |
Select Save settings as a new export template. 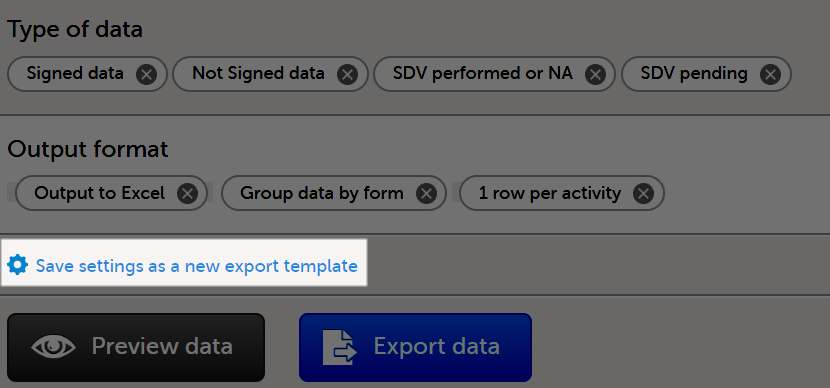
|
| 2 |
In the pop-up that is displayed, enter a name for the template and select whether it should be private or shared. If you select Shared, you are prompted to also select the roles that will be able to use the template. The roles available in the drop-down list are the ones with export permissions for the latest effective design of the study in question. 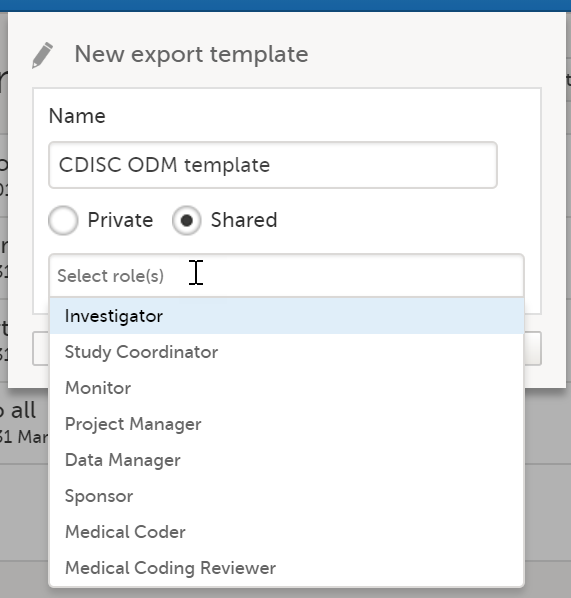
|
| 3 |
Select Save. Now the Export templates list is displayed, with your newly created template at the top of the list: 
|
To apply a data export template:
| 1 |
Select View all templates in the Export templates area of the Data export page. 
|
| 2 |
Select the apply icon for the template that you want to apply. 
|
| 3 | Select Export data to perform an export with the settings in the template. |
Tip! Alternatively, you can use the quick access apply, available in the Export templates area:
To edit a data export template:
| 1 |
Select View all templates in the Export templates area of the Data export page.
|
| 2 |
The Export templates list is displayed. Select the edit icon for the template that you want to edit. 
|
| 3 |
In the pop-up that is displayed, you can edit the name of the export template and the settings for Private/Shared. Note! You can only edit a template that you created yourself. |
To delete a data export template:
| 1 |
Select View all templates in the Export templates area of the Data export page.
|
| 2 |
The Export templates list is displayed. Select the trash can icon for the template that you want to delete. 
|
| 3 |
In the pop-up that is displayed, select Delete. 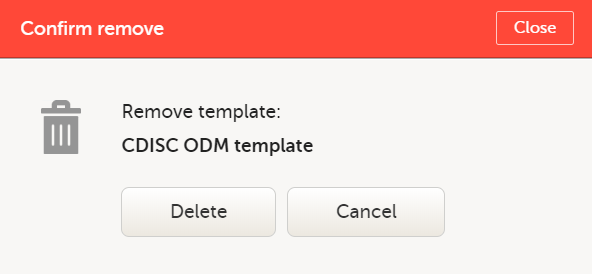
Note: You can only delete a data export template that you created yourself. |
To perform a data export:
| 1 | Filter the data to be exported. See Filtering the data to be exported. |
| 2 | Select the Output format. |
| 3 | Optionally, select the Output version. |
| 4 | Optionally, preview the data to be exported. |
| 5 |
Select Export data. The status of the export is displayed in the Latest exports area, on the top of the list. When the export is completed, you can download the exported file: The exported file is downloaded locally. The filename is generated as follows: SponsorCode_CountryCode_SiteCode_Date_Time, where:
Note! If any of the characters that are invalid for a filename in Windows are used within any of the SponsorCode or SiteCode, these characters will be automatically replaced with - within the exported filename. |
You can see a log of the requested exports in the Latest exports area, where you can download the exported files or delete the logs.
Note! The list of the latest exports is user-specific, that is, you can only see the exports made by yourself.
The latest five exports are shown in the list. To get the complete list of the initiated exports, select the View all exports link at the bottom of the list.
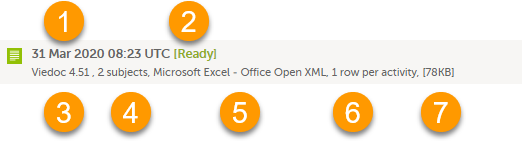
Each log entry provides the following information:
1. The date and time when the export was initiated.
2. The export status:
3. Viedoc output version - see Output versions.
4. The number of exported subjects.
5. The format of the output file.
6. The selected layout, if applicable.
7. File size
Note! If data has been masked after an export was made, it is not possible to download that export because it could include the data that was later masked.
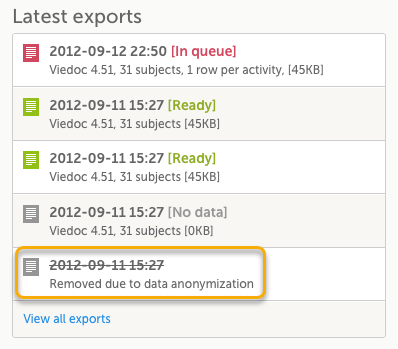
The following are some frequently asked questions and answers about exporting data in Viedoc:
Q: How do I export the audit trail (history)?
A: Any PDF data export will include the audit trail (history) by default. You can also get an Excel or CSV version by changing the layout to one row per item and including the history. See the Include history section in the Excel Export lesson for more information.
Q: Is there a size limit to exports?
A: No, there are no size limits to exports.
Q: Can I schedule exports automatically?
A: Yes, you can configure customized automatic exports using Viedoc's web API. Please see the Exporting data via Viedoc's web API for more information.
Q: How is missing data handled?
A: Viedoc's approach to missing data is to leave it blank. The system does not use "N/A" or "missing." Both unconfirmed and confirmed missing data are included when exporting queries and query history.
Q: Why does the export seem stuck at a certain percent?
A. Sometimes exports (especially PDF exports of large studies) can take a take a longer time to complete and appear "stuck". If you log out, the export will continue in the background. Please do not make multiple requests for the same export. If the export fails with an error message, please contact Viedoc for assistance.
Viedoc uses Microsoft Excel Open Extensible Markup Language (XML) format which is compatible with Excel version 2007 and later.
When selecting Microsoft Excel as Output format in the Data export page, you have different options for grouping data and for the layout, as described in the following sections.
For general information about data export in Viedoc, see Exporting data.
Note! Since the maximum number of rows supported for Excel is 1048576, in case data in a sheet exceeds this number, data will be split into multiple sheets.
The Excel export contains the following sheets:
Note! If the Output IDs (OID) and Output labels have been defined in the study design, these are shown in the Excel/CSV/SAS export. If the Output IDs (OID) and Output labels are left undefined (blank) in the study design, then the configured Item ID and label is used. For more information about the item settings in the study design, see Outputs and Validation.
The table below lists which sheets are included in the Excel file, depending on the selected Grouping and Layout:
| Group data by form | Do not group data | |
|---|---|---|
| one row per subject |
|
|
| one row per activity |
|
|
| one row per item |
|
|
The headers are always represented by the first two rows in a sheet, as illustrated in the following image:
1. Human-readable format
2. Machine-readable format
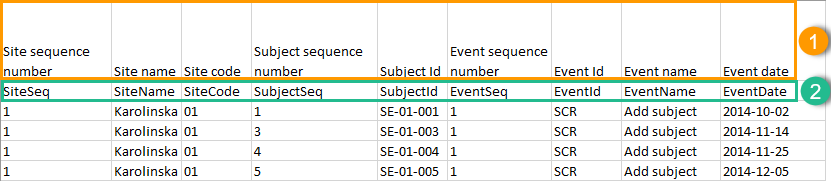
An item that was changed within a new/revised study design version will have a "__n" suffix added, where n is incremented for each study design version where the respective item was changed:
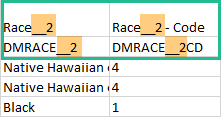
Under Type of data, you can filter the data to be exported. If you filter data for Signed data, Not signed data, SDV performed or NA, or SDV pending, certain cells in the data sheets in the exported Excel file may appear empty. The data rows that contain empty cells due to the filtering are marked by an “X” in the last column of the data sheets that is named Empty cells on row may be due to export filter.
For example, let's say that we have an Add Patient event, and the Date of Birth is one of the data entered during this event. For a particular subject, this data was entered, signed by the Investigator, and afterwards modified, but not signed after the change. We perform an export that includes only the signed data, as illustrated in the image below:
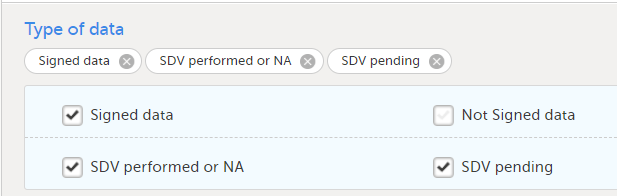
The value of the Date of birth field that was recently changed and not signed is not included in the export (the cell appears empty). The data row containing the empty cell is marked by a "X" the Empty cells on row may be due to export filter, as shown below:
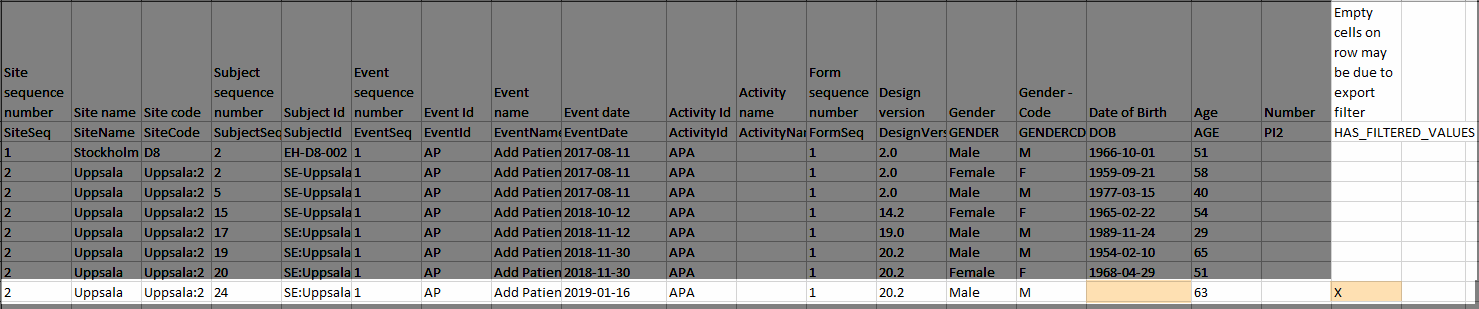
You can select whether the data should be grouped by form or not, from the Data grouping dropdown list.
Note! The data grouping is available only for the Excel/Comma-Separated Values (CSV) output.
When grouping the data by form, a separate sheet is created for each form. The sheet name is the Form ID, as set in the study design (in Viedoc Designer).
In each form sheet, the first columns (to the left) are the same for all the forms and provide information about the site, subject, event, activity and design version:
| Column | Description |
|---|---|
| Site Sequence number | Counter that identifies the site globally within the study. |
| Site name | The site name, as set in Viedoc Admin. |
| Site code | The site code, as set in Viedoc Admin. |
| Subject sequence number | Counter that identifies the subject within the site. |
| Subject Id | The Subject ID, in the format configured in Viedoc Designer. The Subject ID is the subject identifier displayed in Viedoc Clinic on the subject card, subject details page, and so on. |
| Event sequence number | Counter that identifies the event within the sequence of events for the same subject. |
| Event Id | The event ID, as set in the study design (in Viedoc Designer). |
| Event name | The event name, as set in the study design (in Viedoc Designer) and displayed in Viedoc Clinic. |
| Event date | The event date, as set in Viedoc Clinic when the event is initiated. |
| Activity Id | The activity ID, as set in the study design (in Viedoc Designer). |
| Activity name | The activity name, as set in the study design (in Viedoc Designer) and displayed in Viedoc Clinic. |
| Form sequence number |
Counter that identifies the instance of the respective form within the respective activity. This is mostly used for repeating forms. For non-repeating forms, this is "1". If a form is reset and then saved again the new form has sequence number "2", and so on. Form sequence number increases one step every time reset/initiate occurs. |
| Subject form sequence number | Counter that uniquely identifies the instance of a specific form on a subject level, that is, it starts with 1 and it is incremented each time a new instance of the form is created for that subject. |
| Origin Subject form sequence number | For a copied form instance, it identifies the form instance from which data was copied for the first time. For the first instance of the form (that is, not copied) it gets the value of the SubjectFormSeqNo. |
| Source Subject form sequence number | For a copied form instance, a counter that identifies the source of a copied form instance (the form instance the data was copied from). It gets the value of the SubjectFormSeqNo from which the form instance was copied. For the first instance of the form (not copied) it is empty (null). |
| Design version | The design version used at the time of data edit for the respective form. |
| Item Group sequence number | For study designs with repeating item groups: Counter that uniquely identifies the instance of a specific form item group on a subject level, that is, it starts with 1 and it is incremented each time a new instance of the form item group is created for that subject. |
The example in the image below shows an export with the default settings for the Layout, that is, 1 row per activity.
The following columns are specific to each form, one column for each item in the respective form. Each column has the <Item name>, as set in the study design (in Viedoc Designer) as column header.
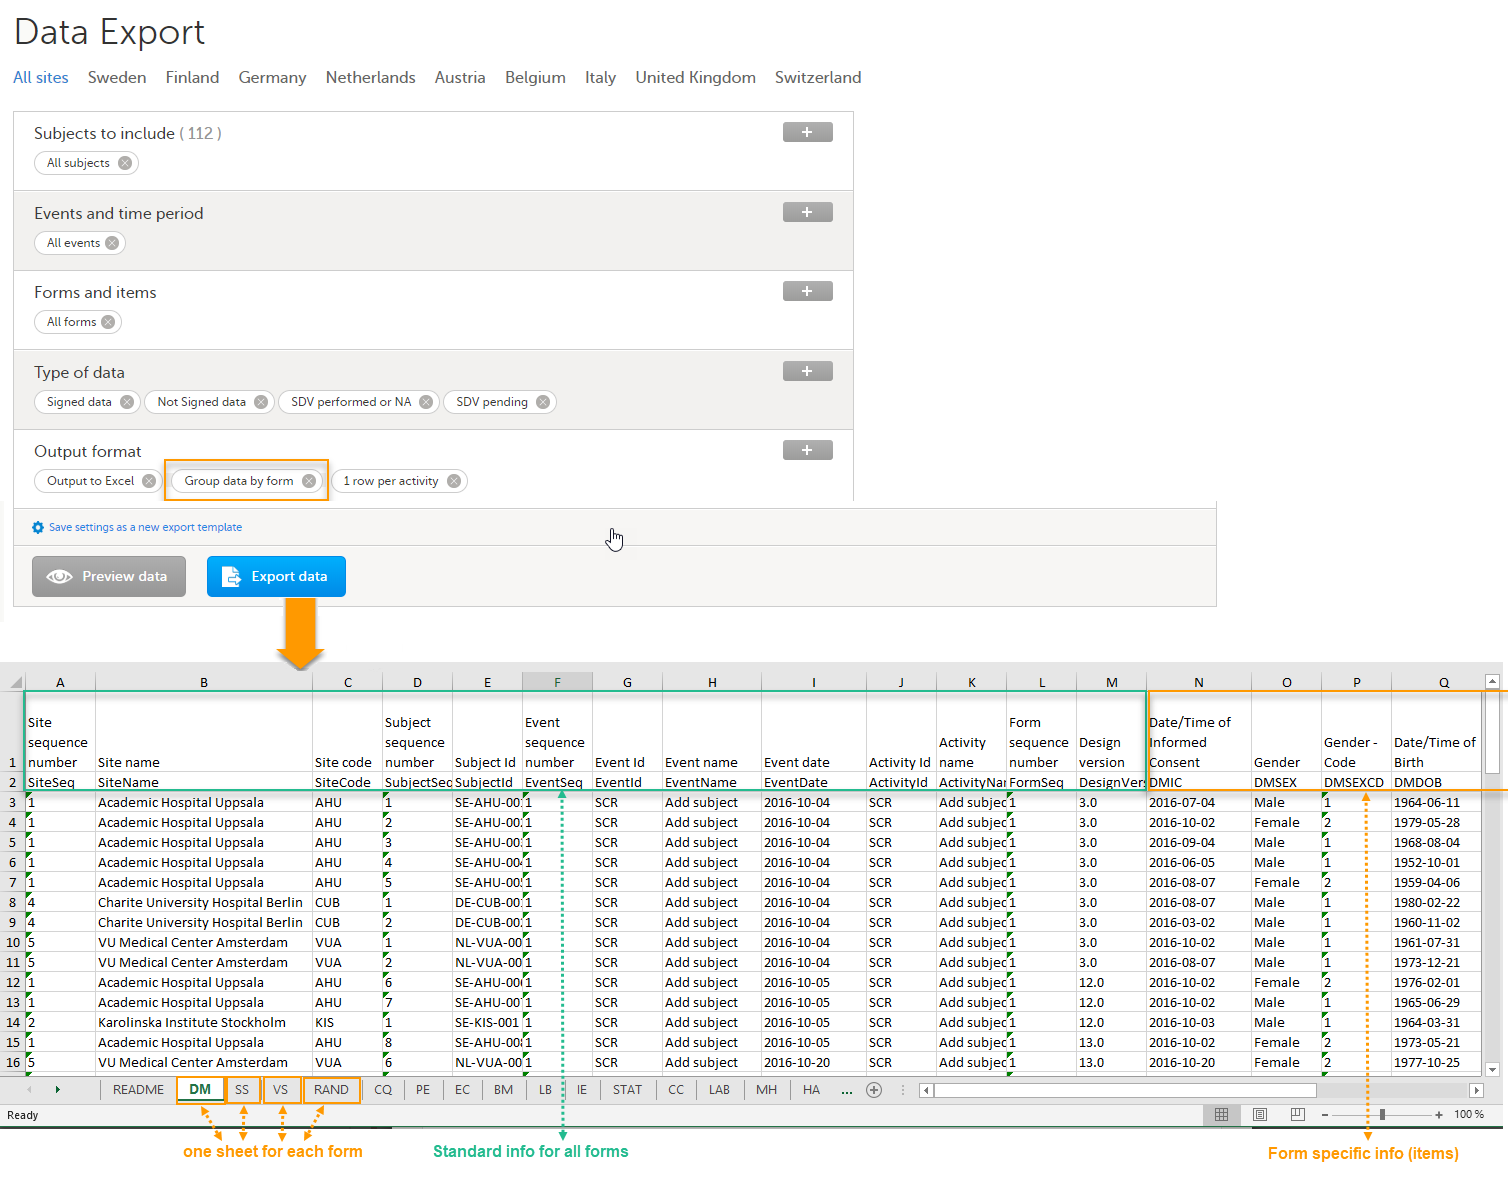
For study designs which include repeating item groups, when the group data by form and one row per activity layout options are selected, there is also the option to export repeating item groups as a separate form/file for the Excel/CSV export. This layout option is selected by default:
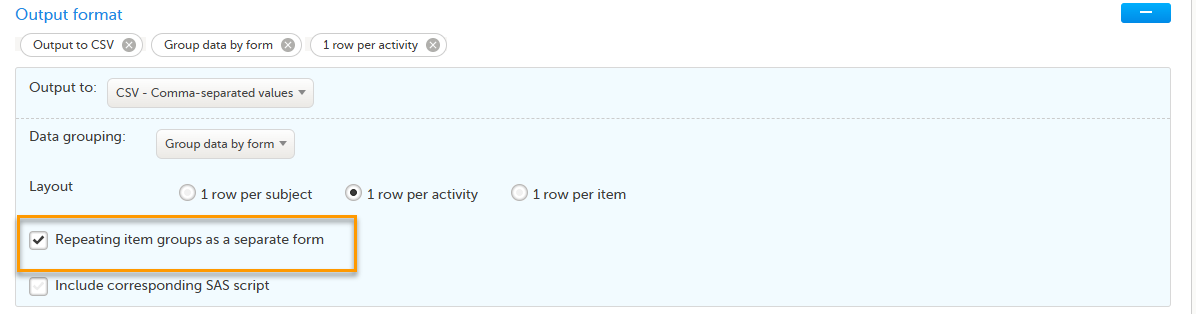
CSV export for repeating item groups uses the same format as the Excel export, so that each repeating item group is generated as a separate CSV file.When multiple CSV files are generated, they are bundled into a ZIP archive.
For the CSV export, the repeating item group structure is supported in the option to Include corresponding SAS script. For more information about exporting data from Viedoc that is formatted for SAS, see Exporting for SAS.
If you choose not to group the data, then all data from all forms will be exported in the same sheet (Data) of the output file.
The example in the image below shows an export with the default settings for the Layout, that is, 1 row per activity.
In the Data sheet, the first columns (to the left, marked in green) are the common for all the forms and provide information about the site, subject, event and activity.
The following columns (to the right, marked in orange) contain form-specific information for all the forms within the event. For each of the forms, the following columns are added:
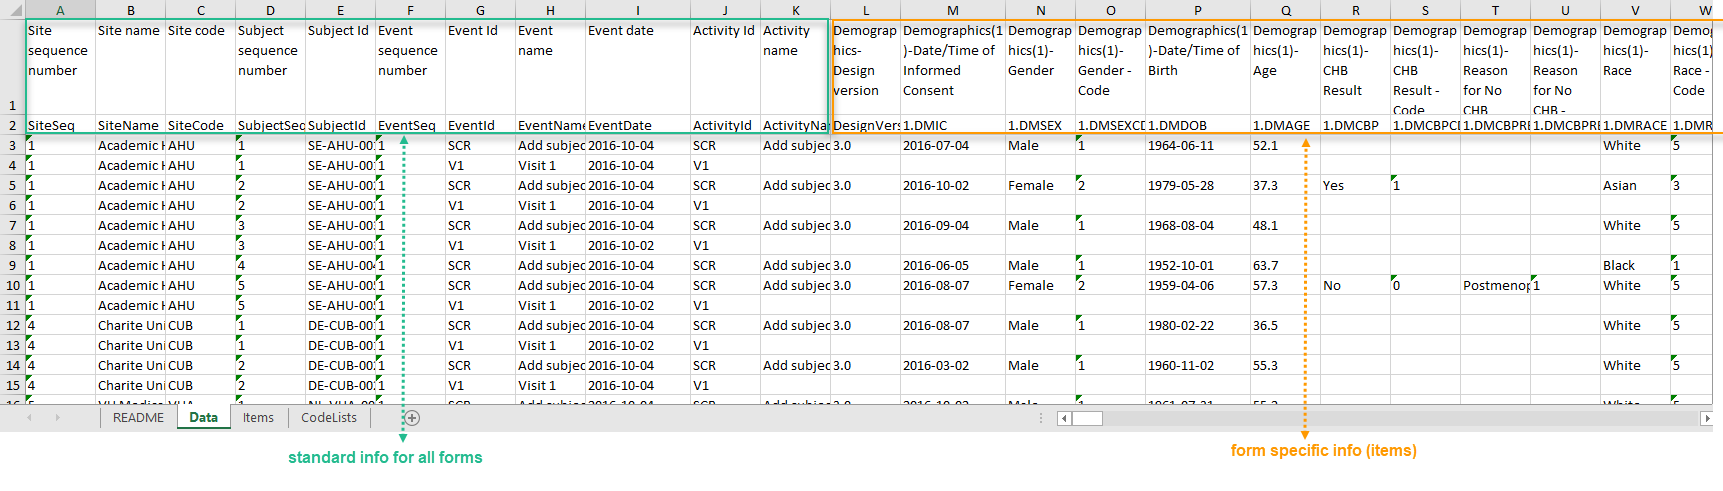
In the Layout section, you can select whether the data should be organized in the output file as:
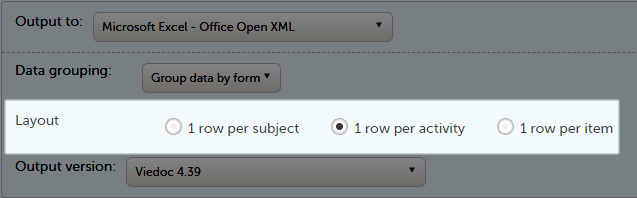
The output in this case will look as shown in the below image. The example shows an export performed with all the default settings except for the Layout which is set to 1 row per subject.
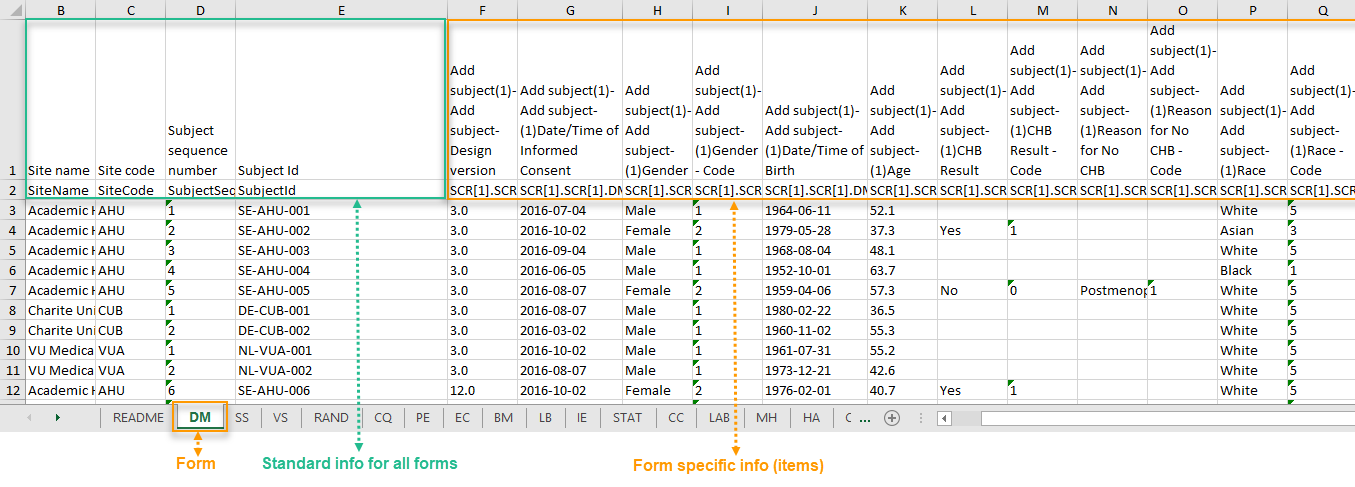
There is one sheet for each form, as the default setting is to Group data by form.
There is one row per subject, that is, one row for each SubjectID (that uniquely identifies the subject).
The first columns provide information on the site and subject:
| Column | Description |
|---|---|
| Site name | The site name, as set in Viedoc Admin. |
| Site code | The site code, as set in Viedoc Admin. |
| Subject sequence number | Counter that identifies the subject within the site. |
| Subject Id | The Subject ID, in the format configured in Viedoc Designer. The Subject ID is the subject identifier displayed in Viedoc Clinic on the subject card, subject details page, and so on. |
The following columns are the item-specific values, one set as described below for each item in the exported data. The order of the items is by event, as set in the study workflow.
Note! The columns Event sequence number, Event Id, Activity Id, Form sequence number, Subject form sequence number, Origin Subject form sequence number, and Source Subject form sequence number are not included when you have selected 1 row per subject.
The output in this case will look as shown in the below image. The example shows an export performed with all the default settings except for the Layout which is set to 1 row per activity.
There is one sheet for each form, as the default setting is to Group data by form.
The data is grouped so that, for each subject (1), there is one row for each activity (2).
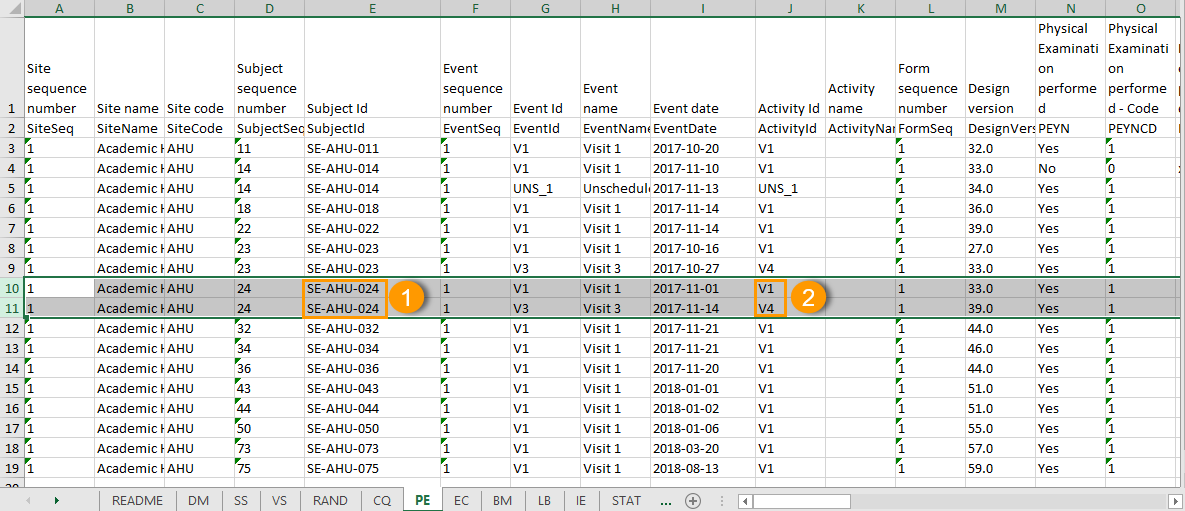
All checkbox responses for an activity are exported within a single row, with each code list option occupying distinct columns. The items that have a code list assigned are output to an additional row with the ID suffixed with "CD", for the code.
For each code list option, two columns are included: one for the label and one for the code value. Column headers use the item's OID and Export Label, each suffixed with a 1-based index (for example, CHECKBOXOID_LABEL1, CHECKBOXOID_LABEL1CD). Only the selected code list values are populated in the corresponding columns. Unselected options are left empty.
The output in this case will look as shown in the below image. The example shows an export performed with all the default settings except for the Layout which is set to 1 row per item.
There is one sheet for each form, as the default setting is to Group data by form.
The data is grouped so that there is one row for each item (3) within an activity (2) for a subject (1).
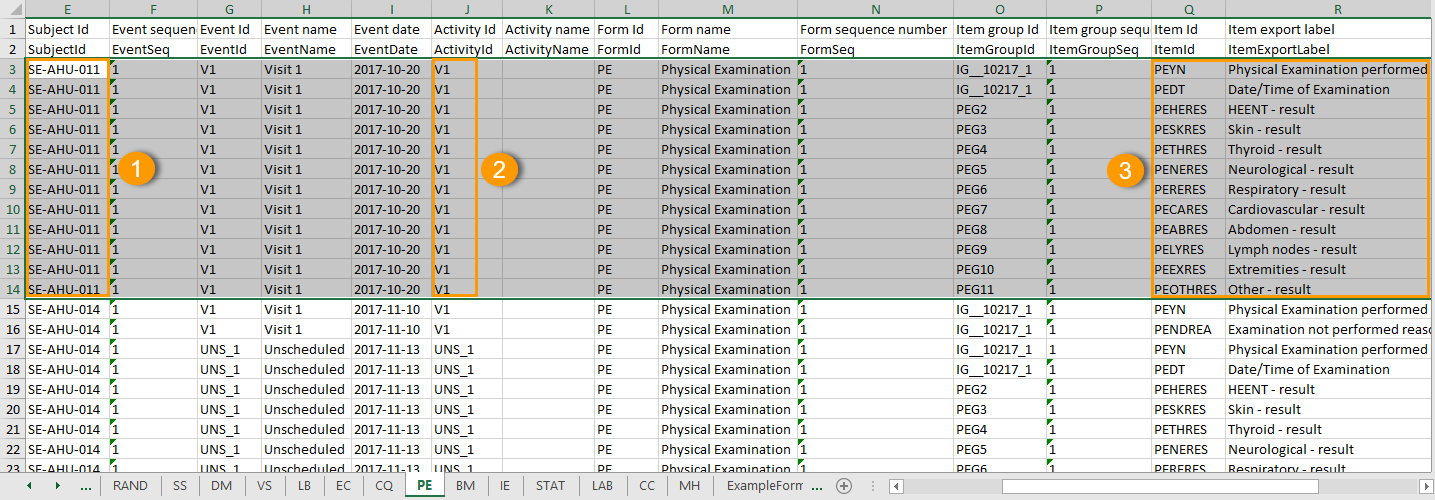
The data is sorted by: site, subject, event date, event repeat key, form repeat key, form ID, item group ID, item ID.
If the Include history option is selected (see following section), the data is ordered from the oldest to the current item data (that is, by the Edit sequence number).
When selecting 1 row per item, the option to Include history becomes available. If selected, the edit history information (audit trail) will be included in the exported output (that is, the information shown in Viedoc Clinic on form level when selecting Show history).
The following information (columns) is added for each entry in the output file:
The items belonging to a reset or deleted form/event/subject are included as well in the export, together with a full history that gives the reason for resetting or deleting the form/event/subject.
Checkbox items are output as one row per code list item. The items that have a code list assigned are output to an additional row with the ID suffixed with "CD", for the code.
All code list items are included in the output, regardless of whether they were selected or not.
The Item Id column contains the item's Object Identifier (OID) with a 1-based index appended, as illustrated in the following image:
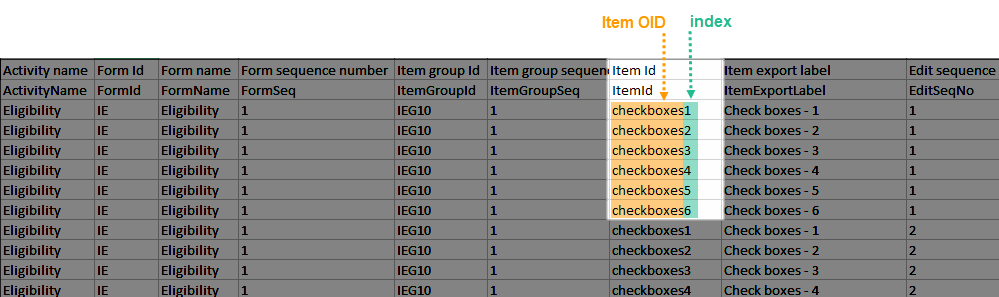
The Item Export Label column similarly includes the Export Label with the same 1-based index.
Two columns are generated per code list item: one for the code label and one for the code value. If a code list value is selected, its corresponding value appears in these columns. Otherwise, they may remain empty.
If the option to Include history is selected, then the code list items are ordered by the time of data entry (that is, by the Edit sequence number).
When reference ranges are used for a laboratory form, the laboratory name and the laboratory code are included and the following two columns are added:
SCOPE_XXX and SCOPE_XXXCD (where XXX is the numeric value)
Form link items can be organized in the Output format as:
Selecting 1 row per activity generates the output as shown in the image below. The exported file contains two columns per linked form instance, the Data column and the Identifier column, (the header is labelled Identifier).
In the example below:
 There are also two header rows in the output:
| Header rows, one row per activity | |
|---|---|
| Row 1: Data column | Item Label, Counter of the selected link starting at one |
| Row 1: Identifier column | Item Label, Counter of the selected link starting at one, Identifier |
| Row 2: Data column | Item ID, Counter of the selected link starting at one |
| Row 2: Identifier column | Item ID, Counter of the selected link starting at one, ID |
Selecting 1 row per item generates the output as shown in the image below. The exported file contains two additional columns with the headers Item value and Item code, and one row per linked form instance.
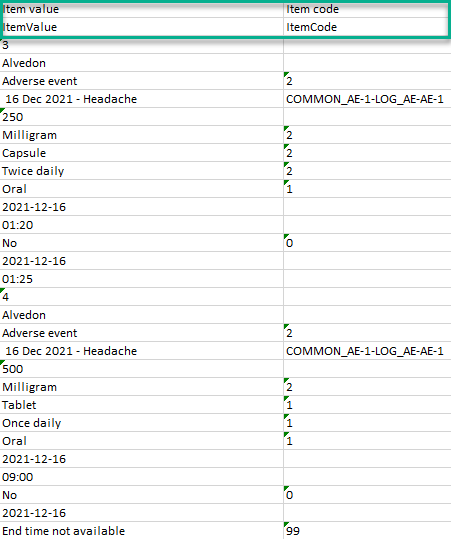
Note! In the export preview the form identifier column is excluded by default. The order the form link item was added (time of data entry) is followed in the export.
Selecting 1 row per subject generates the output as shown in the image below. The exported file adds two columns per linked form instance to the exported file, the Data column and the Identifier column:

There are also two header rows in the output:
| Header rows, one row per subject | |
|---|---|
| Row 1: Data column | Event Label (event counter), Activity label (activity counter), Item label (counter of the selected link.) |
| Row 1: Identifier column | Event Label (event counter), Activity label (activity counter), Item label (counter of the selected link), Identifier |
| Row 2: Data column | Event ID (event counter), Activity ID (activity counter), Item ID (counter of the selected link.) |
| Row 2: Identifier column | Event ID (event counter), Activity ID (activity counter), Item ID, (counter of the selected link), ID |
Recurring events are identified in the export output by the StudyEventRepeatKey.
The image illustrates the form Vital Signs in the Excel export output. The form is used in three events (Visit 1, Visit 2 and Visit 3), of which Visit 3 is a recurring event. The four instances of Visit 3 are identified by the StudyEventRepeatKey that is listed in the Event sequence number (EventSeq) column:
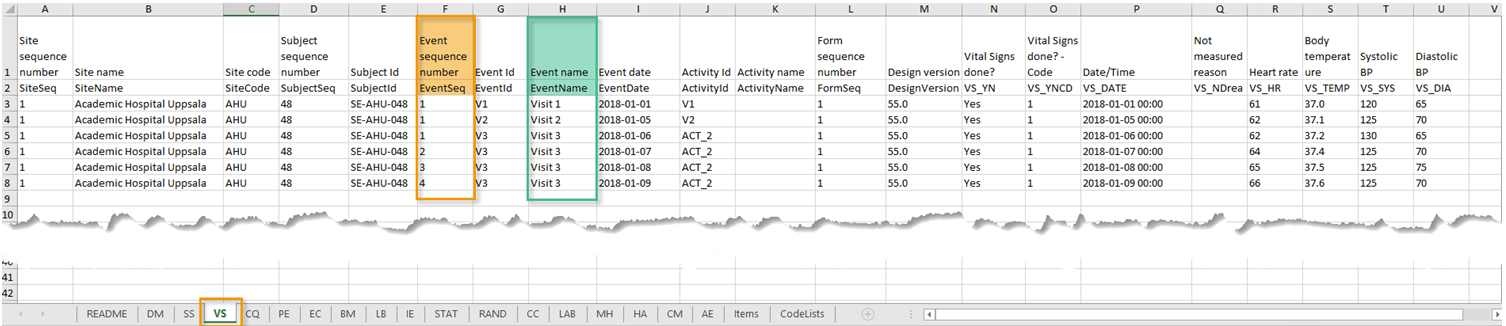
Note! Support for recurring events has been added in Viedoc release 4.39. That means that if you would like to export recurring events, you should select Viedoc version 4.39 or later in the Output version dropdown menu under Output format.
Repeating forms are identified in the export output by the FormRepeatKey.
The image illustrates the repeating form Lab in the export to Excel. The instances of the form are identified by the FormRepeatKey that is listed in the Form sequence number (FormSeq) column:

Note! Support for repeating forms has been added in Viedoc release 4.39. That means that if you would like to export repeating forms, you should select Viedoc version 4.39 or later in the Output version dropdown menu under Output format.
Repeating item groups are identified in the export output by the ItemGroupSeq . The instances of the repeating item group are identified by the ItemGroupSeq number that is listed in the Item group sequence number column:
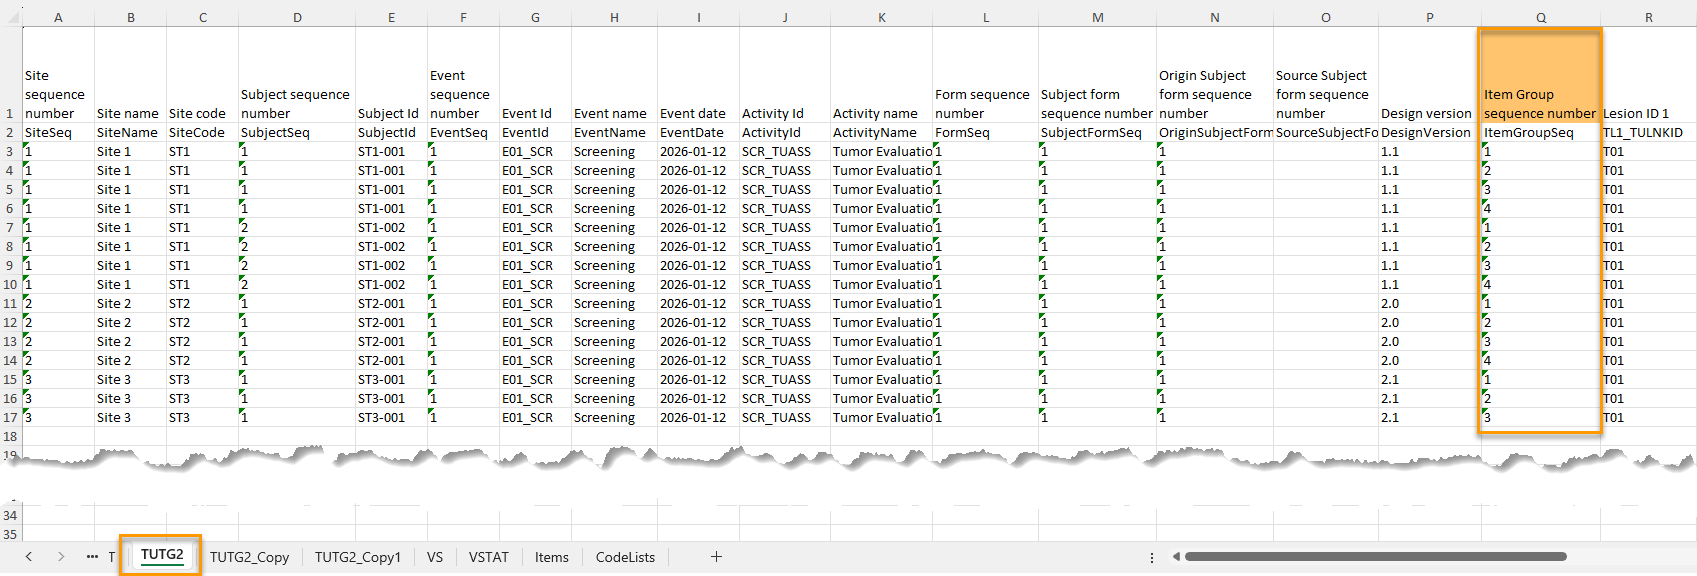
The following form sequence numbers are used to make it easier to track different form instances at subject level, which are useful especially for the form instances initiated by copying the data from previous event.
FormRepeatKey: Counter that identifies the specific instance of a repeating form within a specific activity. This is available in the export output for Viedoc output version 4.39 and onwards.SubjectFormSeqNo: Counter that uniquely identifies the instance of a specific form on a subject level, that is, it starts with 1 and it is incremented each time a new instance of the form is created for that subject. This is available in the export output for Viedoc output version 4.51 and onwards.OriginSubjectFormSeqNo: For a copied form instance, it identifies the form instance from which data was copied for the first time. For the first instance of the form (that is, not copied) it gets the value of the SubjectFormSeqNo. This is available in the export output for Viedoc output version 4.51 and onwards.SourceSubjectFormSeqNo: For a copied form instance, a counter that identifies the source of a copied form instance (the form instance the data was copied from). It gets the value of the SubjectFormSeqNo from which the form instance was copied. For the first instance of the form (that is, not copied) it is empty, that is, null. This is available in the export output for Viedoc output version 4.51 and onwards.The example below illustrates how the values for these sequence numbers are assigned. The demo form used is set as repeatable and copyable and is included in Visit 1, Visit 2 and Visit 3.
We perform the following actions in Viedoc Clinic:
| 1 | Initiate Visit 1 and fill in three instances of the Demo form, these instances will get the sequence numbers as illustrated below: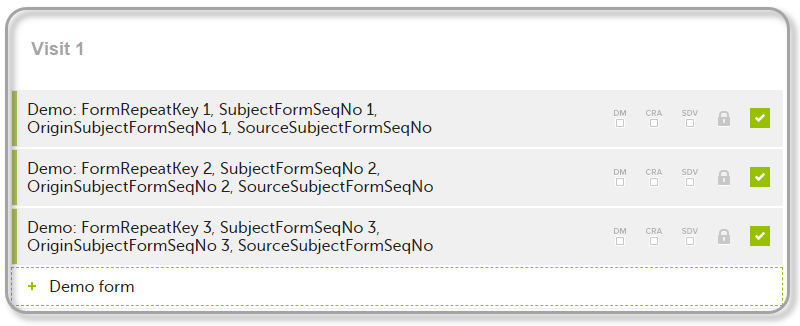 |
| 2 | Initiate Visit 2. Demo form will be available to be initiated by copying data from one of the previously filled-in form instances within Visit 1, so all the three instances will be shown as ghost forms: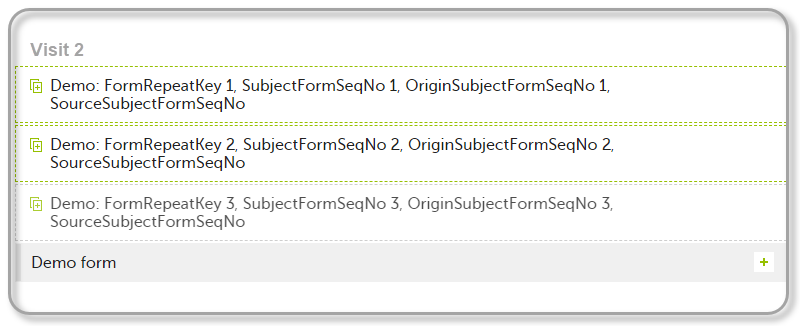 |
| 3 | Create an instance of Demo form within Visit 2 by copying the data from the third instance of the form filled in within Visit 1. This will result in the new form instance getting the sequence numbers as illustrated below: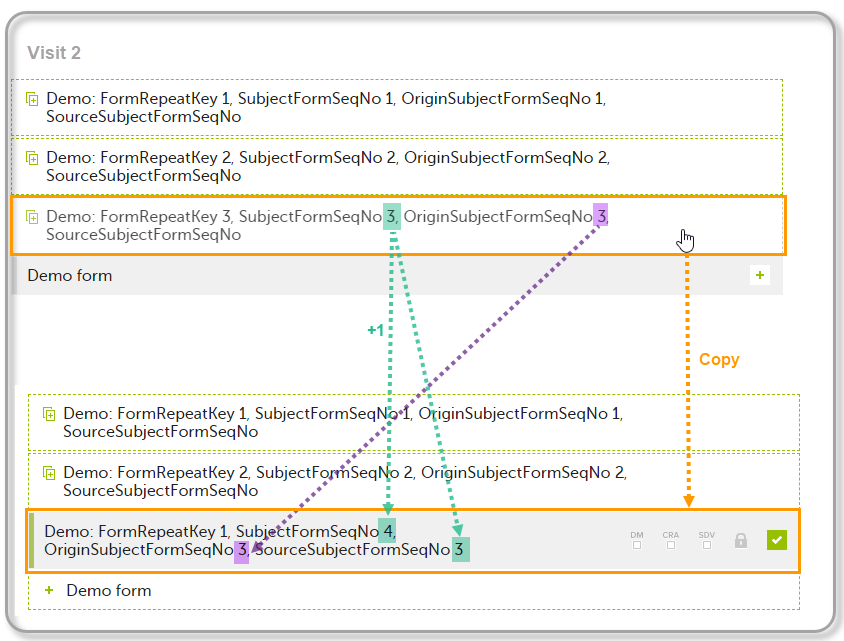 |
| 4 | Initiate Visit 3. Demo form will be available to be initiated by copying data from one of the previously filled-in form instances within Visit 1 and Visit 2, as below: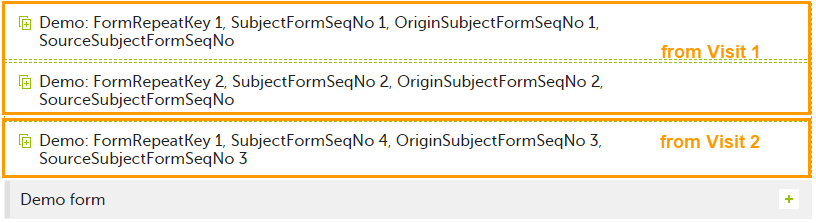 |
| 5 | Create an instance of Demo form within Visit 3 by copying the data from the form filled in within Visit 2. This will result in the new form instance getting the sequence numbers as illustrated below: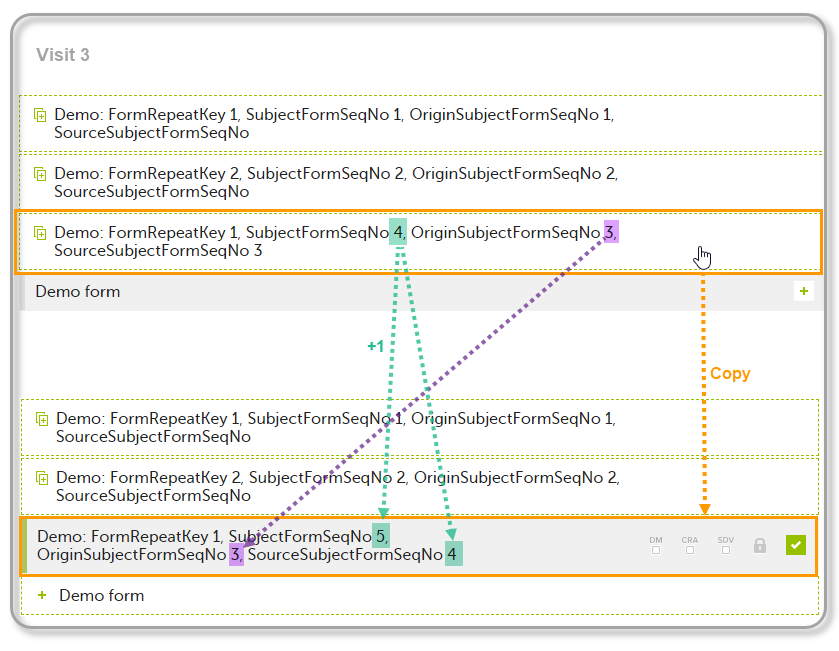 |
These sequence numbers are available to be used within expressions only to get the value of the sequence number for a specific form instance, that is, by using {SubjectFormSeqNo}, {OriginFormSeqNo}, {SourceFormSeqNo}.
In the above example, the form Summary format was configured by using these sequence numbers as below:
Form Repeat Key {FormRepeatKey}, SubjectFormSeqNo {SubjectFormSeqNo}, OriginFormSeqNo {OriginFormSeqNo}, SourceFormSeqNo {SourceFormSeqNo}
Notes!
In the excel export output, these form sequence numbers allows to track, for the form instances that were initiated by copying data from previous events, where the data originates from, as below:
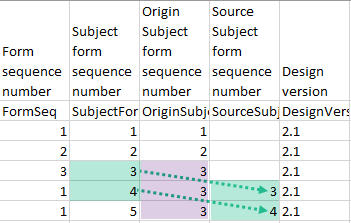
Analyzing the values of the form sequence numbers, only the form instances that were initiated by copying the data from previous visits have values populated in the Source Subject form sequence number column, that is, the last two rows in the example. The data was copied from the form instance having the same Subject form sequence number value, highlighted in green in the above image. The form instance that the data was copied for the first time is identified by the value of the Origin Subject form sequence number, that is, "3" in our example.
When choosing PDF as output format, you have the following options:
Notes!
One .zip file is downloaded for each PDF export performed.
This section describes the structure of the exported PDF file.
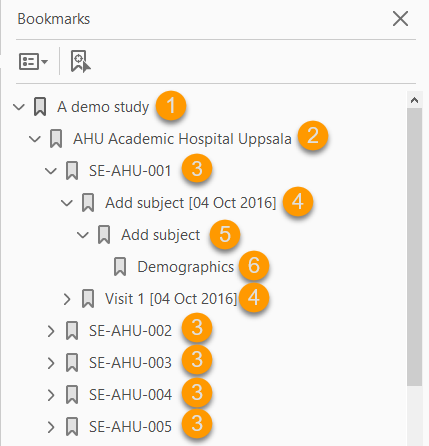
The file is structured as follows:
1. A study summary on the first page.
2. A site summary page.
3. One separate sub-section for each subject in the respective site.
4. For each subject, one sub-section for each event.
5. For each event, one sub-section for each activity.
6. For each activity, one sub-section for each form. The latest version of the form PDFs are included here. See also Audit trail and Form History section in Entering/editing data.
The meaning of the signature in Viedoc is included on the last page.
Note! If the number of forms for a site exceeds 1000, the system splits the archive into one PDF file per subject and stores them in a zip file.
The first page provides a short summary, as illustrated in the image and explained below:
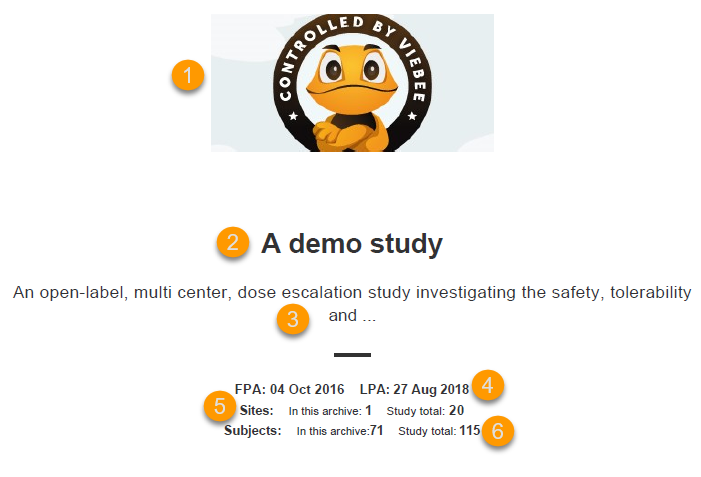
1. The study logo image, if any, as set in Viedoc Admin, under Study Settings.
2. Study name, as set in Viedoc Admin, under Study Settings.
3. Study description, as set in Viedoc Designer.
4. The dates for:
5. The number of sites:
6. The number of subjects:
The site summary page provides a summary of the site, as illustrated in the image and explained below:
1. The study name, as set in Viedoc Admin.
2. The site name, as set in Viedoc Admin.
3. The site code, as set in Viedoc Admin.
4. The country for the respective site, as set in Viedoc Admin.
5. The site time zone, as set in Viedoc Admin.
6. Date of First Patient Added (FPA) to the site, in the site timezone.
7. Date of Last Patient Added (LPA) to the site, in the site timezone.
8. Number of subjects from the site included in the export / total number of subjects in the site (this number will exclude deleted subjects if Exclude deleted subjects/events/forms is checked).
Following the site summary page, comes a Contents list of the subjects included in the export for the respective site, with the Subject ID and corresponding pages. After that, comes one sub-section for each subject, described in the next topic.
The subject summary page provides the following information:
1. The study name and site name, as set in Viedoc Admin.
2. Subject ID in the format set in Viedoc Designer.
3. The date and time the subject was added.
4. The number of Forms filled in / the total number of forms for that subject.
5. A table of Contents with a list of all the events that contain data for the respective subject, the event status and the page numbers where the data related to the respective event can be found.
The event summary page provides the following information:
1. The study name and site name, as set in Viedoc Admin.
2. Subject ID in the format set in Viedoc Designer and the event name together with the date when it was initiated.
3. A table of Contents with a list of all the forms within the respective event for Scheduled and Unscheduled events, providing the following information:
For Common Events, each entry will have its own Event summary page.
For each form, the form PDF is included, in the same format as for the form history pdf file. For details, see Form history PDF in Entering/editing data.
The forms in the PDF are sorted by these characteristics:
The following example illustrates the sort order.
Suppose the study design looks like this:

For the event E01, all forms belong to the same activity. This means that the order of the forms in the PDF will always be like this:
For the event E02, there are three activities. This means that if any form from A02 gets saved first, then any form from A01 gets saved second, and then any form from A03 gets saved third, the order of the forms will be:
In other words, the order of forms for event E02 for this specific example will be like this:
To include the query information in the exported file, you need to select Queries under Type of data in the Data Export page.
The Queries can be exported to the following export output formats:
This lesson describes how and where to find the query related information in the ODM export.
AssociationIn the ODM export output file, the queries are stored under the Association tag.
As the query history is always included in the ODM export, there is an Association entry for each query state (for example if there is one query that has been through 3 different states namely raised, resolved and approved, there will be 3 different Association entries).
Note! All association elements are sorted by the AuditRecord datetime stamp.
Each Association links an item (identified by the KeySet, see the description below) to a set of properties related to a specific query wrapped under the Annotation tag (see detailed description below).
The image illustrates an example of an ODM export output, with the information within the Study tag at the top of the image and a query information under the Association tag at the bottom of the image:
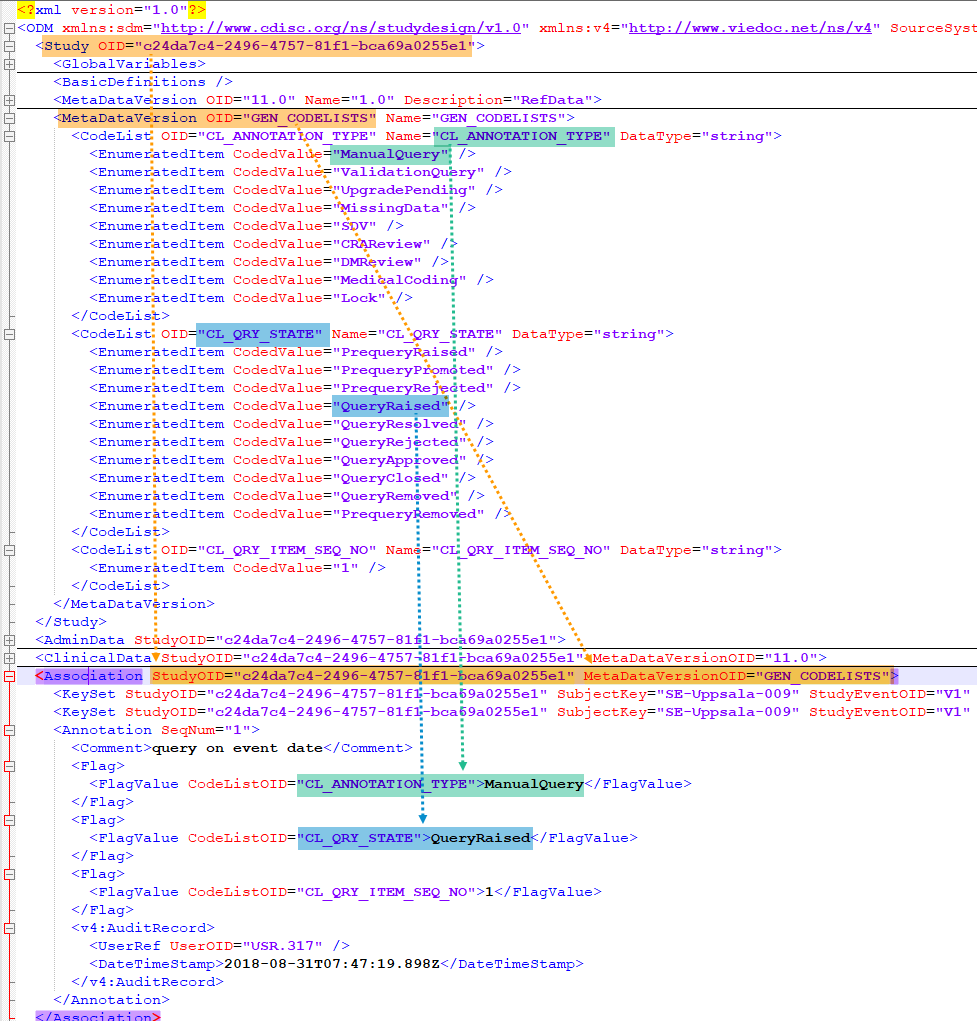
For each Association entry, the following information is provided:
StudyOID and the MetaDataVersionOID indicate where the respective information is defined.KeySet is generally used to identify the start and end of the annotated "link". For queries, both key sets are identical, as they identify the same item, namely the item the respective query corresponds to. It contains the following:
StudyOIDSubjectKeyStudyEventOIDStudyEventRepeatKeyFormOIDFormRepeatKeyItemGroupOID - applicable only for queries on item level.ItemOID - applicable only for queries on item level.AnnotationThe Annotation tag wraps the specific information of the respective query, as described below. Since there is only one Annotation within an Association, the SeqNum is always "1".
CommentThe Comment value depends on the query state and is set as follows:
If the query state is QueryRaised or PrequeryRaised, the query text is specified here.
If the query state is QueryRejected or QueryResolved, the resolution text is specified here, as in our example "I am confirming the data".
No comment element is present for other cases than the ones mentioned above.
"CL_ANNOTATION_TYPE"CodeListOID="CL_ANNOTATION_TYPE" indicates the annotation type, for example "ManualQuery":
All the possible annotation types can be found under the Study tag, under the respective StudyOID and MetaDataVersionOID, respectively:
"ManualQuery""ValidationQuery""UpgradePending""MissingData""SDV""CRAReview""DMReview""MedicalCoding""Lock"Of all the above, only the following refer to queries:
"ManualQuery""ValidationQuery""UpgradePending""MissingData""MissingData" annotation type is used both for unconfirmed missing data and missing data, there is no distinction between those in the ODM export."CL_QRY_STATE"CodeListOID="CL_QRY_STATE" indicates the query state, for example "QueryRaised.
All the possible query states can be found under the Study tag, under the respective StudyOID and MetaDataVersionOID, respectively:
"PrequeryRaised""PrequeryPromoted""PrequeryRejected""QueryRaised""QueryResolved""QueryRejected""QueryApproved""QueryClosed""QueryRemoved""PrequeryRemoved"For more details about the query and pre-query states, see Queries overview.
"CL_QRY_ITEM_SEQ_NO"CodeListOID="CL_QRY_ITEM_SEQ_NO" indicates the sequence number of the respective query for the linked item. This is used to identify the query, meaning that all the Annotation entries corresponding to different states of the same query, will have the same value of CodeListOID="CL_QRY_ITEM_SEQ_NO" and same KeySet.
v4:AuditRecordv4:AuditRecord contains the audit record for the respective annotation.
Since the same query can go through many query states, there can be many Annotations with the same value of CodeListOID="CL_QRY_ITEM_SEQ_NO"and same KeySet. In order to get the latest entry for the same query, you can sort as follows:
CodeListOID="CL_QRY_STATE", as listed above.The Queries can be exported to the following export output formats:
To include the query information in the exported file, you need to select Queries under Type of data in the Data export page. When selecting to include Queries, the Query history option becomes available.
Depending on if the Query history is included in the export or not, the information in the export output file is grouped as follows:
In the Excel export output, considering as an example the default settings under Output format:
...the query information is grouped in a separate sheet of the excel file, called Queries.
The columns provide information on the item that the query was raised on, followed by the query specific information, as illustrated in the image (the image shows the query-specific information only) and listed in the following table:

| Column name | Description |
|---|---|
| Query study sequence number |
Counter that identifies the query globally within the whole study. This field is empty for the Unconfirmed missing data. |
| Columns that identify the item | |
| Site sequence number | Counter that identifies the site globally within the study. |
| Site name | The site name, as set in Viedoc Admin. |
| Site code | The site code, as set in Viedoc Admin. |
| Subject sequence number | Counter that identifies the subject within the site. |
| Subject Id | The Subject ID, in the format configured in Viedoc Designer. The Subject ID is the subject identifier displayed in Viedoc Clinic on the subject card, subject details page, and so on. |
| Event sequence number | Counter that identifies the event within the sequence of events for the same subject. |
| Event Id | The event ID, as set in the study design (in Viedoc Designer). |
| Event name | The event name, as set in the study design (in Viedoc Designer) and displayed in Viedoc Clinic. |
| Event date | The event date, as set in Viedoc Clinic when the event is initiated. |
| Activity Id | The activity ID, as set in the study design (in Viedoc Designer). |
| Activity name | The activity name, as set in the study design (in Viedoc Designer) and displayed in Viedoc Clinic. |
| Form Id | The form ID, as set in the study design (in Viedoc Designer). |
| Form name | The form name, as set in the study design (in Viedoc Designer) and displayed in Viedoc Clinic. |
| Form sequence number | Counter that identifies the instance of the respective form within the respective activity. This is used for the repeating forms. For non-repeating forms, this is always "1". |
| Item Id | The item ID, as set in the study design (in Viedoc Designer). |
| Item Name | The item name, as set in the study design (in Viedoc Designer) and displayed in Viedoc Clinic. |
| Query specific information | |
| Query item sequence number | Counter that identifies the query within a sequence of queries for the same item. |
| Raised on |
Specifies if the query was raised on an item or on the event date:
|
| Query type |
Specifies the query type, depending on how it was raised:
|
| Range check OID | Only for automatically raised item queries (i.e. Query type = Validation and Raised on = Item). The unique Object Identifier (OID) of the edit check that generated the query, as set in Viedoc Designer. |
| Query text | The text of the query. |
| Query state |
Can be one of the following (see also Query overview):
Note! The queries that were automatically closed due to form reset/delete (with status Query Closed) are not included in the export. |
| Query resolution | The resolution text entered when resolving (answering) the query. Not applicable for those changes performed by the system (i.e. User name = System (0)) |
| User name | The name of the user who performed the changes, followed by the user ID in parentheses. Note! For those changes performed by the system (such as validation queries, that are automatically raised by the system) the User name = System (0). |
| Date & time (UTC) | The date and time when the change was performed. |
| User role |
The role of the user who performed the action on the query |
| Query raised by role | The role of the user who raised the query |
This lesson describes how the medical coding information is structured within an Operational Data Model (ODM) file exported from Viedoc.
For general details about data export, see Exporting data.
There is one CL_DICT_TYPE codelist that contains one entry for each dictionary type present in the exported data:

There is one codelist for each dictionary instance present in the exported data, which contains one <ExternalCodeList> element pointing to a specific dictionary version, that specifies:
DictionaryVersionref
There is one codelist with dictionary properties for each dictionary present in the exported data. Each such codelist contains items for each property the dictionary defines:
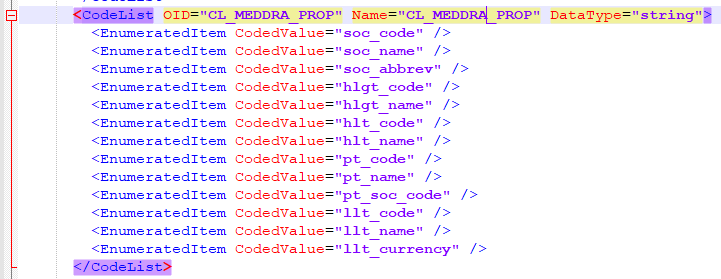
There is one codelist for each dictionary coding scope present in the exported data, specifying:

AssociationFor each medical coding item, there is one <Association> entry.
Each Association links an item (identified by the KeySet, see the description below) to a set of properties related to a specific Annotation (see detailed description below).
KeySetThe KeySet is generally used to identify the start and end of the annotated "link". In this case, both key sets are the same, as they identify the same entity, namely the one the respective action (defined under the Annotation) corresponds to.
The KeySet specifies the following attributes:
StudyOIDSubjectKeyStudyEventOIDStudyEventRepeatKeyFormOID - not applicable for event scopeFormRepeatKey - not applicable for event scopeItemGroupOID - applicable for item group and item scopeItemOID - applicable only for item scopeAnnotationThe Annotation consists of a set of <Flag> elements, and an audit record if the export was set to include the Viedoc extensions.
Flags
1. One flag element for the annotation type, with a <FlagValue> that is always MedicalCoding in this case.
2. One flag element for the dictionary type, with a <FlagValue> set to one of the CL_DICT_TYPE items.
3. One flag for the medical coding scope, with a <FlagValue> set to one of the CL_CODING_SCOPE items.
4. One flag element for the code sequence number, with a set to one of the CL_CODE_SEQ_NO items.
5. One flag element for each dictionary property set, with a <FlagValue> set to the dictionary property codelist (for example CL_MEDDRA_PROP) and a <FlagValue> set to the property value.
AuditRecordThe <v4:AuditRecord> is a Viedoc extension and is included in the output file only if the option to Include extensions was selected at export time.
It contains information on the user ID and the date/time stamp.
In the example image below the user ID = 304:

This lesson describes how the medical coding information is structured within an Excel file exported from Viedoc.
Viedoc Clinic provides two export options related to medical coding: Medical coding and Medical coding history.
To include the medical coding information in the exported file, select Medical coding under Type of data in the Data Export page:
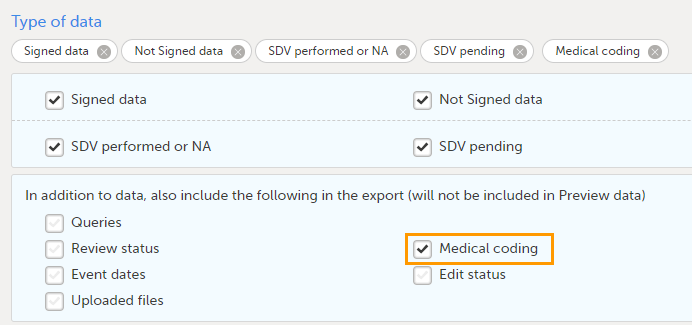
The Medical coding export shows the current coding status.
When you select Medical coding, the Medical coding history option is shown:
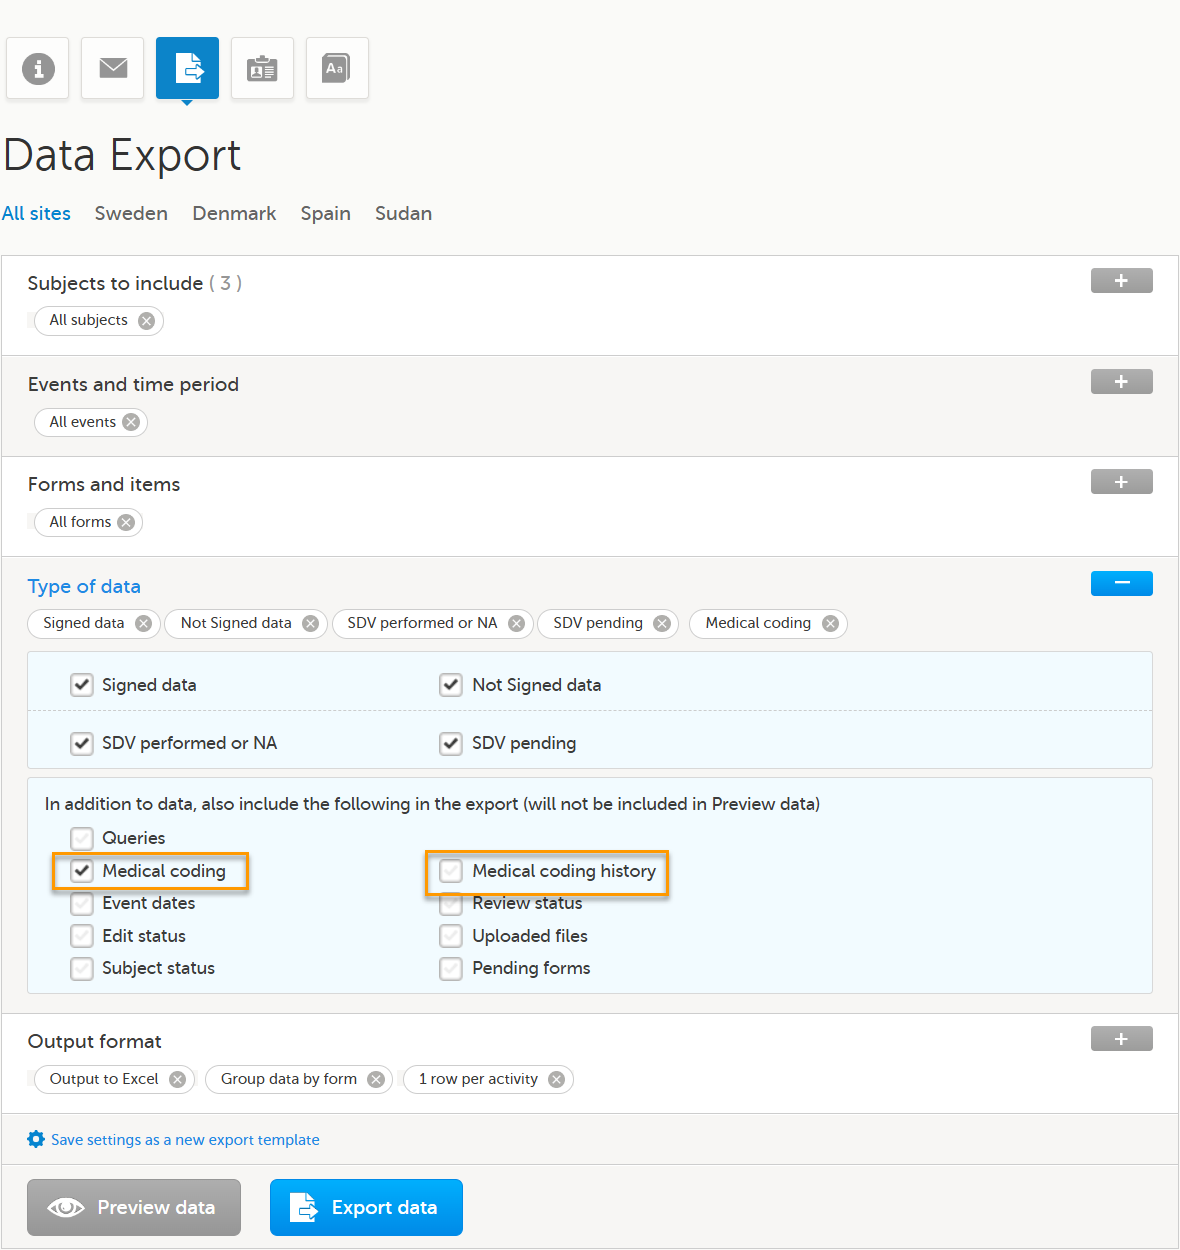
Select the Medical coding history checkbox to include the full audit trail for each coded item in the export.
For general details about data export, see Exporting data.
For more information about medical coding exports, see Exporting the medical coding.
For medical coding, in the Excel export output file, there is one sheet for each dictionary. Only values that have been coded will be present in the export:
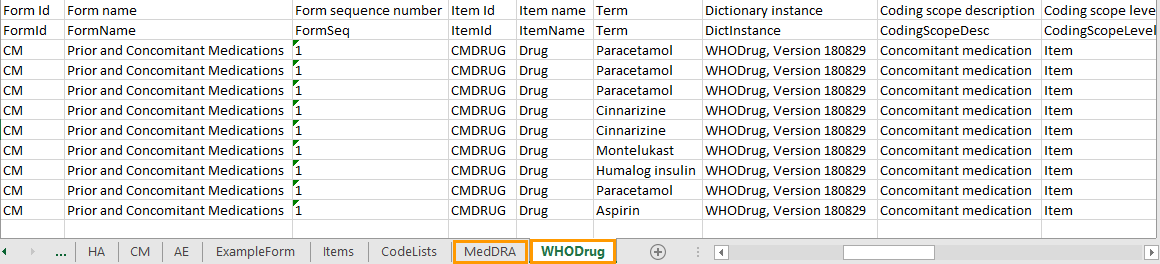
The columns provide information on the item that was coded, followed by the medical coding specific information, as listed in the following table:
| Column name | Description | ||
|---|---|---|---|
| Columns that identify the item | |||
| Site sequence number | A counter that identifies the site globally within the study | ||
| Site name | The site name, as set in Viedoc Admin | ||
| Site code | The site code, as set in Viedoc Admin | ||
| Subject sequence number | A counter that identifies the subject within the site | ||
| Subject Id | The Subject ID, in the format configured in Viedoc Designer. The Subject ID is the subject identifier displayed in Viedoc Clinic on the subject card, subject details page, and so on. | ||
| Event sequence number | A counter that identifies the event within the sequence of events for the same subject | ||
| Event Id | The event ID, as set in the study design (in Viedoc Designer) | ||
| Event name | The event name, as set in the study design (in Viedoc Designer) and displayed in Viedoc Clinic | ||
| Event date | The event date, as set in Viedoc Clinic when the event is initiated | ||
| Activity Id | The activity ID, as set in the study design (in Viedoc Designer) | ||
| Activity name | The activity name, as set in the study design (in Viedoc Designer) and displayed in Viedoc Clinic | ||
| Form Id | The form ID, as set in the study design (in Viedoc Designer) | ||
| Form name | The form name, as set in the study design (in Viedoc Designer) and displayed in Viedoc Clinic | ||
| Form sequence number |
Counter that identifies the instance of the respective form within the respective activity. This is mostly used for repeating forms. For non-repeating forms, this is 1. If a form is reset and then saved again the new form has sequence number 2, and so on. Form sequence number increases one step every time reset/initiate occurs. |
||
| Subject form sequence number | Counter that uniquely identifies the instance of a specific form on a subject level, that is, it starts with 1 and it is incremented each time a new instance of the form is created for that subject. | ||
| Origin Subject form sequence number | For a copied form instance, it identifies the form instance from which data was copied for the first time. For the first instance of the form (that is, not copied) it gets the value of the SubjectFormSeqNo. |
||
| Source Subject form sequence number |
For a copied form instance, a counter that identifies the source of a copied form instance (the form instance the data was copied from). It gets the value of the |
||
| Item Id | The item ID, as set in the study design (in Viedoc Designer) | ||
| Item Name | The item name, as set in the study design (in Viedoc Designer) and displayed in Viedoc Clinic | ||
| Medical coding-specific information | |||
| Term | The coded term | ||
| Dictionary instance | The description of the dictionary instance, as set in Viedoc Admin when uploading the dictionary | ||
| Version | The dictionary version. | ||
| Coding scope description | The coding scope description, as defined in Viedoc Designer | ||
| Coding scope level | The coding scope level, as defined in Viedoc Designer, can be one of the following:
|
||
| Code sequence number | A counter that identifies the code for those values with more than one code | ||
| Dictionary-specific information | |||
|
WHODrug: Note! To align with WHODrug terminology changes planned for 2026, labels in exports containing medical coding have been updated. These updates are available from Viedoc version 4.91.
|
MedDRA:
|
ATC without DDD:
|
IDF:
|
| Interpretation | The medical coder's interpretation of the applied coding value | ||
| Coding operation | Shows the coding operation for each item, for example whether it was coded manually or automatically. | ||
| Coded by user | The name of the user who performed the coding, followed by the user ID in parentheses | ||
| Coded on date (UTC) | The date and time (UTC) when the coding was performed | ||
| Approved by user | The name and ID of the user who approved the items | ||
| Approved on date (UTC) | The date and time (UTC) when the item was approved | ||
|
Medical coding history additional columns |
|||
| In addition to the columns available for Medical coding, the Medical coding history export includes the following columns: | |||
| Audit sequence number (AuditSeqNo) | Indicates the order of audit records for a specific item. The oldest audit record for the item has sequence number 1. The value is not unique within the item. An item with multiple codes will have multiple rows, with one row per code which have the same audit sequence number. | ||
| Audit User (AuditUser) | The name of the user who performed the coding or review action. | ||
| Audit date (UTC) (AuditDate) | The date and time (UTC) when the coding or review action was performed. | ||
| Item status (ItemStatus) |
Indicates the status of the item after the coding action was performed. |
||
| Reason for change (ReasonForChange) | The reason provided when a coding or review decision was changed. | ||
This section illustrates an example of how the data coded using the World Health Organization Drug Dictionary (WHO DD) dictionary looks in the Excel export output.
There are two different use cases, depending on the which level of granularity is selected when applying the code in Viedoc Clinic:
1. Drug (default)
2. Subst
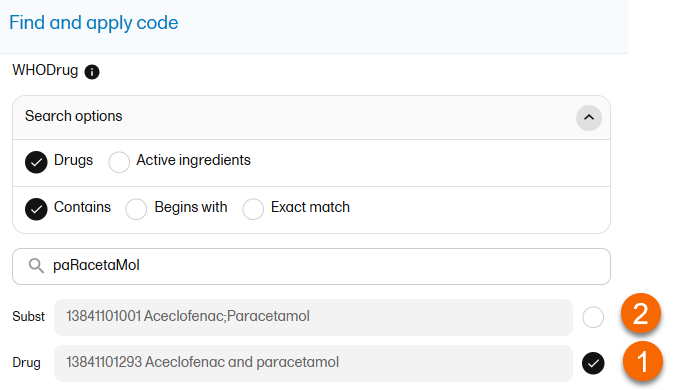
The image below illustrates how the coded data looks in the export output, if the Drug is selected when applying the code in Viedoc Clinic.
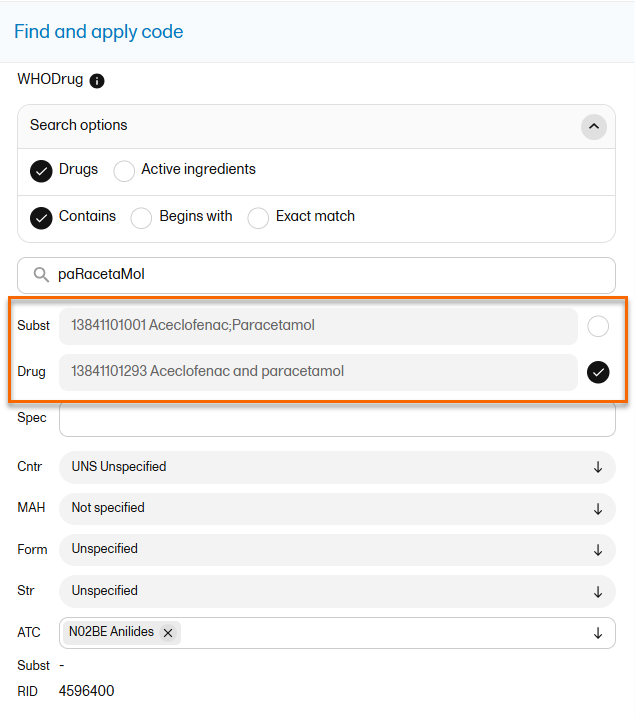
When Drug is selected, the Substance code and Substance name are shown in the export as well, in the last columns, as illustrated in the image.
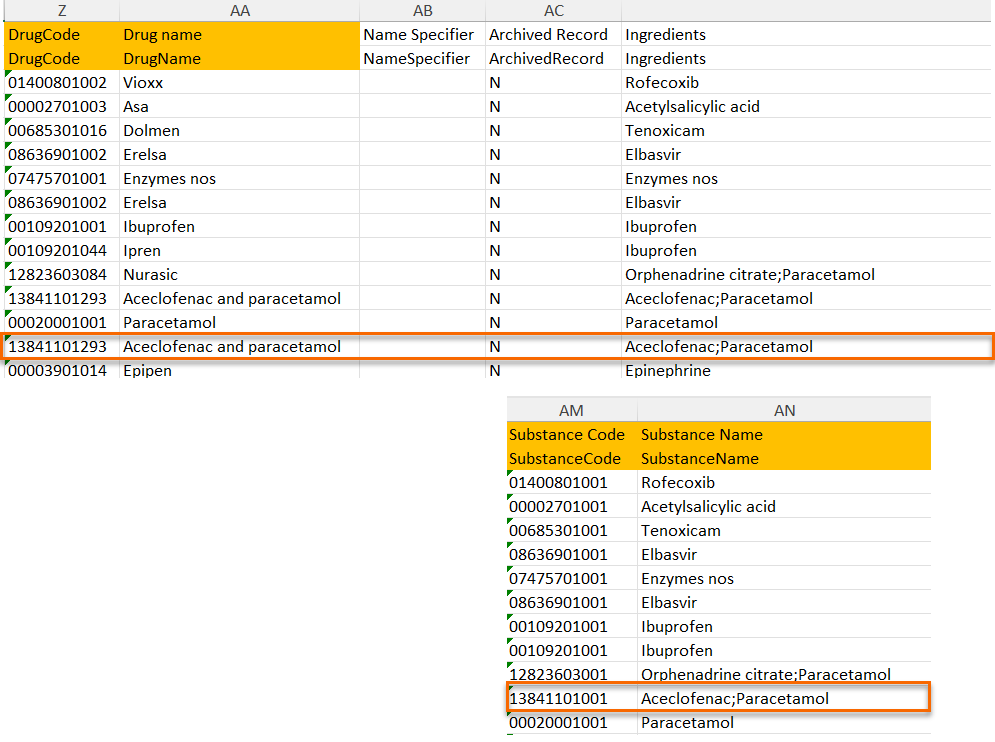
The image below illustrates how the coded data looks in the export output, if substance (Subst) is selected when applying the code in Viedoc Clinic.
After Subst is selected and the code is applied, for the respective coded item, the value of the substance is shown in in both Subst and Drug fields, Viedoc Clinic, as well as in the exported output.
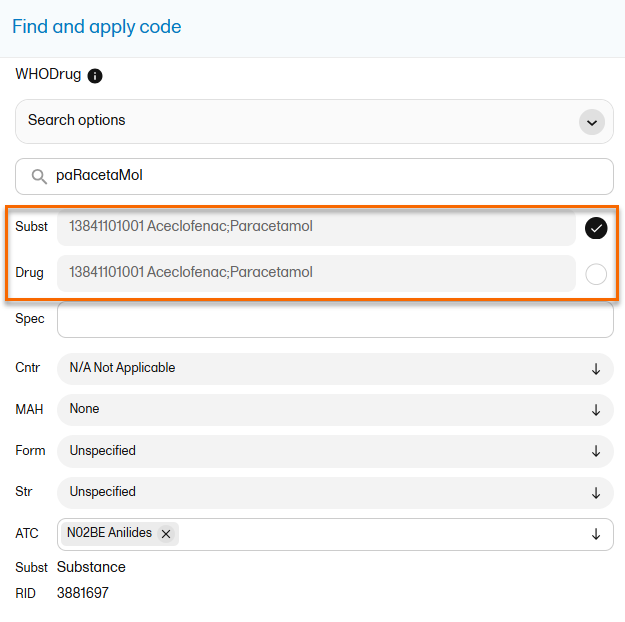
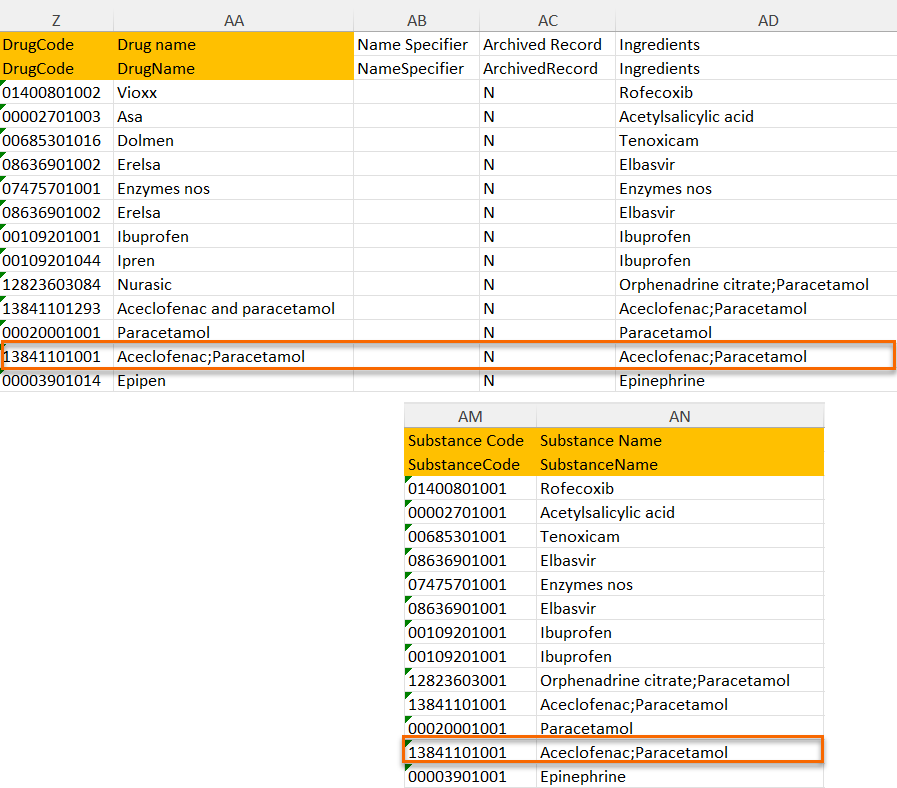
This lesson describes how the review status information is structured within an Operational Data Model (ODM) file exported from Viedoc.
For general details about data export, see Exporting data.
To include the review status in the export, you need to select the Review status under Type of data in the Data Export page:
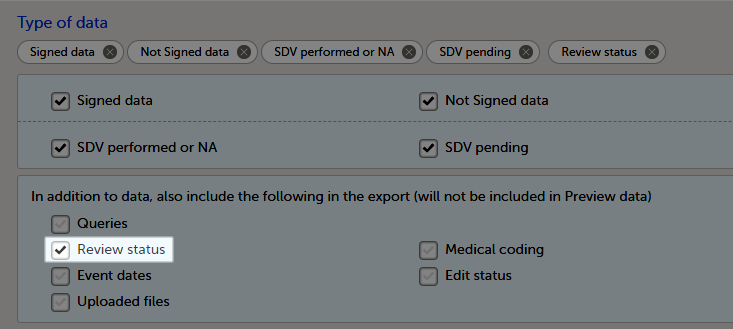
Note! When selecting one row per item as Layout, the review status is not included in the export.
Note! Source Data Verification (SDV) status is only exported on study event and item level. SDV on form level is excluded from the export.
The following annotation types are relevant for the review status and are listed in the CL_ANNOTATION_TYPE codelist:
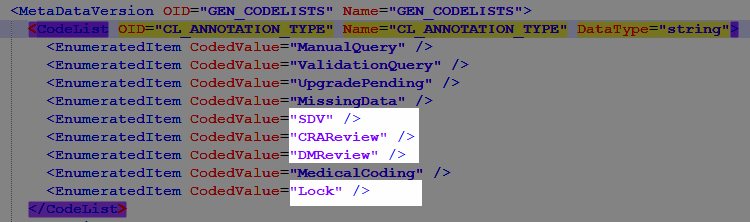
There is a CL_REVIEW_STATE codelist that indicates the review state, which is always Checked for the annotation types mentioned above. If the respective review was not performed in Viedoc, there is simply no entry for it in the ODM file.

AssociationFor each review action, there is one <Association> element.
Each Association links an item (identified by the KeySet, see the description below) to a set of properties related to a specific Annotation (see detailed description below).
KeySetThe KeySet is generally used to identify the start and end of the annotated "link". In this case, both key sets are the same, as they identify the same entity, namely the one the respective action (defined under the Annotation) corresponds to.
StudyOIDSubjectKeyStudyEventOIDStudyEventRepeatKeyFormOIDFormRepeatKeyItemGroupOIDItemOIDAnnotationThe Annotation consists of a set of <Flag> elements, and an audit record if the export was set to include the Viedoc extensions.
Flags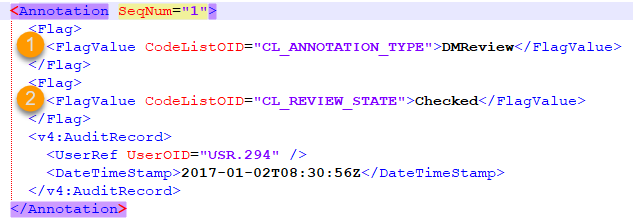
1. One flag element for the review type, with a <FlagValue> set to one of the CL_ANNOTATION_TYPE items.
2. One flag element for the review state, with a <FlagValue> set to one of the CL_REVIEW_STATE items.
AuditRecordThe <v4:AuditRecord> is a Viedoc extension and is included in the output file only if the option to Include extensions was selected at export time.
It contains information on the user ID and the date/time stamp.
In the example image below, the user ID = 294:

Notes!
User OID="USR.0". This is applicable, for example, for the Lock action.User OID="SYSTEM". This is applicable, for example, when the form is locked due to randomization.This lesson describes how the review status information is structured within an Excel file exported from Viedoc.
For general details about data export, see Exporting data.
Note! When selecting one row per item as Layout, the review status is not included in the export.
In the Excel export output file, there is one separate sheet for the Review status:

The first columns provide information for identifying the form that was reviewed, followed by the review information, as listed in the following table:
| Column name | Description |
|---|---|
| Columns that identify the form | |
| Site sequence number | Counter that identifies the site globally within the study. |
| Site name | The site name, as set in Viedoc Admin. |
| Site code | The site code, as set in Viedoc Admin. |
| Subject sequence number | Counter that identifies the subject within the site. |
| Subject Id | The Subject ID, in the format configured in Viedoc Designer. The Subject ID is the subject identifier displayed in Viedoc Clinic on the subject card, subject details page, and so on. |
| Event sequence number | Counter that identifies the event within the sequence of events for the same subject. |
| Event Id | The event ID, as set in the study design (in Viedoc Designer). |
| Event name | The event name, as set in the study design (in Viedoc Designer) and displayed in Viedoc Clinic. |
| Event date | The event date, as set in Viedoc Clinic when the event is initiated. |
| Activity Id | The activity ID, as set in the study design (in Viedoc Designer). |
| Activity name | The activity name, as set in the study design (in Viedoc Designer) and displayed in Viedoc Clinic. |
| Form Id | The form ID, as set in the study design (in Viedoc Designer). |
| Form name | The form name, as set in the study design (in Viedoc Designer) and displayed in Viedoc Clinic. |
| Form sequence number |
Counter that identifies the instance of the respective form within the respective activity. This is mostly used for repeating forms. For non-repeating forms, this is 1. If a form is reset and then saved again the new form has sequence number 2, and so on. Form sequence number increases one step every time reset/initiate occurs. |
| Review status information | |
| Reviewed item |
Can be one of the following:
|
| Clinical review by | User name and user ID of the user that performed the clinical review. |
| Clinical review date (UTC) | The date and time in Coordinated Universal Time (UTC) when the clinical review was performed |
| Data review by | User name and user ID of the user that performed the data review (marked by the DM review flag). |
| Data review date (UTC) | The date and time (UTC) when the data review was performed. |
| SDV by | User name and user ID of the user that performed the Source Data Verification (SDV) (marked by the SDV review flag). For studies where SDV is performed on item level, this column will contain N/A for items that do not require SDV. |
| SDV date (UTC) | The date and time (UTC) when the SDV was performed. For studies where SDV is performed on item level, this column will contain N/A for items that do not require SDV. |
| Signed by | User name and user ID of the user that signed the form. |
| Signed date (UTC) | The date and time (UTC) when the form was signed by investigator. |
| Lock by | User name and user ID of the user that locked the form. |
| Lock date (UTC) | The date and time (UTC) when the form was locked. |
If, on the Data Export page, it was selected to include the SDV information, there is one separate sheet for the SDV information in the Excel export output file:

Note! For studies where SDV is performed on item level, this sheet will include only the items that require SDV and are visible to the user.
The first columns provide information for identifying the item that was SDV-ed, followed by the review information, as listed in the following table:
| Column name | Description |
|---|---|
| Columns that identify the item | |
| Site sequence number | Counter that identifies the site globally within the study. |
| Site name | The site name, as set in Viedoc Admin. |
| Site code | The site code, as set in Viedoc Admin. |
| Subject sequence number | Counter that identifies the subject within the site. |
| Subject Id | The Subject ID, in the format configured in Viedoc Designer. The Subject ID is the subject identifier displayed in Viedoc Clinic on the subject card, subject details page, and so on. |
| Event sequence number | Counter that identifies the event within the sequence of events for the same subject. |
| Event Id | The event ID, as set in the study design (in Viedoc Designer). |
| Event name | The event name, as set in the study design (in Viedoc Designer) and displayed in Viedoc Clinic. |
| Event date | The event date, as set in Viedoc Clinic when the event is initiated. |
| Activity Id | The activity ID, as set in the study design (in Viedoc Designer). |
| Activity name | The activity name, as set in the study design (in Viedoc Designer) and displayed in Viedoc Clinic. |
| Form Id | The form ID, as set in the study design (in Viedoc Designer). |
| Form name | The form name, as set in the study design (in Viedoc Designer) and displayed in Viedoc Clinic. |
| Form sequence number |
Counter that identifies the instance of the respective form within the respective activity. This is mostly used for repeating forms. For non-repeating forms, this is 1. If a form is reset and then saved again the new form has sequence number 2, and so on. Form sequence number increases one step every time reset/initiate occurs. |
| Item ID | The item ID, as set in the study design (in Viedoc Designer) |
| Item name | The item name, as set in the study design (in Viedoc Designer) and displayed in Viedoc Clinic. |
| SDV information | |
| Reviewed item |
Can be one of the following:
|
| SDV by | User name and user ID of the user that performed the SDV. |
| SDV date (UTC) | The date and time (UTC) when the SDV was performed. |
In Viedoc, it is possible to export data in .csv format and analyzed in Statistical Analysis System (SAS).
| Important! Only SAS in Unicode mode is supported. |
Note!
To export data from Viedoc that is formatted for SAS, you have to create the following selections on the Data Export page, under Output format:
Notes!
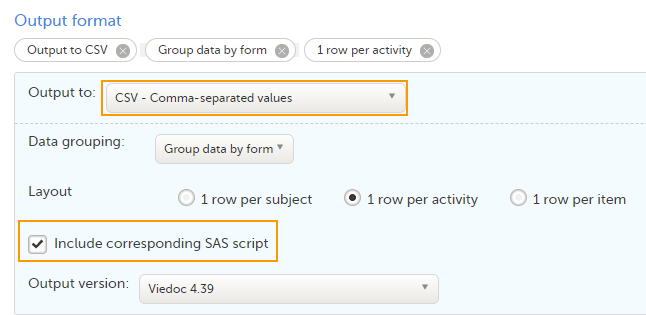
The export output is a zip file, containing:
Note! If the Output IDs (OID) and Output labels have been defined in the study design, these are shown in the Excel/CSV/SAS export. If the Output IDs (OID) and Output labels are left undefined (blank) in the study design, then the configured Item ID and label is used. For more information about the item settings in the study design, see Outputs and Validation.
To import to SAS the data exported from Viedoc:
| 1 | Export the data from Viedoc including the SAS script (the settings are described above). |
| 2 | Open SAS. |
| 3 |
Run the _RunMe.sas file (see description above). The data types from the Items file and the CodeLists formats will be converted to the SAS formats. |
When data collection at a study site has been confirmed and completed, each site should export and archive the study data and site-related documentation.
Site users must have the role permission to export data for the sites where the archiving should be performed. For more information, see the Data export lessons in Viedoc Clinic User Guide.
If Viedoc eTMF is used, see the following lesson eTMF-EMS repository.
The following documentation is recommended to export when archiving a study at site. Export of data is still possible for locked studies.
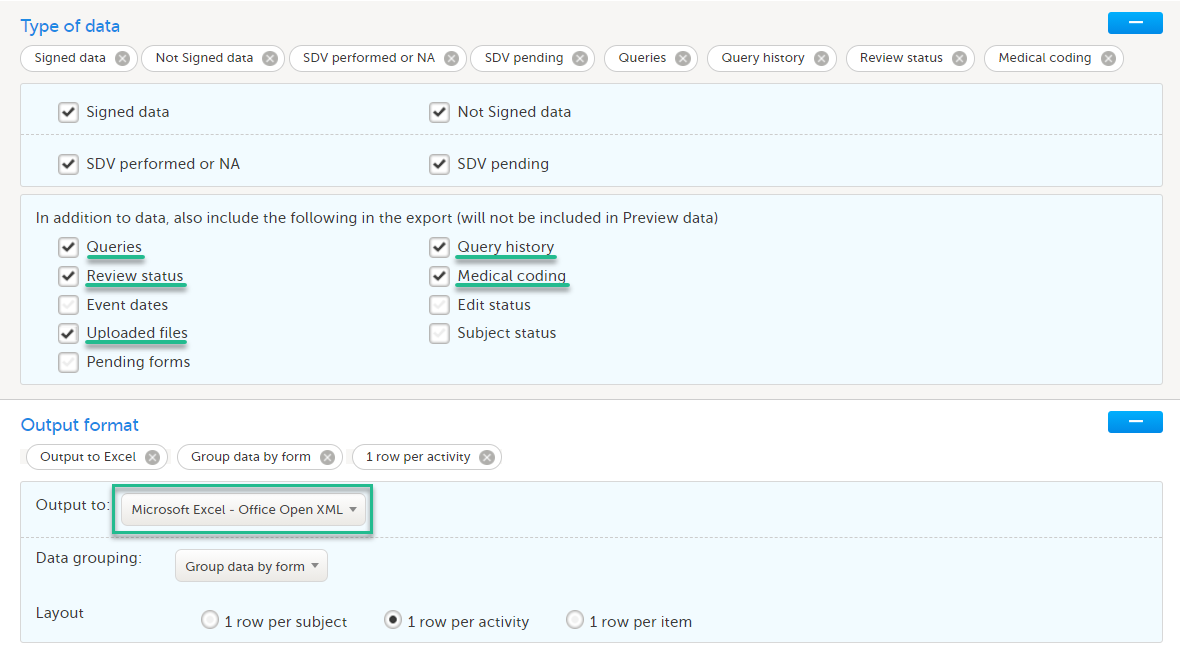
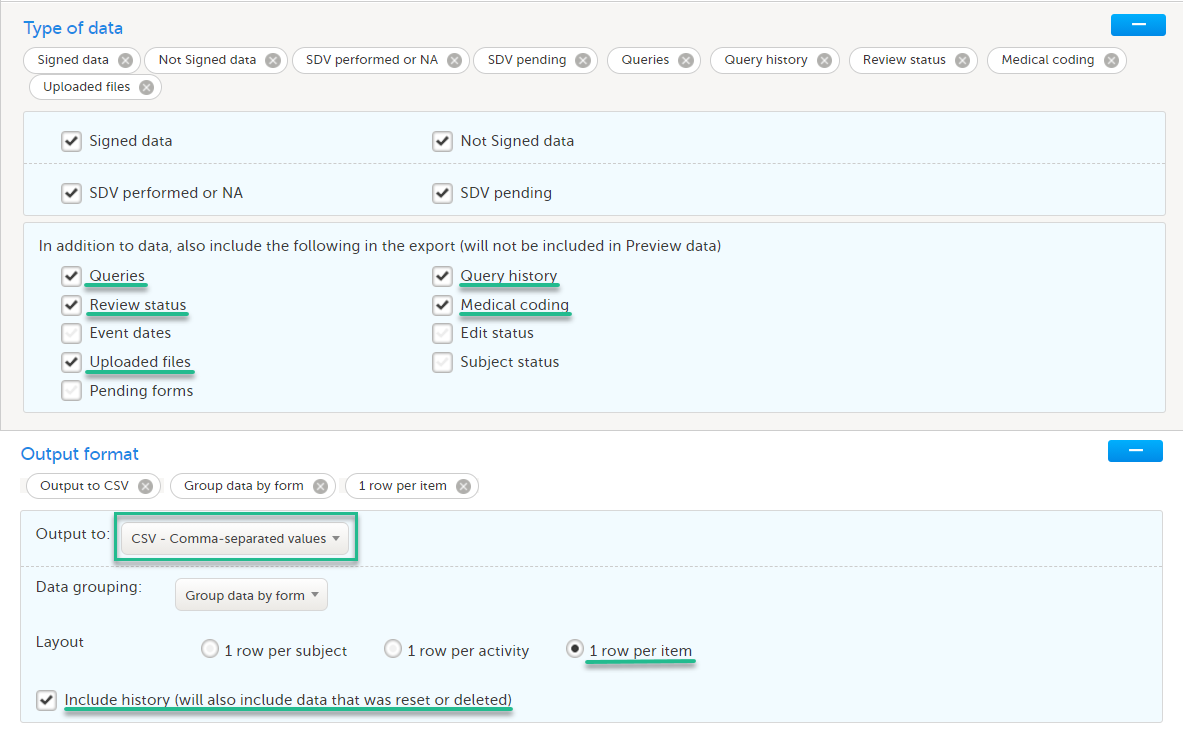


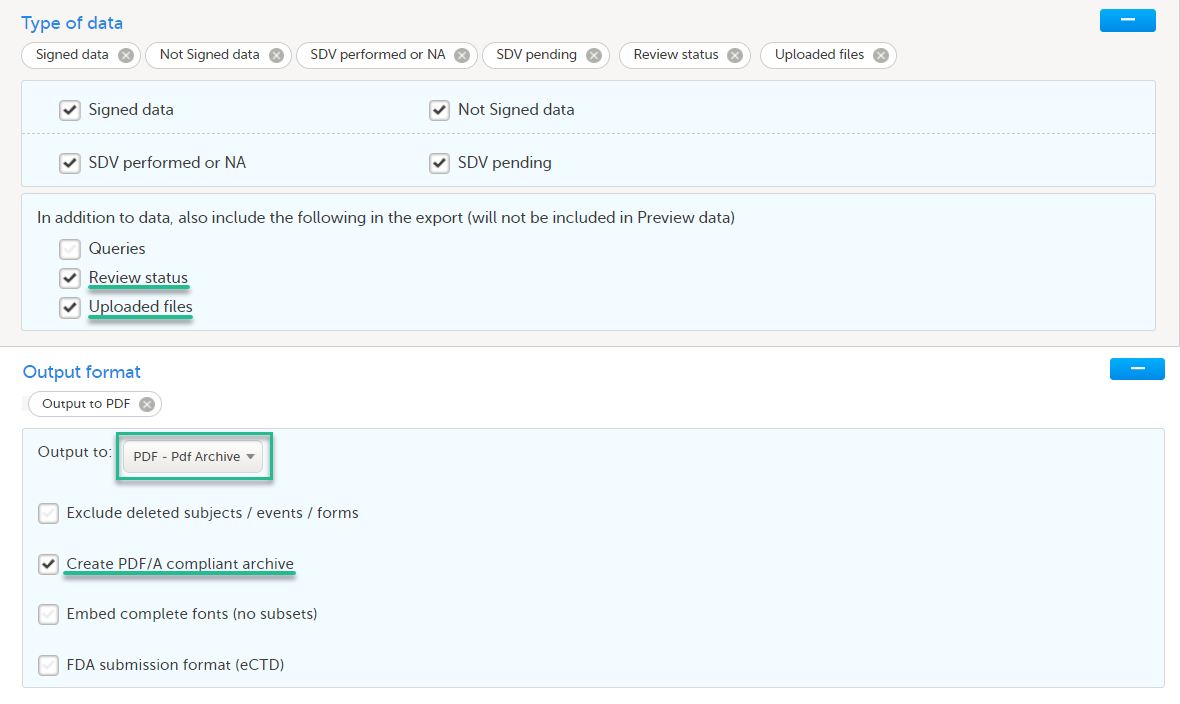
The data export in Viedoc supports all file formats that are required for archiving and regulatory purposes, including these formats:
Viedoc Coder allows you to code data, such as Adverse Events, Medical History, and Concomitant Medications, in a standardized way. You can access Viedoc Coder from the landing page.
The Viedoc Coder page displays metrics about coding, for example, the number and percentage of items that have been coded and approved. There is one set of metrics for each coding scope. The metrics displayed are based on the data and sites that you have permission to view.
Note!
| 1. |
To open Viedoc Coder, select the dictionary icon: 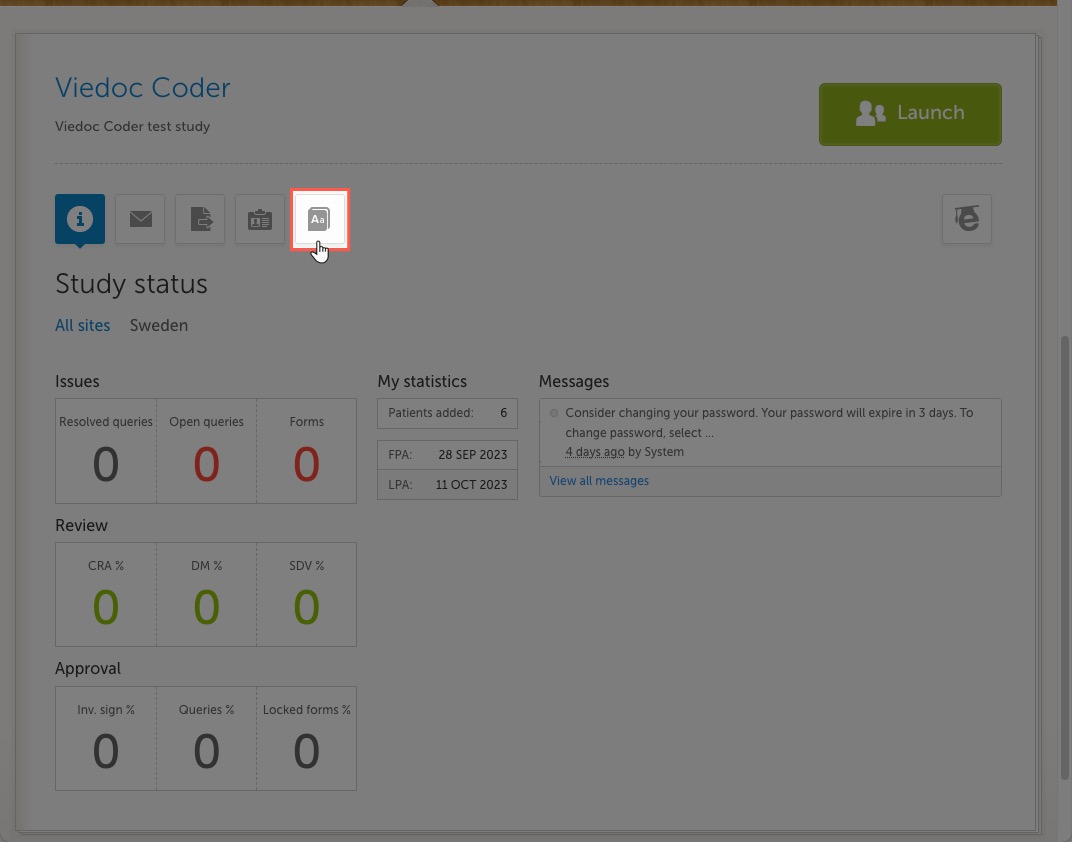
Viedoc Coder opens in a new window: 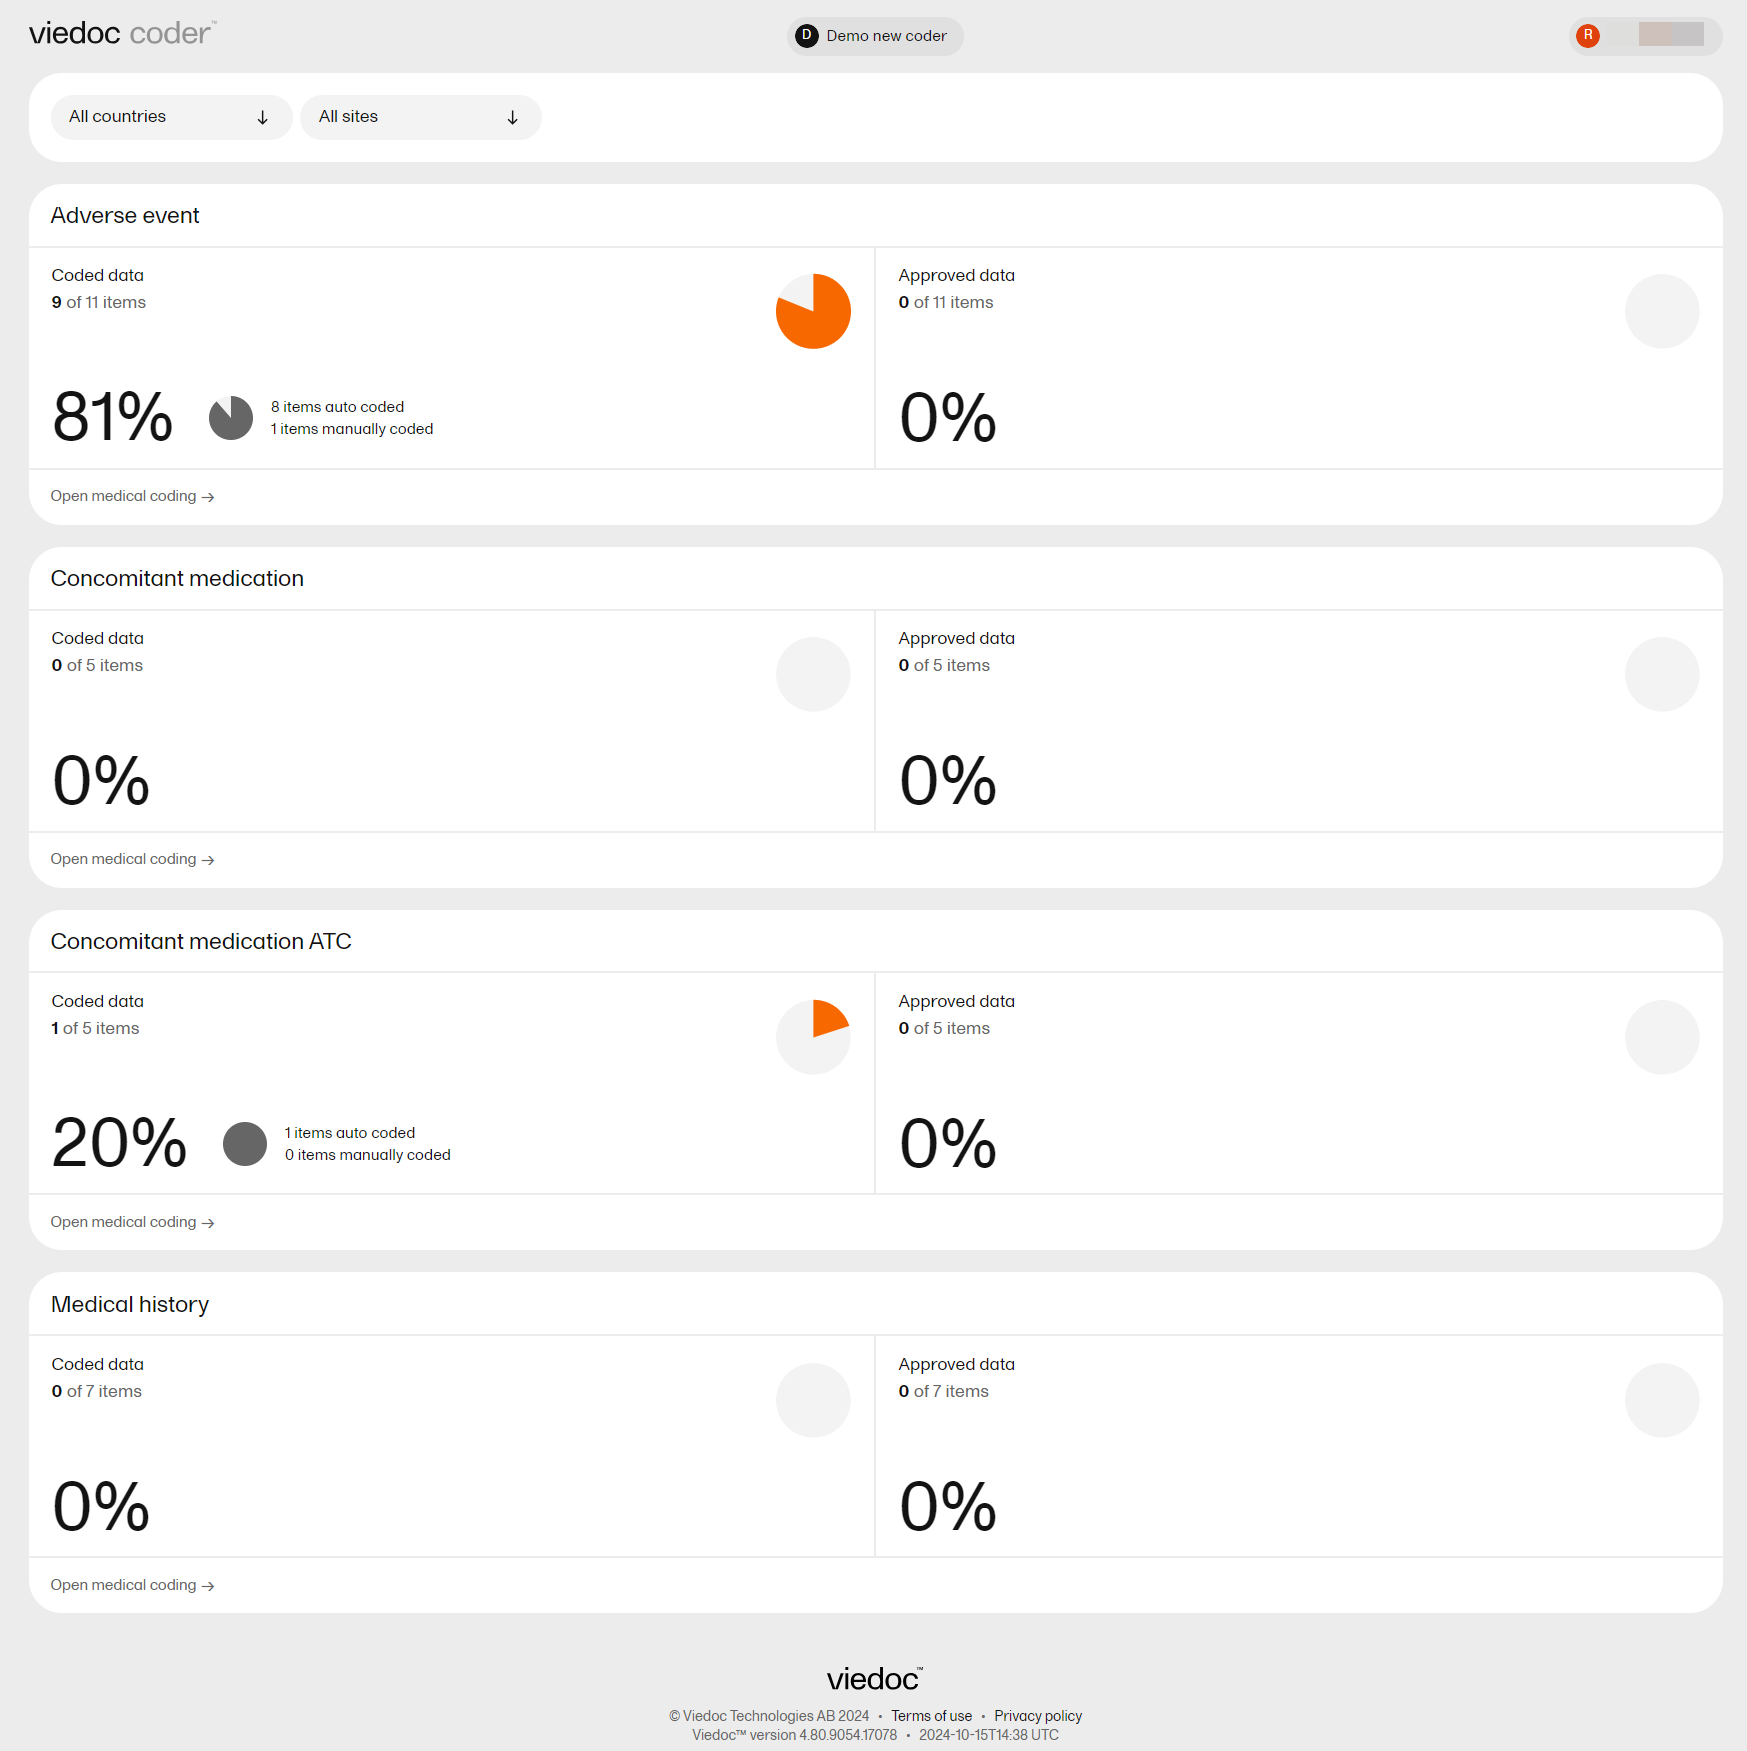
|
| 2. |
Select Open medical coding on a scope: 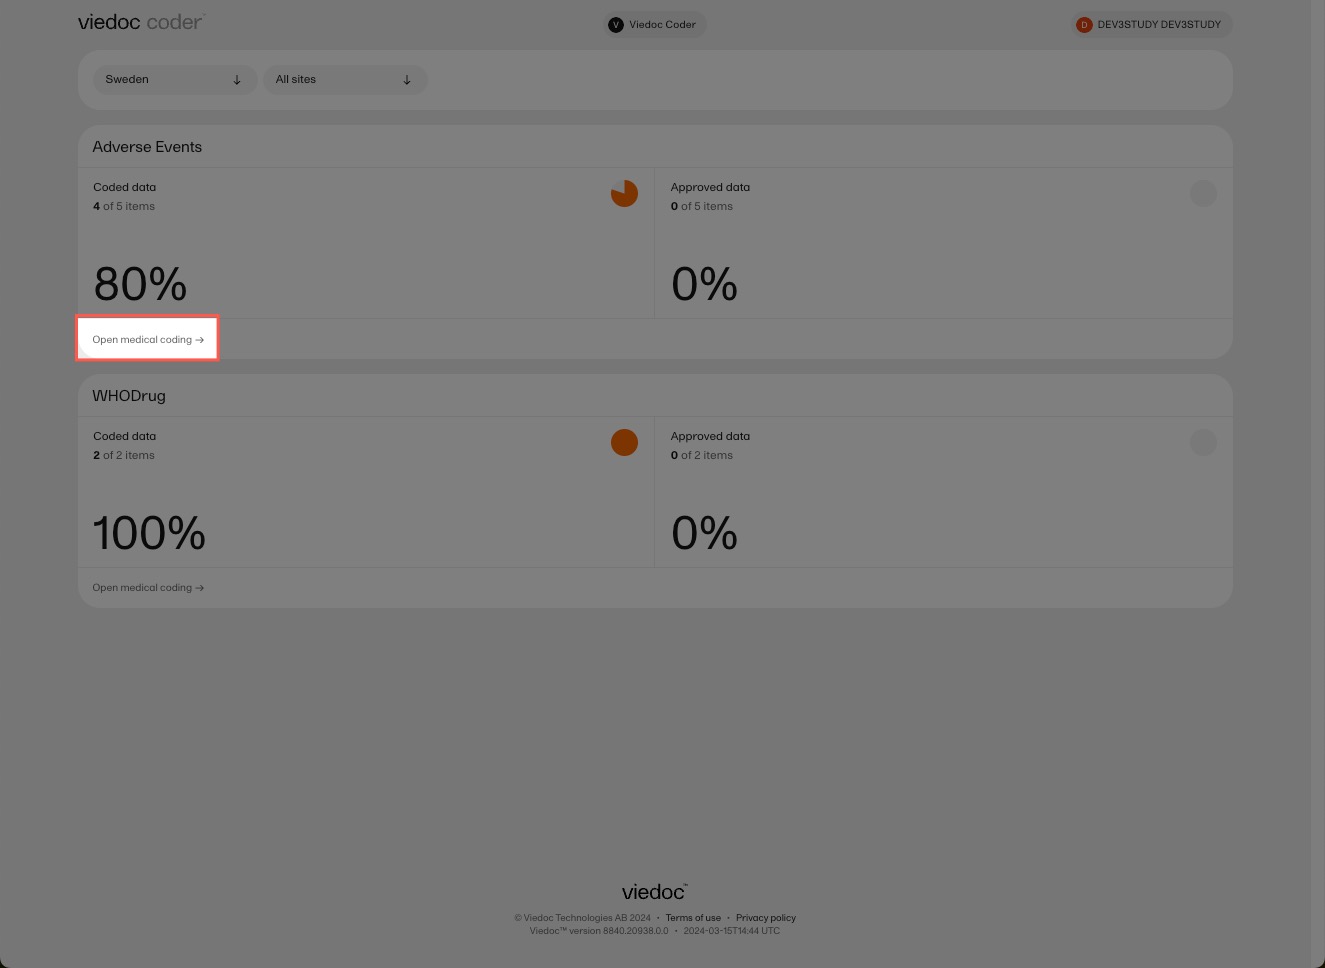
Viedoc Coder displays a table that lists all of the items to be coded in the Value column. 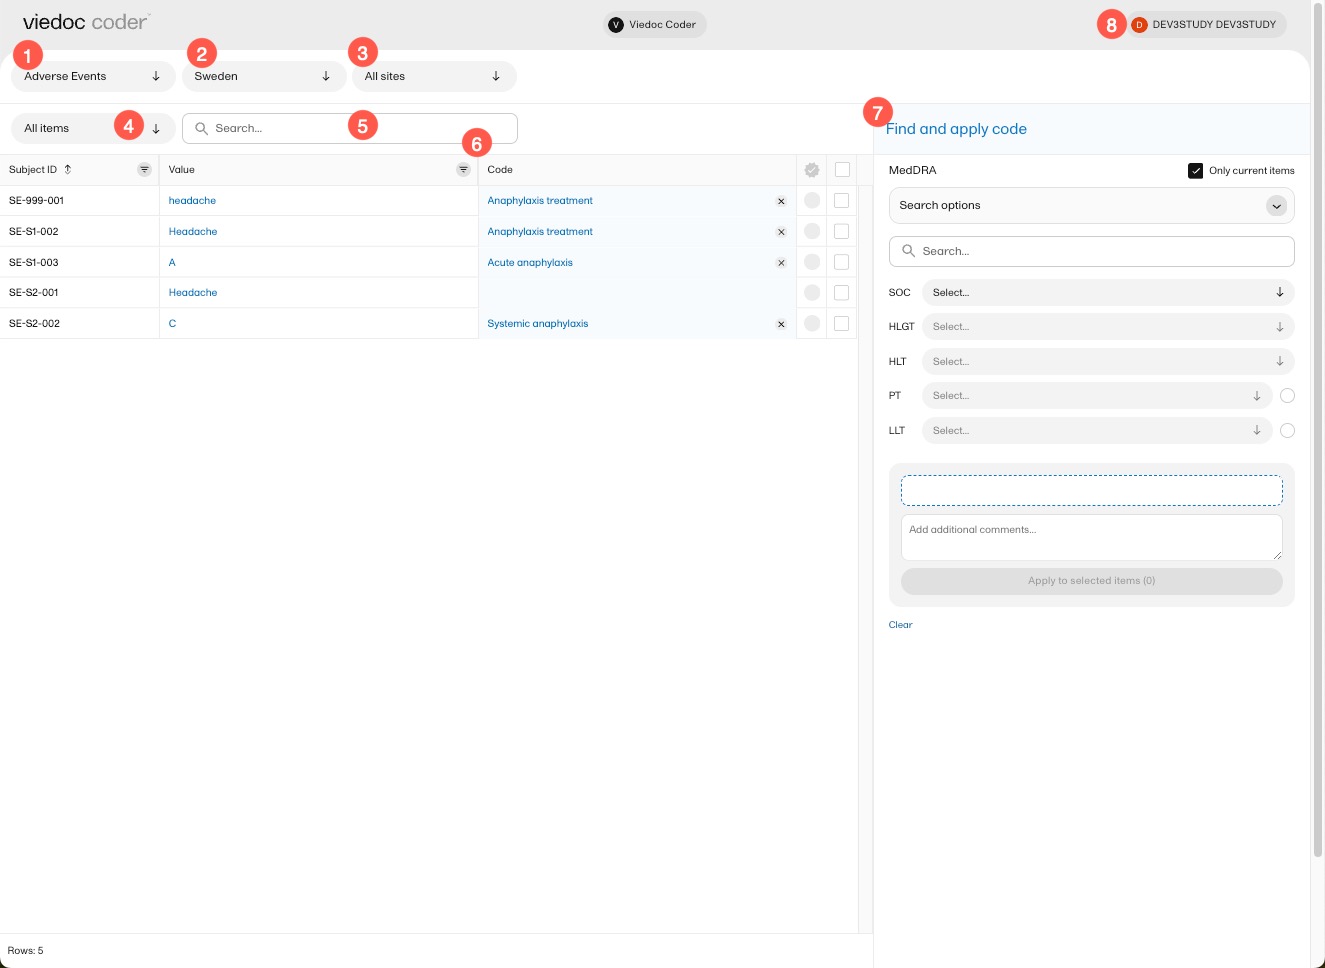
|
In Viedoc Coder, you can:
1. Select the coding scope (the data) to be coded.
2. Select to display items from all countries or from an individual country.
3. Select to display items from all sites or from an individual site.
4. Select to display all uncoded (and rejected) items, all coded items, all approved items, or all items.
5. Perform a text search among all values of the items.
6. If configured for your study, there can be additional columns included with supporting values for the coding, for example route, indication, or other.
7. Find and apply codes (see Finding and applying a medical code).
When applying codes, you can:
8. Select here to change the settings of Viedoc, access the help center, or logout of Viedoc.
In Viedoc Coder, you can find the following symbols:
1. The three horizontal lines is a filter function. Select the symbol to open a dropdown list with a search field and a list of selectable items.
2. Fields have a sorting function which will list its contents in ascending and descending order. This function is not available for all columns.
3. A numbered list in the code field means that there is more than one medical code applied to that value.
4. An orange pen icon in the value field, together with a light orange background in the code field, means that the value (form item) has been changed in Viedoc Clinic by the Investigator after the item was coded. The applied code may not be correct anymore and the item should be re-coded.
5. A clip icon in the code field means that an interpretation has been added. Move the mouse pointer over the clip icon to view the contents of the interpretation.
6. An activated tick mark indicates that the coding has been approved.
7. The checkbox is used to mark the values to which a selected code should be applied.
8. The white cross in a grey circle is used to delete the applied code.
This section gives an example of medical coding of adverse events using the Medical Dictionary for Regulatory Activities (MedDRA) and an example of medical coding of concomitant medication using the World Health Organization Drug Dictionary (WHODrug). The coding procedure is similar even if you are using other types of dictionaries.
Note! You can see the terminology version for both MedDRA and WHODrug if you hover over the i-icon in the dictionary panel:
To find a code that you want to apply to a value, use the Find and apply code section.
There are three search options available:
You can search for codes or (substrings of) terms in the Search field. Codes matching the term will be listed in a dropdrown list that deploys from the Search field. If a term is linked to multiple System Organ Classes (SOCs), the code that links to the primary SOC is displayed in black, while the codes that link to secondary SOCs are displayed in grey.
Searching is not case sensitive. If you type in "Anaphylaxis", the search can return results such as "anaphylaxis" and "Anaphylaxis".
You can also search a code by selecting the System Organ Class (SOC), High Level Group Term (HLGT), High Level Term (HLT), Preferred Term (PT) and Low Level Term (LLT) using the dropdown lists below the search field.
By default, the search returns low level terms (LLTs) that have the status 'current' in the MedDRA dictionary. You can search among non-current MedDRA codes (that is, terms that are vague, ambiguous, truncated, abbreviated, out-dated, or misspelled and thus no longer used), by clearing the checkbox for Only current items.
Select the code you would like to apply. The details of this code appear in the fields below the search field.
You can select to use the Preferred Term (PT) or the Low Level Term (LLT) by selecting one of the blue radio buttons next to the PT and LLT fields, as shown below:
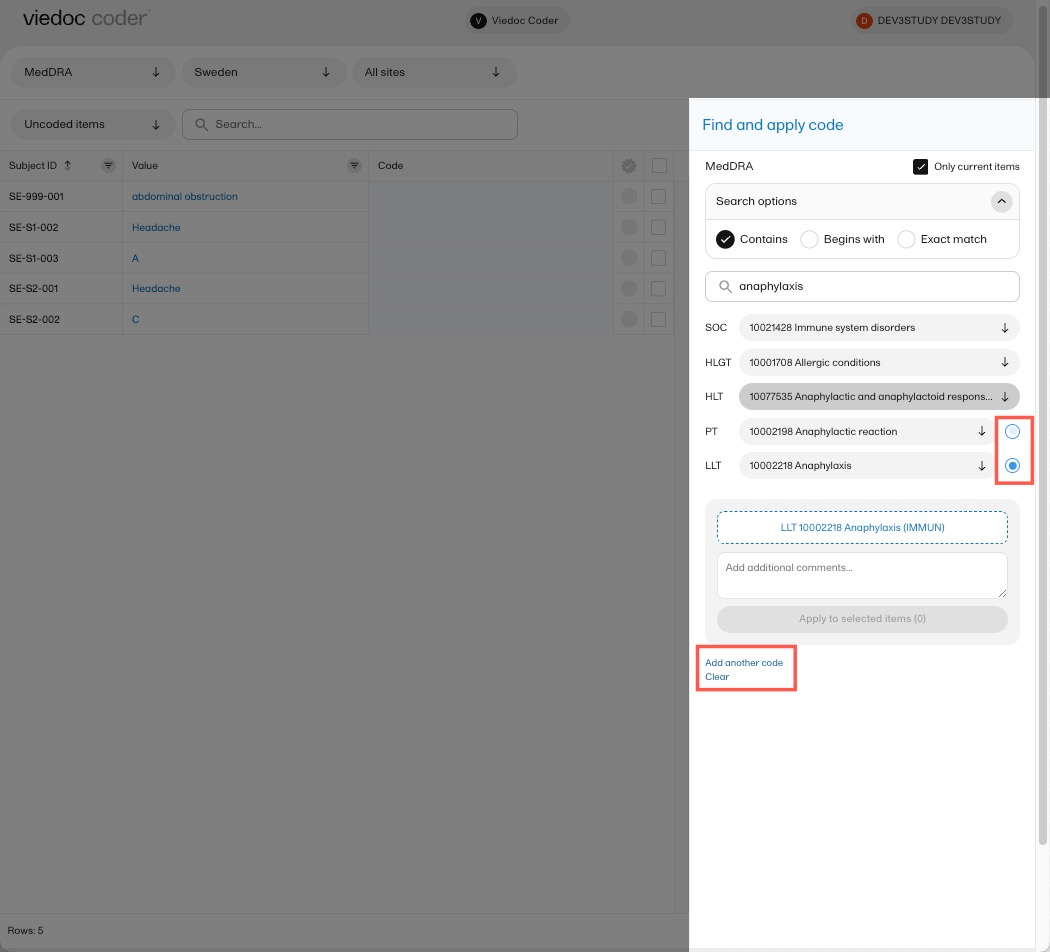
If you would like to add more than one code to the same value, select Add another code.
If you would like to add an interpretation, that is, a comment or explanation of the selected code, select Add interpretation and type your interpretation in the field.
You can reset your selections by selecting Clear.
Tip! If you want to apply a code that has been used before, select that code in the left side of the table. The Find and apply code section is then automatically populated with the selections for that code.
To apply a selected code, select the checkboxes for the value or values you want to apply that code to, and select Apply to selected items. The selected code will be applied to the selected subjects and values.
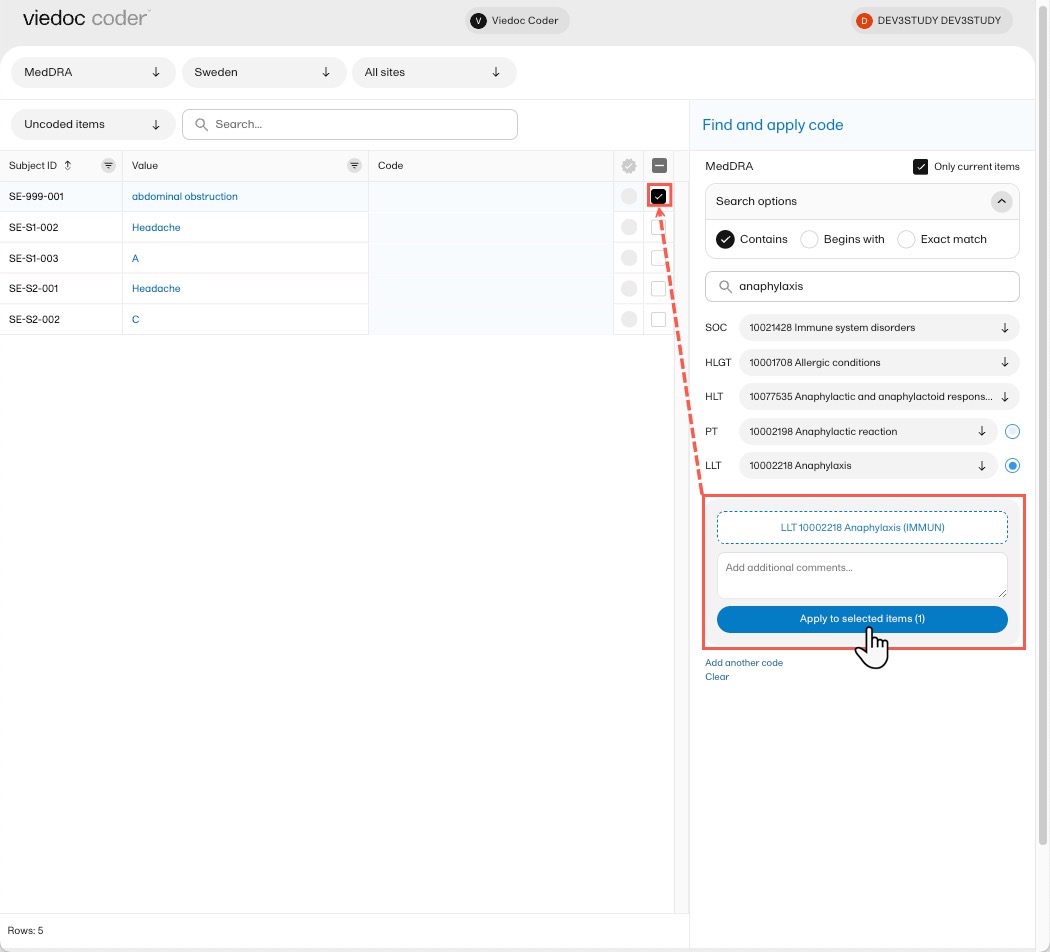
Note! You can remove an applied code by selecting the cross icon to the right of the applied code.
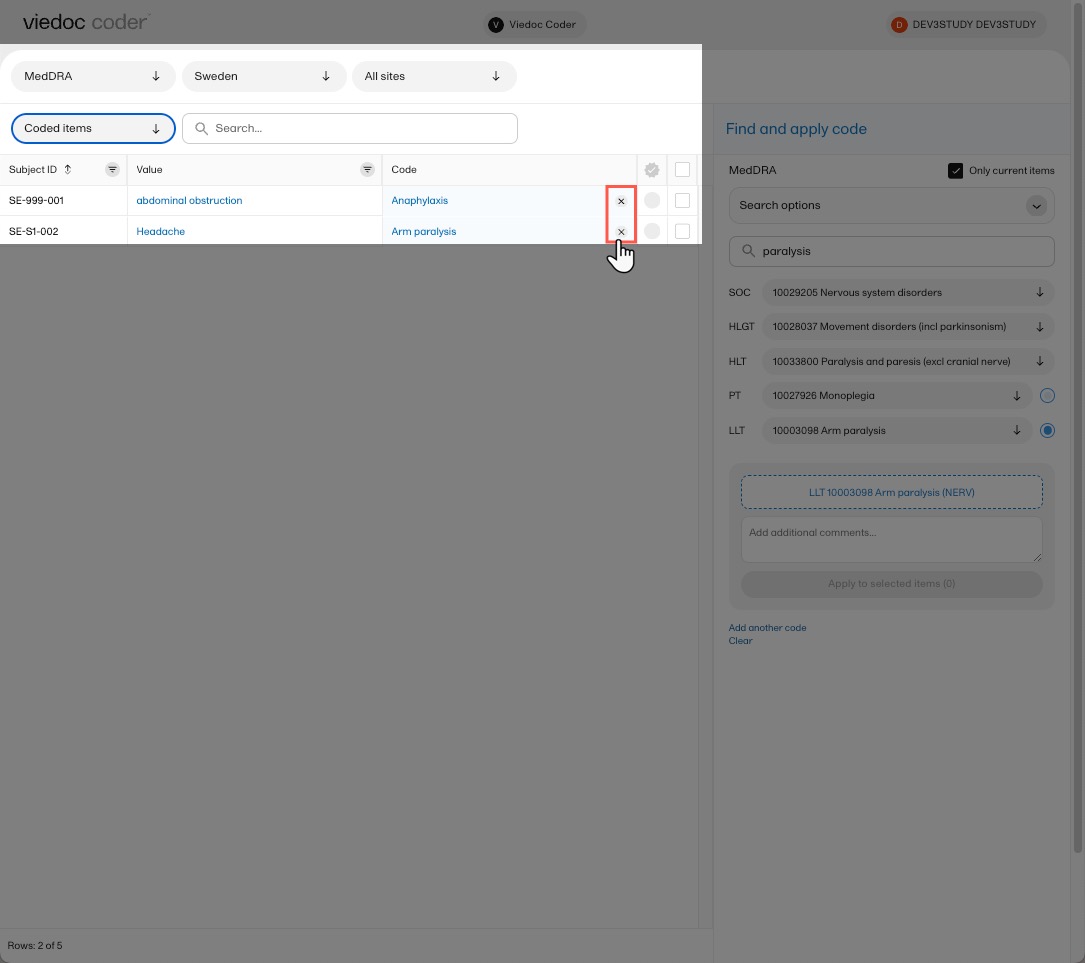
| Important! Some WHODrug terminology changes are planned for 2026, therefore some labels and fields have been updated in Viedoc Coder. These updates are available in the new Viedoc Coder only. Users who are still using the old coding console are advised to contact Viedoc to switch to the new Viedoc Coder. |
To find a code that you want to apply to a value, use the Find and apply code section.
When using WHODrug, you can select to search by:
; and the search will return all drugs that contain all specified ingredients.There are three search options available:
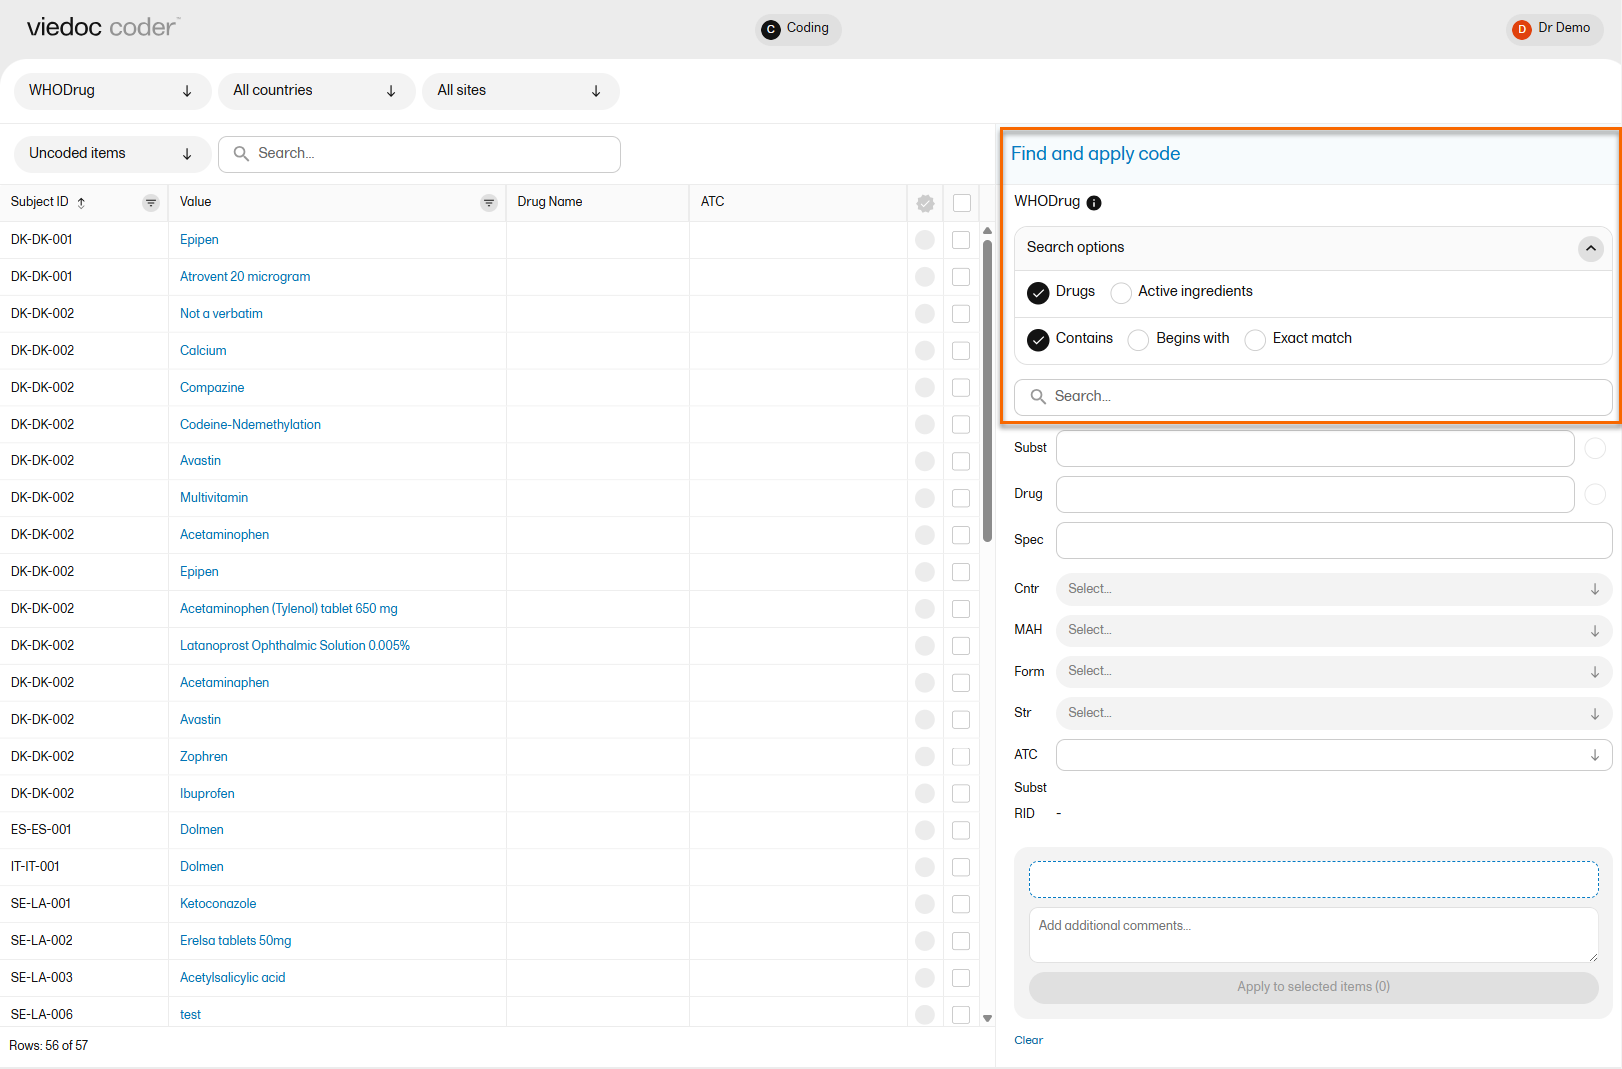
You can search for codes or (substrings of) terms in the Search field. Codes matching the term will be listed in a dropdrown list that deploys from the Search field.
Searching is not case sensitive. If you type in "paRacetaMol", the search can return results such as "paracetamol" or "Paracetamol".
The number behind the entries in the list depicts the number of active ingredients. If you hover the cursor over the number, a dialog box appears that lists the active ingredients:

Select the code (drug) you would like to apply. The details of this drug will appear in the fields below the search field.
In WHODrug, all drugs have a preferred drug. You can select to use the Preferred drug (Pref) or the Drug name by selecting one of the blue radio buttons next to the Pref and Drug fields. Drug is the default.

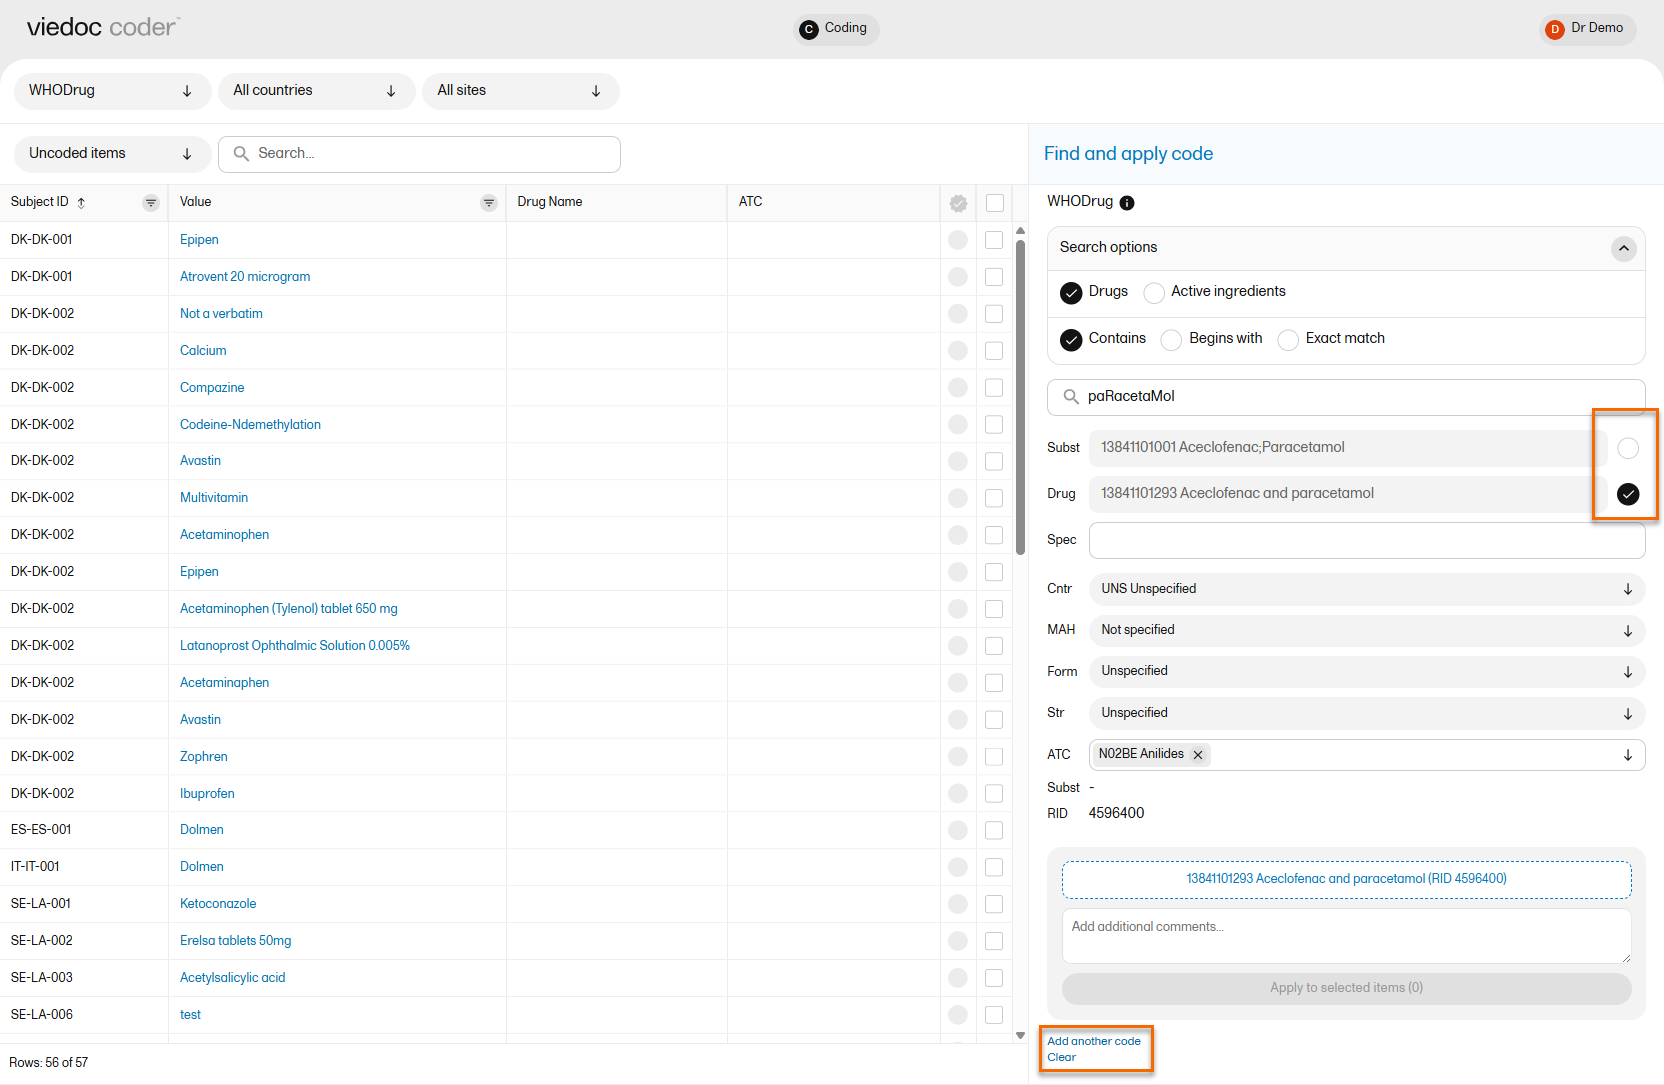
Use the dropdown lists to select Country (Cntr), Marketing Authorization Holder (MAH), Pharmaceutical Form (Form), Strength (Str), or Record ID (RID) , if applicable.
If you would like to add more than one code to the same field, select Add another code.
If you would like to add an interpretation, that is, a comment or explanation of the selected code, select Add interpretation and type your interpretation in the field.
You can reset you selections by selecting Clear.
Tip! If you want to apply a code that has been used before, select that code in the left side of the table. The Find and apply code section is then automatically populated with the selections for that code.
If you selected a drug that carries multiple Anatomic Therapeutic Chemical Classification System (ATC) codes, all ATC codes will be displayed in the ATC field. You can define whether to include all ATC codes in the coding or only a selection. Select the ATC code to include it or select the X icon to remove an ATC code.
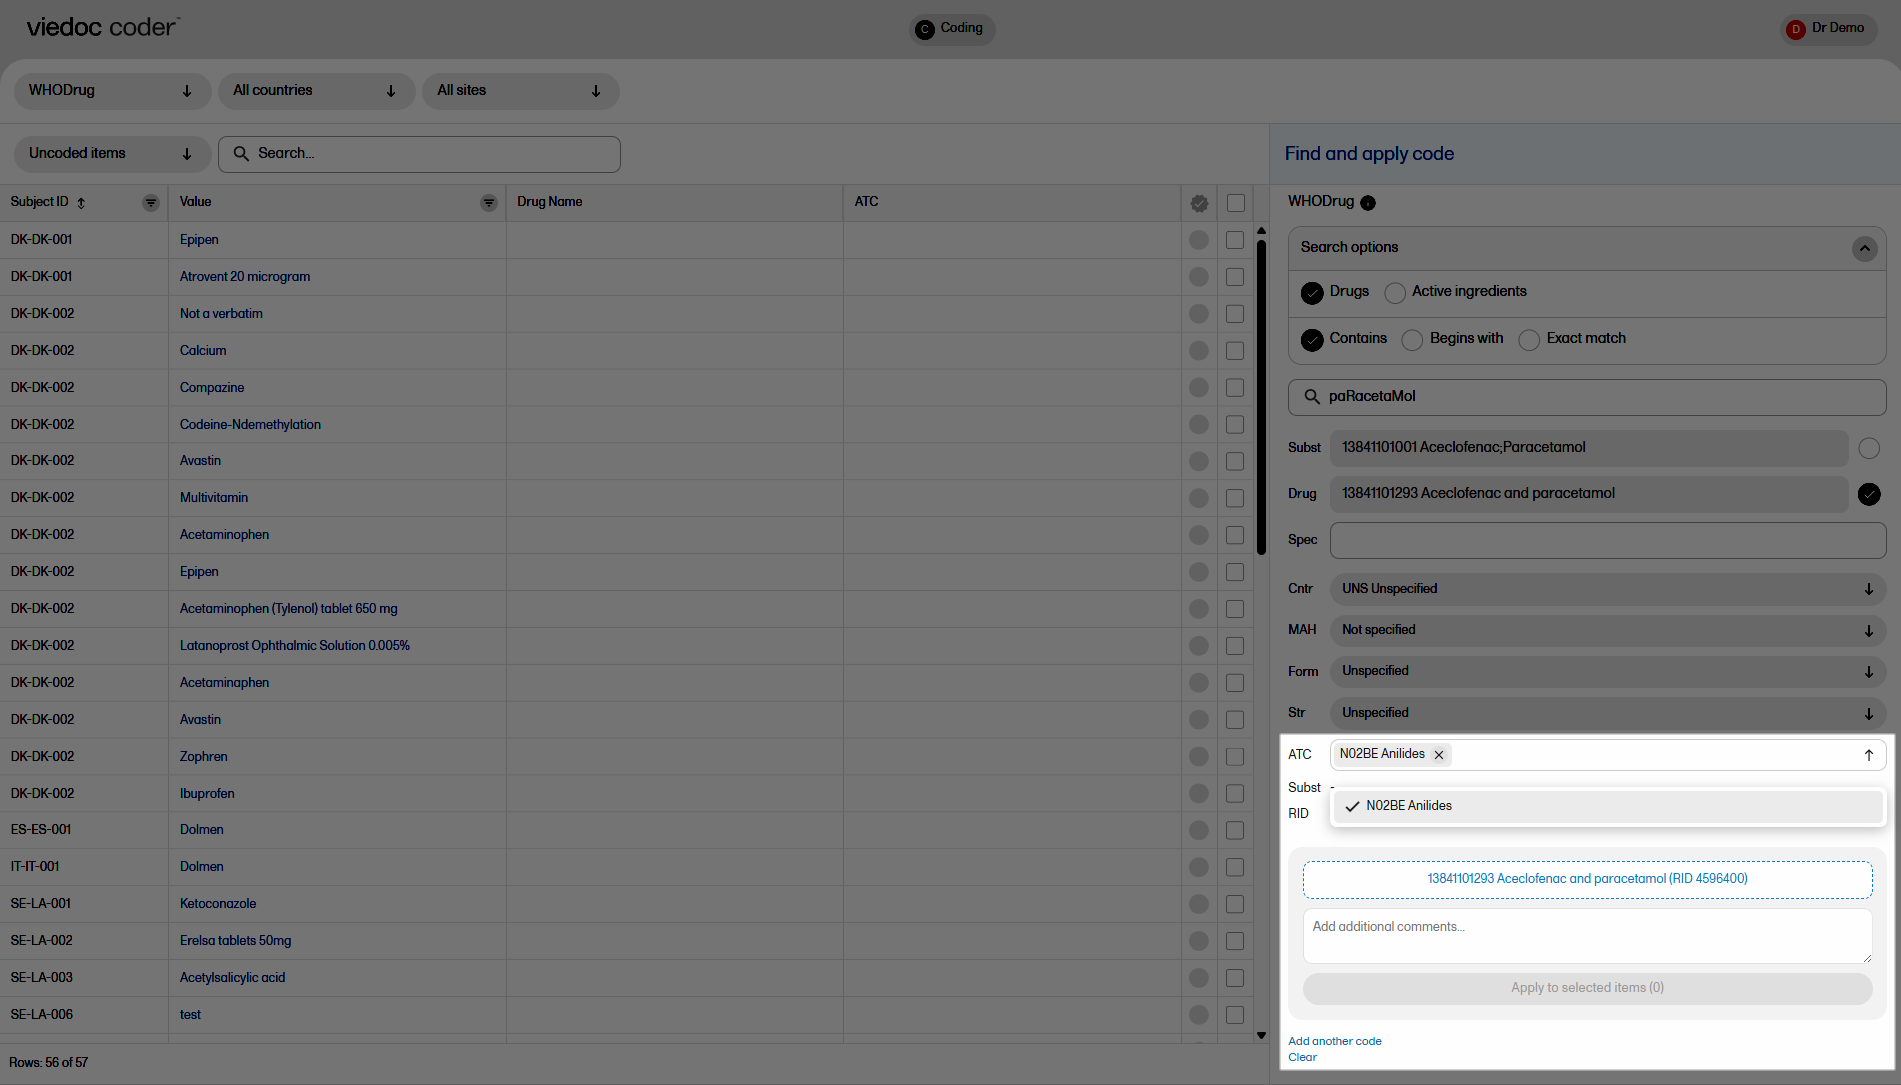
To apply a selected code, select the checkboxes for the value or values you want to apply that code to, and select Apply to selected. The selected code will be applied to the selected subjects and values. The subjects and values can then be found in the Coded items list.
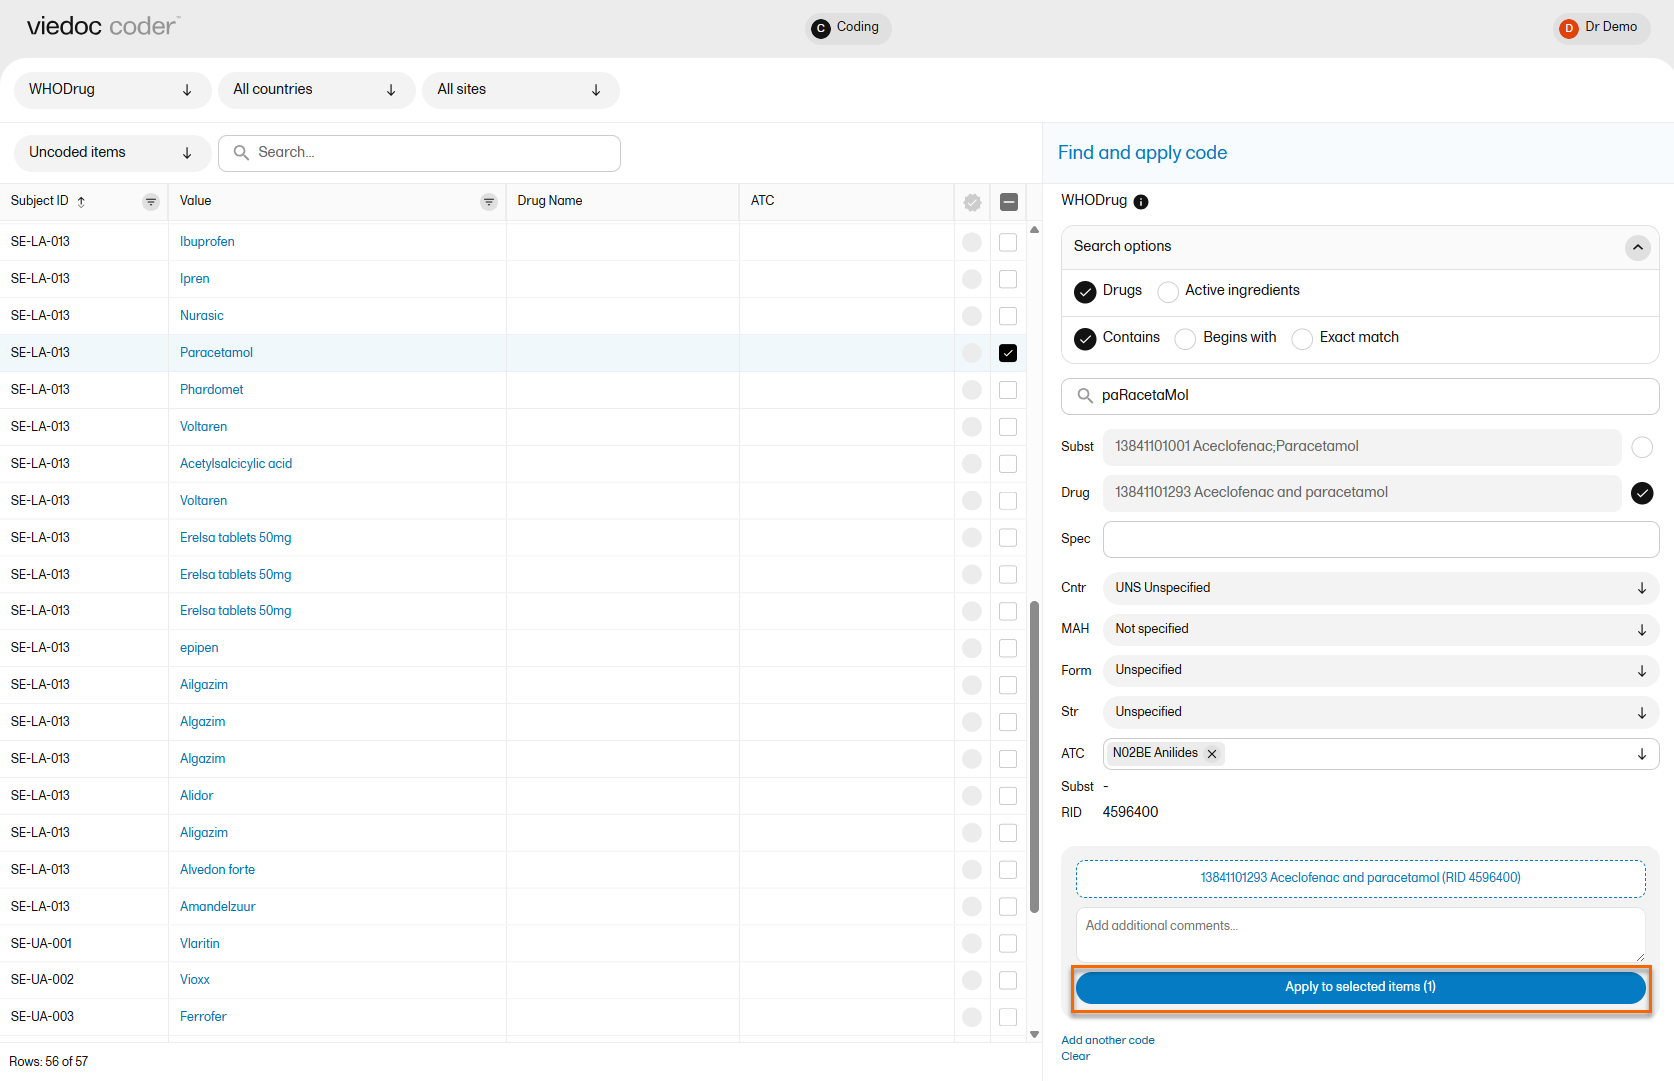
You can remove an applied code by selecting the cross icon to the right of the applied code.
Note! For WHODrug dictionary versions from 2026 and later, Old form is no longer shown in the name specifier. Archived records are indicated with a warning triangle regardless of WHO drug version.
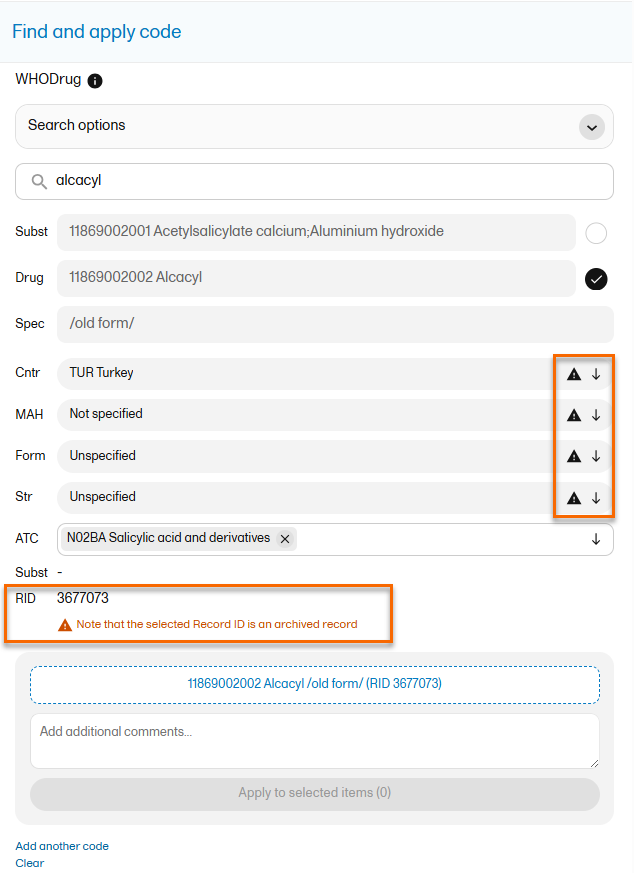
After applying codes to the items, you can approve/reject/reset the items as shown in the below table.
| Action | Current state/found in list | New state/found in list |
| Approve |
Coded Rejected |
Approved items |
| Reject |
Coded Approved |
Uncoded items |
| Reset |
Approved Rejected |
Coded items |
Tip! To see all items in one list, select the filter All items.
To approve items that have been coded:
| 1 |
Select the item(s) that you want to approve and select Approve selected: 
|
| 2 |
The selected item(s) now disappear from the list and are found with the blue "Approved" symbol in the Approved items list. 
|
Tip! The metrics of the medical coding that have been approved can be seen on the landing page:
To reject items that have been coded:
| 1 |
Select the items that you want to reject and select Reject selected. 
|
| 2 |
Once you have entered your reason for the change, the selected item(s) now disappear from the list and are found with the red "rejected" symbol in the Uncoded items list for re-evaluation. 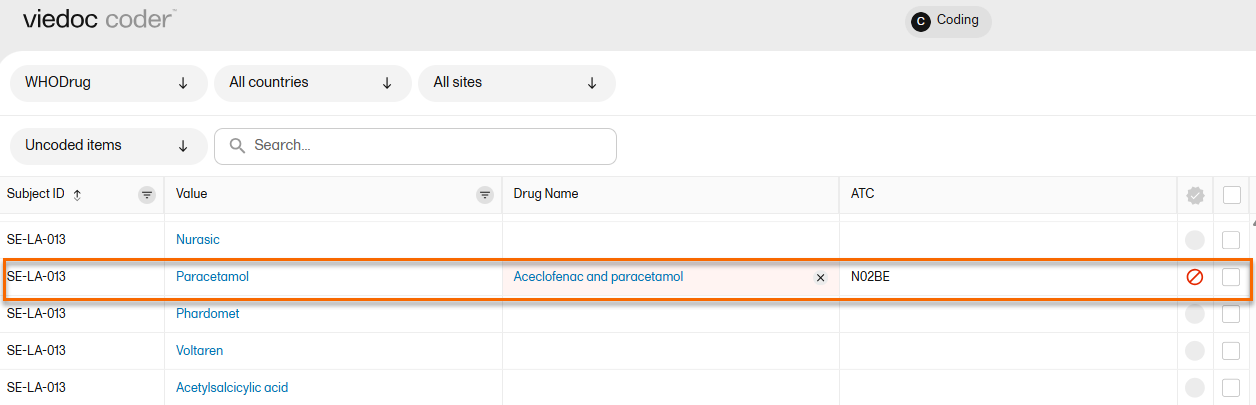
|
To reset items that have been approved or rejected:
| 1 |
Select the item(s) that you want to reset and select Reset selected. 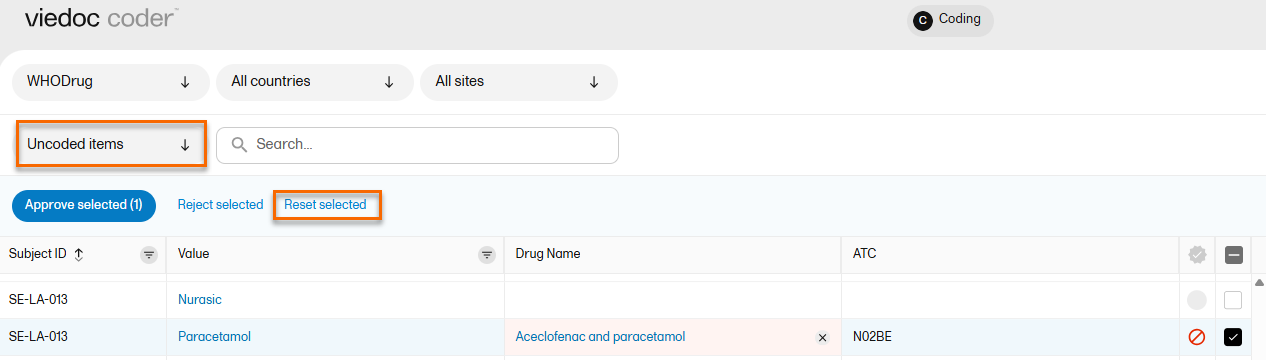
|
| 2 |
Once you have entered your reason for the change, the selected item(s) now disappear from the list and are found in the Coded items list without the approved/rejected flag. 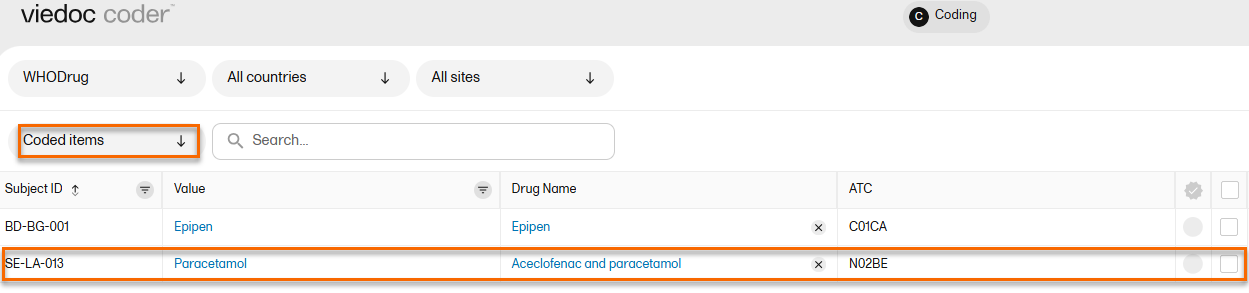
|
To improve the audit trail for medical coding changes, Viedoc Coder requires a reason for the change when you perform an action that changes an existing coding or review decision. This is supported across all coding scopes, including MedDRA, ATC, WHODrug, and IDF, and in both standard and Post Marketing Surveillance (PMS) studies.
You must specify a reason for the change in the following situations:
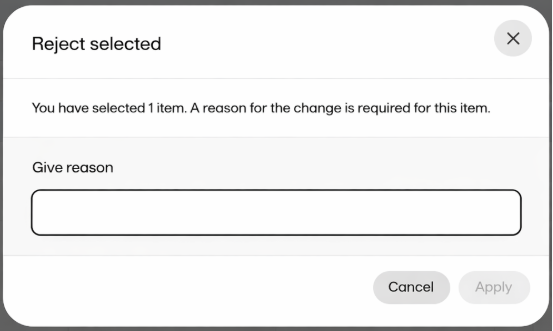
In Viedoc Coder, the system displays the most recent reason for the change for rejected items.
The Viedoc system automatically generates a reason for change message when no manual reason is necessary.
Notes!
You can export medical coding using Viedoc's data export feature, for more information, see Exporting data.

Viedoc Clinic provides two export options related to medical coding: Medical coding and Medical coding history
To export the medical coding, select the Medical coding checkbox in the Type of data section.
Medical coding export
Use the Medical coding export to review the current coding status.
This export:
Medical coding history
Use the Medical coding history export when full traceability of coding decisions is required.
When you select Medical coding, the Medical coding history option is shown. Select the Medical coding history checkbox to include the full audit trail for each coded item in the export as well as including the same coded items as the standard report.
For more information about how medical coding is exported, see:
Notes!
In Viedoc Coder, you can choose to enable auto coding. Viedoc supports auto coding for the MedDRA, ATC and WHO Drug dictionaries.
Note! Support for MedDRA-J is planned for inclusion in a future release.
Auto coding can be enabled and disabled for individual scopes within the MedDRA/ATC terminology. Currently, auto coding includes an exact match to MedDRA, any language and ATC, and is applied automatically.
We also support WHODrug Koda, an automated coding service custom-built by UMC. The integration in Viedoc Coder displays WHODrug Koda suggestions to enhance the medical coding.
WHODrug Koda can code both the drug name and the ATC assignment for a specific drug. For more information, see WHODrug Koda
Notes!
For the MedDRA, and ATC dictionaries, auto coding is disabled by default for ongoing studies and enabled for new studies. However, it can be disabled for new studies.
For WHODrug, auto coding is disabled by default.
The auto coding setting is always available in Viedoc Admin, but is only functional for the new Viedoc Coder and not for the old Viedoc Coding console. Please contact your Viedoc representative if you wish to switch to the new Viedoc Coder.
When auto-coding is enabled for your study, all existing uncoded items are auto coded, and all new items are coded automatically without any manual action required.
Note! Items that are auto coded without a match will be flagged, and will still need to be manually coded.
To apply an auto coded suggestion:
| 1. | Select the blue radio button. The Apply autocoded suggestions button appears |
| 2. | Select Apply auto coded suggestions to add the item to the coded items: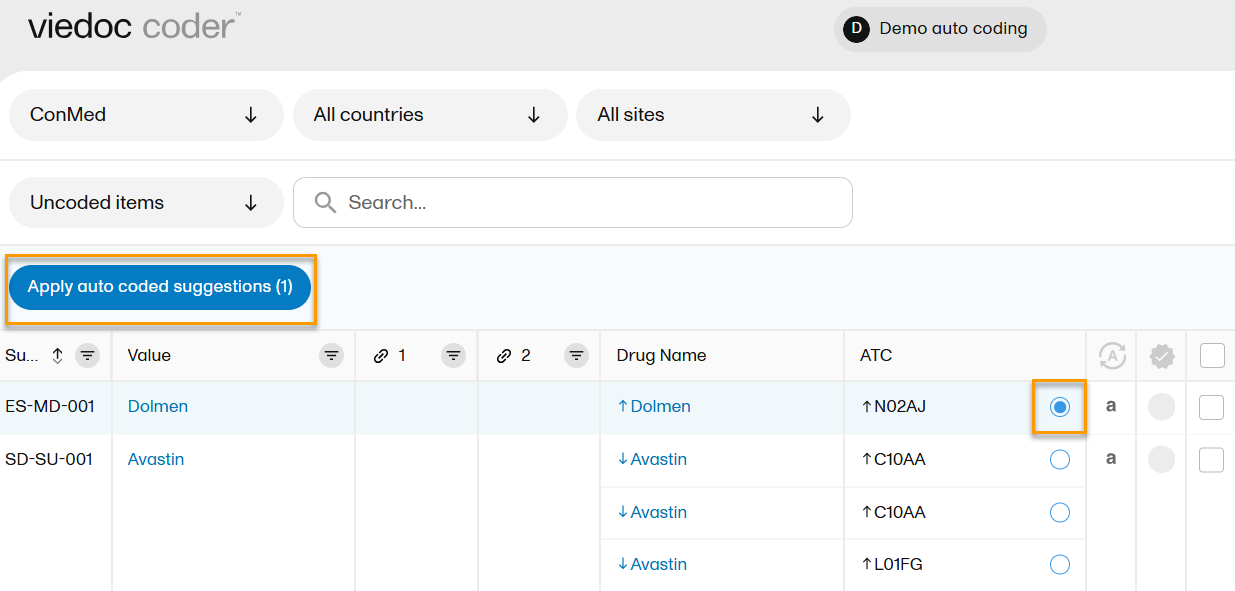 |
The up and down arrows indicate the level of certainty for auto coded items.
An upward arrow signifies a high level of certainty, whereas a downward arrow signifies a lower level of certainty.
Items with a low level of certainty should be reviewed carefully.
An auto coded item is indicated within the column for coded items with the following symbols:
| Symbol | Meaning |
| A | auto coded with a match |
| ! | auto coded without a match and must be manually coded |
| a | suggestion available |
| (empty) | indicates that no auto coding has been run |
For the available suggestions, hover over the a icon to see a tooltip which describes how WHODrug Koda has found the match:
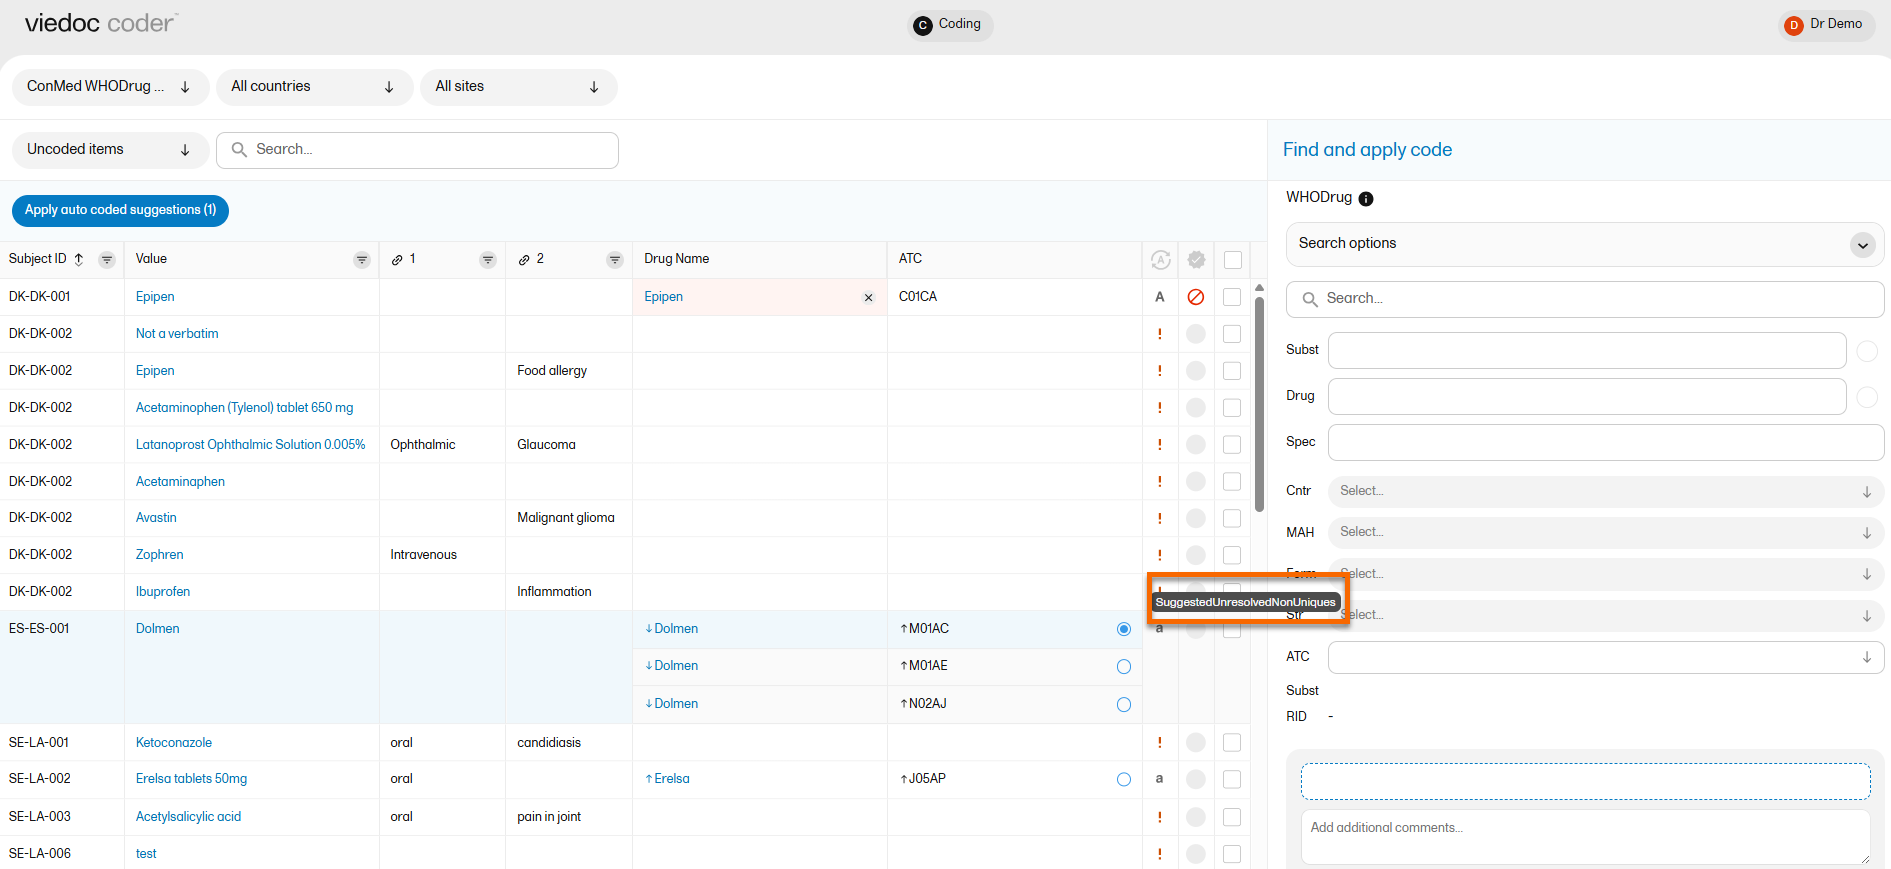
The list of suggested coding paths are as follows:
For more information, see WHODrug Koda
Viedoc Coder allows you to code data, such as Adverse Events, Medical History, and Concomitant Medications, in a standardized way. You can access Viedoc coder on the landing page.
The Viedoc Coder page displays metrics about coding that tell the user the number and percentage of items that have been coded and approved. There is one set of metrics for each coding scope. The metrics displayed are based on the data and sites that you have permission to view.
Note! You can only access Viedoc Coder if permission to view, perform, and/or approve medical coding is activated for your role. If you do not see the medical coding icon, you do not have a role with medical coding permissions.
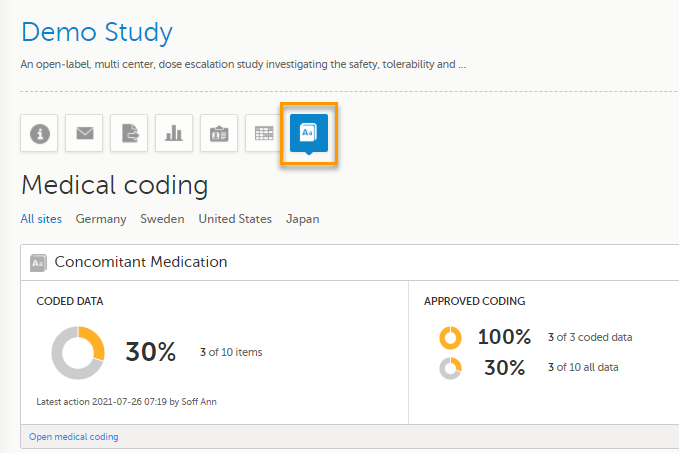
You can select to display the metrics of:
To enter the medical coding console, click Open Viedoc Coder in the lower left corner of the coding scope.
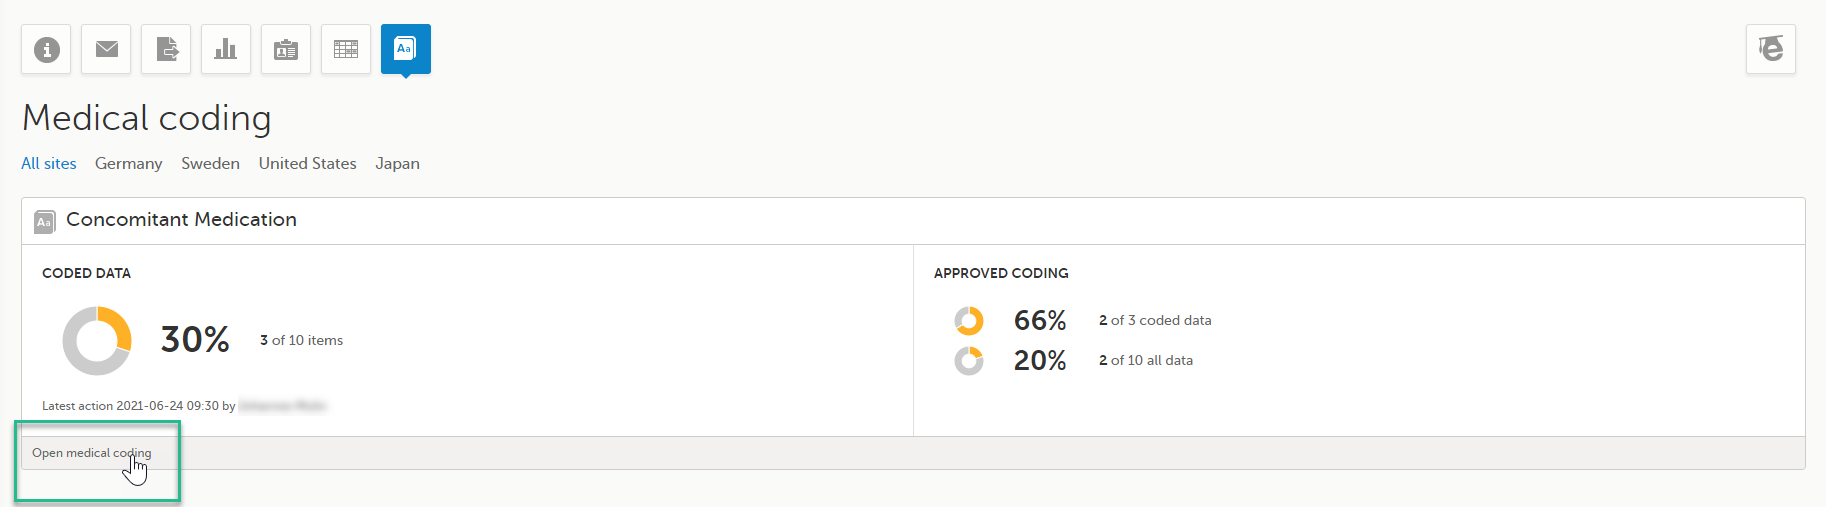
The Viedoc Coder console opens in the same window:
The Viedoc Coder console displays a table that lists all items to be coded in the Values column. You can view the corresponding form (Electronic Case Report Form (eCRF)) of an item by clicking on the value.
On the Viedoc Coder console, you can:
1. Select the coding scope (that is, data) to be coded.
2. Select to display items from all countries or from an individual country.
3. Select to display items from all sites or from an individual site.
4. Select to display all uncoded (and disapproved) items, all coded items, all approved items, or all items.
5. Perform a text search among all values of the items.
6. If configured for your study, there can be additional columns included with supporting values for the coding, for example route, indication, or other.
7. Find and apply codes (see Finding and applying a medical code).
When applying codes, it is possible to:
See Finding and applying a medical code.
On the Viedoc Coder console, you can find the following symbols:
1. The three horizontal lines is a filter function. Click the symbol to open a drop-down list with a search field and a list of selectable items.
2. A filter symbol indicates that a selection has been made and the column only displays your filtered items.
3. A numbered list in the code field means that there is more than one medical code applied to that value.
4. An orange pen icon in the value field, together with a light orange background in the code field, means that the value (form item) has been changed in Viedoc Clinic by the Investigator after the item was coded. The applied code may not be correct anymore and the item needs to be re-coded.
5. A clip icon in the code field means that an interpretation has been added. Move the mouse pointer over the clip icon to view the contents of the interpretation.
6. An activated tick mark indicates that the coding has been approved.
7. The checkbox is used to mark the values to which a selected code should be applied.
8. The white cross in a grey circle is used to delete the applied code.
This section gives an example of medical coding of adverse events using the Medical Dictionary for Regulatory Activities (MedDRA) and an example of medical coding of concomitant medication using the World Health Organization Drug Dictionary (WHO DD). The coding procedure is similar even if you are using other types of dictionaries.
To find a code that you want to apply to a value, use the Find and apply code section.
There are three search options available:
You can search for codes or (substrings of) terms in the Search field. Codes matching the term will be listed in a drop-drown list that deploys from the Search field. If a term is linked to multiple System Organ Classes (SOCs), the code that links to the primary SOC is displayed in black, while the codes that link to secondary SOCs are displayed in grey.
Searching is not case sensitive. If you type in "Anaphylaxis", the search can return results such as "anaphylaxis" and "Anaphylaxis".
You can also search a code by selecting the System Organ Class (SOC), High Level Group Term (HLGT), High Level Term (HLT), Preferrred Term (PT) and Low Level Term (LLT) using the drop-down lists below the search field.
By default, the search returns low level terms (LLTs) that have the status 'current' in the MedDRA dictionary. It is possible to search among non-current MedDRA codes (that is, terms that are vague, ambiguous, truncated, abbreviated, out-dated, or misspelled and thus no longer used), by clearing the checkbox for Only current items.
Select the code you would like to apply. The details of this code appear in the fields below the search field. The checkbox Current displays whether the selected Low Level Term (LLT) has the status current in the MedDRA dictionary or not.
You can select to use the Preferred Term (PT) or the Low Level Term (LLT) by clicking one of the blue radio buttons behind the PT and LLT fields, see image.
If you would like to add more than one code to the same field, click Add another code.
If you would like to add an interpretation, that is, a comment or explanation of the selected code, click Add interpretation and type your interpretation in the field.
You can reset your selections by clicking Clear.
Tip! If you want to apply a code that has been used before, click that code in the left side of the table. The Find and apply code section is then automatically populated with the selections for that code.
To apply a selected code, select the checkboxes for the value or values you want to apply that code to, and click Apply to selected. The selected code will be applied to the selected subjects and values. In the example in the image, we applied two codes to the value Allergic reaction, anaphylaxis for subject SE-AHU-058.
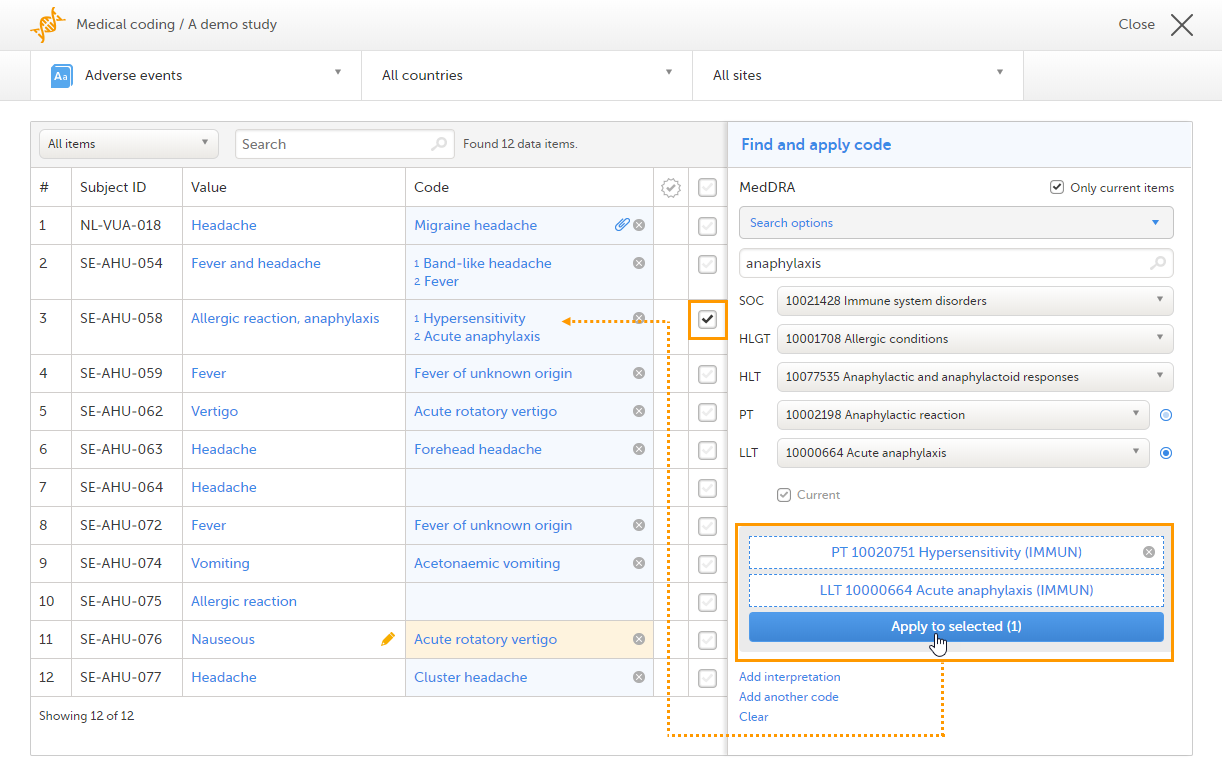
You can remove an applied code by clicking the cross icon to the right of the applied code.
To find a code that you want to apply to a value, use the Find and apply code section.
When using the WHO DD, you can select to search by:
; and the search will return all drugs that contain all specified ingredients.There are three search options available:
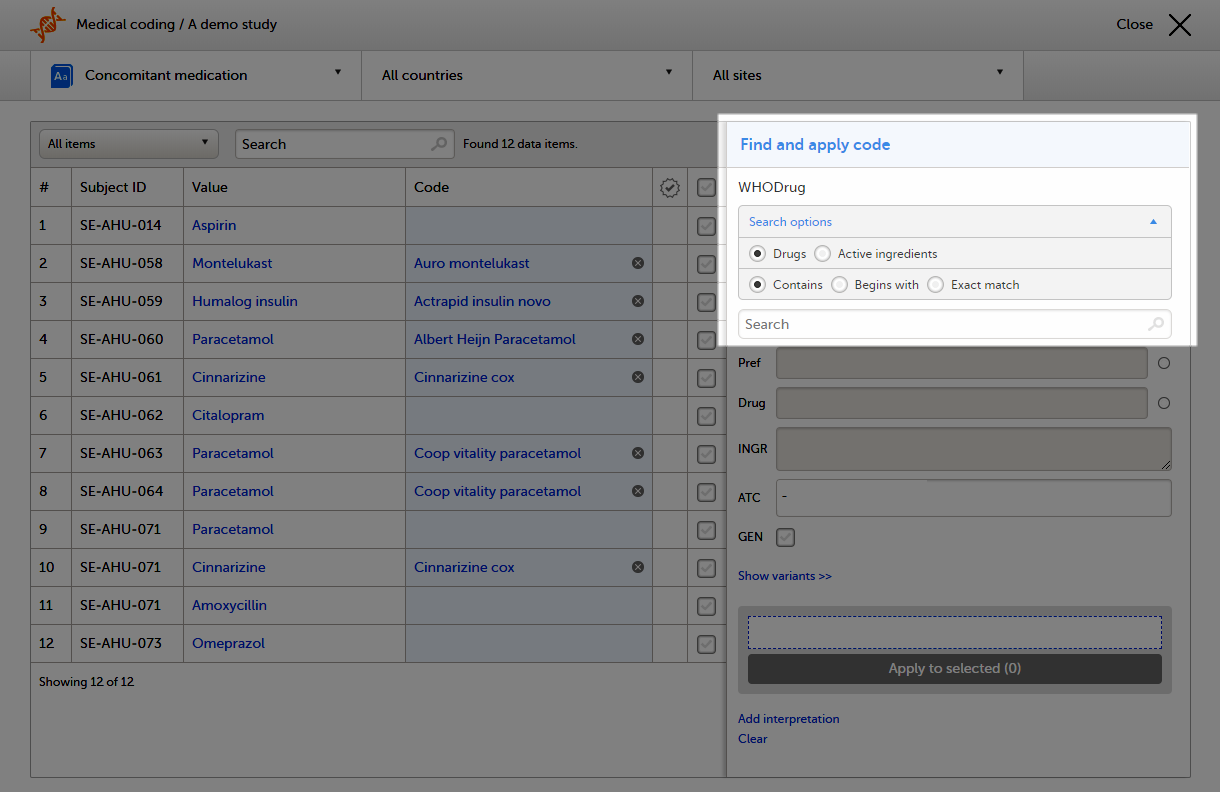
You can search for codes or (substrings of) terms in the Search field. Codes matching the term will be listed in a drop-drown list that deploys from the Search field.
Searching is not case sensitive. If you type in "paRacetaMol", the search can return results such as "paracetamol" or "Paracetamol".
The number behind the entries in the list depicts the number of active ingredients. If you click that number, a pop-up appears that lists the active ingredients.
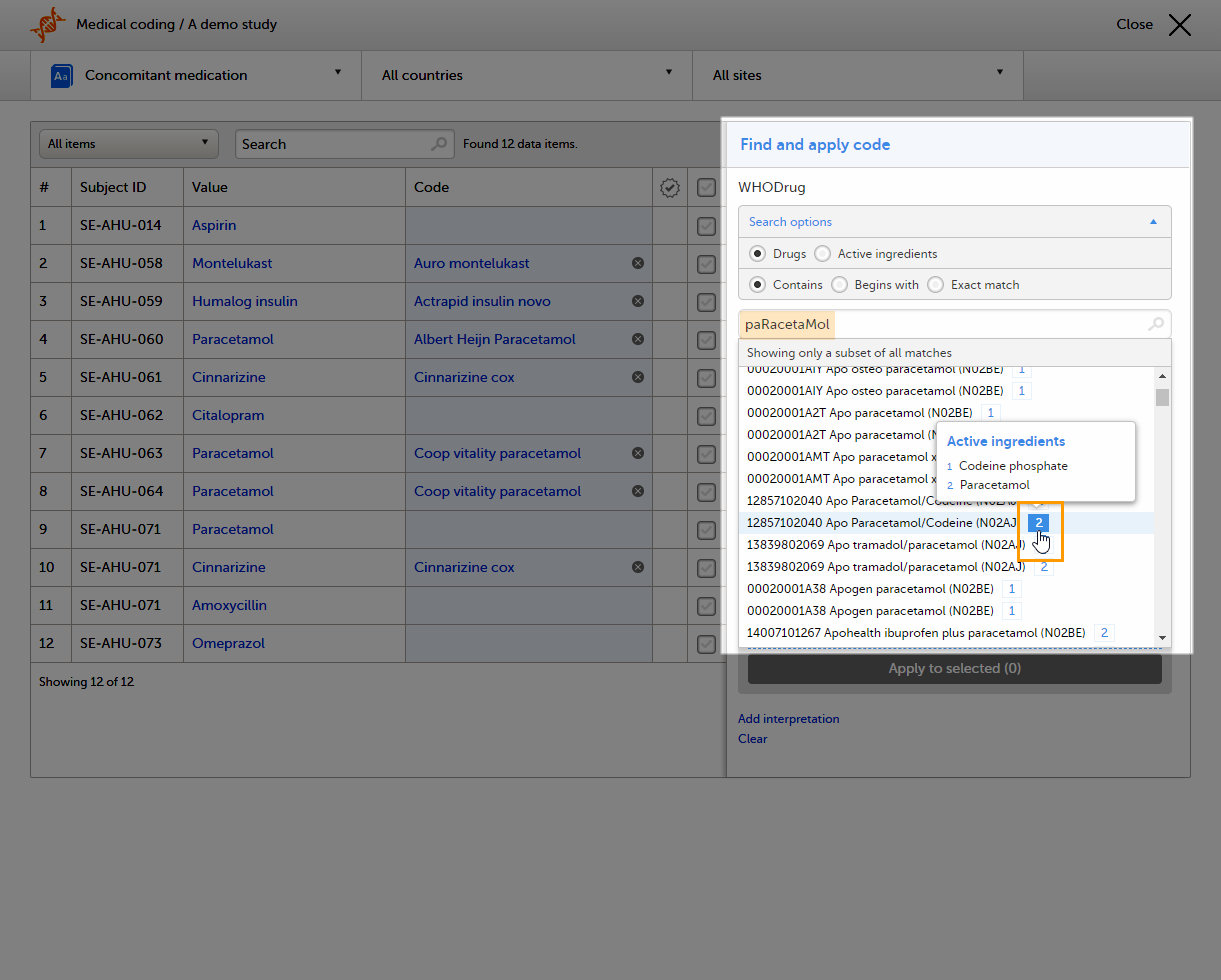
Select the code (drug) you would like to apply. The details of this drug will appear in the fields below the search field.
In the WHO DD, all drugs have a preferred drug as parent. You can select to use the Preferred drug (Pref) or the Drug name by clicking one of the blue radio buttons behind the Pref and Drug fields. Drug is the default.
Note! When exporting medical coding, both the preferred drug and drug name are included in the export (in separate columns). But if you select to apply Pref while coding, the preferred name ends up in both columns in the export. This is to provide consistency for the data managers, so that they only have to look in one column to find their data.
 Click Show variants to display and specify variants of the selected code (drug), and use the drop-down lists to select Country (CNTR), Marketing Authorization Holder (MAH), Pharmaceutical Form (FORM), Strength (STR), or Medicinal Product ID (MPID), if applicable. Click Hide variants to hide the variants, see image.
If you would like to add more than one code to the same field, click Add another code.
If you would like to add an interpretation, that is, a comment or explanation of the selected code, click Add interpretation and type your interpretation in the field.
You can reset you selections by clicking Clear.
Tip! If you want to apply a code that has been used before, click that code in the left side of the table. The Find and apply code section is then automatically populated with the selections for that code..
If you selected a drug that carries multiple Anatomic Therapeutic Chemical Classification System (ATC) codes, all ATC codes will be displayed in the ATC field. You can define whether to include all ATC codes in the coding or only a selection. Click the cross to remove an ATC code, or click the ATC field to add ATC codes.

To apply a selected code, select the checkboxes for the value or values you want to apply that code to, and click Apply to selected. The selected code will be applied to the selected subjects and values.
 You can remove an applied code by clicking the cross icon to the right of the applied code.
After applying codes to the items, it is possible to approve/disapprove/reset the items as shown in the below table.
| Action | Current state/found in list | New state/found in list |
| Approve |
Coded Disapproved |
Approved items |
| Disapprove |
Coded Approved |
Uncoded items |
| Reset |
Approved Disapproved |
Coded items |
Tip! To see all items in one list, select the filter All items.
To approve items that have been coded:
| 1 |
Select the item(s) that you want to approve and click Approve selected. 

|
| 2 |
The selected item(s) now disappear from the list and are found with the blue "Approved" symbol in the Approved items list. 
|
Tip! The metrics of the medical coding that have been approved can be seen on the landing page:
To disapprove items that have been coded:
| 1 |
Select the items that you want to disapprove and click Disapprove selected. 
|
| 2 |
The selected item(s) now disappear from the list and are found with the red "Disapproved" symbol in the Uncoded items list for re-evaluation. 
|
To reset items that have been approved or disapproved:
| 1 |
Select the item(s) that you want to reset and click Reset selected. 
|
| 2 |
The selected item(s) now disappear from the list and are found in the Coded items list without the approved/disapproved flag. 
|
It is possible to export medical coding using the export feature of Viedoc, see Exporting data.
To export the medical coding, select the checkbox in front of Medical coding in the Type of data section.
For more information about how medical coding is exported, see:
Note! You can only export medical coding if permission to export data is activated for your role. If you do not see the data export icon, you do not have a role with export permissions.
This lesson applies to site staff managing the Viedoc Me application.
If applicable for the study, a Viedoc Me account can be activated, allowing the subject to submit data to the study through any device using a web browser (phone, tablet, computer).
To access the platform:
The device must have an active internet connection.
If the subject chooses to receive text message reminders, the device must also be able to receive text messages.
Please make sure patients are aware of these requirements before they start using Viedoc Me. You can share the following information with them as needed: Using Viedoc Me - (information for study participants)
Note! Only user roles with editing permissions for the study start event form can activate a Viedoc Me account. If you do not have editing permissions, the phone icon (as seen in the image below) will not be visible on the Details page.
To activate a Viedoc Me account for a subject:
| 1 |
Open a subject card and select the phone icon located in the top right corner of the Details page: 
The Activate Viedoc Me account window opens: 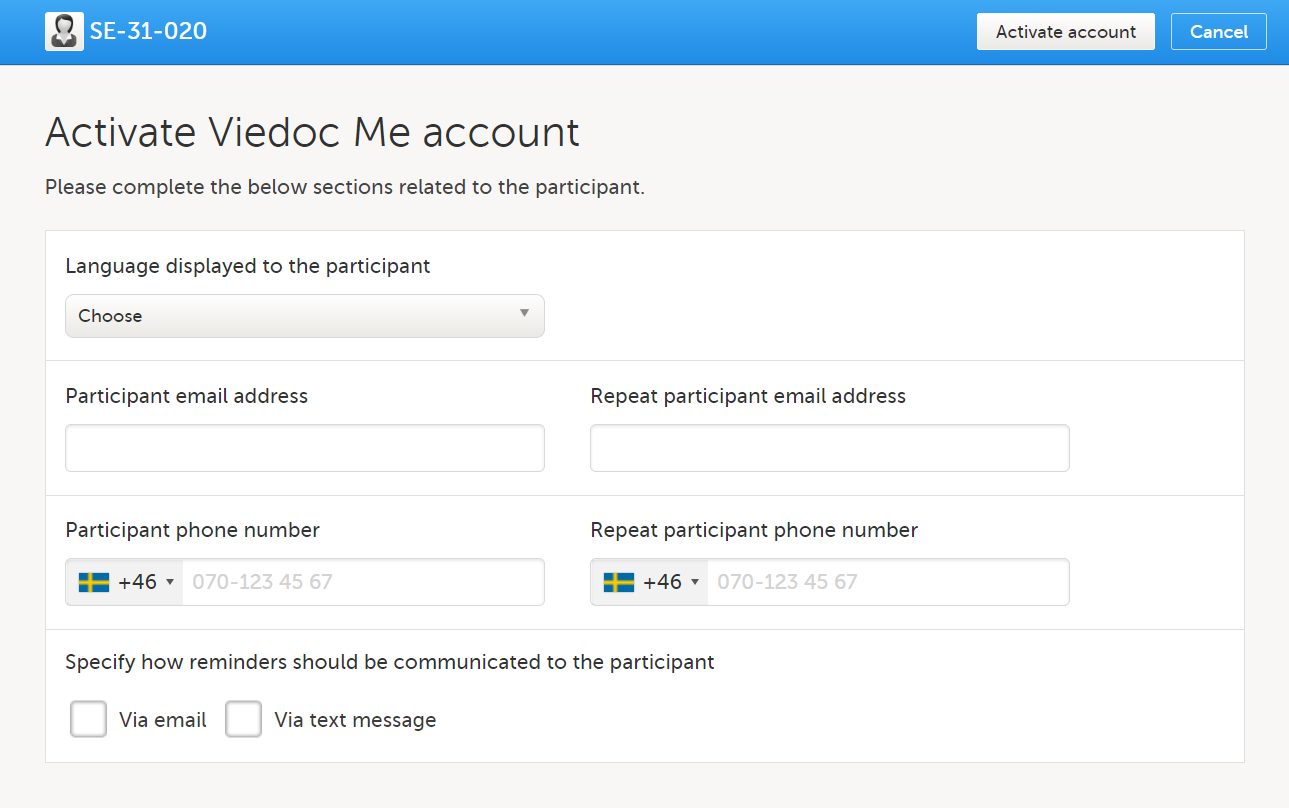
|
| 2 |
Language displayed to the participant Choose the language that should be displayed to the subject by selecting the language from the dropdown list. Note! The languages Cebuano (ceb), Hiligaynon (hil), and Tagalog (tl) are available in when inviting subjects to Viedoc Me in Viedoc Clinic when added as additional languages in Viedoc Designer. These languages are currently displayed as: Unknown language (tl), Unknown language (ceb) Unknown language (hil). |
| 3 |
Participant email address and Participant phone number Enter the subject's email address and/or phone number. These must be entered twice to ensure correct data entry. Note! These options are only visible if the functionality for "sharing of access details" (login information) via email and/or text message has been enabled in the study settings. Please contact your study manager to have this option enabled. |
| 4 |
Specify how reminders should be communicated to the participant Select whether to send reminders via email and/or via text message. Note! These options are only visible if the functionality for "allow activity reminders" via email and/or text message has been enabled in the study settings. Please contact your study manager to have this option enabled. The reminder settings can also be changed at any time after the Viedoc Me account activation. Test messages can be sent out to the entered email address and/or phone number, see Verifying subject email address and phone number. |
| 5 |
Select Activate account at the top right. The Viedoc Me Account window will display the subject's account details and login information: 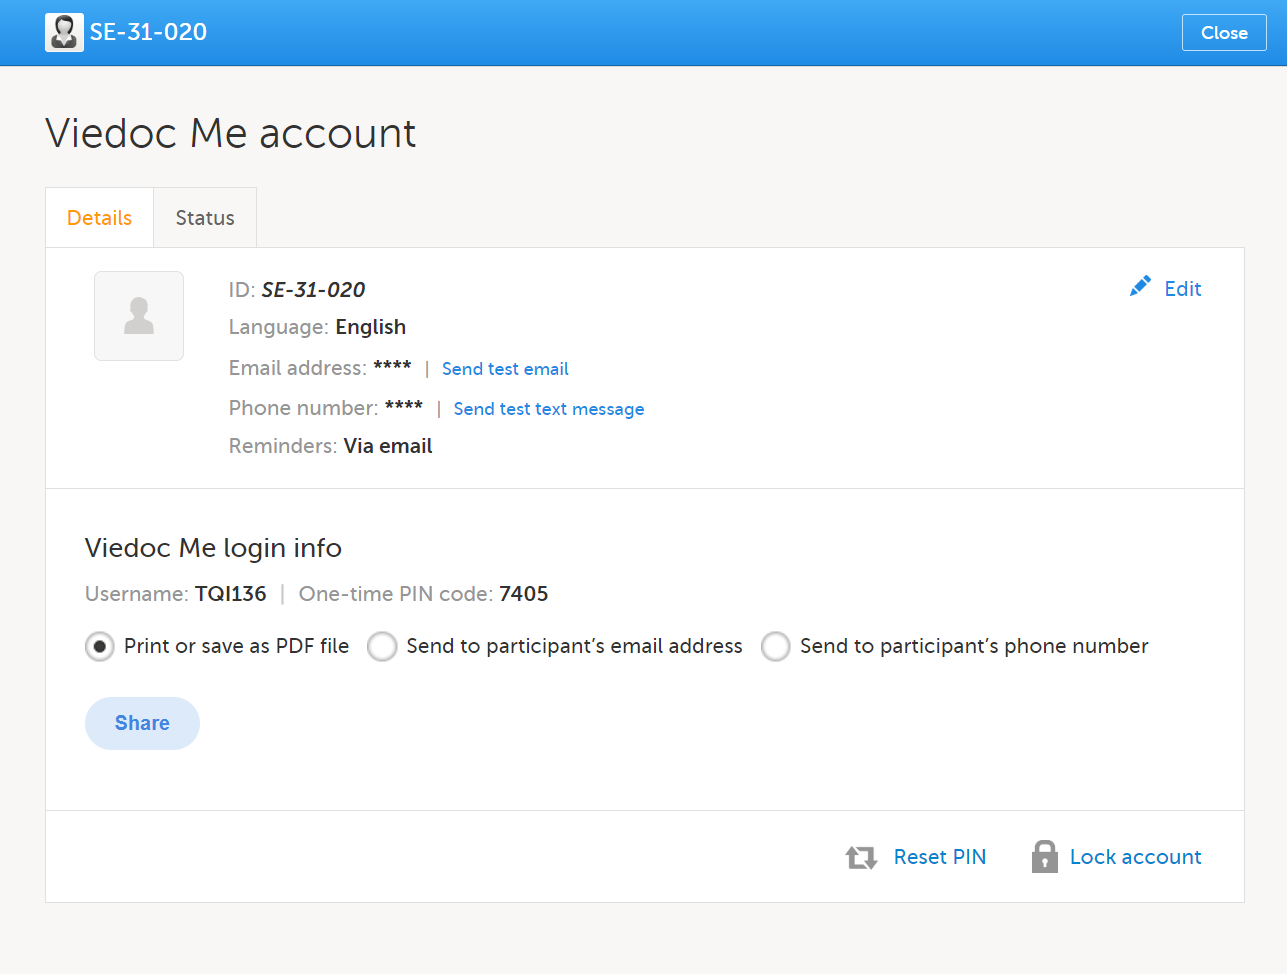
The Viedoc Me Account activation process is now complete. To share the login information with the subject, please continue with the steps below. |
Note! You may only activate one subject's Viedoc Me account at a time.
After the Viedoc Me account has been activated, there are several options to share the login information with the subject. This may be done at any time and repeated as often as needed.
To share login information with a subject:
| 1 |
Open a subject card and select the phone icon located in the top right corner of the Details page:
The Viedoc Me Account window is displayed: 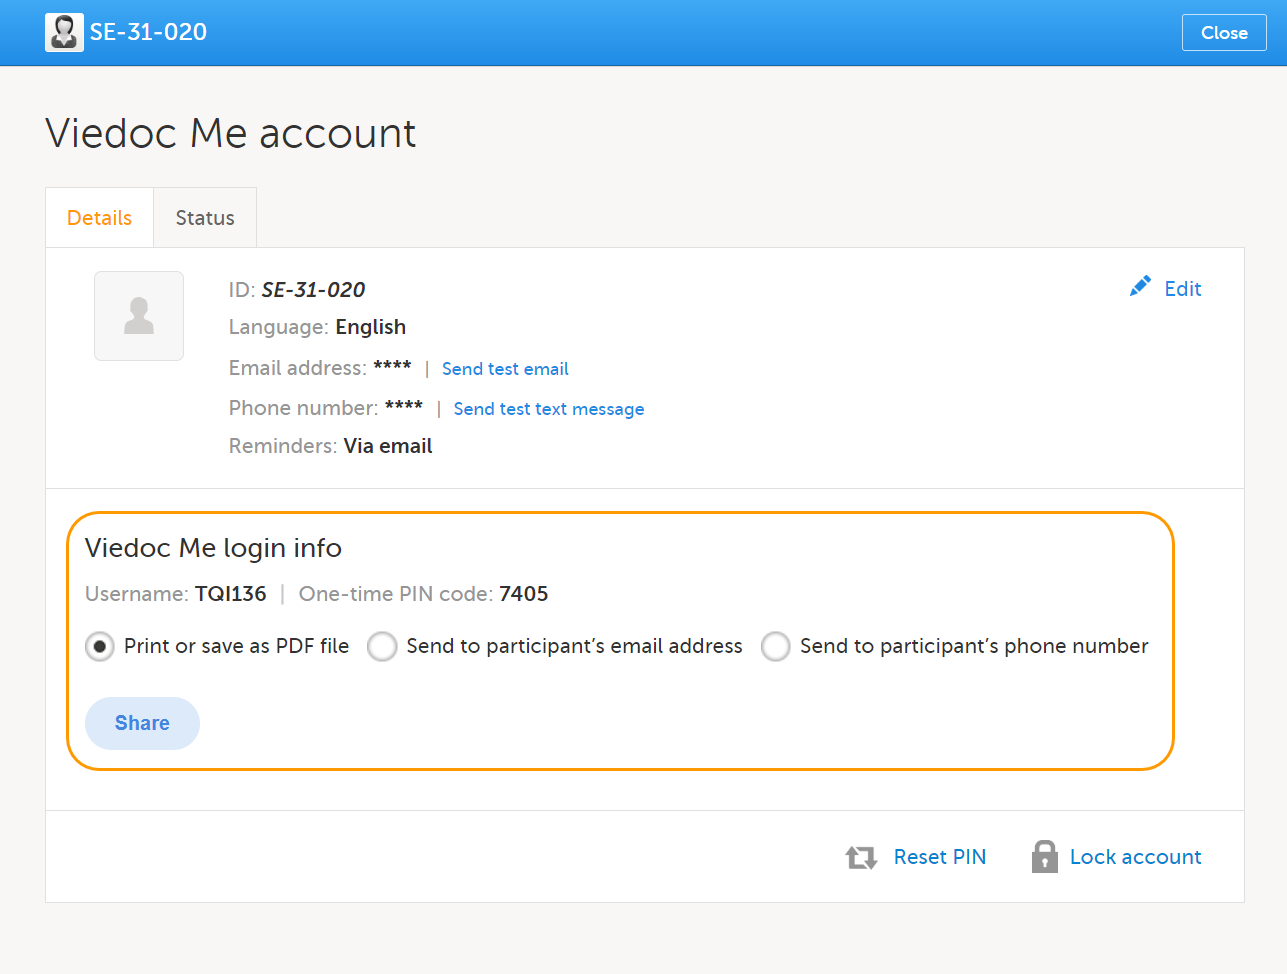
|
| 2 |
Select the options for sharing the Viedoc Me login info with the subject:
Note!
Note! The Viedoc Me login page URL always contains the string "idp". This is expected behavior. |
| 3 |
Once the sharing method has been selected, select Share to complete the action:
|
Note! After sharing the login information, if you wish to share again with the subject you will receive a message next to the share button stating that the PIN code must be reset before sharing the login information again:

Follow instructions on Resetting the PIN code below.
To verify a subject's contact information is correct, a test email/text message can be sent. The test emails and text messages sent from Viedoc cannot be replied to.
Note! Sending a test email or text message is only possible if the functionality for "sharing of access details" (login information) and/or "allow activity reminders" via email and/or text message has been enabled in the study settings.
To send a test email and/or text message:
| 1 |
In the subject's details page, select the phone icon to open the Viedoc Me Account window. Select Send test email and/ Send test text message. 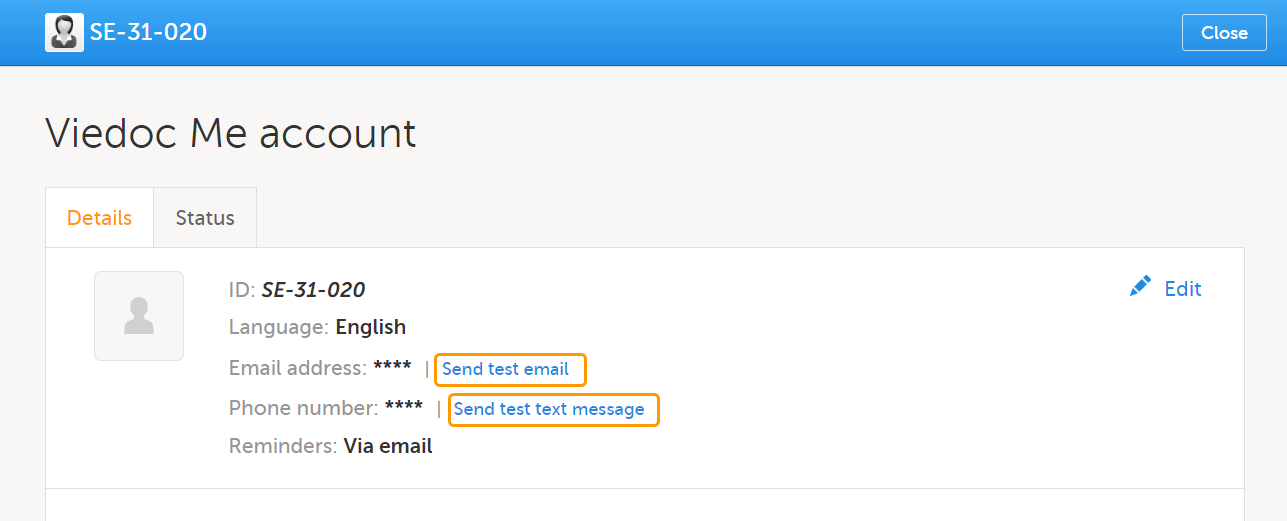
Note! The Send Test links are available only after the email address and/or the phone number was entered and saved. All changes done in the Viedoc Me account window must be saved in order for the test links to be available. |
| 2 |
The result of sending out the test email/text message is displayed by a message. If a test message was successfully sent: 
If a test message failed to send: 
In this case you might want to enter the email address/phone number again by selecting edit, save the changes, and try to send the test message again. Note! A successfully sent message does not confirm the correct email/phone number, only that it was sent out successfully from Viedoc. Please confirm with the subject that the message was received to ensure the email address/phone number is correct. |
| 3 |
The test message(s) may be sent again by selecting Send again (for example, if the subject cannot confirm they have received the message). |
The subject's PIN code can be reset at any time by selecting Reset PIN:
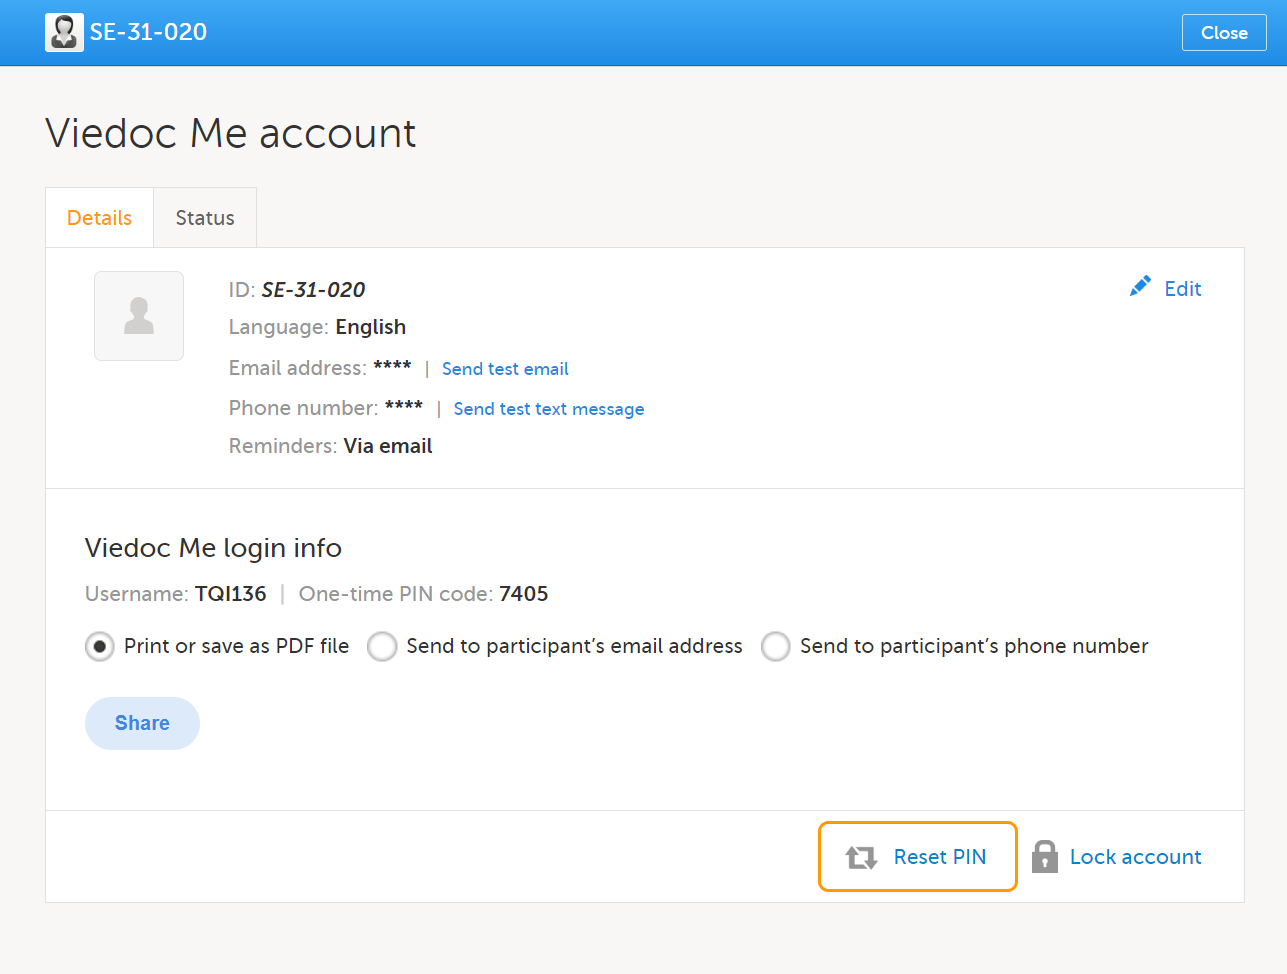
After the PIN code is reset, you will need to share the login details again via PDF, email or text message by following steps 5 and 6 above.
Important! The account must be unlocked before the new PIN code can be used for login. See Locking and Unlocking the Viedoc Me Account below for more information.
If the subject is using Viedoc Me on a mobile phone, saving the URL as a shortcut on the home screen of the device can make future logins easier. Similarly, the Viedoc Me URL can be saved as a bookmark/favorite on a computer. Instructions on how to do this, and other valuable information for Viedoc Me users can be found in the Using Viedoc Me (Information for study participants) lesson.
Subject-submitted (Viedoc Me) forms that have been filled in by a subject are locked by default.
There might be a possibility to unlock a subject-submitted form if this option is activated for your study. In this case, the Lock checkbox appears at the bottom of the form.
To edit a form in Viedoc Me:
| 1 |
A user with lock data permission (typically a Monitor) unlocks the form by clearing the Lock checkbox at the bottom of the form. 
|
| 2 | A user with edit data permission (for example, an Investigator) edits the form data according to these instructions: Editing data. |
| 3 |
To see the audit trail of the edit, select Show history at the top-right corner of the form. 
The subject who made the initial data entry is called Subject (0) in the audit trail. For the data edit, the user name is displayed (blurred in the image above for information security reasons). |
| 4 | A user with lock data permission locks the form for editing. |
The Viedoc Me account can be locked/unlocked by selecting the Lock/Unlock account link in the Viedoc Me account details window:
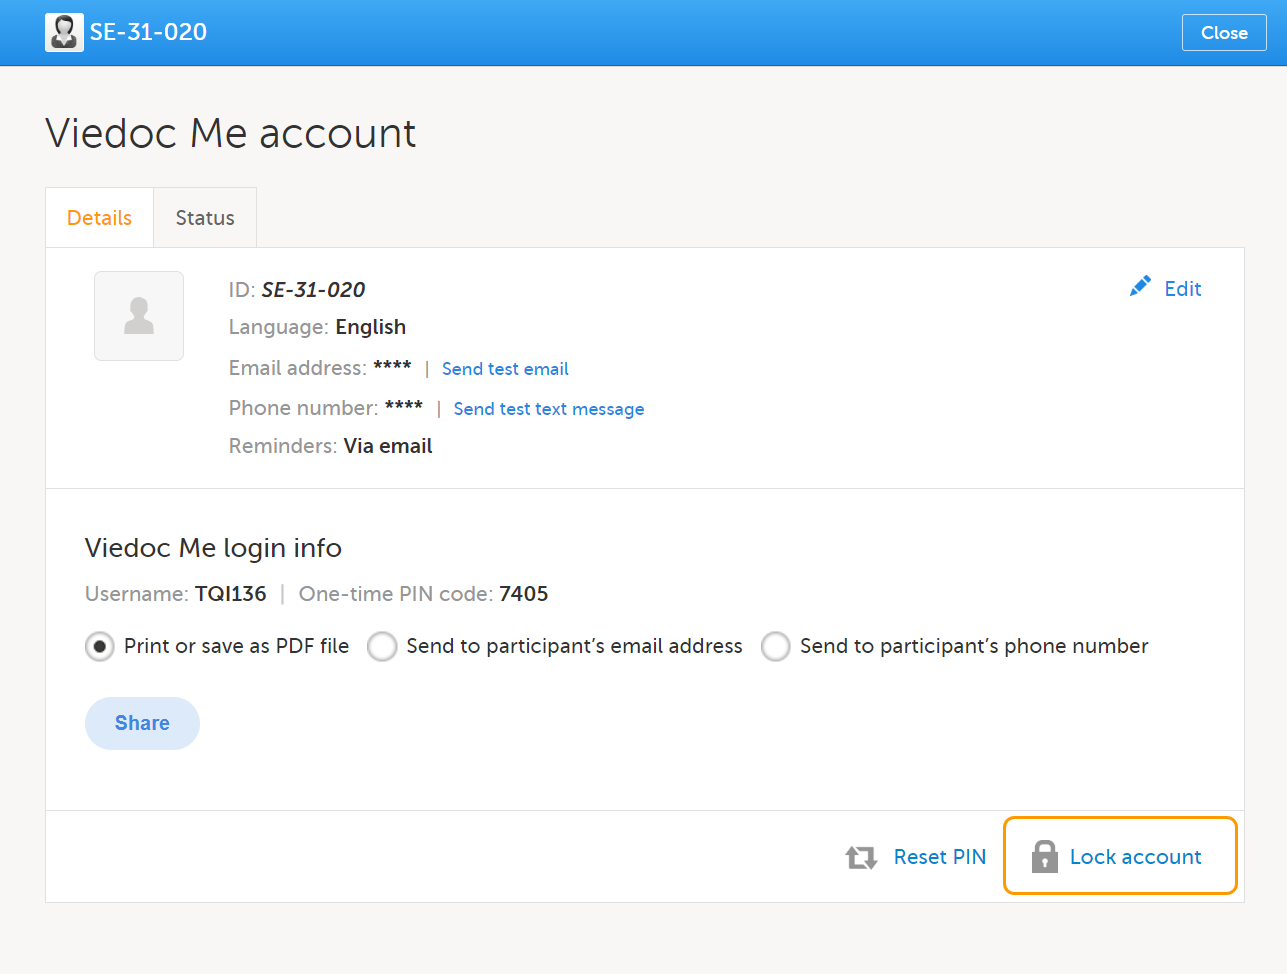
Note! The account is automatically locked if the subject enters incorrect login details more than 3 times. If this occurs, an alert email is sent out with information about the locked account. The users that receive this email are site and monitoring staff, if their user role is configured with:
When the account is locked (either manually or automatically), this is marked by a red Account locked icon in the top-right corner of the Viedoc Me account details window. To unlock it, select the Unlock account link in the bottom-right corner:
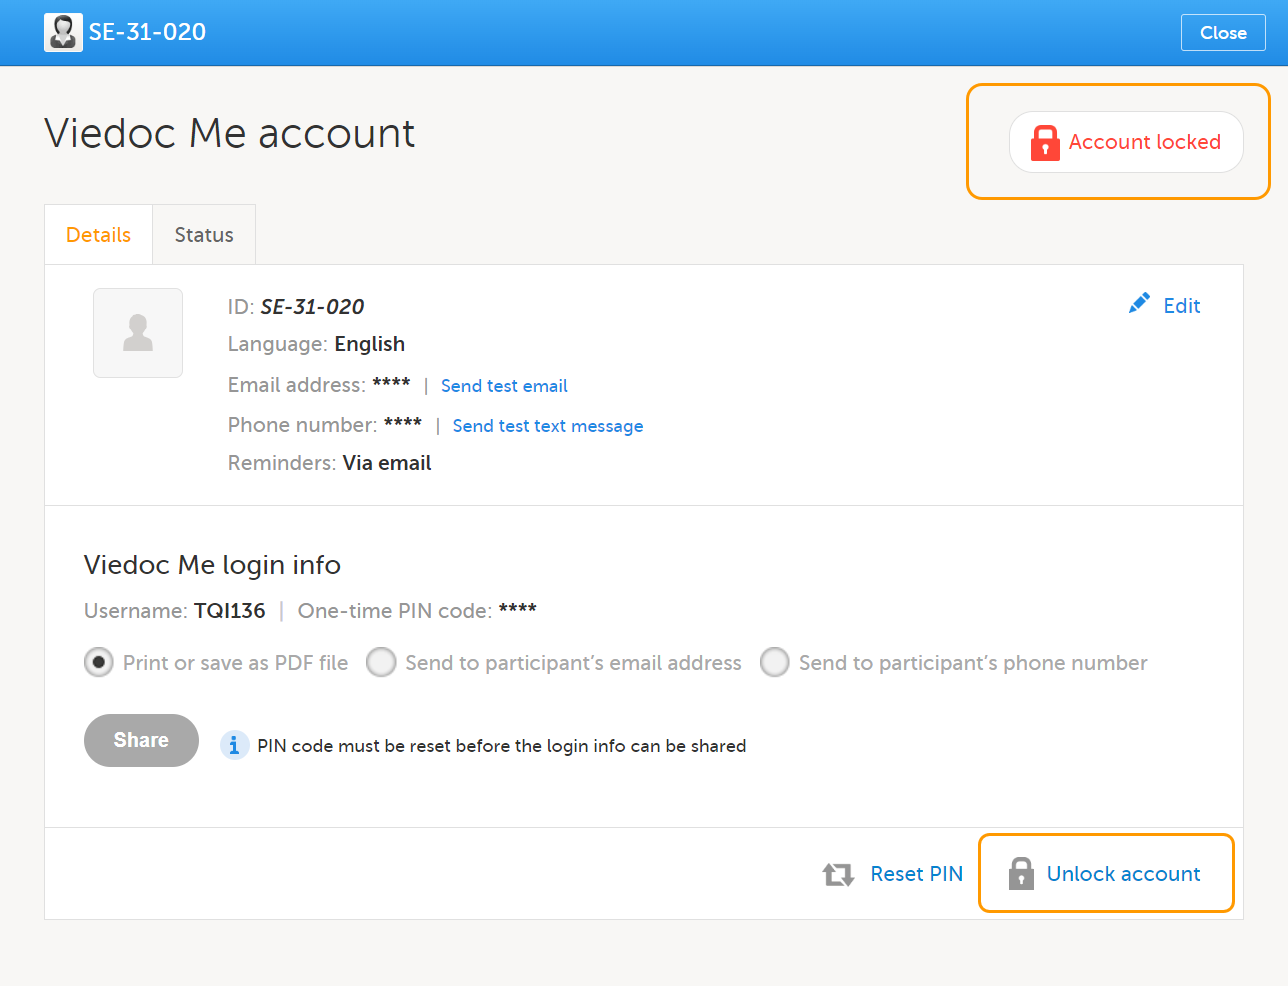
You can check the Status tab of the Viedoc Me account window for status of incoming questionnaires and activity.
Here you can see how many times the subject logged in, when they last logged in, compliance, and when incoming questionnaires are expected:
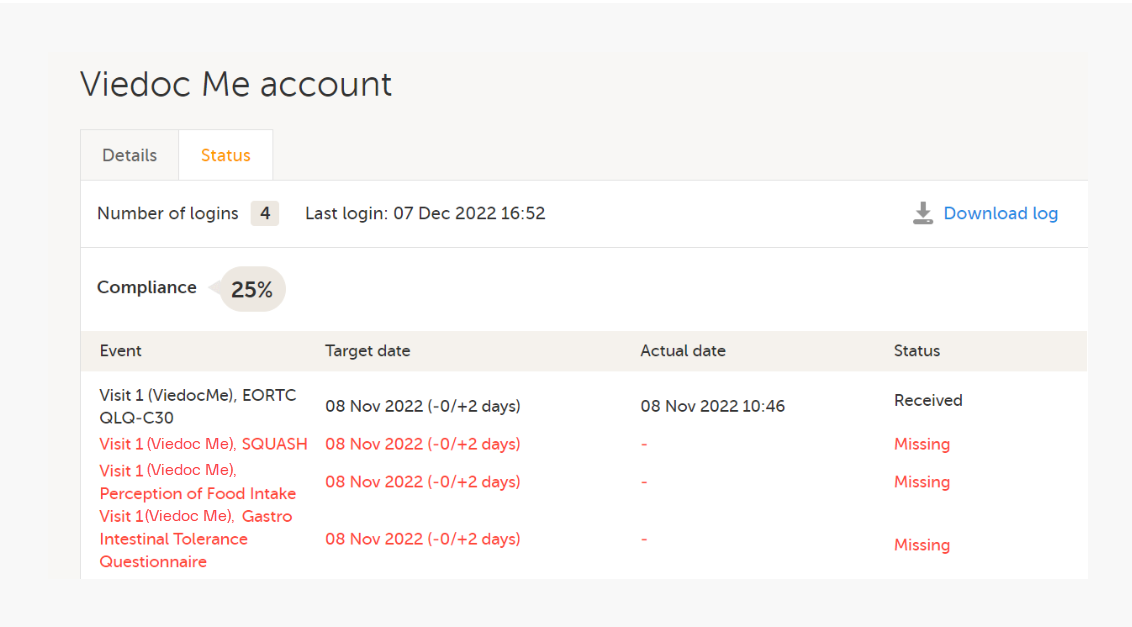
All activities related to the Viedoc Me account can also be downloaded as an Excel file by selecting Download log.
The Excel file contains the following sheets: the Account Activities sheet and the Communication log sheet.
In the Account activities sheet, the following activities are saved, with the latest activity saved in the top row of the Excel file:
*Date and time of the site
To the right of the Account activities sheet is the Communications log sheet which contains information about all the emails and SMS messages sent to that subject.
Note! Email and SMS communication logs before the Viedoc 4.70 release are available, however these do not have the same level of detail.
The Communications log contains the following information:
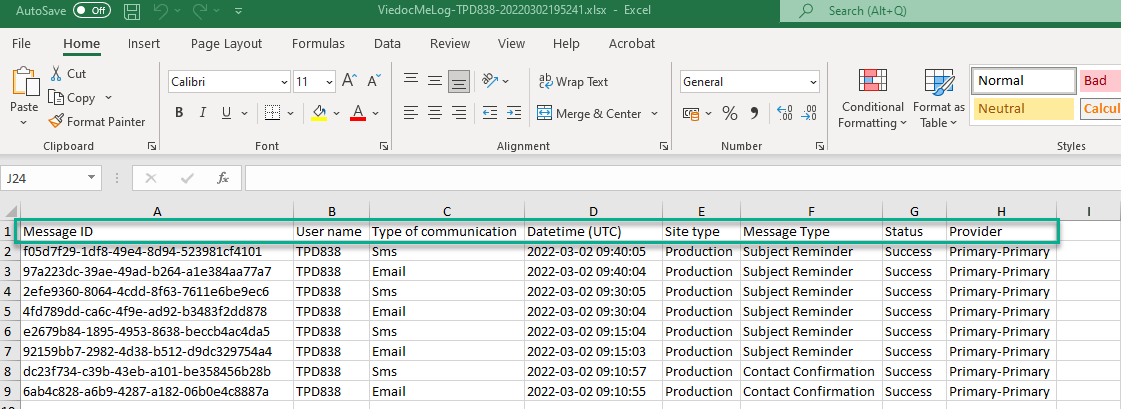
If applicable for your study, you can see an overview of the Viedoc Me accounts on the Selection page:
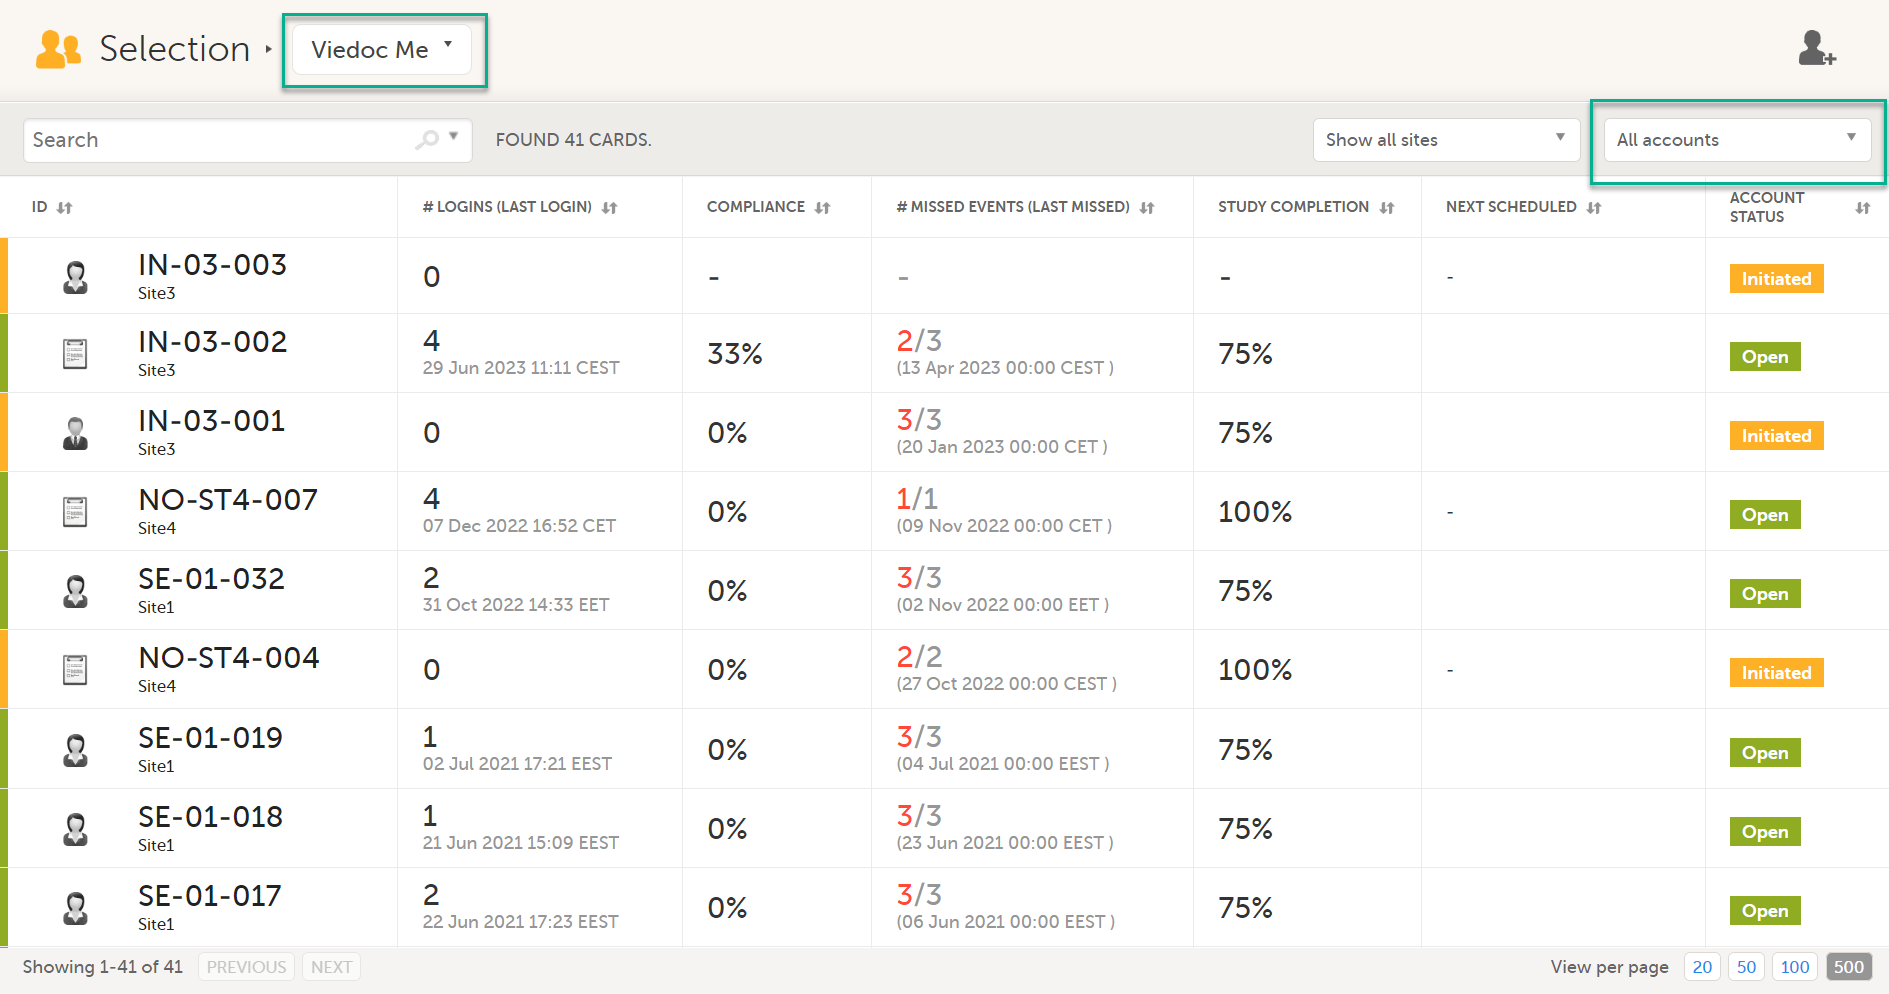
For more information, see Views on the Selection page in the lesson Selection page.
Viedoc Me is a web application used for collecting data from patients participating in clinical trials. It works on any device: a computer, tablet, or mobile phone, as long as the device has a browser and access to the Internet. The application enables you to fill in questionnaires and submit them.
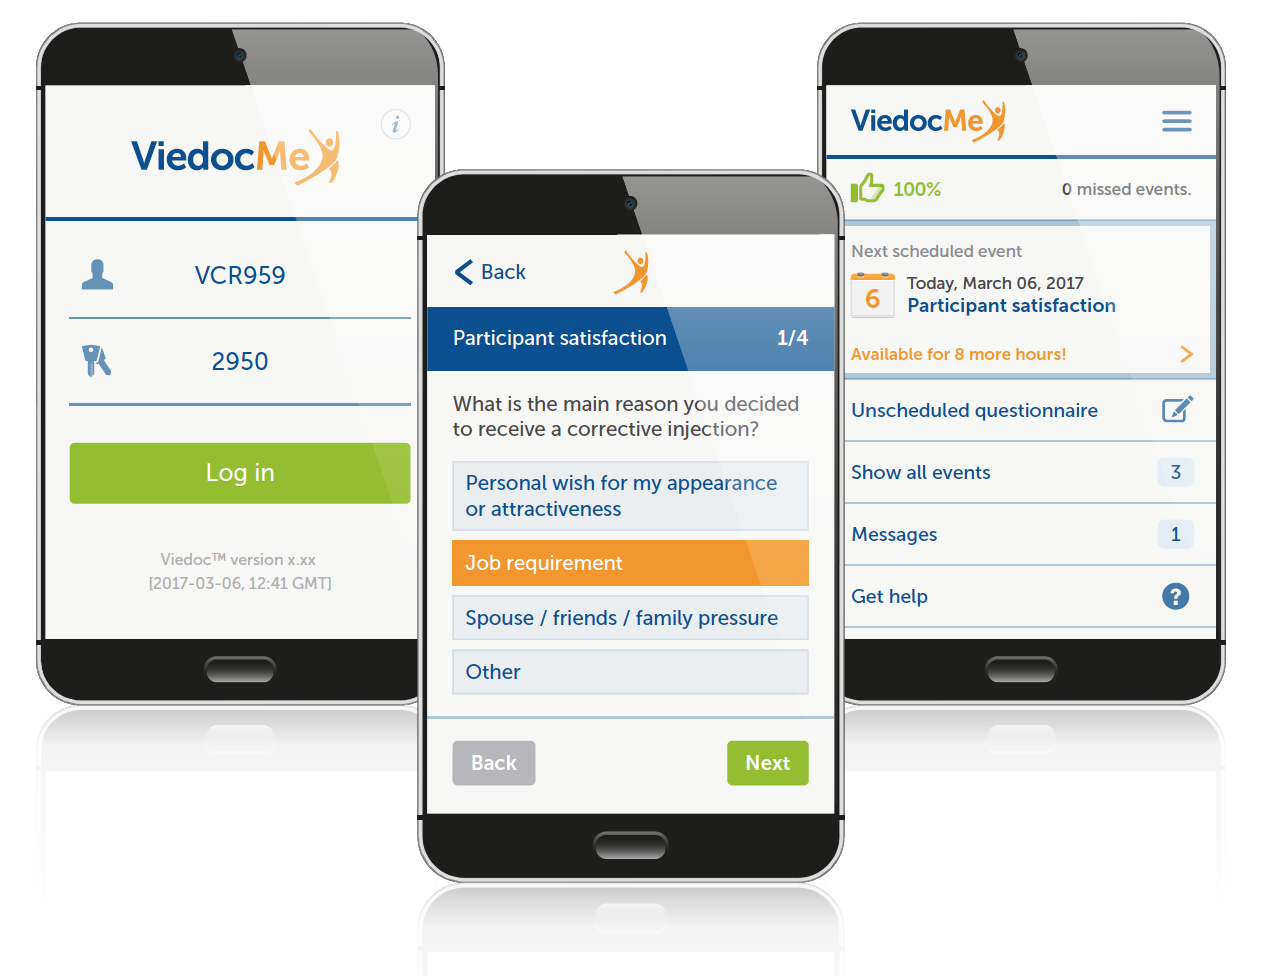
Access to Viedoc Me is provided by your doctor, nurse, or other contact at the clinic. You will be provided with a document that looks as follows:

The document contains the following info:
1. The URL (web address) to Viedoc Me.
2. Your user name. The user name consists of three characters followed by three numbers, for example TVA616.
3. Your PIN code. The PIN code consists of four numbers.
Note! When you enter the URL (web address) from the login information PDF in a browser, you are redirected to a URL that looks slightly different and that contains the string "idp". This is the expected behavior.
To log in to Viedoc Me:
| 1 |
Open a web browser on your device. Type the URL that is stated on your document in the address bar. The Viedoc Me login page opens. 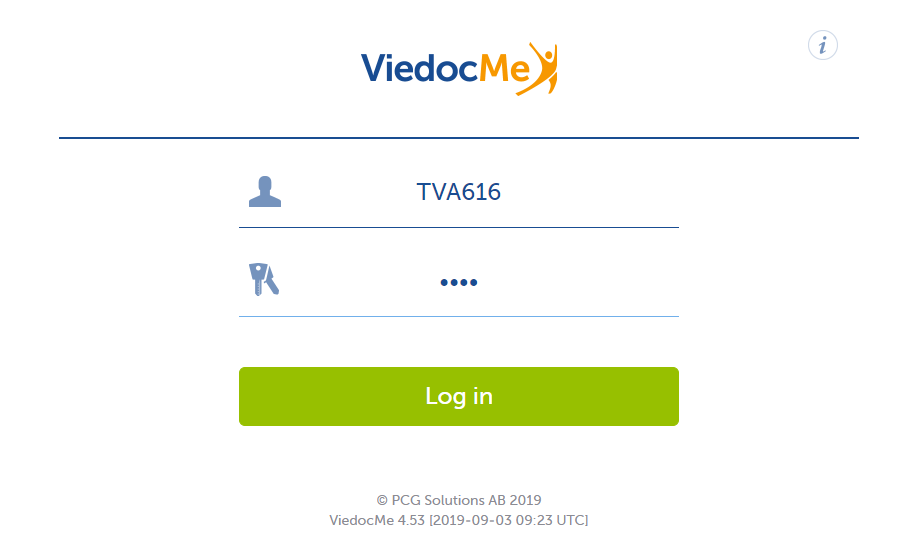
|
| 2 | Type your user name in the field next to the person symbol. |
| 3 | Type your PIN code in the field next to the key symbol. |
| 4 |
Select Log in. Note! When logging in for the first time, you may be prompted to change you PIN code, if applicable for the study you are participating in. This will also be the case if the clinic staff have reset your PIN code: 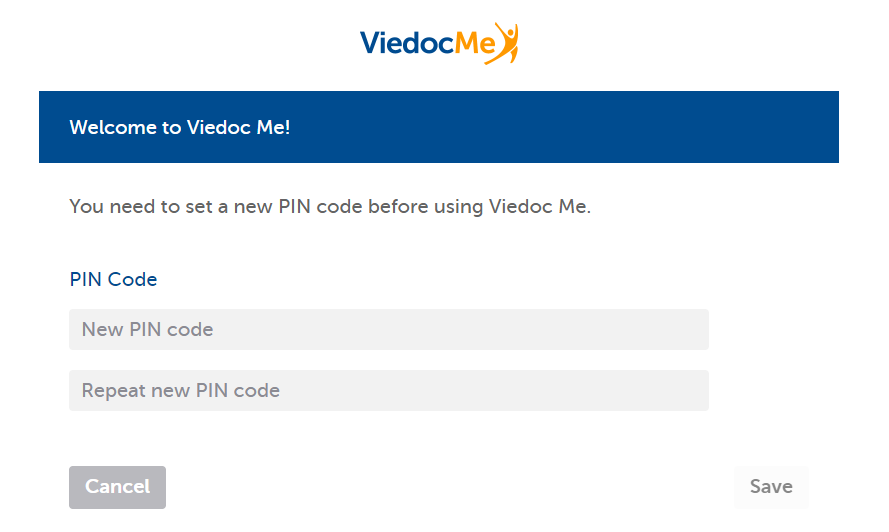
Enter a new PIN code and select Save and then select Continue in the next window. |
If you are using Viedoc Me on a mobile phone, future logins can be done easier by saving the URL. It will appear as an app on the home screen of the device:
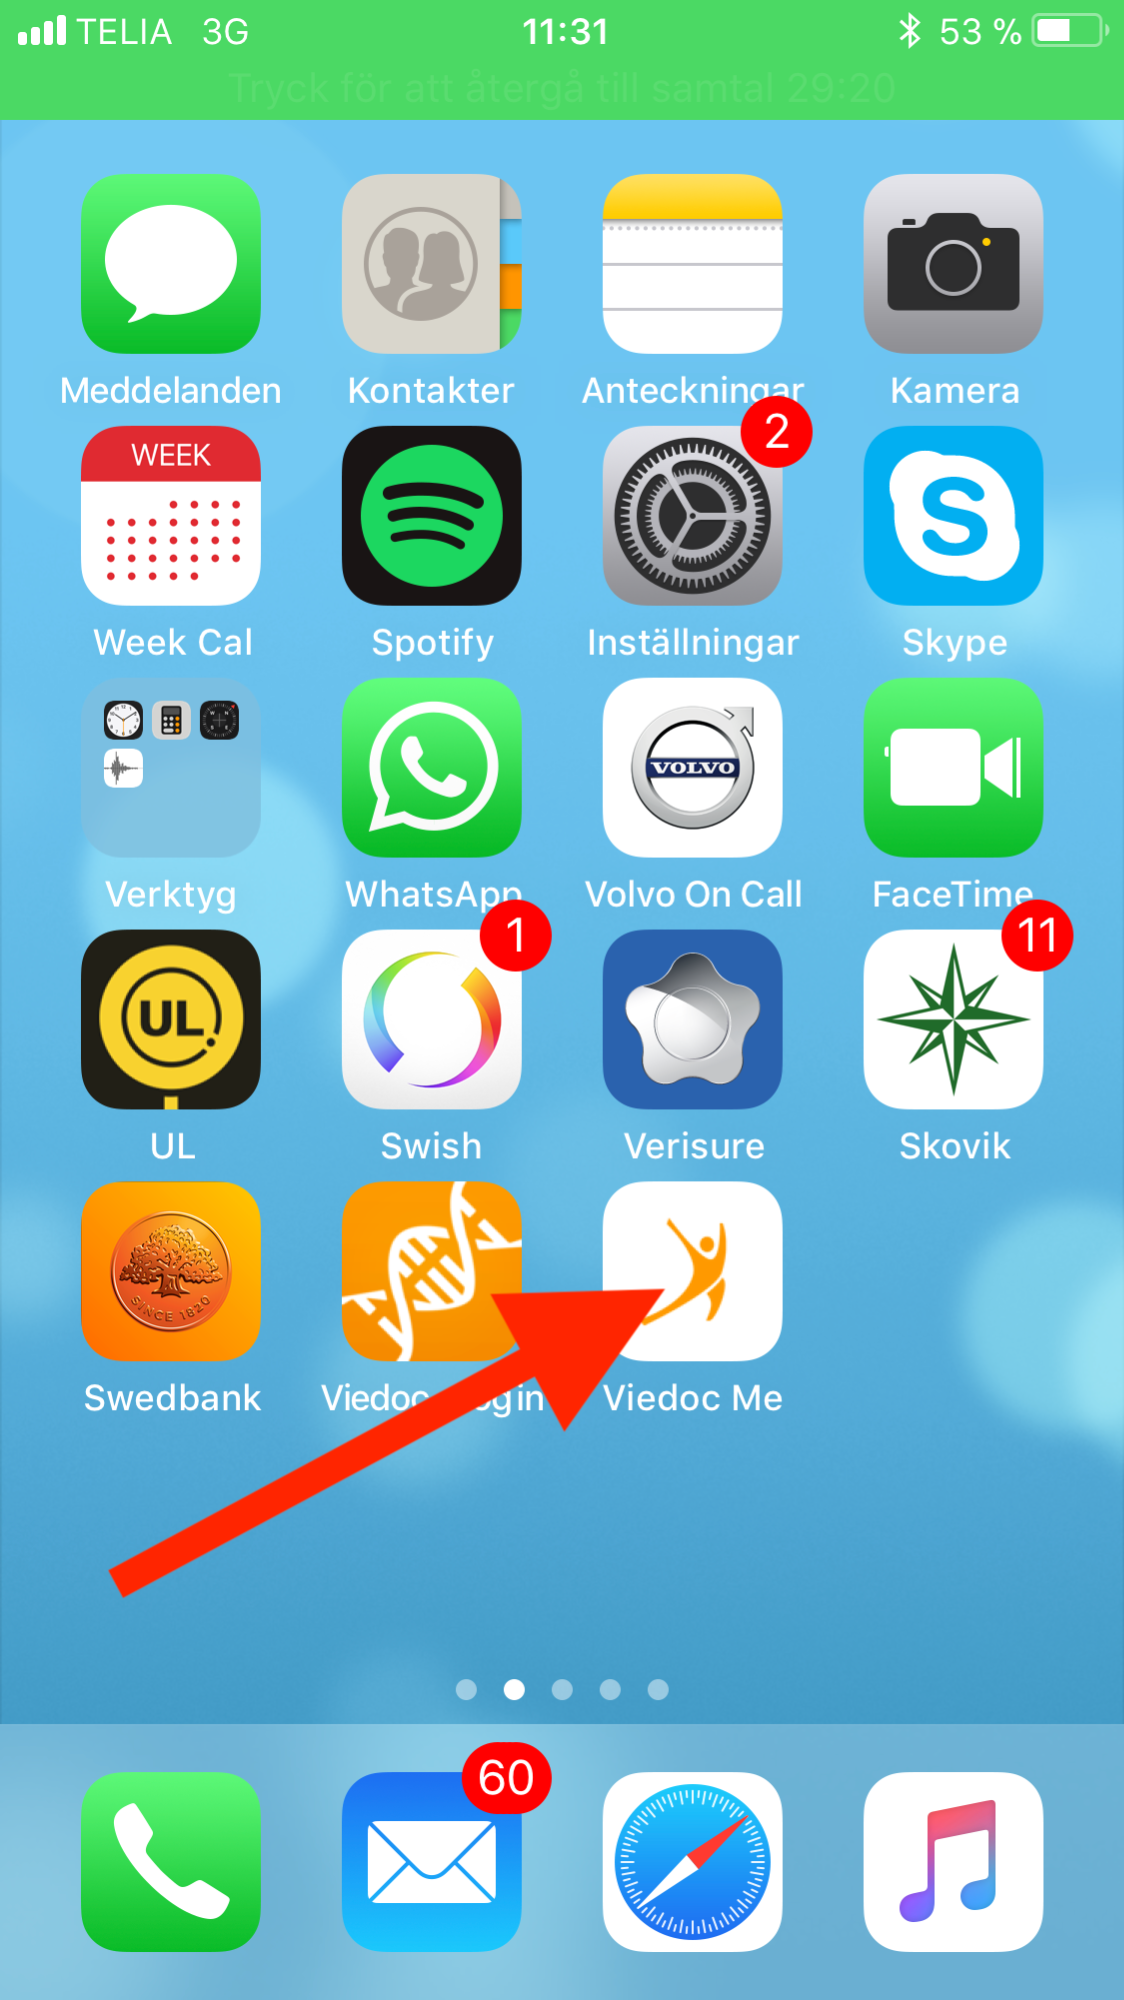
To save Viedoc Me as an app:
| 1 | Open a web browser on the phone and navigate to the URL that is stated in the document provided to you. |
| 2 |
Select the option Save to home screen or anything similar to that, depending on the device. The Viedoc Me application is now available as an app on the phone. |
Similarly, you can save the Viedoc Me URL as a bookmark/favorite on your computer.
There are two types of events:
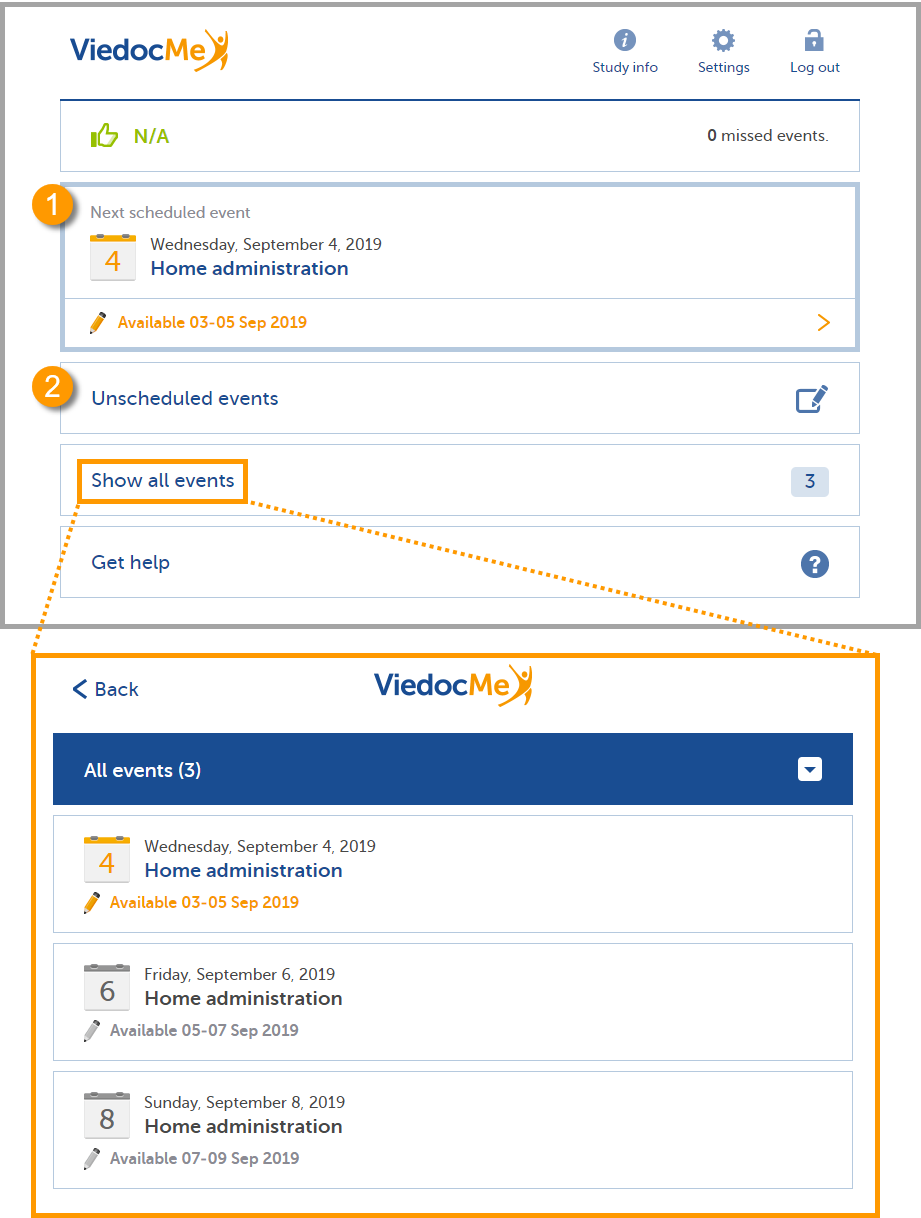
Note! The names of the questionnaires differ depending on the study. The above image is just an example!
To fill in a questionnaire of a scheduled event:
Note! You can only fill in a scheduled event (questionnaire) during the period it is available.
| 1 |
Select the Next scheduled event. 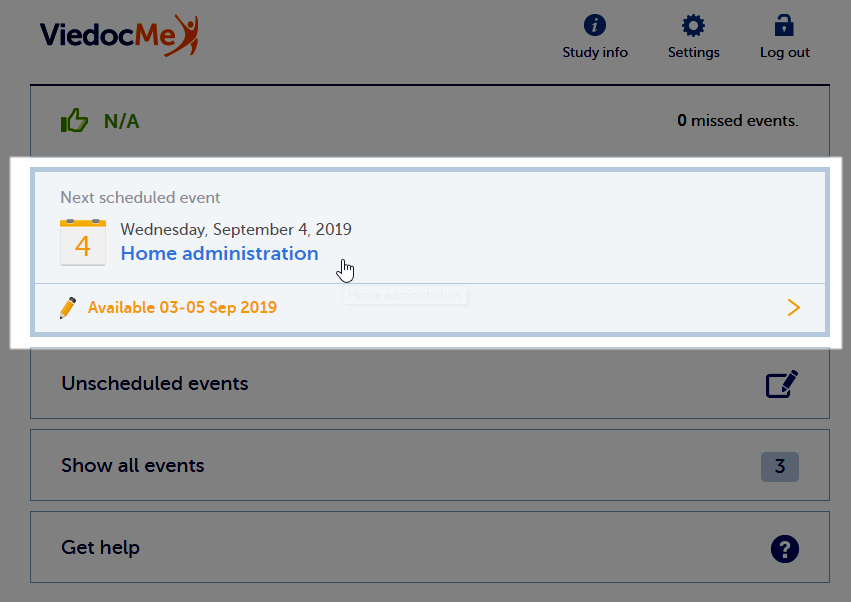
The questionnaire opens. |
| 2 | Enter your answers to the questions. If there are multiple pages, you can navigate to the previous page by selecting Back, or to the next page by selecting Next (only if you have provided an answer to the question). |
| 3 |
When you have answered the last question, select Send to submit the data. |
| 4 | Select Go to startpage to return to the Viedoc Me start page. |
If the study allows, you might be able to spontaneously report data at any time.
To fill in a questionnaire of an unscheduled event:
| 1 |
Select Unscheduled events.  |
| 2 |
Select the name of the questionnaire next to the orange + icon. 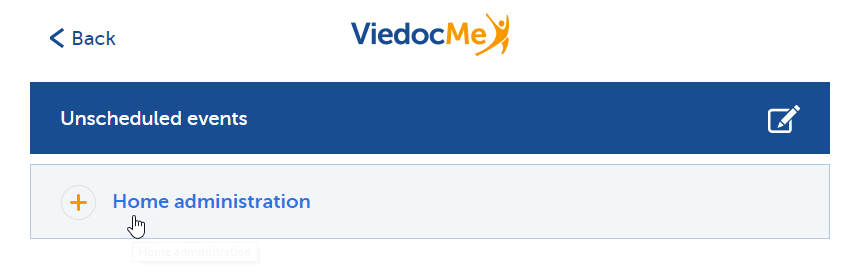
The questionnaire opens. |
| 3 | Enter your answers to the questions. If there are multiple pages, you can navigate to the previous page by selecting Back, or to the next page by selecting Next (only if you have provided an answer to the question). |
| 4 |
When you have answered the last question, select Send to submit the data. |
| 5 | Select Go to startpage to return to the Viedoc Me start page. |
The Viedoc Connect application allows the clinic staff to initiate a video call with you.
When your doctor has initiated a call, the video call module in Viedoc Me flashes in blue with the text Join video call.
Select anywhere on the module to join the call.
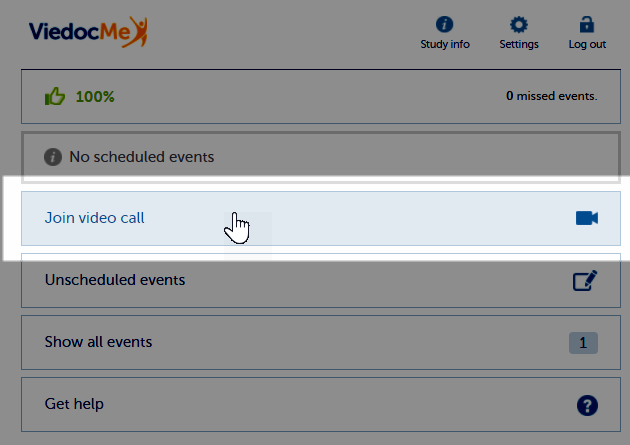
Note! It's important to allow your web browser to access your camera and microphone, if prompted:
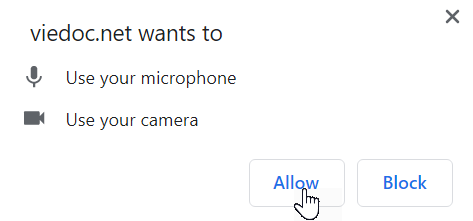
During the call, you will see the following screen:
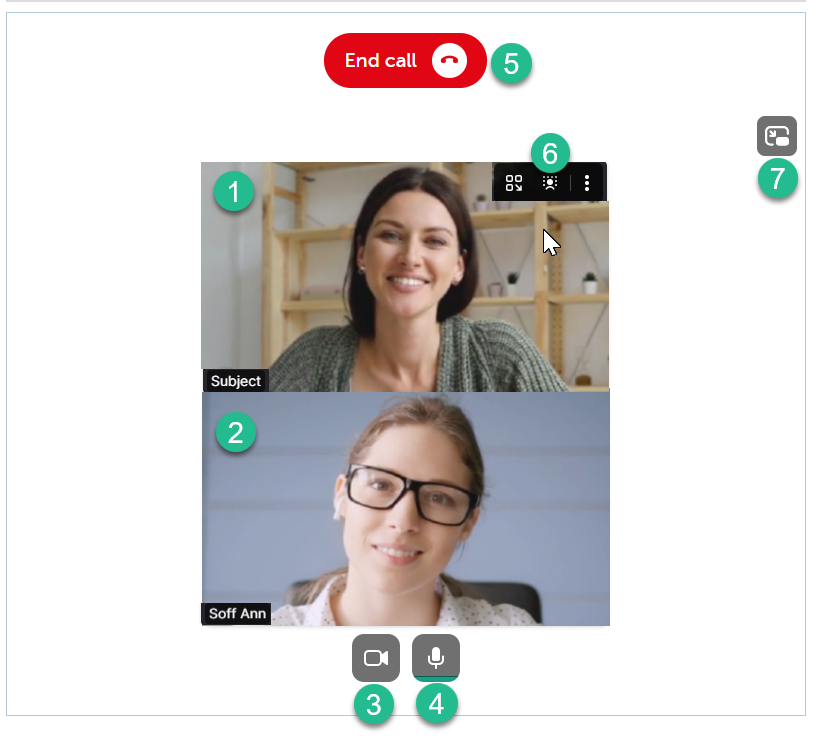
1. The subject's screen (you)
2. The doctor's screen
3. Camera settings - select to disable the camera, hover to see more settings.
4. Microphone settings - select to mute your mic, hover to see more settings.
5. End call button - select to end the call.
6. More screen settings - hover over the participant's screen to show available options in the upper right corner.
7. Picture-in-picture - select to continue the video call with a remotable screen that will be shown even if you switch tab. Hover over the mini-screen and select Back to tab to return to the video call main screen.
The Viedoc Me application can send reminders to remind you of upcoming scheduled events. These reminders are configured by the study staff at the clinic and can be sent as an email and/or a text message (sms). Note that you cannot reply to emails sent from Viedoc.
If applicable for the study you are participating in, you can change your email, phone number, and reminder settings if needed. If this option is not configured for your study, please inform the study staff at the clinic if you need to update your contact information and/or reminder settings.
To change your contact information and reminder settings, if applicable for the study you are participating in:
| 1 |
Select Settings and enter a new email address (1) and/or phone number (2). Make sure to include the country code in format 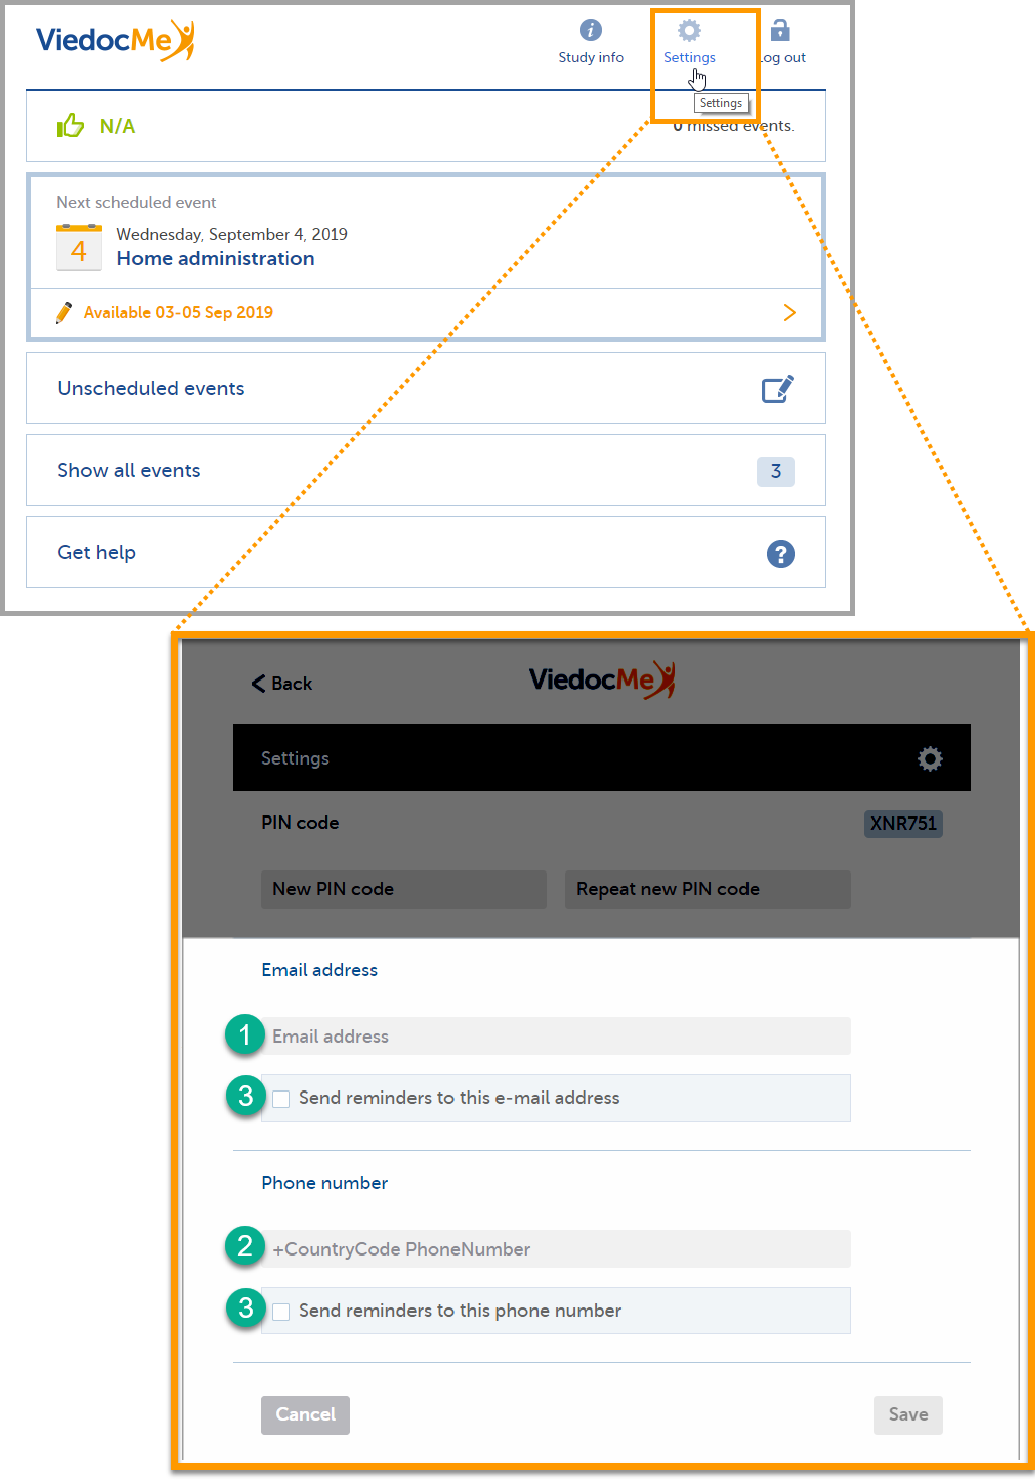
|
| 2 | Check the box(es) (3) to allow Viedoc to send reminders to the email and/or phone. |
| 3 | Select Save to save the changes. |
You can change the PIN code that was provided to you.
To change the PIN code:
| 1 | Select Settings. |
| 2 | Enter a new PIN code in the field New PIN code, and repeat it in the field Repeat new PIN code. |
| 3 | Select Save to save the changes. |
If you forget how to log in to Viedoc Me or if you have lost the document with the login details, please contact your doctor/nurse or site staff at the clinic. They can create a new document with your login details for you.
You will automatically be logged out from Viedoc Me after 20 minutes of inactivity. Yet, we recommend you to always log out when you are done with the questionnaires, to avoid that anyone else can gain access to your device and submit data using your account.
Select Log out in the upper right corner to log out from Viedoc Me.
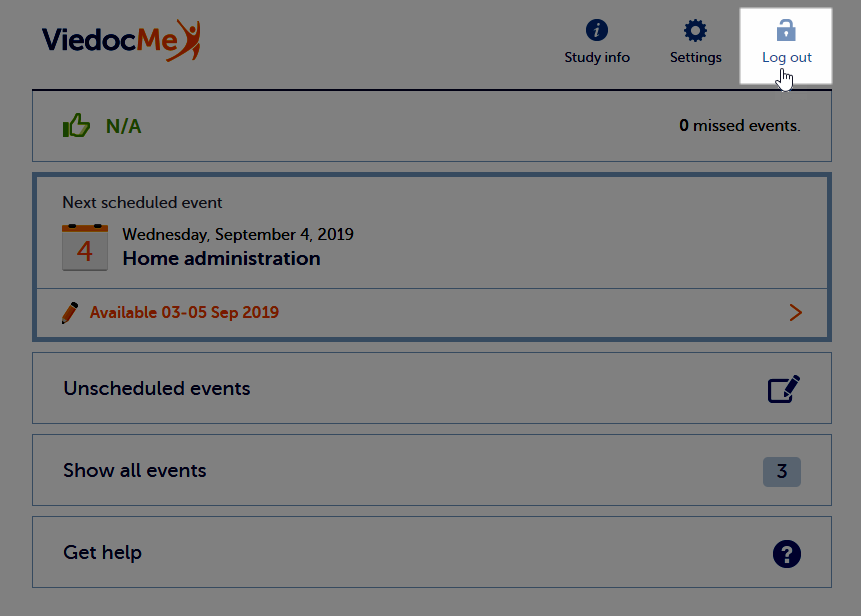
While logged in to Viedoc Me, the system tolerates loss of internet connection up to one minute. If you lose internet connection for more than one minute, you will be automatically logged out. Any data that has not been submitted at that time will be lost.
Viedoc Me is a web application used for collecting data from patients participating in clinical trials. It works on computers, tablets, or mobile phone devices, as long as the device has a browser and access to the internet.
In Viedoc Me you can fill in questionnaires and submit them, keep track of events, connect with a physician through Viedoc Connect, or receive and sign documents through Viedoc Share.
Access to Viedoc Me is provided by your physician, nurse, or other contact at the clinic. Depending on the study, your Viedoc Me login information will be shared via email, text message, and/or a document (paper document or PDF file).
To activate your Viedoc Me account and log in for the first time:
| 1 |
Open Viedoc Me: If your clinic contact shared your Viedoc Me login info via email or text message, you will receive a message with a link to activate your account.
If your clinic contact shared your Viedoc Me login info via a document, you will receive either a paper document or a digital PDF file that contains the URL (web address) to Viedoc Me, a QR code that can be scanned by your mobile device for easy access to the URL, your user name, and your PIN code.
Note! When you enter the URL (web address) from the login information PDF in a browser, you are redirected to a URL that looks slightly different and that contains the string "idp". This is the expected behavior. |
| 2 |
Change your PIN code: The first time you log in to Viedoc Me you may be required to set a new PIN code. Enter your new PIN code twice. Make sure you remember or save your PIN code, you will need it to log in to Viedoc Me in the future. 
|
| 3 |
Select Set PIN code to save. The "PIN code changed!" confirmation message is displayed: 
|
| 4 |
Select Continue. |
| 5 |
Account activation is complete! A Welcome screen is displayed: 
|
| 6 |
Please remember to save your PIN code and the URL for future logins. For tips on saving the URL as an icon on the home screen of your device see Quick Access to Viedoc Me below. Note! Your PIN code can be reset at any time, for example if you forget it. Please reach out to your contact at the clinic for help resetting your PIN code. Select Continue. Your account is now activated! Please see Viedoc Me Start Screen below for more information on using the application. |
To log in to Viedoc Me:
| 1 |
Open a web browser on your device. Type the URL that you received via email, text message or in a document. For tips on saving the URL as an icon on the home screen of your device see Quick Access to Viedoc Me below. The Viedoc Me login page opens: |
| 2 |
Enter your user name. |
| 3 |
Enter your PIN code. |
| 4 |
Select Log in. The Viedoc Me Start Screen is displayed. Please see Viedoc Me Start Screen below for more information on using the application. |
If you are using Viedoc Me on a mobile device, future logins can be made easier by saving the URL as a shortcut. It will appear as an icon on the home screen of your device:
To save Viedoc Me to the home screen:
| 1 | Open a web browser on the phone and navigate to the URL that is stated in the document provided to you. |
| 2 |
Select the option to Add to Home Screen The Viedoc Me application is now available to select on your device. |
Similarly, you can select the Viedoc Me URL and add it to the Favorites menu on your computer.
When you log into Viedoc Me you will see the following start screen:
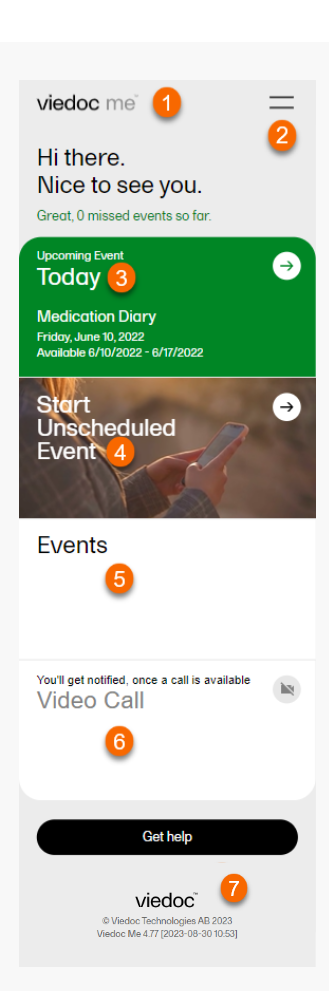
1. The Viedoc Me logo - select from anywhere in the app to return to the start screen.
2. The menu - select to see study info, change your settings, get help, or to log out.
3. The upcoming events tile - select to see which upcoming events you must fill in.
4. The start unscheduled event tile - select to start an unscheduled event.
5. The events tile - select to see past and future events.
6. The video call tile - select when a call becomes available to join a video call.
7. The get help button - select for information on how to contact clinical staff.
In Upcoming Event, you will see the next events that your study has scheduled for you.

1. The title of the event.
2. The date the event is to be started.
3. The dates of availability for the event.
To fill in a scheduled event:
Note! You can only fill in an event during the availability period.
| 1 |
Select the Upcoming Event tile. 
|
| 2 | Select your answer to the questions. If there are multiple pages, you can navigate by using the arrow buttons. |
|
3 |
Complete the event and then select Submit. Note! Before you select Submit, you will be prompted to ensure your answers are set. You can select the back arrow button if you need to edit your answers. |
| 4 | Select Go to startpage to return to the Viedoc Me home page. |
If the study allows for it, you will be able to report data at any time.
To fill in an unscheduled event:
| 1 |
Select Start Unscheduled Event. 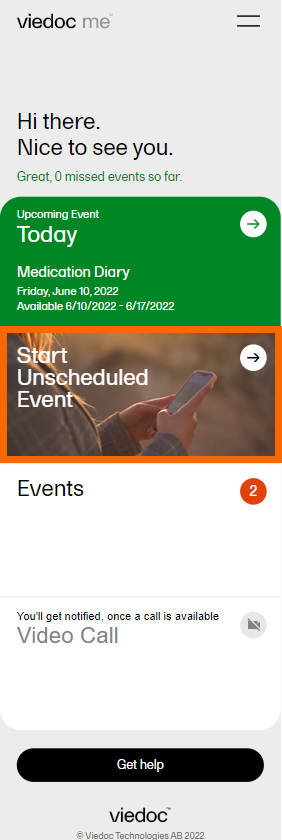
|
| 2 |
Select the name of the event. 
Note! You might have different report names in your study. |
| 3 | Select your answers to the questions. If there are multiple pages, you can navigate using the arrow buttons. |
| 4 | Complete the event and then select Submit. Note! Before you select Submit, you will be prompted to ensure your answers are set. You can select the back arrow button if you need to edit your answers. |
| 5 |
Select Go to startpage to return to the Viedoc Me home page. |
The Viedoc Connect application allows the clinic staff to initiate a video call with you.
When your physician or nurse has initiated a call, the video call button will appear at the bottom of the screen.
Select Join anywhere in the app to join the call. Alternatively, you can select the Video Call tile to join a call.
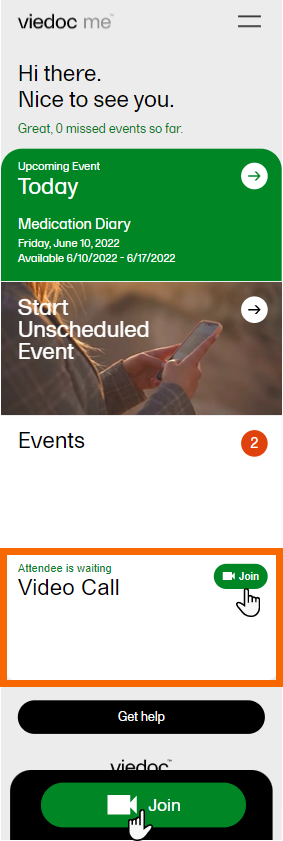
Note! If prompted, please select Allow so Viedoc Connect can access your camera and microphone through the browser.
During the call, you will see the following screen:

1. End call button - select to end the call.
2. Minimize button - select to minimize the Viedoc Connect window and continue in the app or in another window while speaking with the physician or nurse. Select Full screen in the app to bring the video window back into view.
3. Screen settings for subject - select to see more settings.
4. Screen settings for clinician - select to change screen and volume settings for clinician window.
5. Mic symbol - select to mute and unmute your microphone.
6. Cam symbol - select to turn your video stream off and on.
Depending on your study, you may be able to receive and sign documents in Viedoc Me. If a document is shared with you, you may receive a notification via email, text message, and/or directly in the Viedoc Me application.
To open a document that has been shared with you:
| 1 | If you received an email or text message with a notification that a document was shared with you, select the link in the email or text message to go to your document list in Viedoc Share (skip to step 3 below). Depending on the email you received, the link may open the document directly. | ||||||||||
| 2 |
If you did not receive an email or text message, you can view shared documents by logging into your Viedoc Me account. If you have a new document a red circle is displayed next to the documents section, indicating how many new documents are available for you to view and/or sign. Note! The tiles may be arranged slightly differently depending whether you are on a mobile device or computer, but the sections will look the same. Select Documents. 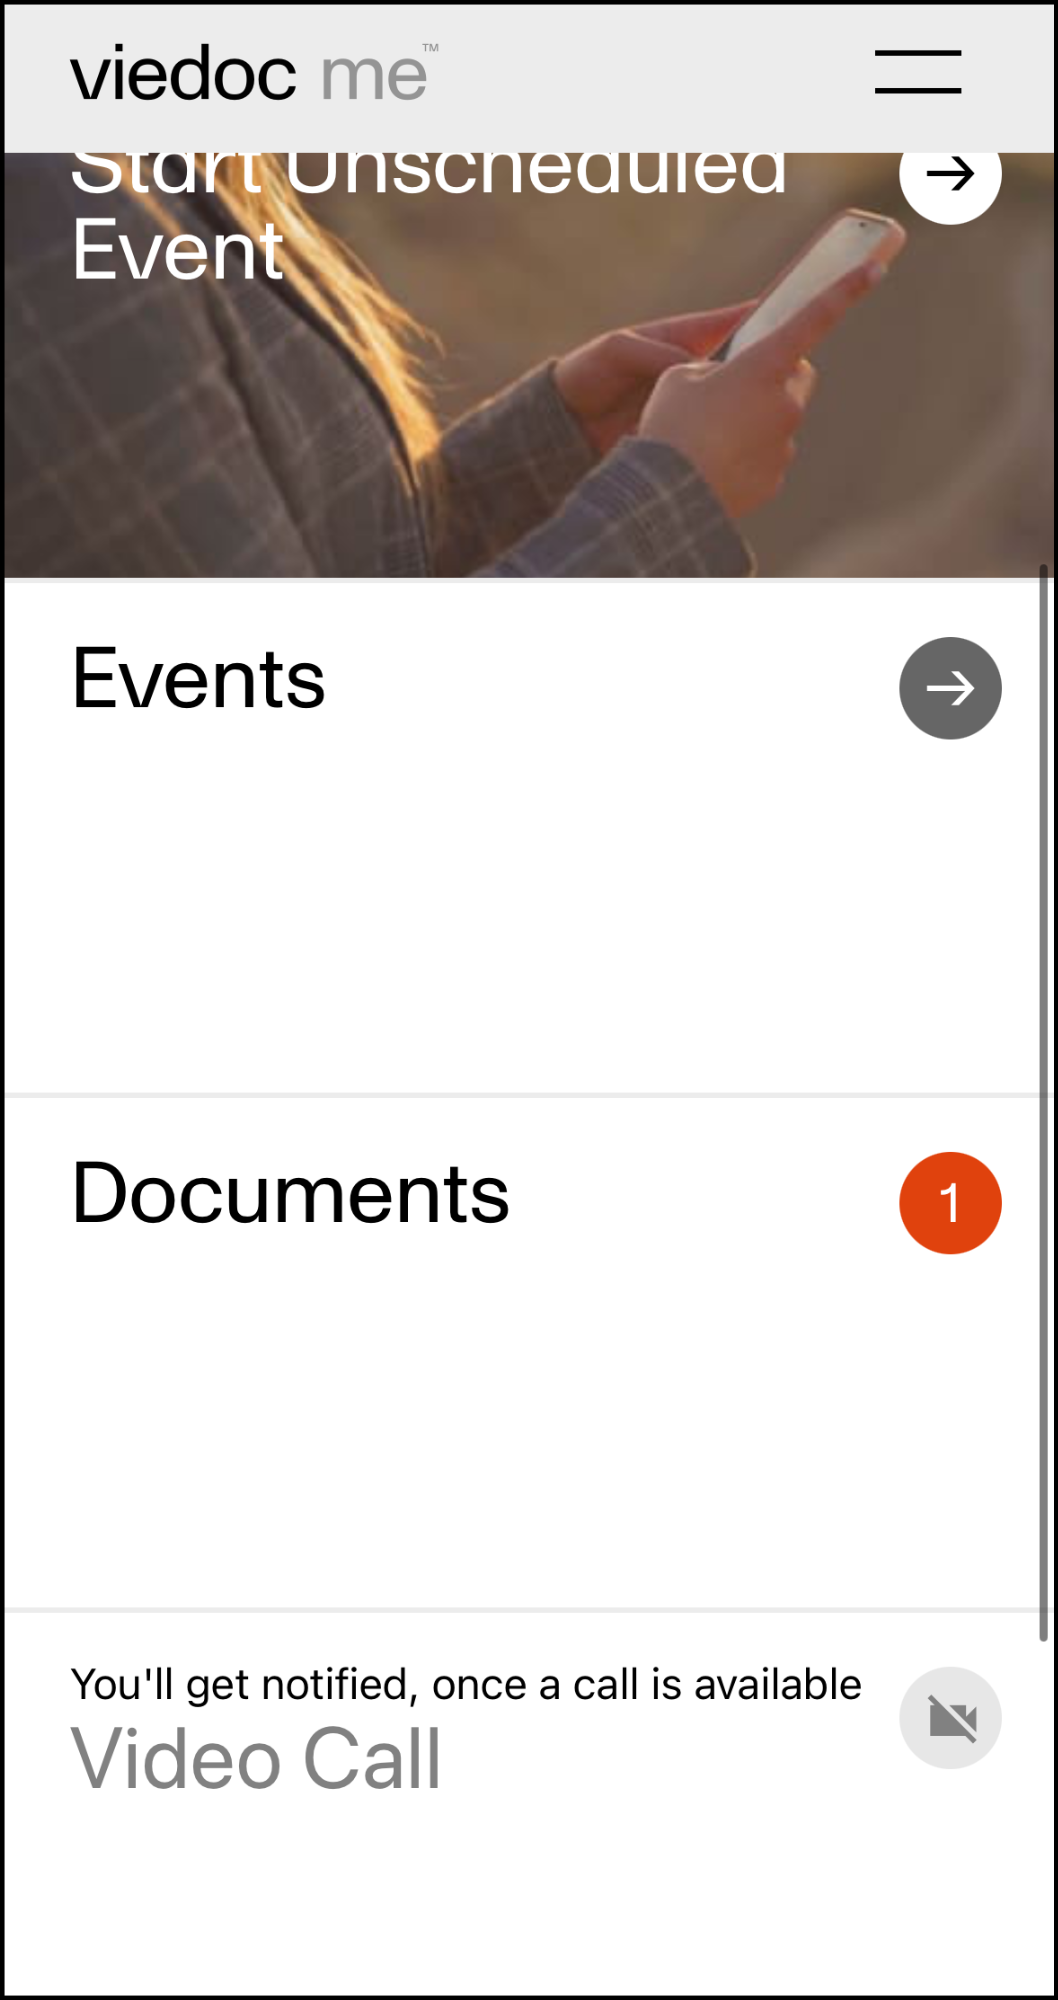
|
||||||||||
|
3 |
Viedoc Share is displayed with a list of documents that have ben shared with you, indicating any actions that you need to complete: 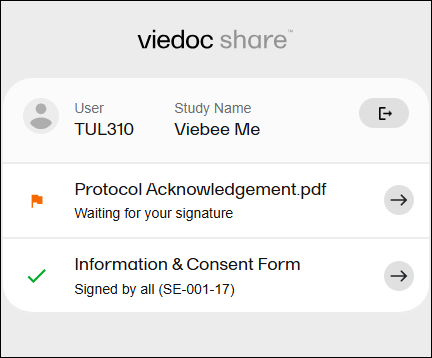 |
||||||||||
|
The icons displayed to the left of each document indicate a status and any required actions:
|
|||||||||||
| 4 | Select a document to open it. | ||||||||||
| 5 |
Review the contents of the document. |
The document may include questions to answer or fields to fill in. If they are required, the fields must be completed before you are able to sign the document.
To fill in document fields:
| 1 |
If there are options or fields for you to complete, they will be displayed in the document. Required fields are outlined in red. |
| 2 |
Select the round or square buttons by tapping with your finger (on a mobile device) or clicking on them with your cursor (on a desktop computer). If there are text fields, select the field to begin typing in it. 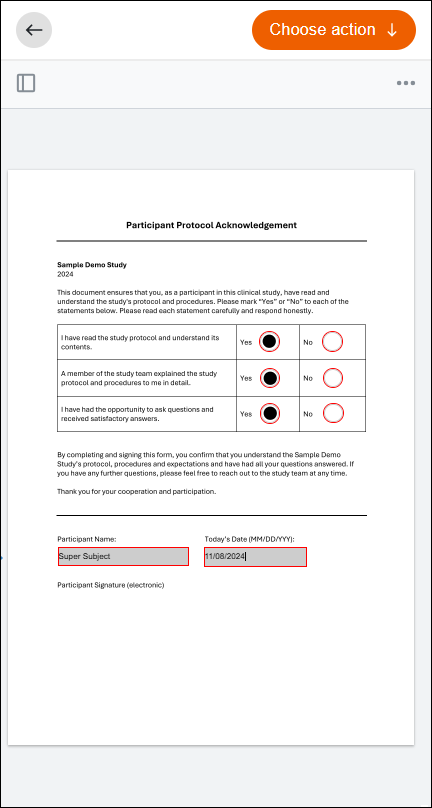
|
| 3 | When all of the required fields have been completed you will be ready to sign the document (if required). |
If you would like to add a question or comment to the document that was shared with you, you can add notes to a document that has not yet been signed. Once a note is added, someone on the study team is able to respond to your note.
Note! You can only add notes to documents that require a co-signatory.
To add a note to a document:
| 1 |
Select the Notes icon on the top right of the document. If you do not see this icon, there is no co-signatory for this document and you will not be able to add notes. 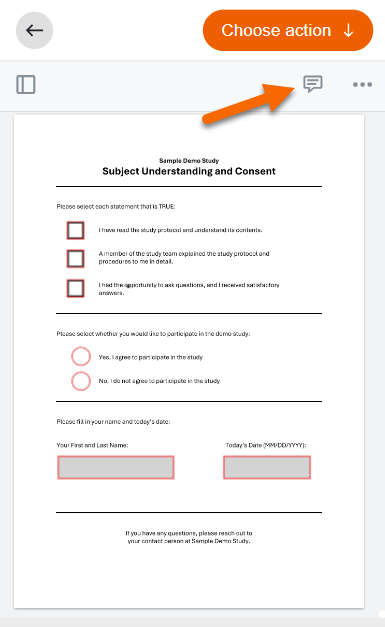
|
| 2 |
Click or tap anywhere on the document to place your note. A textbox will be displayed where you can type in your text: 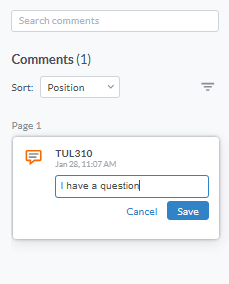
Note! Notes more than 240 characters may not display correctly in the browser after they are downloaded. They will display correctly when the downloaded document is viewed in a PDF viewer. |
| 3 | Select Save when you are finished typing your note. |
You may add multiple notes to the document by repeating the same process.
To edit or delete a note:
| 1 |
Select the note you want to edit or delete. Select the options menu in the top right corner of the note: 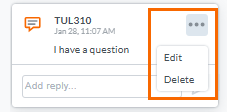
|
| 2 |
Edit the text and select Save when you're finished. Or select Delete to delete the note. Note! Only notes that have not received a reply yet can be edited or deleted. |
When you receive a reply to your note, you can add more replies as needed:
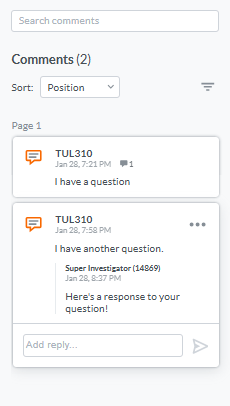
To sign a document:
|
1 |
Select Choose action at the top right of the screen. If your signature is required, and any required fields have been completed, the Confirm and sign option is displayed: 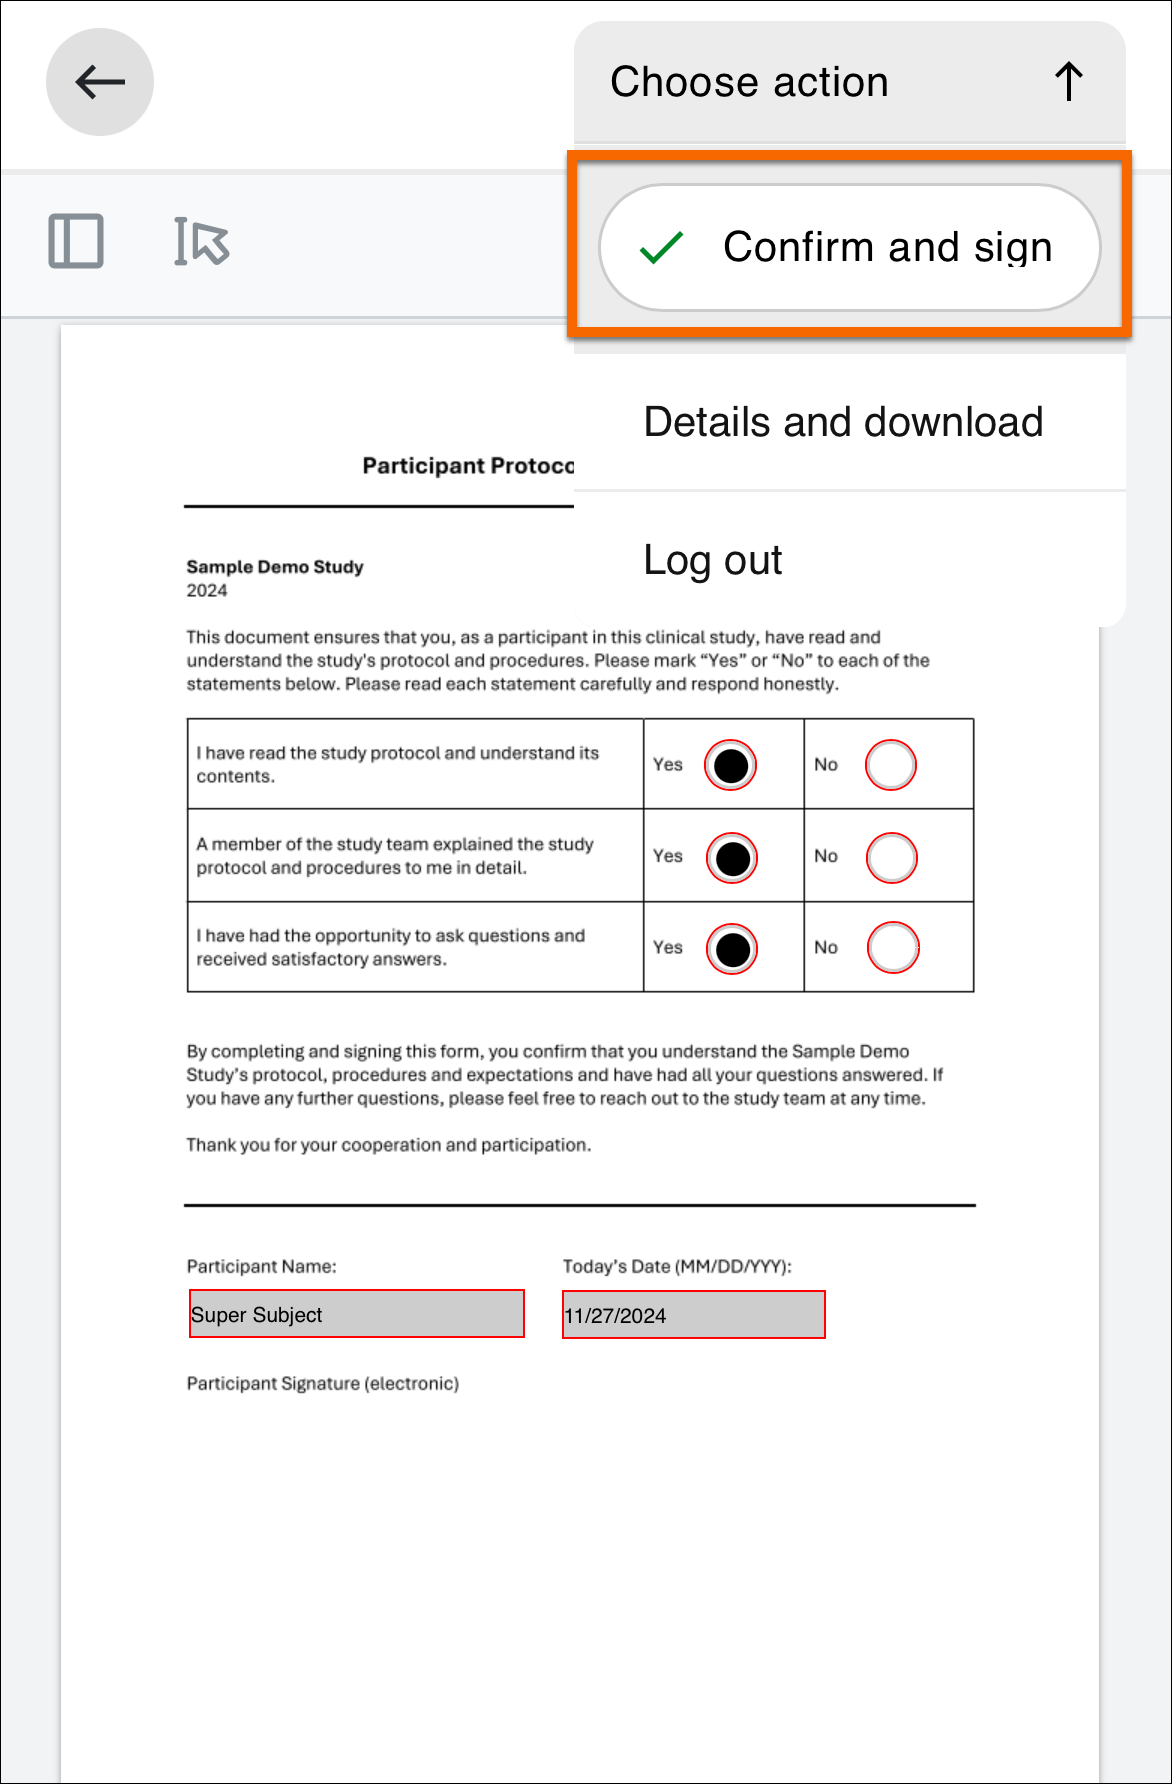 |
| 2 |
Select Confirm and sign. To confirm that you have reviewed the document, select the round button to the left of the confirmation statement and a green check mark will appear. Select Sign using one-time code. 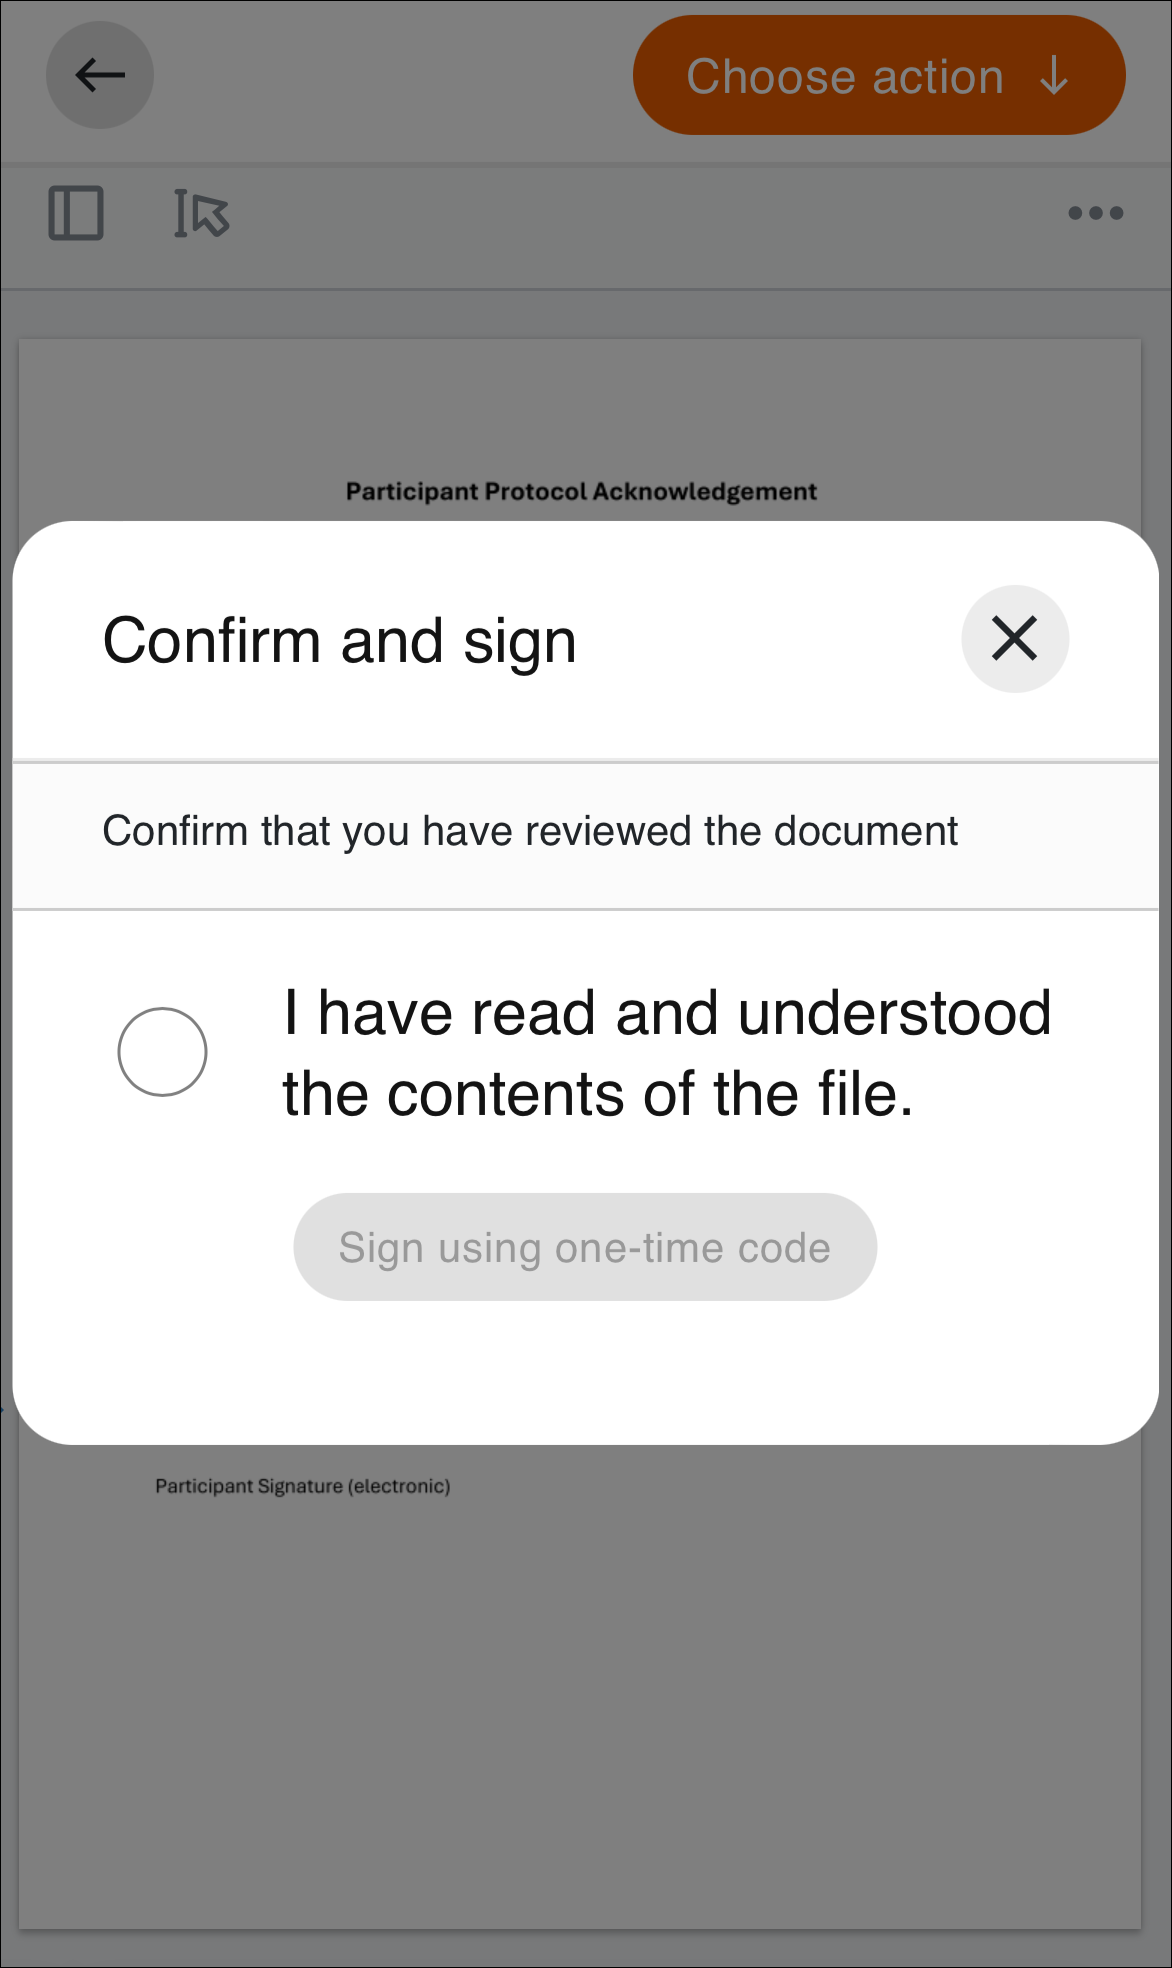
|
| 3 |
A one-time passcode with six numbers will be sent to you via email or text message. Check the message and enter the code. Select Verify. 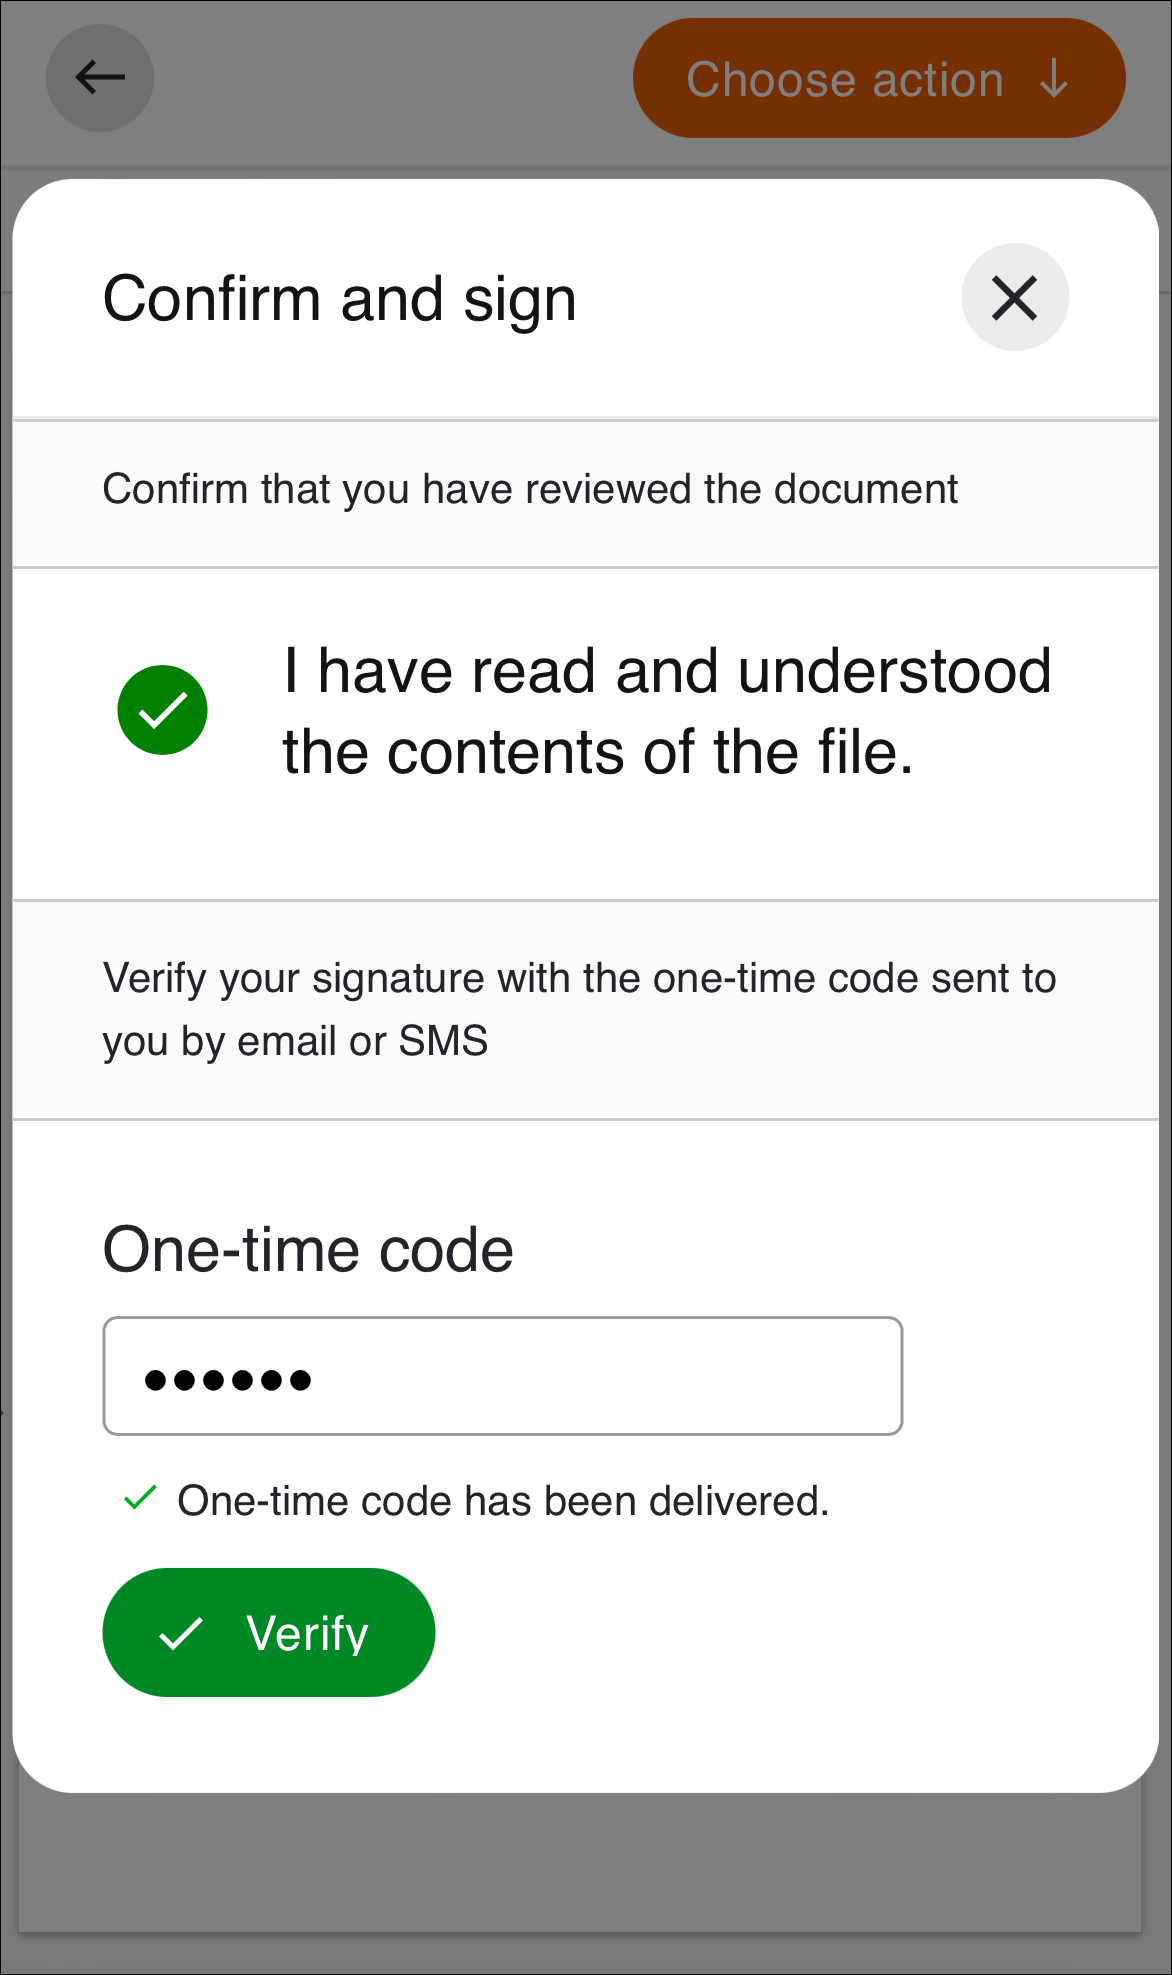
|
| 4 |
Signature details will be displayed, confirming that you have signed the document. 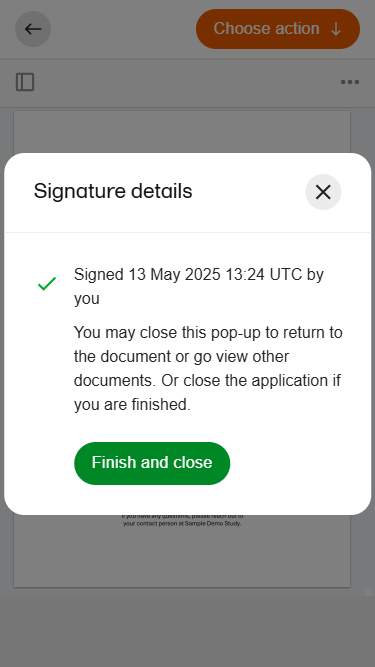
Close this pop-up to return to the document view. From there you can complete other actions such as downloading the document, or navigating to the document list to view other documents. If you are finished, select Finish and close to close the application and sign out of Viedoc Me. |
You can always download a copy of the document, whether the document requires a signature or not.
To download a copy of the document:
| 1 |
While viewing the document select Choose action at the top right, and select Details and download: 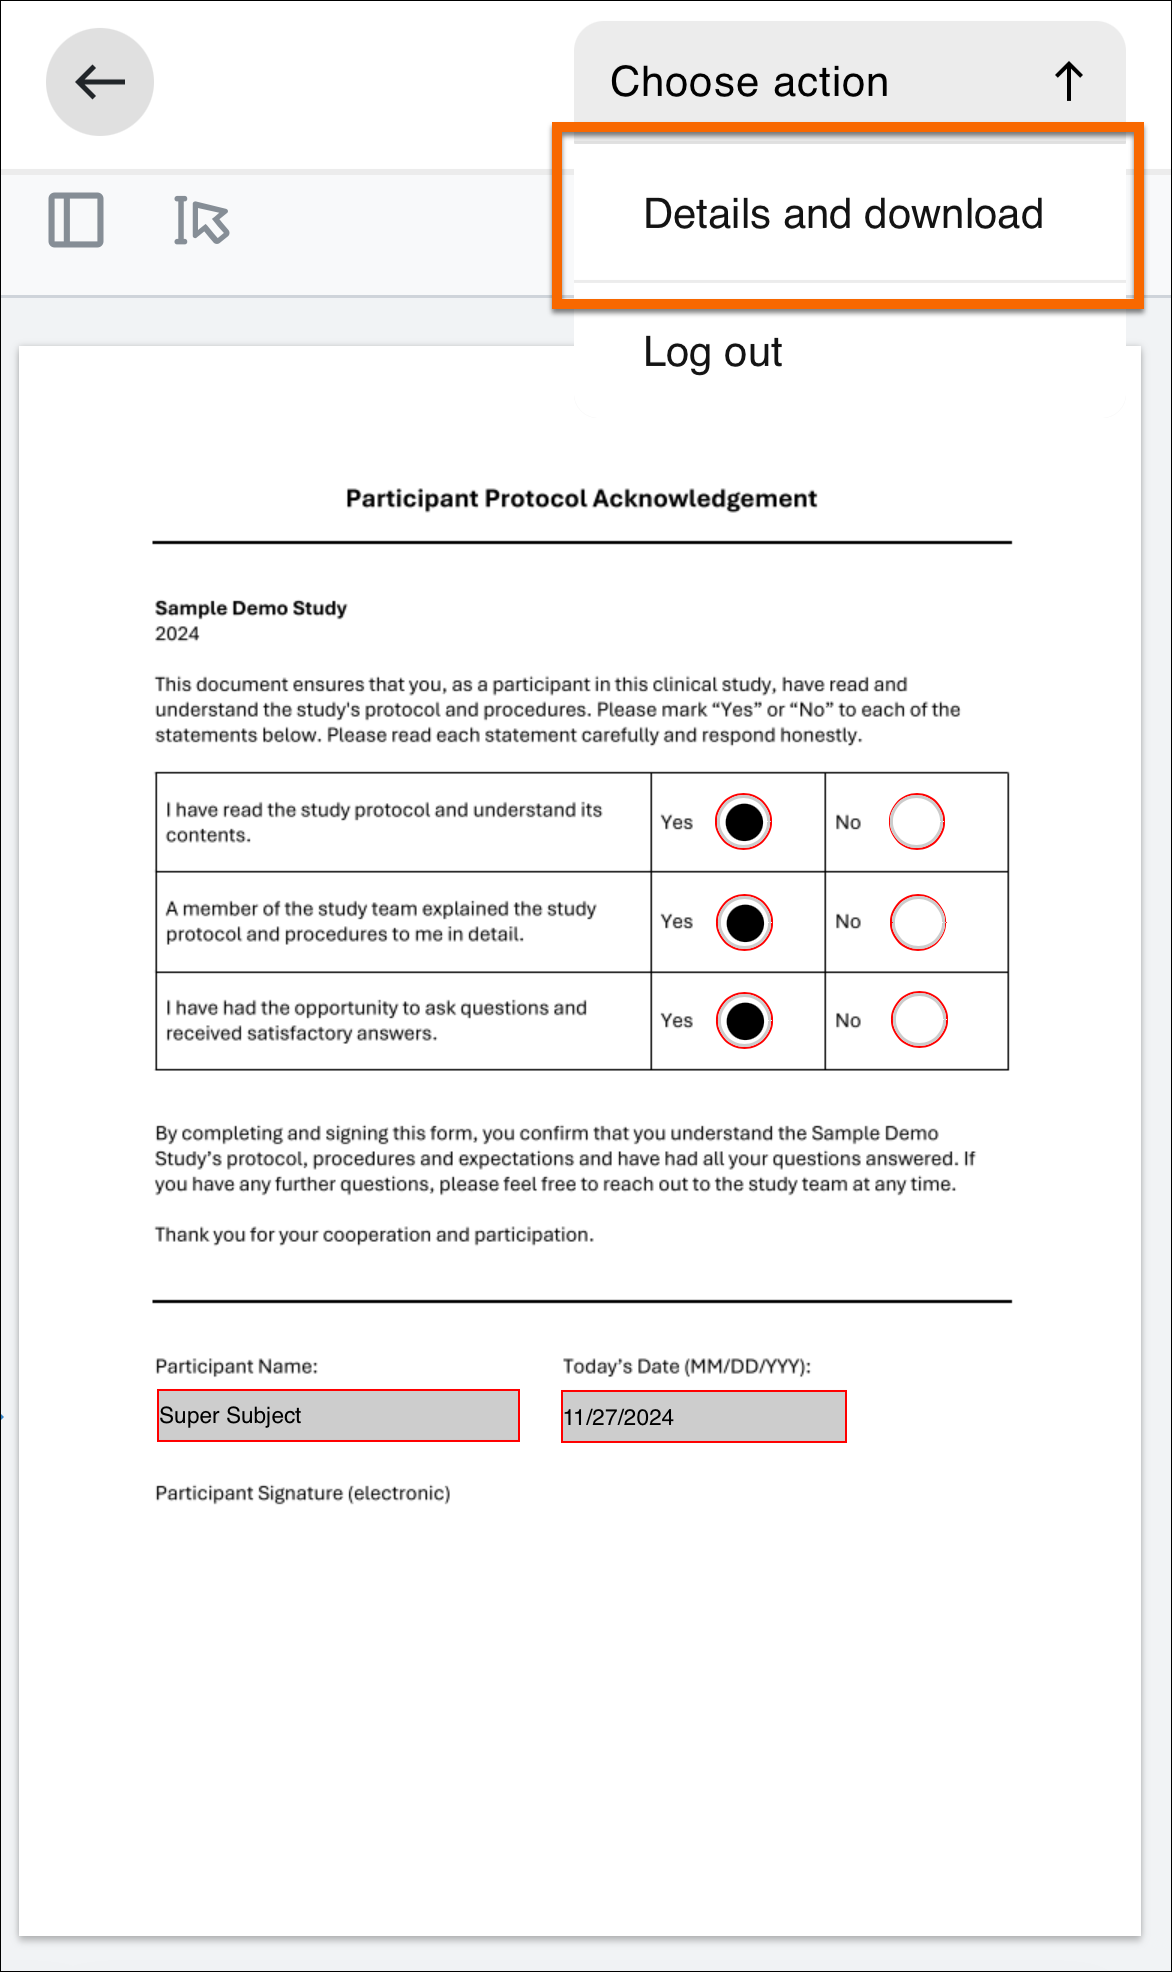 |
| 2 |
Sharing details and document history will be displayed. Under the details select the green download icon to see the options available for downloading: The following options are available for downloading the document:
Note! In some cases notes may not display correctly when viewing the downloaded document in a browser, please try to open the document in a PDF viewer instead. |
| 3 | Select an option to begin downloading the document. |
The Viedoc Me application can send event notifications to your email or as a text message (SMS) to your mobile device. These notifications are configured by the study managers. It is important to know that you cannot reply to these reminders sent from Viedoc.
If your study allows, you can change your email, phone number, and reminder settings from the settings option in the menu. If these options are not available to you, please inform the study managers at the clinic if you need to update your contact information or reminder settings.
Change your contact information and reminder settings in the application when available:
| 1 | Select the menu symbol on the start page. |
| 2 | Select settings. |
| 3 |
Enter your updated email address and phone number. 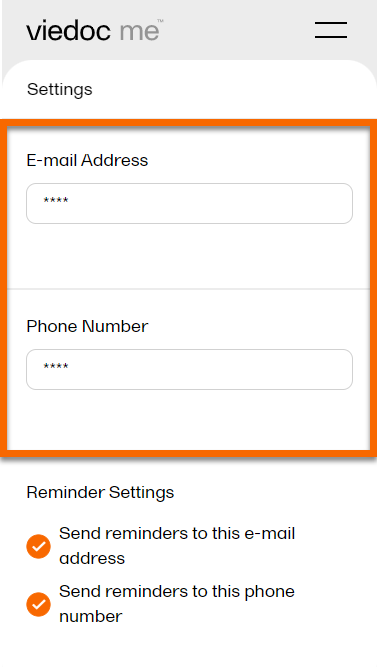
|
| 4 | Select Save Changes and your information will be updated. |
You can update your PIN code anytime.
To update the PIN code:
| 1 | Select the menu symbol on the start page of the app. |
| 2 |
Enter a new PIN code in New PIN code. Re-enter your new PIN code in Repeat new PIN code. 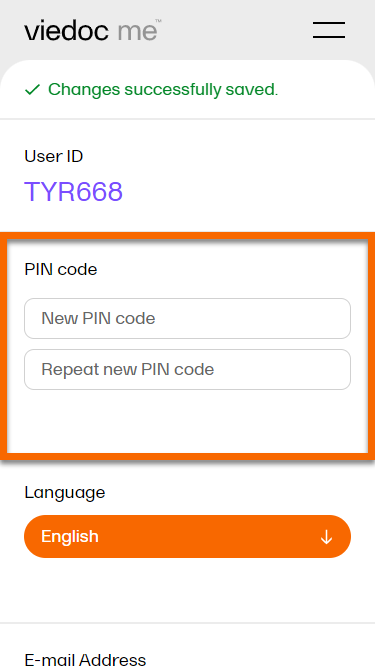
|
| 3 | Select Save Changes and your PIN code will be updated. |
If you forget how to log in to Viedoc Me or if you have lost your login document, please contact your physician, nurse, or site staff for your study. They can reset your PIN code and create a document with new login details for you.
The application will automatically log you out from Viedoc Me after 20 minutes of inactivity. However, we recommend you always log out when you are done with your questionnaires to avoid someone else gaining access to your device and submitting false data.
To log out, select the menu icon, and then select Log out.
Viedoc Connect enables meetings between Clinic and Viedoc Me users through video calls. The video calls are started from Clinic, and the call is opened in a new tab that is the Viedoc Connect application. Once the call is initiated/ongoing, subjects can join the video call through the Connect module which is available in Viedoc Me.
A video call that has been started is valid/open to join within 60 minutes. Users can also leave and re-join the video call. The users are free to navigate in the Clinic tab to other pages during the call, and the subjects can navigate within Viedoc Me and submit questionnaires during the call.
Viedoc Connect only allows one active video call at a time, meaning that only the latest started video call is shown in Viedoc Connect.
To use Viedoc Connect:
Note! For information about supported versions of iOS and Android, and other system requirements for Viedoc Connect use, please refer to System requirements for the Viedoc system and Supported Browsers & Devices for information about the desktop and mobile browsers and devices supported by the Whereby platform.
To open Viedoc Connect, select the icon on the Selection page. Viedoc Connect opens in a new tab:
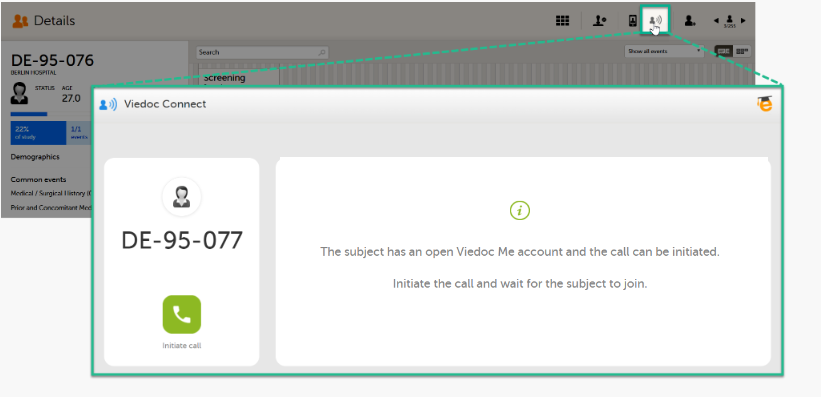
To initiate a call, click the green phone icon.
When the subject joins the call, you will see the following view:
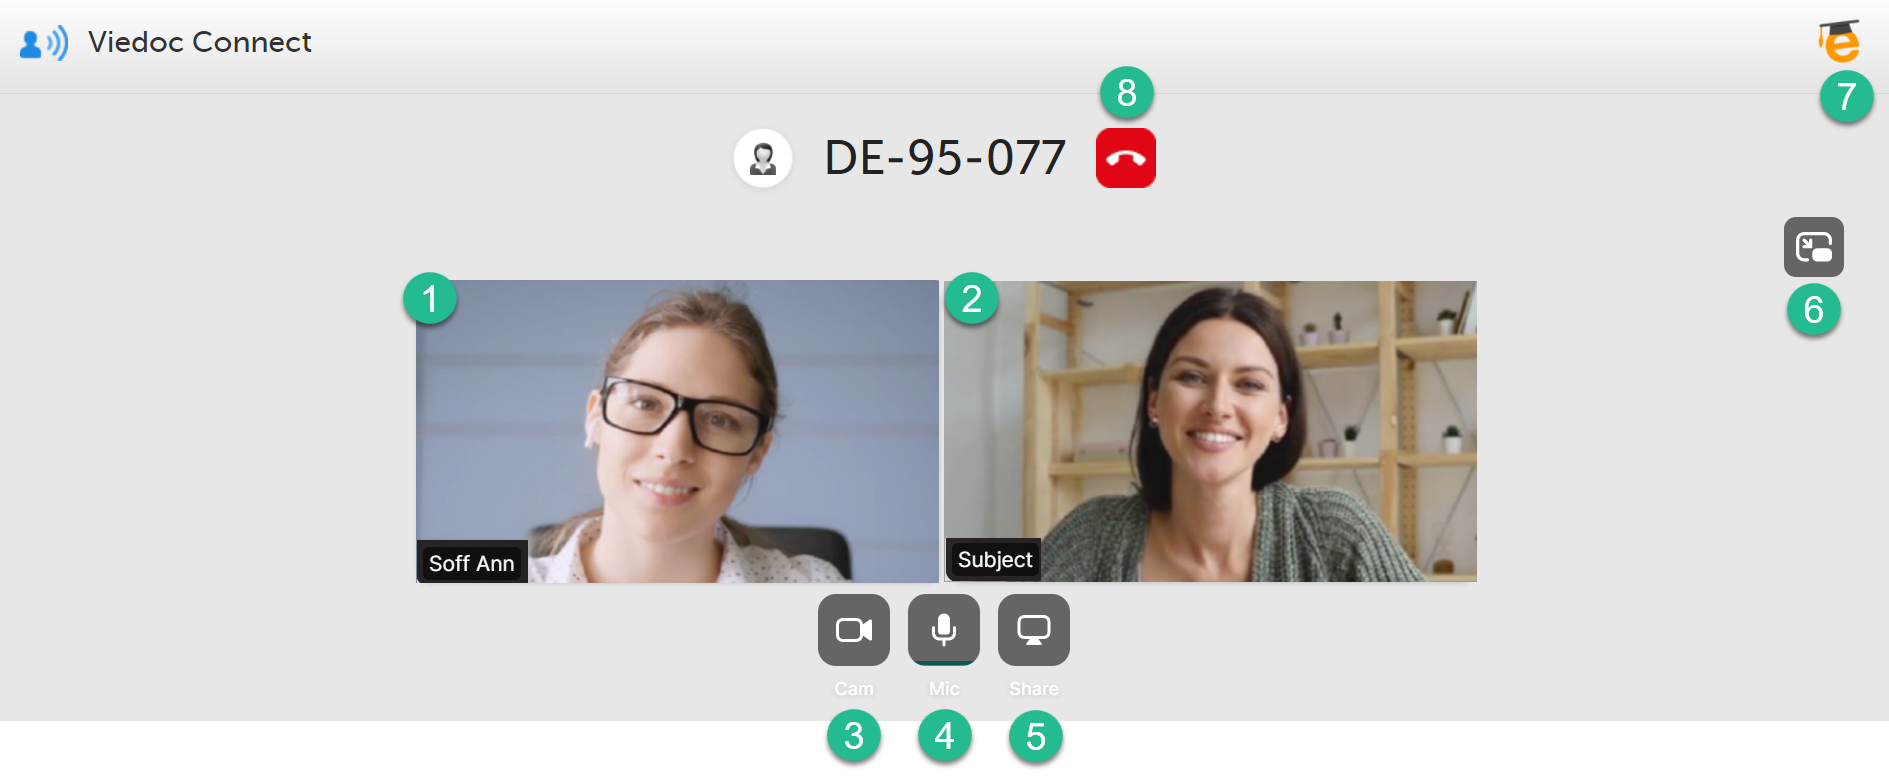
1. To show the screen settings on the site user screen (you), hover over the screen:

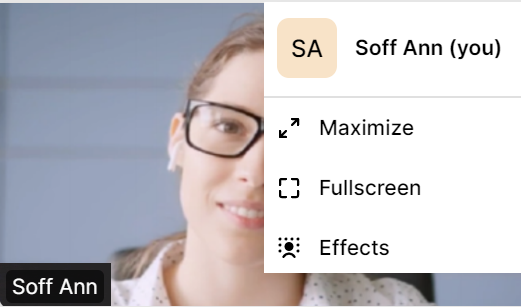
2. To show the screen settings on the subject's screen, hover over the screen:
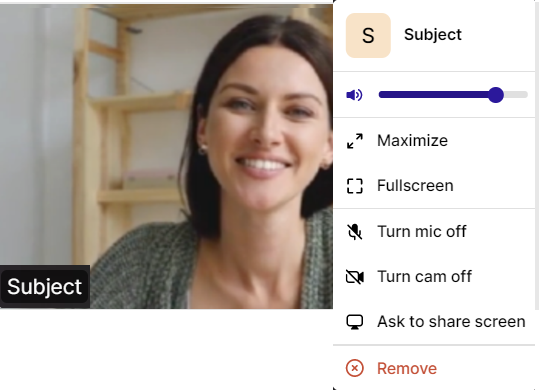
3. Camera settings - select to turn off the camera. Hover to see more camera settings.
4. Microphone settings - select to mute. Hover to see more microphone settings.
5. Screen settings - select to share your screen.
6. Picture-in-picture - select to continue the video call with a remotable screen that will be shown even if you switch tabs. Hover over the mini-screen and select Back to tab to return to the Viedoc Connect main screen.
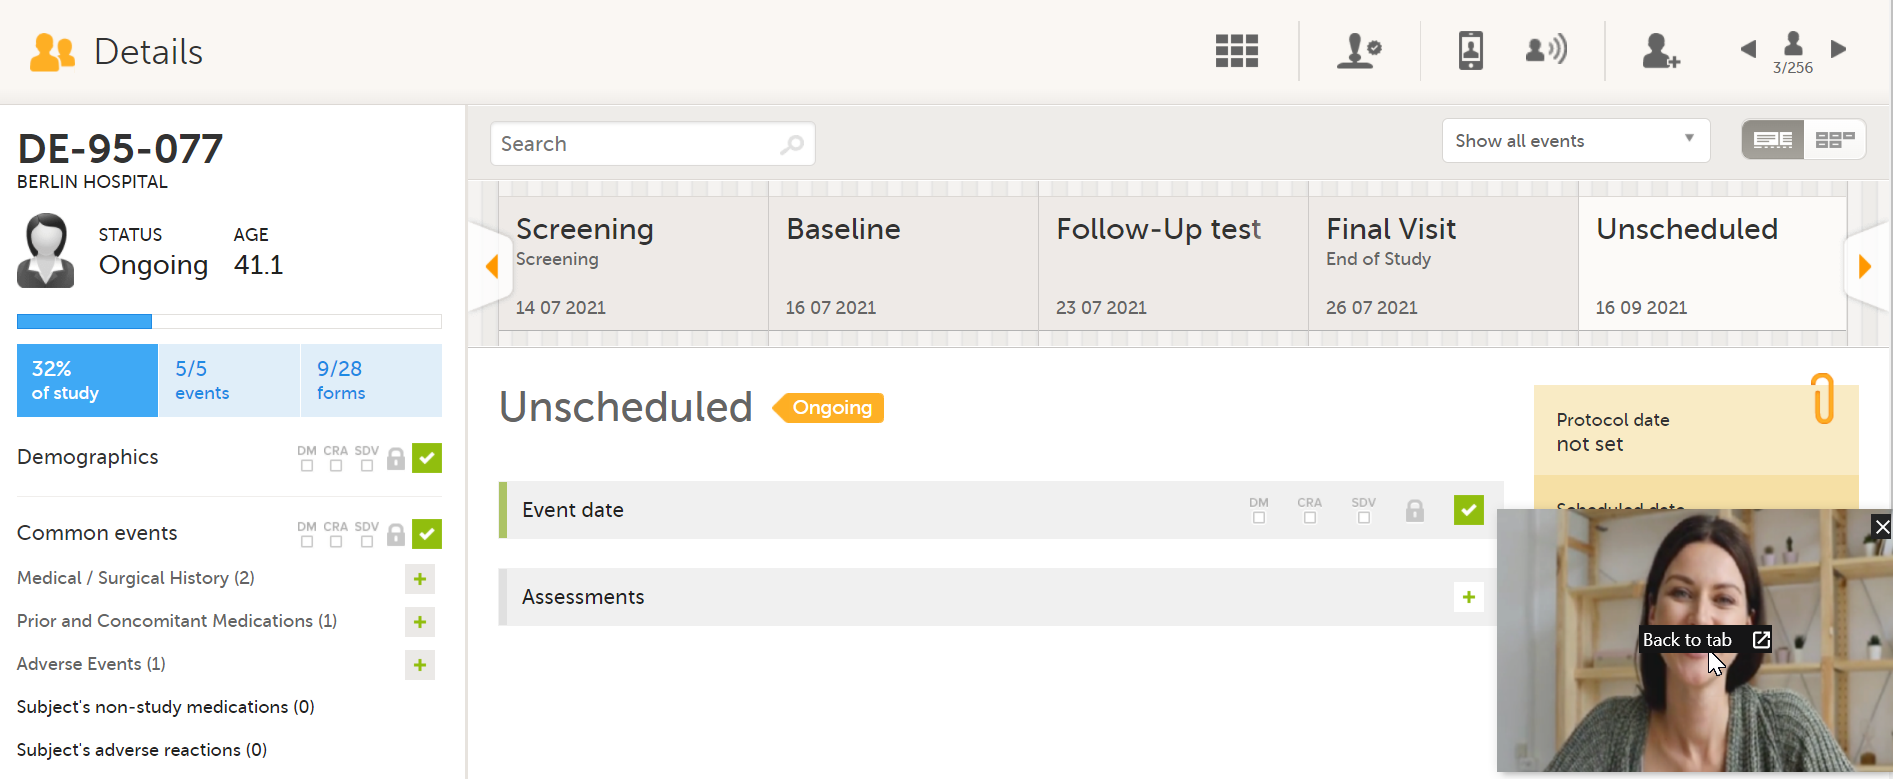
7. eLearning - select to open this lesson whenever you need help with Viedoc Connect.
8. End call button - select to end the call.
When launching Viedoc Connect, your browser may notify you to enable your microphone and camera.
To enable access to your microphone and camera, select Allow:

If you don't allow access, you will be prompted again:
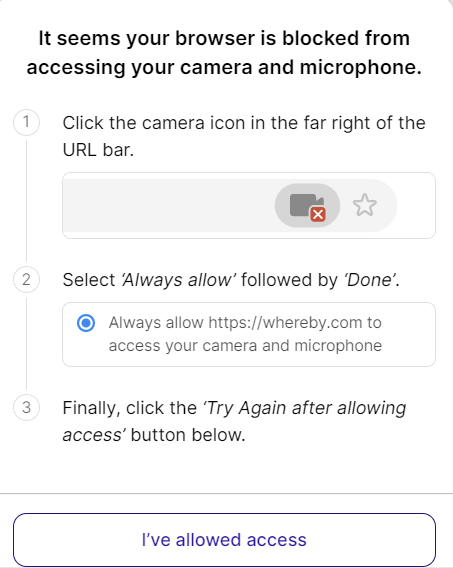
Follow the instructions and select I've alllowed access to enter Viedoc Connect.
As a Viedoc Clinic user, documents can be shared with you directly in Viedoc to review and/or sign.
You may receive:
To open and review a document:
| 1 |
If a document has been shared with you, you will receive an email notification similar to this example: 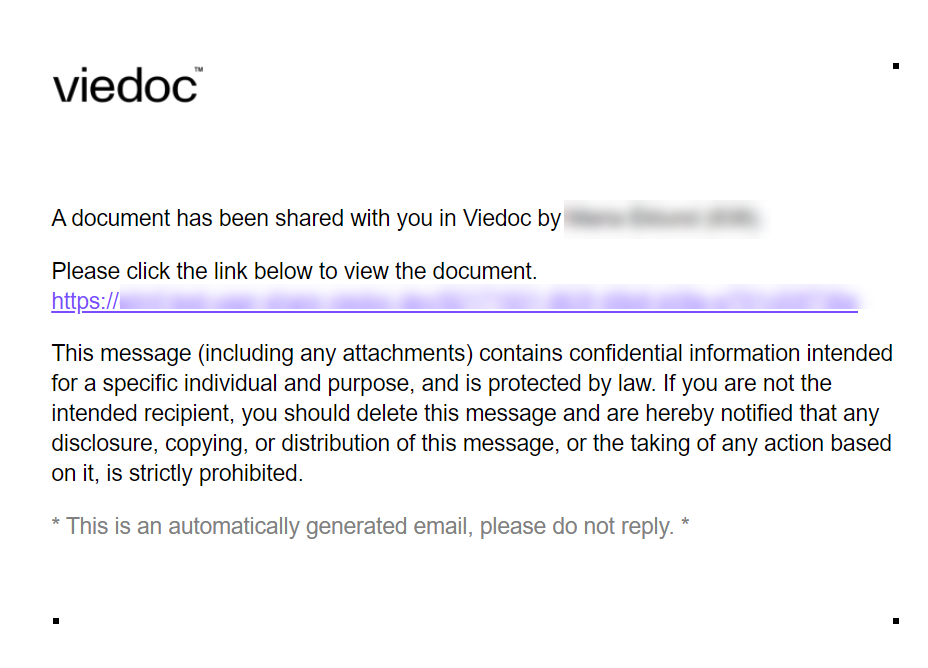
|
||||||||||
| 2 |
To open the document, select the link in the email. Depending on the type of link you received and whether you're already logged into Viedoc, you may be directed to the login page, the Viedoc Share document list (see next steps), or directly to a specific document (skip to the next section). |
||||||||||
| 3 |
If you are directed to Viedoc Share, a list of documents shared with you are displayed: 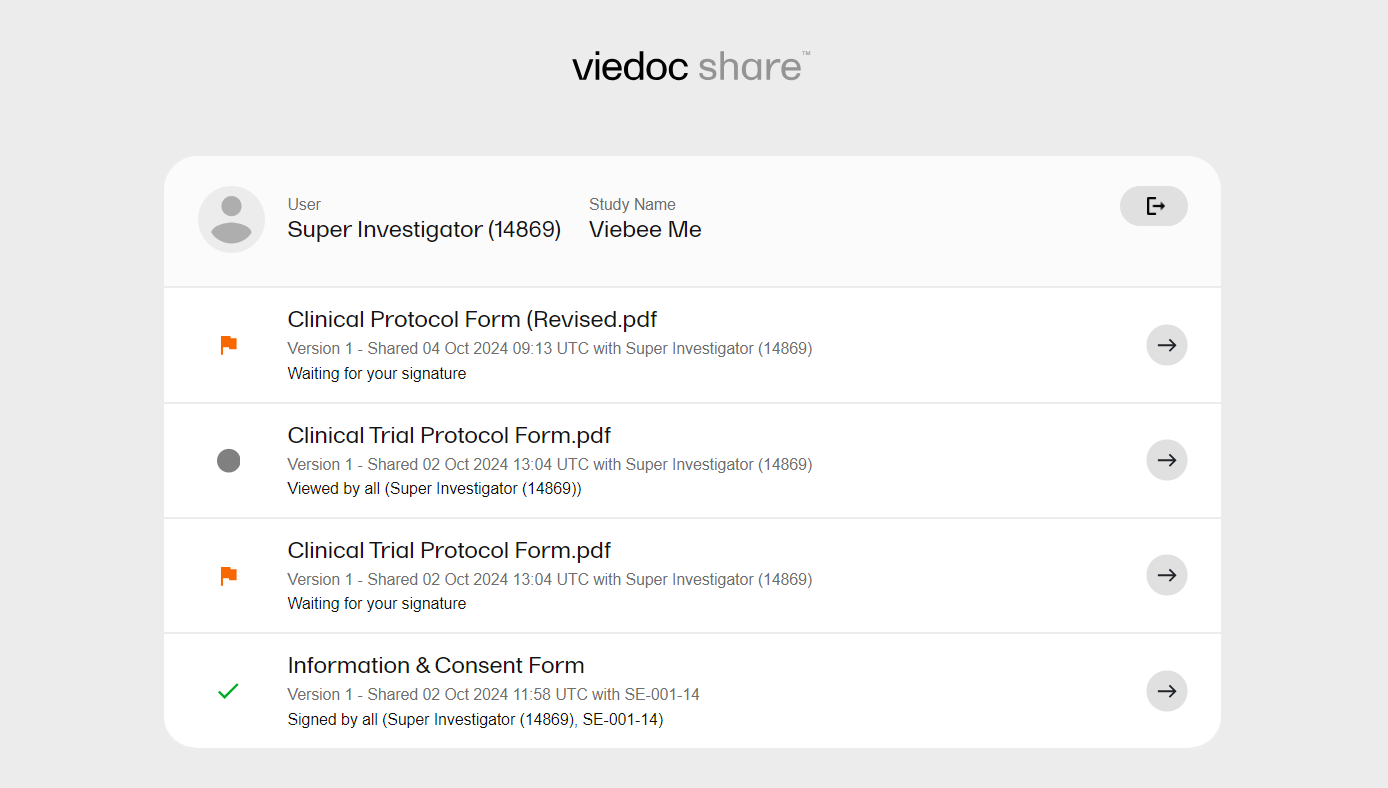
|
||||||||||
|
The icons displayed to the left of each document indicate a status and any required actions:
|
|||||||||||
| 4 |
Select the document you would like to open and view. |
To sign a document:
| 1 |
After you have reviewed the document, select Choose action at the top right of the screen. If your signature is required, there will be an option to select Confirm and Sign. Note! If you have been designated as a co-signatory, the recipient must sign the document first, before you are able to sign it. 
|
| 2 | Select Confirm and Sign. |
| 3 |
Select the round button to the left of the confirmation statement and a green check mark will appear. select Sign using one-time code. 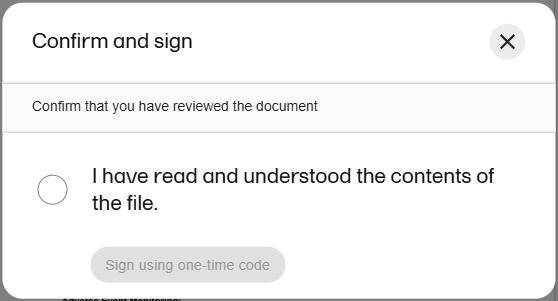 |
| 4 |
A one-time passcode with six numbers will be sent to you via email or text message. Check the message and enter the code. Select Verify. 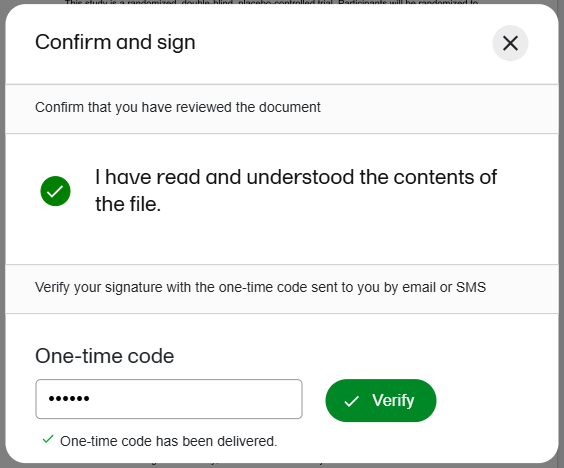 |
| 5 |
Signature details will be displayed, confirming that you have signed the document. 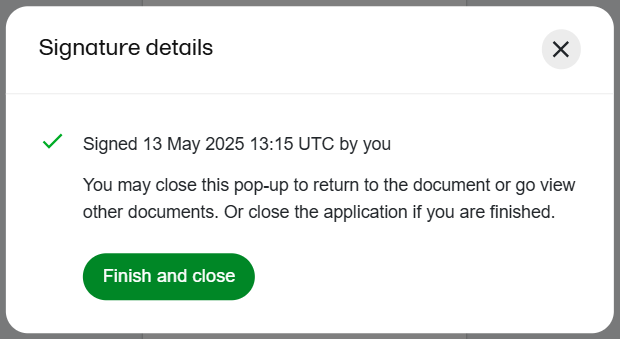
|
| 6 |
Close this pop-up to return to the document view. From there you can complete other actions such as downloading the document, or navigating to the document list in Viedoc Share to view other documents. If you are finished, select Finish and close to close the application and sign out of Viedoc. |
Documents that are shared with a recipient and a co-signatory have the option for users to add and reply to notes. For example if a study participant has a question on a document, they can add a note to the document, and the co-signatory can reply to the note.
To reply to a note:
| 1 |
Navigate to the document by clicking on the link in the email you received, and/or selecting the document from the document list in Viedoc Share (see section 1 above). |
| 2 |
Select the Comments icon on the top right of the document screen, or select the comment icons directly in the document. The notes added by the participant will be displayed on the right side of the screen: 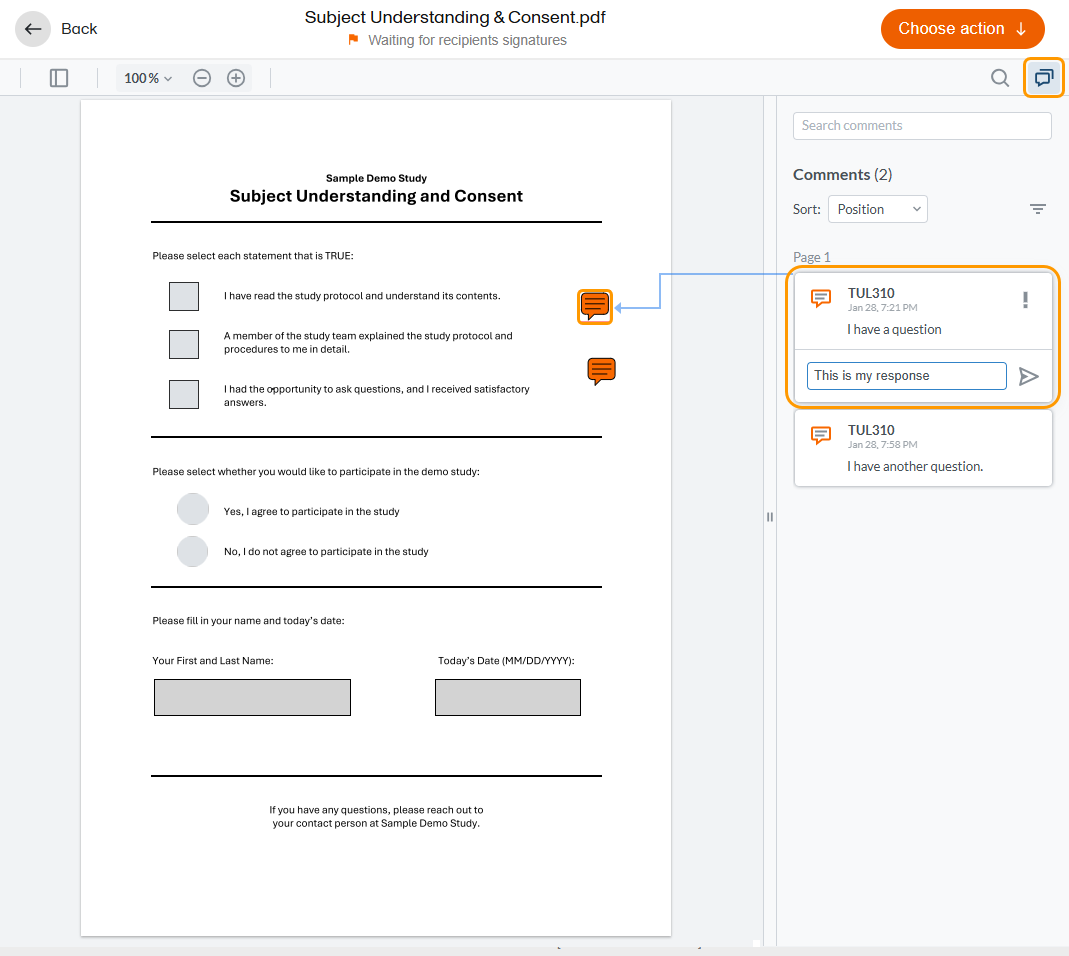
|
| 3 |
Select the comment and type your reply. Select the Send icon to the right of the text field when you are finished. |
| 4 |
To edit your reply, select the options menu to the right or your text and select edit. Edit your text and select Send when you are finished. 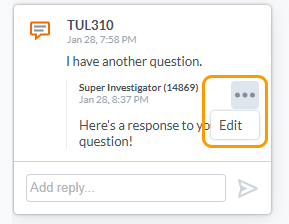
|
Whether or not the document requires a signature, you can download a copy of the document.
To download a copy of the document:
| 1 |
While viewing the document select Choose action at the top right, and select Details and download: 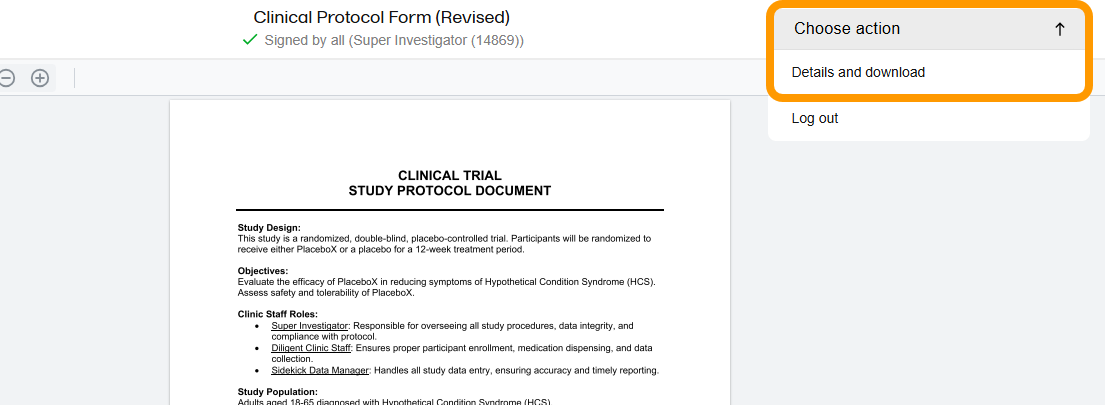
|
| 2 |
Sharing details and document history are displayed. Under the details select the green Download button to see the options available for downloading: 
The following options are available for downloading the document:
|
| 3 | Select an option to begin the download. |
This video is an introduction to Viedoc Clinic for the Site User.
If you have difficulties in viewing the video, click here.
This video shows how to log in/log out to/from Viedoc and how to reset your password.
If you have difficulties in viewing the video, click here.
This video provides a quick overview of the landing page as well as of the study start page.
If you have difficulties in viewing this video, click here.
This video provides a quick overview of the subjects Selection page and shows how to add new subjects.
If you have difficulties in viewing this video, click here.
This video demonstrates how to initiate a visit in Viedoc, as well as how to add an unscheduled visit.
If you have difficulties in viewing this video, click here.
This video demonstrates how to enter data in Viedoc, including filling in various data types and confirming data as missing.
If you have difficulties in viewing this video, click here.
This video demonstrates how data can be signed by the Investigator, using the signing console.
If you have difficulties in viewing this video, click here.
This video demonstrates how to resolve a query in Viedoc.
If you have difficulties in viewing this video, click here.
This video demonstrates how to switch between demo and production mode within a study.
If you have difficulties in viewing this video, click here.
This video demonstrates how to enter reference data in Viedoc Clinic.
If you have difficulties in viewing the video, click here.
This is a Viedoc introductory video for monitors.
If you encounter difficulties in viewing this video click here.
Our Working Smarter webinar series is designed to help Viedoc users get the most out of the platform, from practical tips and feature deep dives to best practices and expert insights. Each session addresses topics for our users including highlighting new features, sharing useful tips, best practices, or deeper insights into specific areas of Viedoc.
Whether you're new to the system or an experienced user, these webinars are here to help you work smarter.
The full list of webinars in Viedoc’s Working Smarter Series, including recordings and Q&A, is provided below.
October 2024
https://help.viedoc.net/l/a29eab/en/
November 2024
https://help.viedoc.net/l/04c262/en/
January 2025
https://help.viedoc.net/l/893419/en/
February 2025
https://help.viedoc.net/l/bb2d9a/en/
March 2025
https://help.viedoc.net/l/027d45/en/
April 2025
https://help.viedoc.net/l/f94362/en/
June 2025
https://help.viedoc.net/l/227838/en/
September 2025
https://help.viedoc.net/l/b01136/en/
November 2025
https://help.viedoc.net/l/f914f3/en/
February 2026
https://help.viedoc.net/l/6c61f9/en/

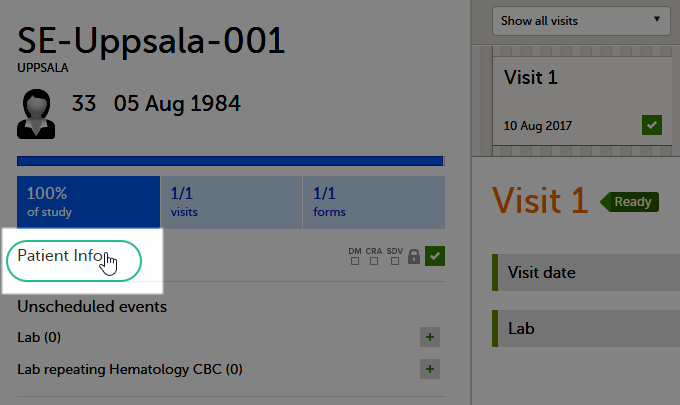
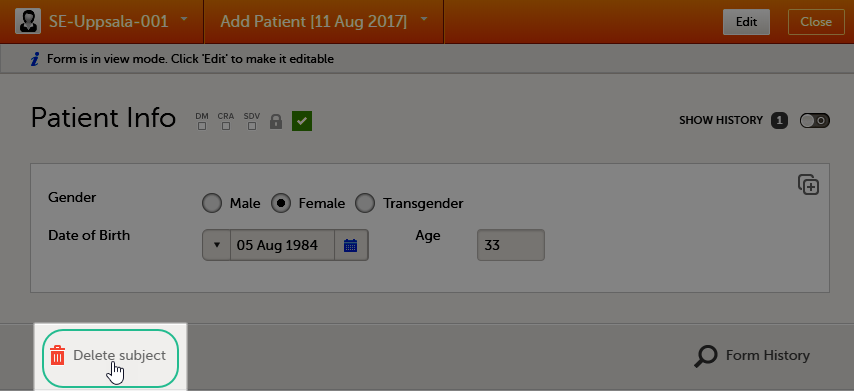


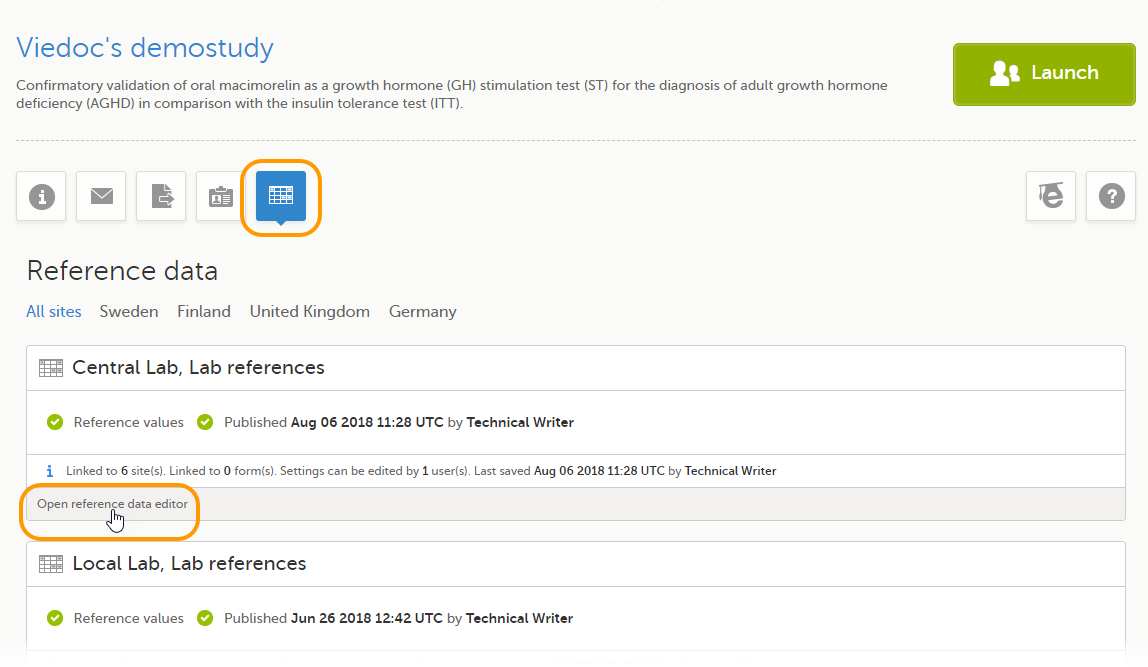 The reference data editor opens and displays the variables and the target types to be populated, as defined in the reference data scope. If you would like to exclude some of the variables, select the arrow to the right of the variable name and select Not available. See also

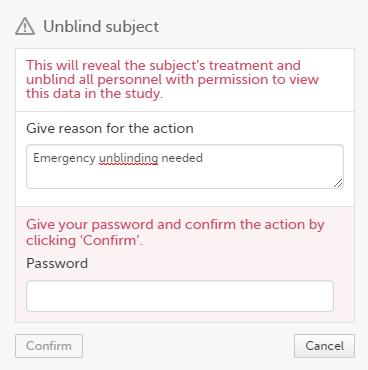

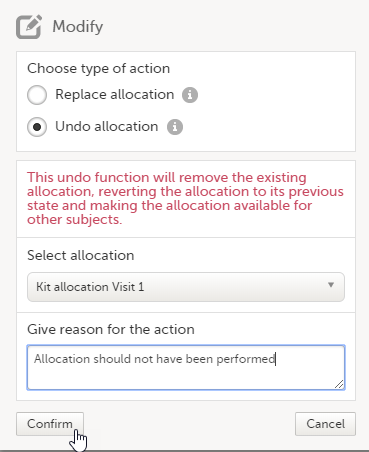
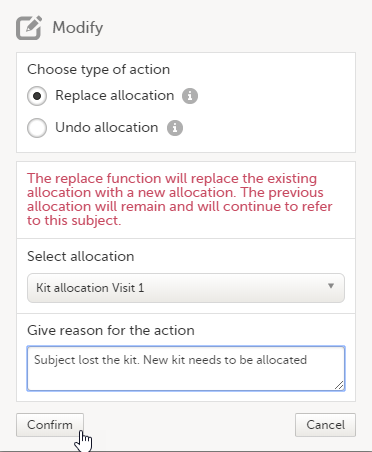
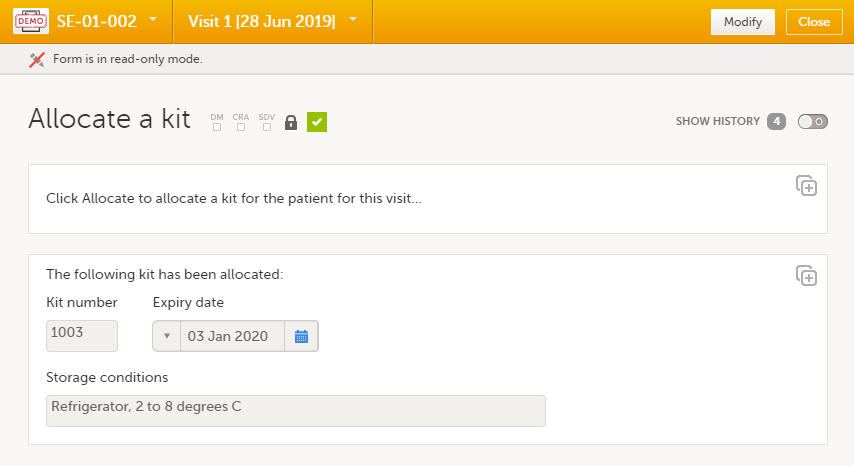 This will replace the existing allocated kit with a new one. The previously allocated kit will continue to be allocated to the same subject.