Study start page
Introduction
When you select the study logo in the landing page, the study start page loads, which contains the following icons that give access to different features, or enable you to view information about the study:

1. Study status
2. Messages
3. Data Export
4. Metrics and Viedoc Reports
5. Roles
6. Reference data
7. Medical coding
8. Viedoc Logistics
9. Viedoc eTMF
10. SDV manager
11. Demo mode
12. Launch
13. eLearning / Documentation & Training
14. Support
Notes!
- The export, metrics and medical coding, roles, reference data, Viedoc Logistics, eTMF and SDV manager icons, the demo mode switch, and the launch button are only visible if you have access to the respective features. Whether you have access to these features, depends on the role assigned to you, and on the permissions that are included in your role.
- Roles and permissions are set up in the study design. The latest effective design for each site will be used to define the permissions that will apply to each role.
The first page displayed when you select a study is, depending on the status of the mandatory documentation and training materials, as below:
- If you have mandatory documentation pending to be read and signed, then the first page that opens is the Documentation & Training.
Important! All the mandatory materials must be "Read & Understood" and signed before you can launch the study. You might be able to launch the study in demo mode, depending on the study settings performed by the Study Manager. - If you do not have any mandatory documentation pending signing, then the first page that opens is the Study status page.
Study status
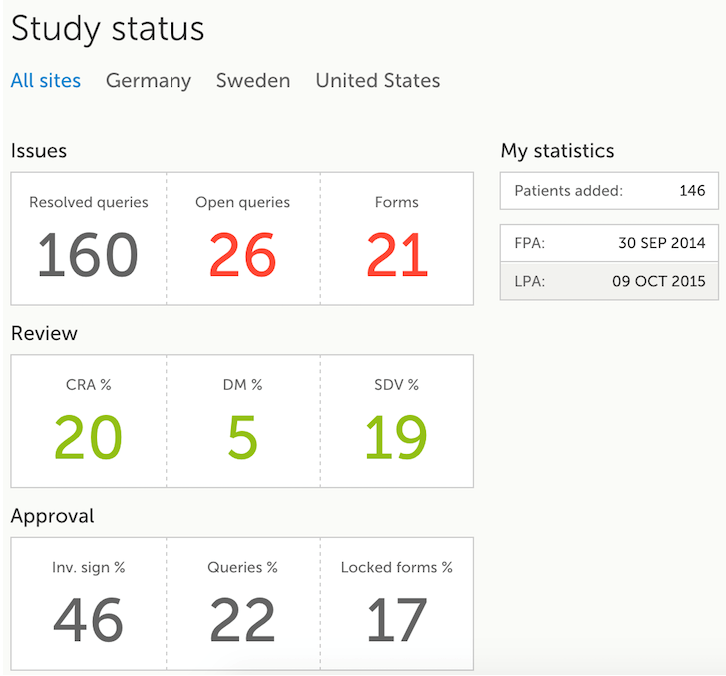
The Study status page is the first page that is shown when accessing a study, if you do not have any mandatory documentation and training material that needs to be signed. This page gives you an overview of the progress of the study - on study, country and/or site level (depending on which sites you have access to):
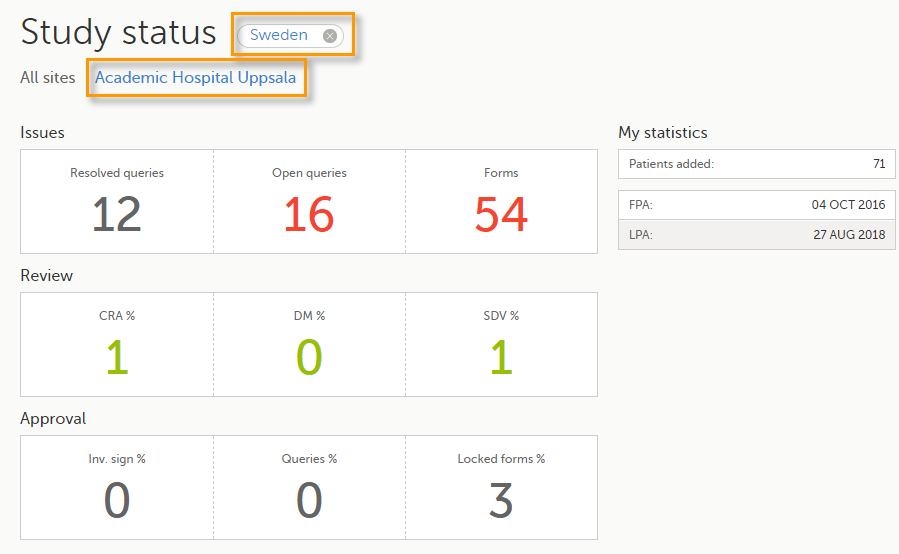
You can filter the displayed data for country or site by selecting the name of the country or site:
The following statistical information is provided, for the selected site(s):
- Issues
- Resolved queries - total number of resolved queries
- Open queries - total number of open queries
- Forms - total number of forms with issues
Note! For resolved and open queries, this includes only manual and validation queries, not missing data queries. For resolved queries, the following statuses are included: Resolved, Rejected, Approved, and Closed.
- Review
- CRA % - percentage of forms that were marked as Clinical Research Associate (CRA) reviewed out of total number of forms that can be CRA reviewed within the study
- DM % - percentage of forms that were marked as DM reviewed out of total number of forms that can be DM reviewed within the study
- SDV % - percentage of forms that were marked as Source Data Verification (SDV) reviewed out of total number of forms that can be SDV reviewed within the study
- Approval
- Inv. sign % - percentage of the forms signed by investigator out of total number of forms
- Queries % - percentage of approved queries out of total number of queries that await approval. For details about query states and process, see Queries Overview.
- Locked forms % - percentage of the locked forms out of total number of filled in forms
- My statistics
- Patients added - the total number of patients added to the study
- FPA - date when the First Patient was Added
- LPA - date when the Last Patient was Added
Note! All the numbers reflect the data entered in the selected operation mode (demo or production), that is, if demo mode is selected, then the numbers reflect only the data entered in demo mode.
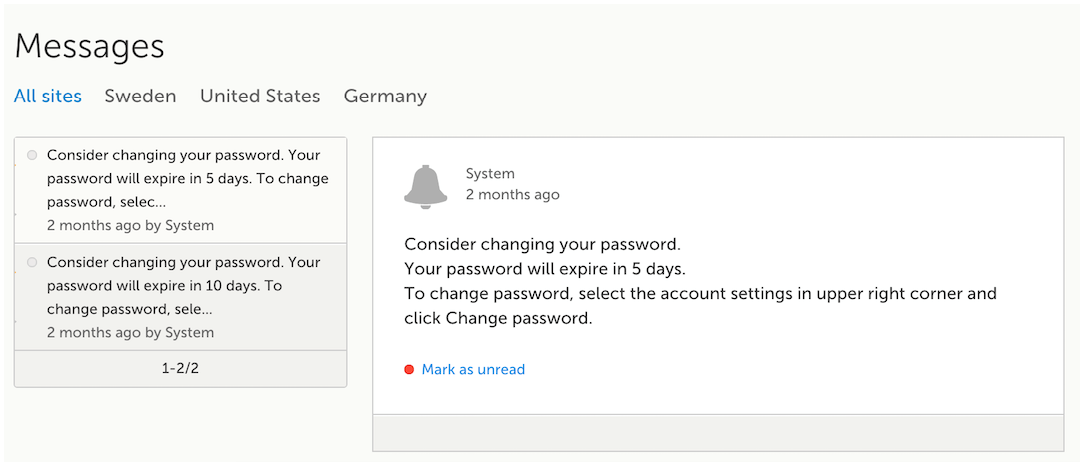
Messages
A message can either be a system message (such as notifications on password expiration), a study message (such as eCRF changes - for more information, see Approving eCRF changes, or other notifications according to the study configuration).
In the message window, a blue dot indicates a study-specific alert, a yellow dot indicates a form change requiring approval, and a red dot indicates an expiring password.
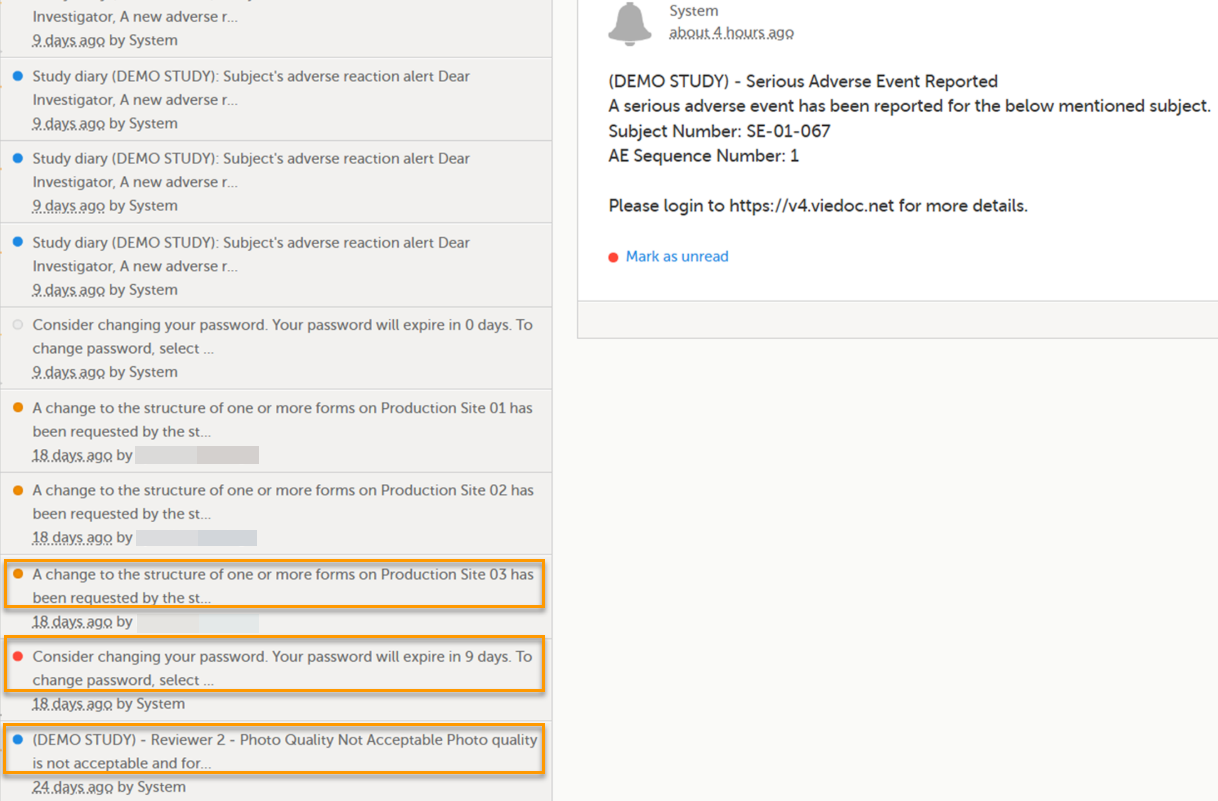
An indicator in the top bar of the application indicates whether you have unread messages.
 Alert messages
According to the study configuration, you can receive alert notifications about important occurrences in the data. (For example, in case of a Serious Adverse Event). Alert notifications can be received in the Messages page and as an email.
Depending on the configuration/study setup, the email might have the PDF of the form that triggered that alert as an attachment.
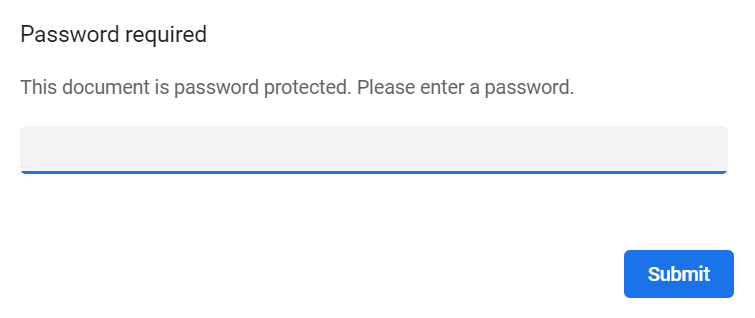
If the option to enable password protection for the alert email attachments has been selected for your study, you should receive a password to enter to open the attachments. The password is provided by your Study Manager.
When you receive an email copy of the alert message with a password-protected attachment, when you open the file you will see the pop-up below where you can enter your password:
Data export
The Data export page enables you to review and download study data in the following formats:
- Excel
- Comma-Separated Values (CSV)
- Statistical Analysis System (SAS)
- Operational Data Model (ODM)
Note! Data export might not be available to all users.
For more information about data export and preview, see Exporting data.
Metrics and Viedoc Reports
The Metrics page gives an overview of the quality of data in terms of open queries and missing data.
Note! Metrics might not be available to all users.
For a detailed description, see Metrics.
If Viedoc Reports is included in the study license and enabled, it is accessed from the Metrics feature. For more information, see Launching Viedoc Reports.
Roles
Note! The Roles page is only available for users with special permission to view roles, as per the study design.
The Roles page provides information on:
- The roles that are assigned to you, see My roles
- All the roles for the sites you have access to, see All roles and users for my site(s)
My roles
Under My roles you can see the roles that you have in the respective study:
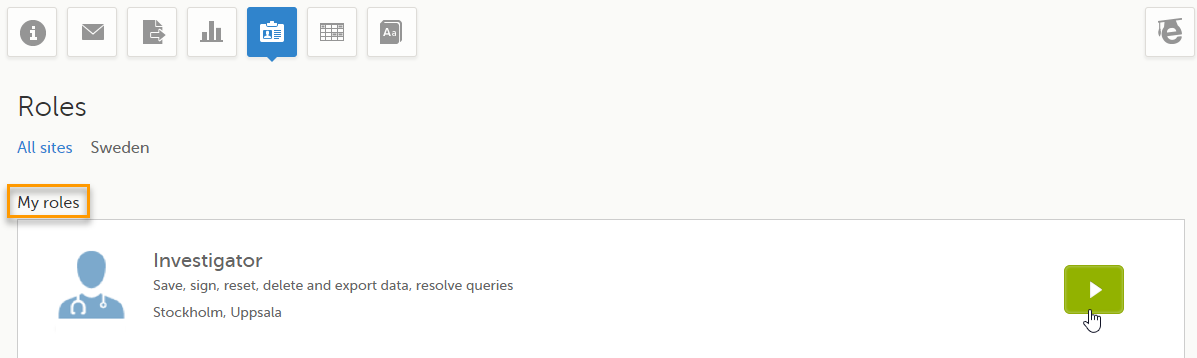
The following information is displayed (with examples):
- The role name (Investigator)
- The list of the permissions (Save, sign, reset, delete and export data, resolve queries)
- The site(s) you have access to (Stockholm, Uppsala)
By selecting the green arrow button to the right, you will be directed to the Selection page. This is equivalent to selecting the Launch button.
All roles and users for my site(s)
Here you can see a list of all the roles and the respective user(s) for the site(s) you have access to:

To see user details of each role, select Show log. The log displays:
- User/Site - the name of the user, email address and site
- Access granted - when* and by whom (user name) access was granted
- Access revoked - when* and by whom (user name) access was revoked (if applicable)
- Data edits/Sessions - the number of times the user edited any data, and the total number of login sessions by the user (defined as the number of times the user has accessed the study)
*date and time in Coordinated Universal Time (UTC) time zone
User logs
For each study, you can download user logs in PDF and Excel format with information about all users and roles for the sites you have access to.The generated file reflects the country/site selection in the language you have currently set in Viedoc.
Notes!
- In Viedoc Clinic, both production sites and demo sites and roles/users for both production sites and demo sites can be included in the user administration log, depending on which mode (Production/ Demo mode) is enabled when the log is generated.
- System roles for a study (organization users are not included) are included in the user and administration log. For example, site managers for demo sites are included when a log is generated for a production site, as a site manager is a system role.
You can generate the log for the country/site selection in your current Viedoc language by selecting Generate a PDF file / Generate an Excel file at the bottom of the study start page:

Once the user log is generated you can:
- Download the latest generated log for the country/site selection (stored on the server with a date and time stamp) making it possible to directly download the file instead of generating a new one, or
- Select Regenerate - if you need a more recent version than the one available for download.

Log of users and roles in PDF
The Log of users and roles PDF contains the following chapters:
- Summary - the summary of active/inactive roles, active/inactive users as well as data contributors, grouped in one section per site.
- An Active role is the current distinct role all active users have for a site.
- An Inactive role is a role that was previously assigned but currently lacks any active user.
- An Active user is a user with at least one active role.
- An Inactive user is a user who had at least one role at a site, but all roles for the site have been revoked.
- Roles - a list of the permissions associated with each role and corresponding history, grouped in one section per site.
- User log per site - a list of all users who ever had access to data, including user activity, grouped in one section per site.
- User account logs - a list of the change history of all user accounts for the users listed in the above sections of the log, grouped per user (identified by the user ID).
User administration log in Excel
The User administration log contains information about all users and roles for the sites you have access to, with the following sheets:
- Report Info - general information about when and by whom the log was generated, and some information about the study status. The following more detailed information is contained:
- The Organization name
- The Study name
- Production study GUID
- Demo study GUID
- For PMS studies: Sponsor side Production study GUID
- For PMS studies: Sponsor side Demo study GUID
- User Access Log - a list with detailed information about user access, showing one row per site and role, including clinic roles and system roles.
Note! The access granted date/time is the date/time when a user accepts the invitation to a study.
Some columns in this sheet are further explained here:
- Site Group - indicates when a user is granted access to the site through a site group invitation. Possible values are Training sites, Countries, and All sites.
- 2FA - indicates what level of two-factor authentication the user has. Possible values are Study level, Account level, or No two-factor authentication enabled.
- Latest system login date/time - information about the latest login of each user (for end users only, not API client users).
- Certified - indicates if the user is certified for the role. Possible values are Yes, No, or an empty cell for roles that don't have mandatory training sections to read.
- If the user has signed the certification associated to their role, the column will display: Certified:Yes.
- If the user has selected Read & Understood but not signed the associated certification, the column will display: Certified: No.
- User type - indicates the type of user. Possible values are End User or API Client, to indicate if the user is an end user that can log in to the system or a Web API Client that can access the API with a role.
- User Invitation Log - a list with information about pending invitations and rejected invitations, including clinic roles and special roles.
Note! When an invitation has been accepted the user will no longer be included in the invitation log, but in the User Access Log.
Some columns in this sheet are further explained here:
- Role - role of the invited user.
- Email Address - Email address of each invited user.
- Existing User - indicates whether the invited user already has another role in the study, or is a new user. Possible values are Yes, No.
- Initial Invitation Sent date/time - information about the first invitation of each user
- Initial Invitation Sent By ID - the numeric user ID for the user
- Initial Invitation Sent By Display Name - initial invitation sent with the display name usedin Viedoc to identify the user.
- Initial Invitation Sent By Email Address - Email address of the initial invitation sent to the invited user.
- Invitation Resend Count - the number of times an invitation has been resent.
- Latest Invitation Sent date/time - information about the latest invitation of each user.
- Status - invitation status, possible values are Pending, Rejected.
- Invitation Rejected date/time - information about a rejected invitation for each user.
- Certification Log - a list of certifications per user. Certifications performed before the release of 4.65 lack information about what roles the certification applies to. That is, the cells in column Certified With Roles are empty.
- Summary - a summary of users per site with information about country, side code, site name, number of active/inactive users, and date/time of last access change.
- Account Settings Log - a list with all user accounts setting changes with user ID, change log, user name, and date/time.
Reference data
When you select the reference data icon, the list of available reference data source-scope combinations is displayed. From here you can open the reference data editor. For details see Working with reference data.
Note! Reference data might not be available to all users.
Medical coding
The medical coding feature allows you to code reported events like Adverse Events, Medical History and Concomitant Medications. When you select the medical coding icon, the page displays metrics regarding medical coding. There is one set of metrics for each medical coding scope available.
Note! Medical coding might not be available to all users.
For more information about medical coding, see Medical coding.
Viedoc Logistics
Viedoc Logistics is the interface for managing the supply of your study. A valid license is required to use Viedoc Logistics.
For more information about Viedoc Logistics, see Viedoc Logistics User Guide.
Viedoc eTMF
Viedoc eTMF is a digital repository for capturing, managing, sharing, and storing essential documents.
For more information about Viedoc eTMF, see Viedoc eTMF User Guide.
SDV manager
Viedoc SDV Manager is an application that allows you to define Source Data Verification (SDV) requirements and plans and apply them selectively across study sites based on risk.
For more information, see Viedoc SDV Manager.
Demo mode
If enabled, a study can operate in demo mode. You can easily switch between demo mode and production mode using the DEMO MODE switch:

The DEMO MODE switch is only visible when you have access to both production and demo mode.
The demo mode is clearly indicated with demo icons. Make sure you do not enter any real data in demo mode!
See also the video tutorial Activate demo mode.
Launch
Select the Launch button to access the patient data and electronic Case Report Forms (eCRFs). The button is only visible when you have access to the study in Viedoc Clinic.
If multiple roles are assigned to you in this study, you are first prompted to select the role you would like to use to access the study.
eLearning / Documentation & Training
If you have mandatory documentation pending to be read and signed, this is the first page that is displayed when you access the study.
Under this section, you have access to several eLearning programs and various documentation, depending on the roles that have been assigned to you. For details about the user documentation and certificates, see Documentation & Training.
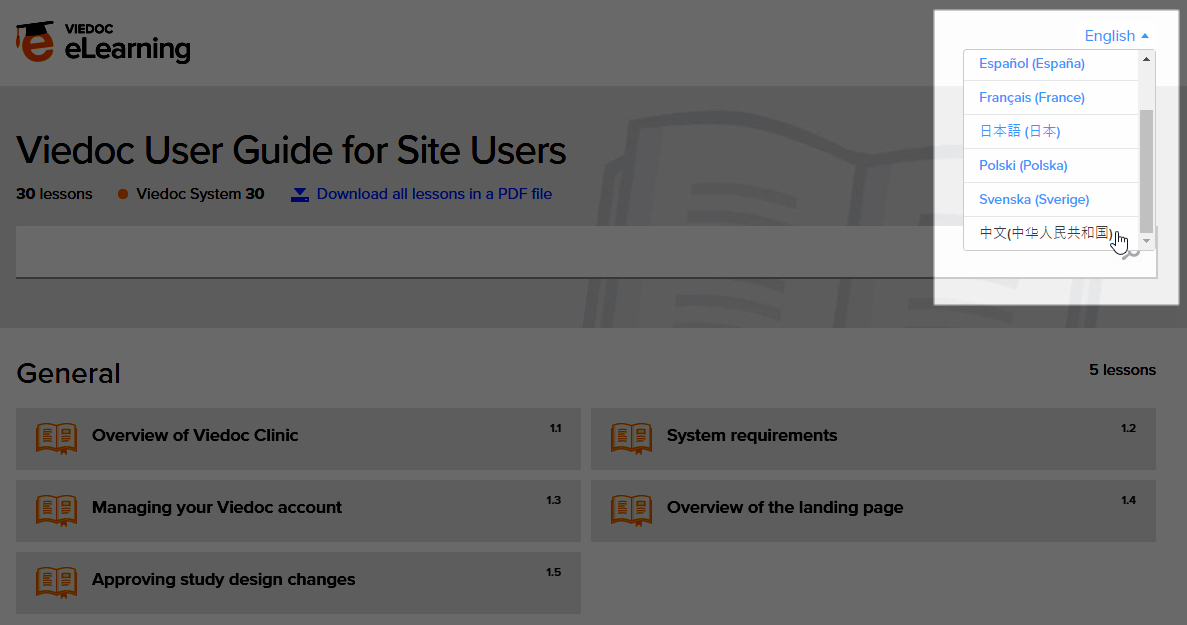
The Viedoc Clinic User Guides are available in the following languages:
- English
- Chinese
- Japanese
To change the language of the Viedoc User Guide, once opened, select the language from the upper right corner, as illustrated below:
Tip! The various lessons in the Viedoc eLearning can easily be compiled into a PDF and printed if you need to store them in the investigator binder.
Support
Select the support icon to open a pop-up with contact details to the users that can help you in case you need support. Normally you will find the contact details of the Monitor here, as the Monitor typically is the first point of contact to the site.