Viedoc PMS is the product on the Viedoc platform that can be used for Japanese Post Marketing Surveillance (PMS) studies. It fulfills all requirements of a PMS study, supports collection of data in booklets, and supports the process of sharing data between site (clinic) and sponsor via the submit-receive-return Kaifu function.
PMS studies are built in Viedoc Designer. Viedoc Designer is where you perform the technical part of a study build, either from scratch or by importing a design from a previous project. A design consists of the study forms, the booklets workflow, study roles, and other configurations and settings, as described further in this curriculum. The following sections describe the specific steps essential to build and design a PMS study.
For more information on how to design a study, see Viedoc Designer User Guide.
In Viedoc PMS, the database is shared by two different sides, a clinic side and a sponsor side. The database contains two versions of each data set, one version that is displayed to the clinic side users and one version that is displayed to the sponsor side users. On the clinic side, typically the Investigator enters subject data, while on the sponsor side the Data Manager typically reviews the data and archives (freezes) the data.
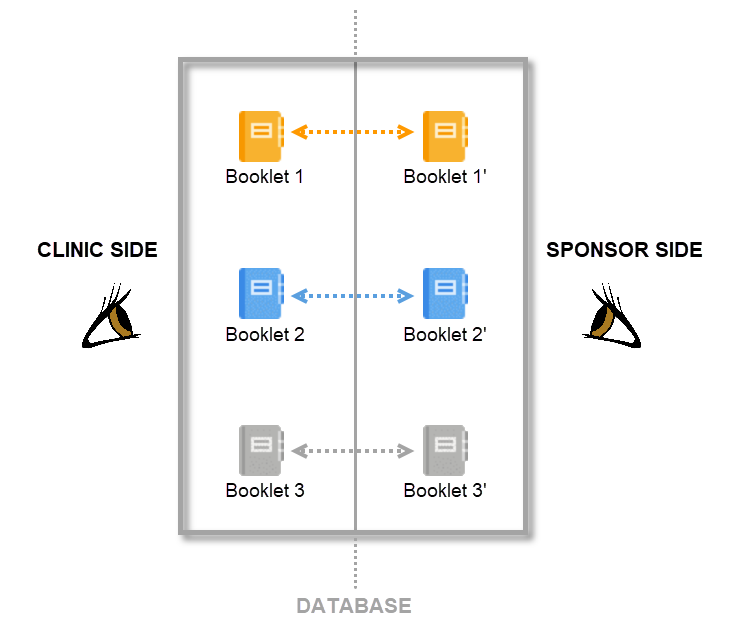
By mirroring the data collection and review process via booklets, Viedoc matches the workflow of a Japanese PMS study. A booklet can be seen as a compilation of data being collected during a specific period of time rather than during a specific event date, which is more typical in clinical trials.

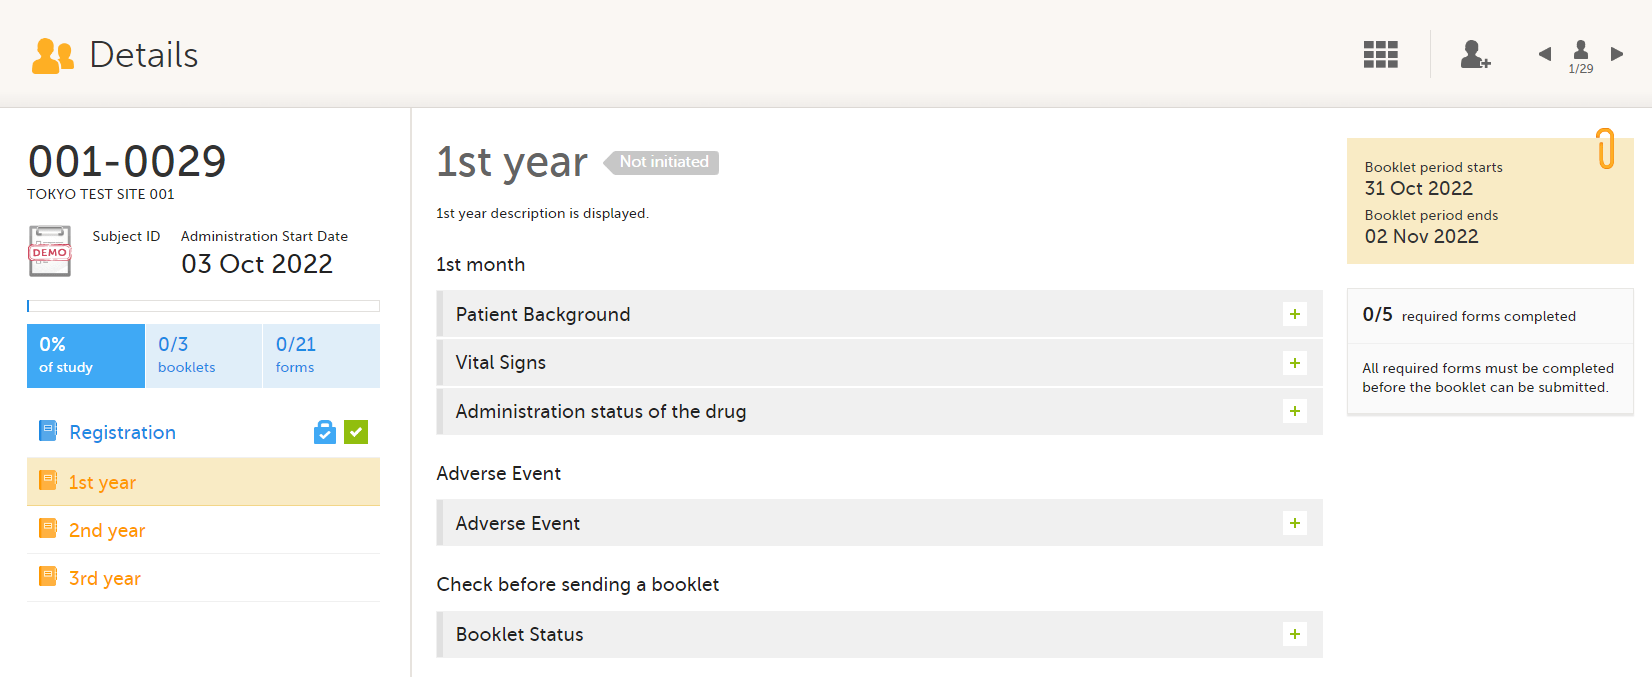
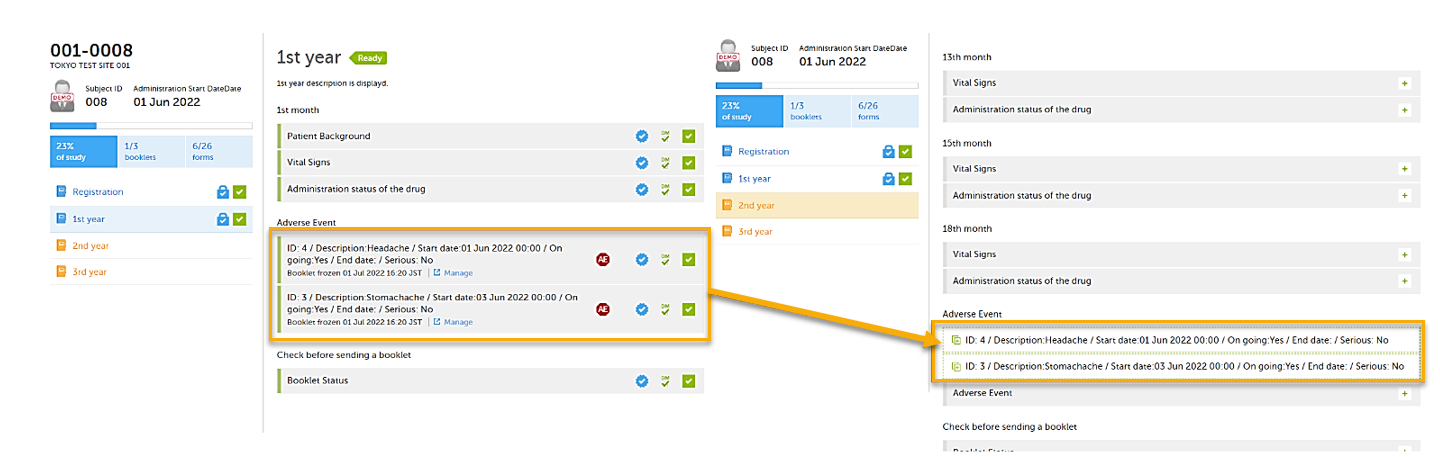
1.Subject details
2.Overview of booklets
3.Content of selected booklet
4.Details of selected booklet
Sending and receiving data on request is a fundamental requirement for a Japanese PMS study. Viedoc PMS offers support for sending and receiving booklets between site and sponsor, a process referred to as Kaifu. In the Kaifu process, the clinic user chooses when to share data with the sponsor and the sponsor side user chooses when to receive the data. It should be noted that the sponsor side user does not have access to any data entered in a booklet until the booklet has been shared by the clinic through the submit function, and a receive action has been actively performed by a user on the sponsor side.
For more information, see Overview of the submit-receive-return process
For more information about PMS operations for Clinic side and Sponsor side users, please see the following User Guides:
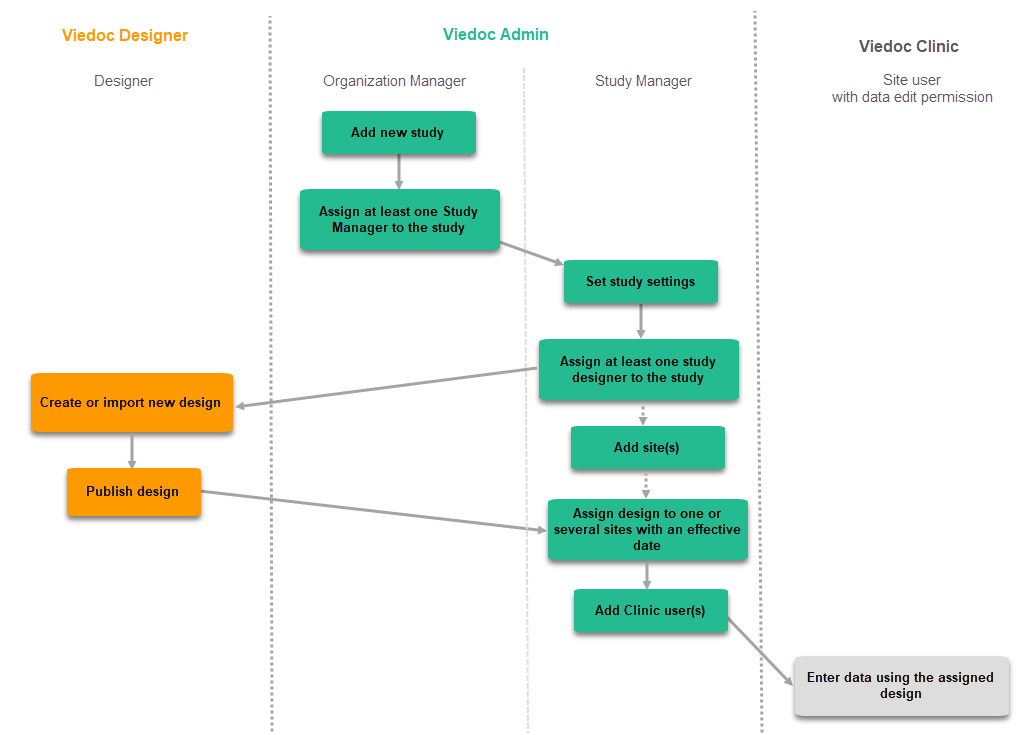
When creating and configuring a PMS study in Viedoc for the first time, you must perform the following steps:
1. In Viedoc Admin, the Organization Administrator creates a new PMS study and invites a Study Manager.
2. In Viedoc Admin, the Study Manager sets the non-version-controlled common settings and invites a Study Designer. For more information, see Managing users (for Org Admin)
3. In Viedoc Designer, the Study Designer creates the first version of the version-controlled settings in the study design and makes the study design available to the Study Manager by publishing the design to Viedoc Admin.
4. In Viedoc Admin, the Study Manager creates the site(s) and assigns the first design version to the site(s)
5.The Clinic side user can start entering data in Viedoc Clinic using the assigned design.
To build a new PMS study, you must first add a PMS study to the Viedoc platform and then invite a Study Designer who will build the study in Viedoc Designer.
The following sections describe the steps needed when adding a PMS study. For more information on setting up a study, see Viedoc Admin User Guide, Adding a new study.
Note! This step is performed by the Organization Administrator
To add a new study:
| 1 |
Open Viedoc Admin and select Show studies for the organization to which you would like to add a study. The study overview page opens. 
|
| 2 |
Select Add a new PMS study 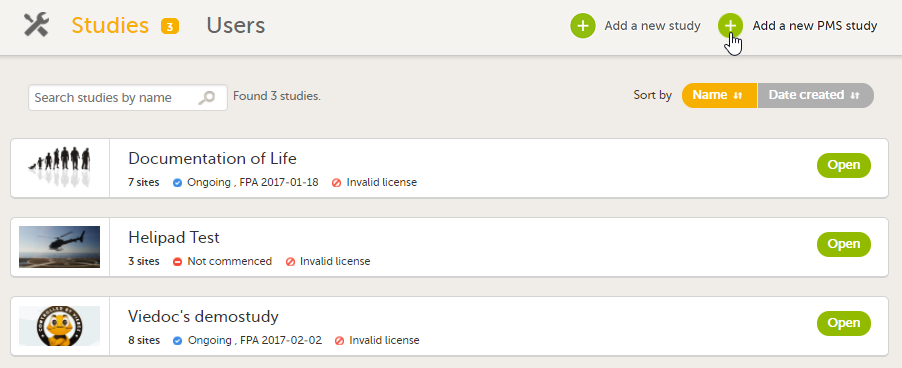
|
| 3 |
In the Study name field, enter the name of the Study, and in the Study Manager field, enter the Study Manager's email address. 
|
| 4 | Select Add PMS study. The study will appear in the list of studies on the study overview page. An e-mail is sent to the Study Manager with an invitation to the newly created study. |
This step is performed by the Study Manager.
| 1 | In Viedoc Admin, open the PMS study to which you would like to invite the Designer |
| 2 |
Select the toolbox icon in the Study crew field. The Study crew pop-up opens. 
|
| 3 |
In the Add study users tab, enter the e-mail address of the user you would like to invite. Select Continue. 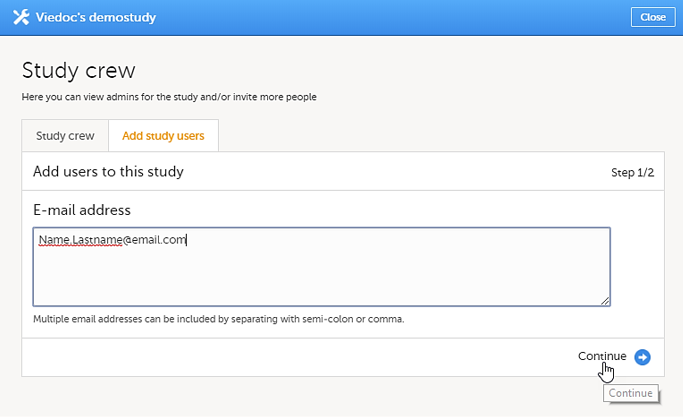
Note! You can invite multiple users at once by adding multiple email addresses in the field. Separate the email addresses with a semi-colon or comma. An invitation email will be sent to the specified e-mail addresses. |
| 4 |
Select Designer from the dropdown menu and then select Send Invite. You can add multiple roles by selecting the + icon. You can remove roles by selecting the - icon. 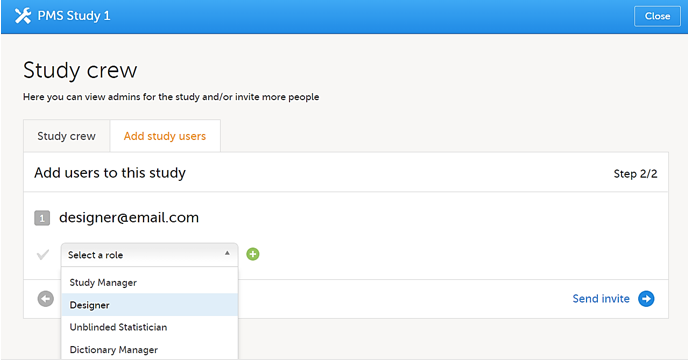
|
These steps are performed in Viedoc Admin by the Study Manager.
To complete the study setup:
| 1 | Add the study site(s). |
| 2 | Enter the following study details under Study settings: Sponsor Code, Contract Research Organization (CRO) code, Reference ID, Study Type, Sponsor Type, Study Phase, Therapeutic Area, Expected number of subjects. |
| 3 | When the Designer has published the study design, assign the study design to the sites in the study. |
| 4 | Invite users to the different system roles and clinic roles. |
| 5 | Open the study in Viedoc Clinic and test the study. |
Note! These steps are described in more detail in the eLearning lessons under Study Management.
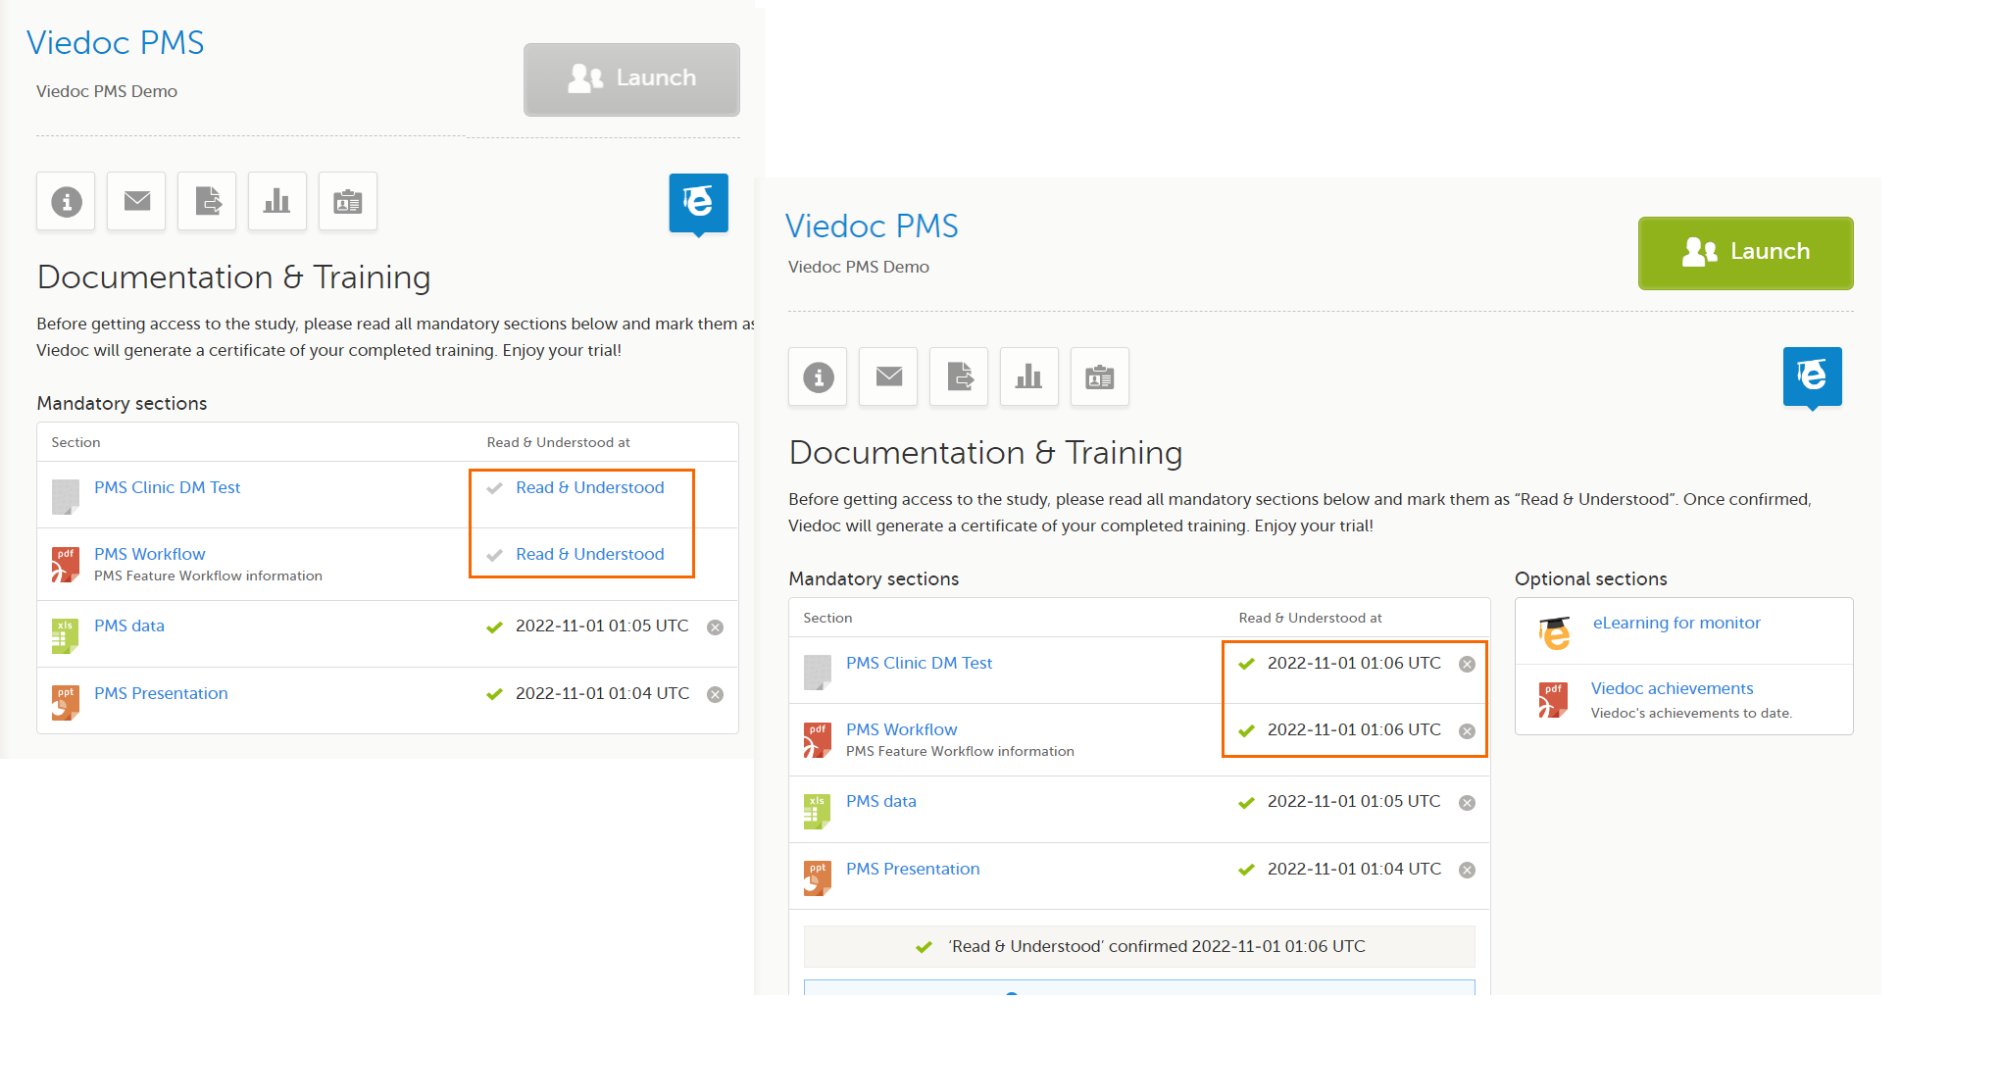
Viedoc allows users to set up the required materials that must be read before accessing and working on a study. Training content can be in Word, Excel, PDF, Power Points, and other document file types, as well as eLearning and web pages.
Training material can be mandatory or optional, and the target audience for each lesson can be customized for each site or role. Additionally, training content can be reset to mandatory for the following booklets, for example, if case protocols and procedures change or are forgotten, during a long period between sessions.
For information about how to set up training documents, see Setting up user documentation and training.
As a Designer, you will be able to access Viedoc Designer once the Study Manager has invited you to a study and you have accepted the invitation. If you have access to Viedoc Designer, you will see the Designer icon in the top-right-hand corner of the main page after you have logged in to Viedoc.
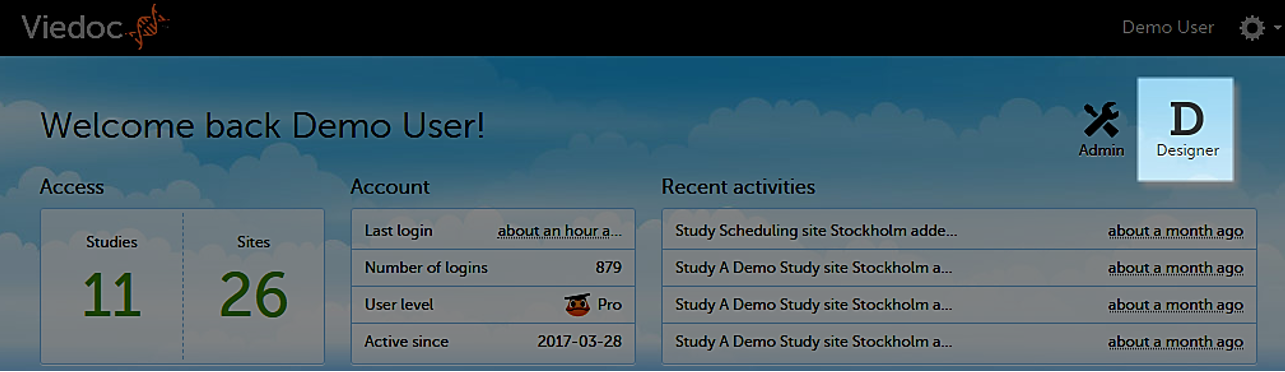
When you select the Designer icon, Viedoc Designer opens and displays a list of all the organizations and studies you have access to as a Designer. If you have several projects, you can search for the relevant project in the Search by study name text field in the top left corner. For more information, see Overview of Viedoc Designer.
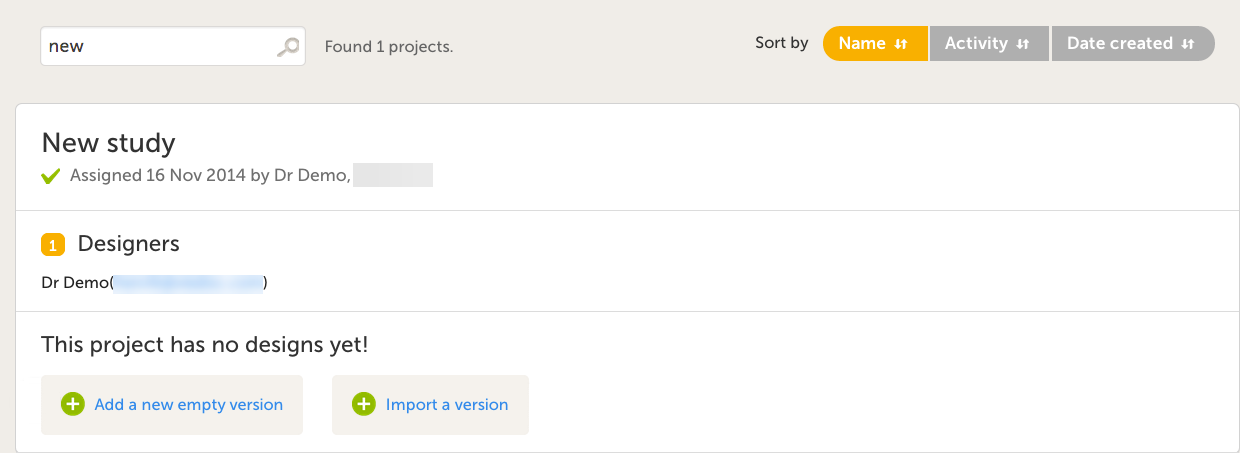
From the Projects page, you can create a new design version, and begin building and designing the study.
Design steps
1. Adding a new empty version
2. Creating and editing forms
3. Creating booklets and setting up the workflow
4. Setting booklet periods and alerts
5. Configuring the roles for the clinical side and sponsor side
6. Configuring the study settings
7. Configuring global design settings
| 1 |
Select Add a new empty version. The New Study Design pop-up window opens. Note! You can import an existing design using the Import a version option. For more information, see Initiating a design. |
| 2 |
In the New Study Design window, fill in the required fields. 
In Viedoc Clinic, when the user selects the respective study, only the Study Description will be shown. Note! All these fields can be changed in new versions or revisions of the study design. |
| 3 |
Select Save changes. You will be directed to the Study Design page. 
|
To create a new form, follow the steps below:
| 1 |
Select Edit in the study design name section in the Projects window to open the Overview of study design page. 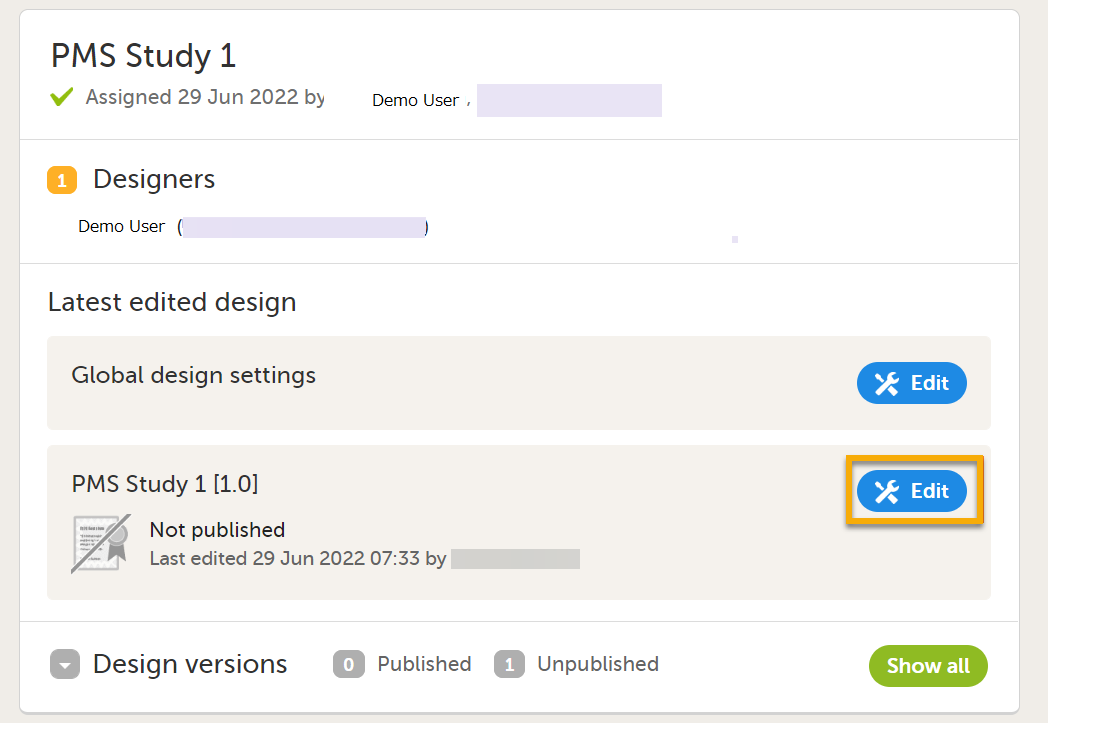 
|
| 2 |
On the Overview of study design page, select Edit in the Forms field. The Forms page opens. 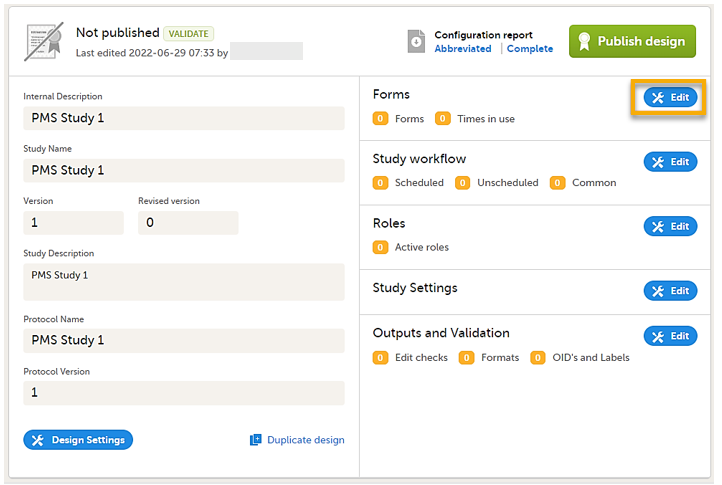
|
| 3 |
Select Add a new form. A new form is created, and then the Form Settings dialog opens. 
|
| 4 |
In the Form Settings dialog on the General tab, enter the form ID and the name of the form. A form ID must be set for each form and it must be unique. Also, an item ID must be set for each item in the form, and the item ID must be unique within each form. The form ID will be used to identify the form in the database and in the export output. It is also used when referring to the form in JavaScript expressions. 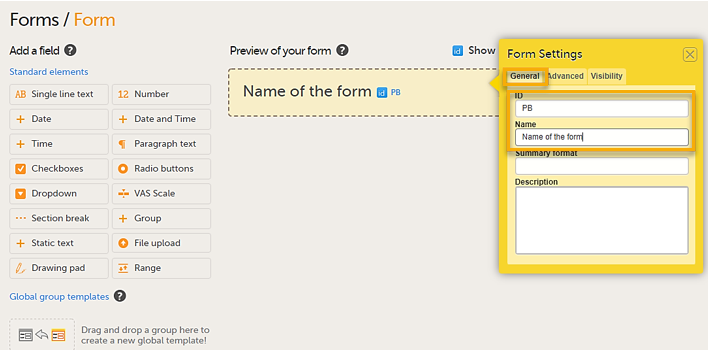
|
| 5 |
Select the required item type from the standard elements menu and click to place all required items on the form and set the required attributes for each. To add an item to the form:
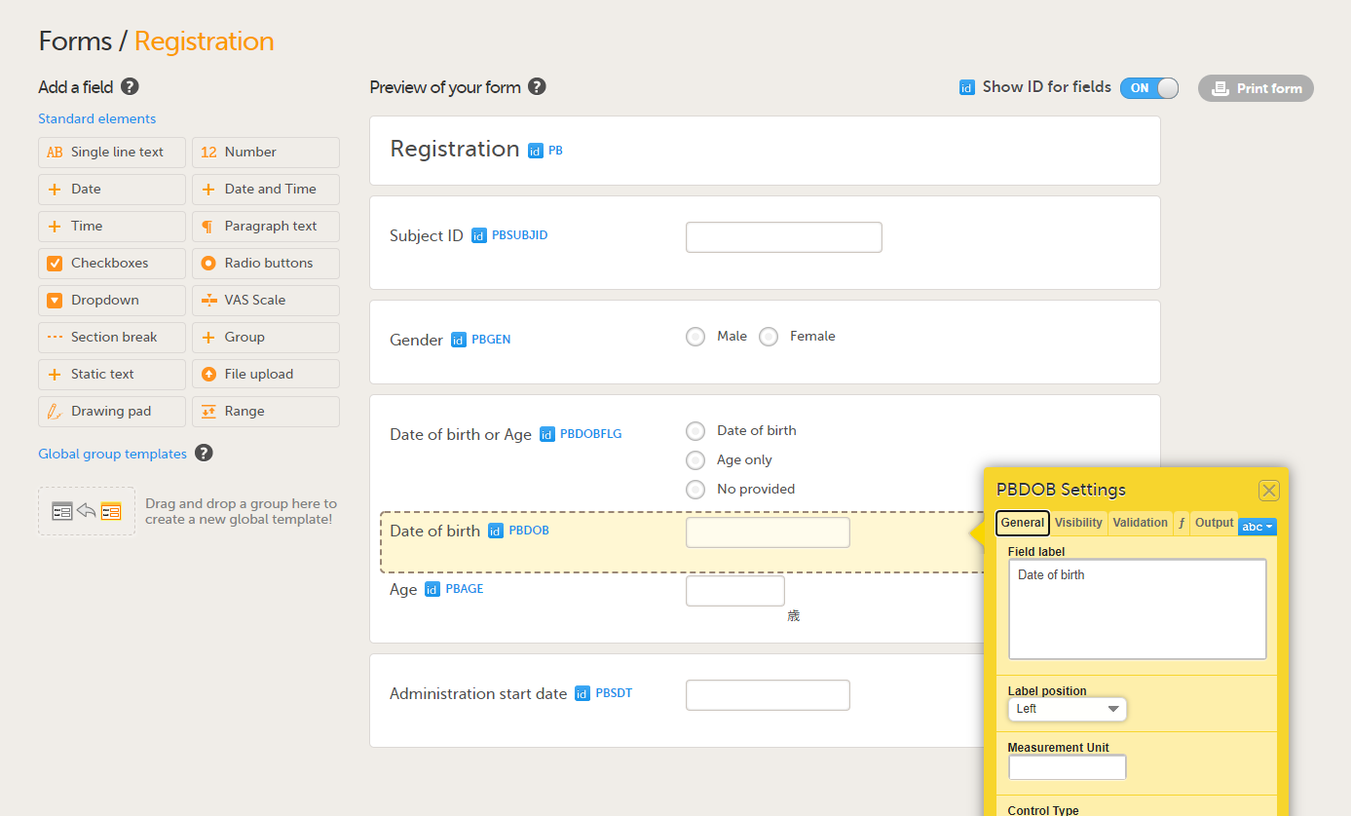
On the Visibility tab, you can set the visibility conditions of the item. 
On the Validation tab, you can set the ID of the item and add data checks that validate the item. 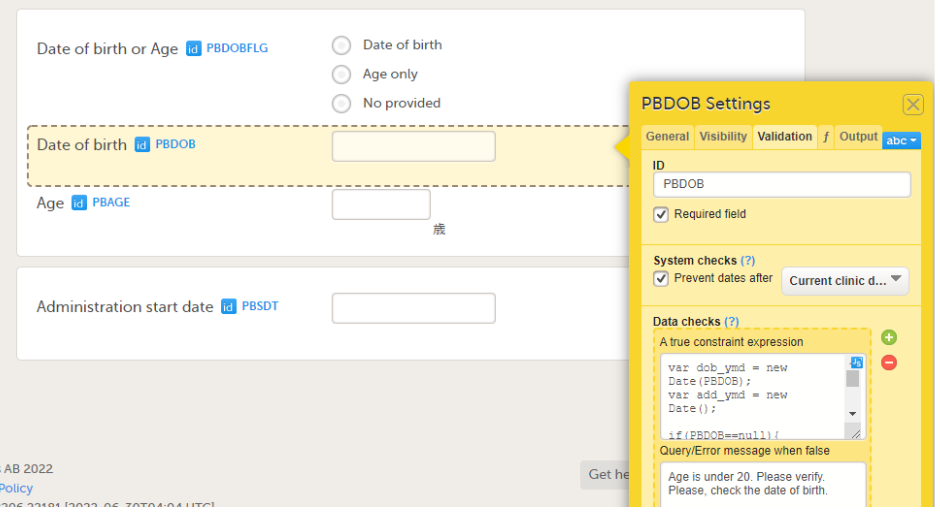
|
| 6 | Select Save changes to finish creating the form. For more information, see Creating and editing forms and Configuring an item. |
| 7 |
Note! For PMS studies, you should first create the initial registration form and then add all forms required for each booklet. The completed forms for the study are listed on the Forms page. 
|
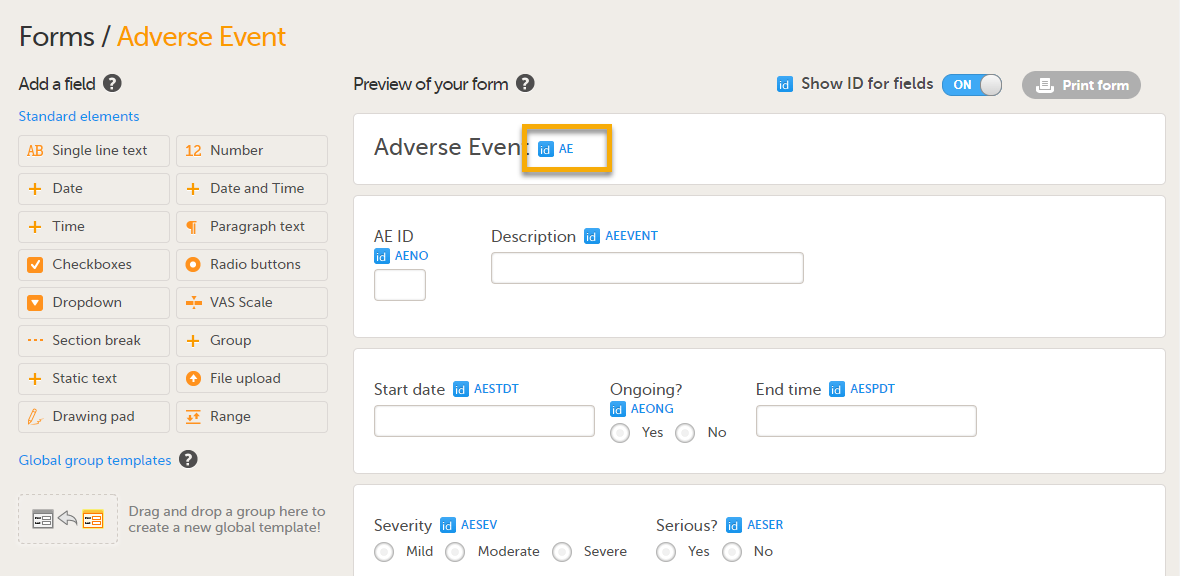
Note! For PMS studies, if you set a form ID to AE, this form becomes an Adverse Event (AE) form. When the AE form is completed and saved on the Clinic side, it can be submitted to the Sponsor side independently of the booklet. For more details about the Adverse Event form, see Adding Adverse Event forms.
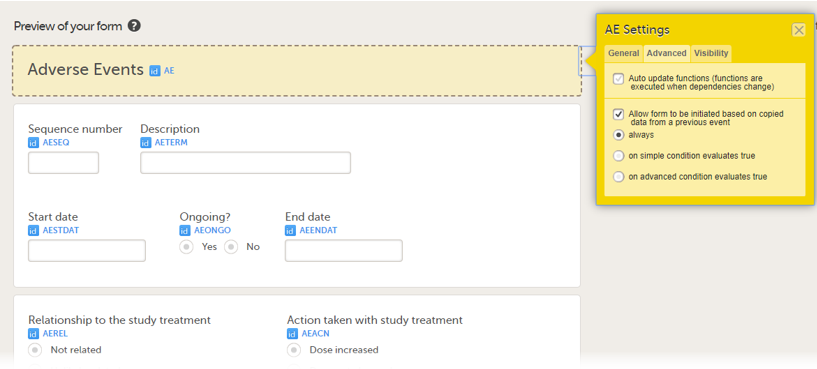
When the option Allow form to be initiated based on copied data from a previous event is selected on the Advanced tab of the form, the data can be copied from a form within one booklet to another instance of the same form within another booklet.
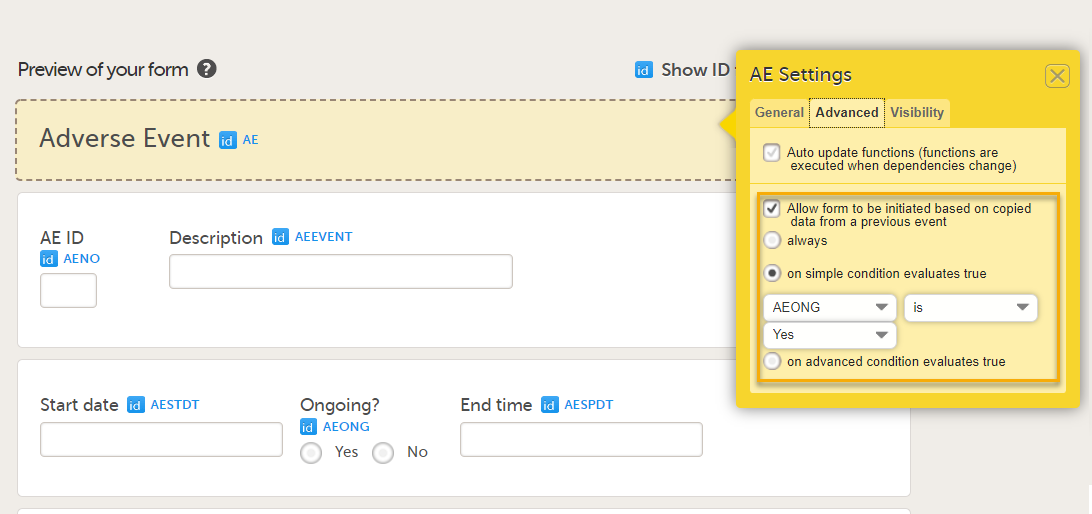
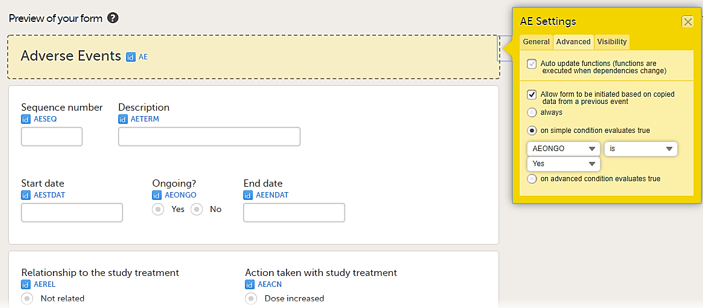
In the example in the figure above, the data is copied when on simple condition evaluates true condition and AEONG (ongoing) are selected.
This is a useful feature especially for the Adverse Event form. When an Adverse Event form is added in a booklet and the adverse event continues to the next booklet period, you can add an Adverse Event form in the next booklet with data copied from the Adverse Event form of the previous booklet.
You can add an Adverse Event form which copies data from the adverse event in the previous booklet, when ongoing is selected in the previous booklet.
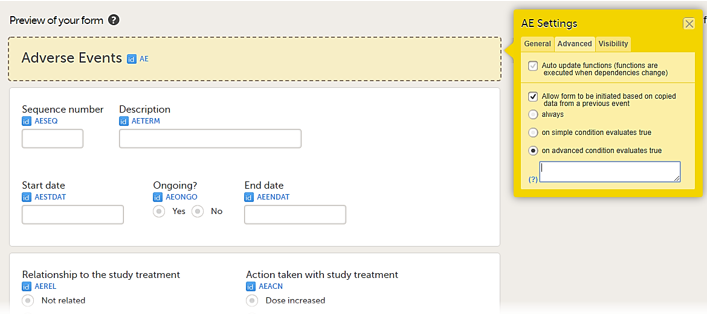
You can select the form to be copyable: always, on simple condition evaluates true, or on advanced condition evaluates true, as shown below.
• always
• on simple condition evaluates true. From the dropdown menus, select the item in the form that the condition should be based on, select is or is not, and select the code list item to specify the condition.
• on advanced condition evaluates true. Enter an expression in JavaScript to specify the condition.
For more information, see Allow form to be copied.
The form link item allows Clinic users to add links between different events and forms containing related/dependent data. For example, while editing the Prior and Concomitant Medications form, users can link to several registered Medical History events.
Note!
To create and configure form link items:
| 1 |
Add the form link item to any of the forms included in your study design (see Adding items to a form below). |
| 2 |
Click Form link to open the form link item. 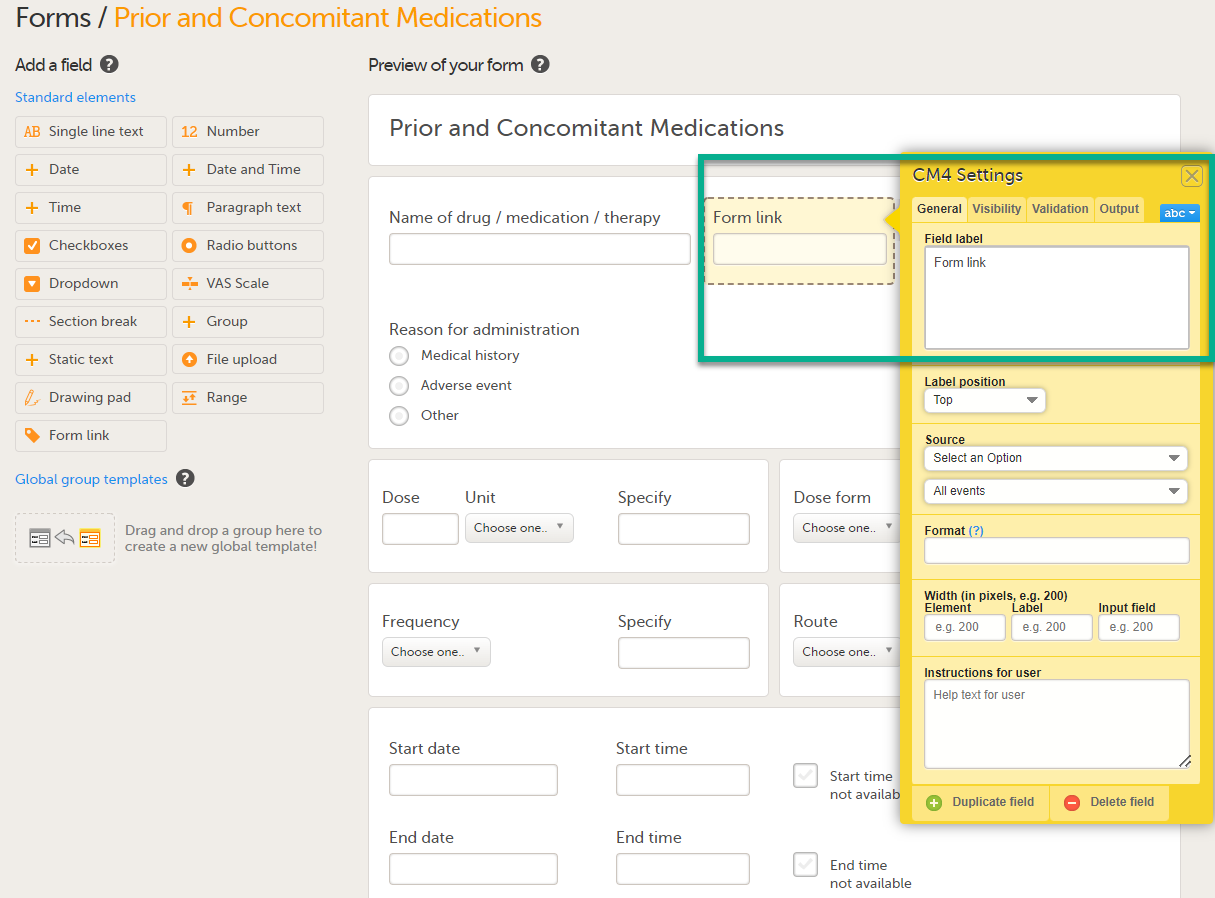
|
| 3 |
In Settings, there are four different tabs, General, Visibility, Validation and Output. See Configuring an item for more information about the tabs. 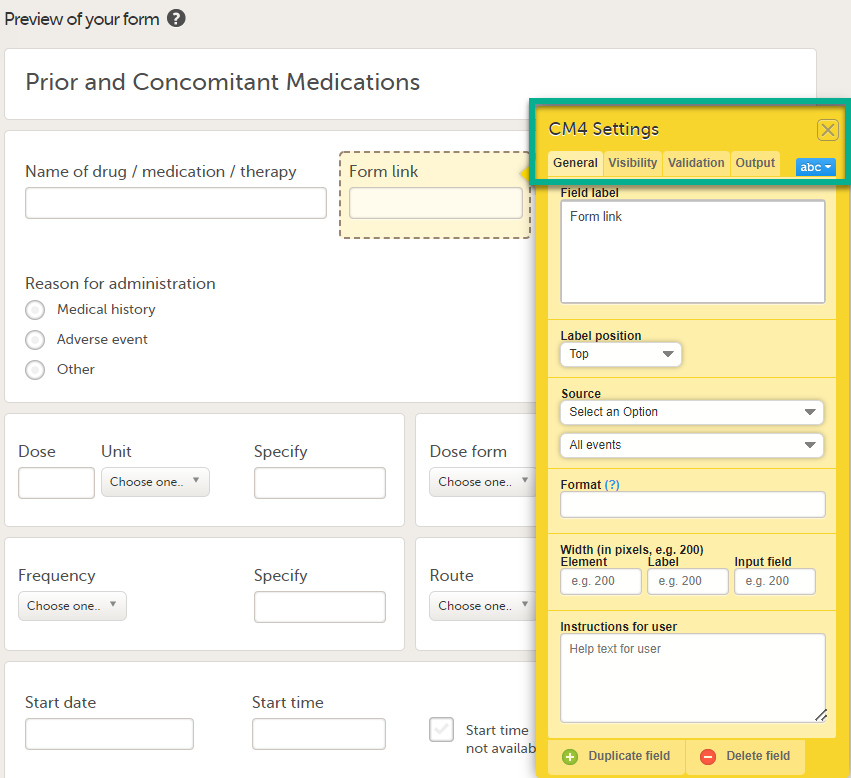
|
| 4 |
Under Source: 1. Click Select an Option to open a dropdown menu and select the form you want to display. In this case Medical History. 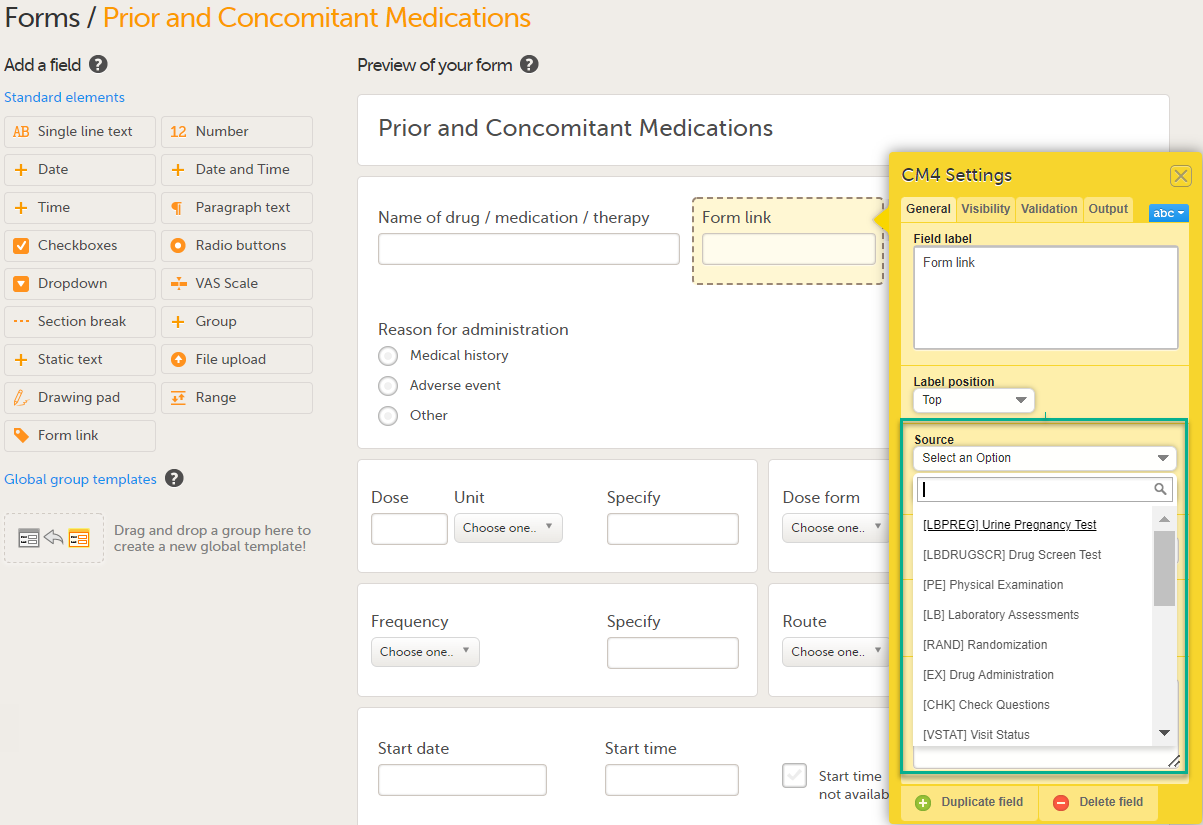
Note! You can either search in the Source field menu or scroll in the dropdown list . 2. Select the Event. In this example the Medical History event is selected in Common events. Note! Depending on your study design, in the Study workflow, you can choose to link the form either to all events with a specific form added (in this case Medical History) or to a single event. In the image below you can see that both the Medical History form in Source and the Medical History Event in Common Events have been added. In this example, all instances of the form type Medical History in Common Events are available for the Clinic user to link to. 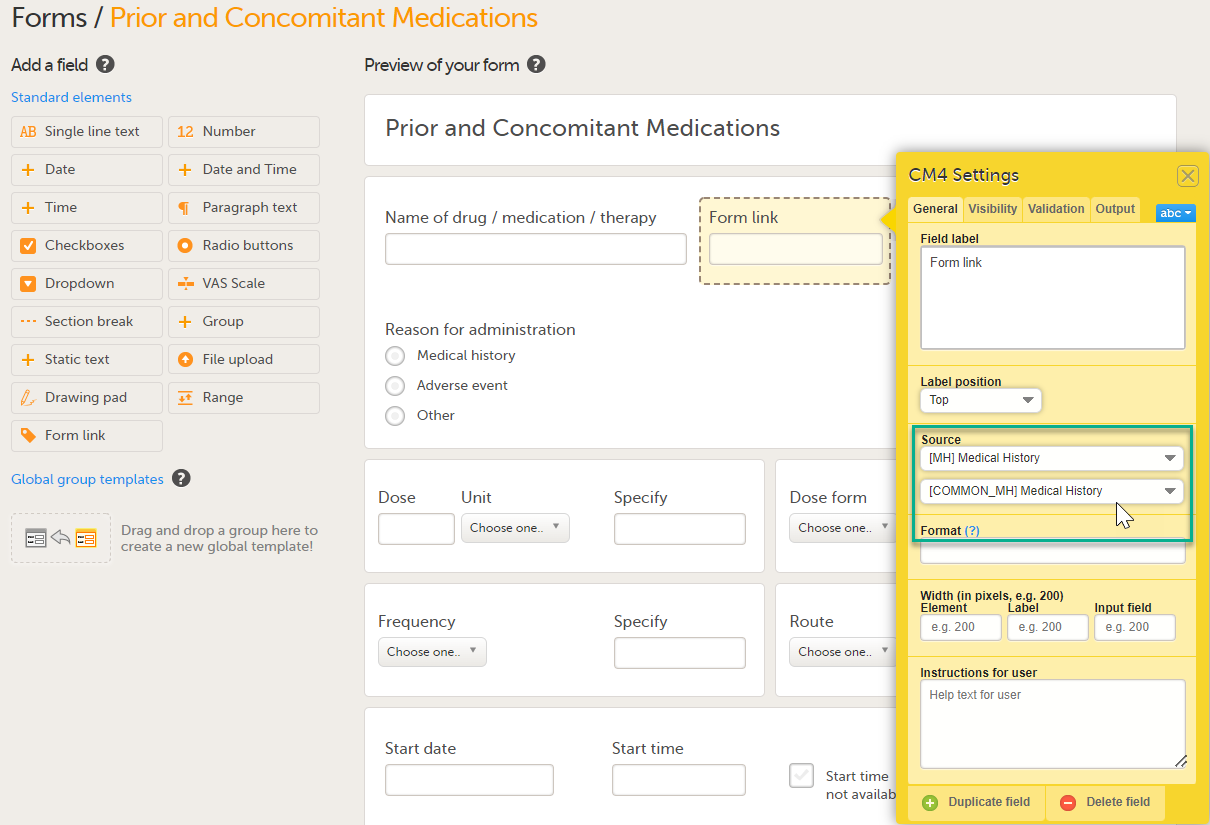
|
| 5 |
Under Format, add the items to be displayed for the available form link(s). For example the Term, Sequence number, and Start, Ongoing and End date for the Medical History. This defines how the form will be displayed in Viedoc Clinic. TIP! Click on the question mark for information about summary formats. For more information see Summary format of the form. 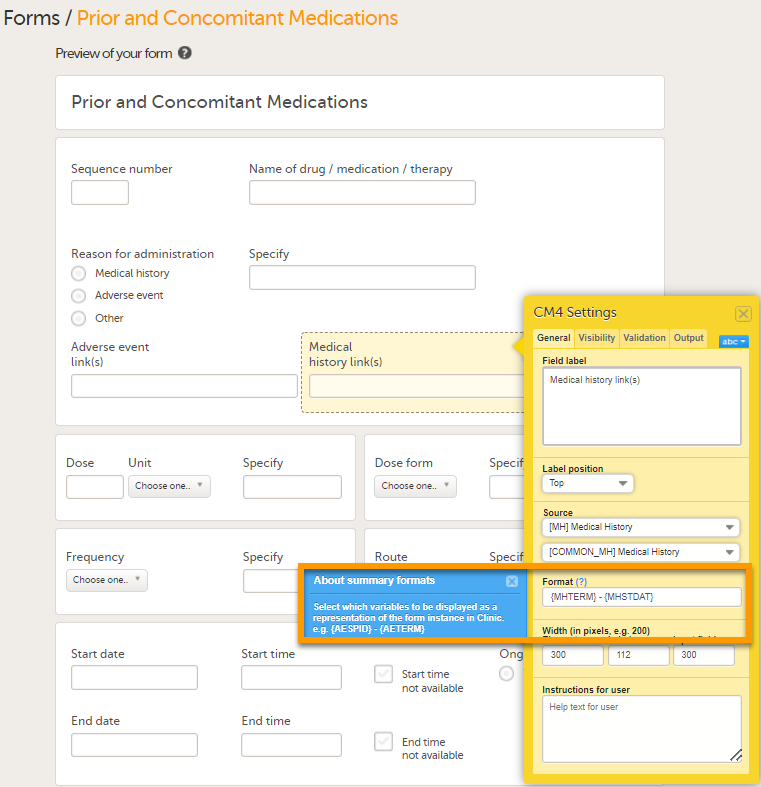
|
| 6 |
Click Save Changes Note!
|
A design with form link validation errors cannot be published. If validation fails, the design will not be published and an error message is displayed:

The format string must refer to the valid item ID of the source form for the display format to be populated and displayed in Viedoc Clinic.
If there is a circular reference between source forms, for example a form link having source form as the form containing the form link, an error message is displayed which identifies the forms with the issue.
In a PMS study, adding a single event with the relevant forms to the Study workflow creates a single booklet.
For more information about study workflows, see Study Workflow.
To create a booklet:
| 1 |
On the Overview of study design page, in the Study workflow field, select Edit. 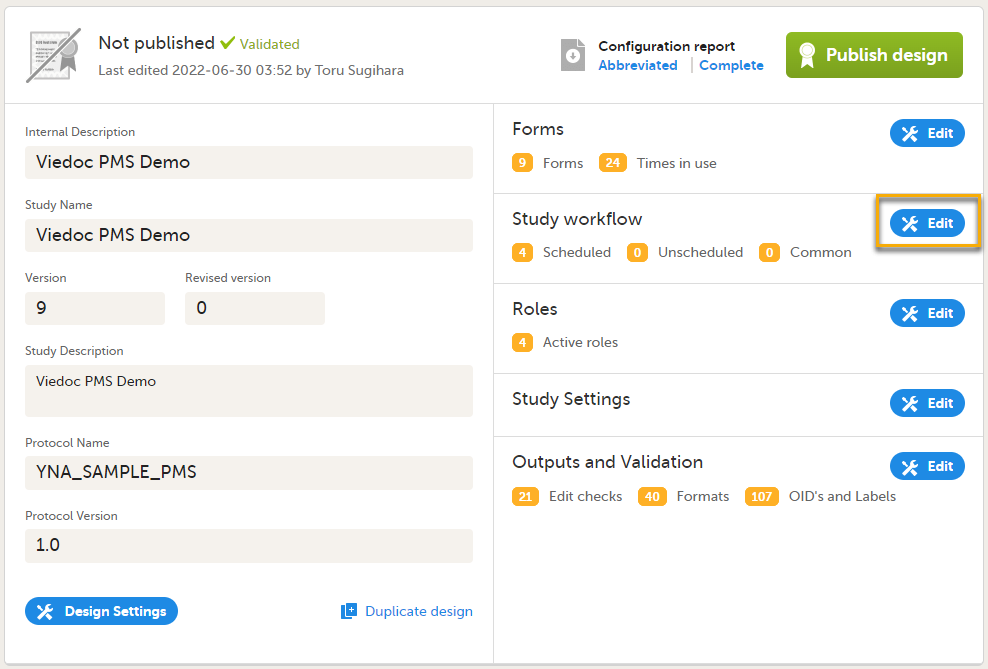
|
|
| 2 |
Select Add study event (add a booklet) in the Study workflow window. 
|
|
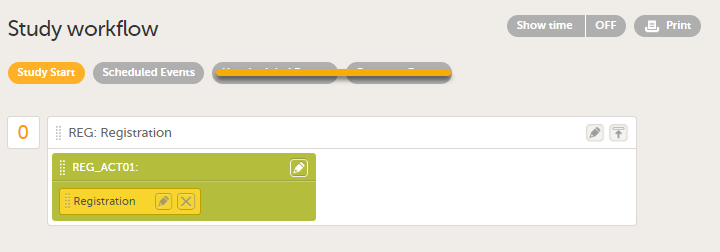
| 3 |
Study start booklet The example below shows a booklet with the Study event ID - REG, Booklet (Event) Name - Registration. 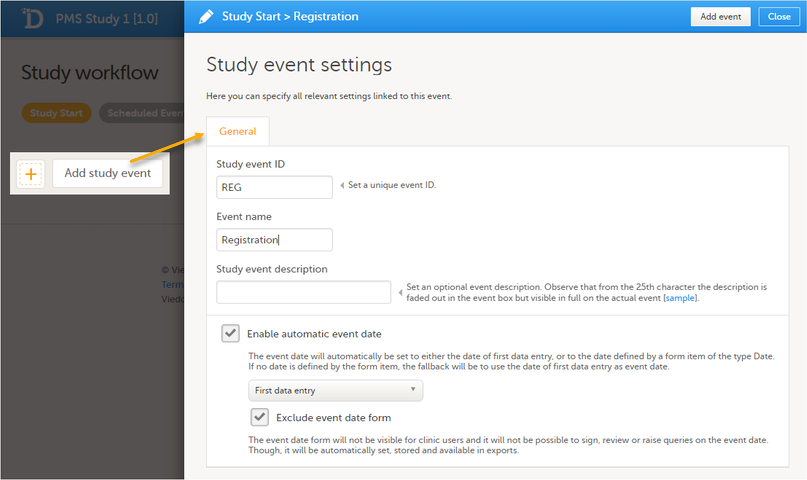
|
|
| 4 |
To add an activity to an event, select the (+) icon in the Registration booklet (event) field to open Activity settings and enter the activity ID. In the example below, the activity ID: REG_ACT01 has been added. 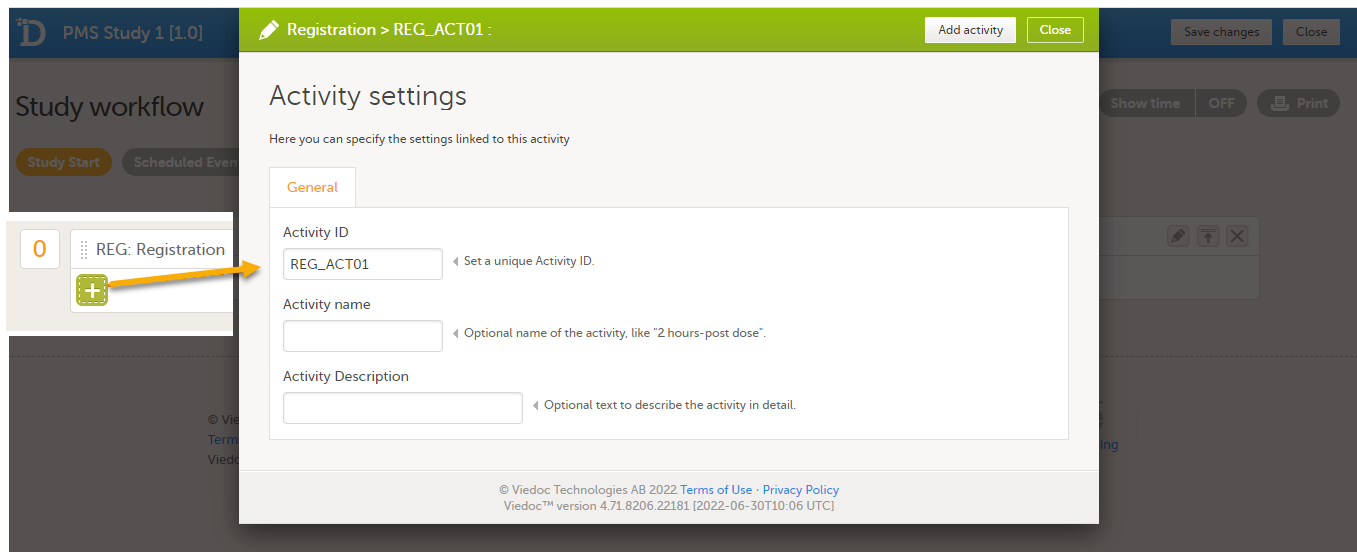
|
|
| 5 |
Add the form(s) you want to include in the Study Start event to the activity. In the example below, the Registration form has been added to the activity. 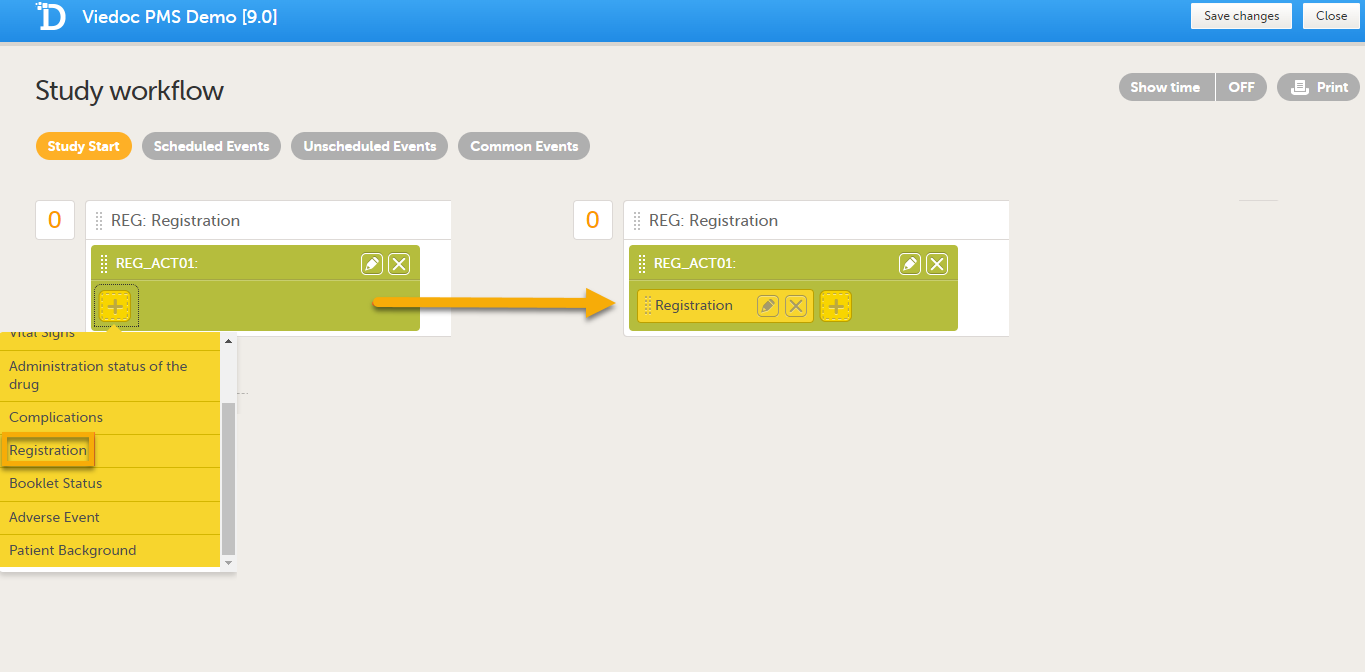
|
|
| 6 |
Add the booklets you require in Scheduled Events. You can add multiple activities to each event, and the name you give to the activities can be used to separate them within the booklets (for example, the number of months from the study start, Adverse Event, as shown in the example below). 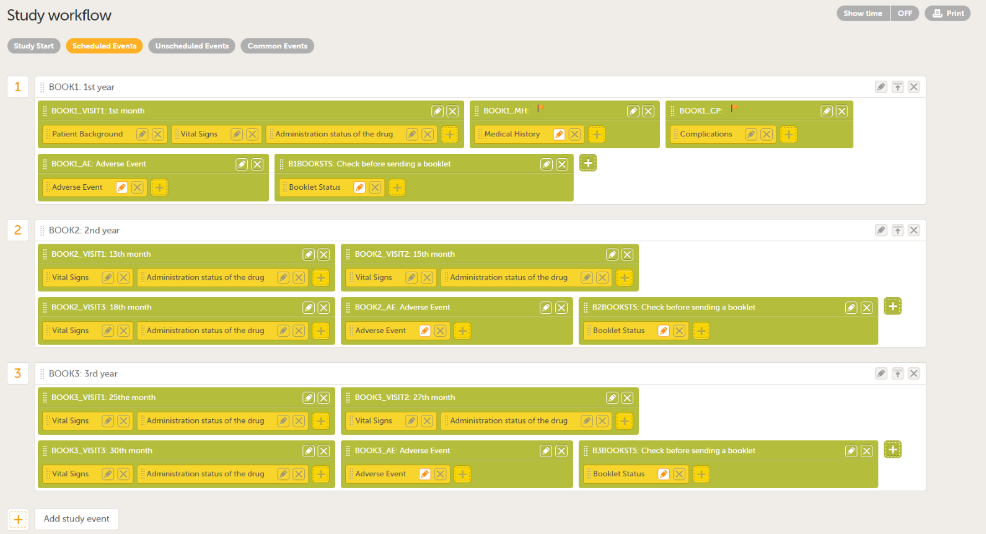
Note! To set a form as repeating, select Allow form to repeat for forms that can occur more than once, such as Adverse events. 
|
To set a schedule for a booklet:
| 1 |
Select the pen icon to open the Study event settings dialog to edit the booklet schedule. 
|
| 2 | On the Scheduling tab, select Enable proposed date calculation if you want to activate calculation of a proposed date for the booklet, and configure the following:
Note! If Actual or Planned is selected for the Reference date, then the scheduled date is calculated on the Reference date entered by the site. However, if the reference event has not been initiated, then the Planned date is used. And if the reference event has not been planned, then the Proposed date of the reference event is used. In the following example, the Registration booklet date is the reference date, and 30 days is the time period during which you can enter data for the booklet. 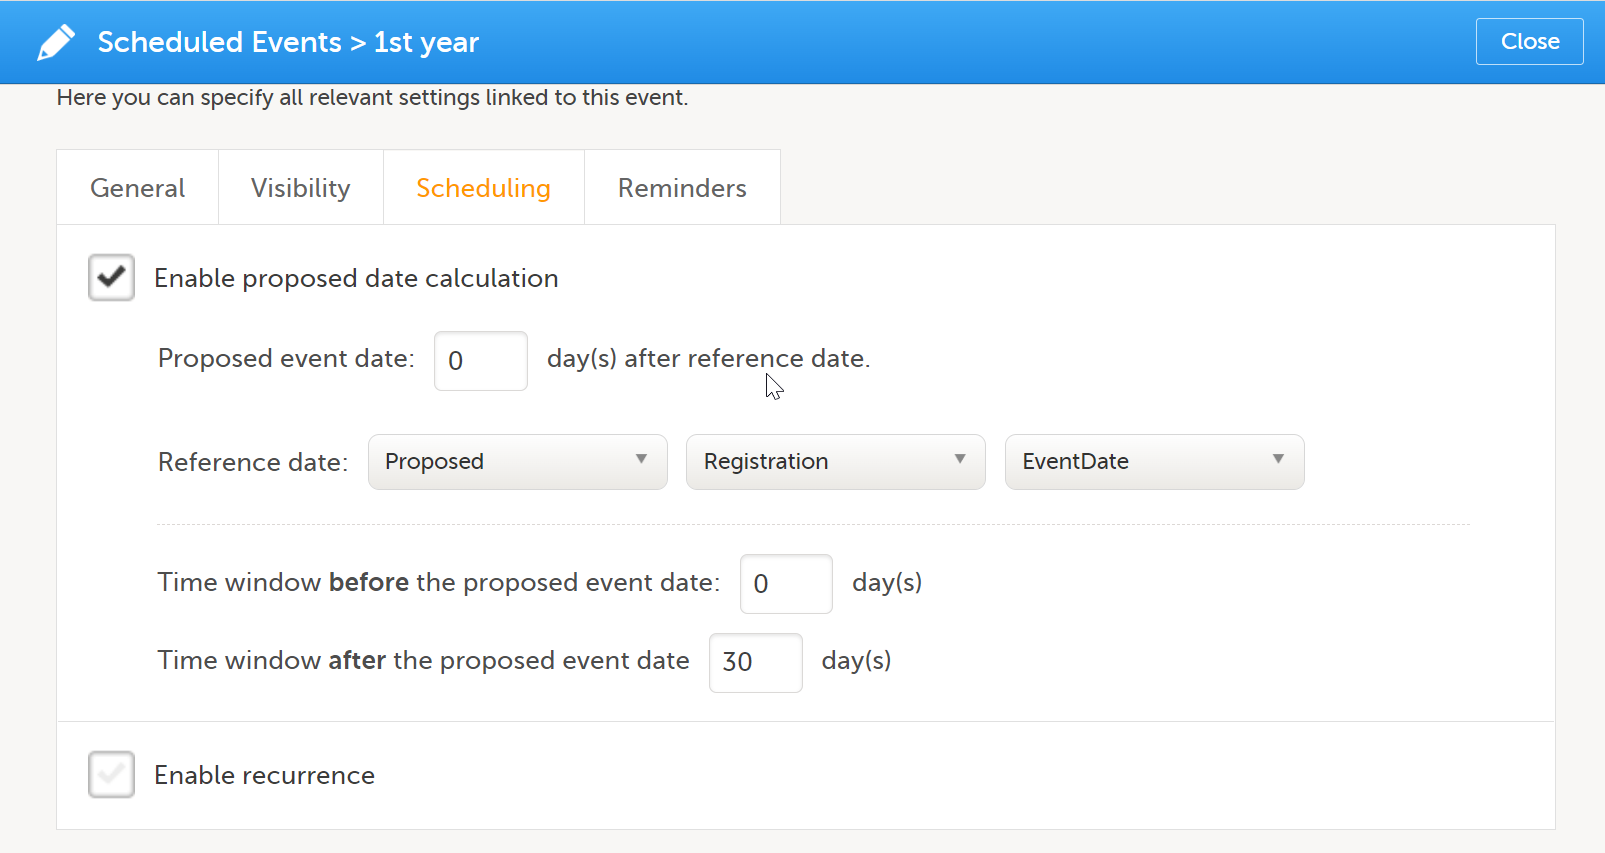 |
When creating a new event, it is possible to start configuring it by duplicating the settings of an existing event. This is done by selecting Use an existing event to duplicate settings, activities and forms and selecting from the dropdown list the event the settings will be copied from:
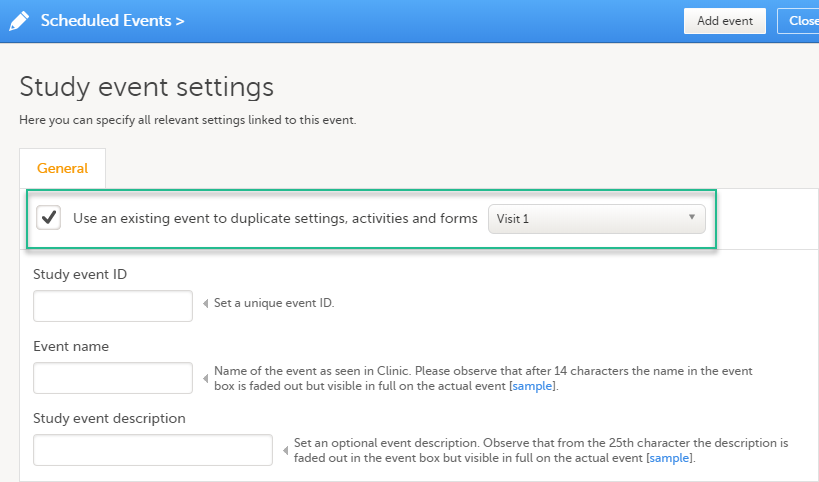
After entering the Study event ID, Event name, Study event description and selecting Add event, a new event is created with the same configuration as the selected event with regards to:
On the Reminders tab, you can set reminders according to the scheduled settings. The reminders are shown as messages in Viedoc Clinic, and, optionally, sent as emails.
Note!
For more information, see Setting scheduled event reminders
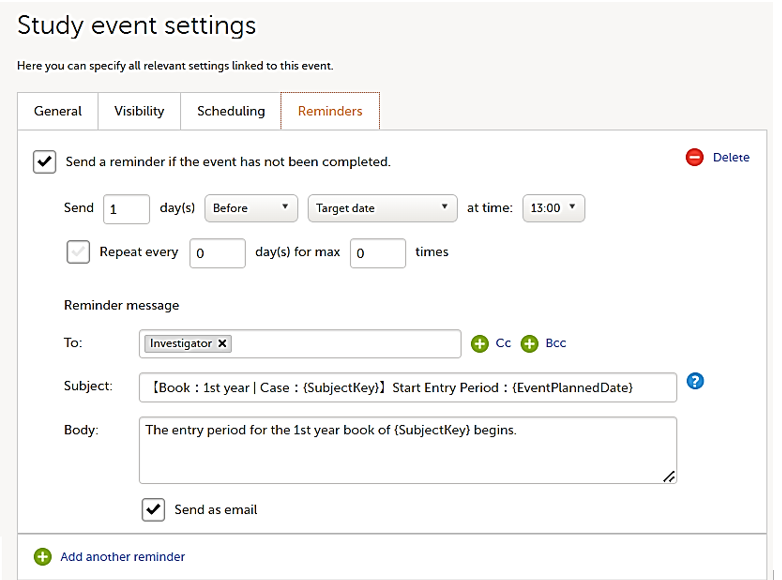
Any static string and/or the following variables can be embedded in both the Subject and Body fields:
Note! The item values included in the message are visible for all the users with the defined roles in To:, Cc:, and Bcc: without respecting the role visibility settings.
Roles are configured on the Roles page. In Viedoc Designer, on the Overview of study design page, select Edit in the Roles field to open the Roles page.

The Roles page allows you to edit, view, add, copy, and delete user roles. Select the Pen icon to open the Edit roles menu and set the rights for each role.
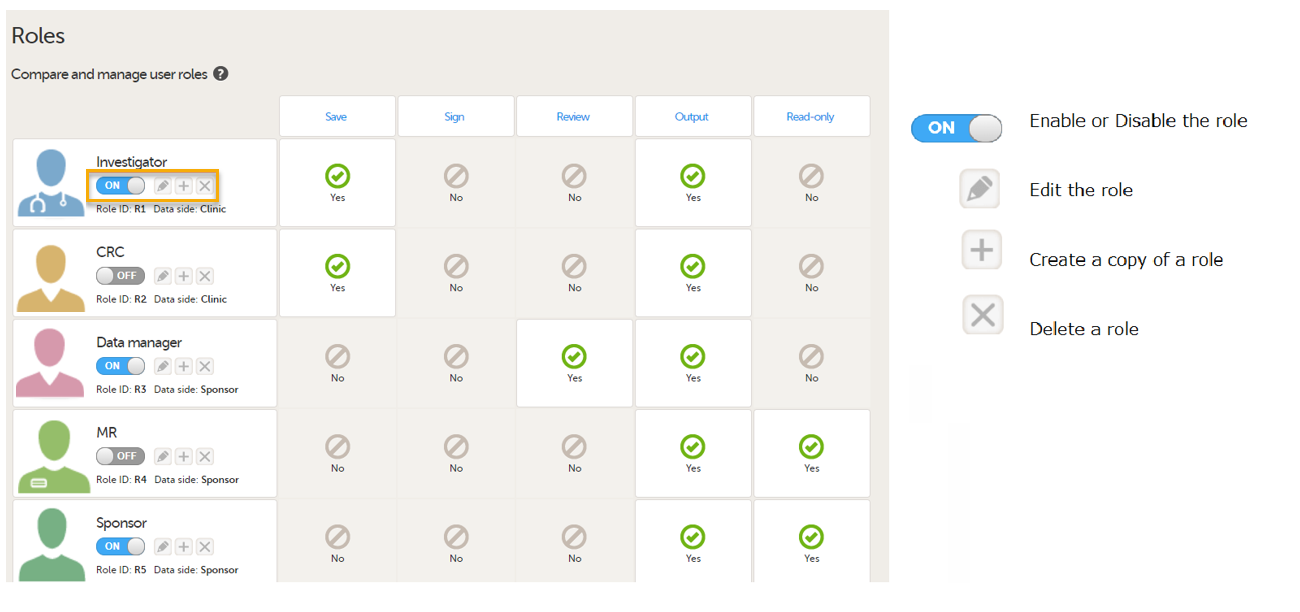
For PMS studies, there are Clinic side and Sponsor side Edit role pages where you can choose to edit roles for either the Clinic Side or the Sponsor side. For more information about how to edit these pages, see Configuring roles.
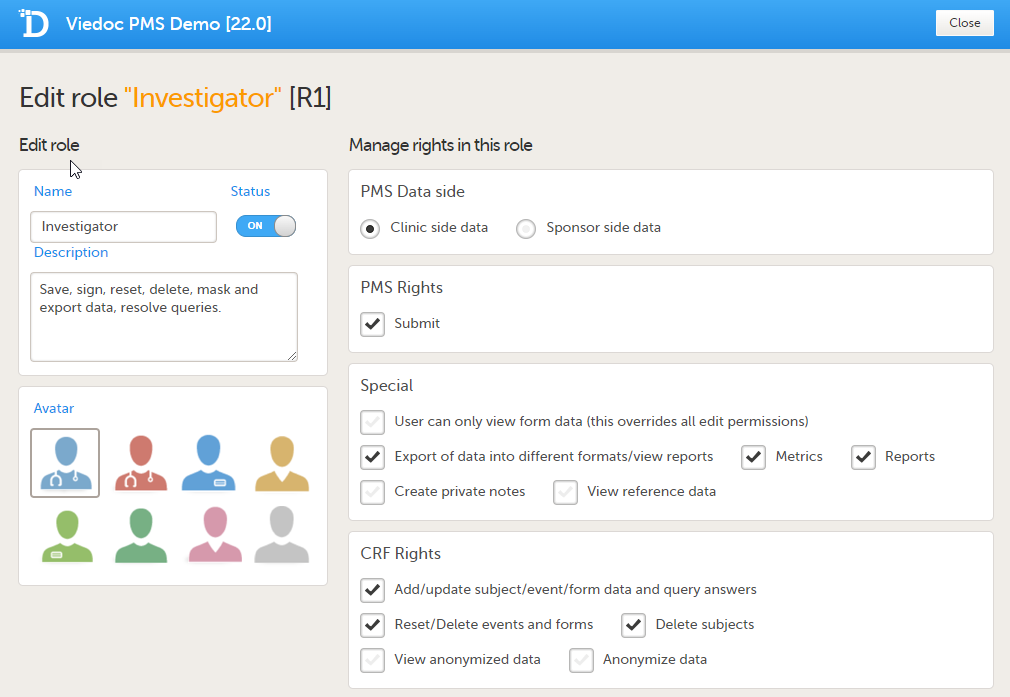
Clinic side Edit role page
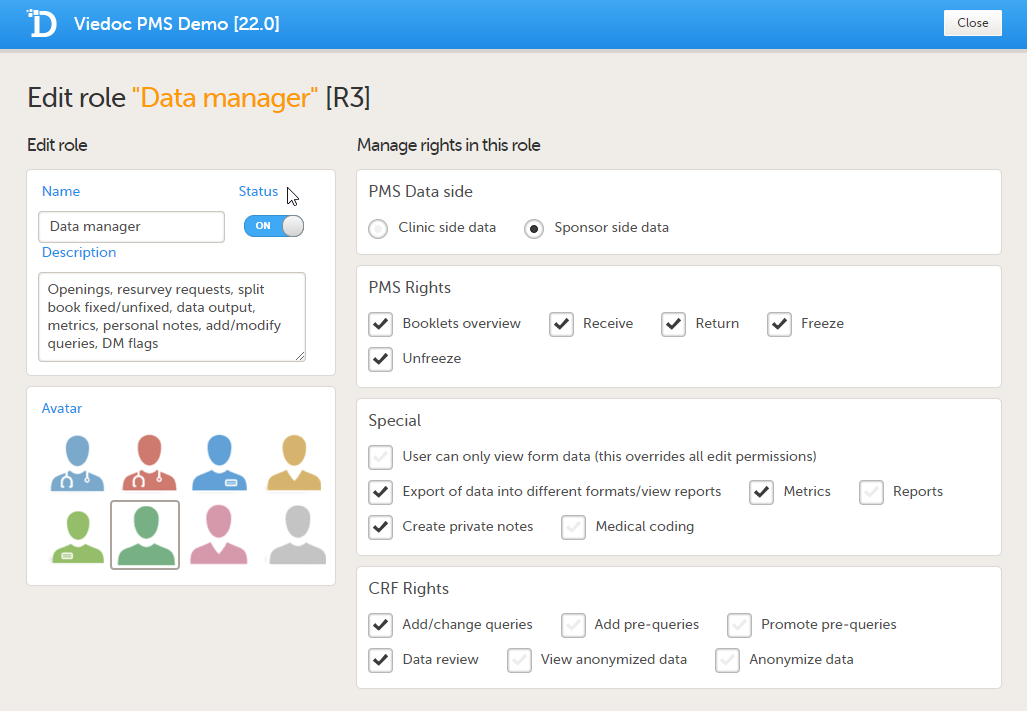
Sponsor side Edit role page
The following rights can be selected:
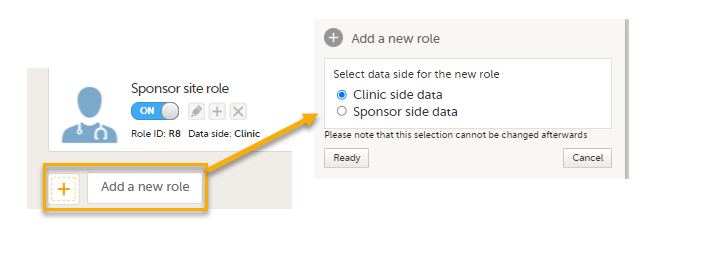
PMS Data side
Note! You can only select a data side when you add a new role. The PMS Data side can NOT be changed after a role has been added.
PMS rights - booklet permissions
Clinic Side:
Sponsor side:
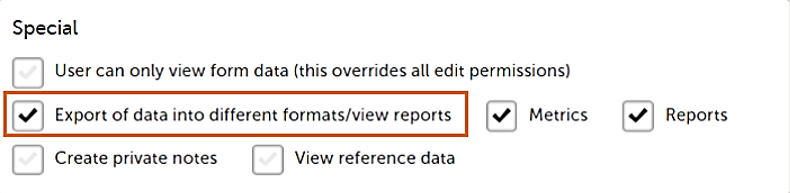
Special rights - rights that give access to specific features
Note!
For Demo sites to work with Viedoc Reports, a user must be invited with direct site access (not through All sites site group).
For Production sites, Viedoc Reports is available for all site groups (All sites and the country-specific groups).
CRF rights - rights regarding adding/editing/saving data and queries
Clinic Side:
Sponsor Side:
By default, a set of predefined roles is set up by the system, and it can be modified for your study. The default roles and default permissions for the Clinic side and the Sponsor side are listed in the following tables:
| Role | PMS rights | Special rights | CRF rights |
|---|---|---|---|
| Investigator (Clinic side) | Submit booklets | - Export of data into different formats/view reports |
- Add/update subject/event/form data and query answers |
| CRC (Clinic side) | Export of data into different formats/view report | - Add/update subject/event/form data and query answers -Reset/Delete events and forms - Delete subjects |
|
| Data Manager (Sponsor side) | - Booklets overview - Receive booklots - Return booklets - Freeze booklets - Unfreeze booklets |
- Export of data into different formats/view reports - Metrics - Reports - Create private notes |
- Add/change queries - Data review |
| MR (Sponsor side) | - The user can only view form data (this overrides all edit permissions) - Export of data into different formats/view reports - Metrics - Reports |
||
| Sponsor (Sponsor side) | - The user can only view form data (this overrides all edit permissions) - Export of data into different formats/view reports - Metrics - Reports |
||
| Data puncher (Clinic side) | Submit booklets | Export of data into different formats/view report | - Add/update subject/event/form data and query answers - Reset/Delete events and forms - Delete subjects |
| Reference Data Editor (Clinic side) | - The user can only view form data (this overrides all edit permissions) - View reference data - Edit reference data - Publish reference data |
||
| Regulatory Inspector (Sponsor side) |
- The user can only view form data (this overrides all edit permissions) |
- View anonymized data |
On the Study Settings page, you can configure other settings useful for your study.
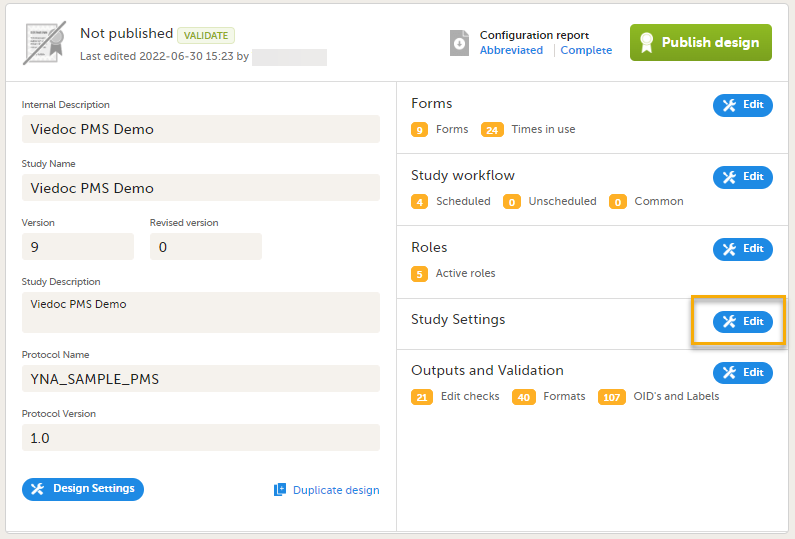

Below is a summary of each menu. For more information, select the relevant page links.
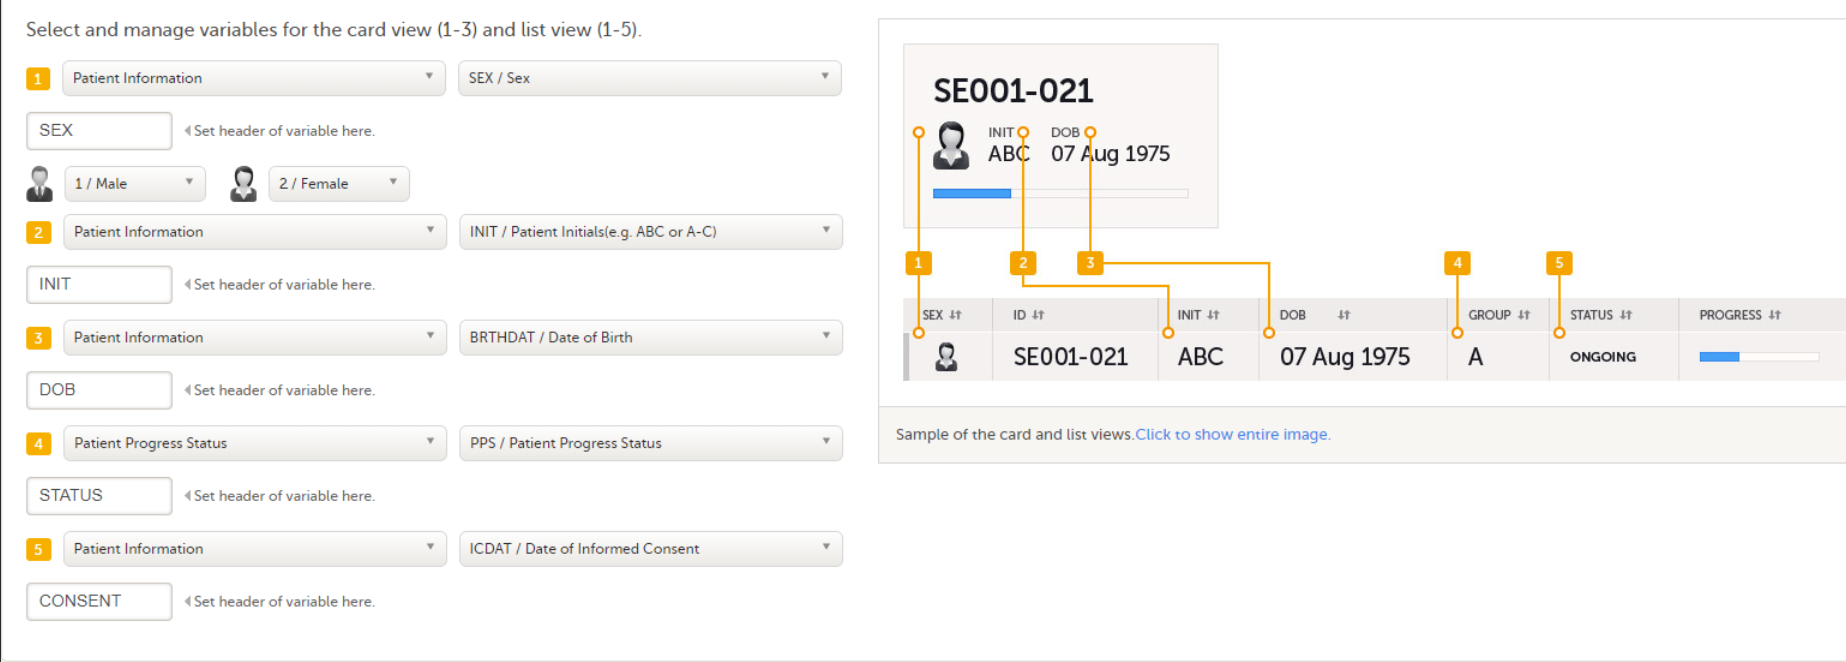
The information to be displayed on the subject card is set on the Selection View Settings page. The subject cards are displayed on the Selection page in Viedoc Clinic.
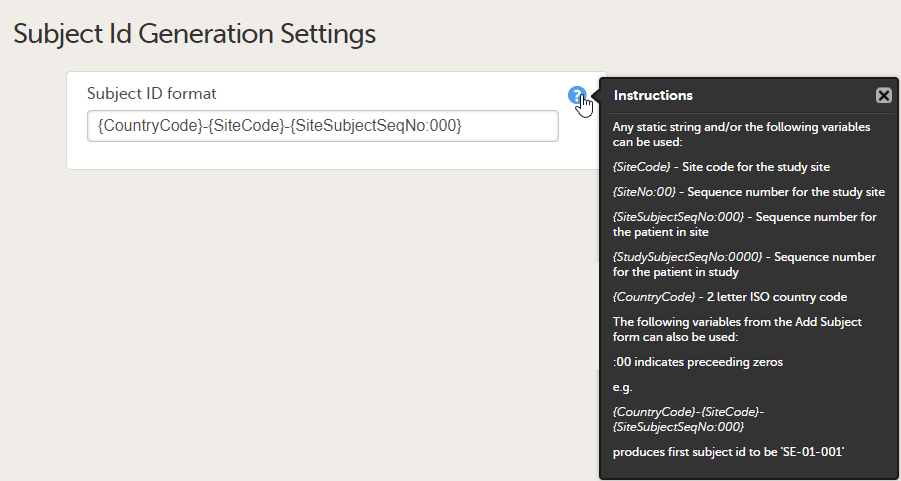
The format for the Subject ID, used to identify a subject within the system, can be configured on the Subject ID Generation Settings page under Study Settings > Subject ID generation settings. The Viedoc default configuration consists of the country code followed by the site ID and finally the consecutive subject ID. This can be changed by modifying the contents of the text field:
Note! Not available for PMS studies. The Source Data Verification (SDV) setting enables you to choose which forms and items to require SDV in your study.

The Miscellaneous section is for various settings that don't fit in anywhere else.
Currently you can choose to enable/disable the need for entering a reason when a field is left blank, that is, when confirming data as missing in Viedoc Clinic.

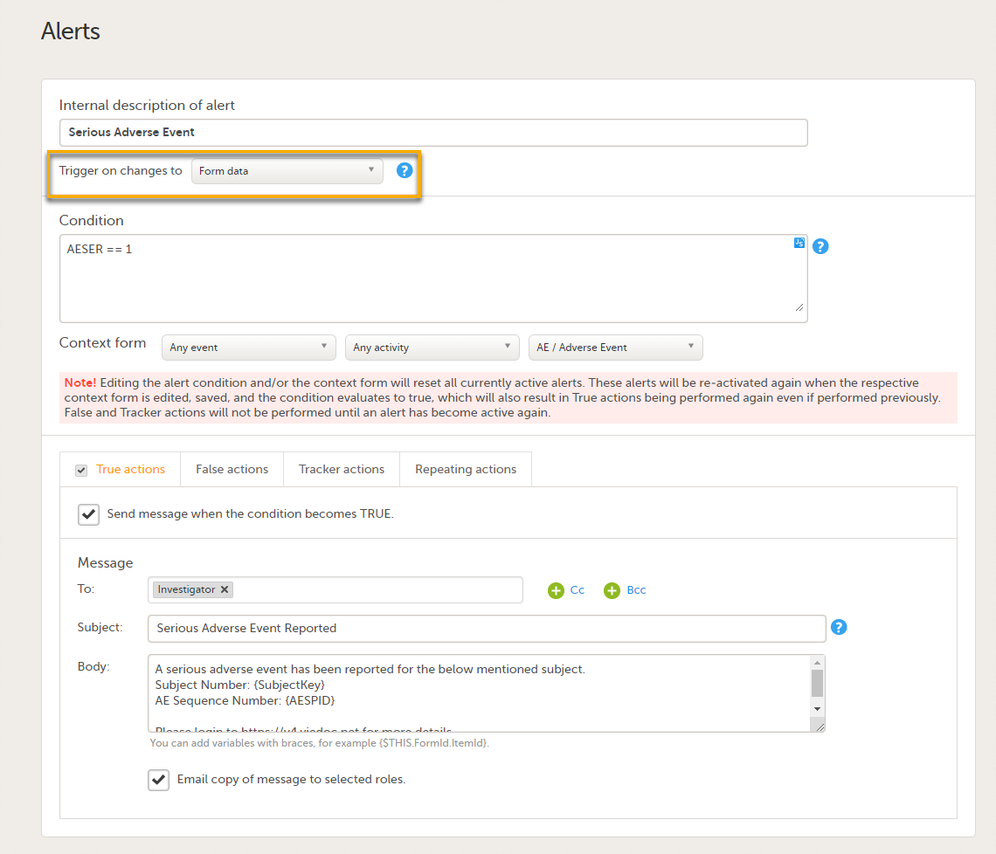
By setting up an alert in your study you can notify users about important occurrences in the data. You can set up alerts that are issued in defined conditions (for example, in case of a Serious Adverse Event). For more information. see Alerts.
Note! For Japanese PMS studies, there is a setting where you define which type of change that will trigger the alert. For more information, see Alert triggers for Japanese PMS studies
The subject status calculations are used in Viedoc in the following places:
Metrics in Clinic
Exporting data in Microsoft Excel Open XML, CSV and ODM
In the Subject status settings, the following statuses are defined:
Screened subjects
Enrolled subjects
Completed subjects
Withdrawn subjects
For more information, see Subject status
Viedoc offers support for randomization. (Not available for PMS studies).
Subjects can be randomized using either: static randomization: randomization based on a randomized list, or dynamic randomization (Pocock and Simon): randomization based on an algorithm. For more information,see RTSM Settings.
When you are ready with the design, select Publish. This will first validate the design, and if no errors are detected, this version will be locked for editing and published, becoming available in Viedoc Admin. All the study design settings are, however, available in view mode.

Note! A published study design can be unpublished and unlocked only if it has not yet been assigned to any site(s) in Viedoc Admin.
To unpublish a design, Go to Design Settings and select Unpublish:
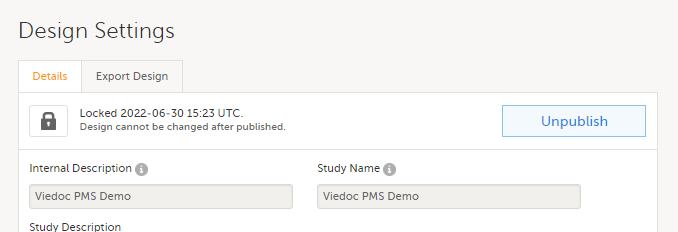
For more information, see: Unpublishing a study design.
Note! You can validate the system to check for any study design errors by selecting the VALIDATE icon in the top left corner of the study design page. For more information, see Validating a study design.

| Important! Unscheduled Events and Common Events are not available for PMS studies although they are visible on the Study workflow page. |
To add an Adverse Event form:
| 1 | Create an Adverse Event form with the form ID as AE and add it as a repeating form in a booklet. A form with an ID set to AE becomes an Adverse Event (AE) form. |
| 2 |
In AE Settings, on the General tab, set the ID of the AE form to AE. 
|
| 3 |
Set the format to be displayed in Viedoc Clinic in the Summary format field using the IDs of the items on the form. 
|
| 4 |
Select the pen icon on the form in the study workflow and select Allow form to repeat. This allows you to add multiple adverse events to a booklet. 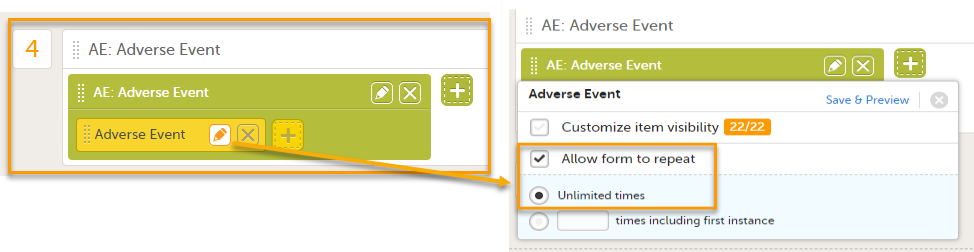
|
Note! All forms in the booklet, including the Adverse Event form, must be completed in order to submit the booklet. Therefore, the Adverse Event form should appear only when an adverse event occurs.
One way to implement this is described in the steps below:
| 1 |
Add a form to check if an Adverse Event occurred during the booklet period by adding the form AE occurred? 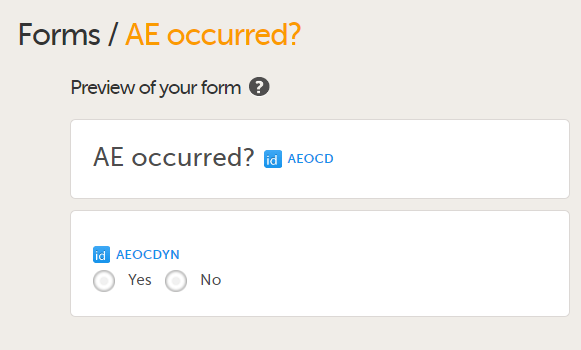
|
| 2 |
Configure the visibility condition of the Adverse Event activity using the added form item value. 
|
| 3 |
If you perform these steps, the Adverse Event form will become visible when an adverse event occurs, as shown in the example below. 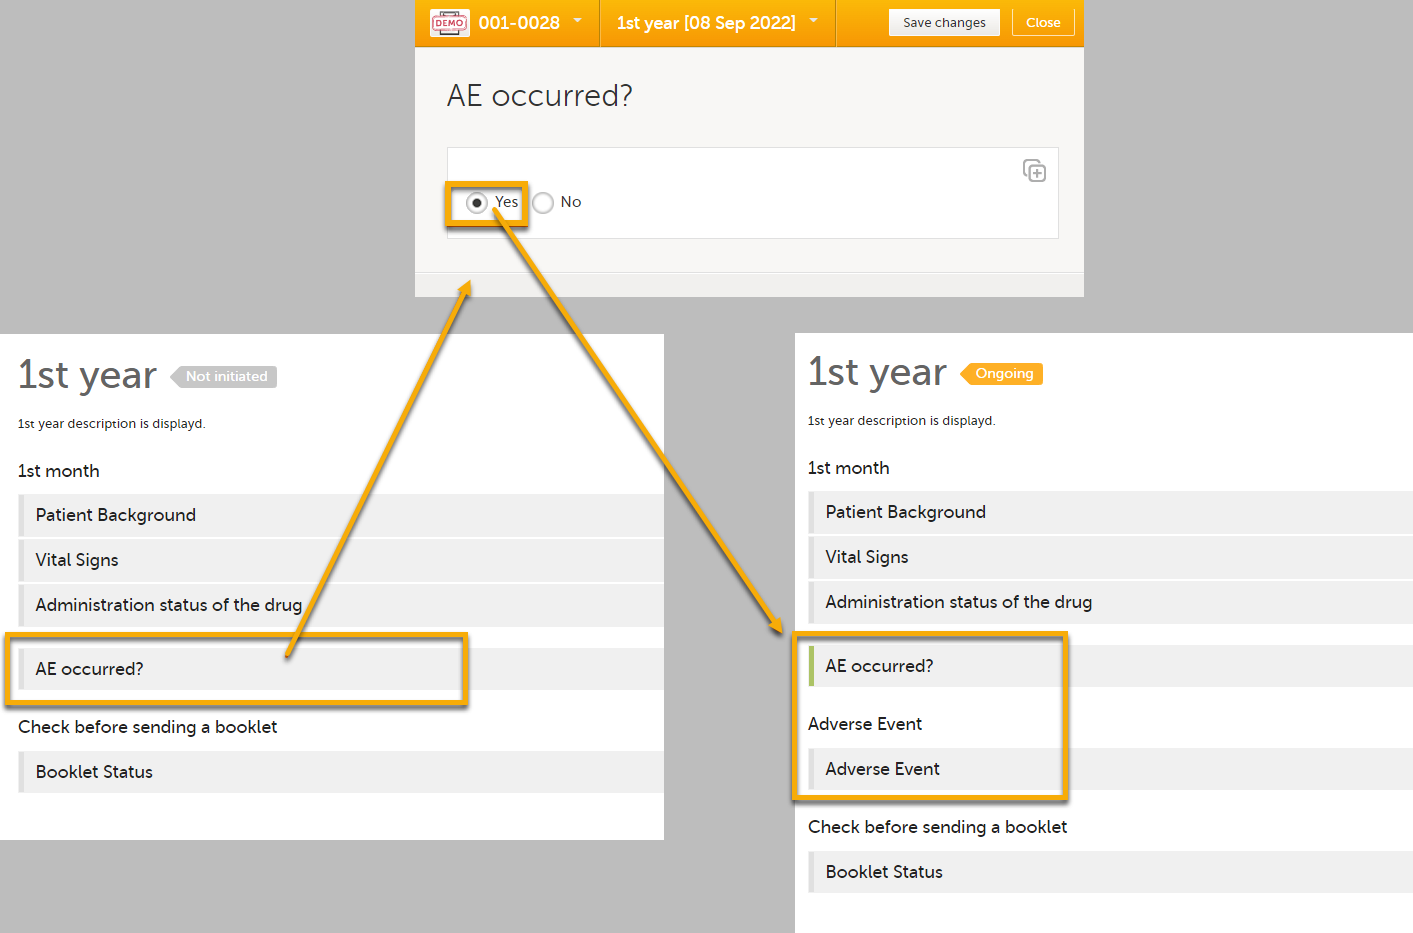
|
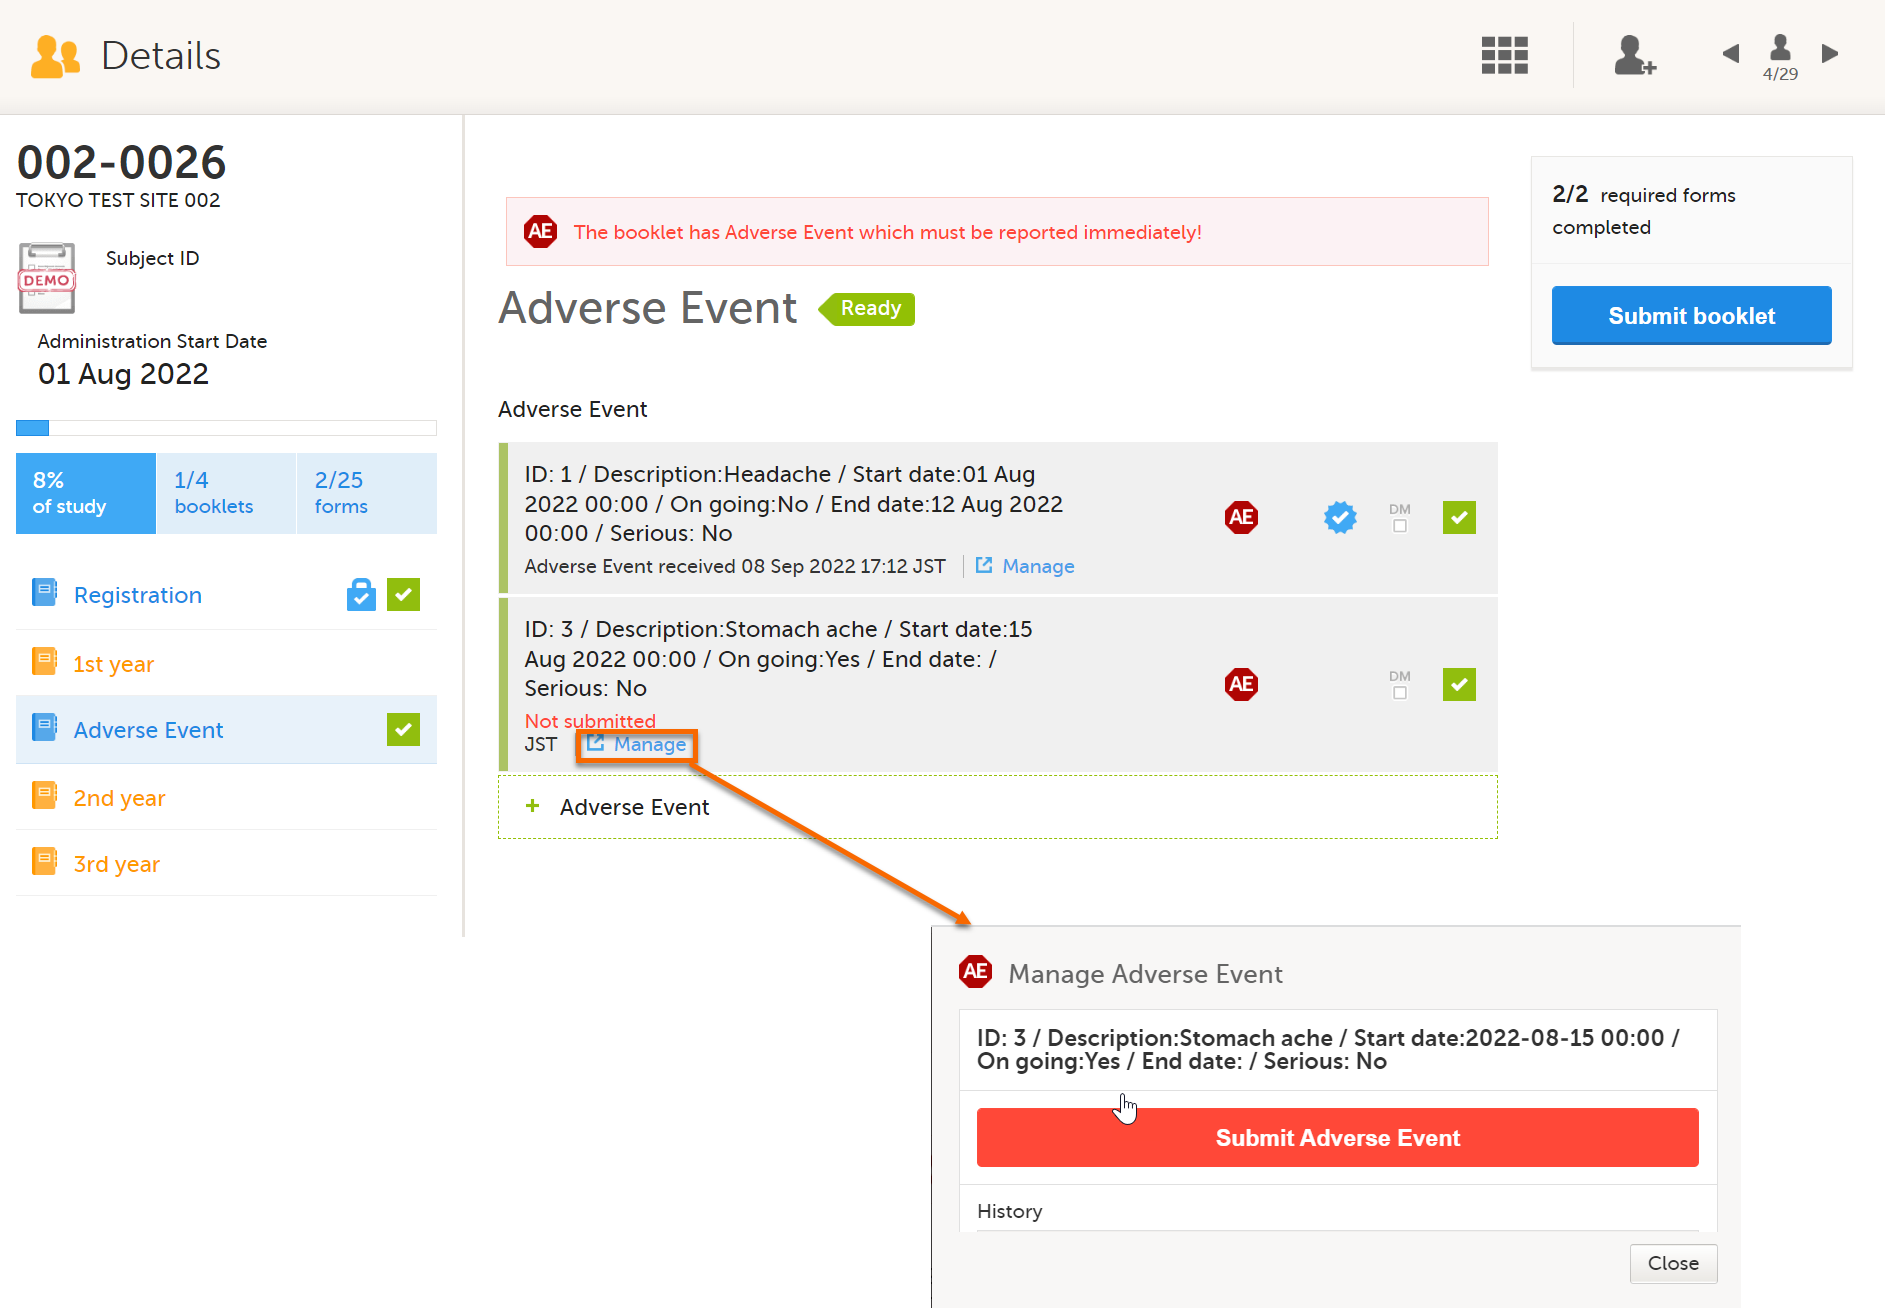
If you want to manage adverse events independently from other forms, you can do that by adding one booklet that contains only an AE form. You can report multiple adverse events at any date and time by selecting Allow form to repeat.
In Clinic, each time you add an adverse event, you can submit each adverse event individually.
You must submit by selecting Manage on the Adverse Event form. If you submit the booklet by selecting the Submit booklet button, the booklet is locked and you cannot add more adverse events.

You can add alerts to a study to notify users about important events.
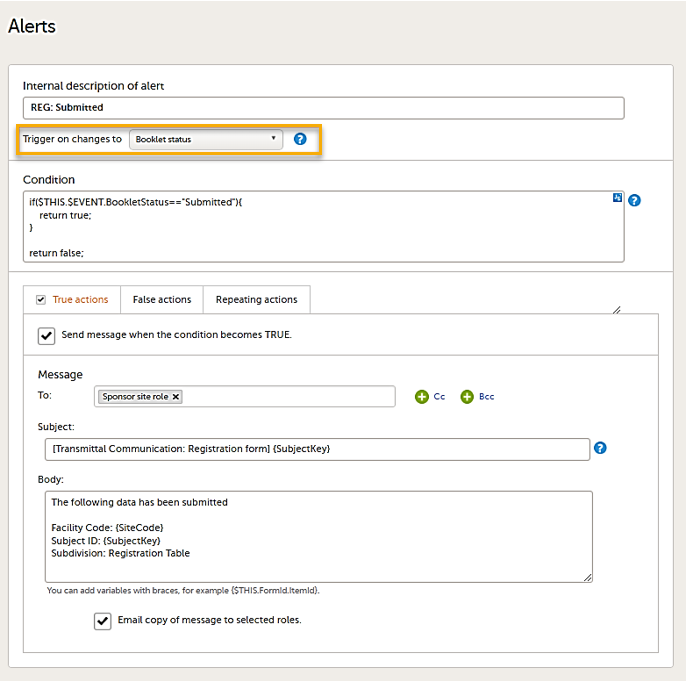
Viedoc allows users to set up alerts that are issued under certain conditions (for example, when a severe adverse event occurs). It can be used to notify the Sponsor side that the Clinic side has submitted a booklet, or to notify the Clinic side that the Sponsor side has returned a booklet to request a re-investigation.
See Alerts for more information.
Setting up the alerts is done in Viedoc Designer, under Study Settings > Alerts:
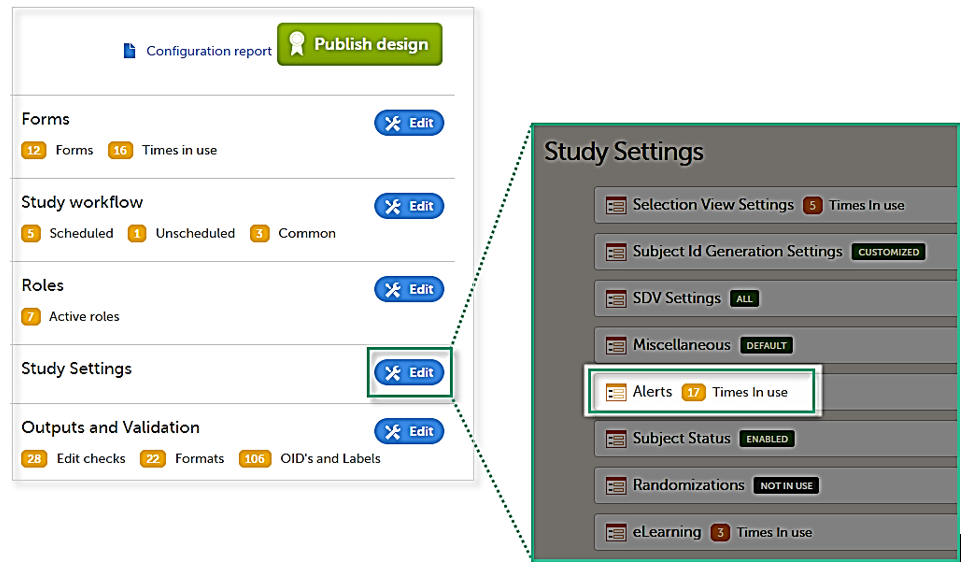
The Alerts page displays a list of existing alerts (if any) and allows you to add new ones, as illustrated below:
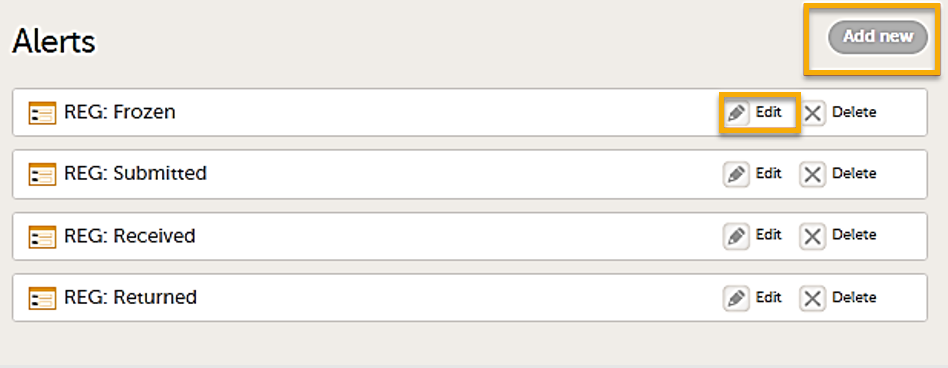
On the Alert details page, you can define which type of change will trigger the alert. There are two options:
On context form data changes - the condition is evaluated when the selected context form below is saved. This option is the default for all existing alerts.
Sponsor users do not receive the message until the Sponsor side receives the booklets with settings that meet the alert condition.
The PMS dashboard report is available for Japanese PMS studies only. This report allows data to be sorted to focus on the booklet status by site, subject, booklet, booklet history, or timelapse. The PMS Dashboard page gives users snapshots of the registration and study progress with terms specific to Japanese PMS studies.
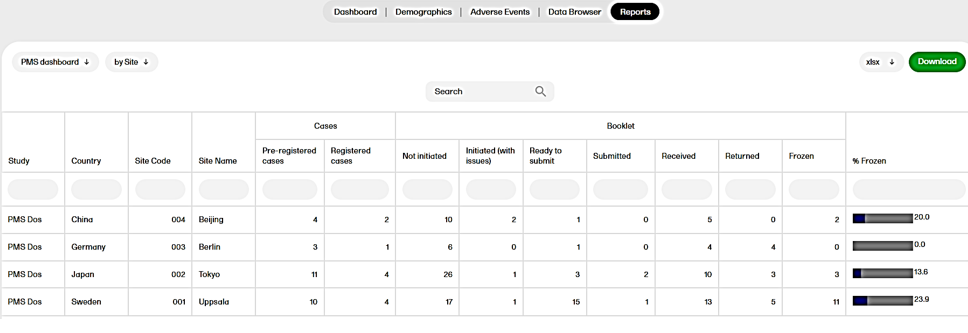
For more information, see PMS dashboard and Japanese PMS studies
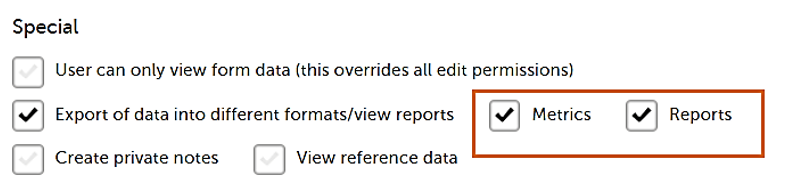
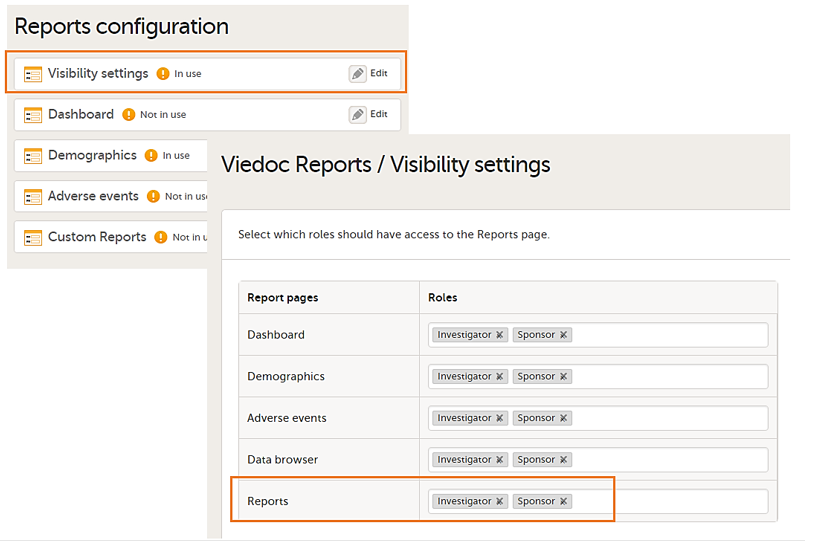
The following settings are required in order to use Viedoc Reports:

Note! The export is allowed only if the export permission is applicable to all the assigned sites.
In Global design settings > Reports configuration > Viedoc Reports / Visibility settings, add the roles who have access to PMS Reports.
When the Study Designer has added all booklets to Scheduled Events, and published the study design, the study will appear on the production environment in Viedoc Clinic.
The Study Manager assigns the designs to sites in Viedoc Admin. See Assigning a study design for more information. When the study design is assigned to one or several sites in the study, the study is available in Viedoc Clinic and all booklets are then available for the sites to enter data.
Once a study is on the production server, it is possible to configure the sites to operate in one of the following modes:
Training (demo) mode only: does not require a license, and the data is saved on demo/training only. This is to be used for the test sites only.
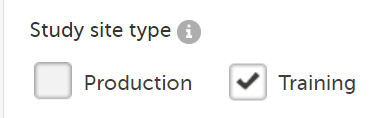
Production mode only: used for the production sites, that is, real sites where real data will be entered, not for testing purposes.

Both training (demo) and production modes: This is not recommended, see Training(Demo) vs Production mode.
Your study is now in production, and you can start work on the site.