Viedoc PMS is the product on the Viedoc platform that can be used for Japanese Post Marketing Surveillance (PMS) studies. It fulfills all requirements of a PMS study, supports collection of data in booklets, and supports the process of sharing data between site (clinic) and sponsor via the submit-receive-return Kaifu function.
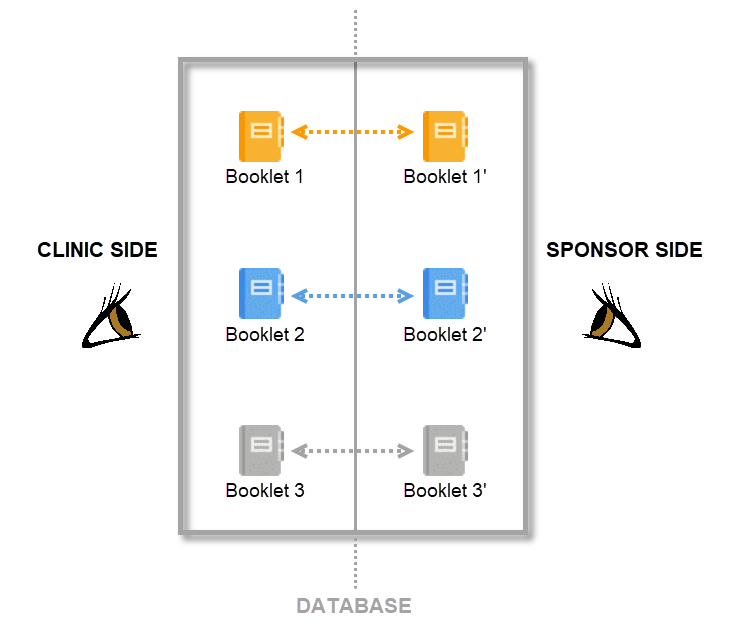
In Viedoc PMS, the database is shared by two different sides, a clinic side and a sponsor side. The database contains two versions of each data set, one version that is displayed to the clinic side users and one version that is displayed to the sponsor side users. On the clinic side, typically the Investigator enters subject data, while on the sponsor side the Data Manager typically reviews the data and archives (freezes) the data.
Synchronization of data between the clinic side and the sponsor side is not performed automatically and continuously, but is controlled by the clinic side users and sponsor side users via the send-receive-return process. This means that data are only transferred from the clinic side to the sponsor side when the clinic user actively performs a submit action and the sponsor side user actively performs a receive action. Similarly, queries raised by the sponsor side user are only displayed to the clinic side user after a return action is performed by the sponsor side user. The send-receive-return process is described in more detail below.
By mirroring the data collection and review process via booklets, Viedoc matches the workflow of a Japanese PMS study. A booklet can be seen as a compilation of data being collected during a specific period of time rather than during a specific event date, which is more typical in clinical trials.

1. Subject details
2. Overview of booklets
3. Content of selected booklet
4. Details of selected booklet
Sending and receiving data on request is a fundamental requirement for a Japanese PMS study. Viedoc PMS offers support for sending and receiving booklets back and forth between site and sponsor, a process referred to as Kaifu. In the Kaifu process, the clinic user chooses when to share data with the sponsor and the sponsor side user chooses when to receive the data. One of the important characteristics of this process is that the sponsor side user does not have access to any data entered in a booklet, until the booklet has been shared by the clinic through the submit function, and a receive action has been actively performed by the user at the sponsor side.
For more information, see Overview of the submit-receive-return process.
Viedoc PMS is the interface for the end user, and is primarily used by site and study staff (Investigators, Study Coordinators, Monitors, Data Managers, and so on).
The access to Viedoc PMS is by invitation only and provided by either the Study Manager or Site Manager. If invited, you will find the invitation in your email inbox (from no-reply@viedoc.net). In some cases the email can be caught by your email spam filter and in that case you will find it in the email spam folder. For detailed instructions on account activation, see Managing your Viedoc account.
The following actions can be performed in Viedoc PMS:
Viedoc PMS is available in the following languages:
Customer computer requirements are defined as capabilities required by the customer computer to use all features of Viedoc with the intended graphical presentation and within guaranteed response times of Viedoc.
Viedoc supports the following browsers:
For non-compliant browsers you will receive a message on the login page that your browser is not supported.
For Viedoc Designer:
Viedoc does not support the use of private mode browsing in Safari.
The following are required for Viedoc to run in the compatible web browsers:
No data is permanently stored on the customer computer. All data stored in session cookies or local web storage is deleted when the browser session is terminated. The only exception to this is the optional persistent cookie used in the main portal of Viedoc 4 to remember if a user chooses to issue a 2FA trust for the browser for 30 days, and thus avoid further second-factor authentication during this period.
Viedoc 3 has no automatic checks enforcing the above requirements. Viedoc 4 checks for, and enforces, browser type and version, and support for JavaScript, local web storage, and session cookies.
The following screen resolutions are required:
Viedoc requires an internet connection of at least 384 kbit/s.
Viedoc requires an outbound firewall policy allowing encrypted HTTP to be established and communicated to a remote server on port 443 (HTTPS) using Transport Layer Security (TLS) version 1.2 or higher.
There are several layers of security built into the platform. Below are some examples:
| Important! All information related to managing your Viedoc account can be found in the following user guide: Viedoc User Account Management |
From the settings button (wheel) you can perform all actions related to managing your Viedoc account by selecting any of the following: Edit your profile, Change Password, Security Settings:
Selecting any of these options opens a new page, in the example below, the User Settings page. Select the Viedoc learning link to open the Viedoc User Account Management Guide:

NOTE! If you update the User settings section here, make sure to also update User settings in System lessons>Viedoc User Account Management>User settings
When you are logged in to Viedoc, you can edit your profile.
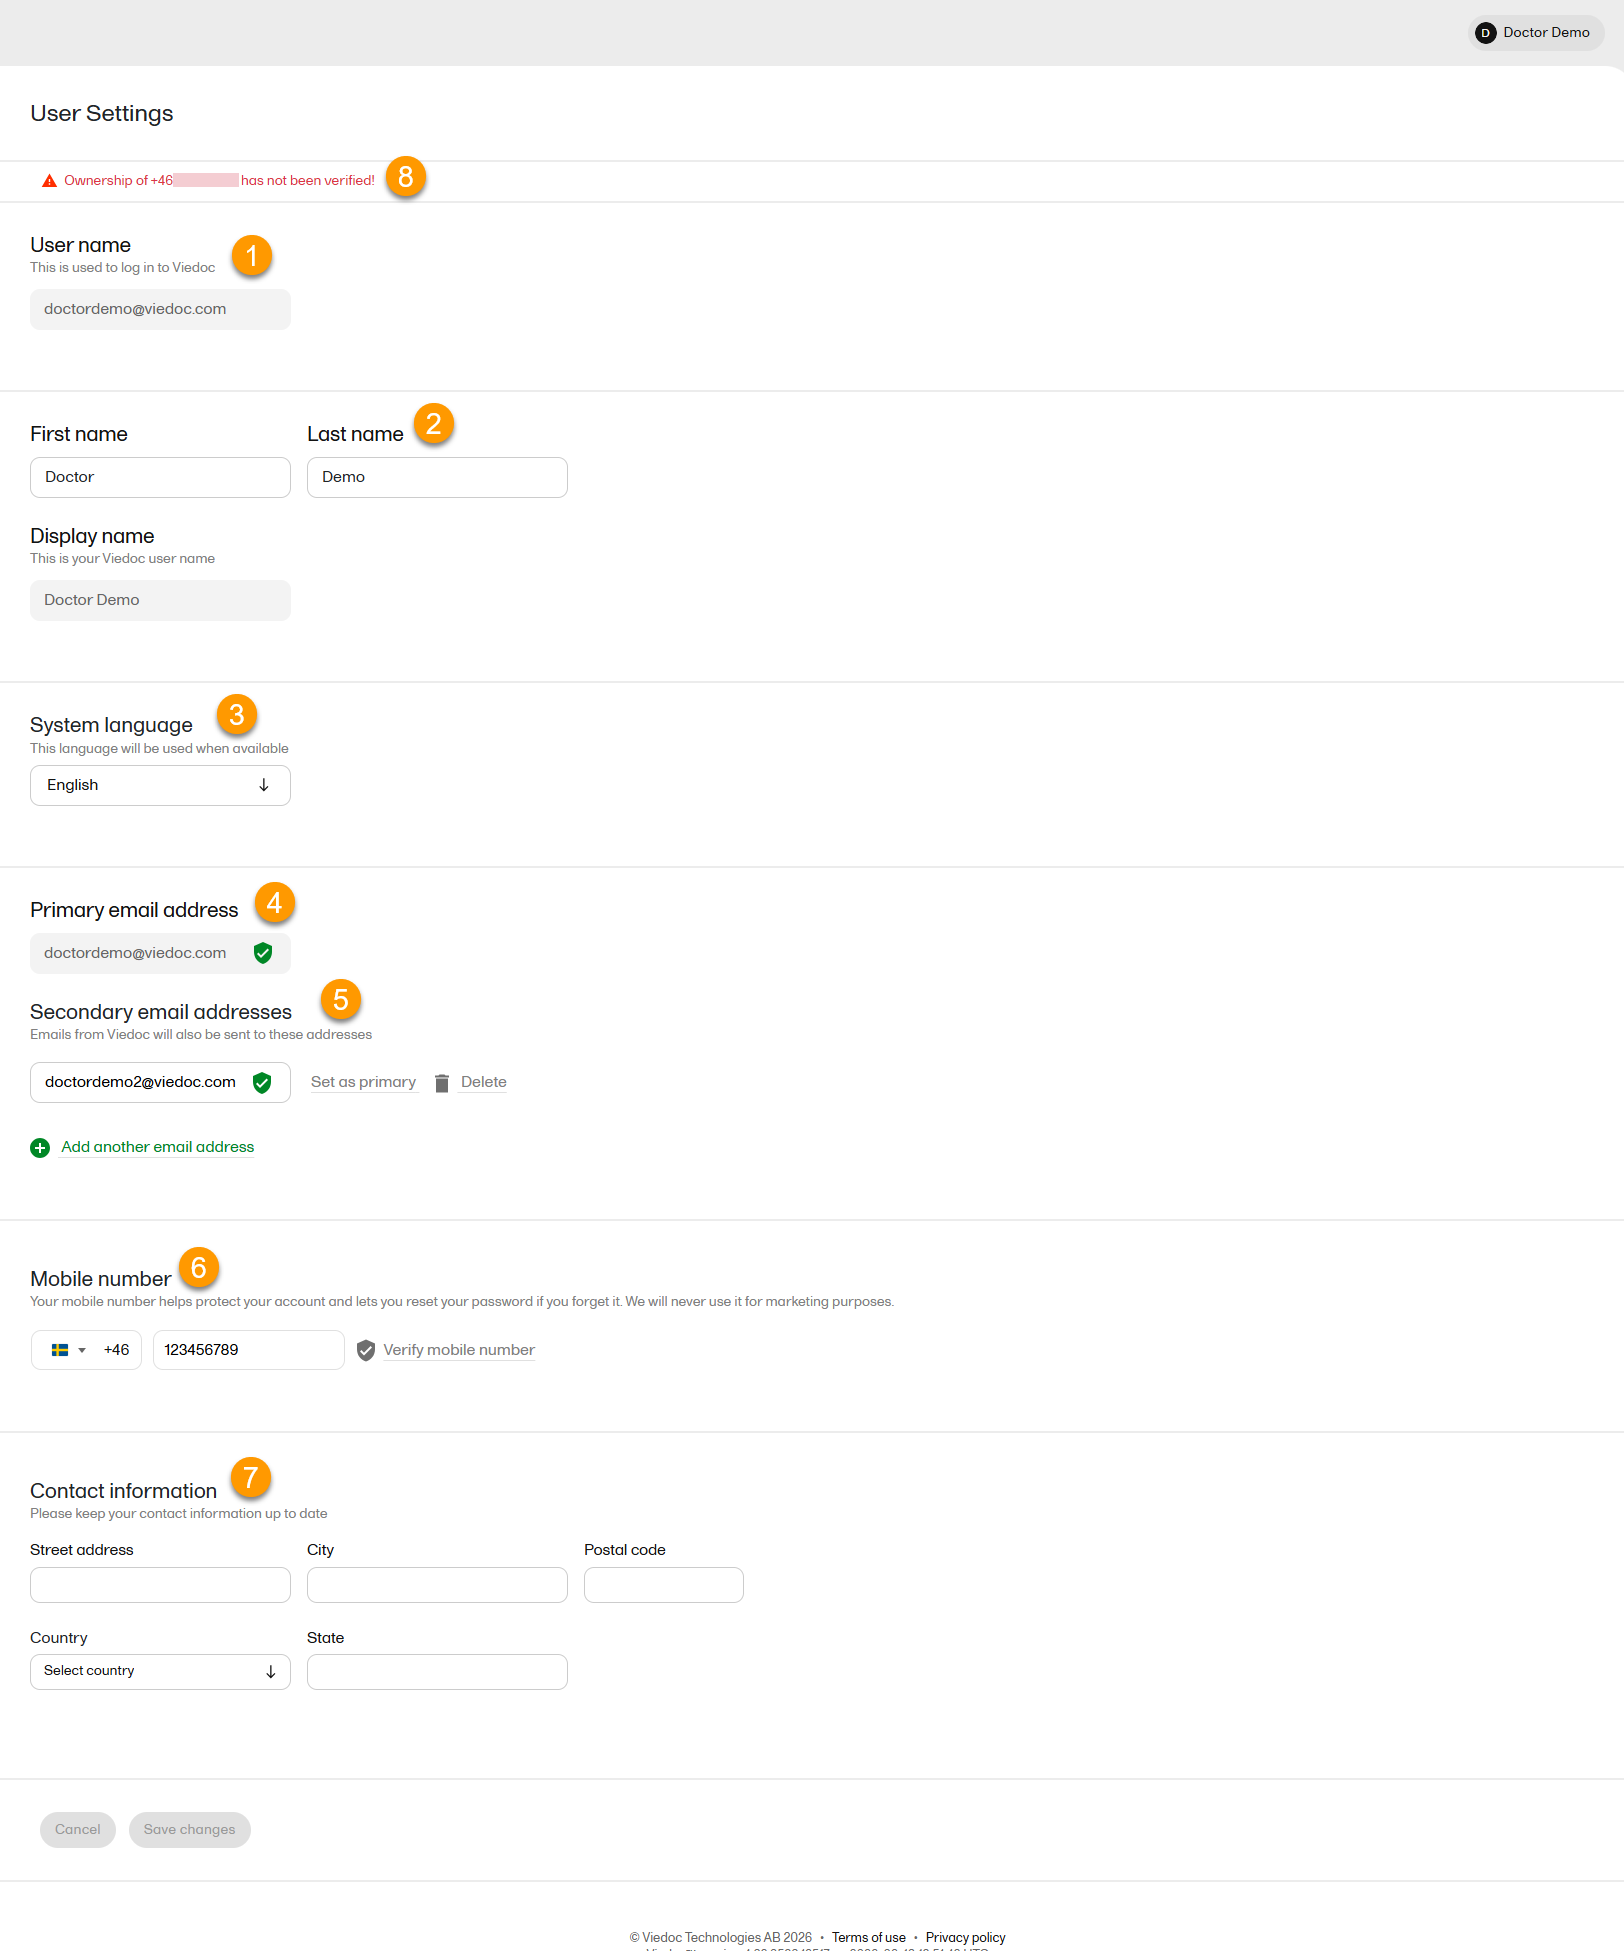
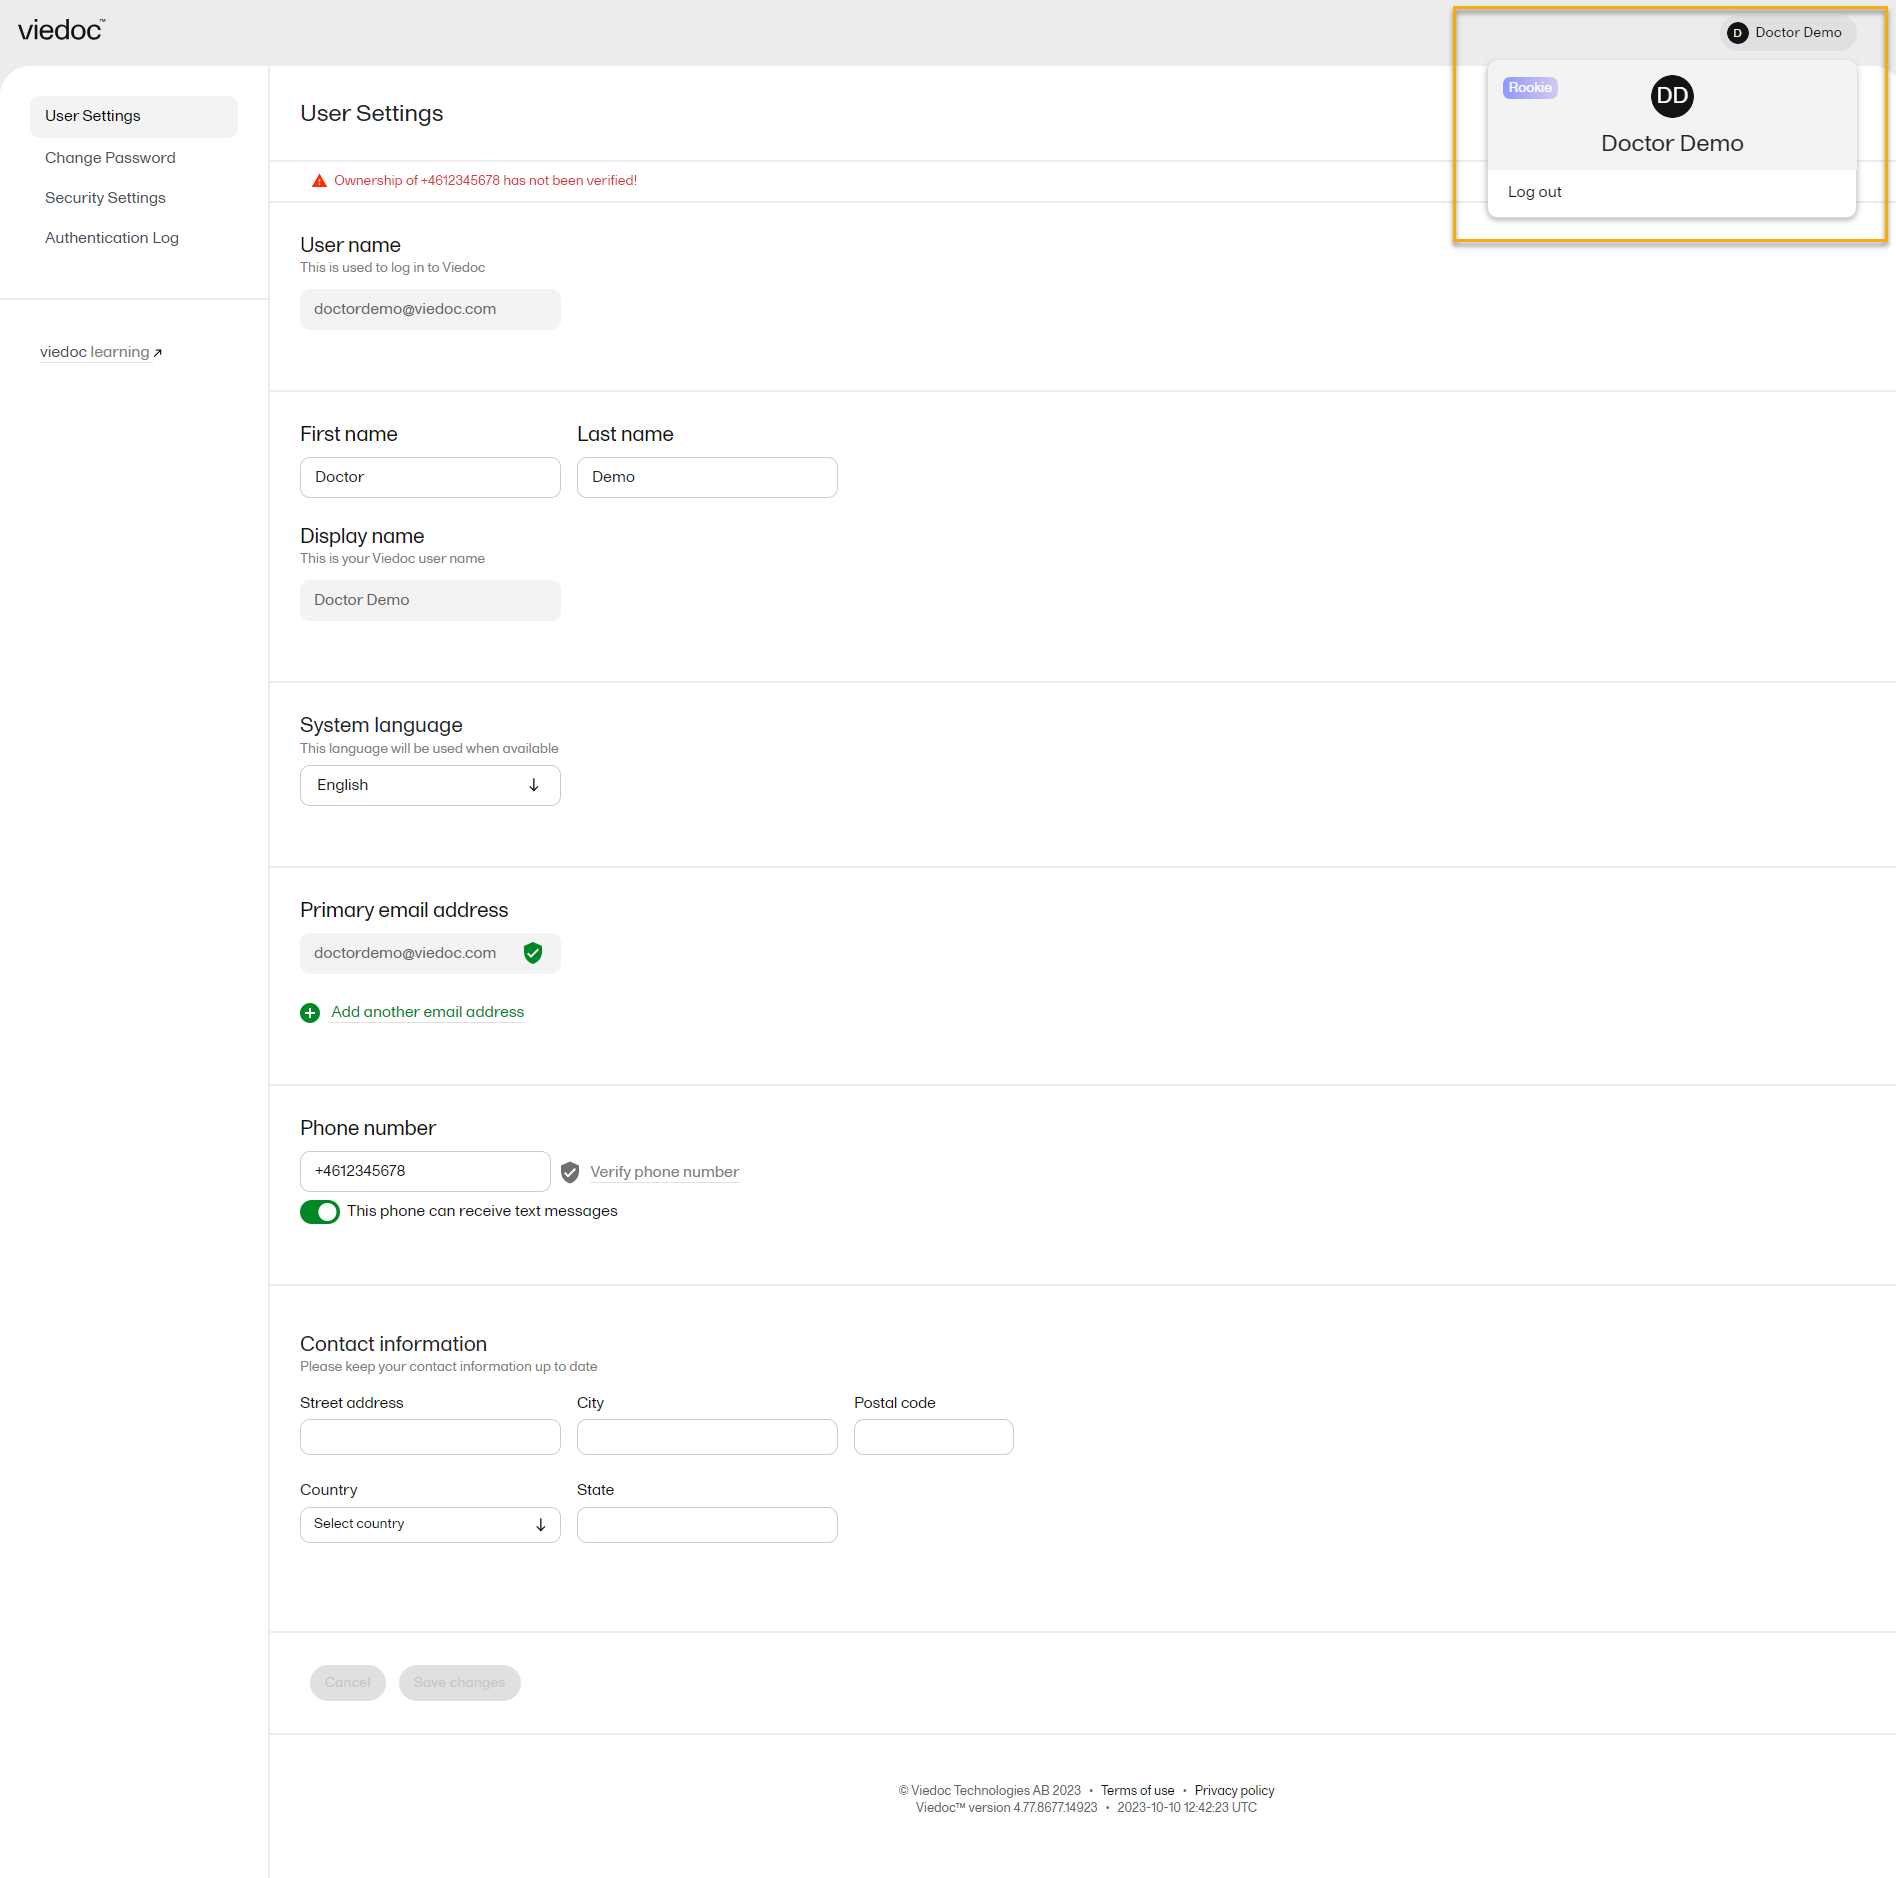
To view or edit your user settings, select the settings button (wheel) in the top right corner of the landing page, and select Edit your profile. The User Settings page opens, where you can configure the following:
1. User name - this is your primary email address used for your Viedoc account. This is the user name you use to log in to Viedoc. See the information below about your primary email address.
2. First name and Last name - fill in these fields that are used for your Display name, used in Viedoc to identify your user.
3. System language - select the language of your choice from the drop-down menu.
4. Primary email address - this is the same as the User name described above. It is the email address used in Viedoc to log in, as well as for Viedoc user account-related operations (account setup, password recovery, study invitations).
By default, this is set to the email address used to initiate the Viedoc user account.
The primary email address must be unique and is mandatory. Therefore, it is not possible to delete the primary email address.
See Changing the primary email address.
5. Secondary email addresses - you can add up to 3 additional email addresses.
Secondary email addresses is used only for:
Delivering second-factor verification codes for self-service password resets initiated by the user.
Sending a notification about changes to your user account when a secondary email address is added or removed.
See Adding a secondary email address and Verifying a secondary email address.
6. Mobile number - Select your country code and enter your mobile number.
You will be asked to Save and verify mobile number. A validation warning (8) will be displayed if the mobile number is not valid.
See Editing your mobile number and Verifying your mobile number.
Important!
|
7. Contact information - fill in the following fields: your street address, city, state, postal code and country.
To add a new (secondary) email address to your account:
| 1 | Select the Add another email address link under the current primary email address. |
| 2 | Enter the email address in the new field under Secondary email addresses. |
| 3 | Select Save changes. A notification email is sent to both the primary email address and to the newly added email address to inform you about the change. At the top of the Edit your profile page, you will see a warning message saying that the newly entered email address is not verified. |
To verify a secondary email address:
| 1 |
Select the Verify email address link next to the newly added email address. A six-digit code will be sent to your new email address and a Verify ownership pop-up is displayed asking you to provide the code in order to verify the new email address. Note! The verification link for the secondary email address is shown only after having saved the changes you may have performed on the other fields on the same page. |
| 2 | Enter the received code and select Confirm. The newly added secondary email address is now verified. |
To change the primary address to one of the existing secondary email addresses:
| 1 | Select Set as primary next to the secondary email address that is to be set as the primary email address. |
| 2 | Select Save changes. A notification email will be sent to both email addresses to inform you about the change. You will use the new primary email address the next time you log in to Viedoc. |
Note! For a secondary email address to be able to be set as primary, it has to be verified first.
To edit your mobile number:
| 1 | Select your country code and enter your mobile number. |
| 2 | Select Save and verify mobile number. A notification email will be sent to your primary email address to inform you about the change. |
To verify your mobile number:
| 1 | Make sure that the mobile number is correctly entered and select Verify mobile number. |
| 2 | A six-digit code will be sent as a text message to your mobile and a Verify mobile number pop-up is displayed. It will ask you to provide the code in order to verify the mobile number. |
| 3 | Enter the code and select Confirm. The mobile number is now verified. |
From the settings button (wheel) you can perform all actions related to study access management in Access Settings.

Select the settings button (wheel) in the top right corner of the window, and select Access settings.
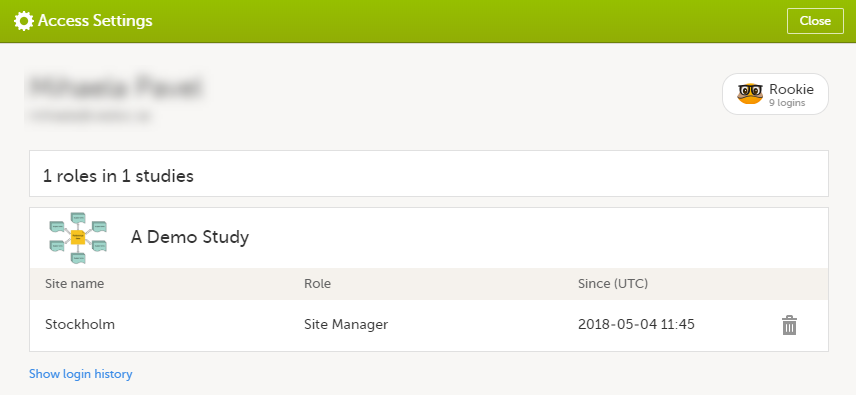
The following information is provided, grouped by study:
For users with organization roles, these are listed in the top of the page, in a separate section, providing the following information:
To remove yourself from a certain role within a study:
| 1 |
Select the trash can icon on the right, corresponding to the role, site and study to be removed from: A confirmation window is displayed. |
| 2 |
Select Delete to confirm the deletion: A notification email will be sent to all the Study Managers, or to the Site Managers if any roles are delegated. |
You can remove your Viedoc account when you have no study memberships left, that is, 0 roles in 0 studies.
To delete your Viedoc account:
| 1 | Go to Access Settings. To be able to remove your account, you should have no roles left in any study and no pending invitations: |
| 2 | Select Remove account from Viedoc. You will be prompted to confirm the account removal by entering your password: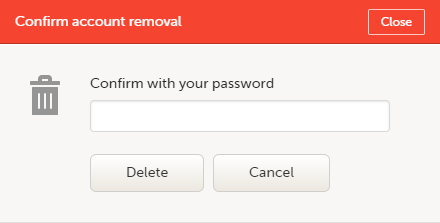 |
| 3 | Enter your password and select Delete. A confirmation message is displayed and a notification email will be sent to your primary email address:
For identification purposes, Viedoc will keep: the user ID, display name, primary email address, and login history. They are kept until all the studies you have participated in are deleted. All other information related to your account will be removed from Viedoc. |
In case you have study invitations that you have not accepted or rejected yet, the Pending invitations window displays a list of all your pending study invitations:
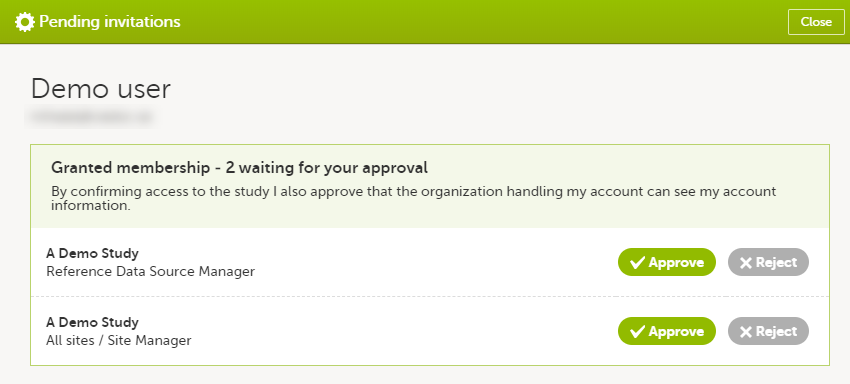
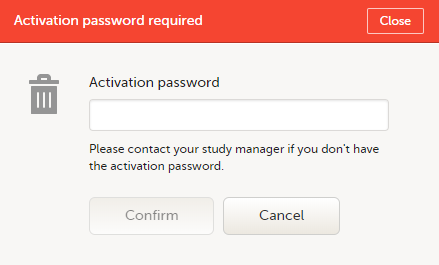
To accept a study invitation, select Approve next to the respective study role. If this is the first role you have in the respective study, and if the study requires an activation password, you will be prompted to enter it:
Note! All the pending role invitations for a user are automatically approved when the Application Programming Interface (API) method GetToken/Token is used.
To reject a study invitation, select Reject next to the respective study role. The invitation will be removed from the Pending invitations list.
To postpone the approval or rejection of study invitations, select Close in the top right corner of the Pending invitations window and postpone providing an answer to the study invitation.
To access the pending invitations again, the Pending invitations window is shown:
From Viedoc you can log out from different locations:

Note! If you exit the system without logging out, any subject you are currently working with will be locked for other users. After 5 minutes, the subject will be automatically unlocked.
This lesson describes the landing page. The landing page is displayed when you log in to Viedoc.
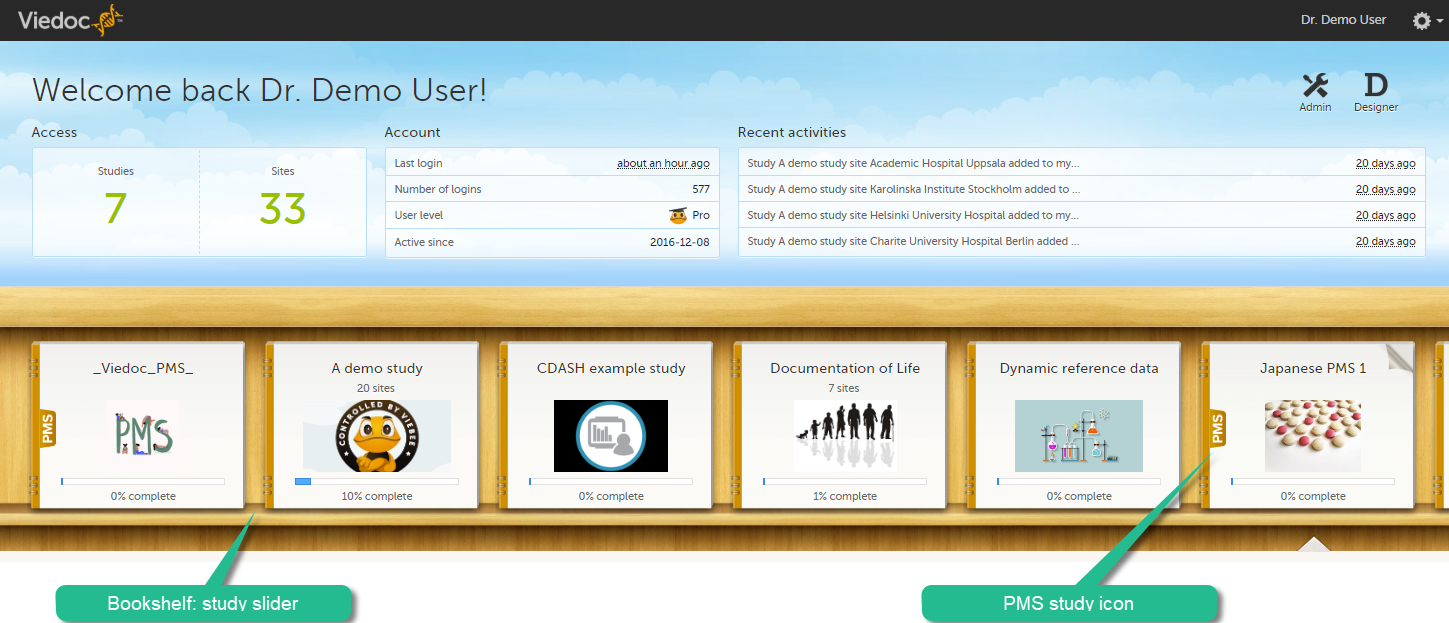
The landing page provides the following summary information:
| Skill level | Icon | Description |
|---|---|---|
| Rookie |  |
≤ 20 logins |
| Semi-pro |  |
21-100 logins |
| Pro |  |
101-1000 logins |
| Legend |  |
> 1000 logins |
The study slider shows an icon for each study you have access to. For those users having access to regular clinical studies as well as PMS studies, the PMS studies are marked with a PMS icon.
To enter a study, select a study icon in the bookshelf. The study start page is loaded on the bottom-half of the screen. For more information, see Study start page.
If you have access to both the clinic side and the sponsor side of the same study, the following launch box opens when you select the study icon in the bookshelf:
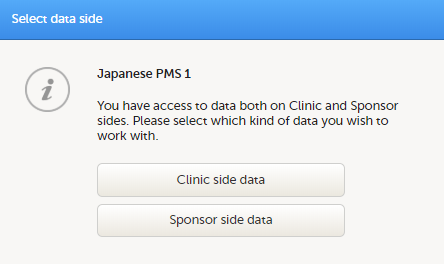
Select Clinic side to enter the clinic side of the study, and add subjects, enter data, answer queries and submit booklets and Adverse Event (AE) reports. Select Sponsor side data to enter the sponsor side of the study to review data, raise queries, and return or freeze booklets and AE reports.
If you are an Administrator and/or Designer you will also have access to Viedoc Admin and Viedoc Designer by selecting the respective icon in the top right corner of the landing page:
Viedoc PMS offers support for collecting data in booklets, allowing data to be collected during a specific time period rather than a specific event date, and support for sending and receiving booklets back and forth between site and sponsor. This process of handling booklets in a Japanese post-marketing surveillance study is known as the Kaifu process. In the Kaifu process, the clinic user chooses when to share data with the sponsor and the sponsor-side user chooses when to receive the data. One of the important characteristics of this process is that the sponsor-side user does not have access to any data entered in a booklet, until the booklet has been submitted by the clinic, and a receive action has been actively performed by the user at the sponsor side.
Booklets can only be submitted to the sponsor when all events and forms in the booklet are completed.
There is an exception to this rule, which depends on your study configuration. It is possible that some forms, (for example, but not limited to, Adverse Events) can be managed, that is, submitted/received/returned/reviewed/reported individually. When these forms are saved, a warning message is displayed and a Manage link is available. For more information, see Submitting and recalling booklets, AE reports and forms and Handling booklets, AE reports and forms for more information.
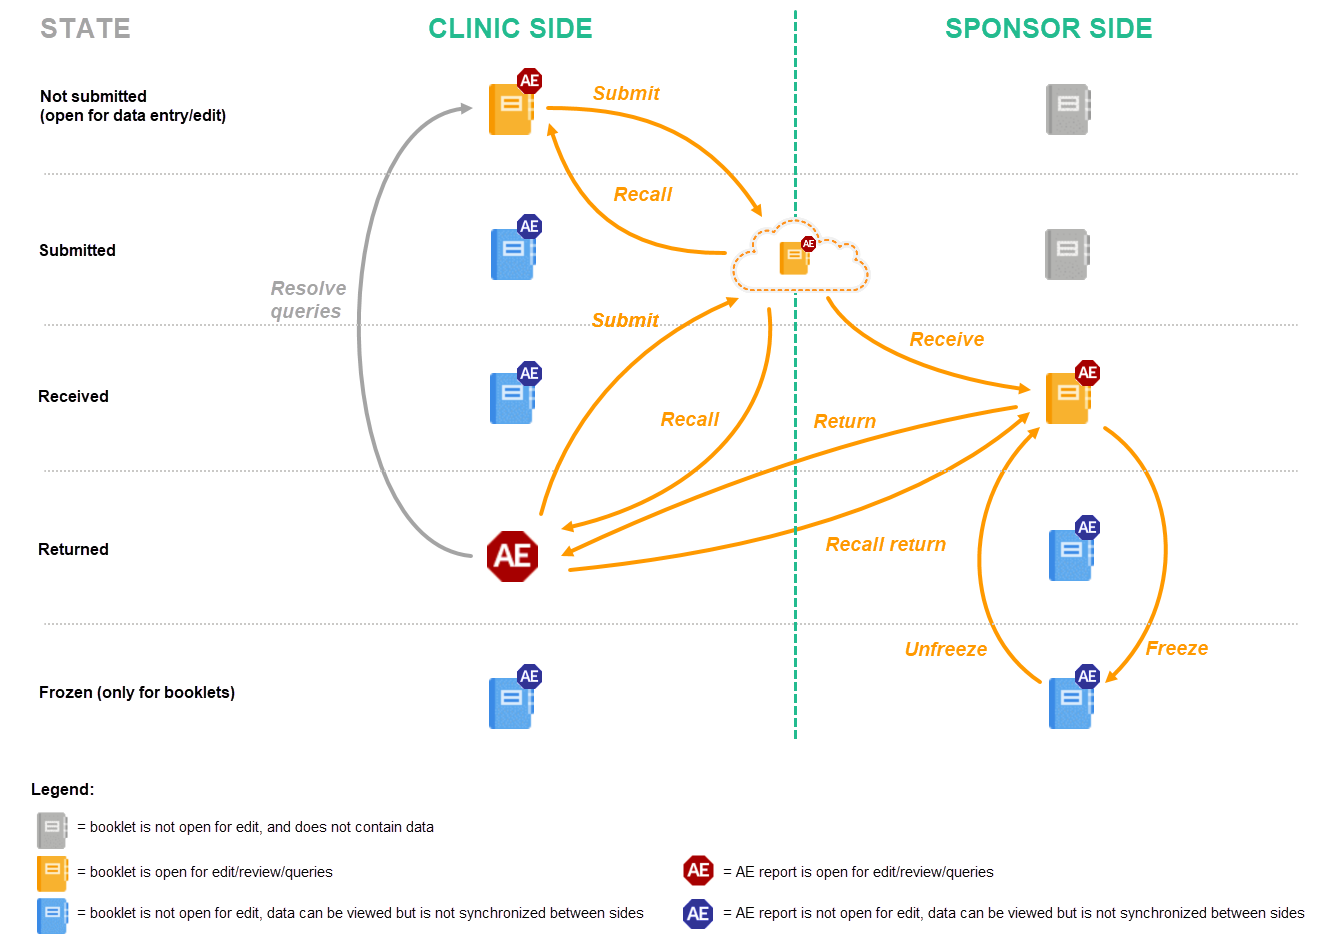
This lesson provides a description and a schematic overview of the submit-receive-return process of handling booklets and adverse events.
The below image provides a schematic overview of the submit-receive-return process of handling booklets.
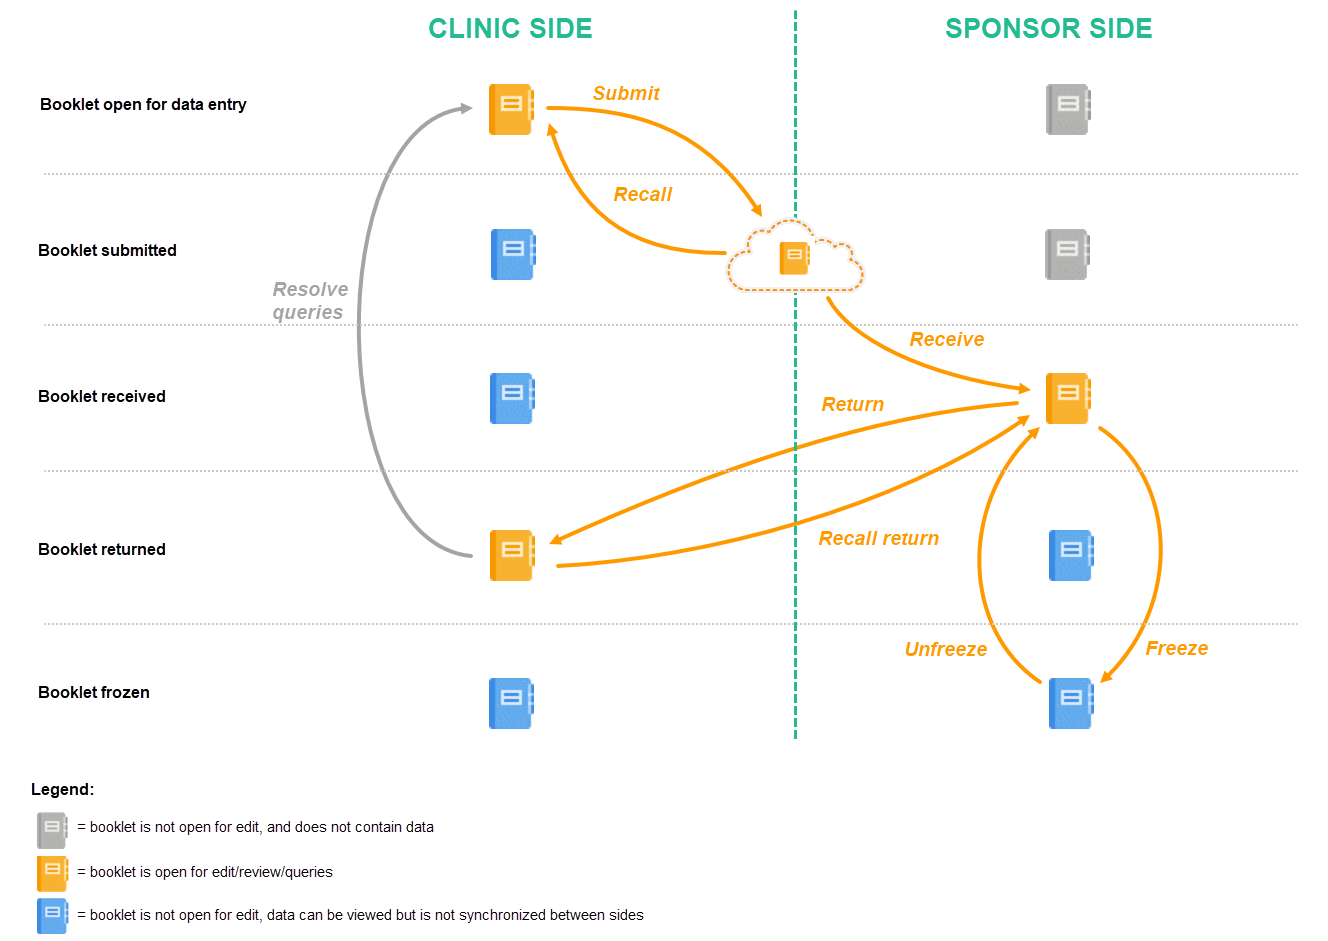
A booklet, a compilation of data being collected during a specific period of time, is initiated on the clinic side and data are entered. Once a booklet is completed and all required items are filled in, the booklet can be submitted. The clinic user has to confirm submission of the booklet by entering his/her password. By giving the password, the user at the same time signs the data in the booklet. Submission of a booklet does not immediately result in the booklet appearing at the sponsor side, instead, the sponsor side user has to actively receive the submitted booklets. A submitted booklet can be recalled at any time up until the moment that the sponsor side has received the booklet. A recalled booklet can then be edited before submitting it again to the sponsor side.
On the sponsor side, the booklet receive action has to be confirmed by clicking Confirm. Only once a booklet is received at the sponsor side, is the data in the booklet displayed to the user at the sponsor side. The sponsor side user can review the data and raise queries, while at the clinic, the booklet is in read-only state and no data changes can be made. The sponsor user has the possibility to either return the booklet to the clinic, in case queries are raised for example, or freeze the booklet if all data are reviewed, all possible queries are closed, and the booklet is ready to be shelved. It is possible for the sponsor side user to unfreeze a booklet that has been frozen. This opens up the booklet for raising queries and returning it to the clinic.
All submit, recall, receive, and return actions are recorded in the audit trail.
The actions in the submit-receive-return process are summarized in the table below.
| Action | Executed on which side? | When? | State of the data in the booklet | |
|---|---|---|---|---|
| Clinic side | Sponsor side | |||
| Initiate booklet/data entry | Clinic side | When adding a subject, and when the time period for a booklet has passed. | Open for data edit | No data can be viewed* |
| Submit to sponsor side |
Clinic side | When all required items are filled in. | Read-only | No data can be viewed until Receive. |
| Recall to clinic side |
Clinic side | When the booklet is submitted, but not yet received on the sponsor side* | Open for data edit | No data can be viewed* |
| Receive | Sponsor side | When the booklet is submitted, and not recalled to the clinic side. | Read-only | Read-only, but open for data review and raising queries |
| Return to clinic side |
Sponsor side | When the booklet is received. | Open for data edit** | Read-only, no actions |
|
Recall return |
Sponsor side | When the booklet is returned but not handled by the clinic side. | Read-only | Read-only, but open for data review and raising queries |
| Freeze | Sponsor side | When the booklet is received, all data are reviewed and all queries are closed. | Read-only | Read-only, no actions |
| Unfreeze | Sponsor side | When the booklet is frozen. | Read-only | Read-only, but open for data review and raising queries |
*The subject is not displayed at the sponsor side until the first booklet of this patient has been submitted and received by a sponsor side user. From that moment on, the submitted booklet with its data, and the structure of the remaining booklets (yet without data) are displayed at the sponsor side. The events and forms inside any not-submitted booklet can be viewed, but the forms cannot be opened.
**The booklet needs to be submitted by the clinic side user again to continue in the workflow.
AE forms can be submitted, recalled, received, and returned in two ways:
When an AE is registered before the booklet is ready to be submitted, it is possible to submit the AE separately, that is, without having to submit the entire booklet. Similarly, the sponsor can return only the AE form instead of returning the complete booklet, even if the complete booklet has been submitted and received. A separately submitted or returned AE is called an AE report. AE reports follow the same Kaifu process for submit, recall, receive, and return as booklets.
Similarly to handling booklets, the clinic user has to confirm submission of the AE report by entering his/her password, and by which he/she at the same time signs the data. A submitted AE report can be recalled until the AE report has been received by the sponsor. Only once the AE report is received, the data is displayed at the sponsor side. The sponsor user has the possibility to return the AE report if necessary. All submit, recall, receive, and return actions are recorded in the audit trail.
The following workflows are possible.
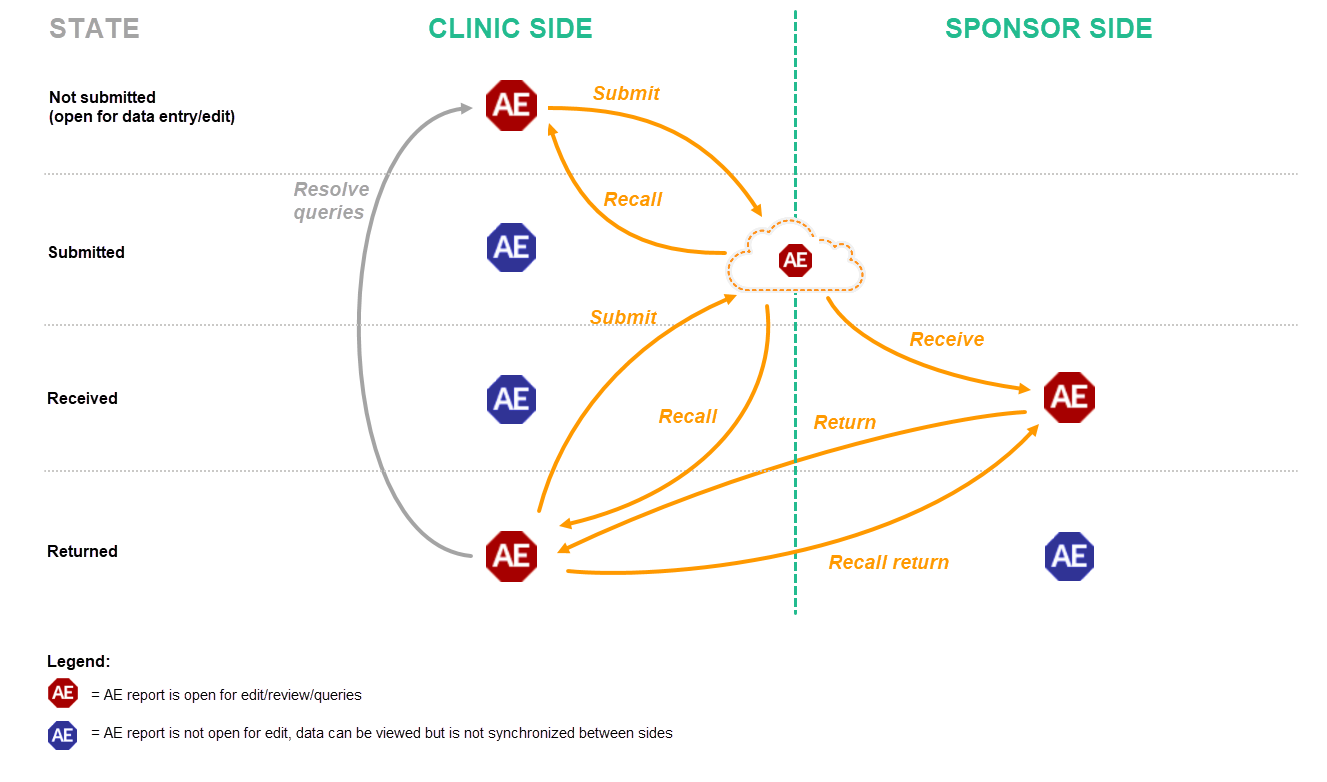

The actions that can be performed with AE reports are similar to the actions that can be performed with booklets, see The actions during the Kaifu process.
Notes!
When you select the study icon on the landing page, the study start page loads. The booklet overview page is displayed by default.
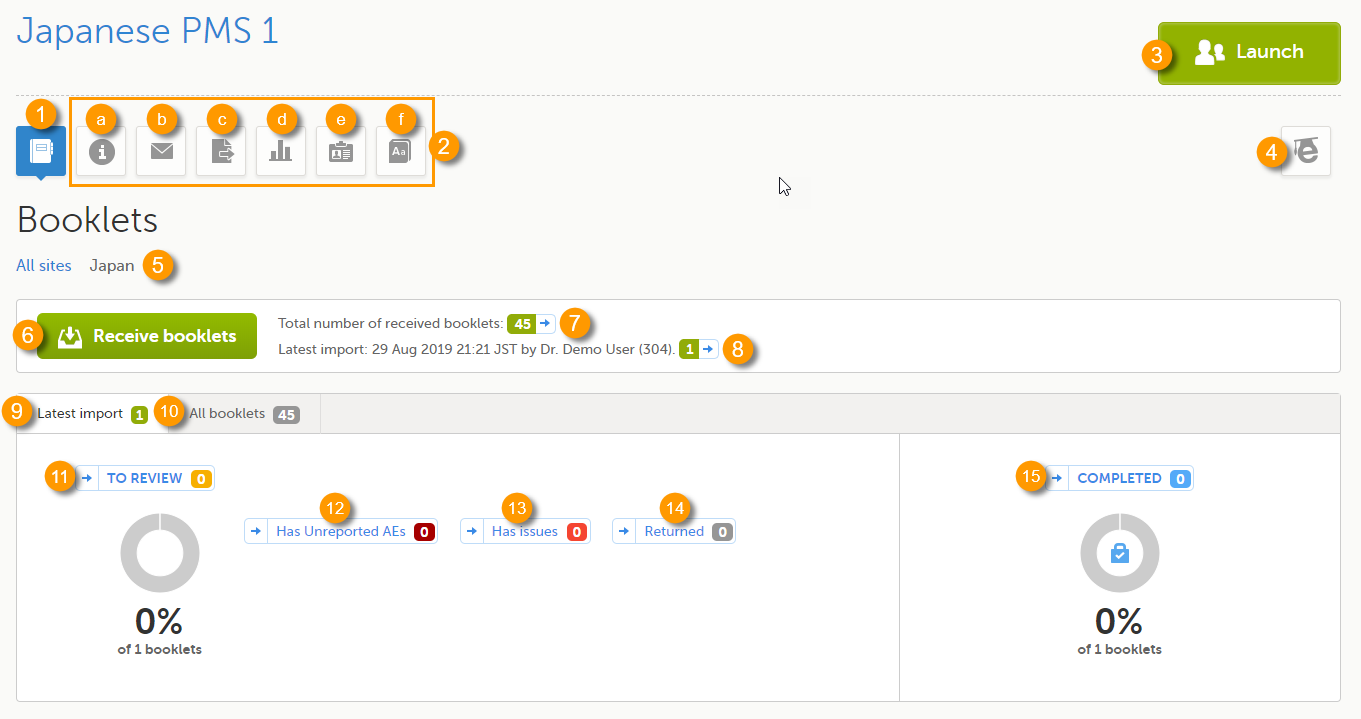
1. Booklet overview icon
2. Icons giving access to other Viedoc functionality, these are described in Study start page. Note that these icons are displayed based on your rights and permissions, so you might not see all of these, or you might even see other icons.
a. Study status
b. Messages
c. Data export
d. Metrics
e. Roles
f. Medical coding
3. Launch button to enter the study
4. eLearning/Documentation & Training
5. Filter the displayed booklet information for country, or select All sites to display booklet information regarding all sites in the study.
6. Receive button. Select to receive all booklets that were submitted since the last time a receive action was performed.
7. Total number of received booklets. Select to enter the Selection page displaying all received booklets. See Booklet overview on the Selection page below.
8. The date of latest import and the number of booklets imported. Select to enter the Selection page displaying only the booklets received during the last import. See Booklet overview on the Selection page below.
9. Latest import tab, displays booklet information (see 11-14) of all booklets imported during the latest import.
10. All booklets tab, displays booklet information (see 11-14) of all booklets in the study.
11-14 display booklet information of booklets among the latest import or among the total number of received booklets, depending on the tab that has been selected (see 9 and 10). These links also serve as shortcuts to enter the Selection page displaying the respective booklets:
11. Number and percentage of booklets to review. Select to enter the Selection page displaying the booklets that contain data to be reviewed.
12. Number of booklets that contain unreported Adverse Events (AE). Select to enter the Selection page displaying the booklets with unreported AEs.
13. Number of booklets that contain issues. Select to enter the Selection page displaying the booklets that contain issues.
14. Number of booklets that are returned. Select to enter the Selection page displaying the booklets that are returned from the sponsor side to the clinic side.
15. Number and percentage of booklets that are completed (frozen). Select to enter the Selection page displaying the booklets that have the status frozen.
On the booklet overview of the Selection page, booklets are displayed in a table. The main purpose of this table is to give the sponsor side user a quick overview of the booklets that require action: AE reports and booklets containing AEs and issues are therefore listed first. Each row in the table represents one booklet, the columns provide the following information:
On the selection page, you can perform or view the following:
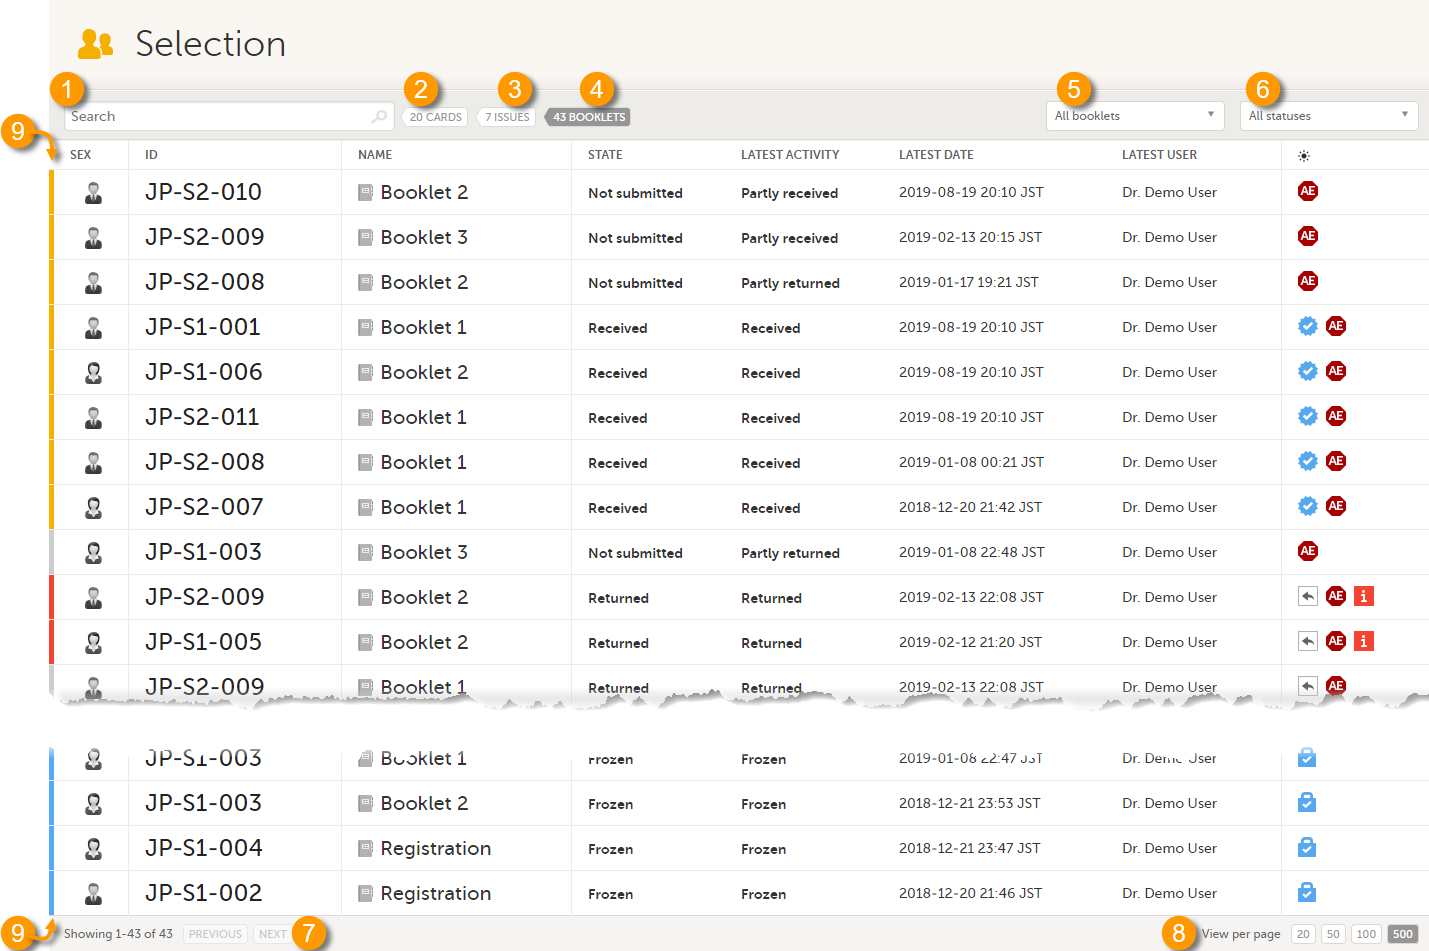
1. Search through subjects and booklets by entering any string in the search field
2. Switch to the card view (see below)
3. Switch to the issue list (see below)
4. Switch to the booklet overview (if you are on the card view or issue list)
5. Filter the displayed booklets for booklet name by selecting All booklets or the booklet name from the drop-down list
6. Filter the displayed booklets for booklet status by selecting one of the following options from the drop-down list:
7. Switch to the previous or next page of the booklet overview.
8. Select how many booklets should be displayed per page.
9. The color band displayed in front of the subject avatar means the following:
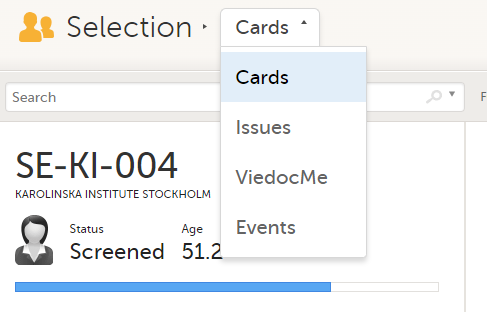
From the Selection page, you can also enter the card view and issue view by selecting the Cards and Issues tabs as follows:

The icons in the last column of the Selection page have the following meaning:
| Symbol | Definition |
|---|---|
 |
Received - the complete booklet has been signed and submitted by the clinic, and received on the sponsor side. |
 |
Issue - at least one open query and/or missing data |
 |
Frozen - the booklet has been frozen on the sponsor side, and is locked for data edit |
 |
Returned - the booklet has been returned from the sponsor side to the clinic side |
 |
Adverse Event - this form contains an adverse event |
 |
Adverse Event reported - the adverse event in this form has been reported to the authorities |
By default, booklets are sorted in the following order:
First sorted by state:
Booklets that are not reviewed and contain AEs or issues.
Booklets that are not reviewed and do not contain AEs or issues.
Booklets that are reviewed booklets and contain issues.
Booklets that are reviewed and do not contain issues.
Returned booklets
Frozen booklets.
...then sorted by date, most recently changed booklets first.
...then sorted by subject ID.
Viedoc PMS offers support for sending and receiving booklets back and forth between site and sponsor. For an overview of this process, see Overview of the submit-receive-return process.
In the submit-receive-return (Kaifu) process, the clinic user chooses when to share data with the sponsor and the sponsor-side user chooses when to receive the data. One of the important characteristics of this process is that the sponsor-side user does not have access to any data entered in a booklet, until the booklet has been submitted by the clinic, and a receive action has been actively performed by the user at the sponsor side.
Booklets can only be submitted to the sponsor when all events and forms in the booklet are completed.
There is an exception to this rule, which depends on your study configuration. It is possible that some forms (for example, but not limited to, Adverse Events) can be managed, that is, submitted/received/returned/reviewed/reported individually. When these forms are saved, a warning message is displayed and a Manage link is available. For more information, see Receiving booklets, AE reports and individual forms.
Note! As soon as an AE has been added, the system displays a warning message at the top of the booklet to facilitate the timely submission of AEs.
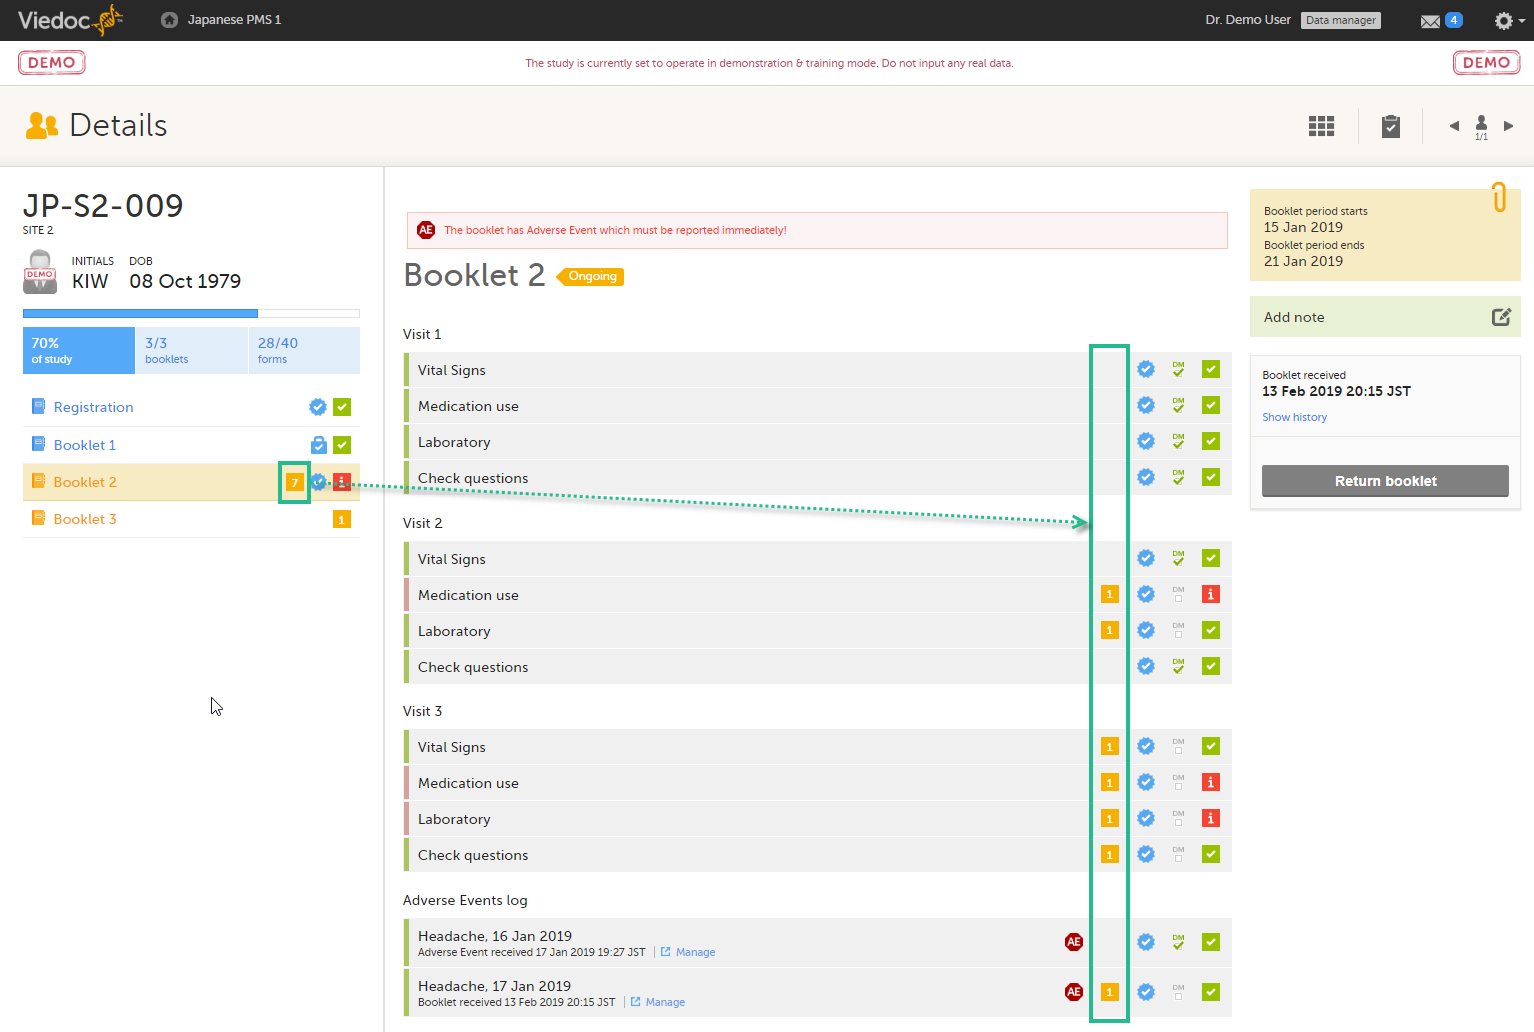
The status of the booklet is displayed on the subject Details page. You can select to display the complete history of submitting-receiving-returning the booklet by selecting Show history. You can select to display only the current status of the booklet by selecting Hide history.
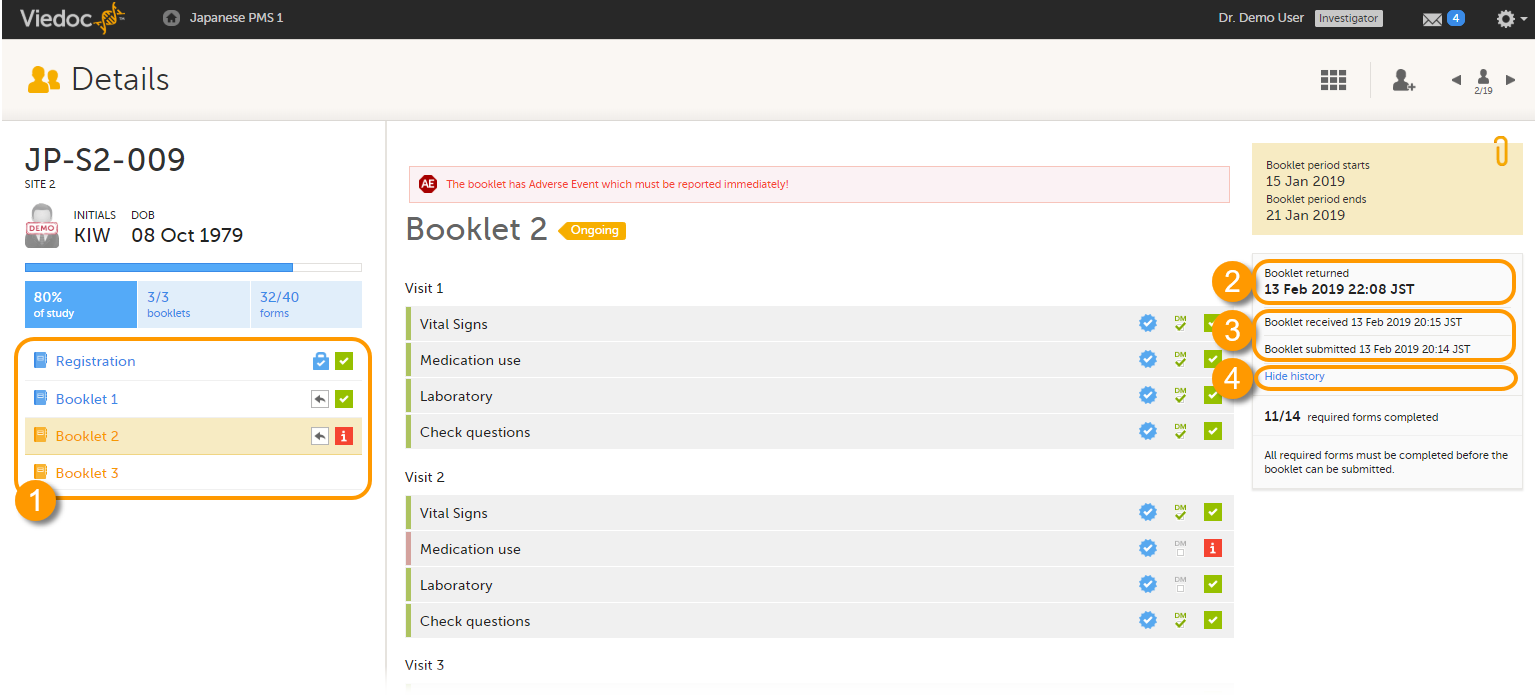
1. Select a booklet to work with
2. Current status of the selected booklet
3. History of the selected booklet
4. Show/hide history
Forms can be received from the clinic side individually, depending on how your study is configured, you can:
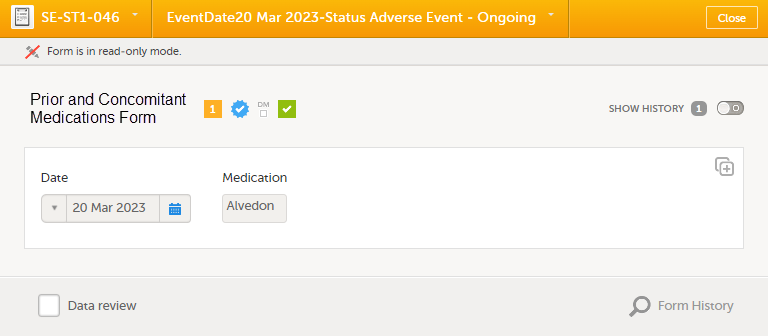
Note! Forms that are linked to other forms can be received individually or as part of a booklet submit. When a linking form (for example an AE) is linked to another form, (for example the Prior and Concomitant Medications form), and the AE form is submitted individually, a read-only copy of the linked form (Prior and Concomitant Medications) is received, if not already available on the sponsor side.
This applies even if the booklet is not yet completed.
There are different icons, warning messages and dialogs shown, depending on the your study configuration.
The icons displayed on the form are as described below:
|
The forms marked as Adverse Events in your study are flagged with this icon. |
|
|
The forms that are NOT marked as Adverse Events in your study, but which can be managed individually are marked with this icon. |
 |
The warning messages are as shown below:
Once receiving a form that was submitted individually, a warning message is shown. The warning message differs depending on the study configuration.


![]()
This applies even if the booklet has the status frozen.
Notes!
To receive booklets, AE reports, and other forms that have been submitted from the clinic side:
| 1 |
Select Receive booklets. 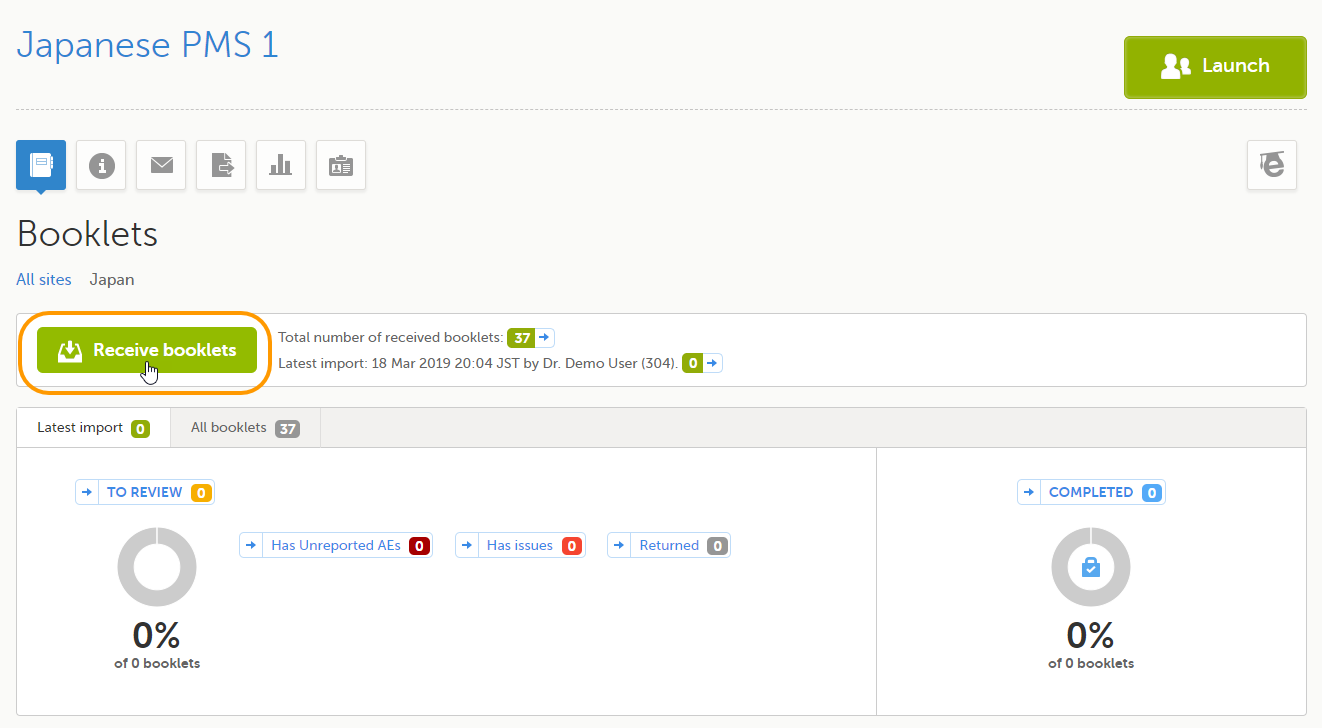
|
|
| 2 |
A window appears that asks you to confirm the receive action. 
|
|
| 3 |
After the booklet/AE report/form is confirmed as received, a Manage link is shown: 
On the relevant form, select Manage. |
|
| 4 |
A text appears. Depending on the study configuration and the received form, the text is as shown below: Manage Form 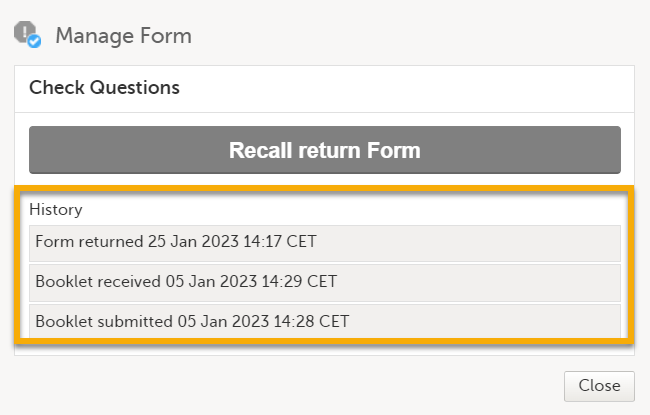
|
|
|
In History, the complete history of the form's submit-receive-return actions is shown. |
||
The information on the Latest import tab is updated with the booklet counts of the latest import.
Notes!
You can view a linked form from the linking form by selecting any link item to open and read that form. In the example shown below, the Prior and Concomitant Medications form is the linked form. Closing the form returns you to the original (linking) form, in this example, the Adverse Event form.
Note! If the linked form is not under control of the sponsor, that is, it is under clinic control, the linked form is available for the sponsor only as a read-only copy, and no Kaifu actions can be taken on the form (such as reviewing a form, returning a form, marking a form as reported, or adding queries, etc). When forms marked as AEs are received as linked form copies, they are not included in the AE forms count.
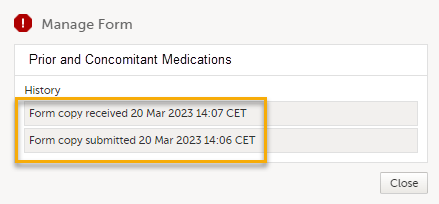
For a linked form that has been received as a read-only copy when a linking form was submitted individually, depending on the received linked form, the the complete history of the form's submit-receive-return actions is shown as below:
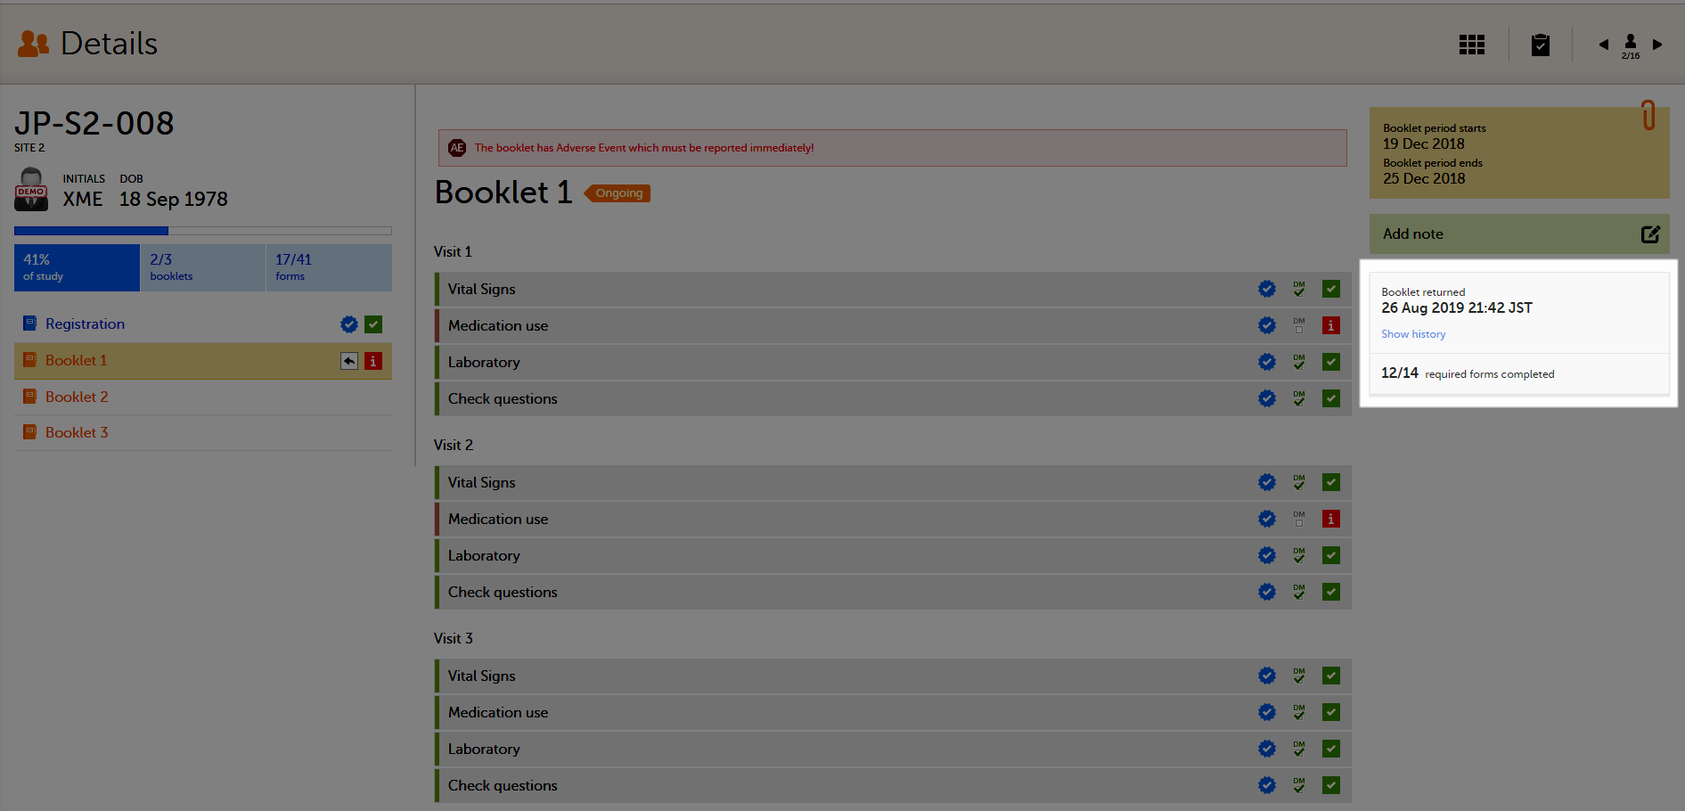
To return a booklet, select Return booklet.
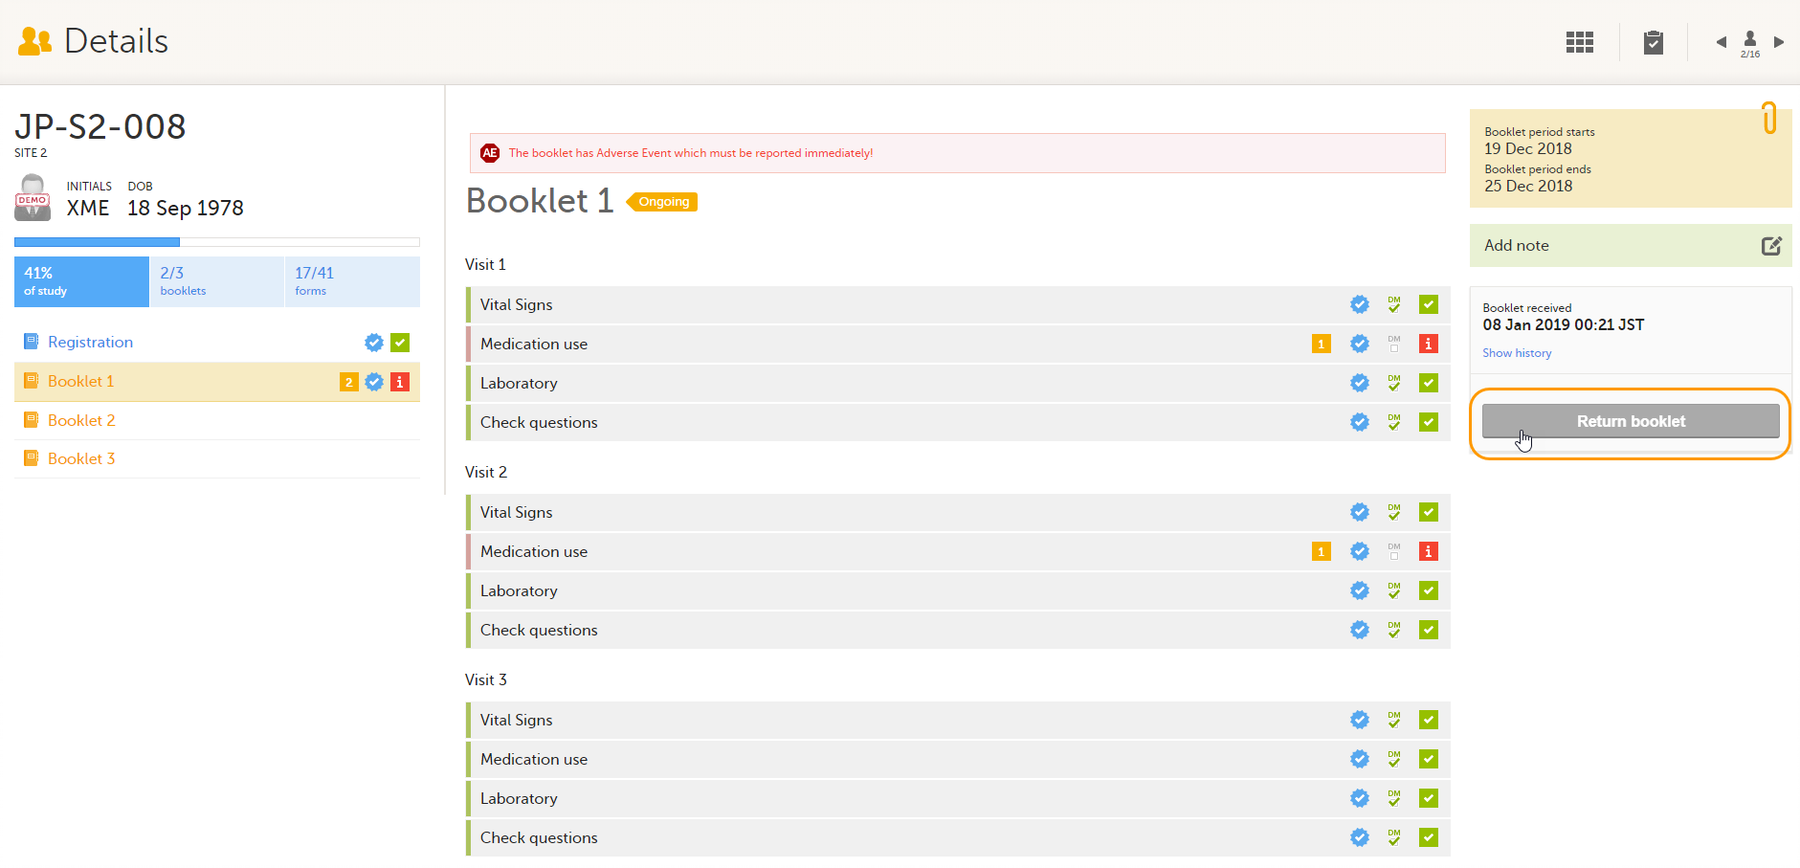
The booklet status changes into returned, and the date and time of the return action are displayed.
On the booklet overview, the booklet receives the following icon, indicating that the booklet has been returned.

The recall function is available for users with the return booklet permission. The function is available when a booklet was returned to the Investigator but has not yet been changed/edited by the Investigator. After a sponsor performs a Recall return action, the booklet is brought back in control of the sponsor and it is no longer possible to edit the booklet on the clinic side.
To recall a booklet, select Recall returned booklet.

Note! If any data in the booklet is changed or added, or, if the booklet has already been recalled, the action is rejected.
After recalling a booklet, the following happens:
...which means that:
To freeze a booklet, select Freeze booklet.
Note! Booklets can only be frozen when all data in the booklet is completed, all data is reviewed and there are no open queries or other issues.
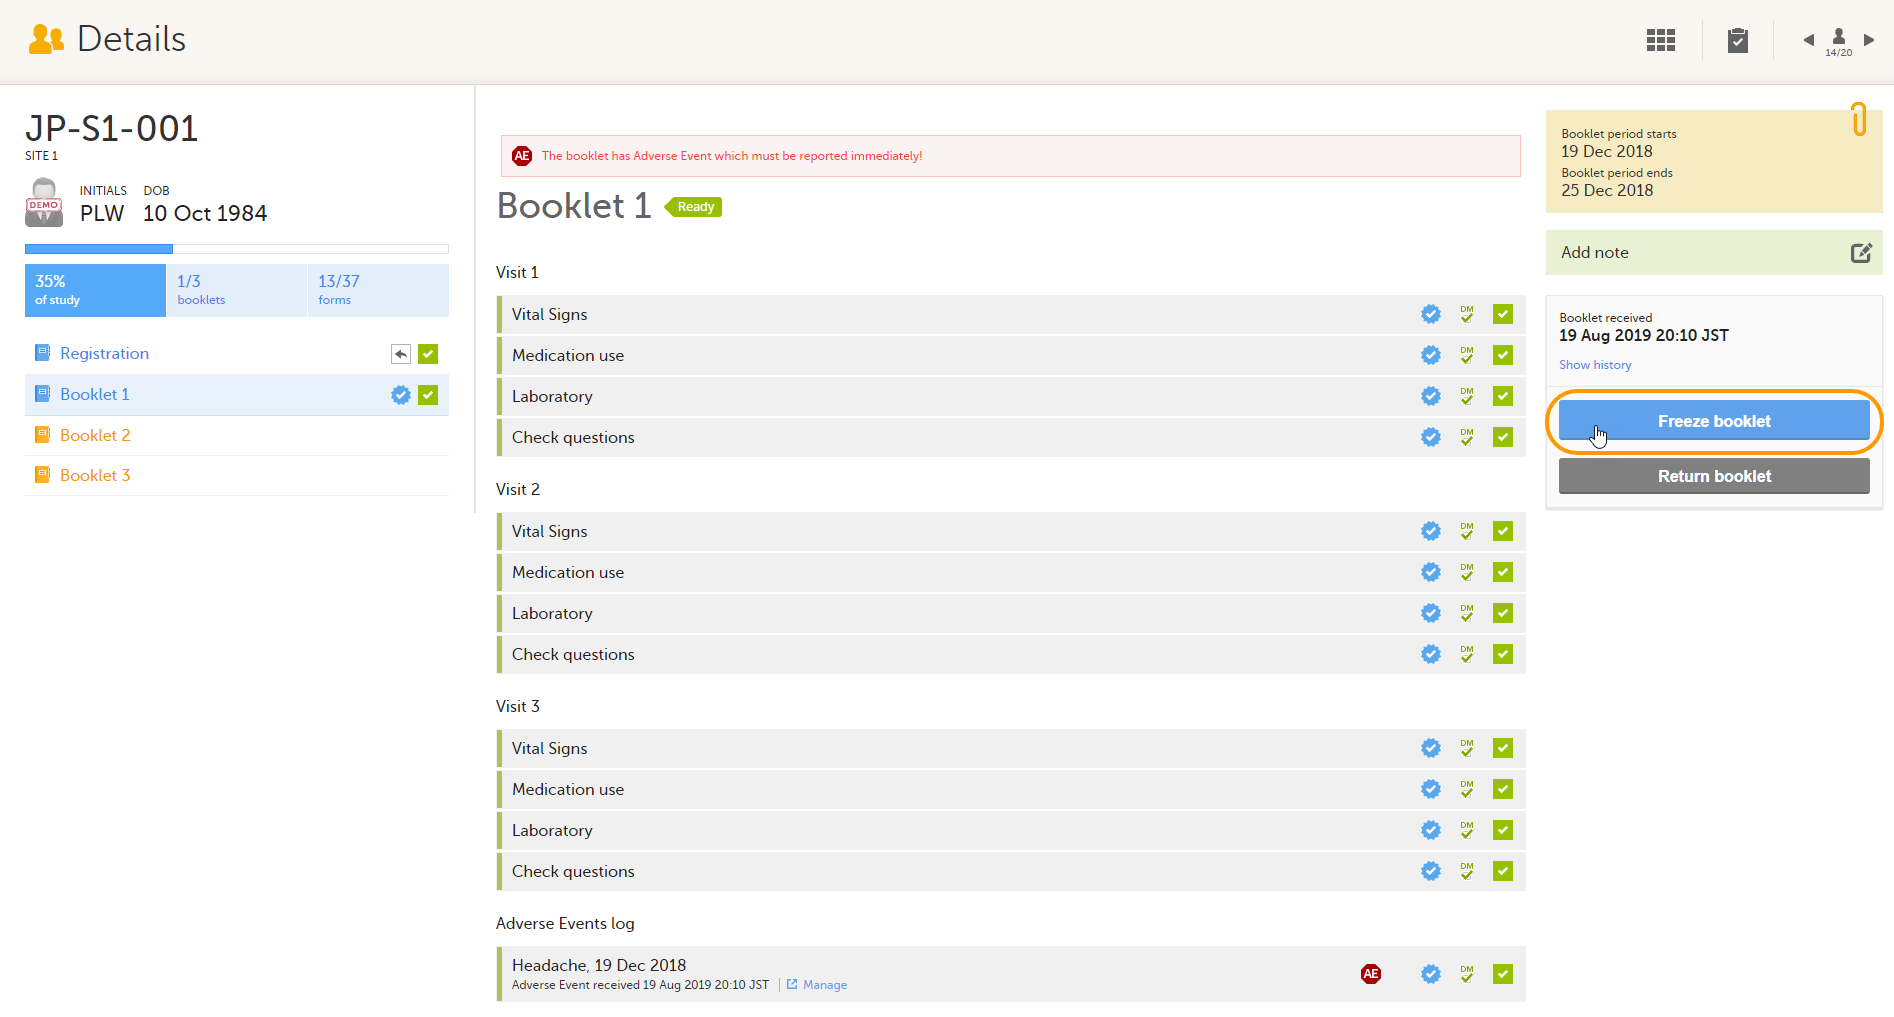 The booklet status changes into frozen, and the date and time of the freeze action are displayed.
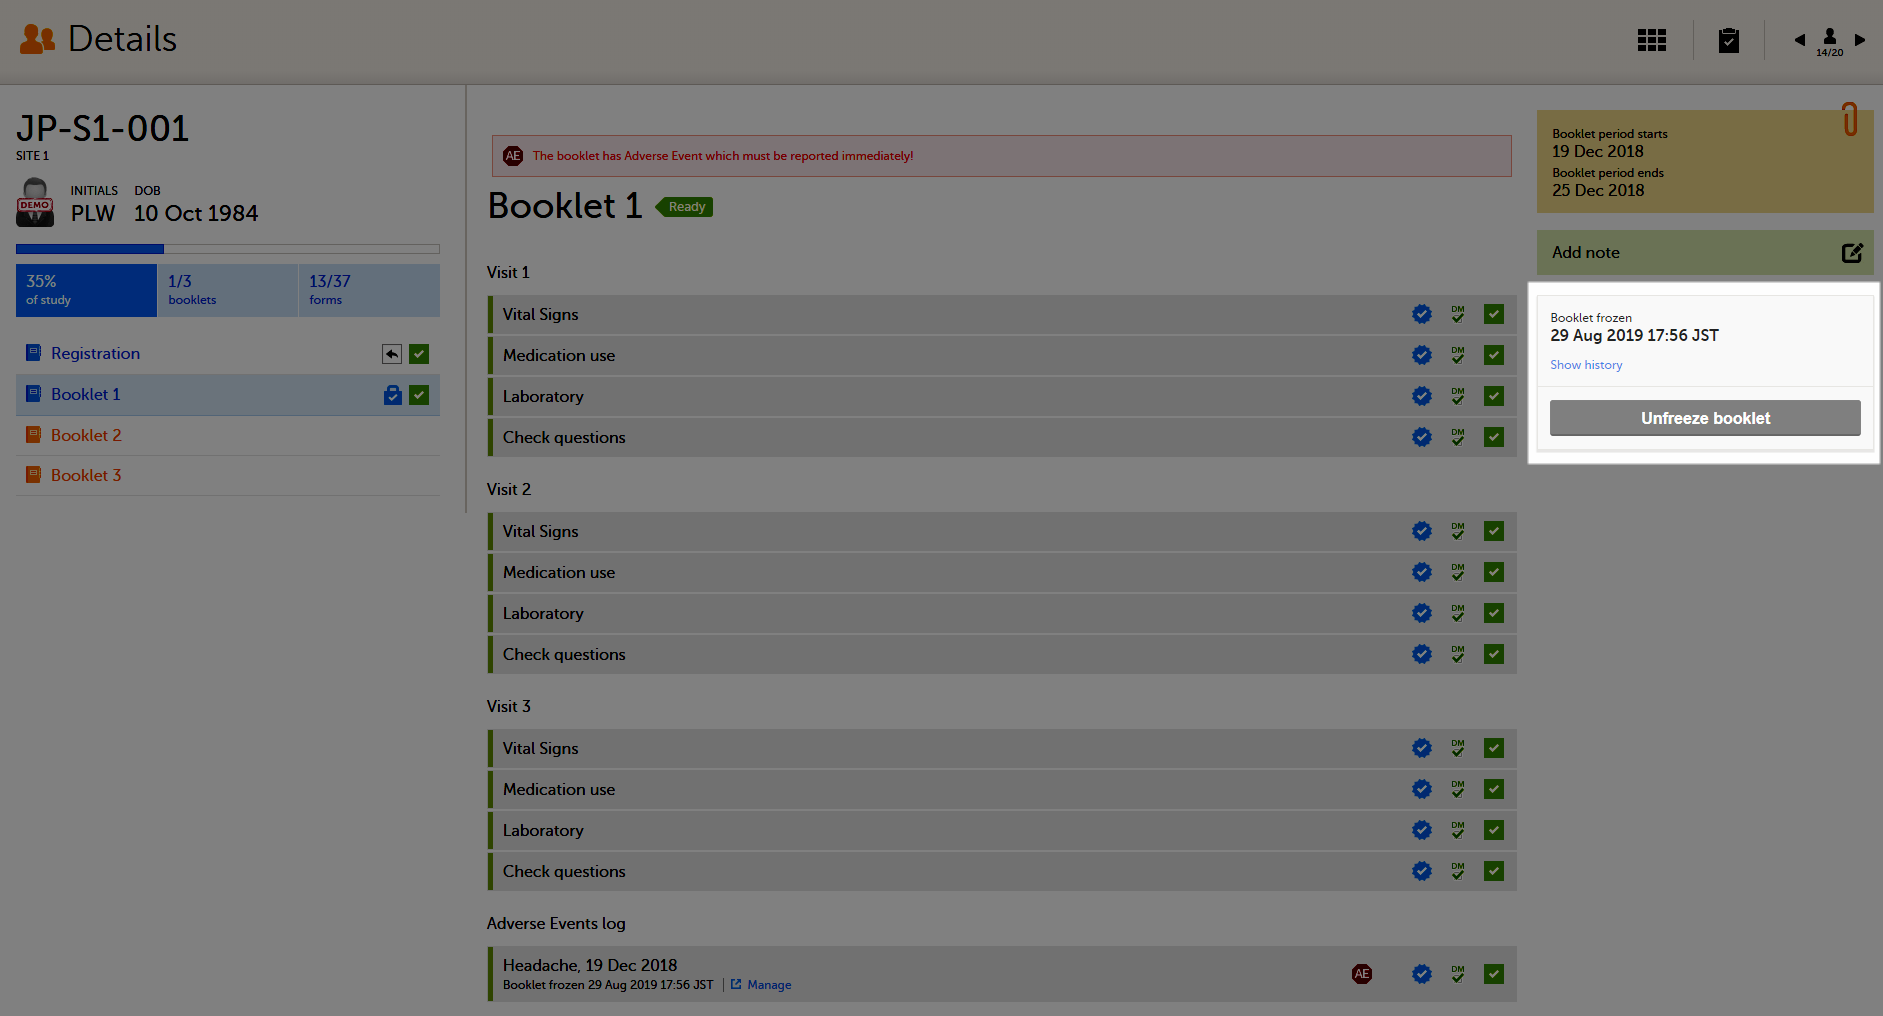
On the booklet overview, the booklet receives the following icon, indicating that the booklet has been frozen.

Depending on your study configuration, AEs can be submitted separately as an AE report. Other individual forms and linked forms can be submitted separately, even if the booklet is not yet completed.
When an AE is registered, a warning message appears at the top of the booklet stating that The booklet has Adverse Event which must be reported immediately! The adverse event has the status Not reported, and a red AE icon appears on the form.
When another individual form is registered, a warning message appears at the top of the booklet stating that The booklet has one or more forms to be reported, and a red exclamation mark icon appears on the form.
Note!
To return an AE/individual form:
| 1 |
On the relevant form, in this example the Adverse Event form, select Manage. 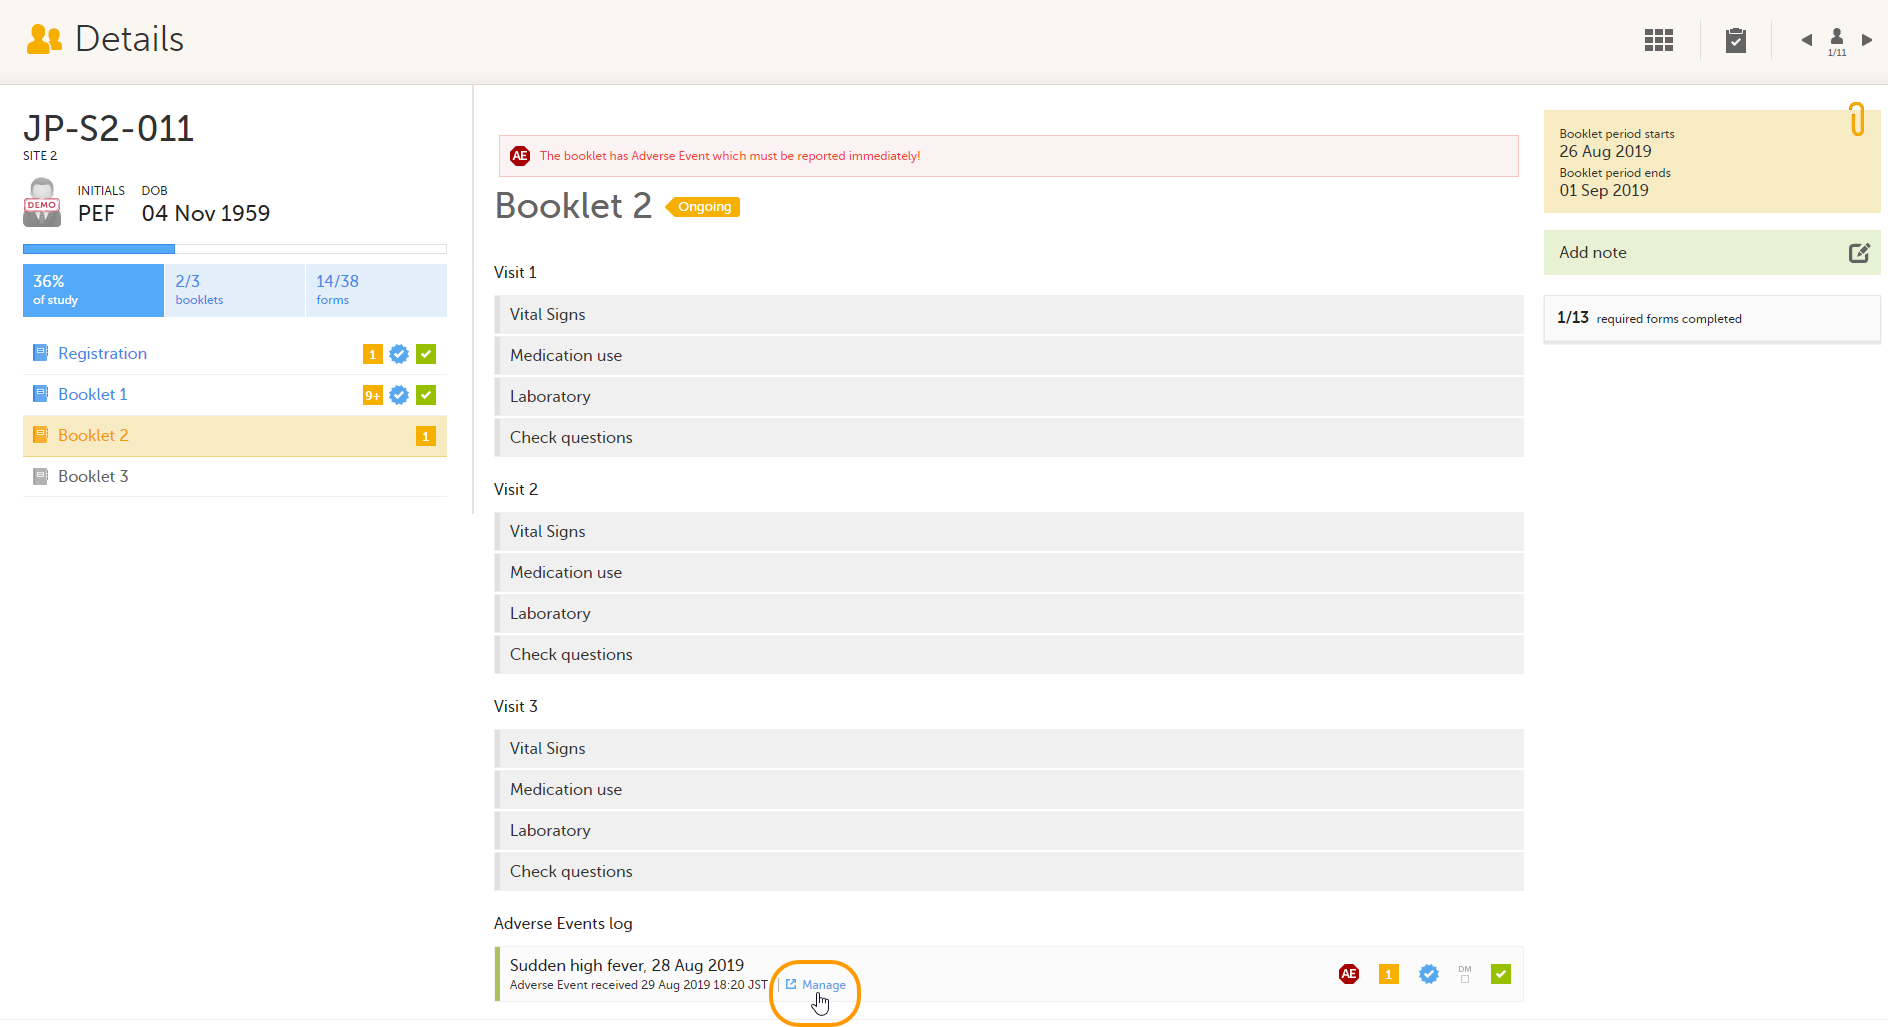
A window appears. |
|
| 2 |
Select Return Adverse Event. 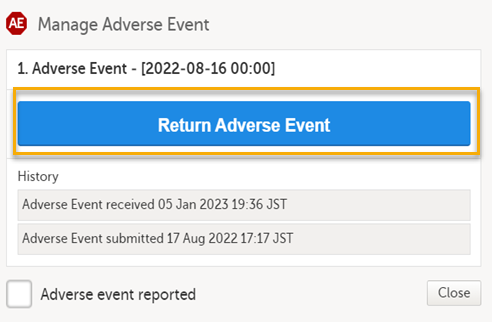
|
To return a form that was submitted individually, select Return Form. 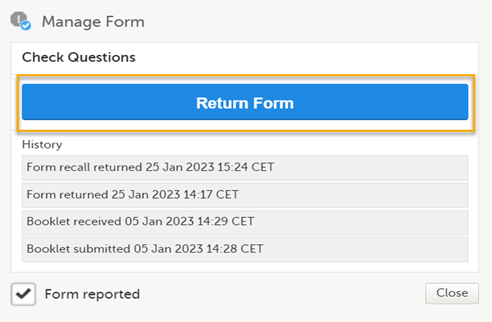
|
| 3 |
The status of the adverse event changes from Adverse Event received to Adverse Event returned + date of submission. 
The complete history of AE submission/recall/receive is shown in the history in the Manage Adverse Event window that appears upon selecting Manage. |
The status of the form changes from Form received to Form returned + date of submission. 
Note! Forms that are received as part of a booklet submit can only be returned if the form has been configured to be submitted individually in the effective study design. |
The recall function is available for users with the return booklet permission. The function is available when an AE or an individually submitted form was returned to the Investigator but has not yet been changed/edited by the Investigator. After a sponsor return recall, the booklet is brought back in control of the sponsor and it is no longer possible to edit the booklet on the Clinic side.
To recall an AE or an individual form, select Recall returned adverse event/Recall return Form.
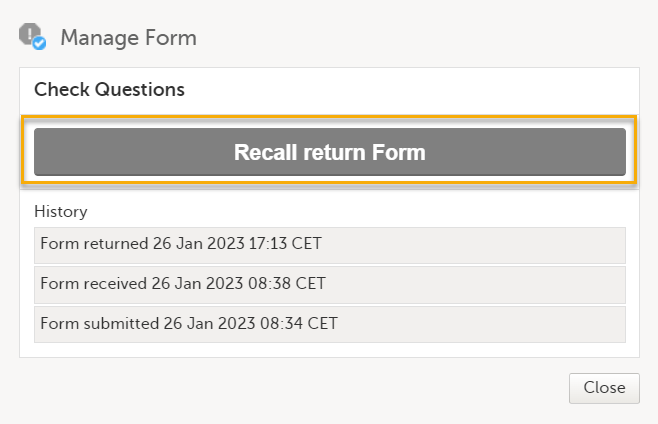
Note! If any data in the AE/individually submitted is changed or added, or, if the AE/individual form has already been recalled, the action is rejected.
After recalling an AE/individual, the following happens:
...which means that:
Note! Forms that have been received on the sponsor side and do not have the status frozen can still be marked as reported to the authorities. Please note that an automatic notification is not sent to the authorities, this is to mark that the relevant authorities that should be notified have been notified. The purpose of this checkbox is to act as a review flag; for example, similarly to how a task is closed when performing SDV.
To mark an AE/individual form as reported:
| 1 |
Select Manage on the relevant form you want to report. The example below is an Adverse Event form.
A window opens. |
|
| 2 |
Select the Adverse event reported and select Close. 
The status of the AE will change to reported, the icon on the AE form will change into a grey AE icon with checkmark, and the red warning text The booklet has Adverse Event which must be reported immediately! at the top of the page disappears. 
|
For other forms, select Form reported and select Close. 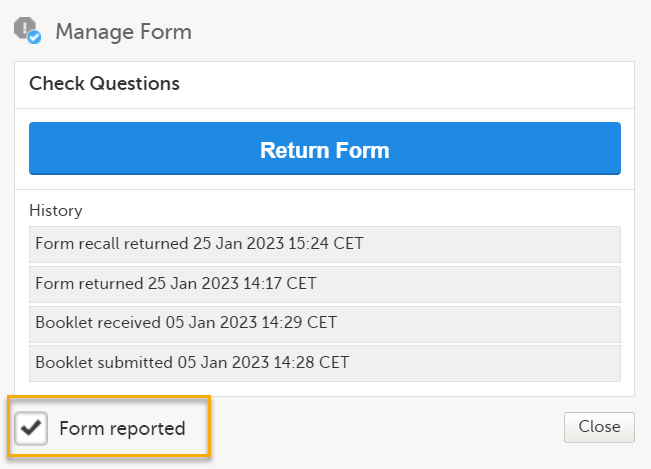
The status of the individually submitted form will change to reported, the icon on the Check Questions form will change into a grey exclamation mark with checkmark, and the red warning text The booklet has one or more forms to be reported at the top of the page disappears. Note! The text in the warning text may differ, depending on the study design. |
Note! Regarding the Adverse event reported checkbox, this checkbox can be selected and requests sent off for the form to be returned:
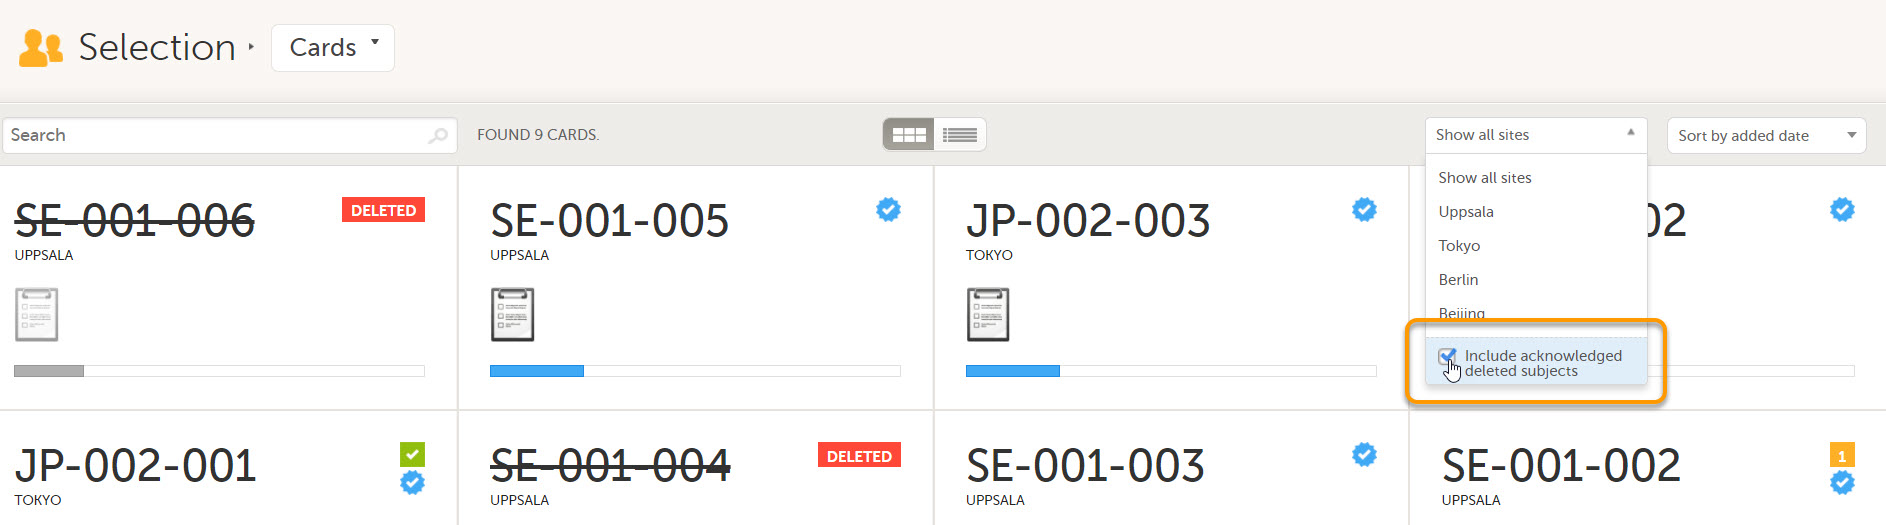
Deleted subjects are included in the receive action. Once data is received at the sponsor side, deleted subjects are displayed in the following places:
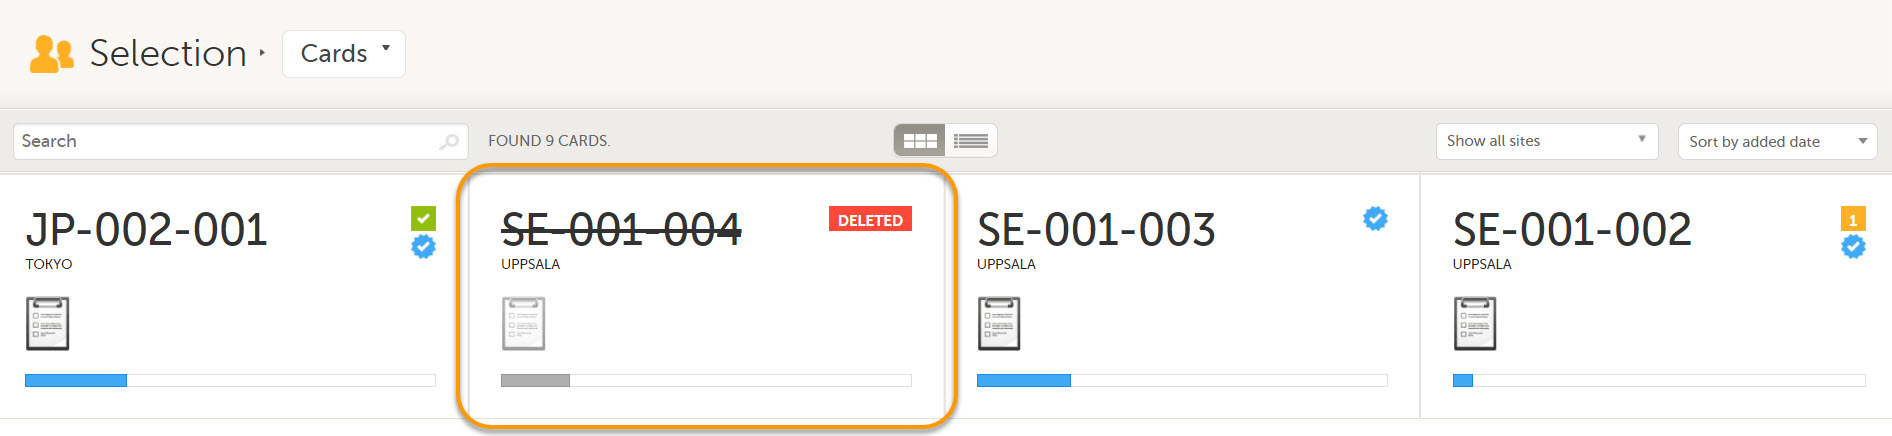

Deleted subjects also appear in the Issues selection page if the deleted subjects had issues.
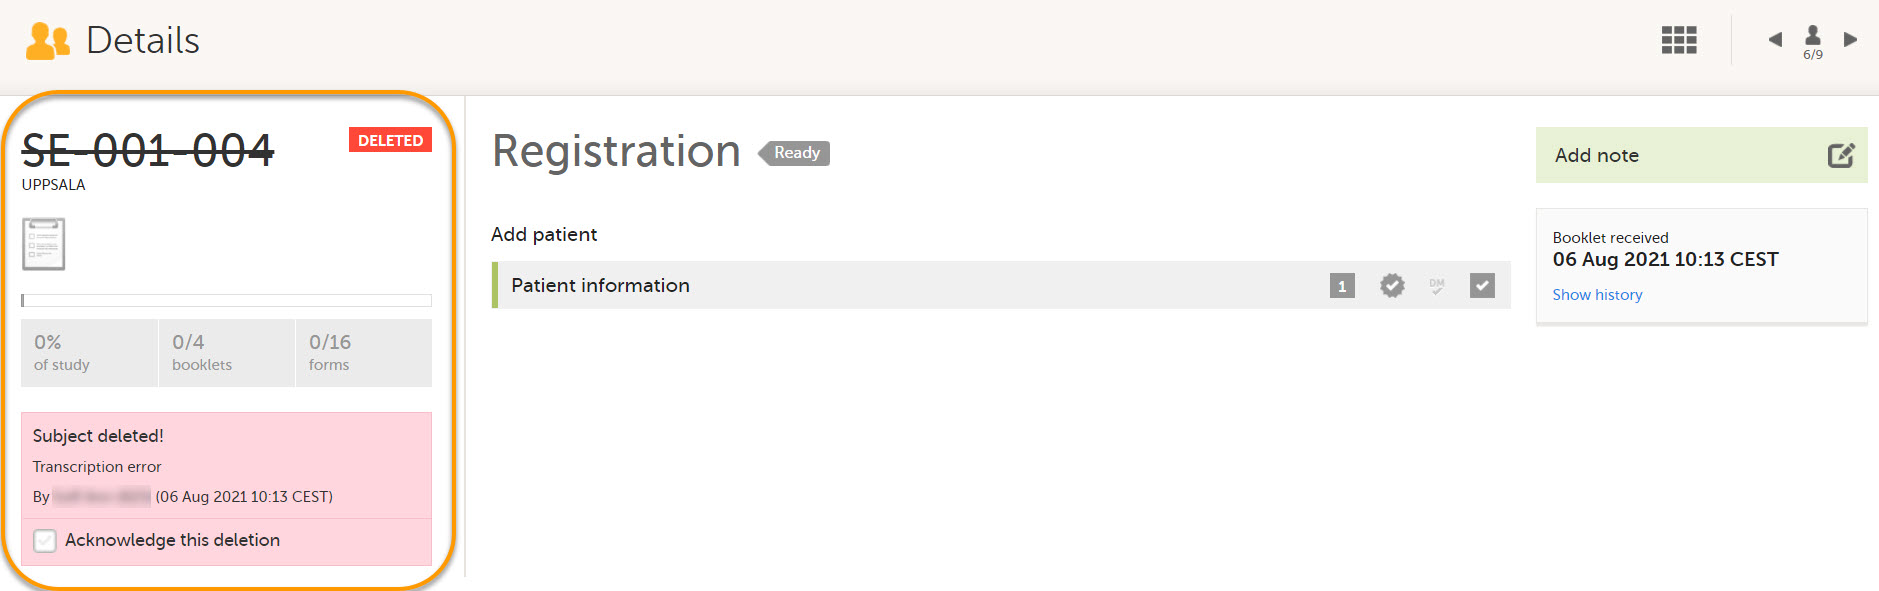
When deleted subjects have been received, they can be acknowledged by selecting Acknowledge this deletion on the subject Details page.
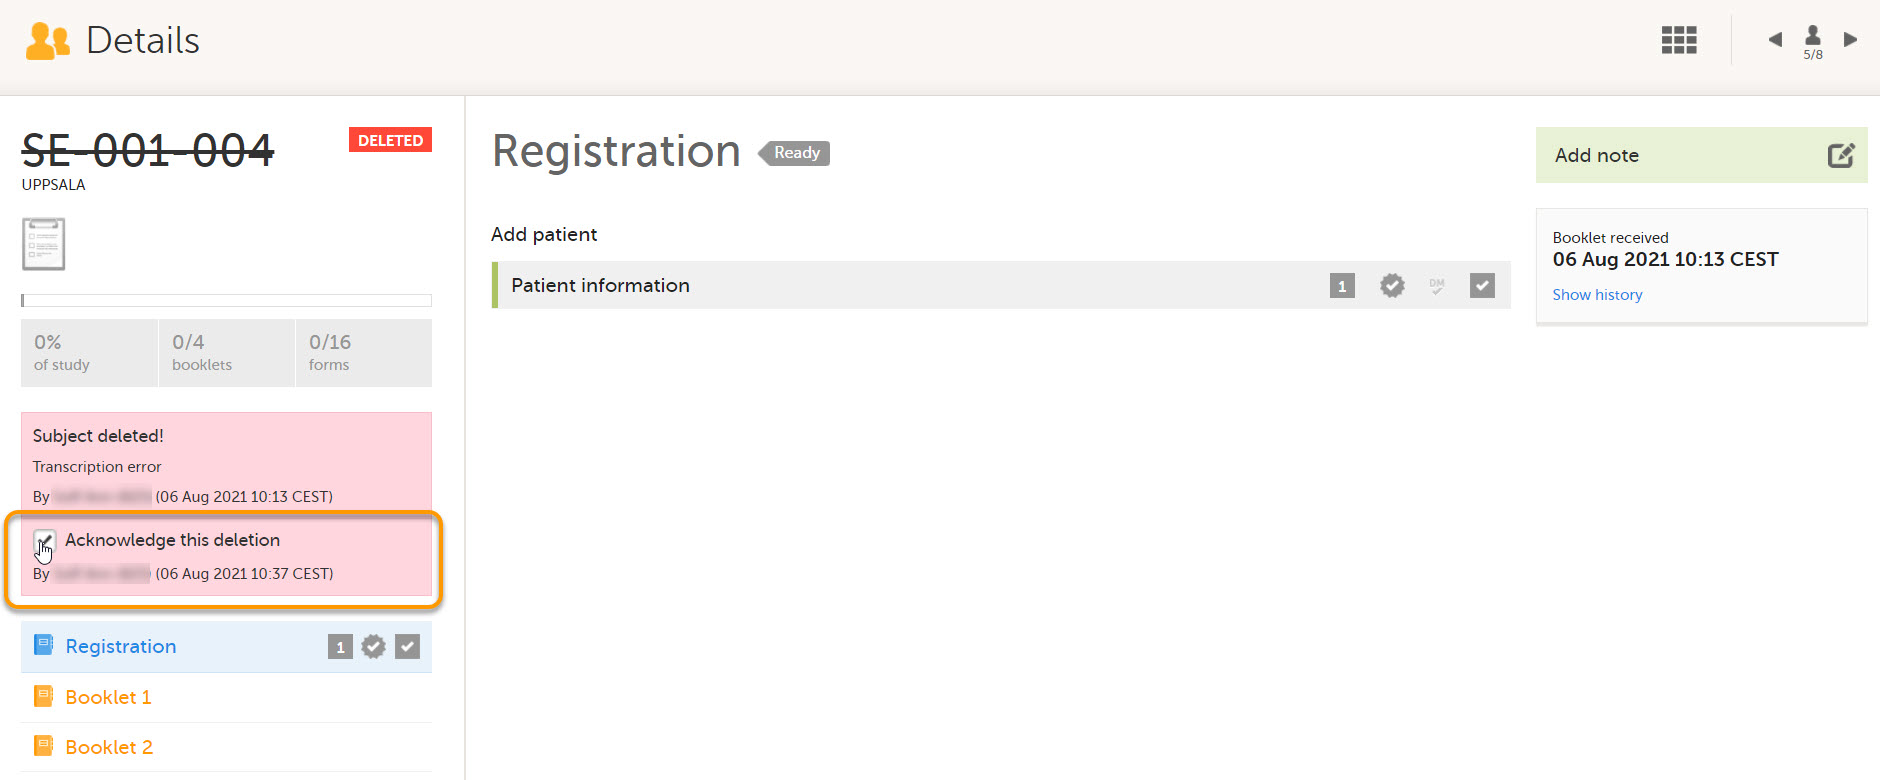
This action is recorded below the checkbox with information about who and when the deleted subject was acknowledged. The acknowledgment causes the deleted subjects to become hidden from the main views. To view acknowledged subjects, select Include acknowledged deleted subjects.
If the study design is updated and configured so that forms can no longer be submitted individually, or if a new study design version is applied to a site, the following rules apply to the actions and messages for existing individually submitted forms:
There are no warning messages displayed on the subject details page for that form.
Forms that have been configured to be individually submitted and also are selected as AEs are included in the counters for Has unreported AEs on the sponsor side shown on the booklet overview page. See Booklet overview for more information.
NOTE! The Has unreported AEs counter is NOT updated when a form is received as a copy.

Unreported AE forms for studies where submitting individual forms is configured are counted when the following conditions apply:

When you select the study logo in the landing page, the study start page loads, which contains the following icons that give access to different features, or enable you to view information about the study:
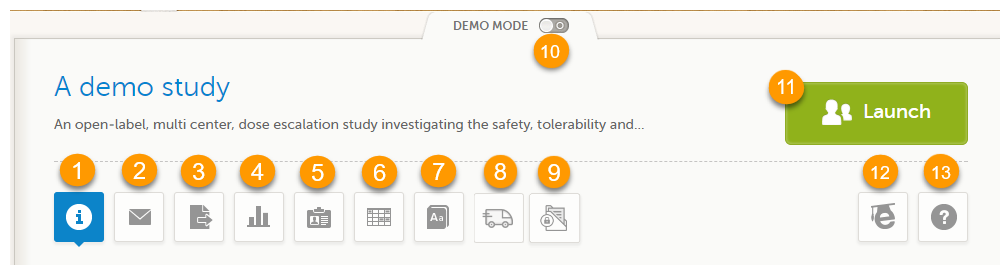
1. Study status
2. Messages
3. Data Export
4. Metrics and Viedoc Reports
5. Roles
6. Reference data
7. Medical coding
8. Viedoc Logistics
9. Viedoc eTMF
10. Demo mode
11. Launch
12. eLearning / Documentation & Training
13. Support
Notes!
The first page displayed when you select a study is, depending on the status of the mandatory documentation and training materials, as below:
| Important! All the mandatory materials must be "Read & Understood" and signed before you can launch the study. You might be able to launch the study in demo mode, depending on the study settings performed by the Study Manager. |
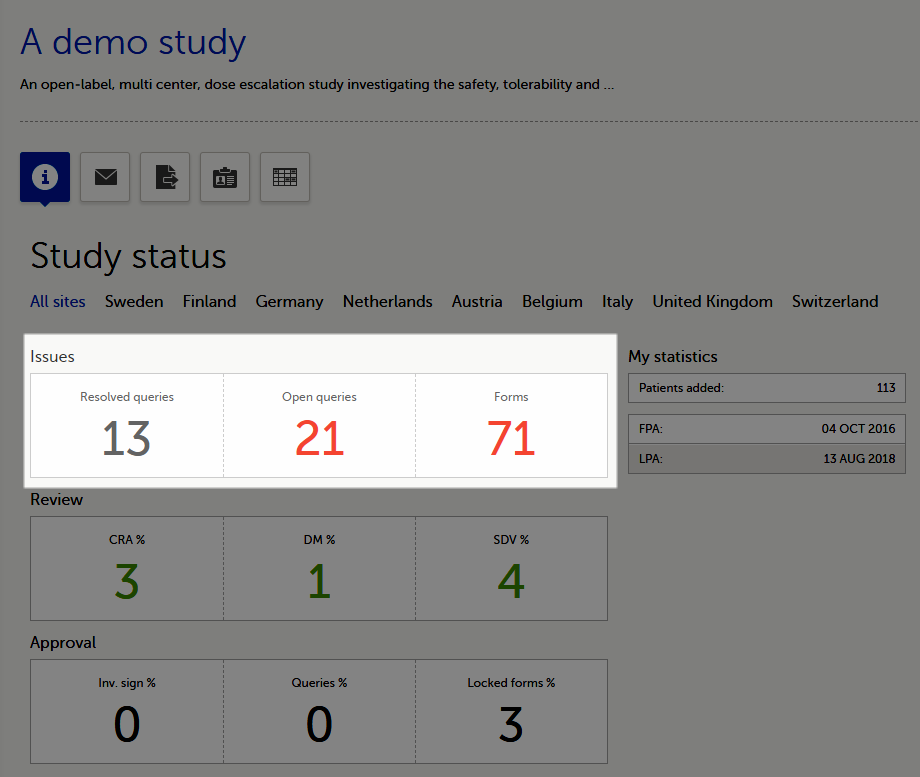
The Study status page is the first page that is shown when accessing a study, if you do not have any mandatory documentation and training material that needs to be signed. This page gives you an overview of the progress of the study - on study, country and/or site level (depending on which sites you have access to):
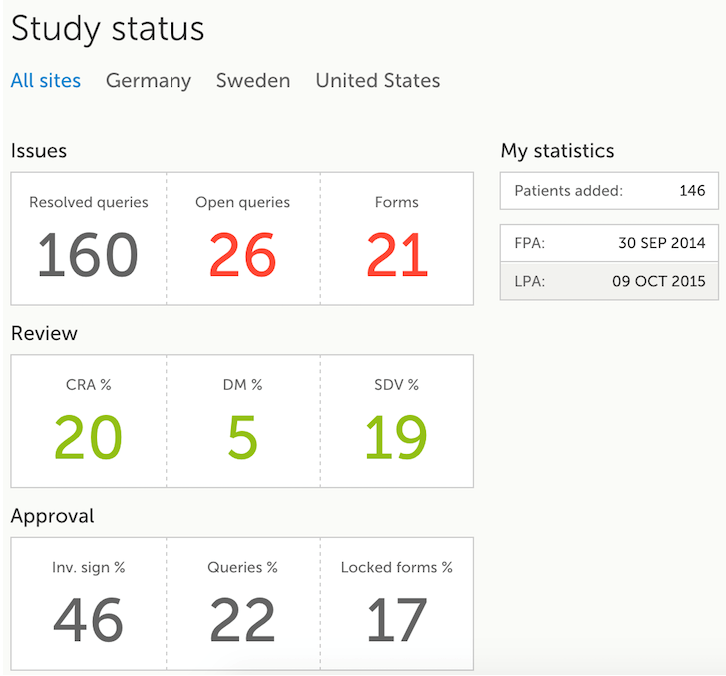
You can filter the displayed data for country or site by selecting the name of the country or site:
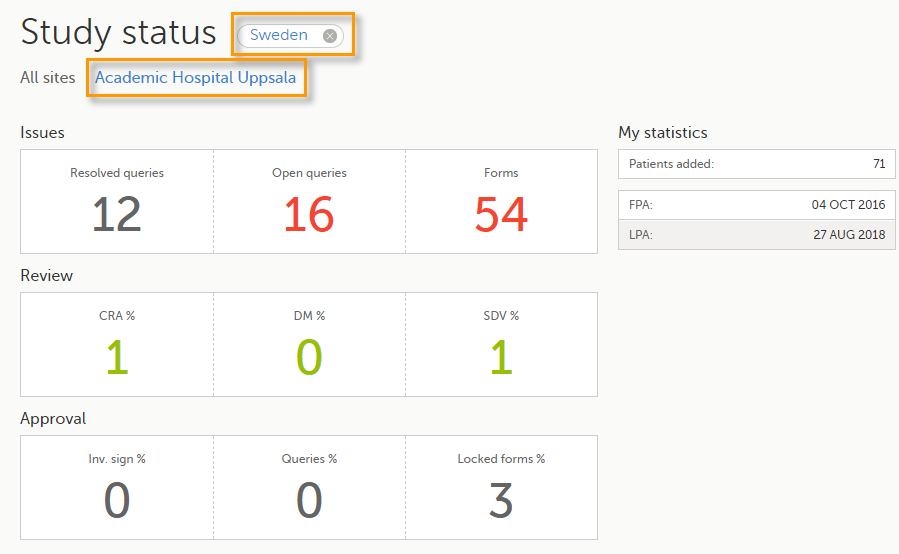
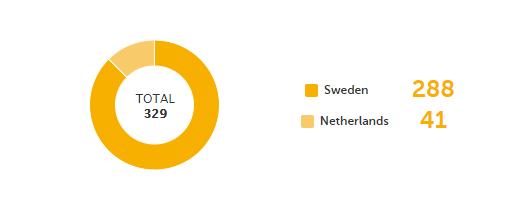
The following statistical information is provided, for the selected site(s):
Note! For resolved and open queries, this includes only manual and validation queries, not missing data queries. For resolved queries, the following statuses are included: Resolved, Rejected, Approved, and Closed.
Note! All the numbers reflect the data entered in the selected operation mode (demo or production), that is, if demo mode is selected, then the numbers reflect only the data entered in demo mode.
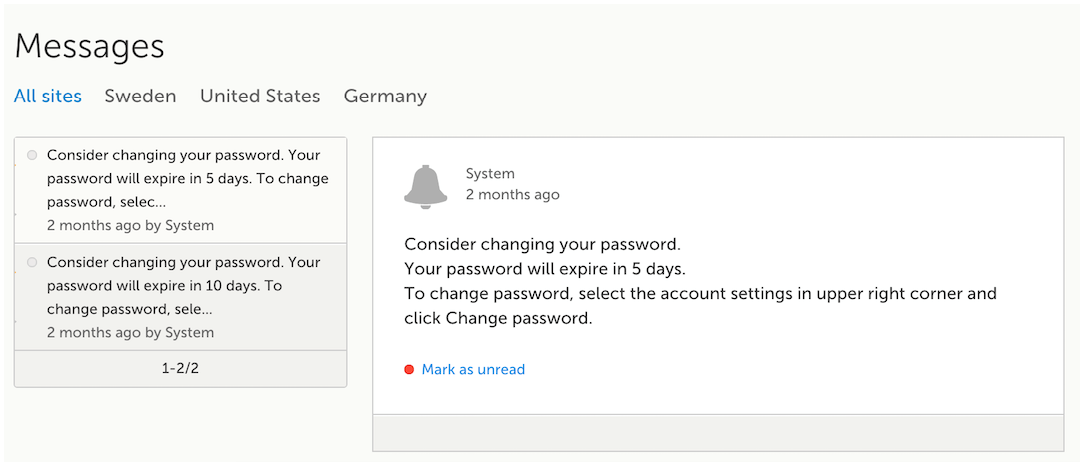
A message can either be a system message (such as notifications on password expiration), a study message (such as eCRF changes - for more information, see Approving eCRF changes, or other notifications according to the study configuration).
In the message window, a blue dot indicates a study-specific alert, a yellow dot indicates a form change requiring approval, and a red dot indicates an expiring password.
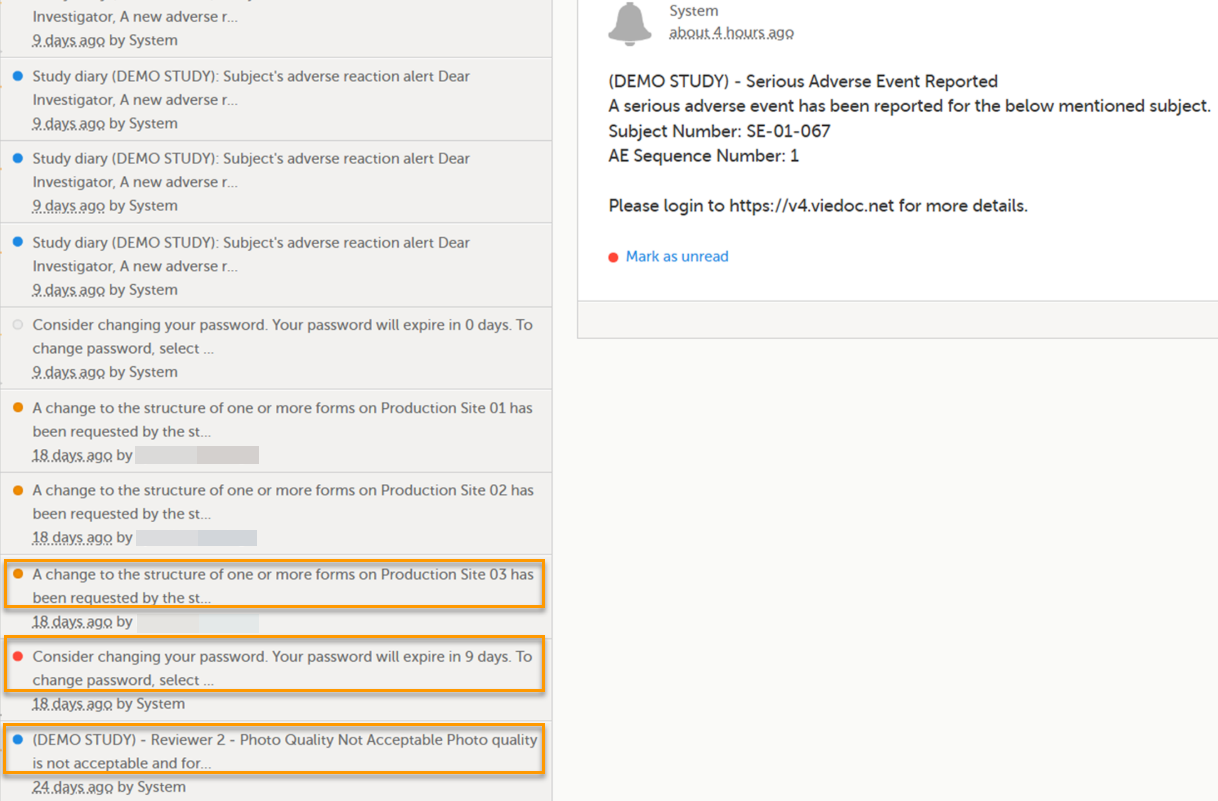
An indicator in the top bar of the application indicates whether you have unread messages.
 Alert messages
According to the study configuration, you can receive alert notifications about important occurrences in the data. (For example, in case of a Serious Adverse Event). Alert notifications can be received in the Messages page and as an email.
Depending on the configuration/study setup, the email might have the PDF of the form that triggered that alert as an attachment.
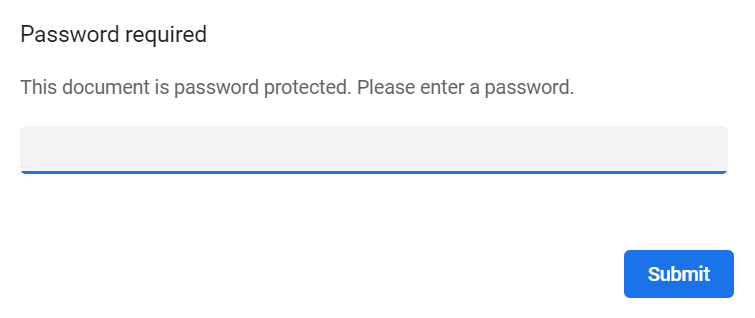
If the option to enable password protection for the alert email attachments has been selected for your study, you should receive a password to enter to open the attachments. The password is provided by your Study Manager.
When you receive an email copy of the alert message with a password-protected attachment, when you open the file you will see the pop-up below where you can enter your password:
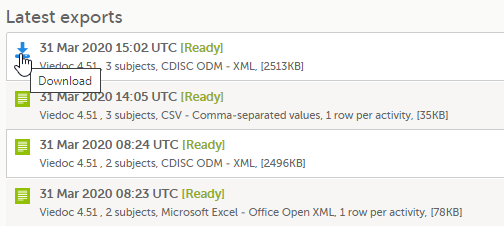
The Data export page enables you to review and download study data in the following formats:
Note! Data export might not be available to all users.
For more information about data export and preview, see Exporting data.
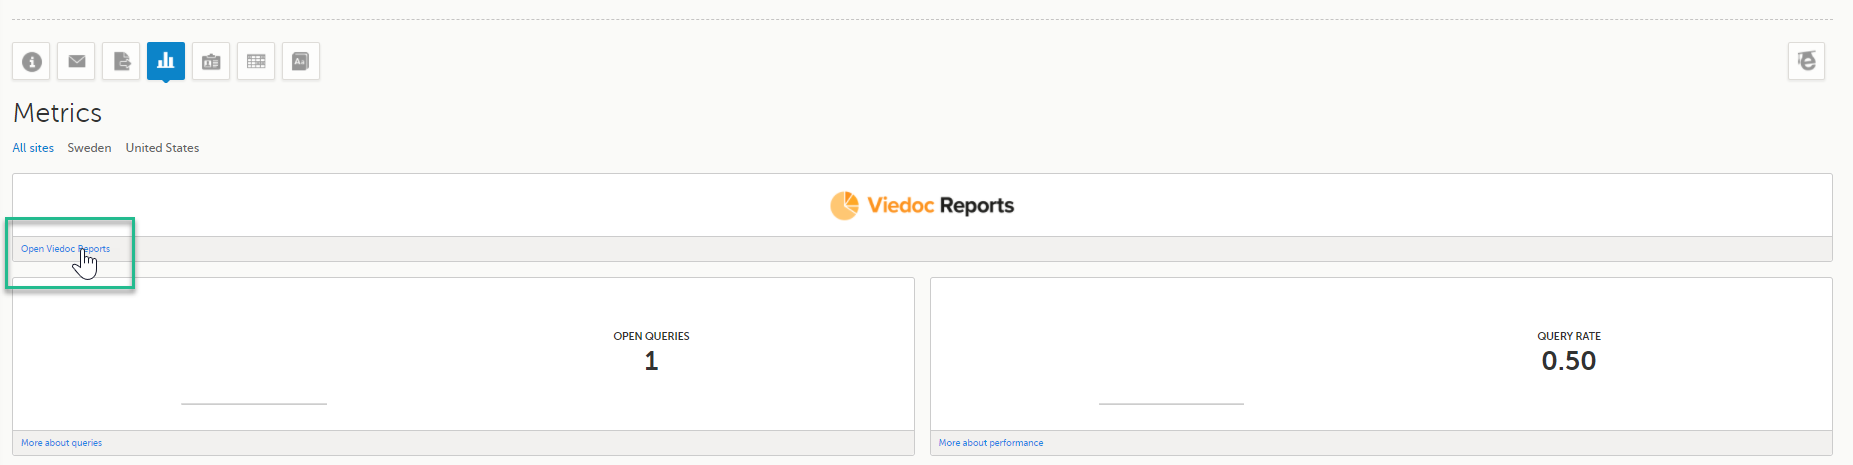
The Metrics page gives an overview of the quality of data in terms of open queries and missing data.
Note! Metrics might not be available to all users.
For a detailed description, see Metrics.
If Viedoc Reports is included in the study license and enabled, it is accessed from the Metrics feature. For more information, see Launching Viedoc Reports.
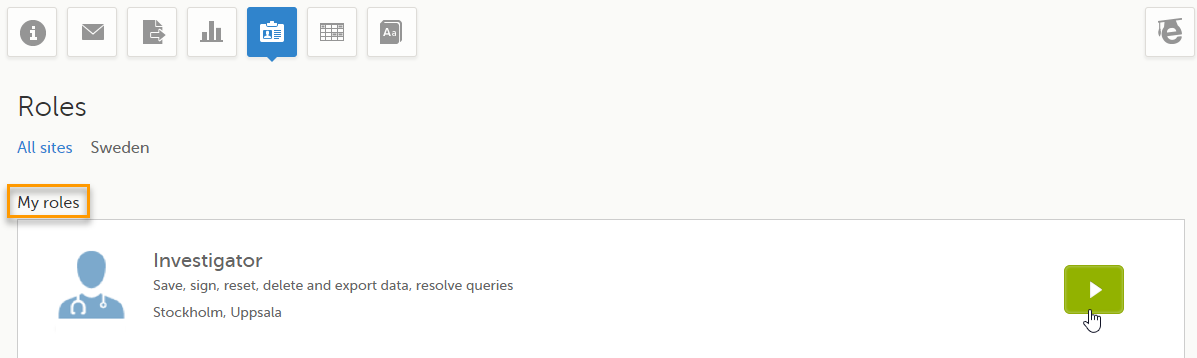
Note! The Roles page is only available for users with special permission to view roles, as per the study design.
The Roles page provides information on:
Under My roles you can see the roles that you have in the respective study:
The following information is displayed (with examples):
By selecting the green arrow button to the right, you will be directed to the Selection page. This is equivalent to selecting the Launch button.
Here you can see a list of all the roles and the respective user(s) for the site(s) you have access to:

To see user details of each role, select Show log. The log displays:
*date and time in Coordinated Universal Time (UTC) time zone
For each study, you can download user logs in PDF and Excel format with information about all users and roles for the sites you have access to.The generated file reflects the country/site selection in the language you have currently set in Viedoc.
Notes!
You can generate the log for the country/site selection in your current Viedoc language by selecting Generate a PDF file / Generate an Excel file at the bottom of the study start page:

Once the user log is generated you can:

The Log of users and roles PDF contains the following chapters:
The User administration log contains information about all users and roles for the sites you have access to, with the following sheets:
When you select the reference data icon, the list of available reference data source-scope combinations is displayed. From here you can open the reference data editor. For details see Working with reference data.
Note! Reference data might not be available to all users.
The medical coding feature allows you to code reported events like Adverse Events, Medical History and Concomitant Medications. When you select the medical coding icon, the page displays metrics regarding medical coding. There is one set of metrics for each medical coding scope available.
Note! Medical coding might not be available to all users.
For more information about medical coding, see Medical coding.
Viedoc Logistics is the interface for managing the supply of your study. A valid license is required to use Viedoc Logistics.
For more information about Viedoc Logistics, see Viedoc Logistics User Guide.
Viedoc eTMF is a digital repository for capturing, managing, sharing, and storing essential documents.
For more information about Viedoc eTMF, see Viedoc eTMF User Guide.
If enabled, a study can operate in demo mode. You can easily switch between demo mode and production mode using the DEMO MODE switch:

The DEMO MODE switch is only visible when you have access to both production and demo mode.
The demo mode is clearly indicated with demo icons. Make sure you do not enter any real data in demo mode!
See also the video tutorial Activate demo mode.
Select the Launch button to access the patient data and electronic Case Report Forms (eCRFs). The button is only visible when you have access to the study in Viedoc Clinic.
If multiple roles are assigned to you in this study, you are first prompted to select the role you would like to use to access the study.
If you have mandatory documentation pending to be read and signed, this is the first page that is displayed when you access the study.
Under this section, you have access to several eLearning programs and various documentation, depending on the roles that have been assigned to you. For details about the user documentation and certificates, see Documentation & Training.
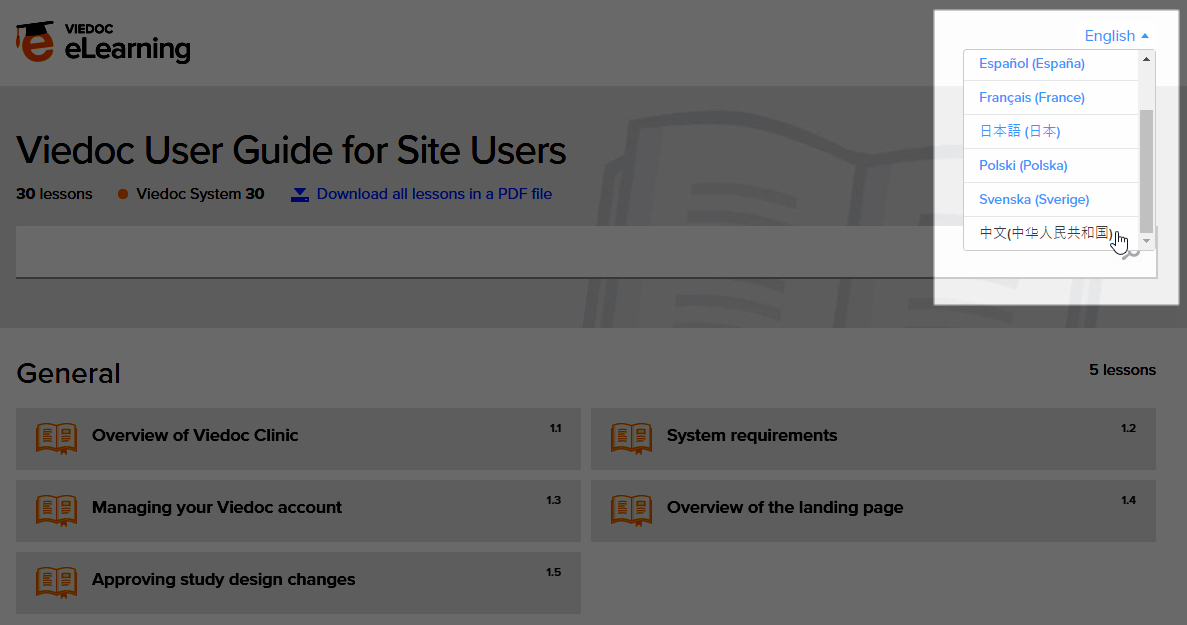
The Viedoc Clinic User Guides are available in the following languages:
To change the language of the Viedoc User Guide, once opened, select the language from the upper right corner, as illustrated below:
Tip! The various lessons in the Viedoc eLearning can easily be compiled into a PDF and printed if you need to store them in the investigator binder.
Select the support icon to open a pop-up with contact details to the users that can help you in case you need support. Normally you will find the contact details of the Monitor here, as the Monitor typically is the first point of contact to the site.
The Selection page displays all the subjects from all the sites you have access to:
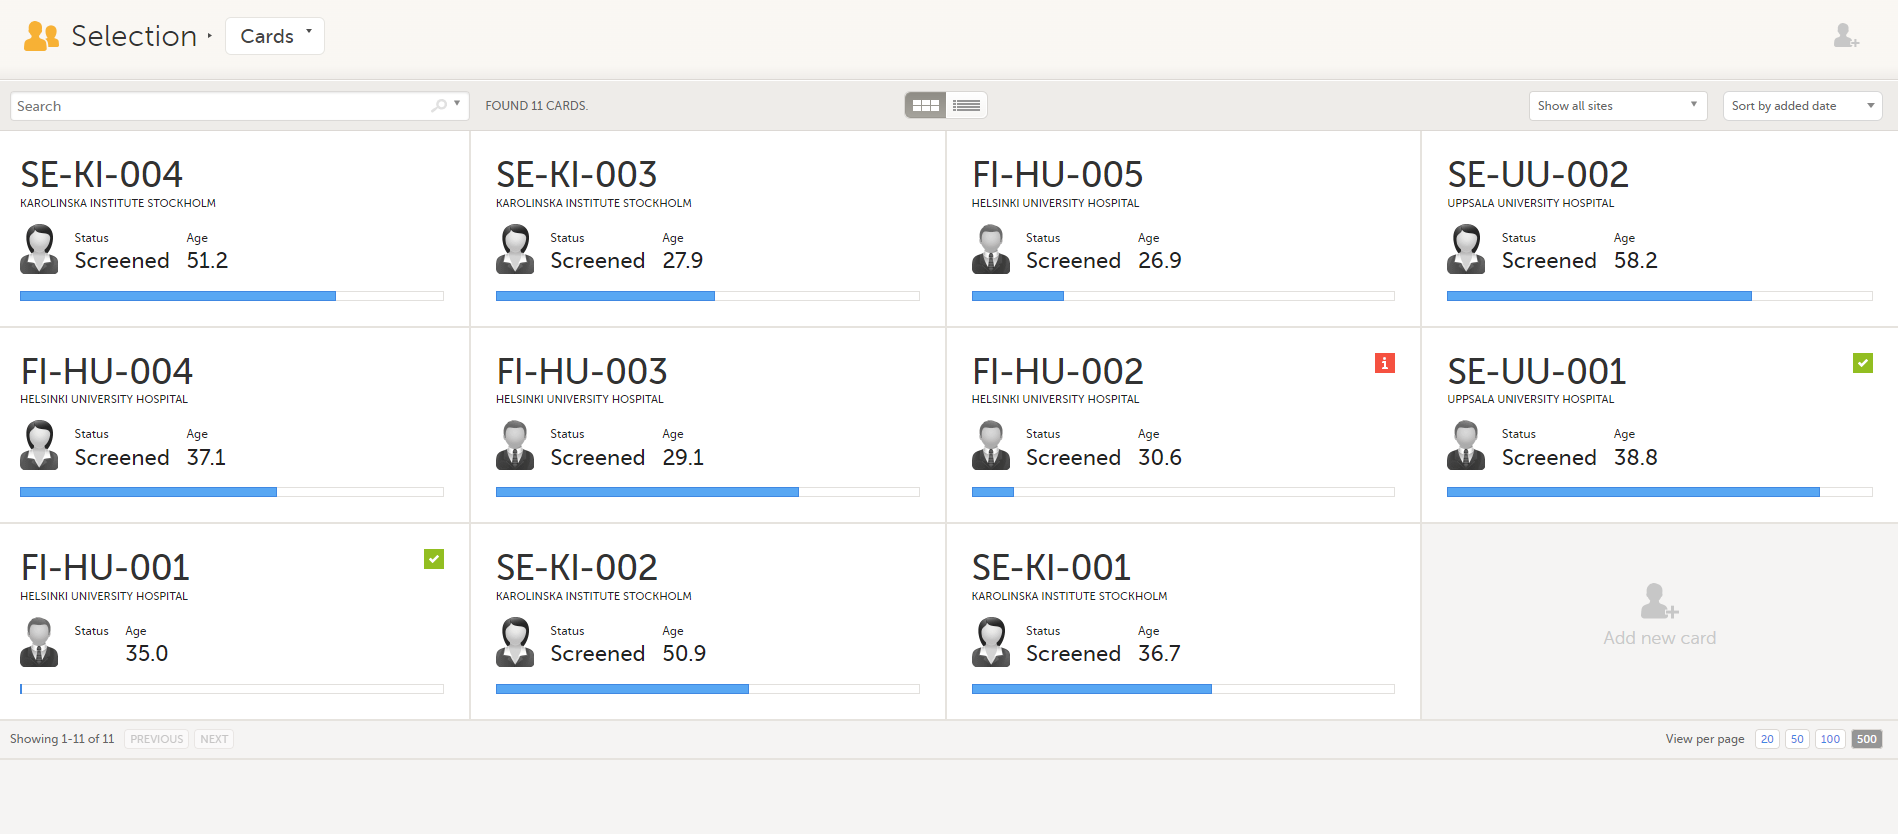
In the default view, each subject is represented by a card. Depending on your study setup, the Selection page can be displayed in several ways. See Views of the Selection page.
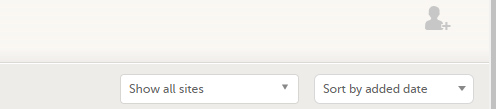
In the top right corner of the Selection page, you have dropdown menus to sort and filter the view. The options depend on the selected view. The selected sorting will be kept throughout your session.
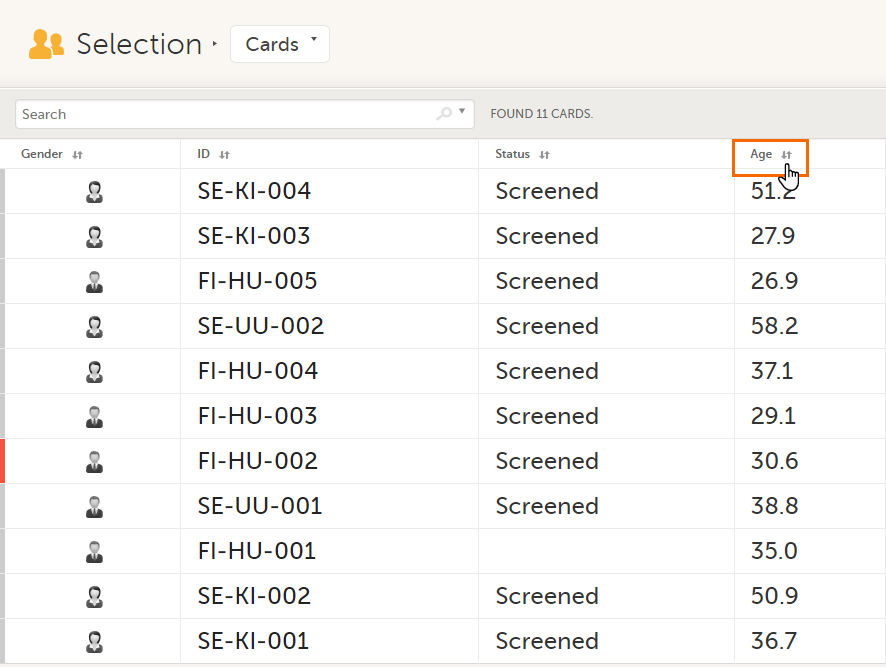
In the table view of the Selection page, you can also sort by column in descending or ascending order by selecting a column header with the arrow symbol. Lit-up arrows indicate the selected sorting in orange:
Notes!
To search for a specific subject or any other information collected for a subject, you can type the text you are looking for in the search field:
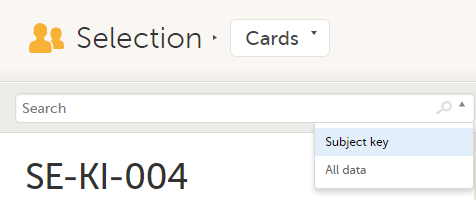
The system will return the subjects with the information sought that has been entered in the Case Report Form (CRF).
Subject key and All data are two filters that can be applied to the search.
Note! For faster searches, we recommend that you select the Subject key filter.
| Important! If your search returns nothing, it could indicate a problem with your study design. Please contact your Professional Services representative to assist you. |
The Selection page displays a number of icons explained in the following table:
| Icon | Description |
|---|---|
 |
Issue - at least one open query and/or missing data |
 |
Task - there are tasks to be completed, the number indicates the number of tasks |
 |
Complete - all initiated events have been completely filled in |
 |
Signed - all data that is possible to sign has been signed |
 |
Read-only - the card is being open for edit by another user. Note that the subject card can still be accessed for review or SDV by a user without edit permissions, for example a monitor or a data manager. |
 |
In progress - the event is initiated but not completed This icon is only shown when none of the other status icons apply |
 |
Locked - the data in all forms of the event is locked |
Note! The icons showing depend on your user role permissions.
Depending on the study setup, the Selection page looks a bit different.
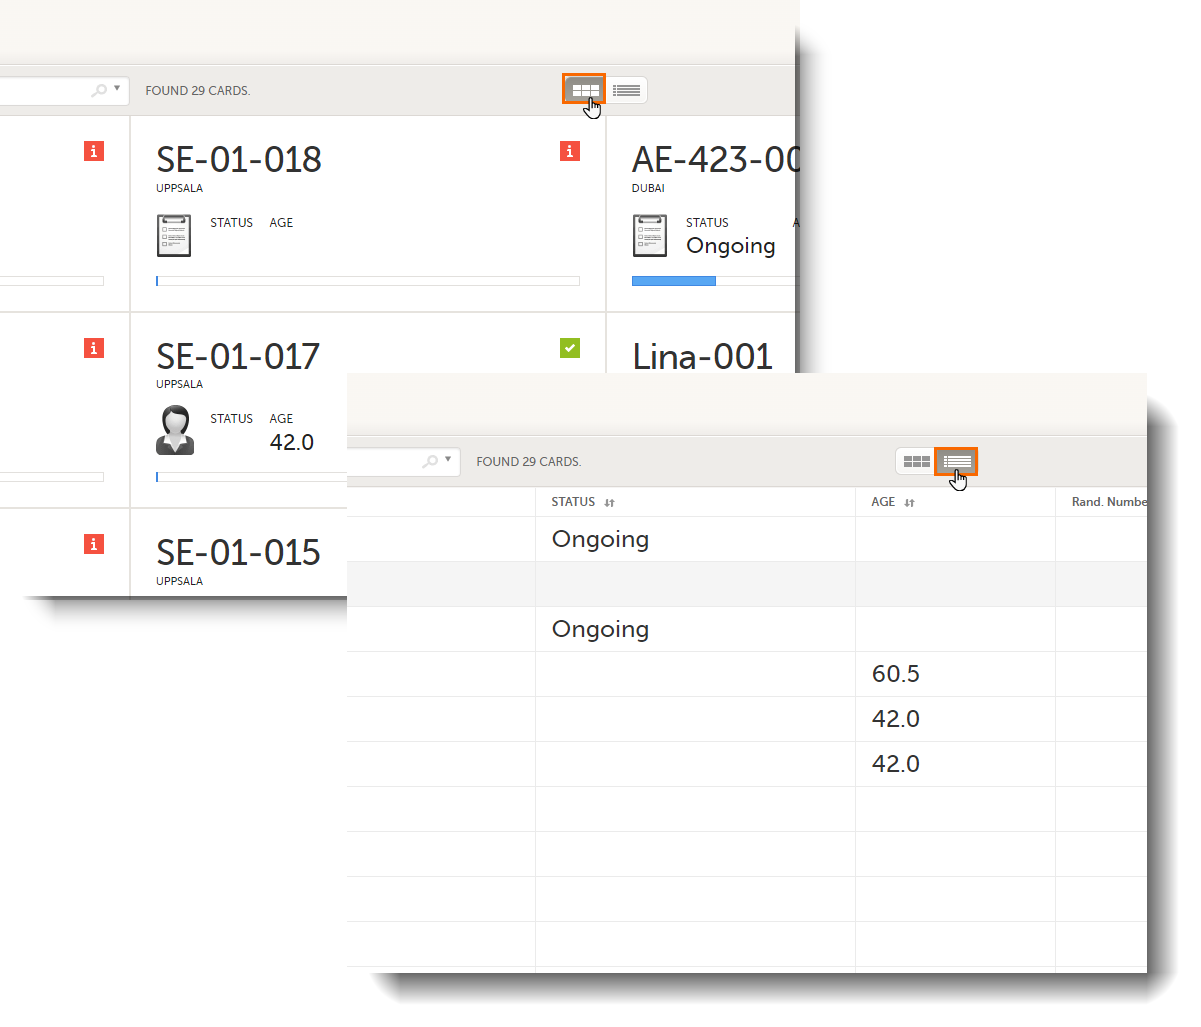
In the Cards view, you can see all the subjects from all the sites you have access to. Select to display the subject cards side-by-side (default) or in a table:
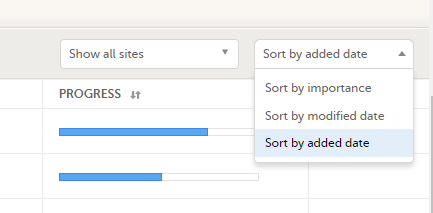
The subjects are sorted by added date, where the most recently added subject is displayed first. You can sort the subject cards by selecting an option in the upper right corner:
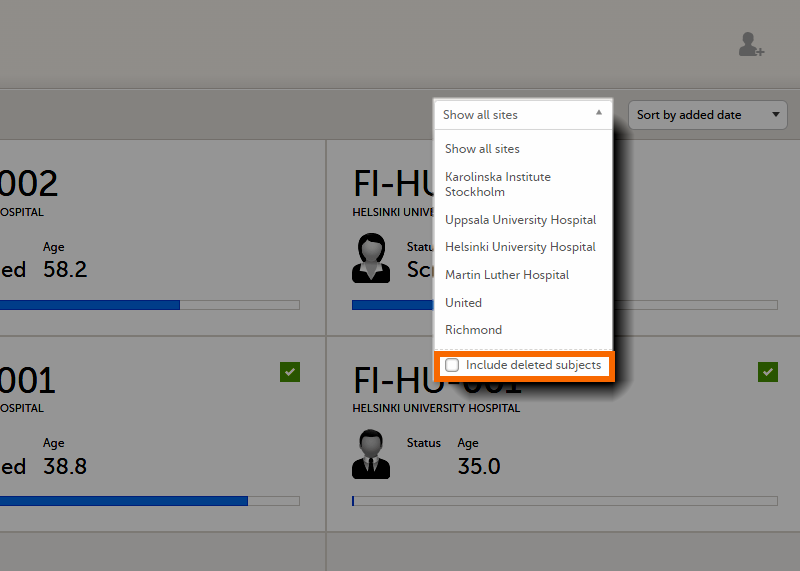
To display only the subjects for a particular site, select the site from the dropdown list. Click Include deleted subjects at the bottom of the dropdown menu to display deleted subjects:
Each card provides subject information as per the respective study design:
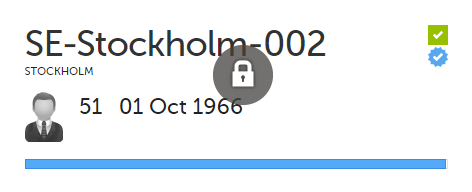
If all the forms were locked (typically by the Monitor), this is shown with a padlock icon on the respective subject card:
Note! The Selection page does not consider the role visibility except for task count; therefore, the subject status reflects the general status of the subject in the study, regardless of the user who has work to be performed. The subject details view reflects the subject status considering the role visibility. This could result in a subject status where a subject could have a green check mark or be locked, while in the Selection page it is not (due to some other user role having unfinished work or forms to complete on the respective subject). See Entering and Editing data for more information on the subject details view.
In the Issues view, you can see the existing issues listed in a table:
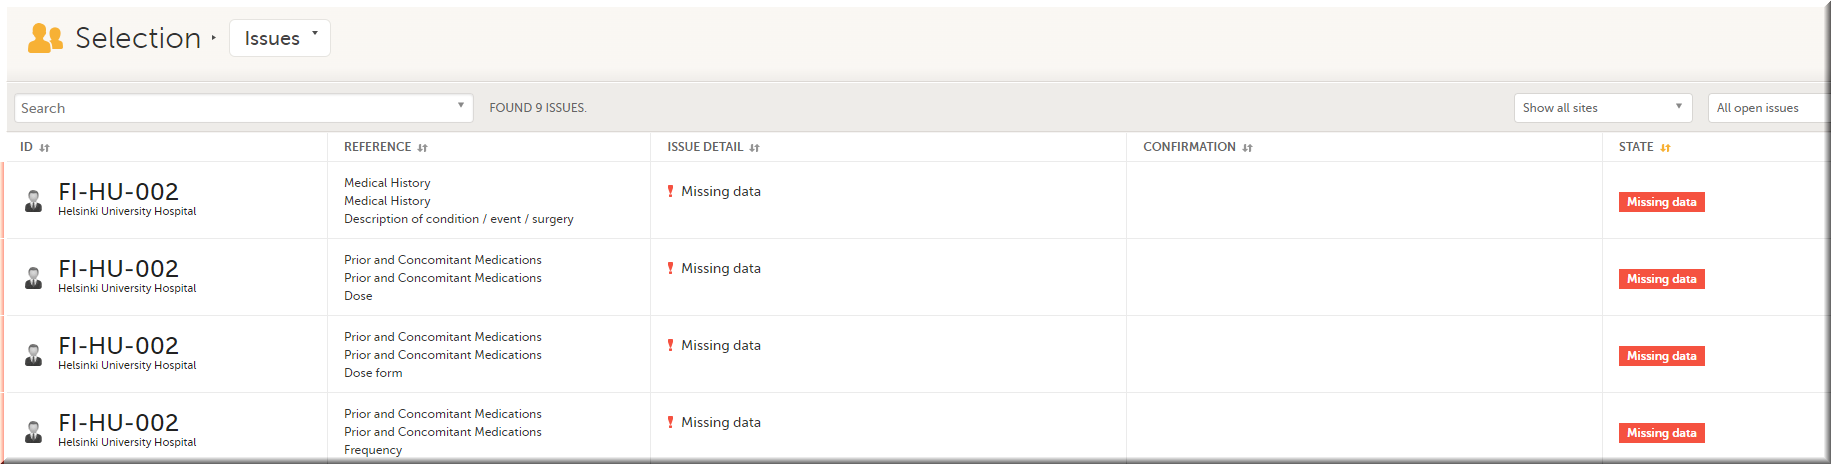
Click any row to open the form where the issue was raised:

Close the form to go back to the Issues list.
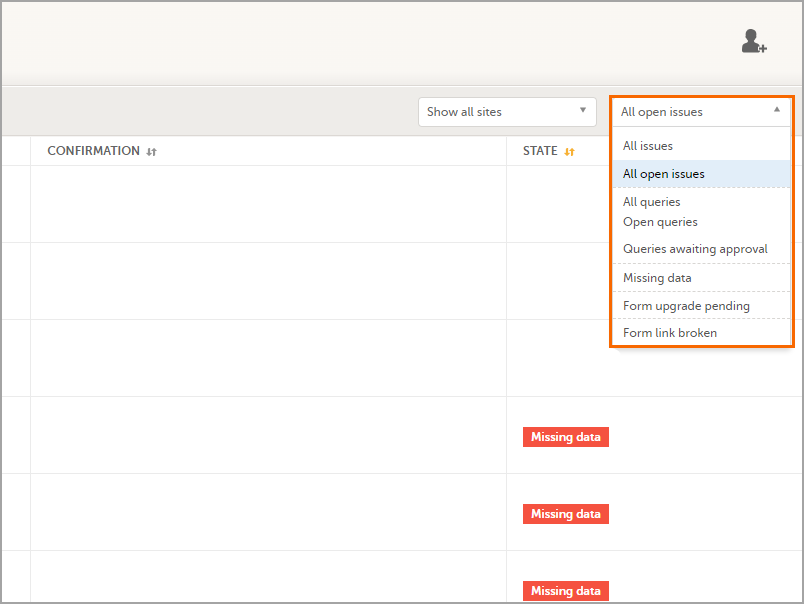
You can filter the Issues list using the dropdown lists in the upper right corner of the page:
In the Viedoc Me account view, you can monitor and follow up on the subjects' expected Viedoc Me event submissions.
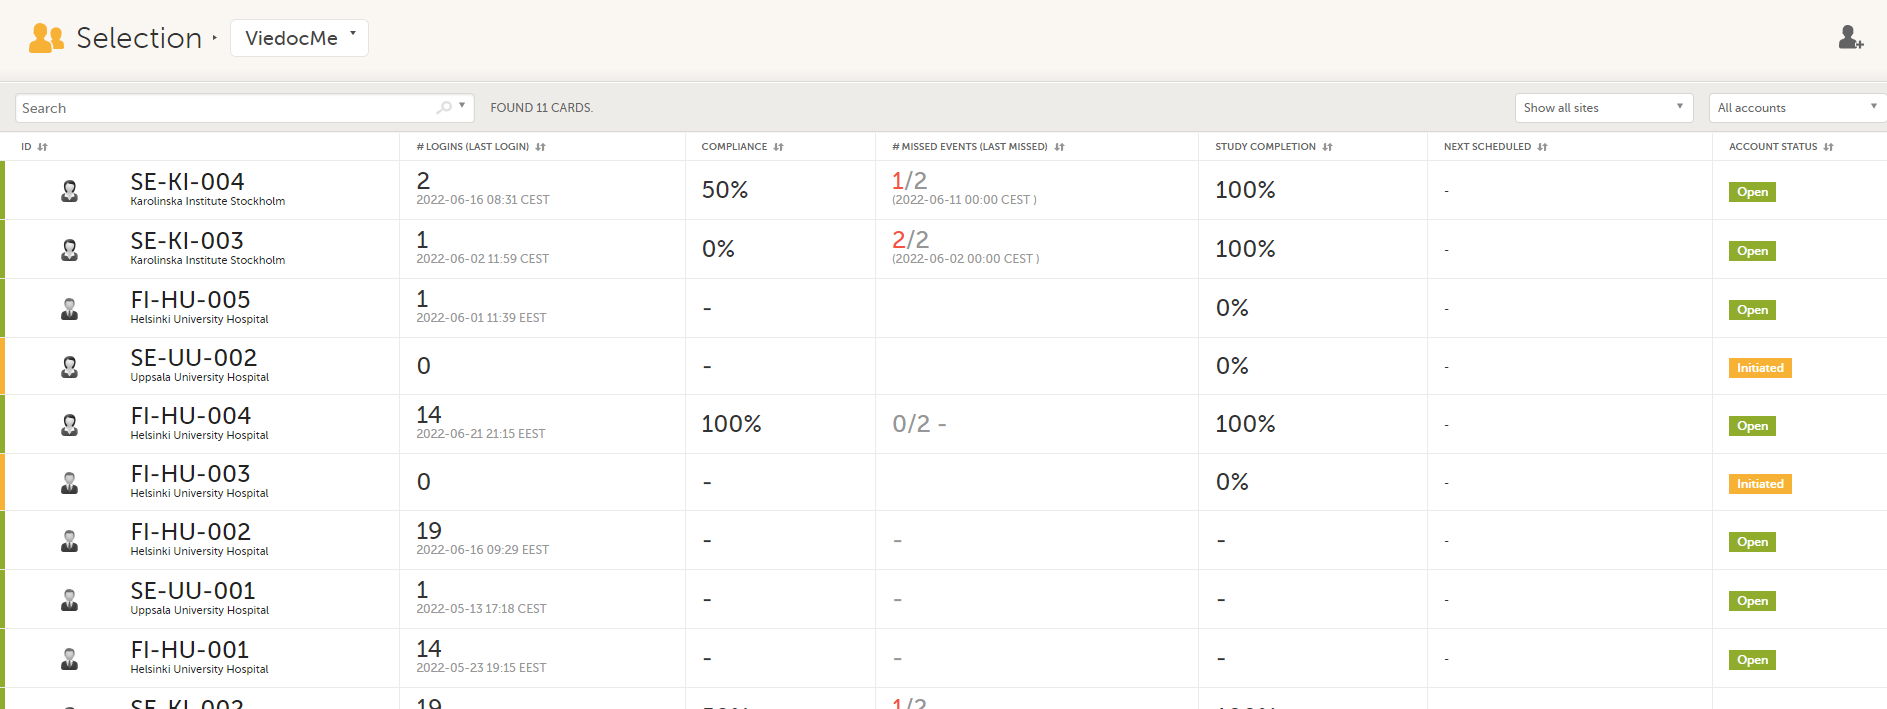
For each subject, the following information is listed:
In the Events view, you can see the status of each event for each subject listed in a table.
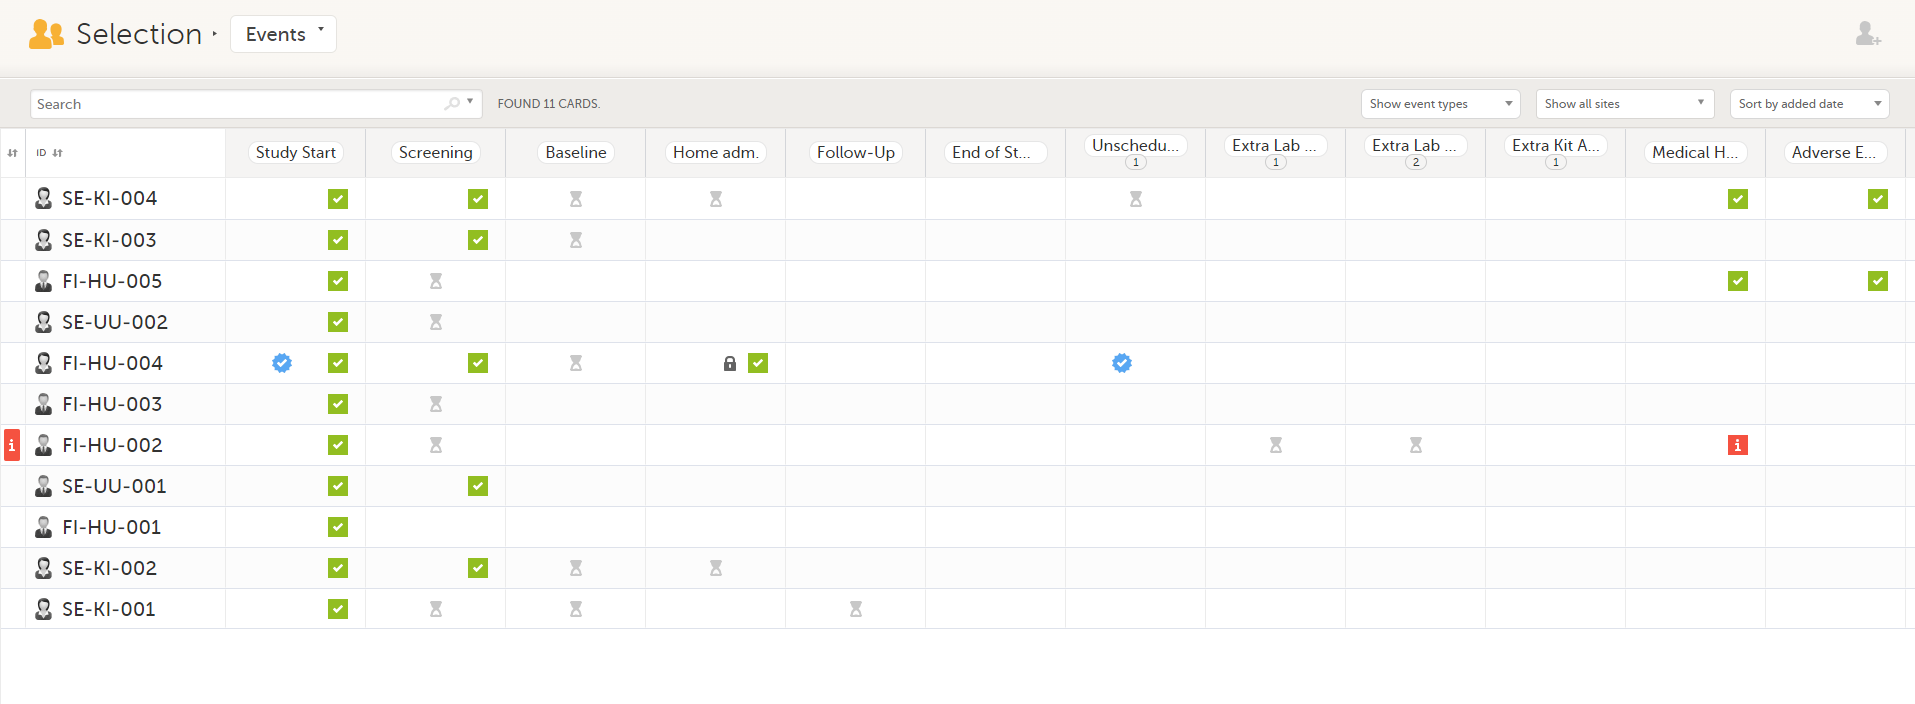
The first column indicates if there are issues/tasks in any of the subjects' events. If there are both issues and tasks for a subject, then issues [ i ] are shown in the column.
Select any cell to go to the event in the Details page:

Click back in the browser to return to the Events view.
Select an empty cell to view the subject's latest event.
The list of subjects can be filtered using the dropdown lists in the upper right corner of the page:
Note! On the selection page, in the Events view, the event name (as set in the Study event settings in the study design) is displayed. If there is a recurring event, a counter is shown under the event name, for example: Follow up 1, Follow up 2.
To add a new subject:
| 1 |
Make sure that you have selected a site (center) from the sites dropdown list.
|
| 2 |
Complete the form and select Save changes on the top right side of the page. A new subject is now added. |
Note! Only user roles with editing permissions for the study start event form can add a new subject. If you do not have editing permissions, you cannot select Add new card and no icon is visible in the top right side of the page.
See also the video tutorial Add and select subjects.
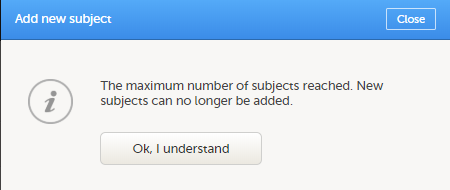
If you receive the following message, the maximum number of subjects that is configured for your site has been reached, and you cannot add new subjects. If you need to add a new subject anyway, contact your Study Manager.
Note! As a Viedoc Clinic user, you need a special permission to view the metrics.
The metrics feature gives an overview of the quality of data in terms of open queries, missing data and overall site performance. You can filter the displayed data by country and site.
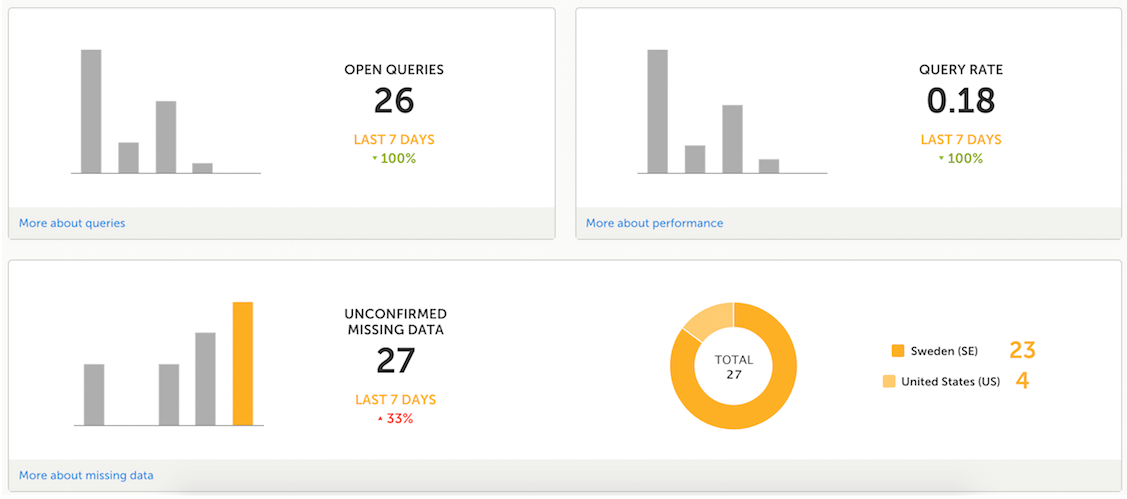
The metrics graphs depict:


Click More about [...] to open a page with detailed metrics about queries, performance or missing data. All detailed metrics pages include filtering possibilities and a bar to show the review status.
Note! The number of open queries differs between the Queries page and the Performance page. The Performance page also includes queries with the state Removed.
If you have access to Viedoc Reports, you can open it from the Metrics feature.
The Queries page includes filtering possibilities and a bar to show the review status for the entire study.
For detailed information about the query process in Viedoc, see Queries overview.
You can filter the data by selecting from the drop-down lists in the top of the page:

Based on the selected filter, the following information is provided:
Queries - a diagram that shows the graphical distribution, the total number as well as the percentage of:
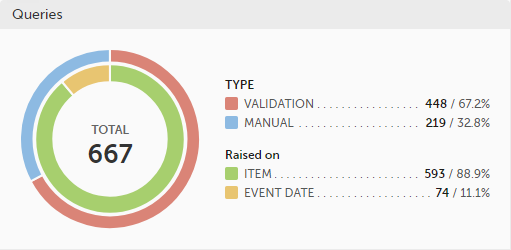
The number in the center of the circle shows the total number of queries.
Note!
For detailed information about query states and pro, see Queries overview.
Query state - a pie chart shows the queries distribution based on the query state:
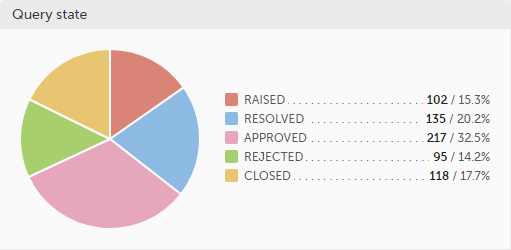
For detailed information about query states and process, see Queries overview.
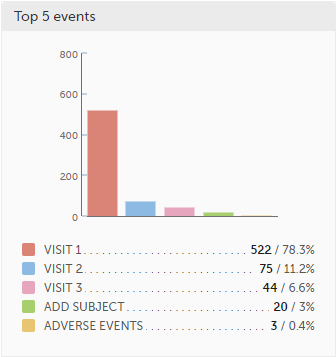
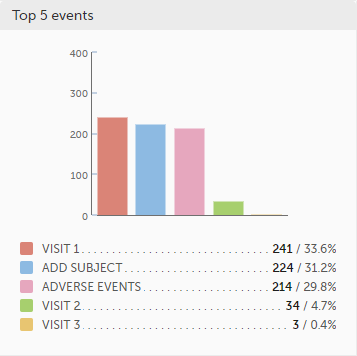
Top 5 events - a column bar shows the top five events with the highest number of raised queries (numeric and percentage). The legend of the graph displays the event name.
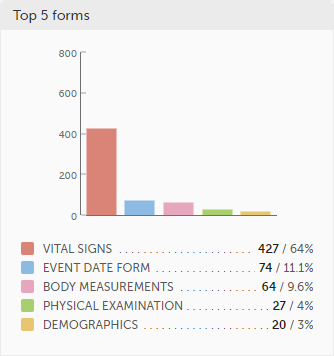
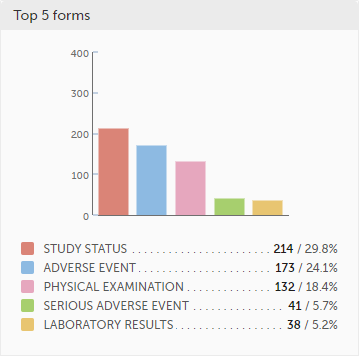
Top 5 forms - a column bar shows the top five forms with the highest number of raised queries (numeric and percentage). The legend of the graph displays the form name.
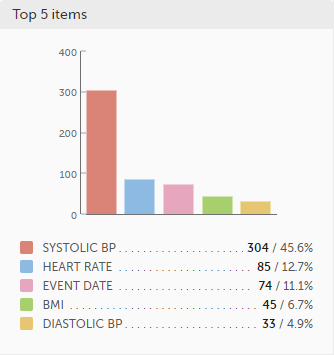
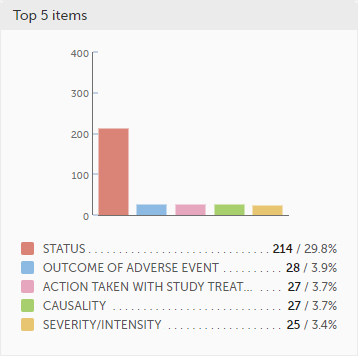
Top 5 items - a column bar shows the top five items with the highest number of raised queries (numeric and percentage). The legend of the graph displays the item name.
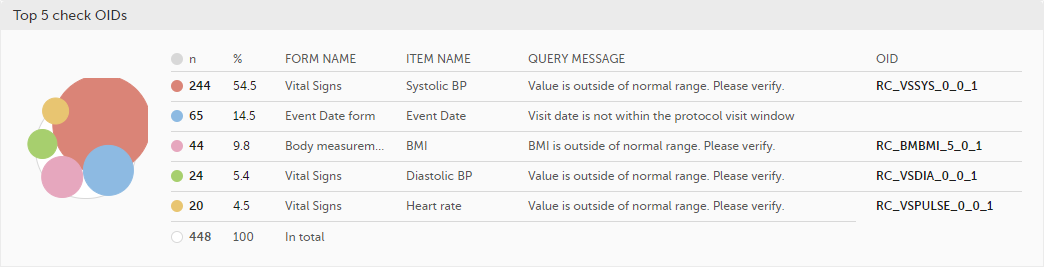
Top 5 check OIDs - top five most triggered edit checks are displayed in a table including the actual number, percentage, Object Identifier (OID), form name as well as the query message.
The last row of the table shows the total number of queries.
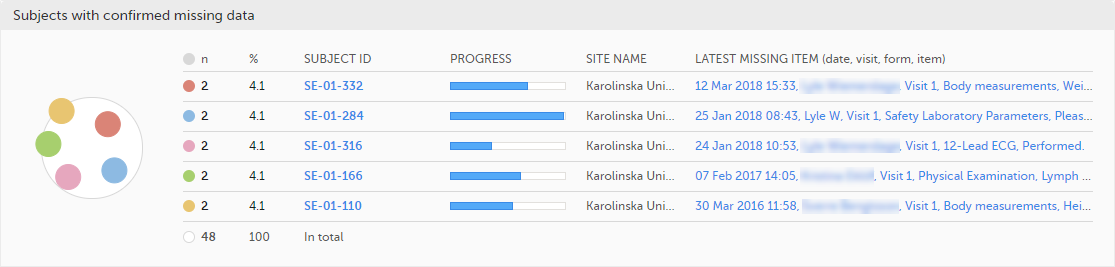
Top 5 subjects (raised queries) - top five subjects that have the highest number of queries with current status raised are displayed in a table including the actual number, percentage, subject ID, study progress, site name as well as date of when the latest query was raised, name of who raised the query as well as the actual query message.
The last row of the table shows the total number of subjects.

For detailed information about query states and process, see Queries overview.
In the bottom of the Queries details page you have the options to:
The Performance page allows you to compare data from:
With data in one of the following:

Based on the comparison selection the graphs will show statistics about:

Subjects - detailed data on the subjects on the selected site(s) (in orange) and compared site(s) (in gray):
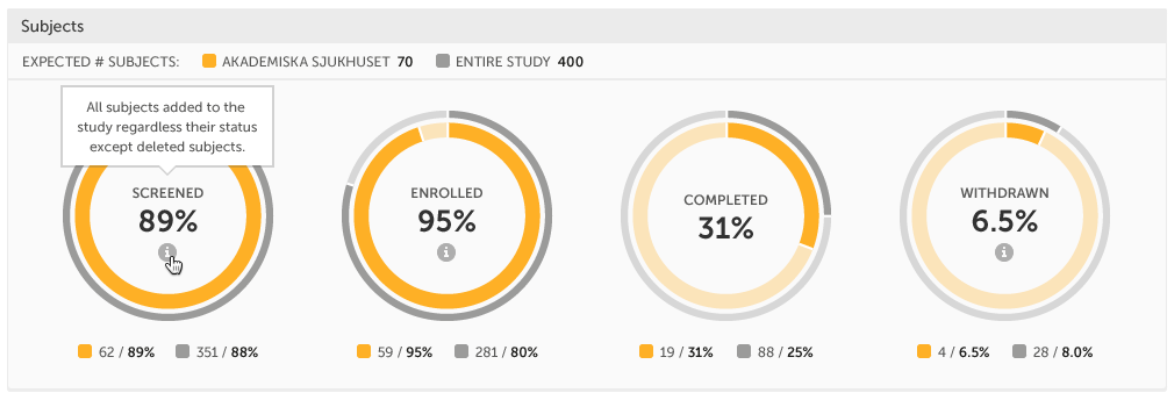
The conditions for the following subject statuses are defined in the study design (in Viedoc Designer under Study Settings > Subject status):
Tip! If there is an i symbol inside of a ring graph, you can hover over it to see a description of the status.
Queries - detailed data on queries on the selected site(s) (in orange) and compared site(s) (in gray):
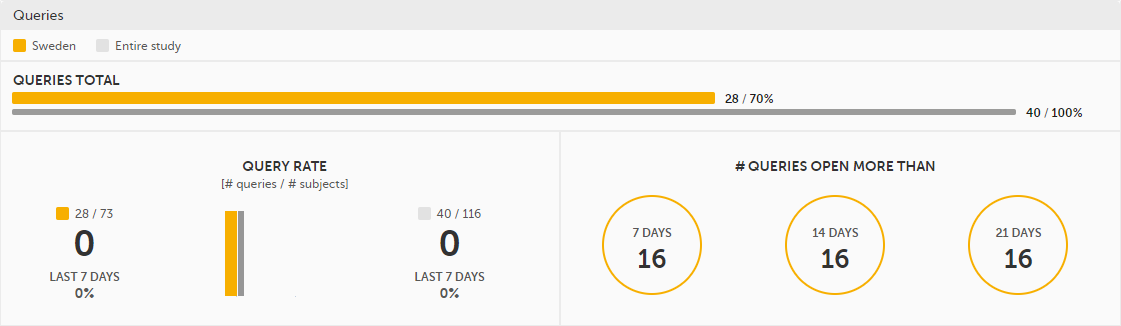
For detailed information about query states and process, see Queries overview.
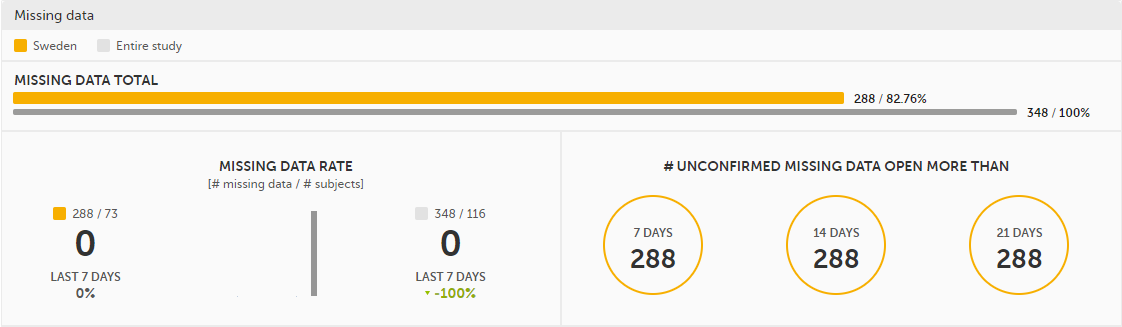
Missing data - detailed information on missing data (both confirmed and unconfirmed data) on the selected site(s) (in orange) and compared site(s) (in gray):
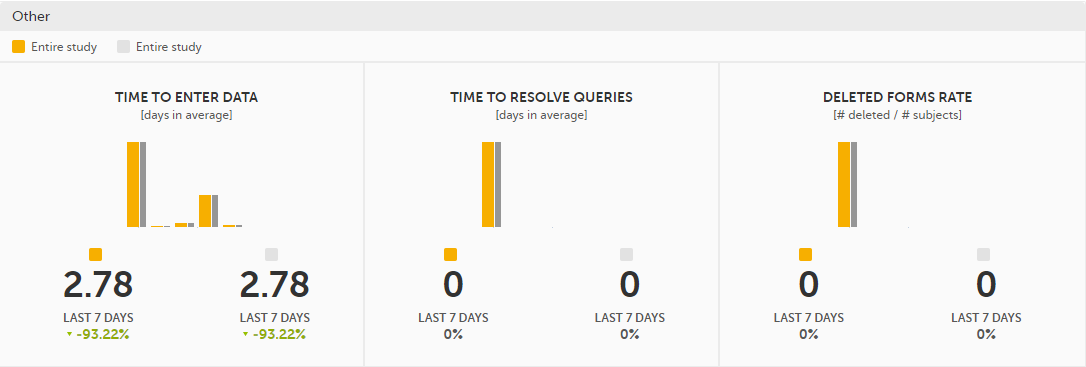
Other - miscellaneous detailed data on the selected site(s) (in orange) and compared site(s) (in gray):
In the bottom of the Performance details page you have the options to:
The Missing data page includes filtering possibilities and a bar to show the review status for the entire study.
You can filter the data by selecting from the drop-down lists in the top of the page:

Based on the selected filter the graphs will show statistics about:
Top 5 events - a column bar shows the top five events with the highest number of items with missing data (confirmed and unconfirmed), both numeric and percentage. The legend of the graph displays the event name.
Top 5 forms - a column bar shows the top five forms with the highest number of items with missing data (confirmed and unconfirmed), both numeric and percentage. The legend of the graph displays the form name.
Top 5 items - a column bar shows the top five items with missing data (confirmed and unconfirmed), both numeric and percentage. The legend of the graph displays the item name.
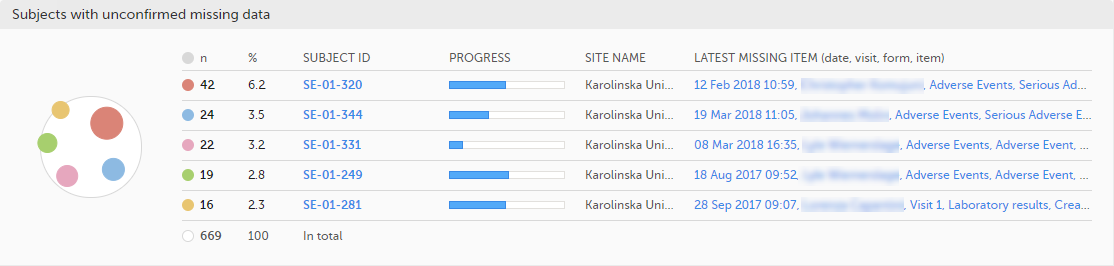
The top 5 subjects that have the highest level of confirmed missing data are displayed in a table including:
The last row of the table shows the total number of subjects with confirmed missing data.
The top 5 subjects that have the highest level of unconfirmed missing data are displayed in a table including:
The last row of the table shows the total number of subjects with unconfirmed missing data.
In the bottom of the Missing data details page you have the options to:
Viedoc offers support for adding centralized reference data to the study, which is automatically populated to the subject forms. When centralized reference data is added to a study, reference values don’t need to be entered individually for each subject and each form.
It is possible to configure different sets of reference data that will be populated to the form based on:
| Term | Definition |
|---|---|
| Reference data source | A source that provides reference data (for example a lab). |
| Reference data scope | A set of measurements that a reference data source carries out, and the parameters that might affect these data. The data in one reference data scope will be populated to one lab data form. One or more reference data scopes can be configured in Viedoc Designer > Global Settings, as set(s) of variables and factors (see definitions below). |
| Factor | A parameter that affects the reference data, for example a subject’s gender. Factors may affect the normal range for a test result. |
| Variable | A specific measurement to be carried out. |
| Target type | Item of a certain type of information that a reference data source can provide (such as range, unit, low/high values) for a specific measurement (defined by a variable). Any number of target types can be defined by the user. |
Reference data sources are configured in Viedoc Admin. Each reference data source is linked to one or more reference data scopes that define the following:
For each reference data source-scope combination, the reference values that should be auto-populated to the forms should be entered in the reference data editor in Viedoc Clinic. This can be done by clinic users that have permission to edit and save reference data.
To make the reference values available for auto-population to the subject forms, the reference values should be published. This can be done by clinic users that have permission to publish the reference data values.
See also the video tutorial demonstrating how to work with reference data in Enter reference data.
Note! You only have access to reference data on the landing page, and to the reference data editor, if you have a role with permission to view, edit and/or publish reference data.
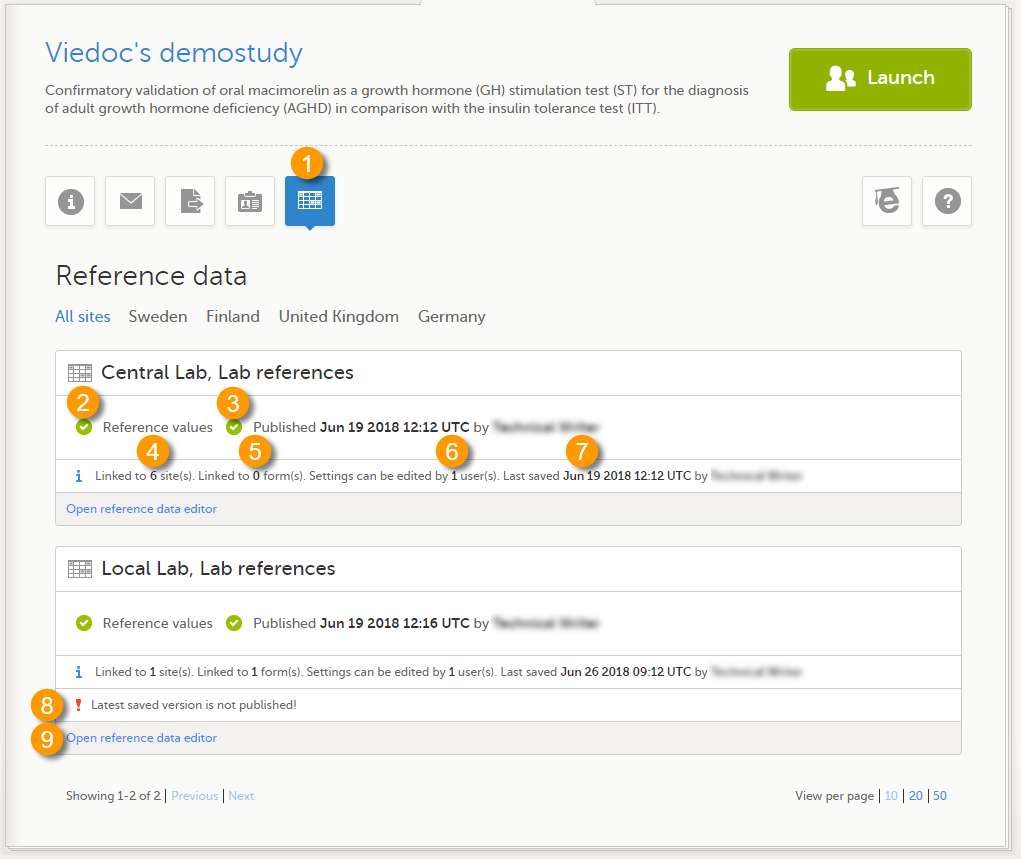
On the landing page, you can view or do the following:
1. Select the Reference data icon to display all the reference data source-scope combinations that are linked to the sites you have access to.
For each reference data source-scope combination, the following information is provided:
2. Status indicator that indicates whether reference values have been entered (green) or whether the fields are still empty (grey).
3. Status indicator that indicates whether the reference values have been Published (including date, time and user who published them) or whether the reference values are Not published yet.
4. The number of sites that the reference data source is linked to. This gives an indication of how many sites are impacted in case the reference values are edited.
5. The number of forms that the reference values have been populated to. This gives an indication of how many forms are impacted in case the reference values are edited.
6. The number of users that have permission to edit the reference values.
7. Name of the user who performed the last changes to the reference values, including date and time.
8. Warning message if the latest saved version was not published.
9. Select Open reference data editor to view or edit the reference data, see The reference data editor.
When you select Open reference data editor on the reference data section of the landing page, the reference data editor opens for that specific reference data source-scope combination. Depending on the user rights that are connected to your role, you can view as read-only, edit and/or publish the reference data.
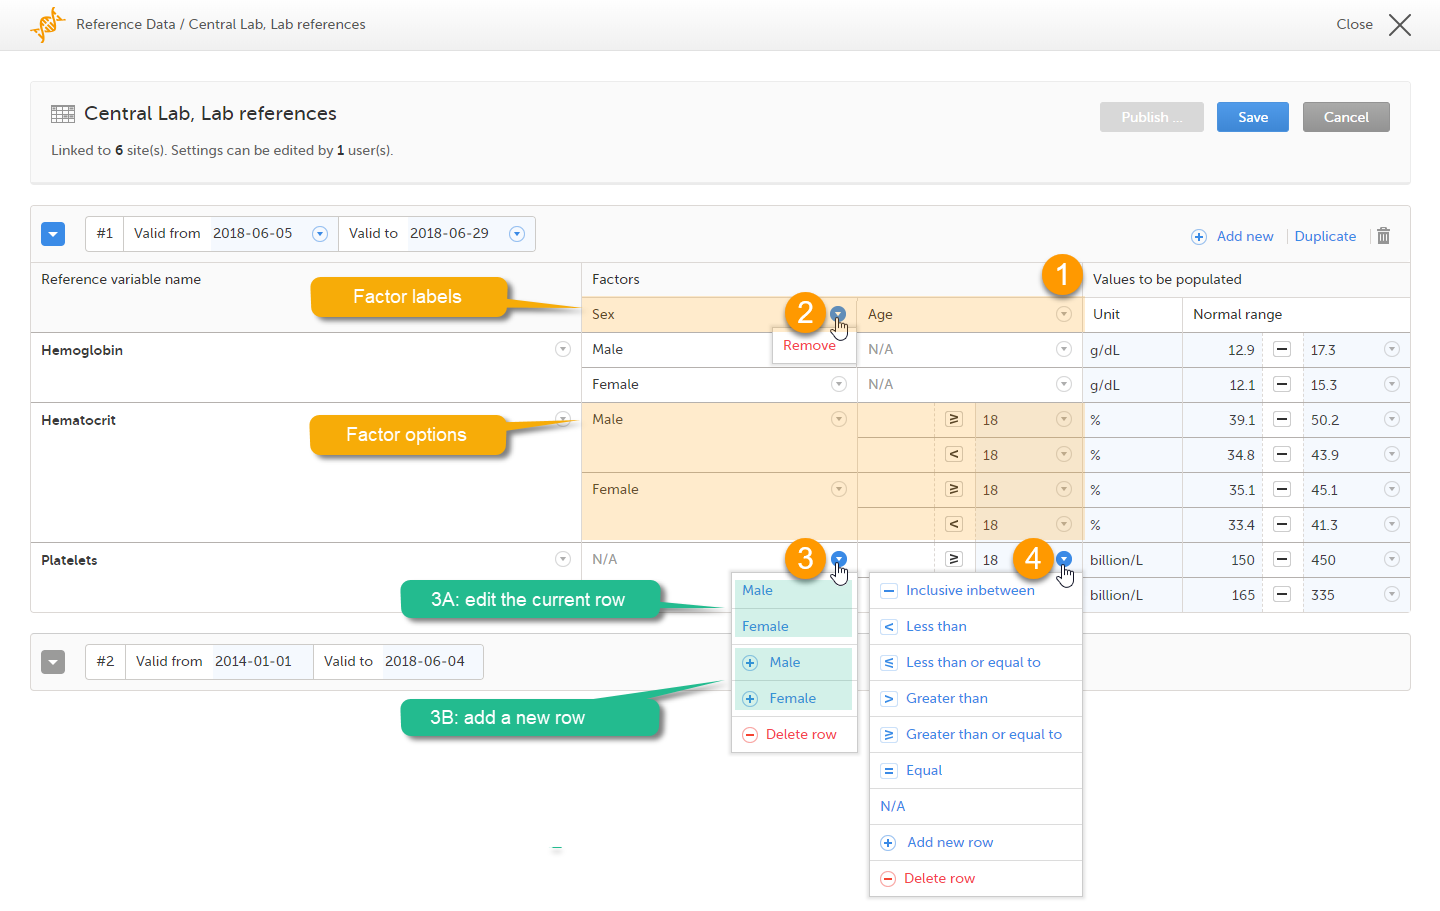
 On the reference data editor, you can view or do the following:
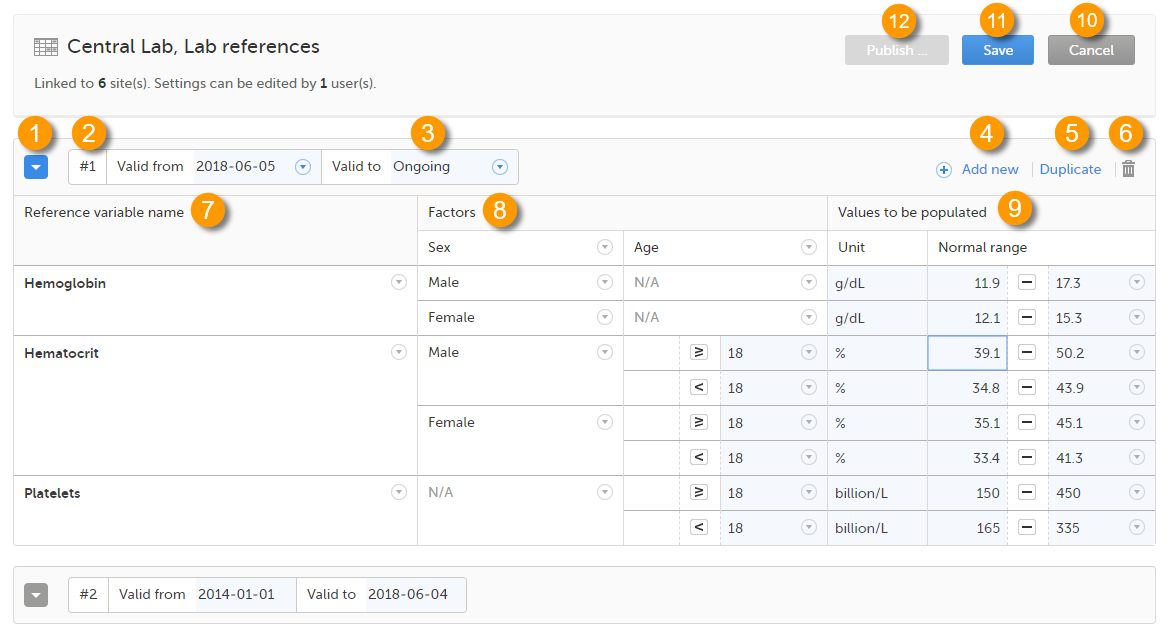
1. Select the arrow to expand the reference data table for that specific time period. The newest time period is expanded by default and shown at the top of the list.
2. The number of the reference data set for a given time period. This number is given by default, based on the order in which the reference data sets have been created.
3. The period the reference data set is valid.
4. Select Add new to create a new reference data set for a new time period.
5. Select Duplicate to create a new reference data set for a new time period based on a previously created set.
6. Select the trash can icon to remove an existing reference data set time period.
7. Reference variable name - the variable that are defined for that reference data scope. A variable is a specific measurement to be carried out. See Variables for more information.
8. Factors - the factors that are defined in the scope. Factors are parameters that affect the reference data. See Factors for more information.
9. Values to be populated - the reference data values provided by the reference data source. The values entered here will automatically be populated to the subject forms.
10. Select Cancel to discard all the changes performed and revert to the latest published reference data.
11. Select Save to save the changes performed.
Note! Only users with clinic roles that have permission to edit reference data can edit and save the reference data.
Upon save, the reference data set becomes available for publishing.
12. Select Publish to publish the reference data. A pop-up appears asking you to enter a message. This message appears in the Messages section on the landing page.
Publishing makes the data available for auto-population into the subject forms.
Note! Only users with clinic roles that have permission to publish reference data can publish the reference data.
The column Reference variable name displays the variables that were configured for the reference data scope. By selecting the arrow to the right of the variable name, you can:
When the variable is not included, such as 3 in the image, you can:
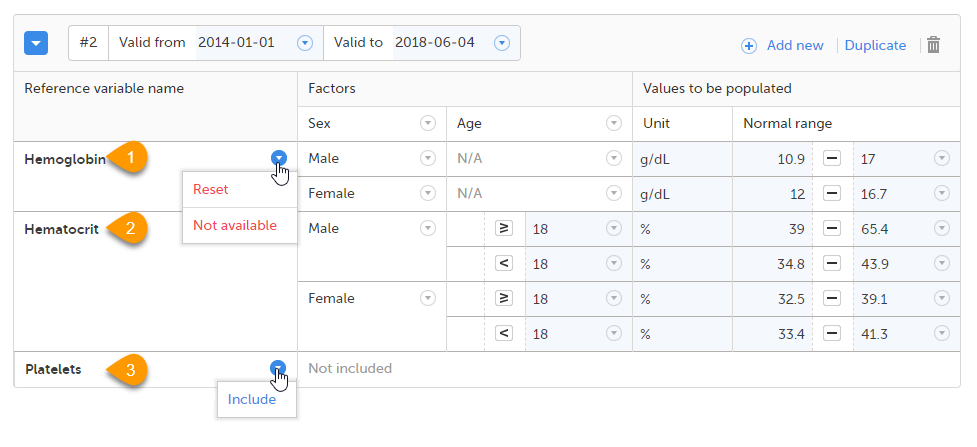
Note! If you do not want automatic population of reference data for a certain variable, the variable should be set to Not included. This way, it is possible to manually add reference data for that variable to a form.
The column Factors displays the factors that were configured for the reference data scope. In this column, you can:
1. Select the arrow to the right of Factors, and select a factor from the drop-down list to add that factor to the table. If no arrow is displayed, all factors predefined in the reference data scope are already added (as in the image).
2. Select the arrow to the right of the factor label and select Remove to remove that factor from the table.
By default, a newly added factor is populated with N/A (not applicable) in the table. You can edit this by selecting the arrow to the right of N/A and select one of the options from the drop-down list. The drop-down list displayed varies depending on whether the factor has predefined factor options or not.
3. For a factor that has predefined options, such as Sex in the example:
+ in front of it to add a new row to the column populated with the selected option, or4. For a numeric range (no predefined options), such as Age in the example:
Note! If you would like to add the factor option N/A to a factor that also has other options, the option N/A should be the last entry for that variable in the table. The reason for this is that, while populating a form with reference data, the system is matching the factor options starting from the top of the table. If a match is found, the corresponding data are populated to the form. The option N/A is always a match. So if N/A is listed at the top of the table, the search will stop and the form will be populated with the data corresponding to N/A. If you want the system to match the other factor options first, these should be listed before N/A in the table.
When the reference data are published, they become available for auto population to the forms they are intended to be used in.
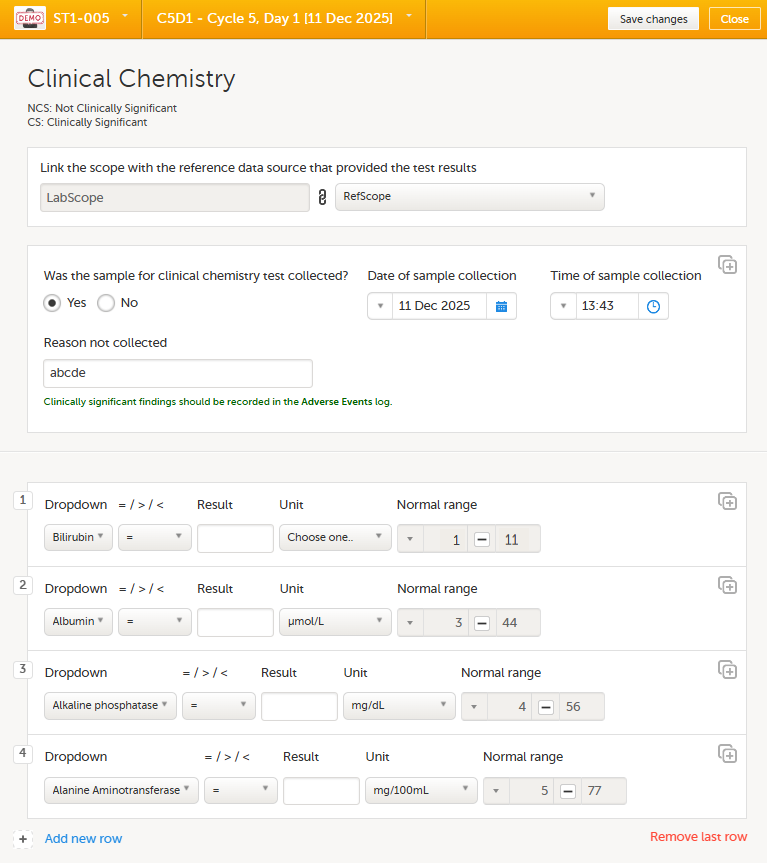
To populate a form with reference data, the Investigator/Study Nurse/site staff selects:
It is also possible that the event date is used instead of date and time of collection. In that case, the reference data populate after the source is selected.
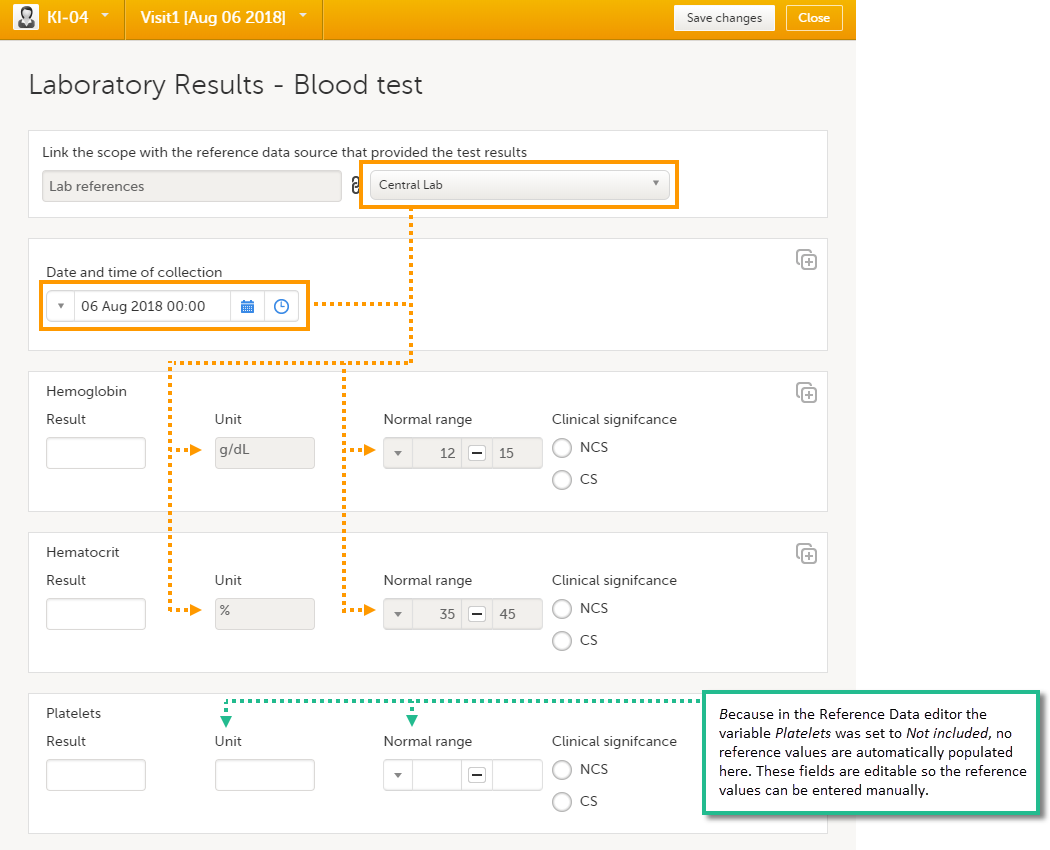
Tip! If you do not want any reference data to be populated automatically, do not select a reference data source, but leave the drop-down list as Select a source. No automatic population of data will take place and you can fill in the fields manually.
Note! When populating numeric fields using functions and reference data, they automatically receive the number of decimals configured in the design.
Note! No reference data can be populated, if...
Note! You can only enter reference values when your role has permission to edit reference data.
To enter a new set of reference values:
| 1 | On the Viedoc landing page, select the Reference data icon. |
| 2 |
Select Open reference data editor for the reference data source-scope combination you would like to enter values into.
|
| 3 |
Select the date from which, and to which, this set of reference values is valid in the Valid to and Valid from fields. 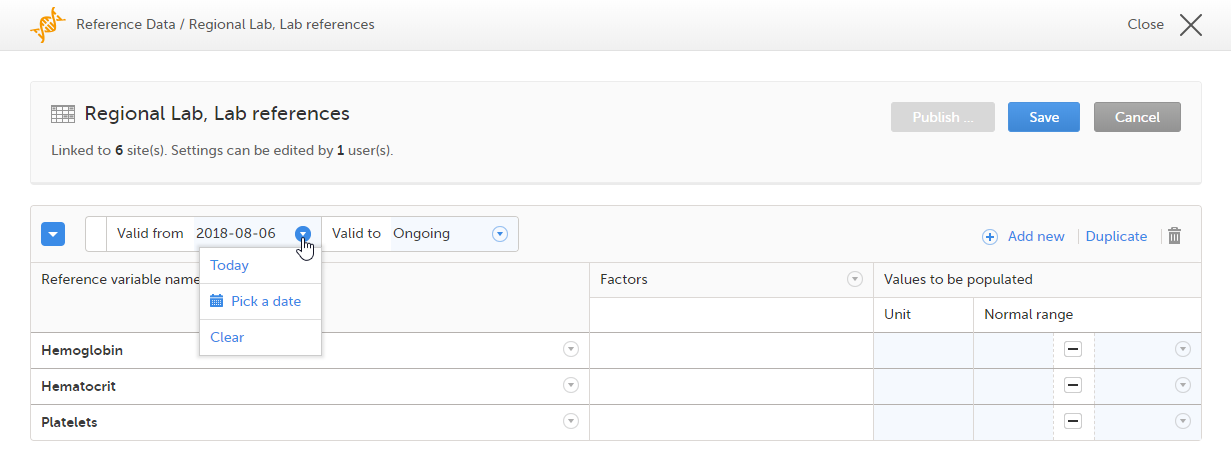
|
| 4 |
Select the arrow to the right of Factors and select the factors that should be included. 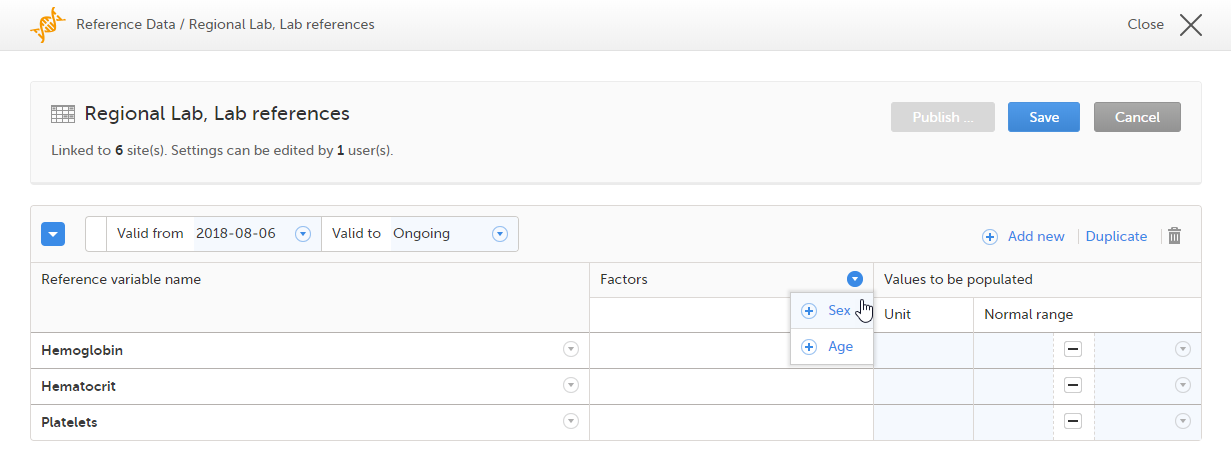
|
| 5 |
For every variable, and for every factor, select the arrow to the right of N/A and select the factor options that should be included. If the factor is a numeric range, select Set a value. By default, the inclusive in between option appears. 
If you would like to change the type of the range, select the arrow again and select the type of range you would like to include. If necessary, select Add new row to add rows. Manually enter the values of the range in the blue fields. 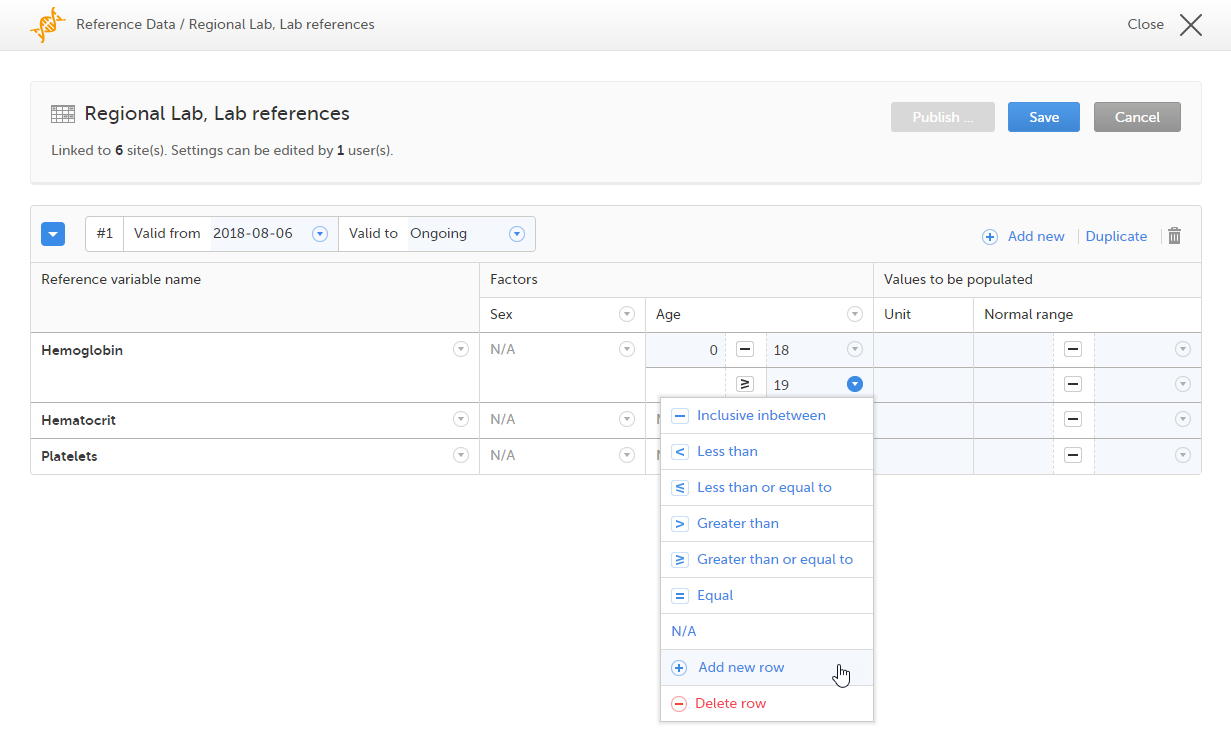
See also Factors for more information. |
| 6 | For every variable, and for every factor, enter the reference values that should be automatically populated to the forms. |
| 7 | Select Save to save the reference data. |
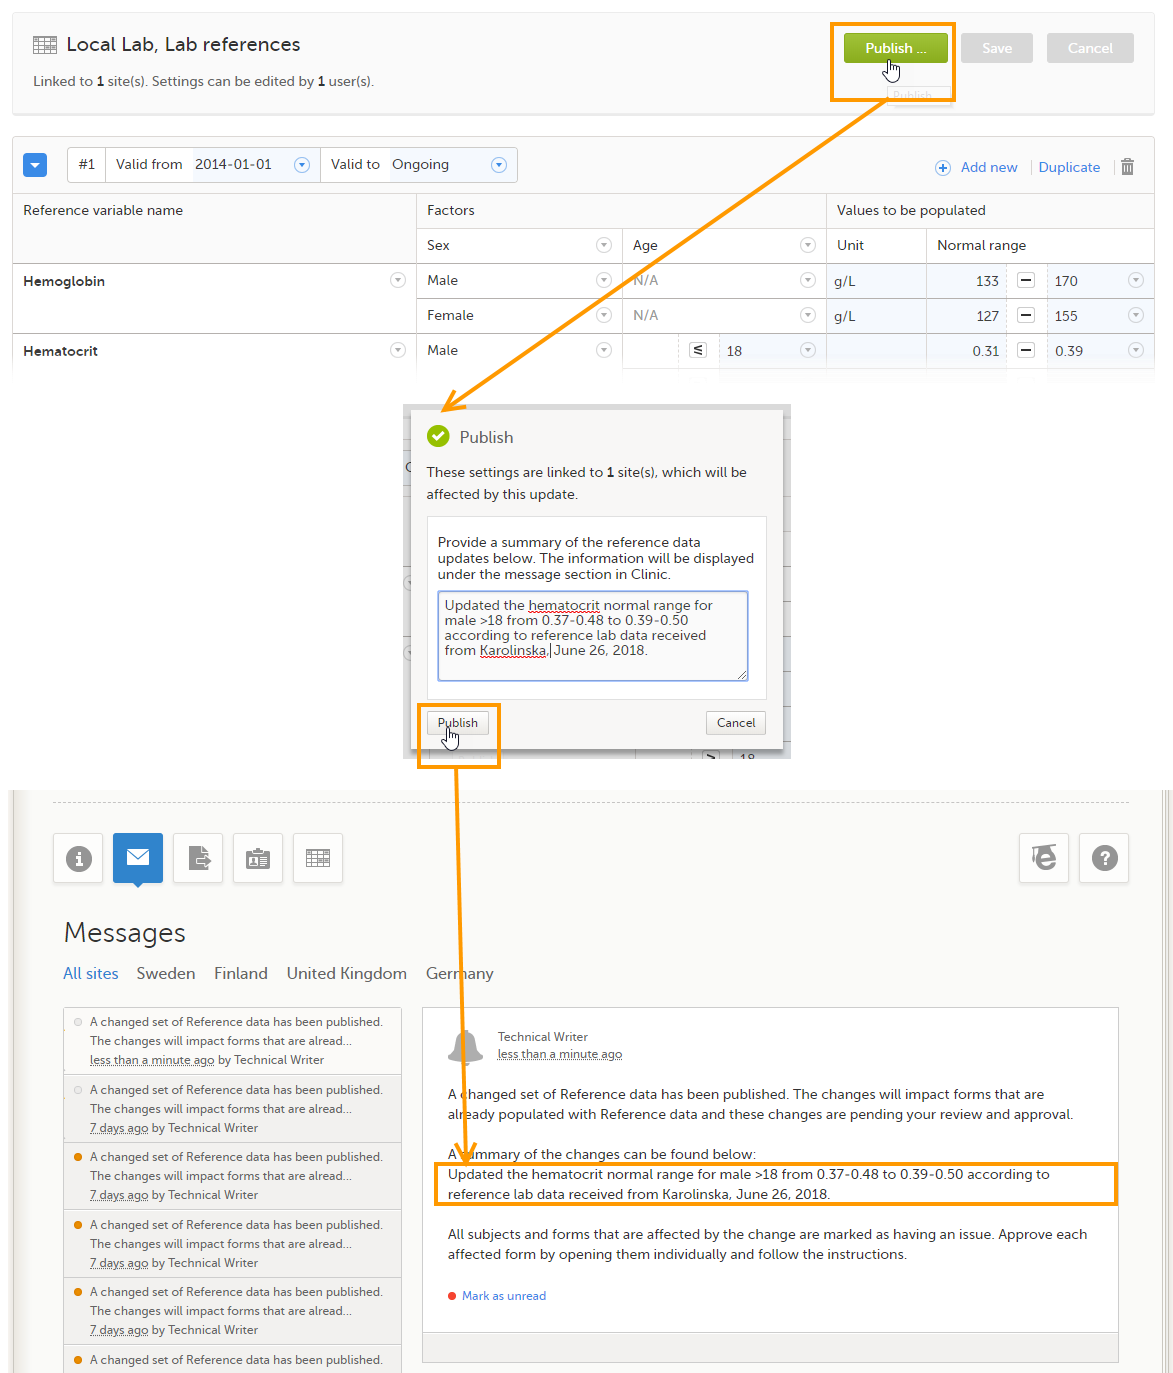
To publish reference data:
Note! You can only publish reference data when your role has permission to publish reference data.
| 1 |
Select Publish.
|
| 2 |
Enter a summary of the reference data updates in the field.
|
If the reference data scope is changed and published in Viedoc Designer after the reference values have been published in Viedoc Clinic, the following message will appear on the Reference data page.
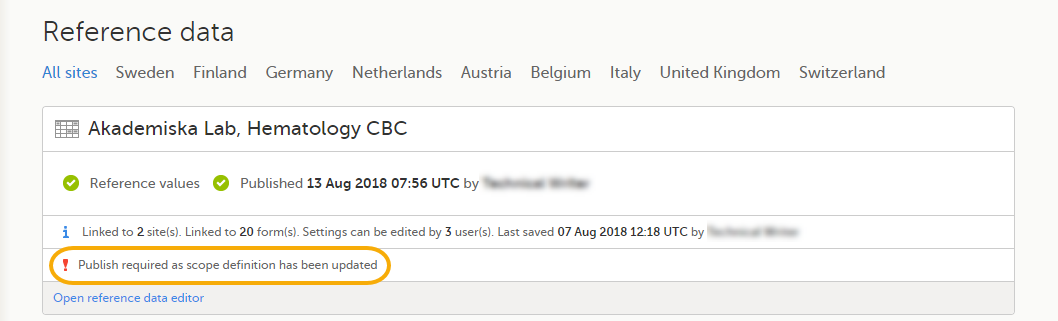
The reference date source-scope combination needs to be updated and published again in Viedoc Clinic, for the reference values to become available for auto-population to the subject forms.
If the reference values change for already populated data, the affected forms will be marked with a red issue icon [ i ].
Note! You can only edit data when your role has permission to edit reference data.
To edit a set of reference values:
| 1 | On the Viedoc landing page, select the Reference data icon. |
| 2 | Select Open reference data editor for the reference data source-reference data scope combination you would like to enter values into. |
| 3 | Edit the variables (see Variables), factors (see Factors), or the reference values. |
| 4 | Select Save to save the reference data. |
If the reference values change during a study for already populated data, ALL affected forms will be marked with a red issue icon [ i ], and a message is displayed on the top of the form as illustrated below:
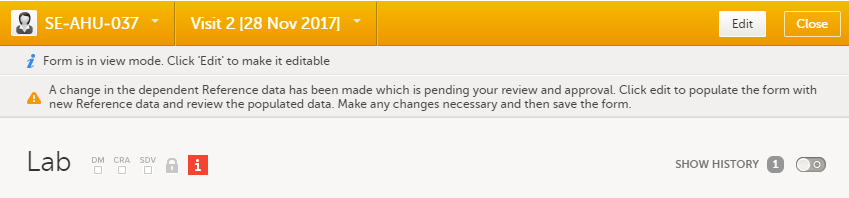
Note! To avoid all forms being marked with a red issue icon, you can follow the alternative procedure as described in the next section.
The affected forms are also listed on the Selection page, under the ISSUES view, being marked as Pending Reference data upgrade. For more details, see Selection page.
To make changes to a reference data set during a study and without causing all affected forms to get issues, you can create a copy of the existing reference data set and make the changes there.
To create a duplicate of your reference data set::
| 1 | Open the reference data editor. |
| 2 |
Select Duplicate. 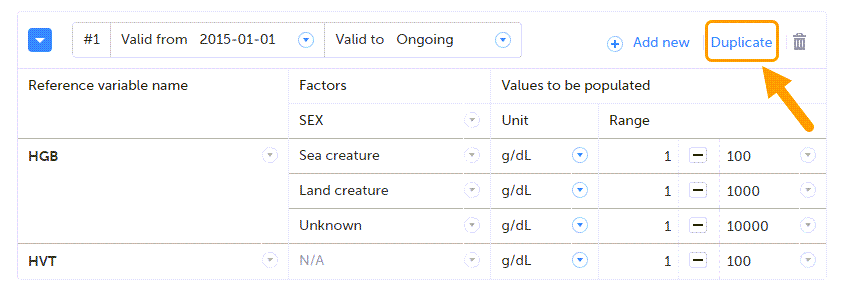
The original set is displayed at the bottom of the list and the new set at the top. |
| 3 | Make your changes in the new set. |
| 4 |
Set the dates for when you want the two sets to apply. Note! The stop date of the previous set cannot overlap the start date of the new set. It is recommended to make the new set start on the day after the old set ends. |
| 5 | Save the changes. |
| 6 | Select Publish... and write a note to the site staff, explaining what has been changed. |
| 7 |
Select Publish. |
Viedoc supports forms containing repeating item groups when using reference data values. The values of items in repeating item groups are defined in the reference data editor, according to the reference data scope specified in the study design.
Data configured in the reference data editor is displayed in the referenced form once the appropriate scope is selected.
When you add a new repeating instance to a form, their values are automatically populated based on the currently published reference data scope:
For more information on repeating item groups, see Entering/Editing data.
When publishing a new reference data scope with updated values, the corresponding form is marked as Update Pending.
Note! When editing this lesson, check if the corresponding edits are also needed in the Clinic User Guide>Issues and tasks.
The Selection page displays all subjects from all sites you have access to. Each subject is represented by a subject card.
In the upper-right corner of each subject card, orange and red icons are displayed when there are issues (such as queries) and tasks to be solved/completed for that subject. These icons help you to identify where actions are needed.
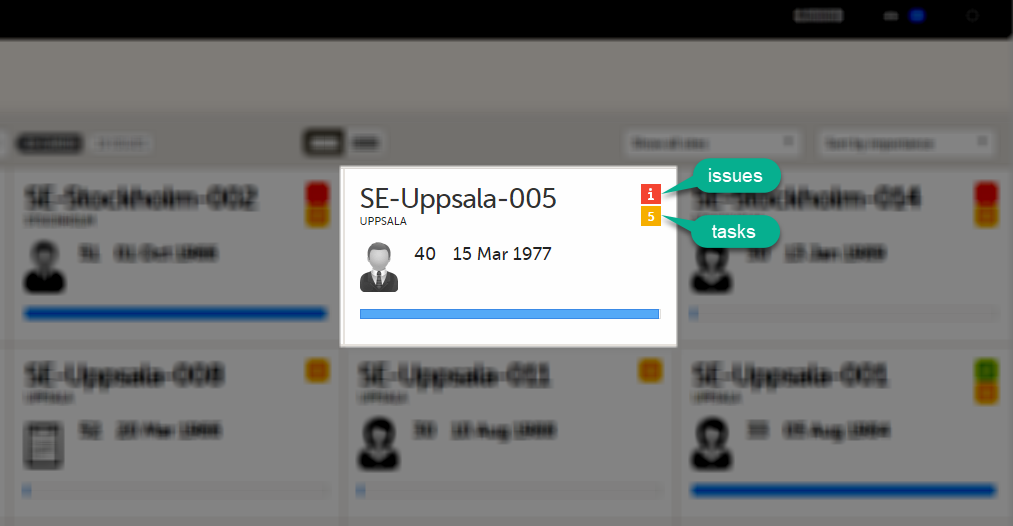
All issues and tasks should eventually disappear but when present they help you identify where action is needed.
Note! The issue list will not be visible for sites that have more than 1000 subjects.
It is possible to switch between the Cards view and Issues view by selecting the Cards icon or Issues icon next to the search field.
The Issues view only displays the list of existing issues.
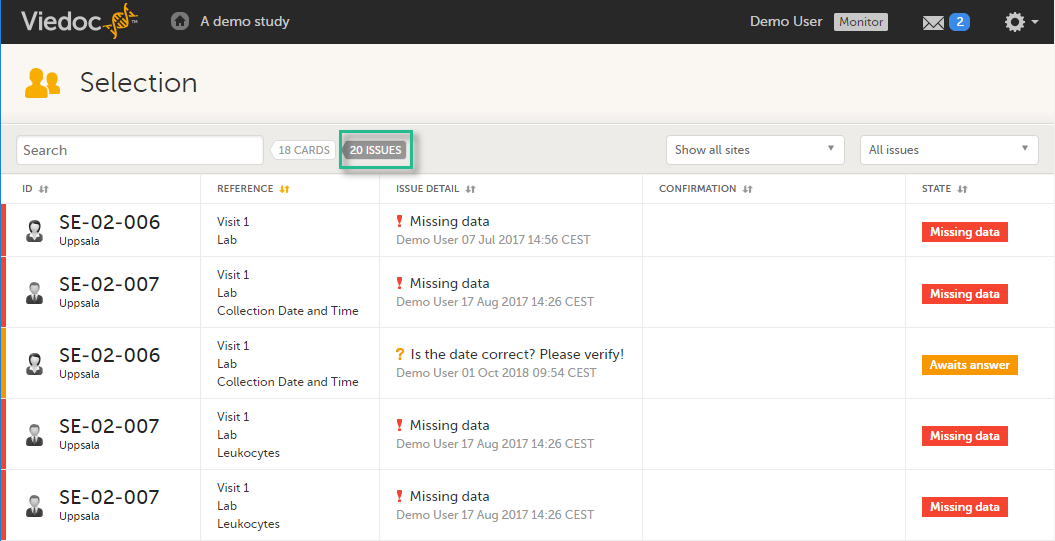
Select any row to open the form where the issue has been raised. If you close the form, you will return to this issue list again.
The list of issues can be filtered by using the dropdown lists on the upper-right of the page. You can filter the issues:
Note! Task icons are only displayed on the sponsor side.
When a booklet or Adverse Event (AE) report has been received, the orange task icon appears indicating that there is data ready for review, or query answers to be approved. The number of tasks is displayed. If there are more than 9 tasks to be performed on a booklet or form, +9 is displayed in the icon. Tasks should be handled continuously throughout the study to make sure data at all times is as clean and accurate as possible.
Tasks are tracked on three levels:
As soon as a task has been completed, it will disappear from the views.
This section describes how data review is performed in a Post Marketing Surveillance (PMS) study. The purpose of data review is to give the Data Manager the possibility to mark forms as reviewed.
Data review is a task to be completed. The number of tasks to be completed is displayed in the orange task icon:
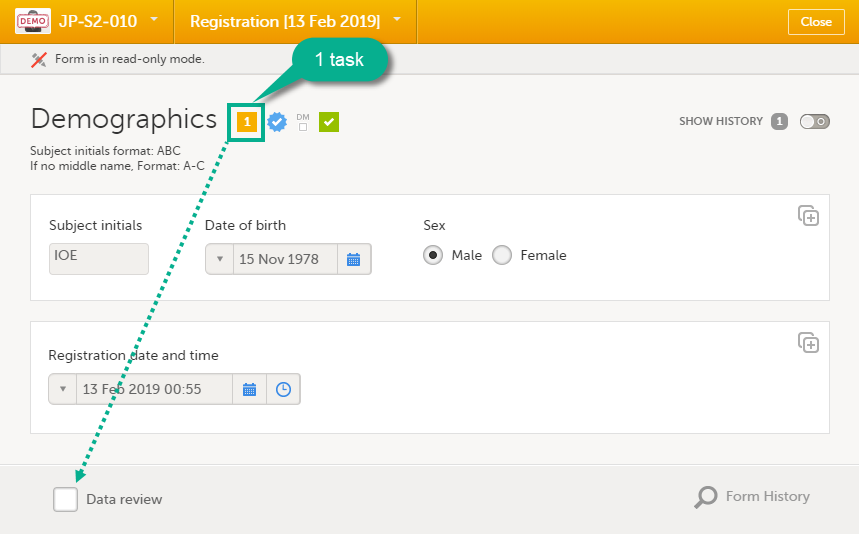
Marking a form as data reviewed can be performed in one of the following ways:
The orange task icon disappears when the Data review checkbox is selected and the task is completed.
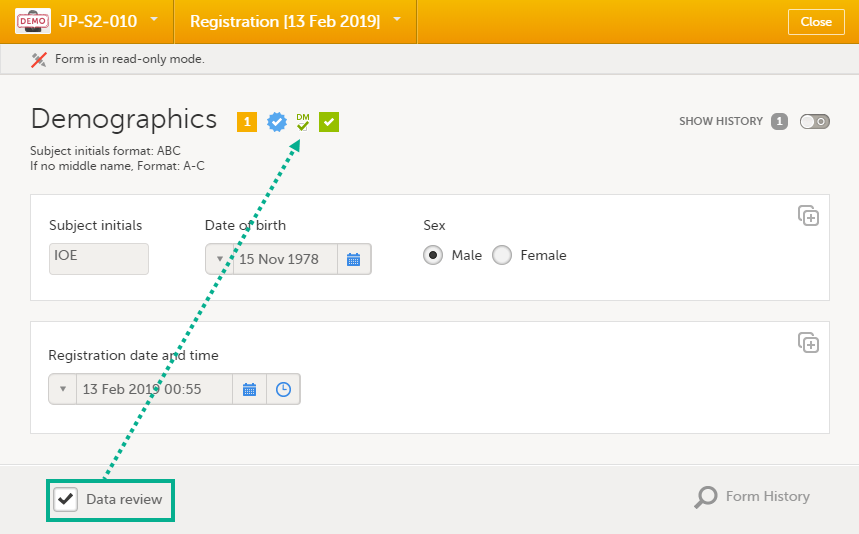
Note! If a form is edited after you have marked it as Data reviewed, the review status breaks and the form has to be reviewed again. The review task appears again in the orange task box icon.
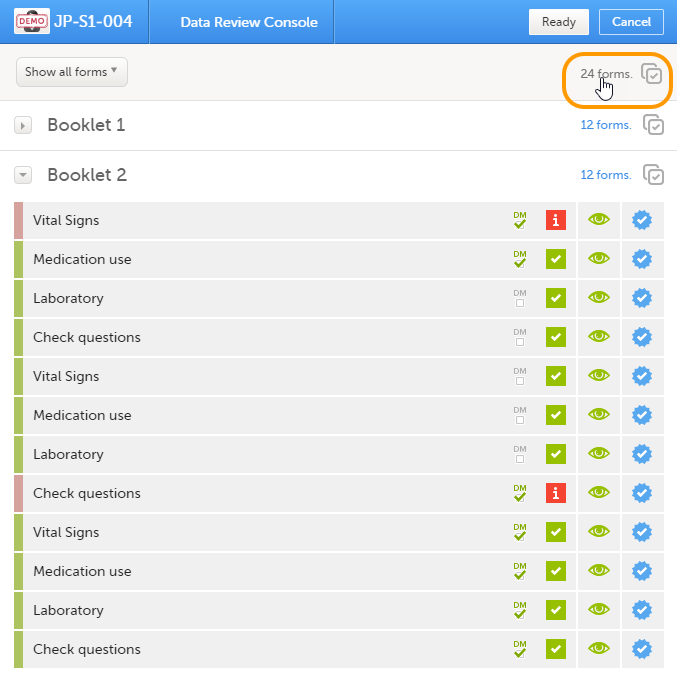
You can perform Data review of multiple forms at once, batch-wise, by using the Data review console.
To open the Data review console, click the Data review icon in the top right corner of the subject Details page.
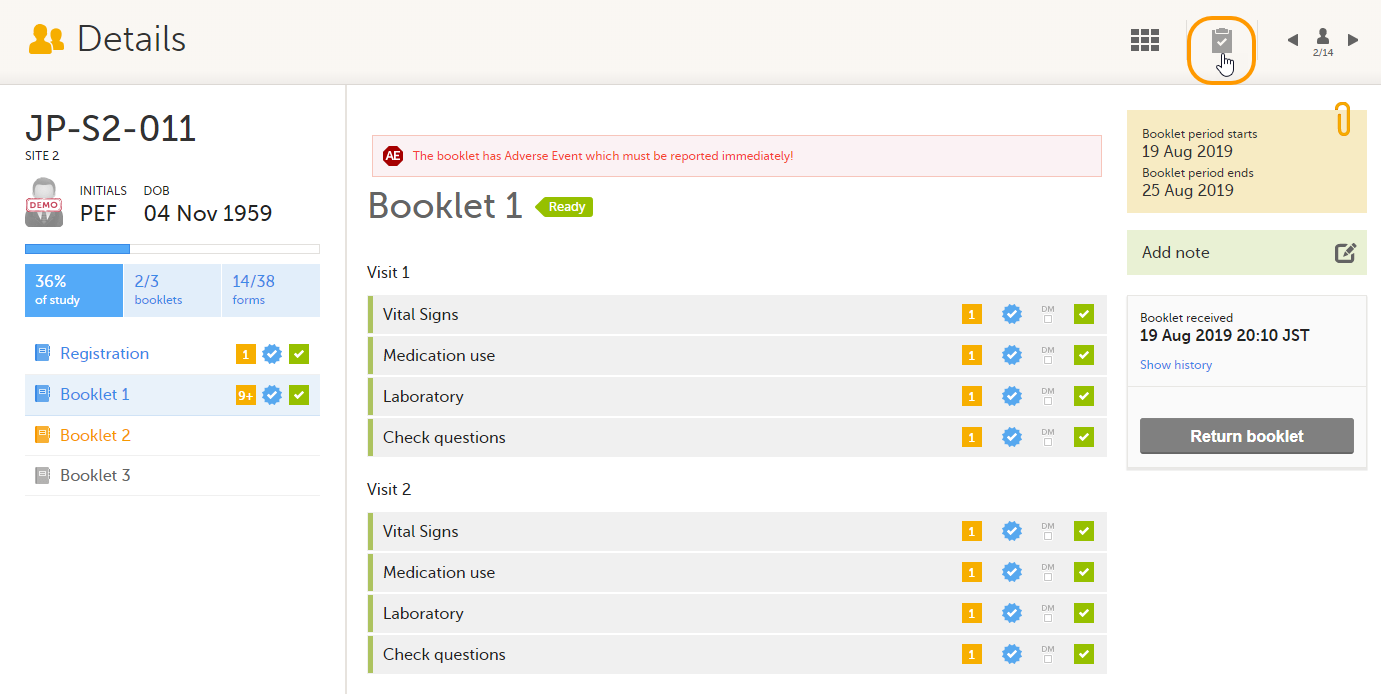
The data review console displays an overview of all forms that require data review for one subject, and shows which forms have been reviewed.
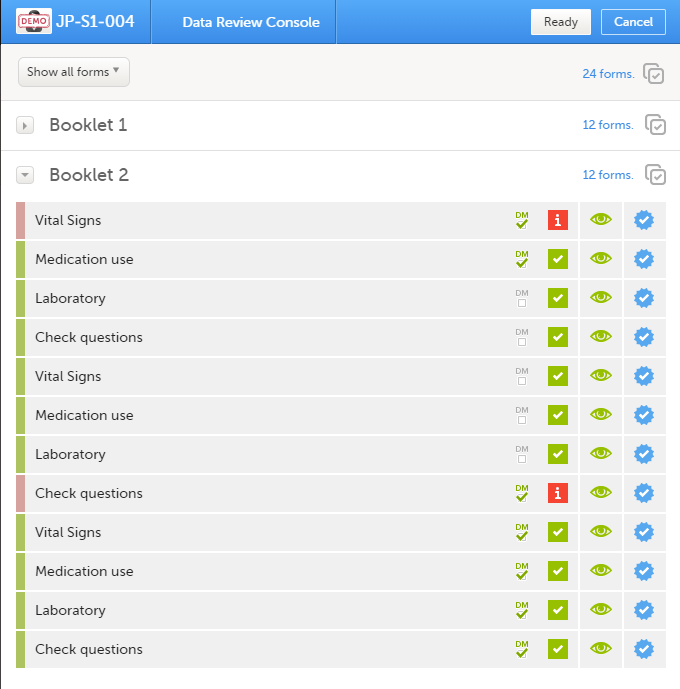
The icons in the data review console have the following meaning:
| Icon | Description |
|---|---|
 |
Data are reviewed |
 |
Data are not reviewed |
 |
All data in the form is completed and the form contains no issues |
 |
The form contains issues, for example, open queries |
 |
You have visited the latest version of the form |
 |
You have not visited the latest version of the form |
 |
Data are signed by the Investigator |
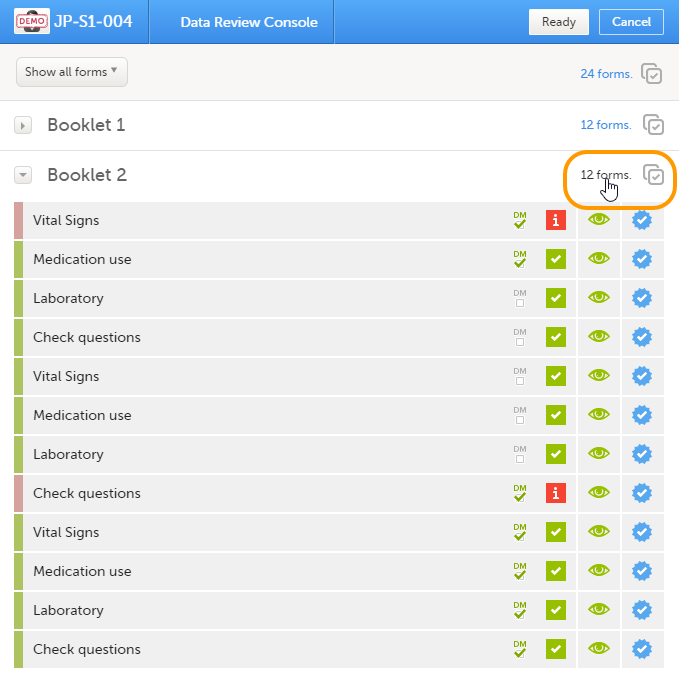
To mark the forms as reviewed:
| 1 |
Select the form(s) to be reviewed in one of the following ways:
|
| 2 |
In the pop-up that opens, select All forms or Only visited forms, and click Ready. 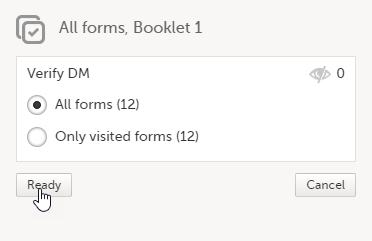
|
The status of the selected forms is updated according to the performed actions.
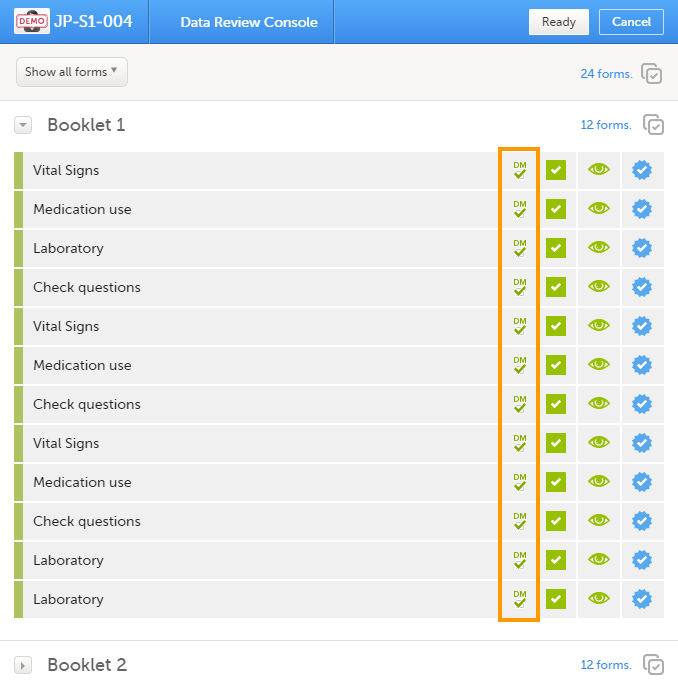
If any of the marked forms have not been visited by you before, you will be asked whether you want to continue with the action or not. If you choose to continue, the forms will be marked as reviewed according to your selections. Thus, the system will not prevent you from marking unvisited forms as reviewed.
The current workload can be checked on the Study status or the Metrics pages.
A query is a question about data. In Viedoc, queries can be raised:
Note! All the related queries are automatically closed, when:
In case of a validation query, when this is resolved by data edit, it is automatically closed. See Validation queries.
Resolving a query always breaks the form signature, even if there are no data changes involved.
A summary of the number of queries is displayed on the study start page, as illustrated below.
Note! This is a summary of the whole study and it does not take into consideration the role visibility conditions.
A query is raised in a form field. After a query is raised, the respective form is marked with the red issue icon i:

| Important! For all new studies started after release 4.80, the default setting Enable role-based queries is selected. For studies started before release 4.80, the default setting Enable role-based queries is cleared. For studies started before Viedoc release 4.80, all query actions will still work as usual until role-based queries is enabled. |
When the role-based queries option is enabled for your study, it restricts, at study level, the approval of the query resolution to the same user role who raised the query.
Notes!
For more information, see the eLearning lesson on Role-based queries.
Viedoc Clinic users with permission to raise queries/pre-queries, can manually add a query to any field value.
Manually raised queries can be:
Viedoc offers support for query review, that is, to review a query before it is released to the site. This is done through pre-queries.
The pre-query process can involve either two or three roles, as follows:
An unlimited number of pre-queries can be added on the same field at the same time.
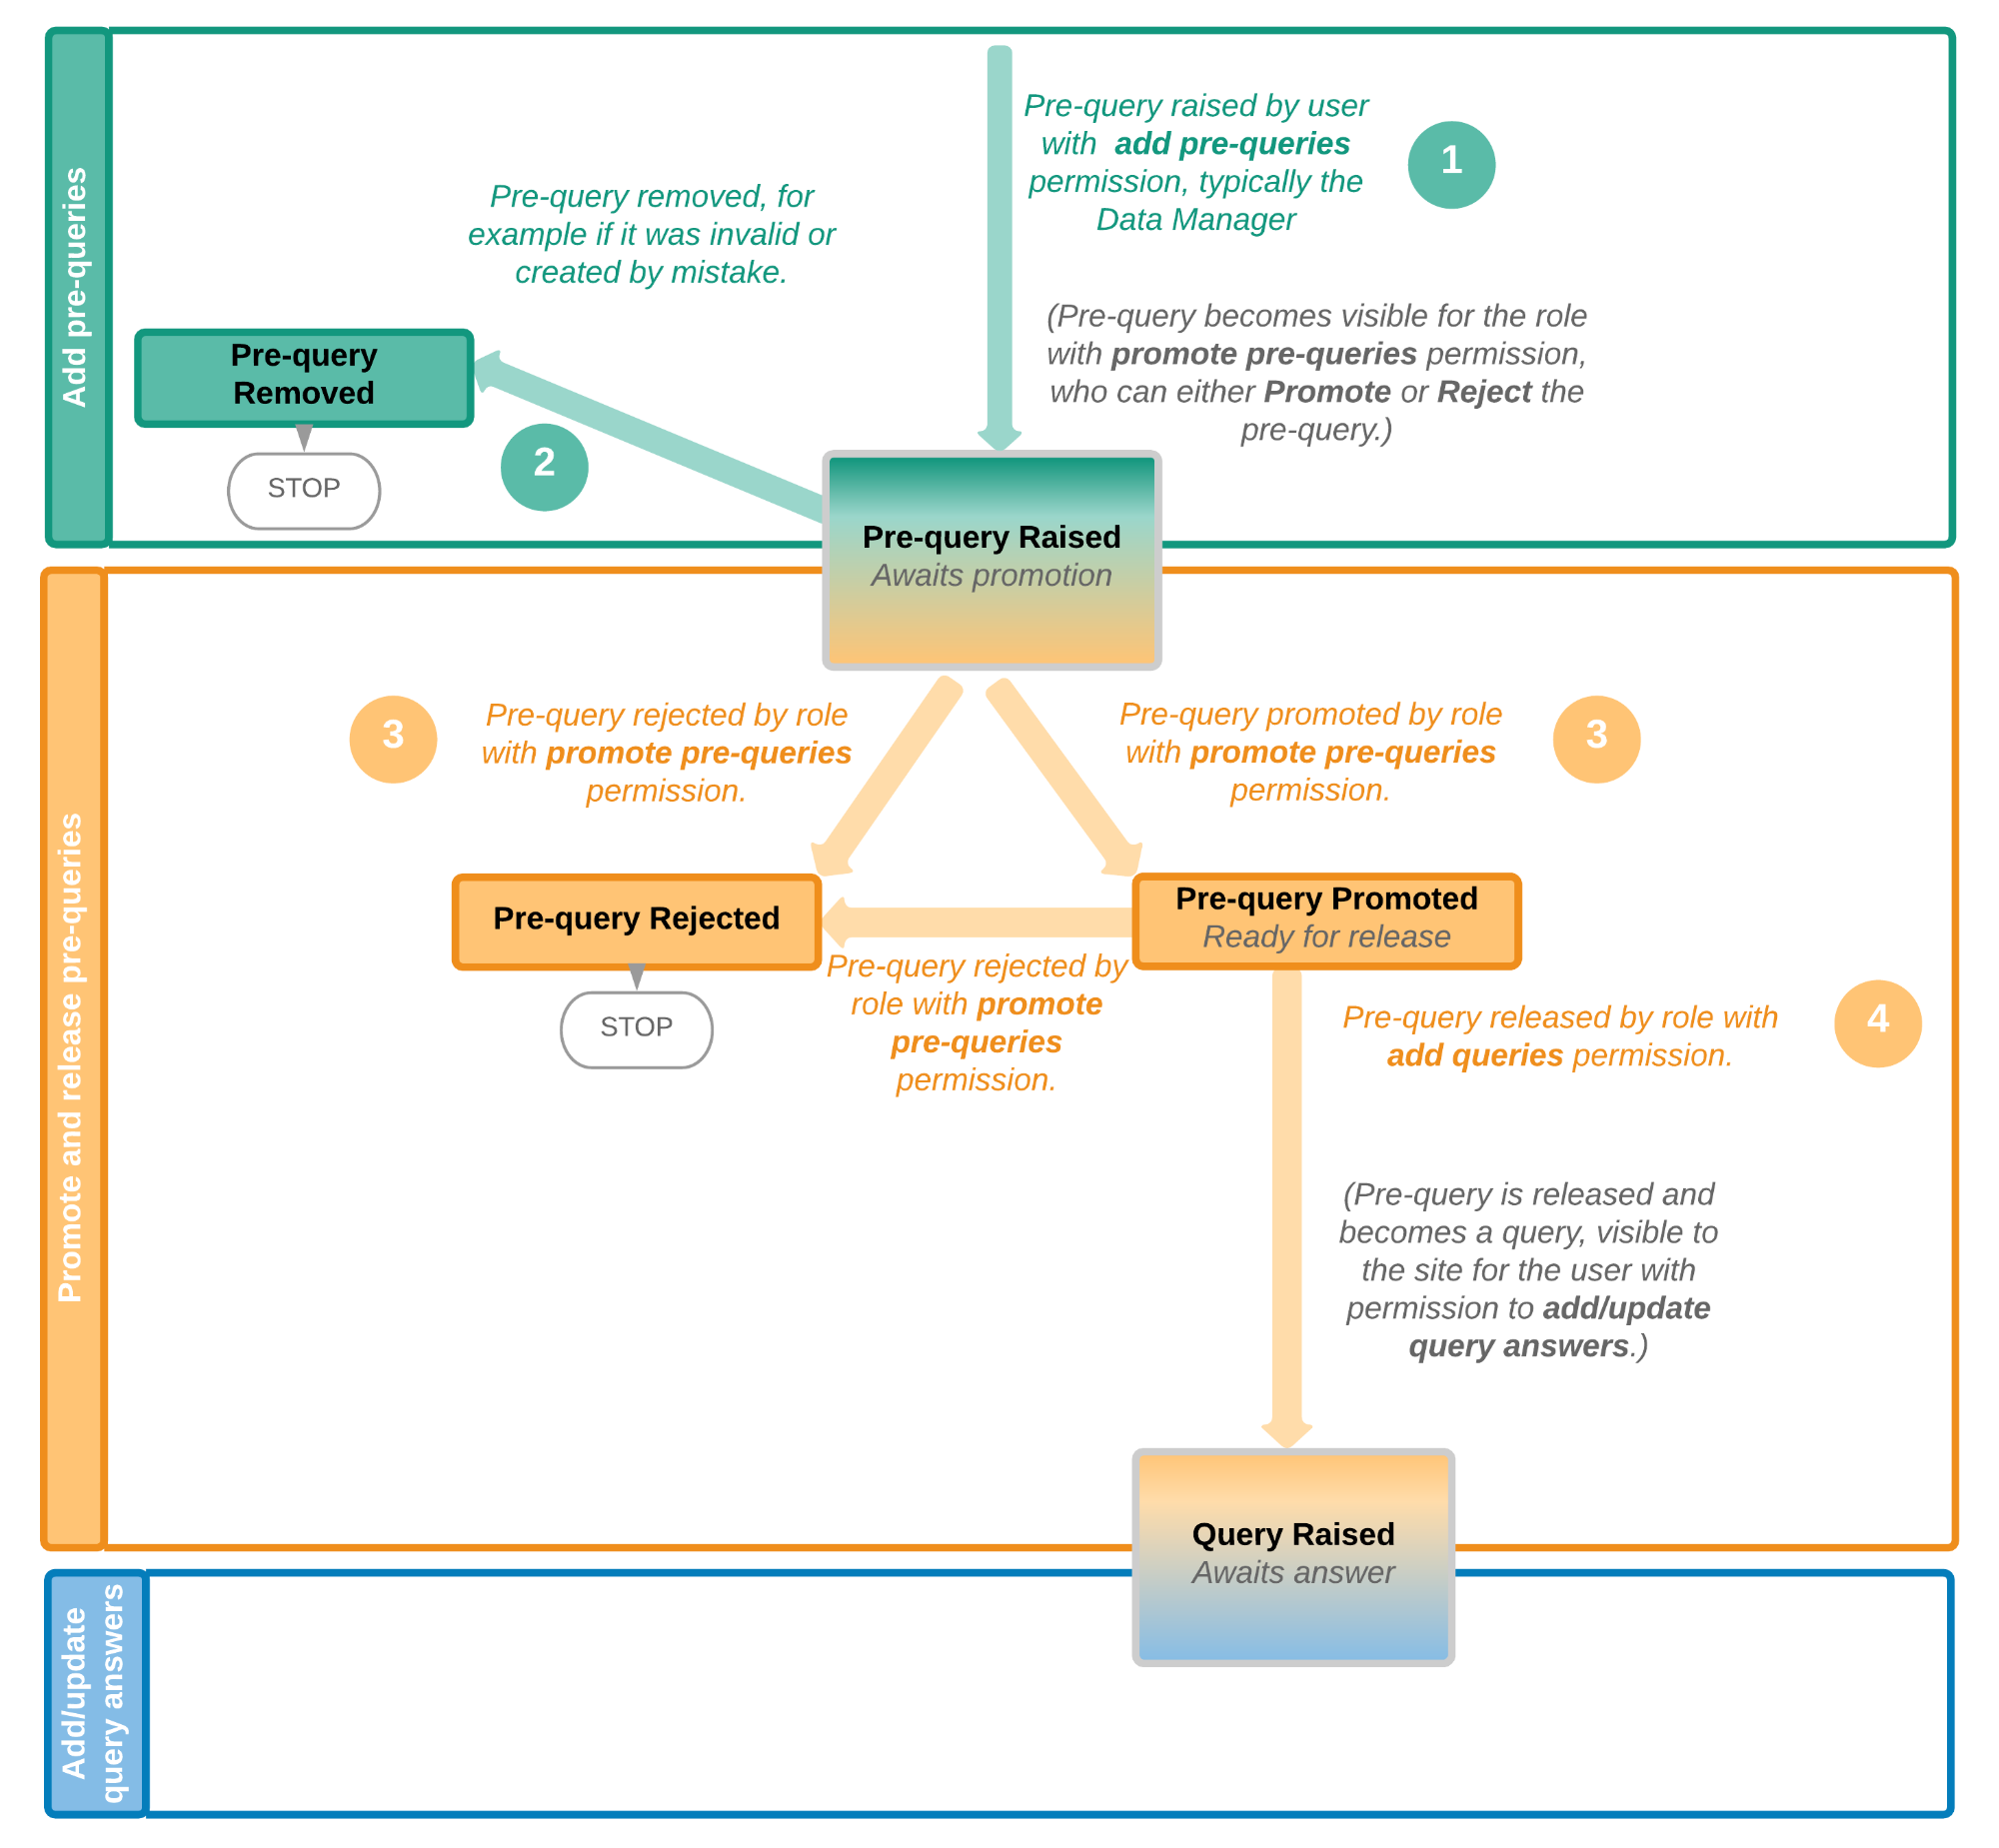
The following image illustrates the main actions that can be performed on a pre-query and all the states the pre-query goes through before it is released as a query:
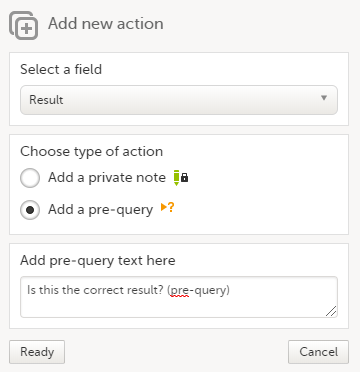
1. The pre-query is added by the user with permission to add pre-queries, typically the Data Manager.
As a result, a pre-query is raised, becoming visible for the Viedoc Clinic user with permission to promote pre-queries, typically the Monitor.
2. The raised pre-query can be removed, for example if it is invalid or added by mistake.
3. The raised pre-query is promoted or rejected by the Viedoc Clinic user with permission to promote pre-queries, typically the Monitor.
4. The promoted pre-query is released by the Viedoc Clinic user with permission to add queries (typically the Monitor), becoming a raised query that is visible for the Viedoc Clinic user with permission to add/update query answers (typically the Investigator), who will be responsible for resolving the query, as described in Queries.
The table below summarizes the different states of a pre-query in Viedoc Clinic, in the export output (Excel/Operational Data Model (ODM), as well as the possible actions that can be performed on a pre-query and the state this will transition to.
| In Viedoc Clinic | In export output | through... | becomes... |
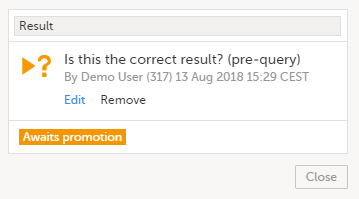
|---|---|---|---|
| Awaits promotion | PrequeryRaised | Promote pre-query (by Monitor) | PrequeryPromoted (Ready for release) |
| Reject pre-query (by Monitor) | PrequeryRejected (Rejected) | ||
| Ready for release | PrequeryPromoted | Release pre-query (by Monitor) | QueryRaised (Awaits answer) |
| Reject pre-query (by Monitor) | PrequeryRejected (Rejected) | ||
| Rejected | PrequeryRejected | N/A. No action can be performed on a rejected pre-query. | N/A. Final state |
| Removed | PrequeryRemoved | N/A. No action can be performed on a removed pre-query. | N/A. Final state |
The query process involves two different roles with different permissions in handling queries:
A query is raised in Viedoc either when a query is manually added or when a pre-query is released.
An unlimited number of queries can be added on the same item at the same time.
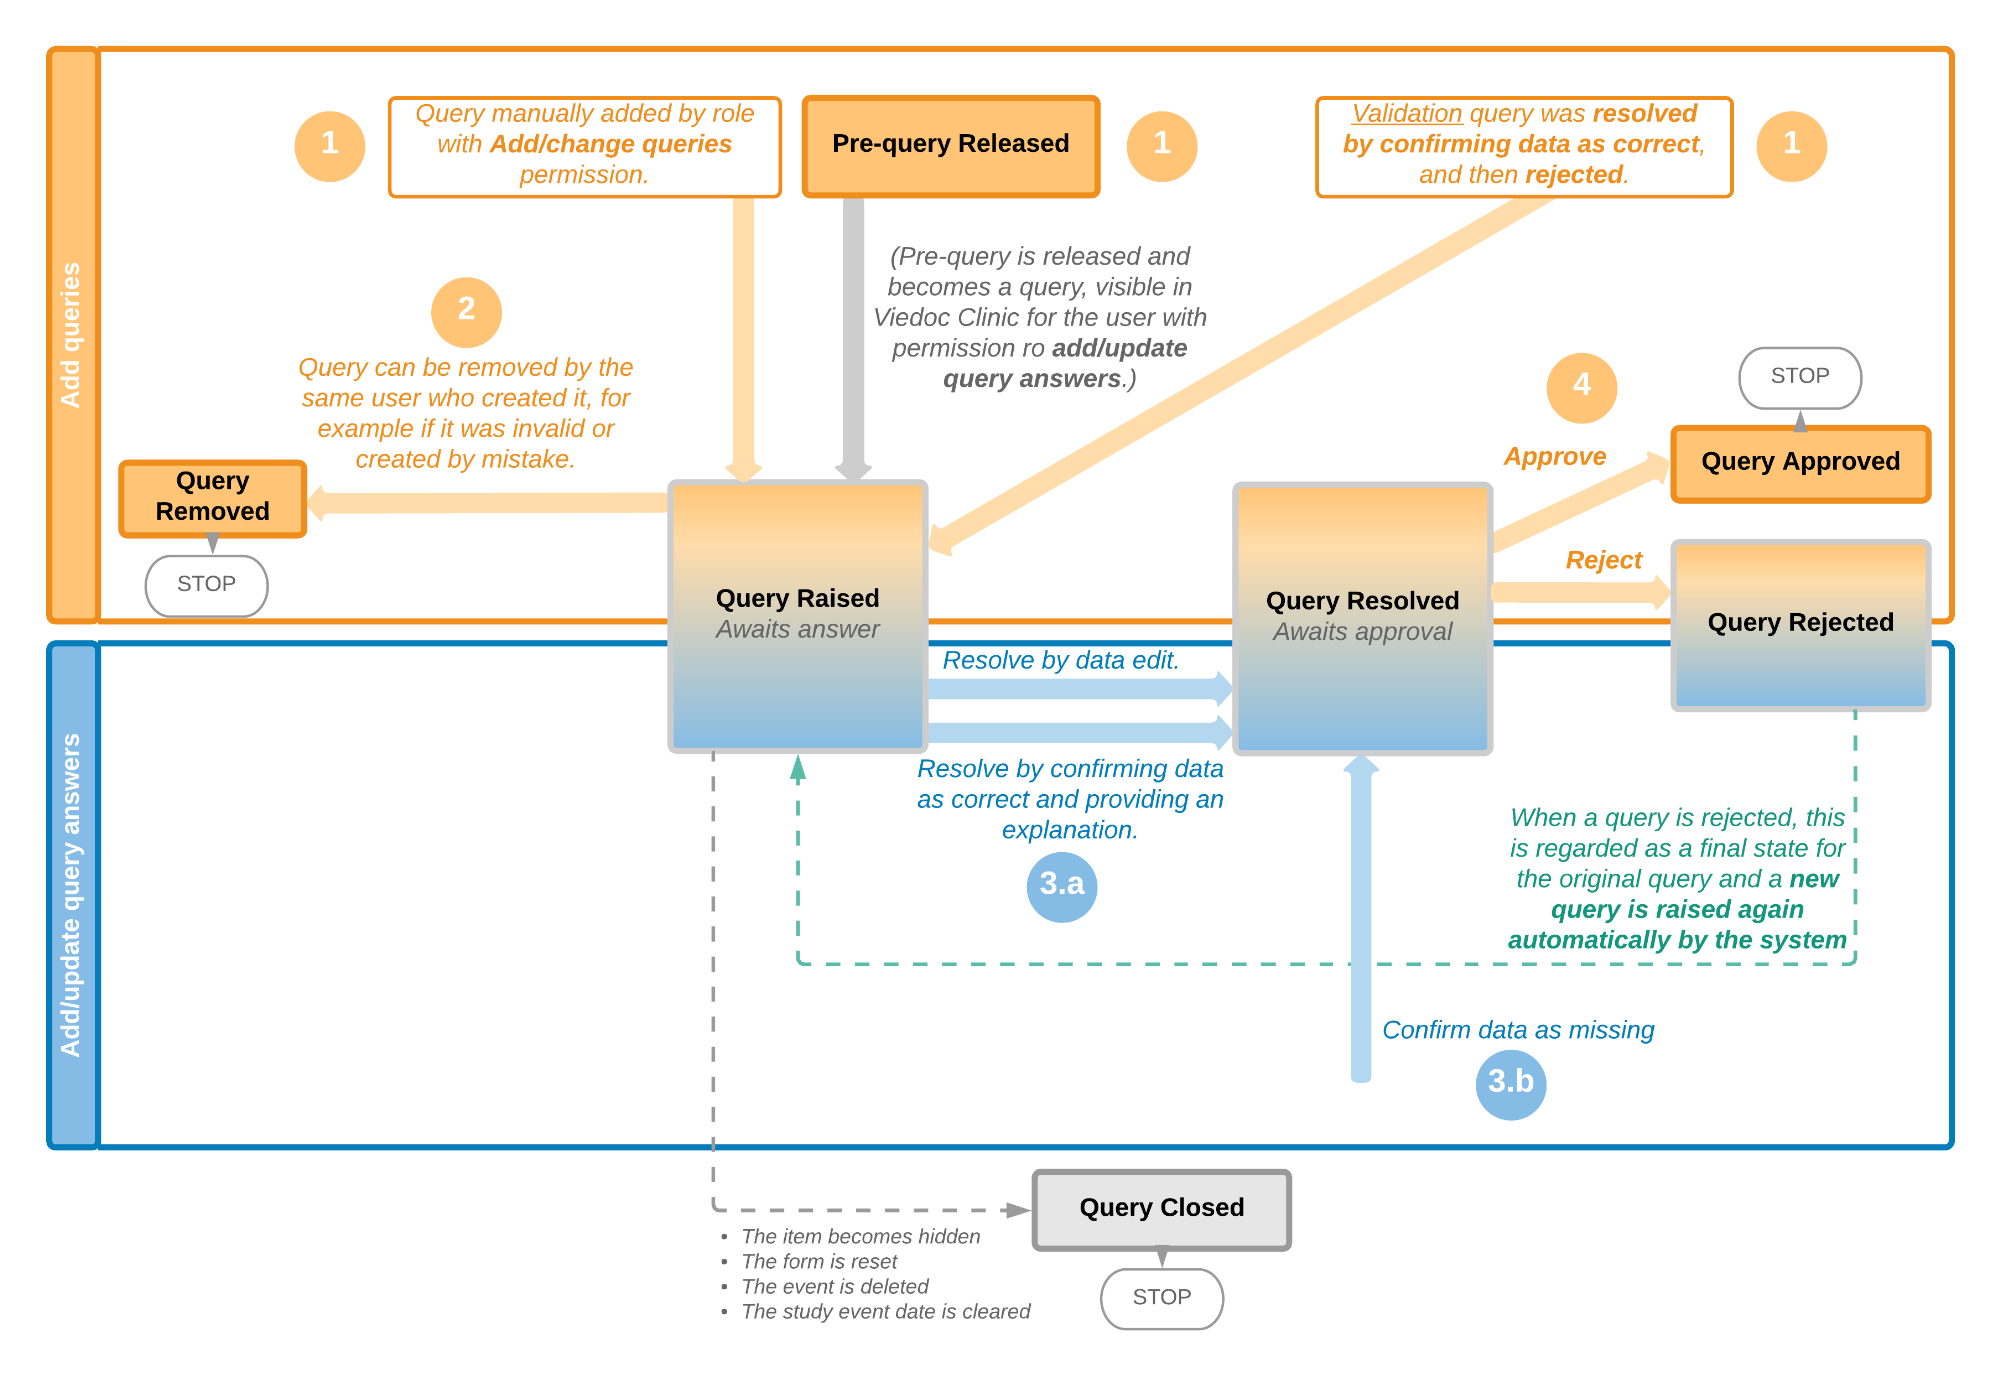
The following image illustrates the main actions that can be performed on a query and all the states it goes through:
1. A query is raised through one of the following:
2. A raised query can be removed, for example if it is invalid or added by mistake.
3.a. The user with permission to add/update subject/event/form data and query answers, typically the Investigator, resolves the query by one of the following:
3.b. When confirming data as missing, typically by the Investigator, this becomes a resolved query that awaits approval. This type of query can only be approved at step 4 below.
4. The user with permission to add/change queries can:
See also Query states.
The following image illustrates the main actions that can be performed on a validation query and all the states it goes through:
1. A query is raised as a result of a validation performed by the system.
2. The user with permission to add/update subject/event/form data and query answers, typically the Investigator, resolves the query by one of the following:
3. The user with permission to add/change queries can:
See also Query states.

The table below summarizes the different states of a query in Viedoc Clinic, in the export output (Excel/ODM, as well as the possible actions that can be performed on a query and the state this will transition to.
Note! All the related queries are automatically closed, when:
| In Viedoc Clinic | In export output | Through... | Becomes... |
|---|---|---|---|
| Awaits answer | QueryRaised | Remove query (by Monitor) | QueryRemoved (Removed) |
| Edit query (by Monitor) | QueryRaised (Awaits answer) | ||
| Resolve query (by Investigator) | QueryResolved (Awaits approval) | ||
| Awaits approval | QueryResolved | Approve query (by Monitor) | QueryApproved (Approved) |
| Reject query (by Monitor) | QueryRejected (Rejected) | ||
| Rejected | QueryRejected | N/A. No action can be performed on a rejected query. Note! When a query is rejected, this is regarded as a final state for the original query and a new query is raised again automatically by the system. |
N/A. Final state |
| Approved | QueryApproved | N/A. No action can be performed on an approved query. | N/A. Final state |
| Closed | QueryClosed | N/A. No action can be performed on a closed query. | N/A. Final state |
| Removed | QueryRemoved | N/A. No action can be performed on a removed query. | N/A. Final state |
In order to include the query information in the exported file, you need to select Queries under the Type of data in the Data export page. When selecting to include Queries, the Query history option becomes available.
The queries can be exported to the following export output formats:
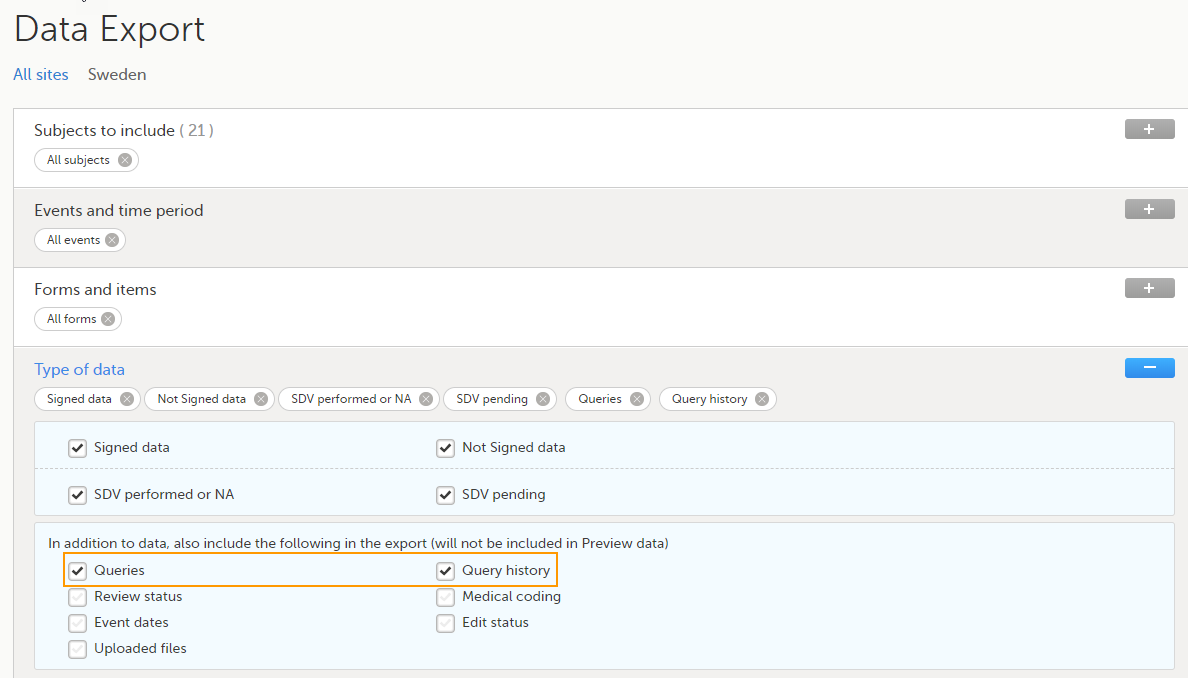
For more details and instructions on how to perform an export, see Exporting data.
For details on how queries look in the ODM export see Queries in ODM export.
For details on how queries look in the Excel/CSV exported file see Queries in Excel export.
For an overview of the entire query process see Queries overview.
To be able to raise a pre-query you must have the permission to add pre-queries, typically the Data Manager (DM).
To add a pre-query:
| 1 | Open the form that contains the field the pre-query will be raised on. |
| 2 | Click the + icon in the top-right corner of the group that contains the respective field. The Add new action pop-up is displayed:
|
| 3 |
Click Ready. The pre-query is created and needs to be promoted and released by the user with permission to promote pre-queries (typically the Monitor), in order to be visible as a query for the site staff. A Removed state is a final state for a pre-query. |
A pre-query is always marked by this icon:
Once a pre-query has been promoted and released, it becomes a query and it is marked by this icon:
To be able to promote/reject a pre-query you must have the permission to promote pre-queries, typically the Monitor.
If there are any pre-queries that await promotion, these are marked as tasks. For details about tasks, see Issues and tasks.
To promote a pre-query:
| 1 |
Browse to the task and open the respective pre-query that is marked with state Awaits promotion. A pop-up is displayed where you can either Promote or Reject the pre-query: 
|
| 2 |
|
A pre-query can be released after it has been promoted, that is, a pre-query in Ready for release state.
A pre-query waiting to be released is marked as a task. For details about tasks, see Issues and tasks.
After releasing a pre-query, this will become a raised query visible to the site staff. This is why, releasing a pre-query can be performed by a user with permission to add queries.
To release a pre-query:
| 1 | Browse to the task and open the pre-query that is Ready for release. A pop-up is displayed where you can either Release or Reject the pre-query: |
| 2 |
Note! When role-based queries is enabled for your study, when a pre-query is released, (typically by the Monitor):
For more information on pre-queries, see Queries overview. |
For an overview of the entire query process see Queries overview.
A query can be added/edited/removed/approved by the user with permission to add/change queries.
Note! When the role-based queries option is enabled for your study, all of the above actions are restricted to the same role as the role who raised the query. For more information, see Role-based queries.
To raise a query:
| 1 | Open the form that contains the field the query will be raised on. |
| 2 | Click the + icon in the top-right corner of the group that contains the respective field. The Add new action pop-up is displayed.
|
| 3 |
Click Ready. The query was raised and it is now visible for the site and ready to be resolved, with state Awaits answer: 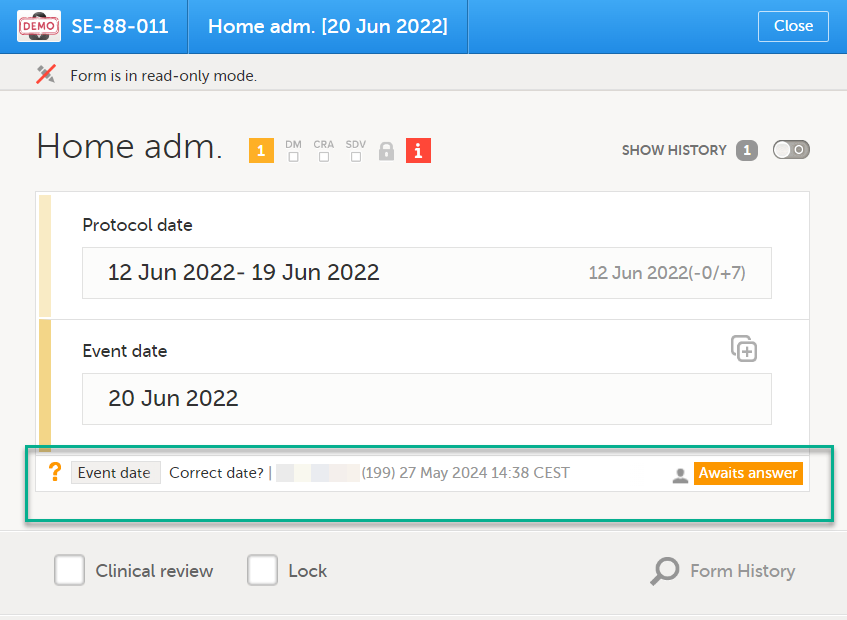
|
After the query has been raised it can be:
The text of a raised query can be edited as long as the query was not resolved (Awaits answer).
To edit a query:
| 1 |
Open the query (from the respective form) and click Edit: Note! The avatar icon and the user role who raised the query is only visible if role-based queries is enabled for the study. For more information, see Role-based queries. |
| 2 |
Edit the text and click Save query: The query text is now updated. |
A query can be removed, for example if invalid or added by mistake, as long as the query was not resolved (Awaits answer).
To remove a query:
| 1 |
Open the query (from the respective form) and click Remove: 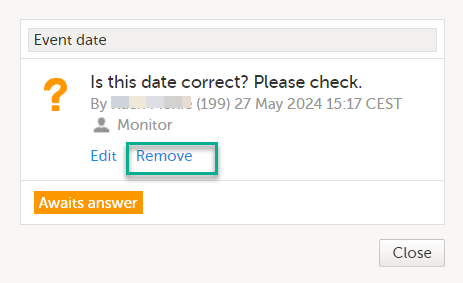
Note! The avatar icon and the user role who raised the query is only visible if role-based queries is enabled for the study. For more information, see Role-based queries. |
| 2 |
Click Save query to confirm: 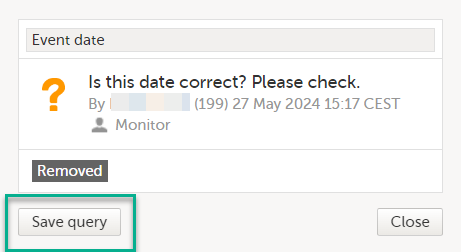
The query state is Removed. This is a final state for a query. |
After the query was resolved by the site (typically the Investigator), it is marked as a task, it is in Awaits approval state and can be either approved or rejected.
Note! An exception is a query raised as a result of confirming data as missing by the site user. This type of query can only be approved.
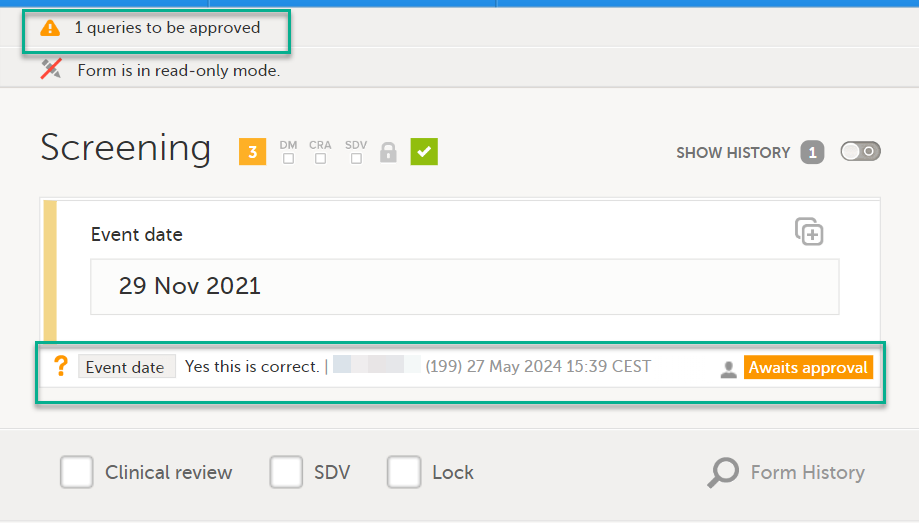
To approve a query:
| 1 | Open the query. The query pop-up opens displaying the list of the query history: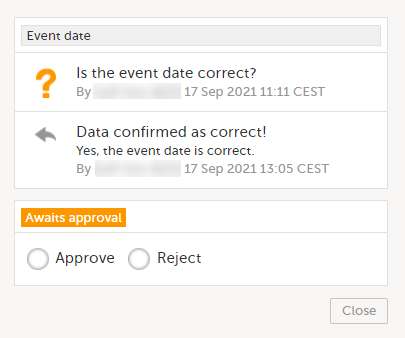 |
| 2 |
Select Approve and click Save query: The query is now Approved. This is a final state for a query: 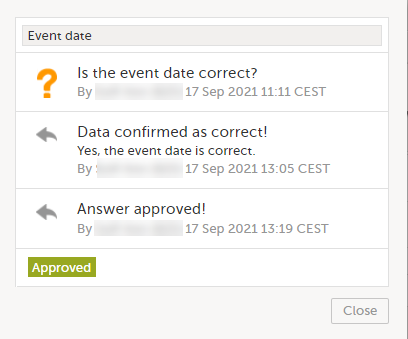
|
To reject a query:
| 1 |
Open the query. The query pop-up opens displaying the list of the query history: 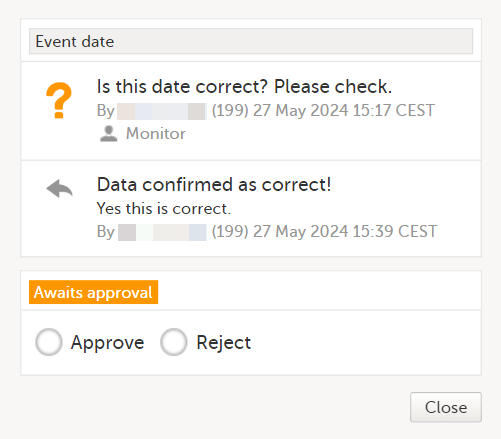
Note! The avatar icon and the user role who raised the query is only visible if role-based queries is enabled for the study. For more information, see Role-based queries. |
| 2 |
Select Reject, optionally rephrase the query and click Save query: 
The old query is closed with state Rejected and a new query is raised that Awaits answer: 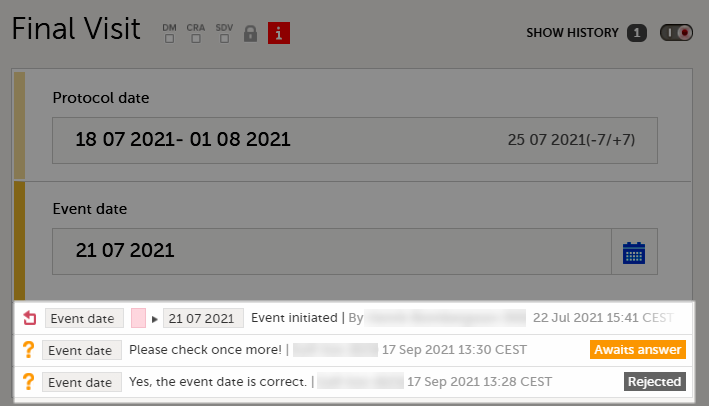
|
The Data Export page can be accessed by selecting the Data Export icon in the study start page:
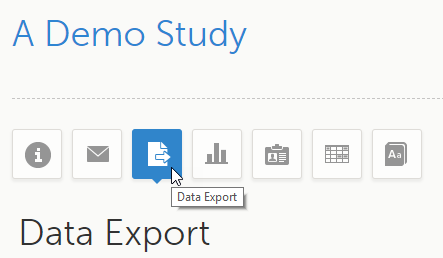
The Data Export page enables you to preview and download study data:Layout option
You can filter the data that you want to preview/export, as described in the following sections.
If you have access to multiple sites, you can filter the data for a specific country or site.
To filter data for a specific country, select the name of the country. The selected country appears in blue letters besides the Data Export header, while the site(s) for the selected country are listed below:
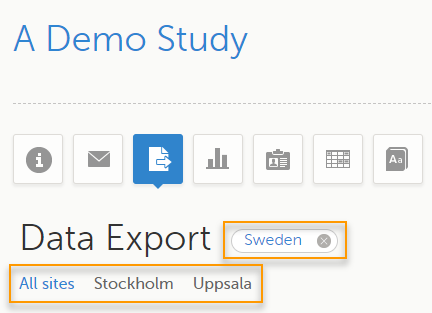
For a specific country, you can choose to export the data for:
To undo the selection of the site, select All sites.
To undo the selection of a country, select the cross x icon beside the name of that country.
While filtering for country or site, the number of subjects depicted in between brackets in the Subjects to include field is updated accordingly.
You can choose to include all subjects in the data preview or export, or include a selection of subjects.
To select which subjects to include:
| 1 | Select Include single subject(s). |
| 2 |
Select the Repeat this step for each subject you want to include in the data preview/export. |
To undo the selection of certain subjects, select the - icon, or select the cross x icon next to the subject ID:
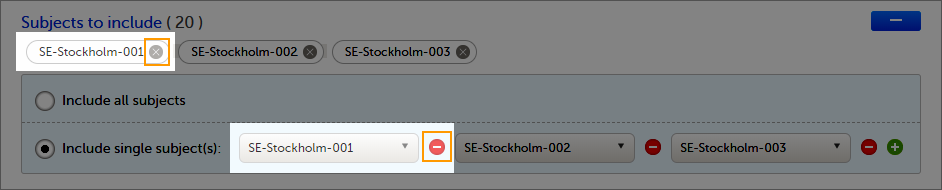
You can choose to include all the data or only for certain events. You can also filter the data added or edited during a certain time period.
Note! The available events are the ones existing in the latest design version applied on the first of the selected sites to be included in the export. If there are multiple design versions running for different of the selected sites, you have to select one site at a time in order to get the available events for the respective site.
You can choose to:
To select which events to include:
| 1 | Select Single event(s). |
| 2 |
Select the |
To undo the selection of certain events, select the - icon, or select the cross x icon next to the event:
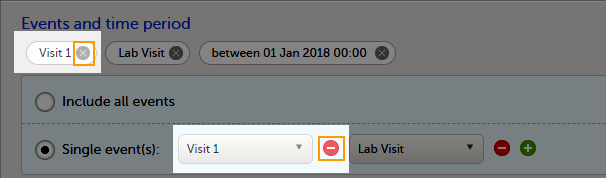
To include data from a specific time period:
| 1 | Select the Time period checkbox: |
| 2 | Select one of the following options from the first drop-down list:
|
| 3 | Select whether to define the time period until a certain date, from a certain date, or between two dates. |
| 4 | Select the date(s). |
Tip! Filtering for data that were added or edited since a specific date is especially useful if you want to see all new and changed data since for example your last monitoring visit.
To undo the selection of a certain time period, select the cross x icon next to it:

You can choose which forms and items to be included in the export output:
Note! Only data belonging to forms and items that exist in the latest effective design applied to the first of the selected sites will be included in the export. Also note that the forms and fields available to choose from are determined by the visibility settings for your user role.
To include data from specific form(s):
| 1 | Select Include single forms and items. |
| 2 | Select the forms and items to be included, in one of the following ways:
|
To undo the selection of a certain form, select the cross x icon next to it:
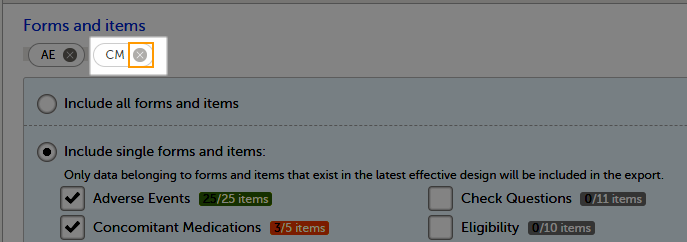
You can filter the data to be included in the export by the review status, as follows:
You can select to include additional information, depending on the export output format, as described in the following sections.
For PMS studies, there is an option to include booklet status and booklet status history in the export.
When selecting to include Booklet status, the Booklet status history option becomes available.
Depending on if the booklet status is included in the export or not, the export contains the following information:
Booklets in submitted status are not included in exports triggered by users on the sponsor side. The booklets are included to those users when they are received.
Note! Clinic actions to submit/recall back and forth are not available on the sponsor side. Only the latest submit of the booklet that was received by the sponsor is included.
If the Booklet Status is selected and the following options: Require Responsible Investigator for booklet submission, and Require Contract for booklet submission, are enabled for the study, two columns are added to the export.
If Booklet history is selected at export, the historically selected Contract and Responsible Investigator are included in the respective booklet status. The most recent contract information shall be shown, regardless of the booklet status.
Note! If the contract linked to a booklet is edited, the contract information is updated in the existing row for that booklet in the export performed after the information was updated.
The booklet status can be exported to the following export output formats:
When selecting to include Booklet status in the Excel export, a separate Booklet status sheet is created that lists all the forms with the following information:
| Column name | Description |
|---|---|
| Site sequence number | A counter that identifies the site globally within the study |
| Site name | The site name, as set in Viedoc Admin |
| Site code | The site code, as set in Viedoc Admin |
| Subject sequence number | A counter that identifies the subject within the site |
| Subject Id | The Subject ID, in the format configured in Viedoc Designer. The Subject ID is the subject identifier displayed in Viedoc Clinic on the subject card, subject details page, and so on. |
| Booklet sequence number | A counter that identifies the booklet within the sequence of booklets for the same subject |
| Booklet Id | The booklet ID, as set in the study design (in Viedoc Designer) |
| Booklet name | The booklet name, as set in the study design (in Viedoc Designer) and displayed in Viedoc Clinic |
| Booklet status | One of Not initiated, Initiated, Submitted, Received, Returned, or Frozen |
| Booklet activity | Initiated, Submitted, Recalled, Received, Frozen, Unfrozen, or Returned |
| Date & time (UTC) | The date and time of the status change |
| User name (ID) | The name (ID) of the user who changed the booklet status |
| Contract number | The number of the selected contract for the specific booklet. Note! This column is present in the export only if the option to link the booklet to a contract is enabled for the study. |
| Responsible Investigator | User name (internal userID ) of the user selected as Responsible Investigator for the specific booklet. Note! This column is present in the export only if the option to link the booklet to a contract is enabled for the study. |
When selecting to include Queries, the Query history option becomes available.
The Queries can be exported to the following export output formats:
See also:
The review status can be exported to the following export output formats:
See also:
The event dates can be exported to the following export output formats:
When selecting to include Event dates in the Excel export, a separate Event dates sheet is created that lists all the events with the following information:
| Column name | Description |
|---|---|
| Site sequence number | A counter that identifies the site globally within the study |
| Site name | The site name, as set in Viedoc Admin |
| Site code | The site code, as set in Viedoc Admin |
| Subject sequence number | A counter that identifies the subject within the site |
| Subject Id | The Subject ID, in the format configured in Viedoc Designer. The Subject ID is the subject identifier displayed in Viedoc Clinic on the subject card, subject details page, and so on. |
| Event Id | The event ID, as set in the study design (in Viedoc Designer) |
| Event name | The event name, as set in the study design (in Viedoc Designer) and displayed in Viedoc Clinic |
| Event repeat key | For recurring events, the counter that identifies different occurrences of the same event (identified by the Event ID). Available for output versions Viedoc 4.39 and onward. |
| Event status | The current status of the event. It can be one of the following:
|
| Event date | The event date, as set in Viedoc Clinic when the event is initiated |
| Planned date | The event planned date, as set in Viedoc Clinic when the event is planned |
| Proposed date | The proposed date for the event, if set in the study design |
| Window start date | The event time window start date, if set in the study design. |
| Window end date | The event time window end date, if set in the study design |
| Initiated by | The name and ID of the user who initiated the event |
| Initiated date (UTC) | The date and time (UTC) when the event was initiated |
| Last edited by | The name and ID of the user who last edited the event |
| Last edited date (UTC) | The date and time (UTC) when the event was last edited |
| Design version | The design version/revision that is active for the event |
When selecting the Uploaded files option, the uploaded file together with the thumbnail (if it exists) are part of the Excel, CSV and PDF export output:
The folder structure obtained when you unzip the file is as follows:
|
- SponsorCode_YYYYMMDD_HHmmss (date and time in UTC format) - FileData - StudySite (SiteCode) - SubjectKey - StudyEventOID - EventRepeatKey - ActivityOID - ActivityRepeatKey - FormOID - FormRepeatKey (if any) - ItemGroupOID - ItemGroupRepeatKey (if any) - ItemDefOID - FileName.extension (original filename) - FileName_tn.extension (thumbnail filename) |
The export output (Excel, PDF, CSV, ODM) as well as the Data preview provides the following information about uploaded files:
The following information on the uploaded file is available in the full history:
The pending forms can be exported to the following export output formats:
Forms are considered pending when they are uninitiated in initiated events. This applies to all types of events, including subject-initiated events. For repeating forms, if the first instance of the form is uninitiated, the form is considered pending. Resetting a form results in that form being pending.
When selecting to include Pending forms in the Excel export, a separate Pending forms sheet is created that lists all the forms with the following information:
| Column name | Description |
|---|---|
| Site sequence number | A counter that identifies the site globally within the study |
| Site name | The site name, as set in Viedoc Admin |
| Site code | The site code, as set in Viedoc Admin |
| Subject sequence number | A counter that identifies the subject within the site |
| Subject Id | The Subject ID, in the format configured in Viedoc Designer. The Subject ID is the subject identifier displayed in Viedoc Clinic on the subject card, subject details page, and so on. |
| Event sequence number | A counter that identifies the event within the sequence of events for the same subject |
| Event Id | The event ID, as set in the study design (in Viedoc Designer) |
| Event name | The event name, as set in the study design (in Viedoc Designer) and displayed in Viedoc Clinic |
| Event repeat key | For recurring events, the counter that identifies different occurrences of the same event (identified by the Event ID). Available for output versions Viedoc 4.39 and onward. |
| Activity Id | The activity ID, as set in the study design (in Viedoc Designer) |
| Activity name | The activity name, as set in the study design (in Viedoc Designer) and displayed in Viedoc Clinic |
| Form Id | The form ID, as set in the study design (in Viedoc Designer) |
| Form name | The form name, as set in the study design (in Viedoc Designer) and displayed in Viedoc Clinic |
| Event date | The event date, as set in Viedoc Clinic when the event is initiated |
| Pending since |
The date and time since when the form has been pending This is not always the date when the event was initiated. For a form that has been hidden due to a visibility condition, the pending since date is the date when the form is made available. |
The medical coding can be exported to the following export output formats:
Note! When exporting medical coding data to Excel or CSV format in studies using Viedoc Coder, Medical coding history is available. This export includes the full audit trail for each coded item.
Medical coding history can also be included in CSV exports through the Viedoc Web API and the Viedoc WCF API.
For more information, see Medical coding in Excel export.
The edit status can be exported to the following export output formats:
The subject status can be exported to the following export output formats:
The sheet Calculated subject status contains the following columns:
Select the export output format of the data under Output format > Output to:
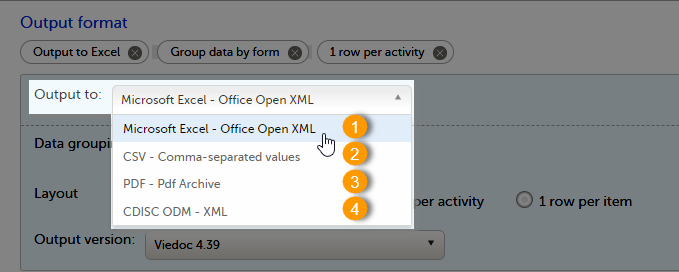
You can export the data to one of the following formats:
1. Microsoft Excel - Office Open XML
2. CSV
3. PDF - PDF/A
4. ODM
Viedoc uses Microsoft Excel Open XML format which is compatible with Excel version 2007 and later.
For details about the Excel export options and the format/structure of the output file, see Excel export.
The output of the CSV export is similar to the Excel export output. The CSV export output consists of a zip archive containing one CSV file that corresponds to each sheet from the Excel export. For details about the Excel export options and the format/structure of the output file, see Excel export.
For the CSV export and the one row per activity selected layout, there is also the option to Include corresponding SAS script. For details, see Exporting for SAS.
For the CSV export, for study designs which include repeating item groups, when the one row per activity and group data by form options are selected, there is also the option to export Repeating item groups as a separate form. This option is selected by default. For details, see Excel export.
Notes! The export to CSV fails if the same OID was used in Viedoc Designer in different design versions with different casing (for example, an OID defined as AE in design version 1 and AE in design version 2).
Labels are truncated to 200 characters when CSV data is imported to SAS using the CSV2SAS macro.
The Excel/CSV export does not include items set to “Hide Always" in visibility conditions when a singleform is selected for export.
For details about the PDF export and the format/structure of the output file, see PDF export output.
The Clinical Data Interchange Standards Consortium (CDISC) Operational Data Model (ODM) is a vendor neutral, platform independent format for interchange and archive of clinical trials data. The format includes the clinical data along with its associated metadata, administrative data, reference data and audit information. All of the information that needs to be shared among different software systems during the setup, operation, analysis, submission or for long-term retention as part of an archive is included in the model.
This is used for exporting the data to an ODM file, with or without Viedoc extensions. To include the Viedoc extensions in the exported file, select the Include extensions checkbox. Viedoc extensions are Viedoc-specific settings that cannot be described as part of the CDISC standards. If the exported file is to be imported to Viedoc at a future time, the checkbox should be selected.
Select SAS compliant XML to automatically populate the SAS field name and the SAS dataset name.
The ODM export file is built up as follows:
Study tag contains the information on the study settings, study design, workflow.AdminData contains data about the user and site settings.ClinicalData tag contains the data that was filled in in Viedoc Clinic.Association tag contains information about the performed actions such as SDV, raising and approving queries, medical coding, lock, CRA and DM reviews.The ODM export also supports repeating item groups in both the standard CDISC ODM and SAS-compliant formats. Repeating item group data is exported with ItemGroupRepeatKey attributes, which identifies each instance of a repeating item group.
This ensures ODM exports are compliant with the CDISC ODM standard for repeating item groups.
See also:
It is possible to select the Viedoc version that the exported file should be compatible with. This option enables you to export files that have the same format as files exported from previous Viedoc versions.
Note! This functionality is optional and set in the study settings in Viedoc Admin. It might not be activated for your study.
If activated for your study, you can select the Viedoc version that you wish the exported file to be compatible with under Output format and export, from the Output version drop-down menu. If you wish to create an export file according to the latest Viedoc version, select Latest Viedoc version:
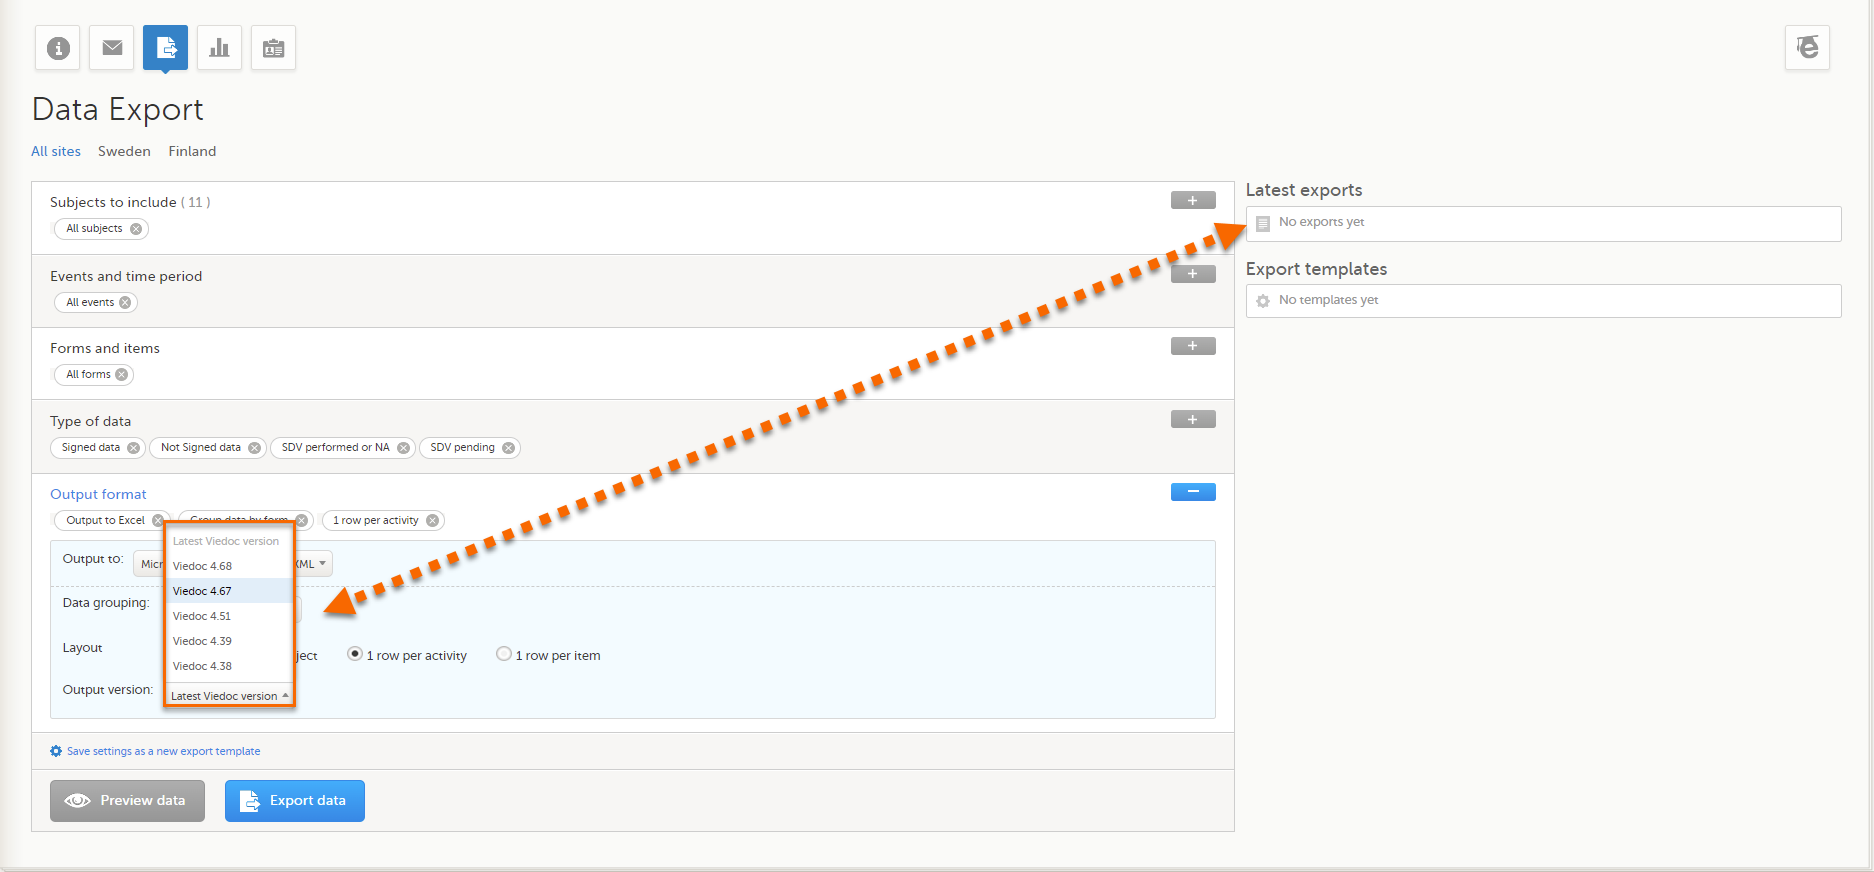
The Viedoc version used for data export is listed in the Latest exports area on the right side of the export page.
The exported file contains information about which Viedoc version was used to create it. You can find information about the Viedoc version in the following places:
The Viedoc versions available in the Output version dropdown menu are only those versions in which changes to the data structure were introduced.
As of Viedoc release 4.79, the following output versions are available:
| Output version | Changes in data structure |
|---|---|
| Latest Viedoc version | When choosing Latest Viedoc version, the exported data will automatically follow the structure of the latest Viedoc release in which changes to the data structure were introduced. |
| Viedoc 4.79 | Introduction of a number of changes to the ODM data export. See the table below for details. |
| Viedoc 4.77 | For studies where item-level SDV is enabled, when exporting review status, the SDV sheet in the CSV and Excel data exports will include only the items that require SDV and are visible to the user. On the Review status sheet, items that do not require SDV are indicated with N/A. |
| Viedoc 4.68 |
Introduction of pdf archive export system check which splits the archive into one pdf file per subject and stores resultant PDF in a zip file. |
| Viedoc 4.67 | Introduction of two new columns for approving medical coding: "approved by" and "approved on date". |
| Viedoc 4.51 | Introduction of three new form repeat keys and the table of contents in the PDF export, see the table below for details |
| Viedoc 4.39 | Introduction of repeating forms and recurring events, see the table below for details. |
| Viedoc 4.38 | Original output format (Viedoc versions 4.38 or older). |
In Viedoc 4.79, the following changes to the export output were introduced:
| File type | Changes in the export output format |
|---|---|
| ODM |
Introduction of support for partial datetime, date, and time. This is now the default type when exporting designs and data in ODM format. Partial dates as per the ISO 6801 standard are written up to the most detailed value available. This makes the export compliant with CDISC ODM. |
| ODM |
When exporting a design to ODM, multi-selection code lists are handled as follows: Checkbox item definitions are split by code list items.
For example, when splitting a checkbox ItemDef with OID="CHK" and code list IDs "Yes" and "No", the split checkbox ItemDefs will have the OIDs "__CHK__Yes" and "__CHK__No", respectively. That is, the original OIDs and the code list IDs are prefixed with two underscore characters and separated by two underscore characters. In Viedoc Designer, checkbox items are exported as multiple ItemDefs - one for each selection value. In Viedoc Clinic and the Viedoc API: In the latest export version, checkboxes are exported as separate items for metadata and clinical data. In previous export versions, checkboxes are exported as one item. This has been introduced to be compliant with CDISC ODM. |
| ODM |
Bug fix: In the ODM data export, the content of the Question element for study event items and booklet forms was not complete. According to the CDISC standard, the element should include one of the TranslatedText attributes. This is now solved, and the Question element is populated with a string related to the corresponding OID. This is applied to all export versions. |
| ODM |
Bug fix: In the ODM data export, the MeasuremetUnit.Name contained HTML code, making it non-compliant with the CDISC standard. This is now solved, and the HTML code is removed from the name. This is applied to all export versions. |
| ODM |
Bug fix: In the ODM data export, the translated text was missing for meta.Protocol.Description.TranslatedText. This is now solved, and the body is populated with the protocol name, as visible on the design overview page. This is applied to all export versions. |
| ODM |
Bug fix: In the ODM data export, the Length attribute was incorrect, making it non-compliant with the CDISC standard. This is now solved, and Length is populated as per the ItemDef data type. This is applied to all export versions. |
| ODM |
Bug fix: In the ODM data export, there was a mismatch between the item data type and the code list data type for checkboxes. This is now solved, and the checkbox data is split into different items, in the same way as for CSV and Excel exports. This is implemented in a new export version, version 4.79. |
| ODM |
Bug fix: In the ODM data export, the study OID and ClinicalData didn't respect the Production/Demo mode for sites. This is now solved, and the study OID and ClinicalData are populated based on the Production/Demo mode of the exported study. This is applied without a new export version. |
| ODM |
Bug fix: In the ODM data export, non-repeating forms included a repeat key, making the ODM data export non-compliant with the CDISC standard. This is now solved. This is implemented in a new export version, version 4.79. |
| ODM |
Bug fix: In the ODM data export, the KeySet elements had an unregistered value for the ItemOID attribute, making the ODM data export non-compliant with the CDISC standard. This is now solved, and the KeySet elements reference items within the same MetaDataVersion. This is implemented in a new export version, version 4.79. |
| ODM |
Bug fix: In the ODM data export, the attribute OrderNumber of the element StudyEventRef was not valid with respect to its type, integer. This is now solved, and StudyEventRef elements have unique and non-empty consecutive order numbers. This is applied to all export versions. |
| ODM |
Bug fix: In the ODM data export, there was a data type mismatch between CodeList and ItemDef, making the ODM data export non-compliant with the CDISC standard. This is now solved by always having a matching data type between ItemDef and CodeList. This is applied to all export versions. |
| ODM |
Bug fix: In the ODM data export, the element MeasurementUnitRef had an unregistered value for the MeasurementUnitOID attribute, making the ODM data export non-compliant with the CDISC standard. This is now solved, and measurement units not referenced in any MetaDataVersion are not included in the ODM data export. This is applied to all export versions. |
| ODM |
Bug fix: In the ODM data export, the Alias names were not correctly populated. This is now solved, and any code list item aliases with empty names are removed at import and export - and the Alias names are populated with the context values. This is applied to all export versions. |
| ODM |
Bug fix: In the ODM data export, the SAS field name and the SAS dataset name were not populated. This is now solved, and the SAS field name is populated based on the ItemDef OID, and the SAS dataset name is populated based on the FormDefOID, which means that the OIDs are SAS-compliant. There is an option for this in the data export. This is applied to all export versions. |
| ODM |
Bug fix: In the ODM data export, revisions linked to study events and revisions linked to forms requiring approval of the new design revision were not included. This is now solved. This is applied to all export versions. |
| ODM |
Bug fix: In the ODM data export, alerts had repeating order numbers. This is now solved, and the order numbers for all study settings alerts in Viedoc Designer are removed. This is applied to all export versions. |
| ODM |
Bug fix: In the ODM data export, the item group containing the reference data items was not added to the MetaDataVersion. This is now solved. This is applied to all export versions. |
In Viedoc 4.51, the following changes to the export output were introduced:
| File type | Changes in the export output format |
|---|---|
| Excel | Addition of three columns for the new form sequence numbers introduced:
|
| ODM | Three new form sequence numbers were introduced, as Viedoc extensions: v4:SubjectFormSeqNo, v4:OriginSubjectFormSeqNo and v4:SourceSubjectFormSeqNo, within the FormData, right after the FormRepeatKey. |
| A table of contents was added to the PDF archive, starting on page 2 of the file. |
In Viedoc 4.39, the following changes to the export output were introduced:
| File type | Changes in the export output format |
| Excel | Addition of a column for Form sequence number (FormSeq) that contains the FormRepeatKey. |
| ODM | The FormRepeatKey now contains the activity ID as well, in the following format: FormRepeatKey$ActivityId. The ExportVersion attribute has been added to the ODM. |
| The summary formats are used to display the event and form names. |
When exporting data from Viedoc, the system determines the available events, forms, and data points based on the study design version applied to the first selected site. Understanding how this works is important when a study includes sites with different study designs or multiple design versions.
What happens when study designs differ?
If a study contains multiple study designs or different versions across sites, the exported data is structured based on the design of the first selected site. This means:
What does "first selected site" mean?
The first selected site is the first site in the study that is chosen for export. The exact determination depends on:
Example: If a study has sites in Germany, Sweden, United States, and Japan, and Germany is the first selected site, the export will be based on the latest design version applied to the first site in Germany.
Selecting multiple sites with different study designs
If multiple sites are selected and they have different design versions, users must:
Best practices to ensure accurate exports:
Note! User visibility settings affect data exports. If an item is missing, check that your user role has the necessary permissions, and that the item exists in the latest design version applied to the first selected site.
Example scenario: How study design affects data export
Scenario: A study has Site A using Design Version 1.0, and Site B using Design Version 2.0. When exporting data:
The Preview data button is only available when you have selected Excel or CSV as output format for the export.
The preview is not available when you have selected 1 row per item.
On the data tab, you can preview the data in table format:
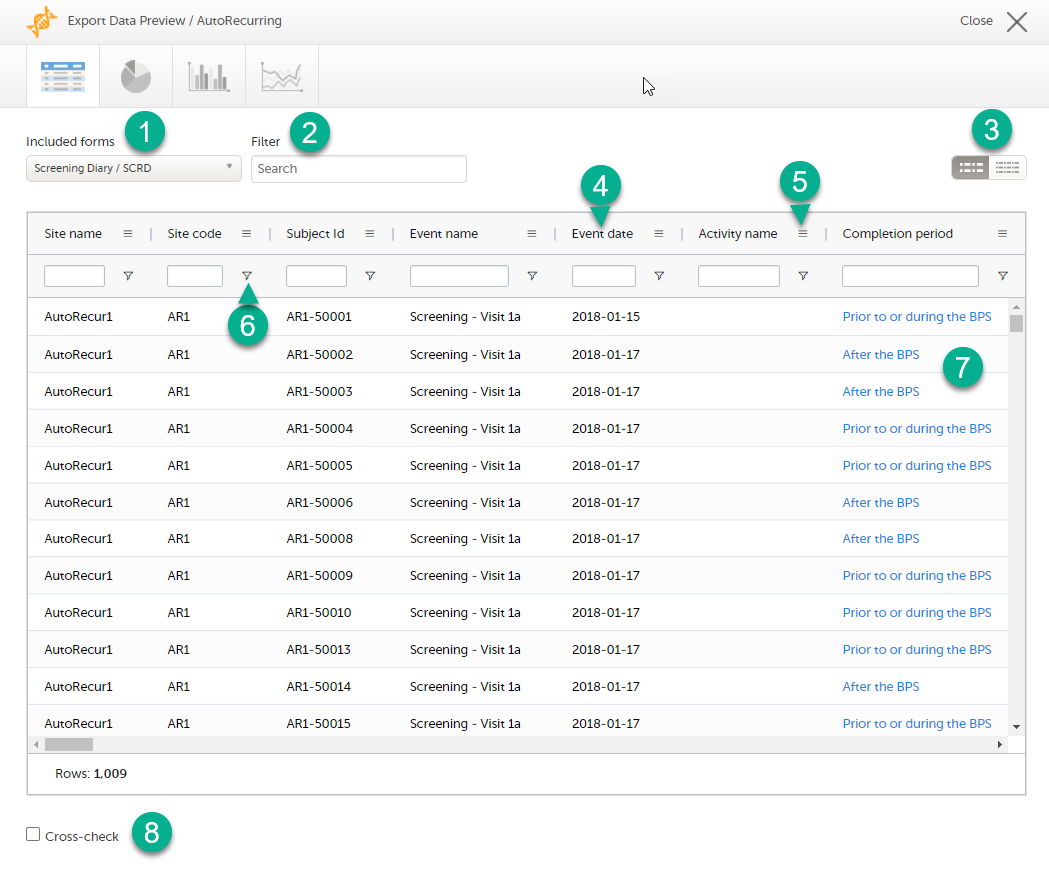
1. If you have selected Group data by form, you can select the form for which you want to display data.
2. Use the Filter text box to filter the preview data by any text in any field. The preview is filtered on all words in this field.
3. Toggle between spacious view and compact view.
4. Select a column header to sort the data in ascending order. Select again to sort in descending order. Selecting a third time removes the column sort order. To rearrange the order of the columns in the table, simply select a column header and drag the column sideways.
5. Select to open the column menu. For more information, see Column menu.
6. Select to access the column filter. For more information, see Column filter.
7. Select any hyperlink data point in the table to view the underlying form in read-only mode.
8. Select Cross-check to display a second data table. This lets you cross-check data between the two tables. Form selection and the filtering and sorting of data in the second table are independent of the settings in the first table.
The column menu contains:
|
 |
|
 |
|
 |
For more information, see the following sub-sections.
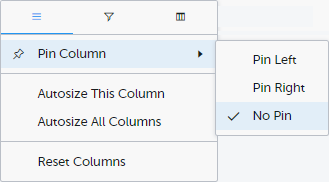
Pin Left/Right makes a column remain visible in the leftmost or rightmost position when you scroll sideways. Select No Pin to unpin the column.
Autosize adjusts the column width to the width of the text in the column.
Reset Columns resets the pinning, sizing, and order of columns to the initial state.
Use the column filters to narrow down the selection of preview data.

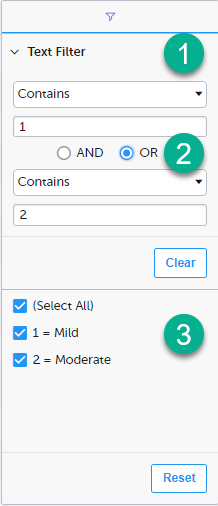
1. Depending on the type of item in the column, you can specify one of these types of filters:
Form items that are radio buttons, drop-down menus, checkboxes, dates, or date/time items are treated as text.
Note! The text filters are case-insensitive.
2. Once you have specified a filter, you can specify another one for the same column, either as an AND filter or an OR filter.
3. Predefined filter options based on the data available in the column.
Select the columns to be displayed in the preview table.
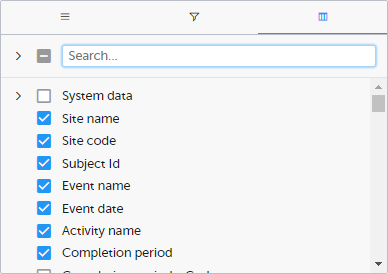
Use the Search field to search for columns.
By default, system data is excluded from the table. To include system data, select the column(s) to include from the System data category. Note that some system data columns are only available when you have selected 1 row per activity. For more information, see Excel export.
When you right-click in a cell in the data table, this context menu is displayed:
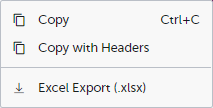
Copy: Copies the cell value to your clipboard.
Copy with Headers: Copies the cell value and its column header to your clipboard.
Excel Export: Exports the preview data on the data tab. The resulting Excel file will have the same sorting and filtering of data and order of columns as the preview.
Select the data set you wish to plot in a chart, and select Draw:
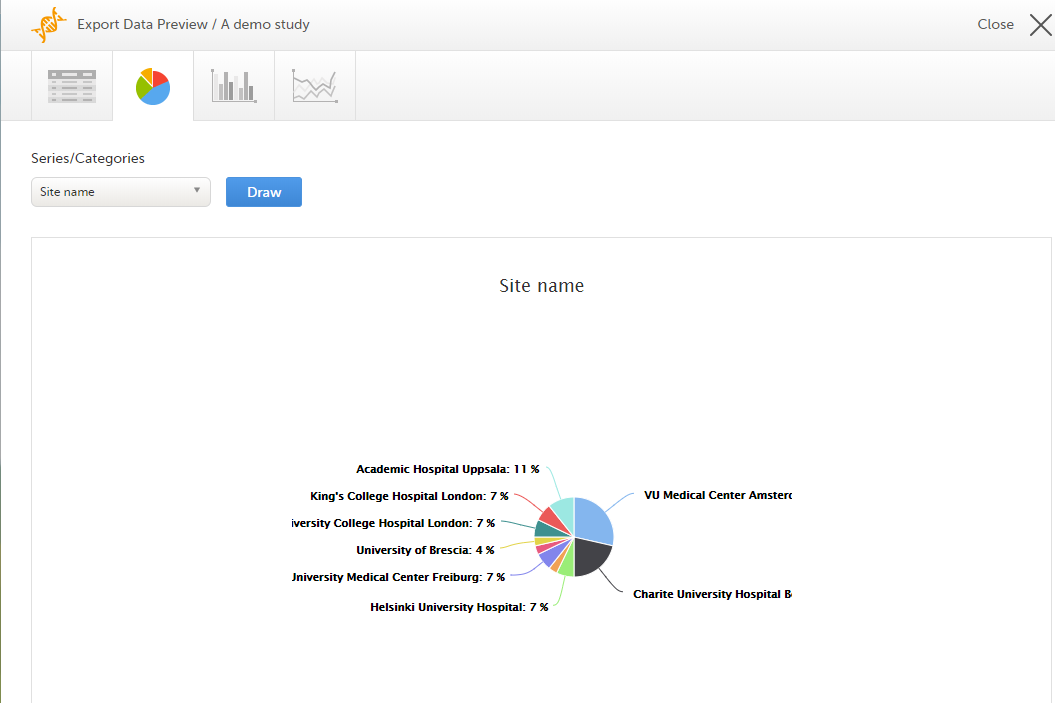
If you have selected Group data by form, you can only choose data sets from the form you have selected on the data table tab.
Select any data point to view its details.
Note! The pie chart has access to the same data as the data tab. That means that if you applied filters on the data tab, only the filtered data will be available in the pie chart.
Select which data you would like to plot on the X-axis and Y-axis, which series should be created, and select Draw:
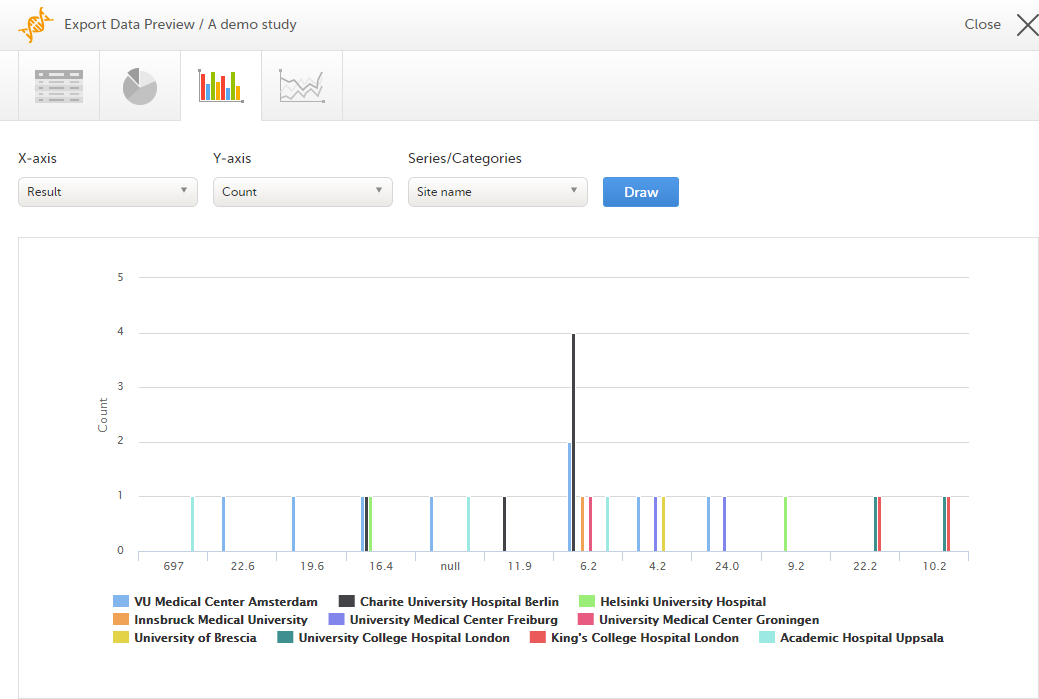
If you have selected Group data by form, you can only choose data sets from the form you have selected on the data table tab.
Select any column to view details of the data.
Note! The column chart has access to the same data as the data tab. That means that if you applied filters on the data tab, only the filtered data will be available in the column chart.
Select which data you would like to plot on the X-axis and Y-axis, which series should be created, and select Draw:
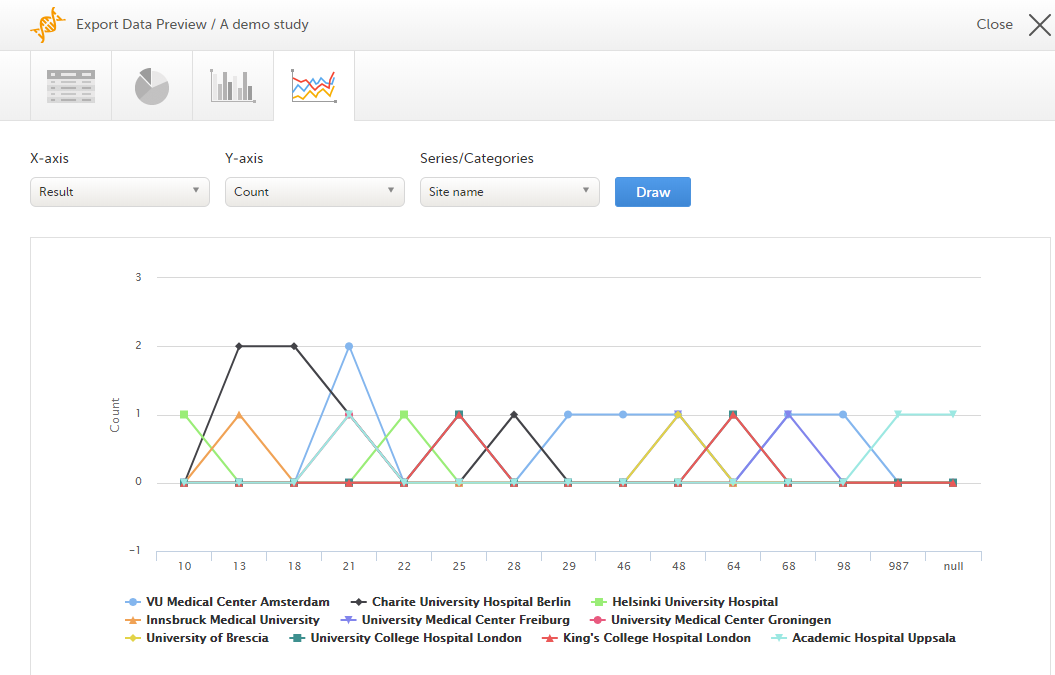
If you have selected Group data by form, you can only choose data sets from the form you have selected on the data table tab.
Note! The line chart has access to the same data as the data tab. That means that if you applied filters on the data tab, only the filtered data will be available in the line chart.
When you have made settings for an export, you can save them as a template. Then you, and optionally others, can use the template to easily make new exports with the same settings.
To save your settings as a template:
| 1 |
Select Save settings as a new export template. 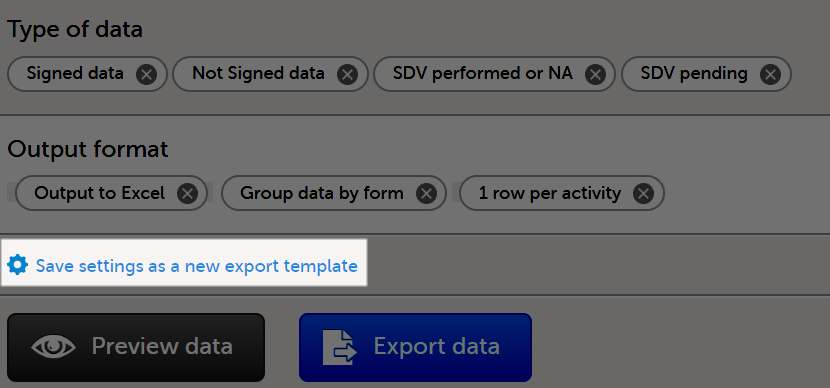
|
| 2 |
In the pop-up that is displayed, enter a name for the template and select whether it should be private or shared. If you select Shared, you are prompted to also select the roles that will be able to use the template. The roles available in the drop-down list are the ones with export permissions for the latest effective design of the study in question. 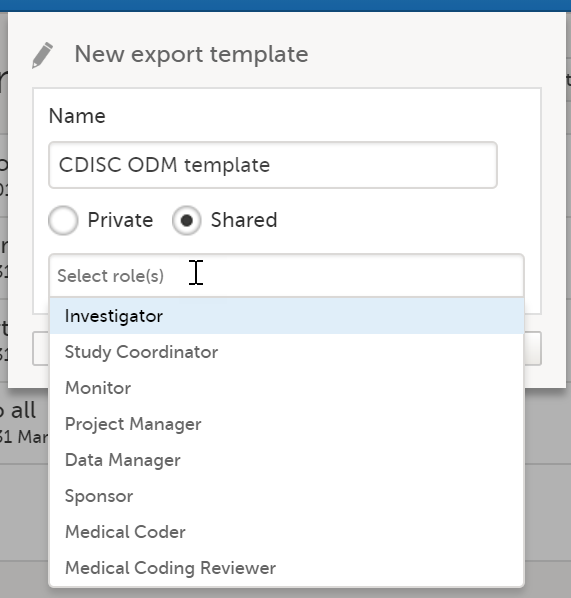
|
| 3 |
Select Save. Now the Export templates list is displayed, with your newly created template at the top of the list: 
|
To apply a data export template:
| 1 |
Select View all templates in the Export templates area of the Data export page. 
|
| 2 |
Select the apply icon for the template that you want to apply. 
|
| 3 | Select Export data to perform an export with the settings in the template. |
Tip! Alternatively, you can use the quick access apply, available in the Export templates area:
To edit a data export template:
| 1 |
Select View all templates in the Export templates area of the Data export page.
|
| 2 |
The Export templates list is displayed. Select the edit icon for the template that you want to edit. 
|
| 3 |
In the pop-up that is displayed, you can edit the name of the export template and the settings for Private/Shared. Note! You can only edit a template that you created yourself. |
To delete a data export template:
| 1 |
Select View all templates in the Export templates area of the Data export page.
|
| 2 |
The Export templates list is displayed. Select the trash can icon for the template that you want to delete. 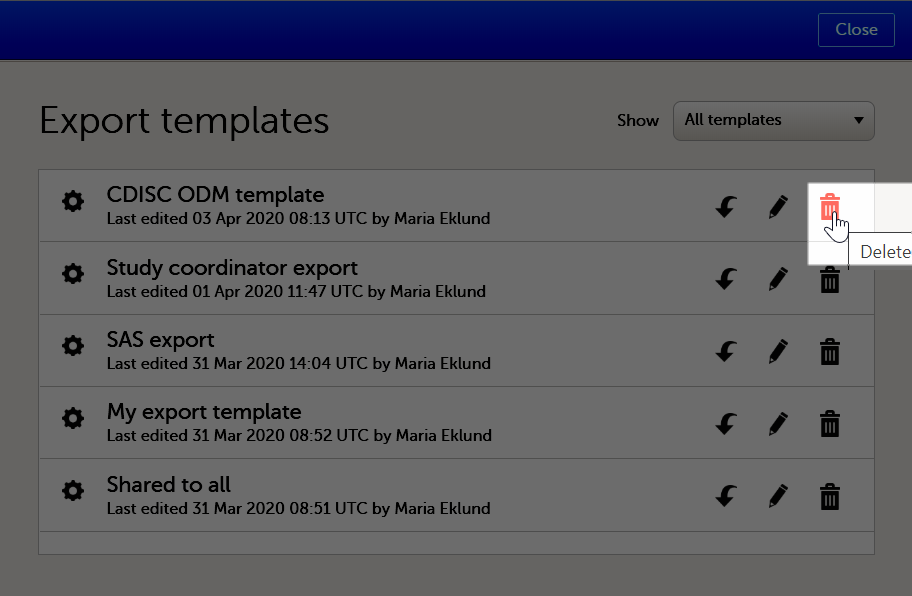
|
| 3 |
In the pop-up that is displayed, select Delete. 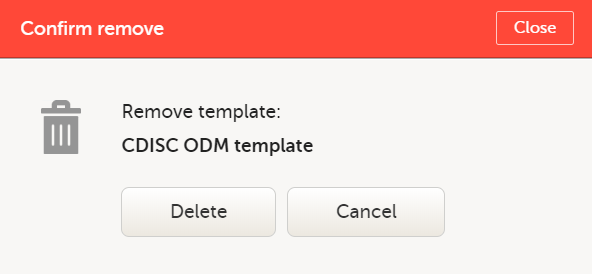
Note: You can only delete a data export template that you created yourself. |
To perform a data export:
| 1 | Filter the data to be exported. See Filtering the data to be exported. |
| 2 | Select the Output format. |
| 3 | Optionally, select the Output version. |
| 4 | Optionally, preview the data to be exported. |
| 5 |
Select Export data. The status of the export is displayed in the Latest exports area, on the top of the list. When the export is completed, you can download the exported file: The exported file is downloaded locally. The filename is generated as follows: SponsorCode_CountryCode_SiteCode_Date_Time, where:
Note! If any of the characters that are invalid for a filename in Windows are used within any of the SponsorCode or SiteCode, these characters will be automatically replaced with - within the exported filename. |
You can see a log of the requested exports in the Latest exports area, where you can download the exported files or delete the logs.
Note! The list of the latest exports is user-specific, that is, you can only see the exports made by yourself.
The latest five exports are shown in the list. To get the complete list of the initiated exports, select the View all exports link at the bottom of the list.
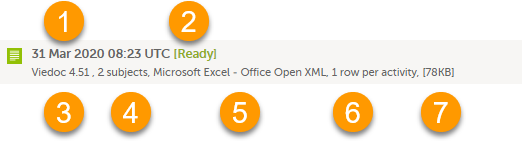
Each log entry provides the following information:
1. The date and time when the export was initiated.
2. The export status:
3. Viedoc output version - see Output versions.
4. The number of exported subjects.
5. The format of the output file.
6. The selected layout, if applicable.
7. File size
Note! If data has been masked after an export was made, it is not possible to download that export because it could include the data that was later masked.
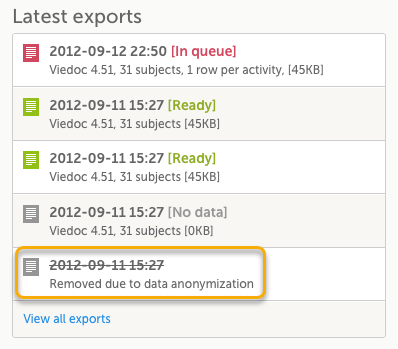
The following are some frequently asked questions and answers about exporting data in Viedoc:
Q: How do I export the audit trail (history)?
A: Any PDF data export will include the audit trail (history) by default. You can also get an Excel or CSV version by changing the layout to one row per item and including the history. See the Include history section in the Excel Export lesson for more information.
Q: Is there a size limit to exports?
A: No, there are no size limits to exports.
Q: Can I schedule exports automatically?
A: Yes, you can configure customized automatic exports using Viedoc's web API. Please see the Exporting data via Viedoc's web API for more information.
Q: How is missing data handled?
A: Viedoc's approach to missing data is to leave it blank. The system does not use "N/A" or "missing." Both unconfirmed and confirmed missing data are included when exporting queries and query history.
Q: Why does the export seem stuck at a certain percent?
A. Sometimes exports (especially PDF exports of large studies) can take a take a longer time to complete and appear "stuck". If you log out, the export will continue in the background. Please do not make multiple requests for the same export. If the export fails with an error message, please contact Viedoc for assistance.
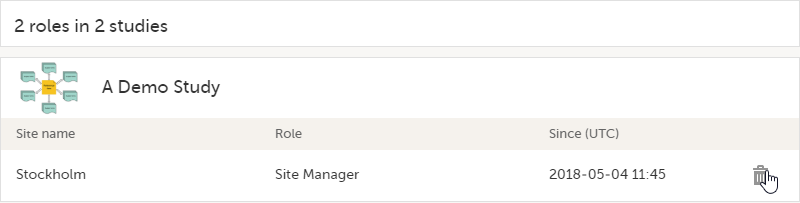
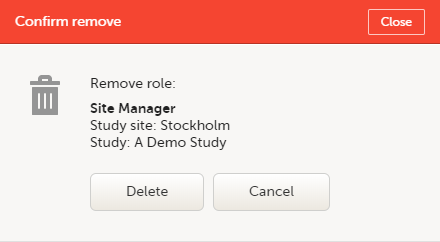
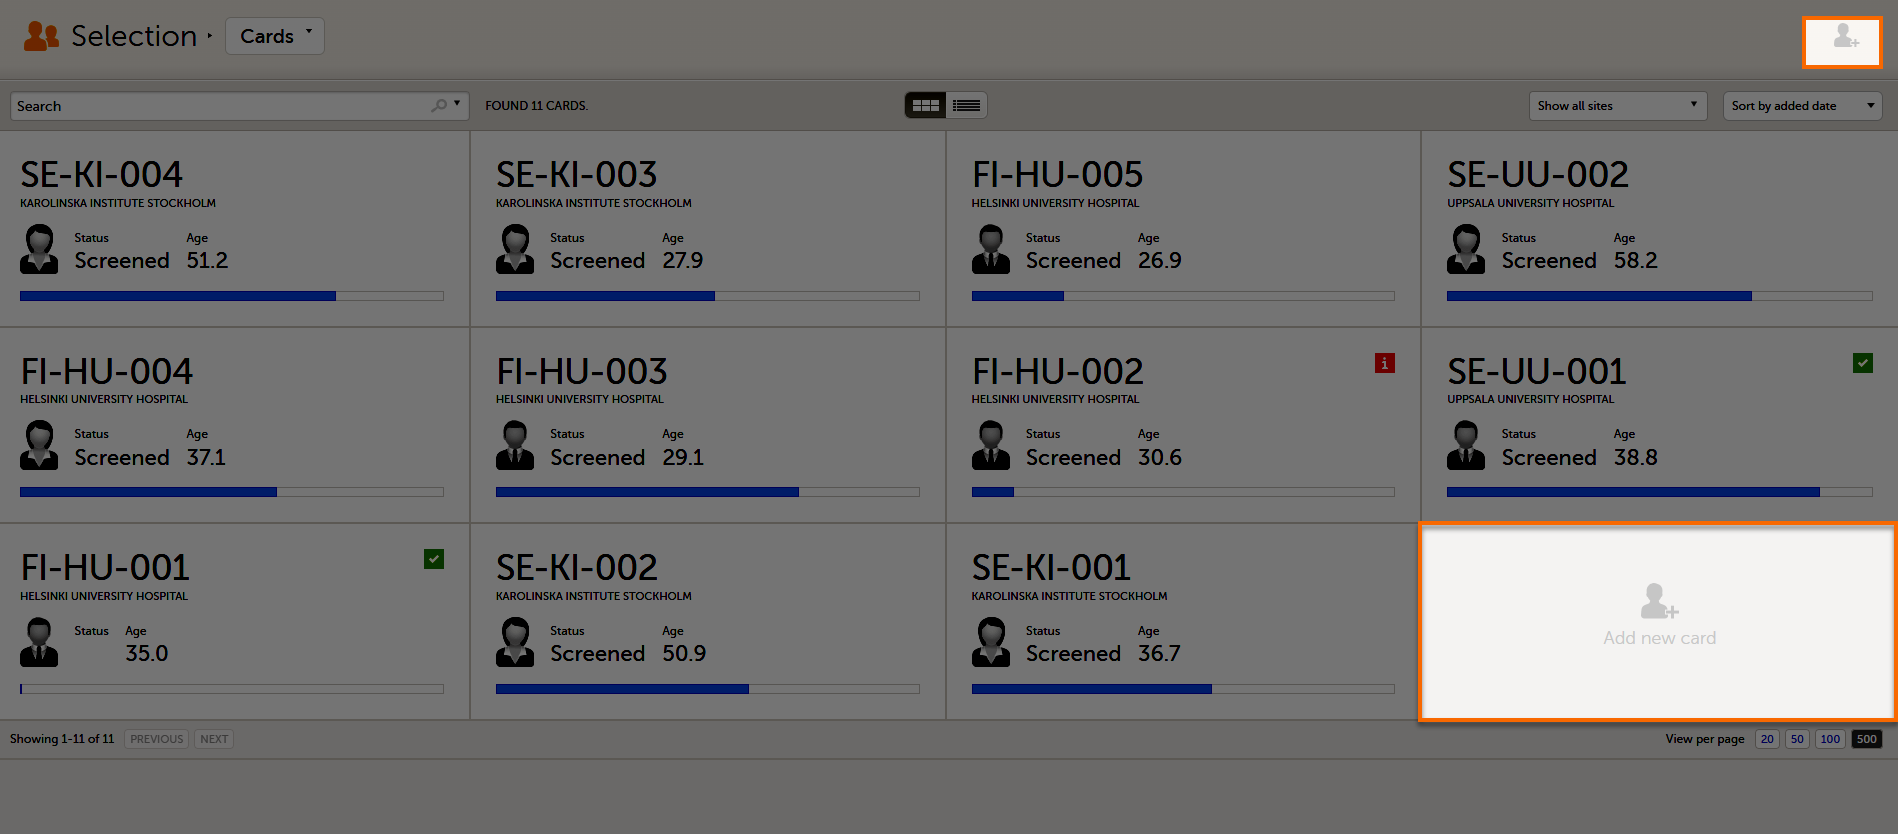
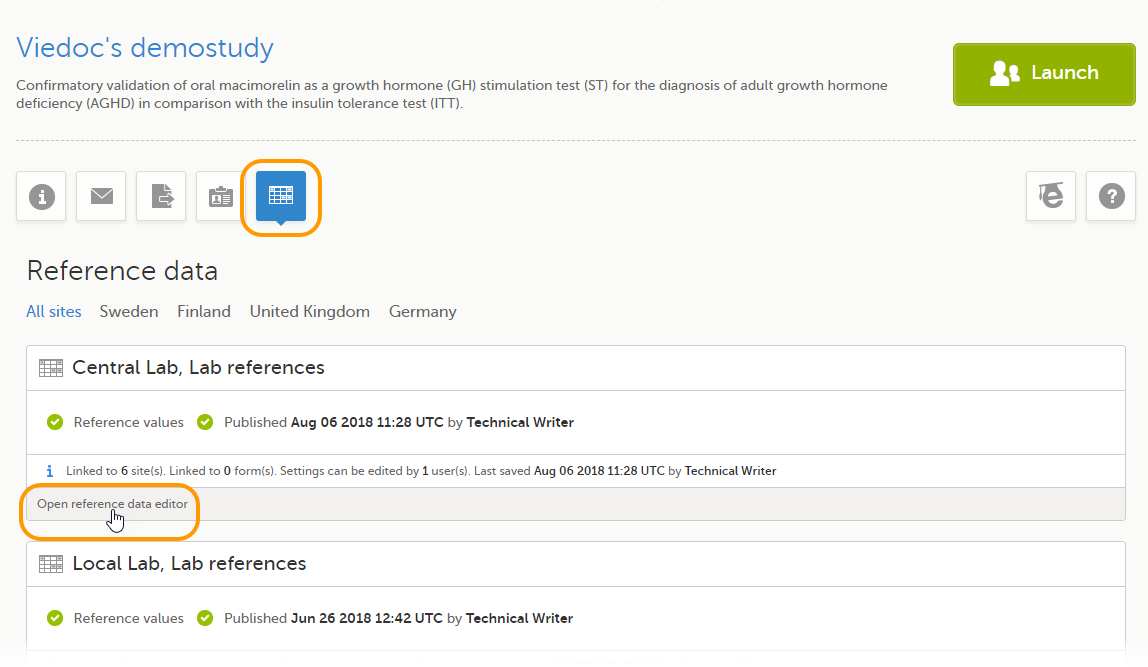 The reference data editor opens and displays the variables and the target types to be populated, as defined in the reference data scope. If you would like to exclude some of the variables, select the arrow to the right of the variable name and select Not available. See also