Viedoc Logistics is the interface for supply managers and all users with permission to manage the Investigational Products (IP) of a study. In Viedoc Logistics you can overview and monitor your IP (kits) as well as ship, receive and return kits between the depots and the participating sites.
Allocation of kits is managed from Viedoc Clinic and the feature is fully integrated with Viedoc Logistics, meaning that kits allocated by the site staff are instantly synchronized with and visible in the stock list.
Viedoc Logistics is available in the following languages:
A valid license is required to use Viedoc Logistics. Access is then given by a Study Manager or a Site Manager who invites the user to the study. For information on how to log in to Viedoc Logistics, see Launching Viedoc Logistics.
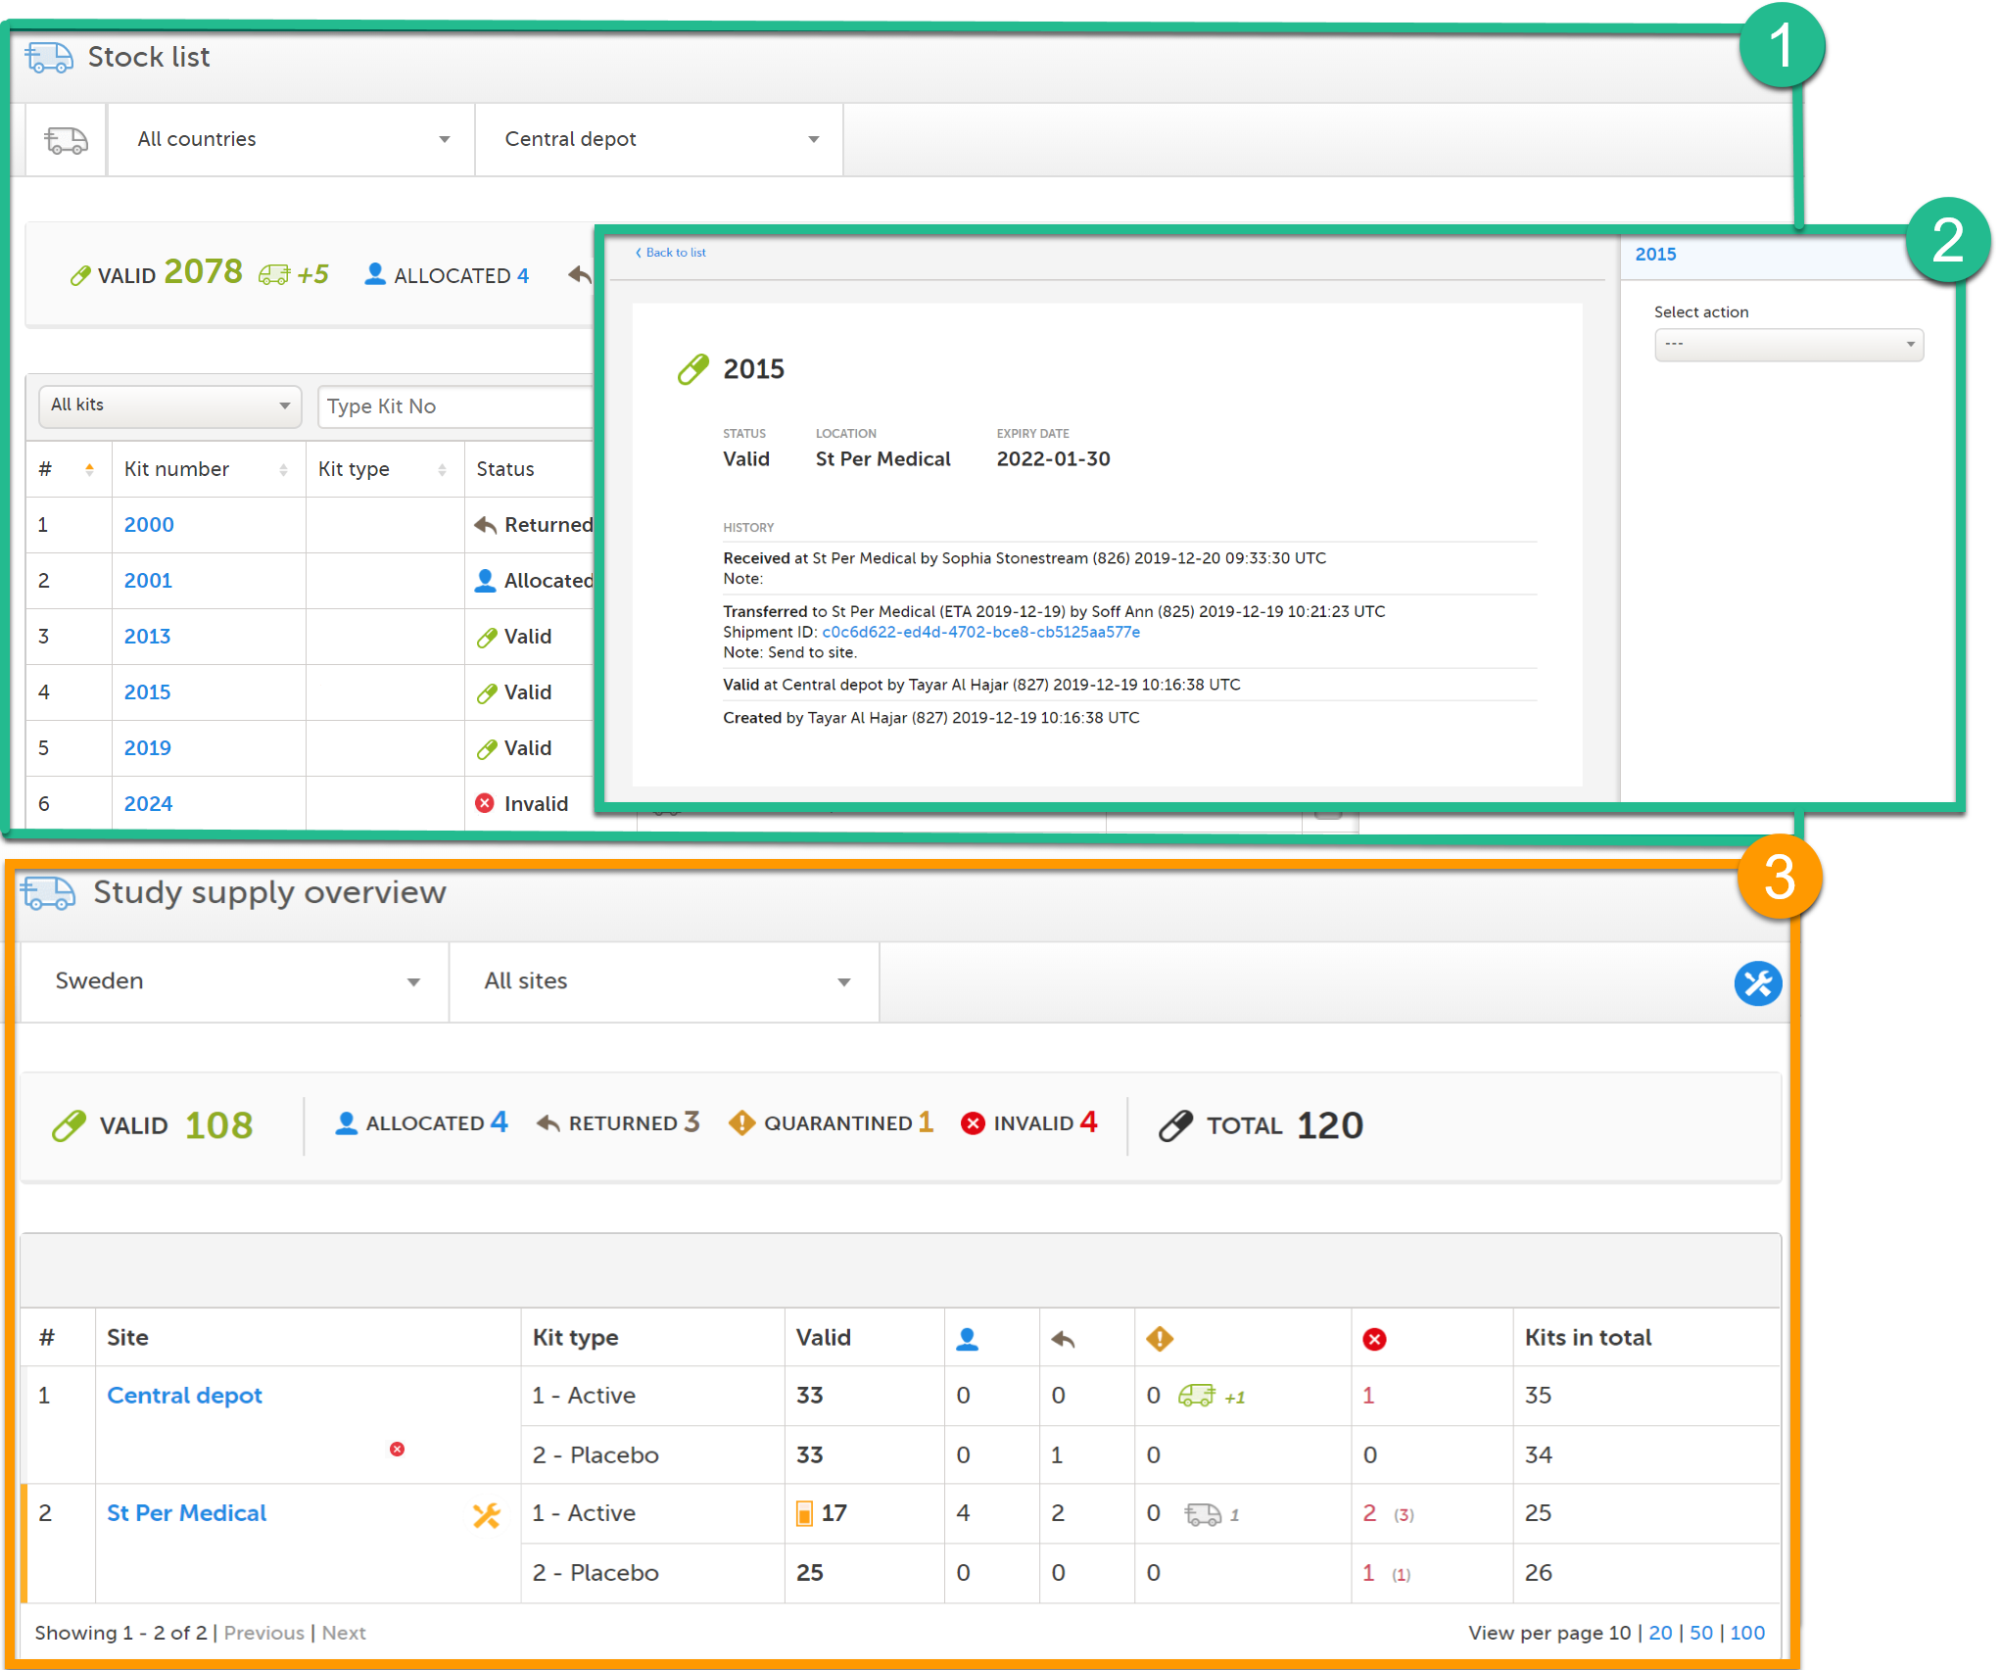
Viedoc Logistics consists of the following pages: Stock list (1), kit details view (2) and Study supply overview (3). The Study supply overview is only accessible for users with permission to manage kits on study level, this is also the landing page for those users. See Main functions below to read more about the interface.
The scope of the allocation determines what depots and sites are enabled and used in Viedoc Logistics. The scope can be set to study, country or site level which is reflected in the interface as the available locations. Allocation of kits is also dependent on the scope, see section Scope of allocation in lesson Managing kits.
The user roles of Viedoc Logistics are configurable and the permission settings can be adjusted according to your study needs. There are two default roles:
Your permission settings determine what depots, sites and features are available to you. Usually, the Study Supply Manager monitors the supply for the whole study and transfers kits from the central depot to the participating (country) depots and sites. The Site Supply Manager usually manages the individual kits at the clinic (site).
The following table summarizes the main functions of Viedoc Logistics:
| Page | Main functions | Accessible for users managing kits | Covered by lessons |
|---|---|---|---|
|
Stock list |
Transfer kits between depots and sites Set status to kits Track kits and shipments |
On site level (landing page) On study level |
|
| Kit details view | View audit trail of a kit Set status to a kit View shipment ID of a kit |
||
| Study supply overview |
Overview and monitor the study supply |
On study level (landing page) |
For more terms, see our Glossary.
| Action | The activity that changes the kit status or location: Transfer - Receive - Cancel - Return - Invalidate - Quarantine - Restore - Edit expiry date |
| Central depot | The main supply depot of a study from where all kits are distributed. |
| Country depot | If the study is conducted in several countries, a country depot can be used as a distribution central to the sites within those countries. |
| ETA | Estimated Time of Arrival. The estimated day that a kit will arrive to destination when performing a transfer. The date is optionally added to the transfer and will be visible in the stock list and saved in the audit trail. |
| Global allocation list | The list of kits that is imported into Viedoc Logistics and constitutes the stock list in the Stock list page. |
| IP | Investigational Product. In Viedoc this is commonly named as kit. |
| Kit | The investigational product of a study. |
| Site supply manager | Default role for users managing kits on site level. |
| Shipment ID | The identification number that is created for each shipment. That is, for every transfer action a shipment ID is created and associated with the transfer. |
| Stock list | The stock list is the list of kits visible in the Stock list page, which is based on the global allocation list. The Stock list page is the landing page for site supply users. |
| Study supply manager | Default role for users managing kits on study level. |
| Study supply overview | The landing page for study supply users and interface for monitoring the study supply. |
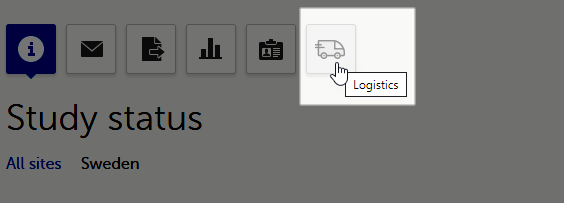
Viedoc Logistics is launched from the landing page. If you have access to Viedoc Logistics, the truck icon is visible next to the other features you have access to in the study start page:
To launch Viedoc Logistics:
| 1 |
Log in to Viedoc: 
For more information, see Managing your Viedoc account. |
| 2 |
Select the study to work with in the bookshelf: 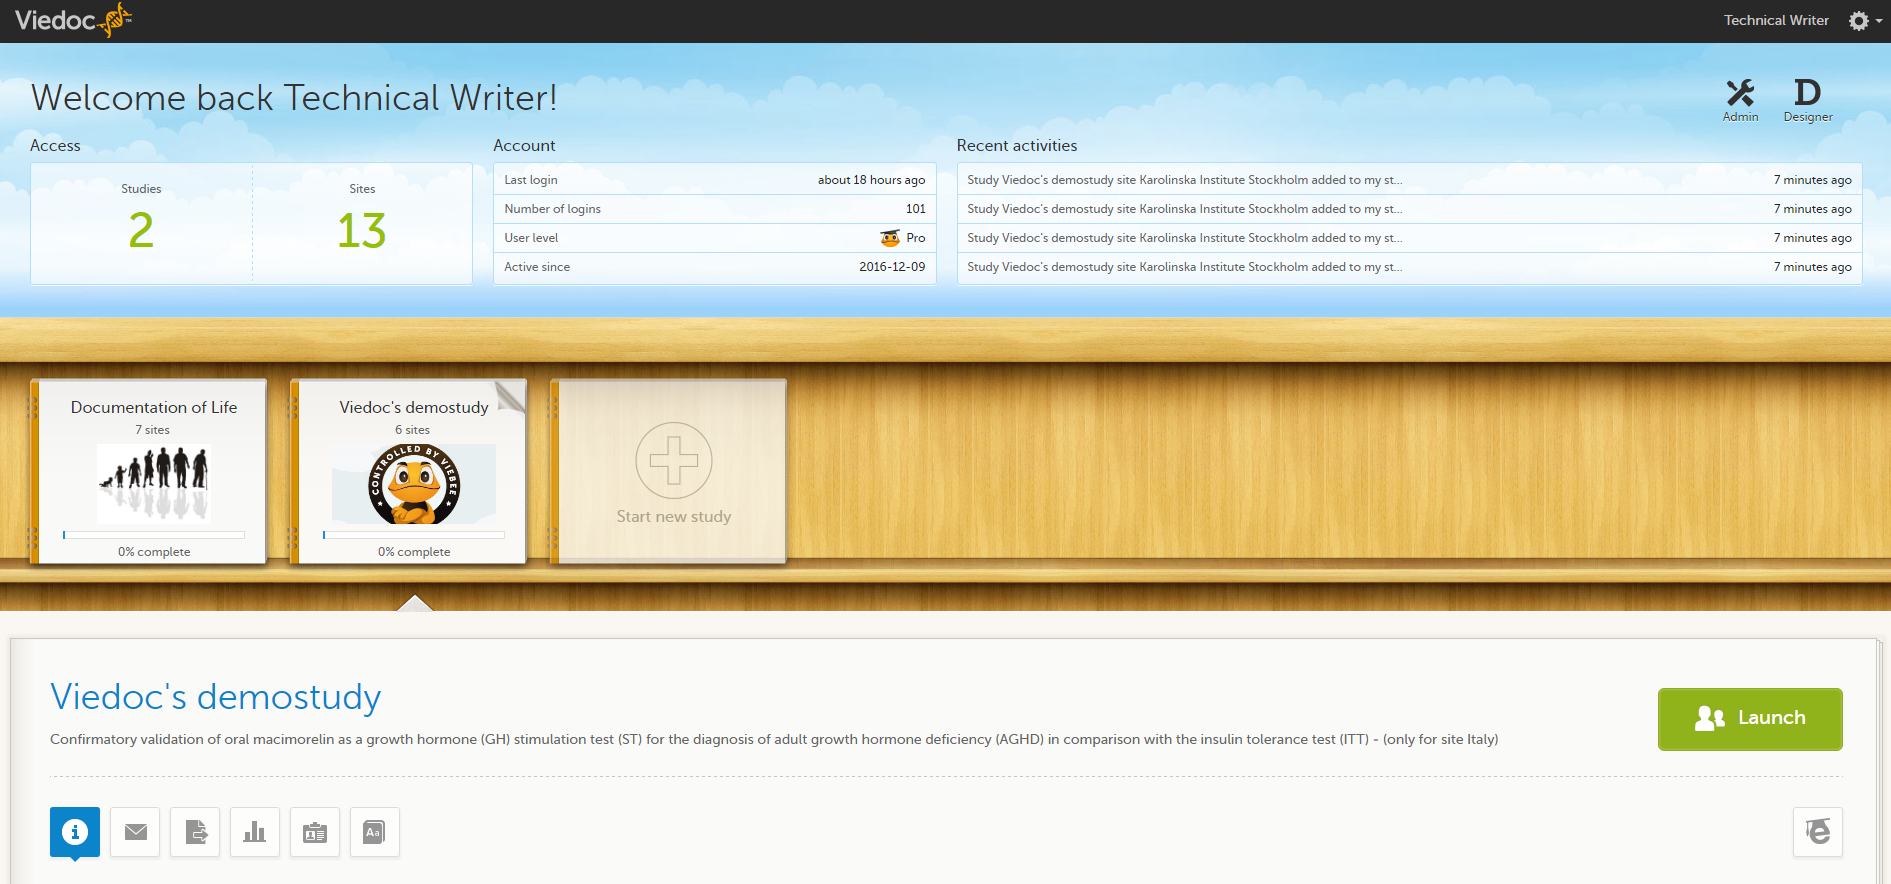 |
|
3 |
Click the truck icon in the study start page:
|
| Depending on your role, one of the following pages of Viedoc Logistics will launch: | |

|
|

|
The Stock list page is the landing page for users with site level permissions. Users with study level permissions can also access the Stock list page from the Study supply overview. See Study supply overview for more information.
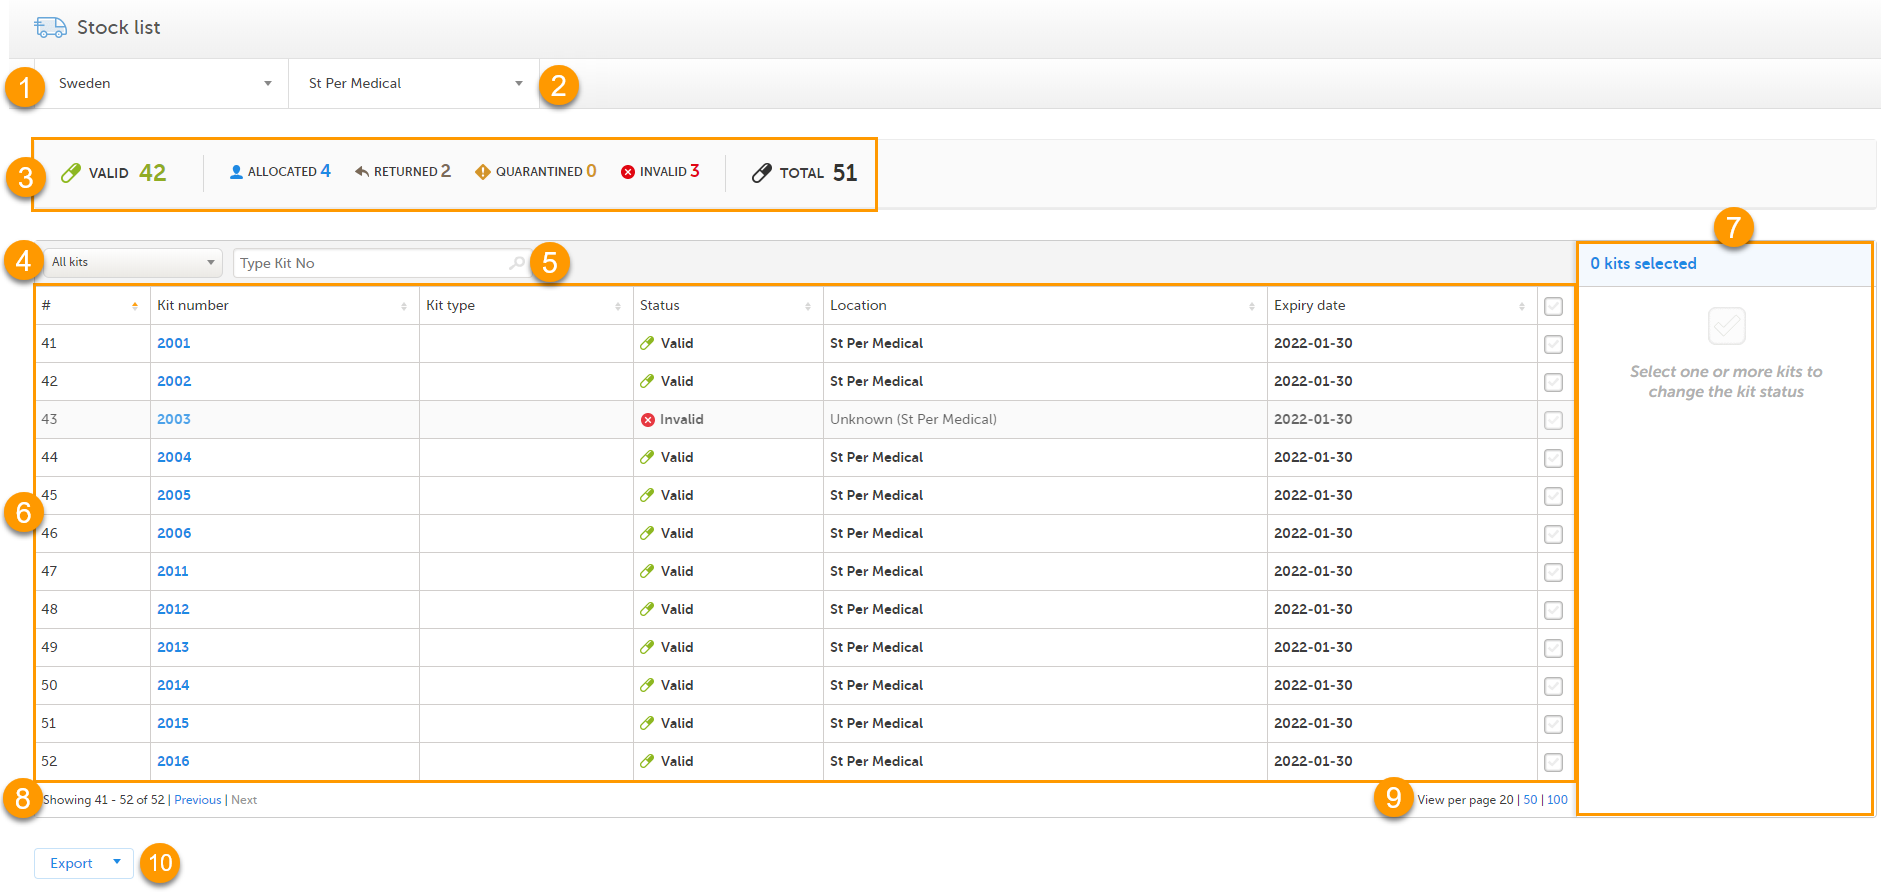
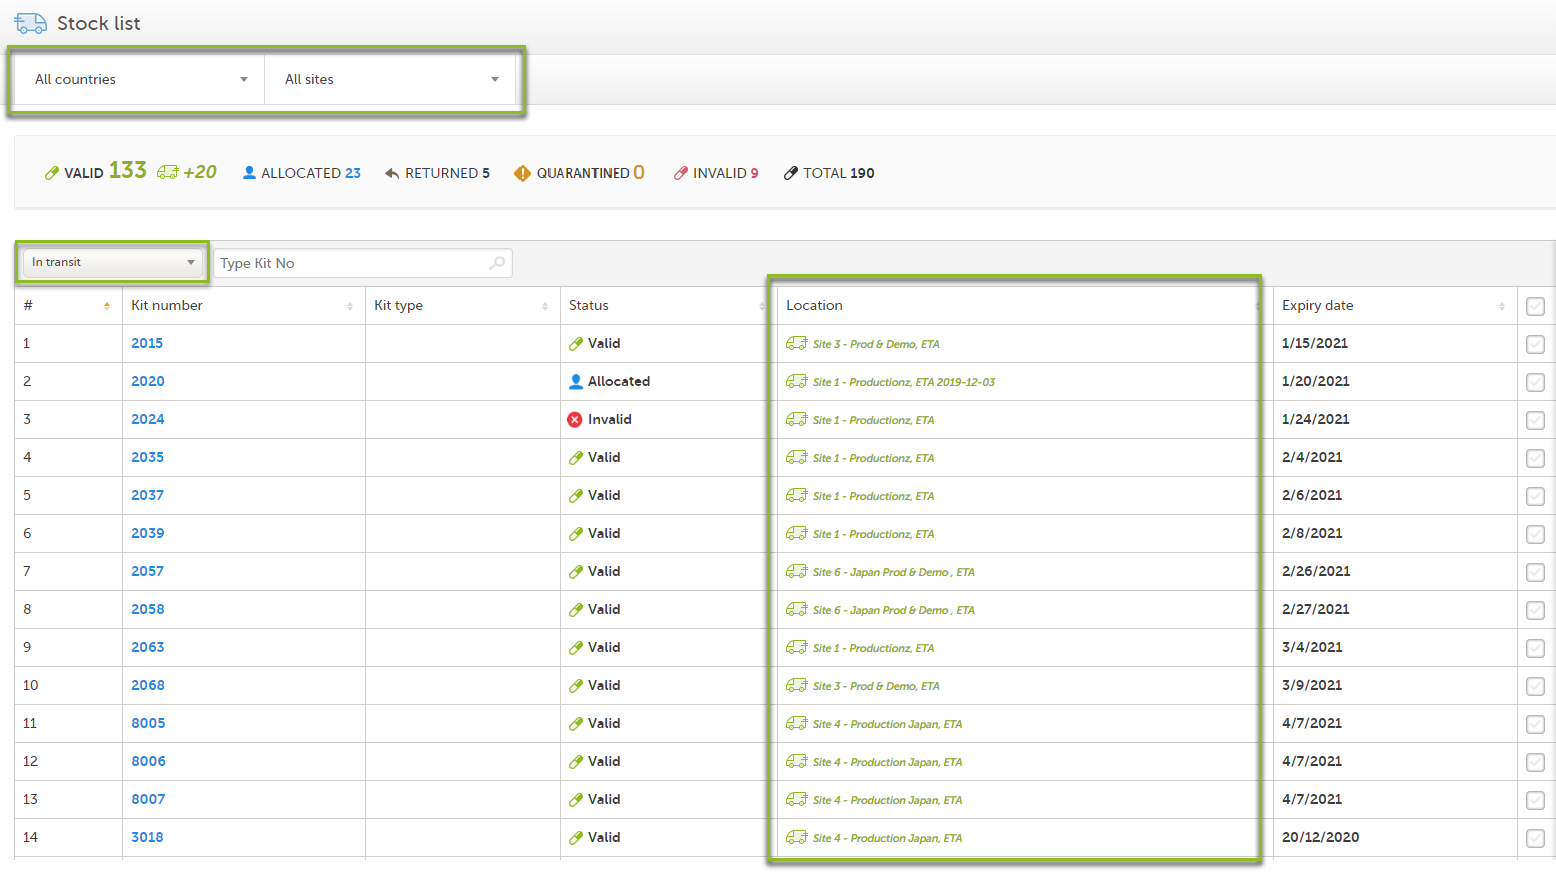
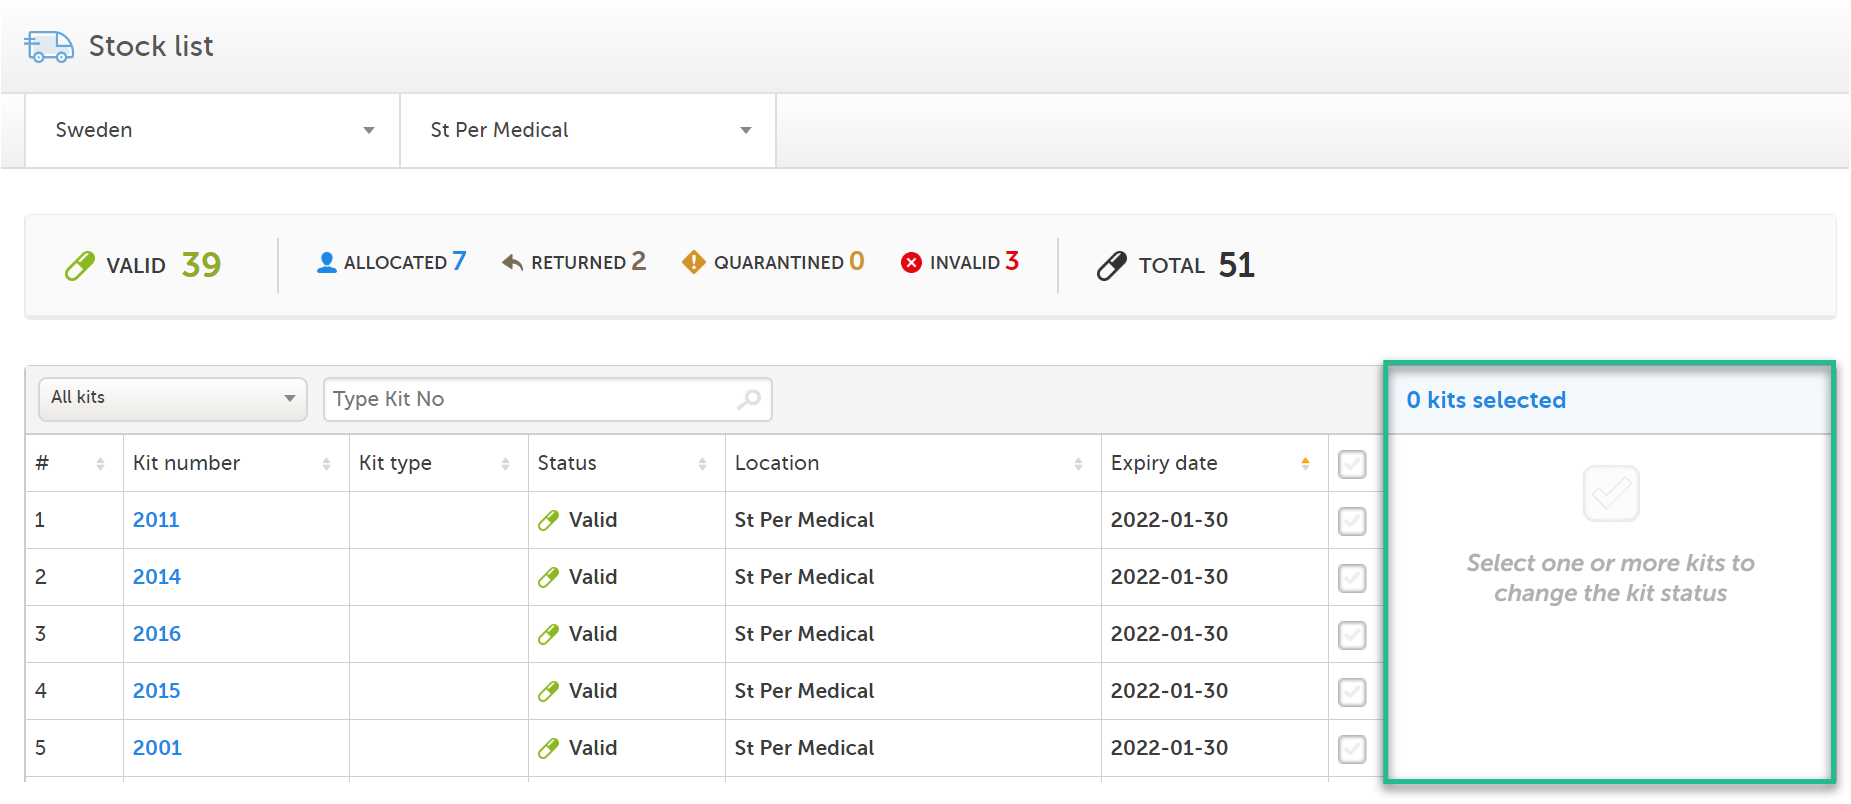
In the Stock list page, you find the following functions:
1. Filter the stock list on country. The countries you have access to are listed in the drop-down list.
2. Filter the stock list on site. The sites you have access to are listed in the drop-down list.
3. Metrics pane showing the number of kits based on the selected country and site filters.
The green truck icon with a plus symbol indicates the number of valid kits that are incoming to the filtered locations. If no location filter is set, the total number of kits in transit are shown (All countries/All sites).
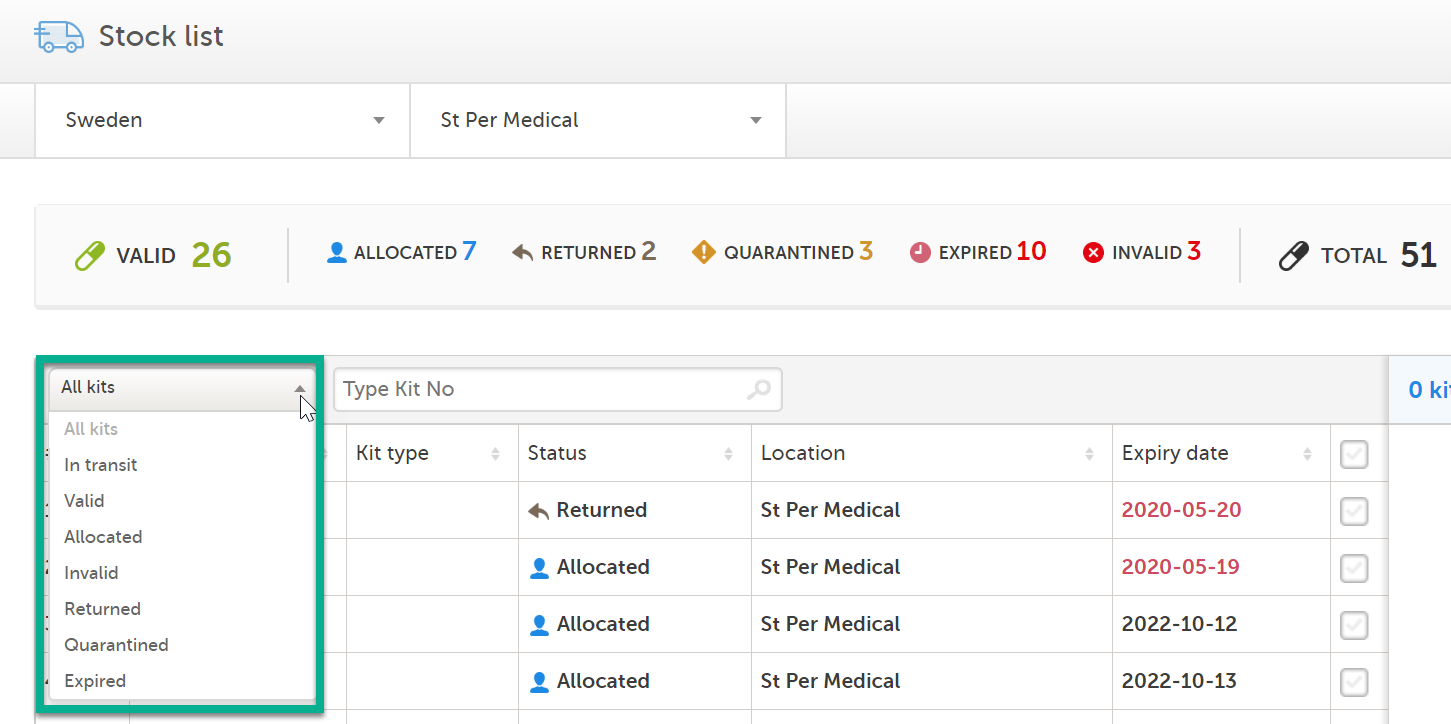
4. Filter the stock list on kit status in the drop-down list. You can also select the filter In transit to show kits that are in transit, that is, kits that are shipped from a location but has not yet arrived.
5. Search the stock list for a specific kit number or Shipment ID by typing or scanning the number into the search field. Use comma to search for multiple kits at once, for example 1000,1001,1002.
6. Stock list with columns showing the following information:
The columns of the stock list can be sorted by clicking the small arrows:
![]()
7. Action pane, where all the kits are managed. For more information, see Managing kits.
8. Number of list items showing out of the total amount of items, click Previous or Next to browse page.
9. Select the number of kits per page to be shown.
10. Export the stock list, see Export.
The truck icon represents kits that are in transit:
 |
A green truck icon with a destination next to it indicates incoming kits to the filtered location. |
 |
A grey truck with a destination next to it indicates outgoing kits from the filtered location. |
Note! If no location filter is set, kits in transit are shown as incoming to the respective site.
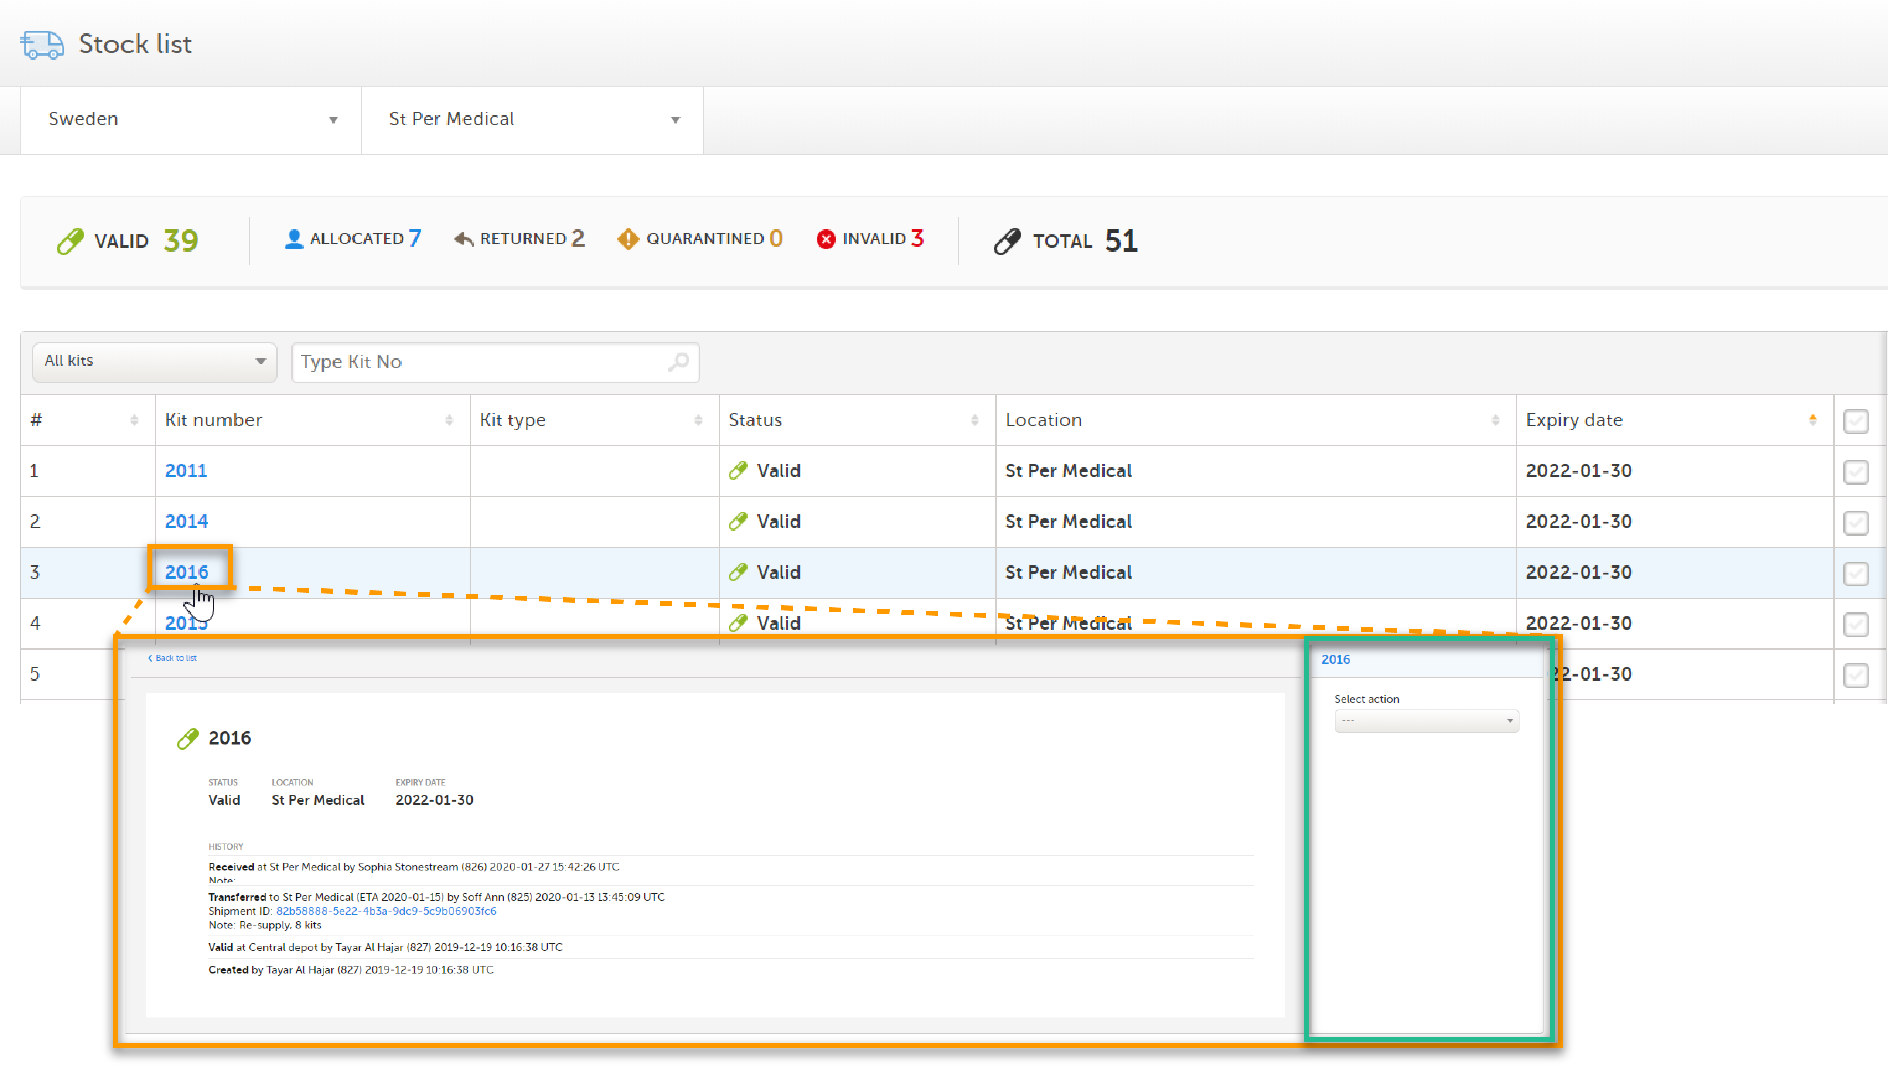
When you click on a kit in the Kit number column, the Kit details view opens:
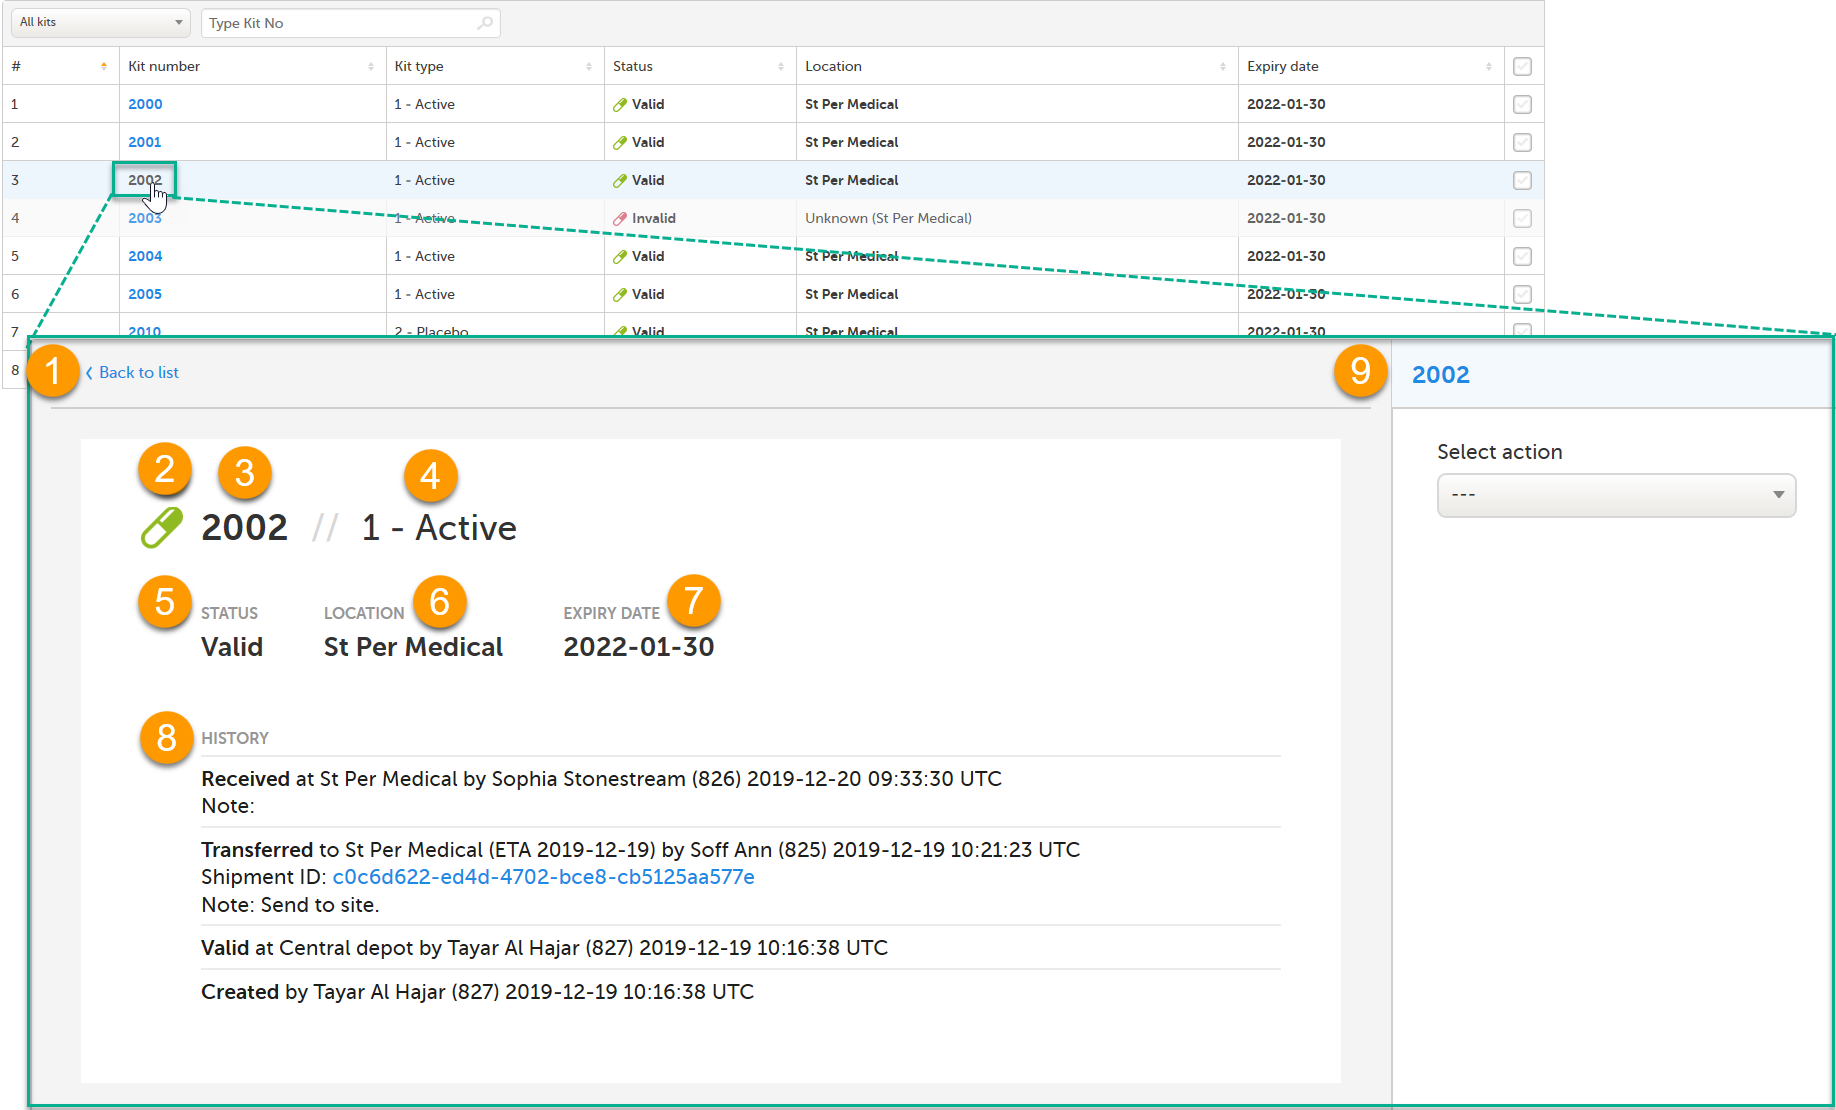
In the Kit details view, you find the following functions:
1. Clickable link - click Back to list to go back to the Stock list page
2. Symbol reflecting the status of the kit. See Kit status for more information.
3. Kit number
4. Kit type - only visible for users with permission to view blinded info
5. Kit status
6. Location
7. Expiry date
8. History showing the audit trail of the kit. All actions performed to the kit are saved with information about when and by whom the action was done. The system automatically registers User action for the following actions: Transfer, Recieve, Cancel, Return. Any notes added to those actions are also registered. If the transfer action was performed to the kit, then the related Shipment ID is listed, as a clickable link. For more information, see Tracking shipments. For the actions Quarantine, Restore, Invalidate, Edit expiry date, the mandatory reason entered by the user is registered.
9. Action pane for managing the kit. For more information, see Managing kits.
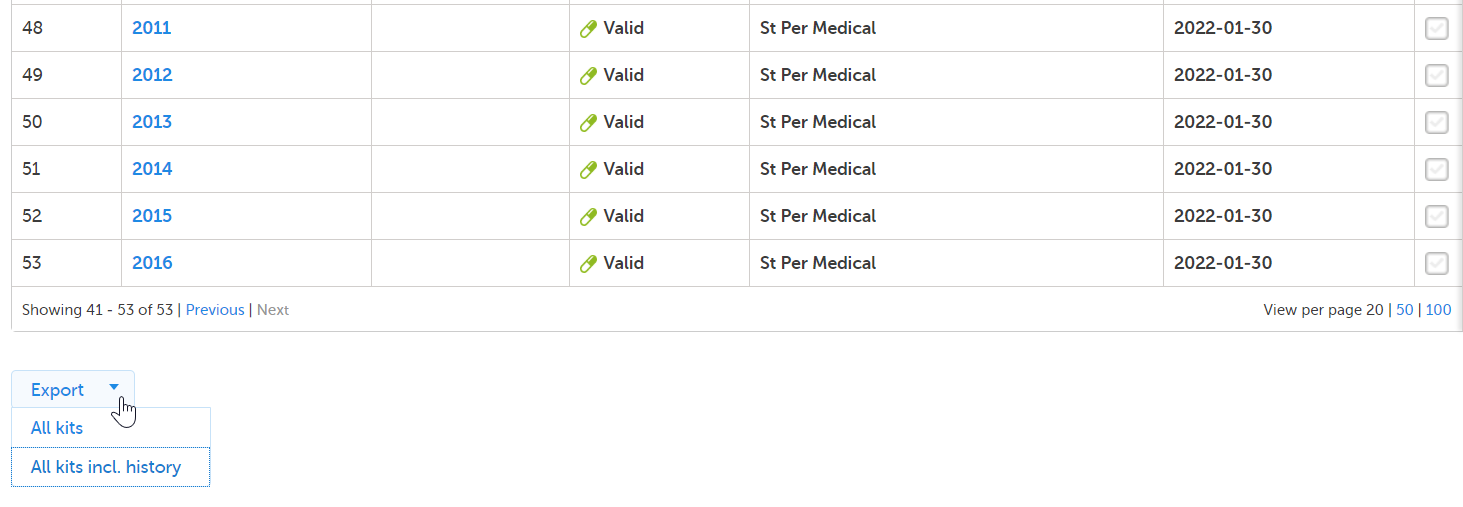
At the bottom left of the Stock list page, there is an option to export the stock list into an Excel file. The export is based on the current filter on Country and Site. All kits on all pages are included in the export.
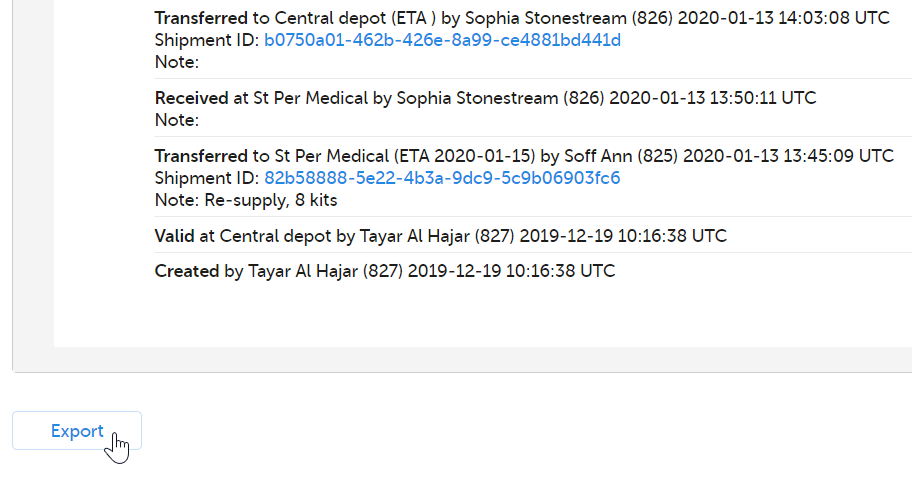
 The export option is also accessible from the Kit details view:
 Selecting All kits generates a basic reflection of the stock list with all kits in their current kit status.
Selecting All kits incl. history generates a detailed file with all kits and their complete history records.
Selecting Export in the Kit details view generates a file with a history record of the selected kit.
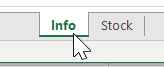
The Excel export contains the following sheets:
Depending on the type of export, the following information is listed in the Stock sheet:
All kits export:
All kits incl. history export and Export from the kit details view:
The data on the Stock sheet is organized as follows:
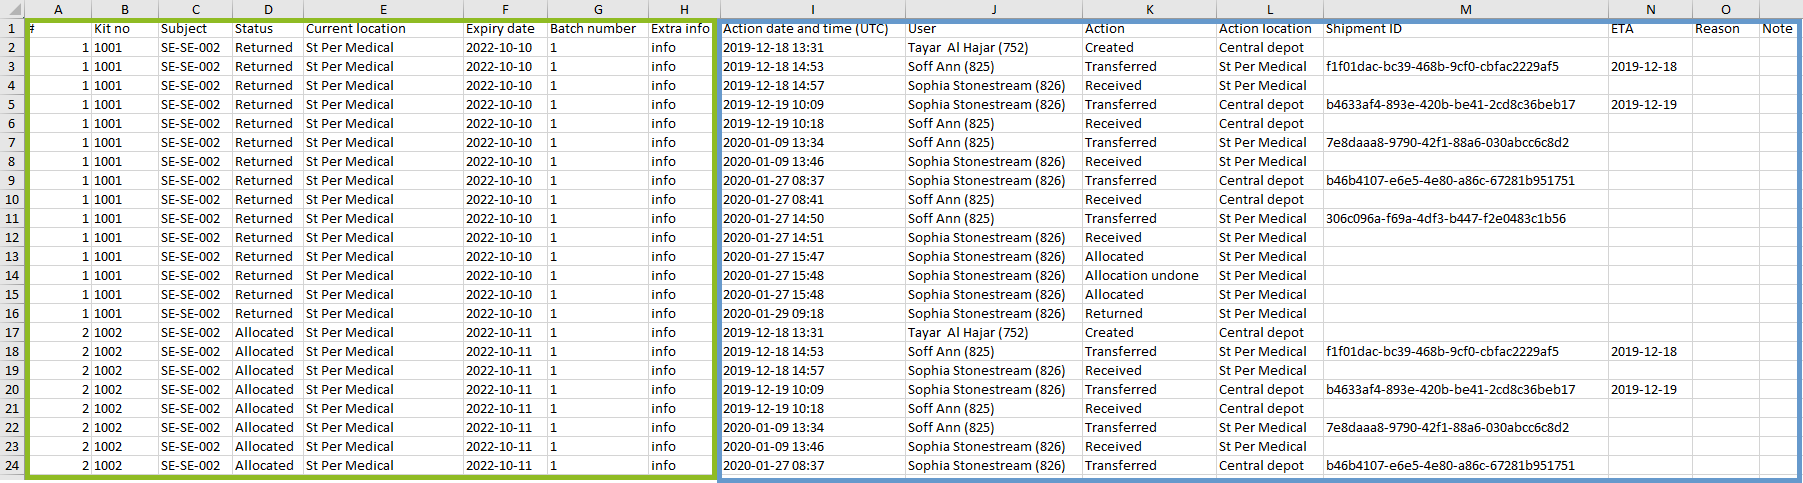 |
||
| Current kit data at the time of the export | Kit history data | |
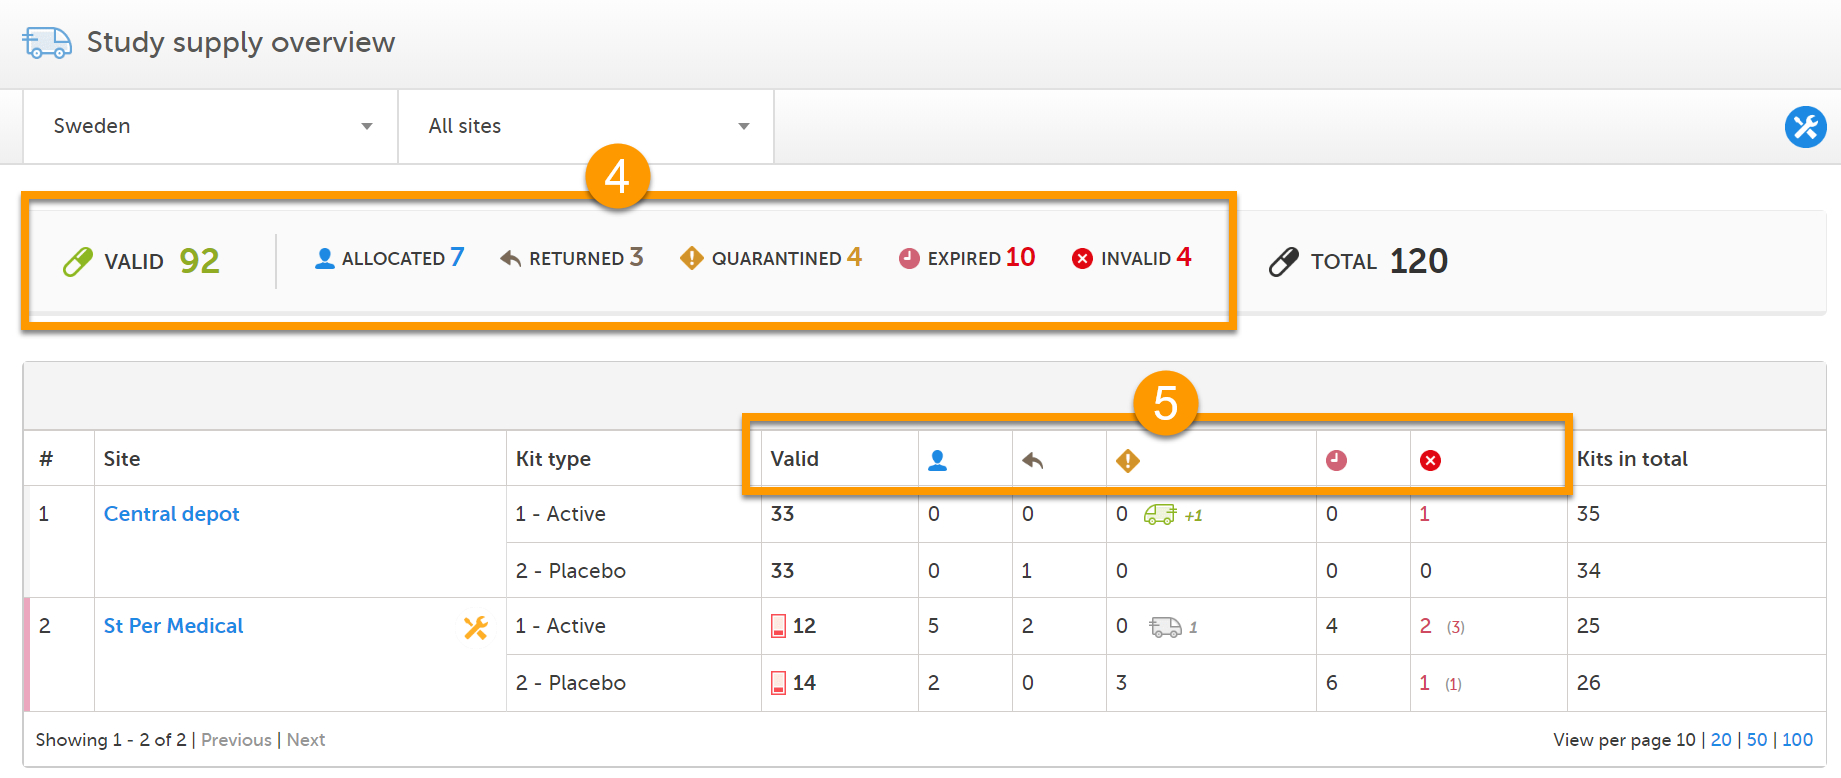
The Study supply overview is the landing page for users with permission to manage kits on study level. Here, you can monitor the supply and see the accumulated number of the kits sorted on status, for each site that you have access to. To check the status of individual kits and make actions, for example transfer kits between depots and sites, simply click on a site to enter the Stock list page. See Stock list and kit details view and Managing kits for more information about handling kits.
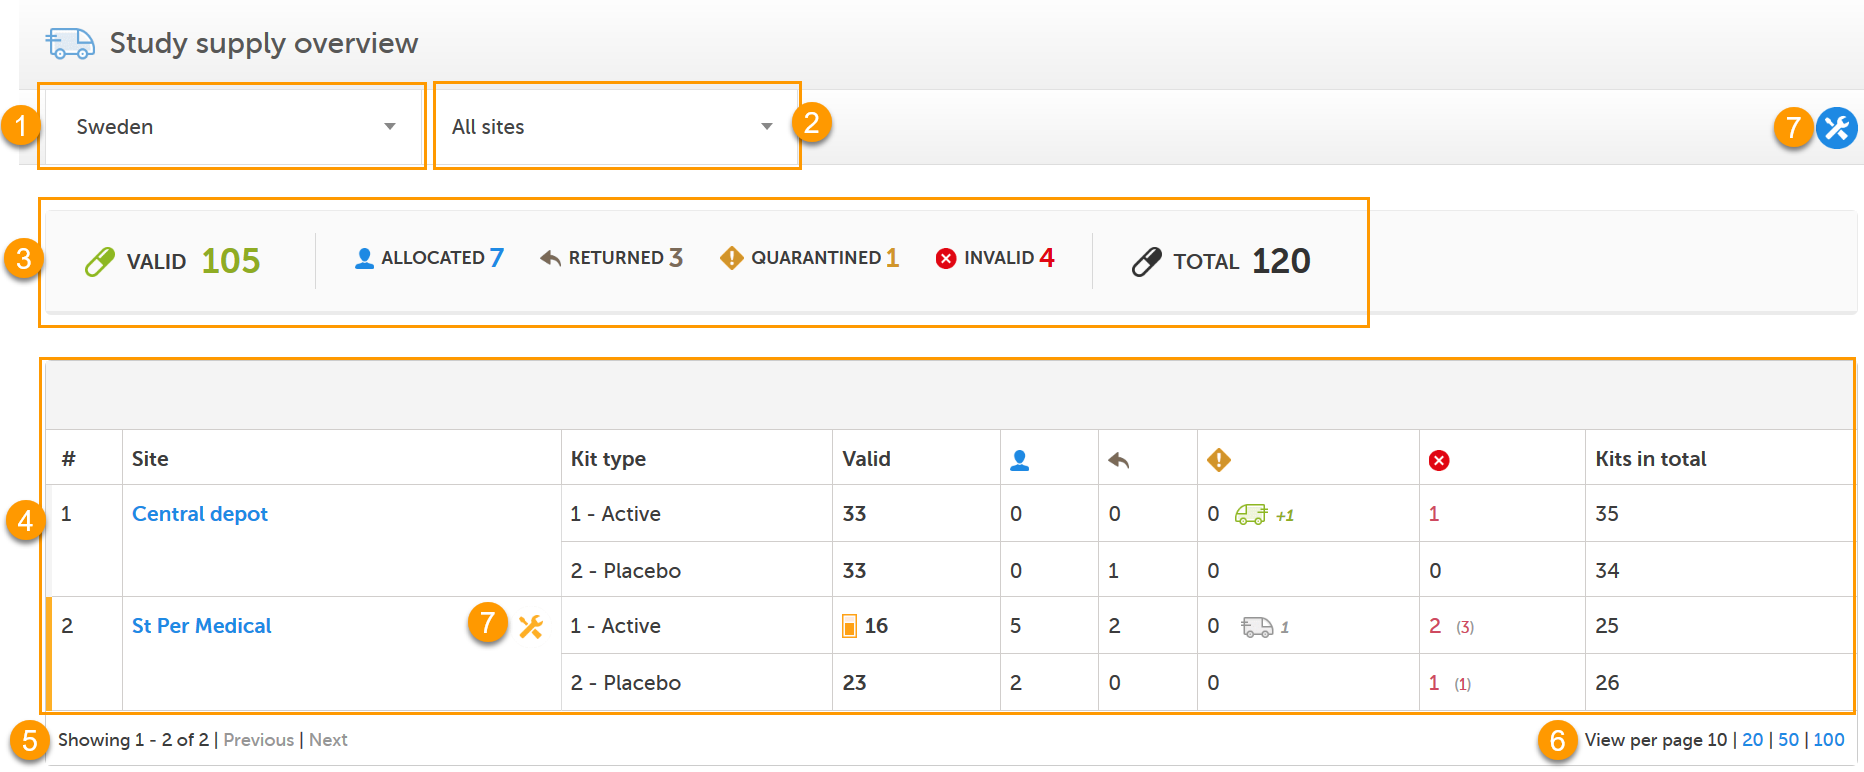
In the Study supply overview, you find the following functions:
1. Filter the study supply on country. The countries you have access to are listed in the drop-down list.
2. Filter the study supply on site. The sites you have access to are listed in the drop-down list. The Central depot is always accessible for users that manage kits on study level.
3. Metrics pane showing the number of kits per status and the total number of kits, based on the selected country and site filters. The green truck icon with a plus symbol indicates the number of valid kits that are incoming to the filtered locations.
4. Study supply overview with columns showing the following information:
5. Number of list items showing out of the total amount of items, click Previous or Next to browse between the pages.
6. Select the number of kits per page to be shown.
7. Logistics settings: Set the expiry period and set alerts and thresholds for your supply. The alert settings are also accessible for the individual sites in the Site column. The settings you make on a specific site overrides the general settings you make. See Setting an expiry period and Setting low supply alerts for more information.
The truck icon represents kits that are in transit:
 |
A green truck icon with a plus symbol indicates incoming number of kits to the location. |
 |
A grey truck indicates outgoing number of kits from the location. |
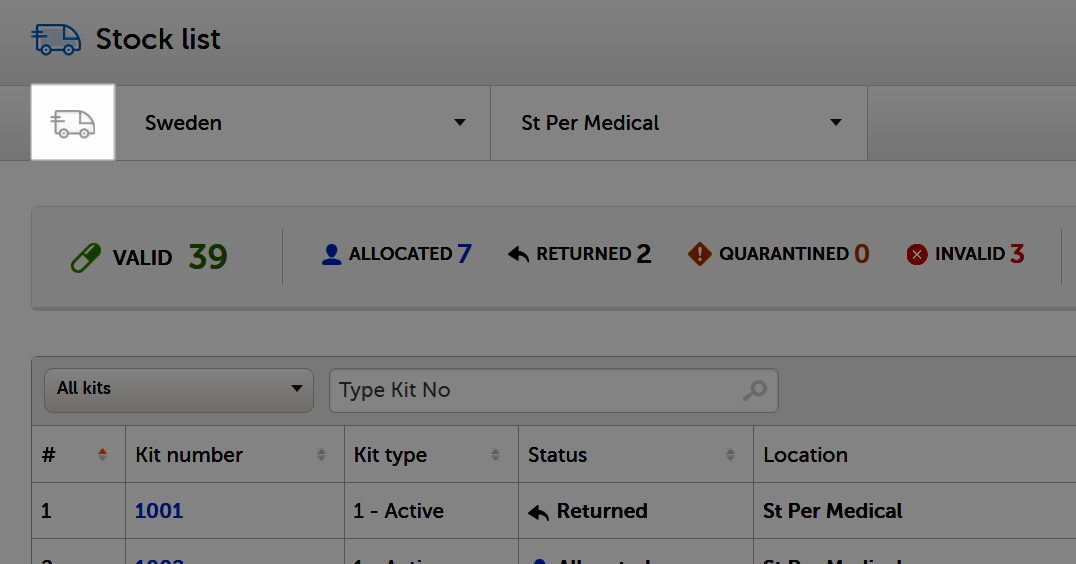
To access the Study supply overview from the Stock list page, click the truck icon in the left corner. The button is only visible for users with permission to manage kits on study level.
The kit status defines what state the kit is currently in. You manage the kits by changing the kit status — this is performed from the Stock list page. For instructions on how to change the kit status, see Managing kits.
|
Valid |
The kit is in good condition and can be allocated to the subject. All kits are set as Valid when uploaded from the global allocation list setup. |
|
Allocated |
The kit is allocated to the subject. |
|
Returned |
The kit is handed back to the site by the subject and is set to Returned in the system. |
|
Quarantined |
The kit is temporarily set aside for investigation and is not available for allocation. |
|
Invalid |
The kit is invalid and will not be used (the kit is lost, broken, or other). |
|
Expired |
The kit has expired and is not valid for allocation. |
You can see the kit status in the following places in Viedoc Logistics:
In the Stock list
1. In the metrics field, showing a summary of all kits on the filtered location.
2. In the Status column, showing the status of each kit.
3. In the kit details view, when clicking on a kit in the Kit number column, showing the status of the selected kit.

In the Study supply overview
4. In the metrics field, showing a summary of all kits on the filtered location.
5. In the table, showing the number of kits per site and kit type, sorted on kit status.
You can filter the stock list to show kits of a certain status. Simply click the arrow and select a status in the drop-down menu:
You manage the kits by changing the kit status. Changing the kit status is done by selecting an action, to a single kit or to a selection of multiple kits at once. The available actions depend on the current kit status.
You can perform the following actions in Viedoc Logistics: Transfer - Receive - Cancel - Return - Quarantine - Restore - Invalidate - Edit expiry date
The following table shows what happens to the kit(s) when performing the actions:
| Action | Result |
|---|---|
| Transfer | Initiates a kit shipment to the selected destination. The kit is in transit, illustrated by a truck icon in the stock list. |
| Receive | Completes a kit shipment. The new location is set. |
| Cancel | Cancels a kit shipment. The previous location is set. |
| Return | Sets the kit status of an allocated kit as returned from the study subject. |
| Quarantine | Sets the kit in quarantine, making it temporarily unavailable for allocation. |
| Restore | Restores a kit from quarantine and makes it valid for allocation. |
| Invalidate | Makes a kit not available for allocation. |
| Edit expiry date | Changes the expiry date of the kit. |
You manage the kits from the action pane. The pane is available in two places:
1. On the Stock list page, to the right:
2. In the kit details view, by clicking on a Kit number in the stock list:
In the kit details view, you can only manage the kit you've selected. When you manage kits from the Stock list page, you can manage a selection of kits at once, see Selecting multiple kits below.
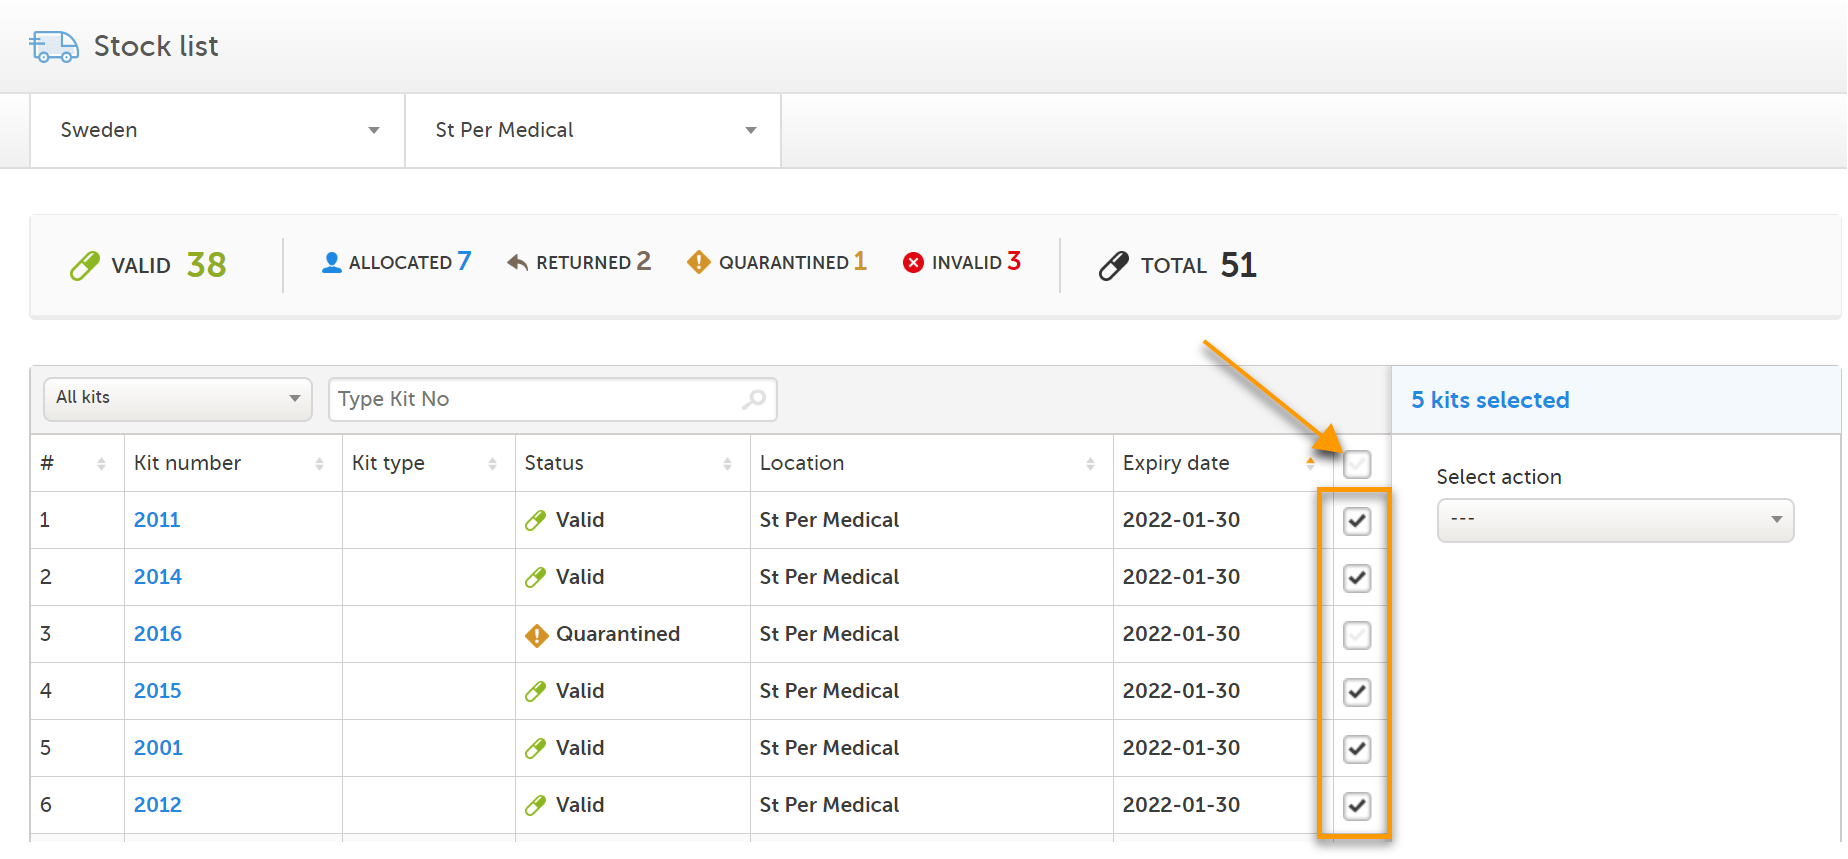
You can manage multiple kits at once if you want to perform the same action to a selection of kits. To select multiple kits, check the boxes in the rightmost column of the stock list. To select all kits, check the top box of the column.
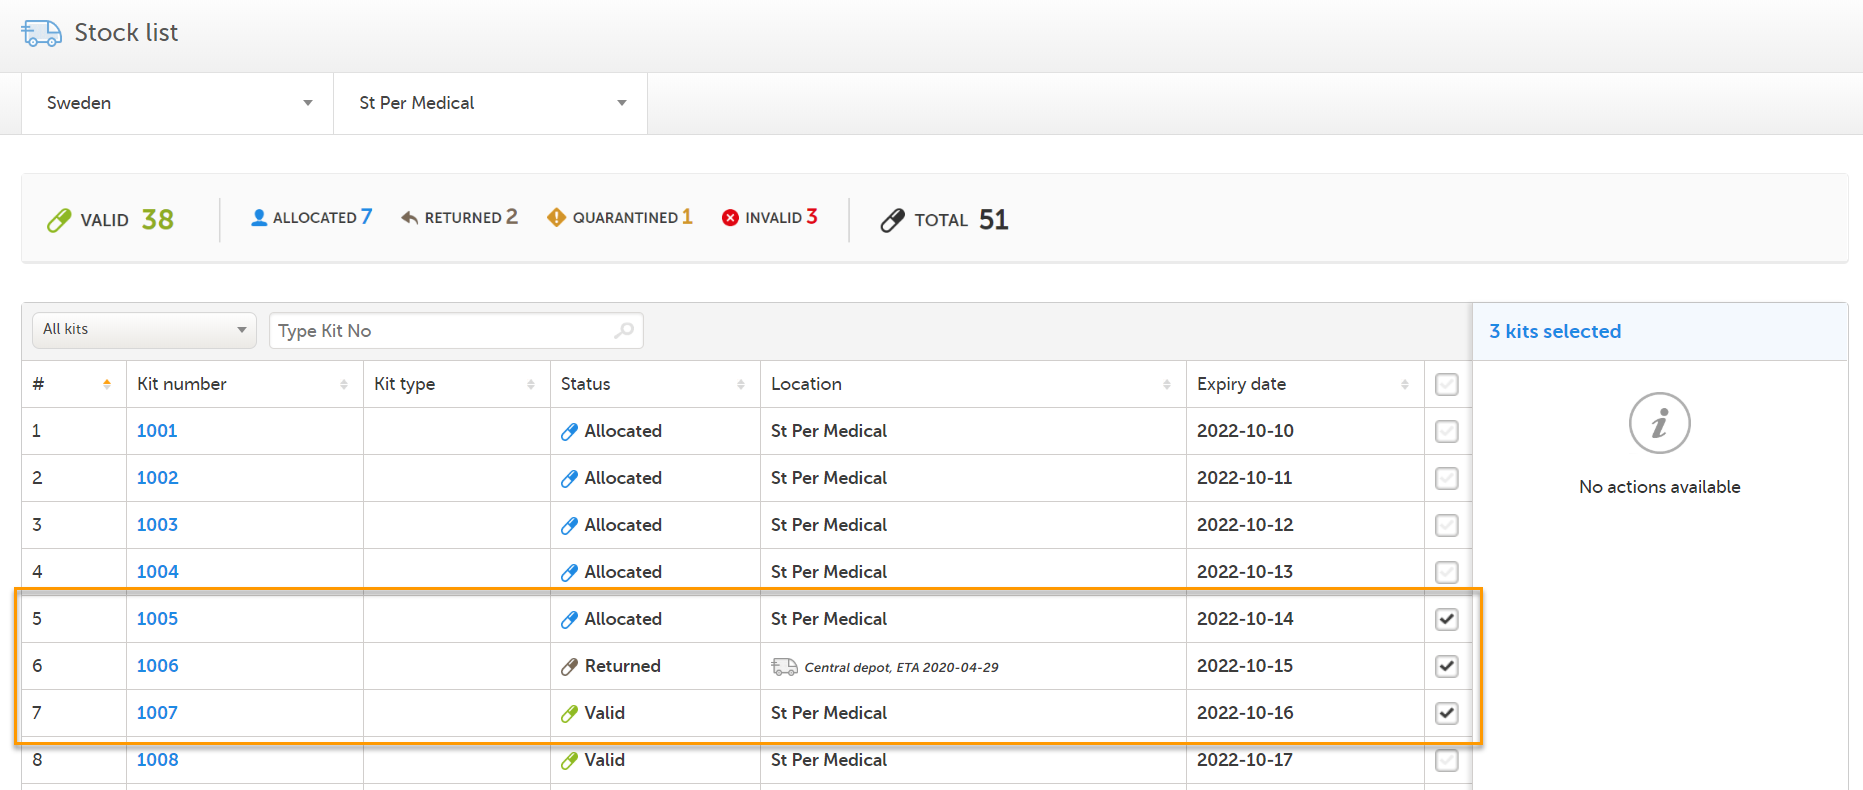
Depending on your selection of kits in the stock list, there may be no applicable actions available. The available actions depend on the current status and/or location of the selected kits. If an action is not available, adjust the selection so that only kits that are applicable for the intended action are selected. Let's look at an example:
1. Three kits are selected, giving us the message No actions available:
2. Now, let's uncheck kit 1006 (in transit with status Returned). The actions Transfer and Invalidate becomes selectable, since these actions are both applicable for kit 1005 (Allocated) and 1007 (Valid):
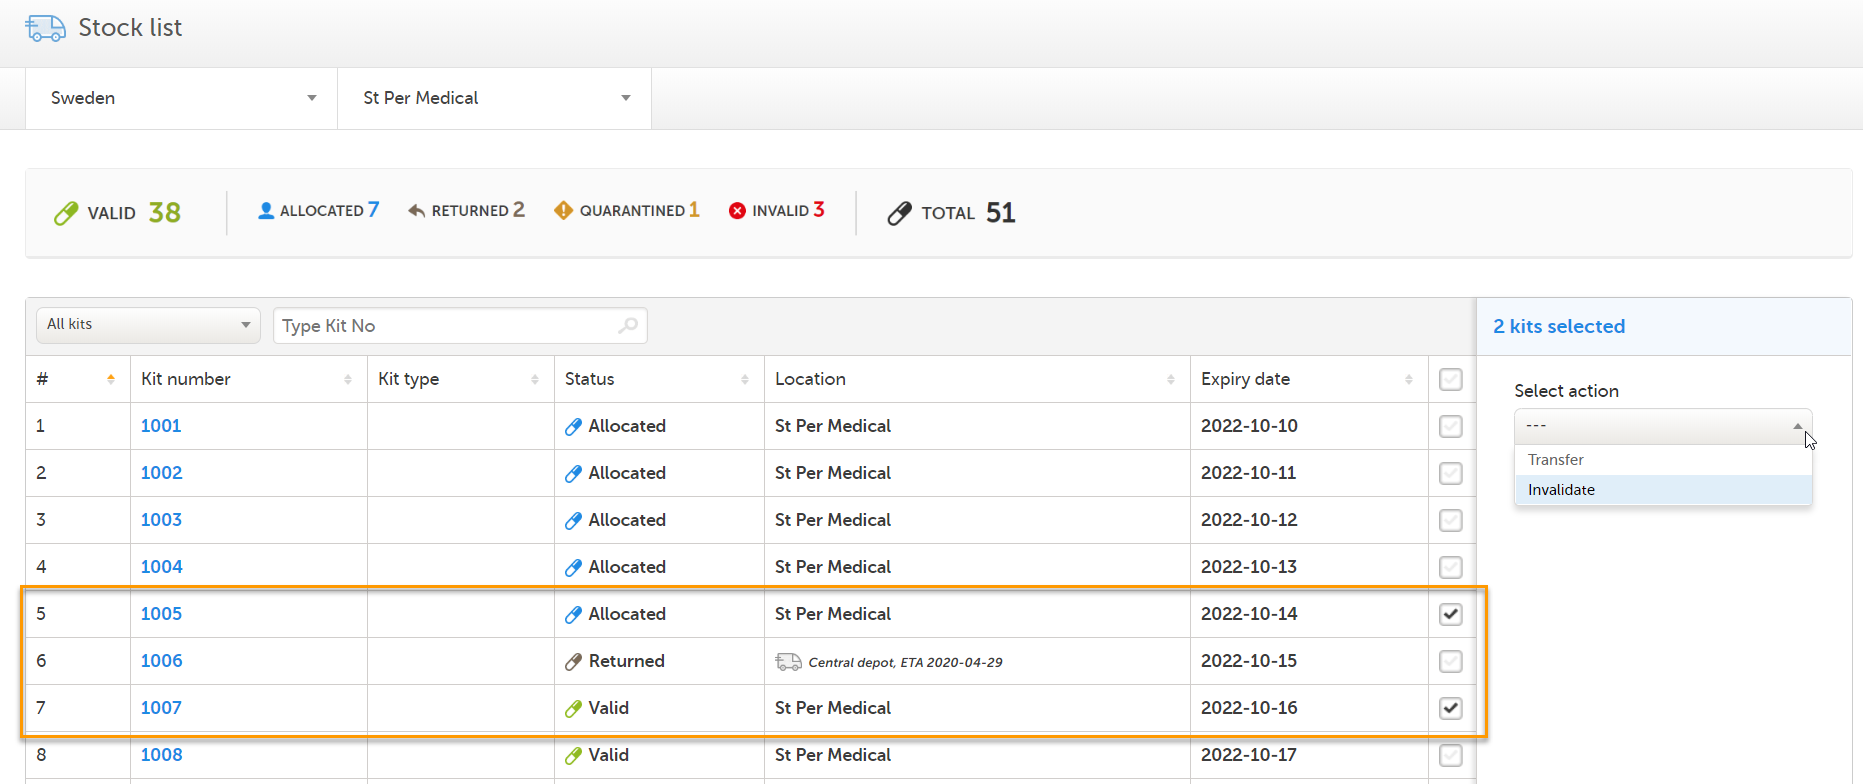
For an overview of the conditions for setting actions, see Summary.
All actions that are performed to the kits are logged in the audit trail, which is visible in the kit details view. See Stock list and kit details view for more information.
| 1 | Select the kit(s) to transfer. |
| 2 | In the action pane, select Transfer in the action drop-down list. |
| 3 | Select the destination in the drop-down list. |
| 4 | Optional: Click on the field and select the date of the Expected Time of Arrival (ETA) in the date picker. |
| 5 | Optional: Enter a note. |
| 6 |
Click Apply. Now, two things happen: 1. A Shipment ID is generated, making it possible to keep track of the shipment: 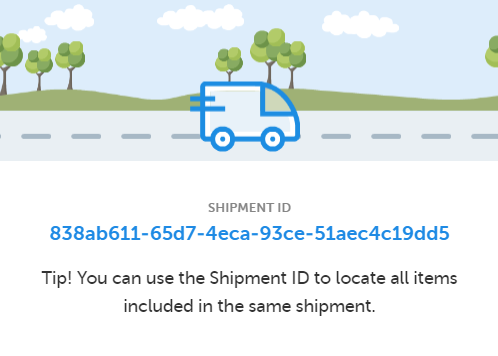
The Shipment ID is also found in the audit trail in the kit details view. See Tracking shipments for more information on Shipment ID. 2. The location is set to In transit—illustrated with a truck icon in the Location column of the stock list—until the kit(s) are received or canceled.
|
The action Transfer can be performed if the conditions are as follows (the settings may vary depending on study setup):
| To perform action... | The kit must have status... | And be located at... | So that study users can... | And site users can... |
|---|---|---|---|---|
| Transfer | • Valid • Invalid • Allocated • Returned • Quarantined |
• Central depot • Country depot • Site |
Transfer from Central depot to: • Country depot • Site Transfer from Country depot to: |
Transfer from Site to:
• Central depot |
If there is a need to transfer valid kits from one site to another, for example in a scenario where Site A has remaining kits that will not be used, and the supply at Site B is running low, the user on site A can send the kits to Central or Country depot, where the Study Supply Manager or other user with permission to manage the kits in turn sends the kits to site B.
| 1 | Select the kit(s) to receive. |
| 2 | In the action pane, select Receive in the drop-down list. |
| 3 | Optional: Enter a note. |
| 4 | Click Apply. The kit is now located at target destination. |
The action Recieve can be performed if the conditions are as follows:
| To perform action... | The kit must have status... | And be located at... | So that study supply users can... | And site supply users can... |
|---|---|---|---|---|
| Receive | • Valid • Invalid • Allocated • Returned • Quarantined |
• In transit | Receive transfer to: • Central depot • Country depot |
Receive transfer to: • Site |
To cancel a kit transfer:
| 1 | Select the kit(s) for which the transfer should be cancelled. |
| 2 | In the action pane, select Cancel in the drop-down list. |
| 3 | Optional: Enter a note. |
| 4 | Click Apply. The kit is now located at the previous location (from which it was transferred). |
The action Cancel can be performed if the conditions are as follows:
| To perform action... | The kit must have status... | And be located at... | So that study users can... | And site users can... |
|---|---|---|---|---|
| Cancel | • Valid • Invalid • Allocated • Returned • Quarantined |
• In transit | Cancel transfer from: • Central depot • Country depot |
Cancel transfer from: • Site |
Kit allocation is the process of designating a kit to a specific subject. Kit allocation is performed in Viedoc Clinic and the feature is integrated with Viedoc Logistics. When a kit is allocated in Viedoc Clinic, the kit is immediately set as Allocated in Viedoc Logistics. Only kits with status Valid can be allocated, and there must be sufficient kits in stock at the location where the allocation will take place. Allocating kits is also dependent on the study set up, see Scope of allocation below.
The regular workflow for kit allocation is as follows:
| Order | Kit status | Description | Action |
|---|---|---|---|
| 1 | Valid | The kit is valid and available for allocation. | Allocate (in Viedoc Clinic) |
| 2 | Allocated | The kit is allocated to a specific subject. | Return |
| 3 | Returned | The kit is returned to the site. |
However, there can also be variations to the regular workflow of allocating a kit, as in the following three scenarios.
1. The kit allocation is undone:
| Order | Kit status | Description | Action |
|---|---|---|---|
| 1 | Valid | The kit is valid and available for allocation. | Allocate (in Viedoc Clinic) |
| 2 | Allocated | The kit is allocated to a specific subject. | Undo (in Viedoc Clinic) |
| 3 | Valid | The kit is valid and available for allocation. |
2. The kit is invalidated after allocation and then returned:
| Order | Kit status | Description | Action |
|---|---|---|---|
| 1 | Valid | The kit is valid and available for allocation. | Allocate (in Viedoc Clinic) |
| 2 | Allocated | The kit is allocated to a specific subject. | Invalidate |
| 3 | Invalid | The kit is invalid. | Return |
| 4 | Invalid | The kit is returned to the site (kit status Invalid remains). |
3. The kit is allocated, returned and then invalidated:
| Order | Kit status | Description | Action |
|---|---|---|---|
| 1 | Valid | The kit is valid and available for allocation. | Allocate (in Viedoc Clinic) |
| 2 | Allocated | The kit is allocated to a specific subject. | Return |
| 3 | Returned | The kit is returned to the site. | Invalidate |
| 4 | Invalid | The kit is invalid. |
Note! Kits that have been allocated and then become invalidated or returned, as in scenario 2 and 3, are shown in the stock list as Invalid or Returned. It is only possible to identify if an invalid or returned kit was previously allocated by checking the kit details view of each kit.
The option for where a kit can be allocated from is dependent on the study setup. In the most flexible setup, kits can be allocated from the Country and/or Central depot if no kits are available at Site. There are three possible scopes for allocation:
1. The scope is set to allocation at Site (Study site) only. The kit must be valid and located at site in order to allocate the kit.
2. The scope is set to allocation at Site and Country depot (Country). If no valid kit is available at site, allocation is performed with the next available kit from the country depot. After allocation, the kit is transferred to site and physically delivered to the study subject.
3. The scope is set to allocation at Site and Central depot (Study). If no valid kit is available at site, allocation can be performed from the central depot. After allocation, the kit is transferred to site and physically delivered to the study subject.
| 1 | Select the kit to return. |
| 2 | In the action pane, select Return in the drop-down list. |
| 3 | Optional: Enter a note. |
| 4 | Click Apply. The kit status is set to Returned. |
The action Return can be performed if the conditions are as follows:
| To perform action... | The kit must have status... | And be located at... | So that study users can... | And site users can... |
|---|---|---|---|---|
| Return | • Allocated • Invalid (after allocation) |
Site | N/A | Return allocated kit on: • Site |
In some scenarios, it could be unclear if a kit is valid for allocation. The kit action Quarantine can then be used, setting the kit as Quarantined until further actions are taken. The kit can be restored, invalidated or transferred when in quarantine.
To set a kit in quarantine:
| 1 | Select the kit to set in quarantine. |
| 2 | In the action pane, select Quarantine in the drop-down list. |
| 3 | Enter the reason for setting the kit in quarantine. |
| 4 | Click Apply. The kit status is set to Quarantined. |
The action Quarantine can be performed if the conditions are as follows:
| To perform action... | The kit must have status... | And be located at... | So that study users can... | And site users can... |
|---|---|---|---|---|
| Quarantine | • Valid |
• Central depot |
Quarantine kits on: |
Quarantine kits on: |
To restore a kit and set it as valid:
| 1 | Select the quarantined kit to restore. |
| 2 | In the action pane, select Restore in the drop-down list. |
| 3 | Enter the reason for restoring the kit. |
| 4 | Click Apply. The kit status is set to Valid. |
The action Restore can be performed if the conditions are as follows:
| To perform action... | The kit must have status... | And be located at... | So that study users can... | And site users can... |
|---|---|---|---|---|
| Restore | • Quarantined |
• Central depot |
Restore kits on: |
Restore kits on: |
During the course of the study, if a kit for some reason is not valid before or after allocation, for example if it is lost or broken, the action Invalidate sets the kit as Invalid. A kit can be invalidated at any time during the study.
| Important! Invalidating a kit is an irreversible action - the kit will always have the status Invalid, irrespective of its allocation status or whether it is returned after invalidating the kit. |
To set a kit as invalid:
| 1 | Select the kit to invalidate. |
| 2 | In the action pane, select Invalidate in the drop-down list. |
| 3 | Select Missing / Broken / Other in the reason drop-down list. If reason Other was selected: Enter the reason for invalidating the kit. |
| 4 | Click Apply. The kit status is set to Invalid. |
The action Invalidate can be performed if the conditions are as follows:
| To perform action... | The kit must have status... | And be located at... | So that study users can... | And site users can... |
|---|---|---|---|---|
| Invalidate | • Valid • Allocated • Returned • Quarantined |
• In transit |
Invalidate kit:
• In transit from/to Central depot |
Invalidate kit:
• At Site |
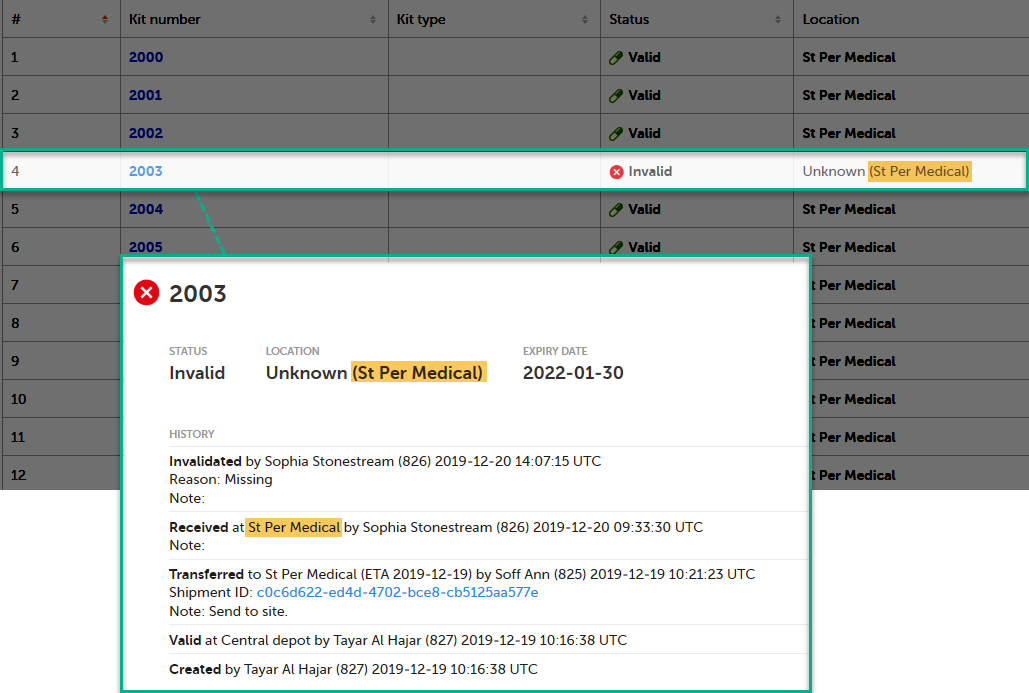
When a kit is invalidated and the reason is set to Missing, the following happens:
In the below example, the last known location was on site, at St Per Medical, where the kit was received:
Note! The action to edit the expiry date is only available for users that manage kits on study level.
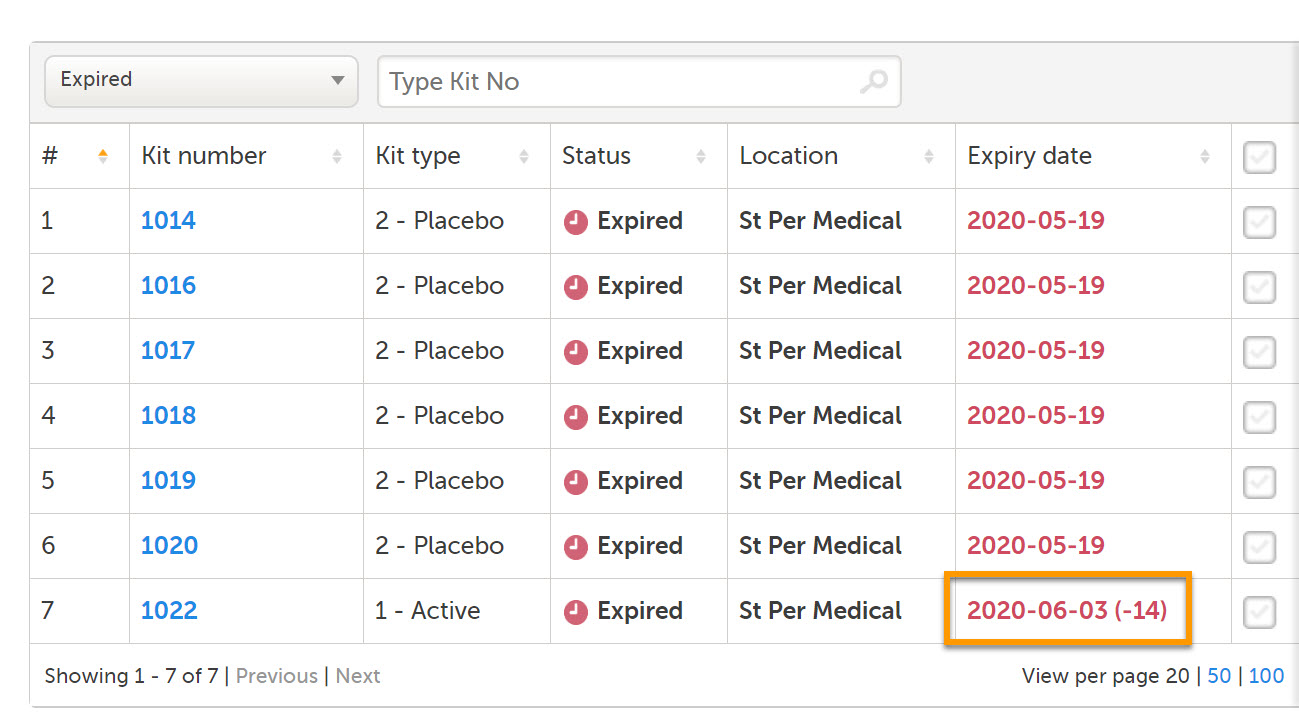
In the stock list, expired kits are shown with a red expiry date in the Expiry date column (1), for example 2020-05-19.
If an expiry period was set by a Study Supply Manager, and the expiry date is within that period, the number of days of the expiry period is shown in parentheses next to the expiry date (2), for example 2020-06-02 (-14). In this example, the expiry period is set to 14 days. For more information on expiry period, see Setting an expiry period.
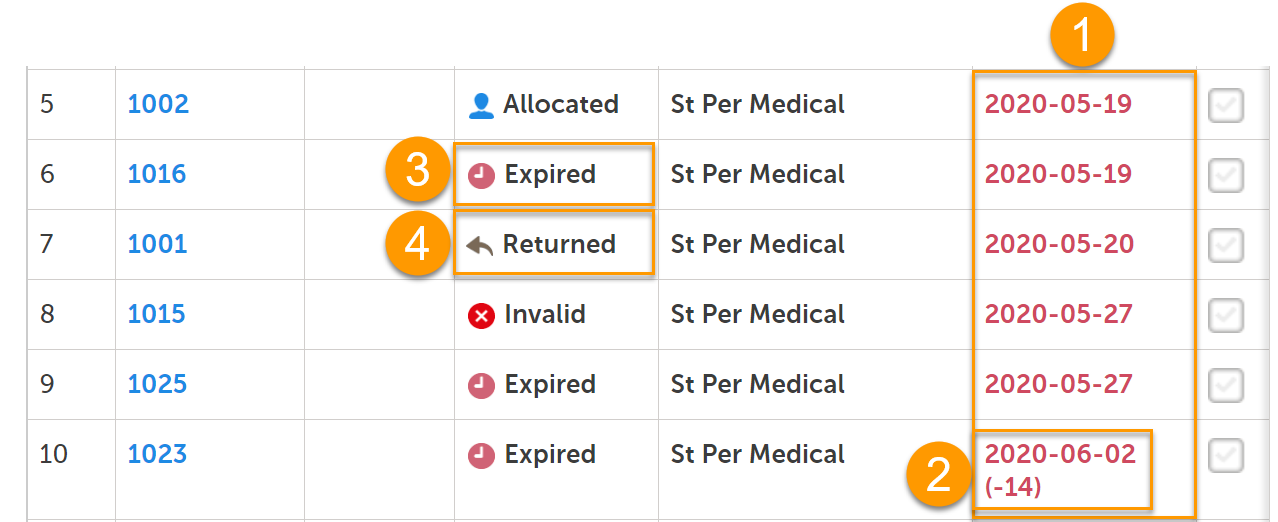
Only kits that have kit status Valid prior to expiry will get the new kit status Expired (3). If the expiry date is then edited so that the kit is no longer expired, the kit status will return to Valid.
Kits with status other than Valid can also expire but their kit status remain (4). All expired kits can however always be identified with a red-colored date in the Expiry date column.
To edit the expiry date:
| 1 | Select the kit for which you want to edit the expiry date. |
| 2 | In the action pane, select Edit expiry date in the drop-down list. |
| 3 | Select a date in the date picker. |
| 4 | Enter the reason for editing the expiry date. |
| 5 |
Click Apply. The new expiry date of the kit(s) is saved. |
The action Edit expiry date can be performed if the conditions are as follows:
| To perform action... | The kit must have status... | And be located at... | So that study users can... | And site users can... |
|---|---|---|---|---|
| Edit expiry date | • Valid • Allocated • Returned • Quarantined • Invalid • Expired |
• In transit |
Edit expiry date on kits:
• In transit from/to Central depot |
The actions available depend on the current kit status. Below is a chart illustrating the possible workflows depending on kit status.
Tip! Start at the circle with kit status VALID and follow the arrows to see what actions are available from there.
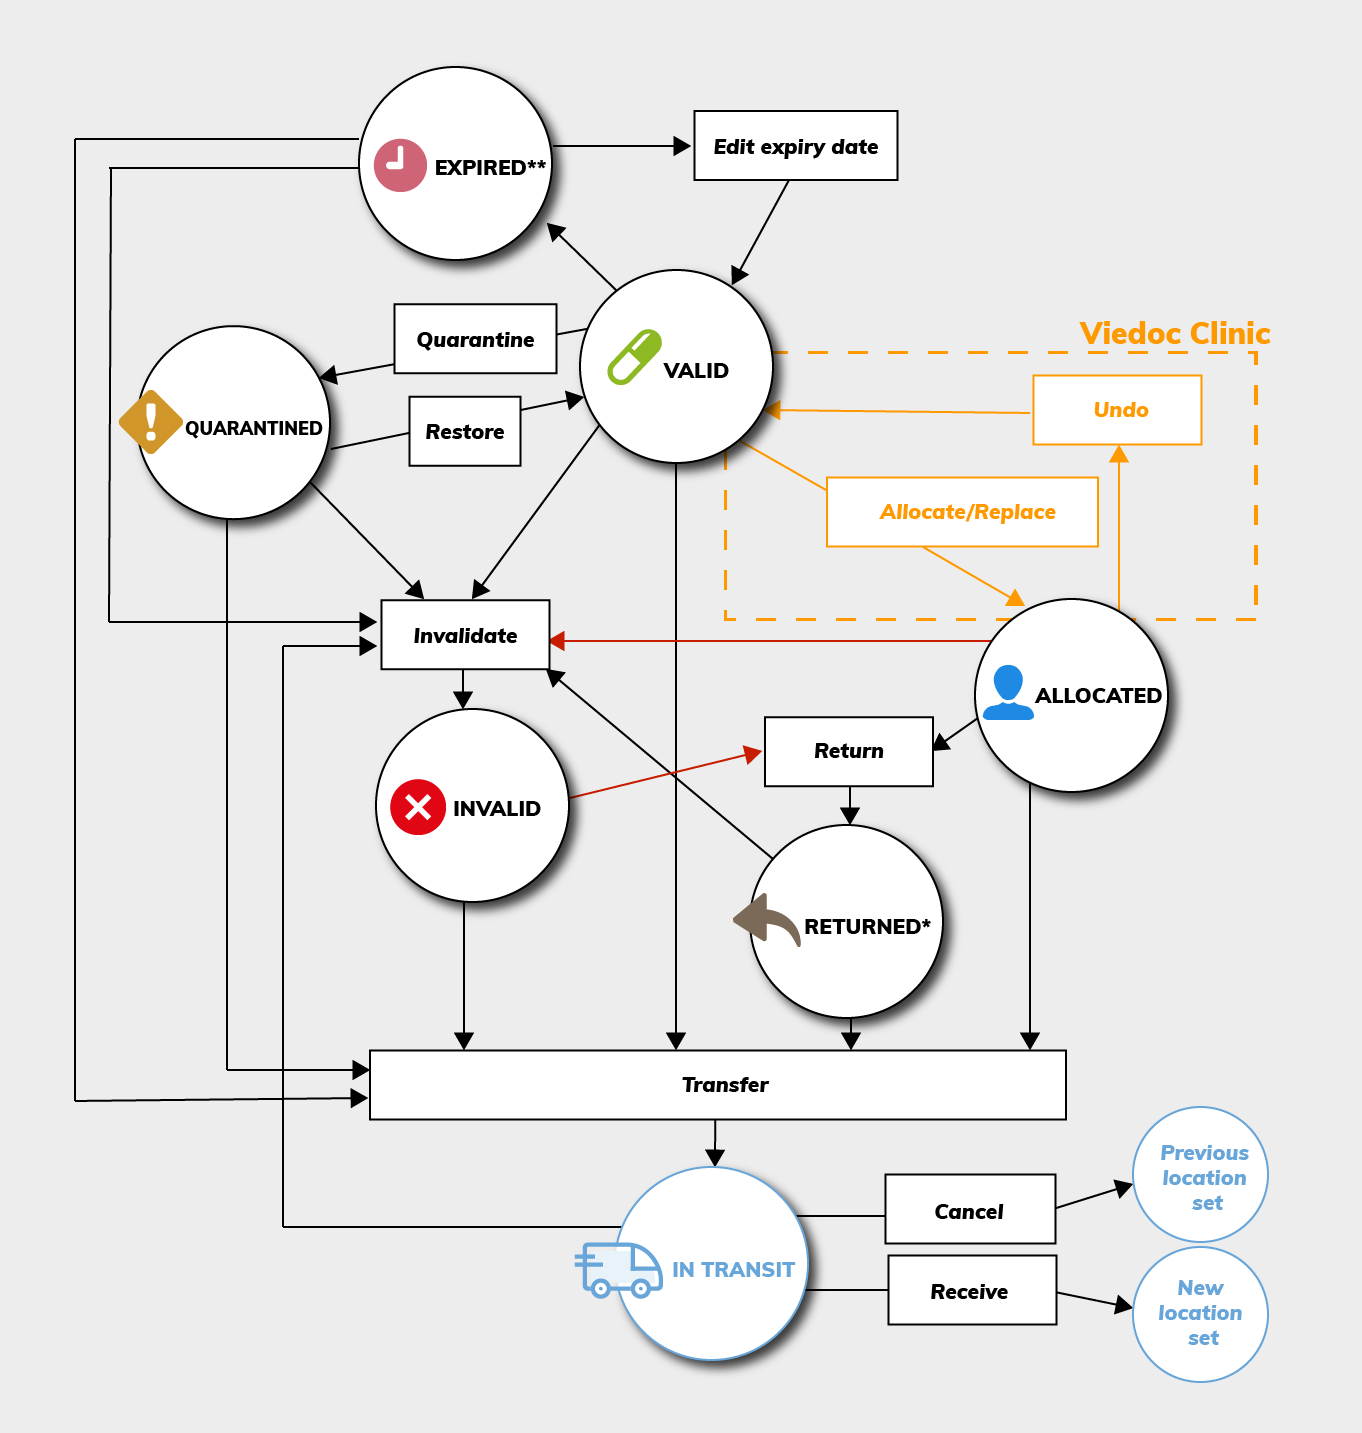
*A returned kit that has been invalidated will remain as Invalid. That is, it will not be set as Returned.
**An expired kit is set to Expired only if it was Valid at the time of expiry. See Editing the expiry date for more information.
To sum it all up, actions are dependent on kit status, location, and user role permissions. Your user role determines which sites you have access to and where you can handle kits. But in general, and as set up with the default roles Study Supply Manager and Site Supply Manager, the following applies:
| To perform action... | The kit must have status... | And be located at... | So that study users can... | And site users can... |
|---|---|---|---|---|
| Transfer |
• Valid |
• Central depot |
Transfer from Central depot to: Transfer from Country depot to: |
Transfer from Site to: • Central depot • Country depot |
| Receive | • Valid • Invalid • Allocated • Returned • Quarantined |
• In transit |
Receive transfer to:
• Central depot |
Receive transfer to:
• Site |
| Cancel | • Valid • Invalid • Allocated • Returned • Quarantined |
• In transit |
Cancel transfer from:
• Central depot |
Cancel transfer from:
• Site |
| Return |
• Allocated |
• Site |
N/A | Return allocated kit on:
• Site |
| Quarantine | • Valid |
• Central depot |
Quarantine kits on: |
Quarantine kits on: |
| Restore | • Quarantined |
• Central depot |
Restore kits on: |
Restore kits on: |
| Edit expiry date | • Valid • Allocated • Returned • Quarantined • Invalid • Expired |
• In transit |
Edit expiry date on kits:
• In transit from/to Central depot |
|
| Invalidate | • Valid • Allocated • Returned • Quarantined |
• In transit |
Invalidate kit:
• In transit from/to Central depot |
Invalidate kit:
• At Site |
A Shipment ID is generated when you perform a transfer of a single or multiple kits, making it possible to keep track of the shipments during the study. All kits ever included in a transfer have a Shipment ID related to them.
When performing a transfer, a pop-up is displayed showing the Shipment ID:

You can also find the Shipment ID in the kit details view, under every transfer action performed:
In both views, the Shipment ID is a clickable link, see Searching kits using the shipment ID for more information.
When clicking the Shipment ID link, you will be redirected to the Stock list page. Here, the Shipment ID is automatically filled into the search field and all kits that belong to that shipment are listed:
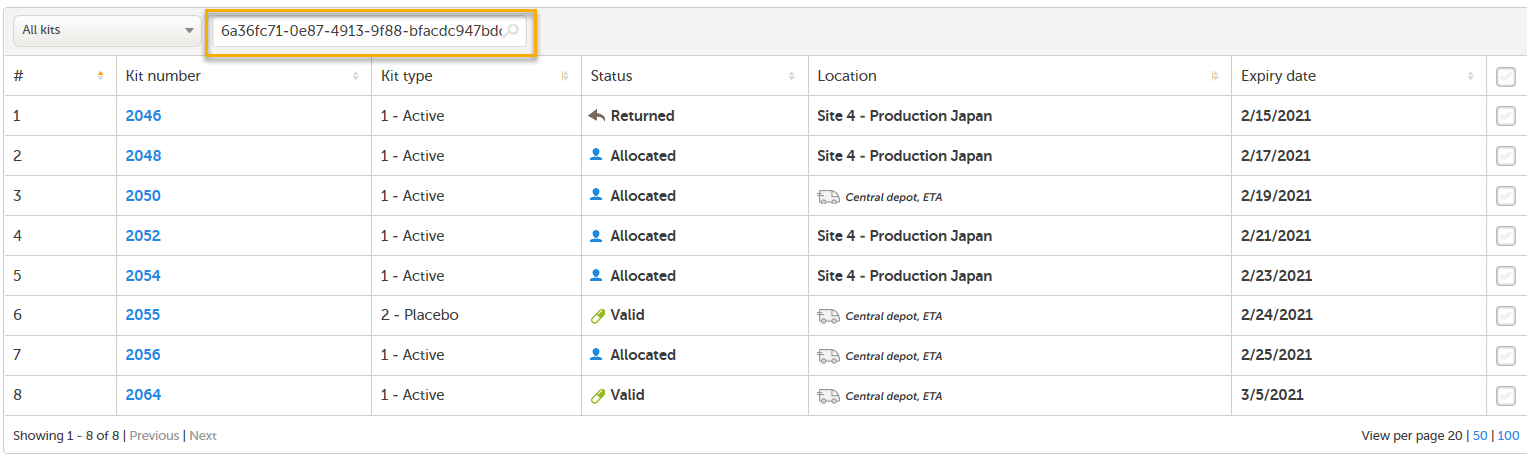
You can also manually enter or scan a Shipment ID into the search field. To search for multiple kits, enter commas between the numbers (for example 1001,1002,1003).
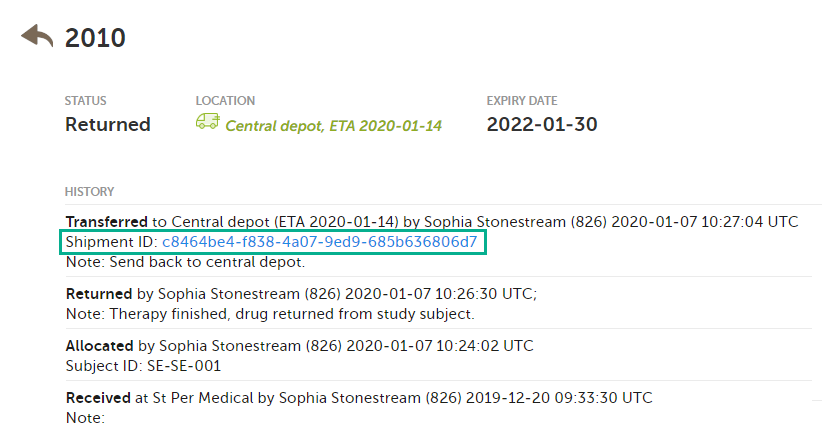
A kit can belong to several shipments, because the ID is created each time a transfer is performed. In the following example, kit number 2010 was transferred three times and is therefore included in three shipments:
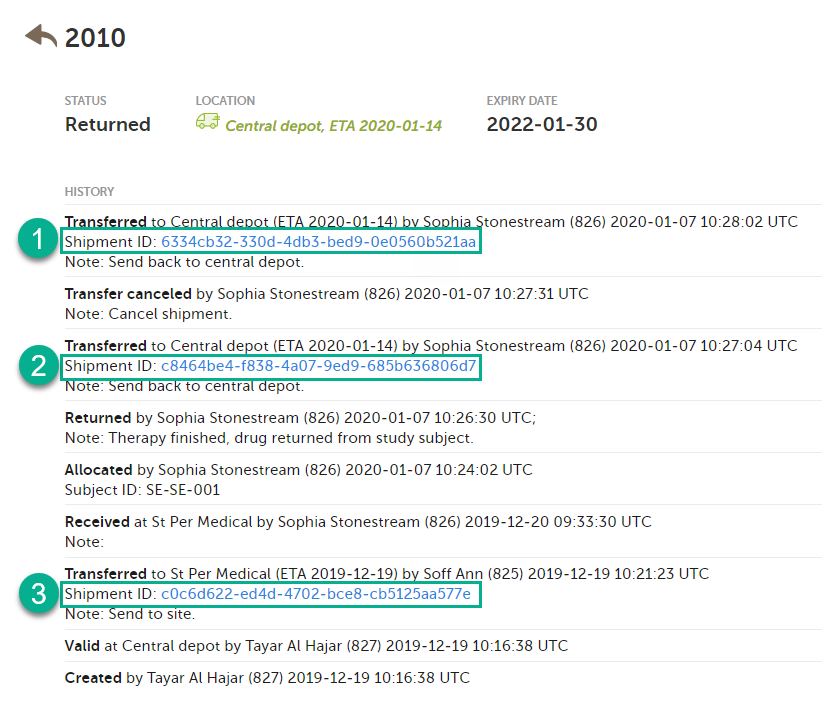
Kit 2010 will be listed in each search that is done in the stock list with the Shipment IDs related to it. However, the second shipment (2) was subsequently canceled and will therefore not appear in the stock list when searching for that Shipment ID. See Canceled transfers below for more details.
When a transfer is performed and a Shipment ID is created, and then the shipment is canceled, the Shipment ID will not list the kit in the search result. The Shipment ID is still visible in the kit details view but the clickable link will not show the kit in the search result.
This lesson applies to users with access to the Study supply overview.
For better control of your inventory, you can define an expiry period so that the system sets kits as expired when they get close to the actual expiry date. You define this period by setting how many days prior to the expiry date the kits should expire.
To set an expiry period:
| 1 |
In the Study supply overview, click the Edit button in the top right corner: 
|
| 2 | In the pop-up window, select the option Treat kits as expired when the number of days prior to expiry date is equal to or less than and enter the number of days. |
| 3 | Click Save changes. |
In the stock list, the defined expiry period is shown in parentheses for kits that expired in the expiry period:
This lesson applies for users with access to the Study supply overview.
To ensure that there is sufficient supply during the study, you can set alerts and be notified when the supply is running low. Thresholds can be set for all sites in the study or for specific sites. The settings you make for individual sites always override the general settings you make.
|
Important! Once you make individual alert settings for a specific site, this is an irreversible action. You can never go back and apply the general alert settings for that site. You can however always edit the alert levels for the site, including enabling/disabling the settings. Note that the tools symbol next to the site will remain lit (orange), even if you have disabled the settings for the site. |
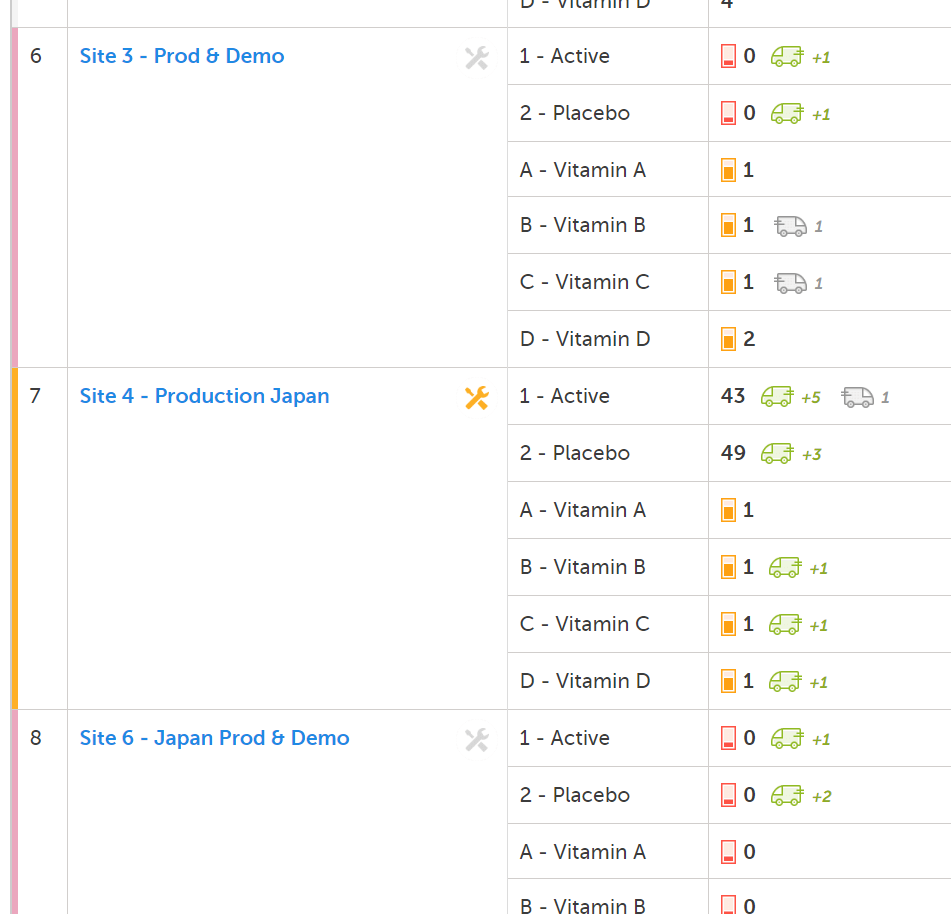
When alerts are activated, and the amount of kits are lower than the set level, a symbol appears in the Valid column:
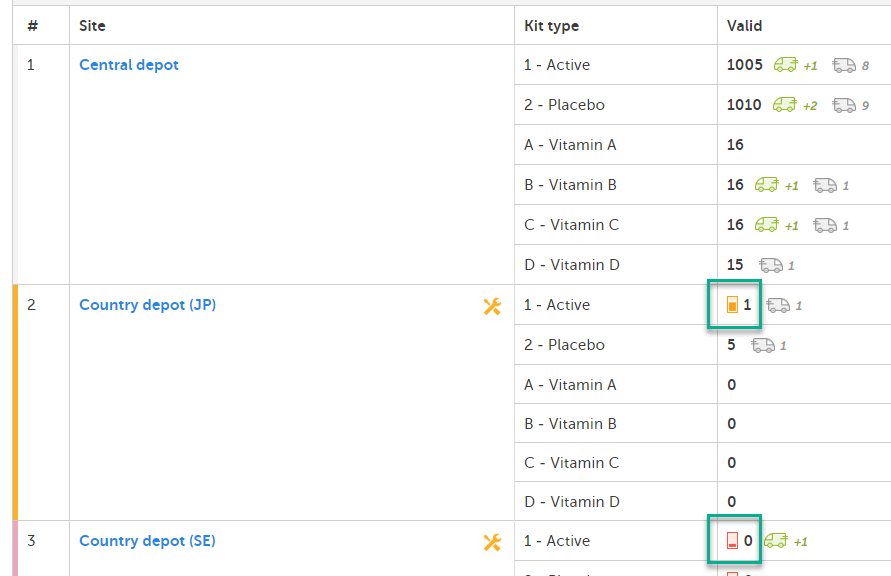
A colored bar in the far left column is also lit to indicate that there is an alert (yellow/red).
There are two alert levels that can be activated:
 |
Notifications | To notify the user that the supply is running low. |

|
Warnings | To warn the user that the supply is running critically low. |
To set alerts for all sites:
| 1 |
In the Study supply overview, click the Edit button in the top right corner: 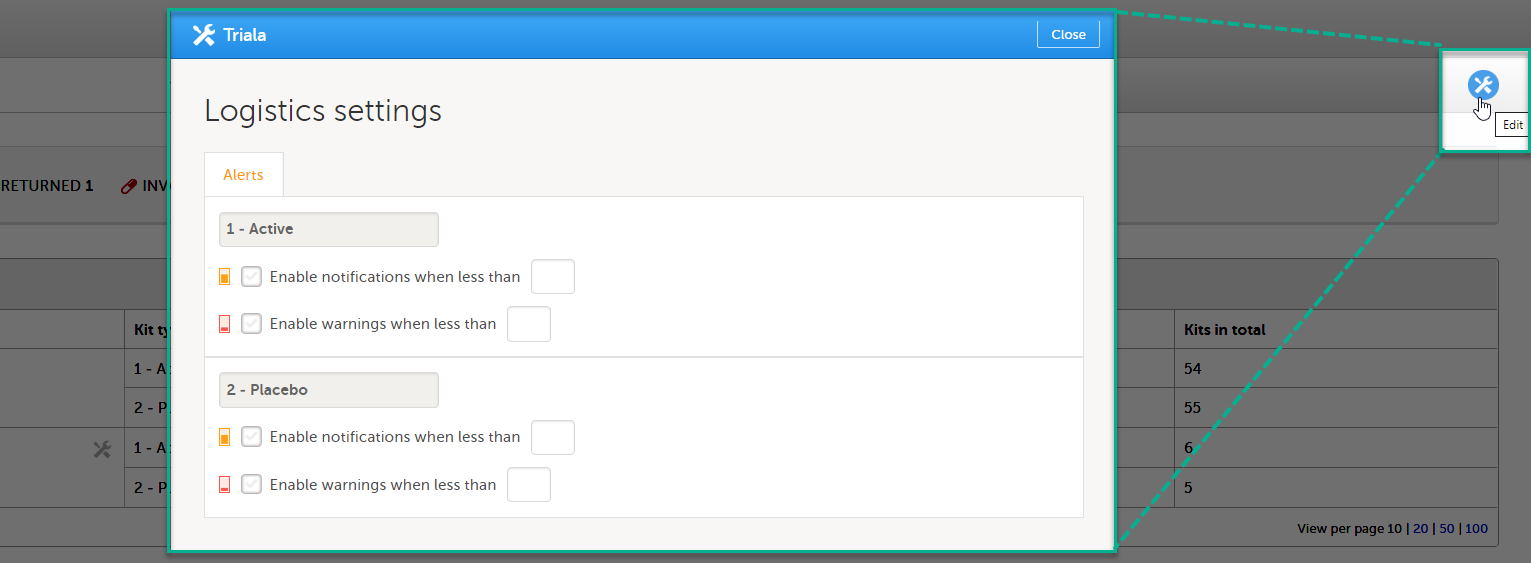
|
| 2 |
In the pop-up window, for each kit type, select the option to enable notifications and/or alerts, and enter the values for when alerts shall trigger. 
|
| 3 |
Click Save changes. |
To set alerts for a specific site, click on the tools symbol next to the site in the Site column and then follow step 2-3 in Setting alerts for all sites.
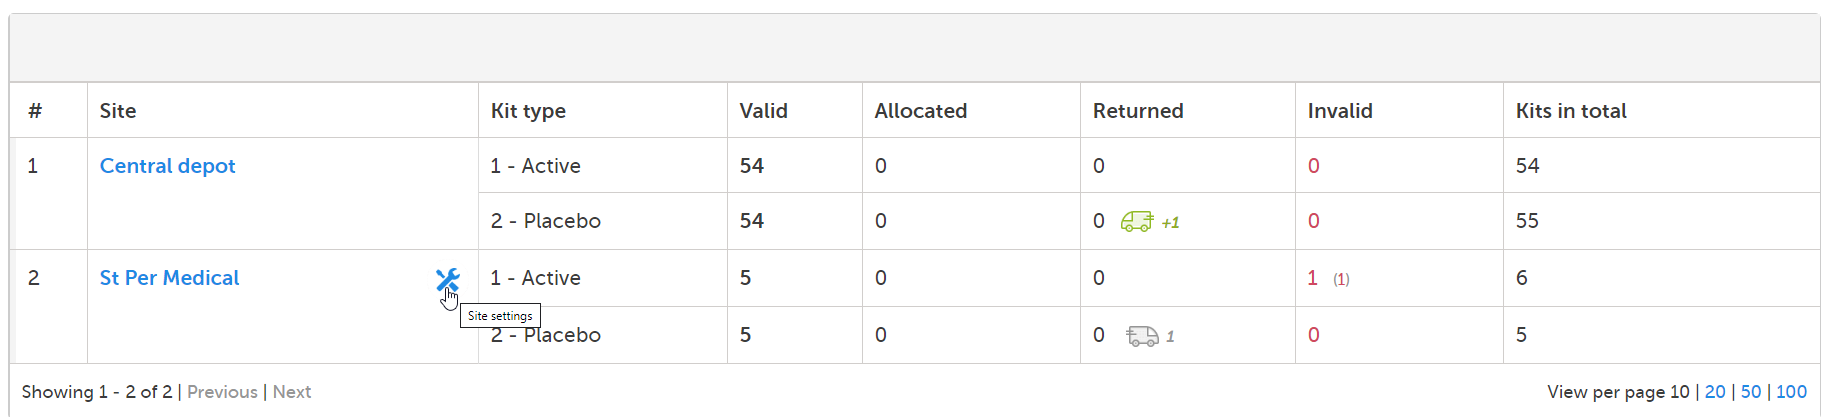
Note! Settings of specific sites always override the general settings.
The tools symbol turns orange when there are individual settings activated for a particular site. The tools symbol remains gray if no individual settings are set and the general settings apply at the site. It also remains gray if there are no alert settings configured.
You can configure email alerts to easily keep track of the supply status. The email is sent out to the users that have permission to manage or view kits on study level. You configure the thresholds for when the emails should be triggered in Logistics settings (the same pop-up where the general thresholds are set).
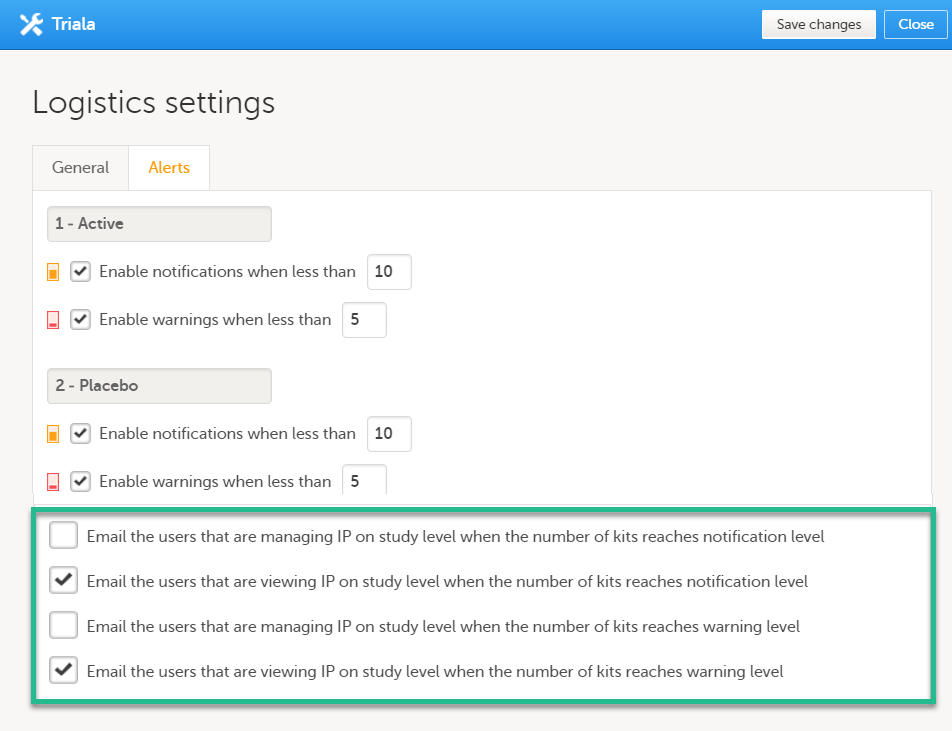
With the above thresholds as an example, an email is triggered when:
The following option is selected: Email the users that are viewing IP on study level when the number of kits reaches notification level and the number of Active and/or Placebo in stock is lower than 10.
The following option is selected: Email the users that are viewing IP on study level when the number of kits reaches warning level and the number of Active and/or Placebo in stock is lower than 5.
The email looks as follows:
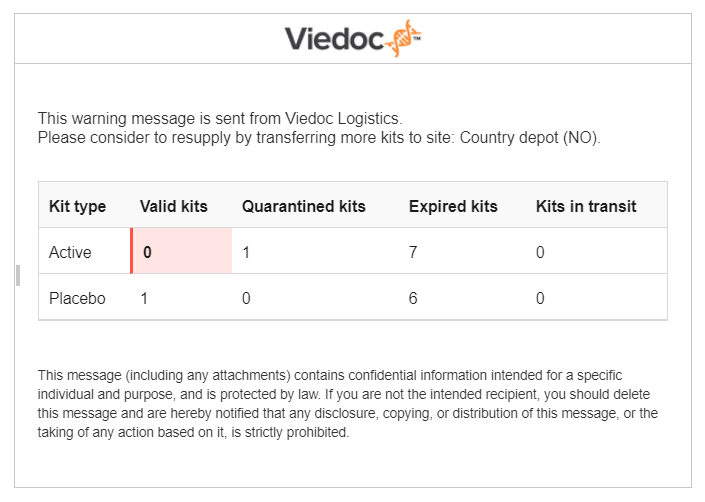
The number of quarantined kits, expired kits, as well as kits in transit are also shown in the email so that you can estimate and plan the inventory accordingly.
Note! It is not possible to make email settings per site—the email settings are general and apply to all sites. The emails are however triggered per site and you can see in the email for which site the email was triggered.
This use case illustrates what the workflow can look like when kits are low in stock at site and it's time to re-supply.
 |
Site Supply Manager |
 |
Study Supply Manager |
| 1 |
The Study Supply Manager views alert notifications for site St Per Medical: 
The notifications are enabled to alert when there are less than 20 kits at site St Per Medical (for both kit types): 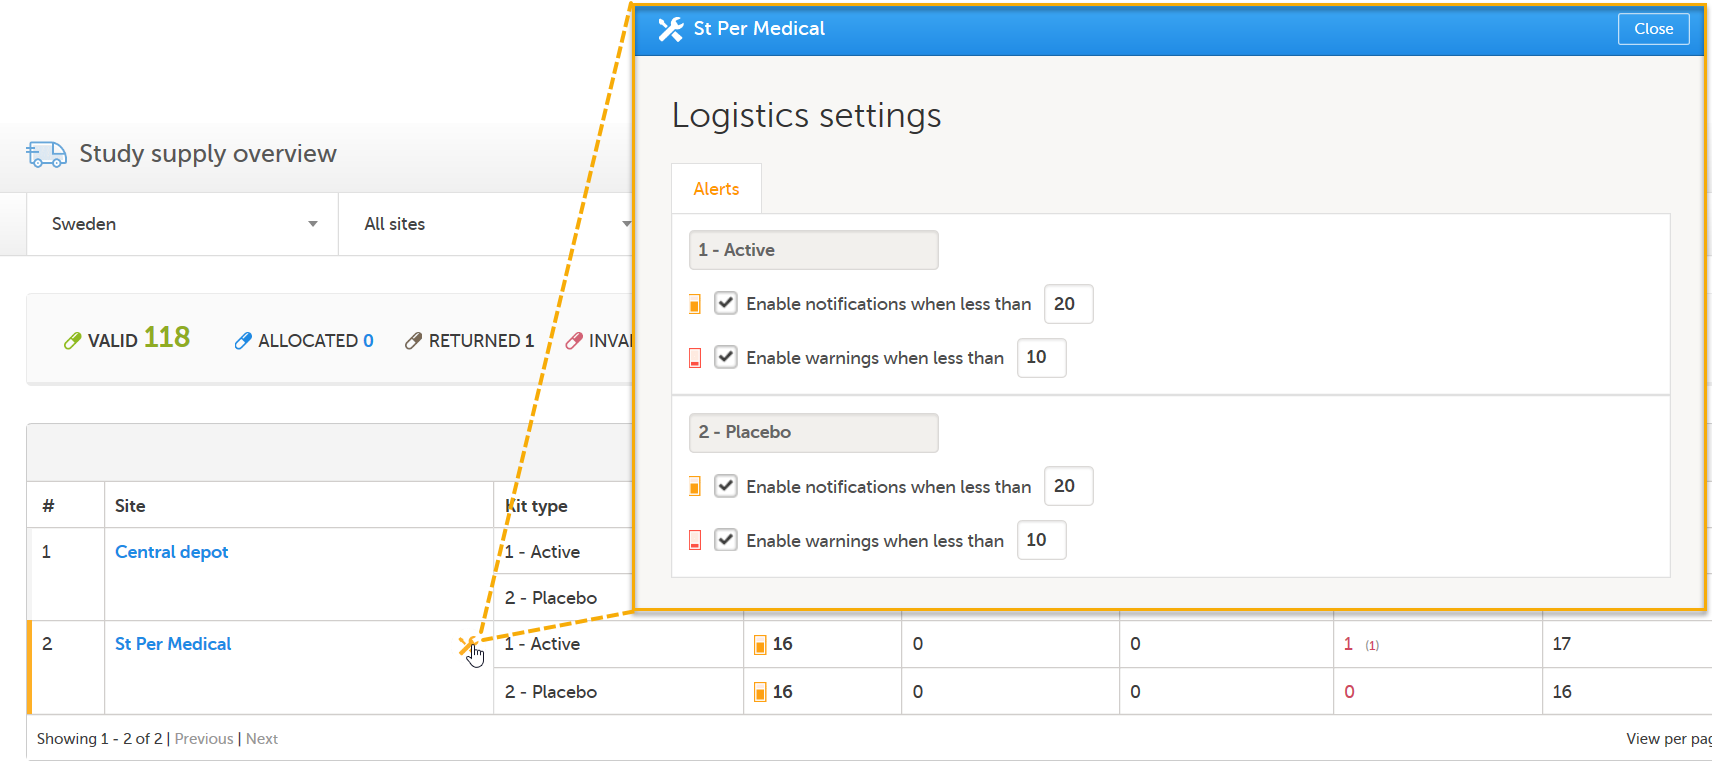
|
| 2 |
The Study Supply Manager transfers 8 kits to site St Per Medical, 4 of each kit type: |
| 3 |
Now, if the Study Supply Manager checks the Study supply overview, the 8 kits in transfer are shown in the Valid column, as 8 outgoing kits from Central depot, and 8 incoming kits to St Per Medical: 
|
| 4 |
The Site Supply Manager can see the incoming kits to St Per Medical in the stock list. When the kits arrive at St Per Medical, the Site Supply Manager sets the kits as received: 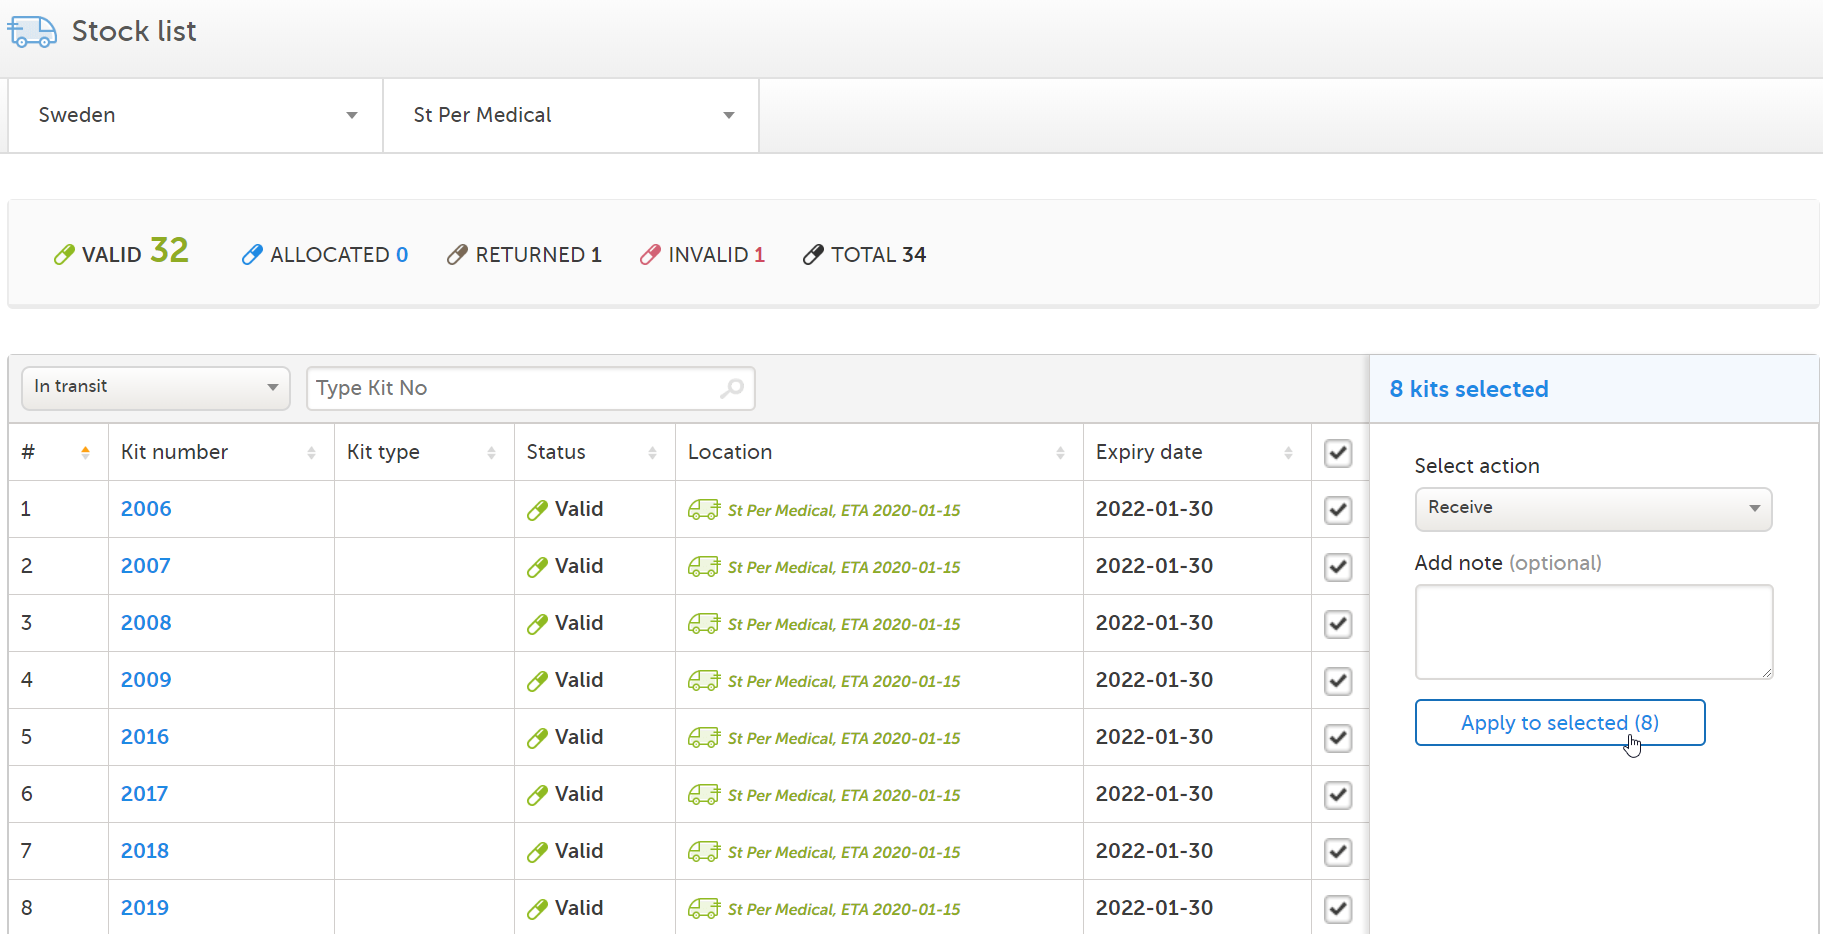
|
| 5 |
The Study Supply Manager can now see that the kits are valid at St Per Medical and the alert notifications are no longer visible: 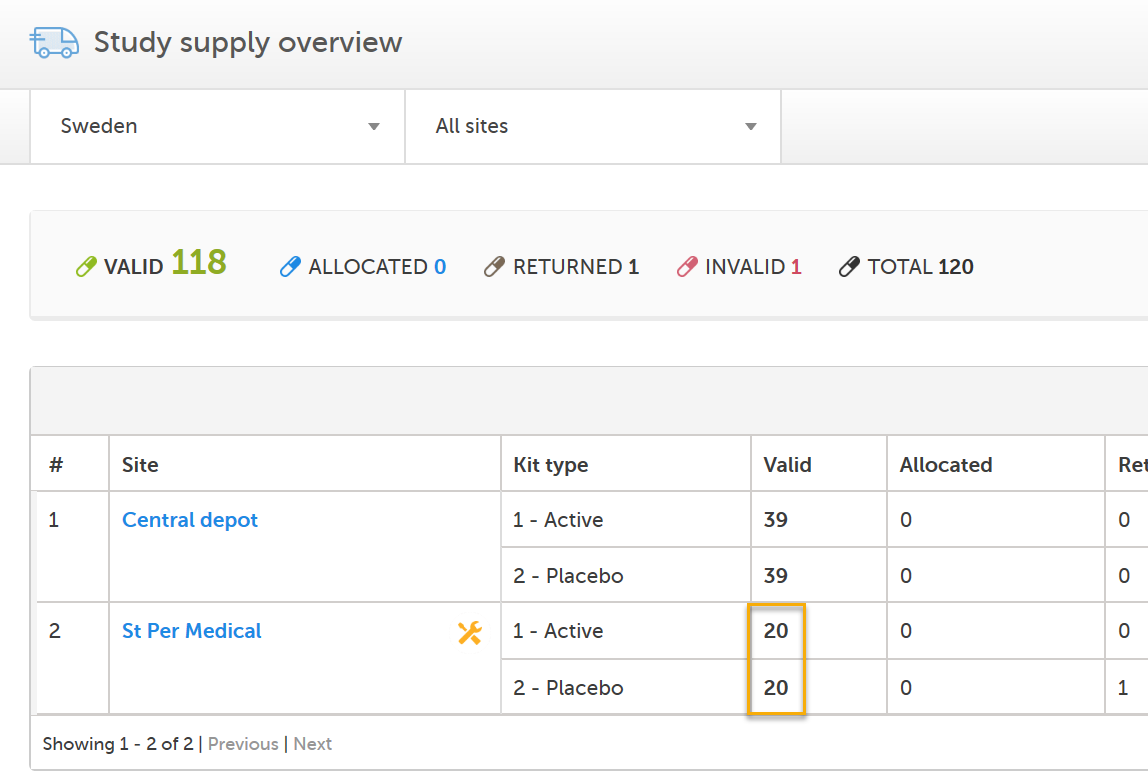
|
This use case illustrates what the workflow can look like when allocating a kit to a study subject (from Viedoc Clinic), how to handle the used kit handed back by the subject and finally how to transfer the kit to Central depot for destruction.
 |
Site Supply Manager Investigator |
In this use case, a user with two roles—Site Supply Manager and Investigator—have access and permission to handle randomization, allocation and supply management at site level.
Randomization and allocation is performed in Viedoc Clinic. In this use case, two separate forms are used but it can also be done in one form, depending on the study design. To learn more about randomization and allocation, see the lesson Randomization, allocation and emergency unblinding in Viedoc User Guide for Site Users.
| 1 |
The subject is first randomized to be assigned a treatment. The treatment is blinded and not visible to the user. 
|
|
Then a kit is allocated in the allocation form. 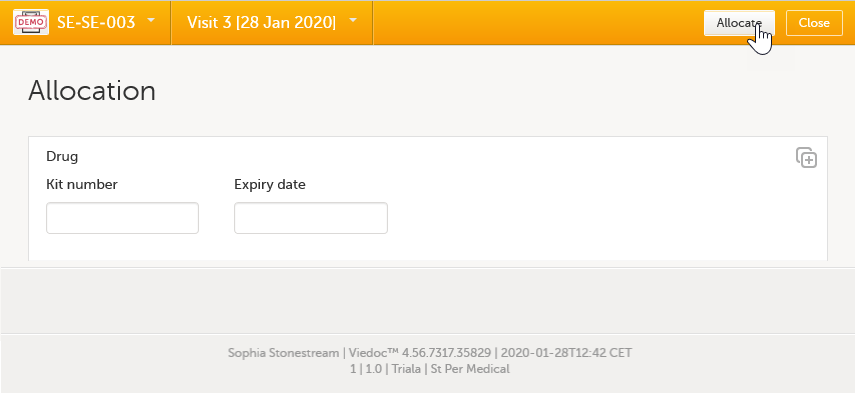 |
|
| 2 |
The kit allocated is the first available/valid kit containing the treatment the subject was assigned to in the randomization. Here we have kit number 1006 picked from the stock list (which is based on the global allocation list): 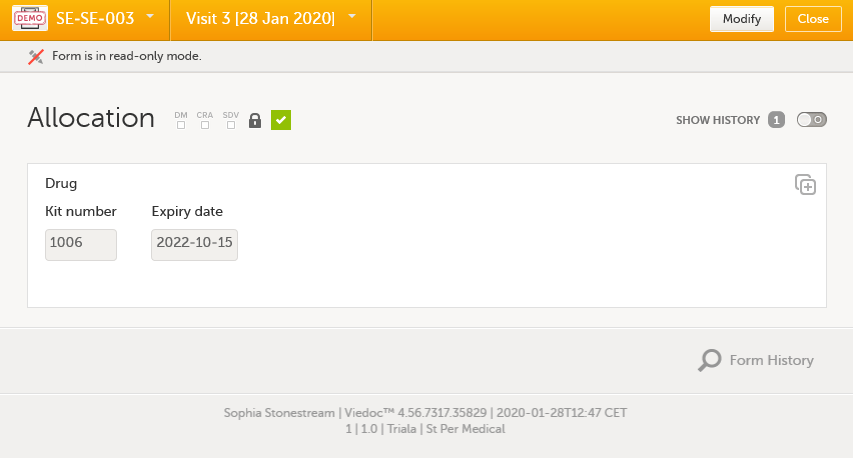
|
| 3 |
Let's follow the journey of kit number 1006 in Viedoc Logistics. Before clicking Allocate in Viedoc Clinic, kit number 1006 can be seen as Valid in the stock list: 
As we can see, the Kit type column is empty since this is blinded information. The user does not know which kit is containing what treatment. |
| 4 |
Now, after clicking Allocate in Viedoc Clinic, let's refresh the page - the kit is now seen as Allocated in the stock list: 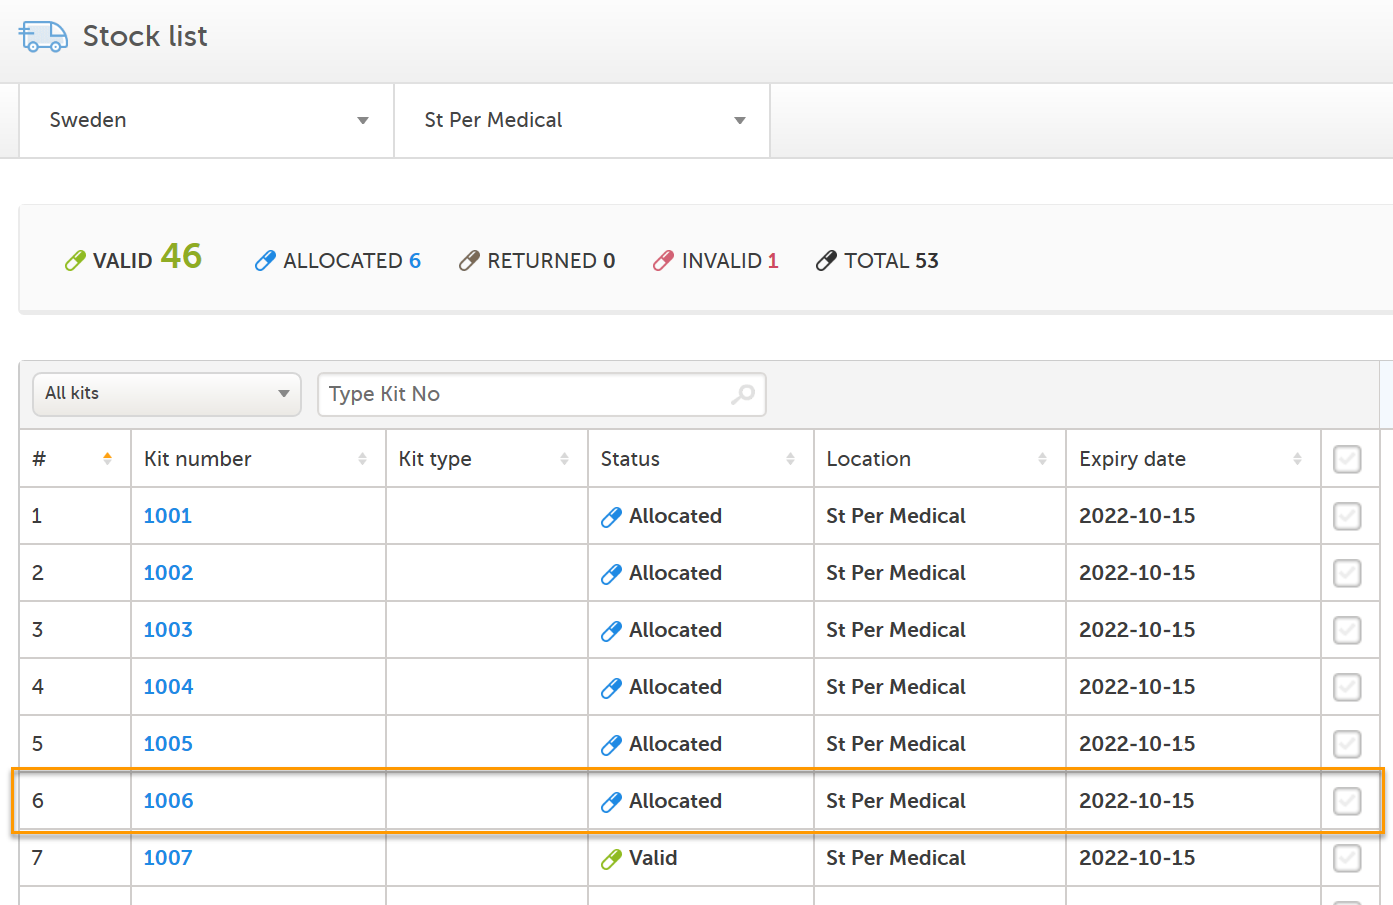
|
| 5 |
To continue through the whole workflow, let's pretend some time passes and the study subject hands over the used kit to the site who in turn sets the kit as Returned: 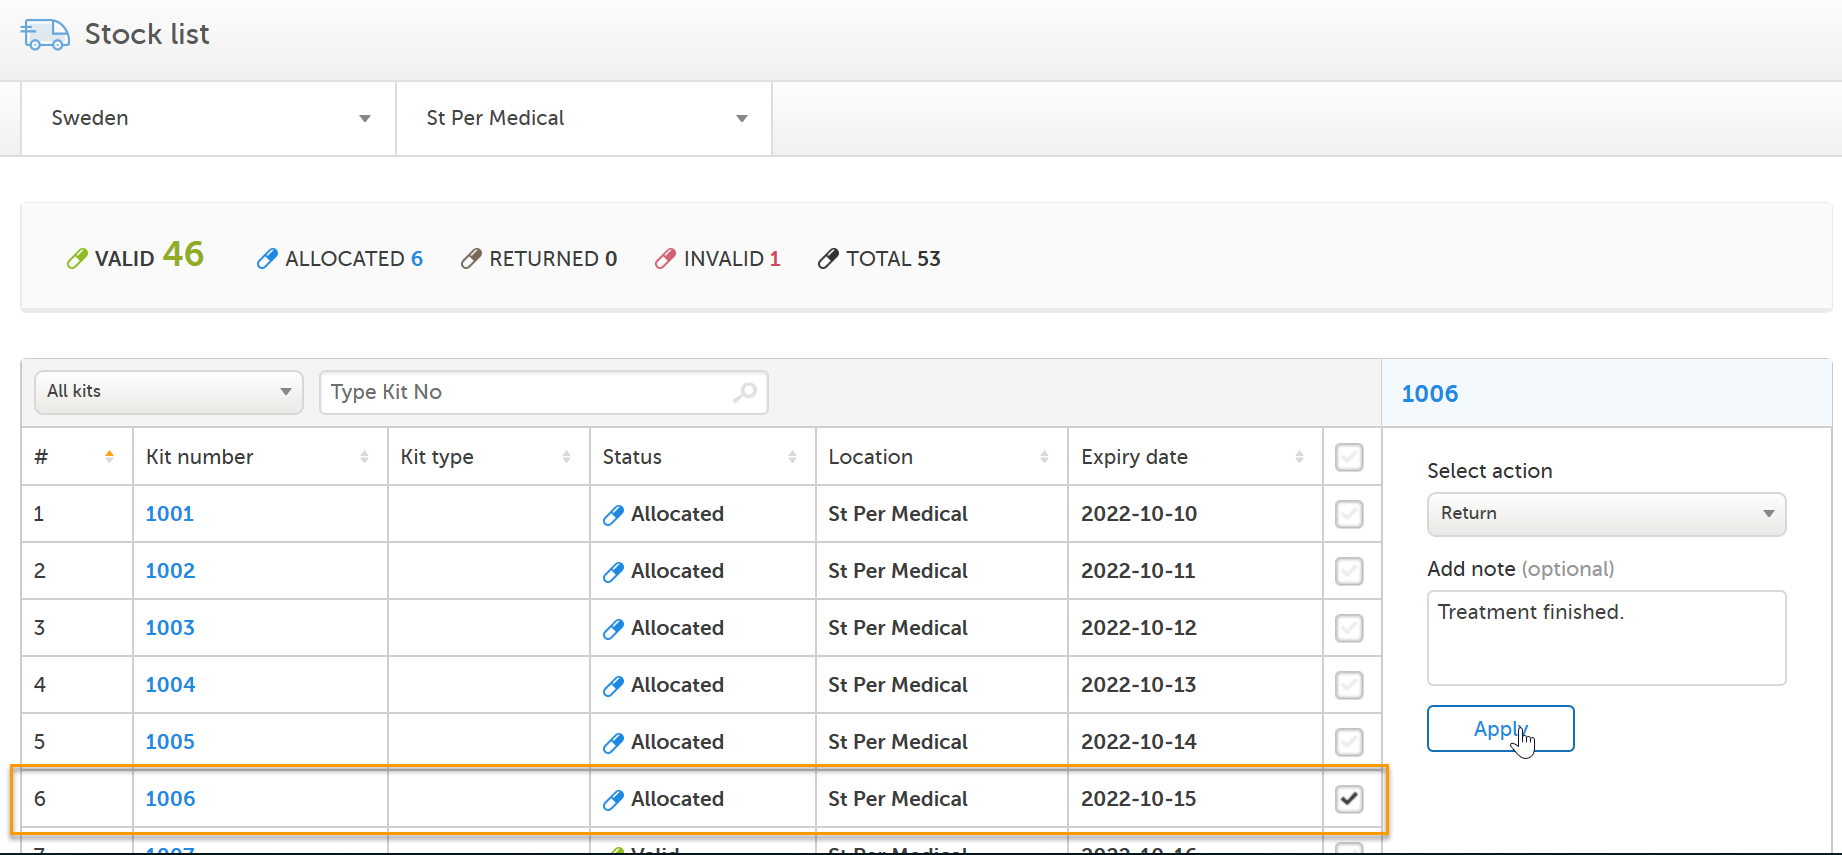
|
| 6 |
Now that the kit has correct status - the user transfers it back to Central depot: Eventually a user with permission to manage kits on study level will set the kit as Recieved and the kit's journey through the workflow is completed. If we click on kit 1006, we can see the history of all the actions that was ever performed to the kit, with the actions included in this use case highlighted in the orange frame. Among information about when and by whom the actions were performed, we can also see that kit number 1006 is connected to subject ID SE-SE-003 (registered below Allocated). 
|
This video gives an overview of how to set up Viedoc Logistics to ship your investigational product between sites and depots and how to allocate kits to patients.
If you have difficulties in viewing this video, click here.
Our Working Smarter webinar series is designed to help Viedoc users get the most out of the platform, from practical tips and feature deep dives to best practices and expert insights. Each session addresses topics for our users including highlighting new features, sharing useful tips, best practices, or deeper insights into specific areas of Viedoc.
Whether you're new to the system or an experienced user, these webinars are here to help you work smarter.
The full list of webinars in Viedoc’s Working Smarter Series, including recordings and Q&A, is provided below.
October 2024
https://help.viedoc.net/l/a29eab/en/
November 2024
https://help.viedoc.net/l/04c262/en/
January 2025
https://help.viedoc.net/l/893419/en/
February 2025
https://help.viedoc.net/l/bb2d9a/en/
March 2025
https://help.viedoc.net/l/027d45/en/
April 2025
https://help.viedoc.net/l/f94362/en/
June 2025
https://help.viedoc.net/l/227838/en/
September 2025
https://help.viedoc.net/l/b01136/en/
November 2025
https://help.viedoc.net/l/f914f3/en/
February 2026
https://help.viedoc.net/l/6c61f9/en/
