Configuring reference data scopes
This lesson describes how to configure reference data scopes in Viedoc Designer.
Introduction
About reference data
Viedoc offers support for adding reference data that will be automatically populated to specific forms. When reference data are configured for your study, it is not necessary to fill in reference values for each subject in each form separately.
It is possible to configure different sets of reference data that will be populated to the form based on:
- factors that can affect the reference data, such as age or gender
- reference data source, such as a lab
- site
- date
Terminology
| Term | Definition |
|---|---|
| Reference data source |
An institute that provides reference data, for example a lab. |
| Reference data scope | A mapping of the items that should be automatically populated with reference values, and the factors that they should depend on. One or more reference data scopes can be configured in Viedoc Designer > Global Settings, as set(s) of variables and factors (see definitions below). |
| Factor | A parameter that affects the reference data, for example a subject’s sex. Factors may affect the normal range for a test result. |
| Variable | A specific measurement to be carried out. |
| Date factor | The date the sample was collected or the measurement carried out. This field determines on which date the reference data to be populated are based, for example when the event date is not the same as the collection or measurement date. |
| Target type | An item of a certain type of information that a reference data source can provide for a specific variable (such as range, unit, low/high values, etc.). Any number of target types can be defined by the user. |
Workflow
Reference data are configured in Viedoc Designer, Viedoc Admin and Viedoc Clinic. The schematic below depicts what different steps need to be taken, and which roles have permission to perform these steps.
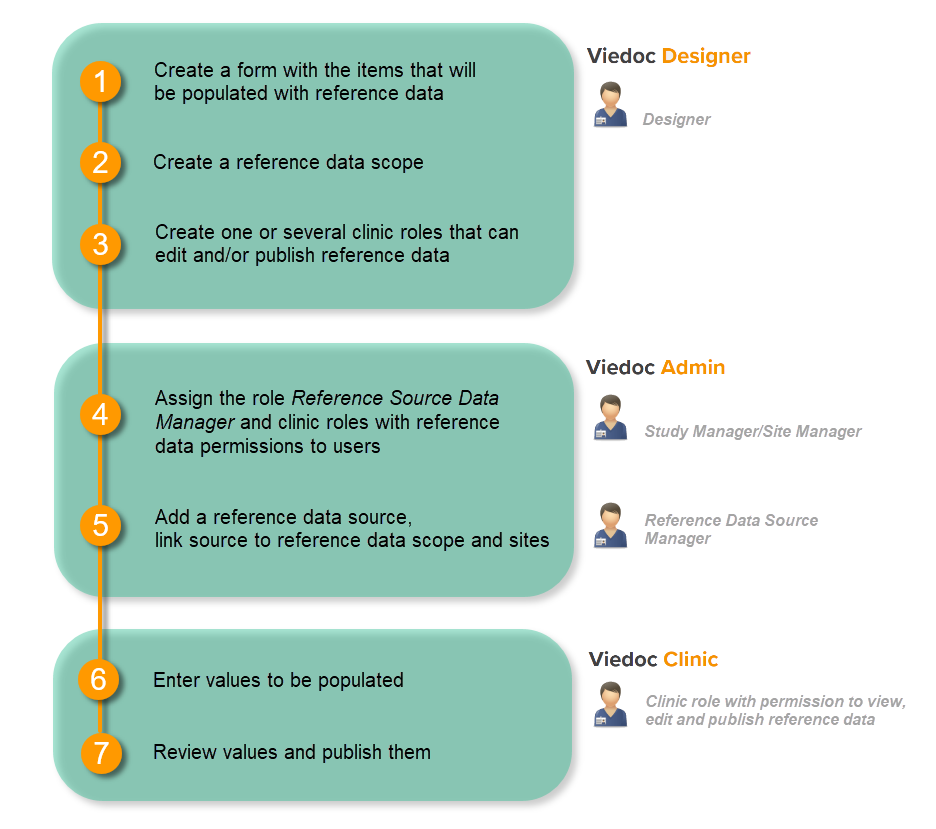 http://help.viedoc.net/l/5cf069/en/
This is a single-sourced file that should have the following content:
Introduction to reference data, description of the workflow.
For more detailed instructions regarding these steps, see:
- Configuring reference data scopes in Viedoc Designer (this lesson!)
- Managing reference data sources in Viedoc Admin
- Working with reference data in Viedoc Clinic
For a detailed example of how to work with reference data, see:
For a video tutorial on how to work with reference data, see
Reference data scopes
About reference data scopes
A reference data scope is a mapping of the items that should be automatically populated with reference values, and a listing of the factors that affect these data. The data for one reference data scope will be populated to one specific lab data form. Reference data scopes are configured under the Global Design Settings in Viedoc Designer.
A reference data scope is linked to a reference data source and defines the following:
- which measurements the reference data source carries out,
- which parameters (factors) might affect the results,
- what are the ranges/units that are used for these parameters.
Description of the reference data scope page
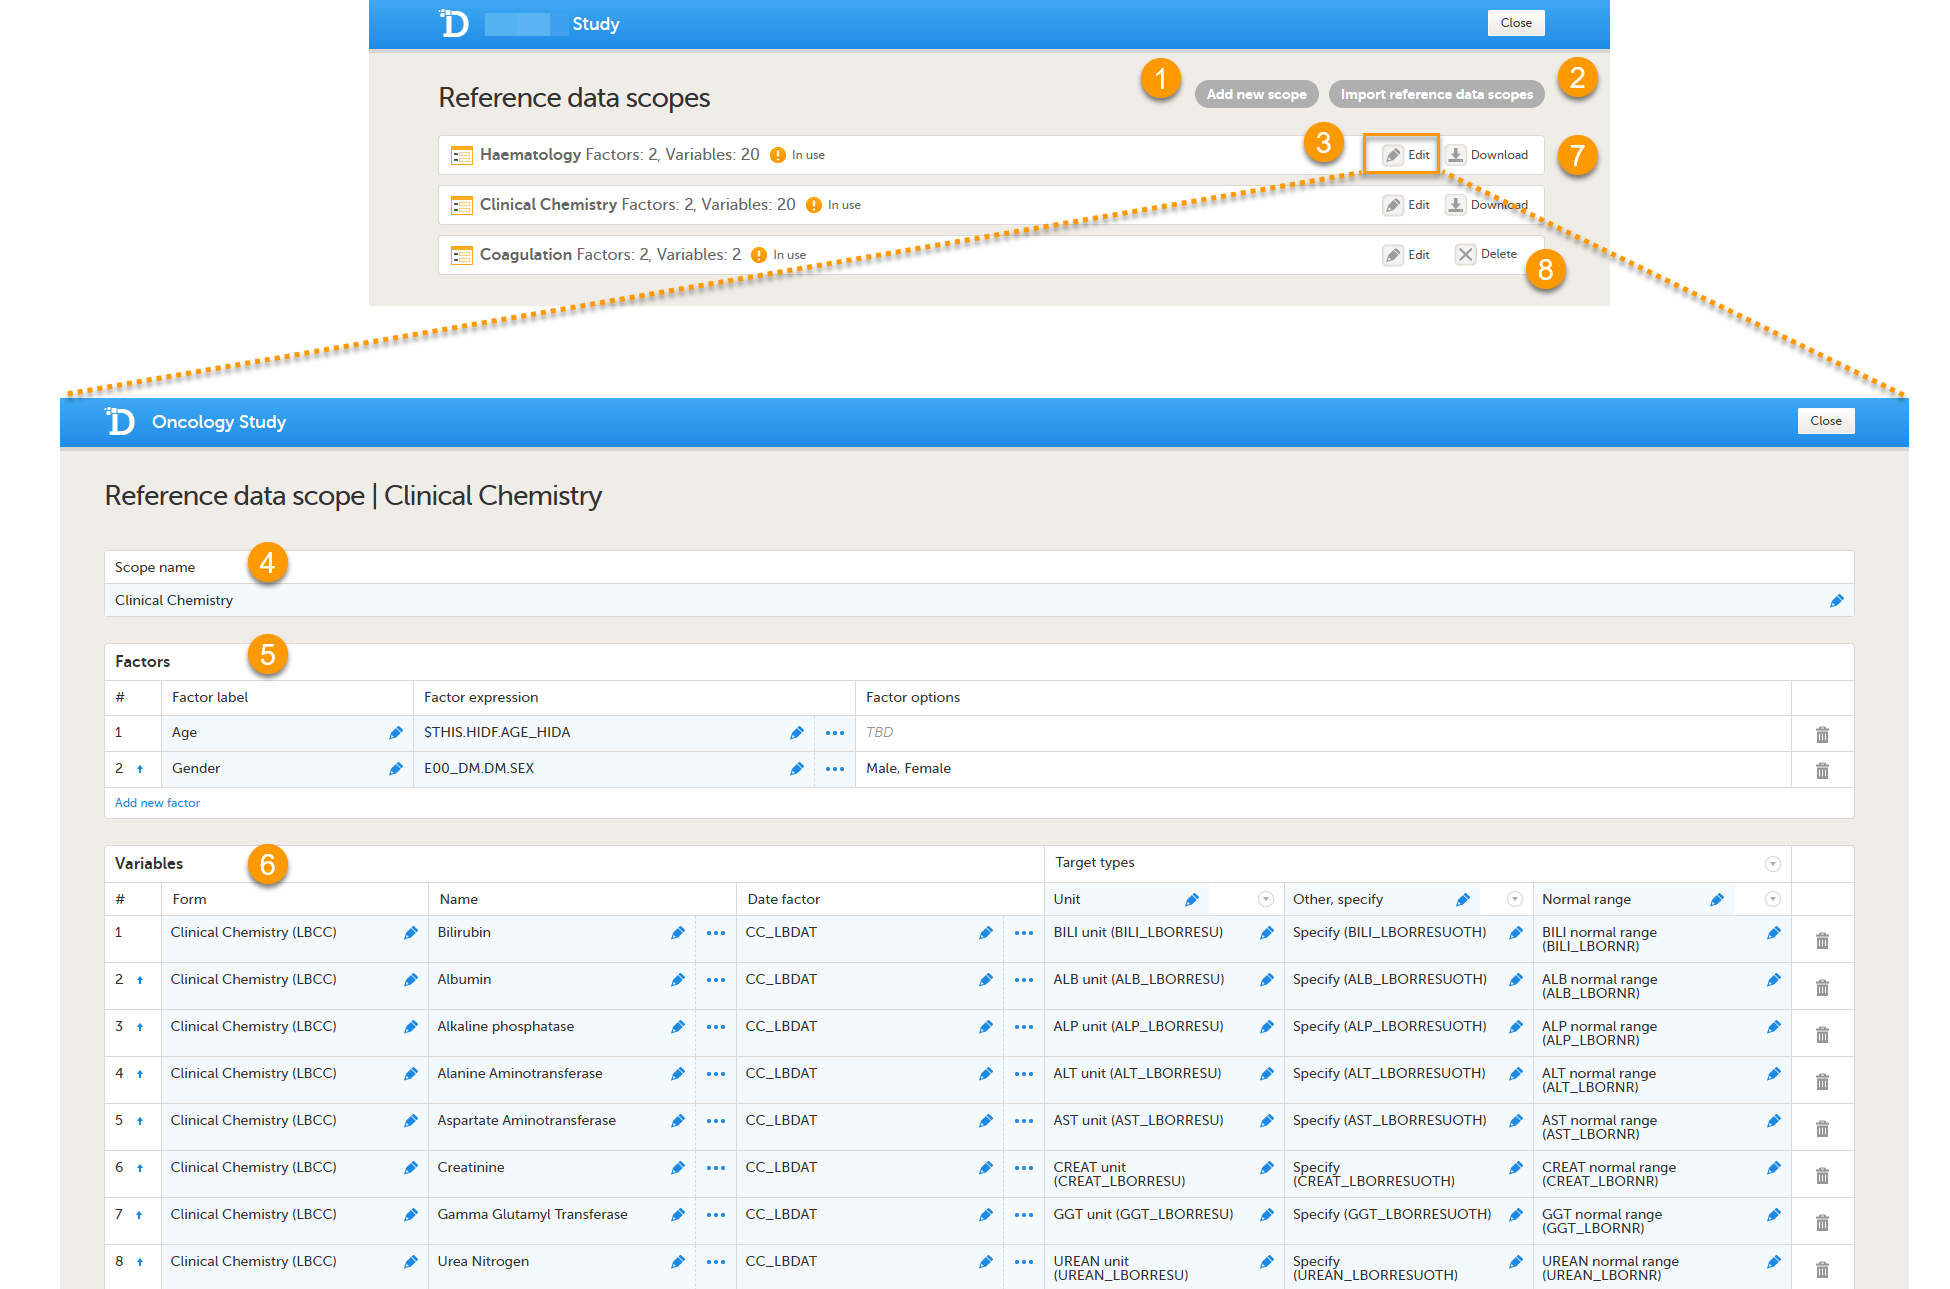
On the Reference data scopes page, you can:
1. Add a new scope, see Creating a reference data scope.
2. Import a scope, see Importing a reference data scope.
3. Edit an existing scope, see Editing a reference data scope. The Reference Data Scope page opens, where you can configure the following:
4. Scope name. The scope name is displayed in Viedoc Admin, where the scope can be linked to a reference data source. It is also displayed in Viedoc Clinic, where the reference data values can be entered. The scope name is a mandatory field.
Tip! Use a scope name that contains a (short) description of the measurements to be carried out. This will make it easier to identify the scope in Viedoc Admin and Viedoc Clinic.
5.The factors that affect the reference data (see Factors).
6. The variables that will be measured and the fields that will be auto-populated with reference data (see Variables).
7. Download a reference scope.
Note! You can only download a reference data scope after it has been published in the Global design settings.

See Downloading a reference data scope
8. Delete an existing scope, see Deleting a reference data scope.
Note! You can only delete a reference data scope before it has been published in the Global design settings.
Factors
What is a factor?
A factor is a parameter that may affect the normal range for a test result, such as a subject’s gender or age. The factors defined here will become available in the reference data editor in Viedoc Clinic.
Configuring factors on the Reference data scope page
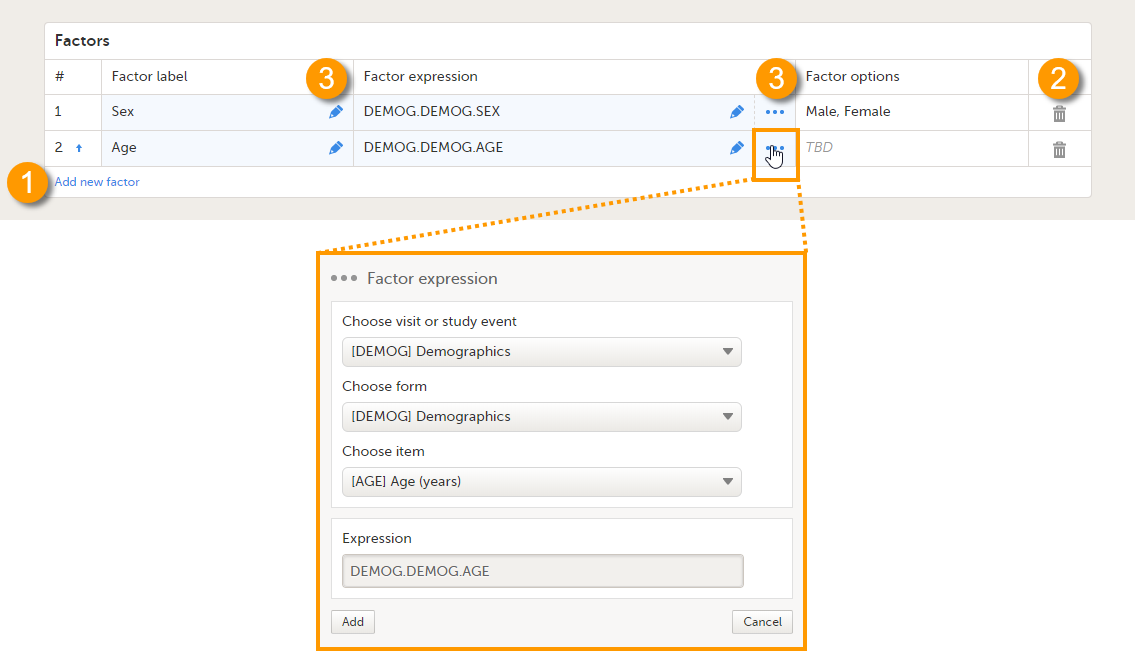 On the Reference data scope page, you can:
1. Add a new factor.
2. Delete a factor.
3. Edit a factor.
Each factor is defined by:
- # - order number. The order number is automatically assigned. You can change the position of the factor in the list by selecting the arrow next to the number. The factors will be displayed in this order in the reference data editor in Viedoc Clinic.
- Factor label - the name of the factor. This label will be displayed in the reference data editor in Viedoc Clinic.
Note! If you change the factor label after data have been entered in the reference data editor in Viedoc Clinic, the entered data will be lost because the factor names do not match anymore. The factor label is case sensitive. - Factor expression - the reference path for the factor to a particular form item. You can edit this field by:
- Typing the expression of the item manually
- Selecting "..." and select the item from the Factor expression pop-up.
The following item types are accepted: drop-down, radio button and number. The items available to select from are all items of effective design versions, and items from previous design versions with existing form or event data.
- Factor options - displays the options that belong to the selected form item. The options are automatically populated. If no options are predefined for the selected form item, the field will display TBD. The options then should be defined in Viedoc Clinic when entering the reference values.
All the above fields are mandatory to fill in when defining the factors.
Variables
What is a variable?
A variable is a specific measurement to be carried out. The variables defined here will become available in the reference data editor in Viedoc Clinic.
Configuring variables on the Reference data scope page
 On the Reference data scope page, you can:
1. Add a new variable.
2. Delete a variable.
3-6. Edit a variable.
Each variable is defined by:
- # - order number. The order number is automatically assigned. You can change the position of the variables in the list by selecting the arrow next to the number. The variables will be displayed in this order in the reference data editor in Viedoc Clinic.
- Form (3) - the form containing the items that you would like to have populated with reference data values (e.g., a lab form). You can select the form from the drop-down list. All forms used in the study are available to select from in the drop-down list.
- Name (4) - the name of the variable. This name will be displayed in the reference data editor in Viedoc Clinic.
You can edit this field by:- Typing the variable name.
- Selecting "..." and selecting an item from the Variable type pop-up. In the Variable type pop-up, you can choose between Static and Dynamic. See Types of Variables for more information.
Note! If you change the name of the variable after data have been entered in the reference data editor in Viedoc Clinic, the entered data will be lost because the variable names do not match anymore. The variable name is case sensitive.
- Date factor (5) - the date the measurement was carried out, by default set to EventDate. This field determines on which date the reference data to be populated are based, for example in case the event date is not the same as the measurement date. You can edit this field by:
- Typing the expression.
- Selecting "..." and selecting an item from the Date factor expression pop-up.
- Target types (6) - the type of information that the reference data source can provide, for example unit or range. This field determines which items from the selected Form will be auto-populated with reference data. You can define an unlimited number of target types. The following item types are accepted: string, number, range, dropdown and radio button. The items available to select from are all items of effective design versions, and items from previous design versions with existing form or event data. The type name is the label that will be displayed in the reference data editor in Viedoc Clinic. The order in which the target types are defined here, is the order in which they are displayed in the reference data editor in Viedoc Clinic.
All the above fields are mandatory to fill in when defining the variables.
Note! One form item can only be mapped to one scope. If the form item is mapped to multiple scopes, the following error message is displayed: Design items can only be related to one scope.
Note! A variable cannot be mapped to form items that contain functions. If the variable is mapped to an item containing a function, the following error message will be displayed: It is not possible to relate to design items that contain functions.
Types of variables
There are two types of variables:
- Static - used when the target items (items to be populated with reference data) have a single and fixed purpose, i.e., when the items are described by a static text.
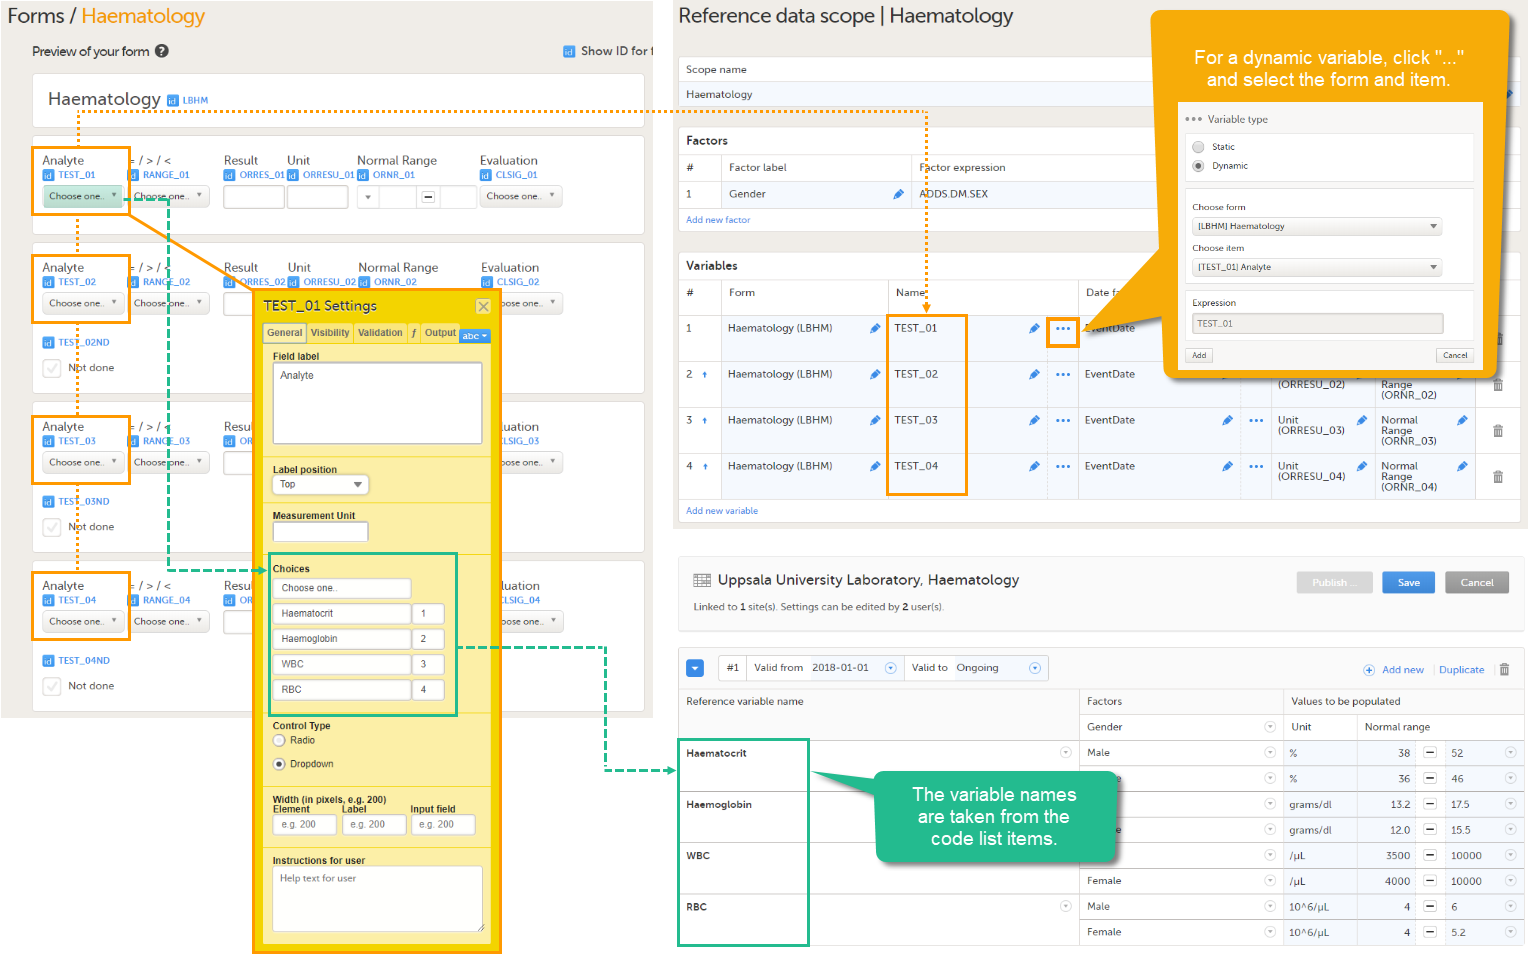
- Dynamic - used when the target items have a purpose that depends on what has been selected in another item, i.e., when the items are described by another item containing a drop-down list or radio button. Each code list item of the describing item is displayed as a separate variable in the reference data editor in Viedoc Clinic, and for each code list item, a separate set of reference values has to be entered.
An example of a static variable is given in the image below.
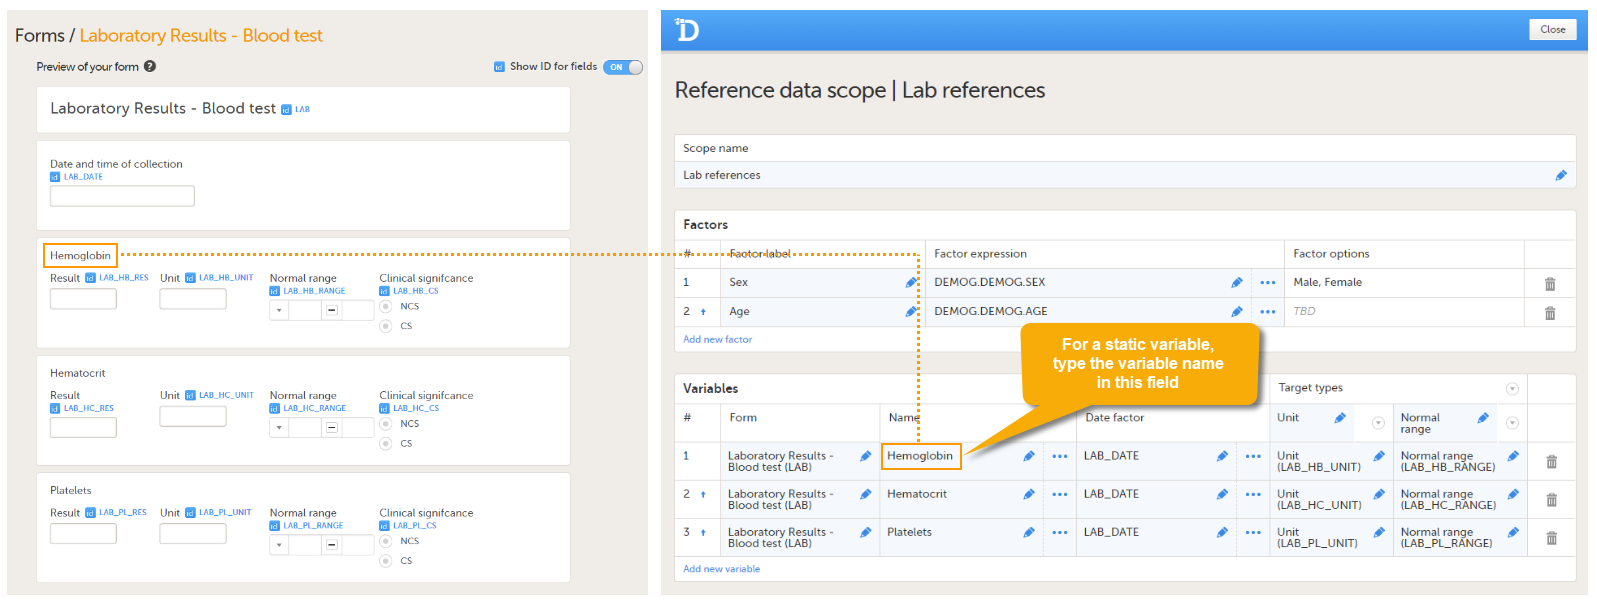
An example of a dynamic variable is given in the image below. If the item consists of radio buttons or a drop-down list, and thus has a code list, the variable names as displayed in the reference data editor in Viedoc Clinic are taken from the code list items. For each code list item, a separate set of reference values has to be entered in the reference data editor. When the clinic user then fills in the form in Viedoc Clinic, the selection he/she makes from the radio buttons or drop-down list determines which reference values are populated to the form.
Step-by-step guides
Workflow in Viedoc Designer
In order to set up reference data in your study, you have to perform the following steps in Viedoc Designer:
- Create a form with the items that you would like to have auto-populated with reference data values.
Note! Range items should allow the maximum number of decimal digits (6).
For more information on creating forms, see the eLearning section Creating and editing forms. - Create a reference data scope. See Creating a reference data scope below.
- Create one or several clinic roles that can edit and/or publish reference data. See Creating a clinic role that can edit and publish reference data below.
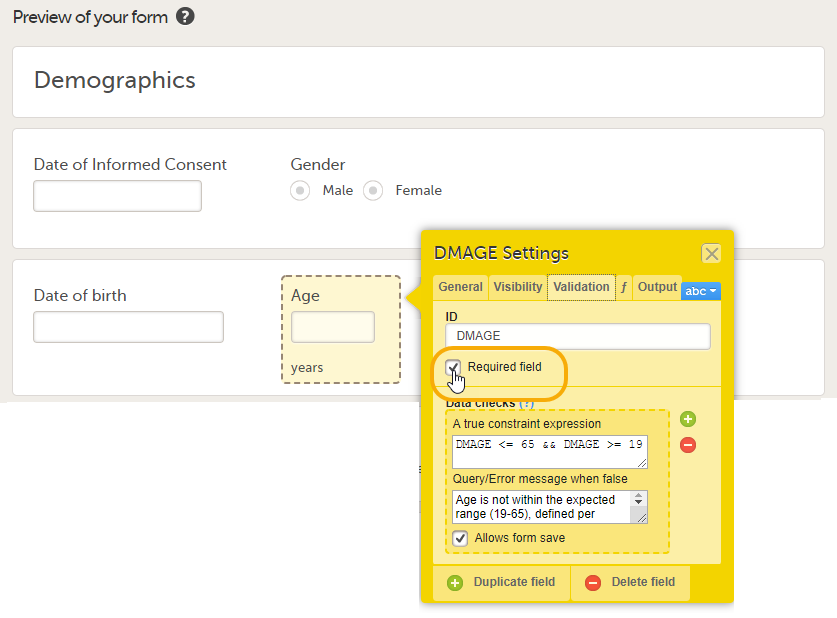
Tip! When creating forms, set the items that serve as factors to Required. If a factor item is left empty in Viedoc Clinic, no reference values can be auto-populated. Setting the item that serves as a factor to Required avoids that they will be left empty. In the example below, Age in the form Demographics serves as a factor for the reference data for the variable Hemoglobin in the form Laboratory Test Results. To make sure that reference values can be populated, the subject's age needs to be provided. The item Age in the form Demographics is therefore set to Required field.
Creating a reference data scope
To create a reference data scope, follow the steps below.
| 1 | In Viedoc Designer, open the Global Design Settings page. In the Reference data scopes field, select Edit. |
| 2 | Select Add new scope. The Reference data scope page opens. |
| 3 | Enter a name for the scope. The scope name will be visible in Viedoc Admin, where the scope can be linked to a reference data source, and in Viedoc Clinic, where the reference data values can be entered. |
| 4 |
Set the factor(s) as follows:
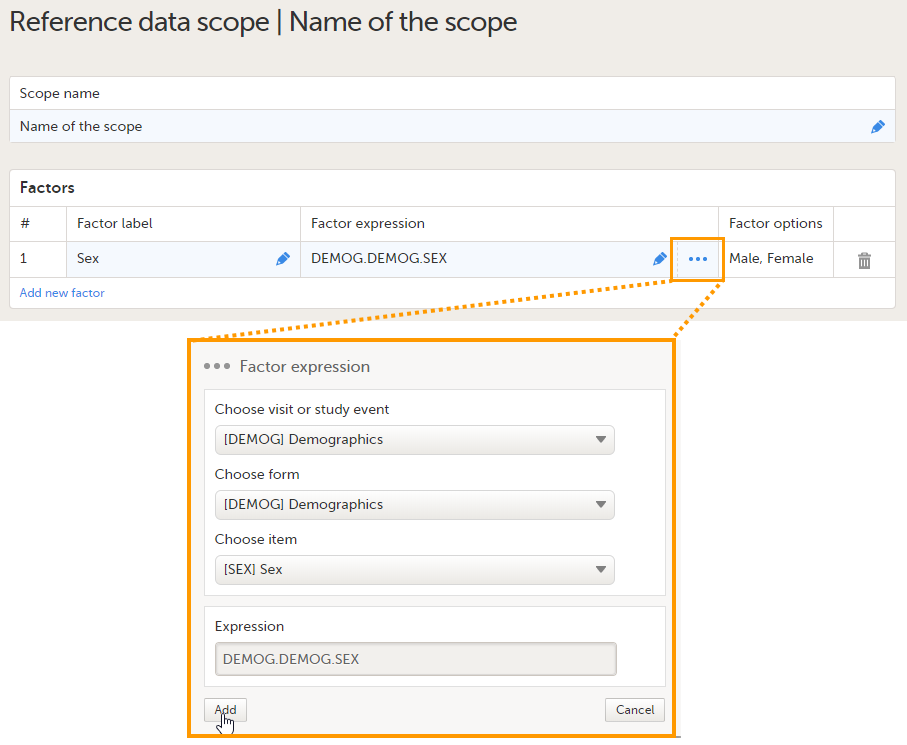
The Factor options field automatically displays the options that belong to the selected form items. If no options are predefined for the selected form item, the field will display TBD. You can add as many factors as you like. You can delete a factor by selecting the trash can icon. See also Factors for more information. |
| 5 |
Set the variable(s) as follows:
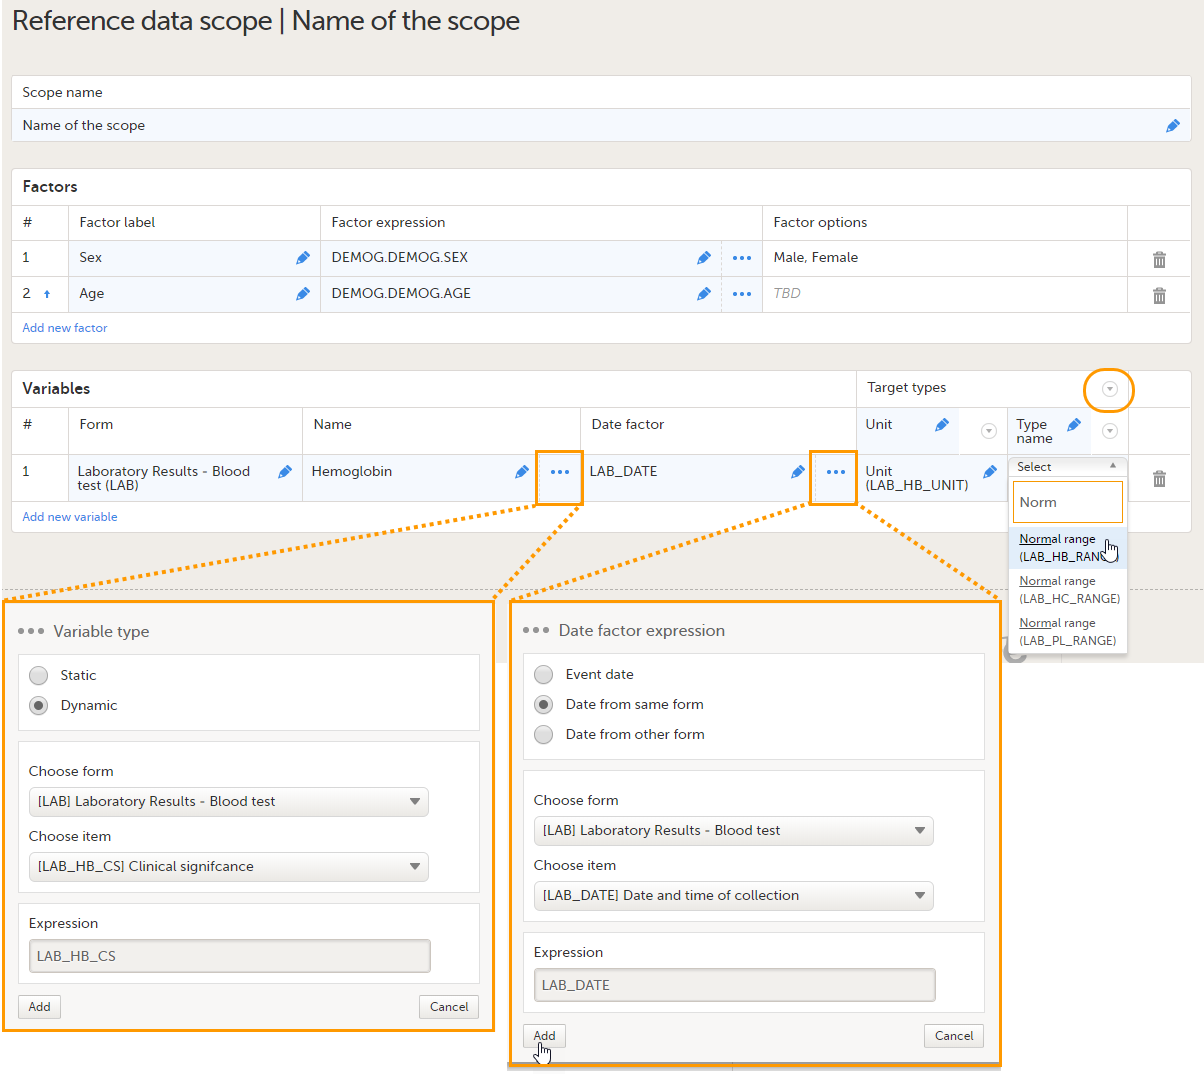
You can add as many variables and target types as you like. You can delete a variable by selecting the trash can icon. You can delete a target type by selecting the arrow to the right of the target type name and selecting Remove type. You can move the target types to the left or to the right by selecting the arrow to the right of the target type name and selecting Move to right or Move to left. See also Variables for more information. |
| 6 |
Select Save changes. |
Note! In order for the newly created reference data scope to take effect, you need to publish the global design settings.
Once the reference data scope has been linked to a reference data source in Viedoc Admin (see Managing reference data sources in Viedoc Admin), it is possible to enter reference values to that source-scope combination in Viedoc Clinic. The reference values should be published in Viedoc Clinic to make them available for auto-population to the subject forms (see Working with reference data in Viedoc Clinic). If the reference data scope is changed and published in Viedoc Designer after the reference values have been published in Viedoc Clinic, the following message will appear in Viedoc Clinic.

The reference date source-scope combination needs to be updated and published again in Viedoc Clinic, for the reference values to become available for auto-population to the subject forms.
Creating a clinic role that can edit and publish reference data
In order to use reference data in your study, you need to create one or more clinic roles that have permission to perform one or more of the following actions:
- View reference data - allows the user to see the existing reference data in read-only mode in Viedoc Clinic. When enabling this option the following two options become available:
- Edit reference data - allows the user to edit and save reference data.
- Publish reference data - allows the user to publish the reference data values, so that the values will become available for population to the subject forms in Viedoc Clinic.
Note! You need to have at least one clinic role with permission to edit reference data and one clinic role with permission to publish reference data. This does not have to be the same role.
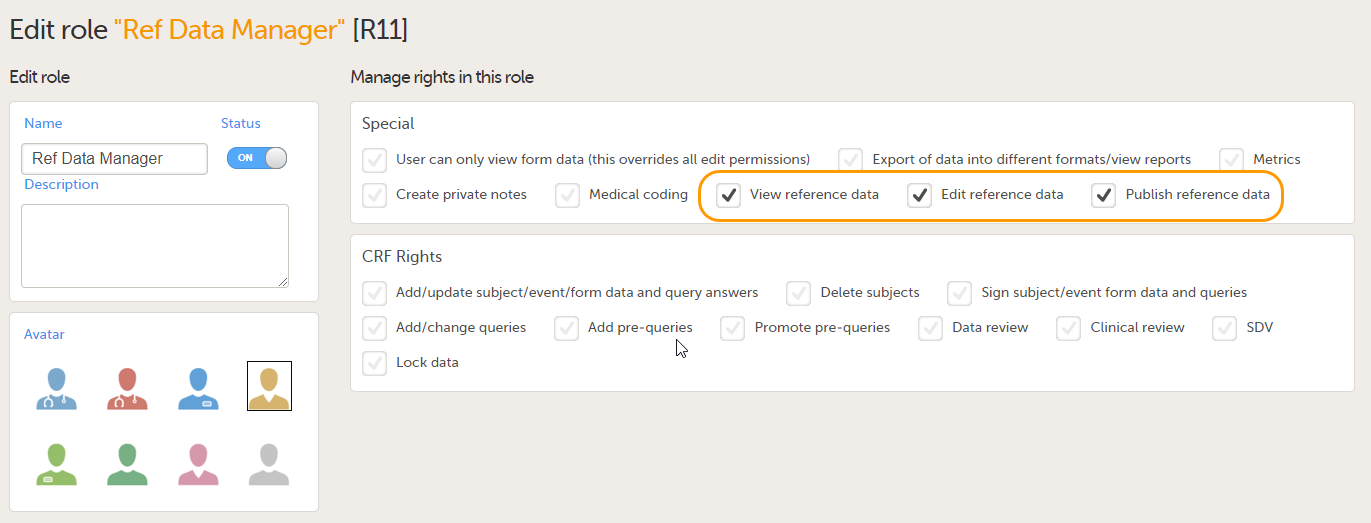
The permissions (rights) for each clinic role are configured in the Roles section of the study design In Viedoc Designer. For more detailed instructions on how to configure clinic roles, see Configuring roles.
Editing a reference data scope
To edit a reference data scope, open the Global design settings page in Viedoc Designer. In the Reference data scopes field, select Edit to open the Reference data scopes page. Select Edit to open the reference data scope you would like to edit and make the required changes.

See also Factors, Variables and Creating a reference data scope for more information.
You can edit a reference data scope at any time, even after the Global design settings have been published and the scope has been linked to a reference data source. In order for the changes to take effect, you have to publish the Global design settings again.
Deleting a reference data scope
Note! You can only delete a reference data scope before it has been published in the Global design settings.
To delete a reference data scope, open the Global design settings page in Viedoc Designer. In the Reference data scopes field, select Delete. A confirmation pop-up opens. Select Delete to proceed with removing the scope, or select Cancel to return without deleting the scope.

Downloading a reference data scope
Note! You can only download a reference data scope after it has been published in the Global design settings.
To download a reference data scope, open the Global design settings page in Viedoc Designer. In the Reference data scopes field, select Download.
When you select Download, the downloaded file in JSON format is available in your browser:

Importing a reference data scope
To import a reference data scope, open the Global design settings page in Viedoc Designer.
| 1. |
In the Reference data scopes field, select Import reference data scopes.
|
| 2. | Select the file you want to import.
Notes!
|
| 3. |
In the edit view you can review the imported reference data scope. Select Edit to open the imported reference data scope and make any required changes. See Editing a reference data scope |
| 4. | Select Save Changes to save the imported reference data scope. This gives you the option of viewing and modifying the reference data scope before saving it. The scope will then appear in the list of reference data scopes. Note! The reference data scope is not saved to the Viedoc database until you select Save Changes. You can always import a new reference data scope. |

