Note! This page contains information and instructions for the new TMF user interface. If you are using the old interface, please go to the relevant user guides:
Want to browse more information for the new interface? Please go to the new TMF user guides:
Viedoc TMF is a digital repository for capturing, managing, sharing, and storing essential documents (records) for your clinical trial.
Viedoc TMF is based on the TMF Reference Model by the Clinical Data Interchange Standards Consortium (CDISC). The TMF Reference Model is an industry consensus catalog of all TMF records. Using the TMF Reference Model ensures compatibility and interoperability with other clinical trial parties, such as CROs.
The TMF Reference Model includes records in all different phases of a clinical trial:
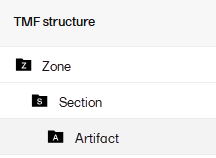
The TMF Reference Model categorizes records in zones, sections, and artifacts in a hierarchical structure:
The set of zones, sections, and artifacts included is defined in a template file that is maintained by the eTMF Manager.
The TMF can include both the Investigator Site File (ISF) and the sponsor TMF.
For portability reasons, the TMF Reference Model is defined in an Excel file.
Viedoc TMF also uses Excel files as templates for the TMF structure.
For detailed information please see Roles and permissions in Viedoc TMF.
The following image shows the record version statuses and the actions that change the status of a record version. The initial status of a record when it is uploaded to Viedoc TMF is Unpublished.
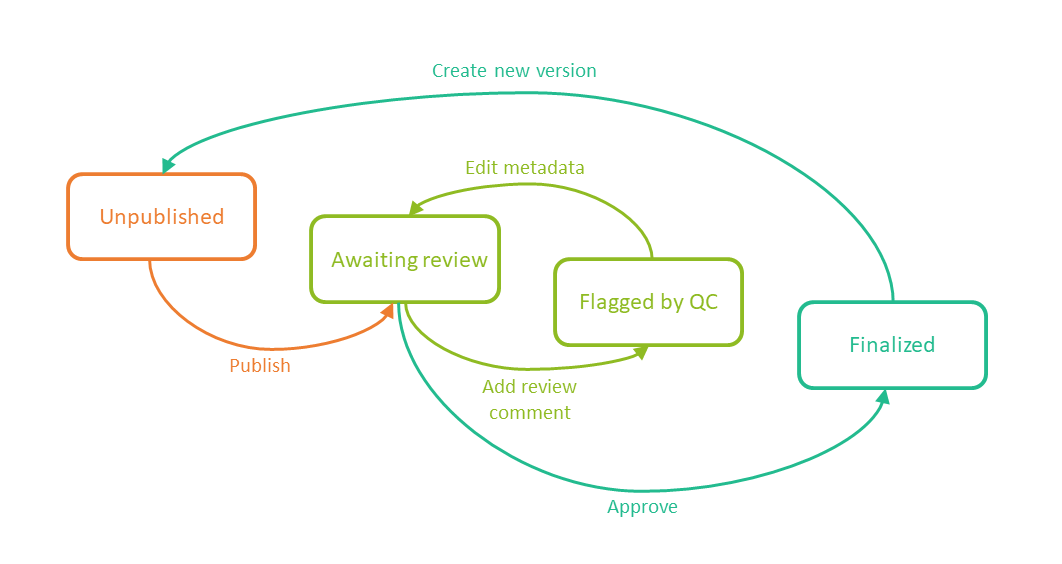
If you edit the metadata for a record version that is Unpublished or Awaiting review, the record version status is not changed.
It is not possible to edit the metadata of a Finalized record. To make changes, a new version needs to be created.
Note! Different actions require different permissions, which means that they are performed by users with different roles.
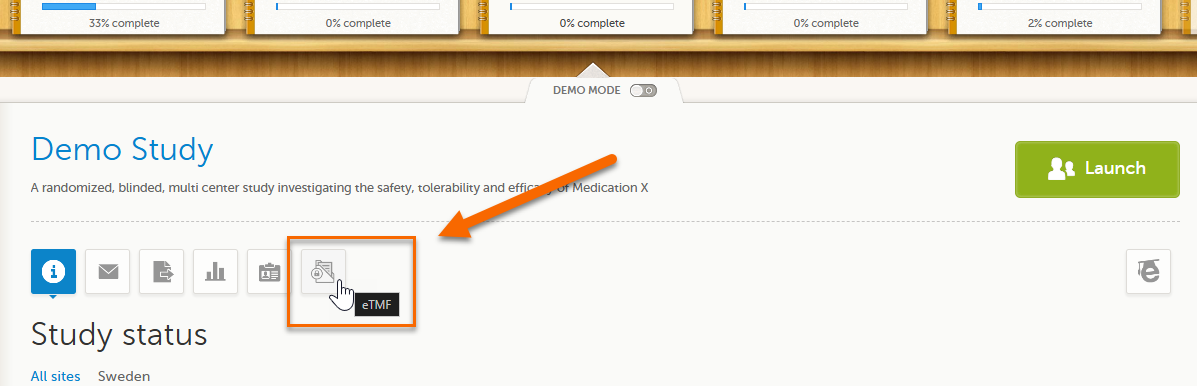
To launch Viedoc TMF for a study log in to Viedoc, select the study from the study slider, and select the eTMF icon:
Alternatively, if you have been assigned an eTMF Manager role, you can also launch Viedoc TMF by logging into Viedoc, navigating to Viedoc Admin, selecting the study, opening the eTMF settings and selecting Launch study eTMF:

In the left navigation menu, there are three main areas or views in Viedoc TMF:
1. Trial Master File
2. TMF Admin
3. TMF Archive
Access to these are determined by a user's role and permissions. They are described briefly in the sections below.
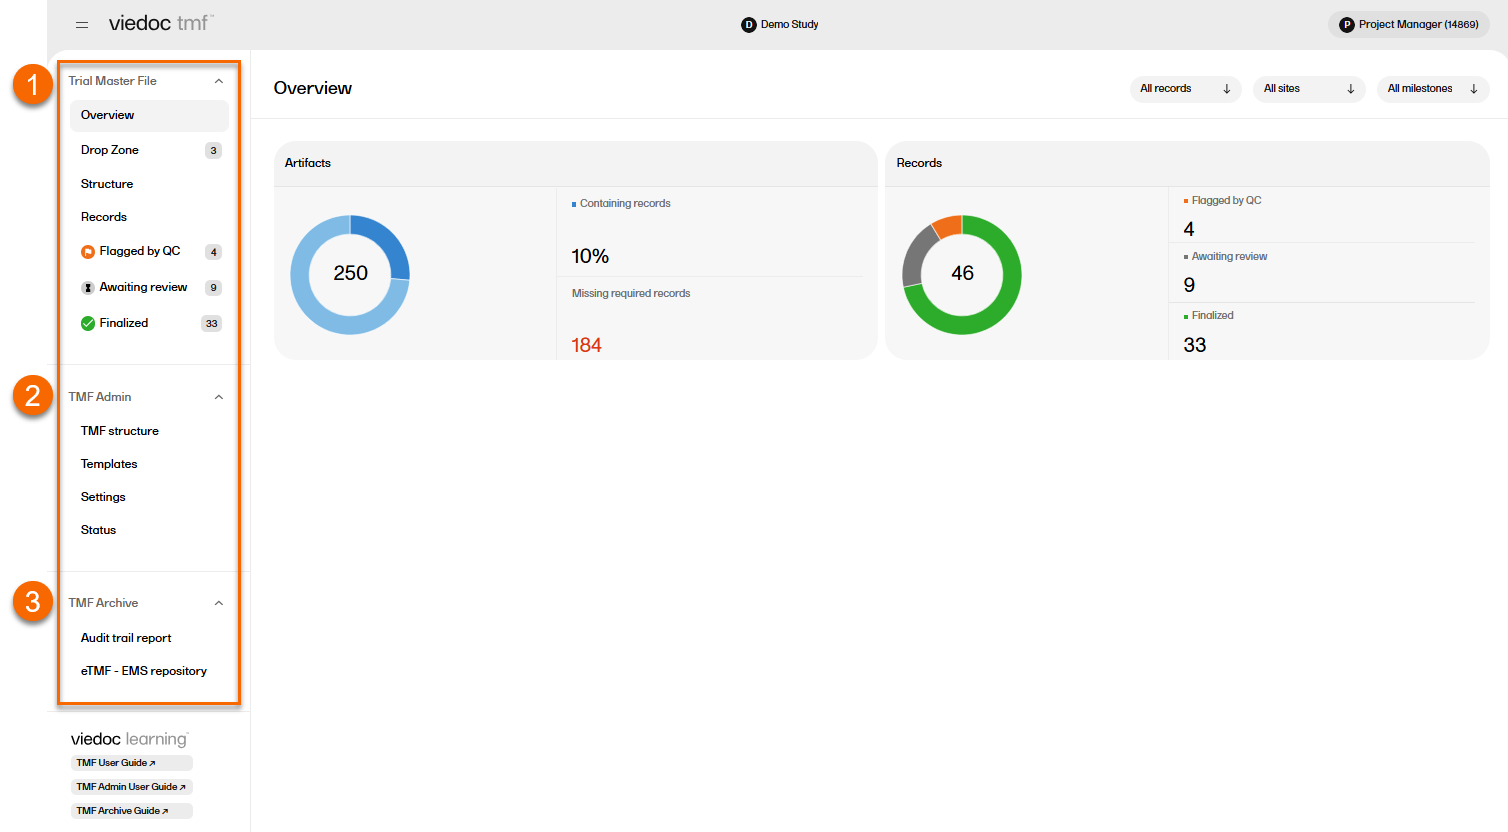
Users with a Viedoc Clinic role that is mapped to a TMF role have access to the Trial Master File area. In the left navigation menu, select to expand Trial Master File to see the four pages for managing records in the TMF:
| The Overview page |
Shows metrics for artifacts and records in the TMF. Allows the user to filter the metrics by level, site, and milestones. |
| The Drop Zone page |
Allows users to upload or "drop" files to a public or private folder (called a "drop zone") and move them into the TMF structure later. Please see TMF Drop Zone for more information. |
| The Structure page |
Allows users to manage records in the TMF structure. Please see Managing records for more information. |
| The Records page |
Provides an table containing the records that you have access to with their metadata. Please see TMF Records page for more information. |
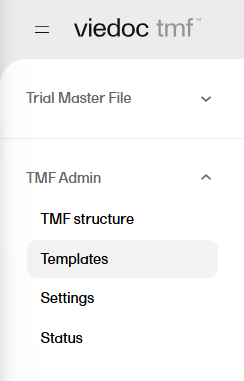
A user with an eTMF Manager role or the Read-only eTMF Admin permission, has access to TMF Admin. In the left navigation menu, select to expand TMF Admin to see the four pages for managing the TMF:
| The TMF structure page |
The eTMF Manager can manage the TMF structure on this page. Please see Editing a structure for more information. |
| The Templates page |
The eTMF Manager can manage, import and export TMF templates on this page. Please see the TMF Admin User Guide to find several lessons about templates. |
| The Settings page |
Contains settings for Viedoc TMF. Please see TMF settings for more information. |
| The Status page |
Shows the status of the TMF, which can be one of the following:
|
A user with permission to Download audit trail report have access to TMF Archive. In the left navigation menu, select to expand TMF Archive to see the two pages for generating archive reports:
| The Audit Trail Report page |
Allows users to generate and download a complete audit trail report. |
| The eTMF-EMS Repository page |
Allows users to generate the eTMF - EMS Repository. |
Please see TMF Archive for more information.
In the left navigation menu below the TMF views, users can find links to relevant user guides based on their roles and permissions including:
Note! This page contains information and instructions for the new TMF user interface. If you are using the old interface, please go to the relevant user guides:
Want to browse more information for the new interface? Please go to the new TMF user guides:
In Viedoc TMF, roles and permissions determine what a user can or can't see in the application, which actions they can perform, and which records they can access. Proper role assignment ensures secure and efficient record management while maintaining compliance with regulatory requirements.
In Viedoc, there are two types of roles:
See About roles in Viedoc for more information about system and clinic roles in Viedoc.
TMF roles, which are different from Viedoc system and clinic roles, are described in the next section.
The user access to Viedoc TMF is determined by the assigned roles and permissions. TMF roles and permissions can work in combination or independently.
Depending on the permission associated with your user role, you can perform different actions on records. Your user role can have permission (no access, read, write, or review) on these TMF levels:
These levels and permissions need to be explained better
You can only see and access records if you have permissions for the artifact on the corresponding TMF level.
For example, if an artifact is linked to two sites, a user with write permission for the artifact for only one of the sites will be able to read but not edit the record. This is due to the fact that the user does not have write permissions for all sites that the record is linked to.
The eTMF Manager is a Viedoc system role (see above) and has permissions to manage the TMF application in Viedoc Admin and to manage templates in Viedoc TMF.
The user access to Viedoc TMF is determined by the assigned roles and permissions. The roles and permissions can work in combination or independently. These user roles are defined in the template, which is maintained by the eTMF Manager.
The TMF roles are:
The respective permissions for these TMF roles are specified in the Excel template file, on the Role sheets. For more information, see the Roles sheets section in the Customizing a template lesson.
These permissions are defined in Viedoc Admin and are assigned to users by the eTMF Manager. See Assigning roles and permissions in Viedoc Admin below for instructions on how to do this.
Permissions in Viedoc TMF can work in combination with roles or independently, providing granular control over user actions:
| Archive sponsor TMF |
Allows users to access the TMF Archive view and archive artifacts that are listed as Sponsor side. (This is set in the Edit artifact window or in the template file on the sheet V 3.1.0, column M Sponsor Document). |
| Archive investigator TMF |
Allows users to access the TMF Archive view and archive artifacts that are listed as Investigator side. (This is set in the Edit artifact window or in the template file on the sheet V 3.1.0, column N Investigator Document). |
| Read-only TMF Admin |
Allows user to inspect the structure, templates, and other settings in the TMF Admin view in read-only mode. A user with this permission can access the TMF Admin view and is able to:
|
| Read-only Trial Master File |
Provides users read-only access to the whole TMF structure and all the "available" records (published and unpublished records linked to a level the user has access to within their scope) in the TMF.
|
| Download audit trail | Allows users to access the TMF Archive view and generate and download the complete audit trail report. |
| Manage drop zone | Allows users to manage the files in the shared Drop Zone. |
| Manage record sharing for Viedoc Clinic users | Allows users to share records with Viedoc Clinic users. |
| Manage record sharing for Viedoc Me users | Allows users to share records with Viedoc Me users. |
For TMF access use cases and frequently asked questions, please see TMF access use cases.
Viedoc TMF user roles are assigned and managed in Viedoc Admin.
Only the eTMF Manager has permission to assign and manage TMF user roles for a specific study.
Note! If a role or permission is changed while the user is actively using Viedoc TMF, the user with the changed role/permissions will need to close and reopen Viedoc TMF for the changes to take affect.
To map the Viedoc clinic roles to TMF roles and permissions:
| 1 |
Go to Viedoc Admin, and select a study to open the study overview page: 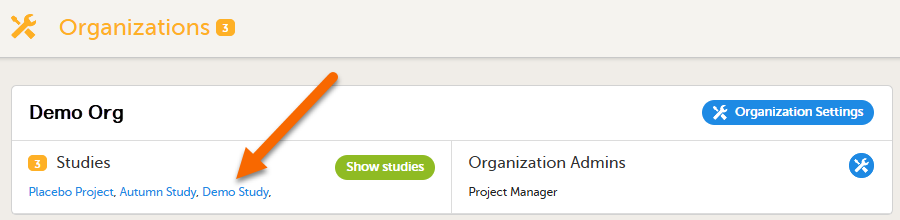
|
| 2 |
Select the eTMF settings button: 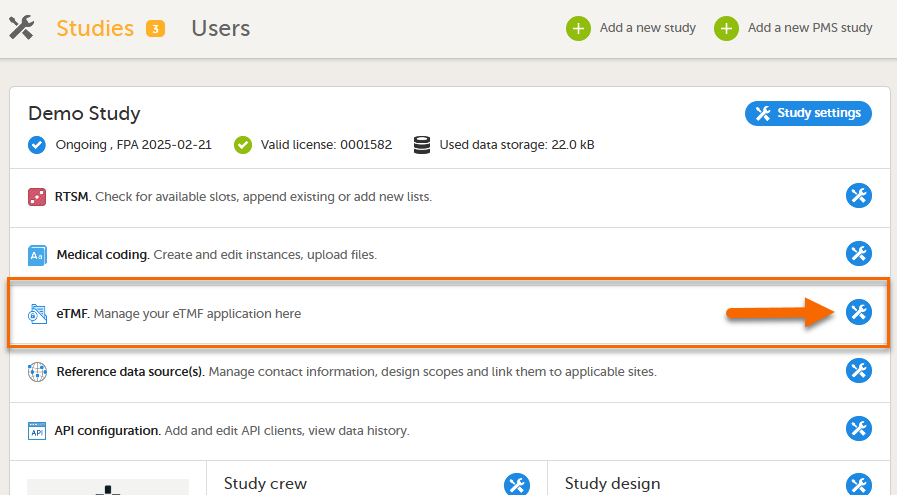
|
| 3 |
In the eTMF roles mapping area, select the TMF role(s) and/or permission(s) that you want to map to the Viedoc clinic (study) roles: 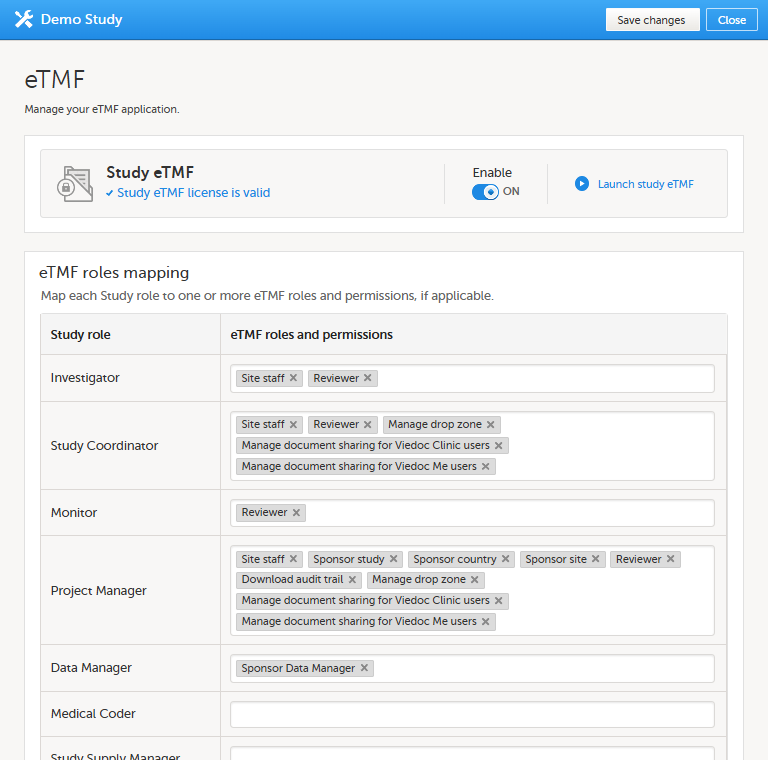
|
| 4 | Select Save changes. |
The following table lists several examples of tasks that study users can face, together with the TMF roles, the Viedoc Clinic site groups, and the TMF level access that they would need to perform the respective task.
For more information about site groups, see Managing users and Managing study sites in the Viedoc Admin User Guide.
| Study role | Task | TMF role | Viedoc Clinic site group | TMF level access | Permissions | Comments |
|---|---|---|---|---|---|---|
|
Study coordinator General site user |
Drop records in the shared drop zone | Site staff - customized with no access for all artifacts | Site | No access to all artifacts | None | |
|
Study coordinator General site user |
View, file, and classify site-level records, view some artifacts on country and study levels, archive the Investigator site TMF | Site staff | Site | Write access to pre-defined artifacts on site level, read access to pre-defined artifacts on study, site, and country levels | 1. Archive Investigator TMF | |
| Project manager | File study-level records, view all sponsor-side records, archive the sponsor TMF, download audit trail, and see TMF settings and structure | Sponsor study | All production sites* |
1. Download audit trail 2. Archive sponsor TMF 3. Read-only TMF Admin |
*Clinic access needs to be on study level and not every site one by one, otherwise the write permission will be translated to read permission. | |
| Monitor | File site-level records, view all records for the study, my country, and my site, manage drop zone records, review site level records |
Sponsor site Reviewer* |
Site** |
Write and review access on site level Read access on all levels |
1. Manage drop zone |
*Although the role sheet grants review rights for study and country level records too, the end user will only have read rights to those records, as long as they are not invited on study or country level for their clinic role. **Clinic access needs to be given to all applicable sites. |
|
Country manager Trial manager |
File country-level records, view all sponsor-side records at all levels and review all records |
Sponsor country Reviewer |
All production sites* | *Clinic access needs to be on study level and not every site one by one, otherwise the review permission will be translated to read permission. | ||
|
Read-only role Regulatory inspector |
Read-only access to all records* and settings Access to audit trail |
No role, permissions only | All production sites** |
1. Read-only Trial Master File* 2. Read-only TMF Admin 3. Download audit trail |
*If read-only Trial Master File permission is assigned, any NO ACCESS permission will be overridden by read access by the system. This means that all artifacts set as optional or required (including blinded and investigator-side artifacts) will be visible. These permissions should be reserved for a role that requires all access, such as a regulatory inspector. **Clinic access needs to be on study level and not every site one by one, otherwise the review permission will be translated to read permission. |
|
|
Unblinded role Sponsor or statistician |
View, file, and classify blinded records only on all levels | Sponsor unblinded | All production sites* |
Write access to blinded records on study level and site level (when applicable) No access to non-applicable records on all levels |
1. Download audit trail | *Clinic access needs to be on study level and not every site one by one, otherwise the review permission will be translated to read permission. |
For TMF access use cases and frequently asked questions, please see TMF access use cases.
Note! This page contains information and instructions for the new TMF user interface. If you are using the old interface, please go to the relevant user guides:
Want to browse more information for the new interface? Please go to the new TMF user guides:
To set up Viedoc TMF, please follow the quick guide below. For detailed instructions, see the sections below and referenced links.
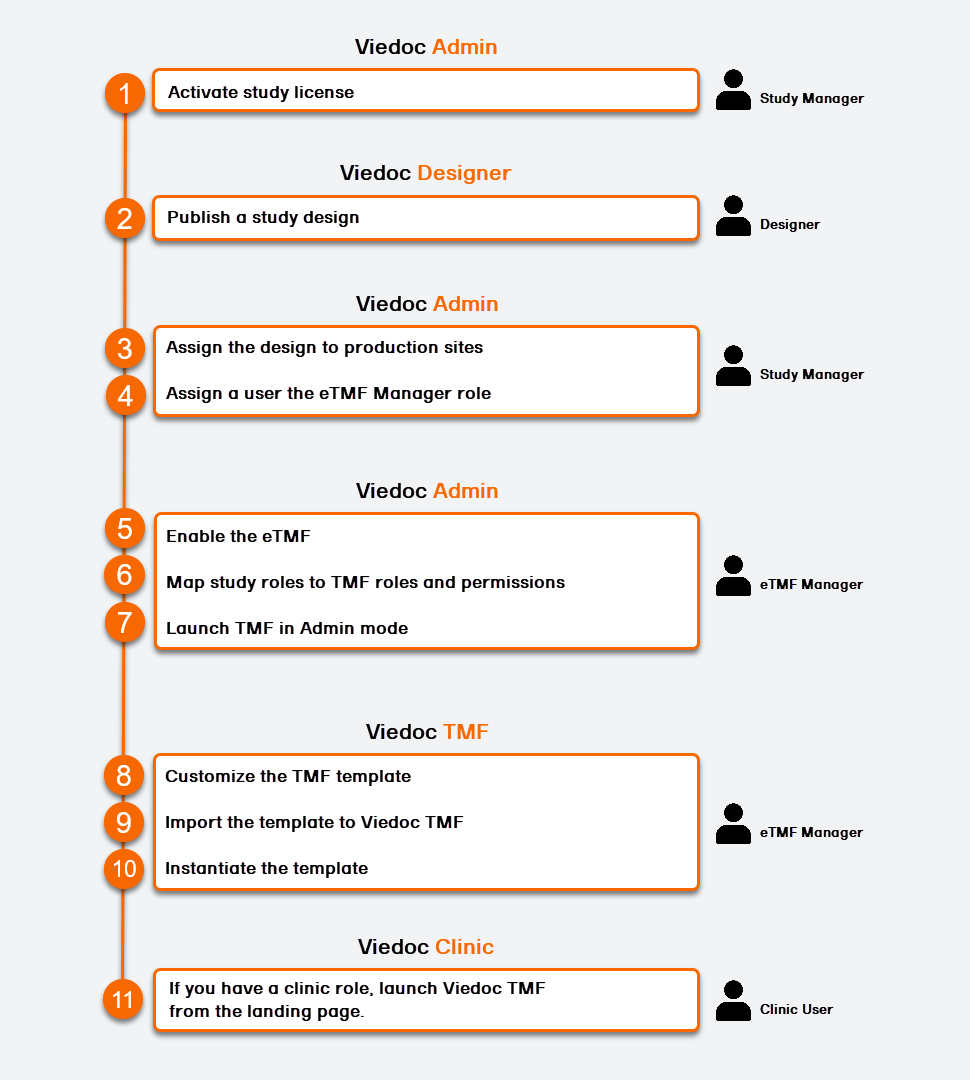
This step is performed by the Study Manager in Viedoc Admin.
To set up Viedoc TMF, you must have an activated valid study license, with eTMF listed as an included feature.
This step is performed by the Designer in Viedoc Designer.
Note! To publish the CRF design, you only need to have the roles configured and enabled, and a form added to the start event in your workflow (the form can be without any items at this stage). The actual CRF design can be added in subsequent versions.
See Publishing a study design.
This step is performed by the Study Manager in Viedoc Admin.
Note! At lease one production site must be added to the study before assigning a design. See Adding a study site for instructions.
This step is performed by the Study Manager in Viedoc Admin.
Assign the eTMF Manager system role to a user.
See Assigning users to system roles and/or clinic roles.
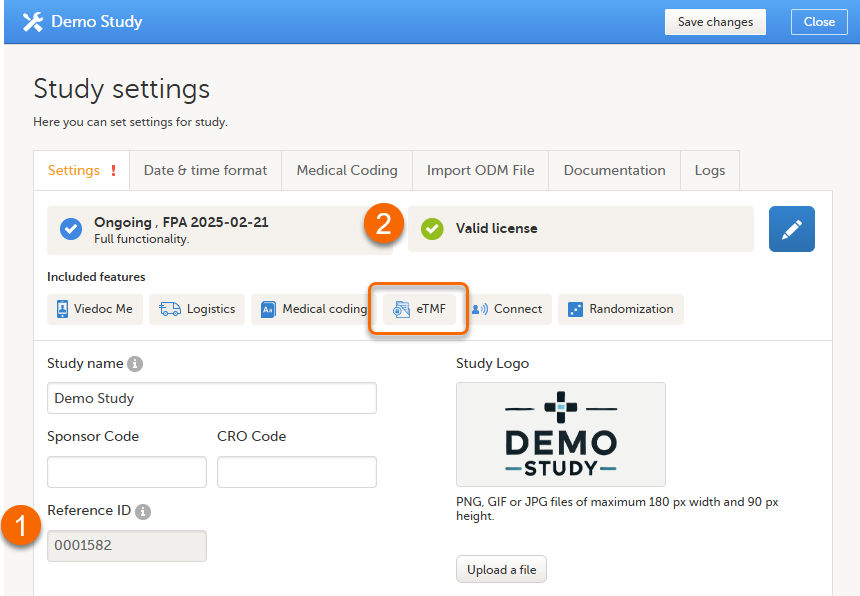
This step is performed by the eTMF Manager in Viedoc Admin.
| 1 |
In Viedoc Admin, select Show studies, then open the study details page:  |
| 2 |
In the study details page, select the tools symbol in the eTMF area: 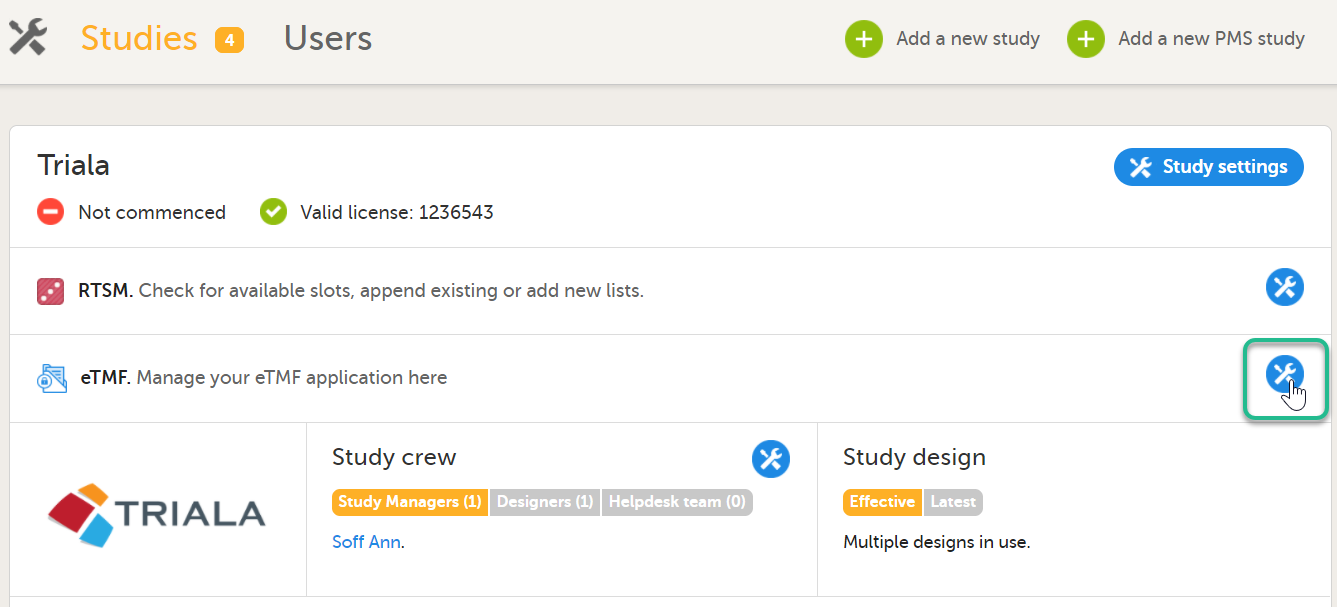 |
| 3 |
Toggle the Enable switch to ON in the TMF settings window: 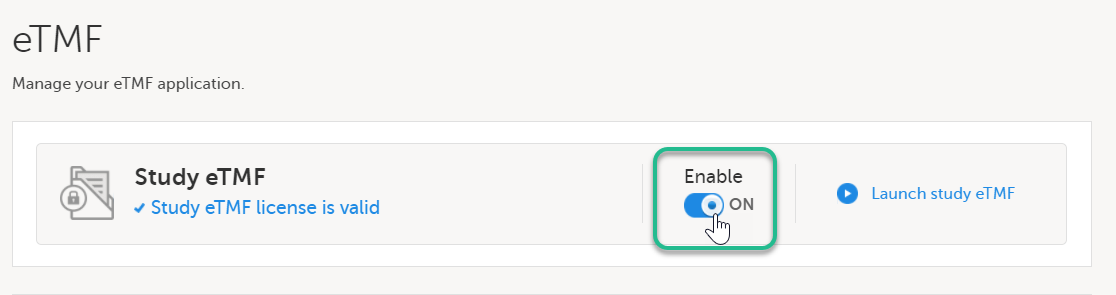
|
This step is performed by the eTMF Manager in Viedoc Admin.
| 1 |
In the eTMF roles mapping area, select the TMF roles and permissions that you want to map to the Viedoc study roles: 
|
| 2 | Select Save changes. |
Note! To launch Viedoc TMF from the study landing page in the future, the user will need to be assigned a Clinic role that is mapped to a TMF role.
This step is performed by the eTMF Manager in Viedoc Admin.
| 1 |
On the study details page, select the tools symbol in the TMF area: |
| 2 | Select Launch study eTMF: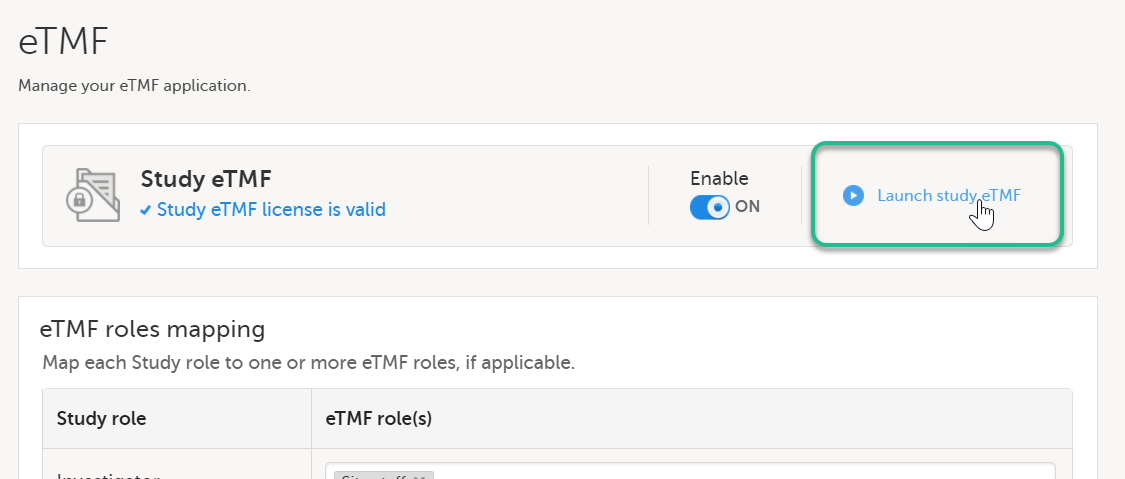 |
All the steps in this section are performed by the eTMF Manager in Viedoc TMF.
The first time you set up your Viedoc TMF, you begin with a baseline template provided by Viedoc. It is recommended that the TMF template is customized to your specific documentation needs.
See Viedoc-provided templates to download the template.
The template can be customized for your study or organization's specific needs. For example, you can edit, add, or delete zones, sections, and artifacts. See Customizing a template for more information.
If there is a template that was previously imported, it can be exported in order to customize it, then imported again.
See Exporting a template for more information.
This step is performed by the eTMF Manager in Viedoc TMF.
Once customized, import the template to TMF. See Importing a template for more information.
This step is performed by the eTMF Manager in Viedoc TMF.
See Instantiating a structure for more information.
The template is now applied to the trial and the TMF structure is available for end users to work with.
Note! Once a structure is instantiated, it can not be uninstantiated.
This step is performed by a Clinic user with a mapped TMF role in Viedoc Clinic.
Select a study from the landing page. Select the eTMF icon:
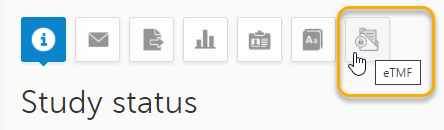
The TMF application opens.
Thorough preparation for inspection of the EDC system used in a clinical trial is of great importance. The regulatory authorities see the EDC system used for a clinical trial as an important computerized system with regards to both patient safety and data integrity.
To assist in this process, Viedoc has developed the Viedoc Inspection Readiness Packet (VIRP) which provides you with the information you need to prepare for a regulatory inspection and to fulfil regulatory expectations and requirements. The VIRP introduction describes the contents of VIRP in more detail, and also talks about additional documentation you should provide. The VIRP introduction is included in VIRP.
If you decide to use VIRP we provide an eLearning lesson which describes the information needed step-by-step in order to fulfil inspector expectations: Inspection Readiness When Working in Viedoc
You can read about how to download the Viedoc Inspection Readiness Packet here: VIRP
You will need to give full read-only access and invite the inspector to the Regulatory Inspector role in the Viedoc system as described below.
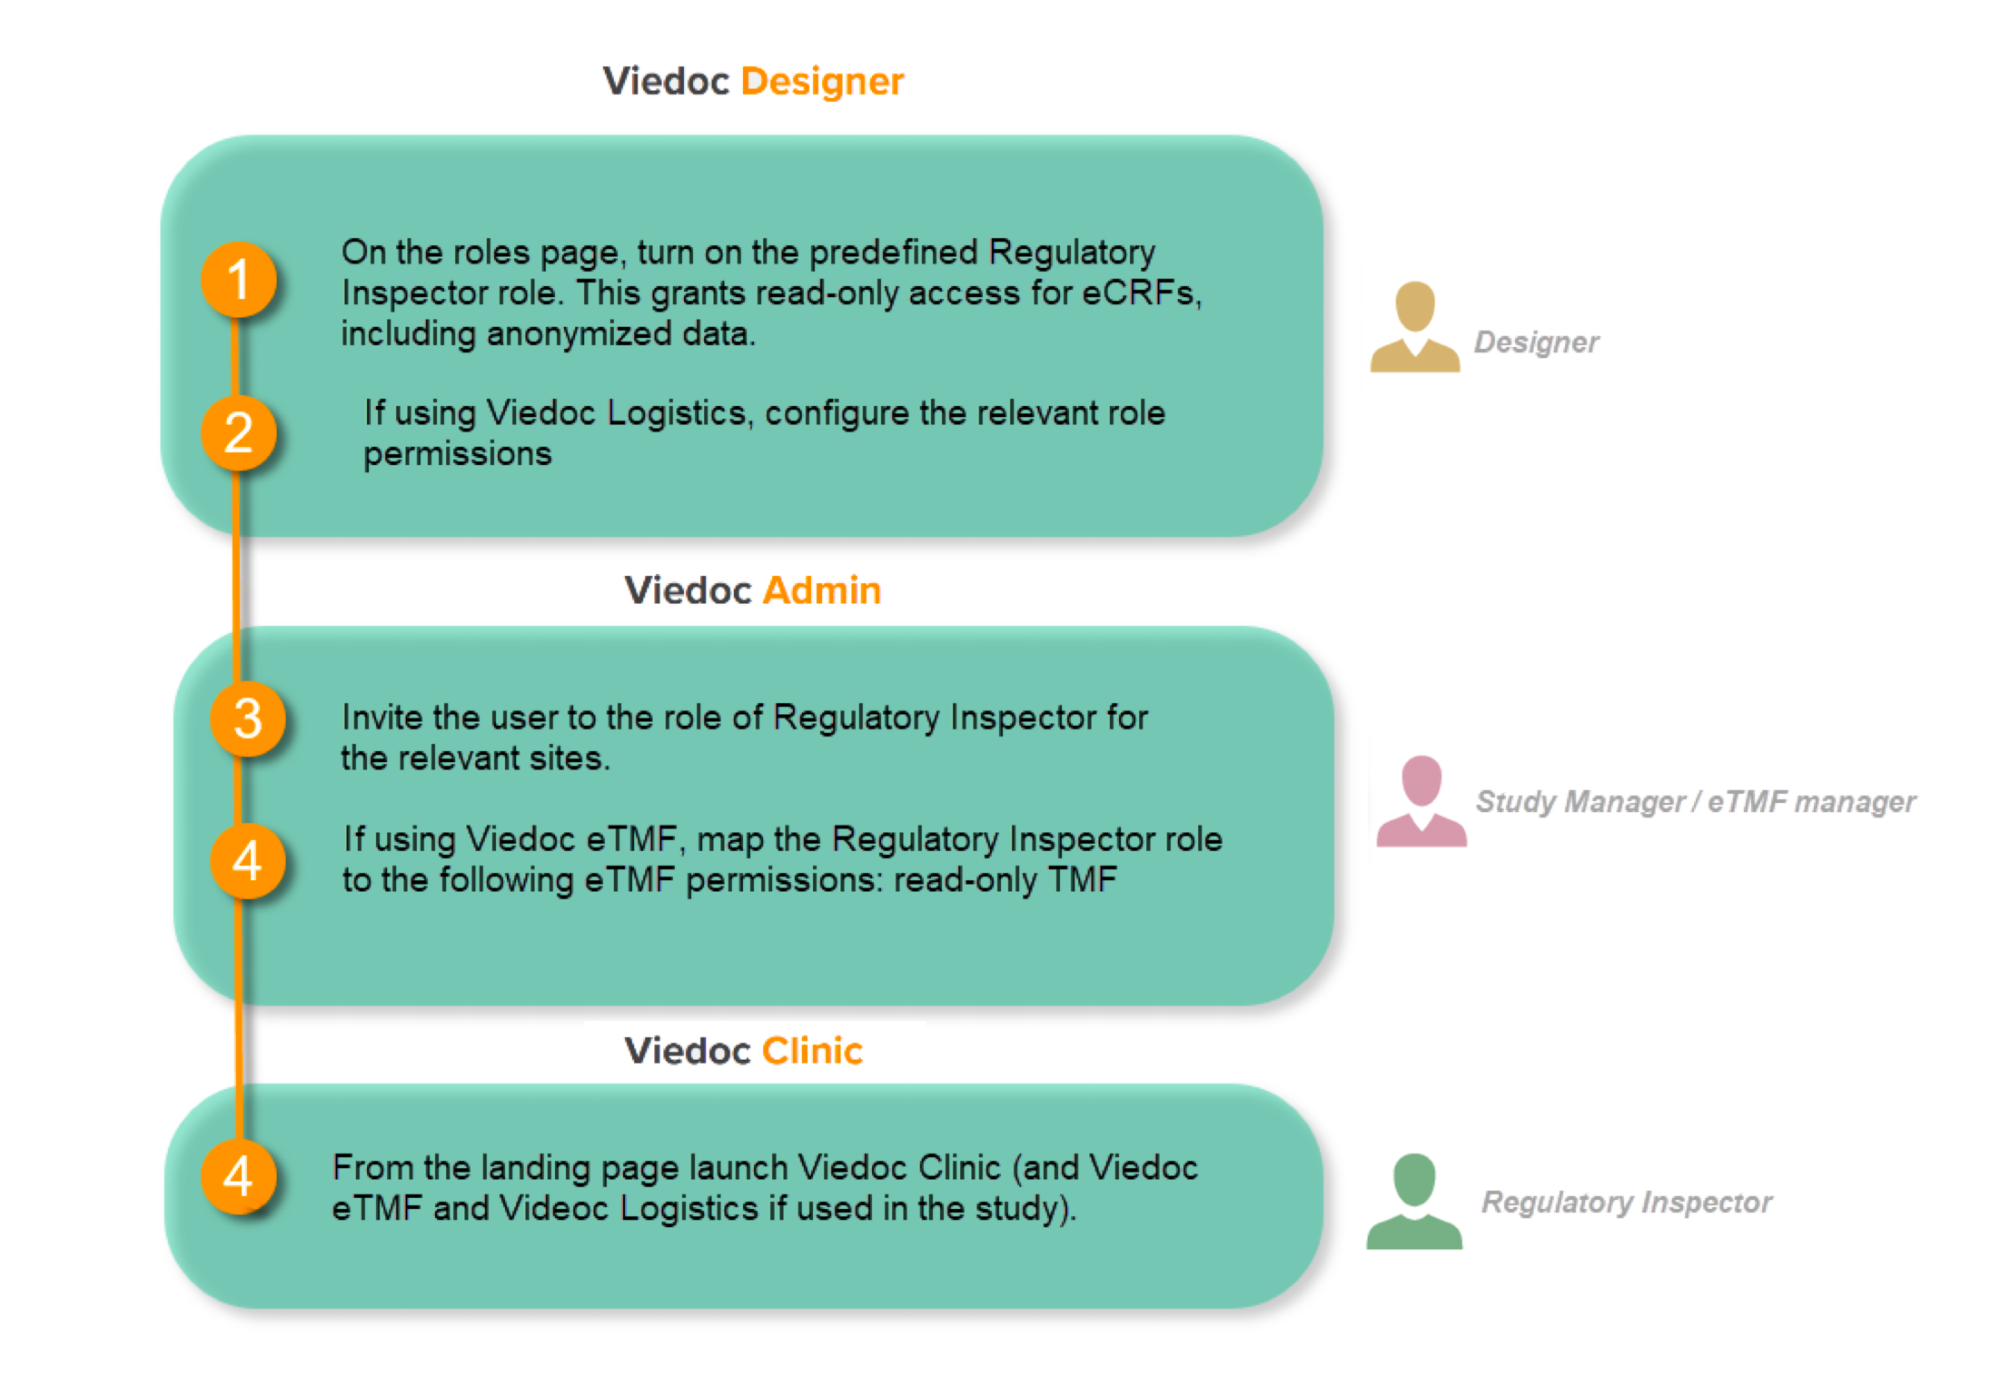
This step is performed by the Designer.
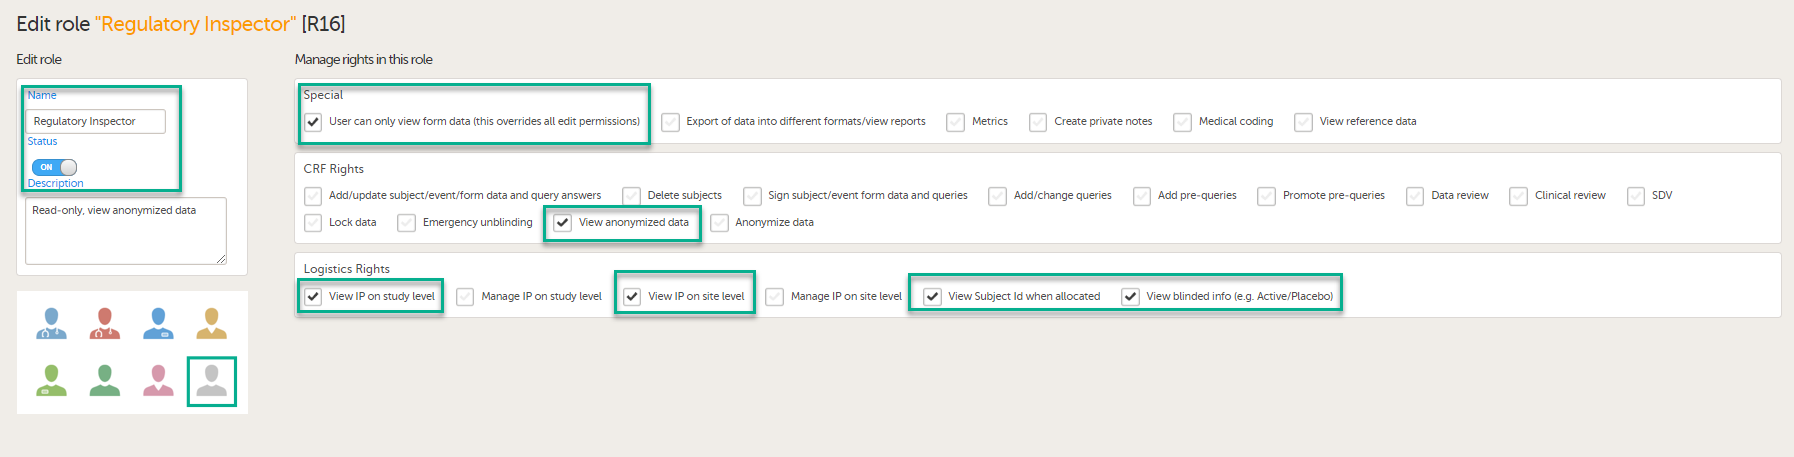
To allow the Regulatory Inspector viewing access to study data, their role must be configured with read-only and view anonymized and blinded data permissions on the Roles page.
Note!
If the study uses Viedoc Logistics, the following role permissions in Logistics Rights for the Regulatory Inspector role must be configured on the Roles page:
See Configuring roles.
Note! Should the inspector also require access to Viedoc Admin or Viedoc Designer, you are always welcome to contact your Viedoc representative if you need assistance.
This step is performed by the Study Manager.
Note! For randomized studies, the inspector should also be invited to the study with the role of Unblinded Statistician, in order to have access to the randomization lists and be able to download them in Viedoc Admin.
See Managing users.
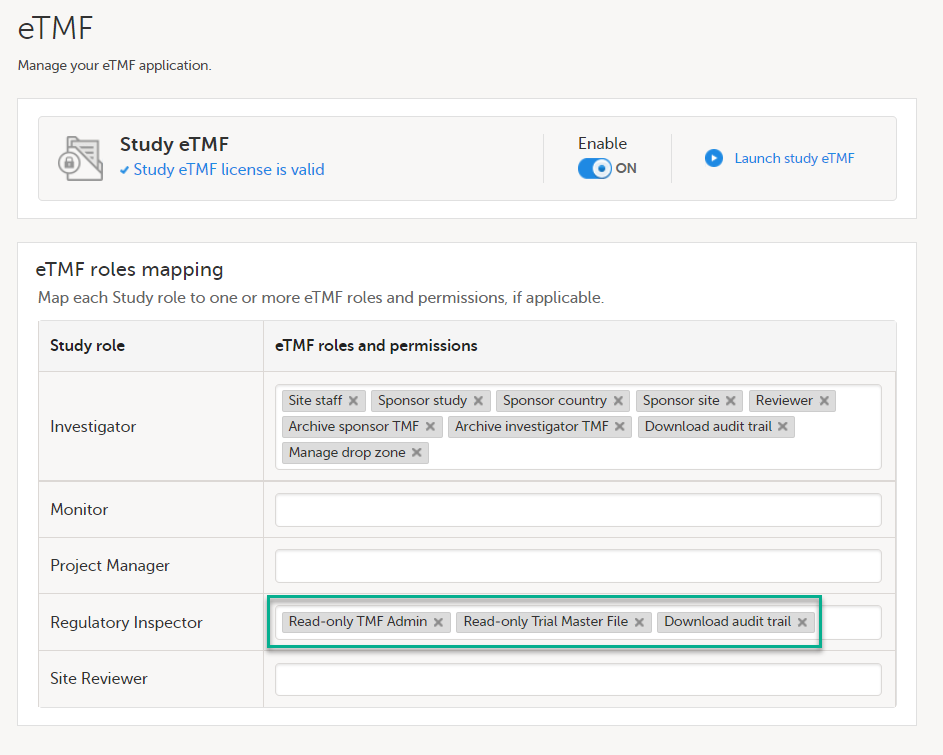
If the study is using the eTMF, map the Regulatory Inspector study role to an eTMF role with the permissions read-only TMF Admin, read-only Trial Master File and Download audit trail.
This step is performed by the Study Manager/eTMF Manager.
Launch Viedoc Clinic and Viedoc eTMF and Viedoc Logistics (if used in the study) from the landing page.
This step is performed by the Regulatory Inspector.
Note! This page contains information and instructions for the new TMF user interface. If you are using the old interface, please go to the relevant user guides:
Want to browse more information for the new interface? Please go to the new TMF user guides:
Users with the TMF Admin permissions can configure settings for the TMF including specific system behaviors in different scenarios.
Note! To configure the patterns for time, date, and date & time, use the general study setting in Viedoc Admin. For more information, see General Study Settings.
In the left navigation menu, select to expand TMF Admin, and select the Settings page:
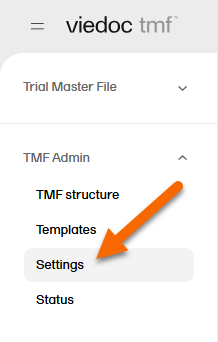
The next sections describe each option on the settings page in detail.

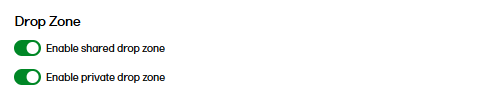
For more information about using drop zones, see TMF Drop Zone.
In this setting, you can define templates for record names, which are used to display customized file names in three scenarios:
Note! For more information on the implications of record name templates on the TMF archive and the eTMF-EMS repository, please see the naming conventions section in TMF archive.
The templates can include any set of static characters and record name variables. If a name variable value is not available for a record, it will appear as an empty value by the system. If no template is defined, the system will use the name that was originally configured for the record.
Viedoc TMF supports the following set of record name variables:
| Variable | Description |
|---|---|
| {StudyName} | Study name |
| {CountryCode} | If the record is linked to many countries, the value will be "Multiple countries" |
| {CountryName} | If the record is linked to many countries, the value will be "Multiple countries" |
| {SiteCode} | If the record is linked to many countries, the value will be "Multiple sites" |
| {SiteName} | If the record is linked to many countries, the value will be "Multiple sites" |
| {VersionLabel} | User-defined version |
| {DocumentVersion} | The latest version of the record |
| {FileVersion} | The number of files uploaded to a record |
| {DocumentStatus} | Unpublished/Awaiting review/Flagged by QC/Finalized |
| {ZoneNumber} | Zone # |
| {ZoneName} | Zone name |
| {SectionNumber} | Section # |
| {SectionName} | Section name |
| {ArtifactNumber} | Artifact # |
| {ArtifactName} | Artifact name |
| {SubArtifactName} | Sub-artifact/Other name depending on the record type |
| {TMFLevel} | TMF level |
| {DatingConventionLabel} | Dating convention label |
| {DatingConventionValue} | Dating convention value in the format YYYYMMDD |
| {DocumentName} |
The defined record name by the user in the Record properties. Note! This is the latest record name, not the uploaded file name. Even if previous versions of the same record had different file names, the record name of each previous version will appear with the latest record name |
|
{DocumentId} |
The record counter ID |


This option is deselected by default for studies that started before the release of Viedoc 4.70. For studies starting after the release of Viedoc 4.70, the option is selected by default.

The option is deselected by default for studies that started before the release of Viedoc 4.73. For studies starting after the release of Viedoc 4.73, the option is selected by default.
Note! This page contains information and instructions for the new TMF user interface. If you are using the old interface, please go to the relevant user guides:
Want to browse more information for the new interface? Please go to the new TMF user guides:
When the TMF is ready to be archived, an eTMF Manager can lock the TMF.
The TMF can be considered complete and ready for archiving when all the records are available, reviewed, and finalized, and no more records are to be added to the study.
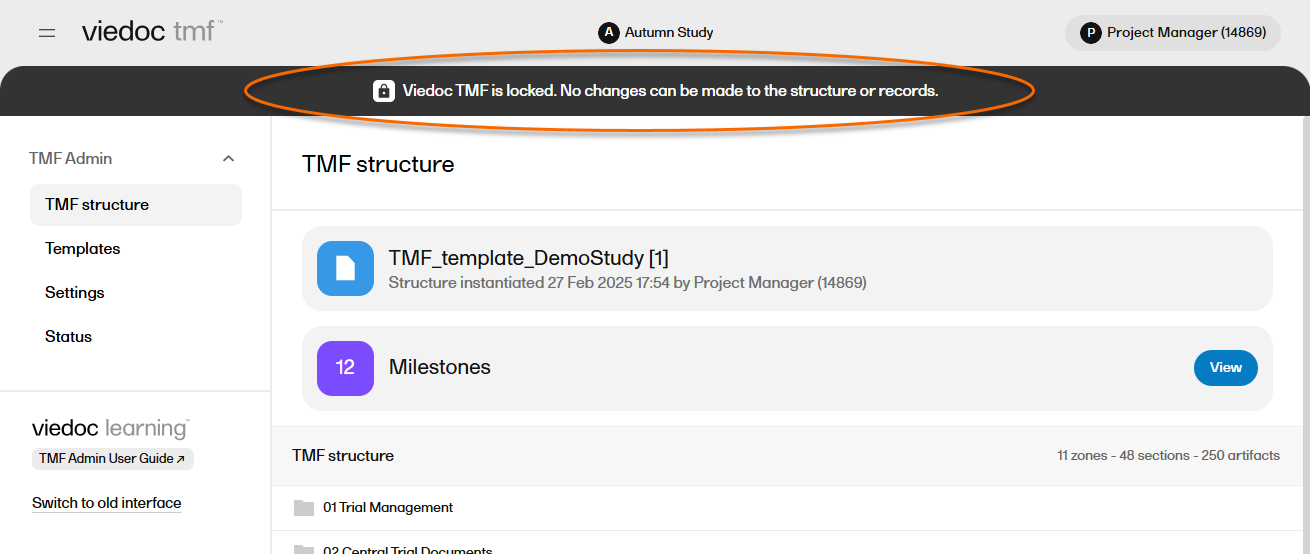
When the TMF is locked, it is available to users who have access to it in read-only mode. This means that records can still be viewed by users who have access to them according to their roles and permissions. It is still possible to grant users access to the TMF. However, no changes can be made to the records, nor to the TMF structure, templates, or settings.
Users who have access to the TMF Archive can still generate the eTMF-EMS repository and the complete audit trail report.
When the TMF is locked, an information message is visible to indicate that the system is locked and available in read-only mode:
Note! It is possible to unlock a locked TMF and then lock it again.
For traceability purposes, all lock and unlock actions are audit trailed and available in the complete audit trail report. You can generate and download the report from the TMF Archive view.
The TMF can only be locked by a TMF Manager.
To lock the TMF:
| 1 |
In the left navigation menu, select to expand TMF Admin and select the Status page. |
| 2 |
Select Lock Viedoc TMF. 
|
| 3 |
A window opens. Enter a reason for locking the TMF and confirm. 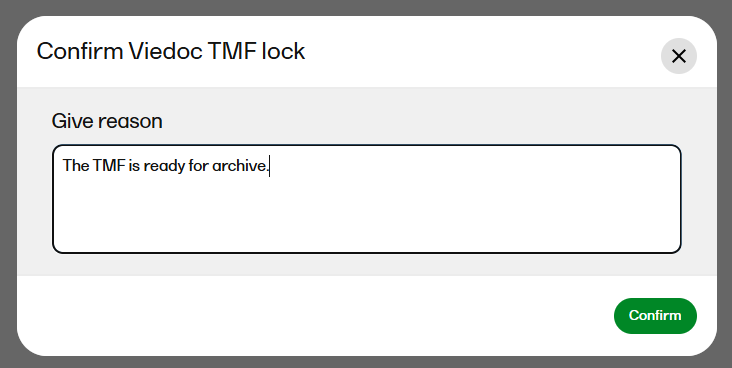
|
| 4 |
The status of the TMF changes to Locked, and information about when the system was locked and by whom is displayed on the Status tab: 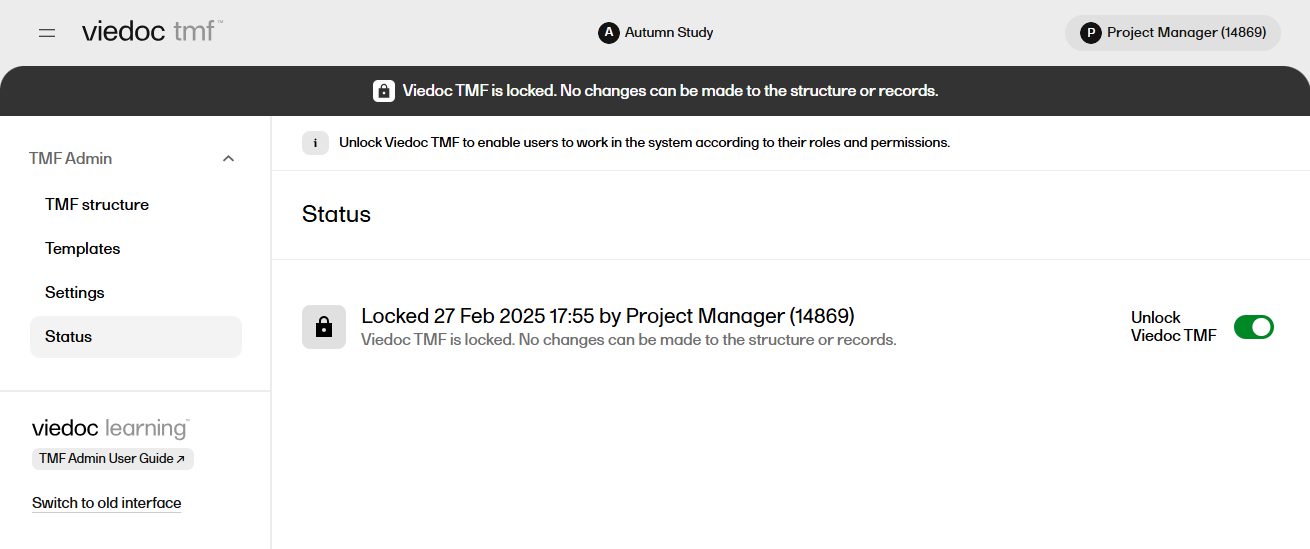
|
The TMF can only be unlocked by an TMF Manager.
To unlock the TMF:
| 1 |
In the left navigation menu, select to expand TMF Admin, and select the Status page. |
| 2 |
Select Unlock Viedoc TMF. 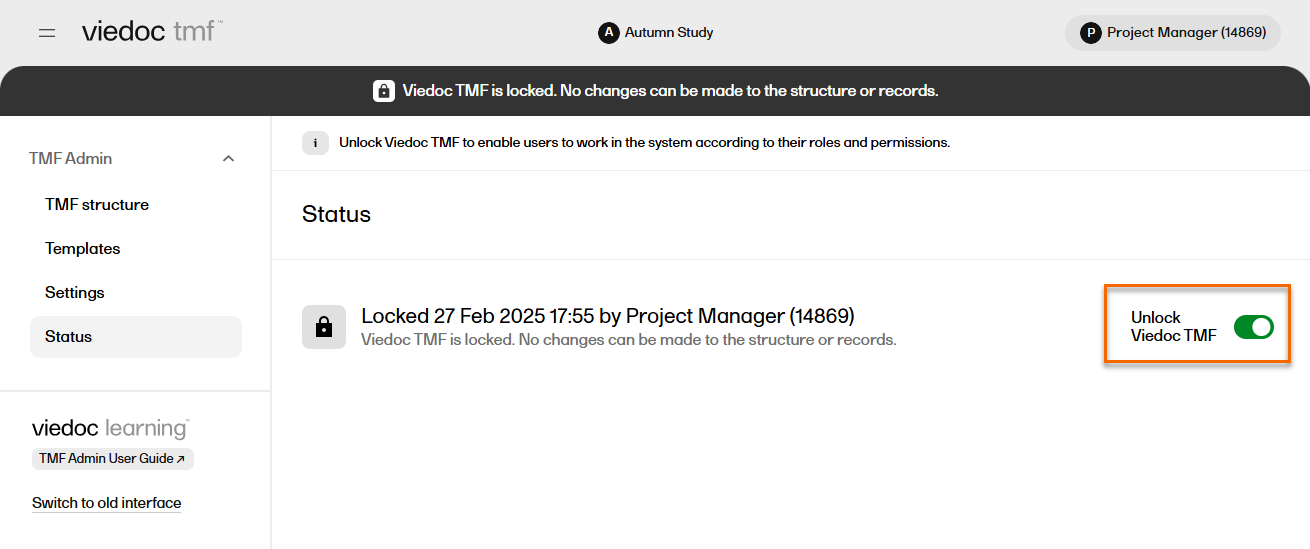
|
| 3 |
A window opens. Enter a reason for unlocking the TMF and confirm. 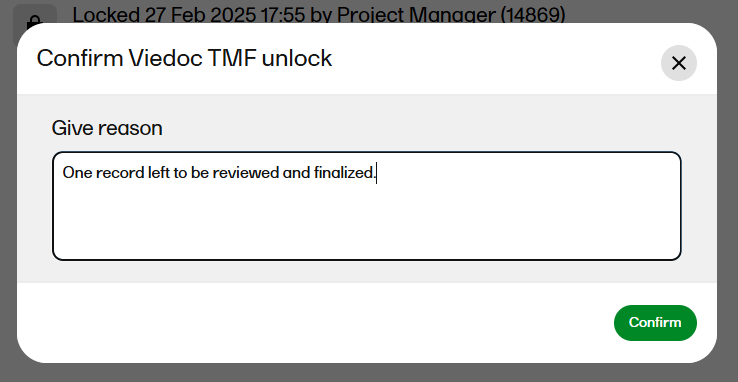
|
| 4 |
The status of the TMF changes to the status it had before locking it. |
Note! This page contains information and instructions for the new TMF user interface. If you are using the old interface, please go to the relevant user guides:
Want to browse more information for the new interface? Please go to the new TMF user guides:
The Viedoc Share feature is available to TMF users for sharing records with Viedoc Me users or Viedoc Clinic users for information sharing or for collecting signatures.
For detailed information, please see Sharing records with Viedoc Share in the Viedoc TMF User Guide.
Before a record can be shared, sharing must be enabled at the artifact level in TMF Admin.
To enable record sharing for an artifact:
| 1 |
In the left navigation menu, select to expand TMF Admin, and select the TMF Structure page. |
| 2 | Switch on Maintenance mode. |
| 3 |
Navigate to an artifact and select the Edit button that appears when you hover over it: 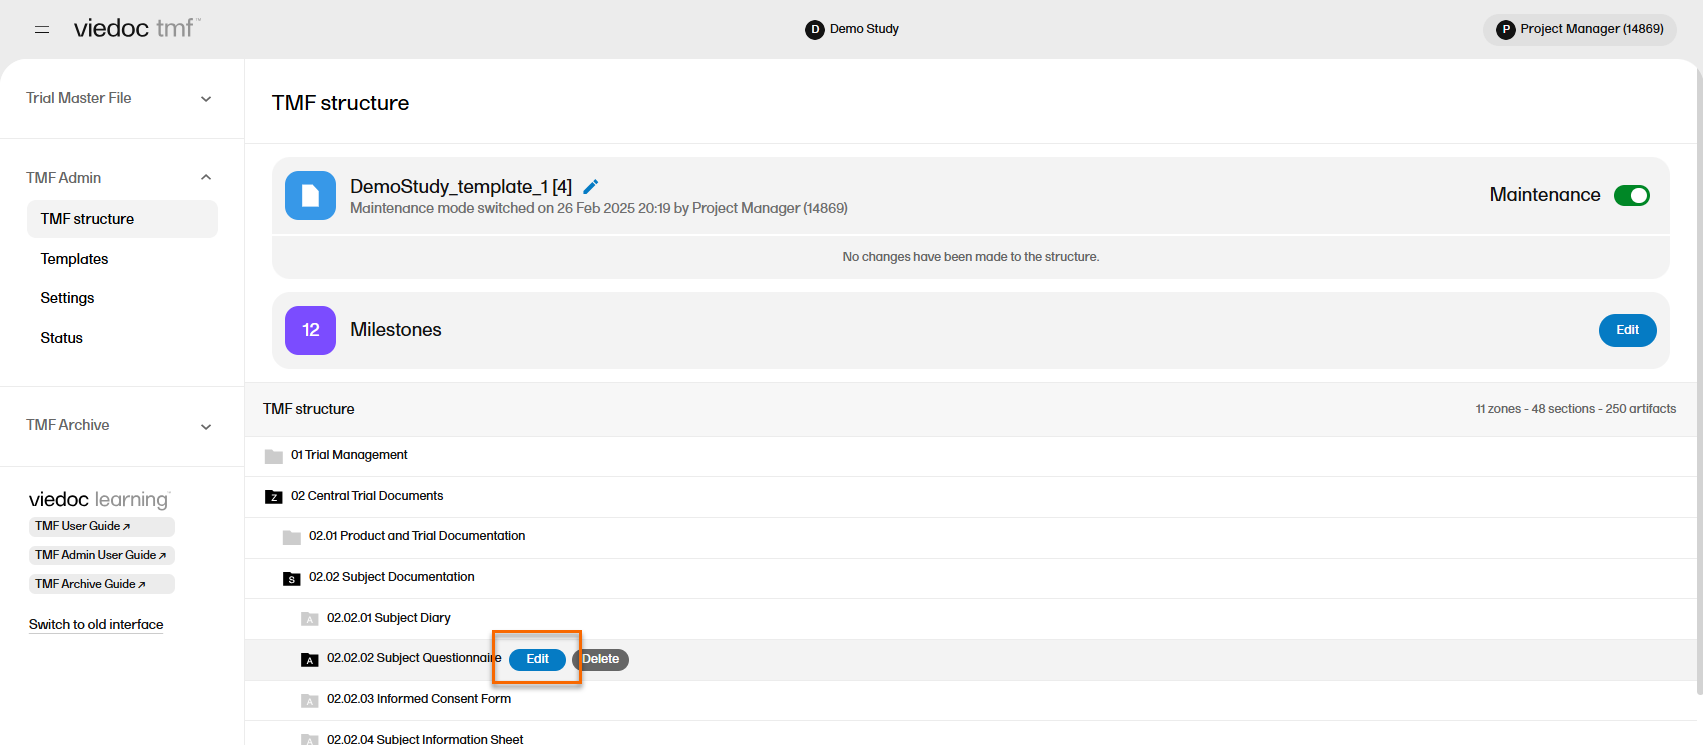
|
| 3 |
At the bottom of the Edit artifact window in the Record sharing section, select the users that records in the artifact can be shared with: Viedoc Clinic users, Viedoc Me users, or both. 
|
| 4 | Select Save. |
| 5 |
Select Apply all changes, then Apply changes. 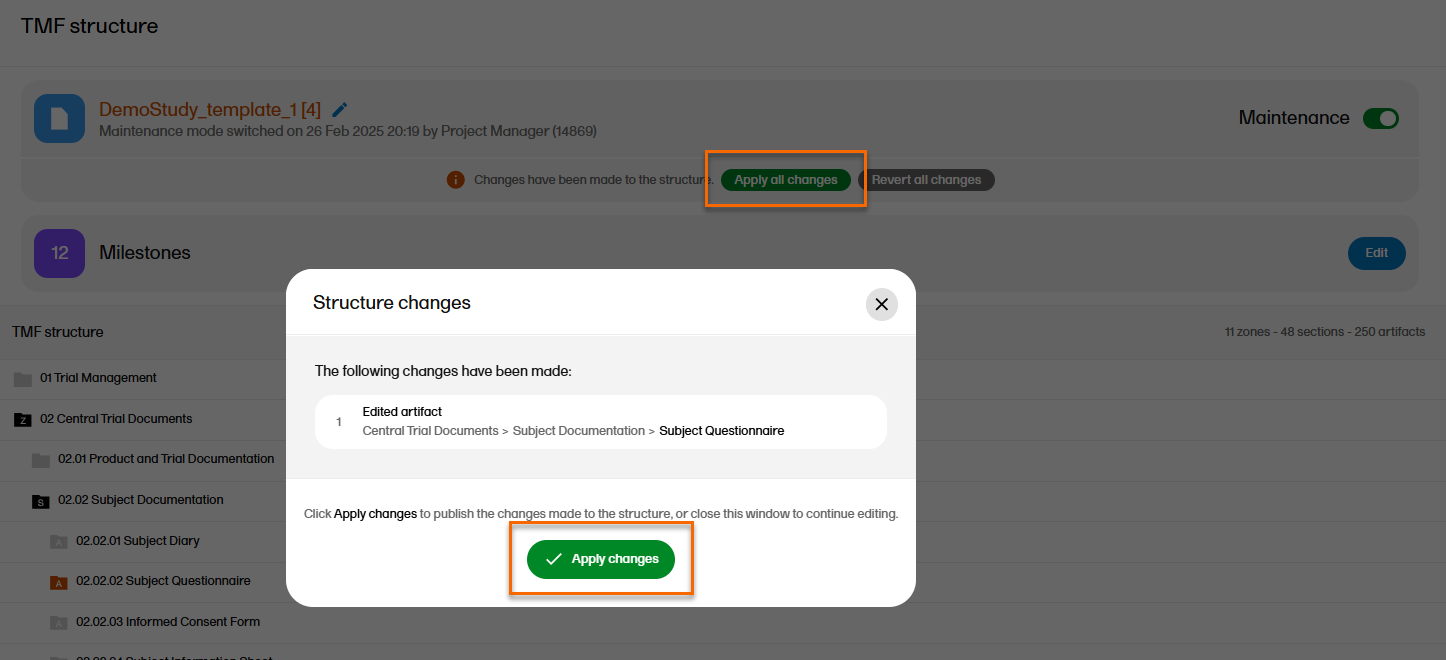
|
Note! This page contains information and instructions for the new TMF user interface. If you are using the old interface, please go to the relevant user guides:
Want to browse more information for the new interface? Please go to the new TMF user guides:
To import a TMF template:
| 1 |
In the left navigation menu, select to expand TMF Admin and select the Templates page. |
| 2 |
Select Import: 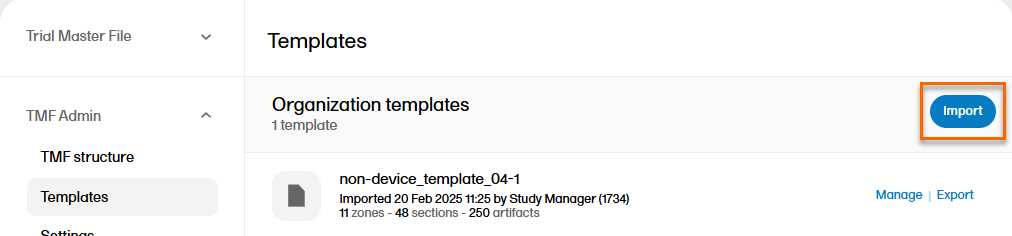
|
| 3 | Browse and select the TMF template you would like to import. |
| 4 |
Note! If there are any errors in the imported template, a message will be displayed. To download the file with the error messages for review, select Download import errors. 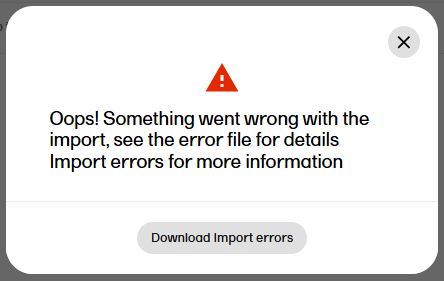
|
An existing template can be exported in order to make changes to the template Excel file.
To export a TMF template:
| 1 |
In the left navigation menu, select to expand TMF Admin and select the Templates page. |
| 2 |
Select Export for the template that you want to export: 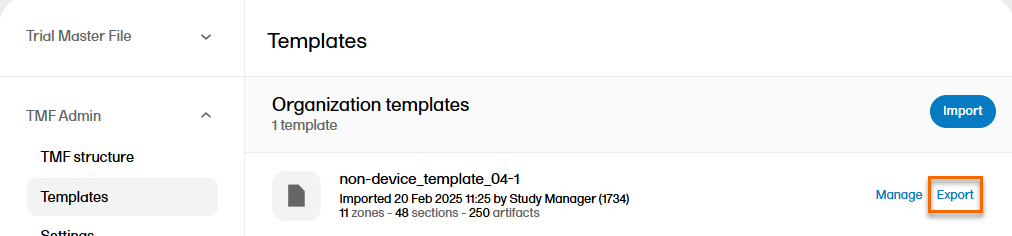
|
| 3 |
The Excel file is then downloaded via your browser. |
Note! This page contains information and instructions for the new TMF user interface. If you are using the old interface, please go to the relevant user guides:
Want to browse more information for the new interface? Please go to the new TMF user guides:
The Viedoc-provided TMF templates are baseline templates in Excel format that you can download and customize to cover your organization's needs.
The templates are of standard structure based on the TMF Reference Model by CDISC, and are created according to best practices in Viedoc TMF considering artifacts and the roles’ permissions to the artifacts.
The templates include artifacts that are meant to be used by the sponsor TMF and Investigator Site File (ISF). The Site staff role is intended to be assigned to Site personnel so that they can upload records to the ISF. The other roles can be used for different purposes when working on the sponsor TMF.
The templates currently available for download are for non-device studies and device studies.
You can download the Viedoc Non-device template here.
You can download the Viedoc Device template here.
The template can be used off the shelf or with modifications to suit your study needs. Ensure that your approach is properly validated for your study. For further information on how to handle and use the templates, refer to the lessons around templates in the Viedoc TMF Admin User Guide.
Note! This page contains information and instructions for the new TMF user interface. If you are using the old interface, please go to the relevant user guides:
Want to browse more information for the new interface? Please go to the new TMF user guides:
When a TMF template is selected, it is made available on the TMF structure tab. There, you can browse through the structure and view the properties of the zones, sections, and artifacts to make sure that the structure corresponds to your needs before you instantiate it.
Note! Once a template has been instantiated, it is not possible to select a new template. However, you can export a template, edit it, and import a new template to use for other studies within the same organization in Viedoc.
To select a template:
| 1 | In the left navigation menu, select to expand TMF Admin, and select the Templates page. |
| 2 |
Identify which template you need, and select the Select button: 
|
| 3 |
You can now view and browse through the corresponding structure on the TMF structure page in TMF Admin. If you need to make changes to the structure, export the template, modify the Excel template file, and import it into Viedoc TMF. |
| 4 | When you have made sure that the structure corresponds to your needs, you can choose to instantiate it. |
Note! This page contains information and instructions for the new TMF user interface. If you are using the old interface, please go to the relevant user guides:
Want to browse more information for the new interface? Please go to the new TMF user guides:
The TMF template is an Excel file which defines which zones, sections, and artifacts that your TMF will have, as well as the permissions associated with the TMF user roles. The eTMF Manager has permission to import, select, instantiate, export, rename, and delete templates.
In Viedoc TMF, there are two types of templates:
With your Viedoc TMF license, a baseline template is provided (see Viedoc-provided templates).This template is not intended to be used as it is, but to be adapted to your organization's needs. For example, you can customize, add, or delete zones, sections, and artifacts.
However, the following requirements must be fulfilled for Viedoc TMF to successfully validate the template:
Note! If the following special characters (\/:*?<>|"\r\n) are used in the TMF template, they will be replaced by an underscore (_) during archive generation to ensure the archive completes successfully.
To access the templates in Viedoc TMF, in the left navigation menu, select to expand TMF Admin, and select the Templates page:
The sections below describe the specific sheets found in the TMF template spreadsheet.
This sheet is based on the TMF Reference Model. Zones, sections, and artifacts can be customized, added, and/or deleted.
These are the requirements for the columns:
| Zone # | Must be unique |
| Zone Name | Must be unique |
| Section # |
Must be unique It consists of two digits that represent the zone number that the section belongs to, followed by a separator and the section number. |
| Section Name | Must be unique within the zone |
| Artifact # |
Must be unique It consists of two digits that represent the zone number, followed by a period (.), then two digits for the section number, a period (.) and the artifact number. Example: |
| Artifact name | Must be unique within the section |
|
Alternate names (artifact also commonly known as) |
This is an alternative name for the artifact. This column is optional. If it exists, its value can be left empty. Note! This column is not currently mapped to system functionality. It is not currently possible to change it in maintenance mode. |
| Definition / Purpose |
A free-text description of the artifact To view the definition in Viedoc TMF: In the left navigation menu, select to expand TMF Admin, and select the TMF Structure page. Navigate to the artifact, and select View. 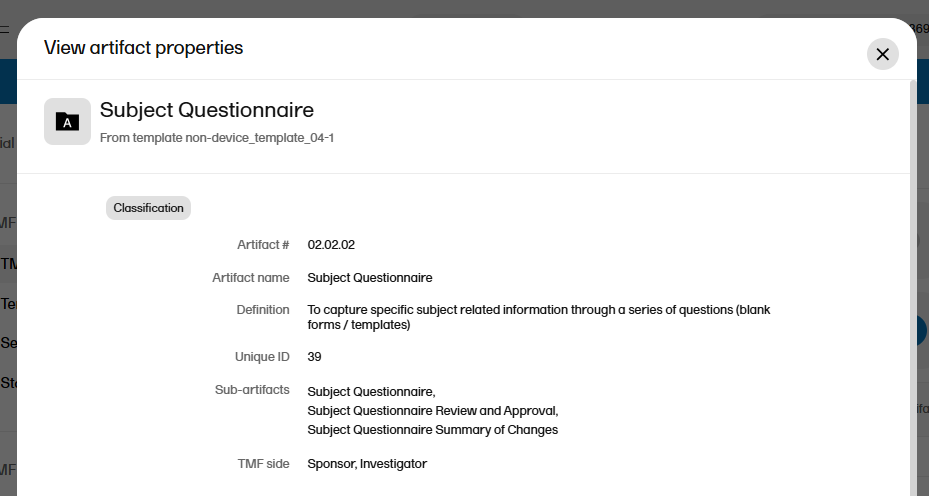
This column must have values. |
| Sub-artifacts |
A newline-separated list of sub-artifacts To view the list of sub-artifacts in Viedoc TMF, see above. Sub-artifacts can be used by TMF users to further classify records. This column can be left empty. |
|
Core or Recommended for inclusion ICH Code |
These columns are related to GCP. These columns can be left empty. Note! This column is not currently mapped to system functionality. It is not currently possible to change it in maintenance mode. |
| Unique ID Number |
An optional unique ID number for the artifact. This number is validated as follows by Viedoc TMF:
|
|
Sponsor Document Investigator Document |
These columns define what side of the TMF the artifact is: sponsor or investigator (according to GCP). The values can be These columns must have values. From Therese: maybe add info that this refers only to archiving, maybe consider a screenshot? Double check with Cecilia |
|
Process Based Metadata - Number Process Based Metadata - Name |
These columns define trial processes that artifacts can be linked to. This can be useful for trials where records are filed across multiple zones. Note! These columns are not currently mapped to system functionality. It is not currently possible to change them in maintenance mode. |
|
Trial Level Document Trial Level MILESTONE/EVENT Country/ Region Level Document Country Level MILESTONE/EVENT Site Level Document Site Level MILESTONE/EVENT |
These columns define which level (Trial/Country/Site) the record should be filed to and which milestones correspond to each. When a Trial/Country/Site level record in the V 3.2.1 sheet in the template is set to:
|
| Dating Convention |
Defines the dating convention that is used in the metadata of records uploaded to Viedoc TMF This column can be left empty. If it is empty, the default dating convention will be the version date. If you select New in the Dating convention field in the Edit artifact window, you can, for example, enter an expiration date as the dating convention. |
This sheet contains Viedoc-specific properties for each artifact.
These are the requirements for the columns:
| Artifact # | Unique artifact number as defined on the V 3.2.1 sheet. |
| Sign |
This column is not yet used in Viedoc TMF, but it must have values. The following values are accepted: |
| Applicable in Trial |
Defines if the artifact is applicable at trial level. The column must have values. The following values are accepted: |
| Applicable in Country |
Defines if the artifact is applicable at country level. The column must have values. The following values are accepted: |
| Applicable at Site |
Defines if the artifact is applicable at site level. The column must have values. The following values are accepted: |
| Metadata properties |
Additional metadata for the artifact. This column can be left empty. To view the additional metadata in Viedoc TMF: In the left navigation menu, select to expand TMF Admin, and select the TMF Structure page. Navigate to the artifact, and select View. 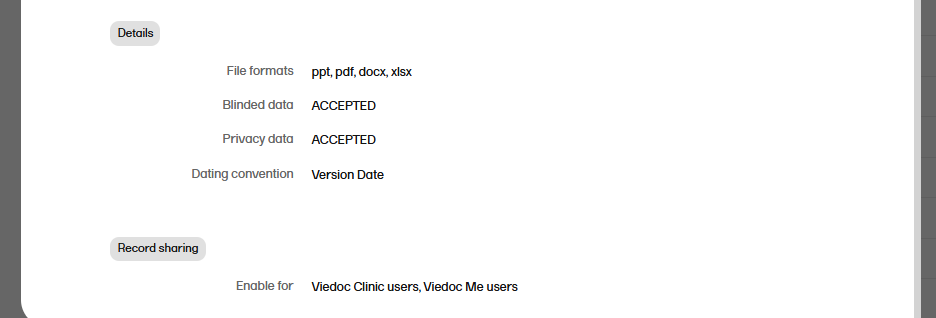 |
| File formats |
A pipe-separated list of accepted file formats for the artifact. Examples:
|
| Accept blinded data |
This column is not yet used in Viedoc TMF. It defines if blinded data is accepted for the artifact. The following values are accepted: |
| Accept privacy data |
This column is not yet used in Viedoc TMF. It defines if privacy data is accepted for the artifact. The following values are accepted: |
This is an optional sheet. It includes Viedoc-specific properties for each milestone.
If this sheet is not provided, the system will create a list of milestones, under the group Other, based on the following specified milestones in the V 3.2.1 sheet:
These are the requirements for the columns:
| Id | Unique milestone Id. This column is mandatory. |
| Name | Unique milestone name. This column is mandatory. |
| Group | One of the four milestone groups defined in the CDISC Reference Model. This column is mandatory, and the following values are accepted: Start UP, Study Conduct, Close Out, Other |
| Trial description | Description of trial-level records this milestone includes. This column can be left empty. |
| Country description | Description of country-level records this milestone includes. This column can be left empty. |
| Site description | Description of site-level records this milestone includes. This column can be left empty. |
The role sheets define the permissions associated with each of the TMF roles.
These are the role sheets:
These are the requirements for the columns:
| Artifact # | Unique artifact number as defined on the V 3.2.1 sheet. |
| Study |
Defines the permission of the role on study/trial level. The following values are accepted:
|
| Country |
Defines the permission of the role on country level. The following values are accepted:
|
| Site |
Defines the permission of the role on site level. The following values are accepted:
|
Note! This page contains information and instructions for the new TMF user interface. If you are using the old interface, please go to the relevant user guides:
Want to browse more information for the new interface? Please go to the new TMF user guides:
To rename a TMF template:
| 1 |
In the left navigation menu, select to expand TMF Admin and select the Templates page. |
| 2 |
Select Manage for the template that you want to rename: 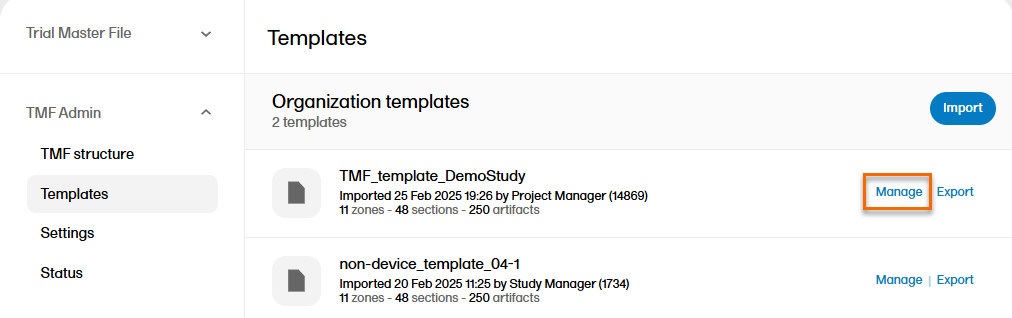
|
| 3 |
Select Edit: 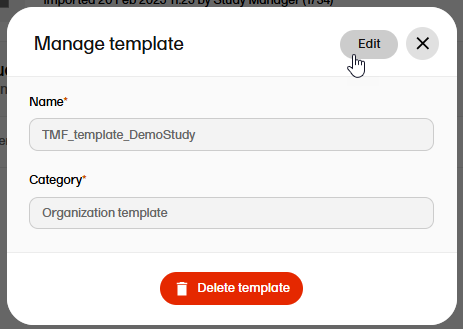 |
| 4 | Change the template name. |
| 5 | Select Save changes. |
To delete a TMF template:
| 1 |
In the left navigation menu, select to expand TMF Admin and select the Templates page. |
| 2 |
Select Manage for the template that you want to delete:
|
| 3 |
Select Delete template: 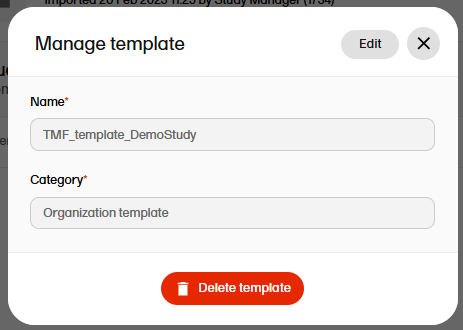 |
| 4 | Select Yes to confirm. |
Note! This page contains information and instructions for the new TMF user interface. If you are using the old interface, please go to the relevant user guides:
Want to browse more information for the new interface? Please go to the new TMF user guides:
After a template has been customized and/or imported, and selected, the TMF structure in the template can be instantiated (applied) to the study.
Note! Once a structure has been instantiated for a study, it cannot be un-instantiated. However you can still make changes to an instantiated TMF structure by switching on Maintenance mode. For more information, see Editing a structure, Customizing a template, Importing and exporting templates, and Selecting a template.
To instantiate a TMF structure:
| 1 |
In the left navigation menu, select to expand TMF Admin and select the TMF Structure page. |
| 2 |
Ensure that the correct template is displayed and select Instantiate. 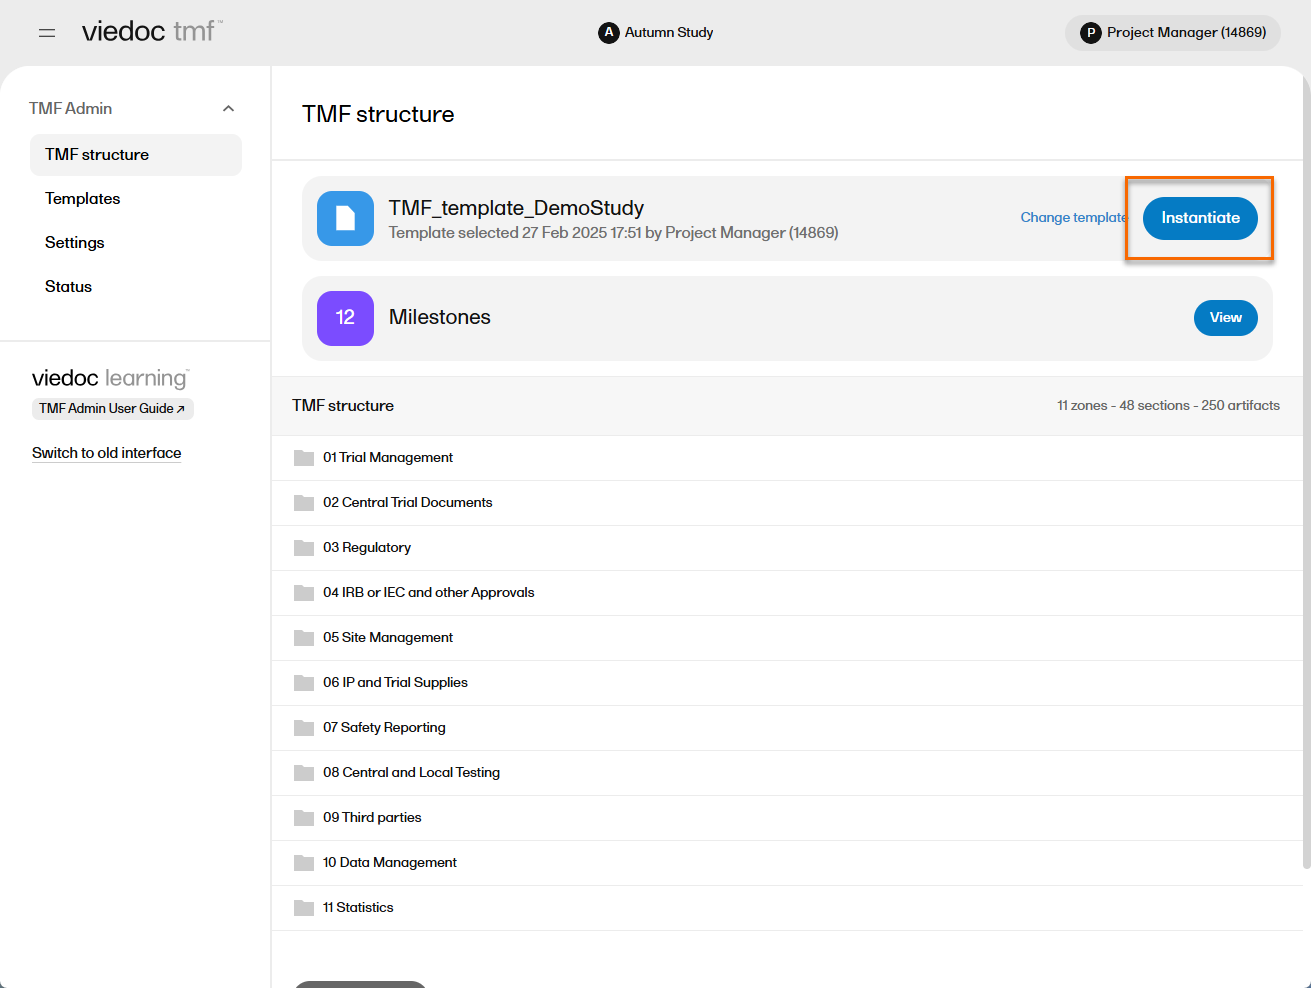
|
| 4 | The template is now applied to the study and the structure is available to work with. |
| 5 |
You can confirm that the structure is instantiated by selecting the Status page under TMF Admin: 
|
Note! This page contains information and instructions for the new TMF user interface. If you are using the old interface, please go to the relevant user guides:
Want to browse more information for the new interface? Please go to the new TMF user guides:
Edits can be made to an instantiated TMF structure by activating maintenance mode in TMF Admin (see section below). Edits can be made to the structure name, TMF reference model version number, zone and section names, artifact details and access, and milestones used in the TMF.
To activate maintenance mode:
| 1 |
In the left navigation menu, select to expand TMF Admin and select the TMF Structure page. |
| 2 |
Select the Maintenance switch: 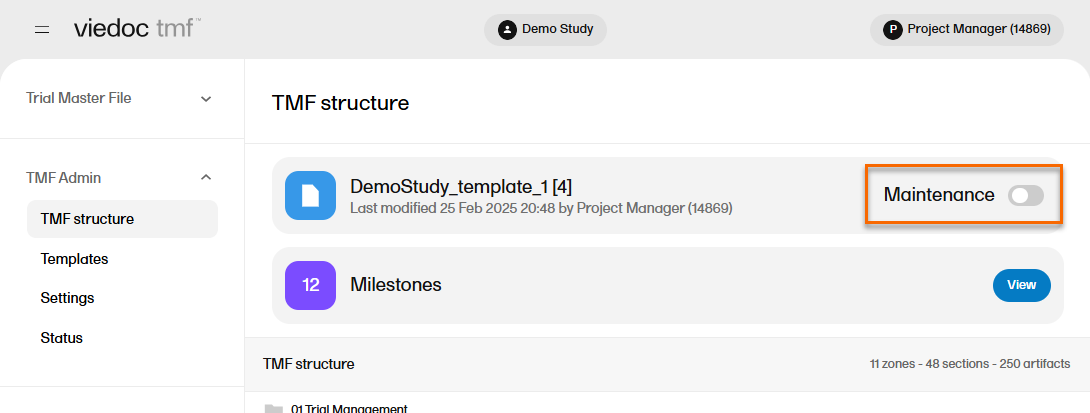
|
When maintenance mode is activated, all non-applied changes to the active structure are shown.
The edits that you can make on the structure level are as described in the following sub-sections.
To edit the structure name:
| 1 |
In maintenance mode, select Edit on the structure level. 
|
| 2 |
In the window that is displayed, edit the structure name and select Ready. 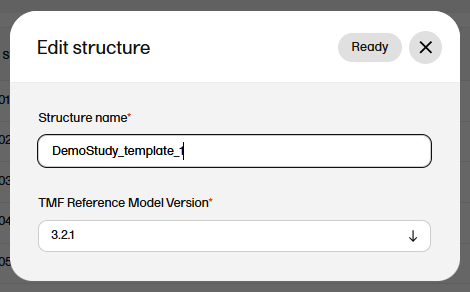
|
To edit the version of the TMF reference model:
| 1 |
In maintenance mode, select Edit on the structure level.
|
| 2 |
In the window that is displayed, select the applicable version of the TMF reference model from the dropdown menu and select Ready. 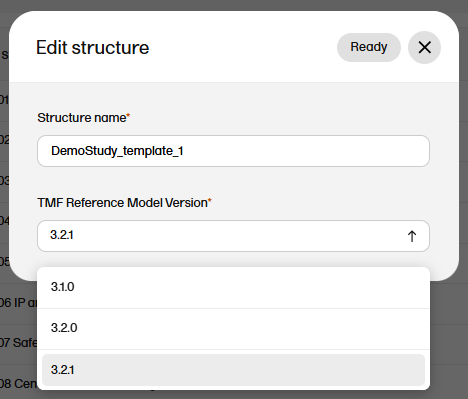
|
Changes that can be made to zones, sections and artifacts are described in this section.
Important! Making changes to any fields (in zones, sections, or artifacts) that are part of the metadata of a record may cause some changes to the record statuses. For examples of the impact of these changes, please see the Impact of changes to zones, sections and artifacts section below.
Only the name can be edited for zones and sections in Maintenance mode.
To edit a zone or section:
| 1 |
When maintenance mode is activated, select the Edit button that appears when you hover over a zone or section in the TMF structure. 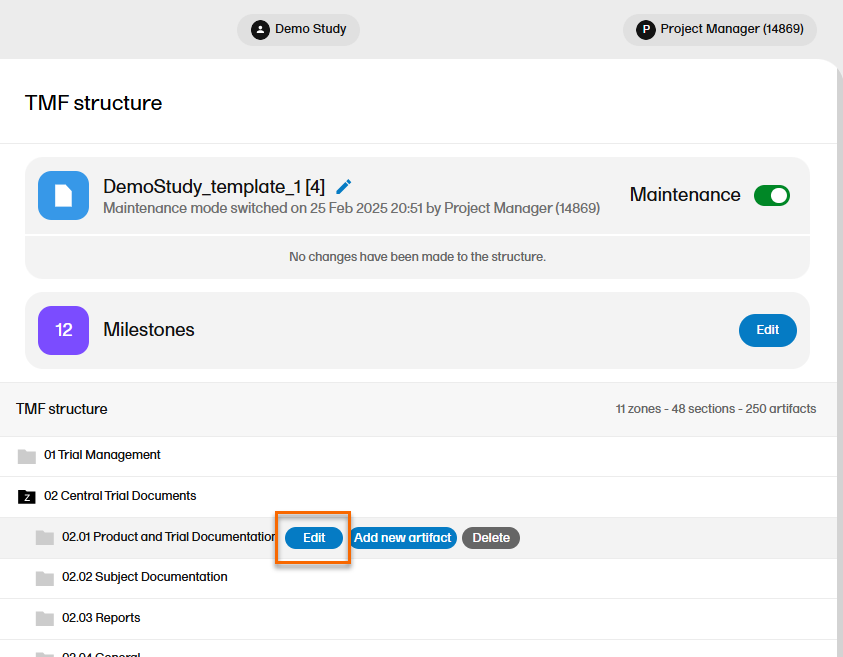
|
| 2 |
In the Edit section or Edit zone window, make your changes to the zone or section name. 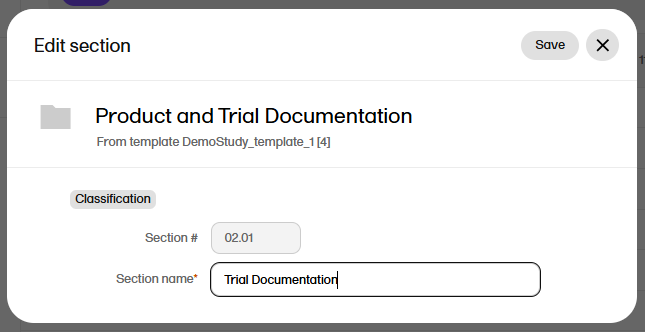
|
| 3 | Select Save changes. |
To edit an artifact:
| 1 |
When maintenance mode is activated, select the Edit button that appears when you hover over an artifact in the TMF structure. 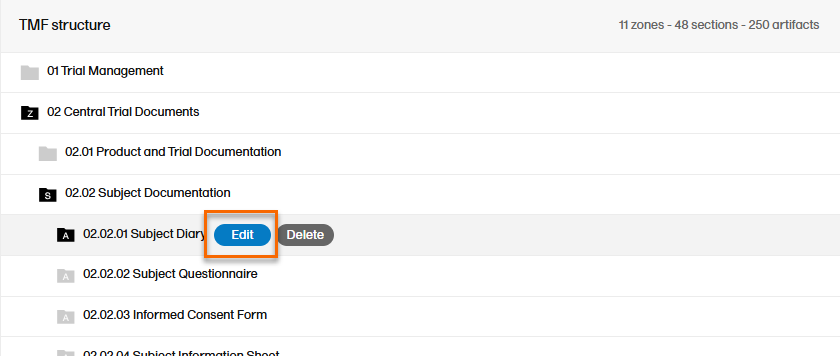
Select Edit and the Edit artifact window will display: |
| 2 |
Make your changes in the Edit artifact window. 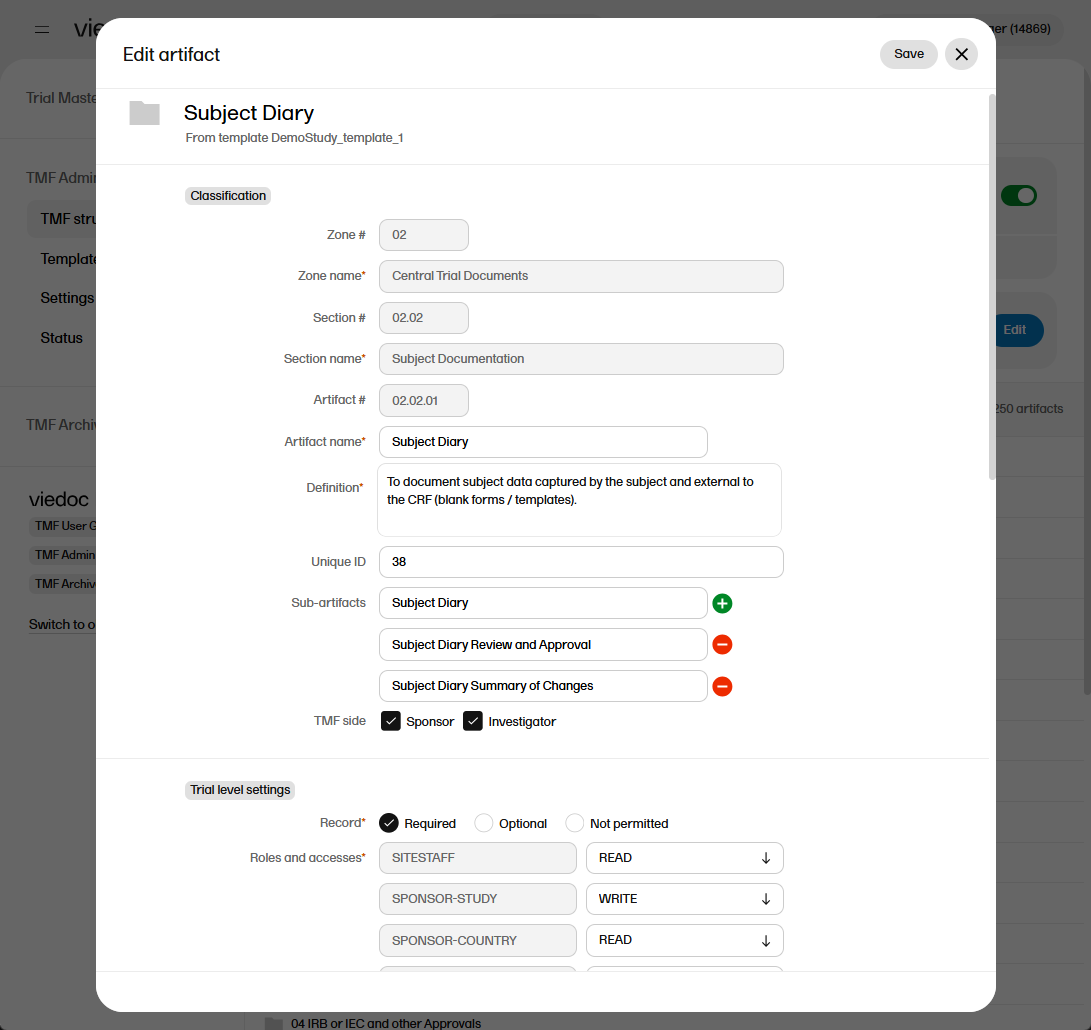
|
|
The fields available in the Edit artifact window are: Classification
Trial, Country, and Site level settings
Details
Record sharing
|
|
| For more information about the artifact properties, see Customizing a template, specifically the sections The V 3.2.1 sheet and Role sheets. | |
| 3 | Select Save. |
When there are uploaded records in a structure, it is important to understand the impact of editing the structure, specifically fields in zones, sections and artifacts that are part of a record's metadata. Everything that you see in the record properties window when you open a record is the metadata, except for the file itself.
To show the impact of such changes, please review the example scenario below:
| 1 |
An artifact contains multiple uploaded files with the following statuses:
|
| 2 |
A TMF Admin user switches on Maintenance mode and makes the following changes:
The changes are then applied. Note! These changes were made to fields that are part of the metadata for the records. |
| 3 |
The following changes can now be observed:
|
| Note! The status changes described above occur because the changes made to fields that are included in the record's metadata. If changes are made to other fields (for example Unique ID, adding a new sub artifact, or selecting Blinded data or privacy data not accepted) then all the statuses for uploaded records will remain the same. |
To add an artifact:
| 1 |
To add a new artifact to a specific zone or section, select the Add new artifact button that appears when you hover over a zone or section in the TMF structure. 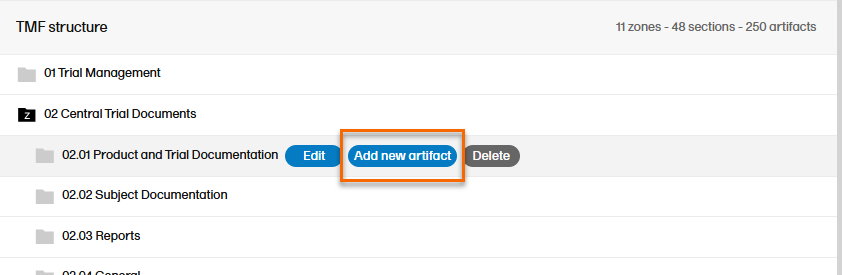
Alternatively, select Add new artifact at the bottom of the structure. 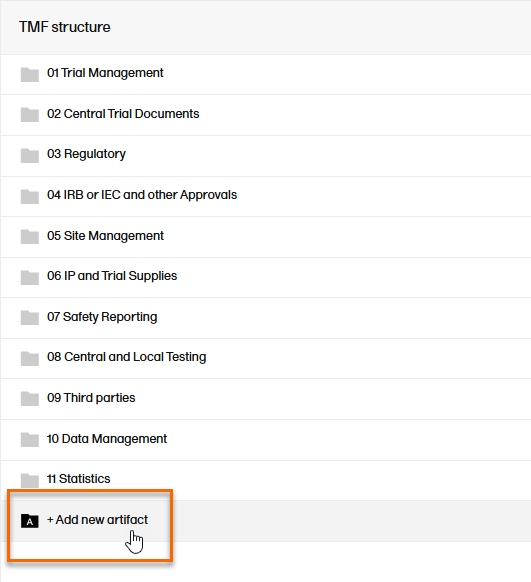 |
| 2 |
Fill in the artifact information in the Add new artifact window. 
If you select New in the Zone name or Section name dropdown menu, you can create a new zone or section where the artifact will be added. Note! The required fields are marked with red. |
| 3 | Select Save. |
To delete zones, sections or artifacts:
| 1 |
Select the Delete button that appears when you hover over a zone, section, or artifact. 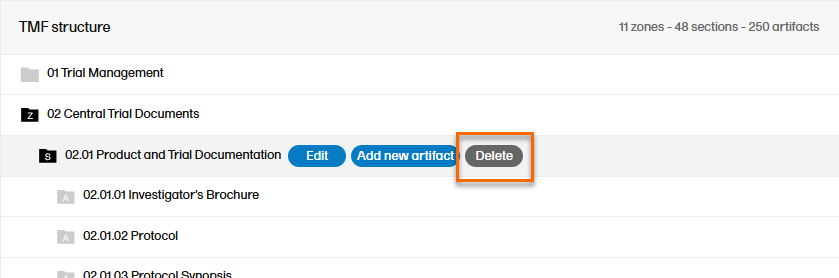
|
| 2 |
The zone or section and all its artifacts are then marked as red strike-through text in the TMF structure. 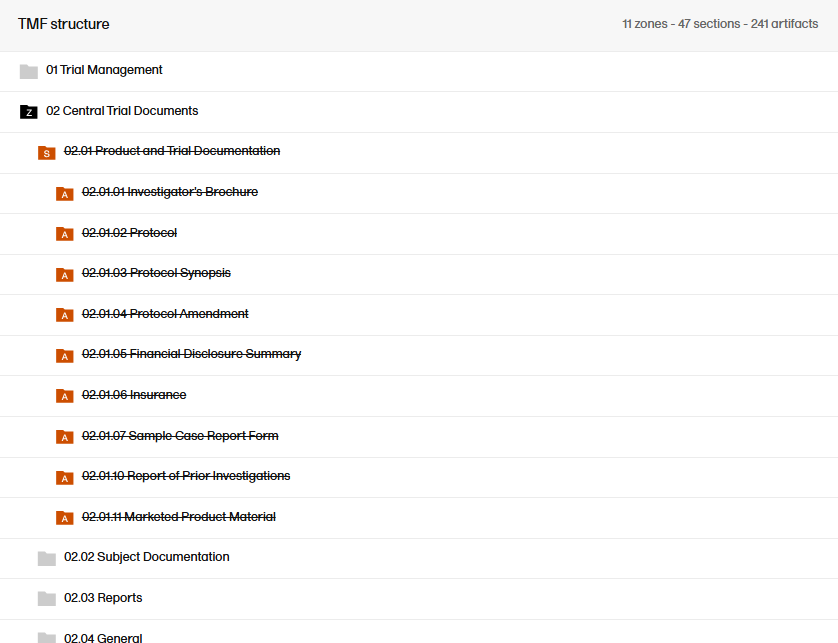
|
| 3 |
Notes on deletion:
For information about how to apply or revert changes to the structure, see Applying or reverting changes to the structure. |
Note! If you delete a zone, section, or artifact, its associated records will not be deleted. Instead, the end user view will display the zone, section, and artifact as deleted to indicate that the records in it should be moved.
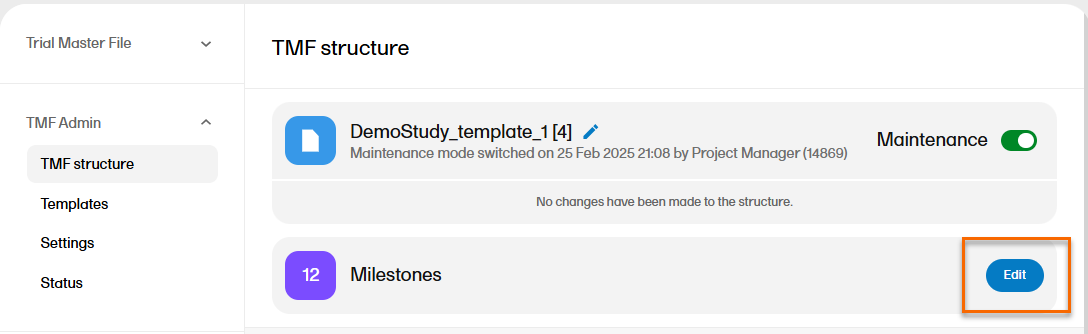
Milestones are a tool for filtering records. Milestones are defined at the artifact level, and all records within that artifact will have the same milestone. Milestones may be used to search for records, to categorize records within a study timeline, or to filter audit trail reports or EMS repositories.
To manage the milestones defined for the study, select Edit in the Milestones section on the TMF structure tab.
The sequence of milestones is how they will appear in the milestones filter in the Trial Master File view, as well as in the milestones dropdown menus in the View artifact properties and the Edit artifact windows in the TMF Admin view.
To change the sequence of milestones within the group, select the up arrow on a milestone level. The changed sequences will be highlighted in red until the changes are applied to the structure or reverted
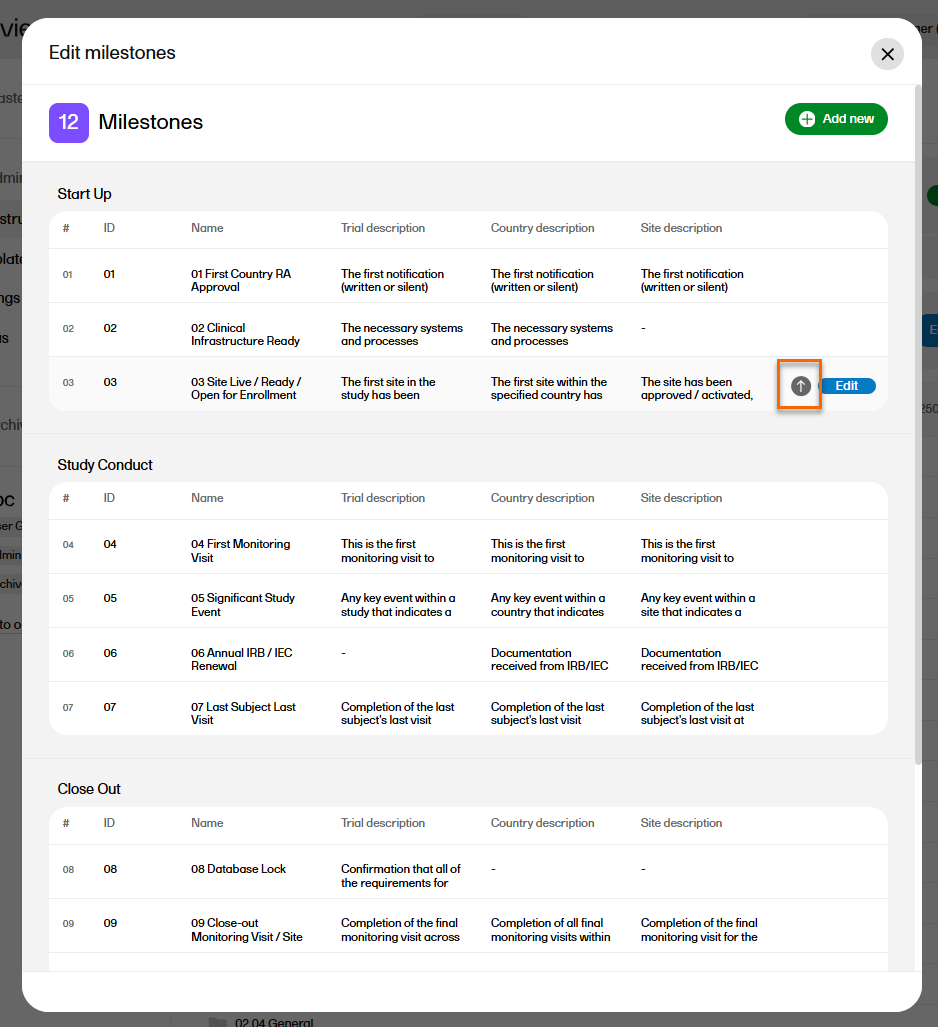
To edit the properties of a milestone, select Edit at that milestone level.

The following applies when editing the properties:
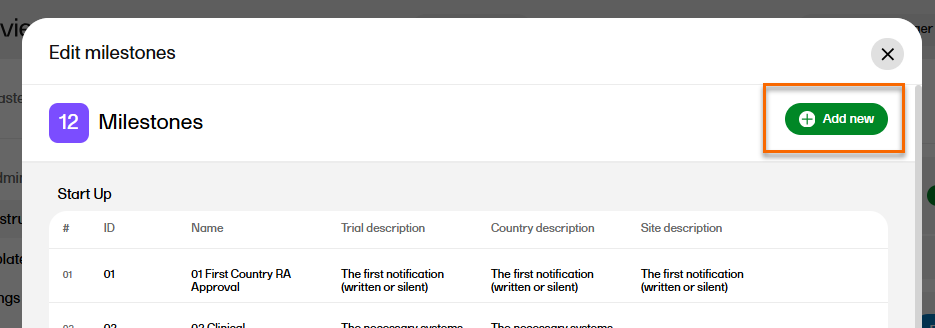
To add a new milestone to the list, select Add new in the Edit milestones window.
Milestones that are linked to active artifacts cannot be deleted. To delete a milestone, you must remove these links either by deleting the artifact linked to it or by linking the artifact to another milestone.
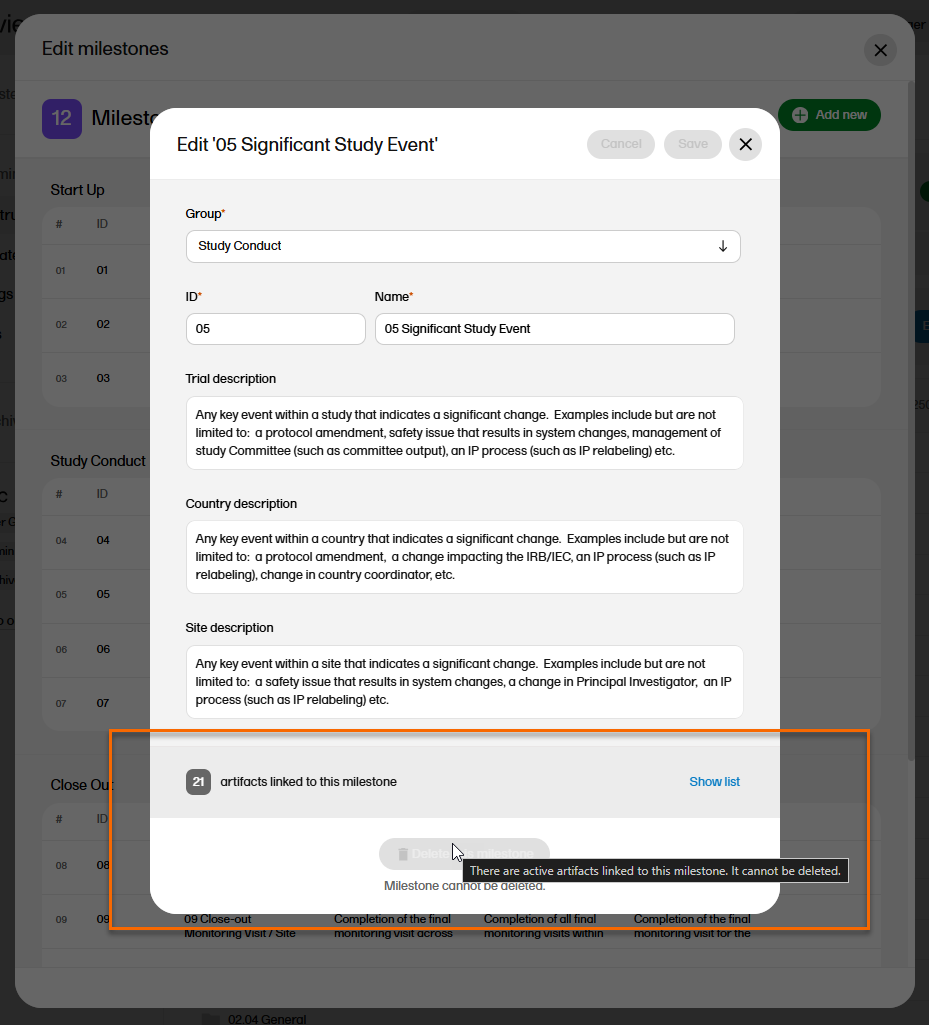
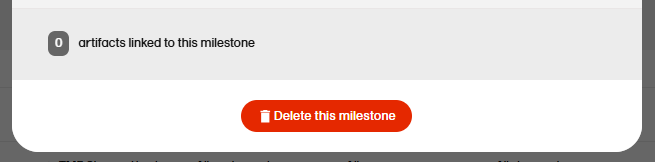
To delete a milestone, select Delete this milestone at the bottom of that milestone edit window.
The Viedoc TMF application automatically recognizes when changes have been made to the TMF structure and displays a message where you can choose to apply or revert all changes that were made during the current maintenance session.
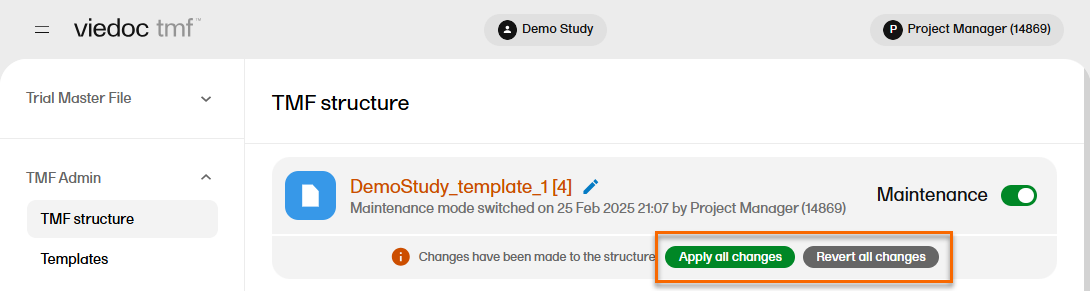
The confirmation window lists the changes that have been made. Select Apply changes to apply or select the X in the top right to close the window without applying the changes.
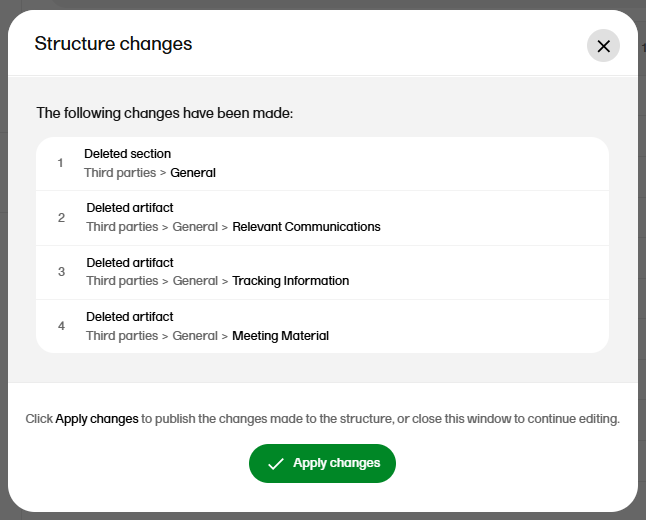
Note! Any applied changes to the structure will be listed in the complete audit trail report.
Note! This page contains information and instructions for the new TMF user interface. If you are using the old interface, please go to the relevant user guides:
Want to browse more information for the new interface? Please go to the new TMF user guides:
This lesson contains scenarios and frequently asked questions about roles and permissions in Viedoc TMF. For detailed information and explanations about roles and permissions, please see Roles and permissions in Viedoc TMF.
The following table contains examples of common use case scenarios together with the requisites for performing them.
| Scenario | Requisites |
|---|---|
| Drop zone: As a General site user, I want to be able to drop site-generated or site-signed records in the drop zone. |
|
| eISF: As a General site user, I want to be able to file pre-defined records on site level, view some artifacts on study and country levels and archive the Investigator site TMF/eISF. |
|
| As a Project manager, I want to be able to file records at study level, view all sponsor-side records at all levels in the study, archive the TMF (sponsor side), download the audit trail, and see the TMF settings and structure. |
|
| As a Monitor, I do not have access to patient information records on site level. I file site-level records that belong on the sponsor-side TMF, view records for my country and the study, manage drop zone records, and review site-level records. |
|
| As a Country Manager or a Trial Manager, I want to be able to file records at country level, view all sponsor-side records at all levels in the study, and review all sponsor-side records. |
|
| As a Regulatory Inspector, I want to have read-only access to all records (sponsor side and investigator side), TMF settings, and access to the audit trail. |
|
| As an Unblinded Statistician, I want to view, file, and classify blinded records only on all levels. |
|
| Check | To resolve |
|---|---|
| Check that the user is invited to a clinic role with a mapped TMF role with at least Read to the artifact at the expected level. | Invite the user to a clinic role with a mapped TMF role with read/write permissions to the artifact or edit the roles and accesses for the artifact in TMF Admin maintenance mode. |
| Check that the artifact itself is Optional or Required at the expected level, as Not permitted records will override any role access for the artifact. | Edit the trial/country/site level settings for the artifact in TMF Admin maintenance mode. |
| Check | To resolve |
|---|---|
| Check that the user is invited to a clinic role with a mapped TMF role with Write access to the artifact at the expected level. | Invite the user to a clinic role with a mapped TMF role with write permission to the artifact or edit the roles and accesses for the artifact in TMF Admin maintenance mode. |
| Check that the user is invited to a clinic role on at least Country level (for write permission to Country level records) or Study level, All production sites (for write permission to Study level records), otherwise Write will be translated to Read. | Invite the user to a clinic role on at least Country level (for write permission to Country level records) or Study level, All production sites (for write permission to Study level records). |
| Check | To resolve |
|---|---|
| Check that the user is invited to a clinic role with a mapped TMF role with Review access to the artifact at the expected level. | Invite the user to a clinic role with a mapped TMF role with review permission to the artifact or edit the roles and accesses for the artifact in TMF Admin maintenance mode. |
| Check that the user is invited to a clinic role on at least Country level (for review permission to Country level records) or Study level, All production sites (for review permission to Study level records, otherwise Review will be translated to Read. | Invite the user to a clinic role on at least Country level (for write permission to Country level records) or Study level, All production sites (for write permission to Study level records). |
| Check | To resolve |
|---|---|
| Check that the user is invited to a clinic role with a mapped TMF permission Manage drop zone. | Map the Manage drop zone permission to the applicable clinic role. |
| Check | To resolve |
|---|---|
| Check that the user is invited to a clinic role with a mapped TMF role with Write access to the artifact at the expected level. | Invite the user to a clinic role with a mapped TMF role with write permission to the artifact or edit the roles and accesses for the artifact in TMF Admin maintenance mode. |
| Check that the user is invited to a clinic role on at least Country level (for write permission to Country level records) or Study level, All production sites (for write permission to Study level records, otherwise Write will be translated to Read. | Invite the user to a clinic role on at least Country level (for write permission to Country level records) or Study level, All production sites (for write permission to Study level records). |