Managing Viedoc Me
This lesson applies to site staff managing the Viedoc Me application.
Introduction
If applicable for the study, a Viedoc Me account can be activated, allowing the subject to submit data to the study through any device using a web browser (phone, tablet, computer).
To access the platform:
-
The device must have an active internet connection.
-
If the subject chooses to receive text message reminders, the device must also be able to receive text messages.
Please make sure patients are aware of these requirements before they start using Viedoc Me. You can share the following information with them as needed: Using Viedoc Me - (information for study participants)
Note! Only user roles with editing permissions for the study start event form can activate a Viedoc Me account. If you do not have editing permissions, the phone icon (as seen in the image below) will not be visible on the Details page.
Activating the Viedoc Me account
To activate a Viedoc Me account for a subject:
| 1 |
Open a subject card and select the phone icon located in the top right corner of the Details page: 
The Activate Viedoc Me account window opens: 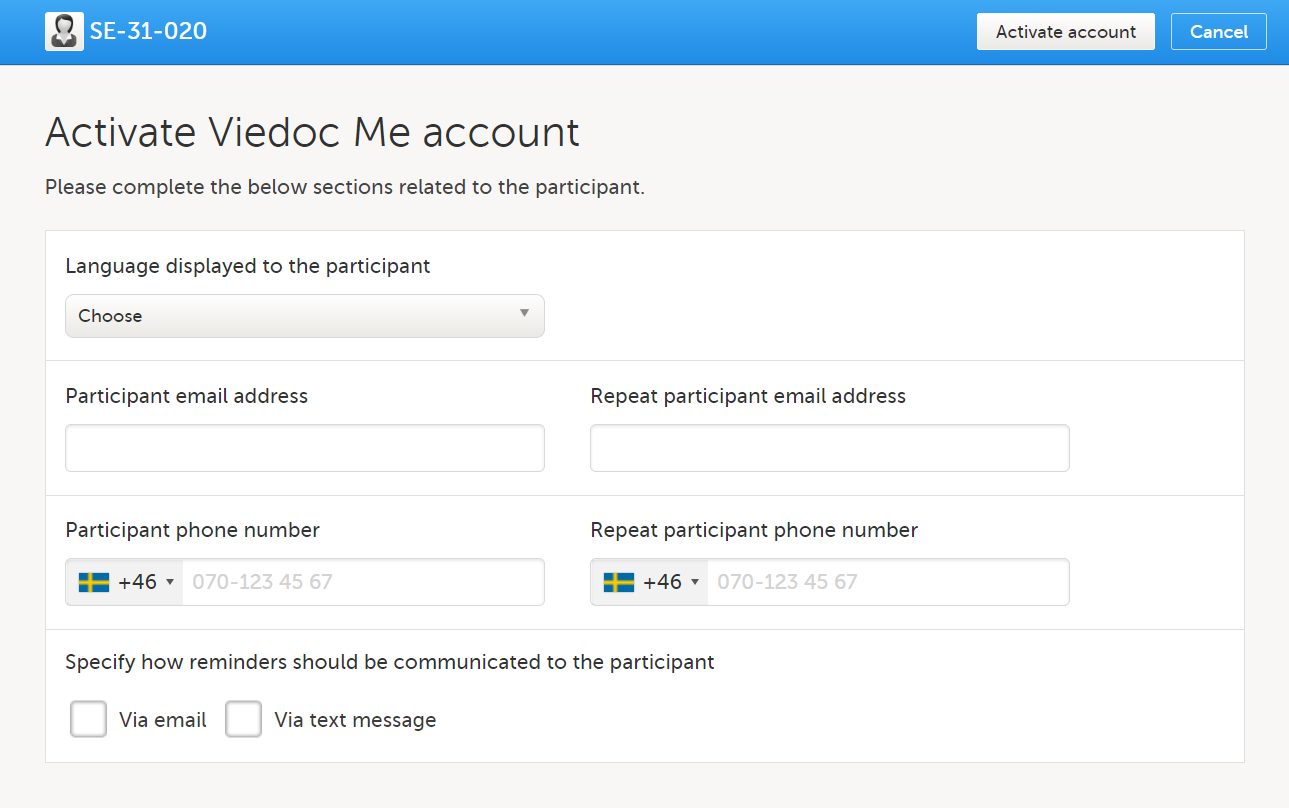
|
| 2 |
Language displayed to the participant Choose the language that should be displayed to the subject by selecting the language from the dropdown list. Note! The languages Cebuano (ceb), Hiligaynon (hil), and Tagalog (tl) are available in when inviting subjects to Viedoc Me in Viedoc Clinic when added as additional languages in Viedoc Designer. These languages are currently displayed as: Unknown language (tl), Unknown language (ceb) Unknown language (hil). |
| 3 |
Participant email address and Participant phone number Enter the subject's email address and/or phone number. These must be entered twice to ensure correct data entry. Note! These options are only visible if the functionality for "sharing of access details" (login information) via email and/or text message has been enabled in the study settings. Please contact your study manager to have this option enabled. |
| 4 |
Specify how reminders should be communicated to the participant Select whether to send reminders via email and/or via text message. Note! These options are only visible if the functionality for "allow activity reminders" via email and/or text message has been enabled in the study settings. Please contact your study manager to have this option enabled. The reminder settings can also be changed at any time after the Viedoc Me account activation. Test messages can be sent out to the entered email address and/or phone number, see Verifying subject email address and phone number. |
| 5 |
Select Activate account at the top right. The Viedoc Me Account window will display the subject's account details and login information: 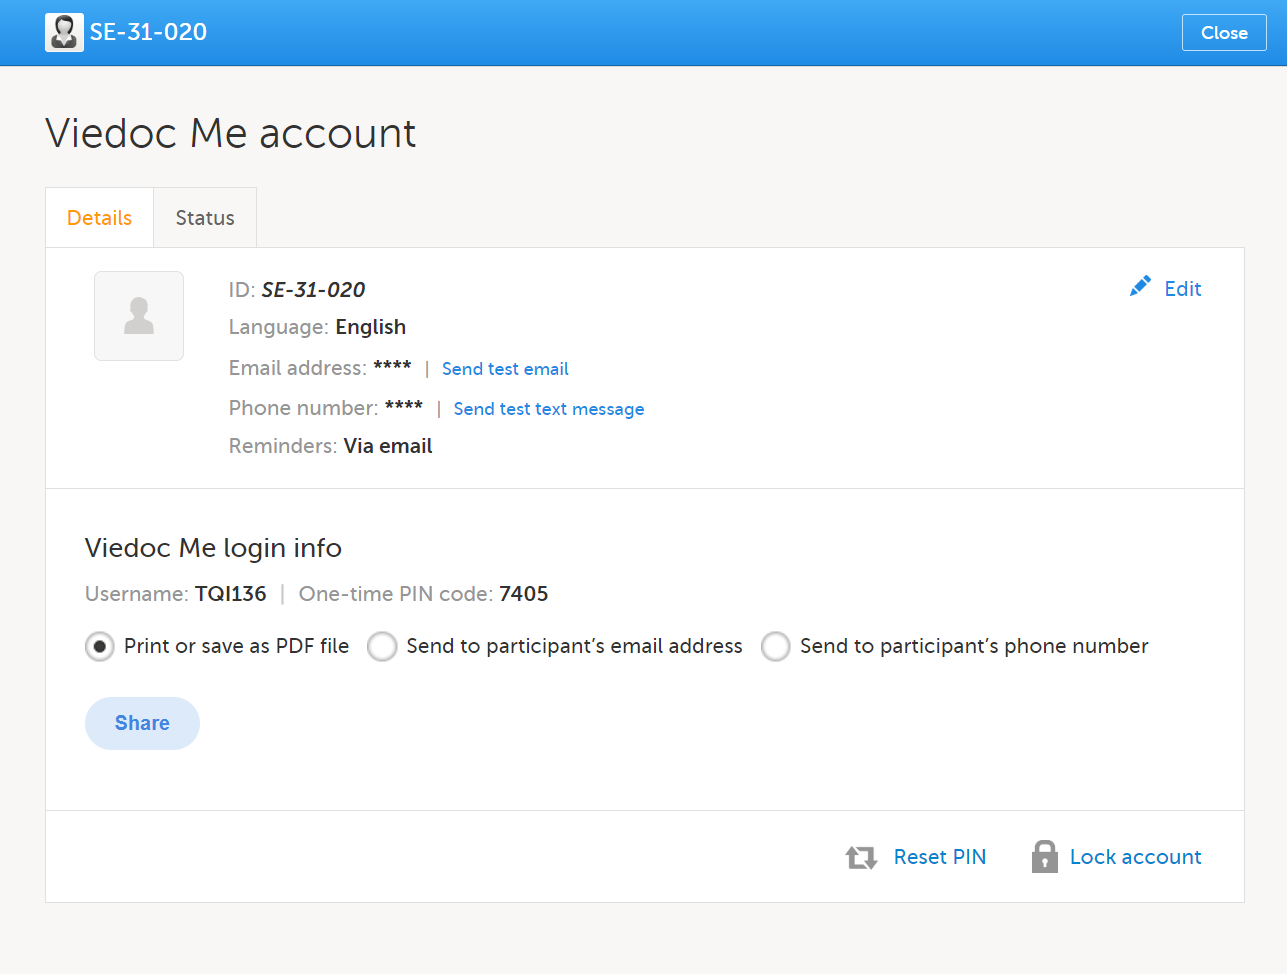
The Viedoc Me Account activation process is now complete. To share the login information with the subject, please continue with the steps below. |
Note! You may only activate one subject's Viedoc Me account at a time.
Sharing Viedoc Me account login information with the subject
After the Viedoc Me account has been activated, there are several options to share the login information with the subject. This may be done at any time and repeated as often as needed.
To share login information with a subject:
| 1 |
Open a subject card and select the phone icon located in the top right corner of the Details page:
The Viedoc Me Account window is displayed: 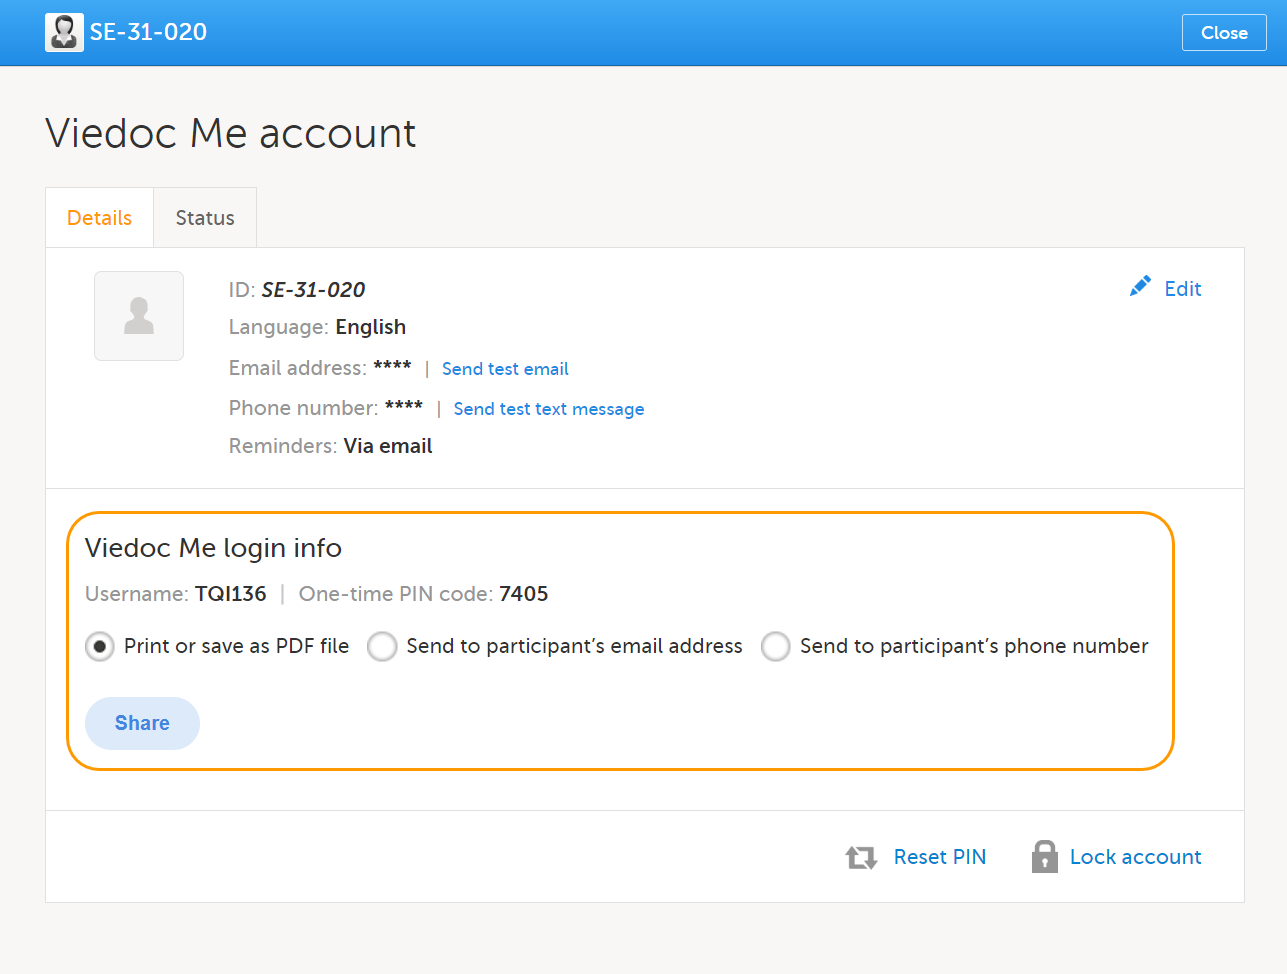
|
| 2 |
Select the options for sharing the Viedoc Me login info with the subject:
Note!
Note! The Viedoc Me login page URL always contains the string "idp". This is expected behavior. |
| 3 |
Once the sharing method has been selected, select Share to complete the action:
|
Note! After sharing the login information, if you wish to share again with the subject you will receive a message next to the share button stating that the PIN code must be reset before sharing the login information again:

Follow instructions on Resetting the PIN code below.
Verifying the subject's contact information
To verify a subject's contact information is correct, a test email/text message can be sent. The test emails and text messages sent from Viedoc cannot be replied to.
Note! Sending a test email or text message is only possible if the functionality for "sharing of access details" (login information) and/or "allow activity reminders" via email and/or text message has been enabled in the study settings.
To send a test email and/or text message:
| 1 |
In the subject's details page, select the phone icon to open the Viedoc Me Account window. Select Send test email and/ Send test text message. 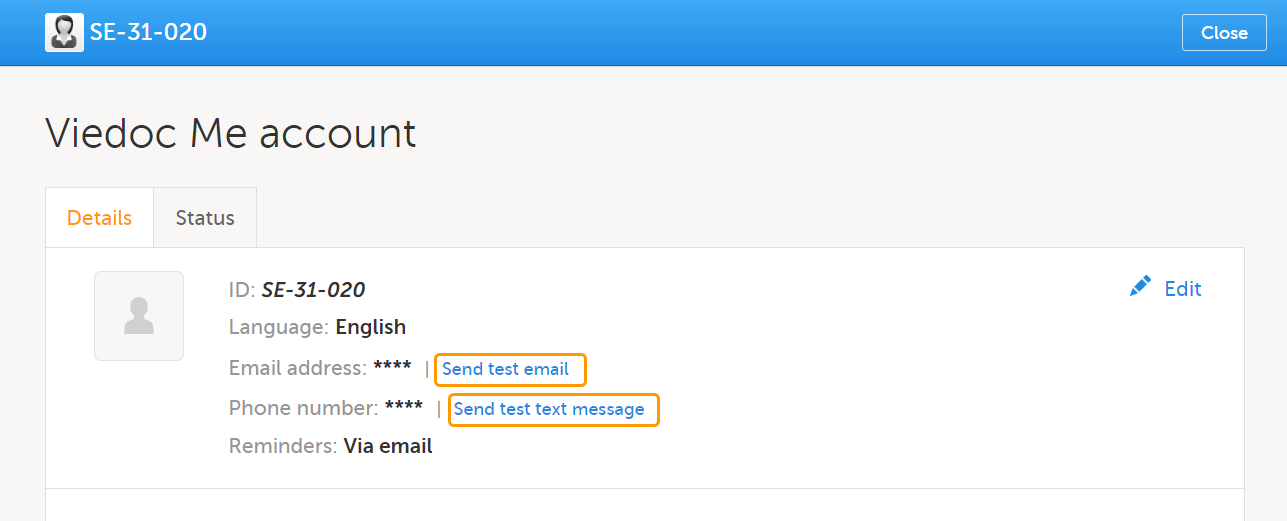
Note! The Send Test links are available only after the email address and/or the phone number was entered and saved. All changes done in the Viedoc Me account window must be saved in order for the test links to be available. |
| 2 |
The result of sending out the test email/text message is displayed by a message. If a test message was successfully sent: 
If a test message failed to send: 
In this case you might want to enter the email address/phone number again by selecting edit, save the changes, and try to send the test message again. Note! A successfully sent message does not confirm the correct email/phone number, only that it was sent out successfully from Viedoc. Please confirm with the subject that the message was received to ensure the email address/phone number is correct. |
| 3 |
The test message(s) may be sent again by selecting Send again (for example, if the subject cannot confirm they have received the message). |
Resetting the PIN code
The subject's PIN code can be reset at any time by selecting Reset PIN:
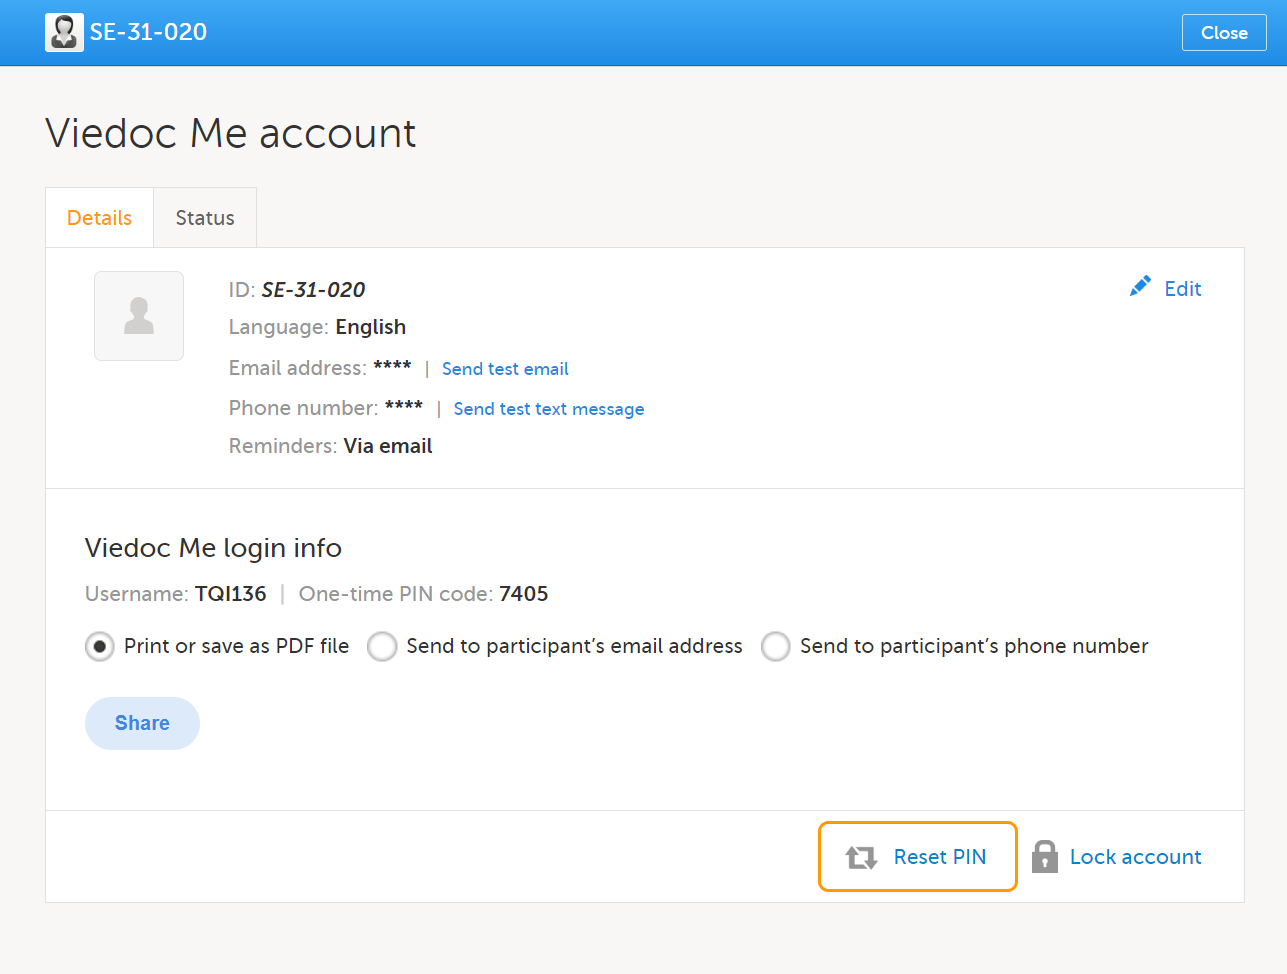
After the PIN code is reset, you will need to share the login details again via PDF, email or text message by following steps 5 and 6 above.
Important! The account must be unlocked before the new PIN code can be used for login. See Locking and Unlocking the Viedoc Me Account below for more information.
Quick access to Viedoc Me
If the subject is using Viedoc Me on a mobile phone, saving the URL as a shortcut on the home screen of the device can make future logins easier. Similarly, the Viedoc Me URL can be saved as a bookmark/favorite on a computer. Instructions on how to do this, and other valuable information for Viedoc Me users can be found in the Using Viedoc Me (Information for study participants) lesson.
Editing form data in Viedoc Me (ePRO data)
Subject-submitted (Viedoc Me) forms that have been filled in by a subject are locked by default.
There might be a possibility to unlock a subject-submitted form if this option is activated for your study. In this case, the Lock checkbox appears at the bottom of the form.
To edit a form in Viedoc Me:
| 1 |
A user with lock data permission (typically a Monitor) unlocks the form by clearing the Lock checkbox at the bottom of the form. 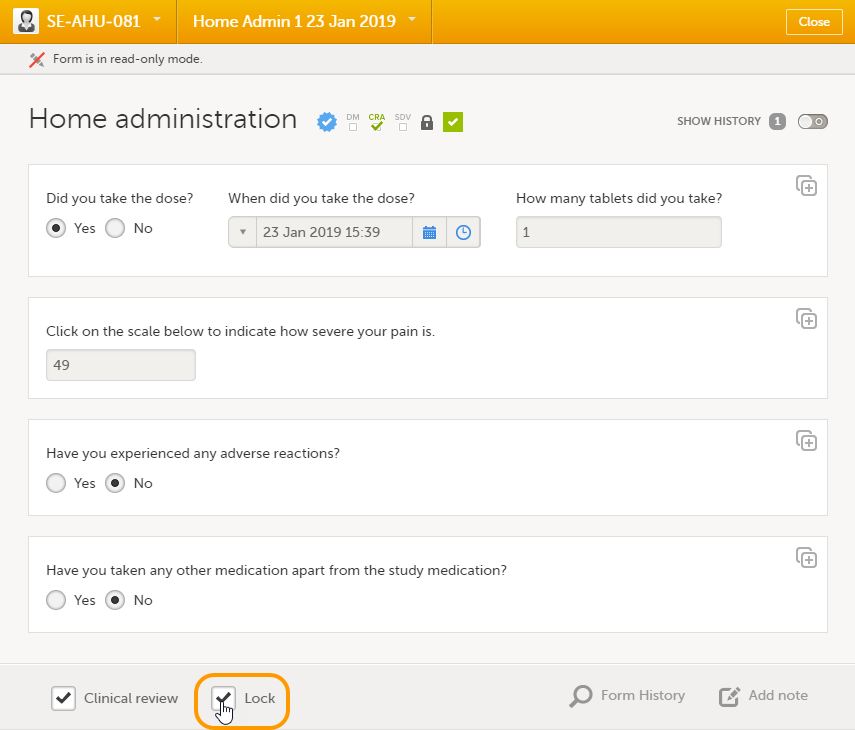
|
| 2 | A user with edit data permission (for example, an Investigator) edits the form data according to these instructions: Editing data. |
| 3 |
To see the audit trail of the edit, select Show history at the top-right corner of the form. 
The subject who made the initial data entry is called Subject (0) in the audit trail. For the data edit, the user name is displayed (blurred in the image above for information security reasons). |
| 4 | A user with lock data permission locks the form for editing. |
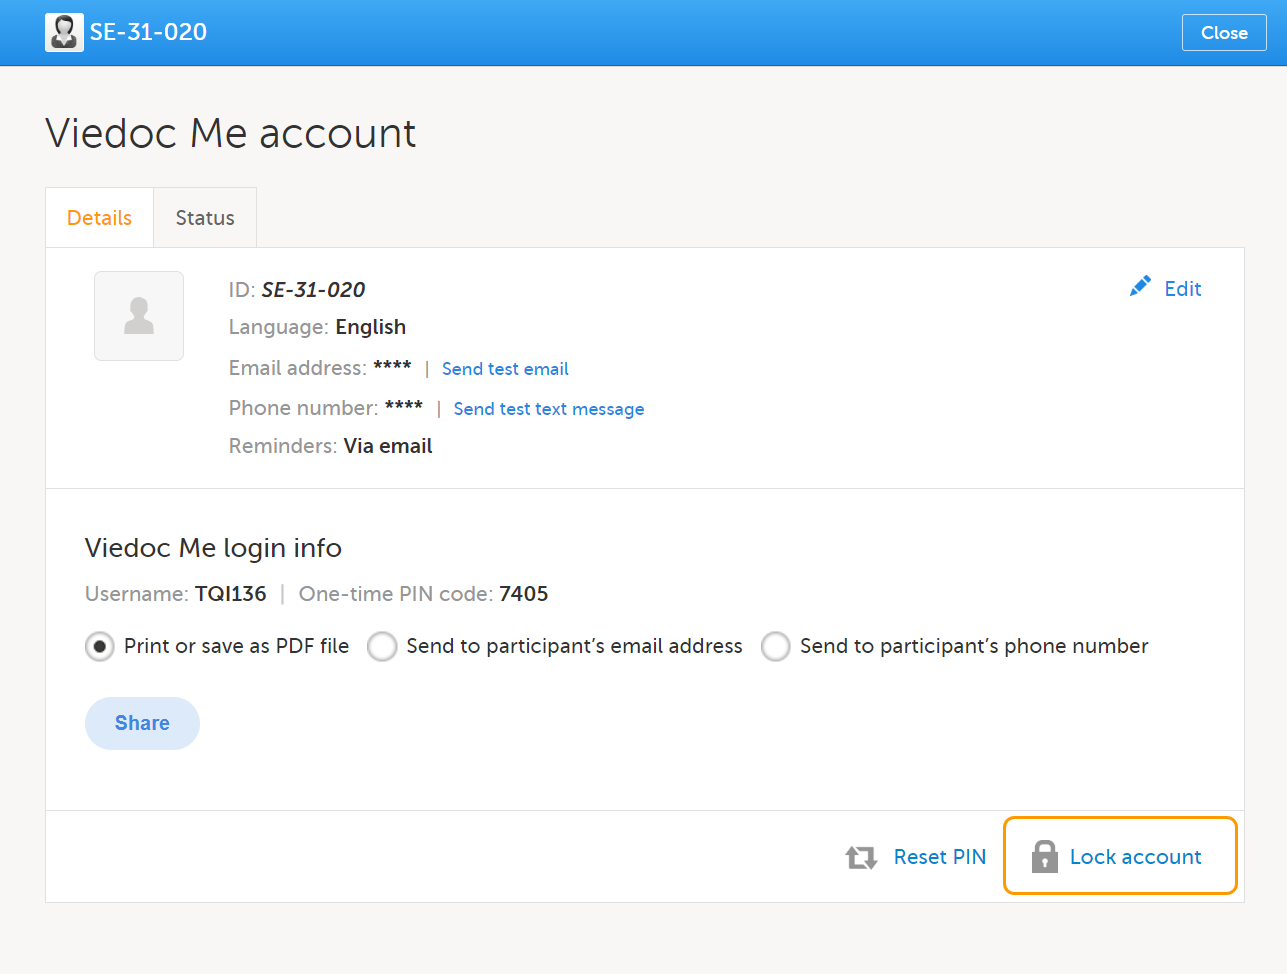
Locking and unlocking the Viedoc Me account
The Viedoc Me account can be locked/unlocked by selecting the Lock/Unlock account link in the Viedoc Me account details window:
Note! The account is automatically locked if the subject enters incorrect login details more than 3 times. If this occurs, an alert email is sent out with information about the locked account. The users that receive this email are site and monitoring staff, if their user role is configured with:
- access to the same site as the subject
- either data entry permissions and/or Clinical Review/SDV permissions, where data entry permissions is defined as any data entry permissions. and not only permissions for the study start event.
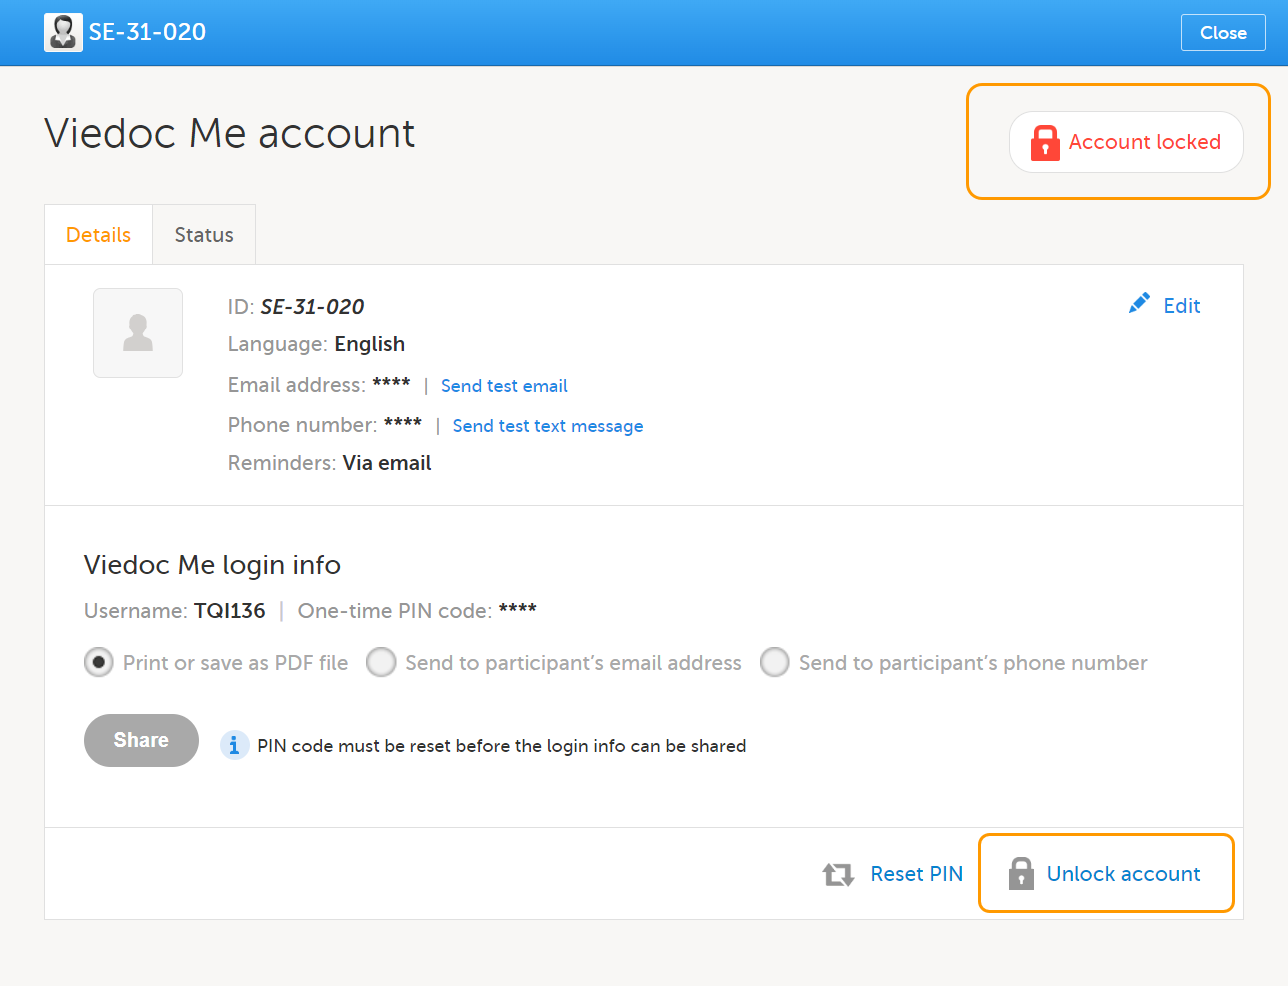
When the account is locked (either manually or automatically), this is marked by a red Account locked icon in the top-right corner of the Viedoc Me account details window. To unlock it, select the Unlock account link in the bottom-right corner:
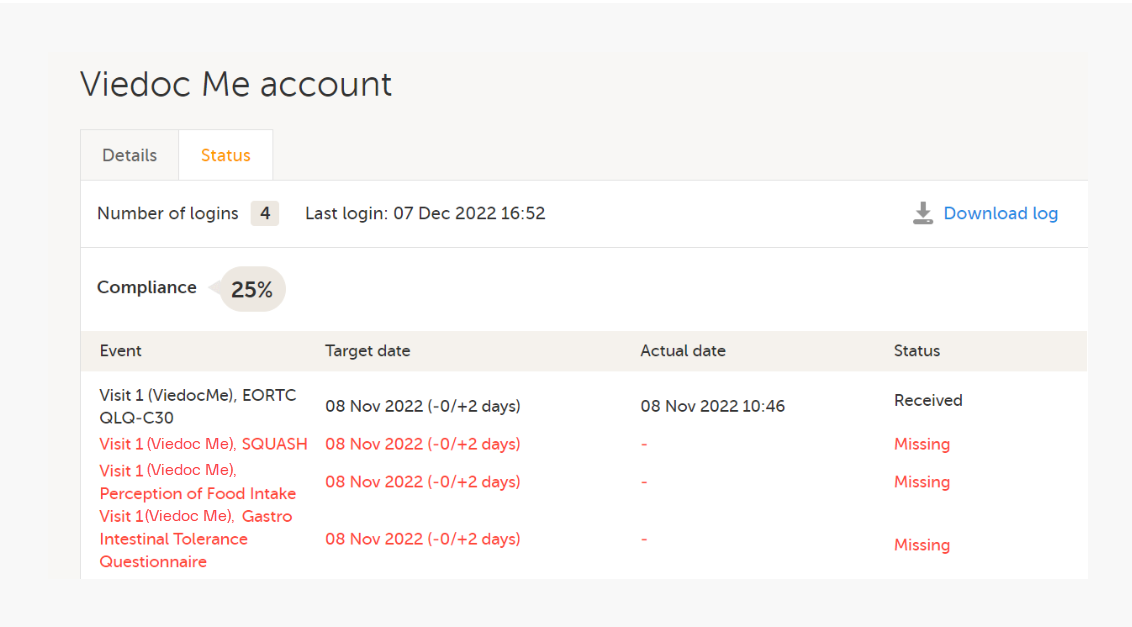
Checking the status and subject activity
You can check the Status tab of the Viedoc Me account window for status of incoming questionnaires and activity.
Here you can see how many times the subject logged in, when they last logged in, compliance, and when incoming questionnaires are expected:
Download log
All activities related to the Viedoc Me account can also be downloaded as an Excel file by selecting Download log.
The Excel file contains the following sheets: the Account Activities sheet and the Communication log sheet.
In the Account activities sheet, the following activities are saved, with the latest activity saved in the top row of the Excel file:
- Date*
- Time*
- Activity
- User name (site user at Clinic or subject)
- Submitted data/event name
- Submitted data/form name
- Submitted data/target date*
- Submitted data/actual date*
- Submitted data/status
- Login result
- PIN (Hashed)
- Change email (Hashed)
- Change phone (Hashed)
- Change reminder settings (email on/off, text message on/off)
*Date and time of the site
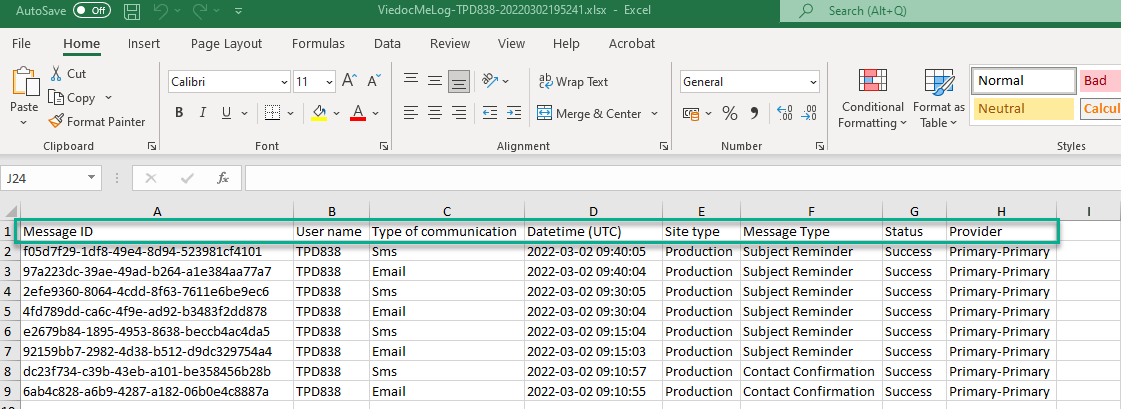
To the right of the Account activities sheet is the Communications log sheet which contains information about all the emails and SMS messages sent to that subject.
Note! Email and SMS communication logs before the Viedoc 4.70 release are available, however these do not have the same level of detail.
The Communications log contains the following information:
- Message ID - GUID
- User name - (as in Viedoc Me account)
- Type of communication - SMS/Email
- Datetime (UTC) - datetime for when the communication happened
- Site type - Training/Production
- Message Type - (Subject Reminder/Contact Confirmation)
- Status - Success/Failed
Note! Success means that the message was successfully sent from Viedoc, and Failed means that the message failed to send from Viedoc. Further, if the status was Success but the recipient did not receive a message, then the problem lies outside of Viedoc. Please contact your PS representative if this should occur, or if your status returns Failed. - Provider - Proxy (Primary/Secondary) - the provider that was used to send the message. (This information is used if needed for troubleshooting purposes).
Viedoc Me account overview
If applicable for your study, you can see an overview of the Viedoc Me accounts on the Selection page:
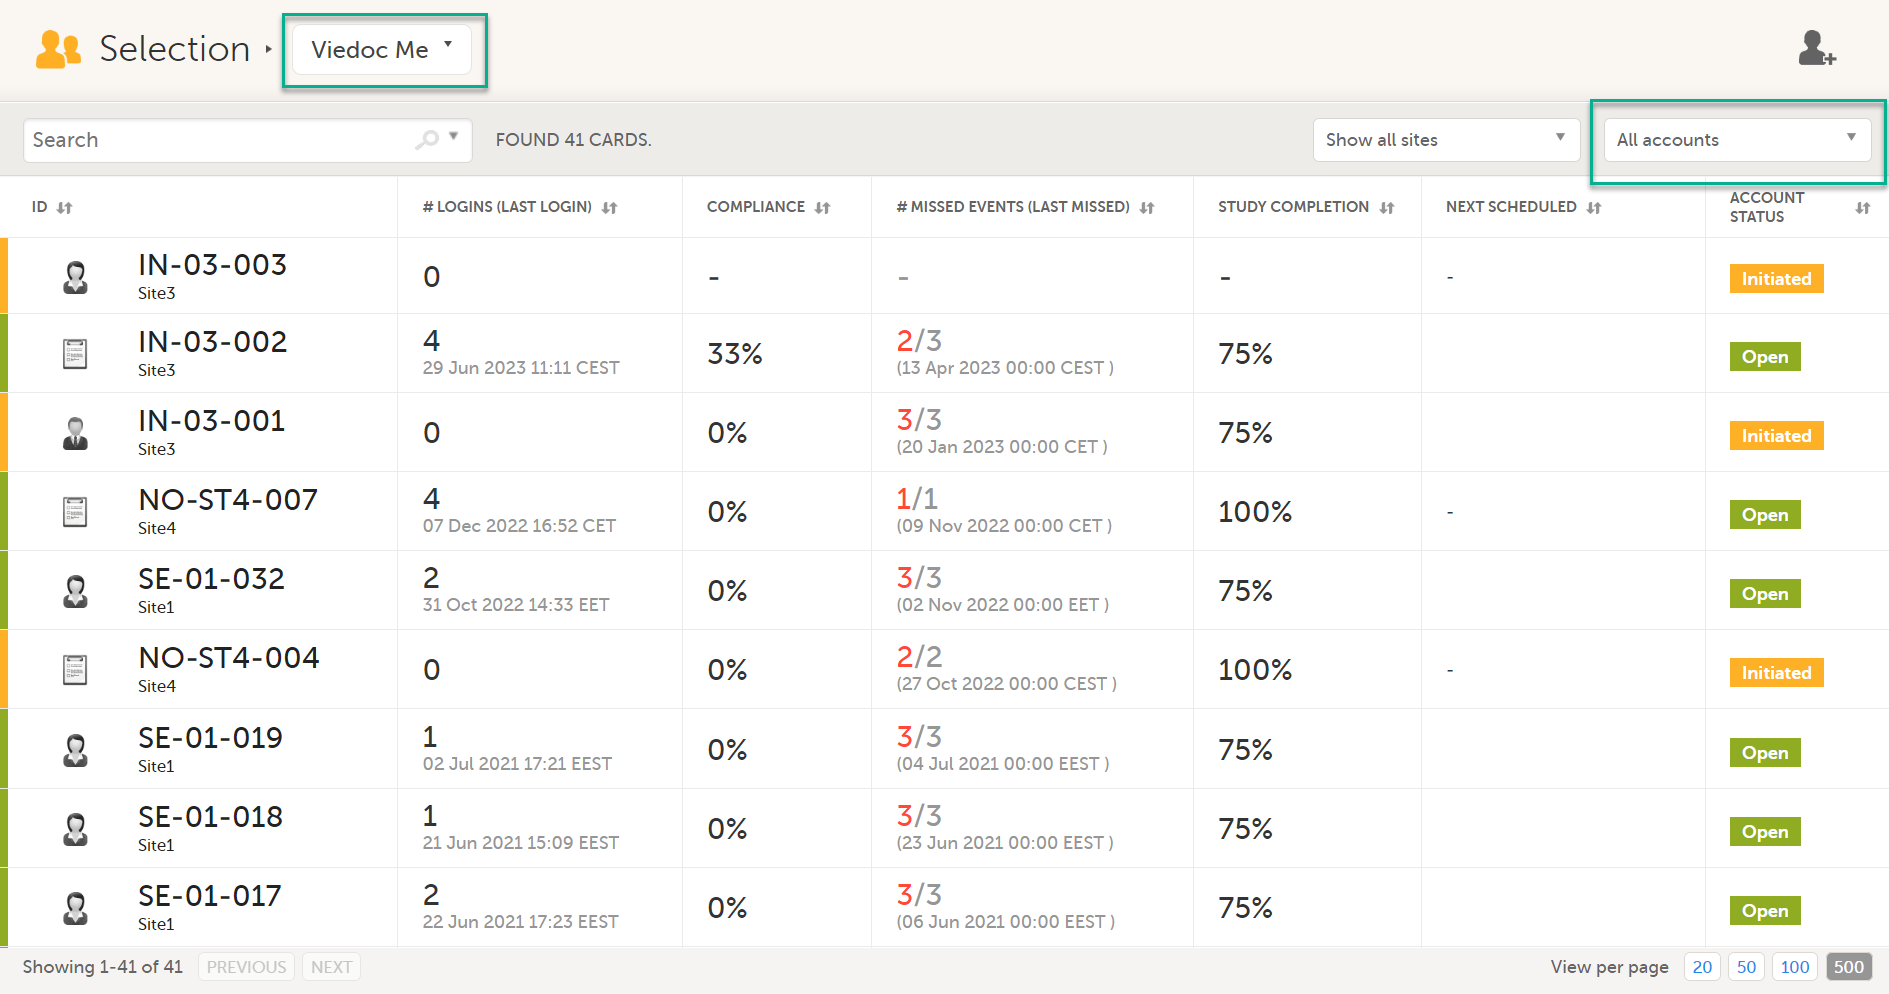
For more information, see Views on the Selection page in the lesson Selection page.