Viedoc SDV Manager
Introduction
This lesson describes the Viedoc SDV Manager application and the main tasks that can be performed in it.
The requirements on Source Data Verification (SDV) vary between clinical trials.
Viedoc SDV Manager allows you to define Source Data Verification requirements and plans and apply them selectively across study sites based on risk.
This is known as targeted SDV and is a part of Risk-based monitoring (RBM). Risk-based monitoring in clinical trials is a strategic approach that focuses monitoring activities on the most critical data and processes that affect participant safety and data integrity. It can use a combination of centralized and on-site monitoring, guided by risk assessment, to allocate resources more efficiently. The goal is to improve trial quality while reducing unnecessary effort and cost. For example, a site that is identified as high risk can be assigned a plan that requires site staff to perform additional verification of the data collected there. Once a site has been identified as lower risk, a new plan can be applied to the site with fewer required targeted items.
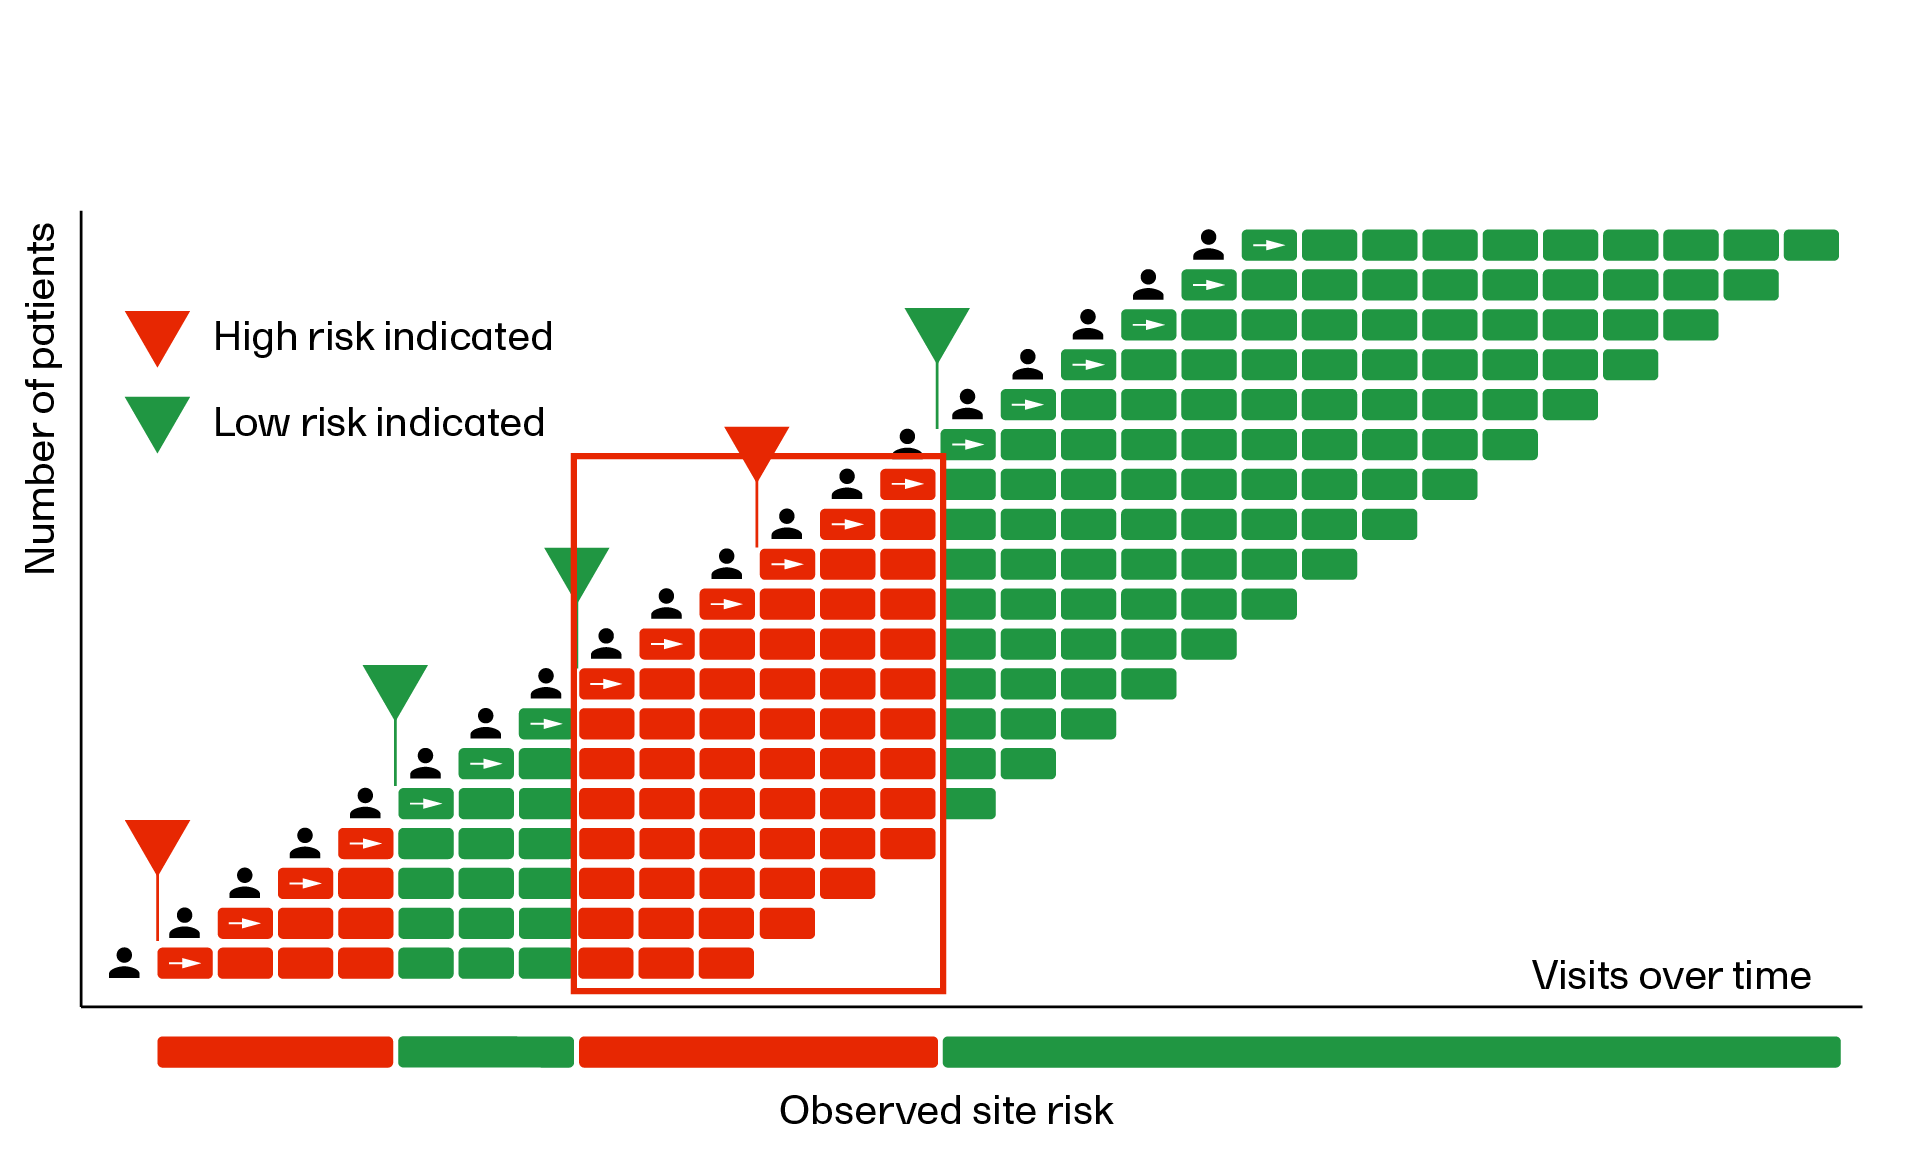
Below is a visual representation of how SDV plan assignments can change over time in response to site risk. Assigning a new plan will impact all events with an EventDate on or after the plan assignment date. This will allow you to use an SDV plan with more required SDV (shown in red below) when the risk is higher, and change to an SDV plan with less required SDV (shown in green below) when the risk is lower.
Overview
Note!
- All new studies (apart from PMS studies) from the Viedoc 4.95 release onwards will have the new Viedoc SDV Manager enabled by default.
- Existing studies will retain their current SDV settings, and have the option to update to the SDV Manager. Once the SDV Manager is enabled for a study, it cannot be reverted.
- In Viedoc 4.95, SDV requirements in reports are still read from the study design, regardless of whether SDV Manager is enabled. This will be corrected from Viedoc 4.96.
For information about performing SDV for older studies that are not using the Viedoc Source Data Verification SDV Manager application, please see Clinical review, SDV and lock.
SDV Manager role and permissions
The SDV Manager role is set up in Viedoc Designer and includes all of the below permissions. This role is intended for users responsible for managing the full SDV plan lifecycle. Individual permissions can also be assigned independently to other roles.
You can only access the Viedoc SDV Manager if permission to either view SDV plans, create/edit plans, publish plans, view plan assignments and assign plans to sites is activated for your user role in Viedoc Designer. If you do not see the SDV Manager icon on the study start page, your role does not include these permissions.
| SDV permissions | Description |
| View SDV plans | View existing plans and their rules. |
| Create/edit plans | Create new plans and edit, duplicate, delete and discard existing draft plans. |
| Publish plans | Publish draft plans and publish pending changes |
| View plan assignments | View the site assignments, plan timelines (evaluated on a per-site basis). |
| Assign plans to sites |
Assign published plans to sites (evaluated on a per-site basis). |
The purpose of an SDV plan is to define which forms and items require SDV and whether the verification is required or optional. SDV Plans can be assigned to one or multiple sites, and a site can have different plans assigned to it over time as its risk profile changes.
Note! A plan must be published before it can be assigned to study sites. For more information, see Working with SDV plans.
Launching SDV Manager
After logging in to Viedoc, you can access the SDV Manager application from the Study start page
User roles with the assigned SDV Manager permissions configured in Viedoc Designer can launch the SDV Manager application.
To launch SDV Manager:
|
1 |
On the study start page, select the SDV manager icon: |
|
2 |
The SDV Manager opens in a new browser tab. Depending on your user role and permissions, either the Plans page or the Site Assignments page is displayed: 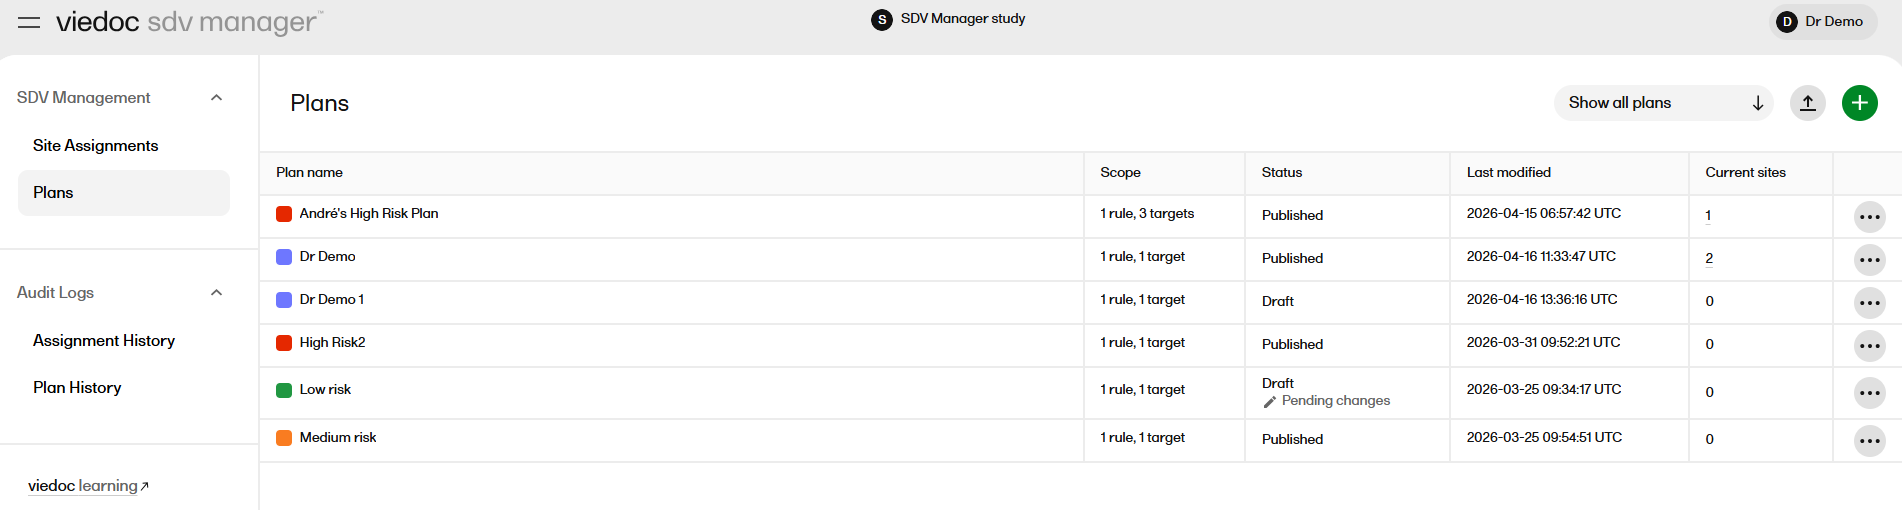

|
Working with SDV plans
This section describes how you can work with the SDV plans and site assignment pages in the SDV Manager.
The SDV plan that is applied to a subject is determined by the Event date set in Viedoc Clinic in combination with the SDV plan that is active (effective) for the site on that specific date.
This means that the applicable plan is dynamically selected based on the plan timeline. The system revalidates which plan applies when a new plan assignment is made, or if the Event date is changed.
In any SDV plan, different rules can target subjects based on the subject status, for example, screening failures. As a result, the applicable rule within the selected plan is also dynamically evaluated and will be rechecked whenever the subject’s status changes.
Plans page
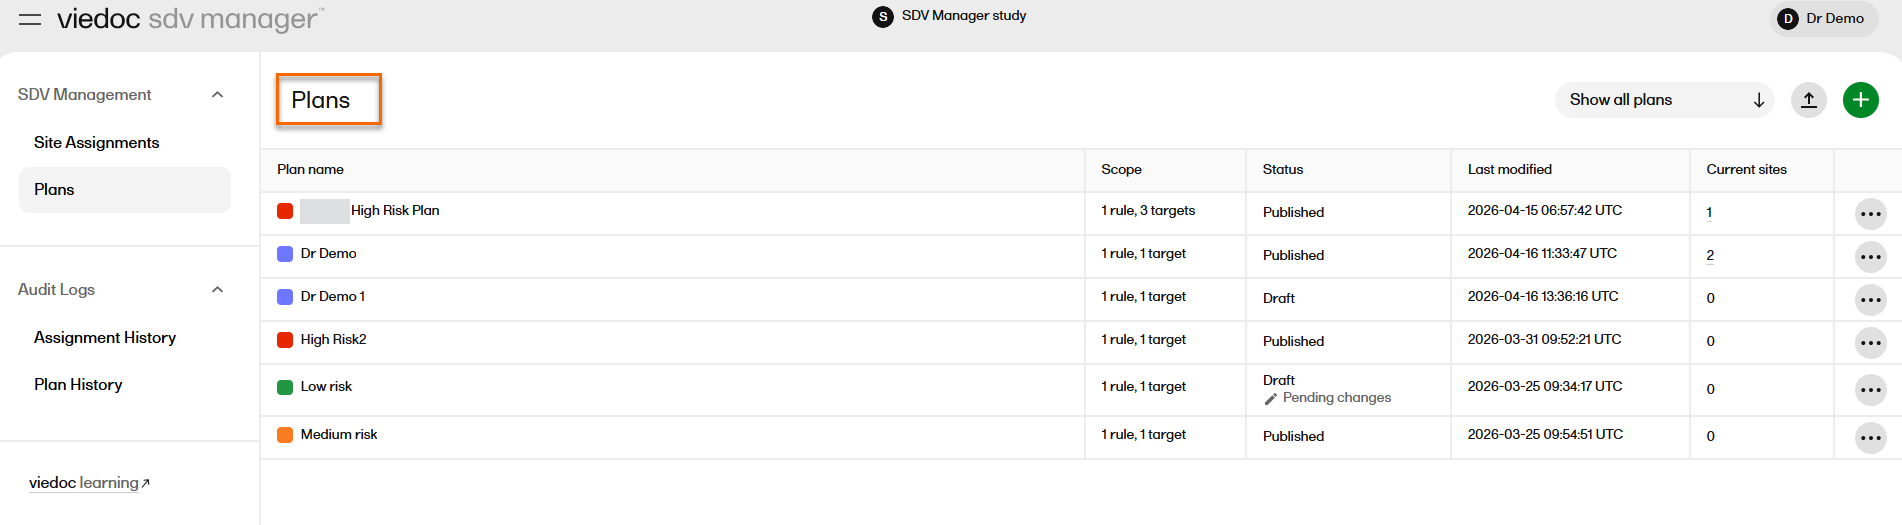
The Plans page is the main page for managing your SDV plans.
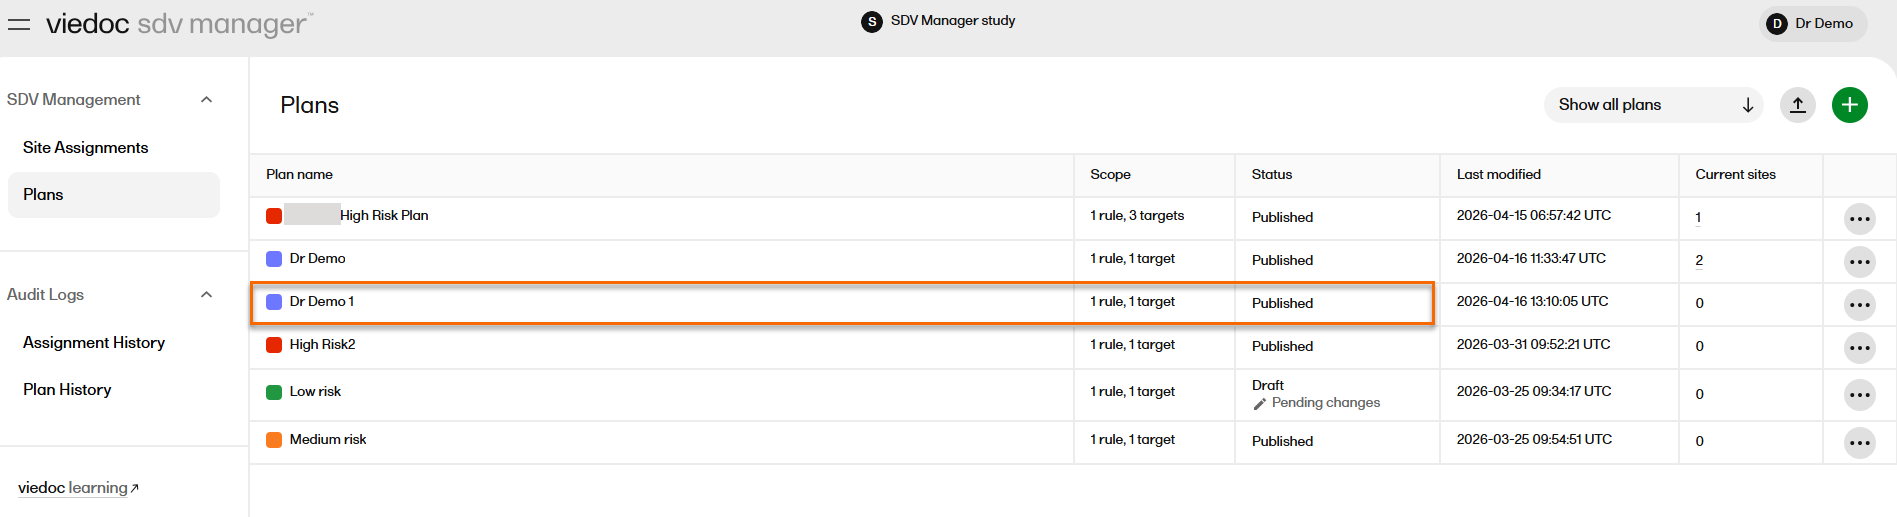
On the Plans page, you can view all of the SDV plans in your study, with the following information and actions:
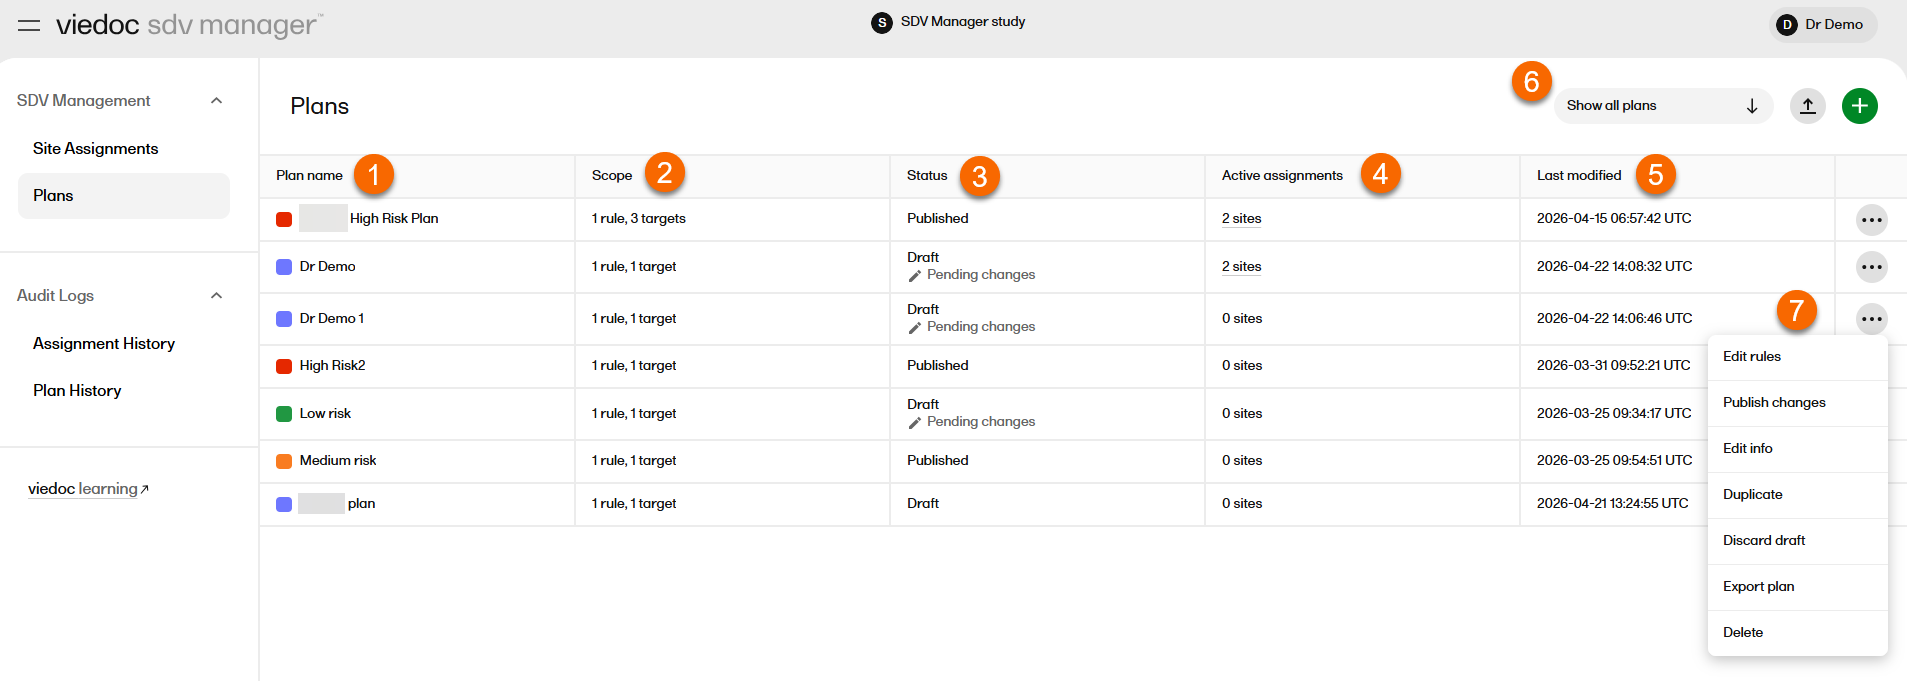
1.The Plan name: the name of the plan, displayed with a colored dot.
2.The Scope of the plan (number of rules and number of targets).
3.The plan Status (draft or published), or if the plan has pending changes.
4.The Active assignments: (the number of sites the plan is currently assigned to).
5. Last modified: The date and time the plan was changed shown as Datetime (UTC).
6. Filter to Show all plans or Show published plans. Plans are ordered by creation date, with the most recently created plan shown first. If you select Show published plans, the number of plans currently displayed out of the total is shown, for example: Showing 2 of 5 plans.
7. Select the ellipsis icon (...) to create new plans, edit rules, edit info, publish plans, publish changes, assign plans to sites, duplicate plans, discard drafts, delete plans and export a plan.
Note! A plan with a draft status that has previously been published may also have a Pending changes label.
The indicator signals that the plan has unpublished edits while sites may still be running on the last-published version.
Each plan row has the ellipsis icon (…) with further options depending on the plan status:
- Publish plan: opens a confirmation dialog to publish the plan (shown only for draft plans)
- Assign plan: opens a dialog to assign the plan to sites (shown only for published plans)
- Edit rules: navigates to the plan detail/rules view
- Edit info: opens a dialog to edit name and description
- Publish changes: opens a confirmation dialog to publish the plan's pending changes (shown only for Draft plans)
- Duplicate plan: duplicates the plan
- Discard draft: opens a confirmation dialog to discard the draft changes
- Export plan: exports the SDV plan to a JSON file format.
- Delete plan: opens a confirmation dialog to delete the plan
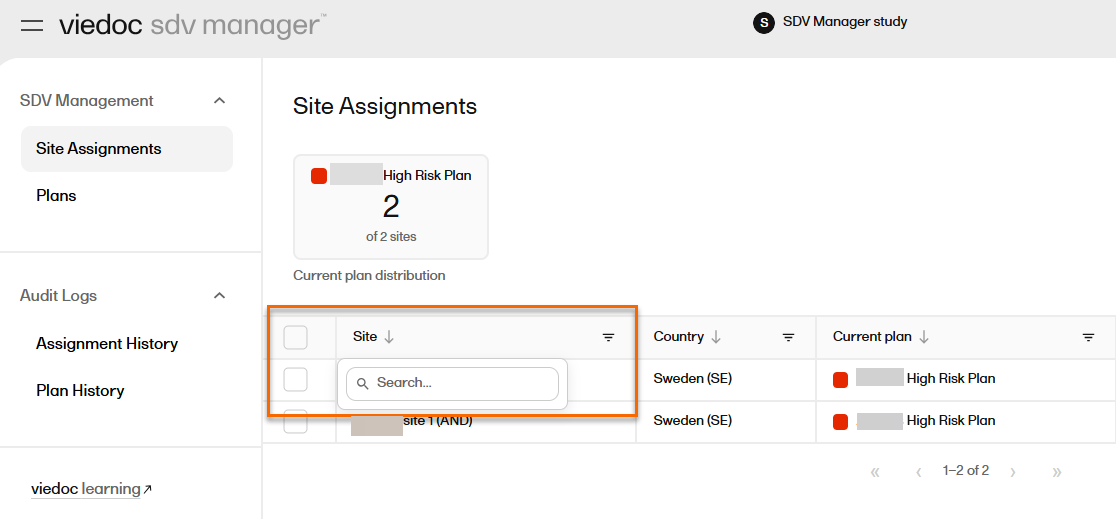
Site assignments page
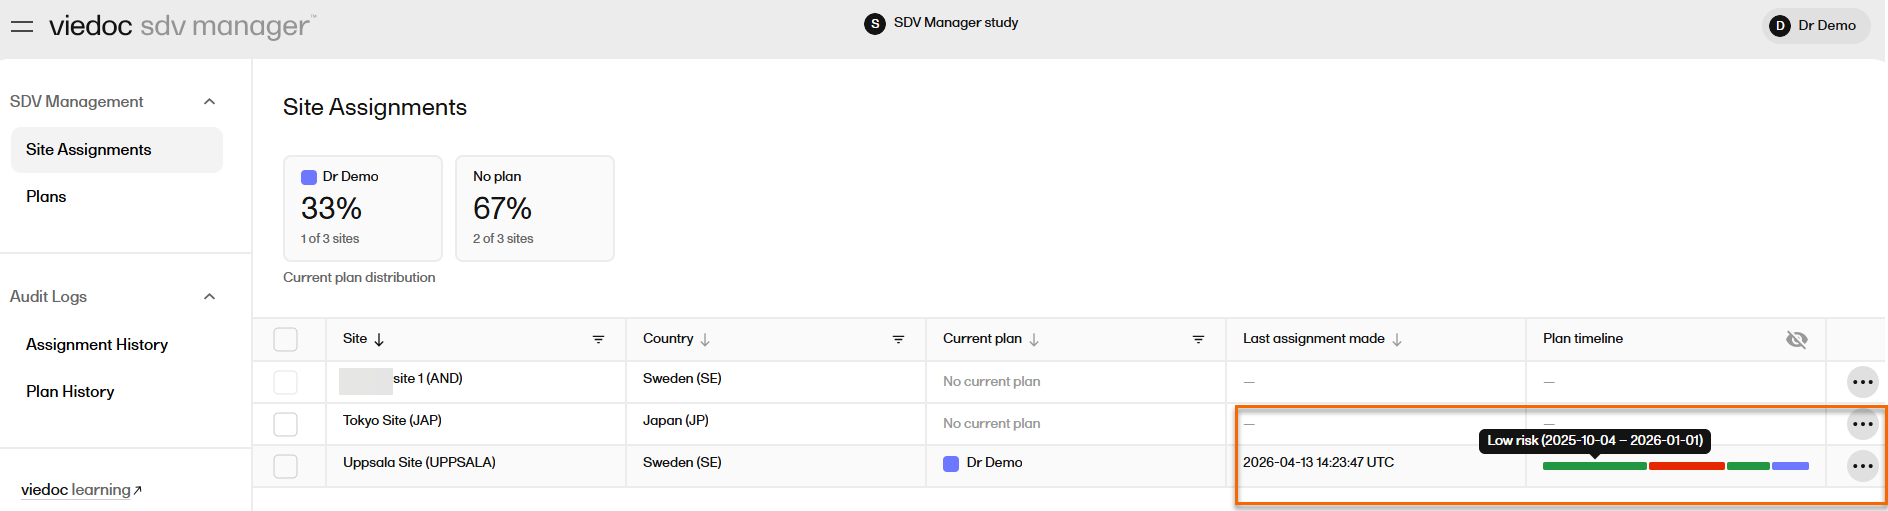
On the Site Assignments page, you can assign plans and view which SDV plans are assigned to each site in your study in a table. The table contains the following columns:
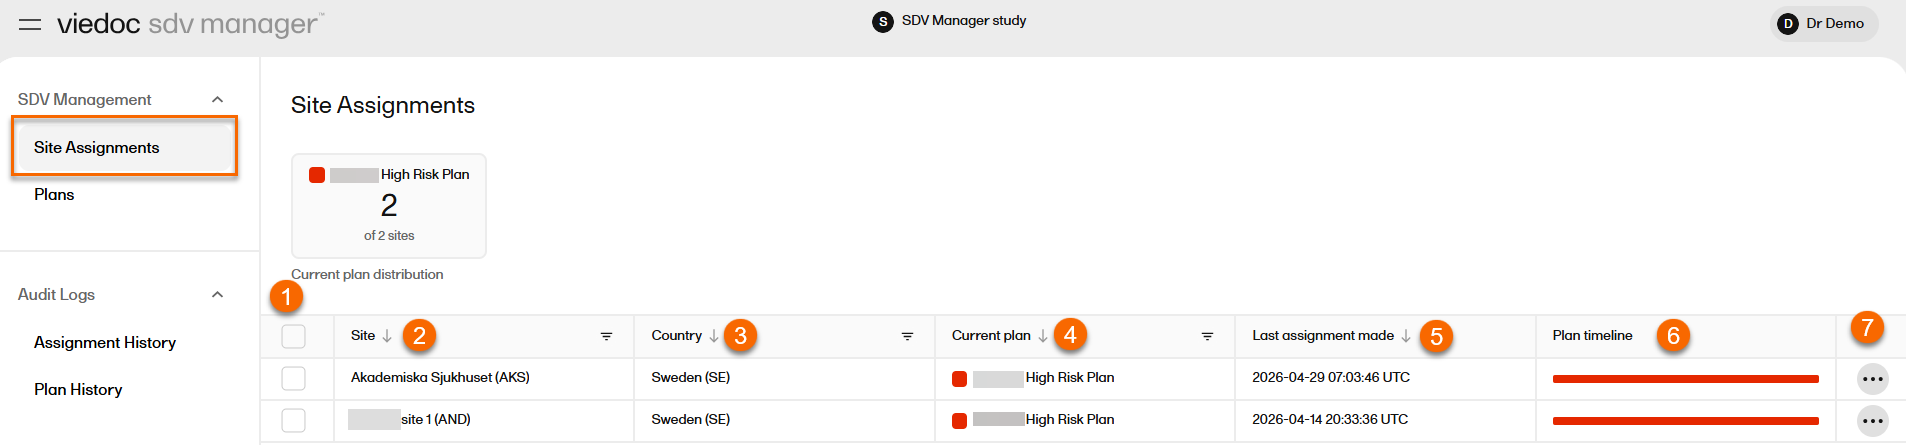
1. Checkbox: Select to assign a plan for single site or multiple sites.
2. Site: Site name and code, formatted as Site Name (CODE).
3. Country: Country name and code, formatted as Country (CODE).
4. Current plan: Plan color code and plan name; displays No current plan if no plan is assigned.
5. Last assignment made: The date and time of the most recent assignment change.
6. Plan timeline: Timeline bar with color-coded segments with size reflecting assignment duration. The timeline column also has an eye icon. You can select the eye icon to toggle between hide or show scheduled assignments.
7. Ellipsis icon (…) with the actions Assign plan and View timeline options.
On the site assignments page, you can:
1. Sort by Site (default site code name ascending, with the option to sort by site name in alphabetical order), Country, Current plan, and Last assignment made.
Regardless of sort direction, sites without:
- An assigned plan always sorts last on the Current plan column.
- A last modified date always sorts last on the Last assignment made column.
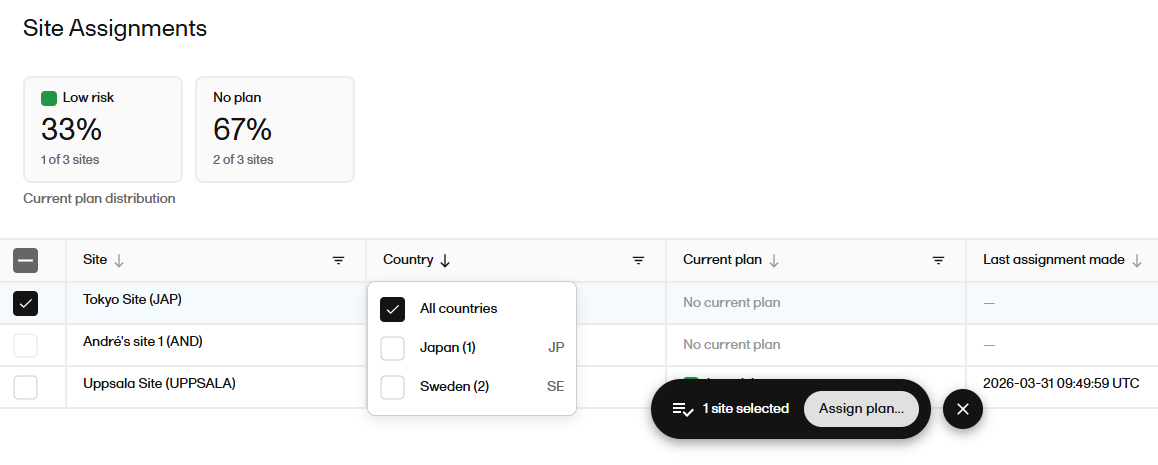
2. Filter by Site/Search, Country, and Current plan. You can select individual sites or site groups for actions such as assigning a plan.
- Site/search: case-insensitive text search matching the site name or site code.
- Country: unique countries in the site list, with site count per country.
- Current plan: dropdown built from unique assigned plans, with site count per plan.
When filters are active, the count is shown below the table: Showing X of Y sites
3. Use the checkbox to toggle all visible (filtered) sites. A selection toolbar appears when 1+ sites are selected, showing {count} site(s) selected" and the Assign plan button:
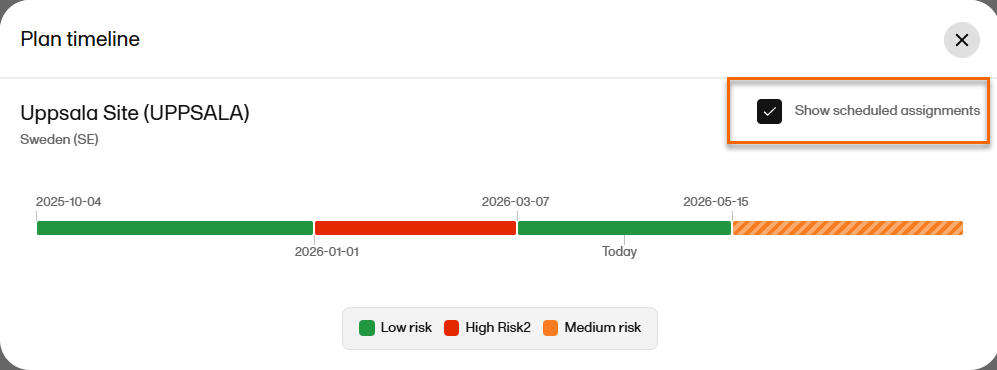
4. View the Plan timeline bar
Each site row shows a Plan timeline bar with color-coded segments representing plan assignments. The width of the segment is proportional to assignment duration.
- Hover over a segment to view a tooltip:
{Plan Name} ({from date}–{to date or 'Present'}. - If the site has no assignment history, "—" is shown.
You can either select a plan timeline on the colored bar, or select the ellipsis icon (…) to view the timeline.
Selecting the ellipsis icon (…) opens a dialog with the assignment dates and a checkbox to show scheduled assignments:
Current plan distribution
The plan distribution summary above the site assignments table shows you how SDV plans are allocated across sites as selectable cards. The cards show one card per currently assigned plan, with the plan name, color, and count (X of Y sites):
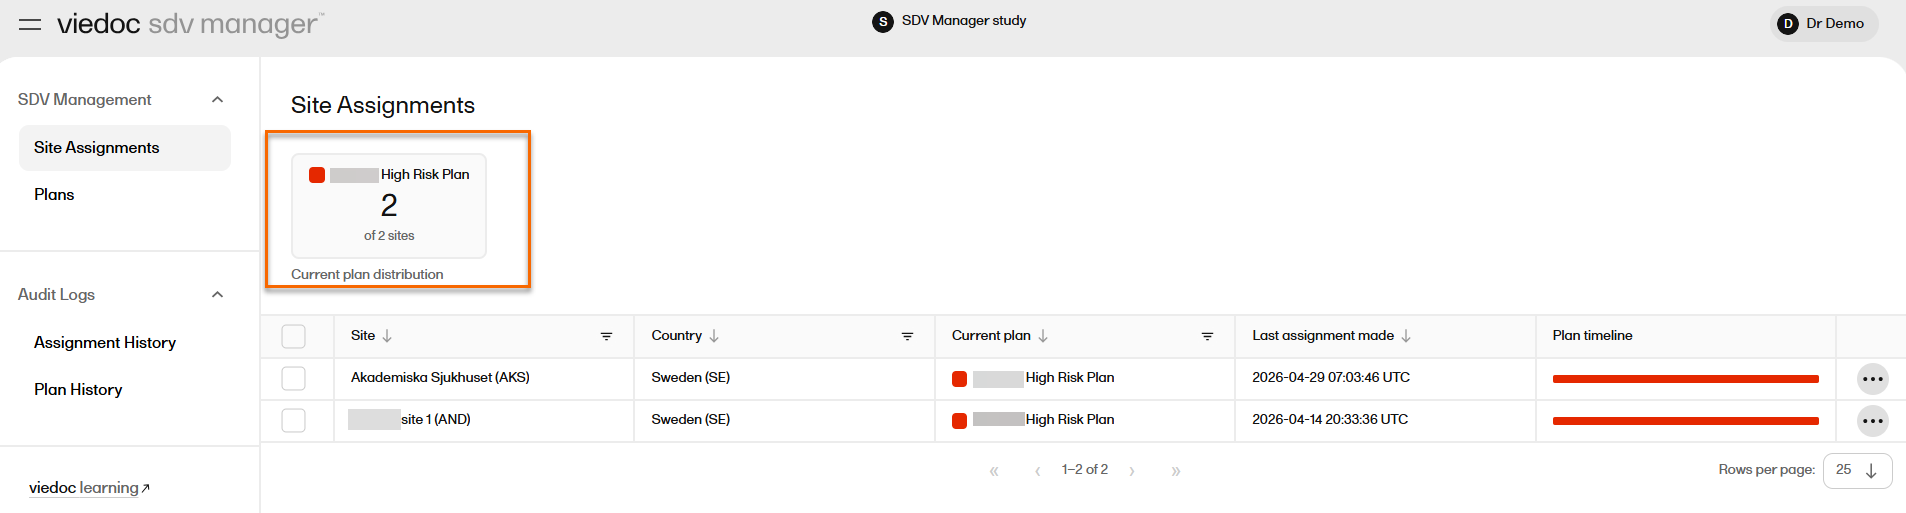
A No plan card is shown if any sites are unassigned.
Selecting a plan card filters the site table to show only sites with that plan.
Creating a new SDV plan
To create an SDV plan:
|
1 |
On the Plans page, select the plus icon, Add new plan: 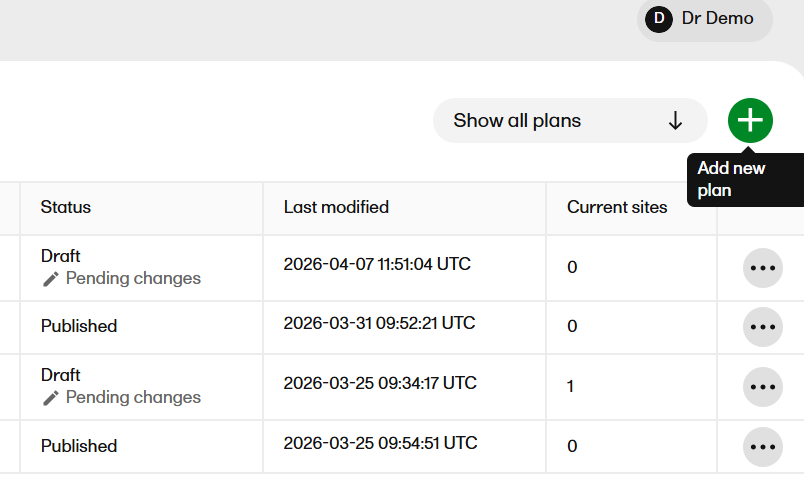
|
|
2 |
The Create SDV plan dialog opens: 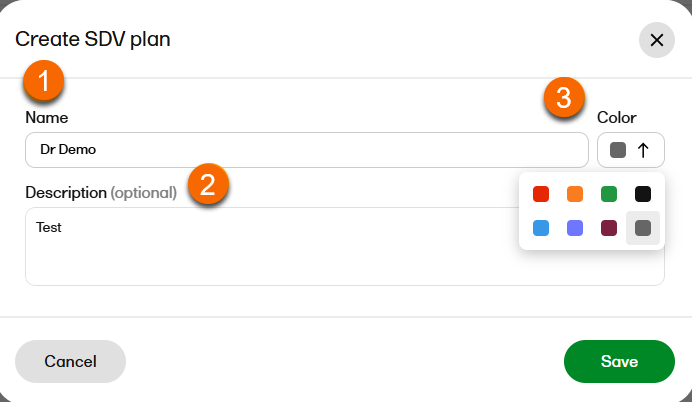
Here you can: 1. Add a unique name, up to a maximum of 200 characters. 2. Add an optional plan description, up to a maximum of 2000 characters. 3. Select a color for your plan. This will be used to visualize the plan in the plan timeline. |
|
3 |
The Edit SDV plan page opens. 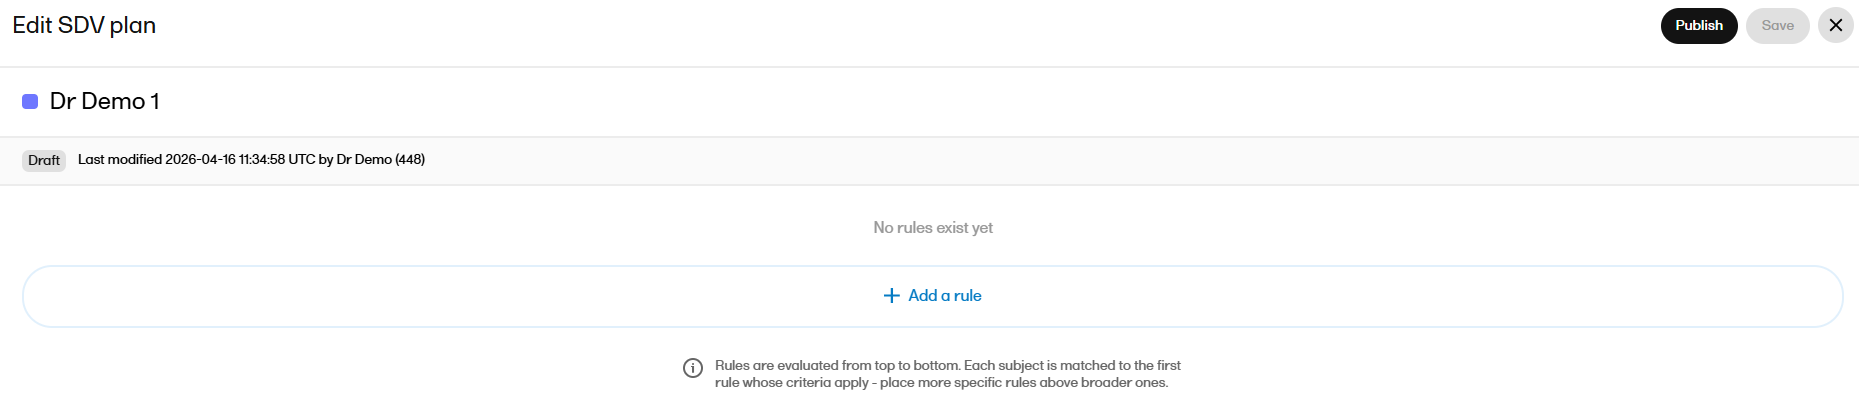
|
| 4 |
Start adding your rules to the plan. Select Add a rule: 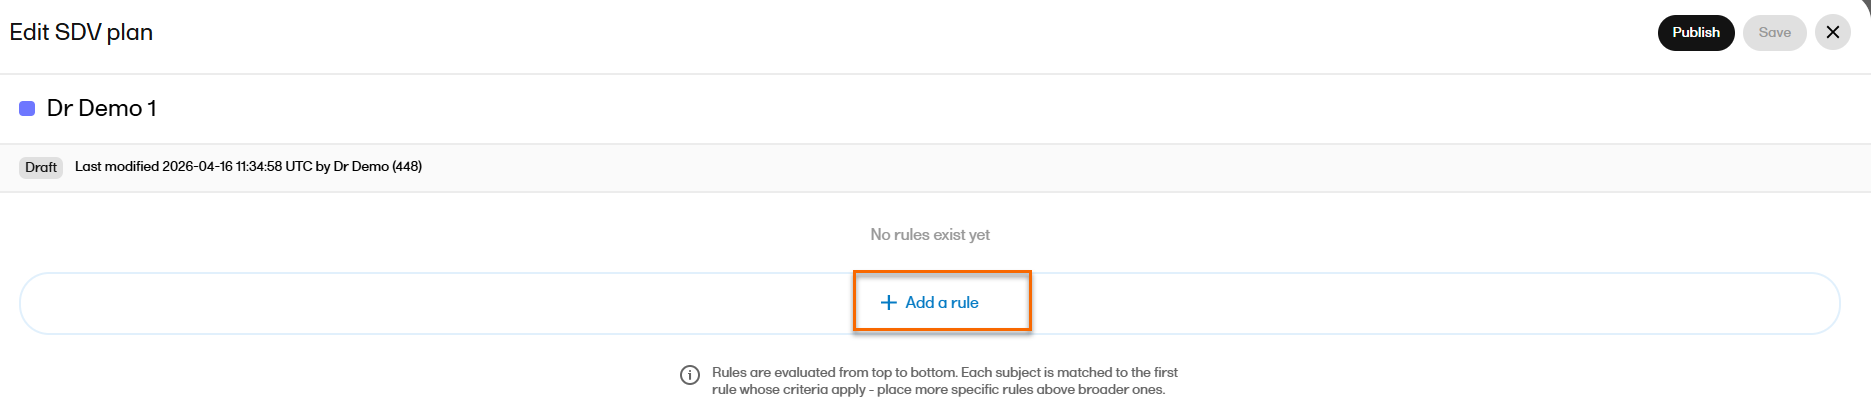
Note! Each rule must have a name, a subject Filter type, and at least one target. Under Subject criteria, select Filter type to select either All subjects or Subject status. Subject criteria sets which subjects this rule applies to. All subjects means the rule targets every subject in the study. You can also filter by subject status (e.g., Enrolled, Screened, Withdrawn, and Screening failure) to apply SDV rules only to specific subject populations. 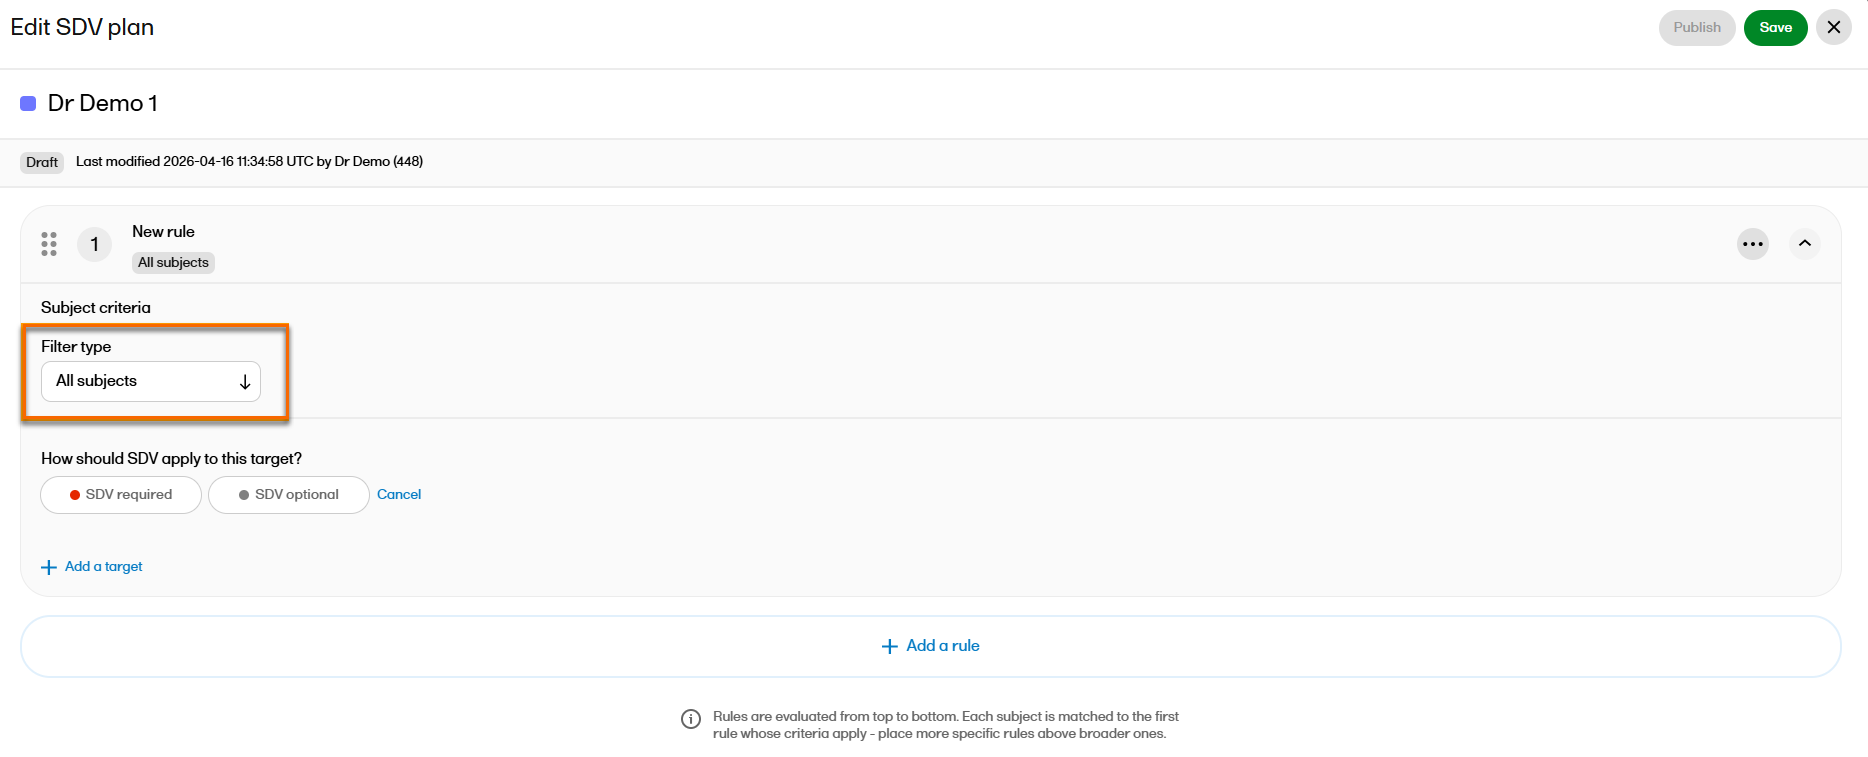
|
| 5 |
When using Subject status, at least one status must be selected: 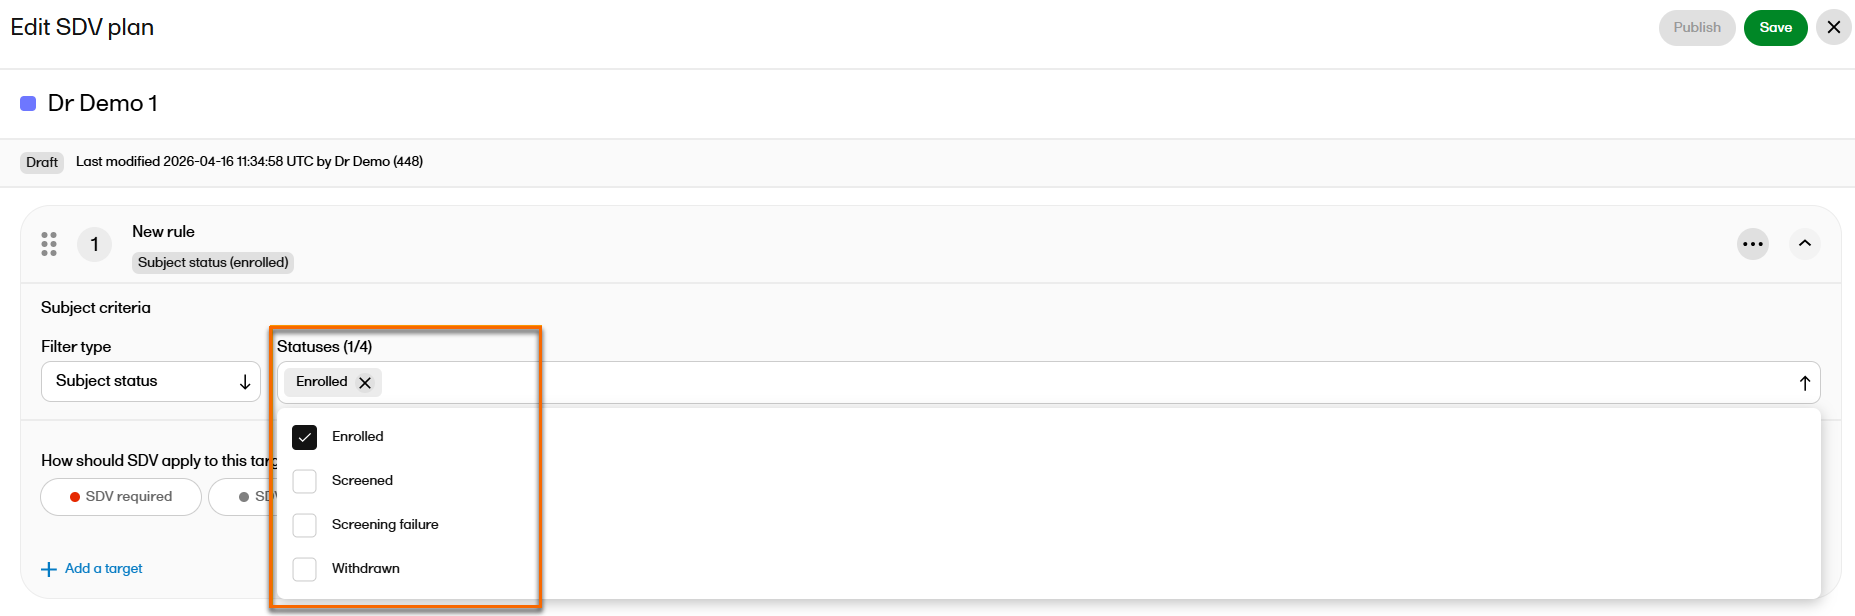
|
| 6 |
Select Add a target. Define how SDV should apply to the target. You can select either SDV required, or SDV optional. 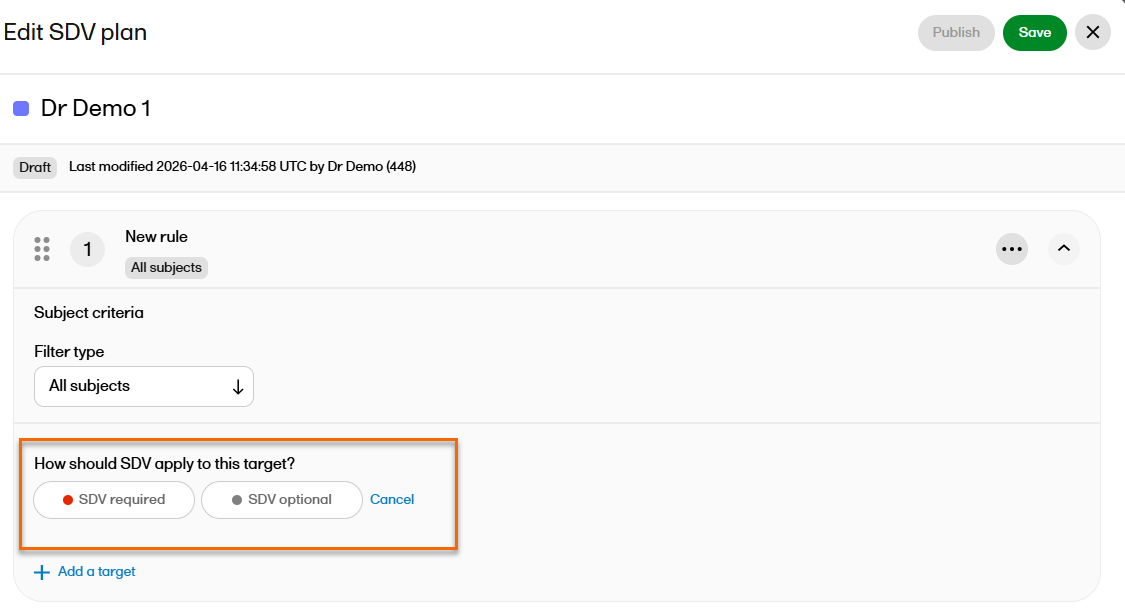

|
| 7 |
In the Target selection field, select elements from the following dropdown menus to decide where you want SDV required or SDV optional to be applied: 1. Forms and items: Sets the target to specific forms and items. Default is set to All current and future where all forms and items are selected automatically. Selecting the down arrow opens a searchable list of all available forms and items. You can select one or more forms individually, or select the checkbox Select all to include all forms and items. Note!

2. Events and activities: Sets the target to specific study events and activities. Default is set to All current and future where all events and activities are selected automatically. Selecting the down arrow opens a searchable list of all available events. You can select one or more events and activities individually, or use Select all to include all events and activities. 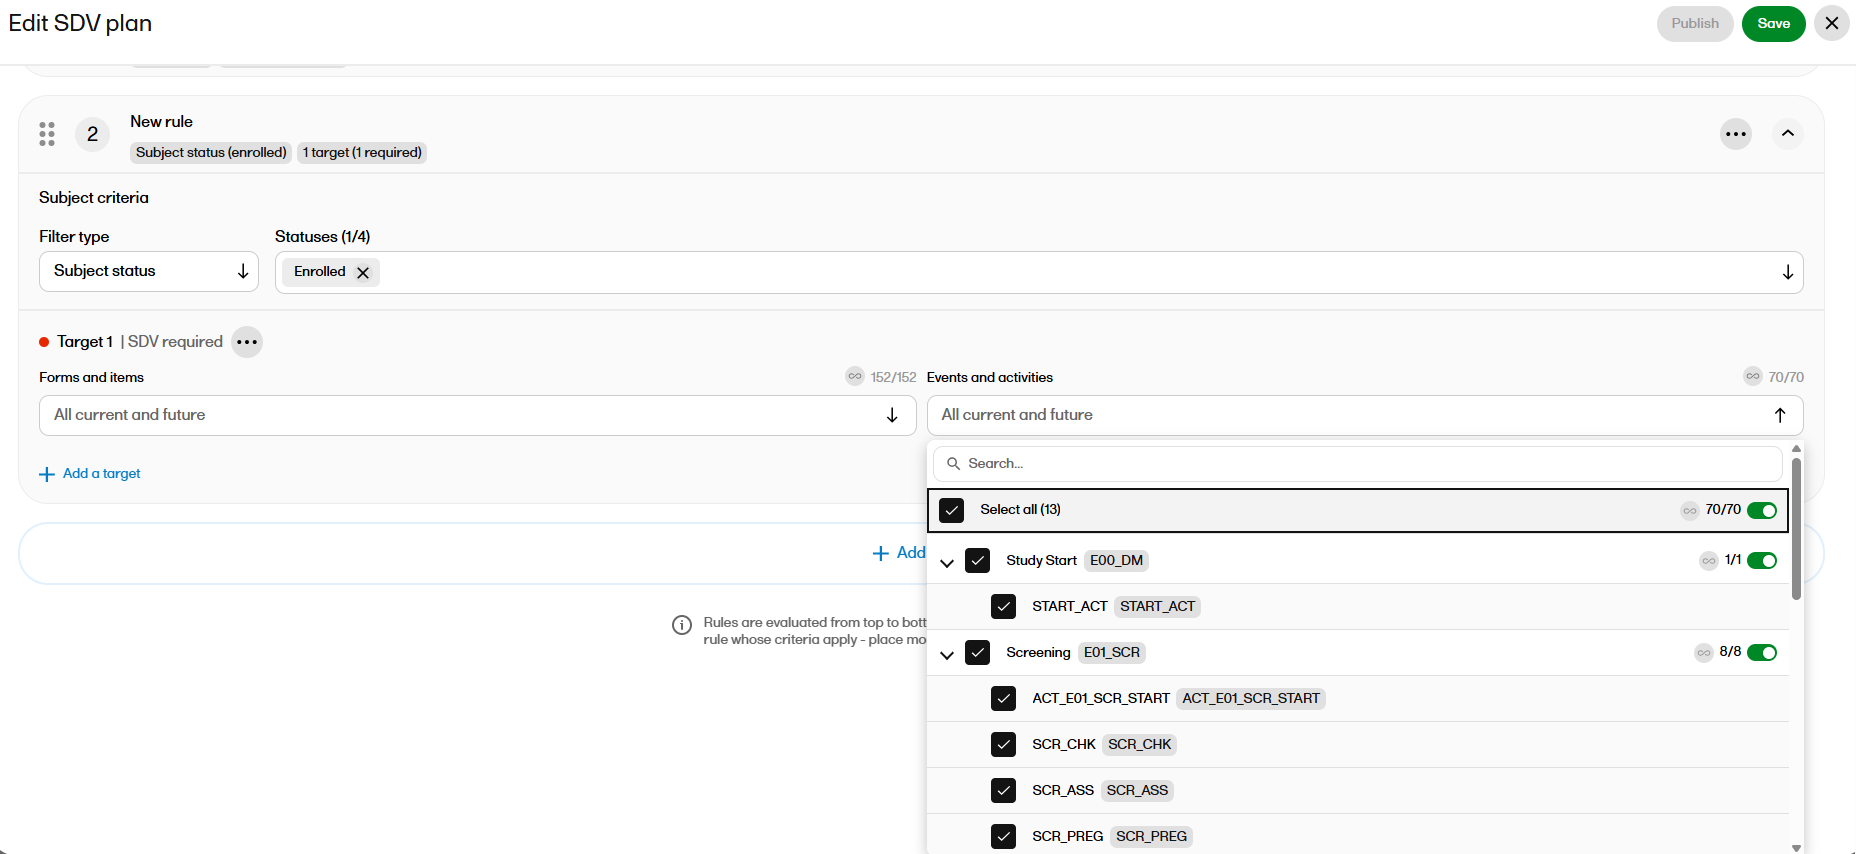
Note!
Select Save. |
| 8 |
You can publish the saved plan from the Edit SDV plan page.
|
Publishing a plan from the plans page
You must publish a plan before you can assign it to a site or sites and for it to take effect at that site(s).
Note! You can only publish a plan in Draft status with at least one defined rule.
To publish an SDV plan from the Plans page:
| 1 |
Select the ellipsis icon (…) A dropdown appears. Select Publish plan: |
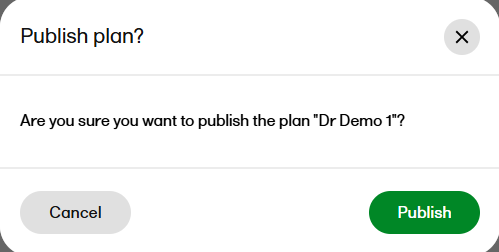
| 2 | 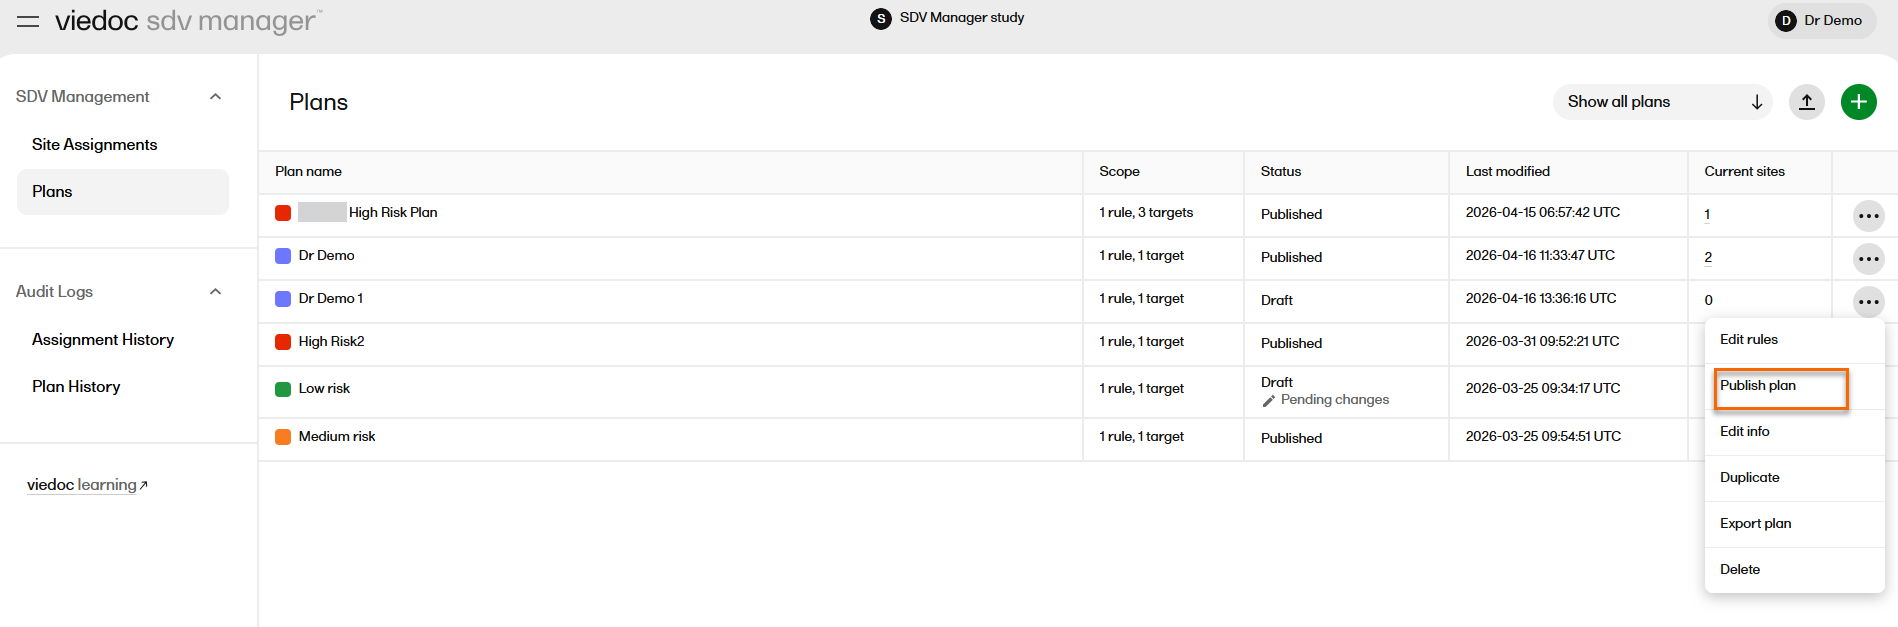 A confirmation message is shown. Select Publish: 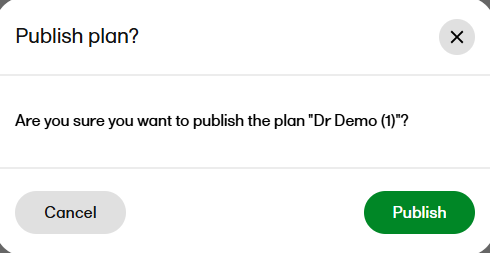 |
Once the plan has been published:
- The plan version is incremented.
- The plan list or plan detail view refreshes to reflect the new status.
- If the plan has been modified by another user since it was loaded the plan can not be published. An error message is shown: Plan is already in Published status.
Assigning a plan to a site
Once the plan is published, you must assign it to one or more sites. If a plan has unpublished changes, the latest-published plan version will be used. Assigning a plan determines which SDV rules apply to a site and how SDV requirements are generated for subjects at that site. The assignment includes an effective date that determines when the plan takes effect.
A site can have multiple plan assignments over time, forming a Plan timeline. The Current plan for a site is determined by the most recent effective date that is not a future date. Assigning a plan to a site that already has assignments adds a new entry to the site's plan timeline.
Sites are shown in alphabetical order, and you can search for a site by selecting the filter symbol on the Site column:
Plans can be assigned from both the Plans page and the Site Assignments page.
To assign a plan from the Plans page:
| 1 |
Select the ellipsis icon (…) on the row of a published plan. A dropdown appears. Select Assign plan: 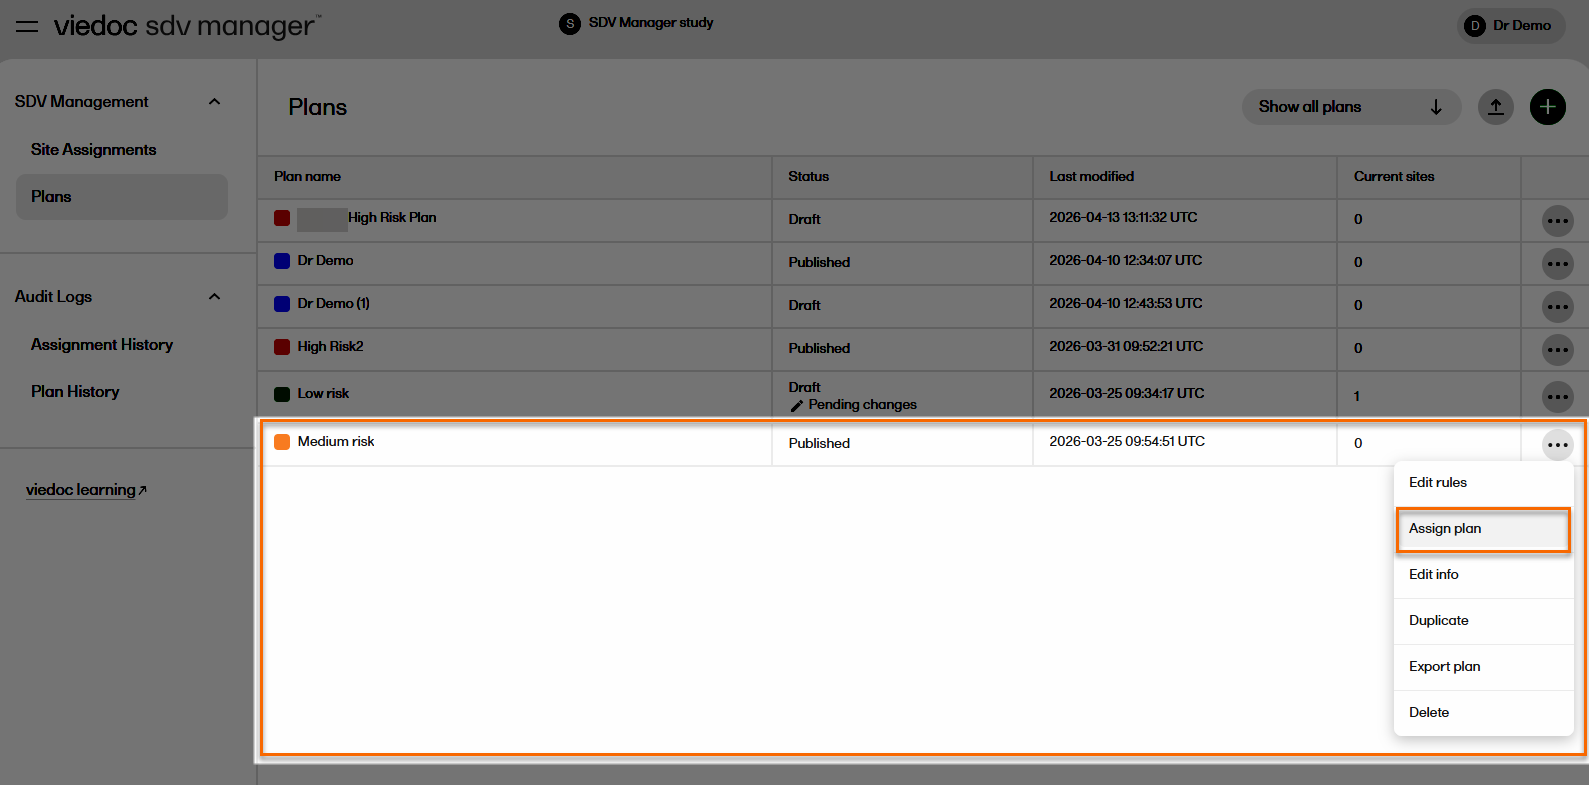
|
| 2 |
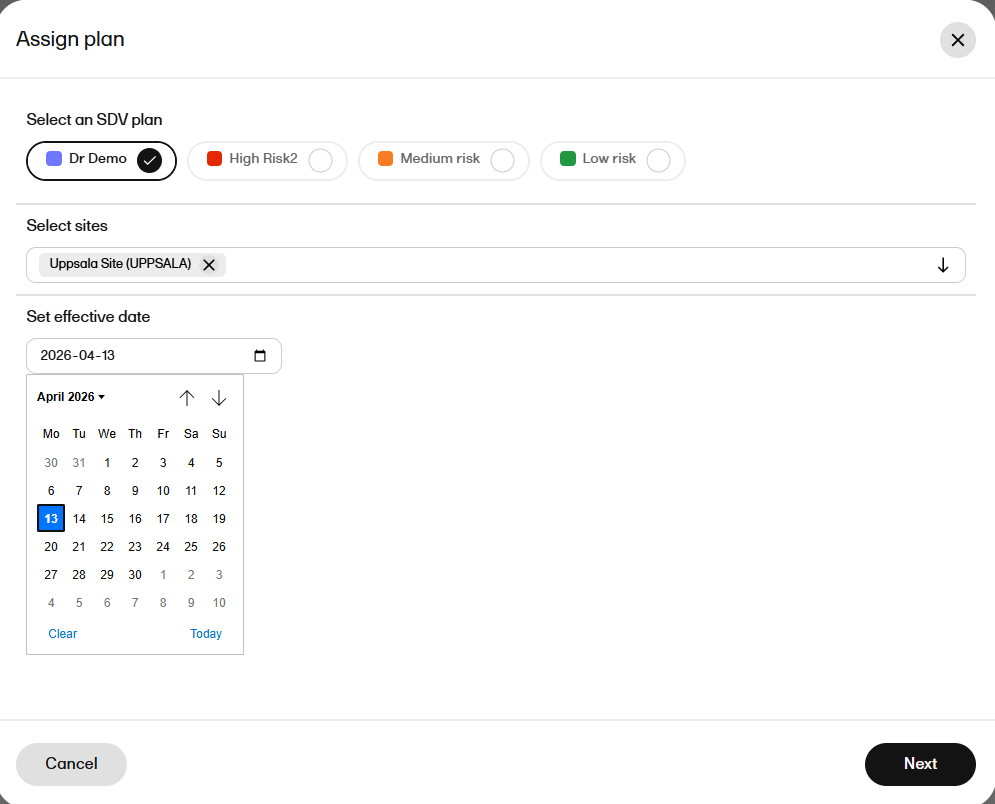
The Assign plan dialog appears: 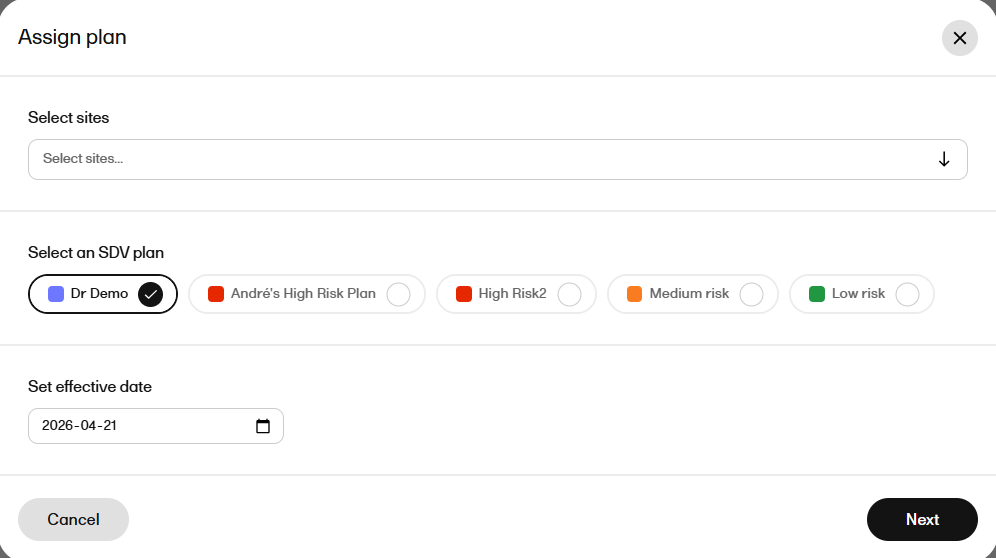
|
| 3 |
Under Select sites, choose to Search, Select all or select one or more sites: 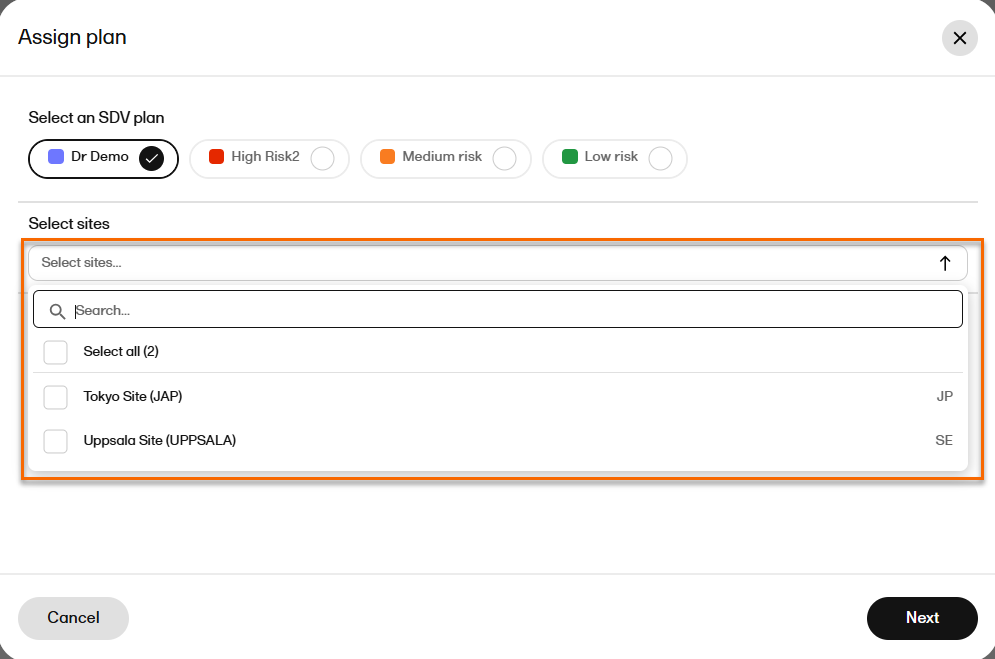
|
| 4 |
Select Next. You are asked to Set effective date: |
| 5 |
Select Next. A confirmation dialog appears: 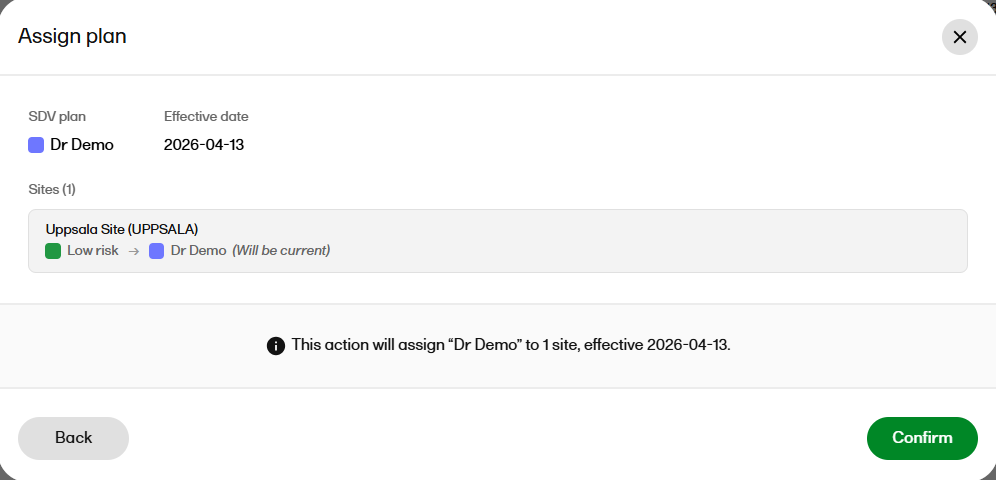
|
| 6 | Select Confirm to confirm the plan assignment to the site(s)
On the Site Assignments page you can now view: The current plan distribution. You can hover over the Plan timeline to see the date range applied to the plan(s): The ellipsis icon (...) for further actions remains available, so you can update the plans assigned to the site. For example, you may want to assign a different level of SDV plan from a certain date. |
To assign a plan from Site Assignments:
| 1 |
You can: 1. Select the uppermost checkbox to assign all sites or select individual checkboxes for one or more sites. 2. Select the ellipsis icon (…) on the row of a published plan. |
| 2 |
After selecting the checkbox(s) Select Assign plan 
|
| 3 | After selecting the ellipsis icon (…), Select Assign plan |
| 4 |
Selecting either option opens the Assign plan dialog: 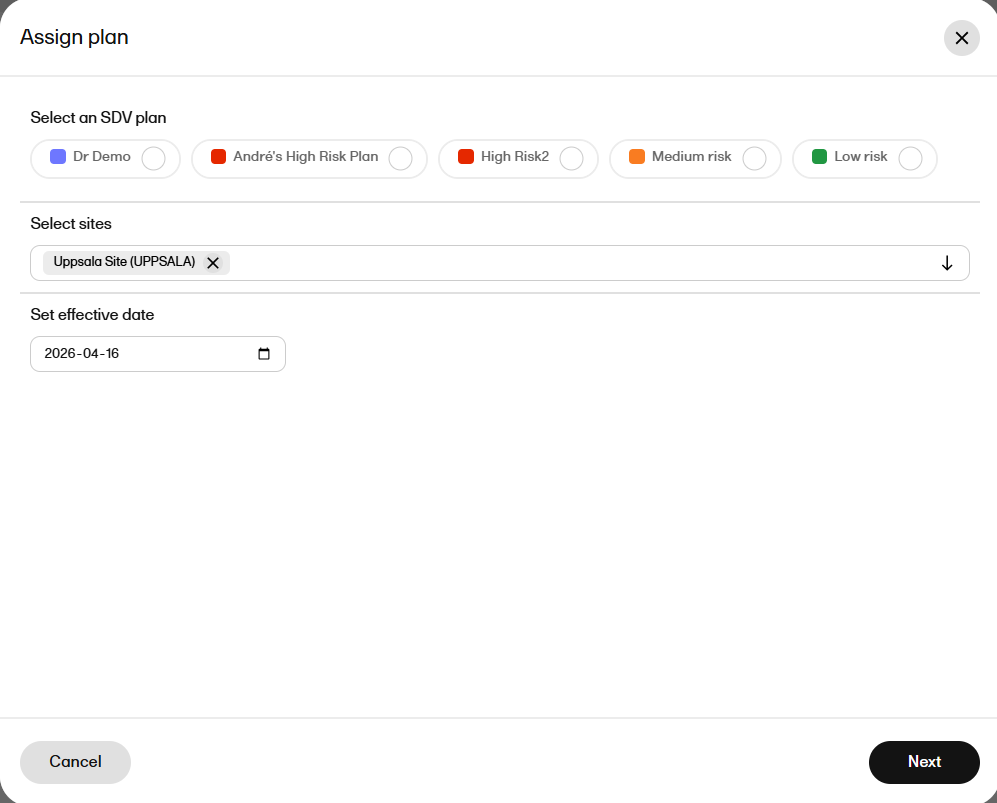
|
| 5 |
Select the plan and site you want to assign the plan to and select Next. A confirmation message is shown. Select Confirm. 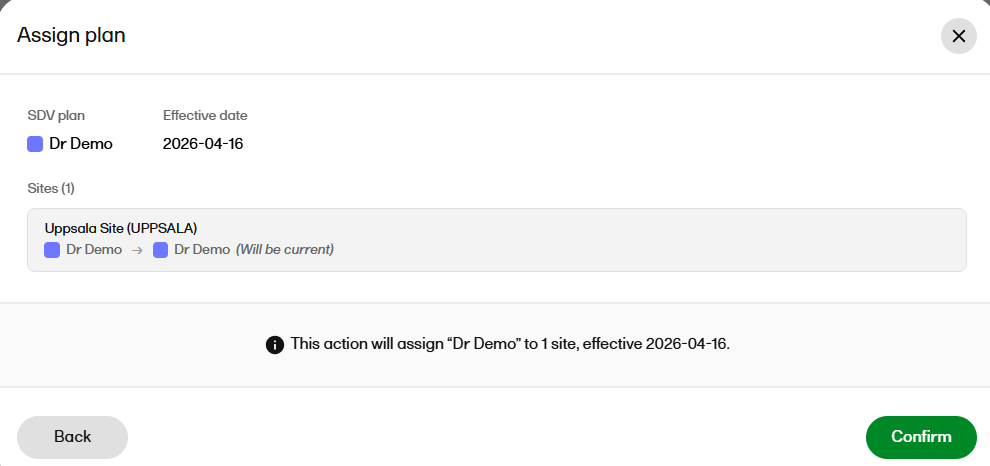
|
Editing an existing SDV plan
You can edit an existing SDV plan's information and the plan rules.
When editing rules, you can manage the complete set of rules that define the SDV requirements. Each rule has a name, subject filter criteria, a priority, and one or more targets that specify which study design elements (Forms and Items, Events and Activities) are subject to SDV and whether the verification is required or optional.
You can add, rename, remove and reorder (by dragging-and-dropping) rules. Rules are saved all at once - the entire rule set is replaced.
Note! If a published plan's rules are changed, the plan automatically reverts to Draft status.
To edit a plan's information:
| 1 |
On the Plans page list, select the ellipsis icon (…) on the plan row and select Edit info. 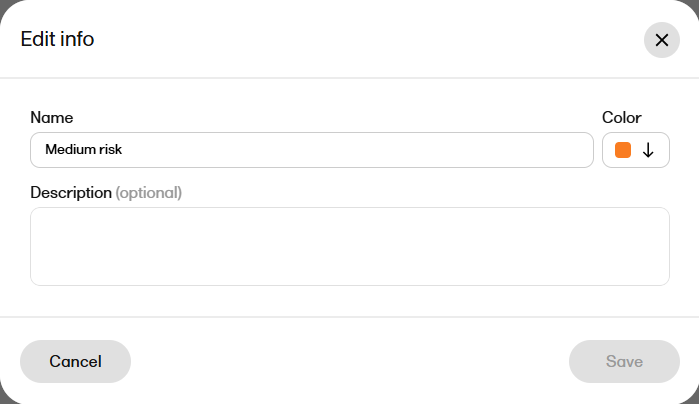
Edit the Name and Description as required. |
| 2 | Select Save. The plans list refreshes to reflect the changes and the plan version is incremented. Note! The status of the plan remains the same- editing the plan's information does not revert a Published plan to a Draft plan. |
To edit a plan's rules:
| 1 |
You can either:
|
|
| 2 |
The Edit SDV plan dialog opens: 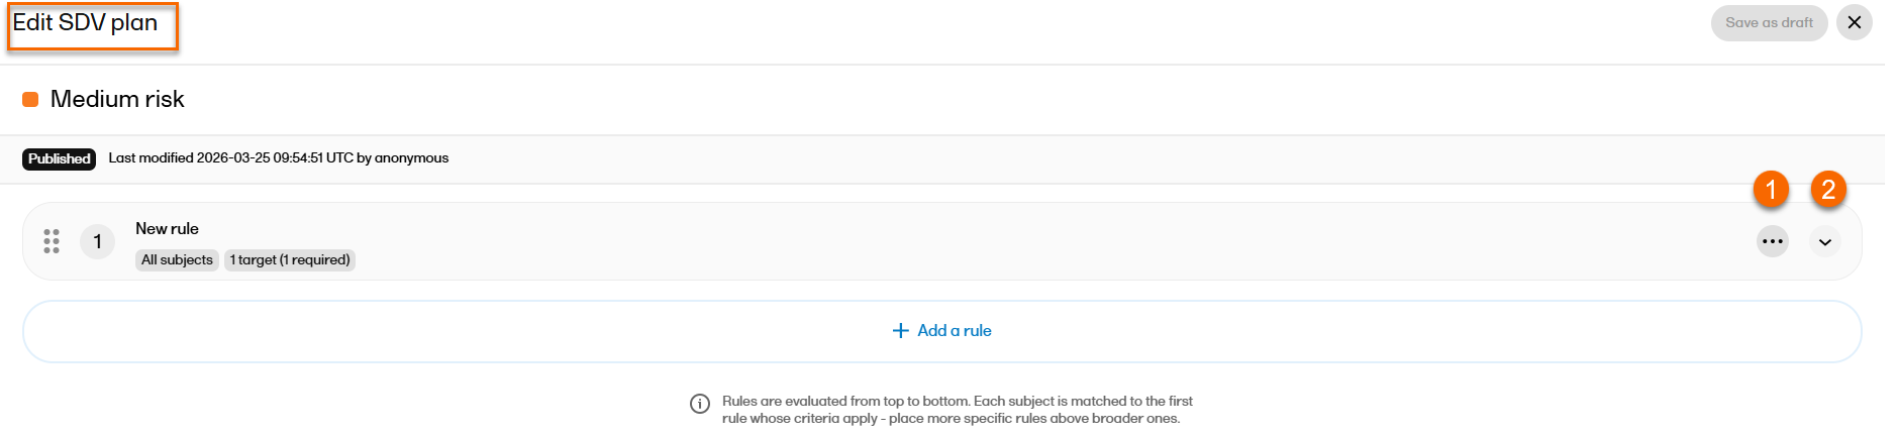
You can: 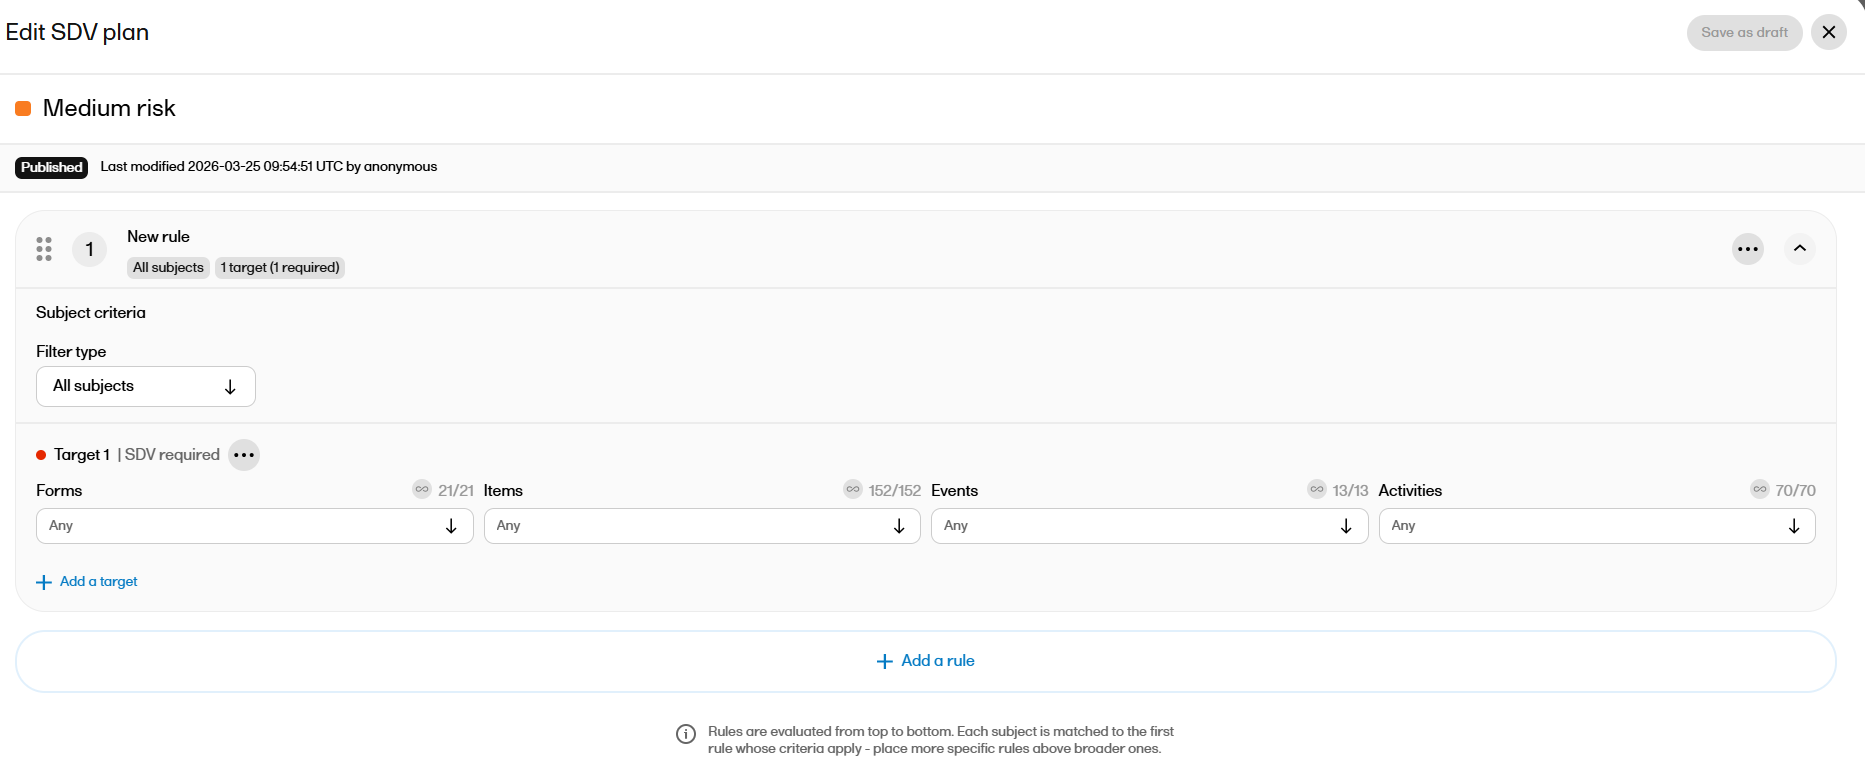
|
|
| 3 |
You can choose to: 1. Update the Filter type, under Subject criteria to All subjects or Subject status. 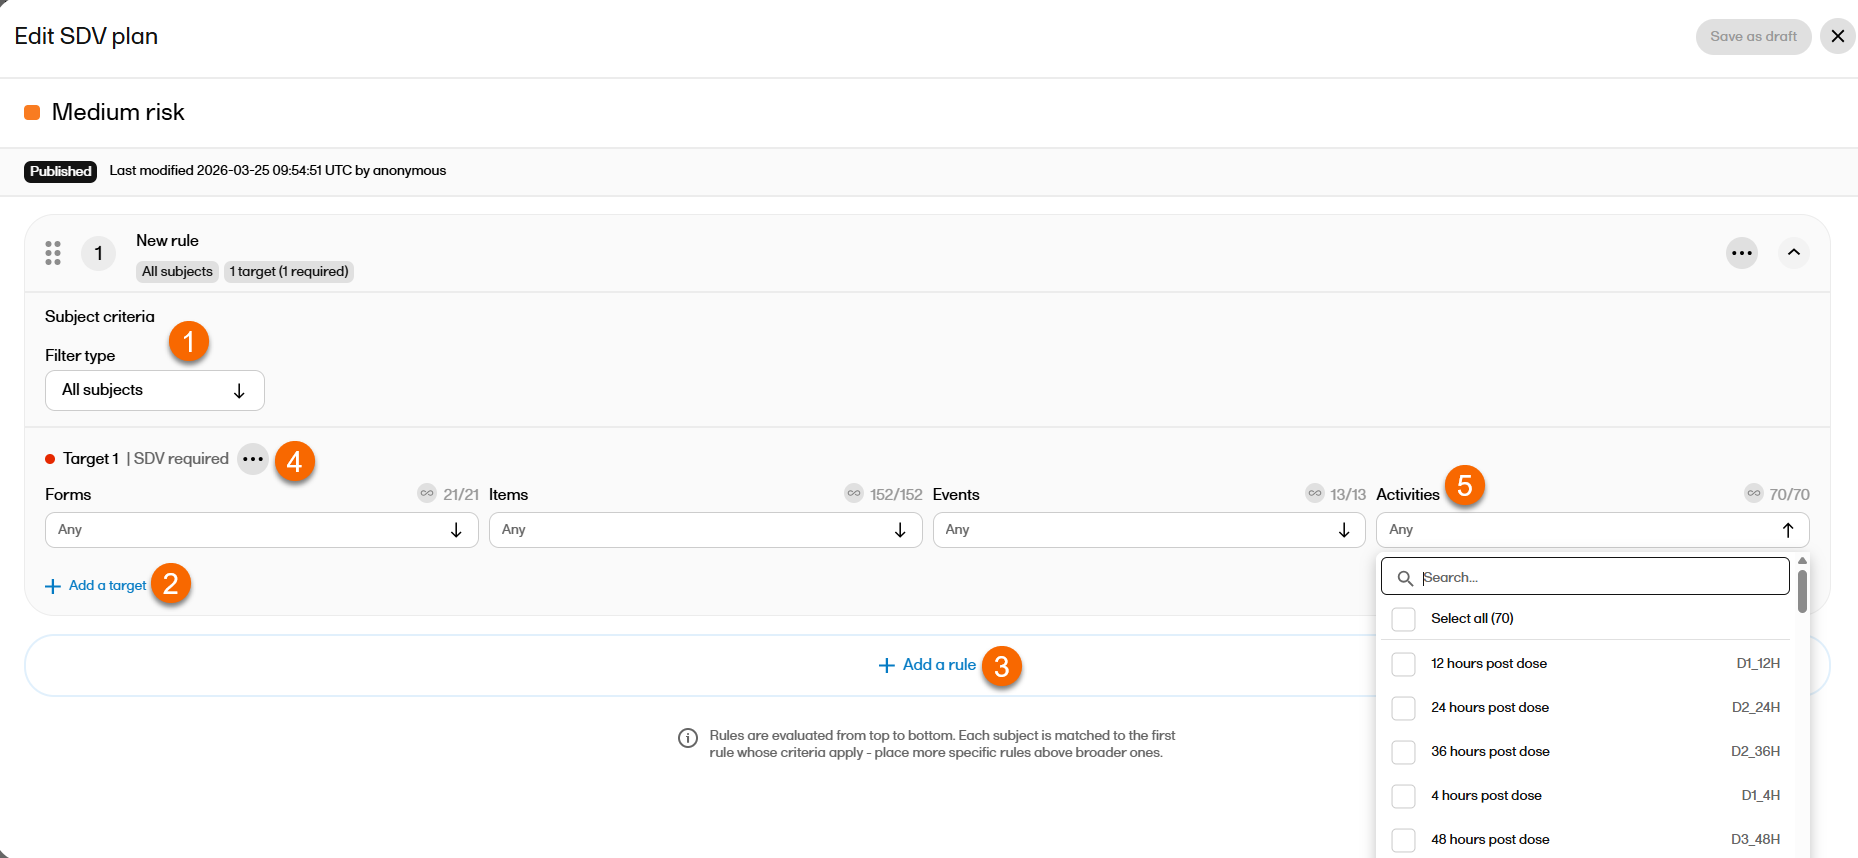
|
|
| 4 |
After editing a published plan's rules, select Save as draft. |
|
| 5 |
Select Publish changes.
|
Discarding drafts for a published plan
You can discard draft rule updates to a previously published plan. All discarded drafts are logged in the audit trail.
Note!
- Only plans in Draft status that have been previously published can be discarded.
- Plans that have not been published cannot be discarded.
- Plans that are already in Published status ( withno pending changes) cannot be discarded.
Duplicating an SDV plan
You can duplicate an existing SDV plan to create a new plan based on an existing plan in both Draft or Published status.
The created duplicate plan will be in Draft status and has the original plan name, description and color, plus a numbered suffix:
Plan (1) and rules with new identifiers.
Note! Site assignments from the original plan are not replicated in the duplicate plan.
To duplicate a plan:
| 1 |
On the Plans page list, select the ellipsis icon (…) on the plan row. A dropdown appears. |
| 2 |
Select Duplicate: 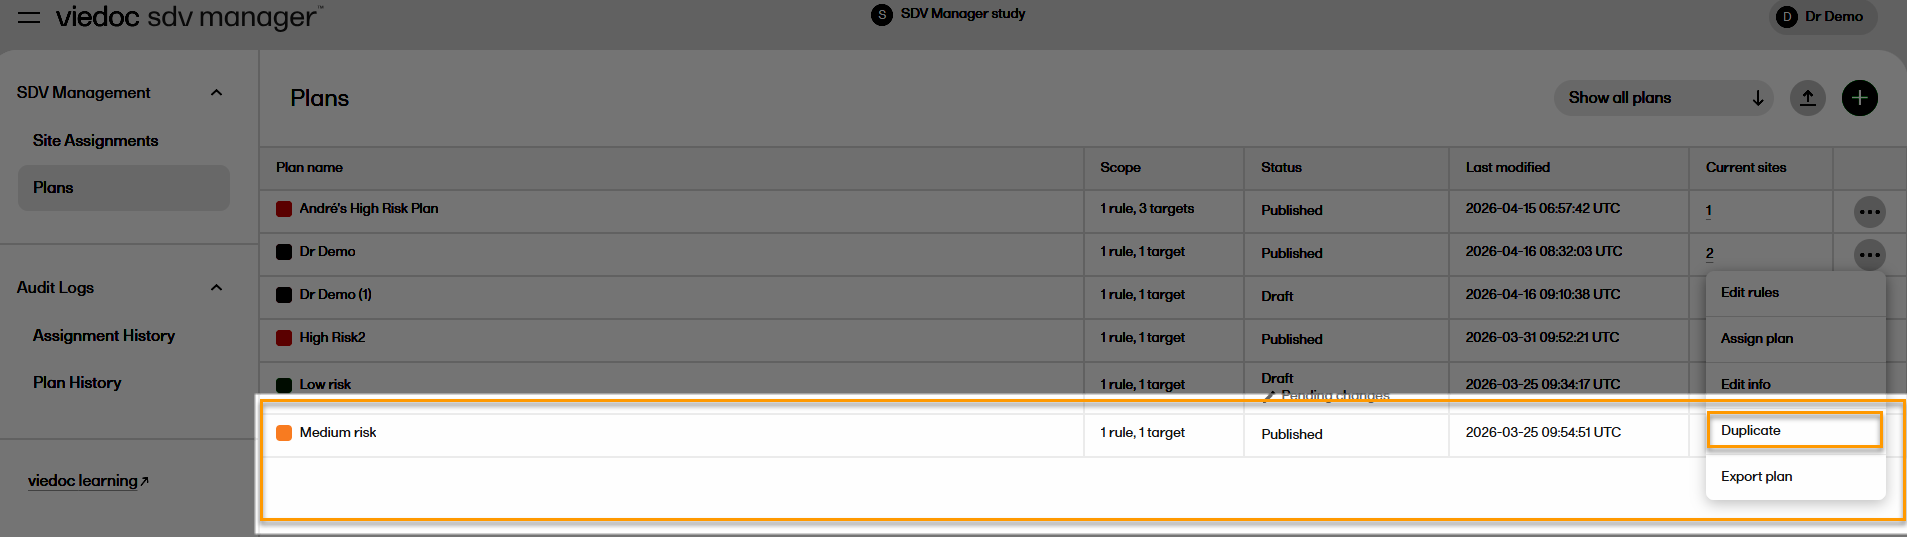
|
| 3 | The plan is duplicated and appears on the Plans list. |
Exporting and importing an SDV plan
You can export an SDV plan and import it into the same study or a different study. This allows you to reuse the plan configuration across studies without having to manually recreate the plan.
To export an SDV plan:
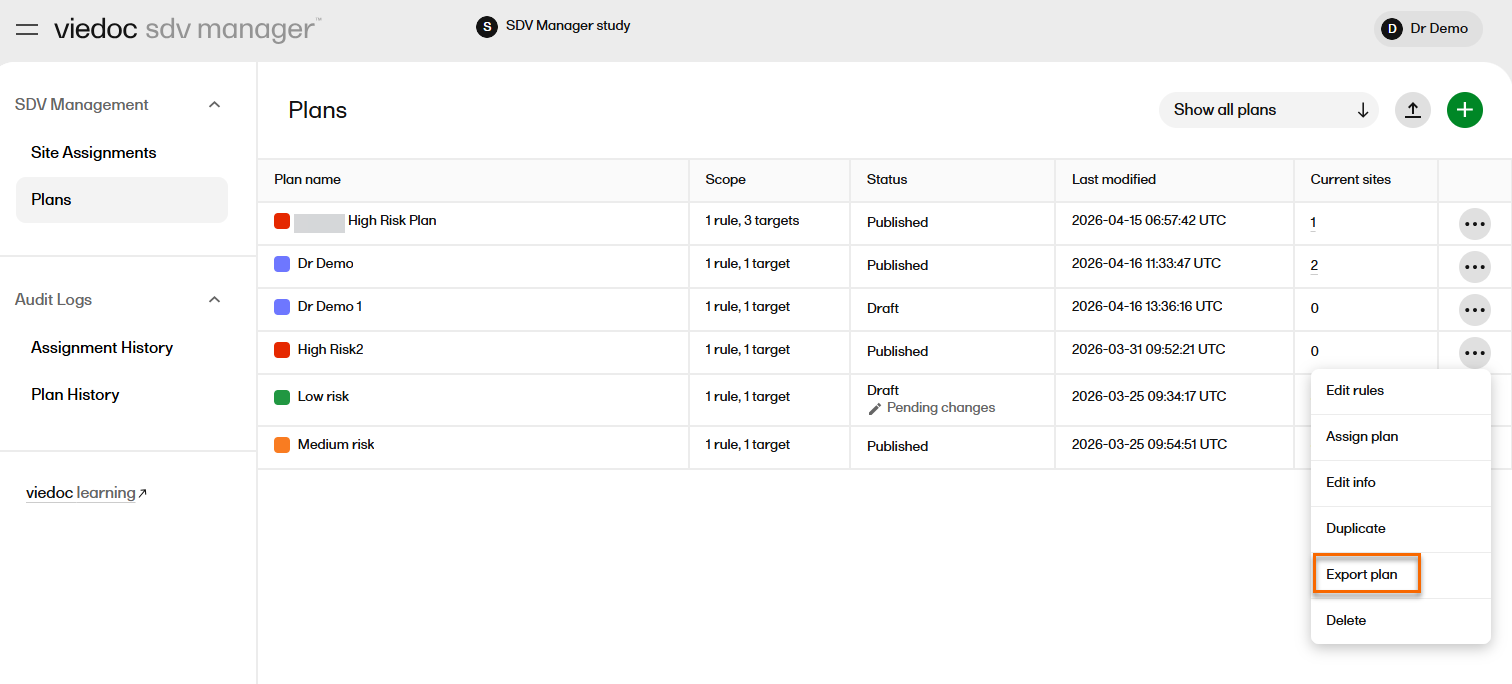
| 1 | On the Plans page, select the select the ellipsis icon (…) on the row of the plan you want to export. |
| 2 |
A dropdown appears. From the dropdown, select Export plan:
Note! The export:
|
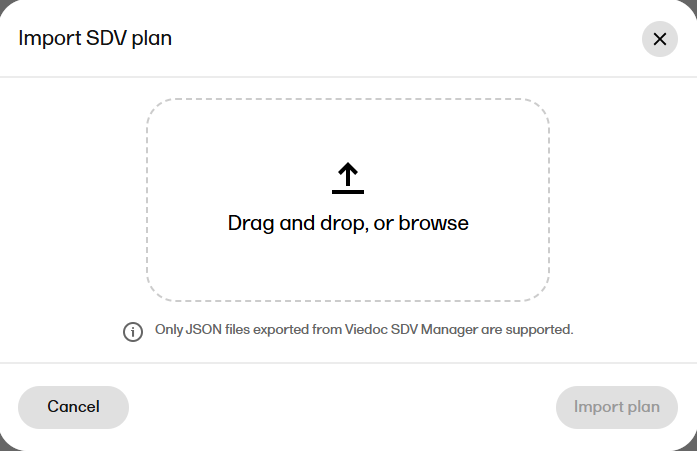
To import an SDV plan:
| 1 |
Select import plan 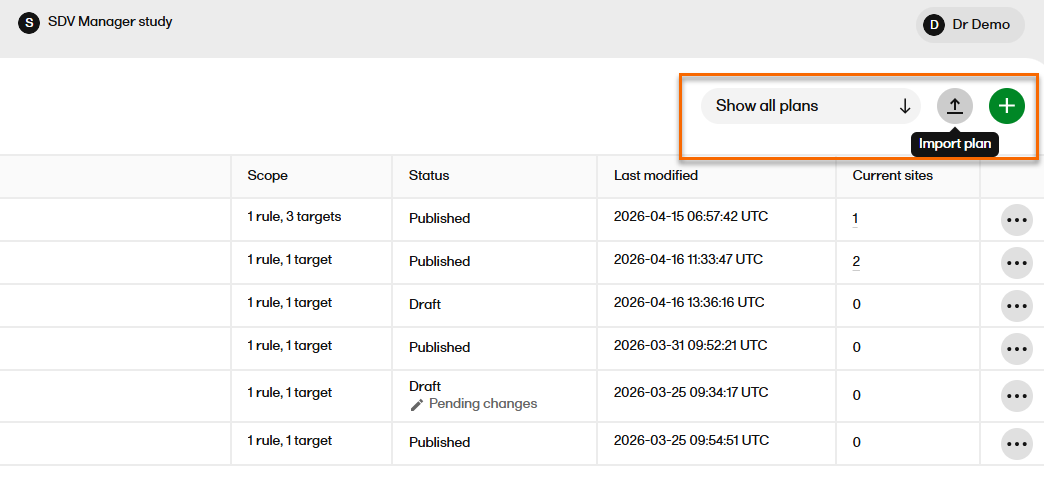
|
| 2 |
The Import SDV plan dialog is shown:
|
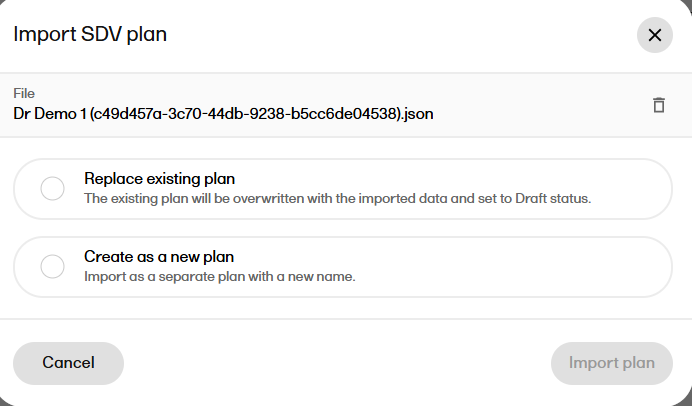
| 3 |
Select to replace your existing SDV plan, or to create the imported SDV plan as a new plan:

Note! If an imported SDV plan contains events, activities, forms, or items that do not exist in the study design, they are still imported and are included in the SDV plan in Viedoc SDV Manager. This does not affect Viedoc Clinic, as the items are not in the study design. |
Deleting an SDV plan
A plan in either Draft or Published status can be deleted, provided it has not been assigned to any sites. A plan that is currently assigned to one or more sites cannot be deleted.
To delete a plan, select the action menu next to the plan in the plans list and select Delete. Confirm the deletion when prompted. The plan is removed from the plans list.
To delete an SDV plan:
| 1 | On the Plans page, select the select the ellipsis icon (…) on the row of the plan you want to export. |
| 2 | Select Delete to confirm when prompted. |
Audit logs
Viedoc SDV Manager keeps an audit log of all changes to SDV plans and plan assignments, supporting 21 CFR Part 11 compliance requirements.
You can view two audit logs: Assignment History, which tracks plan assignment changes, and Plan History, which tracks plan changes.
You can filter entries by plan or site, sort by date, and export the filtered results as a CSV file.
To export the Assignment history and Plan history, select Export CSV. The current filtered and sorted results are downloaded as a CSV file The export includes full a full audit trail.
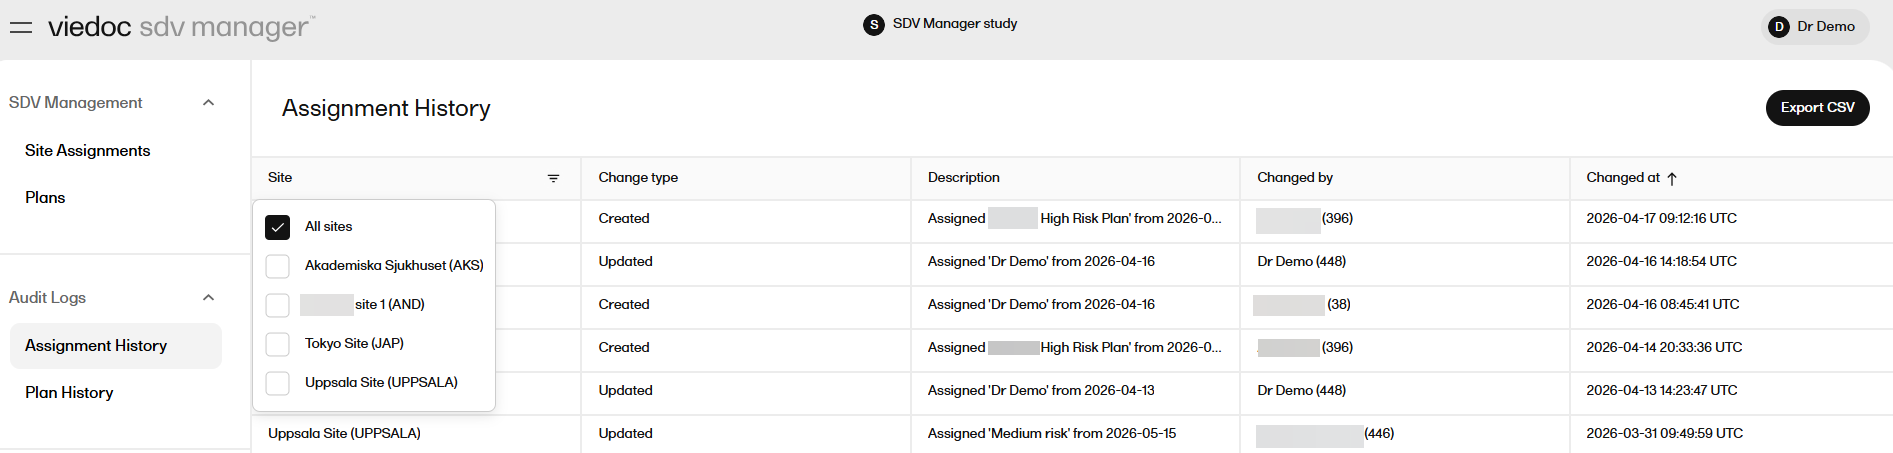
The CSV file contains the following information: Assignment ID, Site ID, Site Name, Site Code, Version, Change Type, Change Description, Changed By, Changed At, Timeline.
SDV plan history
Plan History records when a plan was created, updated, published, or deleted.
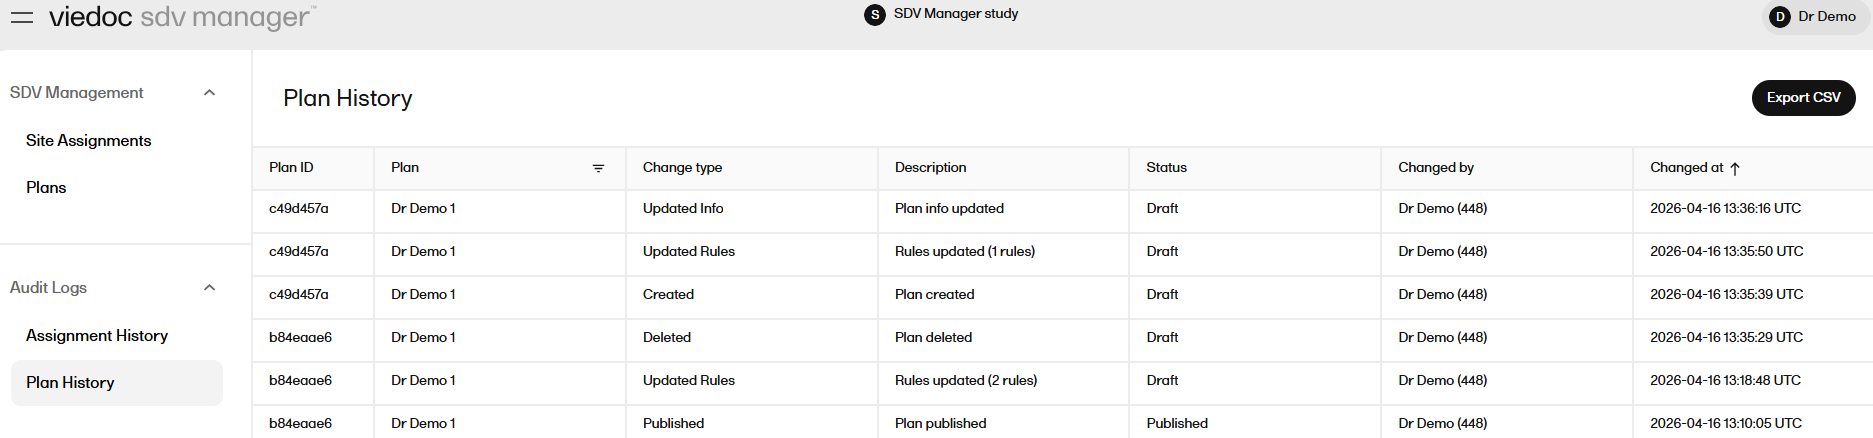
The CSV file contains the following information: Plan ID, Version, Plan Name, Plan Description, Plan Color, Status, Change Type, Change Description, Changed By, Changed At, Rule Count, Rules.
Performing SDV with Viedoc SDV Manager
When Viedoc SDV Manager is enabled, SDV requirements are defined by dynamic rules rather than study design settings. Each item in a form may be marked as Required, Optional, or have no SDV requirement. This can vary by subject depending on their site's assigned SDV plan.
SDV can be performed in one of the following ways:
- On item level, by selecting the SDV badge for the item in the form.
- On form level, by selecting SDV at the bottom of the form.
- Batch-wise through the data review console.
SDV on item level
When Viedoc SDV Manager is enabled for your study, and subject, on the form view, you can view both the SDV required and SDV optional items to help prioritize your tasks.
SDV badges
Items in a form are visually distinguished by badge color:
- A red SDV badge indicates the item is SDV required: it must be verified.
- A gray SDV badge indicates the item is SDV optional: it can be verified at your discretion.
- No badge means no SDV requirement applies to that item.
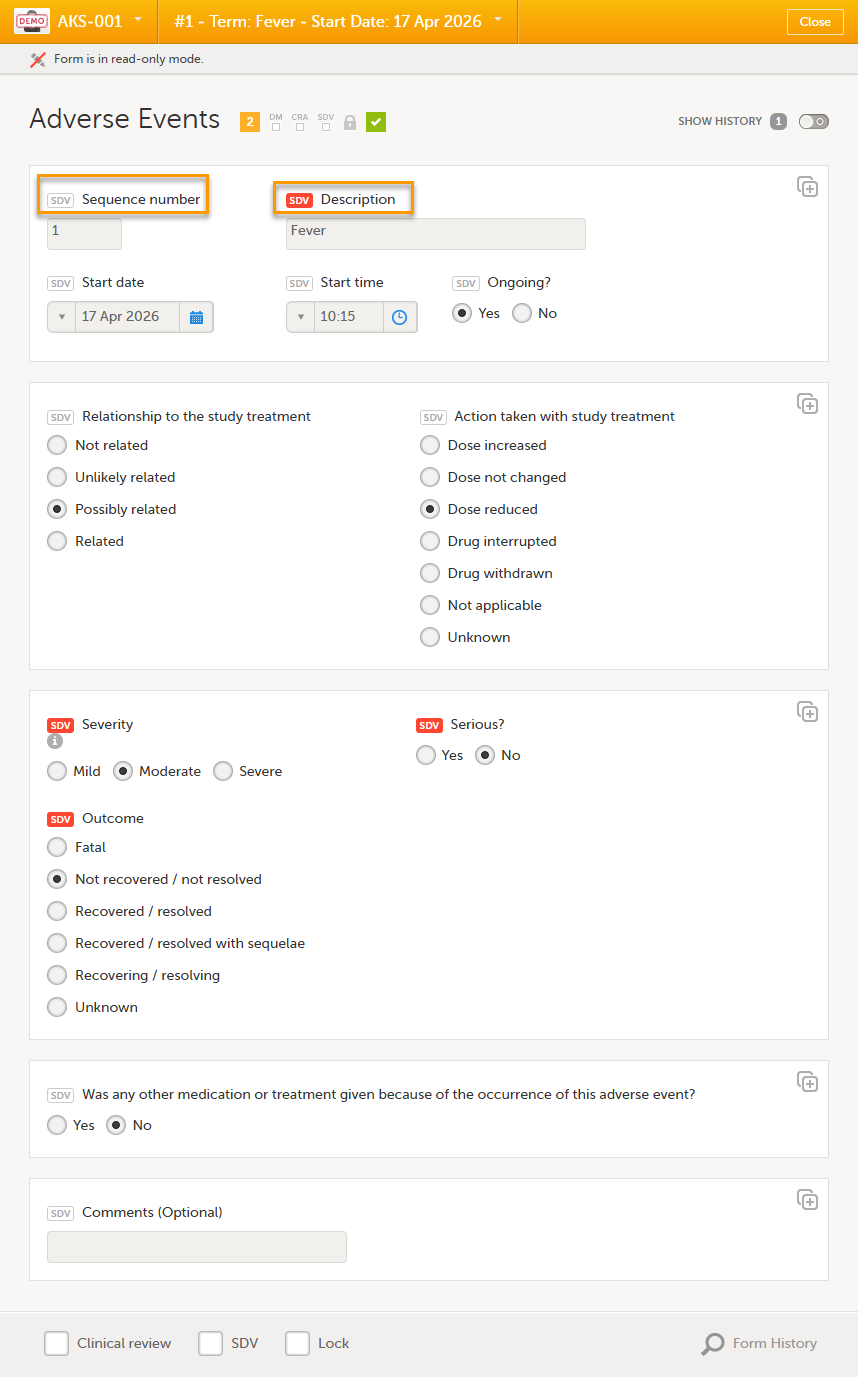
To perform SDV on item level, select the badge next to the item. The badge turns green to confirm that SDV has been performed. Selecting a green badge turns it back to its original color.
When all SDV required items in a form have been verified, the SDV checkbox at the bottom of the form is automatically selected. And vice versa, if you select the SDV checkbox at the bottom of the form, all visible items that require SDV will be indicated with a green SDV icon.
Note!
- Selecting the SDV checkbox verifies only Required items; Optional items remain gray.
- You can verify optional items individually by selecting the gray badge.This does not affect form-level SDV status.
- To complete SDV at form level, required items must be verified.
- On the Data review console, for subjects with dynamic SDV rules, batch-wise SDV automatically applies SDV Required only; SDV Optional items remain gray.
See also Clinical review, SDV, and Lock for SDV behavior when your study does not use the SDV Manager.