Viedoc eTMF is a digital repository for capturing, managing, sharing, and storing essential documents for your clinical trial.
Viedoc eTMF is based on the TMF Reference Model by the Drug Information Association (DIA). The TMF Reference Model is an industry consensus catalog of all TMF records. Using the TMF Reference Model ensures compatibility and interoperability with other clinical trial parties, such as CROs.
The TMF Reference Model includes documents in all different phases of a clinical trial:
The TMF Reference Model categorizes documents in zones, sections, and artifacts in a hierarchical structure.

The set of zones, sections, and artifacts included is defined in a template file that is maintained by the eTMF Manager.
The TMF can include both the Investigator Site File (ISF) and the sponsor TMF.
For portability reasons, the DIA TMF Reference Model is defined in an Excel file.
Viedoc eTMF also uses Excel files as templates for the eTMF structure.
The user access to Viedoc eTMF is determined by the assigned roles and permissions. eTMF roles and permissions can work in combination or independently.
These roles are defined in the template, which is maintained by the eTMF Manager.
Depending on the permission associated with your user role, you can perform different actions on documents. Your user role can have permission (no access, read, write, or review) on these TMF levels:
You can only see and access documents if you have permissions for the artifact on the corresponding TMF level.
For example, if an artifact is linked to two sites, a user with write permission for the artifact for only one of the sites will be able to read but not edit the document. This is due to the fact that the user does not have write permissions for all sites that the document is linked to.
Note that this text section is available also in the lesson Overview of Viedoc eTMF.
The permissions are defined in Viedoc Admin and are assigned to you by the eTMF Manager.
The eTMF permissions are:
Note! For more information about permissions and accesses, see eTMF access use cases.
The following image shows the document version statuses and the actions that change the status of a document version. The initial status of a document when it is uploaded to the eTMF is Unpublished.
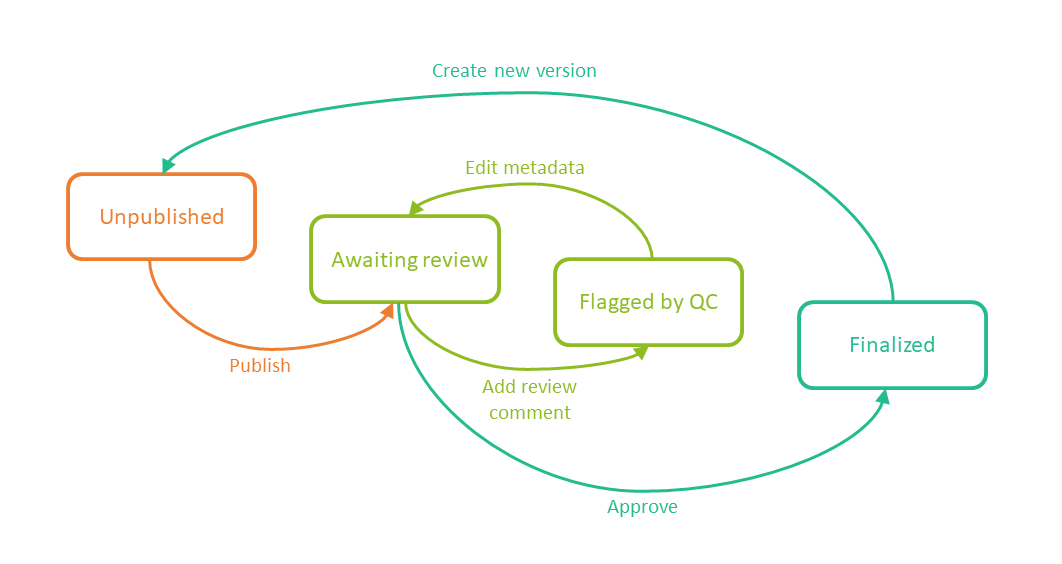
If you edit metadata for a document version that is Unpublished or Awaiting review, the document version status is not changed.
It is not possible to edit the metadata of a Finalized document. To make changes, a new version needs to be created.
Note! Different actions require different permissions, which means that they are performed by users with different user roles.
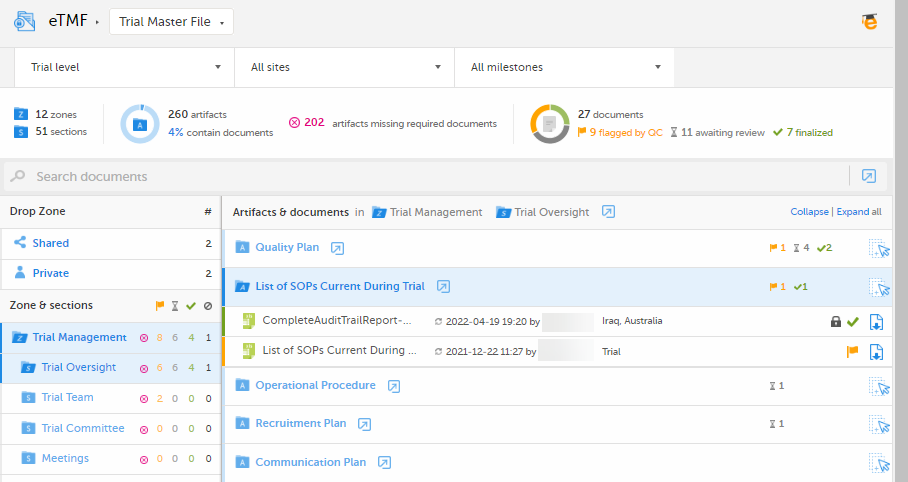
The eTMF user view is your starting point for working with documents:
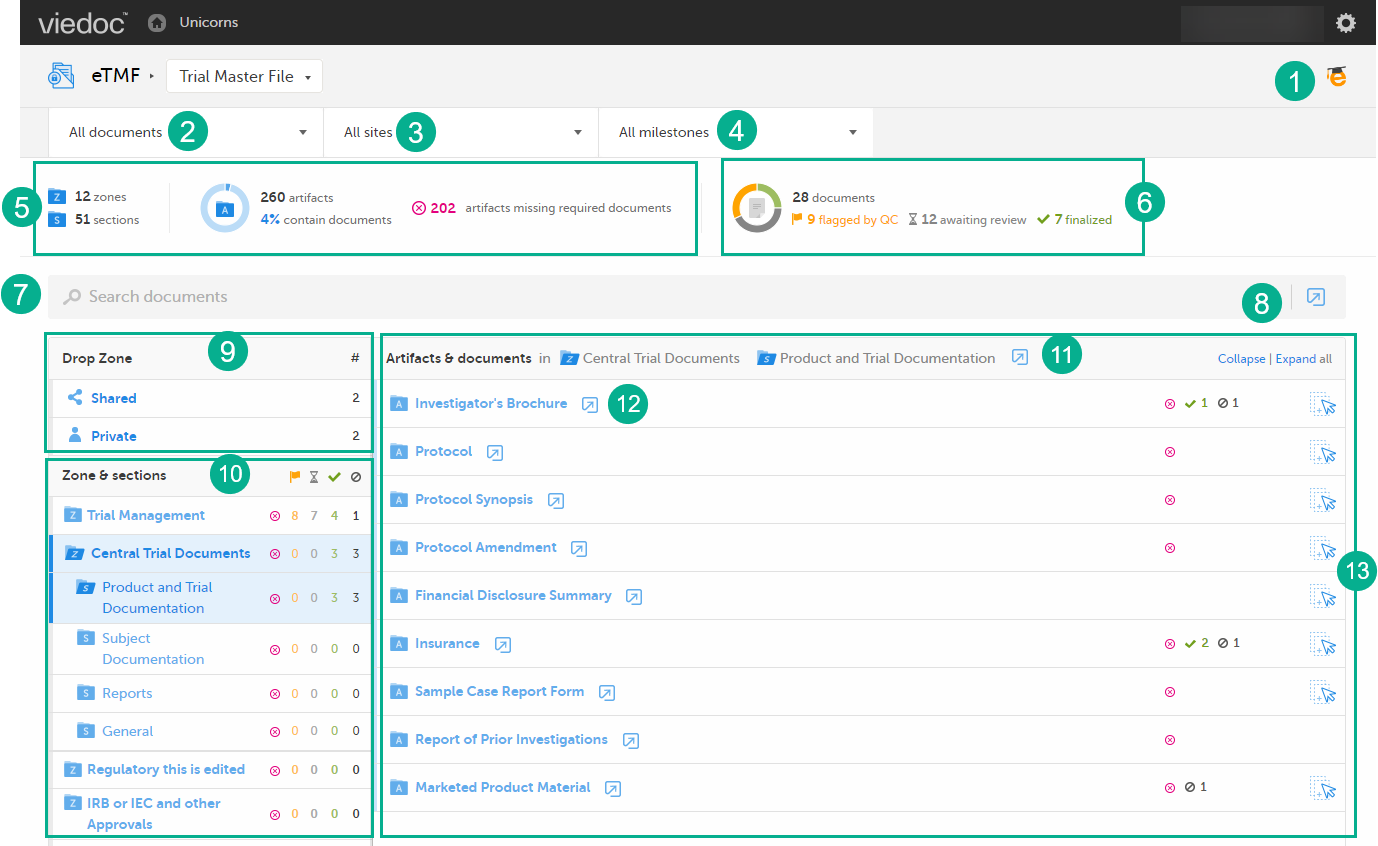
1. Link to the eLearning curriculum Viedoc eTMF User Guide
2. Use the dropdown menu to filter your view by Trial level or Country level. You can only select a country that you have permission for.
3. Use the dropdown menu to filter your view by site. You can only select a site that you have permission for.
4. Use the dropdown menu to filter the artifacts by milestones. You can either select a milestone group (Start Up, Study Conduct, Close Out, Other) or a specific milestone that is defined in the structure. Selecting a group means filtering the artifacts by all the milestones that belong to that group.
5. The left eTMF metrics area gives an overview of the published documents for the complete trial.
6. The right eTMF metrics area gives an overview of the published documents belonging to the trial artifacts that you have access to.
7. Use the search field to search for words or sub-strings in filenames or within file content.
8. Click the Details page button to open the Details page, listing all eTMF documents. For more information, see The Details page.
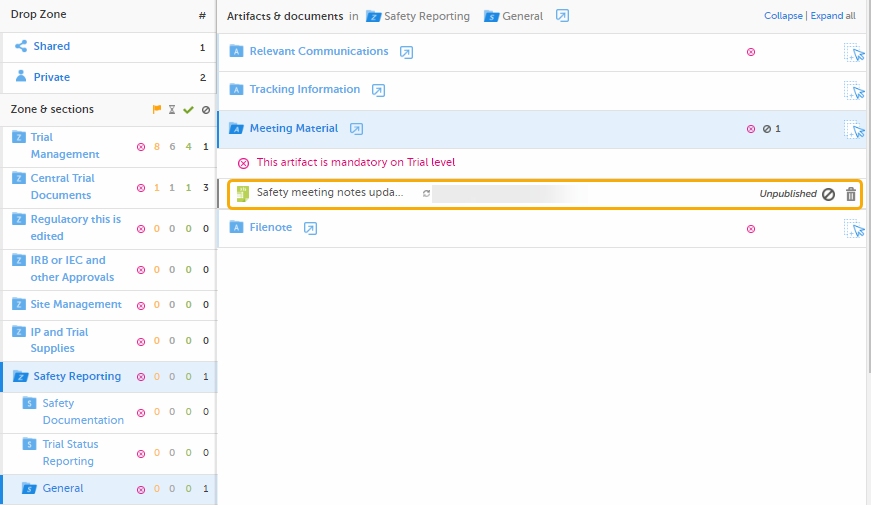
9. Use the Drop Zone area to upload files to be managed later either by you or by the drop zone manager.
10. Use the Zones & sections area to navigate through the eTMF structure. Click on zones and sections to expand/collapse them.
11. Click the Details page button to open the Details page, listing the documents in the section. For more information, see The Details page.
12. Click the Details page button to open the Details page, listing the documents in the artifact. For more information, see The Details page.
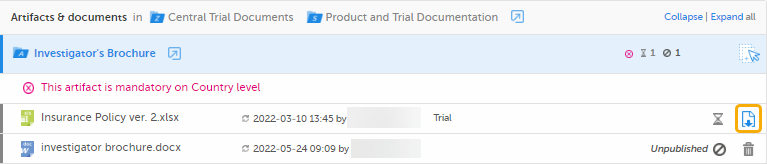
13. The Artifacts & documents area is where you can view documents and their status. In this area, you can also upload and download documents, delete unpublished documents, as well as open the Document properties dialog.
Note! All date and time stamps in the Trial Master File view are according to the user's local time zone.
The document preview feature lets you view the contents of a file without downloading it. The preview shows the latest version of files in each document version.
The preview feature is available in the Document properties dialog and in the file dialog in drop zones.
To preview a file:
| 1 |
Click on the Preview button at the top right corner of the dialog: 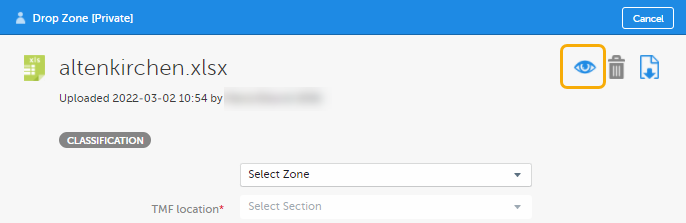
|
| 2 |
The preview opens in the left pane of the dialog. 
|
| 3 |
Use the 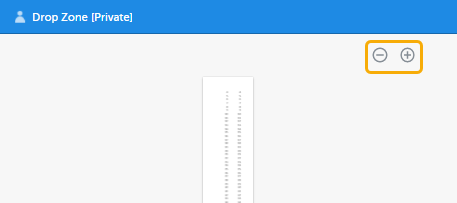
|
| 4 |
If the whole preview does not fit in the pane, you can use the scroll bars to scroll vertically and horizontally. 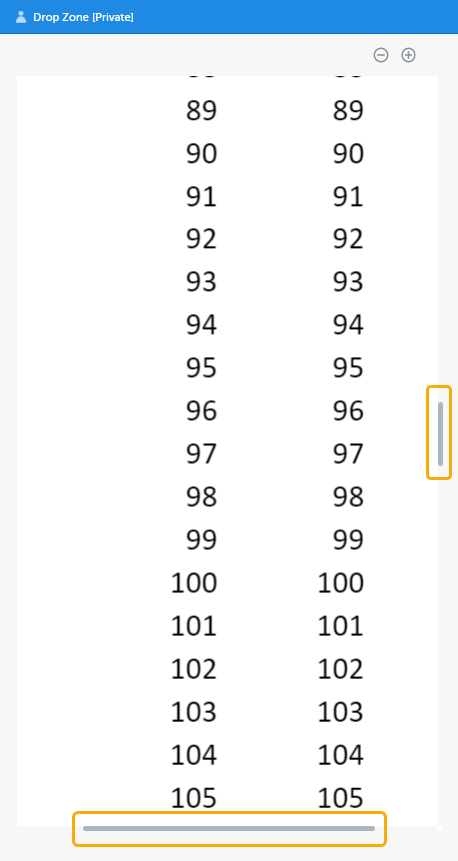
|
| 5 | To close the preview, click on the Preview button again. |
Note! The preview does not support files larger than 2 GB.
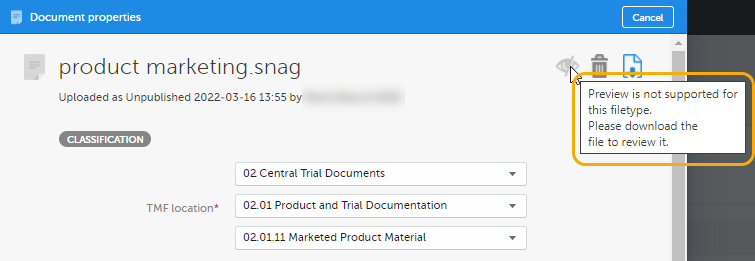
The document preview is supported for the following filetypes:
Note! For filetypes that are not supported, the following dialog is displayed:
All preview actions are logged in the audit trail. For more information, see TMF Archive.
To launch Viedoc TMF, select the eTMF icon on the Viedoc landing page.

Note! The eTMF launch icon is only available in production mode.
Uploading documents to Viedoc TMF requires write permission for the artifact on the TMF level that the document is linked to. For more information about eTMF permissions, see Introduction to Viedoc eTMF.
To upload a document:
| 1 |
In the Artifacts & documents area, select the upload button for the artifact: 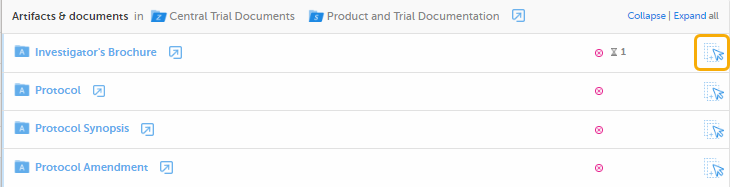
Note! If you do not know which zone, section, or artifact to place the document in, you can use the drop zones. For more information, see Working with drop zones. |
| 2 |
Browse to the file(s) that you want to upload and select Open. Notes!
|
| 3 | Alternatively, drag the file from your file explorer and drop it in the eTMF artifact. It is possible to upload multiple files at the same time. |
| 4 |
When the file has been successfully scanned for viruses, it is uploaded in an Unpublished status. 
Notes!
|
Note! It is not possible to upload files from inside a zipped folder.
Note! Much of the info about the drop zones is available also in the lesson eTMF>Configuring eTMF settings.
Drop zones are folders outside the eTMF structure where you can upload files to manage them later. Files can only be moved from the drop zones to the structure and not the other way around.
Anyone with access to the study eTMF can upload files to the drop zones. However, moving files from the drop zones to the structure is similar to uploading documents to artifacts within the structure. Both require that the user has write permission to the artifact in question.
To upload a file to a drop zone:
| 1 |
Navigate to the desired drop zone, select the Upload button. 
|
| 2 | Browse to the file(s) that you want to upload, select them, and then select Open. |
| 3 |
Alternatively, to upload file(s), drag them from your file explorer and then drop them in the selected drop zone. 
|
To delete a file from a drop zone:
| 1 |
Select the trash can button on the level of the file that you want to delete. 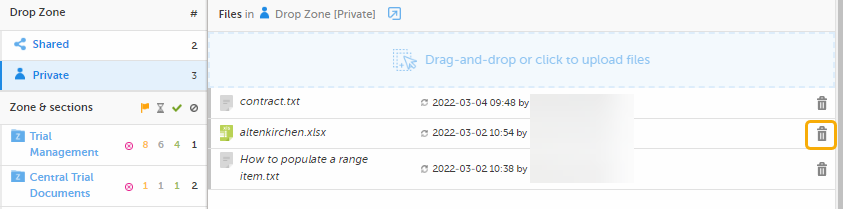
|
| 2 |
Alternatively, open the file by selecting it, and then select the trash can button in the dialog. 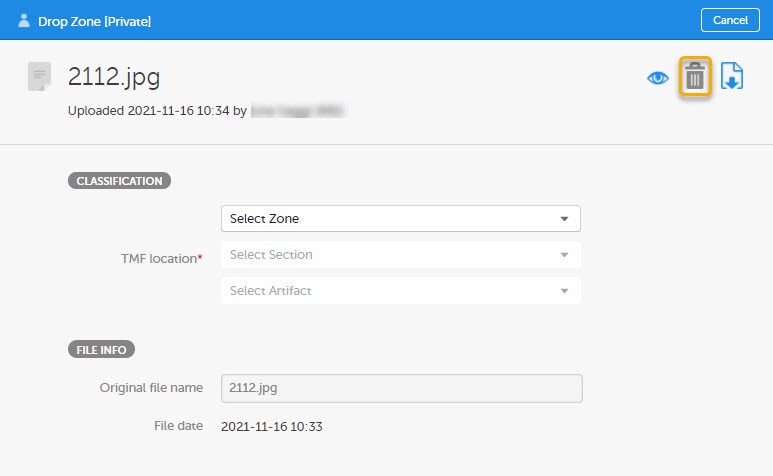
|
| 3 |
Confirm the deletion. 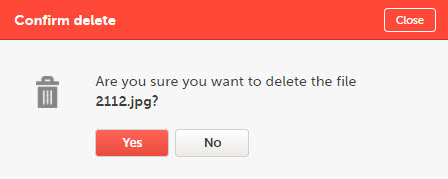
|
To download a file from a drop zone:
| 1 |
Open the file dialog by selecting the desired file. 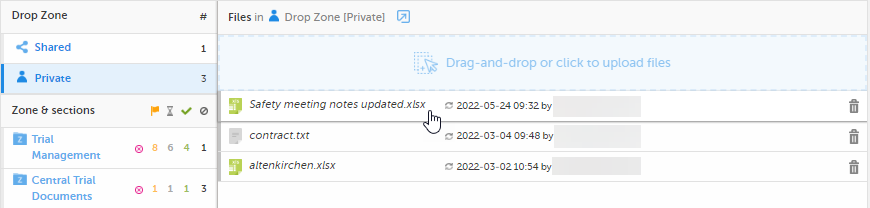
|
| 2 |
Select the download button in the file dialog. 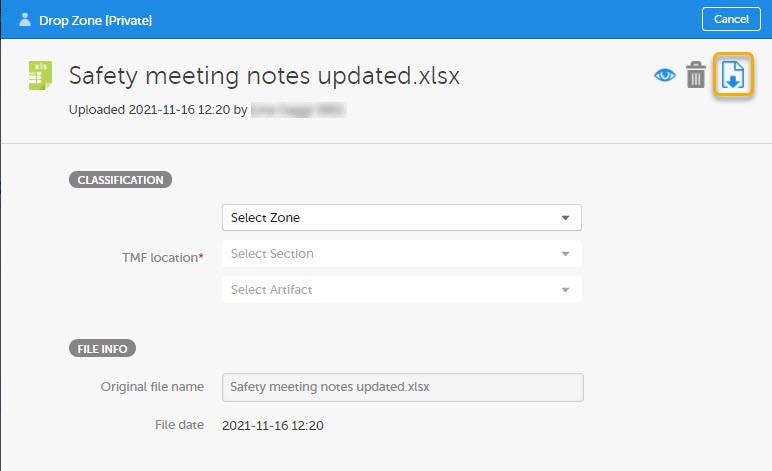
|
To move a file from a drop zone to the structure:
| 1 |
Open the file dialog by selecting the relevant file.
|
| 2 | Select the TMF location (Zone, Section, and Artifact) where you want to move the file.
|
| 3 |
The properties of that artifact will then be populated in the dialog. You can either enter values for the metadata properties or leave them empty. Select Save as unpublished to create a new unpublished document in the selected location with the file that was moved from the drop zone. 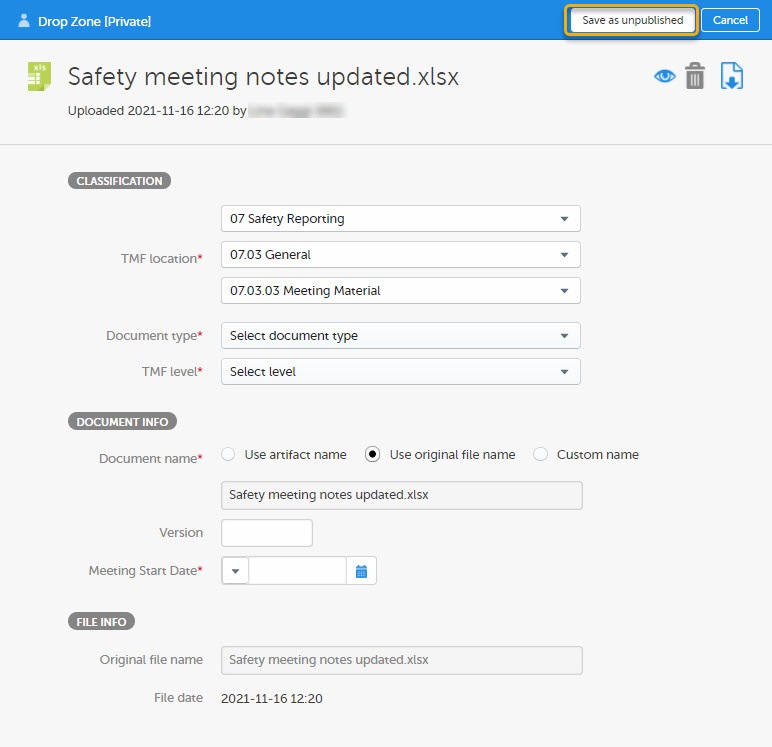
|
| 4 |
Alternatively, fill in all the mandatory fields and select Publish. A new document with the status Awaiting review will be created at the selected location with the file that was moved from the drop zone. 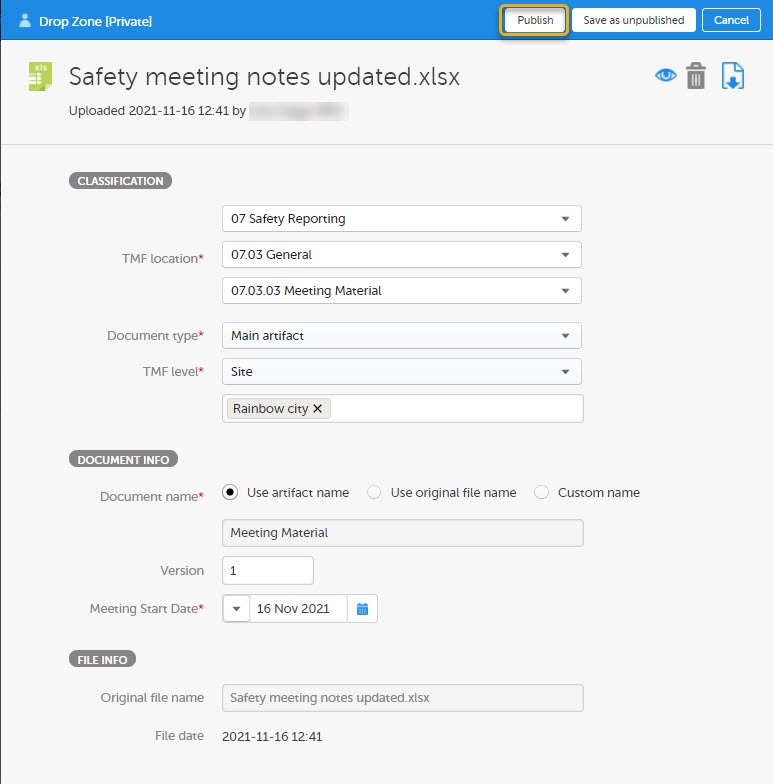

|
To search for documents in Viedoc TMF:
| 1 |
Enter text to search for in the Search field. The text can be a document name or a file name, or a sub-string thereof. It can also be a text or a sub-string of a text in the file contents. 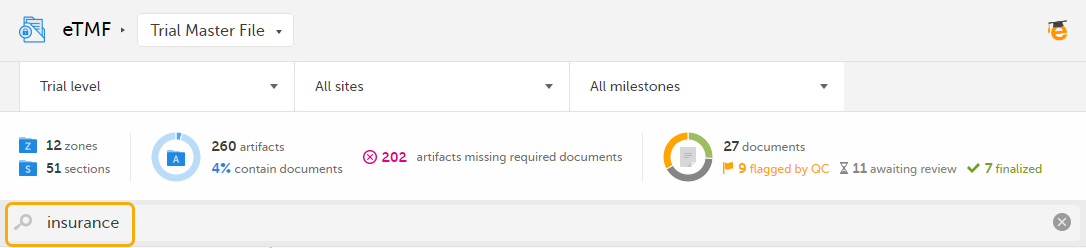
|
| 2 |
Press Return (or Enter) or select the magnifying glass. |
| 3 |
The search results are displayed on the Details page, sorted by relevance. For more information, see The Details page. 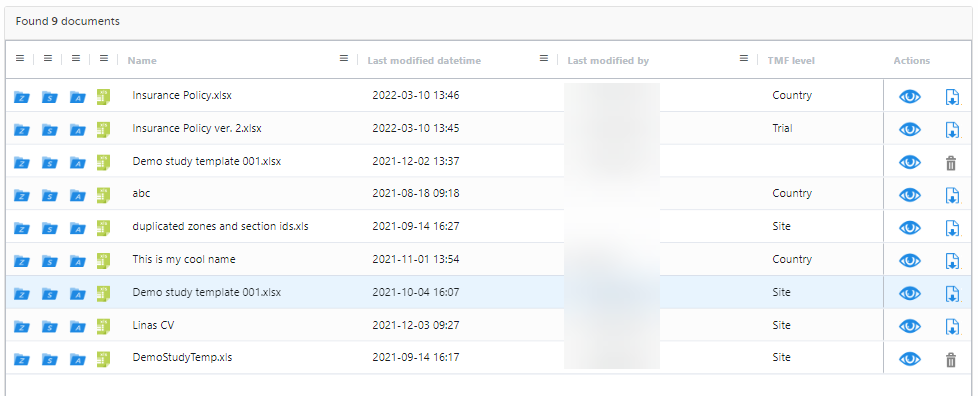
Tip! If you hover over a zone, section, or artifact icon, its name and artifact number will be displayed. |
| 4 |
To return to the structure view, select the Structure page button. 
|
Milestones and milestone groups are tools in the eTMF for sorting and filtering documents. Milestones are assigned at the artifact level in TMF Admin, and all documents added to an artifact will be linked to the same milestone. An artifact can also have different milestones for each TMF level it is applicable to (trial, site, and/or country).
Milestones can be defined in any way that is appropriate for your study. In the Viedoc eTMF template there are 12 milestones that are divided into four milestone groups (start up phase, conduct, close out and other). Assigning these to artifacts allows documents to be linked to a specific timeline in the study or other categories.
Milestones may be used when searching for or filtering documents in the details page (see next section below) and also when filtering audit trail reports or EMS repositories. Note! If no milestones are assigned to an artifact, documents in this artifact will not be included in the audit trail report or the EMS repository when the milestones filter is applied. To extract these documents, a separate report can be generated with the milestone filter removed. For more information see the TMF archive lesson.
To open the Details page, press Return (or Enter) or select the magnifying glass in the search field. You can also open it by selecting the Details page button in any location in the user view:

The Details page provides an overview of the documents that you have access to together with their metadata in a table or grid. The Details page lets you:
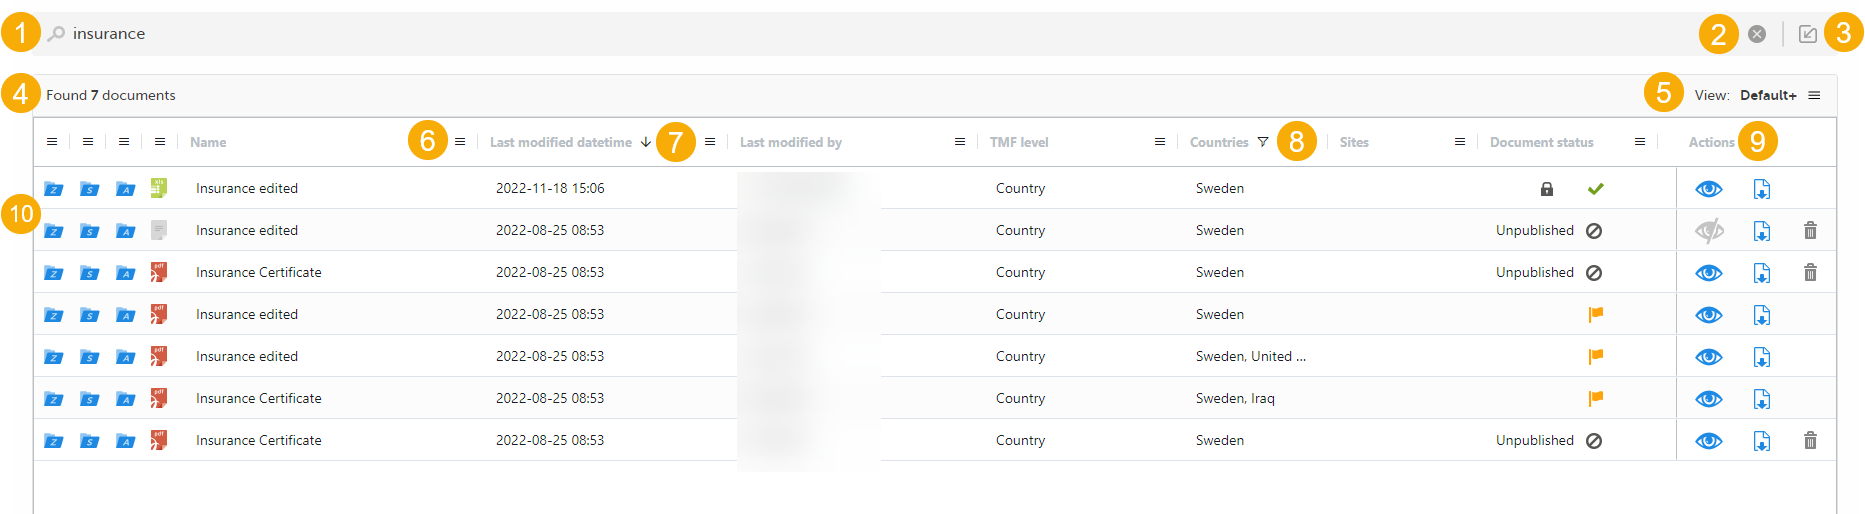
1. The search field
2. Select to delete the entered search string.
3. Select to return to the structure view.
4. The number of search results.
5. The View menu. For more information, see The View menu.
6. The column menu. For more information, see the following sub-sections.
7. An arrow indicates that the search results are sorted by the column contents. For more information, see the following sub-sections
8. A funnel icon indicates that the search results are filtered. For more information, see the following sub-sections
9. The actions that you can perform on the documents. The possible actions are Preview, Download, and Delete. The actions available for you depend on your permissions.
10. Icons showing the status of the zones, sections, and artifacts. The fourth column from the left contains icons for the filetypes.
These are the icons that can occur:
| Icon | Description |
|---|---|
| A zone that is expanded in the tree view | |
| A deleted zone that is expanded in the tree view | |
| A zone that is collapsed in the tree view | |
| A deleted zone that is collapsed in the tree view | |
| A section that is expanded in the tree view | |
| A deleted section that is expanded in the tree view | |
| A section that is collapsed in the tree view | |
| A deleted section that is collapsed in the tree view | |
| An artifact that is expanded in the tree view | |
| A deleted artifact that is expanded in the tree view | |
| An artifact that is collapsed in the tree view | |
| A deleted artifact that is collapsed in the tree view | |
 |
The private drop zone, when enabled |
 |
The private drop zone, when disabled |
 |
The shared drop zone, when enabled |
 |
The shared drop zone, when disabled |
| A file | |
| A deleted file |
The View menu lets you save and display a customized view of the Details page. This can be useful if you have filtered, sorted, or sized the columns and want to be able to re-use your viewing preferences.
These are the available menu options:
| Menu option | Description |
|---|---|
| Default |
Displays the default view, as provided by the system. When you perform a search on the Structure page, this view is displayed. When you perform a search on the Details page, and you haven't made or saved any customization, this view is displayed. |
| Default+ |
Indicates that changes have been made to the default view, but the changes have not been saved as a customization. To save the changes, select Save as customized. |
| Customized |
Displays the saved customized view. This option is not available if you haven't saved a customization. Tip! This view is retained between login sessions. |
| Customized+ | Indicates that changes have been made to the customized view, but the changes have not been saved as a customization. To save the changes, select Save as customized. |
| Reset columns | Resets the view to the latest used of the default or the customized views. |
| Save as customized |
Saves the current view as a user-specific customization. Each user can save their own tailored viewing preferences. This option is not available when the eTMF is locked. |
Note! If you perform any further search on the Details page, the system displays the latest used view.
To sort the data by column contents in ascending order, select the column header. Select it again to sort in descending order. Selecting for a third time removes the column sort order.
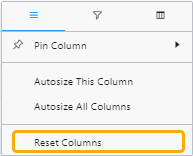
To rearrange the order of the columns on the page, simply select a column header and drag the column sideways. To reset the order of the columns to the initial state, select Reset Columns on the column menu, available from the column header.
To pin a column to the left or the right:
| 1 |
Select the menu button in the column header to open the column menu. 
|
| 2 |
In the leftmost group, select Pin Column and then Pin Left or Pin Right. 
Tips!
|
To adjust the width of columns to the width of the text in them:
| 1 |
Select the menu button in the column header to open the column menu.
|
| 2 |
Select the leftmost button in the header, then select Autosize This Column or Autosize All Columns. 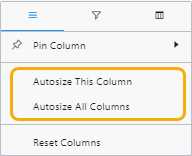
|
Tip! To reset all autosizing, select Reset Columns.
To filter out data to be displayed on the Details page:
| 1 |
Select the menu button in the column header to open the column menu.
|
| 2 |
Select the filter button. 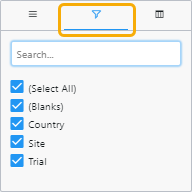
|
| 3 | Select the column contents that you want to filter out, and deselect the ones that you don't want to filter out. |
| 4 | Use the search field to search for column contents to filter by. |
| 5 | When a filter has been applied to a column, a filter icon is visible in the column header. |
Tip! To reset all filtering, open the column menu, select the filter button and select (Select All).
To select which columns to display on the Details page:
| 1 |
Select the button in the column header to open the column menu.
|
| 2 |
Select to open the column selector. 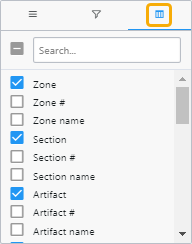
|
| 3 | Select the columns that you want to display. |
| 4 | Use the search field to search for columns. |
Tip! To reset to the initial state, select Reset Columns.
To copy the data in a table cell on the Details page, right-click in the cell and select one of these:
To export the data that is displayed on the Details page:
| 1 | Right-click anywhere in the table and select Export and then CSV Export or Excel Export. |
| 2 | A file of the selected type is then available for download from your browser. |
These are the columns that are available to show or hide on the Details page:
| Column | Description |
|---|---|
| Zone | This column shows the zone or drop zone icon. When you hover over the icon, a tooltip shows the zone number and the zone name. For drop zones, the tooltip shows the drop zone name. |
| Zone # | The zone number. |
| Zone name | The name of the zone as set in the structure. |
| Section | This column shows the section icon. When you hover over the icon, a tooltip shows the section number and the section name. |
| Section # | The section number |
| Section name | The name of the section as set in the structure. |
| Artifact | This column shows the artifact icon. When you hover over the icon, a tooltip shows the artifact number and the artifact name. |
| Artifact # | The artifact number |
| Artifact name | The name of the artifact as set in the structure. |
| Filetype | The filetype icon. When you hover over the icon a tooltip text shows the filetype. |
| Filetype name | The filetype name in text, for example pdf or xlsx. |
| Name |
This column shows:
|
| Display label | This label represents how the document is displayed on the Trial Master File view. |
| Document name | The name of the document as set by the user in the corresponding Document properties window. |
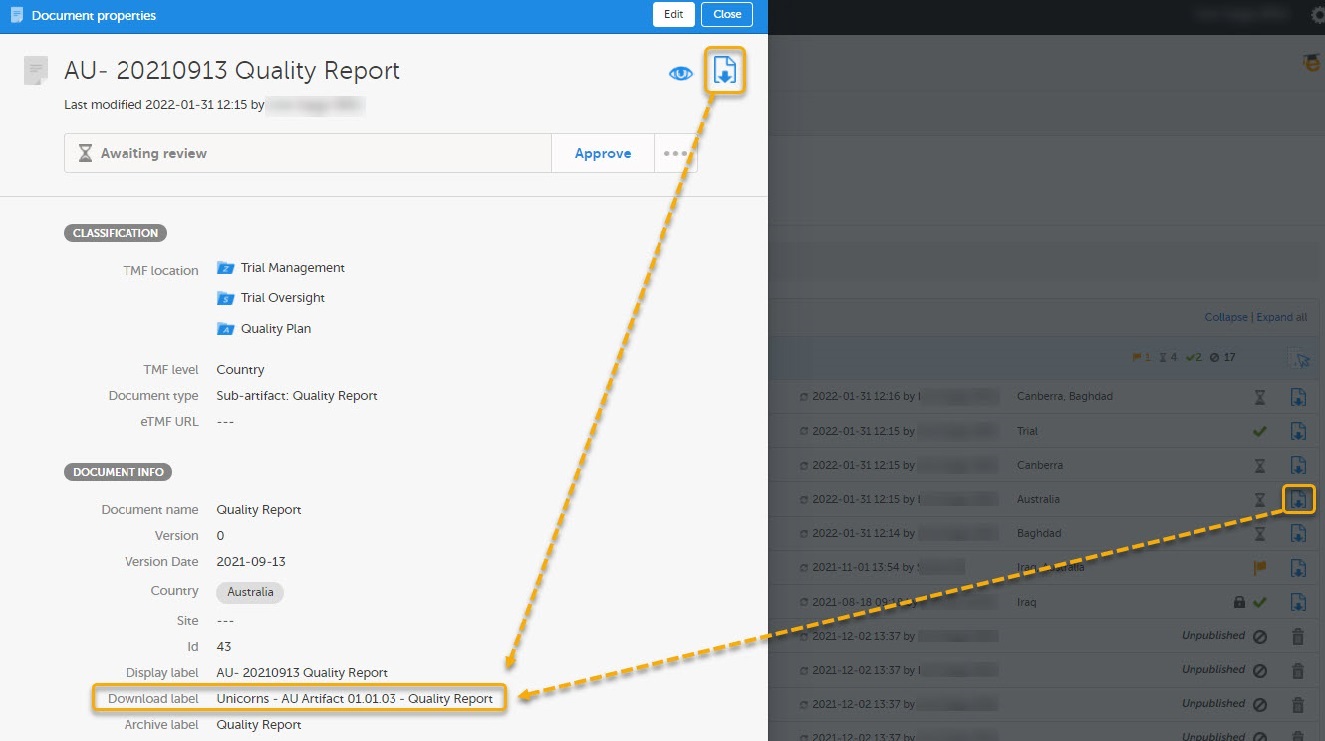
| Download label | The name of the latest version of the document when downloaded. |
| Archive label | The name of the document in the archive. |
| Dating convention | The dating convention label that is applicable to the document. |
| Dating convention value | The date value of the dating convention metadata in the format YYYY-mm-DD. |
| Last modified datetime | The date and time when the document was last modified, in the format YYYY-mm-DD HH:MM. |
| Last modified by | The user name of the user who last modified the document |
| Last reviewed datetime | The date and time when the document moved to the status Flagged by QC, in the format YYYY-mm-DD HH:MM. |
| Last reviewed by | The user name of the user who last commented on the document. |
| Uploaded to drop zone datetime | The date and time when the file was uploaded to a drop zone, in the format YYYY-mm-DD HH:MM. |
| Uploaded to eTMF datetime | The date and time when the file was moved to the eTMF structure, in the format YYYY-mm-DD HH:MM. |
| TMF level | One of Trial, Country, or Site. |
| Document type |
For main artifacts, the column shows the artifact name. For sub-artifacts, the column shows the sub-artifact name. For other types, the column shows the customized name. |
| Countries | The names of the countries that the document is linked to. |
| Country codes | The country codes of the countries that the document is linked to. |
| Sites | The names of the sites that the document is linked to. |
| Site codes | The site codes of the sites that the document is linked to. |
| Document version | The document version number as set by the user in the Document properties window. |
| Document system version | The system version of the document. |
| Document Id | The document's unique Id within the study eTMF. |
| Original file name | The original name of the file when it was uploaded. |
| File size | The size of the file. |
| File date | The date and time when the latest version of the file was uploaded to the eTMF structure, in the format YYYY-mm-DD HH:MM. |
| Milestone |
The milestone that the artifact is linked to. Milestones are assigned at the artifact level, however, different milestones can be assigned to different levels within the artifact (site, trial, country). The milestone in this column refers to the level that the document is filed in. |
| Milestone group |
The milestone group for the milestone that the artifact is linked to. |
| Document status |
This column shows the document status icon. It can be one of the following:
|
| Actions |
This column is pinned to the right and cannot be removed. It shows the action buttons according to the actions that can be performed on the document according to the user permissions.
|
| ICH code | The code according to the International Council for Harmonisation |
| Unresolved notes count | The number of unresolved notes for a document |
Downloading a document from Viedoc TMF requires read, review, or write permission for the artifact on the TMF level that the document is linked to. For more information about permissions, see Introduction to Viedoc eTMF.
To download a document:
| 1 |
Open the Document properties dialog by selecting a document in the Artifacts & documents area. 
|
| 2 |
In the Document properties dialog, select the download button. 
|
You can download published documents by selecting the download button in the Artifacts & documents area:
Note! The name of the latest version of the document, when downloaded, will be according to the download label in the Document properties dialog:
To navigate between versions of a document, use the version menu at the top of the Document properties dialog.
Editing document properties in Viedoc TMF requires write permission for the artifact on the TMF level that the document is linked to. For more information about permissions, see Introduction to Viedoc eTMF.
Note! it is not possible to edit a finalized document. To make changes, a new document version must be created. For more information, see Creating a new version of a document.
To edit the document properties:
| 1 |
Open the Document properties dialog by selecting a document on the Details page. 
|
| 2 |
Alternatively, open the Document properties dialog by selecting a document in the Artifacts & documents area. 
Note! The upload button on artifact level indicates that you have write permission for the artifact. |
| 3 |
The Document properties dialog is displayed: 
1. Preview button. For more information, see Previewing a document. 2. Delete button 3. Download button 4. The document status, one of Unpublished, Awaiting review, Flagged by QC, and Finalized. 5. The Actions menu. Note that the available menu options depend on the document status and your permissions. 6. Document notes section. 7. CLASSIFICATION
8. DOCUMENT INFO
Note! When using the custom name option, it is not necessary to add the file extension in the custom name, the system will add the file extension automatically. Including the file extension in the name will result in the file extension being displayed twice in the archive export. For example if the custom name you create is "file.pdf" then in the archive it will display as "file.pdf.pdf".
Note! If any of the three labels above is not configured by the eTMF Manager, the fallback is the document name as defined by the user. When the labels are configured to include metadata of the document, changes made to the metadata that affect these labels will be reflected on the labels dynamically in the Document properties dialog. 9. FILE INFO File date is the date and time when the file was uploaded. If the document is in edit mode, you can click the upload button to browse for a new version of the file. If you upload a new file, the document status will be changed to Awaiting review. 10. The HISTORY section is the audit trail for the selected document version. Changes to the document version are logged here together with information about the date and time when it was done and by which user. Note that, in this section, you will not see the name of a site that you do not have access to, but instead the site ID. Note also that document note actions are not included in the history. |
| 4 |
Make your settings, and then select Publish or Save as unpublished. When a document is published, it is available for all eTMF users with at least read permission for that artifact, and the document status is changed to Awaiting review. Note! Before a document can be published, all required fields in the Document properties dialog must be filled in. The required fields are marked with red. |
To create a new version of a finalized document:
| 1 | Open the Document properties dialog according to the instructions in the section Editing document properties. |
| 2 | At the top of the dialog, select ... to open the Actions menu. |
| 3 | From the menu, select Create new version. |
| 4 |
Select whether you want to copy the file from the previous version or upload a new file. 
|
| 5 | If applicable, edit the metadata of the new document version. |
| 6 |
Select Ready. The new document version is saved in an unpublished status. |
When you open the Document properties dialog, the latest version of the document is displayed by default.
To navigate between document versions, use the version dropdown menu at the top of the Document properties dialog.

Document notes are a way to communicate with other users about documents without affecting the document status. The notes actions are not recorded in the document history.
These are the permissions needed for adding or resolving notes:
To add a note to a document:
| 1 | Open the Document properties dialog according to the instructions in the section Editing document properties. |
| 2 |
At the top of the dialog, select 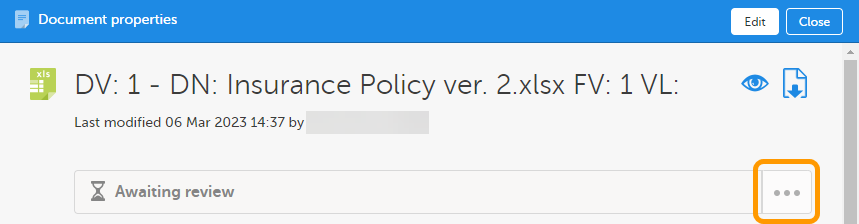
|
| 3 |
Select Add note from the menu. |
| 4 |
Enter your note text and select Save. 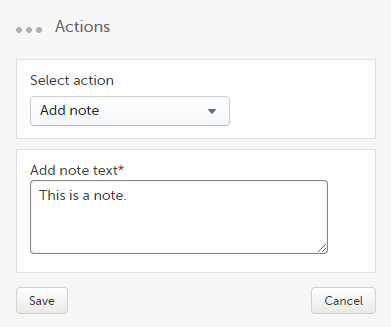
|
| 5 |
The note is then displayed like this: 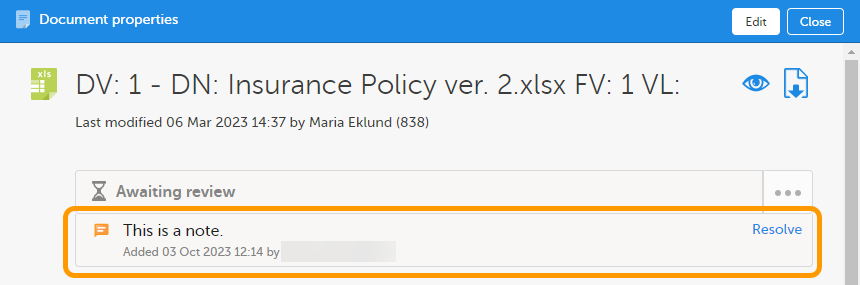
The note is associated with the selected document version. |
To resolve a note in a document:
| 1 | Open the Document properties dialog according to the instructions in the section Editing document properties. |
| 2 |
Select Resolve for the note that you want to resolve.
The note is then immediately removed. |
Publishing a document in Viedoc TMF requires write permission for the artifact on the TMF level that the document is linked to. For more information about permissions, see Introduction to Viedoc eTMF.
To publish a document:
| 1 |
Open the Document properties dialog according to the instructions in the section Editing document properties. |
| 2 | Make sure all mandatory fields (marked with red) are filled in. |
| 3 |
Select Publish at the top of the dialog: 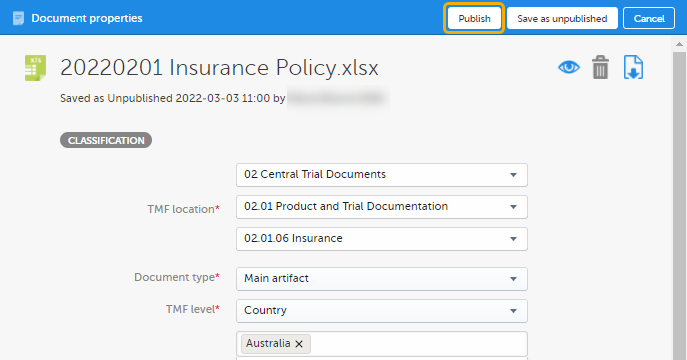
|
| 4 |
When the document is published, it is available for all eTMF users with at least read permissions for that artifact and with access to the TMF level that the document is linked to. The document status is now Awaiting review: 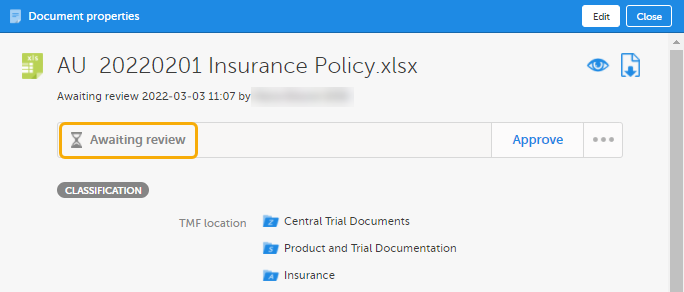
|
In the metrics area at the top of the page, the orange flags indicate if there are any documents that are flagged by QC.

To locate the documents that are flagged by QC:
| 1 |
In the search field, select the Details page button. 
|
| 2 |
On the Details page, locate the column Document status, and select to open the column menu. 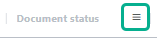
|
| 3 |
Select the filter button, and then deselect all statuses except Flagged by QC. 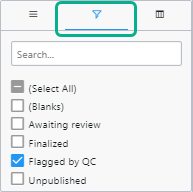
|
| 4 |
The Details page now shows a list of all the documents that are flagged by QC. |
To resolve issues for documents that are flagged by QC, you need to edit the document metadata.
To edit the document metadata:
| 1 | Open the Document properties dialog according to the instructions in the section Editing document properties. |
| 2 |
If there is a review comment, you can see it at the top of the dialog. 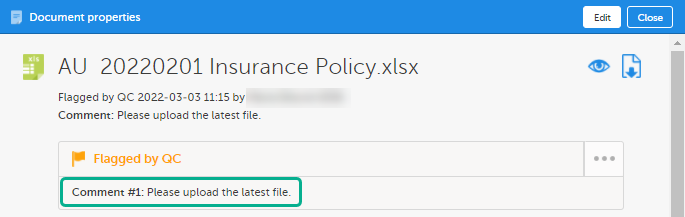
|
| 3 |
Select Edit in the top right corner of the dialog. 
|
| 4 |
In the Document properties dialog, edit the applicable document metadata. To upload another file, select the upload button in the FILE INFO area. 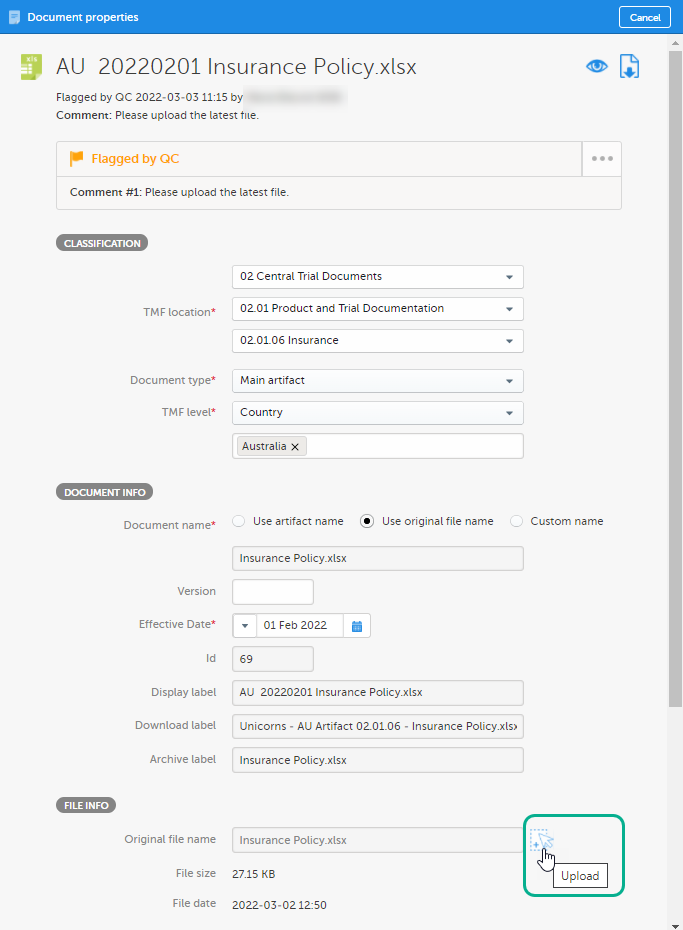
|
| 5 |
When you have made the necessary changes, select Save changes. When the changes have been saved, the document status is changed to Awaiting review. |
Deleting a document in Viedoc TMF requires write permission for the artifact on the TMF level that the document is linked to. For more information about permissions, see Introduction to Viedoc eTMF.
To delete an unpublished document:
| 1 |
Select the delete button in the Artifacts & documents area or in the Document properties dialog. 
|
| 2 |
Select Yes. 
|
Deleting a document in Viedoc TMF requires write permission for the respective trial, country, or site. For more information about permissions, see Introduction to Viedoc eTMF.
To delete a published document:
| 1 |
Open the Document properties dialog by selecting a document in the Artifacts & documents area. |
| 2 |
Select to open the Document action dialog. 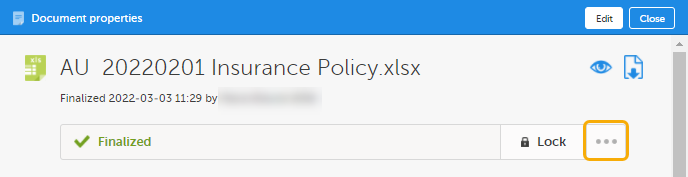
|
| 3 |
In the dropdown menu, select Delete document. Note! If the document has been shared and has at least one active binder, it cannot be deleted. 
|
| 4 | Enter a reason (mandatory). |
| 5 | Select Delete document. |
To launch Viedoc eTMF, click on the eTMF icon on the Viedoc landing page.

Note! The eTMF launch icon is only available in production mode.
Reviewing a document in Viedoc eTMF requires review permission for the artifact on the TMF level that the document is linked to. For more information about permissions, see Introduction to Viedoc eTMF.
To search for documents in Viedoc eTMF:
| 1 |
Enter a text to search for in the Search field. The text can be an document name or a file name, or a sub-string thereof. It can also be a text or a sub-string of a text in the file contents. 
|
| 2 |
Press Return (or Enter) or click on the magnifying glass. |
| 3 |
The search results are displayed on the Details page, sorted by relevance. 
Tip! If you hover over a zone, section, or artifact icon, its name will be displayed. |
To review a document with the status Awaiting review:
| 1 |
Click on a document on the Details page to open the Document properties window in read-only mode. 
|
| 2 |
Make sure that all document metadata is correct. 
|
| 3 |
To view the the latest version of the uploaded file, click the Preview button in the top right corner of the window. For more information, see Previewing a document. 
Alternatively, click the download button to download the file. 
|
| 4 | Review the file contents. |
| 5 |
To navigate between versions of the document, use the version dropdown menu at the top of the Document properties dialog. 
|
| 6 |
If you need to add a review comment, open the Document action window by clicking on the Document action button in the Document properties dialog: 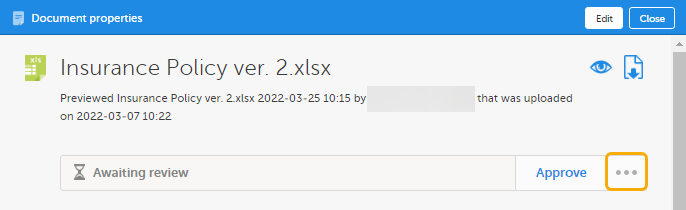
|
| 7 |
Select Add review comment. 
|
| 8 |
Add your review comment in the Comment field. |
| 9 |
Click Ready to save your review comment. Note! If you add a review comment, the document status is changed to Flagged by QC. To change the status back to Awaiting review, a user with write permission needs to edit to the document metadata or upload another file. |
| 10 | If there is no need for a review comment, the document is ready to be approved. |
Approving a document in Viedoc eTMF requires review permission for the respective trial, country, or site. For more information about permissions, see Introduction to Viedoc eTMF.
To approve a document with the status Awaiting review:
| 1 |
Open the Document properties window by clicking on a document on the Details page.
|
| 2 |
In the Document properties window, click Approve. 
|
| 3 |
The document status is now Finalized. Note! Finalized documents cannot be edited. To make changes, a new document version must be created. |
To make sure no changes can be made to a Finalized document, it needs to be locked. If the eTMF is configured to Automatically lock documents on approve, the document will automatically be locked when it is approved. Otherwise you can lock it.
To lock a document:
| 1 |
Open the Document properties window by clicking on a document on the Details page. 
|
| 2 |
In the Document properties window, select Lock. 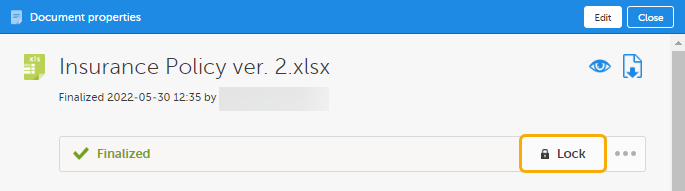
|
| 3 | The Lock button is now changed into an Unlock button. |
Note! It is not possible to create new versions of locked documents.
To enable editing of a locked document, you can unlock it.
To unlock a document:
| 1 |
Open the Document properties window by clicking on a document on the Details page. 
|
| 2 |
In the Document properties window, click Unlock. 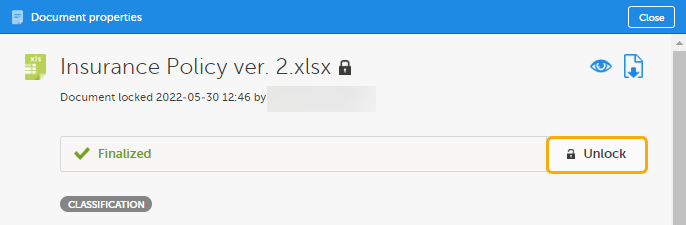
|
| 3 |
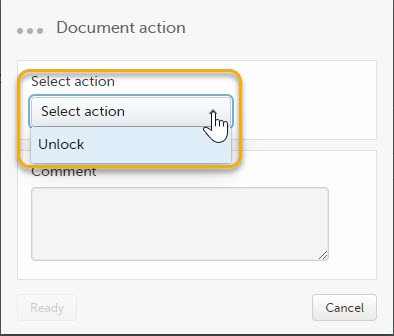
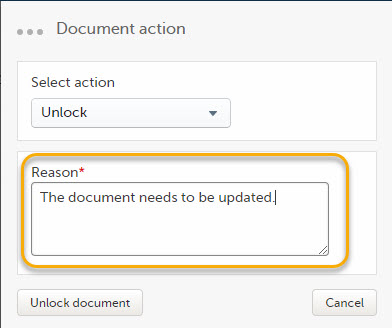
If the eTMF is configured such that a reason must be given to unlock the document, click the Document action button in the Document properties window: 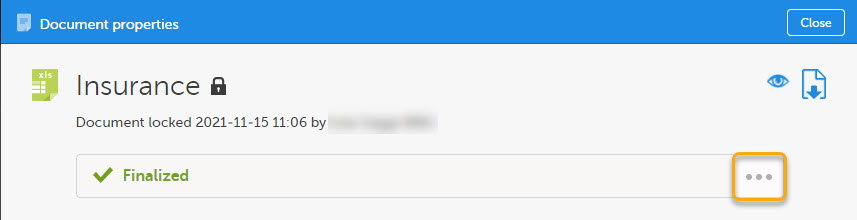
|
| 4 | The document is now unlocked. |
The Viedoc Share feature is available to eTMF users for sharing documents with Viedoc Me users or Viedoc Clinic users for information sharing or for collecting signatures.
These concepts are used in the following text:
An eTMF user can share documents if the eTMF manager assigns one of the following permissions to their role:
A document can only be shared if:
Supported filetypes:
Viedoc Share supports all file types that can be uploaded into the eTMF. For a list of file types that cannot be uploaded to the TMF please see Blacklisted file formats.
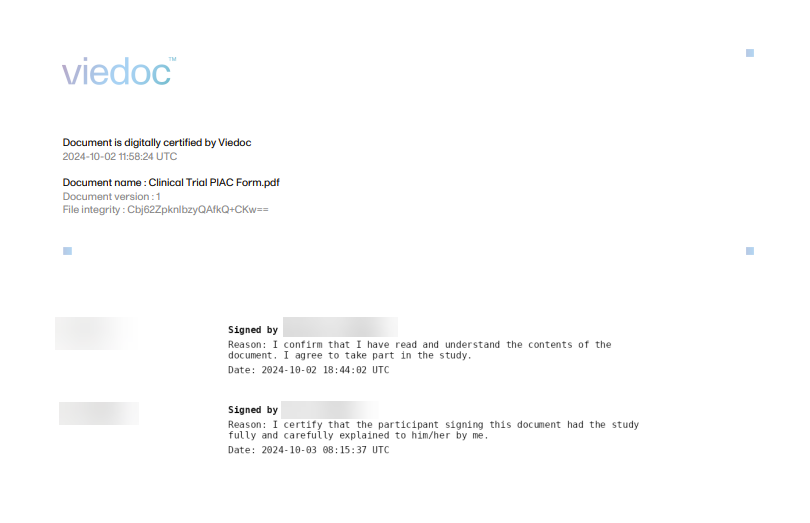
When a document is digitally signed by the recipient, Long-Term Validation (LTV) is embedded into the PDF, ensuring that signatures remain verifiable even after certificate expiration.
This happens automatically, with no extra steps are required from the user. A trusted timestamp is applied at the time of signing, and signatures display as valid in standard PDF viewers such as Adobe Acrobat. If an error occurs during validation or timestamping, the signed document cannot be downloaded, ensuring the integrity and compliance of the signed output.
An eTMF user with WRITE access to a document must enable the sharing before other TMF end users can share the document.
To configure a document for sharing:
| 1 | In the Trial Master File view, navigate to the unpublished document in the TMF structure. |
| 2 | Select the document to open the Document properties window. |
| 3 |
In the DOCUMENT SHARING section, select the users that the document can be shared with - Viedoc Clinic users or Viedoc Me users. 
|
| 4 | Select Publish or Save as unpublished, depending on your needs. |
Note! Only an unpublished document can be configured for sharing or have document fields added (see next section below). If a document has already been published and/or finalized, you can create a new version of the document, configure for sharing and/or add document fields, then publish and finalize again.
Fields such as radio buttons, checkboxes or open text fields can be added to an unpublished document once it has been added to an artifact. These fields can be customized and set as optional or required for the recipient. If fields are set as required, the recipient cannot sign the document until all required fields have been completed.
Notes!
To add form fields to a document:
| 1 | In the Trial Master File view, navigate to the unpublished document in the TMF structure. |
| 2 | Select the document to open the Document properties window. Select the eye icon to open a preview of the document.

|
| 3 |
On the far left of the document, the options for adding/editing form fields are displayed: 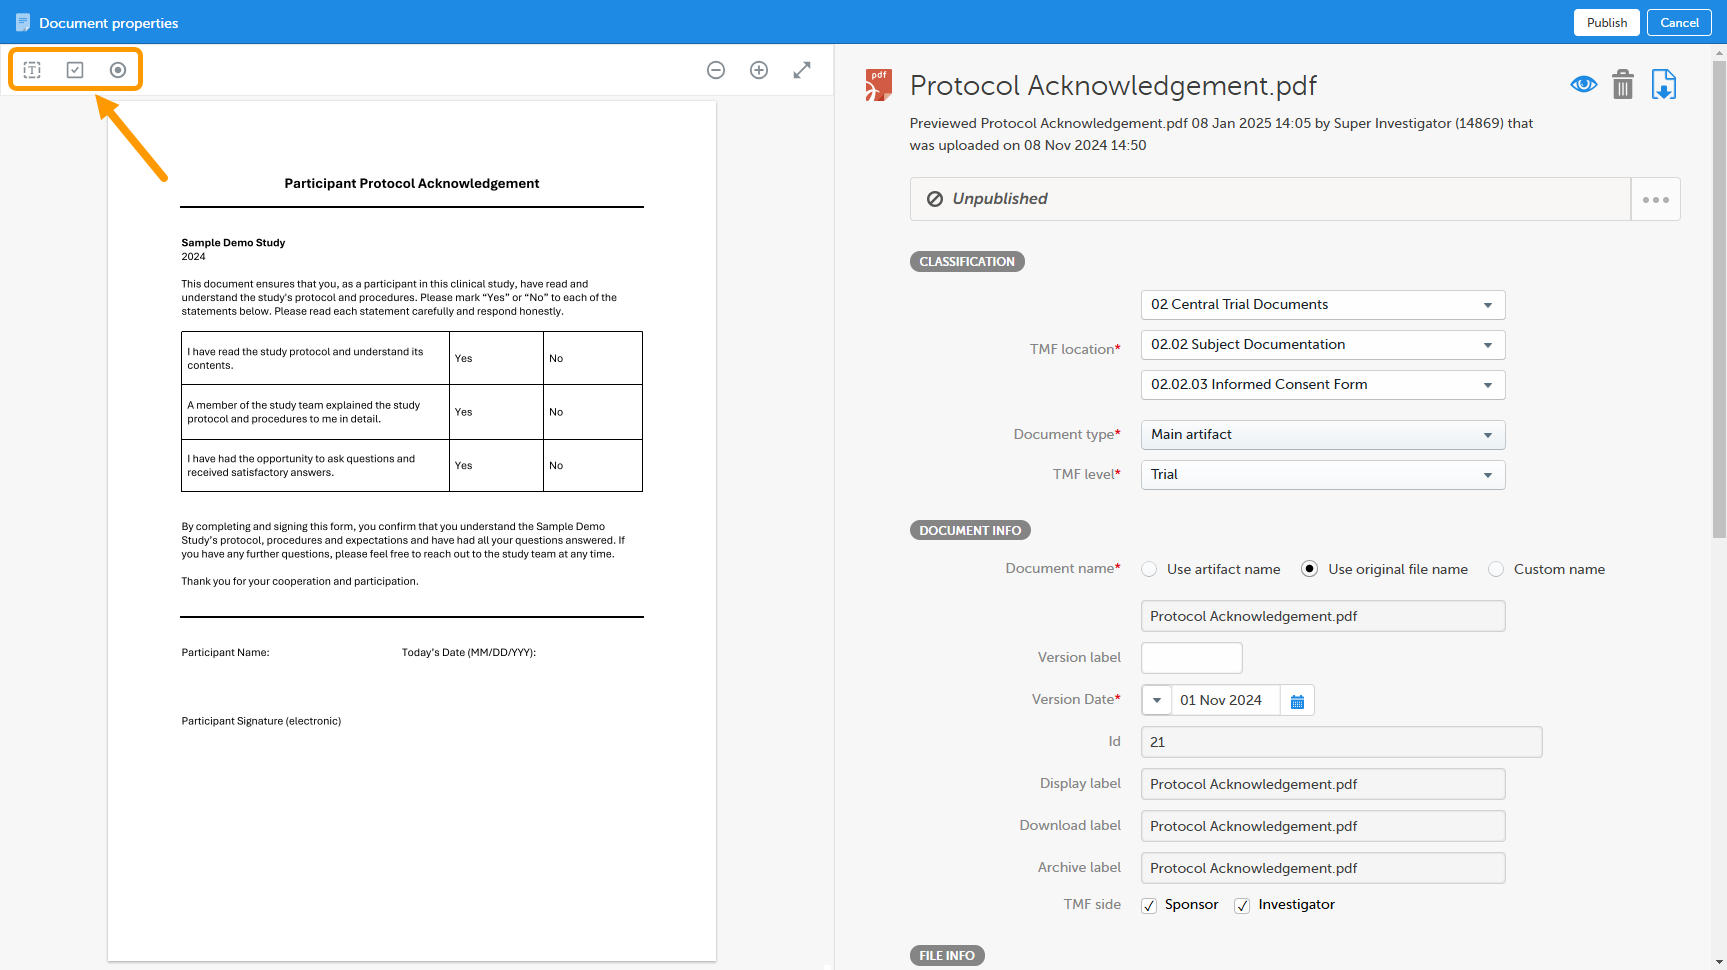
|
Types of form fields available:
Radio buttons allow recipients to select a single option from a predefined set of choices, ensuring only one selection is made.
Checkboxes allow recipients to select multiple options independently from a list, allowing for one, several, or all choices to be selected.
Open text fields provide recipients with a space to input free-form text, accommodating responses that require personalized or detailed information.
| 1 |
Select Radio Button: 
|
| 2 |
Drag the cursor to create the field shape (size and position can be edited later). 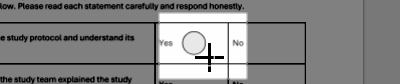
|
| 3 |
Once the shape is created, an edit window is displayed: 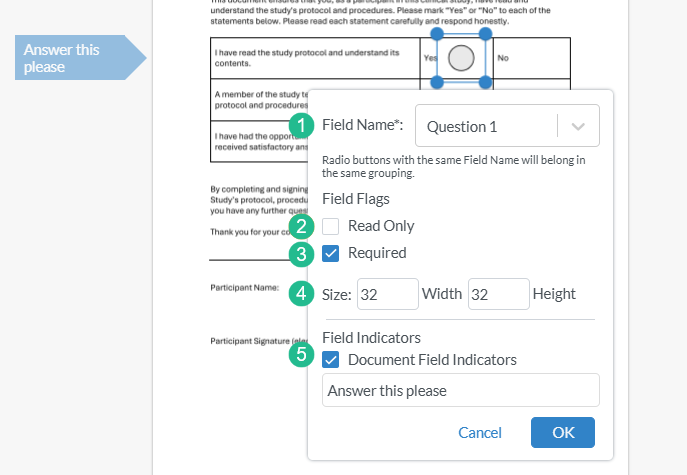
1. To name the radio button, click inside the text box to the right of Field Name and type the name (for example "Question 1". Then select the option that appears below to create the field name. 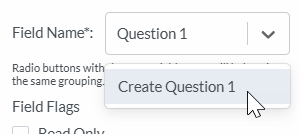
Note! For radio buttons to function properly, options belonging to the same question must have the same field name. For example, both "yes" and "no" radio buttons belonging to the first question must both be named "Question 1", and the next set of "yes" and "no" radio buttons belonging to the second question must both be named "Question 2". 2. Setting the field as Read Only will not allow the recipient to select or deselect the button 3. Setting the field as Required will prevent the recipient from signing the document until all required fields have been completed. 4. Setting the Size controls the size of the radio button 5. Selecting Document Field Indicators and typing in a label creates a flag to the left of the field that the recipient will see. Note! This may not be visible if the recipient is viewing the document on a mobile device. |
| 4 |
Once all of the desired fields and settings have been completed, select save. 
Note! If you do not save the form fields before publishing, saving as unpublished, or closing the document, the changes to the form fields will be lost. |
| 1 |
Select Checkbox: 
|
| 2 |
Drag the cursor to create the field shape (size and position can be edited later). 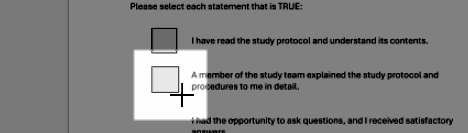
|
| 3 |
Once the shape is created, an edit window is displayed: 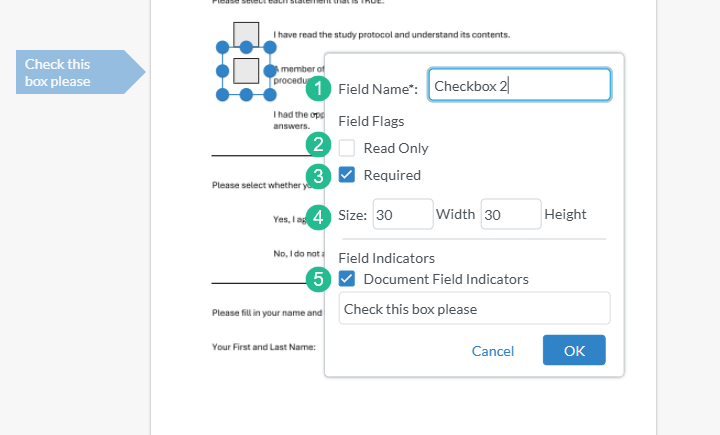
1. To name the checkbox, click inside the text box to the right of Field Name and type the name (for example "CheckBox1". Note! Checkboxes must have unique field names. If you give a checkbox the same name as another checkbox in the same document, you will not be able to save the checkbox. 2. Setting the field as Read Only will not allow the recipient to select or deselect the checkbox. 3. Setting the field as Required will prevent the recipient from signing the document until all required fields have been completed. Note! If a required checkbox if left blank, the recipient will not be able to sign the document. 4. Setting the Size controls the size of the checkbox 5. Selecting Document Field Indicators and typing in a label creates a flag to the left of the field that the recipient will see. Note! This may not be visible if the recipient is viewing the document on a mobile device. |
| 4 |
Once all of the desired fields and settings have been completed, select save.
Note! If you do not save the form fields before publishing, saving as unpublished, or closing the document, the changes to the form fields will be lost. |
| 1 |
Select Text Field: 
|
| 2 |
Drag the cursor to create the field shape (size and position can be edited later). 
|
| 3 |
Once the shape is created, an edit window is displayed: 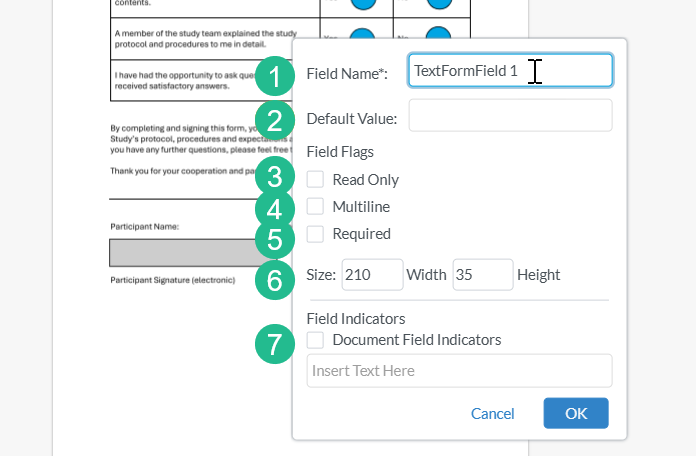
Edit options for the text field as needed: 1. To name the text field, click inside the text box to the right of Field Name and type the name (for example "TextFormField 1"). Note! Text field names do not affect the functionality as the radio button names do. 2. Entering a Default Value will autofill the text field with any text you enter here. 3. Setting the field as Read Only will not allow the recipient to type any text in the text field. 4. Setting the field as Multiline will allow for multiple lines of text to be entered. 5. Setting the field as Required will prevent the recipient from signing the document until all required fields have been completed. 6. Setting the size controls the size of the text field 7. Selecting Document Field Indicators and typing in a label creates a flag to the left of the field that the recipient will see. Note! This may not be visible if the recipient is viewing the document on a mobile device. |
| 4 |
Once all of the desired fields and settings have been completed, select save.
Note! If you do not save the form fields before publishing, saving as unpublished, or closing the document, the changes to the form fields will be lost. |
Note! Form fields and settings may be changed while a document remains unpublished. Once a document is published, fields may not be edited or added.
To share a document with a Viedoc Me user or a Viedoc Clinic user:
| 1 | In the Trial Master File view, navigate to the finalized document in the TMF structure. |
| 2 | Select the document to open the Document properties window. |
| 3 |
In the Sharing section at the top of the window, select 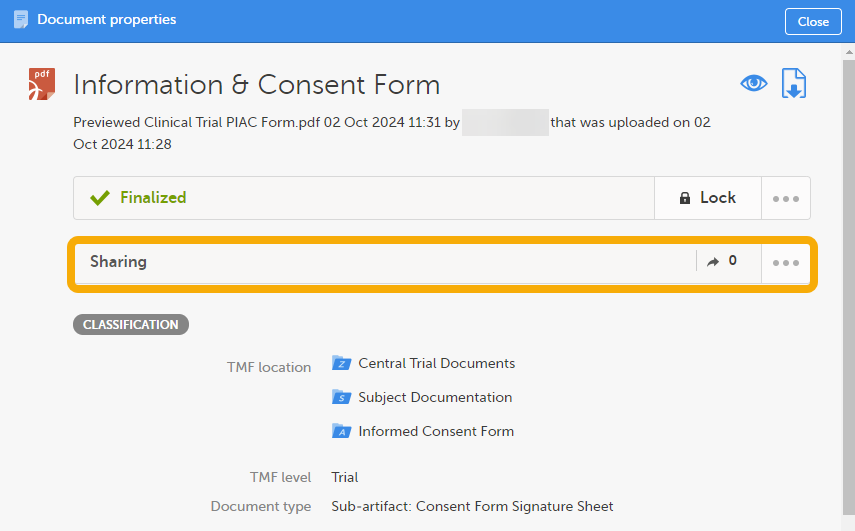
|
| 4 | Select Create a new binder. |
| 5 |
Select Recipients > Viedoc Me users or Viedoc Clinic users. 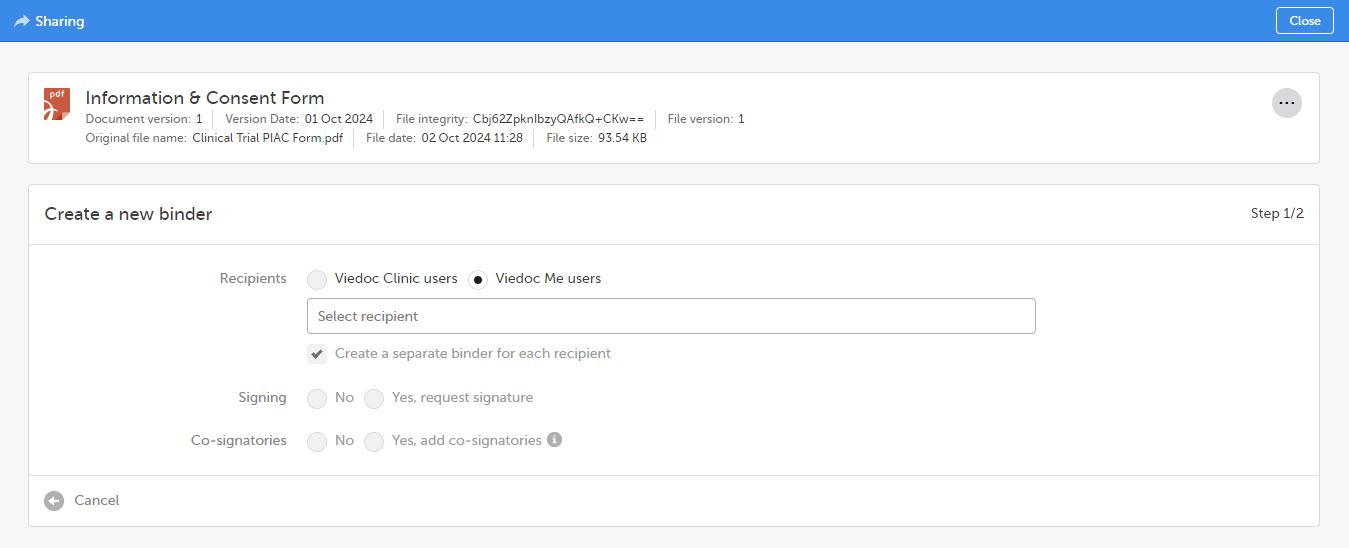
|
| 6 |
In the field just below, select the users that you want to share the document with. Note! If you select more than one user, the option Create a separate binder for each recipient will be automatically selected and non-editable. This is because the recipients should not share any study information with each other. Note! You can only select users within the same scope as yourself. Note! If the document is included in an artifact that is only on the Sponsor side of the TMF (or on neither Sponsor nor Investigator side), and the document version is set to be shared with Viedoc Me users, it is not possible to collect signatures. This is because the signatures can include information that can jeopardize the data integrity of the Viedoc Me users. |
| 7 | For the Signing option, select whether or not to request a signature. |
| 8 | If you selected Yes in the previous step, select a signature reason. |
| 9 |
Select whether or not a co-signatory is required. Note! The co-signatory cannot sign the document if you selected No in step 7. |
| 10 |
Select the co-signatory or co-signatories. Note! You can only select users within the same scope as yourself. |
| 11 | Select a signature reason for the co-signatory. |
| 12 | Select Continue to see an overview of the sharing details. |
| 13 |
If the sharing details are correct, select Confirm. Otherwise, you can select Back and edit. |
| 14 | After confirming, a binder summary is displayed and an email is sent to each of the recipients with a link to Viedoc Share where the document can be viewed and/or signed. |
| 1 | In the Trial Master File view, navigate to the document. |
| 2 | Select the document to open the Document properties window. |
| 3 | In the Sharing section at the top of the window, select ... to open the Sharing window. |
| 4 |
Select the arrow icon to open the Binder properties window. |
| 5 |
The binder properties are displayed, including the history with all actions for the binder. 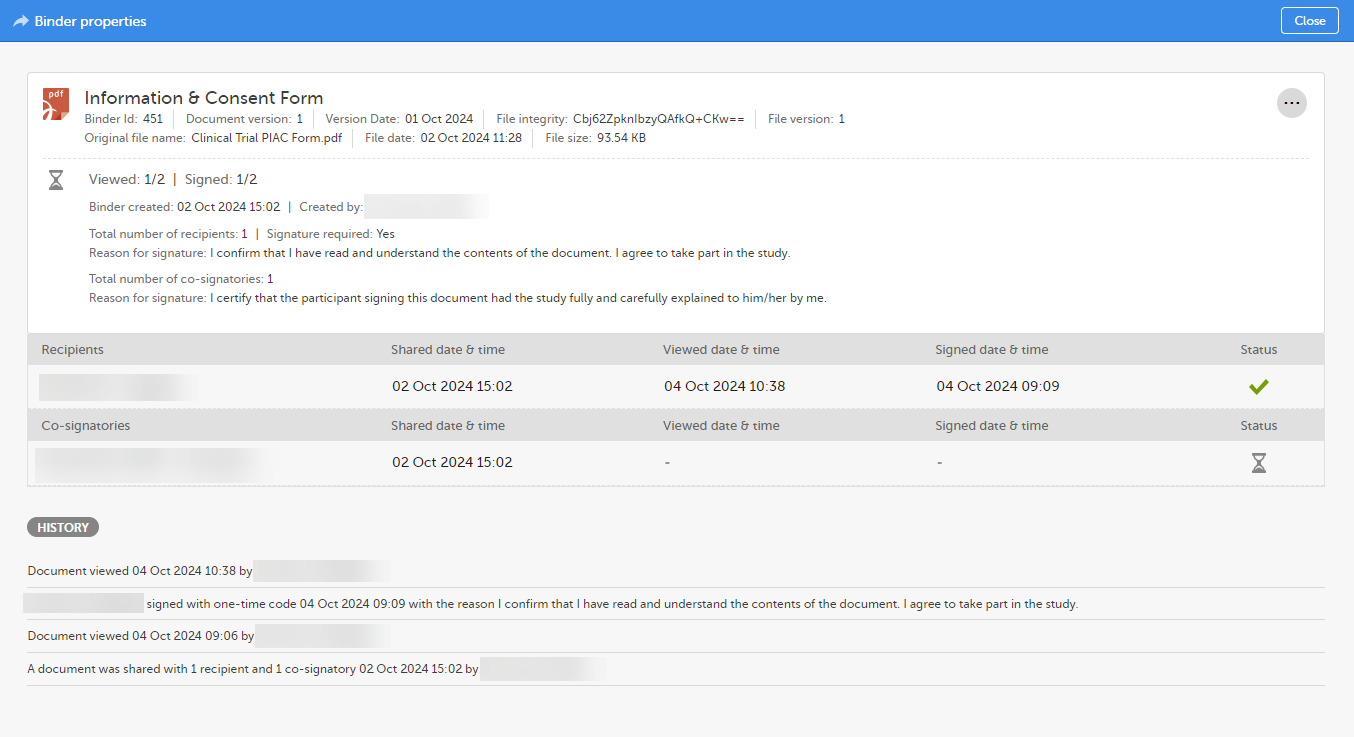
|
To download the shared document from the binder:
| 1 | In the Trial Master File view, navigate to the document. |
| 2 | Select the document to open the Document properties window. |
| 3 | In the Sharing section at the top of the window, select ... to open the Sharing window. |
| 4 |
Select the arrow icon to open the Binder properties window. |
| 5 |
In the top right corner, select 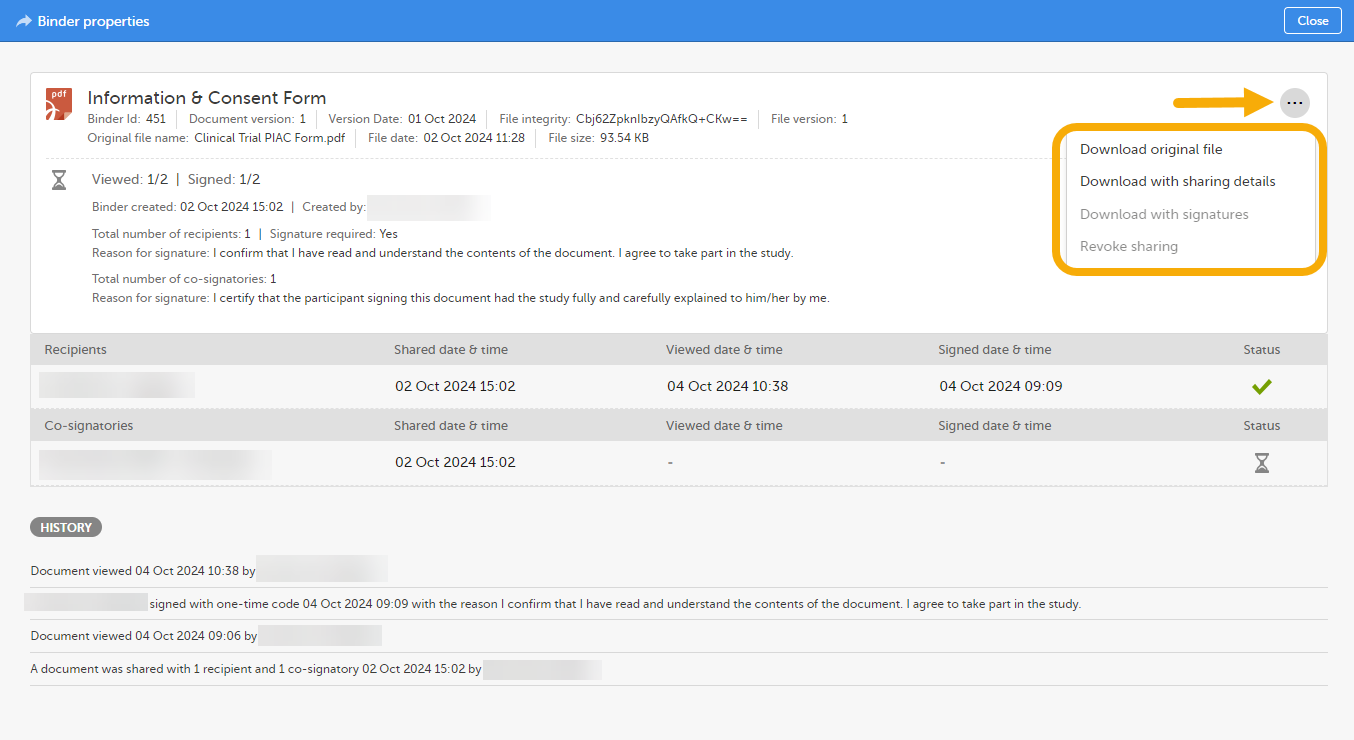
|
| 6 |
|
A binder can be revoked if you want to share a newer version of a document or to cancel the sharing when a document version has been shared by mistake.
Note! If the document in the binder has been signed, even if it's by only one recipient, the binder cannot be revoked.
To revoke a binder:
| 1 | In the Trial Master File view, navigate to the document. |
| 2 | Select the document to open the Document properties window. |
| 3 | In the Sharing section at the top of the window, select ... to open the Sharing window. |
| 4 |
Select the arrow icon to open the Binder properties window. 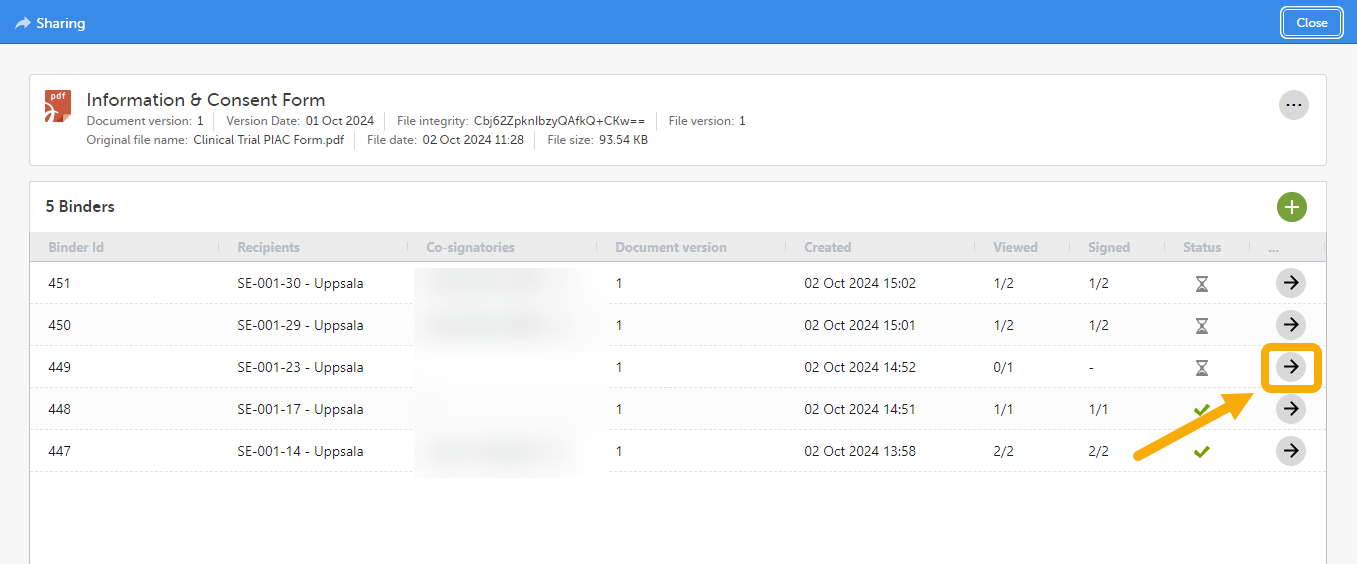
|
| 5 |
In the top right corner, select 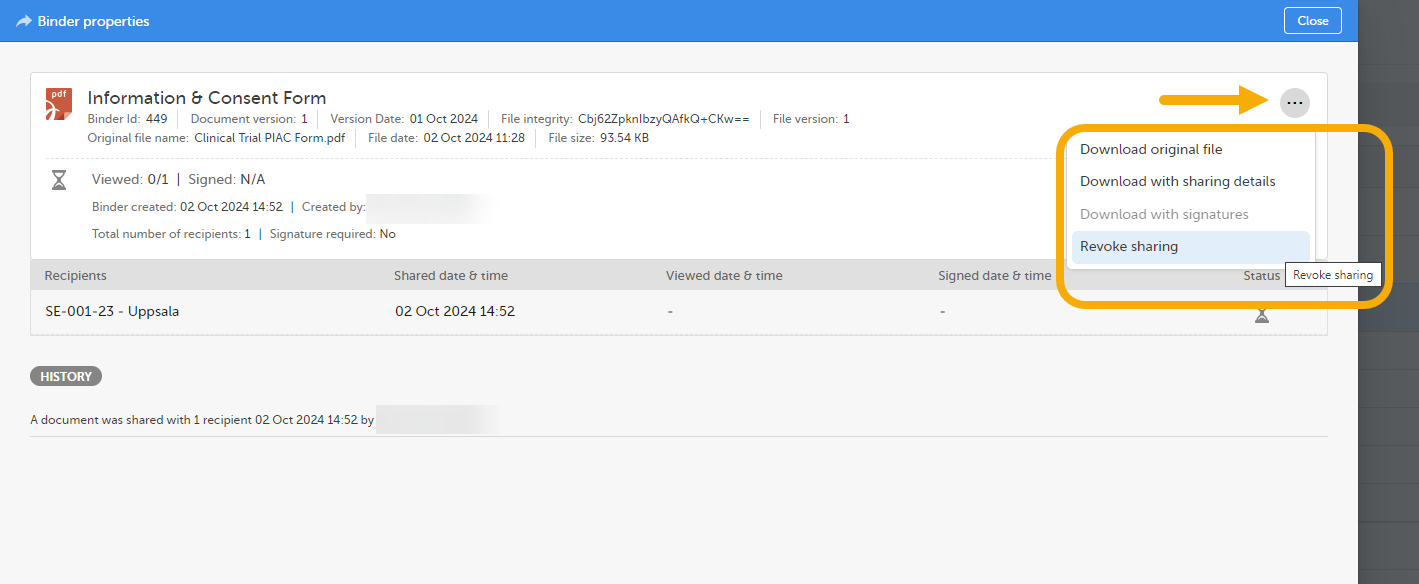
|
| 6 | Select Revoke sharing. |
| 7 |
The binder properties are displayed, and you can now see that the binder is revoked. 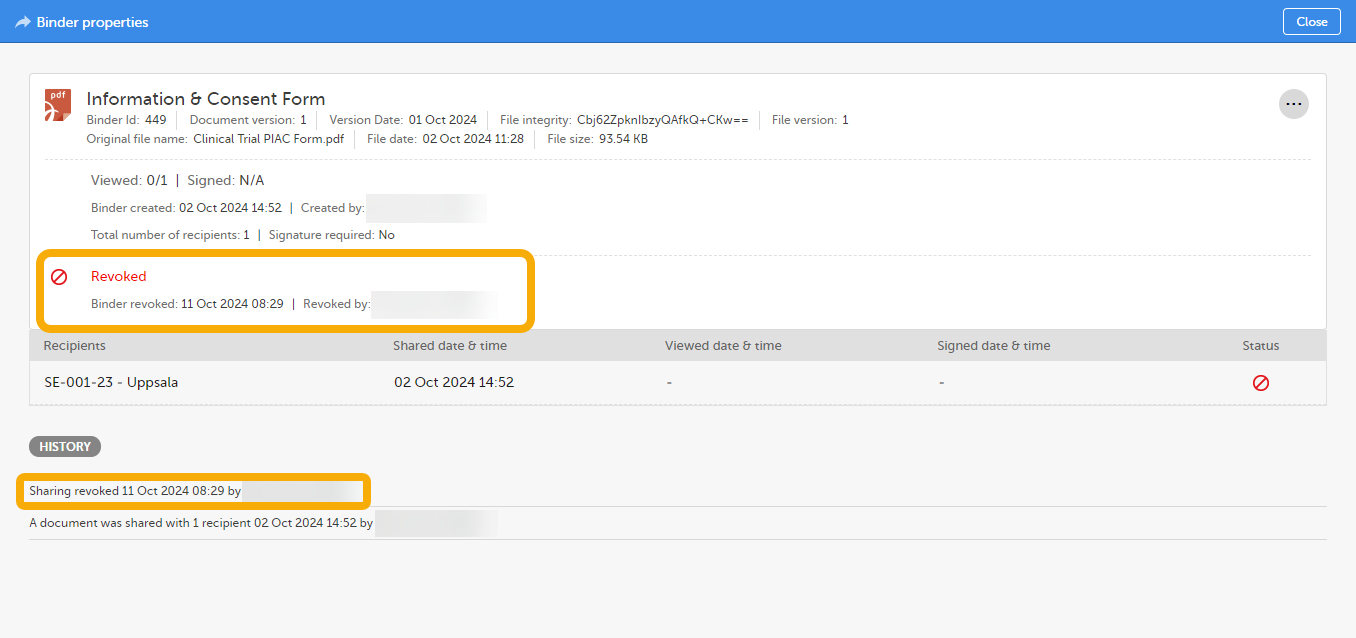
|
An eTMF user with Manage sharing permission will see a Sharing section at the top of the Document properties window.
1. The number of active shared binders accessible by the Sharer.
2. The number of pending actions for binders accessible by the Sharer (only displayed if the number is greater than 0).
3. The number of actions done for binders accessible by the Sharer (only displayed if the number is greater than 0).
4. Select ... to open the Sharing window with an overview of the existing binders. This is also where new binders can be created.
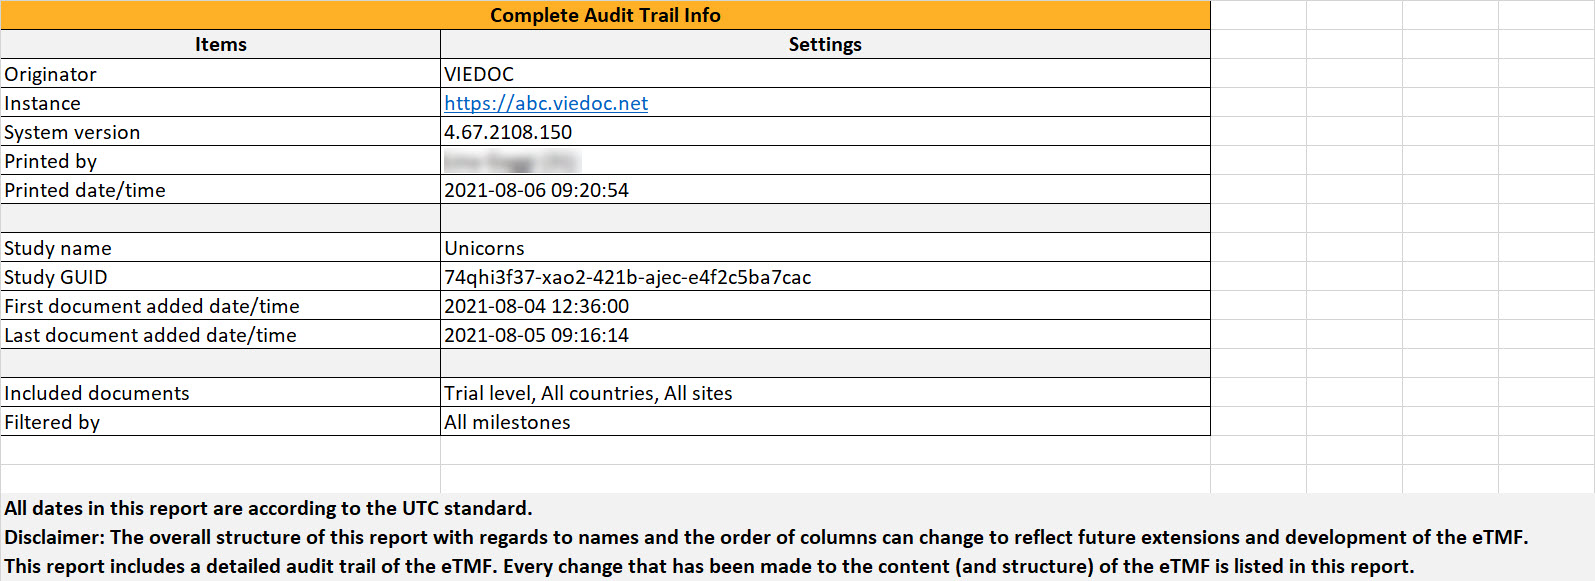
The complete audit trail report is in Excel format. It includes a complete list of actions done on:
The report respects the user roles and access to documents, sites, and countries.
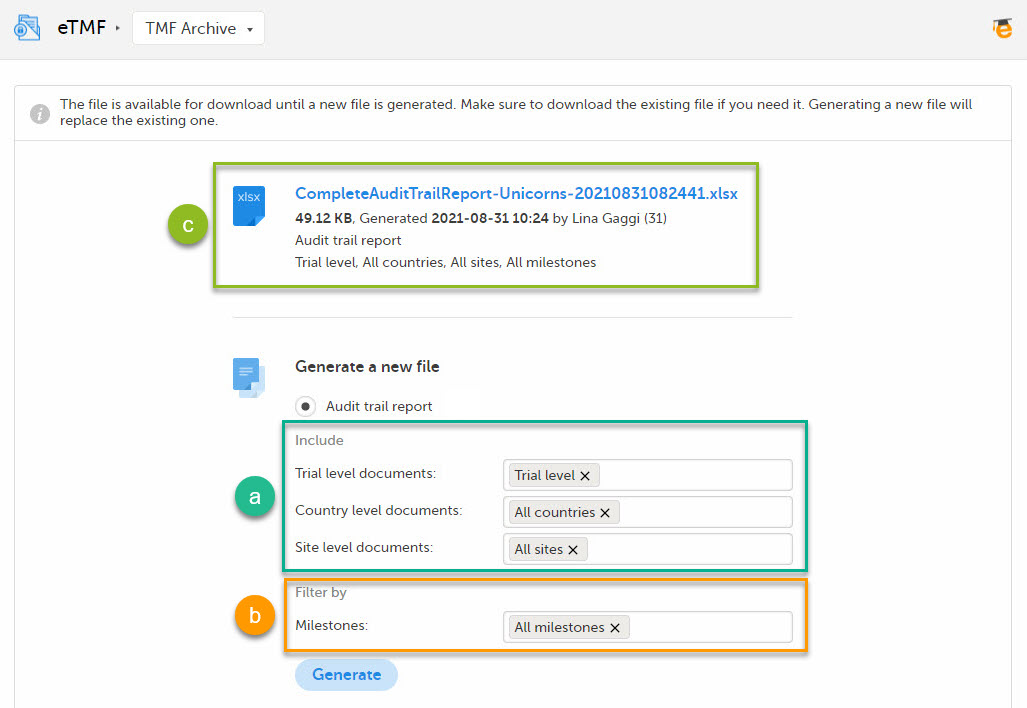
To generate the complete audit trail report:
| 1 | Set the options (a) for the documents’ audit trails to be included. You can choose to include documents that are filed on trial/country/site levels according to your permissions to those. |
| 2 |
Set the milestones/milestone groups (b) you would like to filter by. Note! Artifacts that don't have milestones assigned will not be included when generating an audit trail report. To include the documents from artifacts that don't have an assigned milestone or milestone group, generate a separate audit trail report with this filter removed. |
| 3 | Click Generate. |
| 4 | Click on the generated document link to download the report (c). |
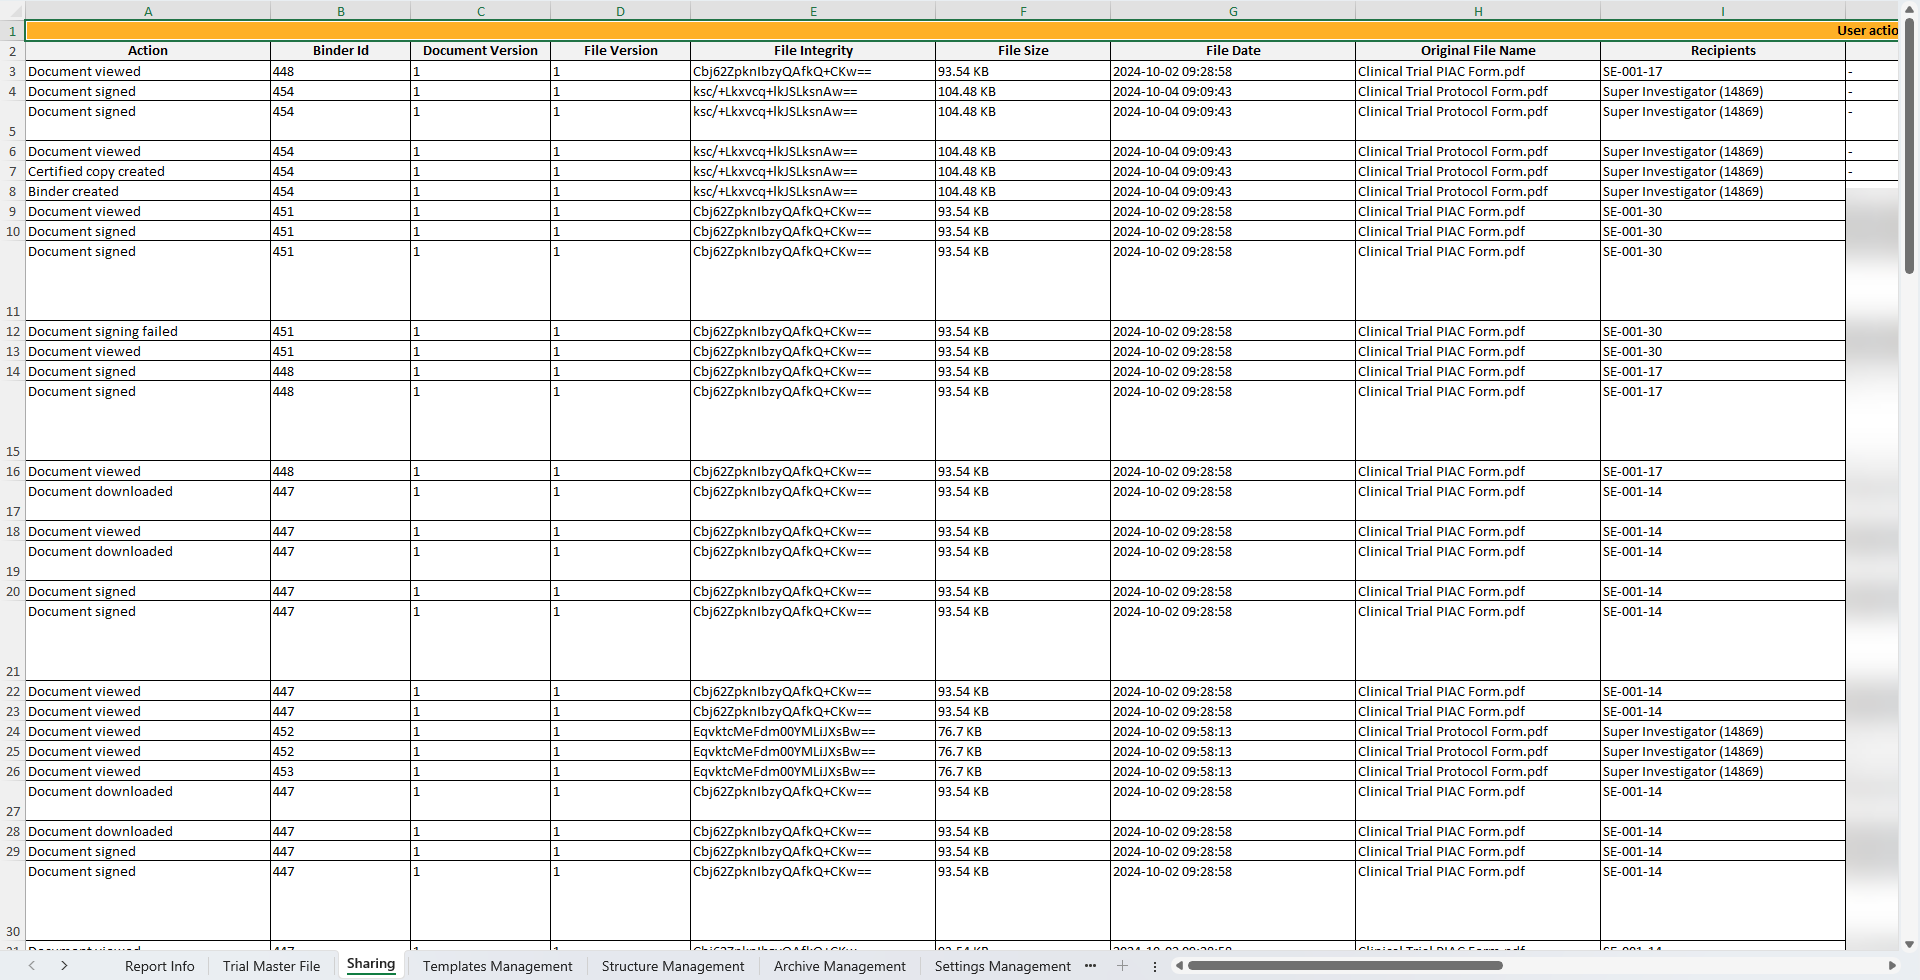
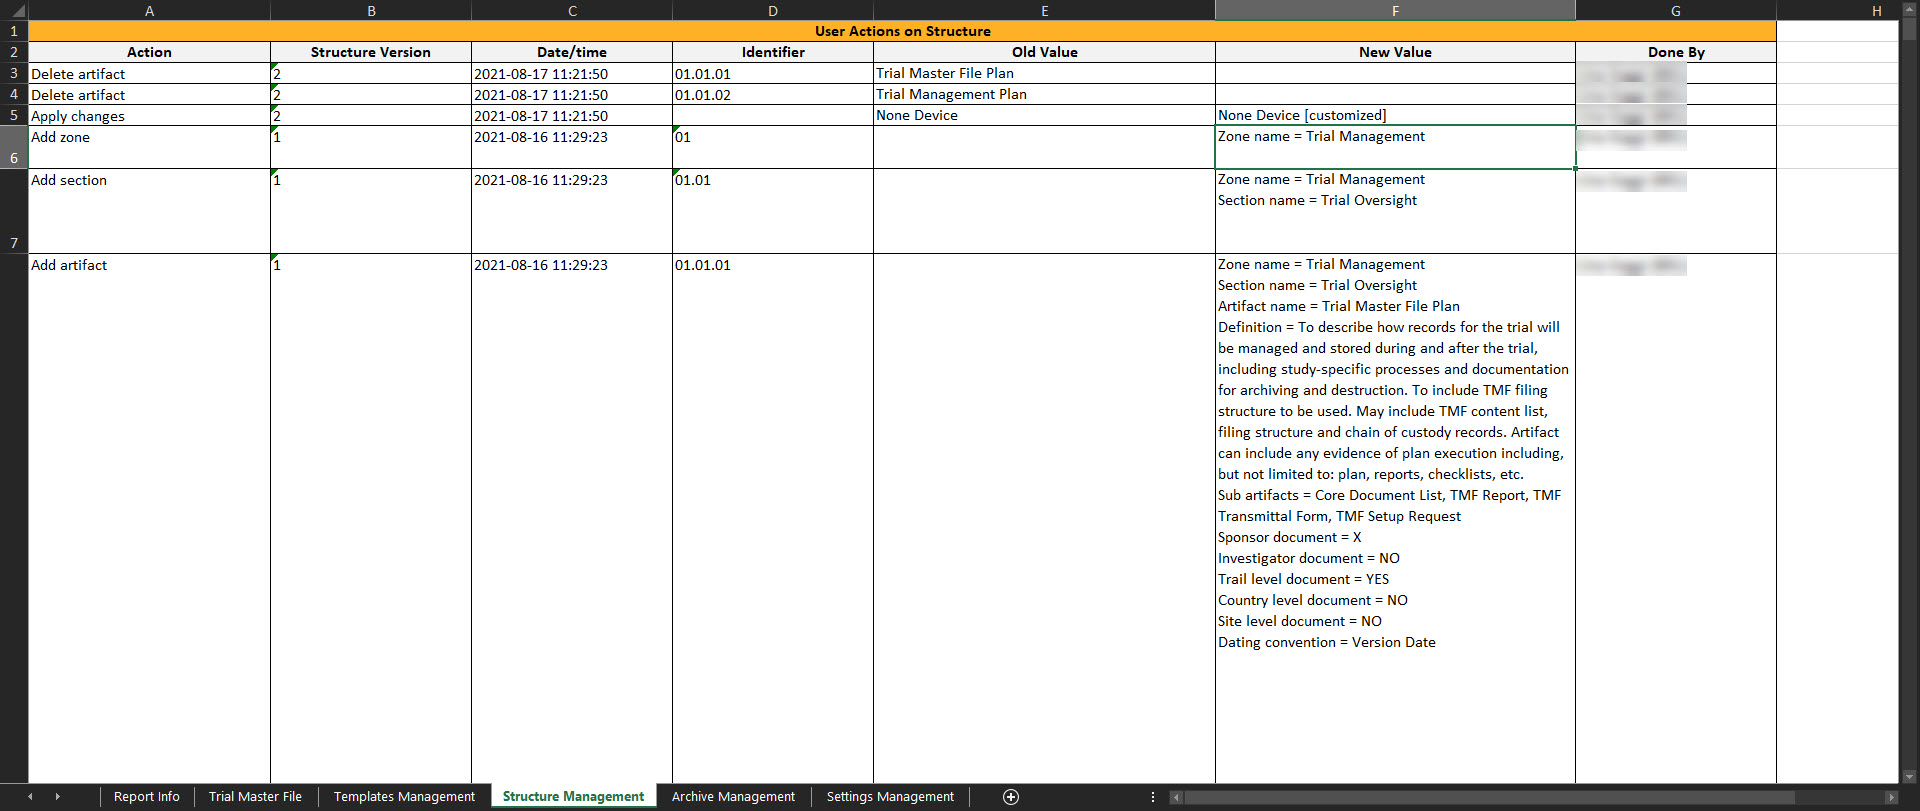
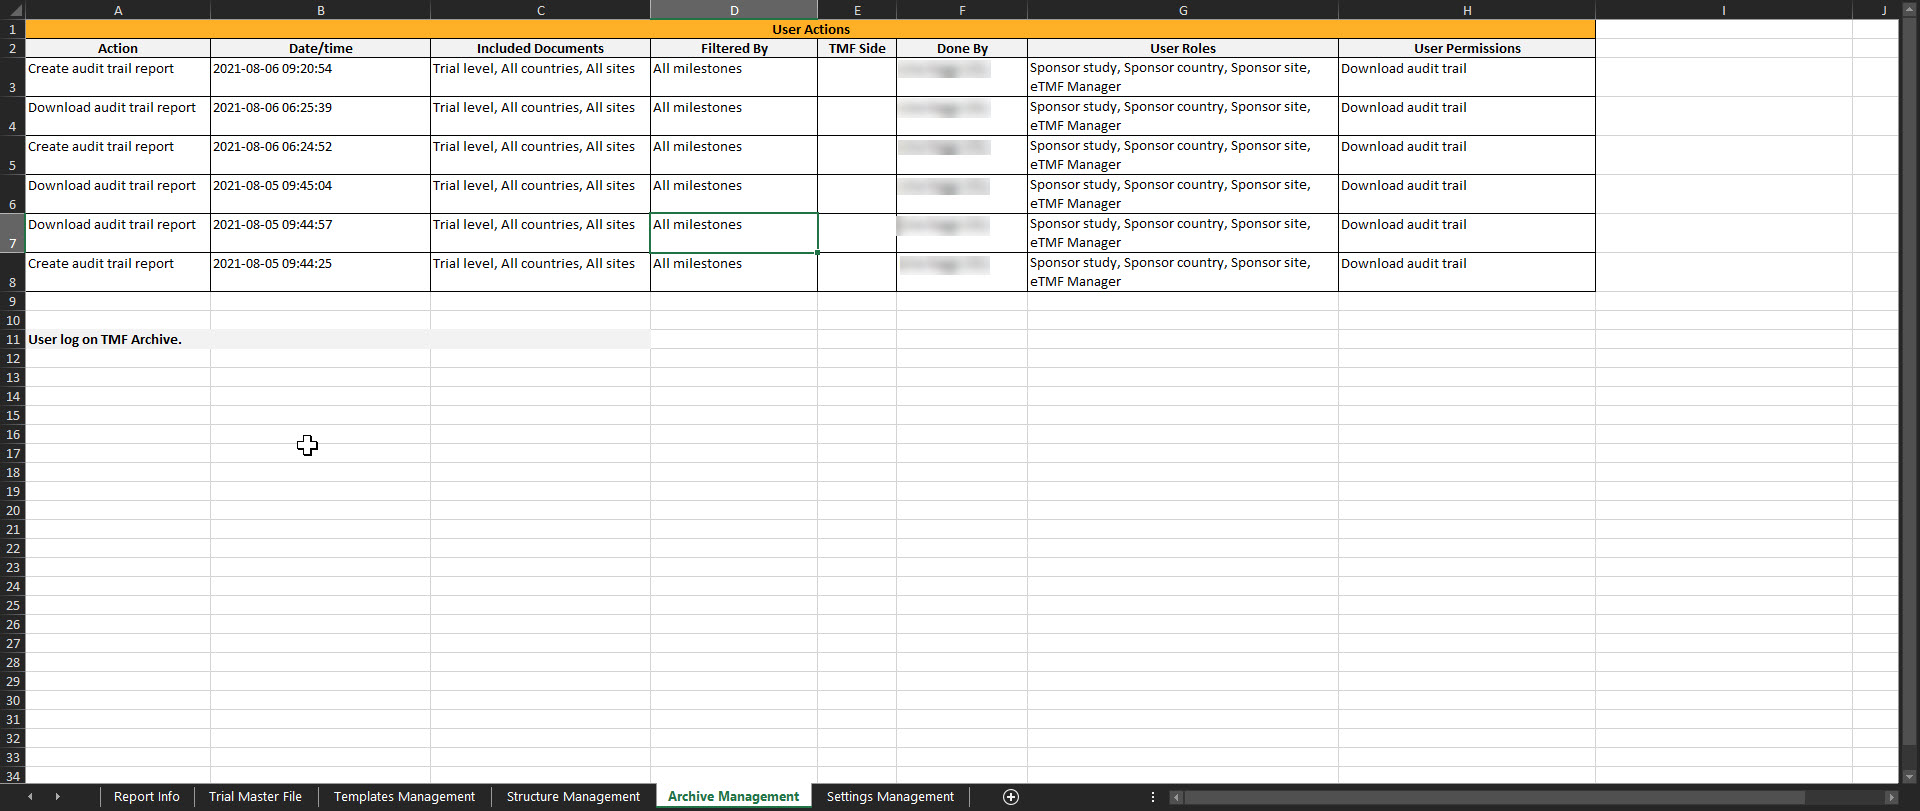
Each sheet in the complete audit trail report corresponds to the actions done by users on a certain view or section, as shown in the following table:
| Trial Master File |
|
| Templates Management |  |
| Structure Management | 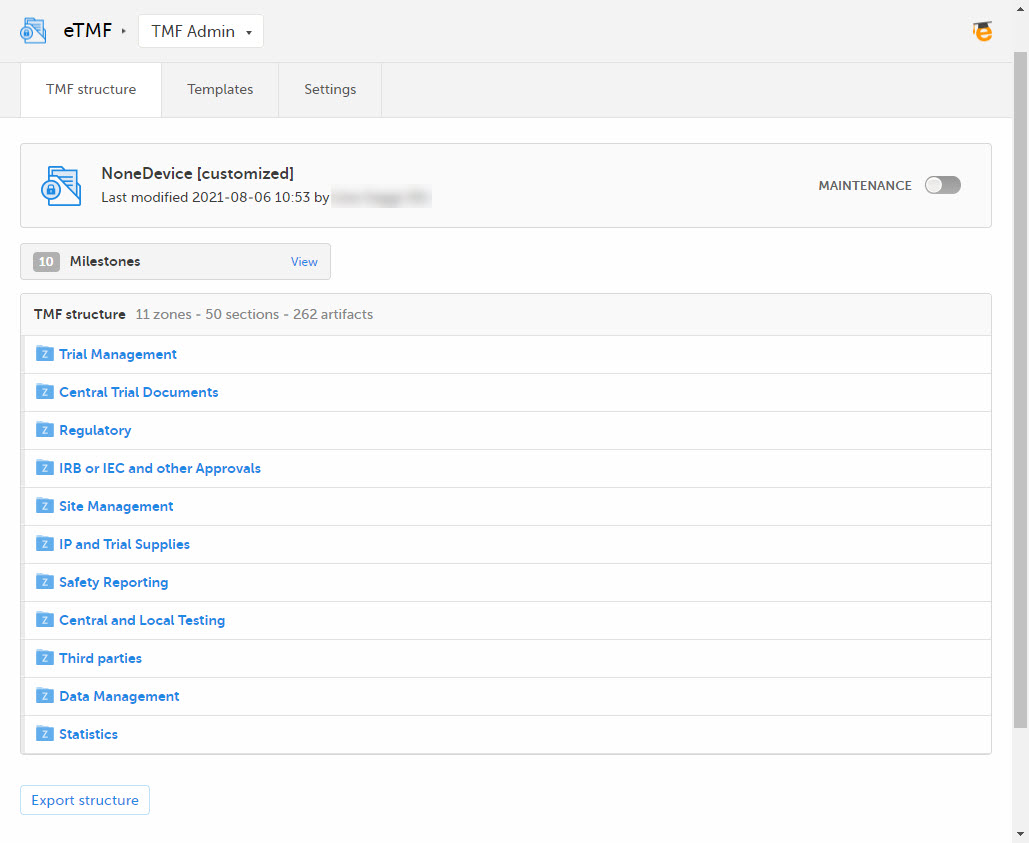 |
| Archive Management |  |
| Settings Management |  |
| Status Management |  |
The report is self-explanatory, but in the following sections you can find detailed information about each sheet in the file:
This sheet includes general information about the report and the study. The First document added date/time and Last document added date/time show when the first and last documents were uploaded to the TMF. This is shown regardless of whether the audit trail of these documents is included or not in the report.
This sheet includes information about all the actions done by users on documents in the Trial Master File view. Note that the actions that are included in this sheet are done on:

This sheet includes information about all user actions on binders in Viedoc Share and Viedoc TMF.
Note! The sheet only include actions on the binders that the archivist has access to.
This sheet includes actions done by eTMF Managers on the templates. If the user doesn’t have access to TMF Admin view, this sheet is empty.

This sheet includes actions done by eTMF Managers on the instantiated structure. If the user doesn’t have access to TMF Admin, this sheet is empty.
This sheet includes this user actions done on the TMF Archive page.
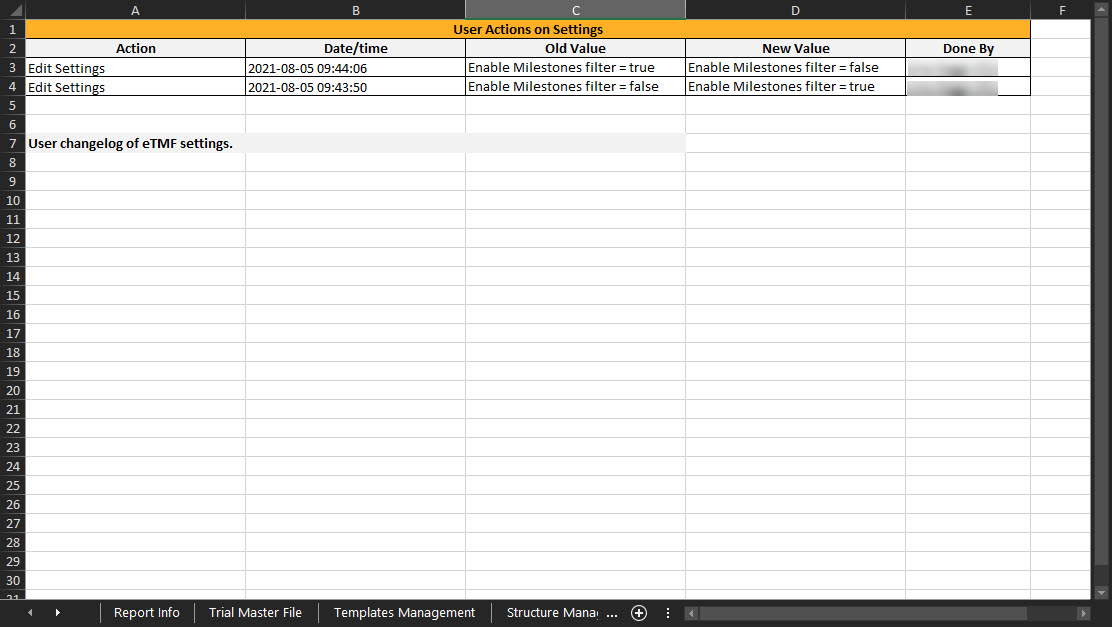
This sheet includes the actions done by eTMF Managers on the Settings tab in TMF Admin. If the user doesn’t have access to TMF Admin, this sheet is empty.
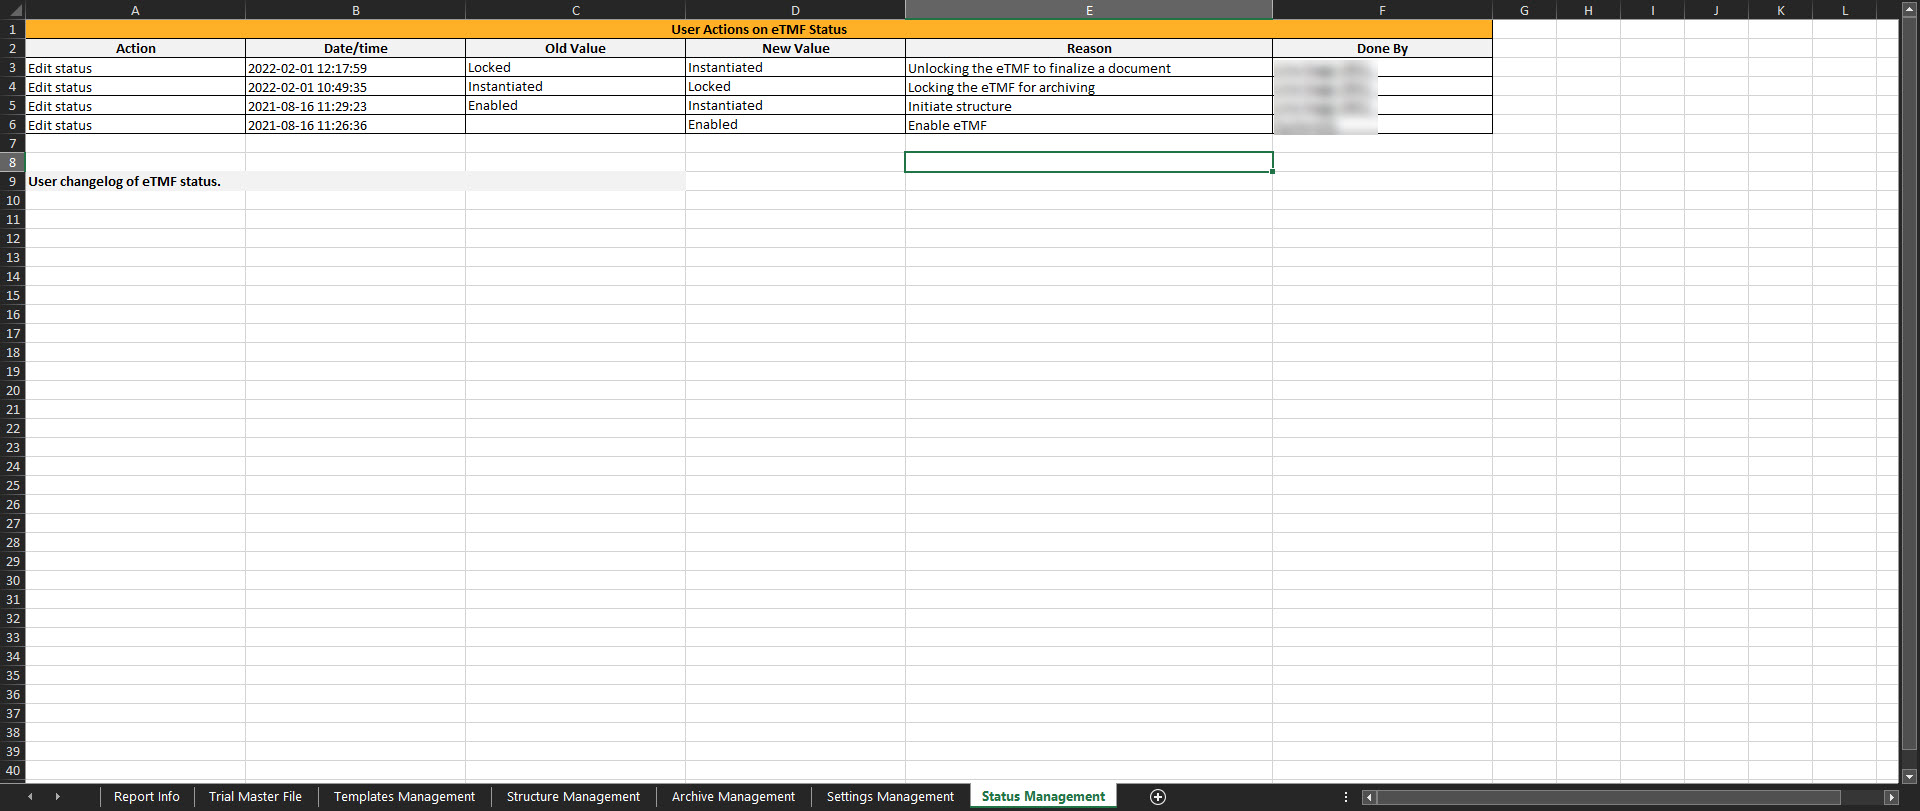
This sheet includes the actions done by eTMF Managers on the Status tab in TMF Admin. If the user doesn't have access to to TMF Admin, this tab is empty.
The eTMF-EMS repository can be used for archiving the sponsor and/or investigator side of the study and/or exporting the documents that are included in the structure. It is compatible with the Exchange Mechanism Standard (EMS). Read more about the EMS here.
The eTMF-EMS repository respects the user roles and access to documents, sites, countries, and eTMF side.
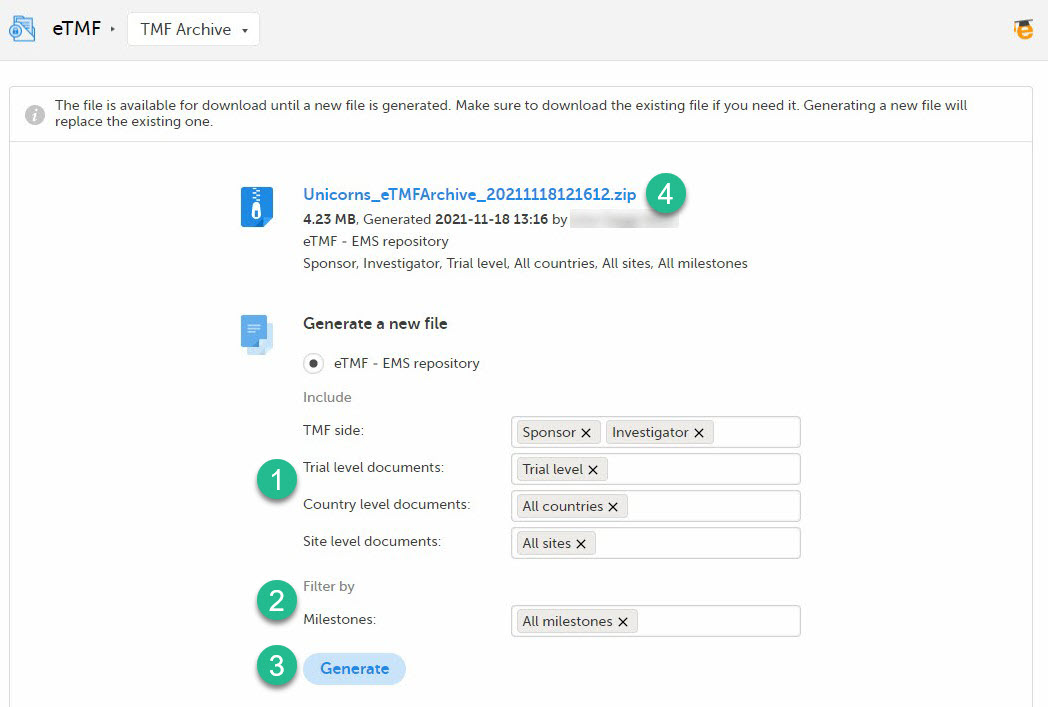
To generate the repository:
| 1 |
Set the options (1) for the documents you want to include in the archive. You can choose to include documents that are filed to the investigator or sponsor side of the eTMF, and documents that are filed on trial/country/site levels according to your permissions to those. Note! Artifacts that are not assigned to a TMF side (sponsor or investigator) will not be extracted when generating a repository. To extract the documents from artifacts that don't have an assigned TMF side, generate a separate EMS repository with both of these filters removed. |
| 2 |
Set the milestones-milestone groups (2) you would like to filter by. Note! Artifacts that don't have milestones assigned will not be extracted when generating a repository. To extract the documents from artifacts that don't have an assigned milestone or milestone group, generate a separate EMS repository with this filter removed. |
| 3 | Click Generate (3). |
| 4 |
Click the generated document link to download the zipped folder (4). |
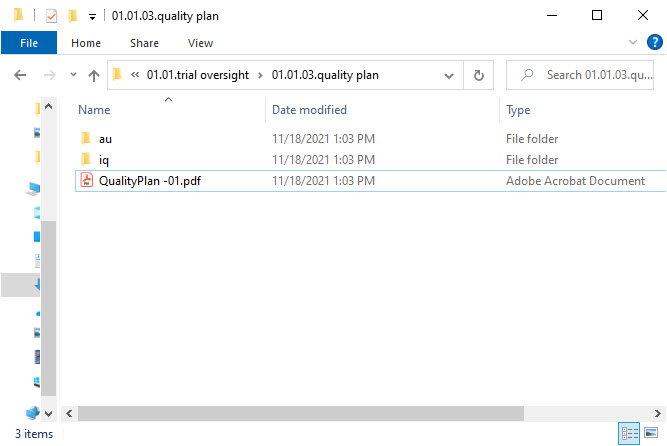
The zipped folder structure mirrors the eTMF structure used for the study as follows:
StudyName_eTMFArchive_DatetimeStamp
StudyName - the study nameeTMFArchive - static textDatetimeStamp - the UTC date and time of generating the eTMF-EMS repository in the format YYYYmmDDHHMMss
YYYYmmDDHHMMss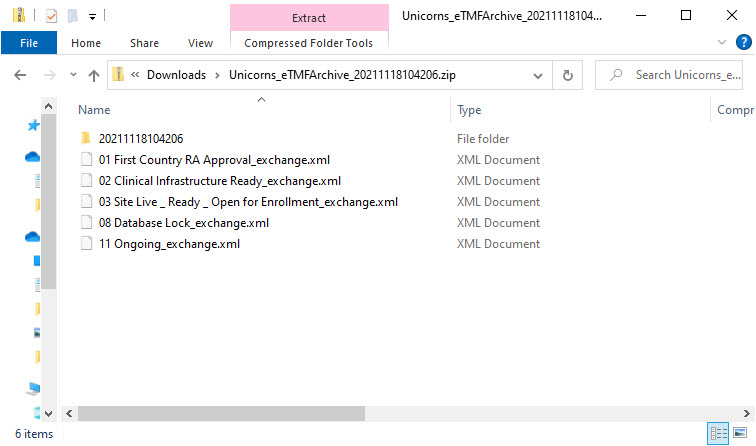
ZoneID.ZoneName for each included zone from the structure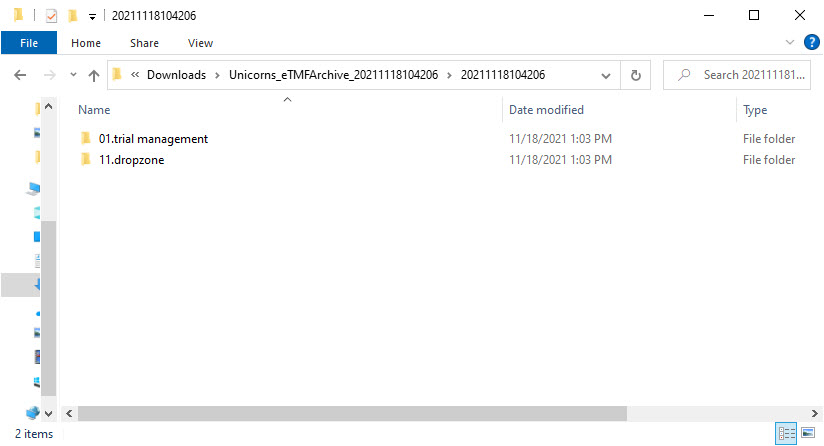
ZoneID.SectionID.SectionName for each included section from the structure
ZoneID.SectionID.ArtifactID.ArtifactName for each included artifact from the structure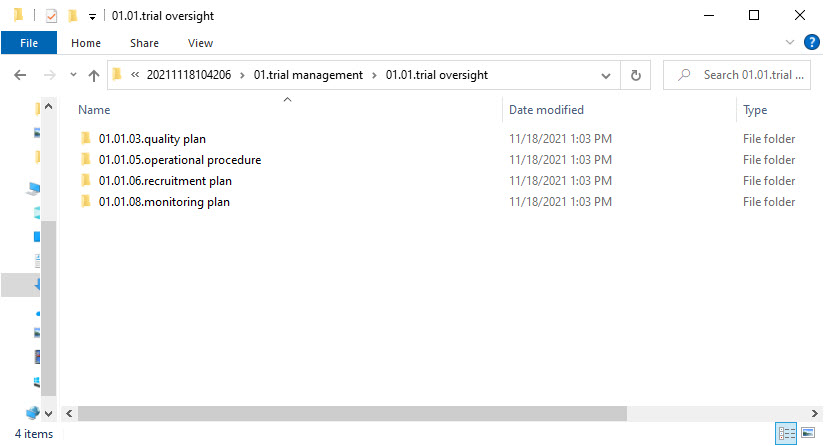
*The files that are signed by Viedoc Me users are only included when archiving the Investigator side of the TMF.
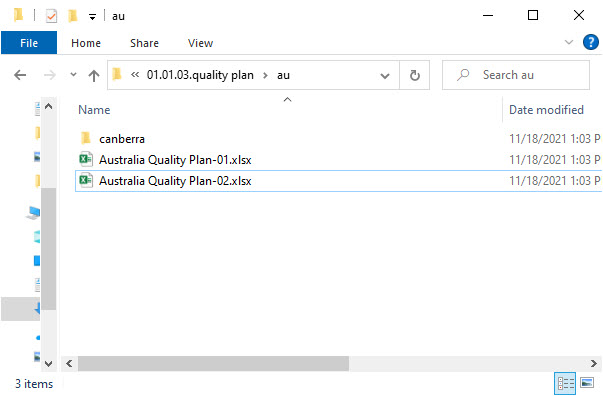
The zipped folder includes all the versions of documents included in the structure. The name of the files will be as follows:
CurrentDocumentName-SystemVersion.extension, where:
CurrentDocumentName is the latest document nameSystemVersion is the integer value of the version set by the system for this fileIf there are multiple documents of the same name filed to the same artifact and linked to the same levels, the system will add (n) as a suffix to the document name to ensure that all files are included in the zipped folder and no files are overwritten.
The following table lists a number of tasks that study users can face, together with the eTMF roles, the Viedoc Clinic site groups, and the eTMF level access that they would need to perform the respective task.
For more information about site groups, see Managing users and Managing study sites.
| Study role | Task | eTMF role | Viedoc Clinic site group | eTMF level access | Permissions | Comments |
|---|---|---|---|---|---|---|
|
Study coordinator General site user |
Drop documents in the shared drop zone | Site staff - customized with no access for all artifacts | Site | No access to all artifacts | None | |
|
Study coordinator General site user |
View, file, and classify site-level documents, view some artifacts on country and study levels, archive the Investigator site TMF | Site staff | Site | Write access to pre-defined artifacts on site level, read access to pre-defined artifacts on study, site, and country levels | 1. Archive Investigator TMF | |
| Project manager | File study-level documents, view all sponsor-side documents, archive the sponsor TMF, download audit trail, and see TMF settings and structure | Sponsor study | All production sites* |
1. Download audit trail 2. Archive sponsor TMF 3. Read-only TMF Admin |
*Clinic access needs to be on study level and not every site one by one, otherwise the write permission will be translated to read permission. | |
| Monitor | File site-level documents, view all documents for the study, my country, and my site, manage drop zone documents, review site level documents |
Sponsor site Reviewer* |
Site** |
Write and review access on site level Read access on all levels |
1. Manage drop zone |
*Although the role sheet grants review rights for study and country level documents too, the end user will only have read rights to those documents, as long as they are not invited on study or country level for their clinic role. **Clinic access needs to be given to all applicable sites. |
|
Country manager Trial manager |
File country-level documents, view all sponsor-side documents at all levels and review all documents |
Sponsor country Reviewer |
All production sites* | *Clinic access needs to be on study level and not every site one by one, otherwise the review permission will be translated to read permission. | ||
|
Read-only role Regulatory inspector |
Read-only access to all documents* and settings Access to audit trail |
No role, permissions only | All production sites** |
1. Read-only Trial Master File* 2. Read-only TMF Admin 3. Download audit trail |
*If read-only Trial Master File permission is assigned, any NO ACCESS permission will be overridden by read access by the system. This means that all artifacts set as optional or required (including blinded and investigator-side artifacts) will be visible. These permissions should be reserved for a role that requires all access, such as a regulatory inspector. **Clinic access needs to be on study level and not every site one by one, otherwise the review permission will be translated to read permission. |
|
|
Unblinded role Sponsor or statistician |
View, file, and classify blinded documents only on all levels | Sponsor unblinded | All production sites* |
Write access to blinded documents on study level and site level (when applicable) No access to non-applicable documents on all levels |
1. Download audit trail | *Clinic access needs to be on study level and not every site one by one, otherwise the review permission will be translated to read permission. |
The following table contains examples of common use case scenarios together with the requisites for performing them.
| Scenario | Requisites |
|---|---|
| Drop zone: As a General site user, I want to be able to drop site-generated or site-signed documents in the drop zone. |
|
| eISF: As a General site user, I want to be able to file pre-defined documents on site level, view some artifacts on study and country levels and archive the Investigator site TMF/eISF. |
|
| As a Project manager, I want to be able to file documents at study level, view all sponsor-side documents at all levels in the study, archive the TMF (sponsor side), download the audit trail, and see the TMF settings and structure. |
|
| As a Monitor, I do not have access to patient information documents on site level. I file site-level documents that belong on the sponsor-side TMF, view documents for my country and the study, manage drop zone documents, and review site-level documents. |
|
| As a Country Manager or a Trial Manager, I want to be able to file documents at country level, view all sponsor-side documents at all levels in the study, and review all sponsor-side documents. |
|
| As a Regulatory Inspector, I want to have read-only access to all documents (sponsor side and investigator side), TMF settings, and access to the audit trail. |
|
| As an Unblinded Statistician, I want to view, file, and classify blinded documents only on all levels. |
|
| Check | To resolve |
|---|---|
| Check that the user is invited to a clinic role with a mapped eTMF role with at least Read to the artifact at the expected level. | Invite the user to a clinic role with a mapped eTMF role with read/write permissions to the artifact or edit the roles and accesses for the artifact in TMF Admin maintenance mode. |
| Check that the artifact itself is Optional or Required at the expected level, as Not permitted documents will override any role access for the artifact. | Edit the trial/country/site level settings for the artifact in TMF Admin maintenance mode. |
| Check | To resolve |
|---|---|
| Check that the user is invited to a clinic role with a mapped eTMF role with Write access to the artifact at the expected level. | Invite the user to a clinic role with a mapped eTMF role with write permission to the artifact or edit the roles and accesses for the artifact in TMF Admin maintenance mode. |
| Check that the user is invited to a clinic role on at least Country level (for write permission to Country level documents) or Study level, All production sites (for write permission to Study level documents), otherwise Write will be translated to Read. | Invite the user to a clinic role on at least Country level (for write permission to Country level documents) or Study level, All production sites (for write permission to Study level documents). |
| Check | To resolve |
|---|---|
| Check that the user is invited to a clinic role with a mapped eTMF role with Review access to the artifact at the expected level. | Invite the user to a clinic role with a mapped eTMF role with review permission to the artifact or edit the roles and accesses for the artifact in TMF Admin maintenance mode. |
| Check that the user is invited to a clinic role on at least Country level (for review permission to Country level documents) or Study level, All production sites (for review permission to Study level documents, otherwise Review will be translated to Read. | Invite the user to a clinic role on at least Country level (for write permission to Country level documents) or Study level, All production sites (for write permission to Study level documents). |
| Check | To resolve |
|---|---|
| Check that the user is invited to a clinic role with a mapped eTMF permission Manage drop zone. | Map the Manage drop zone permission to the applicable clinic role. |
| Check | To resolve |
|---|---|
| Check that the user is invited to a clinic role with a mapped eTMF role with Write access to the artifact at the expected level. | Invite the user to a clinic role with a mapped eTMF role with write permission to the artifact or edit the roles and accesses for the artifact in TMF Admin maintenance mode. |
| Check that the user is invited to a clinic role on at least Country level (for write permission to Country level documents) or Study level, All production sites (for write permission to Study level documents, otherwise Write will be translated to Read. | Invite the user to a clinic role on at least Country level (for write permission to Country level documents) or Study level, All production sites (for write permission to Study level documents). |