Medical coding version 4.78 and earlier
Introduction
Viedoc Coder allows you to code data, such as Adverse Events, Medical History, and Concomitant Medications, in a standardized way. You can access Viedoc coder on the landing page.
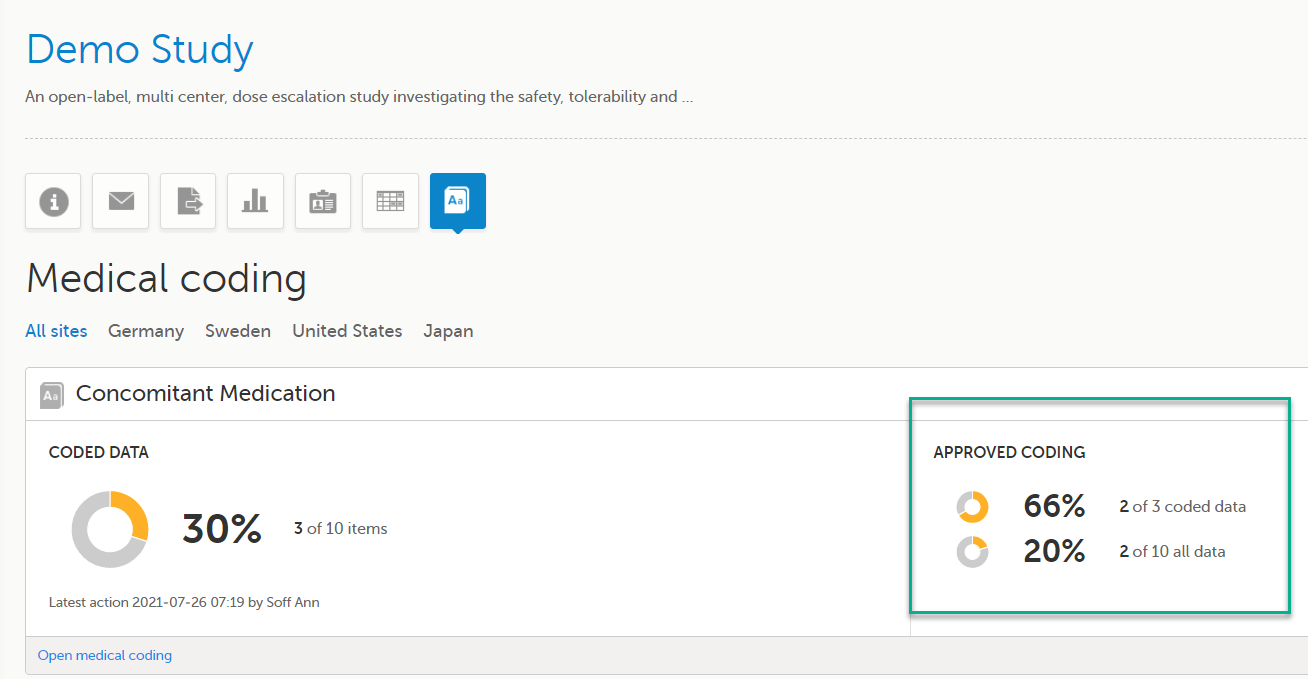
The Viedoc Coder page displays metrics about coding that tell the user the number and percentage of items that have been coded and approved. There is one set of metrics for each coding scope. The metrics displayed are based on the data and sites that you have permission to view.
Note! You can only access Viedoc Coder if permission to view, perform, and/or approve medical coding is activated for your role. If you do not see the medical coding icon, you do not have a role with medical coding permissions.
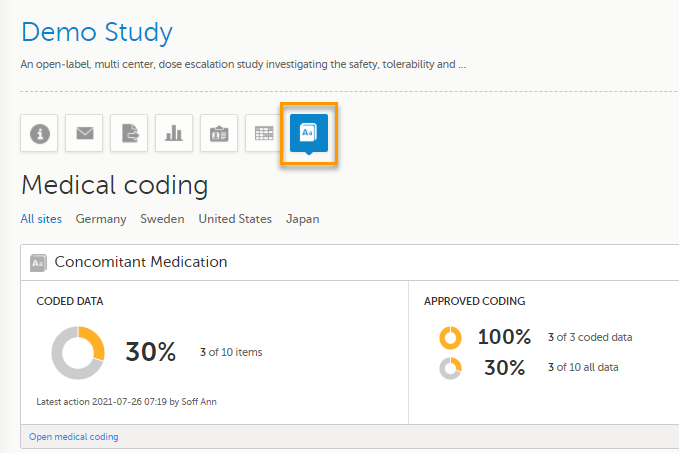
You can select to display the metrics of:
- All sites
- All sites in an individual country
- An individual site
The Viedoc Coder console in Viedoc Clinic
Overview of the medical coding console
To enter the medical coding console, click Open Viedoc Coder in the lower left corner of the coding scope.
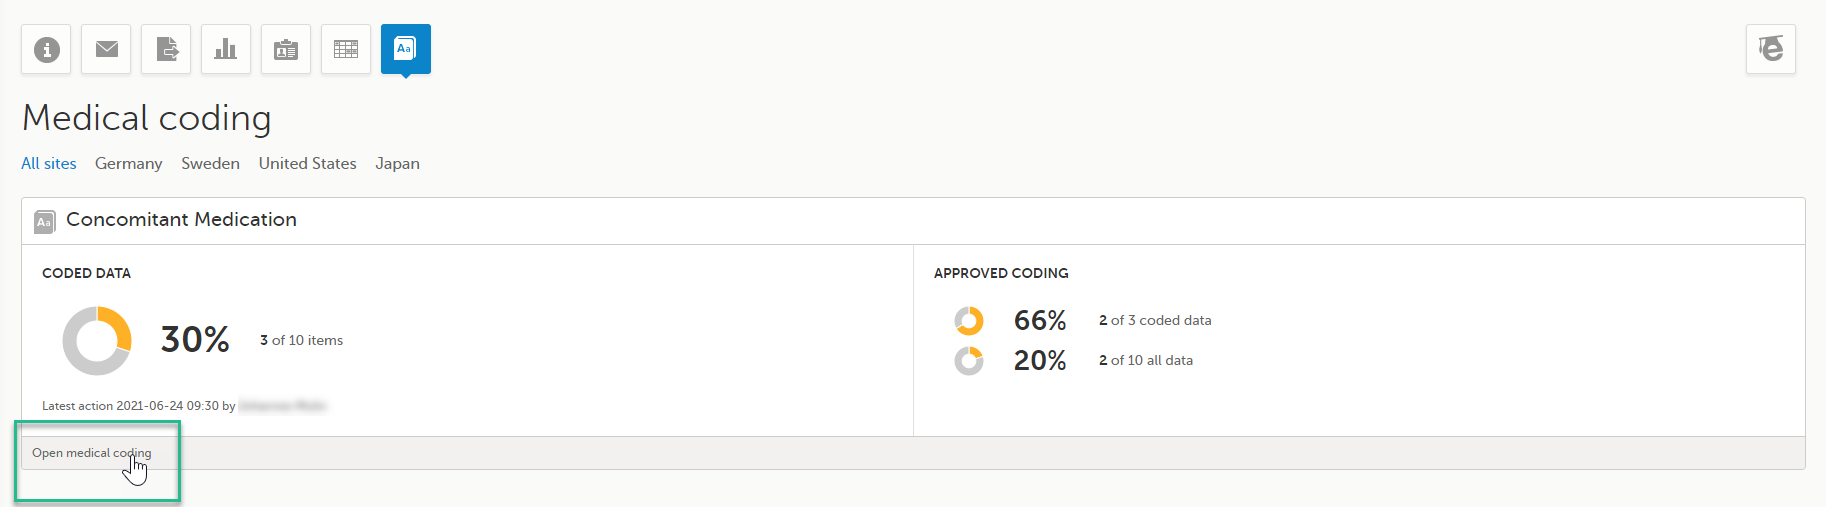
The Viedoc Coder console opens in the same window:
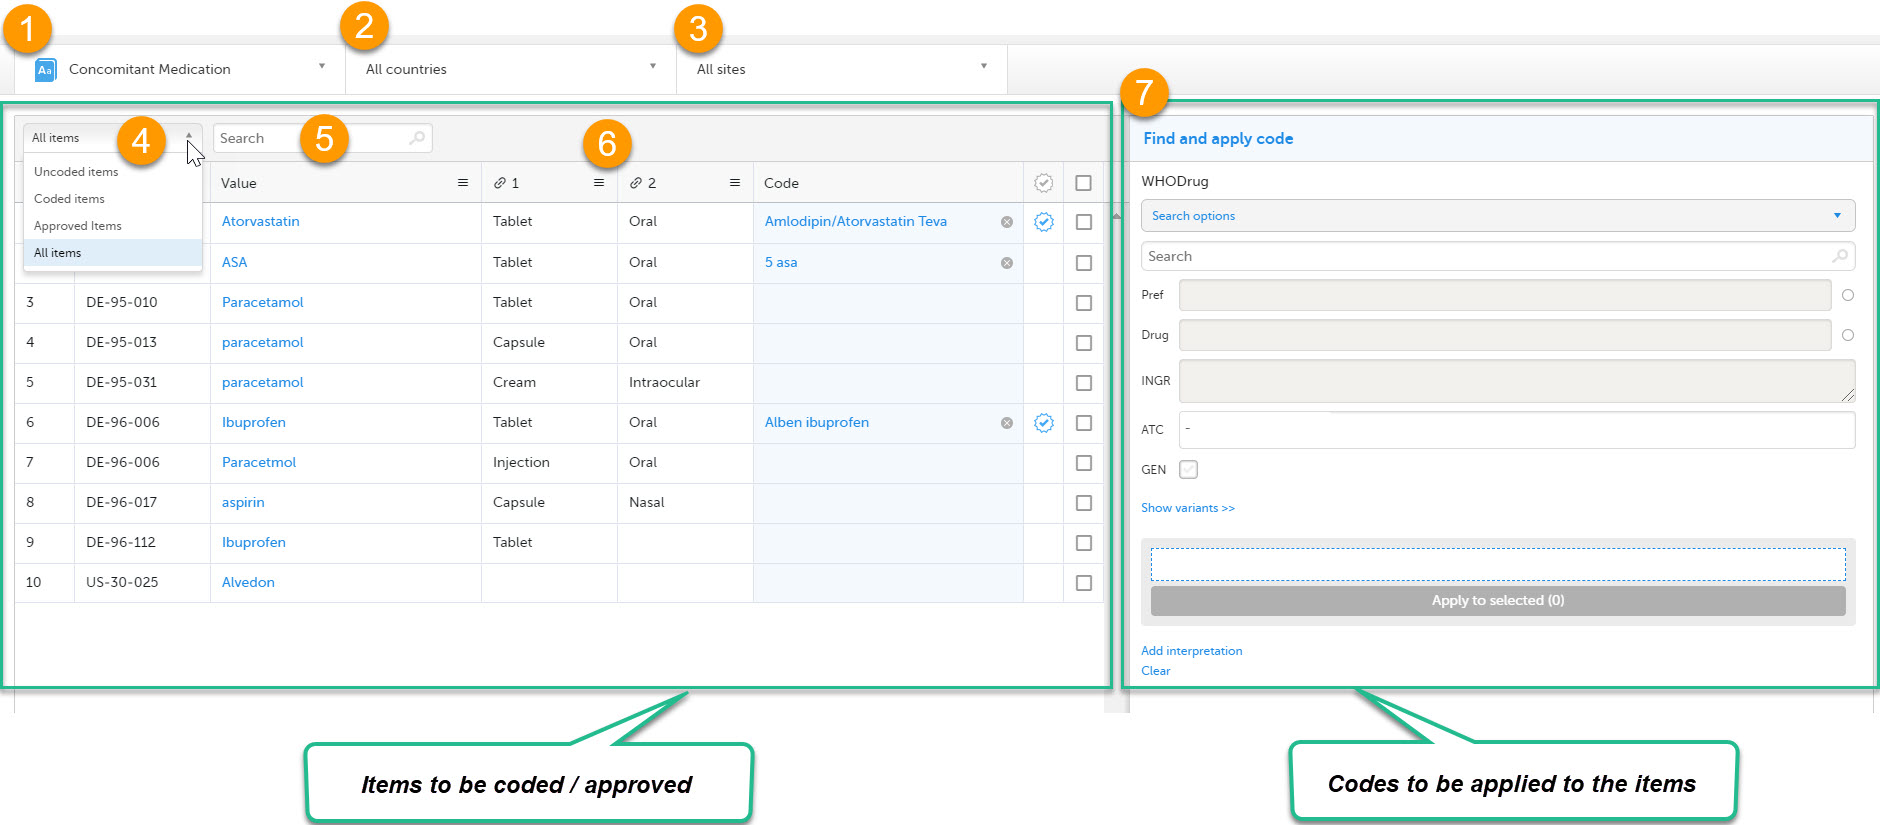
The Viedoc Coder console displays a table that lists all items to be coded in the Values column. You can view the corresponding form (Electronic Case Report Form (eCRF)) of an item by clicking on the value.
On the Viedoc Coder console, you can:
1. Select the coding scope (that is, data) to be coded.
2. Select to display items from all countries or from an individual country.
3. Select to display items from all sites or from an individual site.
4. Select to display all uncoded (and disapproved) items, all coded items, all approved items, or all items.
5. Perform a text search among all values of the items.
6. If configured for your study, there can be additional columns included with supporting values for the coding, for example route, indication, or other.
7. Find and apply codes (see Finding and applying a medical code).
When applying codes, it is possible to:
- Add an interpretation - a comment or explanation of the value that you have assumed in order to code.
- Add multiple codes to one value.
See Finding and applying a medical code.
What do the symbols and colors mean?
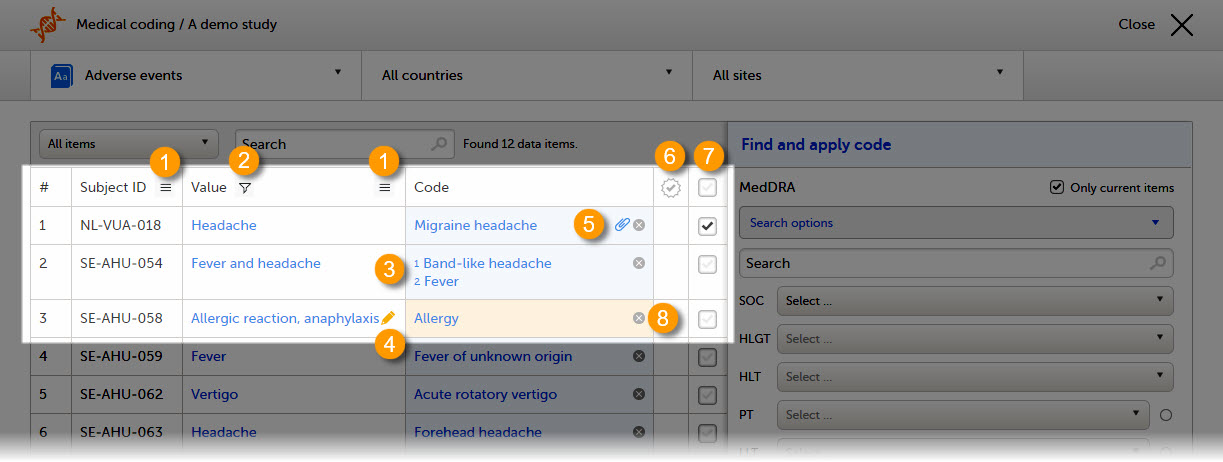
On the Viedoc Coder console, you can find the following symbols:
1. The three horizontal lines is a filter function. Click the symbol to open a drop-down list with a search field and a list of selectable items.
2. A filter symbol indicates that a selection has been made and the column only displays your filtered items.
3. A numbered list in the code field means that there is more than one medical code applied to that value.
4. An orange pen icon in the value field, together with a light orange background in the code field, means that the value (form item) has been changed in Viedoc Clinic by the Investigator after the item was coded. The applied code may not be correct anymore and the item needs to be re-coded.
5. A clip icon in the code field means that an interpretation has been added. Move the mouse pointer over the clip icon to view the contents of the interpretation.
6. An activated tick mark indicates that the coding has been approved.
7. The checkbox is used to mark the values to which a selected code should be applied.
8. The white cross in a grey circle is used to delete the applied code.
Finding and applying a medical code
This section gives an example of medical coding of adverse events using the Medical Dictionary for Regulatory Activities (MedDRA) and an example of medical coding of concomitant medication using the World Health Organization Drug Dictionary (WHO DD). The coding procedure is similar even if you are using other types of dictionaries.
A use case for coding with the MedDRA dictionary
Searching for a code
To find a code that you want to apply to a value, use the Find and apply code section.
There are three search options available:
- Contains - the search will return all entries that contain the text typed in the search field. This is the default option.
- Begins with - the search will return all entries that begin with the text typed in the search field.
- Exact match - the search will return all entries that exactly match the text typed in the search field.
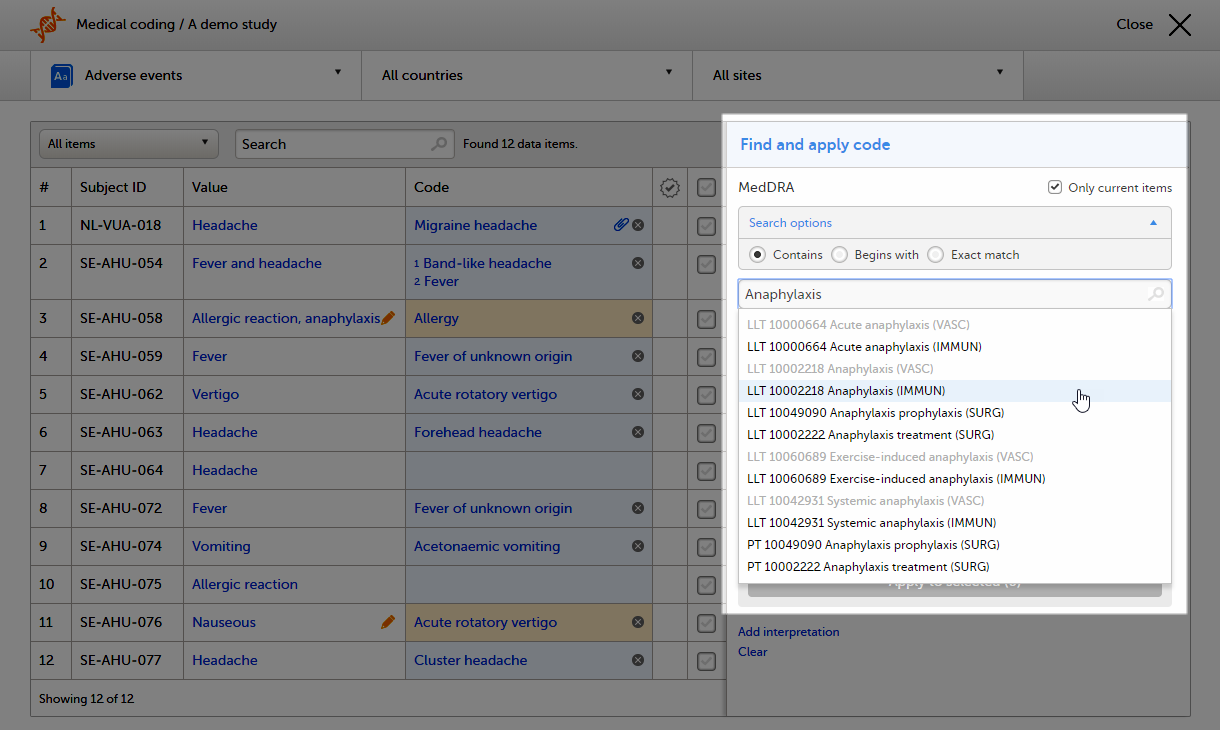
You can search for codes or (substrings of) terms in the Search field. Codes matching the term will be listed in a drop-drown list that deploys from the Search field. If a term is linked to multiple System Organ Classes (SOCs), the code that links to the primary SOC is displayed in black, while the codes that link to secondary SOCs are displayed in grey.
Searching is not case sensitive. If you type in "Anaphylaxis", the search can return results such as "anaphylaxis" and "Anaphylaxis".
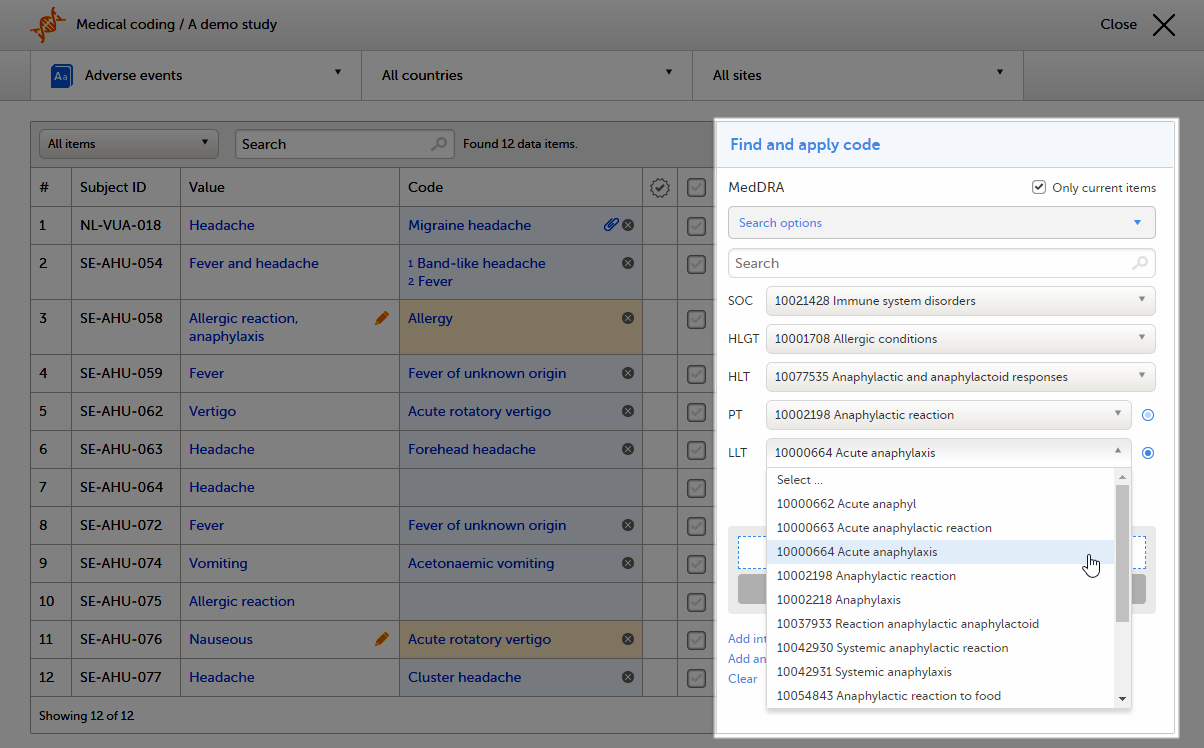
You can also search a code by selecting the System Organ Class (SOC), High Level Group Term (HLGT), High Level Term (HLT), Preferrred Term (PT) and Low Level Term (LLT) using the drop-down lists below the search field.
By default, the search returns low level terms (LLTs) that have the status 'current' in the MedDRA dictionary. It is possible to search among non-current MedDRA codes (that is, terms that are vague, ambiguous, truncated, abbreviated, out-dated, or misspelled and thus no longer used), by clearing the checkbox for Only current items.
Selecting a code
Select the code you would like to apply. The details of this code appear in the fields below the search field. The checkbox Current displays whether the selected Low Level Term (LLT) has the status current in the MedDRA dictionary or not.
You can select to use the Preferred Term (PT) or the Low Level Term (LLT) by clicking one of the blue radio buttons behind the PT and LLT fields, see image.
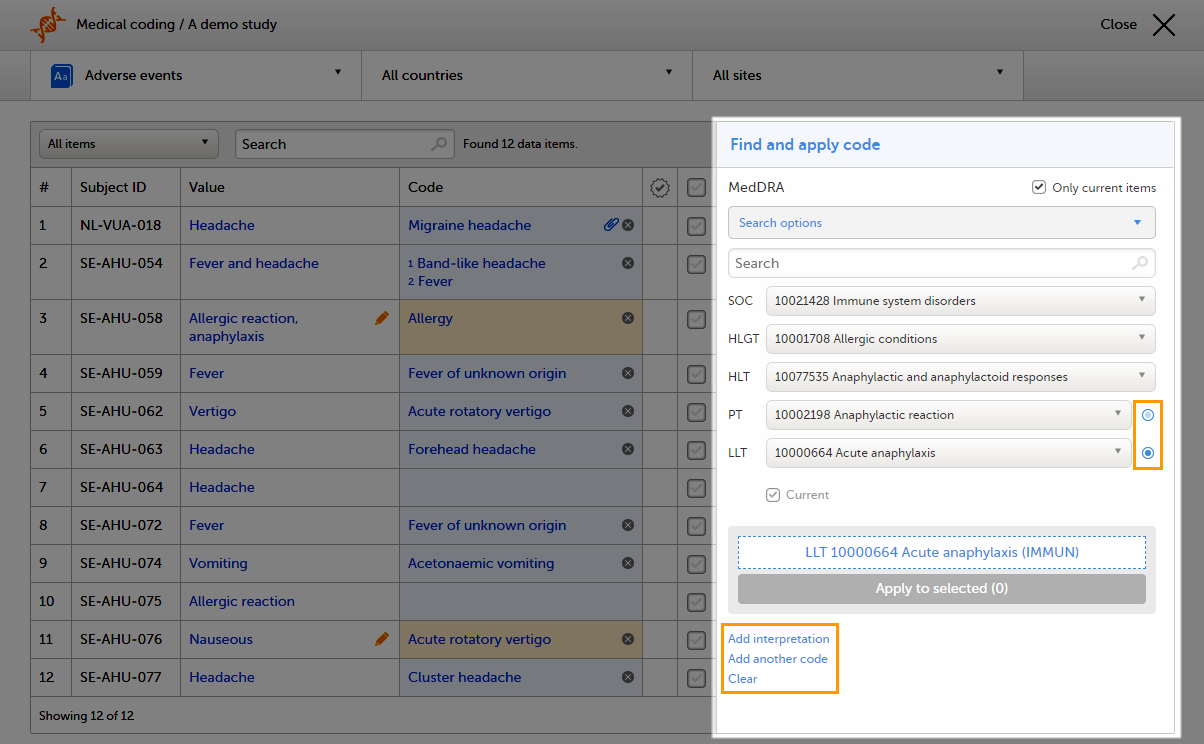
If you would like to add more than one code to the same field, click Add another code.
If you would like to add an interpretation, that is, a comment or explanation of the selected code, click Add interpretation and type your interpretation in the field.
You can reset your selections by clicking Clear.
Tip! If you want to apply a code that has been used before, click that code in the left side of the table. The Find and apply code section is then automatically populated with the selections for that code.
Applying a code
To apply a selected code, select the checkboxes for the value or values you want to apply that code to, and click Apply to selected. The selected code will be applied to the selected subjects and values. In the example in the image, we applied two codes to the value Allergic reaction, anaphylaxis for subject SE-AHU-058.
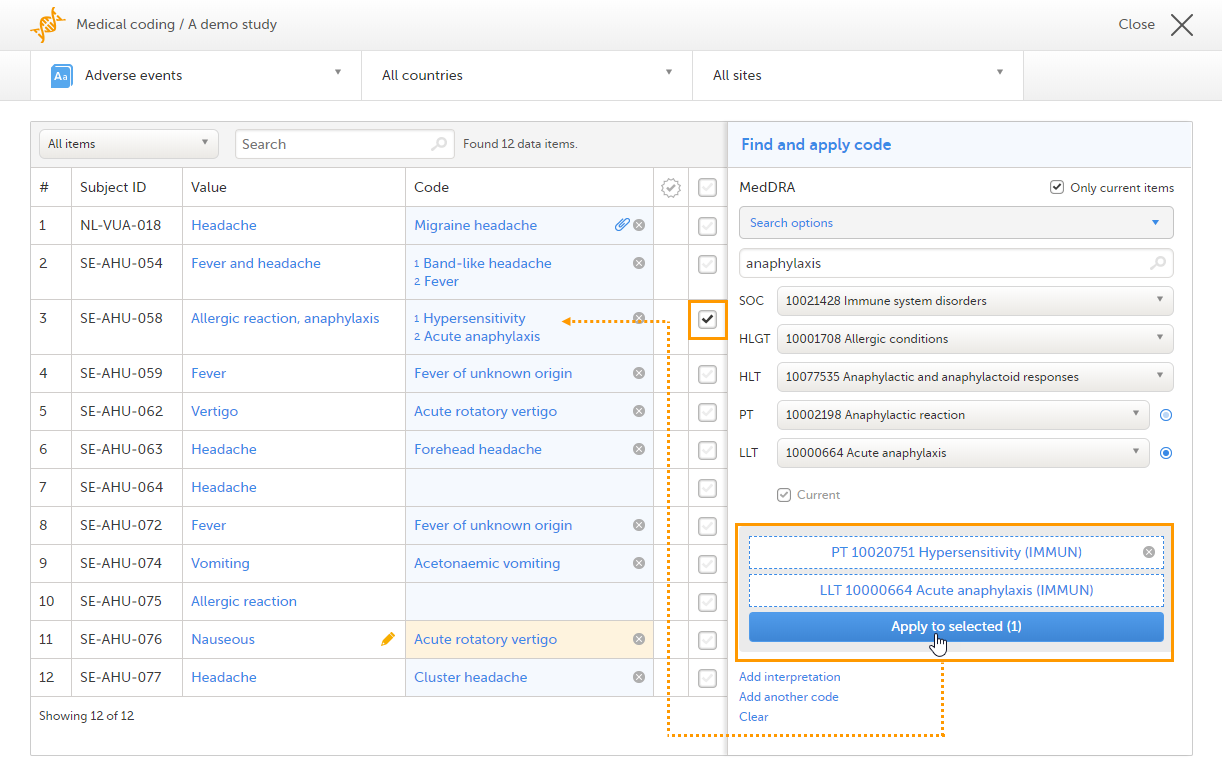
You can remove an applied code by clicking the cross icon to the right of the applied code.
A use case for coding with the WHO Drug Dictionary
Searching for a code
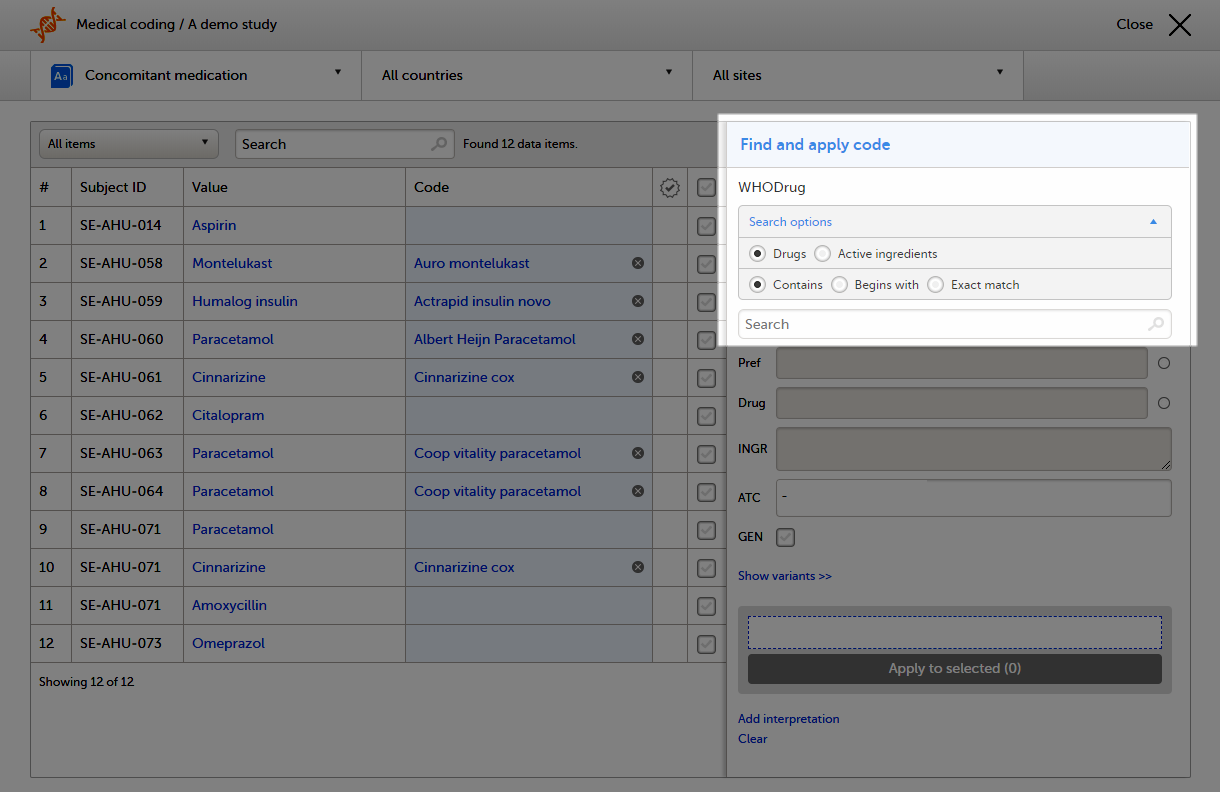
To find a code that you want to apply to a value, use the Find and apply code section.
When using the WHO DD, you can select to search by:
- Drugs - to search for drugs by their name. This is the default option.
- Active ingredients - to search for drugs by their active ingredients. You can enter multiple ingredients in the search field, separated by
;and the search will return all drugs that contain all specified ingredients.
There are three search options available:
- Contains - the search will return all entries that contain the text typed in the search field. This is the default option.
- Begins with - the search will return all entries that begin with the text typed in the search field.
- Exact match - the search will return all entries that exactly match the text typed in the search field.
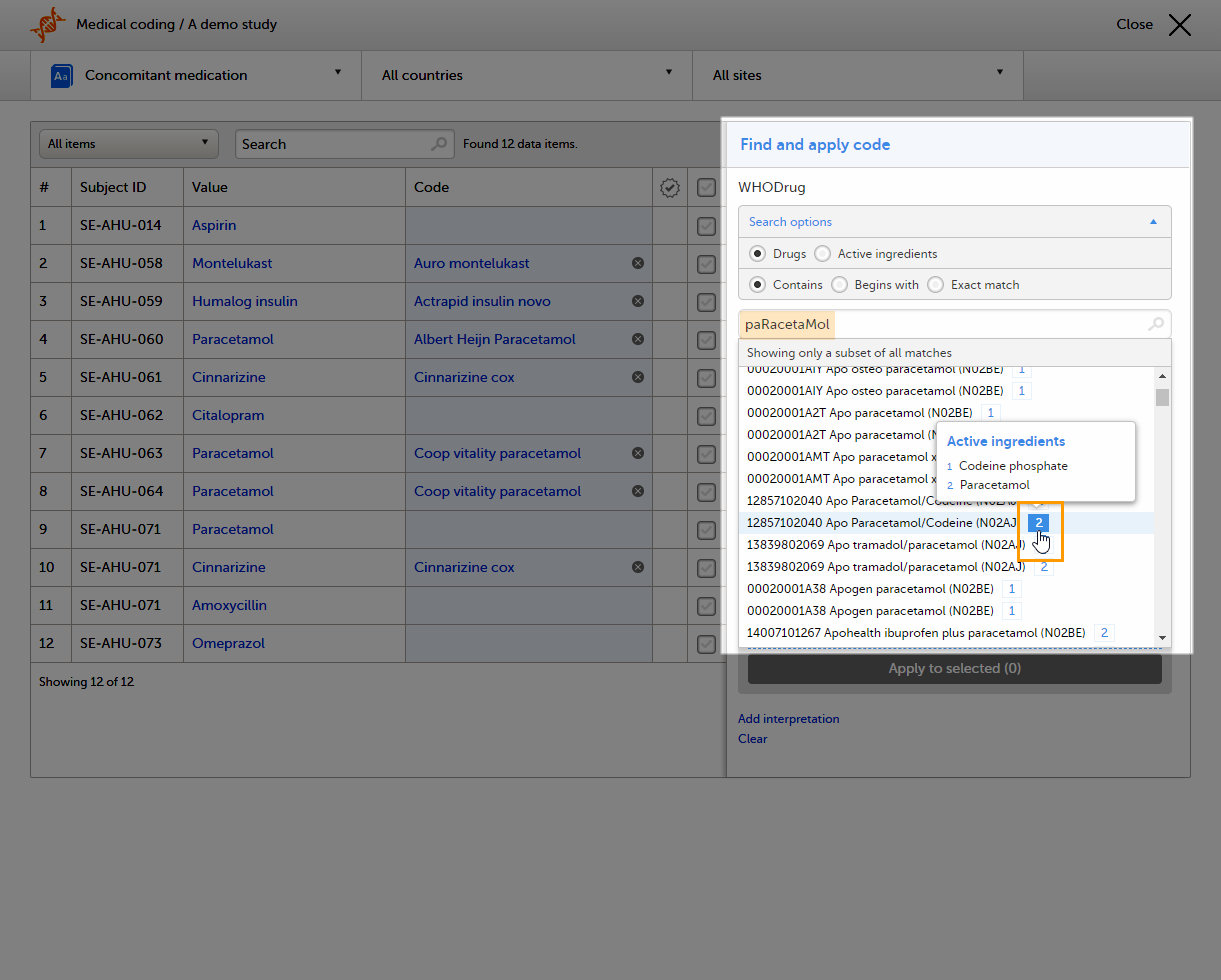
You can search for codes or (substrings of) terms in the Search field. Codes matching the term will be listed in a drop-drown list that deploys from the Search field.
Searching is not case sensitive. If you type in "paRacetaMol", the search can return results such as "paracetamol" or "Paracetamol".
The number behind the entries in the list depicts the number of active ingredients. If you click that number, a pop-up appears that lists the active ingredients.
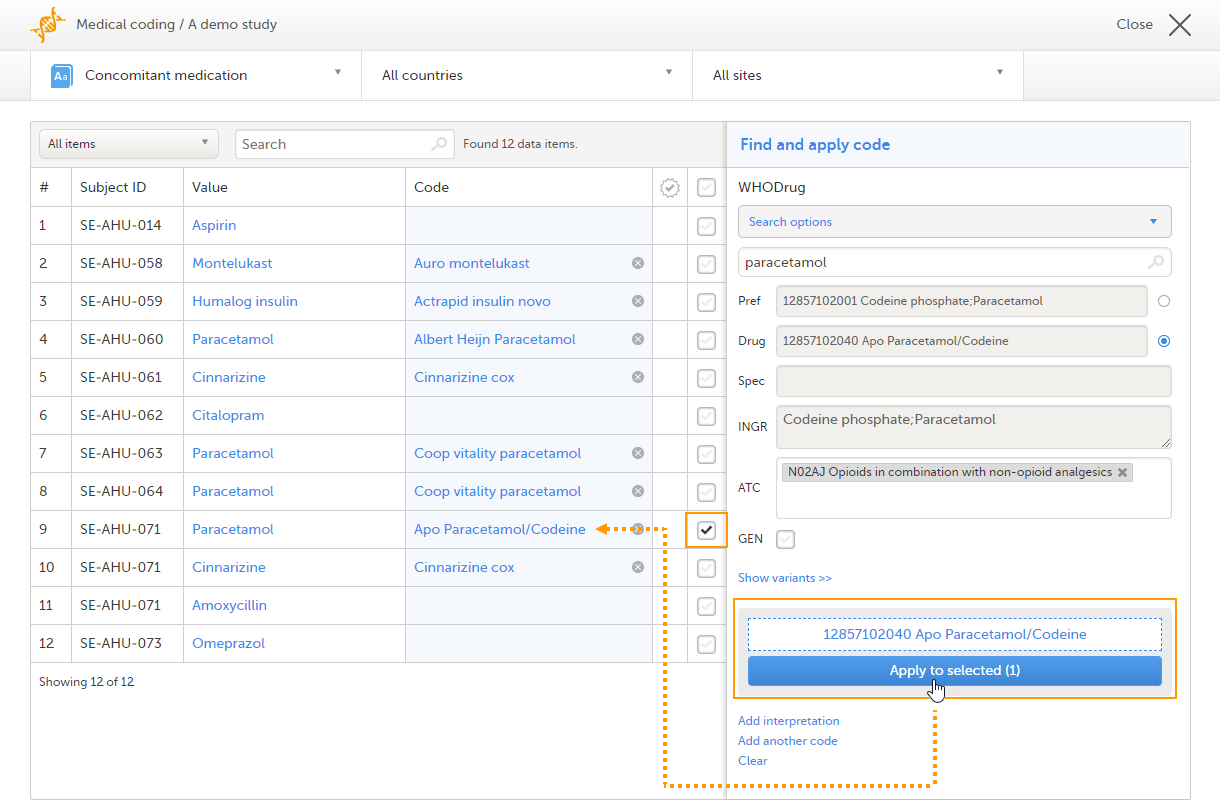
Selecting a code
Select the code (drug) you would like to apply. The details of this drug will appear in the fields below the search field.
In the WHO DD, all drugs have a preferred drug as parent. You can select to use the Preferred drug (Pref) or the Drug name by clicking one of the blue radio buttons behind the Pref and Drug fields. Drug is the default.
Note! When exporting medical coding, both the preferred drug and drug name are included in the export (in separate columns). But if you select to apply Pref while coding, the preferred name ends up in both columns in the export. This is to provide consistency for the data managers, so that they only have to look in one column to find their data.
 Click Show variants to display and specify variants of the selected code (drug), and use the drop-down lists to select Country (CNTR), Marketing Authorization Holder (MAH), Pharmaceutical Form (FORM), Strength (STR), or Medicinal Product ID (MPID), if applicable. Click Hide variants to hide the variants, see image.
If you would like to add more than one code to the same field, click Add another code.
If you would like to add an interpretation, that is, a comment or explanation of the selected code, click Add interpretation and type your interpretation in the field.
You can reset you selections by clicking Clear.
Tip! If you want to apply a code that has been used before, click that code in the left side of the table. The Find and apply code section is then automatically populated with the selections for that code..
If you selected a drug that carries multiple Anatomic Therapeutic Chemical Classification System (ATC) codes, all ATC codes will be displayed in the ATC field. You can define whether to include all ATC codes in the coding or only a selection. Click the cross to remove an ATC code, or click the ATC field to add ATC codes.

Applying a code
To apply a selected code, select the checkboxes for the value or values you want to apply that code to, and click Apply to selected. The selected code will be applied to the selected subjects and values.
 You can remove an applied code by clicking the cross icon to the right of the applied code.
Approving the medical coding
After applying codes to the items, it is possible to approve/disapprove/reset the items as shown in the below table.
| Action | Current state/found in list | New state/found in list |
| Approve |
Coded Disapproved |
Approved items |
| Disapprove |
Coded Approved |
Uncoded items |
| Reset |
Approved Disapproved |
Coded items |
Tip! To see all items in one list, select the filter All items.
To approve items that have been coded:
| 1 |
Select the item(s) that you want to approve and click Approve selected. 

|
| 2 |
The selected item(s) now disappear from the list and are found with the blue "Approved" symbol in the Approved items list. 
|
Tip! The metrics of the medical coding that have been approved can be seen on the landing page:
Disapproving the medical coding
To disapprove items that have been coded:
| 1 |
Select the items that you want to disapprove and click Disapprove selected. 
|
| 2 |
The selected item(s) now disappear from the list and are found with the red "Disapproved" symbol in the Uncoded items list for re-evaluation. 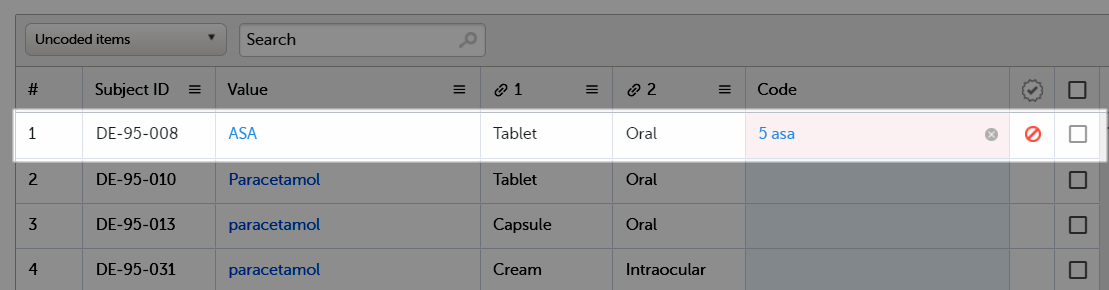
|
Resetting the medical coding
To reset items that have been approved or disapproved:
| 1 |
Select the item(s) that you want to reset and click Reset selected. 
|
| 2 |
The selected item(s) now disappear from the list and are found in the Coded items list without the approved/disapproved flag. 
|
Exporting the medical coding
It is possible to export medical coding using the export feature of Viedoc, see Exporting data.
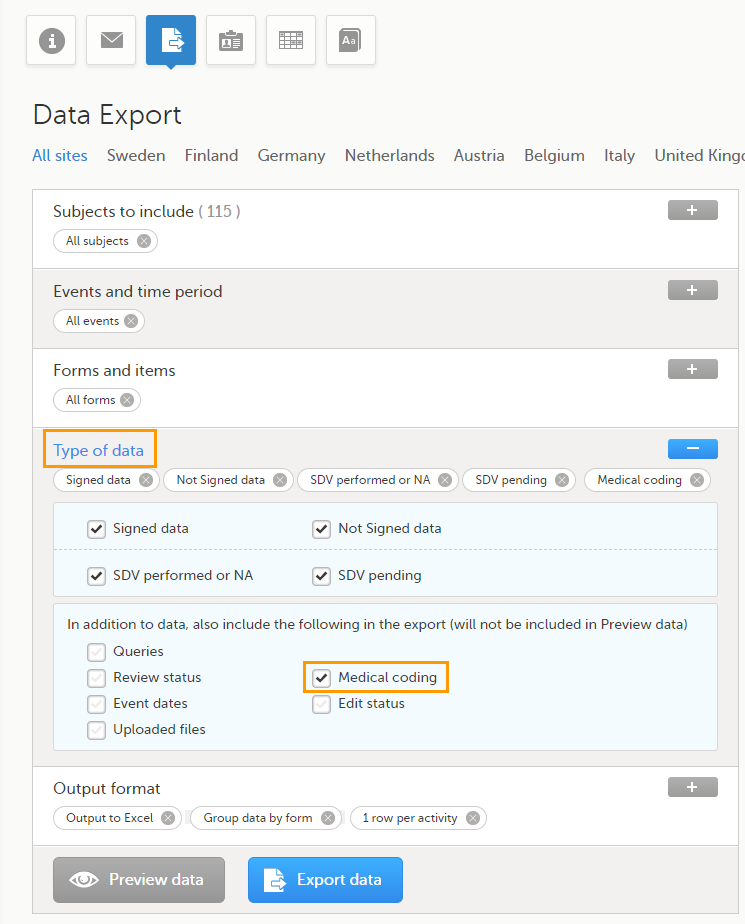
To export the medical coding, select the checkbox in front of Medical coding in the Type of data section.
For more information about how medical coding is exported, see:
Note! You can only export medical coding if permission to export data is activated for your role. If you do not see the data export icon, you do not have a role with export permissions.