Working with reference data
Introduction
About reference data
Viedoc offers support for adding centralized reference data to the study, which is automatically populated to the subject forms. When centralized reference data is added to a study, reference values don’t need to be entered individually for each subject and each form.
It is possible to configure different sets of reference data that will be populated to the form based on:
- Factors that can affect the reference data, such as age or gender
- The reference data source, such as a lab
- A site
- Date of measurement
Terminology
| Term | Definition |
|---|---|
| Reference data source | A source that provides reference data (for example a lab). |
| Reference data scope | A set of measurements that a reference data source carries out, and the parameters that might affect these data. The data in one reference data scope will be populated to one lab data form. One or more reference data scopes can be configured in Viedoc Designer > Global Settings, as set(s) of variables and factors (see definitions below). |
| Factor | A parameter that affects the reference data, for example a subject’s gender. Factors may affect the normal range for a test result. |
| Variable | A specific measurement to be carried out. |
| Target type | Item of a certain type of information that a reference data source can provide (such as range, unit, low/high values) for a specific measurement (defined by a variable). Any number of target types can be defined by the user. |
Workflow
Reference data sources are configured in Viedoc Admin. Each reference data source is linked to one or more reference data scopes that define the following:
- Which measurements the reference data source carries out
- Which factors might affect the results
- What ranges/units are used
For each reference data source-scope combination, the reference values that should be auto-populated to the forms should be entered in the reference data editor in Viedoc Clinic. This can be done by clinic users that have permission to edit and save reference data.
To make the reference values available for auto-population to the subject forms, the reference values should be published. This can be done by clinic users that have permission to publish the reference data values.
See also the video tutorial demonstrating how to work with reference data in Enter reference data.
Reference data overview
Overview of reference data on the landing page
Note! You only have access to reference data on the landing page, and to the reference data editor, if you have a role with permission to view, edit and/or publish reference data.
On the landing page, you can view or do the following:
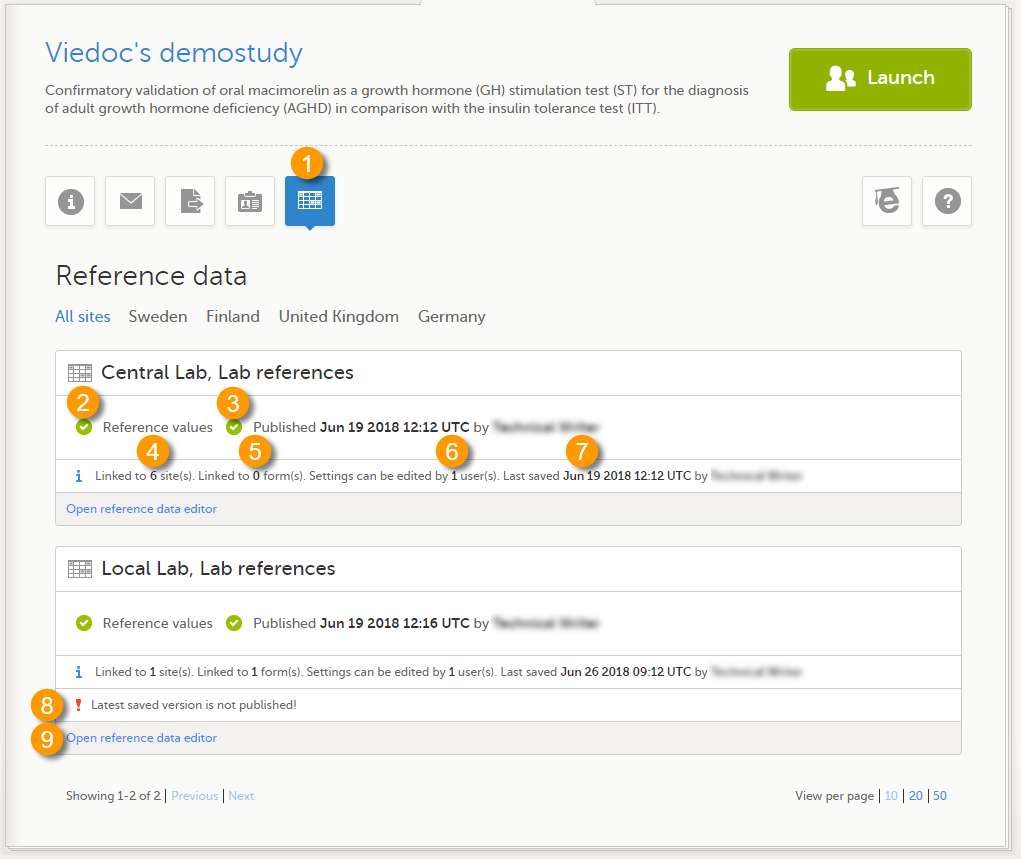
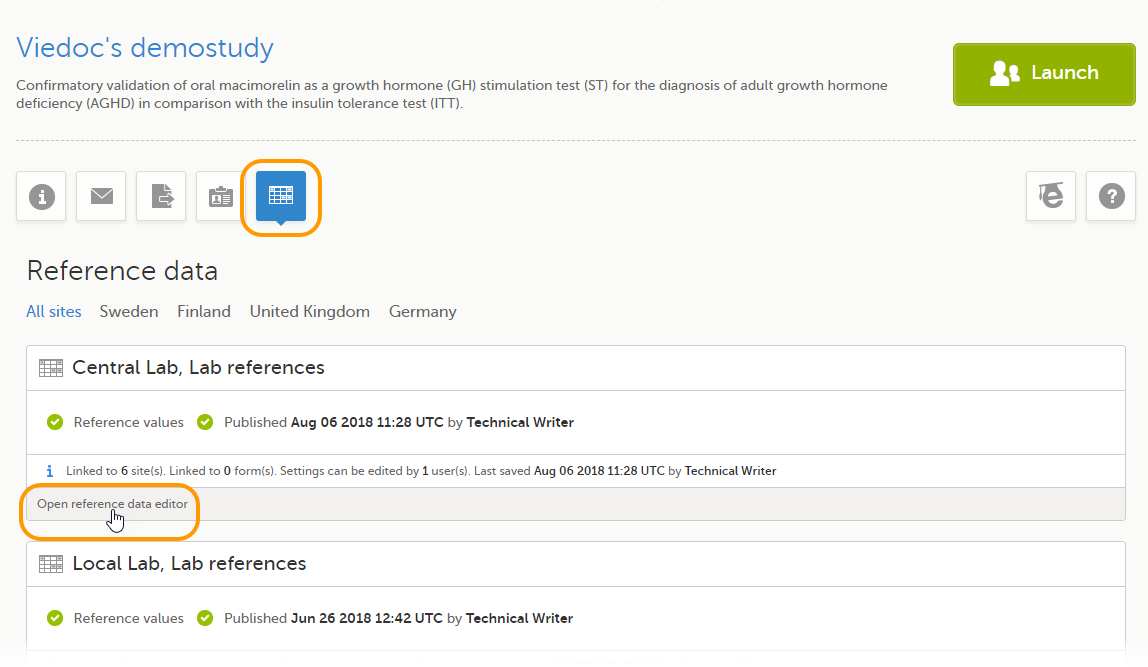
1. Select the Reference data icon to display all the reference data source-scope combinations that are linked to the sites you have access to.
For each reference data source-scope combination, the following information is provided:
2. Status indicator that indicates whether reference values have been entered (green) or whether the fields are still empty (grey).
3. Status indicator that indicates whether the reference values have been Published (including date, time and user who published them) or whether the reference values are Not published yet.
4. The number of sites that the reference data source is linked to. This gives an indication of how many sites are impacted in case the reference values are edited.
5. The number of forms that the reference values have been populated to. This gives an indication of how many forms are impacted in case the reference values are edited.
6. The number of users that have permission to edit the reference values.
7. Name of the user who performed the last changes to the reference values, including date and time.
8. Warning message if the latest saved version was not published.
9. Select Open reference data editor to view or edit the reference data, see The reference data editor.
The reference data editor
How to use the reference data editor
When you select Open reference data editor on the reference data section of the landing page, the reference data editor opens for that specific reference data source-scope combination. Depending on the user rights that are connected to your role, you can view as read-only, edit and/or publish the reference data.
 On the reference data editor, you can view or do the following:
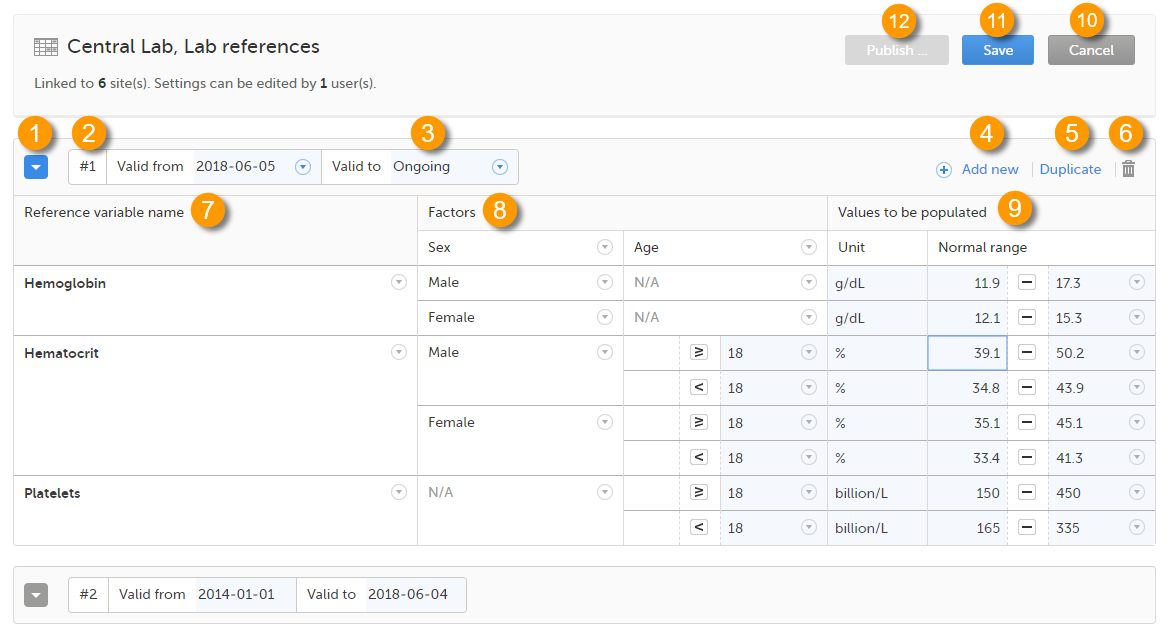
1. Select the arrow to expand the reference data table for that specific time period. The newest time period is expanded by default and shown at the top of the list.
2. The number of the reference data set for a given time period. This number is given by default, based on the order in which the reference data sets have been created.
3. The period the reference data set is valid.
- Valid from (1) - the beginning of the time period. By default this is set to the current date. To change this, select the arrow to the right of the date and select the date.
- Valid to (2) - the end of the time period. By default this is set to "ongoing". To change this, select the arrow to the right of the date and select the date.
4. Select Add new to create a new reference data set for a new time period.
5. Select Duplicate to create a new reference data set for a new time period based on a previously created set.
6. Select the trash can icon to remove an existing reference data set time period.
7. Reference variable name - the variable that are defined for that reference data scope. A variable is a specific measurement to be carried out. See Variables for more information.
8. Factors - the factors that are defined in the scope. Factors are parameters that affect the reference data. See Factors for more information.
9. Values to be populated - the reference data values provided by the reference data source. The values entered here will automatically be populated to the subject forms.
10. Select Cancel to discard all the changes performed and revert to the latest published reference data.
11. Select Save to save the changes performed.
Note! Only users with clinic roles that have permission to edit reference data can edit and save the reference data.
Upon save, the reference data set becomes available for publishing.
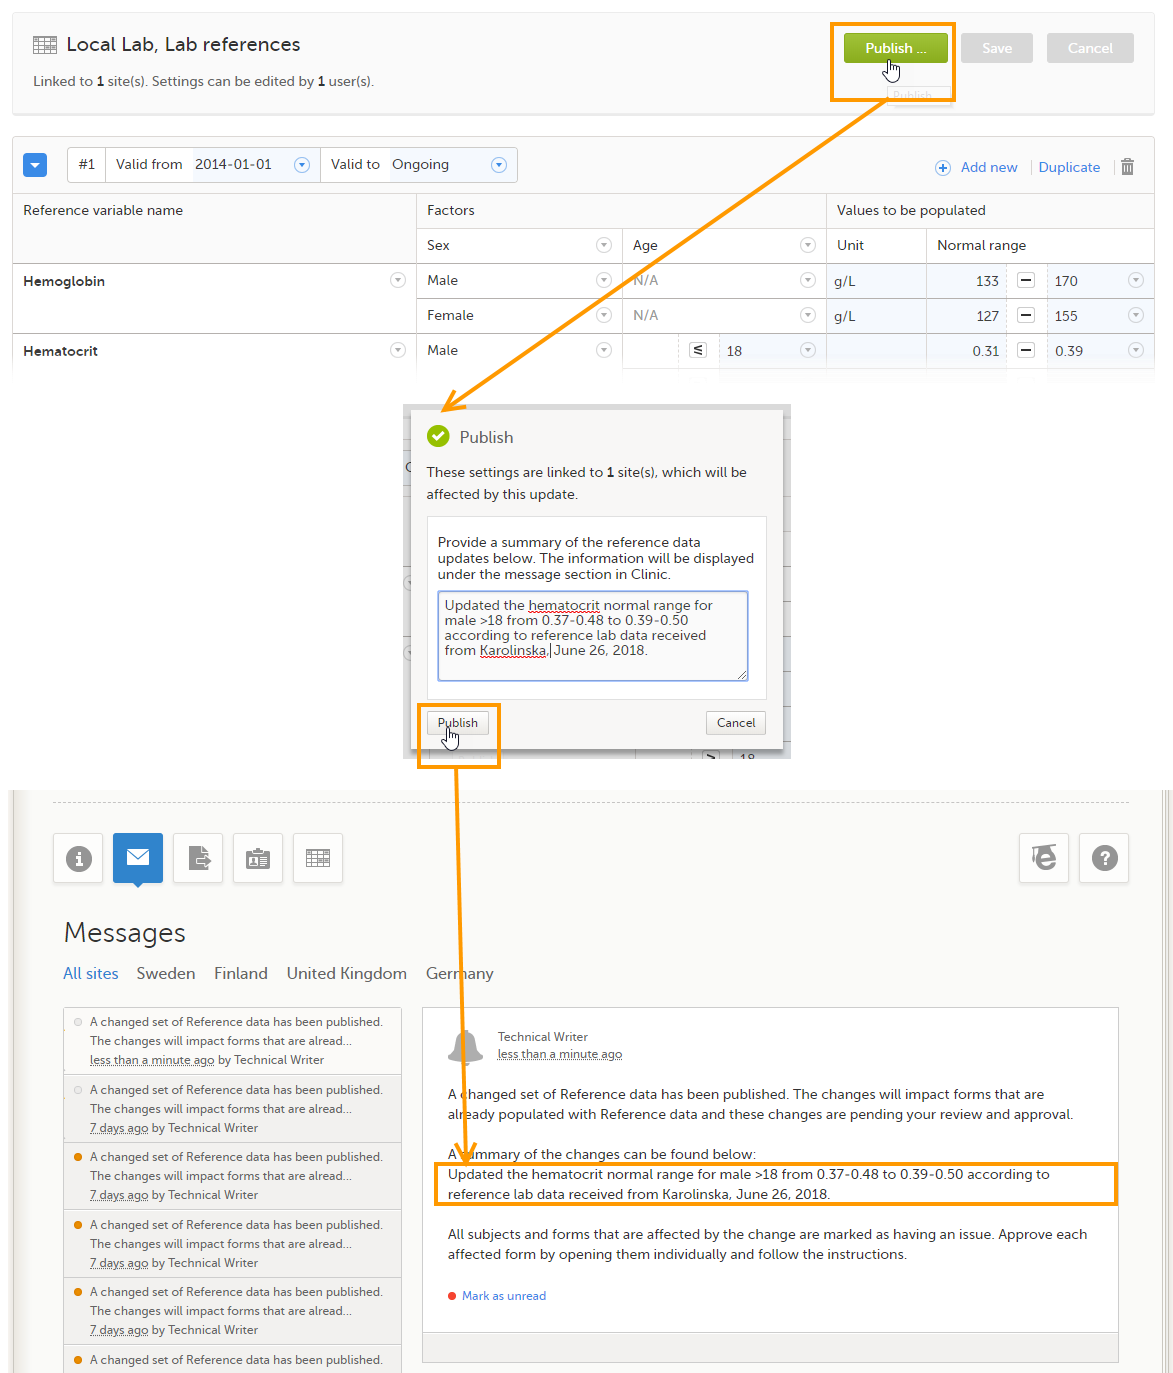
12. Select Publish to publish the reference data. A pop-up appears asking you to enter a message. This message appears in the Messages section on the landing page.
Publishing makes the data available for auto-population into the subject forms.
Note! Only users with clinic roles that have permission to publish reference data can publish the reference data.
Variables
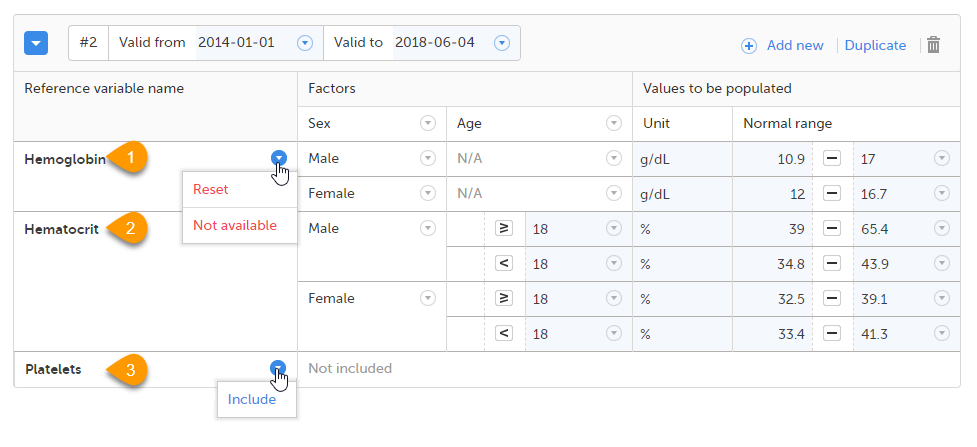
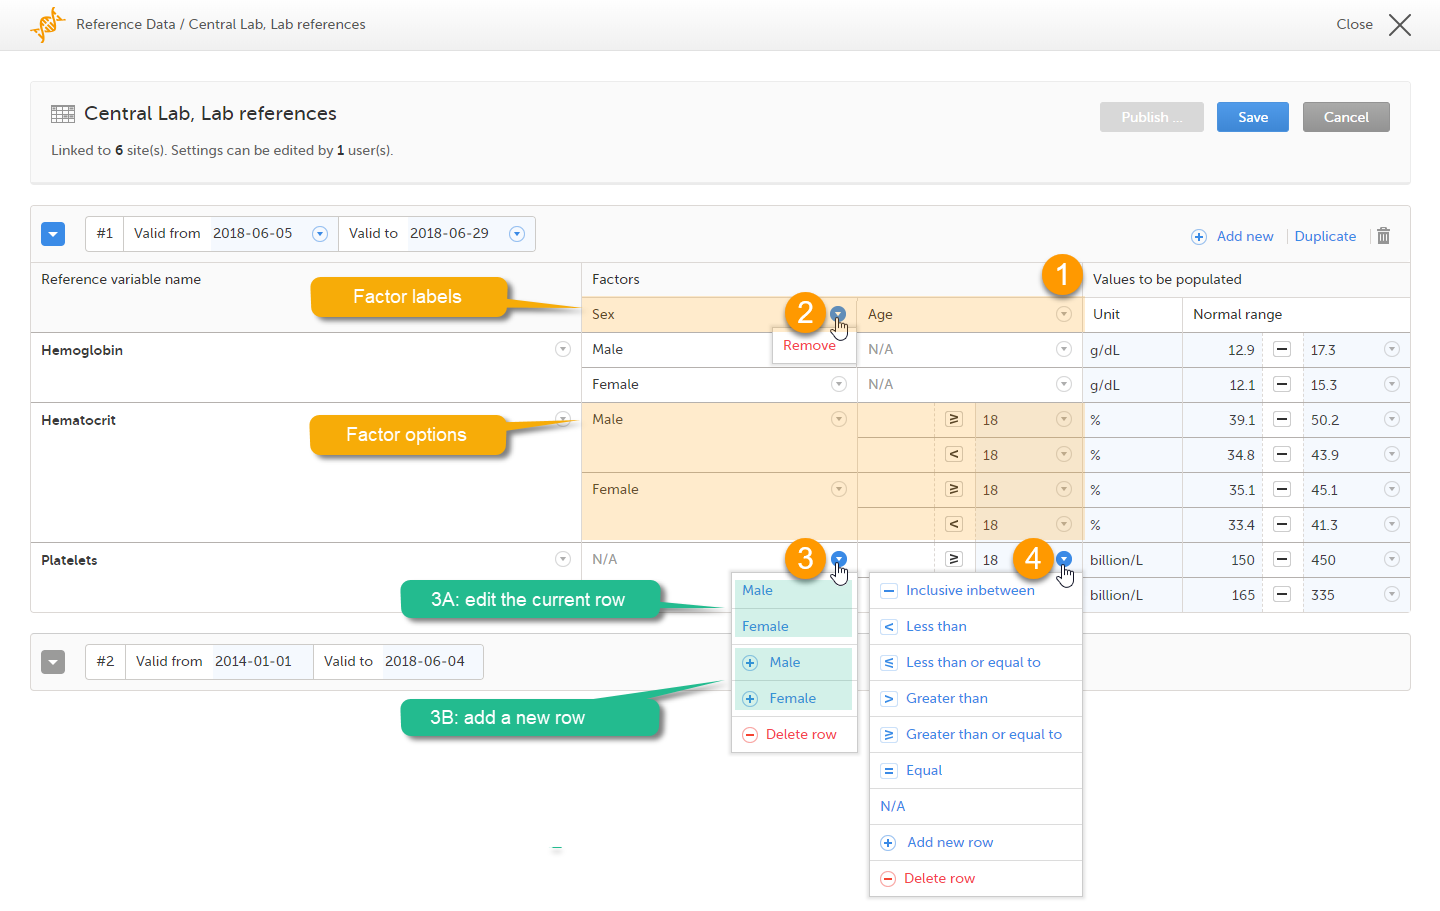
The column Reference variable name displays the variables that were configured for the reference data scope. By selecting the arrow to the right of the variable name, you can:
- Reset the existing reference values for that variable in the Values to be populated. This action is only available for a variable that is included in the reference data list, such as 1 and 2 in the image.
- Select Not available to exclude the variable from the reference data. The variable then appears as Not included. This action is only available for a variable that is included in the reference data list, such as 1 and 2 in the image.
When the variable is not included, such as 3 in the image, you can:
- Select Include to add the variable to the reference data set again.
Note! If you do not want automatic population of reference data for a certain variable, the variable should be set to Not included. This way, it is possible to manually add reference data for that variable to a form.
Factors
The column Factors displays the factors that were configured for the reference data scope. In this column, you can:
1. Select the arrow to the right of Factors, and select a factor from the drop-down list to add that factor to the table. If no arrow is displayed, all factors predefined in the reference data scope are already added (as in the image).
2. Select the arrow to the right of the factor label and select Remove to remove that factor from the table.
By default, a newly added factor is populated with N/A (not applicable) in the table. You can edit this by selecting the arrow to the right of N/A and select one of the options from the drop-down list. The drop-down list displayed varies depending on whether the factor has predefined factor options or not.
3. For a factor that has predefined options, such as Sex in the example:
- A: Select one of the options in the list to set the current row to that option, or
- B: Select one of the options with a
+in front of it to add a new row to the column populated with the selected option, or - Select Delete row to remove the current row from the table
4. For a numeric range (no predefined options), such as Age in the example:
- Select one of the options that define the range: inclusive in between, less than, less than or equal to, greater than, greater than or equal to, equal, and fill in the number(s); or,
- Select N/A (not applicable), or
- Select Add new row to add a new row to the table, or
- Select Delete row to delete the row from the table
Note! If you would like to add the factor option N/A to a factor that also has other options, the option N/A should be the last entry for that variable in the table. The reason for this is that, while populating a form with reference data, the system is matching the factor options starting from the top of the table. If a match is found, the corresponding data are populated to the form. The option N/A is always a match. So if N/A is listed at the top of the table, the search will stop and the form will be populated with the data corresponding to N/A. If you want the system to match the other factor options first, these should be listed before N/A in the table.
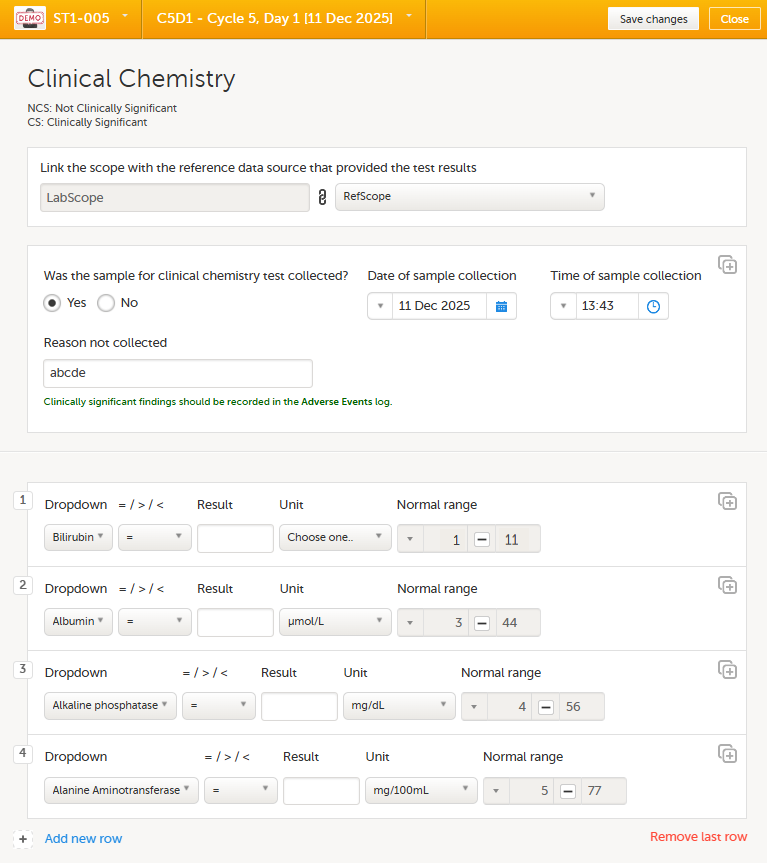
How the reference data feature works within the forms
When the reference data are published, they become available for auto population to the forms they are intended to be used in.
To populate a form with reference data, the Investigator/Study Nurse/site staff selects:
- For each scope in the form, the reference data source that provided the results, from the drop-down list
- The date and time of collection
It is also possible that the event date is used instead of date and time of collection. In that case, the reference data populate after the source is selected.
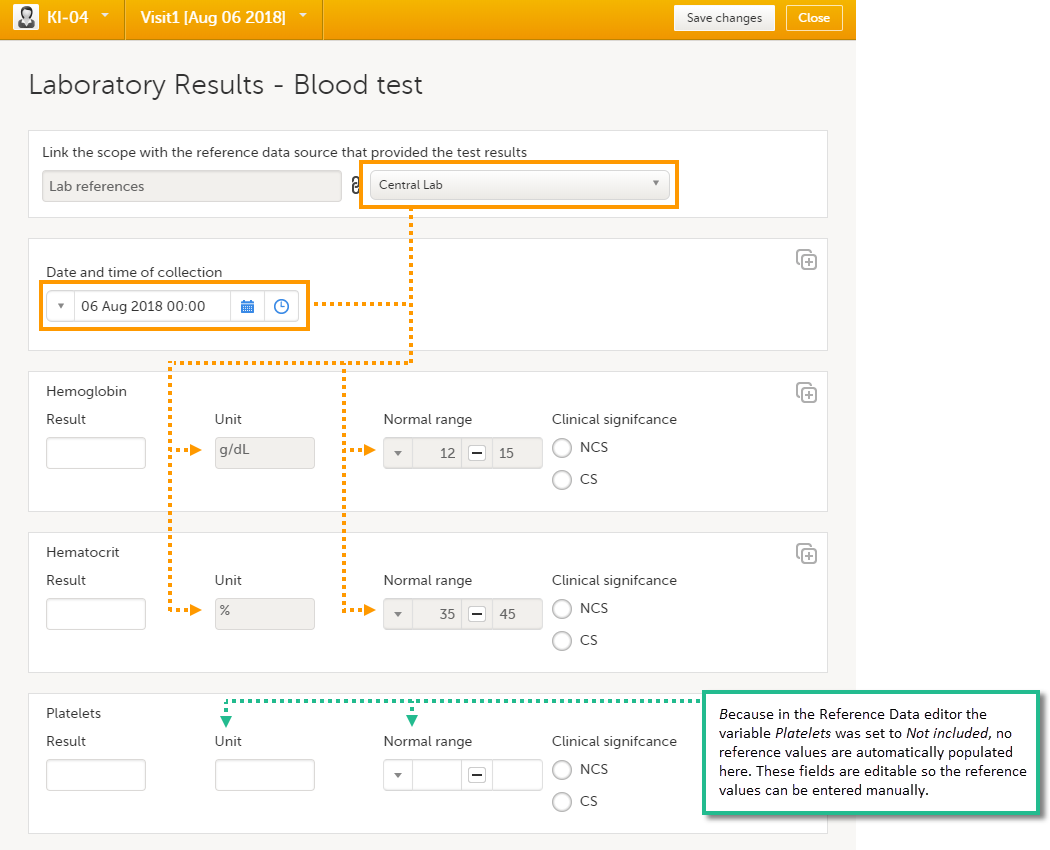
Tip! If you do not want any reference data to be populated automatically, do not select a reference data source, but leave the drop-down list as Select a source. No automatic population of data will take place and you can fill in the fields manually.
Note! When populating numeric fields using functions and reference data, they automatically receive the number of decimals configured in the design.
Note! No reference data can be populated, if...
- The items used as factors are left empty for a specific subject.
- The selected Date and time of collection does not fall within the time frame the reference value set is valid.
Entering and publishing reference data values
Note! You can only enter reference values when your role has permission to edit reference data.
To enter a new set of reference values:
| 1 | On the Viedoc landing page, select the Reference data icon. |
| 2 |
Select Open reference data editor for the reference data source-scope combination you would like to enter values into.
|
| 3 |
Select the date from which, and to which, this set of reference values is valid in the Valid to and Valid from fields. 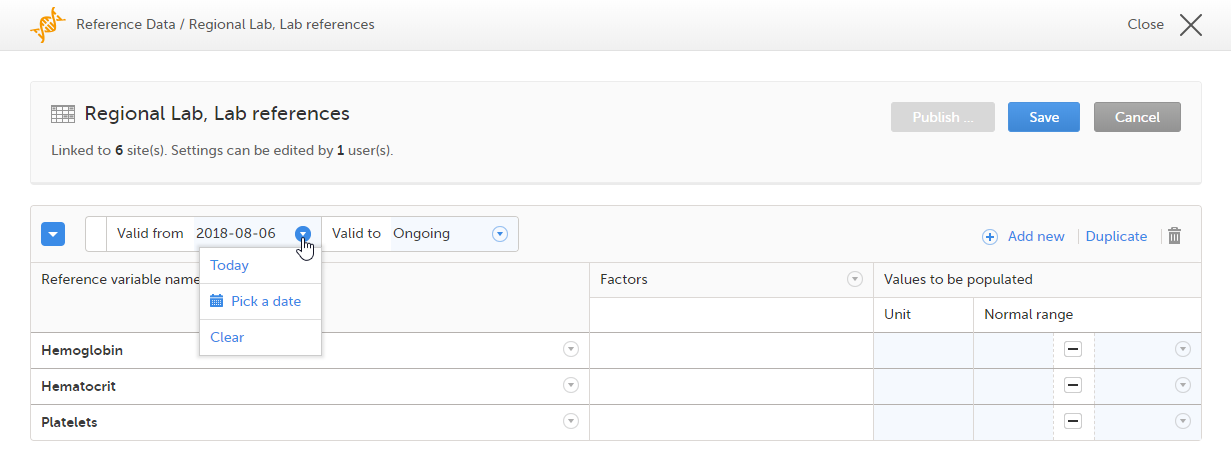
|
| 4 |
Select the arrow to the right of Factors and select the factors that should be included. 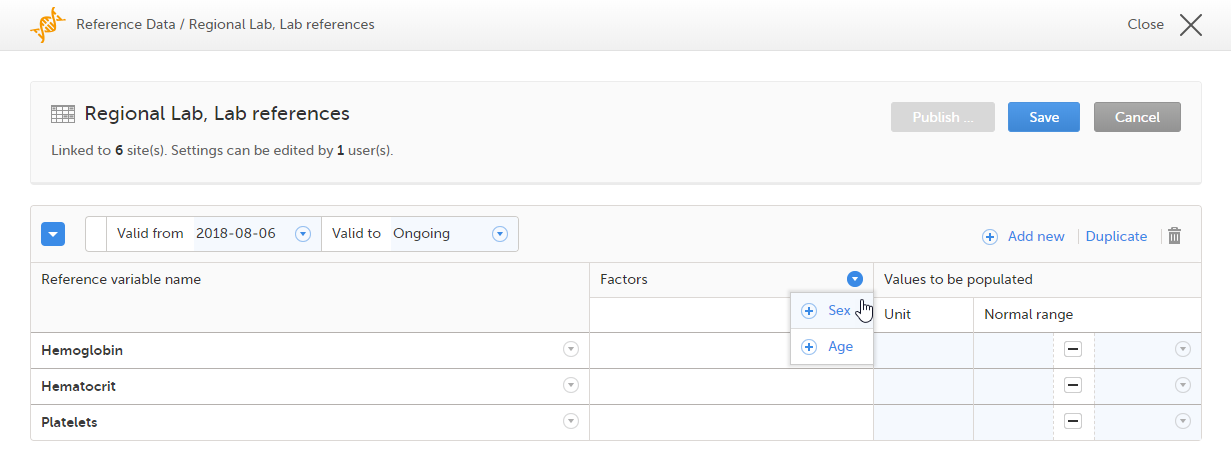
|
| 5 |
For every variable, and for every factor, select the arrow to the right of N/A and select the factor options that should be included. If the factor is a numeric range, select Set a value. By default, the inclusive in between option appears. 
If you would like to change the type of the range, select the arrow again and select the type of range you would like to include. If necessary, select Add new row to add rows. Manually enter the values of the range in the blue fields. 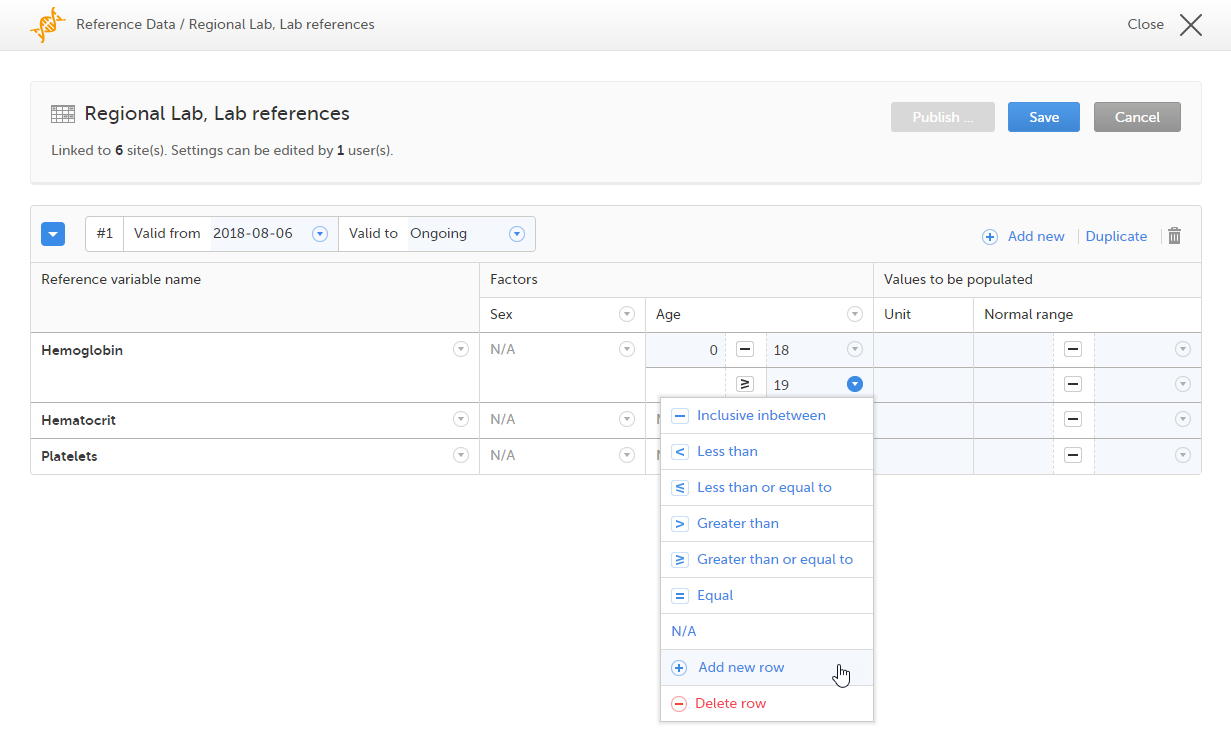
See also Factors for more information. |
| 6 | For every variable, and for every factor, enter the reference values that should be automatically populated to the forms. |
| 7 | Select Save to save the reference data. |
 The reference data editor opens and displays the variables and the target types to be populated, as defined in the reference data scope. If you would like to exclude some of the variables, select the arrow to the right of the variable name and select Not available. See also
 To publish reference data:
Note! You can only publish reference data when your role has permission to publish reference data.
| 1 |
Select Publish.
|
| 2 |
Enter a summary of the reference data updates in the field.
|


If the reference data scope is changed and published in Viedoc Designer after the reference values have been published in Viedoc Clinic, the following message will appear on the Reference data page.
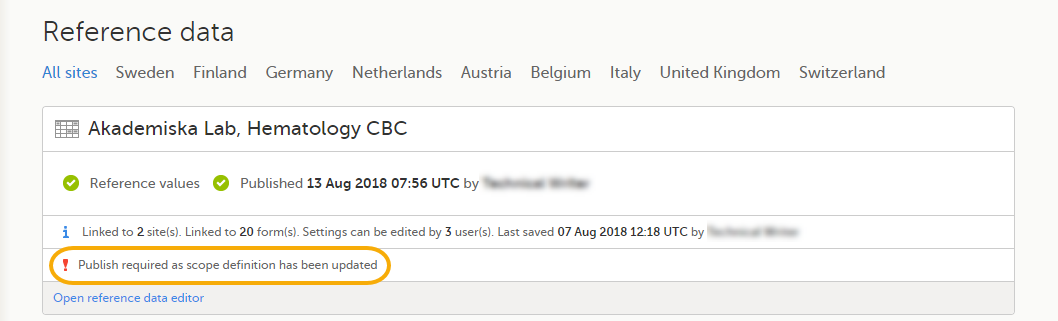
The reference date source-scope combination needs to be updated and published again in Viedoc Clinic, for the reference values to become available for auto-population to the subject forms.
If the reference values change for already populated data, the affected forms will be marked with a red issue icon [ i ].
Editing reference data
Editing existing reference data
Note! You can only edit data when your role has permission to edit reference data.
To edit a set of reference values:
| 1 | On the Viedoc landing page, select the Reference data icon. |
| 2 | Select Open reference data editor for the reference data source-reference data scope combination you would like to enter values into. |
| 3 | Edit the variables (see Variables), factors (see Factors), or the reference values. |
| 4 | Select Save to save the reference data. |
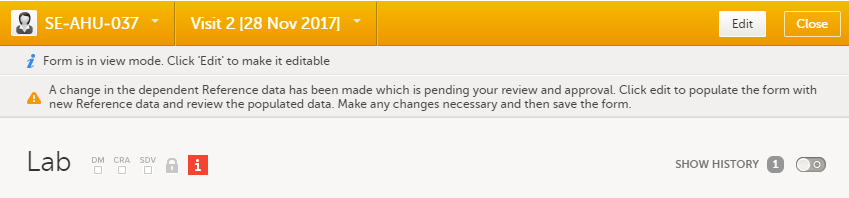
If the reference values change during a study for already populated data, ALL affected forms will be marked with a red issue icon [ i ], and a message is displayed on the top of the form as illustrated below:
Note! To avoid all forms being marked with a red issue icon, you can follow the alternative procedure as described in the next section.
The affected forms are also listed on the Selection page, under the ISSUES view, being marked as Pending Reference data upgrade. For more details, see Selection page.
Making changes to reference data in a duplicate set
To make changes to a reference data set during a study and without causing all affected forms to get issues, you can create a copy of the existing reference data set and make the changes there.
To create a duplicate of your reference data set::
| 1 | Open the reference data editor. |
| 2 |
Select Duplicate. 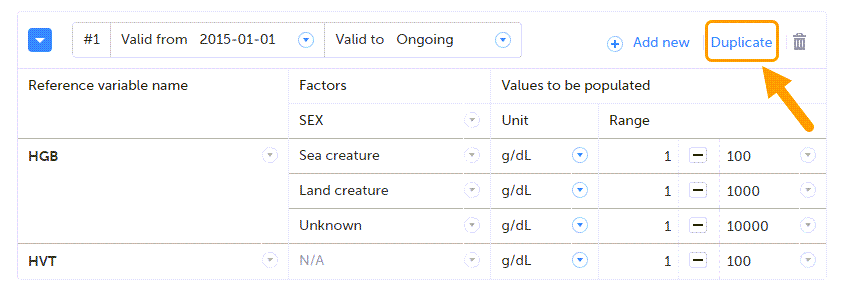
The original set is displayed at the bottom of the list and the new set at the top. |
| 3 | Make your changes in the new set. |
| 4 |
Set the dates for when you want the two sets to apply. Note! The stop date of the previous set cannot overlap the start date of the new set. It is recommended to make the new set start on the day after the old set ends. |
| 5 | Save the changes. |
| 6 | Select Publish... and write a note to the site staff, explaining what has been changed. |
| 7 |
Select Publish. |
Repeating item groups and reference data
Viedoc supports forms containing repeating item groups when using reference data values. The values of items in repeating item groups are defined in the reference data editor, according to the reference data scope specified in the study design.
Data configured in the reference data editor is displayed in the referenced form once the appropriate scope is selected.
When you add a new repeating instance to a form, their values are automatically populated based on the currently published reference data scope:
For more information on repeating item groups, see Entering/Editing data.
When publishing a new reference data scope with updated values, the corresponding form is marked as Update Pending.