This lesson explains how to export data via Viedoc's web API. You will be shown three examples: Windows command prompt, Python, and R.
Note! You must have the API Manager role in order to see the API configuration field.
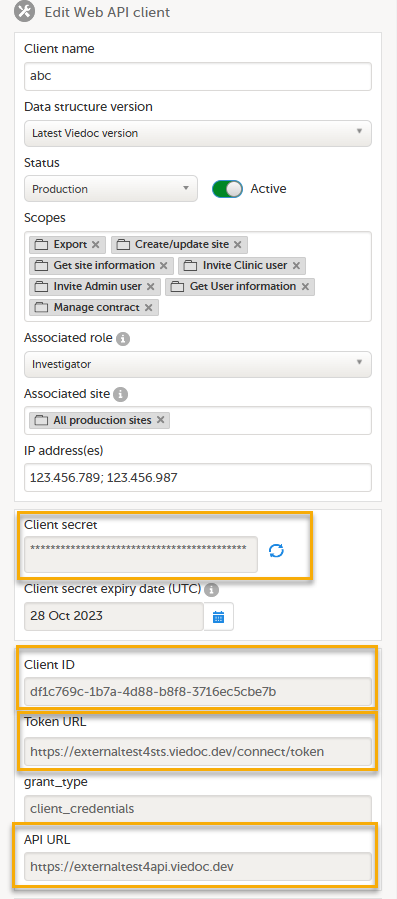
Configuring the API client
Important! To export data, enable the Export scope and to select the correct Status while configuring the API client. We have two modes: demo and production.
Demo – Used to access sites that operate in Demo/Training mode
Production – Used to access sites that operate in Production mode
After creating the API client, take note of the following information, as it is needed in subsequent steps:
Client secret – Needed to obtain the token. Tip! Make sure you copy it, because it is shown only once. If needed, you can regenerate it.
Client ID – Needed to obtain the token.
Token URL – Used for obtaining the token, which is needed to authorize all subsequent API calls.
API URL – All other API calls are made to this base URL with varying endpoints.
Notes!
- An Associated role and an Associated site must be selected for the Export scope.
- The roleID can be optionally selected when exporting via the API. If a roleID is selected, it must match the role selected when configuring the export scope for the Web API client.
For more information on how to configure the API client, select this link: API configuration.
Examples
Windows command prompt
This section describes the steps to export the data using the Windows command prompt.
| 1 |
Obtain the token
To obtain the token, use the following code:
curl -X POST -d "grant_type=client_credentials" -d "client_id=xxxx" -d "client_secret=yyyy" TokenURL
Note! Replace "xxxx" with your Client ID and "yyyy" with your Client Secret. The TokenURL is obtained from Viedoc Admin.
This is an example of template including the output:

|
| 2 |
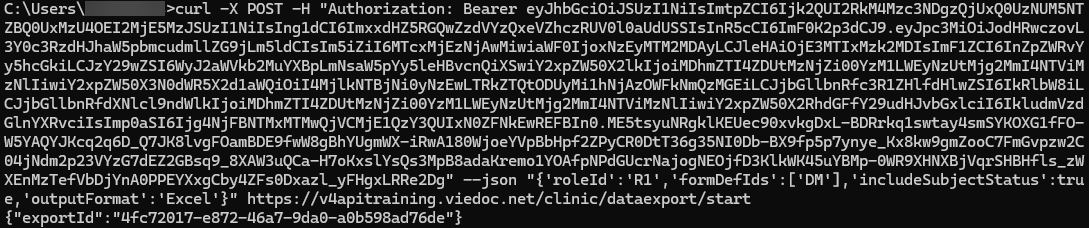
Start the export process
To start the export process, you can use the following code as a template:
curl -X POST -H "Authorization: Bearer xxxx --json "yyyy"

			APIURL/clinic/dataexport/start
Note! Replace xxxx with the token generated in the above step. The yyyy should specify the desired JSON export format. The APIURL should contain the URL obtained from Viedoc Admin.
This is an example of the template including the output:
 Note! You must specify the export with a JSON format. Below is a template which shows all the available export properties. The applied properties are optional. See our Swagger page for more information on export settings. Note! You must specify the export with a JSON format. Below is a template which shows all the available export properties. The applied properties are optional. See our Swagger page for more information on export settings.
|
{'roleId':'','siteIds':[],'eventDefIds':[],'formDefIds':[],'itemDefIds':[],'includeVisitDates':true,

						'includeNotSigned':true,'includeSignedOnly':false,'includeSDVPerformedOrNA':true,

						'includeSDVPending':true,'includeEditStatus':true,'grouping':'GroupByForm','rowLayout':'RowPerActivity',

						'outputFormat':'CSV','timePeriodDateType':'EventDate','timePeriodOption':'Between','includeHistory':true,

						'includeMedicalCoding':true,'includeSignatures':true,'includeReviewStatus':true,'includeSdv':false,

						'includeQueries':true,'includeQueryHistory':false,'includeViedocExtensions':true,'fromDate':'','toDate':'',

						'exportVersion':'','includeSubjectStatus':true,'includeBookletStatus':false,'includeBookletStatusHistory':false,

						'includeSasScript':false,'includePendingForms':true}
|
|
| 3 |
Check the export process
To check the export process, you can use the following code as a template:
curl -X GET -H "Authorization: Bearer xxxx"

			APIURL/clinic/dataexport/status?exportId=yyyy
Note! Replace xxxx with the token and the APIURL with the API URL obtained from Viedoc Admin. Replace yyyy with the export ID obtained in the previous step.
This is an example of the output:
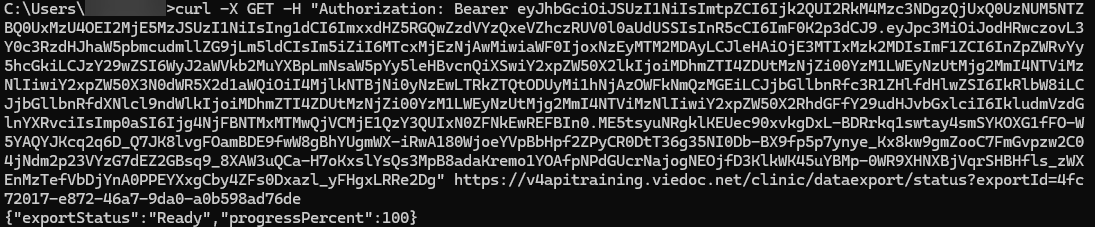 When the export status shows as When the export status shows as Ready, you can continue to the next step.
|
| 4 |
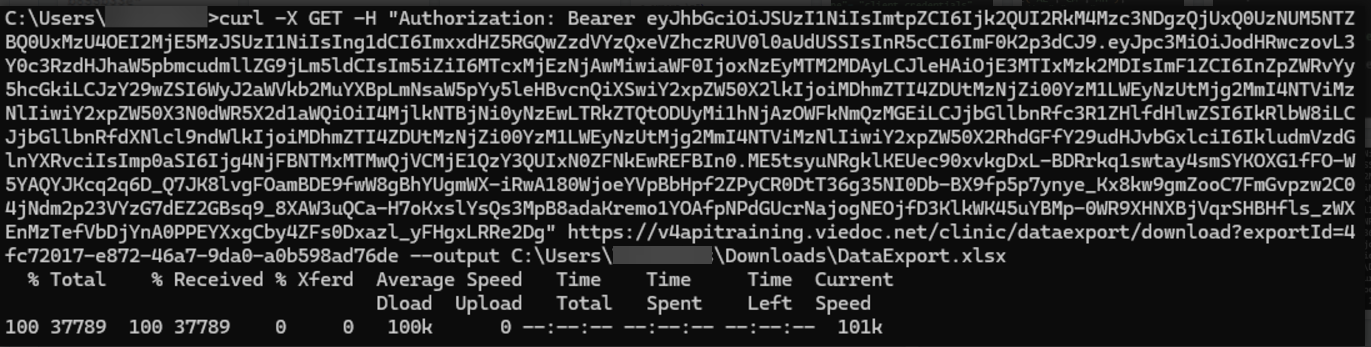
Download the export
To download the export, you can use the following code as a template:
|
curl -X GET -H "Authorization: Bearer xxxx"

						APIURL/clinic/dataexport/download?exportId=yyyy --output

						path\where\to\save\file.zip
|
Note! Replace xxxx with the token and the APIURL with the API URL obtained in Viedoc Admin. Replace yyyy with the export ID. Finally, the path where the file will be saved needs to be specified along with the name and file extension (.zip for CSV exports, .xlsx for Excel, and .xml for XML).
This is an example of the template including the output:
|
Python
This section will take you through the steps to export data using Python.
Note! This example uses the requests package for Python. Ensure that you have it installed before running the code below. To install the requests package open command prompt or terminal and type pip install requests.
| 1 |
Obtain the token
To obtain the token, you can use the following code as a template:
import requests

						clientId = "xxxx"

						clientSecret = "xxxx"

						tokenURL = "xxxx"

						apiURL = "xxxx"

						params = {"grant_type": "client_credentials", "client_id": clientId, "client_secret": clientSecret}

						response = requests.post(tokenURL, data = params)

token = response.json() .get("access_token") |
Note! Replace xxxx with the information you obtained from setting up the API in Viedoc Admin.
This is an example of how to structure the request for a token in Python:

|
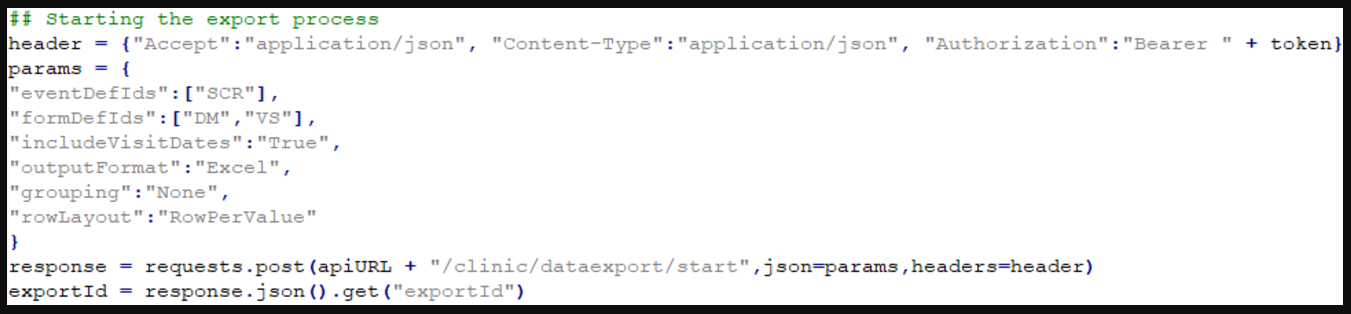
| 2 |
Start the export
To start the export process, you can use the following code as a template:
|
header = {"Accept": "application/json", "Authorization": "Bearer " + token}

						params = {
"roleId":"",

						"siteIds":[],

						"eventDefIds":[],

						"formDefIds":[],

						"itemDefIds":[],

						"includeVisitDates":"True",

						"includeNotSigned":"True",

						"includeSignedOnly":"False",

						"includeSDVPerformedOrNA":"True",

						"includeSDVPending":"True",

						"includeEditStatus":"True",

						"grouping":"GroupByForm",

						"rowLayout":"RowPerActivity",

						"outputFormat":"CSV",

						"timePeriodDateType":"EventDate",

						"timePeriodOption":"Between",

						"includeHistory":"True",

						"includeMedicalCoding":"True",

						"includeSignatures":"True",

						"includeReviewStatus":"True",

						"includeSdv":"False",

						"includeQueries":"True",

						"includeQueryHistory":"False",

						"includeViedocExtensions":"True",

						"fromDate":"",

						"toDate":"",

						"exportVersion":"",

						"includeSubjectStatus":"True",

						"includeBookletStatus":"False",

						"includeBookletStatusHistory":"False",

						"includeSasScript":"False",

						"includePendingForms":"True"}

						response = requests.post("apiURL/clinic/dataexport/start", json=params,headers=header)

						exportId = response.json().get("exportId")
|
Note! The params dictionary specifies the export settings. Key value pairs are optional. See our Swagger page for more information about the export settings.
This is an example of the start of the export process:
|
| 3 |
Check the export status
To check the export status, you can use the following code as a template:
|
from time import sleep

						while(response.json().get("progressPercent") != 100 and response.json().get("exportStatus") != "Error"):

						sleep(3)

						response = requests.get(apiURL + "/clinic/dataexport/status?exportId="

						+ exportId,headers=header)
|
Note! The above code checks for the completion of the export process every 3 seconds.
This is an example of the export process check:

|
| 4 |
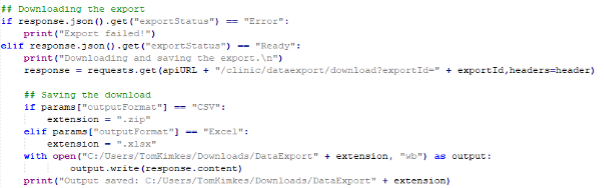
Download the export
To download the export, you can use the following code as a template:
|
if response.json().get("exportStatus") == "Error":
print("Export failed!")
elif response.json().get("exportStatus") == "Ready":
print("Downloading and saving the export.\\n")
response = requests.get(apiURL + "/clinic/dataexport/download?exportId=" + exportId, headers=header)
if params["outputFormat"] == "CSV":
extension = ".zip"
elif params["outputFormat"] == "Excel":
extension = ".xlsx"
with open("path/where/to/save/file" + extension, "wb") as output:
output.write(response.content)
print("Output saved: " + "path/where/to/save/file" + extension)
|
Note! You need to specify the file path where you will save the file, as well as the file name.
This is an example of the export download:
|
R
This section will take you through how to export data using R.
Note! This example uses the httr and jsonlite packages for R. You need to install them before running the code in this example. To do so, type (install.packages(c("httr", "jsonlite")) into your R console. You only need to do this once.
| 1 |
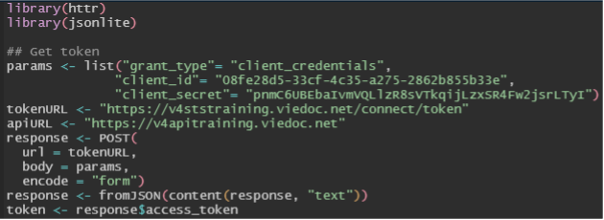
Obtain the token
To obtain the token, you can use the following code as a template:
|
library(httr)

						library(jsonlite)

						clientId <- "xxxx"

						clientSecret <- "xxxx"

						tokenURL <- "xxxx"

						apiURL <- "xxxx"

						params <- list("grant_type" = "client_credentials", "client_id" = clientId, "client_secret" = clientSecret)

						response <- POST(url = tokenURL, body = params, encode = "form")

						response <- fromJSON(content(response, "text"))

						token <- response$access_token
|
Note! Replace the xxxx fields with the information you obtained from Viedoc Admin.
This is an example of how to structure a token request:
|
| 2 |
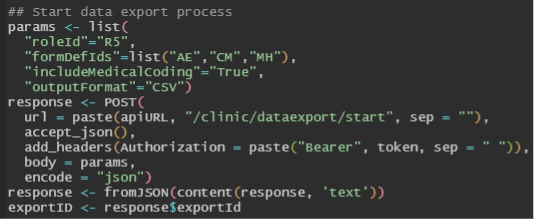
Start the export process
To start the export process, you can use the following code as a template:
|
params <- list(

						"roleId"="",

						"siteIds"=list(),

						"eventDefIds"=list(),

						"formDefIds"=list(),

						"itemDefIds"=list(),

						"includeVisitDates"="True",

						"includeNotSigned"="True",

						"includeSignedOnly"="False",

						"includeSDVPerformedOrNA"="True",

						"includeSDVPending"="True",

						"includeEditStatus"="True",

						"grouping"="GroupByForm",

						"rowLayout"="RowPerActivity",

						"outputFormat"="Excel",

						"timePeriodDateType"="EventDate",

						"timePeriodOption"="Between",

						"includeHistory"="True",

						"includeMedicalCoding"="True",

						"includeSignatures"="True",

						"includeReviewStatus"="True",

						"includeSdv"="False",

						"includeQueries"="True",

						"includeQueryHistory"="False",

						"includeViedocExtensions"="True",

						"fromDate"="",

						"toDate"="",

						"exportVersion"="",

						"includeSubjectStatus"="True",

						"includeBookletStatus"="False",

						"includeBookletStatusHistory"="False",

						"includeSasScript"="False",

						"includePendingForms"="True")

						response <- POST(

						url = paste(apiURL, "/clinic/dataexport/start", sep = ""),

						accept_json(),

						add_headers(Authorization = paste("Bearer", token, sep = " ")),

						body= params,

						encode = "json")

						response <- fromJSON(content(response, "text"))

						exportID <- response$exportId
|
Note! The params list specifies the export settings. You do not need to provide all of the options. See our Swagger page for more information on the export settings.
This is an example of the start of the data export process:
|
| 3 |
Check the export status
To check the export status, you can use the following code as a template:
|
exportStatus <- 0

						while(exportStatus != "Ready" && exportStatus != "Error"){

						Sys.sleep(3)

						response <- GET(

						url = paste(apiURL, "/clinic/dataexport/status?exportId=", exportID, sep = ""),

						accept_json(),

						add_headers(Authorization = paste("Bearer", token, sep = " "))

						response <- fromJSON(content(response, "text"))

						exportStatus <- response$exportStatus
|
Below is a screenshot of the export status:
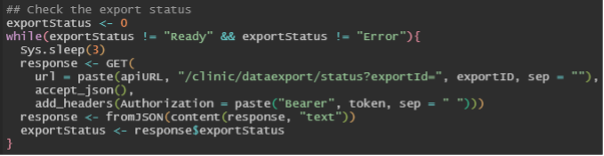
Note! The above code checks for the completion of the export process every 4 seconds.
|
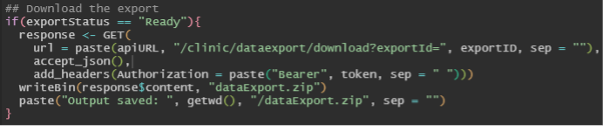
| 4 |
Download the export
To download the data export, you can use the following code as a template:
if(exportStatus == "Ready"){

						response <- GET(

						url= paste(apiURL, "/clinic/dataexport/download?exportId=", exportID,

						sep = ""),

						accept_json(),

						add_headers(Authorization = paste("Bearer", token, sep = " "))

						)

						writeBin(response$content, "path/where/to/save/file.extension")

} |
Note! You need to specify the file path where you will save the file, as well as the file name.
Below is a screenshot of the export download:
|
| 5 |
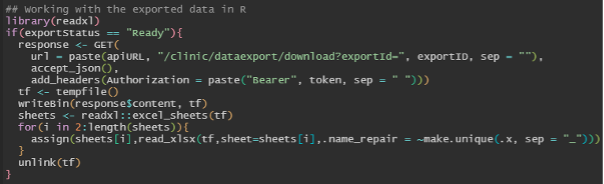
Analysis
If you want to analyze the data in R, you can use the following code as a template:
library(readxl)

						if(exportStatus == "Ready"){

						response <- GET(

						url = paste(apiURL, "/clinic/dataexport/download?exportId=", exportID, sep = ""),

						accept_json(),

						add_headers(Authorization = paste("Bearer", token, sep = " ")))

						tf <- tempfile()

						writeBin(response$content, tf)

						sheets <- readxl::excel_sheets(tf)

						for(i in 2:length(sheets)){

						assign(sheets[i],read_xlsx(tf,sheet=sheets[i],.name_repair = ~make.unique(.x, sep = "_")))

						}

						unlink(tf)

} |
Note! To analyze the data in Excel, you need to set the outputFormat from step 2 to Excel.
This is a screenshot of the exported data for analysis:
|