Viedoc Data Export Application
Objective
This document describes how to export data from Viedoc using the Viedoc Data Export Application. It describes the data export procedure in general, and provides instructions for the following steps:
- Creating a configuration file
- Preparing the work folder
- Running the Viedoc Data Export Application
- Scheduling the Viedoc Data Export Application using Task Scheduler
This document applies to Viedoc Data Export Application version 0.8 (Release candidate/Pre-release).
About the export application
Viedoc Data Export Application
Viedoc offers the possibility to export data via the Clinic interface or automatically via the Viedoc Data Export Application.
Note! The Viedoc Data Export application only supports CSV exports including SAS script.
Also, the Viedoc Data Export application cannot be used with user accounts where the email
domain is configured to use single sign-on.
To use the Viedoc Data Export Application, the application needs:
- a configuration file containing the correct study information.
- a Viedoc username and password with export permissions
Please contact your professional services representative to start using the Viedoc Data Export Application.
The configuration file
The configuration file defines the following:
- which Viedoc studies the data should be exported from.
- where to store the exported data.
- which Viedoc instance the data should be exported from (v4, v4training, v4jp, and so on).
- the login credentials that should be used when exporting the data.
The above information is mandatory to define in the configuration file. Optionally, you can use the configuration file to define the following:
- which additional data to include in the exported data.
- whether you would like the downloaded zip-file to be automatically unzipped.
- which Device Id to use, in case two-tactor authentication is needed for the user account performing the export.
The configuration file is an xml file that can be created in any text editor. One configuration file can contain the export configurations for multiple export projects and studies.
For instructions on how to create a configuration file, see Creating a configuration file and preparing the work folder.
Exported study folder structure
Exported files are put in the folder name set in the configuration file, in the following folder structure:
BasePath\FolderName\Year\Month\Day
The application automatically creates the folder structure when the export is completed and the exported files are downloaded.
That is if the configuration file is setup according to the example in Creating the configuration file, the folder structure is created as follows, if an export was made on 1st December 2019: C:\Viedoc4Export\ProjectFolder1\2019\12\01
Logging
Each run of the Export Application is logged under Logs\ in the BasePath folder. Any errors thrown during the application execution are prefixed with ERROR.
Exporting data from Viedoc using the Viedoc Data Export Application
Introduction
This section provides instructions for exporting data from Viedoc using the Viedoc Data Export Application.
Obtaining the StudyId
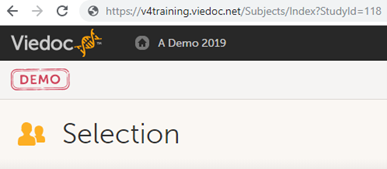
To obtain the study id for the study you wish to export data from, log in to Clinic and launch the study so you get to the Subject selection page. In the browser address bar, the StudyId to use can be found. This numerical id is needed for the export configuration file, see Creating the configuration file.
Obtaining the DeviceId
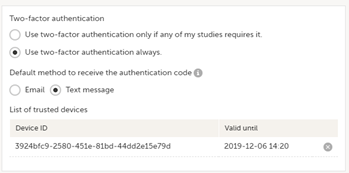
If the account used for exporting the study data requires two-factor authentication, you will need to have a DeviceId in the configuration file. You can get this by logging in to Clinic, and then go to Security Settings, see the figure below. This Device id is needed for the export configuration file, see Creating the configuration file.
|
Important! When your trusted device validity has expired, you will need to perform a new authentication manually and update the configuration file with the new Device Id, as the trusted device is only valid for 30 days. |
The following image shows an example of a Device Id, in this case 3924bfc9-2580-451e-81bd-44dd2e15e79d.
Creating a configuration file and preparing the work folder
Creating a folder structure on your computer
Create a folder structure to store the configuration file as follows:
- Create a work folder on your computer.
In the example used for this document, a work folder calledViedoc4Exportis directly created on the C-drive, see also An example of a folder structure. - Within the work folder, create one subfolder (project folder) for each export project,
for exampleProjectFolder1.
An example of a folder structure
In the configuration file of the example above, the work folder is C:\Viedoc4Export. The work folder contains the project folder ProjectFolder1 and the configuration file ViedocExportConfiguration.xml
The following is an example of a work folder:

Creating the configuration file
To create the configuration file:
| 1 |
In a text editor of choice, create an xml file according to the following example:
|
|
| 2 |
Edit the xml tags and specify the following information. Note! All xml tags are case sensitive. The a) b) c)
d) e) f) g) h) i) j) k) l) m) n) If you would like to export multiple studies, add a new |
|
| 3 |
Save the configuration file in the work folder. |
Running the Viedoc Data Export Application
To run the application and export the data:
| 1 | Open the folder where the Viedoc Data Export Application is placed. |
| 2 |
Write 
|
| 3 |
Run the application by writing Viedoc.Export.exe followed by the path to the export configuration file you wish to use, for example 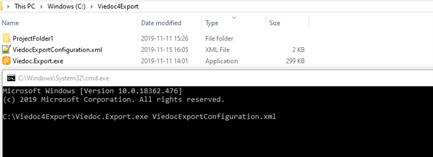
|
When the application is run, it goes through all the project folders that are specified in the configuration file and exports the data.
After the exports, the application closes automatically.
Note! Errors can occur, if, for example:
- The export accesses are incorrectly set.
- The incorrect StudyId is used (the studyid must be collected from the Selection page in Viedoc).
- There are spaces in the folder name; scheduling can only be done when the folder path is without spaces, for example, OneDrive path is not allowed.
About the password
If you have specified a password in the configuration file, the Viedoc Data Export Application will replace this password with an encrypted password when running the application for the first time. The encrypted password will be saved in the configuration file.
If you have not specified a password in the configuration file, the application will ask you for a password upon start-up.

To enter a password, press Y (yes), type your password and press Enter. Type your password again and press Enter. The system will save your password as an encrypted password in the configuration file.
If you press N (no), or do not press anything for 15 seconds, or enter the wrong password, the application cannot login and does not export any data.
If you have changed your Viedoc password, replace the old password in the configuration file with the new password and save the configuration file. The next time the Viedoc Data Export Application is run, the new password will be used to login and export the data.
About the export creation time
Exports will be created by the order they appear in the export configuration file, that is. if there are two export configurations in the same file, the first export will be created and waiting for completion will take place before the second export is created.
If you have studies with a lot of data, you might want to run the exports in parallel, that is,. use one configuration file for each study and run them individually.
Scheduling the Viedoc Data Export Application using Task Scheduler
The Task Scheduler is a Windows functionality that enables you to automatically perform routine tasks on a chosen computer. The Task Scheduler does this by monitoring the criteria you choose (referred to as triggers) and then executing the tasks when those criteria are met. You can use the Task Scheduler to automatically run the Viedoc Export Application on your own computer (if allowed) or have your IT department set up this to be run on a server.
Note! If you're not sure how to set this up, or not allowed to, please consult your IT department for advice.
Setting up the Task Scheduler
To run the Viedoc Data Export Application using Task Scheduler:
| 1 | Open Task Scheduler. |
| 2 |
In the Actions menu, click Create Task... 
|
| 3 |
Enter a name of the task in the Name field and, optionally, select Run whether user is logged on. Click OK. 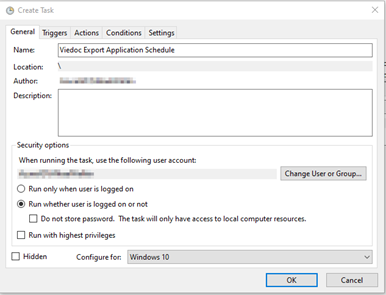
|
| 4 |
On the Triggers tab, make the settings of the trigger. For example, to be run once a day at 08:00. 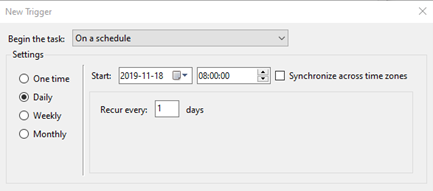
|
| 5 |
On the Actions tab:
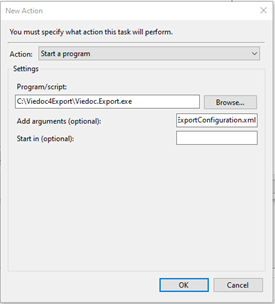
|
The task should now be visible in the list. You can also run the task manually from this view by right-clicking and selecting Run.

