Sharing records with Viedoc Share
Note! This page contains information and instructions for the new TMF user interface. If you are using the old interface, please go to the relevant user guides:
- Viedoc eTMF User Guide (old interface)
- Viedoc User Guide for eTMF Managers (old interface)
Want to browse more information for the new interface? Please go to the new TMF user guides:
Introduction
The Viedoc Share feature is available to TMF users for sharing records with Viedoc Me users, or with Viedoc Clinic users, for information sharing or for collecting signatures.
Definitions
The following terms are used for reference:
- Sharer - a TMF user with Manage sharing permission
- Binder - a digital envelope that includes a finalized record version that is filed to the TMF
- Recipient - a Viedoc Clinic or a Viedoc Me user from the same scope as the sharer
- Co-signatory - a Viedoc Clinic user from the same scope as that sharer. The co-signatory can sign a record after all of the binder's recipients have signed
Prerequisites
A TMF user can share records if the eTMF Manager assigns one of the following permissions to their role in Viedoc Admin:
- Manage document sharing for Viedoc Clinic users
- Manage document sharing for Viedoc Me users
See Roles and permissions in Viedoc TMF for more information
A record can only be shared if:
- the corresponding artifact has been configured for sharing (done by the eTMF Manager)
- the record has been configured for sharing (see configuring a record for sharing in the TMF Admin User Guide)
- the record has been finalized
- the Sharer has permissions for the same scope (trial, country, site) as the Viedoc Me user or the Viedoc Clinic user
Supported file types:
Viedoc Share supports all file types that can be uploaded into the TMF. For a list of file types that cannot be uploaded to the TMF, please see Blacklisted file formats.
Long Term Validation of signatures
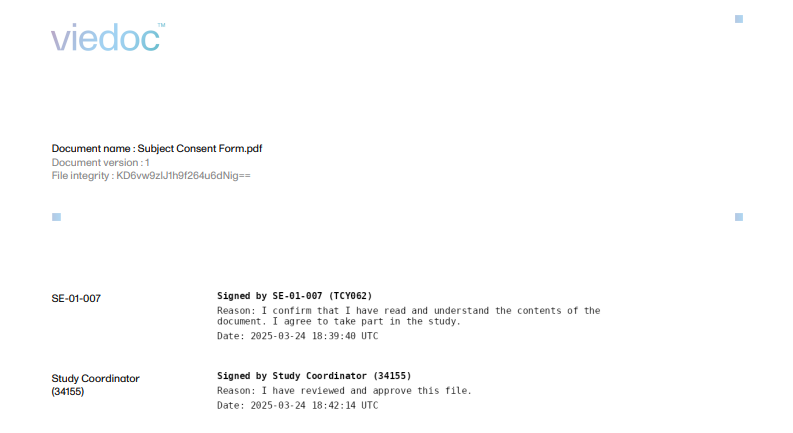
When a shared record is digitally signed by the recipient, Long-Term Validation (LTV) is embedded into the PDF, ensuring that signatures remain verifiable even after certificate expiration.
This happens automatically, with no extra steps are required from the user. A trusted timestamp is applied at the time of signing, and signatures display as valid in standard PDF viewers such as Adobe Acrobat. If an error occurs during validation or timestamping, the signed document cannot be downloaded, ensuring the integrity and compliance of the signed output.
Sharing workflow
- Viedoc Admin: An Admin user assigns permission to a TMF user to Manage document sharing for Viedoc Clinic users and/or Viedoc Me users. This is the Sharer.
- Viedoc TMF > TMF Admin view > Edit artifact. The eTMF Manager enables record sharing for Viedoc Clinic and/or Viedoc Me users.
- Viedoc TMF > Trial Master File view > Record properties. A user with WRITE access:
- Configures a record to be shared with either Viedoc Clinic users or Viedoc Me users
- (Optional) Adds form fields
- Publishes and finalizes the record
- Creates binder(s) and shares them with recipients and co-signatories
- Recipients receive a an email with a link to Viedoc Share where they can read, complete fields, and/or and sign the record using a one-time code.
- For Viedoc Me users, a link to Viedoc Share is also available under Documents on the main page of Viedoc Me.
- If a co-signatory is required, after all recipients have completed required fields and signed the record, the co-signatory receives an email that the record has been signed by the recipient, then also signs it.
- The signed records are included in the corresponding side of the TMF-EMS archive (Investigator and/or Sponsor).
Configuring a record for sharing
Before a record is published, it can be configured for sharing. A TMF user with WRITE access to a record must enable the sharing before other TMF end users can share the record.
To configure a record for sharing:
| 1 |
In the left navigation menu, select Trial Master File to expand it, and select the Records or the Structure page. Navigate to the unpublished record, and select it to open the Record properties window. |
| 2 |
In the Record sharing section, select the users that the record can be shared with - either Viedoc Clinic users or Viedoc Me users. 
|
| 3 | Select Publish or Save as unpublished, as needed. |
Note! Only an unpublished record can be configured for sharing and have form fields added (see Adding form fields below). If a record has already been published and/or finalized, create a new version of the record, configure for sharing and/or add form fields, then publish and finalize again.
The Sharing section in the Record properties window
A TMF user with Manage sharing permission will see a Sharing section at the top of the Record properties window.
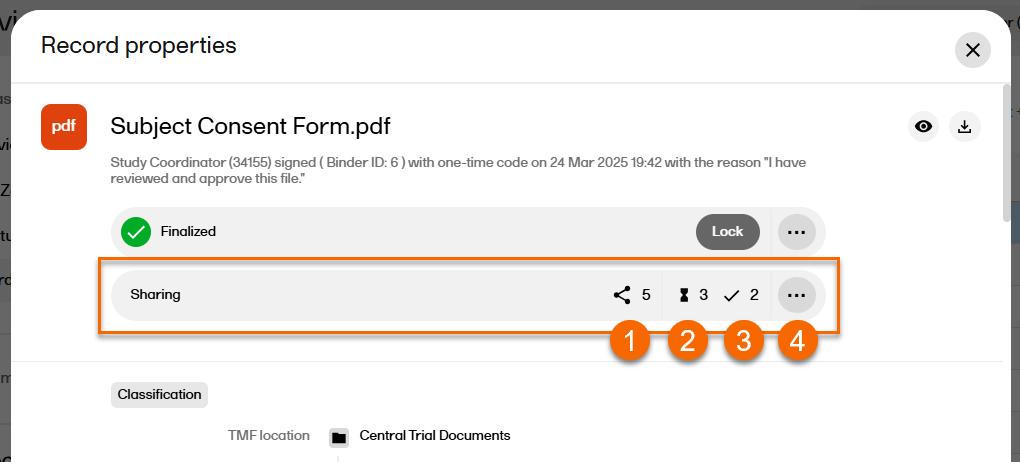
The Sharing section contains the folllowing:
1. The number of active shared binders accessible by the Sharer.
2. The number of pending actions for binders accessible by the Sharer (only displayed if the number is greater than 0).
3. The number of actions done for binders accessible by the Sharer (only displayed if the number is greater than 0).
4. Select ... to open the Sharing window with an overview of the existing binders. This is also where new binders can be created.
Adding form fields
Form fields such as radio buttons, checkboxes or open text fields can be added to an unpublished record once it has been added to an artifact. These fields can be customized and set as optional or required for the recipient. If fields are set as required, the recipient cannot sign the record until all required fields have been completed.
Notes!
- Form fields can only be added to .pdf files.
- Form fields and settings may be changed while a record remains unpublished. Once a record is published, fields may not be edited or added.
- Form fields can only be completed by Viedoc Me users, not Clinic users
To add form fields to a record:
| 1 |
In the left navigation menu, select to expand Trial Master File, and select the Records or the Structure page. Navigate to the unpublished record, and select it to open the Record properties window. |
| 2 | Select the eye icon to open a preview of the record:
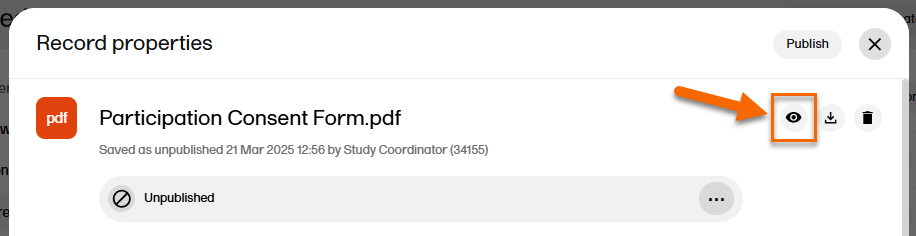
|
| 3 |
On the far left, the options for adding/editing fields are displayed: 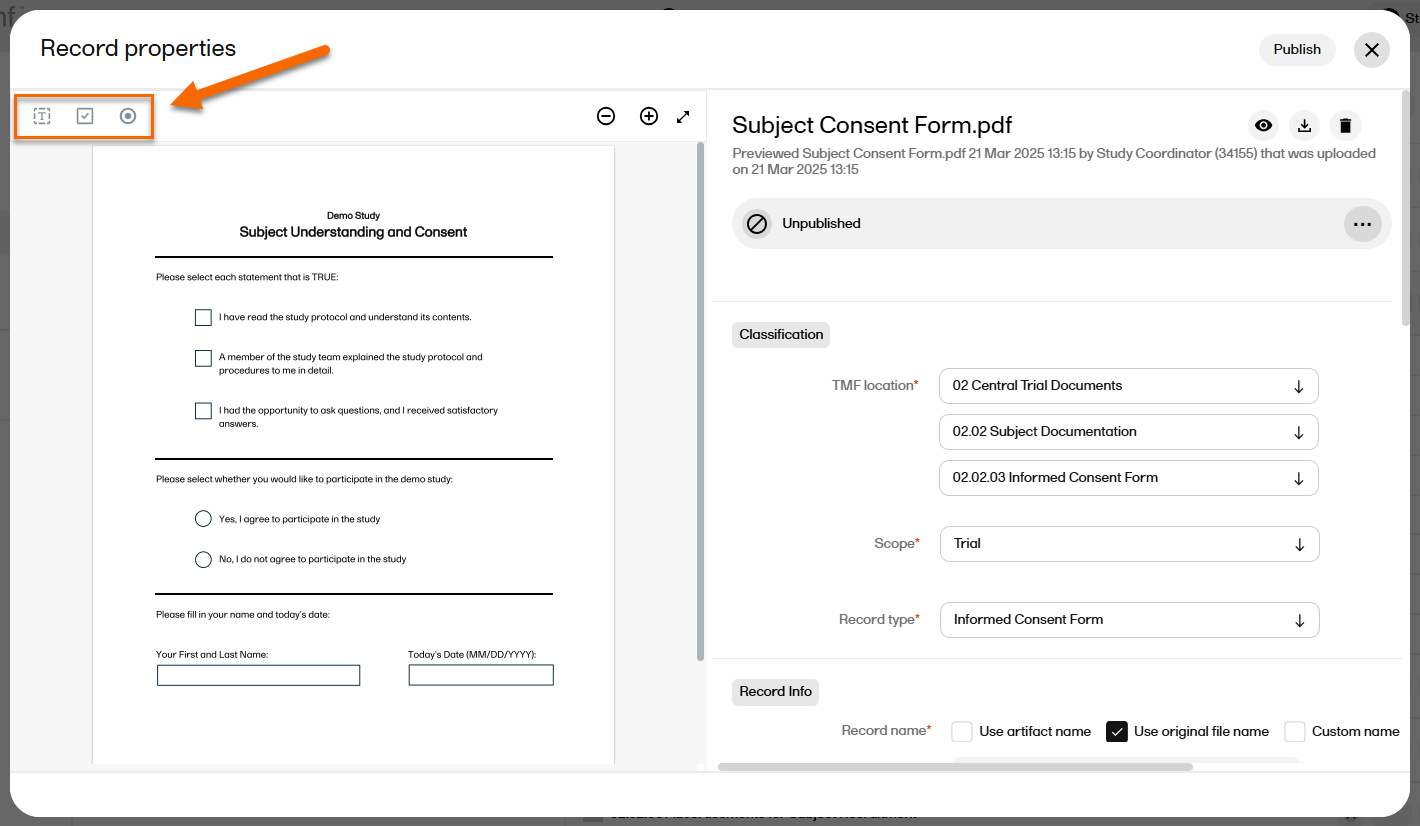
|
Types of form fields available:
-
Radio buttons allow recipients to select a single option from a predefined set of choices, ensuring only one selection is made.
-
Checkboxes allow recipients to select multiple options independently from a list, allowing for one, several, or all choices to be selected.
-
Open text fields provide recipients with a space to input free-form text, accommodating responses that require personalized or detailed information.
Creating a radio button
To create a radio button:
| 1 |
While previewing the record, select Radio button: 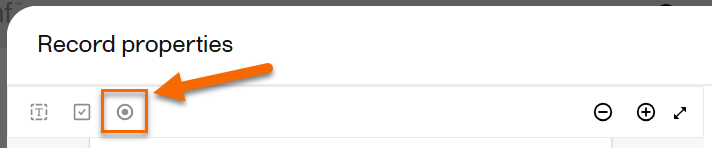
|
| 2 |
Drag the cursor to create the field shape (the size and position can be edited later). 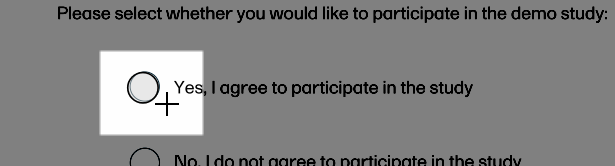
|
| 3 |
Once the shape is created, an edit window is displayed: 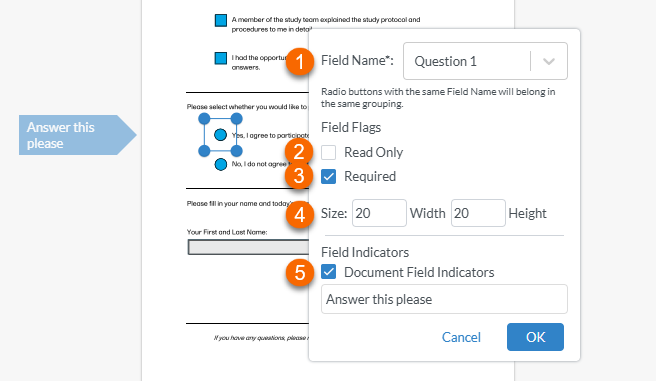
1. To name the radio button, select inside the text box to the right of Field Name and type the name (for example "Question 1". Then select the option that appears below to create the field name. 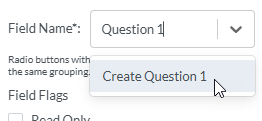
Note! For radio buttons to function properly, options belonging to the same question must have the same field name. For example, both "yes" and "no" radio buttons belonging to the first question must both be named "Question 1", and the next set of "yes" and "no" radio buttons belonging to the second question must both be named "Question 2". 2. Setting the field as Read Only prevents the recipient from selecting or deselecting the button 3. Setting the field as Required prevents the recipient from signing the record until all of the required fields have been filled in. 4. Setting the Size controls the size of the radio button. 5. Selecting Document Field Indicators and typing in a label creates a flag to the left of the field that the recipient will see. Note! This may not be visible if the recipient is viewing the record on a mobile device. |
| 4 |
After completing all of the relevant fields and settings, select Save: 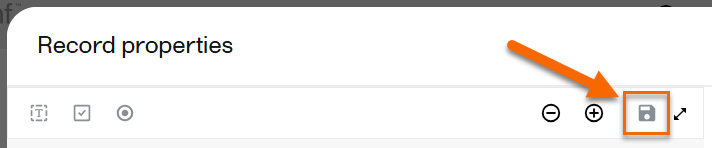
Note! You must save the form fields before publishing, saving as unpublished, or closing the record, otherwise the changes to the form fields will be lost. |
Creating a checkbox
To create a checkbox:
| 1 |
While previewing the record, select Checkbox: 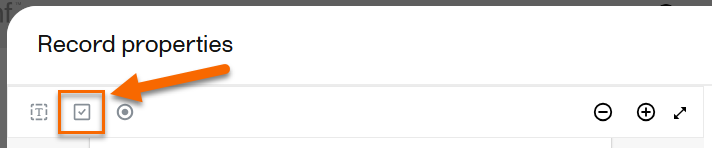
|
| 2 |
Drag the cursor to create the field shape (the size and position can be edited later). 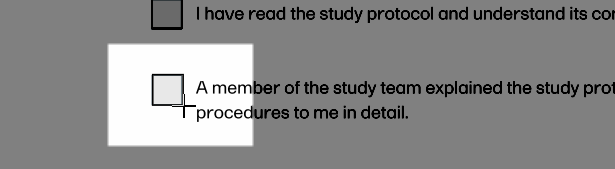
|
| 3 |
Once the shape is created, an edit window is displayed: 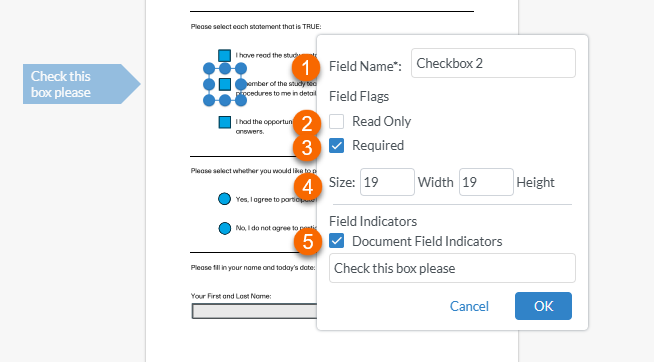
1. To name the checkbox, select inside the text box to the right of Field Name and type the name (for example "CheckBox1". Note! Checkboxes must have unique field names. If you give a checkbox the same name as another checkbox in the same record, you will not be able to save the checkbox. 2. Setting the field as Read Only prevents the recipient to select or deselect the checkbox. 3. Setting the field as Required prevents the recipient from signing the record until all required fields have been completed. Note! If a required checkbox if left blank, the recipient will not be able to sign the record. 4. Setting the Size controls the size of the checkbox 5. Selecting Document Field Indicators and typing in a label creates a flag to the left of the field that the recipient will see. Note! This may not be visible if the recipient is viewing the record on a mobile device. |
| 4 |
After completing all of the relevant fields and settings, select Save:
Note! You must save the form fields before publishing, saving as unpublished, or closing the record, otherwise the changes to the form fields will be lost. |
Creating a text field
To create a text field:
| 1 |
Select Text Field: 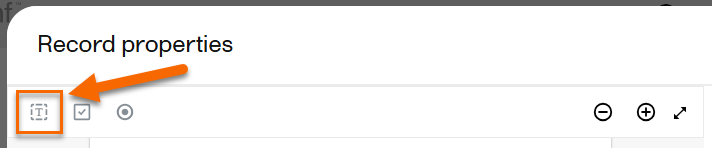
|
| 2 |
Drag the cursor to create the field shape (size and position can be edited later). 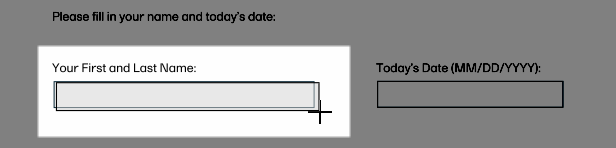
|
| 3 |
Once the shape is created, an edit window is displayed: 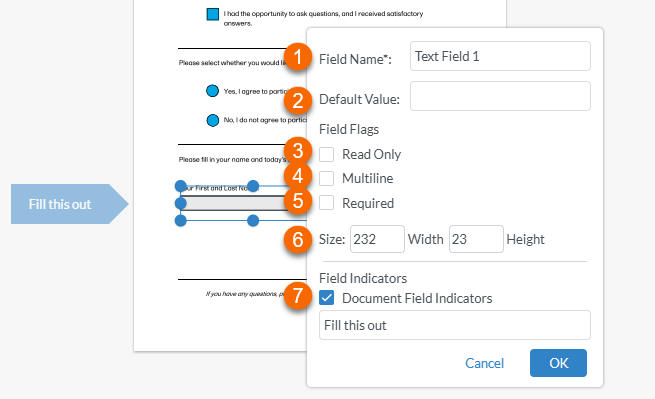
Edit the options for the text field as needed: 1. To name the text field, select inside the text box to the right of Field Name and type the name (for example "TextFormField 1"). Note! Text field names do not affect the functionality as the radio button names do. 2. Entering a Default Value autofills the text field with any text you enter here. 3. Setting the field as Read Only prevents the recipient from typing any text in the text field. 4. Setting the field as Multiline allows for multiple lines of text to be entered. 5. Setting the field as Required prevents the recipient from signing the record until all of the required fields have been completed. 6. Setting the size controls the size of the text field 7. Selecting Document Field Indicators and typing in a label creates a flag to the left of the field that the recipient will see. Note! This may not be visible if the recipient is viewing the record on a mobile device. |
| 4 |
After completing all of the relevant fields and settings, select Save:
Note! You must save the form fields before publishing, saving as unpublished, or closing the record, otherwise the changes to the form fields will be lost. |
Sharing a record
To share a record with a Viedoc Me user or a Viedoc Clinic user:
| 1 |
In the left navigation menu, select to expand Trial Master File, and select the Records or the Structure page. Navigate to the finalized record, and select it to open the Record properties window. |
| 2 |
In the Sharing section at the top of the window, select  |
| 3 |
Select Create a new binder: 
Or, if the record already has shared binders, select the |
| 4 |
For Recipients select either Viedoc Clinic users or Viedoc Me users. 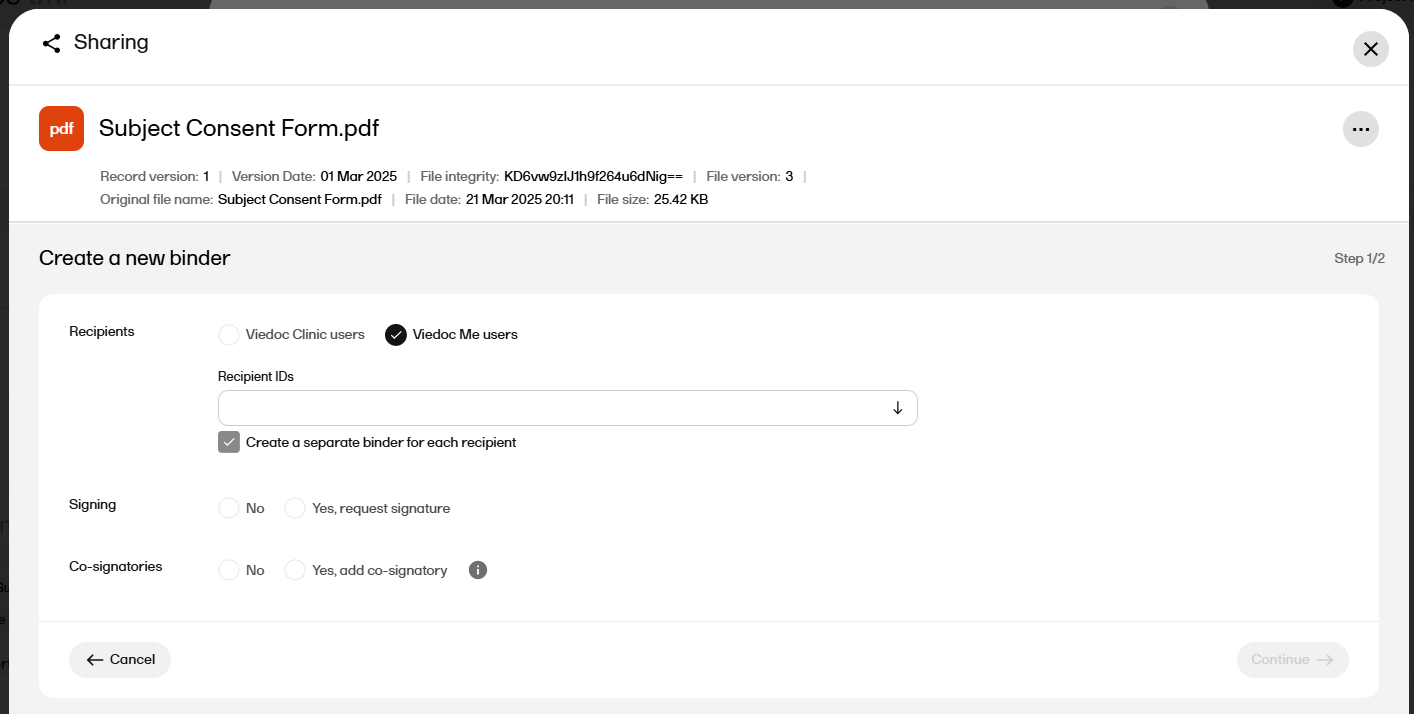
|
| 5 |
For Recipient IDs select the user(s) that you want to share the record with from the dropdown. 
Notes!
|
| 6 |
For Signing, select whether or not to request a signature. Note! If the record is included in an artifact that is only on the Sponsor side of the TMF (or on neither Sponsor nor Investigator side), and the record version is set to be shared with Viedoc Me users, it is not possible to collect signatures. This is because the signatures can include information that could compromise the data integrity of the Viedoc Me users. |
| 7 |
If you selected Yes in the previous step, select a Reason for the signature from the dropdown. 
|
| 8 |
For Co-signatories, select whether or not a co-signatory is required. Note! The co-signatory cannot sign the record if you selected No for the recipient signature. |
| 9 |
If you selected Yes in the previous step, select the co-signatory or co-signatories from the dropdown. Note! You can only select users within the same scope as yourself. |
| 10 |
If you selected to have a cosignatory, select a Reason for the co-signature from the dropdown. 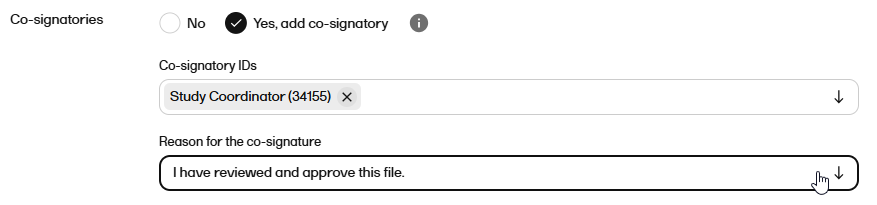
|
| 11 |
Select Continue to see an overview of the sharing details. 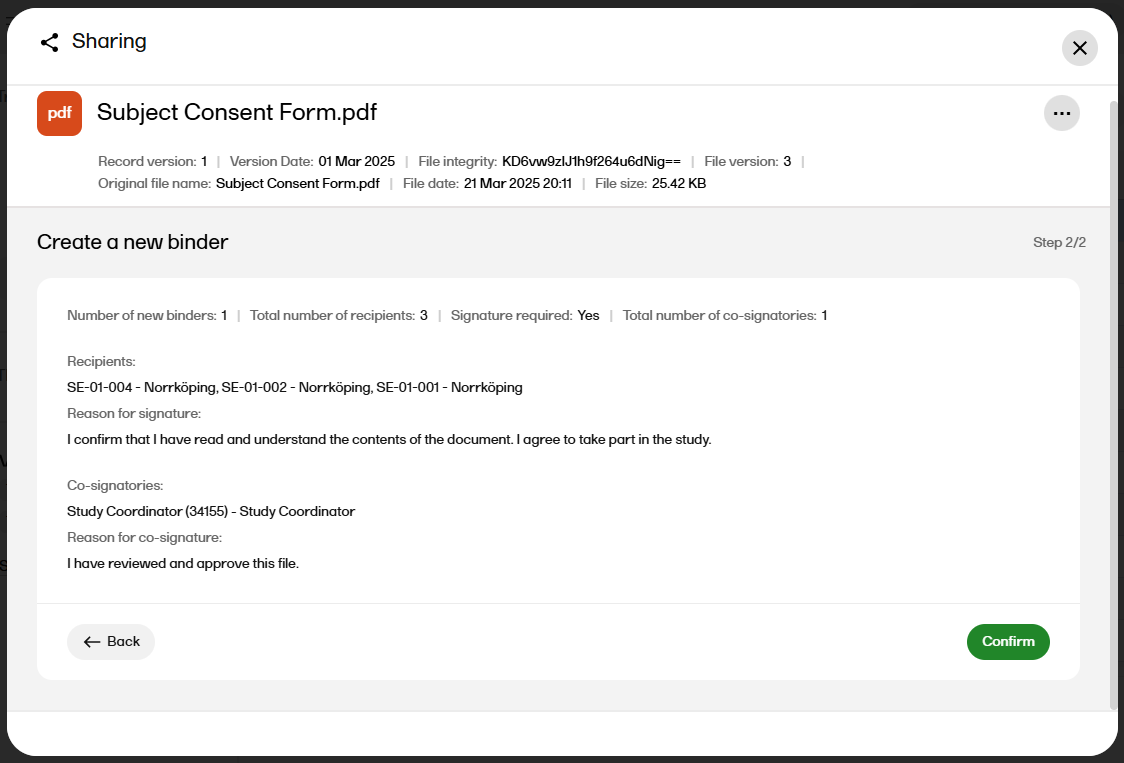
|
| 12 |
If the sharing details are correct, select Confirm. Otherwise, you can select Back and edit. |
| 13 |
After confirming, a binder summary is displayed and an email is sent to each of the recipients with a link to Viedoc Share where the record can be viewed and/or signed. 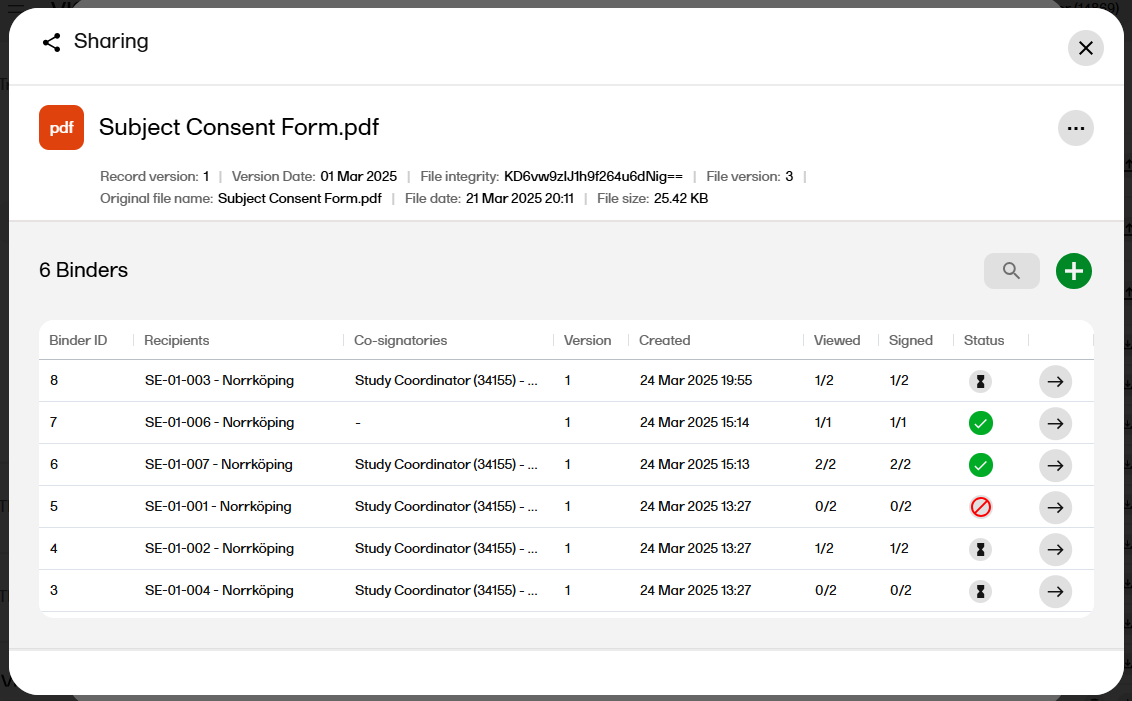
|
Viewing the binder properties
| 1 |
In the left navigation menu, select to expand Trial Master File, and select the Records or the Structure page. Navigate to the record, and select it to open the Record properties window. |
| 2 |
In the Sharing section at the top of the window, select |
| 3 |
Select the arrow icon to open the Binder properties window. 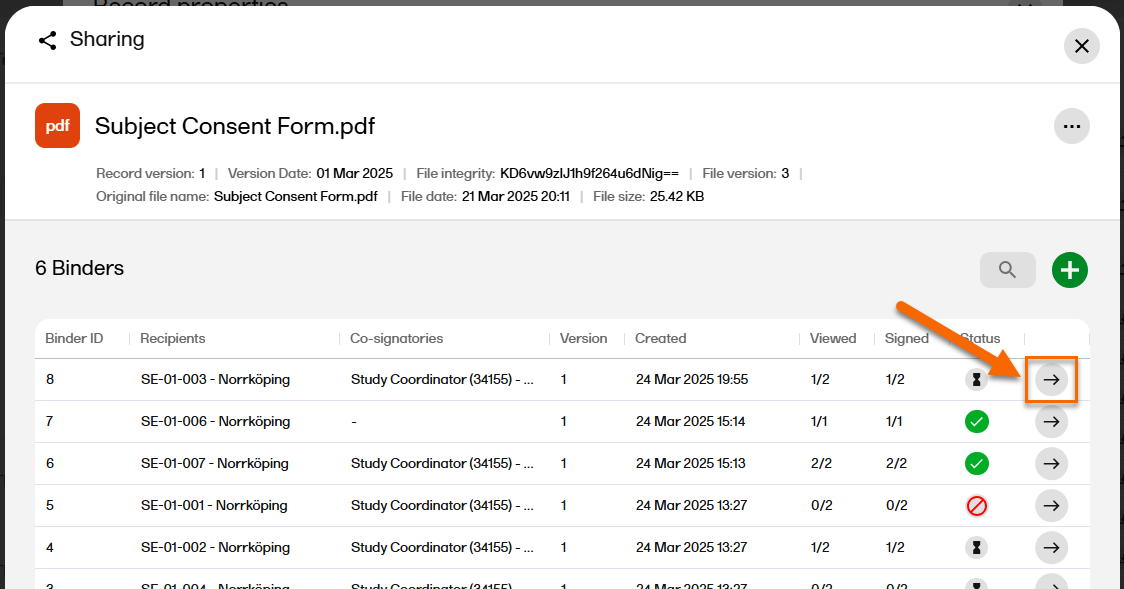
|
| 4 |
The binder properties are displayed, including the history with all actions for the binder. 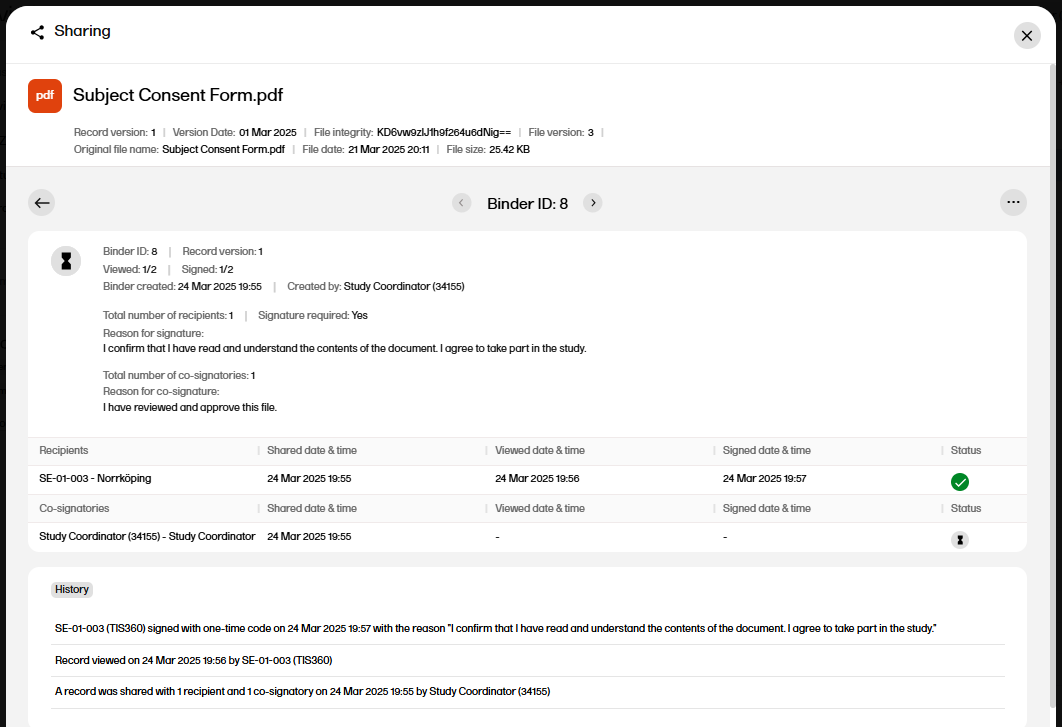
|
Downloading the record
To download the shared record from the binder:
| 1 |
In the left navigation menu, select to expand Trial Master File, and select the Records or the Structure page. Navigate to the record, and select it to open the Record properties window. |
| 2 | In the Sharing section at the top of the window, select ... to open the Sharing window. |
| 3 |
Select the arrow icon to open the Binder properties window. 
|
| 4 |
In the top right corner, select 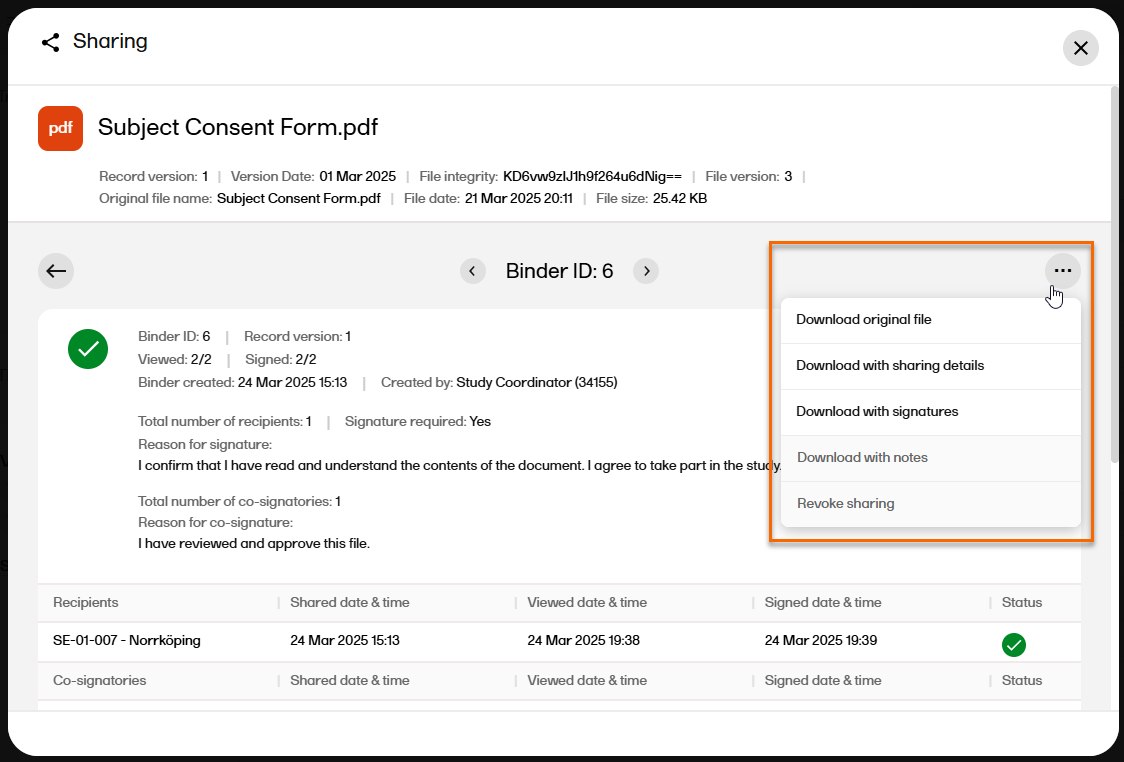
|
| 5 |
Select the download option:
|
Revoking a binder
A binder can be revoked if you want to share a newer version of a record or to cancel the sharing when a record version has been shared by mistake.
Note! If the record in the binder has been signed, even if it's by only one recipient, the binder cannot be revoked.
To revoke a binder:
| 1 |
In the left navigation menu, select to expand Trial Master File, and select the Records or the Structure page. Navigate to the record, and select it to open the Record properties window. |
| 2 | In the Sharing section at the top of the window, select ... to open the Sharing window. |
| 3 |
Select the arrow icon to open the Binder properties window. 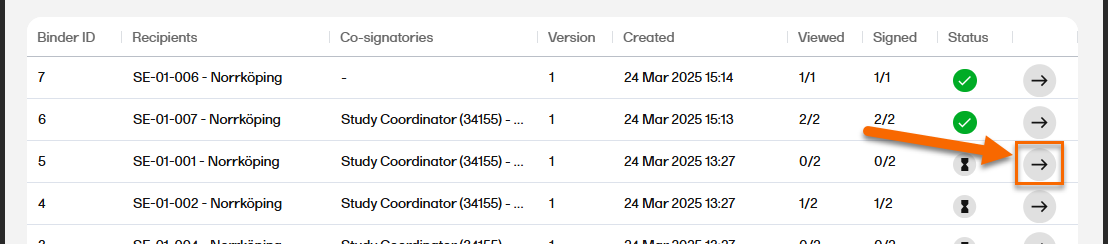
|
| 4 |
In the top right corner, select |
| 5 |
Select Revoke sharing. 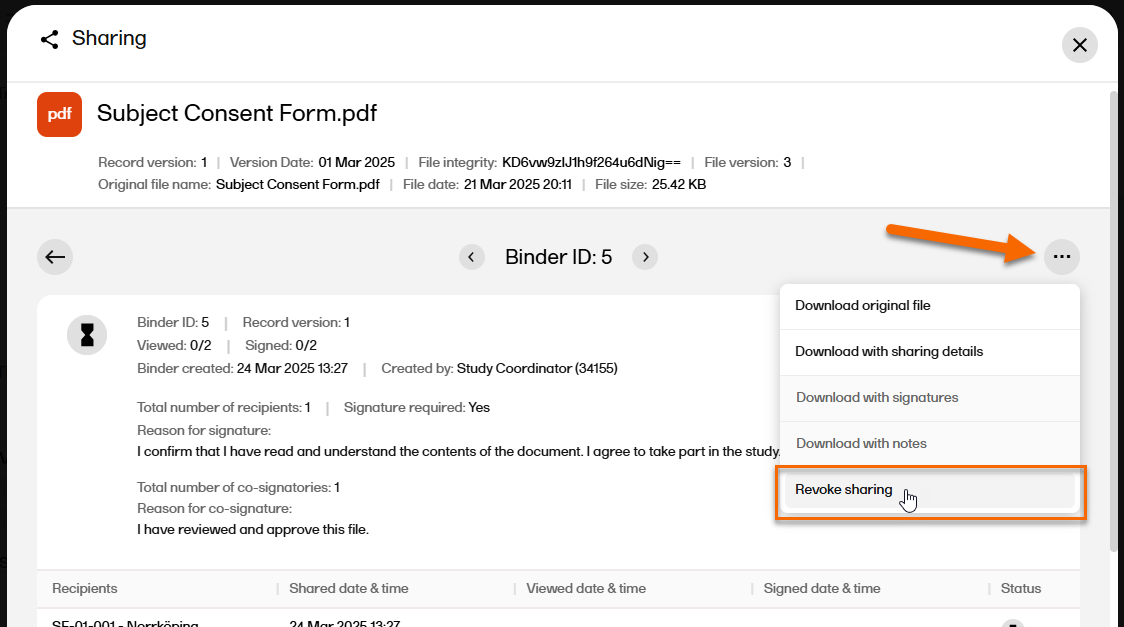
|
| 6 |
The binder properties are displayed, and you can now see that the binder is revoked. 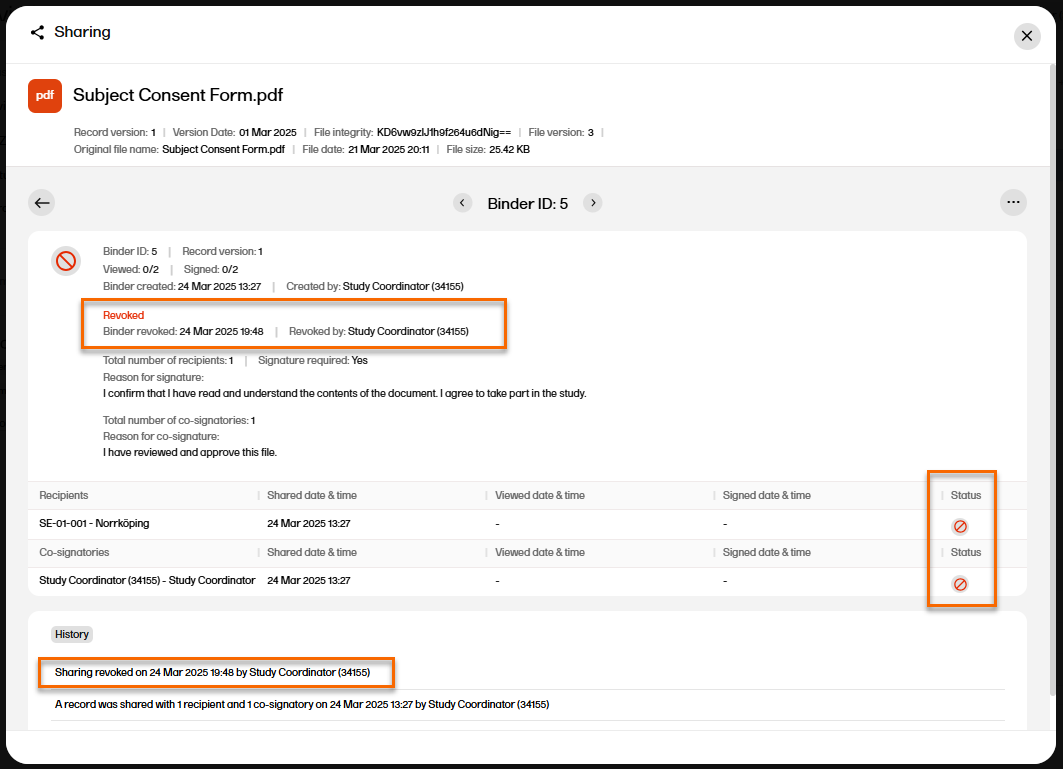
|