Managing users
This lesson describes the types of roles that are supported by Viedoc, how to assign roles to users and where to view the users that have access to a study, and their user details. The instructions are intended for Study Managers (STM) and Site Managers (SIM).
Introduction
Important information about signatures
This content is shared by the lessons in the following user guides
Admin: "Managing users (for Org Admin)"
Monitors & Project Managers: "Managing users"
Clinic: Signing data
The Study Manager should, in cooperation with the Site Manager(s), ensure that all users of Viedoc are informed, and certify that all electronic signatures created in the system are intended to be the legally binding equivalent of a traditional handwritten signature.
In Viedoc, the purpose/meaning of a signature is always “responsibility” as used in Sec. 11.50 of Food and Drug Administration (FDA) 21 Code of Federal Regulations (CFR) part 11. The signer is thereby acknowledging his/her responsibility for the entered data. Viedoc keeps account of what was signed, who signed it, and when the signature was performed.
http://help.viedoc.net/l/1648/About roles in Viedoc
This content is shared by the lessons in the following user guides
Admin: "Managing users (for Org Admin)"
Monitors & Project Managers: "Managing users"
Two types of roles
Viedoc supports two different types of roles.
- System roles are roles that are predefined in the system and give access to Viedoc Admin or Viedoc Designer, see System roles.
- Clinic roles are roles that are study-specific and give access to Viedoc Clinic, see Clinic roles.
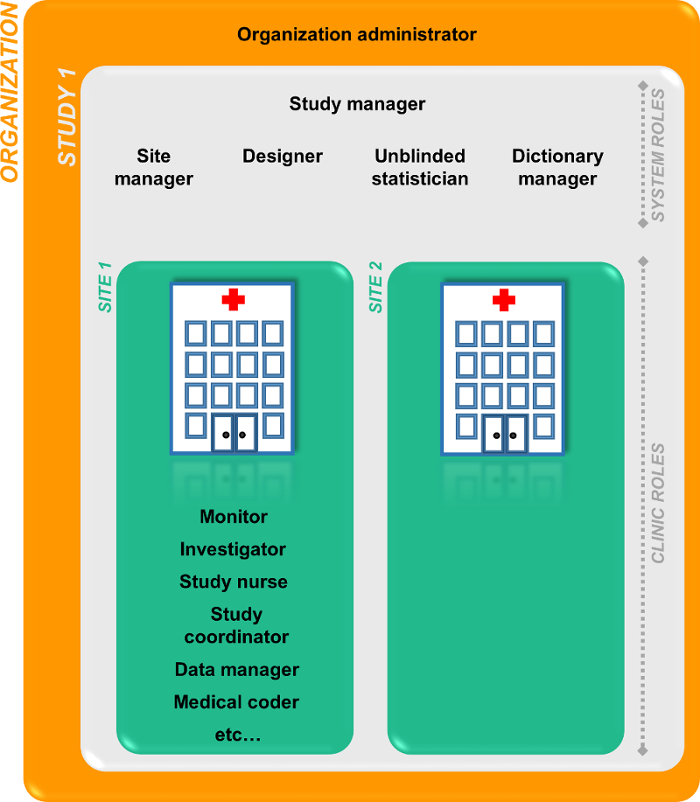
The Organization Administrator invites the Study Manager. The Study Manager can assign users to system roles and clinic roles. The Study Manager can also delegate the management of clinic roles to the Site Manager.
System roles
The system roles are predefined in Viedoc, they cannot be adjusted for your study. The system roles give access to various features in Viedoc Admin or Viedoc Designer.
The following system roles are available.
| Role | Description |
|---|---|
| Organization Administrator | The Organization Administrator is responsible for all projects within the organization. The Organization Administrator initiates projects, and assigns Study Managers to every project in Viedoc Admin. |
| Study Manager | The Study Manager assigns roles to users, adds sites to the study and applies study designs to the sites in Viedoc Admin. For a typical clinical trial, the role of Study Manager in Viedoc is assigned to the project manager. |
| Designer | The Designer builds the study in Viedoc Designer. |
| Site Manager | The Site Managers are appointed by the Study Manager and use Viedoc Admin to assign clinic roles to site users. For a typical clinical trial, the role of Site Manager in Viedoc is assigned to the Clinical Research Associate (CRA). |
| Unblinded Statistician | The Unblinded Statistician manages the randomization lists in Viedoc Admin. This role is only used for randomized studies, when it is necessary to have control over who has access to and can manage the randomization lists. |
| Dictionary Manager | The Dictionary Manager uploads medical coding dictionaries. |
| Reference Data Source Manager | The Reference Data Source Manager manages the reference data sources at study level. The Reference Data Source Manager can also delegate the management of data sources at site level to the Site manager. |
| API Manager | The Application Programming Interface (API) Manager has access to the API settings and performs the API configurations. Complete instructions on how to configure the API are provided in Viedoc API. |
| eTMF Manager | The eTMF Manager manages the eTMF application in Viedoc Admin. The eTMF Manager maps Viedoc Clinic roles to eTMF roles. The eTMF Manager also has permission to manage the eTMF structure in Viedoc eTMF. |
| Design Impact Analyst |
The Design Impact Analyst can run an impact analysis in Viedoc Admin. A user with the role can see what impact a new design revision will have on existing form instances before applying the revision. Note! Before you invite a user with this role, read Design revision impact analysis to understand in which scenarios the design revision impact analysis report might reveal blinded information. |
One organization can have more than one Organization Administrator. One study can have more than one Study Manager, Designer, Unblinded Statistician, Dictionary Manager, Reference Data Source Manager and API Manager. One site can have more than one Site Manager.
Clinic roles
The clinic roles, and the rights that belong to these roles, can be set up in the study design in Viedoc Designer. They are study-specific and give access to Viedoc Clinic. Clinic roles are assigned to site users by the Study Manager or the Site Manager. Each study can have an unlimited number of clinic roles.
Examples of clinic roles are:
- Investigator
- Study Nurse
- Study Coordinator
- Data Manager
- Medical Coder
SDV Manager
Note!
- SDV plans can be made available for all sites, therefore you can invite a user to a single site with a role that has an SDV plan permission (view SDV plan, create/edit SDV plan, publish SDV plan), and the user can then view, create/edit, or publish an SDV plan for the entire study. This is especially important to keep in mind for publishing SDV plans, as a user can publish updates to an SDV plan that is used on sites they do not have access to view.
For example: The Publish SDV Plans permission is enabled for the Data Manager role.
User A is invited as a Data Manager to the Uppsala site. The high-level SDV plan is in use on 10 sites in the study.
User A reviews the edits made to the high-level SDV plan and publishes it. The updated plan will now take effect on all of the 10 sites in the study.
For more information about SDV Manager, see Viedoc SDV Manager.
http://help.viedoc.net/l/829deb/About the study users
Overview of users in the organization/study/site
A list of users can be viewed at the following three places:
1. On the Users page. This page displays a list of users assigned to any role in any study within the organization.
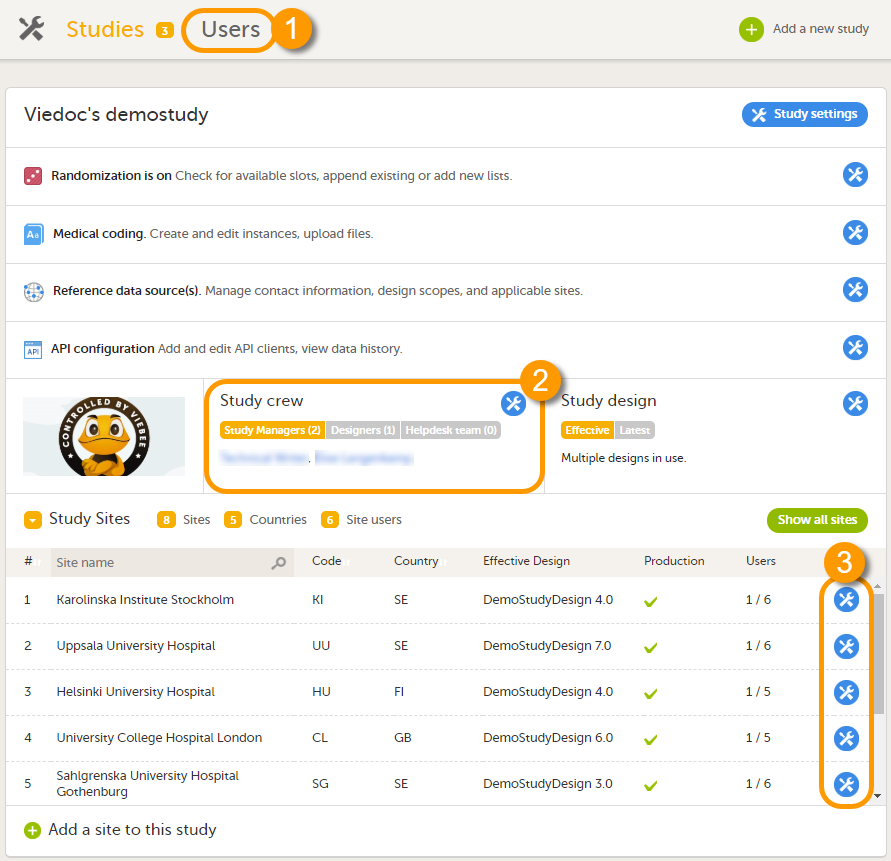
2. In the Study crew window. This window displays a list of all users assigned to a system role in the study.
3. On the Site users tab of the site settings window. This tab displays a list of all users assigned to a clinic role within that specific site.
Note! All three user lists only display the users and roles you have permission to manage (invite or remove). If you are a Study Manager, you can also see the Organization Administrator. If you are a Site Manager, you can also see the Study Manager. However, in both cases you cannot invite users to these roles or remove these roles from users.
Users
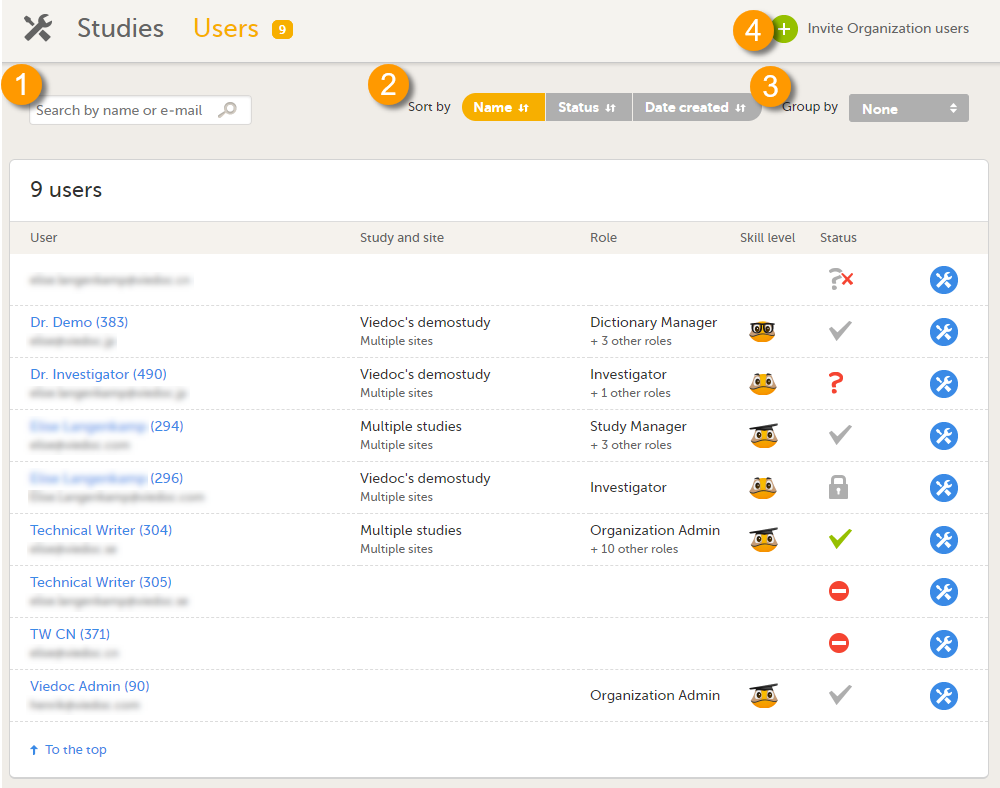
The Users page lists all users within the organization, and displays the following information:
- Name of the user
- User ID (in parentheses behind the user's name)
- E-mail address
- Study/studies and site(s) the user has access to
- Role(s) assigned to the user
- Viedoc skill level of the user (see Viedoc skill level)
- Status of the user (see User status)
If a user has no approved roles, because the invitation is still pending or rejected, or because the roles have been removed, only the user's e-mail address is displayed and all the other fields remain empty.
On this page, you can (see image):
1. Search for a specific user among all users within the organization by entering the user’s name or e-mail address in the search field
2. Sort the list of users by name, status or date of creation
3. Group the list of users by study by selecting Studies in the Group by field
4. Invite organization users (only available for the Organization Administrator)
Study crew
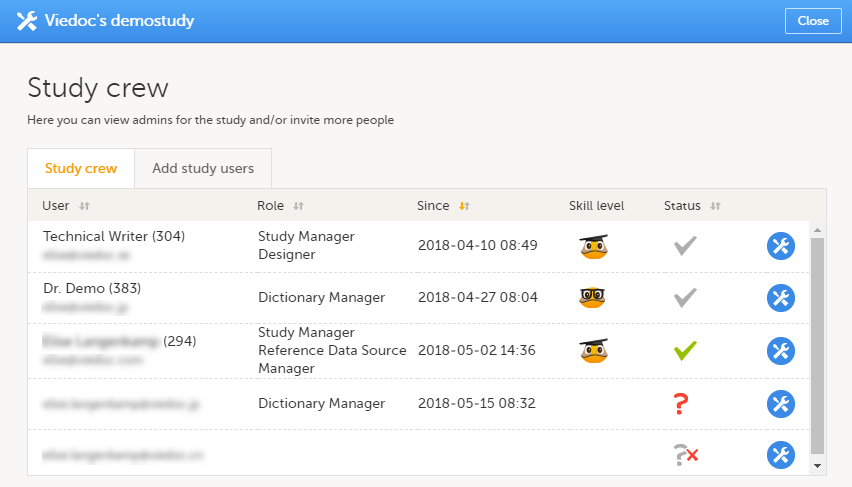
The Study crew window lists all users in the study that are assigned to a system role, and displays the following information:
- Name of the user
- User ID (in parentheses behind the user's name)
- E-mail address
- Role(s) assigned to the user
- Date and time the user has been invited to that role (if the invitation is still pending) or has access to that role (if the invitation has been accepted)*
- Viedoc skill level of the user (see Viedoc skill level)
- Status of the user (see User status)
*If the user has multiple roles, the date and time of invitation or acceptance of the first role that gives access to that site is displayed.
You can sort the users by name, role, date of (accepted) invitation and status. To sort the users, click on the column headers, or click on the arrows to the right of the column header. You can sort the users in ascending and descending order.
Site users
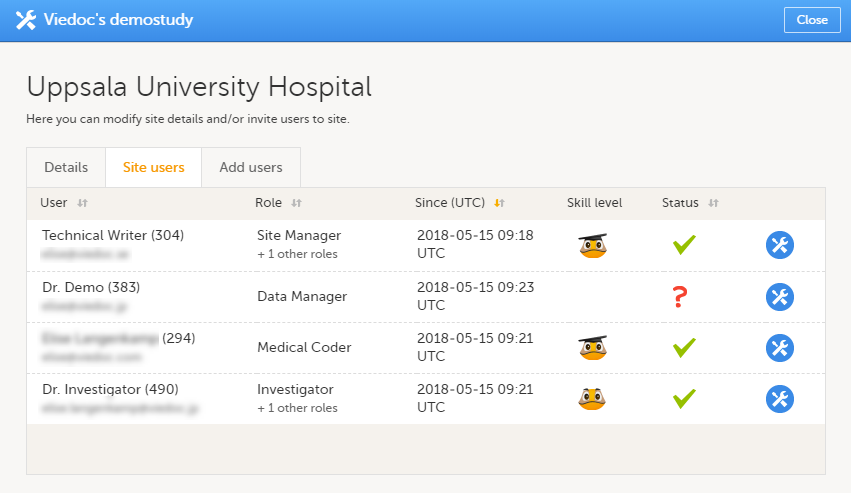
The Site users tab in the Site settings window lists all users with clinic roles that have access to that site, and displays the following information:
- Name of the user
- User ID (in parentheses behind the user's name)
- E-mail address
- Role(s) assigned to the user
- Date and time the user has been invited to that role (if the invitation is still pending) or has access to that role (if the invitation has been accepted)*
- Viedoc skill level of the user (see Viedoc skill level)
- Status of the user (see User status)
*If the user has multiple roles, the date and time of invitation or acceptance of the first role that gives access to that site is displayed.
You can sort the users by name, role, date of (accepted) invitation and status. To sort the users, click on the column headers, or click on the arrows to the right of the column header. You can sort the users in ascending and descending order.
Viedoc skill level
The Viedoc skill level gives an indication of how experienced the user is in using Viedoc. It is based on the number of logins by that user.
| Skill level | Icon | Description |
|---|---|---|
| Rookie |  |
≤ 20 logins |
| Semi-pro |  |
21-100 logins |
| Pro |  |
101-1000 logins |
| Legend |  |
> 1000 logins |
User status
The status of the users is displayed in the status column:
| Status | Icon | Description |
|---|---|---|
| Online |  |
The user is currently logged in to Viedoc, and has no pending invitations. |
| Offline |  |
The user is currently not logged in to Viedoc, and had no pending invitations. |
| Pending |  |
The user has at least one pending invitation to a role. The question mark is displayed even if the user has accepted invitations to other roles. |
| Pending certification |  |
The user has mandatory documentation assigned that was not confirmed as read & understood. |
| Rejected |  |
The user has rejected all invitations to roles. The user has never had access to the study. |
| Locked out |  |
The user is locked out from Viedoc (the user has entered the wrong password three times in a row). |
| Removed |  |
The user has had roles in the study before, but has currently no roles left. |
For the Users page (see Users), the following applies:
If the users are not grouped by study, the user's status symbol will reflect the overall status in all studies you have access to. That means, if the user has one pending invitation in one of the studies, the status will be pending and a red question mark will appear. If the users are grouped by study, the status symbol will reflect the status per study. That means that a user's status can be pending in one study, and logged in in another study.
User settings
To view the details of a specific user, click the toolbox icon behind the name of that user in any of the previously described user lists. The User Settings window opens:
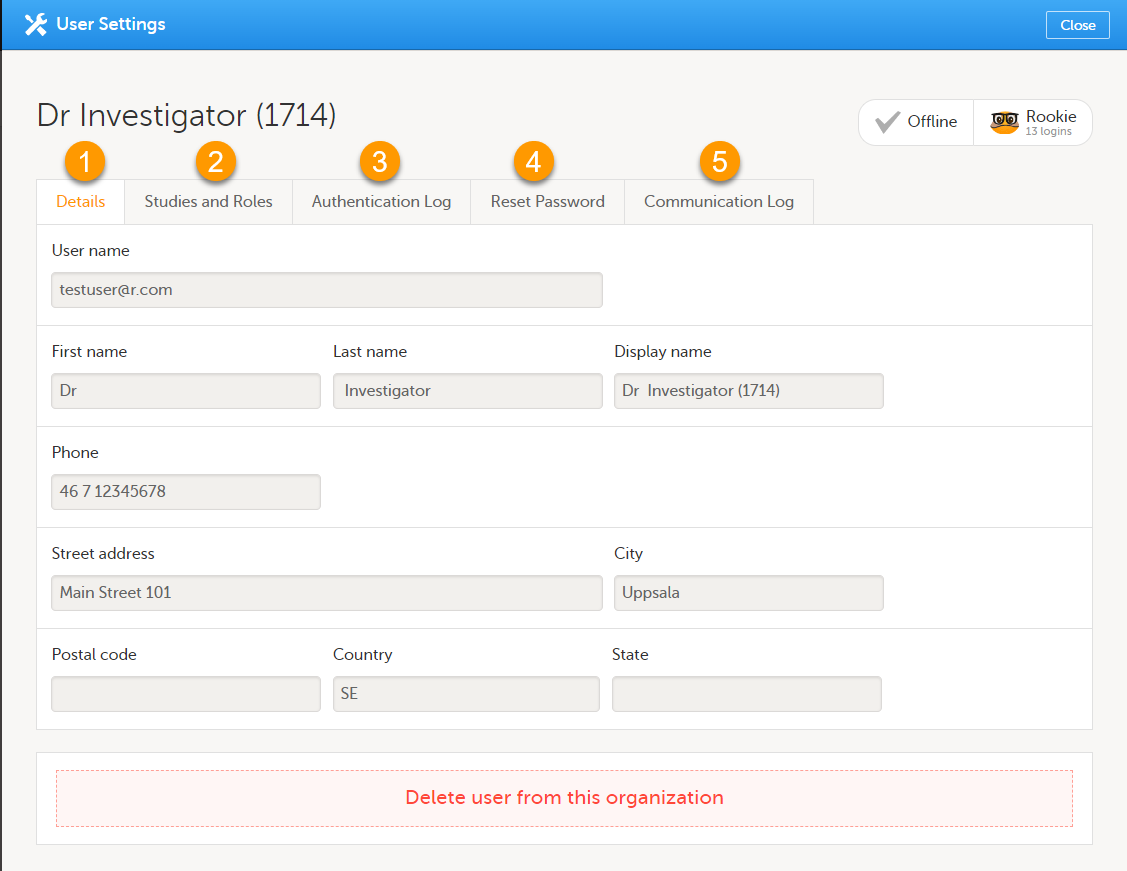
The User Settings window displays the name and email address of the user, the user ID (in parentheses), the status and the skill level. You can perform the following actions:
1. On the Details tab, you can view the user's name and contact details.
2. On the Studies and Roles tab, you can view a list of all roles and sites the user has access to, including the date and time of invitation/acceptance of that role. The roles are grouped per study. You can delete roles by clicking the trash can icon next to the role.
3. On the Authentication log tab, you can view a list of logins by the user, including date and time, the IP address, and the browser that was used. The number of displayed entries is limited to the latest 100 logins.
4. On the Reset Password tab, you can reset the password for that user, if the user has forgotten their password and does not have their mobile number or a secondary email address. Viedoc will send a notification to the user with a link to create a new password.
Note! The authentication code will be required if the user wants to reset their password using the Forgot your password? link on the login page. The authentication code is sent to the user's verified mobile number or to the user's secondary email address. If neither of these options are selected, the user needs to contact their Study Manager to receive a link to reset their password.
5. On the Communication Log tab, you can view the latest 20 communication logs for a user and download an Excel file with the complete user-specific Communication Log containing information about email and SMS communication to study users. All users with access permissions (Study/Site Managers) to the User settings in Viedoc Admin can access the Communication Log.
Note! Email and SMS communication logs before the Viedoc 4.70 release are available, however these do not have the same level of detail.
https://help.viedoc.net/processwire/page/edit/?id=2007The content is shared by the lessons 'Managing Users (OA)" and "Managing Users (STM and SIM)"
User report
For each study, you can download user logs in PDF and Excel format with information about all users and roles for the sites you have access to. See Downloading the user logs for instructions.
Notes!
- In Viedoc Admin, only production sites and roles/users for production sites are included in the user and administration log.
- System roles for a study (organization users are not included) are included in the user and administration log. For example, site managers for demo sites are included when a log is generated for a production site, as a site manager is a system role.
- When sorting studies by group and generating a Log of users and roles or a User administration log report,the download link is not exposed for the newly generated file until the page is refreshed.
The content of the logs depends on the system role that you have, as follows:
| If you are a... | ... then the logs contain: |
|---|---|
| Organization Administrator |
The system roles Application Programming Interface (API) Manager, Dictionary Manager, Unblinded Statistician, Reference Data Source Manager, and eTMF Manager. |
| Study Manager | The system roles API Manager, Dictionary Manager, Unblinded Statistician and Reference Data Source Manager, eTMF Manager, and all sites and site users in the study. |
| Site Manager | The system roles API Manager, Dictionary Manager, Unblinded Statistician and Reference Data Source Manager, eTMF Manager, and all sites you have access to, together with their site users. |
Log of users and roles in PDF
The Log of users and roles PDF contains information about all users and roles for the sites you have access to, grouped in the following chapters:
- Summary - the summary of active/inactive roles, active/inactive users as well as data contributors, grouped in one section per site.
- An Active role is the current distinct role all active users have for a site.
- An Inactive role is a role that was previously assigned but currently lacks any active user.
- An Active user is a user with at least one active role.
- An Inactive user is a user who had at least one role at a site, but all roles for the site have been revoked.
- Roles - a list of the permissions associated with each role and corresponding history, grouped in one section per site.
- User log per site - a list of all users who ever had access to data, including user activity, grouped in one section per site.
- User account logs - a list of the change history of all user accounts for the users listed in the above sections of the log, grouped per user (identified by the User ID).
User administration log in Excel
The User administration log contains information about all users and roles for the sites you have access to, with the following sheets:
- Report Info - general information about when and by whom the log was generated, and some information about the study status. The following more detailed information is contained:
- The Organization name
- The Study name
- Production study GUID
- Demo study GUID
- For PMS studies: Sponsor side Production study GUID
- For PMS studies: Sponsor side Demo study GUID
- User Access Log - a list with detailed information about user access, showing one row per site and role, including clinic roles and system roles.
Note! The access granted date/time is the date/time when a user accepts the invitation to a study.
Some columns in this sheet are further explained here:
- Site Group - indicates when a user is granted access to the site through a site group invitation. Possible values are Training sites, Countries, and All sites.
- 2FA - indicates what level of two-factor authentication the user has. Possible values are Study level, Account level, or No two-factor authentication enabled.
- Latest system login date/time - information about the latest login of each user (for end users only, not API client users).
- Certified - indicates if the user is certified for the role. Possible values are Yes, No, or an empty cell for roles that don't have mandatory training sections to read.
- If the user has signed the certification associated to their role, the column will display: Certified:Yes.
- If the user has selected Read & Understood but not signed the associated certification, the column will display: Certified: No.
- User type - indicates the type of user. Possible values are End User or API Client, to indicate if the user is an end user that can log in to the system or a Web API Client that can access the API with a role.
- User Invitation Log - a list with information about pending invitations and rejected invitations, including clinic roles and special roles.
Note! When an invitation has been accepted the user will no longer be included in the invitation log, but in the User Access Log.
Some columns in this sheet are further explained here:
- Role - role of the invited user.
- Email Address - Email address of each invited user.
- Existing User - indicates whether the invited user already has another role in the study, or is a new user. Possible values are Yes, No.
- Initial Invitation Sent date/time - information about the first invitation of each user
- Initial Invitation Sent By ID - the numeric user ID for the user
- Initial Invitation Sent By Display Name - initial invitation sent with the display name usedin Viedoc to identify the user.
- Initial Invitation Sent By Email Address - Email address of the initial invitation sent to the invited user.
- Invitation Resend Count - the number of times an invitation has been resent.
- Latest Invitation Sent date/time - information about the latest invitation of each user.
- Status - invitation status, possible values are Pending, Rejected.
- Invitation Rejected date/time - information about a rejected invitation for each user.
- Certification Log - a list of certifications per user. Certifications performed before the release of 4.65 lack information about what roles the certification applies to. That is, the cells in column Certified With Roles are empty.
- Summary - a summary of users per site with information about country, side code, site name, number of active/inactive users, and date/time of last access change.
- Account Settings Log - a list with all user accounts setting changes with user ID, change log, user name, and date/time.
Communication log in Excel
There are two different Communication logs. One contains user-specific and one contains study-specific communication information.
Note!
- This Communication log does not include any subject-related communication (Viedoc Me).
- Email and SMS communication logs before the Viedoc 4.70 release are available, however these do not have the same level of detail.
User-specific information
The user-specific Communication log contains information about email and SMS communication to the study users.
All users with access permissions (study/site managers) for the User Settings in Viedoc Admin can view the Communication Log for a specific user. The Communication Log tab has the following columns:
- Date & Time
- Message type
- Status - Note! The status labels are Success or Failed, where Success means that the message was successfully sent from Viedoc, and Failed means that the message failed to send from Viedoc. Further, if the status was Success but the recipient did not receive a message, then the problem lies outside of Viedoc. Please contact your PS representative if this should occur, or if your status returns Failed.

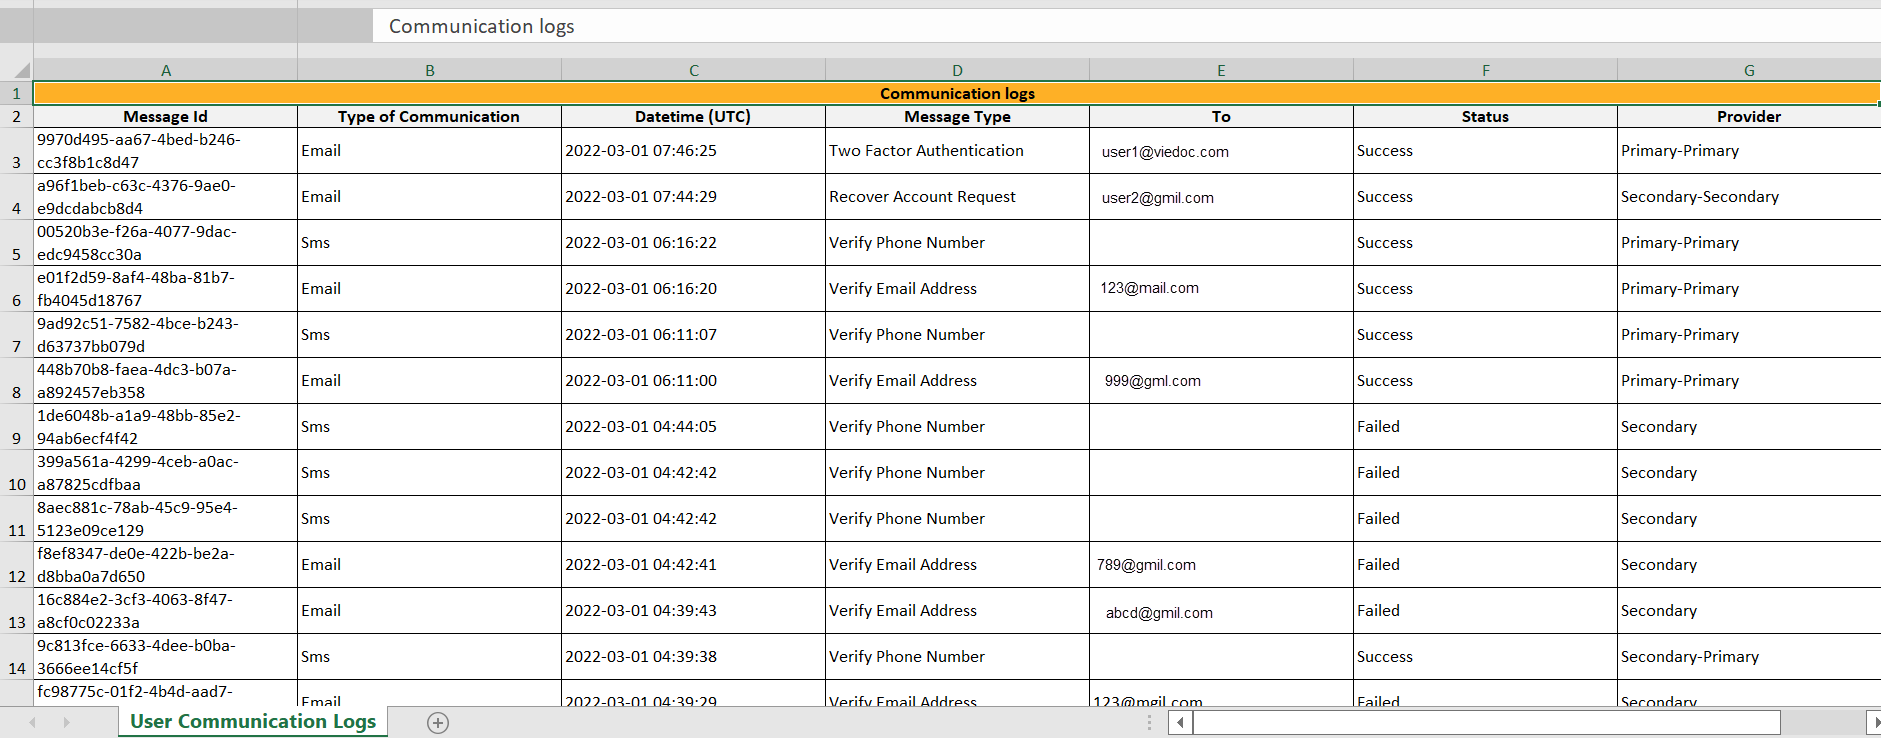
The Excel file contains a sheet named User Communication Logs and includes all email and text message (SMS) communications to the study user on the same Excel sheet.
Note! Users must have activated the Viedoc account and accepted at least one invitation in order to have their communication included in the Communication Log tab in the User Settings window.
The User Communication Logs sheet in the Excel file contains information about user-specific communication – this is the user activity in Viedoc that is unrelated to a specific study:
- Reset password
- Verification & notifications (changing mobile number/email address)
- 2FA (email/SMS)
The file name format is: UserCommunicationLog-UserID-YYYYMMDDhhmmss. (Using UTC)
All the logs are included in the same Excel sheet. The excel sheet has the following columns:
| Column | Description |
|---|---|
| Message ID | GUID: A unique identifier for the message |
| Type of Communication | SMS/email |
| Datetime (UTC) | Date and time for the communication |
| Message Type |
The action that the communication is related to:
|
| To | The email address the message is sent to. For SMS messages, this column is empty. |
| Status | Success/Failed |
| Provider | Provider name - the provider that was used to send the message to the recipient |
Study-specific information
In Admin, under Users - Group by Studies, in the User Logs dropdown list, a separate file called User communication log is available containing the information listed below.
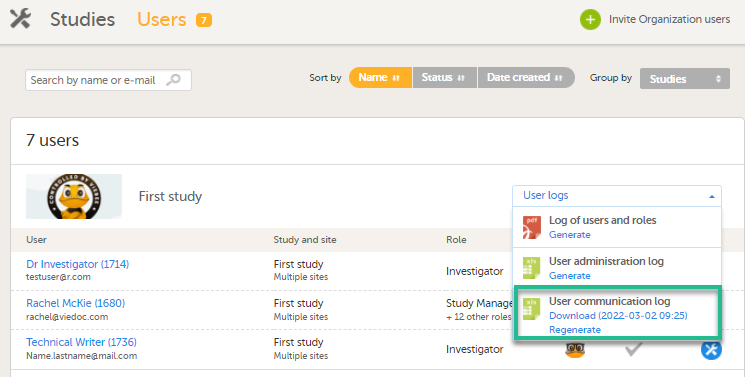
This log contains information about study-specific communication and emails only, related to:
- Alerts
- Invitations to a specific role within a study
- Notifications (study access deletion, etc.)
The Excel file contains a sheet named Study Communication Logs.
The file name format is: UserCommunicationLog-YYYYMMDDhhmmss. (Using UTC)
The Excel sheet has the following columns:
| Column | Description |
|---|---|
| Message ID | GUID: A unique identifier for the message |
| Communication Type | |
| Date time (UTC) | Date and time for the communication |
| Message Type |
The action that the communication is related to:
|
| Site Type | Training/Production (For the message types Invitation and Invitation rejected, this column is empty.) |
| To | Email address(es) (For SMS messages, this column is empty.) |
| CC | The email address(es) of the recipients of a copy |
| BCC | The email address(es) of the recipients of a blind copy |
| Status | Success/Failed |
| Provider | Provider name - The provider that was used to send the email to the recipient |

Note!
- This log does not include user-specific information related to Reset Password, 2FA, etc.
- This log file is available in Viedoc Admin only.
The content is shared by the lessons 'Managing Users- Org Admin and "Managing Users -system lessons and is called User logs in the single source file"
System site groups
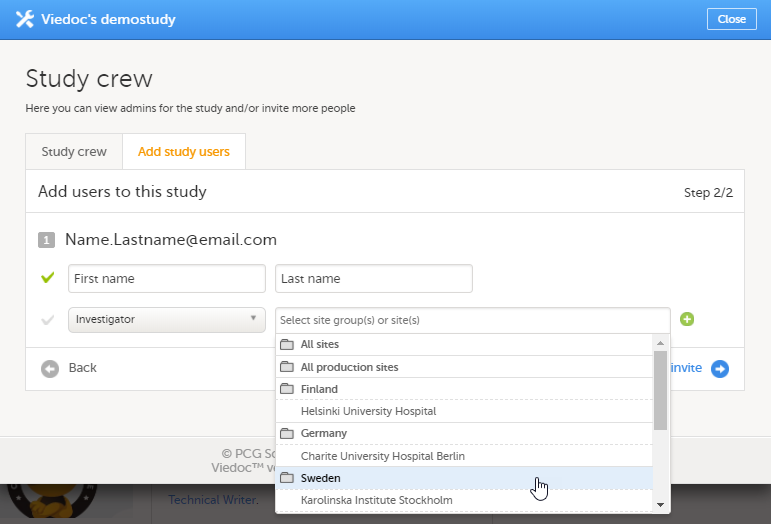
The Study Manager can give users access to individual sites, or to a groups of sites at once. These groups of sites are called system site groups and are automatically created by the system when sites are added to the study. The following systems site groups are created by the system:
- All sites, containing all sites in the study.
- All production sites, containing all production sites in the study, including the sites that are in both production and training mode.
- Country-specific, for example ‘Sweden’, containing all production sites (including the sites that are in both production and training mode) in that specific country in the study.
When you invite users to a system site group, the users will automatically receive instant access to all sites in that group, including all future sites that will be added to that group at a later time. For example, if you invite a user to the country 'Hungary', that user will receive access to all sites in Hungary. Similarly, users that were invited to a system site group will automatically lose access to a site if that site is removed from the group. For more information about system site groups, see Managing study sites.
http://help.viedoc.net/l/81e4bd/Step-by-step guides for the Study Manager
Assigning users to system roles and/or clinic roles
Only the Study Manager can invite users to system roles. The Study Manager can also invite users to clinic roles, or he/she can delegate the management of (some of the) clinic roles to the Site Manager, see Delegating user management to the Site Manager for instructions. Once the management of clinic roles is delegated to the Site Manager, the Study Manager cannot invite users to these roles anymore.
If a user should receive access to multiple sites, the quickest way to invite the user is through the study crew window (described in this section). If a user should receive access to only one site, you can also invite the user through the site settings window of that site (see Assigning users to clinic roles for instructions).
To invite users:
| 1 | In Viedoc Admin, open the study to which you would like to invite users. |
| 2 | Click the toolbox icon in the Study crew field. The Study crew pop-up opens. |
| 3 | On the Add study users tab, enter the e-mail address of the user you would like to invite. Click Continue. Tip! You can invite multiple users at once by adding multiple e-mail addresses in the field. Separate the e-mail addresses with a semi-colon or comma. |
| 4 |
Select the role to which you would like to invite the user. Note! If any of the clinic roles are delegated to the Site Manager (see Delegating user management to the Site Managers), the delegated roles do not appear in the dropdown list. |
| 5 |
If you selected the role Site Manager or a clinic role, select the system site group or the individual sites to which the user should get access. To select a system site group, click on the name of the group (displayed in bold). To select an individual site, click on the name of the site.
|
| 6 | Click Send invite. An invitation e-mail will be sent to the e-mail address(es) you specified. |

Resending the invitation to a user
It is possible to re-invite a user to those roles that are in state pending, i.e. to resend the invitation email to the user for that role.
To resend an invitation:
| 1 | On the Users page, scroll to the user whom you would like to re-invite. Click the toolbox icon behind the name of the user: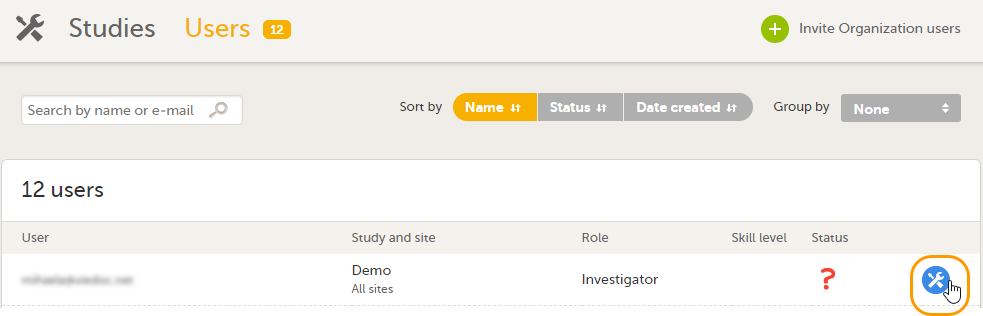 The User Settings pop-up opens. The User Settings pop-up opens. |
| 2 | In the User Settings pop-up, click the Resend invitation icon for the pending role:
A new invitation email is sent and:

|
Removing access to a role
It is possible to remove a user's access to a role. This can only be done by the Study Manager. If the Study Manager has delegated the management of clinic roles to the Site Managers, only the Site Managers can remove access to these roles and sites.
To remove the access from users:
| 1 | On the Users page, scroll to the user whose access you would like to remove. Click the toolbox icon behind the name of the user.

|
| 2 |
On the Studies and Roles tab, scroll to the study, site and role for which the access should be removed. Click the trash can icon. 
A pop up appears. |
| 3 |
Click Delete to confirm that the access should be removed, or click Cancel to cancel. |
Any records generated by the user are stored in the audit trail even when the user has been removed.
Unlocking a user account
If a user has typed in the wrong password more than three times, and do not have a secondary email address or mobile number with text messaging enabled – and therefore cannot use the Forgot your password link – the account will be locked. The Study Manager or Site Manager can unlock a locked account so the user can reset their password without having to provide an authentication code.
To unlock a user account:
| 1 | On the Users page, scroll to the user whose account you would like to unlock. Click the toolbox icon behind the name of the user.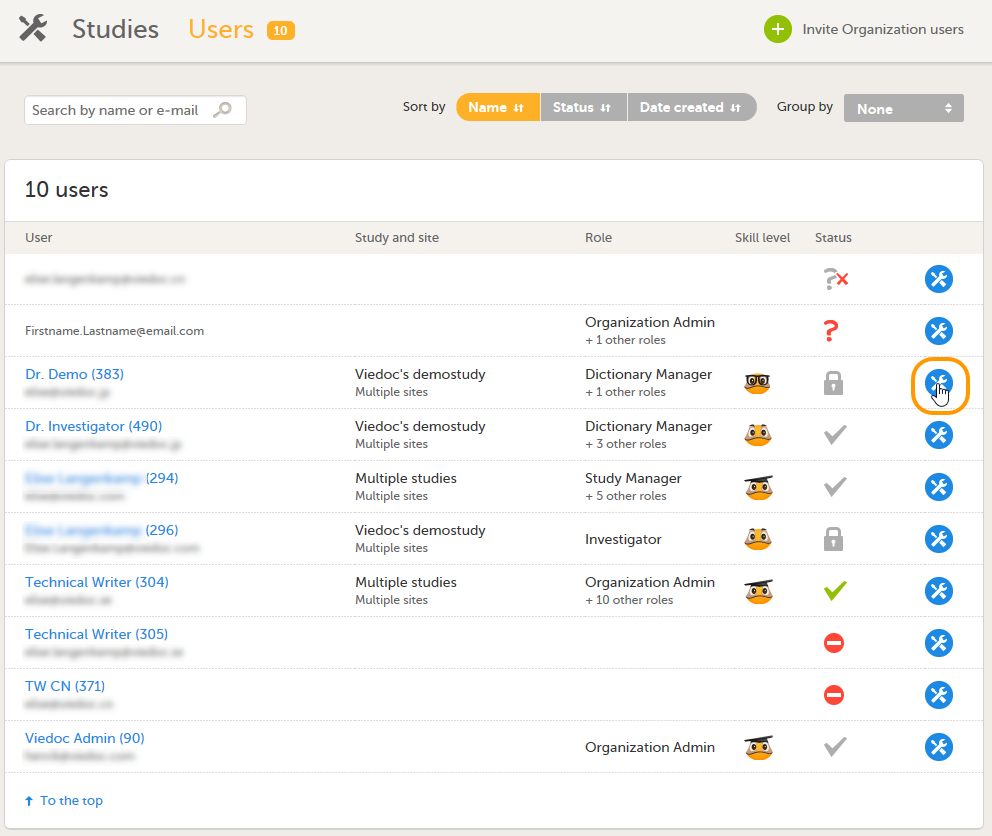 The User Settings pop-up opens. |
| 2 |
On the Reset Password tab, click Reset Password. 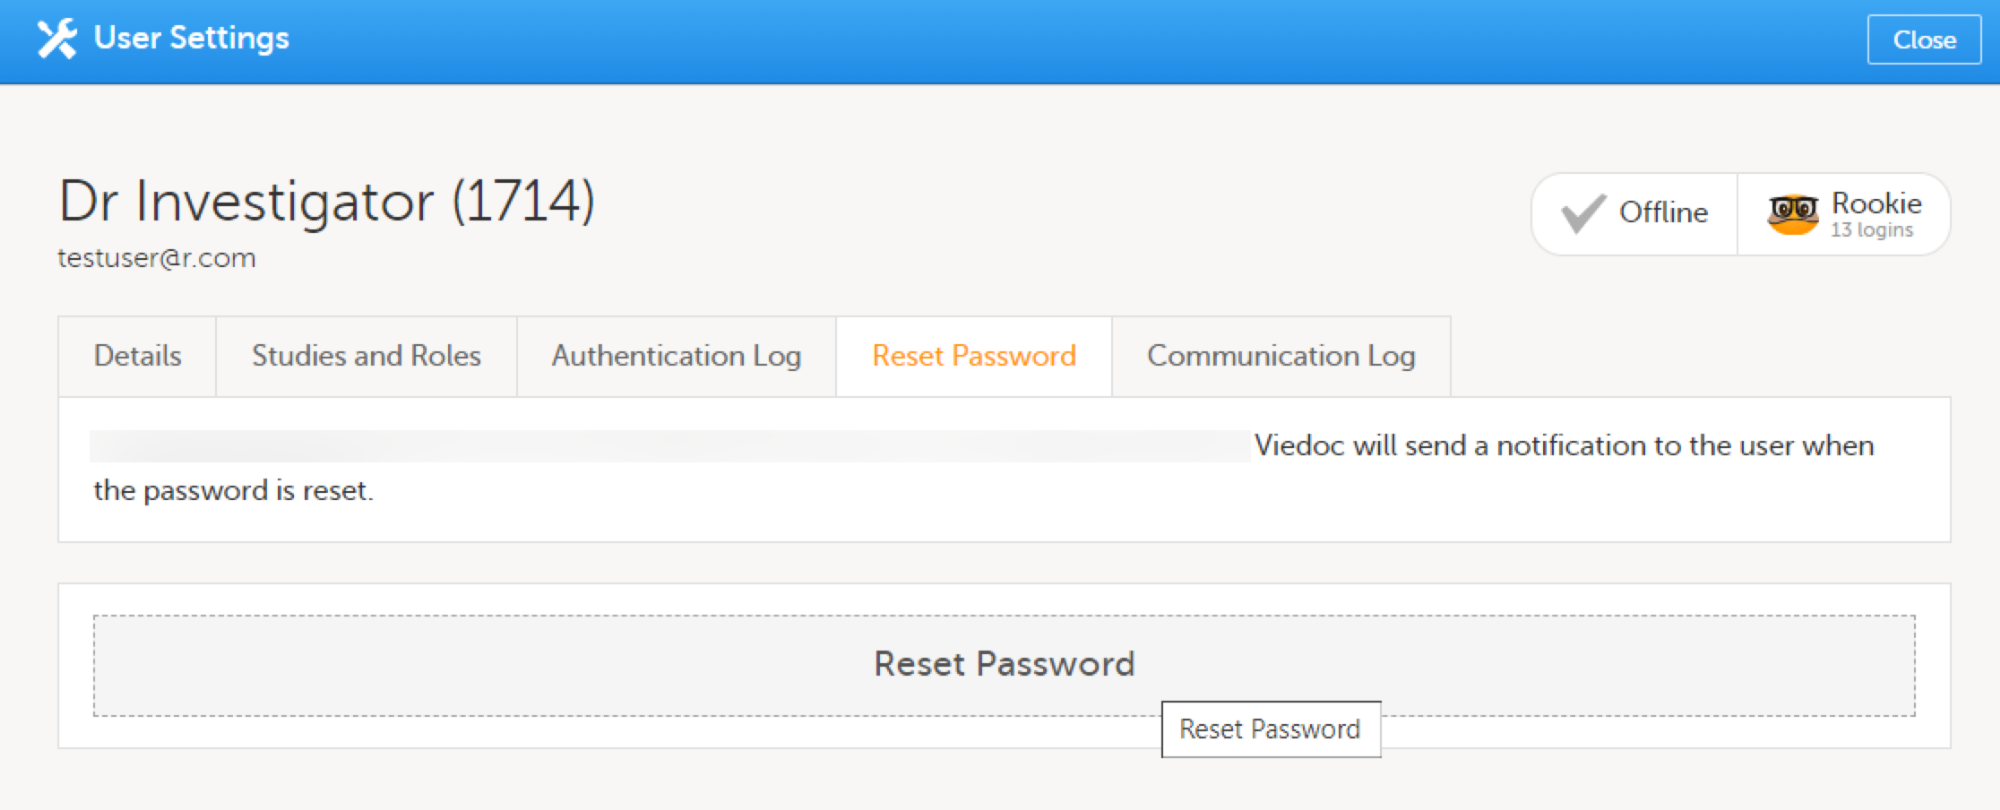
The user will receive an e-mail with a link to reset the password. The user can then reset their password without having to provide an authentication code. |
Note! The authentication code will be required if the user wants to reset their password using the Forgot your password? link on the login page. The authentication code is sent to the mobile number the user set to receive text messages or to the user's secondary email address. If neither of these options are selected, the user needs to contact their Study Manager to receive a link to reset their password.
Note! The email with the link to reset the password is only valid for twelve hours. If the user has not reset the password within twelve hours, a new e-mail needs to be sent.
Delegating user management to the Site Managers
The Study Manager can delegate the management of clinic roles to the Site Manager.
To select the roles that should be managed by the Site Manager:
| 1 | In Viedoc Admin, click Study settings. The study settings window opens. |
| 2 | On the Settings tab, in the field Clinic roles to be administered by Site Manager, select which roles should be assigned by the site manager. The roles that can be selected here are the clinic roles that are defined in the study design. |
| 3 | Click Save changes, and click Close. |
Note! These settings apply to all sites and all Site Managers involved in the study. When the assignment of (some of the) clinic roles is delegated to the Site Manager, these clinic roles can no longer be managed by the Study Manager.
Downloading the user logs
To download the user logs:
| 1 | On the Users page, select to group the users by Studies. |
| 2 |
Scroll to the study from which you would like to download the user log and click User logs to open the dropdown menu. 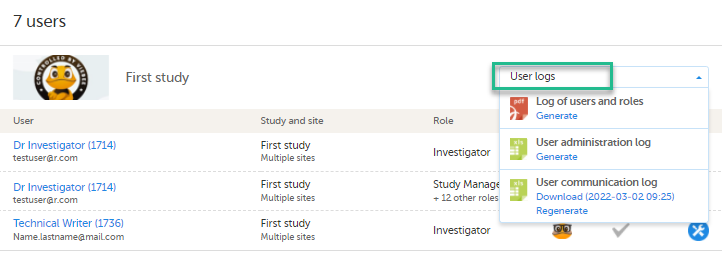
If the log was not previously generated, click Generate a PDF file or Generate an Excel file. If the log was previously generated, the most recent version is stored on the server, shown with a date and time stamp. You can download it by clicking the link, or, generate an updated version by clicking Regenerate. Note! The user logs are generated in the language set by the user who is generating the log. Therefore, the previously generated file is available for download only if it was generated in the language you have currently set in Viedoc. |
Step-by-step guides for the Site Manager
Assigning users to clinic roles
The Site Manager can invite users to (some of the) clinic roles, if the study manager has delegated the management of these clinic roles to the site manager.
To invite users to a specific site:
| 1 | In Viedoc Admin, click the toolbox icon behind the site to which you would like to invite users. The site settings pop-up opens. |
| 2 | On the Add study users tab, enter the e-mail address of the user you would like to invite. Click Continue.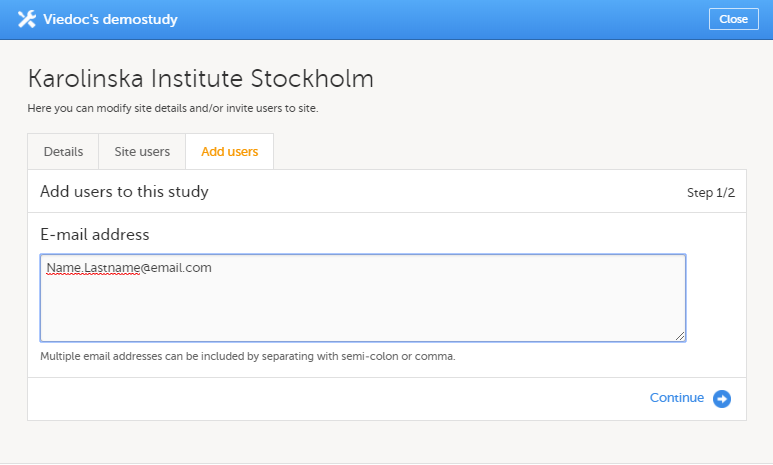 Tip! You can invite multiple users at once by adding multiple e-mail addresses in the field. Separate the e-mail addresses with a semi-colon or comma. |
| 3 | Select the role to which you would like to invite the user.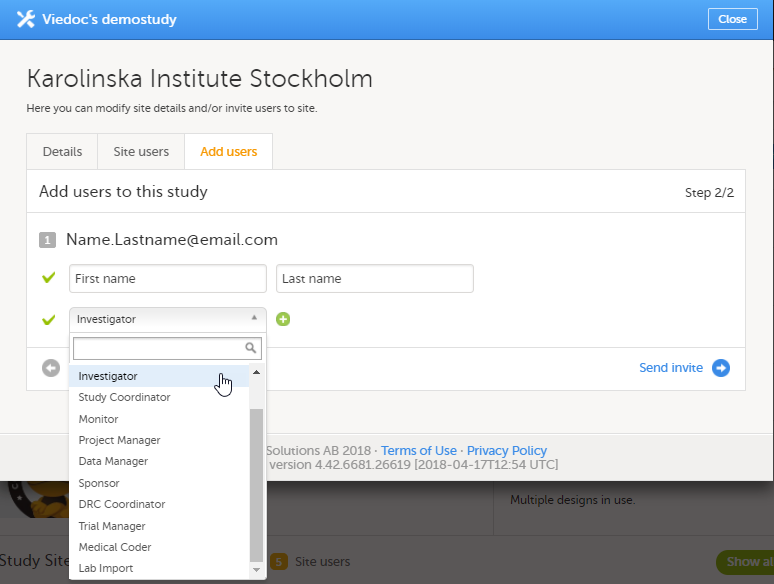 You can add multiple roles by clicking the + icon. Newly added roles can be removed by clicking the - icon. |
| 4 | Click Send invite. An invitation e-mail will be sent to the e-mail address or e-mail addresses you specified. |
Removing a user
Click here for instructions on how to remove a user.
Unlocking a user account
Click here for instructions on how to unlock a user account.