Managing records
- Viedoc eTMF User Guide (old interface)
- Viedoc User Guide for eTMF Managers (old interface)
Want to browse more information for the new interface? Please go to the new TMF user guides:
Introduction
There are three places to work with records in the Trial Master File: the Structure page, the Records page, and the Drop Zone. The following sections provide information on managing records in each area.
Uploading records
Uploading records to Viedoc TMF requires write permission for the artifact on the TMF level that the record is linked to. For more information, see Roles and permissions in Viedoc TMF.
There are two ways to upload records into the TMF:
- TMF Structure: Files can be uploaded directly into a specific artifact. For more information, see the Uploading files into the structure section in The Structure page lesson.
- Drop Zone: Alternatively, if you do not know which zone, section, or artifact to place the record in, you can use the drop zones. For more information, see Working with drop zones.
Searching and filtering records
To find records in the TMF you can search directly using the search field in the upper-right of the Records page, or use filters in both the Structure page and in the Records page.
For more information, go to Searching and filtering in the Structure page, or Filtering columns in the Records page.
Using milestones to filter records
Milestones and milestone groups are the tools used in the TMF for sorting and filtering records. Milestones are assigned at the artifact level in TMF Admin, and all records added to an artifact will be linked to the same milestone. An artifact can also have different milestones for each TMF level it is applicable to (trial, site, and/or country).
Milestones can be defined in any way that is appropriate for your study. In the Viedoc TMF template there are 12 milestones that are divided into four milestone groups (start up phase, conduct, close out and other). Assigning these to artifacts allows records to be linked to a specific timeline in the study or other categories.
Milestones may be used when searching for or filtering records in the Records page and also when filtering audit trail reports or EMS repositories.
Note! If no milestones are assigned to an artifact, records in this artifact will not be included in the audit trail report or the EMS repository when the milestones filter is applied. To extract these records, a separate report can be generated with the milestone filter removed. For more information see the TMF archive lesson.
Previewing a record
The record preview feature allows you view the contents of a file without downloading it. The preview shows the latest version of files in each record version.
To preview a record:
| 1 |
From the Structure page, the Records page, or the Drop Zone, select a record to open the Record properties window. |
| 2 |
Select the eye icon to open the record preview: 
|
| 3 |
The preview opens to the left of the window: 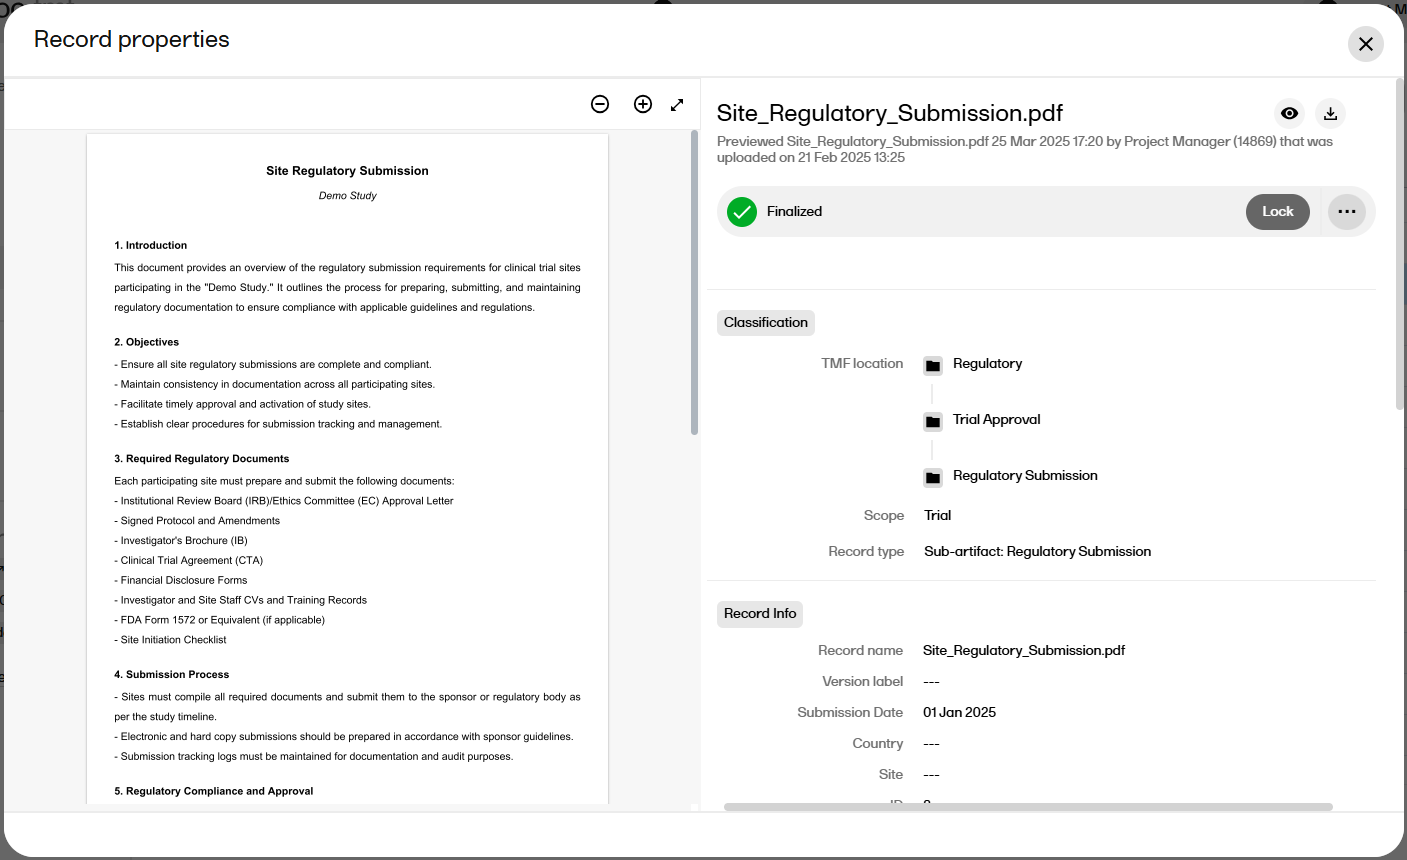
|
| 4 | To close the preview, select the Preview button again. |
Note! The preview does not support files larger than 2 GB.
Note! All preview actions are logged in the audit trail. For more information, see the TMF Archive lesson.
Supported filetypes for record preview
The record preview is supported for the following filetypes:
- bmp
- doc
- docx
- jpeg
- jpg
- png
- ppt
- pptx
- tif
- tiff
- txt
- xls
- xlsx
- xml
- zip
Editing record properties
Editing record properties in Viedoc TMF requires write permission for the artifact on the TMF level that the record is linked to. For more information, see Roles and permissions in Viedoc TMF.
Tip! The upload button on artifact level indicates that you have write permission for the artifact.
Note! it is not possible to edit a finalized record. To make changes, a new record version must be created. For more information, see Creating a new version of a record below.
To edit the record properties:
| 1 |
From the Structure page, the Records page, or the Drop Zone, select a record to open the Record properties window. |
| 3 |
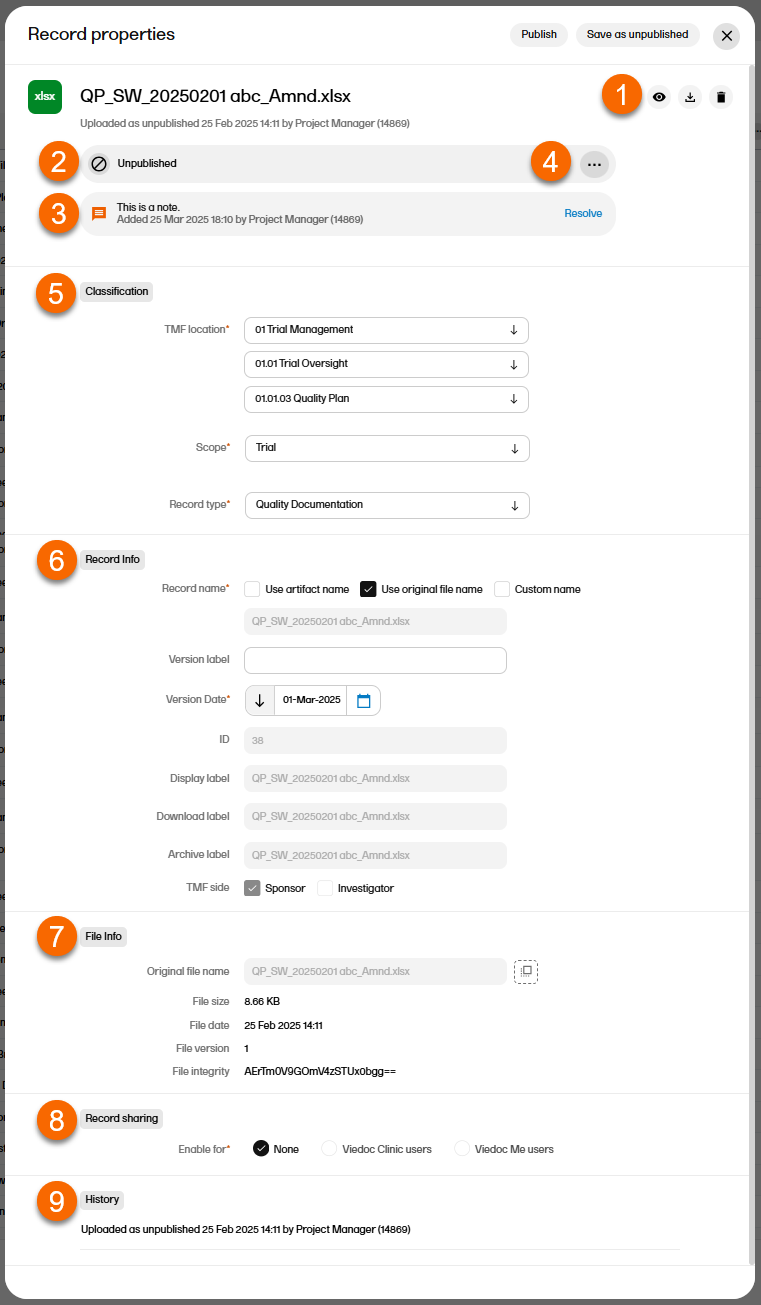
The Record properties window is displayed:
1. The Preview, delete, and download buttons 2. The record status (Unpublished, Awaiting review, Flagged by QC, or Finalized) 3. The notes section 4. The Record actions menu. Note! the available menu options depend on the record status and your permissions. 5. Classification
6. Record Info
Note! When using the custom name option, it is not necessary to add the file extension in the custom name, the system will add the file extension automatically. Including the file extension in the name will result in the file extension being displayed twice in the archive export. For example if the custom name you create is "file.pdf" then in the archive it will display as "file.pdf.pdf".
Note! If any of the three labels above are not configured by the eTMF Manager, the default is the record name as defined by the user. When the labels are configured to include metadata of the record, changes made to the metadata that affect these labels will be reflected on the labels dynamically in the Record properties window.
7. File Info: Contains information about the uploaded file. File date is the date and time when the file was uploaded. If the record is in edit mode, you can select the upload button to browse for a new version of the file. If you upload a new file, the record status will be changed to Awaiting review. 8. Record Sharing: Select to enable record sharing with Viedoc Clinic users or Viedoc Me users. 9. The History section is the audit trail for the selected record version. Changes to the record version are logged here together with information about the date and time they were made and by which user. Record note actions are not included in the history. Note! In this section, you can not see the name of a site that you do not have access to, but you can see the site ID. |
| 4 |
Make your edits, and then select Publish or Save as unpublished at the top of the window. When a record is published, the record status is changed to Awaiting review. It is now available for all TMF users with at least read permission for that artifact. Note! Before a record can be published, all required fields in the Record properties must be filled in. The required fields are marked with red. |
 The sections in the Record properties window are:
Creating a new version of a record
To create a new version of a finalized record:
| 1 | From the Structure page or the Records page, select a record to open the Record properties window. |
| 2 | At the top of the window, select ... to open the Record actions menu. |
| 3 |
From the menu, select Create new version. 
|
| 4 |
Select whether you want to copy the file from the previous version or upload a new file. 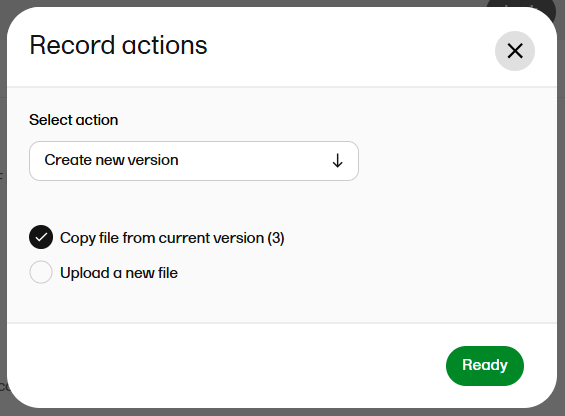
|
| 5 |
Select Ready. The new record version is saved in an unpublished status. |
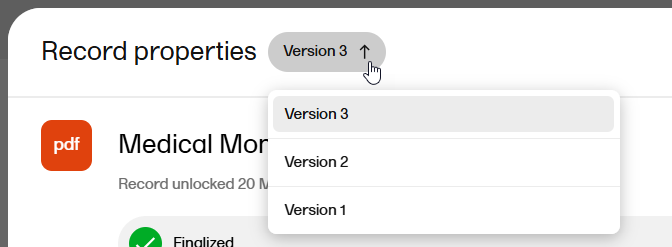
Navigating between record versions
When you open the Record properties window, the latest version of the record is displayed by default.
To navigate between record versions, use the version dropdown menu at the top of the Record properties window:
Adding notes to a record
Record notes are a way to communicate with other users about records without affecting the record status. The notes actions are not recorded in the record history.
These are the permissions needed for adding or resolving notes:
- For a record in the TMF structure, you need write or review permission for the record.
- For a record in a drop zone, you need to have access to the record.
To add a note to a record:
| 1 | From the Structure page, the Records page, or the Drop Zone, select a record to open the Record properties window. |
| 2 | At the top of the window, select ... to open the Record actions menu. |
| 3 |
Select Add note from the menu. 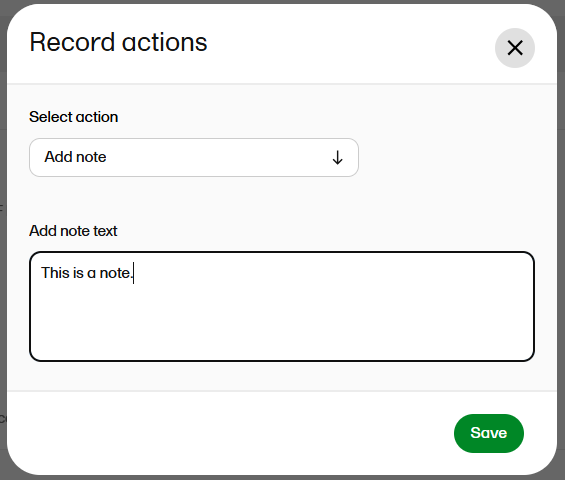
|
| 4 |
Enter your note text and select Save. |
| 5 |
The note is then displayed like this: 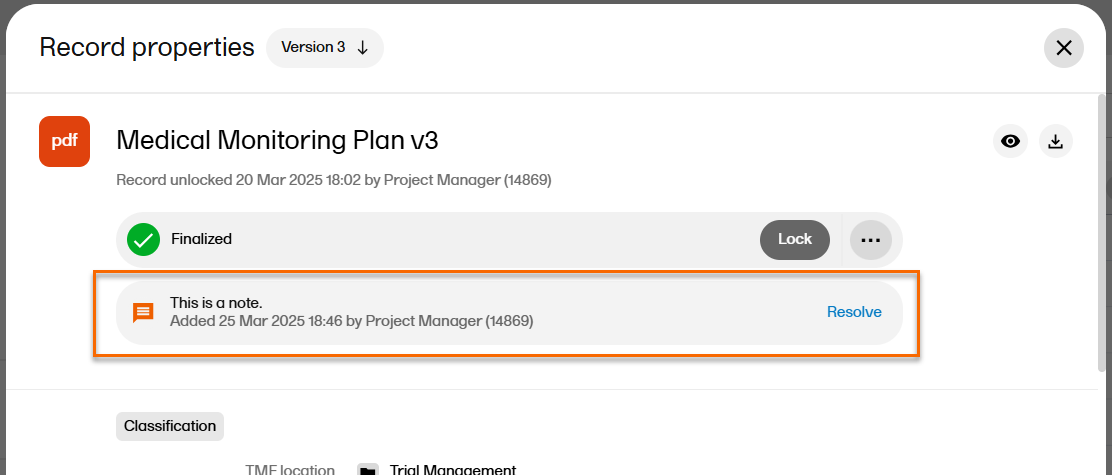
Note! The note is associated with the selected record version. |
Resolving notes
To resolve a note in a record:
| 1 | From the Structure page, the Records page, or the Drop Zone, select a record to open the Record properties window. |
| 2 |
Select Resolve for the note that you want to resolve.
The note is then immediately removed. |
Publishing a record
Publishing a record in Viedoc TMF requires write permission for the artifact on the TMF level that the record is linked to. For more information, see Roles and permissions in Viedoc TMF.
To publish a record:
| 1 | From the Structure page, the Records page, or the Drop Zone, select a record to open the Record properties window. |
| 2 | Make sure all mandatory fields (marked with red) are filled in. |
| 3 |
Select Publish at the top of the window: 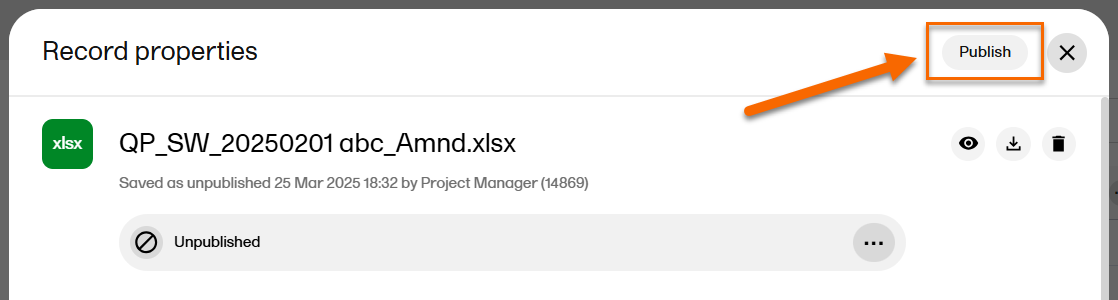
|
| 4 |
When the record is published, it is available for all TMF users with at least read permissions for that artifact and with access to the TMF level that the record is linked to. The record status is now Awaiting review: 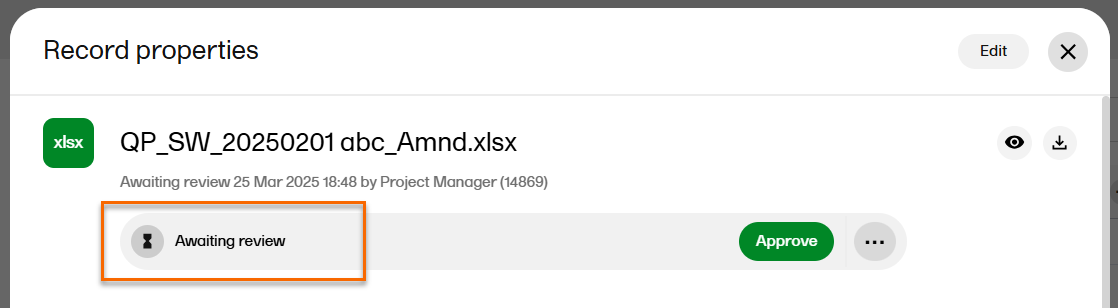
|
Deleting a record
Deleting a record in Viedoc TMF requires write permission for the artifact on the TMF level that the record is linked to. For more information, see Roles and permissions in Viedoc TMF.
To delete an unpublished record:
| 1 |
From the Structure page, the Records page, or the Drop Zone, navigate to the record you want to delete, and select the delete icon on the same row as the record: 
|
Alternatively, select the record to open the Record properties window, select ... to open the Record actions menu, and select Delete record. |
|
| 2 |
Select Confirm to delete. |
To delete a published record:
| 1 | From the Structure page, the Records page, or the Drop Zone, select the record to open the Record properties window, select ... to open the Record actions menu, and select Delete record. |
| 2 | Enter a reason for deletion. |
| 3 | Select Delete record. |
Downloading a record
Downloading a record from Viedoc TMF requires read, review, or write permission for the artifact on the TMF level that the record is linked to. For more information, see Roles and permissions in Viedoc TMF.
To download a record:
| 1 |
From the Structure page, the Records page, or the Drop Zone, navigate to the record you want to download, and select the download icon on the same row as the record: 
|
|
Alternatively, select the record to open the Record properties window, and select the download icon to download the record from there. |
|
| 2 | The record is then downloaded. |
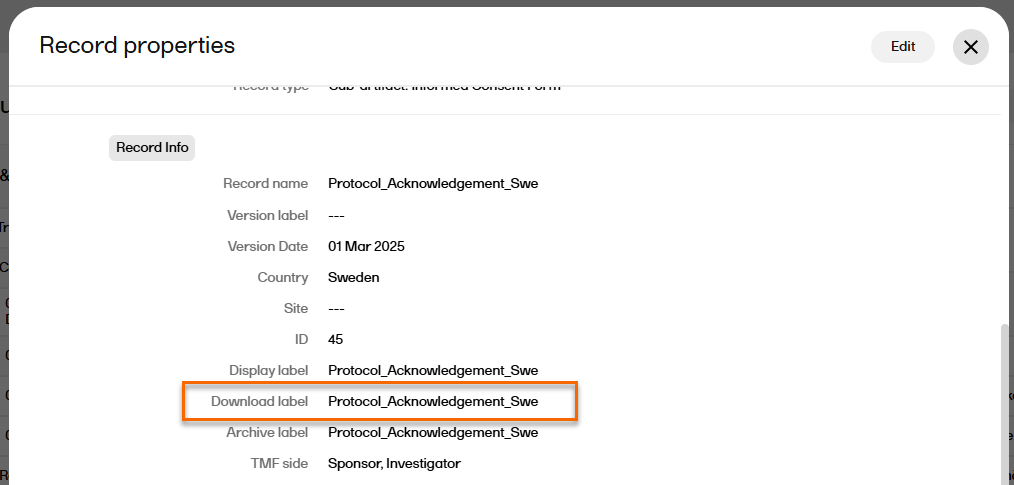
Note! When downloaded, the name of the latest version of the record is according to the download label in the Record properties window: