Medical coding settings
This lesson describes how to manage medical coding dictionaries in Viedoc Admin.
Introduction
This piece of content is used in Designer > Configuring medical coding scopes and Admin > Managing medical coding dictionaries.
About medical coding
Viedoc offers support for medical coding. The medical coding feature allows you to code data, such as Adverse Events, Medical History and Concomitant Medications, in a standardized way.
Viedoc supports the following types of dictionaries:
- Medical Dictionary for Regulatory Activities (MedDRA) (including Chinese version)
- MedDRA/J (Japan)
- Anatomic Therapeutic Chemical Classification System (ATC) without Defined Daily Dose (DDD)
- Iyakuhinmei Data File (IDF)
- World Health Organization Drug Dictionary (WHODrug) - C3 format (including Chinese version)
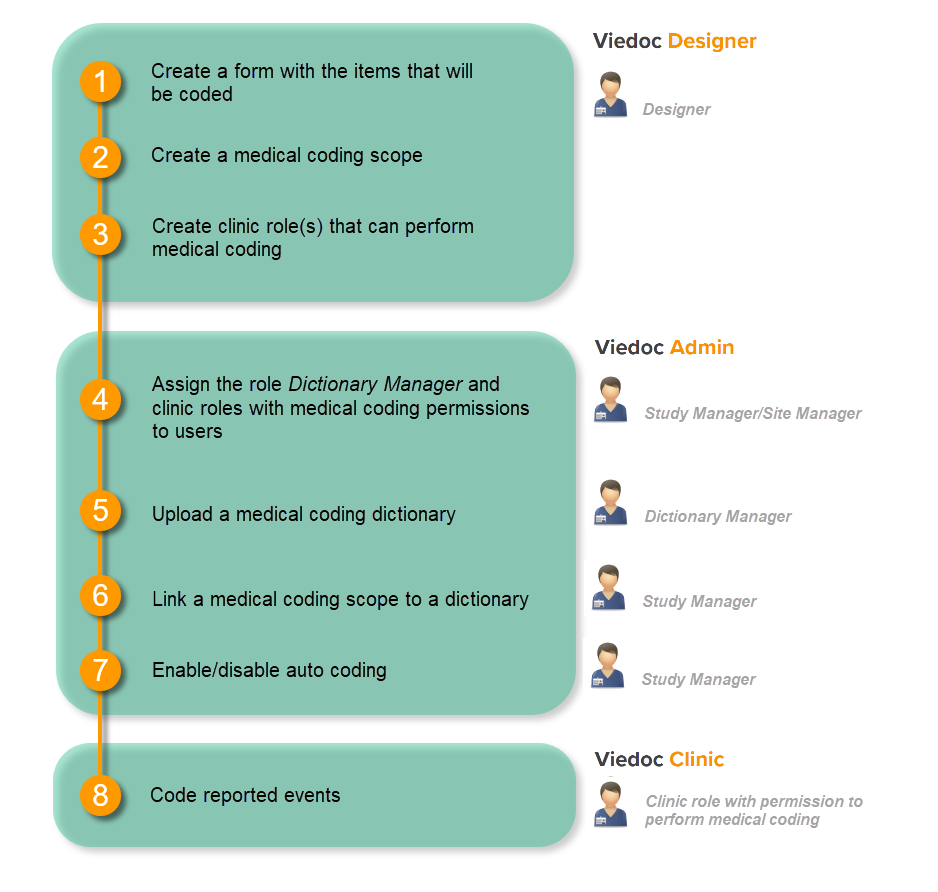
Workflow
Medical coding is configured in Viedoc Designer and Viedoc Admin, and executed in Viedoc Clinic. The schematic below depicts what different steps need to be taken, and which roles have permission to perform these steps.
This is a single-sourced file that should have the following content:
Introduction to medical coding, description of the workflow.
For more detailed instructions regarding these steps, see:
- Configuring medical coding scopes in Viedoc Designer
- Managing medical coding dictionaries in Viedoc Admin (this lesson!)
- Medical coding in Viedoc Clinic
About the dictionary instances in Viedoc Admin
Workflow for creating dictionary instances in Viedoc Admin
In Viedoc Admin, creating a dictionary instance is done according to the following procedure:
- The Study Manager invites a user to the system role Dictionary Manager.
- The Dictionary Manager uploads the medical coding dictionary to create a dictionary instance. This makes the dictionary available for the study.
- The Study Manager links the medical coding scopes that have been defined in the study design to the uploaded medical coding dictionaries.
For detailed instructions, see the Step-by-step guides.
Note! Licenses for medical coding dictionaries are not supplied by Viedoc. It is the user's own responsibility to purchase a license for the dictionary to be used, and to update the uploaded dictionaries.
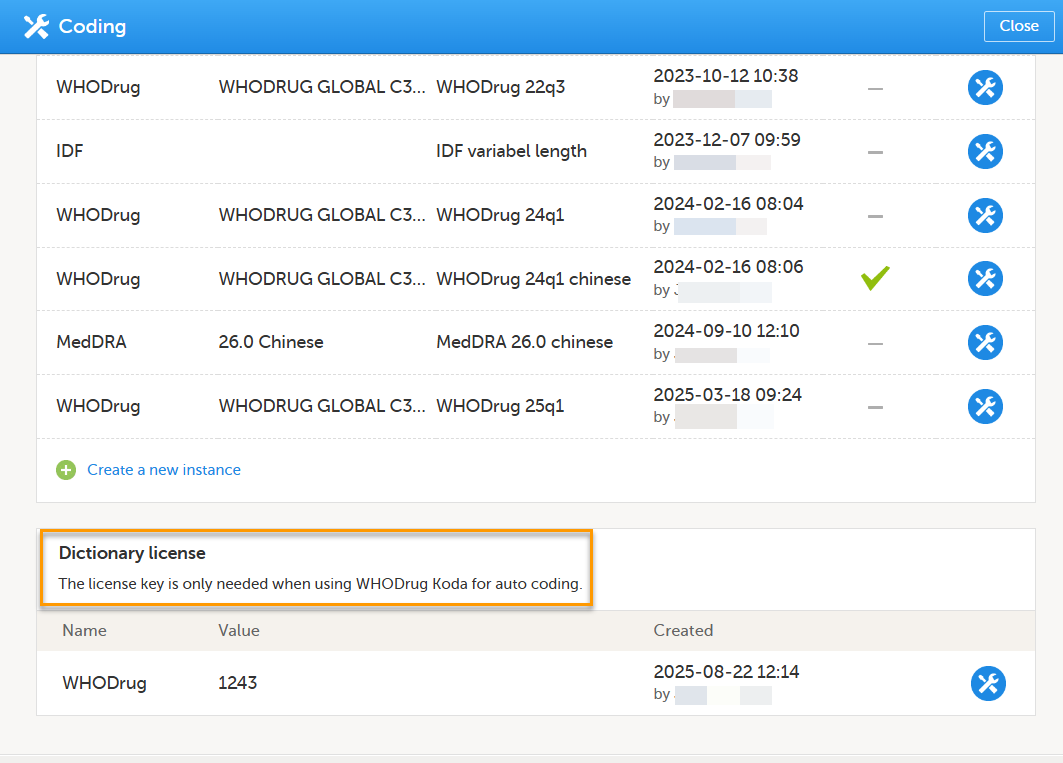
Where to find dictionary instances in Viedoc Admin
To enter the Medical coding page in Viedoc Admin, and to view uploaded dictionary instances or create a new instance, select the toolbox icon in the Medical coding field on the study start page. The Medical coding page opens.
Note! The Medical coding page is only visible for users with the system role Dictionary Manager.
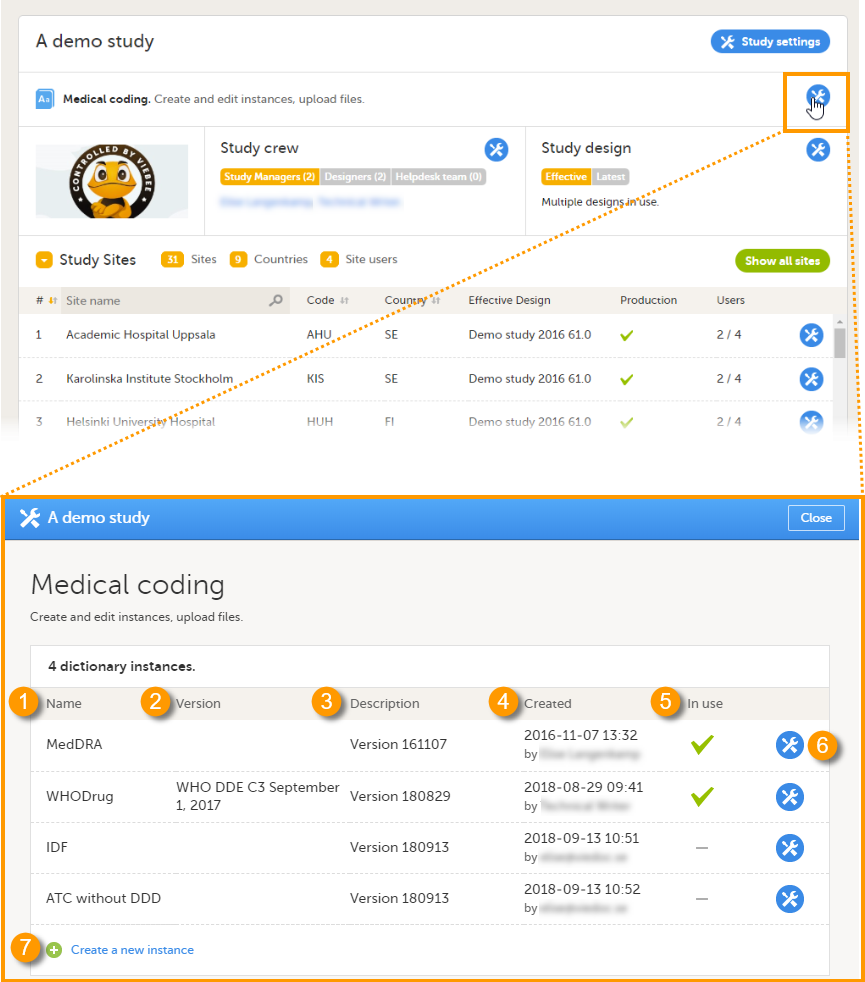
On this page, the following information is displayed:
1. Name - the type of dictionary
2. Version - the version of the dictionary, if applicable
3. Description - a custom description of the dictionary, added by the Dictionary Manager when uploading the dictionary
4. Created - the date when the dictionary has been uploaded, and by whom
5. In use - shows whether the dictionary is linked to a coding scope, as follows:
| Icon | Description |
|---|---|
 |
The dictionary instance is linked to a coding scope. |
 |
The dictionary instance is not linked to a coding scope. |
On this page, you can perform the following actions:
6. Select the toolbox icon to edit the dictionary instance. You can only edit the description of the dictionary instance.
7. Select Create a new instance to upload a new dictionary, see Creating a new dictionary instance.
Step-by-step guides
Creating a dictionary instance
Note! Creating a dictionary instance (uploading a dictionary) can only be done by the Dictionary Manager.
To create a dictionary instance, on the study page, follow the steps below.
| 1 |
Select the toolbox icon in the Medical coding field to open the Medical coding window. 
|
| 2 |
Select Create a new instance.
|
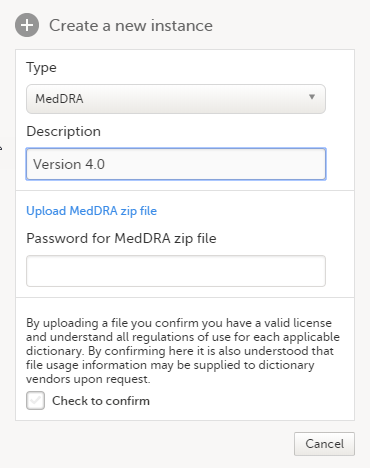
| 3 |
In the Create a new instance pop-up:
For World Health Organization Drug Dictionary (WHODrug) files, see WHODrug files. |
| 5 | Select Close to close the Medical coding window. |

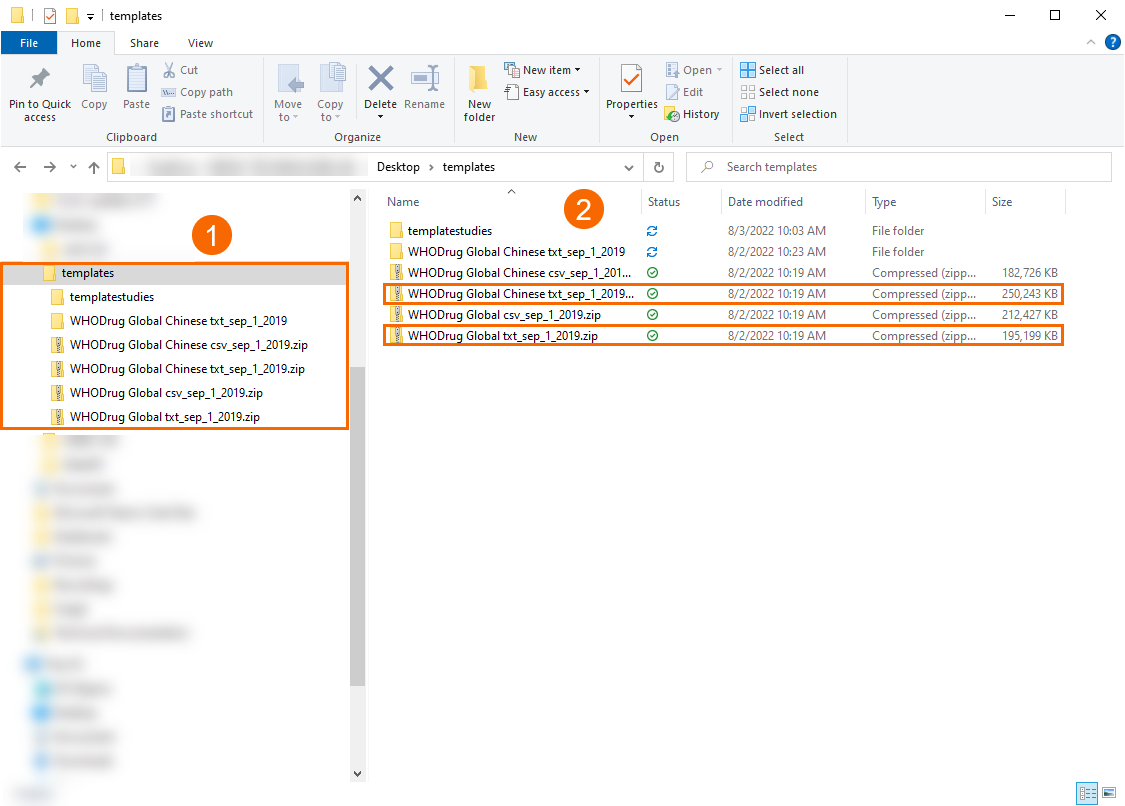
WHODrug files
When you have downloaded the WHODrug Global files, you should locate them in your system. Below is a view of how it will possibly appear once you've located them:
| 1 |
2. These are the the relevant folders that you need to select to extract or unzip. |
| 2 |
Once you've selected the relevant file folder, you must extract (unzip) its contents. Then you will select the next folder which is the one labeled c3, as shown below: 
|
| 3 |
Upload this zipped folder to Viedoc and Viedoc will complete the final extraction for you, placing the WHODrug files in your study. |
Managing the WHODrug Koda user key
For WHODrug you can also connect directly to WHODrug Koda to get suggestions for both the drug name and the ATC assignment for the specific drug, to enhance the medical coding.
When you upload a WHODrug dictionary, or there is an existing WHODrug Dictionary, the Dictionary License section is displayed:
Enter your user key to connect to WHODrug Koda.
The Manage WHODrug Koda user key pop-up displays the user key details and allows for adding, editing or removing the user key.
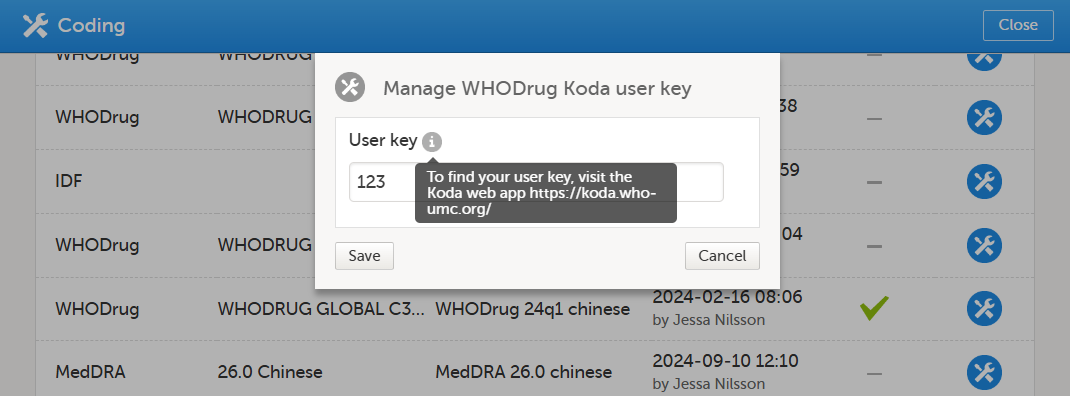
If you have forgotten your user key, hover over the tooltip for the website address to the Koda web application.
Your user key will only work if it is a valid user key and you have a valid license.
Linking coding scopes to a dictionary instance and enabling auto coding
Note! Linking the coding scopes to the uploaded medical coding dictionaries can only be done by the Study Manager.
To link the coding scopes to a dictionary instance and to enable auto coding:
| 1 | On the study details page in Viedoc Admin, select Study settings to open the study settings pop-up. |
| 2 |
Select the Medical Coding tab. 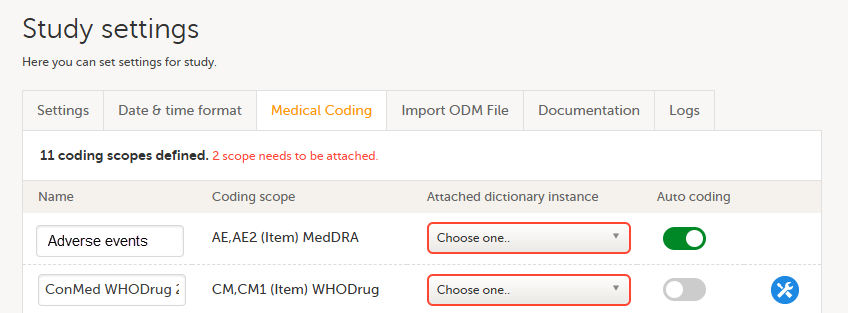
If no scopes are listed, contact the Designer of the study. |
| 3 |
Type a name for each coding scope in the Name field. This name is displayed in the medical coding console in Viedoc Clinic. |
| 4 | Select which dictionary and which version should be applied to each coding scope. You can only select an instance applicable for the coding scope. For example, you can only link a Medical Dictionary for Regulatory Activities (MedDRA) dictionary instance to a MedDRA scope. Note! For a new study, when setting up a scope for the first time, after you have selected the dictionary, the Auto coding button remains greyed out and can not be selected. 
An error message is displayed: 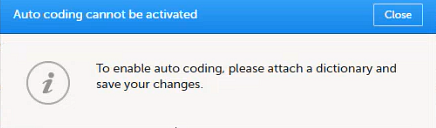
|
| 5 |
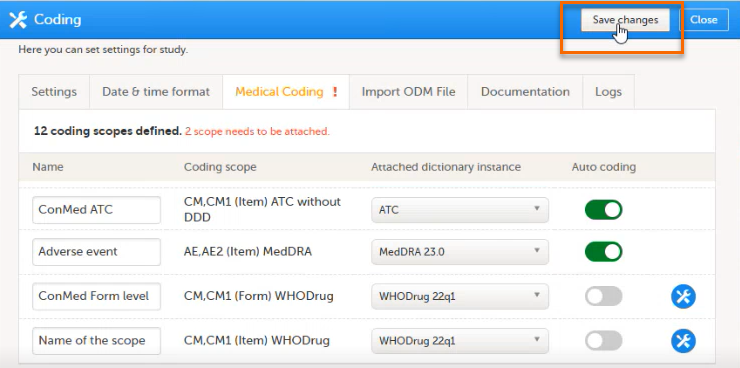
To activate the Auto coding button after you have selected a dictionary: 1. Select save changes: 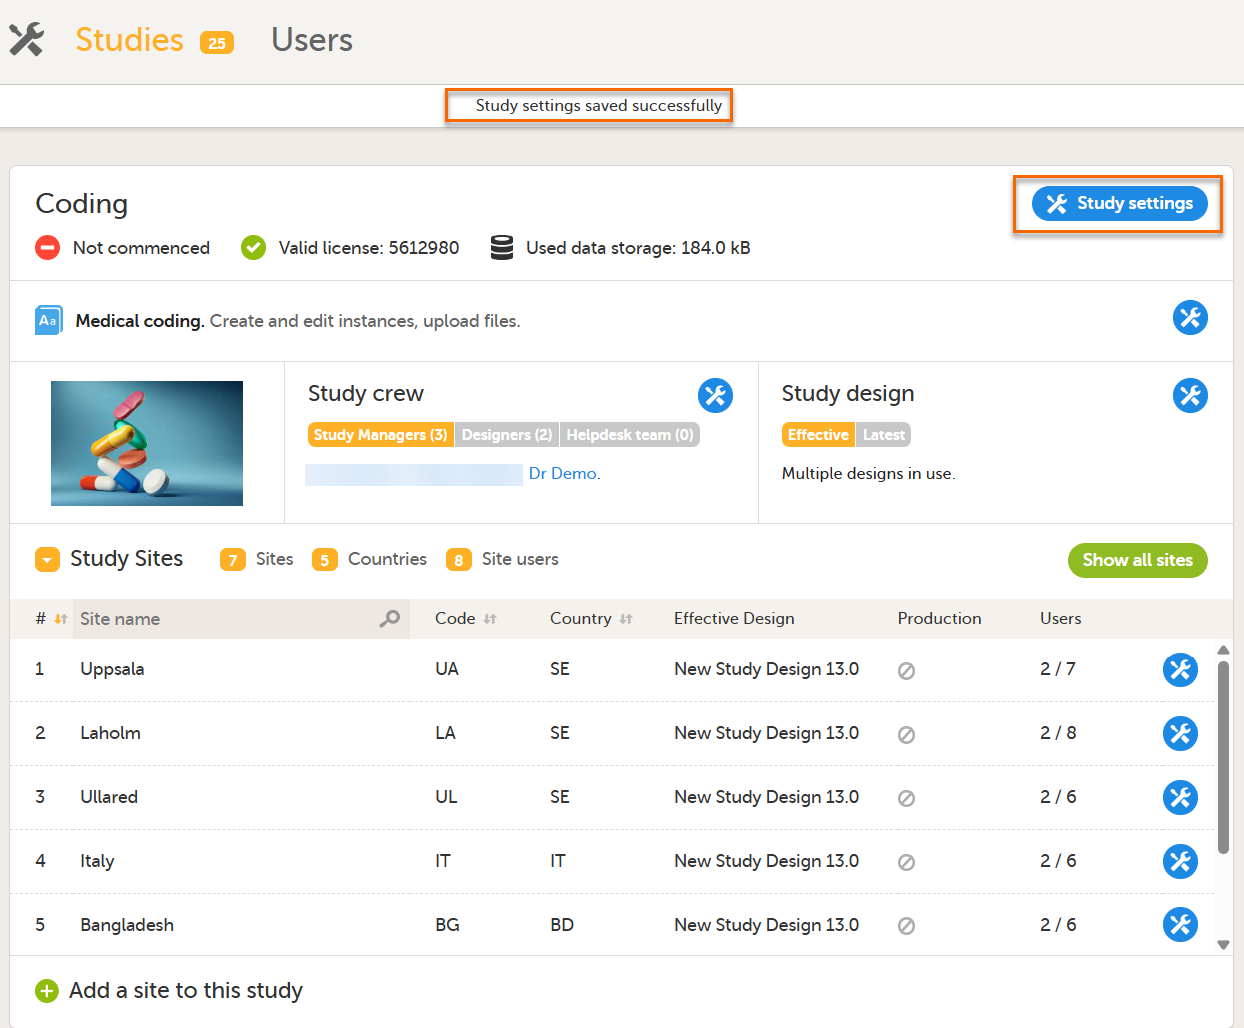
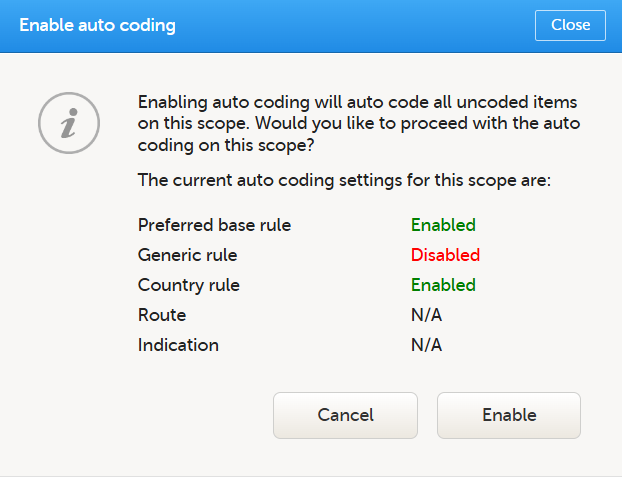
3. Select the Medical coding tab: When you have attached a WHODrug dictionary, and are connected to WHODrug Koda, there are three additional coding settings rules to configure. Note! For WHODrug, We recommend checking and configuring the rules before activating auto coding. When auto coding is activated, all uncoded items are coded using the current rule settings. The settings are: Preferred base rule, Generic rule and Country rule. The settings are enabled by default and are available for all scopes with a WHODrug dictionary. The Rules are specifically for WHODrug Koda. 1. Select the toolbox icon. The coding settings pop-up opens: 
The following example illustrates when you might choose to enable or disable the Country rule:
To get the best results for ATC coding, map items (route and indication), from your study design. |
| 6 |
In Study settings, you can now enable Auto coding.
Select the button to enable or disable auto coding for the respective scope. 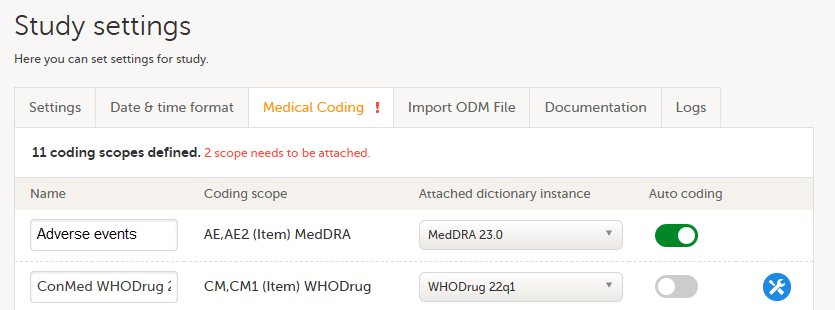
|
| 7 |
Select Save changes to save the changes. |

Updating a dictionary version.
You can replace an old version of the medical coding dictionary with a new version, and continue coding on the same scopes. Replacing an old medical coding dictionary version with a new version involves the following steps:
- The Dictionary Manager creates a new dictionary instance by uploading the latest dictionary version, see Creating a dictionary instance for instructions.
- The Study Manager links the medical coding scopes to the new dictionary instance, see Linking the dictionary instance to coding scopes for instructions.
Note! It is not necessary to create new coding scopes in the study design.
From the moment the new medical coding dictionary version has been uploaded and linked to the medical coding scope, the medical coding console in Viedoc Clinic will use the new version for coding the terms in that scope. Terms that have been coded before updating the dictionary version will keep their codes from the previous dictionary version. The dictionary version that is used for coding each term is displayed when the medical coding is exported.
It is not possible to delete a dictionary instance.